

Page 1
Parallels® Plesk Expand
Page 2

Copyright Notice
ISBN: N/A
Parallels
660 SW 39th Street
Suite 205
Renton, Washington 98057
USA
Phone: +1 (425) 282 6400
Fax: +1 (425) 282 6444
© Copyright 1999-2008,
Parallels, Inc.
All rights reserved
Distribution of this work or derivative of this work in any form is prohibited unless prior written
permission is obtained from the copyright holder.
Patented technology protected by U.S.Patents 7,328,225; 7,325,017; 7,293,033; 7,099,948;
7,076,633.
Patents pending in the U.S.
Product and service names mentioned herein are the trademarks of their respective owners.
Page 3

Contents
Preface 5
About This Guide ........................................................................................................................... 5
Who Should Read This Guide ....................................................................................................... 5
Organization of This Guide ............................................................................................................ 6
Typographical Conventions ........................................................................................................... 6
Feedback ....................................................................................................................................... 7
Introducing Plesk Expand 8
Becoming Familiar With Plesk Expand ......................................................................................... 8
What is Plesk Expand ......................................................................................................... 9
Plesk Expand Business Model and Operation Principles ................................................. 10
What‟s New in This Release ....................................................................................................... 12
Becoming Familiar With Plesk Expand Interface ........................................................................ 13
Navigation Pane ................................................................................................................ 14
Work Area ......................................................................................................................... 15
Action Bar .......................................................................................................................... 18
First Steps With Plesk Expand 19
Logging in to Plesk Expand ......................................................................................................... 19
Changing Your Password ............................................................................................................ 20
If You Forgot Your Password ...................................................................................................... 20
Configuring Your Interface Settings ............................................................................................ 21
Getting Help in Plesk Expand ...................................................................................................... 21
Viewing Useful Information 22
Editing Your Personal Information ............................................................................................... 22
Viewing Limits on Resources Set for You by the Administrator .................................................. 23
Viewing Customized Limits on Certain Plesk Servers Set for You by the Administrator ............ 25
Viewing Permissions on Operations Set for You by the Administrator ....................................... 26
Viewing Your IP Pool ................................................................................................................... 28
Viewing Your Application Pool .................................................................................................... 29
Managing Your Domains 30
Managing Domain Templates ..................................................................................................... 31
Creating a Domain Template From Scratch ..................................................................... 33
Creating a Domain Template From a Domain .................................................................. 39
Creating a Copy of a Domain Template ............................................................................ 39
Exporting a Domain Template to a Plesk Server .............................................................. 40
Viewing the List of Domain Templates .............................................................................. 41
Editing a Domain Template ............................................................................................... 42
Configuring Log Rotation in a Domain Template .............................................................. 43
Configuring Performance Settings in a Domain Template ................................................ 43
Applying a Domain Template to Domains ......................................................................... 44
Viewing the List of Domains Bound With a Domain Template ......................................... 45
Resetting Bound Domains to a Domain Template ............................................................ 46
Detaching Domains From a Domain Template ................................................................. 47
Page 4

Preface 4
Detecting Possible Bindings Between Domains and a Domain Template ....................... 48
Viewing Possible Detected Bindings Between Domains and a Domain Template ........... 49
Removing Domain Templates ........................................................................................... 50
Registering a Domain on the Basis of a Template ...................................................................... 51
Registering a Domain per Customer Requirements ................................................................... 53
Viewing the List of Your Domains ............................................................................................... 58
Administering a Domain .............................................................................................................. 59
Selecting Hosting Type for a Domain ............................................................................... 59
Changing Hosting Type of a Domain ................................................................................ 60
Configuring Hosting for a Domain ..................................................................................... 61
Configuring Limits on Resources for a Domain ................................................................ 63
Configuring Preferences for a Domain .............................................................................. 63
Configuring Account of the Domain Administrator ............................................................ 64
Configuring the DNS Zone for a Domain .......................................................................... 64
Configuring Log Rotation for a Domain ............................................................................. 69
Configuring Performance Settings for a Domain .............................................................. 69
Managing Aliases of a Domain ......................................................................................... 70
Managing Backups of a Domain ....................................................................................... 75
Managing Bindings Between Domains and Domain Templates ................................................. 79
Binding Domains to a Domain Template .......................................................................... 80
Viewing Bindings Between Domains and Domain Templates .......................................... 81
Detaching Domains From a Domain Template ................................................................. 82
Applying a Domain Template to Domains ......................................................................... 82
Detecting Possible Bindings Between Domains and Domain Templates ......................... 83
Viewing Detected Possible Bindings Between Domains and Domain Templates ............ 84
Removing Domains ..................................................................................................................... 85
Managing Scheduled Backups of Domains 86
Adding a Scheduled Backup Task .............................................................................................. 87
Viewing the List of Scheduled Backups ...................................................................................... 88
Viewing Properties of a Scheduled Backup Task ....................................................................... 89
Removing Scheduled Backup Tasks........................................................................................... 90
Managing Backup Processes 90
Viewing the List of Backup Processes ........................................................................................ 91
Viewing Information About a Backup Process ............................................................................ 92
Stopping Backup Processes ....................................................................................................... 93
Removing Backup Processes ..................................................................................................... 93
Viewing Action Log 94
Viewing an Action Information ..................................................................................................... 95
Viewing a Problem Report ........................................................................................................... 97
Page 5

Preface 5
In this section:
About This Guide ............................................................................................... 5
Who Should Read This Guide ........................................................................... 5
Organization of This Guide ................................................................................ 6
Typographical Conventions ............................................................................... 6
Feedback .......................................................................................................... 7
Preface
About This Guide
The purpose of this guide is to provide information about the Expand client panel of Plesk
Expand, the hosting automation software that unites the client‟s domains from multiple Plesk
servers on a single hosting platform. The guide explains the core Plesk Expand concept of
centralized management. It will familiarize you with the way to register and centrally manage
domains on different Plesk servers offered by your provider. Also, you will learn how to back
up your domains‟ information.
Who Should Read This Guide
This guide is intended for hosting resellers and owners of multiple domains, registered on a
number of Plesk servers.
Page 6

6 Preface
Organization of This Guide
Formatting convention
Type of Information
Example
Special Bold
Items you must select,
such as menu options,
command buttons, or
items in a list.
Go to the System tab.
Titles of chapters,
sections, and subsections.
Read the Basic Administration
chapter.
Italics
Used to emphasize the
importance of a point, to
introduce a term or to
designate a command line
placeholder, which is to be
replaced with a real name
or value.
The system supports the so
called wildcard character search.
Chapter 1, Introducing Plesk Expand (see page 8), familiarizes you with Plesk Expand. It outlines
the basic Plesk Expand concept of centralized management and familiarizes you with Plesk
Expand interface.
Chapter 2, First Steps with Plesk Expand (see page 19), describes the way to log in to the system
for the first time and the way to restore your password in case you forget it. You will also
learn how configure interface of your Plesk Expand panel and how to get help, if you need it.
Chapter 3, Viewing Useful Information (see page 22), provides information about how you can
edit your profile and view limits on resources and permissions on operations set for you by
the provider, the IP addresses and application packages you can use for creating domains.
Chapter 4, Managing Your Domains (see page 30), explains how to register and manage
domains, as well as how you can create and use templates for domains creation.
Chapter 5, Managing Scheduled Backups of Domains (see page 86), tells you how to schedule
periodic back up tasks for domains.
Chapter 6, Viewing Action Log (see page 94), provides information on how you can view
information about actions you performed in the system, problem reports in case of actions
failure, as well as gives instructions on how to send an error report to Parallels support team.
Typographical Conventions
Before you start using this guide, it is important to understand the documentation
conventions used in it.
The following kinds of formatting in the text identify special information.
Page 7

Preface 7
Monospace
The names of commands,
files, and directories.
The license file is located in the
http://docs/common/licen
ses directory.
Preformatted
On-screen computer
output in your commandline sessions; source code
in XML, C++, or other
programming languages.
# ls –al /files
total 14470
Preformatted Bold
What you type, contrasted
with on-screen computer
output.
# cd /root/rpms/php
CAPITALS
Names of keys on the
keyboard.
SHIFT, CTRL, ALT
KEY+KEY
Key combinations for
which the user must press
and hold down one key
and then press another.
CTRL+P, ALT+F4
Feedback
If you have found a mistake in this guide, or if you have suggestions or ideas on how to
improve this guide, please send your feedback using the online form at
http://www.parallels.com/en/support/usersdoc/. Please include in your report the guide‟s title,
chapter and section titles, and the fragment of text in which you have found an error.
Page 8

This chapter provides basic information about Plesk Expand, its purposes, business
In this chapter:
Becoming Familiar With Plesk Expand .............................................................. 8
What‟s New in This Release .............................................................................. 12
Becoming Familiar With Plesk Expand Interface ............................................... 13
In this section:
What is Plesk Expand ....................................................................................... 9
Plesk Expand Business Model and Operation Principles ................................... 10
C H A P T E R 1
Introducing Plesk Expand
model and operation principles. This chapter will help you to:
Become familiar with basic Plesk Expand concepts, business model and operation
principles;
Learn what new features are implemented in this version of Plesk Expand;
Become familiar with Plesk Expand interface, its main elements and typical actions.
Becoming Familiar With Plesk Expand
In this section, you can get the general concept of what Plesk Expand is and how it
operates.
Page 9

Introducing Plesk Expand 9
What is Plesk Expand
The main thing about Plesk Expand is that it extends Plesk functionality and works as
an add-on application for Plesk. Plesk Expand cannot be used separately, it requires at
least two Plesk servers to operate.
Below we provide a short description of Plesk and Plesk Expand.
Plesk is a control panel designed for automating of all aspects of a hosting. It enables
users to create and remotely manage hundreds of virtual hosts through an easy-to-use,
intuitive interface, without in-depth technical knowledge of web hosting technologies.
Plesk Expand is a centralized control panel for administering several Plesk servers,
including servers running different Plesk versions and operating systems. From the
Plesk Expand control panel, you can manage all their Plesk domains and other objects
registered on different Plesk servers, without having to log in and re-log in to these
servers.
You can own and manage several domains (web sites) on different Plesk servers
through the single Plesk Expand control panel. Therefore you can use a wide set of site
application packages, regardless of the hosting platform (UNIX or Windows). For
example, you want to host one web site on PHP (which ties you to Plesk for
Linux/UNIX), and to deploy a number of ColdFusion applications on another web site
(which can be hosted only on Plesk for Windows). Being registered as an Expand
Client, you have access to Plesk Expand control panel, where you can manage both
web sites without having to re-log in between Plesk servers.
Page 10
10 Introducing Plesk Expand
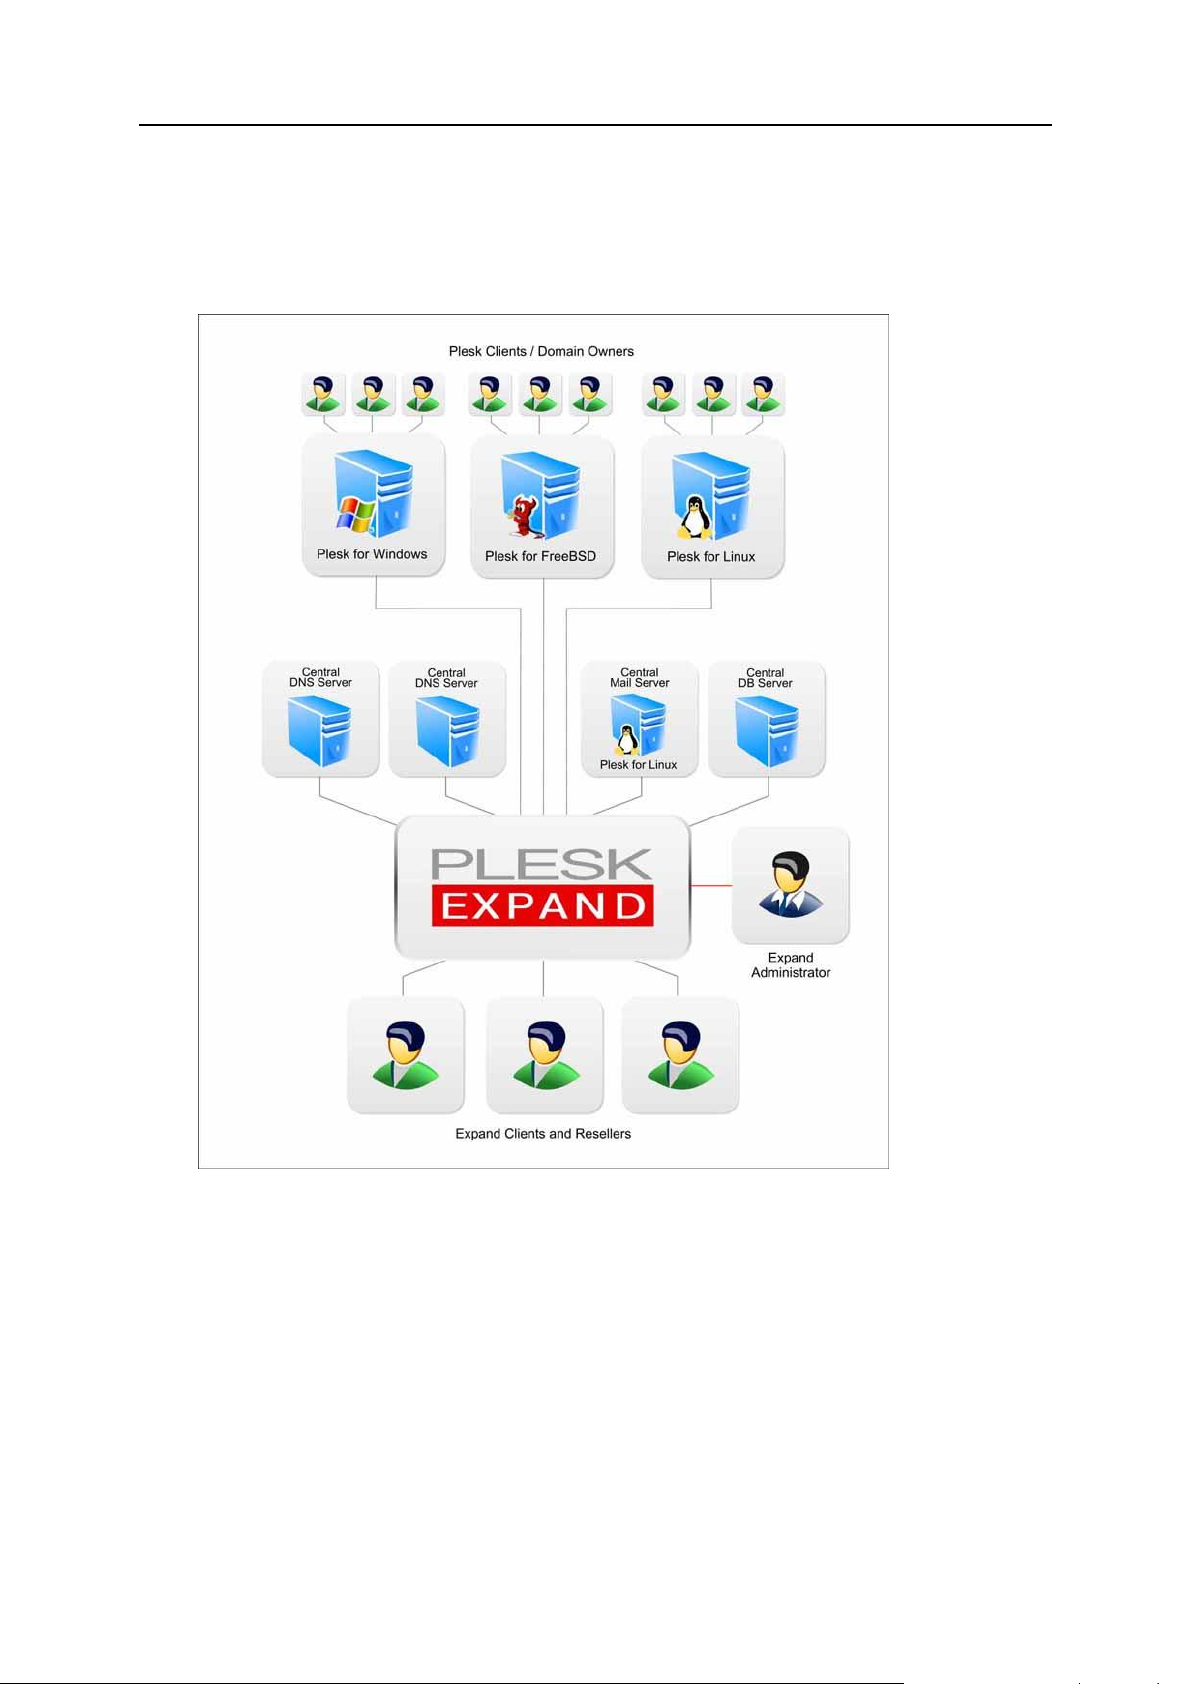
Plesk Expand Business Model and Operation Principles
Plesk Expand operation model is shown in the following figure:
Figure 1: Plesk Expand Operation Diagram
Plesk Expand user roles and basic object types are described below.
Plesk Expand Objects
Plesk Expand objects are Plesk objects registered in Plesk Expand.
There are the following types of objects:
Plesk server is a hosting server running the Plesk control panel software (Plesk for
Windows or Plesk for Linux/Unix) registered in Plesk Expand.
Page 11

Introducing Plesk Expand 11
Plesk client is a Plesk client account registered on one of Plesk servers. Plesk
clients can have access to the Plesk control panel (if the Plesk Expand
administrator provides this permission), but never to the Plesk Expand control
panel.
Domain is a web site (virtual host) on the Internet registered on one of Plesk
servers. The domain administrator can have access to the Plesk control panel, if
they have a configured domain administrator account, and if the Plesk Expand
administrator grants them the permission to access the control panel. The domain
administrator cannot login to Plesk Expand. Each domain is owned by a Plesk client
or an Expand client.
Plesk Expand Users
Plesk Expand users have certain rights and privileges on certain Plesk objects they
own. Plesk Expand users have access to the Plesk Expand control panel, where they
can manage their objects and accounts, within the limits and capabilities provided by
their user roles and by the Plesk Expand administrator. There are the following user
roles in Plesk Expand:
Administrator is a Plesk Expand user, who has the full rights to configure Plesk
Expand and manage all its objects and user accounts.
Expand reseller is a Plesk Expand user, who can own and manage Plesk servers,
groups of Plesk servers, Plesk client accounts and domains. Resellers have
administrator‟s rights to all the Plesk Expand objects they own.
Expand client is a Plesk Expand user, who owns and manages domains registered
on several Plesk servers, including servers running different platforms (Plesk for
Windows or Plesk for Linux/Unix), and manages them through the Plesk Expand
control panel.
Plesk Expand Central Servers
Plesk Expand offers a set of centralized services. A centralized service is a service
received by several Plesk servers remotely from a single central dedicated server.
Such a server is allocated for providing this service to several or all objects registered
on other Plesk servers. This allows reducing the workload on each Plesk server,
optimizing the overall system performance, and helps to quickly and easily detect and
resolve typical service issues. There are the following types of central servers in Plesk
Expand:
Mail server is a Plesk server registered in Plesk Expand, which operates as a
central mail server for several Plesk servers.
DNS server is a Plesk or a non-Plesk server, which operates as a central DNS
server for several Plesk servers.
Database server is a Plesk or a non-Plesk server, which operates as a central
database server for several Plesk servers.
Page 12

12 Introducing Plesk Expand
What’s New in This Release
Please see the Release Notes at http://www.parallels.com/en/download/expand/ for
your version of Plesk Expand.
Page 13

Introducing Plesk Expand 13
Becoming Familiar With Plesk Expand
In this section:
Navigation Pane ................................................................................................ 14
Work Area ......................................................................................................... 15
Action Bar ......................................................................................................... 18
Interface
This section describes the basics of the Plesk Expand interface. Here you can find
instructions on how to navigate in your Plesk Expand control panel.
A regular Plesk Expand page looks as follows:
Figure 2: Plesk Expand Interface
The main components of a Plesk expand page are:
Navigation pane
Work area
Action bar
Page 14
14 Introducing Plesk Expand
Navigation Pane
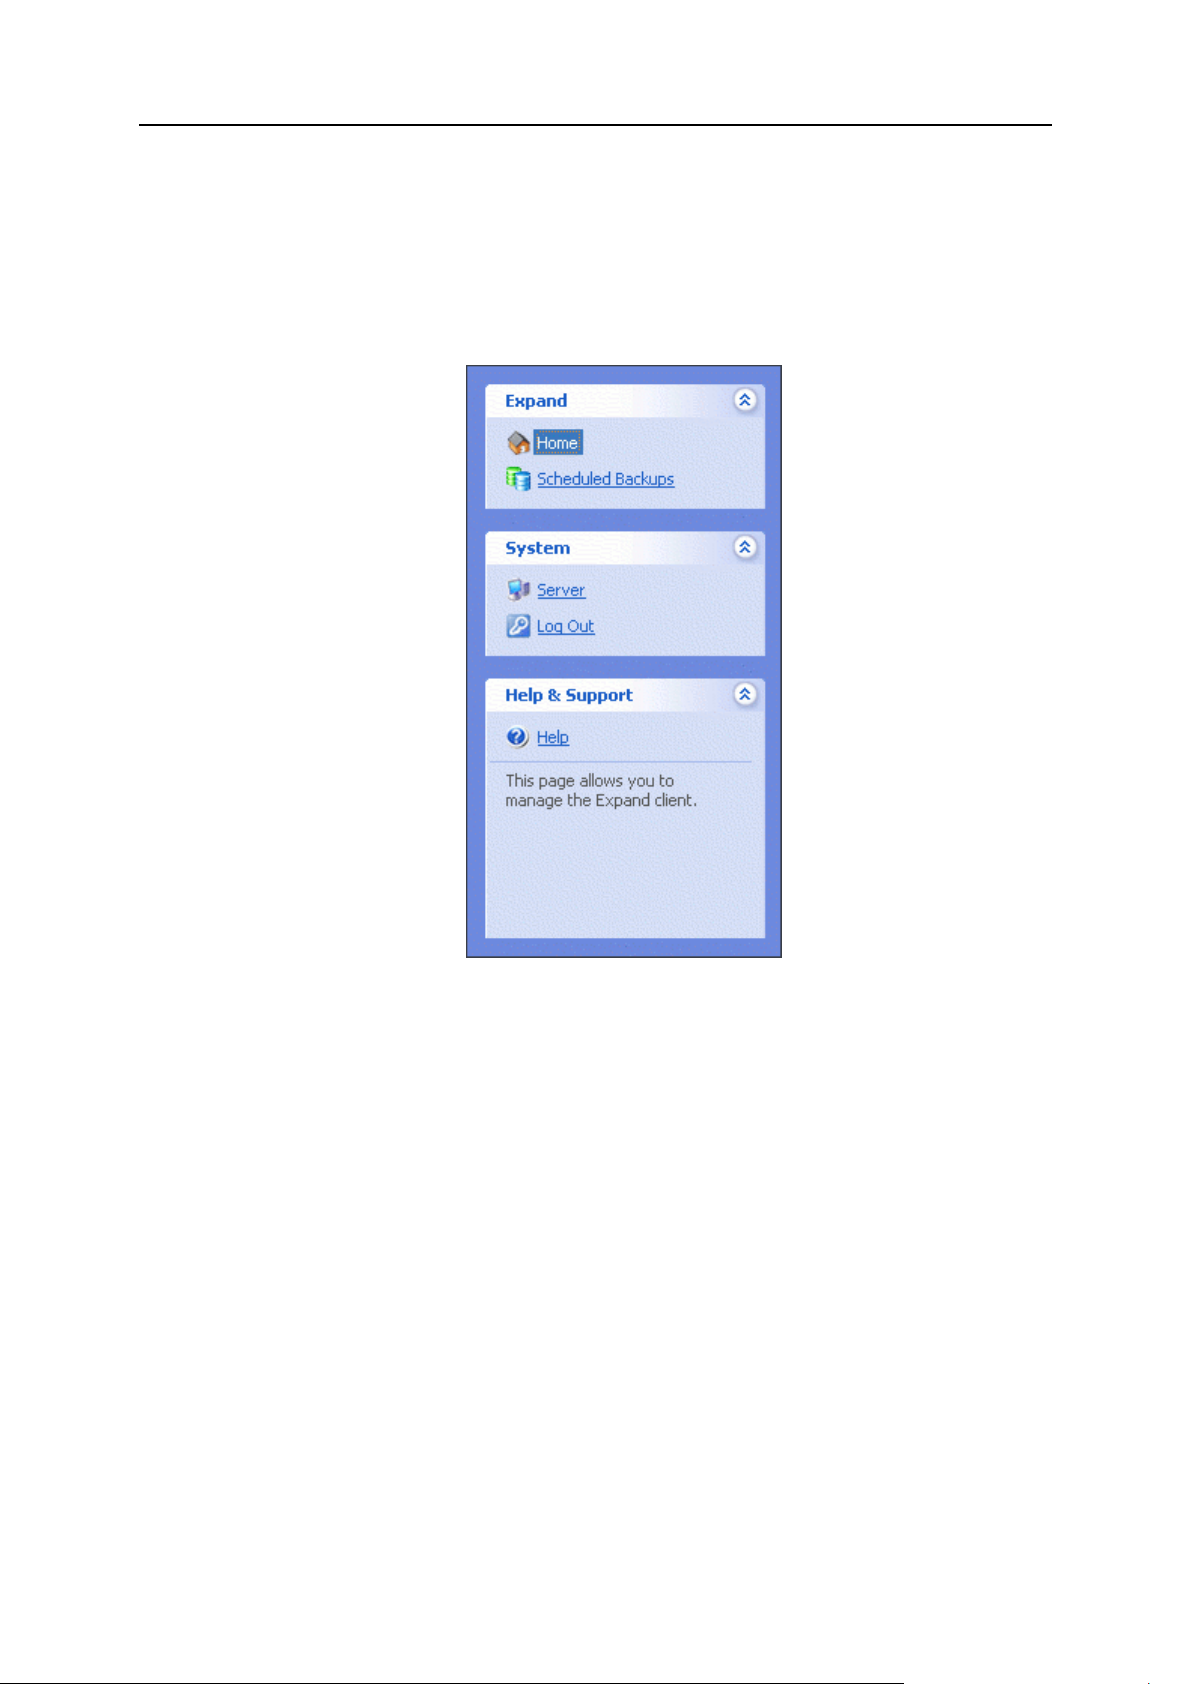
The navigation pane is located on the left side of the Plesk Expand page. In the right
part of the screen there is the work area where you can perform management
operations on a particular Plesk Expand component selected in the navigation pane.
Figure 3: Navigation pane
The navigation pane is divided into three sections: Expand, System and Help & Support.
To expand or collapse the contents of each section, click the arrows in the upper right
corner of each section.
The Expand section contains the following shortcuts:
Home. This shortcut takes you to the list of all your resources. There you can view
the amount of resources allocated to you by the provider, as well as proceed to
managing your domains.
Scheduled Backups. This shortcut takes you to the list of all scheduled tasks for
backing up Plesk domains. There you can schedule and manage backup tasks for
domains.
The System section contains the following shortcuts:
Server. This shortcut takes you to the page, where you can view the action log, edit
your profile and login information, and request help from Parallels support team.
Log out. This shortcut takes you to the confirmation page, where you can close the
current session with Plesk Expand.
The Help & Support section contains the following shortcut:
Page 15
Introducing Plesk Expand 15
Help. This shortcut opens the Online Help topic providing information about the
In this section:
Path Bar ............................................................................................................ 15
Working With Lists............................................................................................. 16
page you are currently on.
Below the Help shortcut there is a context-sensitive help area that contains a short
description of the user interface item. When you point to an interface element, you
can see its brief description and available operations.
Work Area
The Plesk Expand work area includes all interface elements located to the right of the
navigation pane. The work area displays the options available for the shortcut selected
in the navigation pane.
The sections below describe how to work with the following elements of the Plesk
Expand work area interface: the path bar and lists of objects.
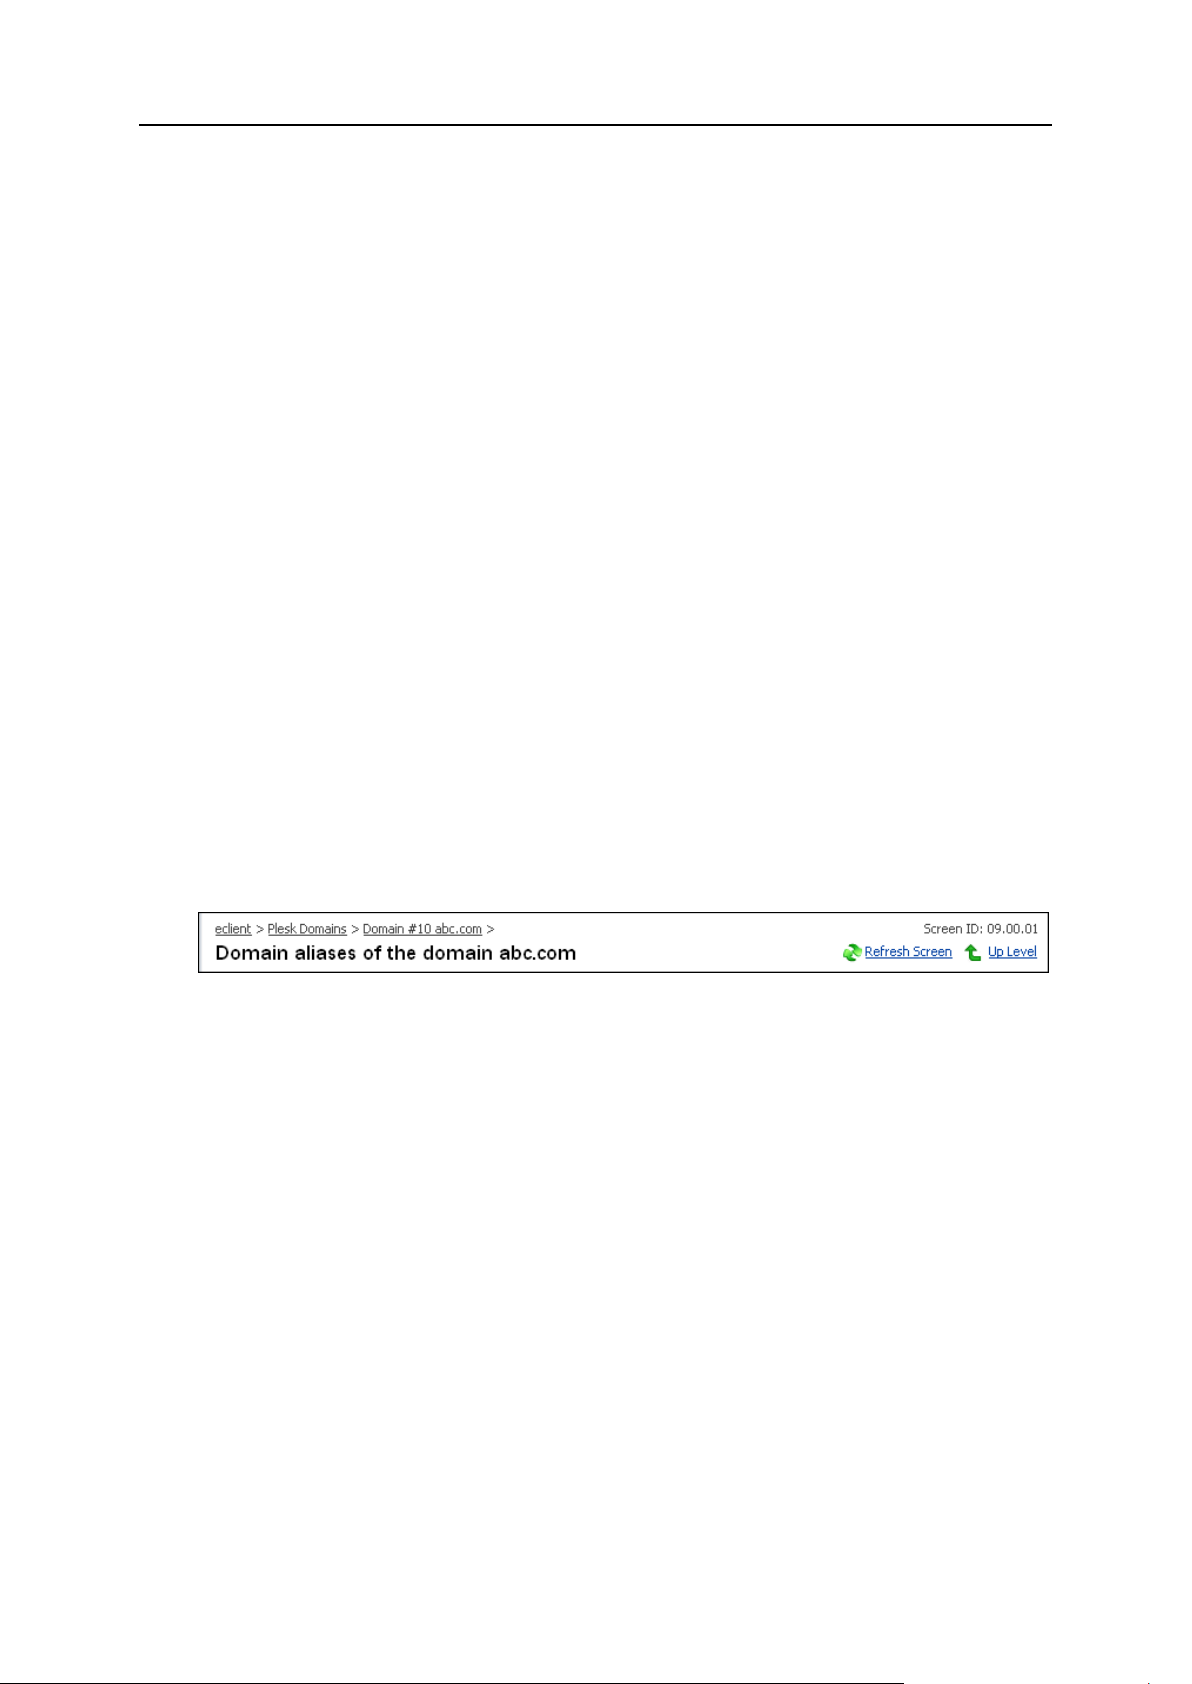
Path Bar
The path bar is a chain of links indicating your current location within the Plesk Expand
system. It is located at the top of the Plesk Expand work area. By clicking these links,
you can jump up one or more levels.
Figure 4: Path bar
The Up Level button located in the upper right corner of the screen is used to jump up
one level.
On some screens, the Refresh Screen button appears in the upper right corner. It can
be used to renew the screen you are on.
Below the path bar, you can see the title of the Plesk Expand page you are currently
on.
Page 16
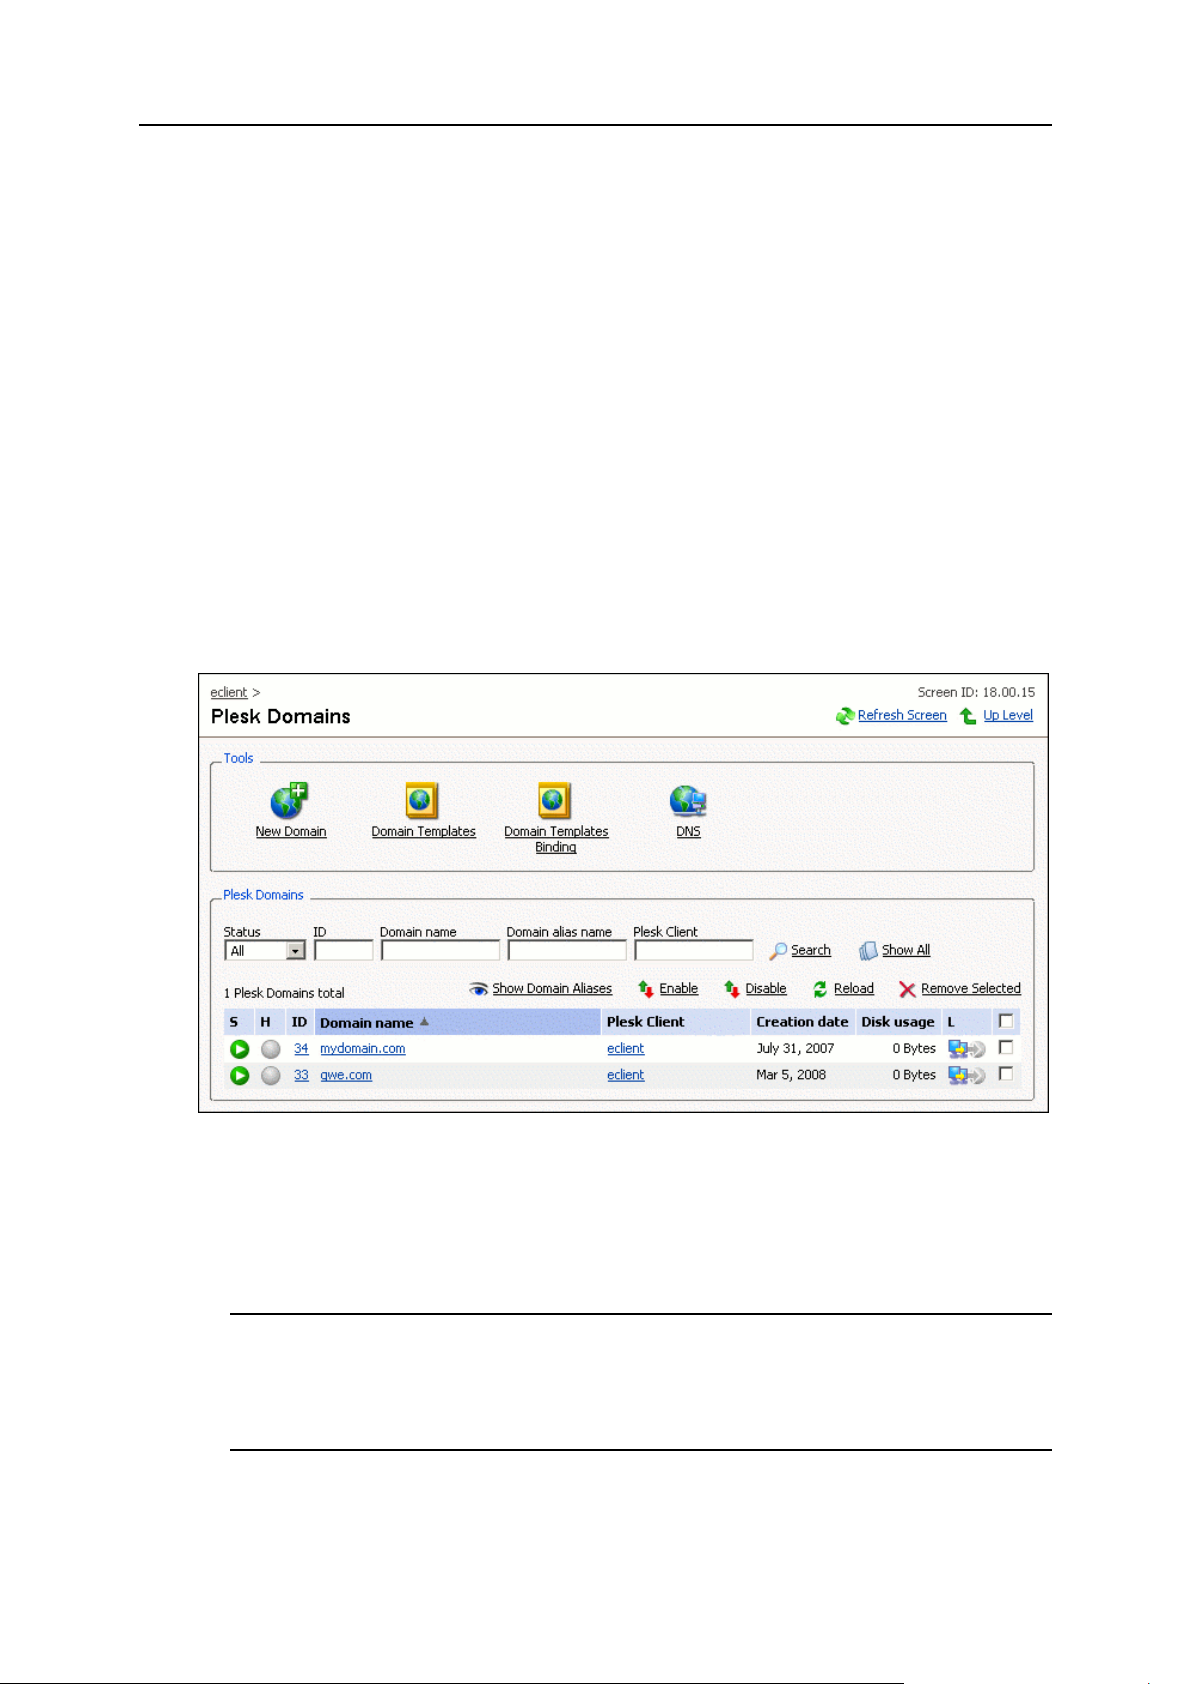
16 Introducing Plesk Expand
Working With Lists
On some pages, you may see a considerable number of items, such as Plesk servers,
Plesk clients, and Plesk domains, shown in Plesk Expand work area. Such multiple
elements are always displayed as shortcuts organized in tables. The list shows the
items (on the Plesk servers‟ management page, it shows Plesk servers, on the
domains‟ management page - domains, and so on), and critical parameters of these
objects in separate columns of the table. Each item in the list is clickable; by clicking an
item you get to its administration page. Values in some columns are also shortcuts to
pages where these parameters can be adjusted.
The list of items can be sorted by any parameter. To sort items by a parameter, for
example, Client name (see the figure below), click the corresponding column title. The
list will be sorted by the client name in ascending alphabet order. You can change the
sorting order, ascending to descending or vice versa, by clicking column title once
more.
The example of such page is shown below.
You can perform the following typical operations on the items listed on such pages:
Search. To search for a specific item in the list, enter the corresponding information
into one or several of the provided search fields, and click Search. All matching
items will be displayed in a reduced list.
Note: The search patterns slightly differ for different types of search fields. For the
ID field, only exact matches are shown. For example, if you enter “3”, only objects
with ID=3 are shown, objects with ID=33 are not shown. All the text fields use the
“any word” search pattern. For example, if you enter “John” in the Client Name field,
you will see all objects containing “John”, such as “Johnson”, “John Smith”, etc.
Show All. If you are viewing a reduced list, click Show All to revert to the complete list
of objects.
Figure 5: Working with lists
Page 17

Introducing Plesk Expand 17
Customize View. Upon clicking this link, a pop-up window opens, where you can do
the following:
Specify the number of items of the list to be displayed per page.
Select the columns to be displayed:
Select the check boxes of columns you want to be displayed;
Clear the check boxes of columns you want to be hidden.
By default, all columns are selected.
Enable. To activate (unsuspend) one or several objects, select the objects in the list
and click Enable.
Disable. To deactivate (suspend) one or several objects, select the objects in the list
and click Disable.
Assign Selected. Plesk Expand objects or users can be assigned to Expand clients or
resellers, and also to central servers. To assign items, select them in the list and
click Assign Selected. Confirm assigning on the confirmation page that appears.
Deassign Selected. To deassign items, select them in the list and click Deassign
Selected. Confirm deassigning on the confirmation page that appears.
Reload. To refresh data about certain items in the list, select them and click Reload.
On the next page, select which data should be refreshed. This option might be
useful if you have applied some changes to these particular Plesk Expand objects
or users, and wish to refresh these data immediately, without having to wait for
Plesk Expand to do this automatically.
Remove Selected. To remove items from the list, select them and click Remove or
Remove Selected. Confirm the deletion on the confirmation page that appears.
Log in. To log in to a particular Plesk object‟s administration page in the Plesk
control panel, click the Login icon next to the corresponding object. It takes you
straight to this object on the Plesk server where it resides. The Plesk control panel
opens in a separate browser window. No login is required.
To proceed to the administration page of a certain item in the list, click its name in the
list.
Page 18
18 Introducing Plesk Expand
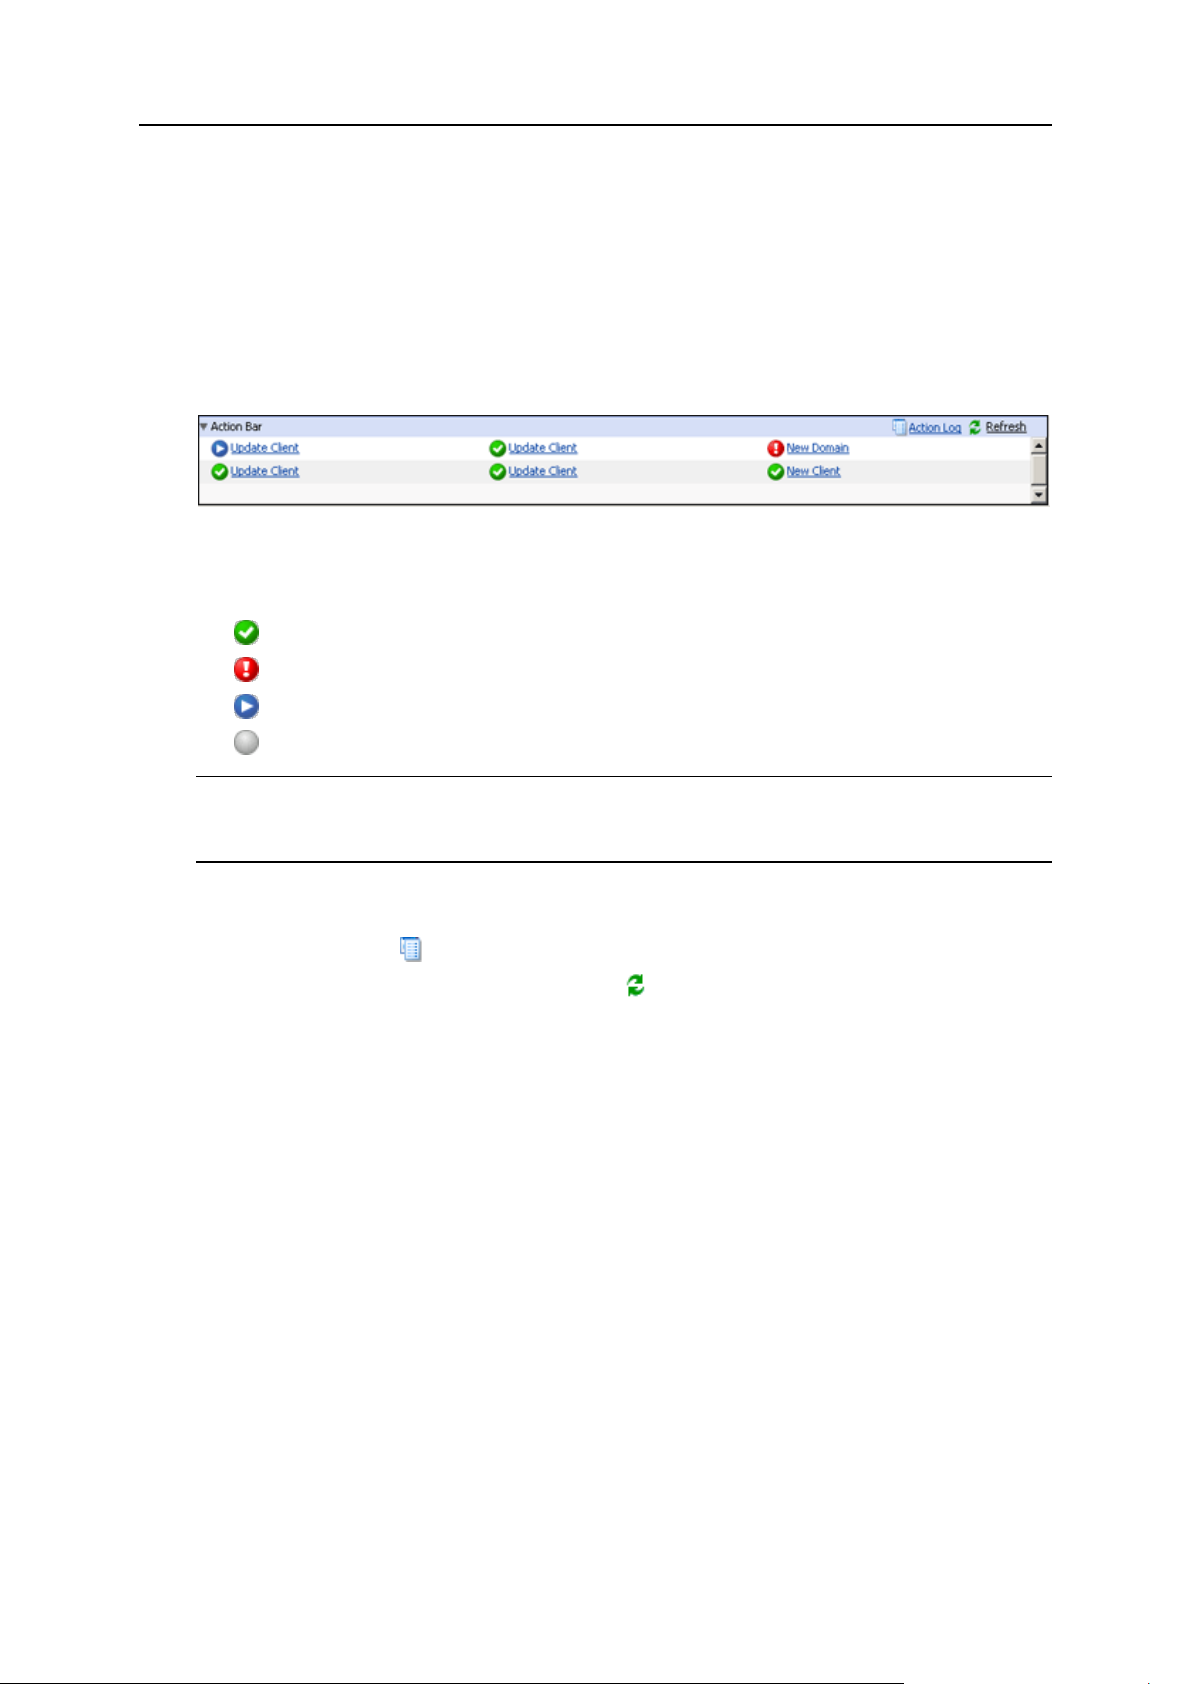
Action Bar
When a certain action is being executed in Plesk Expand, the state of its performance
is displayed in the action bar at the bottom of the page. If you don‟t see the action bar,
click on the small triangle to the left of the Action Bar title in the bottom tray of the Plesk
Expand screen. The action bar shows actions recently performed in Plesk Expand and
their statuses:
Figure 6: Action Bar Screen
The status of an action can be indicated by one of the following icons:
The action was executed successfully;
The action failed;
The action is running;
The action is scheduled for execution.
Note: Actions are temporarily stored in the action bar. When the action bar is filled to
capacity, older actions are replaced by more recent ones. When you log out of the
control panel, the action bar is automatically cleared.
To view the detailed information on a certain action, click this action name.
To proceed to the action log, where you can view the list of all users‟ and system‟s
actions, click the Action Log shortcut.
To refresh the data on the actions, click Refresh.
To hide the action bar, click the small triangle to the left of the Action Bar title. To
show the action bar, click this triangle again.
Page 19

This chapter will guide you through your first steps in Plesk Expand, such as logging in
In this chapter:
Logging in to Plesk Expand ............................................................................... 19
Changing Your Password .................................................................................. 20
If You Forgot Your Password ............................................................................ 20
Configuring Your Interface Settings ................................................................ ... 21
Getting Help in Plesk Expand ............................................................................ 21
C H A P T E R 2
First Steps With Plesk Expand
to the Plesk Expand control panel for the first time and changing your password. It will
also help you restore your forgotten password, configure Plesk Expand interface for
your convenience and get help, if you require it.
Logging in to Plesk Expand
To log in to Plesk Expand:
1 Open your browser and enter the URL of the Plesk Expand control
panel received from your provider.
2 Provide the login and password received from your provider.
3 Select an interface language for your Plesk Expand control panel.
4 Click Login.
Page 20

20 First Steps With Plesk Expand
Changing Your Password
To change your password to Plesk Expand:
1 Click Home.
2 Click Personal Info.
3 Enter your new password.
A password must be from 5 to 14 characters long. You can use Latin letters,
hyphenations and underlines in the password. Do not use quotes, spaces and
national alphabet characters.
4 Retype your new password.
5 Click OK.
If You Forgot Your Password
If you accidentally forgot your password, use the password retrieval option, which lets
you receive your password to your e-mail address.
To find out the password:
1 Open the login screen:
If you are not presently logged in to the Plesk Expand control panel, enter the
URL of your Plesk Expand in a browser.
If you are presently logged in to the Plesk Expand control panel, click Log Out in
the navigation pane.
2 On the login screen, click Forgot your password?.
3 Enter your login and e-mail address into the Login and E-mail fields
respectively.
4 Click OK.
Page 21

First Steps With Plesk Expand 21
Configuring Your Interface Settings
To configure the interface settings for your control panel:
1 Click Server in the navigation pane.
2 Click Profile.
3 In the Interface Settings section:
Select a skin from the Interface skin list.
Select a language from the Interface language list.
Enter a number of items to be displayed per page into the Display field. The
default number is 80.
4 Click OK.
Getting Help in Plesk Expand
For information about the Expand client panel of Plesk Expand, please refer to this
guide or Plesk Expand Help pages, which are available upon click on the Help shortcut
in the Help & Support section of the navigation pane.
If you encounter any problem in the system and need help in solving it, please refer to
your provider.
Page 22

You can view and edit your personal details. You can also view the following settings
In this chapter:
Editing Your Personal Information ..................................................................... 22
Viewing Limits on Resources Set for You by the Administrator ......................... 23
Viewing Customized Limits on Certain Plesk Servers Set for You by the
Administrator ..................................................................................................... 25
Viewing Permissions on Operations Set for You by the Administrator ............... 26
Viewing Your IP Pool ......................................................................................... 28
Viewing Your Application Pool ........................................................................... 29
C H A P T E R 3
Viewing Useful Information
defined for you by the Plesk Expand administrator:
Limits on resources, the amount of resources allocated to you by your provider.
Permissions on operations, operations that your provider allows you to perform in
Plesk Expand.
IP pool, IP addresses you can use for domains creation.
Application pool, applications you can use for creating sites.
Editing Your Personal Information
To edit your personal information:
1 Click Home.
2 Click Personal Info.
3 Edit your contact details, such as company name, phone, fax, e-mail,
postal address. Here you can also change your password.
4 Click OK.
Page 23

Viewing Useful Information 23
Viewing Limits on Resources Set for You
by the Administrator
To view limits on resources set for you by the Plesk Expand administrator:
1 Click Home.
2 Click Limits.
3 View the list of limits and the values set for them:
Maximum number of domains. The number of domain names/web sites you can
host on the server. This includes web sites hosted on this server, and domain
forwarders that point to web sites hosted on other servers. Domain aliases
(additional domain names for a site hosted on this server) and subdomains are
counted separately and are not limited by this resource type.
Maximum number of subdomains. The number of subdomains you can host.
Disk space. The amount of disk space allocated to you. It includes the disk space
occupied by all files related to your domains/web sites: web site contents,
databases, applications, mailboxes, log files and backup files. This is the socalled soft quota: when it is exceeded, your account and domain names/web
sites are not suspended automatically, only the appropriate notices are e-mailed
to you.
Maximum amount of traffic. The amount of data that can be transferred from your
web sites per month. Once the limit is reached, the appropriate notices are emailed to you.
Maximum number of web users. The number of personal web pages you can host
for other users under your domains. This service is mostly used in educational
institutions that host non-commercial personal pages of their students and staff.
These pages usually have web addresses like http://yourdomain.com/~username. See Plesk Administrator Guide for details.
Maximum number of databases. The number of databases you can host on the
server.
Maximum number of mailboxes. The number of mailboxes you can host on the
server.
Mailbox quota. The amount of disk space in kilobytes allocated to each mailbox.
Maximum number of mail redirects. The number of mail forwarders you can set up.
Maximum number of mail groups. The number of mail groups for your domains.
Maximum number of mail autoresponders. The number of automatic responses you
can set up.
Maximum number of mailing lists. The number of mailing lists you can host on the
server. To provide users with mailing lists, you should install the GNU Mailman
software.
Maximum number of Java applications. The number of Java applications or applets
that can be hosted on the server.
Page 24

24 Viewing Useful Information
Validity period. The term for a hosting account. At the end of the term, all your
domains/web sites will be suspended, your Web, FTP and mail services will no
longer be accessible to the Internet users, and your customers (domain owners)
will not be able to log in to the control panel.
Accounts cannot be automatically renewed. To bring the hosted domain
names/web sites back to operation, contact your provider.
The following limits apply to Plesk client accounts registered only on Plesk for
Windows servers. If set for a Unix-based Plesk client, these limits are ignored.
Total mailboxes quota. The amount of space for all your mailboxes.
Maximum number of domain aliases. The number of domain aliases you can use for
your domains.
Maximum number of IIS application pools. The number of dedicated IIS application
pools you can allocate between your domains.
Maximum number of Microsoft SQL Server databases. The number of Microsoft SQL
Server databases you can create on your domains.
Maximum number of shared SSL links. The number of shared SSL links you can use
on your domains.
Microsoft SQL databases quota. The amount of disk space that Microsoft SQL
Server databases can occupy on your domains.
MySQL databases quota. The amount of disk space that Microsoft SQL Server
databases can occupy on your domains.
Page 25

Viewing Useful Information 25
Viewing Customized Limits on Certain
Plesk Servers Set for You by the
Administrator
By default your limits on Plesk servers you have access to are automatically controlled
by Plesk Expand. Some limits on certain Plesk servers can be set specially for you by
the administrator.
To view the list of your customized limits on certain Plesk servers set for you by the
Plesk Expand administrator:
1 Click Home.
2 Click Customized Limits.
3 View the customized limits of the Expand client‟s instances and the
following information about them:
Name, the limit name.
Value, the customized value of this limit set for client on a certain Plesk server.
Plesk server, the name of a Plesk server where the client has a customized limit.
Page 26

26 Viewing Useful Information
Viewing Permissions on Operations Set
for You by the Administrator
To view limits on resources set for you by the Plesk Expand administrator:
1 Click Home.
2 Click Limits.
3 View the list of limits and the values set for them:
Access to control panel. Your ability to access the control panel for managing your
account and sites.
User Interface. The type of user interface you can use: standard, desktop, or both.
Desktop management. Your ability to customize your desktop interface.
Domain creation. Your ability to set up hosting accounts for new sites.
Physical hosting management. Your ability to set up hosting accounts, modify
hosting account features and switch on or off support of programming and
scripting languages.
Management of shell access to server. Your ability to access the server shell through
Secure Shell protocol and to allow your customers to do this.
Non-chrooted shell management. Your ability to allow domain users any type of
shell access, provided that this access type is allowed for this domain user.
Hard disk quota assignment. Your ability to assign hard quotas on disk space for
your web sites and for web sites of your customers.
Subdomains management. Your ability to set up additional sites under your
domains and to allow your customers to do this.
Domain aliases management. Your ability to set up additional alternative domain
names for your web sites and to allow your users to do this.
Log rotation management. Your ability to adjust the cleanup and recycling of
processed log files for your sites.
Anonymous FTP management. Your ability to have an FTP directory where all users
could download and upload files without the need to enter login and password.
A web site should reside on a dedicated IP address in order to use anonymous
FTP service.
Crontab/Scheduler management. Your ability to schedule tasks with the Crontab
task scheduler. Scheduled tasks can be used for running scripts or utilities on
schedule.
Use of Mambo content management system. Your ability to use Mambo CMS, an
integrated with Plesk open-source solution by the Team Mambo group
(http://www.mamboserver.com/).
Domain limits adjustment. Your ability to change resource allotments for your
domains.
DNS zone management. Your ability to manage the DNS zones of your domains.
Page 27

Viewing Useful Information 27
Java applications management. You ability to install Java applications and applets
on web sites through the control panel.
Mailing lists management. Your ability to use mailing lists provided by the GNU
Mailman software.
Spam filter management. Your ability to use spam filter provided by the
SpamAssassin software.
Dr.Web antivirus management. You ability to use server-side antivirus protection for
filtering incoming and outgoing mail.
Backup/restore functions. Your ability to use the control panel‟s facilities to back up
and restore their sites.
Ability to use remote XML interface. Your ability to remotely manage your web sites
through custom applications. The XML interface can be used for developing
custom applications integrated with web sites, which could be used, for
instance, for automating setup of hosting accounts and provisioning of services
for customers purchasing hosting services from your site. The remote XML
interface operations are limited to setting up and removing domain names/web
spaces on the server, modifying domain and web site related preferences and
hosting services, retrieving information on domains. To learn more about using
Expand control panel‟s XML interface (also referred to as Plesk API RPC),
please visit http://download1.swsoft.com/Plesk/Plesk7.5/Doc/plesk-7.5r-sdk-
html/docs/plesk_agent/ch01.html.
The following permissions apply to Expand clients registered only on Plesk for
Windows servers. When specified for Unix-based clients, these permissions are
ignored.
IIS Application Pool Management. Your ability to allocate dedicated IIS application
pools between your domains.
Hosting Performance Management. Your ability to change the hosting performance
preferences for your domains.
Page 28

28 Viewing Useful Information
Viewing Your IP Pool
To view the list of IP addresses you can use for creating domains:
1 Click Home.
2 Click IP Pool.
3 View the list of IP addresses and the following information about
them:
T, the type of an IP address.
The IP address type can be:
Shared IP address. This IP address is shared between several clients
(i.e. one IP address can be used for hosting by several clients).
Exclusive IP address. This IP address is granted to a particular user
exclusively.
IP Address, the IP address.
Domain, domains registered on this IP address.
Page 29

Viewing Useful Information 29
Viewing Your Application Pool
To view the list of applications you can use for your domains:
1 Click Home.
2 Click Application Pool.
3 View the list of applications and the following information about them:
L, the type of a site application package licensing.
The licensing type can be:
Free. A free site application package requiring no license key, included in
the default installation of Plesk for free and automatically added to the
application pool of each client.
Commercial. A commercial site application package requiring a license
key purchased additionally from Parallels.
Commercial without a key. A commercial site application package
requiring a license key purchased additionally from Parallels, with no key
installed at the moment.
A, the access level of a site application package defined by your provider.
The access level can be:
Free. A free site application package, available to all clients registered on
this Plesk server.
Commercial. A commercial application, available for clients by the
provider‟s permission.
Name, an application package name.
Version, an application package version number.
Release, the release number of an application package.
Instances, the number of times an application package was deployed.
Description, a brief description of an application.
Page 30

This chapter is devoted to creating and managing domains in Plesk Expand. If you are
In this chapter:
Managing Domain Templates ............................................................................ 31
Registering a Domain on the Basis of a Template ............................................. 51
Registering a Domain per Customer Requirements........................................... 53
Viewing the List of Your Domains ...................................................................... 58
Administering a Domain .................................................................................... 59
Managing Bindings Between Domains and Domain Templates ......................... 79
Removing Domains ........................................................................................... 85
C H A P T E R 4
Managing Your Domains
allowed to create domains by your provider, you can simplify creating domains by using
domain templates or you can create domains from scratch. With appropriate
permissions you can thoroughly manage domains settings. You can also bind domains
to domain templates and update numerous domains at a time by changing settings of a
template bound with these domains.
Page 31

Managing Your Domains 31
Managing Domain Templates
Plesk Expand domain templates are intended to ease the creation of a number of
similar domains (the accounts with the same hosting plan).
Domain templates are account templates created in Plesk Expand and containing
universal information about domains, which can be shared between Plesk servers and
used for creating domains on any Plesk server.
Domain templates can be created:
From scratch;
Using an existing domain as a prototype;
Using another Plesk Expand domain template as a prototype.
Domains from different Plesk servers can be bound to the same domain template and
managed centrally. Each domain can be bound to only one domain template. If a
domain is bound to a template, the binding can be active or inactive (temporarily
deactivated).
Use the following principles of centralized domains management:
If you bind a domain to a template, the domain parameters will be updated with the
current parameters of the template.
If you change a template, the changes will be applied to all domains actively bound
to the template.
The changes will not be applied to a domain, if its binding with the template is
inactive.
If you activate a temporarily deactivated binding between a domain and a template,
the domain parameters will be updated with the current parameters of the template.
If you delete a template, all the bindings between the template and domains will be
automatically deleted.
Page 32

32 Managing Your Domains
In this section:
Creating a Domain Template From Scratch....................................................... 33
Creating a Domain Template From a Domain ................................................... 39
Creating a Copy of a Domain Template ............................................................. 39
Exporting a Domain Template to a Plesk Server ............................................... 40
Viewing the List of Domain Templates............................................................... 41
Editing a Domain Template ............................................................................... 42
Configuring Log Rotation in a Domain Template ............................................... 43
Configuring Performance Settings in a Domain Template ................................. 43
Applying a Domain Template to Domains .......................................................... 44
Viewing the List of Domains Bound With a Domain Template ........................... 45
Resetting Bound Domains to a Domain Template ............................................. 46
Detaching Domains From a Domain Template .................................................. 47
Detecting Possible Bindings Between Domains and a Domain Template .......... 48
Viewing Possible Detected Bindings Between Domains and a Domain Template 49
Removing Domain Templates ........................................................................... 50
Page 33

Managing Your Domains 33
Creating a Domain Template From Scratch
To create a domain template from scratch:
1 Click Home.
2 Click Domains.
3 Click Domain Templates.
4 Click New Domain Template.
5 Specify the domain template name to identify the template during
domains creation.
6 Select the Allow to use for domains creation check box to make this domain
template available for creation of new domains. The new domain
template will appear active in the list of available domain templates.
7 Specify the type of an IP address to be used by a domain:
Shared IP address, an IP address shared among several users (i.e. one IP
address can be used for hosting by many users).
Exclusive IP address, an IP address granted to a particular user exclusively.
8 Select the hosting type for this domain template from the list:
None, no hosting is configured.
If you select this type of hosting, you proceed to setting domain level limits.
Frame forwarding. With this type of hosting, the pointed domain address is
retained in the browser address bar and the user does not know that the domain
is pointed to another URL. The drawback of this method is that some search
engines do not index the pointed domains and some browsers do not support
frames.
If you select this type of hosting, you proceed to setting domain level limits. The
frame forwarding hosting type is set for each domain individually.
Standard forwarding. With this type of hosting, all requests to your domain are
forwarded by the server to another URL. When the user of your site enters the
address of your domain in the browser address bar, they see that the domain is
routed to another URL. This method is mainly used to have multiple domain
names pointing to one web site.
If you select this type of hosting, you proceed to setting domain level limits. The
standard forwarding hosting type is set for each domain individually.
Physical hosting. The most common type of hosting services, which means
allocating a certain amount of disk space on the local server for your domain. It
enables you to place your files in the domain directory on the hard disk.
If you select this type of hosting, you proceed to configuring physical hosting
parameters. These settings are applied to all domains created on the basis of
this template.
9 Click Next to save the settings and continue.
Page 34

34 Managing Your Domains
10 If you selected physical hosting for domains created with this
template, configure physical hosting for domains created with the
template:
Note: This step is optional. It appears only if physical hosting was selected in
general settings.
Hard disk quota, the maximum amount of disk space to be used by a domain.
FrontPage support, support of the FrontPage Server extensions.
FrontPage over SSL support, support of the FrontPage Server extensions.
FrontPage authoring, enabling authorization of FrontPage extensions.
Important: For security reasons, it is recommended to enable authorization of
FrontPage extensions only when FrontPage extensions are used.
Shell enabled, allowing shell access to the system.
Important: Allowing shell access compromises the system security. It is
recommended to allow shell access to the system only to trusted users.
SSL support, support of Secure Socket Layer.
Microsoft ASP support, support of Active Server Pages.
Microsoft ASP.NET support, support of ASP.NET.
SSI support, support of Server Side Included scripting.
PHP support, support of HTML documents containing PHP scripts.
CGI support, support of Common Gateway Interface scripting and allowing to
create an individual cgi-bin directory.
Perl support, support of Perl scripting.
Python support, support of Python scripting.
FastCGI support, support of Fast Common Gateway Interface scripting.
Miva support, support of Miva scripting.
ColdFusion support, support of ColdFusion scripting.
Web statistics, select the application to be used for retaining domain statistics.
Custom error documents, enabling the client to create their own error pages, which
will be displayed to notify about web server errors.
Publish site with SiteBuilder, allowing the domain administrator to access
SiteBuilder through their Plesk control panel.
Use dedicated IIS application pool, enabling the use of dedicated IIS application
pool for web applications on a domain.
Additional write/modify permissions, enabling in the client‟s web applications the
use of a file-based database (like Jet) located in the root of httpdocs or
httpsdocs folders.
11 Click Next to save the settings and continue.
12 Configure limits for domains created with the template:
Important: This option might compromise the web site security.
Page 35

Managing Your Domains 35
Maximum number of subdomains, the maximum number of subdomains which can
be created for the domain.
Maximum number of domain aliases, the maximum number of domain aliases which
can be created for the domain.
Disk space, the amount of disk space which can be occupied by the domain.
Maximum amount of traffic, the maximum traffic for the domain per month.
Maximum number of web users, the maximum number of web users for the domain.
Maximum number of databases, the maximum number of databases which can be
used on the domain.
Maximum number of mailboxes, the maximum number of mailboxes which can be
used on the domain.
Mailbox quota, the maximum amount of disk space which can be occupied by a
mailbox.
Maximum number of mail redirects, the maximum number of mail redirects allowed
for a mailbox.
Maximum number of mail groups, the maximum number of mail groups which can
be used on the domain.
Note: This limit works for Plesk for Windows servers only. If applied to domains
on Plesk for Linux/UNIX servers, it is ignored.
Maximum number of mail autoresponders, the maximum number of autoresponders
which can be used for a mailbox.
Maximum number of mailing lists, the maximum number of mailing lists supported
by the mailboxes.,
Maximum number of Java applications, the maximum number of web applications
which can be installed on the domain.
Validity period, the period during which a Plesk domain remains active. When this
period is over, the domain status turns to deactivated.
Maximum number of Microsoft FrontPage subaccounts, the maximum number of
Microsoft FrontPage subaccounts which can be created for the domain.
Maximum number of FTP subaccounts, the maximum number of FTP subaccounts
which can be created for the domain.
Total mailboxes quota, the maximum amount of disk space which can be occupied
by all mailboxes on the domain.
Note: This limit works for Plesk for Windows servers only. If applied to domains
on Plesk for Linux/UNIX servers, it is ignored.
Maximum number of Microsoft SQL Server databases, the maximum number of
Microsoft SQL Server databases which can be used on the domain.
Note: This limit works for Plesk for Windows servers only. If applied to domains
on Plesk for Linux/UNIX servers, it is ignored.
Maximum number of shared SSL links, the maximum number of shared SSL links
which can be used on the domain.
Note: This limit works for Plesk for Windows servers only. If applied to domains
on Plesk for Linux/UNIX servers, it is ignored.
Page 36

36 Managing Your Domains
Maximum number of ODBC connections, the maximum number of ODBC
connections which can be set up on the domain.
Microsoft SQL databases quota, the maximum amount of disk space which can be
occupied by Microsoft SQL Server databases on the domain.
Note: This limit works for Plesk for Windows servers only. If applied to domains
on Plesk for Linux/UNIX servers, it is ignored.
MySQL databases quota, the maximum amount of disk space which can be
occupied by MySQL Server databases on the domain.
Note: This limit works for Plesk for Windows servers only. If applied to domains
on Plesk for Linux/UNIX servers, it is ignored.
Maximum number of ColdFusion DNS connections, the maximum number of
ColdFusion DNS connections which can be set up on the domain.
13 Click Next to save the settings and continue.
14 Configure preferences for domains created with the template:
Select the WWW-prefix for domain check box to make the domain accessible by
the same URL without the “www” prefix.
Select the Retain traffic statistics for check box to set the traffic statistics retention
period, and specify the period of time to retain statistics.
15 Click Next to save the settings and continue.
16 Configure permissions for domain administrators of domains created
with the template:
User interface. Specify the type of user interface the domain administrator will be
able to use - standard, desktop, or both.
With the desktop interface, the domain administrator uses the desktop view
with shortcuts to main operations the domain administrator can perform in
Plesk control panel. The regular Plesk control panel interface is unavailable.
With the standard interface, the domain administrator can work in the regular
Plesk interface. The desktop view is unavailable.
With both interfaces, the domain administrator can switch between them.
Desktop management. Specify whether the domain administrator can customize
their desktop interface.
Physical hosting management. Specify whether the domain administrator can set
up and configure physical hosting for the domain. Without this permission, the
domain administrator can set up only standard forwarding or frame forwarding
hosting. The domain administrator can only view hosting parameters of the
domain with physical hosting, but cannot configure them. Only you can set up
and configure physical hosting for the domain.
Management of shell access to server. Specify whether the domain administrator
can select a type of shell access for FTP users of the domain when setting up
physical hosting for the domain. The domain administrator can permit any type
of shell access under FTP account credentials, if non-chrooted shell
management is allowed for the domain administrator. Without this permission,
the domain administrator cannot allow FTP or shell access to users of the
domain.
Page 37

Managing Your Domains 37
Note: Allowing this option might compromise the system security.
Non-chrooted shell management. Specify whether the domain administrator can
allow any type of shell access to users of the domain, if management of shell
access to server is allowed for the domain. Without this permission, the domain
administrator can allow only chrooted shell access to users of the domain, if
management of shell access to server is allowed for the domain.
Hard disk quota assignment. Specify whether the domain administrator can assign
hard disk quota for FTP users when setting up physical hosting for the domain.
Without this permission, only the Plesk Expand administrator can assign hard
disk quota for the domain administrator.
Note: This function may be ignored if hard disk quotation capability is not
configured in the domain administrator's operating system settings.
Subdomains management. Specify whether the domain administrator can create,
edit and remove subdomains (the number of subdomains depends on the limits
set by the administrator and the hosting plan). Without this permission, the
domain administrator can only view the information of subdomains created by
the administrator, and remove them. Only you can create and edit subdomains
of this domain.
Domain aliases management. Specify whether the domain administrator can set up
alternative domain names for the domain.
Log rotation management. Specify whether the domain administrator can use and
configure settings for log rotation.
Anonymous FTP management. Specify whether the domain administrator can
enable and configure anonymous FTP.
Important: Use this option with care. If anonymous FTP is set up with
excessive limits, it could lead to excessive server resources and bandwidth
usage.
FTP subaccount management. Specify whether the domain administrator can
manage FTP subaccounts.
FTP password management. Specify whether the domain administrator can change
their FTP account password. Without this permission, the domain administrator
cannot change their FTP account password, only use the FTP password
provided by the Plesk Expand administrator.
Crontab/Scheduler management. Specify whether the domain administrator can
schedule, edit and remove tasks; set the e-mail address for the crontab
messages to be sent to.
Important: Use this option with care, it might seriously affect the system.
DNS zone management. Specify whether the domain administrator can activate a
DNS zone, switch the DNS server type from master to slave, restore a DNS
zone by a template, add, edit and remove DNS records. Without this permission,
the domain administrator can only view the list of DNS records.
Important: Use this option with care. Misconfigured DNS settings might cause
malfunction of web, mail and FTP services.
Page 38

38 Managing Your Domains
Java applications management. Specify whether the domain administrator can
activate the Tomcat service, upload and remove the Tomcat web application
archive files (.WAR files), access, start, stop and restart web applications,
refresh data on the screen. Without this permission, the domain administrator
can only view uploaded web applications and refresh data on the screen.
Web statistics management. Specify whether the domain administrator can manage
web statistics for the domain
Mailing lists management. Specify whether the domain administrator can activate
the Mailing List service, add, administer and remove mailing lists. Without this
permission, the domain administrator can only view the list of mailing lists.
Antivirus management. Specify whether the domain administrator can use and
configure settings of the server-side antivirus protection for filtering incoming
and outgoing mail. Without this permission, the domain administrator can only
use the server-side antivirus protection.
Backup/Restore functions. Specify whether the domain administrator can create
and remove backup files the domain.
Allow backup/restore using local repository. Specify whether the domain
administrator can store backup files on the server.
Allow backup/restore using remote (FTP) repository. Specify whether the domain
administrator can use an arbitrary FTP server for storing backups.
IIS application pool management. Specify whether the domain administrator can
manage their IIS application pool.
Hosting performance management. Specify whether the domain administrator can
change the hosting performance preferences for the domain.
SiteBuilder. Specify whether the domain administrator can use SiteBuilder for
creating and editing their web site.
Spam filter management. Specify whether the domain administrator can use
SpamAssassin spam filter and customize filtering settings.
Additional write/modify permissions management. Specify whether the domain
administrator‟s web applications can use of a file-based database (like Jet)
located in the root of httpdocs or httpsdocs folders.
Important: This option might compromise the web site security.
17 Click OK.
Tip: You can also create a new domain template:
- using a configured domain as a prototype. Just save a Plesk domain as a template.
- using a domain template as a prototype. Just copy the domain template and edit the
required parameters.
- using a domain template of a Plesk server as a prototype. Just import the domain
template from a Plesk server.
Page 39

Managing Your Domains 39
Creating a Domain Template From a Domain
To create a domain template from a domain:
1 Click Home.
2 Click Domains.
3 Click the name of the domain.
4 Click Save as Template.
5 Specify the template name.
6 Select the Allow to use for domains creation check box to make the
template active.
7 Select the Attach the domain to a newly created template check box to bind the
domain to the template, i.e. all further changes of the template will be
applied to the domain.
8 Click OK.
Creating a Copy of a Domain Template
To create a copy of a domain template:
1 Click Home.
2 Click Domains.
3 Click Domain Templates.
4 Click the name of the domain template you want to export.
5 Click Copy Template.
6 Specify the name of the template copy.
7 Select the Allow to use for domains creation check box to make the
template active.
8 Click OK.
Now you can edit the parameters of a newly created domain template as
required.
Page 40

40 Managing Your Domains
Exporting a Domain Template to a Plesk Server
When you export a domain template to a Plesk server, a copy of the domain template
is created on the specified Plesk server.
To export a domain template to a Plesk server:
1 Click Home.
2 Click Domains.
3 Click Domain Templates.
4 Click the name of the domain template you want to export.
5 Click Export to Plesk.
6 Select a Plesk server where the domain template will be exported.
7 Specify the name of the domain template copy, which will be created
on a Plesk server.
8 Click OK.
Page 41

Managing Your Domains 41
Viewing the List of Domain Templates
To view all domain templates:
1 Click Home.
2 Click Domains.
3 Click Domain Templates.
4 View the list of client templates and the following information about
them:
S (status), the status of the domain template.
The domain template status can be:
Active, the domain template can be used for creating new domains.
Deactivated, the domain template cannot be used for creating new
domains.
Tip: Click the status icon to change the status of the domain template.
ID, the ID number of the template. The ID number is given to each domain
template automatically during its creation and depends on the order of creation.
Template name, the name of the domain template.
Tip: - To add a new domain template, click New Domain Template.
- To proceed to the administration page of a domain template, click its name.
- To change the status of a domain template, click the icon in the S column to
deactivate the template or the icon to activate it.
- To remove one or several domain templates, select the corresponding check boxes
and click Remove Selected.
Page 42

42 Managing Your Domains
Editing a Domain Template
To edit a domain template:
1 Click Home.
2 Click Domains.
3 Click Domain Templates.
4 Click the name of the domain template you want to edit.
5 Change the required settings:
To change the status of the domain template, click the Enable/Disable shortcut.
To change general settings of the domain template, click General Settings.
To change the type of hosting set in this domain template, click Domain Hosting.
To change domain level limits set in the domain template, click Domain Limits.
To change domain preferences set in the domain template, click Domain
Preferences.
To change the domain administrator permissions set in the domain template,
click Administrator Permissions.
To configure log rotation for the domain set in the domain template, click Log
Rotation. This option is available only if physical hosting is selected for the
domain template.
To configure performance for domains under Windows platforms, click
Performance.
6 Click OK.
Page 43

Managing Your Domains 43
Configuring Log Rotation in a Domain Template
This option is available only if physical hosting is selected for the domain template.
To configure in the domain template log rotation for a domain:
1 Click Home.
2 Click Domains.
3 Click Domain Templates.
4 Click the name of the domain template you want to edit.
5 Click Log Rotation.
6 Specify the log rotation condition. You can select from log rotation:
by size, for this option specify the size of log files to be stored.
by time, for this option specify the period of time for log files to be stored.
7 Specify the maximum number of log files to be stored.
8 To compress stored log files, select the Compress log files check box.
9 To send processed log files to the e-mail, specify the e-mail address.
10 To enable log rotation, select the Enable log rotation check box.
11 Click OK.
Configuring Performance Settings in a Domain
Template
You can configure performance settings set in the domain template for domains
created on Windows platforms.
To configure domain performance settings:
1 Click Home.
2 Click Domains.
3 Click Domain Templates.
4 Click the name of the domain template you want to edit.
5 Click Performance.
6 Specify the following parameters:
Maximum network use (KB/s), the maximum bandwidth allowed for this domain.
Connections limited to, the maximum number of connections.
7 Click OK.
Page 44

44 Managing Your Domains
Applying a Domain Template to Domains
To bind one or several Plesk domains with a domain template:
1 Click Home.
2 Click Domains.
3 Click Domain Templates.
4 Click the name of the domain template.
5 Click Plesk Domains Bound to Template.
6 Click Apply Template to Other Domains.
7 Select the check boxes of Plesk domains you want to bind with the
template.
8 Click OK.
Page 45

Managing Your Domains 45
Viewing the List of Domains Bound With a Domain
Template
To view Plesk domains bound with a domain template:
1 Click Home.
2 Click Domains.
3 Click Domain Templates.
4 Click the name of the domain template.
5 Click Plesk Domains Bound to Template.
6 View the list of Plesk domains bound to the selected domain template,
and the following information about the domains:
S, the status of a Plesk domain.
The Plesk domain status can be:
Active, when the Plesk domain is active.
Inactive, when the Plesk domain is deactivated.
ID, the ID number of a domain, which is given to each domain automatically
during its creation in Plesk Expand and depends on the order of creation.
Domain name, the name of a Plesk domain bound to the selected template.
Plesk client, the name of the Plesk client a Plesk domain belongs to.
Plesk server, the name of the Plesk server where a Plesk domain is registered.
Tip: - To bind more Plesk domains with this template, click Apply Template to Other
Domains.
- To apply current settings of the domain template to Plesk domains, actively or
inactively bound with this domain template, select the check boxes of the domains and
click Reset to Template.
- To deactivate the binding between Plesk domains and the domain template, select
the check boxes of the domains and click Detach From Template.
Page 46

46 Managing Your Domains
Resetting Bound Domains to a Domain Template
Resetting a bound domain to the template means applying settings of the domain
template to the domain bound with this template. Resetting domains to templates may
be useful when:
the binding between a domain and a template is active, but the domain was
incidentally changed. Resetting corrects the domain settings in accordance with the
settings of the domain template.
the binding between a domain and a template is inactive, the template was
changed and you want to change the domain accordingly.
To reset one or several bound Plesk domains to the domain template:
1 Click Home.
2 Click Domains.
3 Click Domain Templates.
4 Click the name of the domain template.
5 Click Plesk Domains Bound to Template.
6 Select the check boxes of the domains you want to reset.
7 Click Reset to Template.
8 Select the Confirm operation check box.
9 Click OK.
The domain settings will be changed in accordance with the domain template.
The binding between the domain and the template will become active.
Page 47

Managing Your Domains 47
Detaching Domains From a Domain Template
Detaching a domain from the domain template means deactivating the binding between
the domain and the domain template. Though the binding between the domain and the
template remains, changes of the domain template do not affect the domain. At any
time later, the domain can be reset to template - the binding will be turned back to
active and the domain settings will be updated with the current settings of the template.
To detach one or several domains from the domain template:
1 Click Home.
2 Click Domains.
3 Click Domain Templates.
4 Click the name of the domain template.
5 Click Plesk Domains Bound to Template.
6 Select the check boxes of the domains to detach.
7 Click Detach From Template.
8 Select the Confirm operation check box.
9 Click OK.
The binding between Plesk domains and the domain template will become
inactive, no later changes of the domain template will affect the domain.
Page 48

48 Managing Your Domains
Detecting Possible Bindings Between Domains and a
Domain Template
In Plesk Expand, domains can be bound with domain templates (hosting plans) they
were created with, so that multiple domains can be managed by changing a single
template. Domains created on Plesk servers are transferred to Plesk Expand without
their templates. They can be bound to existing similar templates and managed centrally
in Plesk Expand. To find the most suitable template, you can detect possible bindings
between domains and domain templates.
To detect possible bindings between domains and a domain template:
1 Click Home.
2 Click Domains.
3 Click Domain Templates.
4 Click the name of the domain template.
5 Click Plesk Domains Bound to Template.
6 Go to the Detected Bindings tab.
7 Click Detect Bindings.
8 Select the dataset to be compared. You can compare the following
information: Limits, Administrator permissions, Preferences, Hosting parameters,
Performance settings, and Log rotation settings.
9 Click OK.
Tip: You can also perform the following operations:
- To apply this template to domains, for which possible bindings were detected, click
Apply Template.
Page 49

Managing Your Domains 49
Viewing Possible Detected Bindings Between Domains
and a Domain Template
To view the list of detected possible bindings between domains and a domain
template:
1 Click Home.
2 Click Domains.
3 Click Domain Templates.
4 Click the name of the domain template.
5 Click Plesk Domains Bound to Template.
6 Go to the Detected Bindings tab.
7 View the list of detected possible bindings between domains and the
domain template and the following information about the bindings:
S, the status of binding between a Plesk domain and the domain template.
The status of detected possible bindings is None, which means the domain is
not bound with any template.
ID, the ID number of a domain, which is given to each domain automatically
during its creation in Plesk Expand and depends on the order of creation.
Domain name, the name of a Plesk domain bound to the selected template.
Plesk client, the name of the Plesk client a Plesk domain belongs to.
Plesk server, the name of the Plesk server where a Plesk domain is registered.
Tip: You can also perform the following operations:
- To detect possible bindings between more domains and this template, click Detect
Bindings.
- To apply this template to domains, for which possible bindings were detected, click
Apply Template.
Page 50

50 Managing Your Domains
Removing Domain Templates
To remove one or several domain templates:
1 Click Home.
2 Click Domains.
3 Click Domain Templates.
4 Select the domain templates you want to delete.
5 Click Remove Selected.
6 Select the Confirm removal check box on the confirmation page.
7 Click OK.
Page 51

Managing Your Domains 51
Registering a Domain on the Basis of a
Template
To register a new domain for an Expand client on the basis of a domain template:
1 Click Home.
2 Click New Domain.
3 Specify the general settings for the domain:
Specify the domain name as it was registered. Leave the www check box
selected to allow users to access the site by URL like www.your-domain.com.
Note: Having the www.- prefix preceding a domain name will not cost you
anything, but it will allow users to get to the site no matter what they type in
their browsers: www.your-domain.com or your-domain.com, both URLs will
point to the same site.
To make the new domain active upon creation, leave the Enabled check box
selected.
Select the template from the Select template list.
Select the hosting platform type for a new domain from:
Defined by server
Unix/Linux
MS Windows
4 Select the Plesk server, where the domain will be created.
Autoselect, specify the parameters for automatic server selection:
By type, specify the type of automatic selection:
• The least integral estimate (% used), to select the least loaded server
(integrally estimated).
• The least number of domains (% used), to select the server with the minimum
number of domains.
• The least disk space (% used), to select server with the minimum disk space
used.
By OS, specify the operating system the server should operate on.
By group, specify the group the server must be selected from.
By keyword, specify the keyword of the server.
Select manually, select the server from the list.
5 If frame forwarding hosting is selected in the domain template, specify
in the Destination URL field the URL address, where users will be
redirected when they access the domain on the web. The URL change
will not be visible through the browser.
Page 52

52 Managing Your Domains
6 If standard forwarding hosting is selected in the domain template,
specify in the Destination URL field the URL address, where users will be
redirected when they access the domain on the web. The URL change
will be visible in the browser.
7 If physical hosting is selected in the domain template, configure:
FTP support: specify the FTP login and password.
FrontPage support: specify the login and password of the FrontPage
administrator.
8 Specify the domain administrator settings:
Select the Allow domain administrator access check box to allow access to the
control panel for the domain administrator.
Provide and retype the domain administrator password.
Select the Allow multiple sessions check box to allow several people log in under
this domain administrator account.
9 Click OK.
Note: When a domain is created on a Plesk server, it is assigned to a default Plesk
client account on this Plesk server, which Plesk Expand creates automatically and
assigns the domain to it.
Page 53

Managing Your Domains 53
Registering a Domain per Customer
Requirements
To register a new domain per customer requirements:
1 Click Home.
2 Click New Domain.
3 Specify general settings for the domain:
Specify the domain name as it was registered. Leave the www check box
selected to allow users to access the site by URL like www.your-domain.com.
Note: Having the www.- prefix preceding a domain name will not cost you
anything, but it will allow users to get to the site no matter what they type in
their browsers: www.your-domain.com or your-domain.com, both URLs will
point to the same site.
To make the new domain active upon creation, leave the Enabled check box
selected.
Select Create domain without template in the Select template list.
Select the hosting platform type for a new domain from:
Defined by server
Unix/Linux
MS Windows
4 Select the Plesk server, where the domain will be created.
Autoselect, specify the parameters for automatic server selection:
By type, specify the type of automatic selection:
• The least integral estimate (% used), to select the least loaded server
(integrally estimated).
• The least number of domains (% used), to select the server with the minimum
number of domains.
• The least disk space (% used), to select server with the minimum disk space
used.
By OS, specify the operating system the server should operate on.
By group, specify the group the server must be selected from.
By keyword, specify the keyword of the server.
Select manually, select the server from the list.
5 Specify the way of selecting an IP address for the domain:
Use free IP address from client pool, select a free IP address of the Plesk client‟s IP
pool from the list.
Use free IP address from server pool, select a free IP address of the Plesk server IP
pool from the list.
Page 54

54 Managing Your Domains
Use free IP address from IP ranges, choose to Autoselect a shared IP address or to
Autoselect an exclusive IP address.
A shared IP address is shared among many clients, i.e. one IP address can be
used for hosting by many domains.
An exclusive IP address is used by only one client. An exclusive IP address is
necessary for providing certain system services for a client, such as SSL
encryption.
6 Select the hosting type for the domain:
None, no hosting is configured for a domain.
Frame forwarding, with this type of hosting, the pointed domain address is
retained in the browser address bar and a user does not know that the domain
is pointing to another URL. The drawback of this method is that some search
engines do not index the pointed domains and some browsers do not support
frames.
Standard forwarding, with this type of hosting, all requests to your domain are
forwarded to another URL by the server. When a user of your site enters the
address of your domain in the browser address bar, they see that the domain is
routed to another URL. This method is mainly used to have multiple domain
names pointing to one web site.
Physical hosting, the most common type of hosting services, which means
allocating a certain amount of disk space on the local server for your domain. It
enables you to place your files in the domain directory on the hard disk. If you
choose this option, you will be taken to configuring physical hosting parameters.
7 In the Show Additional Setup section, select the parameters you want to
configure for the Plesk domain:
Domain limits, limits on resource usage;
Domain preferences, preferences for the domain;
Domain administrator, creating an account for a domain administrator. When
creating a domain administrator account, on the same page you can set domain
level permissions on performing operations.
8 Click OK.
9 If you selected physical hosting, specify physical hosting settings.
For details refer to Configuring Physical Hosting (see page 62) section, later in this
guide.
10 Click OK or Next, depending on your choice of additional setup.
11 If you chose to configure limits for the domain, specify the following
parameters:
Maximum number of subdomains, the number of subdomains that can be hosted
under the domain.
Maximum number of domain aliases, the number of domain aliases that can be used
for the domain.
Page 55

Managing Your Domains 55
Disk space, the amount of disk space allocated to a hosting account associated
with the domain. It includes disk space occupied by all files related to this
domain/web site: web site contents, databases, applications, mailboxes, log files
and backup files. This is the so-called soft quota: when it is exceeded, domain
names and web sites are not suspended automatically, only the appropriate
notices are e-mailed to you.
Maximum amount of traffic, the amount of data that can be transferred from the
web site per month. Once the limit is reached, the appropriate notices are emailed to you.
Maximum number of web users, the number of personal web pages that the domain
owner can host for other users under the domain. This service is mostly used in
educational institutions that host non-commercial personal pages of their
students and staff. These pages usually have web addresses like http://yourdomain.com/~username.
Maximum number of databases, the number of databases that can be hosted in the
domain.
Maximum number of mailboxes, the number of mailboxes that can be hosted in the
domain.
Mailbox quota, the amount of disk space allocated to each mailbox in the domain.
Maximum number of mail redirects, the number of mail forwarders that can be used
in the domain.
Maximum number of mail autoresponders, the number of automatic responses that
can be set up for the domain.
Maximum number of mailing lists, the number of mailing lists that the domain owner
can run in the domain.
Maximum number of Java applications, the number of Java applications or applets
that the domain owner can install in the domain.
Validity period, the term for a hosting account. At the end of the term, the
domain/web site will be suspended, its Web, FTP and mail services will no
longer be accessible to the Internet users, the domain owner will not be able to
log in to the control panel. Hosting accounts cannot be automatically renewed.
To renew the hosting account: click Home > Domains > the domain name > Limits
> specify another term in the Validity period field > click OK > click the disabled
status icon for this domain to turn it to the enabled status.
The following group of domain limits apply only to domains running on Plesk for
Windows servers. When applied to domains hosted on Plesk for Linux/Unix servers,
they are ignored.
Maximum number of mail groups, the number of mail groups for the domain.
Total mailboxes quota, the amount of disk space for all the mailboxes.
Maximum number of Microsoft SQL Server databases, the number of Microsoft SQL
Server databases the client and their customers can use on the domain.
Maximum number of shared SSL links, the number of web pages the customer can
protect with shared SSL.
Microsoft SQL databases quota, the disk space amount that Microsoft SQL Server
databases can occupy on the domain.
Page 56

56 Managing Your Domains
MySQL databases quota, the disk space amount that MySQL Server databases
can occupy on the domain.
12 Click OK or Next, depending on your choice of additional setup.
13 If you chose to configure preferences for the domain, specify the
following parameters:
To specify a traffic statistics retention period, select the Retain traffic statistics
check box and specify a period of time.
14 Click OK or Next, depending on your choice of additional setup.
15 If you chose to configure domain administrator permissions, specify
the following parameters:
Select the Allow domain administrator access check box to allow access to the
control panel for the domain administrator.
Provide and retype the domain administrator‟s password.
Select the Allow multiple sessions check box to allow several people log in under
this domain administrator account.
Provide the contact information of the domain administrator.
User interface, select the desktop interface, the standard interface, or both to be
used for the domain.
Desktop management, allows to modify the desktop, if the desktop interface is
used.
Physical hosting management, the domain administrator can set up physical
hosting for the domain and edit hosting parameters.
Management of shell access to server, the domain administrator can:
Select a type of shell access for FTP users of the domain when setting up
physical hosting for the domain;
Permit any type of shell access under FTP account credentials if the non-
chrooted shell management is allowed for this user.
Note: We strongly recommended that you allow this option only to trusted
users.
Non-chrooted shell management, the user is allowed any type of shell access.
Hard disk quota assignment, the domain administrator can assign hard disk quota
for a system (FTP) user when setting up physical hosting for the
domain/subdomain and manage the hard disk quota.
Note: This function may be ignored if hard disk quotation capability is not
configured in the domain administrator's operating system settings.
Subdomains management, the domain administrator can create, edit and remove
subdomains.
Domain aliases management, the domain administrator can create, edit and remove
domain aliases.
Log rotation management, the domain administrator can configure, activate or
deactivate log rotation.
Page 57

Managing Your Domains 57
Anonymous FTP management, the domain administrator can enable and disable
the anonymous FTP capabilities, and configure the anonymous FTP settings.
Important: Be careful when allowing the use of anonymous FTP. If set up with
excessive limits, it could lead to problems with server resources as well as
excessive bandwidth usage.
FTP password management, the domain administrator can change their FTP
account password.
Crontab/scheduler management, the domain administrator can schedule new tasks,
edit, view and remove scheduled tasks and set the e-mail address for the
crontab messages to be sent to.
Important: Allow managing crontab only to trusted users. These operations
must be performed with great care, because they can cause most serious
effects on the system.
Use of Mambo content management system, the domain administrator can use
Mambo CMS. If this permission is not allowed, a user can install it through the
Application Vault.
DNS zone management, the domain administrator can activate and deactivate DNS
zones, switch between the master DNS and the slave DNS server type, restore
a DNS zone by a template, add, edit and remove DNS records.
Important: We strongly recommend that you allow DNS zone management
only to trusted users. Misconfigured DNS settings might cause the web, mail
and FTP services to malfunction.
Java applications management, the domain administrator can activate and
deactivate the Tomcat service, upload and remove the Tomcat web application
archive files (.WAR files), start, stop, and restart web applications, access them
and refresh data on the screen.
Mailing lists management, the domain administrator can activate and deactivate
the Mailing List service, add, administer and remove mailing lists, enable and
disable the selected mailing lists.
Dr.Web antivirus management, the domain administrator can use the Dr. Web
antivirus filtering program and adjust Dr.Web settings.
Backup/Restore functions, the domain administrator can create and remove
backup files of the domain, upload a backup file to a server and view properties
of a backed up domain.
Spam filter management, the domain administrator can set up the spam filter for
the domain.
16 Click OK to complete registration.
Page 58

58 Managing Your Domains
Viewing the List of Your Domains
To view the list of Plesk domains:
1 Click Home.
2 Click Domains.
3 View the list of domains and the following information about them:
S, the status of a Plesk domain.
The Plesk domain status can be:
Active, when the domain is active.
Inactive, when the domain is deactivated.
H, the type of hosting configured for a Plesk domain.
The hosting type can be:
Physical hosting (Virtual host).
Standard forwarding.
Frame forwarding.
No hosting is configured for the domain.
ID, the ID number of a Plesk domain, which is given to each Plesk domain
automatically after registration in Plesk Expand and depends on the order of
registration.
Domain name, the name of a domain without the www prefix.
Plesk client, the name of the Plesk client a domain belongs to.
Creation date, the month, day and year, when a domain was created.
Disk usage, the disk space used by a domain.
L, the Log in icon, which allows logging in to the domain administrator
account as the administrator. Upon clicking this icon you are taken to the Plesk
control panel, which opens in the new browser window.
Note: You will not be asked to enter login and password, as they were provided
during the registration of the Plesk server.
the Log in icon, which opens the domain administration page in the Plesk
control panel. Upon clicking this icon you are taken to the Plesk control panel,
which opens in the new browser window.
Note: This arrow is disabled when no hosting is configured for the
corresponding domain.
Page 59

Managing Your Domains 59
Administering a Domain
In this section:
Selecting Hosting Type for a Domain ................................................................ 59
Changing Hosting Type of a Domain ................................................................. 60
Configuring Hosting for a Domain ...................................................................... 61
Configuring Limits on Resources for a Domain ................................ .................. 63
Configuring Preferences for a Domain............................................................... 63
Configuring Account of the Domain Administrator ............................................. 64
Configuring the DNS Zone for a Domain ........................................................... 64
Configuring Log Rotation for a Domain .............................................................. 69
Configuring Performance Settings for a Domain ................................................ 69
Managing Aliases of a Domain .......................................................................... 70
Managing Backups of a Domain ........................................................................ 75
Selecting Hosting Type for a Domain
If no hosting was selected for the domain during its registration, you can select the
hosting type later.
To select the hosting type for a domain:
1 Click Home.
2 Click Domains.
3 Click the name of the domain, for which you want to select the hosting
type.
4 Click Hosting.
5 Select the hosting type from the Hosting type list.
6 Click Next.
7 Configure hosting according to its type.
For details refer to Configuring Frame Forwarding (see page 61), Configuring
Standard Forwarding (see page 61), and Configuring Physical Hosting (see page
62) sections.
8 Click OK.
Page 60

60 Managing Your Domains
Changing Hosting Type of a Domain
If hosting is already configured for the domain, and you eventually need another
hosting type for this domain, you can change the hosting type.
To change the hosting type for a domain:
1 Click Home.
2 Click Domains.
3 Click the name of the domain, for which you want to change the
hosting type.
4 Click Switch Hosting.
5 Select the hosting type from the Hosting type list.
6 Click Next.
7 Configure hosting according to its type.
For details refer to Configuring Frame Forwarding (see page 61), Configuring
Standard Forwarding (see page 61), and Configuring Physical Hosting (see page
62) sections.
8 Click OK.
Page 61

Managing Your Domains 61
Configuring Hosting for a Domain
In this section:
Configuring Frame Forwarding .......................................................................... 61
Configuring Standard Forwarding ...................................................................... 61
Configuring Physical Hosting ............................................................................. 62
If hosting for a domain is selected but not configured, or if it‟s configured and you
eventually need to change the hosting parameters, you can configure hosting for this
domain.
To configure hosting for a domain:
1 Click Home.
2 Click Domains.
3 Click the name of the domain, for which you want to configure
hosting.
4 Click Hosting.
5 Configure hosting according to its type.
For details refer to Configuring Frame Forwarding (see page 61), Configuring
Standard Forwarding (see page 61), and Configuring Physical Hosting (see page
62) sections.
6 Click OK.
Configuring Frame Forwarding
To configure frame forwarding hosting specify the following parameters:
IP address, select the IP address used for the domain.
Destination URL, the URL address, where users will be redirected when they access
the domain on the web. The URL change will not be visible through the browser.
Configuring Standard Forwarding
To configure standard forwarding hosting specify the following parameters:
IP address, the IP address used for the domain.
Destination URL, the URL address, where users will be redirected when they access
the domain on the web. The URL change will be visible in the browser.
Page 62

62 Managing Your Domains
Configuring Physical Hosting
To configuring physical hosting specify the following parameters:
IP address, the IP address used for the domain.
FTP login, the login for FTP user, used for downloading and uploading HTML
documents.
FTP password, the password for FTP user, used for downloading and uploading
HTML documents.
Confirm password, confirm the FTP user password.
Hard disk quota, the disk space amount to be used by the domain.
Shell access to server with FTP user’s login details, select the necessary option.
„Forbidden‟ prohibits access, which is more preferable as it helps to alleviate
security problems.
Note: Allowing shell access is dangerous for the system security. Allow shell
access to the system only to trusted users.
SSL support, select to enable the Secure Socket Layer support.
The following settings regulate the usage of FrontPage technology.
FrontPage Support, select to allow the use of FrontPage Server extensions.
FrontPage Over SSL Support, select to allow the use of FrontPage Server Extensions
over SSL connection.
FrontPage authoring, select to enable authorization of FrontPage extensions.
Authorization is disabled by default. For security reasons, we recommend that you
enable it only when FrontPage extensions are in use.
FrontPage Admin’s login, is used to log in to the domain when using FrontPage.
FrontPage Admin’s password, is used to log in to the domain when using FrontPage.
Confirm password, confirm the FrontPage password.
The following settings regulate the usage of third-party components integrated with
Plesk Expand. Components which are not installed or properly configured appear in the
list with the comment Component was not installed. Select the components you wish to
allow:
Microsoft ASP Support, select to allow deploying site applications built on Active
Server Pages technology.
Microsoft ASP.NET Support, select to allow deploying site applications built on
ASP.NET.
SSL Support, select to allow Secure Socket Layer connection.
Shell Enabled, select to allow shell access to the system.
Note: Allowing shell access might be dangerous for your system. We recommend
that you allow shell access to the system only to trusted users.
PHP Support, select to enable PHP scripts support on user‟s websites.
SSI Support, select to enable Server Side Included scripting.
CGI Support, select to enable CGI scripting and creating individual cgi-bin
directories.
Page 63

Managing Your Domains 63
mod_perl support, select to enable Perl scripting.
mod_python support, select to enable Python scripting.
ColdFusion Support, select to enable ColdFusion scripting.
Web statistics, select the application to be used for retaining domain statistics:
For Plesk for Linux/Unix servers, select Webalizer,
For Plesk for Windows servers, select AWStats, SmarterStats, or Urchin.
Custom Error Documents, select to enable clients to create and display custom
messages in case of web server errors.
Configuring Limits on Resources for a Domain
To modify limits on resources for a domain:
1 Click Home.
2 Click Domains.
3 Click the name of the domain, for which you want to change limits on
resources.
4 Click Limits.
5 Change the necessary parameters.
6 Click OK.
Configuring Preferences for a Domain
To modify preferences for a domain:
1 Click Home.
2 Click Domains.
3 Click the name of the domain, for which you want to change
preferences.
4 Click Preferences.
5 Change the necessary parameters.
6 Click OK.
Page 64

64 Managing Your Domains
Configuring Account of the Domain Administrator
In this section:
Adding a DNS Record for a Domain .................................................................. 65
Viewing Records of a DNS Zone ....................................................................... 66
Removing Records of a DNS Zone ................................................................... 66
Activating and Deactivating a DNS Zone ........................................................... 67
Switching a DNS Zone Type ............................................................................. 67
Changing SOA Preferences of a DNS Zone ...................................................... 68
To configure the domain administrator account:
1 Click Home.
2 Click Domains.
3 Click the name of the domain, for which you want to configure the
administrator account.
4 Click Domain Administrator.
5 Change the parameters as required.
6 Click OK.
Configuring the DNS Zone for a Domain
Plesk Expand allows you to view and configure DNS zones of domains.
Page 65

Managing Your Domains 65
Adding a DNS Record for a Domain
To add a new DNS record to a domain:
1 Click Home.
2 Click Domains.
3 Click the name of the domain, for which you want to configure the
DNS zone.
4 Click DNS.
5 Click New DNS Record.
6 Select the type of the DNS record from the Record Type list.
7 Specify the parameters according to the DNS record type:
Record type: A.
Domain name, the domain name to associate an IP address with.
IP address, a valid IP address for the domain name to be associated with.
Record type: CNAME.
Domain name, the hostname in the domain.
Canonical name, the appropriate canonical name for the given hostname.
Record type: MX.
Mail domain, the domain name to identify a mail exchanger for. If you are doing
this for your main domain, leave this field blank.
Mail exchanger, the mail exchange server that you want to receive mail for the
domain from.
Priority, the priority of this mail exchange server.
Record type: NS.
Domain name, the domain name you wish to identify a name server for. If you are
doing this for you main domain, leave this field blank.
Nameserver, the name server you want to be responsible for the domain.
Record type: PTR.
IP address, the appropriate IP address and mask. A reverse zone will be
generated using the given IP address and mask.
Domain name, the host name in the domain that you want to associate with the
given IP address.
Note: The PTR record is only needed if your system is responsible for your
reverse zone. Also, the use of the asterisk ( * ) is allowed in the beginning of
the first field entry.
Record type: TXT.
Domain name, the name of the domain you wish to set an SPF record for. If you
are doing this for you main domain, leave this field blank.
Page 66

66 Managing Your Domains
TXT record, an arbitrary text string, which could be a description or an SPF
record.
8 Click OK.
Viewing Records of a DNS Zone
To view records of a DNS zone:
1 Click Home.
2 Click Domains.
3 Click the name of the domain, for which you want to view the DNS
zone information.
4 Click DNS.
5 View the list of DNS records and the following information about them:
ID, the ID number of a DNS record, which is given to each record automatically
after adding in Plesk Expand and depends on the order of adding.
Host, the name of the host.
Record type, the type of a DNS record.
Value, the value of a DNS record, which corresponds to the record type.
Removing Records of a DNS Zone
To remove one or several DNS records:
1 Click Home.
2 Click Domains.
3 Click the name of the domain, for which you want to configure the
DNS zone.
4 Click DNS.
5 Select the check boxes of DNS records you want to remove.
6 Click Remove Selected.
7 Select the Confirm removal check box on the confirmation page.
8 Click OK.
Note: When you remove DNS records from the DNS zone in Plesk Expand, they are
removed from the DNS zone and from the Plesk server.
Page 67

Managing Your Domains 67
Activating and Deactivating a DNS Zone
To deactivate an active DNS zone:
1 Click Home.
2 Click Domains.
3 Click the name of the domain, for which you want to configure the
DNS zone.
4 Click DNS.
5 Click Disable.
6 Click OK.
To activate an inactive DNS zone:
1 Click Home.
2 Click Domains.
3 Click the name of the domain, for which you want to configure the
DNS zone.
4 Click DNS.
5 Click Enable.
6 Click OK.
Switching a DNS Zone Type
To switch a DNS zone type:
1 Click Home.
2 Click Domains.
3 Click the name of the domain, for which you want to switch the DNS
zone from master to slave.
4 Click DNS.
5 Click Switch.
6 Click OK.
Note: We do not recommend that you set the type of the DNS Zone to slave. This may
cause problems in resolving this DNS zone by the central DNS server. Set all your
DNS zones to master type.
Page 68

68 Managing Your Domains
Changing SOA Preferences of a DNS Zone
To change SOA preferences for DNS zone:
1 Click Home.
2 Click Domains.
3 Click the name of the domain, for which you want to view the DNS
zone SOA preferences.
4 Click DNS.
5 Click SOA Preferences.
6 Change the required parameters:
TTL, the amount of time that other DNS servers should store the record in a
cache.
Refresh, the frequency for secondary name servers to check with the primary
name server to see if any changes were made to the domain‟s zone file.
Retry, the time a secondary server waits before retrying a failed zone transfer.
This time is typically less than the refresh interval.
Expire, the time before a secondary server stops responding to queries, after a
lapsed refresh interval where the zone was not refreshed or updated.
Minimum, the time a secondary server should cache a negative response. Plesk
sets the default value of three hours.
7 Click OK.
Page 69

Managing Your Domains 69
Configuring Log Rotation for a Domain
This option is available only if physical hosting is selected for the domain template.
To configure log rotation for a domain:
1 Click Home.
2 Click Domains.
3 Click the name of the domain.
4 Click Log Rotation.
5 Specify the log rotation condition. You can select from log rotation:
by size, for this option specify the size of log files to be stored.
by time, for this option specify the period of time for log files to be stored.
6 Specify the maximum number of log files to be stored.
7 To compress stored log files, select the Compress log files check box.
8 To send processed log files to the e-mail, specify the e-mail address.
9 To enable log rotation, select the Enable log rotation check box.
10 Click OK.
Configuring Performance Settings for a Domain
You can configure performance settings for domains created on Windows platforms.
To configure domain performance settings:
1 Click Home.
2 Click Domains.
3 Click the name of the domain.
4 Click Performance.
5 Specify the following parameters:
Maximum network use (KB/s), the maximum bandwidth allowed for this domain.
Connections limited to, the maximum number of connections.
6 Click OK.
Page 70

70 Managing Your Domains
Managing Aliases of a Domain
In this section:
Adding a Domain Alias ...................................................................................... 71
Viewing the List of Aliases of a Domain ............................................................. 72
Activating and Deactivating a Domain Alias ...................................................... 73
Configuring Preferences of a Domain Alias ....................................................... 73
Viewing the DNS Zone Settings of a Domain Alias ............................................ 74
Removing Domain Aliases ................................................................................ 75
A domain alias is an alternative domain name pointing to the URL of the domain. This
is useful in case you have several domain names already registered, and want them to
point to one website.
In Plesk Expand, you can create, delete and edit domain aliases. Editing the domain
alias DNS zone is not available in the current version of Plesk Expand. DNS zones of a
domain alias are created based on the DNS zones of their parent domains. Domain
aliases registered in Plesk Expand are managed by the Central DNS Server as a part
of the corresponding domain‟s name space.
Page 71

Managing Your Domains 71
Adding a Domain Alias
To add a new domain alias:
1 Click Home.
2 Click Domains.
3 Click the name of the domain, for which you want to create a domain
alias.
4 Click Domain Aliases.
5 Click New Domain Alias.
6 Specify the name of the new domain alias, without the www prefix.
7 Select the services to be available under this domain alias:
Mail, to be able to register e-mail addresses using this domain alias name (such
as user@domainalias.com);
Web, to enable redirect from the domain alias URL to the main domain URL.
Note: If you do not select the Web check box, the main domain will not be
available at the domain alias URL. The domain alias name will be available
for setup of e-mail addresses only.
If the Web check box is selected, the www prefix is added automatically in
front of the domain alias name.
Tomcat, to allow installation of the Tomcat Java applications and applets on web
site through the control panel.
8 Click OK.
Page 72

72 Managing Your Domains
Viewing the List of Aliases of a Domain
To view the list of domain aliases:
1 Click Home.
2 Click Domains.
3 Click the name of the domain, domain aliases of which you want to
view.
4 Click Domain Aliases.
5 View the list of domain aliases and the following information about
them:
S, the status of a domain alias.
The domain alias status can be:
Active, when the domain alias is active.
Inactive, when the domain alias is deactivated.
ID, the ID number of a domain alias, which is given to each domain alias
automatically after registration in Plesk Expand and depends on the order of
registration.
Domain alias name, the name of the domain alias without the www prefix.
In ASCII format, the name of the domain alias in ASCII format. This is useful when
a domain alias name contains international characters.
Page 73

Managing Your Domains 73
Activating and Deactivating a Domain Alias
To inactivate an active domain alias:
1 Click Home.
2 Click Domains.
3 Click the name of the domain, domain alias of which you want to
modify.
4 Click Domain Aliases.
5 Click the name of the domain alias you want to inactivate.
6 Click Disable.
To activate an inactive domain alias:
1 Click Home.
2 Click Domains.
3 Click the name of the domain, domain alias of which you want to
modify.
4 Click Domain Aliases.
5 Click the name of the domain alias you want to activate.
6 Click Enable.
Configuring Preferences of a Domain Alias
To modify preferences for a domain alias:
1 Click Home.
2 Click Domains.
3 Click the name of the domain, domain alias of which you want to
modify.
4 Click Domain Aliases.
5 Click the name of the domain alias, preferences for which you want to
modify.
6 Click Preferences.
7 Change the necessary parameters.
8 Click OK.
Page 74

74 Managing Your Domains
Viewing the DNS Zone Settings of a Domain Alias
To view the DNS zone settings of a domain alias:
1 Click Home.
2 Click Domains.
3 Click the name of the domain, domain alias of which you want to view.
4 Click Domain Aliases.
5 Click the name of the domain alias, the DNS zone settings of which
you want to view.
6 Click DNS.
7 View the list of DNS records and the following information about them:
ID, the ID number of a DNS record, which is given to each record automatically
after adding in Plesk Expand and depends on the order of adding.
Host, the name of the host.
Record type, the type of a DNS record.
Value, the value of a DNS record, which corresponds to the record type.
8 Click SOA Preferences.
9 View the following SOA preferences:
TTL, the amount of time that other DNS servers should store the record in a
cache.
Refresh, the frequency for secondary name servers to check with the primary
name server to see if any changes were made to the domain‟s zone file.
Retry, the time a secondary server waits before retrying a failed zone transfer.
This time is typically less than the refresh interval.
Expire, the time before a secondary server stops responding to queries, after a
lapsed refresh interval where the zone was not refreshed or updated.
Minimum, the time a secondary server should cache a negative response. Plesk
sets the default value of three hours.
Note: Administering of DNS zones of domain aliases registered on Plesk for Linux/Unix
8.1 or Plesk for Windows 8.1 servers is not supported. You can only view the current
settings and SOA parameters of DNS zones of domain aliases registered on Plesk for
Linux/Unix 8.1 or Plesk for Windows 8.1 servers.
Page 75

Managing Your Domains 75
Removing Domain Aliases
In this section:
Creating Backup of a Domain ............................................................................ 76
Adding a Domain to a Scheduled Backup Task ................................................. 76
Viewing the List of Backup Files Created for a Domain ..................................... 77
Downloading a Backup File of a Domain ........................................................... 77
Removing Backup Files of a Domain ................................................................. 78
To remove one or several domain aliases:
1 Click Home.
2 Click Domains.
3 Click the name of the domain, domain aliases of which you want to
remove.
4 Click Domain Aliases.
5 Select the check boxes of domain aliases you want to remove.
6 Click Remove Selected.
7 Select the Confirm removal check box on the confirmation page.
8 Click OK.
Managing Backups of a Domain
Backup management for a domain includes:
Creating immediate backups of domains.
Scheduling periodic backup tasks for domains.
Viewing, downloading and removing backup files of domains.
See also the Managing Scheduled Backups of Domains chapter (see page 86).
Page 76

76 Managing Your Domains
Creating Backup of a Domain
To backup a domain immediately:
1 Click Home.
2 Click Domains.
3 Click the domain name.
4 Click Backup Management.
5 Click Backup Now.
6 Specify the following information:
Backup file name, the name of the backup file which will be created.
Tip: You can use tags to insert the names of the domain, the client it belongs to
and/or the Plesk server where it is registered into the backup file name.
Description, the description of the backup for your convenience.
Volume size, the size of a volume, if you want the backup file to be split into
volumes. A volume size should not exceed 4096 MB.
Using storage with type, select the type of storage for immediate backup:
Auto, the backup file will be stored to the default storage.
Local storage, the backup file will be stored to the local storage.
Remote storage, the backup file will be stored to the assigned remote
storage.
7 Click OK.
Adding a Domain to a Scheduled Backup Task
To add a domain to an existing scheduled backup task:
1 Click Home.
2 Click Domains.
3 Click the domain name.
4 Click Backup Management.
5 Click Schedule Backup.
6 Select the backup task where the domain should be added.
7 Click OK.
Page 77

Managing Your Domains 77
Viewing the List of Backup Files Created for a Domain
To view the list of backup files created for a domain:
1 Click Home.
2 Click Domains.
3 Click the domain name.
4 Click Backup Management.
5 View the list of backup files and the following information about them:
ID, the ID number of a backup file. The ID number is given to each backup file
automatically during its creation and depends on the order of creation.
File name, the name of a backup file.
Description, the description of a backup for your convenience.
Creation date, the date and time when a backup was created.
Storage, the storage where a backup is stored.
Size, the size of a backup file.
D, the icon to download a backup from an FTP storage.
Downloading a Backup File of a Domain
To download a backup file of a domain:
1 Click Home.
2 Click Domains.
3 Click the domain name.
4 Click Backup Management.
5 Click the D icon corresponding to the file you want to download.
6 Select Save File.
Page 78

78 Managing Your Domains
Removing Backup Files of a Domain
To remove one or several domain backup files:
1 Click Home.
2 Click Domains.
3 Click the name of the domain.
4 Click Backup Management.
5 Select check boxes of the backup files you want to remove.
6 Click Remove Selected.
7 Select the Confirm removal check box.
8 Click OK.
Page 79

Managing Your Domains 79
Managing Bindings Between Domains
In this section:
Binding Domains to a Domain Template ........................................................... 80
Viewing Bindings Between Domains and Domain Templates ............................ 81
Detaching Domains From a Domain Template .................................................. 82
Applying a Domain Template to Domains .......................................................... 82
Detecting Possible Bindings Between Domains and Domain Templates ........... 83
Viewing Detected Possible Bindings Between Domains and Domain Templates 84
and Domain Templates
Domains from different Plesk servers can be bound to the same domain template and
managed centrally. Each domain can be bound to only one domain template. If a
domain is bound to a template, the binding can be active or inactive (temporarily
deactivated).
Use the following principles of centralized domains management:
If you bind a domain to a template, the domain parameters will be updated with the
current parameters of the template.
If you change a template, the changes will be applied to all domains actively bound
to the template.
The changes will not be applied to a domain, if its binding with the template is
inactive.
If you activate a temporarily deactivated binding between a domain and a template,
the domain parameters will be updated with the current parameters of the template.
If you delete a template, all the bindings between the template and domains will be
automatically deleted.
Page 80

80 Managing Your Domains
Binding Domains to a Domain Template
Binding existing domains to domain templates will let you update the settings of a
number of domains with the same hosting plan and to simultaneously change settings
(available services) for these domains in the future.
To bind one or several domains to a domain template:
1 Click Home.
2 Click Domains.
3 Click Domain Templates Binding.
4 Select the check boxes of accounts you want to bind to a domain
template.
5 Click Bind to Template.
6 Select the domain template, to which you want to bind domains.
7 Click OK.
8 Select the Confirm binding check box on the confirmation page.
9 Click OK.
The selected domains are actively bound to a domain template. As long as the
binding is active, all changes of the domain template will be automatically
applied to these domains.
Page 81

Managing Your Domains 81
Viewing Bindings Between Domains and Domain
Templates
To view the list of bindings between domains and domain templates:
1 Click Home.
2 Click Domains.
3 Click Domain Templates Binding.
4 View the list of bindings between domains and domain templates, and
the following information about the bindings:
S, the status of a binding.
The binding status can be:
Active, when the domain is bound with a template and all changes of the
template.
Inactive, when the domain is deactivated.
None, when the domain is not bound with any template.
ID, the ID number of a domain, which is given to each domain automatically after
registration in Plesk Expand and depends on the order of registration.
Domain name, the name of a domain without the www prefix.
Plesk client, the name of the Plesk client a domain belongs to.
Plesk server, the name of the Plesk server, where a domain is registered.
Template name, the name of the domain template a domain is bound with.
Page 82

82 Managing Your Domains
Detaching Domains From a Domain Template
Deactivating the binding between domains and domain templates will let you
temporarily change settings for a number of domains. Later you will be able to return
these domains to the same template again, or rebind them to the template.
To deactivate the bindings of one or several domains to a template:
1 Click Home.
2 Click Domains.
3 Click Domain Templates Binding.
4 Select the check boxes of domains, bindings of which you want to
deactivate.
5 Click Deactivate Binding.
6 Select the Confirm deactivating check box on the confirmation page.
7 Click OK.
The selected domains are inactively bound to a central template. As long as the
binding is inactive, all changes of the domain template will be disregarded by
these accounts. If you reactivate the binding, the domain parameters will be
updated with the current parameters of the domain template.
Applying a Domain Template to Domains
Rebinding a domain to a domain template is reactivating the deactivated binding
between the domain and the domain template. When you rebind a domain to a domain
template, the domain properties are updated with the correspondent template
properties.
To rebind one or several domains to a central template:
1 Click Home.
2 Click Domains.
3 Click Domain Templates Binding.
4 Select the check boxes of domains you want to rebind to a domain
template.
5 Click Rebind to Template.
6 Select the Confirm rebinding check box on the confirmation page.
7 Click OK.
The selected domains become again actively bound to a domain template. The
domain parameters are updated with the current parameters of the domain
template.
Page 83

Managing Your Domains 83
Detecting Possible Bindings Between Domains and
Domain Templates
In Plesk Expand, domains can be bound with domain templates (hosting plans) they
were created with, so that multiple domains can be managed by changing a single
template. Domains created on Plesk servers are transferred to Plesk Expand without
their templates. They can be bound to existing similar templates and managed centrally
in Plesk Expand. To find the most suitable template, you can detect possible bindings
between domains and domain templates.
To detect possible bindings between domains and domain templates:
1 Click Home.
2 Click Domains.
3 Click Domain Templates Binding.
4 Go to the Detected Bindings tab.
5 Click Detect Bindings.
6 Select the dataset to be compared. You can compare the following
information: Limits, Administrator permissions, Preferences, Hosting parameters,
Performance settings, and Log rotation settings.
7 Click OK.
Tip: You can also perform the following operations:
- To apply templates to domains, for which the binding were detected, select the
template from the list for each domain and click Apply Template.
Page 84

84 Managing Your Domains
Viewing Detected Possible Bindings Between Domains
and Domain Templates
To view the list of detected possible bindings between domains and domain
templates:
1 Click Home.
2 Click Domains.
3 Click Domain Templates Binding.
4 Go to the Detected Bindings tab.
5 View the list of detected possible bindings between domains and
domain templates and the following information about the bindings:
ID, the ID number of a domain, which is given to each domain automatically
during its creation in Plesk Expand and depends on the order of creation.
Domain name, the name of a Plesk domain.
Plesk client, the name of the Plesk client a Plesk domain belongs to.
Plesk server, the name of the Plesk server where a Plesk domain is registered.
Template name, the list of templates the domain can possibly have bindings with.
Tip: You can also perform the following operations:
- To detect possible bindings between more domains and domain templates, click
Detect Bindings.
- To apply templates to domains, for which the binding were detected, select the
template from the list for each domain and click Apply Template.
Page 85

Managing Your Domains 85
Removing Domains
To remove one or several Plesk domains:
1 Click Home.
2 Click Domains.
3 Select the check boxes of domains you want to remove.
4 Click Remove Selected.
5 Select the Confirm removal check box on the confirmation page.
6 Click OK.
Note: When you remove a domain in Plesk Expand, it is removed both from Plesk
Expand and from the Plesk server it is registered on.
Page 86

To ensure information safety, you might find it convenient to periodically back up your
In this chapter:
Adding a Scheduled Backup Task ..................................................................... 87
Viewing the List of Scheduled Backups ............................................................. 88
Viewing Properties of a Scheduled Backup Task .............................................. 89
Removing Scheduled Backup Tasks ................................................................. 90
C H A P T E R 5
Managing Scheduled Backups of
Domains
domains. Your provider may offer using remote storages for storing backup files of your
domains.
A backup of a domain is stored:
To a remote storage, if a domain has an assigned remote backup storage.
To a local storage, if a domain does not have an assigned remote backup
storage.
For every domain, you can view the list of its backups. The list includes all backups
ever made, not only the ones stored in the currently assigned backup storage. You can
view, manage and schedule backups of your domains.
See also Managing Backups of a Domain section (see page 75).
Page 87

Managing Scheduled Backups of Domains 87
Adding a Scheduled Backup Task
To schedule a new periodic backup task:
1 Click Home.
2 Click Scheduled Backups in the navigation pane.
3 Click Add Backup Task.
4 Specify the following settings:
Name, the friendly name of a scheduled backup task.
Time, the time for a backup process to start on a scheduled day.
Period, the periodicity of a scheduled backup task execution (daily, weekly,
monthly).
File name, the name of the backup file which will be created.
Tip: You can use tags to insert the names of the domain and the client it
belongs to into the backup file name.
File description, the description of the backup for your convenience.
Volume size, the size of a volume, if you want the backup file to be split into
volumes.
5 Click OK.
To add a domain to the periodic backup task:
1 Click Home.
2 Click Domains.
3 Click the domain name.
4 Click Backup Management.
5 Click Add to Schedules.
6 Select the backup task where the domain should be added.
7 Click OK.
Page 88

88 Managing Scheduled Backups of Domains
Viewing the List of Scheduled Backups
To view scheduled backup tasks:
1 Click Home.
2 Click Scheduled Backups.
3 View the list of scheduled backup tasks and the following information
about them:
S, the status of a scheduled backup task.
ID, the ID number of a scheduled backup task. The ID number is given to each
scheduled backup task automatically after its creation and depends on the order
of creation.
Name, the friendly name of a scheduled backup task.
Tip: Click the scheduled backup task ID or name to go to the administration
page of this task.
Time, the time for a backup process to start on a due day.
Period, the periodicity of a scheduled backup task execution (daily, weekly,
monthly).
Creation date, the date and time when a scheduled backup task was created.
Last started, the date and time when a scheduled backup task was started last
time.
Tip: To start one or several scheduled backup tasks immediately, select the check
boxes of these tasks and click Start Selected.
Page 89

Managing Scheduled Backups of Domains 89
Viewing Properties of a Scheduled
Backup Task
You can view information about the scheduled backup task, add Plesk objects to the
task or remove them from the task, configure preferences for the task.
To view properties of a scheduled backup task:
1 Click Home.
2 Click Scheduled Backups.
3 Click the name of the scheduled backup task.
4 View the following information about the scheduled backup task:
Schedule, the periodicity of a scheduled backup task execution and the time for a
backup process to start on a due day.
Created, the date and time when a scheduled backup task was created.
Last started, the date and time when a scheduled backup task was started last
time.
Backed Up Objects, the list of domains scheduled for backup within this task.
You can view the following information about the backed up objects:
T, the type of an object (Plesk client or domain).
Name, the name of a domain.
Server, the Plesk server where a domain is registered.
Tip: - To add one or several domains to this list of backed up objects, click Add
Domains.
- To remove domains from this list of backed up objects, select the corresponding
check boxes and click Remove Selected.
Page 90

90 Managing Backup Processes
Removing Scheduled Backup Tasks
In this section:
Viewing the List of Backup Processes ............................................................... 91
Viewing Information About a Backup Process ................................................... 92
Stopping Backup Processes .............................................................................. 93
Removing Backup Processes ............................................................................ 93
Managing Backup Processes
To remove one or several scheduled backup tasks:
1 Click Home.
2 Click Scheduled Backups.
3 Select the check boxes of the scheduled backup tasks you want to
remove.
4 Click Remove Selected.
5 Select the Confirm removal check box.
6 Click OK.
In Plesk Expand, backup processes can be started automatically on scheduled time or
by a user at any moment. Only a limited number of backup processes can run at once
(10 by default), so backup processes are placed in the queue first. You can view the list
of backup processes and manage them. Records about successfully finished backup
processes are automatically removed. Only a few last successfully finished backup
processes are saved (5 by default).
Page 91

Managing Backup Processes 91
Viewing the List of Backup Processes
To view the list of backup processes:
1 Click Backup Processes in the navigation pane.
2 View the list of backup processes in Plesk Expand and the following
information about them:
ID, the ID number of a backup process, which is given to each backup process
automatically after its start in Plesk Expand and depends on the order of
processes initiation.
Status, the status of a backup process.
The backup process status can be:
Pending, when a backup is put in the backup processes‟ queue and will be
started as soon as the number of working processes becomes less than
maximum (10 by default).
Working, when a backup is in progress.
Stopped, when a backup process was explicitly interrupted by a user.
Working long time, when a backup process has been working for more than
one day. It is recommended that you pay special attention to such processes
and make sure no problems occurred with them.
Success, when a backup process successfully finished. Such a process will
be automatically removed from the backup processes list in 1 day.
Error, when a backup process finished with an error.
Tip: Click the backup process status in the list, to view its details (see page 92).
T, the type of a backed up object.
Object name, the name of a backed up object.
Plesk server, the Plesk server where the backed up object resides.
File name, the name of a backup file created by the backup process.
Description, the description of a backup file created by the backup process.
Start time, the time when the backup process was started.
E, the icon in this column shows whether the backup process was initiated by
Plesk Expand.
Storage, the storage used for storing the backup file.
Tip: - To refresh information about the backup processes, click Refresh.
- To remove all finished backup processes, click Remove Finished Processes.
- To stop one or several backup processes, select the corresponding check boxes
and click Stop Selected (see page 93).
- To remove one or several backup processes, select the corresponding check
boxes and click Remove Selected (see page 93).
Page 92

92 Managing Backup Processes
Viewing Information About a Backup
Process
To view detailed information about a backup process:
1 Click Backup Processes in the navigation pane.
2 Click the backup process status in the list.
3 View the following information about the backup process:
Object, the name of the backed up object.
Plesk server, the Plesk server where the backed up object resides.
Status, the status of the backup process.
The backup process status can be:
Pending, when a backup is put in the backup processes‟ queue and will be
started as soon as the number of working processes becomes less than
maximum (10 by default).
Working, when a backup is in progress.
Stopped, when a backup process was explicitly interrupted by a user.
Working long time, when a backup process has been working for more than
one day. It is recommended that you pay special attention to such processes
and make sure no problems occurred with them.
Success, when a backup process successfully finished. Such a process will
be automatically removed from the backup processes list in 1 day.
Error, when a backup process finished with an error.
Started at, the time when the backup process was started.
Started by Expand, the icon in this column shows whether the backup process
was initiated by Plesk Expand.
File name, the name of the backup file created by the backup process.
Description, the description of the backup file created by the backup process.
Storage, the storage used for storing the backup file.
Error, a notification if any errors occurred during the backup process.
Page 93

Managing Backup Processes 93
Stopping Backup Processes
To stop the selected backup processes:
1 Click Backup Processes in the navigation pane.
2 Select the check boxes of backup processes you want to stop.
3 Click Stop Selected.
4 Select the Confirm stop check box.
5 Click OK.
Removing Backup Processes
To remove the selected backup processes:
1 Click Backup Processes in the navigation pane.
2 Select the check boxes of backup processes you want to remove.
3 Click Remove Selected.
4 Select the Confirm removal check box.
5 Click OK.
To remove all finished backup processes:
1 Click Backup Processes in the navigation pane.
2 Click Remove All Finished Processes.
3 Select the Confirm removal check box.
4 Click OK.
Page 94

Information about actions performed by the user or by Plesk Expand is stored in the
In this chapter:
Viewing an Action Information ........................................................................... 95
Viewing a Problem Report ................................................................................. 97
C H A P T E R 6
Viewing Action Log
action log.
To view the Plesk Expand action log:
1 Click Server in the navigation pane.
2 Click Action Log.
3 View the list of actions and the following information about them:
S, the status of an action.
The action status can be:
The action was executed successfully.
The action failed.
The action is running.
The action is scheduled for execution.
ID, the ID number of the action, showing the order, in which the actions were
scheduled for execution.
Title, the name of the action.
Tip: Action IDs and titles are clickable. Click the action ID or title to view the
detailed information about this action.
Started, the date and the time when the action was started.
Completed, the date and the time when the action was completed.
Tip: Except for regular search options, you can search actions for a certain time
interval. Select the date and the time of the interval beginning and of its end from the
Actions started after and Actions started before lists. Click Show Range.
Page 95

Viewing Action Log 95
Viewing an Action Information
To view the detailed information about an action:
1 Click Server in the navigation pane.
2 Click Action Log.
3 Click the action name.
4 View the following action information:
Action Info, the general information about the action, such as the state of the
action, the initiator of the action, the initiator IP, the date and time when the
action started and when it was completed; the operator used for executing this
action and the exit code of this action.
Example:
Action #49269 Update Plesk server:
State Successful
Initiator root@expand.yourdomain.com
Initiator IP 80.89.140.126
Started Dec 31, 1969 04:33 PM
Completed Dec 31, 1969 04:33 PM
Periodic false
Operator /usr/local/expand/sbin/exp_plesk_server
Exit Code 0
Action Output, the output of the operator used for executing the action.
Example:
<?xml version=”1.0” encoding=”UTF-8” standalone=”no” ?>
<packet version=”0.1.22.1”>
<set>
<result>
<status>ok</status>
<id>3</id>
</result>
</set>
</packet>
Action Input, the input of the operator used for executing the action.
Example:
<?xml version=”1.0”?>
<packet version=”0.0.0.110”>
<set>
<filter>
<id>3</id>
</filter>
<values>
<usage_setup>
<domains_limit>0</domains_limit>
<clients_limit>0</clients_limit>
Page 96

96 Viewing Action Log
<allow_domains>true</allow_domains>
<allow_clients>true</allow_clients>
<comments></comments>
<keyword></keyword>
<def_interface_id>3</def_interface_id>
</usage_setup>
</values>
</set>
</packet>
Advanced: Taskman Output, the information given by the Task Manager about the
execution of this operator.
Example:
<?xml version=”1.0” encoding=”UTF-8” standalone=”no”?>
<packet version=”0.1.1.0”>
<result>
<status>success</status>
<errtxt>Action executed successfully</errtxt>
</result>
</packet>
Tip: Together with the action information, the following options can be provided:
- If the action was executed successfully, you will have an option to proceed to the
administration page of the operated object. To do so, click the Go to object page link in
the Action Info section.
- If the action failed, you will have an option to view a problem report on this action. To
do so, click View Problem Report in the Action Info section.
- If the action failed, you have an option to retry this action. When you have detected
and eliminated the cause of the action failure, you can initiate the same action without
providing information or filling out forms again. To do so, click the Retry Action link in the
Action Info section. The action will be scheduled for execution with the parameters you
specified while initiating the action for the first time. Be careful using this option. If the
changes you made to eliminate the cause of the action failure concerned any objects
involved in the action execution, the repeated action initiation may lead to undesirable
consequences or repeated action failure.
Page 97

Viewing Action Log 97
Viewing a Problem Report
You may view a problem report on any operation which failed.
To view the problem report on a failed action:
1 Click Server in the navigation pane.
2 Click Action Log.
3 Click the action name.
4 Click the View Problem Report link located in the Action Info section.
A problem report contains detailed information about the execution of a certain
action, including the action input, output, debug information and error messages.
For example, the problem report on action “Assigning Plesk client 11 to Expand
client 1” may look as follows:
PROBLEM REPORT FOR ACTION #276901
ACTION INPUT
<?xml version=”1.0” encoding=”UTF-8”?>
<packet version=”2.0.0.18”>
<bind>
<add>
<filter>
<plesk_client_id>11</plesk_client_id>
</filter>
<data>
<client_id>1</client_id>
</data>
</add>
</bind>
</packet>
ACTION LOG:
Jun 05 2006 14:44:20 [:28000] INFO: Request to operator „plesk_multi_client‟
Jun 05 2006 14:44:20 MultiCltOp[:28000] DEBUG: Operator object created.
Jun 05 2006 14:44:20 MultiCltOp[:28000] DEBUG: Binding process.
Jun 05 2006 14:44:20 MultiCltOp[:28000] DEBUG: Binding plesk client to multi client.
Page 98

98 Viewing Action Log
Jun 05 2006 14:44:20 MultiCltOp[:28000] DEBUG: Binding plesk client „11‟ to multi
client „1‟.
Jun 05 2006 14:44:20 MultiCltOp[:28000] ERR: [Operator] Multi Client instancing error.
Multi client „1‟ already instanced to server „6‟
Jun 05 2006 14:44:20 MultiCltOp[:28000] DEBUG: Processing input packet complete
Jun 05 2006 14:44:20 MultiCltOp[:28000] DEBUG: Boss operator finished with code
13900.
ACTION ERROR:
TASKMAN OUTPUT:
<?xml version=”1.0” encoding=”UTF-8” standalone=”no”?>
<packet version=”0.1.1.0”>
<result>
<status>error</status>
<errtxt>Action executed with errors</errtxt>
</result>
</packet>
End of the Report
 Loading...