

Page 1

Parallels Software International, Inc.
Parallels Image Tool
User Guide
(c) 2007
Page 2

Copyright © 2007 by Parallels Software International, Inc. All rights reserved.
Parallels, Parallels logo, Compressor, and Transporter are registered trademarks; Coherence is a trademark of
P
arallels Software International, Inc.
This product is based on a technology t
Distribution of this work or derivative of this work in any form is prohibited unless prior written permission is
btained from the copyright holder.
o
Microsoft, Windows, Windows Server
Microsoft Corporation.
Linux is a registered trademark of Linus Torvalds.
Apple, Bonjour, Mac, MacBook, iMac, Macintosh, a
and Safari are trademarks of Apple Inc.
Solaris is a trademark of Sun Microsystems, Inc.
eComStation is a trademark of Serenity Systems Int
FreeBSD is a registered trademark of the FreeBSD Foundation.
Intel and Intel Core are trademarks or registered trademarks of Int
OS/2 Warp is a registered trademark of International Business Machines Corporatio
VMware is a registered trademark of VMware, Inc.
All other marks and names mentioned herein may be trademarks of their respective owne
hat is the subject matter of a number of pending patent applications.
, Windows NT, Windows Vista, and MS-DOS are registered trademarks of
nd Mac OS are registered trademarks of Apple Inc. Finder
ernational.
el Corporation.
n.
rs.
Page 3

Contents
Introduction 4
About Parallels Image Tool..........................................................................................................................4
About This Guide .........................................................................................................................................4
Getting Help .................................................................................................................................................5
System Requirements 6
Hardware Requirements ...............................................................................................................................6
Software Requirements.................................................................................................................................6
Getting Started 7
Installing Parallels Image Tool.....................................................................................................................7
Uninstalling Parallels Image Tool ................................................................................................................7
Working with Parallels Image Tool 8
Starting Parallels Image Tool .......................................................................................................................8
Increasing Virtual Hard Disk Capacity.........................................................................................................8
Changing Virtual Hard Disk Properties......................................................................................................12
Changing Virtual Hard Disk Format...........................................................................................................15
Merging Snapshots .....................................................................................................................................18
Using Added Space 22
Creating New Partition in Windows...........................................................................................................22
Creating New Partition in Linux.................................................................................................................23
Virtual Hard Disks Types 25
Index 27
Page 4

C HAPTER 1
Introduction
Virtual machines use virtual hard disks that actually are hard disk image files. After using your
virtual machine for some time, you may find that your virtual machine hard disk does not fit
your needs anymore, and you want to increase its capacity or change its type and properties.
Parallels has developed a special utility for increasing the virtual hard disk capacity and
managing its properties - Parallels Image Tool.
In This Chapter
About Parallels Image Tool .................................................................................................. 4
About This Guide .................................................................................................................. 4
Getting Help..........................................................................................................................5
About Parallels Image Tool
Parallels Image Tool is a special utility that enables you to increase the capacity, change the
type and format of your virtual hard disks, or merge snapshots of virtual machines that use these
virtual hard disks. This utility is a part of Parallels Desktop package, and is automatically
installed during Parallels Desktop installation.
About This Guide
The present guide is aimed at a wide range of users who want to increase the capacity , change
the type, or merge snapshots of hard disks used by their virtual machines with the help of
Parallels Image Tool.
Notation Conventions
The table below presents the conventions used in this Guide.
Fonts
This font
This font
Used for buttons, options, menus and menu
commands, windows, and dialog boxes.
Used for keys, paths, and folder names.
This font Used for glossary items.
Note.
Warning.
Used to emphasize the message. Type Styles
Used to warn you about possible data loss.
Page 5

0BIntroduction 5
Getting Help
Parallels Image Tool offers several options for accessing necessary information:
Parallels Image Tool User Guide. This document contains extensive information about the
product, its usage and troubleshooting. The Guide is located in the Parallels Desktop folder.
Default location is Applications/Parallels/
Help buttons. Click the
Help button at the bottom of the Image Tool window to open a
corresponding help page.
Parallels web site (http://www.parallels.com). Explore the Support web page that includes
product help files and FAQ section.
Page 6

C HAPTER 2
System Requirements
Parallels Image Tool is a part of Parallels Desktop package, and the system requirements for
installing and using it are the same as for Parallels Desktop.
In This Chapter
Hardware Requirements........................................................................................................ 6
Software Requirements......................................................................................................... 6
Hardware Requirements
The hardware requirements for Parallels Image Tool are based on those for Parallels Desktop:
Computer Intel-powered Core™ Duo or Core™ Solo Mac® Mini, iMac®,
MacBook™, MacBook Pro or Mac Pro.
System Memory 768 MB of RAM minimum.
1 GB recommended.
Free Hard Disk Space 40.5 MB required for Parallels Desktop.
Enough space for storing enlarged virtual disks.
Optical Drive CD-ROM and/or DVD-ROM drive.
Network Device Ethernet adapter.
Software Requirements
Parallels Desktop with Parallels Image Tool supports Mac OS X 10.4.6 or later.
To check your Mac OS X version number, choose Apple -> About This Mac from the menu bar.
Page 7

C HAPTER 3
Getting Started
This chapter provides information on how to install and uninstall Parallels Image Tool.
In This Chapter
Installing Parallels Image Tool .............................................................................................7
Uninstalling Parallels Image Tool......................................................................................... 7
Installing Parallels Image Tool
Parallels Image Tool is installed automatically during Parallels Desktop installation. For
detailed installation instructions, see Parallels Desktop for Mac User Guide.
By default, Parallels Image Tool is installed in the following folder:
/Applications/Parallels.
Uninstalling Parallels Image Tool
Parallels Image Tool is uninstalled automatically as you uninstall Parallels Desktop. For
detailed instructions, see Parallels Desktop for Mac User Guide.
Page 8

C HAPTER 4
Working with Parallels Image Tool
Using Parallels Image Tool you can increase the capacity, change properties or format of an
existing virtual hard disk image that is not currently used by any running virtual machine. To
learn more about virtual hard disks types and formats, refer to the Virtual Hard Disks Types
topic (page 25).
In This Chapter
Starting Parallels Image Tool................................................................................................ 8
Increasing Virtual Hard Disk Capacity................................................................................. 8
Changing Virtual Hard Disk Properties................................................................................ 12
Changing Virtual Hard Disk Format.....................................................................................15
Merging Snapshots................................................................................................................ 18
Starting Parallels Image Tool
To start the Parallels Image Tool utility, do the following:
1 In the Finder, go to Applications -> Parallels.
2 In the Parallels folder double-click the Parallels Image Tool icon.
Increasing Virtual Hard Disk Capacity
If you find that the capacity of your virtual machine hard disk doesn't fit your needs anymore,
you can increase it using Parallels Image Tool.
Warning. Before modifying the image of a virtual hard disk, always back it up and make
sure you have enough space on the hard disk of your Macintosh computer to allocate a
temporary file of this virtual hard disk image.
To increase the capacity of virtual hard disk
1 Start Parallels Image Tool.
Page 9
3BWorking with Parallels Image Tool 9
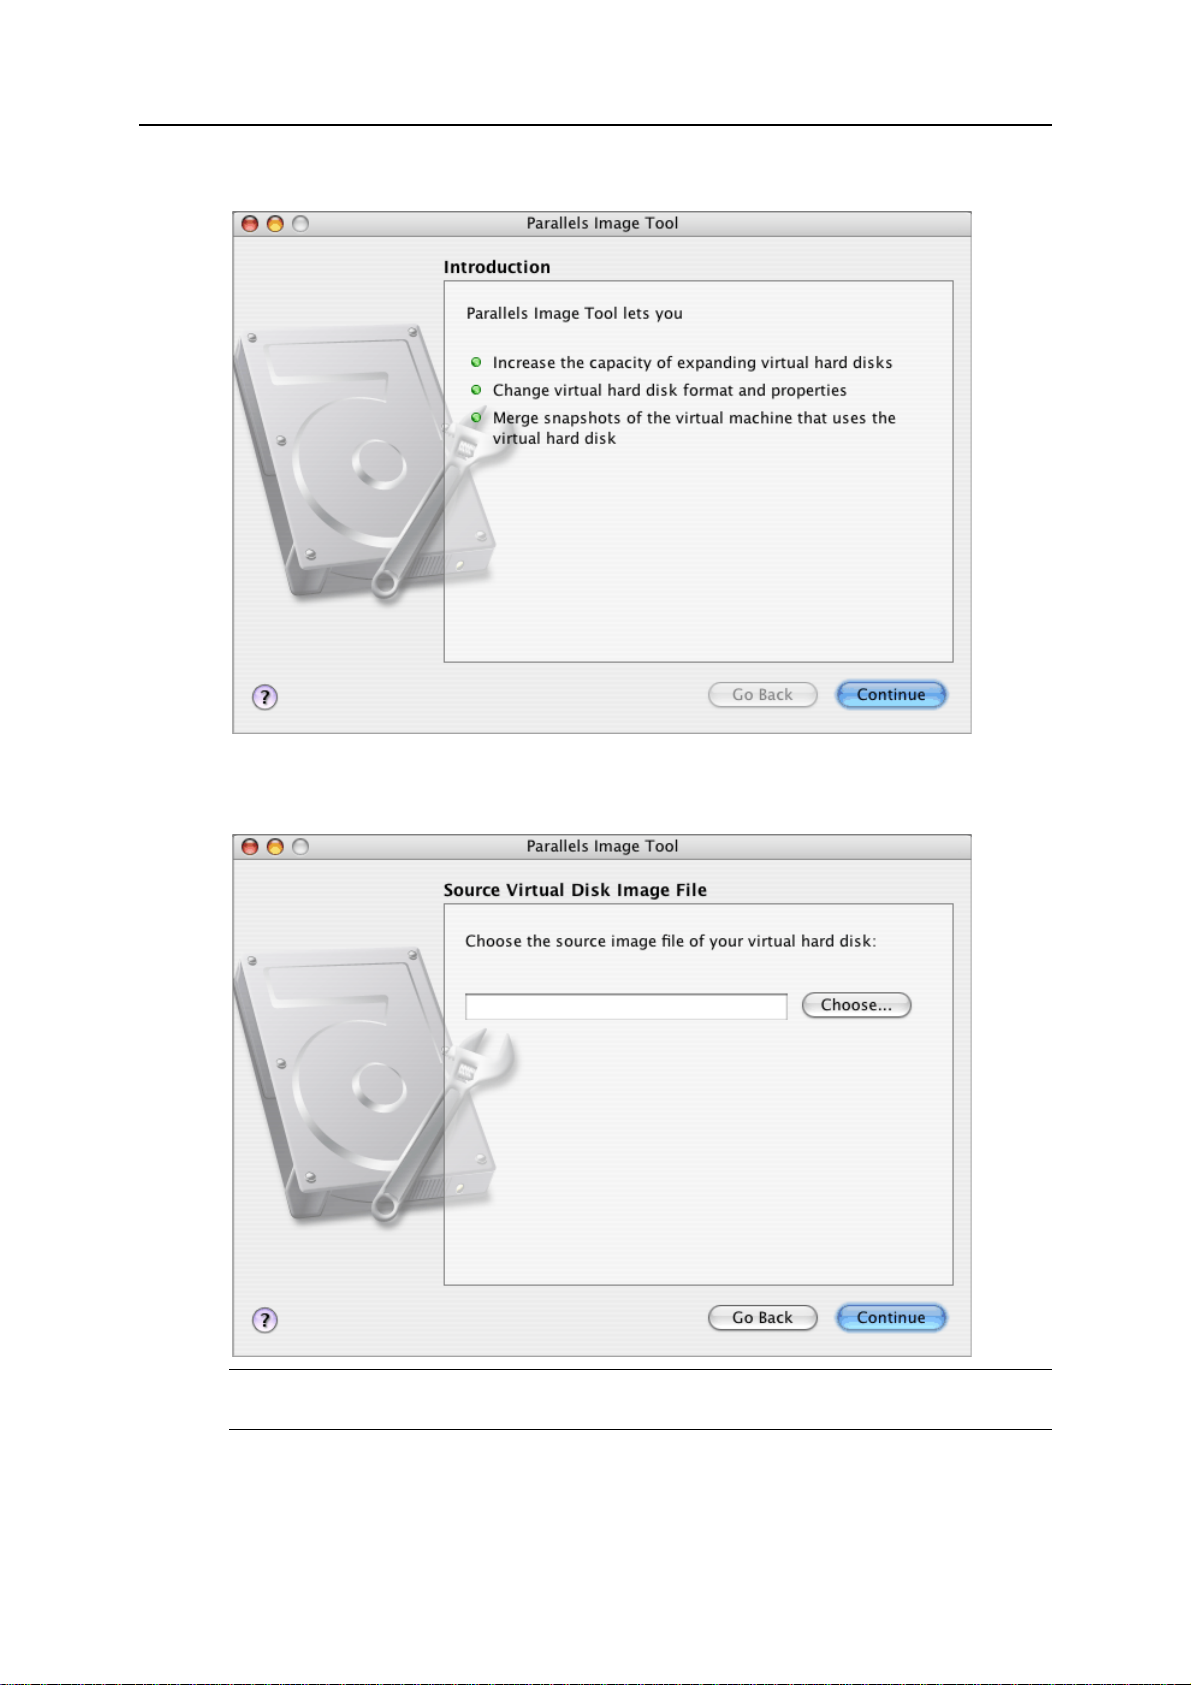
2 In the Introduction window, click Continue.
3 In the Source Virtual Disk Image File window, specify the hard disk image file to be increased
and click Continue. You may type the path and file name or use the Choose button to locate
the file.
Warning. If you choose a hard disk used by virtual machine that has snapshots, all the
snapshots, except the last one, will be deleted.
Page 10

10 Parallels Image Tool User Guide
4 In the Select Action window, choose Increase the disk capacity and click Continue.
5 In the Virtual Disk Capacity window, specify the new capacity for the disk and click Start.
Use arrow buttons to set the required capacity.
Note. If the virtual hard disk image file you specified has an old format, it will be
automatically converted to the new format.
Page 11

3BWorking with Parallels Image Tool 11
6 You can view the operation progress in the Processing the File window. Clicking Cancel
terminates the operation.
7 After the disk image is modified, the Execution is Completed window appears. Click Finish
to close the assistant.
Page 12

12 Parallels Image Tool User Guide
If the modified disk was used by a virtual machine whose snapshots were merged during the
operation, delete the Snapshots folder in the virtual machine folder to save the disk space of
your Mac. You can also delete this folder by deleting the snapshots in Snapshot Manager. For
more information on using Snapshot Manager, refer to Parallels Desktop for Mac User Guide.
The added space appears as unallocated space in the guest operating system. You should
allocate it to use it. For instructions on allocating the added space, see Using the Added Space
topic (on page 22).
Changing Virtual Hard Disk Properties
With Parallels Image Tool you can manage the properties of your virtual hard disk. You can
change the virtual hard disk type from plain to expanding one and vice versa, split or merge the
disk parts, or merge snapshots of the virtual machine that uses this virtual hard disk.
To change the type of the virtual hard disk
1 Start Parallels Image Tool.
2 In the Introduction window, click Continue.
Page 13

3BWorking with Parallels Image Tool 13
3 In the Source Virtual Disk Image File window, specify the hard disk image file to be modified
and click Continue. You may type the path and file name or use the Choose button to locate
the file.
4 In the Select Action window, choose Manage Disk Properties and click Continue.
5 In the Select Operations window, select the operation you want to perform on the disk, and
click Start. You can select several options.
If the virtual hard disk image you specified is an expanding virtual hard disk, the Split
virtual hard disk image file option is selected by default.
If it is a plain disk, the Convert to Expanding option is selected by default.
Page 14

14 Parallels Image Tool User Guide
If the hard disk image you selected has snapshots, the Merge Snapshots option is
selected by default. You cannot clear this option.
Note. If the virtual hard disk image file you specified has the old format, it will be
automatically converted to the new format.
6 You can view the operation progress in the Processing the File window. Clicking Cancel
terminates the operation.
Page 15

3BWorking with Parallels Image Tool 15
7 After the disk image is modified, the Execution is Completed window appears. Click Finish
to close the assistant.
Changing Virtual Hard Disk Format
If you want to use your virtual machine with an earlier version of Parallels Desktop, use
Parallels Image Tool to convert its hard disk image file to the old format. Image Tool can be
also used to convert virtual hard disk image files created with Parallels Desktop 2.5 or earlier to
the new format, supported by Parallels Desktop 3.0 or later.
To change virtual hard disk image file format
1 Start Parallels Image Tool.
Page 16

16 Parallels Image Tool User Guide
2 In the Introduction window, click Continue.
3 In the Source Virtual Disk Image File window, specify the hard disk image file you want to
convert and click Continue. You may type the path and file name or use the Choose button
to locate the file.
Warning. If you choose a hard disk used by virtual machine that has snapshots, all the
snapshots, except the last one, will be deleted.
Page 17

3BWorking with Parallels Image Tool 17
4 In the Select Action window, choose Convert the virtual hard disk to the old format or Convert
the virtual hard disk to the new format. Click Continue.
5 You can view the operation progress in the Processing the File window. Clicking Cancel
terminates the operation.
Page 18

18 Parallels Image Tool User Guide
6 After the disk image file is modified, the Execution is Completed window appears. Click
Finish to close the assistant.
If the modified disk was used by a virtual machine whose snapshots were merged during the
operation, delete the Snapshots folder in the virtual machine folder to save the disk space of
your Mac. You can also delete this folder by deleting the snapshots in Snapshot Manager.
Merging Snapshots
If your virtual machine has several snapshots, and you want to delete all except the last one,
Parallels Image Tool provides the simplest way to merge them.
To merge snapshots of a virtual machine
1 Start Parallels Image Tool.
Page 19

3BWorking with Parallels Image Tool 19
2 In the Introduction window, click Continue.
3 In the Source Virtual Disk Image File window, specify the hard disk image file used by the
virtual machine whose snapshots you want to merge, and click Continue. You may type the
path and file name or use the Choose button to locate the file.
Page 20

20 Parallels Image Tool User Guide
4 In the Select Action window, choose Manage disk properties, and click Continue.
5 In the Select Operations window, select Merge snapshots and click Start. You can select
other options as well.
Page 21

3BWorking with Parallels Image Tool 21
6 You can view the operation progress in the Processing the File window. The operation
cannot be cancelled.
7 After the snapshots are merged, the Execution is Completed window appears. Click Finish to
close the assistant.
After merging the snapshots of the virtual machine, delete the remaining snapshots, if any, in
Snapshot Manager.
Page 22

C HAPTER 5
Using Added Space
As you increase the capacity of your virtual hard disk, the added space appears in the guest
operating system as an unallocated space. To use this additional unallocated space, you can
either create a new partition on this unallocated space, or expand one of the partitions you
already have. The way of allocating the partitions is different for Windows and Linux guest
operating systems.
This chapter provides some general guidelines on creating a new partition in Windows and
Linux guest operating systems.
In This Chapter
Creating New Partition in Windows..................................................................................... 22
Creating New Partition in Linux...........................................................................................23
Creating New Partition in Windows
To create a new partition on the unallocated space of your virtual hard disk, you can use a
Windows build-in utility called Disk Management. In the procedure below the steps are given
for Windows XP. In other Windows operating systems the procedure will be very similar to this
one.
To create a new partition on Windows XP
1 Start the virtual machine that uses the enlarged virtual disk.
2 To start the Disk Management utility, choose Start -> Control Panel. Double-click
Administrative Tools, and open Computer Management. In the Storage section, select Disk
Management.
or
Choose Start -> Run, and type:
diskmgmt.msc
Click OK.
3 In the Disk Management window, right-click the Unallocated Capacity and choose New
Partition from the shortcut menu.
4 In the New Partition wizard introduction window click Next.
5 In the Select Partition Type window select Primary partition and click Next.
6 Specify the partition size and click Next.
7 Assign a drive letter to the new partition and click Next.
Page 23

4BUsing Added Space 23
8 In the Format partition window select Format partition with the following settings.Set the File
system to NTFS and the Allocation unit size to Default. Type the volume name in the Volume
label field and click Next.
9 Carefully review the settings and click Finish to start formatting.
When the operation is complete, the new volume appears in the Computer Management window
and in My Computer.
Creating New Partition in Linux
In most Linux systems, you can use the fdisk tool to create a new partition and to do other
disk management operations.
Note. To be able to execute the commands necessary to create a new partition on Linux, you
must have root privileges.
As a tool with a text interface, fdisk requires typing the commands on the fdisk command
line. The following fdisk commands may be helpful:
Options Description
m
p
n
q
l
w
Displays the available commands.
Displays the list of existing partitions on your hda drive. Unpartitioned space is
not listed.
Creates a new partition.
Exits fdisk without saving your changes.
Lists partition types.
Writes changes to partition table.
To create a new partition on Linux
1 Start terminal.
2 Start fdisk using the following command:
/sbin/fdisk /dev/hda
where /dev/hda stands for the hard drive that you want to partition.
3 In fdisk, to create a new partition type the following command:
n
When prompted to specify the Partition type, type p to create a primary partition or e to
create an extended one. There may be up to four primary partitions. If you want to create
more than four partitions, make the last partition extended, and it will be a container for
other logical partitions.
When prompted for the Number, in most cases, type 3 because a typical Linux virtual
machine has two partitions by default.
When prompted for the Start cylinder, type a starting cylinder number or press Return
to use the first cylinder available.
Page 24

24 Parallels Image Tool User Guide
When prompted for the Last cylinder, press Return to allocate all the available space
or specify the size of a new partition in cylinders if you do not want to use all the
available space.
By default, fdisk creates a partition with a System ID of 83. If you’re unsure of the
partition’s System ID, use the
l
command to check it.
4 Use the
w
command to write the changes to the partition table.
5 Restart the virtual machine by entering
reboot
command.
6 When restarted, create a file system on the new partition. We recommend that you use the
same file system as on the other partitions. In most cases it will be either Ext3 or
ReiserFS file system. For example, to create an Ext3 file system, enter the following
command:
/sbin/mkfs -t ext3 /dev/hda3
7 Create a directory that will be a mount point for the new partition. For example, to name it
data, enter:
mkdir /data
8 Mount the new partition to the directory you just created by using the following command:
mount /dev/hda3 /data
9 Make changes in your static file system information by editing the /etc/fstab file in any
of the available text editors. For example, add the following string to this file:
/dev/hda3 /data ext3 defaults 0 0
In this string /dev/hda3 is the partition you’ve just created, /data is a mount point for
the new partition, Ext3 is the file type of the new partition. For the exact meaning of other
items of the string, consult the Linux documentation for the mount and fstab commands.
10 Save the /etc/fstab file.
Page 25

C HAPTER 6
Virtual Hard Disks Types
This chapter provides basic information on the types of virtual hard disks used in Parallels
virtual machines.
Plain Disks
The file that stores an image of a plain virtual disk resides in Mac OS X and has constant size
from the moment it is created. This reserves space on virtual disk even when there is no free
space on the real hard disk. It also allows the guest OS to operate a little bit faster. You can
create a plain disk when creating a virtual machine in Custom mode.
Expanding Disks
An expanding disk is small initially and grows as you add applications and data to the virtual
hard disk in the guest OS. The size specified when the disk was created is the maximum size of
the disk. Using disks in this format saves space on the hard disk of your Mac.
Split disks
Both plain and expanding virtual hard disks can be single-piece disks or split disks. By default,
a split disk is cut into 2 GB pieces, but is stored as a single HDD file. Split disks allow the user
to transfer the data stored on a split disk piece by piece using a USB drive or other media that
has limited space and cannot store a large image file.
Disks in Old Format
Disks in old format are created and used in versions of Parallels Desktop prior to 3.0.
Disks in New format
Disks in new format are created and used in Parallels Desktop 3.0 and later.
Page 26

Page 27

27
Index
A
About Parallels Image Tool • 4
About This Guide • 4
C
Changing Virtual Hard Disk Format • 15
Changing Virtual Hard Disk Properties • 12
Creating New Partition in Linux • 23
Creating New Partition in Windows • 22
G
Getting Help • 5
Getting Started • 7
H
Hardware Requirements • 6
I
Increasing Virtual Hard Disk Capacity • 8
Installing Parallels Image Tool • 7
Introduction • 4
M
Merging Snapshots • 18
S
Software Requirements • 6
Starting Parallels Image Tool • 8
System Requirements • 6
U
Uninstalling Parallels Image Tool • 7
Using Added Space • 22
V
Virtual Hard Disks Types • 25
W
Working with Parallels Image Tool • 8
 Loading...