

Page 1

Parallels H-Sphere 3.6.2 Reseller Guide
Page 2

Legal and Copyright Notice
Parallels IP Holdings GmbH
Vordergasse 59
CH-Schaffhausen
Switzerland
Phone: +41-526320-411
Fax: +41-52672-2010
Copyright © 2012 Parallels IP Holdings GmbH. All rights reserved.
www.parallels.com
This product is protected by United States and international copyright laws. The product’s
underlying technology, patents, and trademarks are listed at
http://www.parallels.com/trademarks.
Microsoft, Windows, Windows Server, Windows NT, Windows Vista, and MS-DOS are
registered trademarks of Microsoft Corporation.
Linux is a registered trademark of Linus Torvalds.
Mac is a registered trademark of Apple, Inc.
All other marks and names mentioned herein may be trademarks of their respective owners.
Page 3

Contents
Preface 11
Typographical Conventions ......................................................................................................... 11
Feedback ..................................................................................................................................... 12
About This Guide 13
Introduction 14
Getting Started ............................................................................................................................. 15
Step 1. Access Your Reseller Account ........................................................................................ 15
Step 2. Create a DNS Zone ......................................................................................................... 16
Step 3. Create an Instant Alias Template .................................................................................... 16
Step 4. Add Server Aliases .......................................................................................................... 17
Step 5. Change Temporary CP Alias to Your Own Reseller CP URL ......................................... 17
Step 6. Configure Mail Notification Addresses ............................................................................ 18
Step 7. Set up Payment Settings ................................................................................................. 19
Step 8. Create Plans.................................................................................................................... 20
Create Hosting Plans ........................................................................................................ 20
Create a System Plan and Account For Your Corporate Domain ..................................... 20
Step 9. Create Billing Periods ...................................................................................................... 21
Step 10. Configure Support Center ............................................................................................. 21
Step 11. Look and Feel ............................................................................................................... 22
DNS and Hosting 23
DNS Manager .............................................................................................................................. 24
Adding DNS Zones ...................................................................................................................... 24
Instant Alias Templates ............................................................................................................... 26
Adding Instant Alias Templates ......................................................................................... 27
Editing Instant Alias Templates ......................................................................................... 28
DNS Records ............................................................................................................................... 29
Adding custom A records .................................................................................................. 30
Adding custom MX records ............................................................................................... 31
Adding custom CNAME records ........................................................................................ 32
Hosting Your Corporate Site ........................................................................................................ 33
Step 1. Make sure you have a service DNS zone ............................................................. 33
Step 2. Create a service plan ............................................................................................ 33
Step 3. Disallow signups from outside your admin account. ............................................. 34
Step 4. Create a service account ...................................................................................... 34
Adding Domains for Third Level Hosting ..................................................................................... 34
Providing Mail Under Service Domain for Third-Level Hosting ................................................... 35
Control Panel Web Interface 36
Regional Settings ......................................................................................................................... 37
Images and Icons ........................................................................................................................ 40
Logo Images ...................................................................................................................... 40
Icons And Control Images ................................................................................................. 41
Interface Language ...................................................................................................................... 43
Page 4

Preface 4
Setting Default System Language ..................................................................................... 43
Setting Admin Interface Language .................................................................................... 43
Skins and Colors .......................................................................................................................... 44
Interface Texts ............................................................................................................................. 46
Login Texts ........................................................................................................................ 46
Signup Texts ...................................................................................................................... 46
Miscellaneous Texts .......................................................................................................... 46
E-Mail Notifications 48
Setting E-Mail Notification Recipients .......................................................................................... 49
Editing E-Mail Notifications .......................................................................................................... 50
Configuring User Notification Rules ............................................................................................. 55
Online Invoices .................................................................................................................. 56
"No Charge" Notifications .................................................................................................. 57
Control Panel Configuration 58
Company Information .................................................................................................................. 59
Supported TLD's .......................................................................................................................... 60
Provider's Shared SSL ................................................................................................................ 61
Shared SSL Certificates Installation ............................................................................................ 62
Shared SSL installation wizard .......................................................................................... 63
Credit Card Brands ...................................................................................................................... 66
Domain Registrar Manager ......................................................................................................... 68
Merchant Gateways 70
Merchant Gateway Manager ....................................................................................................... 71
Setting Up Merchant Gateway .......................................................................................... 72
Editing Merchant Gateway Settings .................................................................................. 72
Associating Merchant Gateways with Credit Card Vendors ............................................. 73
Editing Description for User Credit Card Statements ........................................................ 73
Handling CC Charge Request Failures ............................................................................. 74
One Step Gateways .......................................................................................................... 75
AssureBuy Configuration ............................................................................................................. 75
Preparation ........................................................................................................................ 75
Configuration ..................................................................................................................... 75
Authorize.Net (Sim Protocol) Configuration ................................................................................ 77
Setting Up Authorize.Net ................................................................................................... 78
Bibit Configuration ....................................................................................................................... 80
Preparation ........................................................................................................................ 80
Configuration ..................................................................................................................... 80
Cardia Services Configuration ..................................................................................................... 81
Preparation ........................................................................................................................ 81
Configuration ..................................................................................................................... 81
ECHO Configuration .................................................................................................................... 82
Preparation ........................................................................................................................ 82
Configuration ..................................................................................................................... 82
ePDQ Configuration..................................................................................................................... 83
Preparation ........................................................................................................................ 83
Configuration ..................................................................................................................... 83
eWay Configuration ..................................................................................................................... 85
Preparation ........................................................................................................................ 85
Configuration ..................................................................................................................... 85
HSBC Configuration .................................................................................................................... 86
Preparation ........................................................................................................................ 86
Configuration ..................................................................................................................... 86
Page 5

Preface 5
Innovative Gateway Configuration ............................................................................................... 87
Preparation ........................................................................................................................ 87
Configuration ..................................................................................................................... 87
LinkPoint (API v3.01) Configuration ............................................................................................ 88
Preparation ........................................................................................................................ 88
Configuration ..................................................................................................................... 90
MainStreetSoftWorks Configuration ............................................................................................ 92
Preparation ........................................................................................................................ 92
Configuration ..................................................................................................................... 92
Moneris Configuration.................................................................................................................. 94
Preparation ........................................................................................................................ 94
Configuration ..................................................................................................................... 94
NetBilling Configuration ............................................................................................................... 96
Preparation ........................................................................................................................ 96
Configuration ..................................................................................................................... 97
NTPNow Configuration ................................................................................................................ 98
Preparation ........................................................................................................................ 98
Configuration ..................................................................................................................... 98
Paradata Configuration .............................................................................................................. 100
Preparation ...................................................................................................................... 100
Configuration ................................................................................................................... 100
PayGate Configuration .............................................................................................................. 101
Preparation ...................................................................................................................... 101
Configuration ................................................................................................................... 101
PayJunction Configuration ......................................................................................................... 103
Preparation ...................................................................................................................... 103
Configuration ................................................................................................................... 103
Pay-Me-Now Configuration ....................................................................................................... 104
Preparation ...................................................................................................................... 104
Configuration ................................................................................................................... 104
PosNet Configuration................................................................................................................. 105
Preparation ...................................................................................................................... 105
Configuration ................................................................................................................... 105
Protx (VSP Direct Protocol 2.22) Configuration ........................................................................ 107
Preparation ...................................................................................................................... 107
Configuration ................................................................................................................... 107
PSiGate (XML API) Configuration ............................................................................................. 108
Preparation ...................................................................................................................... 108
Configuration ................................................................................................................... 108
SecurePay Configuration ........................................................................................................... 110
Preparation ...................................................................................................................... 110
Configuration ................................................................................................................... 110
SkipJack Configuration .............................................................................................................. 111
Preparation ...................................................................................................................... 111
Configuration ................................................................................................................... 112
SecurePay.com.au Configuration .............................................................................................. 113
Preparation ...................................................................................................................... 113
Configuration ................................................................................................................... 113
SecureTrading Configuration ..................................................................................................... 114
Preparation ...................................................................................................................... 114
Configuration ................................................................................................................... 114
ThePayDesk Configuration ........................................................................................................ 116
Preparation ...................................................................................................................... 116
Configuration ................................................................................................................... 117
Tucows Configuration ................................................................................................................ 118
Preparation ...................................................................................................................... 118
Configuration ................................................................................................................... 118
Page 6

Preface 6
Web-based Payments 121
Web Payment Systems Manager .............................................................................................. 122
Work Principles................................................................................................................ 122
Configuration Procedure ................................................................................................. 122
Setting Web Payment Instant Notification URL ............................................................... 123
2CheckOut Configuration .......................................................................................................... 124
Authorize.Net (Sim Protocol) Configuration .............................................................................. 125
Setting Up Authorize.Net ................................................................................................. 125
ChronoPay Configuration .......................................................................................................... 127
Setting Up ChronoPay ..................................................................................................... 127
GestPay Configuration............................................................................................................... 128
PayNova Configuration .............................................................................................................. 129
PayPal Configuration ................................................................................................................. 130
Preparation ...................................................................................................................... 130
Setup Procedure.............................................................................................................. 130
Sentry Configuration .................................................................................................................. 132
Preparation ...................................................................................................................... 132
Setup Procedure.............................................................................................................. 132
Webmoney Configuration .......................................................................................................... 134
1. Set your own purse ..................................................................................................... 134
2. Activate Webmoney payments in your Parallels H-Sphere control panel ................... 134
WorldPay Configuration ............................................................................................................. 135
Setting Up WorldPay ....................................................................................................... 135
Resources 138
User/Account/Domain Management .......................................................................................... 138
Users ............................................................................................................................... 139
Accounts .......................................................................................................................... 139
Domains .......................................................................................................................... 142
Traffic ......................................................................................................................................... 143
Traffic Calculation ............................................................................................................ 144
Traffic Limit ...................................................................................................................... 144
Traffic Pricing ................................................................................................................... 144
Restricting Traffic Usage and Traffic Limit ...................................................................... 145
Charging for Traffic .......................................................................................................... 146
Traffic Configuration Changes ......................................................................................... 152
Tracking End User Traffic Consumption ......................................................................... 153
Disk Space ................................................................................................................................. 153
Charging Users for Disk Space ....................................................................................... 154
Enabling/Disabling Summary Disk Usage ....................................................................... 155
Blacklists in Parallels H-Sphere ................................................................................................. 156
Domains in blacklist ......................................................................................................... 156
Emails in blacklist ............................................................................................................ 157
Uploading and Exporting Black Lists ............................................................................... 158
Plans 159
Creating And Editing Reseller Plans ......................................................................................... 160
Starting Plan Creation Wizards ....................................................................................... 160
Starting Plan Edit Wizards ............................................................................................... 160
Simplified Plan Wizards ................................................................................................... 161
A Typical Plan Wizard................................................................................................................ 163
Step 1. Selecting Resources and Configuring Plan Settings .......................................... 164
Subsequent Steps. Setting Prices ................................................................................... 175
Unix RealMedia Plan Wizard ..................................................................................................... 176
Page 7

Preface 7
MySQL Plan Wizard .................................................................................................................. 176
Windows Plan Wizard ................................................................................................................ 176
Windows RealMedia Plan Wizard ............................................................................................. 178
E-mail Plan Wizard .................................................................................................................... 178
Markup Plan Wizard .................................................................................................................. 178
Admin Plans ............................................................................................................................... 179
Creating Admin Plans ...................................................................................................... 179
Editing Admin Plans ........................................................................................................ 180
Demo Plans ............................................................................................................................... 181
Access to Plans ......................................................................................................................... 184
Plan Controls ............................................................................................................................. 185
Show ................................................................................................................................ 186
Copy ................................................................................................................................ 187
Delete .............................................................................................................................. 187
Plan Settings .............................................................................................................................. 188
Controlling RAM And CPU Usage ............................................................................................. 191
Enable RLimit in Plans .................................................................................................... 191
Configure RLimit Values .................................................................................................. 192
Limiting Resource Use For Individual Accounts .............................................................. 192
Billing 194
Plans ................................................................................................................................ 194
Billing Types .................................................................................................................... 194
Trial Hosting .................................................................................................................... 194
Billing Profiles .................................................................................................................. 194
Prices ............................................................................................................................... 195
Billing Periods .................................................................................................................. 195
Crediting Accounts .......................................................................................................... 195
Debiting Accounts ........................................................................................................... 195
Billing Modes ................................................................................................................... 195
Traffic ............................................................................................................................... 195
Disk Space ...................................................................................................................... 196
E-mailing Invoices ........................................................................................................... 196
Taxes ............................................................................................................................... 196
Promotions ...................................................................................................................... 196
Suspending Debtors ........................................................................................................ 196
Money Returns ................................................................................................................ 197
Billing Statements ............................................................................................................ 197
Reseller Billing ........................................................................................................................... 198
Wholesale Prices vs Retail Prices ................................................................................... 199
How do I view my billing history? .................................................................................... 202
How do I pay?.................................................................................................................. 206
Billing Types .............................................................................................................................. 209
Billing Profiles ............................................................................................................................ 210
Billing Periods and Discounts .................................................................................................... 210
Default and Actual Billing Periods. Base Prices .............................................................. 210
Monthly and Billing Period Resources ............................................................................ 210
Opening a New Billing Period/Month............................................................................... 211
Creating and Configuring Actual Billing Periods ............................................................. 211
Changing Account's Billing Period ............................................................................................. 213
Changing Billing Period Start Date ............................................................................................ 214
Credit Limit ................................................................................................................................. 216
Setting Credit Limit in a Plan ........................................................................................... 217
Increasing Credit Limit for Individual Accounts ............................................................... 217
Resetting Credit Limit For All Users ................................................................................ 217
Fees Collected From Customers ............................................................................................... 218
Plan Fees ........................................................................................................................ 218
Taxes ......................................................................................................................................... 219
Page 8

Preface 8
Tax Exemption ........................................................................................................................... 221
Enabling Tax Exemption ................................................................................................. 221
Setting Tax Exemption Mode at Signup .......................................................................... 222
Activating User Accounts with Tax Exemption Code Entered ........................................ 222
Money Returns .......................................................................................................................... 224
Events that Trigger Refunds ............................................................................................ 224
Refund Formulas ............................................................................................................. 225
Moneyback Period ........................................................................................................... 225
Reducing Quotas and Limits ........................................................................................... 226
Refund Percentage ......................................................................................................... 226
Managing Debtors ..................................................................................................................... 227
Punitive Measures ........................................................................................................... 227
Punitive Measures Automation ........................................................................................ 227
Start Date of Time in Debt ............................................................................................... 228
Promotions ................................................................................................................................. 229
Promotion Types ............................................................................................................. 229
Calculating Promotion Discounts .................................................................................... 229
Creating Promotions ........................................................................................................ 229
Associating Promotions With Plans................................................................................. 232
Extra Packages .......................................................................................................................... 233
Creating Extra Packs ....................................................................................................... 233
Managing Extra Packs .................................................................................................... 234
Dedicated Servers 236
Adding Network Switches .......................................................................................................... 237
Creating/Managing Dedicated Server Templates ..................................................................... 239
Custom-built Dedicated Servers ...................................................................................... 240
Dedicated Server Plans ............................................................................................................. 241
User Plans ....................................................................................................................... 241
User's Choosing a Server at Signup ............................................................................... 244
Managing Dedicated Servers .................................................................................................... 244
Adding Dedicated Servers ............................................................................................... 245
Editing Dedicated Servers ............................................................................................... 247
Deleting Dedicated Servers ............................................................................................. 248
Custom-built Dedicated Servers ................................................................................................ 248
Dedicated Server Status ............................................................................................................ 249
Assigning Additional IP Ranges ................................................................................................ 252
1. Set Prices for Extra IPs in Plans ................................................................................. 252
2. Add IP Subnet ............................................................................................................. 252
3. Split IP Subnet to Smaller IP Ranges ......................................................................... 254
4. Create PTR zone for Reverse DNS Records .............................................................. 255
5. Assign IP Range to Dedicated Server ......................................................................... 256
6. Unassign IP Range ..................................................................................................... 257
Dedicated Servers' Maintenance ............................................................................................... 258
Regular Backups ............................................................................................................. 258
Maintenance Requests .................................................................................................... 259
Automatic Cancellation Settings...................................................................................... 260
Parallels Virtuozzo Containers 262
Creating Virtuozzo Plans ........................................................................................................... 263
Creating Virtuozzo Plan Groups ................................................................................................ 264
Signing Up Users for Virtuozzo Plans ....................................................................................... 264
Parallels Sitebuilder Integration 265
Licensing Parallels Sitebuilder Accounts ................................................................................... 266
Page 9

Preface 9
Configuring Access to Parallels Sitebuilder Plans from Parallels H-Sphere Plans ................... 266
Migrating from Parallels SiteStudio to Parallels Sitebuilder ...................................................... 267
Customer Signup 268
Signing Up Users ....................................................................................................................... 268
Signing Up Users from Admin Control Panel .................................................................. 269
Signing Up Users from the Street .................................................................................... 270
Moderating User Signups .......................................................................................................... 270
Moderated Signups ......................................................................................................... 270
Email Notifications ........................................................................................................... 271
Activating Or Rejecting Signups ...................................................................................... 271
Changing Details of Moderated Accounts ....................................................................... 272
Moderated Credit Card Signup ........................................................................................ 273
Signup Guard Settings .............................................................................................................. 274
Creating moderation rules ............................................................................................... 274
Setting Signup Guard Blacklist ........................................................................................ 276
Viewing Signup Info ................................................................................................................... 281
Signup IPs ....................................................................................................................... 281
Signup Statistics .............................................................................................................. 281
Trial Hosting ............................................................................................................................... 283
Introduction to Trial Hosting ............................................................................................ 283
Managing Trial Accounts ................................................................................................. 283
Enabling Trial Registration .............................................................................................. 284
Grouping Trial Plans ........................................................................................................ 285
Managing Trial Accounts ................................................................................................. 286
Enabling Trial Registration .............................................................................................. 287
Grouping Trial Plans ........................................................................................................ 288
Account Management 289
Finding User Accounts............................................................................................................... 290
Generic Search................................................................................................................ 291
Search in Resellers ......................................................................................................... 292
Search Deleted Accounts ................................................................................................ 293
Search Dedicated Server Accounts ................................................................................ 293
Search Suspended Accounts .......................................................................................... 294
Search by Contact Info .................................................................................................... 295
Search by Credit Card Charges ...................................................................................... 295
Search by Disk Usage ..................................................................................................... 296
Search by Domain Name ................................................................................................ 296
Search by Invoice/Balance Entries.................................................................................. 296
Search by Logical and Physical Servers ......................................................................... 297
Search by Merchant Gateway Transactions ................................................................... 297
Search by Reseller Traffic ............................................................................................... 298
Search by Resellers Disk Usage ..................................................................................... 298
Search by Transfer Traffic ............................................................................................... 298
User Details ............................................................................................................................... 299
Admin Notes .............................................................................................................................. 299
Crediting Accounts ..................................................................................................................... 300
Debiting Accounts ...................................................................................................................... 301
View debits ...................................................................................................................... 304
Deleting Accounts ...................................................................................................................... 305
Suspending and Resuming Accounts........................................................................................ 306
Suspending Accounts ...................................................................................................... 309
Resuming Accounts ........................................................................................................ 309
Restoring Accounts.................................................................................................................... 310
Reports ...................................................................................................................................... 311
Billing Balance ................................................................................................................. 312
Page 10

Preface 10
Estimated balance exhaustion date ................................................................................ 314
Daily Report ..................................................................................................................... 315
Charge Log ...................................................................................................................... 316
Web Payments Log ......................................................................................................... 317
Registrar Log ................................................................................................................... 318
Credit Card Charge ......................................................................................................... 319
CC Processing Errors Report .......................................................................................... 320
Billing Entries ................................................................................................................... 321
Tax/Refund Report .......................................................................................................... 323
Signup/Go-away Statistics .............................................................................................. 324
Monthly Revenue ............................................................................................................ 325
Monetary Transactions .................................................................................................... 326
Transfer Traffic Report .................................................................................................... 327
Disk Usage Report .......................................................................................................... 329
Reports Installed in a Package ........................................................................................ 330
Processing Check Payments ..................................................................................................... 336
Technical Support 337
Client Support Center ................................................................................................................ 338
Configuring Administration Security ................................................................................ 339
Managing Trouble Tickets ............................................................................................... 340
Task System .................................................................................................................... 344
Searching Trouble Tickets ............................................................................................... 345
Exchanging Private Messages ........................................................................................ 346
Supporting Reseller End Users ....................................................................................... 347
Ticket Statistics................................................................................................................ 348
Ticket Queues ................................................................................................................. 349
Configuring Support Center ....................................................................................................... 350
Knowledge Base ........................................................................................................................ 354
Creating Knowledge Bases ............................................................................................. 355
Editing and Removing Knowledge Bases ....................................................................... 355
Exporting Knowledge Base ............................................................................................. 356
Importing Knowledge Bases ............................................................................................ 357
Spellcheck ....................................................................................................................... 357
Search ............................................................................................................................. 358
Settings ............................................................................................................................ 358
Custom Jobs .............................................................................................................................. 359
Adding Custom Jobs ....................................................................................................... 360
Adding Tasks to Custom Jobs ......................................................................................... 361
Tracking Custom Job Status ........................................................................................... 362
Mass Mail ................................................................................................................................... 363
Comodo SSL Manager 365
Step 1. Register as a Comodo CA Web host reseller ............................................................... 366
Step 2. Configure prices for various certificate types ................................................................ 366
Step 3. Enable SSL Support in plans ........................................................................................ 368
Step 4. Manage your customer requests................................................................................... 368
Page 11

In this chapter:
Typographical Conventions ............................................................................... 11
Feedback .......................................................................................................... 12
Formatting convention
Type of Information
Example
Special Bold
Items you must select,
such as menu options,
command buttons, or
items in a list.
Go to the System tab.
Titles of chapters,
sections, and
subsections.
Read the Basic
Administration chapter.
Italics
Used to emphasize the
importance of a point, to
introduce a term or to
designate a command
line placeholder, which is
to be replaced with a real
name or value.
The system supports the
so called wildcard
character search.
Monospace
The names of
commands, files,
directories, and domain
names.
The license file is located
in the
http://docs/common/
licenses directory.
C H A P T E R 1
Preface
Typographical Conventions
Before you start using this guide, it is important to understand the documentation
conventions used in it.
The following kinds of formatting in the text identify special information.
Page 12

12 Preface
Preformatted
On-screen computer
output in your commandline sessions; source
code in XML, C++, or
other programming
languages.
# ls –al /files
total 14470
Preformatted
Bold
What you type,
contrasted with on-screen
computer output.
# cd /root/rpms/php
CAPITALS
Names of keys on the
keyboard.
SHIFT, CTRL, ALT
KEY+KEY
Key combinations for
which the user must
press and hold down one
key and then press
another.
CTRL+P, ALT+F4
Feedback
If you have found a mistake in this guide, or if you have suggestions or ideas on how to
improve this guide, please send your feedback using the online form at
http://www.parallels.com/en/support/usersdoc/. Please include in your report the
guide's title, chapter and section titles, and the fragment of text in which you have found
an error.
Page 13

Parallels H-Sphere Reseller guide aims at resellers of hosting services and explains
C H A P T E R 2
About This Guide
how to configure and administer Parallels H-Sphere control panel.
Page 14

Parallels H-Sphere is a comprehensive hosting automation system that allows you to
In this chapter:
Getting Started .................................................................................................. 15
Step 1. Access Your Reseller Account .............................................................. 15
Step 2. Create a DNS Zone ............................................................................... 16
Step 3. Create an Instant Alias Template .......................................................... 16
Step 4. Add Server Aliases ................................................................................ 17
Step 5. Change Temporary CP Alias to Your Own Reseller CP URL ................ 17
Step 6. Configure Mail Notification Addresses ................................................... 18
Step 7. Set up Payment Settings ....................................................................... 19
Step 8. Create Plans ......................................................................................... 20
Step 9. Create Billing Periods ............................................................................ 21
Step 10. Configure Support Center ................................................................... 21
Step 11. Look and Feel ..................................................................................... 22
C H A P T E R 3
Introduction
provide a heterogeneous operating system environment to your customers across
multiple servers. It can manage hosting servers located in various data centers.
Parallels H-Sphere can have a multiple server layout, called a cluster. The main server
in the cluster is the actual Parallels H-Sphere Control Panel, a web application with
graphical interface, which centralizes all hosting management tasks, controls all hosting
servers and services, manages users, domains, events, and processes. Through
Parallels H-Sphere web interface, you can configure and manage these and other
subsystems, other servers, user accounts and domains, etc. All system data, such as
billing, domain, and other info, is stored in the Postgres system database. The Control
panel consists of many subsystems, the major of them described below.
Page 15

Getting Started
To switch to Reseller Billing CP:
To switch to Reseller Admin CP:
This document explains what you need to do in order to set up your hosting system with
minimum required configuration. We presume that your reseller account has been created.
Follow the given instructions step by step to configure your Reseller CP.
Step 1. Access Your Reseller Account
Parallels H-Sphere offers simplified reseller concept which means more convenient way to
work with both the Reseller User account (hereinafter referred to as Reseller Billing) and the
Reseller Master Admin account which is now created automatically once reseller account is
created. Each of the above accounts has its own CP design.
The new approach allows resellers to switch between accounts easily without having to log
out/into accounts as if they worked with one CP. Both Reseller Admin and Reseller Billing
interfaces are provided with respective links (menu items) to switch between reseller billing
account and reseller admin account CP's. They will open in one and the same window.
Second way to access Reseller Admin CP is to log into your Reseller Admin CP from
Reseller Billing interface. In this case, however, Reseller Admin CP will open in the new
window.
Page 16

There's also a third way to access Reseller Admin Section: via Reseller CP URL which can
contain either Reseller CP alias or registered domain name. Enter URL into the address bar
and when the login page is loaded, enter Reseller User (billing account) login and password.
Parallels H-Sphere will send you to the Reseller Admin CP. However, we don't recommend
doing so for privacy/security reasons. Reseller can have several Admin accounts but only
one Reseller Master Admin Account. According to that, switching between the Reseller Billing
and Reseller Admin is possible only via Reseller Master Admin. Minor Admin accounts can't
find and log into the Master Admin Account, therefore switching panels is security safe.
Step 2. Create a DNS Zone
Now that you have entered the admin account, you need to setup your DNS:
1. Go to DNS Manager -> E. Manager > Add DNS Zone.
2. Enter all necessary information on the page that appears, where:
Name: the name of your domain without the "www" part.
Admin e-mail: your e-mail address with ' .' instead of '@'
Allow third level domain hosting: check this box to let your customers register domains
like customerdomain.yourdomain.com.
Master server and slave 1: Leave as is.
3. Click Submit.
Step 3. Create an Instant Alias Template
The instant alias template is required to generate instant aliases. They provide immediate
access to your customers' sites while DNS servers get updated.
To create an Instant Alias Template in your admin account control panel:
1. Select DNS Manager in the E. Manager menu.
2. Choose DNS zone and click the Edit icon under the Action field.
3. At the top of the page that shows, click the Add instant alias link.
4. In the form that appears, enter "u" or any other letter for prefix and leave the
shared IP tag value as it is. Click Submit.
5. You will now need to go to your domain registrar and create the name
servers that are associated with your domain name. Use the IP numbers that
were assigned to the name servers.
Page 17

Step 4. Add Server Aliases
If you, as a reseller, don't need your own DNS servers, skip this step.
Server alias is your own name for the parent host. Once you set up the server alias, it will
appear everywhere in place of the real server name. In other words, the parent host will
become totally transparent to the end customers, and you will look to them as a totally
independent hosting provider.
To add server aliases:
1. Select Server Aliases in the E. Manager menu.
2. Set your server aliases for each host in the Reseller`s DNS server aliases section
and click Submit. These server aliases must be registered with your domain
name registrar. Note: Name servers and the corresponding IP's for each of
them will show in Reseller`s DNS server aliases section.
3. Set your server aliases for each host in the Other reseller's server aliases section
and click Submit. These server aliases must be registered with any registrar.
Note: until your name servers are registered by an accredited registrar, they
will never be recognized by servers across the Internet and none of your
reseller domains will work. It usually takes about 2 to 4 days before these
name servers become active across the Internet.
Step 5. Change Temporary CP Alias to Your
Own Reseller CP URL
Once the system configuration is completed, the reseller CP can be accessed by the instant
reseller CP domain alias.
To change this temporary CP alias to your own Rreseller CP URL:
1. Switch to Reseller User panel
2. Go to Info - > Admin Settings and change Reseller CP URL:
Page 18

Set the protocol: http for regular or https for SSL secured
Enter the new domain name with cp at the beginning. (e.g.: cp.example.com).
Leave the the port number as is - it must be the same as that of the parent hosting
company.
3. Click Change.
As a result, the URL of the control panel will be similar to http://cp.example.com:8080
Step 6. Configure Mail Notification Addresses
To subscribe your staff to receive copies of user e-mail notifications:
1. Go to the Settings menu - > Notifications - > Notification Recipients.
2. On the page that appears add subscribers to mailing lists you choose.
Page 19

Step 7. Set up Payment Settings
On this step you can configure Parallels H-Sphere to process credit cards, accept check
payments and perform online web payments for the services you provide.
To configure credit card processing through Merchant Gateway Manager:
1. Go to the Settings menu ->Payment Settings -> CC Brands and add necessary CC
brands.
2. Go to the Settings menu ->Payment Settings -> Merchant Gateway and add
necessary merchant gateway from the drop down menu and click Add.
3. In the Set Active drop down box, select this merchant gateway. You can have
only one active merchant gateway at a time.
4. In the Payment Type drop down box, select the CC brand you would like to
process with this merchant gateway.
5. Click the Activate button.
To configure Web Payment Processor, like PayPal or 2CheckOut:
1. Go to the Settings menu ->Payment Settings -> Merchant Gateway.
2. Select the payment system from the drop-down menu and click Edit:
3. Enter your account settings. Once you enter correct settings, the web
payment system will appear in the list as Active
To configure Processing Check Payments:
1. Go to the Settings menu ->Payment Settings -> Merchant Gateway.
2. Enable Accept Checks.
Page 20

Step 8. Create Plans
Create Hosting Plans
Now that your control panel is configured, you can create hosting plans.
1. Go to Plans -> Create and click Select next to the plan to start the wizard.
2. Enter the name of the plan at the top of the page.
3. Select the resources (features) you would like to include in the plan. Make
sure to leave Service Domain unchecked.
4. In the last section of the wizard, make sure to enter Credit limit, e.g. 10 and
click Next to proceed.
5. Enter prices and free units for each type of resource and click the Create
button at the bottom of the page.
6. Go to Plans -> Manage and turn this plan ON for signups.
Now your control panel is ready for signing up users. Please read all documentation before
using Parallels H-Sphere as a production system.
Create a System Plan and Account For Your Corporate
Domain
This step is required to host your corporate promotion site with your hosting system.
1. Go to Plans -> Create menu and select a Unix or Windows plan wizard
2. On Step 1, set the plan name to System and include resources you want to
use with your site.
3. Make sure to check Service domain and in the Settings section set Billing Type to
Without billing.
4. Submit and complete the wizard.
5. Go to Plans -> Manage and click Access for the System plan and make sure only
Admin is checked.
6. Go to Signup menu and create System account using the Signup Wizard
Note: Your system account is treated as an ordinary end customer account. You'll be
charged for all resources used in this account.
Page 21

Step 9. Create Billing Periods
Each plan can have several billing periods with different price discounts for each. You can't
delete billing periods, but you can change their duration. For instance, if you create a billing
period for 1 year and you find out you don't need it, you can change it to 3 months.
To create a billing period for a plan:
1. Go to Plans -> Manage and click Settings in the Advanced section.
2. Scroll down to the Payment Intervals and click Add.
3. Specify the duration of the billing period. For instance, to make it 3 months
long, select MONTH and enter 3 in the Size box.
4. Optionally, enter discounts. For instance, if you want to cancel any setup fee
for this billing period, enter 100 in the Setup Discount field.
5. Click Submit. This will add the billing period to the list.
Step 10. Configure Support Center
Support Center is the web-based means of providing customer support.
To configure your Support Center:
1. Go to Plans -> Create menu and choose Administrator Plan Wizard.
2. Enter TechSupport Admin as the name of the plan, check to include TroubleTicket
Admin and Allow assignment of trouble tickets and submit.
3. Go to Plans -> Manage and turn this plan ON for signups.
4. Go to Signup menu, click to sign up for Tech Support Admin and create Tech
Support Admin account using the signup wizard.
5. Go to Settings - > Tech Support and configure your Support Center. It is
required to collect customers' e-mails and convert them into trouble tickets.
Page 22

Step 11. Look and Feel
Go to Settings -> Look and Feel menu and enter information to all necessary sections. These
settings will affect all your customers' control panels.
Corporate Logos : enter Banner HTML Code for the banner to show up in your users CPs
and the location and sizes of the logos. Click the help [ ? ] icon for details.
Company Info: enter the company info that will show in customer e-mail notifications and
the address will be used by customers to send checks.
Default language: choose CP interface language. It can be overridden by individual
customers.
Regional options: enter preferred currency symbol.The language and the regional settings
will affect all your customers' control panels.
Default CP design: set designs to be available by users and the default design for Users
CPs.
Page 23

This chapter discusses the configuration steps required for your DNS.
In this chapter:
DNS Manager ................................................................................................... 24
Adding DNS Zones ............................................................................................ 24
Instant Alias Templates ..................................................................................... 26
DNS Records .................................................................................................... 29
Hosting Your Corporate Site .............................................................................. 33
Adding Domains for Third Level Hosting ........................................................... 34
Providing Mail Under Service Domain for Third-Level Hosting ........................... 35
C H A P T E R 4
DNS and Hosting
Page 24

24 DNS and Hosting
DNS Manager
DNS Manager in the Admin panel is used to create and manage:
service DNS zones - to host your corporate site and provide third level domain
hosting.
instant alias templates - to provide immediate access to users' newly registered
domains until their domain's DNS hasn't been propagated.
DNS records - to manage servers external to Parallels H-Sphere with Parallels H-
Sphere DNS.
It's not intended to work with your user domains' dns.
Adding DNS Zones
You must have at least one DNS zone in your system. Before you start adding a DNS
zone, make sure to have added the DNS servers with Service IPs.
To add a DNS zone:
1. Select DNS Manager in the E.Manager menu:
2. Click the Add DNS Zone link:
Page 25

DNS and Hosting 25
3. Enter zone name and zone administrator e-mail and choose whether to
allow third level domain hosting in this zone:
Name: the name of the DNS zone you are going to create. If this domain name is
not yet registered, don't forget to register it with a domain registration company.
Admin e-mail: the e-mail address of this DNS zone administrator.
Allow third level domain hosting: allow the creation of lower level domains in this
DNS zone.
Master/slave server: available only for service DNS zones - allows you to choose
and appoint a master and a slave server. The information is backed up every
hour.
4. After you submit the form, the new zone appears in the DNS Manager
table:
Page 26

26 DNS and Hosting
5. Click the EDIT icon to go to the DNS zone management page. Here you
In this section:
Adding Instant Alias Templates ......................................................................... 27
Editing Instant Alias Templates ................................................................ ......... 28
can add instant alias templates, custom DNS records and Reseller CP
alias to your DNS zone:
Instant Alias Templates
Instant Alias Templates are used to generate Instant Aliases, temporary addresses
providing immediate access to users' domains from the Internet. They are usually
helpful when the DNS servers worldwide are being refreshed and the site is temporarily
unavailable at the regular domain name.
Creating an instant alias template will automatically add one or more A-DNS records to
your service zone. These records resolve all your logical servers.
Page 27
DNS and Hosting 27
Adding Instant Alias Templates
To add instant alias:
1. Select DNS Manager in the E.Manager menu.
2. Click the EDIT icon to go to the DNS zone management page. The
following page appears:
Page 28

28 DNS and Hosting
3. To add an instant alias template, click the Add instant alias link. This will
open the following form to fill out:
Prefix: instant alias prefix that will appear on the left to the domain part in user's
instant domain alias. Different prefixes should be set if you use different shared
IP tags. Other than that, it is recommended to use one and the same prefix (e.g.
u for all instant alias templates).
Shared IP tag: a digital "mark" that helps separate sites within one plan on one
logical server. All sites located on the same logical host under the same plan are
usually assigned to the same shared IP. This feature allows to give a different
shared IP to a group of sites of, say, explicit nature. This may become
necessary as many corporate firewalls filter sites based on their IP, not the
domain name.
Normally, you are expected to have devoted one IP address for each shared IP
tag. To use a shared IP tag, you need to have it defined for every logical host.
Numbers 10 to 99 are acceptable. The default value of 2 is assigned when the
field is submitted being empty.
4. Click Submit. You will be taken back to the list of instant aliases with the
new instant alias template added to the list.
Editing Instant Alias Templates
Once an Instant Alias is created, the system adds all necessary A DNS records to this
DNS zone.
To view these DNS records, cilck the Edit button near the necessary Instant Aliases:
Page 29

DNS and Hosting 29
The upper part of the table lists the existing DNS A records in the selected DNS zone.
To delete DNS records, click the Trash icon.
The lower part of the table appears only when the DNS zone does not contain A
records for some logical servers. It lists these logical servers with their IP's.
To add a logical server to the DNS zone, click the Add button. You can add all these
servers to the DNS zone by clicking the Add records to all listed logical servers link at the
bottom of the table.
To delete Instant Alias Template, click the Trash icon next to the corresponding alias.
DNS Records
Custom DNS records are required to manage non-HSphere servers with Parallels HSphere DNS zone or to configure new logical servers that are added manually.
Depending on the service, you can add:
A records
MX records
CNAME records
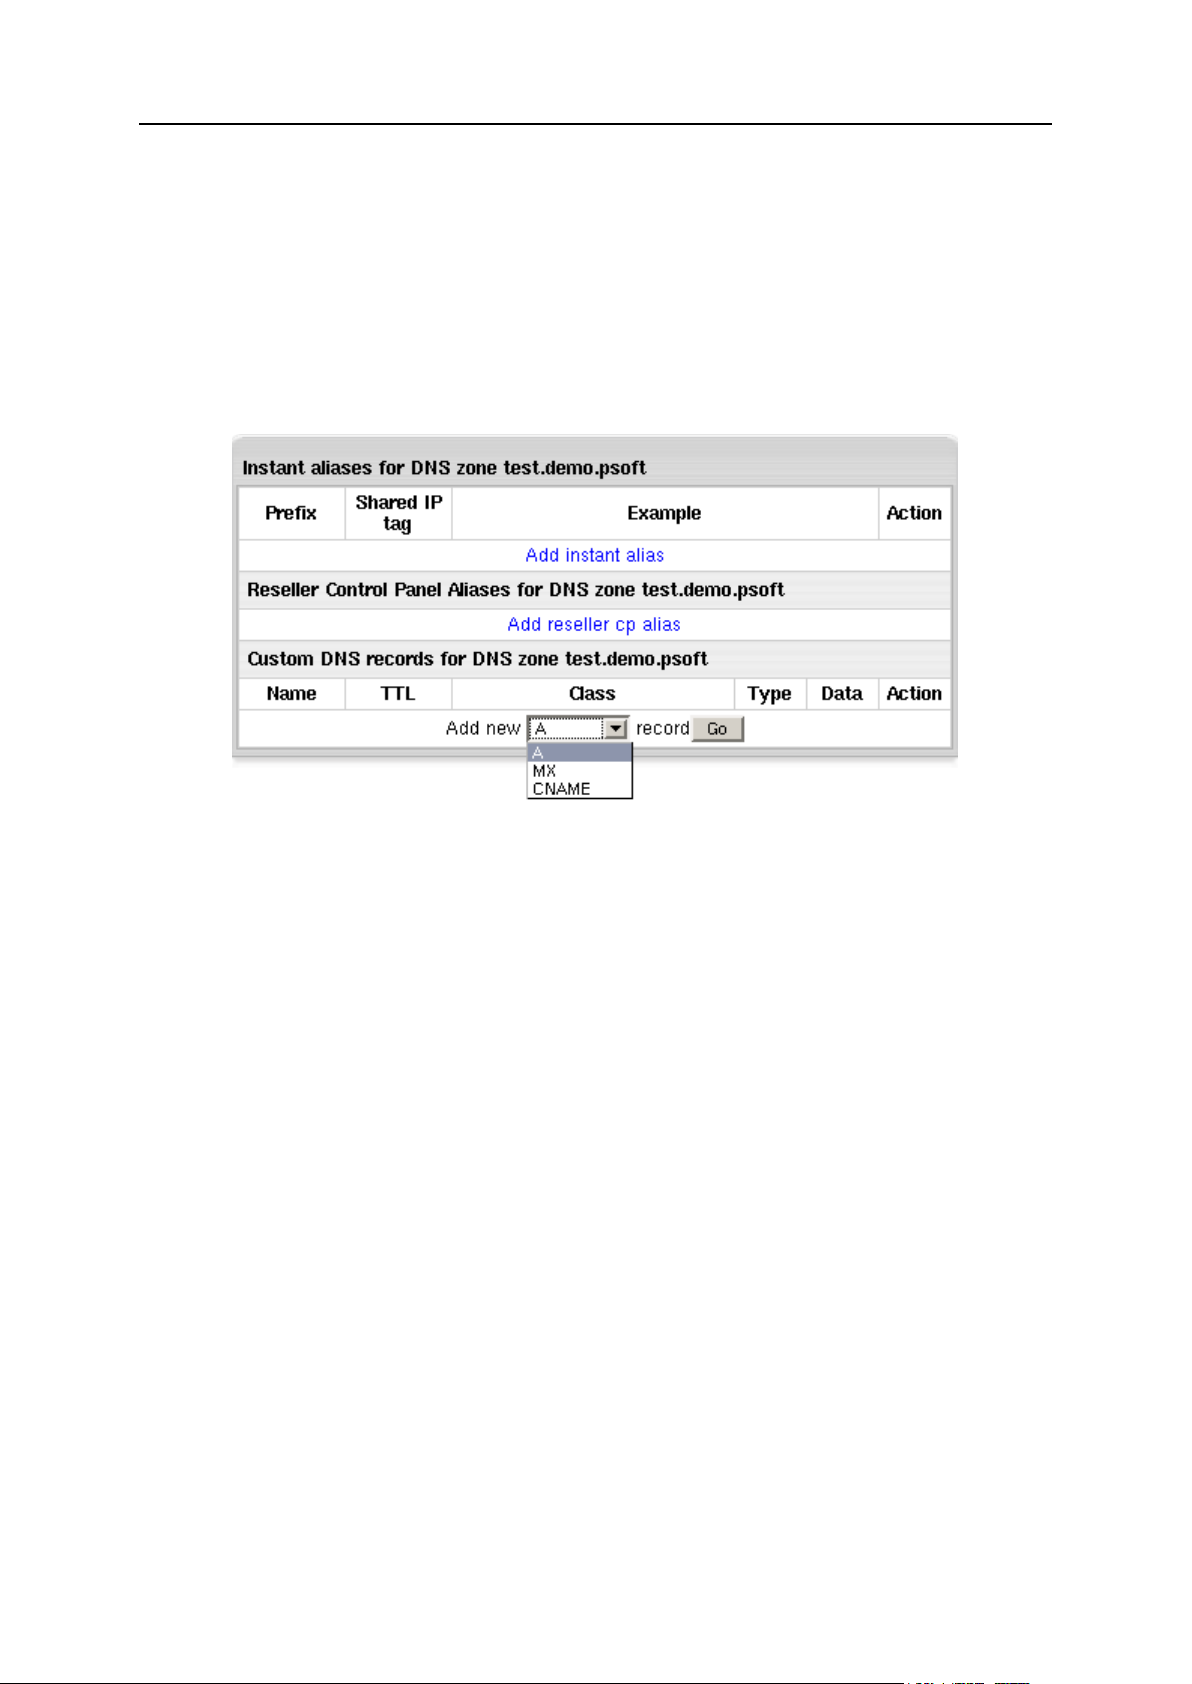
To add new custom DNS records:
1. In your admin control panel go to the E.Manager menu -> DNS Manager.
The following page shows:
Page 30

30 DNS and Hosting
2. Click the Edit icon near the chosen DNS zone. A page similar to this will
In this section:
Adding custom A records ................................................................................... 30
Adding custom MX records ................................................................................ 31
Adding custom CNAME records ........................................................................ 32
appear:
3. At the bottom of the page that shows, select a DNS record from the
drop-down list and click the Go button.
4. On the form that shows enter all necessary data and click Submit to
save.
You can add one of the following types of DNS records:
A records to map domain names and web server IP's.
MX records to map domain names and their mail server IP's.
5. CNAME records to map aliases with domain names.
Adding custom A records
The Address record (A record) gives you the IP address of a domain. That way, users
that try to go to www.example.com will get to the right IP address.
To add a new DNS A record, you need to provide a set of parameters:
Page 31

DNS and Hosting 31
Name: the string appended to the domain name to create a FQDN mapped to the
IP. For example, if your domain name is besthosting.com, entering cp will make
the fully qualified domain name cp.besthosting.com.
TTL (a Time To Live): seconds to elapse before the record is refreshed in the
provider's DNS cache.
Data: the IP address that fully qualified domain name will be mapped to. You can
get this IP address with any ping utility.
Adding custom MX records
A host name can have one or more Mail Exchange (MX) records. These records point
to hosts that accept mail messages on behalf of the host. Adding MX records is similar
to adding A records:
Page 32

32 DNS and Hosting
Name: your local domain name. If you leave the Name field blank, all mail will be
redirected for the base zone.
Data: the priority of the record and mail domain name (not the IP) mail will be
forwarded to.
Note: The priority of the custom MX record defines whether your external
servers will act as secondary or primary. For instance, if you set the priority of
the custom MX record higher than 10 (e.g. 11), your external mail server will be
used as secondary. If you set the priority of the custom MX record lower than 10
(e.g. 9), your external mail server will be used as primary. In the latter case, your
mail will be sent to your external mail server until it goes down or becomes
otherwise inaccessible. Then the default mail server will take over.
WARNING: Please pay attention to $ORIGIN when you add an MX record.
Adding custom CNAME records
The Canonical Name (CNAME) record allows a machine or host to be referenced by
more than one name. A CNAME can be used to define an alias host name. You can
also use aliases when a host changes its name.
If you have selected CNAME record, the following page appears:
In the case of CNAME records, the values have the same format as in the A record with
the exception of the Data field. In the Data field you have to enter the name of the server
to which you are creating the alias record.
WARNING: Please pay attention to $ORIGIN when you add a CNAME record.
The DNS records you create appear on the zone management page:
You can't edit DNS records. To remove unnecessary records, click the Trash icon
Page 33

DNS and Hosting 33
Hosting Your Corporate Site
This document explains how to host your corporate (promotional) web-site at the
service domain (the domain you are offering for third level hosing). For example, if you
are offering third level domains at example.com, such as thirdlevel.example.com or
userdomain.example.com, you need to have your corporate site available at
www.example.com.
To set up your corporate site:
Step 1. Make sure you have a service DNS zone
1. Select DNS Manager in the E.Manager menu.
2. If the DNS zone is not in the list, click Add DNS Zone.
3. On the page that appears, enter the service domain name and other
values and click Submit.
Step 2. Create a service plan
You may already have a service plan in your system. It can also be called 'System
plan'. If you don't, do the following:
1. Select Create in the Plans menu:
2. Click the Select icon for Unix plan wizard:
Page 34

34 DNS and Hosting
3. On the fist step of the Unix Plan Creation Wizard, set the plan name to
System or Service.
4. Check the Include boxes next to the resources you would like to use with
your site.
5. Make sure to check Service domain.
6. Scroll down to the the Settings section and set Billing Type to Without billing.
7. Click the Next button to go to Step 2.
8. Complete the wizard.
Step 3. Disallow signups from outside your admin
account.
After you have created the system plan, you need to make sure that it is not used by
your customers:
1. Select Manage in the Plans menu.
2. Click Access for the system plan.
3. Make sure only Admin is checked.
4. Select Manage in the Plans menu.
5. Enable the System plan by clicking the ON/OFF button.
Step 4. Create a service account
Now you can create an account for your service domain:
1. Select the Signup menu.
2. Click Select next to the recently created System plan.
3. Select service plan signup wizard.
4. Create service account using the wizard. When prompted the type of
the domain, select Service domain.
NOTE: Your service account is treated as an ordinary end customer account. You'll be
charged for all resources used in this account.
Adding Domains for Third Level Hosting
Page 35

DNS and Hosting 35
Third level domains are created based on second level domains and have same
features as second level domains. Customers can use your service domain to create
third level domains of their own. For instance, if your second level domain is
example.com, your customers can create domains like
illustrative.example.com.
Third level domains are registered on your DNS server and need no domain
registration company to be registered.
To add a domain for third level hosting, you need to create a DNS zone (on page 24)
and allow third level hosting in the zone settings.
Third level domain registration will be available for your users only if you allow it in the
plans.
Providing Mail Under Service Domain for
Third-Level Hosting
In Parallels H-Sphere it is possible to allow third-level domain hosters to create e-mail
resources under their service domains. I.e., users that host third-level domains
user.domain.com under service DNS zone domain.com, will be able to create
mailboxes like anything@domain.com from their user CP.
To allow third-level hosters to create mailboxes under a service domain:
1. Choose Manage in the Plans menu and check the Third level domain (Mail
Under Host Domain) option for a plan:
2. Choose DNS Manager in the Settings menu and click the Off icon to enable
the Allow creating emails under Service Zone option for a particular service
domain:
Then, if you search by domain name in the Search menu, affected third-level domains
will have the domain type Third level domain (Mail Under Host Domain).
Page 36

This chapter provides you information on Control Panel web interface settings.
In this chapter:
Regional Settings .............................................................................................. 37
Images and Icons .............................................................................................. 40
Interface Language ........................................................................................... 43
Skins and Colors ............................................................................................... 44
Interface Texts .................................................................................................. 46
C H A P T E R 5
Control Panel Web Interface
Page 37

Control Panel Web Interface 37
Regional Settings
This document explains how to change the default currency settings and date
representation. The defaults are set when you change the default language. Custom
settings are kept until you switch to another default language.
To set custom regional settings:
1. Select Regional Options in Look and Feel under the Settings menu.
2. On the page that appears, enter preferred locale settings:
Page 38

38 Control Panel Web Interface
Currency symbol used in your country that you want to show in prices, invoices
etc.
Corresponding International currency symbol which is an international string
denoting the local currency.
Decimal Monetary Separator, a character used to format decimal numbers.
Grouping Separator, a grouping character used to separate thousands, e.g:
100,000,000.
Note: It's commonly used for thousands, but in some countries it separates tenthousands.
Currency pattern that shows how your monetary amount will look like. Refer to
Comments regarding currency pattern for details. For example, the European
currency pattern will look as follows: # ¤,##0.00;-# ¤,##0.00 (in some countries
negative subpatterns are put into brackets: # ¤,##0.00;(# ¤,##0.00)) Another
example for pattern: #,##0.##: for 3456.00 -> 3,456 although #,0#0.00: for
3,456.00 -> 3,456.00.
Appearance Samples displays monetary amounts the way they will show in the
system after you change the pattern.
Short, medium, long and full date formats represent dates in your control panel.
This feature is not yet implemented, though reserved for future versions.
Regional options page has also information about Day and Time Patterns:
Page 39

Control Panel Web Interface 39
Pattern letters are usually repeated, as their number determines the exact
Presentation:
Text: For formatting, if the number of pattern letters is 4 or more, the full form is
used. Otherwise a short or abbreviated form is used if available. For parsing,
both forms are accepted, independent of the number of pattern letters.
Number: For formatting, the number of pattern letters is the minimum number of
digits, and shorter numbers are zero-padded to this amount. For parsing, the
number of pattern letters is ignored unless it's needed to separate two adjacent
fields.
Year: For formatting, if the number of pattern letters is 2, the year is truncated to
2 digits; otherwise it is interpreted as a number.
Month: If the number of pattern letters is 3 or more, the month is interpreted as
text; otherwise, it is interpreted as a number.
General time zone: Time zones are interpreted as text if they have names.
RFC 822 time zone: For formatting, the RFC 822 4-digit time zone format is used.
3. Click Submit and take a look at the values in the Appearance samples box to
see how your changes will affect monetary amounts throughout the
control panel.
Page 40

40 Control Panel Web Interface
Images and Icons
Here you will learn how to change logo images and icons and control images in your
control panel. These settings will affect control panels of your end users.
Logo Images
Logo images are the images that reflect your corporate identity. To go to the logo
images page, select Corporate Logo in Look And Feel under the Settings menu.
Page 41

Control Panel Web Interface 41
Where:
Control Panel Agent: enter the name you want to see as page title of the Control
Panel interface instead of H-SPHERE.
This feature can be unavailable if you modify login.html, top.html or other service
templates.
Show Copyright: toggle the button to show/hide the copyright notice in the top left
corner of the window above the logo both in admin and user control panels.
Banner HTML Code: enter the HTML code for the banner you want to show up both in
admin and your users control panels.
E.g.:<a href="http://www.destination_company.com/cgi-bin/blah-
blah.cgi" target="blah-bhlah"> <img
src="http://www.domain.com/images//banner.gif" width=468
height=60></a>
Tip: it might be just an image, for example, your logo.
Logo Image URL: enter the URL address of the image to show up in the top left
corner of the window.
E.g.: http://www.domain.com/images/logo.gif
Signup Image URL: enter the URL address of the image to show up in the left top
corner of the windows for plan signup forms.
E.g.: http://www.domain.com/images/signup.gif
Login Image URL: enter the URL address of the image to show up on the logging
page on the right.
E.g.: http://www.domain.com/images/login.gif
Important: Your own custom images added to the Parallels H-Sphere interface can be
lost with the new release update even if you put them into the
/hsphere/local/home/cpanel/shiva/shiva-templates/IMAGES/ directory.
We recommend you to back up your custom images before each Parallels H-Sphere
upgrade.
Icons And Control Images
Icons are the images that take you to certain sections of Parallels H-Sphere interface.
They can be found on the home page of the No Menu skin and on the Quick Access page
of the Left Menu skin.
Control Images are the images that you click to perform certain actions, for example
Add, Edit, Delete.
To change default icons and control images:
1. Select Design Settings in the Look and Feel menu.
2. Ask your parent host to send you the default control panel images.
Create "IMAGES" directory and put the received images into it. Place
the directory with the images to a custom location.Replace the images
you want to change. New images must have the same sizes as the
defaults.
Page 42

42 Control Panel Web Interface
3. Replace the images you want to change. New images must have the
same sizes as the defaults.
4. Go to Look and Feel -> Design Settings and click Change at the bottom of
page.
5. In the Base Image Directory field, enter the path to the IMAGES directory:
This must be either a fully qualified URL of your host, for example
http://cp.mydomain.com:8080/BASE_IMAGE_DIRECTORY/ or a directory
path relative to the CP Web Server Document Root
(/hsphere/local/home/cpanel/shiva/shiva-templates/) if your parent
host put your images there.
The path must not include the IMAGES directory. For instance, if your images sit in
http://www.example.com/hsphere/IMAGES/, enter the path
http://www.example.com/hsphere/. Image directory path configuration is
explained in the Skin and Icon Set Customization document in Customization
Guide.
If you made a mistake and your images do not show, just clear the Base Image Directory
field, and click Submit. The original path will be restored.
Page 43

Control Panel Web Interface 43
Interface Language
You can set both default system language and admin interface language.
Setting Default System Language
Default language is the language of newly created accounts, including navigation
menu, form and control labels, context help, and system messages. However, every
user can override the default language with one of those available in the user control
panel.
Currently Parallels H-Sphere comes with the following languages: English, Russian,
Italian, French, Spanish, Dutch, German and Portuguese. You can also add new
languages by installing language packages from
http://download.hsphere.parallels.com/downloads/index.html#languages, compiling
new language bundles, or bulding new language packages. See Customization Guide
for the info.
Default language affects the default regional settings. You can set custom currency or
currency pattern, but mind that they will be lost once you change to another language.
To change the default language:
1. Go to Default Language in Look and Feel under the Settings menu.
2. Select language from the drop-down box.
3. Click Submit to save changes.
4. Proceed to Regional Settings (on page 37) configuration.
Setting Admin Interface Language
Unlike the language described above, which by default is set in all resellers' and users'
cp, the language configured from Admin User menu relates only to your admin control
panel, including reseller and user accounts which you access from it.
To change admin interface language:
1. Go to Language in the Admin User menu.
2. Select language from the drop-down box.
3. Click Submit to save changes.
Page 44

44 Control Panel Web Interface
Important: Now, when you visit accounts of your resellers and end users from your cp
browser, they will appear for you in the language you just set. However, original
language chosen by owners of these accounts will remain unchanged.
Skins and Colors
This document explains how to configure default design settings such as skins and
color schemes for admin and users' control panels. Changing Look& Feel in your admin
control panel will affect all end users in your Parallels H-Sphere system.
To change the Look& Feel of the control panel:
1. Select Design Settings from Look and Feel under the Settings menu.
2. On the page that appears select the default skin from the Choose Design
box.
3. Click the Modify button.
4. On the page that appears, change the design settings:
Users can choose this design: this option determines whether this design becomes
available to your end users.
If none of the designs is enabled, Parallels H-Sphere sets Left Menu design as
default.
New users will get this design as default: enabling this option will change default
design for your end-users and switch it off for all other designs;
Choose another design: select another design to modify.
Note: XPressia Lite is specially designed to be used if your browser works slowly
with XPressia.
5. Change control panel color and image set in the Color Scheme Setting
section.
Page 45

Control Panel Web Interface 45
Important: You can change the color scheme, image set and icon set for Left
Menu skin, whereas for Text Based and No Menu skins only Icon Set can be
changed.
Color Scheme: select a color scheme and click Apply.
Image Set: select another image set and click Set. Image Set standards can't be
customized.
Default Icon Set for User: select the icon set that will be default for your end users
and click Set.
6. Create your own custom color scheme by changing default color
schemes.
Click Preview Window to see how your settings will effect users' control panel.
Click Reset to return to default color scheme.
Click Save to save your custom color scheme settings. It will appear in the Color
Scheme drop-down box.
If you don't save Custom Color Settings and return to one of the four standard, all
your custom configuration will be lost.
Page 46

46 Control Panel Web Interface
Interface Texts
Here you will learn how to edit interface texts including:
LOGIN TEXTS: the texts that show on the Parallels H-Sphere login page
SIGNUP TEXTS: the texts that show in the signup wizard
MISCELLANEOUS TEXTS: Checks info, customer support info, and other texts
To edit interface texts, select Look and Feel under the Settings menu.
Login Texts
You can change the following texts displayed on the Parallels H-Sphere login page:
Welcome message: the message on the top of the page. You can enter it in text or
HTML format.
Welcome text: the text under the welcome message also can be entered in text or
HTML format.
Welcome Services: describe the services provided by Parallels H-Sphere or enter any
other welcome text.
To change interface login texts, enter your own text into the input box and click Save.
Signup Texts
Texts that appear on every page of the signup wizard and describe Parallels H-Sphere
features and benefits. The title of the input box shows as the title of the signup text on
the signup pages. If you leave the boxes empty, the system will use the default
Parallels H-Sphere signup texts.
To change signup texts, enter your own text into the input box and click Save.
Miscellaneous Texts
Customer Support info shows in the tooltip area when an action fails to execute with
an error message written to the log and e-mailed to the support e-mail address.
Also, this text shows in some customer email notifications after the sentence "If you
have any questions, please contact us at:"
Checks Info is very important for check users and if not entered, your check users
won't be able to pay for the resources.
It appears:
- in signup wizard ("Send your checks to"),
- in check invoice notifications,
- in check approaching resources limit notifications, etc.
Privacy Statement is reserved for future implementation.
Sales Info shows on the signup pages.
Page 47

Control Panel Web Interface 47
To change these texts, enter your own text into the input box and click Save.
Page 48

Parallels H-Sphere provides E-Mail Notifications feature. Please see this chapter for
In this chapter:
Setting E-Mail Notification Recipients ................................................................ 49
Editing E-Mail Notifications ................................................................................ 50
Configuring User Notification Rules ................................ ................................... 55
C H A P T E R 6
E-Mail Notifications
details.
Page 49

E-Mail Notifications 49
Setting E-Mail Notification Recipients
Parallels H-Sphere allows you to configure e-mail addresses where copies (the BCC:
field) of e-mail notifications - such as, welcome messages to customers upon their
signup, billing letters, confirmations of domain registration - will be sent to. Also, you
can add e-mail addresses to receive copies of trouble tickets and system notifications
about critical errors, etc. Mostly, this option is provided to enable various departments
of your company to track and resolve specific issues.
To subscribe e-mail addresses to receive notification copies:
1. Go to the Settings menu - > Notifications - > Notification Recipients.
2. On the page that appears add subscribers to mailing lists you choose.
System e-mail messages are grouped according to their specific tasks. These
messages are configured in the Settings -> Notifications -> E-Mail Notifications menu.
Please refer to Editing E-Mail Notifications for details.
Page 50

50 E-Mail Notifications
Editing E-Mail Notifications
Master admin and resellers can edit e-mail notifications directly from Parallels HSphere control panel.
In previous versions, system emails were stored ONLY in system e-mail templates and
could be edited only by master admin. Now system emails are stored in the Parallels HSphere database and can be modified in the admin CP for each of interface languages
provided in Parallels H-Sphere.
To customize system emails in CP:
1. In the admin interface, choose E-Mail Notifications under the Settings menu:
You will see the list of system e-mail notifications sent from the address entered as
your company information. These notifications are grouped by categories:
Page 51

E-Mail Notifications 51
2. You can enable or disable sending copies (the BCC: field) of particular
notifications to e-mail addresses in e-mail notification groups in the
Settings->Notification Recipients menu. Sending copies is by default enabled
for all notifications within a group.
Checkboxes in the CC column to the left of the notification name indicate if sending
BCCs is enabled or disabled. You cannot enable or disable sending BCCs directly
in the list of notifications. To do this, you should open a notification for edition and
check/uncheck this option at the bottom of the page that appears:
After that, the CC indicator will be changed in the list:
Page 52

52 E-Mail Notifications
3. To edit a custom email message, click on the notification name in the
list or on the Configure icon to the right of the notification name. You
will see the page containing two parts:
1) Preview: message preview as generated from the message template code:
NOTE: Variable message fields such as user's first and last name or user login are
replaced in Preview by the Parallels H-Sphere intuitively understandable "pseudo
texts": FirstName, LastName, USER.LOGIN, and the like.
Page 53

E-Mail Notifications 53
2) Edit Form: contains the subject title and the dynamically generated message
body:
Send the message as: setting the message's content type, the format in which the
message would be sent (in plain text or in HTML format).
Default message for all languages: this allows to make a custom email message
default for those of the languages listed below that have this option ticked. If you
do not want this message to be default for any of the languages, uncheck this
option for that specific language.
Send CC: check/uncheck this box to enable/disable sending copies (BCC:) of this
particular message to e-mail addresses specified for this notification group in the
Settings->Notification Recipients menu. This box is checked by default.
On the bottom of the form there is the language panel with all interface languages
available in Parallels H-Sphere. Click to choose the language you wish to modify
the message for.
4. Click Save to apply changes.
Page 54

54 E-Mail Notifications
If you change the message code correctly, you will get the note that changes have
been successfully saved (in the Parallels H-Sphere database), and you may see
these changes in the Preview Message.
Otherwise, you will receive an error, and changes won't apply:
IMPORTANT:
1. System email messages are generated from Freemarker code. To correctly
customize the code, you should be familiar with Freemarker commands and with
Parallels H-Sphere advanced customization and resources.
2. There is no need to customize lang texts represented in the code as
${lang.text_name} and set in the bundle files in the
/hsphere/local/home/cpanel/shiva//psoft/hsphere/lang/ default bundle
directory or in custom bundles directory. Instead, you could set the text directly for each
interface language here in the given form. For this, please make sure you uncheck the
The default message for all languages box when editing the message for each language.
3. Changes applied to the system emails through the given form are stored in the
system database and do not affect the .txt system email notification templates that are
located in the /hsphere/local/home/cpanel/shiva/shiva-
templates/common/mail. Moreover, you can restore the hardcoded system
notification from the template by pressing the Restore From Template button at the bottom
of the form.
We don't recommend customizing the default templates!
Page 55

E-Mail Notifications 55
Configuring User Notification Rules
When customers approach their traffic, summary disk usage limit or disk quota, they
get respective e-mail warnings.
To choose how closely to the limit these warnings will be issued:
1. Select User Warnings in the Settings -> Notifications menu.
2. Specify when users will be e-mailed. Choose if the accounts will be
suspended:
Page 56

56 E-Mail Notifications
Online Invoices
When creating plans with plan wizards, you choose whether you want Parallels HSphere to e-mail order confirmations to users right after they buy resources. If you
enable sending order confirmations, customers will receive them for every single bill
entry, e.g. overlimit traffic. Order confirmations are sent from the e-mail address
specified in the Look and Feel menu -> Company Info. If this feature is off, customers
will get no order confirmations, even at the end of the billing period.
To turn sending order confirmations on or off:
1. Start a plan edit wizard.
2. On the first step scroll down to the Settings section.
3. Check the E-mail order confirmation box.
4. Complete the wizard.
After signup, users can change this option in their accounts.
To turn sending order confirmations ON or OFF for all your customers
regardless of their current settings:
1. Select Other in the E.Manager menu.
2. Click ON or OFF in the E-mail order confirmations section:
Page 57

E-Mail Notifications 57
Forcing sending order confirmations on or off overrides current user settings. However
it doesn't prevent customers from switching this option back afterwards for their own
accounts.
"No Charge" Notifications
You can configure the system to send clients automatic "No Charges Made for Your
Account" notifications at the end of each billing period or month. To choose the rule,
select Billing Settings in the Settings menu:
For credit limit based billing, customers are notified if their balance does not exceed
credit limit. For anniversary based billing, they are notified if during given billing period
or month there were no billing operations (charges for purchases or exceeded monthly
resource limits).
Page 58

This chapter discusses the configuration steps required to set up and manage your
In this chapter:
Company Information ........................................................................................ 59
Supported TLD's ............................................................................................... 60
Provider's Shared SSL ...................................................................................... 61
Shared SSL Certificates Installation .................................................................. 62
Credit Card Brands ............................................................................................ 66
Domain Registrar Manager ............................................................................... 68
C H A P T E R 7
Control Panel Configuration
Parallels H-Sphere Control Panel.
Page 59

Control Panel Configuration 59
Company Information
The system holds your company's name, mailing address and other details that are
used across the control panel, including the letters e-mailed to the user. It's especially
important for Enom and OpenSRS - incorrect or no info may decline domain
registration.
To enter your company info:
1. Select Company Info in Look and Feel under the Settings menu.
2. Enter your corporate details:
Page 60

60 Control Panel Configuration
Owner's first and last name: enter your name.
Domain Registrar
TLD
OpenSRS
.com, .net, .org, .name, .info, .biz, .ca, .tv, .us, .co.uk, .de
Enom
.com, .net, .org, .us, .info, .biz, .tv, .ws, .nu, .bz, .cc, .ca, .cn, .com.cn,
.net.cn, .org.cn, .br.com, .cn.com, .de.com, .eu.com, .hu.com, .no.com,
.qc.com, .ru.com, .sa.com, .se.com, .uk.com, .us.com, .uy.com, .za.com,
.de, .in, .jp, .uk.net, .se.net, .tw, .co.uk, .org.uk
OnlineNIC
.com, .net, .org, .biz, .info, .us
RRPproxy
.com, .net, .org, .info, .biz, .ws, .cc, .bz, .nu, .ag, .tv, .us, .fm, .name, .la,
.cn, .tk, .tc, .vg, .ms, .gs, .pl, .jp, .sg, .tw, .ac, .am, .be
Ascionic
.co.hu, .co.pn, .com.my, .com.pa, .com.pe, .de, .dk, .hu, .in, .pn, .tm
Company, Adress, City, State, Country and Postal Code: enter your company's postal
address information.
Phone, Fax numbers of your company.
e-mail: Parallels H-Sphere will use this address to send user notifications, mass
mails, etc.
Hostmaster E-mail: your sysadmin e-mail address. Use a dot "." instead of "@" in
the e-mail address.
Website: enter your company website if any.
3. Click Save to preserve changes.
Don't forget to configure Misc. Texts as well.
Supported TLD's
This document outlines the Top Level Domains (TLD's) supported by domain registrars
in Parallels H-Sphere.
Page 61

Control Panel Configuration 61
Provider's Shared SSL
This document explains how to enable your parent host's shared SSL for use by your
end users.
1. Select Shared SSL Manager in the E.Manager menu:
That will list all your DNS zones that you can provide secure hosting on:
2. Turn on Shared SSL support for the secure DNS zone offered by your
parent host.
Now if your end users enable shared SSL on their third-level domains
registered on your main DNS zone, they will get additional access to
their domains through https protocol on your parent host dedicated dns
zone.
E.G.
http://domain.your_dns_zone.com
after enabling shared SSL will be accessed at
https://domain.inherited_secured_dns_zone.com
Page 62

62 Control Panel Configuration
Shared SSL Certificates Installation
Shared SSL certificates, also known as wildcard or server-wide certificates, are used to
service multiple third level domains.
Thawte determines a wildcard certificate as "a single certificate, with a wildcard
character in the domain name field. This allows the certificate to secure multiple hosts
within the same domain. For example, a certificate for ' *.domain.com ', could be used
for www.domain.com, www1.domain.com, www2.domain.com, in fact, any host in the
domain.com domain. When a client checks the host name in this certificate it uses a
shell expansion procedure to see if it matches."
According to VeriSign, a shared SSL certificate "enables Internet Service Providers
(ISPs) to provide SSL (Secure Sockets Layer) encryption and business authentication
to Web business customers, but without the need to issue unique digital certificates to
each hosted customer. The service offers ISPs the convenience and streamlined
management of a single specially licensed SSL digital certificate to share among
multiple hosted web sites".
Shared SSL certificates work only within one domain level. For example, if you get a
domain name for *.domain.com, it will work for www.domain.com and
subdomain.domain.com. But it won't work for www.subdomain.domain.com or
http://domain.com, and visitors' browsers will show a warning message: "The name on
the security certificate does not match the name of the site".
Parallels H-Sphere Shared SSL is based on shared IPs and wildcard SSL certificates
and is bound to a particular service DNS zone. Since different servers use different
shared IPs, Shared SSL is associated with a certain shared IP tag, which identifies
these IPs on each server. When you install a wildcard certificate, it is set up on all web
servers. Just make sure that shared IPs on the web servers have the same shared IP
tag.
Wildcard certificates can be purchased, for instance, at Comodo Ca.
The cost of a shared SSL certificate usually depends on the number of subdomains
that it covers and varies depending on the certificate authority.
Important: when obtaining SSL certificate, make sure it is generated for Apache
regardless of whether you inted to install it on windows or unix box.
To install a shared SSL certificate:
1. Select Shared SSL Manager in the E.Manager menu:
Page 63

Control Panel Configuration 63
That will list all your DNS zones that you can provide secure hosting on:
2. Turn on Shared SSL support for your own DNS zone to install a shared
SSL certificate on your own DNS zone following the wizard (see below).
If you see your parent host's DNS zone, you may also enable shared
SSL on it for use by your end customers.
Shared SSL installation wizard
1. The window that appears on enabling Shared SSL support for your own
service DNS zone will give you two options:
Page 64

64 Control Panel Configuration
Page 65

Control Panel Configuration 65
Generate a temporary wildcard certificate by clicking the link at the top of the
window;
Enter your existent wildcard certificate by entering it in the form. When you click
the Submit button, the certificate will be installed.
If you have created a temporary wildcard certificate, you can request a permanent
wildcard certificate in the future from a trusted certificate authority. To install the
SSL certificate, click the Edit icon next to the domain name and enter the certificate
key and certificate file. Then click the Upload button.
Sometimes, you may have to use a Certificate Authority File provided with the
Certificate by your Certificate Authority (e.g. Comodo Ca, Geotrust, Equifax, etc.).
To use the Certificate Authority File, you have to add a line to the apache config of
each virtual host that uses shared SSL. Parallels H-Sphere can do this for you:
enter the file in the Certificate Authority File text box and click the Upload button.
Page 66

66 Control Panel Configuration
Note: If you are using more than one shared IP, each of them must have a unique
shared IP tag. You can't create more than one certificate on one shared IP tag.
2. Go to Plan Edit Wizard and enable Shared SSL. By doing this, you will
also automatically enable Third Level Domain Alias, Third Level DNS Zone,
Domain Alias A DNS Record.
3. If you have added a new web server and want it to be serviced with the
shared SSL certificate, click the Edit icon next to the domain name and
enter the certificate key and certificate file in the Install completely new
certificate key and file pair boxes. Then click the Upload button. This will
update the shared SSL certificate installation on all servers, including
the newly installed one.
Besides, you can create 'reseller dedicated' DNS zone domain, secure it with your
shared SSL and allow resellers to secure their end user third-level domains (registered
on this domain) with your own shared SSL.
Credit Card Brands
To add support for a credit card brand (vendor) that is not provided with
Parallels H-Sphere:
1. Find a credit card processing center that automatically processes
payments with this credit card brand.
2. Go to your admin control panel and select CC Brands in the Settings>Payment Settings menu.
Page 67

Control Panel Configuration 67
3. On the page that opens, enter the full name and the short name of the
custom credit card brand:
Page 68

68 Control Panel Configuration
Now you can associate your credit card with this merchant gateway in the merchant
gateway manager.
Domain Registrar Manager
Parallels H-Sphere comes with Domain Registrar Manager. It supports automatic
domain registration services with multiple domain registration providers. In order for you
to provide domain registration services, your hosting provider needs to set up a
connection with a supported domain registration provider. You can't create your own
connections. This document provides step-by-step instructions on how to set default
prices for the domain registration services you will offer.
IMPORTANT:
1. Before you start, make sure to have your company info carefully entered, as it will
be used as Billing and Tech info for registered domains. With your company info
incorrect or incomplete, end users may start encountering problems with domain
registration. Company Info is set on the Look&Feel -> Company Info page.
2. TLDs with asynchronous registration, such as .co.uk or .org.uk, .de, etc. can be
handled by admin only by OpenSRS.
3. TLDs that are not registered with supported registrars, such as .pt, or .jp should be
handled by admin with Email Domain Registrar (See Administrator Guide for details).
4. Parallels H-Sphere supports .US, .CA, .INFO, and .BIZ domains. Supported domain
registration providers require that registrant phone and fax numbers be entered in a
special format. Users registering .US and .CA domains are also asked for additional
information.
Phone/fax format depending on the country of residence:
- North America: NXX-NXX-XXXX/YYYY;
- Other countries: +CCC.ZZZZZZZZZZ/YYYY.
Here:
N is a digit from 2 to 9,
X any digit,
YYYY optional extension,
CCC country code,
ZZZZZZZZZZ phone/fax number inside the country.
Administrators/resellers should also change the format of phone and fax numbers in
their Company Info pages.
You can set different domain registration prices in different plans. However, you first
need to set default domain registration prices to be applied every time a plan-specific
price hasn't been specified.
1. Log into your admin CP.
2. Select Domain Registrar in the Settings menu.
3. Click Define Terms/Prices for the top level domain you'd like to configure.
4. Set the default prices for various periods:
Page 69

Control Panel Configuration 69
These are actual prices for the billing periods, they are not prorated to one year.
This means, you need to enter "15 30 45 60 75 90 105 120 135 150", not "15 15 15
15 15 15 15 15 15 15".
5. Repeat steps 3-4 for each TLD.
6. Now that you have entered default prices, set domain registration prices
for individual plans (on page 175).
Warning: If you don't set default or plan-specific prices, end users won't
be able to register domains from their control panels.
Page 70

In this chapter:
Merchant Gateway Manager ............................................................................. 71
AssureBuy Configuration ................................................................................... 75
Authorize.Net (Sim Protocol) Configuration ....................................................... 77
Bibit Configuration ............................................................................................. 80
Cardia Services Configuration ........................................................................... 81
ECHO Configuration .......................................................................................... 82
ePDQ Configuration .......................................................................................... 83
eWay Configuration ........................................................................................... 85
HSBC Configuration .......................................................................................... 86
Innovative Gateway Configuration ..................................................................... 87
LinkPoint (API v3.01) Configuration ................................................................... 88
MainStreetSoftWorks Configuration................................................................... 92
Moneris Configuration ....................................................................................... 94
NetBilling Configuration ..................................................................................... 96
NTPNow Configuration ...................................................................................... 98
Paradata Configuration...................................................................................... 100
PayGate Configuration ...................................................................................... 101
PayJunction Configuration ................................................................................. 103
Pay-Me-Now Configuration ............................................................................... 104
PosNet Configuration ........................................................................................ 105
Protx (VSP Direct Protocol 2.22) Configuration ................................................. 107
PSiGate (XML API) Configuration ..................................................................... 108
SecurePay Configuration ................................................................................... 110
SkipJack Configuration ...................................................................................... 111
SecurePay.com.au Configuration ...................................................................... 113
SecureTrading Configuration ............................................................................. 114
ThePayDesk Configuration ................................................................................ 116
Tucows Configuration ........................................................................................ 118
C H A P T E R 8
Merchant Gateways
This chapter provides information on how to configure Merchant Gateways in Parallels
H-Sphere.
Page 71

Merchant Gateways 71
Merchant Gateway Manager
In this section:
Setting Up Merchant Gateway ........................................................................... 72
Editing Merchant Gateway Settings ................................................................... 72
Associating Merchant Gateways with Credit Card Vendors ............................... 73
Editing Description for User Credit Card Statements ......................................... 73
Handling CC Charge Request Failures .............................................................. 74
One Step Gateways .......................................................................................... 75
Merchant Gateway Manager is a configurable Parallels H-Sphere add-on that allows
you to set up and alter merchant gateways, the media for conducting transactions with
online credit card processing centers. The software tracks gateway usage and provides
statistical information on the number of transactions and total charges for every
particular gateway.
Merchant Gateway Manager allows you to setup different merchant gateway accounts
for different types of credit cards (like VISA, MasterCard, Discover, American Express).
In this way you can maximize your profits by processing every type of credit card with
the gateway that offers the lowest rate for this type of card.
Before configuring a merchant gateway, register an account with a supported merchant
gateway.
Resellers can't use admin merchant gateway settings. They should register their own
accounts with chosen Merchant Gateways.
IMPORTANT!
New merchant gateways are integrated to Parallels H-Sphere by means of packages.
You can:
- download merchant gateway packages compiled by Positive Software
- build your own packages using Merchant Gateway SDK.
Page 72

72 Merchant Gateways
Setting Up Merchant Gateway
Once you have registered an account with a credit card processing center, you can set
up a merchant gateway to your Parallels H-Sphere configuration:
1. Go Settings -> Payment Settings -> Merchant Gateway.
2. The following page will appear:
3. If you need to test Parallels H-Sphere billing without making real
charges, select Dummy Gateway in the Add new gateway box and use it in
the subsequent configuration steps. To configure real gateways, see the
box Configuring Specific Gateways on the right for links to instructions.
Editing Merchant Gateway Settings
To edit the configuration of the merchant gateway:
1. In the Edit Gateway box choose necessary merchant gateway from the
drop-down box.
2. Click the Edit button. On the form that appears you can make necessary
changes.
3. Click the Submit Query button to save changes.
Page 73

Merchant Gateways 73
Associating Merchant Gateways with Credit Card
Vendors
Now that you have configured one or more merchant gateways, you need to associate
them with credit card vendors. You can have different credit card brands processed
with different processing centers. For example, you can configure Parallels H-Sphere to
process VISA and MASTERCARD with AuthorizeNet, and AMERICAN EXPRESS with CyberCash.
To set the associations:
1. In the Set Active field, choose the credit card brand and the processing
center it will be charged through.
2. Click the Activate button to create the association. Now your Merchant
Gateway Manager form should look similar to this:
Make sure to create associations for each credit card brand you would like to support.
Users won't be able to pay with the credit cards that haven't been associated with any
processing center.
Editing Description for User Credit Card Statements
Use this feature to let your customers know from their credit card statements what
charges are related to hosting with Parallels H-Sphere.
1. Select Merchant Gateway in the Settings menu.
2. Enter the description text in the Edit Description text box.
3. Click Submit Query.
Page 74

74 Merchant Gateways
Handling CC Charge Request Failures
Parallels H-Sphere handles rejected credit card transactions by setting the maximum
failed charge attempts and the retry interval. If a processing center rejects a CC charge
request, Parallels H-Sphere will:
1. debit the account;
2. notify the administrator by e-mail (end user isn't notified);
3. send this CC request again in the defined period of time;
4. disable any other paid operations with this CC until this period elapses.
With the first successful credit card transaction, the charge failure counter is reset.
To configure this behavior:
1. Select Merchant Gateway in the Settings menu.
2. Fill out the last two fields on the Merchant Gateway Manager page:
- Maximum allowed failed charge attempts for credit cards: restrict the number of CC charge
request failures.
- Retry interval after failed attempt to process CC (min): set the period (in minutes) to elapse
before the system resends the charge request. Until then, the system will disable any
transactions with this CC.
If charge failures reach the maximum number allowed, Parallels H-Sphere will mark
such credit card as nonchargeable until you reset the charge failure counter:
1. Select CC processing errors in the Reports menu;
2. Retrieve the needed account;
3. In the Controls column of the Search Results page, click the Reset icon for
this account.
Page 75

Merchant Gateways 75
One Step Gateways
To offer completely automated credit card processing, a merchant gateway must
support the following 4 types of transactions:
AUTHORIZE specifies that a transaction authorizes the credit card.
CHARGE specifies that a transaction charges amount without prior authorization.
CAPTURE specifies that a transaction is completed.
VOID specifies that a transaction cancels an amount.
Most credit card charges involve only the CHARGE transaction. An exception is domain
registration, which involves two steps:
1. Lock required amount on the credit card (AUTHORIZE) before domain registration
2.a. If domain registration succeeds, debit the locked amount to the credit card
(CAPTURE)
2.b. If domain registration fails, unlock the amount and cancel the initiated transaction
(VOID)
Some merchant gateways don't support CAPTURE or VOID transactions, requiring that
they be performed manually through a web interface. In case of domain registration,
you will receive email notifications requesting to complete or cancel a transaction every
time a user registers a domain name.
AssureBuy Configuration
Preparation
No preparation is needed before configuration.
Configuration
1. Select AssureBuy in the Add New Gateway box.
2. Click the Add button.
3. Fill out the form that appears:
Page 76

76 Merchant Gateways
Page 77

Merchant Gateways 77
Title: give a name to this AssureBuy connection
Server: the name of the AssureBuy server
Port: the port of the AssureBuy server
Path: the path to the server side handler file. This can be a script or a binary file
that is launched with an http request.
User ID: your AssureBuy User ID
AssureBuy Password: the password which comes with User ID
Currency: the currency in which your end users will be charged
AVS: AVS stands for Address Verification Service. It can be used as an
additional layer of protection for merchants who wish to verify that the purchaser
knows the billing address of the cardholder (in case these are two different
people). This is not a very serious form of risk mitigation or fraud prevention, and
yet it does give some assurance that a hacker isn't simply generating a list of
valid credit card numbers and purchasing product at will. AVS simply matches
the numeric portion of the cardholder's street billing address and the 5 or 9-digit
zip code of the cardholder's billing address. The AVS request parameters are
STREET and ZIP. The processing network verifies the AVS information,
comparing a portion of the billing address from the request message with
address data on file at the VIC or the issuer's center. Based on the comparison,
a response will be returned which confirms whether the information matches or
not. Banks do not decline transactions based on the AVS check. The AVS
response is returned as two single tab-delimited characters: YY, NN, YN, NY (Y'matches', N for 'does not match'). This information is just an advice. However,
the Parallels H-Sphere system will either allow or decline the transaction
depending on the selected AVS status. AVS is available only for US
cardholders.
Important: To provide non US cardholders CC processing, disable AVS check-
up in the merchant gateway configuration.
Test Mode box: with Test Mode checked, all transactions appear to be processed
as real transactions. The gateway accepts the transactions, but does not pass
them on to the financial institutions. Accordingly, all transactions will be
approved by the gateway when Test Mode is turned on.
4. Click Submit Query
CVV (Card Verification Value). To enable fraud protection using CVV, enable and
configure CVV support in your AssureBuy account. More on CVV credit card
verification.
Authorize.Net (Sim Protocol)
Configuration
Before proceeding, make sure to read about Web Payment Systems Manager.
Page 78

78 Merchant Gateways
In order to configure Authorize.Net, download and install the latest Authorize.Net.hsp
package: http://download.hsphere.parallels.com/downloads/index.html#web_payment.
(on page 122)
Setting Up Authorize.Net
Once you have registered an Authorize.Net business account, enable
Authorize.Net in your control panel:
1. Select Merchant Gateways in the Settings -> Payment Settings menu.
2. On the Merchant Configuration page, choose Authorize.Net from the drop-
down menu.
3. Click the Edit button to activate it.
4. Enter the required parameters in the Authorize.Net form:
Page 79

Merchant Gateways 79
Payment Server Address: the name of the server you will be redirected to for
payment operations
Payment Server Port of the Authorize.Net server
URL path to the server side handler file which can be a script or a binary file.
Login: API login ID for the payment gateway account obtained from the Merchant
Interface.
MD5 Hash Value: this security feature enables merchants to verify that the results
of a transaction received by their server were actually sent from the Payment
Gateway. This value should be configured in the Authorize.Net interface by the
users with the appropriate permissions will be able to access this setting. To set
the MD5 Hash Value in the Merchant Interface:
1. Select Settings from the Main Menu in the Merchant Interface
2. In the Security section click on MD5 Hash and enter the MD5 Hash Value
3. Confirm the MD5 Hash Value entered and click Submit to save changes
Transaction Key obtained from the Merchant Interface by users with the
appropriate permissions will be able to access this setting To obtain the
transaction key from the Merchant Interface;
1. Select Settings from the Main Menu in the Merchant Interface
2. In the Security section click on API Login ID and Transaction Key
3. Type in the answer to the secret question configured on setup and click
Submit
Check Activate to enable Authorize.Net for new signups and existing accounts.
5. Click Submit Query. Authorize.Net now must show as active.
Page 80

80 Merchant Gateways
Bibit Configuration
Preparation
No preparation is needed before configuration.
Configuration
1. Select Bibit in the Add New Gateway box.
2. Click the Add button.
3. Fill out the form that appears:
Title: give a name to this Bibit connection
Server: the name of the Bibit server
Port: the port of the Bibit server
Path: the path to the server side handler file. This can be a script or a binary file
that is launched with an http request.
Login: your Bibit login
Password: the password which comes with login/username
Merchant Code: your Bibit account ID
Currency: the currency in which your end users will be charged
4. Click Submit Query
Page 81

Merchant Gateways 81
Cardia Services Configuration
Preparation
To configure Cardia Services, download and install Cardia Services .hsp package from
http://download.hsphere.parallels.com/downloads/index.html#merchant_gateways (for
Java 1.4 and up).
This package can be installed on Parallels H-Sphere 2.4.x and higher as suggested in
Installing Parallels H-Sphere packages in Customization Guide..
Configuration
1. Select Cardia Services in the Add New Gateway box.
2. Click the Add button.
3. Fill out the form that appears:
Title: give a name to this Cardia Services connection
Merchant Token: your Cardia Services account ID
Store: Your Cardia Services unique ID, sometimes also referred to as Config File
Currency: the currency in which your end users will be charged
4. Click Submit Query
Page 82

82 Merchant Gateways
ECHO Configuration
Preparation
No preparation is needed before configuration.
Configuration
1. Select Echo in the Add New Gateway box.
2. Click the Add button.
3. Fill out the form that appears:
Title: give a name to this Echo connection
Login: your Echo login
Pin: once you register an account with Echo, you are given this to verify charge
requests
E-mail: the email address you provided on signing up with Echo
4. Click Submit Query
Page 83

Merchant Gateways 83
ePDQ Configuration
Preparation
Make sure that the CcxClientApi.jar file is present in the
/hsphere/local/home/cpanel/java_rt/ directory.
If it's not there:
1. Contact ePDQ and obtain the CcxClientApi.jar file.
2. Put the lib file into in the directory ~cpanel/java_rt/.
When restarting the Control Panel, make sure that you are logged into the CP server as
root.
For Linux:
/etc/rc.d/init.d/httpdcp stop
killall -9 java
sleep 10
/etc/rc.d/init.d/httpdcp start
For FreeBSD:
1. /usr/local/etc/rc.d/apachecp.sh stop
killall -9 java
sleep 10
/usr/local/etc/rc.d/apachecp.sh start.
Configuration
1. Select ePDQ in the Add New Gateway box.
2. Click the Add button.
3. Fill out the form that appears:
Page 84

84 Merchant Gateways
Title: give a name to this ePDQ connection
Server: the name of the ePDQ server
Port: the port of the ePDQ server
IP Address: your external control panel IP address
Login: your ePDQ login
Password: the password which comes with login/username
Client ID: the unique client ID code you get from ePDQ
Currency: the currency in which your end users will be charged
Test Mode:
- FALSE: credit card transactions will be completed and credit cards will be
charged;
- TRUE: authorization requests will be sent for verification without settlement
requests and credit cards won't be charged.
* In Test Mode, all transactions appear to be processed as real transactions.
The gateway accepts the transactions, but does not pass them on to the
financial institutions. Accordingly, all transactions will be approved by the
gateway when Test Mode is turned on.
4. Click Submit Query
Page 85

Merchant Gateways 85
eWay Configuration
Preparation
No preparation is needed before configuration.
Configuration
1. Select eWay in the Add New Gateway box.
2. Click the Add button.
3. Fill out the form that appears:
Title: give a name to this eWay connection
eWay Customer ID: your unique eWAY customer ID assigned to you when you join
eWAY, e.g.: 11438715
Server: the name of the eWay server
Port: the port of the eWay server
Path: the path to the server side handler file. This can be a script or a binary file that
is launched with an http request.
Notification Email for VOID and CAPTURE Transactions: eWay doesn't support VOID and
CAPTURE transactions. Instead, Parallels H-Sphere sends a notification to this
address that the transaction needs to be canceled or completed manually through
eWay web interface.
4. Click Submit Query
Page 86

86 Merchant Gateways
HSBC Configuration
Preparation
In order to configure HSBC merchant gateway, download and install HSBC .hsp
package
(http://download.hsphere.parallels.com/downloads/index.html#merchant_gateways).
This package can be installed on Parallels H-Sphere as suggested in our instruction on
Installing Parallels H-Sphere packages in Customization Guide.
Configuration
1. Select HSBC in the Add New Gateway box.
2. Click the Add button.
3. Fill out the form that appears:
Page 87

Merchant Gateways 87
Title: give a name to this HSBC connection
Server: the name of the HSBC server
Port: the port of the HSBC server
Client ID: the unique client ID code you get from HSBC
Username: enter the name given to you by HSBC provider
Password: the password which comes with login/username
Currency: the currency in which your end users will be charged
Test Mode box: with Test Mode checked, all transactions appear to be processed
as real transactions. The gateway accepts the transactions, but does not pass
them on to the financial institutions. Accordingly, all transactions will be
approved by the gateway when Test Mode is turned on.
4. Click Submit Query
Innovative Gateway Configuration
Preparation
No preparation is needed before configuration.
Configuration
1. Select InnovativeGateway in the Add New Gateway box.
2. Click the Add button.
3. Fill out the form that appears:
Page 88

88 Merchant Gateways
Title: give a name to this InnovativeGateway connection
Server: the name of the InnovativeGateway server
Port: the port of the InnovativeGateway server
Path: the path to the server side handler file. This can be a script or a binary file
that is launched with an http request.
Login: your InnovativeGateway login
Password: the password which comes with login/username
Test Mode:
- FALSE: credit card transactions will be completed and credit cards will be
charged;
- TRUE: authorization requests will be sent for verification without settlement
requests and credit cards won't be charged.
* In Test Mode, all transactions appear to be processed as real transactions.
The gateway accepts the transactions, but does not pass them on to the
financial institutions. Accordingly, all transactions will be approved by the
gateway when Test Mode is turned on.
4. Click Submit Query
CVV (Card Verification Value). To enable fraud protection using CVV, enable and
configure CVV support in your InnovativeGateway account. More on CVV credit card
verification.
LinkPoint (API v3.01) Configuration
LinkPoint deprecated support for its old API. It may cause problems with signup and
billing. To update API to v3.01, users should convert the certificate from PEM to P12
format (see below)
Preparation
Make sure that the JLinkPointTxn.jar file is present in the
/hsphere/local/home/cpanel/java_rt/ directory.
If it's not there:
1. Contact LinkPoint (API) and obtain the JLinkPointTxn.jar file.
2. Put the lib file into in the directory ~cpanel/java_rt/.
When restarting the Control Panel, make sure that you are logged into the CP server as
root.
For Linux:
/etc/rc.d/init.d/httpdcp stop
killall -9 java
sleep 10
/etc/rc.d/init.d/httpdcp start
Page 89

Merchant Gateways 89
For FreeBSD:
1. /usr/local/etc/rc.d/apachecp.sh stop
killall -9 java
sleep 10
/usr/local/etc/rc.d/apachecp.sh start.
When your linkpoint account is created you receive linkpoint welcome email which
contains username, password and the certificate in the PEM format. You need to
convert this certificate from PEM to P12 format. One way to do this is to run the
following from a command prompt:
openssl pkcs12 -export -in YOURPEM.pem -inkey YOURPEM.pem out YOURPEM.p12 -passout pass:YOURPASS -name "YOURNAME"
Where:
q YOURPEM - the name of your PEM file;
q YOURPASS - your merchant password (the password you specified in merchant
gateway settings);
q YOURNAME - any arbitrary name.
For example:
openssl pkcs12 -export -in cert.pem -inkey key.pem -out
1234567.p12 -passout pass:987654321 -name "LinkPoint"
PEM files example:
key.pem:
-----BEGIN RSA PRIVATE KEY-----
MIICXAIBAAKBgQC6gLgc6I+vcvoSkJHFZfzt/sJRy6rBwAtf8AUMguAqgCq8sz2H
tIYHeng/71Z0uuPXUQY7veFUXDAXFvn4SLCresf5cHl9hxlqNITRY2MhTn92TLlV
lmfzCZtBdhshncWydpQ6HcHOwRYUL8Ure1yw6iOlk7Q8ja6GstqiKbTWDQIDAQAB
AoGAWv8C1dgCgzAuI3EL2APa7KQoW5BrfDzjXYUNNNgggejexeoOU3AZFP0EPu2f
2UR2dk/qIqv6jRaNwDZNsH6G8831PyTmUJoMZB+vuAeYFyEV6uWyzBFYJohubB2g
V+fxq8wSalKKvmuyoUqr2TKexweumppUMCK+pruxfqeXuWECQQDtfpdiohLeTDaQ
Q84yIHABD1H80r9KLfdc77R0f5Y5BL+Obh+p/5T&bdue7HBB673QzNB0CrHOJJQi
xNiPYrJ/AkEAyQj5UX8dSVR8Xhcw/gVoqaB3WnyzmT4VSf8Y2tKlRETLNxIBTkAC
6BV9jkllOIIojFOl9kkj9OaMlF/fTm/ZcwJAPzihyAnpB/A13jWOoF1uM3oGk0zu
yyptXPoaiaClNsyCycGbAEAfM32ax2ceqEL9JqY/H4TxTDUEkjTgiVr2tQJABrlW
HXOy9xDsV/lOmj8V9P9P9P96HUoKTD9MBYWmIXJrmZvwjz101qzpV534Yi+xOpc/
Zd+HahmL+ip6vZTgIQJBANfO45PBiDZV71kHCmVDKnMUtR7FsJ7yKfZ2i/P8+23I
k7GP9lp/fj7MkLLjdui8hdjkdoiZ5ylCYXgIvbE=
-----END RSA PRIVATE KEY-----
cert.pem
-----BEGIN CERTIFICATE-----
MIICZDCCAc2gAwIBAgIBADANBUndj8JJkoIUUTDClLIJNQswCQYDVQQIEwJOWTER
kNNgTfDhBgFYGvNHGIUy8YHKjUY98ojHL9hkjH987YTIJXJlIGRldmVsb3BlcjEY
MBYGA1UEAxMPTWF4aW0gS2FCMGDhhNSHYDJLLLSALLLCIvcNAQkBFhBta2FudHNA
cHNvZnQubBSGDUuNHYiMMMUjhjhBKuuKLLLllHHUUJKHIjE1MzIzMVoweDELMAkG
A1UECBMCTlkxETAPBgNVBAcTCE5ldyBZb3JrMRswGQYDVQQKExJILVNwaGVyZSBk
ZXZlbG9wZXIxGDAW8jGFUUJ7B577b6655HGFHHHG5DSGHjEfMB0GCSqGSIb3DQEJ
ARYQbWthbnRzQHBzb2Z0Lm5ld0UYGD7SH389SUNWFA8HXQEFAAOBjQAwgYkCgYEA
uoC4HOiPr3L6EpFBVmX87f7CUcuqwcALX/AFDILgKoAqvLIIUDSUYID8732UJjjh
SDIUDSTYR478745KWOS89SF7TL3I7RFHJDFPWP09866UJFO99SPWQQ2O9D99W4LJ
ghdjuKKuhhkktgjyr3tcsOojpZO0PI2uhrLaoim01g0CAwEAATANBgkqhkiG9w0B
AQQFAAOBgQBNm1GvV+jrioeiortu+etikugOIUOULLKOFLHJIOijglkr94mjosij
Ommdsktuier/wUUYTUGDJKHGASDIUYODIYF/589739IDJLCKJI48kudow9JKHIOJ
BUokxewLJHK/l1fJQbEr90SJK59DK409SL3Zn0r4sQVTTTQWDTdXjMVYA6A==
Page 90

90 Merchant Gateways
-----END CERTIFICATE-----
Configuration
1. Select Link Point (API v3.01) in the Add New Gateway box.
2. Click the Add button.
3. Fill out the form that appears:
Page 91

Merchant Gateways 91
Title: give a name to this LinkPoint (API) connection
Store Name: Your LinkPoint (API) unique ID, sometimes also referred to as Config
File
Server: the name of the LinkPoint (API) server
Port: the port of the LinkPoint (API) server
Password: the password which comes with login/username
AVS: AVS stands for Address Verification Service. It can be used as an
additional layer of protection for merchants who wish to verify that the purchaser
knows the billing address of the cardholder (in case these are two different
people). This is not a very serious form of risk mitigation or fraud prevention, and
yet it does give some assurance that a hacker isn't simply generating a list of
valid credit card numbers and purchasing product at will. AVS simply matches
the numeric portion of the cardholder's street billing address and the 5 or 9-digit
zip code of the cardholder's billing address. The AVS request parameters are
STREET and ZIP. The processing network verifies the AVS information,
comparing a portion of the billing address from the request message with
address data on file at the VIC or the issuer's center. Based on the comparison,
a response will be returned which confirms whether the information matches or
not. Banks do not decline transactions based on the AVS check. The AVS
response is returned as two single tab-delimited characters: YY, NN, YN, NY (Y'matches', N for 'does not match'). This information is just an advice. However,
the Parallels H-Sphere system will either allow or decline the transaction
depending on the selected AVS status. AVS is available only for US
cardholders.
Important: To provide non US cardholders CC processing, disable AVS check-
up in the merchant gateway configuration.
Test Mode:
- FALSE: credit card transactions will be completed and credit cards will be
charged;
- TRUE: authorization requests will be sent for verification without settlement
requests and credit cards won't be charged.
* In Test Mode, all transactions appear to be processed as real transactions.
The gateway accepts the transactions, but does not pass them on to the
financial institutions. Accordingly, all transactions will be approved by the
gateway when Test Mode is turned on.
4. Click Submit Query
5. In Edit Gateway, select the newly created connection and press Edit.
6. Note the two new parameters that appeared on the gateway
configuration page, Key File, and Certificate File. Put the key and certificate
files on the control panel server to the locations suggested here.
Page 92

92 Merchant Gateways
MainStreetSoftWorks Configuration
Preparation
1. Go to www.mainstreetsoftworks.com/p/17.html page.
2. Download the following APIs:
www.mainstreetsoftworks.com/freedist/java_mcve-3.2.tar.gz
www.mainstreetsoftworks.com/freedist/libmcve-3.2.2.tar.gz
3. Place these APIs somewhere on your control panel server.
4. Log into your control panel server as root user.
5. Unpack libmcve-3.2.2.tar.gz
6. Go to the libmcve-3.2.2 and follow the instructions in the INSTALL file.
7. Unpack java_mcve-3.2.tar.gz
8. Go to the java_mcve-3.2 and follow the instructions in the INSTALL file.
When restarting the Control Panel, make sure that you are logged into the CP server as
root.
For Linux:
/etc/rc.d/init.d/httpdcp stop
killall -9 java
sleep 10
/etc/rc.d/init.d/httpdcp start
For FreeBSD:
1. /usr/local/etc/rc.d/apachecp.sh stop
killall -9 java
sleep 10
/usr/local/etc/rc.d/apachecp.sh start.
Make sure that MCVE.jar is in the /hsphere/local/home/cpanel/java_rt/ directory. If not,
copy this file from the java_mcve-3.2 directory.
Configuration
1. Select MainStreetSoftWorks in the Add New Gateway box.
2. Click the Add button.
Fill out the form that appears:
Page 93

Merchant Gateways 93
Page 94

94 Merchant Gateways
Title: give a name to this MainStreetSoftWorks connection
Username: enter the name given to you by MainStreetSoftWorks provider
Password: the password which comes with login/username
Server: the name of the MainStreetSoftWorks server
Port: the port of the MainStreetSoftWorks server
Timeout: minutes to wait for the server reply before merchantgateway API fails with
IOException
Path to the certificate file: on the control panel server, the path to the SSL certificate
you received when you signed up with MainStreetSoftWorks
1. Click Submit Query
CVV (Card Verification Value). To enable fraud protection using CVV, enable and configure
CVV support in your MainStreetSoftWorks account. More on CVV credit card
verification.
Moneris Configuration
Preparation
In order to configure Moneris merchant gateway, download and install Moneris .hsp
package from
http://download.hsphere.parallels.com/downloads/index.html#merchant_gateways (for
Java 1.5.x only).
This package can be installed as suggested in our instruction on Installing Parallels H-
Sphere packages in Customization Guide.
Configuration
1. Select Moneris in the Add New Gateway box.
2. Click the Add button.
3. Fill out the form that appears:
Page 95

Merchant Gateways 95
Title: give a name to this Moneris connection
Server: the name of the Moneris server
StoreID: your unique ID received from Moneris
API Token: your Moneris account ID
4. Click Submit Query
Page 96

96 Merchant Gateways
NetBilling Configuration
Preparation
NetBilling certificate is trusted by Equifax and provided by GeoTrust. In Java 1.3.x and
older the standard java cartcerts file doesn't include GeoTrust root Certificates and
therefore Parallels H-Sphere returns 'Connect error, untrusted server cert chain' when
trying to connect to the merchant gateway. That's why GeoTrust Root certificates
should be imported into cacerts file.
So, if you have Java 1.3 and older, you have the following solutions:
A. If you have got the default java cacerts file and you have never changed it, you can
simply replace it with the cacerts file offered by Parallels
(http://download.hsphere.parallels.com/cacerts):
/usr/java/<java home>/jre/lib/security/cacerts
B. Upgrade Java to 1.4 by following our documentation in Sysadmin Guide.
Note: If your certificate is already imported into cacerts, but Java still generates
'Connect error, untrusted server cert chain', please check the connection to your
payment server from your control panel server by running the following command from
the control panel server console to check connection:
telnet [server.name] [port]
Make sure that the direct-java-2.3.3.jar file is present in the
/hsphere/local/home/cpanel/java_rt/ directory.
If it's not there:
1. Contact NetBilling and obtain the direct-java-2.3.3.jar file.
2. Put the lib file into in the directory ~cpanel/java_rt/.
When restarting the Control Panel, make sure that you are logged into the CP server as
root.
For Linux:
/etc/rc.d/init.d/httpdcp stop
killall -9 java
sleep 10
/etc/rc.d/init.d/httpdcp start
For FreeBSD:
1. /usr/local/etc/rc.d/apachecp.sh stop
killall -9 java
sleep 10
/usr/local/etc/rc.d/apachecp.sh start.
Page 97

Merchant Gateways 97
Configuration
1. Select NetBilling in the Add New Gateway box.
2. Click the Add button.
Fill out the form that appears:
Page 98

98 Merchant Gateways
Title: give a name to this NetBilling connection
Protocol: http or https protocol to connect to the gateway server
Server: the name of the NetBilling server
Account: your NetBilling account ID
Site Tag: your brief site nickname
Notification Email for VOID transactions: NetBilling doesn't support VOID
transactions. Instead, Parallels H-Sphere sends a notification to this address
that the transaction needs to be canceled manually through NetBilling web
interface.
3. Click Submit Query
CVV (Card Verification Value). To enable fraud protection using CVV, enable and configure
CVV support in your NetBilling account.
NTPNow Configuration
Preparation
No preparation is needed before configuration.
Configuration
1. Select NTPNow in the Add New Gateway box.
2. Click the Add button.
3. Fill out the form that appears:
Page 99

Merchant Gateways 99
Title: give a name to this NTPNow connection
Server: the name of the NTPNow server
Port: the port of the NTPNow server
Path: the path to the server side handler file. This can be a script or a binary file
that is launched with an http request.
Login ID: your NTPNow login ID
Notification Email for VOID transactions: NTPNow doesn't support VOID
transactions. Instead, Parallels H-Sphere sends a notification to this address
that the transaction needs to be canceled manually through NTPNow web
interface.
Currency: the currency in which your end users will be charged
AVS checkbox: AVS stands for Address Verification Service. It can be used as an
additional layer of protection for merchants who wish to verify that the purchaser
knows the billing address of the cardholder (in case these are two different
people). This is not a very serious form of risk mitigation or fraud prevention, and
yet it does give some assurance that a hacker isn't simply generating a list of
valid credit card numbers and purchasing product at will. AVS simply matches
the numeric portion of the cardholder's street billing address and the 5 or 9-digit
zip code of the cardholder's billing address. The AVS request parameters are
STREET and ZIP. The processing network verifies the AVS information,
comparing a portion of the billing address from the request message with
address data on file at the VIC or the issuer's center. Based on the comparison,
a response will be returned which confirms whether the information matches or
not. Unchecking the AVS box you configure Parallels H- Sphere to allow the
transaction regardless of the response. AVS is available only for US
cardholders. To provide non US cardholders CC processing, disable AVS
check-up in the merchant gateway configuration.
4. Click Submit Query
Page 100

100 Merchant Gateways
Paradata Configuration
Preparation
Make sure that the trans_client_jsse.jar file is present in the
/hsphere/local/home/cpanel/java_rt/ directory.
If it's not there:
1. Contact Paradata and obtain the trans_client_jsse.jar file.
2. Put the lib file into in the directory ~cpanel/java_rt/.
When restarting the Control Panel, make sure that you are logged into the CP server as
root.
For Linux:
/etc/rc.d/init.d/httpdcp stop
killall -9 java
sleep 10
/etc/rc.d/init.d/httpdcp start
For FreeBSD:
1. /usr/local/etc/rc.d/apachecp.sh stop
killall -9 java
sleep 10
/usr/local/etc/rc.d/apachecp.sh start.
Make sure to include trans_client_jsse.jar after the rt.jar string but before
the jce1_2_1.jar string (java cryptography extension).
Configuration
1. Select Paradata in the Add New Gateway box.
2. Click the Add button.
3. Fill out the form that appears:
 Loading...