

Page 1
Parallels® H-Sphere
Page 2

Legal and Copyright Notice
ISBN: N/A
Parallels
660 SW 39th Street
Suite 205
Renton, Washington 98057
USA
Phone: +1 (425) 282 6400
Fax: +1 (425) 282 6444
© Copyright 2009,
Parallels, Inc.
All rights reserved
Distribution of this work or derivative of this work in any form is prohibited unless prior
written permission is obtained from the copyright holder.
Product and service names mentioned herein are the trademarks of their respective owners.
Page 3

Contents
Preface 12
Typographical Conventions ......................................................................................................... 12
Feedback ..................................................................................................................................... 13
About This Guide 14
Pre-configuration Wizard 15
Parallels H-Sphere config.xml ..................................................................................................... 18
Elements and Attributes .................................................................................................... 18
Software Used in Parallels H-Sphere 20
Integrated Third Party Products ................................................................................................... 21
Supplementary Software ............................................................................................................. 23
Used Libraries and Technologies ................................................................................................ 24
Update of Operating Systems 25
Updating FreeBSD Kernel ........................................................................................................... 26
Updating Linux ............................................................................................................................. 26
Linux Up2Date ................................................................................................................... 28
Linux Apt-Get..................................................................................................................... 28
Network Address Translation (NAT) 30
Configuring Newly Installed H-Sphere with NAT Support ........................................................... 31
Enabling NAT Support on a Live System .................................................................................... 32
Configuring NAT Firewall ............................................................................................................. 33
Migrating IPs with NAT ................................................................................................................ 33
Server Time Synchronization 34
NTP Time Servers ....................................................................................................................... 34
Cron Scripts 35
Control Panel Server Crons ......................................................................................................... 35
Web Server Crons ....................................................................................................................... 36
DNS Server Cron ......................................................................................................................... 36
Mail Server Crons ........................................................................................................................ 37
PostgreSQL/MySQL Server ........................................................................................................ 37
Traffic Calculation 38
Checking Traffic via Parallels H-Sphere Control Panel ............................................................... 39
Checking Traffic on Physical Servers .......................................................................................... 39
Processing Traffic by Crons ........................................................................................................ 40
Page 4

Preface 4
HTTP traffic ....................................................................................................................... 40
User FTP traffic ................................................................................................................. 40
Virtual FTP traffic ............................................................................................................... 40
Mail traffic .......................................................................................................................... 40
Parsing Traffic by TrafficLoader .................................................................................................. 41
IP Migration (Changing IPs) 42
Changing IPs on Systems Without NAT ...................................................................................... 42
IP Migration Pre-requisites ................................................................................................ 43
IP Migration Map File ........................................................................................................ 44
Creating ipmigration.xml Manually .................................................................................... 45
Creating ipmigration.xml by Parallels H-Sphere IP Migrator ............................................. 46
IP Migration Step by Step .................................................................................................. 46
Changing External IPs on Systems with NAT ............................................................................. 56
Changing Internal IPs on Systems With NAT .............................................................................. 57
Configuring Parallels H-Sphere to Work on Two Sets of IPs ...................................................... 57
Restarting Services 58
Restarting Parallels H-Sphere Control Panel .............................................................................. 60
Restarting Parallels H-Sphere Database..................................................................................... 60
Restarting Web Server ................................................................................................................ 61
Restarting PostgreSQL Server .................................................................................................... 61
Restarting Mail Server ................................................................................................................. 63
Restarting MySQL Server ............................................................................................................ 63
Restarting Named ........................................................................................................................ 64
Control Panel Server 65
Understanding Control Panel Server Configuration .................................................................... 66
Installed Software .............................................................................................................. 66
Interaction Between Servers ............................................................................................. 67
Location of CP Files and Directories ................................................................................. 67
The Parallels H-Sphere Configuration File ........................................................................ 68
Control Panel Apache Server Configuration ..................................................................... 68
Control Panel Back-End Servlet Engine ........................................................................... 68
Reseller Configuration ....................................................................................................... 68
Reseller SSL Configuration ............................................................................................... 69
CP SSL Configuration ....................................................................................................... 69
CP Apache Log Files ......................................................................................................... 69
CP Traffic Calculation ........................................................................................................ 70
The Parallels H-Sphere System Database ....................................................................... 70
The System Database Settings ......................................................................................... 70
Logging into the System Database ................................................................................... 70
VACUUM Utility ................................................................................................................. 71
CP Mail Queue .................................................................................................................. 71
Logging in as the cpanel User ..................................................................................................... 72
Logging into Parallels H-Sphere System Database .................................................................... 72
Launching Control Panel Cron Jobs ............................................................................................ 72
CP Cron XML Configuration Files ..................................................................................... 73
Background Job Manager ................................................................................................. 73
Configuring Tomcat ..................................................................................................................... 73
Tomcat Configuration Files ............................................................................................... 74
Tomcat Log File ................................................................................................................. 74
Restarting Tomcat ............................................................................................................. 74
Customizing Tomcat Environment Variables .................................................................... 75
Running Java Command Line Tools ........................................................................................... 76
Page 5

Preface 5
DNSCreator ....................................................................................................................... 77
IPMigratorFast ................................................................................................................... 78
PhysicalCreator ................................................................................................................. 79
PostApacheConfigs ........................................................................................................... 80
PostFTPConfigs ................................................................................................................ 80
ServerAliasesRenamer ..................................................................................................... 81
ChangeLServerId .............................................................................................................. 82
MIVAEmpresaFix............................................................................................................... 82
KeyPairGenerator .............................................................................................................. 83
PGPEncrypter.................................................................................................................... 83
PGPMessageSigner .......................................................................................................... 83
PGPMessageVerify ........................................................................................................... 84
RepostResellerSSLConfigs ............................................................................................... 84
ServiceZoneRenamer ....................................................................................................... 85
BillingEraser ...................................................................................................................... 85
SetQuota ........................................................................................................................... 86
UrchinReconfig .................................................................................................................. 86
OffLogs .............................................................................................................................. 87
Reset Balance ................................................................................................................... 88
RegenerateIpsFile ............................................................................................................. 88
LicenseExtractor ................................................................................................................ 89
VPSConvertor24_25 ......................................................................................................... 89
MailRelayCorrector ............................................................................................................ 90
Securing Your CP Server with SSL ............................................................................................. 91
Disabling HTTP Access ..................................................................................................... 93
Switching Between IP and Domain Name ........................................................................ 94
Upgrading Java ............................................................................................................................ 94
Supported Versions ........................................................................................................... 94
Upgrade Procedure ........................................................................................................... 95
Converting Parallels H-Sphere System Database from MS SQL to PgSQL ............................... 97
Step 1. Convert Database from MSSQL Server to MySQL .............................................. 98
Step 2. Convert Database from MySQL Server to PgSQL ............................................... 99
Upgrading System Postgres ...................................................................................................... 100
Converting Parallels H-Sphere Database To UNICODE........................................................... 102
Accelerating Control Panel ........................................................................................................ 105
Parallels H-Sphere Java-related Issues .......................................................................... 106
Optimizing Parallels H-Sphere System Database ........................................................... 107
Troubleshooting ............................................................................................................... 113
Changing CP URL ..................................................................................................................... 113
Changing IP Address to Domain Name in CP URL ........................................................ 114
Changing Parallels H-Sphere Port .................................................................................. 114
Changing Entire CP URL ................................................................................................ 115
Setting Multiple Alternative CP URL‟s ............................................................................. 116
Migrating Control Panel Server ................................................................................................. 117
Generating SSH Keys for Parallels H-Sphere Servers ............................................................. 118
Encrypting Trouble Tickets ........................................................................................................ 120
Generating PGP Public Key and PGP Private Key ......................................................... 120
Enabling PGP Encryption In Your Support Center.......................................................... 120
Encrypting Texts With PGP Public Key ........................................................................... 121
Using Encrypted Parts in Trouble Tickets ....................................................................... 122
Customizing Domain Registration Lookup Script ...................................................................... 123
Web Server 125
Understanding Web Server Configuration ................................................................................. 126
FTP Server ...................................................................................................................... 127
SSL Implementation on Unix Web Servers ..................................................................... 132
Dedicated SSL................................................................................................................. 132
Shared SSL ..................................................................................................................... 132
Page 6

Preface 6
Third Party Log Analyzers Integrated in Parallels H-Sphere .......................................... 133
WebShell ......................................................................................................................... 137
MnoGoSearch ................................................................................................................. 138
Parallels H-Sphere Jail .................................................................................................... 140
Preventing Manipulation with Logs Directory Permissions........................................................ 142
Altering Virtual Host Configuration ............................................................................................ 142
Calculating Web Traffic.............................................................................................................. 144
Using Third-Party Log Analyzers for Traffic Calculation ................................................. 145
Calculating Parallels H-Sphere Built-In Traffic ................................................................ 147
Adding Directories for User Homes ........................................................................................... 148
Installing Ruby on Rails ............................................................................................................. 148
Installing Chili!Soft ASP ............................................................................................................. 149
WORKFLOW ................................................................................................................... 149
Installing mod_perl..................................................................................................................... 157
Installing Zend Optimizer ........................................................................................................... 158
Mail System 160
Understanding Parallels H-Sphere Mail .................................................................................... 161
Mail Package ................................................................................................................... 162
Included Software ............................................................................................................ 162
Webmails ......................................................................................................................... 163
IMAP Server .................................................................................................................... 166
Choosing Remote Web and MySQL Logical Servers for Horde Webmail Frontend ................. 168
Changing Mail Server Roles ...................................................................................................... 169
Blocking IPs on Mail Servers ..................................................................................................... 170
Adding Qmail Settings to IP/Subnet .......................................................................................... 171
Bouncing Mail ............................................................................................................................ 171
1. Separate IP for Sending Bounced Mail ....................................................................... 172
2. Processing Error Responses ....................................................................................... 172
3. Bounced Message Delivery ......................................................................................... 173
Configuring Qmail ...................................................................................................................... 173
Antivirus and Antispam Filters (SpamAssassin and ClamAV) ........................................ 174
Integrated Antispam Addons ........................................................................................... 177
Qmail Server Settings ..................................................................................................... 178
Command Line Qmail Configuration ............................................................................... 190
Syslog Facility/Level Configuration For rblsmtpd ............................................................ 190
SMTP Log ........................................................................................................................ 191
Mail Client and ESMTP Destination Server .................................................................... 192
Qmail-spp Support .......................................................................................................... 193
Qmail TLS Support .......................................................................................................... 194
Integrated Plugins ........................................................................................................... 194
Choosing Remote MySQL Logical Server for SpamAssassin................................................... 195
SPF and SRS ............................................................................................................................ 196
SPF (Sender Policy Framework) ..................................................................................... 197
SRS (Sender Re-write Scheme) ..................................................................................... 199
Updating SpamAssassin Rulesets Automatically ...................................................................... 199
Sa-update Script .............................................................................................................. 200
Rules Du Jour Script ....................................................................................................... 200
Migrating Mail Server/IP ............................................................................................................ 204
Moving Mail Domains ................................................................................................................ 207
Calculating Mail Traffic .............................................................................................................. 208
Mail Traffic Log ................................................................................................................ 210
POP3 and IMAP Traffic ................................................................................................... 211
Web Mailing List Traffic ................................................................................................... 211
SpamGuard Setup ..................................................................................................................... 212
DNS Server 213
Page 7

Preface 7
DNS Config Files ....................................................................................................................... 214
Parallels H-Sphere DNS Zones ....................................................................................... 214
Custom DNS Zones ........................................................................................................ 215
Reverse DNS ................................................................................................................... 215
Restarting Named ...................................................................................................................... 216
Bind 9.3 ...................................................................................................................................... 216
New Features .................................................................................................................. 217
Restarting Bind ................................................................................................................ 217
Using rndc ....................................................................................................................... 218
Adding DNS Servers.................................................................................................................. 219
Configuring Single DNS ............................................................................................................. 219
Installing and Configuring MyDNS ............................................................................................. 221
Installation ....................................................................................................................... 221
Uninstallation ................................................................................................................... 222
Migrating DNS from Bind to MyDNS ......................................................................................... 222
Moving DNS ............................................................................................................................... 223
Removing Broken DNS Zones .................................................................................................. 225
Removing User Domain Zone ......................................................................................... 227
Removing Service Domain Zone..................................................................................... 228
Using DNS Creator .................................................................................................................... 229
MySQL Server 230
Installing MySQL Server ............................................................................................................ 230
Step 1. Checking for MySQL on Your Box ...................................................................... 231
Step 2. Downloading MySQL .......................................................................................... 231
Step 3. Installing MySQL ................................................................................................. 231
Step 4. Configuring MySQL ............................................................................................. 232
Step 5. Adding MySQL Server to Parallels H-Sphere ..................................................... 232
Backing Up MySQL Database ................................................................................................... 232
Running Parallels H-Sphere MySQL Scripts ............................................................................. 233
Getting Remote Access to MySQL Logical Server .................................................................... 234
Enabling Linked Tables in phpMyAdmin ................................................................................... 235
Changing MySQL Root Password ............................................................................................. 236
Option 1 ........................................................................................................................... 236
Option 2 ........................................................................................................................... 237
Moving MySQL .......................................................................................................................... 238
Step 1. Preparing Servers ............................................................................................... 238
Step 2. Moving MySQL Content ...................................................................................... 238
Step 3. Updating System Database ................................................................................ 239
Step 4. Updating Resellers‟ Server Aliases .................................................................... 239
Step 5. Synchronizing MySQL Content ........................................................................... 239
Step 6. Finalizing the Migration ....................................................................................... 240
Step 7. Checking Functionality ........................................................................................ 241
Moving MySQL Accounts .......................................................................................................... 241
PostgreSQL Server 243
Installing PostgreSQL Server .................................................................................................... 243
Step 1. Checking for PostgreSQL ................................................................................... 244
Step 2. Downloading PostgreSQL................................................................................... 244
Step 3. Installing PostgreSQL ......................................................................................... 245
Step 4. Configuring PostgreSQL ..................................................................................... 245
Backing Up PostgreSQL Database ........................................................................................... 246
Using VACUUM Utility ............................................................................................................... 246
Running PostgreSQL Scripts ..................................................................................................... 247
Changing Postgres User Password ........................................................................................... 248
Localizing PostgreSQL .............................................................................................................. 249
Configuring Parallels H-Sphere to Use Non-Default MySQL/PostgreSQL Versions ................ 249
Page 8

Preface 8
Choosing Remote Web Logical Servers for phpMyAdmin/phpPgAdmin Frontends ................. 251
Downgrading Postgres .............................................................................................................. 252
Windows Servers 254
MSI Packages ............................................................................................................................ 255
Download and Installation ............................................................................................... 256
Packages Requiring Third-party Software ...................................................................... 257
Dependencies Tree ......................................................................................................... 257
Winbox Directory Structure ........................................................................................................ 258
HSphere .......................................................................................................................... 259
HShome ........................................................................................................................... 260
HSlogfiles ........................................................................................................................ 261
Restarting Winbox Service ........................................................................................................ 261
Restarting IIS ............................................................................................................................. 262
Enabling Winbox Shared SSL ................................................................................................... 262
Integrating Winbox Shared SSL ...................................................................................... 263
Updating Winbox Shared SSL ......................................................................................... 264
Winbox Statistics ....................................................................................................................... 265
Statistics Modules ........................................................................................................... 266
Setting Up SharePoint to Use MSSQL Server .......................................................................... 268
Preinstallation Requirements .......................................................................................... 268
Installing and Configuring SharePoint ............................................................................. 269
Adding ODBC Resource ............................................................................................................ 272
Interface ........................................................................................................................... 273
Configuration ................................................................................................................... 276
Configuring ColdFusion ............................................................................................................. 278
Enabling ASP.NET 2.0 .............................................................................................................. 279
Moving Log Files ........................................................................................................................ 280
Removing Old Log Files ............................................................................................................ 281
Moving User Homes .................................................................................................................. 282
Maintaining HShome ................................................................................................................. 282
Changing hsadmin Login and Password ................................................................................... 284
Winbox IP Migration................................................................................................................... 284
Step 1. Bind Target IPs on Winbox ................................................................................. 285
Step 2. Add Double Bindings on IIS ................................................................................ 285
Step 3. Create Migration XML ......................................................................................... 286
Step 4. Run the Migration ................................................................................................ 287
Step 5. Remove Old IP Bindings on IIS .......................................................................... 287
Uninstalling Winbox ................................................................................................................... 288
Winbox Security Scheme .......................................................................................................... 290
Accounts Hierarchy ......................................................................................................... 291
IIS Security Management ................................................................................................ 292
NTFS permissions ........................................................................................................... 293
FrontPage Server Extensions Management Notes ......................................................... 294
ASP.NET Management Notes ......................................................................................... 294
Migration Notes ............................................................................................................... 294
Recovery Notes ............................................................................................................... 295
Migrating Serv-U to MS-FTP ..................................................................................................... 295
Step 1. Create a User Account and User FTP Accounts in IIS FTP ............................... 296
Step 2. Reset NTFS Permissions .................................................................................... 298
Step 3. Recover Winbox quota ........................................................................................ 299
Step 4. Reset Anonymous Access for All User Domains in IIS ...................................... 300
Preparing Servers for MS Exchange Hosting (Hosted Messaging and Collaboration 3.0) ....... 301
Step 1. Install Required Software on the Servers ........................................................... 302
Step 2. Deploy Hosted Messaging and Collaboration..................................................... 304
Step 3. Install WS Exchange Provider Adapter Namespace .......................................... 315
Step 4. Create Reseller Organization Unit ...................................................................... 316
Preparing Servers for MS Exchange Hosting (Hosted Messaging and Collaboration 3.5) ....... 318
Page 9

Preface 9
Step 1. Install Required Software on the Servers ........................................................... 319
Step 2. Deploy Hosted Messaging and Collaboration..................................................... 321
Step 3. Install WS Exchange Provider Adapter Namespace .......................................... 327
Step 4. Create Reseller Organization Unit ...................................................................... 328
Calculating Winbox Traffic ......................................................................................................... 330
Creating Mail Plan on MPS Server ............................................................................................ 331
Microsoft SQL Server 334
Installing Microsoft SQL 2000 Server ........................................................................................ 335
Installing Microsoft SQL 2005 Server ........................................................................................ 336
Moving MS SQL Databases Across Servers ............................................................................. 337
Moving MS SQL Databases to a New Location ........................................................................ 338
Virtual Private Servers 344
Configuration Parameters .......................................................................................................... 344
VPS Scripts ................................................................................................................................ 346
Perl Modules Used by VPS Scripts ................................................................................. 347
VPS Configuration ........................................................................................................... 348
Create VPS ...................................................................................................................... 349
Migrate VPS .................................................................................................................... 351
Delete VPS ...................................................................................................................... 352
VPS Cron Scripts............................................................................................................. 353
VPS Configuration Scripts ............................................................................................... 357
View List of Installed VPS‟s ............................................................................................. 360
Install/Uninstall Additional Packages .............................................................................. 361
Check VPS Files for Changes ......................................................................................... 363
VPS IP Migration Tool ..................................................................................................... 365
VPS Network Configuration Tools ................................................................................... 366
Device Management ....................................................................................................... 369
Backing Up VPS Content .......................................................................................................... 372
Adding VPS Network Gateways ................................................................................................ 373
VPS Subnet XML Configuration ...................................................................................... 374
Parallels H-Sphere VPS Configuration Parameters .................................................................. 375
VPS Templates .......................................................................................................................... 381
Creating and Modifying VPS Templates ......................................................................... 382
Default Templates ........................................................................................................... 384
VPS Limits ................................................................................................................................. 388
Hints On Handling VPS Limits ......................................................................................... 390
Changing VPS Solution ............................................................................................................. 391
Changing Solution from Parallels H-Sphere Control Panel ............................................ 391
Changing Solution from Console..................................................................................... 392
Changing Solution from Parallels H-Sphere Control Panel ............................................ 393
Configuring VPS Host ................................................................................................................ 394
Customizing Operating System Distributive URLs .................................................................... 398
Dedicated Servers 399
Configuring MRTG ..................................................................................................................... 400
Managing MRTG Service ................................................................................................ 400
Configuration Directory and File ...................................................................................... 400
Scripts Processing Data .................................................................................................. 400
RRD Files ........................................................................................................................ 401
The Problem with Calculating Large (>100mbps) Bandwidth Traffic .............................. 401
System Packages 402
Page 10

Preface 10
Common Packages ................................................................................................................... 402
hsphere-info: Collecting Information About Parallels H-Sphere Servers into XML Configs403
hsphere-update Package ................................................................................................ 404
upackages Syntax ........................................................................................................... 404
Parallels H-Sphere Perl Modules .................................................................................... 406
Parallels H-Sphere Apache ............................................................................................. 410
Parallels H-Sphere PHP .................................................................................................. 421
Parallels SiteStudio Packages ................................................................................................... 431
Load Balancing 432
Load Balancers................................................................................................................ 434
Supported NAS................................................................................................................ 434
Load Balanced Cluster .................................................................................................... 434
Implementation of Load Balanced Cluster in Parallels H-Sphere ............................................. 435
Load Balanced Cluster in CP .......................................................................................... 436
Distribution of Requests Across Load Balanced Cluster ................................................ 436
Shared Content ............................................................................................................... 436
Specific Master/Slave Content ........................................................................................ 437
Synchronization Between Master and Slave Servers ..................................................... 437
Traffic Calculation ............................................................................................................ 438
Load Balanced Cluster Map ............................................................................................ 439
NAT Configuration for Load Balanced Clusters .............................................................. 440
Load Balancing Support in Parallels H-Sphere ......................................................................... 441
Installing Load Balanced Web/Mail Clusters in Parallels H-Sphere .......................................... 441
Step 1. Install and Configure Load Balancer ................................................................... 442
Step 2. Prepare NAS ....................................................................................................... 443
Step 3. Prepare Master and Slave Web/Mail Boxes ....................................................... 448
Step 4. Install Parallels H-Sphere to Load Balanced Parallels H-Sphere Clusters ........ 450
Quota Managers ........................................................................................................................ 451
Resources Migration 452
Migratable Resources ..................................................................................................... 452
Migration Procedure .................................................................................................................. 453
Step 1. Create XML File Containing User Data .............................................................. 453
Data Type Definitions ...................................................................................................... 456
DTD Chart ....................................................................................................................... 456
Attributes Description ...................................................................................................... 457
Files ................................................................................................................................. 458
XML Validation ................................................................................................................ 459
Step 2. Create XML File Containing Reseller Plan Data ................................................ 459
Step 3. Prepare The Target Control Panel ...................................................................... 465
Step 4. Create Reseller Plans ......................................................................................... 465
Step 5. Create Resellers ................................................................................................. 465
Step 6. Create End Users ............................................................................................... 466
Troubleshooting ............................................................................................................... 466
Backup and Recovery 467
Backing Up Parallels H-Sphere Control Panel Server .............................................................. 468
System DB Dump ............................................................................................................ 469
Parallels H-Sphere Backup and Recovery List ......................................................................... 469
Recovering Parallels H-Sphere Control Panel .......................................................................... 471
Step 1. Prepare for the Recovery .................................................................................... 471
Step 2. Recover System Data ......................................................................................... 471
Files and Directories To Be Recovered .......................................................................... 472
Recovering Unix Hosted Parallels H-Sphere Servers ............................................................... 473
Page 11

Preface 11
Step 1. Prepare Crashed Server for Recovery ............................................................... 474
Step 2. Run Parallels H-Sphere Updater ........................................................................ 474
Step 3. Run the Recovery Tool ....................................................................................... 474
Step 4. Restore User Content ......................................................................................... 475
Restoring Files and Directories from Backup ............................................................................ 476
Restoring the Parallels H-Sphere System Database From Backup .......................................... 476
Restoring the Parallels H-Sphere Database on a Server with PostgreSQL Not Installed478
Restoring the Parallels H-Sphere Database Content if PostgreSQL Is Installed: ........... 479
Fixing Crashed Parallels H-Sphere Database ........................................................................... 480
Backing Up Winbox ................................................................................................................... 482
Backing Up the Metabase ............................................................................................... 482
Backing Up MS SQL Databases ..................................................................................... 482
Backing Up User Content ................................................................................................ 483
Recovering Winbox.................................................................................................................... 483
Step 1. Back Up User Content ........................................................................................ 484
Step 2. Install Parallels H-Sphere ................................................................................... 484
Step 3. Set Up Dedicated IPs .......................................................................................... 485
Step 4. Prepare Target Winbox for Physical Creator ...................................................... 485
Step 5. Run PhysicalCreator on the CP Box ................................................................... 486
Step 6. Restore Content from Backup ............................................................................ 487
Step 7. Install Shared SSL .............................................................................................. 488
Step 8. Set Correct NTFS Permissions and Owner for the Home Directory .................. 489
Recovering Winbox Quota ......................................................................................................... 490
Miva 491
Miva Installation for *nix ............................................................................................................. 491
Requirements .................................................................................................................. 491
Miva Empresa Installation ............................................................................................... 492
Miva Merchant Installation ............................................................................................... 495
Miva Installation for Windows .................................................................................................... 496
Updating Miva 4 to Miva 5 ......................................................................................................... 497
Urchin 498
Urchin4 & Urchin5 Installation for Unix ...................................................................................... 499
Urchin4 & Urchin5 Installation for Windows .............................................................................. 501
Urchin 4 And Urchin 5 Database Utilities .................................................................................. 502
Urchin Database Utilities ................................................................................................. 502
Urchin Database Tables .................................................................................................. 502
RealServer 505
RealServer Installation for Unix ................................................................................................. 506
RealServer Installation for Windows .......................................................................................... 512
RealServer Config File Example ............................................................................................... 512
Page 12

In this chapter:
Typographical Conventions ............................................................................... 12
Feedback .......................................................................................................... 13
Formatting convention
Type of Information
Example
Special Bold
Items you must select,
such as menu options,
command buttons, or
items in a list.
Go to the System tab.
Titles of chapters,
sections, and
subsections.
Read the Basic
Administration chapter.
Italics
Used to emphasize the
importance of a point, to
introduce a term or to
designate a command
line placeholder, which is
to be replaced with a real
name or value.
The system supports the
so called wildcard
character search.
Monospace
The names of
commands, files,
directories, and domain
names.
The license file is located
in the
http://docs/common/
licenses directory.
C H A P T E R 1
Preface
Typographical Conventions
Before you start using this guide, it is important to understand the documentation
conventions used in it.
The following kinds of formatting in the text identify special information.
Page 13

Preface 13
Preformatted
On-screen computer
output in your commandline sessions; source
code in XML, C++, or
other programming
languages.
# ls –al /files
total 14470
Preformatted
Bold
What you type,
contrasted with on-screen
computer output.
# cd /root/rpms/php
CAPITALS
Names of keys on the
keyboard.
SHIFT, CTRL, ALT
KEY+KEY
Key combinations for
which the user must
press and hold down one
key and then press
another.
CTRL+P, ALT+F4
Feedback
If you have found a mistake in this guide, or if you have suggestions or ideas on how to
improve this guide, please send your feedback using the online form at
http://www.parallels.com/en/support/usersdoc/. Please include in your report the
guide‟s title, chapter and section titles, and the fragment of text in which you have found
an error.
Page 14

Welcome to the Parallels H-Sphere System Administrator Guide. It aims at system
C H A P T E R 2
About This Guide
administrators and explains how to install, configure and maintain Parallels H-Sphere
and its components.
Page 15
This document explains how to shape your Parallels H-Sphere cluster, add boxes and
C H A P T E R 3
Pre-configuration Wizard
hosting services and configure basic Parallels H-Sphere settings after Control Panel
installation.
Page 16

16 Pre-configuration Wizard
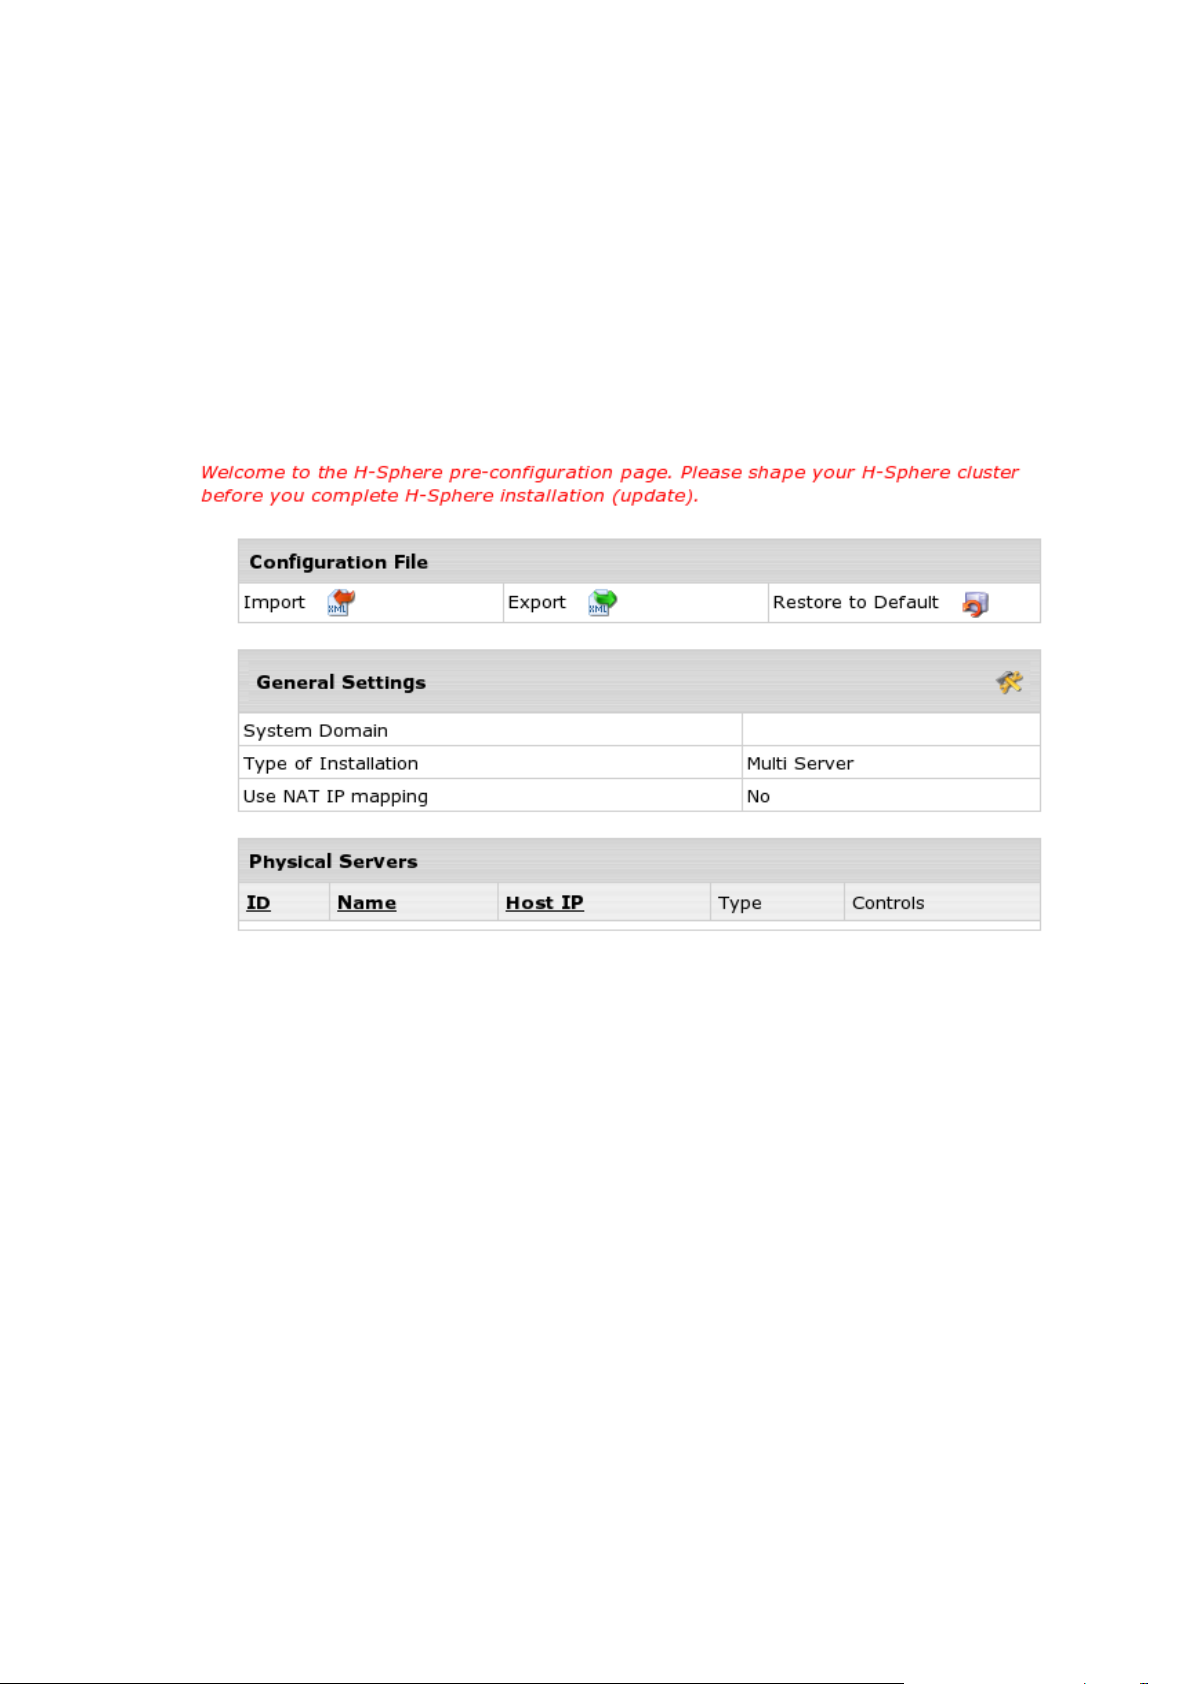
Parallels H-Sphere Pre-Configuration Wizard writes the cluster configuration into the
specially formatted config.xml file (download sample config.xml from
http://hsphere.parallels.com/HSdocumentation/xmls/config.xml). The Configuration File
form on the main page enables you to:
Import: You upload the prepared XML file from a local machine to Parallels H-
Sphere and later reconfigure Parallels H-Sphere in the wizard.
Export: export config.xml with your Parallels H-Sphere cluster configuration to
your local machine.
Restore to Default: choose this option to recreate config.xml and to restart
configuring Parallels H-Sphere cluster in the wizard.
To complete the pre-configuration wizard:
1 Click the Edit General Settings icon on the right corner of the General
Settings caption and fill in the data on the page that appears:
System Domain: Specify the service domain name here.
One Server Installation: check this box if you need a single server installation.
Use NAT IP mapping: Check this box if you implement NAT (on page 30) on your
Parallels H-Sphere.
Press Submit and return to the main page of the wizard.
2 If you choose multiple server installation mode, you will see the Add
Physical Server icon on the right corner of the Physical Servers caption.
Click this icon and proceed to the form for adding new physical
servers and services.
Here you set physical server name, IP, root password to connect to, and choose
which hosting services (CP, Web, mail, DNS, MySQL, PostgreSQL) will be installed
there.
Note: At the moment, VPS, Windows, MRTG are not installed via Parallels HSphere pre-configuration wizard.
Choose Use defaults for this server to apply default names for Parallels H-Sphere
logical servers on this server. By default, they are named webN, mailN, nsN, mailN,
mysqlN, respectively.
3 After you have added physical servers into Parallels H-Sphere cluster,
you will see them on the main page of the wizard.
Click the Edit icon in front of a physical server in the list and edit logical server
parameters. More on Logical Servers read in Parallels H-Sphere Service
Administrator Guide.
4 After you have done with Parallels H-Sphere configuration, press
Proceed Installation Wizard.
5 You will be taken to the Confirm Installation page. To complete
installation via CP web interface, click Yes, continue
6 On the page that appears check the servers you want to be
updated/installed and click Start.
To see the update log, click the server name link.
Page 17

Pre-configuration Wizard 17
7 When update is finished and the light turns green, click Proceed to
In this chapter:
Parallels H-Sphere config.xml ........................................................................... 18
complete installation.
8 On the page that appears, click Return to Admin CP.
You will be taken to the administrator control panel where you can maintain your
hosting business.
Page 18

18 Pre-configuration Wizard
Parallels H-Sphere config.xml
The config.xml file is used in Parallels H-Sphere Pre-configuration Wizard (on page 15).
It contains Parallels H-Sphere cluster configuration: physical servers with their IPs and
root passwords to install Parallels H-Sphere to, and logical servers to be installed on
these boxes.
During regular Parallels H-Sphere installation, config.xml is formed in Parallels HSphere Pre-Configuration wizard in admin CP and is temporarily stored in the
~cpanel/.settings directory. After completing Parallels H- Sphere installation in
the postinstall mode, installer removes this file. However, the postinstall mode
won‟t continue if config.xml is missing or is different from the one used at the
installation.
When installer runs in the install mode, it is required that you specify location of the
correctly formed config.xml. See Appendix B. Installation Script Options of Parallels HSphere Control Panel Installation Guide.
Elements and Attributes
In the following chart xml elements are marked in bold and their attributes—in italics.
physicalServers - a list of Parallels H-Sphere physical servers, each of them
described as physicalServer with attributes:
id - id of the physical server
name - name of the physical server
password - root password to the physical server Each physicalServer contains ip
and logicalServers elements:
ip - server IP with attribute:
type - type of the physical server
Element ip contains such child elements:
addr - IP address
ipExt - external IP for NAT mapping
Note: If Parallels H-Sphere does not use NAT, this child element is redundant.
mask - IP mask
logicalServers - a list of Parallels H-Sphere logical servers each of them described
as logicalServer with attributes:
group - group of the logical server
id -id of the logical server
name - name of the logical server
Page 19

Pre-configuration Wizard 19
Each logicalServer element contains ips element - a list of IPs, each of them
described as ip with the following child elements:
addr - IP address
ipExt - external IP for NAT mapping
Note: If Parallels H-Sphere does not use NAT this child element is redundant.
mask - IP mask
systemzone - a Parallels H-Sphere DNS zone
hsversion - a Parallels H-Sphere version
Page 20

This chapter lists various types of software used in Parallels H-Sphere.
In this chapter:
Integrated Third Party Products ......................................................................... 21
Supplementary Software ................................................................................... 23
Used Libraries and Technologies ...................................................................... 24
C H A P T E R 4
Software Used in Parallels H-Sphere
Page 21

Software Used in Parallels H-Sphere 21
Integrated Third Party Products
Even though we integrate or use the below products in Parallels H-Sphere, we do not
assume any responsibility for bugs in their source code. Should you have any problems
with these products, please contact the developers. The packages are listed in the
alphabetical order.
BS Counter http://www.stanback.net/programming/bscounter
”This is a web hit counter/tracker written in Perl, features include: blocking of multiple
hits from the same user, insertion of commas, text-based or graphical modes, supports
multiple counters from the same script, and tracks users‟ browsers, operating systems,
locations, top 20 referrers, and top 20 search engine keywords. (requires SSI OR
GD.pm)”
ezmlm http://www.ezmlm.org
”ezmlm is a modern mailing list manager. Its purpose is to efficiently send a message to
a large number of recipients with minimal delay. It allows automated additions and
subtractions from the subscriber database. In addition, it may keep an archive of
messages. It can also impose restrictions on what may be sent or retrieved and by
whom. Some mailing list managers keep a database of subscriber information and
tailor the message specifically for each subscriber. ezmlm sends the same message to
all subscribers. This is much more efficient. The benefits to the user are that on
average posts to ezmlm lists reach subscribers much faster than they would with other
mailing list manager.”
FormMail http://www.scriptarchive.com/formmail.html
”FormMail is a generic WWW form to e-mail gateway, which will parse the results of
any form and send them to the specified user. This script has many formatting and
operational options, most of which can be specified through the form, meaning you
don‟t need any programming knowledge or multiple scripts for multiple forms. This also
makes FormMail a perfect system-wide solution for allowing users form-based user
feedback capabilities without the risks of allowing freedom of CGI access.”
Miva Merchant http://www.miva.com
”Miva Merchant is a dynamic browser based storefront development and management
system that allows merchants to create and administrate multiple online stores from
anywhere in the world.”
mnoGoSearch http://www.mnogosearch.org/
”mnoGoSearch (formerly known as UdmSearch) is a full-featured web search engine
software for intranet and internet servers. mnoGoSearch software has a number of
unique features, which makes it appropriate for a wide range of applications from
search within your site to specialized search systems such as cooking recipes or
newspaper searches, ftp archive search, MP3 search, news articles search or even
national-wide portal search engine.”
ModLogAn http://jan.kneschke.de/projects/modlogan/
”ModLogAn is a modular logfile analyzer which is able to analyze logfiles from 15
different server types.”
Page 22

22 Software Used in Parallels H-Sphere
MySQL http://www.mysql.com
”MySQL is the world‟s most popular open source database, recognized for its speed
and reliability.”
OpenSSL http://www.openssl.org
”The OpenSSL Project is a collaborative effort to develop a robust, commercial-grade,
full-featured, and Open Source toolkit implementing the Secure Sockets Layer (SSL
v2/v3) and Transport Layer Security (TLS v1) protocols as well as a full-strength
general purpose cryptography library managed by a worldwide community of volunteers
that use the Internet to communicate, plan, and develop the OpenSSL toolkit and its
related documentation.” Parallels H-Sphere uses system OpenSSL packages. Make
sure you keep them updated. OpenSSL packages are upgraded as any other system
packages.
osCommerce http://www.oscommerce.com
”osCommerce is an online shop e-commerce solution under on going development by
the open source community. Its feature packed out-of-the-box installation allows store
owners to setup, run, and maintain their online stores with minimum effort and with
absolutely no costs or license fees involved.”
phpBB http://www.phpbb.com
”phpBB is a high powered, fully scalable, and highly customisable open-source bulletin
board package. phpBB has a user-friendly interface, simple and straightforward
administration panel, and helpful FAQ. Based on the powerful PHP server language
and your choice of MySQL, MS-SQL, PostgreSQL or Access/ODBC database servers,
phpBB is the ideal free community solution for all web sites.”
phpMyAdmin http://www.phpmyadmin.net
”phpMyAdmin is a tool written in PHP intended to handle the administration of MySQL
over the WWW. Currently it can create and drop databases, create/drop/alter tables,
delete/edit/add fields, execute any SQL statement, manage keys on fields.”
Urchin http://www.urchin.com
”Urchin is the fastest and most accurate web analytics (web statistics) software
available.” It is a commercial product and is available for Windows 2000, Linux RedHat,
and FreeBSD platforms.”
WebBBS http://www.extropia.com/scripts/bbs.html
”eXtropia WebBBS allows a user to post messages as well as post replies to existing
messages. WebBBS keeps track of which messages are posts and which ones are
replies and displays them in a hierarchical tree-like fashion. Posts that start new topics
are at the top of each tree, and the replies are shown indented beneath the original
posts.”
WebChat http://www.extropia.com/opensource.html
”eXtropia WebChat is a useful application that allows a number of people on the World
Wide Web to talk to one another simultaneously. The ability to chat on the Web can be
a quick way to hold a virtual meeting.”
Page 23

Software Used in Parallels H-Sphere 23
WebGuestbook http://www.extropia.com/opensource.html
eXtropia WebGuestbook is “configurable so that you can specify what your guestbook
file looks like and how the script-generated responses are displayed. If configured to do
so, WebGuestbook will email the guestbook administrator the text of new entries as
well as add them to the guestbook. The script will also respond to new entrants with a
configurable “Thank you” message... Finally, the application comes with the capability
of „four letter word‟ filtering for a child-safe guestbook. You can censor words by adding
them to a list of „bad words‟.”
Webalizer http://www.mrunix.net/webalizer/
”The Webalizer is a fast, free web server log file analysis program. It produces highly
detailed, easily configurable usage reports in HTML format, for viewing with a standard
web browser.”
Supplementary Software
Apache http://www.apache.org/
The Apache web-server is used as the back-end for all of PSoft applications running on
the Unix platform. More information about configuring and maintaining Apache is
available at the Apache project site.
Postgresql http://www.postgresql.org/
While our products are designed to work with any SQL-compliant database server,
PostgreSQL is the server we use for internal development and testing. Their website
not only explains how to properly set up this free database, but also has some
information about SQL in general.
ProFTPD http://proftpd.net
”Highly configurable GPL-licensed FTP server software.”
qmail http://www.qmail.org/top.html
”qmail is a secure, reliable, efficient, simple message transfer agent. It is designed for
typical Internet-connected UNIX hosts. As of October 2001, qmail is the second most
common SMTP server on the Internet, and has by far the fastest growth of any SMTP
server.”
vpopmail http://www.inter7.com/vpopmail.html
”vpopmail (vchkpw) is a collection of programs and a library to automate the creation
and maintenance of virtual domain email configurations for qmail installations using
either a single UID/GID or any valid UID/GID in /etc/passwd with a home directory.
Features are provided in the library for other applications which need to maintain virtual
domain email accounts. It supports named or IP-based domains. It works with vqadmin,
qmailadmin, vqregister, sqwebmail, and courier-imap. It supports MySQL, Sybase,
Oracle, LDAP, and file-based (DJB constant database) authentication. It supports
SMTP authentication combined with the qmail-smtp-auth patch. It supports user quotas
and roaming users (SMTP relay after POP authentication).”
Page 24

24 Software Used in Parallels H-Sphere
Used Libraries and Technologies
CGI http://cgi.resourceindex.com
Freemarker http://freemarker.sourceforge.net
Positive Software uses Freemarker 1.5.1 template format for Parallels H-Sphere and
Parallels SiteStudio. Please refer to this site for detailed information about the format
and capabilities of Freemarker.
HTML http://developer.netscape.com
Java 1.4 http://www.javasoft.com/
Perl http://www.perl.org/
PHP http://www.php.net/ and http://www.zend.com/
XML http://www.oasis-open.org/
Page 25

We do not recommend major OS updates that result in changing of OSCODE (refer to
In this chapter:
Updating FreeBSD Kernel ................................................................................. 26
Updating Linux .................................................................................................. 26
C H A P T E R 5
Update of Operating Systems
Appendix D of Parallels H-Sphere Installation Guide). Rather, perform server migration.
You can have it done by Parallels H-Sphere support team,
http://www.parallels.com/support/hsphere/, or migrate servers by yourself using the
following manuals:
Moving Mail Service (on page 204)
Moving DNS (on page 223)
Moving MySQL (on page 238)
Moving CP Server (on page 117)
However, if you did update your OS to another major version, delete the file
/hsphere/shared/bin/oscode.
Page 26

26 Update of Operating Systems
Updating FreeBSD Kernel
Parallels H-Sphere requires that FreeBSD kernel be compiled with quota enabled.
To update kernel on a FreeBSD server in an Parallels H-Sphere cluster:
1 Download and install FreeBSD kernel sources.
2 Under root, change directory to /usr/src/sys/i386/conf, where
the kernel source is located:
# cd /usr/src/sys/i386/conf
3 In this directory, you will have the default GENERIC kernel
configuration file, and, if the custom kernel compilation has been
performed, a custom kernel configuration file, for example MYKERNEL.
4 Open your current kernel configuration file (for example MYKERNEL)
and add the line:
options QUOTA
Important: We don‟t recommend modifying the default GENERIC file. Instead, copy
its content to a custom file (like MYKERNEL) and perform modifications there!
5 Compile and install the kernel:
# /usr/sbin/config MYKERNEL
# cd ../../compile/MYKERNEL
# make depend
# make
# make install
6 Reboot FreeBSD server to activate the new kernel settings.
For more information, see generic instructions on Building and Installing a
Custom Kernel (http://www.freebsd.org/doc/en_US.ISO8859-
1/books/handbook/kernelconfig-building.html).
Updating Linux
When you update Linux automatically by means of up2date (on page 28), apt-get (on
page 28), SWUP, yum (http://linux.duke.edu/projects/yum/) or other RPM updaters, you
must beforehand exclude some packages installed with Parallels H-Sphere from the
update list:
rh-postgres, postgresql, postgresql-server, postgresql-libs on CP and user
postgresql boxes
apache and apache-related packages on Parallels H-Sphere CP, WEB and MAIL
boxes
proftpd, frontpage and related packages on Parallels H-Sphere WEB boxes
Page 27

Update of Operating Systems 27
qmail, vpopmail, ezmlm, sqwebmail and related packages on Parallels H-Sphere
In this section:
Linux Up2Date .................................................................................................. 28
Linux Apt-Get .................................................................................................... 28
MAIL boxes
bind and related packages on Parallels H-Sphere DNS boxes
XFree86 or xorg-x11 packages on CP. XFree86-deprecated-libs (or xorg-x11-
deprecated-libs) with dependences should be installed. This is critical particularly for
Parallels SiteStudio.
MySQL-server on Parallels H-Sphere MAIL and MySQL boxes
Please note that these packages are also to be removed while preparing servers to
Parallels H-Sphere installation.
If you have accidentally upgraded your RedHat without excluding these packages, you
need to downgrade PostgreSQL (on page 252).
Page 28

28 Update of Operating Systems
Linux Up2Date
The up2date utility is used to upgrade the Linux Kernel on RedHat. For generic
information on up2date, please read Upgrading the Linux Kernel on Red Hat Linux
Systems (http://www.redhat.com/support/resources/howto/kernel-upgrade/).
Prior to updating your Linux with the up2date procedure, make sure you exclude
specific Parallels H-Sphere related services (on page 26) from the list of packages to
be updated.
Linux Apt-Get
Since the up2date (on page 28) utility has become a paid service by RedHat
(http://www.redhat.com/docs/manuals/RHNetwork/ref-guide/up2date.html), you may
use the free apt-get utility instead.
APT-RPM is a port of Debian‟s apt tools to a RPM based distribution. apt-get is an
advanced package management utility front-end to easily perform package installation,
upgrading and removal. Dependencies are automatically handled, so if you try to install
a package that needs others to be installed, it will download all needed packages and
install them. More information on apt-get can be found at http://apt.freshrpms.net/ or
http://pt-rpm.tuxfamily.org/.
Prior to updating your OS packages with apt-get, make sure you exclude specific
Parallels H-Sphere-related services (on page 26) from the apt-get configuration.
To exclude these packages, modify the corresponding part of your
/etc/apt/apt.conf file, similar to this:
// Completely ignore the following packages (not regexp)
// Ignore { };
Ignore { “bind-utils”; };
// Do not try to update the following packages
// Hold { };
Hold {
”rh-postgres*”;
”postgresql*”;
”apache*”;
”proftp*”;
”qmail*”;
”vpopmail*”;
”ezmlm*”;
”sendmail*”;
”bind*”;
”XFree86-base-fonts*”;
”XFree86-font-utils*”;
”XFree86-libs*”;
”XFree86-libs-data*”;
”XFree86-xfs*”;
”XFree86-Xvfb*”;
MySQL*};
Page 29

Update of Operating Systems 29
Page 30

Parallels H-Sphere supports NAT (Network Address Translation) which allows you to
C H A P T E R 6
Network Address Translation (NAT)
use internal IPs in your local area network. When configuring Parallels H-Sphere, use
internal IPs in all instances, and Parallels H-Sphere will convert them into external IPs
for the DNS settings and control panel web interface.
To enable NAT support in Parallels H-Sphere:
1 Log into Control Panel server as cpanel user:
1. Log in as root first:
$ su -
2. Log in as the cpanel user:
# su -l cpanel
2 Create the ips-map.xml file in the
~cpanel/shiva/psoft_config/ directory in the following format:
<ips>
<ip ext=”external_ip” int=”internal_ip”/>
. . .
</ips>
Example:
<ips>
<ip ext=”65.219.197.236” int=”192.168.1.27”/>
<ip ext=”65.219.197.237” int=”192.168.1.28”/>
<ip ext=”65.219.197.238” int=”192.168.1.29”/>
<ip ext=”65.219.197.239” int=”192.168.1.30”/>
<ip ext=”65.219.197.242” int=”192.168.1.31”/>
<ip ext=”65.219.197.243” int=”192.168.1.32”/>
<ip ext=”65.219.197.244” int=”192.168.1.33”/>
</ips>
3 Set the following record in
~cpanel/shiva/psoft_config/hsphere.properties:
IPS-XML-FILENAME =
/hsphere/local/home/cpanel/shiva/psoft_config/ips-map.xml
4 Restart Parallels H-Sphere to apply changes. To do this, run under
root:
For Linux:
/etc/rc.d/init.d/httpdcp stop
killall -9 java
sleep 10
/etc/rc.d/init.d/httpdcp start
Page 31

Network Address Translation (NAT) 31
For FreeBSD:
In this chapter:
Configuring Newly Installed H-Sphere with NAT Support .................................. 31
Enabling NAT Support on a Live System ........................................................... 32
Configuring NAT Firewall ................................................................................... 33
Migrating IPs with NAT ...................................................................................... 33
/usr/local/etc/rc.d/apachecp.sh stop
killall -9 java
sleep 10
/usr/local/etc/rc.d/apachecp.sh start
To disable NAT support
1 Remove the line mentioned in step 3 above from
hsphere.properties.
2 Restart Parallels H-Sphere.
See below for particular cases of configuring NAT in your Parallels H-Sphere
cluster.
Configuring Newly Installed H-Sphere with NAT Support
To configure newly Installed H-Sphere with NAT support:
1 Create ips-map.xml file and configure hsphere.properties to
use it as specified in the parent topic.
2 In the E.Manager menu, add your physical and logical servers with the
corresponding internal IPs as described in Parallels H-Sphere Adding
Servers and Services Guide.
3 Go to E.Manager -> DNS Manager and add DNS records with internal IPs
as described in DNS Records section of Parallels H-Sphere Service
Administrator Guide.
Note: Internal IPs will be transformed to the corresponding external IPs in DNS
zones configuration. There will be only external IPs in DNS zones configuration.
Should you still have problems with resolving your servers after that, run DNS Creator
(on page 229) using the following command under the cpanel user:
java psoft.hsphere.tools.DNSCreator -m db -dz
Page 32

32 Network Address Translation (NAT)
Enabling NAT Support on a Live System
To add NAT support to a Parallels H-Sphere already configured with external IPs:
1 Create ips-map.xml file and configure hsphere.properties to
use it as specified in the parent topic.
2 Replace external IPs in E.Manager -> P.Servers and L.Servers with internal
IPs.
Note: These internal IPs should be of the same type (shared, dedicated) as the
corresponding external IPs.
Example: If there was a shared 64.10.10.10 external IP, the corresponding
192.128.10.10 internal IP should also be configured as a shared IP.
In such a case, there will be no need to recreate DNS.
3 Replace external IPs in E.Manager -> DNS Manager with the corresponding
internal IPs.
Note: Internal IPs will be transformed to the corresponding external IPs in DNS
zones configuration. There will be only external IPs in DNS zones configuration.
Should you still have problems with resolving your servers after that, run DNS Creator
(on page 229) using the following command under the cpanel user:
java psoft.hsphere.tools.DNSCreator -m db -dz
Page 33

Network Address Translation (NAT) 33
Configuring NAT Firewall
Some software (osCommerce, phpBB, and Parallels SiteStudio) connects to resources
by hostname (web.example.com, mysql.example.com). Since hostnames resolve
to external IPs, you need to configure your NAT firewall so that your physical servers
(web.example.com, mysql.example.com) can address themselves and each other
both by external and internal IPs.
Alternatively, if you have RedHat Linux running on all servers, you can add the
following rule to the iptables for each IP pair on every single box:
iptables -t nat -A OUTPUT -p tcp -d <external> -j DNAT—to <internal>
For example:
iptables -t nat -A OUTPUT -p tcp -d 65.219.197.236 -j DNAT—to 192.168.1.27 iptables
-t nat -A OUTPUT -p tcp -d 65.219.197.237 -j DNAT—to 192.168.1.28 iptables -t nat -A
OUTPUT -p tcp -d 65.219.197.238 -j DNAT—to 192.168.1.29 iptables -t nat -A
OUTPUT -p tcp -d 65.219.197.239 -j DNAT—to 192.168.1.30 iptables -t nat -A
OUTPUT -p tcp -d 65.219.197.242 -j DNAT—to 192.168.1.31 iptables -t nat -A
OUTPUT -p tcp -d 65.219.197.243 -j DNAT—to 192.168.1.32 iptables -t nat -A
OUTPUT -p tcp -d 65.219.197.244 -j DNAT—to 192.168.1.33
Migrating IPs with NAT
For IP migration with NAT, see the section on changing IPs (on page 42).
Page 34

This document explains how to automate adjusting your servers‟ time through Network
In this chapter:
NTP Time Servers ............................................................................................. 34
C H A P T E R 7
Server Time Synchronization
Time Protocol (NTP). Server time synchronization prevents various errors that you are
likely to run into unless your servers‟ time is correct. Automation of server time
synchronization is implemented through setting up crontab task for your NTP client.
To automate adjustment of your servers’ time through NTP:
1 Make sure you have got an NTP client software installed on your
server(s). If not, download it from www.ntp.org.
2 Choose time server(s) (on page 34) and add it to your NTP client
configuration.
3 Log into your servers as root and use the crontab -e command to
add an NTP cron task.
In the following example your server time is checked with a time
server every 4 hours:
# date syncronization
0 */4 * * * /usr/sbin/ntpdate ntps1-{0,1,2}.uni-erlangen.de
NTP Time Servers
The following links will take you to the lists of time server hosts to choose from.
Public NTP Pool Time Servers (http://ntp.isc.org/bin/view/Servers/NTPPoolServers)
Public NTP Secondary (stratum 2) Time Servers
(http://ntp.isc.org/bin/view/Servers/StratumTwoTimeServers)
Public NTP Primary (stratum 1) Time Servers
(http://ntp.isc.org/bin/view/Servers/StratumOneTimeServers)
To find the time servers that best suit your server location and other requirements, go
to http://ntp.isc.org/bin/view/Servers/WebSearch
Page 35

Parallels H-Sphere uses cron utility on Unix servers to schedule the automatic launch
In this chapter:
Control Panel Server Crons ............................................................................... 35
Web Server Crons ............................................................................................. 36
DNS Server Cron .............................................................................................. 36
Mail Server Crons .............................................................................................. 37
PostgreSQL/MySQL Server .............................................................................. 37
C H A P T E R 8
Cron Scripts
of the Parallels H-Sphere scripts for updating system information, collecting traffic,
analyzing logs, etc.
To view the list of cron jobs on a server, type the following command under root on this
server:
# crontab -l
Crontab enables you to set the sequence and regularity of launching the scripts. To edit
crontab list, type the following command under root:
# crontab -u root -e
For more details on editing cron, read man 5 crontab.
Below see the list of cron jobs for Parallels H-Sphere logical servers.
Control Panel Server Crons
30 5 * * * su -l cpanel -c ―java psoft.hsphere.TrafficLoader‖
0 4 * * * su -l cpanel -c ―java psoft.hsphere.UsageLoader‖
Here,
TrafficLoader is the Parallels H-Sphere Java utility to collect the traffic statistics
from the traffic logs to the Parallels H-Sphere database.
UsageLoader is the Parallels H-Sphere Java utility to collect disk usage statistics
into the Parallels H-Sphere database.
Page 36

36 Cron Scripts
Web Server Crons
*/5 * * * * nice -15 /hsphere/shared/scripts/cron/apache-restart.pl
20 */2 * * * nice -15 /hsphere/shared/scripts/cron/analyze.pl
*/5 * * * * /hsphere/shared/scripts/cron/ftp-restart.pl
0 2 * * * nice -15 /hsphere/shared/scripts/cron/cron_rotate.pl
0 3 * * * nice -15 /hsphere/shared/scripts/cron/ftp_anlz.pl
0 4 * * * nice -15 /hsphere/shared/scripts/cron/ftp_anlz_user.pl
0 6 * * * nice -15 /hsphere/shared/scripts/cron/mnogosearch_index.pl
Here,
apache-restart.pl is the Parallels H-Sphere script to restart Apache web
server; Apache is restarted only if the /hsphere/shared/scripts/apache-
reconfig script has been launched by Parallels H-Sphere beforehand.
analyze.pl is the Parallels H-Sphere Perl script to calculate the traffic.
ftp-restart.pl is the Parallels H-Sphere script to restart FTP.
cron_rotate.pl is the Parallels H-Sphere Perl script to collect and rotate user
traffic for external traffic calculation programs like Modlogan, Webalizer or Urchin.
ftp_anlz.pl is the Parallels H-Sphere script to analyze virtual FTP traffic and
write it to the Parallels H-Sphere statistics directory.
ftp_anlz_user.pl is the Parallels H-Sphere script to analyze FTP traffic and
write it to the Parallels H-Sphere statistics directory.
mnogosearch_index.pl is the Parallels H-Sphere Perl script to update the
MnoGoSearch index.
DNS Server Cron
*/1 * * * * [ ―x‗ps -ax |grep -v grep|grep named‗‖ = ―x‖ ] &&
/hsphere/shared/scripts/cron/dns_check
dns_check is the Parallels H-Sphere shell script to check DNS settings.
Page 37

Cron Scripts 37
Mail Server Crons
30 * * * * /hsphere/local/var/vpopmail/bin/clearopensmtp
*/20 * * * * /hsphere/local/sqwebmail/share/sqwebmail/cleancache.pl
0 3 * * * nice -15 /hsphere/shared/scripts/cron/mail_overlimit.pl
30 3 * * * nice -15 /hsphere/shared/scripts/cron/mail_anlz.sh
0 * * * * /hsphere/shared/bin/freshclam—quiet
Here,
clearopensmtp is the vpopmail utility to clean smtp logs.
cleancache.pl is the sqwebmail utility to clean the webmail cache.
mail_overlimit.pl is the Parallels H-Sphere Perl script to check overlimits on
the mail boxes.
mail_anlz.sh is the Parallels H-Sphere Perl script to analyze qmail traffic and
place it into the H-Shere statistics directory.
freshclam is the script to update ClamAV virus patterns.
PostgreSQL/MySQL Server
10 3 * * * nice -15 /hsphere/shared/scripts/cron/db_usage.pl
db_usage.pl is the Parallels H-Sphere Perl script to collect statistics on the database
usage for PostgreSQL and MySQL servers.
Page 38

This chapter dwells specifically on the issues of traffic logs and traffic calculation.
In this chapter:
Checking Traffic via Parallels H-Sphere Control Panel ...................................... 39
Checking Traffic on Physical Servers ................................................................ 39
Processing Traffic by Crons .............................................................................. 40
Parsing Traffic by TrafficLoader ......................................................................... 41
C H A P T E R 9
Traffic Calculation
Page 39

Traffic Calculation 39
Checking Traffic via Parallels H-Sphere Control Panel
To check traffic using the control panel:
1 Log into your administrator control panel.
2 Check the traffic by going to Reports -> Transfer Traffic Report.
Read more in Reports section of Parallels H-Sphere Service Administrator
Guide.
Checking Traffic on Physical Servers
Web, FTP and mail logs are located in the /hsphere/local/var/statistic
directory of the corresponding physical server.
Log are named as follows:
dd.mm.YYYY.txt - web logs
dd.mm.YYYY.gst.txt - ftp logs
dd.mm.YYYY.ftp.txt - virtual ftp logs
dd.mm.YYYY.qml - mail logs
where dd.mm.YYYY is the timestamp of log file creation date.
Here, mail logs are generated by the qmail server, and ftp logs by the proftpd utility.
Log files contain specially-formatted information tabulated as follows:
|name|xFer(kB)|Hits_All|Hits_HTML|
Here, name is the domain name, xFer is total traffic in kilobytes.
Processed traffic files are moved to the /hsphere/local/var/statistic/loaded
directory as .gz archives.
Refer to section Winbox Traffic Calculation (on page 330) to find out how traffic data on
Winbox is read using XMLs.
Page 40

40 Traffic Calculation
Processing Traffic by Crons
HTTP traffic
Please refer to Web Traffic Calculation (on page 144) for details.
User FTP traffic
Cron runs the /hsphere/shared/scripts/cron/ftp_anlz_user.pl script on
everyday basis for collecting user FTP traffic.
ftp_anlz_user.pl parses the /hsphere/local/var/proftpd/xferlog FTP
log file and writes FTP traffic statistics into the timestamp-named
/hsphere/local/var/statistic/dd.mm.YYYY.gst.txt statistics files.
Virtual FTP traffic
Cron runs the /hsphere/shared/scripts/cron/ftp_anlz.pl script on everyday
basis for collecting virtual FTP traffic.
ftp_anlz.pl parses the
/hsphere/local/var/proftpd/logs/{vhost_id}.ftp.log logs files for each
virtual FTP account and writes traffic statistics into the timestamp-named
/hsphere/local/var/statistic/dd.mm.YYYY.ftp.txt statistics files.
Mail traffic
Cron runs the /hsphere/scripts/cron/mail_anlz.pl script on everyday basis
to collect mail traffic. The script analyzes the /var/log/maillog Qmail log file and
collects mail statistics into the specially formatted dd.mm.YYYY.qml.txt files in the
Parallels H-Sphere statistics directory (/hsphere/local/var/statistic).
Page 41

Traffic Calculation 41
Parsing Traffic by TrafficLoader
1 TrafficLoader Parallels H-Sphere Java class is in charge of parsing
the server traffic. That‟s how it is launched by cron:
30 5 * * * su -l cpanel -c ‗java psoft.hsphere.TrafficLoader‘
TrafficLoader processes Web, mail, FTP and virtual FTP traffic in the formatted
statistics files located in the /hsphere/local/var/statistic directory and inserts
these lines into the translog table of the Parallels H-Sphere system database.
TrafficLoader also calls the /hsphere/shared/scripts/xfer_cat.pl script to
move the already loaded statistics files to the
/hsphere/local/var/statistic/loaded directory as .txt.gz archives.
Page 42

This chapter explains how to change IPs on Unix/Linux servers for Parallels H-Sphere
In this chapter:
Changing IPs on Systems Without NAT ............................................................ 42
Changing External IPs on Systems with NAT .................................................... 56
Changing Internal IPs on Systems With NAT .................................................... 57
Configuring Parallels H-Sphere to Work on Two Sets of IPs.............................. 57
In this section:
IP Migration Pre-requisites ................................................................................ 43
IP Migration Map File ........................................................................................ 44
IP Migration Step by Step .................................................................................. 46
C H A P T E R 10
IP Migration (Changing IPs)
2.4.x and up. If you have an older version, please get updated first.
Changing IPs on Systems Without NAT
Parallels H-Sphere IP migration is performed by means of Java IP Migrator called by
the IPMIGR wrapper available for download from http://download.hsphere.parallels.com
website. IP Migrator will:
change Parallels H-Sphere physical, logical, and system IPs
update IPs in Parallels H-Sphere database
change IPs in the system files except network startup configuration
update IP-dependent resources such as apache, FTP and DNS
IP Migrator does not migrate NIC system files to avoid potential problems with server
inaccessibility. These files must be migrated manually by the local administrator.
IP Migrator does no modify reverse DNS configuration because Parallels H-Sphere
doesn‟t manage reverse DNS. For information on reverse DNS configuration, you may
refer to www.tldp.org/HOWTO/DNS-HOWTO-5.html#ss5.3
Page 43

IP Migration (Changing IPs) 43
IP Migration Pre-requisites
Before you begin IP migration, do the following changes, and do not forget to undo
them after the migration:
1 Add the following line to the very beginning of the /hsphere/shared/scripts/apache-
reconfig script. This will prevent Apache from restarting gracefully after posting each
web site configuration:
exit 0
2 (Skip this step for IP Migrator 0.3 and up, and for Parallels H-Sphere 2.4.3
Patch 5. If you do the migration under FreeBSD, and IP to be bound is the
same as main IP, you need to perform this step notwithstanding the IP
Migrator version. Otherwise you system is at risk of get crashed.)
Add the following line to the very beginning of the
/hsphere/shared/scripts/ip-shared script. This will protect the main
Parallels H-Sphere IP.
exit 0
After that, replace the IP on the main network interface to the new IP for all boxes, and
set up the old IP as an alias for the new one.
Example:
eth0 Link encap:Ethernet HWaddr 00:D2:B5:A1:07:12
inet addr:[New_IP] Bcast:[New_Broadcast] Mask[New_NetMask]:
UP BROADCAST RUNNING MULTICAST MTU:1500 Metric:1
RX packets:269050319 errors:0 dropped:0 overruns:0 frame:11
TX packets:336024701 errors:0 dropped:0 overruns:19 carrier:0
collisions:0 txqueuelen:100
Interrupt:21 Base address:0x4000
eth0:0 Link encap:Ethernet HWaddr 00:D2:B5:A1:07:12
inet addr:[Old_IP] Bcast:[Old_Broadcast] Mask:[Old_NetMask]
UP BROADCAST RUNNING MULTICAST MTU:1500 Metric:1
Interrupt:21 Base address:0x4000
Important: If IP migration is performed whsphereapache.html#script_restarting_apache within one datacenter, make sure that your
servers can be accessed from the Internet at both old and new IPs. If you change to
IPs outside your datacenter, it would take a downtime before you make your servers
available on new IPs.
Page 44

44 IP Migration (Changing IPs)
IP Migration Map File
In this section:
IP Migration Map XML File ................................................................................ 45
Before you start IP migration, you may manually create an IP migration map file in the
cpanel user home directory ~cpanel/. The file contains the list of old IPs to be
migrated to new IPs. It can be either an XML file (on page 45), or a plain text file of the
following format:
IP_OLD1 IP_NEW1 [MASK_NEW1]
IP_OLD2 IP_NEW2 [MASK_NEW2]
...
IP_OLDn IP_NEWn [MASK_NEWn]
Specify the mask in the third column only if it differs from the default mask
(255.255.255.0) for this particular IP. Otherwise, omit it.
This manually created IP migration map file will be used by the Parallels H-Sphere IP
migrator (on page 48) script. IP migrator is able to convert plain text map files into XML
and provides interface to automatically create a ready-to-use map XML file according to
the admin‟s choice.
Important: IP migration map file must have the cpanel:cpanel ownership! Either
create it under the cpanel user (on page 72), or run under root:
chown cpanel:cpanel ipmap.xml
Page 45

IP Migration (Changing IPs) 45
IP Migration Map XML File
IP migration map XML file contains the set of IPs to be replaced with new ones. This
file must be created in the cpanel user home directory ~cpanel/ and must have
cpanel:cpanel ownership.
This document explains alternative ways of creating ipmigration.xml.
Creating ipmigration.xml Manually
IP migration XML has the following format:
<?xml version=”1.0”?>
<!DOCTYPE ips [
<!ELEMENT ips (ip+)>
<!ELEMENT ip (#PCDATA)>
<!ATTLIST ip name CDATA #REQUIRED>
<!ATTLIST ip new_ip CDATA #REQUIRED>
<!ATTLIST ip new_mask CDATA “[New_NetMask]”>
]>
<ips>
<!-- Delete the lines with IPs you don‟t want to migrate! -->
<ip name=”[Old_IP1]” new_ip=”[New_IP1]”/>
<ip name=”[Old_IP2]” new_ip=”[New_IP2]”/>
<ip name=”[Old_IP3]” new_ip=”[New_IP3]”/>
<ip name=”[Old_IP4]” new_ip=”[New_IP4]” new_mask=”[New_NetMask2]”/>
</ips>
In the DTD header of the XML file, specify what attributes will be provided with each IP.
Set [New_NetMask] to the default netmask value for new IPs:
<!ATTLIST ip new_mask CDATA “255.255.255.0”>
To set a different netmask for a particular IP, set the new_mask attribute in the ip tag
for that IP. Otherwise, omit the new_mask attribute.
In the <ips> ... </ips> block, list all old-new IP pairs, including users‟ dedicated
IPs. If you have specified the common netmask in the DTD header, you do not need to
set it in the definition line for each individual IP:
<ip name=”[Old_IP]” new_ip=”[New_IP]” />
If you have set new mask in the DTD header to #REQUIRED, you need to specify the
netmask parameter for each IP:
Page 46

46 IP Migration (Changing IPs)
<ip name=”[Old_IP]” new_ip=”[New_IP]” new_mask=”[New_NetMask]”/>
Creating ipmigration.xml by Parallels H-Sphere IP Migrator
IP Migrator allows you to create ipmigration.xml automatically when you perform
migration by running the IP migrator script (on page 48).
IP Migration Step by Step
The steps below are performed on the server with the Control Panel installed.
1 Log into the CP server as root:
# su -
2 Download IP Migrator:
# wget http://download.hsphere.parallels.com/shiv/IPMIGR-
0.9.1.tgz
3 Untar the archive:
# tar -zxf IPMIGR-x.x.tgz
where x.x is IP Migrator version.
4 Enter the IP Migrator directory:
# cd IPMIGR
5 Install the IP Migrator:
# make install
This will install the following files:
~cpanel/ipmigrator - IP migrator itself
~cpanel/IPMigratorFast.jar - makes Parallels H-Sphere related
changes: in the system database, configs, etc.
~cpanel/shiva/ipm/ipmigr - makes changes in service config files on
Parallels H-Sphere servers
6 Stop Parallels H-Sphere (on page 60)
7 Back up Parallels H-Sphere system database (on page 468)
8 Log in as the cpanel user (on page 72)
9 Run the IP Migrator script (on page 48). The IP Migrator script is
located in the cpanel home directory.
10 Start Parallels H-Sphere (on page 60)
11 Remove the following line from
/hsphere/shared/scripts/apache-reconfig and from
/hsphere/shared/scripts/ip-shared:
exit 0
Page 47

IP Migration (Changing IPs) 47
12 If the IPs have been migrated successfully and all IP-dependent
In this section:
Running the IP Migrator Script ........................................................................... 48
services seem to work fine, finish the migration by removing the old
IPs. To remove the old IPs, run:
./ipmigrator—clear-old-ips—xml=<ipm_xml>
Where <ipm_xml> is the IP migration map XML file that you used for the migration.
Example:
./ipmigrator—clear-old-ips—xml=ipm1.xml
Parallels H-Sphere version is: 2.4.3.503. The new
IPMigratorFast will be used.
Removing old IPs
Done
13 Run the following Java tool to regenerate all config.xml files on all
servers according to the Parallels H-Sphere system database:
java psoft.hsinst.boxes.ClusterPreparer
Page 48

48 IP Migration (Changing IPs)
Running the IP Migrator Script
In this section:
Step 1. Changing Physical Server IPs ............................................................... 49
Step 2. Preparing IP Migration Map ................................................................... 50
Step 3. Reposting configs .................................................................................. 51
Step 4. Final Check ........................................................................................... 52
Step 5. Changing System and Logical IPs ......................................................... 55
This instruction guides you step-by-step through running the IP Migrator script which is
the main part of the IP migration (on page 42) procedure. The IP Migrator script is
located in the cpanel home directory. To start running the script, type:
./ipmigrator
Carefully follow the error notifications. You may also find more detailed information on
the migration process in the ~cpanel/Migration.log and the
/var/log/hsphere/hsphere.log files.
IP migrator will guide you through the following steps. Let‟s take an example with the
following physical servers:
-----------------------------------------------------------------------
----
Server ID Server Name Server IP Address
-----------------------------------------------------------------------
----
22 ns4.vps.psoft 192.168.112.234
21 ns3.vps.psoft 192.168.114.233
20 cp.vps.psoft 192.168.112.232
Page 49

IP Migration (Changing IPs) 49
Step 1. Changing Physical Server IPs
Enter ID of the server you want to change IPs for.
Type [q] to quit the script or [-] to skip this step.
[IPMigrator]: 21
Enter new 192.168.112.233 IP for ns3.vps.psoft:
[IPMigrator]: 192.168.112.233
Uploading front-end migration scripts...
=== 192.168.112.233 ===
Page 50

50 IP Migration (Changing IPs)
Step 2. Preparing IP Migration Map
On this step, create or edit IP migration map. If you quit right after editing or creating
the file, your changes will not be lost.
Enter:
[f] to use existing IP migration map XML file (on page 45)
[l] to transform existing IP map plain text file with whitespace separated values to
XML format
[c] to create a new IP map XML structured file based on your Parallels H-Sphere
boxe(s) configuration
[e] to set the editor to open the IP map file with. By default, it is [vi]
[b] to go back to the previous step
[q] to quit the script
By default, script looks for the file in the current directory. Specify the full path if you
have it in a different location.
Examples:
[IPMigrator]: f
Current directory is: /hsphere/local/home/cpanel/
Enter the filename: ipm1.xml
[IPMigrator]: l
Current directory is: /hsphere/local/home/cpanel/
Enter the plain (text file with whitespace separated values) IP map file name to load
from: ipm1.txt
Current directory is: /hsphere/local/home/cpanel/
Enter the new (XML structured) IP map file name to load into: ipm1.xml
[IPMigrator]: c
Current directory is: /hsphere/local/home/cpanel/
Enter the plain IP map new file name be generated: ipm2.txt
Page 51

IP Migration (Changing IPs) 51
Step 3. Reposting configs
Important! If you are migrating IPs of your webserver(s), check the corresponding
logical server(s).
On this step, check logical web servers you want to repost apache configurations for.
Say, you have the following logical web servers:
-----------------------------------------------------------------------
----
ID Server Name Server Role Process
27 web2.vps.psoft web servers No
24 web.vps.psoft web servers No
31 web3.vps.psoft web servers No
Enter:
[server_id] ID of the server you want to add to the migration list
[-] to start the migration
[b] to go back to the previous step
[q] to quit the script Example:
[IPMigrator]: 31
Page 52

52 IP Migration (Changing IPs)
Step 4. Final Check
Warning! The rest of the steps imply physical changes. If you do not want the migration
to continue, make sure to quit the script now.
On this step check which files on your servers would be changed, except for Parallels
H-Sphere dependent resources.
Enter:
[server_id] ID of the server you want to preview the changes for
[-] to continue
[r] to roll the changes back
[b] to go back to the previous step
[q] to quit the script
[IPMigrator]: 320
Line 8: CP_HOST = 192.168.112.232
Line 119: PATH_SITE_STUDIO =
http://192.168.112.232:8080/studio/servlet/psoft.masonry.Builder
----
File /hsphere/local/home/cpanel/shiva/psoft_config/hsphere.properties
IP entries: --- 2
----------------
Line 2: 192.168.112.232:allow,RELAYCLIENT=””
Line 3: 192.168.112.233:allow,RELAYCLIENT=””
Line 4: 192.168.112.234:allow,RELAYCLIENT=””
----
File /hsphere/local/var/vpopmail/etc/tcp.smtp
IP entries: --- 3
----------------
Line 6: $cfgServers[1][‟host‟] = „192.168.112.233‟;
----
File /hsphere/shared/apache/htdocs/phpMyAdmin/config.inc.php
IP entries: --- 1
----------------
Line 21: <A href=”http://192.168.112.232/cgi-bin/sqwebmail”>SQWebMail - mail
client</A>><BR>
Line 22: <A href=”http://192.168.112.232/horde/index.php”>IMP - mail client</A><BR>
Page 53

IP Migration (Changing IPs) 53
Line 23: <A
href=”http://192.168.112.232:8080/psoft/servlet/psoft.hsphere.CP?action=change_mbo
x_password”>Change your POP3 password</A><BR>
----
File /hsphere/shared/apache/htdocs/index.html
IP entries: --- 3
----------------
Line 288: <VirtualHost 192.168.112.232>
Line 296: ServerName 192.168.112.232
Line 310: #<VirtualHost #192.168.112.232>
Line 318: #ServerName #192.168.112.232
----
File /hsphere/local/config/httpd/httpd.conf
IP entries: --- 4
----------------
Line 3: Bind 192.168.112.232
----
File /hsphere/local/config/ftpd/proftpd.conf
IP entries: --- 1
----------------
Line 4: 192.168.112.236;
Line 5: 192.168.112.232; };
----
File /etc/named.conf
IP entries: --- 2
----------------
Line 1: 192.168.112.236 255.255.255.0
Line 2: 192.168.112.232 255.255.255.0
Line 3: 192.168.112.232 255.255.255.0
----
File /hsphere/local/network/ips
IP entries: --- 3
----------------
Line 2: 192.168.112.236 vps1.psoft
Line 3: 192.168.112.232 vps1.psoft
Line 4: 192.168.112.232 cp.vps.psoft
Line 5: 192.168.112.232 cp.vps.psoft
Line 6: 192.168.112.236 cp.vps.psoft
Line 7: 192.168.112.232 cp.vps.psoft
Line 9: 192.168.112.232 cp.vps.psoft
Line 10: 192.168.112.236 cp.vps.psoft
Page 54

54 IP Migration (Changing IPs)
----
File /etc/hosts
IP entries: --- 8
----------------
Line 1: nameserver 192.168.112.232
Line 2: nameserver 192.168.112.236
Line 3: nameserver 192.168.112.233
Line 4: nameserver 192.168.112.234
----
File /etc/resolv.conf
IP entries: --- 4
----------------
----------------
If you want to proceed the IP changes in the files listed abowe use the following
command:
/hsphere/shared/scripts/ipm/ipmigr—action=process—scode=mncw < ipmigration.xml
If you don‟t want to proceed any changes you can clear the temporary files by running
the following command:
/hsphere/shared/scripts/ipm/ipmigr—action=clear—scode=mncw < ipmigration.xml
Page 55

IP Migration (Changing IPs) 55
Step 5. Changing System and Logical IPs
The process will take a while to complete.
Example:
Changing IPs in:
-----------------------------------------------------------------------
----
Parallels H-Sphere Database... Done
-----------------------------------------------------------------------
----
Server configuration files... Done
-----------------------------------------------------------------------
----
Changing IP Dependent resources... Done
-----------------------------------------------------------------------
----
Fixing service zones
Done
-----------------------------------------------------------------------
----
Fixing Custom records
Done
-----------------------------------------------------------------------
----
Reposting SSL CP VHost configs
Done
-----------------------------------------------------------------------
----
Press Enter to continue:
When you have finished running the IP Migrator script, go on with the IP migration (on
page 42).
Page 56

56 IP Migration (Changing IPs)
Changing External IPs on Systems with NAT
This section explains how to change your external IPs on a system using NAT (see
details here (on page 30)). You may need to follow this instruction when you move to a
different location and would like to preserve your internal IP settings.
1 Change IPs in ~cpanel/shiva/psoft_config/ips-map.xml and
~cpanel/shiva/psoft_config/hsphere.properties
2 Change IPs in Parallels SiteStudio configs
/hsphere/shared/SiteStudio/psoft_config/*. You can use a
simple script:
#!/bin/sh
if [ $# = 0 ] ; then
echo $”Usage: changeip.sh OldIP NewIP”
exit 1
fi
for i in /hsphere/shared/SiteStudio/psoft_config/*.properties
do
echo “Processing $i”;
echo “,s/$1/$2/g
wq” | ed $i
done
3 Change external IPs in httpd.conf on the web box.
4 Restart Parallels H-Sphere (on page 60)
5 Restart Apache (on page 410)
6 Log in as the cpanel user (on page 72) and recreate zones with the
dns creator:
java psoft.hsphere.tools.DNSCreator -m db -dz
Page 57

IP Migration (Changing IPs) 57
Changing Internal IPs on Systems With NAT
To change from one set of internal IPs to another:
1 Change the IPs in ~cpanel/shiva/psoft_config/ips-map.xml.
2 Change your internal IPs by following the instruction on Changing IPs
on Systems Without NAT (on page 42).
Configuring Parallels H-Sphere to Work on Two Sets of IPs
If you would like to ensure smooth change of IPs and have everything duplicated on the
old and new sets of IPs before making the switch, you need to do the following:
On the Web box:
1 Before the IP migration you need to copy the
/hsphere/local/config/httpd/sites directory to
/hsphere/local/config/httpd/sites.old to preserve your old
client‟s apache configs.
2 Go to /hsphere/local/config/httpd/sites.old and edit
index.conf changing sites to sites.old (cd
/hsphere/local/config/httpd/sites.old; perl -pi -e
„s/sites/sites.old/‟ index.conf)
3 Copy namevh.conf to namevh.old.conf
4 Proceed with the IP migration.
5 Add the following lines at the bottom of the
/hsphere/local/config/httpd/httpd.conf file:
Include /hsphere/local/config/httpd/sites.old/[0-9]*.conf
Include /hsphere/local/config/httpd/namevh.old.conf
On the DNS servers:
6 Add your old DNS IPs to the /etc/named.conf config to force your DNS
servers to listen to the old IPs.
7 Bind your old IPs to the NIC on your servers.
Page 58

This chapter explains how to start, stop, and restart daemon services on Parallels H-
C H A P T E R 11
Restarting Services
Sphere servers under Linux and FreeBSD.
Important: Do not stop services with kill, as it may cause information loss!!!
Note: You can also restart services from the Admin CP as described in section System
Service Management of Parallels H-Sphere Service Administrator Guide.
Below instructions do not apply to restarting DNS server (named) for Bind 8.x (on page
64).
To start services, run:
Linux:
# /etc/rc.d/init.d/<SERVICE> start
FreeBSD:
# /usr/local/etc/rc.d/<SERVICE> start
To stop services, run:
Linux:
# /etc/rc.d/init.d/<SERVICE> stop
FreeBSD:
# /usr/local/etc/rc.d/<SERVICE> stop
To restart services, run:
Linux:
# /etc/rc.d/init.d/<SERVICE> restart
FreeBSD:
# /usr/local/etc/rc.d/<SERVICE> restart
An alternative method - and often more appropriate - is to stop and then start the
service:
Linux:
# /etc/rc.d/init.d/<SERVICE> stop
# sleep 10
# /etc/rc.d/init.d/<SERVICE> start
FreeBSD:
Page 59

Restarting Services 59
# /usr/local/etc/rc.d/<SERVICE> stop
Service
Linux
FreeBSD
Parallels H-Sphere
(tomcat)
httpdcp
apachecp.s
h
Parallels H-Sphere
Database
(PostgreSQL)
postgre
sql
010.pgsql.
sh
Apache
httpd
apache.sh
FTP
proftpd
proftpd.sh
Qmail
qmaild
qmaild.sh
SpamAssasin
spamd
spamd.sh
ClamAV
clamd
clamd.sh
PostgreSQL (User DB)
postgre
sql
010.pgsql.
sh
MySQL
mysqld
mysql-
server.sh
DNS (Bind 9.3 and up (on
page 216))
named
named.sh
ImapProxy
imappro
xy
imapproxy.
sh
In this chapter:
Restarting Parallels H-Sphere Control Panel ..................................................... 60
Restarting Parallels H-Sphere Database ........................................................... 60
Restarting Web Server ...................................................................................... 61
Restarting PostgreSQL Server .......................................................................... 61
Restarting Mail Server ....................................................................................... 63
Restarting MySQL Server .................................................................................. 63
Restarting Named ............................................................................................. 64
# sleep 10
# /usr/local/etc/rc.d/<SERVICE> start
Note: While restarting Parallels H-Sphere (on page 60), run killall -9 java after
you stop and before you start CP.
Warning: Do not use kill -9 to stop named, as it may cause information loss!
Following are the commands to put in place of <SERVICE>:
Page 60

60 Restarting Services
Restarting Parallels H-Sphere Control Panel
To restart Parallels H-Sphere Control Panel:
1 Log into the CP server as root.
2 Run:
Linux:
/etc/rc.d/init.d/httpdcp stop
/etc/rc.d/init.d/httpdcp start
FreeBSD:
/usr/local/etc/rc.d/apachecp.sh stop
/usr/local/etc/rc.d/apachecp.sh start
Restarting Parallels H-Sphere Database
Parallels H-Sphere database is used to store system data. It is not used for hosting.
Usually, it is located on the same server as the control panel and is installed and
executed under user pgsql (FreeBSD) or postgres (Linux).
To restart the database, execute:
Linux:
# /etc/rc.d/init.d/postgresql stop
# sleep 1
# /etc/rc.d/init.d/postgresql start
FreeBSD:
# /usr/local/etc/rc.d/010.pgsql.sh stop
# sleep 1
# /usr/local/etc/rc.d/010.pgsql.sh start
Page 61

Restarting Services 61
Restarting Web Server
To restart Web server:
1 Login as root.
2 Execute the following command:
Linux:
# /etc/rc.d/init.d/httpd stop
# sleep 10
# /etc/rc.d/init.d/httpd start
FreeBSD:
# /usr/local/etc/rc.d/apache.sh restart
To restart FTP, run:
Linux:
# /etc/rc.d/init.d/proftpd stop
# sleep 1
# /etc/rc.d/init.d/proftpd start
FreeBSD:
# /usr/local/etc/rc.d/proftpd restart
Restarting PostgreSQL Server
To start PostgreSQL server, run:
Linux:
# /etc/rc.d/init.d/postgresql start
FreeBSD:
# /usr/local/etc/rc.d/010.pgsql.sh start
To stop PostgreSQL, run:
Linux:
# /etc/rc.d/init.d/postgresql stop
FreeBSD:
# /usr/local/etc/rc.d/010.pgsql.sh stop
To restart PostgreSQL, run:
Linux:
# /etc/rc.d/init.d/postgresql restart
FreeBSD:
Page 62

62 Restarting Services
# /usr/local/etc/rc.d/010.pgsql.sh stop
# sleep 10
# /usr/local/etc/rc.d/010.pgsql.sh start
Page 63

Restarting Services 63
Restarting Mail Server
To restart the mail server
1 Login as root
2 Execute the following command:
Linux:
# /etc/rc.d/init.d/qmaild stop
# sleep 1
# /etc/rc.d/init.d/qmaild start
FreeBSD:
# /usr/local/etc/rc.d/qmaild.sh stop
# sleep 1
# /usr/local/etc/rc.d/qmaild.sh start
To restart the auth daemon for sqWebMail under Linux, run:
# /hsphere/local/sqwebmail/libexec/authlib/authdaemond restart
Restarting MySQL Server
To start MySQL server, run:
Linux:
# /etc/rc.d/init.d/mysqld start
FreeBSD:
# /usr/local/etc/rc.d/mysql-server.sh start
To stop MySQL, run:
Linux:
# /etc/rc.d/init.d/mysqld stop
FreeBSD:
# /usr/local/etc/rc.d/mysql-server.sh start
To restart MySQL, run:
Linux:
# /etc/rc.d/init.d/mysqld restart
FreeBSD:
# /usr/local/etc/rc.d/mysql-server.sh start stop
# sleep 10
# /usr/local/etc/rc.d/mysql-server.sh start start
Page 64

64 Restarting Services
Restarting Named
To start, stop, or restart named on the Parallels H-Sphere DNS server:
1 Log in as root.
2 Run the respective command below.
Warning: Do not use kill -9 to stop named, as it may cause information loss!!!
Linux:
starting: /etc/rc.d/init.d/named start
stopping: /etc/rc.d/init.d/named stop
restarting: /etc/rc.d/init.d/named restart
FreeBSD:
For Bind 9.3 and up (on page 216):
starting: /usr/local/etc/rc.d/named.sh start
stopping: /usr/local/etc/rc.d/named.sh stop
restarting: /usr/local/etc/rc.d/named.sh restart
For Bind 8.x:
starting: /usr/sbin/named -u named
stopping: /usr/sbin/ndc stop -u named
restarting: /usr/sbin/ndc restart -u named
Warning: Without “-u named”, the command will run under root.
Usually, a Parallels H-Sphere DNS server contains a cron DNS check which starts
every 1 or 2 minutes and, if named is not started, starts it. Therefore, do not feel
alarmed if you stop named and see that it keeps working for another several minutes.
Page 65

Control Panel (CP) is the Parallels H-Sphere logical representation for managing
In this chapter:
Understanding Control Panel Server Configuration ........................................... 66
Logging in as the cpanel User ........................................................................... 72
Logging into Parallels H-Sphere System Database ........................................... 72
Launching Control Panel Cron Jobs .................................................................. 72
Configuring Tomcat ........................................................................................... 73
Running Java Command Line Tools .................................................................. 76
Securing Your CP Server with SSL ................................................................... 91
Upgrading Java ................................................................................................. 94
Converting Parallels H-Sphere System Database from MS SQL to PgSQL ....... 97
Upgrading System Postgres .............................................................................. 100
Converting Parallels H-Sphere Database To UNICODE .................................... 102
Accelerating Control Panel ................................................................................ 105
Changing CP URL ............................................................................................. 113
Migrating Control Panel Server .......................................................................... 117
Generating SSH Keys for Parallels H-Sphere Servers ...................................... 118
Encrypting Trouble Tickets ................................................................................ 120
Customizing Domain Registration Lookup Script ............................................... 123
C H A P T E R 12
Control Panel Server
servers and hosting resources via the web interface. It is implemented as a Java servlet
that runs on its own Apache server. CP is a separate logical server and is included in
every Parallels H-Sphere configuration.
Page 66

66 Control Panel Server
Understanding Control Panel Server
In this section:
Installed Software .............................................................................................. 66
Interaction Between Servers.............................................................................. 67
Location of CP Files and Directories.................................................................. 67
The Parallels H-Sphere Configuration File ......................................................... 68
Control Panel Apache Server Configuration ...................................................... 68
Control Panel Back-End Servlet Engine ............................................................ 68
Reseller Configuration ....................................................................................... 68
CP SSL Configuration ....................................................................................... 69
CP Apache Log Files ......................................................................................... 69
CP Traffic Calculation ........................................................................................ 70
The Parallels H-Sphere System Database ........................................................ 70
CP Mail Queue .................................................................................................. 71
Configuration
This section provides the necessary information you need to know about the
configuration of Parallels H-Sphere control panel server.
Installed Software
On control panel server the following software is used:
Apache server version 1.3.x and 2.2.xSSL support: OpenSSL
CP back-end servlet engine: Jakarta Tomcat (on page 73)
System database: PostgreSQL 7.4.x and up
SiteStudio - site builder optionally installed with H-Sphere on the CP server.
Page 67

Control Panel Server 67
Interaction Between Servers
Servers in H-Sphere clusters communicate only through the Control Panel. There is no
way for servers like web and DNS exchange commands directly.
To communicate with Linux/Unix servers, CP uses Shell or Perl scripts via SSH
protocol (port 22) as the cpanel user.
Communication between the CP and Windows servers is performed through the SOAP
protocol, http://www.w3.org/TR/soap/, (port 10125) which allows for cross-platform
exchange of data in XML documents via HTTP.
Location of CP Files and Directories
By default, the cpanel user home directory is /hsphere/local/home/cpanel.
There you will find the following files and directories:
apache - CP Apache installation
apache/etc - CP Apache configuration
apache/etc/httpd.conf - CP Apache configuration file
shiva - H-Sphere related binary and config files
shiva/psoft_config - H-Sphere config files
shiva/psoft_config/hsphere.properties - H-Sphere config file
shiva/psoft_config/HS_VERSION - file that contains version number of H-
Sphere
shiva/shiva-templates - H-Sphere templates location, DocumentRoot for
Apache server.
shiva/shiva-templates/index.html - Redirect to control panel; served
when the http://cp.domain.com:8080/ CP URL is accessed
/hsphere/shared/SiteStudio/psoft_config/masonry.properties -
SiteStudio config file (could be on a different server)
IMPORTANT: To make changes in these files, log into the CP server as the cpanel
user.
Page 68

68 Control Panel Server
The Parallels H-Sphere Configuration File
The H-Sphere configuration file should be located at
~cpanel/shiva/psoft_config/hsphere.properties
1 CP URL configuration - URL by which H-Sphere is called:
CP_HOST = cp.domain.com—host name
CP_PORT = 8443 -- port
CP_PROTOCOL=https:// -- protocol
CP_URI = /psoft/servlet/psoft.hsphere.CP
Notes:
This is not the only place where those settings have to be altered.
URI cannot be changed here at the moment.
Make sure that DNS is properly configured if you want to change domain.
Make sure to alter Apache if you want to change domain and port.
2 Database settings
3 Log file:
log4j.appender.A1.File=/var/log/hsphere/hsphere.log - location of
the log file.
Control Panel Apache Server Configuration
CP Apache home directory is /hsphere/local/home/cpanel/apache.
All CP Apache server configurations are placed into the etc/jserv subdirectory of the
Apache home directory: /hsphere/local/home/cpanel/apache/etc/jserv.
This directory also has its symlink:
/hsphere/local/home/cpanel/apache/conf.
Control Panel Back-End Servlet Engine
CP server uses Jakarta Tomcat servlet engine and is automatically installed with
Tomcat (on page 73) embedded.
Reseller Configuration
/hsphere/local/home/cpanel/apache/etc/sites/ contains resellers‟ SSL
and virtual host configuration.
/hsphere/local/home/cpanel/apache/etc/{reseller_main_account_
name}.conf - reseller Apache virtual host configuration file.
Page 69

Control Panel Server 69
/hsphere/local/home/cpanel/apache/etc/{reseller_main_account_
name}/ - reseller SSL directory.
Reseller SSL Configuration
If SSL is enabled for reseller, the following files are placed into the reseller SSL
directory:
server.crt - reseller SSL certificate
server.key - reseller SSL private key
CP SSL Configuration
In the /hsphere/local/home/cpanel/apache CP Apache home directory:
etc/ssl.crt/server.crt - file with server SSL certificates.
etc/ssl.csr/server.csr - file with SSL signing request.
etc/ssl.key/server.key - file with SSL/RSA private key.
CP Apache Log Files
Log files are located in the /hsphere/local/home/cpanel/apache/logs
directory.
Page 70

70 Control Panel Server
CP Traffic Calculation
Traffic generated from browsing the Control Panel is not included in the summary
traffic. To track it, Parallels H-Sphere owners may set up any third-party utilities.
The Parallels H-Sphere System Database
The Parallels H-Sphere system database is used to store system data. In normal
Parallels H-Sphere configuration, it runs on PostgreSQL server. Usually, the system
database is located on the same server with the Control Panel.
The system database is not for user hosting! PostgreSQL hosting server cannot be
installed on the same box with the system database!
Note: The Parallels H-Sphere database is executed under the pgsql or postgres
user.
The System Database Settings
Database settings in hsphere.properties (this should be enough to connect to db):
DB_DRIVER = org.postgresql.Driver
DB_URL = jdbc:postgresql://127.0.0.1/hsphere - the system database
name, usually hsphere
DB_USER = wwwuser - the system db user name, usually wwwuser
DB_PASSWORD = your_db_password - the system db user password
DB_NEWID = SELECT nextval(“{0}”)
Logging into the System Database
To log into the system database:
1 Login as the cpanel user (on page 72) to the server where the system
database is located (usually, CP server).
2 Enter the hsphere database (usually, under the wwwuser user name):
# psql hsphere [user_name]
See also the instructions on:
restarting the system database (on page 60)
backing up the system database (on page 468)
upgrading the system PostgreSQL (on page 100)
the system database optimization (on page 105)
PostgreSQL localization (on page 249) (choosing the language for
PostgreSQL)
Page 71

Control Panel Server 71
VACUUM Utility
The Postgres VACUUM instruction allows cleaning up the server transactions. Enter
the psql server:
# psql hsphere wwwuser
and type in the password set in hsphere.properties.
In the psql command line, type the „vacuum full‟ command:
vacuum full;
The command may vary in different versions of Postgres.
Note: vacuum is a time-consuming procedure; it may take up to several hours to
complete.
CP Mail Queue
The mail queue file is assigned to store unsent CP messages (e.g., trouble tickets,
system notifications, mass mail, etc.) when CP is restarted - formerly, they were lost
after CP restart. Mail queue location is set in hsphere.properties:
MAIL_SWP=/hsphere/local/home/cpanel/shiva/mail.swp
Page 72

72 Control Panel Server
Logging in as the cpanel User
Parallels H-Sphere control panel runs under the cpanel user on the CP server. You
need to log in as cpanel to perform many administrative tasks, such as CP
configuration, customization, access the system databse, running console Parallels HSphere java tools, and many others.
Under cpanel, Parallels H-Sphere control panel communicates with other Parallels HSphere boxes via SSH.
To log in as the cpanel user:
1 Log in as root first:
$ su -l
2 Log in as the cpanel user:
# su -l cpanel
Logging into Parallels H-Sphere System Database
To run SQL queries against the Parallels H-Sphere system database, you need to be
logged into Parallels H-Sphere system database.
To log into Parallels H-Sphere System Database:
1 Log in as root on the CP server:
$ su -
2 Log in as the cpanel user:
# su -l cpanel
3 Connect to the system database:
# psql -d hsphere wwwuser
Launching Control Panel Cron Jobs
Along with the cron scripts (on page 35) that Parallels H-Sphere puts into its physical
servers‟ crontabs, there are several background jobs that are executed by Parallels
H-Sphere on the Control Panel server:
Accounting - does recurrent billing for end users
OverLimitCron - checks that the account is not going over the limit
ResellerCron - does billing for resellers
TrialCron - suspends expired trial accounts
RevenueCron - calculates summary billing info
Page 73

Control Panel Server 73
ContentMovingCron - completes the process of moving user content
FailedSignupsCron - sends emails about failed signups (every 5 minutes)
TTAutocloseCron - closes trouble tickets answered certain time ago
VPSCron - queries the status of creating virtual servers (every 4 minutes)
ecCron - processes the external_credits table and adds payments performed
within an external payment system outside Parallels H-Sphere to this table as the
account credits, thus integrating external payments into Parallels H-Sphere. Read
more about external credits configuration in External Credits section of Parallels HSphere Developer Guide.
These cron processes use the last_start table in the Parallels H-Sphere database.
This table contains the following fields:
name varchar(20) NOT NULL PRIMARY KEY,
value timestamp,
last_user int8
When Parallels H-Sphere is restarted, the values are read from this table for each cron:
name - CP cron job name as in the list above (corresponds to the cron tag‟s name
attribute in cron XML configuration file)
value - last time that cron was executed
last_user - user_id of the last user that was calculated with the cron (used only
for accounting and overlimit).
CP Cron XML Configuration Files
CP cron settings are defined and customized in the corresponding XML configuration
file described in CP Cron Configuration section of Parallels H-Sphere Developer
Guide. You can add new custom CP crons according to the instructions from Adding
Custom CP Cron Jobs of Parallels H-Sphere Developer Guide and/or change cron job
settings such as priority, starting time and period. Such customization can also be done
by means of Parallels H-Sphere packages (see Building Packages section of Parallels
H-Sphere Developer Guide).
Background Job Manager
Background Job Manager is a utility that allows you to enable, start and disable
selected cron jobs from the CP interface. Cron jobs are available from the Admin
control panel, the Background Job System section.
Configuring Tomcat
Tomcat installation is located in the /hsphere/local/home/cpanel/jakarta
directory.
Page 74

74 Control Panel Server
Important: The core Parallels H-Sphere directories such as shiva, shivatemplates, psoft, and psoft-config are located in the
/hsphere/local/home/cpanel/hsphere/WEB-INF/classes/ directory with
Parallels H-Sphere classes run by Tomcat. Symlinks to these new locations are put in
place of the old directories to preserve Parallels H-Sphere integrity with previous
versions‟ configuration.
Tomcat Configuration Files
Tomcat configuration files are located in the
/hsphere/local/home/cpanel/jakarta/conf directory:
/hsphere/local/home/cpanel/jakarta/conf/server.xml - XML config
file for Tomcat;
/hsphere/local/home/cpanel/hsphere/WEB-INF/web.xml - XML
configuration file where CP servlet configuration is set;
/hsphere/local/home/cpanel/apache/etc/mod_jk.conf - mod_jk
configuration. mod_jk is a Tomcat-Apache plug-in that handles the communication
between Tomcat and Apache. For more details, see Apache documentation on
mod_jk (http://jakarta.apache.org/tomcat/tomcat-3.3-doc/mod_jk-howto.html).
Tomcat Log File
Tomcat log file is
/hsphere/local/home/cpanel/jakarta/logs/catalina.out.
Jakarta connector log is
/hsphere/local/home/cpanel/apache/logs/mod_jk.log.
Restarting Tomcat
To stop Tomcat:
Run:
/hsphere/local/home/cpanel/jakarta/bin/catalina.sh stop
To start Tomcat:
Run:
/hsphere/local/home/cpanel/jakarta/bin/catalina.sh start
Tomcat is also restarted when restarting Parallels H-Sphere (Tomcat is restarted
together with CP Apache):
/etc/init.d/httpdcp restart
Note: Sometimes you might need to restart only CP Apache, keeping Tomcat running.
Then, use the following option:
/etc/init.d/httpdcp restartapache
Page 75

Control Panel Server 75
Customizing Tomcat Environment Variables
The file ~cpanel/setenv.sh is designed to customize Tomcat environment
variables.
For example, to allocate Java memory in the range between 64 MB and 512 MB:
1 Log in as cpanel user (on page 72).
2 Stop Tomcat as described above.
3 Open ~cpanel/setenv.sh:
• bash-2.05b$ vi ~cpanel/setenv.sh
Set the following line in the file:
export CATALINA_OPTS=‖-Xms64M -Xmx512M‖
4 Start Tomcat. You will see something like this:
Using external settings -Xms64M -Xmx512M
+ java version 1.4.x
Using CATALINA_BASE: /hsphere/local/home/cpanel/jakarta
Using CATALINA_HOME: /hsphere/local/home/cpanel/jakarta
Using CATALINA_TMPDIR: /hsphere/local/home/cpanel/jakarta/temp
Using JAVA_HOME: /usr/java/jdk
5 Check Java to make sure the custom settings are applied:
• bash-2.05b$ ps auwx | grep java
cpanel 3010 99.9 29.6 436776 27652 pts/0 S 05:54 0:09
/usr/java/jdk/bin/java -Xms64M -Xmx512M Djava.awt.headless=true Djava.endorsed.dirs=/hsphere/local/home/cpanel/jakarta/common/
endorsed -classpath
/usr/java/jdk/lib/tools.jar:/hsphere/local/home/cpanel/jakarta
/bin/bootstrap.jar:/hsphere/local/home/cpanel/j
cpanel 3020 0.0 0.7 3680 664 pts/0 S 05:54 0:00 grep java
Page 76

76 Control Panel Server
Running Java Command Line Tools
In this section:
DNSCreator ....................................................................................................... 77
IPMigratorFast ................................................................................................... 78
PhysicalCreator ................................................................................................. 79
PostApacheConfigs ........................................................................................... 80
PostFTPConfigs ................................................................................................ 80
ServerAliasesRenamer...................................................................................... 81
ChangeLServerId .............................................................................................. 82
MIVAEmpresaFix .............................................................................................. 82
KeyPairGenerator .............................................................................................. 83
PGPEncrypter ................................................................................................... 83
PGPMessageSigner .......................................................................................... 83
PGPMessageVerify ........................................................................................... 84
RepostResellerSSLConfigs ............................................................................... 84
ServiceZoneRenamer ....................................................................................... 85
BillingEraser ...................................................................................................... 85
SetQuota ........................................................................................................... 86
UrchinReconfig .................................................................................................. 86
OffLogs ............................................................................................................. 87
Reset Balance ................................................................................................... 88
RegenerateIpsFile ............................................................................................. 88
LicenseExtractor................................................................................................ 89
VPSConvertor24_25 ......................................................................................... 89
MailRelayCorrector ............................................................................................ 90
This document lists java command line tools that come with the standard Parallels HSphere installation.
IMPORTANT: Before running a Java tool, make sure to log into CP server as the
cpanel user: su -l cpanel
Page 77

Control Panel Server 77
DNSCreator
NAME: psoft.hsphere.tools.DNSCreator - Parallels H-Sphere DNS zones
recreator.
USAGE: java -Xms64M -Xmx512M psoft.hsphere.tools.DNSCreator -m
creation_method [-dz] -z zonename
OPTIONS:
m| creation method. Possible values: db or rand:
db - pick NS servers as they are defined in the Parallels H-Sphere database
rand - pick NS servers randomly
dz|--delete_zones - delete zones first. Add this option only if such zones
already exist. With this option, DNS creation will take at least twice more time.
lids|--logical-servers - process zones which are on the logical servers with
the specified IDs. (This option makes sense if you have more than four logical name
servers with clearly defined Used By roles.)
pip|--pServerIP - specifies a physical server by its primary IP. All necessary
logical server IDs are chosen automatically. Often -pip is used as an alternative to
-lids.
z|--zone - recreate only one specified zone. Without this option, all zones will be
recreated.
Note: If both lids and -z parameters are specified, the -z parameter will be
ignored.
The tool also accepts zone names separated by line breaks:
java -Xms64M -Xmx512M psoft.hsphere.tools.DNSCreator -m creation_method [-dz] <
filename
where filename is the name of the file which contains zone names separated by line
breaks.
DNS Creator is used in Single DNS Configuration (on page 219), Changing IPs on
Systems Using NAT (on page 42), Moving DNS (on page 223) and in Moving Mail
Accounts (on page 207).
Page 78

78 Control Panel Server
IPMigratorFast
NAME: psoft.hsphere.tools.IPMigratorFast - Parallels H-Sphere IP migration utility
SYNOPSIS:
java -Xms64M -Xmx512M psoft.hsphere.tools.IPMigratorFast [options]
ipmigration.
OPTIONS:
help - shows this screen
ip-change - change IP
repost-configs - repost IP dependemd resources
recreate-zone - change and repost DNS records
service-zone - change service zone server IP
custom-rec - process service DNS records
lServerIds=,,..., - to specify logical server ids
repost-cp-ssl - Repost SSL CP VHost configs
clear-old-ips - remove old ips from database and servers
Page 79

Control Panel Server 79
PhysicalCreator
Physical Creator is a java class that generates web hosting resources and
configurations on web, win, and mail servers using the data in the Parallels H-Sphere
system database. This utility is used to recover and migrate user accounts. It is
included into standard Parallels H-Sphere installation.
To run Physical Creator:
1 Log into the control panel server as cpanel (on page 72).
2 Back up the content of the ~cpanel/shiva/psoft/ directory.
3 Run Physical Creator:
java -Xms64M -Xmx512M psoft.hsphere.tools.PhysicalCreator
OPTIONS
where:
Xms64M - recommended minimum memory for this process
Xmx512M - recommended maximum memory for this process OPTIONS:
-h|--help - shows the list of available options
-rg|--rgroup - resource group to perform operations with The following
resource groups are allowed:
unixweb - Unix virtual hosting resources
winweb - Windows virtual hosting resources
mysql - MySQL resources
mail - Mail resources
-co|--create-only - performs creation resources routines only
-do|--delete-only - performs delete resources routines only
-rc|--recreate - performs both delete and creation resources routines
-lid|--lserverId - process accounts on logical server with given number
-accs|--accounts - account IDs separated by comma, e.g.:
java -Xms64M -Xmx512M psoft.hsphere.tools.PhysicalCreator -rg
winweb -co -lid 26 -accs 1725895 > creator.log 2>&1 &
-st|--start-from - account ID. Process will start from this account ID. E.g.:
java -Xms64M -Xmx512M psoft.hsphere.tools.PhysicalCreator -rg
winweb -co -lid 26 -st 1590055 > creator.log 2>&1 &
Here is another example of the entire command:
bash-2.05a$ java psoft.hsphere.tools.PhysicalCreator -rg
unixweb -co -lid 25
This command will create:
empty home dirs
Page 80

80 Control Panel Server
default configuration of FTP and HTTP virtual hosts on unix logical server with
ID 25
If PhysicalCreator hangs on one of the accounts, kill it, debug the issue, and then
resume the process starting with this account, e.g.:
java -Xms64M -Xmx512M psoft.hsphere.tools.PhysicalCreator -rg
winweb -co -lid 26 -st 1590055 > creator.log 2>&1 &
4 Restore the backup of the ~cpanel/shiva/psoft/ directory to the
original (recovery) or target (move) location.
5 Restart Parallels H-Sphere (on page 60).
PostApacheConfigs
Usage:
java -Xms64M -Xmx512M psoft.hsphere.tools.PostApacheConfigs [-lid n ] [
-ic ]
-lid|--lserverid n work only on accounts on logical server with passed
number
-ic|--initcontent initialize content
-h|--help print this message
PostFTPConfigs
NAME:
psoft.hsphere.tools.PostFTPConfigs - Parallels H-Sphere virtual FTP hosts
generator utility
SYNOPSIS:
java -Xms64M -Xmx512M psoft.hsphere.tools.PostFTPConfigs options
OPTIONS:
-h|--help - shows this screen
-acc|--acountId number - process only account with given number
-lid|--lserverId - process only accounts on logical server with given number
-all|--all - process all virtual FTPs
Page 81

Control Panel Server 81
ServerAliasesRenamer
NAME:
psoft.hsphere.tools.ServerAliasesRenamer
This Parallels H-Sphere tool recreates server aliases for resellers.
SYNOPSIS:
java -Xms64M -Xmx512M psoft.hsphere.tools.ServerAliasesRenamer
[options]
Usage:
java -Xms64M -Xmx512M psoft.hsphere.tools.ServerAliasesRenamer
OPTIONS:
--help - shows this screen
--xml - run the tool for determined xml file
--lserver ... - run the tool for determined Logical Server IDs
Page 82

82 Control Panel Server
ChangeLServerId
NAME:
psoft.hsphere.tools.ChangeLServerId - changing logical server id in Parallels
H-Sphere database
SYNOPSIS:
java -Xms64M -Xmx512M psoft.hsphere.tools.ChangeLServerId
[options]
OPTIONS:
--help - shows this screen
-a|--account ACCOUNT_ID -f|--from LOGICAL_SERVER_ID_1 -t|--to
LOGICAL_SERVER_ID_2
where
ACCOUNT_ID - id of the account you want to change;
LOGICAL_SERVER_ID_1 - id of the logical server you want to change from;
LOGICAL_SERVER_ID_2 - id of the logical server you want to change to;
SAMPLE:
java -Xms64M -Xmx512M psoft.hsphere.tools.ChangeLServerId -a 1000 -f 1 -t 2
This tool is also used in Moving Mail Accounts (on page 207).
MIVAEmpresaFix
“MIVAEmpresaFix” utility.
Adds MivaEmpresa resource to the plans
Adds this resource to users which already have MivaMerchant in use.
Works for Unix and Windows plans
Usage:
java -Xms64M -Xmx512M psoft.hsphere.tools.MIVAEmpresaFix
Page 83

Control Panel Server 83
KeyPairGenerator
Parallels H-Sphere PGP key pair generator.
USAGE:
java -Xms64M -Xmx512M psoft.hsphere.tools.KeyPairGenerator
-i|--identification <youridentification string>
-s|--subkeyidentification <your session key identification>
-e|--encryptphrase <phrase for encryption/decryption private key>
-prf|--privatekeyfile <file where private key will be saved>
-pcf|--publickeyfile <file where public key will be saved>
This tool is used in PGP Encryption in Trouble Tickets (on page 120).
PGPEncrypter
java -Xms64M -Xmx512M psoft.hsphere.tools.PGPEncrypter
-m “This is a message to encrypt”
-f “This is a file where encrypted phrase will be saved”
-k “/path/to/PGP_Public_Key/file”
This tool is used for PGP Encryption in Trouble Tickets (on page 120).
PGPMessageSigner
Misconfiguration Parallels H-Sphere PGP message signer.
Usage:
java -Xms64M -Xmx512M psoft.hsphere.tools.PGPMessageSigner
-m|--message <Message to sign> or -mf|--messagefile
</path/to/file/with/message/to/sign>
-f|--file </path/to/file/for/signed/message>
-k|--key </path/to/private/key/file>
-p|--codephrase <private code phrase>
Page 84

84 Control Panel Server
PGPMessageVerify
Misconfiguration Parallels H-Sphere PGP message verify.
Usage:
java -Xms64M -Xmx512M psoft.hsphere.tools.PGPMessageVerify
f|--messagefile </path/to/file/for/signed/message>
k|--key </path/to/public/key/file>
RepostResellerSSLConfigs
NAME:
psoft.hsphere.tools.RepostResellerSSLConfigs This Parallels H-Sphere tool recreates
virtual host config files for resellers.
SYNOPSIS:
java -Xms64M -Xmx512M psoft.hsphere.tools.RepostResellerSSLConfigs
[options]
OPTIONS:
help - shows this screen
process - run the tool for all config files
reseller <res_name_1> <res_name_2>...<res_name_n> - run the tool for
determined reseller user names.
Page 85

Control Panel Server 85
ServiceZoneRenamer
Utility for changing service zone name. Changes zone name, LServers names, rebuilds
DNS.
WARNING: USE ONLY ON EMPTY INSTALLATION OF H-SPHERE.
Usage:
java -Xms64M -Xmx512M psoft.hsphere.tools.ServiceZoneRenamer -oz
zone_name -nz
zone_name
-oz|--old_zone Name of the currently present service zone
-nz|--new_zone Name which should be set to service zone
BillingEraser
Permanently erases billing history of accounts. Before running this utility, stop Parallels
H-Sphere and back up Parallels H-Sphere system database.
SYNOPSIS:
java -Xms64M -Xmx512M psoft.hsphere.tools.BillingEraser—accounts
list_of_account_ids—resellers list_of_reseller_ids
NOTE:
When—resellers option is used, the utility erases billing history for the specified
reseller and all his users.
There is no possibility to do it only for a reseller account (without touching users).
Using—accounts and—resellers parameters simultaneously is disabled.
Specified accounts and reseller ids are delimited with commas.
Page 86

86 Control Panel Server
SetQuota
NAME:
java -Xms64M -Xmx512M psoft.hsphere.tools.SetQuota
This Parallels H-Sphere tool resets quota on a web box according to the data found in
Parallels H-Sphere DB for each account located on each logical server.
SYNOPSIS:
psoft.hsphere.tools.SetQuota [options]
OPTIONS:
help - shows help
lid|--lserverid - process accounts located on Logical Server with specified ID
only
UrchinReconfig
NAME:
psoft.hsphere.tools.UrchinReconfig - Regenerate Urchin config. Used, for
example, after account migration to restore Urchin settings for moved domains.
SYNOPSIS:
java -Xms64M -Xmx512M psoft.hsphere.tools.UrchinReconfig [options]
OPTIONS:
help - shows help
a|--accounts - list of account IDs delimited with „,‟, or „all‟ for all accounts
s|--servers - list of logical server IDs delimited with „,‟, or „all‟ for all servers
SAMPLE:
java -Xms64M -Xmx512M psoft.hsphere.tools.UrchinReconfig -a „1002,8383,1237‟ -s
„12,35,37‟
java -Xms64M -Xmx512M psoft.hsphere.tools.UrchinReconfig -a all -s all
Page 87

Control Panel Server 87
OffLogs
bash-2.05b$ java -Xms64M -Xmx512M psoft.hsphere.tools.OffLogs—help
NAME:
psoft.hsphere.tools.OffLogs - Regenerate users‟ logs and stats
config
SYNOPSIS:
java -Xms64M -Xmx512M psoft.hsphere.tools.OffLogs [options]
OPTIONS:
--help - shows this screen
-a|--accounts list of account IDs, or all for „all‟ accounts, „,‟
- delimiter -s|--servers list of logical server IDs, or „all‟ for all servers, „,‟
- delimiter -e|--errorlog re-generate errorlog only
-ag|--agentlog re-generate agentlog only
-r|--referrerlog re-generate referrerlog only
-t|--transferlog re-generate transferlog only
-w|--webalizer re-generate webalizer only
-m|--modlogan re-generate modlogan only
-aw|--awstats re-generate awstats only
SAMPLE:
java -Xms64M -Xmx512M psoft.hsphere.tools.OffLogs -a „1002,8383,1237‟ -s
„12,35,37‟
java -Xms64M -Xmx512M psoft.hsphere.tools.OffLogs -a all -s all
java -Xms64M -Xmx512M psoft.hsphere.tools.OffLogs -s 24 -aw -w
Page 88

88 Control Panel Server
Reset Balance
NAME:
psoft.hsphere.tools.ResetBalance
This Parallels H-Sphere tool resets billing balance using different criteria. By default,
the tool runs only in information mode.To fix balances, run utility with—process
option.
SYNOPSIS:
java -Xms64M -Xmx512M psoft.hsphere.tools.ResetBalance options
OPTIONS:
h|--help - shows this screen
acc|--acountId number - process only accounts with given number
all|--all - process all accounts
b|--balance <ld balance> - process accounts with balance equal to <balance
for process>
n|--newbalance <new balance> - set balance to <balance for process>
d|--description - <credit description> - notes which will be added to
credit operation
process - to force process, otherwise only affected accounts will show
RegenerateIpsFile
NAME:
psoft.hsphere.tools.RegenerateIpsFile
This Parallels H-Sphere tool regenerates file /hsphere/local/network/ips on
Unix physical box
SYNOPSIS:
java -Xms64M -Xmx512M psoft.hsphere.tools.RegenerateIpsFile options
OPTIONS:
--help - shows this screen
-all - regenerate on all physical boxes
-pid - regenerate on physical servers with specified IDs
Page 89

Control Panel Server 89
LicenseExtractor
A tool to import License info to a file or print it to console screen.
NAME:
psoft.hsphere.tools.LicenseExtractor
Imports License info to a file or prints it to console screen.
SYNOPSIS:
java psoft.hsphere.tools.LicenseExtractor [options]
OPTIONS:
help - shows this screen
file </path/to/file>
</path/to/file> - absolute path to the file and file name where license info will be
imported;
without options - shows license info to console screen.
VPSConvertor24_25
A tool to convert VPS plans and accounts during the update from Parallels H-Sphere
2.4.x to Parallels H-Sphere 2.5 and up.
NAME:
psoft.hsphere.tools.VPSConvertor24_25
Converts VPS plans and accounts during the update from Parallels H-Sphere 2.4.x to
Parallels H-Sphere 2.5 and up
SYNOPSIS:
java -Xms64M -Xmx512M psoft.hsphere.tools.VPSConvertor24_25 [options]
OPTIONS:
help - show this help
all - convert all VPS plans and accounts (recommended)
EXAMPLE:
su -l cpanel
java -Xms64M -Xmx512M psoft.hsphere.tools.VPSConvertor24_25 -all
Important: VPS converter leaves mail quota value blank in converted plans. To add
DNS zones to VPS accounts afterwards, please make sure you set mail quota value in
the plan.
Page 90

90 Control Panel Server
MailRelayCorrector
If you‟ve updated Parallels H-Sphere to 3.1 Beta 1, run this tool to create virtual users
for every mail resource: mailbox, alias, forward, autoresponder, mailing list, and mail
sms if mail relay is enabled for mail domain.
NAME:
psoft.hsphere.tools.MailRelayCorrector
Processes all mail resources (mailbox, forward, alias, autoresponder, mailing list, sms)
for maildomains with enabled mail relays and creates vitrtual users for each of them.
USAGE EXAMPLES:
java -Xms64M -Xmx512M psoft.hsphere.tools.MailRelayCorrector -a
1233,1254
java -Xms64M -Xmx512M psoft.hsphere.tools.MailRelayCorrector lid 7
java -Xms64M -Xmx512M psoft.hsphere.tools.MailRelayCorrector -d
my_maildomain.com
java -Xms64M -Xmx512M psoft.hsphere.tools.MailRelayCorrector—all
OPTIONS:
-h|--help - shows this screen
--all or without any parameter - process all accounts
-a|--accounts - process accounts‟ IDs separated by comma
-lid|--lserverId - process accounts on logical server with given number
-d|--domains - process domains separated by comma
Page 91

Control Panel Server 91
Securing Your CP Server with SSL
This document gives a step-by-step instruction on how to secure your CP apache
server with a regular SSL certificate.
Note: You can secure your control panel with a wildcard certificate if you install it on the
same domain name. For example, if your cp domain name is cp.example.com, you
can secure it by installing wildcard certificate to example.com.
We recommend that you configure your system to be accessible both by http and https,
because Parallels SiteStudio does not fully support https protocol.
To secure your CP with regular SSL:
1 Create or choose a directory to store SSL-related files. E.g.:
#mkdir cert
Make this directory available only for root:
#chmod 700 cert
Go to this directory:
#cd cert
2 Generate an SSL private key with the OpenSSL utility:
#openssl genrsa -des3 -out server.key 1024
When prompted for a pem phrase, enter any combination of 4 characters, e.g.
1234. A unique private key will be generated into the server.key file.
For more, read modssl documentation (http://www.modssl.org/source/mod_ssl-
2.8.16-1.3.29.tar.gz).
3 Copy this file to a secure location. You will need it later.
4 Make the newly generated file readable only by root:
#chmod 600 server.key
5 To view the content of the private key file, use the command:
#openssl rsa -noout -text -in server.key
6 Remove pass phrase from the private key:
#openssl rsa -in server.key -out server.key.unsecure
7 Now you don‟t need the private key with the pass phrase any more.
Overwrite it with the private key without the pass phrase:
#cp server.key.unsecure server.key
8 Generate an SSL certificate signing request based on the private key:
#openssl req -new -key server.key -out server.csr
You will have to answer many questions related to your company. Your answers are
required to be included in the certificate.
Page 92

92 Control Panel Server
Note: Common name is the URL at which you want your control panel to be
available, e.g. cp.yourdomain.com (not yourdomain.com).
9 Check the content of the certificate request file:
#openssl req -noout -text -in server.csr
If you find a mistake in the data you have submitted, you can re-generate the
request anew.
10 Make sure to back up your SSL files:
# mkdir backup
# chmod 700 backup
# cp ./*.* backup/
11 Send the generated CSR file to a trusted Certificate Authority for
signing. They will send you back the certificate. Save it as server.crt.
12 To view the content of the certificate, run:
# openssl x509 -noout -text -in server.crt
13 Save the private key and the certificate:
# cp -f ./server.key
/hsphere/local/home/cpanel/apache/etc/ssl.key/
# cp -f ./server.crt
/hsphere/local/home/cpanel/apache/etc/ssl.crt/
14 Important: Make sure to back up the ssl.key and ssl.crt files to a safe
location. You may need them in the future.
15 If your certificate was signed by a non-trusted certificate authority, run
the following command:
# cp -f ./ca-bundle.crt
/hsphere/local/home/cpanel/apache/etc/ssl.crt/
16 If your certificate doesn‟t require chain certificate, skip this item.
Otherwise, do the following:
a Store chain certificate in file:
/hsphere/local/home/cpanel/apache/etc/ssl.crt/ca.crt
b Create custom CP apache config template if you do not have any (see
Appendix C of Parallels H-SPhere Installation Guide)
c Add line (according to Step 2 “Edit template” in the above mentioned document):
SSLCertificateChainFile
/hsphere/local/home/cpanel/apache/etc/ssl.crt/ca.crt
to file:
/hsphere/local/home/cpanel/apache/etc/httpd.conf.tmpl.custom
17 Open the file hsphere.properties:
# vi
/hsphere/local/home/cpanel/shiva/psoft_config/hsphere.properti
es
and change lines:
Page 93

Control Panel Server 93
CP_PORT = 8080
In this section:
Disabling HTTP Access ..................................................................................... 93
Switching Between IP and Domain Name ......................................................... 94
CP_PROTOCOL=http://
to:
CP_PORT = 8443
CP_PROTOCOL=https://
18 Restart Parallels H-Sphere (on page 60).
19 Check the log file:
# vi /hsphere/local/home/cpanel/apache/logs/ssl_engine_log
Now your control panel must be available at both
http://cp.yourdomain.com:8080 and https://cp.yourdomain.com:8443
Disabling HTTP Access
We don‟t recommend disabling HTTP access, because it is required by Parallels
SiteStudio. Still, if you have chosen to disable http, do the following:
1 Open the file ~cpanel/apache/etc/httpd.conf
2 If you would like to exclude http access and use only secure
connections, comment out the line “Listen 8080” in the block
IfDefine SSL.
3 Restart Parallels H-Sphere (on page 60).
Page 94

94 Control Panel Server
Switching Between IP and Domain Name
In this section:
Supported Versions .......................................................................................... 94
Upgrade Procedure ........................................................................................... 95
You cannot have your control panel available both by domain name and IP address.
You can have only one.
To switch between IP and domain name control panel access:
1 Open the
/hsphere/local/home/cpanel/shiva/psoft_config/hsphere
.properties file.
2 Set the value of CP_HOST to your new CP URL/IP. Make sure not to
change the value of the PATH_SITE_STUDIO property.
3 Save and exit the file.
4 Restart Parallels H-Sphere (on page 60).
Check for feedback from Parallels H-Sphere owners on how to use Parallels H-
Sphere with POP3 SSL, IMAP SSL, SMTP SSL and SFTP:
http://forum.psoft.net/showthread.php?threadid=3187.
Upgrading Java
This section explains how to upgrade Java SDK on the Parallels H-Sphere control
panel server.
Supported Versions
Linux
It is recommended that Linux owners use the Java SDK 1.4.2 by Sun Microsystems
(http://java.sun.com/j2se/1.4.2/). This applies to all products in the RedHat Linux
product line.
FreeBSD
Java 1.4.2 is implemented on CP server under FreeBSD 4.x. Please update your
Parallels H-Sphere to the latest version where you can update Java to 1.4.2.
Page 95

Control Panel Server 95
Upgrade Procedure
In this section:
Automatically By Means of Parallels H-Sphere Update Script ........................... 95
Manually from Java 1.4.2 SDK by Sun Microsystems (Linux Only) .................... 96
You have two alternative ways to upgrade Java. Choose one of the alternatives below.
Automatically By Means of Parallels H-Sphere Update Script
To upgrade Java automatically:
1 Log into the CP server as root:
# su -
2 Download the upgrade package for your Parallels H-Sphere version
from http://download.hsphere.parallels.com, untar it and execute.
3 In the upgrade script interface, type the following option to update
Java to 1.4.2:
javaupdate
This will update your Java to 1.4.2 and will also update your Parallels H-Sphere Java
classes.
Page 96

96 Control Panel Server
Manually from Java 1.4.2 SDK by Sun Microsystems (Linux Only)
To upgrade Java manually:
1 Log into the CP server as root:
# su -
2 Stop Parallels H-Sphere:
# /etc/rc.d/init.d/httpdcp stop
3 Stop all java processes on your system:
# killall java
4 Set up Java JDK 1.4.2 following the instructions by Sun Microsystems
(http://java.sun.com/j2se/1.4.2/install-linux.html).
5 Update symlink /usr/java/jdk/ to point to your installation, for
example to /usr/java/jdk1.4.2_06.
If you don‟t have the /usr/java/jdk/ symlink:
1. Create it to point to your installation.
2. In the file
/hsphere/local/home/cpanel/apache/etc/jserv/jserv.propertie
s, set the following:
wrapper.bin=/usr/java/jdk/bin/java
wrapper.classpath=/usr/java/jdk/jre/lib/rt.jar
6 Skip this step if you don‟t run Parallels SiteStudio.
Open the file /hsphere/shared/SiteStudio/imaker.sh and check if it has
the line:
JAVA_HOME=„su -l cpanel -c „echo $JAVA_HOME‟„
If it doesn‟t, update the JAVA_HOME parameter in this file, e.g.:
JAVA_HOME=/usr/java/jdk1.4.2
7 To ensure correct work with OpenSRS, download the “Unlimited
Strength” Jurisdiction Policy Files from
http://java.sun.com/products/jce/index-14.html#UnlimitedDownload.
The files for version 1.4.2 can be downloaded from page
http://java.sun.com/j2se/1.4.2/download.html#docs, section “Other
Downloads”. Put the files in the directory
JAVA_HOME/jre/lib/security where JAVA_HOME is the Java
SDK home directory.
8 Upgrade to one of the latest versions of Parallels H-Sphere.
9 Start Parallels H-Sphere:
# /etc/rc.d/init.d/httpdcp start
Page 97

Control Panel Server 97
Converting Parallels H-Sphere System
In this section:
Step 1. Convert Database from MSSQL Server to MySQL ............................... 98
Step 2. Convert Database from MySQL Server to PgSQL ................................ 99
Database from MS SQL to PgSQL
PgSQL is the only supported format for the Parallels H-Sphere system database. The
conversion procedure suggested in this section takes two steps listed below.
Page 98

98 Control Panel Server
Step 1. Convert Database from MSSQL Server to MySQL
To Convert database from MSSQL to MySQL:
1 Rename the following fields:
table esc_rules: rename interval to interval2
table revenue: rename usage to usage2
This must be done to avoid conflicts in MySQL, and must be changed back in the
MySQL dump.
2 Download the mssql2mysql.exe convertor from
http://download.hsphere.parallels.com/shiv/db_convert/mssql2mysql.e
xe
3 Start mssql2mysql.exe and configure setting for MSSQL/MySQL
servers (hosts, usernames, passwords, new database name for mysql)
and save settings.
If you get warnings about missing componenets, download and run the
MtaEdt22.exe utility from
http://download.hsphere.parallels.com/shiv/db_convert/MtaEdt22.exe. It will
download and set up all missing components.
4 Click Connect to connect to mssql database and select the database
to convert.
5 Select all necessary tables or press Select All to select all tables
6 Click Start to start database conversion
7 To see the database after the conversion:
mysql hsphere_mysql (for example)
Page 99

Control Panel Server 99
Step 2. Convert Database from MySQL Server to PgSQL
Execute all suggested queries in one transaction. Replace PG_HOST_NAME with the
name of the host where PgSQL server is running, like example.com.
1 Download the mysql/pgsql dump convertor archive from
http://download.hsphere.parallels.com/shiv/db_convert/my2pg.tgz and
unpack it:
tar zxvf my2pg.tgz
2 Dump tables and data from mysql:
mysqldump.exe hsphere_mysql > hsphere_dump
3 As the result, you will get a MySQL dump with table structure and
data (hsphere_dump)
4 In MySQL dump, rename the following fields:
table esc_rules: rename interval2 to interval
table revenue: rename usage2 to usage
5 Convert mysql dump to pgsql dump:
my2pg.pl hsphere_dump > hsphere_pgsql
As the result, you will get a converted dump (hsphere_pgsql)
6 Replace TIMESTAMP to TIMESTAMP WITH TIME ZONE.
7 If the database already exists, delete it:
dropdb -h PG_HOST_NAME -U wwwuser hsphere_pgsql
8 Create a new (empty) database:
createdb -h PG_HOST_NAME -U wwwuser hsphere_pgsql
9 Restore the database from dump (tables and data):
psql -h PG_HOST_NAME -d hsphere_pgsql -U wwwuser -f
hsphere_pgsql > migrate_errors
• d - database name
-f - file with dump
As a result, you will see convertion results in the migrate_errors file.
10 Connect to the database and check all tables and data:
psql -h PG_HOST_NAME -d hsphere_pgsql -U wwwuser
11 For each record of the sequences table, run the following two
commands against the Postgres DB:
CREATE SEQUENCE ―<seq_name>‖ start <id>;
SELECT nextval (‗<seq_name>‘);
For example, for the record newid -> 276488, execute the following SQL
statements:
CREATE SEQUENCE ―newid‖ start 276488;
SELECT nextval (‗newid‘);
Page 100

100 Control Panel Server
Upgrading System Postgres
This document expalins how to update your system and user PostgreSQL from version
7.3.x to version 7.4.7 which is faster, uses server memory more effectively, and
includes security fixes.
Important: If your PosgtreSQL version is lower than 7.3, please upgrade it to v. 7.3
first.
To check your PostgreSQL version:
1 Log into your control panel server as root:
su -
2 Execute:
psql—version
This update includes the following:
PostgreSQL Security Release for 7.4.7, http://www.postgresql.org/about/news.281
Postgres server and client software updates, including:
perl client library on all boxes (install if missing)
server software with data conversion to the current version format
FreeBSD eliminated PL/PgSQL parser vulnerability to buffer overflows
(http://www.freebsd.org/ports/portaudit/6b4b0b3f-8127-11d9-a9e7-
0001020eed82.html).
Make sure that your system satisfies the following requirements:
Current PostgreSQL updated to version 7.3.
hsphere database converted to UNICODE (on page 102).
IMPORTANT: You are highly recommended to backup your databases into a directory
other than Postgres home directory so you do not lose data if anything goes wrong.
To upgrade system Postgres:
1 Log into your control panel server as root:
su -
2 Download the PostgreSQL 7.4.7 upgrade script from the downloads
site:
For Linux:
wget http://download.hsphere.parallels.com/shiv/HS/u-pgsql-
7.4.7.tar.gz
For FreeBSD:
fetch http://download.hsphere.parallels.com/shiv/HS/u-pgsql-
7.4.7.tar.gz
 Loading...