

Page 1
Parallels® H-Sphere
Page 2

Legal and Copyright Notice
ISBN: N/A
Parallels
660 SW 39th Street
Suite 205
Renton, Washington 98057
USA
Phone: +1 (425) 282 6400
Fax: +1 (425) 282 6444
© Copyright 2008,
Parallels, Inc.
All rights reserved
Distribution of this work or derivative of this work in any form is prohibited unless prior
written permission is obtained from the copyright holder.
Product and service names mentioned herein are the trademarks of their respective owners.
Page 3

Contents
Preface 8
Typographical Conventions ........................................................................................................... 8
About This Guide ........................................................................................................................... 9
Feedback ....................................................................................................................................... 9
User Account 10
Temporary Index Page ................................................................................................................ 10
Uploading a Web Site .................................................................................................................. 11
Contents of Home Directory ........................................................................................................ 11
Control Panel Basics 13
Changing Hosting Plan ................................................................................................................ 14
Changing Hosting Platform ............................................................................................... 15
Changing Billing Period ............................................................................................................... 16
Changing Control Panel Password .............................................................................................. 16
Changing FTP Password ............................................................................................................. 16
Changing Traffic Limit .................................................................................................................. 17
Changing Disk Quota................................................................................................................... 17
Configuring Control Panel Skins .................................................................................................. 18
Changing Control Panel Language ............................................................................................. 18
Domain Registration 19
Registering Standard (Second Level) Domains .......................................................................... 19
Transfering Domains ................................................................................................................... 21
Hosting Existing Domains ............................................................................................................ 22
Creating Third Level Domains ..................................................................................................... 22
Hosting Sites Without Domain Names ........................................................................................ 23
Parking External Domains ........................................................................................................... 23
Domain Configuration 24
Removing Domains ..................................................................................................................... 24
Enabling Instant Domain Aliases ................................................................................................. 25
Creating Subdomains .................................................................................................................. 25
Configuring Shared or Dedicated IP Hosting .............................................................................. 26
Configuring Domain Aliasing ....................................................................................................... 27
Adding Server Aliases ................................................................................................................. 31
Configuring Domain Renewal ...................................................................................................... 32
Changing Domain Contact and Billing Information ...................................................................... 34
Adding Web Access Control ........................................................................................................ 34
DNS Settings 36
Removing And Restoring Built-in DNS Records ......................................................................... 37
Creating Custom DNS Records ................................................................................................... 38
Page 4

Preface 4
Web Site Creation and Publishing 41
Parallels SiteStudio...................................................................................................................... 41
Web Site Navigation 42
Redirect URL ............................................................................................................................... 43
Directory Indexes ......................................................................................................................... 46
Error Pages .................................................................................................................................. 47
Server Side Image Map ............................................................................................................... 49
MIME Types ................................................................................................................................. 49
WAP Support ............................................................................................................................... 50
Reverse Traceroute ..................................................................................................................... 50
FTP Management 51
WebShell File Manager and htProtect ......................................................................................... 53
FTP Subaccounts ........................................................................................................................ 53
Virtual FTP ................................................................................................................................... 54
Anonymous FTP .......................................................................................................................... 57
Anonymous FTP Upload Facilities .............................................................................................. 59
SSH Access to Server 60
Accessing Your SSH Account ..................................................................................................... 60
Running Shell Scripts With Crontab ............................................................................................ 61
Dynamic Web Content 62
CGI Scripts .................................................................................................................................. 62
PHP.............................................................................................................................................. 63
ColdFusion ................................................................................................................................... 64
Ruby on Rails .............................................................................................................................. 64
ASP .............................................................................................................................................. 65
ASP.NET ..................................................................................................................................... 65
Server Side Includes.................................................................................................................... 66
PHP/MySQL Applications ............................................................................................................ 67
Preinstalled CGI Scripts: phpBB and mnoGoSearch .................................................................. 68
phpBB Forum .................................................................................................................... 68
mnoGoSearch ................................................................................................................... 69
Fixing Broken Scripts ........................................................................................................ 70
Mail Resources 71
Mailboxes ..................................................................................................................................... 74
Mailbox Storage Quota ...................................................................................................... 75
Signing into a Mailbox ....................................................................................................... 76
Postmaster and Webmaster .............................................................................................. 76
Mail Forwards .............................................................................................................................. 77
Autoresponders ........................................................................................................................... 78
Removing Autoresponder .................................................................................................. 80
Mailing Lists ................................................................................................................................. 80
Managing Your Mail List Subscribers ................................................................................ 82
Sending Messages to Mailing List Subscribers ................................................................. 83
Managing Your Mailing List Moderators ............................................................................ 83
Adding Mailing List Trailer ................................................................................................. 84
Page 5

Preface 5
Configuring Mailing Lists ................................................................................................... 85
Maildomain Aliases ...................................................................................................................... 88
Removing Mail Domain Aliases ......................................................................................... 89
Mailbox Aliases ............................................................................................................................ 90
Creating Mail Aliases ......................................................................................................... 90
Unassigning Mailbox Alias from Mailbox ........................................................................... 91
Removing Mailbox Aliases ................................................................................................ 91
Mail SMS ..................................................................................................................................... 92
Mail Under Service Domain For Third-Level Hosting .................................................................. 94
Managing Mail Under Account With Third-Level Domain ................................................. 95
Managing Mail Under Service Account ............................................................................. 96
AntiSpam Protection .................................................................................................................... 97
Managing Antispam for the Entire Account ....................................................................... 97
Managing Antispam on the Mail Domains Level ............................................................... 98
Managing Greylisting Settings ........................................................................................... 99
Configuring Antispam Protection for Mail Resource ......................................................... 99
AntiVirus Protection ................................................................................................................... 102
Managing Antivirus for the Entire Account ...................................................................... 102
Managing Antivirus on the Mail Domain Level ................................................................ 103
Configuring Antivirus Protection for a Mail Resource...................................................... 103
E-Mail Forgery SPF ................................................................................................................... 105
Enabling SPF................................................................................................................... 106
Disabling SPF .................................................................................................................. 107
Outlook Express Mail ................................................................................................................. 107
Configuring Outlook Express With POP Before SMTP ................................................... 108
Configuring Outlook Express With SMTP Auth Relay..................................................... 114
Eudora Mail Client ..................................................................................................................... 116
Web Site Statistics 121
Enabling Stats Logging .............................................................................................................. 122
Viewing Raw Logs ..................................................................................................................... 123
Running Third-Party Log Analyzers ........................................................................................... 123
Urchin .............................................................................................................................. 123
AWStats ........................................................................................................................... 124
Webalizer ......................................................................................................................... 124
ModLogAn ....................................................................................................................... 124
Protecting Statistics ................................................................................................................... 125
Promoting Your Site With Kanoodle .......................................................................................... 126
Traffic 127
Summary Traffic ........................................................................................................................ 127
Traffic Cycle ............................................................................................................................... 128
Traffic Limit ................................................................................................................................ 128
Disk Space 130
Summary Disk Usage ................................................................................................................ 130
Disk Space Billing ...................................................................................................................... 131
Individual Resource Quotas ...................................................................................................... 132
User Billing 133
Types of Payment ...................................................................................................................... 133
Billing Profile .............................................................................................................................. 134
Becoming a Payable User ......................................................................................................... 135
Paying With Web Based Payment Systems .............................................................................. 136
Page 6

Preface 6
PayPal Subscription ........................................................................................................ 137
Automatic E-mail Invoicing ........................................................................................................ 138
Billing Period and Billing Month ................................................................................................. 139
Online Prices ............................................................................................................................. 140
Plan Fees ........................................................................................................................ 140
Resource Prices .............................................................................................................. 140
Refunds ..................................................................................................................................... 141
Refunds on Deleting Prepaid Billing Period Resources .................................................. 143
Refunds on Changing Hosting Plan ................................................................................ 143
Refunds on Changing Account‟s Billing Period ............................................................... 143
Refunds on Reducing Quotas and Limits ........................................................................ 144
Getting Money Back ........................................................................................................ 144
Billing History ............................................................................................................................. 145
Extra Packages .......................................................................................................................... 149
Online Store 151
Miva Merchant and osCommerce .............................................................................................. 152
Setting Up Miva Merchant ......................................................................................................... 153
Setting Up osCommerce ........................................................................................................... 154
Updating osCommerce to 2.2-MS2 ........................................................................................... 156
Data Transfer Security 157
Using Existing Key and Certificate ............................................................................................ 158
Creating Temporary Certificate ................................................................................................. 159
Acquiring a Permanent Certificate ............................................................................................. 161
Using Shared SSL ..................................................................................................................... 162
Renewing Permanent Certificates ............................................................................................. 163
Managing Comodo SSL Certificates ......................................................................................... 164
Database Hosting 168
MySQL Databases ..................................................................................................................... 168
Creating MySQL Database and Its Users ....................................................................... 169
Editing MySQL Databases with phpMyAdmin ................................................................. 171
Changing MySQL Disk Quota ......................................................................................... 172
Adding MySQL Users And Granting Them Privileges..................................................... 172
Changing User Passwords .............................................................................................. 174
PostgreSQL Databases ............................................................................................................. 175
Creating PostgreSQL Users ............................................................................................ 175
Deleting Users And Changing Their Passwords ............................................................. 176
Creating PostgreSQL Databases .................................................................................... 177
Editing PostgreSQL Databases and User Privileges with phpPgAdmin ......................... 178
Changing PostgreSQL Disk Quota.................................................................................. 179
Microsoft SQL Databases .......................................................................................................... 180
Creating Microsoft SQL Logins ....................................................................................... 180
Creating Microsoft SQL Databases ................................................................................. 181
Adding New Microsoft SQL Database Users .................................................................. 182
Changing Microsoft SQL Database Quota ...................................................................... 183
Managing Microsoft SQL Databases............................................................................... 184
ODBC DSN Records ................................................................................................................. 184
Creating New DSN Record ............................................................................................. 185
Editing DSN Records ...................................................................................................... 186
Virtual Private Servers 187
Checking VPS Status ................................................................................................................ 187
Page 7

Preface 7
Adding Custom DNS Records for VPS ...................................................................................... 188
Changing VPS Root Password .................................................................................................. 188
Adding VPS IP ........................................................................................................................... 189
Changing VPS Limits ................................................................................................................. 189
Looking Up VPS System Information ........................................................................................ 190
Adding VPS Templates ............................................................................................................. 191
Dedicated Servers 193
Adding Dedicated Servers ......................................................................................................... 194
Managing Dedicated Servers .................................................................................................... 194
Viewing Dedicated Server Info ........................................................................................ 195
Requesting Dedicated Server Upgrade .......................................................................... 195
Adding Extra IPs to a Dedicated Server .......................................................................... 195
Creating Reverse DNS Records for Dedicated Server IPs ............................................. 196
Setting Up Dedicated Server Backup Service ................................................................. 196
Requesting Dedicated Server Remote Reboot ............................................................... 196
Cancelling Dedicated Servers ......................................................................................... 197
Microsoft Exchange Hosting 198
Managing Microsoft Exchange Mailboxes ................................................................................. 199
Managing Microsoft Exchange SMTP domains ........................................................................ 200
Adding MX DNS Records for Microsoft Exchange SMTP Domains .......................................... 201
Managing Microsoft Exchange Distribution lists ........................................................................ 201
Microsoft SharePoint Hosting 202
Enabling Microsoft SharePoint Services on a Domain .............................................................. 202
Editing Microsoft SharePoint Settings ....................................................................................... 204
Managing Microsoft SharePoint Users ...................................................................................... 205
Creating New Microsoft SharePoint Users from Scratch ................................................ 205
Enabling Microsoft SharePoint Access for an Existing FTP Subuser ............................. 206
Deleting Microsoft SharePoint Users .............................................................................. 207
Application Pools 208
Adding Dedicated Application Pools .......................................................................................... 209
Assigning Web Applications ...................................................................................................... 209
Adding Web Directories ............................................................................................................. 210
Technical Support 212
Sending Trouble Tickets ............................................................................................................ 213
Following Up Trouble Tickets .................................................................................................... 215
Closing Trouble Tickets ............................................................................................................. 216
Page 8

In this chapter:
Typographical Conventions ............................................................................... 8
About This Guide ............................................................................................... 9
Feedback .......................................................................................................... 9
Formatting convention
Type of Information
Example
Special Bold
Items you must select,
such as menu options,
command buttons, or
items in a list.
Go to the System tab.
Titles of chapters,
sections, and
subsections.
Read the Basic
Administration chapter.
Italics
Used to emphasize the
importance of a point, to
introduce a term or to
designate a command
line placeholder, which is
to be replaced with a real
name or value.
The system supports the
so called wildcard
character search.
Monospace
The names of
commands, files,
directories, and domain
names.
The license file is located
in the
http://docs/common/
licenses directory.
C H A P T E R 1
Preface
Typographical Conventions
Before you start using this guide, it is important to understand the documentation
conventions used in it.
The following kinds of formatting in the text identify special information.
Page 9

Preface 9
Preformatted
On-screen computer
output in your commandline sessions; source
code in XML, C++, or
other programming
languages.
# ls –al /files
total 14470
Preformatted
Bold
What you type,
contrasted with on-screen
computer output.
# cd /root/rpms/php
CAPITALS
Names of keys on the
keyboard.
SHIFT, CTRL, ALT
KEY+KEY
Key combinations for
which the user must
press and hold down one
key and then press
another.
CTRL+P, ALT+F4
About This Guide
Parallels H-Sphere User guide aims at Web site owners and explains how to set up and
manage Web sites from the Parallels H-Sphere User control panel.
Feedback
If you have found a mistake in this guide, or if you have suggestions or ideas on how to
improve this guide, please send your feedback using the online form at
http://www.parallels.com/en/support/usersdoc/. Please include in your report the
guide‟s title, chapter and section titles, and the fragment of text in which you have found
an error.
Page 10

This section explains how to start working with your Parallels H-Sphere user account
In this chapter:
Temporary Index Page ...................................................................................... 10
Uploading a Web Site ........................................................................................ 11
Contents of Home Directory .............................................................................. 11
C H A P T E R 2
User Account
and domains you host.
Temporary Index Page
You will be able to access your Web site right after you register your account. To do
this, you will have to use an instant domain alias. Instant Domain Alias is an additional
web address which lets you access your site during the first several hours after the
domain name registration, the time when the site is yet unavailable at the newly
registered domain. Over the next few days DNS servers all across the Internet will
update themselves with your new site name. Once that happens, you will be able to
access your site at the domain you have registered.
The moment your account is registered, a temporary index page is added to your site‟s
directory.
It will be there until you upload your site and replace it with your own index page (for
example, yoursite/index.html). Meanwhile, from this temporary page you can:
Administer your account. Enter your control panel login and password into Log
into your Control Panel. This login and password are e-mailed to you at the address
you specified at signup. Use the Control Panel to view your bills, change your
contact/billing information, change passwords, get more disk space, report
problems to the technical support staff and more.
Create a web site in a matter of minutes right from your browser. Use the option
Launch Site Builder. Initially, the password to log into the site builder is the same as
that for the control panel.
Page 11

User Account 11
Uploading a Web Site
Whenever possible, upload your site using the utilities that come with your web-site
development software. For instance, if you made your site with Parallels SiteStudio,
FrontPage or Dreamweaver, use their integrated web publishing tools. If you made your
site with simple text editors, or if your site-building software does not have a publishing
utility, use freestanding FTP clients, such as CuteFTP, SmartFTP, or WebShell (on
page 53), a Web-based file manager built in Parallels H-Sphere.
Please note that site publishing tools don‟t remove your old web content from the
server. For instance, if you used Parallels SiteStudio to upload a site with 15 pages and
later you published an updated 7 page version of this site, your directory on the server
will have all the new pages and the old pages that haven‟t been overwritten. If you
publish many versions of the Web site, the site may become cluttered with old files.
Warning: If you have a complete Web site, be careful not to overwrite it with a publish
command.
Warning: Don‟t upload your site to the root of your user directory! Instead, put it to the
specific directory.
Contents of Home Directory
Your home directory contains several default subdirectories. Their number and names
will differ depending on your plan, yet some of them are common for all plans. Here are
some of the directories that are automatically created and may not be deleted:
Directories that contain your sites. Each of your sites is put in a separate directory. The
name of the directory is the same as your site‟s domain name. If you have more
than one site, you will have several such directories. These are the directories
where you will upload your .html files or any other files that you want to make
accessible from the Internet. Each of these directories may contain their own
/webalizer or /modlogan directories.
Note: Do not delete either of these directories! Your site is too valuable to lose at a
touch of a button.
The Logs directory. It contains directories for every site with transfer log enabled.
Each such directory contains its own set of log files that are required to write and
read the data about all visits to your sites.
Note: Deleting the Logs directory will cause the loss of the web statistics
accumulated in the course of your site operation.
The Virtual FTP directory. Its name is the dedicated IP address. This directory is
created when you enable Virtual FTP Server and can be accessed by virtual FTP
users to list and download its content. There are as many such directories as
dedicated IP addresses. Read more on Virtual FTP (on page 54).
Page 12

12 User Account
Note: Deleting Virtual FTP directories will cause incorrect operation of Virtual FTP.
However, you may harmlessly delete individual files in these directories.
The subdomain directories. When you make a subdomain, a new directory is created
with the subdomain name as the directory name. Read more about creating
subdomains (on page 25).
Note: If you delete a subdomain directory, internet visitors will get the 404 “File not
found” error when attempting to access the subdomain.
The ssl.conf directory. This directory stores SSL pairs for all encrypted sites.
Note: Deleting the ssl.conf directory will result in incorrect SSL operation.
Warning: Don‟t delete ANY default directories in your root directory, as this will cause
malfunctions of your account. As a rule of thumb, you may delete only directories and
files you have uploaded yourselves or that have been uploaded by any of your Virtual
FTP and Anonymous FTP users.
Page 13

This document introduces you to the basics of Parallels H-Sphere user control panel
In this chapter:
Changing Hosting Plan ..................................................................................... 14
Changing Billing Period ..................................................................................... 16
Changing Control Panel Password ................................................................... 16
Changing FTP Password .................................................................................. 16
Changing Traffic Limit ....................................................................................... 17
Changing Disk Quota ........................................................................................ 17
Configuring Control Panel Skins ....................................................................... 18
Changing Control Panel Language ................................................................... 18
C H A P T E R 3
Control Panel Basics
management.
Once logged into User control panel, go to Account > Account Settings:
Plan: the arrangement of resources and services you are subscribed to. To change
your plan, click the icon next to the plan name. To switch between plans on different
hosting platforms, like Unix and Windows, you need to go to Account > Change
Hosting Platform and go through the platform change wizard (on page 15).
Account manager Login: the name by which you are known to the hosting system. It‟s
the same as your control panel login.
FTP Login: the login name you use when you upload your site to your home directory
on the server.
FTP Password: the login name you use when you upload your site to your home
directory on the server.
Page 14

14 Control Panel Basics
Changing Hosting Plan
In this section:
Changing Hosting Platform ............................................................................... 15
Your hosting plan determines the services you get with the account and the prices for
these services. Big sites with high hit rates and special services require more
expensive plans; cheaper plans are suitable for simpler sites.
To change to a different plan:
1 Go to Account > Account Settings
2 Click the Change icon next to your plan name.
3 Select your new plan and click Submit.
Warning: Switching plans will disable the resources that are unavailable under the plan
you are switching to.
If you don‟t see the plan of your choice in the list that appears, it means it is
incompatible with your current plan. You can‟t change to an incompatible plan, but you
can create a new account under this plan and then, if you want, you can delete your old
account.
Plan Upgrade: If you are switching to a „higher‟ plan, your disk quota doesn‟t
increase, but free units do. As a result, your disk quota may turn out to be lower
than free units, so you can increase your disk quota without being charged. The
same is true of other resources.
Plan Downgrade: If you are switching to a „lower‟ plan, the system reduces your
quotas for free units. If you are using more than free units, the system reduces the
quota to the amount you are using.
Page 15

Control Panel Basics 15
Changing Hosting Platform
Parallels H-Sphere with the integrated hostingPlatformChanger system package
adds a possibility to change a hosting platform by switching to a plan of a different
nature (Windows or Unix).
The platform change process with the help of hostingPlatformChanger package
involves:
Changing a user‟s hosting plan
Changing domain IPs
Removing incompatible resources (currently, all resources listed on the Web Options
page). You will be warned of it during the plan change.
Manual transfer of a user‟s content.
To initiate the platform change process:
1 Go to Account > Change Hosting Platform. On the page that appears, from
the drop-down box choose the plan you want to switch to.
2 You will be prompted to a Billing Statement that lists the information
about prices on new resources and refunds for the incompatible
resources. Click Submit to continue.
Upon completion of the procedure, a platform change request will be sent to your
Parallels H-Sphere administrator. When it is approved, the necessary resources will
be recreated, incompatible resources removed, DNS and IP changed.
3 When you receive the e-mail informing that your hosting platform is
ready to be used, enable necessary resources and transfer user home
directory content.
Page 16

16 Control Panel Basics
Changing Billing Period
Your billing period determines how far in advance you pay. Your hosting plan may be
configured to allow you to switch between billing periods of different length, price and
discount policies. To change the billing period:
To change the billing period:
1 Go to Billing > Billing Profile.
2 Click Change next to your billing period.
3 Select a different billing period and click Submit.
More about billing on changing billing periods (on page 139).
Changing Control Panel Password
You need your control panel password to log into the control panel. Initially, this
password is the same as your FTP password, but you can make these two passwords
different.
To change the Control Panel password:
1 Go to User > User Password menu.
2 Enter new password and apply.
Changing FTP Password
You need your FTP password to upload your site to the server. Initially, this password
is the same as your Control Panel password, but you can make these two passwords
different.
To change the FTP password:
1 Go to Account > Account Settings.
2 Click the Change icon next to FTP Password
3 Perform changes and submit.
Page 17

Control Panel Basics 17
Changing Traffic Limit
Traffic limit is the gigabytes of transferred data you pre-pay for at the beginning of the
billing period. Every month the system checks if you stay within the limit, and if you
don‟t, it charges you for the excess. Then your traffic is reset. Control Panel navigation
is not included into the total traffic.
Total traffic limit is the amount of traffic you pay for in advance. It is charged at the
recurrent fee. However:
if you fail to run up all your quota resource, you are not returned the payment for the
unused megabytes;
if you exceed the quota, you are charged usage fee per each gigabyte of the
excess traffic.
You can always buy additional amount of the resource in order not to be charged the
extra payment. The system e-mails you a notification once you have used 80% of the
traffic limit.
Example: If your billing period is 2 months long and started on the 5th of October, the
first billing month will end on the 5th of November, and your total traffic will be reset.
However, if you change your total traffic limit on the 15th of November, your traffic will
be reset and a new billing month will start.
If you expect to run up more traffic than comes with your plan, it‟s a good idea to raise
your traffic limit.
To change the traffic limit:
1 Select Quick Access in the Account menu.
2 Click the Change icon next to Total traffic.
3 Enter how much traffic you expect to run up throughout your billing
period.
Read more about traffic (on page 127).
Changing Disk Quota
Depending on your plan configuration, billing for disk space is based on either disk
quota or disk usage.
Disk Usage
If your disk space billing is based on disk usage, the Statistics section will display a bar
showing average summary disk usage since the beginning of the billing month.
In this section you will also see the summary disk usage for the last day. It is the total
disk space used by files in your FTP home directory, all your mailboxes and databases
at the moment of the system scan. As a rule, the scans run every night.
Page 18

18 Control Panel Basics
Disk Quota
If your disk space billing is based on disk quota, the Statistics section will display a bar
showing the amount of disk space actually used out of the disk space allowed by your
account quota. This bar shows disk space only on the web server.
To change your disk quota:
1 Go to Account > Account Settings menu.
2 Click the edit icon in the Quota field.
3 Enter new disk quota and submit.
Read more about disk space (on page 130).
Configuring Control Panel Skins
To select a skin and configure interface design settings:
1 Select Look and Feel in the Account menu.
2 Select the skin from the Choose Design drop-down box. You will see the
skin preview. Click the Choose button.
Note: If your browser works slowly with XPressia, choose XPressia Lite which is
specially designed for such situations.
3 Select an icon set in the Choose Icon Set box. You will see the preview
of images from this icon set. Click the Set button.
Note: Choose the Text Links mode if your browser is slow in drawing images.
4 Set Tooltips state. This option determines whether or not to show hints
at the top of each page.
Changing Control Panel Language
This option will change all texts in the control panel, including labels, system notes,
context online help, etc.
To change the language of the control panel:
1 Select Language in the User menu.
2 On the page that appears, select the preferred language from the
drop-down box and click Submit.
Page 19

This chapter tells about registering domains via Parallels H-Sphere.
In this chapter:
Registering Standard (Second Level) Domains ................................................. 19
Transfering Domains ......................................................................................... 21
Hosting Existing Domains .................................................................................. 22
Creating Third Level Domains ........................................................................... 22
Hosting Sites Without Domain Names ............................................................... 23
Parking External Domains ................................................................................. 23
C H A P T E R 4
Domain Registration
You can create an account without any domain at signup. If so, your account will have
FTP and disk space, but without DNS zone, Virtual and Anonymous FTP, Mail service
or ODBC support. You can create a domain to this account later in the future.
Registering Standard (Second Level)
Domains
To create a new standard domain (.com, .net, .org, etc.):
1 Enter your desired domain name into the field after the www part:
Page 20
20 Domain Registration
2 Choose the top level domain from the drop-down box: .com, .org,
.net, and so on, and click Submit.
3 Enter your contact and billing information. Agree to the charges if any.
Based on these data, the system generates a domain registration request and
submits it to the domain registration company.
Go through subsequent steps (on page 27) that allow you to configure new domain as:
Full-featured web/mail hosting domain
Web hosting/mail service alias for an existing domain
Domain without web hosting/mail service to be considered later either for hosting or
for aliasing
Type of the domain being registered will depend on the options you choose:
Page 21

Domain Registration 21
Transfering Domains
Transfer domain already registered from outside your control panel with any registrar to
OpenSRS or to Enom. This will update domain‟s info and change its DNS servers in the
OpenSRS or Enom databases to the Parallels H-Sphere ones.
Transferred domains are registered with OpenSRS or Enom for the period chosen at
transfer plus the time remaining from registration with original registrar.
Note: You can‟t transfer domains that are already in use in the system. Nor can you
transfer third level domains if they use a second level domain owned by another user.
Go through subsequent steps (on page 27) that allow you to configure new domain as:
Full-featured web/mail hosting domain
Web hosting/mail service alias for an existing domain
Domain without web hosting/mail service to be considered later either for hosting or
for aliasing.
Page 22

22 Domain Registration
Hosting Existing Domains
Choose this option to host a domain registered outside Parallels H-Sphere if you‟d:
prefer to contact the registrar personally rather than apply changes automatically;
like to register a non-standard or regional domain, which can‟t be registered
automatically (e.g. your_domain.de);
prefer a different registrar than the one used by your hosting provider.
In either case, you need to make sure that the domain name is valid. Enter it into the
box, omitting the www part.
Following the registration you will get an e-mail notification with the information to send
to your domain name registration company. They will make appropriate changes on the
root DNS servers, and within a couple of days your domain will be accessible at the
new IP address. Right after registering the domain in your user control panel, your site
will be available by the instant domain alias.
Domain registration is a standard procedure. First, you purchase a domain name from
a domain registration company. Second, you register this domain name with your web
hosting provider and get your new IP address. It is only then that your site becomes
available to all Internet community. This is true for both standard and nonstandard
domains. In case of standard domain names, however, the registration process is
automated.
Creating Third Level Domains
Third level domains are registered on your provider‟s DNS server. You don‟t need to
register a third level domain with a domain registration company. If you choose to
create a third level domain, it will contain your provider‟s domain name. E.g. if your
provider‟s domain name is besthosting.com, and the third level domain you are
registering is mythirdlevel, the fully qualified domain name would be
mythirdlevel.besthosting.com.
Third level domain registration is available only if it‟s allowed under the selected plan.
Functionally, third level domains have same features as second level domains.
To register a third level domain name, enter the desired domain name in the Domain
name field. Choose provider‟s domain name to the right and click Submit.
Page 23
Domain Registration 23
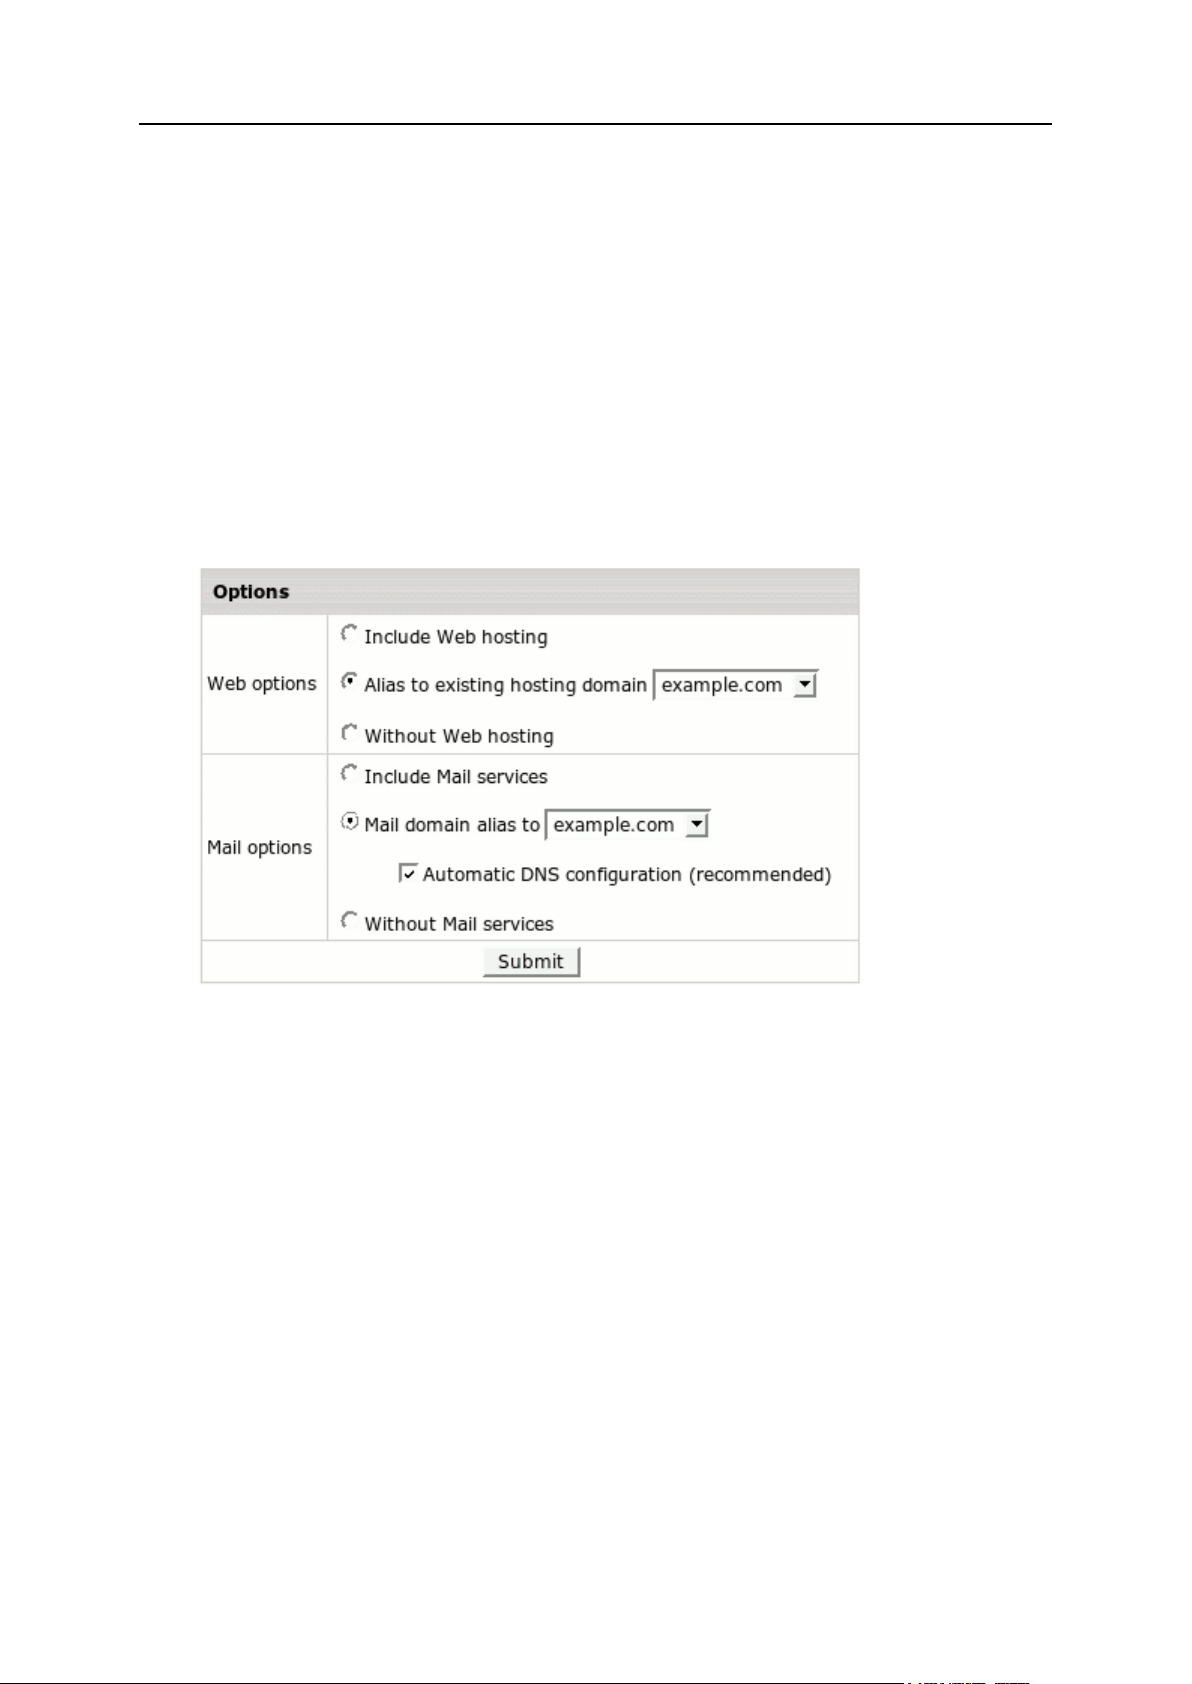
Hosting Sites Without Domain Names
You can also host sites without domain names (the so-called stop-gap domains). When
you create a stopgap domain, you get no DNS zone, and you cannot use e-mail
service. However, you will be able to access and manage your site using the instant
domain alias you get at signup.
Stopgap domains support web site management and FTP services. Also, you can have
IP-only access if you get a dedicated IP.
To create a stopgap domain, just click the Submit button in the Stopgap domain registration
form:
Parking External Domains
This feature allows using Parallels H-Sphere DNS server to map IPs to domain names
serviced and hosted on other servers (not those of Parallels H-Sphere). In this case, a
DNS zone is created with a custom DNS A record for the domain name and its IP is
entered in the form below:
Page 24
This chapter dwells on domain and subdomain configuration, domain and server
In this chapter:
Removing Domains ........................................................................................... 24
Enabling Instant Domain Aliases ................................ ....................................... 25
Creating Subdomains ........................................................................................ 25
Configuring Shared or Dedicated IP Hosting ..................................................... 26
Configuring Domain Aliasing ............................................................................. 27
Adding Server Aliases ....................................................................................... 31
Configuring Domain Renewal ............................................................................ 32
Changing Domain Contact and Billing Information ............................................. 34
Adding Web Access Control .............................................................................. 34
C H A P T E R 5
Domain Configuration
aliasing, shared and dedicated hosting and so on.
Removing Domains
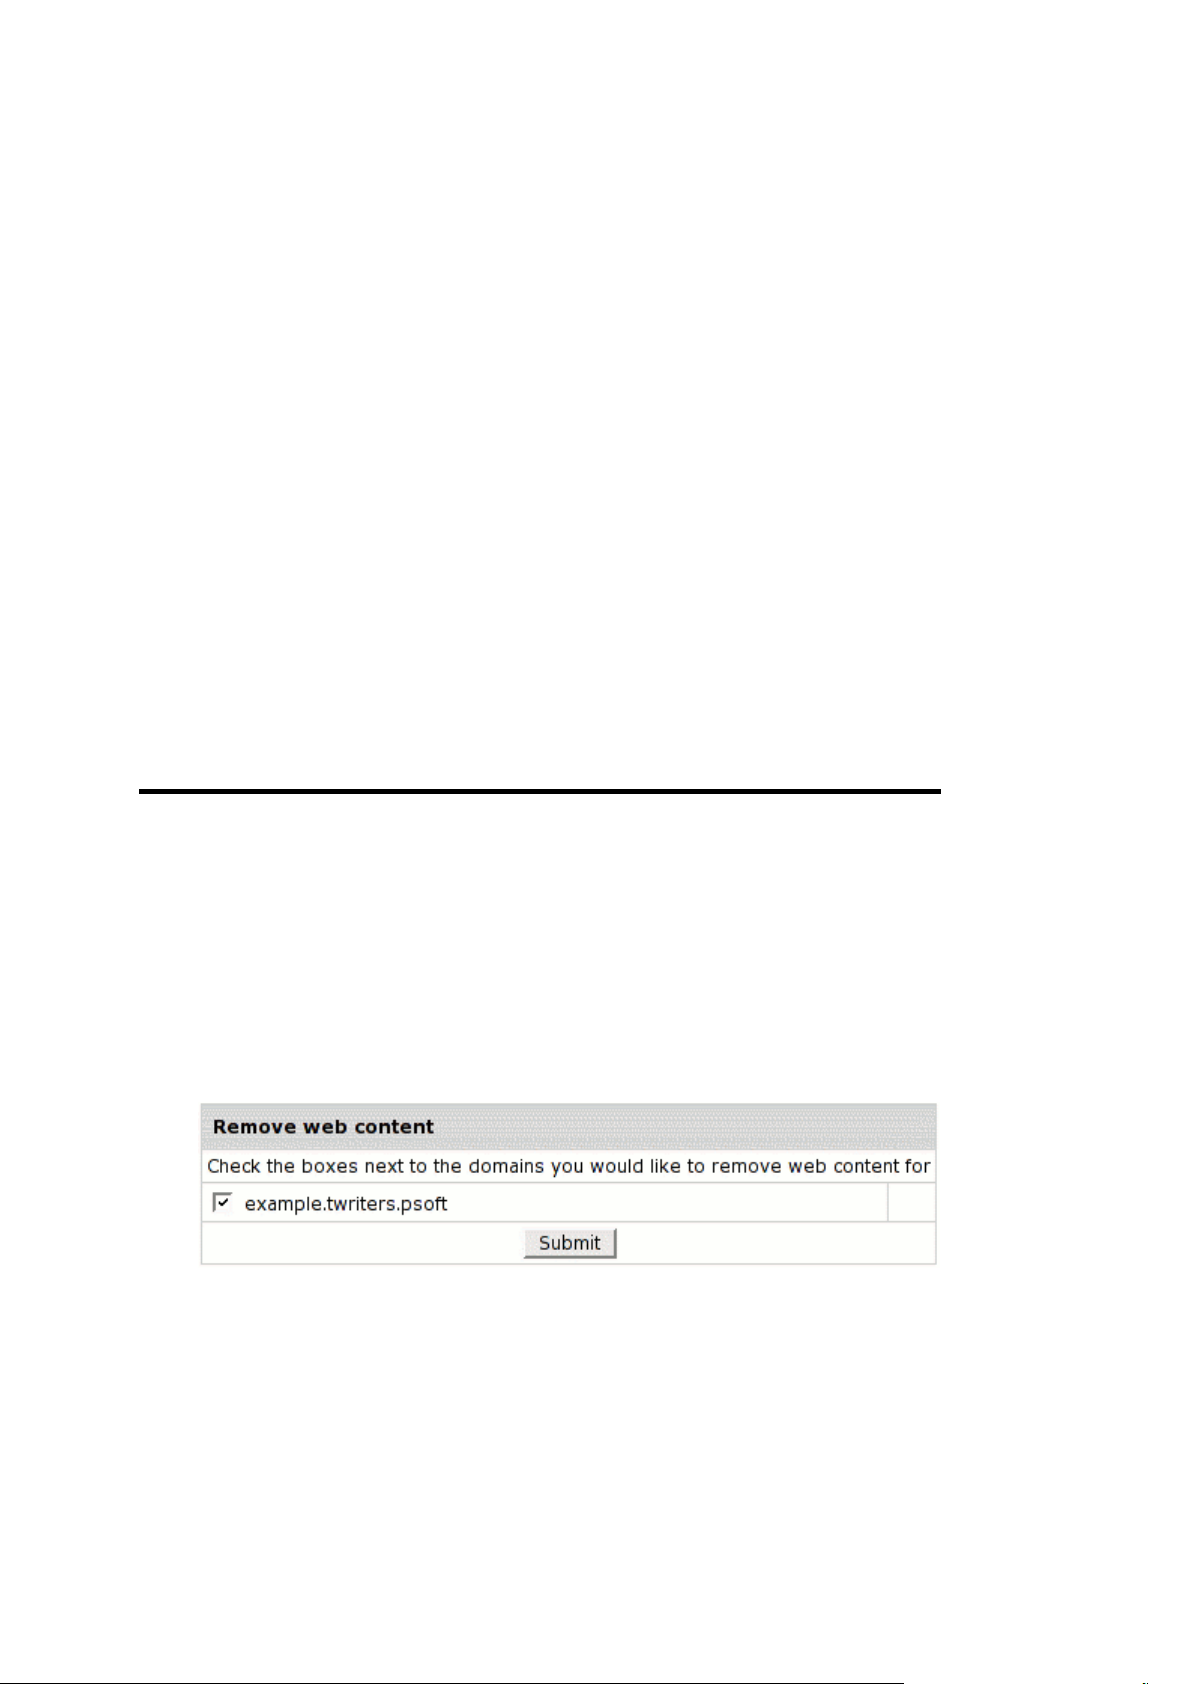
To remove a domain:
1 Select Domain Info link in Domain Settings menu on the left.
2 Click the Delete icon in the Domain name field at the top of the page.
3 Confirm the deletion by clicking “Yes, I agree with the above”.
Choose whether you would like to preserve the content of the domain‟s
directory.
If you choose to leave web content, all this Web site will remain on the server
and will be accessible by FTP.
If you choose to remove web content, all this Web site and its directory will be
permanently deleted from the server.
Page 25
Domain Configuration 25
Enabling Instant Domain Aliases
An instant domain alias is an additional web address that gives access to your Web site
when you don‟t have a real domain name or when your real domain name is
temporarily unavailable. Instant domain aliases are generated randomly based on your
provider‟s domain name and can‟t be changed.
To enable or disable access to your Web site by instant domain alias:
1 Go to Domain Settings > Web Options.
2 Select the domain if you have more than one.
3 Click Edit next to Web Service.
4 At the bottom of the Web Service page that appears, enable or disable
Instant access domain alias.
Creating Subdomains
A subdomain is a lower level domain. It is added on the left of the domain name, e.g.
subdomain.example.com. You can create as many subdomains as allowed by the plan.
Domains and subdomains have equal functional capabilities, including web site
management, e-mail service, FTP, dedicated IPs, etc., but subdomains do not have
their own DNS zones and usually cost less.
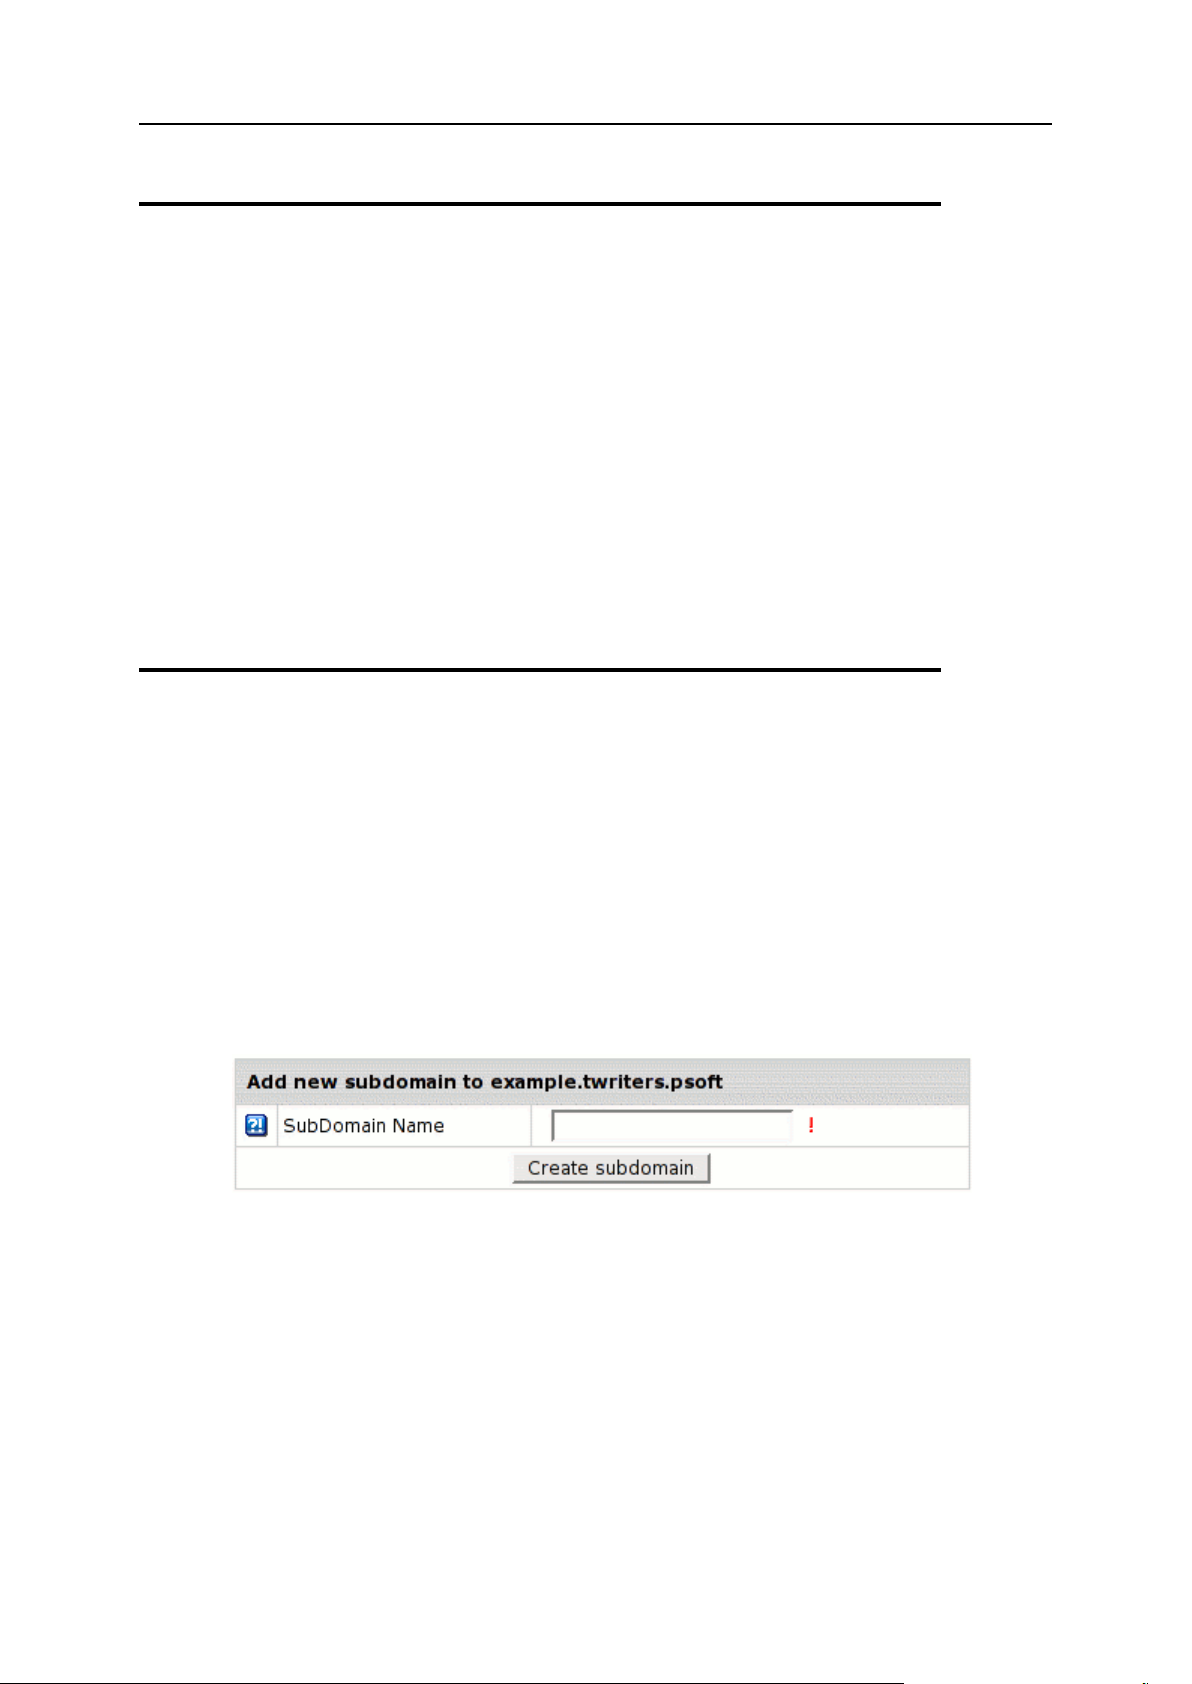
To create a subdomain:
1 Select Domain Info link in Domain Settings menu in user‟s Control Panel.
2 Click Add in the Sub Domains field. You will be asked to enter the
subdomain name:
3 Enter the new subdomain. It will be displayed in the Subdomain field of
the Domain Settings page.
Page 26
26 Domain Configuration
Configuring Shared or Dedicated IP
IP Hosting
Advantages
Disadvantages
Shared IP
can be used for virtually unlimited number
of virtual hosts;
easy to configure and use;
requires no additional hardware of
software;
can be used for free.
does not support Virtual
FTP;
does not support SSL
protection.
Dedicated IP
supports Virtual FTP
supports SSL
It is a pay service
Hosting
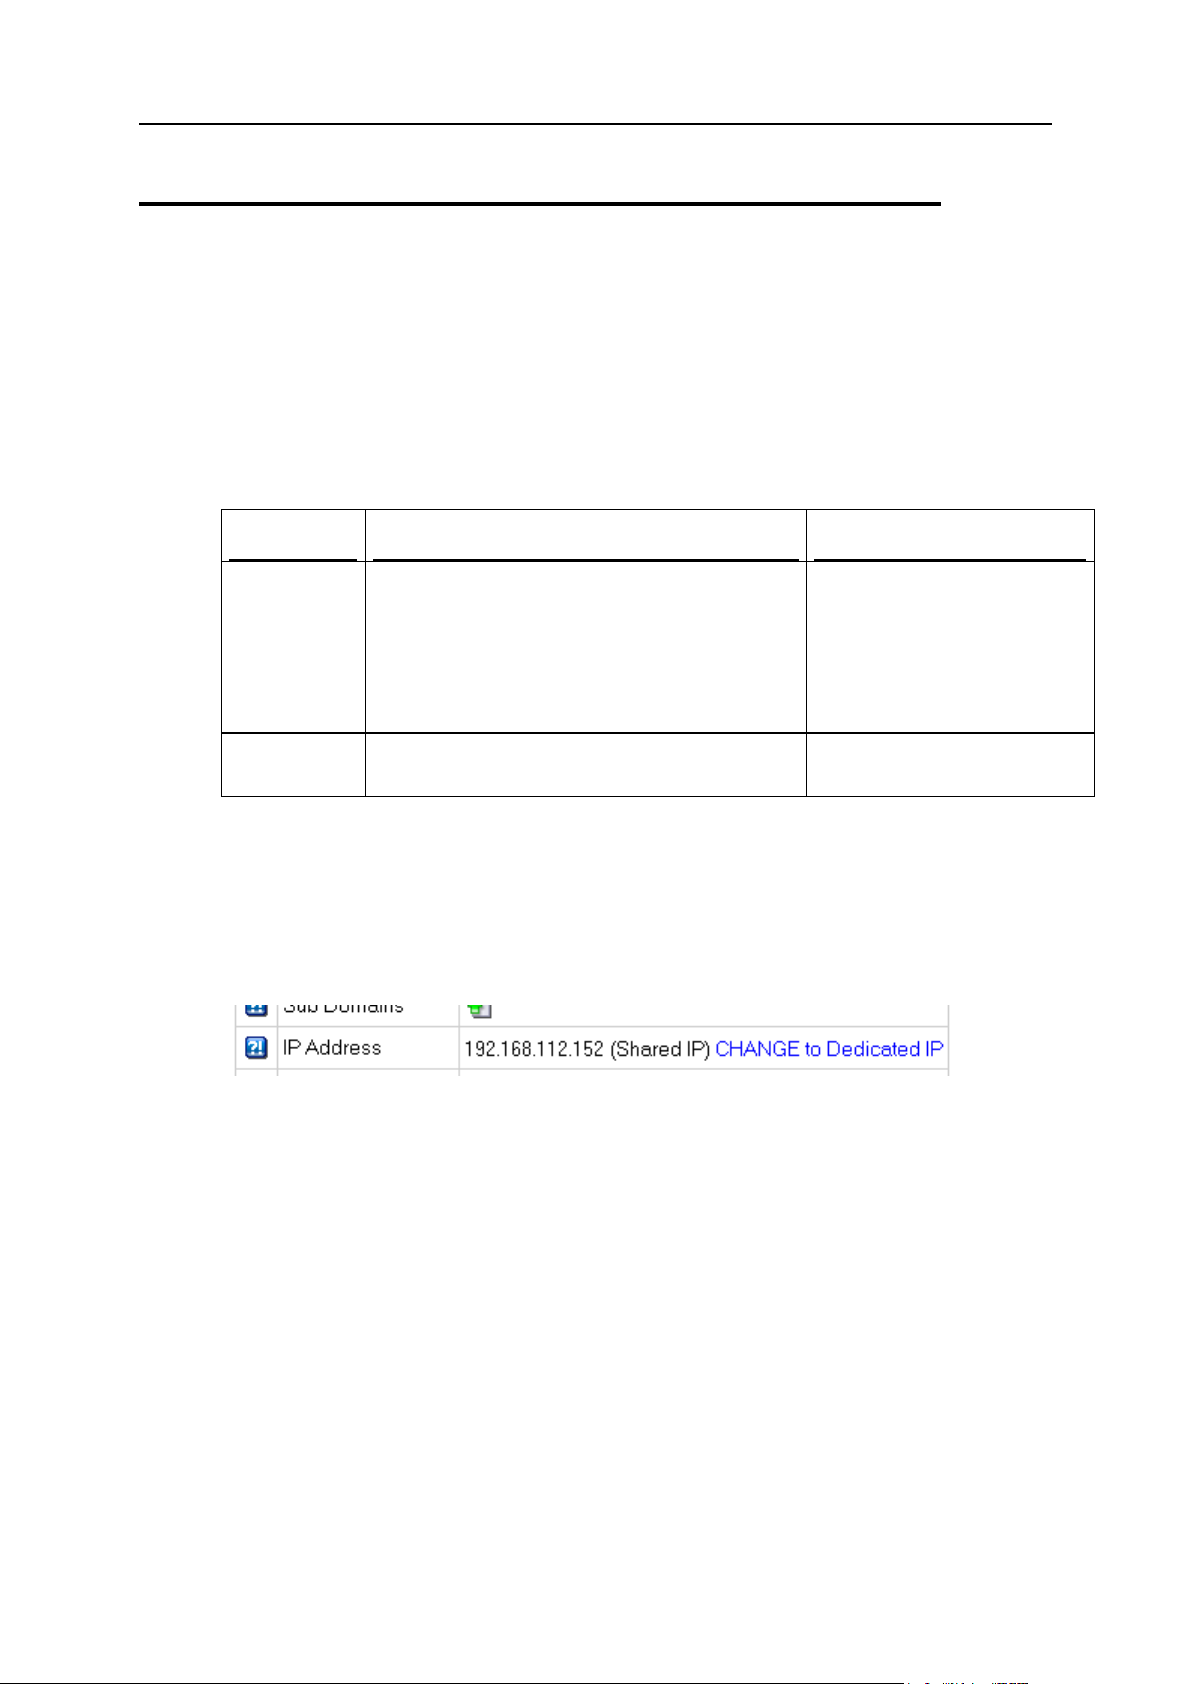
This is also called Virtual Hosting (Shared IP) and IP-Based Hosting (Dedicated IP).
Shared IP hosting - one IP address is assigned to several domains and access to a
domain is available only by its domain name;
Dedicated IP hosting - one IP address is assigned to one domain. To access a
domain, you can use either its IP address or its domain name.
Switching from Dedicated IP to Shared IP will delete your virtual FTP and SSL services.
To change the type of IP:
1 Select Domain Info in the Domain Settings menu.
2 If you have several domains, choose the one to enable virtual FTP for.
3 Click Change to Shared IP in the IP Address field:
Page 27

Domain Configuration 27
4 If prompted, confirm the change by clicking “Yes, I agree with the
Hosting Domain Alias
Mail Service Alias
domain of Host Existing Site
type
Registered domain
Transferred domain
domain of Host Existing Site
type
Registered domain
Transferred domain
above”.
Important:: After you switch between shared and dedicated IPs, it will take several
hours before the domain becomes available at the new IP address.
Domains on dedicated IPs don‟t have instant access aliases.
You can use an IP-only server. To create it, choose “no domain” during signup.
Following the signup, you should change IP to Dedicated.
Configuring Domain Aliasing
Domain aliasing is creating domain names that point to other domains. For example, if
your domain name is example.com, you can register another domain name, e.g.
example.net and have it point to the location of example.com. This means, every
Internet user who goes to example.net will land in example.com.
A domain alias may have:
its own DNS zone;
custom DNS records;
separate mail service.
The new concept of domain aliasing is treating domain aliases as full-featured domains.
It means that they can be registered/renewed via domain registrar right from your
control panel. Besides, domain aliases can be easily turned to full-featured hosting
domains and vice versa.
This concept provides you with more flexible approach to creating web hosting/mail
service aliases. Currently, Parallels H-Sphere supports hosting/mail service alias for the
following types of domains:
If you have domain aliases , they will continue to operate according to the old scheme.
To make old aliases full-featured domains, remove them and then add again as
described below.
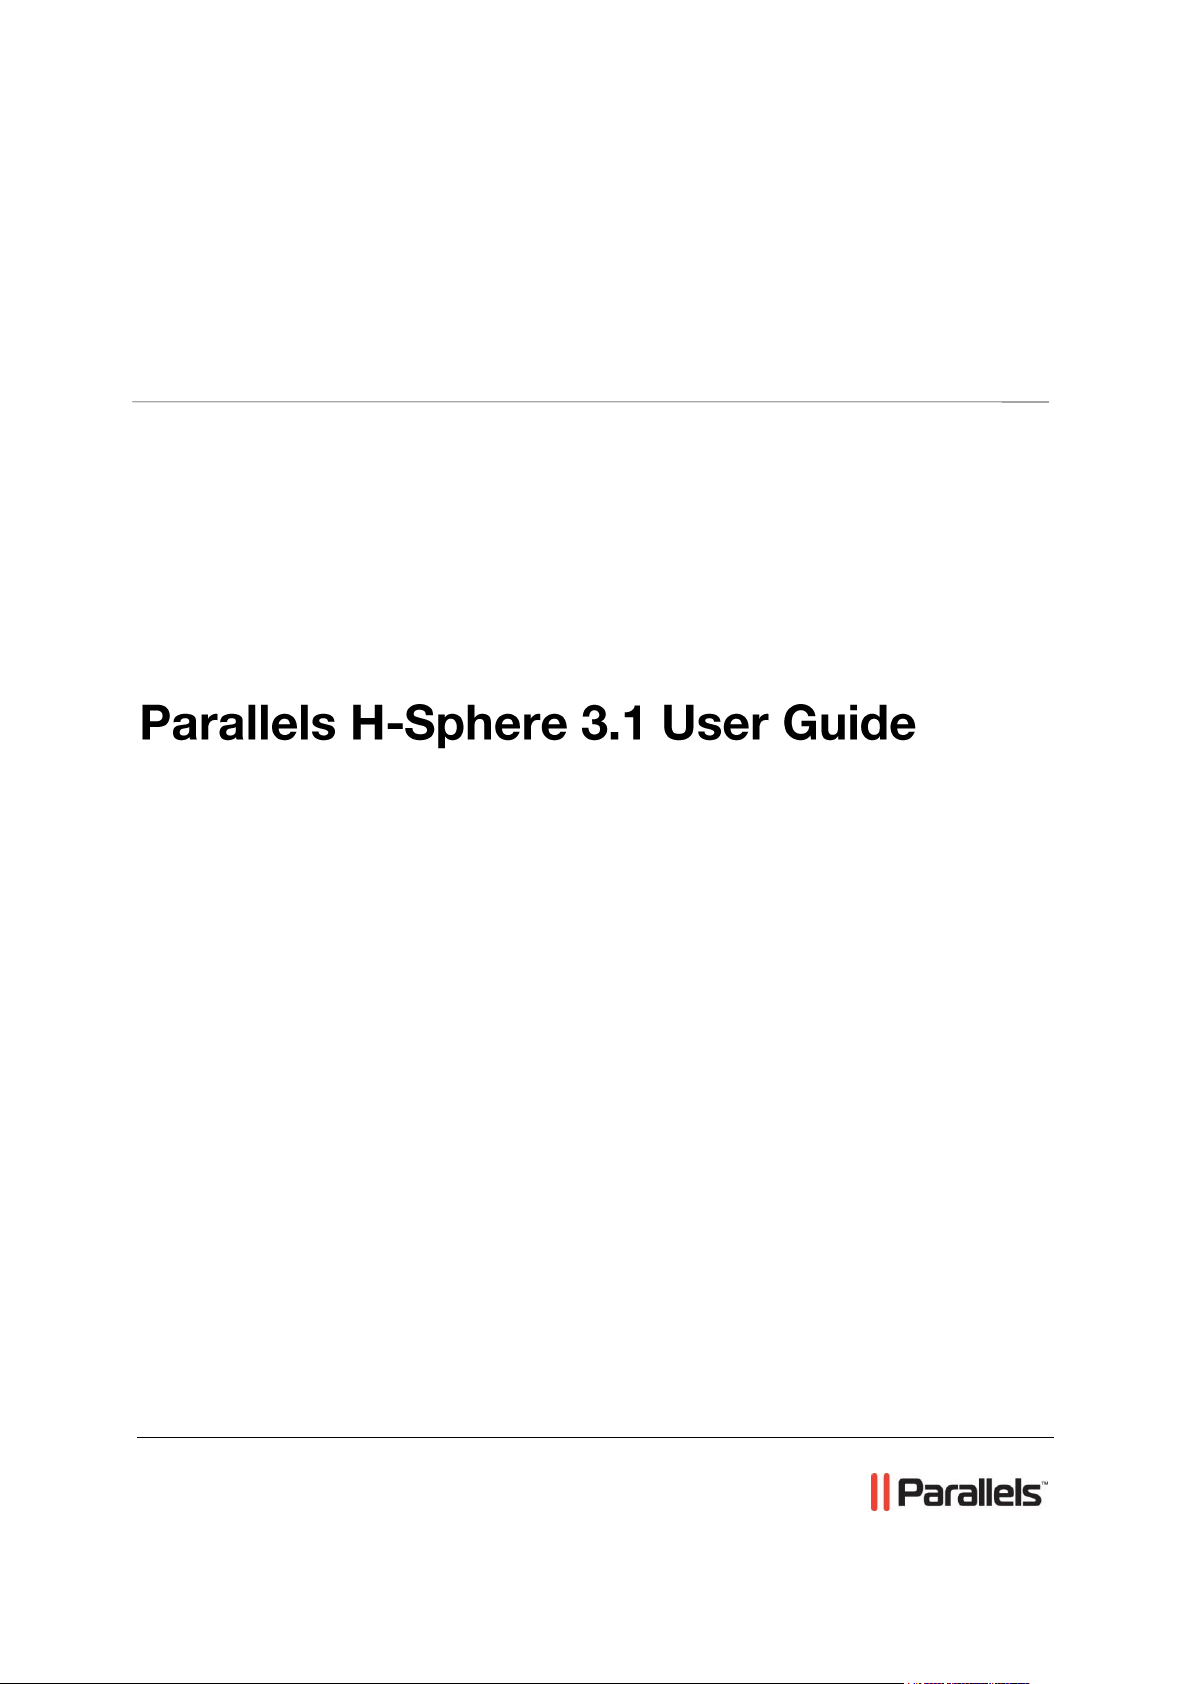
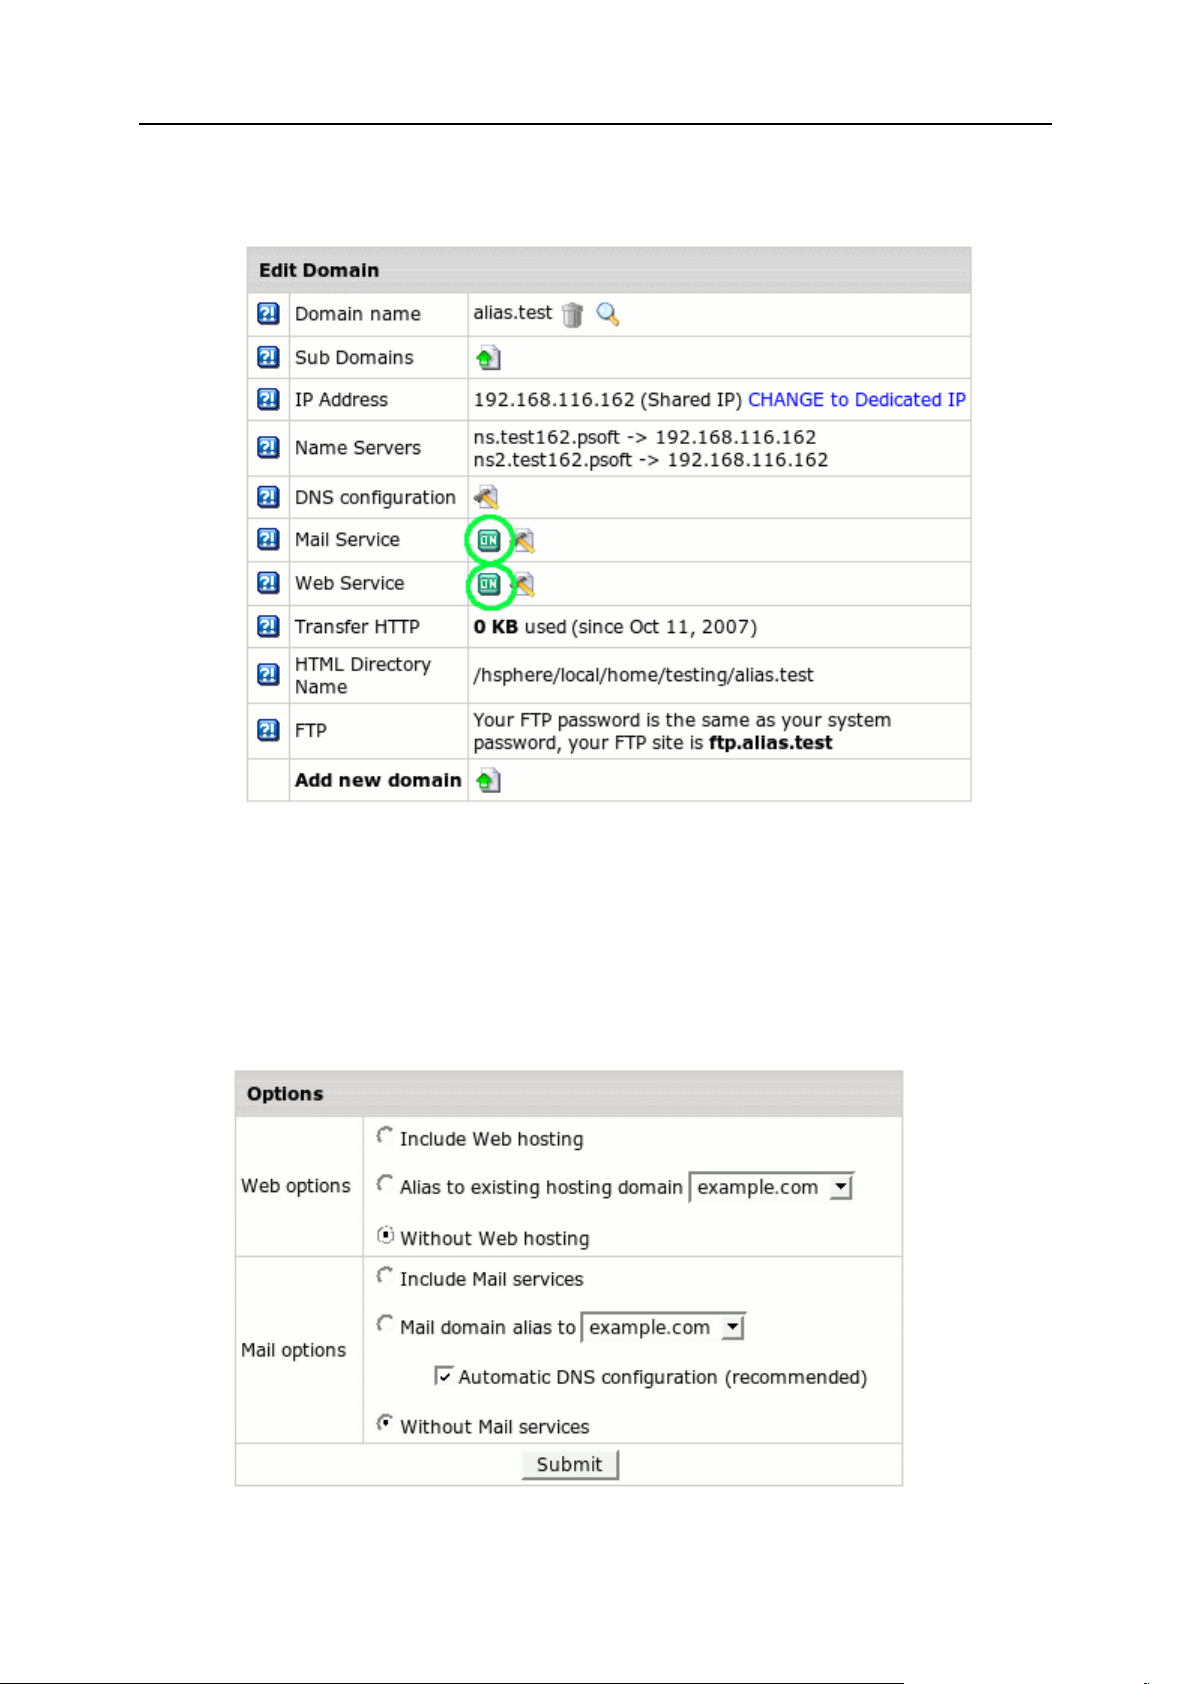
To configure new domain as a web hosting/mail service alias for an existing domain:
1 Choose Add New Domain in Domain Settings menu.
2 Enter name for your alias and click Submit:
Page 28
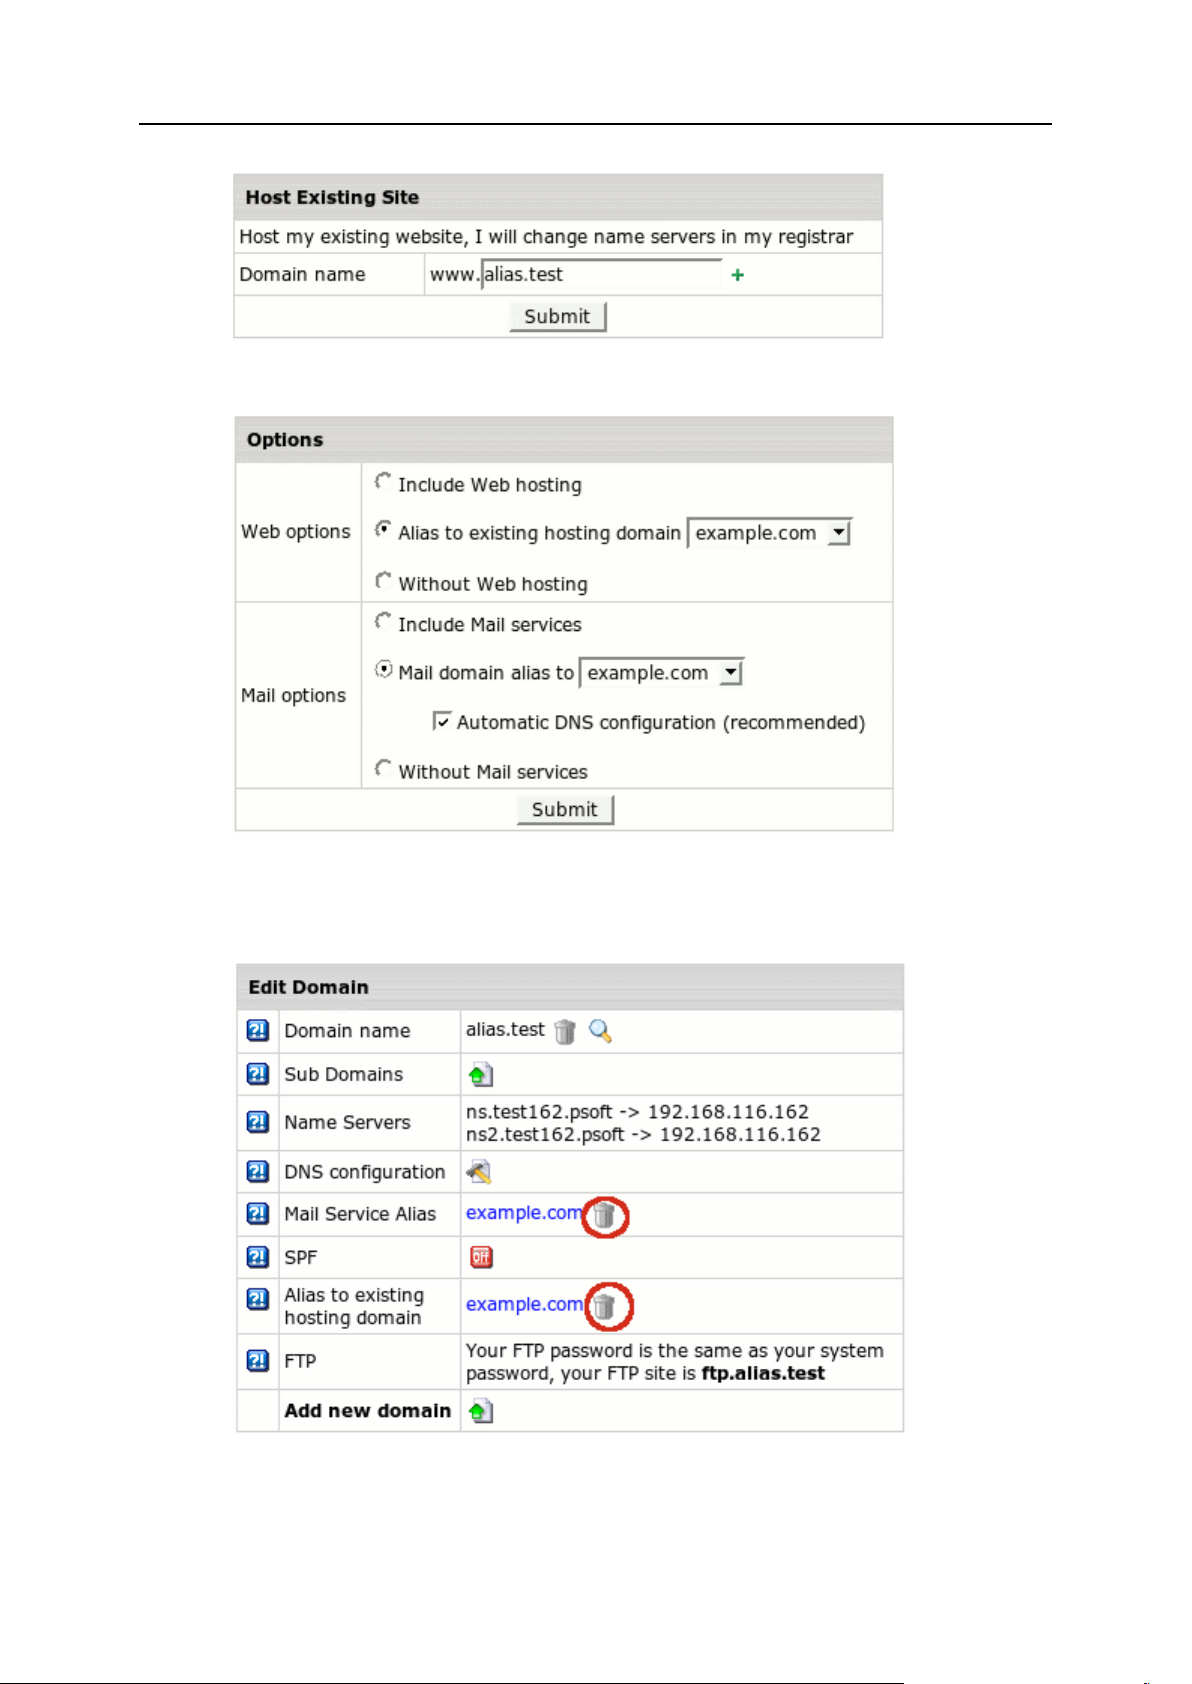
28 Domain Configuration
3 Click Continue. On the Options page choose settings according to the
screenshot below.
4 Click Submit.
To disable web hosting/mail service alias for a domain:
1 Go to Edit Domain page:
Page 29
Domain Configuration 29
2 Click the Trash icon near Mail Service Alias/Alias to existing hosting domain.
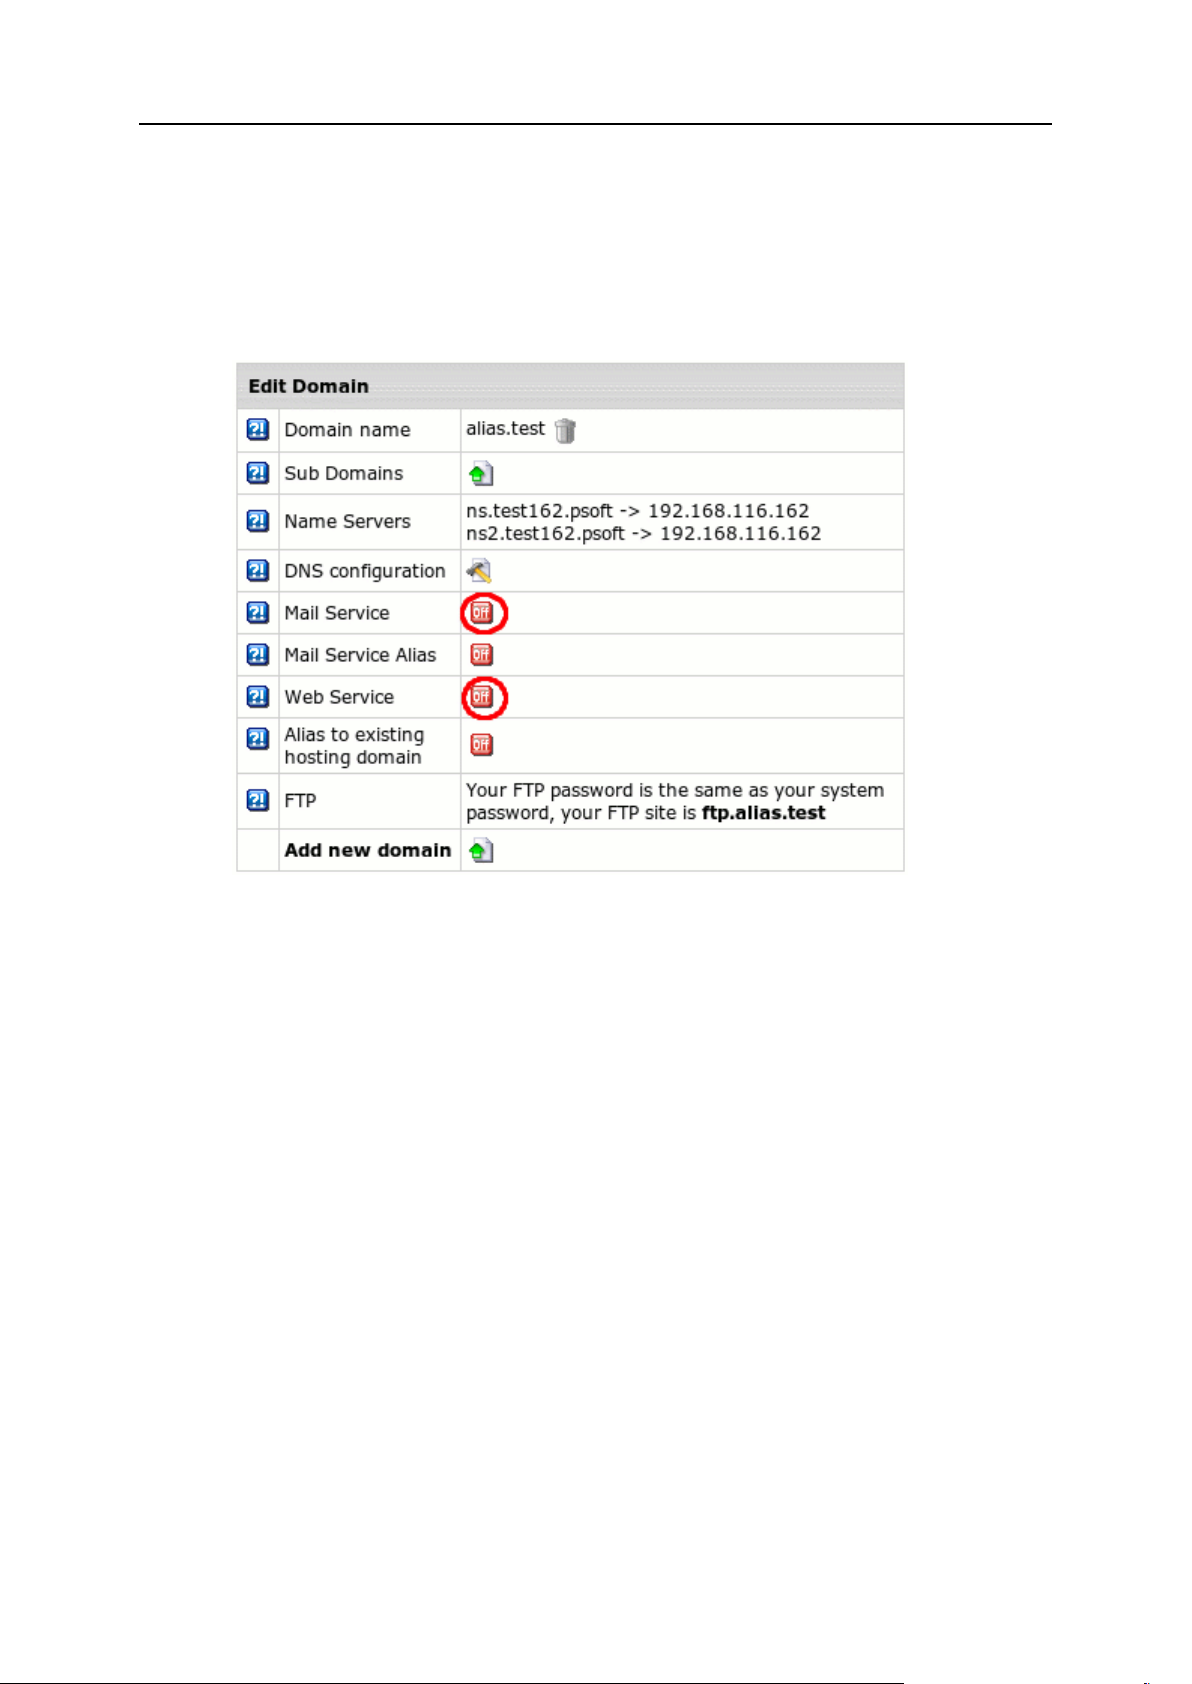
To turn domain/mail service alias to full-featured web/mail hosting domain:
1 Go to Edit Domain page.
2 Click the Trash icon near Mail Service Alias/Alias to existing hosting domain.
3 Click Off near Mail Service/Web Service:
Page 30
30 Domain Configuration
4 Mail/Web Service will show as enabled:
To register domains without web/mail service considered later either for hosting or for
aliasing:
1 Choose Add New Domain in Domain Settings menu.
2 Enter name for your domain and click Submit.
3 Click Continue and on the Options page choose settings exactly as
shown on the below screenshot.
Page 31

Domain Configuration 31
4 Click Submit. Later on the Edit Domain page turn ON either the Service
buttons or the Alias buttons.
Adding Server Aliases
Server aliases are additional names for your virtual host. Unlike domain aliases, they
are not added to your DNS zone, and are registered only with Apache. For instance, if
your virtual host name is example.com and you also would like it to be available at
www.example.com, you should add www server alias to the example.com domain.
To add a server alias:
1 Go to Domain Settings > Web Options.
2 Click the Edit icon next to the domain you need.
3 Scroll down to the Server alias field and click the Add icon.
4 Enter server alias. It will be added to the list of server aliases for this
virtual host name.
Page 32

32 Domain Configuration
Configuring Domain Renewal
Domains transferred or registered from your control panel with a domain registrar need
to be renewed once the registration period expires. In your account you can choose
between manual and automatic renew modes.
This option is available only for domains registered from your control panel.
Although you will be sent an e-mail notification before your domain expires, you can
choose whether to renew your contract with the registrar company manually or
automatically. In the automatic mode, your domain name will be renewed for as many
years as you specify in your control panel settings. In the manual mode, you would
have to enter your control panel and click the Renew Domain link; otherwise the
domain name will expire and become unavailable.
To set the renewal mode to automatic or manual:
1 Go to your control panel Domain Settings/Domain info menu, and click the
domain name link.
2 On the page that appears in section Domain Renew Mode, click the Renew
domain link.
3 To switch to another mode, click the Edit icon. On the page that
opens, select either Manual or Automatic.
With Manual renew mode, you will be warned about domain expiration in advance, so
that you can renew the domain on time.
To renew your domain manually:
1 Click the Renew domain link:
Page 33

Domain Configuration 33
Renew/registration date: the date you registered your domain or last time renewed
the domain registration.
Registration/last renew period in years: the period you registered or last time
renewed the domain registration for.
Total contract length in years: the period you have registered your domain for
(including all the renewals).
Expiration date: the date when your domain registration period expires.
Advisable renew date: the date you are advised to renew the domain registration.
Renew domain for this many year(s): set the period you‟d like to renew the domain
registration for.
2 Click Submit to confirm your renewal request and agree to charges, if
any.
Warning: Make sure to renew your domain on time, as you won‟t be able to renew it
from your Control Panel when it expires.
To configure automatic renewal:
1 Go to your control panel Domain Settings/Domain info menu, and click the
domain name link.
2 On the page that appears in section Domain Renew Mode, click the Renew
domain link.
3 Select Automatic and enter the years to renew the domain for:
Page 34

34 Domain Configuration
If you have opted for an Automatic Renew Mode, the domain will be automatically
renewed for the number of years you specified when choosing the Domain Renew Mode.
The charges for a renewal will be made according to your plan settings.
Changing Domain Contact and Billing
Information
Contact/billing info is available only for domains registered through Control Panel.
If you want to change either your contact or billing information for a registered domain,
click the Edit icon in the corresponding section. Edit info in the form and check Yes in
the Affect Owner Info entry:
Note: If your .org domain is locked, you won‟t be able to update your domain‟s
contact/billing information via control panel! Unlock your domain first!
Adding Web Access Control
This document describes the Web Access Control resource which allows Linux users to
add and configure web access for their domains to different locations. You can allow or
deny access for domain names or IP addresses (groups of IPs).
By adding Web Access Control, you define the default order (type) of access.
To add Web Access Control in your User control panel:
1 Go to Domain Settings - > Web Options
2 Scroll down to Web Access Control and click Add. Configure the form that
shows.
Page 35

Domain Configuration 35
3 Enter Location which provides for access control by URL
If Current Default Access Rule=allow, this location/web directory will be available for
all domain names/IPs.
If Current Default Access Rule=deny, this location will be denied for all.
4 Submit to confirm.
By editing Web Access Control, you can add, delete, upload and export allowed
or denied domain names/IPs.
Current Default Access Rule: if necessary, you can change current default access
rule.
Deny Domains/IPs list: you can delete any domain or IP from the list
If current default access rule=allow, you can define the list of domain names/IPs which have no access. If current default access rule=deny, you can allow access to defined
domain names/IPs.
Domain: type in a new domain and click Add
Add IP address and Mask.
Manage Domains/IPs: you can upload list domains/IPs from file and export
existing list to file. If you define a group of IPs, you should add mask with the “/”
in front of it, e.g: 192.168.112.5/255.255.255.0
Note: Don‟t forget about permissions on directories to where you want to upload/export
files. If you don‟t have permissions toread/write files, you cant‟ upload/export your lists.
Page 36

DNS can be considered something similar to a phone book. When you move from one
In this chapter:
Removing And Restoring Built-in DNS Records ................................................ 37
Creating Custom DNS Records ......................................................................... 38
C H A P T E R 6
DNS Settings
location to another, your name stays the same, but your phone number may change. In
order to point your name to the new phone number, you must contact the telephone
service provider so they assign you the new phone number and update all directory
information to reflect you as pointing to this new phone number.
In this way, the IP number can be compared to a phone number: When someone calls
http://www.example.com/, your ISP looks at the DNS server, and asks “how do I contact
example.com?” The DNS server responds: “It can be found at 198.105.232.4”. As the Internet
understands it, this can be considered the phone number for the server, which houses
the http://www.example.com web site.
The DNS records for your domain are kept on your hosting server in the place called
DNS zone. When you register a domain by means of the control panel, all DNS records
are automatically created for you, but in some rare cases you may need to add custom
records to your DNS zone. An example would be when you want all e-mail to be
processed by an external mail server rather than by the built-in mail system. However,
such user intervention requires knowledge of DNS configuration and clear
understanding of what is to be done.
Page 37

DNS Settings 37
Removing And Restoring Built-in DNS
Records
To remove/restore built-in (default) DNS records of all types (A, CNAME, MX and TXT)
from your control panel:
1 Select Domain info in the Domain Settings menu.
2 On the page that appears, click the Edit icon in the DNS Configuration
field:
3 On the DNS configuration page click Trash for the record you want to
remove:
4 To restore the record, click Restore default records.
Page 38

38 DNS Settings
Creating Custom DNS Records
To create a custom record to your DNS zone:
1 Select Domain info in the Domain Settings menu.
2 On the page that appears, click the Edit icon in the DNS Configuration
field.
3 This link will take you to the DNS Configuration page:
4 On this page you can see several blocks of DNS records.
You can add any type of DNS records by clicking an appropriate link. You will be
asked to enter corresponding DNS data.
Adding Custom A Records
Normally, A records are used to map domain names and web server IP.
Page 39

DNS Settings 39
Name: enter the string to map to the web server.
TTL: set how many seconds will elapse before the record is refreshed in the DNS
cache.
Data: enter the IP of the web server.
Warning: Please pay attention to $ORIGIN when you add an A record.
Adding Custom MX Records
Custom MX records should be added when you want to use your external mail servers
to process your e-mail. To use your external servers instead of those you get by
default, you need to disable mail service on the Domain Settings page of your control
panel. To use the external mail servers in addition to those you get by default, you need
to keep mail service enabled in the control panel. The priority of the custom MX record
will define whether your external servers will act as secondary or primary. For instance,
if you set the priority of the custom MX record higher than 10 (e.g. 11), your external
mail server will be used as secondary. If you set the priority of the custom MX record
lower than 10 (e.g. 9), your external mail server will be used as primary. In the latter
case, your mail will be sent to your external mail server until it goes down or becomes
otherwise inaccessible. Then the default mail server will take over.
When you enable mail service in the control panel, an MX record is created
automatically in the DNS zone. If mail service is disabled, this built-in MX record
remains in the DNS zone, and you can remove it manually using the control panel
interface.
Page 40

40 DNS Settings
Name: your local domain name. If you leave the Name field blank, all mail will be
redirected for the base zone.
Data: the priority of the record and mail domain name (not the IP) mail will be
forwarded to.
Important: To add an MX record for the base domain, leave the Name field empty.
Adding Custom CNAME Records
Finally, CNAME records are used to map aliases with domain names.
Name: The alias you give to the real host name.
TTL: set how many seconds will elapse before the record is refreshed in the DNS
cache.
Data: The real name of the host you create an alias to. This must be an official host
name. It cannot be an alias. A CNAME-record should always point to an A-record to
avoid circular references.
Warning: Please pay attention to $ORIGIN when you add a CNAME record.
Page 41

Your account comes with a comprehensive suite of Web tools that will help you create
In this chapter:
Parallels SiteStudio ................................................................ ........................... 41
C H A P T E R 7
Web Site Creation and Publishing
a professional Web site without knowing HTML, manage files in your home directory
and protect any directory on your site.
Parallels SiteStudio
Before you pay a fortune to a Web design studio or waste hours making a nice-looking
web site in FrontPage, consider our online site builder Parallels SiteStudio that will
create you a professional Web site in a matter of minutes and post it to your directory
on the server.
To start SiteStudio:
1 Go to Domain Settings > Web Options menu for chosen domain.
2 Click Login in the SiteStudio section to launch Parallels SiteStudio
control panel in a new window.
Page 42

This chapter introduces you to the tools that enhance your site navigation.
In this chapter:
Redirect URL ..................................................................................................... 43
Directory Indexes .............................................................................................. 46
Error Pages ....................................................................................................... 47
Server Side Image Map ..................................................................................... 49
MIME Types ...................................................................................................... 49
WAP Support .................................................................................................... 50
Reverse Traceroute ........................................................................................... 50
C H A P T E R 8
Web Site Navigation
Page 43

Web Site Navigation 43
Redirect URL
Use this feature to redirect your visitors from one web page to another or even to a
different Web site.
To create a redirect in a Unix-based account:
1 Go to Domain Setting > Web Options for the domain you need.
2 Scroll down to find the Redirect option and click the Add icon next to it.
3 Agree with the charges.
4 On the page that appears, create the redirect rule.
Unix-based accounts
Entering http://www.examples.com/products into the Redirect from field and
http://www.examples.com?param1=yes in the to field, will take all the
http://www.examples.com/products visitors to the
http://www.examples.com?param1=yes page.
Page 44

44 Web Site Navigation
If you leave the Redirect from field empty, visitors will be redirected from any location in
the site. In the to field, you can enter URLs with parameters, as illustrated in the
screenshot above.
Leave Redirect status as is unless you want to change the default:
Permanent: returns a permanent redirect status (301) indicating that the resource
has moved permanently.
Temporary: returns a temporary redirect status (302). This is the default and
indicates to the client that the resource has moved temporarily.
See other: returns a “See Other” status (303) indicating that the resource has been
replaced.
Gone: will cause a visitor‟s browser display “The requested resource is no longer
available on this server and there is no forwarding address. Please remove all
references to this resource.” message when trying to go to the „to‟ URL.
Windows-based accounts
In Windows plans, redirect works in a slightly different manner:
Page 45

Web Site Navigation 45
The exact URL entered above
redirects requests for any files in the indicated directory to one file. For example, to
redirect all requests for products.html file to the following URL: „www.example.net‟,
enter www.example.net/products.html in the To field and select this option.
You can redirect requests to URLs with parameters, for example
www.examples.net/?param1=yes
*Note: you can redirect requests for files and directories both to your own site and to
any other external URL.
A directory below this one
redirects a parent directory to a child directory.
- For example, to redirect your „examples.net/products‟ directory to a subdirectory
named „news‟, enter „excample.net/products/news‟ in the „to‟ text box and select this
option. Without this option, the Web server will continually map the parent to itself.
A permanent redirection for this resource
sends the following message to the client: „301 Permanent Redirect‟. Redirects are
considered temporary, and the client browser receives the following message: „302
Temporary Redirect‟. Some browsers can use the „301 Permanent Redirect‟
message as the signal to permanently change a URL, such as a bookmark.
Page 46

46 Web Site Navigation
Directory Indexes
This tool allows you to set your own index pages instead of those specified in the
default settings. In other words, you can tell your visitors‟ browsers which page to load
as they hit your domain. Usually, it‟s /index.html by default, but you can set any
other custom welcome page.
Example: If a visitor goes to your site http://www.example.com, the first page to open
will be http://www.example.com/index.html. However, if you set
/welcome.html as the directory index, the page to open will be
http://www.example.com/welcome.html.
Warning: your custom index pages won‟t add to the defaults; they will replace them.
Therefore, make sure to enter the full list of indexes you would like to have in your
configuration.
To set your custom directory indexes:
1 Go to Domain Setting > Web Options for the domain you need.
2 Scroll down to find the Directory Indexes option and click to enable it.
Agree with the charges if any.
3 In the box that appears, enter the names for files that will be treated
as indexes. Put file names in the descending order of priority and
separate them with spaces (for example, index.html cgi.bin
about.html).
4 Skip this step if you are using a Windows-based plan. At the top of the
Web Service page, click the Apply link for the Server configuration to
change. The changes will take effect within 15 minutes.
5 To edit the list you have made, click the Edit icon next to the Directory
Indexes option: with spaces (index.html cgi.bin about.html ).
Page 47

Web Site Navigation 47
If you are using a Unix-based plan, click the Apply link at the top of the Web Service
Successful Client Requests
200 OK
201 Created
202 Accepted
203 Non-Authoritative
Information
204 No Content
205 Reset Content
206 Partial Content
Client Request Redirected
300 Multiple Choices
301 Moved Permanently
302 Moved Temporarily
303 See Other
304 Not Modified
305 Use Proxy
Client Request Errors
400 Bad Request
401 Authorization Required
402 Payment Required (not used
yet)
403 Forbidden
404 Not Found
405 Method Not Allowed
406 Not Acceptable (encoding)
407 Proxy Authentication
Required
408 Request Timed Out
409 Conflicting Request
410 Gone
411 Content Length Required
412 Precondition Failed
413 Request Entity Too Long
414 Request URI Too Long
415 Unsupported Media Type
Server Errors
500 Internal Server Error
501 Not Implemented
502 Bad Gateway
503 Service Unavailable
504 Gateway Timeout
505 HTTP Version Not
Supported
page.
Error Pages
Use this utility to define what will be done if a requested page on your site is missing or
fails to open for any other reason. In order to specify your own Error Documents, you
need to be slightly familiar with the server returned error codes:
To configure Error Pages:
1 Go to Domain Setting > Web Options for the domain you need.
2 Scroll down to find the Error option and click the Add icon on its right.
3 In the form that appears, enter the error document settings:
For Unix accounts:
Page 48

48 Web Site Navigation
Error Document Code: choose the one you need from the drop-down box.
Message or URL: the path to the page with ERROR message
IMPORTANT: if ErrorDocument 401 is chosen in Error Document Code, the path
must be relative to the local user‟s site home root
Type: Specify if the text in the previous field must be treated as a URL (Redirect) or
as a text message (Message).
For Windows accounts:
Users will get a slightly different form to enter the path to the custom error page. Note
that the path should be relative to the home directory, not to the virtual host directory.
If you check FILE:
only static error page files can be used;
the same error page files for this domain can be shared with other account
domains.
For instance, with the following file path, all account domains will share this error page:
pages\404_error.html
use the “\” character as a delimiter in the file path;
do not start the file path with “\”.
If you check URL:
it will allow you to use scripts (php/ASP) to dynamically generate error pages
(alternatively, use static error page files for each type of error page);
error page files for this domain can‟t be shared with other domains;
“Path to Custom Error page” must be relative to the virtual host and start with “/”.
Page 49

Web Site Navigation 49
Server Side Image Map
This feature allows your server to regard files with a specific extension as map files. In
other words, the server checks the file with the specified extension to define the links of
an image (unlike a client-side image map, which uses the information inserted into the
HTML code) and reports back to the browser where to go.
To add an image map file extension:
1 Go to Domain Setting > Web Options for the domain you need.
2 Scroll down to find the Server Side Imagemap option and click the Add icon
on its right.
3 Agree with the charges.
4 Enter the file extension beginning with a dot:
MIME Types
This utility allows defining file formats that are not defined in web browsers. This
enables the browser to display or output files that are not in HTML format, just like it
displays simple text files, .gif graphics files and PostScript files.
To add a definition for your own file format:
1 Go to Domain Setting > Web Options for the domain you need.
2 Scroll down to find the MIME Type option and click the Add icon on its
right.
3 Agree with the charges.
4 On the page that appears, enter the extension for this file type:
5 Begin file extension with a dot. The MIME type must comply with
MIME type specifications, for example, text/rtf or video/mpeg.
Page 50

50 Web Site Navigation
WAP Support
Content
MIME Type
File Extension
WML Source
text/vnd.wap.wml
.wml
Compiled WML
application/vnd.wap.wmlc
.wmlc
WMLScript source
text/vnd.wap.wmlscript
.wmls
Compiled WMLScript
application/vnd.wap.wmlscriptc
.wmlsc
Wireless Bitmap
image/vnd.wap.wbmp
.wbmp
WAP (Wireless Application Protocol) is a secure specification that allows users to access
information instantly via handheld wireless devices such as mobile phones, pagers,
two-way radios, smartphones and communicators. Although WAP supports HTML and
XML, the WML language (an XML application) is specifically devised for small screens
and one-hand navigation without a keyboard. WAP also supports WMLScript.
To add support for WML or WMLScript, add the following MIME Types (on page 49):
Reverse Traceroute
This net troubleshooting tool allows you to ping any Internet host from your hosting
server. In other words, you can use this tool to determine if a host is reachable and how
long it takes for the signal to go all the way through.
To launch the Reverse Traceroute tool, do the following:
1 Select Trace Route link in the Domain Settings menu.
2 In the form that appears, enter the host name or the IP address of the
server you would like to ping:
3 Select the time-out period. If you see the connection is slow, select a
bigger period.
4 Click Trace and wait for the result. The next page will show all the
hosts that were passed to reach the target server.
Page 51

After signup users are provided with FTP access to their home directory. To establish
C H A P T E R 9
FTP Management
an FTP connection, you will need the following pieces of information: FTP login, FTP
password, and FTP host name.
To find this information, select FTP User link in FTP/User Account menu.
Page 52

52 FTP Management
Login is the login to be used to enter a user directory via FTP. It is automatically
In this chapter:
WebShell File Manager and htProtect ............................................................... 53
FTP Subaccounts .............................................................................................. 53
Virtual FTP ........................................................................................................ 54
Anonymous FTP................................................................................................ 57
Anonymous FTP Upload Facilities ..................................................................... 59
generated on the basis of the account name.
Note: instead of using an FTP client, you may choose here Parallels H-Sphere builtin Web-based file manager WebShell (on page 53) by clicking the File Manager
(HtProtect) link.
Password is by default the password associated with your username. If necessary,
you can change (on page 16) and hence make it different from you control panel
password.
Host Name is a web server domain name to be used to access files via FTP.
There are different ways to allow guest users to download, upload or view files in
dedicated directories of your account:
FTP subaccounts
Virtual FTP
Anonymous FTP
They will be described later in this chapter.
Page 53

FTP Management 53
WebShell File Manager and htProtect
WebShell allows you to copy, move, delete, and rename files and directories in your
home directory on the server. Also, you can use it to upload, download, compress and
decompress files as well as preview them in the browser.
htProtect utility is integrated into WebShell. Protect utility allows you to password-protect
any directory on your site so only authorized visitors can open its content with their
browsers.
You can launch WebShell in two different ways:
From the Quick Access page, click File Manager under the Tools section.
Go to FTP/User account>FTP User menu of your Control Panel and click the File
Manager (HtProtect) link on the page that appears.
WebShell and htProtect manuals are available from the WebShell interface, Help button.
WARNING (For Windows-based accounts):
When you want to password protect a folder in WebShell that is accompanied with
creating a user, authentication problem can arise as WebShell will not check whether
system account with the same user name exists. There are two ways to prevent this
problem:
- Create a user in WebShell based on the name of your own FTP account. For
example, FTP account name is mike. Then user name in Webshell can be mikeNNNN,
where NNNN are some other symbols.
- If you want to protect a folder using your own FTP account name, you should set the
same password in Webshell as for FTP account.
Make sure you are logged off Webshell before browsing untrusted sites from the same
browser window.
FTP Subaccounts
The simplest way to authorize your friends or colleagues to work with particular
directories of your account is to create FTP subaccounts. An FTP subaccount is a
combination of a username and a password, which gives full FTP permissions to a
single directory, without giving access to the root directory, other directories or the
control panel. No dedicated IP is required for FTP subaccounts. Although each FTP
subaccount has a login which is different from yours, both have the same ID in the
system.
To create a new FTP subaccount:
1 Select FTP User link in FTP/User Account menu.
2 At the bottom of the page that shows, find FTP sub-accounts (or System
accounts in Parallels H-Sphere 3.0 and up) and click the Add icon.
Page 54

54 FTP Management
3 On the next page, enter the FTP login and password that will be used
by this other user, and the directory this user will be restricted to. The
directory must be relative to your home directory. If you leave the
directory field empty, FTP sub-users will have access to your whole
home directory.
Notes:
FTP subaccount‟s directory can be multi-level nested subdirectory relative to
your home directory.
For Windows accounts you must use the “\” character as a delimiter in the path.
You must not add the leading slash (domain.com/dir/subdir for Unix,
domain.com\dir\subdir for Windows).
4 In Parallels H-Sphere 3.0+, when creating FTP subaccounts you can
also make the FTP subuser being set up a SharePoint user. For this,
on the first step check Allow sharepoint access as well and enter
SharePoint settings (on page 202).
FTP subaccount traffic is a part of the Total/Summary traffic (on page 127), but you can
always see how much FTP traffic has been run up by an individual FTP subaccount by
going to the FTP Manager page and clicking the Edit icon next to the subaccount login.
Important: Windows FTP-subaccounts work only if Webshell (on page 53) version is
4.3.2 and up.
Virtual FTP
Only for Unix-based accounts
Virtual FTP provides ampler possibilities than FTP sub-accounts. You can give your
authorized Virtual FTP users access to more than one directory and specify a different
set of permissions for each directory. Virtual FTP users log right into your root, but can
enter only those directories you allow them to enter.
To provide Virtual FTP Access to a certain domain, do the following:
1 If you are using a dedicated IP, skip this step. Otherwise, switch to
dedicated IP (on page 24).
2 Select FTP in FTP/User Account menu.
3 Enable FTP for this domain:
Page 55

FTP Management 55
4 If you have several domains, choose the one to enable virtual FTP for.
5 Click the confirmation link to agree with the charges.
6 Fill the form that appears:
Add Name of the Server for the new virtual host. This name will appear in the
welcome message when guest users connect to your server with FTP clients.
Enter E-mail of the administrator by which FTP users can reach you with questions
or comments.
7 Create a new Virtual FTP User by going to the FTP Host page and
clicking Add for Virtual ftp-users
8 Click the Add icon for Virtual FTP Directories and enter the name for the
new Virtual FTP Directory:
Page 56

56 FTP Management
End it with a slash, for example: Dir1/. The location must be specified relative to
root.
To create a virtual FTP directory inside a different directory, include the path, for
example, UserDirs/Dir1/.
On the same page, specify permissions to this directory:
Read: check to allow file downloads from this directory.
Write: check to allow file uploads to this directory. List: check to allow viewing /
browsing the contents of the directory. It is usually used jointly with Read.
Grant Permissions to all users: check to grant these permissions to all your Virtual
FTP users. If you leave this property unchecked, you will have to define
permissions on this directory individually for each Virtual FTP User.
9 Click the Edit icon next to the directory you have just created. If you
haven‟t granted the same permissions to all your Virtual FTP Users,
you can specify permissions for each of them individually:
Page 57

FTP Management 57
If you have chosen to grant the same permissions to all users, you can skip this
step.
Anonymous FTP
This feature allows you to give public FTP access to a dedicated directory in your
account. A special directory is created in your root, and its content can be viewed and
downloaded, and for Windows-based accounts uploaded as well.
Note: In Unix-based accounts Anonymous FTP becomes available only after you
create a Virtual FTP server.
To configure Anonymous FTP:
1 Select FTP in FTP/User Account menu.
2 If you have several domains, choose the one to enable virtual FTP for.
On the page that appears, switch to dedicated IP. (Read more about
Shared and Dedicated IPs (on page 24).)
Skip this step if you have already enabled Virtual FTP.
3 For Unix-based accounts, select FTP in FTP/User Account menu. Enable
FTP for this domain and agree with the charges:
4 On your control panel home page, select FTP in FTP/User Account menu.
Enable Anonymous FTP for this domain:
in Unix:
Page 58

58 FTP Management
in Windows:
5 Agree with the charges if any.
6 For Windows-based accounts, set the new FTP virtual host:
Page 59

FTP Management 59
Anonymous FTP Upload Facilities
Only for Unix-based accounts
If you want to allow anonymous FTP users to upload files, enable Anonymous FTP Upload
Facilities by doing the following:
1 Enable Anonymous FTP (on page 51).
2 At the bottom of the FTP vhost page you will find a new option to enable
anonymous FTP upload facilities:
3 Turn it on. This will create a dedicated directory inside the Anonymous
FTP directory.
4 The Uploads (Windows-based plans) / Incoming (Unix-based plans)
directory has only the „upload‟ permissions, so it will allow neither
downloading nor viewing its content.
Page 60

SSH is a secure form of Telnet connection, using an RSA key. It is a more powerful
In this chapter:
Accessing Your SSH Account ........................................................................... 60
Running Shell Scripts With Crontab................................................................... 61
C H A P T E R 10
SSH Access to Server
means of access than FTP, as it provides a command line interface for running scripts,
etc.
At the same time, SSH allows more possibilities for error, and actions which may cause
harm to the server. Therefore, SSH access is a privilege to an account. It can be
revoked at any time if user‟s activities appear detrimental to the health of the server.
Accessing Your SSH Account
To request shell access to the server:
1 Select FTP User in the FTP menu.
2 Enable Shell Access and administrator will receive the request on his
control panel.
3 Agree with charges, if any.
4 Click the Request Status link that appeared to learn if your request has
been processed by administrator. Depending on the request status,
the Request status will show up as not reviewed by administrator or
granted by administrator.
5 If shell access is granted by administrator, it turns ON and opens you
access to the server.
Important: Parallels H-Sphere 3.1+ users with SSH access enabled will be
automatically limited to their home directory. This is done for security reasons, in order
to restrict users from running certain commands and accessing system directories.
However, users will still be able to create, copy, move, rename and delete files and
directories and run a variety of utilities and file managers:
Utilities: cat, echo, ln, mkdir, ps, rm, sh, cp, date, kill, ls,
mv, pwd, rmdir, sleep, md5/md5sum, ping, awk, diff, find, id,
sed, tar, whereis, basename, dirname, grep, ldd, sort, touch,
which, cut, du, head, more, tail, vi, whoami, clear.
File managers: mc, ytree, vifm, deco.
Page 61

SSH Access to Server 61
Running Shell Scripts With Crontab
Crontab allows you to clock and run your own Unix shell scripts automatically. It is
available only in Unix-based plans and requires the knowledge of Unix shell
commands.
To enable crontab jobs:
1 Select FTP User in the FTP menu.
2 Enable Crontab.
3 Agree with charges, if any.
4 Click the Edit icon for Crontab.
5 On the page that appears, add the crontab job.
Commands are executed by cron when the minute, hour, day and month fields
match the current time, and when at least one of the two day fields (day of
month, or day of week) match the current time. If you want to set any minute,
hour, day, enter * symbol.
In the Command box write a command to be executed by cron, i.e. path relative
to your root home directory.
The Mail-To address is where the system will direct reports if errors occur.
To delete a job, check the box in the Delete section and click Submit Query.
Page 62

This document explains how to add support for dynamic Web pages, such as CGI,
In this chapter:
CGI Scripts ........................................................................................................ 62
PHP ................................................................................................................... 63
ColdFusion ........................................................................................................ 64
Ruby on Rails .................................................................................................... 64
ASP ................................................................................................................... 65
ASP.NET ........................................................................................................... 65
Server Side Includes ......................................................................................... 66
PHP/MySQL Applications .................................................................................. 67
Preinstalled CGI Scripts: phpBB and mnoGoSearch ......................................... 68
C H A P T E R 11
Dynamic Web Content
PHP, ColdFusion, or ASP scripts.
CGI Scripts
To add CGI support, it will suffice to create a CGI alias or, in other words, to specify a
CGI file extension and a CGI handler for it, for instance Perl. For example, you can
specify that all *.cgi files must be treated as executable Perl scripts.
To add a CGI alias:
1 Select Domain info in the Domain Settings menu.
2 Click the Edit icon in the Web Service field.
3 On the Web Service page that shows, scroll down to find the CGI-dir
option and turn it on. Now all files in the cgi-bin directory will be
treated as CGI executables. This is the directory to place all your cgi
scripts.
4 On the Web Service page, scroll down to find the CGI option and click the
Add icon on its right.
5 Enter an extension beginning with a dot and select the handler from
the list.
Page 63

Dynamic Web Content 63
PHP
You can add support to your own PHP scripts. Currently, we support 4.x and 5.x.
To add PHP support, do the following:
1 Select Domain info in the Domain Settings menu.
2 Click the Edit icon in the Web Service field.
3 On the Web Service page, scroll down to find the PHP option and turn it
on.
4 If you wish to have the different PHP version than the default one set
by the administrator. Choose the PHP version from the drop-down box
if you wish to have the different version than the default one set by the
administrator. Agree with the charges.
5 Skip this step if you are using a Windows-based plan. At the top of the
Web Service page, click the Apply link for the Server configuration to
change. The changes will take effect within 15 minutes.
6 On the Web Service page, click the Add icon that has appeared next to
the PHP option.
7 On the page that appears, enter an extension for your PHP pages
beginning with a dot, for instance .php4. Select the MIME type from
the list.
8 Skip this step if you are using a Windows-based plan. At the top of the
Web Service page, click the Apply link for the Server configuration to
change. The changes will take effect within 15 minutes.
9 Starting with version 3.1, you can have more options to choose for
PHP 4 and PHP 5. For this, first disable the PHP resource on the Web
Service page and then enable the Advanced PHP resource below. You can
choose between the following modes, if enabled by your administrator:
libphp - PHP runs as an Apache module. The advantage is that PHP is always in
memory use which results in a higher speed capability and lower server load.
cgi - PHP runs as a CGI script in a separate process which starts with each
request and completes its work upon the script execution. This provides a
simpler and more secure PHP work, but draws excessive memory usage and
higher memory load.
fastcgi - PHP also runs as a CGI script, but under a single process which does
not stop when the script is executed. This allows to minimize server load while
running PHP in CGI mode.
Page 64

64 Dynamic Web Content
ColdFusion
To add ColdFusion support in a Windows-based account:
1 Select Domain info in the Domain Settings menu.
2 Click the Edit icon in the Web Service field.
3 On the Web Service page, scroll down to find the ColdFusion option and
turn it on.
4 Agree with the charges.
5 If you need to add custom file extensions to be handled by
ColdFusion, click the Add icon that has appeared next to the PHP
option.
6 On the page that appears, enter an extension for your PHP pages
beginning with a dot.
Note: If your account wasn‟t created from the control panel, default extensions won‟t be
added when you enable ColdFusion.
Ruby on Rails
If Ruby on Rails is installed and enabled in your plan, you can switch it on for your
domains.
Note: To use Ruby on Rails, it must be installed manually to a Web server by your
Parallels H-Sphere administrator.
To enable Ruby on Rails for your domain:
1 Select Domain Info in the Domain Settings menu.
2 Click the Edit icon in the Web Service field.
3 On the Web Service page, scroll down to find the Ruby on Rails option and
turn it on.
4 You will be warned that Ruby on Rails will create its own index page
on your domain instead of the existing one. Choose Yes, continue to
enable Ruby on Rails.
5 After you enabled Ruby on Rails, your domain‟s index page will the
Ruby on Rails invitation.
Page 65

Dynamic Web Content 65
ASP
To add support for ASP (Active Server Pages) in a Windows-based account:
1 Select Domain info in the Domain Settings menu.
2 Click the Edit icon in the Web Service field.
3 On the Web Service page, scroll down to find the ASP option and turn it
on.
4 Agree with the charges.
ASP.NET
To add support for ASP.NET in a Windows-based account:
1 Select Domain info in the Domain Settings menu.
2 Click the Edit icon in the Web Service field.
3 On the Web Service page, scroll down to find the ASP.NET option and turn
it on.
4 Choose the ASP.NET version from the drop-down box.
5 Agree with the charges, if any.
Page 66

66 Dynamic Web Content
Server Side Includes
You can add your own SSI aliases or, in other words, specify SSI file name extensions.
For example, you can specify that all *.ssi files must be treated as server side includes.
To add an SSI alias, do the following:
1 Select Domain info in the Domain Settings menu.
2 Click the Edit icon in the Web Service field.
3 On the Web Service page, scroll down to find the SSI option and click the
Add icon on its right.
4 Agree with the charges, if any.
In the window that appears, enter your SSI file extension beginning with a dot:
Skip this step if you are using a Windows-based plan.
At the top of the Web Service page, click the Apply link for the Server configuration to
change. The changes will take effect within 15 minutes.
Skip this step if you are using a Windows-based plan.
At the top of the Web Service page, click the Apply link for the Server configuration to
change. The changes will take effect within 15 minutes.
Page 67

Dynamic Web Content 67
PHP/MySQL Applications
A pack of over 30 PHP/MySQL third-party Web applications is supplied with Parallels
H-Sphere. If your hosting provider enabled it in your plans, you can install these
applications on your domains. If your hosting provider enabled it in your plans, you can
install these applications on your domains.
To install an application:
1 Select EasyApp in the Domain Settings menu.
2 On the page EasyApps Collection that shows, you will see the list of
applications that can be installed. Press on the title of application you
want to install.
3 you will find yourself at a page with its description (outline, homepage,
diskspace etc.) and a link to install it. Click Install.
4 Fill in the necessary data on the form that appears:
Domain. Choose a domain, if you have more than one, to install the application
on.
Path. Location of the application, when you have installed it, in relation to the
domain‟s root directory.
User name. Name of the application‟s administrator.
Password. Password of the administrator.
E-mail. Electronic address to send notifications to, which will be written in the
application configuration file.
5 In rare cases, such as with Advanced Poll etc., you will be redirected
to the original installation page. In case of more extensive data to fill
in, refer to the application‟s documentation.
6 Press Submit Query.
7 Agree with the additional charges for MySQL-related resources that
will be needed for the application to work.
8 After the application is installed, you will find it on the page with its
description under Installed Applications. Press the Edit button to change
its settings.
Page 68

68 Dynamic Web Content
Preinstalled CGI Scripts: phpBB and
mnoGoSearch
Owners of Unix accounts can use simple CGI wizards to enhance their sites with the
following scripts:
phpBB (requires MySQL).
mnogosearch
All CGI scripts for a particular site are stored in the cgi-bin directory, unless specified
otherwise. If you accidentally delete any files in the cgi-bin directory, you can recover
them by going to the Web Options page and clicking the Restore to default link. Your
existing files remain untouched, so you will not lose your changes. To get rid of
undesirable changes in the script files, delete these files and then click the Restore to
default link on the Web Options page. Also, use the Restore to default link to fix your
temporary index page to default.
See the Contents of Home Directory (on page 11) for more information on the files and
catalogues not to be deleted.
phpBB Forum
phpBB is a high powered, fully scalable, and highly customizable bulletin board
package. phpBB has a user-friendly interface, simple and straightforward administration
panel, and helpful FAQ.
phpBB Key Features:
Unlimited forums and posts
Multiple language interface
Private or public forums
Powerful search utility
Private messaging system
Complete customization with templates
phpBB files are stored in a separate directory for each of your sites.
To add phpBB forum to your site:
1 Select Domain Info in the Domain Settings menu.
2 Click the Edit icon in the Web Service field.
3 On the Web Service page, scroll down to find the phpBB option and turn it
on.
4 Agree with charges, if any.
5 Go through the installation wizard. You will be prompted to select from
the existing MySQL databases to use with phpBB or create a new one.
Page 69

Dynamic Web Content 69
Warning: Assigning a previously created MySQL database to be used for phpBB
needs, you will remove contents of all its tables.
6 Choose or create a MySQL user to access and manage MySQL
database you have allocated for use with phpBB.
7 Click the Setup icon to install the script. You will be taken to the phpBB
administrator control panel, where you can start configuring the forum
to your liking.
8 If you are taken to the setup page again, click the Fix button. This will
reset the config.php script which contains settings to access the
phpBB MySQL database.
mnoGoSearch
If you are running a Unix-based account, you can enhance your site with , a utility that
searches your site by keywords.
To enable mnoGoSearch:
1 Select Domain Info in the Domain Settings menu.
2 Click the Edit icon in the Web Service field.
3 On the Web Service page, scroll down to find the mnoGoSearch option and
turn it on.
4 Agree with charges, if any.
5 Go through the wizard. you will be prompted to select from the
existing MySQL databases or create a new one to be used by
mnoGoSearch.
Warning: Assigning a previously created MySQL database to be used for
mnoGoSearch needs, you will remove contents of all its tables.
6 Choose or create a MySQL user to access and manage MySQL
database you have allocated for use with mnoGoSearch.
7 Go to your search page by clicking the View icon. To make it available
to the Internet users, put a link to your mnoGoSearch page on your
site‟s pages.
Note: It will take some time to index your site pages and get your search
working.
Parallels H-Sphere supports adding mnoGoSearch URLs directly from your Control
Panel. This will improve the process of your site indexing, and therefore the search
results.
To add a mnoGoSearch URL:
1 Select Domain Info in the Domain Settings menu.
2 Click the Edit icon in the Web Service field.
Page 70

70 Dynamic Web Content
3 On the Web Service page, scroll down to find the mnoGoSearch option.
Click the Add URL icon. you will be prompted to enter the URL you want
to add.
4 The URL will appear on the Web Services page, in the mnoGoSearch
section:
You can extend your mnoGoSearch capabilities (for example, set local charset) by
editing the indexer.conf file. To learn how to work with indexer.conf, refer to
indexer.conf-dist which can be found in the
/account/fe_mnogosearch/domain/ directory.
Note: If you mishandle anything, you can always restore mnoGoSearch
configuration to the default by clicking the Edit icon, but all your custom settings will
be lost.
Fixing Broken Scripts
If you have accidentally deleted any of your CGI scripts and/or the index page
(index.html), you can restore them to default. To get rid of any undesirable changes in
you CGI scripts and go back to the default settings, delete the unnecessary files and
restore the scripts.
To fix/restore the scripts:
1 Select Domain Info in the Domain Settings menu.
2 Click the Edit icon in the Web Service field.
3 On the Web Service page, click the Restore to default link.
Page 71

Parallels H-Sphere has an advanced mail system that is easy to manage.
C H A P T E R 12
Mail Resources
Click the Mail Info menu to manage your account mail services from the Mail controls
page:
Page 72

72 Mail Resources
Mail domains: a mail domain whose mail resources you can manage and view on the
mail domain controls page. To manage mail resources on your other domains,
choose it from the drop- down list and click Go.
Incoming POP3 Server and Outgoing (SMTP) Server: to deliver mail from and to your mail
resources.
Login: sign into your mailbox or change its password from outside your control
panel.
Change Mailbox Password Link: change mailbox password without logging into
Parallels H- Sphere control panel.
Mail traffic: traffic run up by incoming and outgoing mail on the mail domain it is
displayed for.
Mind that it also includes traffic generated by incoming spam (on page 97) or virus
(on page 102) messages the system deletes.
Mail relay: switch ON the option to ensure incoming mail is kept on the mail relay
server, if your primary mail server goes down.
AntiSpam: this resource filters and deletes incoming spam messages. Antispam (on
page 97) can be added for all mailboxes or for all mail resources.
AntiVirus: this resource checks incoming mail for viruses. Antivirus (on page 102)
can be added for all mailboxes or for all mail resources.
SPF: determines rules to be used by your corresponding mail servers to check
whether e-mails received from your mail domain are forgery or not.
Page 73

Mail Resources 73
Mail domain aliases: aliases of your mail domain (on page 88)
In this chapter:
Mailboxes .......................................................................................................... 74
Mail Forwards .................................................................................................... 77
Autoresponders ................................................................................................. 78
Mailing Lists....................................................................................................... 80
Maildomain Aliases............................................................................................ 88
Mailbox Aliases ................................................................................................. 90
Mail SMS ........................................................................................................... 92
Mail Under Service Domain For Third-Level Hosting ......................................... 94
AntiSpam Protection .......................................................................................... 97
AntiVirus Protection ........................................................................................... 102
E-Mail Forgery SPF ................................................................ ........................... 105
Outlook Express Mail ......................................................................................... 107
Eudora Mail Client ............................................................................................. 116
New E-mail Setup Functions: links to create new mail resources (on page 71).
[A] ... [Z] first-letter navigation links to the rest of your mail resources (based on
alphabetical sorting)
[Prev] [1] [2] ... [Next] navigation links to the rest of your mail resources. Appear if
there are more than 10 mail resources on the maildomain)
E-mail: e-mail address of mail resources on the mail domain.
Resources included: mail resources working on this e-mail address.
Properties: properties of mail resources working on this e-mail address:
- mailbox quota usage
- sign in the mailbox
- Catch All. This property is set on a mailbox level to catch all mail sent to
non-existent mail addresses at this domain. It can be enabled only for one
mailbox per domain. It can‟t be enabled on other mail objects like mail alias,
forward, responder.
- discard all incoming email
- add subscribers/moderators/trailer to a mailing list
- delete all mail resources working on the e-mail address
Page 74

74 Mail Resources
Mailboxes
Mailboxes are used to send and receive e-mails via client based mail software and can
store mail on the hosting mail server.
Webmaster and postmaster mailboxes are obligatory created on each mail domain.
To create mailboxes:
1 Click New E-mail in the E-mail Setup Functions section and fill in the
configuration page:
2 Enter mailbox name into the Email address box.
Page 75

Mail Resources 75
3 Check AntiSpam/AntiVirus to enable antispam filtering and antivirus
protection for your mailbox.
4 Check the box next to MAILBOX and configure:
Password: an alphanumeric combination that authenticates logging into the
mailbox. It is required when you are logging into the mailbox outside your control
panel or when you configure an external mail client to access your mailbox.
Comment: enter description to help identify the mailbox.
Catch All: This property is set for a mailbox resource to catch all mail sent to non-
existent mail addresses at this domain. It can be enabled only for one mailbox
per domain. Catch All can‟t be set for postmaster or any other mail resource but
mailbox.
Discard All Incoming Mail: If you don‟t need ALL your incoming mail, you can
configure your mailbox to discard all incoming mail. In this case senders won‟t
receive „undelivered mail‟ notifications.
Alias by: use this option for mass creation of mail aliases. Enter alias names
(without the @ part) separated by „,‟ or „;‟ or „SPACE‟.
5 Click Submit at the bottom of the form and agree with the charges, if
any.
To remove a mailbox with preserving other services running on this e-mail address:
1 Click the mailbox e-mail address in the E-mail list on the Mail Manager
page.
2 Uncheck MAILBOX and click Submit.
Note: Postmaster mailbox can‟t be deleted.
To remove a mailbox with other mail services running on this e-mail address:
1 Go to the Mail Manager page
2 Click the Trash icon next to the target mailbox
Note: If Catch All is enabled for a mailbox, it can‟t be deleted. To delete a Catch All
mailbox, first switch Catch All OFF or switch it to another mailbox.
Mailbox Storage Quota
Mailbox quota defines how many megabytes of mail you can store in your mailbox. You
can‟t store more than allowed by the mailbox quota. It‟s not included into the site disk
space quota. If your hosting plan allows, you can increase the initial free mailbox quota.
To increase mailbox quota:
1 On the Mail Manager page click the MB link in the mailbox Properties
section:
Page 76

76 Mail Resources
2 Enter new quota size in megabytes and click Submit.
From this moment on, you will be charged for the difference between this new
amount and the free amount your hosting plan grants. This charge will be added
to the recurrent fee at the beginning of each billing period.
Note: You cannot change quota for the postmaster mailbox.
Signing into a Mailbox
To send and receive mail from your mailbox you should sign in.
On the Mail Manager page click the Launch Webmail icon:
Provided you signed up for a Unix/Linux plan, you can also sign into your mailbox from
outside your control panel by entering http://YOUR_WEB_SERVER_IP in the Address
field of your browser and clicking the IMP-mail client link on the page you are taken to.
Postmaster and Webmaster
You get Postmaster mailbox for free. Webmaster is a regular mailbox and it counts
towards your total mailboxes. This means, if you get 0 free mailboxes, you pay for the
Webmaster box, but you don‟t pay for Postmaster.
When postmaster and webmaster mailboxes are created:
Catch All is disabled by default. You can enable it entirely in the Globals menu
Forward (on page 77) is disabled by default
Option Discard all incoming mail is enabled by default
You can‟t change quota for the postmaster mailbox
Postmaster mailbox can‟t be deleted
Page 77

Mail Resources 77
Mail Forwards
Mail forwards redirect all mail sent to the mail forward e-mail address to other e-mail
addresses.
Important: Mail forward cannot be set with Catch All as postmaster.
To create a new mail forward:
1 Click New E-mail on the Mail Manager page:
2 On the configuration page, that you will be taken to, enter the mail
forward name in the Email address field.
3 Check the box next to MAIL FORWARD.
4 Enter destination e-mail addresses separated with „,‟ or „;‟ or „ENTER‟
or „TAB‟ or „SPACE‟:
5 Click Submit and agree with the charges, if any.
6 To add e-mail addresses to the list of destination addresses, repeat
the last three steps.
To remove e-mail addresses from the list of destination addresses, check the Delete box
next to the target e-mail addressed and click Submit.
To remove a mail forward with preserving other services running on this e-mail
address:
1 Click the mail forward e-mail address in the E-mail list on the Mail
Manager page.
2 Uncheck the Mail Forward box and click Submit.
To remove a mail forward with other mail services running on this e-mail address:
1 Go to the Mail Manager page
2 Click the Trash icon next to the target mail forward
Page 78

78 Mail Resources
Autoresponders
Autoresponder automatically sends a preset message in reply to all mail sent to the
autoresponder‟s e-mail address. They don‟t store the incoming mail as mailboxes do,
nor can they be used to send messages other than the preset autoresponse.
To create an autoresponder:
1 Click New E-mail on the Mail Manager page or click the name of the
existing mail resource:
2 If you chose New E-mail, enter the autoresponder name in the Email
address field. If you choose the existing mail resource, skip to Step 4.
3 Enable antispam (on page 97) and antivirus (on page 102) for mail
SMS. For security reasons, we strongly recommend it to minimize the
risk of using your Mail SMS for distributing spam.
4 Scroll down to the Autoresponder section and fill out the form:
Page 79

Mail Resources 79
Check the box next to AUTORESPONDER.
Enter the uniform response in the Message field and its title in the Subject field.
Enter Sender Filter which restricts the range of possible sender e-mail addresses.
Autoresponder Warning:
If you get the warning, it means that administrator enabled patterns policy where
Sender Filter value is obligatory.
Autoresponder appears as marked and won‟t work until you configure Sender
Filter:
Page 80

80 Mail Resources
Include incoming message: if you want to quote the original message in the
autoresponse.
If you check this option, there is a risk for your autoresponder to be used for
distributing spam messages sent to it from intruders. To minimize this risk,
configure antispam for the autoresponder as it is said in the item 4 above.
Add attachments to your autoresponder, for instance your corporate logo.
5 Click the Submit button at the bottom of the form and agree with the
charges, if any.
You can edit autoresponder message and its subject at any time.
Removing Autoresponder
with preserving other services running on its e-mail address:
1. Click the autoresponder e-mail address on the Mail Manager page.
2. Uncheck the AUTORESPONDER box.
3. Click the Submit button at the bottom of the form.
along with all mail services running on its e-mail address:
1. Go to the Mail Manager page in the Mail Info menu.
2. Click the Trash icon in the autoresponders Properites section.
To remove a Catch All autoresponder, first switch Catch All off.
Mailing Lists
Mailing lists act similar to forwards (on page 77) with the only difference that they offer
wider possibilities such as independent end user subscription, message and
subscription moderation, archiving and more.
The mailing list solution available in the control panel is the popular EZMLM/IDX
MAILING LIST MANAGER (http://www.ezmlm.org). For comprehensive information on
EZMLM, see EZMLM FAQ (http://www.ezmlm.org/faq-0.32/index.html).
To create a mailing list:
1 Click New Mailing List on the Mail Manager page:
2 Fill in the form that appears:
Page 81

Mail Resources 81
E-mail address: the name of the mailing list that all mail will be forwarded from to
subscribers. You can enter only a new e-mail address. If you need to use an
existing address, first delete the resource that uses it.
Comment: a comment that will help you identify this address among other mail
resources, if needed.
3 Click Submit and agree to additional charges if any.
For specific details on how to configure your mail list (on page 85), please read
documentation at www.ezmlm.org (http://www.ezmlm.org/)
Page 82

82 Mail Resources
Managing Your Mail List Subscribers
The number of subscribers shows in brackets in the mailing list Properties column.
To add subscribers to a mailing list:
1 Click the Subscribers icon in the Properties section.
2 Enter subscriber‟s email address in the Add subscriber field. To add
several subscribers at once, enter their e-mail addresses separated
with line break in the Batch subscribers creation field:
Page 83

Mail Resources 83
3 Click Submit.
To remove subscribers from a mailing list:
1 Click the Subscribers icon in the Properties section.
2 Click Delete next to the subscriber to delete subscribers one by one or
the Delete icon in Remove all subscribers.
Sending Messages to Mailing List Subscribers
To send a message to a mailing list, send the newsletter to the mailing list e-mail
address using WebMail or any mail client such as Outlook Express.
Managing Your Mailing List Moderators
Moderators approve of message posts and requests for subscription. Individual
moderator‟s addresses are kept secret, even from other moderators. The total number
of moderators is displayed in brackets in the mailing list Properties column.
To add a moderator to your mailing list:
1 Click the Moderators icon in the Properties section.
2 Enter moderator‟s e-mail in the field:
Page 84

84 Mail Resources
3 Click Add.
In this section:
Configuring Mailing Lists ................................................................................... 85
4 Repeat steps 1-3 if necessary
To remove a moderator from your mailing list:
1 Click the Moderators icon in the Properties section.
2 Click the Delete icon next to the moderator
There can be several moderators, both for messages and subscription:
Message moderators allow messages to be sent to the mail list. The message will
be passed on to the mailing list subscribers only if a moderator approves it.
Subscription moderators allow people to join the list. If at least one subscription
moderator approves the request, the user address becomes a subscriber.
As a rule of thumb, most lists use the same addresses for both functions.
Adding Mailing List Trailer
Message trailer is a uniform text added to each message. Typically, it contains
instructions on how to unsubscribe from the list and similar information for subscribers.
There can be only one trailer for all messages within one mailing list. Message trailer
can edited at any moment.
To add a message trailer:
1 Click the Trailer icon on the Mail Manager page.
2 Enter the text that will be added to each of your subscribe messages:
3 Click Submit.
To remove a message trailer, delete the text and click Submit.
To remove a mailing list, click the Trash icon in the mailing list‟s Properties
section.
Page 85

Configuring Mailing Lists
You can configure mailing list by clicking the e-mail address in the E-mail list on the Mail
Manager page:
Enter the e-mail address that enables mail list subscribers to report their problems or error
messages sending requests to your_mailinglist- owner@domain.com. Since EZMLM can
take care of virtually all requests without human intervention, the list owner may read mail
only infrequently.
By default, all messages sent to a list are kept archived. This way, subscribers can later
retrieve messages from the archive. For instance, subscribers haven‟t been following the
list for a while, or they just want to see the discussion of a specific question. E.g.: retrieve
one message at a time with the -get command: your_mailinglist-get.123@domain.com (get
message 123) Read more on commands to access the ezmlm message archive
(http://www.ezmlm.org/ezman-0.32/ezman1.html#ss1.7%20). * The archive is also used
to create digests (on page 80). You can view mailing list archive from your Control Panel.
For this, click on the magnifying glass above the Archived option:
This will carry you to a web interface where you can view and search for monthly archived
messages received by your mailing list:
Check Not Archived to disable archiving the messages sent to the list.
You can prohibit the overall access to the archive and authorize only moderators to get at
it.
Page 86

Check the Digest box to set up the mailing list with a digest function. The digest is a
special kind of mailing list extension. Instead of sending separate messages, it sends out
a collection of messages ordered by digest subscribers collections of messages. Digest is
sent out when a predetermined time or traffic limit has been reached. Receiving digest is
very convenient for users who want to follow a list, but not to participate in the discussion.
Digests contain each message as it was sent out by the list. No editorials, no missing
messages. If the list owner has chosen to restrict posts and archive access to
subscribers, digest subscribers are automatically given the same privilege. From the
subscriber point of view, the digest list for the mailing list your_mailinglist@domain.com is
called your_mailinglist- digest@domain.com. You use the same commands to work with
digest as you do when you work with the main list. The only difference is that you use
your commands with „digest‟ indication.
Check “No prefix” to prohibit adding prefix to the subject line of each message that does
not already contain it. If you want the subject line of each message that does not contain
it, to include the prefix, place the text in the file DIR/prefix
Here you can restrict the access to the mailing list archive by allowing only subscribers
retrieve the archive. Non-subscribers‟ requests will be rejected.
Usually an applicant for subscription (your_mailinglist-subscribe@domain.com) is sent a
confirmation request. To confirm it, one should just reply to the message. When it is done,
recipient‟s address is added to the database and he becomes a subscriber.
This verification mechanism tests if the person at the subscription address really wants to
be a subscriber. You can always include or exclude confirmation from the subscription
procedure.
Normally, confirmation is not required to unsubscribe from a mailing list. However, this
option gives added security in that one can‟t remove another without permission.
Mailing list users are not allowed to list the addresses of all subscribers. Still, you can
allow remote administrator to get it. The subscription log stores entries for each
modification made to the subscriber database. Remote administrators can list this log or
search it for specific entries. For example, listing this file allows the remote administrator
to see recent additions and removals.
Page 87

In special cases, the list owner may set up the list to be message moderated. On a
message moderated list, messages, instead of going directly to the list (to send messages
to the list, one must know its name. If the list is called mailinglist@domain.com, just send
a message to mailinglist@domain.com), are sent to one or more moderators. They can
accept or reject, but not modify the message. If the message is accepted, it is sent to the
list unmodified. If it is rejected, it is e-mailed back to the sender, optionally with an
explanation from the moderator. On moderated lists it may take a little longer for the
message to reach all the subscribers, since it has to be read and approved by at least one
moderator before being sent out to the subscribers.
Here, you can allow remote administrators to edit the text files that make up most of the
ezmlm responses. Replies are sent only if the target address is a remote administrator.
With this switch, ezmlm replies to the -edit command with a list of the files in dir/text/. Only
files where editing seems reasonable are included in the list. The remote administrator
can edit any file in dir/text/ by sending e-mail containing the new text to -edit.file where
“file” is the name of the file replaced (edited). In reply to this command, ezmlm sends a
message with the file and editing instructions. A “cookie” based on the date, file name,
and contents of the file is added to the “Reply-To:” address. The cookie becomes invalid
as soon as the file has been changed, or after 27 hours, whichever is shorter. Also, the
cookie cannot be used to edit any other file, even if the other file has exactly the same
content.
Here you can disable posting by subscribers to the mailing list, so they will only receive
messages posted by moderators. This is usually chosen to send announcement or
notifications where the interaction between recipients is not intended.
If you enable this function, users will be required to request to the remote administrator in
order to retrieve mail list archives. Otherwise, archive will be accessible only to the remote
administrator.
With this option enabled, it will process commands sent in the subject to listrequest@host.
A remote administrator is an address with the rights to do certain administrative tasks
remotely by E-mail. Depending on how the list is configured, remote administrators may
have the right/ability to list subscribers, search for subscriber addresses by name, add
and remove subscriber addresses and/or edit the texts that are sent in reply to list
commands.
Page 88

Mailing lists may use subscription moderation. Subscription to these lists is identical to the
subscription process in mailing lists, except that after confirmation the request is passed
on to the list moderator(s). One becomes a subscriber only after his request has been
approved by a moderator, i.e. he replies to the “Reply-To:” address.
You can set up your mailing list to allow posts from subscribers only. In this case posts
received from non-subscribers will be rejected and sent back.
To save changes, click Submit.
Maildomain Aliases
Mail resources on a mail domain that has a mail domain alias will all have alternative
addresses. Mail resources and their aliases will have different domain parts (i.e. mail domain
and its alias) and the same resource names. For instance, with example.net being a mail
alias to example.com, every mail resource on example.com will have a counterpart on
example.net, specifically:
mailbox@example.net will be an alternative mail address to mailbox@example.com
mailforward@example.net will be an alternative mail address to mailforward@example.com
autoresponder@example.net will be an alternative mail address to
autoresponder@example.com
etc.
To create a Mail Domain Alias:
1 Make sure you enabled mail domain alias for the target domain.
2 On your control panel home page, click the Mail Info icon.
3 In the Mail domains drop down box, choose the domain you‟d like to enable
mail domain alias for.
4 In the E-mail Setup Functions section, click New Mail Domain Alias
Page 89

5 On the page that appears choose the domain alias to enable mail domain
alias on and click Next:
6 Click Submit on the next page to confirm your choice and agree with
charges, if any.
Removing Mail Domain Aliases
Important: When removing mail domain alias, you remove aliases for ALL your mail
resources on the primary mail domain. You cannot remove a mail domain alias for an
individual mail resource.
To remove a mail domain alias:
1 Go to Mail Info > Mail Manager
2 Click the Trash icon next to the mail domain alias that you are removing in
the Mail Domain Alias section:
Page 90

Mailbox Aliases
Mail aliases are alternative addresses to existing mailboxes (on page 74) on the same domain
name. Messages sent to a mailbox alias arrive to the primary mailbox.
Creating Mail Aliases
1 Click New E-mail on the Mail Manager page:
2 Enter the mailbox alias name in the Email address field.
3 Check the Catch All box to intercept messages sent to a non-existing
account on the mail domain. If Catch All isn‟t enabled on any mail resource
on this domain, such messages will bounce back to the sender with an
error notification.
4 Check the box next to MAIL ALIAS and click to choose from existing
mailboxes list to assign the mailbox alias to it:
Page 91

To assign a mailbox alias to more than one mailbox:
1 Click mailbox names in the list with the Shift or Ctrl key pressed. Chosen
mailbox(es) will appear in the list on the right.
Caution: the mailbox alias won‟t be created for the deselected mailboxes.
2 Click Submit and agree with charges, if any.
You can change a mailbox alias or assign it to other mailbox(es) or do both at any
moment after.
Unassigning Mailbox Alias from Mailbox
You can unassign a mailbox alias from the mailbox(es) it‟s currently assigned to.
1 Click the mailbox alias e-mail address in the E-mail list on the Mail Manager
page.
2 Select the mailbox name it is currently assigned to in the left you have chosen:
mailbox list.
3 Press the Delete button next to the list.
To remove several mailboxes, select the mailboxes names in the list with the Shift or Ctrl
key pressed and click Delete.
Removing Mailbox Aliases
To remove a mailbox alias preserving other services running on its e-mail address:
1 Click the mailbox alias e-mail address in the E-mail list on the Mail Manager
page.
2 Uncheck the MAIL ALIAS box.
3 Click Submit.
To remove a mailbox alias along with all mail services running it‟s e-mail address, click
the Delete icon in the mailbox alias Properties column on the Mail Manager page:
Page 92

To delete a Catch All mailbox alias, first switch Off Catch All.
Mail SMS
Mail SMS is a mail resource which allows forwarding emails to the cell phone number in the
form of SMS message.
To convert email into SMS, Parallels H-Sphere will strip the incoming email of all excessive
content, e.g: HTML tags, system and server info. You can split one incoming e-mail into up to
10 SMS messages that will be sent to the recipients phone number in email format. The
maximum length of one SMS message usually is set to 160 bytes, as required by most of
mobile providers.
To create a mail SMS:
1 Click New E-mail on the Mail Manager page or click the name of existing mail
resource:
2 If you chose New E-mail, enter the mail SMS name in the Email address field.
If you choose the existing mail resource, skip to Step 4.
3 Enable antispam (on page 97) and antivirus (on page 102) for mail SMS.
For security reasons, we strongly recommend it to minimize the risk of
using your Mail SMS for distributing spam.
4 Scroll down to the Mail SMS section and configure it:
Page 93

Check the box next to Mail SMS to add this resource.
Set Max size of one SMS message: as a rule, mobile providers allow up to 160 bytes per
one SMS message, you can set less.
Set Max messages for one email. Your SMS messages will be formed out of email
according to the max size of the message you have set. If email is bigger, it will be
truncated. You can later check email in your mail inbox. If smaller, administrator‟s
value of max messages will override your user settings. Example:
1. You set max SMS message size to 160 bytes and max number of messages to 3
2. You receive an email of 1000 bytes in size
3. According to your settings, cell phone user will receive 3 SMS messages by 160
bytes each, including mail header.
It makes 480 bytes in total, with the rest 520 bytes of email truncated
5 Enter recipients phone numbers in email format e.g:
XXXXXXXXXXXX@sms.mobile-provider.com. where XXXXXXXXXXXX is
the recipient‟s mobile number, sms.mobile- provider.com - mobile operator
domain for incoming SMS messages
6 Optionally, enter Sender Filter which restricts the range of possible sender e-
mail addresses.
7 Click Submit.
To edit Mail SMS message or its subject:
1 Click the Mail SMS e-mail address in the E-mail list on the Mail Manager
page:
Page 94

2 Enter more phone numbers or Sender Filter patterns and click Submit.
In this section:
Managing Mail Under Account With Third-Level Domain ................................... 95
Managing Mail Under Service Account .............................................................. 96
To remove mail SMS:
Option One: To remove Mail SMS by preserving other services running on its e-mail address:
1 Click the Mail SMS e-mail address in the E-mail list on the Mail Manager page.
2 Uncheck the box next to Mail SMS.
3 Click the Submit button at the bottom of the form.
Option Two: To remove Mail SMS along with all mail services running on its e-mail address,
click the Trash icon in the Properties section on the Mail Manager page:
Mail Under Service Domain For Third-Level
Hosting
In Parallels H-Sphere, owners of third-level domains can create e-mail resources under their
service domains. If you host a third-level domain user.domain.com under service DNS zone
domain.com, you can create mailboxes like anything@domain.com from your User control
panel.
Important: You can create mail under third-level domains if administrator enabled creating
emails under Service Zone in his administrator control panel. in his administrator control
panel.
Page 95

Managing Mail Under Account With Third-Level Domain
To manage a mail resource under service domain, go to the Mail Info menu and chose the
third-level domain from the drop-down box:
Note that mail domain shows both third-level domain (health.test4.psoft) and service
domain (test4.psoft) it is created under. If you create a mailbox under the third-level
health.test4.psoft, it will look like user@test4.psoft.
Page 96

Important notes:
You can add any mail resources except for SPF, Mail Relay, Mail Domain Alias and
Catch All.Use unique names for all mail objects on the service domain level. For instance,
if you create mail forward test@test.com, another user can‟t create mailbox named
test@test.com.
Use unique names for all mail objects on the service domain level. For instance, if you
create mail forward test@test.com, another user can‟t create mailbox named
test@test.com.
Managing Mail Under Service Account
Log into your service account and go to Mail Service page and click at Email created under
Service Domain link:
It will show the list of all mail resources created under this service domain:
Page 97

AntiSpam Protection
In this section:
Managing Antispam for the Entire Account ........................................................ 97
Managing Antispam on the Mail Domains Level ................................................ 98
Managing Greylisting Settings ........................................................................... 99
Configuring Antispam Protection for Mail Resource ........................................... 99
AntiSpam allows to trace, filter out and delete spam messages coming to your mailbox. The
system doesn‟t delete messages recognized as spam. It only marks them as spam and
delivers them in a regular way, which is why these messages also count against your
summary traffic.
You can manage antispam protection on the level of account, mail domain and mail resource.
Managing Antispam for the Entire Account
1 Select Account settings in the Account menu. The following page will show:
2 Click to add antispam resource for all mailboxes or for all mail resources (box,
forward, alias, responder) in this account.
3 You can delete all antispams in this account by clicking the Trash icon.
Page 98

Managing Antispam on the Mail Domains Level
1 Go to the Mail Info menu and select the mail domain from the drop-down
box.
2 Click Go and you will see the mail service details of the chosen mail
domain:
3 Click to add antispam either for all mailboxes of this mail domain or for all mail
resources (box, forward, alias, responder). If necessary, you can delete all
antispams under this mail domain by clicking the Trash icon.
4 Clicking the antispam icon will let you configure antispam settings for mail
resources.
5 Click the Submit button at the bottom of the form.
Page 99

Managing Greylisting Settings
Parallels H-Sphere 3.3 introduces the greylisting antispam method
(http://www.greylisting.org/) on the mail domain level.
To configure greylisting parameters for a domain:
1 Go to the Mail Info menu and select a domain from the drop-down list.
2 Click the Edit icon next to the Grey List Manager field.
3 On the page that appears, set the following greylisting parameters:
GL_MIN_REJECT: Minutes to wait after the first delivery attempt. Range: 1-60 minutes.
Default value: 5 minutes.
GL_MAX_WAIT: Days after the first delivery when subsequent delivery attempts will not
be accepted. Range: 1-30 days. Default value: 1 day.
GL_ACCEPT_GOOD: Days to pass after successful delivery when mail with the same
IP/sender/recipient combination can be accepted. Cannot be less than GL_MAX_WAIT.
Range: 1-30 days. Default value: 3 days.
If you wish to reset your changes, click Restore Defaults.
4 To apply these settings to antispam settings for all mail resourses, click the
Set button. Note that this will override individual greylisting settings for mail
resources.
5 Click Submit to apply changes.
To set greylisting parameters for a mailbox:
1 On the Mail Manager page for a mail domain, find and click a required mail
resource from the E-Mail list.
2 In the Edit E-Mail form, make sure the Grey List box is checked. Click Submit to
return to Mail Manager.
3 The Grey List Edit icon will appear next to the mail resource under the
Resource Included column. Click this icon and configure the greylisting
parameters as described above.
Configuring Antispam Protection for Mail Resource
1 Click the e-mail address in the E-mail list on the Mail Controls page.
Page 100

2 On the page that appears check the AntiSpam box and click Submit at the
bottom of the form.
3 On the Mail Manager page click the Antispam icon in the Resources included
column:
4 Fill up the Antispam preferences page that will show:
 Loading...