


PARAGON Software GmbH
Heinrich-von-Stephan-Str. 5c 79100 Freiburg, Germany
Tel. +49 (0) 761 59018201 Fax +49 (0) 761 59018130
Internet www.paragon-software.com Email sales@paragon-software.com
Paragon® Backup & Recovery™ 16
User Guide
Copyright© 1994-2016 Paragon Software Group. All rights reserved.
2
Table of Contents |
|
Product Overview.......................................................................................................... |
4 |
Getting Started .............................................................................................................. |
4 |
Product Components.......................................................................................................................... |
4 |
System Requirements......................................................................................................................... |
4 |
Installation ......................................................................................................................................... |
5 |
First Start ........................................................................................................................................... |
6 |
Changing Program Settings .......................................................................................... |
12 |
Application Section........................................................................................................................... |
13 |
Virtual Mode Options ................................................................................................................................................. |
13 |
Backup Section ................................................................................................................................. |
13 |
Backup Image Options................................................................................................................................................ |
13 |
Copy and Backup Options........................................................................................................................................... |
14 |
Run during Backup Options ........................................................................................................................................ |
14 |
VD Container Options................................................................................................................................................. |
16 |
Include/Exclude Section.................................................................................................................... |
16 |
Copy Backup Exclude Options .................................................................................................................................... |
16 |
Building Recovery Media ............................................................................................. |
17 |
Booting from Recovery Media ..................................................................................... |
21 |
Protecting System and Data......................................................................................... |
22 |
Backup Scenarios.............................................................................................................................. |
22 |
Configuring a One-shot Backup Task.......................................................................................................................... |
22 |
Configuring a Regular Backup Routine ....................................................................................................................... |
27 |
Checking Backup Integrity .......................................................................................................................................... |
32 |
Managing Backup Jobs ............................................................................................................................................... |
33 |
Windows Restore Scenarios.............................................................................................................. |
35 |
Restoring Individual Files and Folders ........................................................................................................................ |
35 |
Restoring an Entire Disk or Separate Volumes........................................................................................................... |
37 |
Mounting a Backup Image.......................................................................................................................................... |
40 |
Transferring Files between Storages .......................................................................................................................... |
41 |
WinPE Restore Scenarios .................................................................................................................. |
44 |
Restoring a Failed System........................................................................................................................................... |
44 |
Fixing Boot Problems.................................................................................................................................................. |
47 |
Extra WinPE Scenarios ...................................................................................................................... |
49 |
Unlocking Bitlocked Volumes ..................................................................................................................................... |
49 |
Adding Specific Drivers ............................................................................................................................................... |
51 |
Copyright© 1994-2016 Paragon Software Group. All rights reserved.
|
3 |
Configuring Network .................................................................................................................................................. |
52 |
Network Troubleshooter ............................................................................................................................................ |
54 |
Using the Command Prompt ...................................................................................................................................... |
55 |
Managing Partitions and Disks..................................................................................... |
55 |
Creating a Partition .......................................................................................................................... |
56 |
Formatting a Partition ...................................................................................................................... |
57 |
Deleting a Partition .......................................................................................................................... |
58 |
Moving/Resizing a Partition.............................................................................................................. |
59 |
Changing Drive Letter ....................................................................................................................... |
59 |
Getting Disk/Partition Properties...................................................................................................... |
60 |
Troubleshooting .......................................................................................................... |
62 |
Copyright© 1994-2016 Paragon Software Group. All rights reserved.

4
Product Overview
Backup and Recovery 16 is an easy-to-use tool for reliable backup of an entire computer, individual volumes or files. It helps to get consistent point-in-time copies of your PC including OS, running applications, user settings and all data in such a way that you don’t even feel any discomfort. Three predefined backup strategies simplify setup of regular backup routines. Full backup images followed by incremental updates of changed data since the last backup strengthened by data retention keep your data precisely up to date with minimal effort and backup storage footprint. Backup data is allowed to store on a local or external device or a network share.
For advanced users, there’s a way to create comprehensive backup policies that utilize full, incremental, and differential backup methods and their combinations, where backup runs can be scheduled from every hour till certain days of the month, or evoked by a certain event (system start or user logon).
Several restore options are available for you to rule out an emergency situation as quickly as possible, from fast retrieval of specific files from a backup image, to complete restore of your computer to an earlier state without losing data, reinstalling and reconfiguring your programs. Even when OS fails to start up, you still have a chance to get everything back on track by loading your PC from a WinPE-based rescue media prepared beforehand.
In this guide you will find the answers to many of the technical questions, which might arise while using our program.
Our company is constantly releasing new versions and updates to its software, that's why images shown in this manual may be different from what you see on your screen.
Getting Started
Product Components
Windows installation package for regular system and data protection. It’s the main component of the product that includes all the necessary tools to help you safe yourself from a system failure, hardware malfunction or a human factor.
WinPE bootable environment for disaster recovery or data retrieval. You can prepare it on a USB thumb drive or in an ISO file with the program’s wizard (highly recommended).
System Requirements
For the Windows installation package
Windows 7 SP1 and later
Internet Explorer 10 and later
Opened ports in Firewall: inbound and outbound 80, 443
https://bo4-fe.paragon-software.com should be added to the list of trusted sites, besides the security level for the trusted zone should not be higher than Medium-high. Go to Control Panel > Network and Internet > Internet Options > Security to configure the necessary parameters.
Copyright© 1994-2016 Paragon Software Group. All rights reserved.

5
During the installation additional free space (up to 1GB) will be required.
For the WinPE bootable environment
Intel Pentium III CPU or its equivalent, with 1000 MHz processor clock speed
At least 1 GB of RAM
SVGA video adapter and monitor
Keyboard
Mouse
Additional requirements
Network card to send/retrieve data to/from a network computer
Recordable CD/DVD drive to burn data to compact discs
External USB hard drive to store data
Installation
Before the installation, please make sure the systems requirements are met. If everything is OK, please do the following to install the product:
In case there is some previous version of the program installed on the computer, the program will offer the user to uninstall it first.
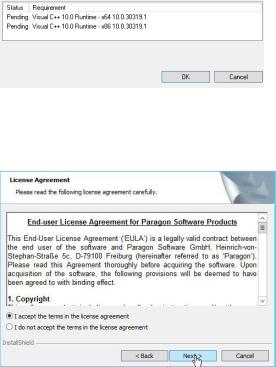
1.Click on the supplied setup file to initiate the installation. First your system will be checked for the presence of Visual Studio C++ 2010 Runtime Library and if not found, you will be prompted to install it (comes with the installation package).
Copyright© 1994-2016 Paragon Software Group. All rights reserved.
6
2.The Welcome page will inform that the application is being installed. Click Next to continue.
3.Please Read Paragon License Agreement carefully and then select the appropriate option to accept. Otherwise you won’t be able to proceed with the installation.
4.Provide the standard customer information, i.e. a user name and an organization. Besides you need to decide whether to make the program available for all users of this computer (if several) or only for the current one.
5.If necessary, click Change to install the utility to a different location (by default C:\Program Files\Paragon Software\Backup and Recovery 16\).
6.On the Ready to Install the Program page click Install to start the installation or Back to return to any of the previous pages and modify the installation settings.
7.The final page reports the end of the setup process. Click Finish to complete the wizard.
First Start
After the installation you can see an icon of Backup and Recovery on the Windows desktop. Double click it to launch the utility.
Copyright© 1994-2016 Paragon Software Group. All rights reserved.

7
Once started, you will see an activation dialog. Backup and Recovery is a commercially distributed product, which needs activation over the Internet. Enter your serial number, then click Activate. For more details, please watch our video guide: https://www.paragon-software.com/de/home/backup-recovery-kompakt/video.htm.
If you see a blank window instead of the Activation dialog, please make sure the systems requirements are met.
After the activation, you will get access to the program interface.
Copyright© 1994-2016 Paragon Software Group. All rights reserved.
8
The upper area of the main window contains several tabs: Home, Main View and X-View.
Home
Use this tab to change the program settings, build bootable recovery media, collect program logs, or go to
Paragon’s website to download a free update, register the product, visit Paragon’s Knowledge Base, etc.
For more details, please consult the following chapters:
-Changing Program Settings
-Building Recovery Media
-Troubleshooting
Main View
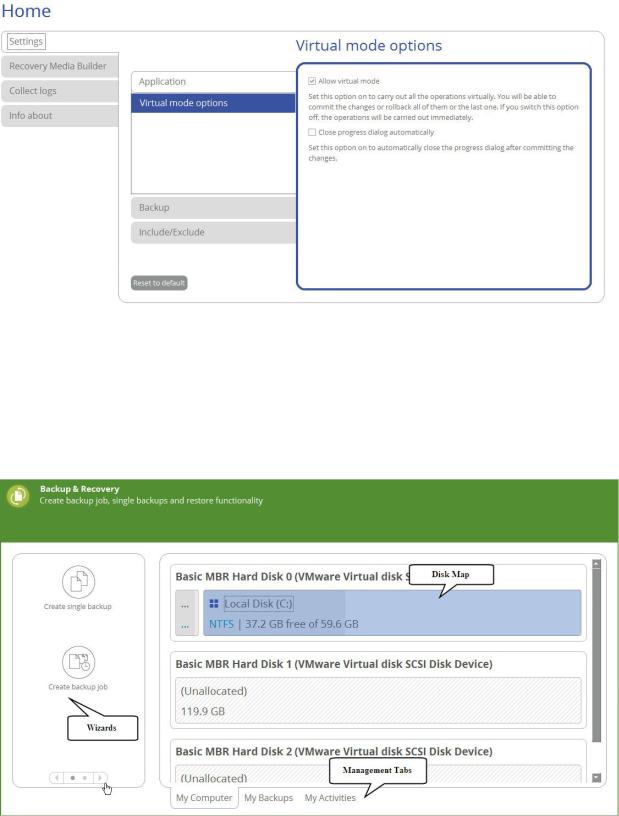
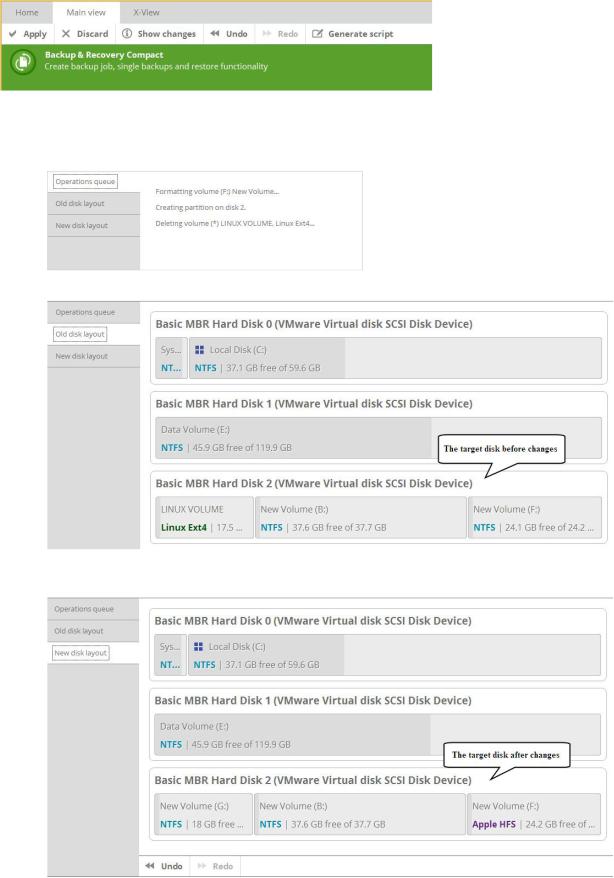
It is displayed each time you launch the program. Use this tab to see the layout of system storage devices, open program wizards and dialogs, monitor backup activities and some other actions.
By default, the program does not accomplish operations that may destroy the on-disk data (format, delete, restore, etc.) immediately, but places them on a special list (the so-called virtual mode). First it helps to avoid possible mistakes as you should confirm all provided changes. Second it saves your time and effort when
Copyright© 1994-2016 Paragon Software Group. All rights reserved.
9
executing several operations, as you don’t need to wait for each operation to physically complete before proceeding to the next operation.
A corresponding bar appears in the upper area after you accomplish a potentially dangerous operation.
Apply. Click to physically execute pending changes.
Discard. Click to cancel all pending changes.
Show changes. Click to see and manage pending changes.
Select Old disk layout to see your disks before accomplishing pending changes.
Select New disk layout to see your disks after accomplishing pending changes. Use the arrow buttons below to see how the target disk layout changes after each operation.
Undo. Click to cancel the last pending operation.
Copyright© 1994-2016 Paragon Software Group. All rights reserved.
10
Redo. Click to cancel the last undo pending operation.
Generate script. Generate a script out of all pending changes. A script may describe one or several operations with macro-language commands. The program installation package includes an interpreter utility – SCRIPTS.exe that allows executing any set of operations automatically in the unattended mode. For more details, please consult Using the Command Prompt.
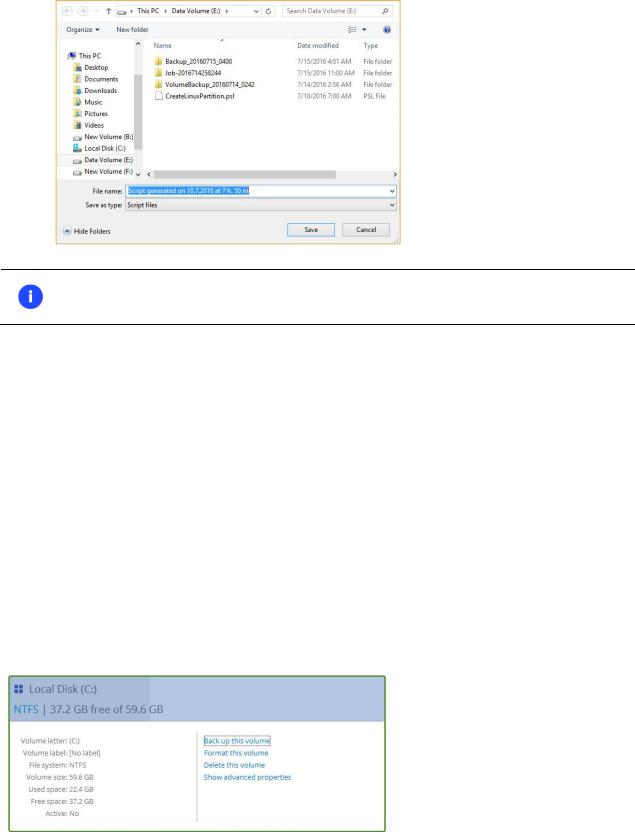
If necessary, you can change the default location and filename for the created script file.
The Virtual operations bar is also displayed in the X-View mode.
To learn more about scripts, please consult the Paragon Scripting Language manual.
Disk Map
The Disk Map displays the layout of storage devices. Each device is represented with a rectangle bar that contains small-sized bars, which represent partitions or logical disks. By looking at the size of the bar’s shaded area it is possible to estimate the used disk space.
Large-sized bars display the following information about storage devices:
Type (physical, virtual),
Used partitioning scheme (MBR or GPT),
Total capacity.
Small-sized bars display the following information about logical disks and blocks of free space:
Volume label (if exists),
Total size,
File system.
Left click a disk, volume, or block of free space to call a context-sensitive menu with detailed information on the selected object and a list of available operations.
Copyright© 1994-2016 Paragon Software Group. All rights reserved.
11
For more details, please consult the following chapters:
-Protecting System and Data
-Managing Partitions and Disks
Wizards
For your convenience the program wizards are grouped into several tabs. Use the arrow buttons to switch between them.
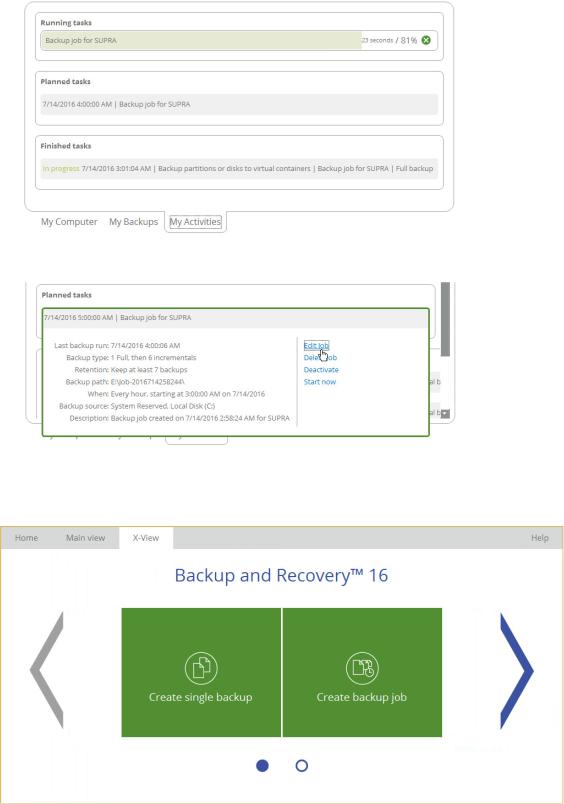
Select Create single backup to configure a one-shot backup task. For more details, please consult
Configuring a One-shot Backup Task.
Select Create backup job to configure a regular backup routine according to one of the predefined backup strategies. For more details, please consult Configuring a Regular Backup Routine.
Select Restore backup to configure a restore operation. For more details, please consult Windows Restore Scenarios.
Select Copy files and folders to transfer files or directories between local, external, or network storages. For more details, please consult Transferring Files between Storages.
Management Tabs
Select My Computer (opened by default) to see the layout of storage devices.
Select My Backups > Single backups>>> to see all configured one-shot backup tasks or My Backups > Backup jobs>>> to see configured regular backup routines. Left click a backup image to call a contextsensitive menu with detailed information on the selected object and a list of available operations.
For more details, please consult the following chapters:
-Restoring Individual Files and Folders
-Restoring an Entire Disk or Separate Volumes
-Checking Backup Integrity
-Mounting a Backup Image
Select My Activities to see completed, scheduled and currently executed operations and their statuses.
Copyright© 1994-2016 Paragon Software Group. All rights reserved.
12
For any scheduled backup job you can call a context-sensitive menu with detailed information on the selected object and a list of available operations. For more details, please consult Managing Backup Jobs.
X-View
Use this tab to simplify the working environment and only see the main program wizards. For your convenience the wizards are grouped into several tabs.
Changing Program Settings
Select Home > Settings to access the program settings. All settings are grouped into several sections, which functions are described in the following paragraphs. By selecting a section from the list, you can open a set of options.
Copyright© 1994-2016 Paragon Software Group. All rights reserved.
13
Application Section
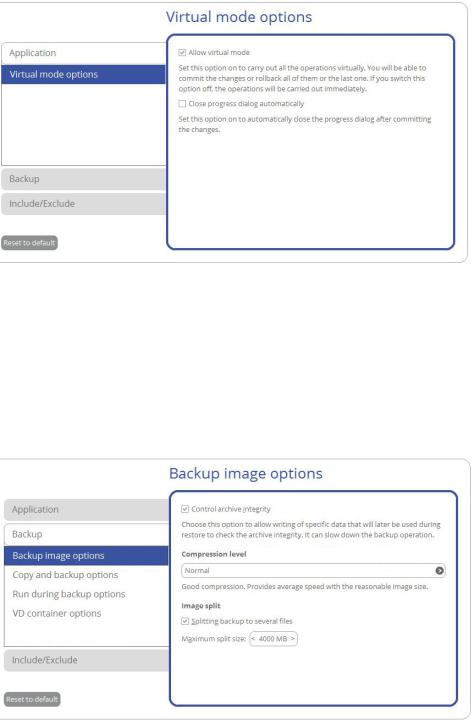
Virtual Mode Options
Allow virtual mode (enabled by default). The virtual mode is an effective way of protection from any troubles, since no potentially dangerous operation is executed until confirmation, thus giving you a second chance to weigh all pros and cons of this or that particular operation. For more details, please consult Main View.
Close progress dialog automatically. Mark the checkbox to automatically close the progress dialog after accomplishing operations.
Backup Section
Backup Image Options
Control archive integrity (enabled by default). Use this option to make sure all backup images created with the program are 100 percent flawless. If you decided not to control the archive integrity, the backup operation would take about 3-5% less time.
Compression level. Select the default compression level for all created backup images from the pull-down list.
Image split. By default, every backup image will be split to files of 4GB. This can help to avoid problems caused by a maximum file size limitation of your file system (e.g. 4GB for FAT32). Use the spinner control to set another size or disable this option if necessary.
Copyright© 1994-2016 Paragon Software Group. All rights reserved.
14
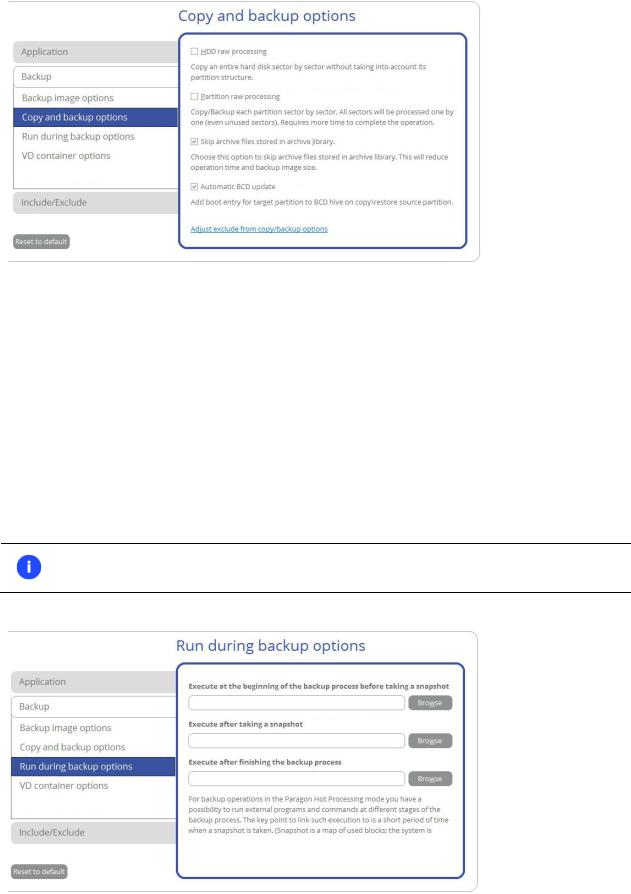
Copy and Backup Options
HDD raw processing. Mark the checkbox to back up a hard disk in the sector-by-sector mode, thus ignoring its information structure (e.g. unallocated space or unused sectors of existing partitions will be processed as well). This can help to avoid problems with hidden data created by certain applications or the system administrator. If you enable this option, the operation will take more time to complete.
Partition raw processing. Mark the checkbox to back up a partition in the sector-by-sector mode to successfully process unknown file systems. If you enable this option for processing supported file systems, the operation will take more time to complete.
Skip archive files stored in archive library. By default, backup images registered in the archive database will be skipped from processing, thus reducing the operation time and the resulted backup size.
Automatic BCD Update. If necessary, unmark the checkbox to suppress automatic update of BCD (Boot Configuration Data) after copy/restore operations.
By clicking the link at the bottom of the window you can jump to the Copy/Backup Exclude Options.
Run during Backup Options
In this section you can specify external applications to execute at various phases of the backup process in order to obtain consistent backup images of systems with high availability requirements (MS SQL, MS Exchange, etc.). The
Copyright© 1994-2016 Paragon Software Group. All rights reserved.
15
point is to provide a coherent state of all open files and databases involved in a backup, taking into account that applications may still keep writing to disks.
Actually a backup process consists of two phases: the preparation phase (snapshot) and the data-copying phase. There are three points of the backup when external commands/programs can be launched:
Execute at the beginning of the backup process before taking a snapshot. Specify an executable file that will help you to prepare running applications for taking a snapshot. It may contain specific commands/programs to delete unnecessary files, suspend services, flush transactions or caches, etc. Everything depends on the used applications.
Execute after taking a snapshot. Specify an executable file that will run just after taking a snapshot. It may contain specific commands/programs, e.g. to resume the previously suspended services, etc. Everything depends on the used applications.
Execute after finishing the backup process. Specify an executable file that will run after the backup process has been accomplished. It may include commands/ programs that will move the backup image to a particular location, etc.
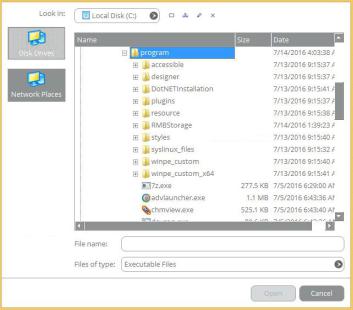
By clicking the Browse button you can get into a browser-like window to choose an executable file.
The program supports three types of executable files (.exe, .bat, .cmd). It’s up to you to write batch files to safely prepare applications for backup. There are certain general requirements for that:
All programs and commands must execute sequentially and finish before the .bat file completes its work.
It is recommended to use external commands/programs in the following format - Start/wait program.exe. The wait option will help to start an application and wait until it completes its work. This guarantees all included commands/programs complete their execution before the batch file does.
You’re allowed to set parameters for an executable file directly from the line. However, if the file path contains word gaps it is necessary to enclose it in quotes in order to make the program distinguish between the path and the used parameters.
Copyright© 1994-2016 Paragon Software Group. All rights reserved.
16
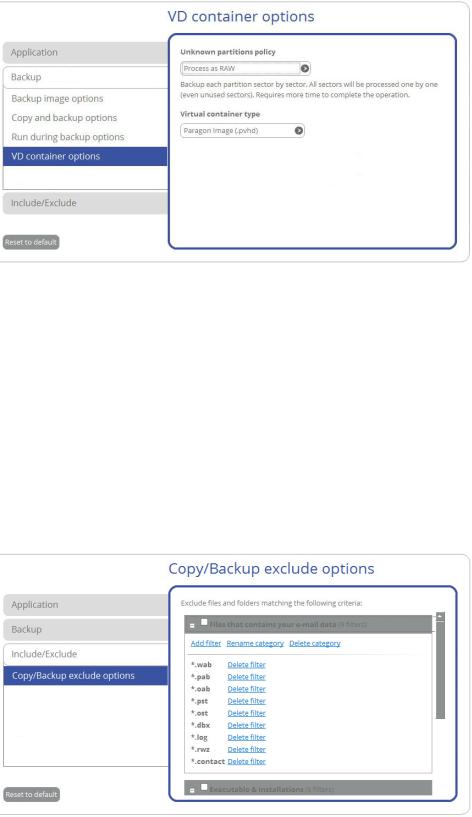
VD Container Options
Unknown partitions policy. Here you can define behavior for processing unknown or unformatted partitions (skip from backup, process in the sector-by-sector mode, or ask the user each time this type of partition has been found).
Virtual container type. By default, the program is configured to back up to pVHD (Paragon Virtual Hard Drive). Use this option to switch the resulted virtual container to VHD, VHDX, or VMDK. Please note that the use of pVHD enables to get full backup images several times smaller than the original objects, while incremental updates – dozens of times smaller when comparing to VHD, VHDX or VMDK, which have some fixed size of blocks, not dynamic. Besides encryption and password protection are only available for pVHD. However, if you’re having a VMware or Microsoft hypervisor at your disposal and are planning to do instant virtualization, please make sure the used backup format matches your hypervisor.
Include/Exclude Section
Copy Backup Exclude Options
In this section you can choose data to automatically ignore during copy and backup operations. You’re allowed to filter certain files or folders by either creating new or using existing masks, thus effectively managing contents of created backup images and partition/hard disk copies.
To create a new filter, use the Add filter link inside one of the existing categories.
Copyright© 1994-2016 Paragon Software Group. All rights reserved.

17
In the opened dialog set the following parameters:
Filter. Click Browse to select files or folders you would like to be excluded from processing or specify a filter mask by using * or ? wildcards;
Description. Add a short description to the filter not to miss it up later.
Click OK when ready. As a result you will get a new item on the list of filters. By marking/unmarking a checkbox before a category name you can choose whether to use filters it includes or not.
Building Recovery Media
The program includes a user-friendly wizard that will guide you through the process of creating a WinPE-based recovery media on a USB thumb drive or in an ISO file to later burn it to CD/DVD. For advanced users, there are capabilities to add drivers for specific hardware devices, configure network settings, and map network shares in the process.
1.Select Home > Recovery Media Builder.
2.The welcome page introduces the wizard’s functionality. Besides you can see two options here:
Advanced mode. Please mark this option if you’d like the future bootable media to have pre-configured network settings, mapped network resources, or injected drivers for specific storage controllers or network cards.
Use ADK/WAIK. Recovery Media Builder doesn’t require Windows Assessment and Deployment Kit (ADK) or Automated Installation Kit (WAIK) to be installed in the system to build a WinPE-based environment, as it can directly use WIM image inside the operating system. However, some system builders remove this image from preinstalled Windows OS. If this is your case, mark the option to use ADK/WAIK. You will also need it to create an ISO image of the WinPE environment.
Copyright© 1994-2016 Paragon Software Group. All rights reserved.
18
WAIK/ADK is a Microsoft’s proprietary tool and can be obtained from its Download Center for free. Please note that you need a genuine Windows installation to be able to download this tool. Moreover you will need to download a version, which is suitable for your Windows OS – Recovery Media Builder automatically detects your system and offers the required download link.
3.Click on Removable flash media, then select a thumb drive of at least 512MB in size from the list of flash memory devices available in the system at the moment (if several). If you’d like to create an ISO image of the WinPE environment, please use the corresponding option.
4. If selecting a thumb drive, the wizard will warn you that all data on it will be deleted.
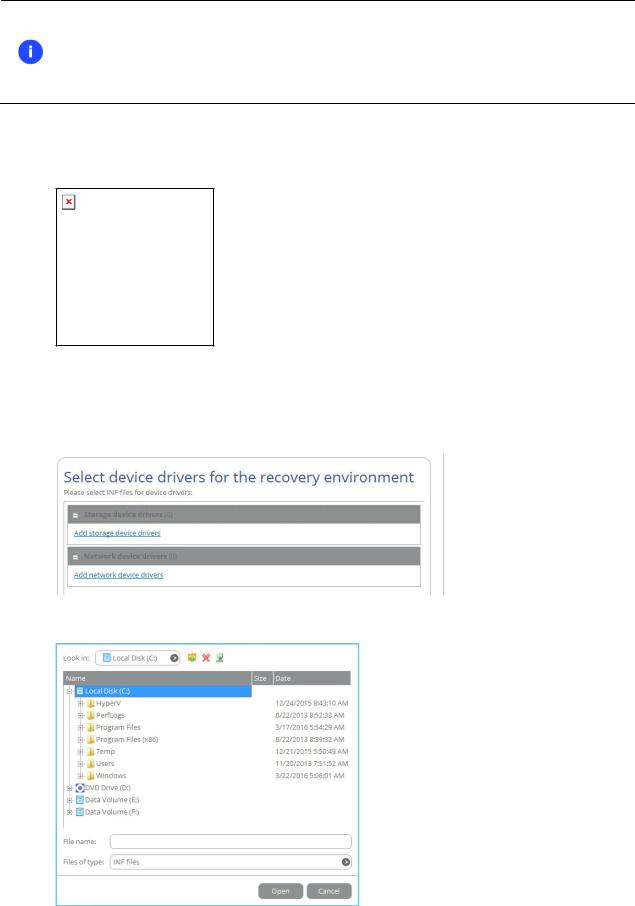
Additional steps of the advanced mode
5.Inject additional drivers for specific storage controllers, network cards, or other devices. First click on the required link.
In the opened dialog browse for an .INF file of the required driver package located on a floppy disk, local disk, CD/DVD or a network share.
If successfully injected, you can see the specified driver on the list. If you’d like to add another driver, please repeat the procedure.
Copyright© 1994-2016 Paragon Software Group. All rights reserved.
19
Recovery Media Builder can build 32-bit WinPE media configured to the uEFI mode, which is the only type compatible with Windows pads running on Intel Atom.
By default, WinPE environment doesn’t support touch screens, thus Windows pads can only be managed by mouse and/or keyboard. You can add required drivers however through our driver injector.
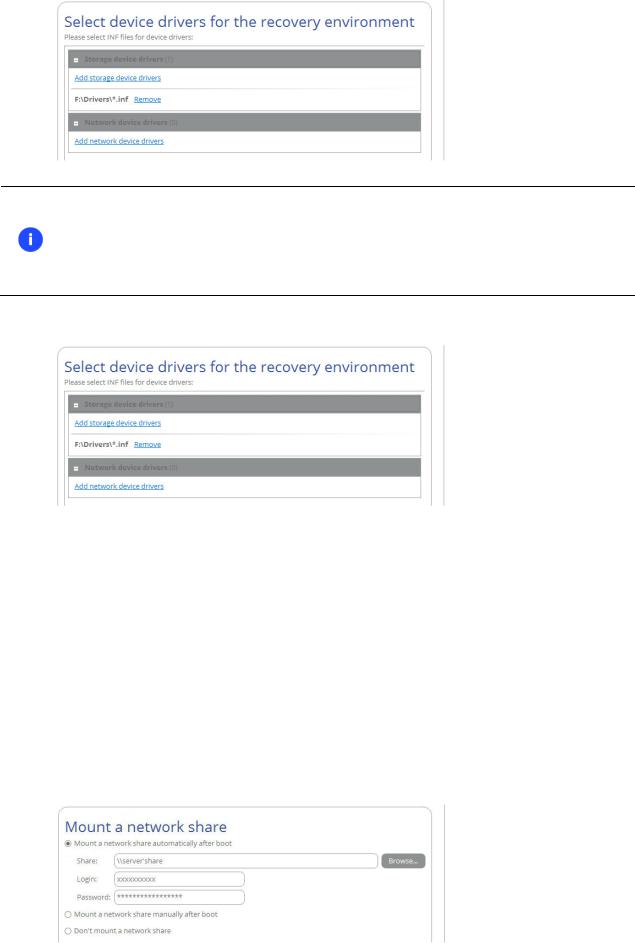
6. Set up a network connection if needed. You’ve got several options to choose from:
Connect to network automatically... Specify the following parameters if you’d like to have an active network connection once the bootable environment has been started up:
-A network adapter to use. Select a network adapter (if several in the system) to be used for the network connection.
-IP address settings. Choose whether to get an IP address automatically from a DHCP server or set it manually.
Connect to network manually... If selecting this option you will be prompted to configure network properties each time the computer has been started up from the bootable media.
Skip network adjustment. Please use this option if you don’t need network support on the bootable media.
7.Map a network share if needed (not be available if selecting Skip network adjustment on the previous step). You’ve got several options to choose from:
Copyright© 1994-2016 Paragon Software Group. All rights reserved.
 Loading...