

Page 1
Captive screw
Front cover
Mounting
screw 1
Mounting
Tam per
screw 2
Tam pe r
knockout
hole
Knockout
holes
1
2
3
NV35MX
Installation Manual V1.0
Outdoor/Indoor Window and
Sliding Door Dual Detector with
Anti-Masking and Pet Immunity
NV35MX-EI01
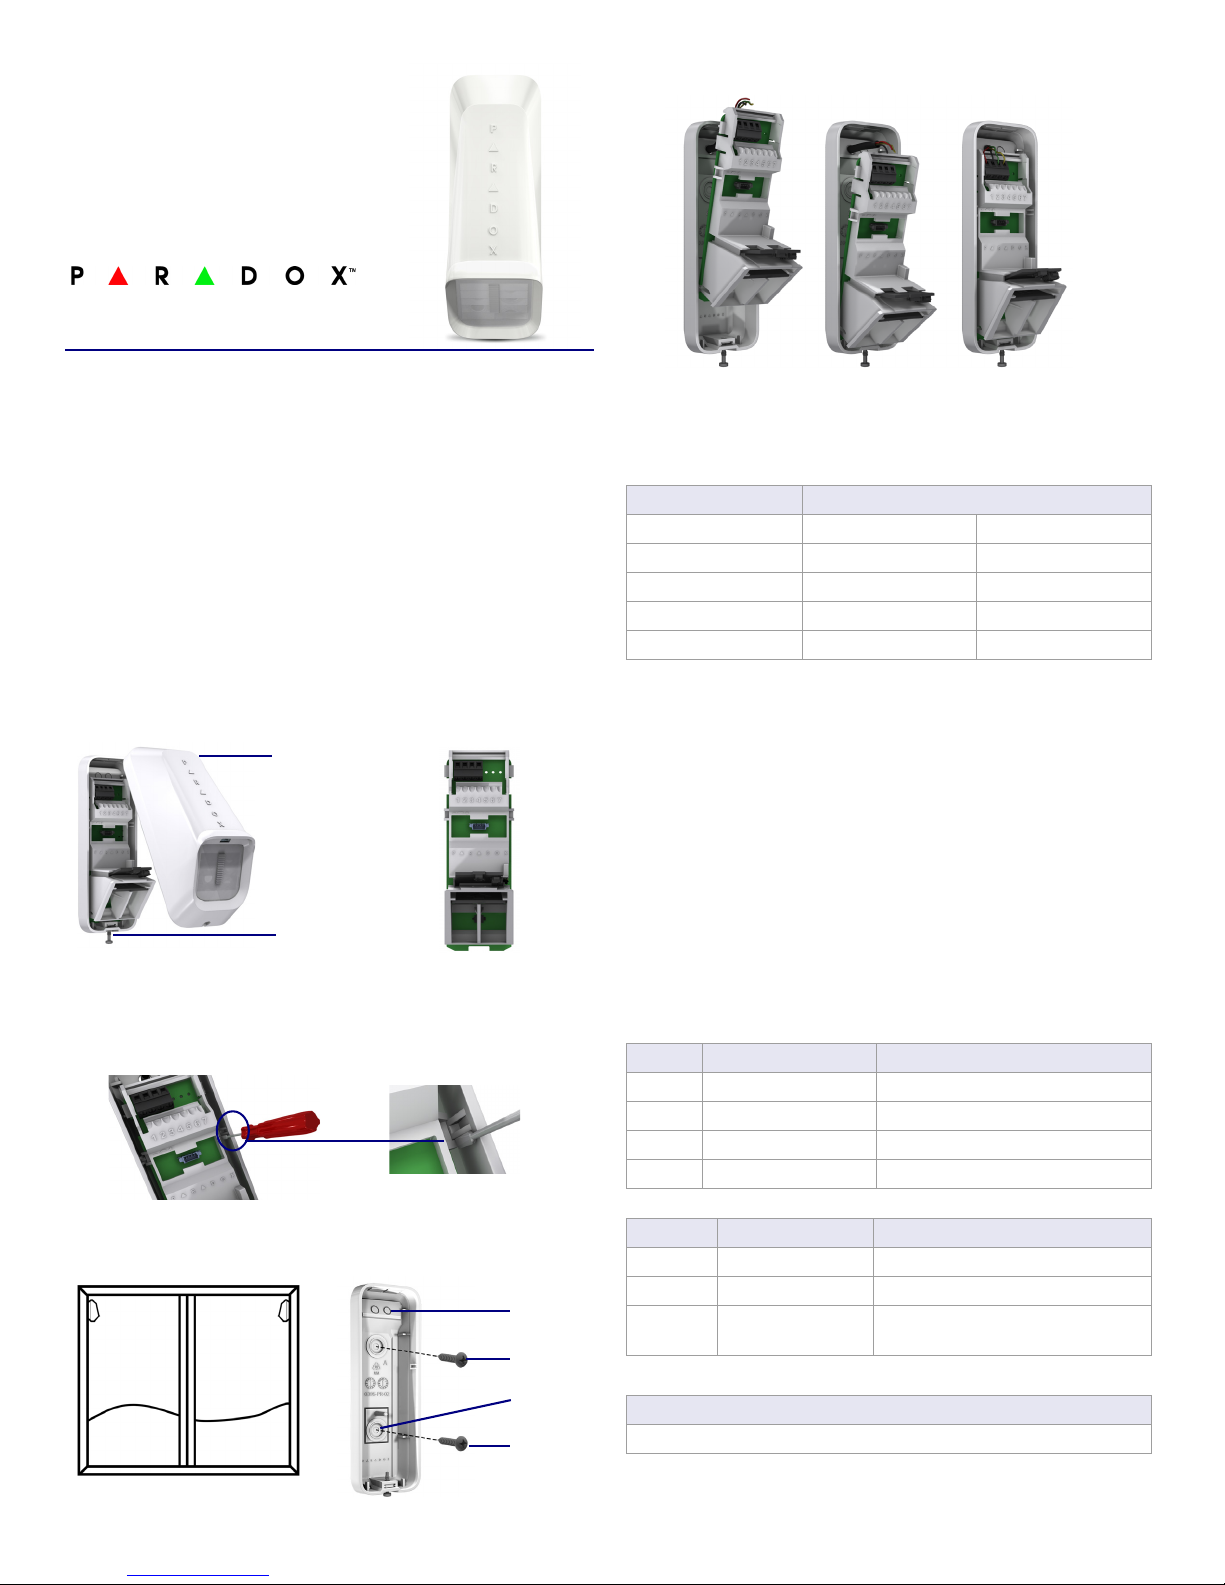
4. Attach the Main Unit to the back cover - ensure the locks snap closed.
General Description
Thank you for choosing the NV35MX for your professional protection
needs. The NV35MX EVO version will provide you the most advanced
window and sliding door protection either in Pet Immune or Sharp mode,
while programming can be done remotely via EVO bus connection. If you
have any comments please write to us at Paradox.com/products/
feedback.This guide describes how to install and program the NV35MX.
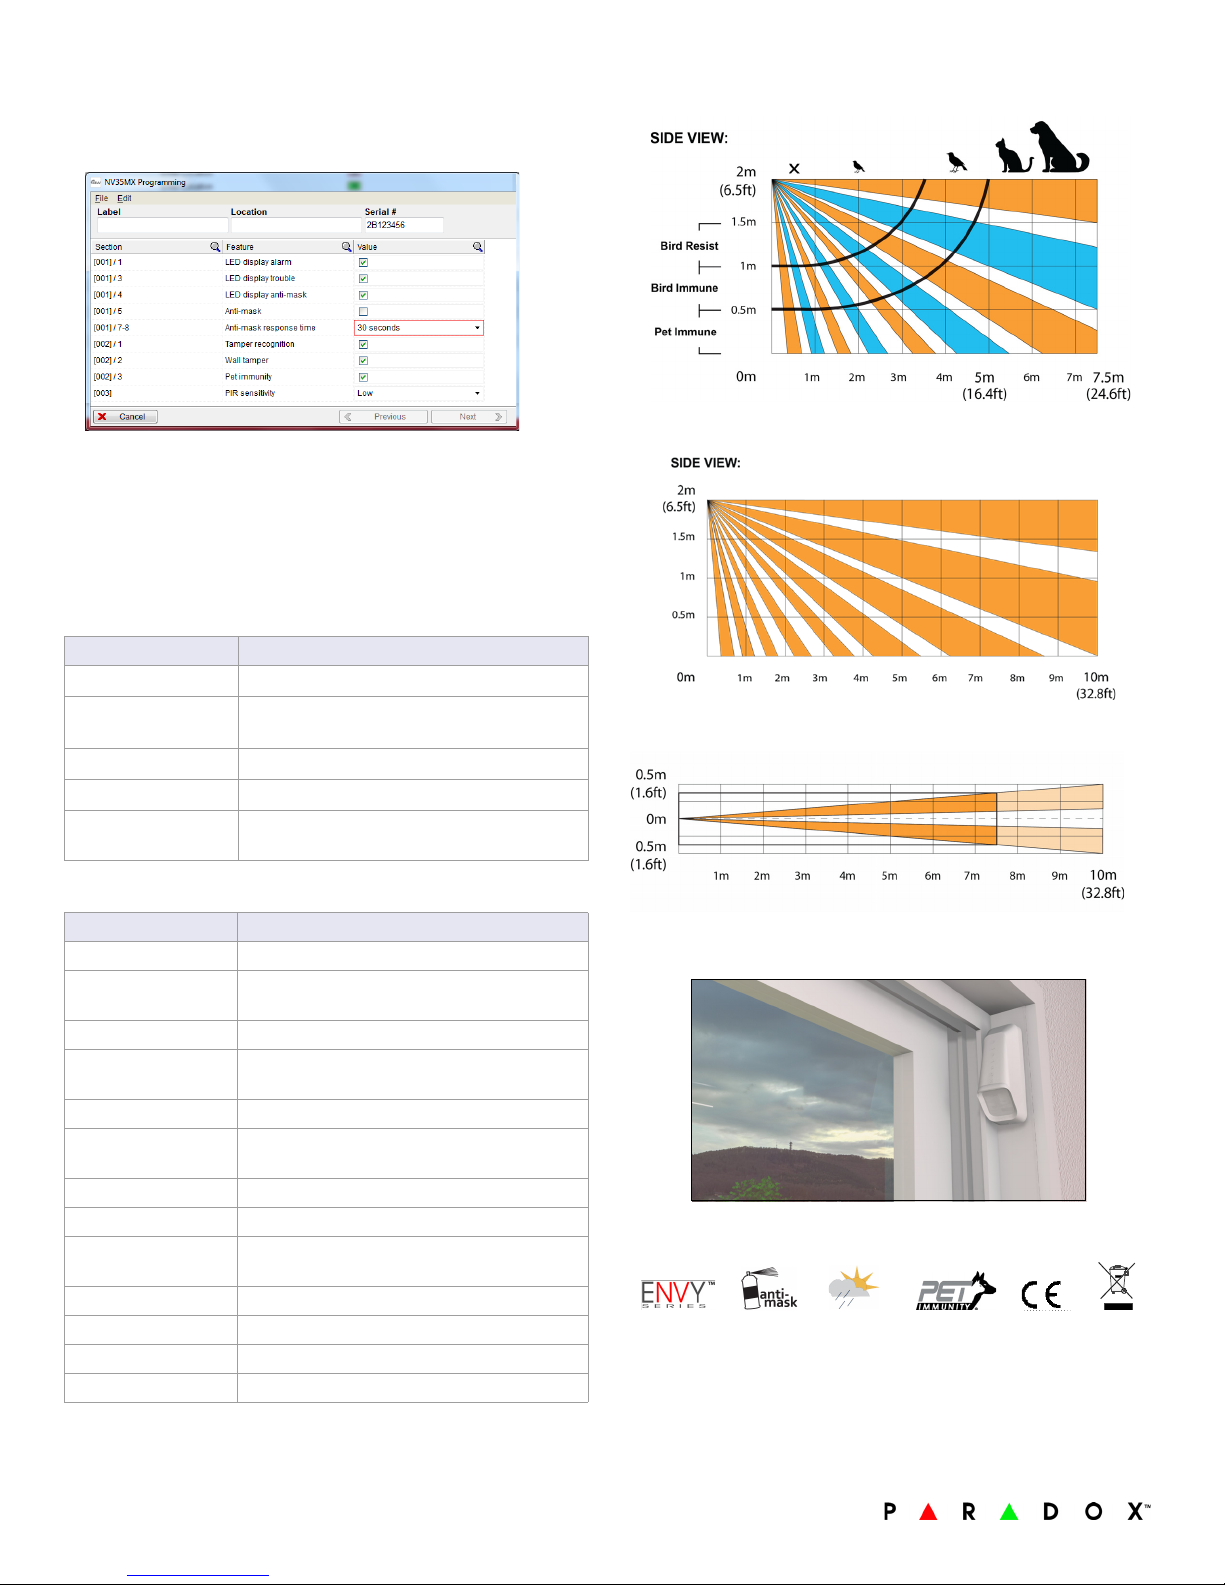
Pet Recommended Installation (please read)
The NV35MX has been designed to be installed within the frame of
windows and doors when installed outdoors. This will ensure the best
performance against false alarms when random pets such as birds, cats
and small dogs access the window sill. Other installation methods can be
used with the NV35MX such as wall beam protection but if installed
outside of the frame its pet immunity may be compromised.
Installing the NV35MX
1. Remove the NV35MX front cover - open the Captive screw.
Figure 1 – Removing the Front Cover Figure 2 – Main Unit
2. Remove the Main Unit: open the two snap-lock mechanisms on each
side of the back cover attaching the Main Unit to the back cover as
displayed below. Then remove the Main Unit.
Figure 3 – Removing the Main Unit
3. Pull the wires from the control panel through the knockout holes and
mount the back cover onto the window frame or wall using screws.
Figure 5 – Attaching the Main Unit
5. Connect the wires to the terminal blocks according to the following
wiring assignment.
Tab le 1 : Wi rin g As sig nme nt
Terminal Connector Recommended Wiring Assignment
Bus Label Wire Color
1 12V+ Red
2Minus (-) Black
3 Data Green
4Clock Yellow
6. Replace the front cover and close the Captive screw.
Warning: Do not obscure the detector's field of view.
Programming the NV35MX
Program the detector with a keypad or BabyWare software.
Programming with a Keypad
1. Enter EVO Installer Programming Mode.
2. Enter Module Programming:
aEnter section [4003] in the Enter Section field.
b Enter the detector’s 8-digit [SERIAL NUMBER].
cEnter the 3-digit [SECTION] number you want to program.
3. Program required functions in section [001] (table 2), section [002]
(table 3) and section [003] (table 4) below.
Tab le 2: Section [001]
Bit Func tion Status/Description
[1] LED Display Alarm O
[3] LED Display Trouble O
[4] LED Display Anti- Mask O
[5] Anti- Mask O
Table 3: Section [002]
Bit Func tion Status/Description
[1] Unit Tamper O
[2] Wall Tamper O
[3] PET Immunity O
N: Enabled (default) OFF: Disabled
N: Enabled (default) OFF: Disabled
N: Enabled (default) OFF: Disabled
N: Enabled (default) OFF: Disabled
N: Enabled (default), OFF: Disabled
N: Enabled (default), OFF: Disabled
N: Enabled (default) (PET Mode)
O
FF: Disabled (SHARP Mode)
Figure 4 – Mounting the Back Cover
Table 4: Section [003]
PIR Sensitivity Level
Low: 00 Normal: 01 (default) High: 02
PARADOX.COM
Page 2
Programming with BabyWare
1. Open BabyWare.
2. Select the detector and set zone type.
3. Right-click on the detector to open detector Programming.
Beam Pattern
PET Mode
4. Configure the required settings.
Testing the NV35MX
Perform a Walk-Test to test successful installation: Walk slowly across the
far end of the detection range. Ensure detection.
Walk test mode lasts 5 minutes after the tamper screw is closed.
LED Display
Feature LED Status Indicator
Tamper open
PIR sensitivity level
setting
Alarm detection
Booting/Tamper close
Green: ON for 0.3 seconds every 30 seconds
Green: Flashes 1-3 times according to the
selected level
Red: ON for 2 seconds
Green/Red alternating flashes for 30 seconds
Anti-mask detection Orange: Flashes ON/OFF 3 times every 60
seconds
Technical Specifications
Model Number NV35MX
Infrared Sensor type 2 Dual elements
Detection range PET Immunity mode: 7.5m x 2m (25 x 7 ft).
Sharp mode: 10 x 2m (33 x 7 ft)
Super Pet Immunity Pet size approximately 50cm
Anti- mask Active IR detection for blocking 30cm and
sprayed liquid
Input voltage 10 to 15 VDC
Current consumption Typical: 15mA
Maximum: 19.2mA
Compatibility EVO systems
Outdoor protection IP54
Operation
temperature
Relative humidity 95% non-condensing
Dimensions 12.3 x 6.1 x 4.3 cm (4.8 x 2.4 x 1.7 in.)
Certifications CE, EN50131-2-2 Grade 3, Class IV
Weight 100g / 0.2 lb
-35°C to +50°C
SHARP Mode
Top View
PET Immunity Mode Installation
Notifications
Changes or modifications to this equipment not expressly approved by the party responsible for
compliance (Paradox Security Systems Ltd.) could void the user’s authority to operate the equipment.
Warra nty
The Limited Warranty Statement found on the website www.paradox.com/terms.
Patents
Your use of the Paradox product signifies your acceptance of these terms and conditions. The following US
patents may apply 5,886,632 and 6,215,399. Oth er Canadian and international patents may apply.
Printed in Canada 08/2015
PARADOX.COM
 Loading...