

Page 1
All-In-One Wireless Security System V1.0
Model #: MG-6060
Reference and Installation Manual
Page 2

Page 3

Paradox Magellan Systems 1
Table of Contents
Introduction................................................... 3
About Magellan and this Manual............................. 3
Conventions ............................................................ 3
Specifications.......................................................... 3
Quick Setup................................................... 4
Installation..................................................... 6
AC Power................................................................ 6
Backup Battery Pack............................................... 6
Telephone Line Connections .................................. 6
Programmable Outputs (PGMs) ............................. 7
Hardwire Zone Connections ................................... 8
WinLoad Connection............................................... 8
UIP-256 Universal In-Field Programmer
Connection.............................................................. 8
X10 Transmitter Connection ................................... 9
Connecting a Paradox Memory Key (PMC-3)......... 9
Location and Mounting............................................ 9
Connecting the Radio Antenna ............................. 10
Programming Methods .............................. 11
WinLoad Installer Upload/Download Software...... 11
Programming Using the Built-in Keypad ............... 11
Programming Using a Paradox Memory Key........ 11
User Codes.................................................. 12
User Code Length ................................................. 12
Installer Code........................................................ 12
Maintenance Code ................................................ 12
System Master Code ............................................ 12
Duress Code ......................................................... 12
Zone Programming..................................... 13
Zone Programming Overview ............................... 13
Zone Definitions .................................................... 13
Zone Options ........................................................ 15
Zones 15 and 16 become Hardwire Zones........... 16
EOL (End-Of-Line) Zones ..................................... 16
Wireless Programming .............................. 17
Assigning Wireless Zone Transmitters ................. 17
Assigning Wireless Doorbells to the Console ....... 17
Deleting Assigned Wireless Transmitters ............. 17
Viewing Wireless Transmitter Signal Strength...... 17
Assigning Remote Controls .................................. 18
Programming the Remote Control’s Buttons ........ 18
Arming and Disarming ............................... 20
Regular Arming Switches to Stay Arming ............. 20
Regular Arming Switches to Force Arming ........... 20
Stay Arming Switches to Force Arming ................ 20
Timed Auto-Arming ............................................... 20
No Movement Auto-Arming ................................... 20
Auto-Arming Options ............................................. 20
One-Touch Arming................................................ 21
Exit Delay .............................................................. 21
Bell Squawk on Arm/Disarm with Remote Control 21
No Exit Delay when Arming with Remote Control. 21
Exit Delay Termination .......................................... 21
Follow Zone Switches to Entry Delay 2................. 21
Closing Delinquency Timer ................................... 21
Alarm Options............................................. 22
Bell Cut-off Timer .................................................. 22
Wireless Transmitter Supervision Options ............ 22
Tamper Recognition Options ................................ 22
Check-in Supervision Options ............................... 22
Panic Alarms ......................................................... 23
Reporting and Dialer Settings................... 24
Report Codes ........................................................ 24
Console Telephone Numbers ............................... 25
Console Account Number ..................................... 26
Reporting Formats ................................................ 27
Event Call Direction............................................... 27
Delay Between Dialing Attempts ........................... 28
Alternate Dial Option ............................................. 28
Force Dial Option .................................................. 28
Dialing Method ...................................................... 28
Pulse Ratio............................................................ 28
Switch to Pulse Dialing on 5th Attempt ................. 28
Telephone Line Monitoring (TLM) ......................... 28
Recent Close Delay .............................................. 28
Auto-Test Report................................................... 29
Power Failure Report Delay .................................. 29
Disarm Reporting Options ..................................... 29
Zone Restore Report Options ............................... 29
Programmable Outputs ............................. 30
PGM Activation Event ........................................... 30
PGM Deactivation Event ....................................... 30
PGM Delay............................................................ 30
PGM Normal State ................................................ 30
PGM X10 Option ................................................... 30
System Settings ......................................... 31
Software Reset...................................................... 31
Installer Lock ......................................................... 31
Console Tamper Supervision ................................ 31
Console Audible Trouble Warning ........................ 31
FM Tuner Option ................................................... 31
Daylight Savings Time .......................................... 31
AC Power Failure Warning.................................... 31
The Trouble Display .............................................. 31
WinLoad Software Settings....................... 33
Page 4

2 Reference & Installation Manual
Panel Answer Options ........................................... 33
Panel Identifier....................................................... 33
PC Password ......................................................... 33
PC Telephone Number .......................................... 33
Call Back Feature .................................................. 33
Appendix 1: Ademco Contact ID Report Code
List ............................................................... 34
Index ............................................................ 37
Page 5
Paradox Magellan Systems 3
Introduction
About Magellan and this Manual
Magellan is designed for fast and easy installation. Simply
remove it from the box, mount the console and wireless
transmitters, apply power and Magellan is ready to protect your
home. Magellan has already been pre-programmed with the
required settings for a basic security installation.
Some of Magellan’s features can be programmed through a quick
Installer Menu (menu programming) or through section
programming. Use the quick setup chapter (page 4) to install the
Magellan console quickly and with the basic programming
required for a standard security application. All other chapters
(pages 6 to 33) are for advanced section programming. These
other chapters provide more in-depth and precise information if
more advanced programming is required.
We recommend that you read this entire manual before you begin
installation.
Conventions
Specifications
Power input: AC*: 9Vac, 1A/9VA transformer or
16.5Vac, 20VA transformer
or
DC: 12Vdc to 18Vdc power supply
Current consumption:With AC input: 600mA
or
With DC input: 400mA
Backup Battery: 7.2Vdc, 1.8 to 2.0Ah NiMH rechargeable
battery pack (order # 0780100178)
PGMs: Two N.O. solid-state relays (not polarized)
Internal resistance - 169 (max.)
Max. current consumption - 50mA
* It is recommended that you use a 9Vac 1A/9VA transformer
to power the Magellan console. The console will generate
less heat when connected to a 9Vac transformer than when
connected to a 16.5Vac transformer.
This symbol designates a reference to another
section, manual or guide.
This symbol designates either a warning or important
information.
This symbol designates a reminder or suggestion.
[
DATA
] =
- Text shown in this manner designates data or
programming information that is entered through the
console’s keypad.
- Text shown in this manner can also designate a
specific key that has to be pressed.
Page 6
4 Reference & Installation Manual
Quick Setup
Follow these steps to quickly set up Magellan with the required
settings for a basic security installation.
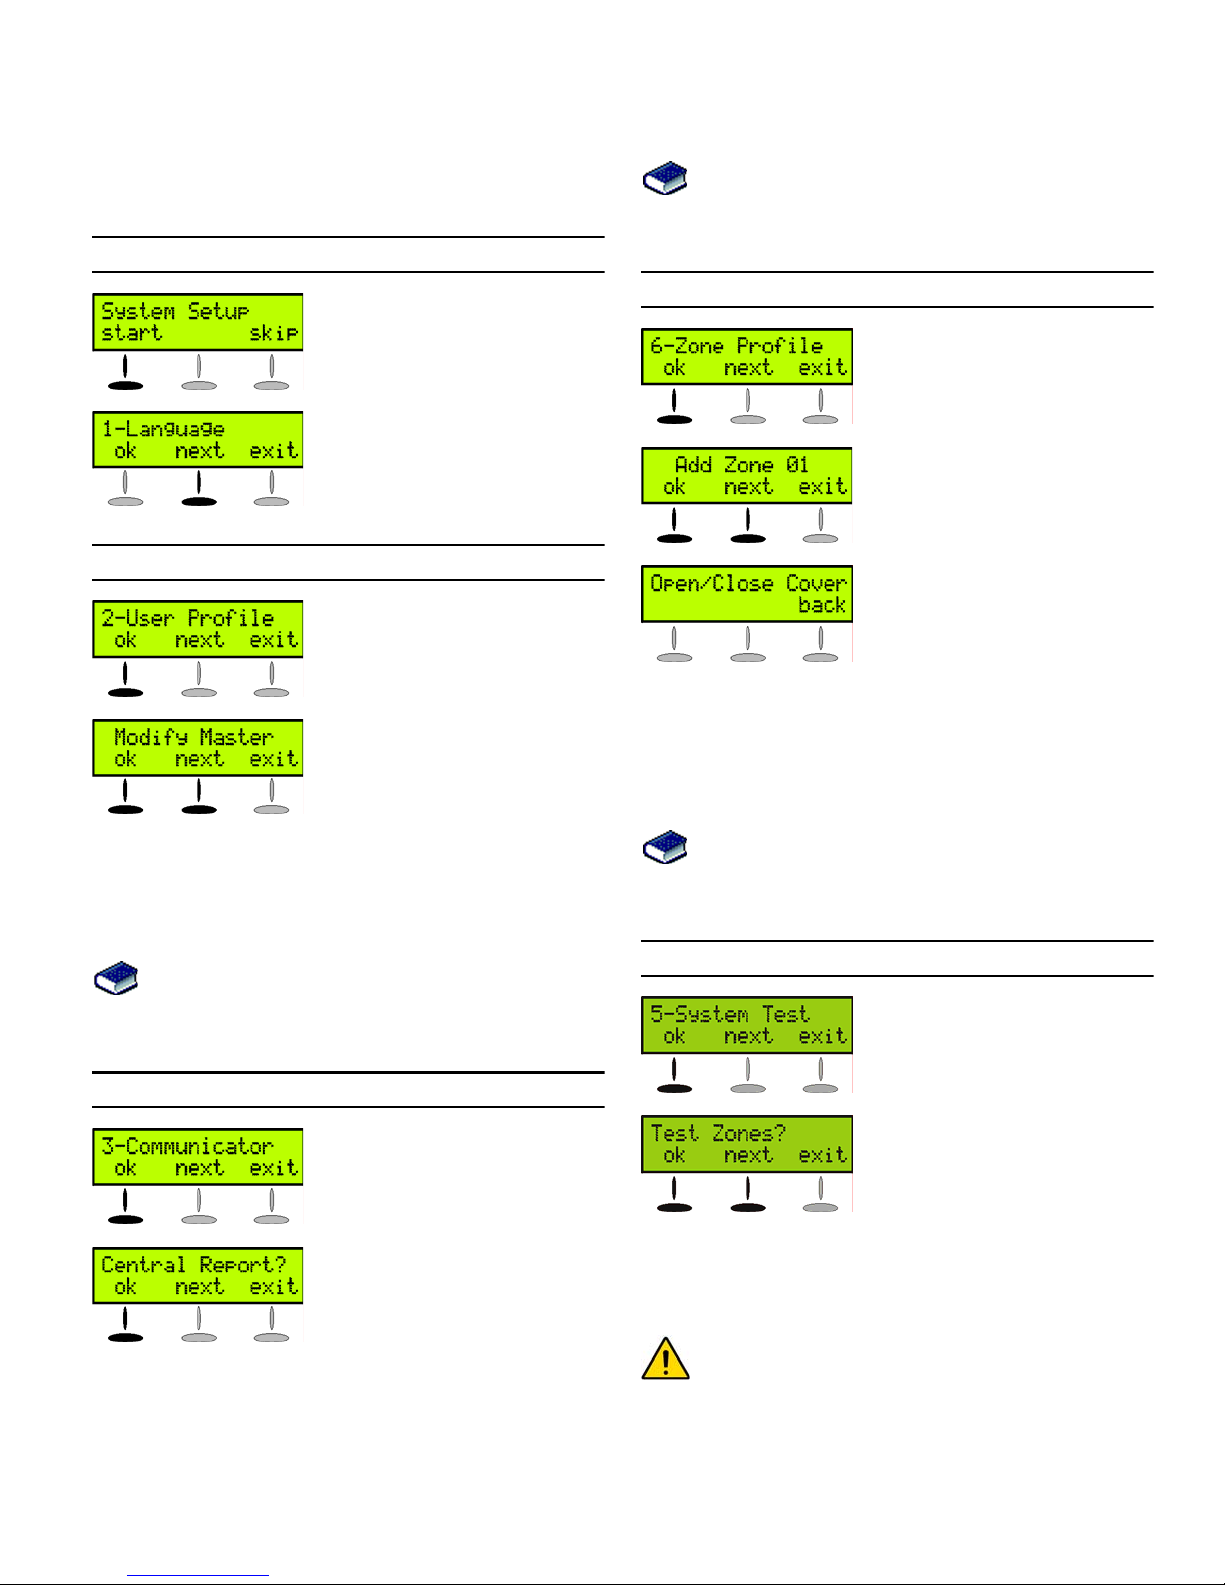
1.Getting Started
1. After powering up for the first
time, press [
START
] to access the
Installer Menu.
2. The first menu option will appear.
Press [
NEXT
] to go to the “User
Profile” menu.
2.User Programming
1. From the “User Profile” menu,
press [
OK
].
2. Select which user you wish to add
by pressing [
NEXT
]. When the
desired user appears, press [
OK
]
and follow the menus to set:
- Access Code
- User Label
- Remote Control
When you are done the next
menu option will appear (see
Central Station Reporting below).
For more in-depth programming of the remote controls,
see Programming the Remote Control’s Buttons on page
18.
3.Central Station Reporting
1. From the “Communicator” menu,
press [
OK
].
2. Press [
OK
] and follow the menus
to set:
- Telephone numbers
- Account Number
- Report Format
When you are done the next
menu option will appear. Press
[
NEXT
] until you see the “Zone
Profile” menu or press the [6] key
to immediately access the “Zone
Profile” menu.
For more in-depth programming of the console’s
communication features, see Reporting and Dialer
Settings on page 24.
4.Adding and Programming Zones
1. From the “Zone Profile” menu,
press [
OK
].
2. Select which zone you wish to
add by pressing [
NEXT
] and press
[
OK
] when the desired zone
number appears.
3. Press the tamper switch on the
transmitter you wish to assign to
the selected zone. Follow the
menus to set:
- Zone Label
- Zone Type
- Other Zones
When you are done the next menu option will appear. Press
[
NEXT
] until you see the “System Test” menu or press the [5] key
to immediately access the “System Test” menu.
For more in-depth programming of the console’s zones,
see Zone Programming on page 13 and Wireless
Programming on page 17.
5.Testing the Magellan System
1. From the “System Test” menu,
press [
OK
].
2. Select which test you wish to
perform by pressing [
NEXT
] and
press [
OK
] when the desired test
appears. The following tests can
be performed:
- Zone tests
- Remote control tests
- Reporting tests
- Hardware tests
WARNING! When testing the hardware, the speaker and
sirens will also be tested. Avoid close proximity to the
Magellan console when performing the hardware test to
avoid any damage to your hearing.
Page 7
Paradox Magellan Systems 5
When you are done the next menu option will appear. Press
[
NEXT
] until you see the “Passwords” menu or press the [8] key
to immediately access the “Passwords” menu.
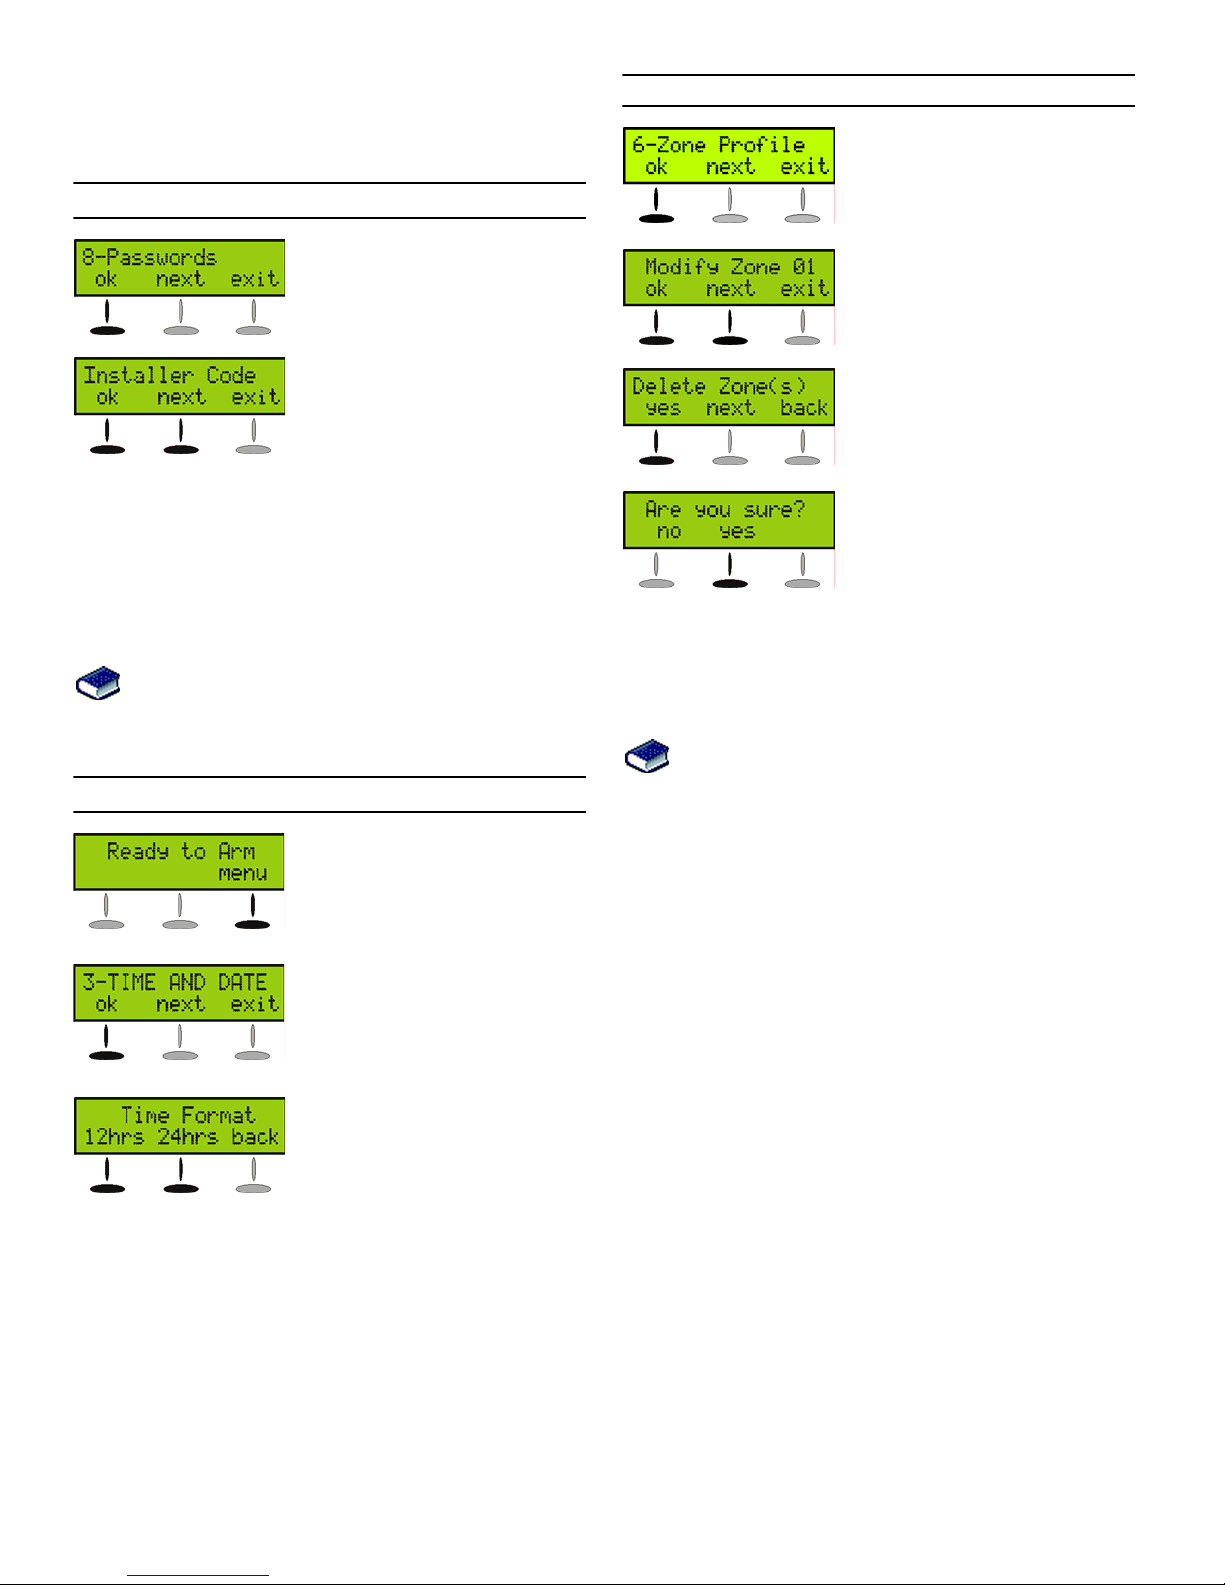
6.Passwords
1. From the “Passwords” menu,
press [OK].
2. Select which password(s) or
code(s) you wish to program by
pressing [
NEXT
] and press [OK]
when the desired password
appears. The following
passwords can be programmed:
- Installer code
- Maintenance code
- Panel ID
- PC Password
When you are done the next menu option will appear. Press
[
EXIT
].
For more in-depth programming of the console’s
passwords, see User Codes on page 12 and WinLoad
Software Settings on page 33.
7.Time and Date
1. Press the [
MENU
] key.
2. Press [
NEXT
] until you reach the
“Time and Date” menu and press
[OK] or press the [3] key to
access the “Time and Date”
menu.
3. Select the time format (12Hrclock or 24Hr-clock) and then
program the time. Press [
OK
]
when done.Program the date by
entering the 4-digit year first,
followed by the 2-digit month and
then the 2-digit day. Press [
OK
]
when done.
Deleting Zones
1. From the “Zone Profile” menu, press
[OK].
2. Select which zone you wish to delete by
pressing [
NEXT
] and press [OK] when
the desired zone number appears.
3. Press [
YES
].
4. Press [
YES
]. To delete another zone,
press [
YES
] and then repeat steps 2 to
4.
When you are done the next menu option will appear. Press
[
NEXT
]
until
you see the “System Test” menu or press the
[5]
key to immediately
access the “System Test” menu.
For more in-depth programming of the console’s zones, see
Zone Programming on page 13 and Wireless Programming on
page 17.
Page 8
6 Reference & Installation Manual
Installation
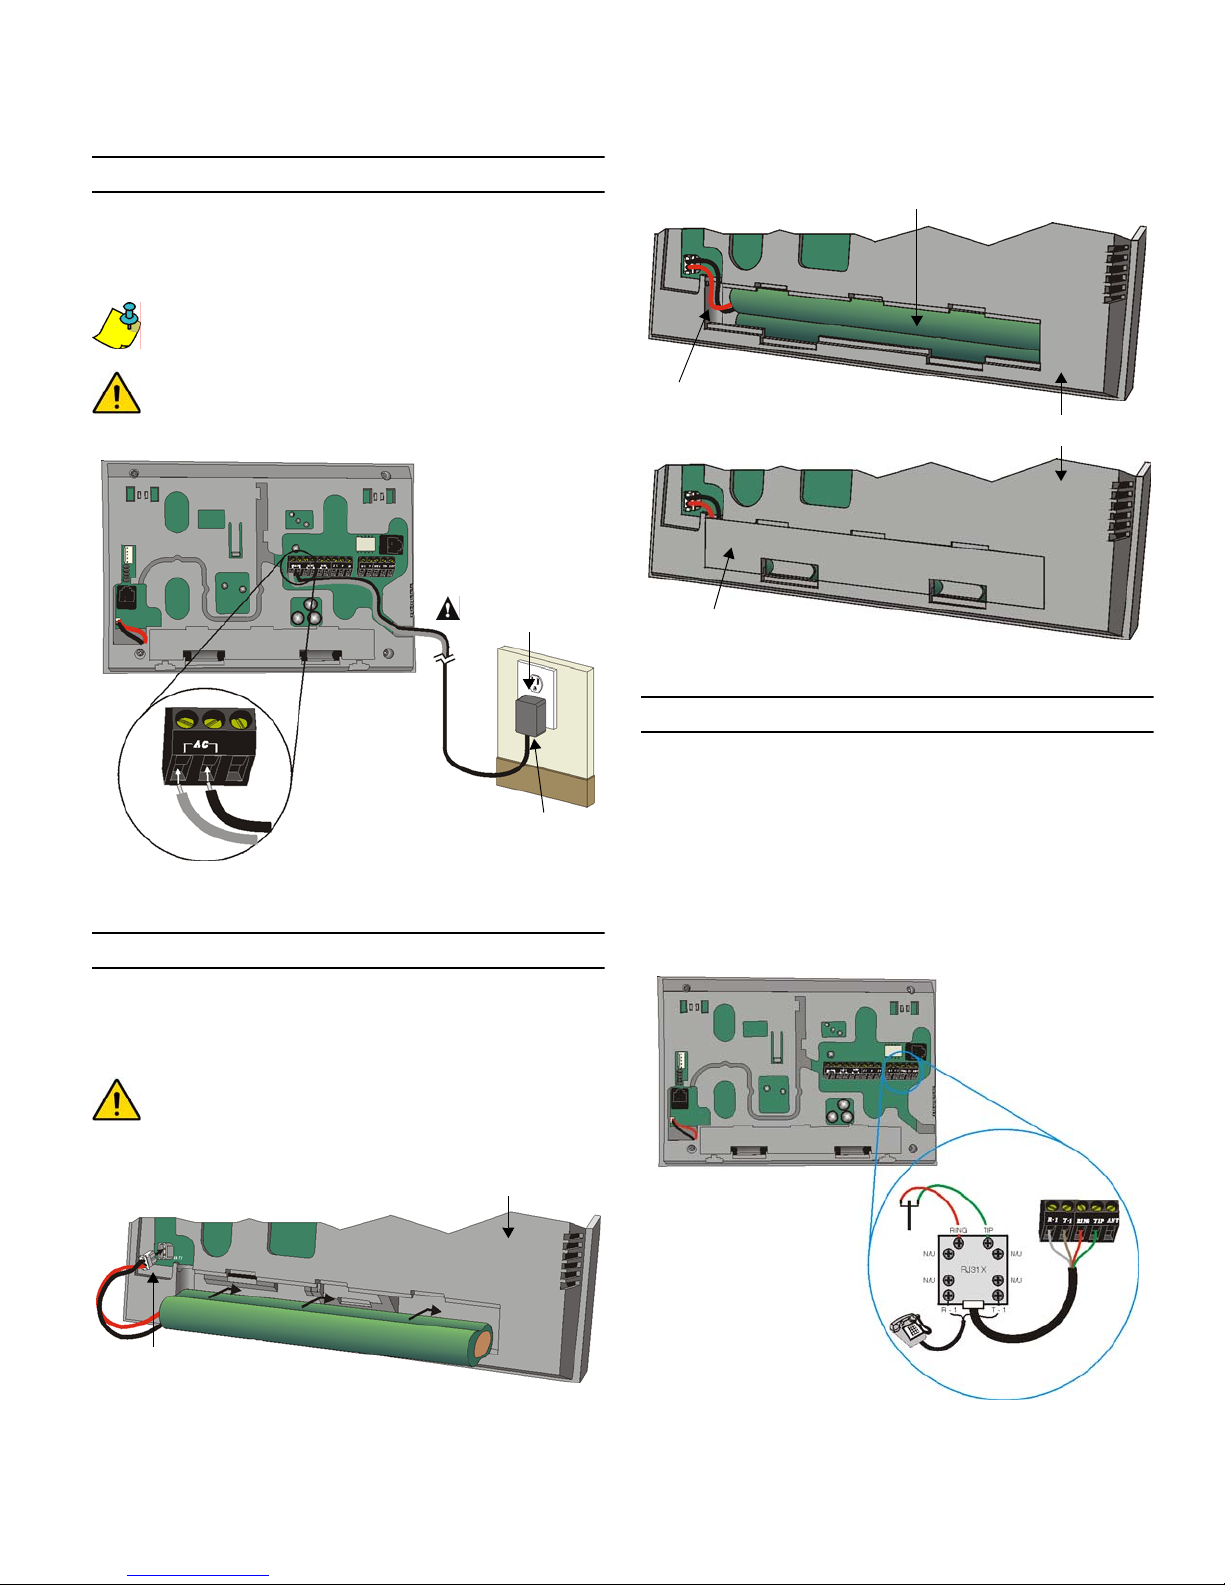
AC Power
Magellan requires a 9Vac (1A/9VA) or 16.5Vac (20VA)
transformer (not included) to supply power to the console.
Connect the transformer to the
AC
terminals as shown in Figure 1
on page 6.
Magellan can also be powered through a DC power supply.
Connect a 12Vdc to 18Vdc to the
AC
terminals to power the
console.
Do not use any switch-controlled outlets to power the
transformer.
Figure 1: Connecting the Transformer
Backup Battery Pack
Magellan uses a backup battery pack to provide power during a
power loss. A 7.2Vdc 1.8 to 2.0Ah NiMH (Nickel Metal Hydride)
rechargeable battery pack is included with the Magellan console.
Connect the battery pack as shown in Figure 2 on page 6.
Connect the backup battery pack after applying AC power.
Figure 2: Connecting the Backup Battery
Figure 2: Connecting the Backup Battery (cont’d)
Telephone Line Connections
The Magellan console can be connected to a telephone line by
connecting the telephone company’s wires directly to Magellan’s
dialer or by connecting a standard 4-pin RJ-11 cable between
the
LINE
plug of the console to a standard telephone wall jack.
Direct Connect
Connect the telephone line through an RJ31X jack as shown in
Figure 3 on page 6.
Figure 3: Telephone Line Direct Connect
9Vac (1A/9VA) to
16Vac (20VA)
transformer
Do not use any
switch- controlled
outlets.
Insert the transformer’s wires into the AC terminals.
Back view of the Magellan
console.
Partial view of the backside of the Magellan console
Insert the backup battery’s
plug into the connector
labeled
BATT
.
1.
Slide in the battery pack horizontally, tilt the battery pack
downward and then tuck it in Magellan’s battery compartment.
Tuck the cables in the specially
designed slot.
2.
3.
Snap in the battery
compartment cover when finished.
4.
Partial view of the backside
of the Magellan console
To connect the telephone line:
1. Connect an RJ31X to the
R
-
1,
T
-1,
RING
and
TIP
terminals as shown at right.
2. Connect the telephone
company wires and the
home telephone to the
RJ31X.
Back view of the Magellan
console.
Page 9
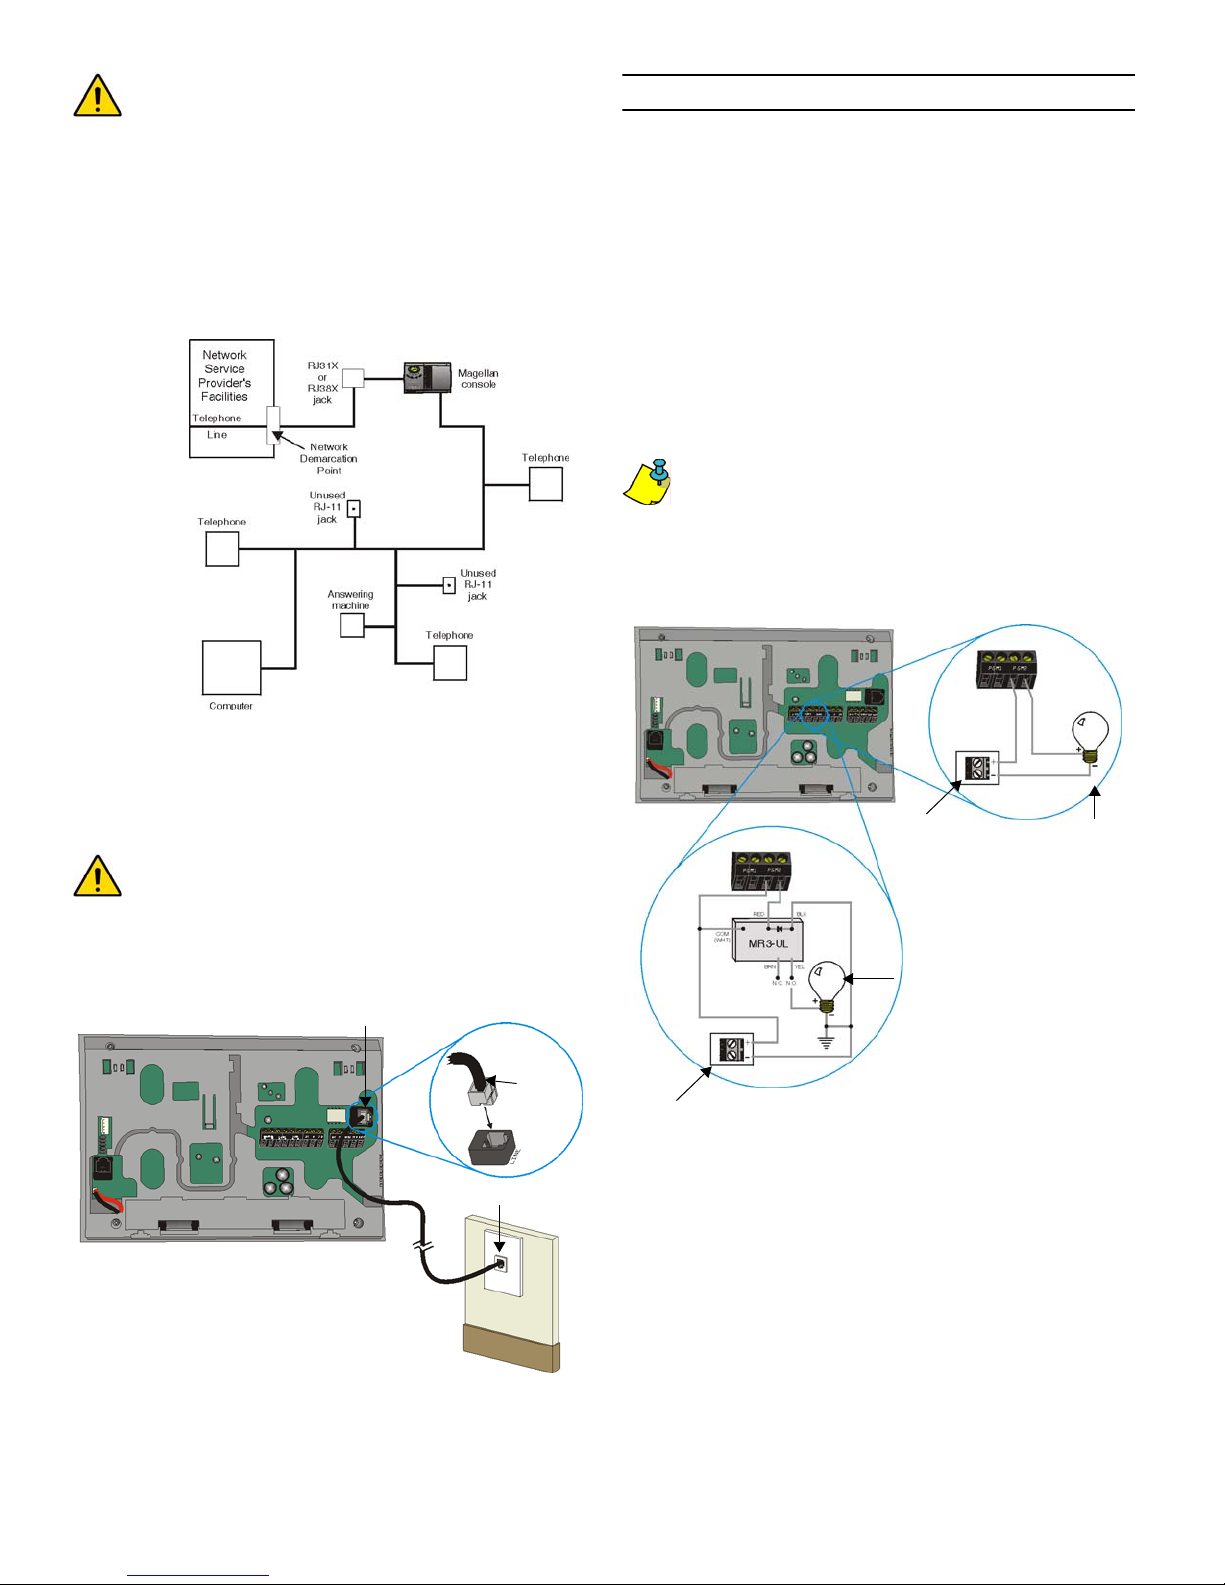
Paradox Magellan Systems 7
For UL compliant installations, the Magellan console must
be able to seize the telephone line and place a call in an
emergency situation. It must be able to do this even if other
equipment (telephones, answering machines, computer
modems, etc.) already has the line in use. To do so, the
Magellan console must be connected to a properly installed
RJ31X jack that is electronically in series with and ahead of
all other equipment attached to the same telephone line.
Proper installation is depicted in the diagram below. If you
have any questions concerning these instructions, you
should consult your telephone company about installing
the RJ31X jack and the Magellan console for you.
Line Plug Connect
The Magellan console can also be connected to a telephone line
via its on-board
LINE
plug. See Figure 4 on page 7 for more
information on connecting the telephone line using this method.
When connecting via the
LINE
plug, if the telephone line is
shared and it is busy (i.e. someone is talking on the
telephone) the console will be unable to communicate with
the Central Monitoring Station. It is recommended that the
Direct Connect method (page 6) be used to connect the
telephone line.
Figure 4: Line Plug Connection
Programmable Outputs (PGMs)
Magellan comes equipped with two 50mA solid-state PGM
outputs. When a specific event occurs in the system, a PGM can
be programmed to activate lights, garage door openers, etc. See
Programmable Outputs on page 30 for more information on
programming PGMs.
Connect Magellan’s PGM outputs as shown in Method 1 in
Figure 5 on page 7. Since Magellan does not come with a power
supply, an external power supply must be employed to power the
circuit. The PGM outputs can be either Normally Open (N.O.) or
Normally Closed (N.C.) as detailed in PGM Normal State on
page 30.
If the current draw on the PGMs is to exceed 50mA, we
recommend using an external relay as shown in Method 2 in
Figure 5 on page 7.
Using Method 2, connect the device to the output terminal of the
external relay that matches the normal state of Magellan’s PGM
output. For example, if PGM1’s normal state is Normally Open
(N.O.), connect the device to the
N.O
. terminal of the external
relay.
Figure 5: PGM Connections
4-pin
RJ-11
cable
Back view of the Magellan console.
1
2
1. Insert one end of the 4-pin RJ-11 cable into the
LINE
plug of the Magellan console.
2. Insert the other end of the RJ-11 cable into a
standard telephone wall plug.
External
Power Supply
Devices
such as a
light, etc.
Devices
such as a
light, etc.
External
Power Supply
Method 1
(less than 50mA)
Method 2
(exceeds 50mA)
Back view of the Magellan console.
External
relay
Page 10
8 Reference & Installation Manual
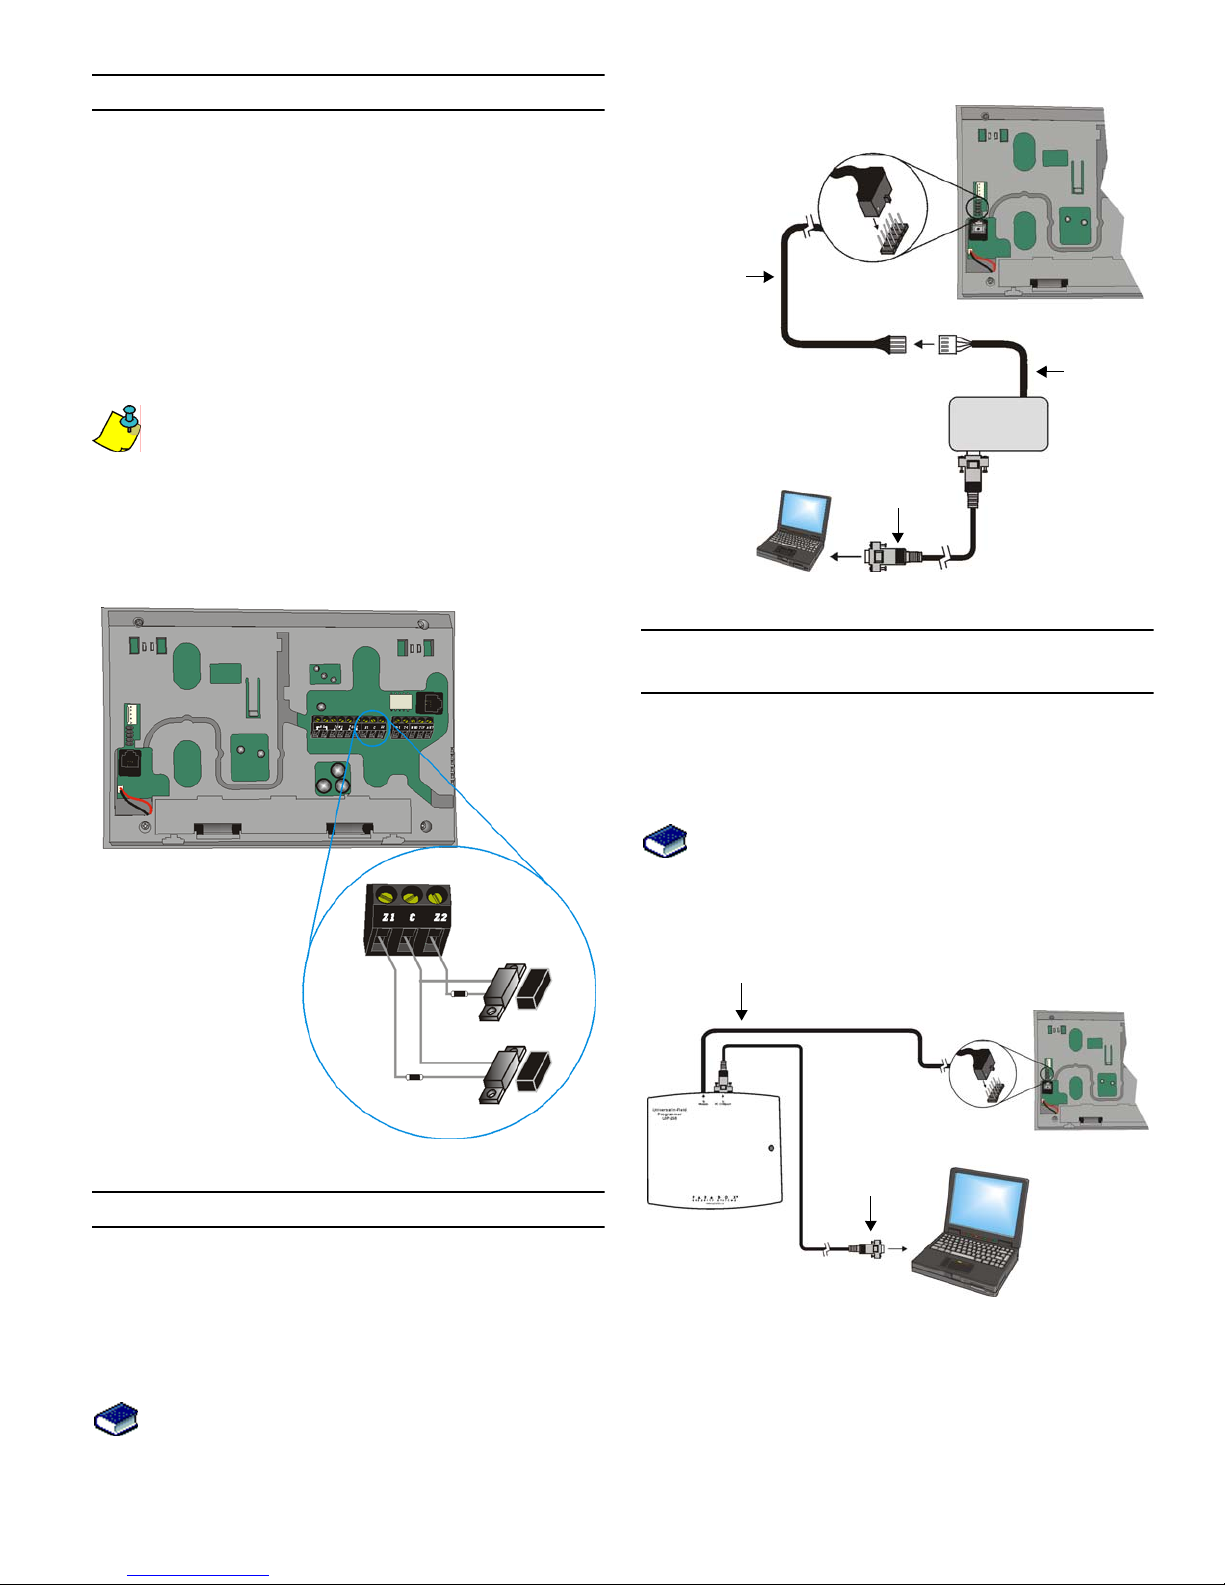
Hardwire Zone Connections
Magellan comes with two on-board hardwire zones. You can
connect hardwire detection devices such as door contacts to
Magellan’s zone terminals. Connect the detection devices as
shown in Figure 6 on page 8. Please note the following:
• Section [095] options [1] and [2] must be enabled in order to
use the two on-board hardwire zones. See Zones 15 and 16
become Hardwire Zones on page 16 for more information.
• After connecting the detection devices, the zones must be
defined. See Zone Programming on page 13 for more
information.
• The hardwire zones follow the console’s EOL and tamper
definitions.
Though any hardwire detection device can be connected to
Magellan’s on-board hardwire zone inputs, it is recommended
that only devices that do not require a power source (i.e.
standard door contacts) be connected. Since Magellan has no
power supply, an external power supply would have to be
connected in order to power hardwire detection devices that do
require a power source.
Figure 6: Hardwire Zone Connections
WinLoad Connection
The Magellan console can be programmed and monitored
through the WinLoad Installer Upload/Download Software for
Windows®. WinLoad allows for remote or on-site uploading and
downloading using most standard modems. It also allows for
advanced printing of reports and supports several languages
simultaneously. Connect Magellan to a computer containing the
WinLoad software as shown in Figure 7 on page 8.
Refer to the WinLoad’s Online Help for more information
on WinLoad.
Figure 7: Connecting to WInLoad
UIP-256 Universal In-Field Programmer
Connection
Magellan’s firmware can be upgraded locally using the UIP-256
Universal In-Field Programmer. The UIP-256 includes
proprietary PC software, cables to interconnect Magellan and a
PC, as well as two 9V batteries. Connect the UIP-256 as shown
in Figure 8 on page 8.
Refer to the Universal In-Field Programmer (UIP-256)
Instructions for more information.
Figure 8: Connecting the UIP-256
Hardwire zone 2
(zone 16)
Hardwire zone 1 (zone 15)
Back view of the Magellan console.
1K9
EOL
1K9
EOL
306 Adapter
Back view of the
Magellan console.
Standard
DB-9 cable
(9-pin serial cable)
Computer
containing
WinLoad
software
4- to 10-pin cable
(supplied with
the 306 Adapter)
4-pin
connector
cable
Connect the 10-pin
cable of the UIP-256 to
the 10-pin connector of
the Magellan console.
Standard
DB-9 cable
(9-pin serial cable)
Download latest
Magellan
firmware from
www.paradox.ca
Back view of the
Magellan console.
UIP-256
Universal In-Field
Programmer
Page 11
Paradox Magellan Systems 9
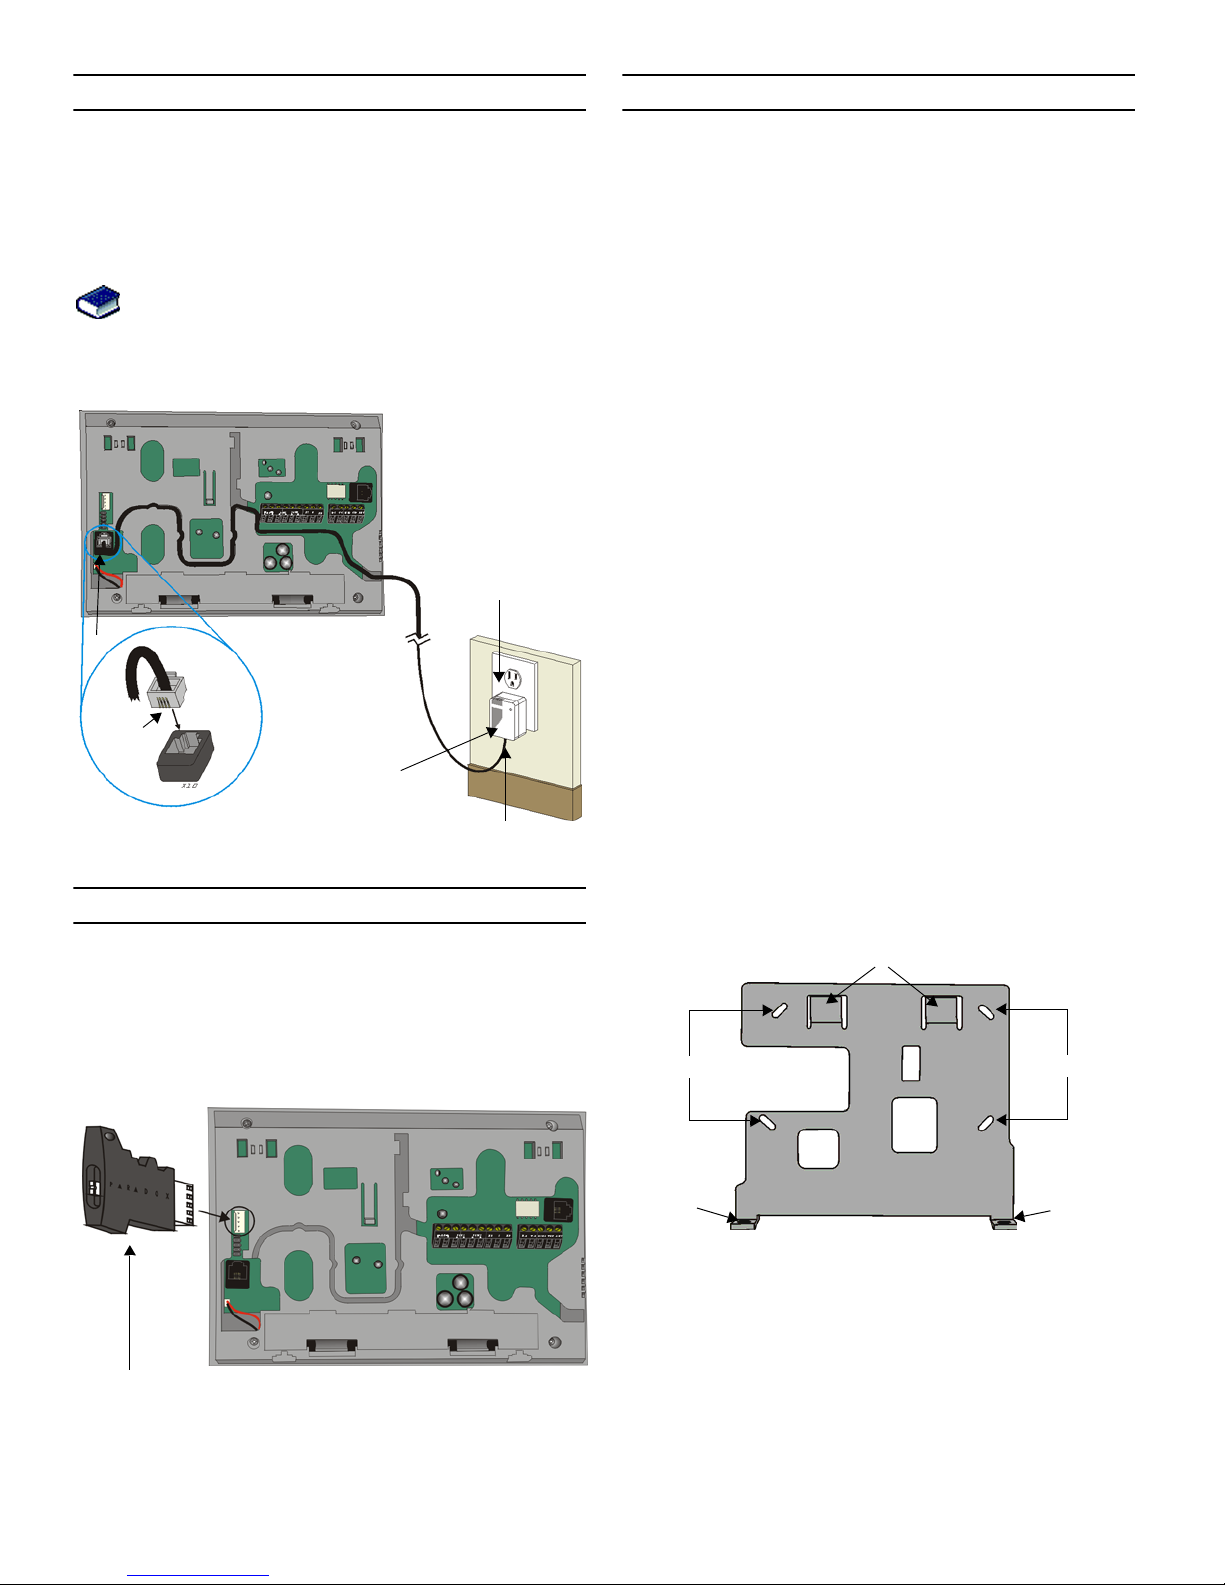
X10 Transmitter Connection
Magellan supports the X10 communication protocol. X10 is a
communication protocol for remote control of electrical devices
such as lamps and appliances. Communication is accomplished
through standard household electrical wiring using X10
transmitters and receivers. Configure Magellan, with the use of
an X10 transmitter, to automate a home. Connect the X10
transmitter as shown in Figure 9 on page 9.
Refer to the Magellan X10 Instructions on our website,
www.paradox.ca, for information on using and
configuring Magellan’s X10 feature.
Figure 9: Connecting the X10 Transmitter
Connecting a Paradox Memory Key (PMC-3)
When using a Paradox Memory Key with a Magellan console,
remove power (both AC and battery power), connect the memory
key to the 5-pin connector on the back of the Magellan console
as shown in Figure 10 on page 9. Once connected, re-apply
power to the console. For more information, see Programming
Using a Paradox Memory Key on page 11.
Figure 10: Connecting a Paradox Memory Key (PMC-3)
Location and Mounting
Location
The locations of Magellan and its wireless transmitters affect the
overall performance of the wireless system. To ensure the best
signal reception, the following list of location criteria should be
respected whenever possible:
• Select an installation site that is free of obstacles that reflect
and absorb radio frequency (RF) signals, as well as
interference that may distort signals. Avoid installation near
or in the path of strong RF fields (i.e. neon lights,
computers), and on or near metal objects, circuit breakers
boxes, air conditioners and heater ducts since they may
cause interference and reduce the console’s sensitivity.
• Select a site that is not susceptible to drastic temperature
changes.
• Mount the Magellan console as central as possible to the
proposed placement of the wireless transmitters.
• Mount the Magellan console as high as possible.
• Avoid installing Magellan in the basement as the range of
the console is reduced when installed below ground level.
However, if it is absolutely necessary to install the console in
the basement, install the console as high as possible.
• Install the Magellan console on a wall allowing at least 5cm
(2”) around the console to permit adequate ventilation and
heat dissipation.
The Wall Plate
Magellan uses a plastic wall plate to stay mounted on a wall. The
wall plate is also used for tabletop mounting to cover the back of
the console as well as keep any wires within their respective wire
slots. After choosing an appropriate location (see Location on
page 9), mount the wall plate onto the Magellan console with two
screws as described in Mounting Magellan on the Wall on page
10 or Tabletop Mounting on page 10.
Figure 11: Wall Plate
4-pin
RJ11
cable
X10 transmitter
1. Connect one end of the 4pin RJ11 cable into the
X
10 plug of the console.
2. Connect the other end of
the 4-pin RJ11 cable into
the X10 transmitter.
3. Plug the X10 transmitter
into a standard wall outlet.
1
2
3
Back view of the Magellan console.
Jumper ON:
Read from and/or write to memory key
Jumper OFF:
Write protected (read from memory key only)
AA
B
CC
Page 12

10 Reference & Installation Manual
Figure 12: Mounting Magellan onto the Wall Plate
Figure 13: Magellan’s Back Plate
Mounting Magellan on the Wall
Magellan can be mounted on a wall by first securing the wall
plate (see The Wall Plate on page 9) to the wall and then
mounting the Magellan console on the secured wall plate as
shown in Figure 12 on page 10 and Figure 13 on page 10. To do
so:
1. Place the wall plate on the desired spot of the wall.
2. Drill and insert screws into holes labeled A as shown in
Figure 11 on page 9.
3. Place the console back plate flush against the mounted wall
plate.
4. Slide the Magellan’s open slots labeled D (see Figure 13 on
page 10) onto the wall plate’s tabs labeled B (see Figure 12
on page 10).
5. Gently apply downward pressure to insert the wall plate’s
tabs into Magellan’s open slots.
6. Insert two screws through the wall plate’s screw holes
labeled C and into holes labeled E (see Figure 12 on page 10
and Figure 13 on page 10) in the Magellan back plate. This
will secure the console to the wall.
Tabletop Mounting
Magellan can also be mounted on a tabletop. This is a useful
convenience that allows Magellan to be situated on a nightstand,
desk, kitchen counter, etc. Included with Magellan are two plastic
feet as well as two rubber stops. The plastic feet raise the
Magellan console to a slight angle for easy viewing while the
rubber stops prevent the console from sliding when Magellan is
being used. To do so:
1. Place the console back plate flush against the wall plate.
2. Slide the Magellan’s open slots labeled D (see Figure 13 on
page 10) onto the wall plate’s tabs labeled B (see Figure 12
on page 10).
3. Gently apply downward pressure to insert the wall plate’s
tabs into Magellan’s open slots.
4. Insert two screws through the wall plate’s screw holes
labeled C and into holes labeled E (see Figure 13 on page
10) in the Magellan back plate.
5. Attach the plastic feet and rubber stops as shown in Figure
14 on page 10.
Figure 14: Mounting Magellan on a Tabletop
Tabletop mounting may not be an approved installation
method by local regulations. It is recommended that the
local regulations be verified prior to installing the Magellan
console using this method.
Connecting the Radio Antenna
If the radio’s reception is not very good, connect the supplied
radio antenna to the
ANT
terminal on the back of the Magellan
console as shown in Figure 15 on page 10. Move the antenna
around until the spot with the best reception is found.
Figure 15: Connecting the Radio Antenna
B
C
D
D
E
Tabletop
Plastic feet
(x2)
Rubber stops
(x2)
Wall
plate
Radio
Antenna
Back view of the Magellan console.
Page 13
Paradox Magellan Systems 11
Programming Methods
WinLoad Installer Upload/Download
Software
Program the Magellan console remotely or on-site using the
WinLoad Installer Upload/Download Software for Windows®. For
more information, contact your local Paradox Distributor or visit
our Web site at www.paradox.ca. If you are using the WinLoad
software, you must program the features explained on page 33.
Please refer to WinLoad’s Online Help for more
information on using WinLoad.
Programming Using the Built-in Keypad
Use the built-in keypad to access Magellan’s programming
mode.
Use the supplied Magellan Programming Guide to keep
track of which sections were programmed and how.
To access programming mode:
1. Press and hold the [0] key.
2. Enter your [
INSTALLER CODE
] or [
MAINTENANCE CODE
].
3. Enter the 3-digit [
SECTION
] you wish to program.
4. Enter the required [
DATA
].
There are two methods that can be used to enter data when in
programming mode; Single Digit Data Entry and Feature Select
Programming methods.
Single Digit Data Entry Method
After entering programming mode, some sections will require
that you enter decimal values from 000 to 255. Other sections
will require that you enter hexadecimal values from 0 to F. The
required data will be clearly indicated in this manual as well as in
the Magellan Programming Guide. When entering the final digit
in a section, Magellan will automatically save and advance to the
next section. Table 1 (see below) shows the keys and their
equivalent decimal and/or hexadecimal value.
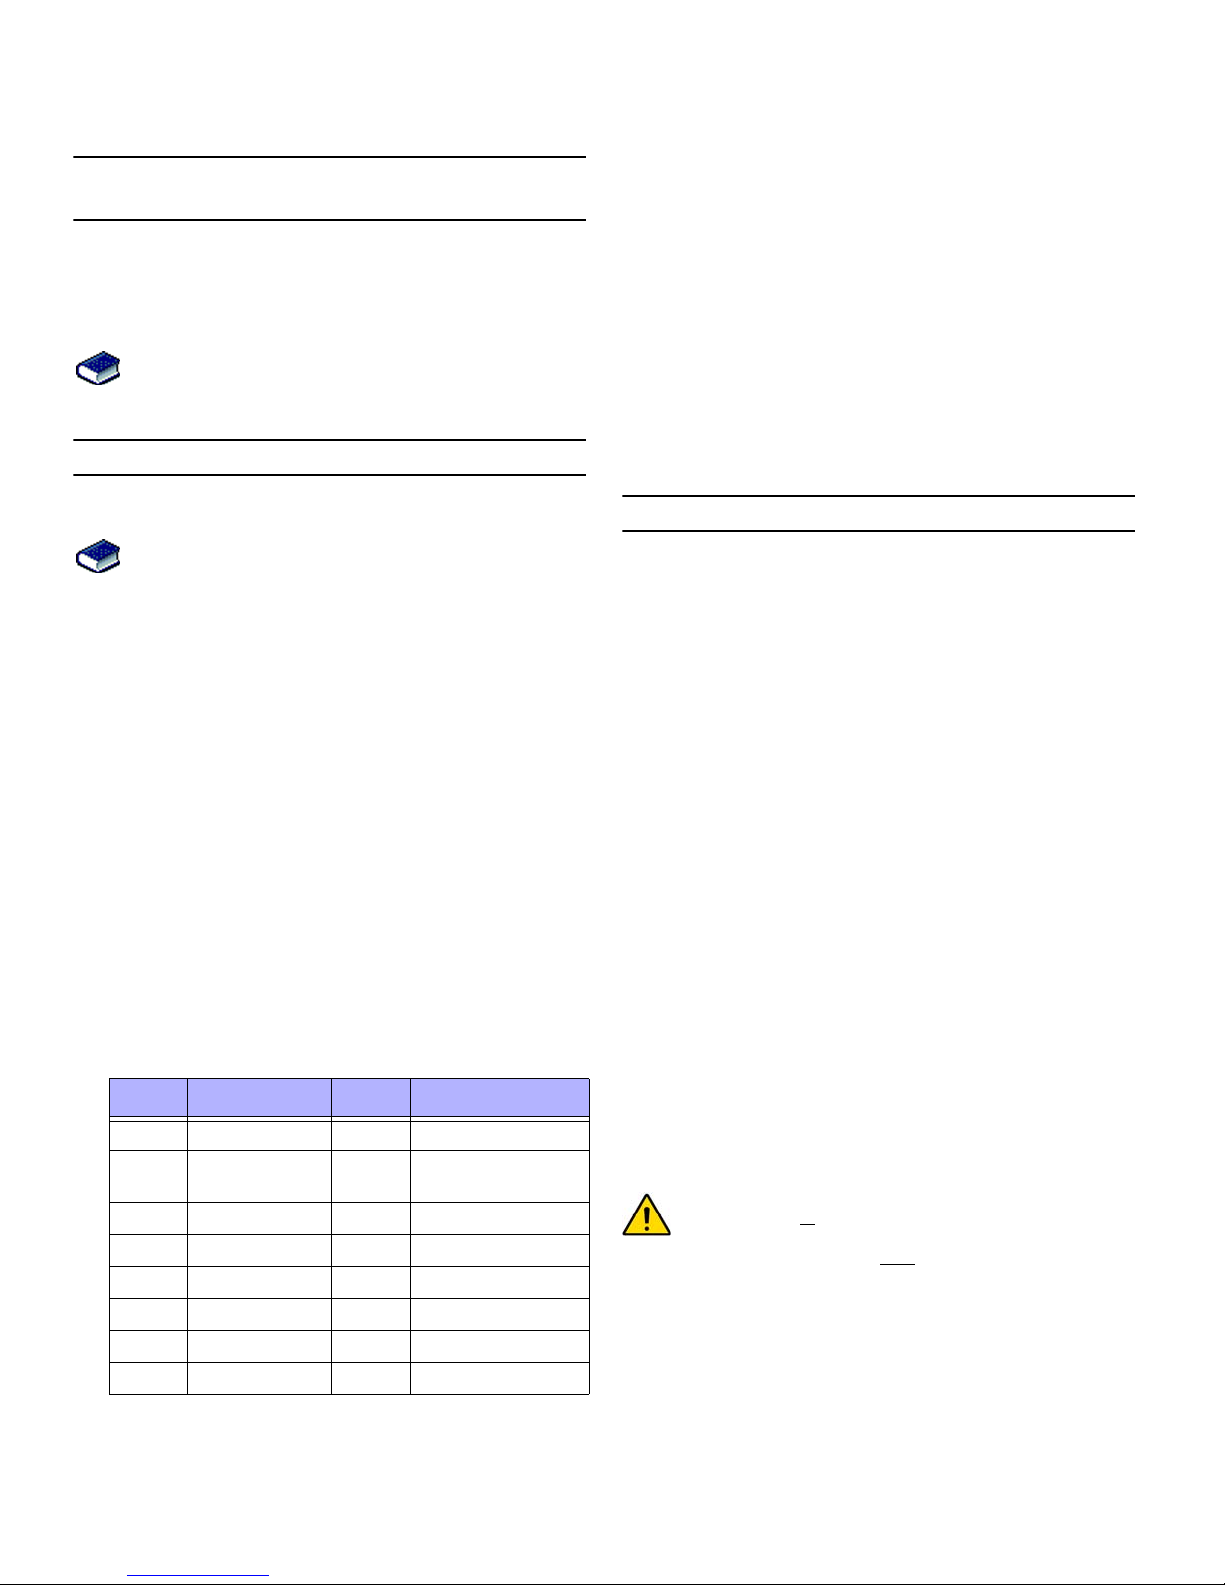
Table 1: Decimal and Hexadecimal Values
* CK = Center keypad
Feature Select Programming Method
After entering certain sections, eight options will be displayed
where each option from [1] to [8] represents a specific feature or
option. To manipulate the options:
• Press the key corresponding to the desired option and the
option number will appear in the LCD display. This means
the option is ON. Press the key again to remove the digit
from the LCD display, thereby, turning OFF the option.
•Press the [*] key to set all eight options to OFF. Press the
keys until the current section’s options are set. When the
options are set, press the [#] key to save and advance to the
next section.
•Press the [*] key twice to exit without changing any data.
Programming Using a Paradox Memory Key
The Paradox Memory Keys (PMC-3) are very useful when
multiple Magellan consoles are to be programmed identically.
Rather then programming each console by entering its
programming mode and then scrolling through programming
sections, use a memory key to program each console. The
programming of a console with a memory key takes
approximately three seconds.
There are two actions that can be performed with a memory key.
Download Data to Destination Console
To download the data of a memory key into a console:
1. Remove power from the Magellan console (AC and battery)
and connect the memory key to the 5-pin connector on the
left side of the back of the console (see Figure 10 on page 9).
2. Re-apply both AC and battery power to the console.
3. Press the [
OK
] key and Magellan will begin downloading the
data from the memory key.
Copy Data to Memory Key from Source Console
To copy the contents of a console into the memory key.
1. Remove power from the Magellan console (AC and battery)
and connect the memory key to the 5-pin connector on the
left side of the back of the console (see Figure 10 on page 9).
2. Re-apply both AC and battery power to the console.
3. Press the [
NEXT
] key and then the [OK] key. Magellan will
begin copying its data into the memory key.
The installer code of the Magellan console used to
download data to
the memory key must be the same
installer code programmed in the Magellan console that is
to download the contents from
the same memory key. If the
installer codes do not match, the contents of the memory
key cannot be downloaded into the receiving console.
Example: The contents of the Magellan console A will be
copied into memory key B. The installer code for console A
is 111111. In order to download the contents of memory key
B into the Magellan console C, the installer code
programmed in console C must also be 111111.
Key Value Key Value
[1] 1 [9] 9
[2] 2 [0] 0 (decimal)
Space (Hexa decimal)
[3] 3 [1] CK* A (Hexadecimal only)
[4] 4 [2] CK* B (Hexadecimal only)
[5] 5 [3] CK* C (Hexadecimal only)
[6] 6 [4] CK* D (Hexadecimal only)
[7] 7 [5] CK* E (Hexadecimal only)
[8] 8 [6] CK* F (Hexadecimal only)
Page 14
12 Reference & Installation Manual
User Codes
A person must be assigned to a user code in order to have
access to Magellan. A user code defines the extent of a user’s
access to the system and consists of a code # (PIN) and user
options. Magellan supports one Installer code, one Maintenance
code and up to 16 user codes (one System Master code and 15
User codes).
User Code Length
Section [090]: Option [1]
Option [1] OFF = 6-digit user codes
Option [1] ON = 4-digit user codes (default)
All user codes can be set to lengths of either 4 or 6 digits. When
the 4-digit option is selected, entering a 4-digit code will allow
access. Using the 6-digit option, entering 6 digits is required to
allow access.
If the User Code Length is changed from 4 digits to 6 digits
when user codes have already been programmed, the
console will automatically add the last 2 digits by using the
first 2 digits. For example, if the access code is 1234 and
you switch to 6 digits, the code will become 123412. Be
sure to verify the access codes after switching from 4-digit
to 6-digit access codes. When switching from 6 digits to 4
digits, the console will simply remove the final 2 digits of
the access code. For example, 123456 will become 1234.
Installer Code
Section [181]; Default = 000000
The Installer code is used to enter the console's programming
mode (see Programming Using the Built-in Keypad on page 11),
which allows you to program all the features, options and
commands of the Magellan console. The Installer code can be 4or 6-digits in length (see User Code Length on page 12) where
each digit can be any value from 0 to 9. The Installer code
cannot be used to program any user code.
To change the Installer code:
1. Access the installer programming mode (page 11).
2. Enter section [181].
3. Enter a new [4-
OR
6-
DIGIT INSTALLER CODE
].
OR
1. Press [
MENU
] + [4] + [
INSTALLER CODE
] + [8] + [
NEW CODE
].
Maintenance Code
Section [182]; Default = 111111
The Maintenance code is similar to the Installer code. It can be
used to enter the console’s programming mode (see
Programming Using the Built-in Keypad on page 11), which
allows you to program all features, options and commands
except
for the console’s communication settings (sections [100]
to [154]) as well as any user code. The Maintenance code can
be 4 or 6 digits in length (see User Code Length on page 12)
where each digit can be any value from 0 to 9.
To change the Maintenance code:
1. Access the installer programming mode (page 11).
2. Enter section [182].
3. Enter a new [4-
OR
6-
DIGIT MAINTENANCE CODE
].
OR
1. Press [
MENU
] + [4] + [
INSTALLER CODE
] + [8] + [
NEW CODE
].
System Master Code
With the System Master code a user can use any arming method
and can program any user’s (from 1 to 16) Access Code. The
System Master code can be 4 or 6 digits in length (see User
Code Length on page 12), where each digit can be any digit from
0 to 9. The System Master code cannot be changed by the
installer or maintenance code, but it can be reset to default.
Lock System Master Code
Section [090]: Option [3]
Option [3] OFF =System Master code unlocked (default)
Option [3] ON =System Master code locked
With section [090] option [3] enabled, the System Master code
can only be changed or deleted through WinLoad or a power
down reset.
Reset System Master Code
Section [200]
Enter section [200] to reset the System Master code to default
(1234/123456).
Make sure that the Lock System Master Code feature (section
[090] option [3]) is disabled.
Duress Code
Section [090]: Option [4]
Option [4] OFF = Duress code disabled (default)
Option [4] ON = User code 016 becomes a duress code
With this feature enabled, user code 016 becomes a Duress
code. When forced to arm or disarm their system, users can
enter a Duress code (user code 016) to arm or disarm the system
which can immediately transmit a silent alert to the Central
Station, transmitting the duress report code programmed in
section [140] (page 25).
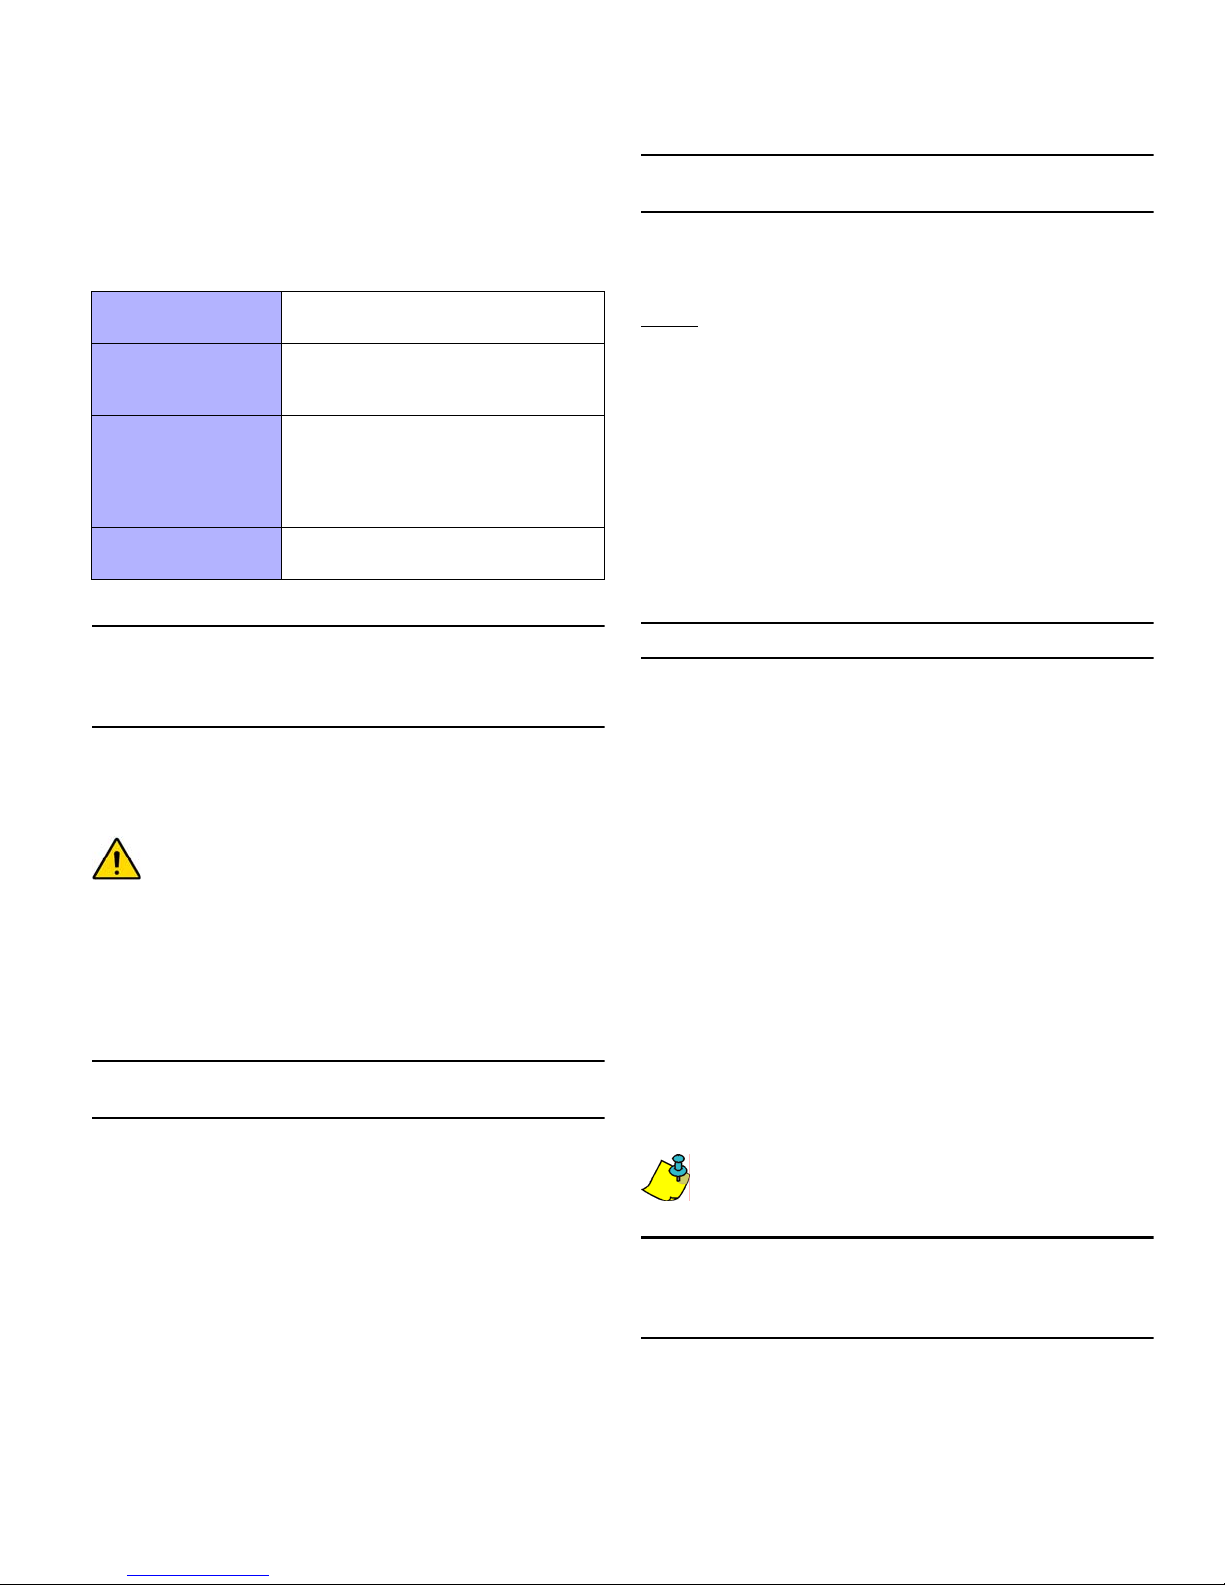
Installer Code Used to program all console settings
except User codes and Remote Controls
Maintenance Code Identical to the Installer code except that
the code cannot program dialer options or
perform a software reset.
System Master Code
User Code 001
Provides access to the following Magellan
user features: language, voice and utility
reporting, delays and tones, zone labels,
system tests. Arm and disarm using any
method as well as program User Codes.
15 User Codes
User Codes 002 to 016
Can arm and disarm the system.
Page 15
Paradox Magellan Systems 13
Zone Programming
Magellan supports up to 16 wireless zones where each zone can
be configured with a different zone definition and option. Each
zone can also have a voice label recorded for it. Magellan’s
zones can be programmed using section programming or
through the Installer menu.
See Quick Setup on page 4 for more information on zone
programming using the Installer menu.
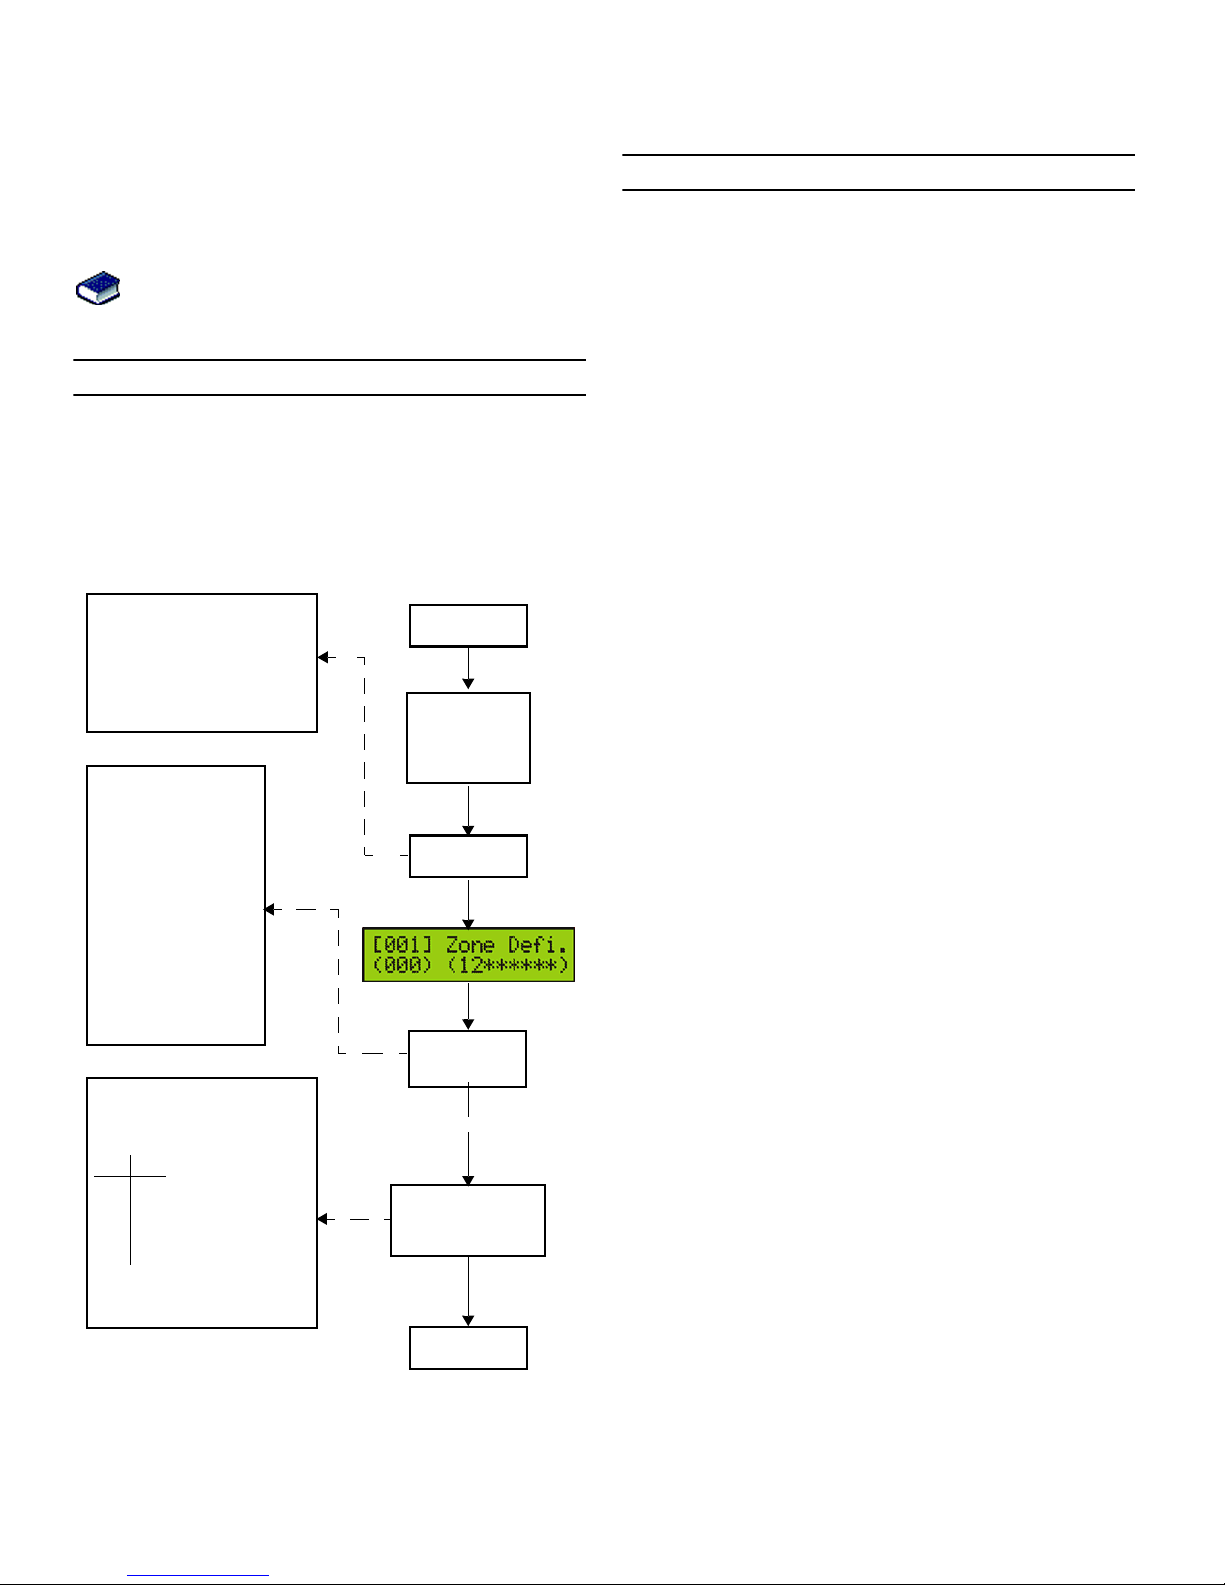
Zone Programming Overview
After assigning and setting up your wireless transmitters, define
the associated zone's parameters. The zone parameters define
the type of zone and how the control panel will react when an
alarm condition occurs on that zone. These zone parameters are
programmed into one section as detailed in Figure 16 on page
13.
Figure 16: Magellan Zone Programming Overview
Zone Definitions
Sections [001] to [016] represent zones 1 through 16
respectively, where the first three digits in each of these sections
represents the zone's definition. To disable a zone, enter 000
and then press the [#] key. There are 15 available Zone
Definitions, which are described as follows:
Entry Delay 1
Sections [001] to [016]: Zones 1 to 16, 3-digit # = 001
When the system is armed and a zone defined with Entry Delay
1 opens, the console will generate an alarm after the
programmed Entry Delay 1 Timer elapses. This is to provide
users with enough time to enter the protected area and disarm
the system. Entry Delay zones are commonly used at the entry/
exit points of the protected area (i.e. front/back door, garage,
etc.). Using different Entry Delays (see Entry Delay 2 below) is
useful when, for example, one entry point requires a longer delay
than the other entry point.
Entry Delay 1 Timer
Section [060]: 001 to 255 seconds; 000 = Disabled; Default
= 45 seconds
Enter the desired 3-digit delay value from 000 to 255
seconds into section [060] to program the Entry Delay 1
Timer.
Entry Delay 2
Sections [001] to [016]: Zones 1 to 16, 3-digit # = 002
Entry Delay 2 zones are identical to the Entry Delay 1 zones (see
Entry Delay 1 on page 13), except it uses a separate Entry Delay
Timer.
Entry Delay 2 Timer
Section [061]: 001 to 255 seconds; 000 = Disabled; Default
= 45 seconds
Enter the desired 3-digit delay value from 000 to 255
seconds into section [061] to program the Entry Delay 2
Timer.
Follow Zones
Sections [001] to [016]: Zones 1 to 16, 3-digit # = 003
When an armed Follow zone opens, the console will immediately
generate an alarm unless an Entry Delay zone opens first as
described in the situations below:
• If an armed Follow zone opens after an Entry Delay zone
opens, the console waits until the Entry Delay Timer has
elapsed before generating an alarm.
• If an armed Follow zone opens after more than one Entry
Delay zone opens, the console will wait until the Entry Delay
Timer of the zone that opened first has elapsed.
This feature is commonly used when a motion detector is
protecting the area occupied by the entry point keypad. This will
prevent the motion detector from causing an alarm when a user
enters through the entry point to disarm the system.
Press and hold
the [0] key
Enter your
[
INSTALLER CODE
]
or
[
MAINTENANCE
CODE
]
Enter 3-digit
[
SECTION
]
[001] = Zone 1
[002] = Zone 2
[003] = Zone 3
[004] = Zone 4
[005] = Zone 5
[006] = Zone 6
[007] = Zone 7
[008] = Zone 8
[009] = Zone 9
[010] = Zone 10
[011] = Zone 11
[012] = Zone 12
[013] = Zone 13
[014] = Zone 14
[015] = Zone 15
[016] = Zone 16
Zone Definition
000 = Zone disabled
001 = Entry Delay 1
002 = Entry Delay 2
003 = Follow
004 = Follow / Stay
005 = Instant
006 = Instant / Stay
007 = Instant Fire
008 = Delayed Fire Zone
009 = 24hr Burglary
010 = 24hr Hold-up
011 = 24hr Buzzer
012 = 24hr Gas
013 = 24hr Heat
014 = 24hr Water
015 = 24hr Freeze
Zone Options*
[1] = Auto-zone Shutdown (default)
[2] = Zone Bypass (default)
[3] = Future use
[6] = Intellizone
[7] = Delay alarm transmission
[8] = Force Zone
[4] [5] Zone Alarm Type
OFF OFF Audible alarm (steady)
OFF ON Audible alarm (pulsed)
ON OFF Silent alarm
ON ON Generate report only
Enter 3-digit
[
ZONE
DEFINITION
]
Use feature select
method (p. 11) to
select the [
ZONE
OPTIONS
]
Press the [#] key
to save
Keypad beeps twice
* Available through Section Programming only.
Page 16

14 Reference & Installation Manual
Follow/Stay Zones
Sections [001] to [016]: Zones 1 to 16, 3-digit # = 004
Follow/Stay zones function as follows:
• All zones defined as Follow/Stay zones become Follow
zones (refer to Follow Zones on page 13) when the
Magellan system is Regular armed.
• All zones defined as Follow/Stay zones become Stay zones
when the Magellan system is Stay or Instant armed.
Instant Zones
Sections [001] to [016]: Zones 1 to 16, 3-digit # = 005
When an armed Instant zone opens, the console immediately
generates an alarm. Instant zones are commonly used for
windows, patio doors, skylights and other perimeter type zones.
Instant/Stay Zones
Sections [001] to [016]: Zones 1 to 16, 3-digit # = 006
Instant/Stay zones function as follows:
• All zones defined as Instant/Stay zones become Instant
zones (refer to Instant Zones on page 14) when the
Magellan system is Regular armed.
• All zones defined as Instant/Stay zones become Stay zones
when the Magellan system is Stay or Instant armed.
Standard 24Hr. Fire Zones
Sections [001] to [016]: Zones 1 to 16, 3-digit # = 007
Whenever a Standard 24Hr. Fire Zone opens, whether it is
armed or disarmed, the console will generate the following:
• The console can send the corresponding Alarm Report
Code from sections [187] to [190].
• Alarms are always audible regardless of other settings. Fire
alarms generate an intermittent (pulsed) bell/siren output
signal as shown in Figure 17 on page 14.
Figure 17: Bell/Siren Output during a Fire Alarm
Delayed Fire Zones
Sections [001] to [016]: Zones 1 to 16, 3-digit # = 008
When a Delayed 24Hr. Fire Zone opens, whether it is armed or
disarmed, the console will react as shown in Figure 18 on page
14. Delayed 24Hr. Fire Zones are commonly used in residential
homes where a smoke detector often generates false alarms (i.e.
burning bread, etc.).
Figure 18: Delayed Fire Zone
24Hr. Burglary Zones
Sections [001] to [016]: Zones 1 to 16, 3-digit # = 009
Whenever a 24Hr. Burglary Zone opens, whether the system is
armed or disarmed, the console will immediately generate an
alarm.
24Hr. Hold-up Zones
Sections [001] to [016]: Zones 1 to 16, 3-digit # = 010
When a 24Hr. Hold-up zone opens, whether it is armed or
disarmed, the console will immediately generate an alarm. The
SIA FSK reporting format includes specific report codes to
identify the alarm as a Hold-up alarm.
24Hr. Buzzer Zones
Sections [001] to [016]: Zones 1 to 16, 3-digit # = 011
This zone definition is particularly useful when a user wishes to
be notified when something such as a safe or locker within the
home has been accessed (i.e. a child accessing a valuable
collection). This zone definition functions as follows:
• Whenever a 24Hr. Buzzer Zone opens, whether the console
is armed or disarmed, the console sets off the keypads’
buzzers to indicate that the zone was breached.
• The console will report the alarm, but will not enable the bell/
siren output.
• Enter any valid access code on the keypad to stop the
buzzer.
Page 17

Paradox Magellan Systems 15
24Hr. Gas Zones
Sections [001] to [016]: Zones 1 to 16, 3-digit # = 012
When a 24Hr. Gas zone opens, whether it is armed or disarmed,
the console will immediately generate an alarm. The SIA FSK
reporting format includes specific report codes to identify the
alarm as a Gas alarm.
24Hr. Heat Zones
Sections [001] to [016]: Zones 1 to 16, 3-digit # = 013
When a 24Hr. Heat zone opens, whether it is armed or disarmed,
the console will immediately generate an alarm. The SIA FSK
reporting format includes specific report codes to identify the
alarm as a Heat alarm.
24Hr. Water Zones
Sections [001] to [016]: Zones 1 to 16, 3-digit # = 014
When a 24Hr. Water zone opens, whether it is armed or
disarmed, the console will immediately generate an alarm. The
SIA FSK reporting format includes specific report codes to
identify the alarm as a Water alarm.
24Hr. Freeze Zones
Sections [001] to [016]: Zones 1 to 16, 3-digit # = 015
When a 24Hr. Freeze zone opens, whether it is armed or
disarmed, the console will immediately generate an alarm. The
SIA FSK reporting format includes specific report codes to
identify the alarm as a Freeze alarm.
Zone Options
Sections [001] to [016] represent zones 1 through 16
respectively as demonstrated in Figure 16 on page 13. After
entering the 3-digit Zone Definition (see Zone Definitions on
page 13), select one or more of the following Zone Options by
using the Feature Select Programming Method (see page 11):
Auto-zone Shutdown
Sections [001] to [016]: Zones 1 to 16; Option [1]
Option [1] OFF =Auto-zone Shutdown disabled
Option [1] ON =Auto-zone Shutdown enabled (default)
If, in a single armed period, the number of alarms generated by a
zone with the Auto Zone Shutdown option enabled exceeds the
number defined by the Auto Zone Shutdown Counter, the
console will no longer generate an alarm for that zone. The Auto
Zone Shutdown Counter resets every time the system is armed.
Auto-zone Shutdown Counter
Section [067]: 001 to 015 alarms; 000 = Disabled; Default =
5 alarms
Enter the desired limit into section [067] to program the
Auto-zone Shutdown Counter.
Bypass Option
Section [001] to [016]: Zones 1 to 16; Option [2]
Option [2] OFF =Bypass option disabled
Option [2] ON =Selected zone is bypass enabled (default)
When a user uses the Bypass Programming feature, only zones
with the Bypass option enabled can be programmed as
bypassed.
Fire zones cannot be programmed with the Bypass option
because the console will not bypass a Fire zone.
Alarm Types
Sections [001] to [016]: Zones 1 to 16; Options [4] and [5]
When an alarm condition occurs, the console can be
programmed to react as shown in Table 2 on page 15.
Table 2: Alarm Type Options
The Alarm Type options cannot be programmed for Fire
zones. Fire zones are automatically programmed with an
audible pulsed alarm. This cannot be altered.
Intellizone
Sections [001] to [016]: Zones 1 to 16; option [6]
Option [6] OFF =Intellizone disabled (default)
Option [6] ON =Intellizone enabled
This feature reduces the possibility of false alarms. When a zone
with the Intellizone option opens, the console does not
immediately generate an alarm. First it triggers the Intellizone
Delay Timer. If any of the following conditions occur during this
period, the panel will generate an alarm:
• During the Intellizone Delay, a second zone has caused an
alarm.
• During the Intellizone Delay, the zone in alarm has restored
(closed) and re-occurred (opened).
• The zone in alarm is still open after the Intellizone Delay has
elapsed.
Options Description
[4] [5]
OFF OFF Audible steady alarm (default)
When the conditions for an alarm have been
met, the control panel can transmit the
appropriate Zone Alarm report code (see
page 24) and provides a steady output for the
on-board siren.
OFF ON Audible pulsed alarm
When the conditions for an alarm have been
met, Magellan can transmit the appropriate Zone
Alarm report code (see page 24) and provides a
pulsed output (see Figure 17 on page 14) for the
on-board siren.
ON OFF Silent alarm
When the conditions for an alarm are met, the
control panel can transmit the appropriate Zone
Alarm report code (see page 24) and will not
activate the control panel’s bell output. The
appropriate
ARM
or
STATUS
LED on the keypads
will flash to indicate an alarm and the user will
still have to disarm the system.
ON ON Report only
When the conditions for an alarm have been
met, the control panel can transmit the
appropriate Zone Alarm report code (see
page 24). The system will not have to be
disarmed.
Page 18

16 Reference & Installation Manual
Intellizone Delay Timer
Section [065]: 010 to 255 seconds; Default = 48 seconds
Enter the desired 3-digit value into section [065] to program
the Intellizone Delay Timer.
Delay Before Alarm Report Code Transmission
Sections [001] to [016]: Zones 1 to 16; option [7]
Option [7] OFF =Delay alarm transmission disabled (default)
Option [7] ON =Delay alarm transmission enabled
This feature is commonly used with Entry Delay zones to reduce
false alarms created by new users who may not disarm the
system in time. This feature works as follows:
• When an alarm condition occurs on a zone with this option
enabled, the console enables the bell/siren output, but does
not report the alarm to the central station until the end of the
Alarm Before Transmission Delay.
• During this period, disarming the system disables the bell/
siren output and cancels the report code transmission.
Alarm Transmission Delay
Section [075]: 001 to 255 seconds; 000 = Disabled; Default = 0
seconds
Enter the desired 3-digit delay value into section [075] to
program the Alarm Transmission Delay.
Remote Panic Disarm Lock Delay
Section [078]: 001 to 255 seconds; 000 = Disabled; Default = 20
seconds
When a panic alarm is generated through the use of a remote
control, the system cannot be disarmed by remote control during
the Remote Panic Disarm Lock Delay.
Enter the desired 3-digit delay value into section [078] to
program the Remote Panic Disarm Lock Delay.
Force Zones
Sections [001] to [016]: Zones 1 to 16; Option [8]
Option [8] OFF =Force zone disabled
Option [8] ON =Selected zone is Force enabled (default)
Any open Force zones at the time of arming will be considered
deactivated by the console. If during this period a deactivated
zone is closed, the console will revert that zone to active status.
Consequently, the console will generate an alarm if the zone is
breached.
Fire zones cannot be programmed with the Force Zone
option because the console will not bypass a Fire zone when
the system is being Force armed.
Stay Delay Zones
Section [094]: Options [1]
Option [1] OFF =Stay Delay zone disabled (default)
Option [1] ON =Stay Delay zone enabled
When a Stay Delay zone is armed using the Stay or Instant
arming methods and the zone is triggered, an alarm will not
generate until the programmed Stay Delay elapses. A zone
defined as Stay Delay 1 follows the Entry Delay 1 Timer of its
assigned partition. Likewise, a zone defined as Stay Delay 2
follows the Entry Delay 2 Timer of its assigned partition. To
program the Entry Delay Timers, refer to Entry Delay 1 and Entry
Delay 2 on page 13.
Zones 15 and 16 become Hardwire Zones
Section [095]: Options [1] and [2]
Option [1] OFF = Wireless zone 15 remains unchanged (default)
Option [1] ON = Wireless zone 15 uses the on-board hardwire
zone input 1
Option [2] OFF = Wireless zone 16 remains unchanged (default)
Option [2] ON = Wireless zone 16 uses the on-board hardwire
zone input 2
The Magellan console comes with two on-board zone inputs,
hardwire zone inputs 1 and 2. Section [095] options [1] and [2]
allow you to convert zones 15 and 16 from wireless to hardwire
by allowing you to connect hardwire detection devices (i.e. door
contact) to zone inputs 1 and 2.
• With section [095] option [1] ON, zone 15 is connected to
zone input 1.
• With section [095] option [2] ON, zone 16 is connected to
zone input 2.
EOL (End-Of-Line) Zones
Section [095]: Option [3]
Option [3] OFF = Hardwire zones 1 & 2 do not require EOL
resistors (default)
Option [3] ON = Hardwire zones 1 & 2 require EOL resistors
This feature only applies to Magellan’s on-board zone
inputs. Section [095] options [1] and/or [2] (see Zones 15
and 16 become Hardwire Zones on page 16) must be ON in
order to use this feature.
If the hardwire detection devices connected to Magellan’s zone
inputs 1 and 2 have input terminals that require 1K9 end of line
resistors, enable (ON) section [095] option [3]. For details on
using EOL resistors, refer to page 8.
Page 19

Paradox Magellan Systems 17
Wireless Programming
The Magellan system supports up to 16 wireless zones and two
wireless doorbells. These wireless zones are monitored using
transmitters such as wireless detectors and door contacts. The
Magellan console only supports the Paradox Magellan series of
wireless transmitters. The programming of the transmitters is
accomplished in two steps:
1. Assign the wireless transmitter to Magellan.
2. Program the wireless zone.
Assigning Wireless Zone Transmitters
Sections [021] to [036]: Zones 1-16; Wireless Transmitters 1-16
Sections [021] to [036] represent zones 1 to 16. A wireless
transmitter assigned to a section ([021] to [036]) will be assigned
to the zone represented by the section.
For example, a wireless transmitter assigned to section [025] will
be assigned to zone 5.
To assign a wireless transmitter:
1. Access the installer programming mode (page 11).
2. Enter the [
SECTION
] corresponding to the desired zone.
3. Enter the 6-digit [
SERIAL NUMBER
] of the wireless transmitter.
The serial number is located on the inside of the wireless
transmitter.
The wireless transmitters must be activated once having been
assigned to the Magellan console. To activate a transmitter,
insert the batteries and close the cover. To ensure proper
synchronization between the console and the transmitter, open
and close the zone corresponding to the transmitter.
Are the zones that have wireless transmitters assigned to them
programmed? See Zone Definitions on page 13 and Zone
Options on page 15.
Wireless transmitters can also be assigned through the Installer
menu. Press [
MENU
] + [4] + [
INSTALLER CODE
] + [6]. Select the
zone you wish to assign the transmitter to, press [
OK
], open the
cover of the transmitter and then close the cover. The
transmitter has been assigned. Refer to the Magellan Quick
Setup for more information on the Installer menu and the
assignment of the wireless transmitters.
Assigning Wireless Doorbells to the Console
Sections [058] and [059]: Wireless Doorbells 1 and 2
Magellan supports the use of two wireless “doorbells”. By
connecting a pushbutton to the Universal Transmitter inputs of a
Magellan Wireless Door Contact (MG-DCT1), the MG-DCT1 will
transmit a signal to Magellan whenever the pushbutton is
pressed. Magellan will in turn become a “doorbell” and play a
predetermined tone (see Wireless Doorbell Tones on page 17).
Please refer to the appropriate Magellan Wireless Door
Contact Instruction for information on the installation and
configuration of the wireless door contact.
To assign a wireless doorbell:
1. Access the installer programming mode (page 11).
2. Enter the [
SECTION
] corresponding to the desired doorbell.
3. Enter the 6-digit [
SERIAL NUMBER
] of the MG-DCT1.
Wireless Doorbell Tones
Section [096]: Options [1] to [4]
Options [1] and [2] = Set tone for wireless doorbell 1
Options [3] and [4] = Set tone for wireless doorbell 2
Section [096] options [1] to [4] set the tones that will be played
when Magellan receives a signal from either wireless doorbell 1
or 2 or both. Magellan comes with four tones. Refer to Table 3 on
page 17 to set the desired tone.
Table 3: Wireless Doorbell Tones
Deleting Assigned Wireless Transmitters
Sections [021] to [036]: Zones 1-16; Wireless Transmitters 1-16
Sections [058] and [059]: Wireless Doorbells 1 and 2
To delete an assigned wireless transmitter:
1. Access the installer programming mode (page 11).
2. Enter the [
SECTION
] corresponding to the desired zone or
doorbell.
3. Press the [0] key six times to clear the wireless transmitter’s
serial number.
Viewing Wireless Transmitter Signal
Strength
Sections [021] to [036]: Zones 1-16; Wireless Transmitters 1-16
Sections [058] and [059]: Wireless Doorbells 1 and 2
Once wireless transmitters have been assigned to the Magellan
console, the signal strength of each transmitter can be verified in
sections [021] to [036] (zones 1 to 16 respectively) and sections
[058] and [059] (wireless doorbells 1 and 2 respectively). Each
section represents the signal strength viewer for the wireless
transmitter assigned to the corresponding zone.
For example, section [021] is the viewer for the wireless
transmitter assigned to zone 1 and section [036] is the viewer for
the wireless transmitter assigned to zone 16.
Section [096] - Options [1] and [2] Doorbell Tone #
Option [1] OFF / Option [2] OFF (Doorbell 1) Tone 1 (default)
Option [1] OFF / Option [2] ON (Doorbell 1) Tone 2
Option [1] ON / Option [2] OFF (Doorbell 1) Tone 3
Option [1] ON / Option [2] ON (Doorbell 1) Tone 4
Section [096] - Options [3] and [4] Doorbell Tone #
Option [3] OFF / Option [4] OFF (Doorbell 2) Tone 1
Option [3] OFF / Option [4] ON (Doorbell 2) Tone 2 (default)
Option [3] ON / Option [4] OFF (Doorbell 2) Tone 3
Option [3] ON / Option [4] ON (Doorbell 2) Tone 4
Page 20

18 Reference & Installation Manual
The signal strength is displayed using two terms:
• “Good”: This is an average reading and is acceptable.
• “Weak”: This is the weakest reading. The transmitter should
be moved to another location. Sometimes moving the
transmitter by a small amount will greatly increase the signal
reception.
To view the signal strength of a wireless transmitter:
1. Access the installer programming mode (page 11).
2. Enter the [
SECTION
] corresponding to the desired zone or
doorbell.
3. The LCD will display either “Good” or “Weak” on the screen.
When performing a signal strength test, Magellan also displays
the noise level surrounding each of the transmitters. “Low”
refers to a low level of noise while “High” refers to a noisy
environment.
The signal strength can also be verified by performing a
system test. See Quick Setup on page 4 for more
information.
Assigning Remote Controls
Sections [041] to [056]: Users 1 to 16; Remote Controls 1 to 16
The Magellan console accepts up to 16 fully programmable
remote controls. Every user code can have one remote control
assigned to it.
To assign a remote control:
1. Press [
MENU
] + [4] + [2].
Programming the Remote Control’s Buttons
Sections [161] to [176]: Users 1 to 16; Remote Controls 1 to 16
Sections [161] to [176] represent the remote controls assigned to
user codes 1 to 16 (see Table 4 on page 18).
The remote control will transmit a signal for only 1 second when
a button is pressed. This is done to conserve the remote
control’s batteries.
Though remote controls can be assigned by the System Master,
the remote control’s buttons are programmed by the installer.
Each remote control can be programmed to perform up to 5
different actions. Each digit in sections [161] to [176] represents
a button or combination of buttons (see Table 4 on page 18).
To program a remote control’s buttons:
1. Access the installer programming mode (page 11).
2. Enter the [
SECTION
] (sections [161] to [176]) corresponding
to the desired remote control.
3. Enter the [
HEXADECIMAL VALUE
] (0 to D) of the desired
button option from Table 20 (page 19).
If you do not wish to program all the buttons or button
combinations, press the [#] key at any time to save and exit.
If you enable any Panic button options, you must enable the
Panic options in the control panel (refer to Panic Alarms on
page 23).
Table 4: Remote Control Button Programming
Figure 19: Remote Control Button Identification
Section
#
Data (refer to Table 20 on page 19)
User
#
[161] _____/_____/_____/_____ Remote Control 1
001
[162] _____/_____/_____/_____ Remote Control 2
002
[163] _____/_____/_____/_____ Remote Control 3
003
[164] _____/_____/_____/_____ Remote Control 4
004
[165] _____/_____/_____/_____ Remote Control 5
005
[166] _____/_____/_____/_____ Remote Control 6
006
[167] _____/_____/_____/_____ Remote Control 7
007
[168] _____/_____/_____/_____ Remote Control 8
008
[169] _____/_____/_____/_____ Remote Control 9
009
[170] _____/_____/_____/_____ Remote Control 10
010
[171] _____/_____/_____/_____ Remote Control 11
011
[172] _____/_____/_____/_____ Remote Control 12
012
[173] _____/_____/_____/_____ Remote Control 13
013
[174] _____/_____/_____/_____ Remote Control 14
014
[175] _____/_____/_____/_____ Remote Control 16
015
[176] _____/_____/_____/_____ Remote Control 16
016
+
+
+
+
+
+
+
+
+
+
+
+
+
+
+
+
MG-REM1
The button of the MG-REM1
remote control has been permanently
programmed to disarm the system.
The button’s functionality cannot be
altered.
The , and
button combinations do not function
with the MG-REM1 remote control.
+ + +
Page 21

Paradox Magellan Systems 19
Figure 20: Remote Control Button Options
* = Hexa values A to F are keys [1] to [6] from Magellan’s Center
Keypad.
†
= The panic feature (section [091] options [1] to [3]; see
page 23) must be enabled in order for this to work.
Figure 21: Replacing the Remote Control’s Battery
Hexa
Value
Description
Hexa
Value
Description
0 Button disabled 8
Panic 1
†
1 Regular arming 9
Panic 2
†
2 Stay arming A*
Panic 3
†
3 Instant arming B* PGM Activation (Event Group #07 - Refer to the Magellan Programming Guide)
4 Force arming C* PGM Activation (Event Group #08 - Refer to the Magellan Programming Guide)
5 Future use D* Turn FM radio ON/OFF
6 Future use E* FM radio memory scan
7 Future use F* Paramedic alarm
Inset 1: Removing the Battery Inset 2: Inserting the New Battery
Step 1
Step 2
WARNING!
Damage to the metal prongs may
occur if the battery is not inserted
correctly.
Battery type: One 3V lithium battery (CR2032)
How to replace the battery:
1. Remove the two screws from the back of the remote control and remove the back cover.
2. Slide a teflon screwdriver, or any plastic device, under the battery to remove it from the battery compartment (see Inset 1 below).
Avoid using metal as it may cause a short in the board.
3. Insert the new battery as shown in Inset 2 below. The negative side of the battery is inserted face down.
4. Set the back cover in place and fasten it with the two screws.
Page 22

20 Reference & Installation Manual
Arming and Disarming
Regular Arming Switches to Stay Arming
Section [092]: Option [4]
Option [4] OFF = Switch to Stay arming disabled (default)
Option [4] ON = Switch to Stay arming enabled
If a user Regular arms the system, but does not exit through
(open and close) an Entry Delay zone during the Exit Delay, the
console can be programmed to switch from Regular arming to
Stay arming.
Regular Arming Switches to Force Arming
Section [092]: Option [5]
Option [5] OFF = Regular arming switches to Force arming
disabled
Option [5] ON = Regular arming switches to Force arming
enabled (default)
With this feature enabled, the console will always Force arm
instead of Regular arm when a valid User code is entered. In
installations where the User must always Force arm when
leaving the protected area, this feature allows users to Force arm
after entering their User code.
Stay Arming Switches to Force Arming
Section [092]: Option [6]
Option [6] OFF = Stay arming switches to Force arming disabled
(default)
Option [6] ON = Stay arming switches to Force arming enabled
With this feature enabled, the console will always Force arm and
Stay arm when a valid User code is entered even if there are
perimeter zones open.
Timed Auto-Arming
Section [092]: Option [1]
Option [1] OFF = Timed Auto-arming disabled (default)
Option [1] ON = Timed Auto-arming enabled
The Magellan system can be programmed to arm every day at
the time specified by the Auto-arm Timer (see Auto-arm Timer
on page 20). The following also apply:
• The Auto-arming options (Auto-Arming Options on page 20)
determine the arming method.
• Any open zones detected when the system is Auto-armed
will be bypassed regardless of their definition (except 24hr.
zones).
• The console will enter a 60-second Exit Delay period before
arming the system. At this point, Auto-arming can be
cancelled by entering a valid access code.
• Once the system has successfully armed, the console can
transmit the Timed Auto-Arming report code programmed in
section [124].
Example: To automatically arm the system everyday at 6:15PM,
enable section [092] option [1] to activate Timed Auto-arming
and then key in 18:15 into section [085].
Auto-arm Timer
Section [085]
Program the time (use the 24-hour clock i.e. 6:30PM = 18:30)
that you wish the console to attempt to arm the system and/or
send the Late to Close report code.
No Movement Auto-Arming
Section [092]: Option [2]
Option [2] OFF = No Movement Auto-arming disabled (default)
Option [2] ON = No movement Auto-arming enabled
If no movement occurs in a zone's protected area for the period
specified by the No Movement Timer (see below), the console
can automatically arm the system.
• The Auto-arming option (Auto-Arming Options on page 20)
determines the system's arming method.
• Any open zones detected when the system is Auto-armed
will be bypassed regardless of their definition (except 24hr.
zones).
• Upon arming, the console will transmit the No Movement
report code if programmed in section [124].
• Regardless of whether the system was successfully armed
or not, the console will always transmit the No Movement
report code if programmed in section [124].
• If No Movement Auto-arming is disabled, the console will
still send the No Movement report code at the time specified
by the No Movement Timer.
Example: To arm the system whenever there is no movement for
a period of 4 hours, enable section [092] option [2] (No
Movement Auto-arming) and then in section [064], enter 016 (16
x 15min. = 240min. = 4 hours).
No Movement Timer
Section [064]: 001 to 255 x 15 minutes; 000 = Disabled; Default
= 000
Program the interval of time without movement you wish the
console to wait before arming and/or sending the No Movement
report code. If No Movement Auto-arming is disabled, the
console can still send the No Movement report code when no
movement has been detected for the period specified by the No
Movement Timer.
Auto-Arming Options
Section [092]: Option [3]
Option [3] OFF = Auto-arm system using Regular arm (default)
Option [3] ON = Auto-arm system using Stay
When using Timed Auto-arming (page 20) or No Movement
Auto-Arming (page 20), the console can Regular or Stay arm the
system.
Page 23

Paradox Magellan Systems 21
One-Touch Arming
Section [092]: Options [7] and [8]
Option [7] OFF = One-touch Regular/Force arming disabled
Option [7] ON = One-touch Regular/Force arming enabled
(default)
Option [8] OFF = One-touch Stay arming disabled
Option [8] ON = One-touch Stay arming enabled (default)
The One-touch arming features allow users to arm the system
without having to enter any access codes. To arm the system,
press and hold the appropriate key for approximately 2 seconds.
Exit Delay
Section [062]: 001 to 255 seconds; 000 = disabled; Default = 60
seconds
The exit delay determines the amount of time a user has to leave
the protected area before Magellan arms the system. The exit
delay applies to all zones (except 24Hr zones) in the system.
Program the exit delay from 001 to 255 seconds.
Bell Squawk on Arm/Disarm with Remote
Control
Section [093]: Option [3]
Option [3] OFF = Bell squawk disabled
Option [3] ON = Bell squawk enabled (default)
When option [3] is enabled (ON), the siren will squawk once
upon arming with a remote control and twice upon disarming with
a remote control.
No Exit Delay when Arming with Remote
Control
Section [093]: Option [4]
Option [4] OFF = Provides exit delay when arming with remote
control (default)
Option [4] ON = No exit delay when arming with remote control
When option [4] is enabled (ON), the console cancels the Exit
Delay (arms instantly) when the system is armed with a remote
control. When disabled, the Exit Delay timer will start when the
system is armed with a remote control.
Exit Delay Termination
Section [093]: Option [6]
Option [6] OFF = Exit delay termination feature disabled
Option [6] ON = Exit delay termination feature enabled (default)
When option [6] is enabled (ON), the console will reduce the exit
delay to 10 seconds when an Entry Delay zone (see Exit Delay
on page 21) is opened and closed during the exit delay.
Example: 15 seconds into a 45 second exit delay, an Entry Delay
zone opens and closes. The remaining 30 seconds is reduced to
10 seconds.
Follow Zone Switches to Entry Delay 2
Section [093]: Option [7]
Option [7] OFF = Follow zone triggers an alarm (default)
Option [7] ON = Follow zone follows Entry delay 2 when
opened
When option [7] is enabled (ON) and an Entry Delay 1 zone is
bypassed, an armed Follow zone that opens without an entry
delay being triggered will switch to the entry delay 2 timer.
Example: Zone 1 is an Entry Delay zone and zone 2 is a Follow
zone protecting the area where the keypad is installed. The
system is armed but zone 1 is bypassed. With option [7]
enabled, zone 2 will switch to and wait for the entry delay 2 timer
to elapse before triggering an alarm.
Closing Delinquency Timer
Section [080]: 001 to 255 days; 000 = Disabled; Default = 000
The Magellan console will verify when the system was last
armed at midnight of every day. If the last time the system was
armed is greater than the programmed Closing Delinquency
timer, the console will transmit a Closing Delinquency report
code (page 25) to the central monitoring station.
Enter a value from 001 to 255 days into section [080] to program
the Closing Delinquency timer. Enter 000 to disable the timer.
Page 24

22 Reference & Installation Manual
Alarm Options
Bell Cut-off Timer
Section [063]: 001 to 255 minutes; 000 = Disabled; Default = 4
minutes
After an audible alarm, the siren will stop upon disarming of the
system or when the Bell Cut-Off timer has elapsed, whichever
comes first.
Wireless Transmitter Supervision Options
Section [094]: Options [6] and [7]
This feature determines how the Magellan console will react to a
Supervision Loss trouble. Table 5 shows the different
supervision loss combinations available and how the system will
react when armed or disarmed.
Table 5: Wireless Transmitter Supervision Options
Supervision Bypass Options
Section [094]: Option [8]
Option [8] OFF =No Supervision Loss if detected on a Bypassed
Zone (default)
Option [8] ON =Generate Supervision Loss if detected on a
Bypassed Zone
• When option [8] is OFF, the Wireless Transmitter
Supervision Options (page 22) will follow the zone's bypass
definition. This means the console will not perform any
action if a Supervision Loss occurs on a bypassed zone.
• When option [8] is ON, the Wireless Transmitter Supervision
Options (page 22) will ignore the bypass definition. This
means the console will generate an incident as per the set
Wireless Transmitter Supervision Option if a supervision
loss occurs on a bypassed zone.
Tamper Recognition Options
Section [094]: Options [3] and [4]
This feature determines how the Magellan console will react to a
zone tamper. Table 6 shows the different tamper recognition
combinations available and how the system will react when
armed or disarmed.
Table 6: Tamper Recognition Options
Tamper Bypass Options
Section [094]: Option [5]
Option [5] OFF =Ignore any tampers detected on a bypassed
zone (default)
Option [5] ON = Generate tamper if detected on a bypassed
zone
• When option [5] is ON, the Tamper Recognition feature
(page 22) will ignore the zone’s bypass definition. This
means the console will generate an incident as per the set
Tamper Recognition option if a tamper occurs on a
bypassed zone.
• When option [5] is OFF, the Tamper Recognition feature
(page 22) will follow the zone's bypass definition. This
means the console will ignore any tampers that occur on a
bypassed zone.
Check-in Supervision Options
Section [103]: Options [1] to [8]; Zones 1 to 8; Default: All ON
Section [104]: Options [1] to [8]; Zones 9 to 16; Default: All ON
If enabled, Magellan can wait for each of its assigned wireless
transmitters to send a status signal within a specified time (see
Check-in Supervision Time on page 23) to confirm their
Options Description
[6] [7]
OFF OFF Wireless transmitter supervision disabled
OFF ON Trouble only (default)
System armed or disarmed: If a supervision loss
occurs on a zone, the console will display a trouble on
the LCD screen and send a report to the central
monitoring station.
ON OFF Audible alarm when armed
System armed:
If
a supervision loss occurs on a zone,
the console will follow the zone's Alarm Types setting
(see page 15).
System disarmed: If a supervision loss occurs on a
zone, the console will display a trouble on the LCD
screen.
ON ON Audible alarm
System armed: If a supervision loss occurs on a zone,
the console will follow the zone's Alarm Types setting
(see page 15).
System disarmed: It functions the same as Trouble
Only setting, except it will also generate an audible
alarm.
Options Description
[3] [4]
OFF OFF Tamper recognition disabled (default)
OFF ON Trouble only
System armed or disarmed: If a tamper wiring failure
occurs on a zone, the console will follow the zone's
Alarm Types setting (see page 15) and send a report
to the central monitoring station.
ON OFF Audible alarm when armed
System armed:
If
a tamper failure occurs on a zone,
the console will follow the zone's Alarm Types setting
(see page 15).
System disarmed: If a tamper failure occurs on a
zone, the console will follow the zone's Alarm Types
setting (see page 15) and send a report to the central
monitoring station.
ON ON Audible alarm
System armed: If a tamper failure occurs on a zone,
the console will follow the zone's Alarm Types setting
(see page 15).
System disarmed: It functions the same as Trouble
Only setting, except it will also generate an audible
alarm.
Page 25

Paradox Magellan Systems 23
presence and functionality. If a device has not sent a signal
within the specified time period, Magellan can generate a
trouble, an alarm and/or transmit a report code to the central
monitoring station as defined by the Wireless Transmitter
Supervision Options (page 22). Sections [103] and [104]
determine which zones will be supervised and which will not.
Enable the option pertaining to the zone you wish Magellan to
supervise.
Check-in Supervision Time
Section [096]: Option [7]
Option [7] OFF =Check-in supervision time = 24Hrs (default)
Option [7] ON =Check-in supervision time = 80 minutes
Section [096] option [7] defines the time period that Magellan will
expect a check-in status signal from the specified wireless
transmitters as defined in the Check-in Supervision Options
(page 22). If no signal is received within the check-in supervision
time, Magellan’s reaction will be defined by the Wireless
Transmitter Supervision Options (page 22).
Panic Alarms
Section [091]: Options [1], [2] and [3]
Option [1] OFF = Panic 1 (Emergency Panic) disabled (default)
Option [1] ON = Panic 1 (Emergency Panic) enabled
Option [2] OFF = Panic 2 (Auxiliary Panic) disabled (default)
Option [2] ON = Panic 2 (Auxiliary Panic) enabled
Option [3] OFF = Panic 3 (Fire Panic) disabled (default)
Option [3] ON = Panic 3 (Fire Panic) enabled
Enable section [091] options [1], [2] and [3] to enable the
system’s three Panic alarms. Each panic alarm is activated by
pressing two keys simultaneously and holding them down for 2
seconds. See Table 7 on page 23 for the appropriate panic
alarm keys. Whether these panic alarms will generate a silent or
audible alarm is determined by section [091] options [4] to [6]
(see Panic Alarm Types on page 23).
Table 7: Panic Alarm Keys
Remote controls can also be programmed to generate panic
alarms. See Programming the Remote Control’s Buttons on
page 18 for more information on programming remote controls
to generate panic alarms.
Panic Alarm Types
Section [091]: Options [4], [5] and [6]
Option [4] OFF =Panic 1 (Emergency Panic) is silent (default)
Option [4] ON =Panic 1 (Emergency Panic) is audible
Option [5] OFF =Panic 2 (Auxiliary Panic) is silent (default)
Option [5] ON =Panic 2 (Auxiliary Panic) is audible
Option [6] OFF =Panic 3 (Fire Panic) is silent (default)
Option [6] ON =Panic 3 (Fire Panic) is pulsed
Options [4] to [6] represent the alarm types of panic alarms 1 to 3
respectively.
Silent Alarm: The Magellan console will emit a confirmation beep
and transmit the appropriate Panic report code (if programmed in
section [139]). The console will not enable its speaker or the
system siren.
Audible Alarm: Same as the silent alarm except that the console
will enable its speaker and system siren until a user cancels the
alarm (disarms) with a valid access code or when the Bell Cut-off
timer elapses (if enabled; see Bell Cut-off Timer on page 22).
Pulsed Alarm (Fire Panic only): Same as the audible alarm
except that the siren will be pulsed as shown in Figure 17 on
page 14. Refer to Standard 24Hr. Fire Zones on page 14 for
more information on a pulsed siren output.
Keys to press Panic Alarm Type
[1] and [3] Panic 1 (Emergency Panic)
[4] and [6] Panic 2 (Auxiliary Panic)
[7] and [9] Panic 3 (Fire Panic)
Page 26

24 Reference & Installation Manual
Reporting and Dialer Settings
Report Codes
A report code is a 1- or 2-digit hexadecimal value consisting of
digits from 1 to F. Each section from [120] to [156] represents a
set of up to four specific events and each of these events can be
programmed with a separate 1- or 2-digit report code.
Only the Ademco Slow, Silent Knight, and Sescoa formats
support 1-digit report codes. To program a 1-digit report
code, press the [0] key followed by the desired hexadecimal
digit or vice versa.
When a specific event occurs, the console will attempt to
transmit the programmed report code to the central station. The
method of report code transmission is defined by the Reporting
Formats (see page 27) and the Event Call Direction (see
page 27). These two items define how and where the report
codes are transmitted. If you are using the Ademco Contact ID
format, sections [120] to [156] do not have to be programmed.
For more information, refer to Reporting Formats (see page 27).
The following sub-sections provide a brief description of the
events that the Magellan console can report.
Arming Report Codes
Sections [120] to [123]
A report code can be programmed for each of the 16 User
Codes. When using an access code to arm the system, the
Magellan console can send the appropriate report code to the
central station, identifying which user armed the system.
Special Arming Report Codes
Sections [124] and [125]
Whenever the system is armed using one of the special arming
features listed below, the console can send the appropriate
report code to the central station identifying how the system was
armed.
Section [124]
• Timed Auto-arming: The system has armed itself at the
programmed time (see page 20).
• Late to Close: Reports every day at the time specified by the
Auto-arm Timer (see page 20).
• No Movement: The system has armed itself after the
programmed period without movement (see No Movement
Auto-Arming on page 20).
• Partial Arming: The system was Stay, Instant or Force
Armed or armed with Bypassed zones.
Section [125]
• One-touch Arming: The system was armed using a Onetouch Arming feature (see page 21).
• Remote Arming: The system was armed using the WinLoad
software.
• Future use
• Future use
Disarming Report Codes
Sections [126] to [129]
A report code can be programmed for each of the 16 User
Codes. Whenever an access code is used to disarm the system
or an alarm, the Magellan console can send the appropriate
report code to the central station, identifying which user
disarmed the system.
The Disarming and the Special Disarming report codes can be
transmitted every time the system is disarmed or only when the
system is disarmed after an alarm (see Disarming Reporting
Options on page 29).
Special Disarming Report Codes
Section [130]
Whenever using one of the special disarming features, the
Magellan console can send the report code to the central station,
identifying how the system was disarmed.
• Cancel Auto-arm: The system is disarmed during the Timed
Auto-arm's 60-second Exit Delay (see page 20). Only reports if
Disarming Reporting Options (see page 29) are set to always
report disarming.
• Remote Disarm: System is disarmed using the WinLoad
software.
• Future use
• Future use
Zone Alarm Report Codes
Sections [131] to [134]
A report code can be programmed for each of the 16 available
zones. Whenever a zone generates an alarm, the console can
send the appropriate report code to the central station,
identifying which zone generated an alarm.
Zone Alarm Restore Report Codes
Sections [135] to [138]
A report code can be programmed for each of the 16 available
zones. The Magellan console can transmit these report codes to
the central station identifying which zone was restored.
A zone is restored when it closes after generating an alarm or
once the bell has cut-off after alarm generation. Please refer to
Zone Alarm Restore Report Codes on page 24.
Special Alarm Report Codes
Sections [139] and [140]
Whenever the system generates an alarm due to one of the
conditions listed below, the control panel can send the
appropriate report code to the central station identifying the type
of alarm.
Section [139]
• Emergency Panic: Panic keys [1] and [3] (page 23) or the
appropriate button(s) on a remote control (page 18) have
been pressed.
Page 27

Paradox Magellan Systems 25
• Auxiliary Panic: Panic keys [4] and [6] (page 23) or the
appropriate button(s) on a remote control (page 18) have
been pressed.
• Fire Panic: Panic keys [7] and [9] (page 23) or the
appropriate button(s) on a remote control (page 18) have
been pressed.
• Recent Closing: Reports when an alarm is generated after
arming the system within period defined by the Recent
Close Delay (see page 28).
Section [140]
• Auto-zone Shutdown: A zone communicates more than the
programmed number of transmissions in a single armed
period (see page 15).
• Duress: A Duress access code is keyed in (see page 12).
• Paramedical alarm
• Future use
Zone Tamper Report Codes
Section [141] to [144]
A report code can be programmed for each of the 16 available
zones. Whenever a tamper or wire fault occurs on a zone, the
Magellan console can send the appropriate report code to the
central station identifying which zone was tampered.
If Tamper Recognition (see page 22) is disabled, the
console will not report the occurrence of any tampers,
wire faults or tamper restores.
Zone Tamper Restore Report Codes
Sections [145] to [148]
A report code can be programmed for each of the 16 available
zones. Whenever a tampered zone is restored, the Magellan
console can send the appropriate report code to the central
station identifying which zone has been restored.
If Tamper Recognition (see page 22) is disabled, the console
will not report the occurrence of any tampers, wire faults or
tamper restores.
System Trouble Report Codes
Section [149] to [151]
Whenever the system generates one of the instances listed
below, the console can send the appropriate report code to the
central station identifying the type of system trouble.
Section [149]
• Console Tamper: A tamper has been detected on the
console itself (see Console Tamper Supervision on page
31).
• AC Failure: Magellan has detected a loss of AC power.
Transmission of this report code can be delayed (see Power
Failure Report Delay on page 29).
• Battery Failure: The backup battery is disconnected or
battery voltage is ≤ (less than or equal to)6.9V.
• Timer Loss: The console has detected a loss in time or clock
failure.
Section [150]
• Future use
• Fail To Communicate: The Magellan console has failed all
attempts to communicate with the central station. The report
code will be transmitted upon the next successful attempt.
• Wireless Low Battery: The battery voltage of an Omnia
wireless transmitter (motion detector or contact switch) has
dropped below recommended limits.
• Tx Supervision Loss: Check-in Supervision (page 22) has
been enabled and a transmitter is no longer communicating
with the system.
Section [151]
• Future use
• Future use
• Future use
• Future use
System Trouble Restore Codes
Sections [152] to [154]
Whenever the system restores one of the troubles listed in
sections [149] and [150] (see System Trouble Report Codes on
page 25), the Magellan console can send the appropriate report
code to the central station identifying the type of system trouble
restored. If Telephone Line Monitoring is enabled (see page 28),
use the first two digits to program a TLM Restore report code
that the console can transmit.
Special Reporting Codes
Sections [155] and [156]
Whenever the system generates one of the instances listed
below, the Magellan console can send the appropriate report
code to the central station identifying the type of system
occurrence.
Section [155]
• Cold Start: The console was completely shutdown (no
battery, no AC) and then was restarted.
• Test Report: A test report has been generated automatically
(see page 29).
• Future use
• WinLoad Logout: The console has ended communication
with WinLoad.
Section [156]
• Installer logon: Installer has entered the programming
mode.
• Installer Logout: Installer has exited the programming mode.
• Closing Delinquency: The last time the system was armed is
greater than the programmed Closing Delinquency timer
(page 21).
• Future use
Console Telephone Numbers
Magellan can dial up to two different central station telephone
numbers and one Pager telephone number. You can enter any
digit from 0 to 9 and any special keys or functions (see Table 8
on page 26) up to a maximum of 32 digits. If the number is less
than 32 digits, press the left [
ACTION
] key (OK) to save the
message.
Page 28

26 Reference & Installation Manual
Table 8: Special Keys for Telephone Numbers
Central Station Telephone Numbers (CSTNs)
Section [111] = Central Station Telephone Number 1
Section [112] = Central Station Telephone Number 2
The Magellan console uses the CSTNs (C
entral Station
Telephone Numbers) programmed in sections [111] and/or [112]
to connect and communicate with the central monitoring station.
The following situations also apply:
• If after eight attempts of calling one central station telephone
number have failed, the console will then dial the backup
telephone number (if section [099] option [1] is enabled. See
CSTN 2 as Backup Number on page 26).
• If the Alternate Dial option (page 28) is enabled, the console
will dial the programmed backup telephone number after
every failed attempt (if section [099] option [1] is enabled.
See CSTN 2 as Backup Number on page 26).
• If no backup telephone number is programmed, the console
will never report to the backup telephone number.
For more information on how these telephone numbers are
used, please refer to Event Call Direction on page 27 and
Reporting Formats on page 27. Also refer to Delay Between
Dialing Attempts on page 28.
CSTN 2 as Backup Number
Section [099]: Option [1]
Option [1] OFF =Use CSTN 2 as a central station telephone
number only
Option [1] ON = CSTN 2 can be used a backup telephone
number (default)
CSTN 2 can also be used as a backup telephone number. If
section [099] option [1] is enabled (ON) the console will use
CSTN 2 as a backup telephone number.
For more information, please refer to Central Station
Telephone Numbers (CSTNs) on page 26 and Alternate
Dial Option on page 28.
Pager Telephone Number
Section [113]
The Magellan console uses the Pager telephone number
programmed in section [113] to connect and communicate the
numeric pager message programmed in section [114] (see
Pager Reporting Message on page 26) to a pager.
Pager Reporting Message
Section [114]: 32-digit decimal number (0 to 9 as well as [*]
and [#])
Program the desired numeric message you wish to send
whenever the console dials the Pager telephone number in
section [114]. If the message is less than 32 digits, press the
left [
ACTION
] key (ok) to save the message.
Voice Message Telephone Numbers
The Magellan console will use the Voice Message telephone
numbers (which are programmed in the Installer menu. Refer to
the Magellan Quick Setup Guide for more information) to play a
pre-recorded message to an external telephone or cellular
telephone. Please note the following when programming and
using this feature:
• The console will only dial a Voice Message telephone
number when the system is in alarm. The console begins
with the first programmed Voice Message telephone
number.
• When the call is connected, the console will play the prerecorded message and the zone labels of all the zones that
are in alarm.
• The person at the other end of the telephone must
acknowledge the call by pressing the [#] key on their
telephone.
• The console will repeat the message a programmed amount
of times (see Voice Message Repetitions on page 26) if no
acknowledgement is immediately received.
• If no acknowledgement is received before the number of
repetitions has elapsed, the console will then call the next
programmed Voice Message telephone number and repeat
the process.
• After calling the last programmed Voice Message telephone
number without an acknowledgement, the console will once
again call the first Voice Message telephone number and
repeat the process a maximum of three times.
• If no acknowledgement is received after the third time, the
console will generate a Fail to Comm. event and trouble.
Voice Message Repetitions
Section [079]: 001 to 255 repetitions; Default = 3 repetitions
This feature determines the amount of times the console will
repeat the pre-recorded message played with the Voice
Message telephone number without receiving an
acknowledgement. Enter any 3-digit number from 001 to
255 into section [079] to program the Voice Message
Repetitions feature.
Service Telephone Number
Section [119]
When there is a trouble in the system that requires servicing from
your installer, the console will offer you the option of calling the
telephone number programmed in section [119]. After selecting
the option, the console becomes a speaker-phone.
Refer to the Magellan User Guide for more information
on using this feature.
Console Account Number
Section [107]
All report codes are preceded by a 4-digit or 3-digit Console
Account Number to ensure correct identification of the Magellan
console. The Console account number can be any hexa-digit
from 1 to F. To enter a 3-digit account number, simply press the
Keys to press Action or Value
[*] *
[#] #
Center [
ACTION
] (pause) key
Add a 4-second pause to the
telephone number. Press the key and
a “P” will be inserted into the
telephone number
Page 29

Paradox Magellan Systems 27
[0] key followed by the 3-digit account number. Also, when using
3-digit account numbers, you must use 1-digit report codes.
Reporting Formats
Section [105] = Reporting Format for CSTN 1
Section [106] = Reporting Format for CSTN 2
The reporting formats apply only to the CSTNs (Central Station
Telephone Numbers) programmed in sections [111] and [112]
(page 26)
The Magellan console can use a number of different reporting
formats and each Central Station Telephone Number can be
programmed with a different reporting format. The three digits
entered into section [105] represents the reporting format used
to communicate with Central Station Telephone Number 1 while
the three digits entered into section [106] represents the
reporting format used to communicate with Central Station
Telephone Number 2.
Table 9: Reporting Formats
UL Note: The installer is required to verify the complete
compatibility of the DAC Receiver and formats at least
once per year.
Standard Pulse Formats
The Magellan console can use the Ademco slow, Silent Knight
and SESCOA standard pulse reporting formats (see Table 9 on
page 27).
Ademco Contact ID
Ademco Contact ID is a fast communicator format that uses tone
reporting instead of pulse reporting. This communicator format
also uses a pre-defined list of industry standard messages and
report codes that will suit most of your basic installation needs.
• To manually program the report codes, use the 2-digit
hexadecimal values from the Contact ID Report Codes List
in the Magellan Programming Guide.
• Enter 00 to disable reporting or FF to use the default report
code from the Automatic Report Code List in the
Programming Guide.
Please refer to Appendix 1: Ademco Contact ID Report
Code List on page 34 for a complete list of the format’s
pre-defined industry standard messages and report codes.
SIA FSK
SIA FSK is a fast communicator format that uses tone reporting
instead of pulse reporting. This communicator format uses a predefined list of industry standard messages and report codes that
will suit most basic installation needs.
Please refer to Appendix 1: Ademco Contact ID Report
Code List on page 34 for a complete list of the format’s
pre-defined industry standard messages and report codes.
Event Call Direction
Section [100]: Options [1] to [3]; Arming/Disarming
Option [1] ON = Call CSTN 1
Option [2] ON = Call CSTN 2
Option [3] ON = Call Pager telephone number
Section [100]: Options [5] to [7]; Alarm/Alarm Restore
Option [5] ON = Call CSTN 1
Option [6] ON = Call CSTN 2
Option [7] ON = Call Pager telephone number
Section [101]: Options [1] to [3]; Tamper/Tamper Restore
Option [1] ON = Call CSTN 1
Option [2] ON = Call CSTN 2
Option [3] ON = Call Pager telephone number
Section [101]: Options [5] to [7]; Trouble/Trouble Restore
Option [5] ON = Call CSTN 1
Option [6] ON = Call CSTN 2
Option [7] ON = Call Pager telephone number
Section [102]: Options [1] to [3]; Special
Option [1] ON = Call CSTN 1
Option [2] ON = Call CSTN 2
Option [3] ON = Call Pager telephone number
The events are divided into five groups (see above) where each
event group can be programmed to dial up to three telephone
numbers (CSTN 1 & 2 and the Pager telephone number) with
one as a possible backup (CSTN 2. See CSTN 2 as Backup
Number on page 26).
• When a reportable event occurs in the system, the Magellan
console will begin dialing the numbers sequentially starting
from CSTN 1 (if enabled), skipping any disabled numbers
and stopping once all selected telephone numbers have
been called.
• If after eight attempts of trying to call the central monitoring
station have failed, the console will then dial the selected
backup telephone number (if enabled. See CSTN 2 as
Backup Number on page 26).
• If the Alternate Dial option (see page 28) is enabled, the
console will dial the programmed backup telephone number
(if enabled. See CSTN 2 as Backup Number on page 26)
after every failed attempt.
• If no backup telephone number is programmed or section
[099] option [1] is disabled (OFF. See page 28), the console
will never report to the backup telephone number.
For more information, please refer to Central Station
Telephone Numbers (CSTNs) on page 26, Alternate Dial
Option on page 28, CSTN 2 as Backup Number on page
26 and Delay Between Dialing Attempts on page 28.
Example: The system is armed and zone 1 has been breached
causing an alarm. If options [5] and [7] are OFF and option [6] is
ON in section [100], the console will attempt to communicate
with CSTN 2 in order to transmit the Zone 1 Alarm Report Code
programmed in section [131].
3-digit Value Reporting Format
001 Ademco slow (1400Hz, 1900Hz, 10BPS)
002 Silent Knight Fast (1400Hz, 1900Hz, 10BPS)
003 SESCOA (2300Hz, 1800Hz, 20BPS)
004 Ademco Contact ID
005 SIA FSK
Page 30

28 Reference & Installation Manual
Delay Between Dialing Attempts
Section [076]: 001 to 255 seconds; 000 = disabled; Default = 20
seconds
This delay determines the amount of time the Magellan console
will wait between each dialing attempt.
Alternate Dial Option
Section [098]: Option [5]
Option [5] OFF = Alternate Dial Disabled (default)
Option [5] ON = Alternate Dial Enabled
With option [5] OFF, the Magellan console will dial the
programmed backup telephone number CSTN 2 (See CSTN 2
as Backup Number on page 26) only after all attempts to call one
CSTN have failed. With option [5] ON, the console will dial the
backup telephone number after every failed attempt.
Force Dial Option
Section [098]: Option [6]
Option [6] OFF = Force Dial Disabled (default)
Option [6] ON = Force Dial Enabled
When option [6] is enabled, the Magellan console will dial a
telephone number even if no dial tone is present after 3 seconds.
Dialing Method
Section [098]: Option [7]
Option [7] OFF = Pulse Dialing
Option [7] ON = Tone / DTMF Dialing (default)
When option [4] is ON, the Magellan console is set for Tone/
DTMF dialing. When option [4] is OFF, the console is set for
pulse dialing. Refer to Pulse Ratio on page 28 for information on
setting the pulse ratio.
Pulse Ratio
Section [098]: Option [8]
Option [8] OFF = European Pulse Ratio of 1:2
Option [8] ON = U.S.A. Pulse Ratio of 1:1.5 (default)
When using Pulse dialing, you can select one of two Pulse
Ratios. Although most European countries use the 1:2 pulse
ratio, the 1:1.5 ratio may provide better results in some cases.
The same applies for North American countries. If the 1:1.5
pulse ratio is not providing the desired results, the 1:2 ratio may
be used.
Switch to Pulse Dialing on 5th Attempt
Section [098]: Option [3]
Option [3] OFF = Switch to pulse dialing on fifth attempt disabled
(default)
Option [3] ON = Switch to pulse dialing on fifth attempt enabled
When section [098] option [3] is ON, the Magellan console
switches from tone/DTMF dialing to pulse dialing on the fifth
attempt to report events to the Central Monitoring Station. The
console continues to use pulse dialing until it establishes
communication. When the console switches to another CSTN, it
returns to tone/DTMF dialing and will once again switch to pulse
dialing on the fifth attempt.
Telephone Line Monitoring (TLM)
Section [098]: Options [1] and [2]
When enabled, the system verifies the existence of a telephone
line once every second. A line test failure occurs when the TLM
detects less than 3 volts for the period defined by the TLM Fail
Timer (page 28). If the line test fails, the Magellan console
generates one or more conditions as defined by the TLM settings
below. These will be restored when the console detects the
telephone line again.
Table 10: Telephone Line Monitoring Options
Please note that when the dialer detects an incoming call, the
TLM test will stop for 1 minute.
TLM Fail Timer
Section [073]: 001 to 255 seconds; 000 = Disabled; Default = 32
seconds
If TLM does not detect the existence of a telephone line for the
duration of this period, the control panel will generate the
condition(s) defined by the TLM options (see Telephone Line
Monitoring (TLM) on page 28).
Recent Close Delay
Section [066]: 001 to 255 seconds; 000 = Disabled;
Default = Disabled
If after having armed the system, an alarm is generated within
the period defined by the Recent Close Delay, the Magellan
console will attempt to transmit the Recent Close report code
programmed in section [139] (page 24).
Options
Description
[1] [2]
OFF OFF TLM disabled (default)
OFF ON Trouble only: Upon a line test failure, a TLM trouble
will appear in the console’s Trouble Display
ON OFF Alarm if System Armed: Upon a line test failure, a
TLM trouble will appear in the console’s Trouble
Display and if the system is armed, the console will
generate an alarm.
ON ON Silent Alarm becomes Audible: Upon a line test
failure, a TLM trouble will appear in the console’s
Trouble Display and causes a silent zone or silent
panic alarm to switch to audible.
Page 31

Paradox Magellan Systems 29
Auto-Test Report
Section [071]: 001 to 255 days; 000 = Disabled; Default =
Disabled
Section [084]: Time (HH:MM)
The Magellan console will transmit the Test Report report code
programmed into section [153] after the number of days
programmed into section [071] has elapsed at the time
programmed into section [084]. Use the 24-hour clock to
program the time (i.e. 6:30PM = 18:30). The first Test Report will
be transmitted within 24 hours after the feature is enabled at the
time programmed in [084].
Example: Section [071] = 005 and section [084] = 13:00. The first
Test Report will be sent at 1 PM that day and then the report will
be sent every 5 days at 1 PM.
Power Failure Report Delay
Section [070]: 001 to 255 minutes; 000 = Disabled;
Default = 15 minutes
The Magellan console will transmit the AC Failure report code
programmed in section [149] after the Power Failure Report
Delay period has elapsed.
Disarm Reporting Options
Section [093]: Option [5]
Option [5] OFF = Always Report Disarming
Option [5] ON = Report Disarming only after Alarm (Default)
With option [5] OFF, the Magellan console will send the
Disarming report codes (see page 24) to the central monitoring
station every time the system is disarmed. With option [5] ON,
the console will send the Disarming report codes to the central
monitoring station when the system is disarmed following an
alarm.
Zone Restore Report Options
Section [094]: Option [2]
Option [2] OFF = Report On Bell Cut-Off (Default)
Option [2] ON = Report On Zone Closure
With option [2] OFF, the Magellan console will send the Zone
Alarm Restore report codes (see page 24) to the central
monitoring station when the zone has returned to normal and the
Bell Cut-Off Timer (see page 22) has elapsed. With option [2]
ON, the console will send the Zone Alarm Restore report codes
to the central station as soon as the zone returns to normal or
when the system is disarmed.
Page 32

30 Reference & Installation Manual
Programmable Outputs
A PGM is a programmable output that toggles to its opposite
state (i.e. a normally open PGM will close) when a specific event
has occurred in the system. For example, a PGM can be used to
activate bells or strobe lights, open/close garage doors and
much more. When a PGM closes, the control panel supplies a
ground to the PGM activating any device or relay connected to it.
When a PGM opens, the circuit opens from ground, therefore,
cutting power to any devices connected to it.
PGM Activation Event
Section [086] = PGM1 Activation Event
Section [088] = PGM2 Activation Event
This feature allows you to program the Magellan console to
activate a PGM when a specific event occurs in the system. The
PGM will remain in its active state until the programmed PGM
Deactivation Event (see page 30) occurs or when the PGM
Delay (see page 30) elapses. To program a PGM Activation
Event:
1. Enter the section that corresponds to the desired PGM;
PGM1 = [086], PGM2 = [088].
2. Enter the [
EVENT GROUP
#].
3. Enter the [
SUB-GROUP
#].
The “AC Loss” PGM event (Event Group #28, Event Sub-group
#01) will only occur after the Power Failure Report Delay
elapses (see page 29).
For the Event List, see the PGM Table in the Magellan
Programming Guide.
PGM Deactivation Event
Section [087] = PGM1
Section [089] = PGM2
After PGM activation (see PGM Activation Event on page 30),
the PGM will return to its normal state (deactivate) when the
programmed PGM Deactivation Event occurs. To program a
Deactivation Event:
1. Enter section that represents the desired PGM; PGM1 =
[087], PGM2 = [089].
2. Enter the [
EVENT GROUP
#].
3. Enter the [
SUB-GROUP
#].
A PGM can also be set to deactivate after a programmed period
elapses (see PGM Delay on page 30). If using the PGM Delay,
sections [087] and [089] can be used as a second PGM
Activation Event.
For the Event List, see the PGM Table in the Magellan
Programming Guide.
PGM Delay
Section [068] = PGM1, Section [069] = PGM2
001 to 255 seconds; 000 = Follow Deactivation Event;
Default = 5 seconds
Instead of deactivating the PGM on the occurrence of a specific
event, the PGM will deactivate after the period programmed in
here has elapsed. Enter 000 to have the PGMs deactivate with a
PGM Deactivation Event (see page 30).
If a PGM Delay is programmed, the PGM Deactivation Event
can be used as a second PGM Activation Event.
PGM Normal State
Section [090]: Options [7] (PGM1) and [8] (PGM2)
Option [7] OFF = PGM1 Normally Open (default)
Option [7] ON = PGM1 Normally Closed
Option [8] OFF = PGM2 Normally Open (default)
Option [8] ON = PGM2 Normally Closed
A PGM toggles to its opposite state (i.e. a normally open PGM
will close) when a specific event has occurred in the system. You
can program each PGM output to be normally open (N.O.) or
normally closed (N.C.) by enabling or disabling options [7] and
[8] in section [090].
PGM X10 Option
Section [091]: Options [7] (PGM1) and [8] (PGM2)
Option [7] OFF = PGM1 used as programmable output (default)
Option [7] ON = PGM1 used as X10 output 7
Option [8] OFF = PGM2 used as programmable output (default)
Option [8] ON = PGM2 used as X10 output 8
With section [091] options [7] and [8] enabled (ON), PGMs 1 and
2 will follow the ON/OFF state of X10 outputs 7 and 8. Therefore
the PGMs will function as follows:
• When X10 output 7 is enabled, PGM1 will activate. When
X10 output 7 is disabled, PGM1 will deactivate.
• When X10 output 8 is enabled, PGM2 will activate. When
X10 output 8 is disabled, PGM2 will deactivate.
When section [091] options [7] and [8] are enabled, the PGM
outputs will disregard their PGM activation and deactivation
events (sections [086] to [089]).
Page 33

Paradox Magellan Systems 31
System Settings
Software Reset
Section [201]
Performing a software reset will reset all programmed sections
back to the factory defaults. To perform a software reset:
1. Access the installer programming mode (page 11).
2. Enter section [201].
You can also perform a software reset by removing power to the
console, pressing and holding down the [*] and [#] keys and
then reapplying power to the console.
Installer Lock
Section [180]: 000 = Disabled; 147 = Lock Enabled;
Default = Disabled
Program 147 into section [180] to lock all programming.
Performing a hardware reset will not affect the current console
settings. To remove the Installer Lock, enter 000.
Console Tamper Supervision
Section [090]: Option [5]
Option [5] OFF = Console Tamper Supervision disabled
(default)
Option [5] ON = Console Tamper Supervision enabled
Magellan can be programmed to monitor its on-board tamper
status. The console will follow its programmed tamper
recognition options. Refer to Tamper Recognition Options on
page 22 for more information.
Console Audible Trouble Warning
Section [090]: Option [2]
Option [2] OFF = Console beep on trouble disabled (default)
Option [2] ON = Console beep on trouble enabled
When enabled, the console emits an intermittent beep tone
whenever a trouble condition occurs in the system. The
intermittent beep tone remains activated until the user enters the
Trouble Display by pressing the left [
ACTION
] key (I). The
intermittent beeps will re-initialize whenever a new trouble
occurs or the trouble restores and re-occurs.
The only trouble not covered by this feature is the AC Power
Failure trouble. See AC Power Failure Warning on page 31.
FM Tuner Option
Section [093]: Option [8]
Option [8] OFF = FM tuner is disabled when the system is
armed (default)
Option [8] ON = FM tuner is enabled when system is armed
With section [093] option [8] ON, the Magellan’s radio is turned
ON automatically after the system is armed (after the Exit Delay
timer has elapsed).
Daylight Savings Time
Section [096]: Option [5]
Option [5] OFF = Daylight savings time disabled (default)
Option [5] ON = Daylight savings time enabled
With section [096] option [5] ON, Magellan adjusts the system’s
clock (time) for daylight saving changes. At 2:00AM on the first
Sunday of a full weekend in April, the console will add one hour
to the programmed time (clock). At 2:00 AM on the last Sunday
of a full weekend in October, the console will subtract one hour
from the programmed time.
AC Power Failure Warning
Section [096]: Option [6]
Option [6] OFF = AC power failure warning disabled (default)
Option [6] ON = AC power failure warning enabled
With this feature enabled, the console emits an intermittent beep
tone whenever an AC power failure is detected. The intermittent
beep tone remains activated until the user enters the Trouble
Display by pressing the left [
ACTION
] key (i). The intermittent
beeps will re-initialize whenever the trouble occurs or the trouble
restores and re-occurs.
The Trouble Display
When the system experiences problems or is tampered with, the
Information symbol ( ) will appear on the LCD screen and the
light will illuminate. The potential troubles that the Magellan
system can experience are listed below. To access the Trouble
Display:
1. Press the key.
2. Use the [
NEXT
] key to scroll through the displayed troubles.
3. Press the [OK] key to view details on the desired trouble.
Trouble Description
Bypass There is a zone (or zones) that is bypassed in
the system.
Alarm Memory An alarm has occurred in the system. The
zones displayed went into alarm.
Console Low Bat The backup battery pack is disconnected,
needs to be recharged or replaced.
Doorbell Low Bat Wireless transmitter being used as a doorbell
(page 17) requires its batteries changed.
Zone Low Battery Zone(s) displayed indicate where a wireless
transmitter’s battery needs to be replaced.
Clock Loss The time and date were reset to default. To
reprogram:
1. Press the
[
MENU
]
key.
2. Press the [3] key.
3. Press the
[12
HRS
]
key to display the time
using the 12-hour clock or the
[24
HRS
]
key
to display the time using the 24-hour clock.
4. Enter the desired time and then press
[OK]
.
5. Enter the date and then press
[OK]
.
Page 34

32 Reference & Installation Manual
AC Failure Power failure detected. The system is running
on the backup battery pack.
Supervision Trouble Zone(s) displayed have not sent a check-in
signal within the programmed interval
(page 22).
Console Tamper The Magellan console was tampered with.
Zone Tamper Zones displayed were tampered with.
Fail to Communicate
with Central
The Magellan console has failed to contact the
monitoring station.
Fail to Communicate
with Voice Reporting
The Magellan console has failed to contact
telephone number programmed for Voice
reporting.
Fail to Communicate
to Pager
The Magellan console has failed to contact
telephone number programmed for Pager
reporting.
Fail to Communicate
with PC
The Magellan console is unable to
communicate with the WinLoad software.
Fail to Communicate
with Voice Utility
The Magellan console has failed to contact
telephone number programmed for Voice
Utility reporting.
Trouble Description
Page 35

Paradox Magellan Systems 33
WinLoad Software Settings
Panel Answer Options
The following two options define how Magellan answers an
incoming call from a computer using the WinLoad Installer
Upload/Download Software.
Answering Machine Override
Section [074]: 010 to 255 seconds; 000 = disabled; Default =
disabled
When using WinLoad to communicate remotely with an
installation site that uses an answering machine or service, the
answering machine override must be programmed. Using
WinLoad, you will call Magellan, hang up, then call back. If the
installation site is called back within the delay programmed in
section [074], the console will override the answering machine or
service by picking-up the line after the first ring on the second
call. You must wait at least 10 seconds before attempting the
second call, otherwise, the console will think it is the same call.
For details on how to use WinLoad, refer to the WinLoad
On-line Help.
Example: A security installation is using an answering machine
set to answer after three rings. If section [074] has been
programmed with 040 (40 seconds) and the second call is made
within 40 seconds, Magellan will pick up the line on the first ring.
If it takes more than 40 seconds, the console will not answer on
the first ring and the answering machine will answer after three
rings.
Number of Rings
Section [072]: 001 to 015 rings; 000 = disabled; Default = 008
This value represents the number of rings Magellan will wait
before picking-up the line. If the line is not answered after the
number of programmed rings, the console will answer the call.
You must wait at least 10 seconds before attempting the second
call or Magellan will think it is the same call.
Panel Identifier
Section [108]: 4-digit Hexa-decimal number from 0000 to FFFF
This 4-digit code identifies the console to WinLoad before
initiating communication. Magellan will verify that the Panel
Identifier in the WinLoad software is the same as the code
programmed in section [108]. If the codes do not match, the
console will not establish communication. Therefore, be sure to
program the same panel identifier code into both Magellan and
WinLoad.
PC Password
Section [109]: 4-digit Hexa-decimal number from 0000 to FFFF
This 4-digit password identifies the PC to Magellan before
establishing communication. Program the same PC password
into both the console and WinLoad. If the passwords do not
match, WinLoad will not establish communication.
PC Telephone Number
Section [118]
Magellan will dial the number programmed in section [118] when
trying to initiate communication with a computer using WinLoad.
You can enter any digit from 0 to 9 and any special keys or
functions (see Table 8 on page 26) up to a maximum of 32 digits.
Call Back Feature
Section [098]: Option [4]
Option [4] OFF = Call Back feature disabled (default)
Option [4] ON = Call Back feature enabled
The Call Back feature provides additional security. When section
[098] option [4] in ON and a computer using WinLoad attempts to
communicate with Magellan, the console hangs up and calls the
computer back to re-verify identification codes and re-establish
communication. When Magellan hangs up, WinLoad
automatically goes into Wait for Call Mode, ready to answer
when the console calls back. The PC Telephone number must
be programmed (see PC Telephone Number on page 33).
Page 36

34 Reference & Installation Manual
Appendix 1: Ademco Contact ID Report Code List
CID# Reporting Code Programming
Value
Medical Alarms - 100
100 Medical alarm 01
101 Pendant transmitter 02
102 Fail to report in 03
Fire Alarms - 110
110 Fire alarm 04
111 Smoke 05
112 Combustion 06
113 Water flow 07
114 Heat 08
115 Pull station 09
116 Duct 0A
117 Flame 0B
118 Near alarm 0C
Panic Alarms - 120
120 Panic alarm 0D
121 Duress 0E
122 Silent 0F
123 Audible 10
124 Duress - Access granted 11
125 Duress - Egress granted 12
Burglar Alarms - 130
130 Burglary 13
131 Perimeter 14
132 Interior 15
133 24-hour 16
134 Entry/Exit 17
135 Day/Night 18
136 Outdoor 19
137 Tamper 1A
138 Near alarm 1B
139 Intrusion verified 1C
General Alarms - 140
140 General alarm 1D
141 Polling loop open 1E
142 Polling loop short 1F
143 Expansion module failure 20
144 Sensor tamper 21
145 Expansion module tamper 22
146 Silent burglary 23
147 Sensor supervision failure 24
24-hour Non-burglary - 150 and 160
150 24-hour non-burglary 25
151 Gas detected 26
152 Refrigeration 27
153 Loss of heat 28
CID# Reporting Code Programming
Value
154 Water leakage 29
155 Foil break 2A
156 Day trouble 2B
157 Low bottled gas level 2C
158 High temperature 2D
159 Low temperature 2E
161 Loss of air flow 2F
162 Carbon monoxide detected 30
163 Tank level 31
Fire Supervisory - 200 and 210
200 Fire supervisory 32
201 Low water pressure 33
202 Low CO
2
34
203 Gate valve sensor 35
204 Low water level 36
205 Pump activated 37
206 Pump failure 38
System Troubles - 300 and 310
300 System trouble 39
301 AC loss 3A
302 Low system battery 3B
303 RAM checksum bad 3C
304 ROM checksum 3D
305 System reset 3E
306 Panel program changed 3F
307 Self-test failure 40
308 System shutdown 41
309 Battery test failure 42
310 Ground fault 43
311 Battery missing/dead 44
312 Power supply over current limit 45
313 Engineer reset 46
Sounder/Relay Troubles - 320
320 Sounder/relay 47
321 Bell 1 48
322 Bell 2 49
323 Alarm relay 4A
324 Trouble relay 4B
325 Reversing relay 4C
326 Notification appliance chk. #3 4D
327 Notification appliance chk. #4 4E
System Peripheral Troubles - 330 and 340
330 System peripheral 4F
331 Polling loop open 50
332 Polling loop short 51
333 Expansion module failure 52
334 Repeater failure 53
Page 37

Paradox Magellan Systems 35
CID# Reporting Code Programming
Value
335 Local printer paper out 54
336 Local printer failure 55
337 Expansion module DC loss 56
338 Expansion module low battery 57
339 Expansion module reset 58
341 Expansion module tamper 59
342 Expansion module AC loss 5A
343 Expansion module self-test fail 5B
344 RF receiver jam detect 5C
Communication Troubles - 350 and 360
350 Communication 5D
351 Telco 1 fault 5E
352 Telco 2 fault 5F
353 Long range radio 60
354 Fail to communicate 61
355 Loss of radio supervision 62
356 Loss of central polling 63
357 Long range radio VSWR problem 64
Protection Loop Troubles - 370
370 Protection loop 65
371 Protection loop open 66
372 Protection loop short 67
373 Fire trouble 68
374 Exit error alarm 69
375 Panic zone trouble 6A
376 Hold-up zone trouble 6B
377 Swinger trouble 6C
378 Cross-zone trouble 6D
Sensor Troubles - 380 and 390
380 Sensor trouble 6E
381 Loss of supervision - RF 6F
382 Loss of supervision - RPM 70
383 Sensor tamper 71
384 RF transmitter low battery 72
385 Smoke detector Hi sensitivity 73
386 Smoke detector Low sensitivity 74
387 Intrusion detector Hi sensitivity 75
388 Intrusion detector Low sensitivity 76
389 Sensor self-test failure 77
391 Sensor watch trouble 78
392 Drift compensation error 79
393 Maintenance alert 7A
Open/Close - 400
400 Open/Close 7B
401 Open/Close by user 7C
402 Group open/close 7D
403 Automatic open/close 7E
406 Cancel 7F
407 Remote arm/disarm 80
CID# Reporting Code Programming
Value
408 Quick arm 81
409 Keyswitch open/close 82
Remote Access - 410
411 Call back request made 83
412 Success - download access 84
413 Unsuccessful access 85
414 System shutdown 86
415 Dialer shutdown 87
416 Successful upload 88
Access Control - 420 and 430
421 Access denied 89
422 Access report by user 8A
423 Forced access 8B
424 Egress denied 8C
425 Egress granted 8D
426 Access door propped open 8E
427 Access point door status monitor trouble 8F
428 Access point request to exit 90
429 Access program mode entry 91
430 Access program mode exit 92
431 Access threat level change 93
432 Access relay/trigger fail 94
433 Access RTE shunt 95
434 Access DSM shunt 96
Arming - 440 and 450
441 Armed Stay 97
442 Keyswitch armed Stay 98
450 Exception open/close 99
451 Early open/close 9A
452 Late open/close 9B
453 Failed to open 9C
454 Failed to close 9D
455 Auto-arm failed 9E
456 Partial arm 9F
457 Exit error (user) A0
458 User on premises A1
459 Recent close A2
System - 460
461 Wrong code entry A3
462 Legal code entry A4
463 Re-arm after alarm A5
464 Auto-arm time extended A6
465 Panic alarm reset A7
466 Service on/off premises A8
Sounder Relay Disabled - 520
520 Sounder/Relay disabled A9
521 Bell 1 disabled AA
522 Bell 2 disabled AB
523 Alarm relay disabled AC
524 Trouble relay disabled AD
Page 38

36 Reference & Installation Manual
CID# Reporting Code Programming
Value
525 Reversing relay disabled AE
526 Notification appliance chk. #3 disabled AF
527 Notification appliance chk. #4 disabled B0
Modules - 530
531 Module added B1
532 Module removed B2
Communication Disables - 550 and 560
551 Dialer disabled B3
552 Radio transmitter disabled B4
Bypasses - 570
570 Zone bypass B5
571 Fire bypass B6
572 24Hr. zone bypass B7
573 Burglary bypass B8
574 Group bypass B9
575 Swinger bypass BA
576 Access zone shunt BB
577 Access point bypass BC
Test/Misc. - 600
601 Manual trigger test BD
602 Periodic test report BE
603 Periodic RF transmission BF
604 Fire test C0
605 Status report to follow C1
606 Listen-in to follow C2
607 Walk test mode C3
608 Periodic test - system trouble present C4
609 Video transmitter active C5
611 Point test OK C6
612 Point not tested C7
613 Intrusion zone walk tested C8
614 Fire zone walk tested C9
615 Panic zone walk tested CA
616 Service request CB
621 Event log reset CC
622 Event log 50% full CD
623 Event log 90% full CE
624 Event log overflow CF
625 Time/Date reset D0
626 Time/Date inaccurate D1
627 Program mode entry D2
628 Program mode exit D3
629 32-hour event log marker D4
630 Schedule change D5
631 Exception schedule change D6
632 Access schedule change D7
654 System inactivity D8
Page 39

Paradox Magellan Systems 37
Index
Numerics
001 to 016 .............................................................. 13–16
021 to 036
.....................................................................17
041 to 056
.....................................................................18
058
................................................................................17
059
................................................................................17
060
................................................................................13
061
................................................................................13
062
................................................................................21
063
................................................................................22
064
................................................................................20
065
................................................................................16
066
................................................................................28
067
................................................................................15
068
................................................................................30
069
................................................................................30
070
................................................................................29
071
................................................................................29
072
................................................................................33
073
................................................................................28
074
................................................................................33
075
................................................................................16
076
................................................................................27
078
................................................................................16
079
................................................................................26
080
................................................................................21
084
................................................................................29
085
................................................................................20
086
................................................................................30
087
................................................................................30
088
................................................................................30
089
................................................................................30
090
................................................................... 12, 30, 31
091
......................................................................... 23, 30
092
......................................................................... 20, 21
093
................................................................... 21, 29, 31
094
................................................................... 16, 22, 29
095
........................................................................... 8, 16
096
................................................................... 17, 23, 31
098
......................................................................... 28, 33
099
......................................................................... 26, 27
100
......................................................................... 12, 27
101
................................................................................27
102
................................................................................27
103
................................................................................22
104
................................................................................22
105
................................................................................27
106
................................................................................27
107
................................................................................26
108
................................................................................33
109
................................................................................33
111
................................................................................26
112
................................................................................26
113
................................................................................26
114
................................................................................26
118
................................................................................ 33
119
................................................................................ 26
120 to 123
..................................................................... 24
124
.......................................................................... 20, 24
125
................................................................................ 24
126 to 129
..................................................................... 24
130
................................................................................ 24
131 to 134
..................................................................... 24
135 to 138
..................................................................... 24
139
................................................................................ 24
140
.................................................................... 12, 24, 25
141 to 144
..................................................................... 25
145 to 148
..................................................................... 25
149
................................................................................ 25
150
................................................................................ 25
151
................................................................................ 25
153
................................................................................ 25
154
.......................................................................... 12, 25
155
................................................................................ 25
156
................................................................................ 25
161 to 176
..................................................................... 18
180
................................................................................ 31
181
................................................................................ 12
182
................................................................................ 12
187
................................................................................ 14
190
................................................................................ 14
200
................................................................................ 12
201
................................................................................ 31
24Hr. zone types
24Hr. Burglary Zones
................................................ 14
24Hr. Buzzer Zones
.................................................. 14
24Hr. Freeze Zones
.................................................. 15
24Hr. Gas Zones
...................................................... 15
24Hr. Heat Zones
...................................................... 15
24Hr. Hold-up Zones
................................................. 14
24Hr. Water Zones
.................................................... 15
Standard 24Hr. Fire Zones
......................................... 14
A
AC failure report code ................................................... 29
AC power
........................................................................ 6
AC power failure warning
............................................. 31
Account number
........................................................... 26
Activation event
............................................................ 30
Adding a zone
................................................................. 4
Ademco Contact ID
...................................................... 27
Ademco slow
................................................................ 27
Alarm options
Bell Cut-off timer
....................................................... 22
Check-in Supervision
................................................. 22
Panic alarms
............................................................ 23
Tamper Recognition options
....................................... 22
Wireless Transmitter Supervision options
.................... 22
Alarm types
................................................................... 15
Alternate dial options
.................................................... 28
Answer options, Panel
.................................................. 33
Page 40

38 Reference & Installation Manual
Answering machine override .........................................33
Arming options
Auto-arm options
....................................................... 20
Bell Squawk on Arm/Disarm with Remote Control
.........21
Closing Delinquency Timer
.........................................21
Exit delay
.................................................................. 21
Exit Delay Termination
...............................................21
Follow Zone switches to Entry Delay 2
......................... 21
No Exit Delay when Arming with Remote Control
..........21
No Movement Auto-arming
.........................................20
One-touch arming
...................................................... 21
Regular Arming switches to Force Arming
.................... 20
Regular Arming switches to Stay Arming
...................... 20
Stay Arming switches to Force Arming
......................... 20
Timed Auto-arming
....................................................20
Arming report codes
...................................................... 24
Assigning remote controls
.............................................18
Assigning wireless doorbells
.........................................17
Assigning wireless zones
..............................................17
Auto-arm timer
.............................................................. 20
Auto-arming options
...................................................... 20
Auto-test report
............................................................. 29
Auto-zone Shutdown
.....................................................15
Auto-zone Shutdown counter
........................................15
B
Backup battery pack ....................................................... 6
Backup telephone number
............................................26
Battery pack
.................................................................... 6
Bell Cut-off timer
........................................................... 22
Bell squawk on Arm/Disarm with Remote Control
........21
Bypass option
............................................................... 15
Bypass options, Supervision
.........................................22
Bypass options, Tamper
...............................................22
C
Call back feature ........................................................... 33
Call direction
................................................................. 27
Central station telephone numbers
............................... 26
Check-in Supervision time
............................................23
Closing Delinquency Timer
...........................................21
Code length
................................................................... 12
Codes
Code length
.............................................................. 12
Duress code
............................................................. 12
Installer code
............................................................ 12
Maintenance code
.....................................................12
System master code
..................................................12
Connections
AC power
................................................................... 6
Backup battery
............................................................ 6
Hardwire zone
............................................................. 8
Paradox Memory Key
.............................................9, 10
PGMs
......................................................................... 7
Telephone Line
........................................................... 6
UIP-256
...................................................................... 8
WinLoad
..................................................................... 8
X10
............................................................................9
Console account number
..............................................26
Console audible trouble warning
................................... 31
Console tamper supervision
..........................................31
Console telephone numbers
.........................................25
Contact ID
.....................................................................27
Cut-off, Bell
....................................................................22
D
Date entry, single digit ...................................................11
Daylight savings time
....................................................31
Deactivation event
.........................................................30
Definitions, zone
24Hr. Burglary Zones
.................................................14
24Hr. Buzzer Zones
...................................................14
24Hr. Freeze Zones
...................................................15
24Hr. Gas Zones
.......................................................15
24Hr. Heat Zones
......................................................15
24Hr. Hold-up Zones
..................................................14
24Hr. Water Zones
....................................................15
Delayed Fire Zones
....................................................14
Entry Delay 1
............................................................13
Entry Delay 2
............................................................13
Follow Zones
.............................................................13
Follow/Stay Zones
.....................................................14
Instant Zones
............................................................14
Instant/Stay Zones
.....................................................14
Standard 24Hr. Fire Zones
..........................................14
Delay before Alarm Report Code Transmission
............16
Delay between dialing attempts
....................................27
Delay Power Failure Report
..........................................29
Delay, Alarm Transmission
...........................................16
Delay, Intellizone
...........................................................16
Delay, PGM
...................................................................30
Delay, Remote Panic Disarm Lock
................................16
Delay, Stay Delay Zones
...............................................16
Delayed Fire Zones
.......................................................14
Deleting wireless zones
.................................................17
Dialer & Reporting Settings
Alternate Dial Option
..................................................28
Auto-test report
..........................................................29
Console account number
............................................26
Console telephone numbers
.......................................25
Delay between dialing attempts
...................................27
Dialing method
..........................................................28
Disarm reporting options
.............................................29
event call direction
.....................................................27
Force Dial Option
.......................................................28
Power failure report delay
...........................................29
Pulse ratio
.................................................................28
Recent close delay
....................................................28
Report Codes
............................................................24
Reporting formats
......................................................27
Switch to pulse dialing
................................................28
TLM
.........................................................................28
Zone restore report options
.........................................29
Dialing method
..............................................................28
Direct connect
.................................................................6
Disarm reporting options
...............................................29
Disarming report codes
.................................................24
Display, trouble
..............................................................31
Doorbell tones
...............................................................17
Duress code
..................................................................12
Page 41

Paradox Magellan Systems 39
E
Entry Delay 1 .................................................................13
Entry Delay 2
.................................................................13
EOL zones
.....................................................................16
Event
PGM activation
..........................................................30
PGM deactivation
......................................................30
Event call direction
........................................................27
Exit Delay Termination
..................................................21
F
Feature select programming .........................................11
Fire zone types
Delayed Fire Zones
....................................................14
Standard 24Hr. Fire Zones
..........................................14
FM tuner option
.............................................................31
Follow Zone switches to Entry Delay 2
.........................21
Follow Zones
.................................................................13
Follow/Stay Zones
.........................................................14
Force Dial Option
..........................................................28
Force Zones
..................................................................16
Formats, reporting
.........................................................27
H
Hardwire zone connections .............................................8
I
Indentifier, panel ............................................................33
Installer code
.................................................................12
Installler lock
..................................................................31
Instant Zones
.................................................................14
Instant/Stay Zones
........................................................14
Intellizone
......................................................................15
Intellizone Delay timer
...................................................16
L
Line plug connect ............................................................7
Location
...........................................................................9
Lock system master code
..............................................12
Lock, installer
................................................................31
M
Maintenance code .........................................................12
Master code
...................................................................12
Master code lock
...........................................................12
Master code reset
..........................................................12
Memory Key
....................................................................9
Memory Key programming
............................................11
Mounting Magellan
........................................................10
N
No Exit Delay when Arming with Remote Control .........21
No Movement Auto-arming
...........................................20
No Movement timer
.......................................................20
Normal state, PGM
........................................................30
Number of rings
.............................................................33
O
Options, zone
Alarm types
.............................................................. 15
Auto-zone Shutdown
................................................. 15
Bypass option
........................................................... 15
Delay before Alarm Report Code Transmission
............ 16
Force Zones
............................................................. 16
Intellizone
................................................................. 15
Overview, zone programming
....................................... 13
P
Pack, backup battery ...................................................... 6
Pager reporting message
............................................. 26
Pager telephone number
.............................................. 26
Panel answer options (WinLoad)
Answering machine override
...................................... 33
Number of rings
........................................................ 33
Panel identifier
.............................................................. 33
Panic Alarm types
......................................................... 23
Panic alarms
................................................................. 23
Password, PC
............................................................... 33
PC password
................................................................ 33
PC telephpone number
................................................. 33
PGM (Control Panel)
Deactivation Event
.................................................... 30
PGM Delay
............................................................... 30
PMC-3
............................................................................ 9
Power failure report delay
............................................. 29
Power, AC
...................................................................... 6
Programmable outputs
................................................... 7
Activation event
........................................................ 30
Deactivation event
.................................................... 30
Normal state
............................................................. 30
PGM delay
............................................................... 30
X10 option
................................................................ 30
Programming methods
Feature select programming
....................................... 11
Paradox Memory Key
................................................ 11
Single digit data entry
................................................ 11
Through the built-in keypads
...................................... 11
WinLoad
.................................................................. 11
Programming zones
..................................................... 13
Pulse ratio
..................................................................... 28
R
Ratio, pulse ................................................................... 28
Recent close delay
....................................................... 28
Regular arming switches to Force arming
.................... 20
Regular arming switches to Stay arming
...................... 20
Remote controls
Assigning
................................................................. 18
Programming buttons
................................................ 18
Remote controls, assigning
.......................................... 18
Report codes
AC failure
................................................................. 29
Arming
..................................................................... 24
Disarming
................................................................. 24
Special
.................................................................... 25
Special alarm
............................................................ 24
Special arming
.......................................................... 24
Page 42

40 Reference & Installation Manual
Special disarming
...................................................... 24
System trouble
.......................................................... 25
System trouble restore
...............................................25
Test
.........................................................................29
Zone alarm
............................................................... 24
Zone alarm restore
....................................................24
Zone tamper
............................................................. 25
Zone tamper restore
..................................................25
Report formats
Ademco Contact ID format
..........................................27
Ademco slow format
..................................................27
SESCOA format
........................................................ 27
SIA FSK format
......................................................... 27
Silent Knight fast format
.............................................27
Standard Pulse format
...............................................27
Reporting & Dialer Settings
Account number
........................................................ 26
Alternate dial options
.................................................28
Auto-test report
......................................................... 29
Console telephone numbers
.......................................25
Delay between dialing attempts
................................... 27
Dialing method
.......................................................... 28
Disarm report options
.................................................29
Event call direction
....................................................27
Force Dial Option
...................................................... 28
Power Failure report delay
..........................................29
Pulse ratio
................................................................ 28
Recent Close Delay
...................................................28
Report Codes
............................................................ 24
Reporting formats
...................................................... 27
Switch to Pulse dialing
...............................................28
TLM
.........................................................................28
Zone Restore Report options
......................................29
Reset software
.............................................................. 31
Reset system master code
............................................12
S
Service telephone number ............................................26
SESCOA
....................................................................... 27
Shutdown, Auto-zone
....................................................15
SIA FSK
........................................................................ 27
Silent Knight Fast
.......................................................... 27
Single digit data entry method
.......................................11
Software reset
............................................................... 31
Special alarm report codes
...........................................24
Special arming report codes
.........................................24
Special disarming report codes
..................................... 24
Special keys for telephone nos.
.................................... 26
Special report codes
.....................................................25
Standard 24Hr. Fire Zones
............................................14
Stay arming switches to Force arming
.......................... 20
Stay zone types
Follow/Stay Zones
.....................................................14
Instant/Stay Zones
.....................................................14
Supervision
Check-in
................................................................... 22
Console tamper
......................................................... 31
Wireless transmitters
.................................................22
Supervision Bypass options
..........................................22
Switch to Pulse dialing
..................................................28
System master code
.....................................................12
System master code lock
..............................................12
System master code reset
.............................................12
System settings
AC power failure warning
............................................31
Console audible trouble warning
..................................31
Console tamper supervision
........................................31
Daylight savings time
.................................................31
FM tuner option
.........................................................31
Installer lock
..............................................................31
Software reset
...........................................................31
System trouble report codes
.........................................25
System trouble restore report codes
.............................25
T
Tamper Bypass options .................................................22
Tamper Recognition options
.........................................22
Tamper supervision, console
........................................31
Telephone line connection
Direct connect
.............................................................6
Line plug connect
........................................................7
Telephone Line Monitoring (TLM)
.................................28
Telephone numbers
......................................................25
Central station
...........................................................26
Pager
.......................................................................26
PC
...........................................................................33
Service
.....................................................................26
Voice Message
..........................................................26
Test report code
............................................................29
Test Report, Automatic
..................................................29
Timed Auto-arming
........................................................20
Timers
Alarm Transmission
...................................................16
Auto-arm
...................................................................20
Auto-zone Shutdown
..................................................15
Bell Cut-off
................................................................22
Check-in Supervision
.................................................23
Closing Delinquency
..................................................21
Delay between dialing attempts
...................................27
Entry Delay 1
............................................................13
Entry Delay 2
............................................................13
Exit delay
..................................................................21
Intellizone
.................................................................16
No Movement
............................................................20
PGM delay
................................................................30
Power failure report delay
...........................................29
Recent close
.............................................................28
TLM fail
....................................................................28
TLM fail timer
.................................................................28
Tones, doorbell
..............................................................17
Transmitter supervision options
....................................22
Trouble display
..............................................................31
Trouble, audible warning
...............................................31
U
User codes
Duress code
..............................................................12
Installer code
.............................................................12
Maintenance code
.....................................................12
System master code
..................................................12
User code length
.......................................................12
Page 43

Paradox Magellan Systems 41
V
Viewing ..........................................................................17
Viewing transmitter signal strength
...............................17
Voice message repetitions
............................................26
Voice message telephone numbers
..............................26
W
Wall plate .........................................................................9
WinLoad
........................................................................11
WinLoad settings
Call back feature
........................................................33
Panel answer options
.................................................33
Panel identifier
...........................................................33
PC password
.............................................................33
PC telephone number
................................................33
Wireless programming
Assigning remote controls
...........................................18
Assigning wireless doorbells
.......................................17
Assigning wireless zones
............................................17
Deleting wireless zones
..............................................17
Programming remote control buttons
...........................18
Viewing signal strength
...............................................17
Wireless Transmitter Supervision options
.....................22
Wireless zones become hardwire
.................................16
Wirless doorbell tones
...................................................17
X
X10 connections ..............................................................9
X10 PGM option
............................................................30
Z
Zone alarm report codes ...............................................24
Zone alarm restore report codes
...................................24
Zone definitions
24Hr. Burglary Zones
.................................................14
24Hr. Buzzer Zones
...................................................14
24Hr. Freeze Zones
...................................................15
24Hr. Gas Zones
.......................................................15
24Hr. Heat Zones
......................................................15
24Hr. Hold-up Zones
..................................................14
24Hr. Water Zones
.....................................................15
Delayed Fire Zones
....................................................14
Entry Delay 1
............................................................13
Entry Delay 2
............................................................13
Follow Zones
.............................................................13
Follow/Stay Zones
.....................................................14
Instant Zones
............................................................14
Instant/Stay Zones
.....................................................14
Standard 24Hr. Fire Zones
..........................................14
Zone options
Alarm types
...............................................................15
Auto-zone Shutdown
..................................................15
Bypass option
............................................................15
Delay before Alarm Code Transmission
.......................16
Force Zones
..............................................................16
Intellizone
.................................................................15
Stay Delay Zones
......................................................16
Zone programming
........................................................13
Zone restore report options
...........................................29
Zone tamper report codes
.............................................25
Zone tamper restore report codes
................................ 25
Zone, hardwire
................................................................ 8
Page 44

42 Reference & Installation Manual
Page 45

Paradox Magellan Systems 43
WARRANTY
Paradox Security Systems Ltd. (“Seller”) warrants its products to be free
from defects in materials and workmanship under normal use for a
period of one year. Except as specifically stated herein, all express or
implied warranties whatsoever, statutory or otherwise, including without
limitation, any implied warranty of merchantability and fitness for a
particular purpose, are expressly excluded. Because Seller does not
install or connect the products and because the products may be used in
conjunction with products not manufactured by Seller, Seller cannot
guarantee the performance of the security system and shall not be
responsible for circumstances resulting from the product’s inability to
operate. Seller obligation and liability under this warranty is expressly
limited to repairing or replacing, at Seller's option, any product not
meeting the specifications. Returns must include proof of purchase and
be within the warranty period. In no event shall the Seller be liable to the
buyer or any other person for any loss or damages whether direct or
indirect or consequential or incidental, including without limitation, any
damages for lost profits stolen goods, or claims by any other party,
caused by defective goods or otherwise arising from the improper,
incorrect or otherwise faulty installation or use of the merchandise sold.
Notwithstanding the preceding paragraph, the Seller’s maximum liability
will be strictly limited to the purchase price of the defective product. Your
use of this product signifies your acceptance of this warranty.
BEWARE: Dealers, installers and/or others selling the product are not
authorized to modify this warranty or make additional warranties that are
binding on the Seller.
© 2004 Paradox Security Systems Ltd. All rights reserved.
Magellan is a trademark or registered trademark of Paradox Security
Systems Ltd. or its affiliates in Canada, the United States and/or other
countries. All rights reserved. Specifications may change without prior
notice.
For technical support in Canada or the U.S., call 1-800-791-1919 for
English or 1-866-912-0600 for French, Monday to Friday from 8:00AM to
8:00PM EST. For technical support outside Canada and the U.S., call
00-1-450-491-7444, Monday to Friday from 8:00AM to 8:00PM EST.
FCC WARNINGS
IMPORTANT INFORMATION
This equipment complies with Part 68 of the FCC rules subpart D and
CS-03. Inside the cover of this equipment is a label that contains, among
other information, the FCC registration number of this equipment.
NOTIFICATION TO TELEPHONE COMPANY
Upon request, customer shall notify telephone company of particular line
to which the connection will be made, and provide the FCC registration
number and the ringer equivalence of the protective circuit.
FCC REGISTRATION NUMBER:5A7AL01BMG-6060
RINGER EQUIVALENCE NUMBER:0.1B (U.S. & Canada)
USOC JACK:RJ31X (USA), CA31A (CANADA)
TELEPHONE CONNECTION REQUIREMENTS
Except for telephone company provided ringers, all connections to the
telephone network shall be made through standard plugs and telephone
company provided jacks, or equivalent, in such a manner as to allow for
easy, immediate disconnection of terminal equipment. Standard jacks
shall be so arranged that, if plug connected thereto is withdrawn, no
interference to operation of equipment at customer's premises which
remains connected to telephone network shall occur by reason of such
withdrawal.
INCIDENCE OF HARM
Should terminal equipment/protective circuitry cause harm to telephone
network, telephone company shall, where practicable, notify customer
that temporary disconnection of service may be required; however,
where prior notice is not practicable, the telephone company may
temporarily discontinue service if action is deemed reasonable in
circumstances. In case of temporary discontinuance, telephone
company shall promptly notify customer and will be given opportunity to
correct the situation.
CHANGES IN TELEPHONE COMPANY EQUIPMENT OR FACILITIES
The telephone company may make changes in its communication
facilities, equipment operations or procedures, where such actions are
reasonably required and proper in its business. Should any such
changes render customer's terminal equipment incompatible with the
telephone company facilities, the customer shall be given adequate
notice to effect the modifications to maintain uninterrupted service.
GENERAL
This equipment shall not be used on coin telephone lines. Connection to
party line service is subject to state tariffs.
RINGER EQUIVALENCE NUMBER (REN)
The ren is useful to determine the quantity of devices that you may
connect to your telephone line and still have all of those devices ring
when your telephone number is called. In most, but not all areas, sum of
the ren's of all devices connected to one line should not exceed five
(5.0). To be certain of the number of devices that you may connect to
your line, you may want to contact your local telephone company.
EQUIPMENT MAINTENANCE FACILITY
If you experience trouble with this telephone equipment, please contact
facility indicated below for information on obtaining service or repairs.
The telephone company may ask that you disconnect this equipment
from network until problem is corrected or until you are sure that the
equipment is not malfunctioning.
FCC PART 15, WARNINGSINFORMATION TO USER
This equipment has been tested and found to comply with the limits for
Class B digital devices, pursuant to Part 15 of FCC rules. These limits
are designed to provide reasonable protection against harmful
interference in a residential installation. This equipment generates, uses
and can radiate radio frequency energy, and, if not installed and used in
accordance with the instructions, may cause harmful interference to
radio communications. However, there is no guarantee that interference
will not occur in a particular installation. If this equipment does cause
harmful interference to equipment intermittently, the user is encouraged
to try to correct the interference by one or more of the following
measures: (1) re orient or relocate the receiving antenna; (2) increase
the separation between the equipment and receiver; (3) connect the
equipment to an outlet on a circuit other than the one to which the
receiver is connected, or (4) consult the dealer or an experienced radio/
tv technician for assistance.
CAUTION:
Changes or modifications not expressly approved by PARADOX
SECURITY SYSTEMS could void the user's authority to operate the
equipment.
Page 46

Page 47

Page 48

780 Industriel Blvd., Saint-Eustache (Quebec) J7R 5V3 CANADA
Tel.: (450) 491-7444 Fax: (450) 491-7313
www.paradox.ca
Printed in Canada - 09/2004 MAGELLAN-EI01
 Loading...