

Page 1

IPR512: IP Monitoring Receiver
Serial
LAN
WAN1
WAN2
COM1
COM2
Paradox Control
Panel
Paradox Internet
Module (IP100)
Paradox IP Monitoring
Receiver (IPR512)
Automation
Software
Serial printer/
PC
Router
Routers
Web Page
Interface
Paradox Communicator Module -
GPRS Edition (PCS100)
COM 1
(PC)
COM
2
(SERIAL OUT)
LAN WAN
1 WAN 2
INPUT
TRIGGER
C1
COM NO
OUTPUT
RELAY
I
O
PARADOX.COM
Automation
Software
COM 1
(PC)
COM
2
(SERIAL OUT)
LAN WAN
1 WAN 2
INPUT
TRIGGER
C1
COM NO
OUTPUT
RELAY
I
O
PARADOX.COM
Serial printer/
PC
Getting Started
The following instructions explain the basic connections and programming require d to get your Paradox IP Monitoring
Receiver up and running. They also guide the installer on how to register the Paradox reporting module (IP100 Internet
Module or PCS100 Communicator Module - GPRS Edition) to the receiver. For more detailed information, please refer to
the IPR512 Operations Manual.
Figure 1: System Overview
Out of the Box (included): Additional Items Required (not included)
• Paradox IP Monitoring Receiver (IPR512)
• 1GB memory card
• 1.8m (6ft) power cable
• 3m (10ft) DB25 to DB9 serial cable for COM1
• DB9 gender changer
• Rack-mount kit (brackets and screws)
• CAT5 network cable for LAN and WAN1/WAN2
• Optional: DB9 or DB25 serial cable (RS-232) for COM2
• Router and computer on a network to access internal web
page interface (LAN)
• Router on a network with internet access (W AN1) to receive
control panel report codes
• Desktop installation kit (rubber feet)
• Removable connector for Input/Output Relay
Step 1: Connect COM1 (Automation Software)
Connect the receiver to a PC running the Automation Software. Connect the provided 3m (10ft) DB25 to DB9 cable
between the receiver’s COM1 connector and a COM port on the PC, or on the PC’s serial hub.
Step 2: Connect COM2 (Optional: Serial printer/PC)
This step is optional. Connect the receiver to a serial printe r or to a PC running RS232 serial communication software. The
receiver sends reported events in plain text format through COM2 (RS-232), which can be printed or viewed. Connect a
serial cable between the receiver’s COM2 (DB9) connector and a COM port on the serial printer or PC (gender changer is
included).
IPR512: IP Monitoring Receiver 1 of 8 Quick Start
Page 2
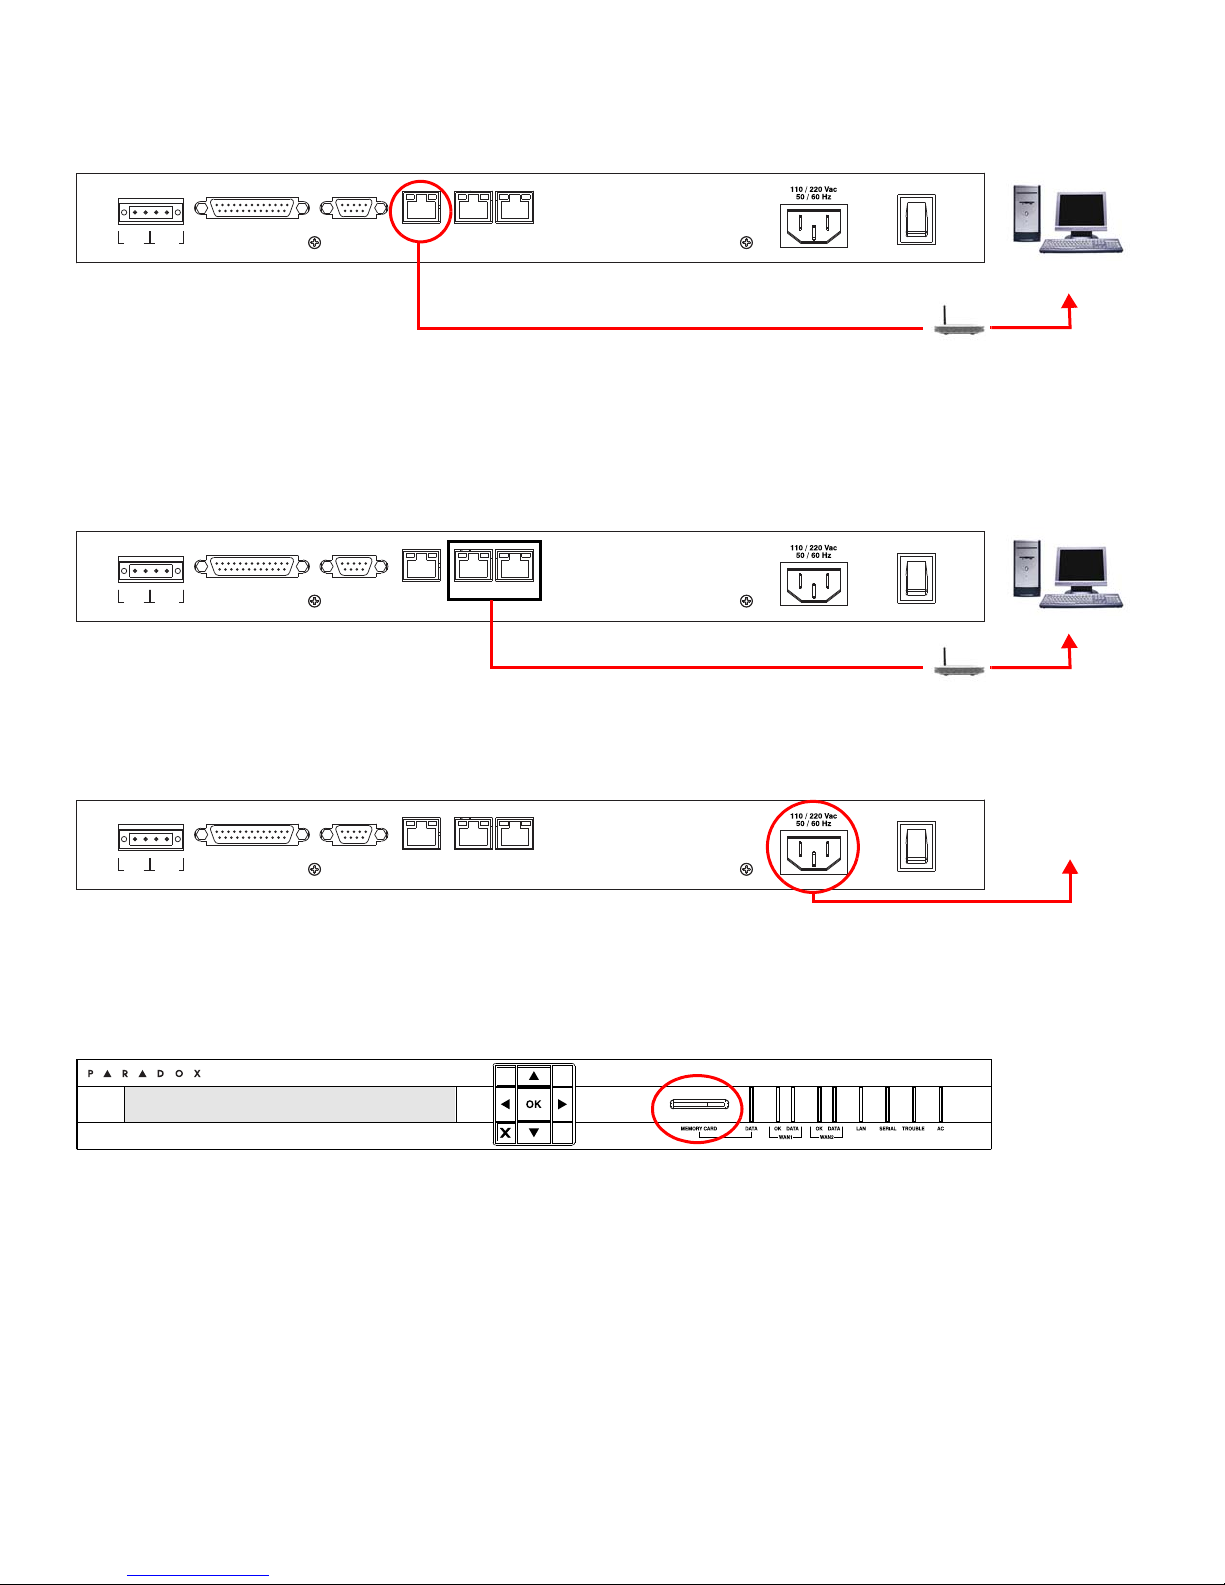
Step 3: Connect LAN (Web Page Interface)
COM 1
(PC)
COM
2
(SERIAL OUT)
LAN WAN
1 WAN 2
INPUT
TRIGGER
C1
COM NO
OUTPUT
RELAY
I
O
PARADOX.COM
Network
PC
Router
COM 1
(PC)
COM
2
(SERIAL OUT)
LAN WAN
1 WAN 2
INPUT
TRIGGER
C1
COM NO
OUTPUT
RELAY
I
O
PARADOX.COM
WAN
Router
COM 1
(PC)
COM
2
(SERIAL OUT)
LAN WAN
1 WAN 2
INPUT
TRIGGER
C1
COM NO
OUTPUT
RELAY
I
O
PARADOX.COM
UPS
Uninterruptible
Power Supply
IP Monitoring Receiver
IPR512
Connect the receiver to a router on a network. A computer on the network will be used to access the receiver’s internal web
page interface in order to configure the re ceiver. Connect a CAT5 network cable between the receiver’s LAN connector and
the router of the network.
Step 4: Connect WAN1 (Internet Service Provider)
Connect the receiver to a router on a network with access to the internet. System events are sent through the internet to the
WAN port of the receiver defined by the IP address and port set in the control panel. Connect a CAT5 network cable
between the receiver’s WAN1 connector and the r outer of a netwo rk with internet access. Connect WAN2 to another router
and network to provide redundant reporting through a different Internet Service Provider (ISP). Note: WAN2 is not
available on the present version. Check the Web for updates.
Step 5: Connect Power
Connect the AC power cable (included) between the plug at the back of the receiver and an Uninterruptible Power Supply
(UPS).
Step 6: Insert Memory Card (Data Backup)
Insert memory card (minimum 1GB recommended) into the Memory Card slot. The IPR512 supports any external SD, SD/
HC, or MMC memory card. The receiver backs up data (receiver configuration and account information) at programmable
intervals (default: every 2 hours). Manual backups can be performed from the receiver LCD menu (see IPR512 Operating
Manual for details).
IPR512: IP Monitoring Receiver 2 of 8 Quick Start
Page 3
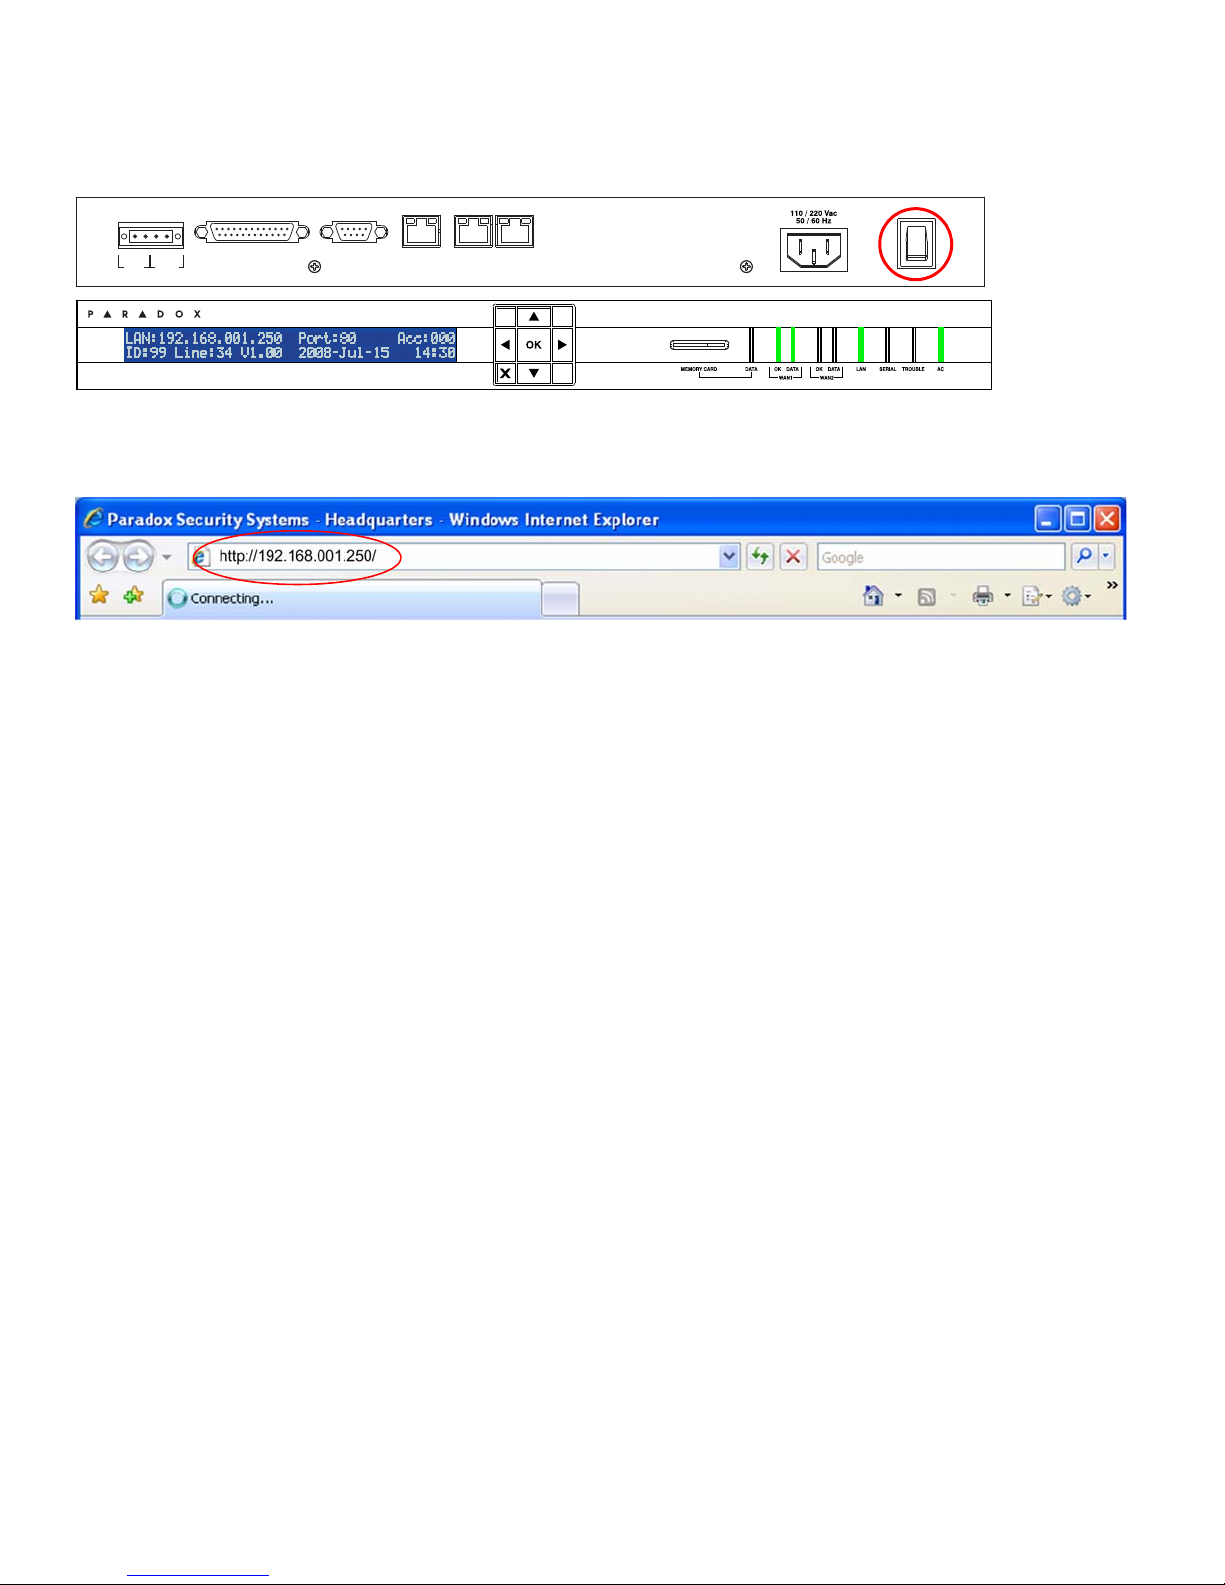
Step 7: Power Up
COM 1
(PC)
COM
2
(SERIAL OUT)
LAN WAN
1 WAN 2
INPUT
TRIGGER
C1
COM NO
OUTPUT
RELAY
I
O
PARADOX.COM
IP Monitoring Receiver
IPR512
Turn on the receiver by pressing the on/off switch. The receiver will go through an initialization process. When complete,
the LCD will display the information show below and the WAN1, LAN and AC lights will be ON as shown below. Note: If the
TROUBLE light is ON, please refer to “Trouble and LED Display” on page 7. However, as long as the AC and LAN lights
are on, you can proceed to step 8.
Step 8: Access Receiver’s Web Page Interface
Open a web browser from a computer on the network connected to the receiver’s LAN port. Refer to “Step 3: Connect LAN
(Web Page Interface)” on page 2. In the address line, enter the receiver’s LAN IP Address (default: 192.168.001.250).
The Login window will appear. If you get an error p age, you must change the receiver’s LAN IP address and Subnet Mask.
Speak to your network administrator to obtain an IP Address and Subnet Mask that will permit access to the receiver on
your network. Perform the following to change the receiver’s default IP Address and Subnet Mask:
1. Press OK on the receiver to access the Main Menu. If there are any troubles, pressing OK will enter the Trouble Menu.
If this occurs, press X to access the Main Menu.
2. Use the Up/Down arrows and scroll to LAN Settings and press OK. The LCD will display the
LAN IP Address and LAN Subnet Mask.
3. To change the IP Address, use the Up/Down arrows to change the value, use the Left/Right arrows to scroll and press
OK when done.
4. To change the Subnet Mask, use the Up/Down arrows to change the value, use the Left/Right arrows to scroll and
press OK when done.
5. The LCD will display New LAN settings saved for 4 seconds.
Step 9: Login
Enter the username (default: admin) and password (default: admin) and press the Login button. The username ca nnot be
changed, but you can change your password by clicking on Change Password.
IPR512: IP Monitoring Receiver 3 of 8 Quick Start
Page 4

Step 10: Configure the Receiver
4 & 5
8
9
2
1
3
6 & 7
4 & 5
8
9
The following lists only the minimum programming required to get the receiver up and running. For more detailed
information on the settings in the Web Page Interface, please refer to the IPR512 Operations Manual.
1. From the Main Menu, click Receiver Configuration.
2. Enter the required WAN1 settings (speak to your network administrator).
3. Enter the required LAN settings (speak to your network administrator).
4. According to the automation software set the Receiver ID and Line #. (ID = 00 to 99 and Line = 00 to 34))
5. Select the ACK/NACK protocol check box, if you want the receiver to supervise communication with the Automation
Software.
6. In the PC column, adjust the COM1 port settings as required to communicate with the automation software.
7. Optional: In the Serial column, adjust the COM2 port settings as required to communicate with the printer/PC.
8. Type a password in the Receiver password text box. The password is a numerical value from 1 to 32 digits in length.
This password is used by the installer when registering a paradox reporting module to the receiver.
9. Select your Time Zone.
10. Scroll to the bottom of the page and click the Save button.
IPR512: IP Monitoring Receiver 4 of 8 Quick Start
Page 5

Step 11: Set Supervision Loss Report Code
2
1
5
3
4
The Paradox reporting module will send a presence message (~100 bytes) at intervals defined by the Module Polling Time.
If the receiver does not receive at least one presence message from the module within the Receiver Supervision Time, the
receiver can report a communication loss to the Automation Software. For more information, see “Step 12: Set Security
Profile” on page 6
1. On the Receiver Configuration page, scroll to the bottom of the page. Highlight the Account supervision loss event.
2. Click the Edit button.
3. Select the Enabled check box to activate reporting of the selected event.
4. In the Code column, enter a report code (3 digits for CID format, 2 alphanumerics characters for SIA format). This
report code will be reported in CID or SIA format to the Automation Software whenever the selected event occurs. The
receiver uses the same report format used by the registered account.
5. Click the blue Save link.
IPR512: IP Monitoring Receiver 5 of 8 Quick Start
Page 6

Step 12: Set Security Profile
1
2
5
6
43
7
1
2
5
6
43
7
1
The receiver supervises the presence of up to 512 assigned Paradox reporting modules. Up to 32 security profiles can be
created per receiver with a programmable polling time (seconds, minutes, or hours). These profiles are then assigned to
each module during registration. The module will send a presence message (~100 bytes) at intervals defined by the
Module Polling Time. If the receiver does not receive at least one presence message from the module within the Receiver
Supervision Time, the receiver can re port a communication loss to the Automation Sof tware (see “Step 11: Set Super vision
Loss Report Code” on page 5).
1. From the Main Menu, click Security Profiles.
2. Click the Add button.
3. Type a name for the new security profile.
4. In the Module Polling Time column type a 2-digit value and select a base time from the drop down list. Represents
interval at which the Paradox reporting module will send a presence message.
5. In the Receiver Supervision Time column type a 2-digit value and select base time from the drop down list. This value
must be higher than the Module Polling Time. Represents the time the receiver will wait before reporting a
communication loss.
6. Click Save.
7. The ID column represents the 2-digit value used by the installer when registering a Paradox reporting module to the
receiver.
NOTE: For the Receiver Supervision Time (item #5), we recommend a minimum value of 1 minute. Also, the
Module Polling Time (item #4) must be at least than half the Receiver Supervis ion Time (e.g., RST: 1 minute - MP T:
30 sec.)
IPR512: IP Monitoring Receiver 6 of 8 Quick Start
Page 7

Step 13: Installation and Set Up Complete
IP Monitoring Receiver
IPR512
Trouble Display LED Display
This completes the basic installation and set up required to get the receiver up and running. The next step is to register
Paradox reporting modules to the receiver. No monitoring station operator action is required to register a module.
Registration is initiated by the installer upon installation of the module. However, the monitoring station must provide the
installer with the following information that is entered by the installer.
• Account # for each partition of the site.
• IP Address and Port of the receiver(s) you wish that site to report to. See item #2 in “Step 10: Configure the Receiver”
on page 4.
• Receiver Password (1 to 32 digits). See item #8 in “Step 10: Configure the Receiver” on page 4.
• Security Profile (2 digits). See “Step 12: Set Security Profile” on page 6.
Once the installer has entered this information, the installer then initiates communication with the receiver and the Pa radox
reporting module will be automatically registered in the receiver. Refer to “Installer Instructions” on page 8.
--------------------------------- This completes installation and setup of the IPR512 ---------------------------------
Trouble and LED Display
Trouble Display
If a trouble occurs on the receiver, the TROUBLE LED will turn on and the screen will display “XX Troubles, click
[OK] to view”. Press OK to access the trouble menu, which will display one or more of the following troubles.
• Automation software communication failed
• LAN: Not connected to a network
• WAN1: Not connected to a network
• WAN1: Not connected to Internet
• WAN2: Not connected to a network
• Memory card not connected
• Memory card init failed
• Time server inaccessible
LED Display
The Status LEDs on the front of the receiver provide the following information:
LED On Status
DATA (memory card) Accessing (reading/writing) the memory card (back up).
WAN1 OK Network connection is detected on WAN1 port.
WAN1 DATA Sending or receiving data through WAN1 port.
WAN1 OK Network connection is detected on WAN2 port.
WAN2 DATA Sending or receiving data through WAN2 port.
LAN Network connection is detected on the LAN port.
SERIAL Connected with the automation software on COM1 (ACK/NACK must be enabled, see
item# 5 in “Step 10: Configure the Receiver” on page 4).
TROUBLE Trouble with the unit is detected. Troubles can be viewed through the LCD.
AC The IPR512 is powered.
IPR512: IP Monitoring Receiver 7 of 8 Quick Start
Page 8

Installer Instructions
PARADOX.COM
IPR512-EQ01 10/2008
© 2008 Paradox Security Systems Ltd. All rights reserved. Specifications may change without prior notice. One or more of the following US patents may apply: 7046142,
6215399, 6111256, 6104319, 5920259, 5886632, 5721542, 5287111, 5119069, 5077549 and RE39406 and other pending patents may apply. Canadian and international
patents may also apply. For the latest information on products approvals, such as UL and CE, pl ease visit www.paradox.com. For complete warranty information on this pro du ct
please refer to the Limited W arra nty Statement found on the website www .p aradox. com/terms. Your use of the Paradox product sig nifies your acce ptance of all warra nty terms and
conditions.
[5] [6] IP Line Monitoring Options
off off Disabled
off on When disa rmed: Trouble only
When armed: Trouble only
on off When disarmed: Trouble only
When armed: Audible alarm
on on Silent alarm becomes audible
alarm
[7] Landline Dialer Reporting
OFF = As backup to IP reporting
ON = In addition to IP reporting
[8] IP Reporting
OFF = Disabled
ON = Enabled
[5] [6] IP Line Monitoring Options
off off Disabled
off on Wh en disarmed: Trouble only
When armed: Audible alarm
on off Whe n di sarmed: Trouble only
When armed: Trouble only
on on Silent alarm becomes audible
alarm
[7] Landline Dialer Reporting
OFF = As backup to IP reporting
ON = In addition to IP reporting
[8] IP Reporting
OFF = Disabled
ON = Enabled
IP Receiver # #1 #2 Backup
IP Address WAN1 [929] [936] [943]
IP Port WAN1 [930] [937] [944]
IP Address WAN2 [931] [938] [945]
IP Port WAN2 [932] [939] [946]
IP Password [933] [940] [947]
IP Profile [934] [941] [948]
IP Receiver # #1 #2 #3 #4
IP Address WAN1 [2984] [2986] [2988] [2990]
IP Port WAN1 * * * *
IP Address WAN2 * * * *
IP Port WAN2 * * * *
IP Password * * * *
IP Profile * * * *
IP Receiver # #1 #2 Backup
Register/Status [935] [942] [949]
IP Receiver # #1 #2 #3 #4
IP Address [2985] [2987] [2989] [2991]
Setup Control Panel and Register Paradox Reporting Module
The installer must program the following settings in the control panel (steps 1 to 4 below) and then register the
communication module with the IPR512 (step 5 below).
STEP MG/SP/E55/E65 EVO
1. Ensure that the panel’s report
code format is set to either
Ademco Contact ID (default) or
SIA. The # represents the telephone number and the IP
Receiver number
2. Enter the IP reporting account
numbers (one for each
partition). These account
numbers are independent of
the landline dialer account
numbers, but you can program
the same value.
3. - Set the IP Line Monitoring
options ([5] and [6]).
- Set the Landline Dialer
Reporting option ([7]).
[810] __ / __ (IP#1 / IP#2)
4 = Contact ID 5 = SIA
[918] = Partition 1
[919] = Partition 2
[3070] __ / __ / __ / __ (IP#1 / IP#2 /IP#3 / IP#4)
5 = Contact ID 6 = SIA
[2976] = Partition 1 [2980] = Partition 5
[2977] = Partition 2 [2981] = Partition 6
[2978] = Partition 3 [2982] = Partition 7
[2979] = Partition 4 [2983] = Partition 8
[806] Bold = default setting [2975] Bold = default setting
- Enable IP reporting ([8]).
4. Enter the IP address(es), IP
port(s), receiver password(s),
and security profile(s) of the
monitoring station’s Paradox
IPR512 IP Monitoring
Receiver(s). This information
is provided by the monitoring
station.
* Port, Password, and Profile are set in the same
section as the Address.
5. Register the Paradox reporting
module with the receiver by
entering the appropriate
section and pressing [
The registration status is
displayed as well as any
registration errors.
IPR512: IP Monitoring Receiver 8 of 8 Quick Start
ARM].
 Loading...