

Page 1

User Guide
Pantum M6200/M6500/M6550 Series
Pantum M6600 Series
Monochrome Laser MFP
It is recommended to carefully read this Guide before using the printer
Page 2

Preface
Welcome to the Pantum series products!
We heartily appreciate your using of Pantum series products!
To protect your vital interests, please carefully read the following statements.
Legal Notice
Trademark
Pantum and Pantum logos are registered trademarks of Zhuhai Pantum Electronics Co.,Ltd.
Microsoft®, Windows®, Windows Server® and Windows Vista® are trademarks registered by
Microsoft Corporation in the United States or other countries/regions.
The ownership to the names of the software in this User Guide belongs to their respective
companies in accordance with corresponding license agreement, and they are referred for
instructions only.
All other product and brand names herein may be the registered trademarks, trademarks or
service marks of their respective owners, and they are referred for instructions only.
Copyright
The copyright of this User Guide is owned by Zhuhai Pantum Electronics Co.,Ltd.
It is prohibited to copy, translate, modify and transmit this User Guide by any means or in any
form without the prior written consent of Zhuhai Pantum Electronics Co.,Ltd.
Version: V1.0
Disclaimer
For a better user experience, Zhuhai Pantum Electronics Co.,Ltd. reserves the right to make
changes to the User Guide. The information contained herein is subject to change without
notice.
Users are responsible for any damages arising from failing to follow this User Guide.
Meanwhile, except the express warranty made in the product maintenance manual or service
commitment, Zhuhai Pantum Electronics Co.,Ltd. does not make any express or implied
warranty or guarantee to this User Guide (including composing or words).
Using this product to copy, print, scan certain documents or images or make other forms
of operations may be prohibited by the local laws. If you are uncertain about the legality of
using this product for certain documents or images, you should consult your legal advisor in
advance.
The product can only be used safely in the non-tropical areas at an altitude no higher than
2000 meters.
I
Page 3
Safety Precautions
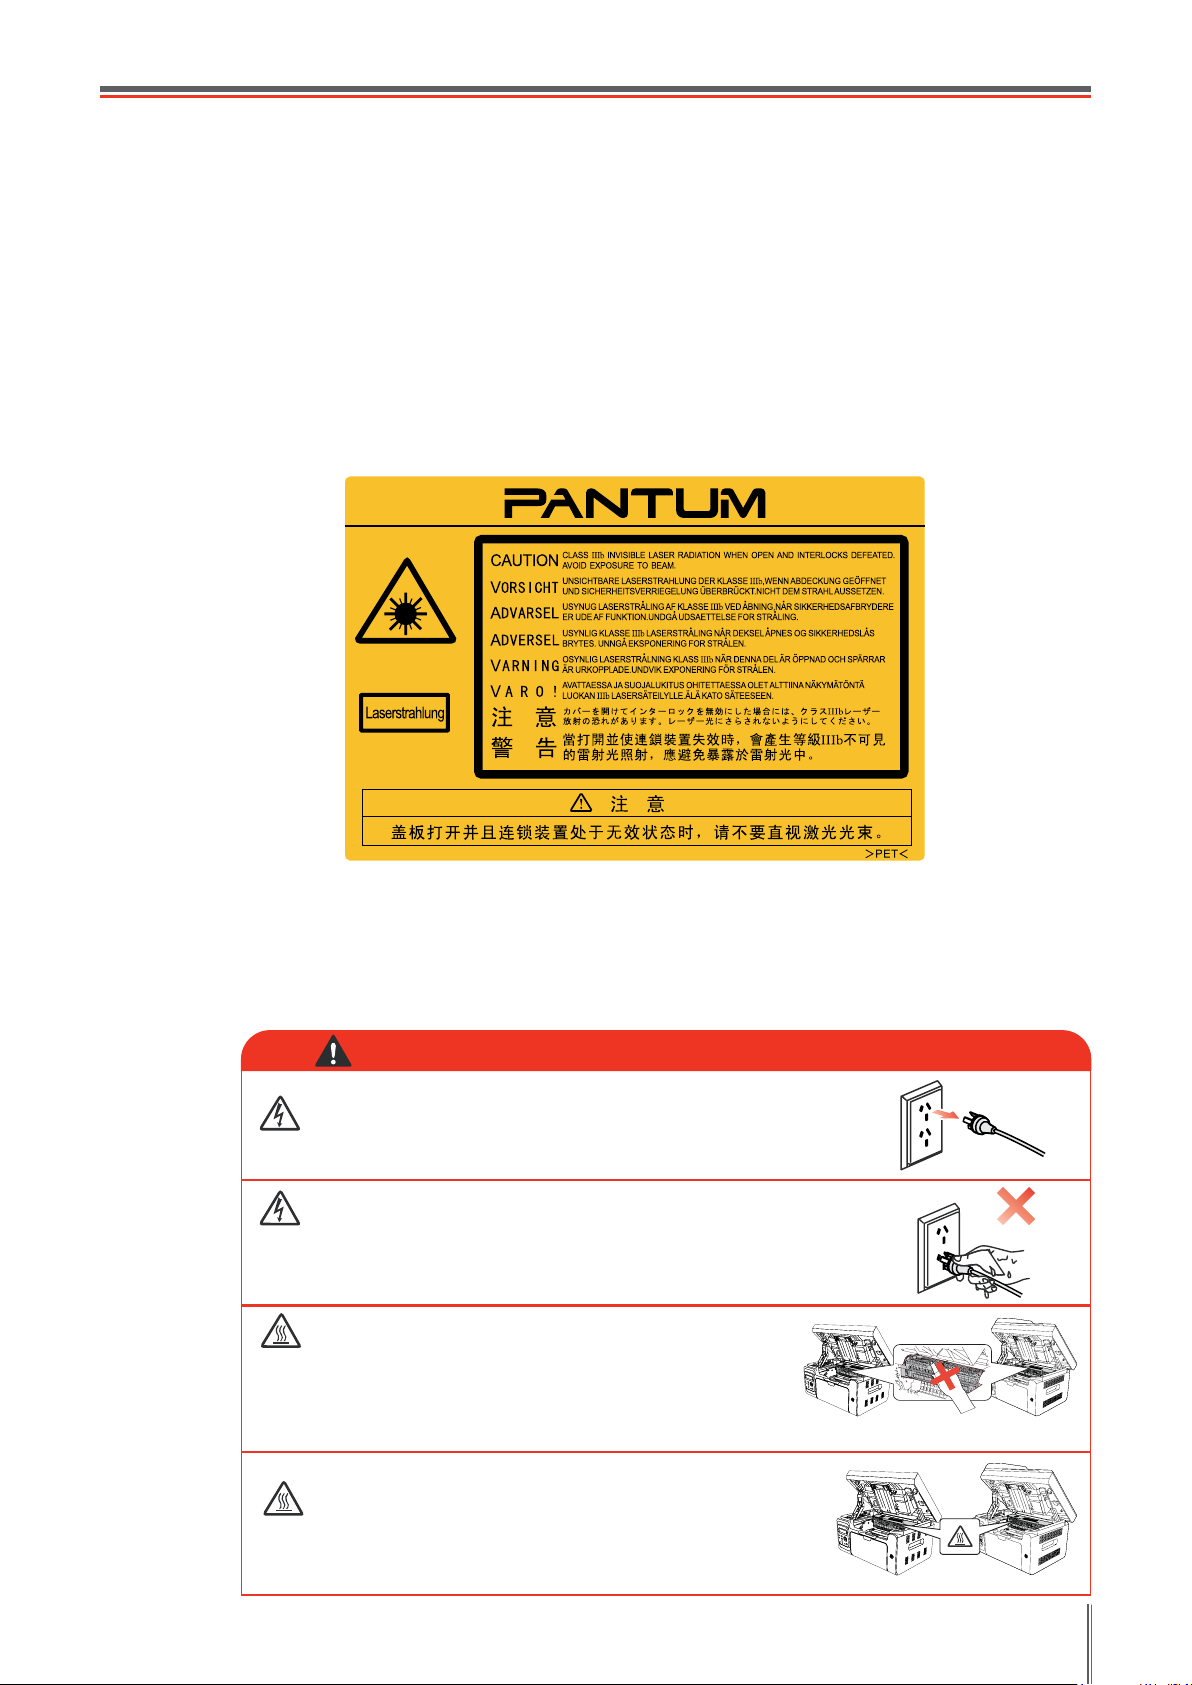
Laser Safety
The laser radiation is harmful to the human body. Since laser components are completely
sealed in the printer, laser radiation will not leak. To avoid laser radiation, please do not
randomly disassemble the printer!
The printer follows the provisions of Class 1 laser products under CFR standard. The printer
has a Class III b laser diode, which has no laser radiation leakage among laser components.
The laser components shall complies with the requirements of: U.S. Code of Federal
Regulations, 21 CFR 1040, IEC 60825-1
The following label is attached to the laser components inside the printer:
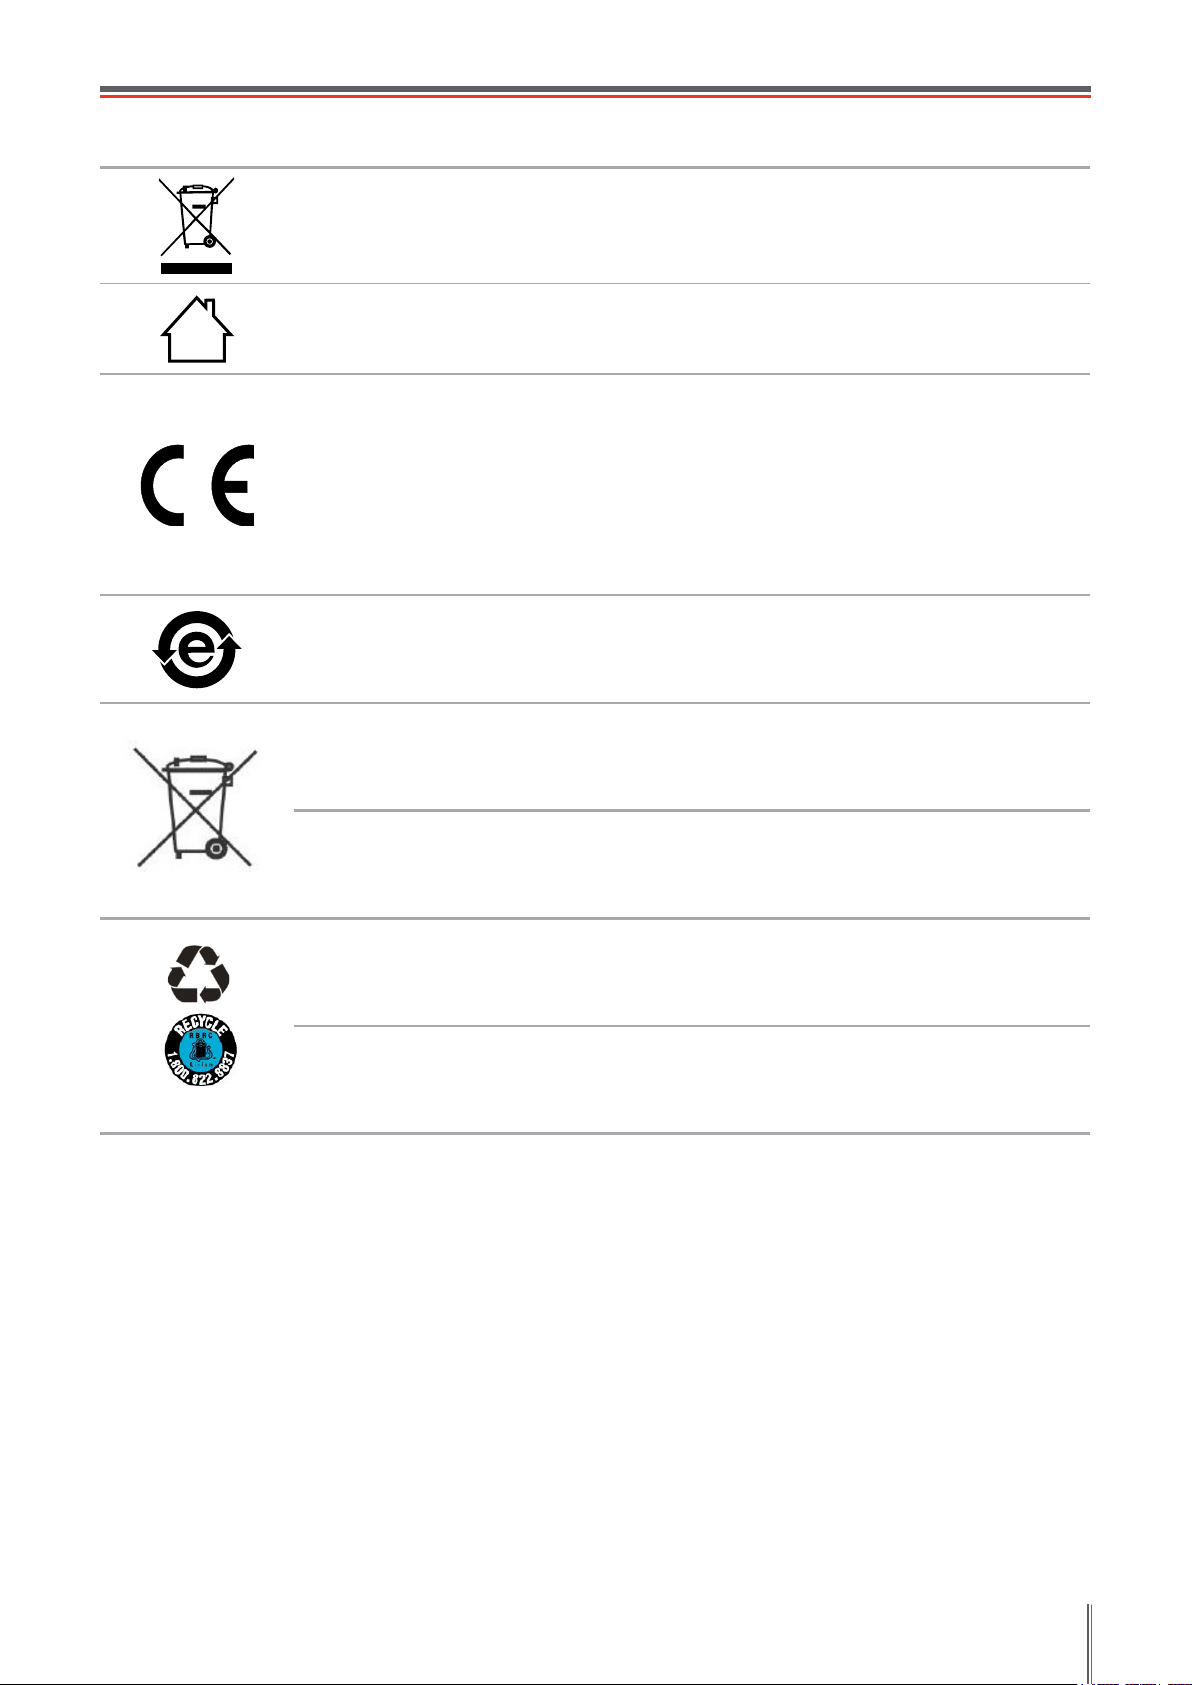
Safety Warning
Please note the following safety warnings before using the printer:
Warning
There is high-voltage electrode inside the printer. Before
cleaning the printer, make sure the power is turned off!
Plugging and unplugging the power cord plug with a
wet hand can result in an electric shock.
The fuser unit is hot when and after
printing. Touching the fuser unit (the
shaded area as shown) may cause burns!
The fuser unit is attached with a high temperature
warning label. Please do not remove or damage
this label.
II
Page 4

Precautions
Precautions before Using the Printer:
Read and understand all instructions;
1.
2. Familiarize yourself with the basic principles associated with operating electrical appliances;
3. Complywithallwarningsandinstructionsmarkedontheequipmentorspeciedinthemanualsuppliedwiththe
equipment;
4. Iftheoperatinginstructionsconictwiththesafetyinformation,pleasereferbacktothesafetyinformation,as
youmayhavemisunderstoodtheoperatinginstructions.Ifyoucannotresolvetheconicts,pleasecallthe
Customer Service Hotline or contact a service representative for help;
5. Before cleaning the equipment, remove the power cord from the AC power supply outlet. Do not use liquid or
aerosol cleaners;
6. Please make sure that the equipment is put on a stable desktop surface to avoid serious damage caused by the
falling of the equipment;
7. Do not put the equipment near a radiator, an air conditioner, or a ventilation pipe;
8. Do not put any articles on the power cord. Do not put the equipment at the place where its power cord could be
stepped on by people;
9. Outletsandextensioncordsmustnotbeoverloaded.Thismayreduceperformanceandcouldresultinreor
electric shock;
10. Do not allow pets to chew on the AC power cord or the computer interface cable;
11. Do not allow sharp objects piercing equipment slot, so as to avoid contact with the
high-voltagedevice,whichotherwisemayresultinreorelectricshock.Takecarenottospillliquidsontothe
equipment;
12. Do not disassemble the equipment so as to avoid the risk of electric shock. Necessary repairs may only be
carried out by professional maintenance personnel. Opening or removing the cover could result in an electric
shock or other potential hazards. Incorrect disassembly and assembly could also result in an electric shock
during future use;
13. If any one of the following occurs, disconnect the equipment from the computer and pull out the power cord from
theACwallsocketandcontactaqualiedmemberoftheservicepersonnelformaintenance:
•Liquidhasbeenspilledintotheequipment.
•Theequipmenthasbeenexposedtorainorwater.
•Theequipmentfalls,orthecoverisdamaged.
•Signicantchangesintheequipment’sperformance.
14. Only adjust the control mentioned in the instructions. Incorrect adjustment of other controls may result in damage
andmeanthatprofessionalmaintenancepersonnelneedtospendmoretimexingit;
15. Do not use the equipment in a thunderstorm so as to avoid the risk of an electric shock. If possible, pull out the
AC power cord during a thunderstorm;
16. If you continuously print multiple pages, the surface of the tray will become very hot. Take care not to touch this
surface, and keep children away from this surface;
17. The signal wire of the device connected with the printer can not be connected to the outdoors;
18. Please ensure timely ventilation in case of a prolonged use or printing huge amounts of documents in a poorly
ventilated room;
19. In standby status, the product will automatically enter into the power saving (sleep) mode if it does not receive
any job order for a while (such as 1 minute); and it can realize zero power consumption only if it has not been
connected with any external input power supply;
20. As the Class 1 equipment, the product must be connected to the power supply outlet with protective grounding
line when using;
21.
This product should be placed according to the shipping marks on the product package box during delivery;
22. Thisproductisakindoflow-voltageequipment.Whenusingthisproductbelowthespeciedvoltagerange,
please refer to the product precautions or call Pantum Aftersales Service Centre, if the toner comes off the
printed contents, or the equipment starts slowly;
23. This product is sold as a complete machine. The consumers can go to Pantum Aftersales Service Centre to
purchasepartstheyneed.Iftheproductsoldisinconsistentwiththepackagelist,pleasegotothespecied
Aftersales Service Centre to solve the problem;
24. Install this product in a place with the temperature between 10°C and 32.5°C and the relative humidity between
20% and 80%;
25. For security and other reasons the printer may switch to intermittent printing after a certain amount of continuous
printing.
26. This device complies with Industry Canada licence-exempt RSS standard(s). Operation is subject to the following
two conditions:
(1) this device may not cause interference, and
(2) this device must accept any interference, including interference that may cause undesired operation of the
device.
27. IC Radiation Exposure Statement:
This equipment complies with Canada and FCC radiation exposure limits set forth for uncontrolled environments.
This equipment should be installed and operated with a minimum distance of 20cm between the radiator and
your body.
This transmitter must not be co-located or operating in conjunction with any other antenna or transmitter.
28. This equipment has been tested and found to comply with the limits for a Class B digital device, pursuant to Part
15 of the FCC Rules. These limits are designed to provide reasonable protection against harmful interference
in a residential installation. This equipment generates, uses and can radiate radio frequency energy and, if not
III
Page 5

installed and used in accordance with the instructions, may cause harmful interference to radio communications.
However, there is no guarantee that interference will not occur in a particular installation.
If this equipment does cause harmful interference to radio or television reception, which can be determined by
turning the equipment off and on, the user is encouraged to try to correct the interference by one or more of the
following measures:
• Reorientorrelocatethereceivingantenna.
• Increasetheseparationbetweentheequipmentandreceiver.
• Connecttheequipmentintoanoutletonacircuitdifferentfromthattowhichthereceiverisconnected.
• Consultthedealeroranexperiencedradio/TVtechnicianforhelp.
29. Changesormodicationnotexpresslyapprovedbythepartyresponsibleforcompliancecouldvoidtheuser’s
authority to operate the equipment.
30. The power consumption of the product is 3.137W in networked standby if all wired network ports are connected
and all wireless network ports are activated;
31. Shielded cables must be used with this unit to ensure compliance with the Class B FCC limits.
32. This Class B digital apparatus complies with Canadian ICES-003.
33. This equipment complies with Part 68 of the FCC rules and the requirements adopted by the ACTA. On the
backofthisequipmentisalabelthatcontains,amongotherinformation,aproductidentierintheformatUS:
VFCFA00B66.Ifrequested,thisnumbermustbeprovidedtothetelephonecompany.Thisequipmentusesthe
followingUSOCjacks:RJ-11,RJ-45,USBjacksandpowerjacks.
34.REN(RINGEREQUIVALENTNUMBERS)STATEMENT
Notice: The Ringer Equivalence Number(REN: 0.01B) assigned to each terminal device provides an indication
of the maximum number of terminals allowed to be connected to a telephone interface. The termination on an
interface may consist of any combination of devices subject only to the requirement that the sum of the Ringer
Equivalence Numbers of all the devices does not exceed 5.
35.ATTACHMENTLIMITATIONSSTATEMENT
Notice: This equipment meets telecommunications network protective, operational and safety requirements as
prescribedintheappropriateTerminalEquipmentTechnicalRequirementsdocument(s).Thisisconrmedby
markingtheequipmentwiththeIndustryCanadacerticationnumber.TheDepartmentdoesnotguaranteethe
equipmentwilloperatetotheuser’ssatisfaction.
Before installing this equipment, users should ensure that it is permissible to be connected to the facilities of
the local telecommunications company. The equipment must also be installed using an acceptable method
of connection. The customer should be aware that compliance with the above conditions may not prevent
degradation of service in some situations.
Repairstocertiedequipmentshouldbecoordinatedbyarepresentativedesignatedbythesupplier.Anyrepairs
or alterations made by the user to this equipment, or equipment malfunctions, may give the telecommunications
company cause to request the user to disconnect the equipment.
Usersshouldensurefortheirownprotectionthattheelectricalgroundconnectionsofthepowerutility,telephone
lines and internal metallic water pipe system, if present, are connected together.
This precaution may be particularly important in rural areas.
Caution:Usersshouldnotattempttomakesuchconnectionsthemselves,butshouldcontacttheappropriate
electric inspection authority, or electrician, as appropriate.
36. ThisproductmeetstheapplicableIndustryCanadatechnicalspecications.
37. PleasekeepthisUserGuideproperly.
IV
Page 6
Legal Information
Thissymbolindicatesthat,attheendofyourproduct’slife,itmustnotbediscardedasdomestic
waste. Instead, you should dispose of your used equipment at a designated collection point for the
recyclingofwasteelectricalandelectronicequipment.Ref:EUDirective2002/96/EConWaste
ElectricalandElectronicEquipment(WEEE).Pleasecontactyourdistributor/supplierforfurther
information.
This product is suitable for indoor use only.
European Community (EC) directives conformity
ThisproductcomplieswiththeprotectionrequirementsofECdirectives2004/108/ECand
2006/95/EContheapproximationandharmonizationofthelawsoftheMemberStatesrelating
to electromagnetic compatibility and safety of electrical equipment designed for use within certain
voltage limits.
Themanufacturerofthisproductis:ZhuhaiPantumElectronicsCo.,Ltd.,No.3883,ZhuhaiAvenue,
Zhuhai, Guangdong, China 519060.
A declaration of conformity to the requirements of the Directives is available upon request from the
Authorized Representative.
ThisproductsatisestheClassBlimitsofEN55022andsafetyrequirementsofEN60950.
ThisprinterisfullycompliantwiththeROHSDirective2009/95/ECandtherequirementsofthe
revisedDirective2011/65/EUformanagingtoxicandhazardoussubstances.
When the product battery is scraped, it should never be disposed with other household waste.
In order to protect the natural resources and promote the reuse of materials, please separate
the battery from other types of waste, and deliver it to your local battery recycling systems for
recycling.
Warning: 1. The battery of this product is non-rechargeable, and it should never be dismantled,
crushed,heatedorburned.Improperreplacementoperationsmaycausereandburns;2.The
battery should be placed beyond the reach of children to prevent them swallowing.
This product contains a battery, in order to protect the natural resources and promote the reuse of
materials, please separate the battery from other types of waste, and deliver it to your local battery
recycling systems for recycling.
Warning: 1. The battery of this product is non-rechargeable, and it should never be dismantled,
crushed,heatedorburned.Improperreplacementoperationsmaycausereandburns;2.The
battery should be placed beyond the reach of children to prevent them swallowing.
V
Page 7

Table of Contents
1. Before Using the Printer .................................................................................................................1-2
1.1. Introduction of Models .............................................................................................................1-2
1.2. Supplied Accessories ...............................................................................................................1-3
1.3. Product View ............................................................................................................................1-4
1.4. Laser Toner Cartridge ..............................................................................................................1-8
1.5. Easily-Relled Laser Toner Cartridge ......................................................................................1-8
1.5.1. Structure of Easily-Relled Laser Cartridge ......................................................................1-8
1.5.2. Steps of Filling the Easily-Relled Laser Cartridge ...........................................................1-8
1.6. Control Panel .........................................................................................................................1-10
2. Paper and Print Media ....................................................................................................................2-2
2.1. Paper Specication ..................................................................................................................2-2
2.2. Special Paper ..........................................................................................................................2-3
2.3. Non-printing Area and Non-scanning Area ..............................................................................2-4
2.4. Load the Paper ........................................................................................................................2-5
2.5. Paper and Manuscript Use Process ........................................................................................2-6
2.5.1. Scanning With Tablet ........................................................................................................2-6
2.5.2. Scanning With Tablet ........................................................................................................2-8
3. Installation and Uninstallation of the Driver Software ....................................................................3-2
3.1. Windows-based Driver .............................................................................................................3-2
3.1.1. Introduction .......................................................................................................................3-2
3.1.2. Installation Steps ...............................................................................................................3-2
3.1.3. Uninstallation ..................................................................................................................3-10
3.2. Mac-based Driver ..................................................................................................................3-12
4. Wired Network Settings (For printer models that support wired network printing) .........................4-2
4.1. Install the Printer to Network ....................................................................................................4-2
4.2. Control the Network Printer .....................................................................................................4-2
4.2.1. View or Change Network Settings ....................................................................................4-2
4.2.2. Set or Change Web Server Login Password ....................................................................4-2
5. Wireless Network settings (for models with WiFi printing)..............................................................5-2
5.1. Conguration via Button ..........................................................................................................5-2
5.2. Conguration via USB Connection ..........................................................................................5-2
5.2.1. WiFi Conguration Tool .....................................................................................................5-2
5.3. WiFi Hotspot Conguration ......................................................................................................5-5
5.4. Turn off the Wireless Connection ............................................................................................. 5-5
6. Pantum Mobile Print, Mobile Scan and Mobile Fax ........................................................................6-2
6.1. Introduction to Pantum Mobile Print, Mobile Scan and Mobile Fax .........................................6-2
6.1.1. What’s Pantum Mobile Print, Mobile Scan and Mobile Fax? ............................................6-2
6.1.2. Download Pantum Mobile Print, Mobile Scan and Mobile Fax .........................................6-2
6.2. Operation Steps for Mobile Print ..............................................................................................6-2
6.2.1. For Android Devices .......................................................................................................... 6-2
6.3. Operation Steps for Mobile Scan .............................................................................................6-6
6.3.1. For Android Devices .......................................................................................................... 6-6
6.3.2. For Apple IOS Devices (iPad, iPhone, etc) .......................................................................6-9
6.4. Operation Steps for Mobile Fax .............................................................................................6-13
6.4.1. For Android Devices ........................................................................................................ 6-13
6.4.2. For Apple IOS Devices (iPad, iPhone, etc) .....................................................................6-15
7. General Settings .............................................................................................................................7-2
7.1. System Settings .......................................................................................................................7-2
VI
Page 8

7.1.1. Toner Save Setting ............................................................................................................7-2
7.1.2. Language Setting .............................................................................................................7-4
7.1.3. Restore to Factory Settings ..............................................................................................7-4
7.1.4. Sleep Time Setting ............................................................................................................ 7-5
7.1.5. Network Settings ...............................................................................................................7-5
7.1.6. Network Information ..........................................................................................................7-6
8. Print ................................................................................................................................................8-2
8.1. Print Function ...........................................................................................................................8-2
8.2. Open Help Document ..............................................................................................................8-3
8.3. Duplex Print .............................................................................................................................8-4
8.4. Cancel Print Job ......................................................................................................................8-7
8.5. Mac System Print .....................................................................................................................8-7
9. Copy ...............................................................................................................................................9-2
9.1. Basic Operations .....................................................................................................................9-2
9.1.1. Copying With Tablet ..........................................................................................................9-2
9.1.2. Copying With Automatic Document Feeder (ADF) ...........................................................9-3
9.2. Special Copy Function .............................................................................................................9-3
9.2.1. Bill Copy ............................................................................................................................9-3
9.2.2. ID Copy .............................................................................................................................9-3
9.2.3. Cancel Copy Operation .....................................................................................................9-5
9.3. Copy Settings ..........................................................................................................................9-5
10. Scan ...........................................................................................................................................10-2
10.1. Push Scan ...........................................................................................................................10-2
10.1.1. Steps for Push Scan with Tablet ...................................................................................10-2
10.1.2. Steps for Push Scan with Automatic Document Feeder(ADF) ......................................10-2
10.1.3. Single Page Scan .........................................................................................................10-3
10.1.4. Merge Scan ...................................................................................................................10-3
10.1.5. Other Scan Functions ...................................................................................................10-4
10.2. Pull Scan ..............................................................................................................................10-8
10.2.1. Pantum Scan Application ..............................................................................................10-8
10.2.2. TWAIN Scan Driver ....................................................................................................... 10-9
10.2.3. WIA Scan Driver .......................................................................................................... 10-11
10.2.4. Cancel Scan Job .........................................................................................................10-14
10.3. Mac System Scan ..............................................................................................................10-15
10.3.1. ICA Scan .....................................................................................................................10-15
10.3.2. TWAIN Scan................................................................................................................10-18
11. Fax .............................................................................................................................................. 11-2
11.1. Connect Devices .................................................................................................................. 11-2
11.2. Fax Settings ......................................................................................................................... 11-3
11.3. Fax Functions ...................................................................................................................... 11-5
11.3.1. Send Fax ....................................................................................................................... 11-5
11.3.2. Receive Fax .................................................................................................................. 11-7
11.3.3. Other Scan Functions .................................................................................................... 11-8
11.4. Contacts ............................................................................................................................. 11-12
11.5. Cancel Fax ......................................................................................................................... 11-13
11.6. Pantum PC-Fax Software ................................................................................................. 11-14
11.6.1. Open With ................................................................................................................... 11-14
11.6.2. Sending Fax with PC-Fax ............................................................................................ 11-14
11.6.3. Basic Settings for PC-Fax ........................................................................................... 11-15
11.6.4. Other Functions for Sending Fax with PC-Fax ............................................................ 11-16
12. Routine Maintenance..................................................................................................................12-2
12.1. Cleaning the Printer .............................................................................................................12-2
VII
Page 9

12.2. Maintenance of Laser Toner Cartridge ................................................................................12-5
12.2.1. Use and Maintenance of Laser Toner Cartridge ...........................................................12-5
12.2.2. Service Life of the Laser Toner Cartridge ......................................................................12-5
12.2.3. Replace Laser Toner Cartridge .....................................................................................12-5
13. Troubleshooting ..........................................................................................................................13-2
13.1. Clearing Jammed Paper ......................................................................................................13-2
13.2. Error Message .....................................................................................................................13-4
13.3. Common Troubleshooting ....................................................................................................13-5
13.3.1. Common Trouble ..........................................................................................................13-5
13.3.2. Image Defects ...............................................................................................................13-6
14. Menu Structure ...........................................................................................................................14-2
14.1. Copy Settings ......................................................................................................................14-2
14.2. Scan Settings .......................................................................................................................14-4
14.3. Fax Settings .........................................................................................................................14-5
14.4. System Settings ...................................................................................................................14-7
14.5. Information Report ...............................................................................................................14-9
14.6. Version Information .............................................................................................................. 14-9
14.7. Fax Menu Structure ...........................................................................................................14-10
15. Product Specications ................................................................................................................15-2
VIII
Page 10

Before Using the Printer
1
Chapter
1. Before Using the Printer ....................................................................................................................2
1.1. Introduction of Models ................................................................................................................2
1.2. Supplied Accessories .................................................................................................................. 3
1.3. Product View ............................................................................................................................... 4
1.4. Laser Toner Cartridge .................................................................................................................8
1.5. Easily-Relled Laser Toner Cartridge .........................................................................................8
1.5.1. Structure of Easily-Relled Laser Cartridge ......................................................................... 8
1.5.2. Steps of Filling the Easily-Relled Laser Cartridge .............................................................. 8
1.6. Control Panel ............................................................................................................................ 10
1-1
Page 11
1. Before Using the Printer
1.1. Introduction of Models
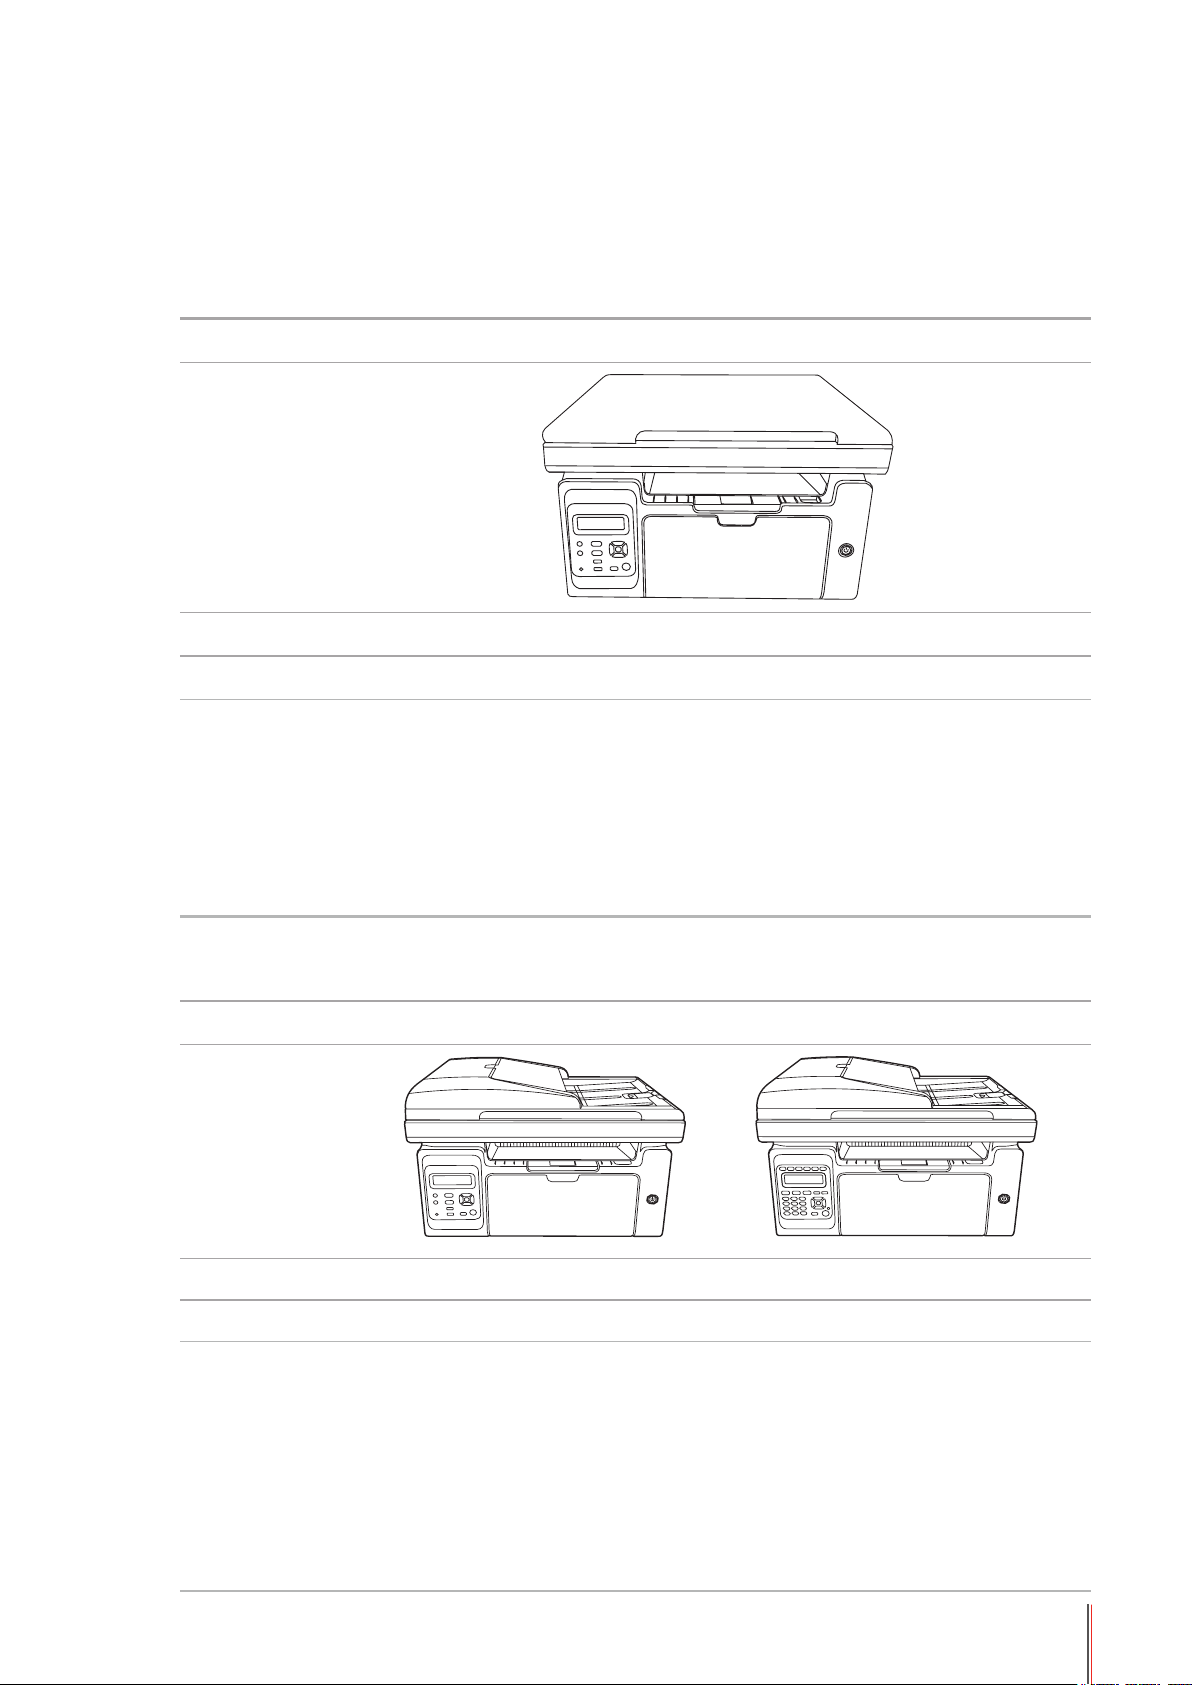
This product have the following congurations:
Series Name M6200/M6500 Series
Picture
Basic Functions Print, Copy, Scan
Basic Models USB Model, NET Model, WiFi Model
The maximum print speed of A4 paper is 20/22ppm, and that of letter
•
paper is 21/23ppm.
The maximum volume of feeder tray is 150 pages and the maximum
•
Basic Specications
volume of output tray is 100 pages
The maximum print volume is 20000 pages per month
•
Support full-color scanning
•
Support the function of scanning to email
•
Series Name M6550 Series M6600 Series
Picture
Basic Function Print, Copy, Scan, Fax
Basic Models USB Model, NET Model, WiFi Model
• The maximum print speed of A4 paper is 22ppm, and that of letter
paper is 23ppm.
• Support scan for automatic document feeder
• The maximum volume of feeder tray is 150 pages and the maximum
Basic Specications
volume of output tray is 100 pages
• The maximum print volume is 20000 pages per month
• Support full-color scanning
• Support the function of scanning to email
• Support fax function (Only M6600 Series)
1-2
Page 12
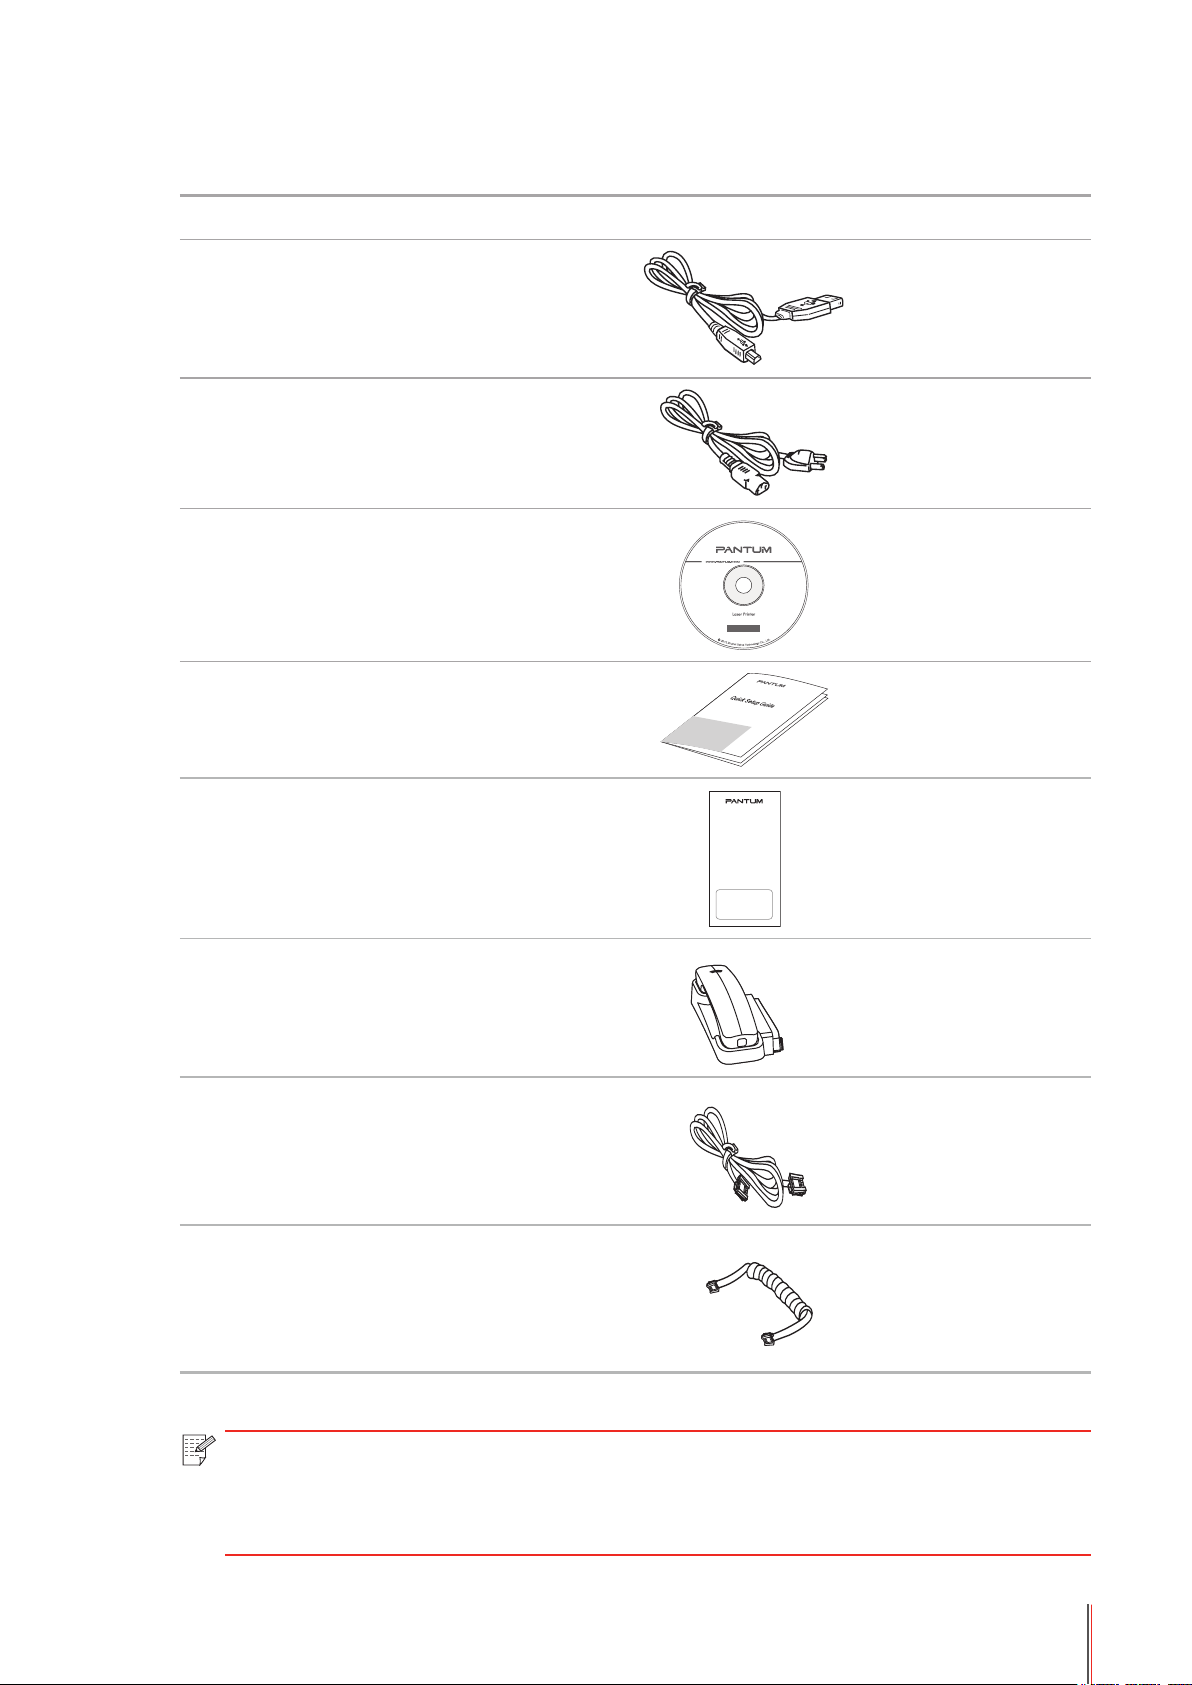
1.2. Supplied Accessories
Name
USB Interface Cable
Power Cord
CD-ROM
Quick Setup Guide
Pantum Warranty
Phone
Phone Cord
Spiral Cable
Note: • The Pantum Warranty may not be attached in some regions.
• M6600 Series come with phone, phone cord and spiral cable in some countries.
• Volume control is not available with the phone.
1-3
Page 13
1.3. Product View
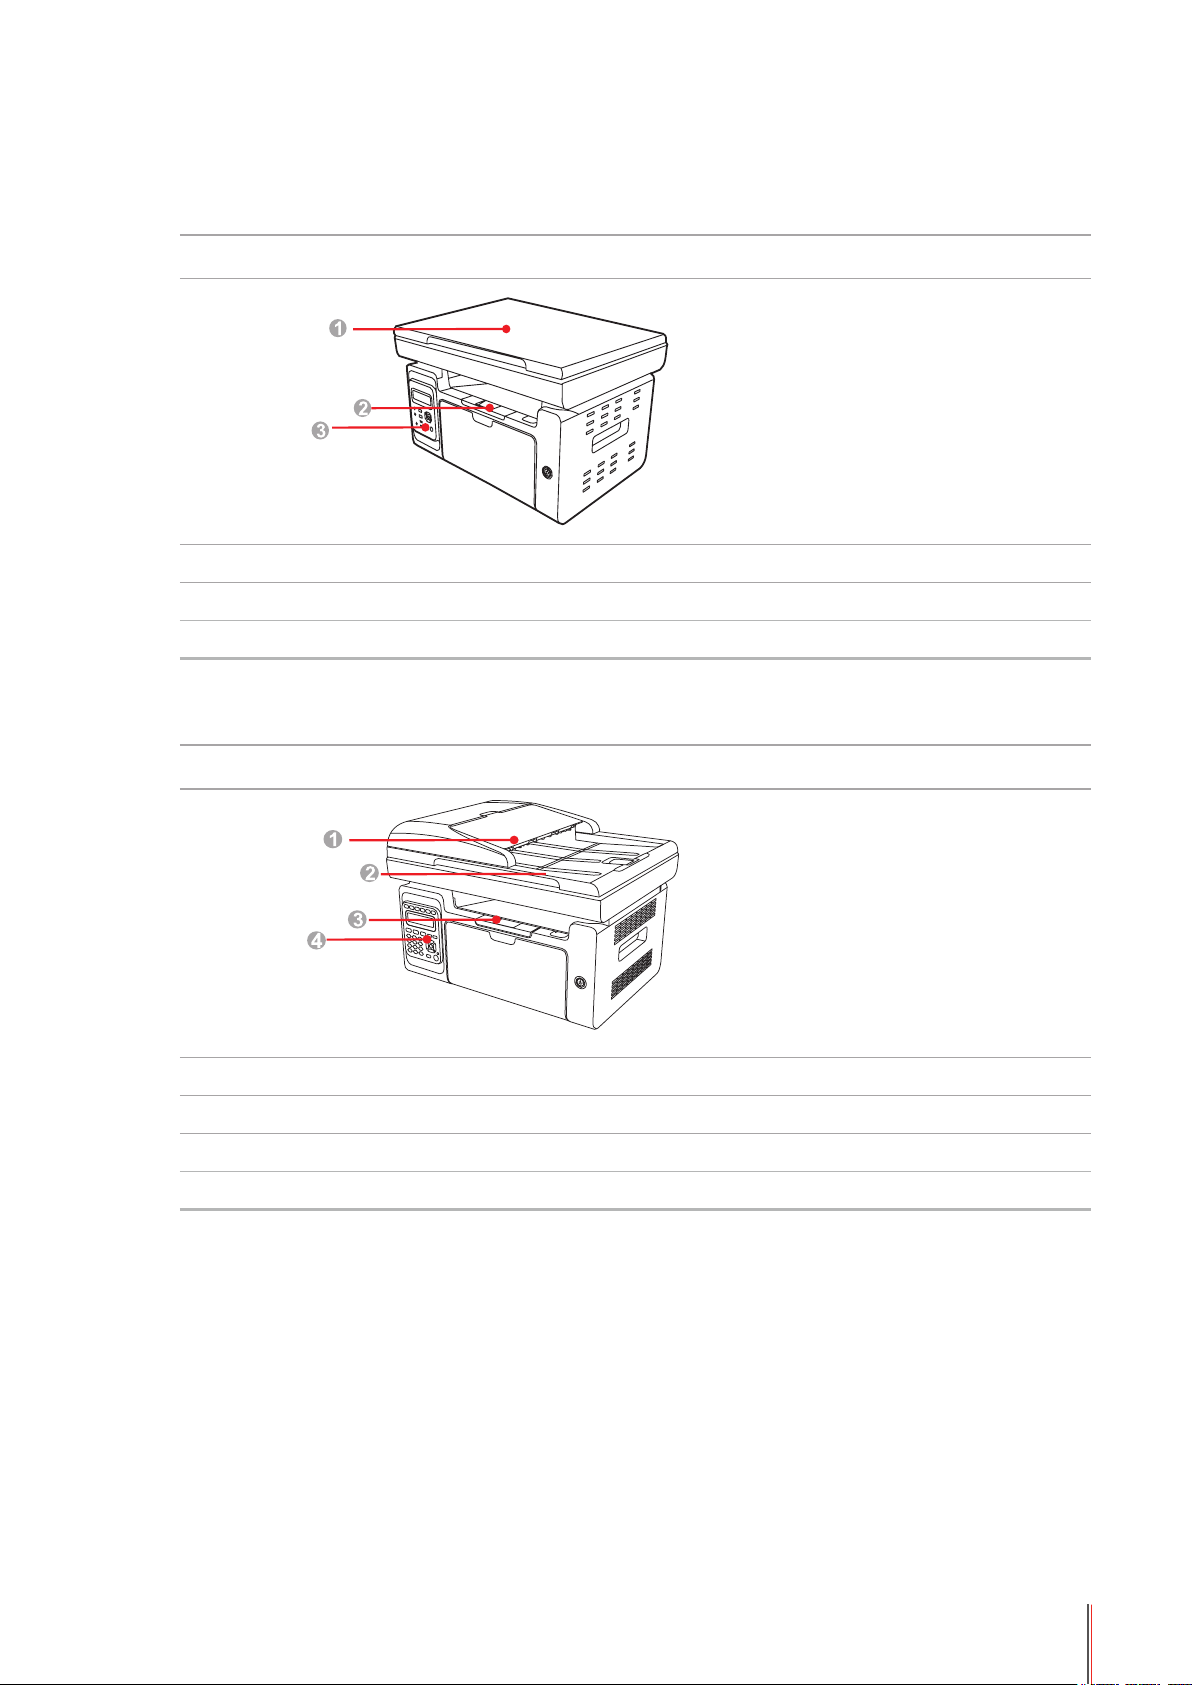
| Side view (1)
No. M6200/M6500 Series
1 Cover
2 Output Bin
3 Control Panel
No. M6550/M6600 Series
1 Automatic document feeder
2 Cover
3 Output Bin
4 Control Panel
1-4
Page 14
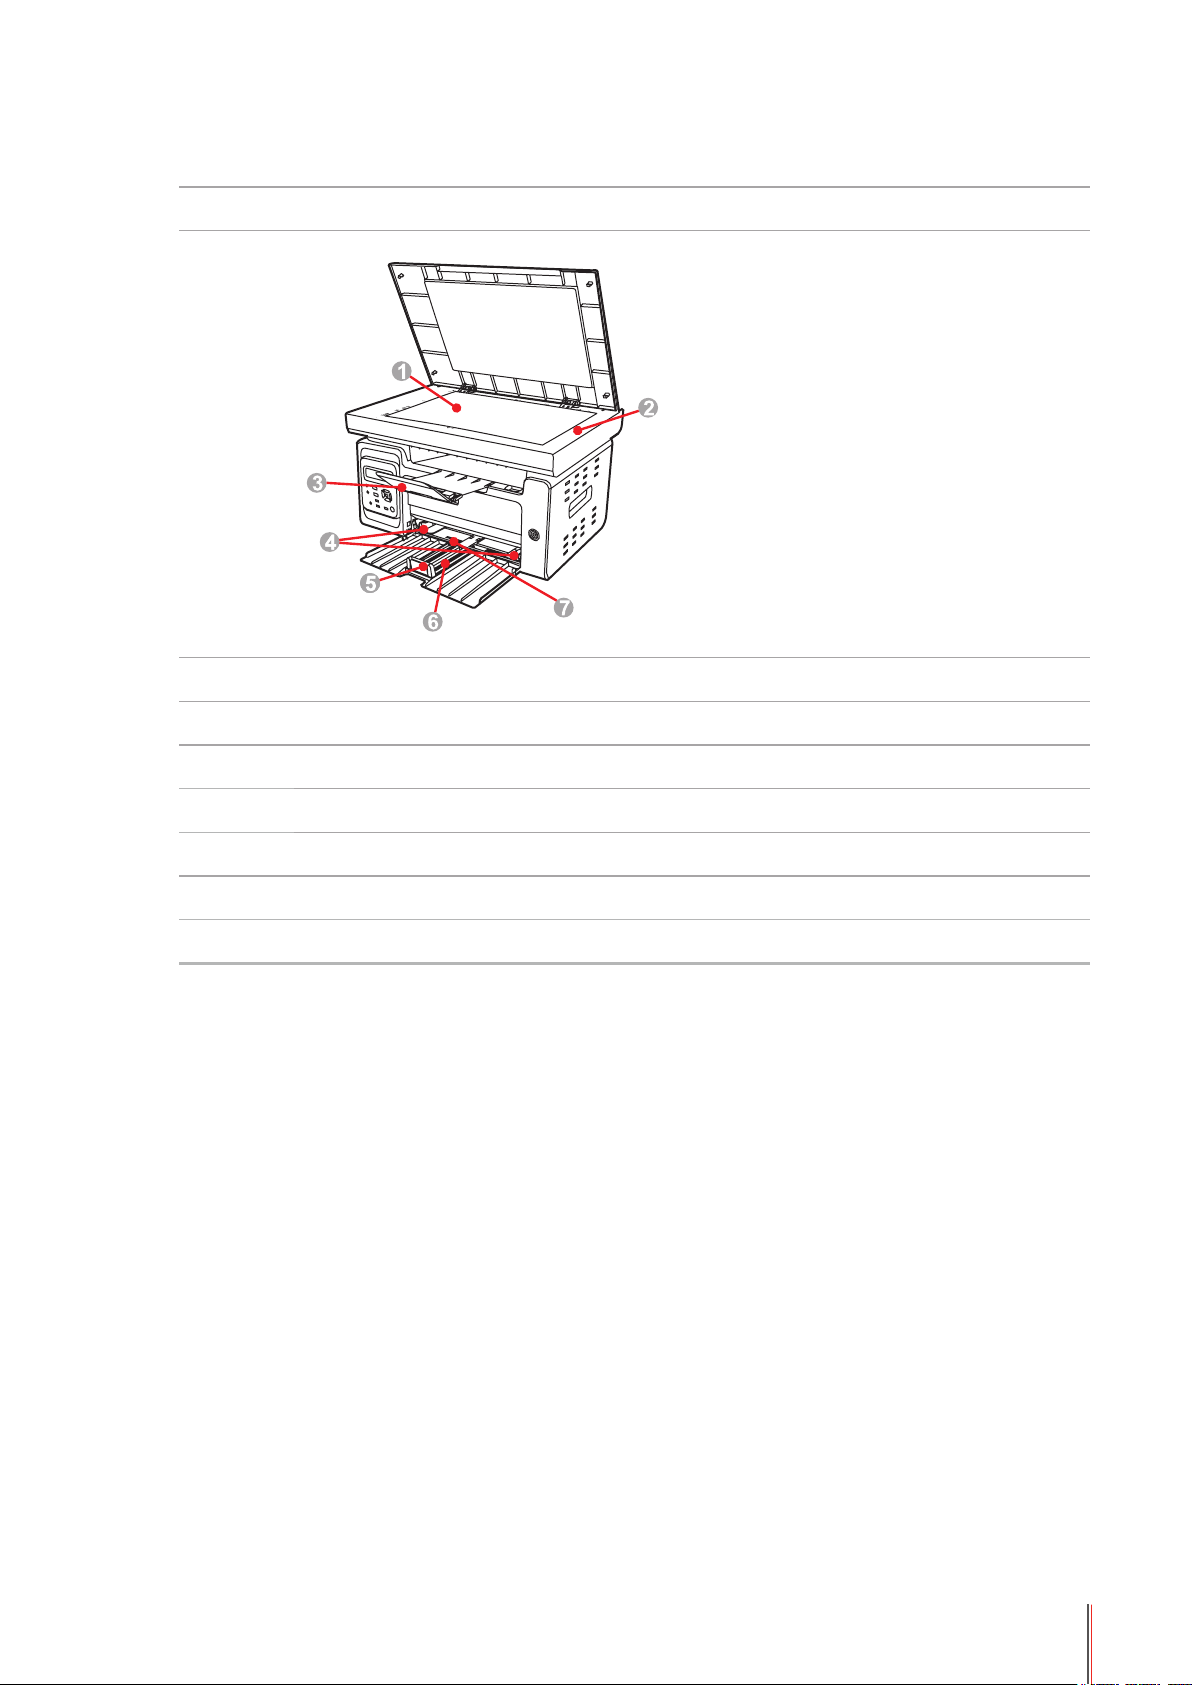
| Side view (2)
No. M6200/M6500 Series
1 Glass Platen
2 Scanning Platform
3 Output Tray
4 Automatic Feed Paper Deector
5 Paper Stop
6 Feeder Tray
7 Automatic Feeder Tray
1-5
Page 15
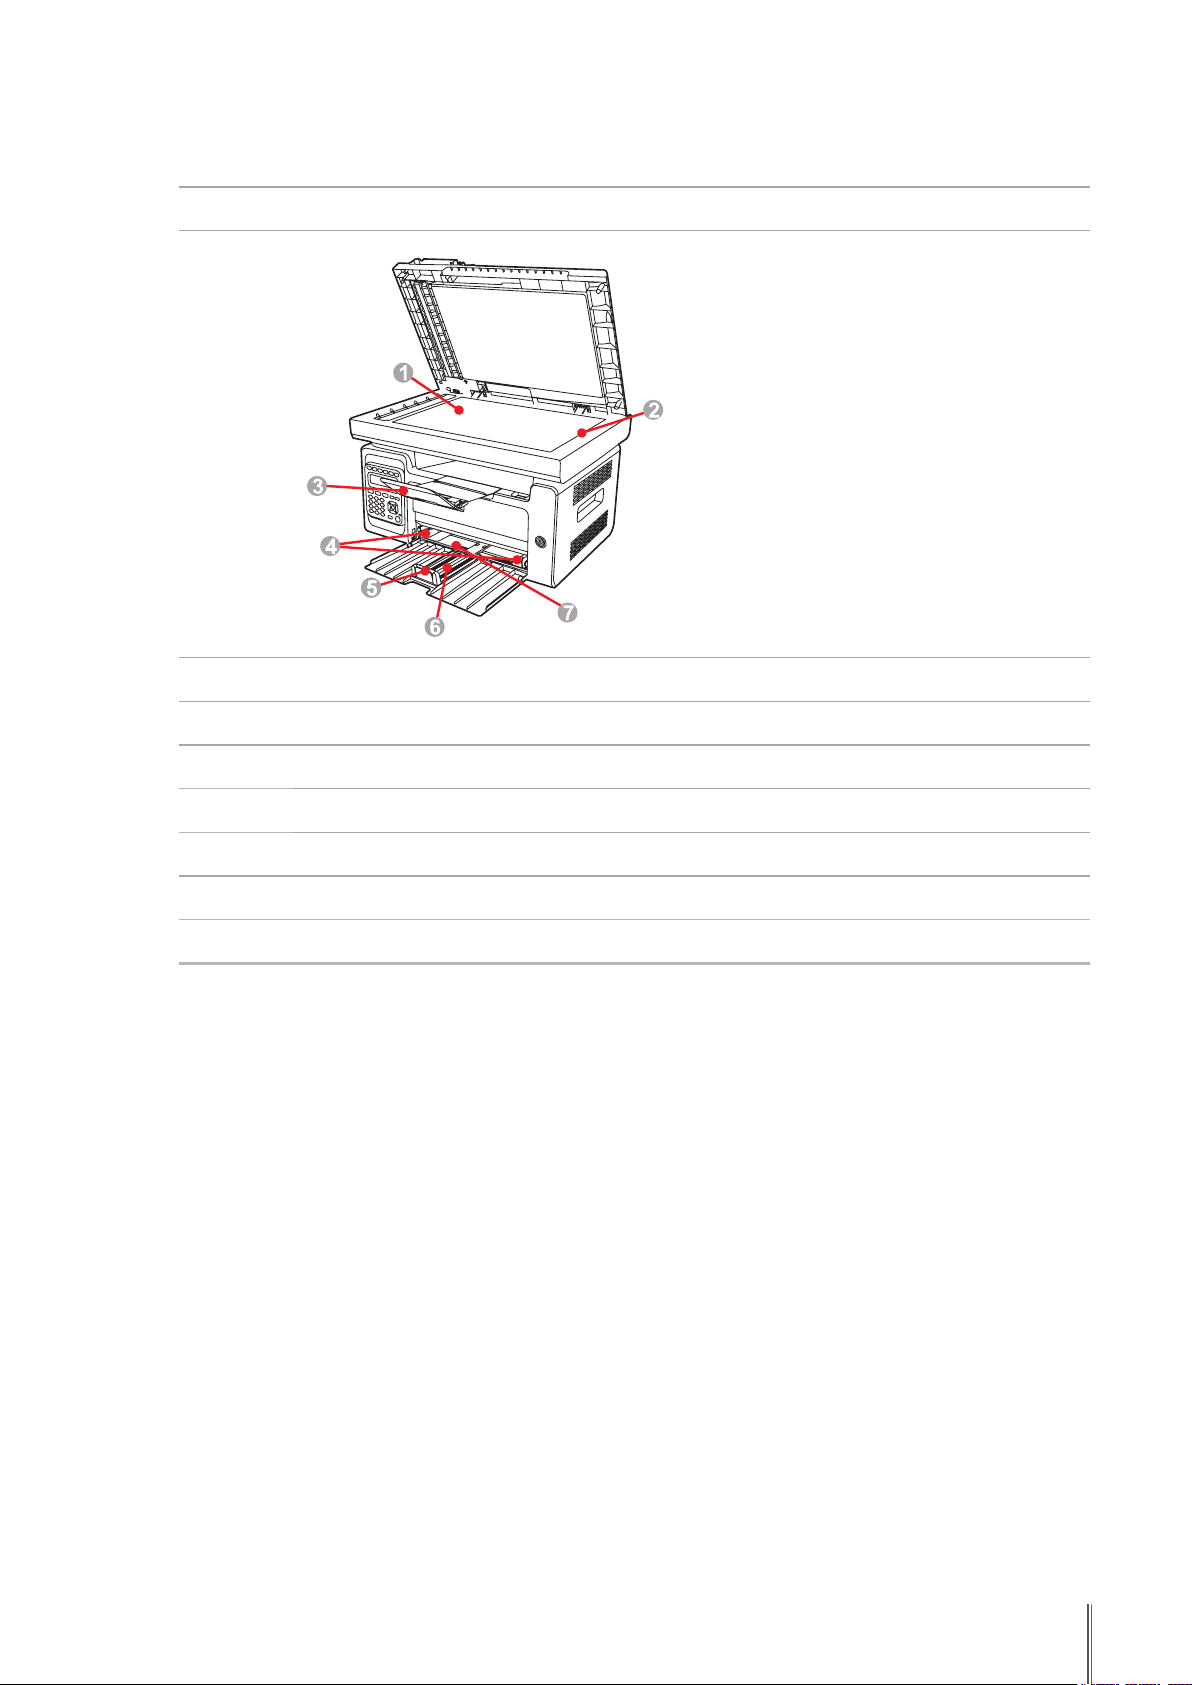
| Side view (2)
No. M6550/M6600 Series
1 Glass Platen
2 Scanning Platform
3 Output Tray
4 Automatic Feed Paper Deector
5 Paper Stop
6 Feeder Tray
7 Automatic Feeder Tray
1-6
Page 16

| Rear View
4
No. M6200/M6500 Series
Diagram
1 USB Interface
2 Network Interface
3 Power Interface
4 Rear Cover
No. M6550/M6600 Series
Diagram
1 USB Interface
2 Network Interface
3 Extension Interface (For M6600 Series only)
4 Phone Cord Interface (For M6600 Series only)
5 Rear Cover
6 Power Interface
Note: • The diagram may vary slightly with different models and functions.
1-7
Page 17
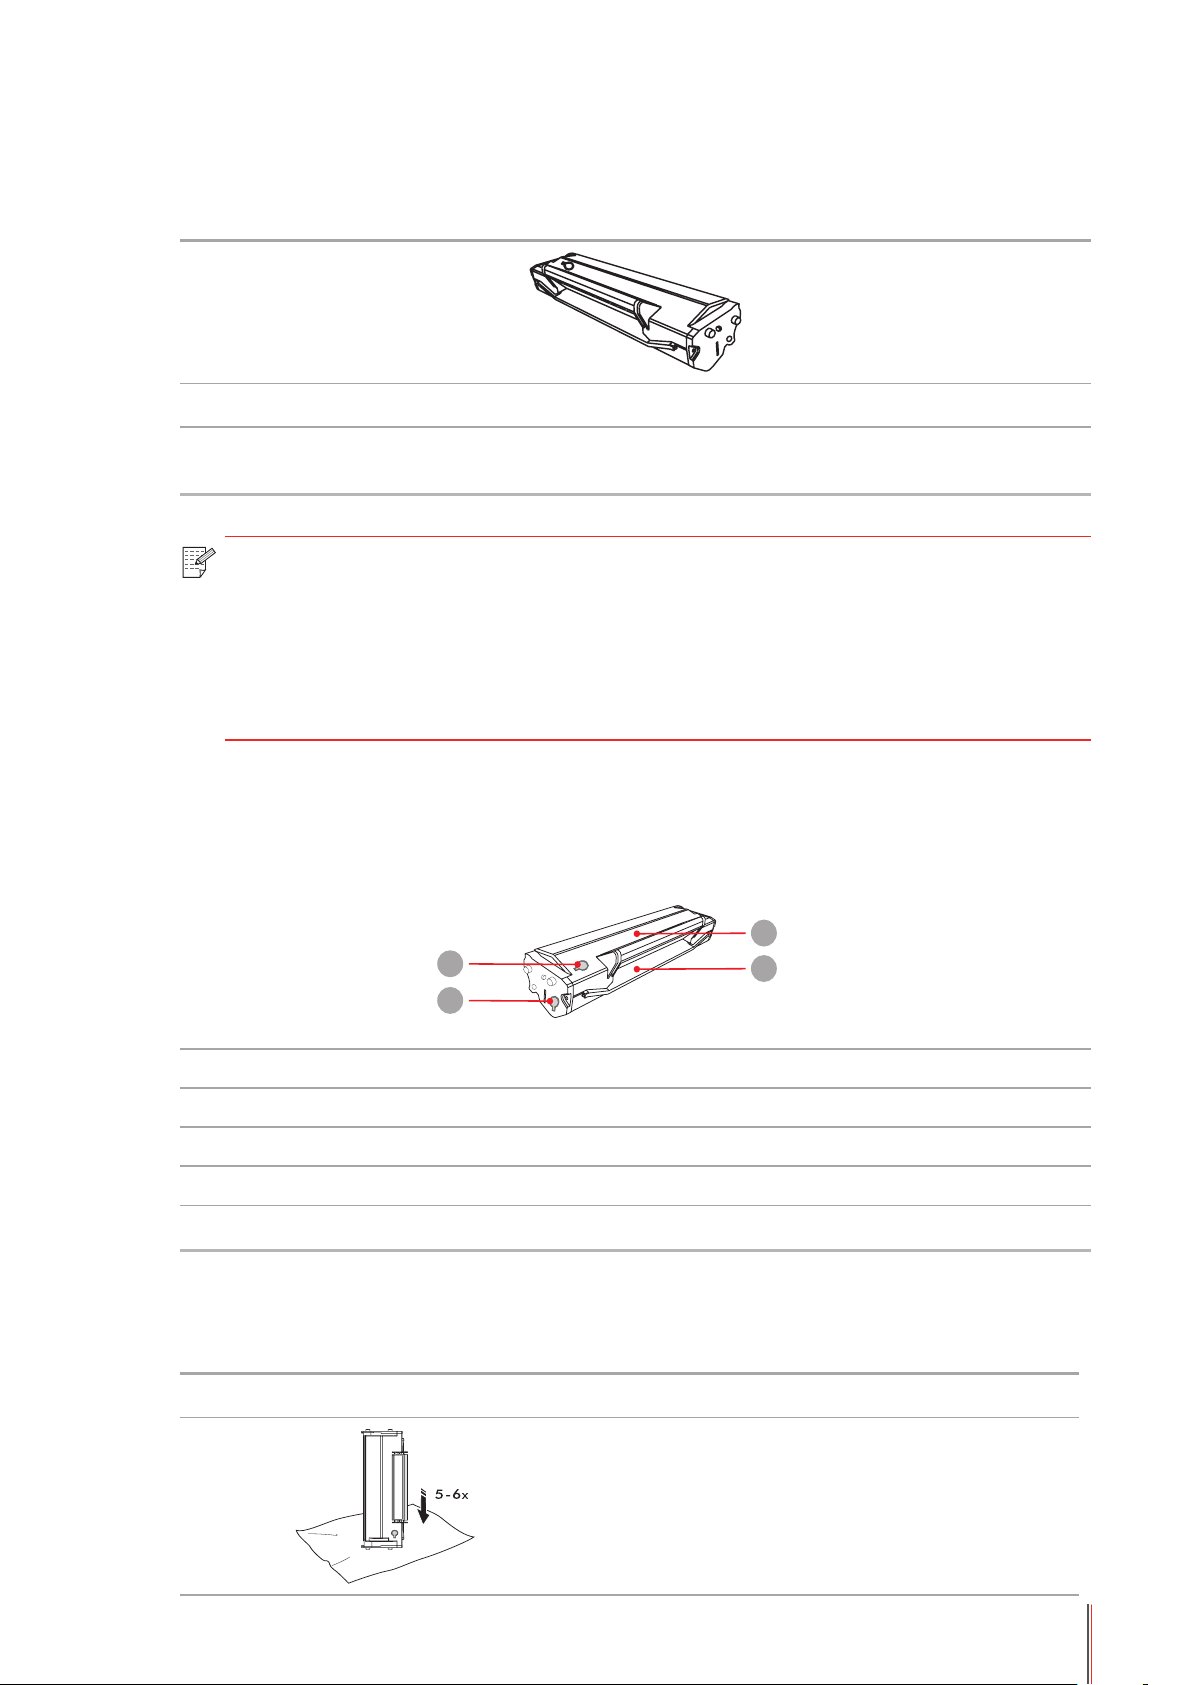
1.4. Laser Toner Cartridge
1
3
4
2
| Service Life of the Laser Toner Cartridge
Type Average Print Volume
Laser Toner Cartridge with
Standard Capacity
Note: • The model is subject to increase without notice.
• Consumables capacity may vary with different using types.
• It's not recommend using consumables other than the original Pantum
consumables.
• Any damages caused by using non-Pantum original consumables are not covered
by the Warranty.
About 1600 Pages
(The above data is based on ISO/IEC 19752 standard)
1.5. Easily-Relled Laser Toner Cartridge
1.5.1. Structure of Easily-Relled Laser Cartridge
No. Name
1 Waste Toner Port
2 Toner Relling Port
3 Waste Toner Box
4 Toner Box
1.5.2. Steps of Filling the Easily-Relled Laser Cartridge
Steps Diagram Description
Hold the laser toner cartridge with
1
the toner port side down and shake it
vertically around 5-6 times.
1-8
Page 18
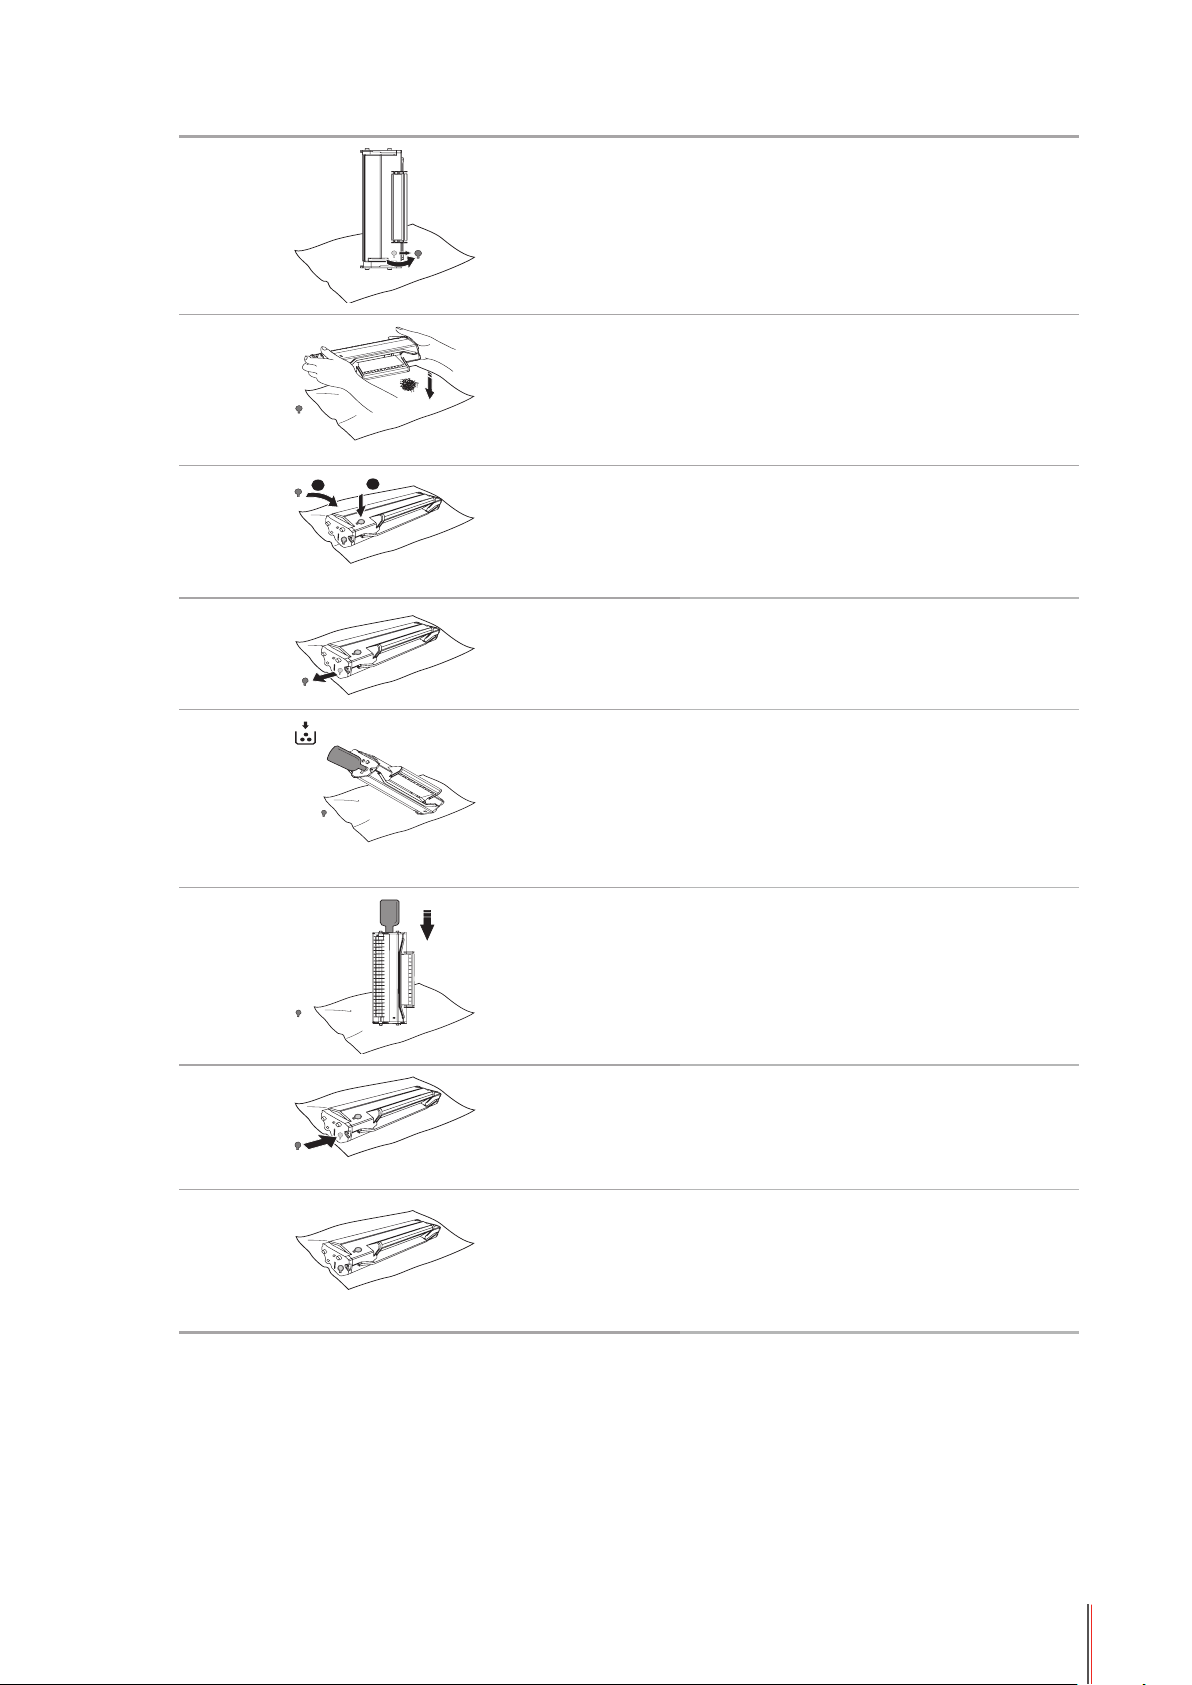
2 Open the cover of the waste toner port.
1
2
3
4
Pour out the waste toner from the waste
toner box.
Close the cover of the waste toner port.
5 Open the cover of the toner relling port.
6
Align the mouth of the toner bottle to the
toner relling port.
7 Pour the toner into the toner box.
8 Close the cover of the toner relling port.
9 The toner relling is completed.
1-9
Page 19
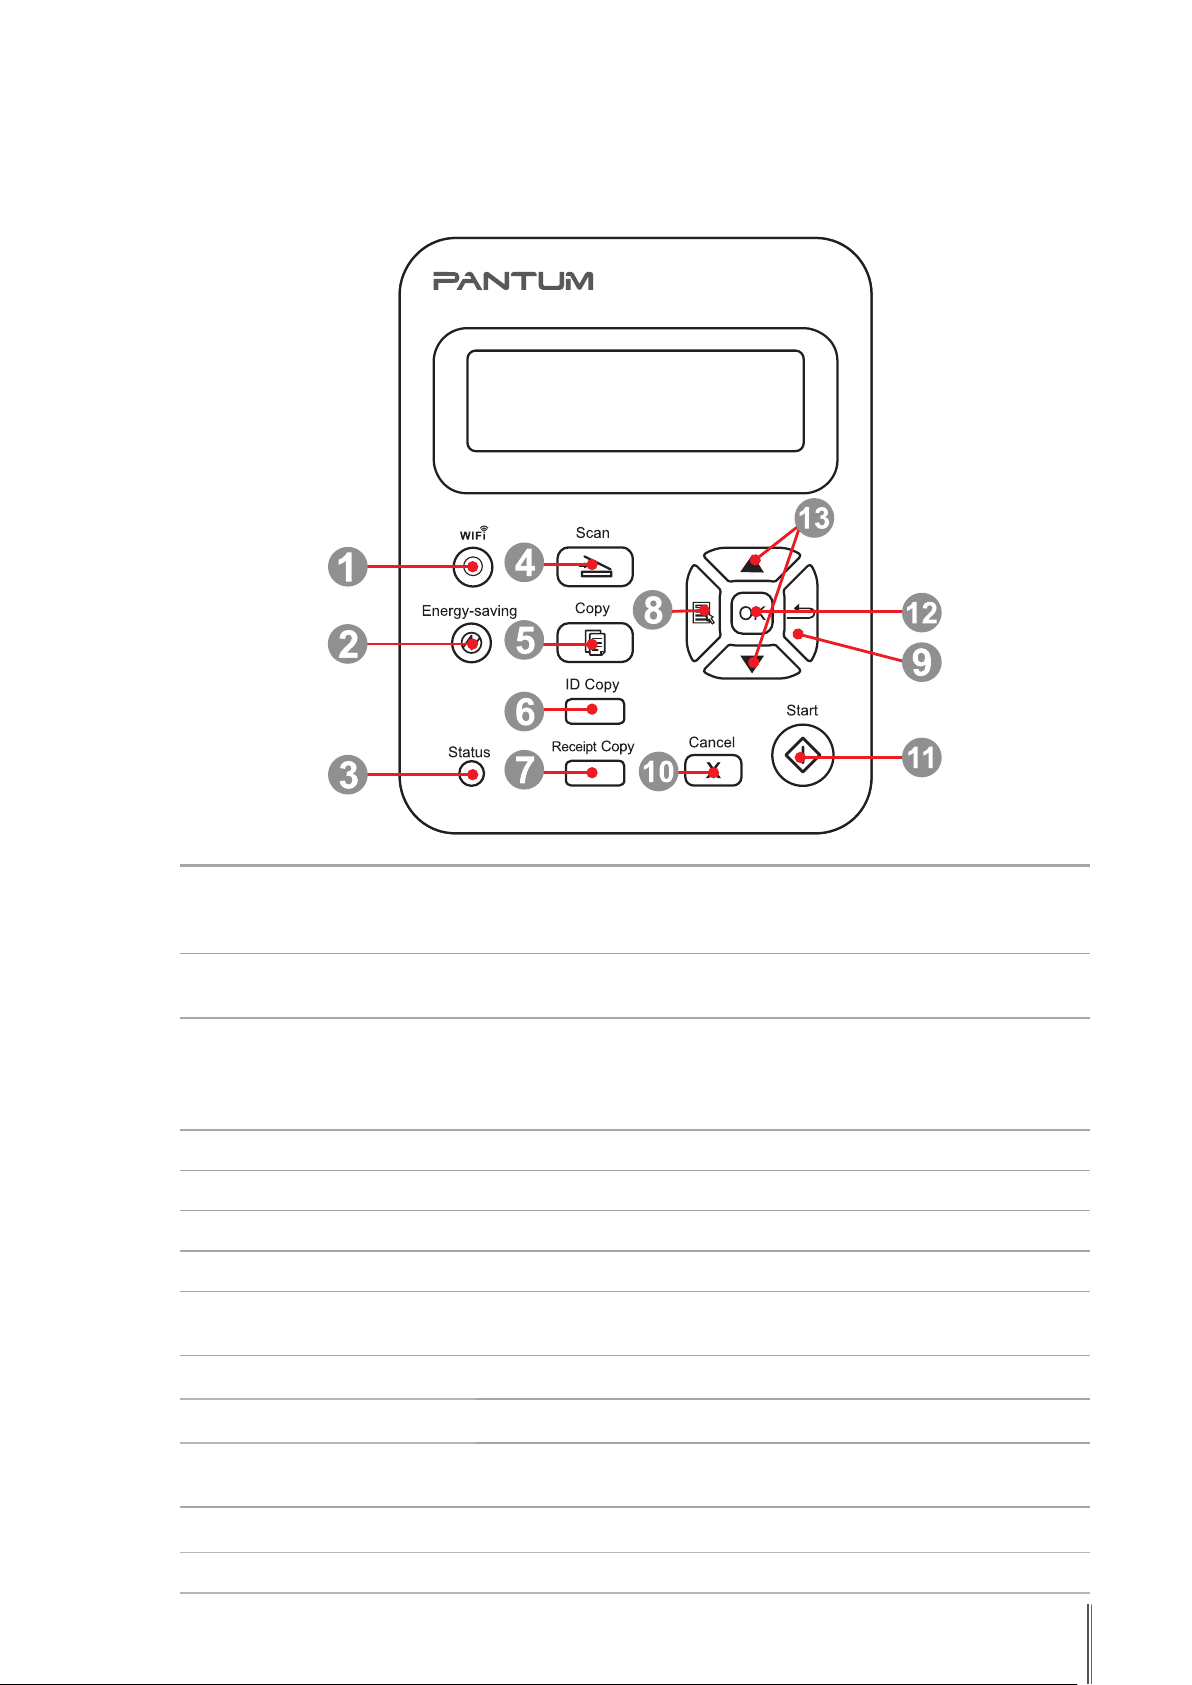
1.6. Control Panel
M6200/M6500/M6550 Series
This button indicates the WiFi connection status (only
1 WiFi button
2
3 Status Light
4 Scan Button Press this button to enter into scan mode
5 Copy Button Press this button to enter into copy mode
6 ID Card Copy Button Press this button to enter into ID Card Copy mode
7 Bill Copy Button Press this button to enter into Bill Copy mode
8 Menu Button Press this button to access the menu options to make the
9 Back Button Press this button to go back to the upper-level page
10 Cancel Button Press this button to cancel the operation
11 Start Button Press this button to start the corresponding operation after the
Power Saving/
Wake-up Button
applicable to WiFi Model).For Non-WiFi Model,this button is for
toner saving.
Press this button to switch to power saving status or wake the
machine from power saving status
This light indicates the ready, alarm and other status of the printer
Green light: Normal
Orange light: Warning
Red Light: Error
settings
operation setting
12 OK Button Press this button to save the setting
13 "▲" and "▼" Press these two buttons to browse each menu and its options
1-10 10
Page 20

M6600 Series
1 Speaker
2 Redial/Pause
3 Contacts This button allows you to dial the speed dial number directly.
4 Junk Fax
5
6 WiFi Button
7 Fax Press this button to enter into the fax mode.
8 Scan Button Press this button to enter into the scan mode
9 Copy Button Press this button to enter into the copy mode
10 ID Card Copy Button Press this button to enter into the ID card copy mode
11 Bill Copy Button Press this button to enter into the bill copy mode
Power Saving/Wakeup Button
Press this button, enter the number to dial, and then press the
Start button to fax.
This button allows you to redial the last number you dialed or
insert pause when you set up speed dial or dial manually.
When you receive a fax, press this button to add the currently
received fax number to the junk fax number list;
Press this button to switch to power saving status or wake the
machine from power saving status
This button indicates the WiFi connection status (for WiFi Model
only). For Non-WiFi Model, this button is for toner saving.
12 Number Buttons You can use these buttons to dial a phone or fax number, or
use them as a keyboard for input into the device.
1-11 11
Page 21

13 Menu Button
14 Back Button Press this button to go back to the upper-level page
15 "▲" and "▼" Press this button to browse through each menu and its options
16 OK Button Press this button to save the settings
17 Status Light
18 Cancel Button Press this button to cancel the operation
Press this button to access the menu options to make the
settings.
This light indicates the ready, alarm or other statuses of the
printer
Green light: Normal
Orange light: Warning
Red light: Error
19 Start Button
Press this button to start the corresponding operation after the
operation is set.
1-12 12
Page 22

Paper and Print Media
2
Chapter
2. Paper and Print Media ....................................................................................................................... 2
2.1. Paper Specication ..................................................................................................................... 2
2.2. Special Paper .............................................................................................................................3
2.3. Non-printing Area and Non-scanning Area .................................................................................4
2.4. Load the Paper ...........................................................................................................................5
2.5. Paper and Manuscript Use Process ...........................................................................................6
2.5.1. Scanning With Tablet ...........................................................................................................6
2.5.2. Scanning With Tablet ...........................................................................................................8
2-1
Page 23

2. Paper and Print Media
2.1. Paper Specication
Media Type
Media size
M6200/M6500/
M6550/M6600
Series
Note: • It is recommended to use the standard paper and recycled paper for the printer.
• It is not recommended to use special paper extensively, which may affect the
service life of the printer.
• The print media that does not meet the guidelines listed in this User Guide may
result in poor print quality, increased paper jam and excessive wear of the printer.
Media weight 60~163g/m²
Feeder tray
volume
Output tray
volume
Plain paper, thick paper, transparent lm, carton paper, label
paper, envelope, thin paper
A4, A5, A6, JIS B5, ISO B5, B6, Letter, Legal, Executive,
Statement, Monarch envelope, DL envelope, C5 envelope,
C6 envelope, NO.10 envelope, Japanese Postcard, Folio,
Ocio, Big 16k, 32k, 16k, Big 32k, ZL, Yougata4, Postcard,
Younaga3, Nagagata3, Yougata2, Custom
150 pages
100 pages
• Properties such as weight, composition, texture and humidity are important
factors affecting the printer performance and output quality.
• Please note the following matters when selecting the print media:
1. Desired print effect: The print media selected should meet the requirement
of the print tasks.
2. Surface smoothness: The smoothness of the print media may affect the
sharpness of the print outcome.
3. Some print media may meet all the use guidelines contained herein,
but they still can not bring satisfactory effect. This may be due to incorrect
operation, inappropriate temperature and humidity, or other factors beyond
the control of Pantum. Before purchasing large quantities of print media, make
sure that the print media meets the specications specied in this User Guide.
4. Using print media that does not meet these specifications may cause
damage to the printer.
2-2
Page 24

2.2. Special Paper
This printer supports using the special paper for printing. Special paper includes: label paper,
envelope, transparent lm, thick paper, thin paper, etc.
Note: • When using special paper or print media, be sure to select matched print type
and size in the print settings so as to get the best print effect.
• When using special media to print, it is recommended to load one piece of paper
at one time.
| Please observe the following standards:
Types of
Print Media
Label Paper
Envelope
Transparent
Film
Thick Paper
Correct Practices Incorrect Practices
Use labels with no exposed
lining paper only.
Labels shall be put at when
using.
Use labels of full sheet only.
There is no guarantee that all the
labels in the market can meet
corresponding requirements.
Envelopes should be loaded
evenly.
Only use transparent lms
approved for use in laser
printers.
Only use heavy paper that
is approved for use in laser
printers and meets the weight
specications of this printer.
Use wrinkled, blistered or damaged label
papers.
Use wrinkled, nicked, stuck or damaged
envelopes.
Use envelopes with clips, snaps, windows,
or coated linings.
Use envelopes with self-adhesive stickers
or other synthetic materials.
Use transparent print media that is not
suitable for laser printers.
Use the paper whose weight is more than
the specication of the media recommended
for this printer, unless the paper is approved
for use in this printer.
2-3
Page 25

2.3. Non-printing Area and Non-scanning Area
The shaded part indicates the non-printing area and non-scanning area.
Usage Paper Size Top and Bottom Margins (A) Left and Right Margins (B)
A4 5 mm (0.197 inch) 5 mm (0.197 inch)
Print
Letter 5 mm (0.197 inch) 5 mm (0.197 inch)
A4 5 mm (0.197 inch) 5 mm (0.197 inch)
Copy
Letter 5 mm (0.197 inch) 5 mm (0.197 inch)
Scan
A4 5 mm (0.197 inch) 5 mm (0.197 inch)
Letter 5 mm (0.197 inch) 5 mm (0.197 inch)
2-4
Page 26
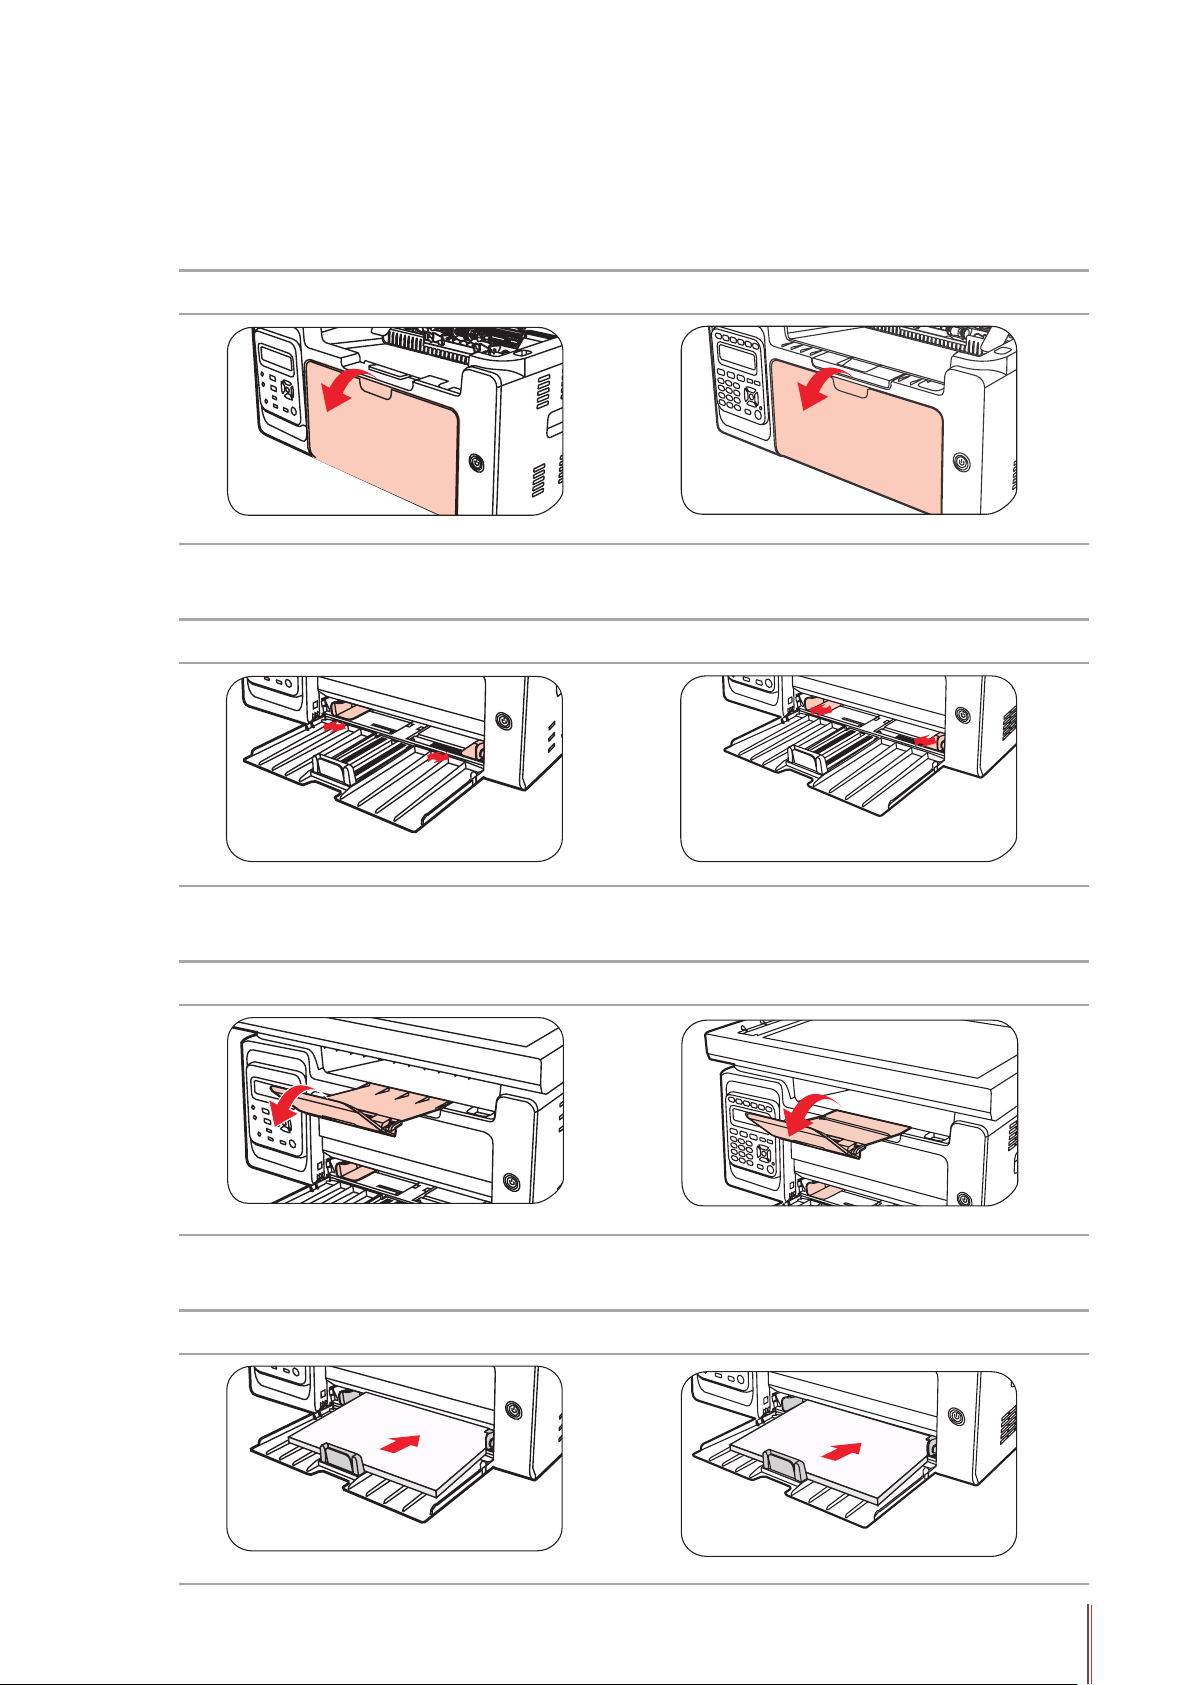
2.4. Load the Paper
Steps are as follows:
a) Open the feeder tray.
M6200/M6500/M6550 Series M6600 Series
b) Slide the automatic feed guides to match both sides of the paper.
M6200/M6500/M6550 Series M6600 Series
c) Raise the output tray to avoid the paper from slipping and falling.
M6200/M6500/M6550 Series M6600 Series
d) Load the paper into the automatic feeder tray with the print-side up.
M6200/M6500/M6550 Series M6600 Series
2-5
Page 27
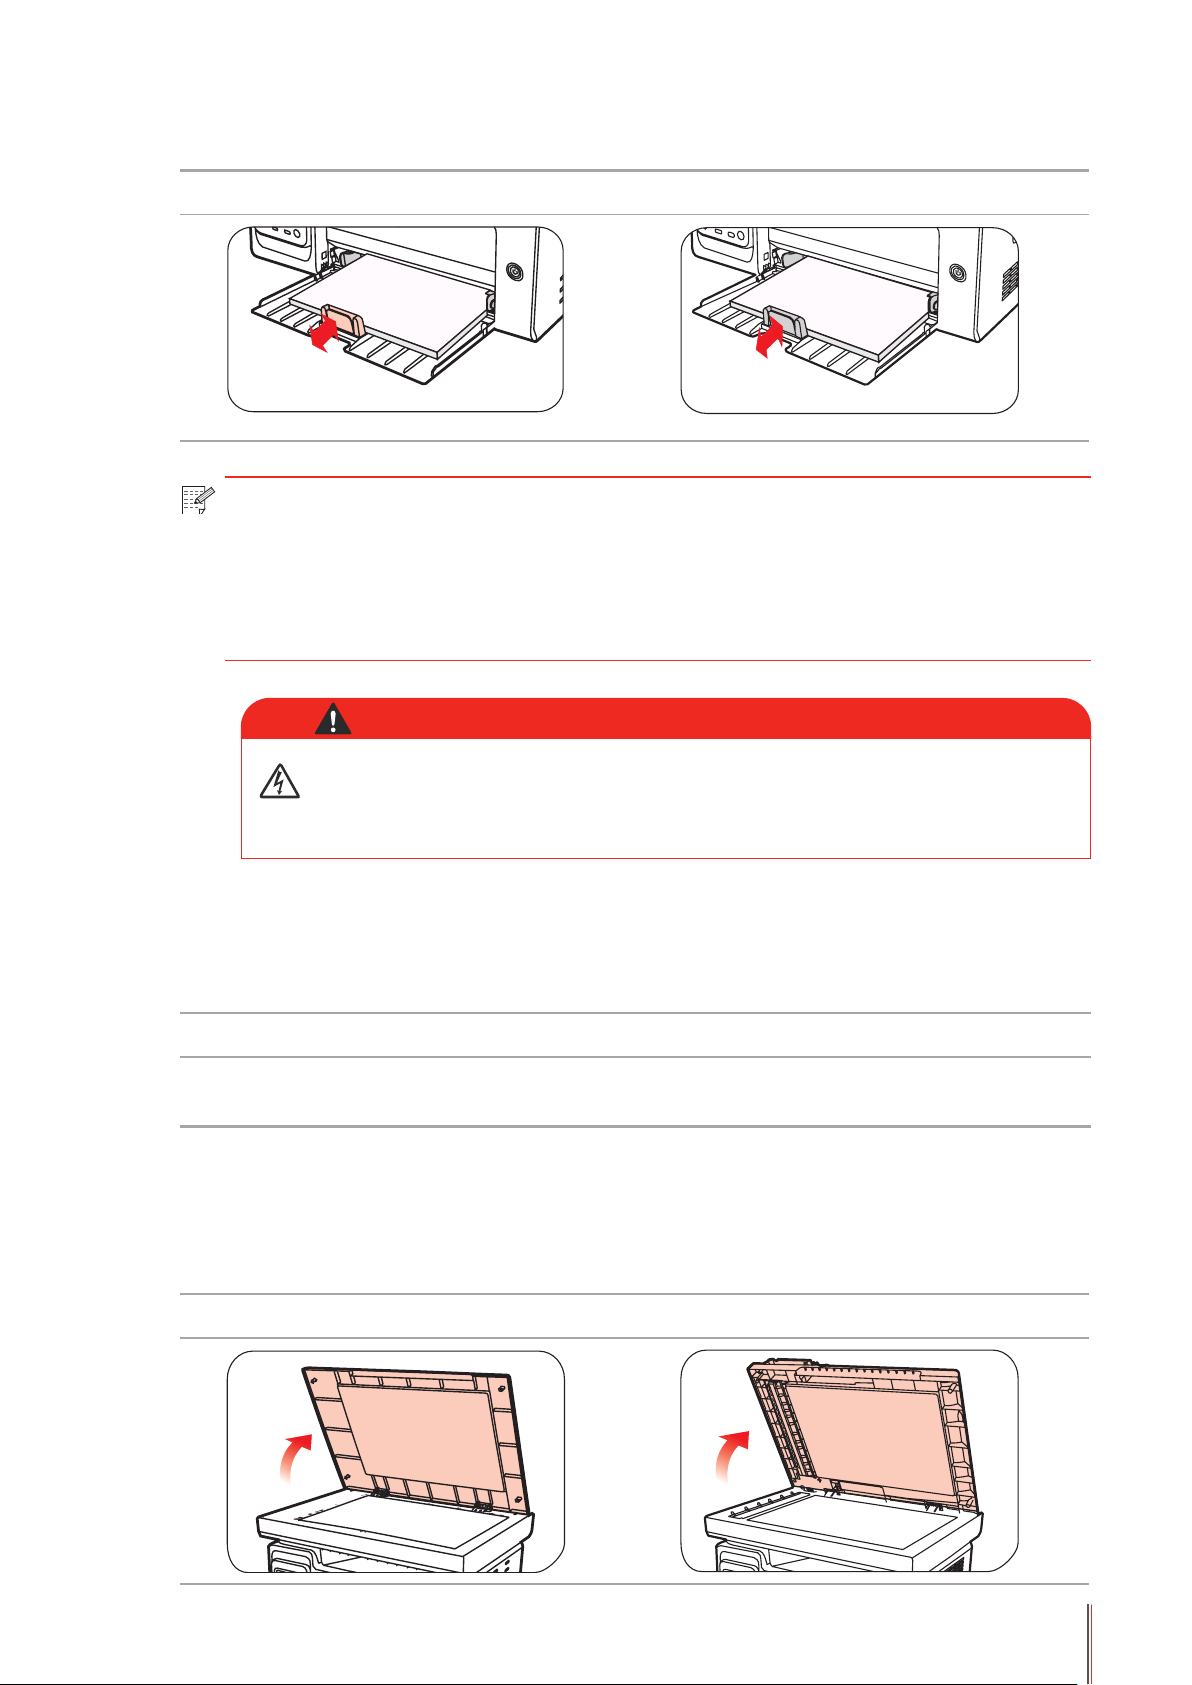
e) Adjust the paper stop to match the paper size.
M6200/M6500/M6550 Series M6600 Series
Note: • If the paper loaded into the automatic feeder tray at one time exceeds 150 pages,
paper will jam or cannot be fed in.
• When using the printed paper, please make the side to be printed (the blank side) up.
• When printing on A5 paper, it is recommended that the paper is fed in landscape
orientation, which can extend the service life of the laser toner cartridge.
Warning
After printing, please immediately remove the paper, envelopes or
transparent lm paper. Stacking paper or envelopes may cause a paper
jam or the paper curling.
2.5. Paper and Manuscript Use Process
Manuscript requirements:
Type Size
Plain paper, thick paper, transparent lm, carton paper,
label paper, envelope, thin paper
2.5.1. Scanning With Tablet
Steps of Use:
1). Raise the cover.
M6200/M6500 Series M6550/M6600 Series
A4, A5, B5, Letter, Custom
2-6
Page 28
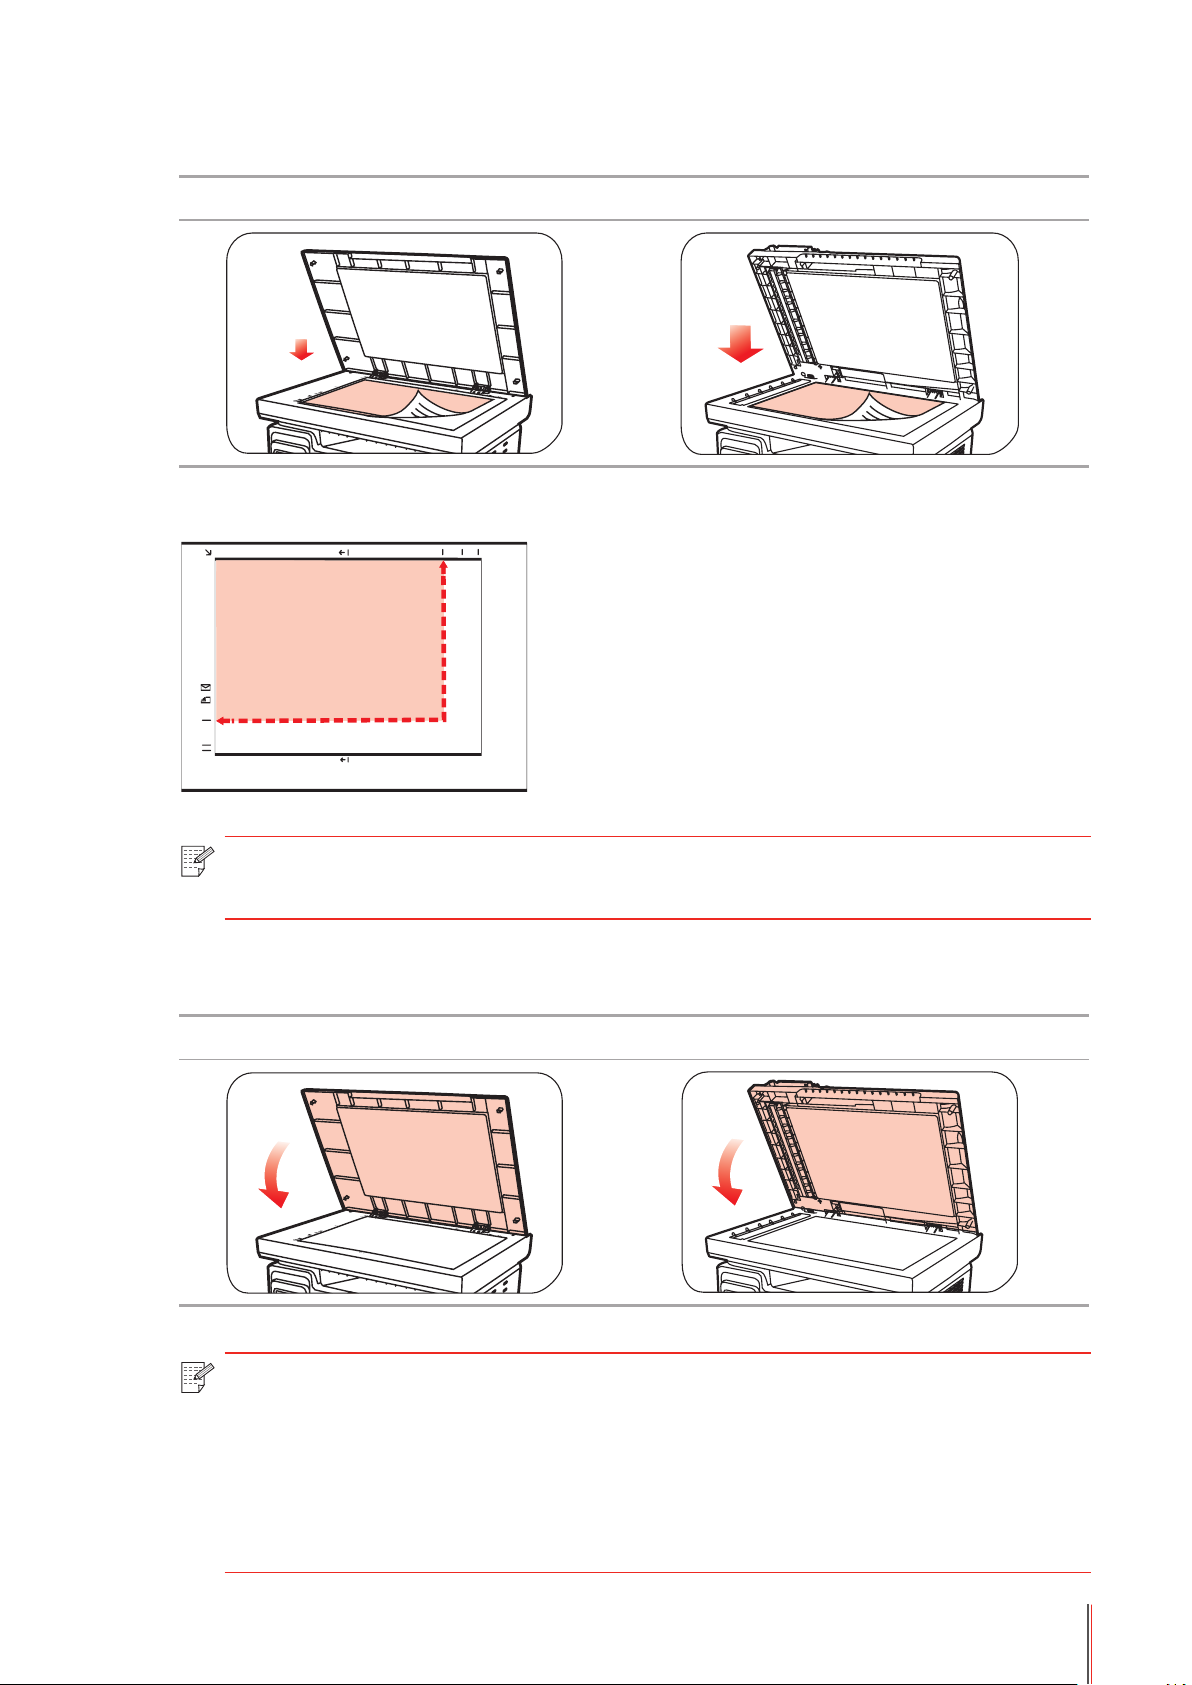
2). Load the manuscript face down.
B5
LTR
A4
B5 LTRA4
IDCOPY
M6200/M6500 Series M6550/M6600 Series
3). Align the manuscript to match the appropriate paper size.
Note: •If the manuscript does not match with any size marker, please align the upper-left
corner of the manuscript with the arrow.
4). Gently put down the cover.
M6200/M6500 Series M6550/M6600 Series
Note: • Please put the paper or document on the scanner glass after the glue, ink or
correction fluid are completely dried.
• Paper or manuscript with rough texture, concave and convex, oil stain and good
smoothness has poor printing performance.
• Please make sure that there is no dust, fluff, etc. on the paper.
• Paper shall be put on a flat surface and stored under a cool and dry environment.
2-7
Page 29
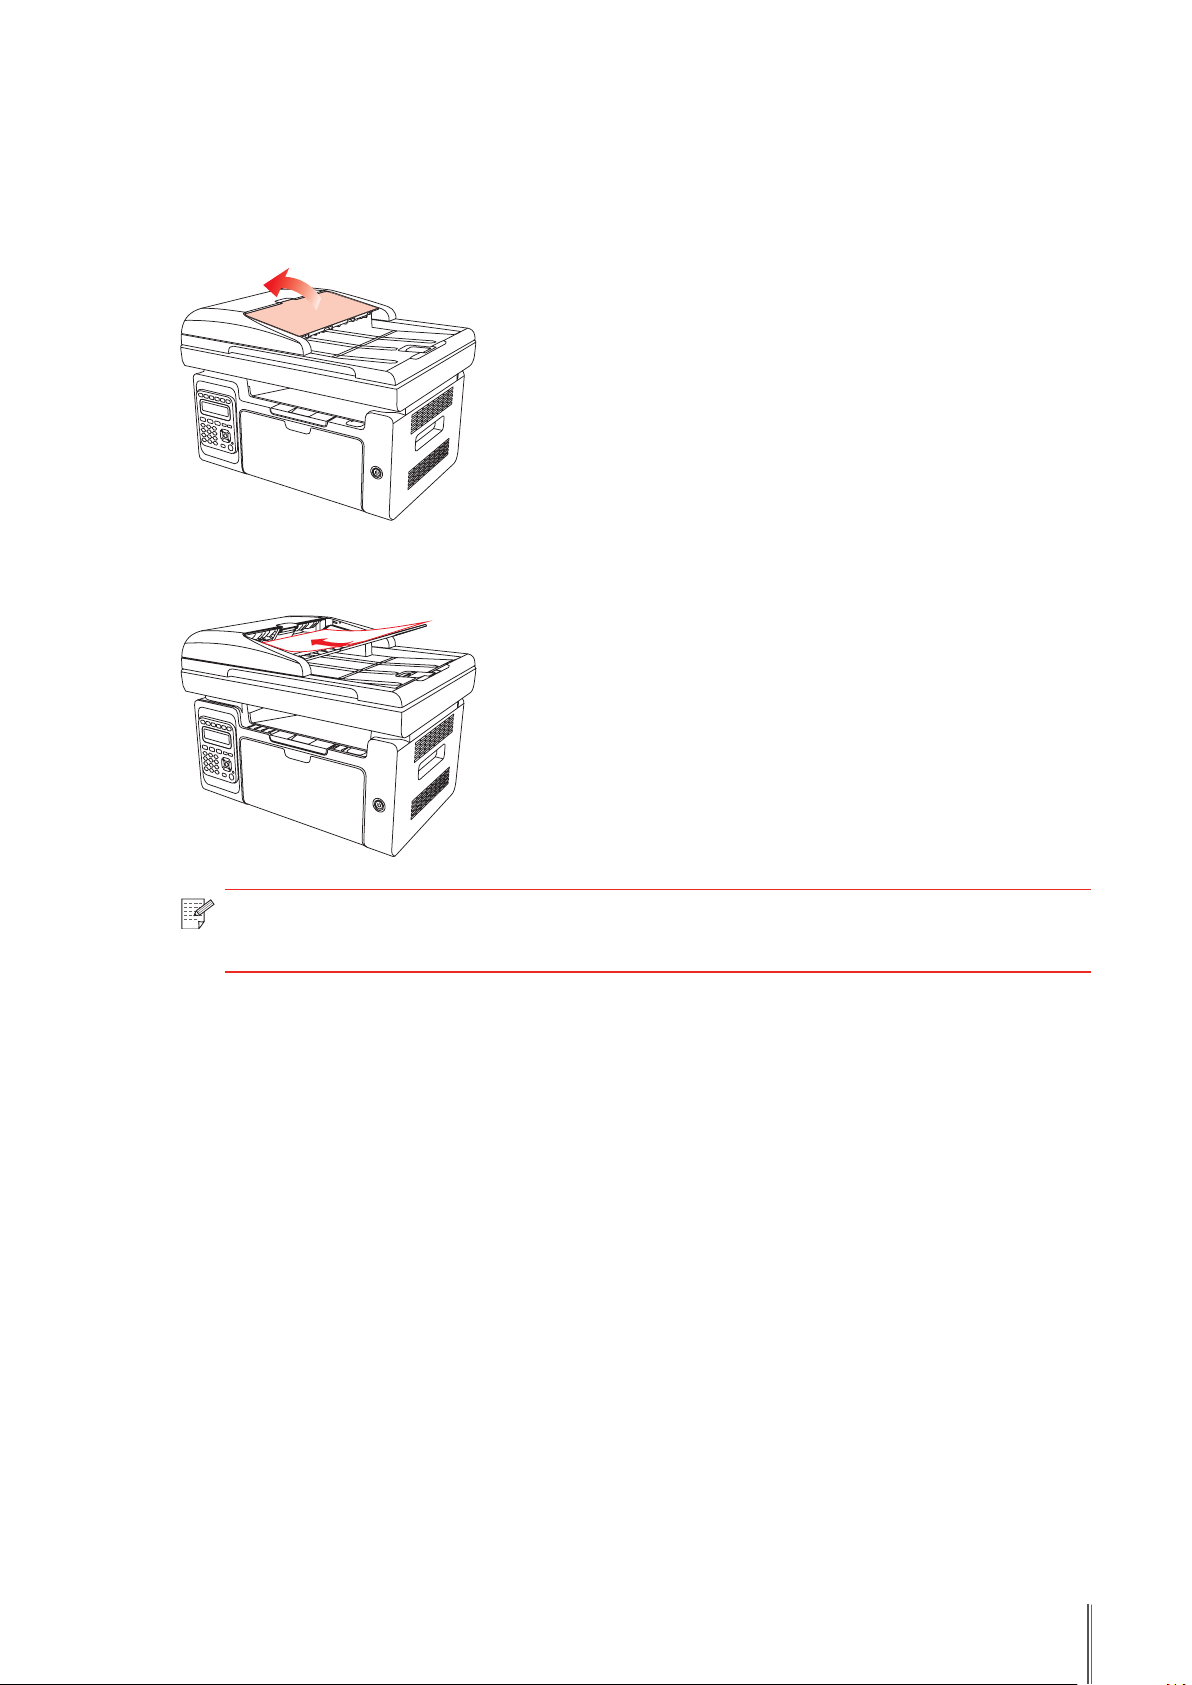
2.5.2. Scanning With Tablet
(For M6550/M6600 series only)
1) Open the manuscript support ap of the automatic document feeder.
2) Load the manuscript into the automatic document feeder with the front-side up and the top
of the manuscript entering into the feeder rst.
Note: • The automatic document feeder can be loaded up to 35 sheets of paper and
supports only feeding paper individually.
2-8
Page 30

Installation and
Uninstallation of the
Driver Software
3. Installation and Uninstallation of the Driver Software ....................................................................... 2
3.1. Windows-based Driver ................................................................................................................2
3.1.1. Introduction ..........................................................................................................................2
3.1.2. Installation Steps .................................................................................................................. 2
3.1.3. Uninstallation .....................................................................................................................10
3.2. Mac-based Driver .....................................................................................................................12
3
Chapter
3-1
Page 31

3. Installation and Uninstallation of the Driver Software
3.1. Windows-based Driver
3.1.1. Introduction
Driver software helps users to run the installer and uninstaller through the installation and
uninstallation wizards, which provides the following modules and main functions:
• Autorun completes the automatic running of the installation CD.
• Installation: Provides users with the installation wizard of the printer driver.
• Uninstallation: Provides users with the uninstallation wizard of the printer driver.
Note: • For users of Windows XP and Windows Server 2003, when connecting the
printer device for the rst time, New Hardware Wizard Found window will pop up.
You should close this window. If this window is not closed, the printer may not be
detected, resulting in failure of installation.
3.1.2. Installation Steps
3.1.2.1 USB Model Installation (One Click Installation)
1) Running Interface
After inserting the installation CD, the Pantum interface will pop up and the installation CD will
run automatically. See the gure below:
User authentication will be performed before the program runs. If the user is an administrator,
this interface will be displayed. If the user is not an administrator, the prompt of "Insufcient
privileges. Please install the printer with administrator privileges" will pop up.
3-2
Page 32

2) Language Interface
When the running completes, the language interface appears where you can choose different
languages as you like.
Note: • you can click to see the user guide and the content of the License Agreement.
3) Installation Process Interface
Click Install to enter into the Installation Process interface. This interface is mainly used for
the installation of driver softwares.
3-3
Page 33

4) Installation Complete
The program will automatically enter into this interface after the driver installation is
completed. It will automatically exit in 3 seconds and set the printer as default.
3.1.2.2. NET Model ( Wired and Wireless Networks)
1) Running Interface
After inserting the installation CD, the Pantum interface will pop up and the installation CD will
run automatically. See the gure below:
User authentication will be performed before the program runs. If the user is an administrator,
this interface will be displayed. If the user is not an administrator, the prompt of "Insufcient
privileges. Please install the printer with administrator privileges" will pop up.
3-4
Page 34

2) Installation Conguration
After the running interface ends, it will enter into Installation Conguration interface. Users
will select the corresponding series, language and model according to the purchased printer
model.
Installation Instruction:
USB Printer: applicable to USB Model ofine or wired installation (the printer disconnected
with the computer); or NET Model with USB Installation (disconnected to the Internet).
Printers connected to the network: applicable to Network Installation for NET Model; or WiFi
Model connected to the network before installation.
Printers connected to a new network: applicable to WiFi Model conguration for network
installation.
3-5
Page 35

3.1.2.2.1. Wired Model Installation (Net)
1) The following interface will display, if users install the Net Model:
Users select Net Model through "Select Printer" and 2 installation options are available
through Installation mode.
2) Search for Printer Interface:
After entering Search for Printers interface, the program will automatically search for printer
devices currently connected to the network.
3-6
Page 36

3) Printer List
After searching for printer, the program will automatically enter into "Detected Printer"
interface. Users can select the found printer or add printer by manually adding IP or Host
Name.
4) Printer Installation Interface
Click on "Next" in "Printer List" interface, the program will enter into "Printer Installation
interface". After installation is completed, it will enter into "Installation Complete" interface,
and exit in 3 minutes and set the printer as default.
3-7
Page 37

3.1.2.2.2. WiFi Model Installation (WiFi)
1) If users install the WiFi Model, the following interface will display:
Users select WiFi Model through "Select Printer", and 3 installation options are available
through Installation mode. Generally, users select the third installation method at the rst-time
installation.
2) WiFi Conguration Interface
At the rst installation, user will install WiFi Model through WiFi Conguration interface and
connect the printer to WiFi. Please refer to Chapter 5.2.1 to see the specic setting steps of
WiFi conguration tools.
3) Search for Printers interface:
After entering Search for Printers interface, the program will automatically search for printer
devices currently connected to the network.
3-8
Page 38

4) Printer List Selection
After searching for printers, the program will automatically enter Select Printer interface.
Users can select from the printers that have been found or add a printer by manually adding
the IP or Host Name.
During the driver installation, if "Windows can not verify the publisher of this driver software"
pops up to ask users whether to continue installation or not, users should click on "Always
install this driver software". System warning interface may differ slightly in different operating
systems.
5) Installation Complete Interface
This interface indicates that the installation is completed.
3-9
Page 39

3.1.3. Uninstallation
1) Select Uninstallation Mode.
From the Start menu, select Pantum uninstallation icon to enter the uninstallation interface or
nd Programs and Features and relevant Pantum options in the PC Control Panel, and click
on Uninstall/Change. The Delete interface will pop up. Users can select to uninstall the printer
that needs to be uninstalled.
2) Uninstallation Privilege Verication
Uninstallation requires administrator privileges. If a non-administrator runs the uninstaller,
this prompt will pop up: "Insufcient privileges. Please uninstall the printer with administrator
privileges."
If any task remains in the print queue, a warning will pop up, saying "Pantum M6600 Series
laser printer is printing. Please uninstall the driver after the printing is completed."
3) Uninstallation Interface
After selecting the printer, click on "Remove One" or "Remove All" to enter into Uninstallation
interface.
3-10 10
Page 40

4) Complete Interface
After the uninstallation progress bar completes, the program will automatically switch to
Uninstall Complete Interface. Click "Done" to nish the uninstallation successfully.
Click "Done" button, the following window will pop up prompting you to restart the computer.
Click "OK" to exit the uninstaller and restart the computer; click "Cancel" to exit the uninstaller.
Note: • If you choose not to restart the computer after the uninstallation is completed,
an unsuccessful installation or scan abnormality after installation may occur when
reinstalling the driver.
3-11 11
Page 41

3.2. Mac-based Driver
Introduction
Mac driver installer is made by using the PackageMaker software that comes with the Mac
System. The installation style is basically consistent with the installation of the ordinary
software under Mac.
The installation is divided into the following steps: introduction, license, destination select,
installation type, installation, summary.
Installation Steps:
1. Introduction
Insert the CD-ROM into the CD-ROM driver, run the CD-ROM and click the installation
package for Mac, then the following interface will be displayed:
2. License Agreement
Click "Continue" on the above gure to display the contents of the License Agreement, as
shown below:
3-12 12
Page 42

Click "Continue", the dialog box of "To continue installing the software, you must agree to the
terms of the Software License Agreement" will pop up.
Click "Agree" to accept the License Agreement and continue the installation.
3. Installation Type
Click "Continue" on the above gure to display the installation-related information, as shown below:
Click "Install", the following prompt box will pop up. Only after getting permission from the
administrator user can you continue with the installation.
3-13 13
Page 43

4. Installation
Click "Install" after lling in relevant information on the above gure, the installation progress
will be displayed, as shown below:
5. Summary
After successful installation is displayed. Click on "Restart" to complete the installation, as
shown below:
3-14 14
Page 44

Wired Network Setting (For
printer models that support
wired network printing)
4. Wired Network Settings (For printer models that support wired network printing) ............................2
4.1. Install the Printer to Network .......................................................................................................2
4.2. Control the Network Printer ........................................................................................................2
4.2.1. View or Change Network Settings .......................................................................................2
4.2.2. Set or Change Web Server Login Password .......................................................................2
4
Chapter
4-1
Page 45

4. Wired Network Settings (For printer models that
support wired network printing)
Printers that support wired network printing can be connected to the network, thereby the
printer will work under the control through a wired network.
4.1. Install the Printer to Network
Please refer to Chapter 3.1. to see the installation steps of NET Model.
4.2. Control the Network Printer
User can control the network settings through the built-in WEB Server in the printer.
4.2.1. View or Change Network Settings
1) From the printer’s Control Panel, using the steps in Chapter 7.1.6., print the report of the
printer’s network conguration information and check it to get the printer’s IP address.
2) Type the IP address into the Web browser's address bar to access the embedded Web
server of the printer.
3) Complete the settings of the Networking Protocol, wireless network, WiFi hotspot, address
list, e-mail and other relative conguration information in the “Setting”.
4.2.2. Set or Change Web Server Login Password
You can control the printer using the administrator settings.
Steps:
1) After opening the built-in WEB server, log in (default user name is admin, default password is
000000).
2) Click "Administrator Settings" to conduct corresponding operations.
4-2
Page 46

Wireless Network
settings (for models
with WiFi printing)
5. Wireless Network settings (for models with WiFi printing).................................................................2
5.1. Conguration via Button .............................................................................................................2
5.2. Conguration via USB Connection .............................................................................................2
5.2.1. WiFi Conguration Tool ........................................................................................................ 2
5.3. WiFi Hotspot Conguration ......................................................................................................... 5
5.4. Turn off the Wireless Connection ................................................................................................ 5
5
Chapter
5-1
Page 47

5. Wireless Network settings (for models with WiFi
printing)
Based on models, printers with WiFi printing support two types of wireless connection,
Infrastructure Connection Mode and WiFi hotspots. Generally, only one type of connection
can be used between the computer and the printer each time.
Infrastructure Connection Mode
The printer communicates with the wireless device via the
access point.
WiFi Hotspot
The wireless computer is directly connected with the wireless
device.
5.1. Conguration via Button
If the printer connects with the wireless router that supports WPS, wireless network can be
easily congured via the WiFi button on the control panel.
Conguration: Press and hold “WiFi” button on the printer’s Control Panel to launch WPS.
Press the WPS button on the wireless router after 2 minutes of the launching, then the printer
will be connected to the wireless network.
Note: • Wireless Router needs to support WPS mode
• WPS must be congured with the network cable unplugged from the printer
5.2. Conguration via USB Connection
USB Connection Conguration means using USB cable to connect the printer with the
computer, then launch the wireless network conguration tool on your computer and conduct
wireless network conguration on the printer.
5.2.1. WiFi Conguration Tool
WiFi Conguration tool is a software designed for the user to congure the wireless network
connection. Open the WiFi Conguration tool from the driver installation package. The
specic steps are as follows:
1) Detect Wireless Network Card
WiFi conguration tool can search the wireless network automatically by a wireless card in
the computer. If the computer does not have a wireless card, the option of "Manually Enter
the SSID" will be automatically checked on the "Wireless Network List" page.
5-2
Page 48

2) Wireless Network List
After launching the conguration tool, the Wireless Network List interface will be displayed to
provide selection function of wireless network.
Users can select an item in the list, and then click on "Next" to enter the Information Input
interface, or manually input the SSID on the bottom left corner.
3) Manually Enter SSID
Click "Enter SSID Manually" to switch to the interface of manually entering the SSID.
Input the needed SSID in the "SSID" bar; Click on "Print the Wireless Network Page" to get
the list of the found wireless networks.
5-3
Page 49

4) Input Conguration Information
Entering the Input Information interface, users can set relative information of the wireless
network.
After the conguration, click on "Next".
5) Conguration Completed
After completing the above steps, the Wireless Network Conguration Result interface pops
up. The conguration result will be displayed.
If the conguration of the printer’s wireless network is successful, the following interface will
pop up:
5-4
Page 50

5.3. WiFi Hotspot Conguration
When the wireless hotspot of printer is active, the user can connect to it directly by searching.
The wireless hotspot is enabled by default, and the default password is "12345678". The
printer-specic SSID and password can be obtained from WiFi Conguration Information
Page, which can be printed out by selecting Print WiFi Conguration. After establishing the
connection, the conguration can be completed according to the Web conguration method.
5.4. Turn off the Wireless Connection
If you want to disconnect the printer with the wireless network, you can turn off the wireless
device in the printer.
1) Users can disconnect the wireless network by pressing the "WiFi" button on the printer's
control panel for over 2 seconds.
2) To verify whether turn off successfully or not, users can check whether the WiFi button is
on or not ,or print the network conguration information to check the wireless network status.
5-5
Page 51

Pantum Mobile Print, Mobile
6
Scan and Mobile Fax
6. Pantum Mobile Print, Mobile Scan and Mobile Fax ........................................................................... 2
6.1. Introduction to Pantum Mobile Print, Mobile Scan and Mobile Fax ............................................2
6.1.1. What’s Pantum Mobile Print, Mobile Scan and Mobile Fax? ...............................................2
6.1.2. Download Pantum Mobile Print, Mobile Scan and Mobile Fax ............................................2
6.2. Operation Steps for Mobile Print .................................................................................................2
6.2.1. For Android Devices ............................................................................................................. 2
6.3. Operation Steps for Mobile Scan ................................................................................................ 4
6.3.1. For Android Devices ............................................................................................................. 4
6.3.2. For Apple IOS Devices (iPad, iPhone, etc) ..........................................................................7
6.4. Operation Steps for Mobile Fax ................................................................................................ 11
6.4.1. For Android Devices ........................................................................................................... 11
6.4.2. For Apple IOS Devices (iPad, iPhone, etc) ........................................................................13
Chapter
6-1
Page 52

6. Pantum Mobile Print, Mobile Scan and Mobile Fax
6.1. Introduction to Pantum Mobile Print, Mobile Scan and Mobile Fax
6.1.1. What’s Pantum Mobile Print, Mobile Scan and Mobile Fax?
Pantum Mobile Print, Mobile Scan and Mobile Fax is a free application, which allows users to
directly print or fax photos, documents and WebPages, or scan photos and documents from
the mobile terminal.
It connects your mobile device with wireless printer through WiFi access points. You just need
to install the Pantum Mobile Print, Mobile Scan and Mobile Fax application to congure the
network settings and detect the compatible Pantum printer for printing, scanning and faxing,
which is very convenient and efcient.
6.1.2. Download Pantum Mobile Print, Mobile Scan and Mobile Fax
To download the Pantum Mobile Print, Mobile Scan and Mobile Fax application, please visit
Pantum ofcial website www.pantum.com.
6.2. Operation Steps for Mobile Print
6.2.1. For Android Devices
Note: • Pantum mobile printing for Andriod system, the current product supports only for
printing txt documents, images or web pages, but not for printing documents in
PDF, Word, Excel, PPT, etc.
1. Turn on the printer.
2. Launch the WiFi in the mobile device, connect it with the WiFi hotspot of Pantum printer (For
example, the WiFi hotspot may display as Pantum-AP-XXXXXX).
If there are several Pantum WiFi printers, when you select the printer hotspot, please tap
Menu Button on the printer to be used, select Information Report and select Print WiFi
Conguration. Then, the printer will print out WiFi Conguration Information Page. View the
hotspot name of SSID in WiFi Conguration Information Page, and connect to the appropriate
hotspot with your mobile phone.
6-2
Page 53

3. Launch Pantum Print App to enter into home page and select Mobile Print button.
4. Select any item from the Menu, such as “Print from Album”, select pictures you need to
print, click on “Print Setting” on the top right corner.
5. Select printer, number of copies and paper size, click on “Print” on the top right corner to
start printing.
Note: • Install “Pantum Print” App (Select from QR Code, Google Play Store, Pantum
ofcial website,etc.).
• Scan the QR Code on the printer, go to www.pantum.com or directly download
our “Pantum Print” App from Google Play Store and install the application in the
mobile device.
6-3
Page 54

6.3. Operation Steps for Mobile Scan
6.3.1. For Android Devices
1. Turn on the printer.
2. Launch the WiFi in the mobile device, connect it with the WiFi hotspot of Pantum printer (for
example, the WiFi hotspot displays Pantum-AP-XXXXXX).
3. Launch Pantum Print App to enter into home page.
4. Click on “Mobile scanning”, the Scan List displays.
6-4
Page 55

Note: Click on the document in the list to enter into the Operation interface, select “Print”
or “Share” and the specific operations are as follows:
1) Click on “Print” to print document:
2) Click on “Share” to share the application:
6-5
Page 56

5. Click on “Scan” on the top right corner, enter into Scan interface.
6. Click on “Click to select scanner” at the top of the interface, select a scanner, the following
interface pops up:
7. Click on “Search”, and the page displays “Searching scanner”. Click on “OK” after
completing searching.
8. Click on “Add IP Address”, the following interface pops up, input the IP address, then click OK.
6-6
Page 57

9. Set the scan parameters below the interface. Click “Start” on the top right corner to start
printing.
10. After the scan is nished, click on “Done” on the top right corner, and the following
interface pops up to prompt you to input the title of the folder.
6.3.2. For Apple IOS Devices (iPad, iPhone, etc)
1. Turn on the printer.
2. Launch the WiFi in the mobile device, connect it with the WiFi hotspot of Pantum printer (for
example, the WiFi hotspot displays Pantum-AP-XXXXXX).
3. Launch the Pantum Scan APP icon (as is shown below), enter into the following interface:
6-7
Page 58

4. In the main menu interface, click Mobile Scan to enter the following interface.
5. Click on “Scan” on the top right corner, enter into Scan interface:
6. Click on “Select scanner”, the following window pops up:
6-8
Page 59

7. Click on “Search”, the page displays “Searching scanner”, the interface is as shown below
and click on “OK” after completing searching.
8. Click on “Add IP Address” in the middle of the navigation bar, the following interface pops
up:
9. Click on Scan Parameters at the bottom of the page, the following parameters setting panel
pops up:
6-9
Page 60

1�. Click on “Start” on the top right corner, start scanning.
11. After the scan is nished, if you still need to scan, click on “Resume” on the top right
corner; if not, click “Done” button on the top left corner. The following interface pops up to
prompt you to input the title of the folder.
6-1� 1�
Page 61

6.4. Operation Steps for Mobile Fax
6.4.1. For Android Devices
1. Turn on the printer.
2. Turn on the WiFi on the mobile device, connect it with the WiFi hotspot of Pantum printer (For
example, the WiFi hotspot may display as Pantum-AP-XXXXXX)
3. Launch Pantum Print App to enter into home page.
4. Click Mobile Fax to enter the fax options interface. Select any option from the Menu for
faxing, for example Fax from Album, select pictures you want to fax, and click Fax Settings on
the top right corner.
5. Click Search for Fax Machine at the top of the interface and the following window pops
up. Click Search and the page displays Searching for fax machine. Click OK or click Add IP
Address when the searching completes.
6-11 11
Page 62

6. Alternatively, click Add IP Address to enter the following interface, input the IP address
manually, then click OK
7. Set the fax number at the bottom left of the interface to enter the number input interface.
When you complete the input, click on “√” at the top right corner.
8. Set the paper size and the resolution at the bottom left of the interface. When you complete
the setup, click Fax on the top right corner to start faxing.
6-12 12
Page 63

6.4.2. For Apple IOS Devices (iPad, iPhone, etc)
1. Turn on the printer
2. Turn on the WiFi on the mobile device, connect it with the WiFi hotspot of Pantum printer (for
example, the WiFi hotspot may display as Pantum-AP-XXXXXX).
3. Launch the Pantum Scan APP icon (as is shown below) to enter the following interface:
4. Click on Pantum Fax, and the Fax List displays:
5. Select the picture(s) you want to fax (for example Fax from Album).
6. Click to enter Camera Roll, select the picture(s) you want to fax, and click Done at the top
right corner.
6-13 13
Page 64

7. Click on Search for fax machine, and the following window pops up:
8. Click Search and the page displays Search for fax machine. When the searching
completes, Click OK; or click Add IP Address button to enter the IP address manually.
9. Click Fax Number at the bottom of the page and the following window pops up. Select a fax
number.
1�. Click the fax setting parameters at the bottom of the page and select the paper size and
the resolution. When you complete the setup, click Fax at the top right corner to start the fax
process.
6-14 14
Page 65

General Settings
7
Chapter
7. General Settings ................................................................................................................................ 2
7.1. System Settings .......................................................................................................................... 2
7.1.1. Toner Save Setting ............................................................................................................... 2
7.1.2. Language Setting ................................................................................................................ 4
7.1.3. Restore to Factory Settings .................................................................................................4
7.1.4. Sleep Time Setting ............................................................................................................... 5
7.1.5. Network Settings .................................................................................................................. 5
7.1.6. Network Information ............................................................................................................. 6
7-1
Page 66

7. General Settings
This chapter mainly introduces some general settings of the menu on the control panel.
7.1. System Settings
7.1.1. Toner Save Setting
Users can select Toner Save Setting to lower the cost of printing. When the Toner Save mode
is "On", the output color of the copy will be lighter. Default Setting is "Off".
1) Press "Menu" button to enter the menu interface.
M6200/M6500/N6550 Series M6600 Series
2) Press direction pad "▲" or "▼" to select "3. System Settings" and press "OK" button.
M6200/M6500/N6550 Series M6600 Series
3) Press direction pad "▲" or "▼" to select "1. Toner Save Setting" option and press "OK"
button.
M6200/M6500/N6550 Series M6600 Series
7-2
Page 67

4) Press direction pad "▲" or "▼" to select "1. Close" and press "OK" button. When symbol
"*" appears after "1. Close", it indicates that the toner save setting is off; or press direction
pad "▲" or "▼" to select "2. Open" and press "OK" button. When symbol "*" appears after "2.
Open", it indicates that the toner save setting is on.
M6200/M6500/N6550 Series M6600 Series
5) Press the “menu” button to enter the menu settings interface. Press the “back” button
to return to the previous menu, or press OK to go to the next level of settings or save the
settings.
M6200/M6500/N6550 Series M6600 Series
Note: • For non-WiFi Model Printer, the WiFi button works as one-key toner saving
button.
• When this menu is placed on the bottom interface of selecting “Close/Open”,
symbol "*" of the options displayed in the menu will not update in time after
changing toner save setting via one-key toner saving button. Users need to go
back to the previous menu to re-enter this menu, the changed Toner Save Setting
information will be displayed.
7-3
Page 68

7.1.2. Language Setting
"Language Setting" is used to select the language to be displayed on the control panel.
1) Press "Menu" button to enter the menu interface.
2) Press direction pad "▲" or "▼" to select System Settings and press OK button.
3) Press direction pad "▲" or "▼" to select "2.Language Setting" and press "OK" button.
M6200/M6500/N6550 Series M6600 Series
Note: • Product’s actual region determines the Language Setting.
7.1.3. Restore to Factory Settings
"Restore Factory Settings" is used to restore the default settings of the printer.
1) Press "Menu" button to enter the menu interface.
2) Press direction pad "▲" or "▼" to select System Settings and press OK button.
▲
3. Press direction pad "
"OK" button, Click Yes or No.
M6200/M6500/N6550 Series M6600 Series
" or "▼" to select “3. Restore to Factory Settings” option and press
7-4
Page 69

7.1.4. Sleep Time Setting
5
Set the Sleep Mode to lower the power consumption. Sleep Time Setting allows you to select
the idle time before the device enter into Sleep Mode. The default idle time is 1 minute.
1) Press "Menu" button to enter the menu interface.
2) Press direction pad "▲" or "▼" to select System Settings and press OK button.
3) Press direction pad "▲" or "▼" to select "4. Sleep Time Setting" and press OK button.
4) The direction pad "▲" or "▼" can be used to select "1 Minute", "5 Minutes", "15 Minutes",
"30 Minutes", and "60 Minutes".
M6200/M6500/N6550 Series M6600 Series
Note: • When the printer is in dormant status, you can wake it up just by pressing Power
Saving button, sending print/scan/fax task, or opening or closing the output bin.
7.1.5. Network Settings
You can view or set the network status through Network Settings.
1) Press "Menu" button to enter the menu interface.
2) Press direction pad "▲" or "▼" to select System Settings and press OK button.
3) Press direction pad "▲" or "▼" to select Network Settings and press OK button.
M6200/M6500/N6550 Series M6600 Series
7-5
Page 70

4) Press direction pad "▲" or "▼" to select "1. Wired cong." and press "OK" button; Press
direction pad "▲" or "▼" to select "1. IPv4" or "2. IPv6".
M6200/M6500/N6550 Series M6600 Series
5) Press direction pad "▲" or "▼" to select "2. Wireless Network Settings" and press "OK"
button; Press direction pad "▲" or "▼" to select "1. WPS PIN Mode".
M6200/M6500/N6550 Series M6600 Series
7.1.6. Network Information
Users can check the network status through Network Information.
1) Press "Menu" button to enter the menu interface.
2) Press direction pad "▲" or "▼" to select System Settings and press OK button.
3) Press direction pad "▲" or "▼" to select Network Information and press OK button.
M6200/M6500/N6550 Series M6600 Series
7-6
Page 71

4) Press direction pad "▲" or "▼" to select "1. TCP/IP" "2. WiFi Information".
5) Select "1. TCP/IP" option and press "OK" button, press direction pad "▲" or "▼" to select
"1. IP Address", "2. Subnet mask" and "3. Gateway".
M6200/M6500/N6550 Series M6600 Series
6) Select "2. WiFi Information" option and press "OK" button, press direction pad "▲" or "▼" to
select "1. MAC Address ", "2. WiFi Status", "3. WiFi Channel" or "4. SSID Information" (The
display of SSID Information only supports English letters and numbers).
M6200/M6500/N6550 Series M6600 Series
7-7
Page 72

Print
8
Chapter
8. Print ...................................................................................................................................................2
8.1. Print Function ..............................................................................................................................2
8.2. Open Help Document .................................................................................................................3
8.3. Duplex Print ................................................................................................................................4
8.4. Cancel Print Job .........................................................................................................................7
8.5. Mac System Print ........................................................................................................................7
8-1
Page 73

8. Print
8.1. Print Function
You can set the print function through "Start"-"Device and Printer"- select corresponding
printer- right click – set print function in "Print Preferences". Some functions are as follows:
Functions Diagram
Manual Duplex
Collate Print
Reverse Print
N-in-1
Poster Print
(for Windows
Operation System
only)
Zoom Print
Custom Size
8-2
Page 74

Note: • You can select the 2 x 2 Poster printing from Layout options in the settings
interface to use the poster printing function.
• You can open the Printing Preferences and click Help button to check the specific
function explanation. For information about how to open the help document, see
Chapter 8.2.
8.2. Open Help Document
You can open the "Printing Preferences" and click "Help" button (for Windows Operation
System only). The help document contains the user guide where you can nd the information
on print settings.
8-3
Page 75

8.3. Duplex Print
1) The printer driver supports manual duplex.
Note: • If the paper is thin, it may wrinkle.
• If the paper is curled, make it flat and put it back into the manual feeder tray.
• If the manual duplex function causes a paper jam, see Chapter 13.1 for handling it.
2) Ensure that certain amount of paper is loaded into the automatic feeder tray before printing.
Note: • For loading paper, see Chapter 2.4.
• For the media types that support printing, see Chapter 2.1. It is recommended to
use the standard paper.
• Some paper media are not suitable for the duplex printing. Trying the duplex
printing may damage the printer. When "Paper Type" is "Thick Paper" or
"Transparent Film", please do not try "Duplex Print". If you choose "Reversed
Order" printing in Printing Preferences dialog box, Manual Duplex will not be
supported when "2 x 2 Poster" printing.
• Paper may get jammed or cannot be fed in when the automatic feeder tray is
loaded with more than 150 sheets.
3) Printing steps are as follows (for Windows Operation System only) :
a) Open the document to be printed from the application (such as Notepad), and select "Print"
from the "File" menu.
8-4
Page 76

b) Select Pantum printer
Click "Preferences" to set printing.
c) Set options in "Manual Duplex" of the "Basic" tab and click "OK" after completing the
settings.
8-5
Page 77

d) Click "Print".
Note: • It is recommended to raise the output tray to prevent the paper from sliding out of
it. If you choose not to raise the output tray, we recommend that you immediately
remove the printed paper output from the printer.
e) Send the print task after choosing Manual Duplex, then the following prompt window will
appear, telling you the next specic operations. Interfaces are different depending on the models.
f) After turning over the paper according to the prompt, press "OK" button of the printer to go
on printing the other side.
8-6
Page 78

g) You can click "Close" button to close this prompt window, and it will not appear until the
next Manual Duplex job comes in.
8.4. Cancel Print Job
You can press the Cancel button on the control panel to cancel the print job you want to
cancel during the printing process, or cancel the print job in the printing pool.
8.5. Mac System Print
Operation Steps:
1. After installing the printer’s driver, click on "System Preferences" on the bottom left corner.
2. After the window pops up, click on "Print and Scan".
8-7
Page 79

3. After the window pops up, select "Print".
4. Select printer
1) For USB Model printer: plug the USB cable, the corresponding printer will automatically
show in the left list.
2) For NET Model printer: plug the network cable, click on symbol "+" at the bottom of the left
list to add printer.
8-8
Page 80

3) For WiFi Model printer: select the WiFi icon on the top right corner of the page, click on
"Open Network Preferences" in the list.
After the window pops up, click on SSID.
8-9
Page 81

Select the corresponding SSID.
5. Open the document to be printed, click on "Document" – "Print".
8-10 10
Page 82

After the window pops up, set the printing parameters, and press the "Print" button on the top
right corner.
8-11 11
Page 83

Copy
9
Chapter
9. Copy ..................................................................................................................................................2
9.1. Basic Operations ........................................................................................................................2
9.1.1. Copying With Tablet .............................................................................................................2
9.1.2. Copying With Automatic Document Feeder (ADF) ..............................................................3
9.2. Special Copy Function ................................................................................................................ 3
9.2.1. Bill Copy ............................................................................................................................... 3
9.2.2. ID Copy ................................................................................................................................3
9.2.3. Cancel Copy Operation ........................................................................................................ 5
9.3. Copy Settings .............................................................................................................................5
9-1
Page 84

9. Copy
9.1. Basic Operations
The printer offers two modes of copying, namely, copying with the tablet and copying with the
automatic document feeder. The operation procedure is as follows:
9.1.1. Copying With Tablet
One sheet is scanned at a time when you use copying with tablet. Then the scanned image is
printed out after which the next copy can start. The basic procedure for copying with tablet is
as follows:
1. Put the manuscript face down into the glass platen.
M6200/M6500 Series M6550/M6600 Series
Note: • During copying, please do not open the cover to avoid any adverse impact on the
image quality.
• For the information on "Steps of Using Paper and Manuscript", please refer to
Chapter 2.5.
2. Press Copy button on the control panel, press OK to enter the settings interface for normal
copy mode.
M6200/M6500/M6550 Series M6600 Series
Note: • The printer will enter normal copy mode automatically when it starts up or restarts..
3. Press direction pad "▲" or "▼" to select "1. Image Quality", "2. Luminosity", "3. Zoom", "4.
N-in-1", "5. Clone", "6. Poster", "7. Collate", "8. Manual Duplex", or "9. Paper Setting" to set
the copy.
4. Press "Start" button to start copy.
9-2
Page 85

9.1.2. Copying With Automatic Document Feeder (ADF)
(For M6550/M6600 Series models only)
Operation Steps:
1. For the steps of loading the manuscript, please see section 2.5.
2. Press Copy button on the control panel to enter the copy mode interface.
3. Press Start to start copying.
9.2. Special Copy Function
9.2.1. Bill Copy
M6200/M6500/M6550 Series M6600 Series
Press this button to enter "Bill Copy" mode,which is used to output high-sharpness bill copy.
Steps of Bill Copy:
1. Press "Bill Copy" button to enter the "Bill Copy" mode, and then the area on the main LCD
interface to display image quality will change to display "Bill";
2. Put the bill on the scanning platform and press "Start" button, then the LCD will prompt
"Copying...";
3. The bill will be printed out after completing the scan.
9.2.2. ID Copy
M6200/M6500/M6550 Series M6600 Series
Press "ID Copy" button to enter "ID Card Copy" mode. It is used to copy ID Card and other
two-sided certicates.
9-3
Page 86

Steps of ID Copy:
1. Press ID Copy button to enter the ID Card Copy mode. The printer of this model supports
four types of ID Card copy, namely full page top to bottom, half page top to bottom, half page
left to right, A5 length, examples are as follows:
(1) (2) (3) (4)
2. Put the ID Card on the left half of the scanning platform. The orange part is the placed area
of ID Print Type 1, while ID Print Type 2, 3, 4 are in the blue part. The corresponding top and
left sides of the blue part on the scanning platform are marked with scale line. The distance
between the blue part and the boundary is 5mm. Press "Start" button to start scan, then the
LCD will prompt "Copying...";
3. After nishing scanning the one side of the ID Card, the rst line of the LCD prompts "Flip
the ID Card: Start", the second line displays "Scan Completed: OK”.
4. If the scanning of the second side of the ID Card is required, please open the cover to ip
ID Card and keep it in the same area. After pressing down "Start" button, LCD will prompt
"Copying..."; After completing scan, the front back of the ID Card will be copied to the same
page of the same paper;
5. If only one side is required, then press "OK" button to end scanning. This time only one
side of the ID Card is copied to one side of the paper.
9-4
Page 87

9.2.3. Cancel Copy Operation
If you want to cancel the copy operation, please press "Cancel" button. The LCD Screen will
prompt "Canceling....".
M6200/M6500/M6550 Series M6600 Series
9.3. Copy Settings
M6200/M6500/M6550 Series M6600 Series
Press Menu button to enter the menu interface. See section "7. General Settings" for the
settings on specic functions.
9-5
Page 88

Scan
10
Chapter
10. Scan ................................................................................................................................................2
10.1. Push Scan ................................................................................................................................2
10.1.1. Steps for Push Scan with Tablet ........................................................................................2
10.1.2. Steps for Push Scan with Automatic Document Feeder(ADF) ...........................................2
10.1.3. Single Page Scan ..............................................................................................................3
10.1.4. Merge Scan ........................................................................................................................ 3
10.1.5. Other Scan Functions ........................................................................................................4
10.2. Pull Scan ...................................................................................................................................8
10.2.1. Pantum Scan Application ................................................................................................... 8
10.2.2. TWAIN Scan Driver ............................................................................................................ 9
10.2.3. WIA Scan Driver ............................................................................................................... 11
10.2.4. Cancel Scan Job .............................................................................................................. 14
10.3. Mac System Scan ................................................................................................................... 15
10.3.1. ICA Scan .......................................................................................................................... 15
10.3.2. TWAIN Scan.....................................................................................................................18
10-1
Page 89

10. Scan
This printer provides two types of scan: "Push Scan", which means scanning through the
printer’s Control Panel operations; "Pull Scan" which means scanning through PC terminal
scanning the application.
10.1. Push Scan
10.1.1. Steps for Push Scan with Tablet
This section introduces how to scan documents to the PC (only through USB cable
connection) with control panel of the printer. The specic operation steps are as follows:
1) Put the document face down on the glass platen.
M6200/M6500 Series M6550/M6600 Series
Note: • During copying, please do not open the cover to avoid any adverse impact on the
image quality.
• For the information on "Steps of Using Paper and Manuscript", please refer to
Chapter 2.5.
2) Press Scan on the Control Panel and press direction pad "▲" or "▼" to select "Single Page
Scan" or "Merge Scan" to enter into the Scan mode.
Note: • For the information on Single Page Scan and Merge Scan, see 10.1.3. and
10.1.4.
3) Press "Start" button to start scanning.
Note: • Formats of scanned attachments: network scan supports PDF, TIFF and
JPEG formats. Users can select the Save As Type on the panel for the scanned
documents.
10.1.2. Steps for Push Scan with Automatic Document Feeder(ADF)
(For M6550/M6600 Series models only)
1) For information about Manuscript Loading Procedures, see 2.5.
2) Press Scan on the Control Panel and press direction pad "▲" or "▼" to select Single Page
Scan or Merge Scan to enter into the Scan mode.
3) Press Start button to start scanning.
4) Paper comes out from the ADF output exit and the scan completes;
10-2
Page 90

Note: • For a single page scanned to PC/E-mail/FTP, you can save it as PDF, TIFF or
JPEG;
• If you choose to scan to PC with N-UP Scan under the ADF scanning mode, the
scanned documents will be PDFs by default; For those scanned to E-mail/FTP with
N-UP Scan, you can save them as PDF, TIFF or JPEG;
10.1.3. Single Page Scan
The default scan mode of control panel is Single Page Scan mode.
For the specic steps of scan operation, please refer to Chapter 10.1.
10.1.4. Merge Scan
When you want to merge multi-page scanned documents into one PDF, please use Merge
Scan function.
Note: • The Merge Scan allow the document to be scanned into the PDF format by
default.
• This printer can perform Merge Scan operation only on the control panel.
The specic operations are as follows:
1. Press "Scan" button to enter scan status. The default scan mode of control panel is Single
Page.
M6200/M6500/M6550 Series M6600 Series
2. Press "▲" or "▼" button to select and enter "Merge Scan" mode.
M6200/M6500/M6550 Series M6600 Series
10-3
Page 91

3. Press "Start" button and the Scan Process Bar Interface will pop up on the computer.
4. After completing scanning the rst page, the contents as shown below will appear on the
control panel:
Press "Start" button - scan the next page
Press "OK" button- end the scanning
5. Put the document to be scanned on the glass platen and press Start button to continue to
scan the second page (For ADF scanning, it can run continuous scan directly).
6. Repeat the operation as described in the step 5 to scan multi-pages till you press "OK"
button to end this operation.
7. After completing the operation, the application will save PDF document to the specied folder.
10.1.5. Other Scan Functions
1. Scan to E-mail
Users can scan monochrome or color documents as attachments to E-mail application.
Operation steps as follows:
Type the IP address in the Web browser's address bar to access the embedded Web
①
server of the printer.
Click on "Setting"—"SMTP" to set the relative parameters of the SMTP Protocol; After
②
nishing setting, click on "Apply" to save.
10-4
Page 92

Click on "E-mail Address Book" in the left setting column to enter into the settings interface
③
of the email.
Click on "New" and the following window will pops up, edit the name of contacts ,input the
④
E-mail address and then click on "Submit".
Put the document on the platen.
⑤
M6200/M6500 Series M6550/M6600 Series
10-5
Page 93

Press "Scan" button on the control panel, and press "▲" or "▼" to select "1. Single Page
⑥
Scan" or "2. Merge Scan", then press "OK" button.
In the "1. Scan To" interface, press "OK" button.
⑦
Press "▲" or "▼" to select "Scan to E-mail" and press "OK" button.
⑧
Press "▲" or "▼" to select "E-mail Address Book" or "Group Mail" and press "OK" button.
⑨
Press "▲" or "▼" to select address or group and then press "OK" button; press "Start"
⑩
button to start scan.
Please follow these instructions on the settings for group emails:
Set the group name for group e-mail sending by webpage, and set the members, i.e.the
receivers, in the group of group email. After nishing scanning, rmware will send the scanned
documents to the mail server. Then mail server sends the documents to every member of the
group.
2. Scan to FTP
Scanning to FTP requires a network environment. Users can scan comparatively large
les online. Users need to log in FTP server with user name and password and install IIS
Component on the computer.
1) Operation Steps:
Type the IP address in the Web browser's address bar to access the embedded Web
①
server of the printer.
Click on "Setting" – "FTP" to enter into FTP Setting interface.
②
10-6
Page 94

Click "New", the following window will pop up. Set the relative parameters of the FTP
③
Protocol. After complete setting, click on "Submit".
Put the document on the platen.
④
M6200/M6500 Series M6550/M6600 Series
Press "Scan" button on the control panel, press "▲" or "▼" to select "1. Single Page Scan"
⑤
or "2. Merge Scan" and press "OK" button.
In the "1. Scan To" interface, press "OK" button.
⑥
Press "▲" or "▼" to select "Scan to FTP" and press "OK" button.
⑦
Press "▲" or "▼" to select the server and press "OK" button; Press "Start" button to start
⑧
scan.
Note: The relative parameters setting of the FTP Protocol are as follows:
FTP Server: IP Address of the server (such as 10.10.145.100 )
Port Number: Default port number is 21
Login Name: For example, anonymous
Password: such as (anonymous login needs no password)
Confirm Password: For example (anonymous login needs no password)
Server Name: For example, PANTUM
10-7
Page 95

10.2. Pull Scan
10.2.1. Pantum Scan Application
Operation Steps:
1) Double click on "Pantum Scan Application" on the computer, the icon is shown as below:
2) The prompt window is shown as below:
3) Set Scan in the right list. Click "Scan" on the bottom right corner and start scan.
This product complies with the TWAIN and Windows Image Application (WIA) standard.
If using the application which supports TWAIN and WIA standard, users can use the scan
function and directly scan the images to the open application. The handbook requires Ofce
Software (Word and Excel) and Photoshop ,for example, to show the operation.
10-8
Page 96

10.2.2. TWAIN Scan Driver
10.2.2.1. Ofce Software (Word and Excel)
Operation Steps:
1) Keyboard shortcuts: Alt+I+P+S to open the application’s window.
2) Click on "Device" option and select TWAIN Scan, click the "Custom Insert" button below.
3) After the window pops up, set the scan information in the right list of "Basic Setting" and
"Advanced Setting". Click on "Scan" and start scan.
10-9
Page 97

Note: Click on the "Port" below to select the scan port, which is shown as below:
10.2.2.2. Photoshop
Operation Steps:
1) Launch Photoshop, click on "File" – "Import" on the top left corner, select TWAIN Scan, as
is shown below:
2) After the window pops up, please refer to Step 3 of 10.2.2.1. to see the specic operation
steps.
10-10 10
Page 98

10.2.3. WIA Scan Driver
10.2.3.1. WIA1.0 Scan (Windows XP / Windows Server 2003)
1. Ofce Software (Word and Excel)
Operation Steps:
1) Keyboard shortcuts: Alt+I+P+S to open the application’s window.
2) Click on "Device" and select WIA Scan,click the "Custom Insert" below.
3) The prompt window as is shown below, set the scan information.
10-11 11
Page 99

4) Click on "Adjust the Scanned Image Quality" on the bottom left corner of the above picture,
the advanced properties interface will pop up, then users can set the scan; After nishing the
settings, click on the "OK" button, then "Scan" button to start scan.
2.Photoshop
Operation Steps:
1) Launch Photoshop, click "File"- "Import" on the top left conrner and select WIA Scan, as is
shown below:
2) After the window pops up, please refer to Step 3 and Step 4 of 10.2.3.1. to see the specic
operation steps.
10-12 12
Page 100

10.2.3.2. WIA 2.0 Scan (Windows Vista / Windows Server 2008 and later versions)
Operation Steps:
1) Click on "Start"- "All Programs"- "Device and Printer" on the left bottom of the desktop.
2) When the pop-up window appears, select the printer you want to use, and right click the
mouse.
10-13 13
 Loading...