

Page 1

User Guide
Pantum M5000/M6000 Series
Monochrome Laser MFP
Read this User Guide carefully before using the printer
Page 2

Preface
Welcome to Pantum series products!
Thank you for choosing to use a Pantum series product!
To protect your vital interests, please read the following statements carefully.
Legal Notice
Trademark
Pantum and Pantum logos are registered trademarks of Zhuhai Seine Technology Co., Ltd.
®
Microsoft
Microsoft Corporation in the United States and/or other countries/regions.
The ownership of the names of the software in this User Guide belongs to their respective
parent companies in accordance with the corresponding license agreement, reference is for
illustration only.
All other product and brand names herein may be the registered trademarks, logos, or service
marks of their respective owners, reference is for illustration only.
, Windows®, Windows server® and Windows Vista® are trademarks registered by
Copyright
The copyright of this User Guide is owned by Zhuhai Seine Technology Co., Ltd.
It is prohibited to copy, translate, modify and transmit this User Guide by any means or in any
format without the prior written consent of Zhuhai Seine Technology Co., Ltd.
Version: V 1.1 AF2B-1253-AL0
Disclaimer
For a better user experience, Zhuhai Seine Technology Co., Ltd. reserves the right to make
changes to the User Guide. The information contained herein is subject to change without
notice.
Users are responsible for any damages arising from a failure to follow this User Guide.
Meanwhile, apart from the express warranty made in the product maintenance manual or
service commitment, Zhuhai Seine Technology Co., Ltd. does not make any express or
implied warranty or guarantee in relation to this User Guide (including typesetting or words).
The copying, printing, scanning (or reproduction by any other means) of this product to create
certain documents or images may be prohibited by local laws. If you are uncertain about the
legality of using this product to create certain documents or images, you should consult your
legal advisor in advance.
I
Page 3
Safety Precautions
Laser Safety
Laser radiation is harmful to the human body. Since the laser components are completely
sealed within the printer, laser radiation will not leak. To avoid laser radiation, please do not
disassemble the printer at discretion!
The device is certied as a Class IIIB laser product. Since radiation emitted inside the device
is completely conned within protective housings and external covers, the laser beam
cannot escape during any phase of normal operation. Do not open the laser unit under any
circumstances to avoid exposure to the laser beam.
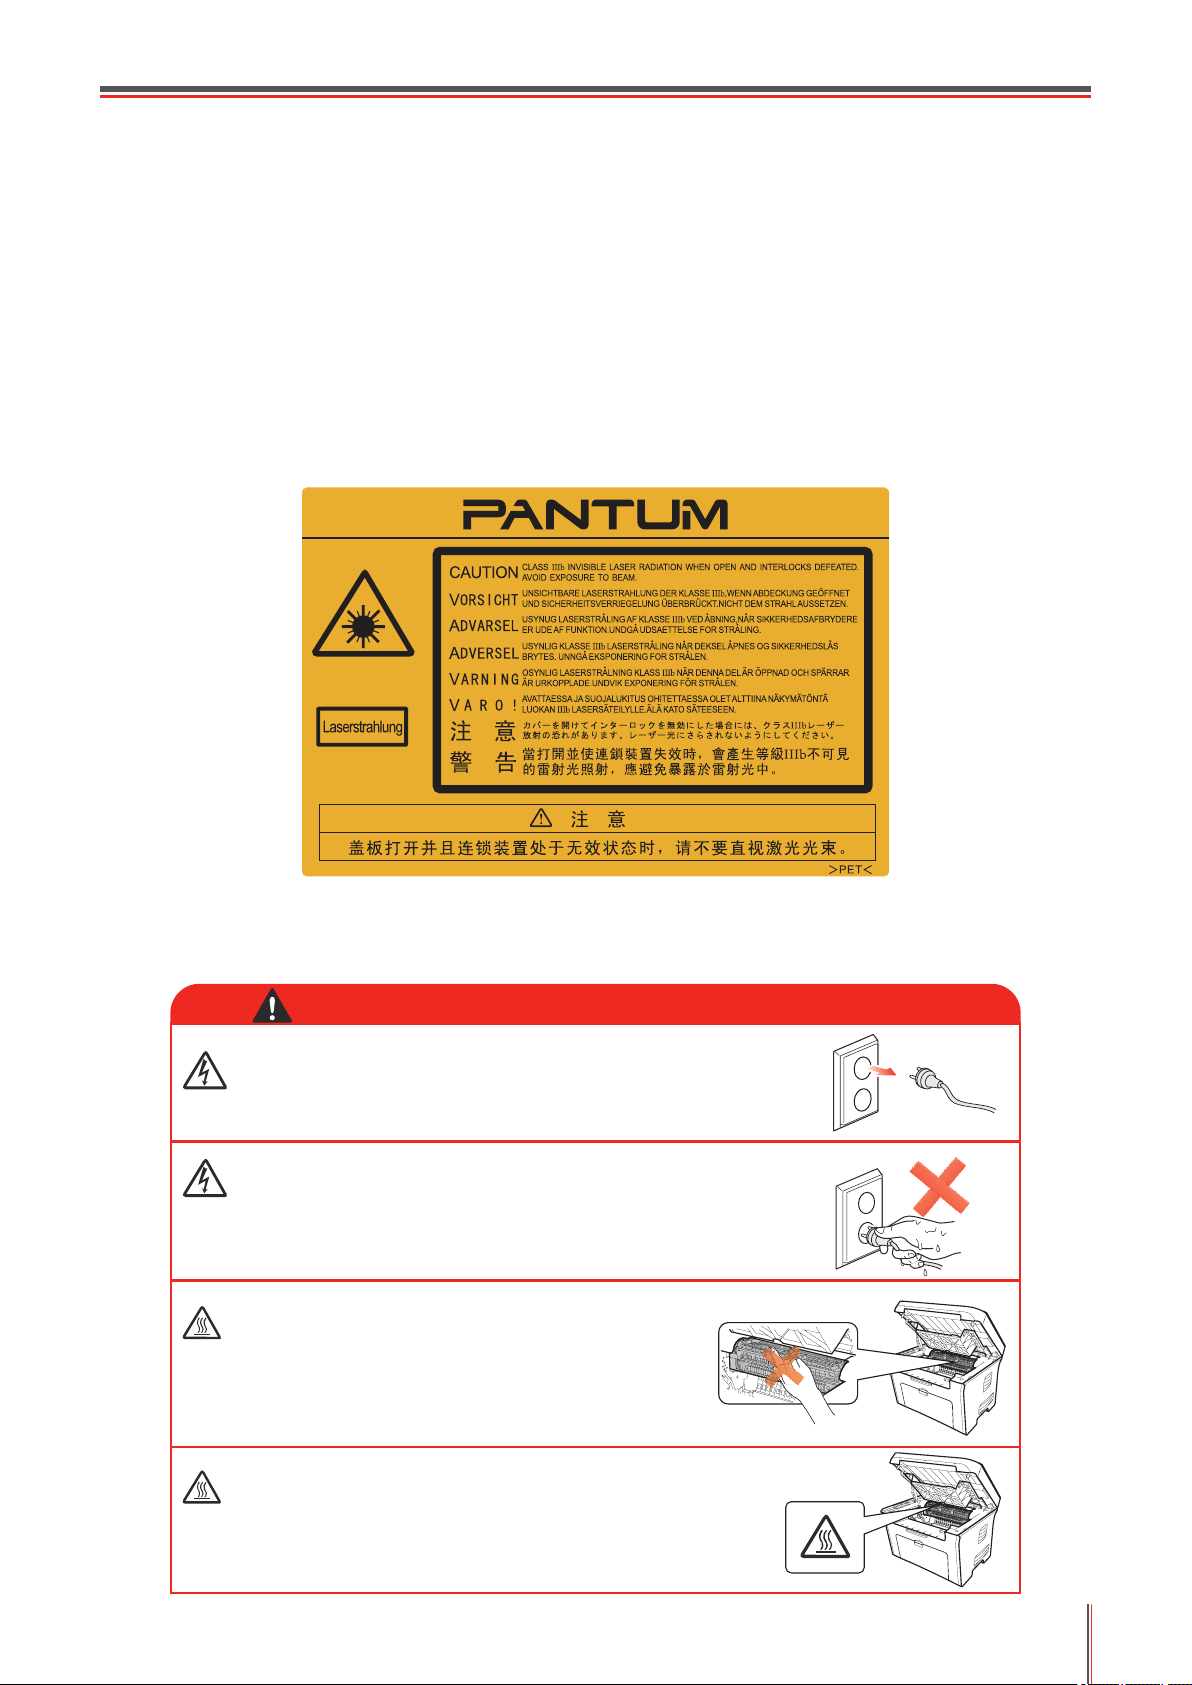
The following label is attached to the laser components inside the printer.
Safety Warning
Please note the following safety warnings before using the printer:
Warning
There is a high-voltage current inside the printer. Before
cleaning the printer, make sure the power is turned off!
Plugging and unplugging the power cord plug with
a wet hand may result in an electric shock.
The fuser unit is hot during and after
printing. Touching the fuser unit (the
shaded area as shown) may cause burns!
The fuser unit bears a high temperature warning
label. Please do not remove or damage this label.
II
Page 4

Precautions
Precautions before Using the Printer:
1. Read and understand all instructions.
2. Familiarize yourself with the basic principles associated with operating electrical appliances.
3. Comply with all warnings and instructions marked on the equipment or specied in the
manual supplied with the equipment.
4. If the operating instructions conict with the safety information, please refer back to the
safety information, as you may have misunderstood the operating instructions. If you
cannot resolve the conicts, please call the Customer Service Hotline or contact a service
representative for help.
5. Before cleaning the equipment, remove the power cord from the AC power supply outlet.
Do not use liquid or aerosol cleaners.
6. Please make sure that the equipment is put on a stable desktop surface to avoid serious
damage caused by the falling of the equipment.
7. Do not put the equipment near a radiator, an air conditioner, or a ventilation pipe.
8. Do not place any articles on top of the power cord. Do not put the equipment in a place
where its power cord will be stepped on by people.
9. Outlets and extension cords must not be overloaded. This may reduce performance and
could result in re or electric shock.
10. Do not allow pets to chew on the AC power cord or the computer interface cable.
11. Do not allow sharp objects piercing equipment slot, so as to avoid contact with the
high-voltage device, which otherwise may result in re or electric shock. Take care not to
spill liquids onto the equipment.
12. Do not disassemble the equipment so as to avoid the risk of electric shock. Necessary
repairs may only be carried out by professional maintenance personnel. Opening or
removing the cover could result in an electric shock or other potential hazards. Incorrect
disassembly and assembly could also result in an electric shock during future use.
13. If any one of the following occurs, disconnect the equipment from the computer and pull
out the power cord from the AC wall socket and contact a professional service person for
maintenance:
• Liquid has been spilled into the equipment.
• The equipment has been exposed to rain or water.
• The equipment falls, or the cover is damaged.
• Signicant changes in the equipment’s performance.
14. Do not perform adjustments or procedures not described in this document or damage
may occur requiring repair by a professional service person.
15. Do not use the equipment in a thunderstorm so as to avoid the risk of an electric shock. If
possible, pull out the AC power cord during a thunderstorm.
16. If you continuously print multiple pages, the surface of the tray will become very hot. Take
care not to touch this surface, and keep children away from this surface.
17. The apparatus with CLASS 1 construction shall be connected to a mains socket outlet with a
protective earthing connection.
18. Please keep this User Guide for future reference.
III
Page 5
Regulatory Information
This symbol indicates that, at the end of your product’s life, it must not be discarded
as domestic waste. Instead, you should dispose of your used equipment at a
designated collection point for the recycling of waste electrical and electronic
equipment. Ref: EU Directive 2002/96/EC on Waste Electrical and Electronic
Equipment (WEEE). Please contact your distributor / supplier for further
information.
This product is suitable for indoor use only.
European Community (EC) directives conformity
This product complies with the protection requirements of EC directives 2004/108/
EC and 2006/95/EC on the approximation and harmonization of the laws of the
Member States relating to electromagnetic compatibility and safety of electrical
equipment designed for use within certain voltage limits.
The manufacturer of this product is: Zhuhai Seine Technology Co., Ltd., No. 63,
Mingzhubei Road, Xiangzhou District, Zhuhai City, Guangdong, P.R. China.
A declaration of conformity to the requirements of the Directives is available upon
request from an Authorized Representative.
This product satises the Class B limits of EN 55022 and safety requirements of
EN 60950.
This printer is fully compliant with the RoHS Directive 2009/95/EC and the
requirements of the revised Directive 2011/65/EU for managing toxic and
hazardous substances.
IV
Page 6

Table of Contents
1. Before Using the Printer .................................................................................................................1-2
1.1. Packing List
1.2. Components of the Printer
1.3. Overview of the Control Panel
1.4. Display
1.5. Menu Button Settings
1.6. Toner Cartridge
2. Paper and Media
2.1. Paper type and sizes
2.2. Special Paper
2.3. Loading Paper
2.3.1. Loading into the Automatic Feeder Tray
2.3.2. Loading into the Manual Feeder Tray
2.4. Select Media
2.5. Loading Media
2.6. Nonprinting Area
3. Installation and Uninstall of the Driver Software
3.1. Windows-based Driver
3.1.1. Driver Installation
3.1.2. Driver Uninstall
3.2. Mac System-based Driver
3.2.1. Introduction
3.2.2. Installation Steps
4. General Settings
4.1. System Settings
4.1.1. Toner Save Settings
4.1.2. Language Settings
4.1.3. Copies
4.1.4. Power Saving Button
4.1.5. Restore..............................................................................................................................4-4
4.1.6. View System Information
4.1.7. Test Print
4.1.8. Sleep Time
4.2. Paper Settings
4.2.1. Setting Paper Size
4.2.2. Setting Paper Type
5. Print
................................................................................................................................................5-2
5.1. Print Function
5.2. Opening Help Document
5.3. Manual Duplex
5.4. Cancel Job
.............................................................................................................................1-2
.......................................................................................................1-3
.................................................................................................1-6
.....................................................................................................................................1-7
..............................................................................................................1-8
........................................................................................................................1-8
............................................................................................................................2-2
...............................................................................................................2-2
..........................................................................................................................2-3
.........................................................................................................................2-4
...........................................................................2-4
...............................................................................2-6
............................................................................................................................2-8
.........................................................................................................................2-8
...................................................................................................................2-10
.............................................................................3-2
.............................................................................................................3-2
..............................................................................................................3-2
................................................................................................................3-12
.....................................................................................................3-15
.....................................................................................................................3-15
.............................................................................................................3-15
.............................................................................................................................4-2
.......................................................................................................................4-2
..........................................................................................................4-2
............................................................................................................4-3
...............................................................................................................................4-3
........................................................................................................4-3
..................................................................................................4-4
...........................................................................................................................4-4
........................................................................................................................4-5
.........................................................................................................................4-5
............................................................................................................4-5
............................................................................................................4-6
...........................................................................................................................5-2
.........................................................................................................5-3
.........................................................................................................................5-4
...............................................................................................................................5-8
V
Page 7

6. Scan ...............................................................................................................................................6-2
6.1. Basic Operations .....................................................................................................................6-2
6.1.1. Scanning with Control Panel .............................................................................................6-2
6.1.2. Scanning with TWAIN .......................................................................................................6-3
6.1.3. Cancel Job ........................................................................................................................6-3
6.2. Scan Function ..........................................................................................................................6-4
6.2.1. Single Page Scan .............................................................................................................6-4
6.2.2. Merge Scan .......................................................................................................................6-4
6.3. Scan Settings ...........................................................................................................................6-6
6.3.1. Basic Settings ...................................................................................................................6-6
6.3.2. Advanced Settings ............................................................................................................6-7
7. Copy ...............................................................................................................................................7-2
7.1. Basic Operations .....................................................................................................................7-2
7.1.1. Basic Operations of Copying ............................................................................................7-2
7.1.2. Cancel Copy Operations ...................................................................................................7-3
7.2. Copy Function ..........................................................................................................................7-3
7.2.1. Receipt Copy.....................................................................................................................7-3
7.2.2. ID Copy .............................................................................................................................7-4
7.3. Copy Settings ..........................................................................................................................7-5
8. Routine Maintenance......................................................................................................................8-2
8.1. Cleaning the Printer .................................................................................................................8-2
8.2. Maintenance of the Toner Cartridge ........................................................................................8-5
8.2.1. About the Toner Cartridge .................................................................................................8-5
8.2.2. Steps for Replacing the Toner Cartridge ...........................................................................8-6
9. Troubleshooting ..............................................................................................................................9-2
9.1. Clearing Jammed Paper ..........................................................................................................9-2
9.2. Error Message .........................................................................................................................9-5
9.3. Common Troubleshooting ........................................................................................................9-6
9.3.1. Common Problems ...........................................................................................................9-6
9.3.2. Software ............................................................................................................................9-8
9.3.3. Image Defects ...................................................................................................................9-8
10. Product Specication ..................................................................................................................10-2
10.1. Overview ..............................................................................................................................10-2
10.2. Scanning Specication ........................................................................................................10-3
10.3. Printing Specication ...........................................................................................................10-3
10.4. Copying Specication ..........................................................................................................10-3
10.5. Paper Handling Capacity .....................................................................................................10-3
VI
Page 8

Before Using the Printer
1
CHAPTER
1. Before Using the Printer ....................................................................................................................2
1.1. Packing List ................................................................................................................................2
1.2. Components of the Printer .......................................................................................................... 3
1.3. Overview of the Control Panel .................................................................................................... 6
1.4. Display ........................................................................................................................................7
1.5. Menu Button Settings .................................................................................................................8
1.6. Toner Cartridge ........................................................................................................................... 8
1-1
Page 9
1. Before Using the Printer
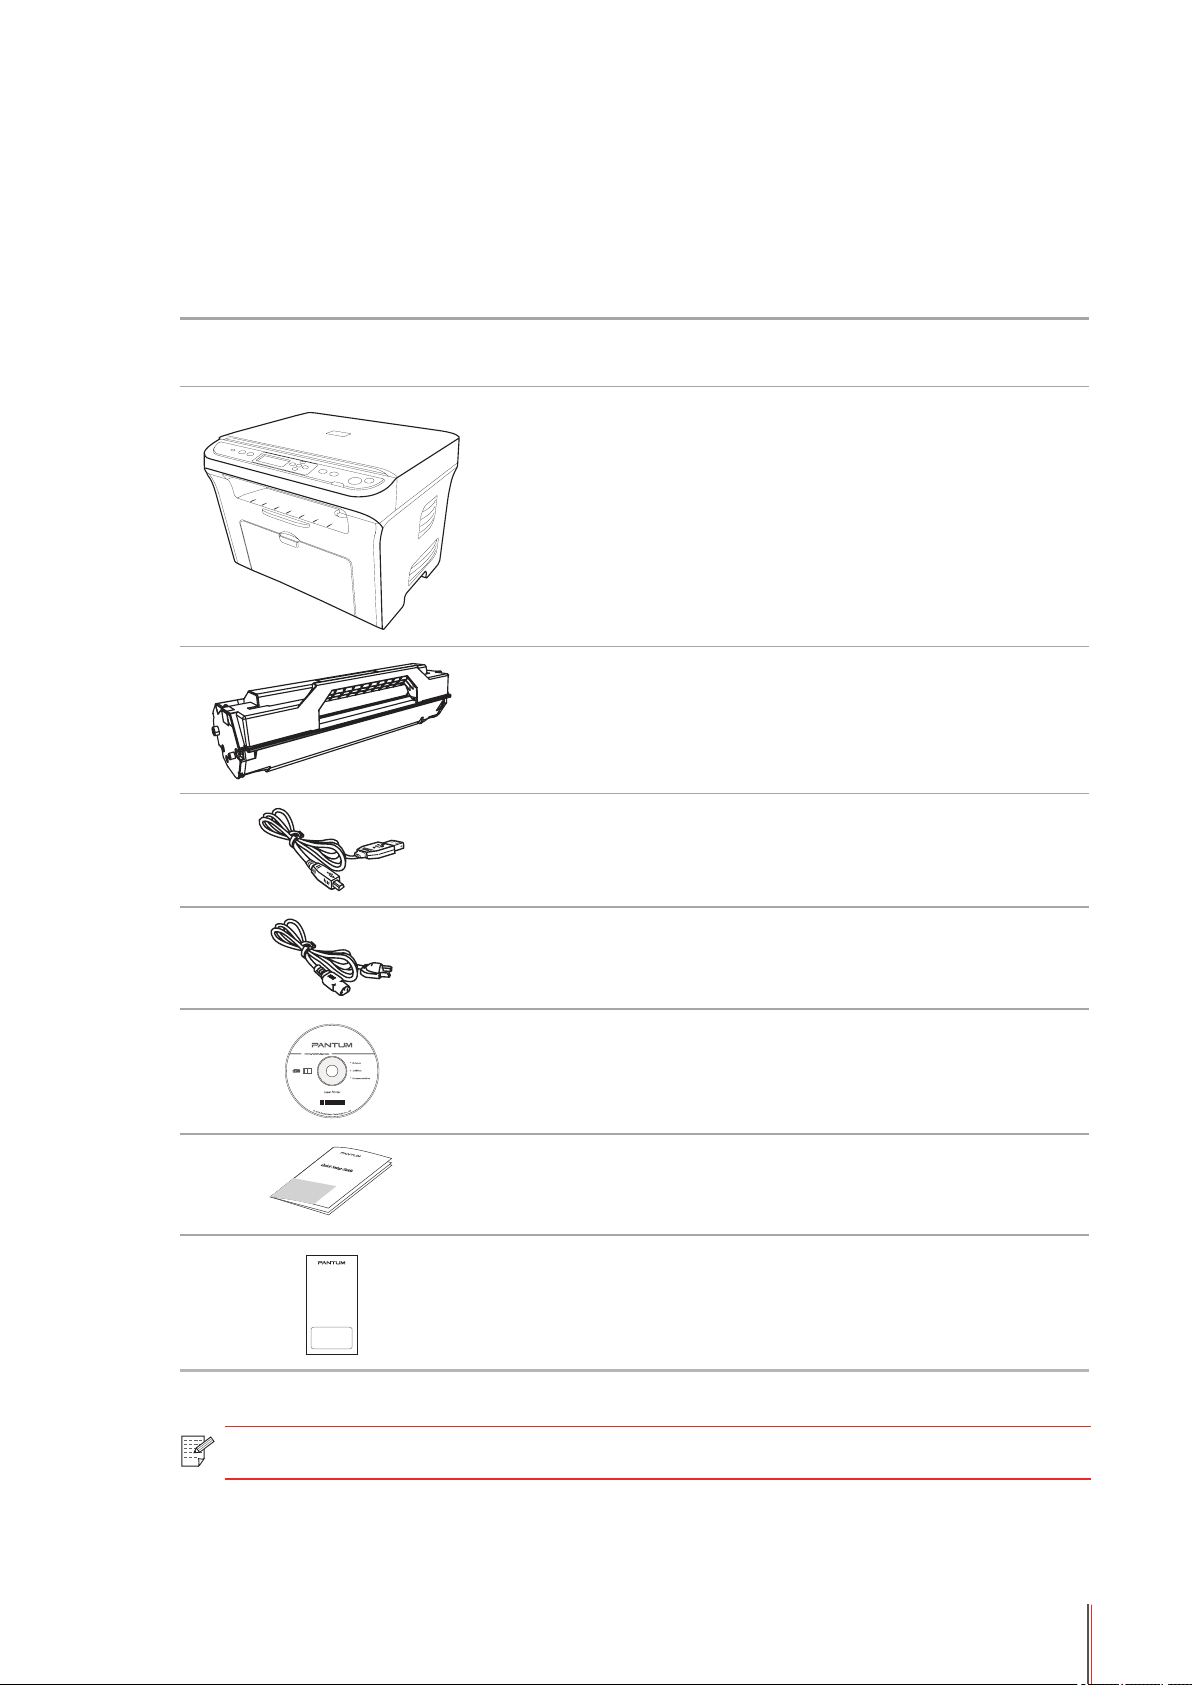
1.1. Packing List
When you open the package, make sure that the following parts are included:
Parts Name Quantity
Printer 1
Toner cartridge 1
USB interface cable 1
Power cord 1
CD-ROM 1
Quick Setup Guide 1
Pantum Warranty 1
Note: • The warranty card may not be included in some regions.
1-2
Page 10
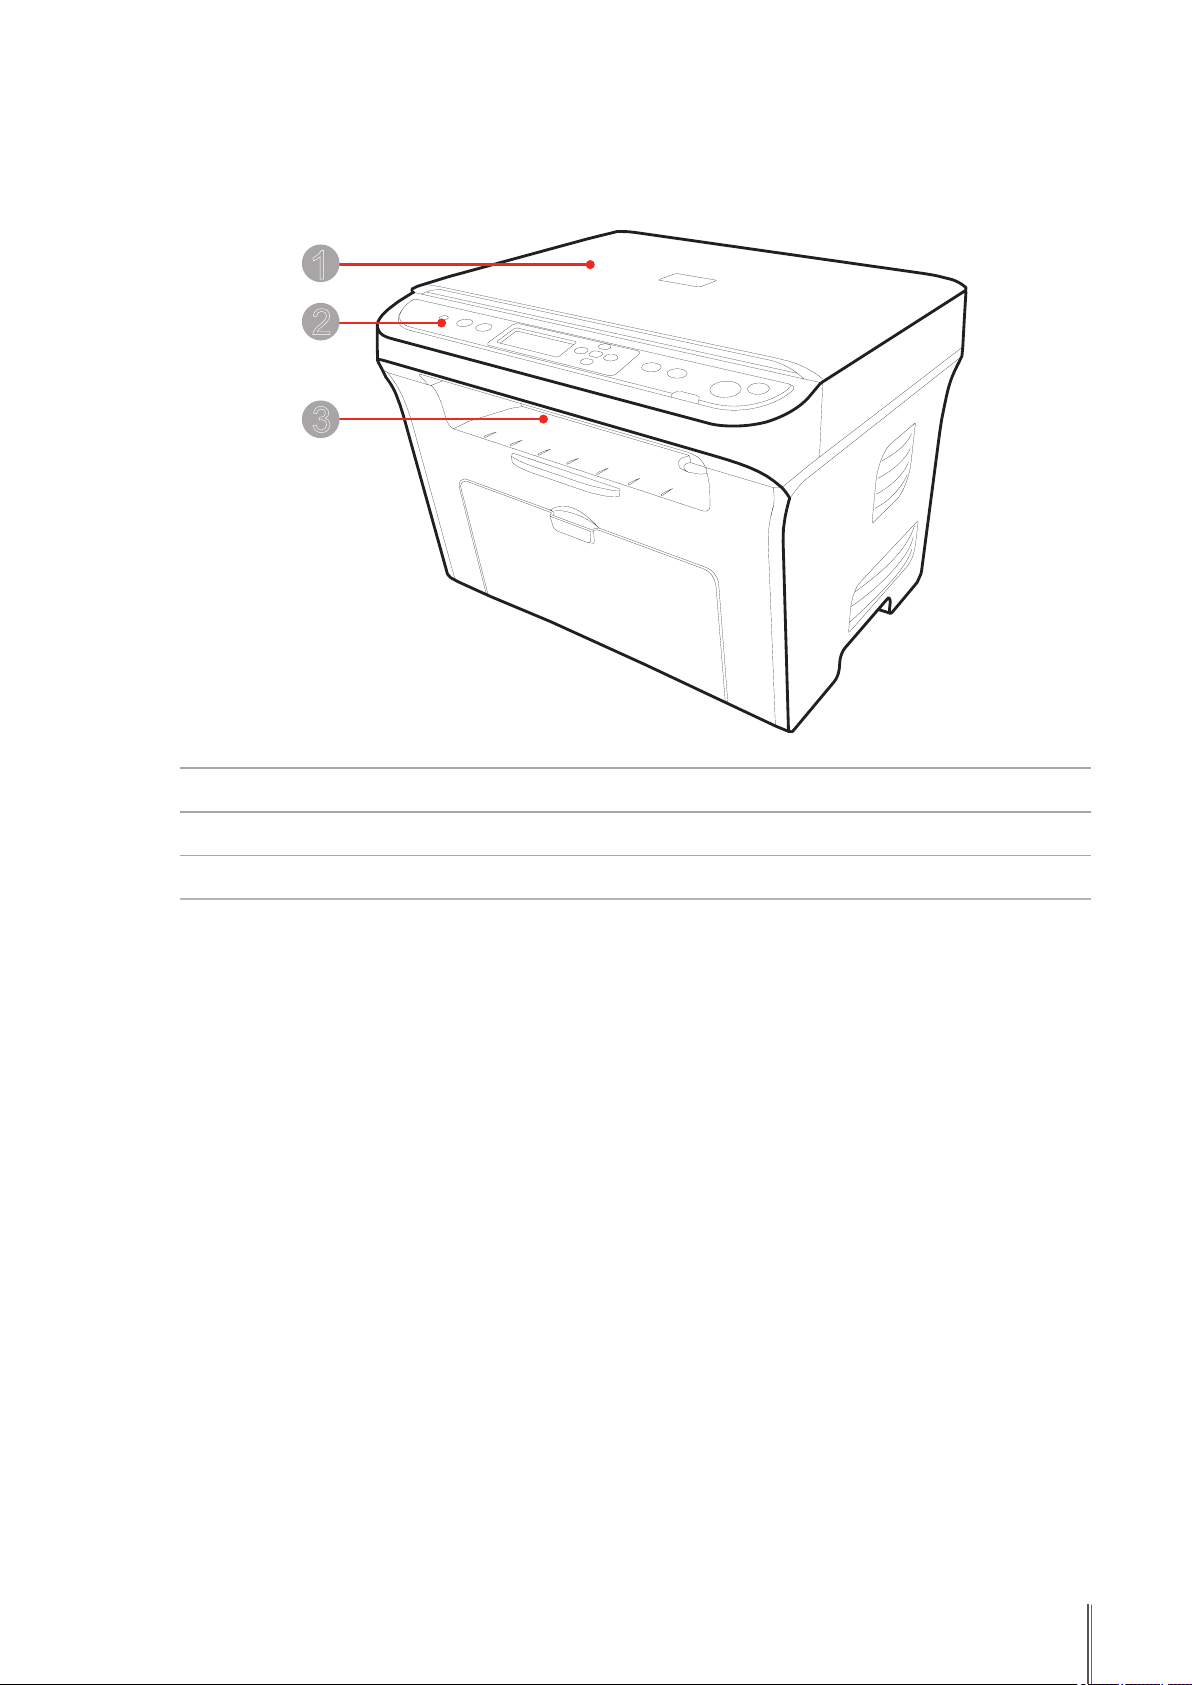
1.2. Components of the Printer
|Front view (1)
1
2
3
1 Cover
2 Control Panel
3 Output Bin
1-3
Page 11
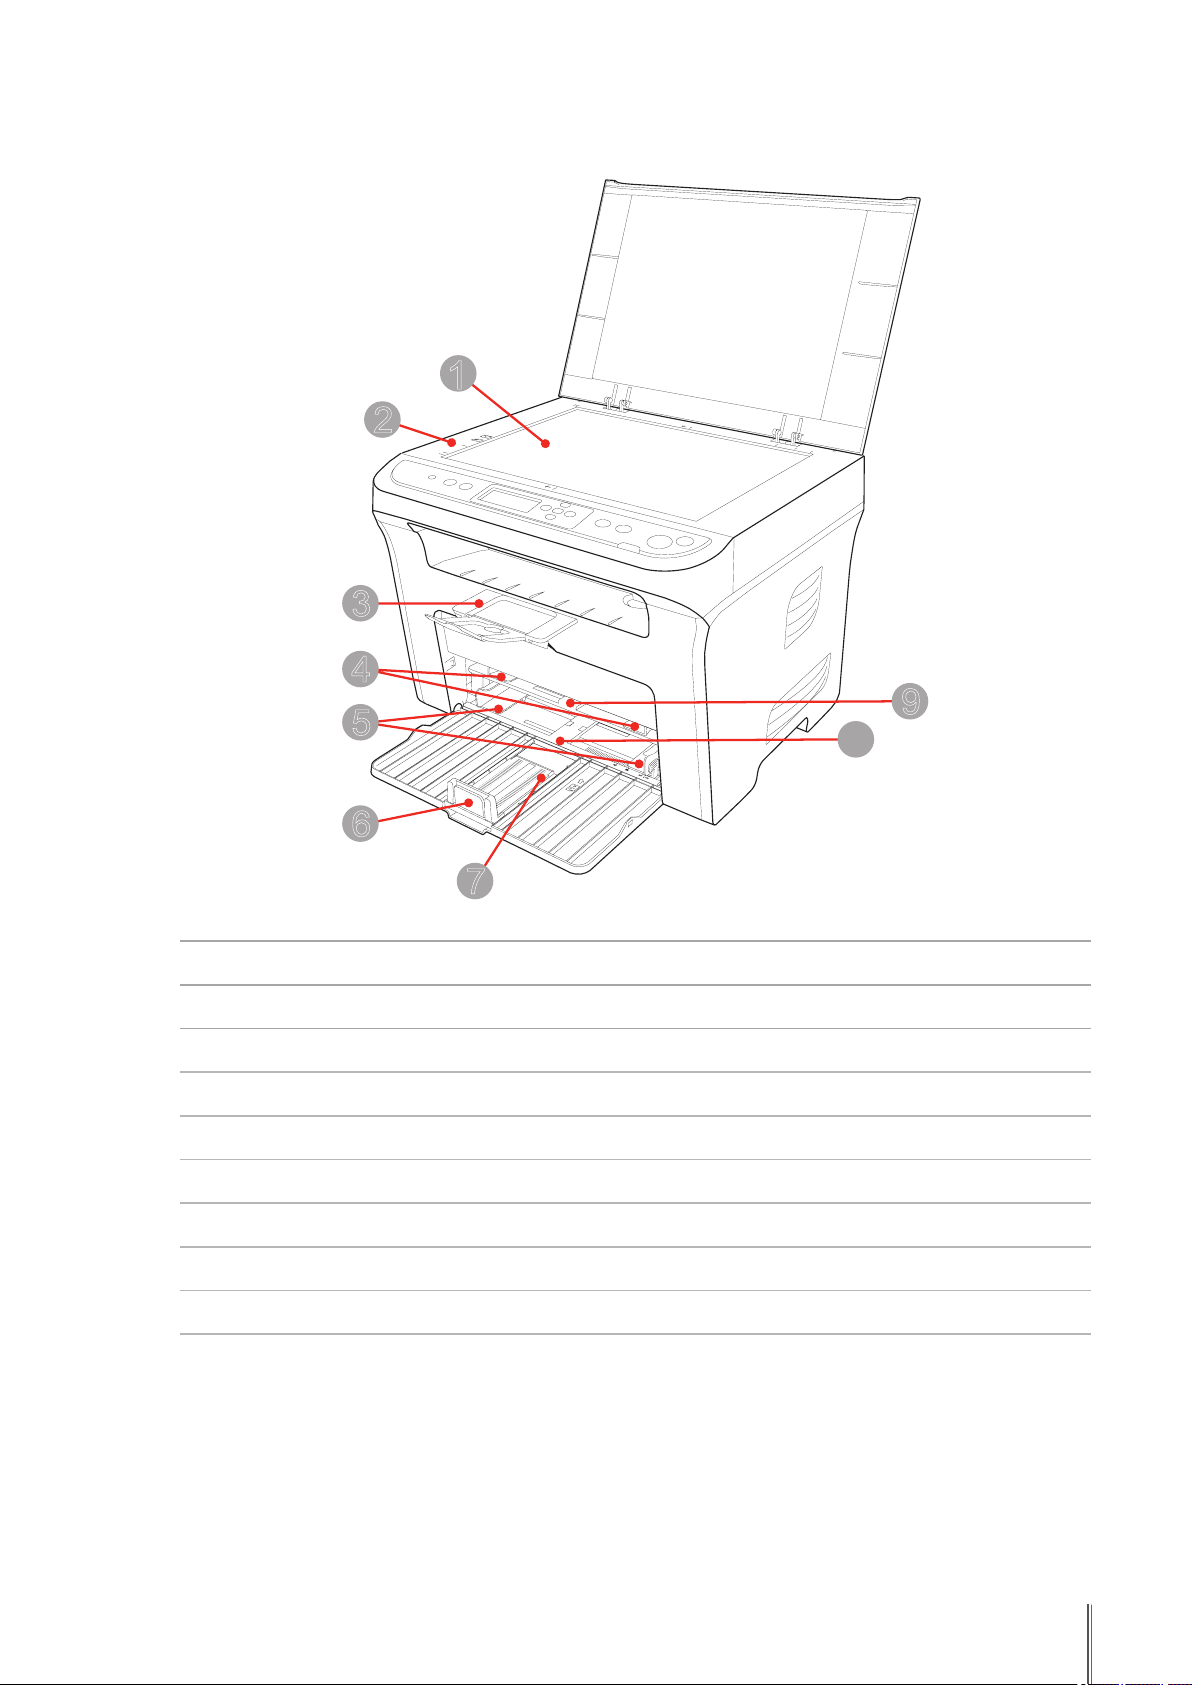
|Front view (2)
1
2
B5
A4
LTR
ID COPY
3
4
5
6
7
1 Glass Platen
B5
LT
R
A4
9
8
2 Scanning Platform
3 Output Tray
4 Manual Feed Guide
5 Automatic Feed Guide
6 Paper Stop
7 Feeder Tray
8 Automatic Feeder Tray
9 Manual Feeder Tray
1-4
Page 12
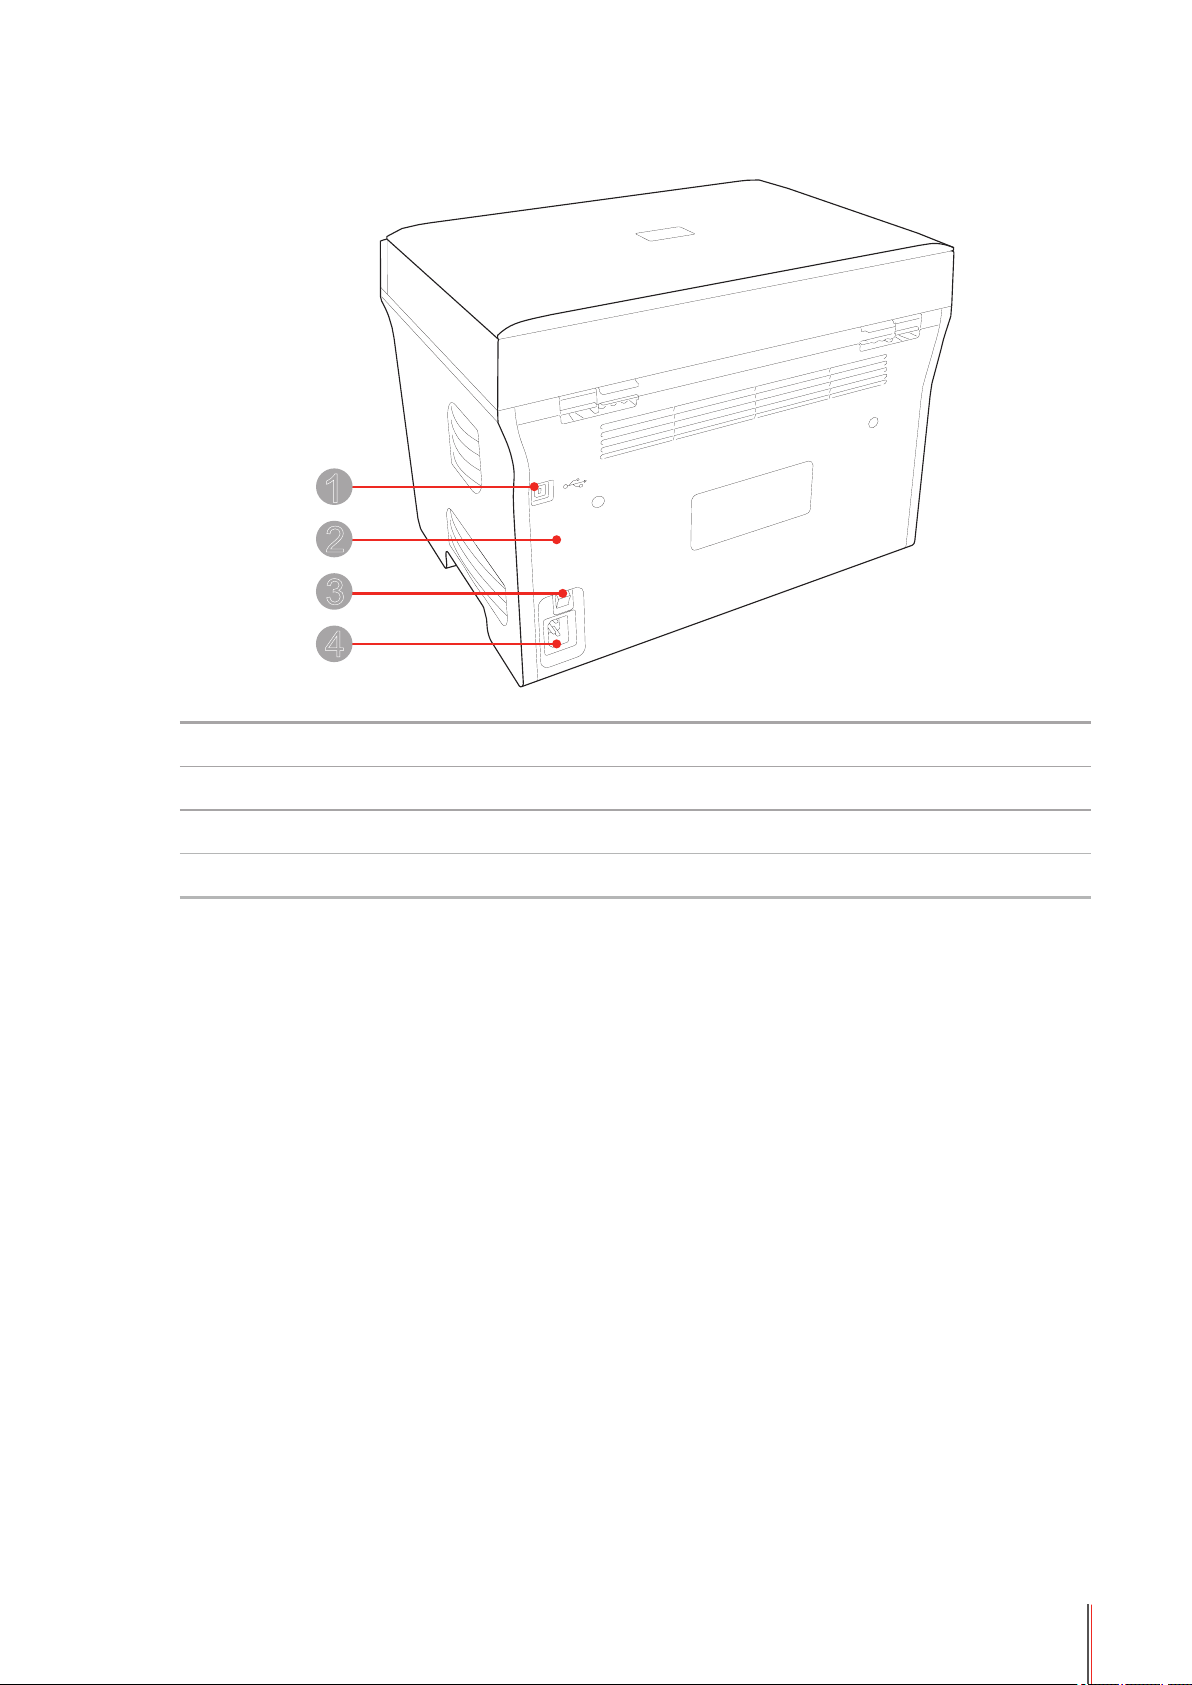
|Rear view
1
2
3
4
1 USB Interface
2 Rear Cover
3 Power Switch
4 Power Supply Socket
1-5
Page 13
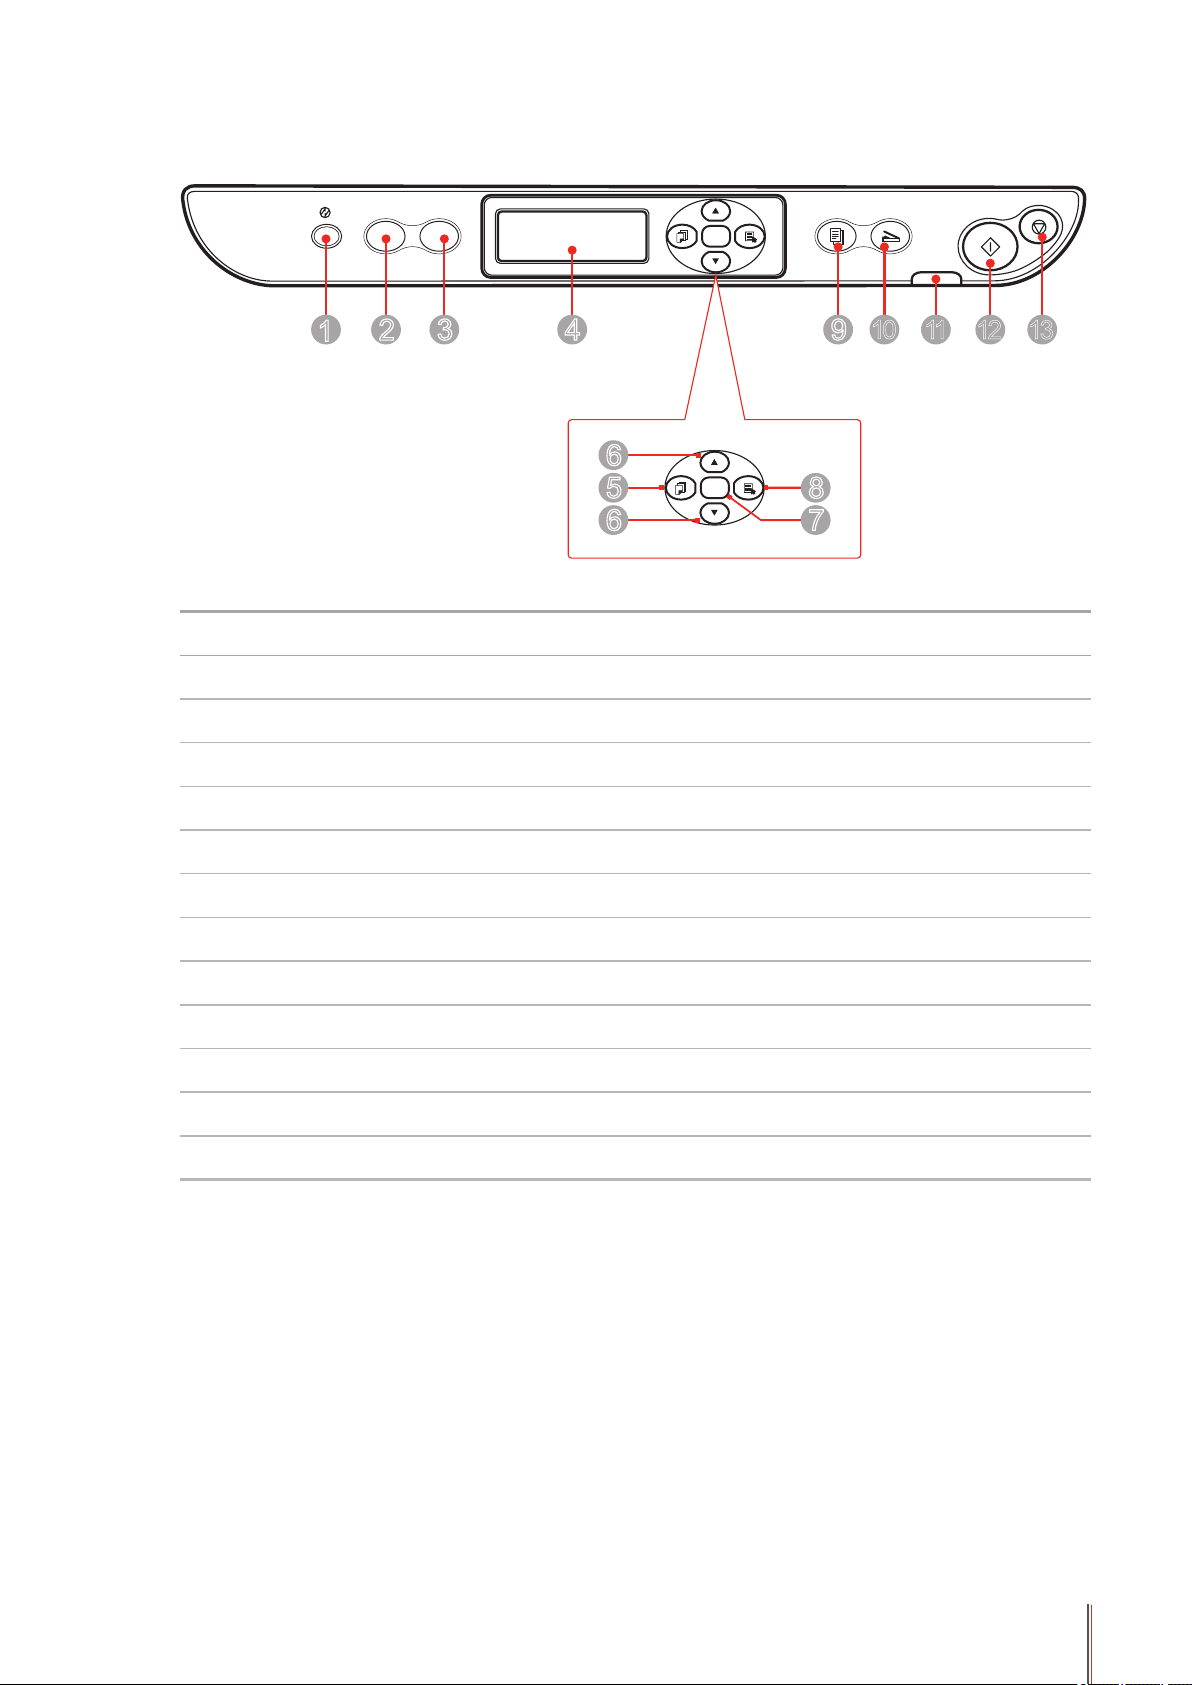
1.3. Overview of the Control Panel
4
5
6
6
9
10
11 12 13
1
2
3
7
8
Status
Start
Cancel
Scan
Copy
OK
ID copy
Receipt copy
OK
1 Power Saving Button
2 ID Copy Button
3 Receipt Copy Button
4 LCD Display
5 Copies Setting Button
6 Direction Buttons (▲ ▼)
7 OK Button
8 Menu Button
9 Copy Button/Indicator
10 Scan Button/Indicator
11 Status Indicator
12 Start Button
13 Cancel Button
1-6
Page 14
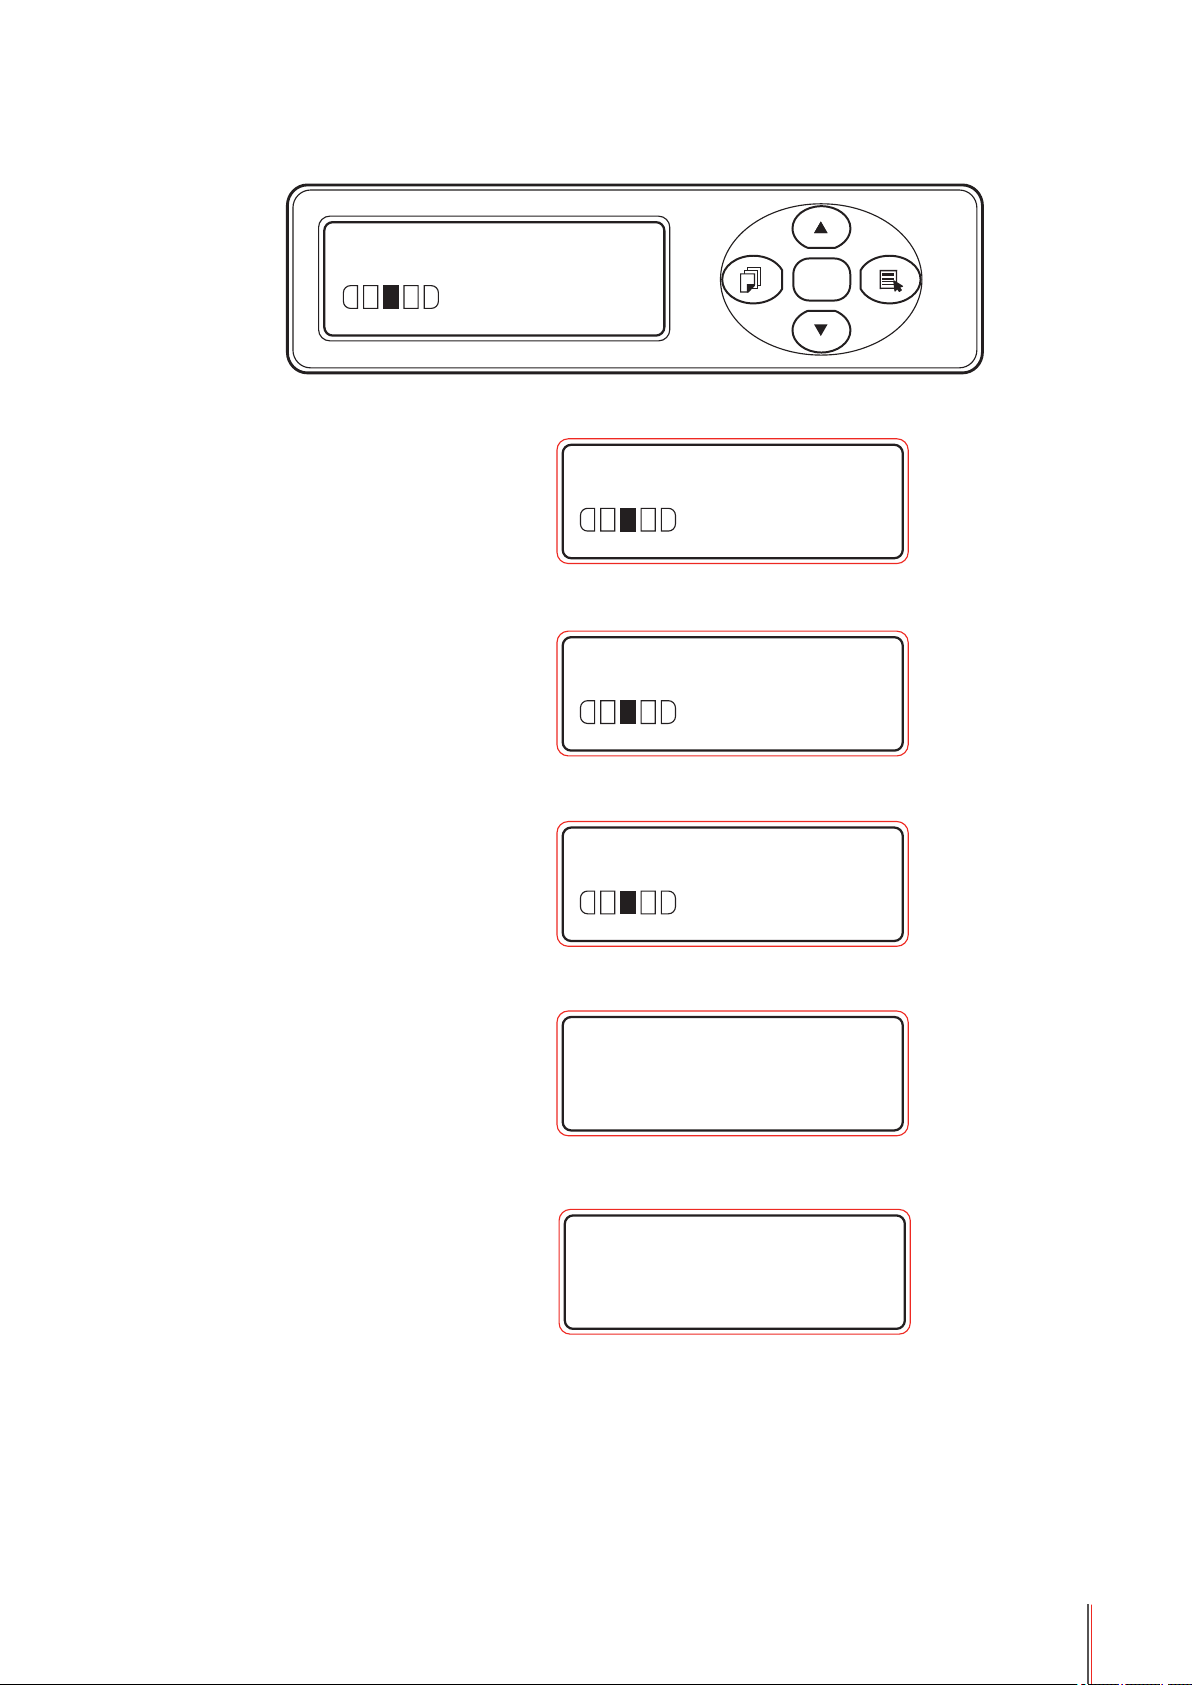
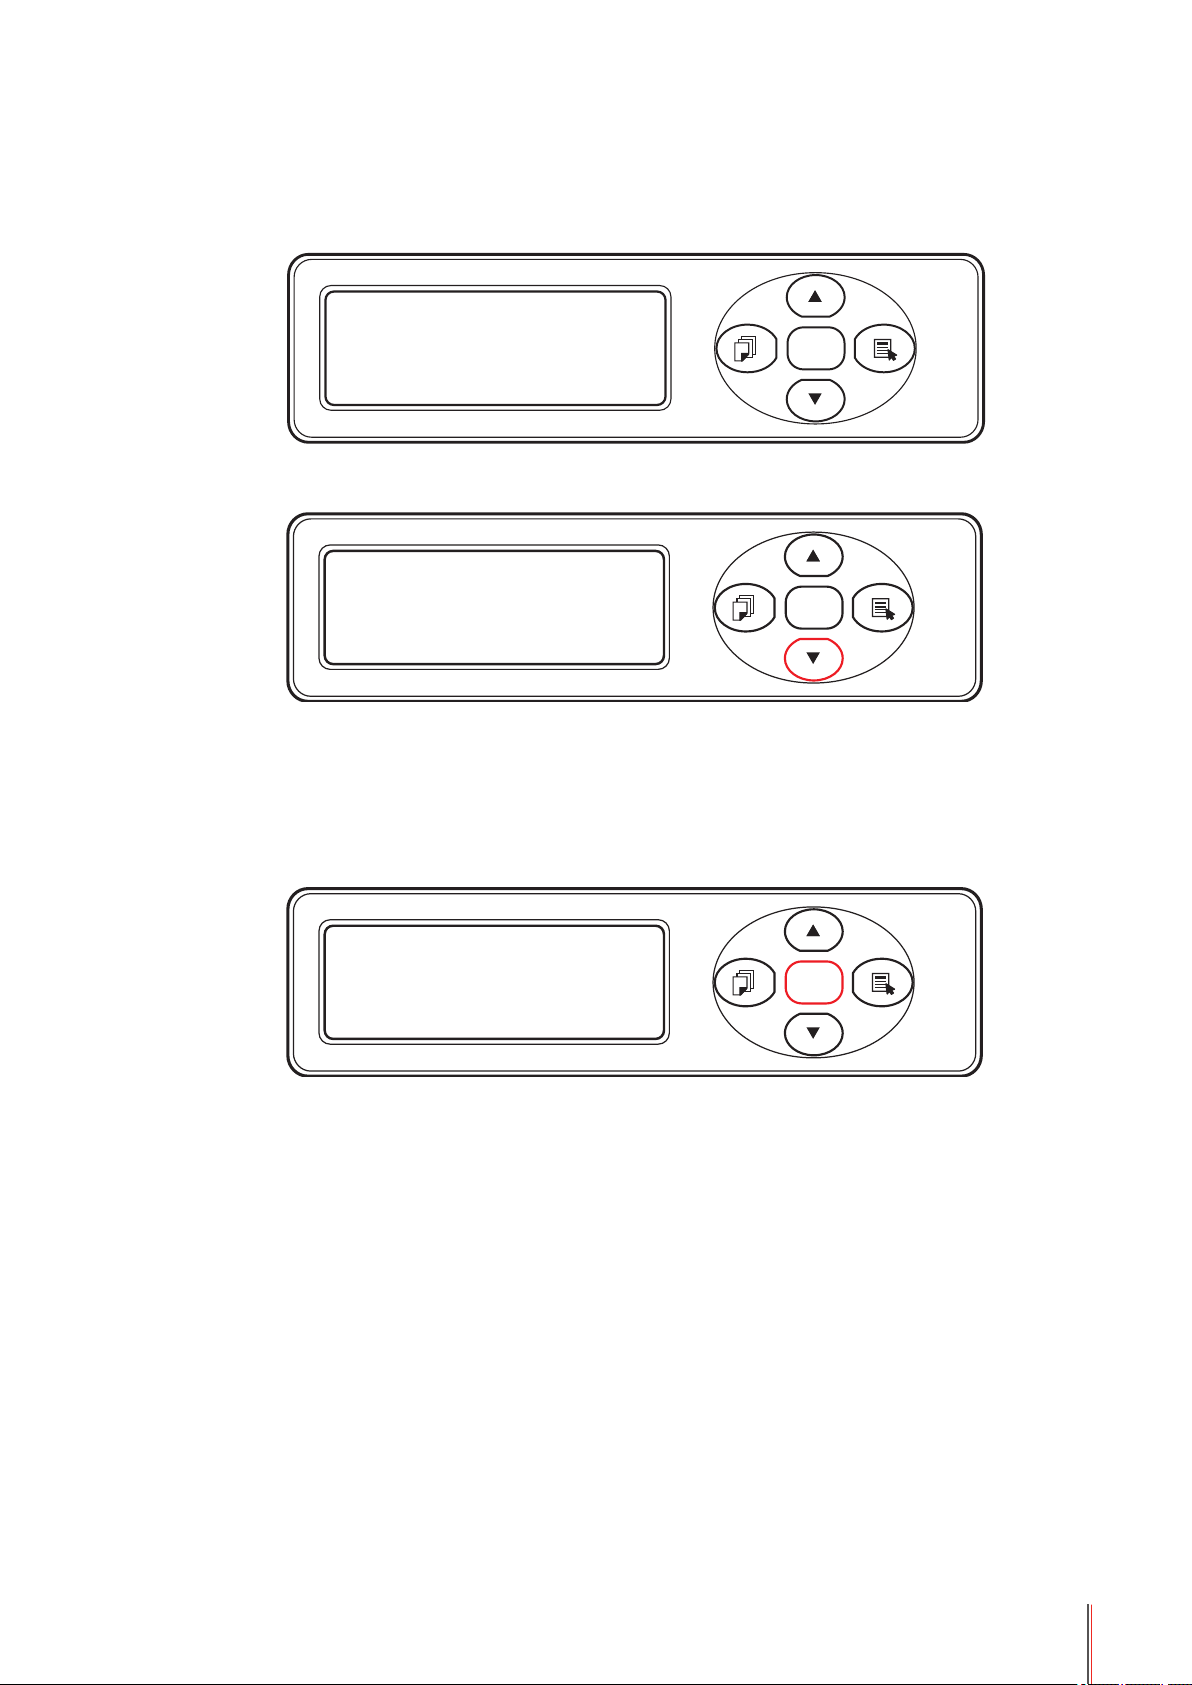
1.4. Display
OK
100 01%
|Copy Standby Mode
T+ P A4
100 01%
T+ P A4
|ID Copy Standby Mode
|Receipt Copy Standby Mode
|Single Page Scan Standby Mode
|N-UP Scan Standby Mode
100 01%
ID A4
100 01%
Re c e i p t A4
Scan/Merge
1.Scan mode
Scan/Merge
2.Merge mode
1-7
Page 15
1.5. Menu Button Settings
1. Copy Settings/Scan Settings
2. Paper Settings
3. System Settings
4. System Information
5. Back
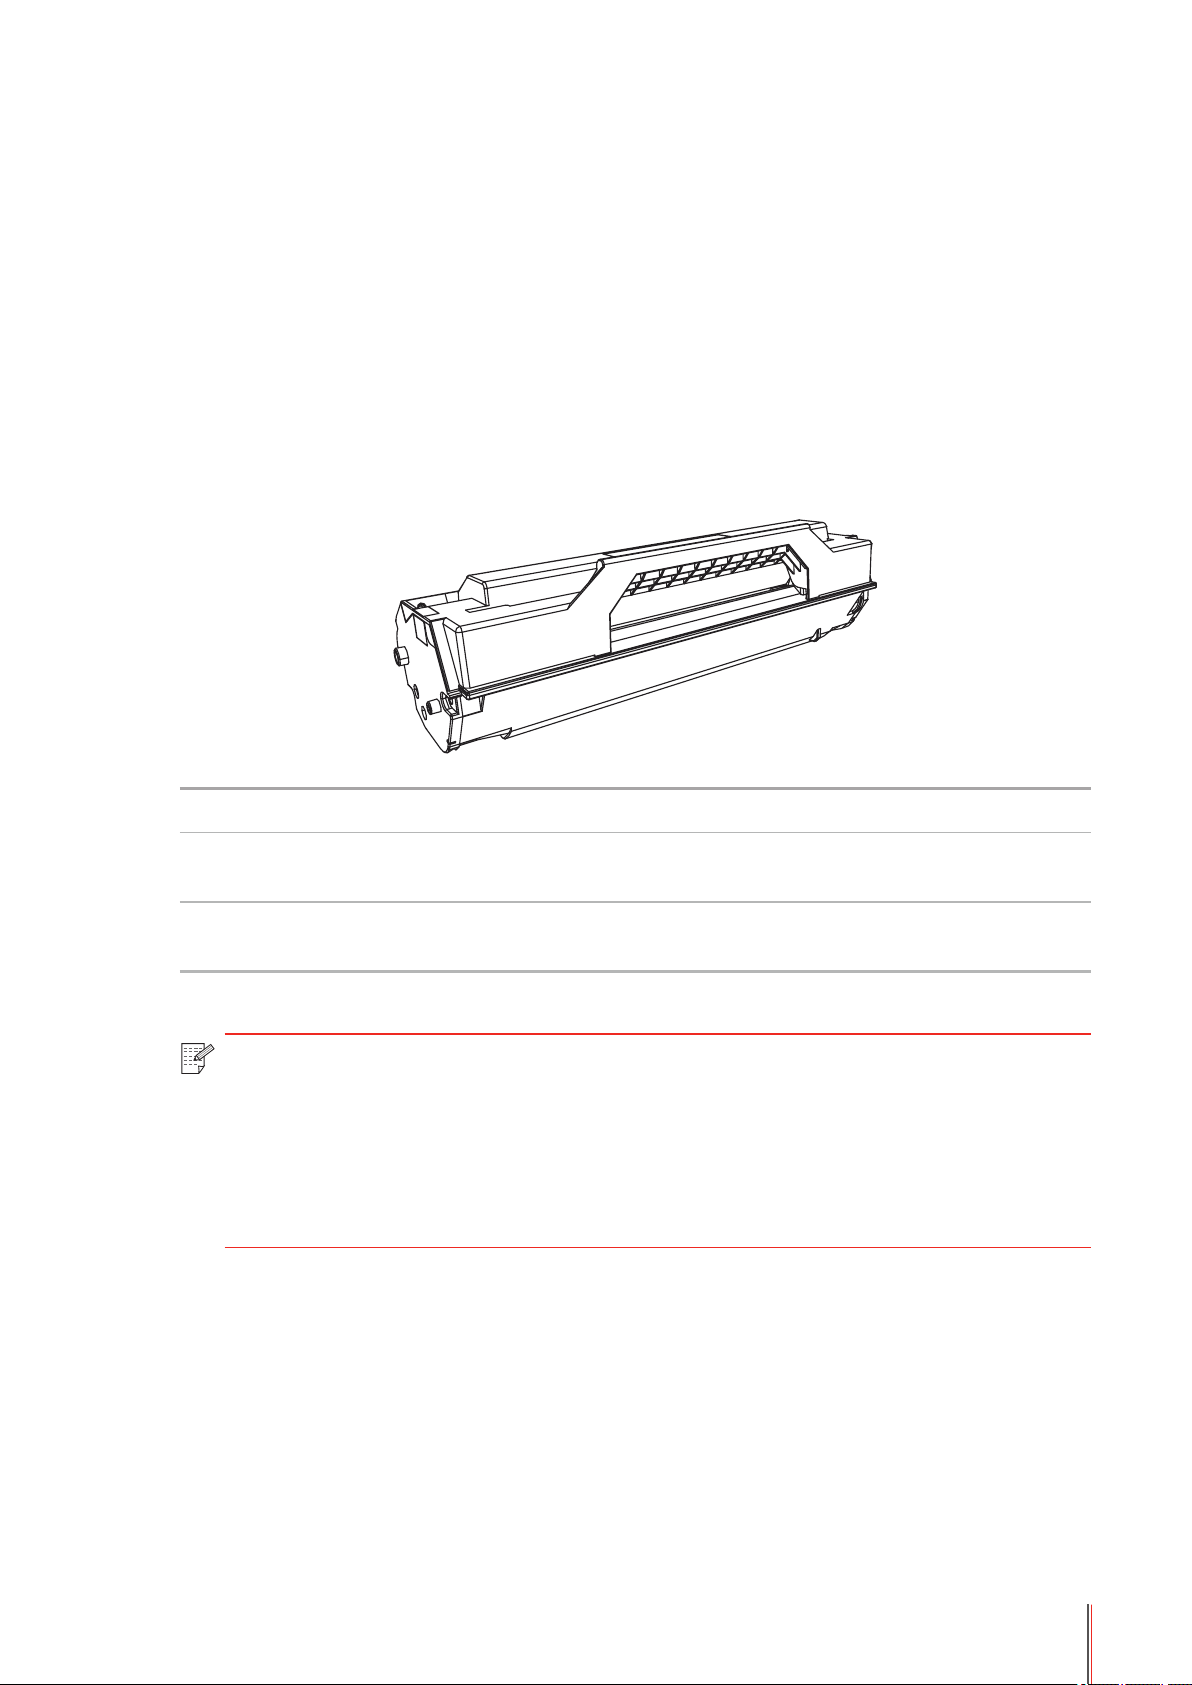
1.6. Toner Cartridge
| Outside view of the toner cartridge
Type Average print volume
Standard-capacity
toner cartridge
High-capacity toner
cartridge
Note: • Subject to change without notice.
• Consumables capacity may vary depending on the different types used.
• The Company does not recommend using consumables other than that of the
original Pantum consumables.
• Warranty is void if any damages are caused by using non-Pantum original
consumables.
About 1500 pages
(The above data is based on ISO/IEC 19752 standard)
About 2300 pages
(The above data is based on ISO/IEC 19752 standard)
1-8
Page 16

Paper and Media
2
CHAPTER
2. Paper and Media ...............................................................................................................................2
2.1. Select Paper ...............................................................................................................................2
2.2. Special Paper .............................................................................................................................3
2.3. Loading Paper ............................................................................................................................4
2.3.1. Loading into the Automatic Feeder Tray .............................................................................. 4
2.3.2. Loading into the Manual Feeder Tray .................................................................................. 6
2.4. Select Media ...............................................................................................................................8
2.5. Loading Media ............................................................................................................................8
2.6. Nonprinting Area and Non-scanning Area ................................................................................10
2-1
Page 17

2. Paper and Media
2.1. Paper type and sizes
Media Type Plain, Preprinted
Media Size
Automatic Feeder
Tray
Media Weight 60~105g/m²
A4, A5, JIS B5, IS0 B5, A6, Letter, Legal,
Executive, Folio, Ocio, Statement, Japanese
Postcard, Monarch Env, DL Env, C5 Env, C6
Env, No.10 Env, ZL, Big 16K, Big 32K, 16K, 32K,
B6, custom, etc.
Manual Feeder
Tray
Maximum capacity of
the tray
Media Type
Media Size
Media Weight 60~163g/m²
Maximum tray
capacity
150 pages, 80g/m²
Plain, Cardstock, Transparency, Envelope, Label,
Thick
Width: 75~218mm (2.95-8.58in)
Length: 148~360mm (5.82-14.17in)
1 page
Note: • Extensive use of special paper may affect the service life of the printer.
• Print media that does not meet the standard set out in this User Guide may
result in poor print quality, increased paper jams and excessive wear of the printer.
• Properties such as weight, properties, texture and humidity are important factors
affecting the printer performance and output quality.
• Please note the following when selecting the print media:
1. Desired print effect: The print media selected should be in line with the
requirement of the print tasks.
2. Surface smoothness: The smoothness of the print media may affect the
sharpness of the print outcome.
3. Some print media may meet all the standards for use contained herein, but
they do not print properly. This may be due to incorrect operation, inappropriate
temperature and humidity, or other factors beyond the control of Pantum. Before
purchasing large quantities of print media, make sure that the print media
meet the specications specied in this User Guide and work properly in your
environment.
4. Using print media that does not meet these specifications may cause damage
to the printer.
2-2
Page 18

2.2. Special Paper
This printer supports using special paper for printing. Special paper includes: labels,
envelopes, transparencys, thick papers, etc.
Note: • When using special paper or print media, be sure to select the appropriate
media type and size in the print settings so as to get the best results.
|Please observe the following standards:
Type of media Correct practices Incorrect practices
Labels must be put at when being
used.
Label
Envelope Envelopes should be loaded evenly.
Use a full sheet of labels only.
There is no guarantee that all the
labels in the market can work in the
printer.
Use wrinkled, blistered or damaged
labels.
Use wrinkled, nicked, stuck or
damaged envelopes.
Use envelopes with clips, snaps,
windows, or coated linings.
Use self-adhesive stickers or other
synthetic materials.
Transparency
Thick
Only use transparencies approved
for use in laser printers.
Transparencies removed from the
printer should be placed on a at
surface.
Only use heavy paper that is
approved for use in laser printers
and meets the weight specications
of this printer.
Use transparent print media that is
not suitable for laser printers.
Use paper that weighs greater
than the specication of the media
recommended for this printer, unless
the paper is approved for use in this
printer.
2-3
Page 19
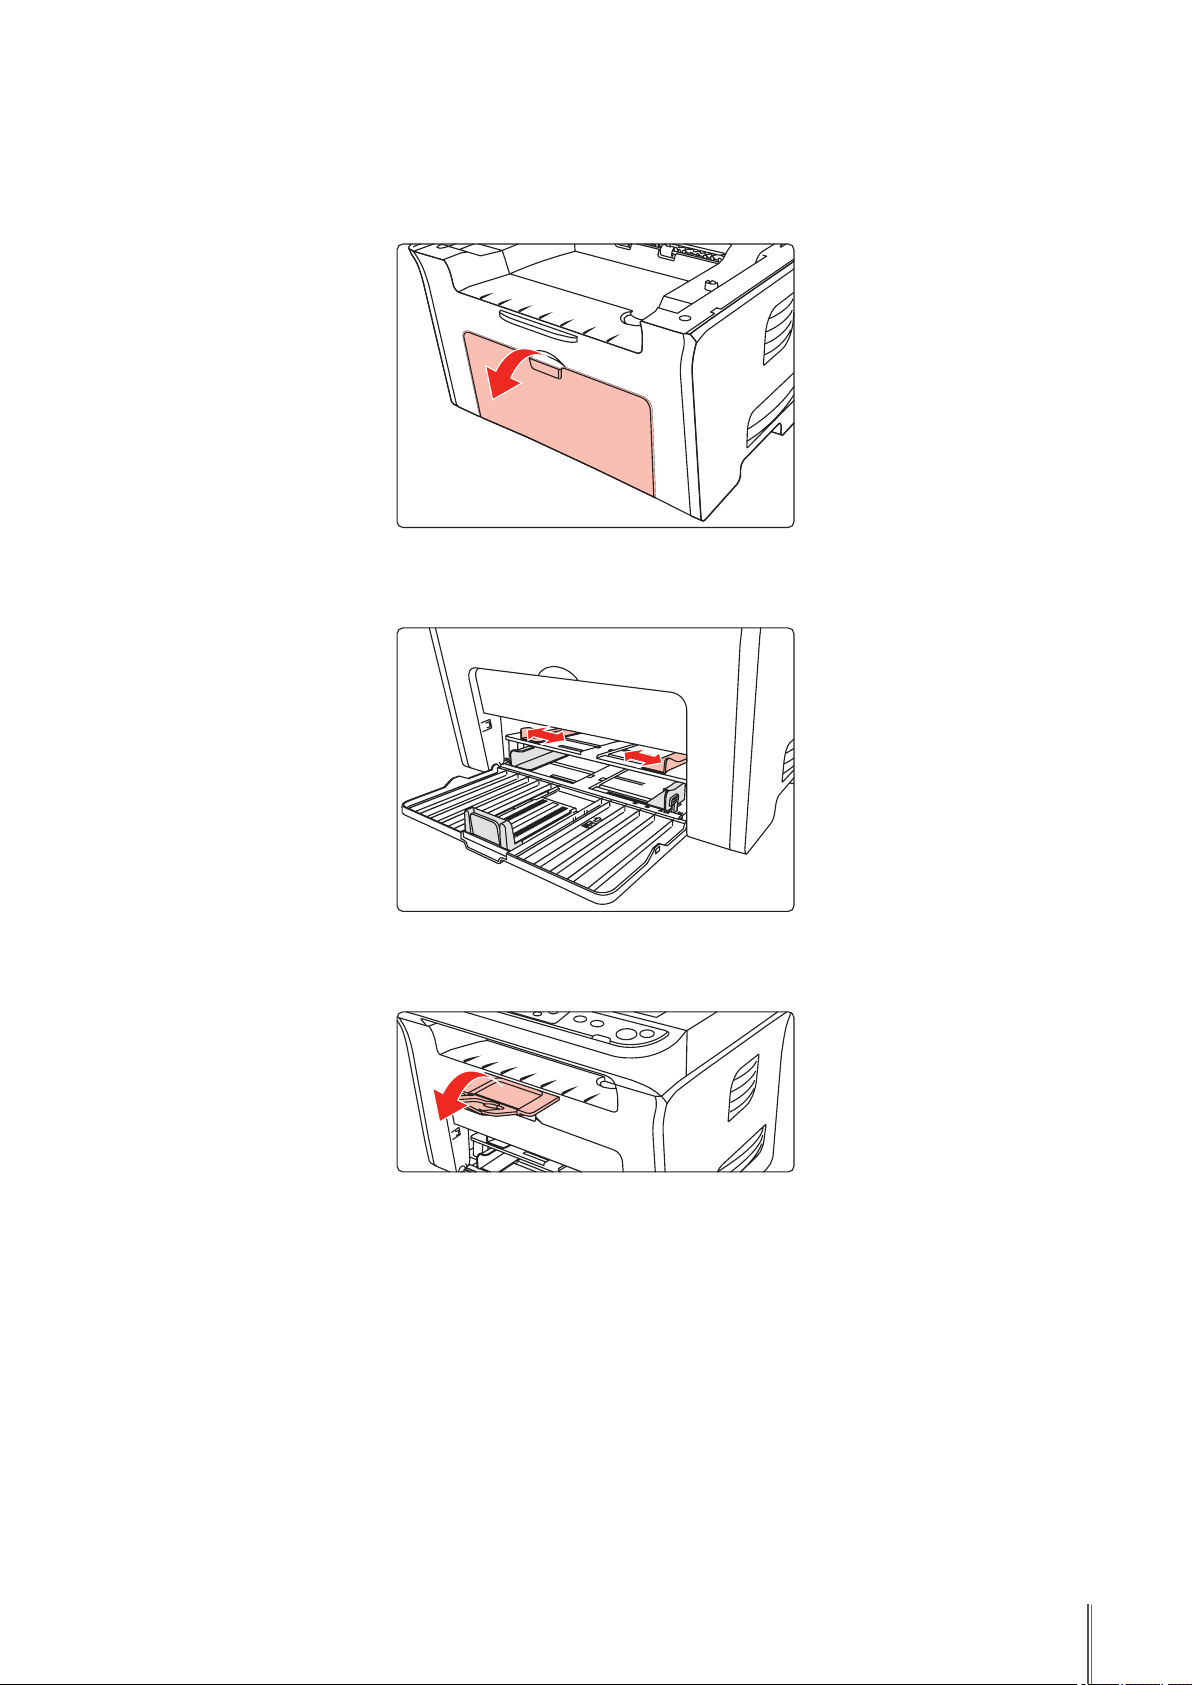
2.3. Loading Paper
2.3.1. Loading into the Automatic Feeder Tray
a) Open the feeder tray.
b) Slide the automatic feed guides to match both sides of the paper.
c) Raise the output tray to avoid paper slipping and falling.
2-4
Page 20

d) Load the paper into the automatic feeder tray print-side up.
e) Adjust the paper stop to match the paper size.
Note: • If the paper loaded into the automatic feeder tray at one time exceeds 150
pages, the paper will jam or will not be fed in.
• When using printed paper, please place the side to be printed (the blank side)
facing up.
• When printing on A5 paper, it is recommended that the paper is fed in landscape
orientation, which helps extend the toner cartridge life.
2-5
Page 21
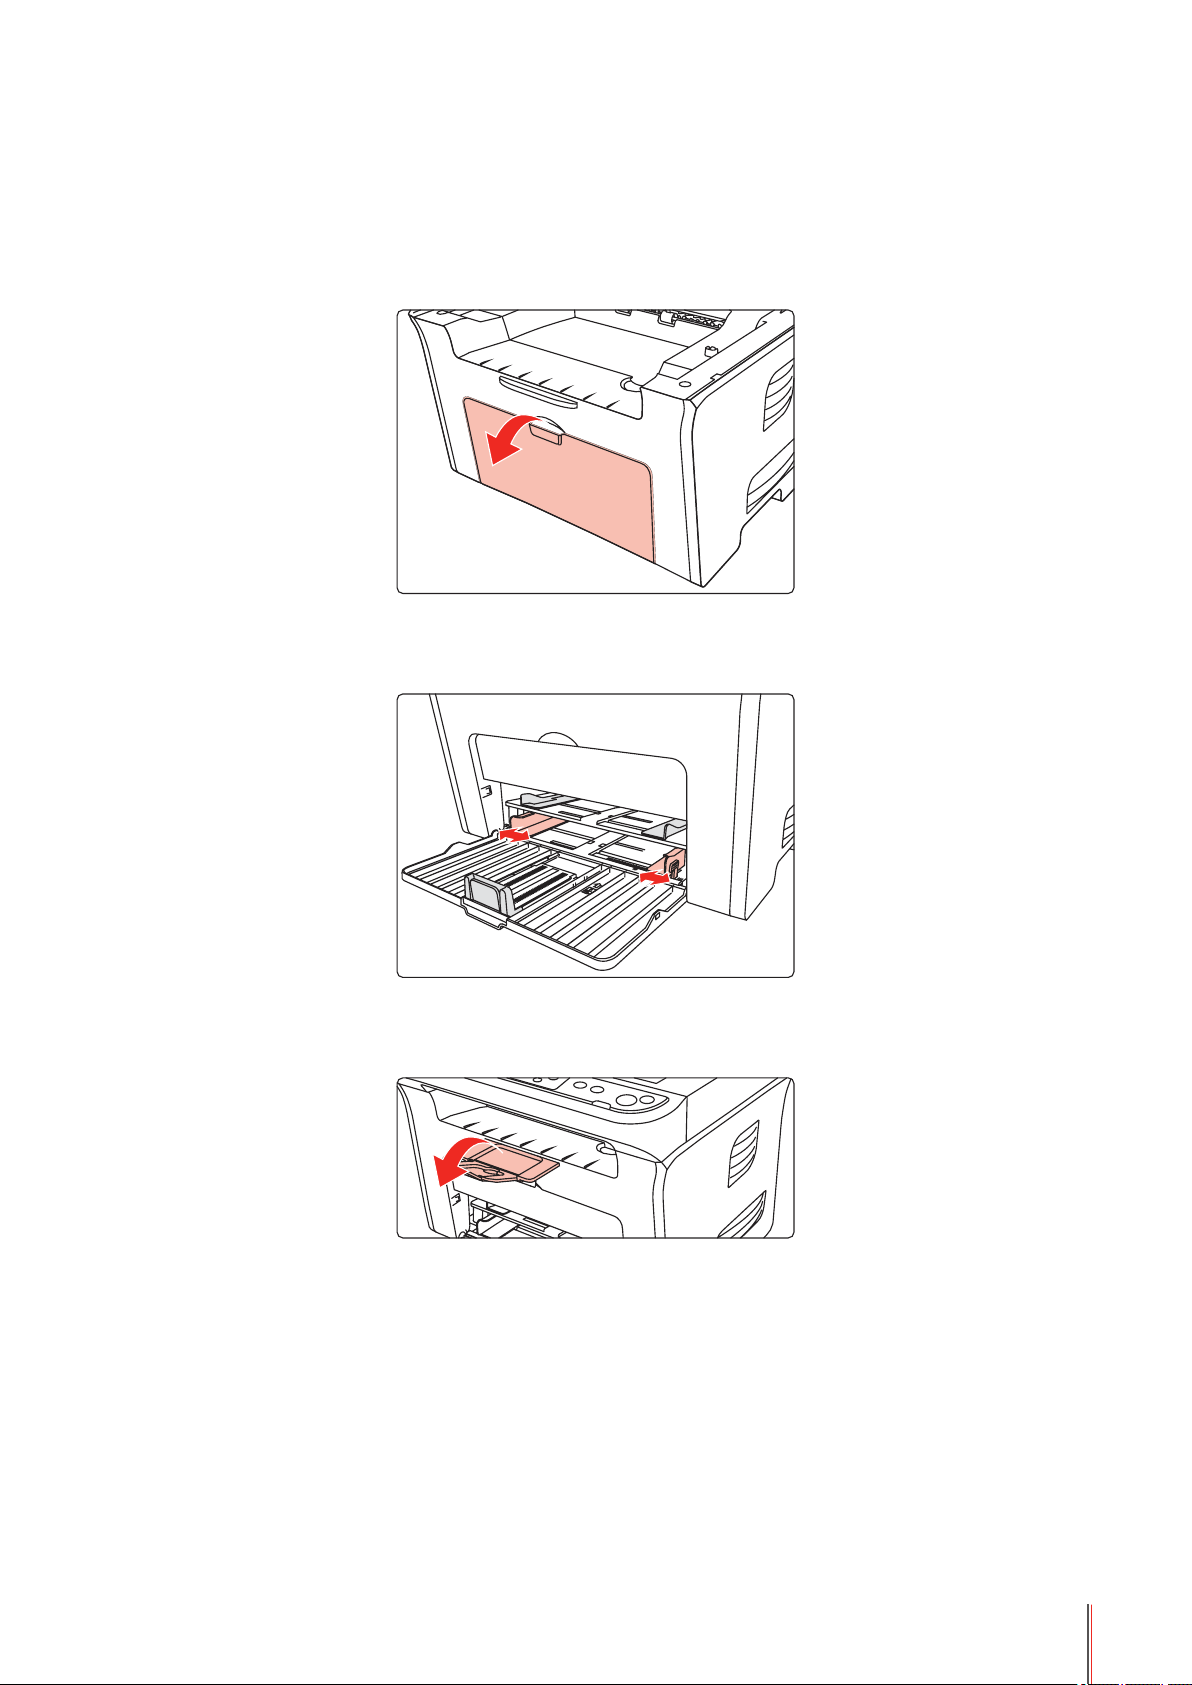
2.3.2. Loading into the Manual Feeder Tray
a) Open the feeder tray.
b) Slide the manual feed guides to match both sides of the paper.
c) Raise the output tray to avoid the paper from slipping and falling.
2-6
Page 22
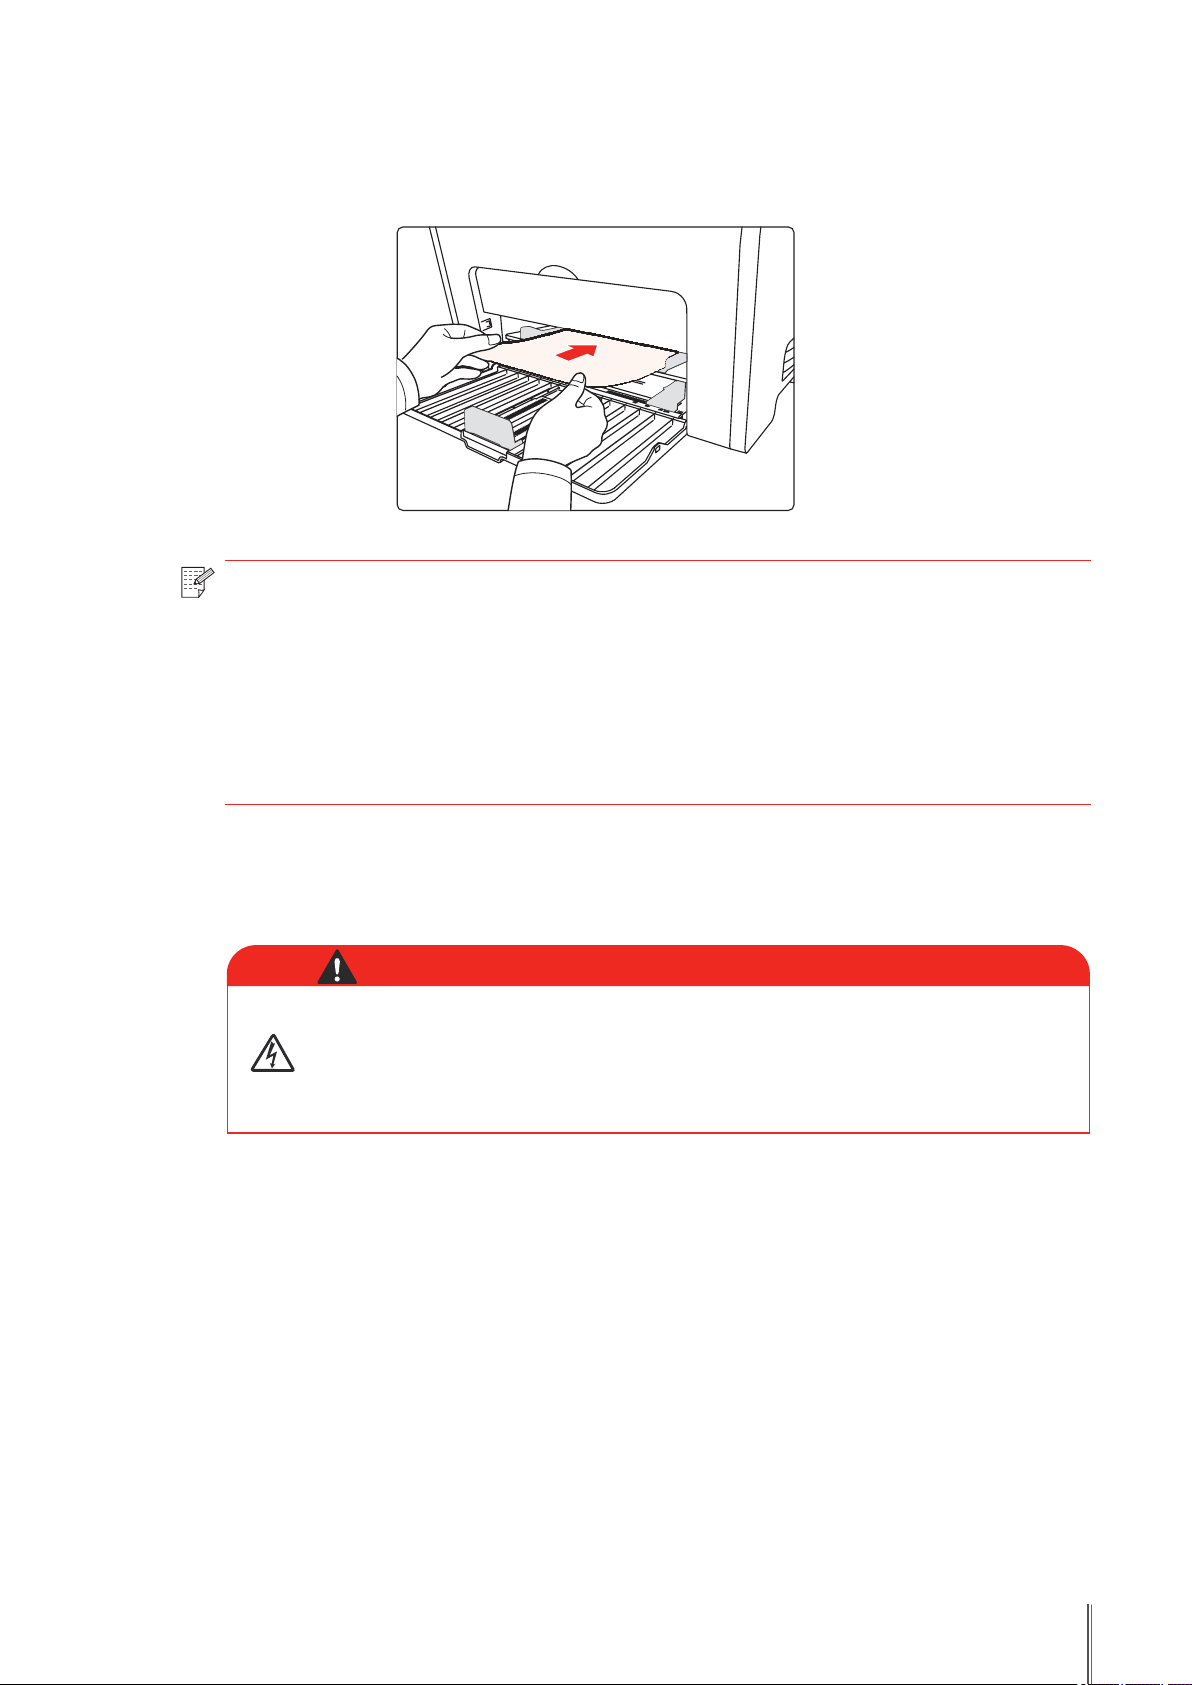
d) Put a piece of paper, envelope or transparency into the manual feeder tray with two hands
until the front end of the paper, envelope or transparency contacts the feed roller.
Note: • When loading paper into the manual feeder tray, the printer will automatically
enable the manual feed mode.
• Load the paper into the manual feeder tray print-side up. When loading, the top
of the paper rst enters into the manual feeder tray.
• Ensure that the paper, envelope or transparency is loaded in straight and in the
correct position of the manual feeder tray. Otherwise, it will result in a skewed
printout or a paper jam.
e) After the printed page is output from the printer, load another piece of paper according to
the above steps to continue printing.
Warning
After printing, please immediately remove the paper, envelopes and
transparencies. Stacking paper or envelopes may cause a paper jam or cause
the paper to curl.
2-7
Page 23
2.4. Select Media
|Paper requirements:
Type Size Quantity
Plain, Cardstock, Transparency,
Envelope, Label, Thick
2.5. Loading Media
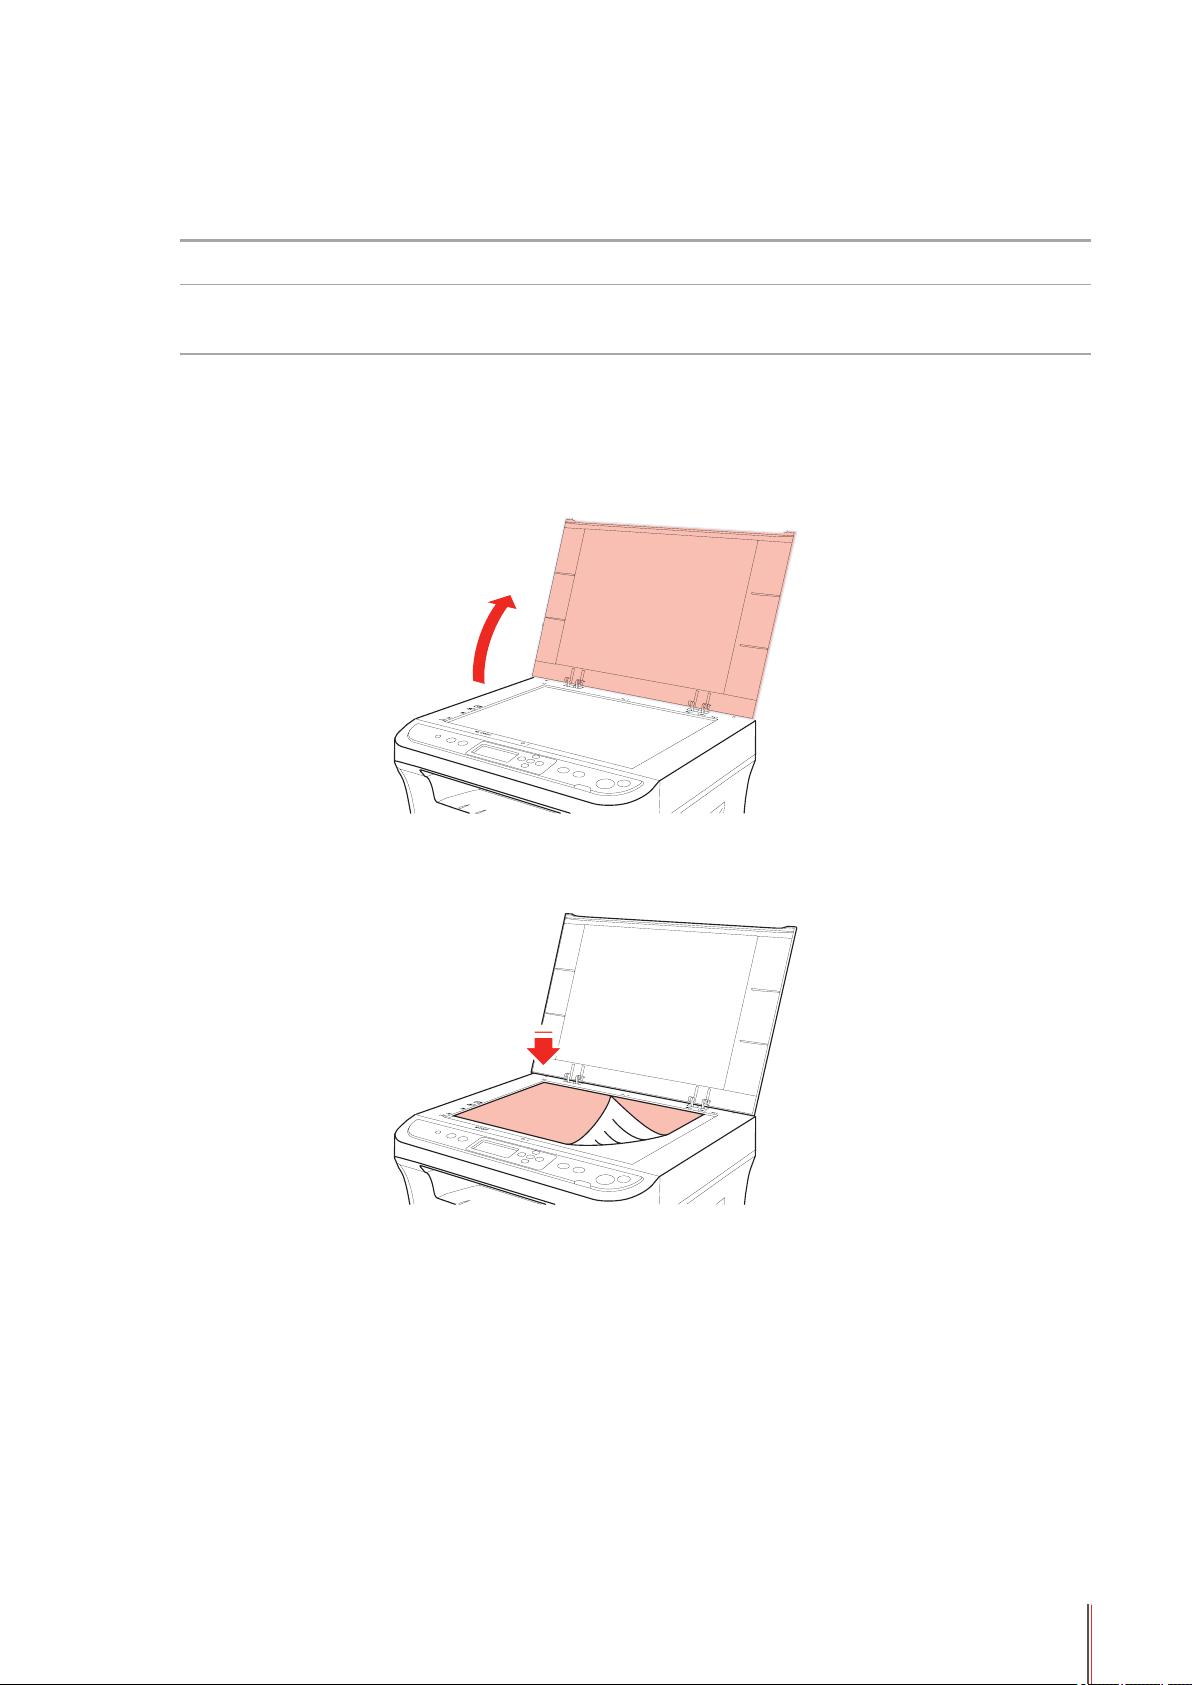
1). Raise the cover.
2). Load the document face down.
A4, B5, A5, A6, Letter, Executive One piece at a time
2-8
Page 24
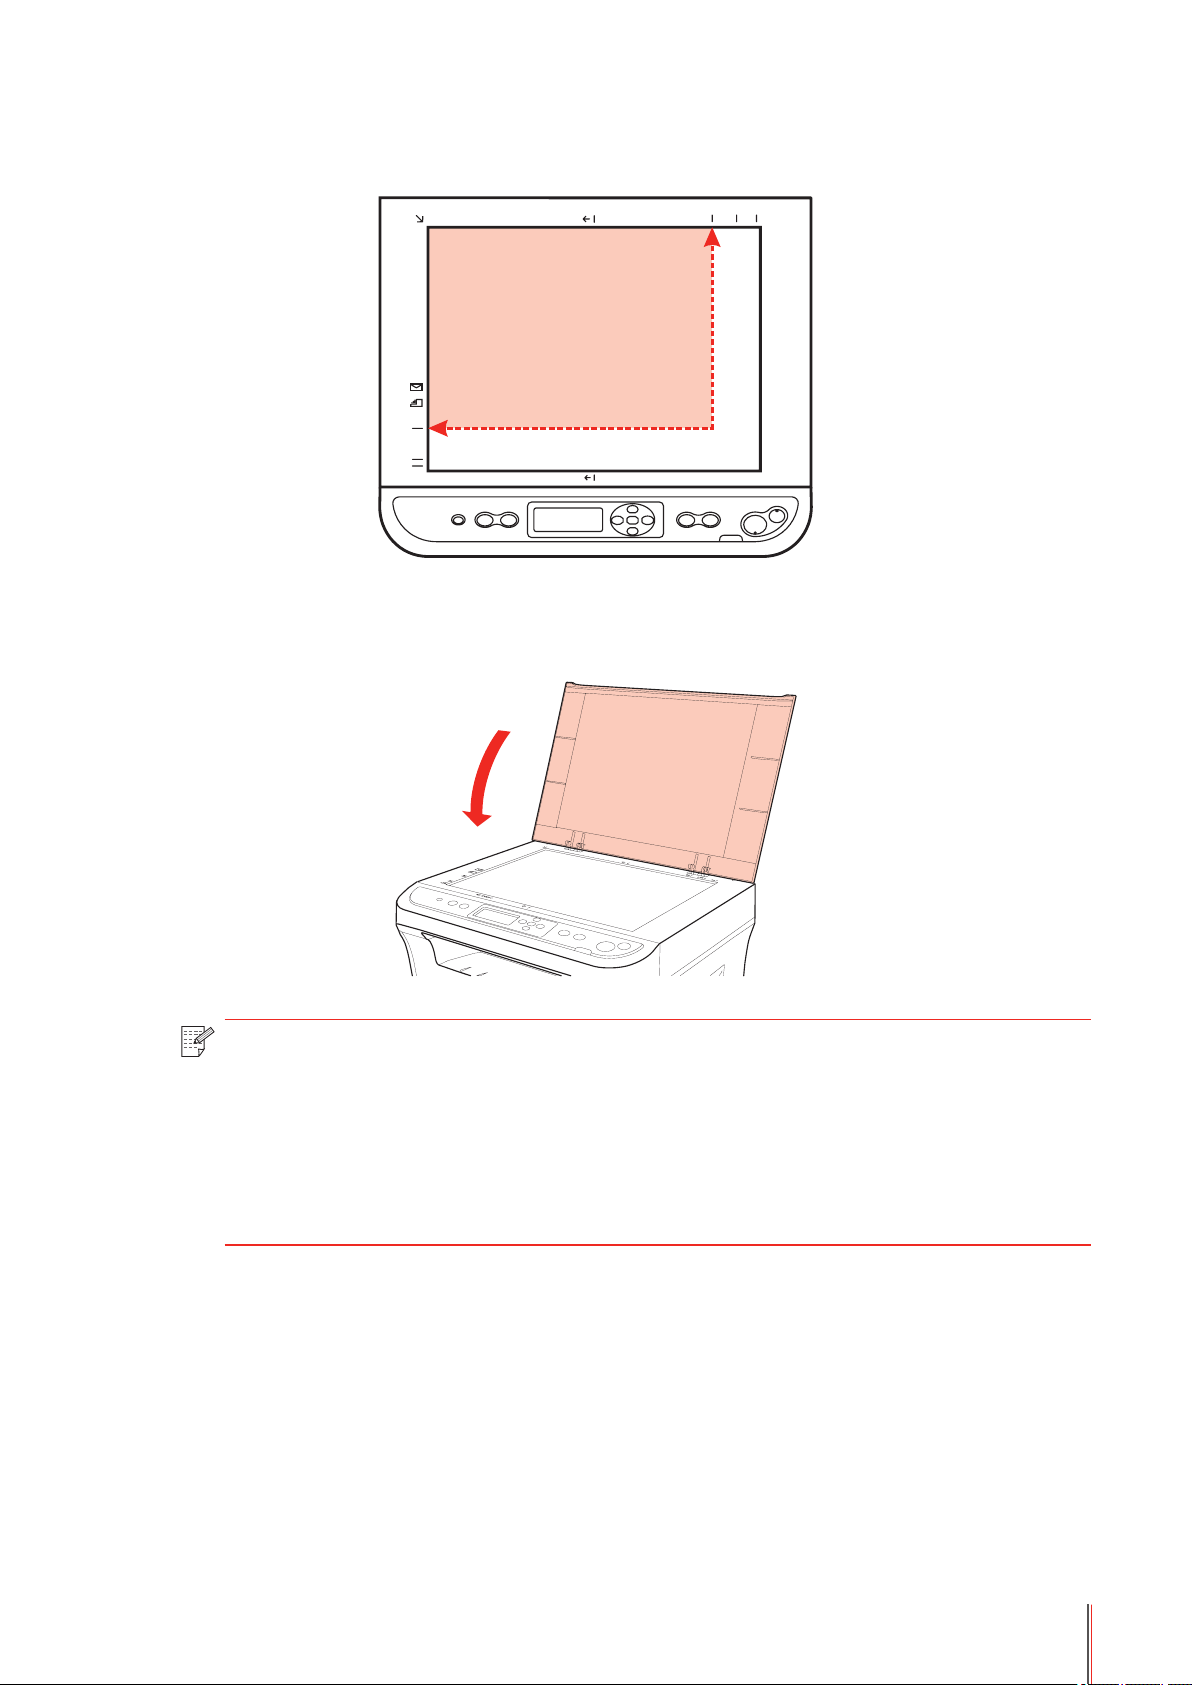
3). Align the manuscript to match the appropriate paper size.
B5 LTR A4
B5
A4
LTR
IDCOPY
4). Gently close the cover.
Note: Cautions:
• Do not put documents with glue, ink or correction uid on the glass unless it is
completely dry.
• Only use paper designed for laser printers.
• Paper should be clean and free of dust and other contaminants.
• Store unused paper on a flat surface in a dry place
2-9
Page 25

2.6. Nonprinting Area
A
The shaded edge indicates the nonprinting area.
A
Usage Paper Size
A4 5mm (0.197in) 5mm (0.197in)
Copy
LETTER 5mm (0.197in) 5mm (0.197in)
A4 5mm (0.197in) 5mm (0.197in)
Printing
LETTER 5mm (0.197in) 5mm (0.197in)
B
Top and bottom
margins (A)
B
Left and right
margins (B)
2-10 10
Page 26

Installation and Uninstall
3
of Driver Software
3. Installation and Uninstall of the Driver Software ................................................................................2
3.1. Windows-based Driver ................................................................................................................ 2
3.1.1. Driver Installation ................................................................................................................. 2
3.1.2. Driver Uninstall ...................................................................................................................12
3.2. Mac System-based Driver ........................................................................................................15
3.2.1. Introduction ........................................................................................................................ 15
3.2.2. Installation Steps ................................................................................................................15
CHAPTER
3-1
Page 27

3. Installation and Uninstall of the Driver Software
3.1. Windows-based Driver
3.1.1. Driver Installation
1. Introduction
The driver can be installed using two methods.
• Install the driver with the printer connected to the PC.
• Install the driver rst and then connect the printer after the driver installation is completed.
For users of Windows XP and Windows Server 2003: when connecting the equipment for the
rst time, the Found New Hardware Wizard window will pop up. Please close this window.
If this window is not closed, the printer may not be detected, resulting in the installation not
being completed.
2. Installation steps
There are two methods for installing the driver software: Install Now and Custom Installation.
The specic installation steps are as described below:
1) Install Now
a) Driver Interface
After running the installation CD, the program will run automatically and display the following
screen:
The user’s Windows authority will be checked before the installation proceeds. If the
user is an administrator, this screen will display. If the user is a non-administrator, the
prompt “Insufcient privileges. Please install the Pantum M5000-M6000 Series MFP with
administrator privileges.” will pop up.
3-2
Page 28
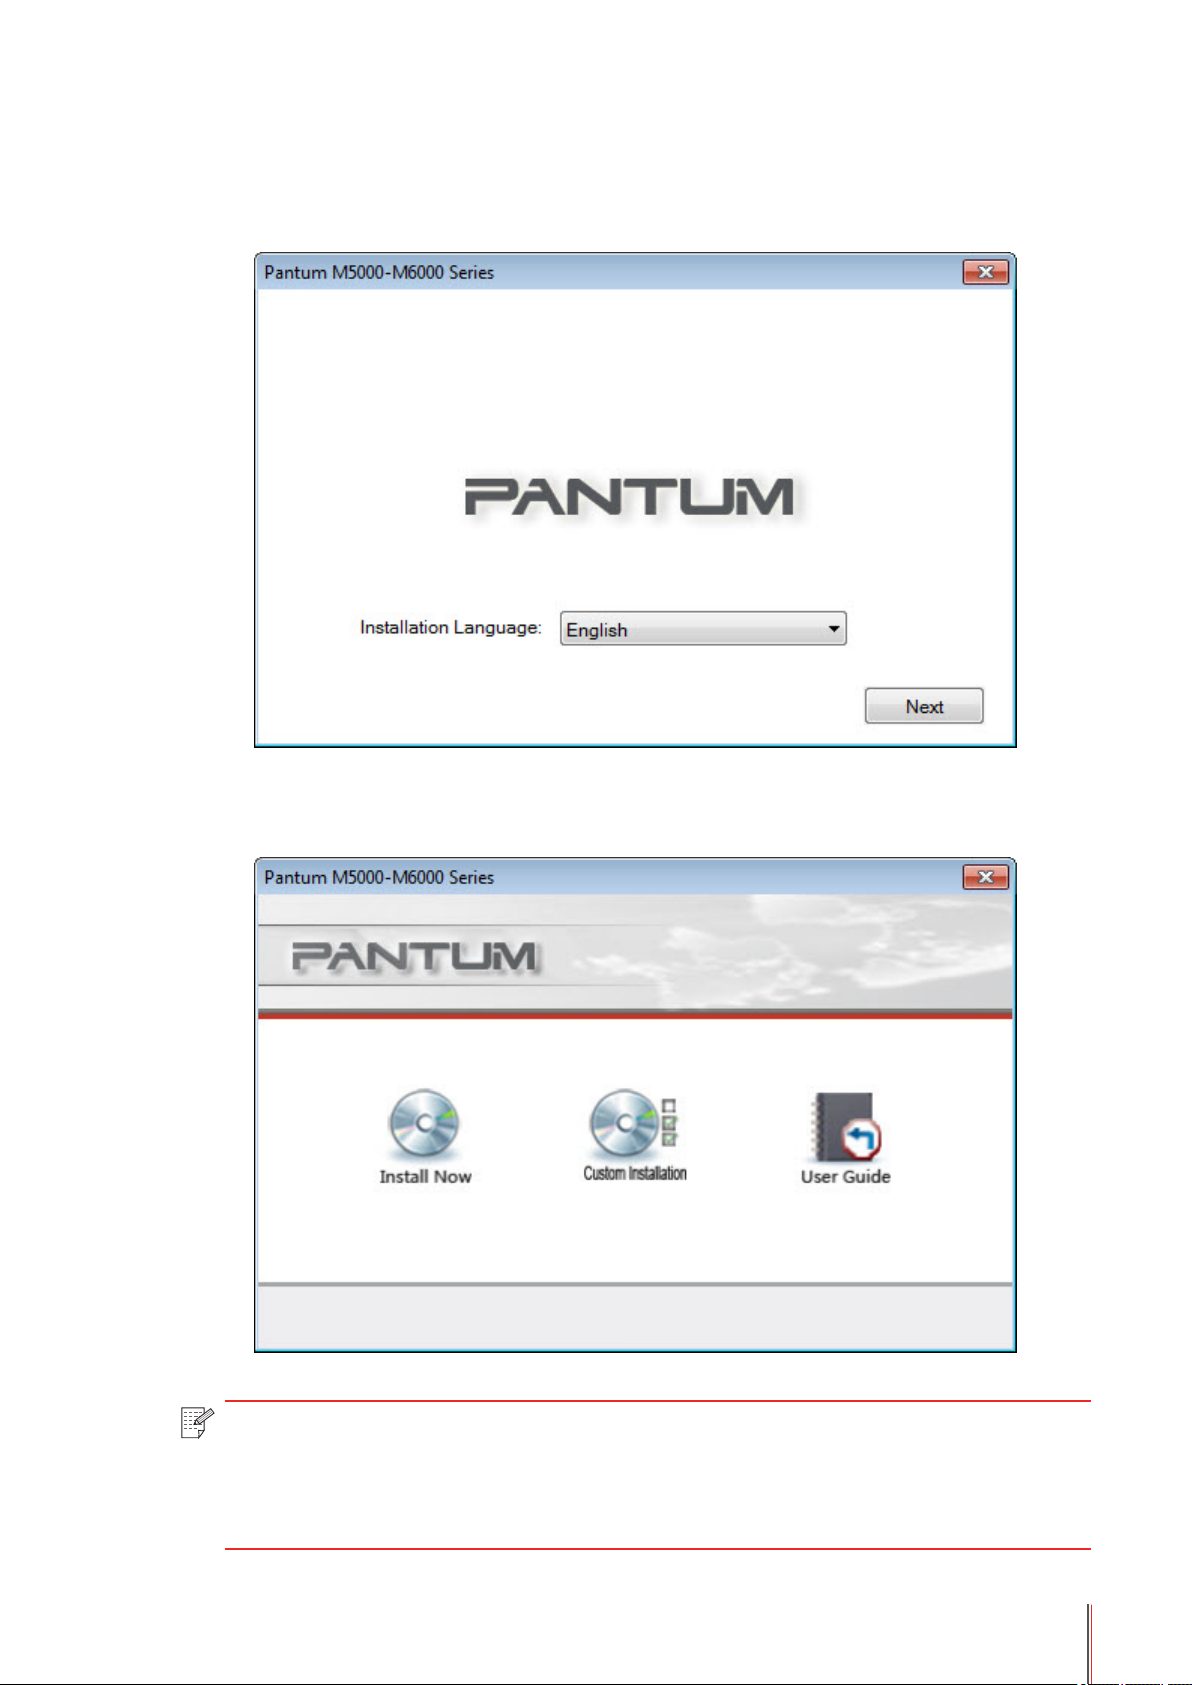
b) Installation Language
After the authority is checked the installation proceeds to the next step – Language Selection
interface.
c) Installation Settings
Click Next to select the installation method.
Note: • Install Now installs the printer driver software, the scanner driver software and
Pantum Push Scan Manager together.
• The Install Now installs the software to the default path, namely the "System
disk:\Program Files" directory.
3-3
Page 29
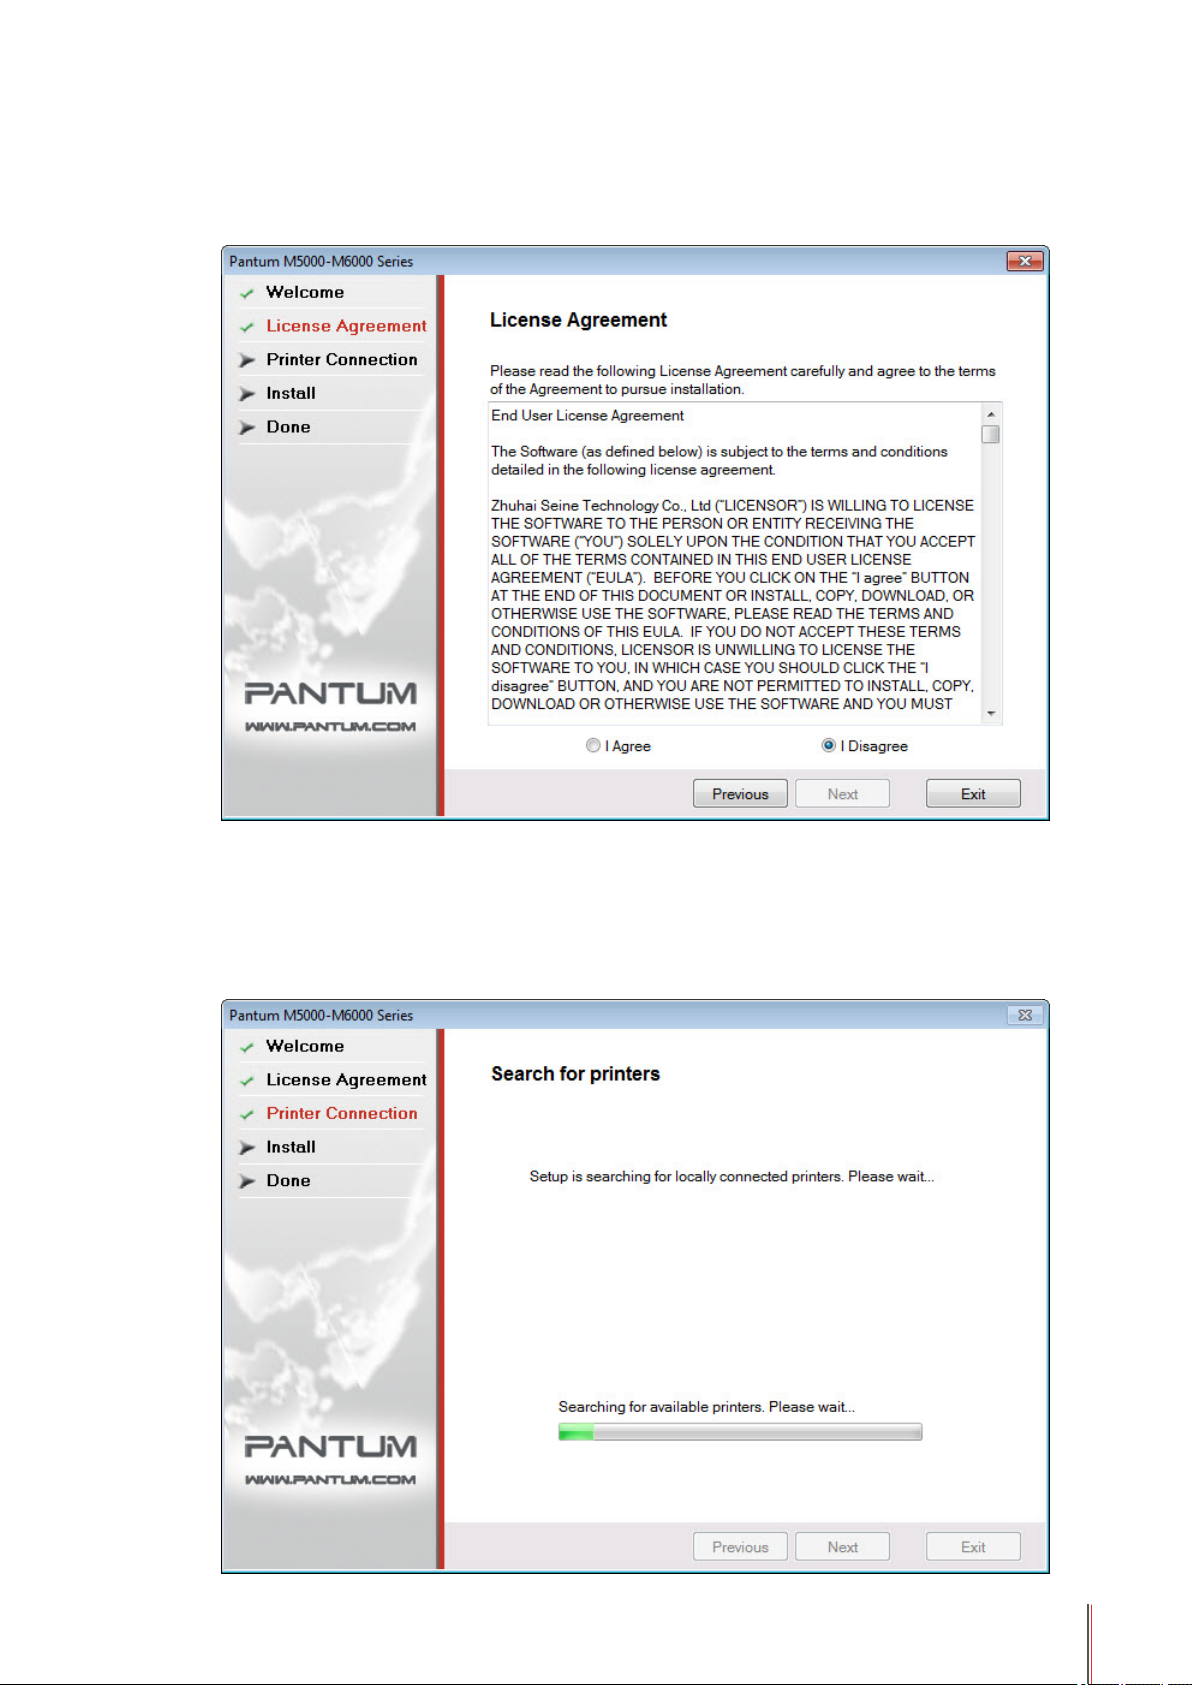
d) License Agreement
Click Install Now button to enter the License Agreement screen. Please carefully read and
accept the user license agreement by selecting I Agree option and clicking Next button to
proceed with the installation.
The “I Disagree” radio button is checked in the interface by default, and the Next button is
grayed out. To proceed with the installation of the software, users need to check the “I Agree”
option. The Next button is then available.
e) Search for Printers
After selecting Agree and clicking Next, it will Search for Printers, and the program will
automatically search for the appropriate printer device connected to the computer.
3-4
Page 30

If the appropriate printer device is detected, it will automatically move to the Copying Files
step.
If the printer is plugged into the PC the user can click “Try Again” to look again for the
connected printer. If the user will connect the printer later the user can click ‘Continue
Installation”.
Selecting Continue Installation will go to the next step, copying les.
f) Copying Files
Copy the installation les to the installation path.
3-5
Page 31
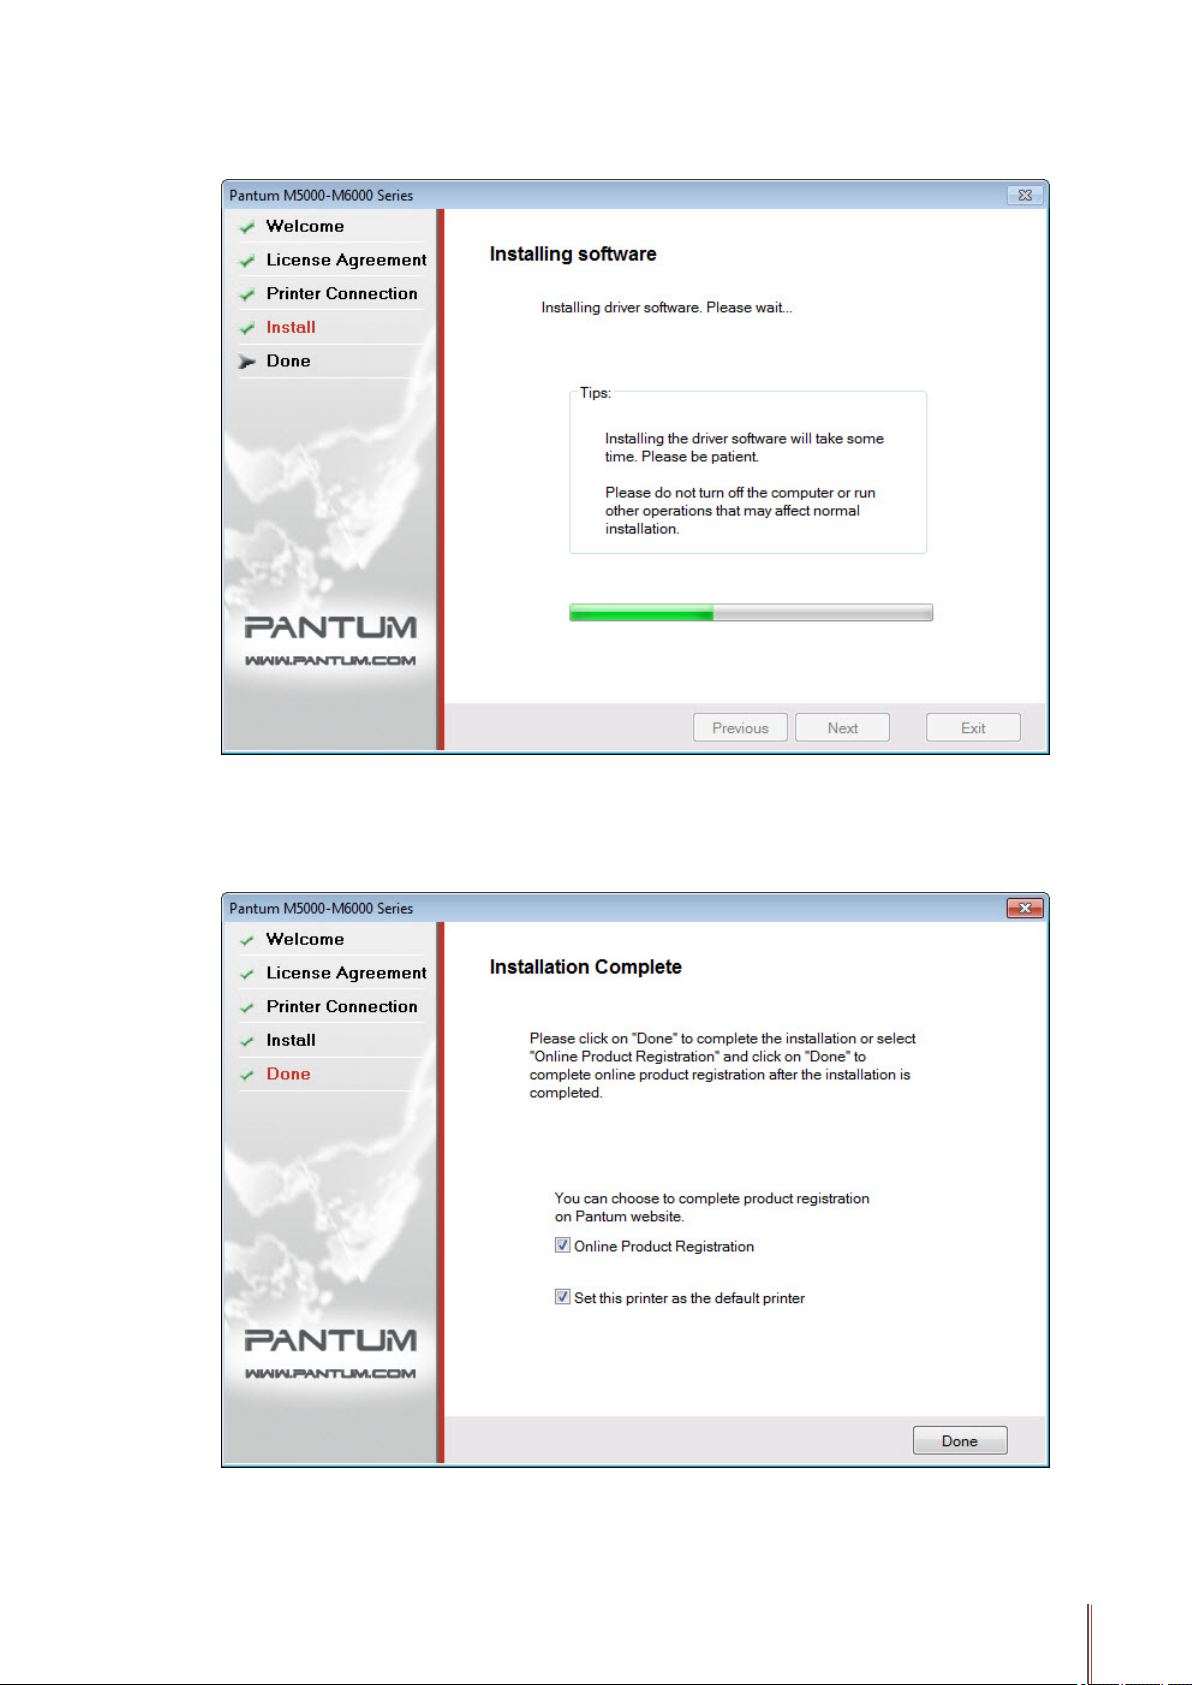
g) Driver Installation
h) Completing Installation
After the driver installation progress bar shows that the installation progress is completed, it
will show Installation Complete screen.
3-6
Page 32

Click the Done button to complete the installation of the printer driver, carry out online product
registration which can provide online services and consultation as well as the toner cartridge
and other information, and set this printer as the default printer. You can also cancel these
options as needed.
Note: • If the driver is installed with the printer unconnected, the option "Set this printer
as the default printer" will not be displayed.
2) Custom Installation
Note: • User authorization and Installation Language are the same as the Install Now
method.
a) Installation Settings
Click Next to enter the Installation Settings step
3-7
Page 33

b) Component Selection
Click the Custom Installation button to enter the Element Selection and select the desired
components for installation as well as change the installation path if desired.
c) License Agreement
After selecting components and installation path, click Next button to enter the interface of the
License Agreement. Please carefully read and accept the user license agreement by selecting
I Agree option and clicking Next button to proceed with the installation.
3-8
Page 34

The “I Disagree” radio button is checked in the interface by default, and the Next button is
grayed out. To proceed with the installation of the software, users need to check the “I Agree”
option. The Next button is then available.
d) Search for Printers
After selecting Agree and clicking Next, it will go to the interface of Search for Printers, and
the program will automatically search for the appropriate printer device connected to the
computer.
If the appropriate printer device is detected, it will automatically enter the Copying Files
interface.
If no appropriate printer device is detected, the program will automatically switch to the
interface, after running the progress bar is completed.
3-9
Page 35

Please check the device connection and click Try Again.
If the printer is not connected, select Continue Installation to enter the Copying Files interface.
e) Copying Files
Copy the installation les to the installation path.
3-10 10
Page 36

f) Driver Installation
g) Completing Installation
After the driver installation progress bar shows that the installation progress is completed, it
will enter the Installation Complete interface.
3-11 11
Page 37

Click the Done button to complete the installation of the printer driver, carry out online product
registration which can provide online services and consultation as well as the toner cartridge
and other information, and set this printer as the default printer. You can also cancel these
options as needed.
Note: • If the driver is installed with the printer unconnected, the option "Set this printer
as the default printer" will not be displayed.
3.1.2. Driver Uninstall
1. Select uninstall mode.
In the Start menu, select the path “Pantum - Pantum M5000-M6000 Series Uninstall Icon” to
enter the uninstall interface or nd Add/Remove in the PC control panel, nd relevant Pantum
options, and click Change and Delete, Welcome interface will pop up.
2. Uninstall privilege verication prompt.
Uninstall requires administrator privileges. If a non-administrator runs the uninstaller, it will
pop up the “Insufcient privileges. Please uninstall Pantum M5000-M6000 Series MFP with
administrator privileges.” prompt box, and the main interface of the uninstaller will not be
displayed. Click OK in the prompt box, the prompt box interface will disappear.
3-12 12
Page 38

3. Uninstall Uninstall Element interface.
Click OK on the Welcome interface to enter the Uninstall Element interface where you can
select the components to be uninstalled. Only all installed components will be displayed.
4. Uninstall progress interface
After selecting the components, click Next to enter the uninstall interface.
3-13 13
Page 39

5. Done interface
After the progress bar advancing is completed, it will enter the Done interface.
Click Done button, the following window will pop up prompting you to restart the computer.
Click OK to exit the uninstaller and restart the computer; click Cancel to exit the uninstaller.
Note: • If you choose not to restart the computer after uninstalling is completed, an
unsuccessful installation or scan abnormality after installation may occur when
reinstalling the driver.
• If you uninstall the "Pantum Push Scan Manager" component separately,
the window for prompting you to restart the computer will not pop up after you
complete uninstalling and click Exit.
3-14 14
Page 40

3.2. Mac System-based Driver
3.2.1. Introduction
Mac driver installer is made by using the PackageMaker software that comes with the Mac
System. The installation style is basically consistent with the installation of the ordinary
software under Mac.
The installation is divided into the following steps: introduction, license, destination volume,
type of installation, installation, and summary.
3.2.2. Installation Steps
1. Introduction
Insert the CD-ROM into the CD-ROM driver, run the CD-ROM and click the Mac system
installation package. The following interface will then display:
3-15 15
Page 41

2. License Agreement
Click Continue on the above gure to display the contents of the License Agreement, as
shown below:
Click Continue, it will pop up the “To continue installing the software you must agree to the
terms of the software license agreement.” dialog box.
Click Agree to accept the License Agreement and continue the installation.
3-16 16
Page 42
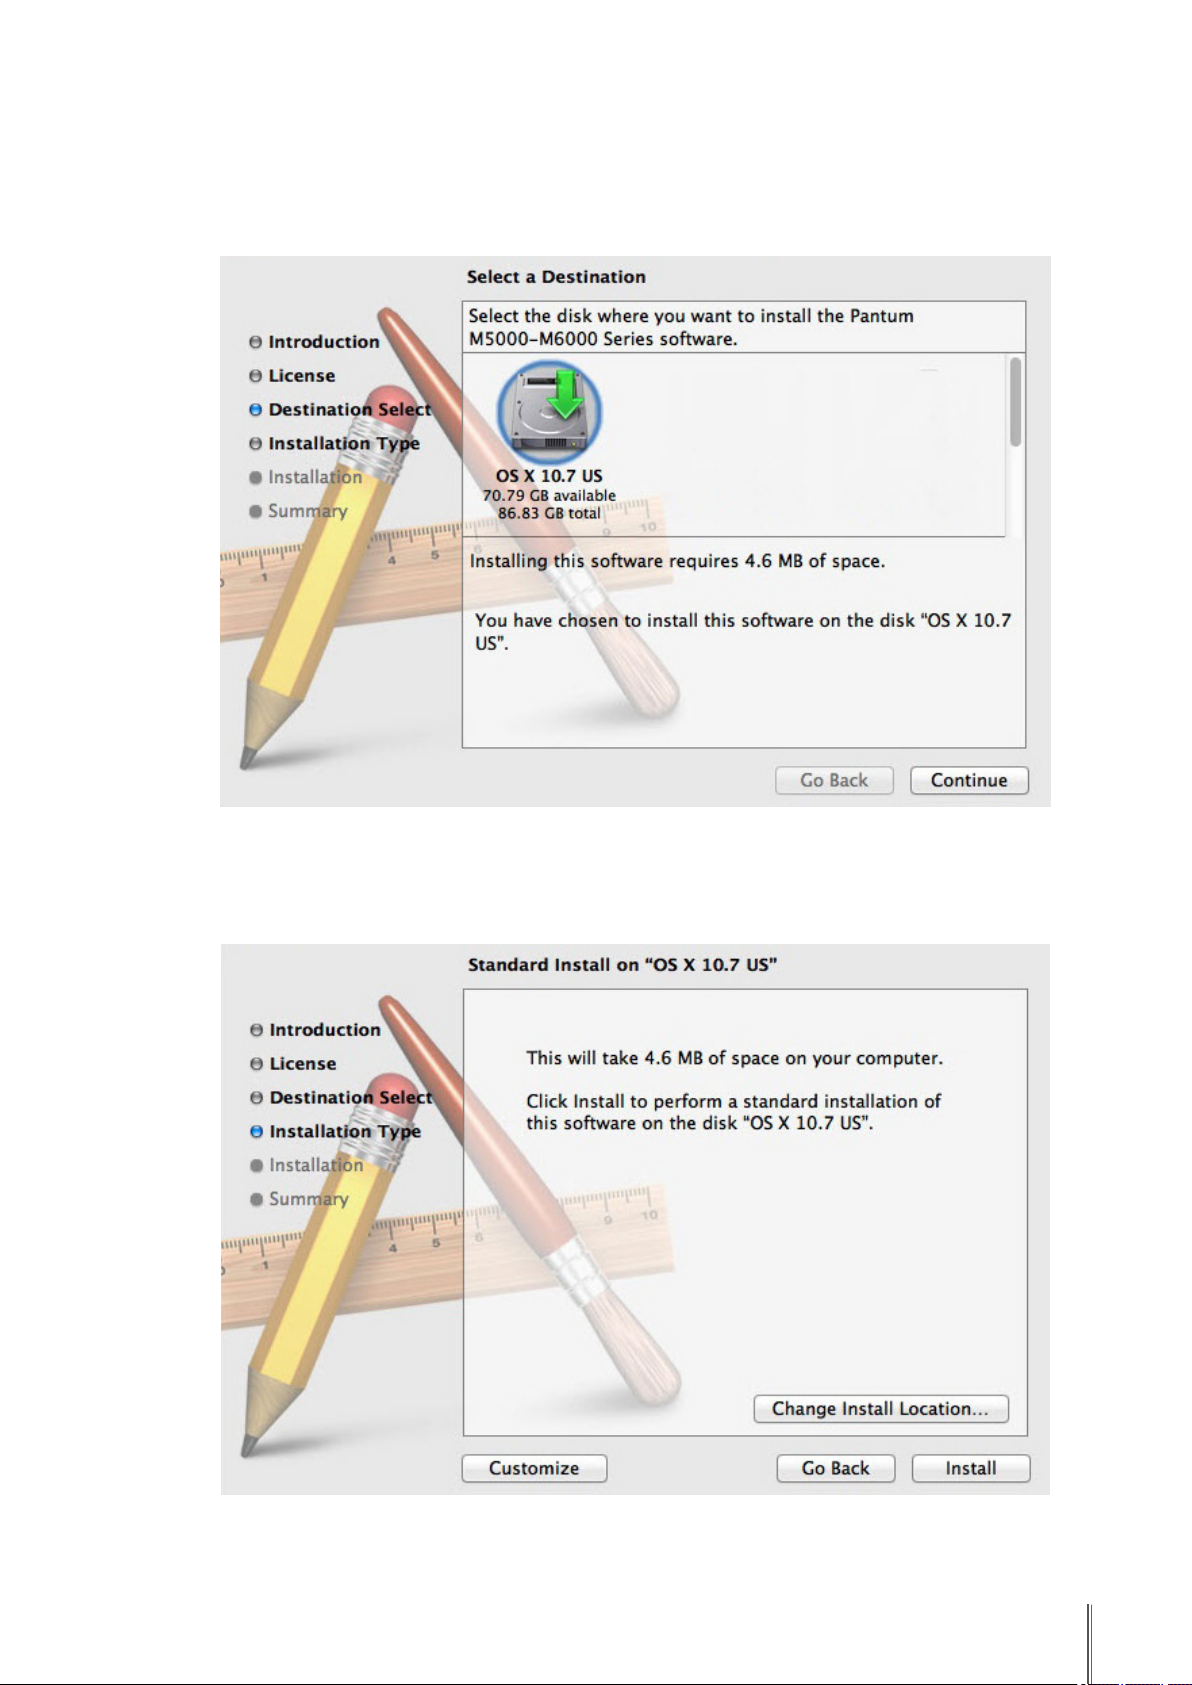
3. Destination Volume
Click Continue on the above gure to select the installation disk, then the following view will
be displayed:
4. Installation Type
Click Continue on the above gure to display the installation-related information, as shown
below:
3-17 17
Page 43

Click Install, the following prompt box will pop up. Only after getting permission from the
administrator user can you continue with the installation.
5. Install
Click Install Software after lling in relevant information on the above gure, the installation
progress will be displayed, as shown below:
3-18 18
Page 44

6. Summary
Click Continue on the above gure, then the Installation Complete interface will be displayed;
click Restart button to restart the system, as shown below:
3-19 19
Page 45

General Settings
4
CHAPTER
4. General Settings ................................................................................................................................2
4.1. System Settings .......................................................................................................................... 2
4.1.1. Toner Save Settings .............................................................................................................2
4.1.2. Language Settings ............................................................................................................... 3
4.1.3. Copies ..................................................................................................................................3
4.1.4. Power Saving Button ...........................................................................................................3
4.1.5. Restore.................................................................................................................................4
4.1.6. View System Information ..................................................................................................... 4
4.1.7. Test Print ..............................................................................................................................4
4.1.8. Sleep Time ...........................................................................................................................5
4.2. Paper Settings ............................................................................................................................5
4.2.1. Setting Paper Size ............................................................................................................... 5
4.2.2. Setting Paper Type ...............................................................................................................6
4-1
Page 46
4. General Settings
OK
OK
OK
OK
This chapter mainly introduces some general settings of the control panel's menu. To learn
about other buttons and functions of the control panel, please see Section 1.3.
4.1. System Settings
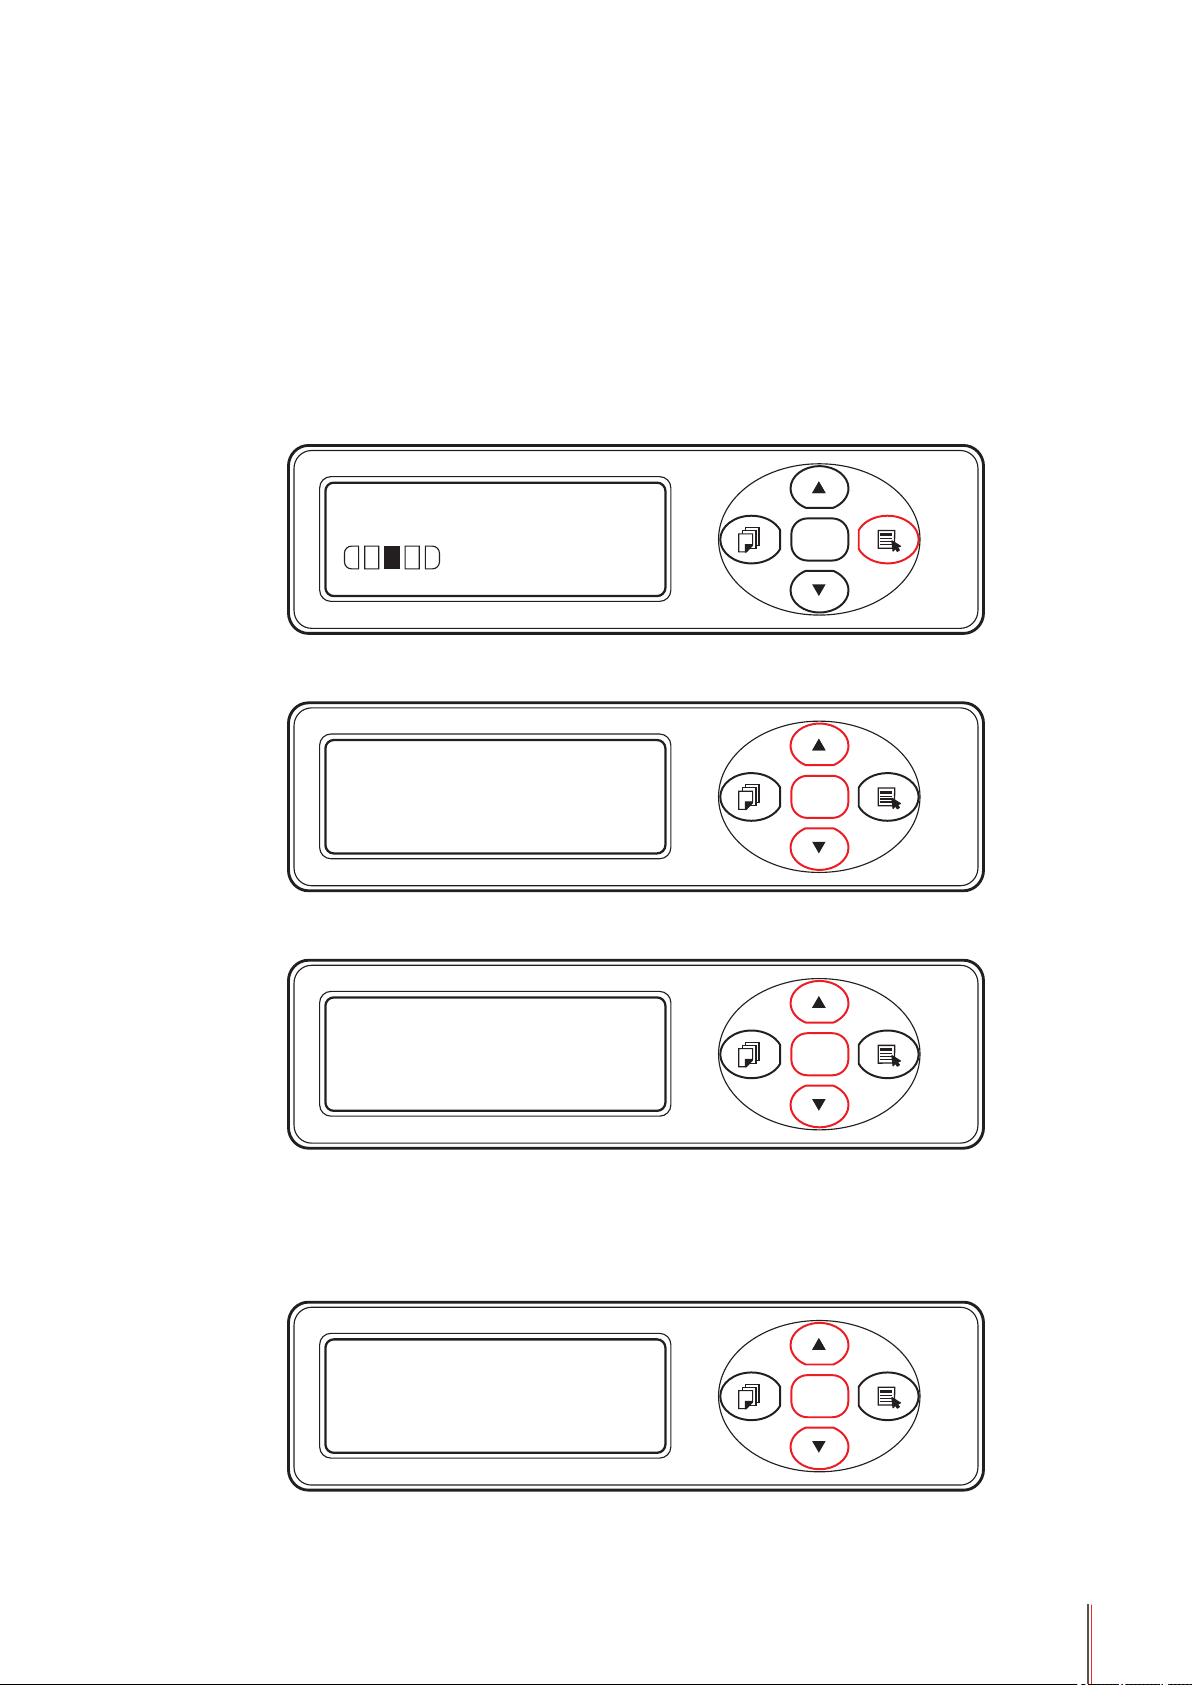
4.1.1. Toner Save Settings
1) Press Menu button to enter the menu interface.
100 01%
2) Press direction pad ▲ or ▼ to select 3. System setting and press OK button.
T+ P A4
Menu setting
3.System setting
3) Press direction pad ▲ or ▼ to select the 1. Toner save option and press the OK button.
Toner save
1.Toner save
4) Press direction pad ▲ or ▼ to select 1. Off and press OK button. When symbol * appears
after 1. Off, it indicates “close” and the toner save setting is completed; or press direction pad
▲ or ▼ to select 2. On and press OK button. When symbol * appears after 2. On, it indicates
that the toner save setting is on.
Toner save
1.Off *
4-2
Page 47
5) Press Menu button to exit the menu interface directly or select the last option from each
Status
Start
Cancel
Scan
Copy
OK
OK
OK
level of menu and press OK button to exit the menu interface.
4.1.2. Language Settings
Language setting is used to select the language of the control panel to be displayed.
1) Press the Menu button to enter the menu interface.
2) Press direction pad ▲ or ▼ to select 3. System setting and press the OK button.
3) Press direction pad ▲ or ▼ to select 2. Language and press the OK button.
System setting
2.Language
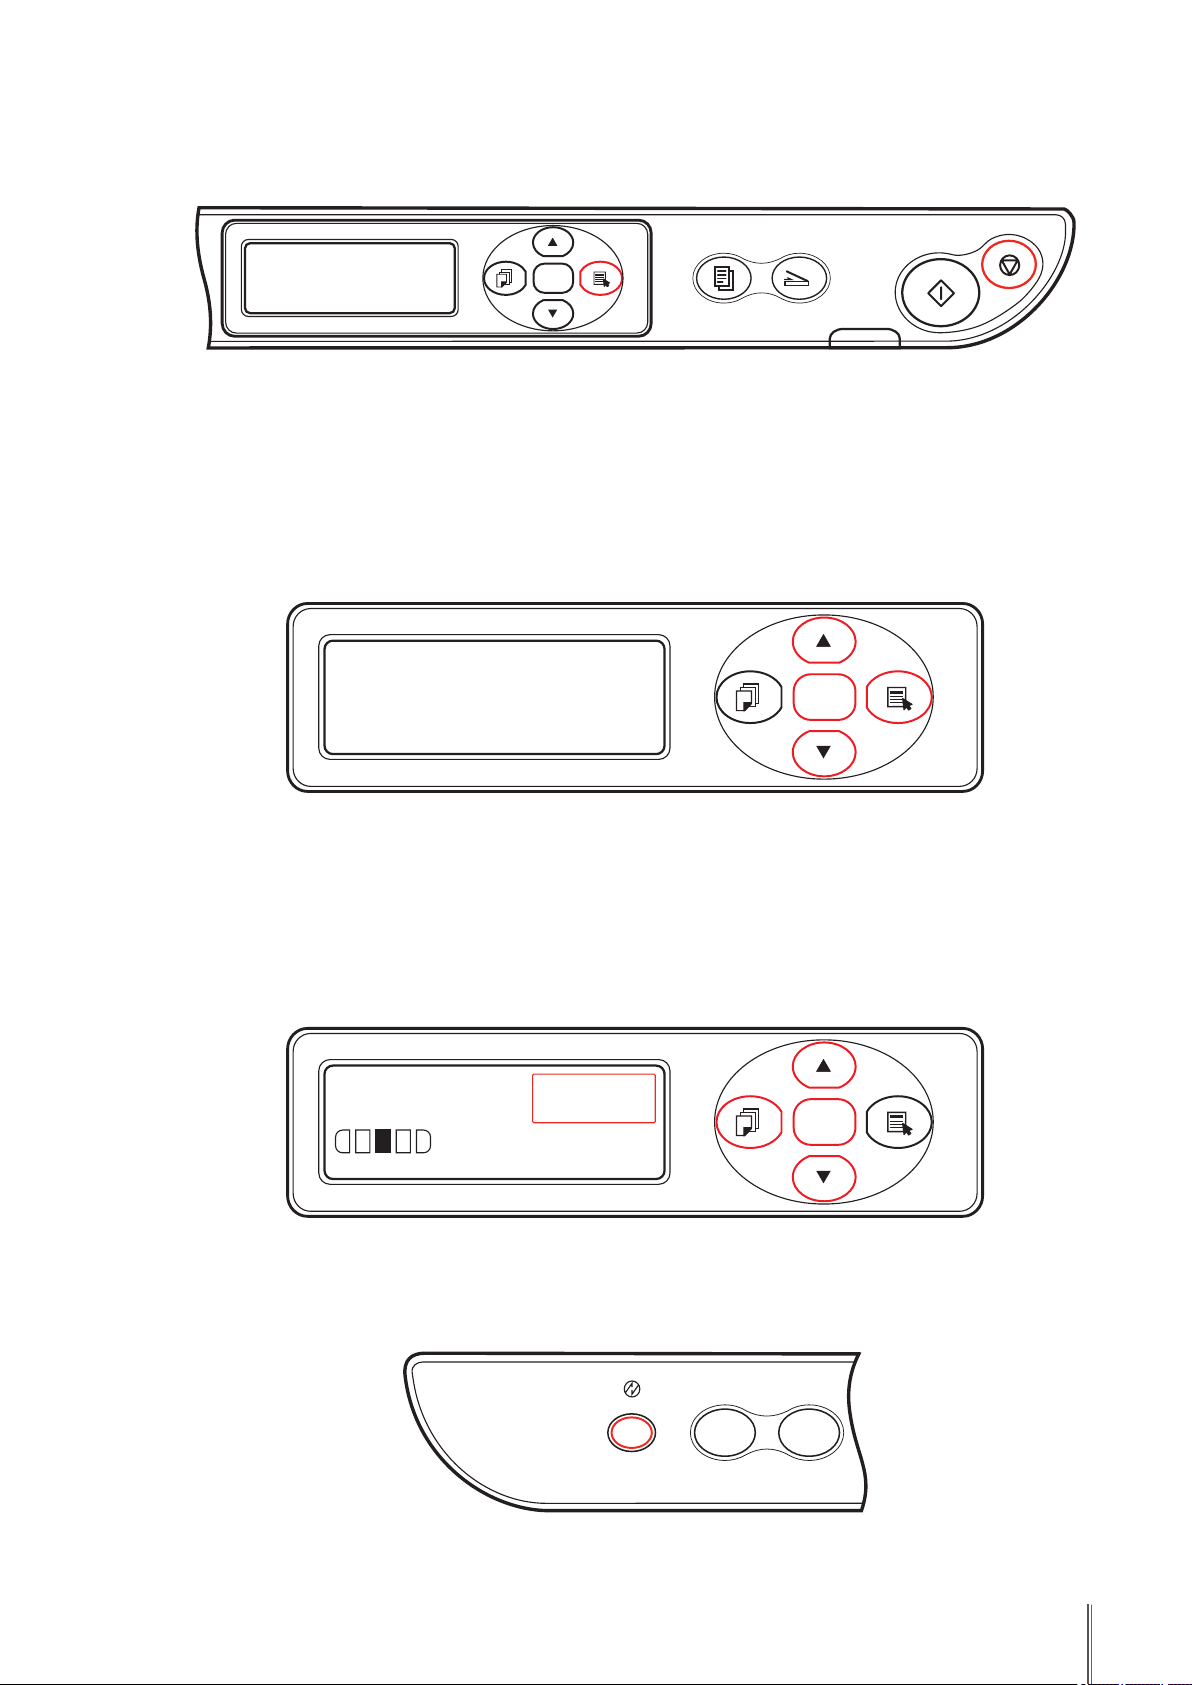
4.1.3. Copies
When more than one copy (1-99 copies) is required, press Copies button to ash to Copies
mode and the copies value starts ashing. Then press direction pad ▲ or ▼ to adjust copies;
short press of the button ▲ or ▼ represents 1 copy is added or subtracted and long press of
the button ▲ or ▼ represents 10 copies are added or subtracted.
100 01%
T P A4+
Press the OK button to nish the settings.
4.1.4. Power Saving Button
ID copy
Receipt copy
4-3
Page 48

This is used to help users to set power saving quickly. It can only be operated after exiting all
OK
OK
OK
operations. Press down this function button and the equipment will enter Power Saving Sleep
status. The power saving indicators will stay on (green) to indicate that the equipment is in
Sleep Status and both the LCD display and backlight are off. To wake up the printer, press the
Power Saving button to cancel power saving or send print and scan job. Pressing any other
button does not work.
4.1.5. Restore
Restore is used to restore the default settings of the printer.
System setting
3.Restore
4.1.6. View System Information
1) Press the Menu button to enter the menu interface.
2) Press direction pad ▲ or ▼ to select the 4. System info option and press the OK button.
3) Press direction pad ▲ or ▼ to select 1. Memory size, 2. Versions and other options. Press
the OK button after checking one option to display corresponding information.
4) Press down 3. Back to return to the previous menu.
Sy s t em in f o
2. Vers i o ns
4.1.7. Test Print
This option is used to test whether the printer can work normally.
System setting
4.Test print
4-4
Page 49

4.1.8. Sleep Time
OK
OK
System setting
5.Sleep time
1) Press Menu button to enter the menu interface.
2) Press direction pad ▲ or ▼ to select 3. System setting and press the OK button.
3) Press direction pad ▲ or ▼ to select 5. Sleep time and press the OK button.
4) The direction pad ▲ or ▼ can be used to select 1. 1 Minute, 2. 5 Minutes, 3. 15 Minutes,
4. 30 Minutes, 5. 60 Minutes and Back.
Note: • After selecting the time, the printer will go into sleep mode if no operation is
carried out within the corresponding time period.
• When the printer is in sleep mode, it can be woken up by pressing down the
Power Saving button; or the printer will automatically terminate sleep mode after
receiving a print job or scan task.
4.2. Paper Settings
4.2.1. Setting Paper Size
Menu setting
2.Paper setting
1. Press the Menu button to enter the menu interface.
2. Press direction pad ▲ or ▼ to select the 2. Paper setting option and press the OK button.
3. Press direction pad ▲ or ▼ to select the 1. Paper size option and press the OK button.
4. Press direction pad ▲ or ▼ to select A4, Letter, B5, A5, etc. and press the OK button. The
symbol * will appear after the corresponding paper size to indicate that the setting of this paper
size is completed.
4-5
Page 50

5. Press Menu button to exit the menu interface directly or select the last option from each
OK
level of menu and press OK button to exit the menu interface.
Note: • For information on paper size, please see Section 2.1.
4.2.2. Setting Paper Type
Paper setting
2.Paper type
1. Press the Menu button to enter the menu interface.
2. Press direction pad ▲ or ▼ to select the 2. Paper setting option and press the OK button.
3. Press direction pad ▲ or ▼ to select the 2. Paper type option and press the OK button.
4. Press direction pad ▲ or ▼ to select Plain, Thick, Envelope, Transparency, etc. Press
OK button, then symbol * will appear after the corresponding paper type to indicate that the
setting of this paper type is completed.
5. Press Menu button to exit the menu interface.
Note: • Paper type includes Plain, Thick, Envelope, Transparency, Cardstock, Label
and Preprinted.
4-6
Page 51

Print
5
CHAPTER
5. Print ...................................................................................................................................................2
5.1. Print Function .............................................................................................................................. 2
5.2. Opening Help Document ............................................................................................................3
5.3. Manual Duplex ............................................................................................................................ 4
5.4. Cancel Job .................................................................................................................................. 8
5-1
Page 52

5. Print
1 2 1
321321
1
1
2
2
3
3
1 2
21
A
1
1
5.1. Print Function
This printer can achieve the following print functions:
Functions Diagram
Manual Duplex
Collate
Reverse Print
N-in-1
Poster Printing
(Only for Windows
system)
Zoom Print
Custom Size
5-2
Page 53

Note: • You can select the 2x2 Poster printing in N-in-1 to see the poster printing
function.
• You can open the Printing Preferences and click the Help button to view the
explanation of the specific function. For information about how to open the help
document, see Section 5.2.
5.2. Opening Help Document
Open the Printing Preferences and click the Help button (Only for Windows system).
5-3
Page 54

The Help document contains the User Guide for the printer.
5.3. Manual Duplex
1. The printer driver supports manual duplex.
Note: • If the paper is thin, it may wrinkle.
• If the paper is curled, make it at and put it back into the manual feeder tray.
• If the manual duplex function causes a paper jam, see Section 9.1 for instructions.
2.
Ensure that a certain amount of paper is loaded into the automatic feeder tray before printing.
Note: • For loading paper, see Section 2.2.
• For the type of media that can be printed with the automatic feeder tray, see
Chapter 10.5. It is recommended to use the standard paper.
• Some paper media are not suitable for duplex printing. Trying duplex printing
may damage the printer. When Paper Type is Thick or Transparency, please
do not try duplex printing. If 2x2 Poster printing is checked in the Printing
Preferences dialog box, Manual Duplex will not be supported.
• If the paper loaded into the automatic feeder tray exceeds 150 pages, paper will
jam or will not be fed in.
5-4
Page 55

3. The printing steps are as follows (Only for Windows system):
a) Open the document to be printed from the application (such as Notepad), and select Print
from the File menu.
b) Select Pantum Printer.
5-5
Page 56

c) Click Printing Preferences or Properties button for the print settings.
d) Check Manual Duplex in the Basic tab and click OK after completing the settings.
e) Click Print.
Note: • It is recommended to raise the output tray to prevent the paper from sliding
out of it. If you choose not to raise the output tray, we recommend that you
immediately remove the printed paper from the printer.
5-6
Page 57
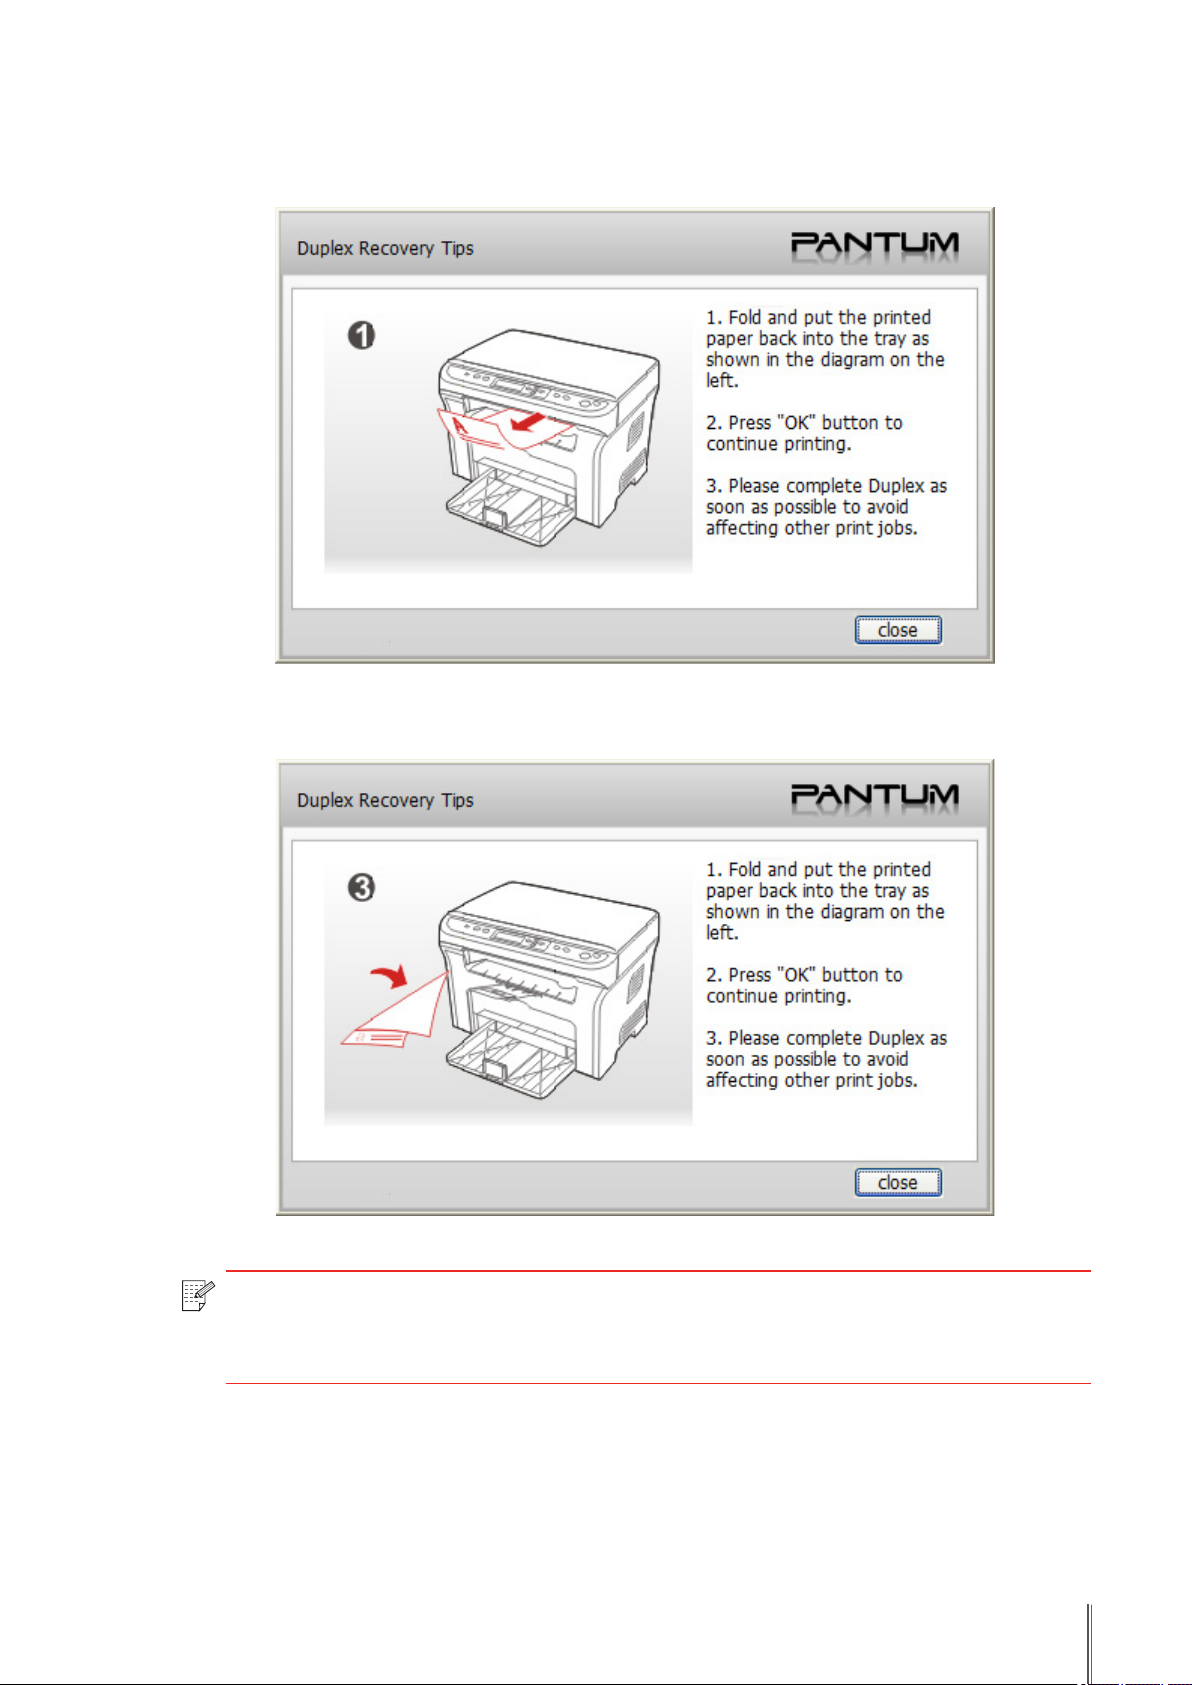
f) A window of “Duplex Recovery Tips” will automatically pop up to inform you of the specic
operation procedures.
g) Remove the printed paper from the output tray, tidy the paper and put it back into the
automatic feeder tray, print-side (blank side) facing up.
Note: • Remove a stack of paper from the output tray and put them into the automatic
feeder tray after flipping the up and down sides. Do not change the order of the
stack of paper during this process.
5-7
Page 58
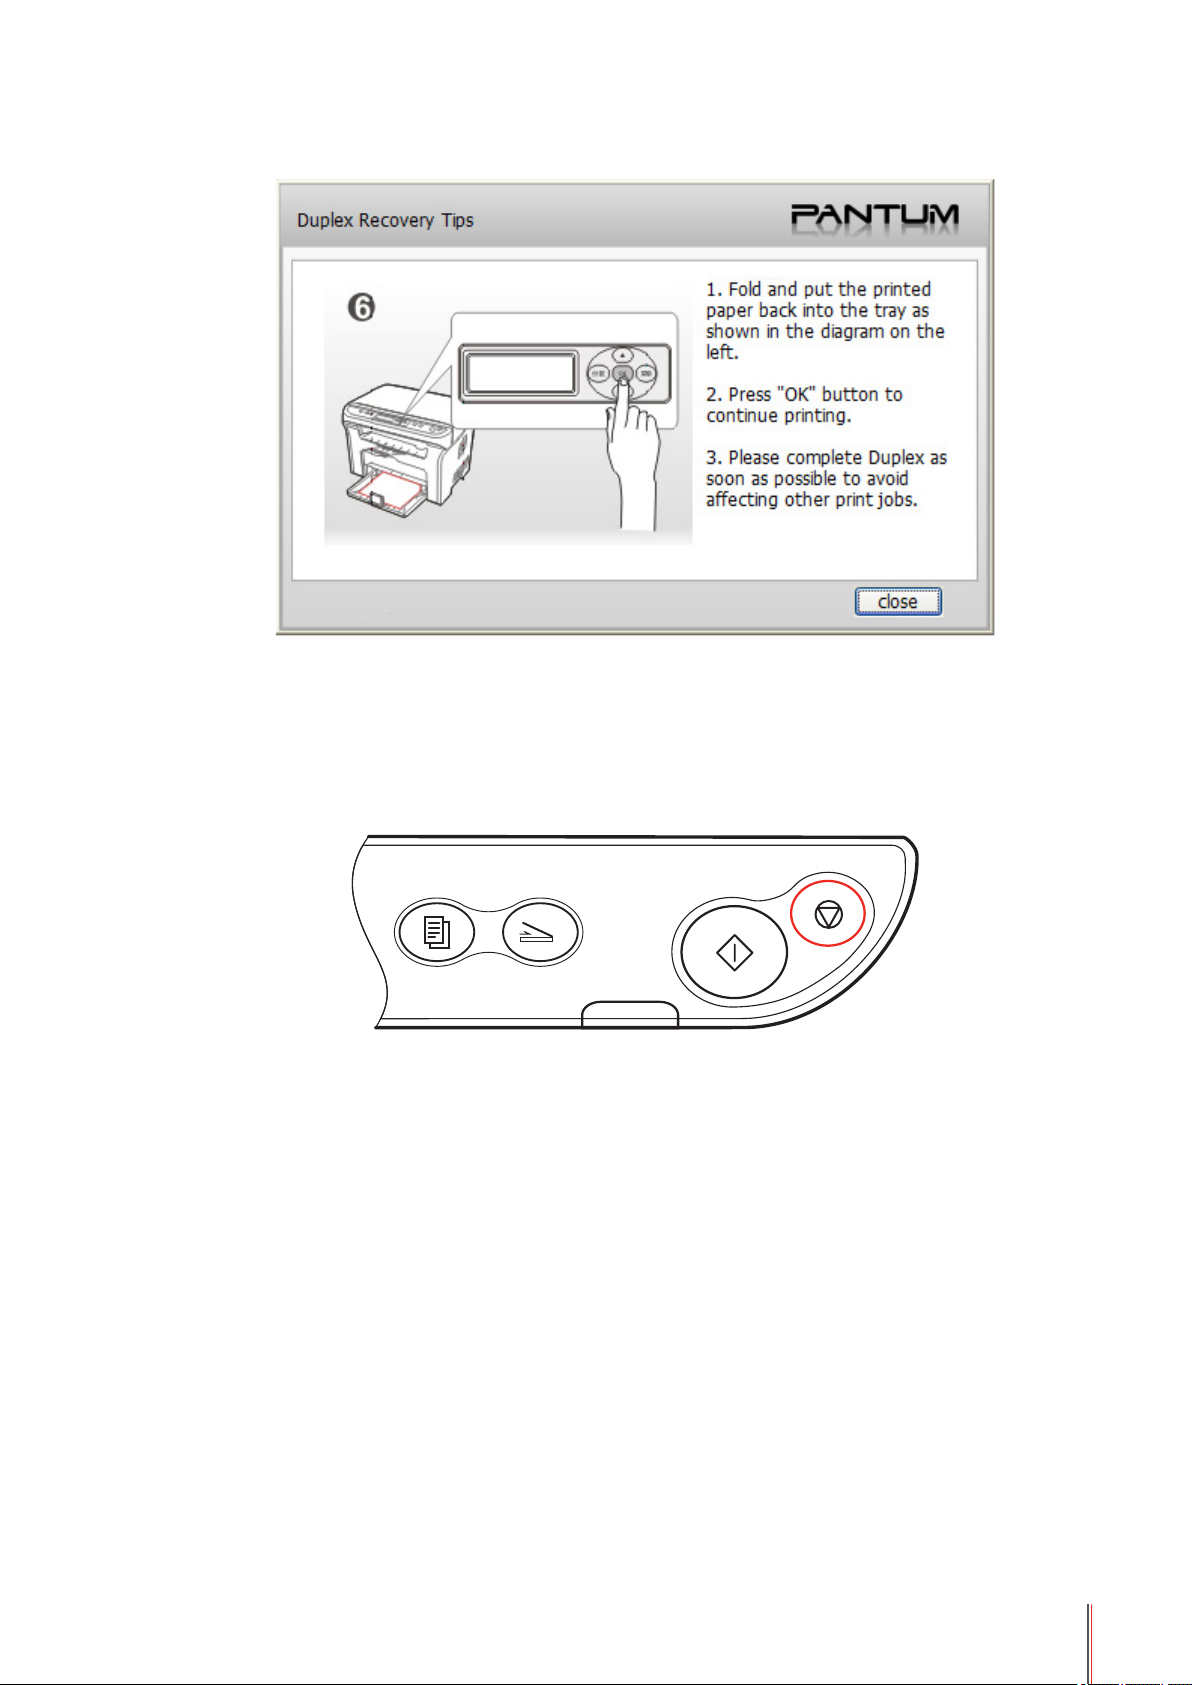
h) Press OK on the control panel to continue printing.
The printer will print all the even pages on the other side of the paper in turn.
5.4. Cancel Job
Press the Cancel button on the control panel to cancel the job you want to cancel during the
printing process.
Cancel
Copy
Scan
Status
Start
5-8
Page 59

Scan
6
CHAPTER
6. Scan ..................................................................................................................................................2
6.1. Basic Operations ........................................................................................................................2
6.1.1. Scanning with Control Panel ................................................................................................2
6.1.2. Scanning with TWAIN .......................................................................................................... 3
6.1.3. Cancel Job ........................................................................................................................... 3
6.2. Scan Function ............................................................................................................................. 4
6.2.1. Single Page Scan ................................................................................................................4
6.2.2. Merge Scan ..........................................................................................................................4
6.3. Scan Settings .............................................................................................................................. 6
6.3.1. Basic Settings ...................................................................................................................... 6
6.3.2. Advanced Settings ............................................................................................................... 7
6-1
Page 60

6. Scan
This printer offers two types of scanning modes: scanning with the control panel or TWAIN.
6.1. Basic Operations
6.1.1. Scanning with Control Panel
This section introduces how to scan documents to the computer with the control panel. The
specific operation procedures are as follows:
Put the document into the glass platen.
Note: • During the scanning, please do not open the cover to avoid any adverse impact
on the image quality.
• For information about the Media Selecting Requirements, please see 2.4.
• For information about Media Loading Procedures, please see 2.5.
Press the Scan button on the control panel to enter scan mode.
Cancel
Copy
Note: • When the printer is in Power Saving status, it can be woken up only by pressing
the Power Saving button or sending a print/scan job.
Press the Start button to start scanning.
Scan
Status
Start
6-2
Page 61
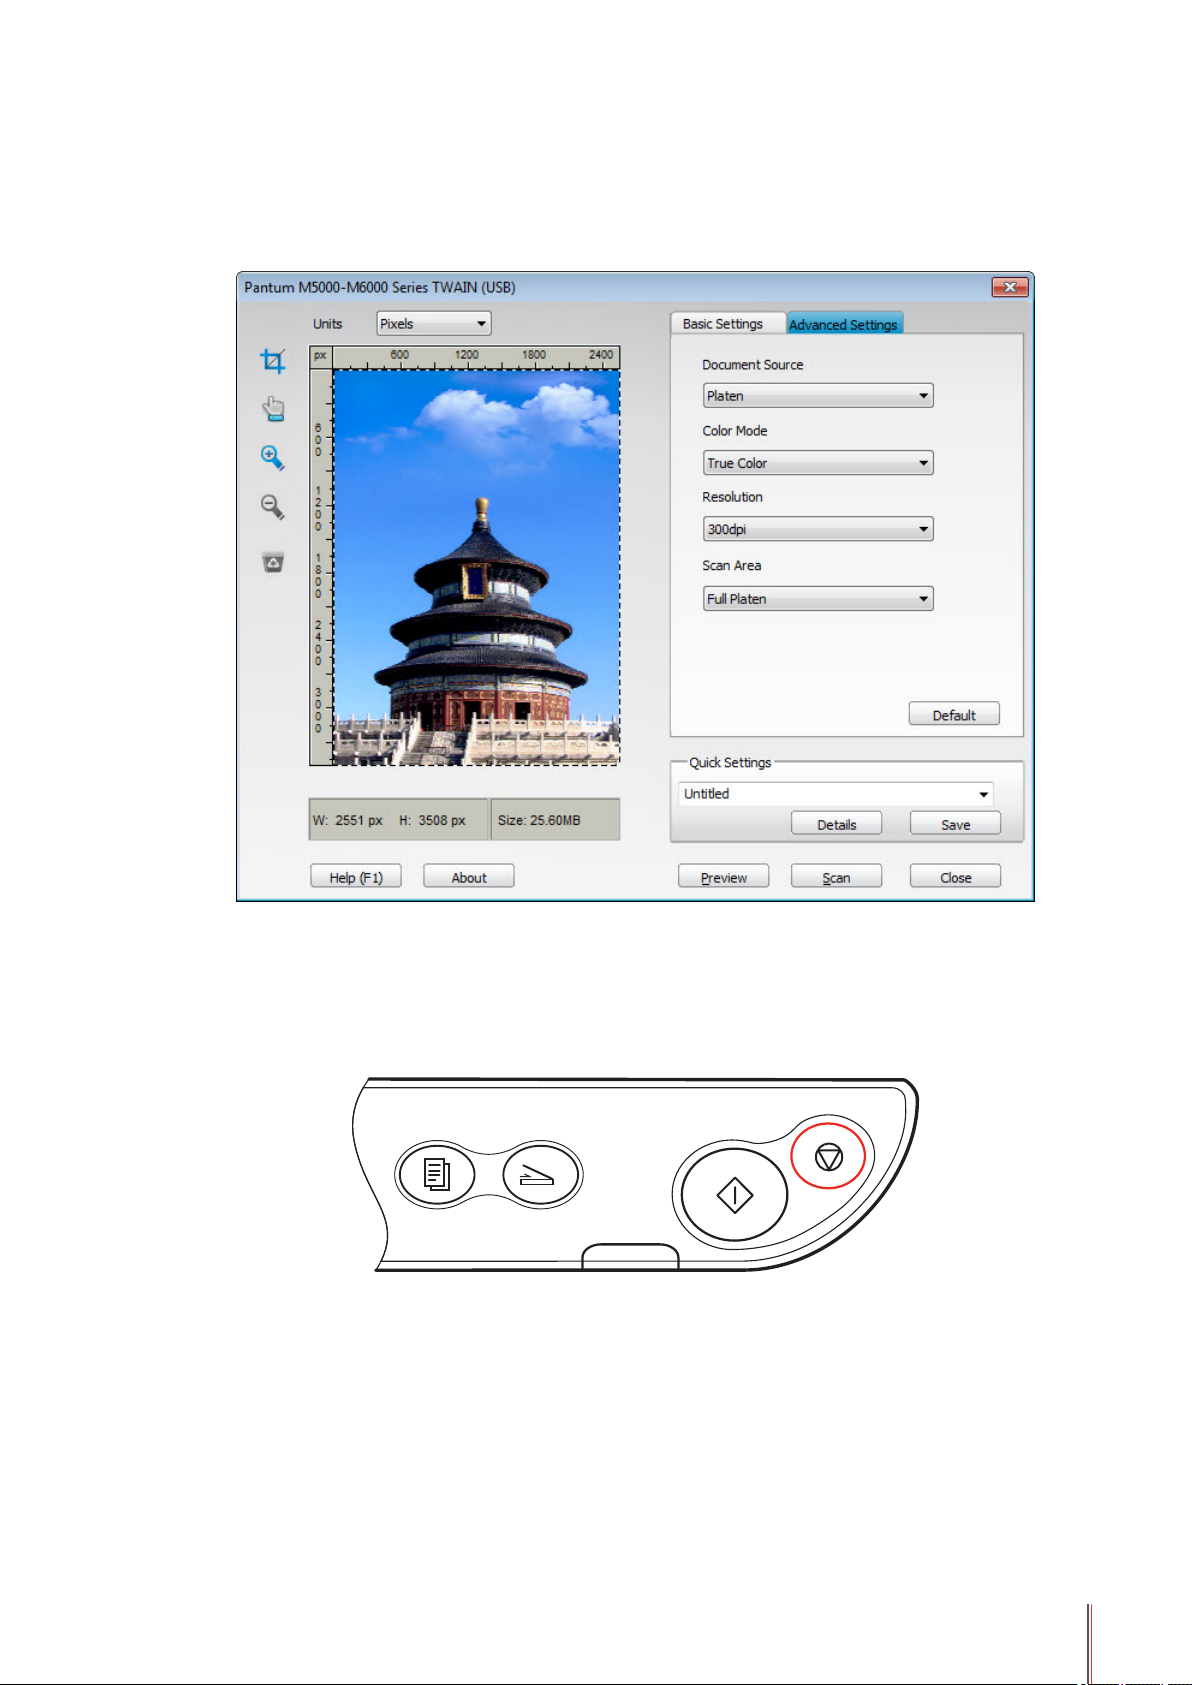
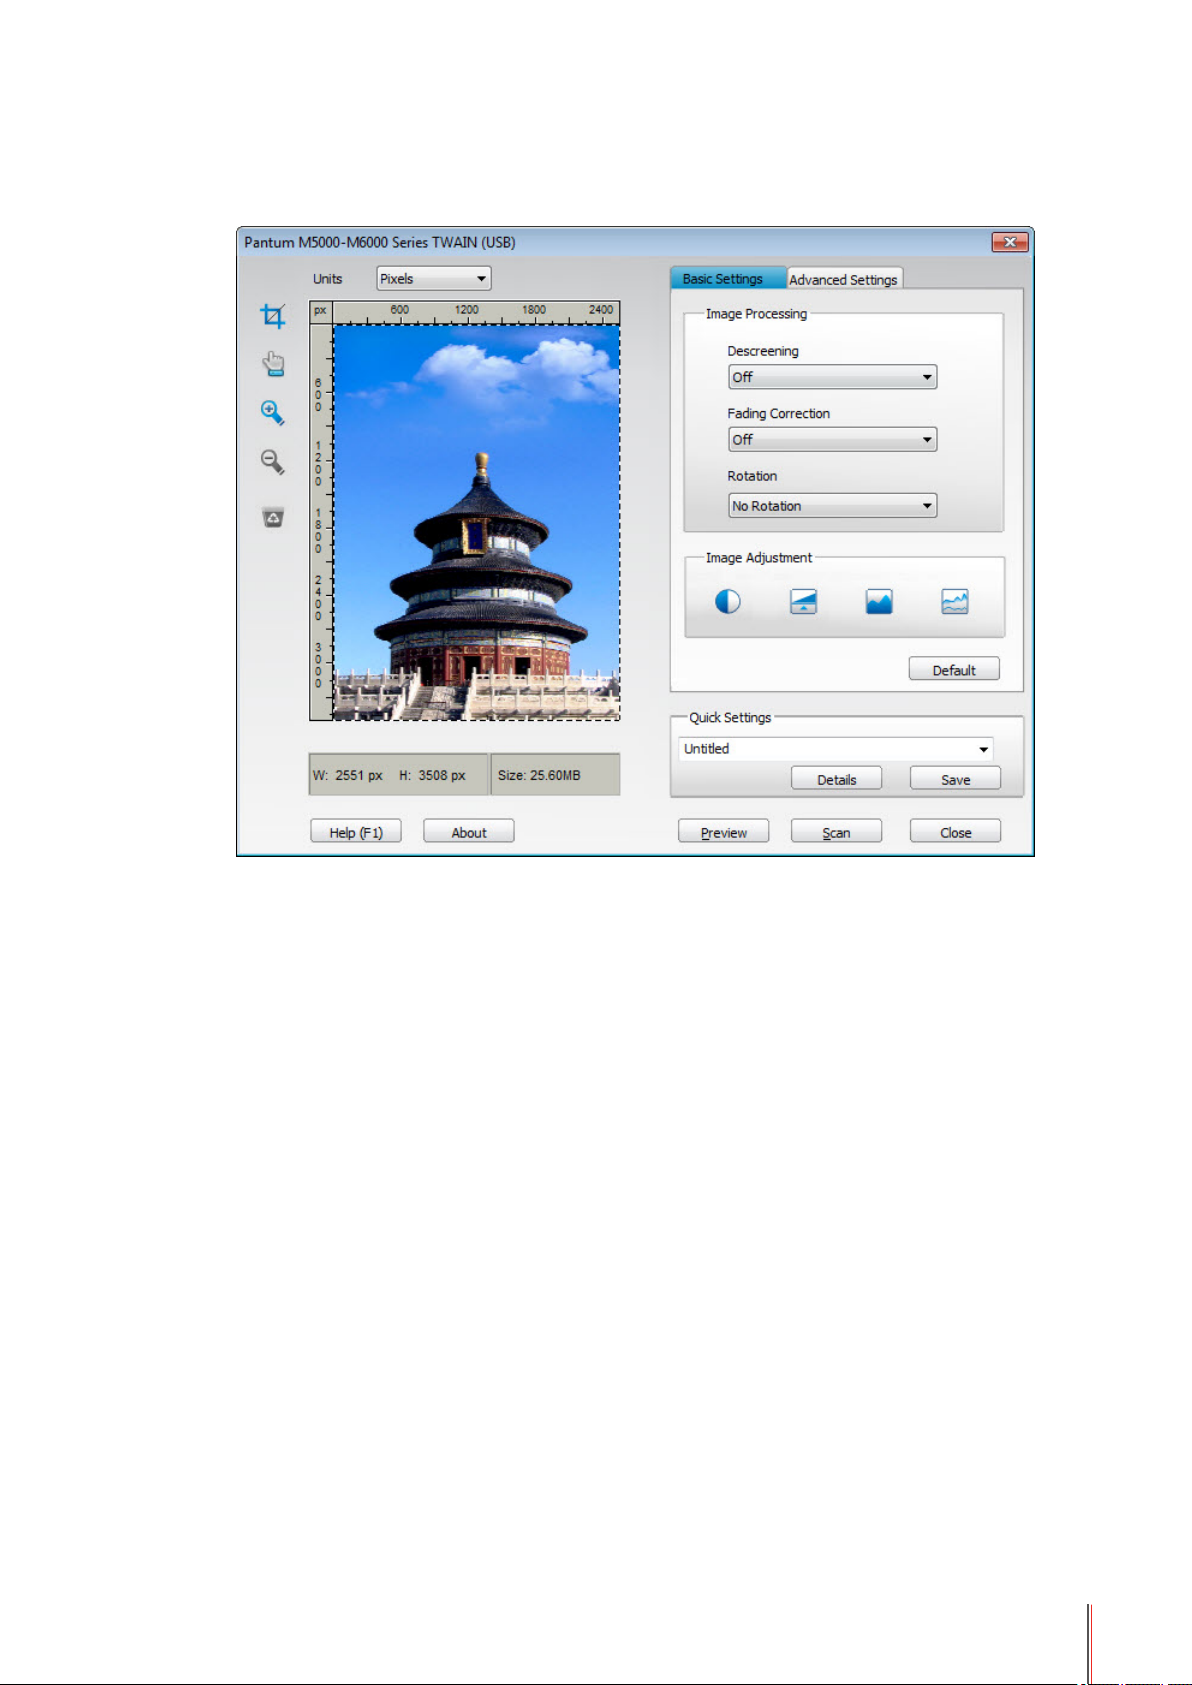
6.1.2. Scanning with TWAIN
PANTUM printer can be selected by other applications to perform scanning with TWAIN.
After selecting the printer, the following interface will pop up:
6.1.3. Cancel Job
When a document is scanning, there are two ways to cancel the job:
Press the Cancel button on the control panel.
Cancel
Copy
Scan
Status
Start
6-3
Page 62
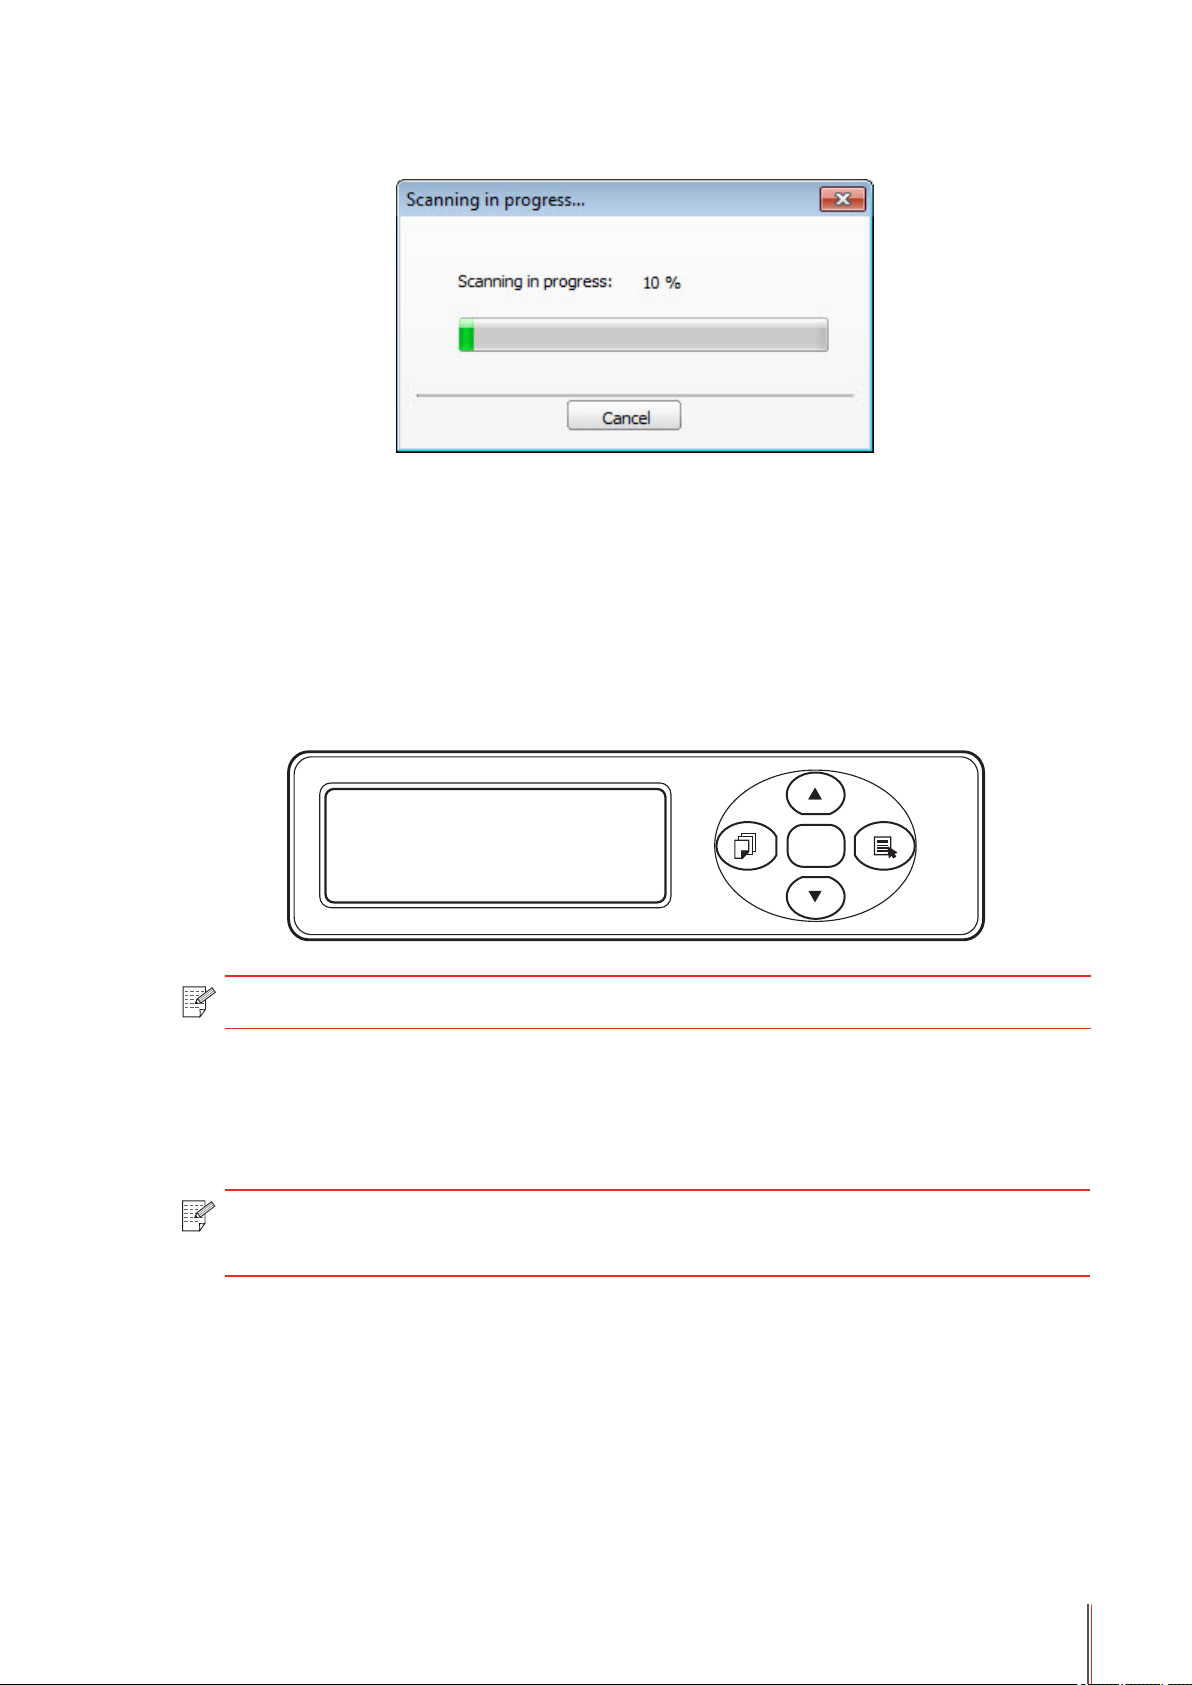
Click the Cancel button on the scanning progress bar interface.
OK
6.2. Scan Function
This section introduces how to use the control panel to achieve single page scan and N-UP
scanning.
6.2.1. Single Page Scan
The default scan mode of the control panel is single page scan. The prompted control panel
is shown as follows:
Scan/Merge
1.Scan mode
Note: • For the procedures of scanning operation, please see Section 6.1.1.
6.2.2. Merge Scan
When you want to merge multipage scanned documents into one PDF, please use Merge
Scan function.
Note: • Merge Scan can scan documents into PDF format by default.
• This printer can perform Merge Scan operations only on the product control panel.
6-4
Page 63
The specific operations are as follows:
OK
OK
OK
1. Press Scan button to enter scan status. The control panel defaults to the single page scan
mode.
Scan/Merge
1.Scan mode
2. Press ▼ button to select and enter the 2. Merge mode.
Scan/Merge
2.Merge mode
3. Press Start button and the scanning progress bar interface will pop up on the computer.
4. After completing a scan of the first page, the contents, as shown below, will appear on the
control panel:
Press the Start button to scan the next page and press the OK button to finish scanning.
Next page: Start
End scanning: OK
5. Put the document to be scanned into the glass platen and press the Start button to
continue to scan the second page. Repeat the operation as described in the fifth step to scan
multiple pages. Press the OK button to end this operation.
6. After completing the operation, the application will save PDF document to the specified
path.
6-5
Page 64

6.3. Scan Settings
6.3.1. Basic Settings
Basic Settings can be used to set Scan Configuration and Variable Size.
In Scan Configuration, it can perform the configurations of Color Mode, Resolution and Scan
Area.
For the specific contents and detailed description of the Scan Configuration, please click the
Help button at the bottom left of the interface.
6-6
Page 65
6.3.2. Advanced Settings
Click the Advanced Settings tab to perform image adjustment and image processing.
For the detailed description of the advanced settings, please click Help button to view the
corresponding Help Document.
6-7
Page 66

Copy
7
CHAPTER
7. Copy ..................................................................................................................................................2
7.1. Basic Operations ........................................................................................................................2
7.1.1. Basic Operations of Copying ...............................................................................................2
7.1.2. Cancel Copy Operations ......................................................................................................3
7.2. Copy Function ............................................................................................................................. 3
7.2.1. Receipt Copy........................................................................................................................3
7.2.2. ID Copy ................................................................................................................................ 4
7.3. Copy Settings .............................................................................................................................5
7-1
Page 67

7. Copy
7.1. Basic Operations
7.1.1. Basic Operations of Copying
1. Put the manuscript into the scanner glass.
Note: • During copying, please do not open the cover to avoid any adverse impact on
the image quality.
• For information about the Manuscript Selecting Requirements, please see
Section 2.3.
• For information about the Manuscript Loading Procedures, please see Section 2.4.
2. Press Copy on the control panel and enter the copy mode.
Cancel
Copy
Note: • When the printer is in Power Saving mode, it can be woken up only by pressing
The Power Saving button or sending a print/scan job.
• The printer will enter copy mode automatically with restart or startup.
• For operations of selecting copies, please see Section 4.1.3.
Scan
Status
Start
7-2
Page 68

3. Press the Start button to start copy.
OK
Cancel
Copy
Scan
Status
Start
7.1.2. Cancel Copy Operations
If you want to cancel the copy operation, please press Cancel button. LCD screen will prompt
Cancelling...
Cancelling...
7.2. Copy Function
7.2.1. Receipt Copy
ID copy
Press this button to enter Receipt Copy mode. It is used to get high-sharpness Receipt
copies.
Procedures for Receipt copies:
1. Press this button to flash to Receipt Copy mode, and then the area on the LCD main
interface to display image quality will change to display Receipt;
2. Put the Receipt into the scanning platform and press the Start button. The LCD will then
prompt Copying...;
3. The Receipt is printed after completing the scan.
Receipt copy
7-3
Page 69

7.2.2. ID Copy
ID copy
Receipt copy
Press this button to enter ID Copy mode. It is used to copy ID cards and other two-sided
certificates.
Procedures for ID Card copies:
1. Press this button to flash to ID Copy mode. The area on the main interface that displays
image quality will then change to display ID Card;
2. Place the certificates on the left half of the scanning platform and press the Start button to
start the scan. The LCD will then prompt Copying...;
3. After scanning the first side is completed, the LCD will display Flip ID Card: Start in the first line
and Finish Scan OK in the second line;
4. If the scanning of the second side of the ID Card is required, please open the cover to
flip ID Card and keep it in the same area. After pressing down Start button, LCD will prompt
Copying...; After completing scan, the front and back of the ID Card will be copied to the same
page of the same paper;
5. If only one side is required, then press the OK button to end scanning. This time only one
side of the ID Card is copied to one side of the paper.
7-4
Page 70

7.3. Copy Settings
OK
100 01%
T+ P A4
Press the Menu button to enter the menu interface. The settings of specific functions are
shown in the table below:
Level I Option Level II Option Level III Option
Text + image
Copy Settings
Image Quality
Contrast
Zoom
Image
Text
Back
Manual adjustment
Automatic adjustment
Back
100%
141% A5->A4
122% A5->B4
115% B5->A4
97% LTR->A4
94% A4->LTR
86% A4->B5
81% B5->A5
70% A4->A5
Manual adjustment
N-in-1
Clone copy
Back
Off
2-in-1
4-in-1 landscape orientation
4-in-1 portrait orientation
Back
Close
2 x 2
3 x 3
4 x 4
Back
7-5
Page 71

Routine Maintenance
8
CHAPTER
8. Routine Maintenance.........................................................................................................................2
8.1. Cleaning the Printer .................................................................................................................... 2
8.2. Maintenance of the Toner Cartridge ........................................................................................... 5
8.2.1. About the Toner Cartridge .................................................................................................... 5
8.2.2. Steps for Replacing the Toner Cartridge ..............................................................................6
8-1
Page 72

8. Routine Maintenance
8.1. Cleaning the Printer
Note: • Please use mild detergents.
Please clean the printer in accordance with the following steps:
1. Turn off the main power switch and unplug the power cord.
2. Use a soft cloth to wipe the outside of the printer clean.
3. Raise the cover and gently wipe the scanner glass with a soft cloth.
8-2
Page 73
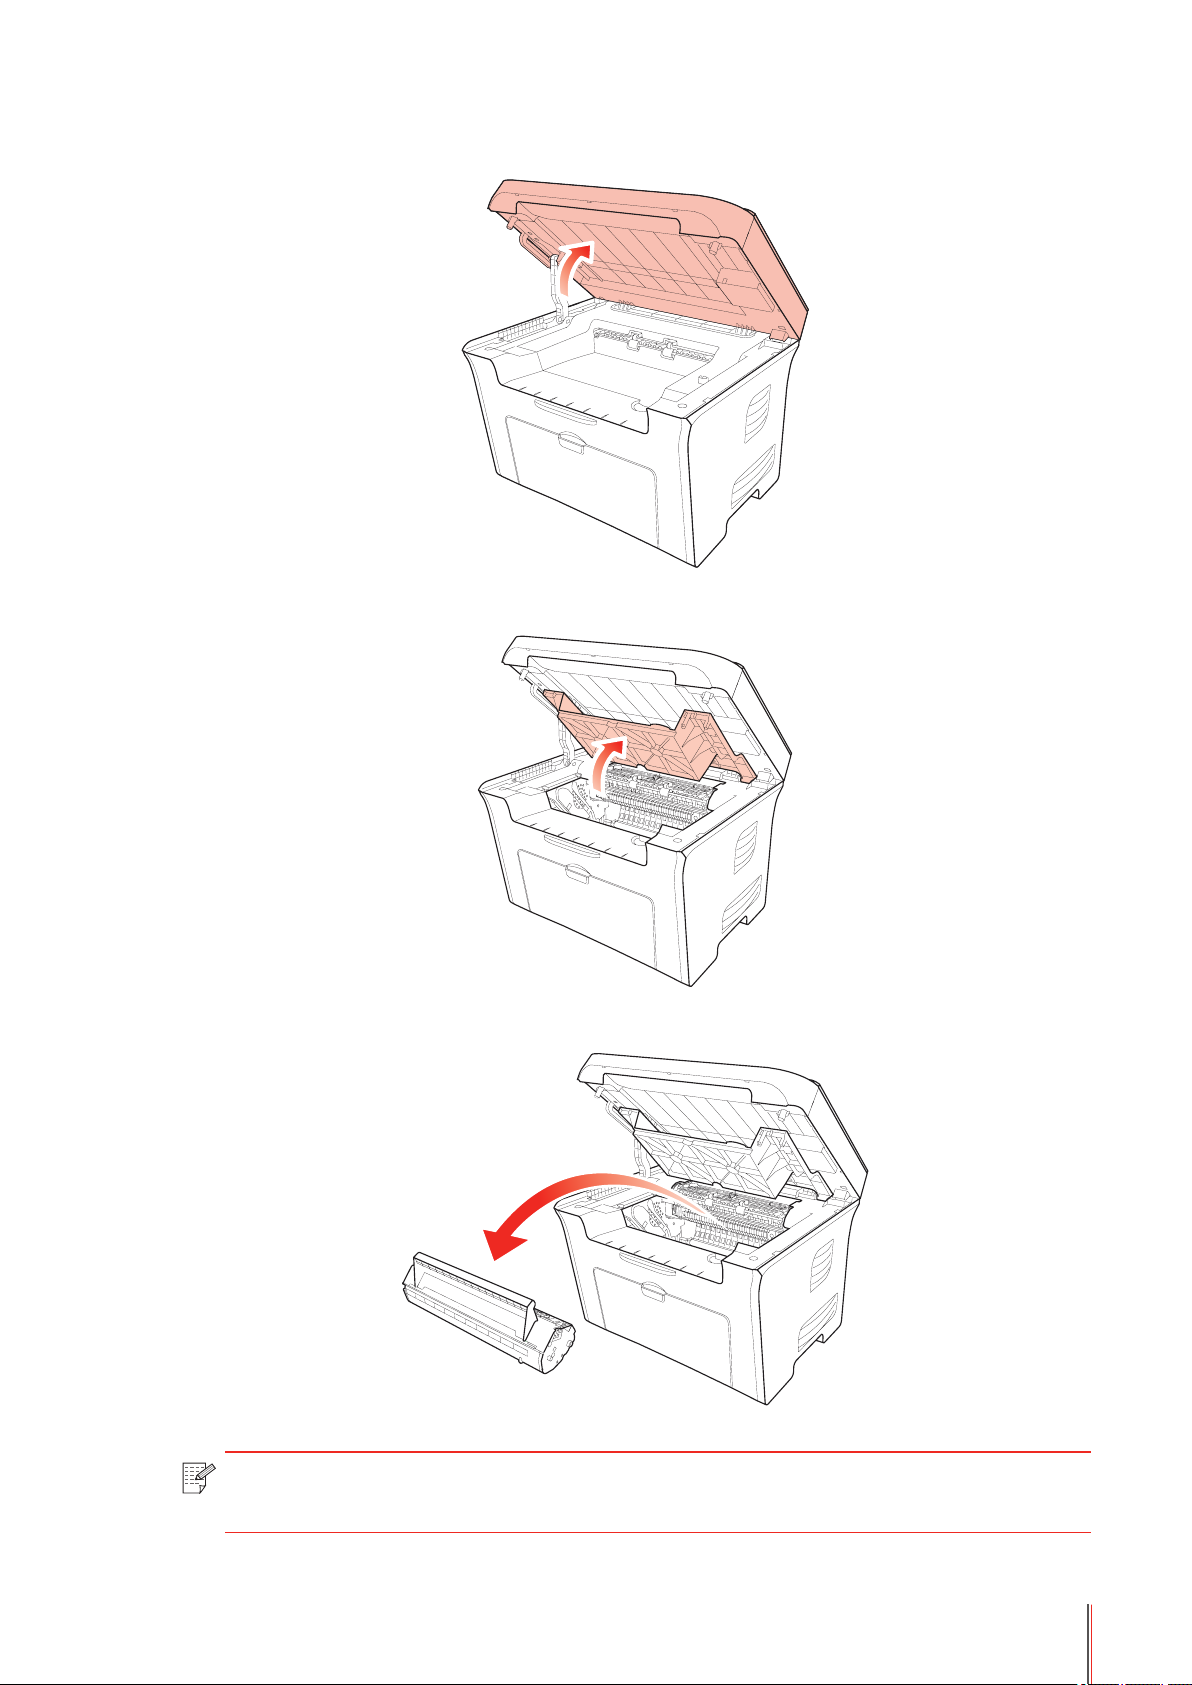
4. Raise the scanning platform until it is locked.
5. Open the output bin from the upper right ridge of the concave section.
6. Remove the toner cartridge along the guides.
Note: • When removing the toner cartridge, put the toner cartridge in a protective bag or
wrap it with thick paper to avoid direct light damaging the toner cartridge.
8-3
Page 74
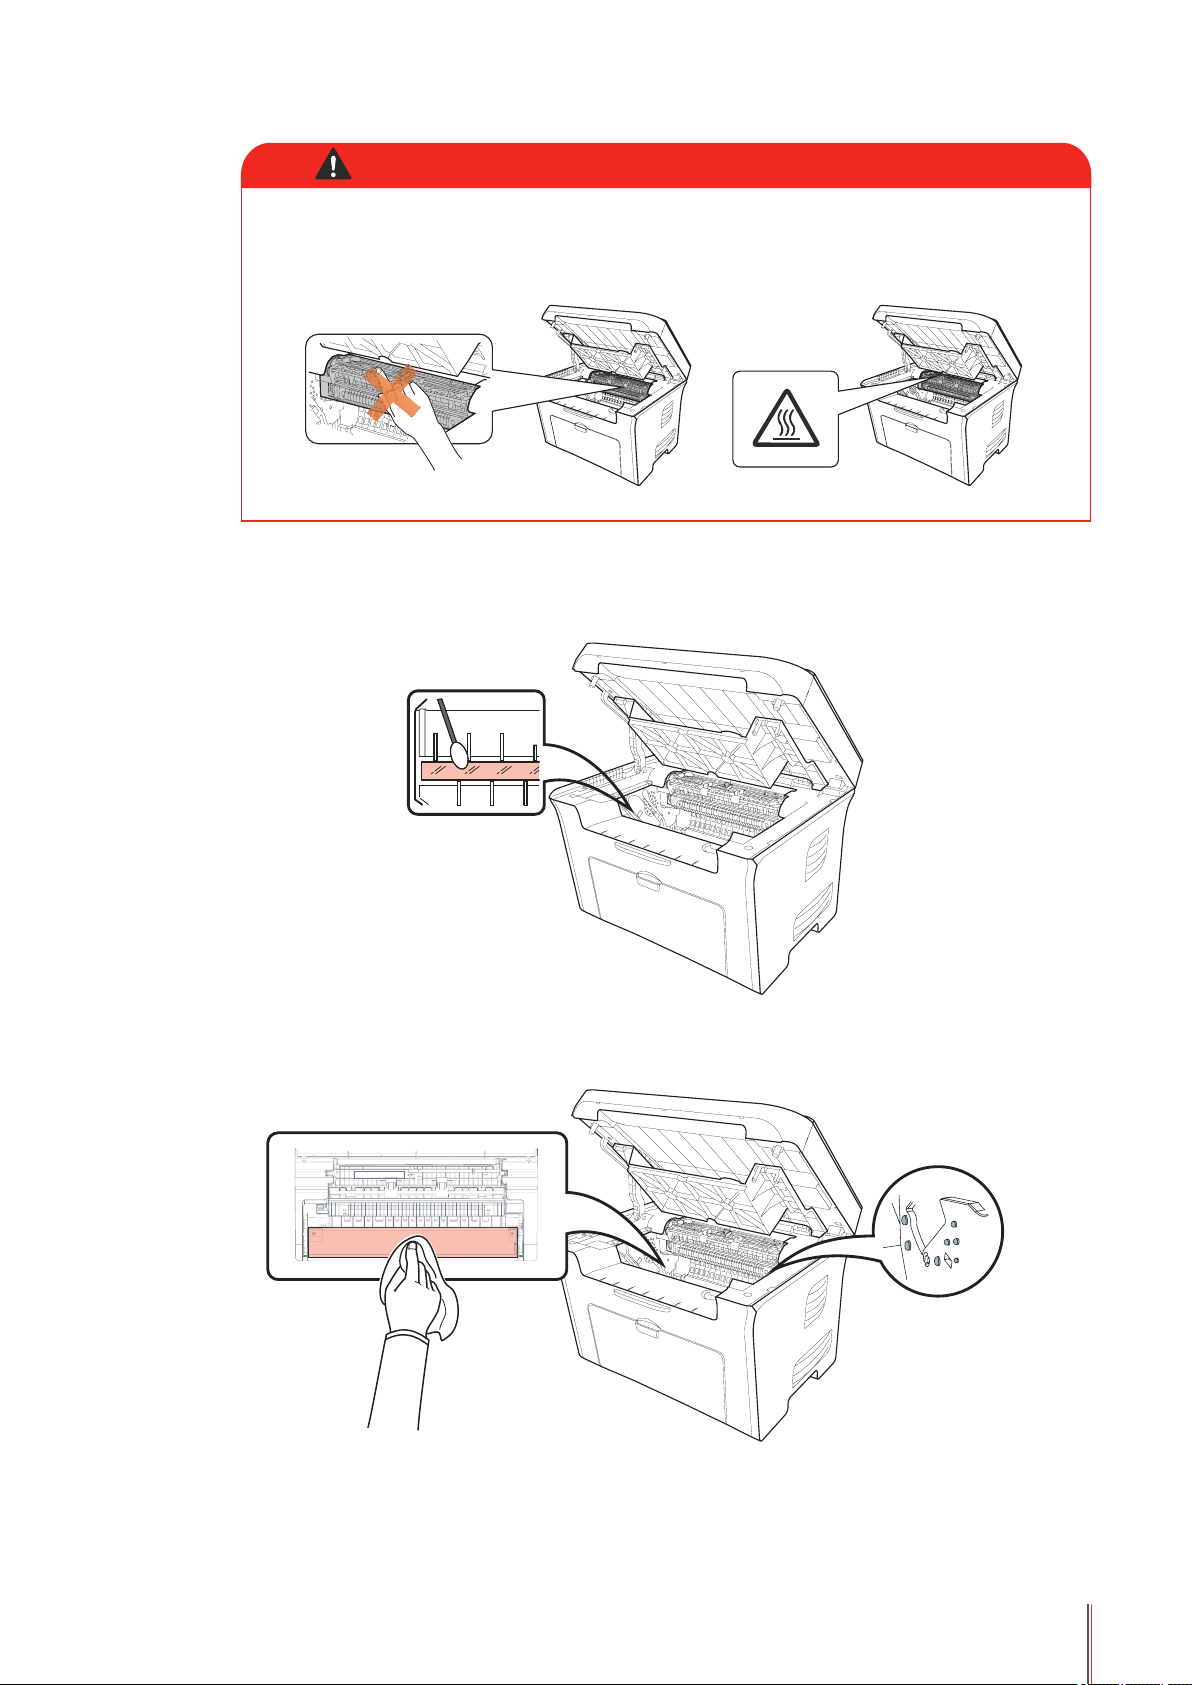
Warning
Some parts of the printer are still hot within a short time after use. When opening the
front cover or rear cover to clean the parts inside the printer, please do not touch the
parts in the shaded area, as shown below, so as to avoid burns.
7. Wipe the laser scanning unit's dustproof surface gently with a cotton, swab or a dry and
lint-free soft cloth with a little alcohol.
8. Clean the inside of the printer by using a dry and lint-free cloth to gently wipe the shaded
area, as shown in the picture below.
8-4
Page 75

8.2. Maintenance of the Toner Cartridge
OK
8.2.1. About the Toner Cartridge
1. Use and maintenance of the toner cartridge
For better print quality, please use an original Pantum toner cartridge.
When using the toner cartridge, please pay attention to the following:
• Unless it is used immediately, do not remove the toner cartridge from the package.
• Do not attempt to refill the toner cartridge without authorization. Otherwise, the resulting
damage is not included in the printer warranty.
• Please store the toner cartridge in a cool, dry place.
• Toner inside the toner cartridge is combustible. Please do not put the toner cartridge near
any source of ignition, so as to avoid causing a fire.
• When removing or disassembling the toner cartridge, please pay attention to the toner
leakage problem. In the event of the toner leaking and contacting your skin or splashing
into your eyes and mouth, please immediately wash with clean water, and consult a doctor
immediately if you do not feel better.
• When placing the toner cartridge, please keep it away from the reach of children.
2. Actual service life of the toner cartridge.
When the orange indicator of the printer flashes or the LCD screen prompts that the toner is
exhausted (as shown below), it indicates that the toner cartridge life is expiring or has expired.
To ensure the print quality, please replace the toner cartridge when necessary.
Cartridge end
8-5
Page 76

8.2.2. Steps for Replacing the Toner Cartridge
Note: Before replacing the toner cartridge, please pay attention to the following:
•
The toner cartridge surface may contain toner. Please remove it carefully to avoid
spilling.
• Put the removed toner cartridge on a piece of paper to avoid the toner from
accidently spilling.
• After removing the protective cover, please immediately install the toner
cartridge into the printer, so as to avoid damage from exposure to too much direct
sunlight or indoor light.
• When installing, do not touch the surface of the toner cartridge, so as to avoid
scratching the toner cartridge.
The steps for replacing the toner cartridge are as follows:
1. Turn off the printer and raise the scanning platform until it is locked.
2. Open the output bin by the upper right ridge of the concave section.
3. Remove the exhausted toner cartridge along the guides.
8-6
Page 77
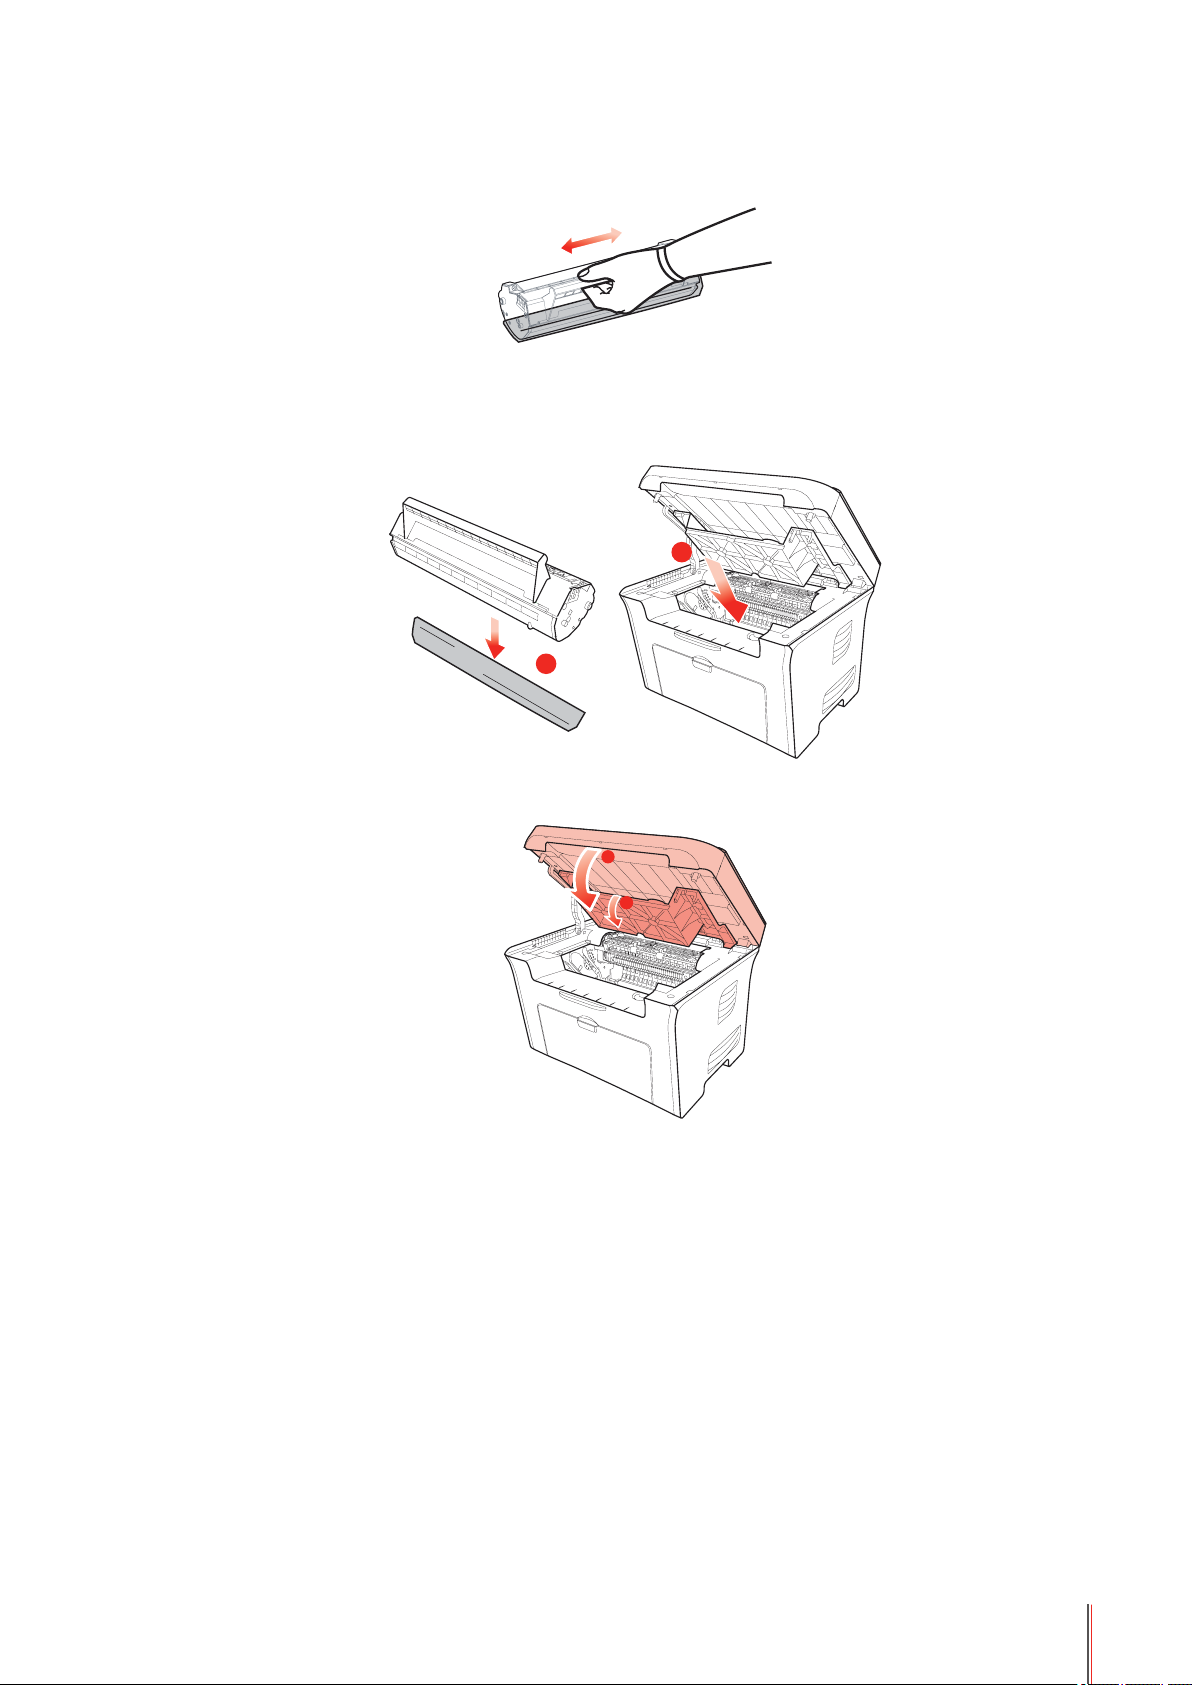
4. Open the package of a new toner cartridge, hold the handle of the toner cartridge and
gently shake around 5-6 times, so as to evenly distribute the toner inside the toner cartridge.
5. Remove the toner cartridge protector (blister cover), insert the toner cartridge along the
guides, then push it firmly along the direction of the arrow until you hear a click, assuring you
that the toner cartridge is fully inserted.
6. Cover the output bin and close the scanning platform.
7. Restart the printer to print a test page on the product control panel.
8-7
Page 78

Troubleshooting
9
CHAPTER
9. Troubleshooting .................................................................................................................................2
9.1. Clearing Jammed Paper ............................................................................................................. 2
9.2. Error Message ............................................................................................................................5
9.3. Common Troubleshooting ...........................................................................................................6
9.3.1. Common Problems .............................................................................................................. 6
9.3.2. Software ...............................................................................................................................8
9.3.3. Image Defects ......................................................................................................................8
9-1
Page 79

9. Troubleshooting
Please read this section carefully. It can help you solve common problems in the printing
process. If the problems that arise remain, please contact Pantum Aftersales Service Centre.
Prior to handling common problems, first check that:
• The power cord is connected correctly and the printer is powered on.
• All of the protective parts are removed.
• The toner cartridge is installed correctly.
• The output bin is fully closed.
• The paper is correctly loaded into the tray.
• The interface cable is correctly connected between the printer and the computer.
• The correct printer driver is selected and installed properly.
• The computer port is properly configured and is connected to the proper printer port.
9.1. Clearing Jammed Paper
Note: • Remove the jammed paper in accordance with the following steps: close the
output bin and tidy the paper in the feeder tray. The printer will then automatically
resume printing. If the printer cannot automatically start printing, press the Cancel
button.
• If the printer still does not start printing, check whether all the jammed paper
inside the printer is cleared.
• If you cannot remove the jammed paper yourself, please contact your local
Pantum authorized repair center or send the printer to the nearest Pantum
authorized service center for repair.
Please follow the following steps to clear the jammed paper if you are prompted by the LCD
that there is a paper jam:
1) Raise the scanning platform until it is locked.
9-2
Page 80

2) Open the output bin by the upper right ridge of the concave section.
3) Remove the toner cartridge along the guides.
4) Gently draw the jammed paper out along the paper output orientation.
9-3
Page 81

5) After removing the jammed paper, insert the toner cartridge into the printer along the
guides until you hear a click assuring you that the toner cartridge is fully inserted.
6) Put the paper in the tray neatly to carry out the next print until the indicator resumes
print-ready status.
7) If you cannot remove the jammed paper yourself, please contact your local Pantum
authorized repair center or send the printer to the nearest Pantum authorized service center for
repair.
9-4
Page 82

9.2. Error Message
Error Message Cause Measure
Please Close Output Bin The output bin is not fully
closed.
Toner cartridge is not detected Toner cartridge is not properly
installed or is damaged.
Toner Low Cartridge toner is insufficient. Replace the toner cartridge.
Toner cartridge has expired Cartridge toner is exhausted. Replace the toner cartridge.
Paper Empty No print paper is loaded
Incorrect loading of paper.
Feed Jam The print paper is loaded
incorrectly.
The paper is outside of the
specification range.
Middle jam The print paper is loaded
incorrectly.
Exit jam The print paper is loaded
incorrectly.
Scanner is Busy There are other job tasks. Please cancel the current job
Close Output Bin.
Properly install or replace the
toner cartridge.
Please correctly load the print
paper.
Please correctly load the print
paper.
Please correctly load the print
paper.
Please correctly load the print
paper
.
task or wait for the completion
of other job tasks.
Scan Failed Scanner internal failure. Please contact Pantum
Customer Service.
Note: • If the problem remains, please contact Pantum Customer Service.
9-5
Page 83

9.3. Common Troubleshooting
9.3.1. Common Problems
Problem
Type
Problems in
printing
Problems in
copying
Problems
with the
printer
Problem Cause Solution
Poor print
quality
Failed to copy The scanner is damaged. Please contact Pantum
There are
abnormal
images on the
copy
The printer
does not work
See 9.3.3 Image Defects for
details.
• The scanner is dirty or
defective.
• The toner cartridge is dirty
or damaged.
• Power cord of the device is
not properly connected.
• Data cable of the device is
not properly connected.
• The print driver is installed
incorrectly.
• The printer selected is not
suitable for printing.
• The LCD screen prompts
error messages.
See 9.3.3 Image Defects for
details.
Customer Service.
• Clean the scanner.
• Clean or replace the toner
cartridge.
• Ensure proper connection of
the power cord.
• Ensure proper connection of
the data cable.
• Properly install the printer
driver.
• Select the proper printer.
Problems
in scanning
Online printing
does not work
Scanning error •
•
Data cable of the device is
not properly connected.
•
The printer driver is installed
incorrectly.
• Printer internal failure.
Data cable of the device is
not properly connected.
• The scan driver is installed
incorrectly.
• The LCD screen prompts
error messages.
• Ensure proper connection of
the data cable.
• Reinstall the printer driver.
• Ensure proper connection of
the data cable.
• Reinstall the scan driver.
9-6
Page 84

Problem
Type
Problem Cause Solution
Problems
with
handling
paper
Paper feed
failure
Paper jam • There is too much paper in
Print multipage
feed
• The print media is loaded
incorrectly.
•
The print media is beyond the
use specification range.
• The feed roller is dirty.
the tray.
•
The print media is beyond the
use specification range.
• There is foreign matter in
the feed channel.
• The feed roller is dirty.
• Internal parts failure.
• Excessive static electricity
on the print media.
•
The print media is damp and
sticks together.
• Internal parts failure.
• Please correctly load the
print media. If you use special
print media for printing, please
print with the manual feeder
tray.
•
Please use the print media
within the specification range.
• Clean the feed roller
• Remove excess paper from
the tray. If you print on special
print media, please use the
manual feeder tray.
• Make sure to use the paper
that meets specifications.
If you print on special print
media, please use the manual
feeder tray.
• Clean the feed channel.
• Clean the feed roller
• Separate the print media
to eliminate some static
electricity. It is suggested that
you use the recommended
print media.
• Separate the print media or
use new print media.
.
Note: • If the problem remains after the above operations, please contact Pantum
Customer Service.
9-7
Page 85

9.3.2. Software
P
Status Recommended Solution
When the printer is
connected, during the steps
from installing to searching
for printers, the driver file
copying interface can not be
accessed, and the installation
can not be continued.
“M5000-M6000 Series
printer driver has not been
successfully installed, please
reinstall it.” will be displayed
by Pantum when copying the
data.”
• When selecting a printer series, ensure to select the
same series as the printer and that which the printer is
powered on.
• Ensure that the USB interface cable is properly connected.
• Download and reinstall the latest version of the driver.
• If the problem remains, please contact the Pantum Customer
Service Center.
If you select the Setup.exe file yourself, please ensure that the
selected Setup file is consistent with the system bit, or quit the
Setup program and click the Autorun.exe file to start the driver
installation in accordance with corresponding steps.
If the above operations do not fix the problem, please deal with
it as described below:
1) Right click on the My Computer icon, select Manage, then
Services and Applications, and then Services.
2) Select the print spooler service in the Services interface and
manually enable the service. (The service is used to support
the printer to print. To use the printer, make sure that the
service is enabled.)
3) Restart the Autorun.exe file and finish the driver installation
following the wizard.
The printer still does not work
after completing the driver
installation.
Installation files may be damaged. Clean up the residual
driver files and download the latest driver corresponding to
the printer, then install the new driver with the Autorun.exe file
following the normal steps.
9.3.3. Image Defects
Problem Cause Solution
A B C D
a b c d e
1 2 3 4 5
The printout is whitish
or light
• Toner is low.
• The print media does not meet
use specification, such as the
media is damp or too rough.
• The resolution in the print
program is set too low, the density
is set too low, or Toner Save Mode
is checked.
• The toner cartridge is damaged.
• Please properly use the print
media within the specification
range.
• Set the print resolution and
the density in the program or
uncheck Toner Save Mode.
9-8
Page 86

Problem Cause Solution
P
P
A B C D
a b c d e
1 2 3 4 5
Toner spots
White spots
• The toner cartridge is dirty or
leaks toner.
• The toner cartridge is damaged.
•
The print media does not meet use
specification, such as the media is
damp or too rough.
• The feed channel is dirty.
• If toner spots appear on the
copied or scanned pages, the
platen glass may be dirty.
• The scanner is dirty or damaged.
• The print media does not meet
use specification, such as the
media is damp or too rough.
• The feed channel is dirty.
• The internal part of the toner
cartridge is damaged.
• The reflective glass of the laser
inside the printer is dirty.
• The scanner is damaged.
• The print media does not meet
use specification, such as the
media is damp or too rough.
• The inside of the printer is dirty.
• The toner cartridge is damaged.
• The parts inside the printer are
damaged.
• Please use the print media
within the specification range.
• Clean the feed channel.
• Clean the platen glass.
• Please use the print media
within the specification range.
• Clean the feed channel.
• Clean the reflective glass of the
laser.
•
Please use the print media within
the specification range. If you use
special print media, please print
with the manual feeder tray.
• Clean the inside of the printer.
Toner comes off
Black vertical stripes
• The toner cartridge is dirty.
• The parts inside the toner
cartridge are damaged.
• The reflective glass of the laser
inside the printer is dirty.
• The feed channel is dirty.
• If black vertical stripes appear
when copying or scanning, the
scanner or the platen glass may be
dirty.
• Scanner LED has smudges.
• The scanner is damaged.
• Clean the reflective glass of the
laser at the back of the printer.
• Clean the feed channel at the
back of the printer.
• Clean the scanner or the platen
glass.
9-9
Page 87

Problem Cause Solution
Black background
(gray background)
Cyclical traces
appear
• The print media does not meet
use specification, such as the
media is damp or too rough.
• The toner cartridge is dirty.
• The parts inside the toner
cartridge are damaged.
• The feed channel is dirty.
• The transfer voltage inside the
printer is abnormal.
• Scanning exposure.
• If black background or gray
background appears on the copied
or scanned pages, the platen glass
may be dirty.
• The toner cartridge is dirty.
• The parts inside the toner
cartridge are damaged.
• The fuser component is damaged.
• Please use the print media
within the specification range.
• Clean the feed channel inside
the printer.
•
Please first close the cover on
the manuscript, and then carry out
copying and scanning.
• Clean the platen glass.
• Clean or replace the toner
cartridge
• Please contact Pantum
Customer Service to repair and
replace the fuser component.
Skewed pages
Wrinkled paper
• The print media is loaded
incorrectly.
• The feed channel of the printer is
dirty.
• The print media is loaded
incorrectly.
• The print media does not meet
use specification.
• The feed channel inside the
printer is dirty.
• The fuser component of the
printer is damaged.
• The toner cartridge is dirty.
• The transfer roller inside the
printer is dirty.
• The transfer voltage inside the
printer is abnormal.
• Ensure correct loading of the
print media.
• Clean the feed channel inside
the printer.
• Ensure correct loading of the
print media.
• Please use the print media
within the specification range.
• Clean the feed channel inside
the printer.
• Clean or replace the toner
cartridge
• Clean the internal transfer parts
of the printer.
The back of the
printout is dirty
9-10 10
Page 88
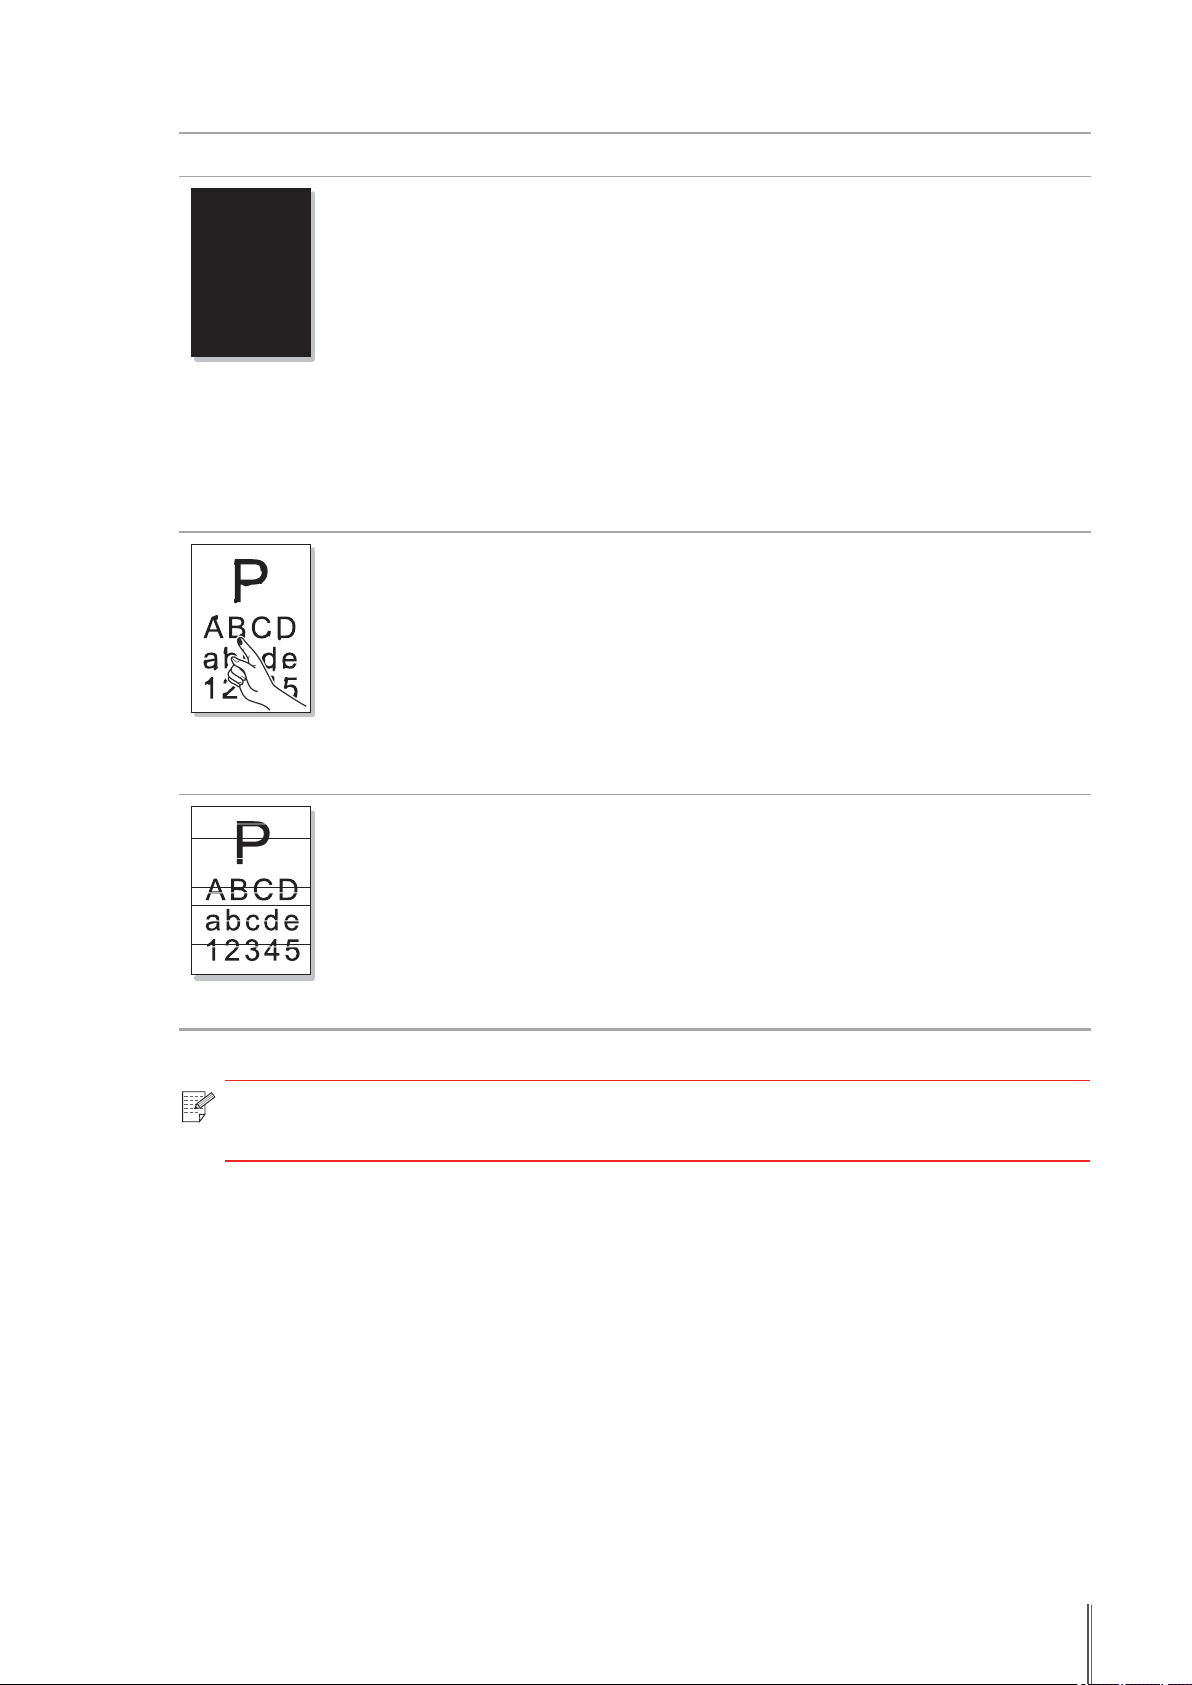
Problem Cause Solution
Whole page dark
The toner does not
adhere to the paper
• The toner cartridge is installed
incorrectly.
• The inside of the toner cartridge is
damaged.
• Abnormal charge inside the
printer; the toner cartridge is not
charged.
• If all-black image appears when
copying and scanning, it could be
scanning exposure, and the cover
on the manuscript is not properly
closed.
• The scanner is damaged.
• The print media does not meet
use specification, such as the
media is damp or too rough.
• The inside of the printer is dirty.
• The toner cartridge is damaged.
• The parts inside the printer are
damaged.
• Ensure correct installation of
the toner cartridge.
• Please first close the cover on
the manuscript, and then carry
out copying and scanning.
•
Please use the print media within
the specification range. If you use
special print media, please print
with the manual feeder tray.
• Clean the inside of the printer.
• The toner cartridge is installed
incorrectly.
• The toner cartridge may be
damaged.
• The parts inside the printer are
damaged.
• Ensure correct installation of
the toner cartridge.
Horizontal stripes
Note: • The above problems can be handled by cleaning or replacing the toner
cartridge. If the problem remains, please contact Pantum Customer Service.
9-11 11
Page 89

Product Specification
10
CHAPTER
10. Product Specication .......................................................................................................................2
10.1. Overview ................................................................................................................................... 2
10.2. Scanning Specication .............................................................................................................3
10.3. Printing Specication ................................................................................................................3
10.4. Copying Specication ...............................................................................................................3
10.5. Paper Handling Capacity .......................................................................................................... 3
10-1
Page 90

10. Product Specification
10.1. Overview
Functions PC monochrome printing, PC colored/monochrome
Memory 128 MB
Interface Type USB 2.0 (High-speed interface)
Supported Operating Systems Microsoft Windows Server 2003/Server 2008/
LCD Display 16 English characters × 2 lines
scanning, monochrome copying
Server 2012/XP/Vista/Win7/Win8 (32bit&64bit)
Mac OS X 10.5/10.6/10.7/10.8
Power Supply
220V Model: AC220~240V (-15%, +10%),
50/60Hz (±2Hz); 3A;
110V Model: AC110~127V (±10%),
50/60Hz (±2Hz); 6A
(Note: For the power supply and voltage that
is suitable for this printer, please refer to the
nameplate on the back of the printer.)
Noise
Power Consumption Print 355W Max. Power 650W (25°C)
Operation Environment
Product Size (W*D*H) mm 399*327*299
Printing ≤54db
Stand-by ≤35db
Stand-by 38 W
Sleep 4.5 W
TEC
≤ 1.7kwh
Operation temperature range (best print quality):
5-35(10-32)°C
Operation humidity range: 20~80% RH
Weight (Excluding Toner Cartridge) About 8kg
Note: Typical Energy Consumption (TEC): Refers to the weekly energy consumption
of a product in kilowatt-hour (kWh) obtained by the test method and the
calculation method stipulated by the relevant technical specications.
10-2
Page 91

10.2. Scanning Specification
Scan Source Platen
Optical System CIS
Scan Driver TWAIN WIA
Scan Resolution Optics 1200*1200DPI
Maximum Scan Size (Tablet) 216 mm x 297 mm
Bit Depth 24 bit/8 bit/1 bit
Output Function
Scan to PC
10.3. Printing Specification
Print Speed A4: 16ppm, 20ppm
LTR: 16ppm, 21ppm
Print Language GDI
Resolution 1200*600DPI
Max Monthly Volume 20,000 pages
10.4. Copying Specification
Copy Speed A4: 16ppm, 20ppm
LTR: 16ppm, 21ppm
Resolution 1200*600DPI
Continuous Copying Pages 1-99
Copying Mode Text, image, text + image
Special Copy Function
One-click ID Copy, Receipt Copy and N-in-1 copy
10.5. Paper Handling Capacity
Media Type Plain, thick, special paper (cardstock, label,
envelope, etc.)
Media Size A4, A5, JIS B5, IS0 B5, A6, Letter, Legal,
Executive, Folio, Oficio, Statement, Japanese
Postcard, Monarch Env, DL Env, C5 Env, C6 Env,
No.10 Env, ZL, Big 16K, Big 32K, 16K, 32K, B6
Media Weight Automatic feed: 60~105g/m², manual feed:
60~163g/m²
Paper Input Capacity Standard: 150 pages (80g/m²), manual: 1 page
Paper Output Capacity
100 pages
10-3
Page 92

 Loading...