

Page 1

choosing our security system Pandora Camper
Pandora Camper – is a telemetric service-security system built for motorhomes with on-board
voltage of 12V. It is a complex engineering solution, which includes unique and modern technological
software and hardware solutions.
When developing the system, we were using the most up-to-date electronics from world’s best
manufacturers. The device is built using high-precision mounting and control machinery, thus we
guarantee highest possible quality, reliability and stable technical characteristics for the whole
operation period.
Pandora Camper has a cryptographically strong authorization code with unique dialog algorithm
and individual 128 bit encryption key on every device. We guarantee 100% protection form electronic
hacking for the whole operation period.
The system is built for your convenience: it’s ergonomic, reliable and it has the highest security and
service characteristics, 3 years unconditional warranty and free service and support. We are happy to
provide any support we can – feel free to use our online support.
This device has limited external factors resistance. It should not be subjected to water beyond occasional splatter, or operated in
temperatures outside -40 to +85° C range. All system components must be installed only in a car interior. The base unit, remote control and
radio tags fulfil the IP40 category of protection against water.
Our web-site: pandorainfo.com
Customer support: support@pandorainfo.com
Pandora would like to thank you for
Page 2

Table of contents
General information 4
System set 5
System modules layout 6
Base unit of the system 7
Owner’s personal card 8
External VALET button 9
System functions and modes 11
Security mode 11
Security zones 11
Sound and light signalization 12
Stay Home mode 13
Slave mode 13
Owner authorization devices and functions 13
Checking the number of paired remote controls/radio tags/mobile device 15
Remote control D030 16
Switch on/off the remote control 17
LED indicator of the remote control signals 17
Charging the remote control 17
Updating firmware of the remote control 17
Icons of the remote control 18
Quick access functions of the remote control 19
Immobilizer radio tag BT760 20
Functions of the button 20
Replacing an immobilizer tag battery 21
Update firmware of a radio tag 21
EN
Control the system from a phone 22
Changing settings via a phone 24
Online service and mobile apps 26
Events history 27
Mobile application Pandora Camper 27
Control the system 28
Arming 28
Activating Stay Home mode 29
Delayed arming 30
Disarming 30
Locking/unlocking doors when ignition is on 31
Car search function 32
PANIC mode 32
Service mode 33
Control the system in case of emergency 34
Emergency disarming 35
Emergency control of the anti-theft functions 36
Warranty obligations 37
Installation certificate 38
Acceptance certificate 39
Warranty card 39
2
USER MANUALSECURITY-SERVICE SYSTEM PANDORA CAMPER
3
Page 3

System set
1. User manual and wiring diagram 1
2. Remote control D030 1
3. Radio tag BT760 1
4. Owner’s personal card 1
5. Base unit 1
6. External LED/VALET button 1
7. Beeper 1
8. Wireless door sensor DMS-100 BT 4
9. Siren PS-330 1
10. Main cable of the base unit 1
11. Additional cable of the base unit 1
12. External temperature sensor 1
13. Blocking relay 2
14. Magnetic reed sensor 2
15. Fastening kit 1
16. Packaging 1
! The manufacTurer reser ves The righT To change The sysTem seT and consTrucTion of The producT To improve iTs
Technological and operaTional parameTers wiThouT noTificaTion.
Read the following section before using the system
Carefully read this manual before starting installation and using the security-service system. Pay
attention to text marked with
The sysTem is a complex Technical producT. sysTem insTallaTion and configuraTion musT be carried ouT only by a
!
skilled professional.
feaTures and sysTem modes, conTrol of The vehicles zones depends on The Type of connecTion and sysTem seTTings,
!
original vehicle operaTion logic and Trim.
! The sysTem seT includes an “owner’s personal card”. This card conTains informaTion under a proTecTive layer ThaT
is inTended only for The owner of The sysTem. make sure ThaT The proTecTive layer on The owner’s plasTic card is inTacT
afTer The insTallaTion of The sysTem.
read The “owner’s personal card” secTion of This manual before erasing The proTecTive layer.
!
!
4
The sysTem has a gsm inTerface. ask an insTaller who has insTalled The sysTem To check The gsm funcTions
!
operaTion using your phone:
• dial 500* command To requesT coordinaTes (see The “conTrol The sysTem from a phone” secTion).
• Trigger alarm when The sysTem is armed. The sysTem musT call your phone number (“main owner’s phone number”).
To quickly change The “main owner’s phone number”, Turn on The igniTion when The sysTem is disarmed and call The
sysTem phone number. waiT for The answer, Then press and hold The buTTon on The radio Tag for 2 seconds (unTil The
second flash of The send indicaTor). release The buTTon, The sysTem will recognize The incoming phone number as
The “main owner’s phone number”.
• check The “guesT pin-code” (facTory defaulT value is 1-2-3-4). call The sysTem from an “addiTional phone number”
or from any oTher phone number unknown for The sysTem.
! The sysTem can work wiTh a mobile applicaTion. iT is required To creaTe an accounT, add The sysTem To your accounT,
pair your mobile phone wiTh The sysTem. ask an insTaller To help you To configure The mobile applicaTion.
! when sysTem insTallaTion is finished:
• check ThaT The “insTallaTion cerTificaTe” and “warranTy card” are filled ouT. These documenTs may be required for
conTacTing The cusTomer supporT.
• check The sysTem operaTion and funcTions wiTh a specialisT.
• we recommend ThaT you mark each working funcTion wiTh a sign in The “conTrol The sysTem” secTion.
• ask an insTaller To mark The layouT of The sysTem componenTs on The diagram. This informaTion may be required for
diagnosTic/configuring or emergency deacTivaTion of The sysTem.
• we recommend ThaT you change The defaulT value of The “service pin-code” (1-1-1-1). ask an insTaller To change
The “service pin-code”.
wriTe down and remember a new value of The “service pin-code”
• we recommend ThaT you change The defaulT value of The “guesT pin-code” (1-2-3-4). (see The “changing seTTings
from a phone” secTion -> 5* addiTional seTTings -> 1* changing The guesT pin code.
wriTe down and remember a new value of The “guesT pin-code”
• if The “code immobilizer (pin-To-drive)” funcTion is implanTed:
wriTe down and remember The “immobilizer pin-code”
mark a buTTon (buTTon/lever/pedal) ThaT is used To enTer The “immobilizer pin-code” in The layouT diagram.
USER MANUALSECURITY-SERVICE SYSTEM PANDORA CAMPER
EN
5
Page 4
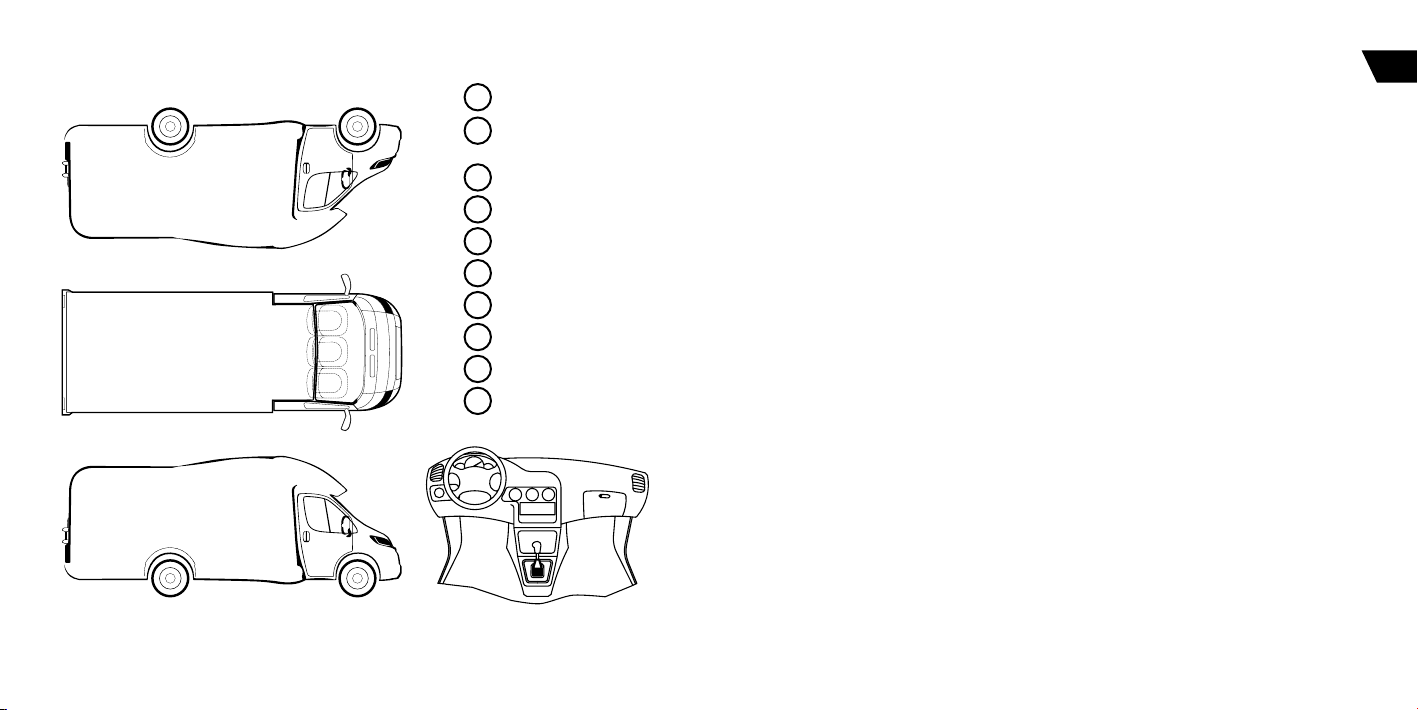
System modules layout
Base unit
1
2
Blocking relay (circuit
being blocked)
3
External VALET button
4
Sensor DMS-100 BT
5
6
7
8
9
10
Base unit of the system
Built-in GSM modem (GPRS/SMS/LBS-services)
A built in modem allows the system to work in a mobile network using an installed SIM card: voice
and SMS notifications, control from a phone using DTMF-commands, determination of coordinates
based on cellular base station location (only for 500* command), connection with our online-service
and mobile applications.
For the correct operation of the GSM functions, an owner should monitor the status/balance of the
SIM card installed in the system. If the SIM card is blocked or defective, GSM functions of the system will
be unavailable.
Built-in GPS/GLONASS-receiver
A built-in GPS/GLONASS-receiver is designed to determine current location and to automatically
determine date and time.
To auTomaTically deTermine daTa and Time, iT is required To seT correcT uTc Time zone using The mobile app or The
!
online-service.
2.4GHz radio channel, Bluetooth 5.0 protocol (BT5.0)
An integrated radio channel is used to connect the system with a mobile phone and additional
Bluetooth devices. The system supports up to 14 additional Bluetooth devices: 1 remote control D-030,
up to 3 radio tags, 1 mobile phone, up to 10 DMS-100BT sensors, up to 2 radio relays BTR-101, 1 RHM03BT module, 1 BT-01 relay or DI-04 module.
Digital protection AES (128 Bit)
Dialog coding of commands with a 128-bit encryption key guarantee secure communication via
the radio channel. The encryption key can be changed when you re-pair a remote control or additional
Bluetooth devices.
3D-accelerometer
A built-in accelerometer is used to detect shock/motion/tilt:
• 2 zones of the shock sensor (alarm/warning);
• Separate sensitivity adjustment by zones;
• Engine blocking on motion start;
• Central lock closing when start driving.
EN
6
USER MANUALSECURITY-SERVICE SYSTEM PANDORA CAMPER
7
Page 5

Multisystem digital 2CAN | LIN interface
2-2-2-2
PIN
Integrated digital CAN and LIN interfaces allow connection to digital buses of a vehicle for reading
information (statuses) and controlling vehicles (commands). The LIN-interface can be used to control
Webasto ThermoTopEvo and Eberspacher Hydronic/Hydronic2 heaters.
see deTailed informaTion on loader.pandorainfo.com
!
icro-USB port
The system has a buil-in micro-USB port that is used for system configuration and update via the
Pandora Alarm Studio. The system can be power from the USB, so you can configure it before installation.
Temperature
The system can determine interior, engine and outside temperature. The following sources are used:
built-in temperature sensor, connector of an external temperature sensor, digital CAN-bus, values from
additional devices.
! defaulT values: inTerior Temp eraTe – builT-in sensor; e ngine TemperaTure – exTernal sens or; ouTside Tem peraTure
– can.
Synchronized clock of the baze unit
Built in clock is automatically synchronized with the built-in GPS/GLONASS receiver
! iT is required To seT correcT uTc Time zone using The mobile app or The online-service.
Owner’s personal card
! erase The proTecTive layer car efully. do noT use any sharp
objecTs To avoid damaging of hid den informaTion under The
proTecTive layer. The informaTion is inTe nded only for The ow ner.
he card an d The hidden in formaTion cannoT be re sTored.
T
The owner’s personal card contains private information
under a protective layer:
• PIN (the «Secret PIN-code”) is a 4-digit number. This
code can be used to disarm the system and to deactivate
immobilizer functions. It can be also used to enter programming mode. This information cannot be
changed or restored
• LOGIN – is a 10-digit number. This information is used to add the system to the online service and
mobile applications. This information cannot be changed or restored
• PASS – contains 8 characters and can consist of digits, lower and upper case letters. This information
is used to add the module to the online service and mobile applications. This information cannot be
changed or restored.
• Phone number is a phone number of the SIM-card supplied with the system. This number is not used
if you change the SIM-card.
External VALET button
An external VALET button with a three-color status
LED indicator is placed inside a vehicle (see the system
modules layout). The button is used for programing
the system, arming/disarming, activating/deactivating
dimmobilizer mode.
original vehicle conTrols (buTTons/levers/pedals) can be used
!
as The valeT buTTon. see The deTailed informaTion on loader.pandorainfo.com.
LED INDICATOR
VALET BUTTON
EN
8
USER MANUALSECURITY-SERVICE SYSTEM PANDORA CAMPER
9
Page 6
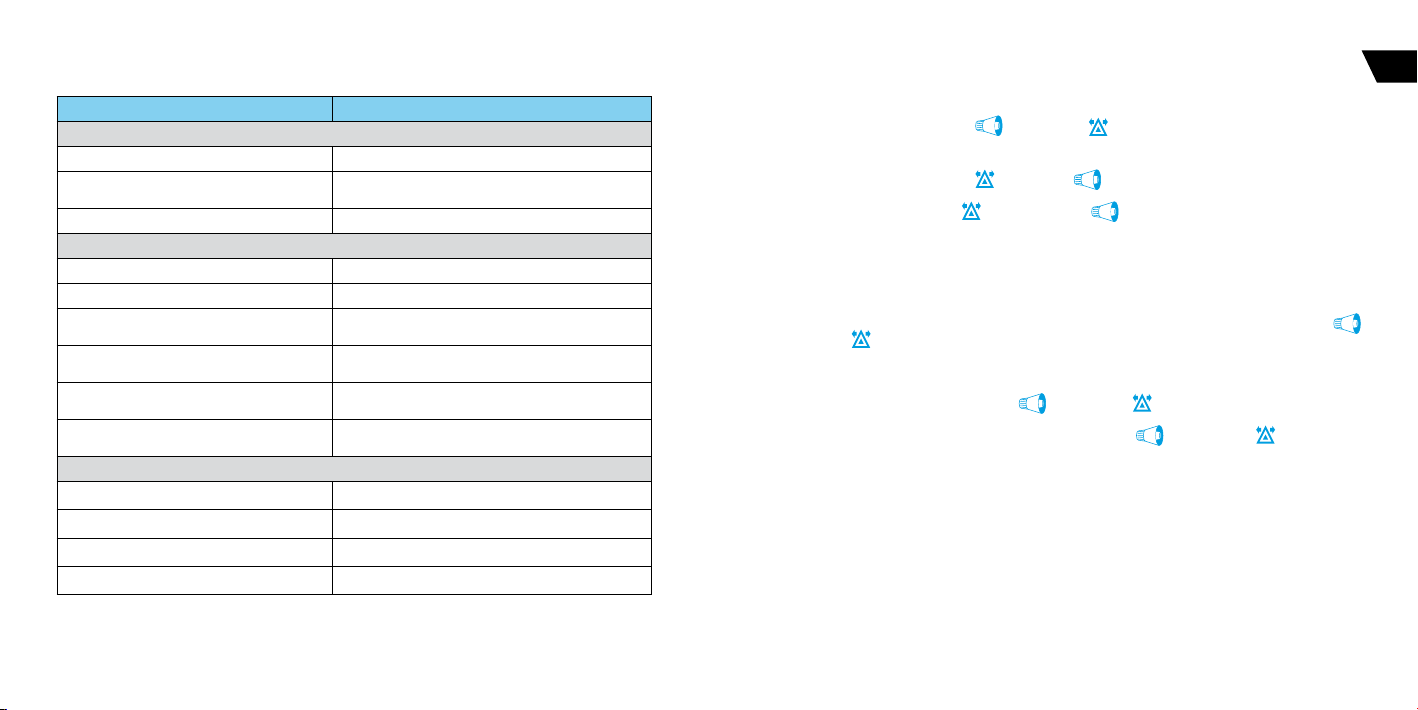
LED indicator signals
INDICATOR STATUS DESCRIPTION
THE SYSTEM IS ARMED
Short red ashes System is armed
Short green ashes System is armed
Fast red ashes Alarm
Faded System is disarmed
Red System is preparing for automatic or delayed arming
Green
(when ignition is on)
Orange ashes
(when turning on the ignition)
Green ashes
(when switching on the ignition)
Red ash
(when switching on the ignition)
WHEN ENTERING THE “SECRET PIN-CODE” OR THE “SERVICE PIN-CODE”
Orange ash Conrms a VALET button press
Conrms a paired mobile device Conrms a digit input
Red and green ashes Conrms correct PIN code
Long red ash PIN-code is incorrect
(a radio tag is in the coverage zone)
THE SYSTEM IS DISARMED
System is in service mode
Conrms the number of paired remote controls
Conrms the number of paired radio tags
Conrms a paired mobile device
SYSTEM FUNCTIONS AND MODES
Security mode (the system is armed)
The system confirms arming with 1х
system monitors security zones with separated warning and alarm level of triggering:
• Warning mode – this mode activates when there is a slight impact on the shock sensor or additional
senor. It is accompanied with 1х
• Alarm mode - this mode activates when a sensor or one of the security zones is triggered. It
is accompanied with 30 sec.
canceled by an arming or disarming command.
If one of the security zones is triggered the system:
• records this event in its non-volatile memory;
• activates the alarm or warning mode;
• informs an owner by all available means;
• blocks the engine (in accordance with the settings and connections).
If one of the security zones is opened at the moment of arming, the system will produce 4х
sound and 4х
If one of the security zones fails, the system will forcibly turn off this zone. If a switch triggers
more than 9 times in a row, it will be disabled until the next arming. The shock/tilt/motion sensor is
temporarily deactivated (15 sec.) if it has been triggered more than 3 times in a row.
The system confirms disarming with 2х
engine blocking (if the immobilizer function and additional blocking are not used). If there were alarm
events during the armed period, the system will produce 4х
signals. The system continues to display all zones when it is disarmed, but the information is not saved
in the memory.
light warning signals.
Security zones
• Interior temperature (status)
• Engine temperature (status)
• Outside sensor (status)
• Voltage of the on-board circuits (status)
• Engine operation control - RPM (status)
• Heater operating control (status)
sound and 1х light signals. When the system is armed, the
light and 3х
sound signals.
light and 30 sec. sound signals. The alarm signals can be
sound and 2х
light signals. The system deactivate
sound and 4х
light warning
EN
10
USER MANUALSECURITY-SERVICE SYSTEM PANDORA CAMPER
11
Page 7

• Fuel level (status)
• Parking (automatic gearbox) /Handbrake (manual gearbox) status
• “Parking light is not turned off” notification (status)
• Shock sensor (security zone – alarm and warning level)
• Motion sensor (security zone – alarm level)
• Tilt sensor (security zone – alarm level)
• OE alarm system status via CAN, additional sensor (status, security zone – alarm and warning level)
• Turning ignition on (status, security zone – alarm level)
• Opening doors (status, security zone – alarm level)
• Opening a trunk (status, security zone – alarm level)
• Opening a hood (status, security zone – alarm level)
• Pressing brake (status, security zone – alarm level)
Sound and light signalization
DESCRIPTION STATE
Arming
Disarming
Car search
Alarm, PANIC mode
Warning level of a sensor is triggerd
‘Sensors were triggered’ signal when disarming /
Parking light is not turned o notication /
‘Sensors are triggered” signal when arming
Engine blocking warning in Anti-Hi-Jack mode
1х
2х
5х
30sec.
3х
4х
30sec.
(sound/light)
/1х
/2х
/5х
/30sec.
/1х
/4х
/30sec.
Stay Home mode
This mode is used to control the outer perimeter of a vehicle during parking when passengers are inside
the vehicle. This mode allows the system to protect your vehicle against intrusion through the parts of
the vehicle that can be open.
• The system will be armed silently when you activate the “Stay Home” mode, it will be confirmed
with 1х
not included in the set) in this mode, built-in sensors (shock/tilt/motion) are disabled in this mode.
• The system will be disarmed when you deactivate the “Stay Home” mode, it will be confirmed with
2х
light signal. The system controls vehicle security zones and an additional gas sensor (it is
sound and 1х
light signals.
Slave mode
This mode allows arming and disarming using original vehicle control – an original key, button/sensor
of a keyless access entry system.
Slave mode can be implemented using analog connections or a digital protocol of a vehicle.
This mode is enabled by defaulT for a digiTal proTocol. more informaTion on loader.pandorainfo.com. iT is
!
recommended To ac TivaTe The “prohibiT disarming when a Tag is absenT” To increase securiTy feaTures of The slave
mode. if This mode is acTivaTed, iT will be possible To disarm The sysTem only when a Tag is in The coverage zone or using
The “secreT pin-code”.
Owner authorization devices and functions
Authorization devices
Authorization devices are Bluetooth-devices used to recognize an owner in the radio coverage zone
of the base unit. These devices allow implementing security and anti-hijack functions. You can use a
mobile phone, a radio tag BT-760 or a remote control D030 as an authorization device.
Alerts when using authorization devices
It is recommended to use an additional sound emitter Beeper when you use authorization devices.
EN
12
USER MANUALSECURITY-SERVICE SYSTEM PANDORA CAMPER
13
Page 8

BEEPER SOUND SIGNALS
SIGNAL NAME DESCRIPTION
Activating service mode 1 sound signal
Deactivating service mode 2 sound signal
Correct input of the “Immobilizer PIN-code” 1 sound signal
A battery in a radio tag is discharged 3 sound signals /3 times
Absence of a radio tag 4 sound signals /4 times
Blocking warning Fast sound signals
Hands Free mode
This mode is used for automatic arming/disarming
distancing
!
alarm sTudio To use This mode. quick access commands To manage handsfree mode: 223* - acTivaTe handsfree
arming, 224* - acTivaTe handsfree disarming, 222* - deacTivaTe all handsfree modes.
Immobilizer mode
This mode is used to recognize an owner using authorization devices when the system is disarmed.
When turning on the ignition, the base unit performs a search for authorization devices in the radio
coverage zone. If there is no any authorization device in the radio coverage zone:
• If engine blocking is implemented – the system will block the engine. Engine blocking will occur
immediately or at the time a motion sensor detects movement, it depends on the system settings;
• If OBD connector blocking is implemented – the system will stay the connector blocked.
will continue to work in normal mode.
!
ANTI-HI-JACK-1/2 modes
The Anti-HiJack modes help to prevent aggressive seizure of a vehicle when authorization in case of
disappearance of authorization devices from the radio coverage zone when system is disarmed.
each time when ignition is on and a door is opened/closed.
or approaching a vehicle.
This mode is disabled by defaulT. iT is required To make addiTional seTTings using The mobile applicaTion or pandora
When an authorization device appears in the coverage zone, the system will exit blocking mode and
This mode is enabled by defaulT. iT is required To make addiTional connecTions for This mode.
ANTI-HI-JACK-1 mode – The base unit checks if an authorization device is in the radio coverage zone
when an owner with an authorization device is
14
ANTI-HI-JACK-2 mode – The base unit constantly checks if an authorization device is in the radio
coverage zone when ignition is on.
If the system cannot detect an authorization device, the base unit will perform a delayed engine
blocking. The siren will play the ‘Engine blocking warning’ ringtone before blocking. The engine will
be blocked immediately or at the time the car starts moving, it depends on system settings. When an
authorization device appears in the coverage zone, the system will exit blocking mode and will continue
to work in normal mode.
This mode is disabled by defaulT. iT is required To make addiTional seTTings and connecTions for This mode.
!
Multi-button code immobilizer (pin-to-drive)
Multi-button code immobilizer (pin-to-drive) is a function that allows disarming, disabling blocking and
controlling service mode and time channels using original vehicle controls (button, lever or pedal) and
a pre-programmed PIN-code (the “Immobilizer PIN-code”).
AN EXAMPLE OF USING THE FUNCTION
• Turn on the ignition to disable engine blocking or enable service mode, turning on the ignition is not
required if you want to disarm the system or control time channels.
• Enter the “Immobilizer PIN-code”. Press a programmed button/lever/pedal the number of times
equals to the first digit. Pauses between presses should not exceed 1 second. More than 1 second
pause will be interpreted as the start of the next digit input. The immobilizer code can consist max
of 4 digits from 1 to 9.
• The system will confirm the correct input by a sound signal of the beeper and a programmed
function will be performed.
This mode is disabled by defaulT. iT is required To make addiTional seTTings and connecTions for This mode.
!
Checking the number of paired remote controls/radio tags/mobile device
The number of paired remote controls/radio tags/mobile device can be checked by the number of
flashes of the LED indicator. The number of paired remote controls/tags/mobile device can be checked
when switching on the ignition (the system must be disarmed). The number of orange flashes will
indicate the number of paired remote controls, the number of green flashes will indicate the number of
paired radio tags, a following red flash will indicate a paired mobile device.
You can also check the number of paired remote controls/radio tags/mobile device by taking off
and putting back on battery terminal. The system will emit short sound signals from a siren
• First series of the siren signals
• The second long signal
indicates the number of paired radio tags
after a pause of 2 seconds indicates a paired mobile devices.
USER MANUALSECURITY-SERVICE SYSTEM PANDORA CAMPER
.
15
EN
Page 9
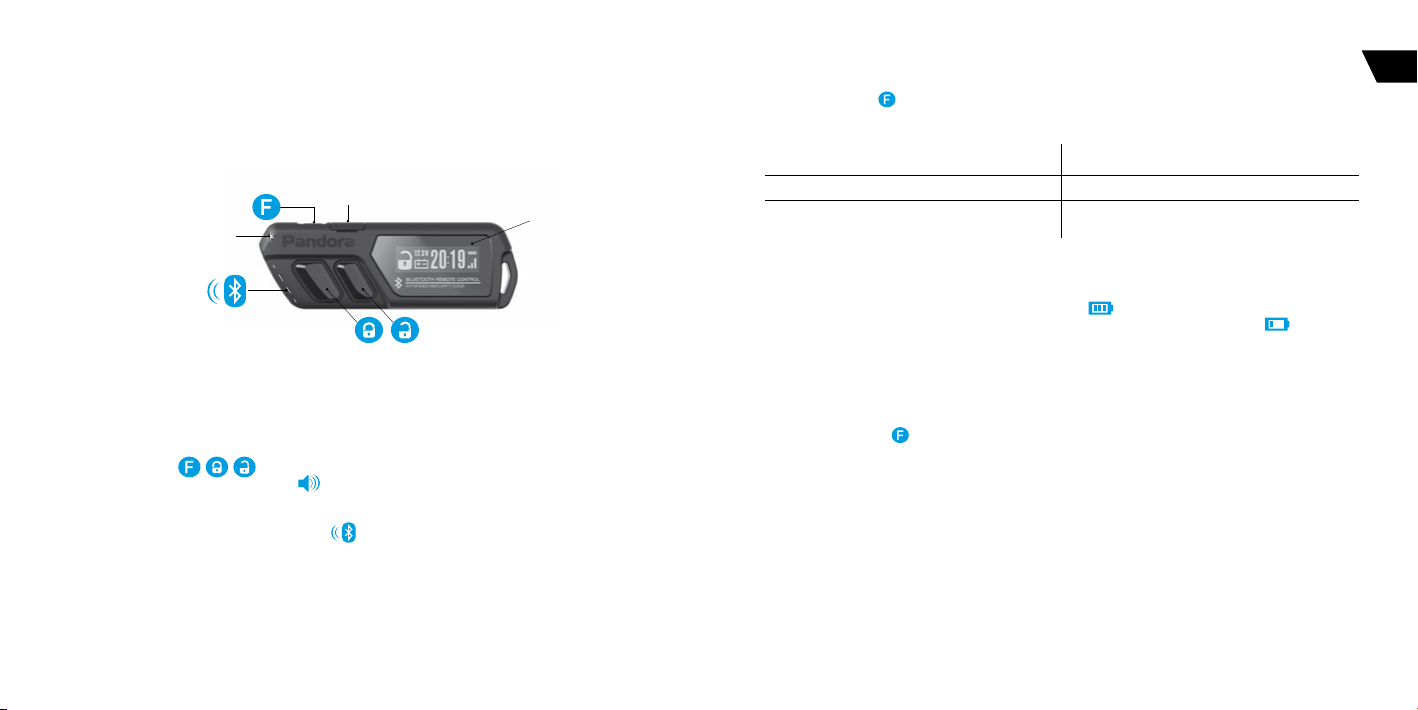
REMOTE CONTROLD030
A remote control is a device used to control and monitor vehicle/system state. The remote control is
also used as an authorization device for “Immobilizer/Anti-Hijack/HandsFree” modes. It works in the
Bluetooth coverage zone. Each event is displayed as an icon on the OLED-display and is accompanied
with a sound and vibro indication.
micro-USB
SEND/ALARM
! all conTrol commands are TransmiTTed via radio channel, for maximum effecTiveness and range iT is recommended
noT To shield aerial area (see picTure) wiTh fingers when using a remoTe conTrol.
• OLED – display
• 3 control buttons
• Built-in sound indicator (16 ringtones)
• Built-in vibro indicator
• Built-in LED SEND/ALARM indicator
• 2,4 GHz radio interface (Bluetooth protocol)
• Dialog coding of commands (AES-128 encryption)
• Built-in battery
• Built-in micro-USB port
OLED
Switch on/o the remote control
Press and hold the button for 3 seconds to switch on/off the remote control.
LED indicator of the remote control signals
RED indicator “ALARM” Green indicator “SEND”
Flashes frequently if there is any notication Flashes if there is a connection with the base unit
Flashes occasionally when there is no connection Goes dark when there is no connection with the base
unit
Charging the remote control
There is an indication of the battery charge level . on the display. Charge the battery if the
remote control does not turn on or the charge level indicator displays the last segment
is charged using a standard micro-USB cable.
. The battery
Updating rmware of the remote control
• Download the Pandora BT application (for Android or iOS devices equipped with a Bluetooth 4.0 Low
Energy or higher module).
• Press and hold the
button. Release the button after the connection.
• Open the mobile app and find the remote control, select the device and select one of the update
option: FILE MANAGER – firmware will be uploaded from the phone storage (only for Android).
INTERNET – firmware will be uploaded by an internet connection.
button. Connect the micro-USB cable to the remote control whule holding the
EN
16
USER MANUALSECURITY-SERVICE SYSTEM PANDORA CAMPER
17
Page 10
Icons of the remote control
°
°
V
Connected to the base unit
Security mode status
Current time
12 48
Battery charge level
90
Engine temperature
22
Interior temperature
°
-18 С
Outside temperature
12.0
Vehicle battery voltage
55
Fuel level
Shock sensor Security zone
(Warning level)
Shock sensor Security sensor
(alarm level)
Additional sensor/
OE alarm status
Security zone
(alarm level)
Additional sensor/
OE alarm status
Security zone
(warning level)
Tilt sensor
Security zone
Motion sensor
Security zone
Ignition
Security zone
Doors security zone
Trunk security zone
Low voltage security zone
P
Brake pedal security zone
Heater operation icon
Quick access functions of the remote control
System is disarmed
Ignition is on Ignition is o
(short press)
(1 sec.)
(short press)
(1 sec.)
(short press)
(1 sec.)
(2 sec.)
(3 sec.)
+
(short press)
+
(short press)
+ (1 sec.)
Lock doors without
arming
Unlock doors Unlock doors Disarming with sound
Switch on the display
Open side door
Switch on/o time channel
Switch on/o the remote control
PANIC mode
Arming when the engine
is running with sound
conrmation
Arming when the engine
is running with sound
conrmation
Arming with sound
confrmation
Activate “Stay Home”
mode
Arming in 30 seconds
With sound notication
Arming in 30 seconds
without sound
notication
System is armed
(no alarm events)
Search mode – flashes of turn
signals with sound signals for 5
seconds
Search mode – flashes of turn
signals with sound signals for 5
seconds
conrmation
Disarming without sound
conrmation
EN
18
USER MANUALSECURITY-SERVICE SYSTEM PANDORA CAMPER
19
Page 11

RADIO TAG BT760
SEND
A radio tag is a device used to control a vehicle/system. The remote control is also used as an authorization
device for “Immobilizer/Anti-Hijack/HandsFree” modes. It works in the Bluetooth coverage zone.
A radio tag has: a control button
a built-in accelerometer allows the tag to go into energy saving mode when there is no movement; a
LED indicator SEND.
• Control button
deactivating service mode
• LED indicator SEND
• Bluetooth protocol
• Built-in accelerometer
• CR 2032 Battery
• 2,4 GHz radio interface (dialog encryption AES-128)
Light indication of the SEND indicator when there is a
short press of the button
• No flashes – a battery is discharged
• 1 flash – radio tag operation is correct
Light indication of the SEND indicator when installing a
battery
• No flashes – a battery is discharged
• 1 flash – low battery level
• flashes – high battery level
avoid moisTure on The radio Tag. do noT place The radio Tag near magneTs or producTs wiTh self-magneTic fields.
!
for arming/disarming and activating/
Functions of the button
ACTION FUNCTION
Short press when ignition is o Arm/disarm
Press and hold for 2 sec when the
system is disarmed and ignition is o
for arming/disarming and activating/deactivating service mode;
Activate Stay Home
Press and hold for 2 sec when the
system is disarmed and ignition is on
Press and hold for 2 sec when ignition
is on
Press and hold for 6 sec. Pair a tag with the base unit
Press and hold for10 sec. Firmware update
Change the “Main owner’s phone number”
Activate/deactivate Service mode
Replacing an immobilizer tag battery
Carefully open the cover of the tag’s battery compartment. Extract discharged battery and insert a
new one keeping in mind the correct polarity. Replacing a battery will not cause a loss of tag code
information, as authorization data is stored in the non-volatile memory of the MCU. Carefully close the
cover of the tag’s battery compartment. All elements of construction should be rigidly locked in places.
If it is so, the tag can be operated as usually.
Update rmware of a radio tag
• Download the Pandora BT application (for
Android or iOS devices equipped with a
Bluetooth 4.0 Low Energy or higher module)
• Open the mobile app Pandora BT.
• Press and hold the button
tag until the 10th flash of the «SEND», indicator,
then release the button.
• Select the found device and select one of the
update option: FILE MANAGER – firmware will
be uploaded from the phone storage (only for
Android). INTERNET – firmware will be uploaded
by an internet connection.
of the radio
Open here
EN
20
USER MANUALSECURITY-SERVICE SYSTEM PANDORA CAMPER
21
Page 12

CONTROL THE SYSTEM FROM A PHONE
#
#
*
*
*
*
22558
8
*
*
for The correcT operaTion of The gsm funcTions, an owner should moniTor The sTaTus/balance of The sim card
!
insTalled in The sysTem. if The sim card is blocked or defecTive, gsm funcTions of The sysTem will be unavailable.
Call the system’s phone number. When it answers, enter a command code
Repeat the last message
1
1
Arming
*
*
0
0
Disarming
*
*
1
001
*
*
Silent arming
0
000
Silent disarming
*
*
9
9
Help
*
*
0
990
Events history
*
*
1
551
Tow truck mode
*
*
0
11000
Request GSM account balance
*
*
3
33333
Switch on add. CAN function
*
*
0
55000
Request current coordinates
*
*
6
44556
Switch on additional channel
*
*
4
66554
Switch o additional channel
* iT is required To enTer The “secreT pin-code” afTer dialing a command
Activate/Deactivate service mode
1. Call the system number. Wait for the answer.
2. Turn on the ignition, an authorization device (a radio tag, a remote control, a paired mobile phone
with the app installed) must be in the coverage zone, enter the “Immobilizer PIN-code” (if the “Code
immobilizer” function is enabled).
3. To activate service mode, dial the 551* DTMF command — “Activate service mode”, then enter the
“Secret PIN-code” from the owner’s personal card.
4. To deactivate service mode, dial the 552* DTMF command — “Deactivate service mode”.
Voice help
The system has a voice help menu. During a voice call to the system, dial 9* and listen to the information
about system control commands.
22
2
22222
Disable HandsFree
*
*
3
22223
Enable HandsFree arming
*
*
4
22224
Enable HandsFree disarming
*
*
7
22997
End a call
*
*
1
55551
Activate service mode (see description below)*
*
*
2
55552
Deactivate service mode
*
*
6
11556
Switch on heater
*
*
1
66551
Switch o heater
*
*
6
66666
Activate engine blocking
*
*
9
99999
Deactivate engine blocking*
*
*
8
99998
Deactivate authorization devices*
*
*
8
88888
Activate authorization devices
*
*
To end the session, hang up the phone.
Repeat the last message
To repeat any message, press * during a voice call to the system.
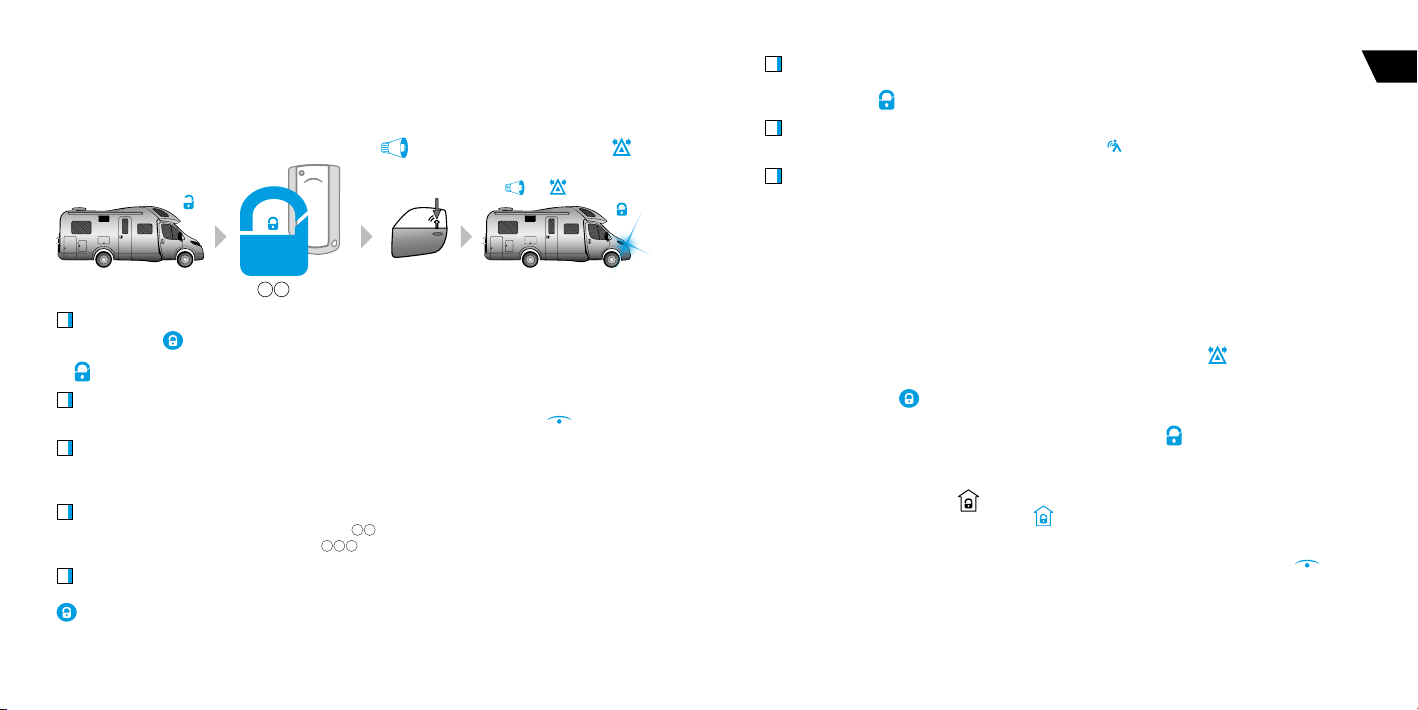
Arming/Disarming
1. Call the system number. Wait for the answer.
2. Dial 1* to arm, and 0* to disarm.
For silent arming dial 10* or 00
3. The system will confirm arming/disarming. To end the session, hang up the phone.
Request current coordinates
1. Call the system number. Wait for the answer.
2. Dial 500*.
3. The system will confirm: ‘Current coordinate sent via text message’ and will send text message
with coordinates and a web link to a map to your phone.
To end the session, hang up the phone.
Request GSM account balance
1. Call the system number. Wait for the answer.
2. Dial 100*.
3. The system will confirm: ‘Balance information sent via text message’ and will send text message
with account balance information to your phone.
To end the session, hang up the phone.
Tow truck mode
This mode is intended for car transportation with preservation of arming function. Tow truck mode
can be activated only when the system is armed, it will be deactivated automatically when disarming.
1. Call the system number. If the system is in PANIC mode, receive an emergency call. Wait for the answer.
2. Dial 15* , to enable the “Tow truck” mode, the system will disable motion, shock and tilt sensors. To
end the session, hung up the phone.
3. To disable this mode, disarm the system.
Activating/Deactivating engine blocking
You can block a car engine using any phone. The engine will remain blocked
until phone command ‘Unlock engine’ will be sent and the “Secret PIN-code” will be
entered. This blocking cannot be disabled using a remote control or VALET button.
USER MANUALSECURITY-SERVICE SYSTEM PANDORA CAMPER
* for silent disarming
23
EN
Page 13

1. Call the system number and wait for the answer.
*
*
*
*
*
2. Dial 666* to block an engine or 999* to unlock it (after dialing 999* you should enter the “Secret PINcode” that is located on the owner’s card).
all oTher sysTem commands can be enTered in The same manner.
!
Changing settings via a phone
Enter the settings mode
Disarm the system, call the system number, wait for the answer, switch on the ignition for 1-3 seconds,
then switch it off. The system will enter the settings mode.
Example of changing the owner’s system number:
1. Enter the setting menu via a phone according to the instruction above;
2. Dial DTMF command 1*(phone number settings) and 1*(owner’s system number);
3. Enter new owner’s number in the format *XXXXXXXXXXX # (the system recognizes ‘*’ as ‘+’);
To confirm, dial 1*.
! There are 3 ways To change main owner’s phone number:
1. via a phone, using dTmf commands seTTings mode.
2. using radio Tags: Turn on The igniTion when The sysTem is disarmed and call The sysTem phone number. waiT for
The answer, Then press and hold The buTTon on The radio Tag for 2 seconds (unTil The second flash of The send
indicaTor). release The buTTon, The sysTem will recognize The incoming phone number as The “main owner’s phone
number.
3. using The pandora alarm sTudio applicaTions.
1
1
Phone
number settings
2
2
*
*
Settings
of the voice calls
3
3
*
*
Settings
of the text messages
Owner's number -> #
1
1
*
*
Additional owner's number -> #
2
2
*
*
Second additional owner's
3
3
*
*
number -> #
Account balance inquiry number -> #
4
4
*
*
5
System’s number -> «#»
5
*
*
Voice calls on alarm
1
1
*
*
Voice calls on triggering warning
2
2
level of the sensors
*
*
Voice calls on engine start
3
3
*
*
Voice calls on engine stop
4
4
*
*
Voice calls on restoring GSM
5
5
connection
*
*
Voice calls on disarming
6
6
*
*
Voice calls on entering
7
7
programming mode
*
*
Voice calls when radio relay
8
8
connection is lost
*
*
Voice calls when on-board voltage
9
9
*
*
is low
Voice calls on accident
0
0
*
*
Text messages on alarm
1
1
*
*
Text messages on triggering warning
2
2
level of the sensors
*
*
Text messages on engine start
3
3
*
*
Text messages on engine stop
4
4
*
*
Text messages on restoring GSM
5
5
*
connection
*
Text messages on disarming
6
6
*
*
Text messages on entering
7
7
programming mode
*
*
Text messages when radio relay
8
8
*
*
connection is lost
Text messages when on-board
9
9
*
voltage is low
*
Text messages on accident
0
0
*
5
5
Additional
settings
7
7
*
*
Sensor
sensitivity settings
8
8
*
*
Settings
of saving mode
9
9
*
*
Current time
and date settings
Changing guest PIN-code
1
1
*
*
Entering as guest
2
2
*
*
Set threshold voltage for sending
5
5
text message
*
*
Settings of the warning level of the
1
1
shock sensor sensitivity
*
*
Settings of the alarm level of the
2
2
shock sensor sensitivity
*
*
Settings of the motion sensor
3
3
sensitivity
*
*
Settings of the tilt sensor sensitivity
4
4
*
*
Settings of the warning level of the
5
5
supplementary sensor sensitivity
*
*
Settings of the alarm level of the
6
6
supplementary sensor sensitivity
*
*
GSM connection
1
1
*
*
Money saving mode of the GSM
2
2
connection
*
*
Voice calls in roaming service
3
3
*
*
Set up date
1
1
*
*
Set up time
2
2
*
*
EN
24
USER MANUALSECURITY-SERVICE SYSTEM PANDORA CAMPER
25
Page 14

ONLINE SERVICE PANDORAON.COM AND MOBILE APPLICATION
PANDORA CAMPER
for The correcT operaTion of The gsm funcTions, an
!
owner should moniTor The sTaTus/balance of The sim
card insTalled in The sysTem. if The sim card is blocked
or defec Tive, gsm funcTions of The sysTem will be
unavailable.
It is required to create an account, add the
system to your account, pair your mobile phone
with the system. Registration is performed in the
mobile application or on the web-site.
Registration
Visit pandora-on.com website and register following
the instructions.
System login
After completing of the registration process, you
can login- to the online service via a computer’s web
browser or via special mobile app Pandora Camper
for the Android and iOS. Use your previously created login/password to enter the web site or mobile
app.
Adding a system to the online service
The Internet service pandora-on.com can support simultaneously several telemetry systems, installed
on various cars (private car park).
To add a telemetry system (vehicle) to the service, press ‘Add car’ button and go through the process
of adding, following the instructions. To add a car, individual owner’s card with registration information is
needed (shipped with the system).
erase The proTecTive layer carefully. do noT use any sharp objecTs To avoid damaging of hidden informaTion under
!
The proTecTive layer.
pandora-on.com
@E-MAIL
********
LOGIN
PASS
Pandora Camper
@E-MAIL
LOGIN
********
PASS
Events history
Event history holds more than 100 different types of events that can happen to the system. Every event
is saved with date, time, coordinates and status of all control zones at the time the event has occurred.
The number of events in the history is limited. Storage of event history life is no less than 1 month.
Mobile application Pandora Camper
You can download the free app Pandora Camper from the App Store for iOS and Google Play for Android
devices. To access the app, use the login data received from the service at the registration stage.
Control via a radio channel
Mobile application Pandora Camper can control the system, receive status information and open
advanced settings without Internet connection when a phone is in the Bluetooth coverage zone.
To get access to these functions, pair a mobile device in the system.
Pairing a mobile device
To pair a mobile phone with the system:
I. ENTER PROGRAMMING MODE
Use the VALET button to enter the “Service PIN-code” (default value is 1-1-1-1). See the deatailed
instruction of code entering in the “Control the system in case of emergency” section.
II. ENTER THE “PAIRING A MOBILE PHONE” PROGRAMMING LEVEL
After entering programming mode, press and hold the VALET button for 5 seconds (until the fifth
signal of the Siren/Beeper”). The system will enter the “Pairing a mobile phone” programming level. The
LED indicator will light green, the system is ready for pairing.
III. PAIR A MOBILE PHONE
Turn on Bluetooth on your mobile phone and open the mobile application. Go to the “Search
device” screen: “My systems” -> “Add a bluetooth device”. The application will search for the system via
a Bluetooth connection.
Select the found system, the system and the mobile device will be automatically paired. The system
will confirm pairing with the series of green and red flashes of the LED and a sound signal of the siren.
IV. EXIT PROGRAMMING MODE
Turn on the ignition and then turn off to exit programming mode.
The sysTem supporTs only one mobile device. if There is no auTomaTic pairing, enable The “pin requesT for phone
!
pairing” iTem in The “radio Tag and mobile device func Tions” seTTings and make The pairing procedure again. a mobile
device will requesT a pin-code (facTory pre-seT is 0-0-1-1-1-1 where 4 lasT digiTs are The “service pin-code”.
EN
26
USER MANUALSECURITY-SERVICE SYSTEM PANDORA CAMPER
27
Page 15
CONTROL THE SYSTEM
1 *
Arming
To arm the system when the ignition is off, use one of the methods described below. The system
will confirm the command with 1 short sound signal
SLAVE
SLAVE
HANDS FREE
HANDS FREE
MOBILE APP
PANDORA BT
Remote control
Shortly press the
remote control will play “ARMING” ringtone and security mode status icon (the lock) will be changed
.
to
Radio tag
A radio tag must be in the Bluetooth coverage area. Shortly press the control button
Slave mode
Shortly press the “Lock” button on an original remote control or use a sensor/button on a door handle
(for cars with an intelligent access system).
Phone
Call the system number. Wait for the answer. Dial the
To arm the system without siren signals dial the
Online-service
Login to the PANDORA-ON.COM, when the system is online (there is an Internet connection) press the
on the control panel.
, button on the remote control when you are in the radio coverage zone. The
1 0 *
and 1 flash of light signalization
doors locking
system arming
1 *
. command.
command.
.
1x /1x
on the tag.
Mobile application
Open the mobile application. When the system is online (there is an Internet or Bluetooth connection),
press and hold the
HandsFree mode
Move with an authorization device away from your vehicle
VALET button
Press and hold the VALET button for 3 seconds. The system will be armed in 30 seconds. The LED
indicator is lighting red during the countdown.
There is an opTion in The sysTem seT Tings ThaT allows To arm The sysTem wiTh disabled sensors (shock/TilT/moTion
!
and addiTional sensors). The seTTing “swiTch off sensors when arming using val eT buT Ton” is available in The
alarmsTudio (“main seTTings” -> “sensors se TTings”).
button on the control panel until the scale is fully loaded.
.
Activating Stay Home mode
To activate Stay Home mode when the ignition is off, use one of the methods described below.
The system will confirm the command with 1 flash of light signalization
Remote control
Press and hold the
SEND/ALARM indicator) when you are in the radio coverage zone. The remote control will play “ARMING”
ringtone and security mode status icon (the lock) will be changed to
Mobile application
Open the mobile application. When the system is online (there is an Internet or Bluetooth
connection), press and hold the
security mode status icon will be changed to
Radio tag
A radio tag must be in the Bluetooth coverage area. Press and hold the control button
tag for 2 seconds (until the second flash of the «SEND» indicator).
button on the remote control for 1 second (until a sound signal/flash of the
button on the control panel until the scale is fully loaded. The
.
.
.
on the
EN
28
USER MANUALSECURITY-SERVICE SYSTEM PANDORA CAMPER
29
Page 16
0 *
Delayed arming
If when leaving the car you cannot arm it using a remote control (you have your hands full), you can use
delayed arming. To activate this mode, shortly press the
indicator will turn red, the system will lock doors and will arm in 30 seconds, the siren will sound and turn
signals will flash once, indicating that the mode is triggered.
To activate this mode without sound confirmation, press and hold both
until a sound and vibration signal.
To cancel delayed arming when it is triggered, simply press the
and buttons simultaneously. The LED
and buttons for 1 second
button.
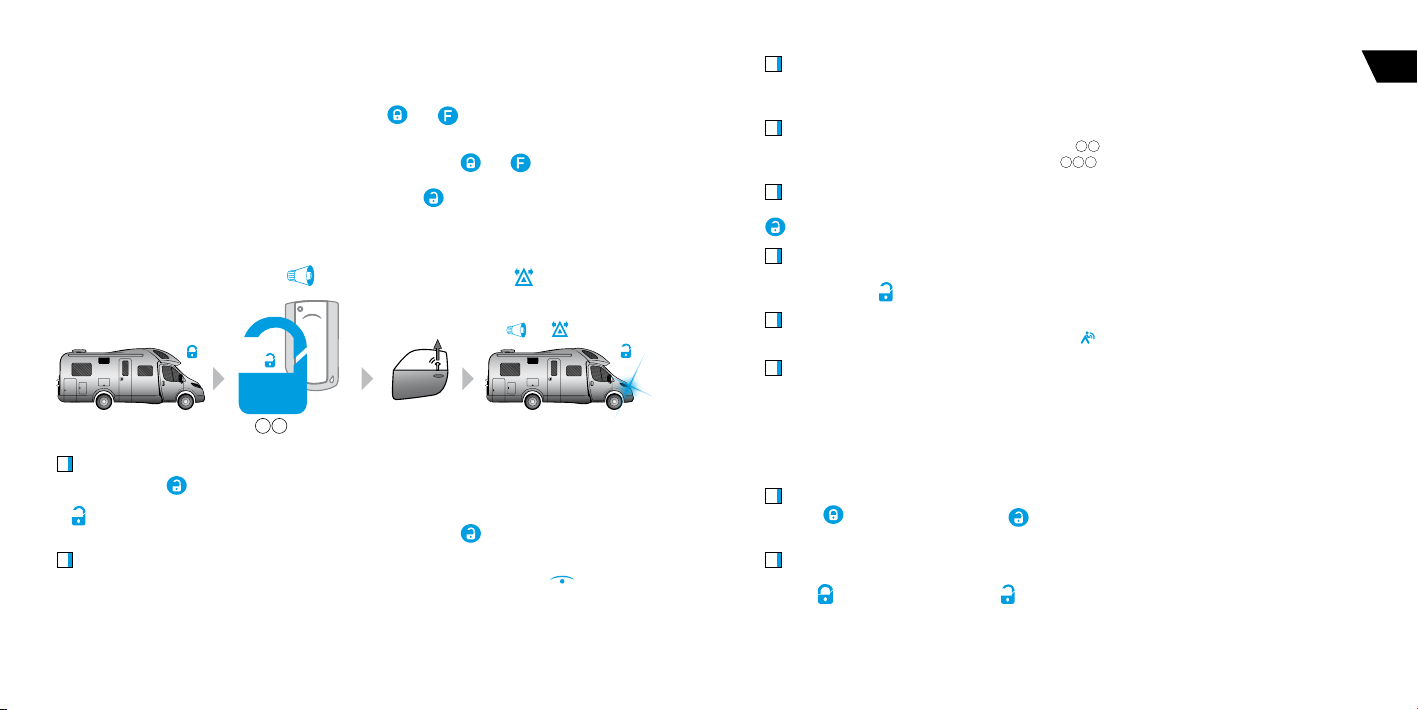
Disarming
To disarm the system, use one of the methods described below. The system will confirm the
command with 2 short sound signals
SLAVE
HANDS FREE
MOBILE APP
Remote control
Shortly press the
remote control will play “DISARMING” ringtone and security mode status icon (the lock) will be changed
.
to
To disarm the system without sound confirmation press and hold the
Radio tag
A radio tag must be in the Bluetooth coverage area. Shortly press the control button on the tag .
, button on the remote control when you are in the radio coverage zone. The
and 2 flashes of turn indicators .
doors unlocking
system disarming
2x /2x
button for 1 second or more.
Slave mode
Shortly press the “Unlock” button on an original remote control or use a sensor/button on a door handle
(for cars with an intelligent access system).
Phone
Call the system number. Wait for the answer. Dial the
To disarm the system without siren signals dial the
Online service
Login to the PANDORA-ON.COM, when the system is online (there is an Internet connection) press the
on the control panel.
Mobile application
Open the mobile application. When the system is online (there is an Internet or Bluetooth connection),
press and hold the
HandsFree mode
Move toward the vehicle with an authorization device
VALET button
Enter the ”Secret PIN-code” (see the ”Emergency disarming using the VALET button” section).
button on the control panel until the scale is fully loaded.
0 *
command.
0 *0
command.
.
Locking/unlocking doors when ignition is on
The system allows you to lock and unlock doors when ignition is on. To do this, use one of the
methods described below.
Remote control
Press the
coverage zone.
Mobile application
Open the mobile application. When the system is online (you are in the radio coverage area), press and
hold the
is fully loaded.
button to lock doors or the button to unlock doors when you are in the radio
button to lock doors or the button to unlock doors on the control panel until the scale
EN
30
USER MANUALSECURITY-SERVICE SYSTEM PANDORA CAMPER
31
Page 17
Automatic modes
There are automatic lock modes that will lock the doors at the car movement or on switching on the
ignition. When using doors locking mode on car movement start, the system will detect car moving
and perform doors locking (it depends on speed status in a digital CAN-bus or motion sensor sensitivity
settings). When using doors locking mode on switching on the ignition, the doors will be locked
automatically 5 seconds after the ignition was switched on. If any door was opened after the ignition
had been switched on, automatic locking will be disabled to prevent locking the keys inside the car.
Doors can be automatically unlocked when the ignition is switched off.
These modes are disabled by defaulT, use The pandora alarm sTudio To enable These seTTings.
!
Car search function
To easily find your vehicle on a massive parking, shortly press the
system will sound the siren
sound signals press and hold the
and flash turn signals 5 times in a row. To use this function without
button for 1 second.
button when the car is armed. The
PANIC mode
If your car or you are in danger and you want to draw attention to your car, you can use PANIC mode. In
this mode the siren will sound and turn signals will flash repeatedly for 30 seconds.
To activate this mode, use one of the methods described below.
Remote control
To activate the PANIC mode, press the
or button.
Mobile application
Open the mobile application. When the system is online (there is an Internet or Bluetooth connection),
press and hold the
off press and hold the
button on the control panel until the scale is fully loaded. To switch this function
button on the control panel until the scale is fully loaded.
and
buttons simultaneously. To switch it off, press either
32
Service mode
It is recommended to put the system into the service mode before handing it to a car service or valet
parking. When this mode is switched on, security system stops interfering with built-in electronics and
disables all functions to ease maintenance.
To switch on this mode, disarm the system, turn on the ignition, an authorization device (a radio
tag, a remote control, a mobile phone) must be in the coverage zone, enter the “Immobilizer PINcode” (if the “Code immobilizer” function is used) and use one of the method described below:
Radio tag
To activate/deactivate service mode, press and hold the
(until the third flash of the LED), release the button.
Phone
Call the system number wait for the answer.
• To activate service mode, dial the
from the Owner’s personal card.
• To deactivate service mode dial the
•
Mobile application
To activate/deactivate service mode, open the mobile application. When the system is online (there
is an Internet or Bluetooth connection), press and hold the
the scale is fully loaded.
To change buTTons layouT or add new buTTons on The conTrol panel, go To “seTTings conTrol buTTons“.
!
Immobilizer buttons
• To activate service mode, enter the “Immobilizer PIN-code” and press the immobilizer button 10
times within 20 seconds.
• To deactivate service mode, turn on the ignition and enter the “Immobilizer PIN-code”.
Service mode indication
• Activated Service mode is indicated by: an icon
when the ignition is on, long sound signal of a Beeper at the moment you activate the mode.
• Deactivated Service mode is indicated by: no “Service mode” icon
the mobile application, no constant green LED when the ignition is on, two long sound signal of a
Beeper at the moment you deactivate the mode.
DTMF command and then dial the “Secret PIN-code”
155 *
DTMF command.
255 *
USER MANUALSECURITY-SERVICE SYSTEM PANDORA CAMPER
button on a radio tag for 3 seconds
button on the control panel until
in the mobile application, constant green LED
in the mobile application in
33
EN
Page 18

CONTROL THE SYSTEM IN CASE OF EMERGENCY
The system has emergency ways to deactivate security and anti-hijack functions (using the VALET
button and the “Secret PIN-code”) in case of loss or failure of control devices or in case of discharge of a
battery (when you cannot replace it or charge).
Before using emergency system control, check the system and vehicle control devices: check a
battery, turn on a device in accordance with its manual (if required).
If all devices are working, try to make a primary vehicle diagnosis: check the vehicle original control
device, vehicle battery charge level, gearbox selector position, check information on the dashboard.
! The sysTem can be conTrolled from a phone using dTmf commands:
0* – disarming.
998*xxxх – deacTivaTe auThorizaTion devices (immobilizer and anTi-hijack funcTions), where хххх is The “secreT pin-
code” wriTTen on The owner’s personal card under The proTecTive layer.
1*– arming.
888* – acTivaTe auThorizaTion devices (immobilizer and anTi-hijack funcTions).
! read The procedure for enTering The pin-code before using emergency funcTions.
ENTERING THE PIN-CODE
The code must be entered only when the base unit is powered and the ignition is off. The PIN-code can
be entered using the external or located on the base unit VALET button. The digits input and correct
input is indicated by the external or located on the base unit LED indicator.
• Enter the first digit • Press the button the number of times equal to the first digit. Pauses between
presses should not exceed 1 second. Each pressing will be confirmed with an orange LED indicator flash.
Pause for more than 1 second, a red LED indicator flash and a short sound single of the Beeper confirm
the input of the first digit. Then you can enter the next digit.
• Enter the second digit • Press the button the number of times equal to the second digit. Pauses
between presses should not exceed 1 second. Each pressing will be confirmed with an orange LED
indicator flash. Pause for more than 1 second, a red LED indicator flash and a short sound single of the
Beeper confirm the input of the second digit. Then you can enter the next digit.
• Enter the third digit • Press the button the number of times equal to the third digit. Pauses
between presses should not exceed 1 second. Each pressing will be confirmed with an orange LED
indicator flash. Pause for more than 1 second, a red LED indicator flash and a short sound single of the
Beeper confirm the input of the third digit. Then you can enter the next digit.
• Enter the fourth digit • Press the button the number of times equal to the fourth digit. Pauses
between presses should not exceed 1 second. Each pressing will be confirmed with an orange LED
34
indicator flash. The correct input will be confirmed with the series of green and red flashes of the LED
indicator.
Emergency disarming
In case you cannot disarm the system as usual, use the VALET button and the ‘Secret PIN-code’ written
on the Owner’s personal card (see the “General information” section):
• If your car is locked, unlock it by an original key. Not paying attention to the siren signals, make sure
that the ignition is off and enter the “Secret PIN-code” (see the procedure description above). If there
are no siren sounds or LED flashes, check the battery. It is not possible to enter the “Secret PIN-code”,
if there is no power supply.
• The system will be disarmed in case of correct PIN-code input. It will be confirmed with the series of
green and red flashes of the LED indicator, the series of sound signals of the Beeper, 4 beeps of the
Siren and 4 signals of the light signalization.
• The system will stay in previous state in case of incorrect input of the PIN-code. It will be indicated
with a long red flash of the LED indicator. New input can be attempted after 5 seconds.
• Emergency disarming is equivalent to a normal method of disarming. No additional actions are
required for further operation of the system.
Emergency control of the anti-theft functions
This section describes how to deactivate and activate “Code immobilizer” and anti-theft functions
(Immobilizer and Anti-Hi-jack), which use a radio tag, a remote control or a mobile phone as an owner
authorization device.
! To Temporarily deacTivaTe The immobilizer or code immobilizer funcTion (pin-To-drive), Turn on The igniTion when The
sysTem is disarmed. enTer The “secreT code” from The owner’s personal card using The valeT buTTon. The immobilizer
funcTions will be being deacTivaTed by The Time The igniTion is Turned off.
Emergency activation/deactivation Immobilizer/Code Immobilizer functions
Emergency control of the anti-theft functions is possible only when the system is disarmed, the
ignition is off, service mode is deactivated, a vehicle battery is charged. Enter the “Secret PIN-code” to
put the system in programming mode.
! you can also enTer programming mode using The “service pin-code” (defaulT value is 1-1-1-1).
USER MANUALSECURITY-SERVICE SYSTEM PANDORA CAMPER
35
EN
Page 19

1. Emergency activation/deactivation the immobilizer function
After entering programming mode, press the VALET button 15 times. Pauses between presses should
not exceed 1 second. Each pressing will be confirmed with an orange LED indicator flash. The system
will confirm entering the 15th level with the red flashes of the LED and short signals of the Siren/Beeper.
• Deactivate immobilizer: The LED indicator will be green after entering the programming
level. The system will wait 10 seconds for entering the ‘Secret PIN-code’. Enter the ‘Secret
PIN-code’ that is written on the owner’s plastic card. If the PIN-code is not entered within
10 seconds or the input is incorrect, the siren will sound one signal, the LED will produce
the series of red and green flashes and the system will return to the programming menu.
The system will confirm deactivating with two sound signals of the siren, a long red LED flash and
the series of signals of the Beeper. After that, the system will return to the programming menu.
Turn on the ignition and then turn off to exit programming mode. The immobilizer will be deactivated.
• Activate immobilizer: The LED indicator will light red and the Beeper will sound a long
beep after entering the programming level. The system will wait for action. Press the
VALET button once activate the immobilizer function. The system will confirm enabling
with one short sound signal of the Siren/Beeper and a green LED light. Turn on the
ignition and then turn off to exit programming mode. The immobilizer will be activated.
2. Emergency activation/deactivation the code immobilizer function (pin-to-drive).
After entering programming mode, press the VALET button 13 times. Pauses between presses should
not exceed 1 second. Each pressing will be confirmed with an orange LED indicator flash. The system
will confirm entering the 13th level with the red flashes of the LED and short signals of the Siren/Beeper.
• Deactivate code immobilizer: The LED indicator will be green after entering the programming
level. The system will wait 10 seconds for entering the ‘Secret PIN-code’. Enter the ‘Secret
PIN-code’ that is written on the owner’s plastic card. If the PIN-code is not entered within
10 seconds or the input is incorrect, the siren will sound one signal, the LED will produce
the series of red and green flashes and the system will return to the programming menu.
The system will confirm deactivating with two sound signals of the siren, a long red LED flash and
the series of signals of the Beeper. After that, the system will return to the programming menu.
Turn on the ignition and then turn off to exit programming mode. The code immobilizer will be
deactivated.
• Activate code immobilizer: The LED indicator will light red and the Beeper will sound a long beep
after entering the programming level. The system will wait for action. Press the VALET button once
activate the immobilizer function. The system will confirm enabling with one short sound signal of
the Siren/Beeper and a green LED light. Turn on the ignition and then turn off to exit programming
mode. The code immobilizer will be activated.
36
Warranty obligations
Manufacturer guarantees correct operation of the service-security system if exploitation, installation,
storage and transportation conditions described in this manual were met.
The system should only be used according to installation scheme and user manuals.
The system is meant to be installed by the professional car electronics installers. The installer should
fill in installation certificate that is included in this manual.
Parts malfunctioning during warranty period on the fault of the manufacturer should be repaired
or replaced by the installation center of the manufacturer or by certified service center. List of certified
service centers can be found on pandorainfo.com
The user loses the right for warranty services in the following cases:
• when warranty period expires;
• if exploitation, installation, storage or transportation conditions were not met;
• if there is mechanical damage of the external parts of the system after it is sold.
This includes: fire damage, consequential damage in case of car accident, aggressive liquids and
water seeping damage, damage caused by improper use;
• if the damage was caused with incorrect settings and parameter adjustment;
• if system devices are replaced with any devices that are not recommended by the manufacturer;
• if manufacturer sealing is broken;
• if there is no properly filled warranty card and installation certificate.
Warranty period is 3 years since the moment of purchase, but no more than 3.5 (three and a half)
years since the moment of production. This warranty does not include batteries of the remotes, as they
have their own service lifetime.
Maintenances and repairs of the system with expired warranty period are carried out at the expense
of the user on a separate contract between the user and the installer/service center.
we recommend ThaT you ask an insTaller To fill ouT The insTallaTion cerTificaTe and The warranTy card. These
!
documenTs may be required for conTac Ting The cusTomer supporT.
USER MANUALSECURITY-SERVICE SYSTEM PANDORA CAMPER
37
EN
Page 20

Installation certifcate
I, the undersigned_________________________________________________________
Position, name.
______________________________________________________________________________
professional installer, certify that installation of the service-security system, specified below, was carried
out by me in accordance with manuals and schemes provided by the manufacturer.
Car specifications:
Car model____________________________________________ Type _____________________
Id number (VIN)_________________________________________________________________
Registration number_____________________________________________________________
Security system specification:
Model Pandora Camper
Acceptance certicate
Pandora Camper is in conformity with Electromagnetic Compatibility Directive EMC 2004/108/EC and
R&TTE Directive 1999/5/EC.
Serial number ______________________________ Date of production__________________________
Responsible person’s signature (stamp)
Packager_____________________________________________________________________________
Signature (personal stamp)
Warranty card
Model Pandora Camper
EN
Serial number______________________________
Service center name, full address and installer’s stamp
______________________________________________________________________________
______________________________________________________________________________
Signature_____________________/___________________________________/
Signator
Work accepted__________________/___________________________________/
Signator
Date «____»___________________20___year.
38
Serial number ________________________________________________________________________
Date of purchase «____» ______________________ 20____year
____________________________________________________________________________________
Seller’s (installer’s) stamp
Seller’s signature ______________________________________________________________________
USER MANUALSECURITY-SERVICE SYSTEM PANDORA CAMPER
39
Page 21

DE
Sehr geehrte Kundin, sehr geehrter Kunde,
für den Kauf des Produkts „Pandora Camper“
Pandora Camper – ist ein Telemetrisch-Sicherheits- und Servicegerät, das für die Installation an
einem Wohnmobil mit einer 12-V-Bordspannung ausgelegt ist.
Dieses Produkt ist das Ergebnis der Arbeit einer Gruppe hochqualifizierter russischer Ingenieure
und umfasst viele einzigartige und moderne technische, technologische sowie Software- und
Hardwarelösungen. Das Gerät wurde mit neuen hochpräzisen Ausrüstung zur Steuerung und zum
Einbau von Komponenten hergestellt. Bei der Entwicklung des Produkts wurde die modernste
Elementbasis von der weltweit besten Hersteller elektronischer Komponenten eingesetzt.
Dieses Camper-Alarm-System wurde speziell zum Schutz Ihres Wohnmobiles und den Personen
darin entwickelt. Das System überwacht den Fahrgastraum und den Wohnbereich durch den
optimalen Einsatz speziell entwickelter Bluetooth Sensoren. Drahtlose Erschütterungs-, Neigungs-,
Öffnungssensoren sowie das Auswerten der vorhanden Fahrzeugsignale melden Einbruchversuche
optisch / akustisch am Wohnmobil und per Mobilfunk als Anruf / SMS. Eine spezielle “Zu Hause” Funktion
schützt die Wohnräume und Klappen auch dann, wenn sich der Besitzer im Wohnmobil aufhält. Die
Alarmanlage ist individuell mit weiteren Sensoren und Komfortfunktionen aufrüstbar. Zusätzlichen
Schutz vor kopierten Fahrzeugschlüssel bieten die Transponder, welche beim Entschärfen abgefragt
werden bzw. auch die Fernbedienung der Wohnmobile ersetzen können.
Das System ist für Ihre Bequemlichkeit gebaut: Ergonomie und Zuverlässigkeit, höchste Sicherheitsund Service-Eigenschaften; 3 Jahre absolute Herstellergarantie; Service-Unterstützung; operative
Unterstützung bei der Lösung neu auftretender Problemen im Zusammenhang mit dem Betrieb und
der Installation des Systems, bereitgestellt durch den Online-Unterstützungsdienst
Dieses Gerät hat eine begrenzte Widerstandsfähigkeit gegen äußere Faktoren und ist für den Betrieb bei Umgebungstemperaturen von
-40°C bis + 85°C ausgelegt. Alle Komponenten des Sicherheitssystems, die im Umfang enthalten sind, dürfen nur im Fahrerraum verbaut
werden. Die Basiseinheit, die Funk-Fernbedienung und der RFID-Tag er füllen die Schutzklasse IP40 gegen Wasser.
Wichtig! Bitte Beachten Sie, daSS dieSe BedienungSanleitung gröSStenteilS die Funk-FernBedienung und die
manuellen Funktionen BeSchreiBt. die Funktionalität deS SyStemS iSt enorm und Für die vollStändige BeSchreiBung
iSt ein vollStändigeS Buch erForderlich. StattdeSSen verWenden Wir eine BenutzerFreundliche SoFtWare namenS
alarmStudio, die alS ProgrammierWerkzeug und erWeiterte inStallationS- / FunktionShandBuch dient, Benötigt
WindoWS und kann unter PandorainFo.com heruntergeladen Werden.
„Pandora“ bedankt sich bei Ihnen
40
SECURITY-SERVICE SYSTEM PANDORA CAMPER
Unsere Webseite: www.pandorainfo.com
Kundendienst: support@pandorainfo.com
Das Produkt entspricht der elektromagnetischen Verträglichkeit
Directive EMC 2004/108/EC und R/TTE Directive 1999/5/EC
Page 22

Inhaltsverzeichnis:
Allgemeine Informationen 44
Einführung 44
Bestimmungsgemäße Verwendung 44
Lieferumfang 46
Sicherheitshinweise 46
Anordnung der Systemkomponenten 48
Basiseinheit des Systems 49
Individuelle Inhaberkarte 50
„Valet“-Taste 51
Funktionen und Modi 53
Schutzmodus 53
Kontrollierte und geschützte Bereiche 53
Ton- und Lichtalarm 54
„Stay Home“ Modus 55
„Slave“ Modus 55
Geräte und Funktionen der Benutzerautorisierung 55
Überprüfen der Anzahl der gekoppelten Fernbedienungen /
RFID-Tage / Mobilgeräte 58
Funk-Fernbedienung D030 59
Einschalten/Ausschalten 60
Der Zweck der LED-Anzeigen 60
Aufladen der Fernbedienung 60
Aktualisierung der Software 60
Piktogramme der Fernbedienung 61
Schnellzugriff-Funktionen 62
RFID-Tag der Wegfahrsperre BT760 63
Funktionen der Taste 63
Auswechseln des Akkus 64
Aktualisierung der Software des RFID-Tags 64
Steuerung des Systems mit dem Mobilgerät 65
Internet-Service pandora-on.com
und Mobile Applikation Pandora Camper 69
Systemverwaltung 72
Notfall-Steuerung des Systems 79
Garantieverpflichtungen 83
Änderung der Einstellungen mit Mobilgerät 67
Ereignisverlauf 70
Mobile Applikation Pandora Camper 70
Das System scharfschalten 72
Aktivierung des „Stay home“–Modus 73
Verzögerte Scharfschaltung (Hände besetzt) 74
Das System entschärfen 74
Verriegeln / Entriegeln der Türen bei
eingeschalteter Zündung 75
Autosuche 76
„Panik“-Modus 76
Wartungsbetrieb (Wartung) 77
Notfall-Entschärfung des Systems 80
Notsteuerung der Anti-Hi-Jack-Funktionen 80
Installationszertifikat 84
Abnahmeprotokoll 85
Garantieschein 85
DE
42
BEDIENUNGSANLEITUNGSICHERHEITS-SERVICE-SYSTEM PANDORA CAMPER
43
Page 23

ALLGEMEINE INFORMATIONEN
Einführung
Dieses Produkt entspricht den gesetzlichen, nationalen und europäischen Anforderungen. Um diesen
Zustand zu erhalten und einen gefahrlosen Betrieb sicherzustellen, müssen Sie als Anwender diese
Bedienungsanleitung beachten!
Lesen Sie sich diese Bedienungsanleitung vollständig und aufmerksam durch, sie enthält
viele wichtige Informationen für Montage, Inbetriebnahme und Bedienung. Beachten Sie alle
Sicherheitshinweise dieser Bedienungsanleitung!
- Das Symbol mit dem Ausrufezeichen weist auf wichtige Hinweise in dieser Bedienungsanleitung
!
hin, die unbedingt zu beachten sind.
! der hersTeller behälT sich das rechT vor, veränderungen in der verpackung und im design der produkTe
jederzeiT durchzuführen, um ihre Technologischen und beTrieblichen parameTer ohne vorherige benachrichTigung
des verbrauchers zu verbessern.
Bestimmungsgemäße Verwendung
!
das sysTem isT ein komplexes Technisches produkT, das zur überwachung eines objekTs dienT und von fachpersonal
fachgerechT insTallierT, konfigurierT werden muss.
!
funkTionen und modi, verwalTung und konTrolle der TransporTzonen (sysTembeTrieb) hängen von der arT der
verbindung, der konfiguraTion, den vorgenommenen sysTemeinsTellungen sowie dem normalen beTrieb und der
konfiguraTion des fahrzeugs ab.
!
das sysTem beinhalTeT einen «individuellen inhaberkarTe». unTer einer schuTzschichT, die nur für den inhaber
des sysTems besTimmT isT. wir empfehlen, die unversehrTheiT der schuTzbeschichTung nach abschluss der arbeiTen
sicherzusTellen. wenn die schuTzschichT der karTe vom insTaller enTfernT (beschädigT) wurde, wird das sysTem vom
miTarbeiTer neu insTallierT. lesen sie vor dem enTfernen der schuTzschichT unbedingT die beschreibung des abschniTTs
« individuelle inhaberkarTe».
!
das sysTem unTersTüTzT die arbeiT miT einem mobilfunkne Tz (gsm-funkTionaliTäT). führen sie sicher in
anwesenheiT des insTallers eine ersTe sysTemprüfung miT ihrem eigenen mobilgeräT durch: führen sie eine anfrage des
sysTemkonTo miT dem befehl 100* (siehe abschniTT „verwalTung des sysTems via Telefon“, abschniTT für selbsTändige
einsTellung „änderung der einsTellungen miThilfe des mobilgeräTes -> 1* rufnummerneinsTellung-> 4 * nummer
der konToanfrage“). verleTzen sie im scharfgeschalTeTen modus die alarmzone. das sysTem rufT ihre nummer an
- «die haupTnummer des besiTzers». um die „haupTnummer des inhabers“ schnell einzugeben oder zu ändern beim
u
nscharfschalTen, schalTen sie die zündung ein, rufen sie die sysTemTelefonnummer an, warTen sie auf eine anTworT,
halTen sie die TasTe auf dem rfid-Tag bis 2 blinken der led-anzeige „send“ (2 sekunden) gedrückT. lassen sie die
TasTe los. das sysTem merkT sich die eingehende Telefonnummer als „haupTnummer des besiTzers“.
• überprüfen sie den «gasTen-pin-code» (1-2-3-4), indem sie von einer «zusäTzlichen nummer» oder einer
unbekannTen Telefonnummer aus anrufen.
!
das sysTem kann miT einer mobil-applikaTion arbeiTen. dazu müssen sie: ein konTo ersTellen, das sysTem dem
konTo hinzufügen, das mobilgeräT im sysTemspeicher aufnehmen. die beraTung über die mobil-applikaTion sollTe von
einem spezialisTen durchgeführT werden, der das sysTem insTallierT haT.
nach abschluss der insTallaTion:
• sTellen sie sicher, dass die abschniTTe „insTallaTionszerTifikaT“, „abnahmeproTokoll“ und „garanTieschein“ ausgefülT
sind. in garanTiefällen oder bei den konTakTen miT dem supporT können ausgefüllTe dokumenTe erforderlich sein.
• sTellen sie sicher, dass das sysTem beTriebsbereiT isT und die funkTionen in anwesenheiT eines spezialisTen ausgeführT
werden.
• wir empfehlen, die leisTung der implemenTierTen funkTionen gegenüber jeder beschreibung im abschniTT „sTeuerung“-
eine anmerkung zur leisTung .
• fragen sie den fachmann die anordnung der sysTemblöcke auf der skizze zu markieren. das info kann für
diagnose/konfiguraTion oder noTabschalT des sysTems erforderlich sein.
• um den sysTemschuTz zu verbessern, empfehlen wir nach der insTallaTion dringend den serien werT des servicepin-codes (1-1-1-1) zu ändern. die beraTung zur änderung des «service-pin-codes» wird von einem fachmann
durchgeführT, der das sysTem insTallierT haT.
noTieren oder merken sie sich die neue «service-pin-code“
• um den schuTz des sysTems zu verbessern, empfehlen wir nach der insTallaTion dringend, den serien- werT des „gasT-
pin-codes“manuell zu ändern (siehe abschniTT „einsTellungen via mobilTelefon ändern -> 5 * zusaTzfunkTionen
einsTellen -> 1 * gasT-pin-code ändern“).
noTieren oder merken sie sich den neuen « gasT-pin-code“
• bei der implemenTierung der funkTionen der wegfahrsperre:
noTieren oder merken sie sich den neuen « pin-code der wegfahrsperre “
markieren sie die eingabeTasTe (TasTe / hebel / pedal) des «wegfahrsperren-codes» im abschniT T «anordnung der
sysTemelemenTen».
DE
44
BEDIENUNGSANLEITUNGSICHERHEITS-SERVICE-SYSTEM PANDORA CAMPER
45
Page 24

Lieferumfang
1. Einbau- und Bedienungsanleitung 1 St.
2. Funk-Fernbedienung D030 1 St.
3. RFID-Tag BT760 1 St.
4. Individuelle Inhaberkarte 1 St.
5. Basiseinheit 1 St.
6. „Valet“ Taste 1 St.
7. Beeper (kleiner Schallmelder) 1 St.
8. Drahtlose Türsensor DMS-100 BT 4 St.
9. Sirene PS-330 1 St.
10. Hauptkabel der Basiseinheit 1 St.
11. Zusatzkabel der Basiseinheit 1 St.
12. Außentemperatursensor 1 St.
13. Sperr-Relais 2 St.
14. Reed-Magnetschalter 2 St.
15. Befestigungssatz 1 St.
16. Verpackung 1 St.
Sicherheitshinweise
Bei Schäden die durch Nichtbeachten dieser Bedienungsanleitung verursacht werden, erlischt die
Gewährleistung/Garantie! Für Folgeschäden übernehmen wir keine Haftung!
Bei Sach- oder Personenschäden, die durch unsachgemäße Handhabung oder Nichtbeachten der
Sicherheitshinweise verursacht werden, übernehmen wir keine Haftung! In solchen Fällen erlischt die
Gewährleistung/Garantie!
• Aus Sicherheits- und Zulassungsgründen (CE) ist das eigenmächtige Umbauen und/oder Verändern
des Systems nicht gestattet.
• Das System dient zur Alarmierung, es entbindet den Benutzer nicht von seiner Sorgfaltspflicht.
• Was der Kunde, wann über die Relais schaltet und welche Auswirkungen dies
• hat, unterliegt dem Verantwortungsbereich des Kunden. Der Hersteller übernimmt keinerlei Haftung
für Schäden, die in solch einem Fall entstehen.
• Die GPS-Funktionalitäten dienen nur zur Überwachung des Eigentums. Der Kunde ist selbst für die
Einhaltung der gesetzlichen Bedingungen für weitergehende Überwachungen verantwortlich.
• Beachten Sie beim Anbau und im Betrieb die geltenden Zulassungsvorschriften.
• Achten Sie auf eine fachgerechte Inbetriebnahme des Systems. Beachten Sie hierbei diese
Bedienungsanleitung.
• Setzen Sie das Gerät keinen hohen Temperaturen, Tropf-oder Spritzwasser, starken Vibrationen,
sowie hohen mechanischen Beanspruchungen aus.
• Wenden Sie sich an eine Fachkraft, wenn Sie Zweifel über die Arbeitsweise, die Sicherheit oder den
Anschluss des Systems haben.
• Lassen Sie das Verpackungsmaterial nicht achtlos liegen; dieses könnte für Kinder zu einem
gefährlichen Spielzeug werden.
• Vermeiden Sie eine starke mechanische Beanspruchung der Systemkomponenten.
• Das Gerät gehört nicht in Kinderhände. Es ist kein Spielzeug.
• Beachten Sie bitte auch die zusätzlichen Sicherheitshinweise in den einzelnen Kapiteln dieser
Anleitung.
• Sollten Sie sich über den korrekten Anschluss nicht im Klaren sein oder sollten sich Fragen ergeben,
die nicht im Laufe der Bedienungsanleitung abgeklärt werden, so setzen Sie sich bitte mit uns oder
einem anderen Fachmann in Verbindung.
DE
46
BEDIENUNGSANLEITUNGSICHERHEITS-SERVICE-SYSTEM PANDORA CAMPER
47
Page 25

Anordnung der Systemkomponenten
Basiseinheit
1
2
Sperr-Relais
3
„Valet“ Taste
4
DMS-100 BT Sensor
5
6
7
8
9
10
Basiseinheit des Systems
Eingebautes GSM-Modem (GPRS / SMS / LBS-Dienst)
Das eingebaute Modem funktioniert über das in der Basiseinheit installierte SIM-Karte im Mobilfunk netz:
Sprach- und SMS-Benachrichtigung, Telefonsteuerung mit DTMF-Befehlen, Koordinatenermittlung
durch Mobilfunk-Basisstationen (nur für den Befehl 500 *), Internetverbindung und Verbindung mit der
Mobilapplikationen.
damiT die gsm-funkTion ordnungsgemäss funkTionierT, muss der besiTzer den sTaTus / das konTo der im sysTem
!
insTallierTen sim-karTe gemäss den bedingungen des zugehörigen Tarifplans des mobilfunkbeTreibers über wachen.
wenn die sim-karTe gesperrT oder fehlerhafT isT, isT die gsm-funkTionaliTäT des sysTems nichT verfügbar.
Integrierter GPS/Glonass-Empfänger
Der eingebaute Empfänger ermittelt automatisch das Datum, Uhrzeit und den aktuellen Standort.
! um das daTum und uhrzeiT richTig zu besTimmen, müssen sie die uTc-zeiTzone miThilfe einer mobilen applikaTion
oder eines inTerneTdiensTes anpassen.
Funkkanal 2.4 GHz, Protokoll Bluetooth 5.0 (BT5.0)
Der eingebaute Funkkanal ist notwendig, um die Kommunikation mit der Mobilapplikation und den
im Systemspeicher befindlichen Bluetooth-Peripheriegeräten sicherzustellen. Unterstützung für
das Arbeiten mit Bluetooth-Peripheriegeräten bei einer Frequenz von 2,4 GHz ist verfügbar: 1 D030Funk-Fernbedienung, 3 BT760-RFID-Tage, 1 Mobilgerät (Bluetooth 4.0 Low Energie und höher) und 9
zusätzliche Peripheriegeräte.
Digitaler Schutz AES (128 Bit)
Eine sichere Kommunikation beim Informationsaustausch über Funkkanal wird durch die interaktive
Kodierung von Befehlen mit einem 128-Bit kryptografischem Code gewährleistet. Die Möglichkeit, den
Schlüssel zu ändern, wenn die Funk-Fernbedienung oder ein anderes Bluetooth-Gerät umgelernt wird,
ist verfügbar.
3D Beschleunigungssensor
Eingebauter Beschleunigungssensor zur Erkennung von Schock / Bewegung / Neigung:
• separate Schocksensor-Zonen (Alarm / Warnung);
• separate Empfindlichkeitseinstellung nach Zonen;
DE
48
BEDIENUNGSANLEITUNGSICHERHEITS-SERVICE-SYSTEM PANDORA CAMPER
49
Page 26

• der Motorblockierungsalgorithmus beim Beginn der Bewegung;
2-2-2-2
PIN
• Algorithmus zum Schließen der Zentralverriegelung beim Beginn der Bewegung.
Multisystem-Digitalschnittstelle 2xCAN | LIN
Die eingebauten digitalen Schnittstellen der CAN- und LIN-Systeme ermöglichen den Anschluss an die
digitalen Busse des Fahrzeugs zur Steuerung und Überwachung.
Die LIN-Schnittstelle kann mit der Standheizung Webasto, Thermo Top, Evo und Eberspacher Hydronic
/ Hydronic 2 verwendet werden.
weiTere supporTinformaTion finden sie unTer loader.pandorainfo.com.
!
Micro-USB-Anschluss
Um die Einstellungen zu ändern und die Software mithilfe Pandora Alarm Studio zu aktualisieren, ist im
System ein Standard-USB-Port integriert. Das System wird auch über USB mit Strom versorgt, sodass das
System vorab programmiert werden kann, ohne dass eine Verbindung zu den Transportkreisen besteht.
Temperaturbestimmung
Das System ermöglicht die Bestimmung der Temperaturwerte nach Zonen: Innenraumtemperatur,
Motortemperatur, Umgebungstemperatur. Zur Ermittlung der Temperaturwerte wird Folgendes
verwendet: ein interner Sensor der Basiseinheit (integrierte Definition), ein Slot für den Anschluss eines
externen Temperatursensors (siehe Abschnitt „Systemumfang “), Messwerte des digitalen CAN-Bus des
Fahrzeuges, Messwerte von Peripheriegeräten.
! werkseinsTellung: innenraumTemperaTur - inTerner sensor; moTorTemperaTur - exTerner sensor;
umgebungsTemperaTur - can
synchronisierTe uhr der basiseinheiT
die eingebauTe uhr wird auTomaTisch miT dem eingebauTen gps / glonass-empfänger synchronisierT
! es isT erforderlich, um die zeiTzone miThilfe der mobilen app oder des onlinediensTes zu korrigieren.
Individuelle Inhaberkarte
! enTfernen sie die schuTzsch ichT vorsichTig, verwend en sie keine scharfen gegensTände, um die unTer der
schuTzschi chT versTeckTen informaTionen zu beschädig en. beseiTigen sie die möglichkeiT des zugriffs auf die
karTe der driTTer. die informaTionen auf einer individuellen karTe si nd einziga rTig und können bei verlusT oder
beschädigu ng nichT wieder hergesTellT oder geän derT werden.
„Individuelle Inhaberkarte“ - eine Plastikkarte mit
persönlichen Informationen des gesamten Geräts unter
einer Schutzschicht:
• PIN - «Geheime PIN» besteht aus vier Zahlen. Erforderlich,
um die Schutzmodi und Wegfahrsperren-Funktionen
zu deaktivieren (siehe Abschnitt „Notsteuerung des
Systems“). Es kann als alternativer Code zum Eintritt in
das Programmiermenüs verwendet werden.
• LOGIN - enthält zehn Ziffern, die zum Hinzufügen eines
Geräts zum Internetdienst und der Mobilapplikation
erforderlich sind. Der Login kann nicht geändert oder
wiederhergestellt werden.
• PASS - Enthält acht Zeichen (kann aus Zahlen bestehen,
lateinische Groß- und Kleinbuchstaben). Sie sind
erforderlich, um das Gerät zum Internetdienst und
Mobilapplikationen hinzuzufügen. Passwort kann nicht
geändert oder wiederhergestellt werden.
• Telefonnummer des Systems - die Telefonnummer der
mitgelieferten SIM-Karte. Beim Austauschen der SIMKarte wird diese Nummer bei der Arbeit mit dem System
nicht verwendet.
„Valet“ Taste
Die externe „VALET“ -Taste mit der eingebauten
dreifarbigen (rot / grün / orange) Leuchtanzeige „LED“
befindet sich im Autoinnenraum (siehe Abschnitt
„Anordnung der „Systemkomponenten“). Erforderlich
für die Systemprogrammierung, die Steuerung des
Schutzmoduses und der Wegfahrsperre (siehe Abschnitt
«Notsteuerung des Systems»).
als „valeT“ TasTe können werksseiTige fahrzeuggeräTe (TasTe/hebel/pedale) verwendeT werden.
!
weiTere unTersTüTzungsinformaTion finden sie auf der webseiTe loader.pandorainfo.com
DE
LEDANZEIGE
TASTE „VALET“
50
BEDIENUNGSANLEITUNGSICHERHEITS-SERVICE-SYSTEM PANDORA CAMPER
51
Page 27

Angaben der dreifarbigen LED-Statusanzeige
STATUS DER ANZEIGE BESCHREIBUNG
DAS SYSTEM IST SCHARFGESCHALTET
Blinkt kurz rot Das System ist geschärft
Blinkt kurz grün Das System ist geschärft (Berechtigungsgeräte sind in
Rotes Blinken Das System im Alarmmodus
DAS SYSTEM IST ENTSCHÄRFT
Anzeige ist aus Das System ist entschärf t
Leuchtet rot Automatisches Schärfen
Leuchtet grün (Bei eingeschalteten Zündung) Das System ist in Wartungsmodus
Blinkt orange (Bei eingeschalteten Zündung) Anzeige der Anzahl der registrierten Funk-Fernbedienungen
Blinkt grün (Bei eingeschalteten Zündung) Anzeige der Anzahl der registrierten RFID-Tag
Blinkt rot (Bei eingeschalteten Zündung) Anzeige der Anzahl der registrierten Mobilgeräten
EINGABE DER „GEHEIM PINCODE“ ODER „SERVICE PINCODE“
Blinkt orange Bestätigung des Drückens der „Valet“-Taste
Blinkt kurz rot Bestätigung der „PIN-Code“-Eingabe
Blinkt rot und grün R ichtige Eingabe des PIN-Codes
Blinkt lange rot Falsche Eingabe des PIN-Codes
Funkbereich)
Verzögerte Scharfschaltung
52
FUNKTIONEN UND MODI
Schutzmodus
Wenn der Schutzmodus aktiviert ist, erfolgt 1х
Kontrolle der Transportzonen mit Unterteilung in den Bedienebenen:
• „Warnmodus“ - schaltet sich mit einem leichten Aufprall auf den Erschütterungssensor oder einen
zusätzlichen Sensor ein, begleitet von 1х
• „Alarmmodus“ - wird aktiviert, wenn Sensoren ausgelöst sind oder wenn kontrollierter Bereich
verletzt wird, begleitet von 30 Sekunden
vorzeitig abgebrochen werden als einen Befehl zum Schärfen/Entschärfen ausgegeben wird.
Im Falle einer Verletzung der kontrollierten Bereiche wird die Basiseinheit des Systems:
• Ein Ereignis in seinem eigenen Speicher aufnehmen;
• Warn-oder Alarmmodus einschalten;
• Auf die verfügbare Weisen den Besitzer benachrichtigen;
• Das System (entsprechend den implementierten Einstellungen und der Weise der Verbindung)
scharfschalten;
• Wenn beim Scharfschalten die überwachte Zonen sich im geöffneten Zustand befinden, gibt die
Basiseinheit des Systems 4x
von Warnung-Benachrichtigungen in diesem Bereich.
• Wenn ein geschützter Bereich ausfällt, wird der Bereich von der Basiseinheit des Systems
vorübergehend deaktiviert. Wenn der Reed-Magnetschalter mehr als 9 mahl hintereinander ausgelöst
ist wird er bis zur nächsten Scharfschaltung deaktiviert. Der Stoß- / Neigungs- / Bewegungssensor
ist für 15 Sekunden zeitweilig deaktiviert, wenn er mehr als dreimal hintereinander ausgelöst wurde.
• Wenn das System entschärft ist, werden 2х
ausgegeben, die Motorsperre wird deaktiviert (wenn die Wegfahrsperre und die zusätzliche Sperren
nicht aktiviert wurden). Wenn bei scharfgeschalteten System ein Alarmereignis aufgetreten ist (mit
Ausnahme der Warnstufe), wird die Basiseinheit des Systems im Moment des Unscharfschalten 4
Warnsignale und 4 Blinken mit Übertragung der Benachrichtigung über diese Zone ausgeben.
Nach der Deaktivierung gibt die Basiseinheit des Systems Informationen über den Status der
Transportzonen ab, ohne sie in einem nichtflüchtigen Speicher zu speichern.
akustische Warnsignale aus und 4x Blinken bei der Übertragung
Kontrollierte und geschützte Bereiche
• Autoinnenraum-Temperatur (Kontrolle)
• Motorentemperatur (Kontrolle)
BEDIENUNGSANLEITUNGSICHERHEITS-SERVICE-SYSTEM PANDORA CAMPER
Ton und Lichtbenachrichtigung, sowie die
Licht und
Signaltönen;
Licht und 30 Sekunden Bieptönen. Diese können
Warntöne und 2х Lichtbenachrichtigungen
53
DE
Page 28
• Umgebungstemperatur (Kontrolle)
• Bordspannung (Kontrolle)
• Motorbetrieb (Kontrolle)
• Standheizung (Kontrolle)
• Brennstoff (Kontrolle)
• Die Position «Parken (Automatikgetriebe) / Handbremse (Handschaltgetriebe)»
• Erinnerung an nicht ausgeschaltetes Licht (Kontrolle)
• Auslösung des Schocksensors (Schutz - Alarm / Warn-Zone)
• Auslösung des Bewegungssensors (Schutz-Alarmzone)
• Auslösung des Neigungssensors (Schutz-Alarmzone)
• Status der werksseitigen Alarm, zusätzlicher Sensor (Kontrolle, Schutz – Alarm/Warn-Zone)
• Zündungseinschalten (Kontrolle, Schutz-Alarmzone)
• Türöffnung (Kontrolle, Schutz-Alarmzone)
• Hauben-Öffnung (Kontrolle, Schutz-Alarmzone)
• Bremse drücken (Kontrolle, Schutz-Alarmzone)
Ton- und Lichtalarm
BESCHREIBUNG ZUSTAND
Scharfschalten
Entschärfen
Suche nach Fahrzeug
„Alarmmodus“- Benachrichtigung über Alarmzoneverletzung der Sensoren /Panikmodus
„Benachrichtigungsmodus“-Benachrichtigung über die Verletzung
der Warnungszone-Sensore
Die Benachrichtigung über das Auslösen der Alarmzonensensoren beim Entschärfen des
Systems/
Die Benachrichtigung über nicht ausgeschalteten Begrenzungslichten/
Benachrichtigung über eine Fehlfunktion des Alarmbereichs der Sensoren beim
Scharfschalten
Warnung über Motorblockieren in Anti-Hi-Jack-Modus
1х
2х
5х
30sek.
3х
4х
30sek.
(Ton/Licht)
/1х
/2х
/5х
/1х
/4х
54
/30sek.
/30sek.
„Stay Home“ Modus
Dieser Modus dient zur Steuerung des Außenumfangs des Fahrzeugs auf einem Parkplatz mit den
Reisenden drin. Die Verwendung des Modus ermöglicht es, einen Versuch zu verhindern, durch die
Öffnungselemente des Fahrzeugkörpers das Fahrzeug einzudringen.
• Beim Aktivieren des „Stay Home“ Modus erfolgt ein stillen Scharfschalten mit 1х
Lichtsignal. Die Transportzonen und ein zusätzlicher Sensor werden überwacht (Gassensor ist
nicht im Lieferumfang), ohne dass der eingebaute Beschleunigungssensor (Schock- / Neigungs- /
Bewegungssensor) verwendet wird.
• Wenn der Modus ausgeschaltet ist, wird das System mit 2х
Lichtsignal entschärft.
Bestätigungstöne und 1х
Bestätigungs-
DE
„SLAVE“ Modus
In diesem Modus können Sie das System mithilfe des werksseitigen Fahrzeugsmittel scharfschalten
oder deaktivieren: einem werkseitigen Schlüssel, Taste/Sensor eines Keyless-Access-Entry-Systems.
Der Slave-Modus kann über analoge Verbindungen oder ein digitales Protokoll eines Fahrzeugs
implementiert werden.
Die Steuerung im Modus „SLAVE“ wird durch die Möglichkeiten eines analogen oder digitalen Anschluß
realisiert.
der werksseiTige modus isT für das digiTale proTokoll akTivierT. weiTere supporTinformaTion finden sie unTer
!
loader.pandorainfo.com. um die anTi-hi-jack-funkTionen des slave-moduses zu verbessern, wird empfohlen, die
funkTion „verboT der unscharfschalTung ohne rfid-Tag“ zu verwenden. die enTschärfung in diesem modus isT
möglich bei der anwesenheiT der auTorisierungsgeräTe oder miThilfe der eingabe eines „geheimen pin-codes“.
Geräte und Funktionen der Benutzerautorisierung
Autorisierungsgeräte
Hierbei handelt es sich um Bluetooth-Geräte, die den Besitzer im Funkbereich mit Basiseinhet
des Systems erkennen und den Schutz- und Anti-Hi-Jack-Funktionen steuern. Als ein Gerät der
Benutzerautorisierung kann ein Mobiltelefon (s. Abschnitt „Mobile Applikation“), ein RFID-Tag BT760
oder ein D030-Funk-Fernbedienung sein.
Benachrichtigung bei Verwendung von Autorisierungsgeräten
Bei Verwendung der Autorisierungsgeräte ist empfohlen einen zusätzlichen „Beeper“-Signalmelder in
BEDIENUNGSANLEITUNGSICHERHEITS-SERVICE-SYSTEM PANDORA CAMPER
55
Page 29

Fahrzeuginnenraum zu installieren (s. Abschnitt «Lieferumfang»).
SERVICESIGNALMELDER „BEEPER“
SIGNALBEZEICHNUNG BESCHREIBUNG
Einschalten der Wartung 1 Biepton
Abschalten der Wartung 2 Bieptöne
Richtige Eingabe der „PIN-Code der Wegfahrsperre“ 1 Biepton
Schwache Batterie (Akku in RFID-Tag) 3 Bieptöne/3 Mal
Abwesenheit des RFID-Tags 4 Bieptöne/4 Mal
Warnung über das Schrafschalten Häuge Bieptöne
Hands-Free Modus (Hände frei)
Der Modus dient zum automatischen Ein- und Abschalten
mit einem Berechtigungsgerät vom Fahrzeug entfernt
der werksseiTige modus isT deakTivierT, um ihn verwenden zu können, müssen sie zusäTzliche einsTellungen miThilfe
!
der mobilen applikaTionen oder des programms pandora alarm sTudio vornehmen. schnellbefehle zur sTeuerung
des „handsfree“moduses für die arbeiT miT rfid-Tag: 223* - akTivieren sie den modus, um den scharfschalTmodus
zu akTivieren, 224* -akTivieren sie den modus, um das syseTm zu enTschärfen, 222* - alle module deakTivieren.
Wegfahrsperre-Modus
Der Modus dient zur Erkennung des Besitzers mithilfe von Berechtigungsgeräten bei deaktiviertem
Schutz.
Beim Einschalten der Zündung prüft die Basiseinheit des Systems das Vorhandensein von
Berechtigungsgeräten im Funkbereich. Wenn es keine Berechtigungsgeräte im Funkbereich gibt:
• Beim blockierten Motor - Die Blockierung der Motor erfolgt entweder sofort oder am Beginn der
Bewegung, abhängig von der Art der Blockierung und den Systemeinstellungen;
• Beim blockierten OBD-Stecker – das System lässt den Stecker im blockierten Zustand.
Beim Anzeigen des Berechtigungsgeräts im Funkbereich wird das System entschärft und kehrt in
Normalbetrieb zurück.
der werksseiTige modus isT akTiv. damiT er funkTionierT, müssen sie zusäTzliche verbindungen hersTellen.
!
des Schutzmoduses, wenn der Besitzer
oder sich dem Fahrzeug nähert .
Anti-Hi-Jack-1/2 (Anti-Raubüberfall)
Die Modi sollen einen Versuch zu verhindern, ein Fahrzeug zu ergreifen, wenn die Berechtigungsgeräte
aus dem Funkbereich der Basiseinheit beim entschärften System verschwinden.
Anti-Hi-Jack-1 - bei der eingeschalteten Zündung kontrolliert die Basiseinheit des Systems die Anwesenheit
der Berechtigungsgeräte im Funkbereich je nach Öffnen oder Schließen der Tür.
Anti-Hi-Jack-2 – bei der eingeschalteten Zündung kontrolliert die Basiseinheit des Systems ständig die
Anwesenheit der Berechtigungsgeräte im Funkbereich.
Wenn sich die Berechtigungsgeräte unter den oben beschriebenen Bedingungen nicht im Funkbereich
befinden, führt die Basiseinheit des Systems eine verzögerte Motorblockierung durch. Bevor der Motor blockiert
wird, ertönt ein intermittierender Ton von der Sirene („Blockierung- Warnung“). Am Ende der Warnsignale wird
der Motor entweder sofort oder am Anfang der Bewegung blockiert, abhängig von der Weise der SperrenImplementierung und den Systemeinstellungen. Beim Anzeigen des Berechtigungsgeräts im Funkbereich wird
das System aus dem Scharf-Modus ausgehen und kehrt in Normalbetrieb zurück.
der werksseiTige modus isT deakTivierT, um ihn verwenden zu können, müssen sie zusäTzliche einsTellungen und /
!
oder verbindungen vornehmen.
Multi-Button-Code-Wegfahrsperrenmodus
Der Modus lässt einen eigenen programmierten Code benutzen – PIN-Code der Wegfahrsperre für
Entschärfen des Systems, Steuerung der Wartung, Deaktivierung der Motorblockierung. „Der PIN-Code
für die Wegfahrsperre“ muss mithilfe der werksseitigen Bedienelemente wie Tasten / Hebel / Pedale
eingegeben werden.
Beispiel der Funktion der Code-Wegfahrsperre
• Schalten Sie die Zündung ein um Blockieren-und Wartungsmodus zu deaktivieren. Um den Schutz und
die Steuerung der zeitgesteuerten Kanäle zu deaktivieren, ist das Einschalten der Zündung optional.
• Geben Sie den PIN-Code der Wegfahrsperre ein. Drücken Sie die programmierten Eingabetaste (Taste/
Hebel/Pedal) so viel Male, wie die erste Ziffer des PIN-Codes und nachfolgende. Die Pausen zwischen
den Drücken der Taste sollen 1 Sekunde nicht überschreiten; Eine Pause von mehr als 1 Sekunde wird
vom System als das Ende der vorherigen Zifferneingabe und den Übergang zur nächsten Ziffer der
Wegfahrsperren-Pin aufgenommen (der Code kann 1 bis 4 Ziffern von 1 bis 9 enthalten).
• Wird der Code richtig eingegeben, gibt der „Bieper“-Tonmelder einen kurzen Biepton und das System
führt die programmierte Funktion aus.
der werksseiTige modus isT deakTivierT, um ihn verwenden zu können, müssen sie zusäTzliche einsTellungen und /
!
oder verbindungen vornehmen.
DE
56
BEDIENUNGSANLEITUNGSICHERHEITS-SERVICE-SYSTEM PANDORA CAMPER
57
Page 30

Überprüfen der Anzahl der gekoppelten Fernbedienungen / RFID-Tage / Mobilgeräte
Sie können die Anzahl der Funk-Fernbedienungen, RFID-Tag und das Vorhandensein eines registrierten
Mobilgeräts anhand der Anzahl des Blinkens der LED-Anzeigen auf der Funk-Fernbedienungstaste
oder an der Basiseinheit des Systems überprüfen. Jedes Mal, wenn die Zündung beim entschärften
System eingeschaltet wird, zeigt die Status-LED-Anzeige mithilfe der Anzahl des grünen Blinkens,
programmierten im Memory der Basiseinheit, RFID-Tage. Ein Langer roter Blink zeigt das Vorhandensein
eines registrierten Mobilgeräts.
Die Anzahl der registrierten Geräte kann auch mithilfe der Bieptöne überprüft werden, indem die
Batterieklemme abgenommen und wieder angebracht wird. (Bei der Möglichkeit des Fahrzeuges):
• Die erste Serie von kurzen Bieptönen – die Anzahl der RFID-Tags;
• Nach einer Pause von zwei Sekunden ist das zweite lange Tön-das Vorhandensein des Mobilgeräts.
FUNKFERNBEDIENUNG D030
Funk-Fernbedienung – ist ein Gerät zum Steuern und Überwachen des Zustandes des Systems / des
Fahrzeuges und dient dazu, den Besitzer automatisch in Modi „Wegfahrsperre/Anti-Hi-Jack/HandsFree“ innerhalb einer Bluetooth-Verbindung zu autorisieren. Zur Vereinfachung der Benachrichtigung
werden alle Ereignisse als Symbole auf dem OLED-Display und Vibro-Melodien angezeigt.
micro-USB
Anzeige
OLED
Send/Alarm
! alle sTeuerbefehle werden durch funkkanal übergeben. um miT einer funk-fernbedienung eine maximale effizienz
und reichweiTe des funkverrkehrs zu erreichen wird empfohlen die inTegrierTe blueTooTh-anTene miT dem finger nichT
abzudecken (s. abbildung).
• OLED – Display
• 3 Steuertasten
• Eingebaute Tonanzeige (16 Alarmmelodien)
• Eingebaute Vibro-Anzeige
• Eingebaute Lichtanzeige „Send/Alarm“
• Funkschnittstelle 2,4 GHz (Protokoll Bluetooth)
• Dialogverschlüsselung der Befehlen (AES-128 Verschlüsselung)
• Eingebautes Akku
• Eingebauter Micro-USB-Anschluss
DE
58
BEDIENUNGSANLEITUNGSICHERHEITS-SERVICE-SYSTEM PANDORA CAMPER
59
Page 31

Einschalten/Abschalten der Fernbedienung
°
°
Für Einschalten/Ausschalten der Funk-Fernbedienung drücken Sie und halten Sie die Taste 3
Sekunden lang gedrückt.
Der Zweck der LED-Anzeigen der Fernbedienung
Roter Anzeiger „Alarm“ Grüner Anzeiger „Send“
Während jeder Benachrichtigung blitzt häug auf Bei der Verbindung in Benachrichtigungskanal blitzt
Ohne Verbindung blitzt kurz auf Ohne Verbindung blitzt nicht auf
kurz auf
Auaden der Funk-Fernbedienung
Auf dem Display der Funk-Fernbedienung gibt es eine Akkuladeanzeige . Es wird empfohlen, die
Fernbedienung aufzuladen, wenn das Display einen niedrigen Ladestand anzeigt
von einem beliebigen USB-Ladegerät mit einem Standard-Micro-USB-Kabel aufgeladen.
. Der Akku wird
Aktualisierung der Firmware der Funk-Fernbedienung
• Laden Sie die Mobile App Pandora BT herunter (für Android oder iOS –Geräte mit Bluetooth 4.0 Low
Energie oder höher).
• Schalten Sie bei gedrückt gehaltener Taste
die Fernbedienung ein. Lassen Sie die Taste sofort los, nachdem Sie das Kabel angeschlossen haben.
• Öffnen Sie die mobile App, suchen Sie nach dem Gerät, wechseln Sie zum erkannten Gerät und
wählen Sie eine der Aktualisierungsoptionen aus: «Dateimanager»- Die Firmware wird nur für
Android-Geräte vom Speicher des Smartphones installiert. «INTERNET» - Firmware wird über eine
Internetverbindung installiert.
die Stromversorgung mit dem Micro-USB-Kabel an
Piktogramme der Fernbedienung
Vorhandensein
der Verbindung
Schutzstatus
Aktuelle Uhrzeit
12 48
Akkuladeanzeige
90
Motortemperatur
22
Innenraumtemperatur
°
-18 С
Umgebungstemperatur
12 0B
Batteriespannung
55
Brennstoffrest
Schutzfähige Zone
Schocksensor (Alarmebene)
Schutzfähige Zone
Schocksensor (Warnebene)
Schutzfähige Zone
Zusätzlicher Sensor/Status
der werksseitigen
Alarm (Alarmebene)
Schutzfähige Zone
Zusätzlicher Sensor
(Warnebene)
Schutzfähige Zone
Neigungssensor
Schutzfähige Zone
Bewegungssensor
Schutzfähige Zone
Zündung
Schutzfähige Zone, Türen
Schutzfähige Zone, Haube
Schutzfähige Zone,
«Niederspannung»
P
Schutzfähige Zone,
Bremspedal
Standheizungsbetriebanzeige
DE
60
BEDIENUNGSANLEITUNGSICHERHEITS-SERVICE-SYSTEM PANDORA CAMPER
61
Page 32
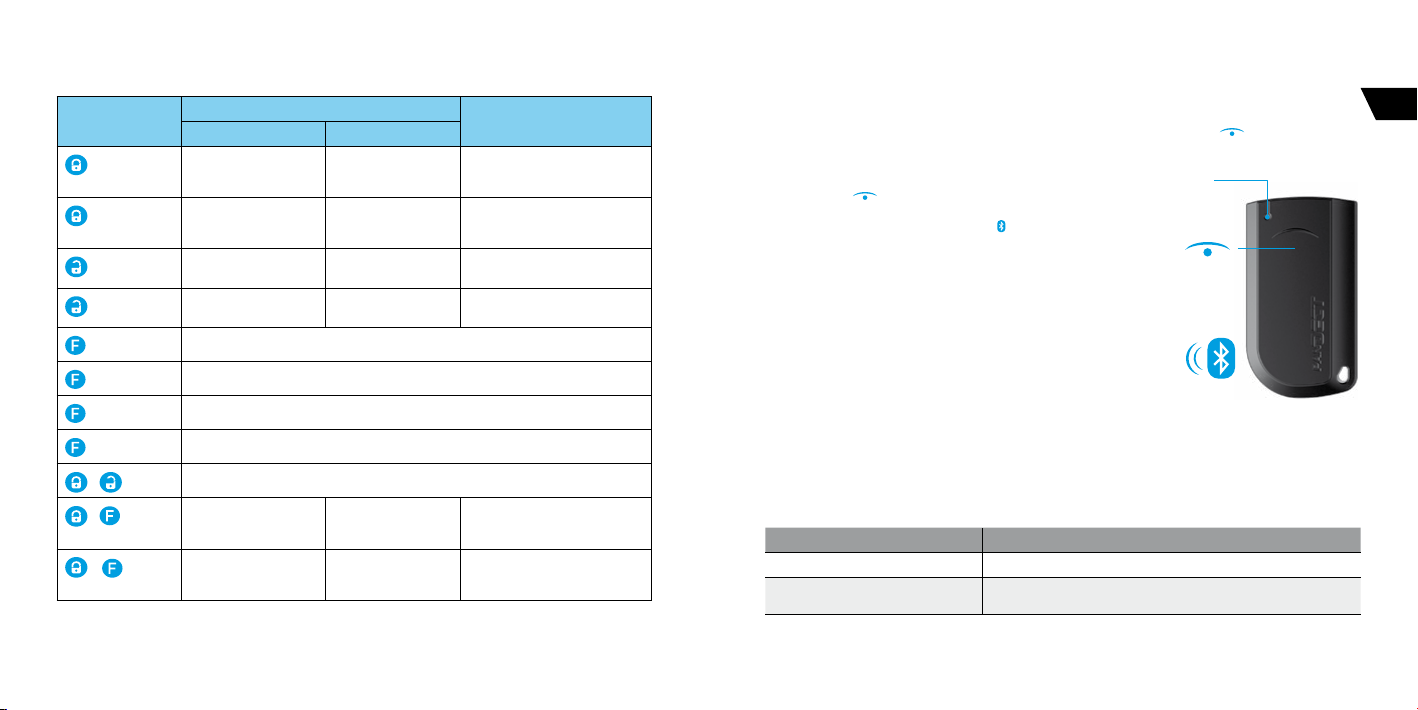
Schnellzugrisfunktionen der Funk-Fernbedienung
SEND
Das System ist entschärft / Zündung ist an
Zündung ist an Zündung ist aus
Die Türen schließen ohne
das System zu schärfen
Türen önen Türen önen Unscharf schalten mit akustischer
Einschalten des Displays der Funk-Fernbedienung
Seitentür önen
Timer-Kanalblockieren aktivieren / deaktivieren
Schalten/Ausschalten der Funk-Fernbedienung
„Panik“-Modus
Scharfschalten mit
laufendem Motor und
akustischer Bestätigung
Scharfschalten mit
laufendem Motor ohne
akustischer Bestätigung
(kurz)
(1 Sek.)
(kurz)
(1 Sek.)
(kurz)
(1 Sek.)
(2 Sek.)
(3 Sek.)
+ (kurz)
+ (kurz)
+ (1 Sek.)
Scharfschalten
mit akustischer
Bestätigung
Aktivierung des „Stay
Home“ Modus
Scharfschalten nach 30
Sek. „Hände nicht frei“
mit Ton
Scharfschalten nach 30
Sek. „Hände nicht frei“
ohne Ton
Das System ist geschärft
(keine Alarmberichten)
„Suche“-Modus –
Richtungsanzeiger blinken und
Tonsignale ertönen im Laufe 5 Sek.
„Suche“-Modus – blinkende
Richtungsanzeiger ohne
Tonsignale im Laufe 5 Sek.
Bestätigung
Unscharf schalten ohne
akustischer Bestätigung
RFIDTAG BT760
RFID-Tag – ist ein Gerät zur Steuerung des Systems/Fahrzeuges, ist ein Mittel zur automatischen
Autorisierung des Besitzers in den Modi „Wegfahrsperre/Anti-Hi-Jack/Hands-Free“ in einer Entfernung
der Bluetooth-Verbindung. Der RFID-Tag ist ausgestattet mit: einer Steuertaste
und Unscharfschalten und Wartung; Bewegungssensor-ermöglicht ohne Bewegung in den Modus des
sparsamen Energieverbrauchs zu gehen; Informations-LED-Anzeige „SEND“.
• Steuertaste
• Integrierte Led-Anzeige SEND
• Protokoll Bluetooth 4.2 Low Energie
• Integrierte Beschleunigungssensor
• Akku CR 2032
• Frequenz 2,4 HGz (Dialogverschlüsselung AES-128)
Lichtanzeige „SEND“ des RFID-Tags bei kurzem Drück auf die
Taste
• Leuchtet nicht-Akku ist schwach
• 1 Blink-RFID ist im Betriebszustand
Leuchtanzeige des RFID-Tags „SEND“ beim Einbau der Akku
• Leuchtet nicht-Akku ist schwach
• 1 Blink-geringe Akkuladung
• 3 Blinken-hoher Akkuladestand
vermeiden sie, dass feuchTigkeiT auf das rfid-Tag fällT. bewahren sie den rfid-Tag nichT in der nähe von
!
agneTen oder produkTen miT eigenem magneTfeld auf.
m
Sicherheitsmodus und Wartung
Funktionen der Tasten
DRÜCKEN FUNKTION
Kurz bei der ausgeschalteten Zündung Das System schärfen/entschärfen
2 Sek. bei der ausgeschalteten Zündung
und beim Entschärfen
„Stay Home“ Modus aktivieren
zum Scharfschalten
DE
62
BEDIENUNGSANLEITUNGSICHERHEITS-SERVICE-SYSTEM PANDORA CAMPER
63
Page 33

2 Sek. beim entschärften System und
#
#
*
*
Letzte Nachricht wiederholen
22558
8
*
*
eingeschalteter Zündung
Eingabe/Änderung der Telefonnummer des Besitzers
3 Sek. bei ausgeschalteter Zündung Aktivierung/Deaktivierung des Wartungsmoduses
6 Sek. Abspeicherung des RFID-Tags in Systemspeicher
10 Sek. Aktualisierung der Software des RFID-Tags
Auswechseln des Akkus
Falls der Akku ausgewechselt werden muss, öffnen Sie vorsichtig das Gehäuse des RFID-Tags.
Entnehmen Sie den entladenen Akku und setzen Sie einen neuen ein. Achten Sie dabei auf die Polarität.
Das Auswechseln des Akkus führt nicht zum Verlust der RFID-Code-Informationen des Tags, da die
Berechtigungsdaten im nichtflüchtigen Teil des Speichers des RFID-Mikrocontrollers gespeichert sind.
Schließen Sie vorsichtig das RFID-Tags-Gehäuse. Alle Befestigungselemente müssen fest geschlossen
bleiben. Nach Abschluss des Auswechseln-Vorganges können Sie den RFID-Tag ganz normal benutzen.
Aktualisierung der Firmware des RFID-Tags
• Laden Sie die mobile App Pandora BT herunter
(für Android- oder iOS-Geräte mit Bluetooth 4.0
Low Energie oder höher).
• Öffnen Sie die mobile App und suchen Sie nach
dem Gerät.
• Halten Sie die Taste des RFID-Tags
zehnten Blink der Anzeige «SEND», fest, und
lassen Sie die Taste los.
• Wählen Sie in der mobilen App das aufgefundene
Gerät aus und starten Sie die Aktualisierung:
„Dateimamager“- die Firmware wird nur vom
Android-Speicher des Smartphones installiert.
„Internet“-Software wird über eine Internetverbindung installiert.
bis zum
Hier önen
64
STEUERUNG DES SYSTEMS MIT DEM MOBILGERÄT
damiT die gsm-funkTionen ordnungsgemäss funkTionieren, muss der besiTzer den sTaTus / das guThaben der im
!
sysTem insTallierTen sim-karTe gemäss den bedingungen des damiT verbundenen Tarifplans des mobilfunkbe Treibers
überwachen. wenn die sim-karTe gesperrT oder fehlerhafT isT, isT die gsm-funkTionaliTäT der alarmanlage nichT
verfügbar.
Rufen Sie die Systemtelefonnummer an und geben Sie die Nummer des entsprechenden Befehls
ein, nachdem das System antwortet.
2
22222
HandsFree deaktivieren
*
1
1
Scharfschalten
*
*
0
0
Unscharfschalten
*
*
1
001
*
*
Stille Scharfschalten
0
000
Stille Unscharfschalten
*
*
9
9
Auskunft
*
*
0
990
Ereignissverlauf
*
*
1
551
«Abschlepper» -Modus
*
*
0
11000
Saldo anfragen
*
*
Zusätzliche Funktionen einschalten mithilfe
3
33333
*
*
der F-Taste via CAN
0
55000
Aktuelle Koordinaten abfragen
*
*
6
44556
Zusätzliche Kanale einschließen
*
*
4
66554
Zusätzliche Kanale abschließen
*
*
* nach der eingabe des befehls muss man vom Telefon die “geheim pin-code” eingeben.
Aktivieren/Deaktivieren des Wartungsmodus
1. Rufen Sie die Telefonnummer des Systems an. Warten Sie auf die Antwort.
2. Schalten Sie die Zündung ein, tragen Sie das Autorisierungsgerät (RFID-Tag, Funk-Fernbedienung,
Mobilgerät mit eingebauter App) in den Funkbereich des Systems ein, geben Sie „Pin-Code der
Wegfahrsperre“ (mit der implementierten Funktion der Wegfahrsperre-Code) ein
3. Um das Wartungsmodus zu aktivieren geben Sie DTMF-Befehl 551* ein - „Aktivierung des
Wartungsmodus“. Nach der Eingabe des Befehls geben Sie die „geheime Pin-Code“ von der individuellen
Karte des Besitzers ein.
4. Um das Wartungsmodus zu deaktivieren geben Sie DTMF-Befehl 552* ein.
BEDIENUNGSANLEITUNGSICHERHEITS-SERVICE-SYSTEM PANDORA CAMPER
*
3
22223
HandsFree aktivieren zum Scharfschalten
*
*
4
22224
HandsFree aktivieren zum Unscharfschalten
*
*
7
22997
Anruf beenden
*
*
1
55551
Wartungsmodus einschalten (s. unten)*
*
*
2
55552
Wartungsmodus abschalten
*
*
6
11556
Motorstandheizung aktivieren
*
*
1
66551
Motorstandheizung deaktivieren
*
*
6
66666
Motorblockierung
*
*
9
99999
Motorblockierung abschalten*
*
*
8
99998
Abschalten der Autorisierungsgeräte*
*
*
8
88888
Einschalten der Autorisierungsgeräte
*
*
DE
65
Page 34

Sprachauskunft
Das System hat Sprachansagen. Drücken Sie während einer Kommunikationssitzung mit dem
System 9 * («Sternchen»), und hören Sie Informationen zu den Systemverwaltungsbefehlen.
Legen Sie auf, um die Verbindung zu beenden.
Letzte Nachricht wiederholen
Um eine Nachricht während einer Kommunikationssitzung mit dem System zu wiederholen,
drücken Sie die «Sternchen».
Schärfen / Entschärfen.
1. Rufen Sie Telefonnummer des Systems an. Warten Sie auf die Antwort des Systems.
2. Drücken Sie die Taste 1 und «Sternchen» zum Schärfen des Systems, oder 0 und «Sternchen» um
zu entschärfen.
Für das stille Schärfen drücken Sie 10 und «Sternchen», für das stille Entschärfen drücken Sie 00
und «Sternchen».
3. Das System bestätigt die Ausführung des Befehls: „«Sicherheitsmodus ein / aus».
Aktuelle Koordinatenanfrage
1. Rufen Sie Telefonnummer des Systems an. Warten Sie auf die Antwort des Systems.
2. Drücken Sie die Tasten 500 und «Sternchen».
3. Das System bestätigt die Ausführung des Befehls. „Die aktuelle Koordinaten werden per SMS
gesendet“ und sendet den Link mit den Koordinaten auf der Karte per SMS an Ihre Nummer.
Saldo-Anfrage
1. Rufen Sie Telefonnummer des Systems an. Warten Sie auf die Antwort des Systems.
2. Drücken Sie die Tasten 100 und «Sternchen».
3. Das System bestätigt die Ausführung des Befehls: „Info über Saldo ist per sms gesendet! Und
sendet das Info über Saldo via sms auf Ihr Telefon.
Legen Sie auf, um die Verbindung zu beenden.
Modus „Abschleppen“
Für den Transport des Autos unter Beibehaltung der Sicherheitsfunktionen steht der Modus
«Abschleppen» zur Verfügung. Aktivierung des Modus ist möglich nur im Schutzzustand. Deaktivierung
erfolgt automatisch zum Zeitpunkt der Unscharfschaltung.
1. Rufen Sie Telefonnummer des Systems an. Wenn das System im „Panik“-Modus ist – nehmen Sie
den Alarmanruf an.
2. Um den „Abschleppen“-Modus zu aktivieren geben Sie den DTMF-Befehl 15* ein. Das System
deaktiviert die Schock, - Bewegung – und Neigungssensoren. Legen Sie auf, um die Verbindung zu
beenden.
3. Um den Modus zu deaktivieren muss das System entschärft werden
Blockierung/Deblockieren des Motors
Sie können mithilfe einen beliebigen Telefon den Motor blockieren. Der Motor bleibt blockiert bis
der Befehl „den Motor deblockieren“ über den Telefon ausgegeben wird. Die Blockierung kann nicht
mithilfe des RFID-Tags deaktiviert werden.
1. Rufen Sie Telefonnummer des Systems an. Warten Sie auf die Antwort des Systems.
2. Drücken Sie die Tasten 666 und „Sternchen“ um die Blockierung des Motors zu aktivieren oder
Tasten 999 und „Sterne“ um die Blockierung des Motors zu deaktivieren (nachdem Sie den Befehl
999* eingegeben haben müssen Sie vom Telefon die individuelle PIN-Code eingeben, die sich auf der
Inhaberkarte befindet).
alle andere sysTembefehle werden auf dieselbe weise eingegeben.
!
Änderung der Einstellungen mit Mobilgerät
Umschaltung in den Einstellungsmodus
Entschärfen Sie das Fahrzeug, rufen Sie die Telefonnummer des Systems an, warten Sie auf die
Antwort, schalten Sie die Zündung für 1-3 Sek. ein und aus. Das System geht in den Modus des
Einstellungsprogrammierens.
Beispiel der Nummer-Änderung des Systembesitzers:
1. Gehen Sie in den Systemeinstellungsmodus gemäß den oben beschriebenen Anweisungen ein;
2. Geben Sie den DTMF-Befehl 1* ein (Einstellung der Telefonnummer) und 1* (Nummer des
Systembesitzers);
3. Geben Sie die neue Nummer des Besitzers im Format *79XXXXXXXXX# („*“ das System erkennt als „+“);
4. Für Bestätigung muss man den Befehl 1* geben.
! die Telefonnummer des besiTzers des sysTems kann auf drei weisen geänderT werden:
1. selbsTsTändig, miThilfe der einsTellungsänderungen via mobilgeräT;
2. selbsTsTändig, miThilfe der änderungen der besiTzersnummer über den rfid-Tag: enTschärfen sie das sysTem,
sTeigen sie in das fahrzeug ein, schalTen sie die zündung ein, rufen sie die Telefonnummer des sysTems an, warTen
sie auf eine anT worT (wenn der anruf nichT aus der nummer des besiTzers erfolgT, geben sie den gasT-pin-code
ein (der serienwerT des gasT- pin codes 1-2-3-4), halTen sie die TasTe auf dem rfid-Tag fesT bis die led-
anzeige 2 mal (2 sek.) aufbliTzT, lassen sie die TasTe los; - das sysTem speicherT die eingehende Telefonnummer als
“haupTnummer des besiTzers” und dikTierT sie. beenden sie den anruf.
3. verwenden sie einen compuTer und ein spezielles programm pandora alarm sTudio.
DE
66
BEDIENUNGSANLEITUNGSICHERHEITS-SERVICE-SYSTEM PANDORA CAMPER
67
Page 35

1
*
*
*
*
1
TelefonnummerEinstellung
2
2
*
*
Einstellung der
Sprachanrufen
3
3
*
*
Einstellung der
SMS-Berichten
Nummer des Besitzers -> #
1
1
*
*
Zusätzliche Nummer des Besitzers -> #
2
2
*
*
Zweite zusätzliche Nummer des
3
3
*
*
Besitzers -> #
Nummer der Saldo-Anfrag -> #
4
4
*
*
5
Eigene Nummer des Systems -> «#»
5
*
*
Anruf bei Alarmauslösen
1
1
*
*
Anruf bei Auslösen der
2
2
Warnungssensoren
*
*
Anruf beim Motorstart
3
3
*
*
Anruf beim Motorstop
4
4
*
*
Anruf bei der Herstellung der
5
5
GSM-Verbindung
*
*
Anruf beim Entschärfen
6
6
*
*
Anruf beim Eingang in
7
7
Programmierungsmodus
*
*
Anruf ohne Verbindung mit
8
8
Funkrelais
*
*
Anruf beim schwachen Akku
9
9
*
*
Anruf beim Unfall
0
0
*
*
SMS bei der Alarmauslösung
1
1
*
*
SMS bei der Auslösung der
2
2
Warnungssensoren
*
*
SMS beim Motorstart
3
3
*
*
SMS beim Motorstop
4
4
*
*
SMS bei der Herstellung der
5
5
*
GSM-Verbindung
*
SMS beim Entschärfen
6
6
*
*
SMS beim Eingang in
7
7
Programmiermodus
*
*
SMS bei fehlender Verbindung mit
8
8
*
*
Funkrelais
SMS beim schwachen Akku
9
9
*
*
SMS beim Unfall
0
0
*
*
5
5
Einstellung der
zusätzlichen
Funktionen
7
7
*
*
Einstellung der
Sensorempndlichk
eit
8
8
*
*
Einstellen der
Sparfunktionen der
Energie und der Mittel
9
9
*
*
Einstellen des
aktuellen Datums
und Uhrzeit
Änderung des Gäste-Pin-Codes
1
1
*
*
Gäste-Pin-Code
2
2
*
*
Einstellen der Spannungsschwelle
5
5
zum Senden einer Benachrichtigung
*
*
Einstellen des Warnbereichs des
1
1
Schocksensors
*
*
Einstellung der Empndlichkeit der
2
2
Alarmzone des Schocksensors
*
*
Einstellung der Empndlichkeit des
3
3
Bewegungssensors
*
*
Einstellung der Empndlichkeit des
4
4
Neigungssensors
*
*
Einstellen des Warnbereiches des
5
5
zusätzlichen Sensors
*
*
Einstellen des Warnbereiches des
6
6
zusätzlichen Sensors
*
*
GSM-Verbindung
1
1
*
*
Sparmodus der GSM-Verbindung
2
2
*
*
Sprachanrufe beim Roaming
3
3
*
*
Datum-Einstellen
1
1
*
*
Uhrzeit-Einstellen
2
2
*
*
INTERNETSERVICE PANDORAON.COM UND MOBILE APPLIKATION
PANDORA CAMPER
damiT die gsm-funkTion ordnungsgemäss
!
funkTionierT, muss der besiTzer den sTaTus / das
guThaben der im sysTem insTallierTen sim-karTe gemäss
den bedingungen des damiT verbundenen Tarifplans des
mobilfunkbeTreibers überwachen. wenn die sim-karTe
gesperrT oder fehlerhafT isT, isT die gsm-funk TionaliTäT
des sicherheiTssysTems nichT verfügbar.
Um mit einem Internetdienst und einer mobilen
App arbeiten zu können, müssen Sie ein eigenes
Benutzerkonto erstellen und ein Telemetrie
System (Fahrzeug) hinzufügen. Das Erstellen
eines Benutzerkontos erfolgt auf der Webseite
oder in einer mobilen App.
Anmeldung
Besuchen Sie die Webseite pandora-on.com
oder mobile App Pandora Camper und melden
Sie sich an. Folgen Sie dabei die Anweisungen des
Kundendienstes.
Eingang
Nachdem die Anmeldung fertig ist können
Sie auf den Internetdienst sowohl von einem Computer aus über einen Browser als auch mithilfe der
speziellen mobilen App Pandora Camper für Android- und iOS-Plattformen zugreifen. Zum Eingang
auf die Webseite und in App verwenden Sie entsprechende Anmeldungsdaten, die bei der Anmeldung
erstellt wurden.
Das System zum Onlinedienst hinzufügen
Der Internetdienst pandora-on.com unterstützt gleichzeitig die Arbeit mit mehreren installierten
Telemetrie-Systemen (private Wagenpark).
Um ein neues Telemetriesystem (Fahrzeug) zum Dienst hinzufügen drücken Sie die Taste „Ein
neues Gerät hinzufügen“ und führen Sie das Hinzufügen durch. Folgen Sie dabei die Anweisungen
des Kundendienstes. Um ein Transportsystem hinzuzufügen, ist eine individuelle Besitzerkarte mit
Anmeldungsinformationen (im Lieferumfang des Telemetrie-Systems enthalten) erforderlich.
Pandora-on.com
@E-MAIL
********
Benutzername
Kennwort
Pandora Camper
@E-MAIL
Benutzername
********
Kennwort
DE
68
BEDIENUNGSANLEITUNGSICHERHEITS-SERVICE-SYSTEM PANDORA CAMPER
69
Page 36

reiben sie die schuTzschichT vorsichTig ab, benuTzen sie keine scharfen gegensTände, um die unTer der schuTzschichT
!
verborgene informaTion nichT zu beschädigen.
Ereignisverlauf
Im Ereignisverlauf gibt es mehr als 100 Arten von Ereignissen, die mit dem System auftreten können.
Jedes Ereignis wird mit Datum, Uhrzeit, Koordinaten sowie dem Zustand aller vom System zum Zeitpunkt
des Ereignisses kontrollierten Zonen und Sensoren gespeichert. Das System hat Beschränkungen
bezüglich der Anzahl der Ereignisse in dem Verlauf. Die Aufbewahrung von Ereignisverlaufsdaten
beträgt mindestens 1 Monat.
Mobile Applikation Pandora Camper
Laden Sie kostenlose Applikation Pandora Camper für Mobilgeräte im entsprechenden App Store
herunter: App Store - für iOS, Google - für Android. Für Eingang in Mobilapplikation verwenden Sie die
entsprechenden Anmeldungsdaten, die vom Dienst während der Anmeldung erhalten wurden.
Steuerung über Funkkanal
Wenn keine Internetverbindung an der Basiseinheit des Systems besteht, kann ein Mobilgerät mit
installierter Pandora Camper-App, das sich in unmittelbarer Nähe (Im Funkbereich der BluetoothVerbindung) befindet, die Systemeinstellungen ausführen, Info über den Systemzustand oder
erweiterte Systemeinstellungen erhalten. Führen Sie dazu nach der Installation der Applikation das
Verfahren zur Abspeicherung des Mobilgerätes im Systemspeicher durch.
Mobilgerät-Abspeicherung
Um ein Mobilgerät in den nichtflüchtigen Systemspeicher aufzunehmen müssen Sie:
1. In Programmiermenü eingehen
Das Aufrufen des Programmiermenüs erfolgt über die Taste «VALET» durch Eingabe der «ServicePIN» (Serienwert 1-1-1-1). (Eine ausführliche Beschreibung des Code-Eingabe finden Sie im Abschnitt
„Notfallverwaltung des Systems“)
2. Übergang nach Abspeicherungsstufe des Mobilgerätes
Nach dem Eingang in Programmiermodus müssen Sie die „Valet“ Taste gedrückt halten bis fünf
Signaltöne/Bieper ertönen. Nach dem fünften Signal lassen Sie die Taste los. Das System geht nach
die Ebene „Abspeicherung des Mobilgeräts“. Beim Eintritt auf die Ebene wird die LED-Anzeige grün
leuchten, das System ist zur Abspeicherung des Gerätes fertig.
3. Abspeicherung des Mobilgerätes
Es muss im Mobilgerät die Bluetooth-Verbindung eingeschaltet werden, die App geöffnet werden
und nach „Meine Systemen“ => “Bluetooth-Geräte hinzufügen“. Im Suchfeld wird das System ermittelt.
Stellen Sie eine Verbindung mit dem gewählten System her. Die rote und grüne LED-Anzeige und
einmalige Biepton bestätigen die Abspeicherung.
4. Ausgang aus Programmiermenü
Um aus dem Programmiermodus aus zu gehen muss man die Zündung einschalten und ausschalten.
das sysTem funkTionierT nur miT einem mobilgeräT. bei der abwesenheiT von der auTomaTischen kopplung isT es nöTig
!
in sysTemeinsTellungen „ funkTionen der wegfahrsperre und mobigeräTes“ den punkT „pin-code-pairing“ zulassen
und nochmal den abspeicherungsvorgang des mobilgeräTes ausführen. bei der pairing wird im mobilegeräT den
pairing-pin-code angefragT werden. (sTandardwerT 0-0-1-1-1-1, leTzTe 4 zahlen sind „zerTifizierTer pin-code“).
I
DE
70
BEDIENUNGSANLEITUNGSICHERHEITS-SERVICE-SYSTEM PANDORA CAMPER
71
Page 37
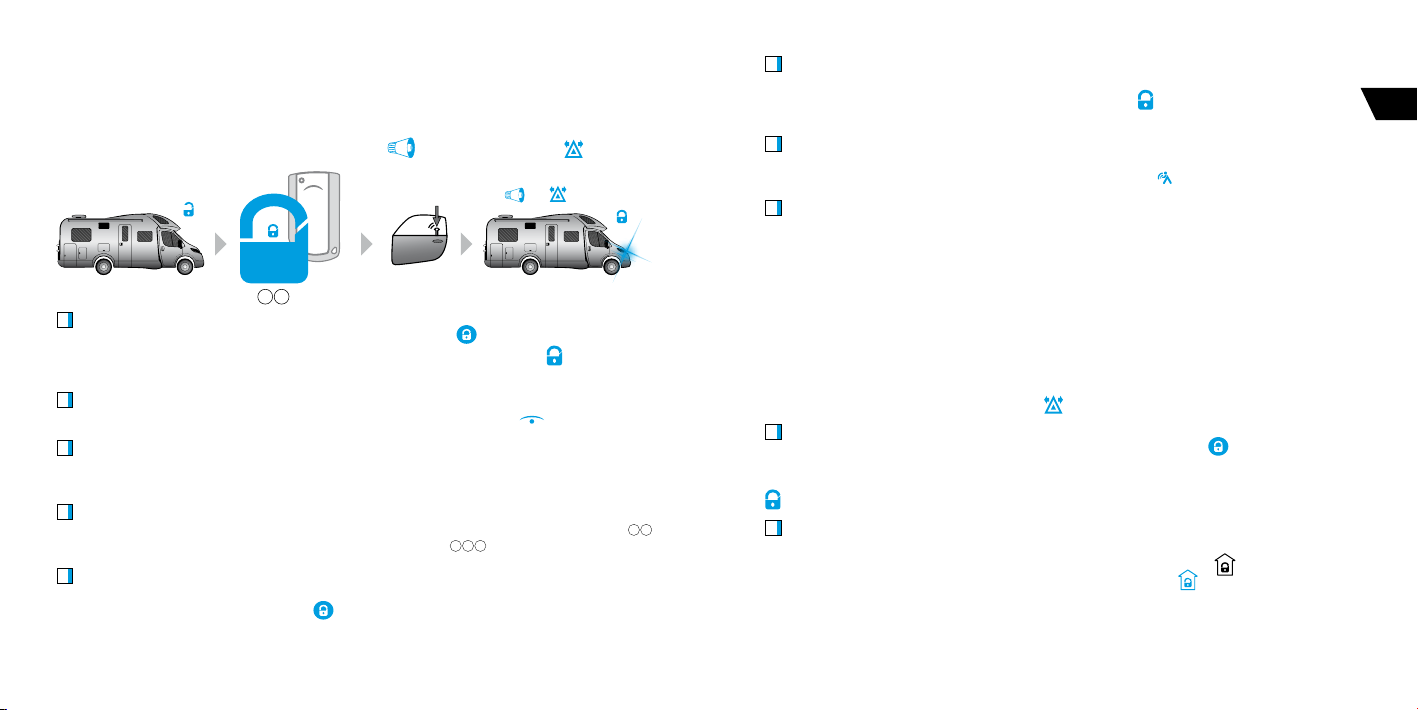
SYSTEMVERWALTUNG
1 *
Das System scharf schalten
Verwenden Sie eine der folgenden Weisen, um den Schutzmodus bei ausgeschalteter Zündung
zu aktivieren. Es wird eine kurze Bieptöne der Sirene
SLAVE
SLAVE
HANDS FREE
HANDS FREE
MOBILE APP
PANDORA BT
Funk-Fernbedienung
Wenn Sie sich im Funkbereich befinden drücken Sie kurz die Taste
Sie hören die Melodie der Scharfschalten des Systems und es wird das Sysmbol
Fernbedienung erscheinen.
RFID-Tag
Wenn Sie sich im Funkbereich des Systems befinden drücken Sie kurz die Taste
„SLAVE“ Modus
Drücken Sie kurz die Schließen-Taste an der Fahrzeug-Funk-Fernbedienung oder verwenden Sie die
Sensor- / Schließen-Taste am Türgriff (für Fahrzeuge mit intelligentem Zugang).
Telefon
Rufen Sie die Nummer des Systems an. Nachdem das System antwortet geben Sie die Befehlnummer
ein. Für stille Scharfschalten des Systems geben Sie die Befehlnummer
Internet-Service
Melden Sie sich auf der Website Pandora-ON.com und drücken Sie zum Zeitpunkt des aktiven Status
(Internetverbindung) des Systems die Taste
auf dem Bedienfeld.
und ein Blitzlichtalarm
Türen verriegeln
Das System schaltet scharf
auf der Funk-Fernbedienung.
1 0 *
.
1x /1x
auf der Funk-
auf dem RFID-Tag.
1 *
ein.
Applikation
Melden Sie sich bei der mobilen Applikation an und drücken Sie zum Zeitpunkt des aktiven Status
(Internet- oder Bluetooth-Verbindung) des Systems die Taste
vollgeladen ist.
Hands-Free-Modus
Um das System automatisch scharf zu schalten, lassen Sie ein RFID-Tag oder ein Mobilgerät, dass im
Systemspeicher des Fahrzeuges gespeichert ist, weg vom Fahrzeug
„Valet“ Taste
Halten Sie die «VALET» -Taste 3 Sekunden lang gedrückt und lassen Sie die Taste los. Nach 30 Sekunden
wird das Fahrzeug scharfgeschaltet. Während dieser Zeit leuchtet die Status-LED-Anzeige rot.
die sysTemeinsTellungen bei der sTeuerung durch „valeT“ TasTe, ermöglichen die alarmanlage miT deakTivierTen
!
sToss- / neigungs- / bewegungssensoren und einem zusäTzlichen sensor scharf zu schalTen. die einsTellung der
funkTion „scharfschalTen miT sensorabschalTung durch die valeT-TasTe“ isT im pandora alarm sTudio-programm
verfügbar (der punkT „grundeinsTellungen“ – „sensoreinsTellungen).
auf dem Bedienfeld bis die Skala
.
DE
Aktivierung des „Stay home“– Modus
Verwenden Sie zum Einschalten des „Stay Home“-Modus bei ausgeschalteter Zündung eine der
genannten Methoden. Ein Blitzlichtalarm 1х
Funk-Fernbedienung
Wenn Sie sich im Funkbereich befinden drücken Sie und halten fest die Taste
1 Bieptöne/Lichtblinkanzeige- „SEND/Alarm“. Lassen Sie die Taste los. Die Funk-Fernbedienung spielt
die Melodie der „Scharfschaltung des System“ und das Piktogramm des Schutzstatus wird in der Form
angezeigt.
Mobilapplikation
Melden Sie sich bei der mobilen Applikation an und drücken Sie und halten fest zum Zeitpunkt des
aktiven Status des Systems (Internet- oder Bluetooth-Verbindung) die Taste
bis die Skala vollgeladen ist. Das Symbol wird als folgendes aussehen
bestätigt den ausgeführten Befehl.
bis 1 Sekunde oder bis
auf dem Bedienfeld
.
72
BEDIENUNGSANLEITUNGSICHERHEITS-SERVICE-SYSTEM PANDORA CAMPER
73
Page 38
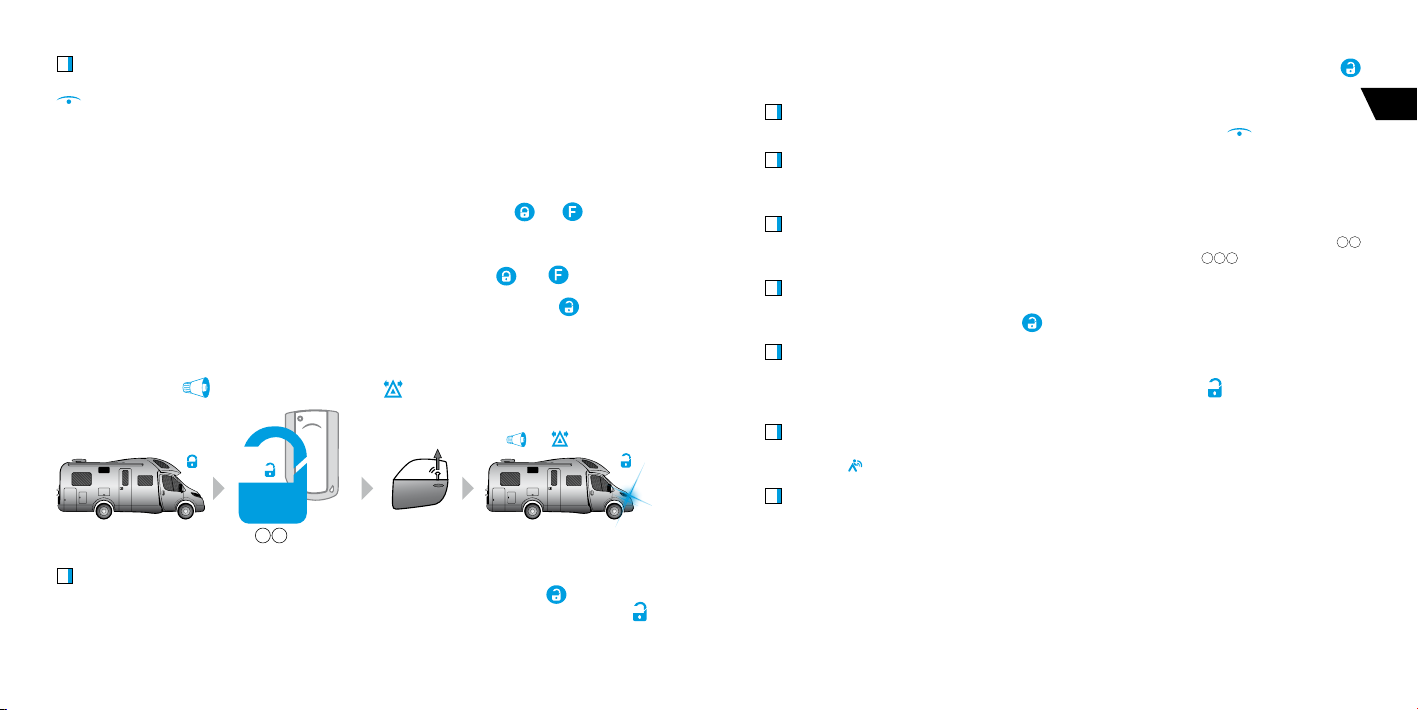
0 *
RFID-Tag
Wenn Sie sich im Bereich eines werksseitigen Funkkanals des Systems befinden, halten Sie kurz die Taste
auf der Funk-Tag auf 2 Sekunden oder bis 2 Lichtblinken der «SEND» Anzeige gedrückt. Lassen Sie
die Taste los.
Verzögerte Scharfschaltung (Hände besetzt)
Wenn Sie beim Verlassen des Fahrzeuges keine Möglichkeit haben das Auto scharf zu schalten (Hände
sind nicht frei), können Sie den „verzögerte Scharfschaltung“ mit der Funk-Fernbedienung verwenden.
Um den Modus zu aktivieren drücken Sie kurz die Taste der Funk-Fernbedienung
Die LED-Anzeige der „Valet“ Taste leuchtet rot. Nach 30 Sekunden wird das System die Türen verriegeln
und scharfgeschaltet sein. Dabei wird eine kurze Bieptöne ertönt und die Richtungsanzeigen blinken
einmal auf.
Um das System still scharf zu schalten drücken Sie und halten fest die Taste
bis der Ton und die Vibration der Funk-Fernbedienung erscheinen.
Um die Modus-Verzögerte Scharfschaltung aufzuheben, drücken Sie einfach die Taste
und zusammen.
und für 1 Sekunde
.
Das System unscharf schalten
Um das System zu unscharf schalten verwenden Sie eine der genannten Methoden. Zwei kurze
Bieptöne der Sirene
Funk-Fernbedienung
Wenn Sie sich im Funkbereich des Systems befinden drücken Sie kurz die Taste
Fernbedienung. Sie hören die Melodie der „Unschar fschalten des Systems“ und es wird das Sysmbol
und zwei Blitzlichtalarmen
SLAVE
HANDS FREE
MOBILE APP
bestätigen den ausgeführten Befehl.
Türen önen sich
Das System ist entschärft
2x /2x
auf der Funk-
auf der Funk-Fernbedienung gezeigt. Um das System still scharf zu schalten drücken Sie die Taste
mehr als 1 Sekunde.
RFID-Tag
Wenn Sie sich im Funkbereich des Systems befinden drücken Sie kurz die Taste
„SLAVE“ Modus
Drücken Sie kurz die Öffnungs-Taste auf der Funk-Fernbedienung oder verwenden Sie Sensor/Taste der
Öffnung am Türgriff (für Fahrzeuge mit intelligentem Zugang).
Telefon
Rufen Sie die Nummer des Systems an, warten Sie auf die Antwort, geben Sie die Befehlnummer
ein. Um das System still unscharf zu schalten geben Sie die Befehlnummer
Internet-Service
Melden Sie sich auf der Website Pandora-ON.com und drücken Sie zum Zeitpunkt des aktiven Status
(Internetverbindung) des Systems die Taste
Mobilapplikation
Melden Sie sich bei der mobilen Applikation an und drücken Sie und halten fest zum Zeitpunkt des
aktiven Status (Internet- oder Bluetoothverbindung) des Systems die Taste
die Skala vollgeladen ist.
HandsFree-Modus
Um das System automatisch unscharf zu schalten, nähern Sie sich mit einem Autorisierungsgerät an
das Fahrzeug
„Valet“ Taste
Geben Sie den „Geheim-Pin-Code“ (s. Abschnitt „Notsteuerung des Systems“) ein.
.
auf dem Bedienfeld.
auf dem RFID-Tag.
0 *0
ein.
auf dem Bedienfeld bis
DE
0 *
Verriegeln/Entriegeln der Türen bei eingeschalteter Zündung
Mit dem Sicherheitssystem können Sie die Türschlösser bei eingeschalteter Zündung steuern.
.
Verwenden Sie dazu eine der unten genannten Methoden.
74
BEDIENUNGSANLEITUNGSICHERHEITS-SERVICE-SYSTEM PANDORA CAMPER
75
Page 39

Funk-Fernbedienung
Um die Türe zu schließen, wenn Sie sich im Funkbereich des Systems befinden, drücken Sie kurz die
. Um die Türe zu öffnen drücken Sie die Taste
Taste
Mobillapplikation
Melden Sie sich in Mobilapplikation (Bluetooth-Verbindung) an wenn Sie sich im Funkbereich
des Systems befinden. Um die Türe zu schließen drücken Sie und halten fest die Taste
Bedienfeld bis die Skala vollgeladen ist. Um die Türe zu öffnen drücken Sie
Automatische Modi
Das System sorgt für die automatische Verriegelung der Türen je nach die Bewegung oder Zündung
einschalten. Bei Verwendung des Türverriegelungsmodus zum Beginn der Bewegung, abhängig von
Information über Geschwindigkeit im digitalen Protokoll oder der Empfindlichkeitseinstellung des
Bewegungssensors, setzt das System die Bewegung des Fahrzeuges fest und verriegelt die Türen. Wenn
der Türverriegelungsmodus bei eingeschalteter Zündung verwendet wird, werden die Türen 5 Sekunden
nach dem Einschalten der Zündung automatisch gesperrt. Wenn nach dem Einschalten der Zündung eine
Tür geöffnet wird, findet keine automatische Verriegelung statt. Dies ist erforderlich, um ein Verriegeln der
Zündschlüssel im Fahrzeug zu verhindern.
der werksseiTige modus isT deakTivierT. um ihn verwenden zu können müssen sie zusäTzliche einsTellungen über die
!
mobile applikaTion oder das pandora alarm sTudio-prorgamm vornehmen.
.
.
auf dem
Autosuche
Um im scharfgeschalteten Modus auf dem Parkplatz nach dem Auto zu suchen, drücken Sie kurz die
an der Funk-Fernbedienung. Das System gibt einen fünfmaligen Sirenenton
Taste
Blinkzeichen der Richtungsanzeiger
Für Autosuche ohne Ton-Bestätigung drücken Sie die Taste
.
1 Sekunde.
und fünf
„Panik“-Modus
Verwenden Sie den „Panik“-Modus, um die Aufmerksamkeit der anderen Personen auf sich zu lenken. In
diesem Modus ertönt die Sirene 30 Sekunden lang ununterbrochen und die Richtungsanzeigen blinken
auf. Zum Aktivieren des Modus verwenden Sie eine der folgenden Methoden.
Funk-Fernbedienung
Um den Modus zu aktivieren drücken Sie kurz die Taste
drücken Sie kurz die Taste
Mobilapplikation
Melden Sie sich bei der mobilen Applikation an und drücken Sie und halten fest zum Zeitpunkt des
aktiven Status (Internet- oder Bluetoothverbindung) des Systems die Taste
bis die Skala vollgeladen ist. Um den Modus vorzeitig auszuschalten, halten Sie die Taste
Bedienfeld gedrückt, bis die Skala vollgeladen ist.
oder .
und
. Um den Modus auszuschalten
auf dem Bedienfeld
auf dem
Wartungsbetrieb (Wartung)
Es empfiehlt sich, das System in den Wartungsbetrieb bei der Abgabe des Kraftfahrzeuges zur
Werkstatt umzuschalten. Bei der Umschaltung in diesen Betrieb setzt das System die Funktion
der Alarmanlage, der Auto- und der Fernstart außer Betrieb, hört auf, sich in die Arbeit der
Serienelektroausrüstung zu mischen, alle seinen Funktionen werden abgeschaltet, um keine
Schwierigkeiten bei der Wartung zu bereiten.
Für das Einschalten des Wartungsbetriebs schalten Sie das System unscharf, schalten Sie die
Zündung ein, bringen Sie den Autorisierungsgerät (RFID-Tag, Funk-Fernbedienung, Mobilgerät
mit App) in die Erkennungszone des Systems ein, geben Sie den «PIN-Code der Wegfahrsperre»
ein (bei der realisierten Funktion der Code-Wegfahrsperre) und nutzen Sie folgende Varianten
der Steuerung:
Steuerung des Wartungsbetriebs mit Hilfe des RFID-Tags
Für das Einschalten oder Ausschalten des Wartungsbetriebs drücken Sie und halten Sie die Taste
auf dem RFID-Tag bis zu drei Lichtblinken der LED-Anzeige des RFID-Tags fest, dann lassen Sie die Taste
los.
Steuerung des Wartungsbetriebs mit Hilfe des Mobilgeräts
• Rufen Sie die Nummer des Systems an, warten Sie auf die Antwort.
• Für das Einschalten des Wartungsbetriebs geben Sie den DTMF-Befehl
PIN-Code“ von der individuellen Inhaberkarte.
• Für das Ausschalten des Wartungsbetriebs geben Sie den DTMF-Befehl
155 *
255 *
und „geheime
ein.
DE
76
BEDIENUNGSANLEITUNGSICHERHEITS-SERVICE-SYSTEM PANDORA CAMPER
77
Page 40

Steuerung des Wartungsbetriebs mit Hilfe der Mobile App Pandora Camper
Für das Einschalten oder Ausschalten des Wartungsbetriebs loggen Sie sich in die Mobile App ein,
drücken Sie und halten Sie die Taste
bis zur vollen Beladung der Skala fest.
! um den sTandorT zu ändern oder die TasTen auf die bedienfeld hinzufügen, gehen sie in „einsTellungen/menü der
einsTellungen“ „verwalTungsTasTen“.
Steuerung des Wartungsbetriebs mit Hilfe der Taste der Wegfahrsperre
• Für das Einschalten des Wartungsbetriebs drücken Sie nach der Eingabe des «PIN-Codes der
Wegfahrsperre» die Taste der Code-Wegfahrsperre zehnmal hintereinander binnen 20 Sekunden.
• Für das Ausschalten des Wartungsbetriebs schalten Sie die Zündung ein und geben Sie den «PINCode der Wegfahrsperre» ein.
Anzeige des Wartungsbetriebs
• Als Nachweis des Einschaltens des Wartungsbetriebs dienen: die Anzeige
permanentes grünes Leuchten der LED-Anzeige bei der eingeschalteten Zündung, lange Schallmeldung
des «Beepers» zum Zeitpunkt des Einschaltens des Betriebs.
• Als Nachweis des Ausschaltens des Wartungsbetriebs dienen: das Erlöschen der Anzeige
der Mobile App, das Erlöschen des grünen Leuchtens der LED-Anzeige bei der eingeschalteten
Zündung, zwei lange Schallmeldungen des «Beepers» zum Zeitpunkt des Ausschaltens des Betriebs.
auf der Bedienoberfläche im aktiven Zustand des Systems
in der Mobile App,
in
NOTFALLSTEUERUNG DES SYSTEMS
Beim Verlust oder Versagen von Steuergeräten oder bei Entladung der Batterie und Unmöglichkeit
des sofortigen Batteriewechsel sind Notfallmethoden verfügbar, mit denen die Sicherheits- und AntiRaubüberfallsfunktionen mithilfe des «Geheim-PIN-Codes» und der VALET-Taste deaktiviert werden
können. Vergewissern Sie sich vor der Verwendung der Notfallsystemsteuerung, dass das System und
die Transportsteuerungsgeräte betriebsbereit sind: Überprüfen Sie die Batterie und schalten Sie das
Gerät gemäß seiner Beschreibung ein (falls erforderlich).
Wenn alle Geräte funktionieren, versuchen Sie eine primäre Fahrzeugdiagnose durchzuführen:
Überprüfen Sie das originale Fahrzeugsteuergerät, den Ladezustand der Fahrzeugbatterie, die
Getriebeposition und die Benachrichtigungen (meistens auf dem Armaturenbrett).
! das sysTem verfügT über schnelle sTeuerfunkTionen per Telefon.
0* - das sysTem enTschärfen;
998* xxxx-auTorisierungsgeräTe abschalTen (“wegfahrsperre“ und anTi-hi-jack“), wobei xxxx-„geheime pin-code“
isT, der sich unTer der schuTzschichT des „einzelkarTeninhabers“ befindeT;
1*-das sysTem scharfschalTen;
888* - die auTorisierungsgeräTe einschalTen ( wegfahrsperre“ und „anTi-hi-jack“).
! vor der noTsTeuerung des sysTems machen sie sich miT der eingabe des pin-codes bekannT.
EINGABE DES CODES:
Geben Sie den Code nur beim Vorhanden der Speisung der Basiseinheit und bei der ausgeschalteten
Zündung ein. Geben Sie den Code mit Hilfe der externen oder der sich auf der Basiseinheit befindlicher
Taste «VALET» ein. Die Anzeige der Eingabe des Codes erfolgt mithilfe des Leuchtens der externen LEDAnzeige oder der sich auf der Basiseinheit befindlichen Anzeige.
• GEBEN SIE DIE ERSTE ZIFFER EIN Drücken Sie die Taste «VALET» so viel Male, wie die erste Ziffer
des PIN-Codes. Die Pausen zwischen dem Drücken der Taste sollen 1 Sekunde nicht überschreiten,
jedes Drücken der Taste wird mit dem orangen Leuchten der Status-LED-Anzeige angezeigt. Eine
Pause von mehr als 1 Sekunde und ein rotes Blinken der LED-Statusanzeige zeigen die Bestätigung
der zweiten Zifferneingabe und den Übergang zur nächsten an.
• GEBEN SIE DIE ZWEITE ZIFFER EIN Drücken Sie die Taste «VALET» so viel Male, wie die zweite Ziffer
des PIN-Codes. Die Pausen zwischen den Drücken der Taste sollen 1 Sekunde nicht überschreiten,
jedes Drücken der Taste wird mit dem orangen Leuchten der Status-LED-Anzeige angezeigt. Eine
Pause von mehr als 1 Sekunde und ein rotes Blinken der LED-Statusanzeige zeigen die Bestätigung
der zweiten Zifferneingabe und den Übergang zur nächsten an.
DE
78
BEDIENUNGSANLEITUNGSICHERHEITS-SERVICE-SYSTEM PANDORA CAMPER
79
Page 41

• GEBEN SIE DIE DRITTE ZIFFER EIN Drücken Sie die Taste «VALET» so viel Male, wie die dritte Ziffer
des PIN-Codes. Die Pausen zwischen den Drücken der Taste sollen 1 Sekunde nicht überschreiten,
jedes Drücken der Taste wird mit dem orangen Leuchten der Status-LED-Anzeige angezeigt. Eine
Pause von mehr als 1 Sekunde und ein rotes Blinken der LED-Statusanzeige zeigen die Bestätigung
der dritten Zifferneingabe und den Übergang zur nächsten an.
• GEBEN SIE DIE VIERTE ZIFFER EIN Drücken Sie die Taste «VALET» so viel Male, wie die vierte Ziffer
des PIN-Codes. Die Pausen zwischen den Drücken der Taste sollen 1 Sekunde nicht überschreiten,
jedes Drücken der Taste wird mit dem orangen Leuchten der Status-LED-Anzeige angezeigt.
Notfall-Entschärfung des Systems
Ist es nicht möglich, das System zu entschärfen, benutzen Sie die „Valet“-Taste und den «Geheim-PINCode», der sich unter der Schutzschicht auf der individuellen Inhaberkarte befindet (ausführliche
Beschreibung über die Anordnung der Taste und des Codes finden Sie im Abschnitt „Allgemeine
Informationen“):
• Als das Fahrzeug scharfgeschaltet ist, öffnen Sie es mithilfe der werksseitigen Schlüssel. Ignorierend
die Bieptöne der Sirene, vergewissern Sie sich, dass die Zündung ausgeschaltet ist und geben Sie
dann die „Geheim-Pin-Code“ ein (s. Beschreibung oben „Eingabe des „Pin-Codes“). Wenn keine
Signaltöne ausgegeben werden oder die LED-Anzeigen fehlen, überprüfen Sie den Zustand der
Batterie. Beim fehlenden Strom ist die Eingabe des „Geheimen Pin-Codes“ nicht möglich.
• Ist der Pin-Code richtig eingegeben, wird das System unscharf geschaltet. Die richtige Pin-CodeEingabe wird das System als folgendes nachweisen: abwechselnde Blinken der roten und grünen
LED-Anzeigen, eine Reihe von Bieptönen, 4 kurze Bieptöne der Sirene und 4 Blinklichtsignalen
(Warnung über verletzten Sicherheitszonen)
• Wenn der Code falsch eingegeben wurde, zeigt ein langes Blinken der roten Leuchten der LEDAnzeige dies an und das System kehrt zum vorherigen Zustand zurück. Eine neue Eingabe kann erst
nach 5 Sekunden erfolgen.
• Die Notabschaltung des Sicherheitssystems entspricht der werksseitigen Methode der SystemEntschärfung. Nach dem Wiederherstellen des Betriebs der Steuergeräte ist für den weiteren Betreib
keine weitere Maßnahme erforderlich.
Notsteuerung der Anti-Hi-Jack-Funktionen
In diesem Abschnitt wird beschrieben, wie Sie die Diebstahlschutzmodi („Wegfahrsperre“ und „Anti-
Hi-Jack“) mit einem RFID-Tag, einer Funk-Fernbedienung oder einem Mobilgerät als Autorisierungsgerät
80
des Besitzers deaktivieren und aktivieren sowie die „Code -Wegfahrsperre“ deaktivieren (s. Beschreibung
der Modi im Abschnitt „Geräte und Funktionen der Besitzersautorisierung“).
! um die „wegfahrsperre“ und die „code-wegfahrsperre“ für kurze zeiT zu deakTivieren, wenn das sysTem enTschärfT
isT und die zündung eingeschalTeT isT, geben sie den „geheimen pin-code“ auf der „individuellen besiTzerkarTe“ miT der
TasTe „valeT“ ein. in diesem modus werden „wegfahrsperre“ und „code-wegfahrsperre“ deakTivierT, bis die zündung
ausgeschalTeT wird.
Notsteuerung der Wegfahrsperre und Code-Wegfahrsperre
Die Notfallsteuerung der Diebstahlschutzmodi wird nur durchgeführt, wenn das System entschärft
ist, die Wartung abgeschaltet ist, die Batterie eingeladen ist und die Zündung ausgeschaltet ist. Um
das System in Programmiermodus zu bringen muss man den „Pin-Code“ geben, der sich unter der
Schutzschicht auf der individuellen Inhaberkarte befindet.
! als der „geheime pin-code“ fehlT, isT der eingang in den programmiermodus nach der eingabe des „service-pin-
code“ (werkseiTige werT des service-pin-codes 1-1-1-1) möglich.
1. Notsteuerung der Wegfahrsperre
Nach der Umschaltung des Systems in den Programmiermodus, der Eingabe des PIN-Codes drücken
Sie die Taste «VALET» 15 Male hintereinander. Die Pausen zwischen dem Drücken der Taste sollen 1
Sekunde nicht überschreiten, jedes Drücken der Taste wird mit dem orangen Leuchten der Status-LEDAnzeige angezeigt. Das System bestätigt die Nummer der Stufe mit dem roten Blinken der LED-Anzeige
und mit den kurzen Signalen der «Sirene» und des «Beepers».
• Für Ausschalten der Funktion:
Beim Eintritt in die Stufe leuchtet die Status-LED-Anzeige mit dem grünen Licht, das System geht in
den 10-Sekunden-Modus des Wartens auf die Eingabe des «Geheim-PIN-Codes». Beginnen Sie binnen
10 Sekunden nicht mit der Eingabe des «Geheim-PIN-Codes», verlässt das System die Stufe «Ausschalten
und Einschalten der Wegfahrsperre». Geben Sie den «Geheim-PIN-Code», der sich auf der individuellen
Inhaberkarte befindet (s.o. – «Eingabe des Codes»). Als Nachweis des Ausschaltens des RFID-Tags
der Wegfahrsperre dienen das lange Leuchten der roten Status-LED-Anzeige, zwei Schallsignale der
«Sirene» und die Serie der Schallmelder «Beeper». Gehen Sie aus dem Programmiermodus mit dem
Einschalten der Zündung aus, die Code-Wegfahrsperre ist nun ausgeschaltet.
• Für Einschalten der Funktion:
Beim Eintritt in die Stufe leuchtet die Status-LED-Anzeige mit dem roten Licht, der Schallmelder
«Beeper» gibt einen langen Schallsignal von sich, das System geht in den Modus des Wartens.
Für Einschalten der Code-Wegfahrsperre drücken Sie die Taste «VALET» einmal. Als Nachweis des
Einschaltens der Code- Wegfahrsperre dienen das Leuchten der grünen LED-Anzeige, einmaliger
BEDIENUNGSANLEITUNGSICHERHEITS-SERVICE-SYSTEM PANDORA CAMPER
DE
81
Page 42

Schallsignal der «Sirene» und des «Beepers». Gehen Sie aus dem Programmiermodus mit dem
Einschalten und Ausschalten der Zündung aus, die Code-Wegfahrsperre ist nun eingeschaltet.
2. Notsteuerung der Code-Wegfahrsperre (pin-to-drive).
Nach der Umschaltung des Systems in den Programmiermodus, drücken Sie die Taste «VALET» 13
Male hintereinander. Die Pausen zwischen dem Drücken der Taste sollen 1 Sekunde nicht überschreiten,
jedes Drücken der Taste wird mit dem orangen Leuchten der Status-LED-Anzeige angezeigt. Das System
bestätigt die Nummer der Stufe mit dem roten Blinken der LED-Anzeige und mit den kurzen Signalen
der «Sirene» und des «Beepers».
• Für Ausschalten der Funktion:
Beim Eintritt in die Stufe leuchtet die Status-LED-Anzeige mit dem grünen Licht, das System
geht in den 10-Sekunden-Modus des Wartens auf die Eingabe des «Geheim-PIN-Codes». Beginnen
Sie binnen 10 Sekunden nicht mit der Eingabe des «Geheim-PIN-Codes», verlässt das System die
Stufe «Notsteuerung der Code-Wegfahrsperre». Geben Sie den «Geheim-PIN-Code», der sich auf der
individuellen Inhaberkarte befindet. Als Nachweis des Ausschaltens der Code-Wegfahrsperre dienen
das lange Leuchten der roten Status-LED-Anzeige, zwei Schallsignale der «Sirene» und die Reihe des
Schallmelders «Beeper». Gehen Sie aus dem Programmiermodus mit dem Einschalten und Ausschalten
der Zündung aus, die Code-Wegfahrsperre ist nun ausgeschaltet.
• Für Einschalten der Funktion
Beim Eintritt in die Stufe leuchtet die Status-LED-Anzeige mit dem roten Licht, der Schallmelder
«Beeper» gibt einen langen Schallsignal von sich, das System geht in den Modus des Wartens.
Für Einschalten der Code-Wegfahrsperre drücken Sie die Taste «VALET» einmal. Als Nachweis des
Einschaltens der Code-Wegfahrsperre dienen das Leuchten der grünen LED-Anzeige, einmaliger
Schallsignal der «Sirene» und des «Beepers». Gehen Sie aus dem Programmiermodus mit dem
Einschalten und Ausschalten der Zündung aus, die Code-Wegfahrsperre ist nun eingeschaltet.
GARANTIEVERPFLICHTUNGEN
Der Hersteller garantiert, dass das Sicherheits- und Servicesystem den technischen Anforderungen
entspricht, vorausgesetzt, dass die in diesem Handbuch angegebenen Bedingungen für Betrieb,
Installation, Lagerung und Transport eingehalten werden.
Das Produkt darf nur in Übereinstimmung mit der Gebrauchsanweisung und Installation verwendet
werden.
Das Produkt darf nur in zertifizierten Installationszentren fachgerecht installiert werden. Der
Installateur des Systems ist verpflichtet das im Satz enthaltene Installationszertifikat einzufüllen.
Komponenten der Alarmanlagen, die während des Garantiezeitraums durch des Verschuldens des
Herstellers außer Betrieb sind, müssen vom Installateur (Hersteller oder Organisation der umfangreichen
Betreuung) ersetzt oder repariert werden.
In folgenden Fällen verliert der Verbraucher das Recht auf Garantieleistung:
• nach Ablauf der Garantiezeit;
• unter Verletzung der Installations-, Betriebs-, Transport- und Lagerungsregeln;
• bei mechanischen Schäden an den äußeren Teilen der Alarmanlage nach dem Verkauf, einschließlich
der Auswirkungen von Feuer, Unfällen, Eindringen von aggressiven Flüssigkeiten und Wasser sowie
nachlässiger Behandlung;
• wenn es Schäden durch unsachgemäße Einstellung gibt;
• beim Ersatz der Bestandteilen der Alarmanlage auf die Geräte, die vom Hersteller nicht empfohlen
waren;
• wenn die Versiegelung des Herstellers verletzt wird
• wenn kein ordnungsgemäß ausgefülltes Installationszertifikat oder Garantiekarte vorliegt;
Die Garantiezeit beträgt 3 Jahre ab dem Verkaufsdatum, aber nicht mehr als 3,5 Jahre ab dem
Herstellungsdatum.
Diese Garantie gilt nicht für komplette Batterien, deren Lebensdauer natürlich begrenzt ist.
Reparatur und Wartung der Alarmanlage mit abgelaufener Garantiezeit werden auf Kosten des
Verbrauchers in gesonderten Vereinbarungen zwischen dem Lieferanten / Installateur und dem
Verbraucher durchgeführt.
wir empfehlen, dass sie das insTallaTionszerTifikaT und das garanTiezerTifikaT des arbeiTers, der das sysTem
!
insTallierT haT, ausfüllen, da diese dokumenTe erforderlich sind, wenn sie sich an den kundendiensT wenden.
DE
82
BEDIENUNGSANLEITUNGSICHERHEITS-SERVICE-SYSTEM PANDORA CAMPER
83
Page 43

Installationszertikat
Ich, der unterzeichnete
Stellung, Name, Vorname
Installateur bestätigt, dass die Installation der nachstehend beschriebenen Alarmanlage für Fahrzeuge
von mir gemäß den vom Systemhersteller bereitgestellten Installationsanweisungen durchgeführt
wurde.
Beschreibung des Fahrzeuges
Automarke
Typ
VIN-Nr.
Kfz-Kennzeichen
Beschreibung der Alarmanlage des Fahrzeuges:
Produktmarke Pandora Camper
Seriennummer
Name der Firma, Adresse, Stempel des Installateurs
Unterschrift_____________________/___________________________________/
Name, Vorname
Arbeit ist durch________________/___________________________________/erledigt.
Name, Vorname
Datum «____»___________________20____
84
Abnahmeprotokoll
Die Alarmanlage Pandora Camper entspricht der Elektromagnetischen Verträglichkeitsrichtlinie EMC
2004/108 / EG und der R & TTE-Richtlinie 1999/5 / EG.
Seriennummer
Herstellungsdatum
Unterschrift der Personen, die für die Abnahme verantwortlich sind
Stempel
Einpacker, Unterschrift
(Persönliche Code)
Garantieschein
Modell Pandora Camper
Seriennummer
Bezugsdatum «____» ______________________ 20____
Stempel der Handelsunternehmen (Installationszentrum)
Unterschrift des Verkäufers
BEDIENUNGSANLEITUNGSICHERHEITS-SERVICE-SYSTEM PANDORA CAMPER
DE
85
Page 44

IT
Il personale della società «Pandora» Vi ringrazia
per la scelta del sistema di sicurezza Pandora Camper
Pandora Camper è un sistema di sicurezza e servizio telematico studiato per l’installazione
su autocaravan con tensione di bordo 12V. Questo apparato è il risultato del lavoro di un gruppo di
ingegneri russi altamente specializzati e contiene moltissime soluzioni tecnologiche, ingegneristiche e
di programmazione uniche e all’avanguardia.
Nel processo di sviluppo sono stati usati come base gli elementi più moderni dei migliori produttori
di componentistica elettronica. È stato prodotto utilizzando nuove attrezzature ad alta precisione
per l’assemblaggio dei componenti e per il controllo, garantendo elevate doti di qualità, affidabilità e
stabilità delle caratteristiche tecniche e di utilizzo durante tutto il periodo di vita dell’apparato.
Il sistema è dotato di un codice criptato di autorizzazione ai comandi con un algoritmo di dialogo
unico ed individuale per ogni singola chiave di crittografia (non meno di 128 bit), che garantisce una
protezione inattaccabile dai tentativi di forzatura elettronica.
L’apparato ha tre anni di garanzia e l’assistenza tecnica nelle città della Russia e delle repubbliche ex
sovietiche. Per la soluzione dei problemi legati all’utilizzo e all’installazione del sistema è disponibile un
servizio di assistenza online e un numero verde gratuito
Il sistema è dotato della versione climatica U-2.1 (N-2.1) secondo il GOST 15150-69 per l’utilizzo in condizioni di temperatura da -40° a
+85°. Tutti i componenti del sistema di sicurezza inclusi nel prodotto devono essere installati solo all’interno del veicolo. Il portachiavi e il
sistema di trasmissione radio sono studiati per funzionare in condizioni di temperatura da -10° a +40°.
Il livello di protezione del blocco di base, del portachiavi e del sistema di trasmissione radio dall’infiltrazione di acqua è di categoria
IP40 secondo il GOST 14254-96.
Il nostro indirizzo web: pandorainfo.com
Servizio assistenza clienti: support@pandorainfo.com
86
SISTEMA DI SICUREZZA PANDORA CAMPER
MANUALE D’USO
87
Page 45

Indice
Informazioni generali 90
Dotazione del sistema 90
Leggere attentamente 90
Disposizione degli elementi del sistema 92
Blocco di base del sistema 93
Owner’s personal card 94
Tasto Valet 95
Funzioni e modaltà 97
Funzione antifurto 97
Zone sotto controllo e sicurezza 97
Segnalazioni acustiche e luminose 98
Modalità «Stay Home» 99
Modalità «Slave» 99
Dispositivi e funzioni di autorizzazione del proprietario 99
Controllo della quantità di dispositivi registrati al sistema 102
Portachiavi D030 103
Accensione/spegnimento portachiavi 104
Significati degli indicatori luminosi del portachiavi 104
Ricarica portachiavi 104
Aggiornamento del software del portachiavi 104
Pittogrammi del portachiavi 105
Funzioni eseguibili dai tasti del portachiavi 106
Radiotrasmettitore BT760 107
Funzioni dei tasti 107
Sostituzione del sistema di alimentazione
della trasmissione radio immobilizer 108
Aggiornamento del software del radiotrasmettitore 108
88
Gestione del sistema via telefono 109
Servizio internet pandora-on.com e applicazione
per cellulari Pandora Camper 113
Gestione del sistema 115
Gestione d’emergenza del sistema 122
Garanzia 126
Modifica delle impostazioni con l’ausilio del telefono cellulare 111
Archivio eventi 114
Applicazione per cellulare Pandora Camper 114
Inserimento della modalità antifurto 115
Accensione del sistema «Stay home» 116
Messa in allarme differita (mani occupate) 117
Disattivazione dell’antifurto 117
Apertura/chiusura delle porte con motore in movimento 119
Ricerca del veicolo 119
Modalità «Panico» 120
Modalità «Assistenza Tecnica» 120
Disinserimento d’emergenza dell’antifurto 123
Gestione d’emergenza delle funzioni antifurto 123
Certificato di installazione 127
Certificato di accettazione 128
Certificato di garanzia 128
MANUALE D’USOSISTEMA DI SICUREZZA PANDORA CAMPER
IT
89
Page 46

Dotazione del sistema
1. Manuale d’uso ed installazione 1 pz.
2. Portachiavi D030 1 pz.
3. Radiotrasmettitore BT760 1 pz.
4. Carta individuale del proprietario 1 pz.
5. Blocco di base 1 pz.
6. Tasto Valet 1 pz.
7. Beeper (rilevatore acustico di piccole dimensioni) 1 pz.
8. Sensore porte senza fili DMS-100 BT 4 pz.
9. Sirena PS-330 1 pz.
10. Cavo principale del blocco di base 1 pz.
11. Cavo aggiuntivo del blocco di base 2 pz.
12. Sensore esterno di temperatura 1 pz.
13. Relè di bloccaggio 1 pz.
14. Sensore Reed 2 pz.
15. Set di fissaggio 1 pz.
16. Imballaggio 1 pz.
! il produTTore si riserva il diriTTo di apporTare modifiche nella doTazione e nella cosTruzione dell’apparaTo, senza
avvisarne il consumaTore, per il miglioramenTo dei suoi parameTri Tecnici e funzionali.
Leggere attentamente
Prima di iniziare l’assemblaggio e l’utilizzo del sistema di servizio antifurto, leggete attentamente le
presenti istruzioni, e fate particolarmente attenzione al testo indicato dal segno
il sisTema è un prodoTTo TecnicamenTe sofisTicaTo, che richiede l’assemblaggio, l’imposTazione e la assisTenza
!
Tecnica da parTe di specialisTi professionali qualificaTi.
le funzioni e le modaliTà, la gesTione e il conTrollo delle zone TrasporTo (funzionamenTo del sisTema) dipendono dal Tipo
!
di collegamenTo, dalla doTazione, dalle imposTazioni effeTTuaTe ed inolTre dal funzionamenTo e dalle doTazioni del veicolo.
! nella doTazione di sisTema è inclusa una «carTa individuale del proprieTario», soTTo alla coperTura di sicurezza della quale
si Trovano informazioni esclusive per il proprieTario del sisTema. raccomandiamo forTemenTe di verificare l’inTegriTà della
coperTura di sicurezza dopo aver TerminaTo i lavori. se lo sTraTo di proTezione della carTa è sTaTo rimosso (compromesso) dallo
specialisTa che ha provveduTo all’insTallazione, la nuova insTallazione del sisTema sarà a carico di deTTo specialisTa. prima
di procedere alla rimozione dello sTraTo di proTezione, leggeTe aTTenTamenTe il capiTolo «carTa individuale del proprieTario».
!
90
! il funzionamenTo del sisTema è supporTaTo dalla reTe mobile (gsm), obbligaToriamenTe verificaTe inizialmenTe il
sisTema con il proprio disposiTivo cellulare in presenza dello specialisTa che procederà all’assemblaggio del sisTema:
• verificaTe il crediTo residuo disponibile del Telefono con il comando 100* (vedi il capiTolo «gesTione del sisTema via
Telefono», il capiTolo sulle imposTazioni personali «modifica delle imposTazioni con l’ausilio del Telefono cellulare
-> 1* imposTazione dei numeri di Telefono -> 4* numero di conTrollo del crediTo residuo»).
• nella modaliTà anTifurTo, violaTe la zona di allarme, il sisTema invia una chiamaTa al vosTro numero di Telefono «numero
principale del proprieTario». per l’inserimenTo rapido o modifica del «numero principale del proprieTario» con sisTema di
sicurezza disaTTivaTo daTe Tensione al quadro, chiamaTe il numero di Telefono del sisTema, aTTendeTe la risposTa, premeTe e
TeneTe premuTo il TasTo sul radioTrasmeTTiTore per due lampeggiamenTi dell’indicaTore luminoso «send» sul TrasmeTTiTore (2
secondi), rilasciaTe il TasTo, il sisTema si ricorda del numero di Telefono in enTraTa come «numero principale del proprieTario».
• verificaTe il «pin ospiTe» (1-2-3-4) chiamando il «numero addizionale» o un numero di Telefono sconosciuTo al sisTema.
! il sisTema può funzionare con l’applicazione per cellulari. per quesTo è necessario: creare un accounT, aggiungere
il disposiTivo all’accounT, aggiungere l’accounT dell’apparaTo mobile nella memoria del sisTema. la consulenza circa
l’applicazione deve essere forniTa dallo specialisTa che insTalla il sisTema.
! al Termine dell’insTallazione:
• accerTaTevi che venga compilaTo il capiTolo «cerTificaTo di insTallazione» e «cerTificaTo di garanzia». i documenTi
compilaTi possono rendersi necessari nei casi previsTi dalla garanzia e al momenTo in cui vi rivolgeTe al servizio assisTenza.
• verificaTe il funzionamenTo del sisTema e delle funzioni in presenza dello specialisTa.
• raccomandiamo di annoTare il funzionamenTo di ogni funzione a fianco delle singole voci indicaTe nel capiTolo
«gesTione» - annoTazioni di funzionamenTo .
• chiedeTe allo specialisTa di annoTare sullo schema la disposizione dei blocchi di sisTema. quesTa informazione può
essere uTile per la diagnosTica/imposTazioni oppure per l’esclusione in emergenza del sisTema.
• per aumenTare la proTezione del sisTema, dopo l’insTallazione raccomandiamo forTemenTe di modificare il «pin
di servizio» di fabbrica (1-1-1-1). la consulenza circa la modifica del «pin di servizio»deve essere forniTa dallo
specialisTa che insTalla il sisTema.
scriveTe o ricordaTe il nuovo «pin di servizio»
• per aumenTare la proTezione del sisTema, dopo l’insTallazione raccomandiamo forTemenTe di modificare il «pin ospiTe»
di fabbrica (vedi il capiTolo «modifica delle imposTazioni con l’ausilio del Telefono cellulare -> 5* imposTazione di
funzioni aggiunTive -> 1* modifica del pin ospiTe»).
scriveTe o ricordaTe il nuovo «pin ospiTe»
•in caso di realizzazione delle funzioni dell’immobilizer codificaTo:
scriveTe o ricordaTe il «pin immobilizer»
indicaTe il TasTo di inserimenTo (TasTo/leva/pedale) del «pin immobilizer» nel capiTolo «disposizione degli elemenTi del
sisTema». sysTem modules layouT
MANUALE D’USOSISTEMA DI SICUREZZA PANDORA CAMPER
IT
91
Page 47
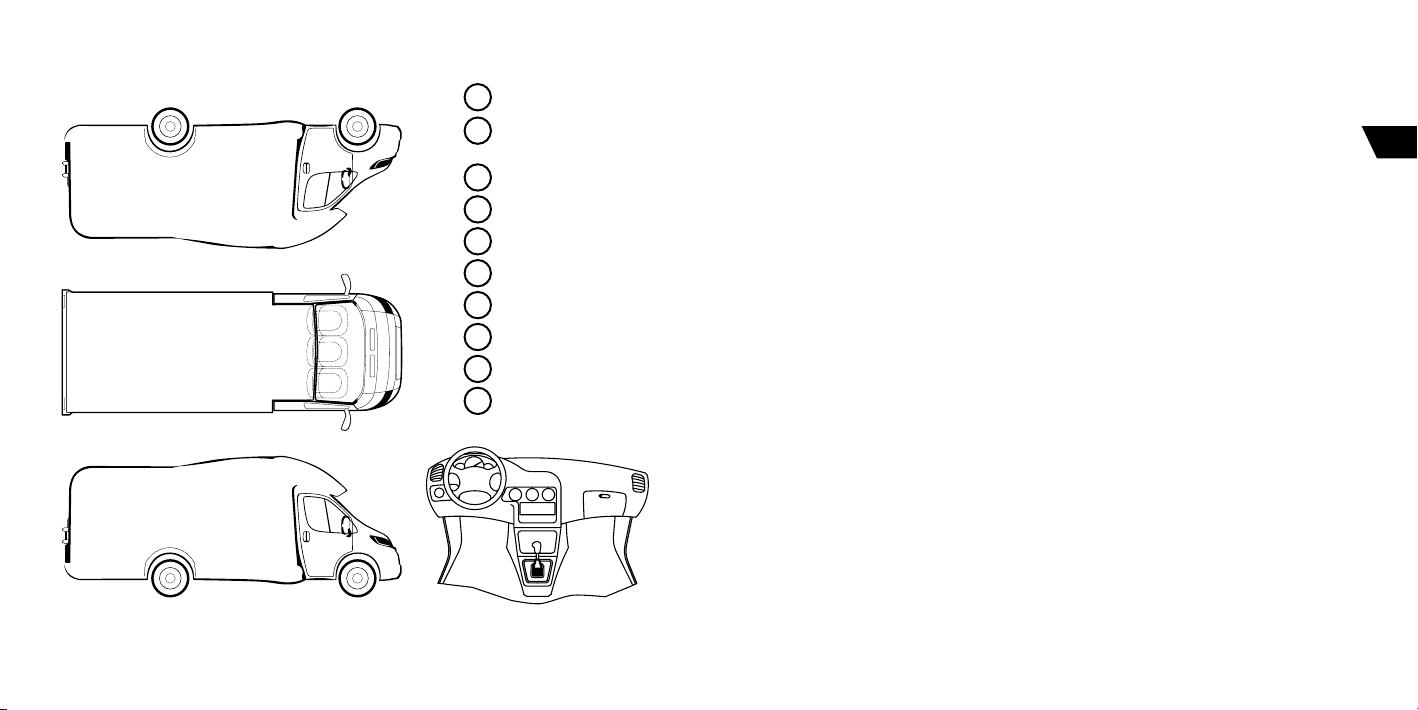
Disposizione degli elementi di sistema
Blocco di base
1
2
Relè di bloccaggio
(circuito bloccante)
3
Tasto rimovibile
4
Sensore DMS-10 BT
5
6
7
8
9
10
Blocco di base del sistema
Modem GSM integrato (GPRS/SMS/LBS)
Il modem integrato è predisposto per l’utilizzo in una rete mobile con l’inserimento nel blocco
di base di una SIM card: SMS e messaggi vocali, gestione da telefono via DTMF, determinazione delle
coordinate attraverso le stazioni di ripetizione cellulare (solo per il comando 500*), collegamento
all’assistenza online e all’applicazione per cellulare.
! per un correTTo funzionamenTo del sisTema gsm, il proprieTario si deve preoccupare di manTenere soTTo conTrollo
il crediTo residuo della sim card, secondo il piano Tariffario del forniTore del servizio. se la sim card è bloccaTa o
funziona in modo scorreTTo, la funzione gsm del sisTema anTifurTo non è disponibile.
Ricevitore GPS/GLONASS incorporato
Il ricevitore determina la posizione corrente, e i paramentri data e ora in modo automatico.
per la correTTa deTerminazione della daTa e dell’ora è necessario provvedere alla correzione della fascia oraria
!
uTc aTTraverso l’applicazione per cellulare o il servizio online.
Radiocanale 2.4GHz, protocollo Bluetooth 5.0 (BT5.0)
Il radiocanale integrato è necessario per il funzionamento del sistema con l’applicazione cellulare
e accessori Bluetooth periferici. Il sistema supporta fino a 14 accessori: 1 portachiavi D030, non più di
3 trasmettitori BT760, un’applicazione cellulare (Bluetooth 4.0 Low Energy e superiore), non più di 10
sensori DMS100, il relè di bloccaggio ecc.
Protezione elettronica AES (128 bit)
Le comunicazioni protette durante lo scambio di informazioni via radiocanale sono garantite dai
dialoghi codificati dei comandi con chiave di cifra lunga 128 bit. È disponibile la possibilità di modificare
le chiavi in caso di successivi cambi di istruzioni al portachiavi o del sistema Bluetooth periferico.
Accelerometro 3D
Accelerometro integrato per l’identificazione di colpi/movimento/inclinazione:
• zone dei sensori di urto separate (preventiva/allarme);
• regolazione separata della sensibilità delle zone;
• algoritmo di bloccaggio del motore all’inizio del movimento;
• algoritmo di chiusura centralizzata delle serrature all’inizio del movimento.
IT
92
MANUALE D’USOSISTEMA DI SICUREZZA PANDORA CAMPER
93
Page 48

Interfaccia elettronica multisistema 2xCAN|LIN
2-2-2-2
PIN
Le interfacce elettroniche integrate CAN e LIN del sistema consentono il collegamento ai bus
elettronici del veicolo per la gestione e il controllo.
L’interfaccia LIN può essere utilizzata per il funzionamento con i sistemi di preriscaldamento
Webasto Thermo Top Evo e Eberspacher Hydronic/Hydronic 2.
maggiori informazioni sul supporTo sono disponibili sul siTo loader.alarmTrade.ru.
!
Porta Micro-USB
Per il cambio delle impostazioni e l’aggiornamento del software con l’ausilio dei programmi
Pandora Alarm Studio, nel sistema è installata una porta Micro-USB standard. Inoltre anche il sistema
di alimentazione si realizza via USB, per cui il sistema è programmabile anche prima dell’allacciamento
al circuito del veicolo.
Determinazione della temperatura
Il sistema consente di determinare i dati sulla temperatura per zone: temperatura dell’abitacolo,
temperatura del motore, temperatura esterna. Per la determinazione dei dati sulla temperatura
vengono usati: sensore interno del blocco di base (determinazione integrale), spina di collegamento
del sensore esterno di temperatura (vedi il capitolo «Dotazione del sistema»), lettura elettronica del bus
CAN del veicolo, lettura dei dispositivi periferici.
! im posTazioni di fabbrica: Tempe raTura dell’abi Tacolo - sensore in Terno; Temp eraTura moTore - sensore esTerno;
TemperaTura esT erna - can..
Orologio sincronizzato del blocco di base
L’orologio interno del blocco di base si sincronizza automaticamente con i dati ricevuti dal sistema
GPS/GLONASS integrato, consentendo di eseguire molte funzioni e condizioni di lavoro.
! per una correTTa deTerminazione è necessario eseguire le imposTazioni del fuso orario (uTc) usando l’appplicazione
cellulare o un collegamenTo inTerneT.
Owner’s personal card
! rimuovere con precauzione lo sT raTo di proTezione, non usare sTrumenT i affilaTi per non da nneggiare le
informazion i nascosTe soTTo lo sTraTo di proTezione. impediTe l’accesso di persone Ter ze ai daTi. l’informazione sulla
carTa iindivid uale è personalizz aTa , in caso di s marrimenTo o danneg giamenTo non può essere riemess a o sosTiTuiTa.
94
La «Carta individuale del proprietario» è una carta in
plastica che contiene, sotto uno strato di protezione, le
informazioni personalizzate dell’apparecchio in dotazione:
• PIN – il «PIN segreto» si compone di quattro cifre. È
necessario per l’esclusione della funzione antifurto
e delle funzioni di immobilizzazione (vedi il capitolo
«Gestione d’emergenza del sistema»). Può essere
utilizzato come codice alternativo per l’accesso al menù
di programmazione.
• LOGIN – si compone di dieci cifre, è necessario per
l’aggiunta di accessori attraverso il collegamento Internet
e l’applicazione cellulare. Il codice login non può essere
modificato o fornito nuovamente.
• PASS – contiene otto cifre (può essere composto da
numeri, lettere maiuscole e minuscole latine) ed è
necessario per l’aggiunta di dispositivi via Internet e l’applicazione cellulare. La password non può
essere modificata o fornita nuovamente.
• Numero di telefono di sistema – numero di telefono della SIM card, fornita in dotazione. In caso di
sostituzione della SIM card, il numero non verrà utilizzato per il funzionameto del sistema.
Tasto Valet
Il tasto «VALET» con indicatori»LED»integrati di tre
colori (rosso/verde/arancio) è da installarsi all’interno
dell’abitacolo del veicolo (vedi il capitolo «Disposizione
degli elementi del sistema»). È necessario per la
programmazione del sistema, la gestione delle funzioni
di antifurto e immobilizzazione (vedi il capitolo
«Gestione d’emergenza del sistema»).
le doTazioni di base del veicolo (pulsanTi/leve/pedali) possono essere uTilizzaTi come TasTi «valeT». maggiori
!
informazioni sul supporTo della funzionaliTà sono disponibili sul siTo LOADER.ALARMTRADE.RU.
INDICATORE LED
TASTO VALET
MANUALE D’USOSISTEMA DI SICUREZZA PANDORA CAMPER
IT
95
Page 49

Significato degli indicatori di condizione a»LED»a tre colori
CONDIZIONE DELL’INDICATORE DESCRIZIONE
FUNZIONE ANTIFURTO INSERITA
Lampeggio breve rosso Sistema inserito
Lampeggio breve verde Sistema inserito
Lampeggio veloce rosso Sistema in funzione allarme
FUNZIONE ANTIFURTO DISINSERITA
Spento Sistema disinserito
Rosso acceso Autoinserimento antifurto
Verde acceso
(con accensione inserita)
Lampeggio arancione
(con accensione inserita)
Lampeggio verde
(con accensione inserita)
Lampeggio rosso
(con accensione inserita)
INSERIMENTO DEL «PIN SEGRETO» O DEL «PIN DI SERVIZIO»
Lampeggio arancio Conferma della pressione del tasto «VALET»
Lampeggio breve rosso Conferma inserimento cifre del PIN
Lampeggio verde e rosso PIN corretto
Lampeggio rosso lungo PIN errato
(dispositivi di autorizzazione in raggio d’azione)
Attivazione antifurto ritardata
Sistema in modalità assistenza tecnica
Visualizzazione del numero di telecomandi registrati
Visualizzazione del numero di trasmettitori radio registrati
Visualizzazione del numero di telefoni registrati
FUNZIONI E MODALITÀ
Funzione antifurto
All’inserimento della funzione antifurto viene emesso 1х
luminoso, viene eseguito il controllo delle zone del veicolo con suddivisione in livelli di azionamento:
• «Modalità preavviso» - si attiva a seguito di azioni non significative sul sensore di urto o su un sensore
aggiuntivo, è accompagnato da 1x
• «Modalità allarme» - si attiva a seguito di azioni sui sensori o di violazione delle zone di controllo, è
accompagnato da 30 sec.
anticipato del quale è possibile eseguendo il comando di accensione/spegnimento della modalità
antifurto.
• In caso di violazione delle zone di controllo, il blocco di base del sistema:
• esegue la memorizzazione automatica dell’evento nella memoria non volatile;
• attiva la modalità preavviso o allarme;
• con le modalità disponibili manda un messaggio al proprietario;
• attiva il bloccaggio (secondo le impostazioni inserite e il tipo di collegamento);
Se al momento dell’attivazione della modalità antifurto la/le zona/e controllata/e si trova/no in
condizione aperta, il blocco di base emette 4x
luminosi lampeggianti con informazione sulla zona interessata.
In caso di malfunzionamento della zona sottoposta a controllo, il blocco di base disinserisce
temporaneamente tale zona. Se il sensore terminale si attiva più di 9 volte di seguito, esso verrà
disinserito fino alla successiva messa in funzione dell’antifurto. Il sensore di urto/inclinazione/
movimento si disattiva temporaneamente per 15 secondi, se si attiva più di tre volte di seguito.
Alla disattivazione della funzione antifurto, vengono emessi 2x
luminosi di avviso, viene disinserita la funzione di blocco motore (se non sono entrati in funzione
l’immobilizer e i bloccaggi aggiuntivi). Se nella modalità antifurto sono avvenuti degli eventi di allarme
(escluso il livello di preavviso), il blocco di base al momento della disattivazione dell’antifurto emette
segnali acustici di avvertimento e 4x
4x
sulla zona interessata. Dopo la disattivazione dell’antifurto, il blocco sistema dà informazione sulla
condizione delle zone del veicolo senza salvarle nella memoria non volatile.
segnale luminoso e 3x segnali acustici;
segnale luminoso e 30 sec.
segnali acustici di avvertimento e 4x
segnali luminosi lampeggianti con informazione
Zone sotto controllo e sicurezza
• Temperatura dell’abitacolo (controllo)
segnale acustico e 1x segnale
segnale acustico, l’annullamento
segnali
segnali acustici e 2x
segnali
IT
96
MANUALE D’USOSISTEMA DI SICUREZZA PANDORA CAMPER
97
Page 50

• Temperatura del motore (controllo)
• Temperatura esterna (controllo)
• Violazione della rete di bordo (controllo)
• Funzionamento del motore (controllo)
• Funzionamento del riscaldatore (controllo)
• Carburante (controllo)
• Inserimento «Parking» (cambio automatico) o «Freno a mano» (cambio manuale)
• Informazione luci accese (controllo)
• Attivazione del sensore di urto (sicurezza - zona in allerta/allarme)
• Attivazione del sensore di movimento (sicurezza - zona in allarme)
• Attivazione del sensore di inclinazione (sicurezza - zona in allarme)
• Stato degli allarmi di fabbrica, sensore aggiuntivo (controllo, sicurezza - zona in allerta/allarme)
• Accensione dell’avviamento (controllo, sicurezza - zona in allarme)
• Apertura delle porte (controllo, sicurezza - zona in allarme)
• Apertura del cofano (controllo, sicurezza - zona in allarme)
• Pressione del pedale del freno (controllo, sicurezza - zona in allarme)
Segnalazioni acustiche e luminose
DESCRIZIONE CONDIZIONE
Inserimento antifurto
Disinserimento antifurto
Ricerca veicolo
«Funzione allarme» - avviso di violazione della zona di allarme dei sensori /
Modalità Panico
«Funzione preavviso» - avviso di violazione della zona di preavviso dei sensori
Avviso di messa in funzione della zona di allarme dei sensori al disinserimento
dell’antifurto / Avviso di fari accesi / Avviso di malfunzionamento della zona di allarme dei
sensori all’inserimento dell’antifurto
Preavviso di blocco del motore nella modalità antifurto
(acustica/luminosa)
1х
/1х
/2х
2х
5х
30sec.
3х
4х
30sec.
/5х
/30sec.
/1х
/4х
/30sec.
98
Modalità «Stay Home»
Questa modalità consente il controllo del perimetro esterno del veicolo durante le soste con passeggeri
nell’abitacolo. L’uso della modalità previene i tentativi di accedere all’interno del veicolo attarverso gli
elementi apribili della carrozzeria.
• All’attivazione della modalità «Stay Home» si attiva silenziosamente la condizione di antifurto
confermata da 1x
aggiuntivo (il sensore gas non rientra nella dotazione) senza l’intervento dell’accelerometro integrato
(sensore di urto/inclinazione/movimento).
• Al disinserimento della modalità si disattiva la modalità sicurezza con emissione di 2x
acustici e 2x
segnale luminoso, viene fatto il controllo delle zone del veicolo e del sensore
segnali luminosi di conferma.
segnali
IT
Modalità «Slave»
Questa modalità consente di inserire e disinserire la modalità sicurezza per mezzo delle dotazioni di
fabbrica del veicolo: il portachiavi a distanza, il sensore/pulsante di chiusura sulla maniglia della portiera
(per i veicoli con sistema di apertura intelligente).
La gestione della modalità «Slave» avviene tramite collegamento digitale o analogico cifrato.
di base la modaliTà è aTTivaTa con proTocollo digiTale, maggiori informazioni sul supporTo della funzionaliTà
!
sono disponibili sul siTo loader.alarmTrade.ru. per aumenTare la funzionaliTà della modaliTà «slave» si raccomanda
di usare la funzione «divieTo di esclusione allarme in assenza di TrasmeTTiTore». il disinserimenTo della sicurezza in
quesTa modaliTà sarà possibile solamenTe in presenza del disposiTivo di auTorizzazione e con l’inserimenTo del «pin
segreTo».
Dispositivi e modalità di autorizzazione del proprietario
Dispositivi di autorizzazione
Sono dispositivi Bluetooth di identificazione del proprietario nella zona di radiocopertura del blocco
di base del sistema, predisposto per la gestione delle funzioni di sicurezza ed antifurto. Il dispositivo
di autorizzazione del proprietario può essere un telefono cellulare (vedi il capitolo «Applicazioni per
cellulari»), il radiotrasmettitore BT760 o il portachiavi D030.
Allarmi dell’utilizzo dei dispositivi di autorizzazione
Utilizzando i dispositivi di autorizzazione si raccomanda di installare il sistema acustico di notifica
aggiuntivo «Beeper» (vedi il capitolo «Dotazione dei sistema»), montabile nell’abitacolo del veicolo.
MANUALE D’USOSISTEMA DI SICUREZZA PANDORA CAMPER
99
Page 51

SEGNALI DI SERVIZIO DEL BEEPER
DESCRIZIONE DEL SEGNALE TIPO DI SEGNALE
Accensione TO 1 segnale acustico
Spegnimento TO 2 segnali acustici
«PIN immobilizer» correttamente inserito 1 segnale acustico
Sistema di alimentazione scarico (batteria nel
radiotrasmettitore)
Assenza di segnale radio 4 segnali acustici / 4 emissioni
Avviso di bloccaggio S egnali sonosri in sequenza
Modalità «Hands Free» (mani libere)
La modalità prevede l’accensione e lo spegnimento automatico
o all’avvicinarsi del proprietario al dispositivo di autorizzazione installato sul veicolo.
di defaulT la modaliTà è disinseriTa, per poTerla uTilizzare è necessario imposTarla con l’ausilio dell’applicazione
!
per cellulare o del programma pandora alarm sTudio. i comandi rapidi per la gesTione della modaliTà hands free
insieme al radioTrasmeTTiTore sono: 223* - aTTivazione della modaliTà per l’inserimenTo della funzione anTifurTo,
224* - aTTivazione della modaliTà per lo spegnimenTo della funzione anTifurTo, 222* - disaTTivazione della modaliTà
hands free.
Modalità dell’immobilizer
La modalità prevede il riconoscimento del proprietario con l’ausilio del dispositivo di autorizzazione
con antifurto disinserito.
Nel momento in cui si dà tensione al quadro, il blocco di base del sistema verifica la presenza dei
dispositivi di autorizzazione nella zona di copertura del radiotrasmettitore. Se non rileva dispositivi di
autorizzazione nella zona di copertura del trasmettitore:
• in presenza di sistema di bloccaggio del motore, il sistema blocca il motore immediatamente o
all’inizio del movimento, a seconda del tipo di bloccaggio e delle impostazioni di sistema;
• in presenza di sistema di bloccaggio del connettore OBD, il sistema mantiene il connettore bloccato.
Non appena nel raggio d’azione del radiotrasmettitore viene rilevato un dispositivo di autorizzazione,
il regime di bloccaggio viene disinserito e vengono ripristinate le normali condizioni di funzionamento.
di defaulT la modaliTà è disinseriTa, per poTerla uTilizzare è necessario provvedere ad ulTeriori collegamenTi.
!
1 segnale acustico / 3 emissioni
della modalità antifurto all’allontanarsi
100
Modalità ANTI-HI-JACK-1/2 (antifurto)
La modalità prevede l’impedimento di tentativi di furto del veicolo quando i dispositivi di autorizzazione
sono fuori dal raggio di azione del radiotrasmettitore del blocco di base con sistema antifurto disinserito.
Modalità ANTI-HI-JACK-1 – con quadro in tensione, il blocco di base del sistema verifica la presenza
di dispositivi di autorizzazione nel raggio d’azione del radiotrasmettitore all’apertura e alla chiusura
delle porte.
Modalità ANTI-HI-JACK-2 – con quadro in tensione, il blocco di base del sistema verifica in
continuazione la presenza di dispositivi di autorizzazione nel raggio d’azione del radiotrasmettitore.
Se non ci sono dispositivi di autorizzazione nel raggio d’azione del radiotrasmettitore nelle
condizioni indicate sopra, il blocco di base del sistema fa entrare in funzione il bloccaggio ritardato
del motore. Prima del bloccaggio motore viene emesso un suono di sirena intermittente («Preavviso
di bloccaggio»). Il bloccaggio del motore avviene o immediatamente oppure all’inizio del movimento,
a seconda del tipo di bloccaggio e delle impostazioni di sistema. Non appena nel raggio d’azione
del radiotrasmettitore viene rilevato un dispositivo di autorizzazione, il regime di bloccaggio viene
disinserito e vengono ripristinate le normali condizioni di funzionamento.
di defaulT la modaliTà è disinseriTa, per poTerla uTilizzare è necessario provvedere ad ulTeriori collegamenTi ed
!
imposTazioni.
Modalità immobilizer a codice multitasto
La modalità prevede di impostare un codice personale «PIN immobilizer» per l’esclusione dell’antifurto,
per la gestione della funzione assistenza tecnica, per lo spegnimento del blocco motore. È necessario
inserire il «PIN immobilizer» con gli elementi in dotazione di fabbrica del veicolo, come pulsanti, leve
o pedali.
ESEMPIO DI ESECUZIONE DELLA MODALITÀ IMMOBILIZER
• Mettete in tensione il quadro per le funzioni di esclusione del blocco motore e della modalità
assistenza tecnica. Per lo spegnimento dell’antifurto e della gestione dei canali timer non è
obbligatorio mettere in tensione.
• Inserite il «PIN immobilizer». Premete il tasto programmato di inserimento (pulsante/leva/pedale)
tante volte quanto sono la prima e ultima cifra. Le pause fra le pressioni del tasto non devono
essere superiori a 1 secondo; pause superiori a 1 secondo vengono interpretate dal sistema come
conclusione dell’inserimento della cifra precedente del PIN e inizio dell’inserimento della successiva
(il codice PIN può contenere da 1 a 4 cifre comprese fra 1 e 9).
• Una volta inserito correttamente il codice, il «Beeper» emette un breve segnale acustico e il sistema
esegue le funzioni programmate.
MANUALE D’USOSISTEMA DI SICUREZZA PANDORA CAMPER
101
IT
Page 52

di defaulT la modaliTà è disinseriTa, per poTerla uTilizzare è necessario provvedere ad ulTeriori collegamenTi ed
!
imposTazioni.
Controllo del numero di dispositivi registrati nel sistema
La verifica del numero di portachiavi, trasmettitori radio e telefoni cellulari associati al sistema si può
fare guardando il numero di lampeggi dell’indicatore di stato «LED» installato sul tasto Valet o sul blocco
di base del sistema. Ad ogni accensione del quadro, il numero di lampeggi verdi dell’indicatore «LED»
indica la quantità di trasmettitori radio associati, mentre il numero di segnali rossi prolungati indica la
quantità di telefoni cellulari associati.
• La quantità di dispositivi associati è verificabile anche con i segnali acustici di sirena
e riattaccando il cavo della batteria (quando questo è possibile sul veicolo):
• la prima serie breve di segnali
• dopo una pausa di due secondi, un secondo segnale
cellulare.
indica la quantità di trasmettitori radio;
lungo indica la presenza di telefono
staccando
PORTACHIAVI D030
Il portachiavi è un dispositivo per la gestione e il controllo delle condizioni del sistema e del veicolo, è
un sistema di autorizzazione automatico del proprietario nelle modalità «immobilizer/antifurto/mani
libere» alla distanza di lavoro del Bluetooth. Per una comodità di trasmissione, ogni messaggio viene
visualizzato sul display OLED ed associato ad una melodia e una vibrazione.
micro-USB
Indicatore
OLED
SEND/ALARM
! TuTTi i comandi di gesTione vengono Trasmessi via radiocanale. uTilizzando il porTachiavi, per oTTenere la massima
efficacia di funzionamenTo a disTanza del TrasmeTTiTore, si raccomanda di non coprire con la mano o le diTa la zona
del TrasmeTTiTore blueTooTh (vedi disegno).
• Display OLED
• Tre tasti di comando
• Indicatore acustico integrato (16 melodie di avviso)
• Indicatore a vibrazione integrato
• Indicatore luminoso «SEND/ALARM» integrato
• Interfaccia radio 2,4 GHz (protocollo Bluetooth)
• Codifica di dialogo dei comandi (crittografia AES-128)
• Batteria integrata
• Porta Micro-USB integrata
IT
102
MANUALE D’USOSISTEMA DI SICUREZZA PANDORA CAMPER
103
Page 53

Per l’accensione o lo spegnimento del portachiavi premete il tasto e tenetelo premuto per 3 secondi.
°
°
V
Signicati dei segnali luminosi del portachiavi
Indicatore a luce rossa «ALARM» Indicatore a luce verde «SEND»
lampeggia spesso durante qualsiasi trasmissione lampeggia brevemente in presenza di collegamento nel
in assenza totale di segnale lampeggia brevemente in assenza totale di segnale non lampeggia
canale di trasmissione
Ricarica batteria del portachiavi
Sul display del portachiavi è presente in indicatore di carica della batteria del portachiavi . Si
raccomanda di mettere in carica il portachiavi quando l’indicatore segnala un livello di carica basso
. La ricarica avviene con un qualsiasi sistema di ricarica dotato di porta USB e con un comune cavo
micro-USB.
Aggiornamento del software del portachiavi
• Installate l’applicazione mobile Pandora BT (per dispositivi Android o iOS dotati di modulo Bluetooth
4.0 Low Energy e superiore).
• Alla pressione del tasto
non appena lo avete collegato al cavetto.
• Aprite l’applicazione, lanciate la ricerca del dispositivo, scegliete il dispositivo trovato, scegliete una
delle varianti di aggiornamento: «FILE MANAGER» - il software viene installato dalla memoria dello
Smartphone solo per i dispositivi Android; «INTERNET» - il software viene installato via connessione
internet.
date corrente con il cavo micro-USB al portachiavi, rilasciate il pulsante
Pittogrammi del portachiaviAccensione e spegnimento del portachiavi
Zona di sicurezza «Sensore
aggiuntivo/Stato allarme di
fabbrica» (livello allarme)
Zona di sicurezza «Sensore
aggiuntivo» (livello preavviso)
Zona di sicurezza «Sensore di
inclinazione»
Zona di sicurezza «Sensore
movimento»
Zona di sicurezza «Accensione»
Zona di sicurezza «Porte»
Zona di sicurezza «Cofano»
Zona di sicurezza «Bassa
tensione»
P
Zona di sicurezza «Pedale
freno»
Indicatore di funzione del
preriscaldamento
IT
12 48
90
22
°
-18 С
12.0
55
Presenza di segnale radio
Condizione della modalità
antifurto
Indicatore dell’ora
Indicatore del livello di carica
Temperatura motore
Temperatura abitacolo
Temperatura esterna
Tensione batteria
Livello carburante
Zona di sicurezza «Sensore di
urto» (livello allarme)
Zona di sicurezza «Sensore di
urto» (livello preavviso)
104
MANUALE D’USOSISTEMA DI SICUREZZA PANDORA CAMPER
105
Page 54

Funzioni eseguite dai tasti del portachiavi
SEND
Sistema antifurto disinserito
(assenza di allarmi) Ignition is o
Chiusura porte senza
inserimento allarme
Apertura porte Apertura serrature
Spegnimento display portachiavi
Apertura porte laterali
Accensione/spegnimento blocco del canale timer
Accensione/spegnimento portachiavi
Funzione «Panico»
Inserimento allarme con
motore in funzione con
segnale di avviso
Inserimento allarme con
motore in funzione senza
segnale di avviso
(breve)
(1 sec.)
(breve)
(1 sec.)
(breve)
(1 sec.)
(2 sec.)
(3 sec.)
+
(breve)
+
(breve)
+ (1 sec.)
Messa in allarme con
segnale acustico di
avviso
Spegnimento funzione
«Stay Home»
porte
Messa in allarme
entro 30 sec. «Mani
occupate» con segnale
Messa in allarme
entro 30 sec. «Mani
occupate» senza
segnale
Sistema antifurto inserito
Funzione «Ricerca» - lampeggio
delle luci di direzione e segnali
acustici 5 sec.
Funzione «Ricerca» - lampeggio
delle luci di direzione senza segnali
acustici 5 sec.
Disinserimento allarme con
conferma acustica
Disinserimento allarme senza
conferma acustica
RADIOTRASMETTITORE BT760
Il radiotrasmettitore è un dispositivo per la gestione del sistema/veicolo, è uno strumento di
riconoscimento automatico del proprietario nella modalità «immobilizzazione/antifurto/mani libere»
a distanza di Bluetooth. Il radiotrasmettitore è dotato di: tasto di comando
disinserimento dell’allarme e della assistenza tecnica; sensore di movimento che consente in assenza di
movimento di passare alla funzione di risparmio energetico; indicatore luminoso informativo «SEND».
• Tasto di comando
• Indicatore integrato luminoso «SEND»
• Protocollo Bluetooth 4.2 Low Energy
• Accelerometro integrato
• Batteria CR 2032
• Frequenza 2,4GHz (codifica di dialogo AES-128)
Indicazione luminosa di radiotrasmissione «SEND» con
pressione breve del tasto
• non si illumina – batteria scarica
• un lampeggio – radiotrasmettitore in funzione
Indicazione luminosa di radiotrasmissione
«SEND» all’inserimento della batteria
• non si illumina – batteria scarica
• un lampeggio – livello di carica della batteria basso
• tre lampeggi – livello di carica della batteria elevato
! eviTare l’enTraTa di umidiTà nel radioTrasmeTTiTore. non Tenere il radioTrasmeTTiTore vicino a magneTi o a disposiTivi
con un proprio campo magneTico.
della funzione allarme e assistenza tecnica
Funzioni dei tasti
PRESSIONE FUNZIONE
breve allo spegnimento motore attivazione/disattivazione allarme
2 sec. alla disattivazione allarme e
motore
attivazione funzione «Stay Home»
per l’inserimento e il
IT
106
MANUALE D’USOSISTEMA DI SICUREZZA PANDORA CAMPER
107
Page 55

2 sec. alla disattivazione allarme e
#
#
*
*
22558
8
*
*
accensione motore
inserimento/modica numero telefono proprietario
3 sec. all’accensione motore attivazione/disattivazione funzione assistenza tecnica
6 sec. registrazione radiotrasmettitore nel sistema
10 sec. aggiornamento software radiotrasmettitore
Sostituzione della batteria del radiotrasmettitore dell’immobilizer
Facendo molta attenzione, rimuovete il coperchio del radiotrasmettitore. Rimuovete la batteria scarica
ed inseritene una nuova, prestando attenzione alla corretta polarità. La sostituzione della batteria non
causa la perdita delle informazioni codificate del radiotrasmettitore, in quanto i dati delle autorizzazioni
sono salvati nella parte di memoria indipendente dalla carica della batteria del microcontroller del
trasmettitore. Richiudete accuratamente il coperchio del trasmettitore.
Tutti gli elementi di fissaggio devono rimanere in posizione fermamente chiusa. Al termine della
procedura di sostituzione, è possibile riprendere l’utilizzo del radiotrasmettitore come in precedenza.
Aggiornamento del software del radiotrasmettitore
• Installate l’applicazione per cellulare Pandora BT
(per dispositivi Android o iOS con Bluetooth 4.0
Low Energy o superiori).
• Lanciate l’applicazione, ricercate i dispositivi.
• Premete e tenete premuto il tasto
radiotrasmettitore fino a che non sono passati
10 lampeggi dell’indicatore «SEND», quindi
rilasciate il tasto.
• Sull’applicazione scegliete il dispositivo rilevato
ed iniziate l’aggiornamento: «FILE MANAGER» - il
software viene installato dalla memoria del telefono solamente dai dispositivi Android; «INTERNET»
- il software viene installato attraverso una connessione internet.
del
Aprire qui
GESTIONE DEL SISTEMA VIA TELEFONO
per il correTTo funzionamenTo del sisTema gsm, il proprieTario deve verificare periodicamenTe il crediTo residuo
!
sulla sim card insTallaTa nel sisTema, secondo il piano Tariffario sTabiliTo dal gesTore del servizio. se la SIM card è
bloccaTa o danneggiaTa, la funzione GSM del sisTema anTifurTo non sarà disponibile.
Chiamate il numero di telefono del sistema. Alla risposta, inserite il numero corrispondente al
comando
Ripetere il messaggio precedente
*
*
1
1
Inserimento antifurto
*
*
0
0
Disattivazione antifurto
*
*
1
001
*
*
Inserimento silenzioso antifurto
0
000
Disinserimento silenzioso antifurto
*
*
9
9
Guida
*
*
0
990
Archivio eventi
*
*
1
551
Modalità «Carro attrezzi»
*
*
0
11000
Verica credito
*
*
3
33333
Acc. funzioni agg.ve dal tasto F a CAN
*
*
0
55000
Coordinate attuali
*
*
6
44556
Accensione canale aggiuntivo
*
*
4
66554
Spegnimento canale aggiuntivo
* dopo la digiTazione del comando è necessario digiTare il «pin segreTo» sul Telefono.
Accensione e spegnimento della modalità Assistenza Tecnica
1. Chiamate il numero di telefono del sistema. Attendete la risposta del sistema.
2. Mettete in tensione il quadro, portate il dispositivo di autorizzazione (radiotrasmettitore, portachiavi,
telefono cellulare con applicazione installata) nella zona di riconoscimento del sistema (se in modalità
«Immobilizer»), digitate il «PIN immobilizer» (se in modalità «Immobilizer con codice»).
3. Per l’accensione della modalità Assistenza Tecnica inserite il comando DTMF 551* - «Accensione
modalità Assistenza Tecnica», dopodiché digitate il «PIN segreto» dalla carta individuale del proprietario.
4. Per lo spegnimento della modalità Assistenza Tecnica, inserite il comando DTMF 552*.
2
22222
Spegnimento HandsFree
*
*
3
22223
Accensione HandsFree all’inserimento allarme
*
*
4
22224
Accensione HandsFree al disins. allarme
*
*
7
22997
Fine chiamata
*
*
1
55551
Accensione mod. Assist.Tecn. (v. sotto)*
*
*
2
55552
Spegnimento mod. Assist. Tecn.
*
*
6
11556
Accensione preriscaldamento motore
*
*
1
66551
Spegnimento preriscaldamento motore
*
*
6
66666
Blocco del motore
*
*
9
99999
Disattivazione blocco motore*
*
*
8
99998
Spegnimento dispositivi autorizzazione*
*
*
8
88888
Accensione dispositivi autorizzazione
*
*
IT
108
MANUALE D’USOSISTEMA DI SICUREZZA PANDORA CAMPER
109
Page 56

Guida vocale
Nel sistema è prevista la modalità suggerimenti vocali. Durante il collegamento digitate 9* («asterisco»),
ascoltate le informazioni sui comandi di gestione del sistema.
Per terminare il collegamento chiudete la comunicazione.
Ripetizione dell’ultimo messaggio
Per la ripetizione di qualunque messaggio, durante il collegamento con il sistema premete il tasto
«asterisco».
Inserimento/disinserimento della modalità antifurto
1. Chiamate il numero di telefono del sistema. Attendete la risposta.
2. Digitate 1 e «asterisco» per l’inserimento della modalità antifurto, oppure 0 e «asterisco» per il
disinserimento.
Per l’inserimento silenzioso dell’antifurto digitate 10 e «asterisco», per il disinserimento silenzioso
digitate 00 e «asterisco»
3. Il sistema conferma l’esecuzione dei comandi: «Modalità antifurto inserita/disinserita».
Per terminare il collegamento chiudete la comunicazione.
Richiesta delle coordinate del momento
1. Chiamate il numero di telefono del sistema. Attendete la risposta.
2. Digitate 500 e «asterisco».
3. Il sistema conferma l’esecuzione dei comandi: «Le coordinate attuali sono state inviate via SMS» ed
invia un link alle coordinate sulla carta sul vostro numero di telefono.
Per terminare il collegamento chiudete la comunicazione.
Richiesta di verifica del credito residuo
1. Chiamate il numero di telefono del sistema. Attendete la risposta.
2. Digitate 100 e «asterisco».
3. Il sistema conferma l’esecuzione dei comandi: «Informazione sul credito residuo inviata via SMS» ed
invia un messaggio sul vostro numero di telefono.
Per terminare il collegamento chiudete la comunicazione.
Modalità Carro attrezzi
Per il trasporto del veicolo mantenendo le impostazioni dell’antifurto è prevista la modalità «Carro
attrezzi». La modalità è inseribile solamente con antifurto attivato, l’esclusione della modalità avviene in
automatico al disinserimento dell’antifurto.
110
1. Chiamate il numero di telefono del sistema. Se il sistema è nella modalità «Panico» ricevete la
comunicazione di allarme. Attendete la risposta del sistema.
2. Per l’inserimento della modalità «Carro attrezzi» inserite il comando DTMF 15*, il sistema esclude i
sensori di urto, di movimento e di inclinazione. Per terminare il collegamento chiudete la comunicazione.
3. Per disinserire la modalità disinserite l’antifurto.
Bloccaggio/sbloccaggio del motore
Potete bloccare il motore del veicolo con qualsiasi apparato telefonico. Il motore resta bloccato finché non
viene dato via telefono il comando «Sbloccare il motore» (non è possibile togliere il bloccaggio in altro modo).
1. Chiamate il numero di telefono del sistema. Attendete la risposta del sistema.
2. Digitate 666 e «asterisco» per attivare il bloccaggio del motore oppure digitate 999 e «asterisco» per
togliere il bloccaggio del motore (dopo l’inserimento del comando 999* è necessario digitare il «PIN
segreto», che si trova sulla carta di plastica).
in modo analogo si aTTivano TuTTi gli alTri comandi del sisTema.
!
Modica delle impostazioni con il telefono cellulare
Passaggio alla modalità programmazione impostazioni
Disinserite l’antifurto del veicolo, chiamate il numero di telefono del sistema, attendete la risposta, date
tensione al quadro per 1-3 secondi e togliete tensione al quadro. Il sistema passa nella modalità di
programmazione delle impostazioni.
Esempio di modifica del numero del proprietario del sistema:
1. Entrate nella modalità di programmazione delle impostazioni come da istruzioni qui sopra;
2. Digitate il comando DTMF 1* (impostazione numero di telefono) e 1* (numero del proprietario del sistema);
3. Digitate il nuovo numero di telefono del proprietario nel formato *79XXXXXXXXX# (il sistema
riconosce il simbolo «*» come «+»);
4. Per confermare è necessario digitare il comando 1*.
! il numero di Telefono del proprieTario può essere sosTiTuiTo in Tre modi:
1. in modo auTonomo, uTilizzando la modifica delle imposTazioni dal Telefono cellulare.
2. in modo auTonomo, uTilizzando la modifica del numero di Telefono del proprie Tario con l’ausilio del
radioTrasmeTTiTore: disaTTivaTe l’anTifurTo, sedeTevi nell’abiTacolo, daTe Tensione al quadro, chiamaTe il numero di
Telefono del sisTema, aTTendeTe la risposTa (se la chiamaTa non viene faTTa dal numero del proprieTario, digiTaTe il
«pin ospiTe» - il codice di fabbrica è 1-2-3-4), premeTe e TeneTe premuTo il TasTo sul radioTrasmeTTiTore finché non ci
saranno avuTi due lampeggi dell’indicaTore luminoso (2 secondi), rilasciaTe il TasTo; - il sisTema ricorda il numero da
cui ha ricevuTo la chiamaTa come «numero principale del proprieTario» e lo deTTa, chiudeTe la comunicazione.
3. con l’ausilio di un compuTer e il programma speciale pandora alarm sTudio.
MANUALE D’USOSISTEMA DI SICUREZZA PANDORA CAMPER
111
IT
Page 57

*
*
*
*
*
1
1
Impostazione dei
numeri di telefono
2
2
*
*
Impostazione delle
chiamate vocali
3
3
*
*
Impostazione dei
messaggi SMS
Numero proprietario sistema -> «#»
1
1
*
*
Numero proprietario sistema
2
2
*
*
aggiuntivo -> «#»
Secondo numero aggiuntivo
3
3
*
*
proprietario sistema -> «#»
Numero verica credito residuo -> «#»
4
4
*
*
5
Numero proprio del sistema -> «#»
5
*
*
Chiamata in caso di attivazione
1
1
allarme
*
*
Chiamata in caso di attivazione sensori
2
2
zona preavviso
*
*
Chiamata in caso di avvio motore
3
3
*
*
Chiamata in caso di spegnimento del
4
4
motore
*
*
Chiamata per aggiornamento
5
5
collegamento GSM
*
*
Chiamata in caso di disattivazione
6
6
antifurto
*
*
Chiamata in caso di attivazione
7
7
modalità programmazione
*
*
Chiamata in caso di assenza
8
8
collegamento con relè radio
*
*
Chiamata in caso di livello basso
9
9
*
*
carica batteria
Chiamata in caso di incidente
0
0
*
*
SMS in caso di attivazione allarme
1
1
*
*
SMS in caso di attivazione sensori zona
2
2
preavviso
*
*
SMS in caso di avvio motore
3
3
*
*
SMS in caso di spegnimento del
4
4
motore
*
*
SMS per aggiornamento
5
5
*
collegamento GSM
*
SMS in caso di disattivazione
6
6
*
*
antifurto
SMS in caso di attivazione modalità
7
7
programmazione
*
*
SMS in caso di assenza collegamento
8
8
*
*
con relè radio
SMS in caso di livello basso carica
9
9
*
batteria
*
SMS in caso di incidente
0
0
*
5
5
Impostazione di
funzioni aggiuntive
7
7
*
*
Impostazioni della
sensibilità dei
sensori
8
8
*
*
Impostazione delle
funzioni di risparmio
energetico e di mezzi
9
9
*
*
Impostazione data
e ora
Modica del PIN ospite
1
1
*
*
Inserimento ospite
2
2
*
*
Determinazione limite di tensione
5
5
per l’invio di avvisi
*
*
Impostazione zona preavviso sensore
1
1
urto
*
*
Impostazione sensibilità zona allarme
2
2
sensore urto
*
*
Impostazione sensibilità sensore
3
3
movimento
*
*
Impostazione sensibilità sensore
4
4
inclinazione
*
*
Impostazione zona preavviso sensore
5
5
aggiuntivo
*
*
Impostazione sensibilità allarme
6
6
sensore aggiuntivo
*
*
Collegamento GSM
1
1
*
*
Modalità risparmio energetico GSM
2
2
*
*
Chiamate vocali in roaming
3
3
*
*
Inserimento data
1
1
*
*
Inserimento ora
2
2
*
*
SERVIZIO INTERNET PANDORAON.COM E APPLICAZIONE PER CELLULARI
PANDORA CAMPER
per il correTTo funzionamenTo del sisTema GSM, il
!
proprieTario deve verificare periodicamenTe il crediTo residuo
sulla SIM card insTallaTa nel sisTema, secondo il piano
Tariffario sTabiliTo dal gesTore del servizio. se la SIM card
è bloccaTa o danneggiaTa, la funzione GSM del sisTema
anTifurTo non sarà disponibile.
Per lavorare con il server internet e con
l’applicazione per cellulari è necessario creare
un account e aggiungerci il sistema telemetrico
(trasporto). La creazione dell’account avviene sul
sito o sull’applicazione mobile.
Registrazione
Andate nel sito pandora-on.com o nell’applicazione
mobile Pandora Camper e completate la procedura di
«REGISTRAZIONE», seguendo le indicazioni delle pagine.
Accesso
Al termine della procedura di registrazione, potete
accedere al servizio internet sia con un computer via browser, sia attraverso la speciale applicazione per
cellulari Pandora Camper per piattaforme Android e iOS.
Per l’accesso al sito e all’applicazione usate le credenziali che avete usato alla registrazione.
Aggiunta del sistema al servizio internet
Il servizio internet pandora-on.com supporta contemporaneamente il lavoro di diversi sistemi
telemetrici (autoparco privato).
Per l’aggiunta di un sistema telemetrico (di trasporto) al servizio cliccate su «Aggiungere un nuovo
dispositivo» e seguite la procedura di aggiunta secondo le istruzioni del servizio. Per aggiungere i sistemi
di trasporto occorre essere in possesso della carta individuale del proprietario con le informazioni di
registrazione (fa parte della dotazione del sistema telemetrico).
rimuovere con precauzione lo sTraTo di proTezione, non usare sTrumenTi affilaTi per non danneggiare le informazioni
!
nascosTe soTTo lo sTraTo di proTezione.
pandora-on.com
@E-MAIL
********
LOGIN
PASS
Pandora Camper
@E-MAIL
LOGIN
********
PASS
IT
112
MANUALE D’USOSISTEMA DI SICUREZZA PANDORA CAMPER
113
Page 58
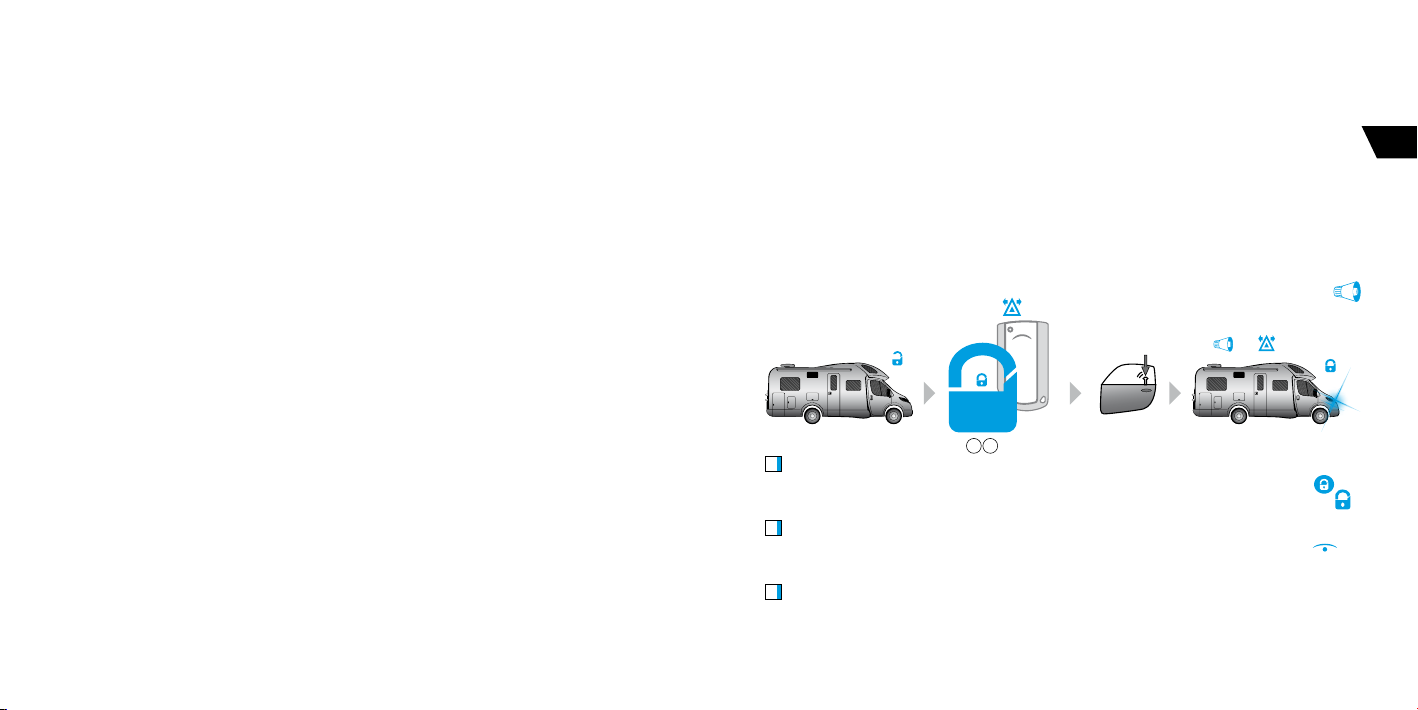
Archivio eventi
1 *
Nell’archivio eventi vengono salvati oltre 100 tipi di eventi, che possono accadere con il sistema. Ogni
evento nell’archivio viene salvato con data, ora, coordinate ed inoltre con lo status di tutte le zone
controllate dal sistema e dei sensori al momento del verificarsi dell’evento. Nel sistema la quantità di
archivi di eventi è limitata. Il termine di conservazione dell’archivio eventi è di non meno di 1 mese.
Applicazione per cellulari Pandora Camper
È possibile scaricare l’applicazione gratuita Pandora Camper sul vostro cellulare dai relativi servizi online
(App Store per iOS e Google Play per Android).
Per accedere al servizio utilizzate le credenziali che avete ricevuto dal servizio nella fase di
registrazione.
Gestione via radio canale
In assenza di collegamento internet nel blocco di base del sistema, il dispositivo mobile con
installata l’applicazione Pandora Camper, trovandosi nelle immediate vicinanze (nella zona di ricezione
del segnale Bluetooth) può fare da gestore, ricevere informazioni sullo status oppure aprire le
impostazioni avanzate del sistema. Per fare ciò, dopo aver installato l’applicazione seguite la procedura
di registrazione del dispositivo mobile nella memoria del sistema.
Registrazione del dispositivo mobile
Per la registrazione del dispositivo mobile nella memoria non volatile è necessario:
I. ENTRARE NEL MENÙ DI PROGRAMMAZIONE
L’accesso al menù di programmazione avviene attraverso il pulsante «VALET» e con l’inserimento del
«PIN di servizio», password di fabbrica 1-1-1-1 (per dettagli sull’inserimento del codice vedi il capitolo
«GESTIONE DEL SISTEMA IN EMERGENZA»).
II. PASSARE AL LIVELLO DI REGISTRAZIONE DEL DISPOSITIVO MOBILE
Dopo l’accesso alla modalità di registrazione è necessario premere e tenere premuto il tasto «VALET»
fino a sentire cinque segnali acustici della «Sirena/Beeper», dopo il quinto segnale rilasciare il tasto e
il sistema passa al livello «REGISTRAZIONE DISPOSITIVO MOBILE». All’accesso al livello sull’indicatore
«LED» si accende la luce verde e il sistema è pronto a ricevere i dati.
III. REGISTRAZIONE DEL DISPOSITIVO
È necessario attivare il Bluetooth del telefono cellulare, accedere all’applicazione e passare nella
finestra di ricerca «Miei sistemi» -> «Aggiungere dispositivo Bluetooth». Nella finestra di dialogo appare
il sistema, stabilite la connessione. A conferma della registrazione lampeggeranno i «LED» rosso e verde
e verrà emesso un unico segnale acustico dalla sirena.
114
IV. USCIRE DALLA MODALITÀ PROGRAMMAZIONE
Dopo aver registrato il dispositivo, per uscire dalla modalità di programmazione è necessario dare
tensione al quadro e quindi toglierla.
il sisTema supporTa il lavoro con un solo disposiTivo cellulare. in assenza di inTerfaccia auTomaTica, nelle
!
imposTazioni di sisTema «funzioni del radioTrasmeTTiTore e del Telefono cellulare» è necessario meTTere la spunTa
su «pin inTerfaccia» e ripeTere la procedura di regisTrazione del disposiTivo mobile. nell’inTerfacciare sul cellulare
comparirà la richiesTa di un pin 0-0-1-1-1-1, le ulTime cifre del quale sono il «pin di servizio».
GESTIONE DEL SISTEMA
Inserimento della modalità antifurto
Per l’inserimento della modalità antifurto con motore spento, usate uno qualunque dei modi
illustrati. La conferma di comando eseguito sarà data da un breve segnale acustico di sirena
e un lampeggio del segnale luminoso
SLAVE
SLAVE
HANDS FREE
HANDS FREE
MOBILE APP
PANDORA BT
Portachiavi
Nella zona di funzionamento del radiocanale del sistema premete brevemente il tasto
portachiavi. Il portachiavi emetterà la melodia «MESSA IN ANTIFURTO», il pittogramma cambia in
Radiotrasmettitore
Nella zona di funzionamento del radiocanale del sistema premete brevemente il tasto
radiotrasmettitore.
Modalità «SLAVE»
Premete brevemente il tasto di chiusura sul dispositivo di comando remoto del veicolo oppure usate il
sensore/tasto di chiusura sulla maniglia della porta (per i veicoli con sistema di apertura intelligente).
MANUALE D’USOSISTEMA DI SICUREZZA PANDORA CAMPER
.
chiusura porte
si attiva
la modalità antifurto
1x /1x
, sul
sul
115
IT
.
Page 59
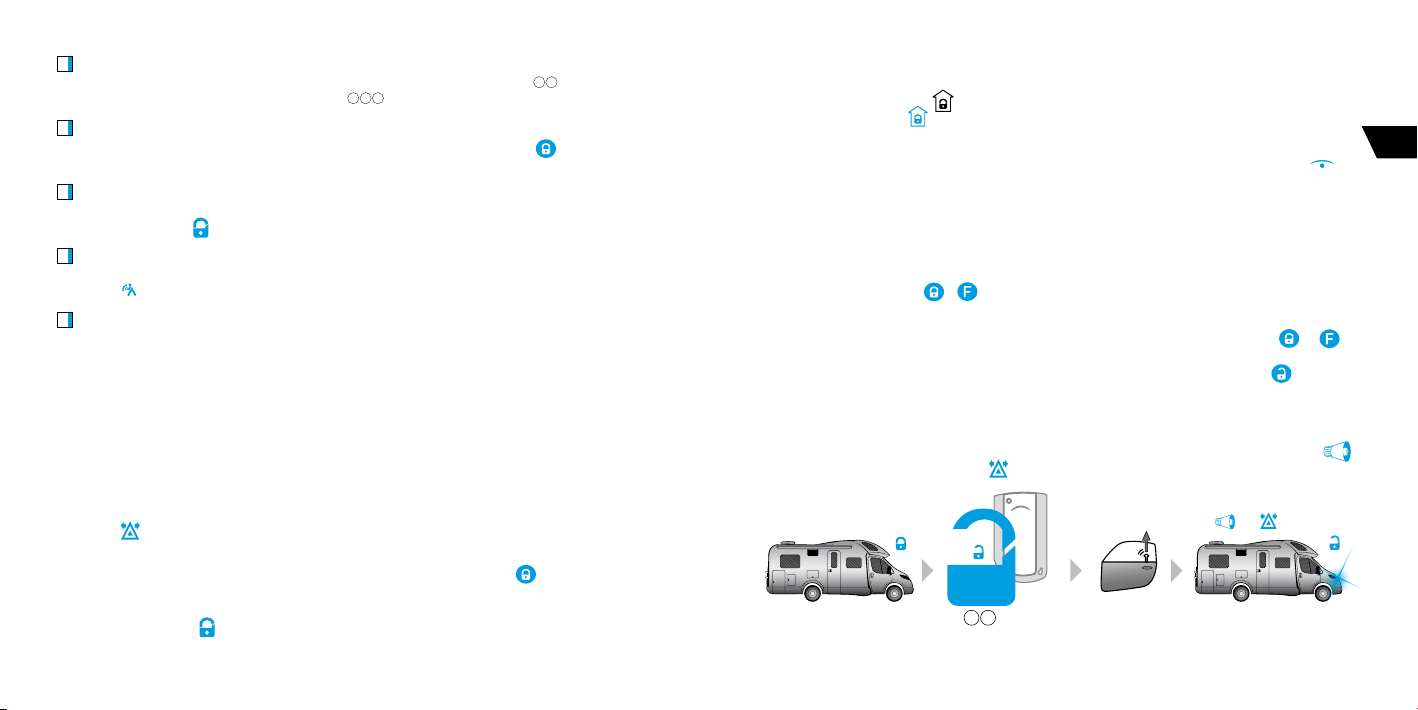
Telefono
0 *
Chiamate il numero di telefono del sistema, dopo la risposta digitate il comando
antifurto senza segnale acustico digitate il comando
Servizio internet
Accedete al sito pandora-on.com, con connessione effettuata premete il tasto
comando.
Applicazione mobile
Accedete all’applicazione mobile, con connessione effettuata (via Bluetooth o browser), premete e
tenete premuto il tasto
Modalità «HANDS FREE»
Per l’inserimento automatico della modalità antifurto, allontanatevi con il dispositivo di autorizzazione
dal veicolo
Gestione con tasto «VALET»
Premete e tenete premuto il tasto «VALET» per 3 secondi, quindi rilasciate il tasto. Il veicolo verrà messo
in antifurto entro 30 secondi, nel periodo di attesa sull’indicatore «LED» si accende la luce rossa.
!
movimenTo/inclinazione/aggiunTivo disinseriTi. le imposTazioni della funzione «messa in anTifurTo con esclusione
sensori via TasTo valeT» sono disponibili nel programma pandora alarm sTudio (punTo «imposTazioni generali» -
«imposTazioni sensori»).
.
le imposTazioni del sisTema, con l’uTilizzo del TasTo «valeT», consenTe la messa in anTifurTo con i sensori di urTo/
sul pannello fino alla carica completa della sequenza.
1 0 *
.
1 *
. Per la messa in
sul pannello di
Inserimento della modalità STAY HOME
Per inserire la modalità «Stay Home», con quadro del veicolo non in tensione usate uno qualsiasi
dei modi indicati. A conferma dell’esecuzione del comando si vedrà un lampeggio del segnale
luminoso
Portachiavi
Nella zona di funzionamento del radiocanale del sistema premete il tast
1 secondo oppure fino a quando non udirete due segnali acustici e luminosi dell’indicatore «SEND/
ALARM», quindi rilasciate il tasto. Il portachiavi emette la melodia «MESSA IN ANTIFURTO» e il
pittogramma cambia in
.
sul portachiavi per
.
116
Applicazione mobile
Accedete all’applicazione mobile, a connessione stabilita (Bluetooth o browser), premete e
tenete premuto il pulsante
pittogramma cambia in
Radiotrasmettitore
Nella zona di funzionamento del radiocanale del sistema premete il pulsante
radiotrasmettitore per 2 secondi oppure fino a che l’indicatore «SEND» non lampeggerà due volte,
quindi rilasciate il tasto.
sul pannello di comando fino al completamento della sequenza. Il
.
sul
Messa in allarme dierita (mani occupate)
Se al momento di lasciare il veicolo non avete la possibilità di metterlo in allarme (avete le mani occupate),
potete attivare la modalità «Messa in allarme differita» con l’ausilio del portachiavi. Per attivare la modalità
premete brevemente i tasti
secondi il sistema chiude le serrature delle porte e si mette in allarme, viene emesso un breve suono di
sirena e le luci di direzione lampeggiano una volta.
Per attivare la modalità senza la conferma acustica premete e tenete premuti i tasti
portachiavi per 1 secondo fino all’emissione di un suono e alla vibrazione del portachiavi.
Per annullare la modalità di messa in allarme differita, è sufficiente premere il tasto
e sul portachiavi, l’indicatore luminoso «LED» diventa rosso, entro 30
e sul
.
Disattivazione dell’antifurto
Per disattivare la modalità antifurto usate uno qualsiasi dei tre modi elencati di seguito. A
conferma dell’esecuzione del comando vengono emessi due brevi segnali acustici di sirena
due lampeggi del segnale luminoso
MANUALE D’USOSISTEMA DI SICUREZZA PANDORA CAMPER
SLAVE
HANDS FREE
MOBILE APP
.
apertura porte
l’antifurto si disinserisce
2x /2x
117
IT
e
Page 60

Portachiavi
Nella zona di funzionamento del radiocanale del sistema premete il tasto
secondo oppure fino a quando non udirete due segnali acustici e luminosi dell’indicatore «SEND/
ALARM», quindi rilasciate il tasto. Il portachiavi emette la melodia «MESSA IN ANTIFURTO» e il
pittogramma cambia in
Per la messa in antifurto senza segnale acustico premete il tasto
Radiotrasmettitore
Nella zona di funzionamento del radiocanale del sistema premete brevemente il pulsante sul
radiotrasmettitore.
Modalità «SLAVE»
Premete brevemente il tasto di apertura sul dispositivo a distanza del veicolo oppure usate il sensore/
pulsante di apertura sulla maniglia della porta (per i veicoli dotati di sistema intelligente di apertura).
Telefono
Chiamate il numero di telefono del sistema, attendete la risposta, quindi digitate il comando
Per disattivare l’antifurto senza l’emissione del segnale acustico digitate il comando
Servizio internet
Accedete al sito pandora-on.com, a connessione stabilita (via browser o Bluetooth) premete e tenete
premuto il tasto
Mobile application
Open the mobile application. When the system is online (there is an Internet or Bluetooth connection),
press and hold the
Modalità «HANDS FREE»
Per il disinserimento automatico della modalità antifurto avvicinate il dispositivo di autorizzazione al
.
veicolo
Tasto «VALET»
Digitate il «PIN segreto» (vedi «GESTIONE DEL SISTEMA IN EMERGENZA»).
.
sul pannello di comando fino al completamento della sequenza.
button on the control panel until the scale is fully loaded.
per più di 1 secondo.
, sul portachiavi per 1
0 *
0 *0
.
.
Apertura/chiusura delle porte con motore in movimento
Il sistema di sicurezza permette di operare sulle serrature delle porte con motore in movimento.
Per fare ciò, utilizzate uno qualunque dei modi di seguito illustrati.
Portachiavi
Nella zona di funzionamento del radiocanale del sistema premete il tasto
per l’apertura premete
Applicazione mobile
Nella zona di funzionamento del radiocanale del sistema (Bluetooth) accedete all’applicazione mobile.
Per la chiusura delle porte premete e tenete premuto il tasto
completamento della sequenza, per aprire premete
Modalità automatiche
Nel sistema sono predisposte modalità automatiche di chiusura delle porte in movimento oppure
all’avvio del motore. Se si utilizza la modalità di chiusura porte all’inizio del movimento, a seconda
delle informazioni sulla velocità presenti nel protocollo elettronico o nella sensibilità del sensore di
movimento, il sistema registra il movimento del veicolo e procede alla chiusura delle porte. Se si utilizza
la modalità di chiusura porte con motore in funzione, le porte vengono chiuse automaticamente 5
secondi dopo l’avvio del motore. Se dopo l’avvio del motore viene aperta una qualsiasi delle porte, la
chiusura automatica non avviene: ciò è studiato per evitare di chiudere le chiavi all’interno dell’abitacolo.
la modaliTà di defaulT è disinseriTa. per poTerla uTilizzare sono necessarie delle imposTazioni ulTeriori con l’ausilio
!
dell’applicazione mobile o del programma pandora alarm sTudio.
.
.
per la chiusura delle porte,
sul pannello di comando fino al
Ricerca del veicolo
Per cercare il veicolo nelle zone di parcheggio in modalità antifurto attivata, premete brevemente il
sul portachiavi. Il sistema ripete cinque volte il segnale di sirena e fa lampeggiare le luci
tasto
di direzione per cinque volte
per 1 secondo.
Per la ricerca del veicolo senza l’emissione di suoni premete il tasto
IT
118
MANUALE D’USOSISTEMA DI SICUREZZA PANDORA CAMPER
119
Page 61

Modalità «Panico»
Per attirare l’attenzione dei passanti verso il vostro veicolo utilizzate la modalità «Panico». In questa
modalità per 30 secondi senza interruzione suona la sirena e lampeggiano le luci di direzione.
Per l’esclusione della modalità usate uno qualsiasi dei modi elencati di seguito.
Portachiavi
Per l’attivazione della modalità premete brevemente i tasti
premete brevemente i tasti
Applicazione mobile
Per l’attivazione della modalità accedete all’applicazione mobile. A connessione stabilita (Bluetooth
o browser), premete e tenete premuto il tasto
della sequenza. Per la disattivazione anticipata della modalità premete e tenete premuto il tasto
pannello di comando fino al completamento della sequenza.
e button.
sul pannello di comando fino al completamento
e
. Per la disattivazione della modalità
sul
Modalità «Assistenza Tecnica»
Passare alla modalità di assitenza tecnica è raccomandato quando si lascia il veicolo dal meccanico.
Passando a questa modalità il sistema cessa di funzionare e non influisce sulle apparecchiature elettriche
di fabbrica del veicolo: tutte le sue funzioni vengono spente per non creare problemi all’assistenza
tecnica.
Per attivare la modalità Assistenza Tecnica, togliete il sistema dalla sicurezza, date tensione al
quadro, mettete il dispositivo di autorizzazione (radiotrasmettitore, portachiavi, telefono cellulare
con l’applicazione) nel raggio d’azione del sistema (se si dispone della funzione «Immobilizer»),
digitate il «PIN immobilizer» (se installata l’opzione «Immobilizer con password») e scegliete una
delle seguenti varianti di gestione:
Gestione della modalità Assistenza Tecnica con l’ausilio del radiotrasmettitore
Per inserire o disinserire la modalità Assistenza Tecnica premete e tenete premuto il pulsante
finché non vengono emessi tre lampeggi sul «LED» del trasmettitore, quindi rilasciate il pulsante.
Gestione della modalità Assistenza Tecnica con l’ausilio del cellulare
• Chiamate il numero di telefono del sistema e attendete la risposta.
• Per l’inserimento della modalità Assistenza Tecnica digitate il comando DTMF
digitate il «PIN segreto» indicato sulla carta individuale del proprietario.
• Per il disinserimento della modalità digitate il comando DTMF
Gestione della modalità Assistenza Tecnica con l’ausilio dell’applicazione mobile
Per inserire o disinserire la modalità Assistenza Tecnica accedete all’applicazione e quando la
connessione è stabilita (Bluetooth o browser) premete e tenete premuto il tasto
di comando fino alla completa carica della sequenza.
per modificare la posizione o aggiungere un pulsanTe al pannello di conTrollo, passaTe al menù «imposTazioni/menù
!
imposTazioni» -> «TasTi di gesTione».
Gestione della modalità Assistenza Tecnica con l’ausilio dei tasti Immobilizer
• Per inserire la modalità Assistenza Tecnica, dopo aver digitato il «PIN Immobilizer» entro 20 secondi
premete il pulsante del «Immobilizer con password» 10 volte consecutive.
• Per disinserire la modalità, mettete in tensione il quadro e digitate il «PIN Immobilizer».
Indicazioni della modalità Assistenza Tecnica
• Come conferma dell’inserimento della modalità Assistenza Tecnica si ha: l’apparizione dell’icona
nell’applicazione mobile, l’accensione continua del «LED» verde alla messa in tensione del
quadro, un lungo segnale acustico del «Beeper» al momento dell’inserimento della modalità.
• Come conferma del disinserimento della modalità si vede: scompare l’icona
mobile, si spegne il «LED» verde alla messa in tensione del quadro, emissione di due segnali acustici
prolungati del «Beeper» nel momeno del disinserimento della modalità.
255 *
155 *
DTMF command.
sul pannello
nell’applicazione
e quindi
IT
120
MANUALE D’USOSISTEMA DI SICUREZZA PANDORA CAMPER
121
Page 62

GESTIONE IN EMERGENZA DEL SISTEMA
In caso di perdita o di danneggimento dei dispositivi di gestione, oppure nel caso in cui si scaricasse
la batteria e non sia possibile ricaricarla o sostituirla operativamente con una carica, sono previsti dei
modi d’emergenza di disattivazione dell’allarme e delle funzioni antifurto per mezzo del «PIN segreto»
e del tasto «VALET».
Prima di lanciare l’uso della gestione in emergenza del sistema, assicuratevi del funzionamento dei
dispositivi del sistema e del veicolo: controllate la batteria, accendete il dispositivo secondo le istruzioni
(se necessario).
Se il dispositivo di gestione è funzionante, fate una prima diagnosi del veicolo: verificate che
funzionino i dispositivi di fabbrica, la carica della batteria, la posizione dei selettori, le spie del veicolo
(solitamente sul cruscotto).
! nel sisTema sono previsTe operazioni di gesTione rapida dal Telefono.
0* - disaTTivazione anTifurTo
998*xxxx – spegnimenTo dei disposiTivi di auTorizzazione («immobilizer» e «anTifurTo»), dove xxxx è il «pin segreTo»
indicaTo soTTo lo sTraTo di proTezione della «carTa individuale del proprieTario».
1* - aTTivazione dell’anTifurTo
888* - aTTivazione dei disposiTivi di auTorizzazione («immobilizer» e «anTifurTo»).
! prima della gesTione in emergenza del sisTema, leggeTe la procedura di inserimenTo del pin.
INSERIMENTO DEL PIN
La procedura di inserimento del PIN è disponibile solamente con batteria carica e quadro non in
tensione. L’inserimento avviene attraverso il tasto «VALET» asportabile o situato sul blocco di base.
L’inserimento del codice è visualizzato dall’illuminazione dell’indicatore «LED» o dell’indicatore situato
sul blocco di base.
• Inserite la prima cifra • Premete il tasto «VALET» un numero di volte pari al valore della prima
cifra del PIN. Le pause fra una pressione e l’altra non devono superare 1 secondo; ogni pressione
viene visualizzata con l’accensione di un indicatore di colore arancione. Dopo aver inserito la prima
cifra, fate una pausa di 1 secondo e un indicatore rosso del «LED» conferma ed avvisa del passaggio
all’inserimento della seconda cifra, accompagnato da un breve segnale acustico del «Beeper».
• Inserite la seconda cifra • Premete il tasto «VALE T» un numero di volte pari al valore della seconda
cifra del PIN. Le pause fra una pressione e l’altra non devono superare 1 secondo; ogni pressione
viene visualizzata con l’accensione di un indicatore di colore arancione. Dopo aver inserito la seconda
cifra, fate una pausa di 1 secondo e un indicatore rosso del «LED» conferma ed avvisa del passaggio
all’inserimento della terza cifra, accompagnato da un breve segnale acustico del «Beeper».
122
• Inserite la terza cifra • Premete il tasto «VALET» un numero di volte pari al valore della terza
cifra del PIN. Le pause fra una pressione e l’altra non devono superare 1 secondo; ogni pressione viene
visualizzata con l’accensione di un indicatore di colore arancione. Dopo aver inserito la terza cifra, fate
una pausa di 1 secondo e un indicatore rosso del «LED» conferma ed avvisa del passaggio all’inserimento
della quarta cifra, accompagnato da un breve segnale acustico del «Beeper».
• Inserite la quarta cifra • Premete il tasto «VALET» un numero di volte pari al valore della quarta
cifra del PIN. Le pause fra una pressione e l’altra non devono superare 1 secondo; ogni pressione viene
visualizzata con l’accensione di un indicatore di colore arancione.
Disinserimento d’emergenza dell’antifurto
In caso non sia possibile disattivare l’antifurto con i metodi previsti, utilizzate il disinserimento
d’emergenza con l’ausilio del tasto «VALET» e del «PIN segreto», indicato sulla carta individuale del
proprietario (informazioni dettagliate sulla posizione del tasto e del codice sono disponili nel capitolo
«Informazioni generali»).
• Se il veicolo è chiuso, apritelo utilizzando il metodo di fabbrica del veicolo. Ignorando l’emissione
dei segnali della sirena, assicuratevi che il quadro non sia in tensione, dopodiché iniziate ad inserire
il «PIN segreto» (vedi descrizione precedente «Inserimento del PIN»). Se i segnali acustici della sirena
o gli indicatori luminosi «LED» sono assenti, verificate la condizione della batteria: in assenza di
alimentazione non è possibile inserire il «PIN segreto».
• Se il PIN è stato inserito in modo corretto, il sistema disattiva l’allarme. A conferma del corretto
inserimento del PIN si vede: il lampaggio alternato dell’indicatore rosso e verde del «LED», una serie
di segnali acustici del «Beeper», quattro brevi segnali acustici della «Sirena» e quattro segnalazioni
dell’allarme visivo (avviso di violazione della zona di sicurezza).
• Se il PIN è stato inserito in modo scorretto, il sistema rimane nella condizione precedente, e il
successivo inserimento del PIN può avvenire solo dopo 5 secondi. L’inserimento di un PIN errato
viene visualizzato da un segnale luminoso rosso di lunga durata sul «LED».
• Il disinserimento d’emergenza dell’antifurto è equiparabile al disinserimento in condizione normale,
per cui dopo aver ripristinato le funzionalità dei dispositivi di gestione non è necessario condurre
azioni aggiuntive per l’utilizzo futuro.
Gestione d’emergenza delle funzioni antifurto
In questo capitolo vengono spiegati i modi di disinserimento ed inserimento delle fuzioni di
sicurezza («Immobilizer» e «Antifurto») che utilizzano il radiotrasmettitore, il portachiavi o il telefono
cellulare come dispositivi di autorizzazione del proprietario, ed anche il disinserimento del «Immobilizer
MANUALE D’USOSISTEMA DI SICUREZZA PANDORA CAMPER
123
IT
Page 63

con password» (vedi la descrizione delle modalità nel capitolo «Dispositivi e funzioni di autorizzazione
del proprietario»).
! per disaTTivare TemporaneamenTe l’«immobilizer» e l’«immobilizer con password», al con allarme disinseriTo e
con quadro in Tensione, per mezzo del TasTo «valeT» digiTaTe il «pin segreTo» indicaTo sulla «casrTa individuale del
proprieTario». in quesTo modo «immobilizer» e «immobilizer con password» resTano disaT TivaTi fino a quando non verrà
TolTa Tensione al quadro.
Gestione d’emergenza dell’Immobilizer e dell’Immobilizer con password
La gestione d’emergenza delle modalità di difesa antifurto è possibile solamente con allarme
e modalità Assistenza Tecnica disinseriti, con la batteria carica e quadro non in tensione. Portate il
sistema nella modalità programmazione, per fare questo digitate il «PIN segreto» che si trova sulla carta
individuale del proprietario.
! in assenza del «pin segreTo», l’accesso al menù di programmazione è disponibile dopo la digiTazione del «pin di
servizio» (password di fabbrica 1-1-1-1).
1. Gestione d’emergenza dell’Immobilizer
Dopo aver portato il sistema nella modalità programmazione, premete il tasto «VALET» quindici
volte di seguito. La pausa fra una pressione e l’altra non deve essere superiore ad 1 secondo, ogni
pressione viene visualizzata da una luce arancione sull’indicatore «LED». Il sistema conferma il numero
di livello con lampeggi dell’indicatore «LED» di colore rosso con brevi segnali acustici della «Sirena» e
del «Beeper».
• Per la disattivazione della funzione:
All’accesso al livello l’indicatore di stato «LED» si accende in verde, il sistema passa per 10 secondi
in modalità di attesa inserimento «PIN segreto». Se entro dieci secondi non si digita il «PIN segreto»,
il sistema abbandona il livello «Accensione/spegnimento dell’Immobilizer». Digitate il «PIN segreto»
indicato sulla carta individuale del proprietario. A conferma della disattivazione dell’Immobilizer con
password viene emesso un lungo segnale luminoso rosso dell’indicatore «LED», due segnali acustici
della «Sirena» e una serie di segnali acustici dal «Beeper». Per uscire dalla modalità programmazione
date e togliete tensione al quadro – l’Immobilizer con password verrà disattivato.
• Per l’attivazione della funzione:
All’accesso al livello l’indicatore di stato «LED» si accende in rosso, il «Beeper» dà un lungo segnale
acustico e il sistema passa in modalità di attesa. Per attivare l’Immobilizer con password premete il
pulsante «VALET» una volta. A conferma dell’attivazione dell’Immobilizer con password viene emesso
un segnale luminoso verde dell’indicatore «LED», un segnale acustico della «Sirena» e uno del «Beeper».
Per uscire dalla modalità programmazione date e togliete tensione al quadro – l’Immobilizer con
password verrà attivato.
2. Gestione d’emergenza dell’Immobilizer con password
Dopo aver portato il sistema nella modalità programmazione, premete il tasto «VALET» tredici volte
di seguito. La pausa fra una pressione e l’altra non deve essere superiore ad 1 secondo, ogni pressione
viene visualizzata da una luce arancione sull’indicatore «LED». Il sistema conferma il numero di livello con
lampeggi dell’indicatore «LED» di colore rosso con brevi segnali acustici della «Sirena» e del «Beeper».
• Per la disattivazione della funzione:
All’accesso al livello l’indicatore di stato «LED» si accende in verde, il sistema passa per 10 secondi
in modalità di attesa inserimento «PIN segreto». Se entro dieci secondi non si digita il «PIN segreto»,
il sistema abbandona il livello «Accensione/spegnimento dell’Immobilizer con password». Digitate
il «PIN segreto» indicato sulla carta individuale del proprietario. A conferma della disattivazione
dell’Immobilizer con password viene emesso un lungo segnale luminoso rosso dell’indicatore «LED»,
due segnali acustici della «Sirena» e una serie di segnali acustici dal «Beeper». Per uscire dalla modalità
programmazione date e togliete tensione al quadro – l’Immobilizer con password verrà disattivato.
• Per l’attivazione della funzione:
All’accesso al livello l’indicatore di stato «LED» si accende in rosso, il «Beeper» dà un lungo segnale
acustico e il sistema passa in modalità di attesa. Per attivare l’Immobilizer con password premete il
pulsante «VALET» una volta. A conferma dell’attivazione dell’Immobilizer con password viene emesso
un segnale luminoso verde dell’indicatore «LED», un segnale acustico della «Sirena» e uno del «Beeper».
Per uscire dalla modalità programmazione date e togliete tensione al quadro – l’Immobilizer con
password verrà attivato.
IT
124
MANUALE D’USOSISTEMA DI SICUREZZA PANDORA CAMPER
125
Page 64

Garanzia
Il produttore garantisce la conformità del sistema di sicurezza-assistenza tecnica ai Requisiti Tecnici
se vengono rispettati la destinazione d’uso, il montaggio, la conservazione e il trasporto secondo
quanto riportato nel presente manuale.
Il prodotto deve essere utilizzato solamente in conformità con le istruzioni d’uso e di installazione.
Il prodotto deve essere installato solo da personale qualificato in centri di installazione certificati.
L’installatore del sistema di sicurezza-assistenza tecnica è obbligato a compilare il certificato di
installazione allegato alla dotazione.
I componenti del dispositivo del sistema andati fuori uso nel periodo di garanzia per cause
imputabili al produttore sono soggetti a sostituzione o riparazione a spese dell’installatore (dell’azienda
produttrice o dell’organizzazione che fornisce il servizio).
Il consumatore perde il diritto all’assistenza in garanzia nei seguenti casi:
• al termine del periodo di garanzia;
• in caso di violazione delle modalità di installazione, di utilizzo, di trasporto e di conservazione;
• in presenza di danneggiamento meccanico dei particolari esterni del sistema di allarme antifurto
dopo la vendita, inclusa l’azione del fuoco, avaria, ingresso di liquidi aggressivi e acqua, trattamenti
errati;
• in presenza di danneggiamenti a seguito di impostazioni o regolazioni errate;
• in caso di sostituzione di elementi dispositivi del sistema di allarme antifurto con dispositivi non
raccomandati dal costruttore;
• se è stato violato il sigillo di fabbrica;
• se sono assenti il certificato di assemblaggio debitamente compilato o il certificato di garanzia.
La garanzia ha una durata di 3 anni dalla data di vendita, ma non oltre i 3,5 anni dal momento della
produzione.
La presente garanzia non si estende agli elementi di alimentazione, che hanno un naturale limitato
termine di utilizzo.
La riparazione e l’assistenza del sistema di allarme antifurto dopo il termine della garanzia avviene a
spese del consumatore a seguito di accordo a parte fra il fornitore/installatore e il consumatore.
raccomandiamo di preTendere la compilazione del cerTificaTo di insTallazione e del cerTificaTo di garanzia da parTe
!
del personale che esegue l’insTallazione del sisTema, in quanTo deTTi documenTi possono rendersi necessari in caso di
chiamaTa al servizio clienTi.
126
Certicato di installazione
Io sottoscritto _________________________________________________________
Mansione, nome e cognome
______________________________________________________________________________
installatore professionista, dichiaro che l’installazione del sistema di allarme antifurto del veicolo
descritto di seguito è stata eseguita da me secondo le istruzioni di installazione fornite dal produttore
del sistema.
Descrizione del veicolo:
Marca del veicolo ____________________________________________ Modello ____________________
Numero di identificazione (VIN___________________________________________________________
Targa ________________________________________________________________________________
Descrizione del sistema di allarme antifurto del veicolo
Marca del prodotto Pandora Camper
Numero di serie ______________________________
Denominazione dell’organizzazione, indirizzo completo, timbro dell’installatore___________________
_____________________________________________________________________________________
Firma _____________________/___________________________________/
Nome per esteso
Lavoro accettato __________________/___________________________________/
Nome per esteso
Data «____»___________________20___.
MANUALE D’USOSISTEMA DI SICUREZZA PANDORA CAMPER
127
IT
Page 65

Certicato di collaudo
Il sistema di allarme antifurto Pandora Camper è conforme alle condizioni tecniche del documento TU
4573-001-89696454-2014 e dichiarato idoneo all’utilizzo
Numero di serie _____________________________Data di fabbricazione __________________________
Responsible person’s signature (stamp)
Firma della persona responsabile del collaudo ______________________________________________
Imballatore
Firma (sigillo personale)_________________________________________________________________
Certicato di garanzia
Modello Pandora Camper
Numero di serie_______________________________________________________________________
Data di acquisto «____» ______________________ 20____
____________________________________________________________________________________
Timbro dell’azienda di commercio (centro di installazione)
Firma del venditore ____________________________________________________________________
128
SISTEMA DI SICUREZZA PANDORA CAMPER
 Loading...