

Page 1

Before attempting to connect or operate this product,
please read these instructions carefully and save this manual for future use.
Model No. WX-CH2050A
All-in-One Headset
Operating Instructions
ENGLISH
FRANÇAIS
Page 2

2
The serial number of this product may be found in the battery compartment of the unit.
You should note the serial number of this unit in the space
provided and retain this book as a permanent record of your
purchase to aid identification in the event of theft.
Model No.
Serial No.
CAUTION
It is a violation of Federal Law to begin operating this system prior to obtaining an FCC Radio License. The FCC ID
number for this radio equipment is listed below.
FCC ID: ACJ9TAWX-CH2050A
RSS-210
Operation is subject to the following two conditions;
(1) this device may not cause interference, and
(2) this device must accept any interference, including interference that may cause undesired operation of the device
ATTENTION:
A lithium-ion battery that is recyclable powers the
product you have purchased. Please call
1-800-8-BATTERY for information on how to
recycle this battery.
ENGLISH VERSION
FEDERAL COMMUNICATIONS COMMISSION INTERFERENCE STATEMENT
This equipment has been tested and found to comply with the limits for a Class A digital device, pursuant to part 15 of the
FCC Rules. These limits are designed to provide reasonable protection against harmful interference when the equipment is
operated in a commercial environment. This equipment generates, uses, and can radiate radio frequency energy and, if
not installed and used in accordance with the instruction manual, may cause harmful interference to radio communications.
Operation of this equipment in a residential area is likely to cause harmful interference in which case the user will be
required to correct the interference at his own expense.
FCC Warning: This transmitter must not be co-located or operated in conjunction with any other antenna or transmitter.
FCC Warning: The available scientific evidence does not show that any health problems are associated with using low
power wireless devices. There is no proof, however, that these low power wireless devices are absolutely safe. Low power
wireless devices emit low levels of radio frequency energy (RF) in the microwave range while being used. Whereas high
levels of RF can produce health effects (by heating tissue), exposure to low-level RF that does not produce heating effects
causes no known adverse health effects. Many studies of low-level RF exposures have not found any biological effects.
Some studies have suggested that some biological effects might occur, but such findings have not been confirmed by additional research. WX-CH2050A has been tested and found to comply with FCC radiation exposure limits set forth for an
uncontrolled equipment and meets the FCC radio frequency (RF) Exposure Guidelines in Supplement C to OET65.
FCC Warning: To assure continued FCC emission limit compliance, use only the provided power supply cord and shielded
interface cable when connecting this device to the computer. Also, any unauthorized changes or modifications to this
equipment would void the user's authority to operate this device.
This device complies with Part 15 of the FCC Rules. Operation is subject to the following two conditions: (1) This device
may not cause harmful interference, and (2) this device must accept any interference received, including interference that
may cause undesired operation.
DoC Responsible Party: Panasonic Corporation of North America
One Panasonic Way, Secaucus, NJ 07094
Technical Support Party: Panasonic Consumer Electronics Company
1707 N. Randall Rd., Elgin IL. 60123
Technical Support Tel No.: 886-472-6767
Page 3

3
INTRODUCTION
Panasonic WX-CH2050A All-in-One Headset is designed for the use in Panasonic Wireless Communication System, which is
used in Drive thru menu boards, etc. It incorporates such necessary devices as a microphone and earphone, as well as a battery compartment and control buttons. With the built-in antennas, transmitter, and receiver you can communicate by voice with
other store personnel and the customer.
FEATURES
• Compatible center modules: WX-C1010 and WX-C1011
• Less noise and interference thanks to the use of UHF band
• Easy frequency setting by use of phase locked loop (PLL)
• A/B channel selection available for convenience of double drive-through (DDT)
• Talk mode selectable between talk-lock and press-to-talk
• Page mode selectable between page-lock and press-to-talk
• Easy-to-replace cushions: head pad cushion, earphone cushion, and windproof cushion
PRECAUTIONS
• All setup procedures of this product should be performed by qualified service personnel or system installers.
• Use only Panasonic authorized batteries like the rechargeable Li-ion 3.7 V normal type or long life type.
• Follow the battery care and handling instructions.
• Read the instructions included with the battery charger.
• Charge the battery when the power indicator lights up in red and a beep is heard in the headset. Fully charge the battery.
Failure to do so may shorten the operating time.
CONTENTS
INTRODUCTION.............................................................................................................................................3
FEATURES......................................................................................................................................................3
PRECAUTIONS...............................................................................................................................................3
NAMES & FUNCTIONS ..................................................................................................................................4
BATTERY LOADING & REPLACEMENT.........................................................................................................6
● Loading ..................................................................................................................................................6
● Replacement ..........................................................................................................................................6
MAINTENANCE..............................................................................................................................................6
SETUP PROCEDURES ...................................................................................................................................7
● Opening the Switch Pocket ....................................................................................................................7
● Channel Group Selection .......................................................................................................................7
● DIP Switch Setup....................................................................................................................................8
● Operation Mode Setup ...........................................................................................................................9
OPERATING PROCEDURES........................................................................................................................11
● Preparations .........................................................................................................................................11
● Communications with Customers [TALK].............................................................................................12
● Communications with Other Store Personnel [PAGE]..........................................................................12
TROUBLESHOOTING ..................................................................................................................................13
SPECIFICATIONS.........................................................................................................................................13
STANDARD ACCESSORIES.........................................................................................................................13
OPTIONAL ACCESSORIES..........................................................................................................................13
ENGLISH
Page 4

4
1
2
3
4
5
6
7
8
SERVICE
USE ONLY
GROUP
F
U
N
C
T
I
O
N
O
F
F
O
N
E
J
E
C
T
A/B
VOL.
!1
!2
!3
!4
!5
q
r
e
w
u
i
o
!0
yt
!6
NAMES & FUNCTIONS
Page 5

5
q Head Band and Head Pad
Adjustable to your head by sliding the head pad.
w Battery Lock [EJECT]
When removing the battery, slide out the lock.
When loading a new battery, insert the battery until the
lock clicks.
e Battery (Optional accessory)
Refer to p. 3 PRECAUTIONS.
r Head Pad Cushion
t Strap (Standard accessory)
y Switch Pocket
Do not open the lid. Should be opened only by qualified
service personnel or system installers.
u Earphone Pad
i Microphone Boom
Adjust the microphone position to your mouth by rotating and bending the boom.
o Microphone and Windproof Cushion (Standard
accessory)
!0 Channel Indicator
Stead red and green light indicates which channel is in
operation.
Red: Is lit when channel A is selected.
Green: Is lit when channel B is selected.
Blinks to indicate the Talk or Page mode.
Constant Blink: Talk mode
Random Blink: Page mode
!1 Power Button and Indicator [POWER]
Pressing the button for one second will turn the headset
on or off.
The indicator shows the status as follows.
Green On: The headset is supplied power and in
operation.
Red On: The battery requires recharging.
Red Blink: The channel selector is set to the wrong
position.
!2 Volume Control Buttons [VOL ▲▼]
Pressing the respective buttons will increase or
decrease the sound level.
!3 Talk Button [T]
This button controls communications with the customer.
When the button is released, you can hear any cus-
tomer who is at the menu-board.
While the button is held down in the press-to-talk
mode, you can speak to the customer.
When the button is pressed in the talk-lock mode, you
can speak to the customer until you press the button a
second time.
!4 Page Button [P]
This button controls communications with store personnel.
When the button is released, you can hear the communications among store personnel.
While the button is held down in the press-to-talk
mode, you can speak to store personnel.
When the button is pressed in the page-lock mode,
you can speak to the store personnel until you press a
button a second time.
!5 A/B Channel Selection Button [A/B]
This button switches the frequencies used from channel
A to B and vice versa. The channel indicator will display
the currently selected channel in red (A) or green (B).
!6 Head protectors (Standard accessory)
Page 6
6
BATTERY LOADING &
REPLACEMENT
Notes:
• Refer to operating instructions included with the battery
and battery charger.
• Battery replacement is recommended when the power
indicator lights up in red and a pulsing beep is heard in
the headphone.
● Loading
1. Prepare a fully charged battery.
2. Insert the battery as shown in the figure.
Note: Be sure to insert it until the lock clicks.
● Replacement
1. Slide the battery lock to the outside.
2. Remove the battery.
3. Proceed as described in "Loading" above.
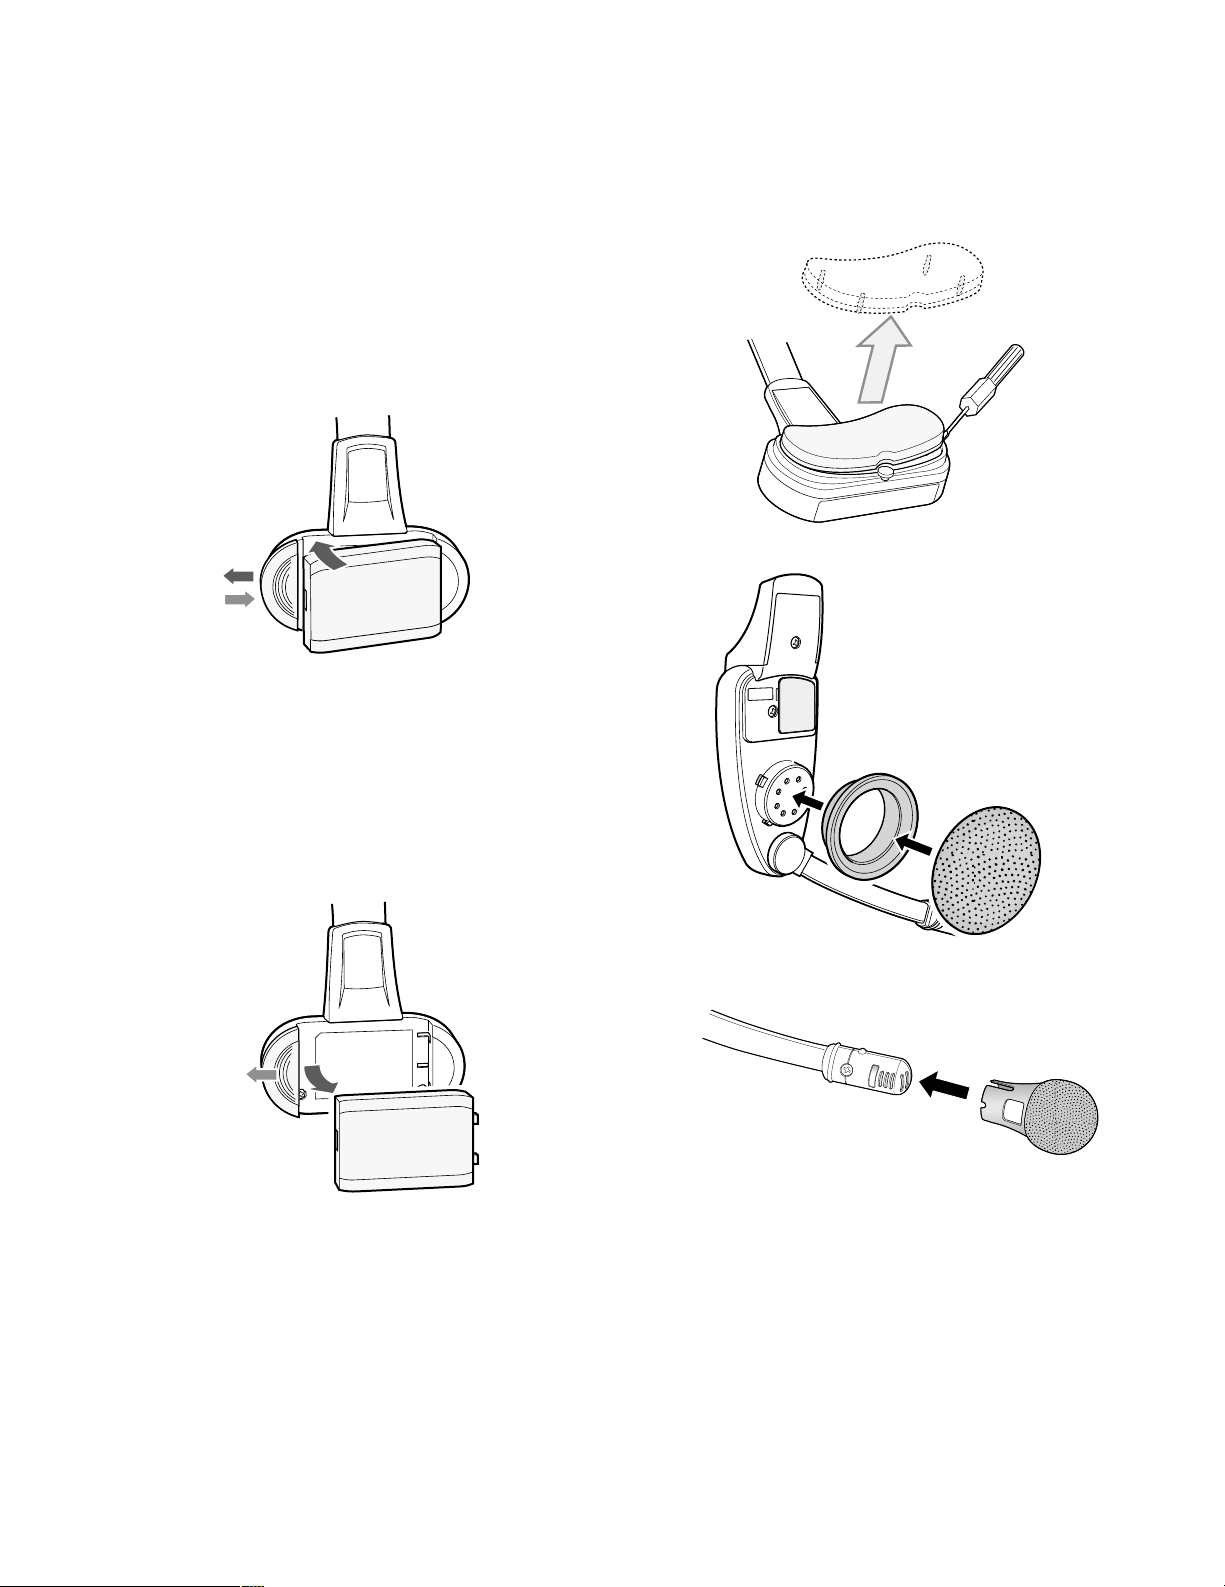
MAINTENANCE
The head-pad cushion, earphone-pad, and windproof
cushion of the microphone are replaceable. Replace when
necessary.
q
w
e
SERVICE
USE ONLY
q
w
Page 7

7
SETUP PROCEDURES
Caution: Setup of this product should only be performed
by qualified service personnel or system installers.
● Opening the Switch Pocket
1. Press the power button to turn off the headset.
2. Open the switch pocket adjacent to the ear pad using
the supplied screwdriver.
3. Set the switches as described below.
4. After finishing the setup, turn on the headset.
5. Replace the lid.
● Channel Group Selection
You can select a channel group by setting the rotary switch
inside the pocket.
Note: When a switch position other than 1 through 8 is
selected, the power indicator will blink in red.
1. Press the power button to turn off the headset.
2. Set the switch to the channel group.
Available Channel Group: 1 - 8
E
C
I
V
R
E
S
Y
L
N
O
E
S
U
E
C
I
V
R
E
S
Y
L
N
O
E
S
U
SERVICE
USE ONLY
8 7 6 5 4 3 2 1
OFF
ON
GROUP
FU
OF
O
TI
C
N
F
N
GROUP
FUNCTION
F
OF
N
O
1
2
8
3
7
4
6
5
N
O
1
2
3
8
1
2
3
8
4
7
5
6
4
7
5
6
Page 8

8
● DIP Switch Setup
An eight-bit DIP switch is provided for system setups. The
initial setting is marked with an asterisk *.
Note: Be sure to turn off the headset in Step 1. Otherwise,
the channel group (refer to p. 7 “Channel Group
Selection”) will not be activated until you turn off and on
the power again.
1. Press the power button to turn off the headset.
2. Set the switches as follows.
SW#1: For selection of a radio frequency suitable for
the location
ON: Applies the US frequency to the headset.
OFF: Applies the Canadian frequency.
SW#2: OFF
SW#3: OFF
SW#4: OFF
SW#5: OFF
SW#6: This switch selects the mode of Tone Squelch
method.
ON: The audio is output detecting the Tone Squelch
signal from the Center Module.
OFF: The audio is output in disregard of the Tone
Squelch signal from the Center Module.
Note: Normally, set SW#6 to ON. Pay attention to high
level noise that may be output when set to OFF.
SW#7: While talking with a customer in the TALK lock
mode, you may need to contact store personnel in
the PAGE mode which interrupts the TALK mode.
This switch specifies the status of the interrupted
TALK lock mode after ending the PAGE mode.
ON: Resumes the TALK lock mode.
OFF: Releases the TALK lock mode.
SW#8: OFF
SW#
Function
1
Location
2
3
4
5
Tone Squelch
6
Talk Lock Resumption
7
8
ON
USA*
—
—
—
—
——
—
—
—
—
ON*
ON
OFF
CANADA
OFF*
OFF*
OFF*
OFF*
OFF
OFF*
OFF*
Page 9

9
● Operation Mode Setup
Three operation modes can be set up to adapt the headset to your requirements.
Indicator
Selected mode
Power Indicator
Blink
Push
Push
A B
On
Blink
Off
Off
Off On
Off Blink
CH A/B Button
A Disable
A Enable
B Disable
B Enable
Selected mode A Indicator
Press to TALK Blink
TALK Lock On
A/B
VOL.
A/B
Push
Power Indicator
On
VOL.
Push
Selected mode B Indicator
Press to TALK Blink
TALK Lock
On
A/B
Page 10

10
1. Press the power button to turn off the headset.
2. While holding down the buttons T and P simultaneously,
press the power button to turn on the headset.
The headset enters the setup mode where the indicators and buttons have different functions than in normal
operation.
3. Select a default channel setup from four options, pressing the button T.
4. Press the button A/B to move to the talk setup and page
setup.
5. Select a talk mode, pressing the button T.
6. Select a page mode, pressing the button P.
7. Press the button A/B to confirm that the indicators show
the three modes selected for the default channel, talk
and page.
8. Hold down the power button for two seconds to turn off
the headset, and then turn it on again.
Page 11

11
OPERATING PROCEDURES
Notes:
• Transmission using the button T or P is allowed for a
single headset at a time. A continuous beep or distorted sound will be heard in a headset that tries to transmit while another person is operating.
• Maintain a distance of more than 0.3 m (1 ft) between
the headset and the order taker, or more than 1 m (3 ft)
between the headset and the center module.
● Preparations
Prior to operating the headset, confirm that the system
setup for the headset, center module, and other devices
has been completed.
1. Hook the tabs of the strap to the two strap buttons on
the headset. There are two strap buttons on the headset: one is at the lower part of the head pad, and the
other is behind the ear cushion.
2. Attach the supplied head protectors under the head
band as needed.
3. Install a battery in the battery compartment, referring to
p. 6 BATTERY LOADING & REPLACEMENT.
4. Wear the headset, and route the strap behind your
neck.
5. Adjust the head pad so that the earphone is placed on
your ear.
6. Rotate and bend the microphone boom so that the
microphone is placed near your mouth.
7. Hold down the power button for two seconds to turn on
the headset.
V
O
L
.
A
/
B
Head protector
V
O
L
.
A
/
B
Strap
q
w
e
V
O
L
.
A
/
B
Page 12

12
● Communications with Customers
[TALK]
Any store personnel wearing the headset can communicate
bidirectionally with any customer who is at the menu board.
1. Select a proper sound level by pressing the button ▲ or
▼.
2. You will hear a tone in the headset when a vehicle
arrives at the menu board.
Note: The tone duration varies depending on the set-
tings made in the center module.
<When the talk-lock mode is preset>
1. Press the button T and speak to the customer.
A short beep is heard in the headset.
2. Press the button again. The lock will be released, and
your voice will not be heard by the customer.
<When the press-to-talk mode is preset>
1. Hold down the button T and speak to the customer.
A short beep is heard in the headset.
2. Release the button. Your voice will not be heard by the
customer.
● Communications with Other Store
Personnel [PAGE]
Store personnel wearing the headset can communicate
with each other without being heard by customers.
<When the page-lock mode is preset>
1. Press the button P and speak into the microphone at a
normal level.
A short beep is heard in the headset to notify all store
personnel that the system operates in the page mode.
2. Press the button P again. The lock will be released, and
your voice will not be heard by the customer.
<When the press-to-talk mode is preset>
1. Hold down the button P and speak into the microphone
at a normal level.
A short beep is heard in the headset to notify all store
personnel that the system operates in the page mode.
2. Release the button. Your voice will not be heard by the
customer.
Press
Press again
Hold down
Release
Press
Press again
Hold down
Release
VOL
Page 13

13
SPECIFICATIONS
Operating Frequency: UHF/FM
Type of Radio Wave: F3E
Required Power Supply: Rechargeable Li-ion Battery, 3.7 VDC, normal type or long life type
Control Function: Power (On/Off)
Volume (Up/Down)
Talk
Page
Channel Selection (A/B)
Channel Group Selection (1-8)
DIP Switch Setup (8 bit)
Dimensions: 140 mm(W) x 240 mm(H) x 84 mm (D)
5-1/2" (W) x 9-7/16" (H) x 3-5/16" (D)
Weight (excluding battery): 160
g (0.35 lbs)
STANDARD ACCESSORIES
Windproof Cushion ........................................................... 1 pc.
Strap.................................................................................. 1 pc.
Miniature Screwdriver ....................................................... 1 pc.
Head protector.................................................................. 2 pcs.
OPTIONAL ACCESSORIES
Long Life Battery (Li-ion 3.7 VDC, 1 500 mA/h)................ 2050BAT
Standard Battery (Li-ion 3.7 VDC, 1 035 mA/h)................ 2051BAT
Battery Charger................................................................. 2050CH
TROUBLESHOOTING
Phenomenon
The power indicator blinks in red.
The power indicator lights up in red.
Cannot turn on the headset.
Cannot communicate with other
store personnel or the customer at
the menu board.
Cannot hear or talk to the customer,
while communications with the store
personnel are OK.
Cannot "page" or "talk" in certain
areas.
A constant beep is always heard in
the headset when the "page" or
"talk" button is pressed.
Possible Cause
A wrong channel is selected.
The battery power is nearing its end.
The battery is exhausted.
The battery is not inserted correctly.
The center module may be turned off.
The vehicle detector may malfunction
because it is not plugged into the
center module, no power is supplied,
or the detecting function is out of
order.
Radio wave intensity is insufficient in
the areas.
The "page" or "talk" button on one of
the units may be kept depressed.
What to do
Select any of channels 1 through 8.
If no remedy exists, consult your dealer
for repairs.
Recharge the battery.
Recharge the battery.
Position the battery properly.
Turn on the power switch of the center
module. If no remedy exists, consult your
dealer for repairs.
Check that the vehicle detector is
plugged in and is supplied power.
If no remedy exists, consult your dealer
for repairs.
Remove any metal obstacles blocking
radio waves, or extend the transmission
antennas.
Turn off the units one by one while
listening to the beep. You can identify the
faulty unit through the process of the
elimination of the units. Consult your
dealer for repairs.
Page 14

14
RSS-210
Le fonctionnement est soumis aux deux conditions suivantes:
(1) cet appareil ne doit provoquer d'interférence et
(2) cet appareil doit pouvoir accepter toute interférence
reçue, y compris les interférences qui pourraient provoquer
un fonctionnement indésirable de l'appareil.
ATTENTION:
Une pile recyclable alimente l'appareil que vous
avez acheté. Veuillez appeler 1-800-8-BATTERY
pour toute information sur la façon de recycler
cette pile.
VERSION FRANÇAISE
(FRENCH VERSION)
Le numéro de série de cet appareil se trouve dans le
logement de batterie.
Nous vous conseillons de relever le numéro de série de
votre appareil dans l'espace réservé ci-dessous et de
conserver précieusement votre notice d'instructions en tant
que justificatif d'achat aux fins d'identification en cas de vol.
No. de modèle
No. de série
Page 15

15
INTRODUCTION
Le WX-CH2050A Panasonic est un casque d'écoute tout-en-un conçu pour être utilisé avec les systèmes de communication à
liaison radio Panasonic dont on se sert dans les tableaux de menu de service clientèle de passage, etc. Il intègre les
dispositifs nécessaires tels que microphone et écouteur, ainsi qu'un logement de pile et les boutons de commande. Avec les
antennes, l'émetteur et le récepteur incorporés, il est possible de communiquer en mode vocal avec les autres personnes du
personnel de magasin et le client.
CARACTÉRISTIQUES DOMINANTES
• Modules centraux compatibles: WX-C1010 et WX-C1011
• Niveau minimum de bruit et d'interférence grâce à l'utilisation de la bande UHF
• Paramétrage aisé de fréquence avec l'utilisation de la boucle à accrochage de phase (PLL)
• Possibilité de sélection des canaux A/B de commodité of double service de clientèle de passage (DDT)
• Possibilité de sélection de mode parler entre verrouiller pour parler et presser pour parler
• Possibilité de sélection de mode page entre verrouiller-page et presser pour parler
• Remplacement rapide de rembourrages: coussin d'oreillette de casque, coussin d'écouteur et coussin pare-vent
MESURES DE PRÉCAUTION
• Toutes les procédures de configuration de ce produit doivent être exécutées par un personnel de dépannage qualifié ou
des installateurs professionnels.
• Utiliser uniquement des batteries autorisées par Panasonic telles que des batteries rechargeables Li-ion 3,7 V de type normal ou de type longue durée.
• Se conformer aux instructions de précaution et d'utilisation de batterie.
• Lire les directives qui accompagnent le chargeur de batterie.
• Charger la batterie quand le témoin d'alimentation s'allume en rouge et qu'un bip est entendu dans le casque d'écoute.
Charger complètement la batterie. Le fait de ne pas procéder ainsi risque d'écourter la durée d'utilisation.
TABLE DES MATIÈRES
INTRODUCTION ......................................................................................................................................... 15
CARACTÉRISTIQUES DOMINANTES ........................................................................................................ 15
MESURES DE PRÉCAUTION ..................................................................................................................... 15
NOMENCLATURE ET FONCTIONS ........................................................................................................... 16
CHARGEMENT ET REMPLACEMENT DE LA BATTERIE ........................................................................... 18
● Chargement ........................................................................................................................................ 18
● Remplacement ................................................................................................................................... 18
MAINTENANCE .......................................................................................................................................... 18
PROCÉDURES DE CONFIGURATION ....................................................................................................... 19
● Ouverture de la poche de commutateur ............................................................................................ 19
● Sélection de groupe de canal ............................................................................................................ 19
● Configuration d'interrupteur DIP ......................................................................................................... 20
● Configuration de mode fonctionnement ............................................................................................. 21
PROCÉDURES D’UTILISATION ................................................................................................................. 23
● Préparatifs .......................................................................................................................................... 23
● Communications avec les clients [TALK] ........................................................................................... 24
● Communication avec d'autres membres du personnel du magasin [PAGE] .................................... 24
DÉPANNAGE .............................................................................................................................................. 25
CARACTÉRISTIQUES TECHNIQUES ......................................................................................................... 25
ACCESSOIRES STANDARD ....................................................................................................................... 25
ACCESSOIRES OPTIONNELS ................................................................................................................... 25
FRANÇAIS
Page 16

16
1
2
3
4
5
6
7
8
SERVICE
USE ONLY
GROUP
F
U
N
C
T
I
O
N
O
F
F
O
N
E
J
E
C
T
A/B
VOL.
!1
!2
!3
!4
!5
q
r
e
w
u
i
o
!0
yt
!6
NOMENCLATURE ET FONCTIONS
Page 17

17
q Bande de casque d'écoute et rembourrage de
casque
S'ajuste à la taille de la tête par coulissement du rembourrage de casque.
w Verrouillage de batterie [EJECT]
Faire coulisser le verrouillage pour retirer la batterie.
Lors du chargement d'une batterie neuve, introduire la
batterie jusqu'à ce qu'elle se verrouille en place.
e Batterie (accessoire optionnel)
Référez-vous à la page 15 à MESURES DE PRÉCAUTION.
r Rembourrage de casque d'écoute
t Sangle (accessoire standard)
y Poche de commutateur
Ne pas ouvrir le couvercle. Ne doit être ouvert que par
un technicien professionnel ou des installateurs de
système qualifiés.
u Rembourrage d'écouteur
i Perche de microphone
Ajuster la position du microphone par rapport à la
bouche en faisant tourner et en pliant la perche.
o Microphone et rembourrage pare-vent de
microphone (accessoire standard)
!0 Indicateur de canal
Les témoins rouge et vert fixes indiquent le canal qui
est en service.
Rouge: S'allume quand le canal A est sélectionné.
Vert: S'allume quand le canal B est sélectionné.
Clignote et indique le mode Parler ou Page.
Clignote constamment: Mode Parler
Clignotement à sélection aléatoire: Mode Page
!1 Bouton et témoin d'alimentation [POWER]
Une pression du bouton pendant une seconde permet
de mettre le combiné microcasque en fonction ou de
l'arrêter.
L'indicateur montre l'état actuel comme suit.
Gris allumé: Le combiné microcasque est alimenté
et est en fonction.
Rouge allumé: La batterie doit être rechargée.
Rouge clignote: Le sélecteur de canal n'est pas
réglé sur la bonne position.
!2 Boutons de réglage de volume [VOL ▲▼]
Une pression des boutons respectifs a pour effet d'augmenter ou de diminuer le niveau de sortie son.
!3 Bouton Parler [T]
Ce bouton contrôle les communications avec le client.
Lorsque le bouton est relâché, tout ce que dit le client
réglé qui est le tableau de menu est entendu.
Alors que le bouton est maintenu pressé en mode
presser pour parler, il est possible de parler au client.
Alors que le bouton est maintenu pressé en mode de
verrouillage pour parler, il est possible de parler au
client jusqu'à ce que le bouton soit pressé une seconde
fois.
!4 Bouton Page [P]
Ce bouton contrôle les communications avec le personnel du magasin.
Lorsque le bouton est relâché, les communications
entre les membres du personnel du magasin peuvent
être entendues.
Alors que le bouton est maintenu pressé en mode
presser pour parler, il est possible de parler au personnel du magasin.
Lorsque le bouton est pressé en mode de verrouillage
pour parler, il est possible aux membres du personnel
du magasin jusqu'à ce qu'un bouton soit pressé une
deuxième fois.
!5 Bouton de sélection de canal A/B [A/B]
Ce bouton commute les fréquences utilisées du canal A
à B et vice versa. L'indicateur affichera le canal
actuellement sélectionné en rouge (A) ou en vert (B).
!6 Protecteurs de tête (accessoire standard)
Page 18

18
CHARGEMENT ET
REMPLACEMENT DE LA
BATTERIE
Remarques:
• Se référer aux directives d'utilisation qui accompagnent
la batterie et le chargeur de batterie.
• Le remplacement de la batterie est recommandé quand
le témoin d'alimentation s'allume en rouge et qu'un bip
est entendu régulièrement dans le combiné microcasque.
● Chargement
1. Se munir d'une batterie complètement chargée.
2. Introduire la batterie comme représenté sur la figure.
Remarque: Faire en sorte de l'introduire jusqu'à son
verrouillage.
● Remplacement
1. Faire coulisser le verrouillage vers l'extérieur.
2. Retirer la batterie.
3. Procéder de la façon indiquée plus haut à la rubrique
"Chargement".
MAINTENANCE
Le rembourrage de casque d'écoute, le coussin d'écouteur
et le coussin pare-vent du microphone sont des éléments
remplaçables. Remplacer si nécessaire.
q
w
e
q
w
SERVICE
USE ONLY
Page 19

19
PROCÉDURES DE
CONFIGURATION
Attention: La configuration de ce produit doit être
exécutée par un personnel de dépannage qualifié ou
des installateurs professionnels.
● Ouverture de la poche de commutateur
1. Appuyer sur le bouton d'alimentation pour arrêter le
combiné microcasque.
2. Ouvrir la poche de commutateur adjacente au rembourrage d'oreille en utilisant le tournevis fourni.
3. Régler les commutateurs comme indiqué ci-dessous.
4. Une fois la configuration terminée, mettre le combiné
microcasque en marche.
5. Remettre en place le couvercle.
● Sélection de groupe de canal
Il est possible de sélectionner un groupe de canal en
réglant le sélecteur rotatif placé dans la poche.
Remarque: Quand une position de commutateur autre
que les positions 1 à 8 est sélectionnée, le témoin
d'alimentation clignote en rouge.
1. Appuyer sur le bouton d'alimentation pour arrêter le
combiné microcasque.
2. Régler le sélecteur sur le groupe de canal.
Groupe canal disponible: 1 - 8
E
C
I
V
R
E
S
Y
L
N
O
E
S
U
E
C
I
V
R
E
S
Y
L
N
O
E
S
U
SERVICE
USE ONLY
8 7 6 5 4 3 2 1
OFF
ON
GROUP
FU
OF
O
TI
C
N
F
N
GROUP
FUNCTION
F
OF
N
O
1
2
8
3
7
4
6
5
N
O
1
2
3
8
1
2
3
8
4
7
5
6
4
7
5
6
Page 20

20
● Configuration d'interrupteur DIP
Un interrupteur DIP à huit bits est installé pour effectuer les
configurations de système. Le réglage initial est identifié
par un astérisque *.
Remarque: Ne pas oublier de couper l'alimentation du
combiné microcasque au cours de l'étape 1. Dans le
cas contraire, le groupe de canal (se référer à la p. 19
"Sélection de groupe de canal") ne serait pas activé
tant que l'alimentation ne serait pas coupée puis
rétablie.
1. Appuyer sur le bouton d'alimentation pour arrêter le
combiné microcasque.
2. Régler les commutateurs comme indiqué ci-dessous.
SW#1: Pour la sélection d'une fréquence radio adaptée
à l'emplacement
ON: Appliquer la fréquence US au combiné
microcasque.
OFF: Appliquer la fréquence canadienne.
SW#2: OFF
SW#3: OFF
SW#4: OFF
SW#5: OFF
SW#6: Ce commutateur sélectionne le mode de la
méthode de silencieux à commande par tonalités.
ON: Le son est délivré après détection du signal de
silencieux à commande par tonalités à partir du
module central.
OFF: Le son est délivré sans tenir compte du signal
de silencieux à commande par tonalités à partir
du module central.
Remarque: SW#6 doit être normalement placé en
position ON. Faire attention au bruit aigu qui risque
de se manifester lors du positionnement sur OFF.
SW#7: Tout en parlant avec un client en mode de
verrouillage pour parler TALK, il est parfois
nécessaire de prendre contact avec le personnel
du magasin en mode PAGE, ce qui a pour effet
d'interrompre le mode TALK. Ce commutateur
spécifie l'état du mode de verrouillage TALK
interrompu après l'interruption du mode PAGE.
ON: Rétabli le mode de verrouillage pour parler
TALK.
OFF: Libère le mode de verrouillage pour parler
TALK.
SW#8: OFF
SW#
Fonction
1
Emplacement
2
3
4
5
6
7
8
—
—
—
—
Réglage silencieux
Rétablissement du mode
de verrouillage parler
——
ON
ÉTATS-UNIS *
—
—
—
—
ON*
ON
OFF
Canada
OFF*
OFF*
OFF*
OFF*
OFF
OFF*
OFF*
Page 21

21
● Configuration de mode fonctionnement
Trois modes de fonctionnement peuvent être configurés aux fins d'adaptation du combiné microcasque à vos besoins.
Témoin d'alimentation
Indicateur
Mode sélectionné
Clignote
Presser
Presser
A B
Marche
Clignote
Arrêt
Arrêt
Arrêt Marche
Arrêt Clignote
Canal Bouton A/B
A
Invalidé
A
B
Invalidé
B
Mode sélectionné Indicateur A
Presser TALK Clignote
Verrouillage pour parler Marche
Validé
Validé
VOL.
A/B
Presser
A/B
Témoin d'alimentation
Marche
VOL.
Presser
Mode sélectionné Indicateur B
Presser TALK Clignote
Verrouillage pour parler
Marche
A/B
Page 22

22
1. Appuyer sur le bouton d'alimentation pour arrêter le
combiné microcasque.
2. Tout en pressant et immobilisant simultanément les
boutons T et P, presser le bouton d'alimentation pour
mettre le combiné microcasque en marche.
Le combiné microcasque passe en mode de configuration quand les témoins et les boutons ont des fonctions
différentes de celles du fonctionnement normal.
3. Choisir la configuration de canal par réglage implicite
parmi les quatre options proposées en pressant le bouton T.
4. Presser le bouton A/B pour passer en configuration parler et en configuration page.
5. Choisir le mode parler en appuyant sur le bouton T.
6. Choisir le mode page en pressant le bouton P.
7. Presser le bouton A/B pour confirmer que les témoins
indiquent les trois modes sélectionnés pour le canal par
réglage implicite, parler et page.
8. Presser et immobiliser le bouton d'alimentation pendant
deux secondes pour arrêter le combiné microcasque
puis le remettre en marche.
Page 23

23
PROCÉDURES D’UTILISATION
Remarques:
• La transmission en utilisant le bouton T ou P est
autorisée pour un seul combiné microcasque à la fois.
Un bip continu ou une distorsion du son sera entendu
dans le combiné microcasque qui essaye de transmettre pendant qu'une autre personne est active.
• Assurer une distance de plus de 0,3 m (1 pd.) entre le
combiné microcasque et le preneur de commande ou
de plus de 1 m (3 pd.) entre le combiné microcasque et
le module central.
● Préparatifs
Avant d'utiliser le combiné microcasque, confirmer que la
configuration du système pour le combiné microcasque, le
module central et d'autres périphériques est complètement
terminée.
1. Accrocher les segments de la courroie aux deux boutons de courroie du combiné microcasque. Il existe
deux boutons de courroie sur le combiné microcasque:
l'un est placé à la partie inférieure du rembourrage de
combiné microcasque et l'autre est placé derrière le
coussinet d'oreillette.
2. Fixer les protecteurs de tête fournis sous le serre-tête
selon les besoins.
3. Installer une batterie dans le logement de batterie en se
référant à la page 18 CHARGEMENT ET REMPLACEMENT DE LA BATTERIE.
4. Porter le combiné microcasque et faire passer la courroie derrière le cou.
5. Ajuster le rembourrage de casque pour que l'écouteur
soit placé sur l'oreille.
6. Faire pivoter et replier la perche de microphone pour
que le microphone soit placé près de la bouche.
7. Presser et immobiliser le bouton d'alimentation pendant
deux secondes pour mettre le combiné microcasque
en marche.
V
O
L
.
A
/
B
Protecteur de tête
Courroie
V
O
L
.
A
/
B
V
O
L
.
A
/
B
q
e
w
Page 24

24
● Communications avec les clients
[TALK]
Tout membre du personnel portant un combiné
microcasque peut communiquer en mode bidirectionnel
avec n'importe quel client qui se trouve à la hauteur du
tableau de menu.
1. Sélectionner un niveau sonore approprié en appuyant
sur le bouton
▲ ou ▼.
2. Une tonalité est entendue dans le combiné microcasque quand un véhicule arrive à la hauteur du
tableau de menu.
Remarque: La durée de la tonalité varie suivant les
réglages faits au module central.
<Lorsque le mode verrouillage pour parler est préréglé>
1. Presser le bouton T et parler au client.
Un bip très court est entendu dans le combiné microcasque.
2. Appuyer encore une fois sur le bouton. Le verrouillage
sera libéré et votre voix ne sera plus perceptible par le
client.
<Lorsque le mode presser pour parler est préréglé>
1. Presser et immobiliser le bouton T et parler au client.
Un bip très court est entendu dans le combiné microcasque.
2. Libérer le bouton. Votre voix ne sera pas perceptible
par le client.
● Communication avec d'autres membres
du personnel du magasin [PAGE]
Tous les membres du personnel portant un combiné
microcasque peuvent communiquer entre eux sans être
des clients.
<Lorsque le mode verrouillage de page est préréglé>
1. Presser le bouton P et parler dans le microphone avec
un réglage de niveau normal.
Un bip très court est entendu dans le casque d'écoute
pour signaler au personnel du magasin que le système
fonctionne en mode page.
2. Appuyer encore une fois sur le bouton P. Le verrouillage sera libéré et votre voix ne sera plus perceptible
par le client.
<Lorsque le mode presser pour parler est préréglé>
1. Presser le bouton P et parler dans le microphone de
casque d'écoute avec un réglage de niveau normal.
Un bip très court est entendu dans le combiné microcasque pour signaler au personnel du magasin que le
système fonctionne en mode page.
2. Libérer le bouton. Votre voix ne sera pas perceptible
par le client.
Presser
Presser encore une fois
Presser et immobiliser
Libérer
Presser
Presser encore une fois
Presser et immobiliser
Libérer
VOL
Page 25

Phénomène
Le témoin d'alimentation clignote en
rouge.
Le témoin d'alimentation s'allume en
rouge.
Impossibilité de mettre le combiné
microcasque en marche.
Impossibilité de communiquer avec
les autres membres du personnel
du magasin ou avec le client qui se
trouve à la hauteur du tableau de
menu.
Impossibilité d'entendre ou de
parler au client alors que la
communication avec les autres
membres du personnel du magasin
est normale.
Impossibilité de passer en mode
"page" ou en mode "parler" dans
certaines zones.
Un bip continu est entendu en
permanence dans le combiné
microcasque alors que le bouton
"page" ou "parler" est pressé.
Cause probable
Le mauvais canal est sélectionné.
L'énergie de la batterie est proche
d'être épuisée.
La batterie est épuisée.
La batterie n'est pas introduite
correctement.
Le module central est peut être arrêté.
Le détecteur de véhicule est peut être en
dysfonctionnement parce qu'il n'est pas
branché dans le module central ou bien
l'alimentation n'est pas fournie ou encore
la fonction de détection est déréglée.
L'intensité des ondes radio est
insuffisante dans certains secteurs.
Le bouton "page" ou "parler" de l'un
des appareils est peut être maintenu
pressé.
Que faire ?
Choisir n'importe lequel des canaux de 1
à 8.
S'il n'existe aucun moyen de rectifier,
consulter le distributeur pour qu'il
effectue les réparations nécessaires.
Recharger la batterie.
Recharger la batterie.
Orienter correctement la batterie.
Mettre le module central sous tension
avec l'interrupteur d'alimentation. S'il
n'existe aucun moyen de rectifier,
consulter le distributeur pour qu'il
effectue les réparations nécessaires.
Vérifier que le détecteur de véhicule est
branché et est alimenté.
S'il n'existe aucun moyen de rectifier,
consulter le distributeur pour qu'il
effectue les réparations nécessaires.
Retirer les obstacles métalliques bloquant
les ondes radio ou déployer les antennes
de transmission.
Arrêter chaque appareil, l'un après l'autre
tout en écoutant le bip. L'appareil
défaillant peut être identifié par le
procédé d'élimination des appareils.
Consulter le distributeur pour qu'il
effectue les répartitions nécessaires.
25
CARACTÉRISTIQUES TECHNIQUES
Fréquence d'utilisation: UHF/FM
Type d'onde radio: F3E
Alimentation requise: Batterie rechargeable Li-ion 3,7 V type normal ou type longue durée
Fonction de commande: Alimentation (marche-arrêt)
Volume (accroissement / réduction)
Parler
Page
Sélection de canal (A/B)
Sélection de groupe de canal (1-8)
Configuration d'interrupteur DIP (8 bits)
Dimensions: 140 mm (L) x 240 mm (H) x 84 mm (P)
5-1/2 po. (L) x 9-7/16 po. (H) x 3-5/16 po. (P)
Poids (à l'exclusion de la batterie): 160
g (0,35 liv.)
ACCESSOIRES STANDARD
Rembourrage de pare-vent .............................................. 1 él.
Courroie ............................................................................ 1 él.
Tournevis miniature........................................................... 1 él.
Protecteur de tête ............................................................. 2 él.
ACCESSOIRES OPTIONNELS
Batterie longue durée (Li-ion 3,7 V c.c., 1 500 mA/h)....... 2050BAT
Batterie standard (Li-ion 3,7 V c.c., 1 035 mA/h).............. 2051BAT
Chargeur de batterie......................................................... 2050CH
DÉPANNAGE
Page 26

26
Page 27

27
Page 28

Panasonic System Solutions Company,
Unit Company of Panasonic Corporation of North America
Security Systems
www.panasonic.com/security
For customer support, call 1.877.733.3689
Executive Office: Three Panasonic Way 2H-2, Secaucus, New Jersey 07094
Zone Office
Eastern: Three Panasonic Way, Secaucus, New Jersey 07094
Central: 1707 N. Randal Road, Elgin, IL 60123
Southern: 1225 Northbrook Parkway, Suwanee, GA 30024
Western: 6550 Katella Ave., Cypress, CA 90630
Panasonic Canada Inc.
5770 Ambler Drive,Mississauga,
Ontario, L4W 2T3 Canada (905)624-5010
http://www.panasonic.ca
Panasonic Sales Company
Division of Panasonic Puerto Rico Inc.
San Gabriel Industrial Park 65th Infantry Ave. KM. 9.5 Carolina
P.R. 00985(809)750-4300
© 2005 Matsushita Electric Industrial Co., Ltd. All Rights Reserved. N1004-3025 3TR003261DAA Imprimé au Japon
Printed in Japan
 Loading...