

Panasonic WV-Q150S, WV-Q150C User Manual
Installations
Be sure to read "Precautions" before installation. The Installation Guide of the network camera, WVNS202, shall be read as well.
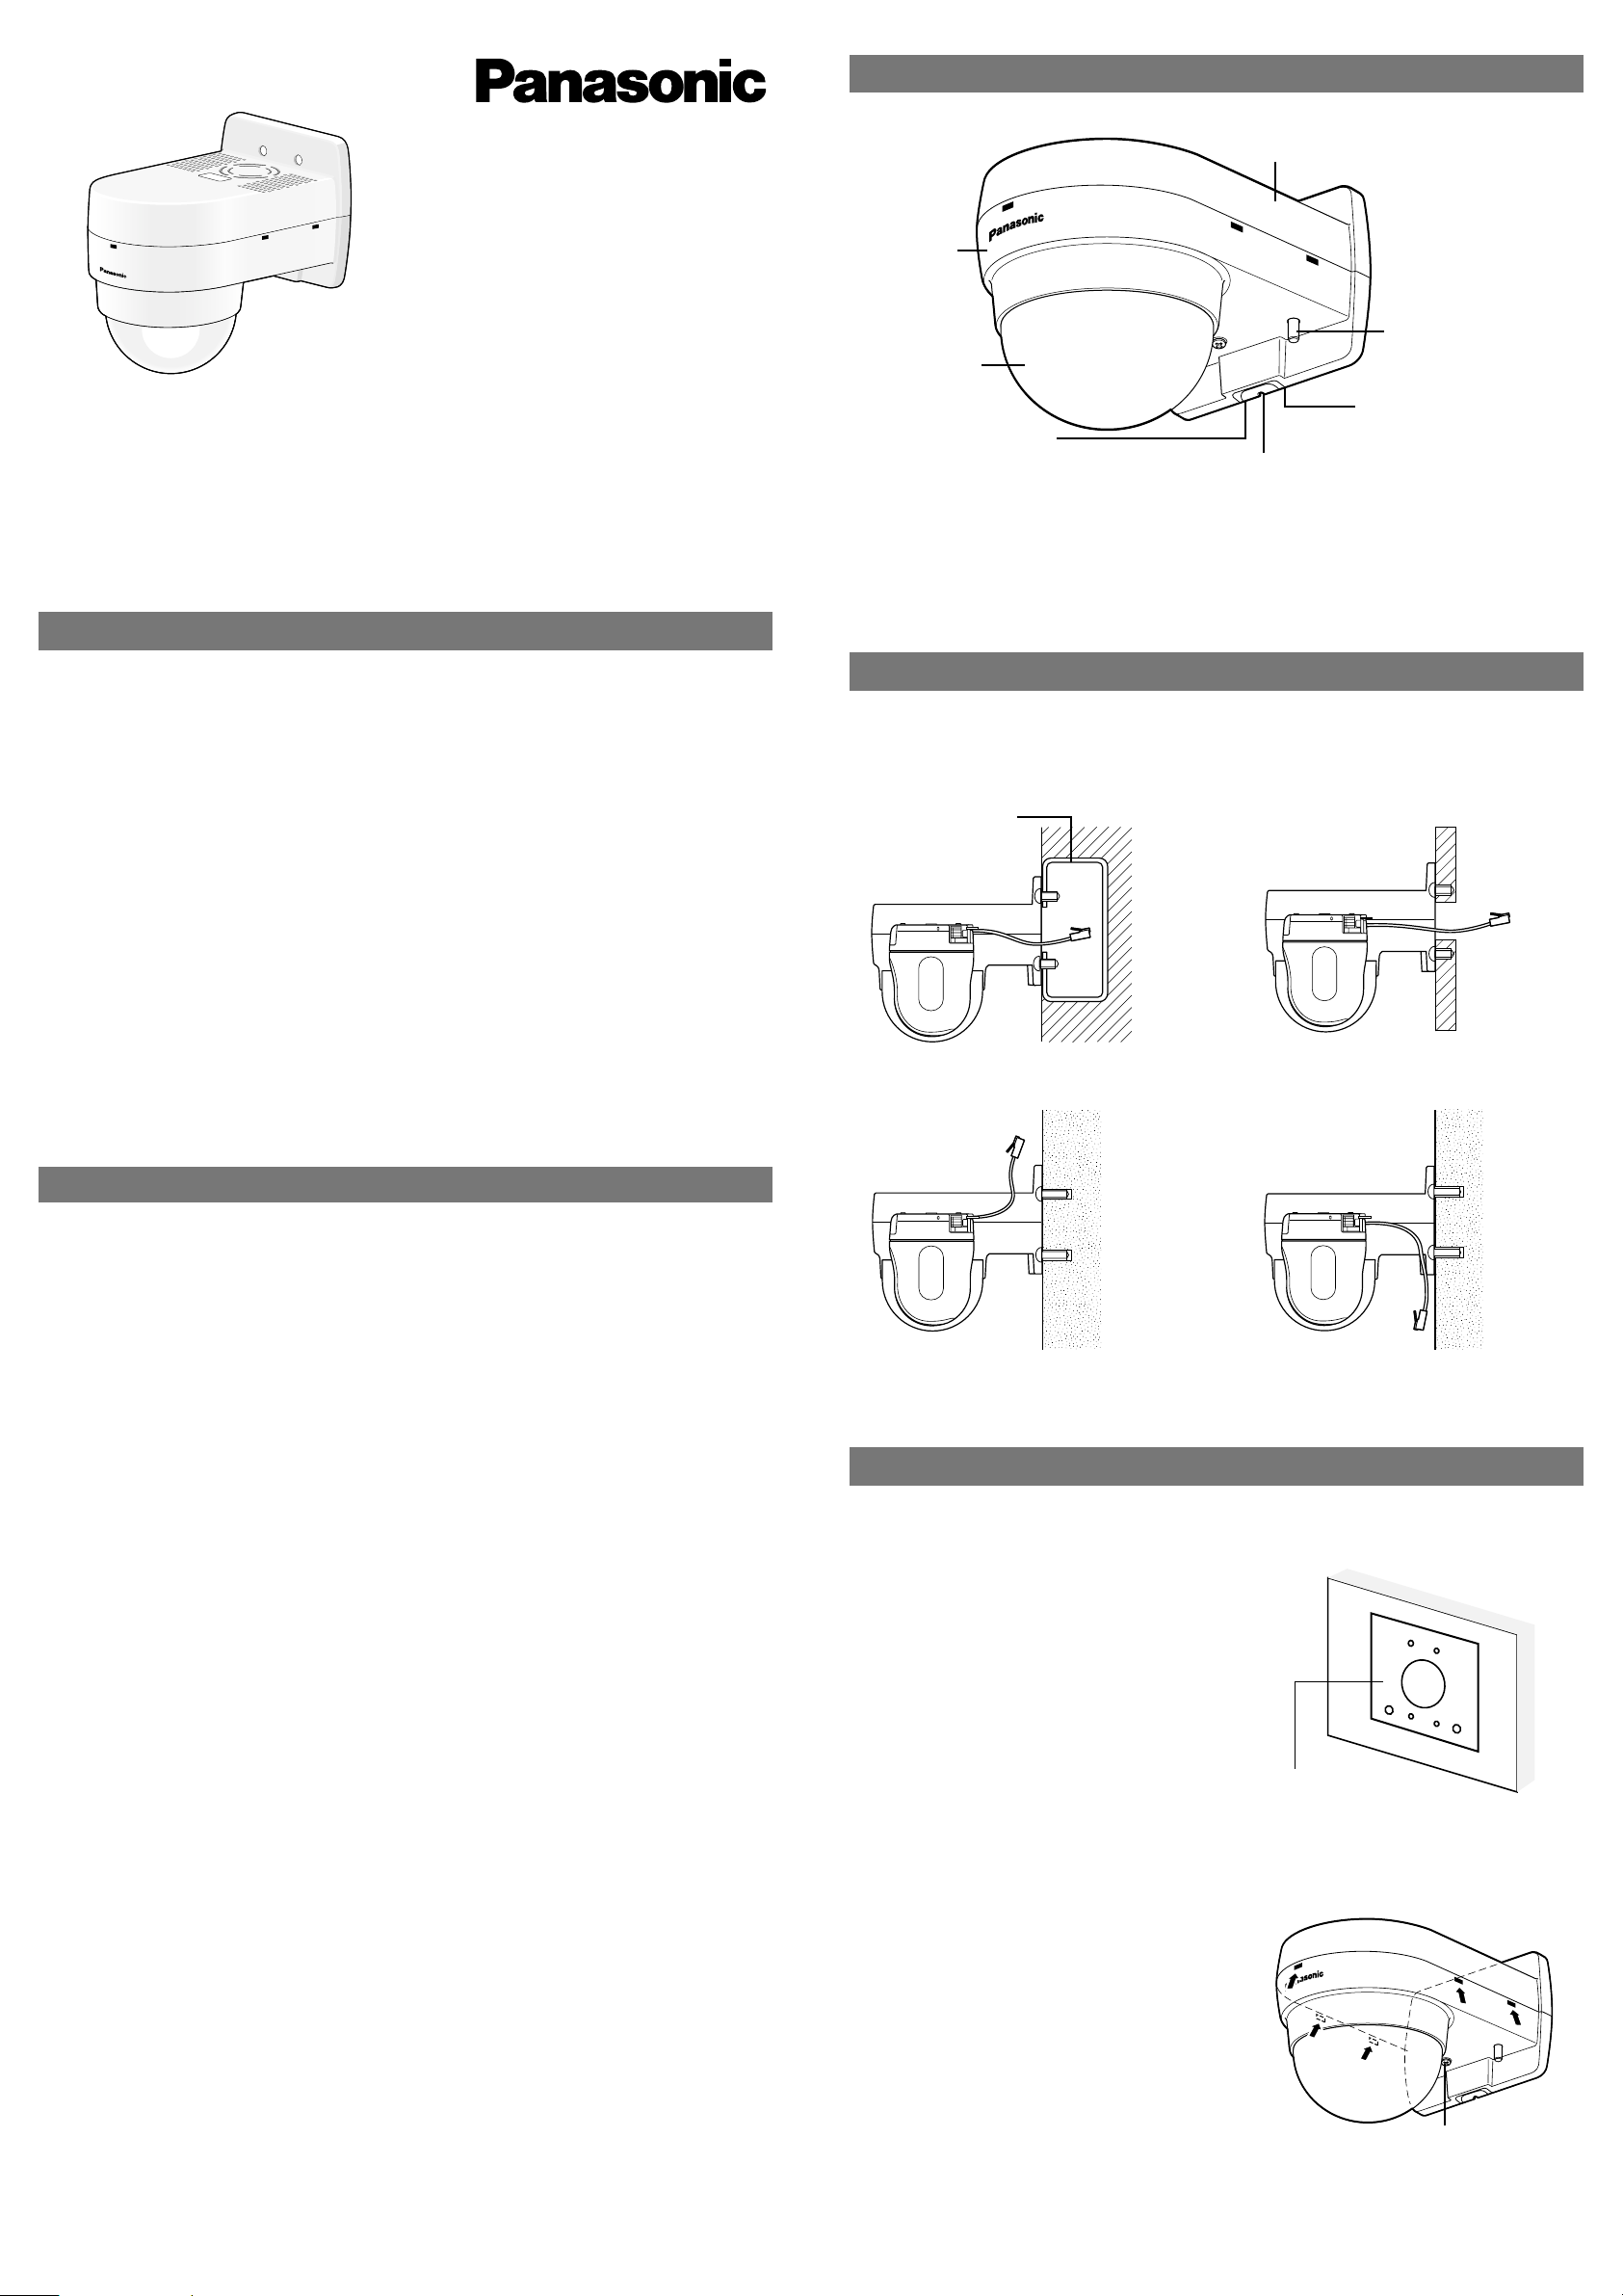
1. Put the template (accessory) against the wall
and mark the positions of fixing screws and
hole through which the cables run.
If you run the cables through the wall, drill a hole
through the wall.
2. Remove the bottom cover from this bracket.
q Loosen the fixing screw (unremovable) to be
used for cover fall prevention.
w Pull down the bottom cover while pressing
the marks (shown with a in the drawing) to
remove the cover.
* Be aware that the inner shell is present in
the cover.
Wall Mount Bracket
Operating Instructions
WV-Q150C
Model Nos. WV-Q150S
Before attempting to connect or operate this product,
please read these instructions carefully and save this manual for future use.
No model number suffix is shown in this manual.
NM0806-1096 3TR004556BAA Printed in Japan
Preface
This bracket is exclusively designed to mount the network camera, WV-NS202, on a wall.
The network camera shall be mounted on this bracket after mounting this bracket on a concrete
wall.
• WV-Q150C: Clear dome cover
• WV-Q150S: Smoked dome cover (approx. 50 % of transmittance)
● Embedded box ● Strong panel
● Concrete
Wall box
Wall
Fixing screw to be used for
cover fall prevention
Precautions
• Refer installation work to the dealer.
Installation work requires technique and experiences. Be sure to refer installation work to the
dealer to avoid fire, electric shock, injury, or damage to the product.
• Use only the specified camera.
Failure to observe this may cause a fall of an inappropriate camera resulting in injury or accidents. Mount WV-NS202 on this bracket exclusively.
• The measures of protection against a fall of the camera shall be taken.
Failure to observe this may cause injury. Be sure to install this bracket-specific safety wire.
• Avoid installing this bracket in the locations where salt damage occurs or corrosive gas is
produced.
Otherwise, the mounting portions will deteriorate and accidents such as a fall of the camera may
occur.
• The screws and fixation mechanisms shall be tightened securely.
Failure to observe this may cause a fall of the camera resulting in injury or accidents.
• Periodic inspections shall be conducted.
Rust on the metal parts or screws may cause a fall of the camera resulting in injury or accidents.
Be sure to consult the dealer for the inspections.
• Do not rub the edges of metal parts with your hand.
Failure to observe this may cause injury.
• Make sure that the installation area is strong enough to hold the total weight of the camera
assembly (approx. 1.8 kg {0.4 lbs.}) before installation.
• The screws that secure this bracket on a wall are not supplied. Prepare the screws according to
the material, structure, strength and other factors of the mounting area and the total weight of
objects to be mounted. (4 pieces of M4 screws or 2 pieces of M4 screws and 2 pieces of M6 or
M8 anchor bolts) In this case, wood screws and nails should not be used.
• Avoid installing in the following locations.
• Locations where it may get wet from rain or water splash (not only outdoor)
• Locations where a chemical agent is used such as a swimming pool
• Locations subject to steam and oil smoke such as a kitchen
• Locations near flammable gas or vapor
• Locations where radiation or x-ray emissions are produced
• Locations subject to strong magnetic field or radio waves
• Locations where it may be damaged by briny air such as seashores
• Locations where the temperature is not within –10 °C - +50 °C {14 °F - 122 °F}.
• Locations subject to vibrations (This product is not designed for on-vehicle use.)
• Locations where the temperature may rapidly change such as the peripheral areas of the air
outlets of air conditioners or doors facing outside. (In case of installing the camera in such
locations, the dome cover may become foggy or condensation may be caused on the cover.)
• The screws and bolts must be tightened with an appropriate tightening torque according to the
material and strength of the installation area. After tightening the screws or bolts, perform visual
check to ensure tightening is enough and there is no backlash.
• The pull-out strength of the installation area shall be 40 N {4 kgf} or more per 1 screw.
• The protection sheet attached to the dome cover shall be peeled off after installation.
Major Operating Controls and Their Functions
* If a microphone is used, mount the microphone on the rubber-made microphone stand. Unless
the microphone is used, cut the rubber with a nipper or conduct another treatment.
Installation Area
The drawings below show how to conduct the wiring of this bracket.
Template (accessory)
Top cover
Bottom cover
Notch for network cable, monitor output cable, etc.
Hole for microphone cable
Notch for network cable
Dome cover
Microphone stand*
(To be continued reverse page)
3. Install the inner shell.
Slide the covers located on the both lateral
sides of the camera and put the inner shell on
the camera until the hooks inside the inner shell
are held in the holes of the camera (until a click
is heard).
Important: Put the inner shell down on the cam-
era until the outside cover of the camera
cannot be seen from the opening (from
which the camera lens is visible) of the inner
shell. If this integration is not successfully
performed, the inner shell may be removed
or the hidden part at the top of the screen
may become larger in the WIDE mode.
How to remove the inner shell
Press the inner shell from the front and rear
sides inward (at the same vertical position as
the hooks) to bend the shell and remove the
shell from the camera.
4. Mount the top cover on the wall and run the cables.
Secure the top cover in either of the following
two ways: q and w. No screw is supplied.
Procure screws according to the installation
area.
q M4 screws, 4 positions (a)
or
w M4 screws, 2 positions ((a) upper 2 posi-
tions, not available in lower positions) and
M6 or M8 anchor bolts, 2 positions (b)
Important: The length of the anchor bolt pro-
jecting portion (the distance between the tip
of the anchor bolt and the chassis attaching
surface) shall be 7 mm {1/4"} or less. Failure
to observe this causes interference between
the anchor bolt and bottom cover. Therefore,
the bottom cover cannot be mounted.
5. Mount the camera.
Refer to "Installations/Connections" in the Installation Guide of WV-NS202 for further information.
The camera mounting bracket is already
attached to this bracket at the time of purchase.
6. Mount the bottom cover.
Be sure to push the bottom cover up until a click
is heard.
Important: Do not let the cables be caught dur-
ing installation work.
7. Tighten the fixing screw to be used for cover
fall prevention.
Recommended tightening torque: 1.6 N·m {16 kgf·cm}
Cover
Hook
Put on until a click is heard
(a) (a)
(a)
(a)
(b) (b)
Anchor bolt
Safety wire
Camera fixing screw
Bottom cover
Specifications
Ambient temperature: –10 °C - +50 °C {14 °F - 122 °F}
Dimensions: 165 (W) x 206.5 (H) x 217.5 (D) mm
{6-1/2" (W) x 8-1/3" (H) x 8-9/16" (D)}
Weight: Approx. 950 g {2.10 lbs.}
Finish: Main body: Treatment steel
Top and bottom covers: ABS resin with silver metallic coating
Dome cover: Acrylic resin
Press from the front and rear
sides inward to bend
Standard Accessories
Operating Instructions (this book) ............................. 1 pc.
The following are for installation.
Template .................................................................... 1 sheet
Inner shell .................................................................. 1 pc.
Installations
(continued)
© 2006 Matsushita Electric Industrial Co., Ltd. All Rights Reserved.
For European and other fields:
Matsushita Electric Industrial Co., Ltd.
Osaka, Japan
http://panasonic.net
For U.S., Canadian and Puerto Rican fields:
Panasonic System Solutions Company,
Unit Company of Panasonic Corporation of North America
Security Systems
www.panasonic.com/security
For customer support, call 1.877.733.3689
Executive Office: Three Panasonic Way 2H-2, Secaucus,
New Jersey 07094
Zone Office
Eastern: Three Panasonic Way, Secaucus, New Jersey 07094
Central: 1707 N. Randal Road, Elgin, IL 60123
Southern: 1225 Northbrook Parkway, Suwanee, GA 30024
Western: 6550 Katella Ave., Cypress, CA 90630
Panasonic Canada Inc.
5770 Ambler Drive,Mississauga,
Ontario, L4W 2T3 Canada (905)624-5010
http://www.panasonic.ca
Panasonic Sales Company
Division of Panasonic Puerto Rico Inc.
San Gabriel Industrial Park 65th Infantry Ave. KM. 9.5 Carolina
P.R. 00985(809)750-4300
Inner shells
Note: When the camera lens is pointed in the horizontal direction, the inner shell interferes with
the camera’s view, and consequently about upper half of the monitor screen is hidden in the
WIDE mode.
7 mm {1/4"}
 Loading...