

Page 1
Operating Instructions
Included Installation Instructions
ENGLISHDEUTSCH
WV-CS5C
WV-CS5S
please read these instructions carefully and save this manual for future use.
Precautions
Installation work requires technique and experience.•
Failure to observe this may cause injury or damage to the product.•
Be sure to consult the dealer.•
Mounting procedures
Dome Cover
Model No. WV-CS5S
WV-CS5C
Before attempting to connect or operate this product,
WV-CS5S is a smoke type, WV-CS5C is a clear type.
FRANÇAISESPAÑOL
Read along with the Installation Guide of the camera body.
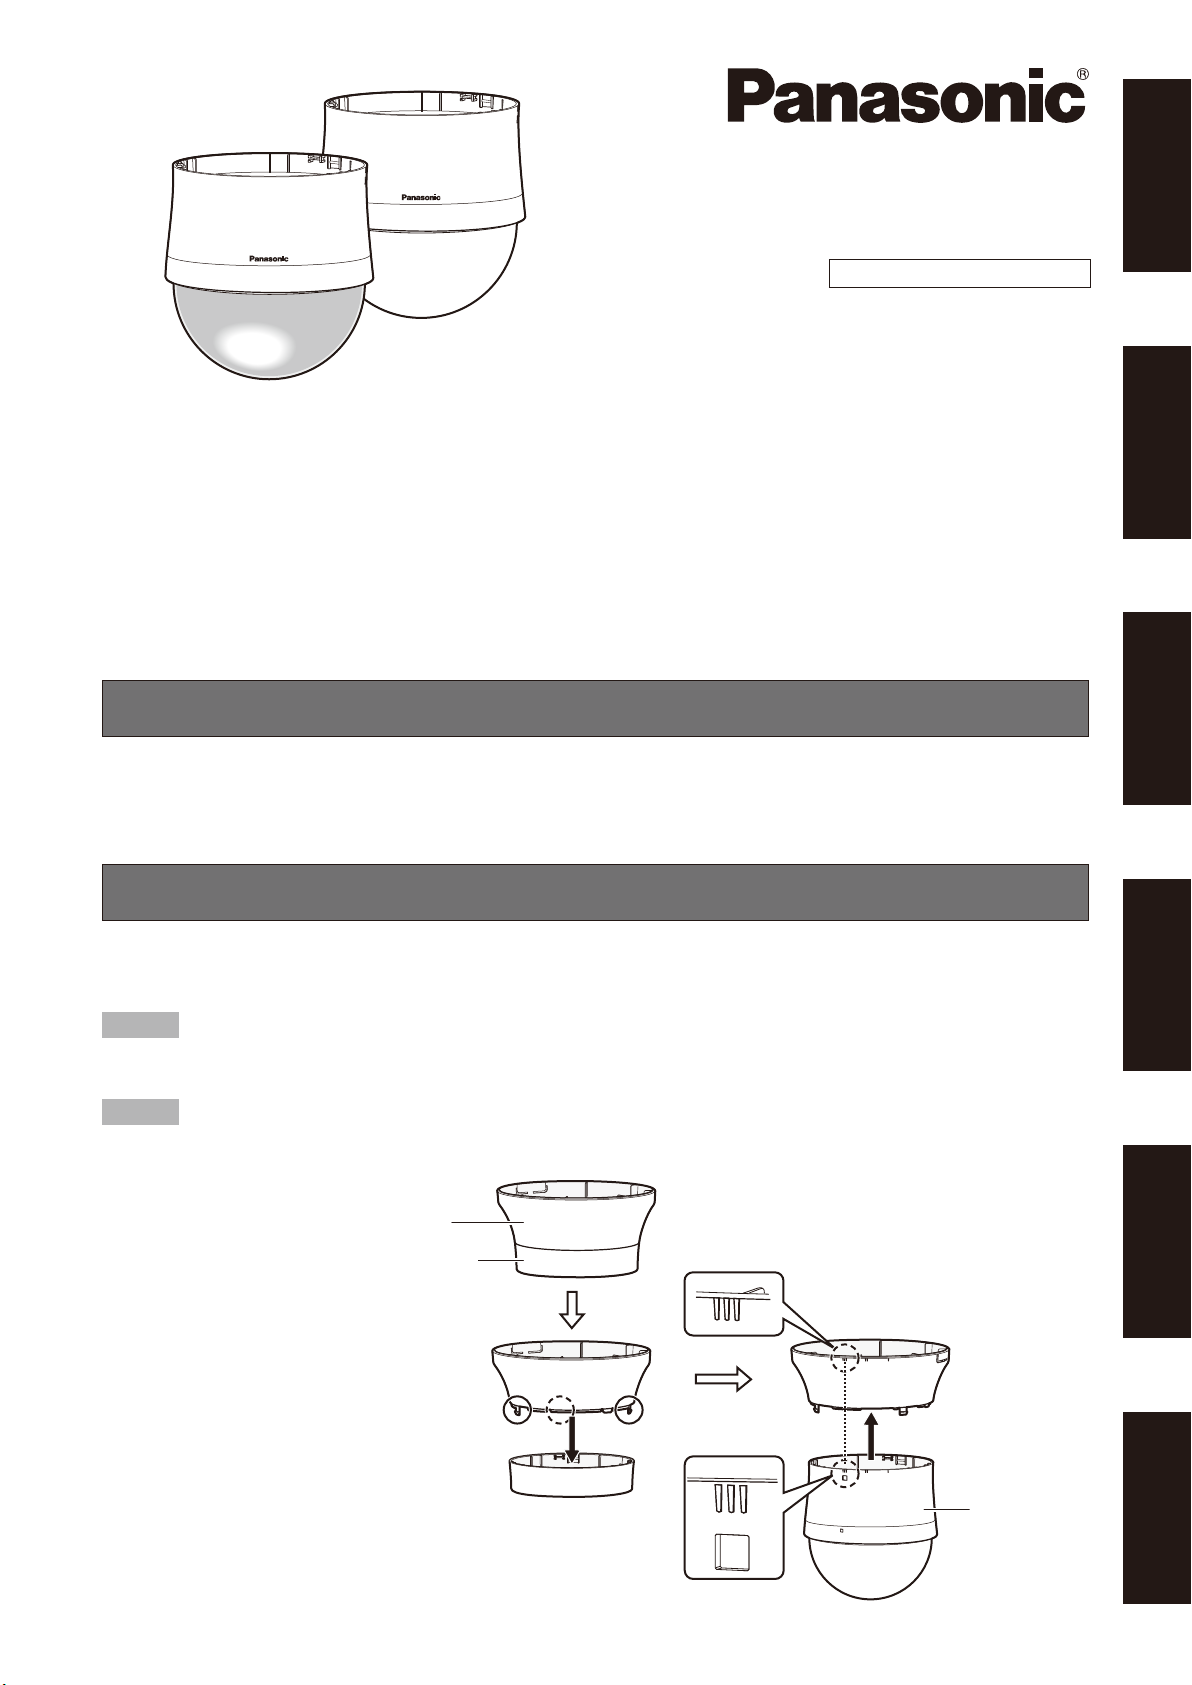
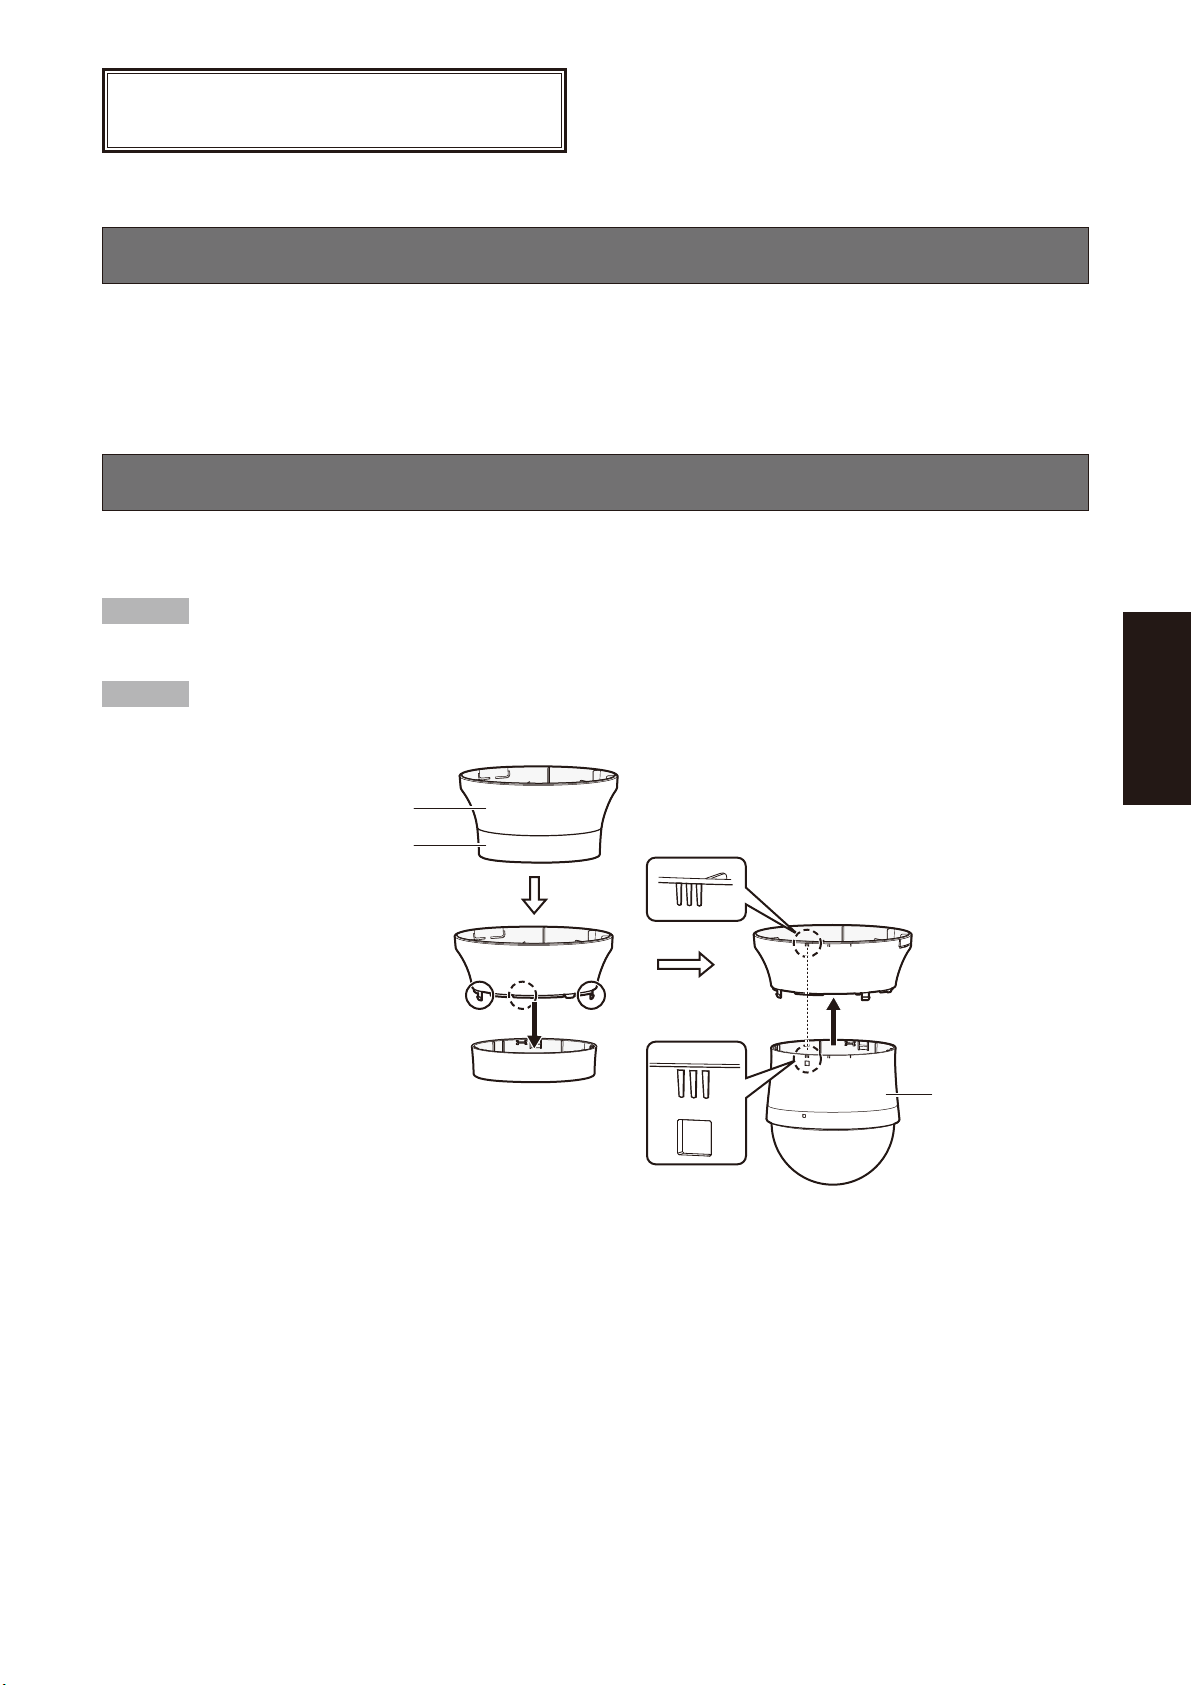
Step 1
Connect the cables to the camera, and fix them to the ceiling. (Refer to the Installation Guide of the camera in use.)
Step 2
Remove the bottom decorative cover, and attach the dome cover to the top decorative cover.
Decorative cover (Top)
Decorative cover (Bottom)
Remove
The decorative cover (Bottom) is not used.•
The decorative cover is secured with hooks at 3 points.•
The dome cover is also secured with the same hooks.
Match the markings.
ITALIANOРУССКИЙ
Dome cover
Page 2
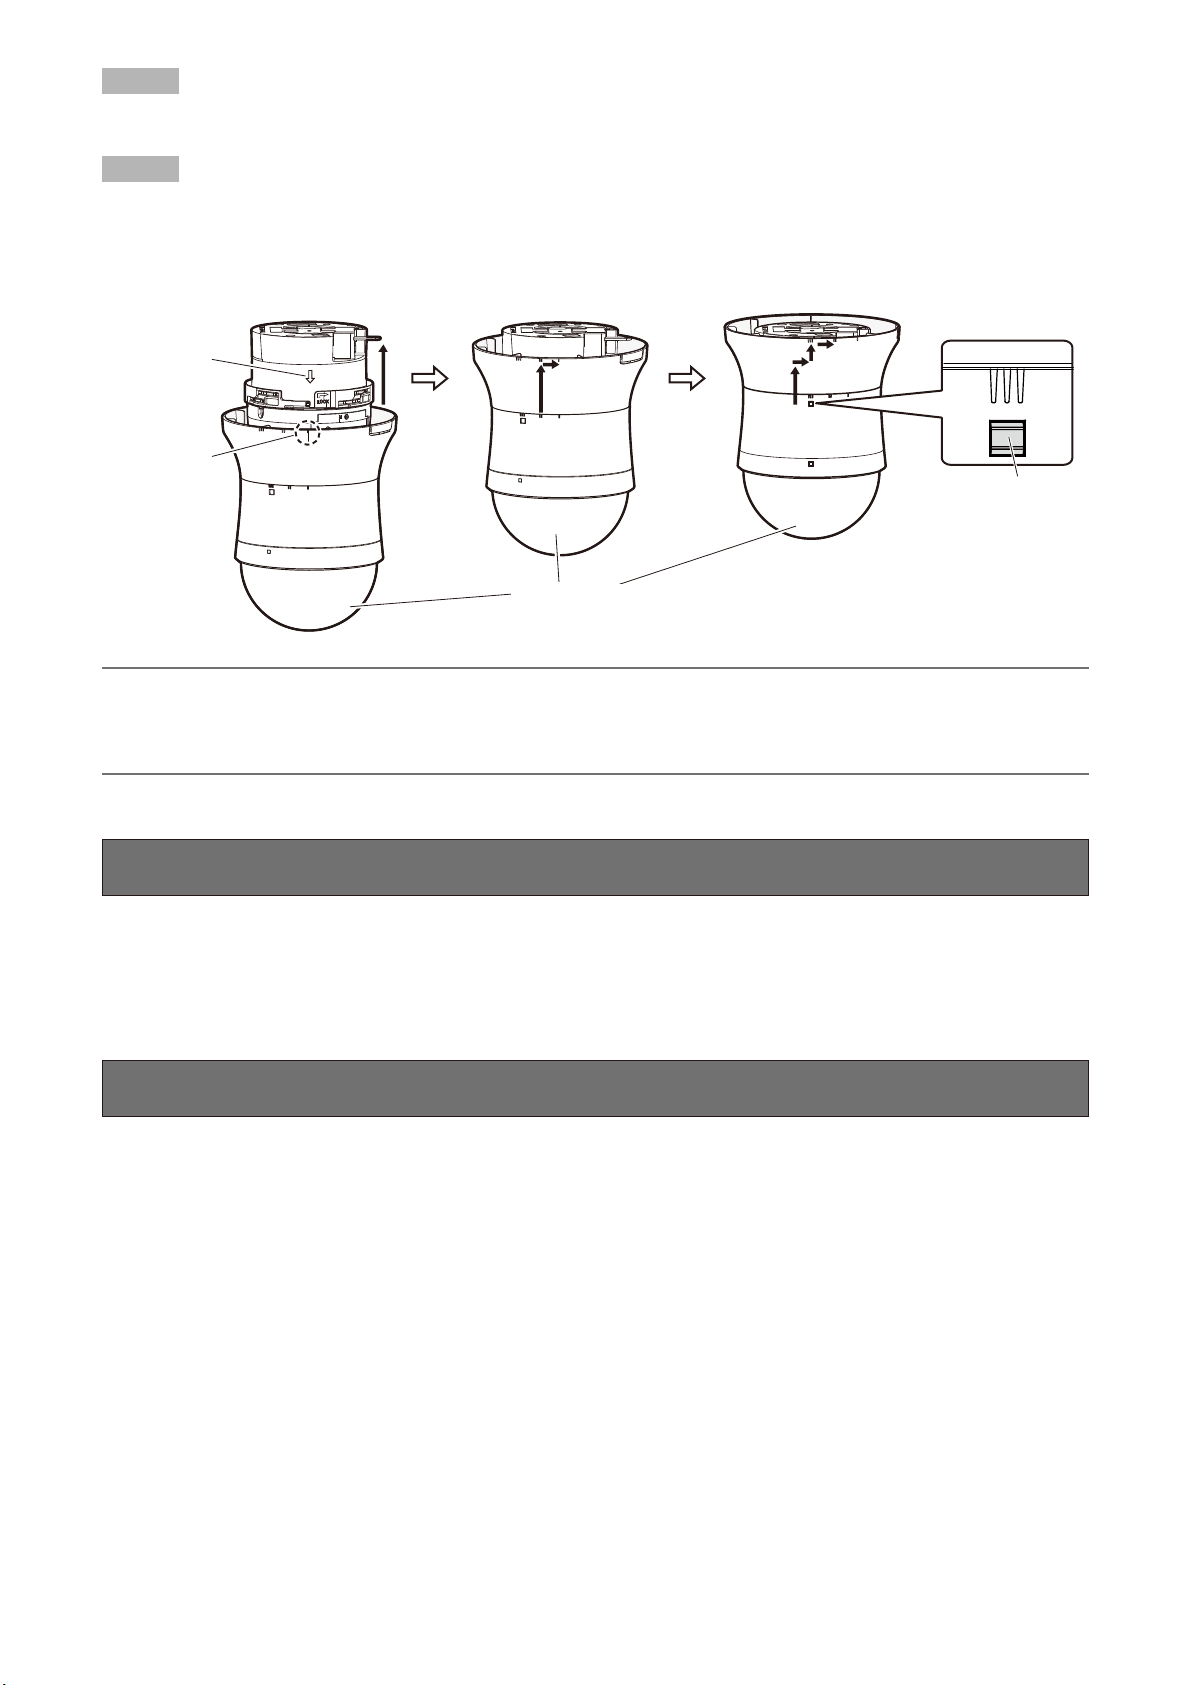
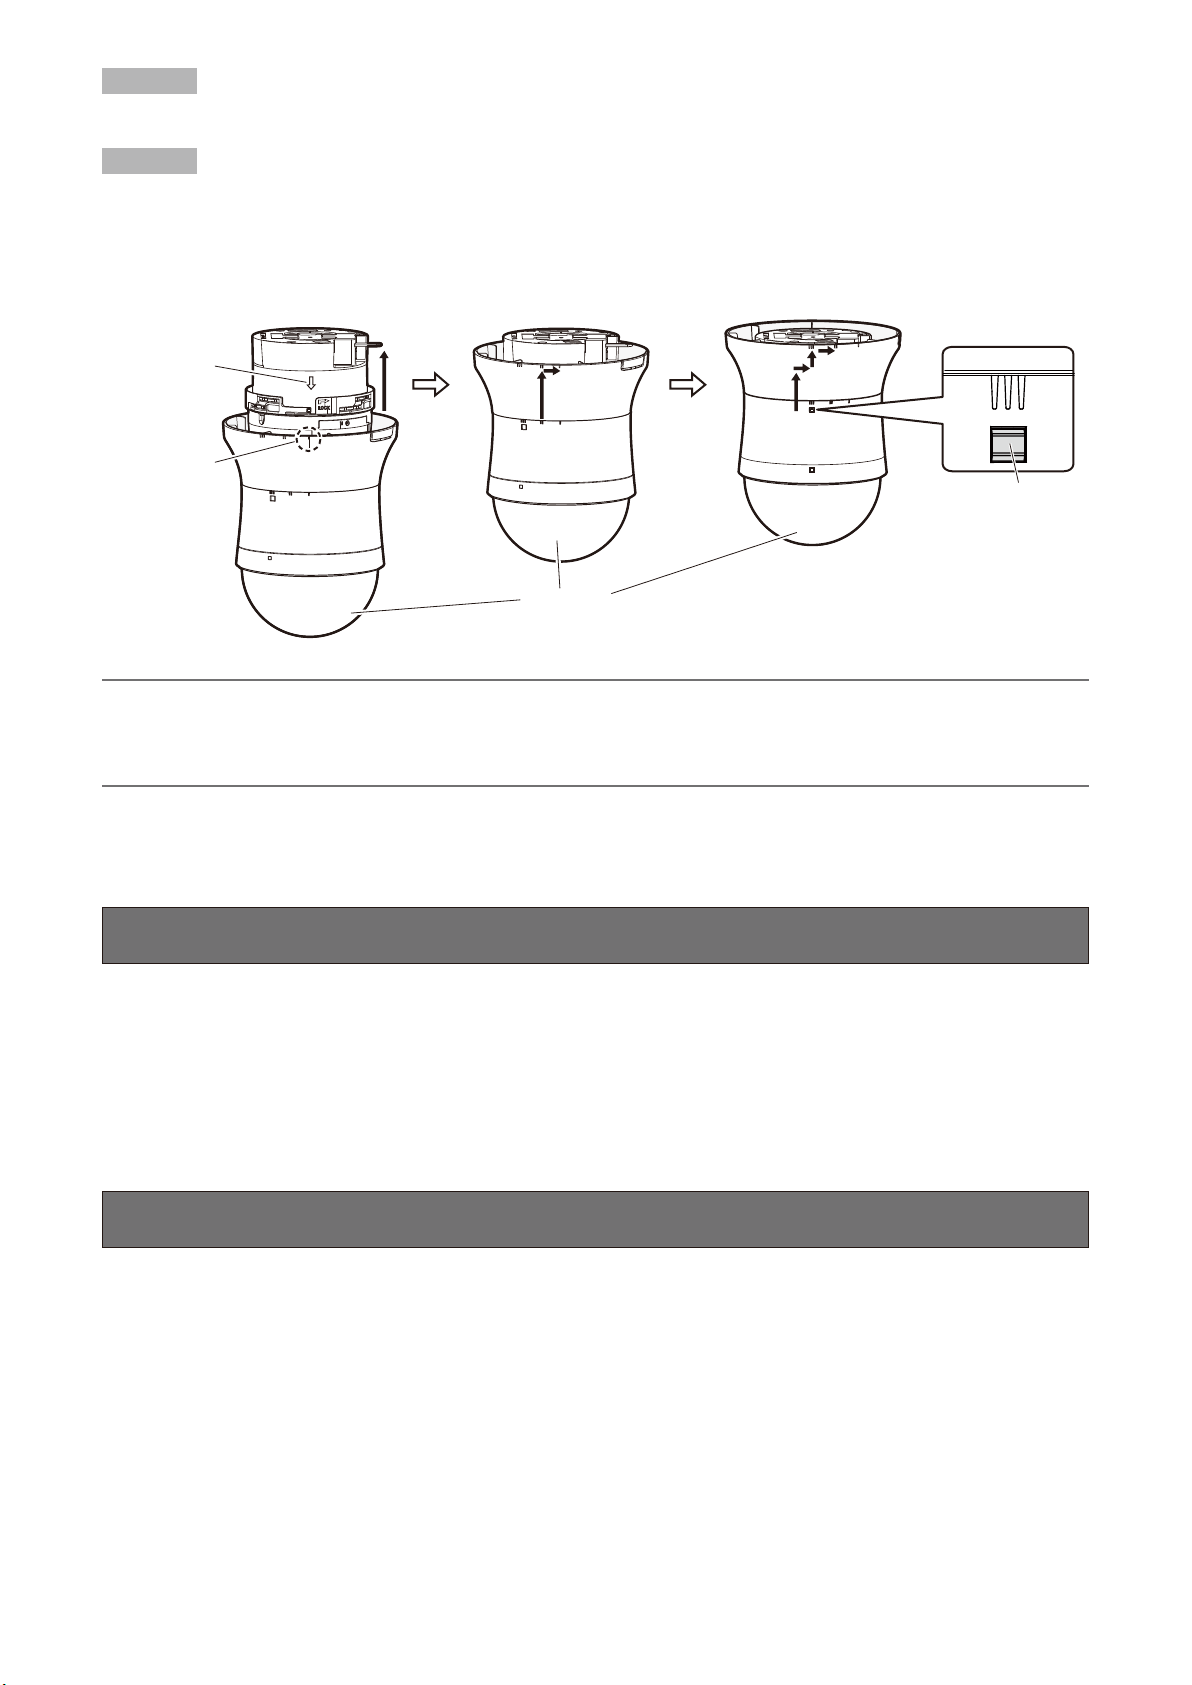
Step 3
Remove the protective sheet from the lens surface of the camera.
Step 4
Align the "|" mark of the decorative (Top) and the arrow mark of the camera body, and insert the cover from the bottom.
After inserting the decorative cover, rotate it clockwise when looking at it from underneath by 2 steps to engage the cover by
pushing it up as shown in the drawing below.
Make sure that the lock lever is securely inserted into the slot of the decorative cover. Then remove the protective sheet from
the dome cover.
Arrow mark
"|" mark
Lock lever
Protective sheet
Note:
To remove the decorative cover from the camera body, rotate the decorative cover counterclockwise when looking at it from •
underneath and pull it slightly downward while pressing the lock lever.
The body part of the dome cover may be caught in the view depending on the lens direction and the angle. In such a case, •
adjust the lens direction.
Specifications
Ambient operating temperature: –10 °C to +55 °C {14 °F to 131 °F}
Mass: Approx. 200 g {0.44 lbs}
Dimensions: ø156 mm x 162 mm (H) {ø6-5/32 inches x 6-3/8 inches (H)},
diameter of the dome: 145 mm {5-23/32 inches}
Standard Accessories
Operating Instructions .................................1 set
2
Page 3

DEUTSCHE AUSGABE
(GERMAN VERSION)
Vorsichtsmaßregeln
Installationsarbeiten erfordern Fachkenntnisse und Erfahrung.•
Andernfalls besteht die Gefahr von Verletzungen oder Schäden am Produkt.•
Unbedingt einen Fachhändler konsultieren.•
Montagevorgänge
In Verbindung mit dem dem Kameragehäuse beiliegenden Installationshandbuch lesen.
Schritt 1
Die Kabel an die Kamera anschließen und an der Decke befestigen. (Siehe das der Kamera beiliegende Installationshandbuch.)
Schritt 2
Die untere Abdeckblende entfernen und die Dome-Abdeckung an der oberen Abdeckblende befestigen.
Abdeckblende (Oberen)
Abdeckblende (Untere)
Entfernen
Die Markierungen
ausrichten.
DEUTSCH
Die (untere) Abdeckblende wird nicht benötigt.•
Die Abdeckblende ist an 3 Stellen mit Haken gesichert.•
Dieselben Haken sichern auch die Dome-Abdeckung.
Dome-Abdeckung
3
Page 4
Schritt 3
Die Schutzfolie vom Objektiv der Kamera abziehen.
Schritt 4
Die Markierung "|" an der (oberen) Abdeckblende auf die Pfeilmarkierung am Kameragehäuse ausrichten und die Abdeckung
von unten her aufsetzen.
Die Abdeckblende gemäß Abbildung andrücken und in 2 Stufen nach rechts drehen (von der Unterseite her gesehen), bis sie
fest sitzt.
Sicherstellen, dass der Verriegelungshebel fest in der Öffnung in der Abdeckblende sitzt. Anschließend die Schutzfolie von der
Dome-Abdeckung abziehen.
Pfeilmarkierung
"|"-Position
Verriegelungsarm
Schutzfolie
Anmerkung:
Zum Trennen der Abdeckblende vom Kameragehäuse die Abdeckblende nach links drehen (von der Unterseite her gese-•
hen), auf den Verriegelungshebel drücken und die Blende nach unten abziehen.
Je nach Ausrichtung des Objektivs kann der undurchsichtige Teil der Glockenabdeckung die Sicht verdecken. In diesem •
Fall die Ausrichtung des Objektivs verändern.
Technische Daten
Betriebsumgebungstemperatur: –10 °C bis +55 °C
Masse: Ca. 200 g
Abmessungen: ø156 mm x 162 mm (H), Glockendurchmesser: 145 mm
Standardzubehör
Bedienungsanleitung ...................................1 Satz
4
Page 5
VERSION FRANÇAISE
(FRENCH VERSION)
Mesures de précaution
Les travaux d'installation exigent des connaissances techniques et de l'expérience.•
Le fait de ne pas respecter cette recommandation risque de blesser quelqu'un voire endommager ce produit.•
Faire en sorte de consulter le distributeur.•
Procèdures de fixation
Lire avec le guide d'installation du bloc de caméra vidéo.
Étape 1
Connecter les câbles à la caméra vidéo et les fixer au plafond. (Se référer au Guide d'installation de la caméra vidéo utilisée.)
Étape 2
Retirer le couvercle décoratif inférieur, puis fixer le couvercle en dôme sur le couvercle décoratif supérieur.
Couvercle décoratif (Supérieur)
Couvercle décoratif (Inférieur)
Retirer
Le couvercle décoratif (inférieur) n'est pas utilisé.•
Le couvercle décoratif est fixé à l'aide de crochets à 3 emplacements.•
Le couvercle en dôme est également fixé à l'aide des mêmes crochets.
Faire correspondre
les repérages.
FRANÇAIS
Couvercle en dôme
5
Page 6

Étape 3
Retirer la feuille de protection de la surface de l'objectif de la caméra vidéo.
Étape 4
Aligner le repère "|" de la partie décorative (supérieur) et le repère en flèche du bloc de caméra vidéo et insérer le couvercle par
la base.
Après l'introduction du couvercle décoratif, le faire pivoter dans le sens des aiguilles d'une montre en l'observant du dessous de
2 crans de manière à l'engager en le repoussant vers le haut comme indiqué sur le schéma ci-dessous.
S'assurer que le levier de verrouillage est solidement inséré dans la rainure du couvercle décoratif. Retirer ensuite le film de protection du couvercle en dôme.
Repère fléché
Position "|"
Bras de
verrouillage
Feuille de protection
Remarque:
Pour retirer le couvercle décoratif du bloc de caméra vidéo, faire pivoter le couvercle décoratif dans le sens contraire des •
aiguilles d'une montre observé de dessous et le tirer dessus légèrement vers le bas tout en appuyant le levier de
verrouillage.
Le bloc du couvercle en dôme risque d'être saisi dans le champ visuel selon l'orientation de l'objectif et son angle •
d'orientation. Si toutefois c'est le cas, régler l'orientation de l'objectif.
Caractéristiques techniques
Température ambiante en service: –10 °C à +55 °C {14 °F a 131 °F}
Masse: Environ 200 g {0,44 lbs}
Dimensions: ø156 mm x 162 mm (H) {ø6-5/32 pouces x 6-3/8 pouces (H)},
diamètre du dôme: 145 mm {5-23/32 pouces}
Accessoires standard
Manuel d'utilisation ......................................1 ensemble
6
Page 7

VERSION ESPAÑOLA
(SPANISH VERSION)
Precauciones
Es necesario poseer técnica y experiencia para realizar el trabajo de instalación.•
Si no se sigue esta indicación, pueden producirse lesiones o causarse daños en el producto.•
Consúltelo sin falta al distribuidor.•
Procedimiento de instalación
Léalo consultando la guía de instalación del cuerpo de la cámara.
Paso 1
Conecte los cables a la cámara y fíjelos al techo. (Consulte la guía de instalación de la cámara que esté utilizando.)
Paso 2
Extraiga la cubierta decorativa inferior y coloque la cubierta del domo en la cubierta decorativa superior.
Cubierta decorativa (Superior)
Cubierta decorativa (Inferior)
Extraer
No se utiliza la cubierta decorativa (inferior).•
La cubierta decorativa se fija con ganchos en 3 lugares.•
La cubierta del domo también se fija con los mismos ganchos.
Haga corresponder
las marcas.
ESPAÑOL
Cubierta del domo
7
Page 8

Paso 3
Extraiga la lámina protectora de la superficie del objetivo de la cámara.
Paso 4
Alinee la marca "|" de la cubierta decorativa (superior) y la marca de la flecha del cuerpo de la cámara e inserte entonces la
cubierta desde debajo.
Después de haber insertado la cubierta decorativa, gírela hacia la derecha, mirándola desde debajo, en 2 pasos para acoplar la
cubierta empujándola hacia arriba como se muestra en la ilustración siguiente.
Asegúrese de que la palanca de bloqueo esté insertada con seguridad en la ranura de la cubierta decorativa. Extraiga entonces
la lámina protectora de la cubierta del domo.
Marca de la
flecha.
Marca "|"
Brazo de fijación
Lámina protectora
Nota:
Para extraer la cubierta decorativa del cuerpo de la cámara, gire hacia la izquierda la cubierta decorativa cuando se mira •
desde debajo y tire ligeramente de la misma hacia abajo mientras empuja la palanca de bloqueo.
La parte del cuerpo de la cubierta del domo podría entrar en la visión dependiendo de la dirección y del ángulo del objetivo. •
En tales casos, ajuste la orientación del objetivo.
Especificaciones
Temperatura ambiental de funcionamiento: –10 °C a +55 °C
Masa: Aprox. 200 g
Dimensiones: ø156 mm x 162 mm (H), diámetro del domo: 145 mm
Accesorios estándar
Manual de instrucciones ..............................1 juego
8
Page 9

VERSIONE ITALIANA
(ITALIAN VERSION)
Precauzioni
I lavori di installazione richiedono tecnica ed esperienza.•
La mancata osservanza di questa precauzione può causare ferite o danni al prodotto.•
Non esitare a rivolgersi al rivenditore.•
Procedure di montaggio
Leggere queste istruzioni insieme alla Guida all’installazione del corpo della telecamera.
Passaggio 1
Collegare i cavi alla telecamera e fissarli al soffitto. (Far riferimento alla Guida all’installazione della telecamera utilizzata.)
Passaggio 2
Rimuovere il coperchio decorativo inferiore e installare il coperchio a cupola sul coperchio decorativo superiore.
Coperchio decorativo (Superiore)
Coperchio decorativo (Inferiore)
Rimuovere
Il coperchio decorativo (inferiore) non viene utilizzato.•
Il coperchio decorativo è fissato con ganci in tre punti.•
Anche il coperchio a cupola è fissato con gli stessi ganci.
Allineare i segni.
Coperchio a cupola
9
ITALIANO
Page 10

Passaggio 3
Rimuovere il foglio di protezione dalla superficie dell'obiettivo della telecamera.
Passaggio 4
Allineare il segno "|" del coperchio decorativo (superiore) con la freccia del corpo della telecamera e inserire il coperchio dalla
parte inferiore.
Dopo aver inserito il coperchio decorativo ruotarlo di due scatti in senso orario guardandolo da sotto, in modo da innescare il
coperchio premendo verso l'alto come illustrato nel disegno seguente.
Assicurarsi che il dispositivo di blocco sia inserito saldamente nella fessura del coperchio decorativo. Quindi rimuovere il foglio
di protezione dal coperchio a cupola.
Freccia
Posizione "|"
Dispositivo di
blocco
Foglio di protezione
Nota:
Per rimuovere il coperchio decorativo dal corpo della telecamera ruotarlo in senso antiorario guardandolo da sotto e tirarlo •
leggermente verso il basso mentre si preme il dispositivo di blocco.
Il corpo della copertura a cupola potrebbe venire ripreso a seconda della direzione e dell’angolo dell’obiettivo. In tal caso •
regolare la direzione dell’obiettivo.
Dati tecnici
Temperatura ambiente di funzionamento: Da –10 °C a +55 °C
Massa: Circa 200 g
Dimensioni: ø156 mm x 162 mm (H), diametro della cupola: 145 mm
Accessori standard
Manuale di istruzioni ....................................1 set
10
Page 11

РУССКАЯ ВEРСИЯ
(RUSSIAN VERSION)
Меры предосторожности
Монтажные работы требуют технических навыков и опыта.•
Несоблюдение этого требования может привести к травмам или повреждению продукта.•
Нужно обязательно обращаться к дилеру.•
Процедура монтажа
Читайте вместе с Руководством по монтажу корпуса камеры.
Шаг 1
Подсоедините кабели к камере и закрепите их на потолке. (См. Руководство по монтажу используемой камеры.)
Шаг 2
Снимите нижнюю декоративную накладку и присоедините крышку купола к верхней декоративной накладке.
Декоративная накладка (Верхней)
Декоративная накладка (Нижняя)
Снимите
Декоративная накладка (нижняя) не используется.•
Декоративная накладка закрепляется крючками в 3 местах.•
Крышка купола также закрепляется этими же крючками.
Совместите метки.
Крышка купола
11
РУССКИЙ
Page 12

Шаг 3
Снимите защитную пленку с поверхности объектива камеры.
Шаг 4
Совместите метку "|" на декоративной накладке (верхней) и стрелку на корпусе камеры и вставьте крышку снизу.
Вставив декоративную накладку, поверните ее по часовой стрелке, если смотреть на нее снизу, на 2 шага, чтобы закрепить крышку,
потянув ее вверх, как показано на рисунке ниже.
Убедитесь в том, что рычаг блокировки надежно вставлен в слот декоративной накладки. Затем снимите защитную пленку с
крышки купола.
Стрелка
"|" положение
Рычаг
блокировки
Защитная пленка
Замечание:
Чтобы снять декоративную накладку с корпуса камеры, поверните ее против часовой стрелки, если смотреть на нее снизу, и •
слегка потяните ее вниз, нажимая на рычаг блокировки.
Корпус куполообразной крышки может оказаться в поле зрения в зависимости от направления объектива и угла. В таком слу-•
чае, отрегулируйте направление объектива.
Технические характеристики
Температура окружающей среды при эксплуатации: –10 °C до +55 °C
Масса: Около 200 g
Габаритные размеры: ø156 mm x 162 mm (H), диаметр куполообразной головки: 145 mm
Стандартные аксессуары
Инструкция по эксплуатации .......................................1 комплект
12
Page 13

13
Важная информация
[Русский язык]
Декларация о Соответствии Требованиям Технического Регламента об Ограничении Использования некоторых Вредных
Веществ в электрическом и электронном оборудовании (утверждённого Постановлением №1057 Кабинета Министров
Украины)
Изделие соответствует требованиям Технического Регламента об Ограничении Использования некоторых Вредных Веществ в электрическом
и электронном оборудовании (ТР ОИВВ).
Содержание вредных веществ в случаях, не предусмотренных Дополнением №2 ТР ОИВВ:
1. свинец (Pb) – не превышает 0,1 % веса вещества или в концентрации до 1000 миллионных частей;
2. кадмий (Cd) – не превышает 0,01 % веса вещества или в концентрации до 100 миллионных частей;
3. ртуть (Hg) – не превышает 0,1 % веса вещества или в концентрации до 1000 миллионных частей;
4. шестивалентный хром (Cr6+) – не превышает 0,1 % веса вещества или в концентрации до 1000 миллионных частей;
5. полибромбифенолы (PBB) – не превышает 0,1 % веса вещества или в концентрации до 1000 миллионных частей;
6. полибромдифеноловые эфиры (PBDE) – не превышает 0,1 % веса вещества или в концентрации до 1000 миллионных частей.
[Українська мова]
Декларація про Відповідність Вимогам Технічного Регламенту Обмеження Використання деяких Небезпечних
Речовин в електричному та електронному обладнанні (затвердженого Постановою №1057 Кабінету Міністрів України)
Виріб відповідає вимогам Технічного Регламенту Обмеження Використання деяких Небезпечних Речовин в електричному та електронному
обладнанні (ТР ОВНР).
Вміст небезпечних речовин у випадках, не обумовлених в Додатку №2 ТР ОВНР, :
1. свинець(Pb) – не перевищує 0,1 % ваги речовини або в концентрації до 1000 частин на мільйон;
2. кадмій (Cd) – не перевищує 0,01 % ваги речовини або в концентрації до 100 частин на мільйон;
3. ртуть(Hg) – не перевищує 0,1 % ваги речовини або в концентрації до 1000 частин на мільйон;
4. шестивалентний хром (Cr6+) – не перевищує 0,1 % ваги речовини або в концентрації до 1000 частин на мільйон;
5. полібромбіфеноли (PBB) – не перевищує 0,1 % ваги речовини або в концентрації до 1000 частин на мільйон;
6. полібромдефенілові ефіри (PBDE) – не перевищує 0,1 % ваги речовини або в концентрації до 1000 частин на мільйон.
Page 14

14
Page 15

15
Page 16

For U.S. and Canada:
Panasonic System Communications Company of North America,
Unit of Panasonic Corporation of North America
www.panasonic.com/business/
For customer support, call 1.800.528.6747
Three Panasonic Way, Secaucus, New Jersey 07094 U.S.A.
Panasonic Canada Inc.
5770 Ambler Drive, Mississauga, Ontario, L4W 2T3 Canada
(905)624-5010
www.panasonic.ca
Printed in China
Gedruckt in China
Imprimé en Chine
Impreso en China
© Panasonic System Networks Co., Ltd. 2013 Ns0813-1093 PGQX1403ZB
For Europe and other countries:
Panasonic Corporation
http://panasonic.net
Importer's name and address to follow EU rules:
Panasonic Testing Centre
Panasonic Marketing Europe GmbH
Winsbergring 15, 22525 Hamburg, Germany
Stampato in Cina
Напечатано в Китае
 Loading...