

Page 1

Installation Guide
Network Disk Recorder
Model No. WJ-NX400K
WJ-NX400K/G
1
2
3
4
5
6
7
8
9
Network Disk Recorder WJ-NX400
Before attempting to connect or operate this product,
please read these instructions carefully and save this manual for future use.
The model number is abbreviated in some descriptions in this manual.
Page 2

Contents
Introduction .............................................................................................................................. 4
Standard accessories ...............................................................................................................................................................4
About the user manuals ............................................................................................................................................................ 4
About HDD Unit ........................................................................................................................................................................5
About Additional Camera Kit (option) .......................................................................................................................................5
About Secure Communication Kit (option)................................................................................................................................5
Precautions for installation ........................................................................................................................................................ 5
Basic operations .......................................................................................................................................................................7
Setup menu ............................................................................................................................................................................... 9
Operations flow ..................................................................................................................... 10
1 Obtain the license (Registration Key) ............................................................................. 12
2 Rack mounting .................................................................................................................. 13
Installation procedure .............................................................................................................................................................. 13
Position in the Rack ................................................................................................................................................................14
3 Connections ...................................................................................................................... 15
Connection of cameras and a mouse ..................................................................................................................................... 15
Connection of monitors ..........................................................................................................................................................16
Connection of a PC ................................................................................................................................................................. 17
Connection of extension units ................................................................................................................................................19
How to use the terminals of the ALARM/CONTROL ..............................................................................................................20
How to use the terminals of the ALARM IN ............................................................................................................................24
Time and polarities of the ALARM/CONTROL connector .......................................................................................................26
4 Turn on the devices........................................................................................................... 27
Turn on the power of the recorder .......................................................................................................................................... 27
(When turn off the power of the recorder) ............................................................................................................................... 28
5 Register the license (Registration Key) .......................................................................... 29
6 Assemble HDD unit ........................................................................................................... 31
7 Installation of HDD unit .................................................................................................... 32
Install HDD unit in recorder ..................................................................................................................................................... 32
Install HDD unit in extension unit ............................................................................................................................................ 33
Initialize the HDD unit .............................................................................................................................................................. 34
8 Configure the minimum settings [Easy Start] ................................................................ 35
Troubleshooting ..................................................................................................................... 38
2
Page 3

Contents (continued)
Important Information
Refer to the Important Information (PDF) in the provided CD-ROM for the following items.
Safety Information · Important safety instructions
Introduction · Preface · System requirements for a PC
· Network security
Precautions · Precautions for use
Major operating controls · Major operating controls and their functions
User management · User/Host management
HDD unit · Handle the HDD units
· Remove the HDD units from recorder
Others · Troubleshooting
· Specifications
Operating Instructions
Refer to the Operating Instructions (PDF) in the provided CD-ROM for the following items.
Setup via recorder's main
monitor
Operation via recorder's main
monitor
Operation via PC web browser · Monitor live images
· Basic setup
Set up date & time and language [Date/Language]
Camera setup [Camera]
Set up recording/events [REC & event]
· Advanced setup
Configure the settings relating to monitors [Monitor]
Configure the settings relating to network [Network]
Configure the settings relating to the user management [User management]
Configure the settings relating to maintenance [Maintenance]
Manage the hard disk drives [HDD management]
Configure the settings relating to the extra functions [Extra function]
· Lists of the setting items
· Monitor live images
Operate the camera
· Event function
· Record images
· Play recorded images
· Useful functions
Copy recorded images
Play back copied images with this recorder
Operate the camera
· Event function
· Play recorded images
· Copy and download
Copy recorded images
Download
Play back the copied/downloaded images on a PC
· Setup
3
Page 4

Introduction
Standard accessories
CD-ROM*1 .................................................................................................1 pc.
Mouse ........................................................................................................1 pc.
Installation Guide (this book) ......................................................................1 pc.
Quick Reference Guide ...............................................................................1 pc.
Warranty (provided with WJ-NX400K) .........................................................1 pc.
Activation Key Card ....................................................................................1 pc.
Terminal Plug (12 pin) .................................................................................2 pcs.
Terminal Plug (16 pin) .................................................................................2 pcs.
Cable Clamp (for fixing cable connected to Terminal Plug) ..........................1 pc.
Dust caps for the front USBs*2 ...................................................................2 pcs.
Power cord (WJ-NX400K) ..........................................................................1 pc.
Power cord (WJ-NX400K/G) .......................................................................2 pcs.
Key .............................................................................................................2 pcs.
Label*3 .......................................................................................................1 pc.
Rack mounting bracket ..............................................................................2 pcs.
Rack mounting bracket fixing screw ...........................................................6 pcs.
Rack handle ...............................................................................................2 pcs.
Screws for the rack handle .........................................................................4 pcs.
Washer .......................................................................................................4 pcs.
HDD canister ..............................................................................................9 pcs.
HDD fixing screw ........................................................................................54 pcs.
Power cord clamp ......................................................................................1 pc.
*1 The CD-ROM contains the operating instructions (PDFs). Make sure to read them when installing or setting the recorder.
*2 Put the dust caps for the front USBs on the front copy port and mouse connection port to prevent dust brought by fan's
intake while you are not using a mouse or an external storage device.
*3 This label is the same one found on the surface of this product. Keep it in view when installing this product in the rack.
About the user manuals
There are 4 manuals provided for the WJ-NX400K, WJ-NX400K/G as follows.
Installation Guide (this book): Contains procedures how to install/connect this product, and descriptions of easy
configurations.
Important Information (PDF): Contains preface, precautions, and major operating controls and their functions and
specifications.
Operating Instructions (PDF): Contains descriptions of how to operate this product with a PC.
Quick Reference Guide: Contains descriptions of how to configure the basic settings and how to use the
major functions.
®
Adobe
When Adobe
"NX400" shown in the instructions and illustrations used in these operating instructions indicate the WJ-NX400K, WJ-NX400K/G.
The screens used in these operating instructions show the case of NTSC model.
Refer to "readme.txt" on the provided CD-ROM for further information about the optional dedicated software, compatible network
cameras (hereinafter, cameras) and their versions.
Refer to the Panasonic support website (http://security.panasonic.com/support) for latest information about the compatible cameras and functions to be added or changed by firmware upgrade.
The external appearance in the document may differ from the actual product within no influence range on operation due to
improvement of the product.
Reader® is required to read the PDF files (the setup instructions and the operating instructions) on the provided CD-ROM.
®
Reader® is not installed on the PC, download the latest Adobe® Reader® from the Adobe web site and install it.
4
Page 5

Introduction (continued)
About HDD Unit
To install a hard disk drive in the recorder, it is necessary to assemble an HDD unit (encase the hard disk drive in the HDD canister). The HDD unit is designed to easily install/remove the hard disk drive in/from the recorder. Contact your dealer about purchasing, installing, and replacing the hard disk drives.
About Additional Camera Kit (option)
Number of cameras to be used in the system (64 cameras in basic system) can be increased to 96 and 128 (maximum) by
purchasing the Additional Camera Kit (WJ-NXE40, WJ-NXE40W: option). Refer to following table regarding camera numbers.
Additional Camera Kit
WJ-NXE40, WJ-NXE40W
(license for 32 cameras)
Important:
• The following functions are not available when registering the additional camera kit license.
∙ Display of the camera image on the main and the sub monitors connected to the recorder
* Camera images will be displayed on the web browser of the personal computer (hereinafter, PC), but not on the main or
sub monitor.
∙ Display, search, playback and copy of the recorded image on the main monitor connected to the recorder
∙ Sub-stream recording
∙ Re-encoding transmission
∙ A part of setup menu operation
* The main monitor displays not a camera image but a special menu. The sub monitors turn black.
NX400 only
(No additional license)
up to 64 cameras up to 96 cameras up to 128 cameras
one Additional Camera Kit
(one additional license)
two Additional Camera Kit
(two additional licenses)
About Secure Communication Kit (option)
Registering a license of a secure communication kit (option) to the recorder enables secure communication with cameras. Each
secure communication kit differs in the number of cameras that can be registered as shown in the table below. Use several
licenses as necessary.
WJ-NXS01, WJ-NXS01W WJ-NXS04, WJ-NXS04W WJ-NXS16, WJ-NXS16W WJ-NXS32, WJ-NXS32W
1 camera 4 cameras 16 cameras 32 cameras
Precautions for installation
This product is designed to be used indoors.
Panasonic assumes no responsibility for injuries or
property damage resulting from failures arising out of
improper installation or operation inconsistent with
this documentation.
Do not place this product in the following places:
• Locations exposed to direct sunlight
• Locations subject to having strong vibration or impact
• Locations near magnetic field sources such as a television or speakers
• Locations near the devices that emit large sound and
generate vibration by sound pressure
5
Page 6

Introduction (continued)
• Locations where condensation forms easily, where temperature changes greatly or where humidity level is high
• Locations subject to steam and oil smoke such as a
kitchen
• Locations which are not level
• Locations subject to dust
• Locations where it may get wet from rain or water splash
Do not install this product in locations where the
product or the cables can be destroyed or damaged
by persons with malicious intent.
Place this product horizontally on a level surface.
Do not place this product in an upright position. When
stacking multiple recorders, clear a space of more than 5 cm
{2 inches} from both sides, the top, the bottom and the rear
of the recorders.
More than
5 cm {2 inches}
More than
5 cm {2 inches}
More than
5 cm {2 inches}
Heat dissipation
To prevent this product from overheating, heed the following. Failure to observe this may cause fire or trouble.
• Do not block the cooling fan outlet or the ventilation holes
with a wall, rack, cloth, etc. Maintain the product periodically to prevent dust from blocking ventilation holes.
• The lifetime of the cooling fan is limited by use. It is recommended to replace them after around 30000 hours of
operation. Contact your dealer for replacement of the
cooling fans.
• Clear a space of more than 5 cm {2 inches} from both
sides, the top, and the rear of the product. Do not block
the ventilation holes on the front side since this product
is designed to cool the hard disk drives by drawing in air
from the front.
Grounding
Confirm that the wire is connected from the SIGNAL GND
terminal to earth ground.
A grounding connection must be made before connecting
the power plug or this product to the main power supply.
When disconnecting the grounding wire, make sure that the
power plug of this product is disconnected from the main
power supply.
For BNC cable connection
Use only the recommended plug below when connecting the
BNC plug to the connectors on the rear panel of this product.
Applicable plug: MIL-C39012C, MIL-C39012/16F or BS
CECC2212: 1981
* Suffixes attached to the standards may be updated.
BNC cable (locally procured)
Plug (locally procured)
Tip dimensions inside the recommended BNC plug
ø1.32 mm - ø1.37 mm
{ø0.052 inches - ø0.054 inches}
ø0.13 mm - ø0.69 mm
{ø0.005 inches - ø0.027 inches}
Important:
• A compatible plug shall be used. Failure to observe this
may cause trouble such as poor contact. At worst, the
connector of this product may be damaged.
Avoid placing receptacles that contain liquids such as
water near this product.
If liquid spills onto this product, it may cause fire or an electric shock.
Avoid placing this product near noise sources
If the cables are placed near noise sources such as fluorescent lamps, noises may be produced. In this case, rewire
avoiding the noise sources, or move the product to a place
far from the source.
6
Shielded (STP) LAN cables must be used with this unit
to ensure compliance with EMC standards.
About sulfuration of rubber products
Do not leave rubber products containing sulfur (packing and
rubber feet) close to the recorder or in the same storing box.
Sulfur constituent from the rubber products may cause sulfuration corrosion on electrical parts or terminals and defects
in the recorder.
Page 7
Introduction (continued)
Basic operations
This section explains operation of a mouse and the soft keyboard, and setting screen only.
The recorder can be operated using the mouse (provided) connected to the mouse connection port either on the front or the rear
side of the recorder.
It is also possible to perform settings and some operations of the recorder from the web browser. Refer to the Operating
Instructions (PDF) for descriptions of how to operate from the web browser and the configurable settings using the web browser.
Connection of a mouse
Connect the provided mouse to the mouse connection port
on the rear side of the recorder.
The mouse cursor will be displayed on the main monitor.
Mouse operation
Left-click the desired buttons and tabs on the screen.
(Hereinafter, "Left-click..." will be described as "Click..." in
this document.)
When the entry field has the [▲] and [▼] buttons or the [▼]
button, the setting value can be changed using the mouse
wheel.
When no operation is made for 10 seconds or more, the
mouse cursor will be hidden. The mouse cursor will be displayed again when the mouse is moved.
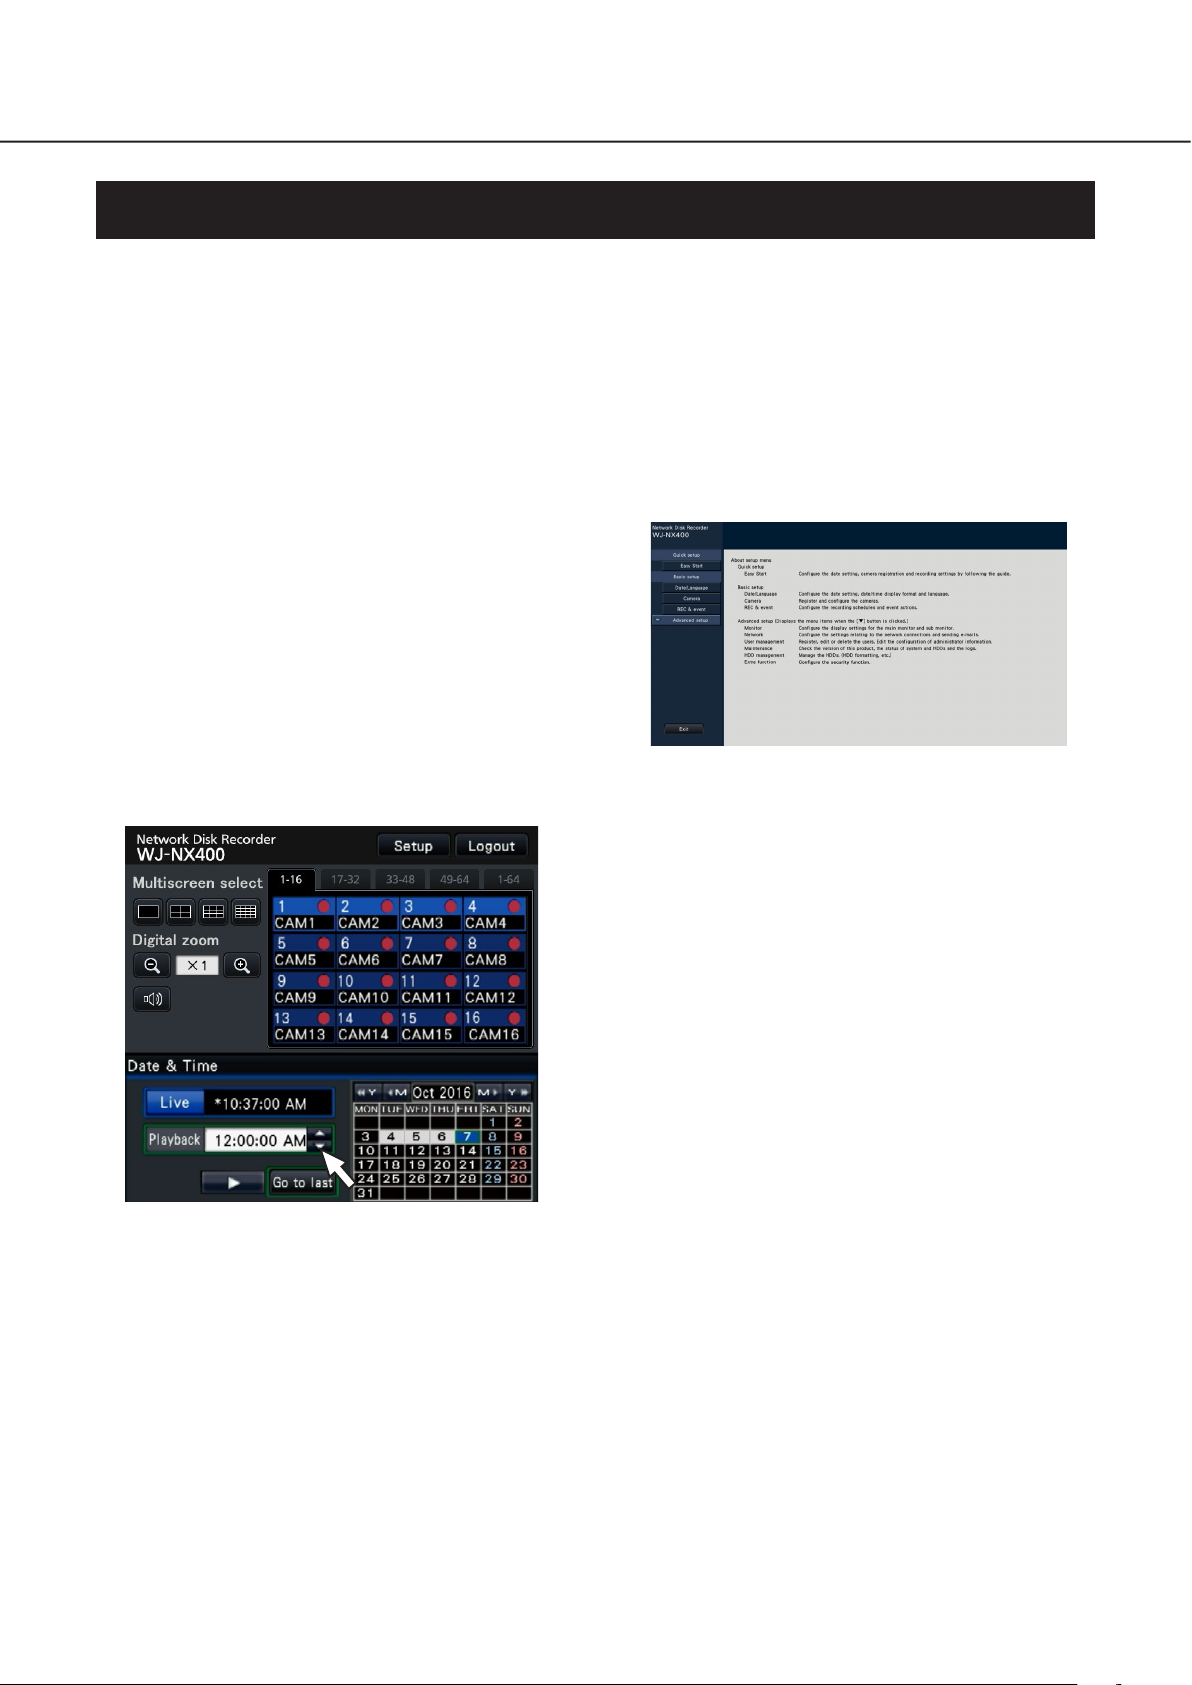
Display method of the setting screen
Click the [Setup] button.
The top screen of the setup menu will be displayed.
7
Page 8
Introduction (continued)
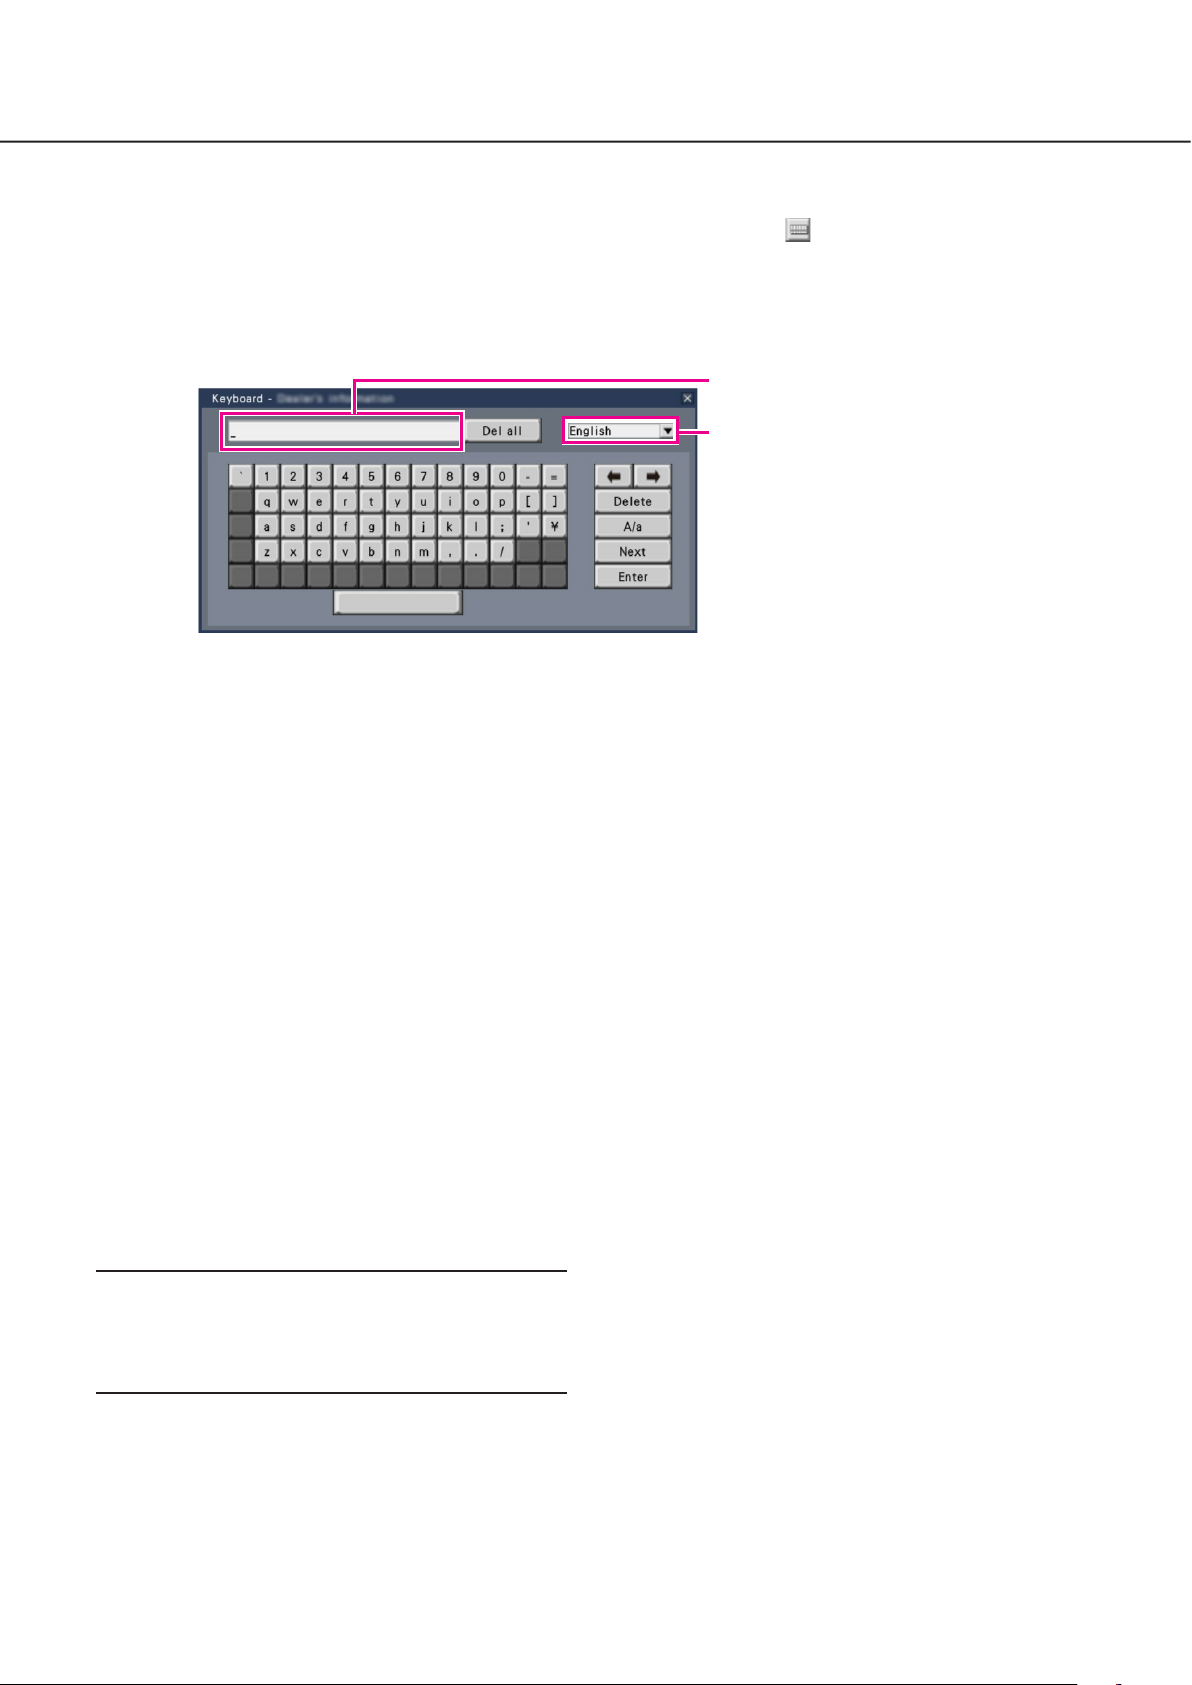
About the operation of on-screen keyboard
Use the on-screen keyboard to enter characters for the setting items. When clicking the [ ] icon beside the entry field, the onscreen keyboard will be displayed, and it will become possible to enter characters by clicking the character keys on the keyboard.
On-screen keyboard screen
Entry field
Language selection pull-down menu
Click the [▼] button to select the language
for character entry.
[Del all] button
Deletes all the characters in the entry field.
[]/[] button
Move the cursor in the entry field to either direction.
[Delete] button
Deletes a character pointed by the cursor in the entry field.
[A/a] button
This button changes the characters to be entered between
capital letters and small letters.
[Next] button
Changes the keys to be displayed for character entry.
The displayed keys are changed as follows:
Keys for the language selected by the language selec-
tion pull-down menu Combination characters
Special characters
[Enter] button
Determines the entered characters and closes the on-screen
keyboard.
Note:
• Basic operations are also applied to the "Login" window
and registration window for license.
• Click the [×] button to close the window without determining the entered characters.
8
Page 9
Introduction (continued)
Setup menu
Configuration of each setting item in the setup menu should be completed in advance to use this recorder.
The setup menu has the following levels for the setting items. On "Easy Start", the minimum settings required to operate the
recorder will be performed, but other settings will remain default. On the [Basic setup] or [Advanced setup] page, the settings can
be customized in accordance with a variety of operational modes.
The following is the example of the setup menu that describes the features and operations.
The setup menu will be displayed when clicking the [Setup] button (☞ page 7) at the upper right corner of the operational screen
on the main monitor.
The buttons of the setup pages will be displayed on the left column of the setup menu.
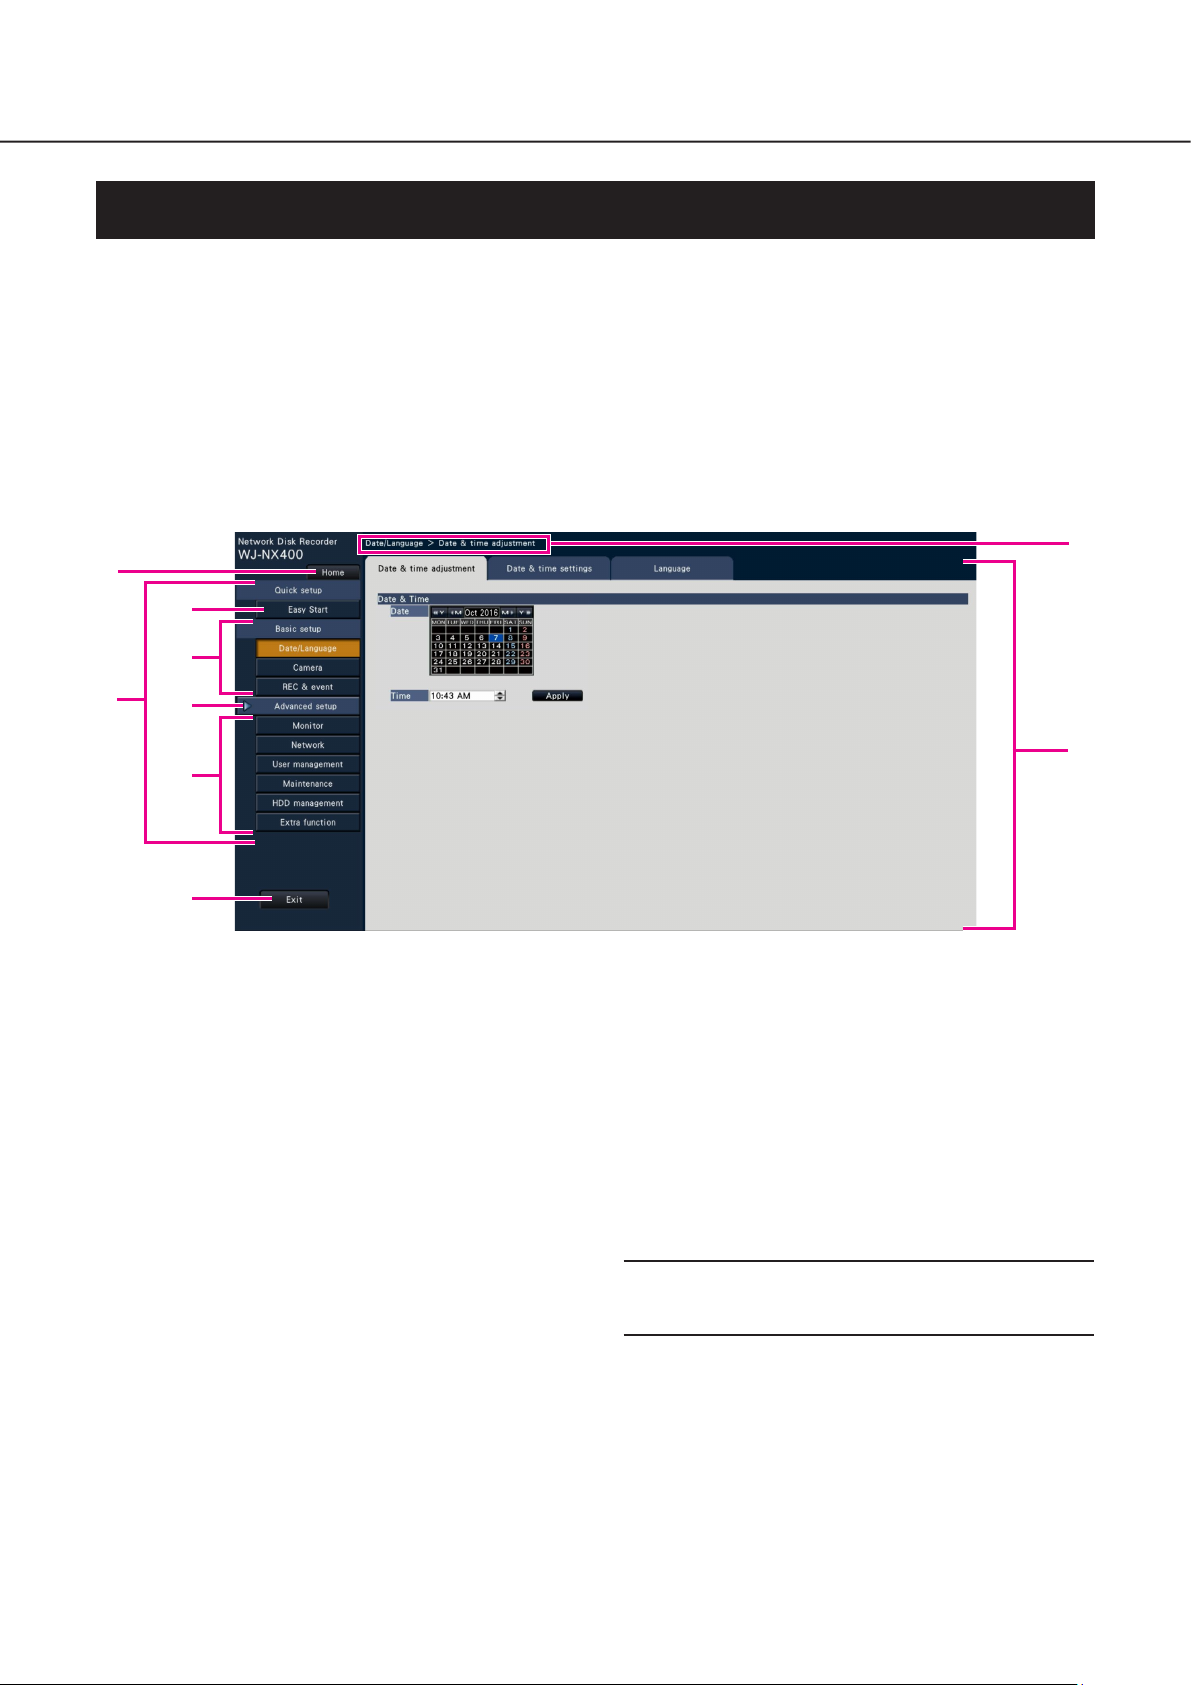
➀ [Home] button
It is possible to return to the top screen (☞ page 7) of
the setup menu from any setup page.
➁ Setup menu panel
Displays buttons of the setup pages.
➂ [Easy Start] button
It is possible to configure the minimum settings required
to operate the recorder, such as date & time and camera registration.
➃ [Basic setup] – Setup page buttons
Each "Basic setup" page will be displayed.
➄ [Advanced setup] button
The buttons to open the corresponding setup pages of
the "Advanced setup" menu will be displayed. When
clicking this button again, the buttons will be hidden.
➇ Setup page
Displays each setup page. If the current setup page is
composed of two or more tabs, it is possible to change
the page display by clicking the tabs.
➈ [Exit] button
Applies the settings to the recorder and closes the setup
menu to return to the operational screen (☞ page 11).
Except for some cases, the descriptions of this document
follow the hierarchical display and setup pages.
Important:
• If the settings are applied, all login users will be forcibly
logged out.
➅ [Advanced setup] – Setup page buttons
Each "Advanced setup" page will be displayed.
➆ Hierarchical display
The name of the current setup page will be displayed in
the hierarchy. The tab name will also be included.
9
Page 10
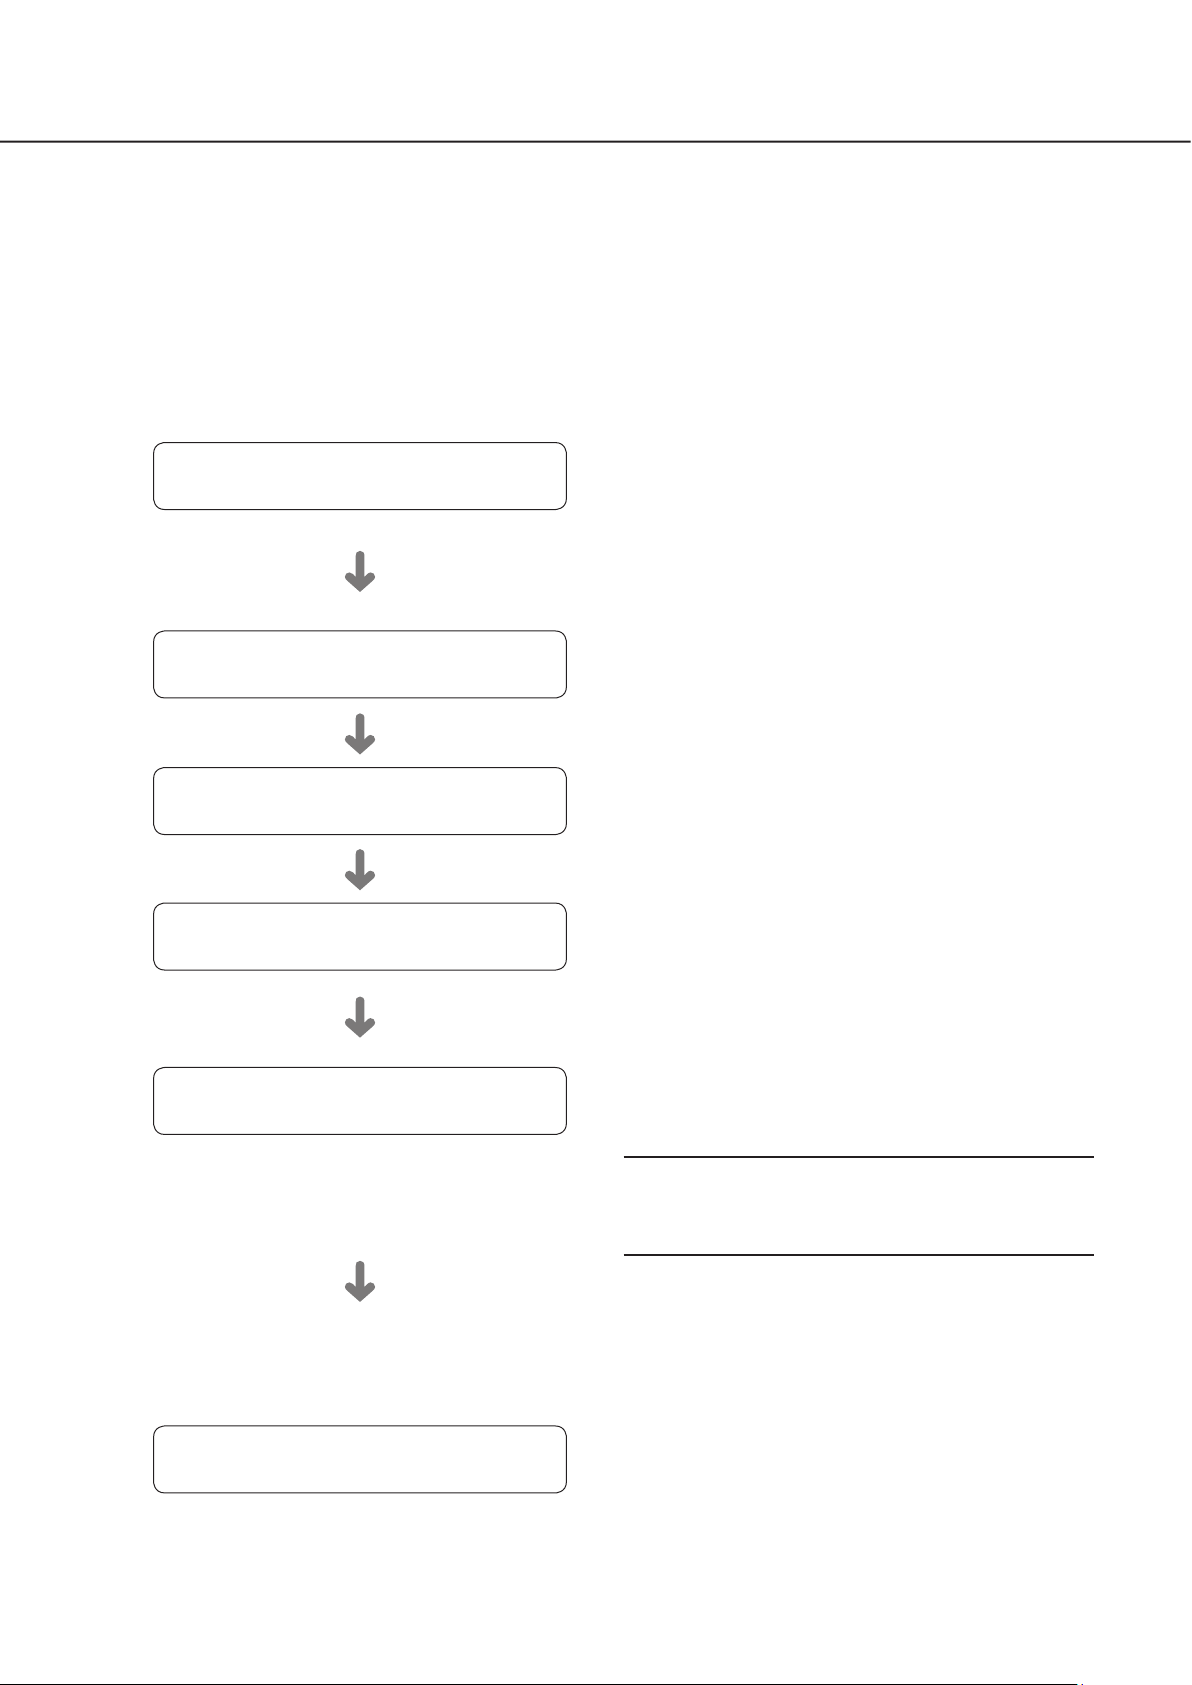
Operations flow
• Professional knowledge on and experience in network and the HDD are required for
the settings and changes of the operation.
• The main monitor is required for the settings.
* The settings can be done through a web browser on the PC (Refer to the Operating
Instructions (PDF)).
• The PC is required for reading the Important Information, the Operating Instructions
(PDF) and camera settings.
1
2
3
4
Obtain the license (Registration Key)
☞ Page 12 and Activation Key Card
Rack mounting
☞ Page 13
Connections
☞ Page 15
Turn on the devices
☞ Page 27
Obtain the "Registration Key" of the recorder by following the
instructions on the provided Activation Key Card. To
increase the number of connected cameras or use the
secure function, get the registration key of the additional
license according to the appropriate Additional Kit (option).
The obtained "Registration Key" will be used in Step 5.
Install the recorder in the rack. (☞ Page 13) Go to step 3
when not installing it in the rack.
Connect the recorder to each device.
Turn on the power to launch in the following order.
Turn on the power of the camera and the monitor.
Turn on the power of the extension unit if connected.
Turn on the power of the recorder.
10
Register the license (Registration Key)
5
6
☞ Page 29
Assemble HDD unit
☞ Page 31
Register the Registration Key of the recorder. If necessary,
register the "Registration Key" for the Additional Camera Kit
or the Secure Communication Kit.
Important:
• Be sure to register the "Registration Key" of the recorder.
If the "Registration key" of the recorder is not registered,
the Additional Kit cannot be registered.
After registration, click [Restart] button on the license
registration screen to reboot the recorder and activate the
license.
To install a hard disk drive in the recorder, it is necessary to
assemble an HDD unit (encase the hard disk drive in the
HDD canister).
Page 11

Operations flow (continued)
7
8
Installation of HDD unit
☞ Page 32
Configure the minimum settings
[Easy Start]
☞ Page 35
Setup
☞ Operating Instructions (PDF)
Start operations
Remove the "HDD unit holding bracket" of the recorder and
take out the HDD unit.
The removed "HDD unit holding bracket" is necessary when
transporting the recorder. Keep it in an appropriate place.
Register the date & time and cameras on "Easy Start".
When it is not necessary to change other default settings, it
is possible to start operations.
If necessary, perform the detailed settings for each function.
When the camera image is displayed on the main monitor or
the web browser on the PC and can be recorded or played,
the recorder is ready for operation.
Example of an operational screen
11
Page 12

1
Obtain the license (Registration Key)
Keep the "Activation Key Card" provided with the recorder nearby.
Obtain the "Registration Key" of the recorder by following the instructions on the provided Activation Key Card.
To increase number of connected cameras, get the registration key number of the additional camera license according to the
Additional Camera Kit (option).
To use the secure function, get the registration key number of the additional secure license according to the Secure
Communication Kit (option).
* Each additional kit is the "Activation Key Card" with "the recorder ID number, activation ID number" for the applicable additional
license.
Note:
• A PC or a mobile phone accessible to the Internet is necessary to acquire the registration key number.
12
Page 13

2
Rack mounting
Install the recorder in an EIA standard 19-inch rack (Depth:
550 mm or more).
Note:
• Use four M5 × 12 screws (locally procured) to install the
recorder in a rack.
• The illustration on this page is schematic. Details of the
shape are omitted.
Installation procedure
Step 1
Remove the five rubber feet from the bottom of the
recorder using a flathead screwdriver.
Use a screwdriver to remove the screws holding the rubber feet.
Remove rubber feet
Step 2
Attach the rack handles (provided) to the rack mounting brackets (provided).
Fix them using the screws (provided) (x4) and the washers
(provided) (x4) for the rack handle.
Tightening torque: 2.0 N·m ~ 2.4 N·m (1.48 lbf·ft ~ 1.78 lbf·ft)
Screws for the rack handle (provided)
Step 3
Place the provided rack mounting brackets (provided)
on both sides of the recorder and fix them with the
rack mounting bracket fixing screw (provided) (x6).
Secure them using the rack mounting bracket fixing screw
(provided) (x6).
Tightening torque: 0.88 N·m ~ 1.08 N·m (0.65 lbf·ft ~ 0.80 lbf·ft)
Rack mounting bracket fixing screws (provided)
Rack handle (provided)
Rack mounting brackets (provided)
Rack handle (provided)
Step 4
Install the recorder in the rack by using four rack
mounting screws.
Secure using the rack mounting screws (x4).
Tightening torque: 2.0 N·m ~ 2.4 N·m (1.48 lbf·ft ~ 1.78 lbf·ft)
Washer (provided)
Rack mounting bracket (provided)
Washer (provided)
Rack handle (provided)
Note:
• The rack mounting bracket (provided) has two types of
fitting holes to adjust the protrusion of the front rack. Use
either of them depending on the installation conditions.
Standard fitting holes
Fitting holes for the front position (about 15 mm {19/32 inches})
Rack mounting screws (M5 x 12, locally procured)
Important:
• When installing the recorder in the rack, make a space
of 1U (44 mm {1-23/32 inches}) above and below the
recorder for ventilation.
• Keep the temperature in the rack below +45 °C {113 °F}.
• It is recommended to install cooling fans or equivalents to
keep the temperature in the rack below +30 °C {86 °F}.
• Do not block the ventilation holes or slots to prevent the
recorder from overheating.
• The recorder weighs over 10 kg {22.1 lbs}. Be careful
not to drop the recorder when installing it into a rack.
Dropping may cause damage, deformation of the
recorder, or injury.
13
Page 14

2
Rack mounting (continued)
Position in the Rack
This is an example where the recorder and the extension unit (WJ-HXE400, max 5 units) are installed in the rack.
Connect the recorder and the extension unit using the connection cable (1.5 m {4 feet 11 inches}) provided with the extension unit.
(☞ Page 19)
Other unit, Rack upper side
Require a space of 1 unit
Connection cable
NX400
Extension unit
(Unit number 1)
(provided with extension unit)
Require a space of 1 unit
Require a space of 1 unit
Extension unit
(Unit number 2)
Extension unit
(Unit number 3)
Extension unit
(Unit number 4)
Extension unit
(Unit number 5)
Require a space of 1 unit
Require a space of 1 unit
Require a space of 1 unit
Require a space of 1 unit
Other unit, Rack bottom side
Note:
• When installing the recorder in the rack, leave a space of 1U (44 mm {1-23/32 inches}) above and below the recorder for ventilation.
• The unit number of the connected extension unit is the same as the external storage connector number of the recorder.
14
Page 15

3
Connections
Connection of cameras and a mouse
Up to 128 cameras can be connected to the recorder via a switching hub.
Connect to the Camera/PC port of the recorder.
Use a Ethernet cable (straight) to connect the recorder and the switching hub.
Connect the provided mouse to the mouse connection port on the front or rear side of the recorder.
Recorder
Ethernet cable (locally procured):
category 5e or better (straight) for
WJ-NX400K, category 7 (straight) for
WJ-NX400K/G
Mouse (provided)
Note:
• Make sure to use the wired network to connect with the recorder even for the cameras equipped with the wireless LAN function.
PoE hub
Network camera (x 128 max.)
(When 2 licenses are used for the additional camera kit)
15
Page 16

3
Connections (continued)
Connection of monitors
Connect a main monitor (to be used to display live images, recorded images or the setup menu) and a sub monitor (to be used
to display live images only) to the HDMI (video/audio output) connectors using HDMI cables (optional). Connect a sub monitor
(BNC) to the video output connector using a BNC cable (locally procured).
* When outputting audio
Connect a powered
speaker.
Powered speaker
Audio cable
(option)
Recorder
Sub monitor (BNC)
BNC cable (locally procured)
Main monitor (HDMI)
HDMI cable (option)
Sub monitor (HDMI)
HDMI cable
(option)
Important:
• If the additional camera license is not registered, the main or sub monitor displays image of a channel (from 1 to 64 channel).
• When the additional camera license is registered, the image will be displayed only on the web browser of the PC. The main
and sub monitors go black and do not display the image.
Note:
• Use "High Speed HDMI
• To maintain the stable performance without deteriorating the image quality, use an HDMI cable whose length is 5 m {16 feet
5 inches} or less.
• Audio will be output from the monitor when the monitor is connected with an HDMI cable.
• Same audio output from the main monitor will be heard from the speaker connected with an audio cable.
• No audio will be heard from the sub monitor (HDMI) connected with an HDMI cable.
®
Cable". When the main monitor is used in 4K/25P(30P), use a 10.2 Gbps compatible HDMI cable.
16
Page 17

3
Connections (continued)
Connection of a PC
Connect this recorder and a PC via a switching hub.
When PC and the camera are in the same network
When the PC and the camera are configured on the same network, connect the PC to the Camera/PC port.
Recorder
IP address: 192.168.0.x
IP address: 192.168.0.250
Subnet mask: 255.255.255.0
Default gateway: 192.168.0.1
Ethernet cable (locally procured):
category 5e or better (straight) for
WJ-NX400K, category 7 (straight) for
WJ-NX400K/G
(except 0, 1, 250 and 255)
Subnet mask: 255.255.255.0
Default gateway: 192.168.0.1
PC
PoE hub
IP address: 192.168.0.1
Subnet mask: 255.255.255.0
Network camera (x 128 max.)
(When 2 licenses are used for the additional camera kit)
Network
17
Page 18

3
Connections (continued)
When PC and the camera are in different networks
When the PC and the camera are configured on different networks, connect the PC to the PC port.
Recorder
IP address: 192.168.1.x
(except 0, 1, 250 and 255)
Subnet mask: 255.255.255.0
Default gateway: 192.168.1.1
[Camera/PC port]
IP address: 192.168.0.250
Subnet mask: 255.255.255.0
Default gateway: 192.168.1.1
PC
[PC port]
IP address: 192.168.1.250
Subnet mask: 255.255.255.0
Ethernet cable (locally procured):
category 5e or better (straight) for
WJ-NX400K, category 7 (straight) for
WJ-NX400K/G
Ethernet cable (locally procured):
category 5e or better (straight) for
WJ-NX400K, category 7 (straight) for
WJ-NX400K/G
Network
Switching hub
PoE hub
Network camera (x 128 max.)
(When 2 licenses are used for the additional camera kit)
Note:
• Cameras shall be connected to the camera/PC port. If the camera is connected to the PC port, the camera will not be
detected automatically.
18
Page 19

3
Connections (continued)
Connection of extension units
Up to 5 extension units (WJ-HXE400: optional) can be connected with a single network disk recorder. Connect the recorder and
the extension unit using the connection cable provided with the extension unit. Connect the extension units as shown in the illustration below. Refer also to the operating instructions of the extension unit.
Fix the connection cable
1
23
Attach a cable clamp to each connection
cable.
45
Network disk recorder
Fix the connection cable
Attach a cable clamp to each connection
cable.
Connection cable
(provided with extension unit)
Extension unit (unit number 1)
Extension unit (unit number 2)
Extension unit (unit number 3)
Extension unit (unit number 4)
Extension unit (unit number 5)
Important:
• Use only the dedicated connection cable provided with the extension unit when connecting the recorder and the extension
unit.
• Fix the connection cable firmly using the cable clamp provided with the extension unit. When the cable is not connected
firmly or when it is disconnected, the system may become unstable or recording may fail.
Refer to the operating instructions of the extension unit for details on how to fit the cable clamp.
• Do not wind the cable in a coil.
19
Page 20

3
Connections (continued)
How to use the terminals of the ALARM/CONTROL
The ALARM/CONTROL connectors on the back is used when connecting an external device such as a sensor that outputs alarm
signals or when installing an external alarm device such as a buzzer or a lamp outside.
Insert the unarmored cable into the provided terminal plug (12 pin) and then mount it on the ALARM/CONTROL connector on the
back.
* The cable should be a single or twisted wire with AWG 26~16 and an exposed length of 9 mm {11/32 inches}.
ALARM/CONTROL
connector on the back
Pin array
Pin No. Signal Operation Remarks
C1 Alarm output 1
C2 Alarm output 2
C3 Alarm output 3
C4 Alarm output 4
C5 Time adjustment I/O According to the signal input from the other device,
C6
C7
C8
C9
C10 +5 V output +5 V output +5 V±0.5 V, 200 mA max.
C11 Signal ground
C12 Signal ground
D1 Alarm reset input Canceling the alarm display Non-voltage make contact input
D2 Emergency recording
D3
D4
D5 Network error output A signal will be output upon detection of a discon-
D6 HDD error output Signal output upon detection of an HDD error
D7 Camera error output Signal output upon detection of a camera error
D8
D9 Recorder error output Signal output upon detection of a recorder error
D10 Outage processing
D11 Signal ground
D12 Signal ground
Preliminary Input/Output 1
Preliminary Input/Output 2
Preliminary Input/Output 3
Preliminary Input/Output 4
input
Outage detection input
External recording
mode switching input
Recording error output
end output
D1 C1
D12
ALARM/CONTROL
C12
Alarm signal will be supplied at an event occurrence
Alarm signal will be supplied at an event occurrence
Alarm signal will be supplied at an event occurrence
Alarm signal will be supplied at an event occurrence
the time of the recorder will be adjusted to the hour
based on the input time
In addition, the signal is output at the setting time
of the recorder and the time of other equipment is
adjusted to the time of the recorder
These are for future input and output, and cannot
be used
Starting emergency recording signal input
Start of outage processing according to the signal
input
Changeover to the external recording mode by
the signal input
nected Ethernet link or IP expiration of the DHCP
Signal output upon detection of a recording error
Signal output upon completion of outage processing
Cable connections
Loosen the screw of the desired
terminal on the terminal plug.
Tight the screw when the cable is
fully inserted into the terminal hole.
Mount the terminal plug with the
cable connected on the ALARM/
CONTROL connector socket on
the back.
Terminal plug (12 pin)
Open collector output
24 V DC max., –200 mA max.
Input:
Non-voltage make contact input
Output:
Open collector output
24 V DC max., –200 mA max.
Open collector output
24 V DC max., –200 mA max.
High (ON) 5 V DC
Low (OFF) 0 V DC
C1 (D1) side
* Refer to the "About the error logs and the network logs" (☞ Operating Instructions (PDF)) for further information about each
error output.
20
Page 21

3
Connections (continued)
Connection example for emergency recording
When the external switch is turned on, emergency recording will start.
Recording time and recording rate for emergency recording differ according to the settings of "Emergency rec." on the setup
menu. (Refer to the Operating Instructions.)
C1
(Emergency recording input)
D2
External switch
(Signal ground)
D11
C12
Connection example for external recording switching
When the external switch is turned on, the recording program will be switched and recording will start.
The recording program can be set by selecting "Ext." for "Time table" of "Schedule" on the setup menu. (Refer to the Operating
Instructions (PDF) for further information.)
C1
External switch
(External recording mode switching input)
(Signal ground)
D4
D11
C12
Connection example 1 for the auto adjustment time function
When "Auto time adjustment" found in "Date & time settings" under "Date/Language" on the setup menu is set to
"Master".
"Time adjustment output" becomes available and the clock of this recorder will be applied to other devices.
The time adjust output signal will be supplied from C5 terminal to other recorders at the time set for "Activation time" of "Time &
date" under "Basic" on the setup menu.
D1
D12
(Time adjustment I/O)
C5
(Signal ground)
C11
Terminal of the other device
Signal ground
Sensor input
Alarm input
Alarm reset input
Series recording input
Time adjustment input
Signal ground
Alarm output
Alarm reset output
Front panel
LED monitor
output
Alarm recording
During recording
Disk
Buzzer output
System error output
Temperature warning output
Time adjustment output
Series recording output
21
Page 22

3
Connections (continued)
Connection example 2 for the auto adjustment time function
When "Auto time adjustment" found in "Date & time settings" under "Date/Language" on the setup menu is set to
"Slave".
When a signal output from the other device is supplied to the time adjustment input (C5 terminal) and the time difference between
the recorder and the other device is 29 minutes or less, the clock of the recorder will be set to the time set for the other device.
When a signal output is supplied to the recorder 29 minutes before/after the hour, the clock of the recorder will be set to the hour
(nn:00:00). ("nn" is the hour.)
Example:
• Signal is supplied at 2:50:00 pm Set at 3:00:00 pm
• Signal input supplied at 3:28:45 pm Set at 3:00:00 pm
• Signal is supplied at 3:29:30 pm Time will not be adjusted.
Terminal of the other device
Front panel
LED monitor
output
D1
C1
(Time adjustment I/O)
C5
(Signal ground)
C11
Signal ground
Sensor input
Alarm input
Alarm reset input
Series recording input
Time adjustment input
Signal ground
Alarm output
Alarm reset output
Alarm recording
During recording
Disk
Buzzer output
System error output
Temperature warning output
Time adjustment output
Series recording output
D12
Important:
• When "Slave" is selected, the clock will not be adjusted during event recording or emergency recording.
Connection example of control output
When an alarm device such as a buzzer or a lamp is connected, the signal output from terminal D5~9 can be used to notify the
status by sounding a buzzer or lighting a lamp.
The following example is of a connection with the HDD error output (D6 terminal).
D1 C1
(HDD error output)
D6
22
Alarming device
Relays, etc.*
* Attached when necessary
(Signal ground)
D11
C12
Page 23

3
Connections (continued)
Connection with an uninterruptible power system (UPS)
This is an example of a connection with the uninterruptible power system (UPS) to be installed to protect from a power outage.
When a signal is supplied to the outage detection input terminals from the uninterruptible power system (UPS), internal processing (stops recording safely) will start to shut off the power supply for the recorder.
After completion of the internal processing, the signal will be output from the outage processing end output to the UPS and the
recorder will be ready to be shut off.
(Detection)
(Shutdown)
(Signal ground)
* Refer to the instruction manual for
the UPS in use.
Uninterruptible
Power System
(UPS)
To electric outlet
Important:
• Be sure to use an UPS that provides a sine wave output.
Do not use an UPS that provides a square wave. It may damage the recorder.
(Outage processing end output)
(Outage detection input)
(Signal ground)
C1D1
D3
D10
C12D12
23
Page 24

3
Connections (continued)
How to use the terminals of the ALARM IN
ALARM IN terminals on the back are used to connect the alarm devices such as sensors, door switches, etc.
Insert the unarmored cable into the provided terminal plug (16 pin) and then mount it on the ALARM IN terminal on the back.
* The cable should be a single or twisted wire with AWG 26~16 and an exposed length of 9 mm {11/32 inches}.
* Tie cables of the ALARM/CONTROL connectors and of the ALARM IN connectors, and fix them with the cable clamp (provid-
ed). Refer to "Major Operating Controls and Their Functions"of the Important Information for further information.
ALARM IN terminal on
the back
Pin array
Pin No. Signal Operation Remarks
A1 Alarm input 1
A2 Alarm input 2
A3 Alarm input 3
A4 Alarm input 4
A5 Alarm input 5
A6 Alarm input 6
A7 Alarm input 7
A8 Alarm input 8
A9 Alarm input 9
A10 Alarm input 10
A11 Alarm input 11
A12 Alarm input 12
A13 Alarm input 13
A14 Alarm input 14
A15 Alarm input 15
A16 Alarm input 16
B1 Alarm input 17
B2 Alarm input 18
B3 Alarm input 19
B4 Alarm input 20
B5 Alarm input 21
B6 Alarm input 22
B7 Alarm input 23
B8 Alarm input 24
B9 Alarm input 25
B10 Alarm input 26
B11 Alarm input 28
B12 Alarm input 28
B13 Alarm input 29
B14 Alarm input 30
B15 Alarm input 31
B16 Alarm input 32
B1 A1
B16
ALARM IN
A16
Event action will be performed according to the
settings
Connections
Loosen the screw of the desired
terminal on the terminal plug.
Tight the screw when the cable is
fully inserted into the terminal hole.
Mount the terminal plug with the
cable connected on the alarm
input terminal socket on the back.
Terminal plug (16 pin)
Non-voltage make contact input
A1 (B1) side
24
Page 25

3
Connections (continued)
Alarm connection example
When a signal output from the other device is supplied to the Alarm input 1 to 32 terminals (pin nos. A1~A16, B1~B16), recording or an alarm action will be performed in accordance with the settings. When an alarm device such as a buzzer, a lamp, etc., is
installed outside, connect them to the Alarm output terminal (pin no. C2).
Alarming device
Sensor
Relays, etc.*
* Attached when necessary
(Alarm input 17)
(Signal ground)
(Alarm input 1)
(Signal ground)
Door security
switch
D1
D11
D12
ALARM/CONTROL connector
B1
B16
ALARM IN connector
C1
C2
C12
A1
A16
(Alarm output 2)
25
Page 26

3
Connections (continued)
Time and polarities of the ALARM/CONTROL connector
Terminal name Active Time Remarks
Alarm input 100 ms or more N.O.: L active
N.O.: H active
Alarm reset input 100 ms or more L active
Emergency recording input 100 ms or more L active
Outage detection input 5 s or more L active
External recording mode
switching input
Network error output At an error occurrence until the period selected for "Error out-
HDD error output At an error occurrence until the period selected for "Error out-
Camera error output At an error occurrence until the period selected for "Error out-
Recording error output At an error occurrence until the period selected for "Error out-
Recorder error output At an error occurrence until the period selected for "Error out-
Outage processing end output
Alarm output The set time on the setup menu L active
Time adjustment I/O Input: 100 ms or more
100 ms or more L active
L active
put duration" has passed*
L active
put duration" has passed*
L active
put duration" has passed* or the camera reset
L active
put duration" has passed*
L active
put duration" has passed*
10 s or more H active
Input/Output: L active
Output: The set time on the setup menu
* The error output duration is configured on the "Advanced setup" menu - the "Maintenance" page - "System setup" of the setup
menu. (☞ Operating Instructions (PDF))
Note:
• During "L active (Low active)", the logic will be implemented when the voltage level of signal is low.
• During "H active (High active)", the logic will be implemented when the voltage level of signal is high.
26
Page 27

4
⋈
{5-7/8 to 7-7/8 inches}
Turn on the devices
Turn on the power of the recorder
Turn on the power of the recorder. When using the recorder for the first time, register the license for the recorder. (☞ Page 29)
Important:
• When using extension units, connect all the extension units to the power cords and turn on the power of all the extension
units before turning on the power of the recorder.
Step 1
Connect the provided power cord to the power cord
inlet on the rear panel of the recorder, and insert the
power plug to an outlet whose rating is as follows.
WJ-NX400K: 120 V AC, 60 Hz
WJ-NX400K/G: 220 V - 240 V AC, 50 Hz/60 Hz
The [OPERATE] indicator on the front of the recorder will
light, the system check will start, and the startup window
will be displayed on the main monitor.
Important:
• Never turn off the power of the recorder during startup.
• Insert the power cord fully into the power supply terminal
so that it will not loosen or come out.
• Fix the power cord firmly at 15 cm to 20 cm {5-7/8 to
7-7/8 inches} from the plug with the provided power
cord clamp to prevent the cable from unplugging.
How to use the power cord clamp
Clamp mount
Pass the power cord clamp through the clamp mount.
Make a ring with the power cord clamp as shown in the
illustration to tighten the power cord.
15 cm to 20 cm
Power cord clamp
⋇
⋉
Tighten the power cord at 15 cm to 20 cm {5-7/8 to 7-7/8
inches} from the connector and fix it to the clamp mount.
Cut the unnecessary part of the power cord clamp as
necessary.
27
Page 28

4
Turn on the devices (continued)
Step 2
The administration registration window is displayed on
the main monitor.
Enter an administrator, a password and a password confirmation following the instruction on the display, and click
[Registration].
Important:
• Change the password periodically.
Step 3
If the license for the recorder has not been registered
yet, the message asking you to register the "Registration
Key" will be displayed after the completion of the system
check and the administrator registration.
If the "Registration Key" for the recorder has not been registered yet, register the "Registration Key" by following the
procedures on page 29.
Note:
• If the "Registration Key" for the recorder is once registered, the message asking you to register the
"Registration Key" will not be displayed from the next
time.
Precautions on storing the administrator name
and the password
If you forget the set administrator name and password,
you need to initialize* the recorder. Once the recorder
is initialized, all the settings are deleted. Keep information on the administrator name and the password in a
safe place where nobody can see it except you.
* Contact your dealer for initializing.
(When turn off the power of the recorder)
Follow the procedure below to turn off the power.
Important:
• When using extension units, turn off the power of the recorder before turning off the extension units.
Step 1
During recording, set "Recording mode" on
[Advanced setup] tab under "REC & event" under
[Basic Setup] from Setup menu to "Off" to stop all
recordings. (☞ Operating Instructions (PDF))
Step 2
Press the power button after confirming that
[Recording] indicator is off.
[OPERATE] indicator on the front of the recorder will
go off.
28
Important:
• Remove the plug from the outlet if not operating the recorder for a long period.
Note:
• Be sure to perform the operation to start recording (select "On" for "Recording mode") after turning on the power
of the recorder again.
Page 29

5
Register the license (Registration Key)
When using the recorder for the first time, using the secure function, or increasing the number of the cameras to be connected, it
is necessary to register the recorder license (Registration Key).
Important:
• In the following cases, the recorder must be rebooted by clicking the [Restart] button. The licenses will not be effective until
the recorder is rebooted.
• When the Registration Key of the recorder is registered
• When the license of the additional camera kit is added
• The added cameras shall be registered on "Easy start" (☞ page 35) or on the "Camera registration" tab.
Each setting value is the default. Configure each setting according to your needs.
Step 1
Obtain the "Registration Key" for the recorder by following the instructions on the provided "Activation
Key Card".
To add cameras, get the additional license registration key
number in the Additional Camera Kit (option). To use the
secure function, get the additional license registration key
number in the Secure Communication Kit (option).
Refer to the "Activation Key Card" for further information.
Step 2
Start the recorder. (☞ Page 27)
When the system check is complete, the operational
screen will be displayed on the main monitor.
Step 3
Click the [Setup] button.
The setup menu will be displayed.
Step 4
Click [Advanced setup] - [Maintenance] - the [System
management] tab on the setup menu.
The "System management" page will be displayed.
29
Page 30

5
Register the license (Registration Key) (continued)
Step 5
Click the [Setup >] button of [Registration of license
(This product, camera extension, etc.)].
The registration window will be displayed.
Step 6
Click the [Registration >] button of "Product" "Registration Key".
The "Registration key input" window will be displayed.
Step 7
Enter the "Registration key" for the recorder in the
"Registration key" field using the on-screen keyboard,
and click the [Registration] button.
Step 8
To increase number of connected cameras, enter the
registration key of the additional camera license
obtained in step 1 to the "Registration Key 1-2" fields
under "Additional camera" on the "Registration of
license" page shown in step 5.
To use the secure function, click the [Setup >] button
of [Registration of license (Security)] under the system
management screen shown in Step 4, and then enter
the registration key of the secure communication
license obtained in Step 1 in the "Registration Key
1-128" fields under "Secure communication" on the
"Registration of license" page.
The operations are the same as those of Step 6 and 7.
Note:
• Register the registration key for the recorder first, and
then for the additional camera and secure communication licenses.
Step 9
Click the [Restart] button on the registration window
to register the license.
The recorder will reboot and each license will become
effective.
The "Registration key input" window will return to the
registration window.
Note:
• When an error message is displayed, enter the effective
"Registration Key" again on the entry field.
30
Page 31

6
Assemble HDD unit
To install a hard disk drive in the recorder, it is necessary to
assemble an HDD unit (encase the hard disk drive in the
HDD canister).
The HDD unit is designed to easily install/remove the hard
disk drive in/from the recorder.
Contact your dealer about purchasing, installing, and replacing the hard disk drives.
HDD canister HDD
Anti-static mat
Important:
• Hard disk drives are precision devices. Before installing
the hard disk drives, read the "Hard disk drive" section
of Precautions in important information together with the
following.
• Before touching a hard disk drive, release static
electricity from your body using an anti-static
grounding strap, etc.
Even after releasing static electricity, hold the side of
the hard disk drive when carrying it. To prevent
damage to the hard disk drive from static electricity,
do not touch the circuit board and the connectors of
the hard disk drive.
• Use an anti-static mat and an anti-static grounding
strap when installing/replacing the hard disk drives.
• When installing hard disk drives, use a low-torque
powered screwdriver or a torque screwdriver to
tighten screws with the specified torque.
Step 2
Fix the bottom of the hard disk drive with the HDD
canister using the 2 provided screws for HDD canister
installation.
Tightening torque for the screws: 0.49 N·m (5 kgf·cm) (use a
low-torque powered screwdriver or a torque screwdriver)
Important:
• To use 5TB, 6TB or more capacity of HDD in the future
with HDD canister, please do not fix two provided
screws into bottom side. Because the screw length is
longer than depth of tapped hole of HDD.
HDD fixing screws for the HDD canister
Step 1
Fix both sides of the hard disk drive with the dedicated
HDD canister using the 4 provided screws for HDD
canister installation.
Tightening torque for the screws: 0.49 N·m (5 kgf·cm) (use a
low-torque powered screwdriver or a torque screwdriver)
HDD fixing screws for the HDD canister
HDD fixing screws for the HDD canister
31
Page 32

7
Installation of HDD unit
Install HDD unit in recorder
The illustration on this page is schematic. Details of the shape are omitted.
It is possible to install the HDD units without stopping the operation (except when RAID5 or RAID6 mode is in operation).
Step 1
After inserting the key (provided) into the key hole on
the front cover, push and turn it to the right to open
the front cover.
Step 2
Remove the HDD unit holding bracket.
Remove the screw.
Slide the HDD unit holding bracket sideways and remove
it.
Upper part of lever
Protruding section
at back side
Removal knob
Important:
• Insert the HDD units from the slot number 1.
• When mounting the HDD unit, be careful not to pinch
your fingers with the lever.
The LCD displays as follows.
Lever
HDD unit holding bracket
• Keep the removed screw and the HDD unit holding
bracket in an appropriate place.
Step 3
Insert the HDD units into the HDD slots in order starting from HDD1.
Lift up the lever on the HDD unit while holding down the
removal knob, and then insert the HDD unit all the way
into the HDD slot.
Insert the HDD unit carefully without knocking it against
anything (and without knocking against HDD units which
are already inserted).
Push the upper part of the lever securely until it hits the
protruding section at the back side of disk slot top and
then turn down the lever.
The removal knob fits into position with a "click" sound
when turning down the lever.
MAIN-y
NEW HDD DETECT
* y is a slot number
•When the inserted hard disk drive is formatted, it will be
recognized as the hard disk drive for playback use only.
In this case, [STS] (HDD status) indicator on the front of
the HDD unit will blink green. Initialize the HDD following
the instructions of "Initialize the HDD unit (☞ page 34)"
when you use it as recording media.
• If the HDD unit is not identified, confirm that the HDD unit
is inserted all the way into the HDD slot.
32
Page 33

7
Installation of HDD unit (continued)
Install HDD unit in extension unit
Install the HDD units in the extension unit as in the recorder.
The illustration on this page is schematic. Details of the shape are omitted.
It is possible to install the HDD units without stopping the operation (except when RAID5 or RAID6 mode is in operation). Attach three
or more HDDs if it is being operated in RAID5 mode, and attach four or more HDDs if it is being operated in RAID6 mode. Then,
connect the extension unit to the recorder, turn on the power of the extension unit first and then turn on the power of the recorder.
Step 1
After inserting the key (provided) into the key hole on
the front cover, push and turn it to the right to open
the front cover.
Step 2
Remove the HDD unit holding bracket.
Remove the screw.
Slide the HDD unit holding bracket sideways and remove
it.
Upper part of lever
Protruding section
at back side
Removal knob
Important:
• Insert the HDD units from the slot number 1.
• When mounting the HDD unit, be careful not to pinch
your fingers with the lever.
The LCD of NX400 displays as follows.
Lever
HDD unit holding bracket
• Keep the removed screw and the HDD unit holding
bracket in an appropriate place.
Step 3
Insert the HDD unit into the disk slot of the extension
unit adjusting the HDD number on the HDD slot.
Lift up the lever on the HDD unit while holding down the
removal knob, and then insert the HDD unit all the way
into the HDD slot.
Insert the HDD unit carefully without knocking it against
anything (and without knocking against HDD units which
are already inserted).
Push the upper part of the lever securely until it hits the
protruding section at the back side of disk slot top and
then turn down the lever.
The removal knob fits into position with a "click" sound
when turning down the lever.
EXTx-y
NEW HDD DETECT
* x is an extension unit number
y is a slot number in the extension unit
• When the inserted hard disk drive is formatted, it will be
recognized as the hard disk drive for playback use only.
In this case, [STS] (HDD status) indicator on the front of the
HDD unit will blink green. Initialize the HDD following the
instructions of "Initialize the HDD unit (☞ page 34)" when
you use it as recording media.
• If the HDD unit is not identified, confirm that the HDD unit
is inserted all the way into the HDD slot.
33
Page 34

7
Installation of HDD unit (continued)
Initialize the HDD unit
Open the "HDD management" page from the setting screen and format the HDD.
Step 1
Click the [HDD management] button of the setup
menu - the "Advanced setup" menu.
The window with the administrator name and password
entry fields will be displayed. The window is also displayed when a user has already logged in as the administrator.
Step 2
Enter the "Administrator name" and the "Password"
registered on page 28, and then click the [OK] button.
Step 4
Click "Execute" next to "HDD Format" on the "HDD
management" page.
HDD format screen is displayed.
Step 5
Check the hard disk drives to format in the "Format"
field, and click the [Start] button.
Format check screen is displayed.
The "HDD management" page will be displayed.
Step 3
Confirm that the connected HDD is displayed on the
"HDD management" page.
Step 6
Click the [OK] button on Format check screen. When
"OK" is displayed on the "Results" field on the HDD
format screen, click the [Back] button.
When "Error" is displayed, format the hard disk drives again.
Click the [Operation] button to return from the "HDD management" page to the operational screen.
34
Page 35

8
Configure the minimum settings [Easy Start]
The minimum settings required to operate the recorder, such as the date & time, camera registration, recording, can be configured on the setup menu - the "Quick setup" menu - "Easy Start".
First, configure the minimum settings on "Easy Start", and to configure more advanced settings, go to each setup page.
Available settings on "Easy Start"
• Date & time of the recorder
• Camera registration
* Other settings will remain default or will be conformed to the camera settings.
* To apply 25, 50 or 60 ips for the recording frame rate, configure on the advanced recording setup (for each camera) on the
"Recording setup" tab under "REC & event" of "Basic setup", but not on Easy Start.
* To reset the time, do not use "Easy Start", and go to "Basic setup" menu - "Date/Language" page.
• Order change of the registered camera numbers
• Recording frame rate and image quality
Step 1
Click the [Easy Start] button on the top screen of the
setup menu.
Refer to "Basic operations" (☞ page 7) for how to display the
setup menu.
The setup menu for the date & time will be displayed.
Step 2
Set the date & time.
[Time]
Set the current time.
Step 3
Click the [Apply] button after setting the date & time.
The second will be set to "00".
[Set time zone]
Select your time zone.
GMT-12:00 - GMT+13:00
Default: GMT-5:00 (WJ-NV400K)
GMT (WJ-NV400K/G)
Marking the checkbox for [Activate the Daylight saving time]
will active daylight saving time.
Step 4
Click the [Next] button.
The camera registration window opens.
Note:
• To use the existing IP address of the connected cameras,
refer to "Detect cameras for registration [Detect cameras]"
(☞ Operating Instructions (PDF)) instead of "Easy start".
• Before the settings, register the cameras into the network. Only the cameras added by license registration will
be detected even though more cameras than the registered license number are connected.
It is recommended to disconnect unnecessary cameras.
• Cameras shall be connected to the Camera/PC port.
Cameras will not be detected if they are connected to
the PC port.
[Date]
Set the current date. Select the year, month and day from
the calendar.
[<<Y]/[Y>>] button: Selects the previous or next year.
[<M]/[M>] button: Selects the previous or next month.
Step 5
Register the cameras connected to the recorder.
35
Page 36

8
Configure the minimum settings [Easy Start] (continued)
[New] button
Usually use it with no camera registered in the recorder.
Detects all the connected cameras.
The models and results of the detected cameras will be displayed.
Make sure that the model numbers of all the connected
cameras are being displayed.
[Addition] button
Usually use it when there are added or replaced cameras
during operation.
Detects only the added or replaced cameras.
The models and results of the detected cameras will be displayed.
Make sure that the model numbers of all the added or
replaced cameras are being displayed.
Important:
• When there are cameras in use, the system can overwrite
the registered information and assign new IP addresses
to all connected cameras (including cameras currently in
use) by clicking the [New] button.
• Cameras newly added after the operation start will be
registered in the default settings. To conform the settings to those of the registered cameras, perform the
settings for the added cameras.
• For the video encoder (WJ-GXE500), only the camera
connected to CH1 will be detected. The channels CH2
to CH4 are needs to be registered from the setup menu.
[Camera]
After the license is registered (☞ page 29), 64, 96 or 128
cameras can be connected.
Step 6
Enter a user name and a password to register for a camera
with "*" in the results.
Step 7
Click the [Next] button.
IP address will be given to the cameras newly con-
nected, replaced or added, and the images from the
camera will be displayed on the operational screen.
Note:
• On "Easy Start", it is impossible to register the camera in
a different network via the same router.
• For the security enhancement, changing of the IP
address of the camera will become impossible when 20
minutes have passed after the power is turned on.
Perform the camera detection within 20 minutes, or turn
off the power of the camera and turn it on again if more
than 20 minutes has passed. Refer to the operating
instructions of the camera for further information.
When 20 minutes have passed after the power of the
camera is turned on, "ONVIF" may be detected depending on the models of Panasonic cameras. In such a
case, turn off the power of the camera and turn if on
again to perform the camera detection.
• When "On" is selected for the "DHCP" setting of the
detected cameras, the recorder will forcibly change the
setting to "Off" to give the IP addresses automatically.
• When the [Cancel] button is clicked, the top screen of
"Easy Start" (the menu to set the date & time) without
applying the camera detection result will be displayed.
[Model]
When Panasonic cameras are used, the model numbers will
be displayed.
[Results]
New: Displayed when the camera is newly connected to
the recorder.
Replaced: Displayed when the camera has been
replaced by another one.
Added: Displayed when the camera connection is added
to the recorder.
Registered: Displayed when the camera has already
been registered.
Lost: Displayed when the registered camera is not
detected.
Blank: No camera is detected.
*: Administrator not registered
Note:
• If "Lost" is displayed or the column is left blank, check if
the power of the camera is turned on, and make sure
that cables are properly connected.
Step 8
When you wish to change the registered camera numbers,
it is possible to change the order of the camera numbers.
Images from the cameras will be displayed on the monitor
from the upper left corner to the right in order of the camera
number (1, 2 ... 64).
To interchange camera numbers, drag the camera image to
be moved with the mouse and drop on the desired position.
If the camera titles are to be interchanged as well, mark the
"Also change camera titles" checkbox.
36
Page 37

8
Configure the minimum settings [Easy Start] (continued)
[Camera status]
The model numbers and statuses of each camera will be
displayed in a list.
Displaying image: Displays the images from the camera
using the IP address that is newly registered or that
has already been registered.
Changing IP address: Images are being obtained from
the camera whose IP address has been changed.
Undetectable: Cannot obtain images from the camera.
Authentication error: Failed in the authentication to dis-
play images from the camera.
Important:
• If "Undetectable" is displayed, check the camera connections, and retry the camera registration.
• If "Authentication error" is displayed, initialized the camera and retry the camera registration by referring to the
operating instruction of the camera.
• If the registered camera is not correctly detected or if
you wish to change the camera settings, change the
registered information on the "Basic setup" menu - the
"Camera" page - the "Camera registration" tab.
(☞ Operating Instructions (PDF))
[Refresh] button
Obtain the latest camera image after interchanging cameras.
[Exit] button
Exits the setup menu and returns to the top screen of the
setup menu.
[Next] button
Proceeds to the settings for recording.
Step 9
Perform the settings for recording. If the settings are
performed on "Easy Start", the settings will be applied
to all the cameras.
Important:
• To apply 60 ips, configure on "Advanced recording
setup" on the "Recording setup" tab under "REC &
event" of "Basic setup".
• For a camera whose compression method is [MJPEG],
"10 ips / 15 ips / 30 ips" cannot be selected.
• If a camera whose compression method is [MJPEG] is
included, [MJPEG] camera is set to "5 ips" even if "10
ips / 15 ips / 30 ips" is set by slider bar of frame rate setting. You can confirm the current setting value with
[Advanced setup >] in Recording setup (All cameras).
[Image quality]
Selects the image quality of recorded images.
NQ (Normal): Standard quality
FQ (Fine): High quality
SF (Super Fine): Super fine quality
XF (Extra Fine): Extra fine quality
Default: FQ
Important:
• For a camera whose compression method is [MJPEG],
"XF" cannot be selected.
• If a camera whose compression method is [MJPEG] is
included, [MJPEG] camera is set to "SF" even if "XF" is
set by slider bar of image quality setting. You can confirm the current setting value with [Advanced setup >] in
Recording setup (All cameras).
[Referenced recording days]
Calculates and displays the total number of days for which
recording on the hard disk drives is available.
Note:
• The referenced recording days will be calculated based
on the assumption that recording is started on Monday.
• The HDD consumption for the event recording will be
excluded.
• If a camera manufactured by other than Panasonic is
used, the value of "Referenced recording days" will not
be displayed.
• When configured to perform recording in high resolution
and high quality, recording may sometimes not be performed at the specified rate.
When there may be possibility to fail recording at the
specified rate while using only Panasonic cameras, the
confirmation window will be displayed.
[Frame rate]
Select the recording frame rate.
1 ips/ 3 ips/ 5 ips/ 10 ips/ 15 ips/ 30 ips
Default: 10 ips
Step 10
Click the [Exit] button.
Saves the settings and returns to the top screen of the
setup menu.
When the camera image is displayed on the main monitor or
the web browser on the PC and can be recorded or played,
the recorder is ready for operation.
37
Page 38

Troubleshooting
Before asking for repairs, check the symptoms with the following table.
Contact your dealer if a problem cannot be solved even after checking and trying the solution in the table or a problem is not
described below.
Symptom Cause/solution Ref. pages
Power is not turned on. • Is the power plug connected to the outlet firmly?
Confirm the cable is firmly connected.
• Check if the power cord is properly inserted into the power socket
of the recorder.
Check if it is connected firmly.
Camera images are not
displayed on the monitor
Part of the displayed image is
missing.
Image is blurred. • Is the lens of the camera soiled with dirt or dust?
Cannot open the setup menu. • Users who have logged into the system may not be authorized to
The images or embedded
characters displayed on the
monitor look blurry.
No alarm action is taken. • Check if alarm input signals are properly input to the ALARM/
The "Communication error:
Cam.cc" indication is displayed
on the main monitor.
• Is the lens cap of the camera detached from the camera?
Check whether the lens cap is removed.
• Is the power of the camera and connected devices on?
Check whether the power is supplied to the camera and the
devices.
• Confirm that the cables are connected correctly and firmly.
Confirm the cables are firmly connected.
• Is the monitor luminance appropriately adjusted, or is the contrast
appropriately adjusted?
Check whether the settings are appropriate.
• Users who have logged into the system may not be authorized to
display the images from cameras.
Check the user level settings of these users.
• Have the licenses of the additional camera kit been registered?
If you have increased the camera connection number, and the
camera image on the monitor does not appear, please use the
browser on your PC.
• This phenomenon is caused by dispersion of display area on the
monitor. This is not a malfunction.
• When a function to automatically enlarge the images in the connected monitor is enabled, some part of the images may not be
displayed depending on the photographic subject.
Check whether the lens of the camera is clean.
display the setup menu.
Check the user level settings of these users.
• Isn’t it the sub monitor you are currently operating?
The setup menu cannot be displayed on the sub monitor.
• Depending on the photographic subject or HDMI monitor that is
connected, images or embedded characters may look blurry. This
phenomenon is not trouble.
CONTROL connector at the rear panel.
• Are the settings of the alarm connector appropriate? Operating
• Is "Off" or "Recording only" selected for "Mode"?
Check whether the settings are appropriate.
• Confirm that the camera is connected correctly and firmly.
Check the camera connection.
• If the connection is appropriate, the cable may be broken or the
camera may be out of order. Contact the dealer.
−
Important
Information
−
−
15, 16
−
Operating
Instructions
5
−
−
−
Operating
Instructions
16
−
24
Instructions
Operating
Instructions
15
−
38
Page 39

Troubleshooting (continued)
Symptom Cause/solution Ref. pages
The "Thermal error" indication
is displayed on the main
monitor.
The clock of the recorder may
keep bad time.
[STS] indicator of the HDD unit
lights/blinks red.
The extension unit is not
recognized.
(When an extension unit is
connected)
The HDD unit is not identified.
[STS] indicator of the HDD unit
is not on.
"EXTu ERR INITIAL ERR" is
displayed on the LCD of the
recorder.
u: Unit number
"Error" indictor blinks red. • The system is out of order. Contact your dealer. –
"Authentication error" of the
camera is displayed.
• Check if the fan is malfunctioning. Operating
Instructions
• Check if the recorder ventilation holes or cooling fan are blocked,
and also check for dust collected around the ventilation holes.
• The ambient operating temperature is +5 °C to +45 °C {41 °F to
113 °F}. The "Thermal error" is displayed based on the internal
thermal information of the HDD. If the "Thermal error" indication is
displayed, it is recommended to change the installation environment so that the ambient temperature is maintained at approx.
+25°C {77 °F}. When the "Thermal error" indication is displayed
frequently, contact your dealer.
• The clock function of the recorder is accurate within ±30 seconds
per month.
To keep the correct recording, set the time periodically, or enable
the auto time adjustment function on the rear panel terminal, or
configure the system using the NTP function so as to keep the correct current time.
• The hard disk drive is faulty. Contact your dealer. –
• Make sure that the connection cable provided with the extension
unit is being used.
• Make sure that the connection cable is not loose. 14
• Was the power of the extension unit turned on before turning on
the power of the recorder?
Turn off the power of the recorder and the extension unit. Turn on the
extension unit before turning on the power of the recorder.
• When using a circuit breaker or equivalent device to turn on/off the
power of the whole system at one time, make sure that all devices
are connected to the same power source.
• When using an UPS (uninterruptible power system), connect all
devices to the same UPS.
• Make sure that the HDD unit is inserted all the way into the HDD slot. 32
• The hard disk drive is faulty. –
• Initialize an applicable extension unit.
• When operating the recorder in RAID5 mode, attach three or more
HDDs in the extension unit. If the recorder is being operated in
RAID6 mode, attach four or more HDDs in the extension unit. Then,
connect to the recorder and turn on the power of the extension unit
first, and later turn on the power of the recorder.
• Initialize the camera and retry the camera registration upon referring
to the operating instructions of the camera.
Operating
Instructions
6
13
–
14
27
–
–
–
Inspect the power cord, power plug and connectors periodically.
Symptom Cause/solution Ref. pages
The power cord insulation is damaged.
The power cord, plug and
connectors get hot during use.
The power cord gets hot when bent
or stretched.
• The power cord, connector, or power plug is damaged.
This may result in electric shock or a fire.
Unplug the power plug from the AC outlet immediately, and
refer to qualified service personnel.
−
39
Page 40

Disposal of Old Equipment and Batteries
Only for European Union and countries with recycling systems
These symbols on the products, packaging, and/or accompanying documents mean that used electrical and electronic
products and batteries must not be mixed with general household waste.
For proper treatment, recovery and recycling of old products and used batteries, please take them to applicable collection
points in accordance with your national legislation.
By disposing of them correctly, you will help to save valuable resources and prevent any potential negative effects on human
health and the environment.
For more information about collection and recycling, please contact your local municipality.
Penalties may be applicable for incorrect disposal of this waste, in accordance with national legislation.
Note for the battery symbol (bottom symbol)
This symbol might be used in combination with a chemical symbol. In this case it complies with the requirement set by the
Directive for the chemical involved.
For U.S.A.
Disposal may be regulated in your community due to environmental considerations. For disposal or recycling information,
please visit Panasonic website: http://www.panasonic.com/environmental or call 1-888-769-0149.
For U.S. and Canada:
Panasonic System Communications Company of North America,
Unit of Panasonic Corporation of North America
www.panasonic.com/business/
For customer support, call 1.800.528.6747
Two Riverfront Plaza, Newark, NJ 07102-5490
Panasonic Canada Inc.
5770 Ambler Drive, Mississauga, Ontario, L4W 2T3 Canada
(905)624-5010
www.panasonic.ca
For Europe and other countries:
Panasonic Corporation
http://www.panasonic.com
Panasonic Corporation
Osaka, Japan
Authorised Representative in EU:
Panasonic Testing Centre
Panasonic Marketing Europe GmbH
Winsbergring 15, 22525 Hamburg, Germany
© Panasonic Corporation 2017 Ls1116-2047 PGQX2108XA Printed in China
 Loading...