

DVD Video Camera/Recorder
Operating Instructions
Model No. VDR-M30EG
Before use, please read these instructions completely.
Web Site: http://www.panasonic-europe.com
VQT0E31
Important Information
English
For Your Safety
The power switch turns the DVD video camera/record er on and off, leaving the date/time feature unaffected. If the camera/
recorder is to be left unattended for a long period of time, turn it off .
WARNING : TO PREVENT FIRE OR SHOCK HAZARD, DO NOT
EXPOSE THIS UNIT TO RAIN OR MOISTURE.
WARNING : TO PREVENT FIRE OR SHOCK HAZARD, USE THE
The DVD video camera/recorder and AC adapter/
charger have the following caution marks.
CAUTION
RISK OF ELECTRIC SHOCK
DO NOT OPEN
RECOMMENDED ACCESSORIES ONLY.
CAUTION: TO REDUCE THE RISK OF
ELECTRIC SHOCK, DO NOT OPEN.
NO USER-SERVICEABLE PARTS INSIDE.
REFER SERVICING TO QUALIFIED
SERVICE PERSONNEL.
Precautions
WARNING: Many television programmes and films
are copyrighted. In certain circumstances, copyright law may apply to private in-home videotaping
of copyrighted materials.
The liquid crystal display (LCD) panel is made by
highly precise technology. More than 99.99% of
its picture elements (pixels) are effective, but
some (less than 0.01%) may appear as coloured
bright dots. This does not indicate a fault as the
LCD panel stretches the limits of current
technology.
Identifications of caution marks
This symbol warns the user that
uninsulated voltage within the unit may
have sufficient magnitude to cause
electric shock. Therefore, it is
dangerous to make any kind of contact
with any inside part of this unit.
This symbol alerts the user that
important literature concerning the
operation and maintenance of this unit
has been included. Therefore, it should
be read carefully to avoid any problems.
WARNING: To prevent risk of injury or damage to
your DVD video camera/recorder and the AC
adapter/charger, use only the CGA-DU14 battery
and VSK0631 AC adapter/charger.
CLASS 1
LASERPRODUCT
CAUTION
This product contains a laser diode of higher
class than 1. To ensure continued safety, do not
remove any covers or attempt to gain access to
the inside of the product. Refer all servicing to
qualified personnel.
2

Table of Contents
Important Information.......................................... 2
For Your Safety................................................... 2
Precautions......................................................... 2
Table of Contents ............................................... 3
Checking Provided Accessories ......................... 6
Names of Parts................................................... 7
About This Manual............................................ 11
Discs and Cards ............................................... 12
Available Discs ......................................................12
Information on DVD-R Disc ...................................13
Examples of Discs that cannot be used on this
DVD Video Camera/Recorder: ...........................13
Handling Discs.......................................................14
Removing and Replacing from/in Round DVD
Holder .................................................................14
How to Remove Disc .............................................15
Replacing Disc in Round DVD Holder ...................15
When the Hinge of Round DVD Holder Comes
off........................................................................15
Disc Cleaning ........................................................15
Available Cards .....................................................16
Storage Capacity on Disc or Card .................... 17
Recordable Time of Movie (Video) ........................17
Recordable Stills (Photos) .....................................18
Features of DVD Video Camera/Recorder ....... 19
Versatile Functions Available ................................19
Recording on Disc .................................................21
Recording Movie and Still ......................................21
Immediate Reviewing of Recorded Image.............22
Editing in Various Ways on DVD Video Camera/
Recorder Alone...................................................22
Using with Various Devices ...................................22
Setups
Setting Up the DVD Video Camera/
Recorder ........................................................ 23
Holding DVD Video Camera/Recorder ..................23
Attaching Lens Cap ...............................................23
Attaching Shoulder Strap.......................................24
Inserting Battery into Remote Control ...................25
Removing Battery from Remote Control................25
Setting Up the Battery....................................... 27
Charging Battery....................................................27
Attaching Battery to DVD Video Camera/
Recorder .............................................................28
Removing Battery ..................................................28
Battery Remaining Level Indicator.........................30
Efficient Use of Battery ..........................................30
Using DVD Video Camera/Recorder with AC
Adapter/Charger .................................................31
Inserting and Removing Disc............................ 32
Inserting Disc.........................................................32
Removing Disc ......................................................34
Inserting and Removing Card ........................... 35
Basic Techniques
Basic Handling of DVD Video Camera/
Recorder ........................................................ 36
Turning DVD Video Camera/Recorder On and
Off....................................................................... 36
Viewing Subject through Viewfinder...................... 37
Viewing Image on LCD Monitor Screen ................37
Closing LCD Monitor ............................................. 38
Setting Date and Time...................................... 39
Changing Display Format of Date and Time .........40
Recording Movie............................................... 41
Using External Microphone ...................................43
Recording Stills................................................. 44
Zooming............................................................ 46
Macro Recording ................................................... 47
Recording Subjects for Stronger Wide-Angle or
Telephoto Effect .................................................47
Manually Focusing Subject............................... 48
Focusing During Recording...................................48
Adjusting Exposure Manually ........................... 50
Compensating for Backlight.............................. 51
Using Full Auto Function .................................. 52
On-Screen Information ..................................... 53
Information Display During Recording................... 53
Playing Back..................................................... 56
Immediately Checking Recorded Scene ...............56
Playback from Start of Disc or Card ......................57
Search Playback of Movie ..................................... 57
Frame Advance/Frame Back/Slow Playback of
Movie.................................................................. 57
Skip Playback of Movie .........................................58
Playing Back Stills .................................................58
Jumping to specified Point (Go To) .......................59
On-Screen Information Display ........................ 60
Information Display during Playback .....................60
Playback on Other Devices .............................. 61
Connecting to a TV................................................61
Viewing on TV Screen ........................................... 62
Playback on DVD Player ....................................... 63
Playback on DVD Video Recorder/Player ........ 64
English
3

Advanced Techniques
Understanding Flow of Menu............................ 65
English
Setting Up Camera Functions........................... 67
Selecting Shooting Mode to Match the Subject
(Switching Programme AE Mode) ......................67
Adjusting Colour (White Bal.) ................................68
Using the Electronic Image Stabiliser (EIS)...........70
Magnifying Subject Image (Dig. Zoom) .................71
Reducing Wind Noise during Recording
(MIC.Filter)..........................................................72
Switching to 16:9 Mode .........................................72
Setting Up Record Functions............................ 73
Switching Movie Quality (VIDEO Mode)................73
Switching Quality of Still Image (Quality)...............74
Self-Timer ..............................................................75
Setting On-Screen Display Output On or Off
(OSD Output)......................................................76
LCD Setup ........................................................ 77
Setting Brightness of LCD Screen (Brightness) ....77
Setting Colour Density of LCD Screen
(Color Level) .......................................................77
Initial Settings ................................................... 78
Switching Operating Sound On or Off (Beep) .......78
Turning DVD Video Camera/Recorder Off
Automatically (Power Save)................................78
Turning Record LED On or Off (Record LED) .......79
Changing Display Language (Language) ..............79
Resetting Menu Settings to Defaults (Reset) ........80
Disc Navigation
Using Disc Navigation....................................... 81
Starting Disc Navigation ........................................81
Terminating Disc Navigation..................................83
Playing Back from Disc Navigation Screen ...........83
Selecting Multiple Scenes .....................................84
Selecting Consecutive Scenes Together...............84
Disc Navigation Menu....................................... 85
Functions Available with Disc Navigation ..............85
Understanding Flow of Disc Navigation Menu.......86
Scene................................................................ 87
Deleting Scenes (Delete).......................................87
Changing Images for Thumbnails
(Edit - Thumbnail) ...............................................89
Playing Back by Skipping Scenes (Edit - Skip) .....90
Adding Special Effects (Edit - Fade)......................91
Arranging Order of Scenes (Edit - Move) ..............92
Combining Multiple Scenes (Edit - Combine) ........93
Dividing Movies (Edit - Divide)...............................94
Copying Stills on DVD-RAM Disc to Card
(Copy) .................................................................95
Locking Scenes on Card (LOCK) ..........................96
Designating Scenes to Be Printed (DPOF) ...........97
Selecting Scenes Using Menu Screen (Select).....98
Displaying Information Using Menu Screen
(Detail) ................................................................99
Programme..................................................... 100
What is “programme”? .........................................100
Switching to Thumbnail Display of Specific Date
(Switch).............................................................100
Playing Back Programme (Play)..........................101
Changing Title of Programme (Title) ...................101
Play List.......................................................... 103
What is “play list”? ............................................... 103
Creating New Play List (Create).......................... 103
Switching to Display of Each Play List (Switch) .. 104
Playing Back a Play List (Play)............................105
Adding Scenes to Play List (Editing Play List).....106
Deleting Scenes from Play List
(Editng Play List) ..............................................107
Adding Scenes Using Submenu for Editing
(Editing Play List) ............................................. 107
Deleting Scenes Using Submenu for Editing
(Editing Play List) ............................................. 108
Selecting Scenes Using Submenu for Editing
(Editing Play List) ............................................. 108
Arranging Order of Scenes (Move) ..................... 109
Changing Title of Play List (Title) ........................ 110
Deleting Play List (Delete)................................... 110
Go To.............................................................. 111
Top (End) ............................................................111
Disc or Card Management.............................. 112
Verifying Remaining Free Space on Disc or Card
(Capacity) ......................................................... 112
Protecting Disc from Writing (Protect Disc) .........112
Initialising DVD-RAM Disc or Card
(Format Disc/Format Card) .............................. 113
Updating Control Information of DVD-RAM
Disc ..................................................................114
Finalising DVD-R Disc......................................... 115
Others............................................................. 116
Displaying Movies or Stills Independently
(Category) ........................................................ 116
Playing Back Scenes Repeatedly
(Repeat Play) ...................................................116
Slide Show (Continuous Playback of Stills)......... 117
Installing Software
Contents on Provided CD-ROM ..................... 119
Installing USB Driver ...........................................121
Installing DVD-RAM Driver ..................................123
Installing DVD-MovieAlbumSE ............................ 125
Installing MyDVD................................................. 127
Creating DVD Video on PC from DVD-RAM
Disc Recorded on DVD Video Camera/
Recorder ...................................................... 129
4

Subsidiary Information
Cleaning.......................................................... 131
Changing Setting of Demonstration................ 132
No DVD Video Camera/Recorder Operation -
Check the Following:.................................... 133
Trouble Messages .......................................... 135
Troubleshooting.............................................. 142
System Reset ................................................. 149
Major Specifications........................................ 150
Introduction to Optional Accessory ................. 152
Power Supply ......................................................152
Information on Square Adapter ...........................152
English
5
Checking Provided Accessories
English
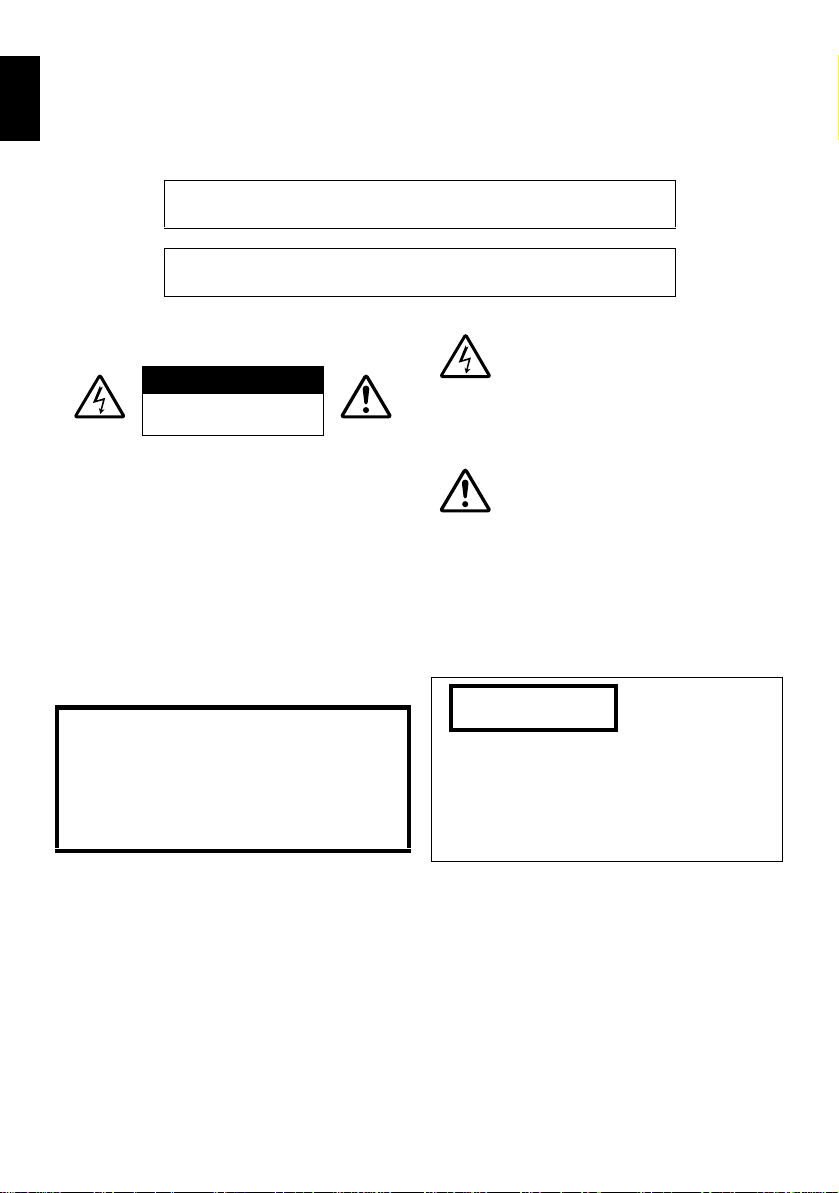
Make sure that you have all the following accessories in package:
Battery (model CGA-DU14):
Portable power supply for this DVD video
camera/recorder. Charge it before use.
Mains lead:
Connect between household AC outlet and
AC adapter/charger.
for VDR-M30B
AV/S output cable:
Used when viewing the picture played back
on the DVD video camera/recorder on TV
screen, or output video to another video
device.
8 cm DVD-R disc (in Round DVD Holder):
To record video (movie) on this DVD video
camera/recorder
AC adapter/charger (model VSK0631):
Used to power the DVD video camera/
recorder from AC outlet, or charge battery.
Infrared remote control
(model VEQ3993):
Use to control the DVD video camera/
recorder from a distance.
Shoulder strap:
Attach to the DVD video camera/recorder to
hang it from shoulder.
Ferrite core:
In order to control radio noise emission,
attach this to external microphone cable if
you are using the external microphone.
DC power cord:
When powering the DVD video camera/
recorder from household AC outlet, use this
cord to connect the DVD video camera/
recorder and AC adapter/charger.
Lithium battery (model CR2025):
To power the remote control.
WARNING: Keep
this battery away
from children. If
swallowed, consult
a physician
immediately for
emergency
treatment.
Lens cap and lens cap string:
Attach the lens cap when not recording, to
protect the lens.
Software CD- ROM:
Use this CD-ROM when connecting the DVD
video camera/recorder to PC.
PC connection cable:
6
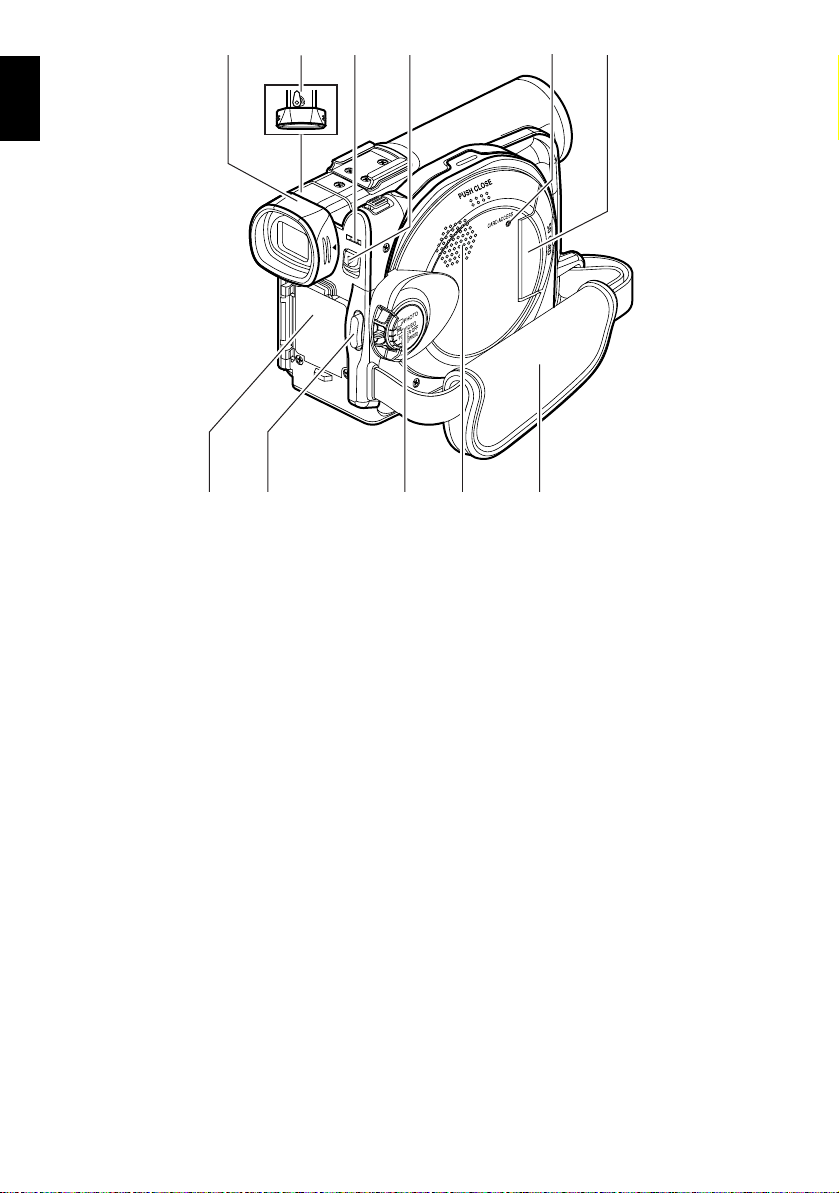
Names of Parts
1234 5 6
8
7
A/V
MIC
(Inside the cover)
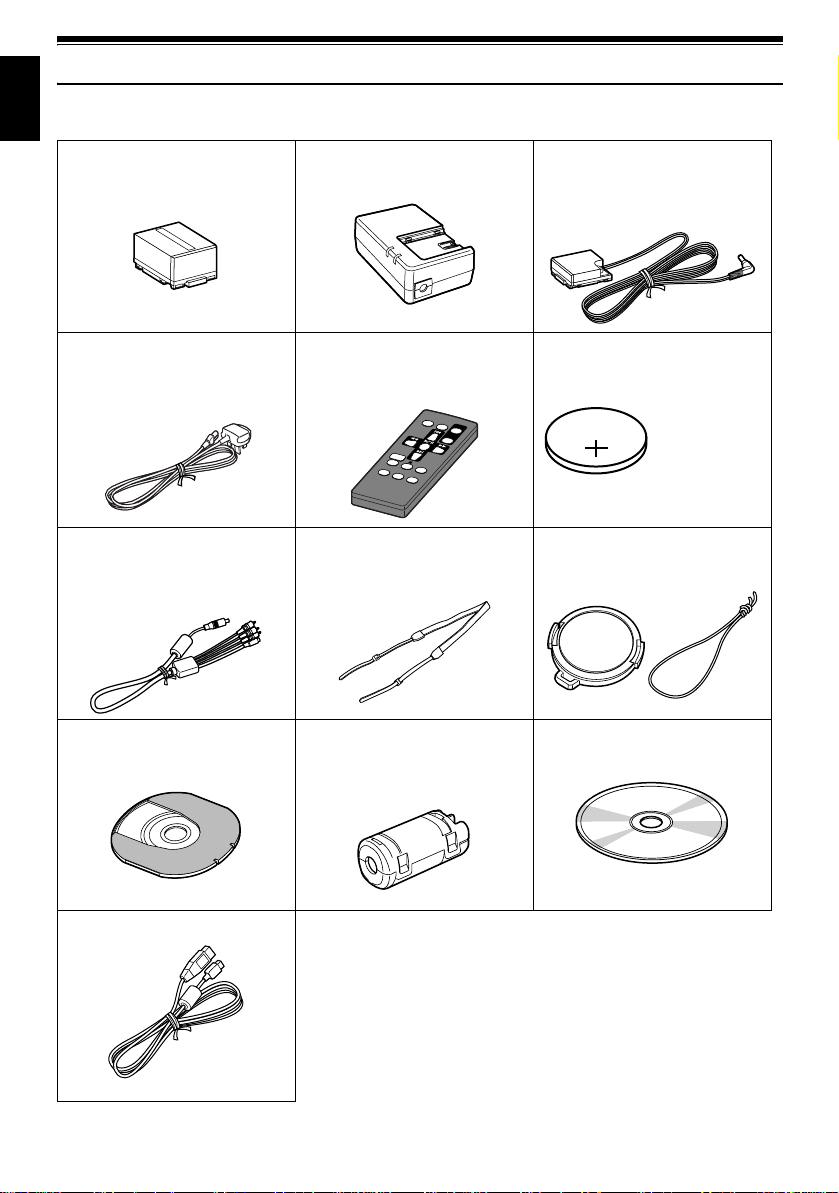
1 Recording indicator (P. 79)
The red indicator will light during recording.
2 Optical 10× zoom lens (P. 46)
3 Lens hood (P. 47)
Always remove this lens hood when using
generally available tele-conversion or wideconversion lens.
4 Infrared receiver (P. 26)
When the remote control is used to operate the
DVD video camera/recorder, this receiver will
receive the infrared signal.
11
910
BATTERY EJECT
(Bottom)
7 External microphone jack (P. 43)
8 AV output jack (P. 61)
9 Stereo microphone (P. 43)
10 2.5” type liquid crystal display (inside) (P. 37)
11 BATTERY EJECT switch (P. 28)
The BATTERY EJECT switch is located on the
bottom of this DVD video camera/recorder:
Slide it when removing the battery.
English
5 Zoom lever (P. 46)
Push the lever to the T side for telephoto, or to
the W side for wide-angle.
6 Accessory shoe
7
12 13 14 1715
16
English
ACCESS/PC
DISC EJECT
REC
18 19 20 2221
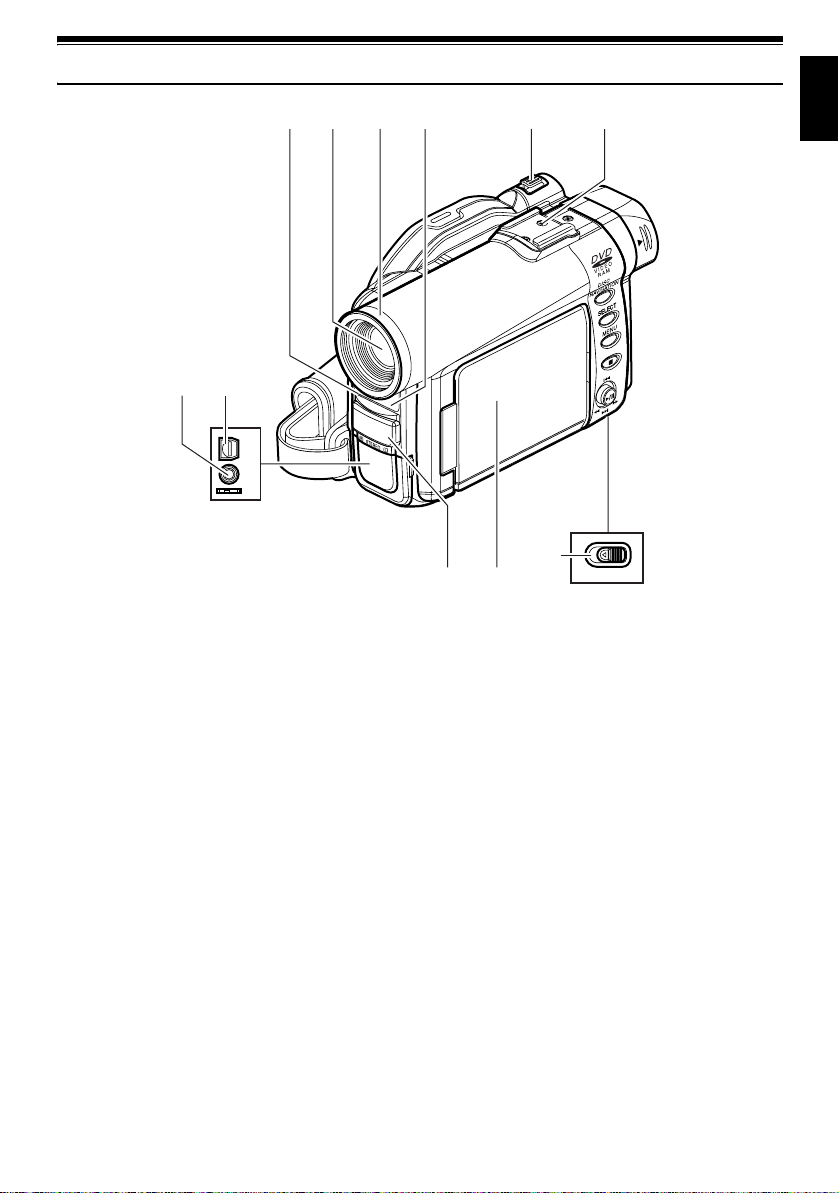
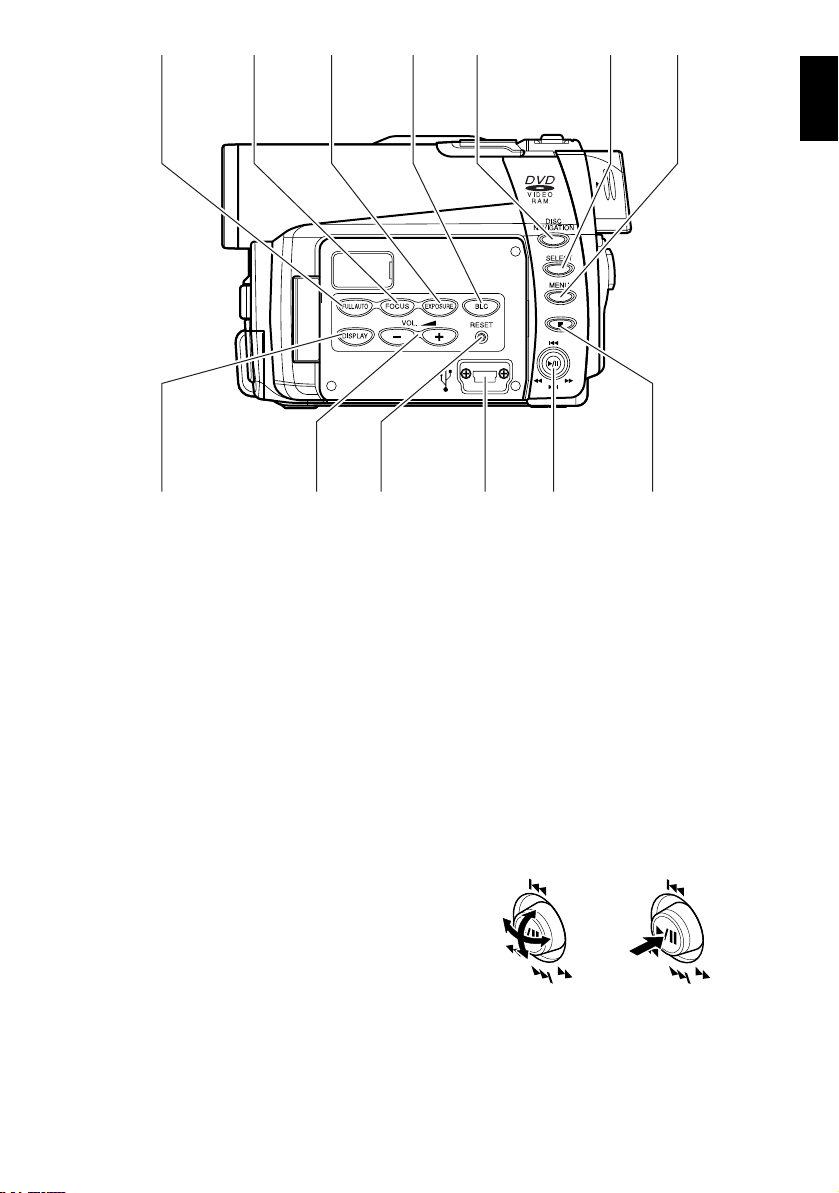
12 Viewfinder (P. 37)
13 Dioptre control (P. 37)
To adjust the focus of image appearing in the
viewfinder. (Pull out the viewfinder.)
14 ACCESS/PC indicator (P. 8, 41, 44)
Will blink or light while the DVD video camera/
recorder is operating.
15 DISC EJECT button (P. 32)
Press down and release this button to open the
disc guide.
16 CARD ACCESS indicator (P. 8, 44)
17 Card insertion block (P. 35)
18 Battery attachment platform (P. 28)
19 Record button (REC) (P. 41)
20 Power switch (P. 36, 41, 44)
21 Speaker (P. 56)
22 Hand strap (P. 23)
8
23 24 25 26 27 28 29
3531 32 33 3430
English
23 FULL AUTO button (P. 52)
To switch the DVD video camera/recorder to full
automatic
24 FOCUS button (P. 48)
To switch between manual focus and autofocus.
25 EXPOSURE button (P. 50)
Press this button to adjust the exposure.
26 BLC (backlight compensation) button
(P. 51)
Press this button when subject is being lighted
from rear.
27 DISC NAVIGATION button (P. 81)
28 SELECT button (P. 84)
29 MENU button (P. 39, 65, 87)
Press this button to display the menu for setting
camera functions and Disc Navigation.
The camera menu will appear even if disc is not
loaded.
30 Screen display button (DISPLAY) (P. 60)
Press this button to display the details of image
being played back or camera setting status, or
switch the display off.
31 Volume control buttons (VOL)/ S R buttons
(P. 48, 50, 56)
To adjust the volume of sound from speaker,
etc.
32 RESET button (P. 149)
To reset all settings to defaults (status when the
DVD video camera/recorder was shipped from
the factory).
33 PC connection terminal (TO PC)
34 Joystick (P. 39, 56, 78)
Move the joystick to select a scene or menu
item; then play back the scene or pause it.
35 Stop/cancel button (P. 11, 56, 83)
To end playback or cancel setting of menu.
9
English
36
37
38
REC
DIGITAL
ZOOM
ZOOM
T
W
42
43
39
NAVIGATION
40
41
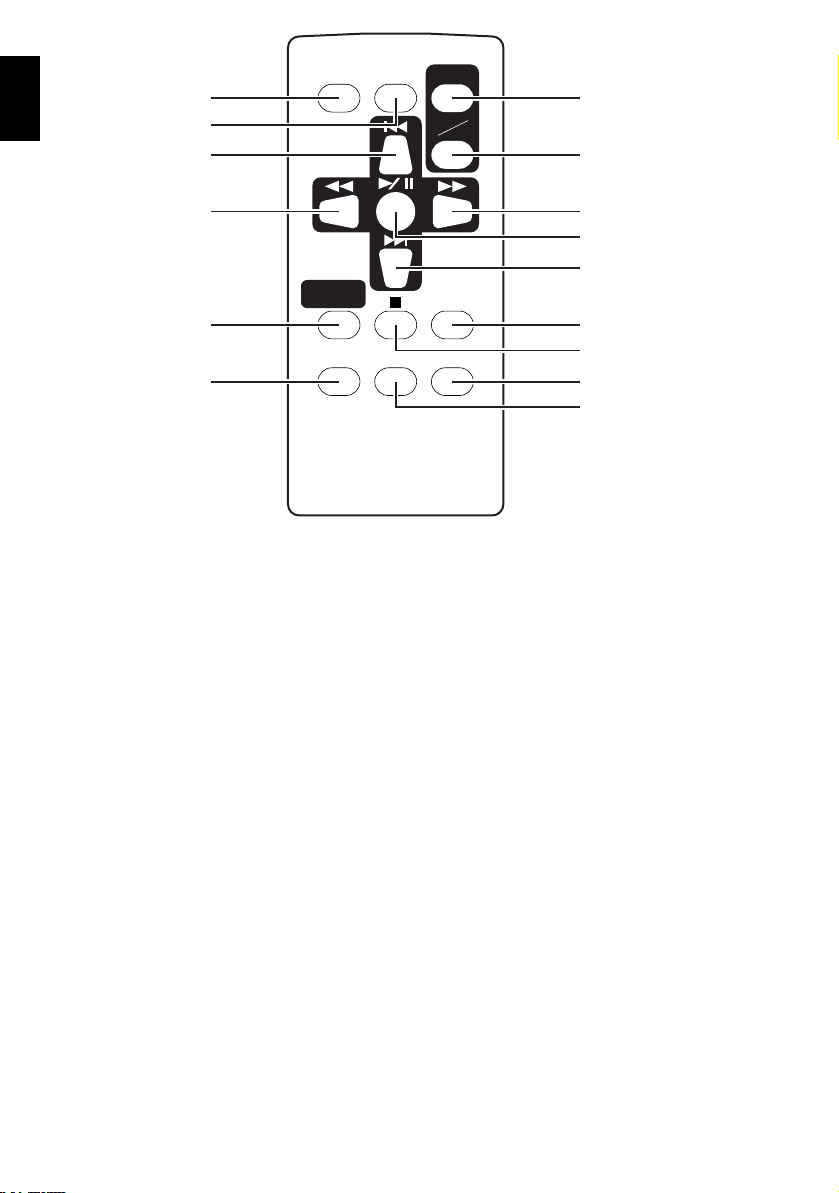
36 REC button (P. 41)
37 DIGITAL ZOOM button (P. 71)
38 Reverse skip button (P. 58)
39 Reverse search button (P. 57)
40 DISC NAVIGATION button (P. 81)
41 MENU button (P. 39, 67, 88)
DISC
MENU
44
45
46
DISPLAY
47
DELETESELECT
48
49
50
42 ZOOM T button (P. 46)
43 ZOOM W button (P. 46)
44 Forward search button (P. 57)
45 Play/pause button (P. 56)
46 Forward skip button (P. 58)
47 DISPLAY button (P. 60)
48 Stop button (P. 11, 56, 83)
49 DELETE button (P. 87)
50 SELECT button (P. 84)
* The buttons on remote control will function the same as those on DVD video camera/recorder.
10

About This Manual
lDisplays in this manual
Understand that the displays are different from those you will actually see in the viewfinder or on the LCD
screen.
lNotation of cancel button
Press the stop/cancel button to stop your operation midway, or return the menu screen to the preceding
one. The expression “press the B button” will be used in this text.
l1, 2 and 3 marks beside headings
Some functions of this DVD video camera/recorder are unavailable with disc or card used. Refer to the
marks at right above each function to identify whether the disc or card is compatible with the function. Refer
to these marks and identify the functions and operation to match the disc or card you use.
English
11
Discs and Cards
English
The following table lists the storage media (discs and cards) that can be used on this DVD video camera/
recorder and the functions which are available with them:
Function DVD-RAM disc DVD-R disc
Recording movie ∴∴ ×
Recording still ∴
Deleting recorded image ∴
Editing on this DVD video
camera/recorder
Playback on DVD player
Playback on DVD-RAM
recorder
*1:
Can be played back on some DVD players.
*2:
Must be finalised on this DVD video camera/recorder before DVD-R disc can be played back on DVD player or DVD
recorder (See P. 63). May not be playable on some DVD players.
*3:
Can be played back on some DVD-RAM recorders.
∴
*1
×
∴
×
×
××
*2
∴
*2
×
SD memory card/
Multimedia card
∴
∴
×
*3
×
∴: Functions available; ×: Not available
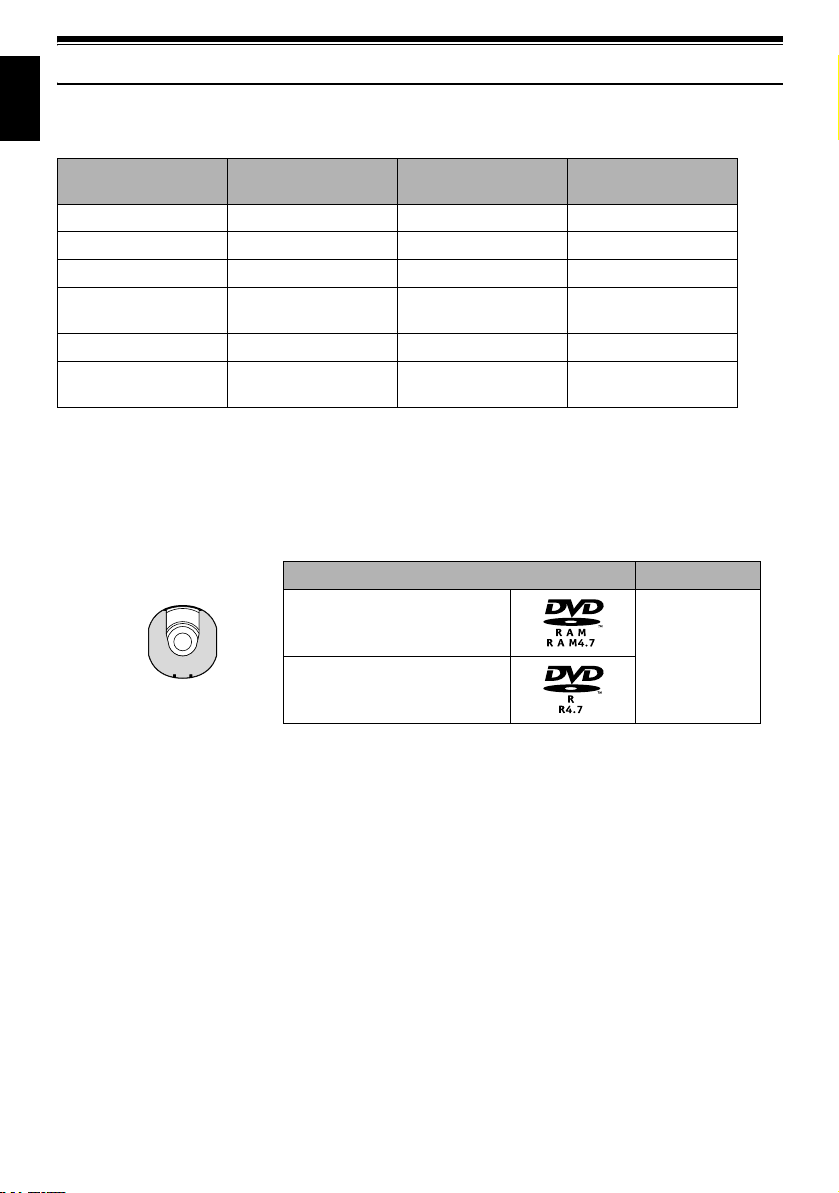
Available Discs
Usable discs and logos Shape
DVD-RAM Ver. 2.1 (8 cm)
In Round DVD
DVD-R
[for General Ver. 2.0 (8 cm)]
This DVD video camera/recorder uses 8 cm DVDRAM discs and 8 cm DVD-R discs for camcorder
use.
Discs removed from Round DVD Holder cannot be
used on this DVD video camera/recorder: Use them
only in the holder.
Note:
• It is recommended that you use Panasonic discs, since
their compatibility with this DVD video camera/recorder
has been confirme d. Using a disc other than those made
by Panasonic may not allow the DVD video camera/
recorder to deliver optimum performance.
• It is necessary to initialise an unformatted disc . When an
unformatted disc is inserted into the DVD video camera/
recorder, a message will appear: Initialise the disc
following the instructions on screen (P. 113).
• T he Round DVD Holder cannot be used on the following
DVD video camera/recorders:
- Other DVD video camera/recorders that use square
type adapters.
• I mage data edited on PC and certain types of image data
may not be visible on this DVD video camera/recorder.
• The image data recorded on another device may not be
playable on this DVD video camera/recorder.
Holder
12

Information on DVD-R Disc
You cannot record a still on DVD-R disc, or delete
any recorded images or data.
For optimum recording on DVD-R disc, this DVD
video camera/recorder writes control data to the
disc in order to automatically make adjustments
when it is inserted and ejected accompanying
recording. If the disc has no area to be written for
adjustment, recording may not be possible. To
prevent this, do not insert or eject a DVD-R disc
accompanying recording more than 50 times. The
DVD video camera/recorder will not perform “write
adjustment” when the DVD video camera/recorder
is turned on again, from off, for recording with the
disc in it, or when no recording is made, even if the
disc is removed and then reinserted.
lFinalising DVD-R disc
Before using the 8 cm DVD-R disc provided on this
DVD video camera/recorder on a DVD player or
DVD video recorder that is compatible with 8 cm
DVD-R disc, the disc must be finalised on this DVD
video camera/recorder. For the finalising procedure
of 8 cm DVD-R disc, refer to “Finalising DVD-R
Disc” (P. 115).
Note:
• Do not insert a DVD-R disc recorded on this DVD video
camera/recorder but not finalised, into a recordable
device, such as a DVD video recorder: The recor ded data
may be damaged.
• DV D-R discs edited and finalised on PC or those finalised
on another DVD video recorder may not be playable on
this DVD video camera/recorder, depending on the
editing software used or recorded status of DVD-R disc.
Examples of Discs that cannot be used on this DVD Video Camera/Recorder:
• DVD-RAM (2.6 GB) Ver. 1.0 • DV D-R OM • MO
• DVD-R (3.9 GB) Ver. 1.0 • DVD-Video • MD
• DVD-R (4.7 GB) for Authoring Ver. 2.0 • CD-R • iD
• DV D-RW • CD-RW • Floppy disk
• DV D+RW • CD • Discs other than those with diameter
• DV D+R • LD • CD-ROM
of 8 cm
English
13

Handling Discs
English
lUsing discs
DVD-RAM and DVD-R discs are very delicate
recording media. Carefully read the following
cautions and observe them:
• When using disc on this DVD video camera/
recorder, be sure to keep it in Round DVD Holder.
• Always use a brand new disc when recording
important material.
• Be sure not to touch the disc
exposed portion, and be
careful that no dirt adheres to
it.
• If there is dust, scratch, dirt on
disc or if it is warped, the
following phenomena may occur:
− Block noise in playback
image
− Momentary stop of playback
image
− Sound interrupted during
playback, or abnormal sound
− Grey Disc Navigation screen
− Disc cannot correctly be recognised
− Delay between video and audio
Even if disc is normal, the above phenomena may
occasionally occur. While the ACCESS/PC
indicator is lit, do not subject disc to vibrations or
impact, and avoid using DVD video camera/
recorder at extremely high or low temperatures,
or in environment where condensation is likely to
occur.
• When recording images,
the DVD video camera/
recorder may avoid the
portions of disc where
recording is not possible,
due to dust, scratches, etc.
[It will pause m at such a
portion and automatically
restart recording (n).]
This will cause recording
to be interrupted for several seconds to several
minutes, and multiple thumbnails will be created
by one recording session as shown above. In this
case, the recordable time on disc will decrease.
• Be careful when removing the disc since the
metal of removal slot of DVD video camera/
recorder, and disc itself, may be hot.
PLAY
(Recording one scene
may produce multiple
thumbnails.)
Do not touch
Block noise
001 / 002All Programs
lStoring discs
• When storing disc, insert it in Round DVD Holder
into plastic case.
• Be careful that no condensation occurs on disc.
• Do not place disc in following places:
− Direct sunlight for a long time
− Where humidity is high or in dusty place
− While there is heat from a heater, etc.
Note:
• See page 75 when cleaning the removed disc.
• S ee page 74 for how to ha ndle disc removed from R ound
DVD Holder.
• S ee page 74 for how to set the disc removed from Round
DVD Holder or another disc correctly in Round DVD
Holder.
REMOVING AND REPLACING FROM/ IN ROUND DVD HOLDER
You can remove DVD-RAM or DVD-R disc used on
this DVD video camera/recorder from Round DVD
Holder and use the uncovered disc on DVD player,
DVD-RAM recorder, drive for PC, etc., which
conforms to 8 cm DVD-RAM or 8 cm DVD-R.
Removing disc from Round DVD Holder may vary
with the disc maker: See the disc instruction sheet.
The following explains the disc in Round DVD
Holder made by Panasonic.
It is recommended that you do not remove the disc
from Round DVD Holder until camera recording is
finished, in order to avoid getting dirt on disc.
Note:
Using discs removed from holders on var ious devices may
not always be possible.
RAM
14
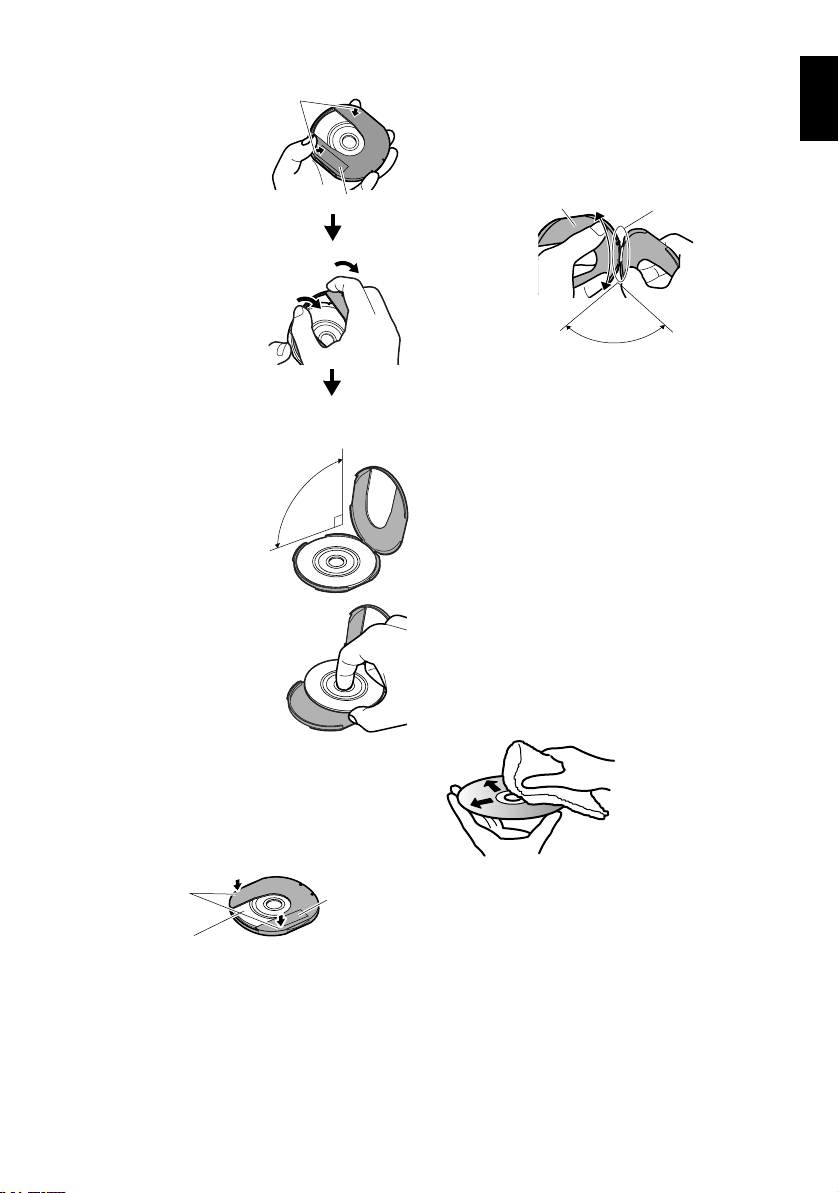
How to Remove Disc
1 Hold the Round DVD
Holder with SIDE A facing
up. While pushing the two
release levers in the
direction of arrows (1)
marked on holder, slowly
open SIDE A of the holder
in the direction of arrows
(2), taking care not to drop
the disc.
Release
levers
1
2
1
SIDE A mark
2
When the Hinge of Round DVD Holder Comes off
1 Push the hinged portion of the holder piece
marked SIDE A with thumb and middle finger,
and warp it in the direction of arrows (4).
SIDE A mark side
Hinged portions
4
Approx. 90°
English
Do not open
more than 90°.
90°
2 Without touching the
recording/playback
surface, hold the disc edge
and centre hole to remove
it.
Replacing Disc in Round DVD Holder
Open SIDE A of the Round DVD Holder, and
replace the disc in the holder with the SIDE A mark
or label surface facing up, taking care not to touch
the disc surface.
3
OPEN marks
SIDE A mark side
or label surface
SIDE A
mark
3
2 Fit the hinged portion of the other holder piece
into the warped hinge portion.
Note:
• Handle the disc carefully so that no scratch, dirt,
fingerprint or dust adheres to the recording/playback
surface.
• When not using the Round DVD Holder, store it in case:
Do not leave a bare holder as is.
• Be careful of drop or impact: If you drop the Round DVD
Holder, the disc may pop out.
• Do not subject the Round DVD Holder to force.
Disc Cleaning
Use a soft, dry cloth to lightly wipe off any dust, dirt,
etc. adhering to disc, as shown in the figure. Never
use solvent. Do not use thinner, water, anti-static
spray, etc. to clean disc.
Use soft cloth to clean
from inner to outer
circumference in axial
direction.
3 Close SIDE A of the Round DVD Holder, and
push it to lock the release levers at positions (3).
15

Available Cards
English
SD memory card
and multimedia
card can be used
on this DVD video
camera/recorder.
• When the erasure prevention switch on SD
memory card is locked, no recording, deletion or
editing will be possible on the card.
lHandling card
• Do not use cards other than
the designated ones.
• Be sure to use a brand new
card when recording vital
images.
• Do not touch the card terminal
or allow it to touch metal.
• Do not paste anything other
than exclusive label on label
pasting portion.
• Do not subject card to impact, bend or drop it.
• Do not disassemble card or modify it.
• Do not expose card to water.
• Do not use or store card in the following places:
− Where the temperature is high, such as in
vehicle at high temperatures, under burning
sun or near a heater.
− Where humidity is high, or in dusty place
Terminal
Erasure prevention
switch
Locked status
• It is recommended that you create a backup file
for valuable data on hard disk of PC.
• Do not do the following, or the data on card may
be damaged or lost:
− Do not remove the card or turn DVD video
camera/recorder off during reading or writing of
data
− Do not use DVD video camera/recorder in a
place subject to static electricity or electrical
noise
Note:
• This DVD video camera/recorder can play back image
data recorded on other digital cameras conform ing to the
DCF (Design rule for Camer a File system) standard. The
range of image data playable on this DVD video camera/
recorder is that w ith pixels from 80 horizon tal × 60 vertical
to 4000 horizontal × 3000 vertical.
• DCF is an integrated image file format of digital cameras:
Image files can be used on all digi tal devices conforming
to DCF.
• I mage data edited on PC and certain types of image data
may not be visible on this DVD video camera/recorder.
• The image data recorded on another device may not be
playable on this DVD video camera/recorder.
16

Storage Capacity on Disc or Card
Recordable Time of Movie (Video)
The recordable time will vary depending on the
recording quality: See page 73 for the setting of
recording quality.
Movie recordable time on one disc (on single side)
(when recording only movies)
Recording
quality
XTRA Approx. 18 min *1No recording
FINE Approx. 30 min
STD Approx. 60 min *3Approx. 60 min
*1:
Variable bit recording (recording of more than 18
minutes may be possible because the transfer rate
varies automatically between approx. 3-10 Mbps)
*2:
Transfer rate: Approx. 6 Mbps
*3:
Transfer rate: Approx. 3 Mbps
DVD-RAM DVD-R
Disc used
possible
*2
Approx. 30 min
*2
*3
English
Note:
• No movie can be recorded on SD memory card or
multimedia card.
• The movie quality mode can be changed for recordings
on DVD-RAM disc, but not on DVD-R disc.
17

Recordable Stills (Photos)
English
lRecordable stills on one DVD-RAM
disc (single side) (when recording
only still): Up to 999
If the disc still has free space after recording 999
stills on it, movies can also be recorded on it.
lRecordable stills on one blank card:
The number of recordable stills will vary depending
on the recording quality: See page 74 for the setting
of recording quality.
Capacity
8 MB
16 MB
32 MB
64 MB
128MB
256 MB
512 MB
(The numbers of recordable stills above are only for
reference)
Approx. 45 Approx. 95 Approx. 190
Approx. 100 Approx. 200 Approx. 400
Approx. 220 Approx. 440 Approx. 880
Approx. 440 Approx. 880 Approx. 1,760
Approx. 880 Approx. 1,760 Approx. 3,520
Approx. 1,760 Approx. 3,520 Approx. 7,040
Approx. 3,520 Approx. 7,040 Approx. 14,080
Recording quality
FINE NORM ECO
Note
:
• Cards used on other devices can be used on this DVD
video camera/recorder.
• No movie or music data recorded on card can be
checked, viewed or heard on this DVD video camera/
recorder. In addition, no such a data file can be displayed
on this DVD video camera/recorder.
• Use the remaining display function to check the
remaining free spa ce on disc before use. See “Verifyi ng
Remaining Free Space on Disc or Card (Capacity)” on
page 112.
• Some still data recorded on this DVD video camera/
recorder may not be playable on another device (for
example, on a device tha t limits the maximum number of
recognisable stills to 999).
• No still can be recorded on DVD-R disc.
18

Features of DVD Video Camera/Recorder
Versatile Functions Available
This DVD video camera/recorder has numerous use ful functions. However, the functions that can be used
will vary depending on whether DVD-RAM disc, DVD-R disc or card is used.
Use the functions, following the table below:
Camera Functions:
Function
Camera Functions Setup
Record Functions Setup
Date Setup
LCD Setup
Initial Setup
Program AE
White Bal.
EIS
Dig.Zoom
MIC.Filter
16:9
VIDEO Mode
Quality
Self Timer
OSD Output
Date Mode
Date Set
Brightness
Color Level
Beep
Powe r S ave
Record LED
Language
Demo Mode
Reset
Disc/Card used
DVD-RAM DVD-R CARD
∴∴ ∴
∴∴ ∴
∴∴×
∴∴ ∴
∴∴×
∴∴ ∴
∴∴
*1
×
××∴
∴ × ∴
∴∴ ∴
∴∴ ∴
∴∴ ∴
∴∴ ∴
∴∴ ∴
∴∴ ∴
∴∴ ∴
∴∴ ∴
∴∴ ∴
∴∴ ∴
∴∴ ∴
∴: Available; ×: Unavailable
(*1 Except for XTRA mode)
Reference
page
67
68
70
71
72
72
73
74
75
76
40
39
77
77
78
78
79
79
132
80
English
19

Disc Navigation Functions:
English
Scene Delete
PlayList Switch
Program Switch
Go To Top
Disc Capacity
Others Category All
Function
Edit Thumbnail
Copy
Select Start → Current
Detail
Play
Create
Edit
Title
Delete
Play
Title
End
Protect Disc
Format Disc
Update Control Info.
Finalize Disc
Repeat Play On
Skip
Fade
Combine
Divide
Move
Current → End
All
VIDEO
PHOTO
Off
Disc used
DVD-RAM DVD-R
∴ ×
∴ ×
∴ ×
∴ ×
∴ ×
∴ ×
∴ ×
∴ ×
∴∴
∴∴
∴∴
∴∴
∴ ×
∴ ×
∴ ×
∴ ×
∴ ×
∴ ×
∴∴
∴∴
∴ ×
∴∴
∴∴
∴ ×
∴ ×
∴ ×
∴ ×
× ∴
∴ ×
∴ ×
∴ ×
∴∴
∴∴
∴: Available; ×: Unavailable
Reference
page
87
89
90
91
93
94
92, 109
95
98
98
98
99
104
105
103
106 - 109
110
110
100
101
101
111
111
112
112
113
114
115
116
116
116
116
116
20

Card Navigation Functions:
Function Reference page
Delete 87
Lock 96
Scene
Go To
Card
Slide Show
DPOF 97
Select Start → Current 98
Detail 99
To p 1 1 1
End 111
Capacity 112
Format Card 113
All 117
DPOF 117
English
Current → End 98
All 98
Recording on Disc
You can use both 8 cm DVD-RAM and DVD-R
discs on this DVD video camera/recorder for
recording. The recorded video and audio will be
stored on an 8 cm DVD-RAM disc or 8 cm DVD-R
disc.
Using disc allows you to record without overwriting
previous recordings, and also to store your valuable
recordings for as long as need be while retaining
clarity.
With disc you can immediately access recording
and playback, in contrast to videotape, which must
be fast-forwarded or rewound.
In addition, simply loading a DVD-RAM disc into a
PC equipped with DVD-RAM drive and DVD video
recording software compatible with 8 cm DVDRAM allows you to easily view the recorded disc.
You can finalise a recorded DVD-R disc on this DVD
video camera/recorder so that you can play it back
on a DVD player or DVD video recorder that is
compatible with 8 cm DVD-R disc (however, the
finalised DVD-R disc may not be usable on some
DVD players).
Recording Movie and Still
The DVD video camera/recorder can record
movies of events and sports, in the same way as
with conventional camcorders.
It can also record stills on a DVD-RAM disc or card,
as with a digital still camera. With CCD of 800,000
pixels, high-quality movies and stills (on DVD-RAM
disc only) can be recorded. When recording
movies, subject images can be zoomed up to 240
times; when recording stills, subject images can be
zoomed up to 40 times. Movies and stills can be
recorded on the same disc, by simply switching the
recording mode (power switch). However, if you
use a DVD-R disc, a still image cannot be recorded.
(If the DVD video camera/recorder is connected to
PC, the DVD video camera/recorder can capture
still images, such as JPEG data.)
21

Immediate Reviewing of Recorded Image
English
You can check the recorded movie or still in the viewfinder or on the LCD screen.
Editing in Various Ways on DVD Video Camera/Recorder Alone
This DVD video camera/recorder is provided with a useful editing/playback tool. Disc Navigation allows
you to easily attach a title or special video effect to the recorded movie or still. With Disc Navigation, you
can arrange the playback order and edit multiple images to play them back continuously. You can create
an entire movie on this DVD video camera/recorder alone, without inputting video to a PC for editing.
Using with Various Devices
Connect this DVD video camera/recorder to your TV and you can enjoy the playback picture with your
family and friends on the large TV screen; or connect it to a video printer (generally available) to print the
recorded image. You can also transfer recorded movies and stills (for DVD-RAM disc or card) to PC.
22
Setups
This section explains preparations for recording - setting up the DVD video camera/recorder and
battery.
Setting Up the DVD Video Camera/Recorder
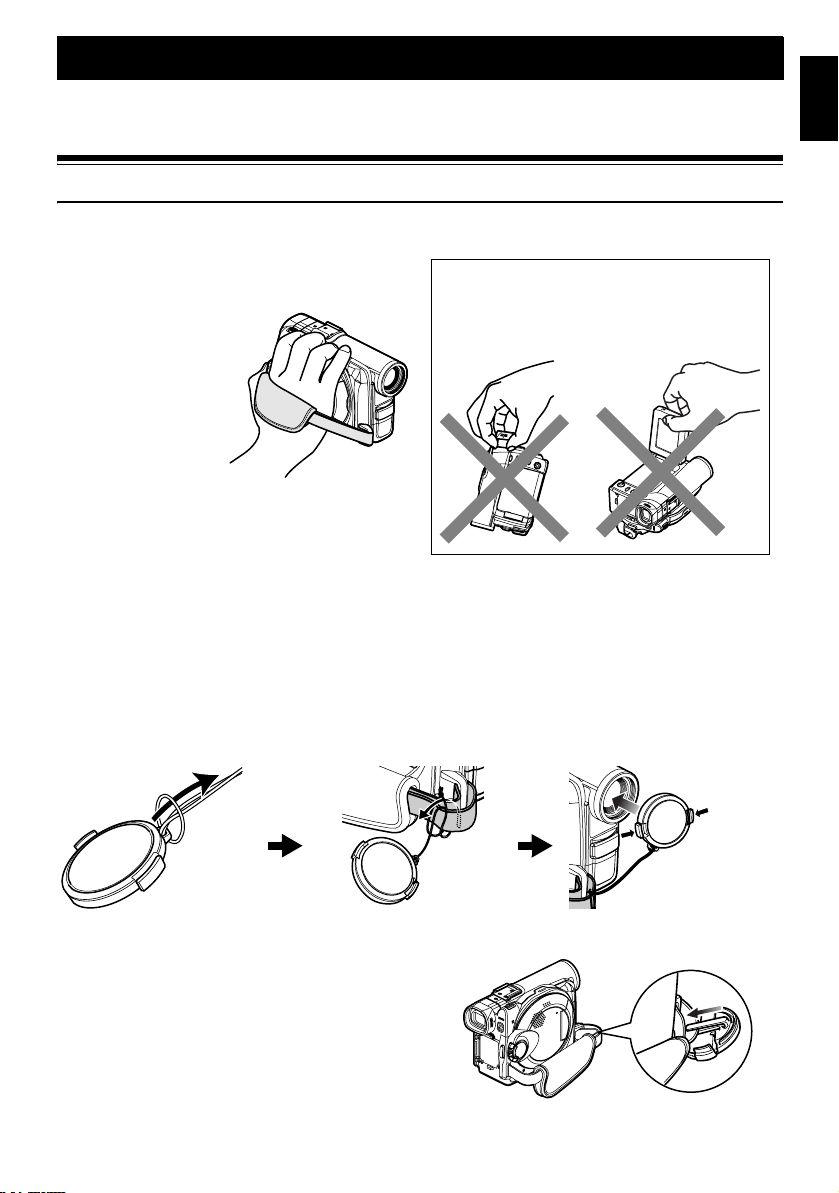
Holding DVD Video Camera/Recorder
Insert your right hand from the bottom of DVD video
camera/recorder up to the base of your thumb.
Put your hand in a
position where you can
easily operate the REC
button and the Zoom
lever.
Adjust the length of hand
strap so that the DVD
video camera/recorder
is stable when you press
the REC button with your thumb.
Note:
Do not adjust the hand strap while holding the DVD video
camera/recorder: Doing this could cause the DVD video
camera/recorder to fall and be damaged.
Attaching Lens Cap
Pass the provided string through the hole in the lens cap and attach it to the hand strap of DVD video
camera/recorder.
Caution:
Do not lift the DVD video camera/recorder by
holding the viewfinder or LCD monitor: If the
viewfinder or LCD monitor comes off, the DVD video
camera/recorder will fall.
English
1 Use the string to attach the cap to the DVD video
camera/recorder.
Note:
• Always keep the lens cap on when not using the DVD
video camera/recorder, to protect the lens.
• W hen recording, attach the lens cap to the hand strap by
hooking the tab insid e the cap onto strap for comfortable
shooting.
2 Push the both sides of cap inward and attach it
over the lens.
Push and fit
23

Attaching Shoulder Strap
English
Be sure to pass through the 2 slots.
Pass the shoulder strap through
the shoulder strap attachments.
24
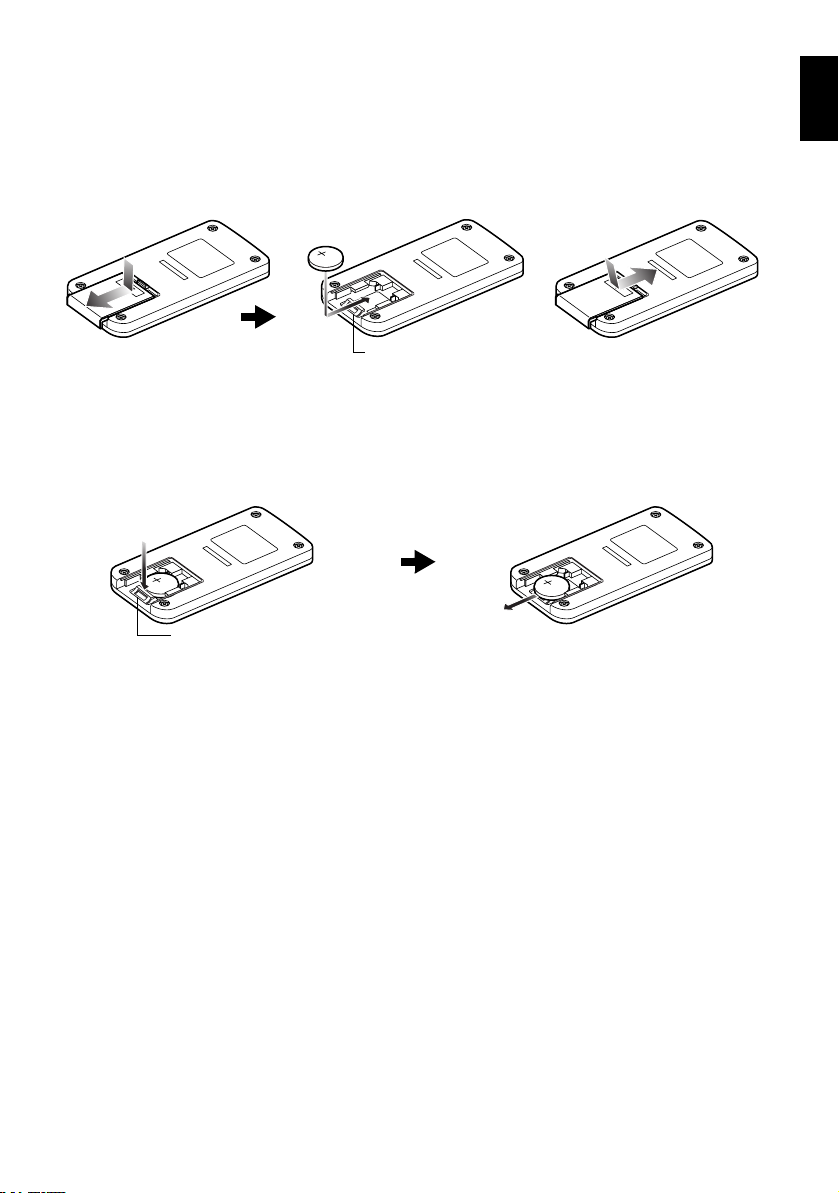
Inserting Battery into Remote Control
Insert the provided lithium battery into remote control.
1 Slide the cover to remove it.
2 Insert the lithium battery with the positive R
terminal facing up.
Battery stopper
Removing Battery from Remote Control
1 While pushing the battery stopper, slide the
battery out.
While pushing
battery stopper
Battery stopper
3 Slide the cover to close it.
Note:
The life of lithium battery is approximately one year. If the
battery is discharged, no ope ration is possible with remote
control: Replace the battery.
English
Warning:
• KEEP THE BATTERY AWAY FROM CHILDREN AND
PETS.
• IF SWALLOWED CONSULT A PHYSICIAN
IMMEDIATELY FOR EMERGENCY TREATMENT.
• BATTERY MAY EXPLODE IF NOT HANDLED
PROPERLY. DO NOT RECHARGE, DISASSEMBLE
OR DISPOSE OF IN FIRE.
Note
:
• Replace the battery with a Panasonic CR2025. Use of
another battery may present a risk of fire or explosion.
• Dispose of battery safely in accordance with local laws.
Do not dispose of in fire.
• Do not short circuit the battery.
• Do not hold the battery with the metallic tweezers.
• Keep the battery in a dark, cool, dry place.
25

lUsing Remote Control
Point the remote control to the infrared receiver on
English
the DVD video camera/recorder. The remote
controllable distance is up to 5 m.
10˚
15˚
10˚
5m
.
x
o
r
p
p
A
Infrared
receiver
15˚
Note:
• When using the remote control, make sure that the
infrared receiver on DVD video camera/recorder is not
exposed to direct sunlight or any intense light. If the
infrared receiver is subject to light stronger than the
infrared light from remote control, the DVD video camera /
recorder cannot be operated by remote control.
• If there is an obstacle between the remote control and
infrared receiver on D VD video camera/recorder, remote
control may not be possible.
26
Setting Up the Battery
The CGA-DU14 battery provided with this DVD video camera/recorder has not been charged at purchase
time: Charge it before using the DVD video camera/recorder.
Note:
• B e sure to use the CGA-DU14/CGA-D U21 battery for the DVD video came ra/recorder: Using other bat teries could cause
the DVD video camera/recorder to malfunction, or result in fire.
• Be sure to use the VSK0631 AC adapter/charger to charge the battery: Using other chargers could cause electric
shock or fire.
• Charge the battery at temperatures of 10-30°C.
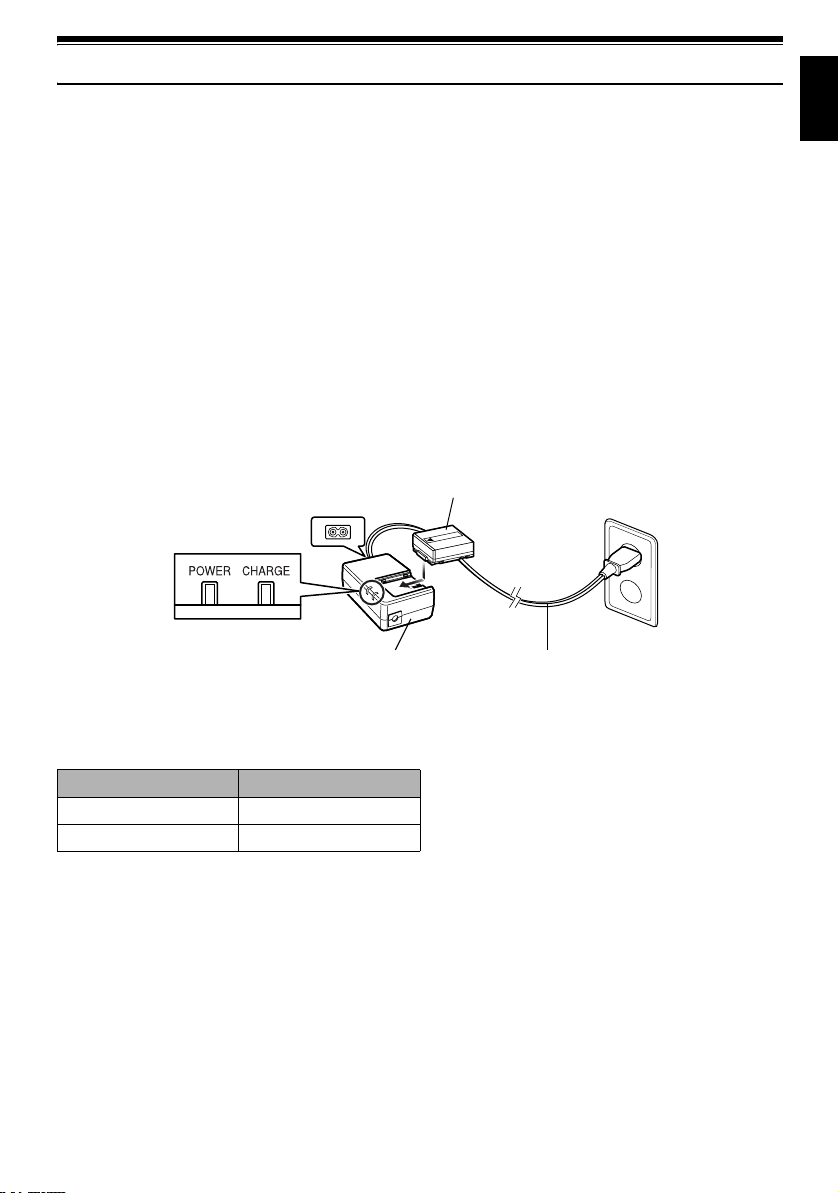
Charging Battery
Use the provided AC adapter/charger to charge the battery.
1 Connect the mains lead to AC adapter/charger.
2 Plug the mains lead into AC outlet.
The CHARGE indicator on AC adapter/charger
will light.
POWER and
CHARGE indicators
AC adapter/charger
3 Attach the battery to AC adapter/charger.
Note:
When charging a battery, unplug the DC power cord from
the DC output jack on AC adapter/charger.
Battery
Mains lead
English
lBattery charged status
You can find out the charged status of battery by checking the CHARGE indicator on AC adapter/charger:
Charge status CHARGE indicator
During charge Lit
Charge complete Goes out
Note:
See “Troubleshooting” on page 142 when the CHARGE
indicator blinks.
27
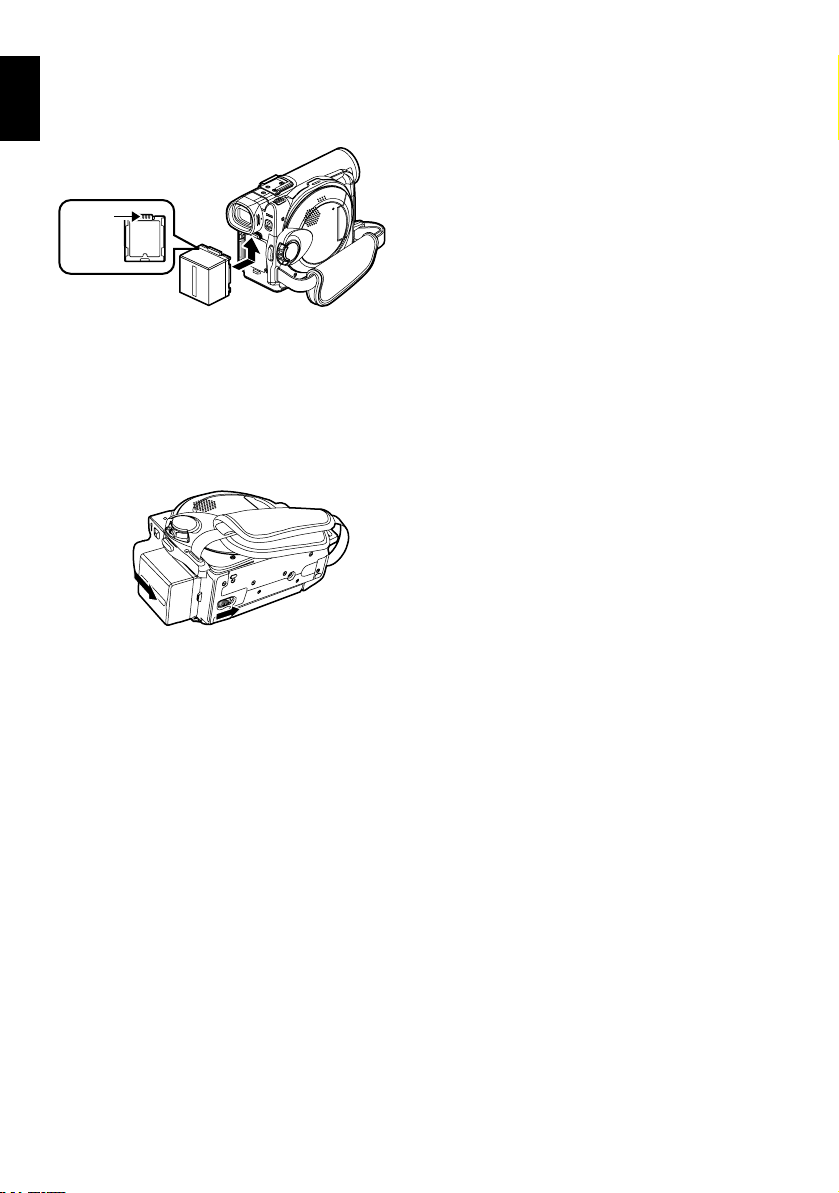
Attaching Battery to DVD Video Camera/Recorder
English
1 Fit the battery to the battery attachment platform
on this DVD video camera/recorder and slide it
upward until a click is heard.
Te rm i na l
must
face up.
Note:
• Make sure that the battery is in the correct orientation.
• Make sure that the battery is securely attached:
Incomplete attachment could cause the battery to fall,
resulting in damage.
Removing Battery
After using the DVD video camera/recorder, remove the battery from it.
1 Slide the BATTERY EJECT switch on the bottom
of DVD video camera/recorder: The battery can
be removed.
2
1
Note:
• For safety, be sure to turn the DVD video camera/
recorder off before attaching or removing the battery.
• Be careful not to drop the removed battery.
• If the battery remains attached, minute level current will
flow even if the DVD vide o camera/recorder is off, and the
battery will discharge.
28

lRecordable time with fully charged
battery (with no zoom operation,
etc.)
The reference for DVD video camera/recorder
recordable time with fully charged battery is
between 40 and 60 minutes:
Video
quality
mode
*
XTRA
FINE When using
STD When using
*
The time in XTRA mode is only for reference: It varies
depending on recording contents.
When using
viewfinder
When using
LCD monitor
viewfinder
When using
LCD monitor
viewfinder
When using
LCD monitor
DVD-RAM
disc
125 min
100 min
125 min 125 min
100 min 100 min
145 min 145 min
115 min 115 min
DVD-R disc
(approx.)
−
−
Without any extraordinary operation,
such as zooming:
The continuously recordable time of DVD video
camera/recorder in the above table shows the time
available when the DVD video camera/recorder is
in the recording mode without using any other
function after recording is started. In actual
recording, the battery will discharge 2-3 times faster
than this reference, since the REC button and zoom
are being operated, and playback is performed.
Assume that the recordable time with a fully
charged battery is between 40 and 60 minutes, and
prepare the number of batteries to allow for the time
you are planning to record on the DVD video
camera/recorder.
Note that the battery discharges faster in cold
places.
lThe time taken for charging the
battery is 165 minutes at 25°C
Note:
• See page 142 when charging is not possible.
• The charge time will vary depending on the battery
remaining level.
• During and after charging, the battery will be warm, but
this does not indicate a fault.
• If the following phenomena appear, the battery may be
dead: Replace it.
- Charging does not start within 10 seconds (the
CHARGE indicator does not light).
- The battery cannot be charged up to 75% if more than
9 hours has elapsed after charging started.
- The battery cannot be fully charged if more th an 5 hours
has elapsed after it was charged to 75%.
• C harge the battery at ambie nt temperature 10°C to 30°C:
Charging at temperatures other than this range could
damage the battery.
English
29

Battery Remaining Level Indicator
English
When the battery is used to power the DVD video camera/recorder, the battery remaining level appears
in the viewfinder or on the LCD screen as follows:
Fully charged Nearly empty
(Blinks)
White portion shows remaining level
Note:
The remaining level indicator “w” may be displayed for an extended period, and “x” or “y” may be displayed for
a shorter period.
Efficient Use of Battery
Charge battery immediately before using DVD
video camera/recorder:
The battery will slightly discharge even if it is
detached from the DVD video camera/recorder. If
the battery is left attached to DVD video camera/
recorder, it will consume a slight amount of power.
Therefore, it is recommended that you charge the
battery shortly before using the DVD video camera/
recorder, usually on the day before you plan to use
it.
However, since the battery used for this DVD video
camera/recorder is free from the memory effect,
you do not need to completely discharge the battery
before charging it.
When not using the DVD video camera/recorder
for an extended period:
It is recommended that you fully charge the battery
once a year, attach it to DVD video camera/recorder
and use it up; then remove the battery and store it
in a cool place again.
Store in cool, dark place:
When you are not using the DVD video camera/
recorder, remove the battery and store it in a cool,
dark place. If you store it in a place where the
temperature is high, the battery life will be
shortened. Be especially sure not to store the
battery in an environment (in a closed vehicle) over
60°C: Neglecting this could damage the battery.
Battery life:
The battery life varies greatly depending on the
ambient environment and how often the DVD video
camera/recorder is used. If the usable time of DVD
video camera/recorder with a fully charged battery
is noticeably short, the battery is probably dead:
Purchase a new one.
Power save and discharge of battery:
It is recommended that you turn the DVD video
camera/recorder off in status other than recording,
since even during recording pause battery power is
consumed at the same level as during recording.
If, when you specify Power Save On, the recording
pause status continues for approximately
5 minutes, the DVD video camera/recorder will
automatically turn off.
To set or release power save, see “Turning DVD
Video Camera/Recorder Off Automatically (Power
Save)” on page 78.
30
 Loading...