

Page 1

Operating Instructions
LCD Television
Model No.
TX-L32EM6B
Thank you for purchasing this Panasonic product.
Please read these instructions carefully before operating this product and
retain them for future reference.
The images shown in this manual are for illustrative purposes only.
English
UK and Ireland model
Page 2

Transport only in upright position
Panasonic does not guarantee operation and performance
of peripheral devices made by other manufacturers; and
we disclaim any liability or damage arising from operation
and/ or performance from usage of such other maker’s
peripheral devices.
This product is licensed under the AVC patent portfolio
license for the personal and non-commercial use of a
consumer to (i) encode video in compliance with the AVC
Standard (“AVC Video”) and/or (ii) decode AVC Video that
was encoded by a consumer engaged in a personal and
non-commercial activity and/or was obtained from a video
provider licensed to provide AVC Video. No license is
granted or shall be implied for any other use.
Additional information may be obtained from MPEG LA,
LLC. See http://www.mpegla.com.
Contents
Be Sure to Read
Safety Precautions ...............................................3
Maintenance ..........................................................5
Quick Start Guide
Accessories / Options ..........................................6
Basic Connection ............................................... 11
Identifying Controls ...........................................14
Auto Setup ..........................................................15
Notice for DVB / Data broadcasting
This TV is designed to meet the standards (as of August,
2012) of digital services.
● Not all the features are available depending on the
country, area, broadcaster, service provider and network
environment.
● The compatibility with future services is not guaranteed.
● Check the latest information on the available services at
the following website.
http://panasonic.jp/support/global/cs/tv/
Basic Features
Watching TV ........................................................16
How to Use Menu Functions .............................18
Advanced Features
Using Media Player ............................................26
Others
FAQs ....................................................................30
Specications .....................................................31
Licence ................................................................35
2
Page 3

Be Sure to Read
Safety Precautions
Warning
Mains plug and lead
To help avoid risk of electrical shock, re, damage or injury, please follow the warnings below:
● This TV is designed to operate on AC 220-240 V, 50/60 Hz.
● Insert the mains plug fully into the socket outlet.
● Ensure that the mains plug is easily accessible.
● Remove the mains plug when cleaning the TV.
● Do not touch the mains plug
with a wet hand.
● Do not damage the mains
lead.
• Do not place a heavy
object on the lead.
• Do not place the lead
near a high temperature
object.
• Do not pull on the lead.
Hold onto the mains plug
body when disconnecting
the plug.
• Do not move the TV with the lead plugged into a socket outlet.
• Do not twist the lead, bend it excessively or stretch it.
• Do not use a damaged mains plug or socket outlet.
• Ensure the TV does not crush the mains lead.
● Do not use any mains lead other than that provided with this TV.
● If you detect anything unusual, immediately switch
off the mains supply switch and remove the mains
plug.
AC 220-240 V
50/60 Hz
Safety Precautions
.YLLUFERAC TXET GNIWOLLOF EHT DAER ESAELP ,YTEFAS RUOY ROF
A 5 amp fuse is fitted in this mains plug. Shall the fuse need to be replaced, please ensure that the replacement
fuse has a rating of 5 amps and that it is approved by ASTA or BSI to BS1362.
interference and for your safety.
dealer.
securely into the mains plug (see example 1).
then press the fuse cover down securely (see example 2).
kram ATSA eht rof kcehC
or the BSI mark on the body of the fuse.
.gulp sniam eht ffo tuc ton oD
esuf eht ecalper ot woH
:1 elpmaxe ni nwohs epyt gulp roF
:2 elpmaxe ni nwohs epyt gulp roF
.relaed lacol ruoy morf desahcrup eb yam revoc esuf tnemecalper A
.VT siht htiw deilppus eno eht tpecxe dael sniam fo epyt rehto yna esu ton oD
siht htiw desu eb ot dengised era gulp dedluom dna dael sniam deilppus ehT
.ecneinevnoc dna ytefas ruoy rof gulp sniam nip eerht dedluom a htiw deilppus si VT sihT
.deniatbo si revoc tnemecalper a litnu desu eb ton tsum gulp sniam eht revoc esuf eht esol uoy fI
Example 1
diova ot VT
.naicirtcele deifilauq a yb degnahc ti teg ,elbatius ton si emoh ruoy ni teltuo tekcos eht fI
dezirohtua na morf tnemecalper a esahcrup ,degamad semoceb dael sniam ro gulp eht fI
tifer neht ,esuf eht ecalper dna revirdwercs a htiw tnemtrapmoc esuf elbavomer eht tuo tfiL
Example 2
,esuf eht ecalper dna ,revirdwercs a htiw ,gulp sniam eht ni ,tnemtrapmoc esuf eht nepo tfiL
.decalper si esuf eht nehw dettifer si ti taht erusne tsum uoy ,revoc esuf elbavomer a sniatnoc gulp sniam eht fI
3
GULP SNIAM DEDLUOM EHT :TNATROPMI
Page 4

Warning
10
10 10 10
Take care
To help avoid risk of electrical shock, re, damage or injury, please follow the warnings below:
Safety Precautions
● Do not remove covers and never modify the TV yourself as live parts
are accessible when they are removed. There are no user serviceable
parts inside.
● Do not expose the TV to rain or excessive moisture. This TV must not
be exposed to dripping or splashing water and objects lled with liquid,
such as vases, must not be placed on top of or above the TV.
● Do not expose the TV to direct sunlight and other sources of heat.
To prevent re never place any type of candle or naked ame on top or
near the TV.
● Do not place the TV on sloped or unstable surfaces, and ensure that
the TV does not hang over the edge of the base.
● Do not insert foreign objects into the TV through the air vents.
● Do not use an unapproved pedestal / mounting equipment. Be sure to ask your local Panasonic dealer to perform
the setup or installation of approved wall-hanging brackets.
● Do not apply strong force or impact to the display panel.
● This TV is designed for Table-top use.
To prevent the spread of re, keep candles or other open
ames away from this product at all times
Small object
This product contains possibly dangerous parts that can be breathed in or swallowed by young children accidentally.
● Keep the dangerous parts out of reach of young children.
Caution
Ventilation
Allow sufcient space around the TV in order to help prevent excessive heat, which could lead to early failure of some
electronic components.
● Ventilation should not be impeded by covering
the ventilation openings with items such as
newspapers, tablecloths and curtains.
● Whether you are using the pedestal or not, always ensure the vents in the bottom of the TV are not blocked and
there is sufcient space to enable adequate ventilation.
4
Minimum distance
(cm)
Page 5

Moving the TV
Before moving the TV, disconnect all cables.
When not in use for a long time
This TV will still consume some power even in the Off mode, as long as the mains plug is still connected to a live socket
outlet.
● Remove the mains plug from the wall socket when the TV is not in use for a prolonged period of time.
Excessive volume
Do not expose your ears to excessive volume from the headphones.
Irreversible damage can be caused.
Maintenance
First, remove the mains plug from the socket outlet.
Display panel, Cabinet, Pedestal
Regular care:
Gently wipe the surface of the display panel, cabinet,
or pedestal by using a soft cloth to clean the dirt or
ngerprints.
Caution
● Do not use a hard cloth or rub the surface too hard, otherwise this may cause scratches on the surface.
● Take care not to subject the TV’s surfaces to water or detergent. Liquid inside the TV could lead to product failure.
● Take care not to subject the surfaces to insect repellent, solvent, thinner or other volatile substances. This may
degrade surface quality or cause peeling of the paint.
● The surface of the display panel is specially treated and may be easily damaged. Take care not to tap or scratch the
surface with your ngernail or other hard objects.
● Do not allow the cabinet and pedestal to make contact with a rubber or PVC substance for a long time. This may
degrade surface quality.
Mains plug
Wipe the mains plug with a dry cloth at regular intervals. Moisture and dust may lead to re or electrical shock.
For stubborn dirt:
First clean the dust on the surface. Dampen a soft cloth
with clean water or diluted neutral detergent (1 part
detergent to 100 parts water). Wring the cloth and wipe the
surface. Finally, wipe away all the moisture.
Quick Start Guide
Maintenance
5
Page 6

Quick Start Guide
VIERA
TOOLS INPUT
TV AV
MENU TEXT STTL GUIDE
EXIT
OK
OPTION
BACK/
RETURN
ASPECT
MUTE
STILL
LAST VIEW
TV
jkl
tuv
abc
mno
wxyz
def
ghi
pqrs
Accessories / Options
Standard accessories
Remote Control
● N2QAYB000815
Quick Start Guide
Batteries for the Remote
Control (2)
● (R6AA)
(p. 6)
Pedestal
(p. 8)
Mains Lead
(p. 11)
Assembly screws for
base (4)
(p. 8)
Accessories / Options
M4 × 14 M4 × 10
Assembly screws for
pedestal (4)
(p. 8)
● Accessories may not be placed all together. Take care not to throw them away unintentionally.
● This product contains possibly dangerous parts (such as plastic bags), that can be breathed in or swallowed by
young children accidentally. Keep these parts out of reach of young children.
Installing / removing remote’s batteries
1 Remove the battery compartment cover. 2 Insert two R6AA batteries (1.5V) according to
“+” and “-” polarity markings inside the battery
compartment, then close the battery compartment
cover.
Pull open
Hook
Caution
● Incorrect installation may cause battery leakage and corrosion, resulting in damage to the remote control.
● Do not mix old and new batteries.
● Replace only with same or equivalent type. Do not mix different battery types (such as alkaline and manganese
batteries).
● Do not use rechargeable (Ni-Cd) batteries.
● Do not burn or break up batteries.
● Do not expose batteries to excessive heat such as sunshine, re or the like.
● Make sure you dispose of batteries correctly.
● Ensure batteries are replaced correctly, there is danger of explosion and re if battery is reversed.
● Do not disassemble or modify the remote control.
Note the correct
polarity (+ or -)
Close
6
Page 7

Optional accessories
Please contact your local Panasonic dealer to purchase the recommended optional accessories.
For additional details, please read the manual of the optional accessories.
Wall-hanging bracket
Please contact your local Panasonic dealer to purchase the recommended wall-hanging bracket.
● Holes for wall-hanging bracket installation
Depth of screw:
TX-L32EM6B
Rear of the TV
● TX-L32EM6B
a: 200 mm
b: 100 mm
Minimum 16 mm
Maximum 21 mm
Diameter: M6
Screw for xing the TV onto the wall-hanging
bracket (not supplied with the TV)
● Make sure that all screws are securely
(View from the side)
tightened.
Warning
● Using other wall-hanging brackets, or installing a wall hanging bracket by yourself have the risk of personal injury and
product damage. In order to maintain the unit’s performance and safety, be absolutely sure to ask your dealer or a
licensed contractor to secure the wall-hanging brackets. Any damage caused by installing without a qualied installer
will void your warranty.
● Carefully read the instructions accompanying optional accessories, and be sure to take steps to prevent the TV from
falling off.
● Handle the TV carefully during installation since subjecting it to impact or other forces may cause product damage
which will void your warranty.
● Do not mount the unit directly below ceiling lights (such as spotlights, oodlights or halogen lights) which typically
give off high heat. Doing so may warp or damage plastic cabinet parts.
● Take care when xing wall brackets to the wall. Wall mounted equipment must not be grounded by metal within the
wall. Always ensure that there are no electrical cables or pipes in the wall before hanging bracket.
● To prevent fall and injury, remove the TV from its xed wall position when it is no longer in use for extended period of
time.
Quick Start Guide
Accessories / Options
7
Page 8

Attaching / removing the pedestal
Warning
Do not disassemble or modify the pedestal.
● Otherwise the TV may fall over and become damaged, and personal injury may result.
Caution
Do not use any pedestal other than the one provided with this TV.
● Otherwise the TV may fall over and become damaged, and personal injury may result.
Do not use the pedestal if it becomes warped or physically damaged.
● If you use the pedestal while it is physically damaged, personal injury may result. Contact your local Panasonic
Quick Start Guide
dealer immediately.
During set-up, make sure that all screws are securely tightened.
● If insufcient care is taken to ensure screws are properly tightened during assembly, the pedestal will not be strong
enough to support the TV, and it might fall over and become damaged, and personal injury may result.
Ensure that the TV does not fall over.
● If the TV is knocked or children climb onto the pedestal with the TV installed, the TV may fall over and personal injury
may result.
Two or more people are required to install and remove the TV.
● If two or more people are not present, the TV may be dropped, and personal injury may result.
Accessories / Options
When removing the pedestal from the TV, do not remove the pedestal by the methods other than the specied
procedure. (see below)
● Otherwise the TV and / or pedestal may fall over and become damaged, and personal injury may result.
Assembly screw (8) Bracket Base
M4 × 14
Assembly screws for base (4)
M4 × 10
Assembly screws for pedestal (4)
1 Place the TV screen face-down
on a cushioned, clean surface to
protect the screen from damages
and scratches.
2 Assembling the pedestal
Use the assembly screws to fasten
the bracket to the base securely.
● Make sure that the screws are
securely tightened.
● Forcing the assembly screws the
wrong way will strip the threads.
M4 × 14
Hold the
bracket not
to fall over
3 Securing the TV
Adjust the position of the
A
pedestal, then insert the
pedestal to the TV screen.
Use the assembly screws to
B
fasten securely.
● Tighten the four assembly screws
loosely at rst, then tighten them
rmly to x securely.
● Carry out the work on a horizontal
and level surface.
M4 × 10
B
A
Front
8
Page 9

Removing the pedestal from the TV
Be sure to remove the pedestal in the following way when using the wall-hanging bracket or repacking the TV.
1 Place the TV screen facing down on a at surface place where maintained with soft materials (such as a blanket)
for protecting the display screen.
2 Remove assembly screws for pedestal with screw driver.
3 Remove the pedestal from the TV.
Preventing the TV from falling over
Using the fall-prevent screw hole and a screw (commercially available), securely x the body of the pedestal to the
installation surface.
● The place where the pedestal is to be xed should be thick enough and made of hard material.
Quick Start Guide
Screw (not supplied)
Diameter: 3 mm
Length: 25 - 30 mm
Screw hole
Accessories / Options
9
Page 10

Indicator / Control panel
1/2
Mode
Bass
Treble
Equaliser
Balance
Surround
Headphone Volume
Auto Gain Control
Volume CorrectionVolume Correction
Speaker Distance to Wall
Standard
0
0
0
20
O
O
0
Over 30cm
Main Menu
Picture
Sound
Network
Change
Select
RETURN
Page up
Page down
Selects your favourite sound mode.
Timer
Setup
Help
OK
BACK/
EXIT
1 C.A.T.S. (Contrast Automatic Tracking System)
sensor
● Senses brightness to adjust picture quality when
[Ambient Sensor] in [Picture] is set to [On].
(p. 19)
2 Remote control signal receiver
● Do not place any objects between the TV remote
control signal receiver and remote control.
3 Power indicator
Quick Start Guide
Red: Standby
Green: On
● The LED blinks when the TV receives a command from
the remote control.
1 2 3
4
● Selects an input source.
● Conrms and enters a selection on the On-Screen
Display Menu.
Accessories / Options
5 Menu
● Press the button for a while to open or close the
On-Screen Display Menu
6
● Changes channels.
7
● Changes volume.
● Adjusts the value of the selected item on the
On-Screen Display Menu.
8
(POWER)
● Switches TV on or off.
● To completely turn off the TV, please remove the mains
lead from the wall socket.
● Selects item on the On-Screen Display Menu.
Note
● If the TV is turned off by (POWER) button on the back of the TV, you cannot switch TV power on by button of
the remote control. Please press (POWER) button again on the back of the TV to turn the TV on.
Using the On-Screen Displays - Operation guide
Many features available on this TV can be accessed via the On-Screen Display menu.
Operation guide How to use remote control
Operation guide will help you to operate by using the
remote control.
Example: [Sound]
MENU
OK
● Open the main menu
● Move the cursor / select from a
range of options / select the menu
item (up and down only) / adjust
levels (left and right only)
● Access the menu / store settings
after adjustments have been made
or options have been set
INPUT
OK
4
HOLD
for
MENU
5
6
7
8
Auto power standby function
The TV will automatically go into Standby mode in the following conditions:
• [Off Timer] is active in the [Timer]. (p. 22)
• No operation is performed for 4 hours if [Auto Standby] is set to [On] (p. 22)
10
Operation guide
RETURN
● Return to the previous menu
● Exit the menu system and return to
the normal viewing screen
Page 11
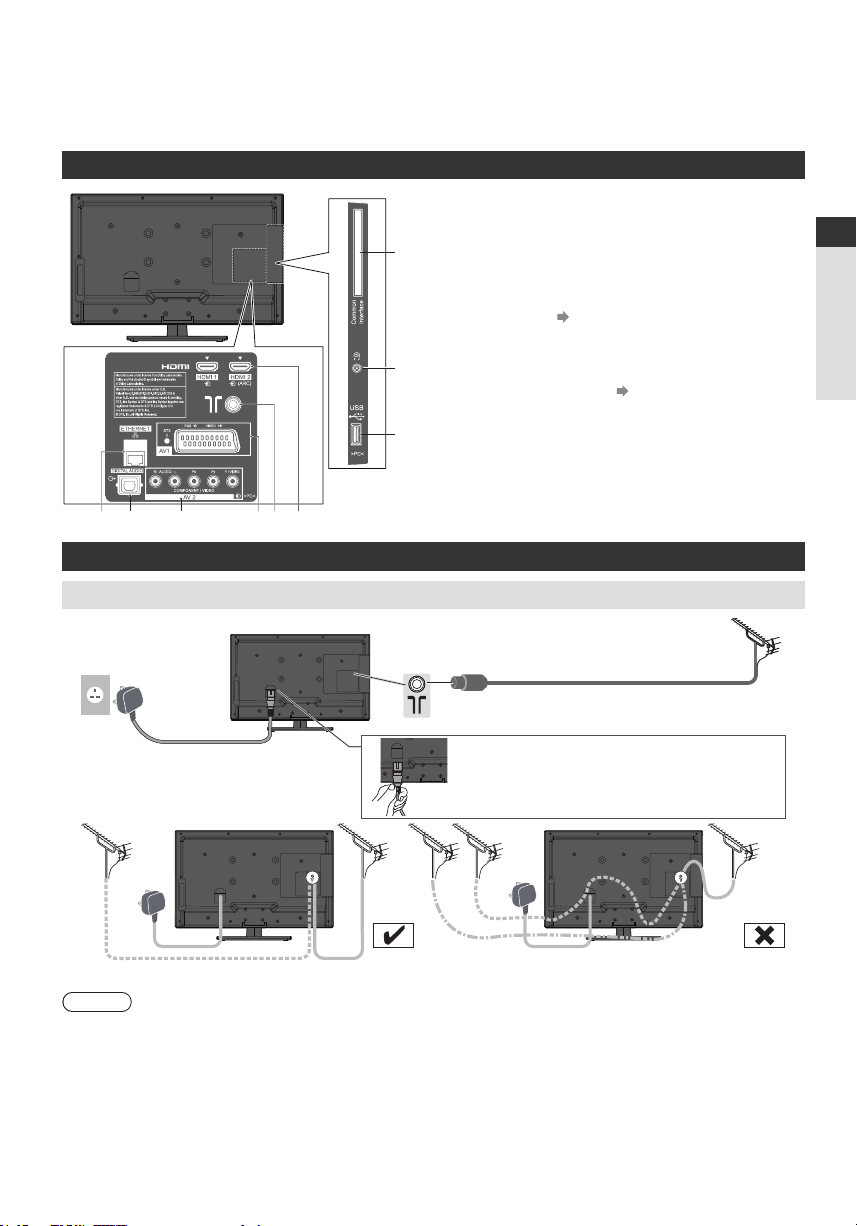
Basic Connection
External equipment and cables shown are not supplied with this TV.
Please ensure that the unit is disconnected from the mains socket before attaching or disconnecting any leads.
Terminals
1 ETHERNET
2 DIGITAL AUDIO
7
3 AV 2 (COMPONENT / VIDEO)
4 AV 1 (SCART) (p. 12)
5 Terrestrial terminal (see below)
8
6 HDMI 1 - HDMI 2 (ARC) (p. 12)
7 CI slot
9
8 Headphone jack
9 USB port
2 3 4 5 61
Connections
Mains lead and aerial
Mains lead
AC 220-240 V
50/60 Hz
DVB, Analogue
Mains Lead
Insert the mains plug (supplied) rmly into
place.
● When disconnecting the mains lead,
be absolutely sure to disconnect the mains plug
at the socket outlet rst.
Terrestrial aerial
RF cable
Quick Start Guide
Basic Connection
If the aerial cable is placed in the wrong location, interference might happen.
Note
● Do not put the coaxial cable close to the mains lead to avoid noise.
● Do not place the coaxial cable under the TV.
● To obtain optimum quality picture and sound, an aerial, the correct cable (75 Ω coaxial) and the correct terminating
plug are required.
● If a communal aerial system is used, you may require the correct connection cable and plug between the wall aerial
socket and the TV.
● Your local Television Service Centre or dealer may be able to assist you in obtaining the correct aerial system for
your particular area and the accessories required.
● Any matters regarding aerial installation, upgrading of existing systems or accessories required, and the costs
incurred, are the responsibility of you, the customer.
11
Page 12
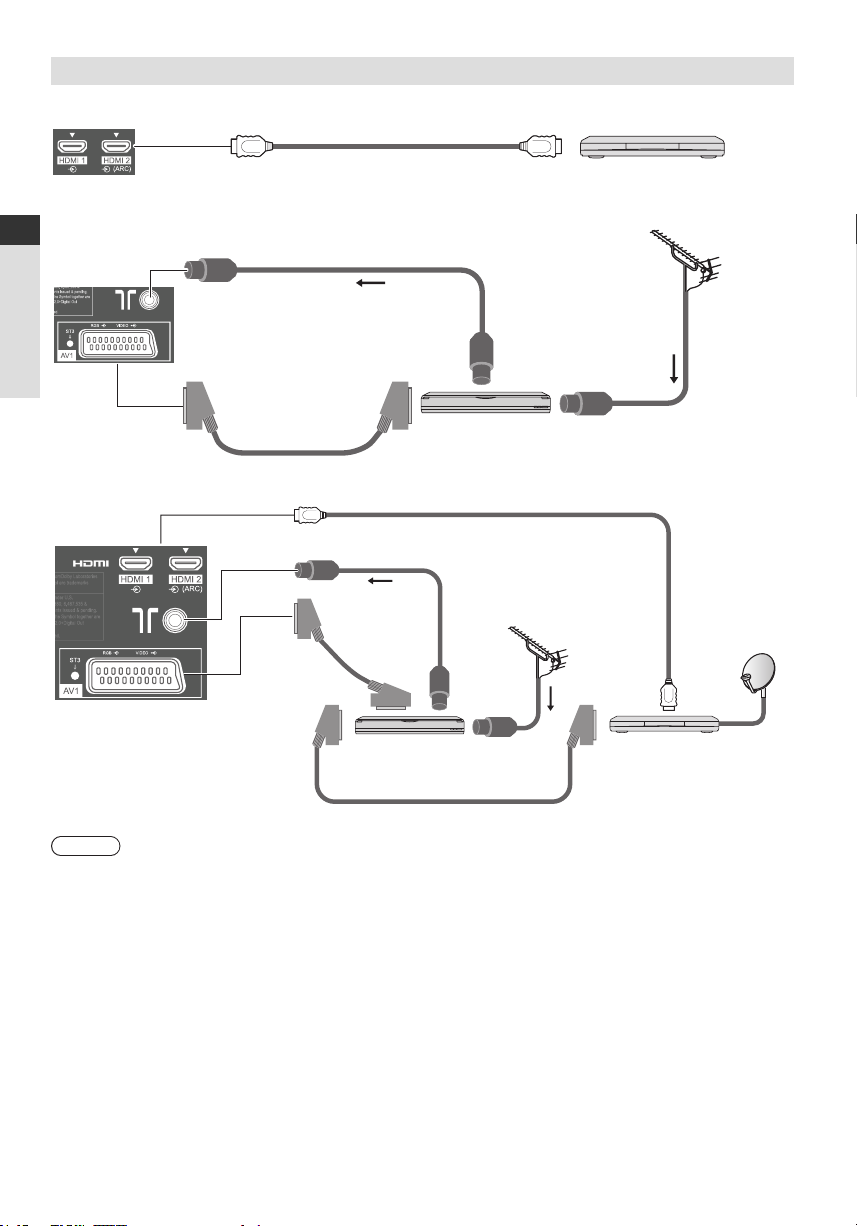
AV devices
Player
TV
DVD Recorder / VCR
Quick Start Guide
TV
Basic Connection
DVD Recorder / VCR and Set top box
TV
SCART cable
Player
HDMI cable
Terrestrial aerial
RF cable
RF cable
DVD Recorder / VCR
HDMI cable
RF cable
Terrestrial
aerial
SCART cable
DVD Recorder / VCR
SCART cable
RF cable
Set top box
Note
● Please also read the manual of the equipment being connected.
● Keep the TV away from electronic equipment (video equipment, etc.) or equipment with an infrared sensor.
Otherwise, distortion of image / sound may occur or operation of other equipment may be interfered.
● When using a SCART or HDMI cable, use the fully wired one.
● Check the type of terminals and cable plugs are correct when connecting.
12
Page 13
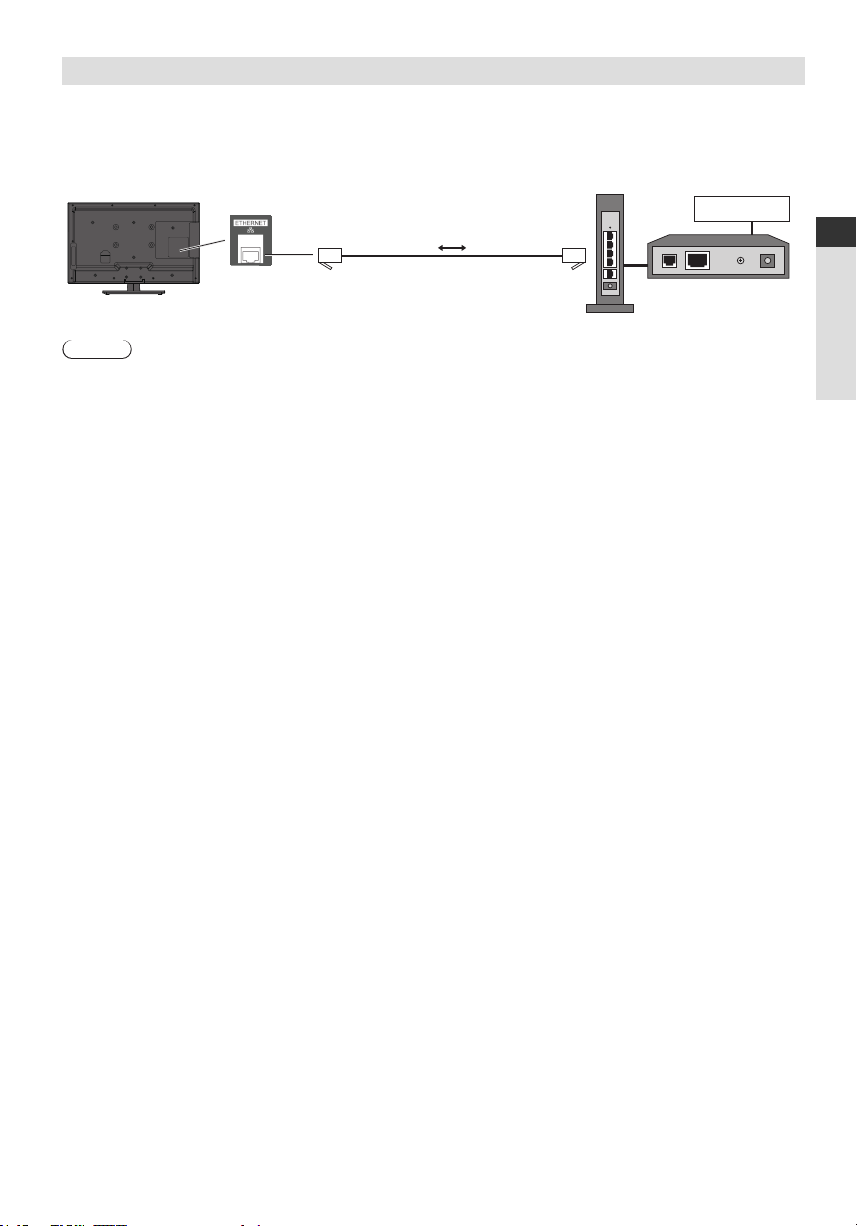
Network connections
Connect the TV and the Broadband network equipment (modem, hub, or router) by using a LAN cable.
● If you do not have a Broadband network services, please consult your retailer for assistance.
● Conrm the term and conditions of the contracts with your Internet Service Provider (ISP) or telecommunications
company.
● Set up and connect any equipment required for the network environment.
● Read the manual of the network equipment, too.
Internet
LAN cable (shielded)
Hub or Router
Modem
Note
● Depending on the ISP or telecommunications company, the required equipment and the internet connection
procedure are different. Ensure that you use the network equipment that are authorized by your ISP and
telecommunications company.
● You cannot make settings for the network equipment on this TV. You may be required to make settings on your
computer.
● Depending on the terms and conditions of the contracts with your ISP or telecommunications company, additional
fees may be charged or multiple connections to the internet may be impossible.
● Please contact your ISP or telecommunications company if you require further assistance regarding the network
equipment.
Quick Start Guide
Basic Connection
13
Page 14
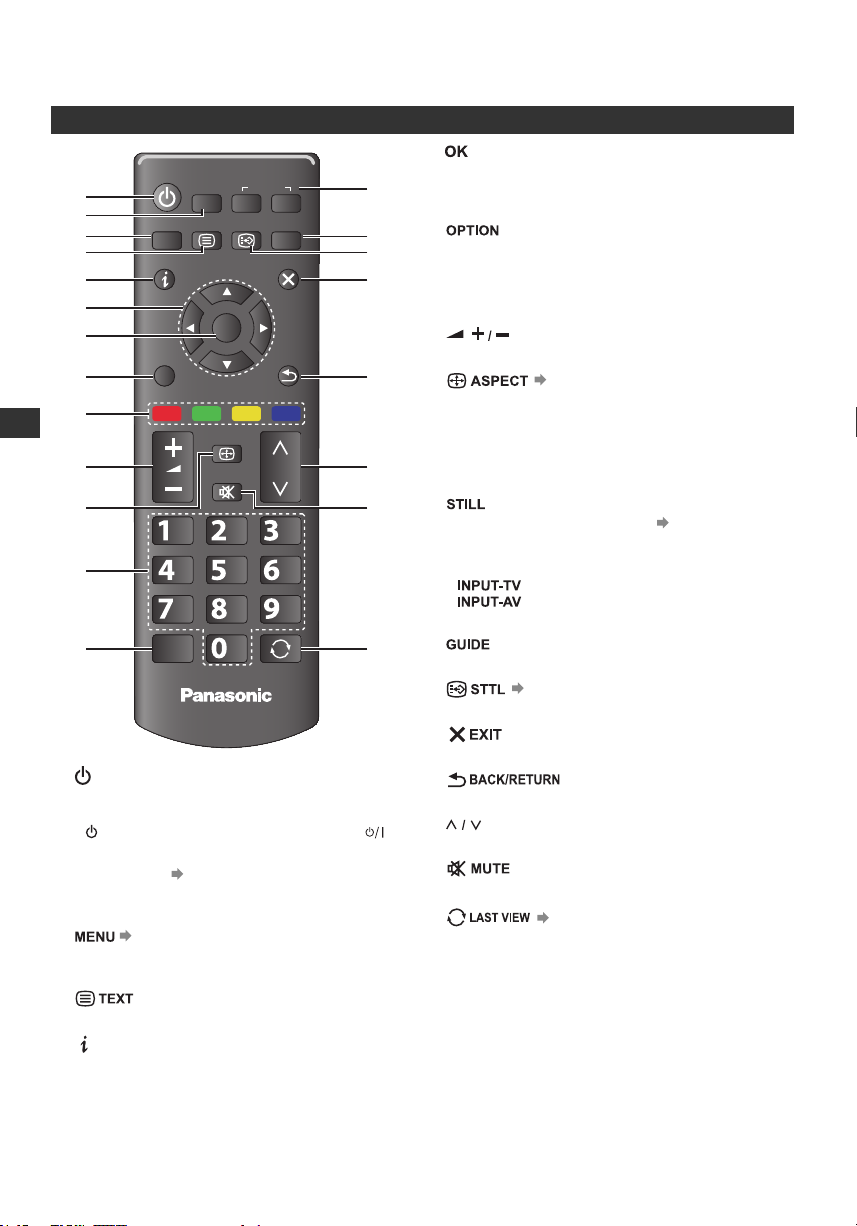
Identifying Controls
Remote Control
VIERA
1
2
3
4
5
6
7
8
9
Identifying Controls
10
11
12
13
1 Standby On / Off switch
● Switches TV on or off standby.
● If you cannot turn the TV power on by pressing
button of the remote control, please press
(POWER) button on the back of the TV.
2 VIERA TOOLS (p. 27)
● Displays some special feature icons and accesses
easily.
3 (p. 18)
● Press to access [Picture], [Sound], [Network],
[Timer], [Setup], and [Help].
4
● Switches to teletext mode.
5 (Information)
● Displays channel and programme information.
6 Cursor buttons
● Makes selections and adjustments.
TOOLS INPUT
TV AV
MENU TEXT STTL GUIDE
OK
OPTION
ASPECT
MUTE
abc
jkl
ghi
tuv
pqrs
STILL
LAST VIEW
TV
EXIT
BACK/
RETURN
def
mno
wxyz
7
● Conrms selections and choices.
14
15
16
17
18
19
20
21
● Press after selecting channel positions to quickly
change channel.
8
● Easy optional setting for viewing, sound, etc.
9 Coloured buttons (red-green-yellow-blue)
● Used for the selection, navigation and operation of
various functions.
10 (Volume up / Volume down)
● Changes volume.
11 (p. 17)
● Changes aspect ratio.
12 Numeric buttons
● Changes channel and teletext pages.
● Sets characters.
● When in Standby mode, switches TV on.
13
● Freezes / unfreezes the picture. (p. 16)
● Holds the current teletext page (teletext mode).
14 Input mode selection
● - Switches Analogue/ DVB channel.
● - Switches to AV input mode from
[Input Selection] list.
15
● Displays TV guide.
16 (p. 16)
● Switches subtitles on or off.
17
● Returns to the normal viewing screen.
18
● Returns to the previous menu / page.
19 (Channel up / Channel down)
● Selects channel in sequence.
20
● Switches sound mute on or off.
21 (p. 16)
● Switches to previously viewed channel or input mode.
14
Page 15
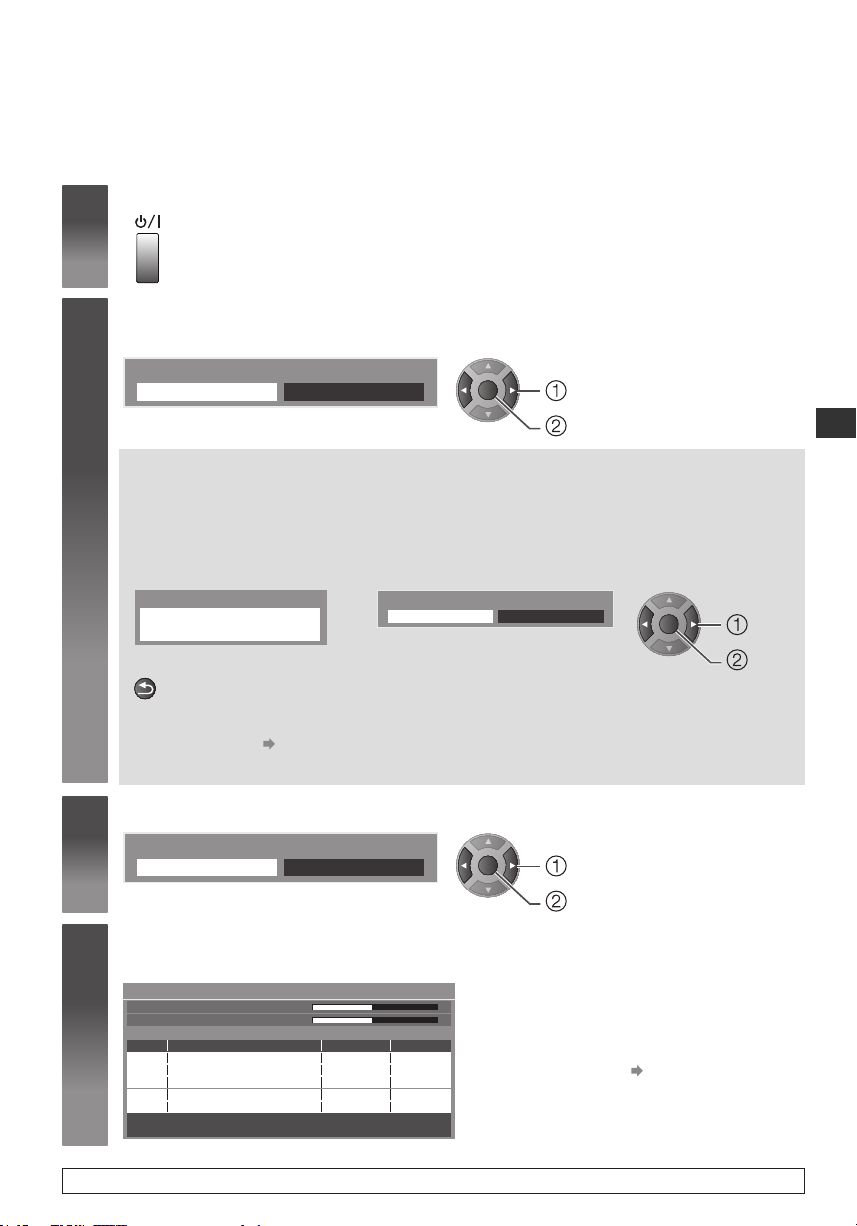
Auto Setup
BACK/
Search and store TV channels automatically.
● These steps are not necessary if the setup has been completed by your local dealer.
● Please complete connections (p. 11, 12) and settings (if necessary) of the connected equipment before starting
Auto Setup. For details of settings for the connected equipment, read the manual of the equipment.
Plug the TV into mains socket and switch On
1
Select [Home]
2
Select [Home] viewing environment to use in your home environment.
● Takes a few seconds to be displayed.
● If the red LED shows on the TV, press the Standby On / Off switch on the remote control.
Please select your viewing environment.
Home Shop
OK
change
conrm
[Shop] viewing environment (for shop display only)
[Shop] viewing environment is the demonstration mode to explain main features of this TV.
Select [Home] viewing environment to use in your home environment.
● You can return to viewing environment selection screen at the stage of [Shop] conrmation screen.
1 Return to viewing environment
selection screen
Shop
You have selected shop mode
RETURN
2 Select [Home]
Please select your viewing environment.
Home Shop
OK
Auto Setup
change
conrm
To change viewing environment later on, you will need to initialise all settings by accessing
[Shipping Condition]. [Shipping Condition] (p. 24)
Select your country
3
Country Selection
United Kingdom Ireland
Start [Auto Setup]
4
Example: UK
Auto Setup - DVB and Analogue
DVB Scan
This will take about 6 minutes.
CH Channel Name Type Quality
CBBC Channel
62
BBC Radio Wales
62
E4
62
62
Free TV : 4 Pay TV : 0 Radio : 0
CH 21 69
CH 21 69Analogue Scan
100
100
100
100Cartoon Nwk Free TV
Searching
Free TV
Free TV
Free TV
Data : 0 Analogue : 0
OK
If tuning has failed, check the connection of
the RF cable, and then, follow the on screen
instructions.
● Auto Setup will start to search for TV
channels and store them.
● To initialise all settings
[Shipping Condition] (p. 24)
Auto Setup is now complete and your TV is ready for viewing.
change
conrm
15
Page 16
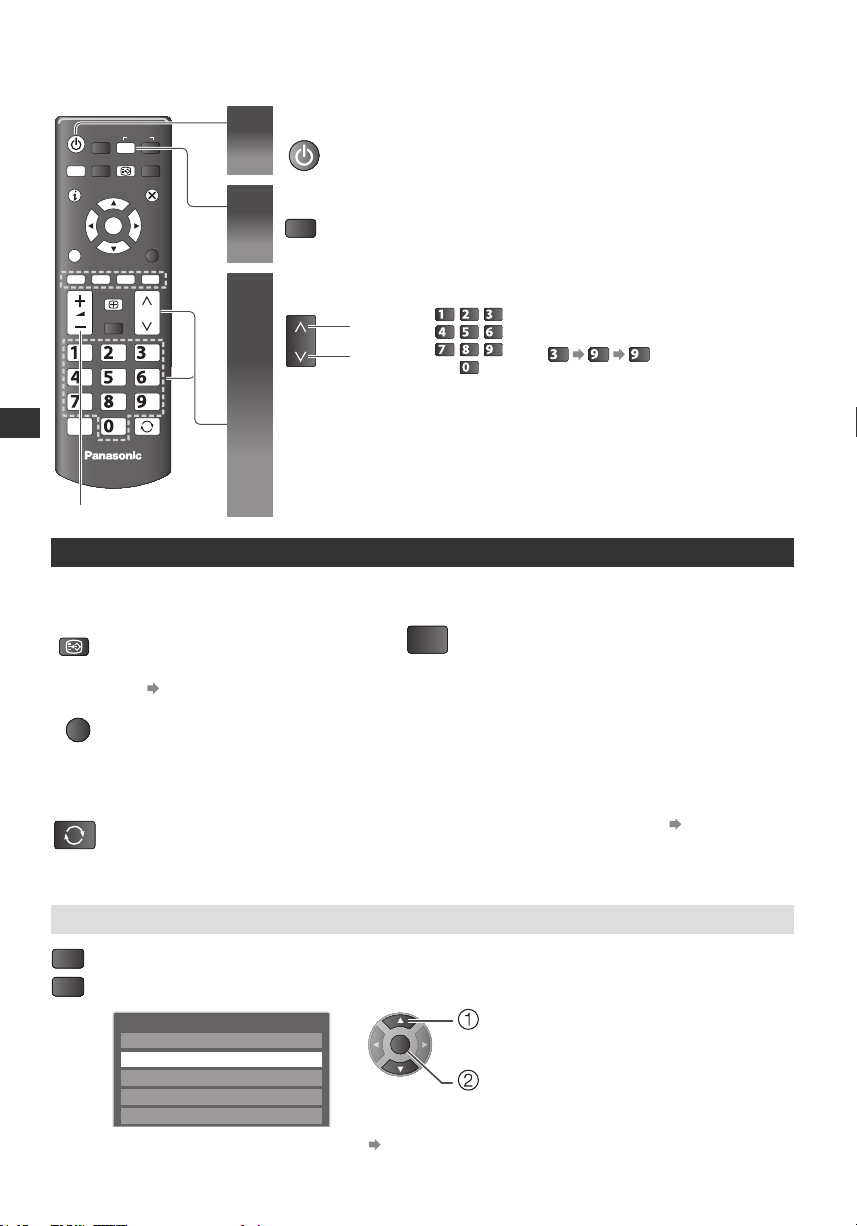
Basic Features
TV
STTL
STILL
LAST VIEW
TV
Watching TV
INPUT
TV
MENU STTL
EXIT
OK
OPTION
ASPECT
abc
def
mno
jkl
ghi
tuv
pqrs
STILL
Watching TV
Volume
Other useful functions
Display subtitles
Display / hide subtitles (if available)
wxyz
LAST VIEW
TV
Turn power on
1
Select the mode
2
● Selects Analogue or DVB channel
Select a channel
3
up
down
abc
jkl
ghi
or
tuv
pqrs
● To select a more than two-digit channel
def
position number, e.g. 399
mno
wxyz
Still
Freeze / unfreeze picture
wxyz wxyz
def
● To change the language for DVB
(if available) [Subtitle Language]
OPTION
Selects the language in which
subtitles should appear
(if available)
Last view
Switch to previously viewed channel or input
easily.
● Press again to return to the present
view.
Display the input selection menu
● Press to return to TV. (Analogue / DVB)
● Press to display the input selection menu.
AV
● Selects the input mode connected to the equipment.
Input Selection
HDMI1
HDMI2
AV1
AV2
TV
● You can label or skip each input mode. [Input Labels] (p. 24)
16
Off Timer
Turn the TV to Standby mode automatically after a xed
period.
You can set the [Off Timer] via the [Timer]. (p. 22)
● To cancel, set to [Off] or turn the TV off.
● When the remaining time is within 3 minutes, the remaining
time will ash on the screen.
select
OK
watch
Page 17
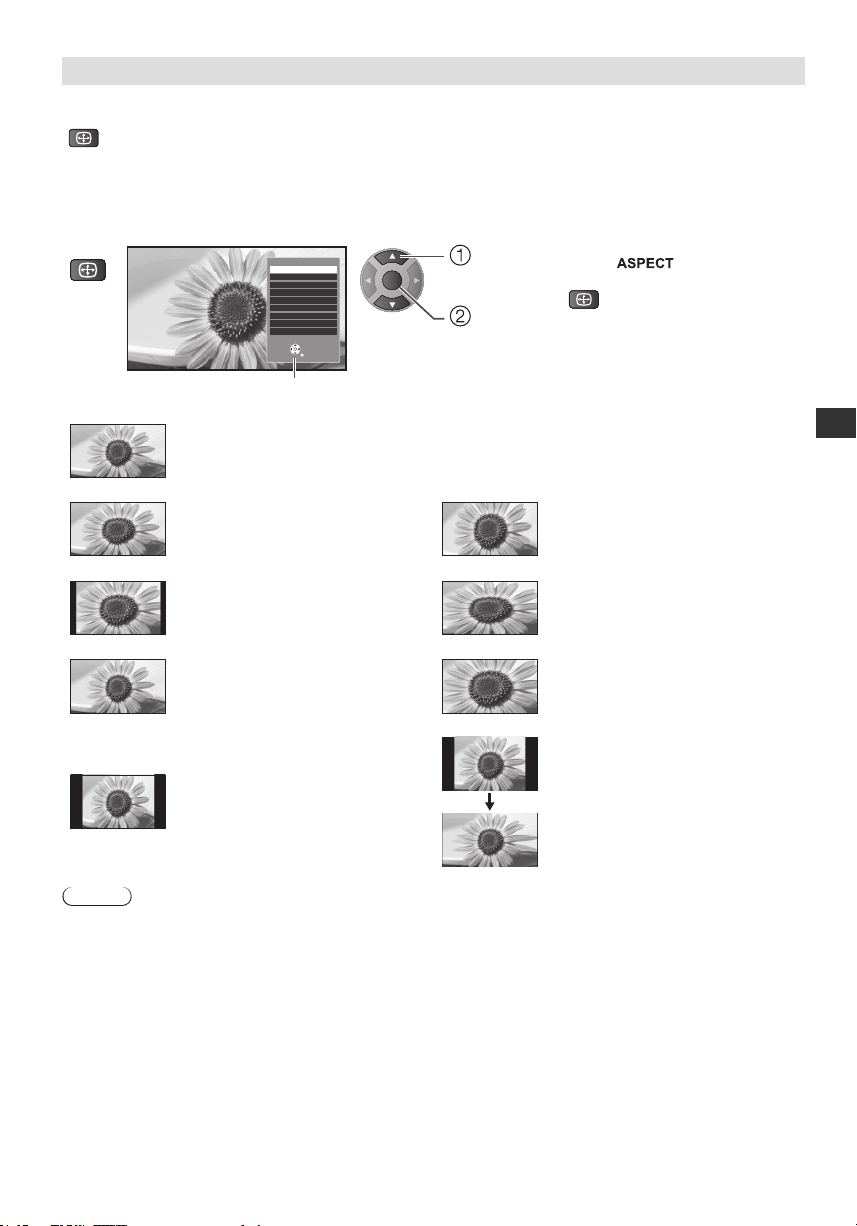
Aspect
ASPECT
ASPECT
Change the aspect ratio (image size)
Enjoy viewing the image at its optimum size and aspect.
Programmes usually contain an “Aspect Control Signal” (Widescreen signal, etc.), and the TV will choose
the aspect ratio automatically according to the “Aspect Control Signal”.
If you would like to change the aspect ratio manually
1 Display [Aspect Selection] list
ASPECT
[Aspect Selection] list
[Auto]]
The aspect ratio works automatically based on programmes signal format.
Aspect Selection
Auto
16:9
14:9
Just
4:3
Zoom
4:3 Full
Sidecut Just
Sidecut Zoom
Change
2 While the list is displayed,
select the mode
OK
Select
RETURN
select
store
● You can also change the mode only
using button.
(Press repeatedly until you
reach the desired mode)
Watching TV
[16:9]
Directly displays the image at 16:9
without distortion (anamorphic).
[14:9]]
Displays the image at the standard 14:9
without distortion.
[Just]
Displays a 4:3 image full-screen.
Stretching is only noticeable at the left
and right edges.
[4:3]]
Displays the image at the standard 4:3
without distortion.
Note
● Not available in teletext service.
[Zoom]]
[4:3 Full]]
[Sidecut Zoom]
[Sidecut Just]]
Displays a 16:9 letterbox or 4:3 image
without distortion.
Displays a 4:3 image enlarged
horizontally to t the screen.
● HD signal only
Displays a 16:9 letterbox (anamorphic)
image full-screen without distortion.
● HD signal only
Displays a 16:9 letterbox (anamorphic)
image full-screen. Stretching is only
noticeable at the left and right edges.
● HD signal only
17
Page 18
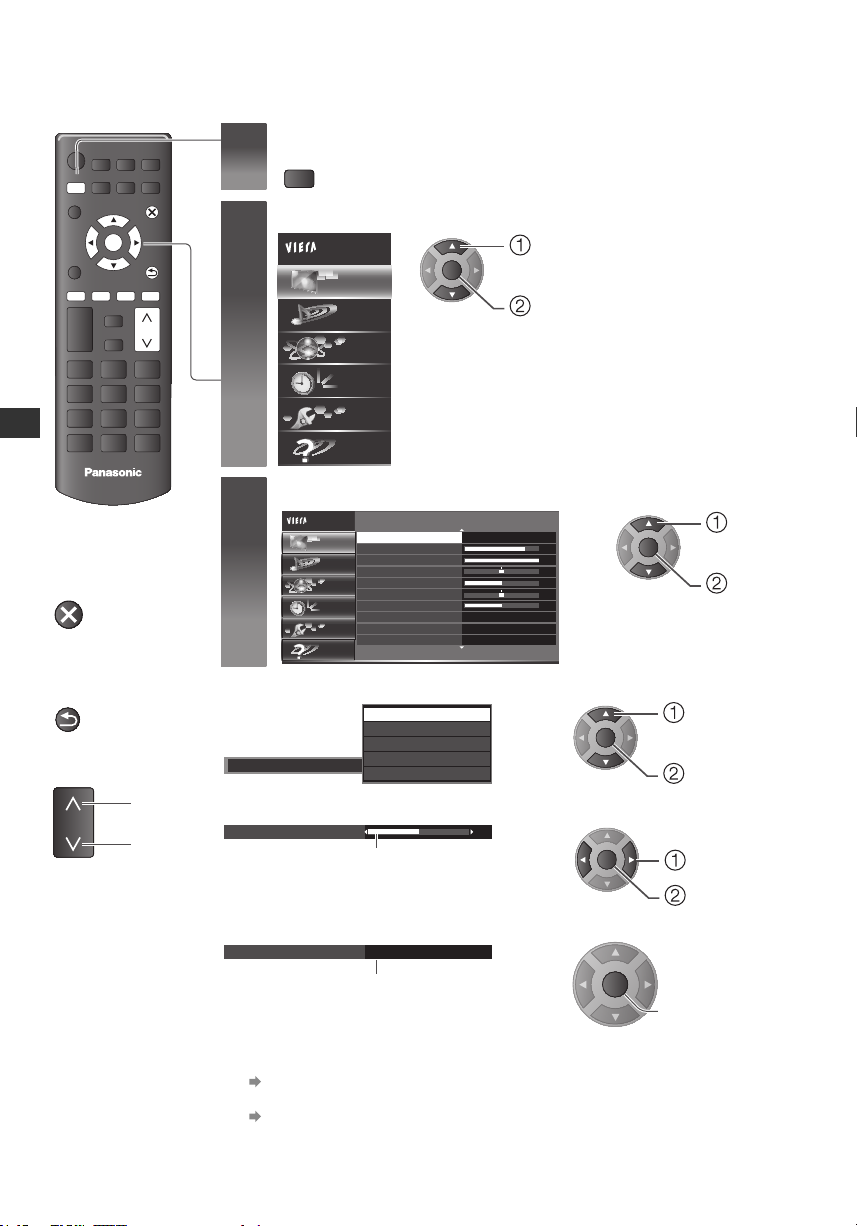
How to Use Menu Functions
EXIT
BACK/
RETURN
MENU
Various menus allow you to make settings for the picture, sound, and other functions.
Display the menu
MENU
EXIT
OK
BACK/
RETURN
How to Use Menu Functions
TV
To return to TV at
any time
To return to the
previous screen
To change menu
pages
up
down
1
Select the menu
2
Main Menu
Network
Select the item
3
Choose from among alternatives
Colour Temperature
Adjust using the slide bar
Sharpness 50
Go to the next screen
Screen Settings
Main Menu
Picture
Sound
Network
Timer
Setup
Help
Displays the next screen
● Displays the functions that can be set
(varies according to the input signal)
Picture
Sound
Timer
Setup
Help
Viewing Mode
Backlight
Contrast
Brightness
Colour
Tint
Sharpness
Colour Temperature
Vivid Colour
Adaptive Backlight Control
Cool2
Cool1
Normal
Warm1
Warm2
OK
Normal
Normal
On
On
Moved
select
access
1/2
70
100
0
50
0
50
OK
select
access
select
OK
store
OK
change
conrm
OK
access
18
To reset the settings
● Picture or sound settings only
[Reset to Defaults] in the [Picture] or [Sound]
● To initialise all settings
[Shipping Condition] (p. 24)(p. 24)
Page 19
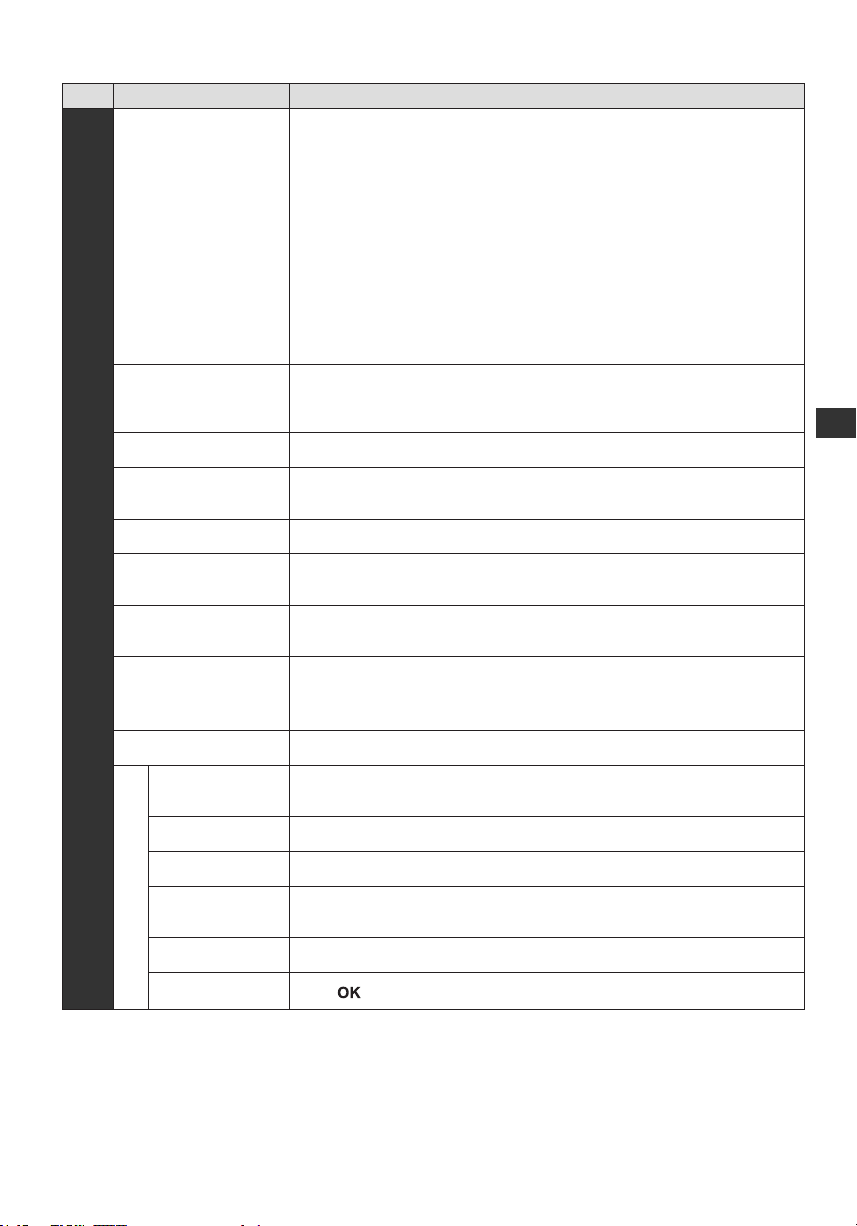
Menu list
Menu
Item Adjustments / Congurations (alternatives)
Viewing Mode
Selects your favourite picture mode for each input.
[Dynamic] / [Normal] / [Cinema] / [True Cinema] / [Custom]
[Dynamic]:
Improves contrast and sharpness for viewing in a bright room.
[Normal]:
Normal use for viewing in a normal lighting condition.
[Cinema]:
Improves the performance of contrast, black and colour reproduction for
watching movies in a darkened room.
[True Cinema]:
Reproduces the original image quality precisely without any revision.
[Custom]:
Sets the settings for your preferred.
Backlight, Contrast,
Brightness, Colour,
Sharpness
Tint Adjusts the picture hue to suit your taste.
Colour Temperature
Picture
Vivid Colour Automatically adjusts colours to vivid ones. [Off] / [On]
Adaptive Backlight
Control
Ambient Sensor
Noise Reduction
MPEG Noise Reduction Reduces unwanted MPEG block noise. [Auto] / [Max] / [Mid] / [Min] / [Off]
Adaptive Gamma
Control
Advanced Settings
Black Expander Gradually adjusts the dark shades of the image.
White Balance Adjusts the white balance for red, green, and blue signal.
Colour
Management
Gamma Adjusts the gamma settings.
Increases or decreases the levels of these options according to your personal
preference.
Sets the overall colour tone of the picture.
[Cool 2] / [Cool 1] / [Normal] / [Warm 1] / [Warm 2]
Automatically controls luminance level according to the image. [Off] / [On]
Automatically adjusts picture settings according to ambient lighting conditions.
[Off] / [On]
Picture Noise Reduction
Reduces unwanted picture noise and icker noise in the contoured parts of a
picture. [Auto] / [Max] / [Mid] / [Min] / [Off]
Automatically controls middle level of luminance according to the image.
Adjusts the hue, saturation, luminance settings.
How to Use Menu Functions
Reset to Defaults
Press button to reset to the default settings in [Advanced Settings] menu.
19
Page 20
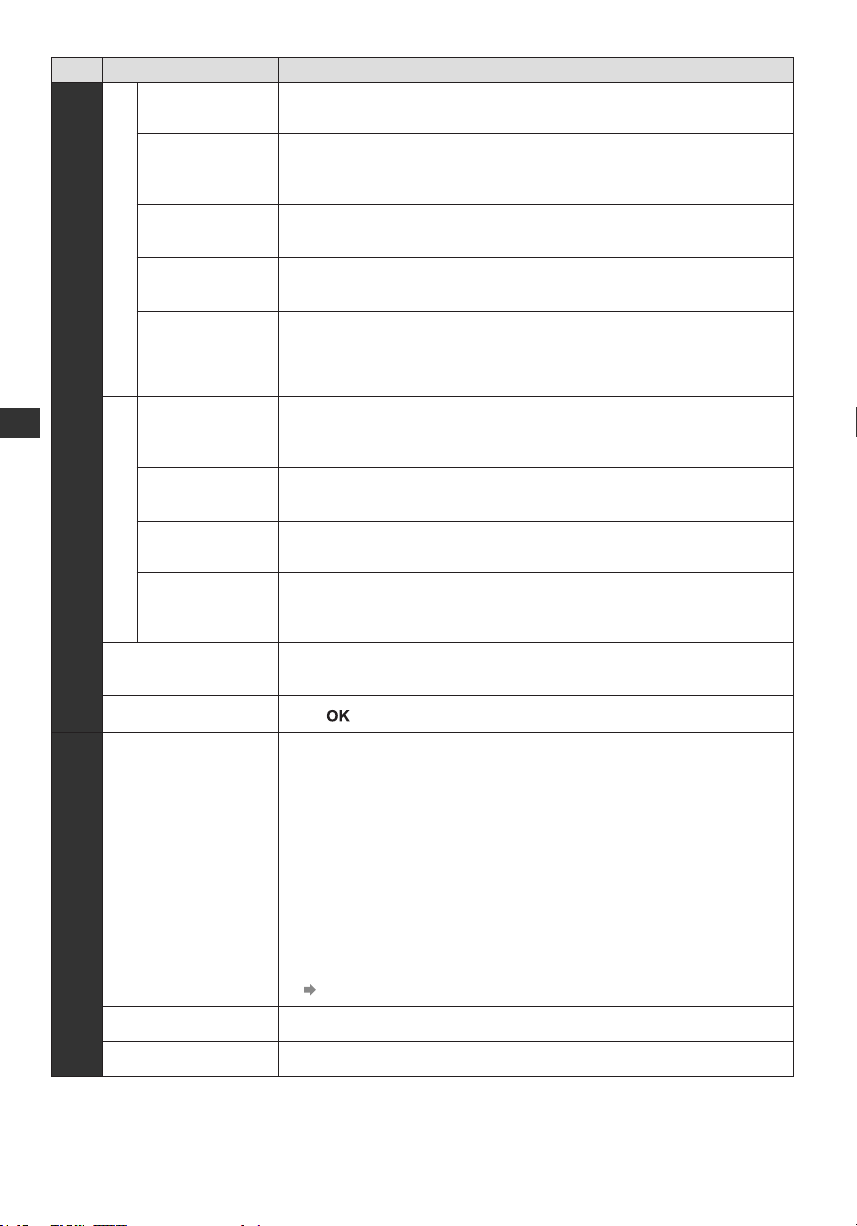
Menu
Item Adjustments / Congurations (alternatives)
Film Cadence
Mode
1080p Pixel Direct
Option Settings
Improves vertical resolution for movie images. [Off] / [On]
Reproduces the original image quality for 1080p (HDMI) input signal.
[Off] / [On]
● For HDMI input only
HDMI Content
Type
HDMI RGB Range
3D-COMB
Picture
How to Use Menu Functions
Sound
16:9 Overscan
Screen Settings
H-size
Zoom
Adjustments
Screen Display
Copy Adjustment
Reset to Defaults
Mode
Automatically adjusts picture according to received HDMI content.
● For HDMI input only
Changes the black level in the image for HDMI input mode.
● For HDMI input only
Makes still or slow moving pictures more vivid. [Off] / [On]
● Occasionally, while viewing still or slow moving pictures, colour patterning
may be seen. Set to [On] to display sharper and more accurate colours.
● For PAL / NTSC signal reception in TV mode or from composite
Selects the screen area displaying the image for 16:9 aspect. [Off] / [On]
[On] : Enlarges the image to hide the edge of the image.
[Off] : Displays the image in the original size.
Switches over horizontal scanning size. [H-Size1] / [H-Size2]
● For TV mode, AV input, and HDMI input
Adjusts the vertical position and size when the aspect is set to [Just],
[Sidecut Just], [Zoom], or [Sidecut Zoom] modes.
Turns the display screen off when you select [Off]. [Off] / [On]
● Press any button (except Mute and Volume) of TV or remote control to turn
the screen [On] again.
Copies picture adjustments to other inputs.
● Only active when [Viewing Mode] is [True Cinema] or [Custom].
Press button to reset to the default settings.
Selects your favourite sound mode. [Standard] / [Music] / [Speech] / [User]
● The selected mode affects all input signals.
[Standard]:
Provides the suitable sound quality for all types of scenes.
[Music]:
Improves sound quality for watching music videos, etc.
[Speech]:
Improves sound quality for watching news, drama, etc.
[User]:
Adjusts the sounds manually by using the equaliser to suit your favourite
sound quality.
● For the [User] mode, [Equaliser] will be available in [Sound] menu instead of
[Bass] and [Treble]. Select [Equaliser] and adjust the frequency.
[Equaliser] (see below)
20
Bass Adjusts level to enhance or minimise lower, deeper sound output.
Treble Adjusts level to enhance or minimise sharper, higher sound output.
Page 21
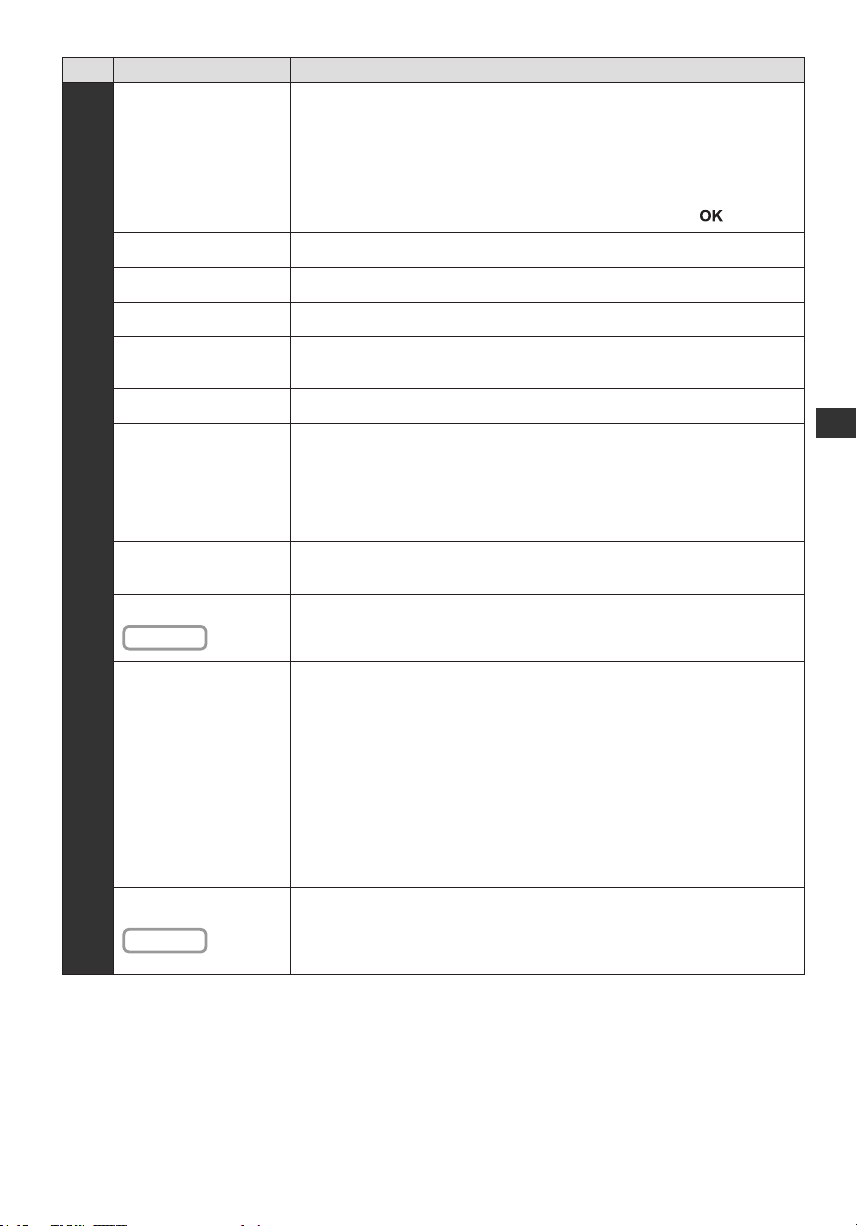
Menu
Equaliser
Balance Adjusts volume level of right and left speakers.
Surround Surround sound settings. [Off] / [On]
Headphone Volume Adjusts the volume of the headphones.
Item Adjustments / Congurations (alternatives)
Adjusts the frequency level to suit your favourite sound quality.
● This function is available when [Mode] is set to [User].
● Select the frequency and change the frequency level by using the cursor
button.
● To enhance the bass sound, raise the level of the lower frequency.
To enhance the treble sound, raise the level of the higher frequency.
● To reset the levels of each frequency to the default settings, select
[Reset to Defaults] by using the cursor button, and then press button.
Auto Gain Control
Volume Correction Adjusts the volume of individual channel or input mode.
Speaker Distance to Wall
Sound
NICAM
Audio Preference
Ireland only
SPDIF Selection
SPDIF Delay
Ireland only
Automatically regulates large sound level differences between channels and
inputs. [Off] / [On]
Compensates for the low frequency sound due to the distance between the
speakers and the wall. [Over 30cm] / [Up to 30cm]
● If the back space between the TV and wall is over 30 cm, [Over 30cm] is
recommended.
● If the back space between the TV and wall is within 30 cm, [Up to 30cm] is
recommended.
Reproduces NICAM stereo sound.
● Only for Analogue mode
Selects the initial setting for audio tracks. [Multichannel] / [Stereo] / [MPEG]
● For digital mode
SPDIF: A standard audio transfer le format
Selects the initial setting for digital audio output signal from DIGITAL AUDIO and
HDMI 2 (ARC) (ARC function) terminals.
● For DVB mode or video contents of [Media player]
[Auto] / [PCM]
[Auto]: Dolby Digital Plus, Dolby Digital and HE-AAC multi-channel are output
as Dolby Digital Bitstream. MPEG is output as [PCM].
DTS is output as DTS for video contents of [Media player].
[PCM]: Digital output signal is xed to [PCM].
● ARC (Audio Return Channel) : A function of digital audio output using HDMI
cable
Adjusts the delay time of the sound output from DIGITAL AUDIO and
HDMI 2 (ARC) (ARC function) terminals, if the sound does not synchronise the
image.
● For digital mode
How to Use Menu Functions
21
Page 22
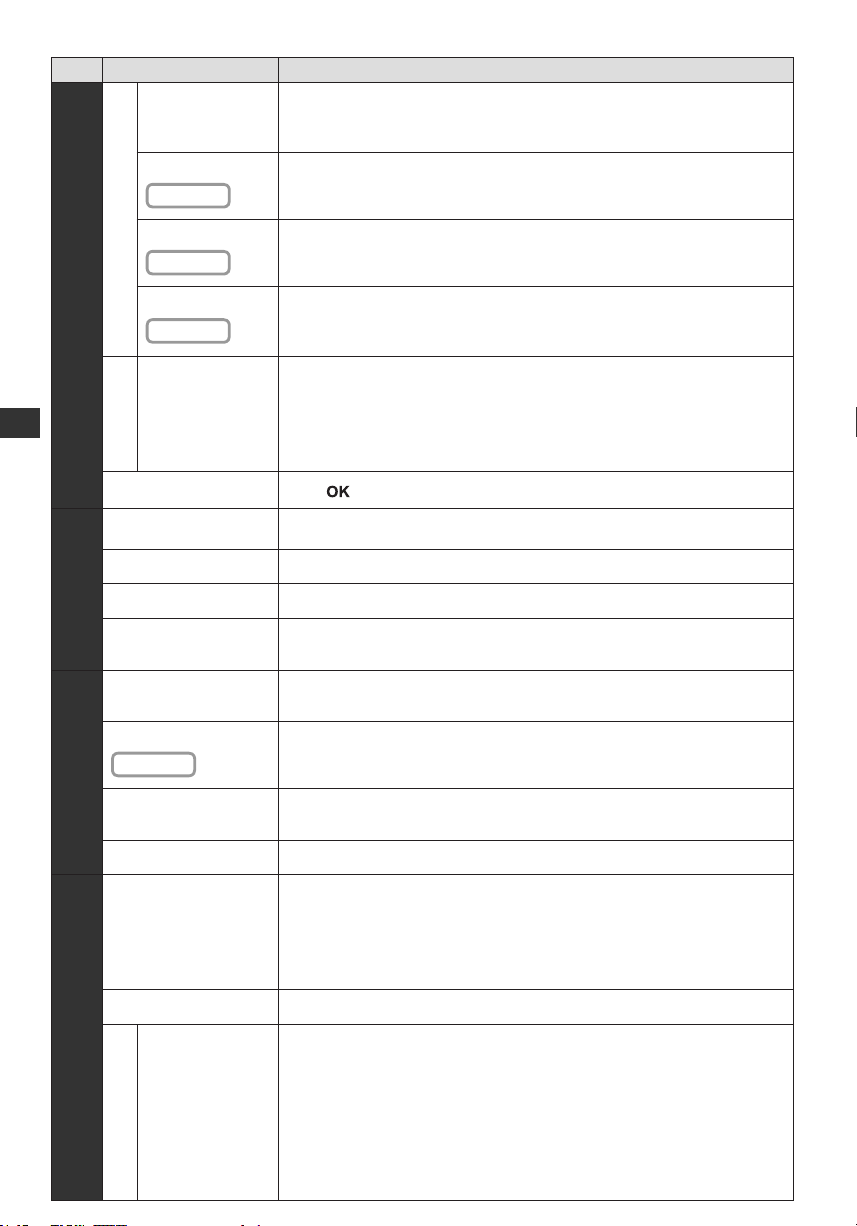
Menu
Item Adjustments / Congurations (alternatives)
Sets to [Auto] to activate the narration sound track when available on the
Audio Description
Audio Description
Volume
UK only
broadcast. [Auto] / [Off]
● For DVB mode only
Adjusts the volume for [Audio Description].
● For DVB mode only
Speakers
Sound
UK only
Headphones
UK only
HDMI Input
HDMI 1
HDMI 2
How to Use Menu Functions
Reset to Defaults
Network Connection Allow this TV to be used in your network environment.
Network
Network Status Displays and checks the network status.
Software Update Checks for available software updates from the Panasonic website.
New Software Message
Off Timer
Time Zone
Timer
Ireland only
Auto Standby
Narration sound track is output to the TV speakers. [Off] / [On]
● For DVB mode only
Narration sound track is output to the headphone. [Off] / [On]
● Connect a headphone before selecting this option.
● For DVB mode only
Selects to t the input signal. [Digital] / [Analogue]
[Digital]: When sound is carried via the HDMI cable connection
[Analogue]: When sound is not carried via the HDMI-DVI adaptor cable
connection
● For HDMI input only
Press button to reset to the default settings.
Selects whether to give a notication message when new software is found via
network. [Off] / [On]
Sets the time until the TV automatically goes to Standby mode.
[Off] / [15] / [30] / [45] / [60] / [75] / [90] (minutes) (p. 16)
Adjusts the time data. [Auto] / [DVB-T Time]
Enables turning the TV off automatically if no button is pressed for 4 hours.
[Off] / [On]
22
No signal Power off Enables turning the TV off if no signal is detected for 10 minutes. [Off] / [On]
● Only available in [Shop] mode.
[Demo Settings]:
Shop Settings
Eco Navigation Automatically sets the TV to the most suitable energy-saving mode.
Setup
TV Guide Settings
TV Guide View
The demonstration mode to explain main features of this TV.
[Picture Reset Settings]:
Resets to the default picture settings.
Changes the layout of TV Guide. [Normal] / [Full] / [Info]
[Normal]:
Default TV Guide screen
[Full]:
Displays channels and programmes full-screen without the operation guide.
[Info]:
Displays details of the selected programme at the bottom without the
operation guide.
Page 23
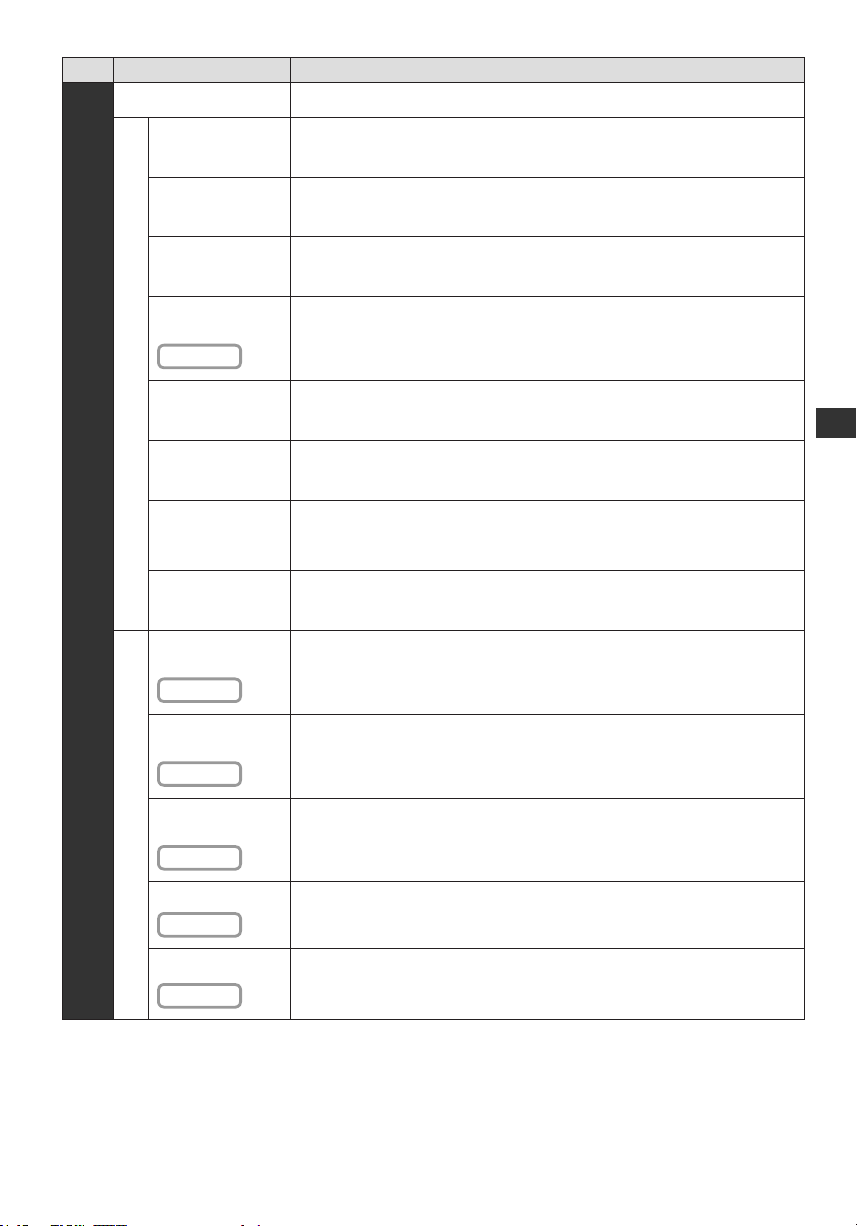
Menu
Child Lock Locks a channel / AV input to prevent access to it.
Item Adjustments / Congurations (alternatives)
DVB Tuning Menu (DVB mode) / Analogue Tuning Menu (Analogue mode)
Favourites Edit
Channel List Skips unwanted channels or edits channel list.
Auto Setup Automatically sets the channels supplied.
Creates a list of favourite channels.
● Not valid on Analogue mode
Setup
Channel Sorting
by Region
UK only
Manual Tuning Searches for the channels manually.
Update Channel
List
New Channel
Message
Signal Condition
Preferred Multi
Audio
UK only
Preferred Audio 1
Preferred Audio 2
Ireland only
Language
Preferred Subtitles 1
Preferred Subtitles 2
Ireland only
Automatically sorts tuned channels according to the available region.
● Not valid on Analogue mode
Updates Channel List while keeping your settings.
● Not valid on Analogue mode
Selects whether to give a notication message when a new channel is found.
[Off] / [On]
● Not valid on Analogue mode
Displays the signal condition.
● Not valid on Analogue mode
Selects the preferred language for digital channel multi audio.
(Depending on the broadcaster)
Selects the initial setting for audio tracks.
Selects the preferred subtitles language for digital channels.
How to Use Menu Functions
Preferred Subtitles
UK only
Preferred Teletext
Ireland only
Selects the preferred subtitles language for digital channels.
Selects the preferred language for digital channel teletext service (depending on
the broadcaster). [English] / [Irish] / [Welsh] / [Gaelic] / [Danish] / [Finnish] /
[Norwegian] / [Swedish]
23
Page 24
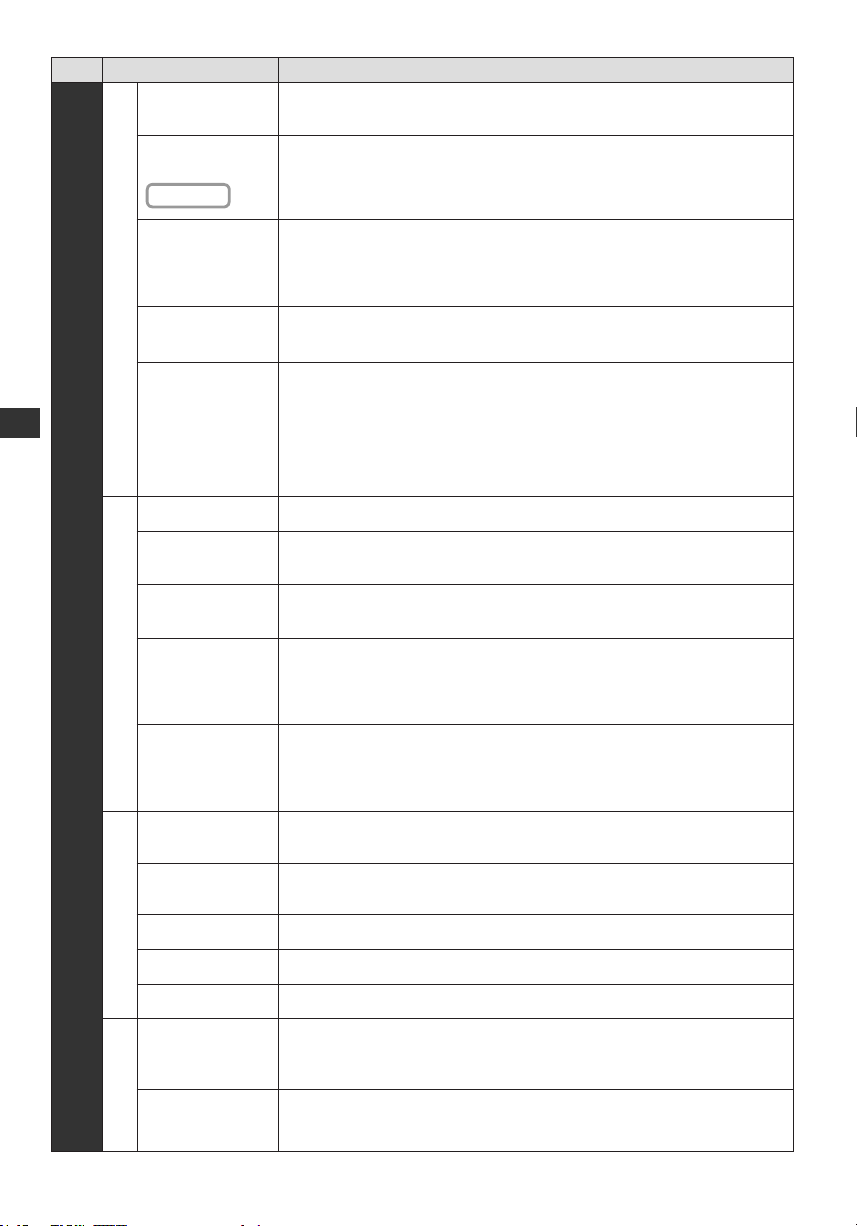
Menu
Item Adjustments / Congurations (alternatives)
Teletext
Teletext Character
Set
Ireland only
Selects the teletext display mode. [FASTEXT] / [List]
● Only for Analogue mode
Selects teletext language font. [West] / [East1] / [East2]
Display Settings
Input Labels
Banner Display
Timeout
How to Use Menu Functions
Setup
Radio Mode
VIERA Link Sets to use VIERA Link functions. [Off] / [On]
Power on Link
VIERA Link Settings
Power off Link
Standby Power
Save
Intelligent Auto
Standby
Accesses the input labels list to select the label of each input mode or set to
skip unconnected one for easier identication and selection in [TV Selection],
[Input Selection] or banner.
● To skip the input mode, select [Skip].
Sets how long the Information banner stays on screen.
[0 (No display)] / [1] / [2] / [3] / [4] / [5] / [6] / [7] / [8] / [9] / [10] (seconds)
Sets the timer for turning off the screen automatically when a radio channel is
selected [Off] / [5] / [10] / [15] / [20] (seconds)
● The sound is active even if the screen turns off. This function is effective in
reducing power consumption when listening to a radio channel.
● Press any buttons except Standby, Volume Up / Down and Sound Mute
buttons to turn the screen on.
● Not valid on Analogue mode
Sets to use Power on Link function. [Off] / [On]
● This function is available when [VIERA Link] is set to [On].
Sets to use Power off Link function. [Off] / [On]
● This function is available when [VIERA Link] is set to [On].
Controls the power consumption in Standby mode of the connected equipment
to reduce the consumption. [Off] / [On]
● This function is available when [VIERA Link] is set to [On] and
[Power off Link] is set to [On].
Makes non-watched or non-used connected equipment go into Standby mode to
reduce the power consumption.
[Off] / [On]
● This function is available when [VIERA Link] is set to [On].
24
USB Keyboard
Layout
System Menu
Shipping
Condition
Common Interface Sets to watch encrypted channels, etc.
System Update Downloads new software to this TV.
Licence Menu Displays the software licence information.
Other Settings
Power on Channel
List
Power Save
Selects the language that your USB keyboard supports.
Resets all settings to the original condition.
Automatically selects all channels or favourites list in the information banner
when the TV is turned on. [All Channel List] / [Last]
● Not valid on Analogue mode
Reduces brightness of picture to economise on power consumption.
[Off] / [On]
Page 25
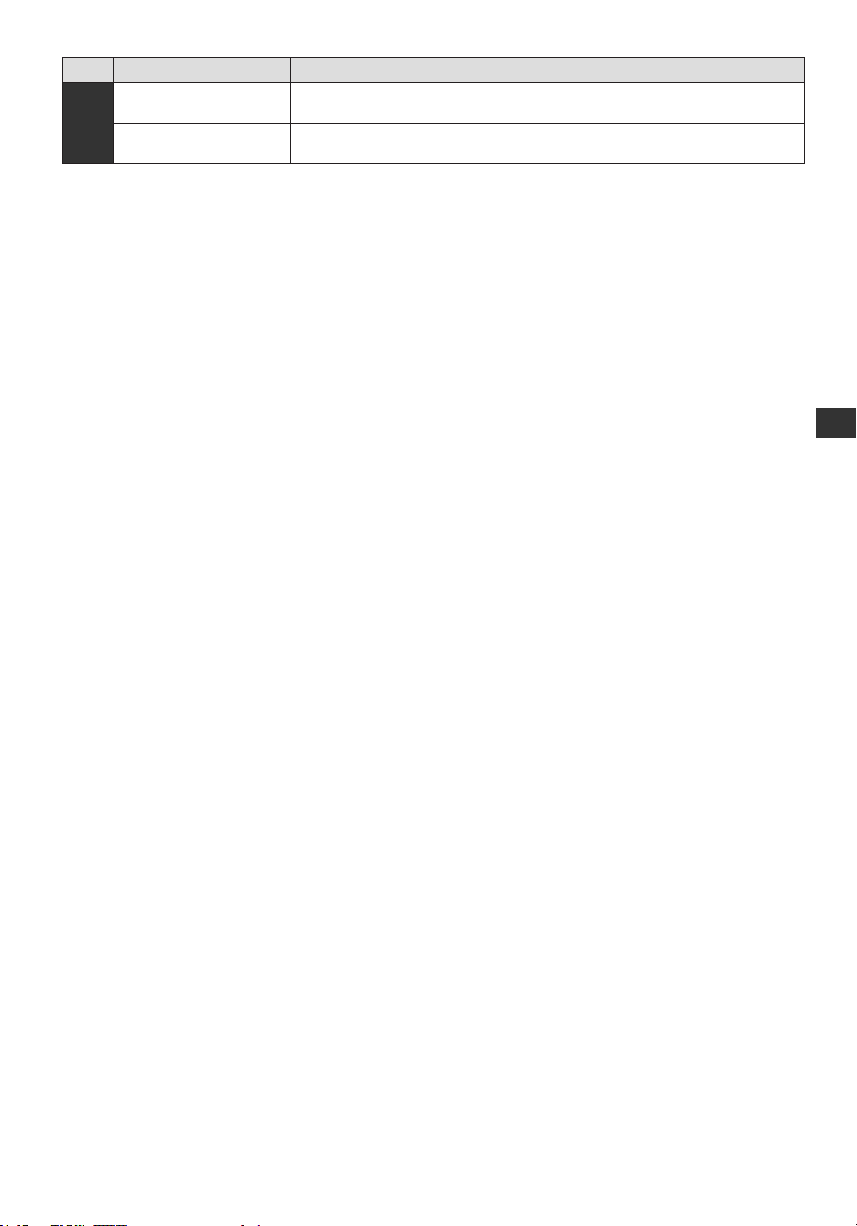
Menu
Help
TV Self Test Make a diagnosis of picture or sound problems.
System Information Displays the system information.
● A different menu will be displayed in the mode of [Media player]. (p. 26)
● Only available items can be selected.
Item Adjustments / Congurations (alternatives)
How to Use Menu Functions
25
Page 26
Advanced Features
Using Media Player
[Media player] allows you to enjoy photo, video or music recorded on a USB Flash Memory.
Photo mode:
Still pictures recorded by digital cameras will be displayed.
Video mode:
Moving pictures recorded by digital video cameras will be played back.
Music mode:
Digital music data will be played back.
● During the operation, audio signal is output from DIGITAL AUDIO and HDMI 2 (ARC) (ARC function) terminals.
But no video signals are output. To use HDMI 2 (ARC) with ARC function, connect an amplier that has ARC function.
● [Date] shows the date on which the recording was made by the recording equipment. The le without record of the
date is shown “**/**/****”.
● The picture may not appear correctly on this TV depending on the recording equipment used.
● Display may take some time when there are many les and folders.
● Partly degraded les might be displayed at a reduced resolution.
● Picture setting may not work depending on the conditions.
● The folder and le names may be different depending on the digital camera or digital video camera used.
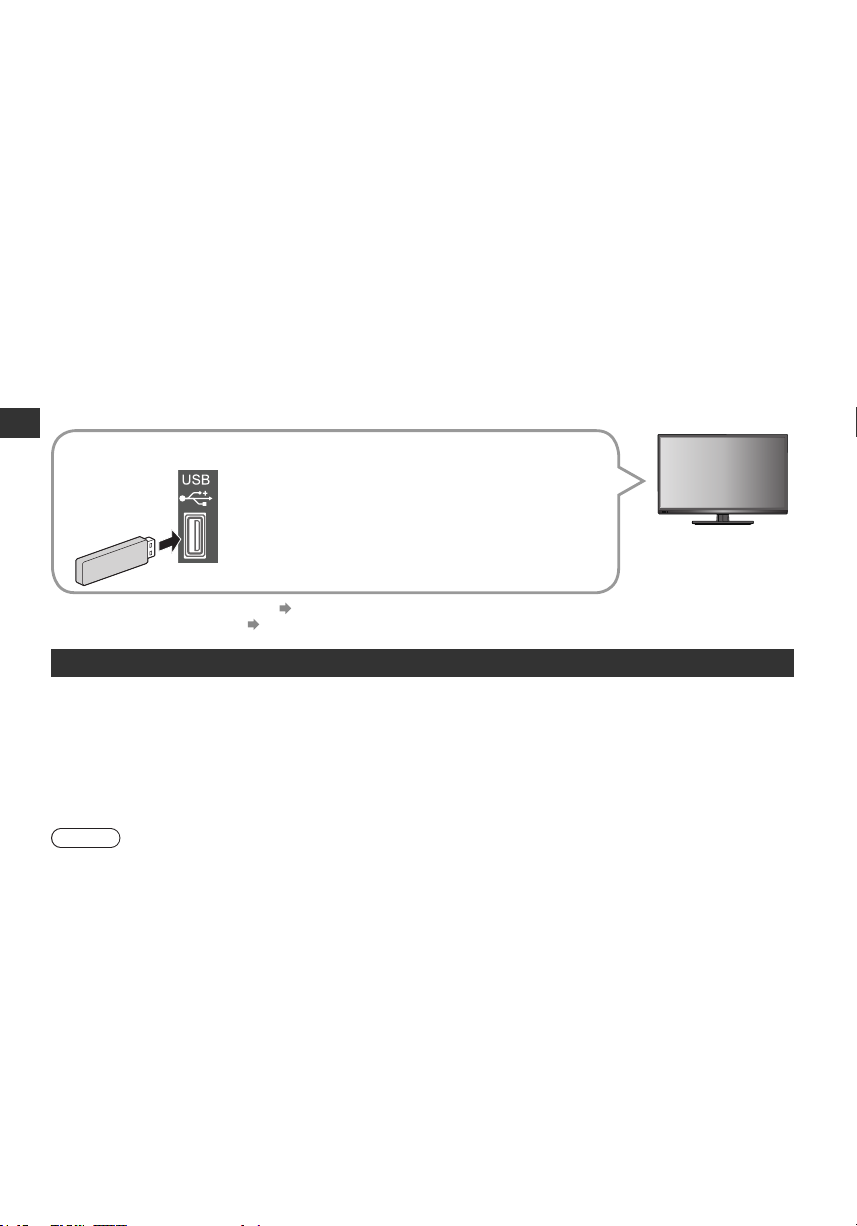
To insert or remove the USB Flash Memory
Using Media Player
USB Flash Memory
● Insert or remove straightly and completely.
● For the information of the devices “Devices for playing back” (p. 26)
● For the supported le format “Supported le format in Media Player” (p. 33)
Devices for playing back
USB Flash Memory (for playing back in [Media player])
USB Flash Memory format:
FAT16, FAT32
USB Flash Memory compliance:
Supports only USB1.1 or USB2.0 standard
Maximum USB capacity supported is 32GB
USB Hub or card adapter is not supported
Note
● Data modied with a PC may not be displayed.
● Do not remove the device while the TV is accessing data. Otherwise this can damage device or TV.
● Do not touch the pins on the device.
● Do not subject the device to a high pressure or impact.
● Insert the device in the correct direction. Otherwise this can damage device or TV.
● Electrical interference, static electricity, or erroneous operation may damage the data or device.
● Back up the recorded data at regular intervals in case of deteriorated or damaged data or erratic operation of the TV.
Panasonic is not liable for any deterioration or damage of recorded data.
26
Page 27
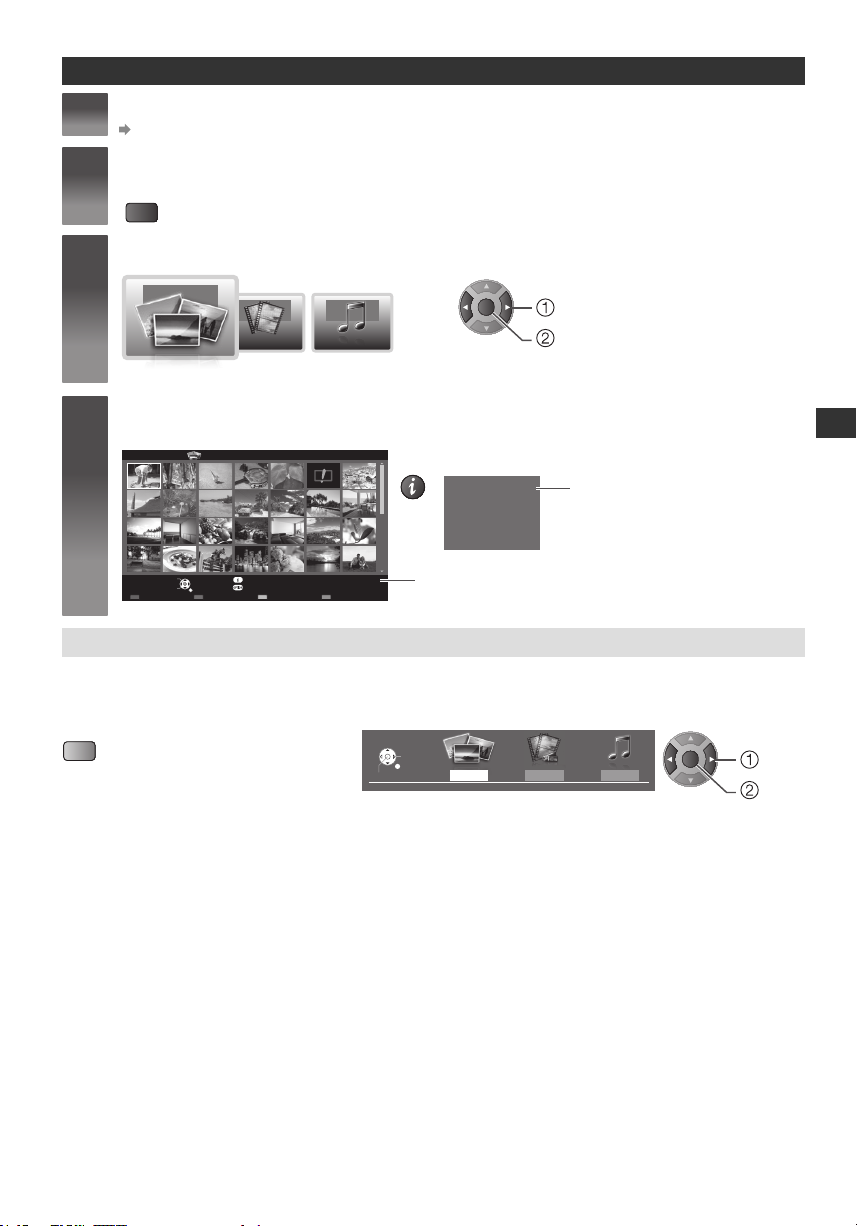
Starting Media Player
VIERA
TOOLS
Insert the USB Flash Memory to the TV
1
(p. 26)
Start [Media player]
2
.
Select the content
3
OK
MUSICVIDEO
Photo
Enjoy [Media player]
4
Example: Thumbnail - [All photos]
Media Player Photo All photos
RETURN
Info
Option Menu
Contents SelectSlideshow View Select Drive Select
View
Select
● To display the information of the highlighted content
File name
p1010001.JPG
Date
23/10/2011
Pixel
1600X1200
USB
Selected device name
Change the contents
You can switch to the other mode of [Media player] from the thumbnail view.
● The mode can be switched in the current device.
1 While the thumbnail is displayed, display
the contents selection
(blue)
2 Select the contents
Contents Select
Select
RETURN
Access
USB
Photo
select
access
1/48
File number / Total le number
MusicVideo
Using Media Player
OK
select
access
27
Page 28
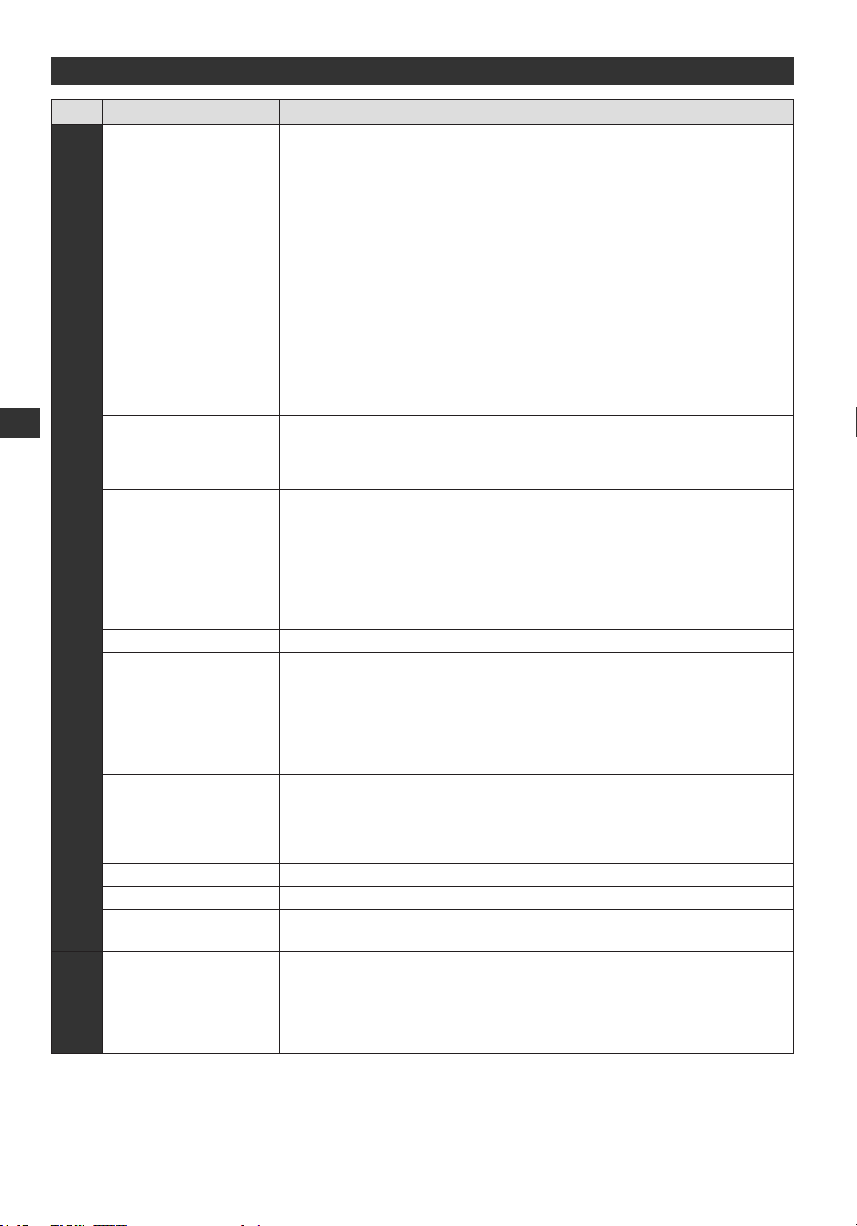
Option menu of [Photo]
Menu
Item
Frame
Using Media Player
Colour Effect
Slideshow Settings
Transition Effect
Auto makeup Set [Auto makeup] On or Off.
Screen Mode
Burst Playback
Interval Selects slideshow interval. [Long] / [Normal] / [Short]
Repeat Slideshow repeat [Off] / [On]
Back Ground Music
Change
Size
Change Size
Adjustments / Congurations (alternatives)
Selects the frame type of the slideshow
[Off] / [Multi] / [Collage] / [Drift (+ calendar)] / [Drift] / [Gallery (+ calendar)]
/ [Gallery] / [Cinema]
[Multi] :
9 photos are displayed orderly at once.
[Collage] :
Each photo is displayed at a random position and random scale.
[Drift (+ calendar)] / [Drift] :
Photos are displayed like ow images.
● You can select to display the calendar or not. The month of calendar is turned
by pressing left or right cursor button.
[Gallery (+ calendar)] / [Gallery] :
The various sizes of photos in the frame are displayed.
● You can select to display the calendar or not. The month of calendar is turned
by pressing left or right cursor button.
[Cinema] :
Photos are displayed like old lms (sepia tone)
Selects the colour effect of photos on [Single view] and [Slideshow].
[Off] / [Sepia] / [Gray scale]
This function is not available when [Frame] is set to [Drift], [Gallery], or
[Cinema].
Selects the transition effect for switching the photo during the slideshow.
[Off] / [Fade] / [Dissolve] / [Motion] / [Random]
[Fade] : The next photo fades in gradually.
[Dissolve] : Each photo is dissolved when switching to the next photo.
[Motion] : Each photo is displayed with an effect of enlarging, reducing, moving
up or moving down.
[Random] : Each transition is selected at random.
● This function is available when [Frame] is set to [Off].
Selects enlarged or normal viewing on [Single view] and [Slideshow].
[Normal] / [Zoom]
● This function is not available when [Frame] is set to [Collage], [Drift],
[Gallery], or [Cinema].
● This function is not available when [Transition Effect] is set to [Motion].
● Depending on the photo size, it may not be fully enlarged to ll the screen,
e.g. portrait style picture.
Selects whether to display burst photos in a fast-paced slideshow mode.
[Off] / [On]
● This function is not available when [Frame] is set to [Drift], [Gallery], or
[Cinema].
● This function is not available when [Transition Effect] is set to [Motion].
Selects the background music during [Photo] mode.
[Off] / [Type1] / [Type2] / [Type3] / [Type 4] / [Type 5] / [User] / [Auto]
Changes picture viewing size in thumbnail mode.
● Not valid on sildeshow mode
28
Page 29
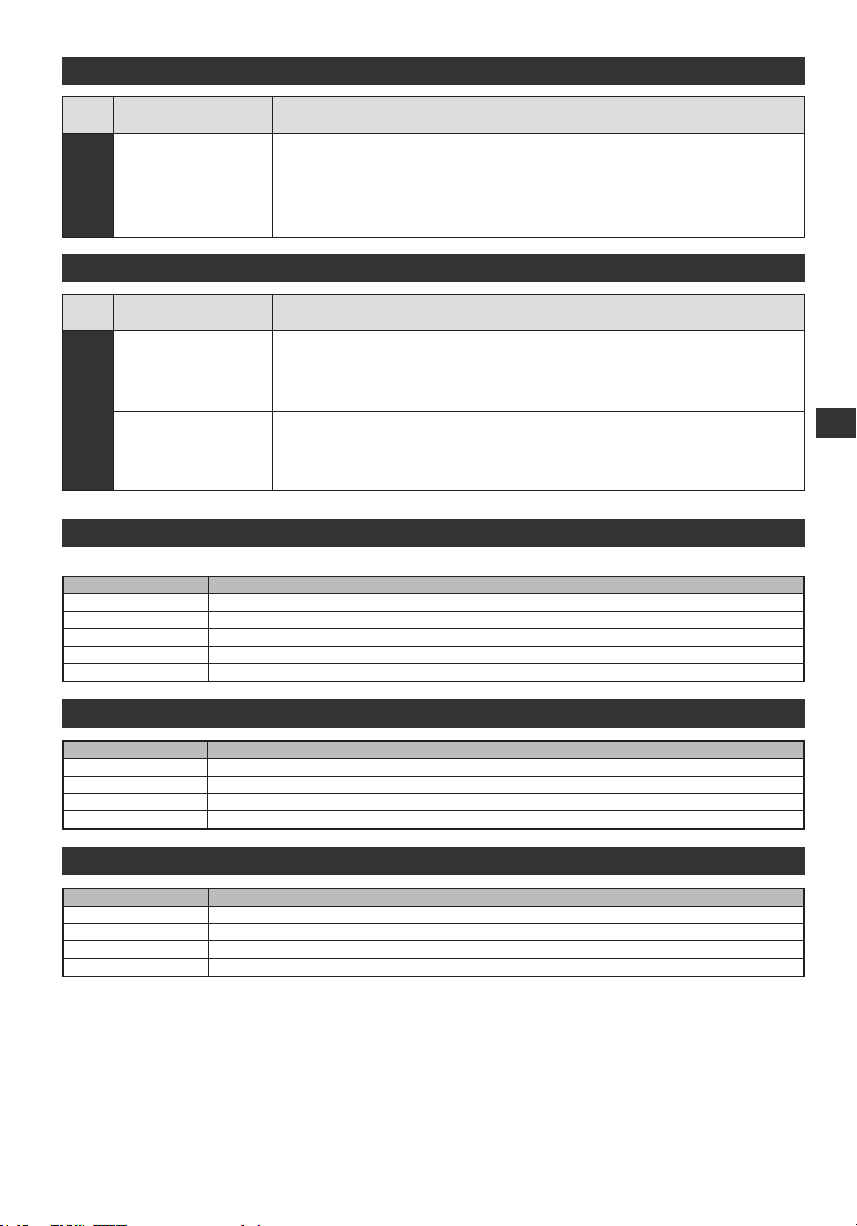
Option menu of [Music]
Menu
Music
Setup
Item Adjustments / Congurations (alternatives)
Repeat Set play repeat function. [Off] / [Folder] / [One]
Option menu of [Video]
Menu
Video Setup
Item Adjustments / Congurations (alternatives)
Video Preview
Repeat
Sets to start the preview of the title or scene in the thumbnail view. [Off] / [On]
● Image may not be displayed for an instant in the thumbnail view. Set the preview
[Off ] to resolve this.
Playback repeat within the title or selected le (depending on the content).
[Off] / [On]
[Photo]
● Browsing Photos
Buttons Description
a
Red
Green
Yellow
Blue
/b/c/
d
Playslideshow
•
Selectsviewingtype
•
Selectsdrivetype
•
Selects[Photo],[Video],or[Music]
•
Selectsphotos
•
Using Media Player
[Music]
Buttons Description
a
/b/c/
Red
Yellow
Blue
d
Playfolder
•
Selectsdrivetype
•
Selects[Photo],[Video],or[Music]
•
Selectsmusics
•
[Video]
Buttons Description
a
Red
Yellow
Blue
/b/c/
d
Playvideo
•
Selectsdrivetype
•
Selects[Photo],[Video],or[Music]
•
Selectsvideos
•
29
Page 30
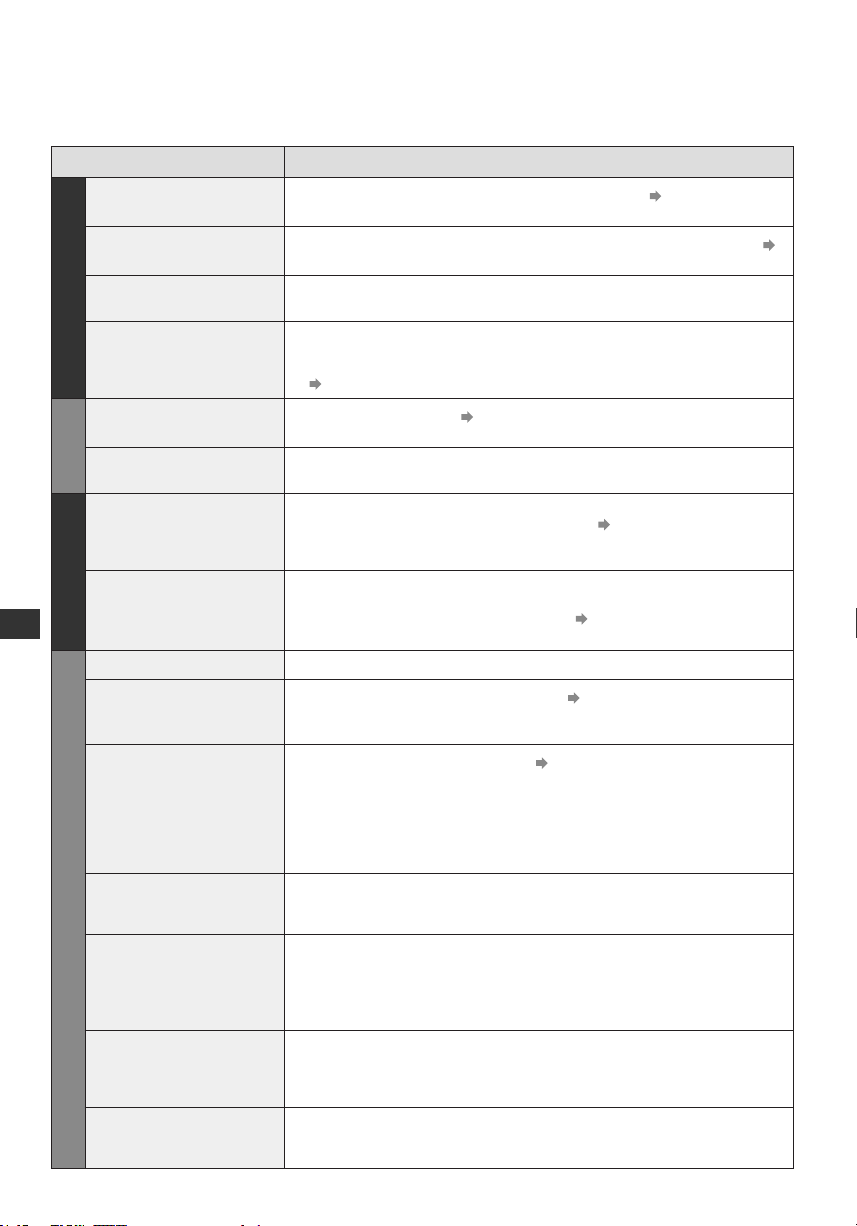
Others
FAQs
Before requesting service or assistance, please follow these simple guides to resolve the problem. If the problem still
persists, please contact your local Panasonic dealer for assistance.
Problem Causes / Actions
● Set [Noise Reduction] in the [Picture] to remove noise. (p. 19)
● Check nearby electrical products (car, motorcycle, uorescent lamp).
● Is [Contrast], [Brightness] or [Colour] in the [Picture] set to the minimum?
(p. 19)
● Reset channels.
● Turn the TV to standby mode with Standby On / Off switch, then turn it on
again.
● If the problem persists, initialise all settings.
[Shipping Condition]
● Is “Sound mute” active? (p. 14)
● Is the volume set to the minimum?
● Sound signal reception may be deteriorated.
● Set the sound setting of the connected equipment to “2ch L.PCM”.
● Check the [HDMI Input] setting in the [Sound]. (p. 22)
● If digital sound connection has a problem, select analogue sound
connection.
● Check the HDMI cable is connected properly.
● Turn the TV and equipment off, then turn them on again.
● Check an input signal from the equipment. (p. 32)
● Use equipment compliant with EIA/CEA-861/861D.
● Auto power standby function is activated. (p. 10)
● The TV enters Standby mode about 30 minutes after analogue broadcasting
ends.
● Are the batteries installed correctly? (p. 6)
● Has the TV been switched on?
● The batteries may be running low. Replace them.
● Point the remote control directly at the TV’s remote control signal receiver
(within about 7 m and a 30 degree angle of the signal receiver).
● Situate the TV away from sunshine or other sources of bright light not to
shine on the TV’s remote control signal receiver.
● Even when the temperature of parts of the front, top and rear panels has
risen, these temperature rises do not cause any problems in terms of
performance or quality.
● There is some exibility around the panel to prevent damage to the panel.
● The panel might move slightly when it is pushed with a nger, and clattered
sound might be heard. This is not a malfunction.
● The connected USB device might cause this error. Remove the device and
turn the TV to standby mode with Standby On / Off switch, then turn it on
again.
● Check foreign objects are not inside the USB port.
● Follow the message’s instructions.
● If the problem persists, contact your local Panasonic dealer or the authorised
service centre.
FAQs
30
Chaotic image, noisy
No image can be displayed
Screen
Blurry or distorted image
(no sound or low volume)
Unusual image is
displayed
Sound
No sound is produced
Sound level is low or
sound is distorted
Sound is unusual
HDMI
Pictures from external
equipment are unusual
when the equipment is
connected via HDMI
The TV does not switch on ● Check the mains lead is plugged into the TV and the socket outlet.
The TV goes into Standby
mode
The remote control does
not work or is intermittent
Other
Parts of the TV become hot
The LCD panel moves
slightly when it is pushed
with a nger
Clattered sound might be
heard
Overcurrent error message
appears
An error message appears
Page 31
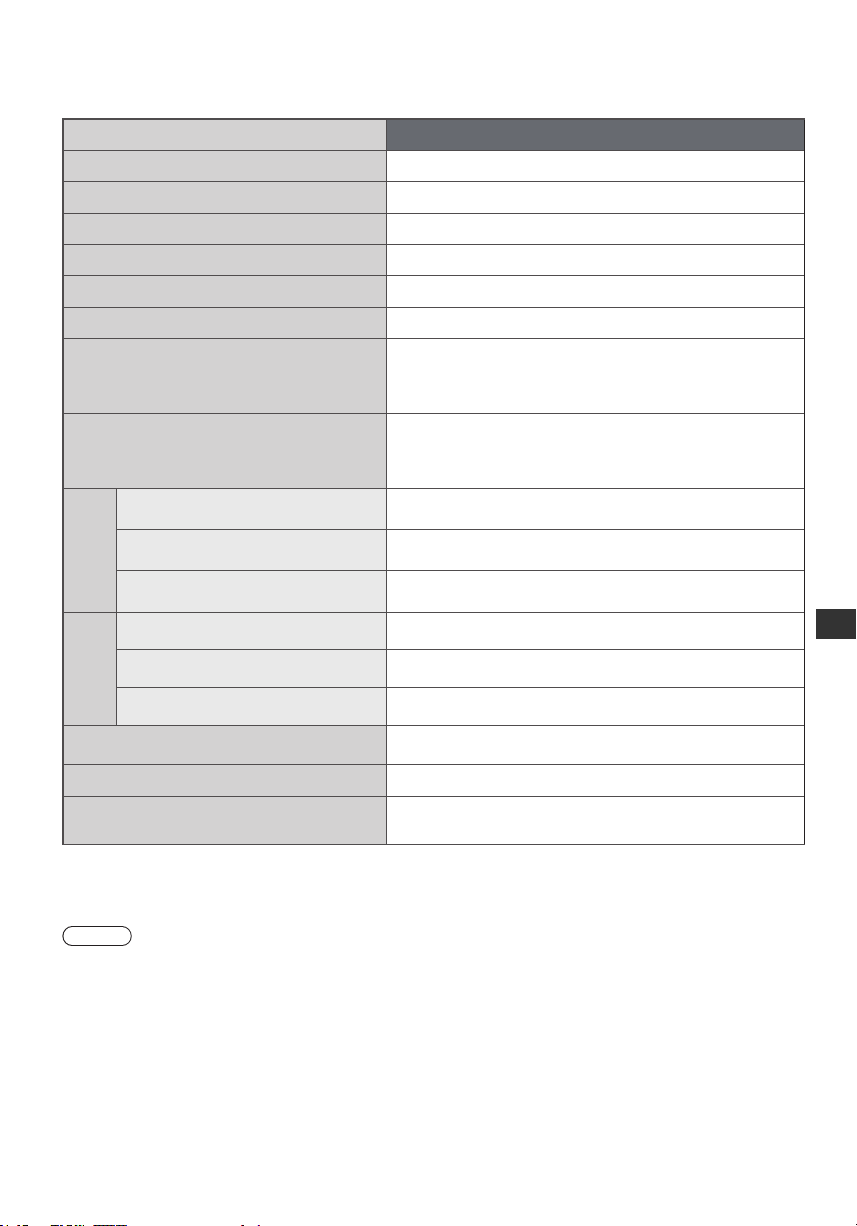
Specications
Model No.
Power source
Energy efciency class
On mode average power consumption
Annual energy consumption
Rated power consumption
Standby power consumption
Dimensions (W × H × D)
Mass
Display panel
Aspect ratio
Visible screen size
Number of pixels
Speaker
Sound
Audio output
Headphones
Broadcast System
Antenna input
Operating conditions
*1
*2
TX-L32EM6B
AC 220-240 V, 50/60 Hz
A+
30 W
42 kWh
66 W
0.3 W
With Pedestal:
738 mm × 512 mm × 206 mm
Without Pedestal (TV only):
738 mm × 454 mm × 66 mm
With Pedestal:
8.5 kg
Without Pedestal (TV only):
7.5 kg
16:9
80 cm (diagonal)
2,073,600 (1,920 (W) × 1,080 (H))
(132 mm × 34 mm × 34.5 mm) × 2, 16 Ω
Specications
10 W (5 W + 5 W), 10% THD
3.5mm stereo mini Jack × 1
Analogue: PAL-I
Digital: DVB-T/T2
VHF / UHF
Temperature : 0 °C - 35 °C
Humidity : 20 % - 80 % RH (non-condensing)
*1: EnergyconsumptionXYZkWhperyear,basedonthepowerconsumptionofthetelevisionoperating4hoursperdayfor
365days.Theactualenergyconsumptionwilldependonhowthetelevisionisused.
*2: WhentheTVisturnedoffwiththeremotecontrolandnofunctionisactive.
Note
● Design and Specications are subject to change without notice. Mass and Dimensions shown are approximate.
31
Page 32
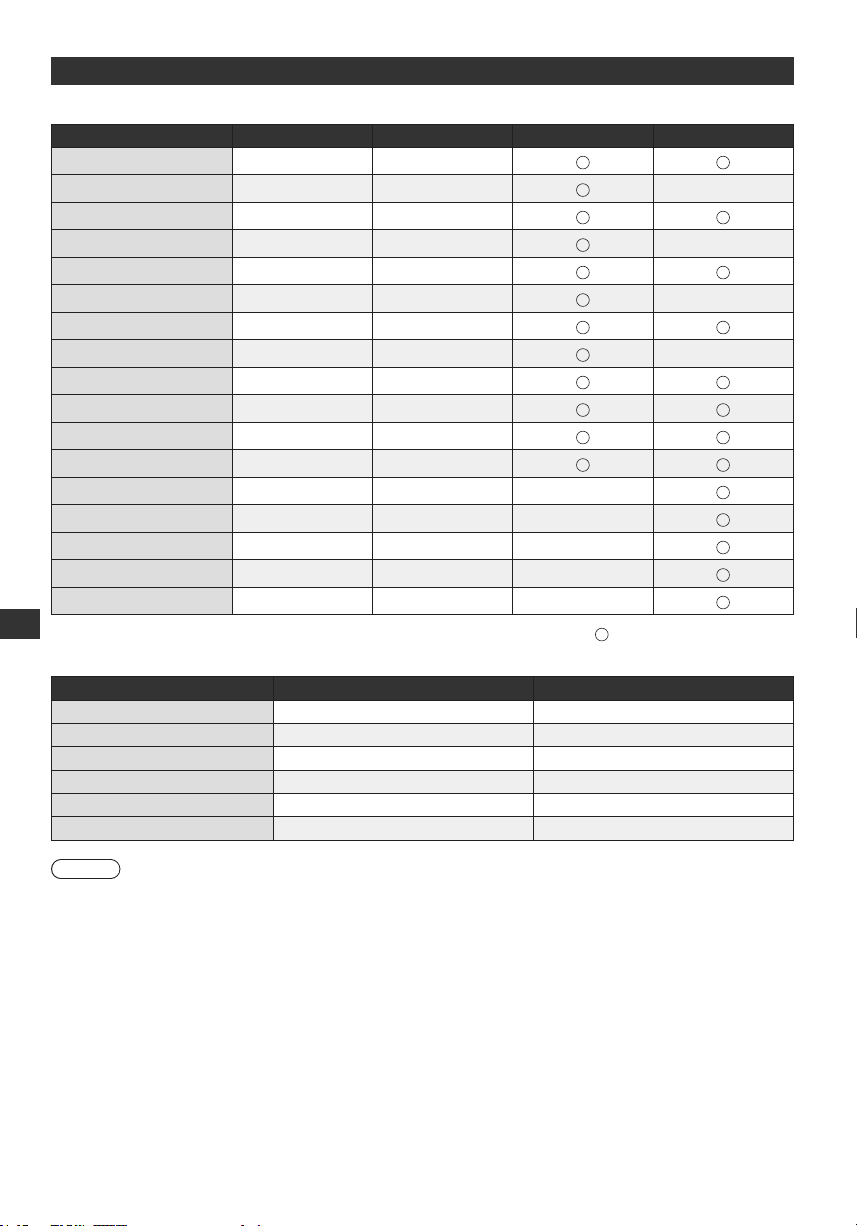
Input signal that can be displayed
COMPONENT (Y, Pb, Pr), HDMI
Mode H. Freq. (KHz) V. Freq. (Hz) COMPONENT HDMI
525 (480) / 60i 16:9 15.73 59.94
525 (480) / 60i 4:3 15.73 59.94
525 (480) / 60p 16:9 31.47 59.94
525 (480) / 60p 4:3 31.47 59.94
625 (576) / 50i 16:9 15.625 50
625 (576) / 50i 4:3 15.625 50
625 (576) / 50p 16:9 31.25 50
625 (576) / 50p 4:3 31.25 50
750 (720) / 60p 45 59.94
750 (720) / 50p 37.5 50
1,125 (1,080) / 60i 33.75 59.94
1,125 (1,080) / 50i 28.125 50
1,125 (1,080) / 60p 67.43 59.94
1,125 (1,080) / 50p 56.25 50
1,125 (1,080) / 24p 26.97 23.98
1,125 (1,080) / 30p 33.75 29.97
1,125 (1,080) / 25p 28.12 25
Specications
PC (from HDMI terminal)
Signal Name H. Freq. (KHz) V. Freq. (Hz)
640 × 480 @ 60Hz 31.47 59.94
800 × 600 @ 60Hz 37.88 60.32
1,024 × 768 @ 60Hz 48.36 60
1,280 × 1,024 @ 60Hz 63.98 60.02
1,920 × 1,080 50P 56.25 50
1,920 × 1,080 60P 67.43 60
Mark : Applicable input signal
Note
● Signals other than above may not be displayed properly.
● The above signals are reformatted for optimal viewing on your display.
● PC signal is magnied or compressed for display, so that it may not be possible to show ne detail with sufcient
clarity.
32
Page 33
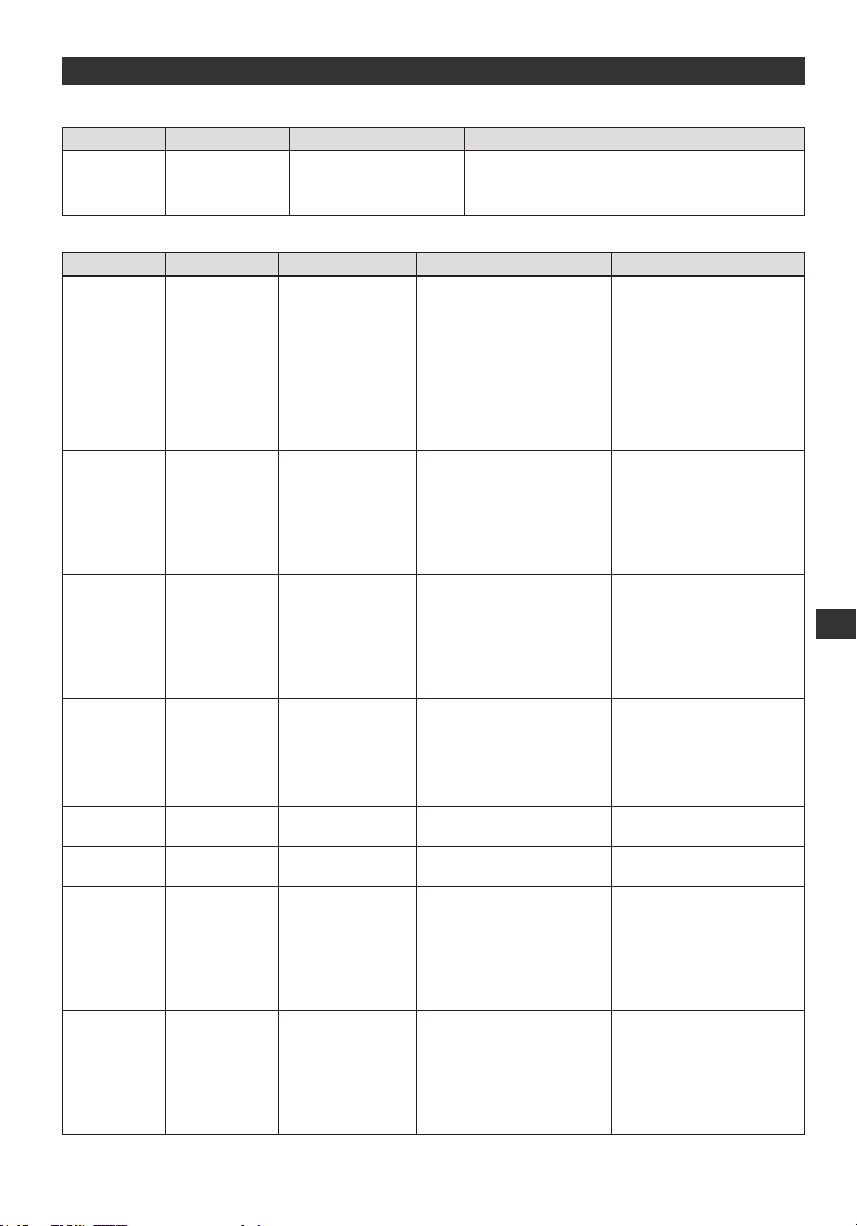
Supported le format in Media Player
Photo
Format File extension
JPEG
.jpg
.jpeg
Video
Container File extension Video codec Audio codec Details / Restrictions
AVI .avi
MKV .mkv
ASF
MP4
FLV .v H.264 BP/MP/HP
3GPP
PS
TS
.asf
.wmv
.f4v
.m4v
.mp4
.3gp
.3g2
.mod
.mpg
.mpeg
.vob
.vro
.mts
.m2ts
.tp
.trp
.ts
.tts
Image resolution (pixel) Details / Restrictions
8 x 8
to
30,719 x 17,279
DCF and EXIF standards
Sub-sampling: 4:4:4, 4:2:2, 4:2:0
● Progressive JPEG is not supported.
AAC
H.264 BP/MP/HP
MPEG1
MPEG2
MPEG4 SP/ASP
VC-1
Windows Media
Video Ver.9
ADPCM
Dolby Digital
Dolby Digital Plus
DTS core
HE-AAC
LPCM
MPEG Audio
MP3
● Some subtitles or chapter
functions may not be
available.
● WMA Pro and WMA
Lossless are not
supported.
WMA
H.264 BP/MP/HP
MPEG1
MPEG2
MPEG4 SP/ASP
AAC
Dolby Digital
Dolby Digital Plus
DTS core
HE-AAC
MPEG Audio
MP3
● Some subtitles or chapter
functions may not be
available.
● WMA Pro and WMA
Lossless are not
supported.
AAC
MPEG4 SP/ASP
VC-1
Windows Media
Video Ver.9
Dolby Digital
Dolby Digital Plus
HE-AAC
LPCM
MP3
● Copy-protected les
cannot be playback.
● WMA Pro and WMA
Lossless are not
supported.
WMA
H.264 BP/MP/HP
MPEG1
MPEG2
MPEG4 SP/ASP
H.264 BP/MP/HP
MPEG4 SP/ASP
H.264 BP/MP/HP
MPEG1
MPEG2
*1
VC-1
AAC
Dolby Digital
Dolby Digital Plus
HE-AAC
MPEG Audio
MP3
AAC
MP3
AAC
HE-AAC
*1
AAC
Dolby Digital
*1
Dolby Digital Plus
HE-AAC
LPCM
MPEG Audio
*1
MP3
*1
*1
● This TV supports this
container recorded with
Panasonic products. For
details, read the manual
of the products.
–
–
*1:
This codec can be played
back only in Media Player.
AAC
H.264 BP/MP/HP
MPEG1
MPEG2
*2
VC-1
Dolby Digital
Dolby Digital Plus
*2
DTS core
HE-AAC
MPEG Audio
*2
MP3
*2:
This codec can be played
back only in Media Player.
Specications
33
Page 34
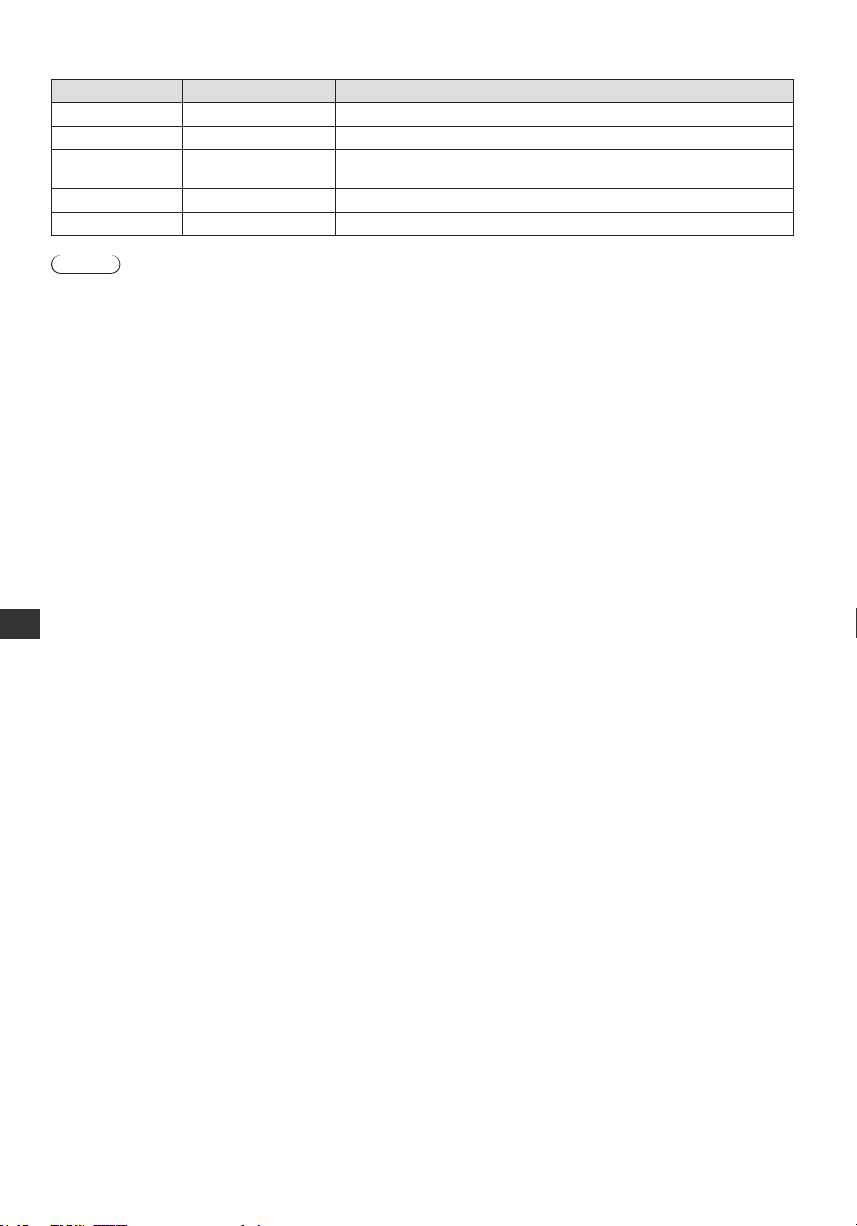
Music
Codec File extension Restrictions
MP3 .mp3 –
AAC .m4a ● Copy-protected les cannot be played back.
WMA .wma
LPCM .wav –
FLAC .ac –
● Copy-protected les cannot be played back.
● WMA Pro and WMA Lossless are not supported.
Note
● Some les may not be played back even if they fulll these conditions.
● Do not use two-byte characters or other special codes for le names.
● The device may become unusable with this TV if the le or folder names are changed.
● Supported Video formats are different in Media Player and media server.
Specications
34
Page 35

Licence
Even if no special notation has been made of company or product trademarks, these trademarks have been fully
respected.
This product incorporates the following software:
(1) the software developed independently by or for Panasonic Corporation,
(2) the software owned by third party and licensed to Panasonic Corporation,
(3) open sourced software
The software categorized as (3) is distributed in the hope that it will be
useful, but WITHOUT ANY WARRANTY, without even the implied warranty of MERCHANTABILITY
or FITNESS FOR A PARTICULAR PURPOSE. Please refer to the detailed terms and conditions
thereof shown in the “Software Licence” menu on this product.
DVB ● DVB and the DVB logos are trademarks of the DVB Project.
Dolby
● Manufactured under license from Dolby Laboratories. Dolby and the double-D symbol are
trademarks of Dolby Laboratories.
HDMI
● HDMI, the HDMI logo, and High-Denition Multimedia Interface are trademarks or
registered trademarks of HDMI Licensing LLC in United States and other countries.
HD TV
● The “HD TV” Logo is a trademark of DIGITALEUROPE.
Licence
DTS
● Manufactured under license under U.S. Patent Nos: 5,956,674; 5,974,380; 6,487,535 &
other U.S. and worldwide patents issued & pending. DTS, the Symbol, & DTS and the
Symbol together are registered trademarks & DTS 2.0+Digital Out is a trademark of DTS,
Inc. Product includes software. © DTS, Inc. All Rights Reserved.
35
Page 36
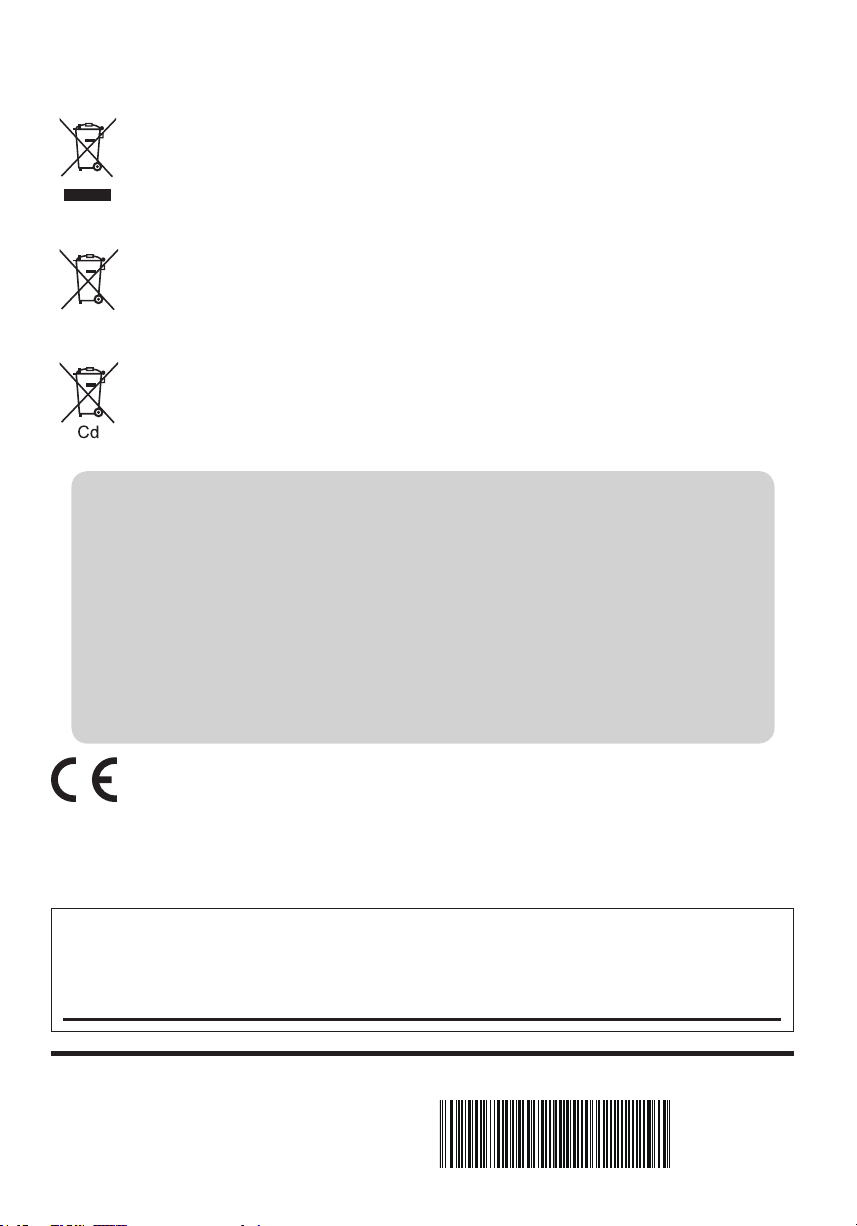
Information for Users on Collection and Disposal of Old Equipment and used
Batteries
These symbols on the products, packaging, and/or accompanying documents mean that used electrical
and electronic products and batteries should not be mixed with general household waste. For proper
treatment, recovery and recycling of old products and used batteries, please take them to applicable
collection points, in accordance with your national legislation and the Directives 2002/96/EC and
2006/66/EC.
By disposing of these products and batteries correctly, you will help to save valuable resources and
prevent any potential negative effects on human health and the environment which could otherwise
arise from inappropriate waste handling.
For more information about collection and recycling of old products and batteries, please contact your
local municipality, your waste disposal service or the point of sale where you purchased the items.
Penalties may be applicable for incorrect disposal of this waste, in accordance with national legislation.
For business users in the European Union
If you wish to discard electrical and electronic equipment, please contact your dealer or supplier for
further information.
[Information on Disposal in other Countries outside the European Union]
These symbols are only valid in the European Union. If you wish to discard these items, please contact
your local authorities or dealer and ask for the correct method of disposal.
Note for the battery symbol (bottom two symbol examples) :
This symbol might be used in combination with a chemical symbol. In this case it complies with the
requirement set by the Directive for the chemical involved.
Sales and Support information
Customer Communications Centre
• For customers within the U.K.: 0844 844 3899
• For customers within Ireland: 01289 8333
• Monday - Friday 9:00am - 5:00pm, (Excluding public holidays).
• For further support on your product, please visit our website: www.panasonic.co.uk
Direct Sales at Panasonic U.K.
• Order accessory and consumable items for your product with ease and confidence by phoning our Customer
Communications Centre Monday - Friday 9:00am - 5:00pm, (Excluding public holidays).
• Or go on line through our Internet Accessory ordering application at www.pas-europe.com
• Most major credit and debit cards accepted.
• All enquiries transactions and distribution facilities are provided directly by Panasonic U.K.
• It couldn’t be simpler!
• Also available through our Internet is direct shopping for a wide range of finished products.
Take a browse on our website for further details
Declaration of Conformity (DoC)
Authorized Representative :
Panasonic Testing Centre
Panasonic Marketing Europe GmbH
Winsbergring 15, 22525 Hamburg, Germany
Customer’s Record
The model number and serial number of this product may be found on its rear panel. You should note this serial
number in the space provided below and retain this book, plus your purchase receipt, as a permanent record of your
purchase to aid in identication in the event of theft or loss, and for Warranty Service purposes.
Model Number Serial Number
Panasonic UK, a branch of Panasonic Marketing Europe GmbH
Willoughby Road, Bracknell, Berkshire, RG12 8FP
Web Site: http://panasonic.net
© Panasonic Corporation 2013 Printed in China
X41G32MV03713A
T0213-0
 Loading...