

Panasonic TX-26LE8A User Manual
Operating Instructions
LCD TV
Model No. TX-26LE8A
Please read these instructions before operating your set and retain them for future reference.
The images shown in this manual are for illustrative purposes only.
LG
TQB4GC0091
Dear Panasonic Customer
Welcome to the Panasonic family of customers. We hope that you will have many years of enjoyment from
your new LCD TV.
Contents
Warnings and Cautions ............................................2
Important Installation Notices ...................................3
Accessories / Options ...............................................4
Identifying Controls ...................................................5
Basic Connection......................................................6
Initial Setup ...............................................................7
Auto Tuning ..............................................................8
Watching TV .............................................................9
Watching Videos and DVDs ...................................10
Viewing Teletext ..............................................11 ~ 12
How to use Menu Functions ...........................13 ~ 16
Editing and Setting Channels .................................17
Displaying PC Screen on TV ..................................18
External Equipment ........................................19 ~ 24
Aspect Ratio ...........................................................25
HDMI Connection ...................................................26
PC Connection .......................................................26
Control with VIERA Link .........................................27
Input signal that can be displayed ..........................27
Stereo / Bilingual Sound Selection .........................28
Licence ...................................................................28
FAQs.......................................................................29
Troubleshooting ......................................................30
Specifications .........................................................31
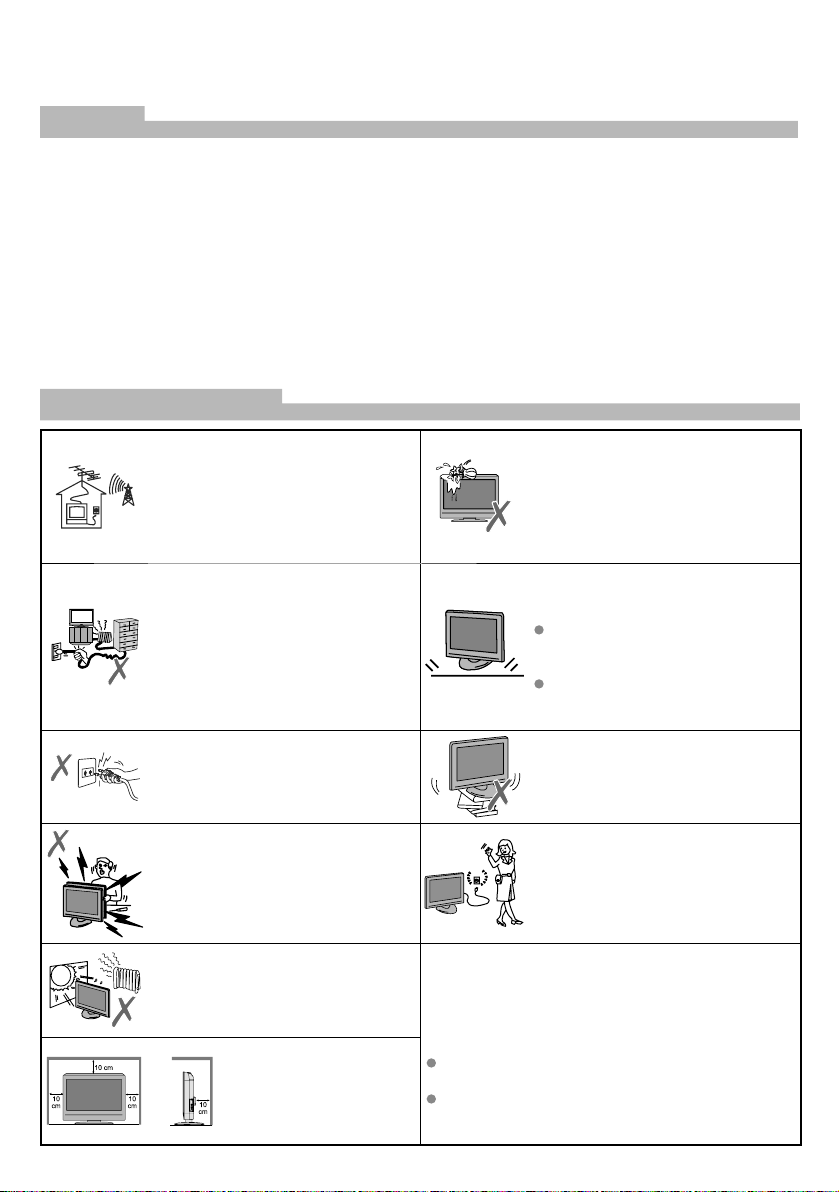
Warnings and Cautions
To prevent damage which might
result in electric shock or fire, do not
TV operating voltage:
AC SINGLE 230V, 50Hz
Do not use at a voltage other than
indicated.
Take care not to damage the power
cord.
Do not use if the power cord or power
plug is damaged, or if the plug does
not fit tightly into the socket.
Do not twist the lead, bend it
excessively, or stretch it.
expose this TV set to rain or excessive
moisture. This TV must not be exposed
to dripping or splashing water, and
objects filled with liquid, such as vases,
must not be placed on top of or above
the TV.
Keep the unit away from below
equipment
Electronic equipment
Do not place video equipment near
the unit. It may distort images/sound.
Equipment with an infrared sensor
This TV also emits infrared rays.
Do not touch the power plug if your
hands are wet.
Do not remove the rear cover as
live parts are accessible when it
is removed. There are no user
serviceable parts inside.
Avoid exposing the TV set to direct
sunlight and other sources of heat. To
prevent fire, never place any type of
candle or naked flame on top or near
the TV set.
Allow sufficient space
around the unit for
radiated heat.
Do not block the rear air
vents.
Maintenance
First, remove the mains plug from the socket outlet.
Wipe the surface clean using a soft cloth dampened
with clean water. Then, using a soft dry cloth, evenly,
wipe the surface clean until it is dry.
Caution
Do not tap or scratch the surface with your fingernail
or other hard object.
Use care not to subject the surface to bug repellent,
solvent, thinner, or other volatile substances (this
may degrade surface quality).
Do not place the TV on an unstable
surface.
Remove the plug from the wall outlet
(Power point) when the TV set is not
used for a prolonged period of time.
The mains plug is used as the
disconnecting device.
2
Important Installation Notices
■ Install TV on a stable surface
If a television is not positioned in a sufficiently stable location, it can be potentially hazardous due to
falling.
Many injuries, particularly to children, can be avoided by taking simple precautions such as:
Using cabinets or stands recommended by the manufacturer of the television.
Only using furniture that can safely support the television.
Ensuring the television is not overhanging the edge of the supporting furniture.
Not placing the television on tall furniture (for example, cupboards or bookcases) without anchoring
both the furniture and the television to a suitable support.
Not standing the televisions on cloth or other materials placed between the television and supporting
furniture.
Educating children about the dangers of climbing on furniture to reach the television or its controls.
■ When cleaning the TV, remove the mains plug
Cleaning an energized TV may cause electrical shock.
■ When the TV is not going to be used for a long period of time, remove the
mains plug
This TV will still consume some power even in the Off mode, as long as the mains plug is still
connected to a live socket outlet.
■ Transport only in upright position
Transporting the TV with its display panel facing upright or downward may cause damage to the
internal circuitry.
■ Do not expose your ears to excessive volume from the headphones
Irreversible damage can be caused.
■ Auto power standby function
If no signal is received and no operation is performed in Analogue TV mode for 30 minutes, the TV
will automatically go to standby mode.
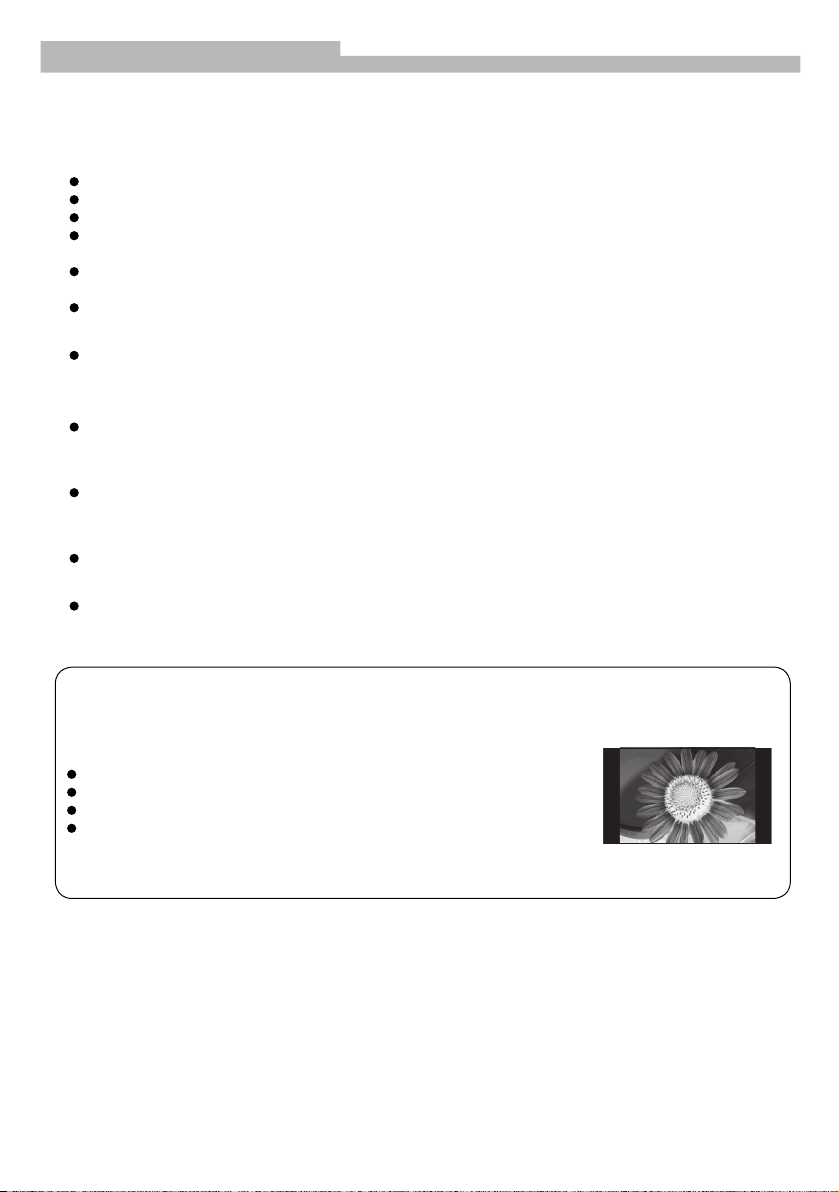
Do not display a still picture for a long time
This causes the image to remain on the screen (“image retention”).
This is not considered a malfunction and is not covered by the warranty.
Typical still images
Programme number and other logos
Image displayed in “4:3” mode
Video game
Computer image
To prevent image retention, contrast is lowered automatically after a few
minutes if no signals are sent or no operations are performed.
3
Accessories / Options
Standard accessories
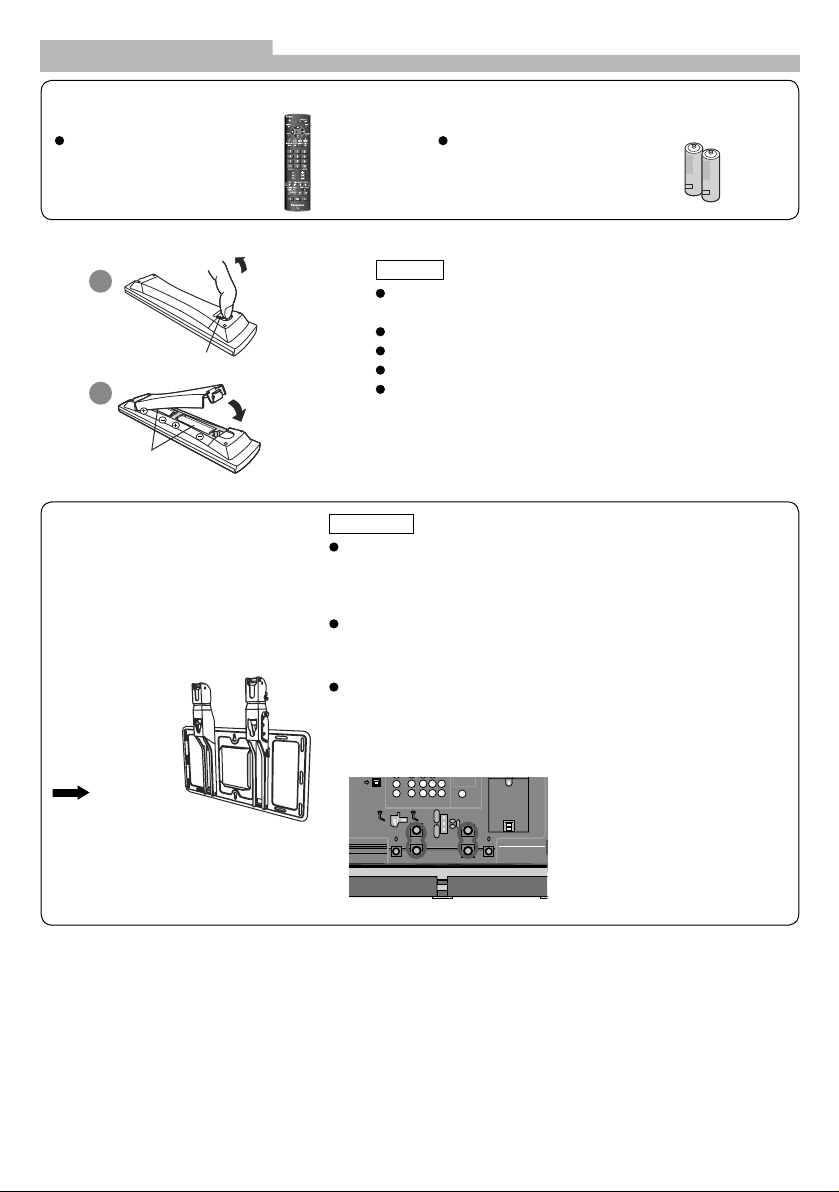
Remote Control Transmitter
N2QAKB000065 or
N2QAYB000227
Installing remote control batteries
Pull Open
1
Hook
2
Note the correct
polarity (+ or –)
Close
Batteries for the Remote Control Transmitter (2)
R6 (AA)
Caution
Incorrect installation may cause battery leakage and
corrosion, resulting in damage to the remote control unit.
Do not mix old and new batteries.
Do not mix different battery types.
Do not use rechargable (Ni-Cd) batteries.
Do not burn or breakup batteries.
Optional accessories
Please contact your Panasonic
dealer to purchase the
recommended wall-hanging bracket.
For additional details, please refer to
the wall-hanging bracket installation
manual.
TY-WK32LR2W
Wall-hanging
bracket
(Vertical)
WARNING
Failure to use a Panasonic bracket or choosing to mount the
unit yourself will be done at the risk of the consumer. Any
damage resulting from not having a professional installer
mount your unit will void your warranty.
Always be sure to ask a qualified technician to carry out setup.
Incorrect fitting may cause equipment to fall, resulting in injury
and product damage.
Do not mount this LCD Television directly below ceiling lights
which typically give off high heat. Doing so may warp or
damage plastic cabinet parts.
L How to remove the TV stand
Remove four screws
Rear of the TV
4
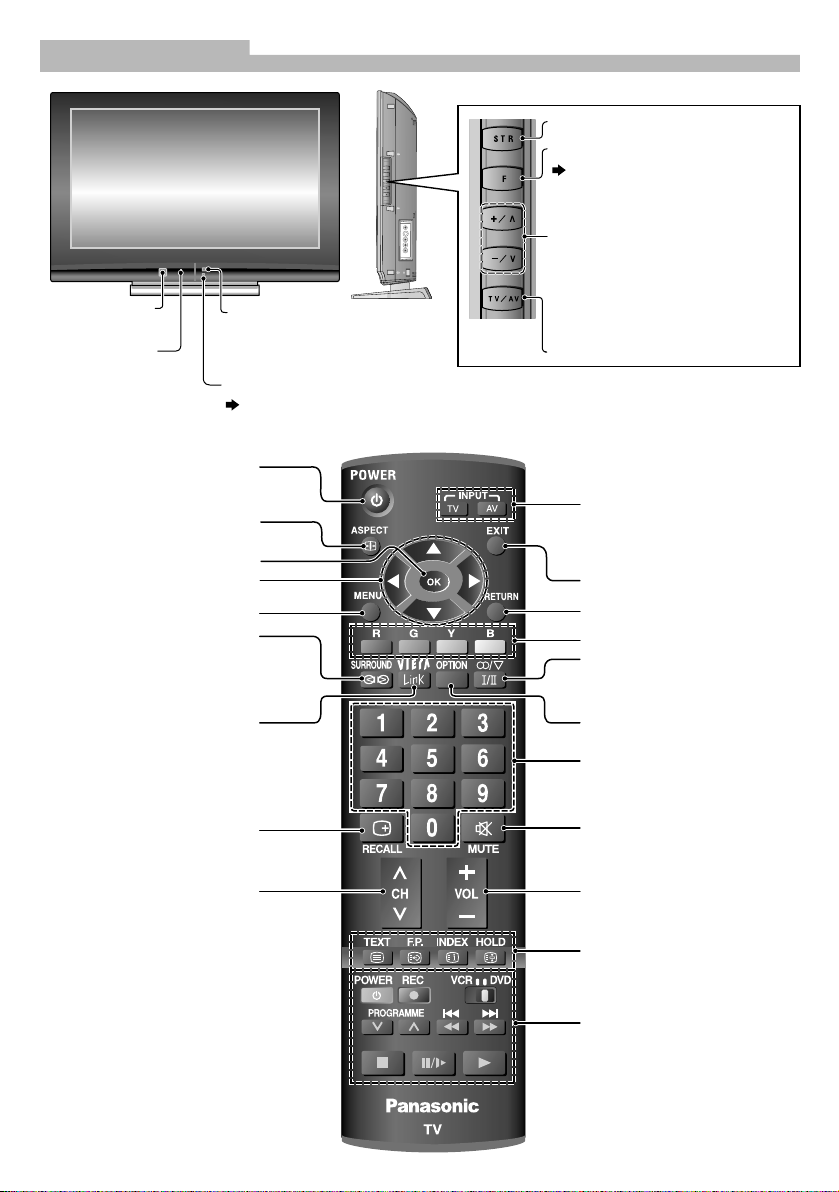
Identifying Controls
Mains power
On/Off switch
Power indicator:
Standby: RED
Power ON: GREEN
Switches TV to On or Standby
(Mains power must be on)
Select Aspect ratio
Confirm selected option
Move cursor to make
selection or adjustment
Access Main menu
Turn on/off surround sound
Remote control
signal receiver
(Range: 7 metres)
C.A.T.S. (Contrast Automatic Tracking System) sensor
senses brightness to adjust picture quality when Picture mode is set to Eco.
Store setting
S
TR
F
V
+
V
VV
AT
Function select
Volume / Contrast / Brightness
/ Colour / Sharpness / NTSC-Tint
(Tint) / Balance / Tuning mode
Select programme number in
sequence / When a function is
displayed, press to increase or
decrease the selected function /
When in Standby mode, switches
TV on
Change input mode
Change input mode
TV – select TV mode
AV – select AV mode
Exit Main menu
Return to previous menu
Multifunctional buttons
Select Stereo/Bilingual sound
Access Viera Link menu
Display/hide programme
information
Select programme
number in sequence
Access Option menu
Select programme number/
When in standby mode,
switch TV on
Turn on/off sound mute
Adjust volume
Operate Teletext function
Operate connected VCR/DVD
5
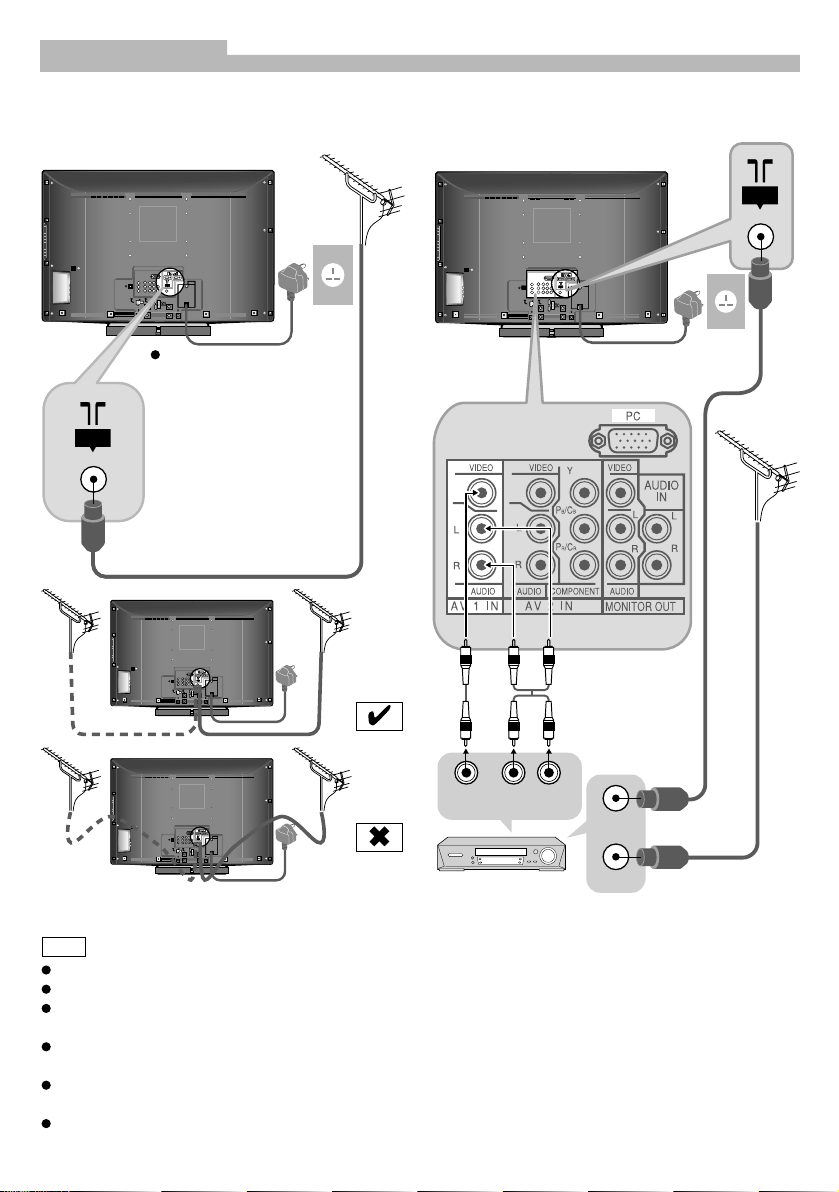
Basic Connection
External equipments and cables shown are not supplied with this TV.
Please ensure that unit is disconnected from the mains socket before attaching or disconnecting any leads.
Connecting aerial Connecting DVD Recorder / VCR
ANT
ANT
ANTANT
Mains plug types vary
between countries.
The power plug shown
above may, therefore, not
be the type fitted to your
set.
(Connect after all other
connections.)
75 Ω Coaxial cable
VIDEO
OUT
AUDIO
OUT
ANT
RF OUT
75
Coaxial
cable
RF IN
If the antenna is placed in the wrong location,
DVD Recorder
or VCR
interference might happen.
Note
Do not put the Coaxial cable close to the mains lead to avoid noise.
Do not place the Coaxial cable under the TV.
To obtain optimum quality picture and sound, an Aerial, the correct cable (75 Ω coaxial) and the correct
terminating plug are required.
If a communal Aerial system is used, you may require the correct connection cable and plug between the
wall Aerial socket and the TV.
Your local Television Service Centre or dealer may be able to assist you in obtaining the correct Aerial
system for your particular area and the accessories required.
Any matters regarding Aerial installation, upgrading of existing systems or accessories required, and the
costs incurred, are the responsibility of you, the customer.
6
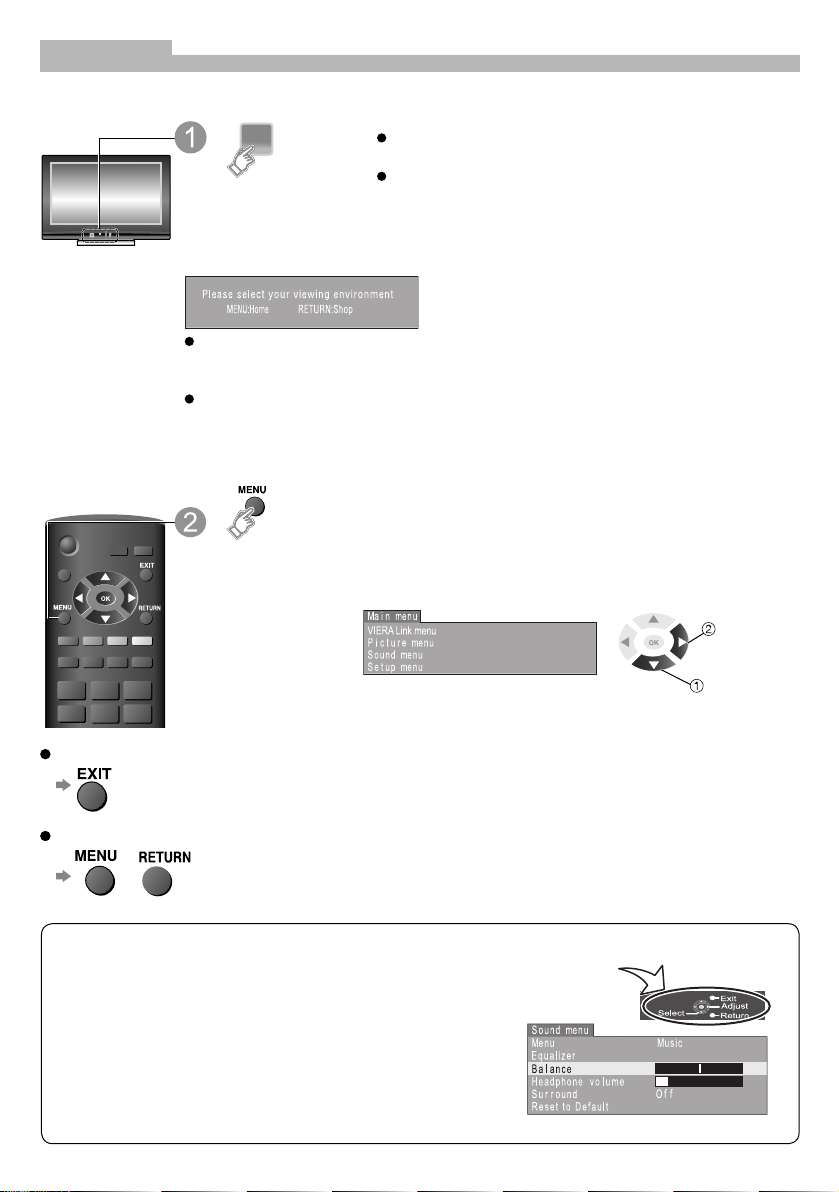
Initial Setup
These steps are not necessary if the setup has been completed by your local dealer.
You can now use the remote control to turn On the unit or
turn the unit to standby mode.
Turn On the TV with
the mains power On /
Off switch
Select the picture setting
“Home” is the recommended mode for viewing at
home. Select “Home” for optimal picture / power
consumption. “Shop” is for in-store display.
If “Shop” is selected, the word “Shop” appears every
time the TV is switched on. (page 9)
Home: “Viewing Mode” is set as “Standard”. (page 15)
Shop: “Viewing Mode” is set as “Dynamic”. (page 15)
Display the menu
If you turned the TV Off during Standby mode last time,
the TV will be in Standby mode when you turn the TV On
with mains power On / Off switch.
access
To exit
To return to the previous screen
or
Need help with operations?
On-screen operation guide will help you.
select
(example : Sound menu)
7
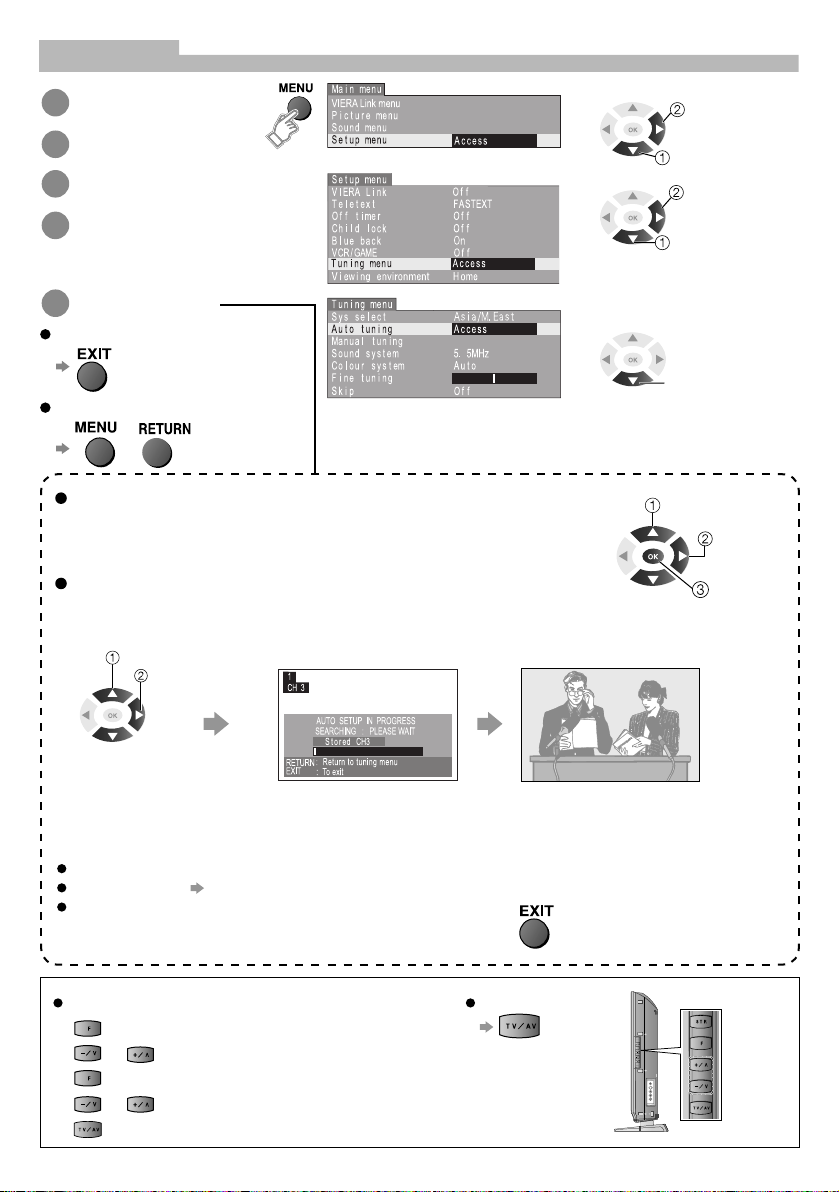
Auto Tuning
Display the menu
1
Select and access
2
“Setup menu”
Select and access
3
“Tuning menu”
Select the item
4
(Sys select / Auto tuning)
Change or access
5
To exit
To return to the previous screen
or
access
select
access
select
select
Sys select (System selection)
Select the system of your area.
(China / HK/UK / Asia/M.East / NZ/INDONES / Australia / E.Europe /
SPECL Ver / America / CATV / Japan)
Auto tuning
Automatically set the channels received in your area.
Auto tuning is now complete and
select “Auto tuning”
your TV is ready for viewing.
access
The TV will search for, locate, store and then sort into
order your local stations.
Once Auto tuning is completed the
TV will display the programme now
stored on programme position1.
If it is not the first time to perform Auto tuning, all previous tuning data will be erased.
To edit channels “Editing and Setting Channels” on page 17.
Press the EXIT button at any time to go back to watching TV.
For Auto tuning using the buttons on the unit
1 (Press until “Tuning mode” appears)
or (Access Tuning menu)
2
(Press until “Auto tuning” is reached)
3
4
or (Searching channels)
(Exit Tuning mode)
5
To return to TV
8
select
change
store
STR
F
V
+
V
VVAT
Watching TV
Turn power on
1
Mains power On/Off switch should be On.
If “Shop” is displayed on the top right of
the screen, select “Home” in “Viewing
Environment”. (page 7)
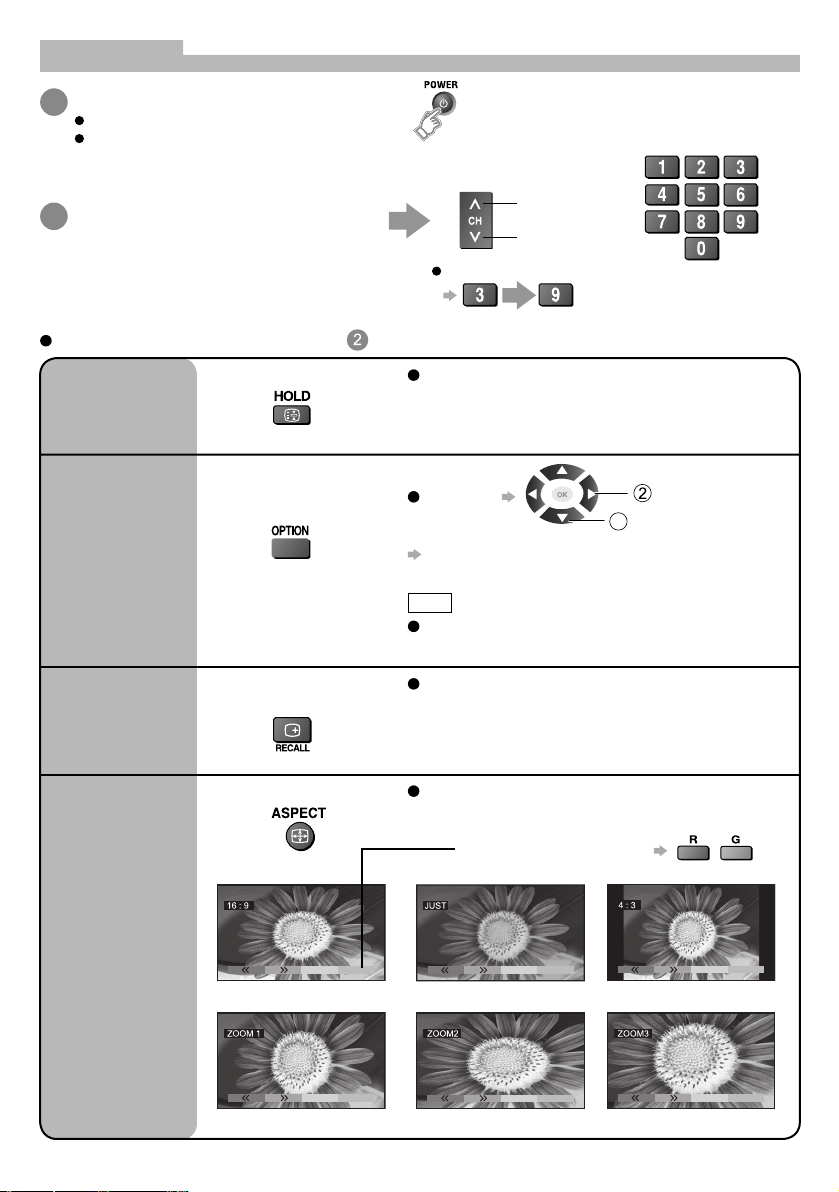
Select a programme number
2
Other Useful Functions (Operate after )
up
down
To select a 2 or 3-digit programme number, eg. 39
(in a short time)
or
Picture
Still
Display the
current
programme
status
Display status
information
Change aspect
ratio
Freeze / unfreeze picture
Check or change the
current programme
status instantly
Recall status
information
Change the aspect ratio
Press the HOLD button to freeze the picture.
(TV/VIDEO input only. Component / HDMI / PC
input does not freeze.) Press again to return to
watching the current programme.
1
change
select
To change
CH colour set
Adjusts colour density variation between
broadcasting channels.
Note
Also possible to change the settings in Menu list
(page 15 and 16).
Displayed information:
For example, Programme number, Channel
number, Stereo mode, Aspect mode, Sound menu,
Picture menu, Sound system.
Each press changes the mode.
(16:9 / Just / 4:3 / Zoom1 / Zoom2 / Zoom3)
While the bar is displayed
9
Watching Videos and DVDs
Once the equipment is connected, use the following procedure to view the input. (For connection, see
“External Equipment” on page 23.)
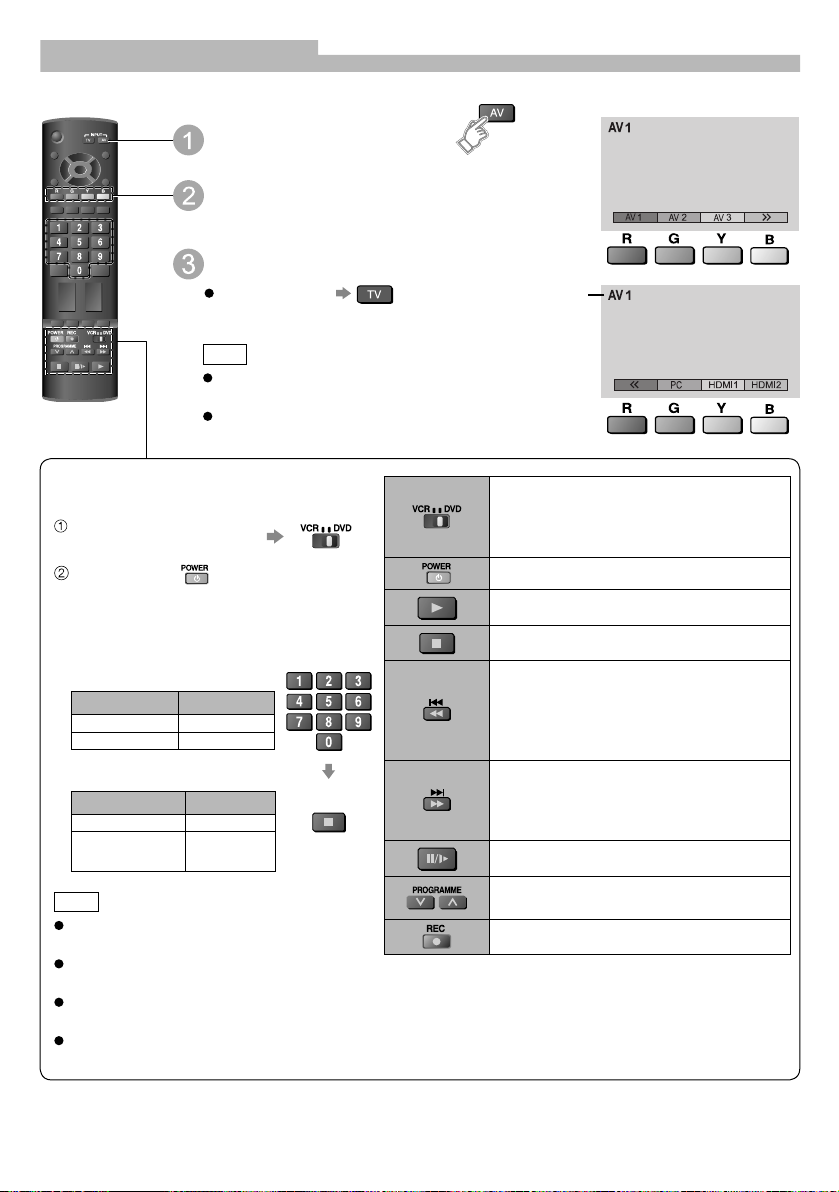
Display the input select menu
Select the input mode
connected to the equipment
View
To return to TV
Note
If the external equipment has an aspect adjustment
function for a connected TV, set to “16:9”.
You can also select the connector using the AV
button on the remote control or side panel of the TV.
Displays the
selected mode
Setting your remote control to operate
Panasonic VCR, DVD, etc.
Set the VCR / DVD switch
to the appropriate position
Press and hold during the following
operations
Enter the appropriate code for the
equipment to be controlled, see table
below.
“VCR” position
Equipment Code
VCR 10 (default)
DVD 11
“DVD” position
Equipment Code
DVD 70 (default)
Home Player
theatre
Note
Confirm correct operation after the code
changed.
The codes will be reset to default values if
batteries are replaced.
“DVD” means DVD player, DVD recorders
and home theatre recorders.
Some operations may not be possible on
some equipment models.
71
Press
Select VCR to operate Panasonic VCR
or DVD
Select DVD to operate Panasonic DVD
or Home Player theatre
Standby mode / Turn on
Playback video cassette / DVD
Stop the operations
VCR : Rewind, review the picture rapidly
in reverse
DVD : Play at slow speed
Press and hold to search
backward
VCR : Fast-forward, view the picture
rapidly forward
DVD : Play at slow speed
Press and hold to search forward
Pause / Restart
VCR : Select programme
DVD : Skip the track or title
Start recording
10
 Loading...