

Page 1

TX-28/25XD4F Service Manual/A
Safety
Specifications
Parts List
Service
Information
Adjustments
Self Check
Service Hints
Mechanical
View
Disassembly
Location of
Controls
Waveforms
Block Diagrams
Schematic Diagrams
PCB Views
Service Support
Service and repair of
this product is
supported by
Panasonic's LUCI
interface.
This interface provides a
link between the TV and
a standard PC to allow a
number of diagnostic
and control functions to
be performed.
For more details contact
your local Panasonic
company.
BACK
EXIT
Page 2
Audio
Control
Power supply
BACK
E - PCB Y - PCB
BACK
Video
E - Schematic
N - Schematic
H - Schematic
Y - Schematic
BACK
Page 3

ORDER No. SM-98028
Colour Television
TX-28XD4F / TX-25XD4F
EURO4 Chassis
SPECIFICATIONS
(Information in brackets { } refer to TX-25XD4F)
Power Source: 220-240V AC, 50Hz
Power Consumption: 90W
Aerial Impedance: 75Ω unbalanced, Coaxial Type
Standby Power Consumption: 1,8W
Receiving System: PAL-I, B/G, H, D/K, PAL-525/60
Receiving Channels:
VHF E2-E12 VHF H1-H2 (ITALY)
VHF A-H (ITALY) VHF R1-R2
VHF R3-R5 VHF R6-R12
UHF E21-E69 CATV (S01-S05)
CATV S1-S10 (M1-M10) CATV S11-S20 (U1-U10)
CATV S21-S41 (HYPERBAND)
Intermediate Frequency:
Video 38,9MHz, 34MHz
Sound 32,9MHz, 33,4MHz, 33,16MHz
Colour 34,47MHz (PAL)
Video/Audio Terminals:
AUDIO MONITOR OUT Audio (RCAx2) 500mV rms1k
AV1 IN Video (21 pin) 1V p-p 75
AV1 OUT Video (21 pin) 1V p-p 75
AV2 IN Video (21 pin) 1V p-p 75
AV2 OUT Video (21 pin) 1V p-p 75
AV3 IN Audio (RCAx2) 500mV rms10k
High Voltage: 28,5kV ±1kV {28,2kV ±1kV}
Picture Tube: A66ECF50X41 66cm
Audio Output: 2 x 15W (Music Power)
Headphones: 8Ω Impedance
Accessories supplied: Remote Control
Dimensions:
Height: 596,5 mm {550 mm}
Width: 778 mm {730 mm}
Depth: 481,5 mm {479 mm}
Net Weight: 35kg {29kg}
Specifications are subject to change without notice.
Weights and dimensions shown are approximate.
NOTE: This Service Manual should be used in conjunction with the
EURO4 technical guide.
SECAM L/L’ B/G, D/K
M.NTSC
NTSC (AV only)
32,4MHz, 40,4MHz, 33,05MHz
32,66MHz
34,5MHz, 34,65MHz (SECAM)
Audio (21 pin) 500mV rms 10k
RGB (21 pin)
Audio (21 pin) 500mV rms 1k
Audio (21 pin) 500mV rms 10k
S-Video IN Y: 1V p-p 75
(21 pin) C: 0.3V p-p 75
Audio (21 pin) 500mV rms 1k
Selectable Output (21 pin)
Video (RCAx1) 1V p-p 75
{A59ECF50X41 59cm}
8Ω Impedance
2 x R6 (UM3) Batteries
Ω
Ω
Ω
Ω
Ω
Ω
CARACTÉRISTIQUES
(Les informations entre parenthèses { } concernent le TX-25XD4F)
Alimentation: 220-240V AC, 50Hz
Consommation: 90W
Impédance d'antenne: 75Ω asymétrique sur prise coaxiale
Standby Consommation: 1,8W
Systéme de réception: PAL-I, B/G, H, D/K, PAL-525/60
Canaux de réception:
VHF E2-E12 VHF H1-H2 (ITALY)
VHF A-H (ITALY) VHF R1-R2
VHF R3-R5 VHF R6-R12
UHF E21-E69 CATV (S01-S05)
CATV S1-S10 (M1-M10) CATV S11-S20 (U1-U10)
CATV S21-S41 (HYPERBAND)
Fréquency Intermédiaire:
Video 38,9MHz, 34MHz
Sound 32,9MHz, 33,4MHz, 33,16MHz
Couleur 34,47MHz (PAL)
Ω
Ω
Ω
Ω
Ω
Ω
Ω
Les bornes vidéo/audio:
SORTIE AUDIO MONITOR Audio (RCAx2) 500mV rms1k
Entrée AV1 (21 brioches) Video (21 pin) 1V p-p 75
Sorties AV1 (21 brioches) Video (21 pin) 1V p-p 75
Entrée AV2 (21 brioches) Video (21 pin) 1V p-p 75
Sorties AV2 (21 brioches) Video (21 pin) 1V p-p 75
Entrée AV3 Audio (RCAx2) 500mV rms10k
Tension d’anode: 28,5kV ±1kV {28,2kV ±1kV}
Tube image: A66ECF50X41 66cm
Sortie Audio: 2 x 15W (Music Power)
Casque d'écoute: 8Ω Impédance
Accessories fournis: Télécomande
Dimensions:
Hauteur: 596,5 mm {550 mm}
Largeur: 778 mm {730 mm}
Profondeur: 481,5 mm {479 mm}
Poids (NET): 35kg {29kg}
Les caractéristiques techniques sont susceptibles de modification sans
Préavis.
Le poids et les dimensions indiqués sont approximatifs.
SECAM L/L', B/G, D/K
M.NTSC
NTSC (Entrée AV seulement)
32,4MHz, 40,4MHz,33,05MHz
32,66MHz
34,5MHz, 34,65MHz (SECAM)
Audio (21 pin) 500mV rms 10k
RGB (21 pin)
Audio (21 pin) 500mV rms 1k
Audio (21 pin) 500mV rms 10k
S-Video IN Y: 1V p-p 75
(21-pin) C:0.3V p-p 75
Audio (21 pin) 500mV rms 1k
Être sélectionnée
Video (RCAx1) 1V p-p 75
{A59ECF50X41 59cm}
8Ω Impédance
R6 (UM3) x 2 Piles
Ω
Ω
Ω
Ω
Ω
Ω
Ω
Ω
Ω
Ω
Ω
Ω
Ω
3DQDVRQLF
Page 4

CONTENTS CONTENTS
SAFETY PRECAU TIO NS ....................................................2
SERVICE HINTS.................................................................4
SERVICE MODE.................................................................5
SELF CHECK......................................................................7
ADJUSTMENT PROCEDURE .............................................8
WAVEFORM PATTERN TABLE..........................................9
ALIGNMENT SETTINGS .....................................................10
BLOCK DIAGRAMS.............................................................12
PARTS LOCATION..............................................................16
REPLACEMENT PARTS LIST.............................................17
SCHEMATIC DIAGRAMS....................................................26
CONDUCTOR VIEWS.........................................................30
SAFETY PRECAUTIONS
GENERAL GUIDE LINES
1. It is advisable to insert an isolation transformer in the
AC supply before servicing a hot chassis.
2. When servicing, observe the original lead dress in the
high voltage circuits. If a short circuit is found, replace
all parts which have been overheated or damaged by
the short circuit.
3. After servicing, see that all the protective devices
such as insulation barriers, insulation papers, shields
and isolation R-C combinations are correctly
installed.
4. When the receiver is not being used for a long period
of time, unplug the power cord from the AC outlet.
5. Potentials as high as 29,5kV {29,2kV} are present
when this receiver is in operation. Operation of the
receiver without the rear cover involves the danger of
a shock hazard from the receiver power supply.
Servicing should not be attempted by anyone who is
not familiar with the precautions necessary when
working on high voltage equipment. Always
discharge the anode of the tube.
6. After servicing make the following leakage current
checks to prevent the customer from being exposed
to shock hazard.
PRECAUTIONS DE SECURITE..........................................2
SUGGESTIONS DE DEPANNAGE ..................................... 4
REGLAGES......................................................................... 6
AUTO TEST ........................................................................ 7
REGLAGES......................................................................... 8
TABLEAU DES OSCILLOGRAMMES..................................9
REGLAGES......................................................................... 11
SCHEMA SYNOPTIQUE.....................................................12
EMPLACEMENT DES PIÈCES........................................... 16
LISTE DES PIÈCES DE RECHANGE..................................17
DIAGRAMME SCHEMATIQUE............................................26
VUE DU CIRCUIT IMPRIMÉ................................................30
PRECAUTIONS DE SECURITE
CONSEILS GENERAUX
1. Avant d'effectuer toute révision d'un châssis sous
tension il est recommandé d'installer un
transformateur d'isolation.
2. Il est important, lors des réparations, de conserver la
position initial de tours les fils et faisceaux, surtout
dans le circuit de la haute tension. Remplacer toutes
les pièces affectées par la chaleur dégagée lors d'un
cort-circuit.
3. Aprés les réparations, s'assurer que toutes les pièces
protectrices telle que barrières ou papiers isolant,
blindages et réseaux d'isolation R-C soient
convenablement placées.
4. Il est préférable de débrancher le fil d'alimentation si
la télé-couleur ne doit pas être utilisée pendant un
certain temps.
5. Une tension élevée, de l'odre de 29,5kV {29,2kV}, est
présente en plusieurs edroits lorsque l'appareil est en
circuit. Il y a danger de chocs électriques lorsque le
contact est établi en absence du panneau arrière.
Toute personne qui tente de réparer cet appareil doit
d'abord être consciente des précautions à observ er
avant de travailler sur un circuit à haute tension.
Toujours décharger l'anode du tube cathodi que au
châssis avant de manipuler.
6. Aprés tout réparation, on doit effectuer les tests de
courant de fuite dans le but d'éviter tout choc.
VERIFICATION DES COURANTS DE FUITE
SANS ALIIMENTATION
LEAKAGE CURRENT COLD CHECK
1. Unplug the AC cord and connect a jumper between
the two prongs of the plug.
2. Turn on the receiver’s power switch.
3. Measure the resistance value with an ohmmeter,
between the jumpered AC plug and each exposed
metallic cabinet part on the receiver, such as screw
heads, aerials, connectors, control shafts etc. When
the exposed metallic part has a return path to the
chassis the reading should be between 4M ohm and
20M ohm. When the exposed metal does not have a
return path to the chassis the reading must be
infinite.
1. Débrancher le fil d'alimetation et installer un fil
STRAP entre les deux broches de la fiche.
2. Placer l'interrupteur comme pour établir le cont act sur
l'appareil.
3. Mesurer la résistance entre les branches de la fiche
d'alimentation et les pièces métalliques visibles telles
que têtes de vis, antennes, arbre des commandes,
support des poignées, etc. Certaines de ces pièces
sont en contact avec le châssis et la rèsistance
measurée devrait se siture entre 4MΩ et 20MΩ. La
résistance des pièces qui ne sont pas en contact
avec le châssis doit être infinie.
2
Page 5

LEAKAGE CURRENT HOT CHECK
1. Plug the AC cord directly into the AC outlet. Do not
use an isolation transformer for this check.
2. Connect a 2kΩ 10W resistor in series with an
exposed metallic part on the receiver and an earth,
such as a water pipe.
3. Use an AC voltmeter with high impedance to
measure the potential across the resistor.
4. Check each exposed metallic part and check the
voltage at each point.
5. Reverse the AC plug at the outlet and repeat each of
the above measurements.
6. The potential at any point should not exceed
1,4 V rms. In case a measurement is outside the
limits specified, there is a possibility of a shock
hazard, and the receiver should be repaired and
rechecked before it is returned to the customer.
HOT CHECK CIRCUIT
CIRCUIT DE VERIFICATION A CHAUD
To Instrument’s
exposed
metallic parts
AC Voltmeter
Voltmetre CA
Vers les parties
metallique exposees
Vers les parties
de ll’instrument.
metallique exposees
de ll’instrument.
VERIFICATION A CHAUD DU
COURANT DE FUITE
1. Brancher le cordon secteur directement à une prise
secteur. Ne pas utiliser de transformateur d'isolation
pour cette vérification.
2. Raccorder une résistance de 2kΩ, 10W, en série
avec une partie métallique exposée du récepteur et
une terre comme une conduite d'eau.
3. Utiliser un voltmètre CA, de type à impédance
élevée, pour mesurer le potentiel à travers la
résistance.
4. Vérifier toutes les parties métalliques exposées et
mesurer la tension à chaque point.
5. Retourner la fiche CA dans la prise secteur et répéter
toutes les mesures ci-dessus.
6. Le potentiel à tous les points ne doit pas dépasser
1,4 volt rms. Au cas où une mesure est supérieure à
cette limite spécifiée, il y a un risque de décharge
électrique et le récepteur doit être réparé et revérifié
avant d'être rendu au cliente.
WATER PIPE (EARTH)
CONDUITE D’EAU
2kΩ 10 Watts
(TERRE)
Fig. 1.
X-RADIATION WARNING
1. The potential sources of X-Radiation in TV sets are
the high voltage section and the picture tube.
2. When using a picture tube test jig for service, ensure
that the jig is capable of handling 29,5kV without
causing X-Radiation.
NOTE : It is important to use an accurate
periodically calibrated high voltage meter.
1. Set the brightness to minimum.
2. Measure the high voltage. The meter should indicate
28,5kV± 1kV {28,2kV± 1kV}. If the meter indication is
out of tolerance, immediate service and correctio n is
required to prevent the possibility of premature
component failure.
3. To prevent any X-Radiation possibility, it is essential
to use the specified tube.
IRRADIATION AUX RAYONS X ATTENTION :
1. Les parties de la haute tension et du tube-cathodique
d'une télé-couleur sont des sources possible
d'emissions de rayons X.
2. Si un tube cathodique témoin est utilisé pour la
réparation, s'assurer que son assemblage pourra
supporter 29,5kV sans, émettre de radiations.
REMARQUE : Il est important que le multimètre
à haute tension utilisé soit étalonné
périodiquement.
1. Tourner entièvers la gauche la commande de
lumière.
2. Mesurer la haute tension à l'aide du multimètre
approprié. La valeur nominale est de 28,5kV± 1kV
{28,2kV± 1kV}. la lecture est hors des tolérances,
une réparation immédiate s'impose afin de prévenir
toute panne prématurée.
3. Il est essentiel d'utiliser le tube cathodique d'origine
pour prévenir toute émission de rayons X.
3
Page 6
SERVICE HINTS
HOW TO REMOVE THE REAR COVER
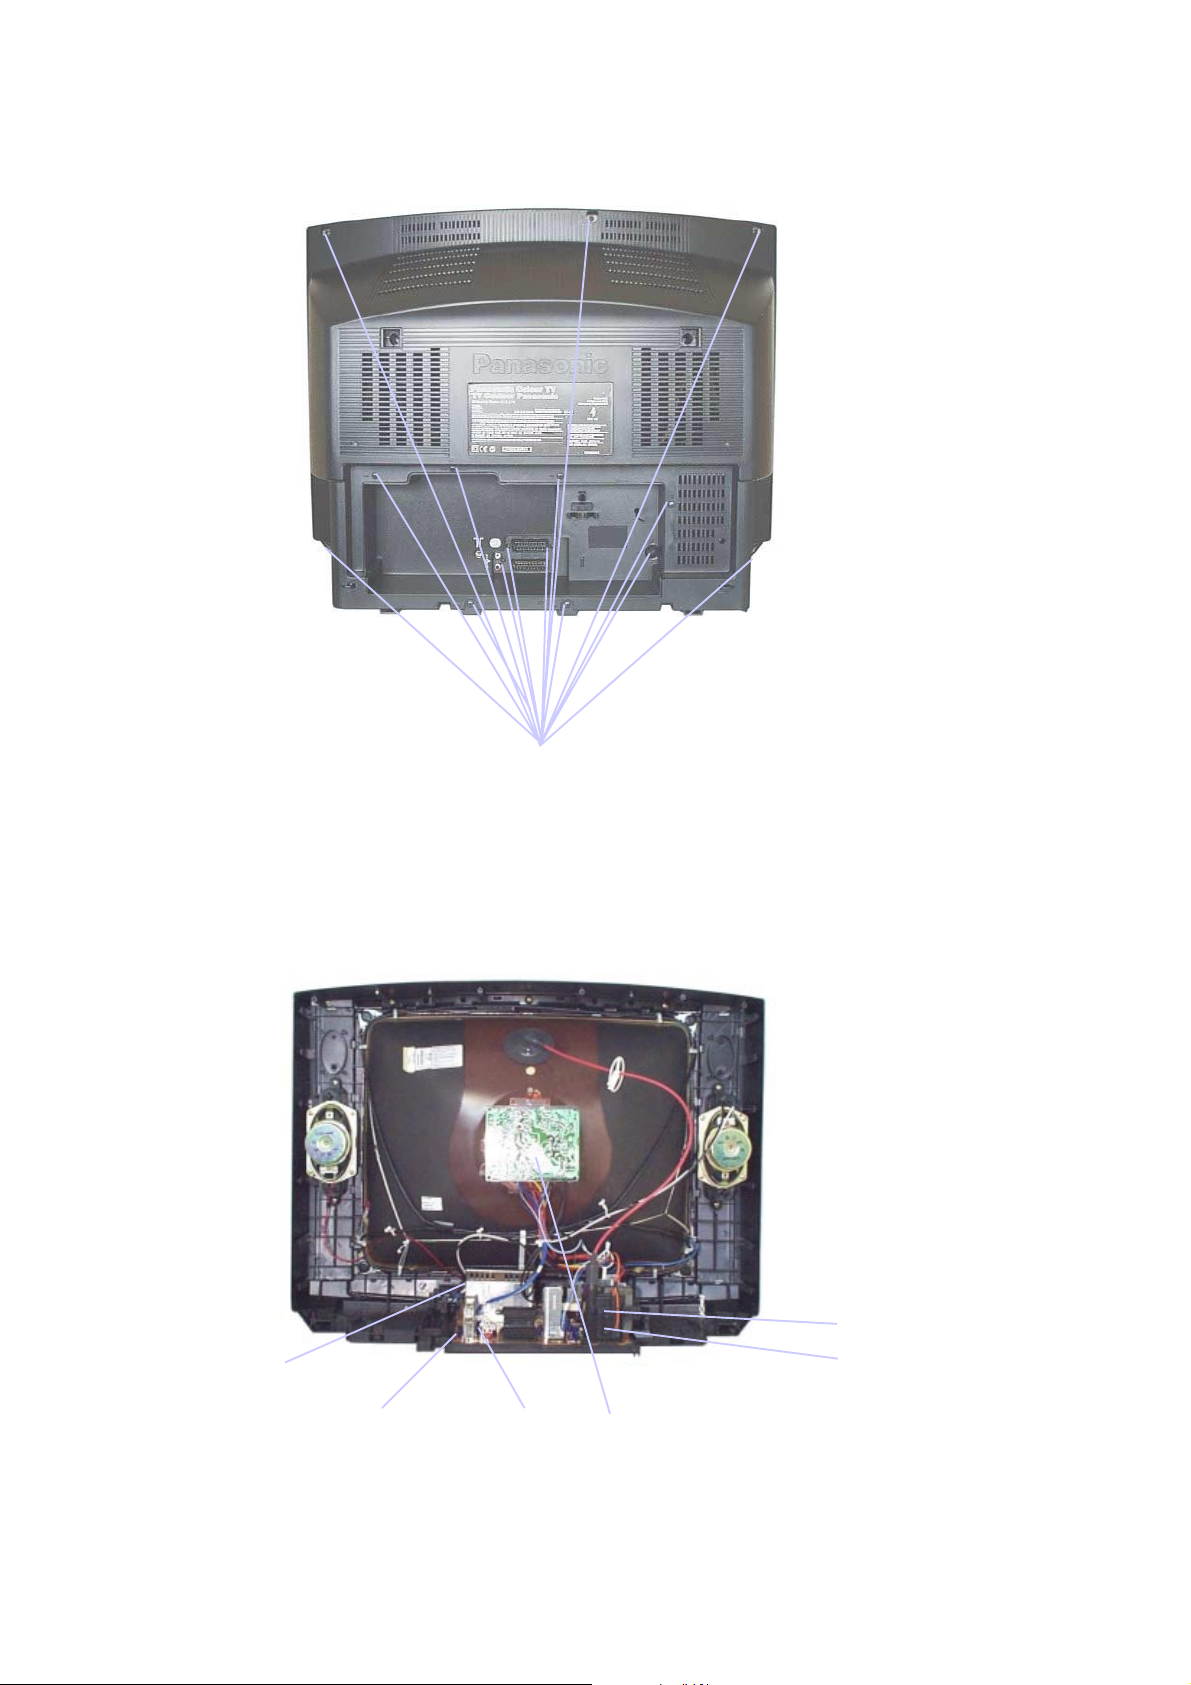
1. Remove the 15 screws (A) as shown in Fig.2.
SUGGESTIONS DE DEPANNAGE
COMMENT RETIRER LE PENNEAU ARRIÈRE
1. Retirer les 15 vis (A) comme sur la Fig.2.
Screws A
Vis A
Fig.2.
LOCATION OF CONTROLS EMPLACEMENT DES COMMANDES
Focus
N - Board
E - Board
H - Board
Fig.3.
Screen
Y - Board
4
Page 7

SERVICE MODE
The remote control is used for entering and storing adjustments, with the exception of Cut-off adjustments, which must
always be done prior to service adjustment. Perform adjustments in accordance with screen display. The display on the
screen also specifies the CCU variants as well as the approx. setting values. The adjustment sequence for the service mode
is indicated below.
1. Set the Bass to maximum position, set the Treble to
minimum position, press the down button (- / v) on
the customer controls at the front of the TV and at the
same time press the INDEX button on the remote
control, this will place the TV into the Service Mode.
2. Press the RED / GREEN buttons to step up / down
through the functions.
NOTE: This TV also has the option of using a Memory Pack which enables you to copy the preset TV channels into the
Memory Pack and then download them onto this or any other EURO-4 TV set.
TV to Memory Pack process
1. Plug the memory pack into the the AV1 21 pin
terminal at the back of the TV and switch the TV on.
2. Go into Service Mode as explained above. The
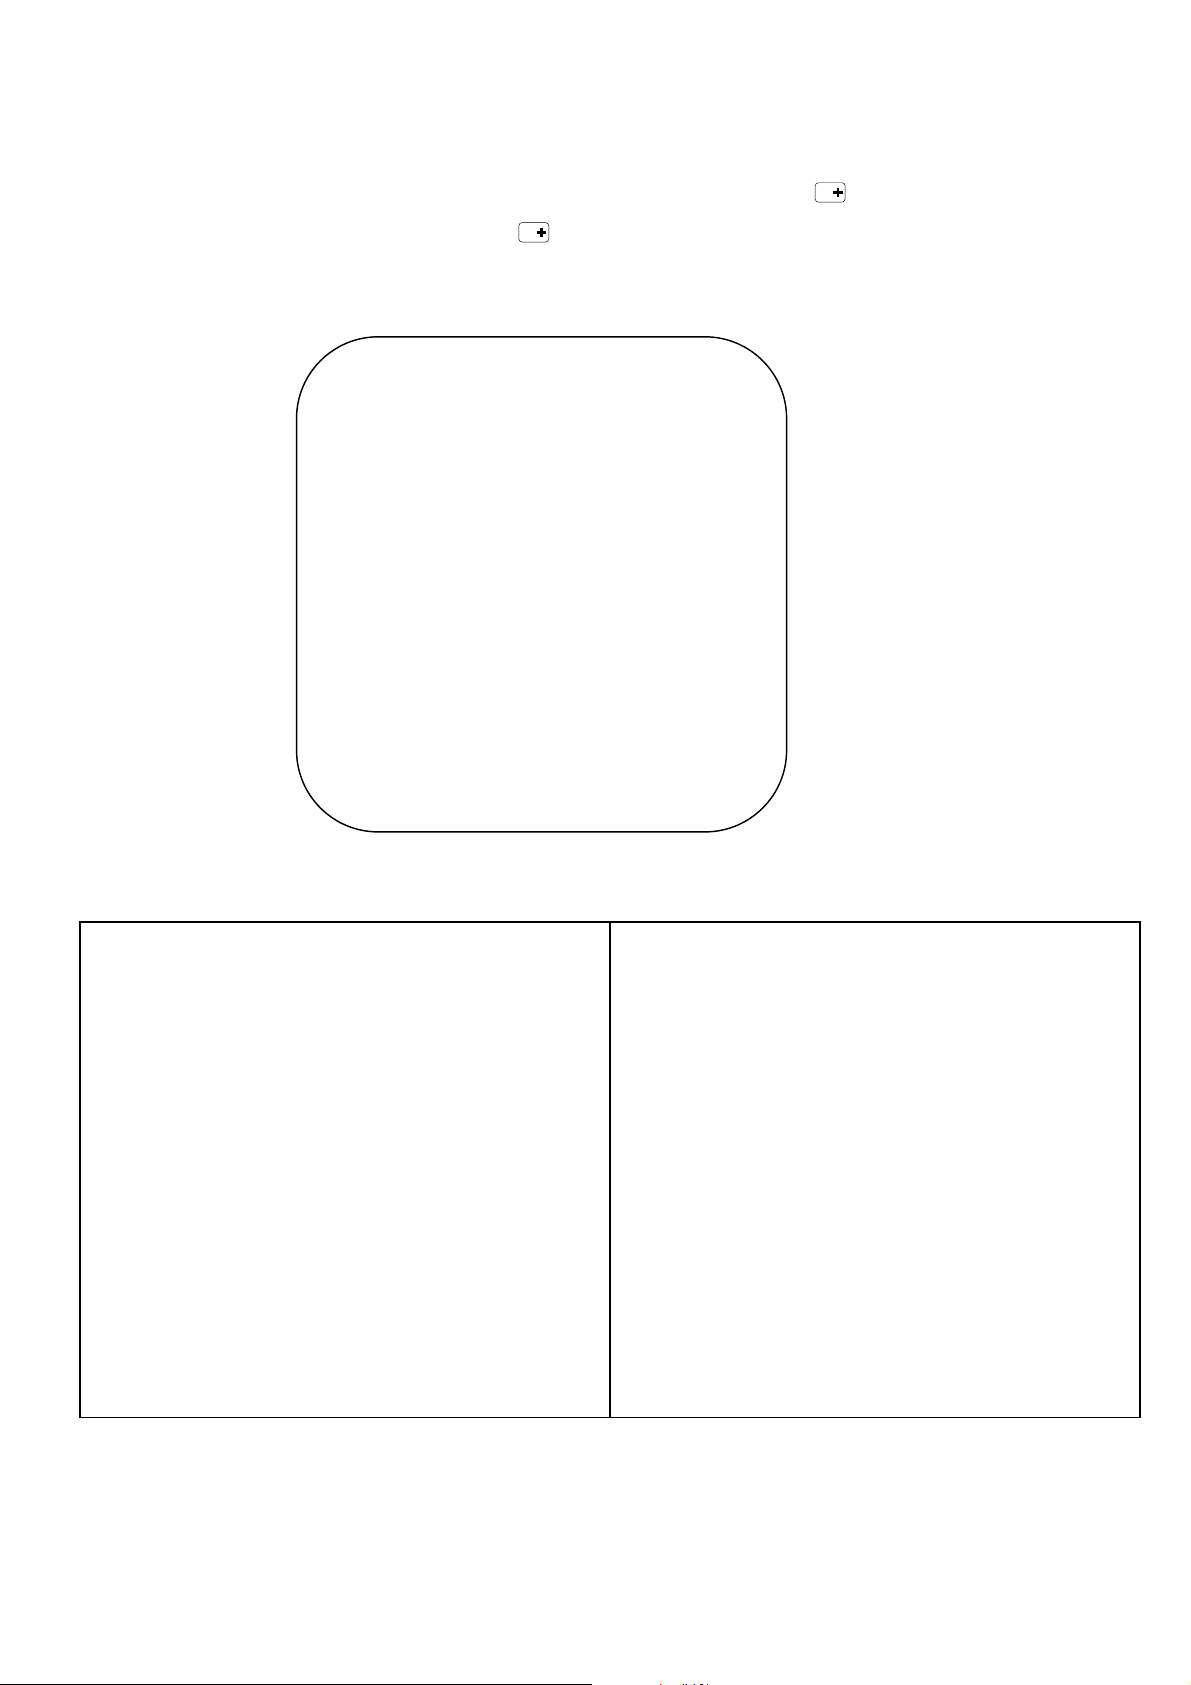
screen will show :-
3. Press the YELLOW / BLUE buttons to alter the
function values.
4. Press the STR button after each adjustment has
been made to store the required values.
5. To exit the Service Mode, press the "N" button.
Memory Pack to TV process
1. Plug the memory pack into the the AV1 21 pin
terminal at the back of the TV and switch the TV on.
2. Go into the Service Mode as explained above. The
screen will show :-
Program
External>>TV
3. Press the BLUE button on the remote control. The
screen will show :-
Program
TV>>External
4. Press the STR button on the remote control The
screen will show :-
Please Wait
5. All the tuning information stored inside the TV will
now be transferred to the Memory Pack. This process
will take 2-3 minutes to complete and when finished
the screen will show :-
Complete
3. Press the STR button on the remote control. The
screen will show :-
4. All the tuning information stored inside the Memory
Pack will now be transferred to the TV. This process
will take 2-3 minutes to complete and when finished
the screen will show :-
5. The tuning information from the Memory Pack has
now been copied into the TV.
6. To exit from the Service Mode press the "N" button.
7. The process has now been completed and the
Memory Pack can now be removed.
Program
External>>TV
Please Wait
Complete
ERRORS
If an error occurs while using the Memory Pack the TV will detect this and the screen will show :-
Error !!
If this happens then press the "N" button and repeat the process that was being used. If the errors continue to occur then
check the connectors between the TV and the memory pack and check the 9V battery inside the memory pack.
5
Page 8
REGLAGES
La télécommande sert à entrer et stocker les données des réglages. Sauf pour le cut-off qui doit être réalisé en priorité.
Les réglages s'affichent sur l'écran, ainst qui les spécificités nominales du CCU.
.
1. Régler par la télécommande le niveau de GRAVE au
maximum, AIGU au minimum. Appuyer
simultanément sur le bouton (-/v) en face avant du
TV et le bouton INDEX de la télécommande. Ces
actions positionnent le TV en Mode Service.
2. Appuyer sur la touch ROUGE ou VERTE pour
sélectionner la fonction désirée.
REMARQUE:
Le Memory Pack permet de copier la configuration du TV, (Chaines, Niveaux analogiques) et de la transférer, via le Memory
Pack vers un autre TV EURO-4.
Processus de transfert "téléviseur vers blocmémoire"
1. La partie arrière du téléviseur comporte deux
connecteurs à 21 broches:brancher le bloc-mémoire
dans le connecteur supérieur AV1, puis mettre le
téléviseur en marche ("ON").
2. Passer en Mode Service (voir ci-dessus).
L'écran affichera :-
Program
External>>TV
3. Appuyer sur la touche JAUNE ou BLEUE pour
modifier les valeurs des réglages.
4. Mettre en mémoire après chaque réglage, en
appuyant sur la touche STR.
5. Pour sortir de la position SERVICE MODE arrèter
le TV.
Processus de transfert " bloc-mémoire vers
téléviseur "
1. La partie arrière du téléviseur comporte deux
connecteurs à 21 broches:brancher le bloc-mémoire
dans le connecteur supérieur AV1, puis mettre le
téléviseur en marche ("ON").
2. Passer en Mode Service (voir ci-dessus).
L'écran affichera :-
Program
External>>TV
3. Appuyer sur la bouton BLEU de la télécommande.
L'écran du téléviseur présentera la message suivant:-
Program
TV>>External
4. Appuyer sur la bouton de mémorisation (STR) de la
télécommande et l'écran présentera la message
suivant :-
Please Wait
5. Toutes les informations de syntonisation enregistées
par le téléviseur seront maintenant transférées vers
le bloc-memoire. Cette opération ne prend que 2 à 3
minutes. Lorsqu'elle est terminée, l'écran du
téléviseur présentera le message suivant :-
Complete
3. Appuyer sur la bouton de mémorisation (STR) de la
télécommande et l'écran présentera la message
suivant :-
Please Wait
4. Toutes les informations de syntonisation enregistées
par le téléviseur seront maintenant transférées vers
le bloc-mémoire. Cette opération ne prend que 2 à 3
minutes. Lorsqu'elle est terminée, l'écran du
téléviseur présentera la message suivant :-
Complete
5. Les informations de syntonisation du téléviseur du
bloc-mémoire ont maintenant été copiées dans le
téléviseur.
6. Pour sortir du mode d'exploitation SERVICE, mettre
le téléviseur dors circuit ("OFF").
7. Une fois l'opération terminée, enlever le bloc-mémoir.
ERREURS
Le téléviseur détectera toutes les erreurs susceptibles de se produire éventuellement pendant l'utillisation du bloc-mémoire.
L'écran présentera alors le message suivant :-
Error !!
Dans ce cas, appuyer sur le bouton "N" (Normalisation) et répéter l'opération qui était en cours. En cas d'erreurs répétées,
vérifier les connexions entre le téléviseur et le bloc-mémoir, plus contrôler l'état de la pile 9V à l'intérieur du bloc-mémoire.
6
Page 9
SELF CHECK
Aides Techniques
q
1. Self-check is used to automatically check the bus
lines and hexadecimal code of the TV set.
2. To get into the Self-Check mode press the down
(-/v) button on the customer controls at the front of
the set,at the same time pressing the STATUS
button on the remote control, and the screen will
show :-
AUTO TEST
1. L'auto test est utilísé pour vérifier les BUS et les
codes Hexadécimaux du TV .
2. Pour renter dans le mode Auto Test presser le
bouton STATUS de la télécommande et
simultanément le bouton (-/v) en face avant du TV.
Le menu Auto Test s'affiche :-
VDP O.K.
TUN O.K.
E2 O.K.
MSP O.K.
DPL - -
OPTION 1 39
OPTION 2 0C
OPTION 3 1F
OPTION 4 00
OPTION 5 EF
OPTION 6 25
If the CCU ports have been checked and found to be incorrect or not located then " - - " will appear in place of "O.K.".
Si les ports du CCU ont été testés et qu'ils soient incorrectes ou non identifiés Lorsqu'il apparait " - - " au lieu de "O.K.".
PCB O.K.
Cab O.K.
Sum Factory use only
Usage d'usine
seulement
Service Aids
To aid in the service of our current chassis there are a number
of Service Aids, which have been made available.
• LUCI interface kit (Linked Utility Computer Interface)Part
number: TZS6EZ002
This contains interface and cables for connecting TV
service connector and a PC as well as diagnostic
software. As new models are introduced upgrade
software will become available.
Pour faciliter le dépannage des modèles courants il'y-a un
certain nombres d'outils de service dispo nibles.
• Interface LUCI (Linked Utility Computer Interface)
Ref: TZS6EZ002
Cette référence contient; L'interface et les cables de
connexion aux TV et PC et également le logiciel de
diagnostic. ( A l'introduction des nouveaux modèles un
logiciel remis à jour sera disponible ).
• VICI (Visual Interactive Computer Information)
These C.D.'s contain multimedia documentation providing
quick access to service information.
Part No. TZS7EZ006 & TZS7EZ005
1. Service Manuals
2. Instruction Books
3. Technical Information
• TASMIN (Technically Advanced System for Multimedia
Interactive Notes)
As well as providing a first step towards more interactive
training this product also achieves quick access to
Technical Information.
• VICI (Visual Interactive Computer Information)
Ces céderom contienent des documents multimédias
donnant acces rapide aux informations de Service.
Ref. TZS7EZ006 & TZS7EZ005
1. Les schémas techniques
2. Les modes d'emplois
3. Les informations techniques
• TASMIN (Technically Advanced System for Multimedia
Interactive Notes)
C'est le premier pas vers un "training" plus interactif, ce
produit permet aussi bien un acces rapide aux
informations techni
ues.
7
Page 10

ADJUSTMENT PROCEDURE
Item/Preparation Adjustments
+B SET-UP
1. Receive a Greyscale signal.
2. Set the controls :Brightness Minimum
Contrast Minimum
Volume Minimum
1. Set the +B voltage up as follows :Adjust R811 so that B2 shows 148V±1V
2. Confirm the following voltages.
B9 5 ± 0,25V B10 5 ± 0,25V
B5 12 ± 0,5V B11 33 ± 1,5V
B4 16 ± 1V B7 8 ± 0,5V
B12 26 ± 1V B8 5,5 ± 0,5V
B3 41 ± 1V B13 15 ± 1V
B1 200 ± 10V B14 -15 ± 1V
Cut-Off / Ug2 Test
1. Receive a Greyscale signal.
2. Degauss the tube externally.
3. Set the TV into Service Mode 1.
4. Select Cutoff mode.
To adjust Cutoff, connect an oscilloscope to the blue
cathode, adjust "cutoff" value using the "YELLOW" and
"BLUE" buttons until the black level is 160V±5V press
"STR" to store the value. Remove the oscilloscope.
Select Ug2 adjustment and adjust the screen VR until the
display shows "O.K."
REGLAGES
Préparation Réglages
+B Réglages
1. Appliquer une mire à carreaux N/B.
2. Régler les contrôles suivants :Lumière Minimum
Contraste Minimum
Volume Minimum
Cut-Off / Ug2 Test
1. Appliquer une mire à carreaux N/B.
2. Démagnétiser le tube extérieurement.
3. Mettre le TV en Mode Service 1.
4. Sélectionner le Mode Cutoff.
1. Régler les tensions +B comme suit: Régler R811 tel
que la tension B2 soit de 148V±1V.Confirmer le
réglage -:
B9 5 ± 0,25V B10 5 ± 0,25V
B5 12 ± 0,5V B11 33 ± 1,5V
B4 16 ± 1V B7 8 ± 0,5V
B12 26 ± 1V B8 5,5± 0,5V
B3 41 ± 1V B13 15 ± 1V
B1 200± 10V B14 -15± 1V
Pour régler le cutoff mettre un oscilloscope sur la cathode
"Bleu" et régler avec les touches "Jaune" et "Bleu" jusqu'a
ce que le niveau de noir soit à 160V±5V, mémoriser cette
valeur en appuyant sur "STR". Enlever l'oscilloscope et
sélectionner le réglage "Ug2" à l'écran et régler le
potentiometre "screen" du transfo THT pour que "OK" soit
indiqué à l'écran.
8
Page 11
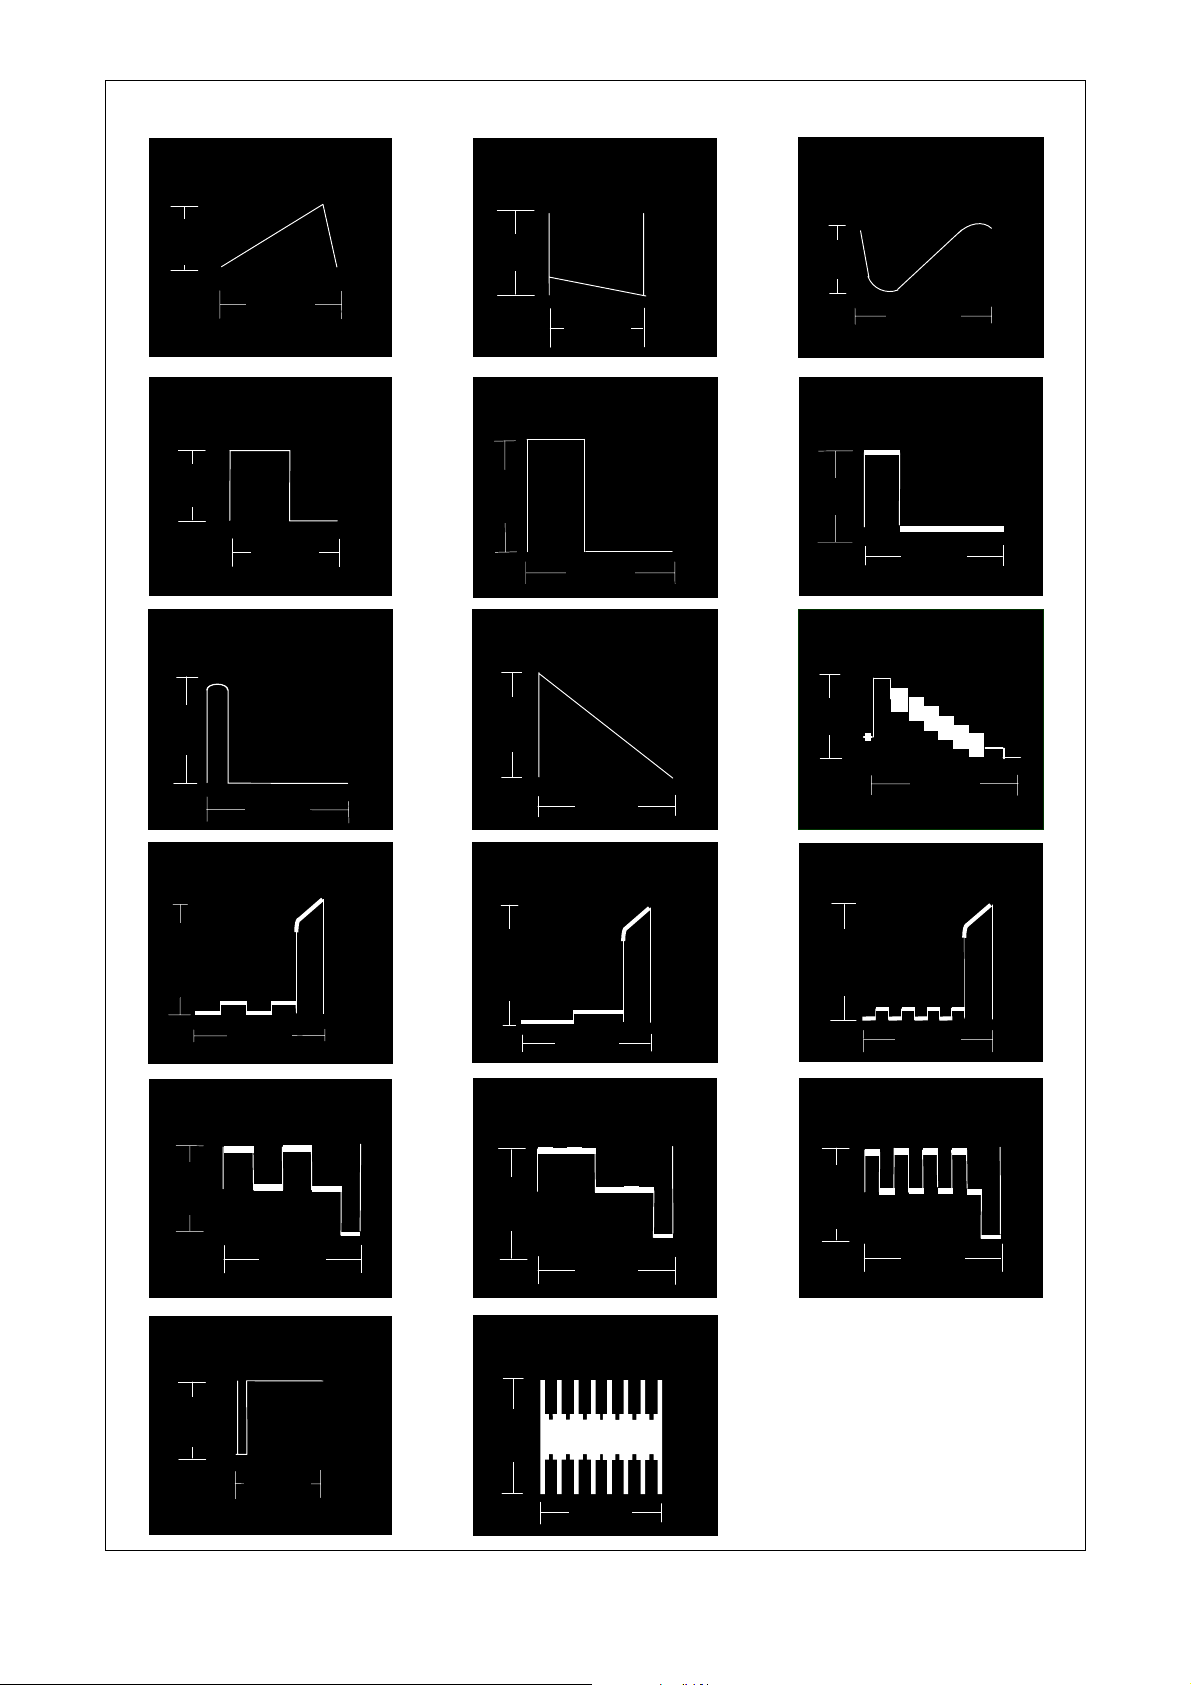
WAVEFORM PATTERN TABLE TABLEAU DES OSCILLOGRAMMES
Vert Out
IC601 Pin 31
0.7V
H - Out
IC601 Pin 50
3V
HFLB
IC601 Pin 13
6.2V
20mS
64µS
Vert Drive
IC451 Pin 2
57V
H - Out
IC701 Pin 5
30mV
HFLB
IC701 Pin 8
1.5V
20mS
64µS
VFLB
IC451 Pin 3
1V
20mS
H - Pulse
Base Q503
2V
64µS
Video Out
IC601 Pin 59
2V
R - Out
IC601 Pin 37
275mV
R - Out
E8 Pin 5
4.6V
SCL
IC1201 Pin 3
64µS
64µS
64µS
G - Out
IC601 Pin 38
275mV
G - Out
E8 Pin 3
4.4V
SVM Out
IC601 Pin 34
64µS
64µS
64µS
64µS
B - Out
IC601 Pin 39
275mV
64µS
B - Out
E8 Pin 4
4.6V
64µS
3.7V
88mV
13µS
64µS
9
Page 12
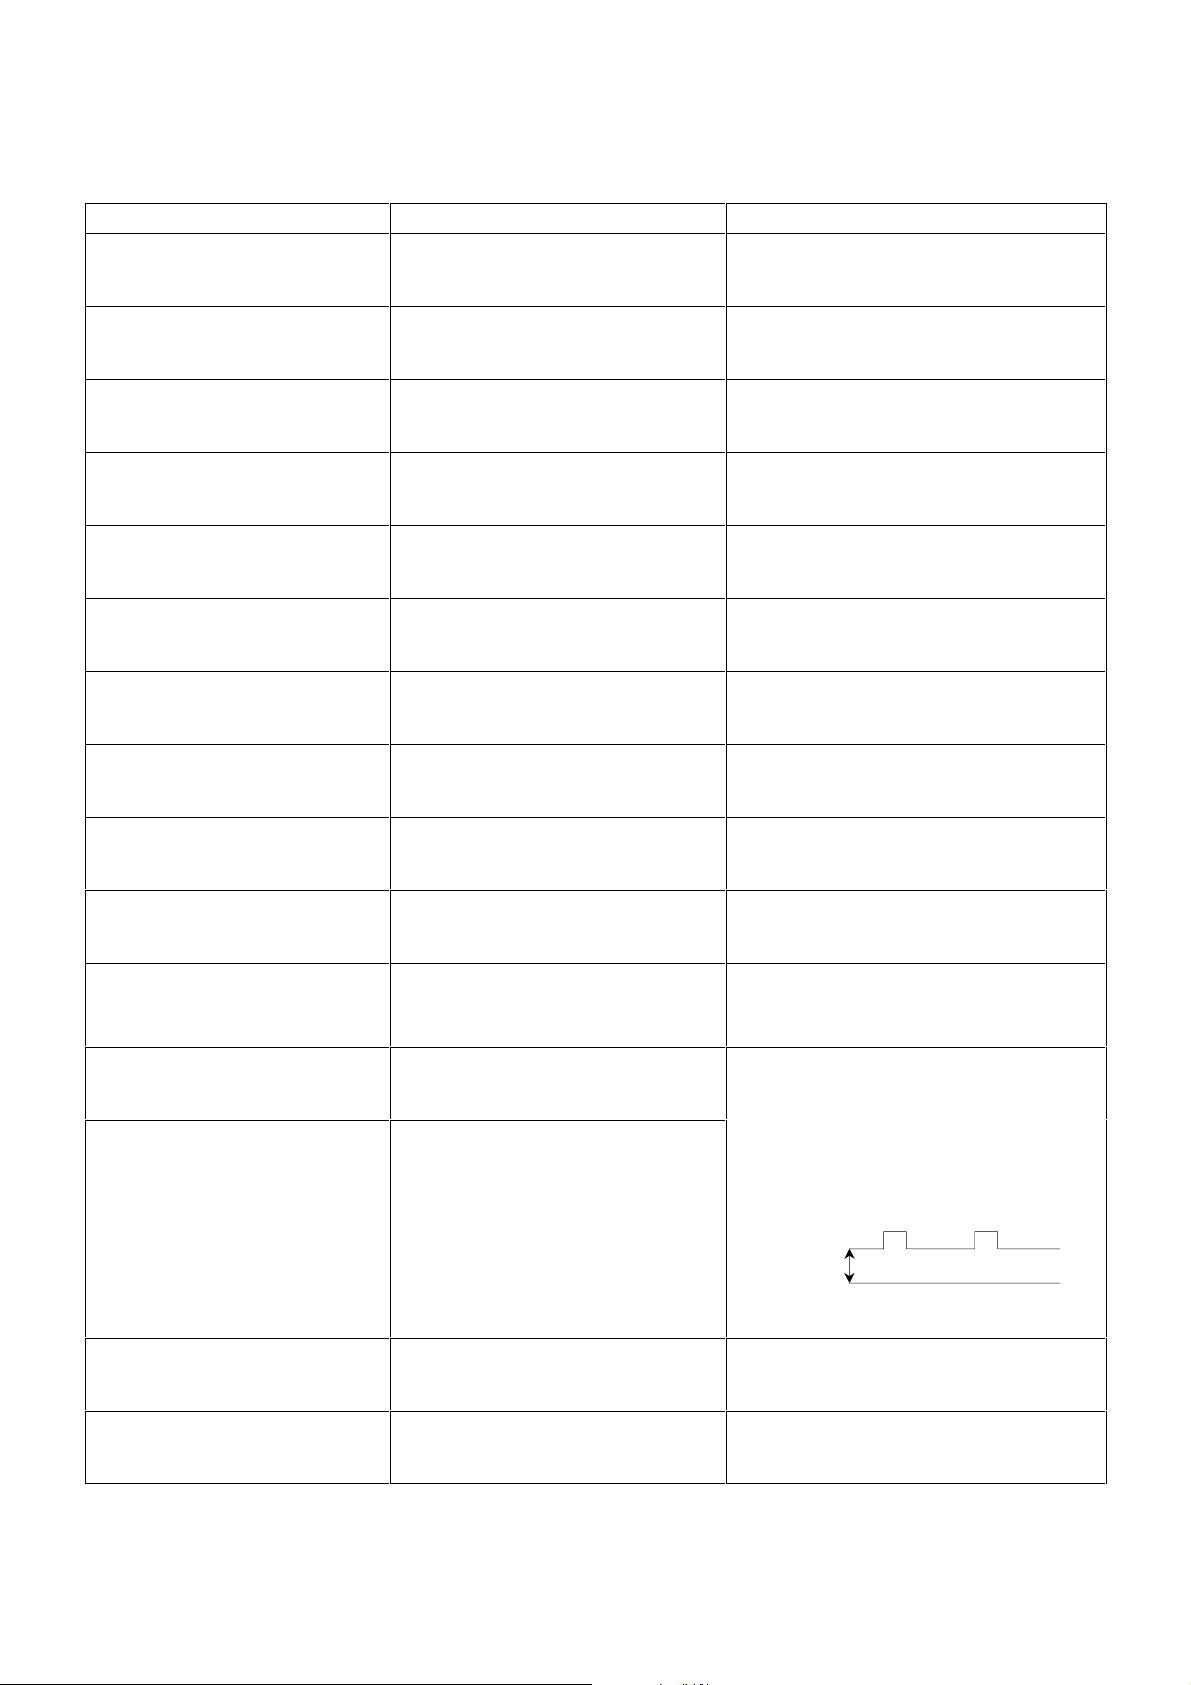
ALIGNMENT SETTINGS:
(The figures below are nominal and used for representative purposes only.)
Alignment Function Settings / Special features
Horizontal Position
Vertical Position
Horizontal Amplitude
Vert. Amplitude
EW-amplitude
EW-amplitude
Trapezium-comp
Trapezium-comp
H-Pos
061
V-Pos
005
H-Amp
055
V-Amp
054
E/W-Amp1
-128
E/W-Amp2
006
Trapez-1
047
Trapez-2
-128
Optimum setting.
Optimum setting.
Optimum setting.
Optimum setting.
Optimum setting.
Optimum setting.
Optimum setting.
Optimum setting.
Vertical Linearity
Vertical Symmetry
DVCO
Cut-off DC
Ug2 Test
Highlight
Lowlight
V-Lin
006
V-Sym
002
DVCO
-005
Cut-off
0171
Ug2
055
O.K.
High 0902 0777 0864
Low 0117 0132 0112
Optimum setting.
Optimum setting.
Receive a PAL Colour Bar Pattern. For
DVCO alignment press "Blue" button, wait
until the colours are changing slowly and
press "STR".
To adjust Cutoff connect an oscilloscope to
the blue cathode, adjust "cutoff" value
using the "Yellow" and "Blue" button s
until the black level is 160V±5V pre ss
"STR" to store the value. Remove the
oscilloscope.
Select Ug2 adjustment and adjust the
screen VR until the display shows "O.K."
Black Level
160V±5V
GND
Optimum setting.
Sub-Brightness
Sub-Brightness
255
10
Optimum setting.
Page 13
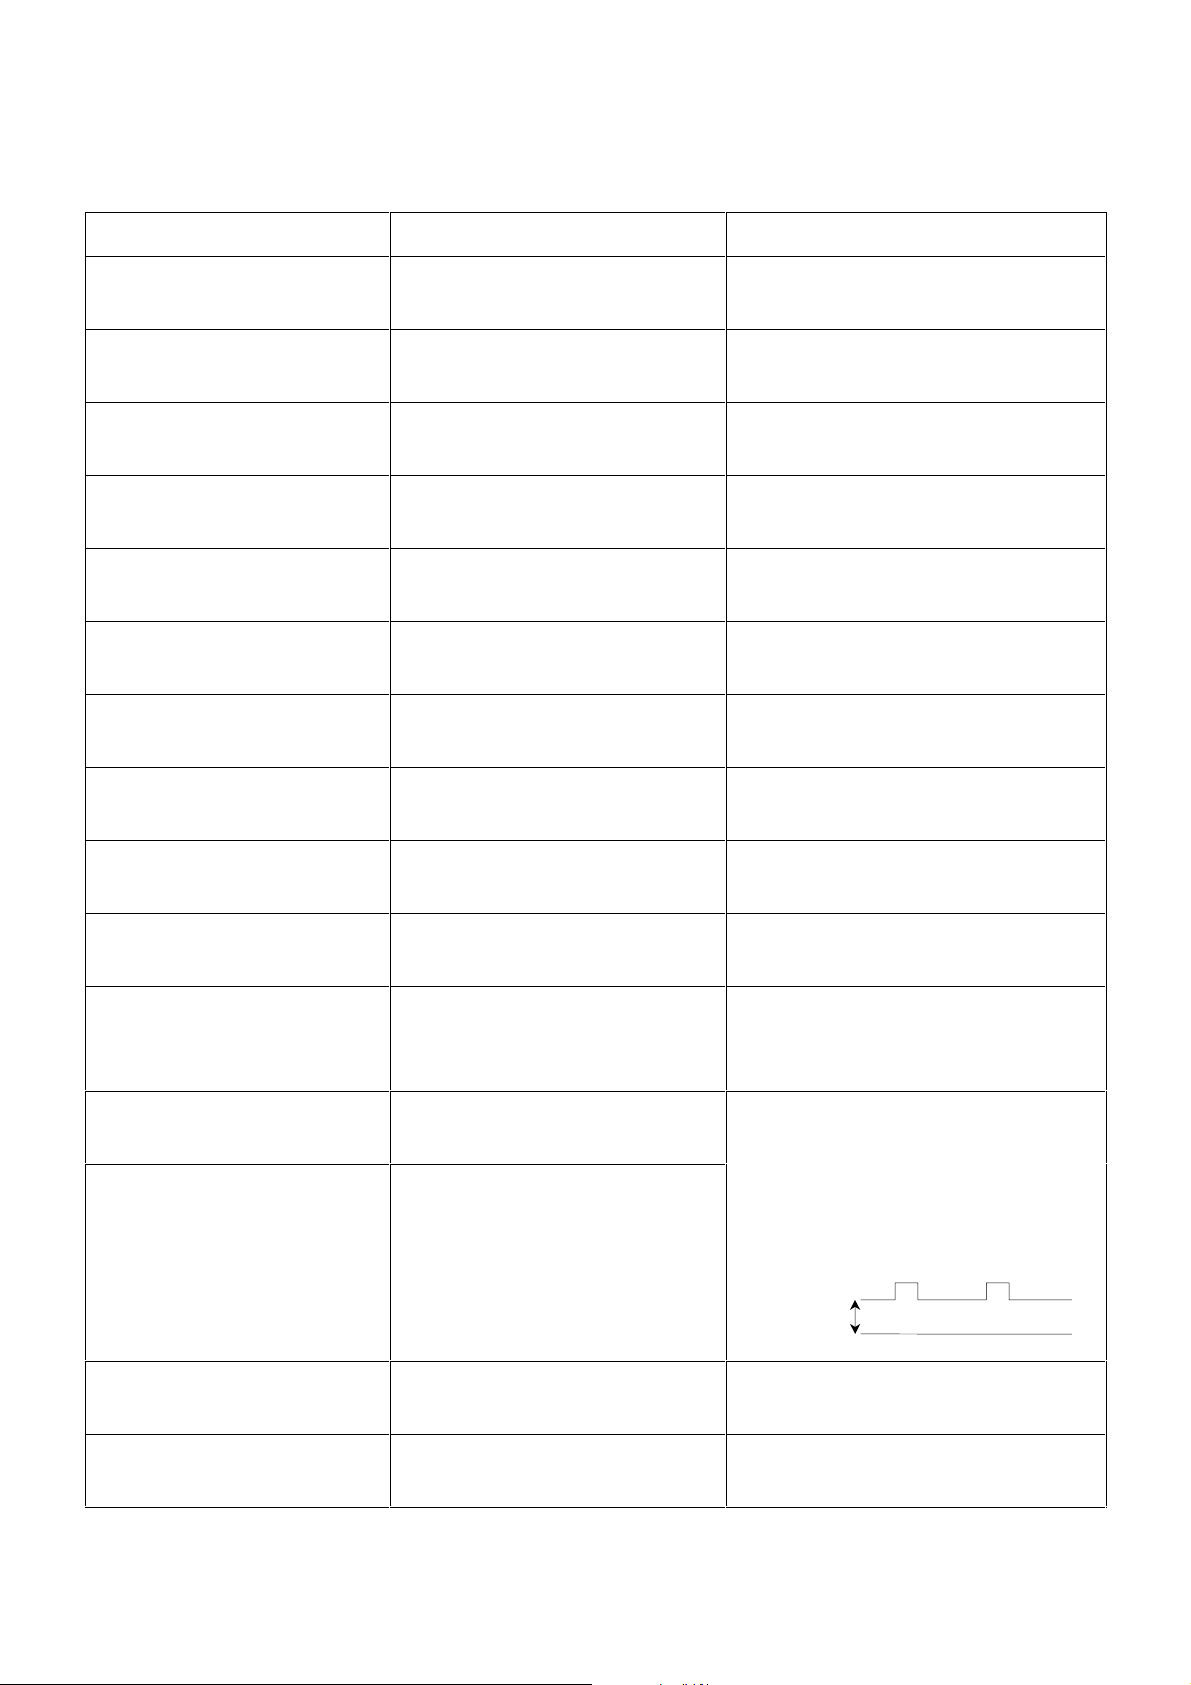
REGLAGES
(Les figures ci-dessous sont fictives et utilisées uniquement à des fins représentatives)
Fonctions Réglages/Points particuliers
Centrage Horizontal
V-Pos.
Amplitude Horizontal
Amplitude Verticale
Amplitude E.O.
Amplitude E.O.
Correction Trapèze
Correction Trapèze
H-Pos
061
V-Pos
005
H-Amp
055
V-Amp
054
E/W-Amp1
-128
E/W-Amp2
006
Trapez-1
047
Trapez-2
-128
Optimiser les réglages.
Optimiser les réglages.
Optimiser les réglages.
Optimiser les réglages.
Optimiser les réglages.
Optimiser les réglages.
Optimiser les réglages.
Optimiser les réglages.
Linèarité Verticale
Vertical Symmetry
DVCO
Cut-off DC
Ug2 Test
Highlight
Lowlight
V-Lin
006
V-Sym
002
DVCO
-005
Cut-off
0171
Ug2
055
O.K.
High 0902 0777 0864
Low 0117 0132 0112
Optimiser les réglages.
Optimiser les réglages.
Mettre une mire de barre couleur en
PAL.Pour régler DVCO appuyer sur la
touche "Bleu" et attendre que les couleurs
défilent le plus lentement possible et
appuyer sur "STR".
Pour régler le cutoff mettre un oscilloscope
sur la cathode "Bleu" et régler avec les
touches "Jaune" et "Bleu" jusqu'a ce que
le niveau de noir soit à 160V±5V,
mémoriser cette valeur en appuyant sur
"STR". Enlever l'oscilloscope et
sélectionner le réglage "Ug2" à l'écran et
régler le potentiometre "screen" du transfo
THT pour que "OK" soit indiqué à l'écran.
Black Level
160V±5V
GND
Optimiser les réglages.
Sub-Brightness
Sub-Brightness
255
11
Optimiser les réglages.
Page 14
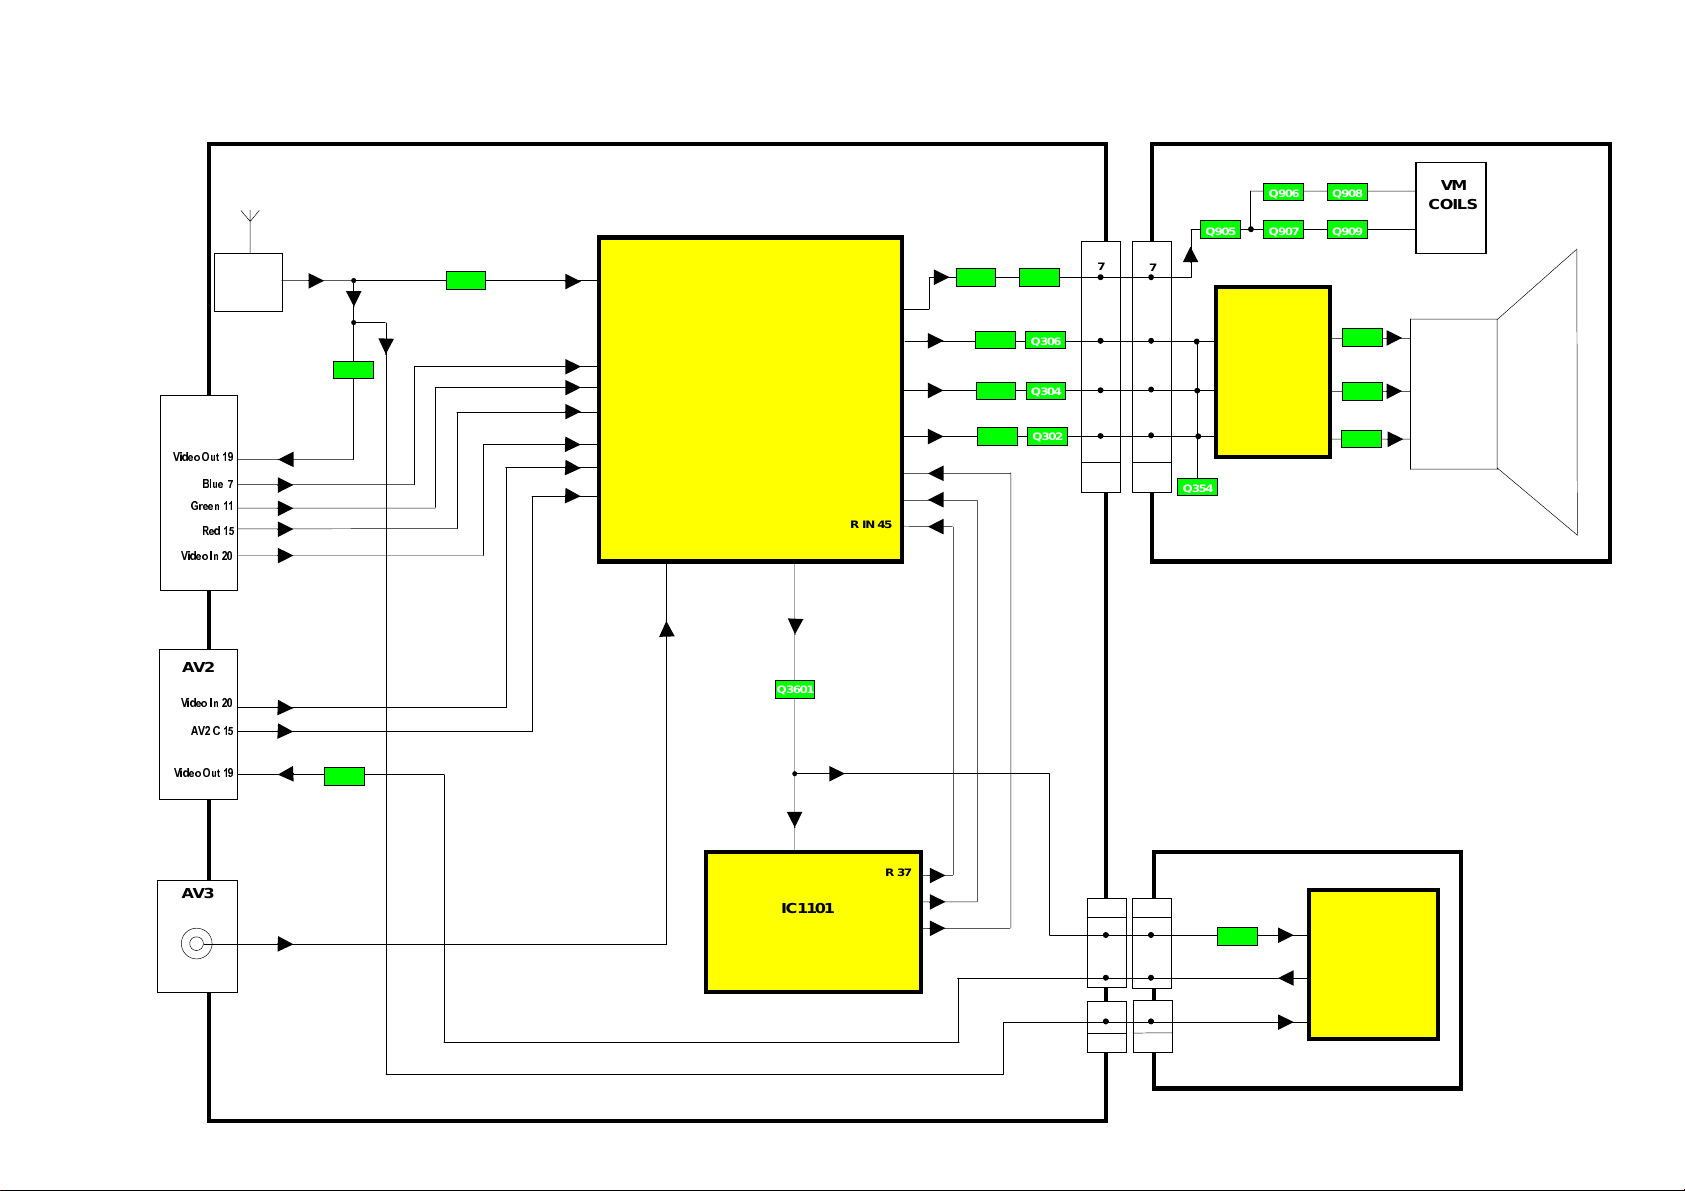
,Q
Q352Q35
,Q
&
Q35
12
AV1
9LGHR2XW
%OXH
*UHHQ
5HG
9LGHR
AV2
9LGHR
$9
E - BOARD
Q105
VIDEO BLOCK DIAGRAM SYNOPTIQUE VIDEO
Y - BOARD
Q905 Q907 Q909
7
Q104
61 V IN 1
43 B IN
42 G IN
41 R IN
62 VIN 2
63 VIN 3
60 C IN
VIN 4
64
IC601
VIDEO
PROCESSOR
VIDEO OUT
59
Q3601
SVM OUT 34
B OUT 39
G OUT 38
R OUT 37
B IN 47
G IN 46
R IN 45
Q950 Q951
Q303
Q304
Q301
Q302
E8
7
4
4
3
3
5
5
Y2
IC351
3
OUTPUT
2
1
4
RGB
Q908Q906
7
Q353
8
9
1
VM
COILS
CRT
2XW
9LGHR
AV3
Q3001
68
CVBS
IC1101
MICRO
PROCESSOR
R 37
G 38
B 39
E15
6
8
1
E61
H - BOARD
H1
6
8
1
H3
Q3402
IC3401
8
VIDEO
SWITCHING
6
3
Page 15
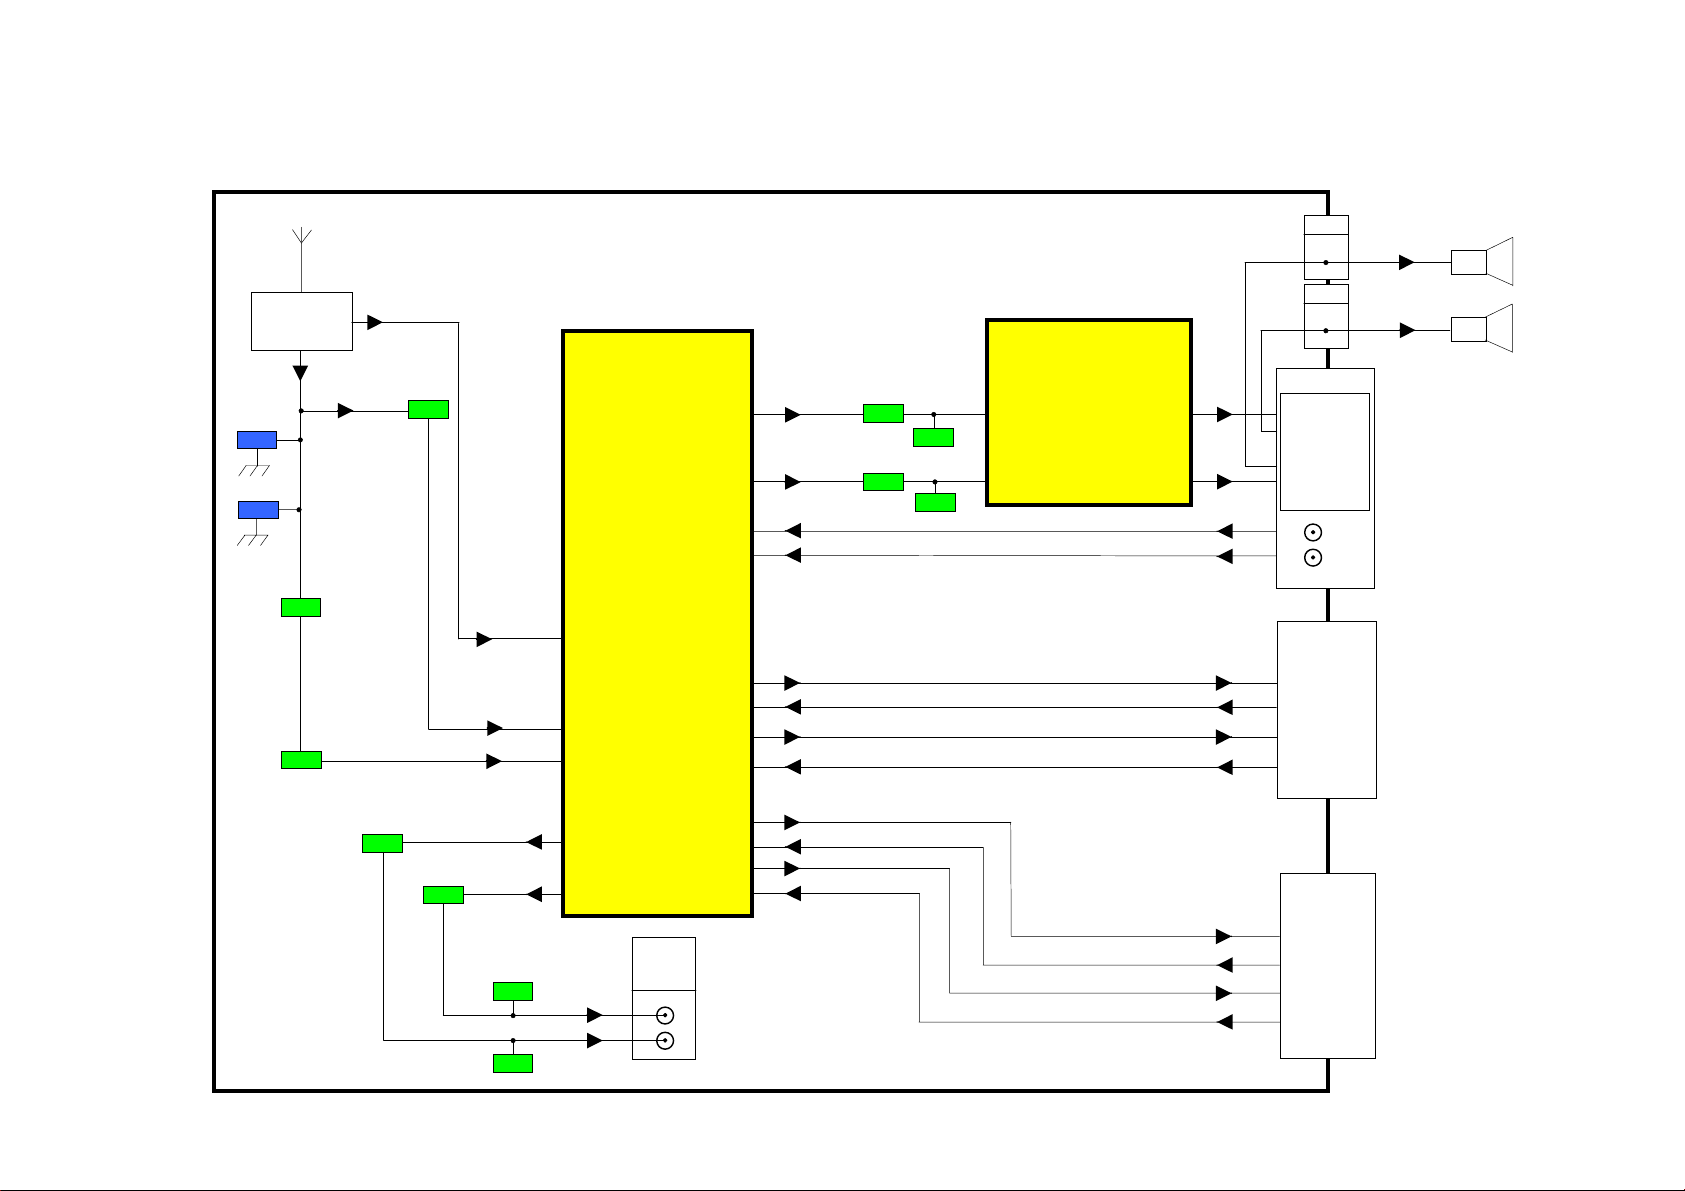
AUDIO BLOCK DIAGRAM SYNOPTIQUE AUDIO
Q103
13
E - BOARD
TUNER
X101
X102
Q101
Q102
IC2101
PROCESSOR
44 MONO IN
49 ANA_IN2+
47 ANA_IN1+
AUDIO
DACM_R 24
DACM_L 25
SC3_IN_L 37
SC3_IN_R 38
SC1_OUT_R 30
SC1_IN_R 42
SC1_OUT_L 31
SC1_IN_L 41
Q2102
Q2103
Q252
Q251
5 R
2 L
IC251
AUDIO
OUTPUT
R 7
L 11
E6
1
E7
3
AV3
6 R
7 R
HEADPHONE
5 L
4 L
L
R
1 R OUT
2 R IN
3 L OUT
6 L IN
Q2304
Q2302
Q2301
Q2303
21 DACA_R
22 DACA_L
SC2_OUT_R 27
SC2_IN_R 40
SC2_OUT_L 28
SC2_IN_L 39
AUDIO
MONITOR
OUT
AV1
1 R OUT
2 R IN
3 L OUT
6 L IN
Page 16
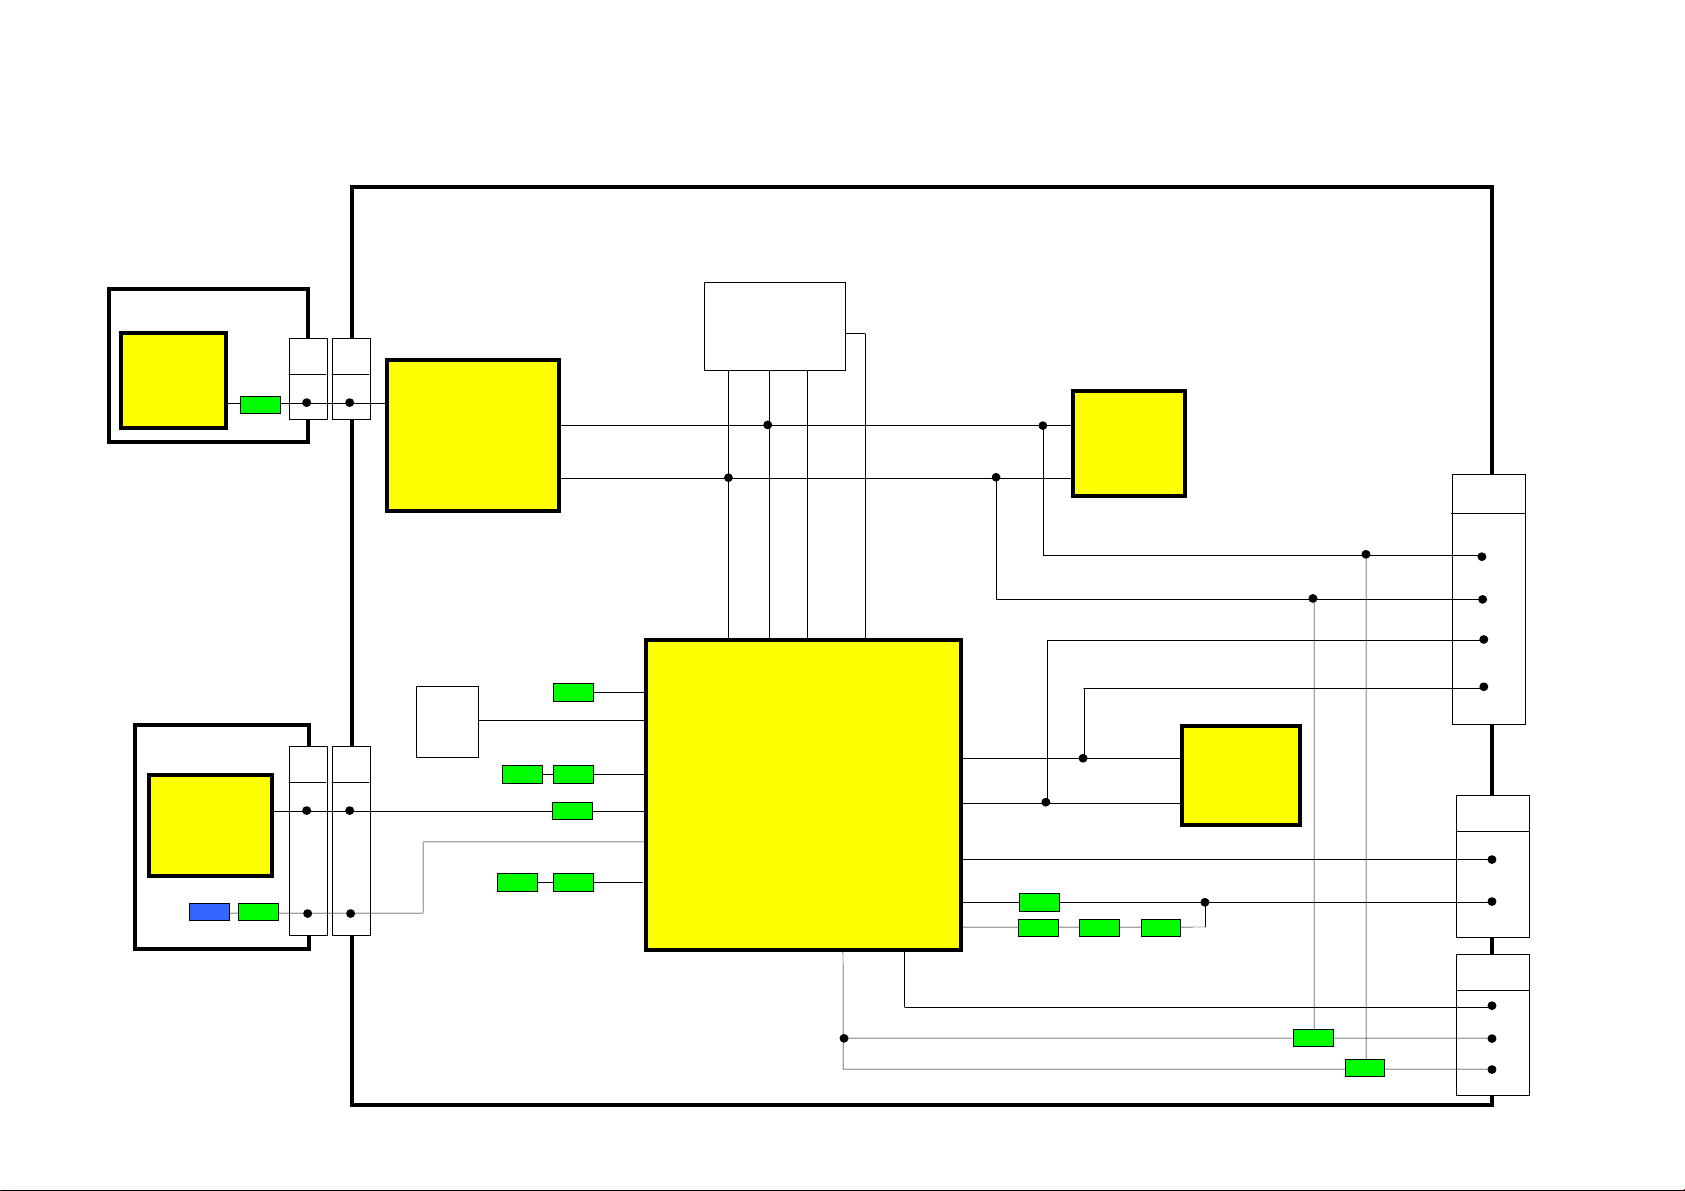
CONTROL BLOCK DIAGRAM SYNOPTIQUE DE COMMANDE
E - BOARD
14
H - BOARD
IC3401
VIDEO
SWITCHING
N - BOARD
IC1071
REMOTE
CONTROL
RECEIVER
TUNER
POS/NEG
H33E63
5
1
IC2101
4
AUDIO
PROCESSOR
8
7
SDA 1
SCL 1
SCL
SDA
L/L’
IC601
4
VIDEO
PROCESSOR
3
SERVICE / TEST
E18
6
SDA 1
5
SCL 1
4
SDA 2
3
SCL 2
8
SLOW 2
10
AV LINK
N14E19
4
8 8
LOCAL
KEYS
SWITCH
MATRIX
VPROT
KEYSCAN
ON/OFF
R.C.
L.E.D.
PROT 1
SCL
48
71
60
52
74
81
75
PROCESSOR
SDA
49
IC1101
MICRO
L/L’
POS/NEG
83
82
SCL 2
50
SDA 2
51
SLOW 2
59
OUT
72
IN
73
58
55
IC1103
6
EAROM
5
AV2
AV1
SERVICE
SLOW 1
8
SLOW 1
10
SCL 1
12
SDA 1
Page 17
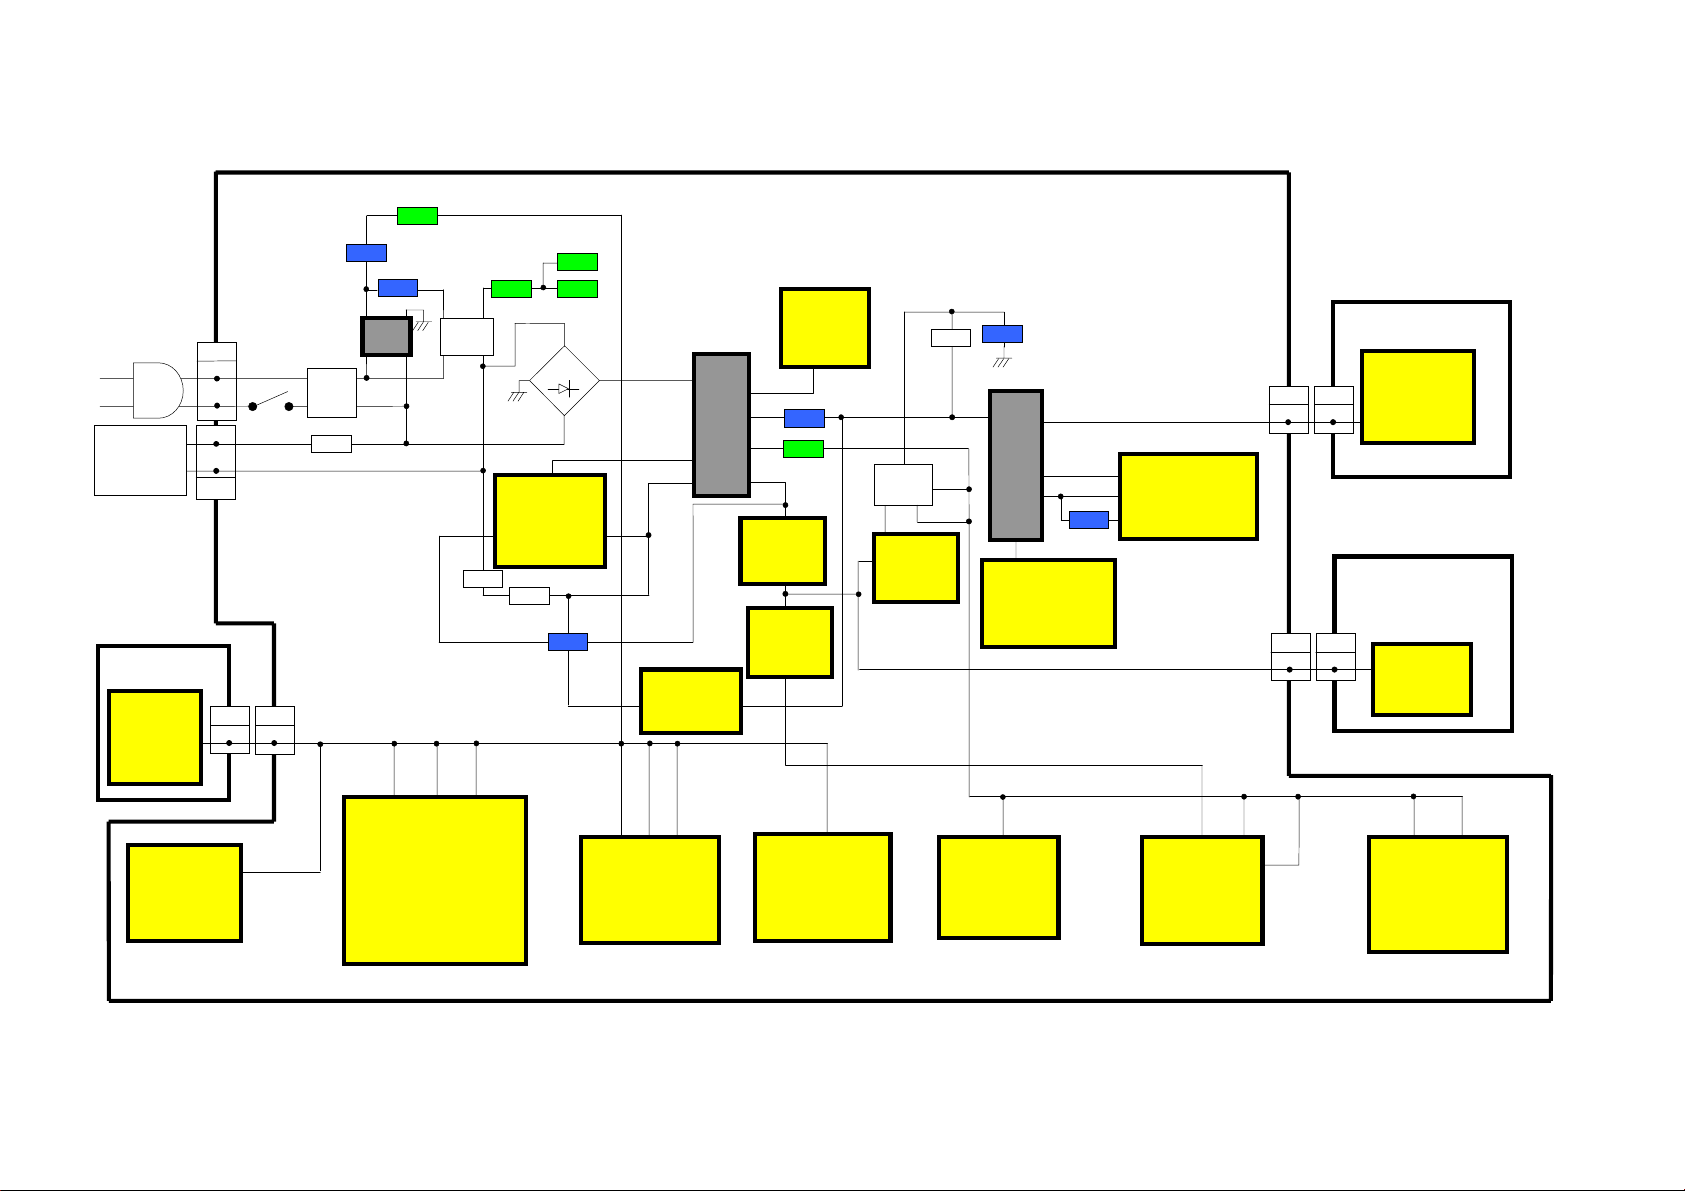
POWER SUPPLY BLOCK DIAGRAM SYNOPTIQUE ALIMENTATION
15
DEGAUSS
COIL
N - BOARD
IC1071
REMOTE
CONTROL
RECEIVER
RESET
E - BOARD
E1
4
1
2
1
E2
N12E19
2
D801
3
IC801
POWER
SUPPLY
R814
D805
5V SBY
5V SBY
Q855
Q854
~
~
+
4
2
31
1
IC1102
EPROM
IC850
REG
32
T801
P1
P2
B1
IC251
AUDIO
OUTPUT
10
29V
S7
150V
S2
D850
7V
S5
Q850
15V
S4
1
IC851
REG
3
12V
1
IC853
REG
2
1
8V
8
IC1103
EAROM
TUNER
9V
3
IC852
1
REG
33V
R854
33V
5V
5V
D862
T551
9
2
6
5
8
27V
6
IC701
EW
CORRECTION
5V
2
IC1105
RESET
-14V
14V
200V
D454
IC451
1
6
V-OUTPUT
3
IC2101
AUDIO
PROCESSOR
Y - BOARD
IC351
E32Y3
2
RGB
OUTPUT
6
H - BOARD
E621H3
2
IC3401
7
VIDEO
SWITCHING
46
33
16
15
58
IC601
VIDEO
PROCESSOR
Q852
D867
D868
Q853
T802 RL801
Line
Filter
R802
1
R805
2
43
2
66
IC1101
MICRO
PROCESSOR
Page 18
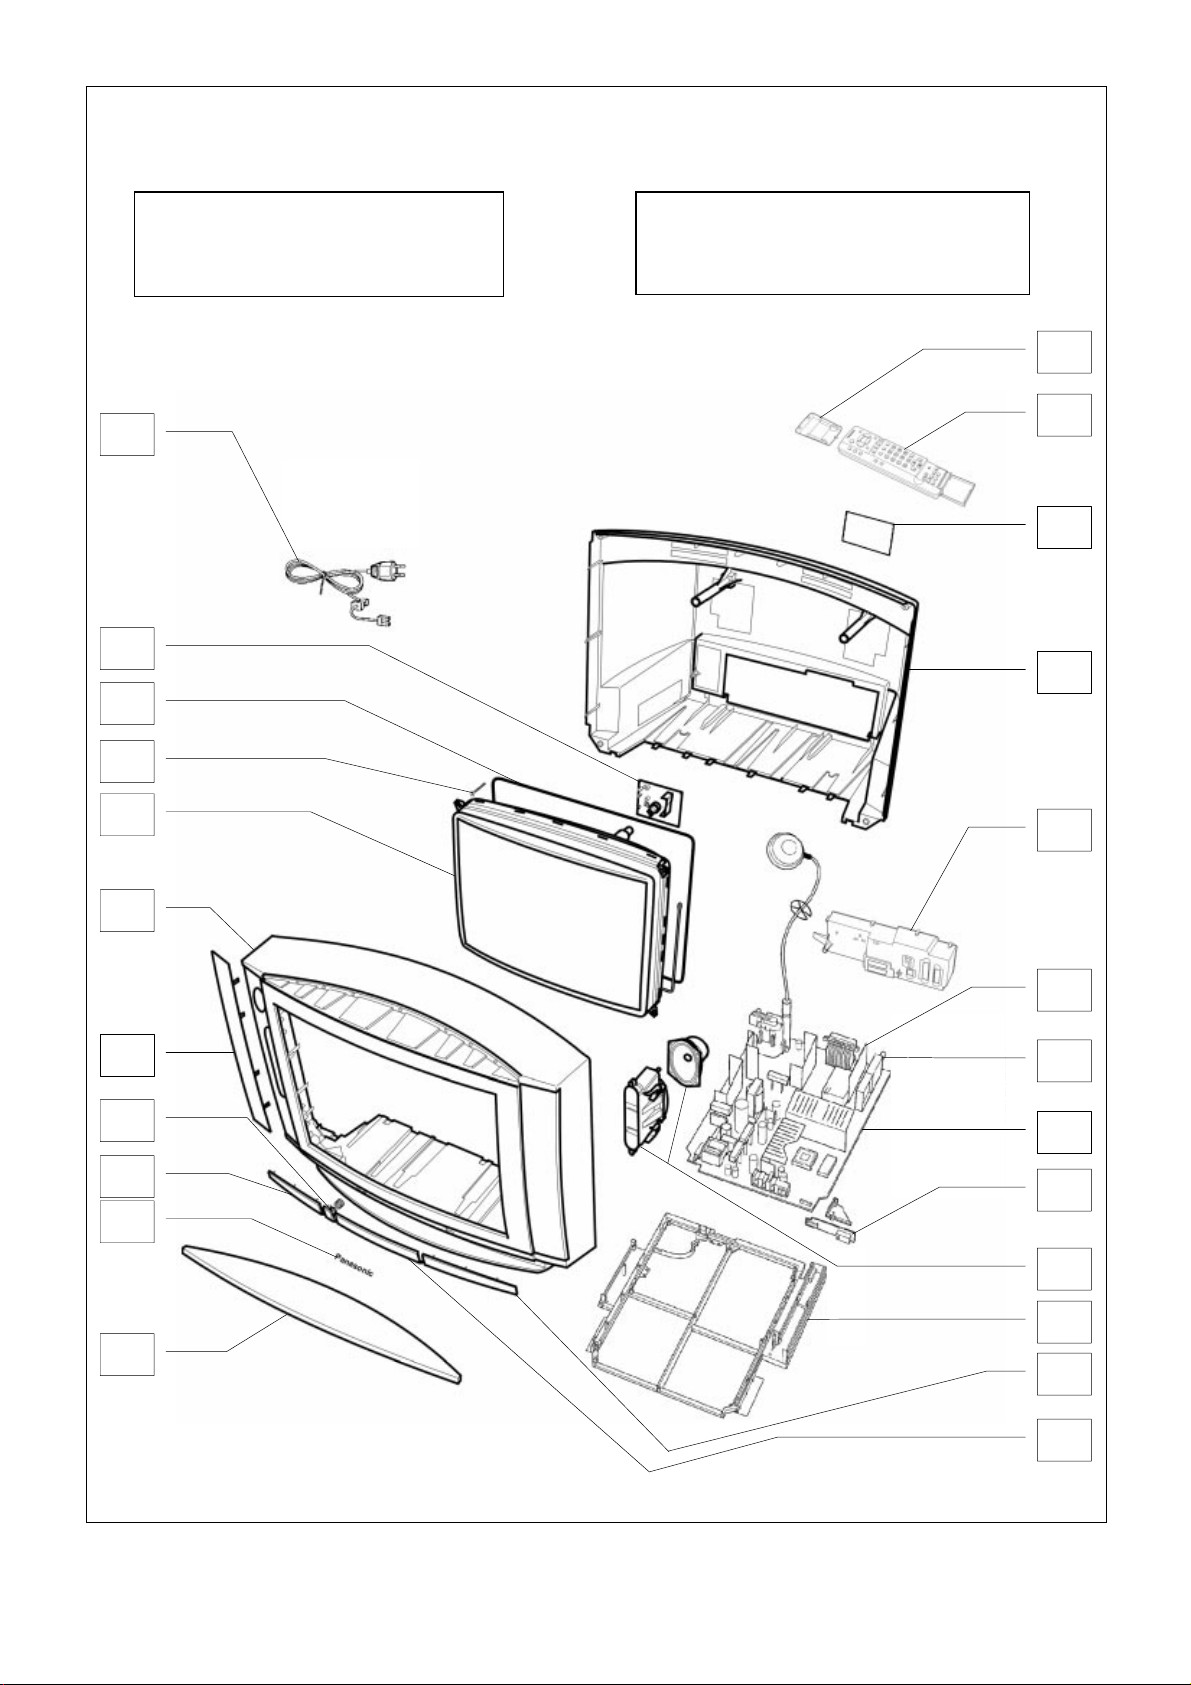
PARTS LOCATION EMPLACEMENT DES PIÈCES
NOTE:
The numbers on the exploded view below
refer to the mechanical section of the
Replacement Parts List.
21
24
15
11
REMARQUE:
Les numéros sur les pièces mécaniques
indiquent les No. de réf. de la liste des pieces
de rechange.
10
3
19
12
13
14
5
20
18
4
23
6
8
2
17
9
1
7
22
16
16
Page 19
LISTE DES PIÈCES DE RECHANGE
y
REPLACEMENT PARTS LIST
Important Safety Notice
Components Identified by mark have special
characteristics important for safety.
When replacing any of these components, use only
manufacturers specified parts.
* In case of ordering these spare pa rts, please
always add the complete Model-Type number to
our order.
DescriptionCct Ref Parts Number DescriptionCct Ref Parts Number
COMMON PARTS
MECHANICAL PARTS
SPEAKER 1 EAGG1216C2
TUNER 2 ENG29504G
REMOTE CONTROL 3 EUR511200
PANASONIC BADGE 4 TBM8E1728
SPEAKER NET 5 TKP8E1169
REAR AV COVER 6 TKP8E1222
CHASSIS FRAME 7 TMX8E020
H P.C.B. 8 TNP8EH002AA
N P.C.B. 9 TNP8EN015AA
BATTERY COVER (REMOTE) 10 UR51EC904A
CRT FIXING SCREW 11 VP17005-32
MISCELLANEOUS COMPONENTS
FIX CLIP 31221212478
I.C. SOCKET 832AG11D-ESL
RELAY F9-4-220
84 PIN SOCKET PCS-084A-1
PRESET LABEL TBM8E1615
REAR AV LABEL TBM8E1781
LID CATCH TEK6940
POWER BUTTON SPRING TES8E015
LED HOLDER TMW8E020-1
BATTERY PACK UM-3DJ-2P
ANODE LEAD ZTUZAE550A
RELAY RL801 TSE1885-1
THERMISTOR R802 232266296706
CRT SOCKET S351 0330550049
INSTRUCTION BOOKS
GERMAN TQB8E2562A
DUTCH/FRENCH TQB8E2562BD
ITALIAN/SPANISH TQB8E2562CE
SWEDISH/NORWEGIAN TQB8E2562FG
SUOMI/DANISH TQB8E2562HK
I.C.s
AUDIO OUTPUT IC251 LA4282
R.G.B. AMPLIFIER IC351 TDA6103Q-N3
VERTICAL OUTPUT IC451 LA7845N
VIDEO PROCESSOR IC601 VDP3108BPPB1
HORIZONTAL OUTPUTIC701 TEA2031A
POWER SUPPLY IC801 STRF6654LF51
ERROR AMPLIFERIC850 SE140N
12V REGULATORIC851 L78M12MRB
5V REGULATORIC852 L78M05MRB
8V REGULATOR IC853 AN78L08TA
LED RECEIVER IC1071 RPM-637CBRL
Remarque importante por la sécurité
Les éléments portant la indication possèent des
caractéristiques de sécurité spécials. Lors du
remplacement de l'une quelc onque des ces pièces,
n'utiliser que celles spécifiées par la fabricant.
* En cas de commande de ces pieces, veuiilez
toujours ajouter le numero de modele complet a
votre commande
MICRO PROCESSOR IC1101 SDA5450C48
EPROM * IC1102 27C2001-F11
DIODE IC1104 MN1381-R(TA)
DIODE IC1105 MN1381-T(TA)
AUDIO PROCESSOR IC2101 MSP3410DPOB4
AV SWITCHING IC3401 TEA2114
FUSES
FUSE F802 19181-3.15
FUSE HOLDERF8021 EYF52BC
FUSE HOLDERF8022 EYF52BC
DIODES
DIODE D101 MA3020TX
DIODE D102 MA3020TX
DIODE D251 MA2180TP
DIODE D253 MA700TA5
DIODE D254 MA700TA5
DIODE D354 1SR124-4AT82
DIODE D355 1SR124-4AT82
DIODE D356 1SR124-4AT82
DIODED357 MA165TA5
DIODED358 MA165TA5
DIODED359 MA165TA5
DIODE D360 MTZJT-7715A
DIODED361 MA165TA5
DIODED362 MA165TA5
DIODED363 MA165TA5
DIODED364 MA165TA5
DIODED453 MA165TA5
DIODE D454 ERA15-02V3
DIODE D456 MTZJT-775.6C
DIODED457 MA165TA5
DIODED501 MA165TA5
DIODE D502 1SR124-4AT82
DIODE D511 MA4047
DIODE D551 ERD07-15L7
DIODE D552 RU3LFA1
DIODE D553 1SR124-4AT82
DIODE D554 1SR124-4AT82
DIODED556 MA165TA5
DIODE D557 1SR124-4AT82
DIODE D558 1SR124-4AT82
DIODE D601 DAN217T146
DIODE D603 DAN217T146
DIODE D605 DAN212KT146
DIODED606 MA165TA5
DIODE D607 MA4051
DIODE D609 1SR124-4AT82
DIODE D615 STZ6.2NT146
DIODE D616 STZ6.2NT146
DIODED701 MA165TA5
DIODE D702 MTZJT-775.1C
DIODE D704 MA29TA5
17
Page 20
TRANSISTORS
DescriptionCct Ref Parts Number DescriptionCct Ref Parts Number
DIODE D705 MTZJT-775.6C
DIODE D801 RBV4-08
DIODE D803 1SR124-4AT82
DIODE D804 1SR124-4AT82
PHOTO COUPLER D805 TLP621GR-LF2
DIODE D806 1SR124-4AT82
DIODE D850 RU4BLF-L1
DIODE D851 MTZJT776.2B
DIODED852 MA165TA5
DIODE D853 MA2180BLFS
DIODE D854 TVSRU2AMLFA5
DIODE D855 FML22SLF610
DIODE D856 RU4AMLF-M1
DIODE D857 MTZJT-775.1C
DIODED858 MA165TA5
DIODED859 MA165TA5
DIODED860 MA165TA5
DIODED861 MA165TA5
DIODE D862 MTZJT-7736A
DIODED863 MA165TA5
DIODED864 MA165TA5
DIODED865 MA165TA5
DIODED866 MA165TA5
DIODE D867 EK06-V0
DIODE D868 1N4150T-77
DIODE D869 1N4150T-77
DIODED870 MA165TA5
DIODE D871 1N4150T-77
DIODE D873 MTZJT-775.6C
DIODE D874 1SR124-4AT82
DIODE D875 BZX79A75A26A
DIODED901 MA165TA5
DIODED902 MA165TA5
DIODED904 MA165TA5
DIODED905 MA165TA5
DIODED906 RLS72TE-11
LED D1071 SLR56UR3FLF
DIODE D1072 MTZJT-778.2C
DIODED1101 MA165TA5
DIODED1102 MA165TA5
DIODE D2101 MA723TA5
DIODE D2102 MA723TA5
DIODE D2103 MA723TA5
DIODE D2104 MA723TA5
DIODE D2105 MTZJT-778.2C
DIODE D2303 MA723TA5
DIODE D2304 MA723TA5
DIODE D3101 MTZJT-778.2C
DIODE D3102 MTZJT-778.2C
TRANSISTOR Q101 BC847B
TRANSISTOR Q102 BC847B
TRANSISTOR Q103 BC847B
TRANSISTOR Q104 BC847B
TRANSISTOR Q105 BC847B
TRANSISTOR Q251 2SD1328STX
TRANSISTOR Q252 2SD1328STX
TRANSISTOR Q253 BC847B
TRANSISTOR Q254 BC847B
TRANSISTOR Q301 BC847B
TRANSISTOR Q302 FMY4T148
TRANSISTOR Q303 BC847B
TRANSISTOR Q304 FMY4T148
TRANSISTOR Q305 BC847B
TRANSISTOR Q306 FMY4T148
TRANSISTOR Q351 2SA1767
TRANSFORMERS
COILS
TRANSISTOR Q352 2SA1767
TRANSISTOR Q353 2SA1767
TRANSISTOR Q354 BC857B
TRANSISTOR Q451 BC857B
TRANSISTOR Q503 2SD2398-M2
TRANSISTOR Q551 BU2508AXLB
TRANSISTOR Q552 2SC1473-RN
TRANSISTOR Q701 BC857B
TRANSISTOR Q850 2SD1273PLB
TRANSISTOR Q851 BC857B
TRANSISTOR Q852 2SC1383-S
TRANSISTOR Q853 BC847B
TRANSISTOR Q854 BC847B
TRANSISTOR Q855 BC847B
TRANSISTOR Q856 BC847B
TRANSISTOR Q857 2SA1018QTA
TRANSISTOR Q905 BC847B
TRANSISTOR Q906 BC847B
TRANSISTOR Q907 BC857B
TRANSISTOR Q908 2SA1535ARLB
TRANSISTOR Q909 2SC3944ARLB
TRANSISTOR Q950 BC847B
TRANSISTOR Q951 FMY4T148
TRANSISTOR Q1051 BC847B
TRANSISTOR Q1052 BC847B
TRANSISTOR Q1072 BC847B
TRANSISTOR Q1101 BC847B
TRANSISTOR Q1104 BC847B
TRANSISTOR Q1105 BC847B
TRANSISTOR Q1106 BC847B
TRANSISTOR Q1107 BC847B
TRANSISTOR Q1108 BC847B
TRANSISTOR Q2101 BC857B
TRANSISTOR Q2102 BC857B
TRANSISTOR Q2103 BC857B
TRANSISTOR Q2301 BC847B
TRANSISTOR Q2302 BC857B
TRANSISTOR Q2303 BC847B
TRANSISTOR Q2304 BC857B
TRANSISTOR Q3001 BC847B
TRANSISTOR Q3006 BC847B
TRANSISTOR Q3007 BC847B
TRANSISTOR Q3401 BC847B
TRANSISTOR Q3402 BC847B
TRANSISTOR Q3601 BC847B
TRANSFORMER T501 ETH19Y173AY
F.B.T. T551 ZTFL94002A
TRANSFORMER T801 ETS39AG1H7AD
TRANSFORMER T802 ETP35KAN619U
COIL J208 EXCELSA35V
COILL101 TLT100K991R
COILL102 TLT068K991R
COILL103 EXCELSA35T
COIL L104 TLTACT4R7K
COIL L105 TLTACTR47K
COIL L106 TLTACT100K
COIL L107 TLTACT6R8K
COIL L114 ELJFC2R2KF
COIL L115 ELJFC2R2KF
COIL L301 TLTACT4R7K
COIL L302 TLTACT4R7K
COILL451 EXCELSA35T
COILL501 EXCELSA35T
COIL L552 ELH5L4105
18
Page 21
FILTERS
CRYSTALS
RESISTORS
DescriptionCct Ref Parts Number DescriptionCct Ref Parts Number
COIL L553 ELC08D682E
COIL L554 ELC18B102L
COIL L601 TLTACT4R7K
COIL L602 TLTACT4R7K
COIL L603 TLTACT4R7K
COIL L604 TLTACT4R7K
COIL L606 TLTACT4R7K
COIL L607 ELJFC2R2KF
COIL L701 ELC10D822E
COILL850 EXCELSA35T
COILL851 EXCELSA35T
COIL L852 ELEIN470KA
COILL853 EXCELSA35T
COILL854 EXCELSA35T
COILL855 EXCELSA35T
COILL856 EXCELSA39V
COIL L901 EXCELSA24T
COIL L902 EXCELSA24T
COIL L1103 TLTACT100K
COILL1104 EXCELSA35T
COIL L1105 ELJFC2R2KF
COIL L2101 TLTACT100K
COILL2103 EXCELSA35T
COIL L2104 TLTACT4R7K
COIL L3001 ELEMV1R5MA
COIL L3002 ELEMV1R5MA
COIL L3003 ELEMV1R5MA
COIL L3004 ELEMV1R5MA
COIL L3005 ELEBR2R2KA
COIL L3006 ELEBR2R2KA
COIL L3007 TLTACT2R2K
COIL L3101 ELEBT6R8KA
COIL L3102 ELEBT6R8KA
COIL L3401 ELESN2R2KA
COIL L3402 ELESN2R2KA
LINE FILTER L804 ELF18N010A
FILTERX101 EFCT6504BF
CERAMIC FILTER X102 EFCT7004BF
CRYSTAL X601 4730007267
CRYSTAL X1101 TSSA121
CRYSTAL X2101 4730007158
SOLID ERC12GK825 0.5W 10% 8M2
S.M.CARBJA40 ERJ6GEY0R00 0.1W 5% 0
S.M.CARBJA52 ERJ6GEY0R00 0.1W 5% 0
S.M.CARBJA48 ERJ6GEY0R00 0.1W 5% 0
S.M.CARBJA47 ERJ6GEY0R00 0.1W 5% 0
S.M.CARBJA45 ERJ6GEY0R00 0.1W 5% 0
S.M.CARBJA44 ERJ6GEY0R00 0.1W 5% 0
S.M.CARBJA49 ERJ6GEY0R00 0.1W 5% 0
S.M.CARBJA39 ERJ6GEY0R00 0.1W 5% 0
S.M.CARBJA38 ERJ6GEY0R00 0.1W 5% 0
S.M.CARBJA37 ERJ6GEY0R00 0.1W 5% 0
S.M.CARBJA36 ERJ6GEY0R00 0.1W 5% 0
S.M.CARBJA3 ERJ6GEY0R00 0.1W 5% 0
S.M.CARBJA54 ERJ6GEY0R00 0.1W 5% 0
S.M.CARBJSE35 ERJ6GEY0R00 0.1W 5% 0
S.M.CARBJA28 ERJ6GEY0R00 0.1W 5% 0
S.M.CARBJA55 ERJ6GEY0R00 0.1W 5% 0
S.M.CARBJA57 ERJ6GEY0R00 0.1W 5% 0
S.M.CARBJA58 ERJ6GEY0R00 0.1W 5% 0
S.M.CARBJA60 ERJ6GEY0R00 0.1W 5% 0
S.M.CARBJA9 ERJ6GEY0R00 0.1W 5% 0
S.M.CARBJSE10 ERJ6GEY0R00 0.1W 5% 0
S.M.CARBJSE12 ERJ6GEY0R00 0.1W 5% 0
S.M.CARBJSE25 ERJ6GEY0R00 0.1W 5% 0
S.M.CARBJSE26 ERJ6GEY0R00 0.1W 5% 0
S.M.CARBJSH001 ERJ6GEY0R00 0.1W 5% 0
S.M.CARBJSE33 ERJ6GEY0R00 0.1W 5% 0
S.M.CARBJSE4 ERJ6GEY0R00 0.1W 5% 0
S.M.CARBJA27 ERJ6GEY0R00 0.1W 5% 0
S.M.CARBJSE5 ERJ6GEY0R00 0.1W 5% 0
S.M.CARBJSE3 ERJ6GEY0R00 0.1W 5% 0
S.M.CARBJA13 ERJ6GEY0R00 0.1W 5% 0
S.M.CARBJA2 ERJ6GEY0R00 0.1W 5% 0
S.M.CARBJA16 ERJ6GEY0R00 0.1W 5% 0
S.M.CARBJA12 ERJ6GEY0R00 0.1W 5% 0
S.M.CARBJSN1 ERJ6GEY0R00 0.1W 5% 0
S.M.CARBJA22 ERJ6GEY0R00 0.1W 5% 0
S.M.CARBJA15 ERJ6GEY0R00 0.1W 5% 0
S.M.CARBJA14 ERJ6GEY0R00 0.1W 5% 0
S.M.CARBJA1 ERJ6GEY0R00 0.1W 5% 0
S.M.CARBJA10 ERJ6GEY0R00 0.1W 5% 0
S.M.CARBJA11 ERJ6GEY0R00 0.1W 5% 0
S.M.CARBJA26 ERJ6GEY0R00 0.1W 5% 0
S.M.CARBJA25 ERJ6GEY0R00 0.1W 5% 0
S.M.CARBJSE17 ERJ8GEY0R00 .125W 5% 0
S.M.CARBJA5 ERJ8GEY0R00 .125W 5% 0
S.M.CARBJA1 ERJ8GEY0R00 .125W 5% 0
S.M.CARBJA46 ERJ8GEY0R00 .125W 5% 0
S.M.CARBJA8 ERJ8GEY0R00 .125W 5% 0
S.M.CARBJA50 ERJ8GEY0R00 .125W 5% 0
S.M.CARBJA59 ERJ8GEY0R00 .125W 5% 0
S.M.CARBJA2 ERJ8GEY0R00 .125W 5% 0
S.M.CARBJA56 ERJ8GEY0R00 .125W 5% 0
S.M.CARBJA29 ERJ8GEY0R00 .125W 5% 0
S.M.CARBJA23 ERJ8GEY0R00 .125W 5% 0
S.M.CARBJA43 ERJ8GEY0R00 .125W 5% 0
S.M.CARBJA30 ERJ8GEY0R00 .125W 5% 0
S.M.CARBJA31 ERJ8GEY0R00 .125W 5% 0
S.M.CARBJA32 ERJ8GEY0R00 .125W 5% 0
S.M.CARBJA35 ERJ8GEY0R00 .125W 5% 0
S.M.CARBJA34 ERJ8GEY0R00 .125W 5% 0
S.M.CARBJA33 ERJ8GEY0R00 .125W 5% 0
S.M.CARBJA51 ERJ8GEY0R00 .125W 5% 0
S.M.CARBJA21 ERJ8GEY0R00 .125W 5% 0
S.M.CARBR101 ERJ6GEYJ331 0.1W 5% 330
S.M.CARBR102 ERJ6GEYJ103 0.1W 5% 10K
S.M.CARBR103 ERJ6GEYJ102 0.1W 5% 1K
S.M.CARBR104 ERJ6GEYJ331 0.1W 5% 330
S.M.CARBR105 ERJ6GEYJ101 0.1W 5% 100
S.M.CARBR106 ERJ6GEYJ680 0.1W 5% 68
S.M.CARBR107 ERJ6GEYJ102 0.1W 5% 1K
S.M.CARBR108 ERJ6GEYJ103 0.1W 5% 10K
S.M.CARBR109 ERJ6GEYJ103 0.1W 5% 10K
S.M.CARBR110 ERJ6GEYJ471 0.1W 5% 470
S.M.CARBR111 ERJ6GEYJ393 0.1W 5% 39K
S.M.CARBR112 ERJ6GEYJ101 0.1W 5% 100
S.M.CARBR113 ERJ6GEYJ223 0.1W 5% 22K
S.M.CARBR116 ERJ6GEYJ562 0.1W 5% 5K6
S.M.CARBR117 ERJ6GEYJ222 0.1W 5% 2K2
S.M.CARBR118 ERJ6GEYJ102 0.1W 5% 1K
S.M.CARBR121 ERJ6GEYJ471 0.1W 5% 470
S.M.CARBR251 ERJ6GEYJ101 0.1W 5% 100
S.M.CARBR252 ERJ6GEYJ272 0.1W 5% 2K7
S.M.CARBR253 ERJ6GEYJ103 0.1W 5% 10K
S.M.CARBR254 ERJ6GEYJ101 0.1W 5% 100
S.M.CARBR255 ERJ6GEYJ103 0.1W 5% 10K
S.M.CARBR256 ERJ6GEYJ471 0.1W 5% 470
19
Page 22
DescriptionCct Ref Parts Number DescriptionCct Ref Parts Number
S.M.CARBR257 ERJ6GEYJ100 0.1W 5% 10
S.M.CARBR258 ERJ6GEYJ272 0.1W 5% 2K7
S.M.CARBR259 ERJ6GEYJ100 0.1W 5% 10
S.M.CARBR260 ERJ6GEYJ103 0.1W 5% 10K
S.M.CARBR261 ERJ6GEYJ471 0.1W 5% 470
S.M.CARBR262 ERJ6GEYJ103 0.1W 5% 10K
S.M.CARBR263 ERJ6GEYJ473 0.1W 5% 47K
S.M.CARBR264 ERJ6GEYJ103 0.1W 5% 10K
CARBON R265 ERD25TJ2R2 0.25W 5% 2R2
CARBON R266 ERD25TJ2R2 0.25W 5% 2R2
WOUND R267 ERF7ZK4R7 7W 10% 4R7
S.M.CARBR268 ERJ6GEYJ103 0.1W 5% 10K
METAL R269 ERQ14AJ101 0.25W 5% 100
S.M.CARBR271 ERJ6GEYJ103 0.1W 5% 10K
WOUND R272 ERF7ZK4R7 7W 10% 4R7
S.M.CARBR301 ERJ6GEYJ391 0.1W 5% 390
S.M.CARBR302 ERJ6GEYJ102 0.1W 5% 1K
S.M.CARBR303 ERJ6GEYJ750 0.1W 5% 75
S.M.CARBR304 ERJ6GEYJ331 0.1W 5% 330
S.M.CARBR305 ERJ6GEYJ391 0.1W 5% 390
S.M.CARBR306 ERJ6GEYJ102 0.1W 5% 1K
S.M.CARBR307 ERJ6GEYJ750 0.1W 5% 75
S.M.CARBR308 ERJ6GEYJ331 0.1W 5% 330
S.M.CARBR309 ERJ6GEYJ391 0.1W 5% 390
S.M.CARBR310 ERJ6GEYJ102 0.1W 5% 1K
S.M.CARBR311 ERJ6GEYJ750 0.1W 5% 75
S.M.CARBR312 ERJ6GEYJ331 0.1W 5% 330
S.M.CARBR351 ERJ6GEYJ302 0.1W 5% 3K
S.M.CARBR352 ERJ6GEYJ302 0.1W 5% 3K
S.M.CARBR353 ERJ6GEYJ302 0.1W 5% 3K
S.M.CARBR354 ERJ6GEYJ102 0.1W 5% 1K
S.M.CARBR355 ERJ6GEYJ102 0.1W 5% 1K
S.M.CARBR356 ERJ6GEYJ102 0.1W 5% 1K
CARBONR357 ERDS1TJ114 0.5W 5% 110K
CARBONR358 ERDS1TJ114 0.5W 5% 110K
CARBONR359 ERDS1TJ114 0.5W 5% 110K
CARBONR363 ERD25TJ103 0.25W 5% 10K
CARBONR364 ERD25TJ103 0.25W 5% 10K
CARBONR365 ERD25TJ103 0.25W 5% 10K
CARBONR366 ERDS1TJ152 0.5W 5% 1K5
CARBONR367 ERDS1TJ152 0.5W 5% 1K5
CARBONR368 ERDS1TJ152 0.5W 5% 1K5
CARBONR369 ERD25TJ472 0.25W 5% 4K7
S.M.CARBR370 ERJ6GEYJ102 0.1W 5% 1K
FUSIBLE R372 ERQ12AJ121 0.5W 5% 120
S.M.CARBR373 ERJ6GEYJ220 0.1W 5% 22
CARBONR374 ERD25TJ274 0.25W 5% 270K
S.M.CARBR375 ERJ6GEYJ684 0.1W 5% 680K
S.M.CARBR376 ERJ6GEYJ183 0.1W 5% 18K
METALR377 ERQ1ABJP5R1 0.5W 5% 5R1
S.M.CARBR381 ERJ6GEYJ473 0.1W 5% 47K
S.M.CARBR451 ERJ6GEYJ223 0.1W 5% 22K
S.M.CARBR452 ERJ6GEY0R00 0.1W 5% 0
S.M.CARBR453 ERJ6GEY0R00 0.1W 5% 0
S.M.CARBR454 ERJ6GEYJ752 0.1W 5% 7K5
S.M.CARBR455 ERJ6GEYJ222 0.1W 5% 2K2
S.M.CARBR456 ERJ6GEYJ104 0.1W 5% 100K
S.M.CARBR457 ERJ6GEYJ223 0.1W 5% 22K
CARBON R458 ERD25TJ1R5 0.25W 5% 1R5
S.M.CARBR459 ERJ6GEYJ101 0.1W 5% 100
CARBONR460 ERDS1TJ331 0.5W 5% 330
WOUNDR461 ERW2PK1R2 2W 10% 1R2
CARBONR463 ERD25TJ222 0.25W 5% 2K2
S.M.CARBR464 ERJ6GEYJ182 0.1W 5% 1K8
S.M.CARBR465 ERJ6GEYJ681 0.1W 5% 680
S.M.CARBR502 ERJ6GEYJ511 0.1W 5% 510
CARBON R506 ERD25TJ560 0.25W 5% 56
METALR507 ERG1FJ271P 1W 5% 270
CARBONR509 ERDS1TJ152 0.5W 5% 1K5
CARBON R510 ERDS1FJ152 0.5W 5% 1K5
METAL R553 ERG1SJ152 1W 5% 1K5
METAL R554 ERG1SJ101 1W 5% 100
METAL R555 ERQ12HKR33 0.5W 5% R33
CARBON R558 ERDS1TJ124 0.5W 5% 120K
METAL R559 ERQ12HKR33 0.5W 5% R33
S.M.CARBR560 ERJ6GEYJ274 0.1W 5% 270K
S.M.CARBR561 ERJ6GEYJ273 0.1W 5% 27K
S.M.CARBR563 ERJ6GEYJ474 0.1W 5% 470K
S.M.CARBR564 ERJ6GEYJ623 0.1W 5% 62K
S.M.CARBR566 ERJ6GEYJ563 0.1W 5% 56K
WOUNDR567 ERF7ZK1R0 7W 10% 1
S.M.CARBR601 ERJ6GEYJ101 0.1W 5% 100
S.M.CARBR602 ERJ6GEYJ821 0.1W 5% 820
S.M.CARBR603 ERJ8GEYJ103 .125W 5% 10K
S.M.CARBR604 ERJ6GEYJ101 0.1W 5% 100
CARBONR605 ERD25TJ331 0.25W 5% 330
CARBONR606 ERD25TJ331 0.25W 5% 330
S.M.CARBR607 ERJ6GEYJ821 0.1W 5% 820
S.M.CARBR608 ERJ6GEYJ271 0.1W 5% 270
S.M.CARBR609 ERJ6GEYJ122 0.1W 5% 1K2
S.M.CARBR610 ERJ6GEY0R00 0.1W 5% 0
S.M.CARBR611 ERJ6GEYJ103 0.1W 5% 10K
S.M.CARBR612 ERJ6GEYJ101 0.1W 5% 100
S.M.CARBR613 ERJ6GEYJ152 0.1W 5% 1K5
S.M.CARBR622 ERJ6GEY0R00 0.1W 5% 0
S.M.CARBR636 ERJ6GEYJ750 0.1W 5% 75
S.M.CARBR645 ERJ6GEYJ103 0.1W 5% 10K
S.M.CARBR647 ERJ6GEYJ472 0.1W 5% 4K7
S.M.CARBR648 ERJ6GEYJ152 0.1W 5% 1K5
S.M.CARBR650 ERJ6GEYJ750 0.1W 5% 75
S.M.CARBR651 ERJ6GEYJ750 0.1W 5% 75
S.M.CARBR652 ERJ6GEYJ102 0.1W 5% 1K
S.M.CARBR654 ERJ6GEYJ622 0.1W 5% 6K2
S.M.CARBR655 ERJ6GEYJ103 0.1W 5% 10K
S.M.CARBR658 ERJ6GEYJ153 0.1W 5% 15K
S.M.CARBR659 ERJ6GEY0R00 0.1W 5% 0
S.M.CARBR660 ERJ6GEY0R00 0.1W 5% 0
FUSIBLE R701 ERQ12AJ101 0.5W 5% 100
FUSIBLER702 ERQ12HJ8R2 0.5W 5% 8R2
METAL R703 ERG2FJ821 2W 5% 820
S.M.CARBR704 ERJ6GEYJ563 0.1W 5% 56K
S.M.CARBR705 ERJ6GEYJ104 0.1W 5% 100K
S.M.CARBR706 ERJ6GEYJ103 0.1W 5% 10K
S.M.CARBR707 ERJ6GEYJ391 0.1W 5% 390
S.M.CARBR708 ERJ6GEYJ393 0.1W 5% 39K
S.M.CARBR709 ERJ6GEYJ393 0.1W 5% 39K
S.M.CARBR710 ERJ6GEYJ273 0.1W 5% 27K
METAL R711 ERG1SJ101 1W 5% 100
S.M.CARBR712 ERJ6GEYJ102 0.1W 5% 1K
SOLID R803 ERC12ZGK335D 0.5W 10% 3M3
CARBONR805 ERD25TJ473 0.25W 5% 47K
CARBONR806 ERD25TJ100 0.25W 5% 10
CARBONR807 ERD25TJ332 0.25W 5% 3K3
CARBONR809 ERD25TJ681 0.25W 5% 680
WOUNDR810 ERW2PKR33 2W 20% R33
WOUNDR811 ERW2PKR33 2W 20% R33
CARBONR812 ERD75TAJ825 0.75W 5% 8M2
WOUND R813 ERF7ZK2R7 7W 20% 2R7
CARBONR814 ERD25TJ473 0.25W 5% 47K
CARBONR815 ERD25TJ222 0.25W 5% 2K2
CARBONR850 ERD25TJ122 0.25W 5% 1K2
S.M.CARBR852 ERJ6GEY0R00 0.1W 5% 0
20
Page 23
DescriptionCct Ref Parts Number DescriptionCct Ref Parts Number
S.M.CARBR853 ERJ6GEYJ102 0.1W 5% 1K
METAL R854 ERG2FJ223 2W 5% 22K
S.M.CARBR855 ERJ6GEYJ752 0.1W 5% 7K5
S.M.CARBR856 ERJ6GEYJ752 0.1W 5% 7K5
S.M.CARBR857 ERJ6GEYJ752 0.1W 5% 7K5
S.M.CARBR858 ERJ6GEYJ752 0.1W 5% 7K5
S.M.CARBR859 ERJ6GEYJ753 0.1W 5% 75K
FUSIBLER860 ERQ1CJP2R2 1W 10% 2R2
CARBONR861 ERD25TJ221 0.25W 5% 220
CARBONR862 ERD25TJ272 0.25W 5% 2K7
CARBONR863 ERDS1TJ560 0.5W 5% 56
CARBON R864 ERDS1TJ680 0.5W 5% 68
S.M.CARBR865 ERJ6GEY0R00 0.1W 5% 0
S.M.CARBR867 ERJ6GEYJ103 0.1W 5% 10K
S.M.CARBR868 ERJ6GEYJ223 0.1W 5% 22K
S.M.CARBR869 ERJ6GEY0R00 0.1W 5% 0
S.M.CARBR870 ERJ6GEYJ272 0.1W 5% 2K7
S.M.CARBR871 ERJ6GEYJ153 0.1W 5% 15K
METALR872 ERG1SJ183 1W 5% 18K
METALR873 ERG1SJ223 1W 5% 22K
CARBONR874 ERD25TJ104 0.25W 5% 100K
S.M.CARBR876 ERJ6GEYJ103 0.1W 5% 10K
WOUNDR877 ERW2PKR56 2W 10% R56
S.M.CARBR878 ERJ6GEYJ473 0.1W 5% 47K
METALR882 ERG2FJ330H 2W 5% 33
S.M.CARBR913 ERJ6GEYJ473 0.1W 5% 47K
S.M.CARBR914 ERJ6GEYJ822 0.1W 5% 8K2
S.M.CARBR915 ERJ6GEYJ152 0.1W 5% 1K5
S.M.CARBR916 ERJ6GEYJ391 0.1W 5% 390
FUSIBLER919 ERQ14AJW390 0.25W 5% 39
FUSIBLER920 ERQ14AJW390 0.25W 5% 39
CARBONR921 ERD25TJ471 0.25W 5% 470
CARBON R922 ERD25TJ393 0.25W 5% 39K
CARBON R923 ERD25TJ393 0.25W 5% 39K
CARBONR924 ERDS1FJ390 0.5W 5% 39
S.M.CARBR925 ERJ6GEY0R00 0.1W 5% 0
S.M.CARBR926 ERJ6GEY0R00 0.1W 5% 0
CARBONR927 ERD25TJ471 0.25W 5% 470
CARBONR928 ERD25TJ5R6 0.25W 5% 5R6
CARBONR929 ERDS1FJ471 0.5W 5% 470
CARBONR930 ERD25TJ5R6 0.25W 5% 5R6
CARBONR931 ERDS1FJ390 0.5W 5% 39
FUSIBLER935 ERQ14AJW3R9 0.25W 5% 3R9
FUSIBLER936 ERQ1CJP331 1W 5% 330
S.M.CARBR951 ERJ6GEYJ391 0.1W 5% 390
S.M.CARBR952 ERJ6GEYJ102 0.1W 5% 1K
S.M.CARBR953 ERJ6GEYJ750 0.1W 5% 75
S.M.CARBR954 ERJ6GEYJ391 0.1W 5% 390
S.M.CARBR1051 ERJ6GEYJ102 0.1W 5% 1K
S.M.CARBR1052 ERJ6GEYJ471 0.1W 5% 470
S.M.CARBR1053 ERJ6GEYJ103 0.1W 5% 10K
S.M.CARBR1054 ERJ6GEY0R00 0.1W 5% 0
S.M.CARBR1071 ERJ6GEYJ271 0.1W 5% 270
S.M.CARBR1073 ERJ6GEYJ103 0.1W 5% 10K
S.M.CARBR1074 ERJ6GEYJ750 0.1W 5% 75
S.M.CARBR1101 ERJ6GEYJ101 0.1W 5% 100
S.M.CARBR1102 ERJ6GEYJ102 0.1W 5% 1K
S.M.CARBR1103 ERJ6GEYJ331 0.1W 5% 330
S.M.CARBR1104 ERJ6GEYJ331 0.1W 5% 330
S.M.CARBR1105 ERJ6GEYJ101 0.1W 5% 100
S.M.CARBR1106 ERJ6GEYJ104 0.1W 5% 100K
S.M.CARBR1107 ERJ6GEYJ104 0.1W 5% 100K
S.M.CARBR1108 ERJ6GEYJ102 0.1W 5% 1K
S.M.CARBR1109 ERJ6GEYJ472 0.1W 5% 4K7
S.M.CARBR1110 ERJ6GEYJ472 0.1W 5% 4K7
S.M.CARBR1111 ERJ6GEYJ473 0.1W 5% 47K
S.M.CARBR1112 ERJ6GEYJ473 0.1W 5% 47K
S.M.CARBR1113 ERJ6GEYJ101 0.1W 5% 100
S.M.CARBR1115 ERJ6GEYJ471 0.1W 5% 470
S.M.CARBR1116 ERJ6GEYJ101 0.1W 5% 100
S.M.CARBR1117 ERJ6GEYJ101 0.1W 5% 100
S.M.CARBR1118 ERJ6GEYJ472 0.1W 5% 4K7
S.M.CARBR1119 ERJ6GEYJ472 0.1W 5% 4K7
S.M.CARBR1120 ERJ6GEYJ101 0.1W 5% 100
S.M.CARBR1121 ERJ6GEYJ101 0.1W 5% 100
CARBONR1122 ERD25TJ103 0.25W 5% 10K
S.M.CARBR1123 ERJ6GEYJ101 0.1W 5% 100
S.M.CARBR1125 ERJ6GEYJ472 0.1W 5% 4K7
S.M.CARBR1126 ERJ6GEYJ101 0.1W 5% 100
S.M.CARBR1127 ERJ6GEYJ101 0.1W 5% 100
S.M.CARBR1128 ERJ6GEYJ682 0.1W 5% 6K8
S.M.CARBR1129 ERJ6GEYJ682 0.1W 5% 6K8
S.M.CARBR1130 ERJ6GEYJ103 0.1W 5% 10K
S.M.CARBR1131 ERJ6GEYJ103 0.1W 5% 10K
S.M.CARBR1132 ERJ6GEYJ101 0.1W 5% 100
S.M.CARBR1133 ERJ6GEYJ273 0.1W 5% 27K
S.M.CARBR1136 ERJ6GEYJ823 0.1W 5% 82K
S.M.CARBR1137 ERJ6GEY0R00 0.1W 5% 0
S.M.CARBR1138 ERJ6GEYJ474 0.1W 5% 470K
S.M.CARBR1139 ERJ6GEYJ471 0.1W 5% 470
S.M.CARBR1140 ERJ6GEYJ471 0.1W 5% 470
S.M.CARBR1141 ERJ6GEYJ471 0.1W 5% 470
S.M.CARBR1142 ERJ6GEYJ472 0.1W 5% 4K7
S.M.CARBR1145 ERJ6GEYJ101 0.1W 5% 100
S.M.CARBR1146 ERJ6GEYJ101 0.1W 5% 100
S.M.CARBR1147 ERJ6GEYJ101 0.1W 5% 100
S.M.CARBR1148 ERJ6GEYJ101 0.1W 5% 100
S.M.CARBR1149 ERJ6GEYJ223 0.1W 5% 22K
S.M.CARBR1151 ERJ6GEYJ101 0.1W 5% 100
S.M.CARBR1152 ERJ6GEYJ101 0.1W 5% 100
S.M.CARBR1154 ERJ6GEYJ101 0.1W 5% 100
S.M.CARBR1155 ERJ6GEYJ101 0.1W 5% 100
S.M.CARBR1156 ERJ6GEYJ101 0.1W 5% 100
S.M.CARBR1157 ERJ6GEYJ103 0.1W 5% 10K
S.M.CARBR1158 ERJ6GEY0R00 0.1W 5% 0
S.M.CARBR1159 ERJ6GEY0R00 0.1W 5% 0
S.M.CARBR1160 ERJ6GEYJ223 0.1W 5% 22K
S.M.CARBR1161 ERJ6GEYJ103 0.1W 5% 10K
S.M.CARBR1162 ERJ6GEYJ222 0.1W 5% 2K2
S.M.CARBR1163 ERJ6GEYJ222 0.1W 5% 2K2
S.M.CARBR1164 ERJ6GEYJ332 0.1W 5% 3K3
S.M.CARBR1165 ERJ6GEYJ512 0.1W 5% 5K1
S.M.CARBR1166 ERJ6GEYJ912 0.1W 5% 9K1
S.M.CARBR1167 ERJ6GEYJ100 0.1W 5% 10
S.M.CARBR1168 ERJ6GEYJ473 0.1W 5% 47K
S.M.CARBR1169 ERJ6GEYJ472 0.1W 5% 4K7
S.M.CARBR1170 ERJ6GEYJ273 0.1W 5% 27K
S.M.CARBR1171 ERJ6GEYJ224 0.1W 5% 220K
S.M.CARBR1172 ERJ6GEYJ223 0.1W 5% 22K
S.M.CARBR1173 ERJ6GEYJ104 0.1W 5% 100K
S.M.CARBR1174 ERJ6GEYJ221 0.1W 5% 220
S.M.CARBR1175 ERJ6GEYJ225 0.1W 5% 2M2
S.M.CARBR1176 ERJ6GEYJ100 0.1W 5% 10
S.M.CARBR2101 ERJ6GEYJ103 0.1W 5% 10K
S.M.CARBR2102 ERJ6GEYJ101 0.1W 5% 100
S.M.CARBR2103 ERJ6GEYJ101 0.1W 5% 100
S.M.CARBR2104 ERJ6GEYJ101 0.1W 5% 100
S.M.CARBR2105 ERJ6GEYJ101 0.1W 5% 100
S.M.CARBR2106 ERJ6GEYJ101 0.1W 5% 100
S.M.CARBR2107 ERJ6GEYJ101 0.1W 5% 100
S.M.CARBR2108 ERJ6GEYJ101 0.1W 5% 100
S.M.CARBR2109 ERJ6GEYJ183 0.1W 5% 18K
21
Page 24
DescriptionCct Ref Parts Number DescriptionCct Ref Parts Number
S.M.CARBR2110 ERJ6GEY0R00 0.1W 5% 0
S.M.CARBR2111 ERJ6GEYJ221 0.1W 5% 220
S.M.CARBR2112 ERJ6GEYJ102 0.1W 5% 1K
S.M.CARBR2113 ERJ6GEYJ562 0.1W 5% 5K6
S.M.CARBR2114 ERJ6GEYJ101 0.1W 5% 100
S.M.CARBR2115 ERJ6GEYJ222 0.1W 5% 2K2
S.M.CARBR2116 ERJ6GEYJ101 0.1W 5% 100
S.M.CARBR2117 ERJ6GEYJ101 0.1W 5% 100
S.M.CARBR2118 ERJ6GEYJ222 0.1W 5% 2K2
S.M.CARBR2119 ERJ6GEYJ101 0.1W 5% 100
S.M.CARBR2120 ERJ6GEYJ222 0.1W 5% 2K2
S.M.CARBR2302 ERJ6GEYJ104 0.1W 5% 100K
S.M.CARBR2303 ERJ6GEYJ101 0.1W 5% 100
S.M.CARBR2304 ERJ6GEYJ471 0.1W 5% 470
S.M.CARBR2305 ERJ6GEYJ102 0.1W 5% 1K
S.M.CARBR2306 ERJ6GEYJ103 0.1W 5% 10K
S.M.CARBR2308 ERJ6GEYJ104 0.1W 5% 100K
S.M.CARBR2309 ERJ6GEYJ101 0.1W 5% 100
S.M.CARBR2310 ERJ6GEYJ471 0.1W 5% 470
S.M.CARBR2311 ERJ6GEYJ102 0.1W 5% 1K
S.M.CARBR2312 ERJ6GEYJ103 0.1W 5% 10K
S.M.CARBR3001 ERJ6GEYJ101 0.1W 5% 100
S.M.CARBR3002 ERJ6GEYJ471 0.1W 5% 470
S.M.CARBR3003 ERJ6GEYJ101 0.1W 5% 100
S.M.CARBR3004 ERJ6GEYJ153 0.1W 5% 15K
S.M.CARBR3005 ERJ6GEYJ101 0.1W 5% 100
S.M.CARBR3006 ERJ6GEYJ471 0.1W 5% 470
S.M.CARBR3007 ERJ6GEYJ101 0.1W 5% 100
S.M.CARBR3008 ERJ6GEYJ153 0.1W 5% 15K
S.M.CARBR3009 ERJ6GEYJ750 0.1W 5% 75
S.M.CARBR3010 ERJ6GEYJ750 0.1W 5% 75
S.M.CARBR3011 ERJ6GEYJ750 0.1W 5% 75
S.M.CARBR3012 ERJ6GEYJ750 0.1W 5% 75
S.M.CARBR3013 ERJ6GEYJ101 0.1W 5% 100
S.M.CARBR3014 ERJ6GEYJ471 0.1W 5% 470
S.M.CARBR3015 ERJ6GEYJ101 0.1W 5% 100
S.M.CARBR3016 ERJ6GEYJ153 0.1W 5% 15K
S.M.CARBR3017 ERJ6GEYJ101 0.1W 5% 100
S.M.CARBR3018 ERJ6GEYJ471 0.1W 5% 470
S.M.CARBR3019 ERJ6GEYJ101 0.1W 5% 100
S.M.CARBR3020 ERJ6GEYJ153 0.1W 5% 15K
S.M.CARBR3021 ERJ6GEYJ750 0.1W 5% 75
S.M.CARBR3022 ERJ6GEYJ102 0.1W 5% 1K
S.M.CARBR3023 ERJ6GEYJ123 0.1W 5% 12K
S.M.CARBR3024 ERJ6GEYJ472 0.1W 5% 4K7
S.M.CARBR3025 ERJ6GEYJ750 0.1W 5% 75
S.M.CARBR3026 ERJ6GEYJ750 0.1W 5% 75
S.M.CARBR3044 ERJ6GEYJ750 0.1W 5% 75
S.M.CARBR3046 ERJ6GEYJ101 0.1W 5% 100
S.M.CARBR3047 ERJ6GEYJ101 0.1W 5% 100
S.M.CARBR3048 ERJ6GEYJ103 0.1W 5% 10K
S.M.CARBR3049 ERJ6GEYJ101 0.1W 5% 100
S.M.CARBR3050 ERJ6GEYJ103 0.1W 5% 10K
S.M.CARBR3057 ERJ6GEYJ750 0.1W 5% 75
CARBON R3101 ERDS1TJ151 0.5W 5% 150
CARBON R3102 ERDS1TJ151 0.5W 5% 150
METAL R3103 ERG2FJ221 2W 5% 220
METAL R3104 ERG2FJ221 2W 5% 220
S.M.CARBR3105 ERJ6GEYJ101 0.1W 5% 100
S.M.CARBR3106 ERJ6GEYJ101 0.1W 5% 100
S.M.CARBR3107 ERJ6GEYJ153 0.1W 5% 15K
S.M.CARBR3108 ERJ6GEYJ153 0.1W 5% 15K
S.M.CARBR3402 ERJ6GEYJ750 0.1W 5% 75
S.M.CARBR3403 ERJ6GEYJ101 0.1W 5% 100
S.M.CARBR3404 ERJ6GEYJ242 0.1W 5% 2K4
S.M.CARBR3405 ERJ6GEYJ104 0.1W 5% 100K
CAPACITORS
S.M.CARBR3406 ERJ6GEYJ301 0.1W 5% 300
S.M.CARBR3407 ERJ6GEYJ123 0.1W 5% 12K
S.M.CARBR3408 ERJ6GEYJ472 0.1W 5% 4K7
S.M.CARBR3409 ERJ6GEYJ750 0.1W 5% 75
S.M.CARBR3601 ERJ6GEYJ101 0.1W 5% 100
S.M.CARBR3602 ERJ6GEYJ101 0.1W 5% 100
S.M.CARBR3603 ERJ6GEYJ101 0.1W 5% 100
S.M.CARBR3604 ERJ6GEYJ101 0.1W 5% 100
S.M.CARBR3605 ERJ6GEYJ101 0.1W 5% 100
S.M.CARBR3606 ERJ6GEYJ101 0.1W 5% 100
S.M.CARBR3607 ERJ6GEYJ472 0.1W 5% 4K7
S.M.CARBR3608 ERJ6GEYJ752 0.1W 5% 7K5
S.M.CARBR3609 ERJ6GEY0R00 0.1W 5% 0
S.M.CARBR3610 ERJ6GEYJ102 0.1W 5% 1K
ELECTC101 ECJ2VB1C104K 350V
ELECTC102 ECJ2VB1C104K 350V
ELECTC103 ECJ2VF1H104Z 350V
S.M. CAPC104 ECUV1H102JCX 50V
S.M. CAPC105 ECUV1H560JCX 50V
S.M. CAPC106 ECUV1H560JCX 50V
ELECTC107 ECJ2VF1H104Z 350V
ELECT C108 ECA1CM470GB 16V
S.M. CAPC109 ECUV1H102JCX 50V
S.M. CAPC110 ECUV1H103ZFX 50V
ELECT C111 ECA1HMR33GB 50V
ELECTC114 ECJ2VF1H104Z 350V
S.M. CAPC115 ECUV1H103ZFX 50V
ELECT C116 ECA1CM221GB 16V
ELECT C120 ECA1CM221GB 16V
S.M. CAPC121 ECUV1H103KBX 50V
S.M. CAPC124 ECUV1H220JCX 50V
S.M. CAPC125 ECUV1H100DCX 50V
S.M. CAPC133 ECUV1H104KBX 50V
S.M. CAPC134 ECUV1H104KBX 50V
S.M. CAPC135 ECUV1H104KBW 50V
S.M. CAPC136 ECUV1H104KBX 50V
S.M. CAPC138 ECUV1H104KBX 50V
ELECTC251 ECA1EM330B 25V
S.M. CAPC252 ECUV1H223KBX 50V
ELECT C253 ECA1HM4R7GB 50V
FILM C254 ECQM1H684J 50V
ELECT C255 ECA1EM101GB 25V
S.M. CAPC256 ECUV1H223KBX 50V
ELECT C257 ECA1HM4R7GB 50V
ELECTC258 ECA1EM330B 25V
FILM C259 ECQM1H684J 50V
ELECT C260 ECA1VM102GB 35V
ELECT C261 ECA1VM102GB 35V
FILM C262 ECQM1H394J 50V
ELECT C263 ECA1HM010GB 50V
ELECTC264 ECA1HHG222E 50V
FILM C265 ECQM1H394J 50V
ELECT C266 ECA1HM010GB 50V
ELECTC267 ECJ2VB1H104K 350V
ELECTC268 ECJ2VB1H104K 350V
ELECTC270 ECJ2VB1H104K 350V
ELECTC301 ECJ2VB1C104K 350V
ELECTC302 ECJ2VB1C104K 350V
ELECTC303 ECJ2VB1C104K 350V
ELECT C304 ECA1CM100GB 16V
FILMC354 ECQM2104KZ 250V
S.M. CAPC355 ECUV1H471JCX 50V
S.M. CAPC356 ECUV1H471JCX 50V
S.M. CAPC357 ECUV1H471JCX 50V
FILMC358 ECQM1H224J 50V
100nF
100nF
100nF
1nF
56pF
56pF
100nF
47µF
1nF
10nF
10nF
100nF
10nF
220µF
220µF
10nF
22pF
10pF
10pF
10pF
10pF
10pF
10pF
33µF
22nF
4.7µF
4.7µF
100µF
22nF
4.7µF
33µF
33µF
1nF
1nF
390nF
1µF
1µF
390nF
1µF
100nF
100nF
100nF
100nF
100nF
100nF
10µF
100nF
470pF
470pF
470pF
220nF
22
Page 25
DescriptionCct Ref Parts Number DescriptionCct Ref Parts Number
CERAMIC C360 ECKC3D152J 2KV
ELECT C361 ECA1HMR47GB 50V
ELECT C363 ECA1VM471GB 35V
S.M. CAPC364 ECUV1H103ZFX 50V
ELECT C366 ECA1CM100GB 16V
S.M. CAPC451 ECUV1H102JX 50V
S.M. CAPC453 ECUV1H152KBX 50V
S.M. CAPC454 ECUV1H223KBM 50V
ELECT C455 ECA1HM100GB 50V
ELECTC456 ECA1HHG221B 50V
FILMC458 ECQB1222JF3 100V
FILM C459 222236516154 160V
CERAMIC C461 ECCR2H270J 500V
FILMC508 ECQV1H105JZ 50V
ELECT C509 ECEA1HU101 50V
S.M. CAPC510 ECUV1H104KBX 50V
FILMC511 ECQM2683JZ 250V
FILMC552 ECWH15H102J 1500V
FILM C554 ECWF2H514J 500V
FILMC555 ECWH15H103J 1500V
FILM C556 ECQM4333JC 400V
CERAMIC C557 ECKC2H471J 500V
ELECTC558 ECA1HHG471E 50V
FILM C559 ECWF2H684J 500V
ELECTC560 ECA2GHG2R2B 400V
ELECTC561 ECA1EHG102B 25V
CERAMIC C562 ECKC2H101J 500V
ELECTC563 ECA2EHG220B 250V
ELECT C564 ECEA2AU2R2 100V
FILM C565 ECQP1H273J 100V
CERAMIC C566 ECKC2H471J 500V
ELECTC567 ECA1EHG102B 25V
CERAMIC C568 ECKC2H471J 500V
CERAMIC C569 ECKC2H102J 500V
S.M. CAPC601 ECUV1H104KBX 50V
ELECT C602 ECA1HM101GB 50V
S.M. CAPC603 ECUV1H102JCX 50V
ELECTC604 ECJ2VF1H223Z 350V
ELECT C605 ECA1HM101GB 50V
ELECT C606 ECA1HM3R3GB 50V
ELECTC607 ECJ2VF1H104Z 350V
S.M. CAPC608 ECUV1H153KBX 50V
S.M. CAPC609 ECUV1H153KBX 50V
S.M. CAPC610 ECUV1H153KBX 50V
S.M. CAPC611 ECUV1H153KBX 50V
S.M. CAPC612 ECUV1H153KBX 50V
S.M. CAPC613 ECUV1H153KBX 50V
S.M. CAPC614 ECUV1H050CCX 50V
S.M. CAPC615 ECUV1H050CCX 50V
ELECT C616 ECA1CM100GB 16V
S.M. CAPC617 ECUV1H223KBX 50V
ELECT C618 ECA1CM221GB 16V
ELECTC619 ECJ2VB1H473K 350V
ELECT C620 ECA1HM101GB 50V
ELECTC621 ECJ2VB1C104K 350V
S.M. CAPC622 ECUV1H683KBX 50V
S.M. CAPC623 ECUV1H102JCX 50V
ELECTC624 ECJ3VB1C474K 3.5KV
ELECTC625 ECJ3VB1C474K 3.5KV
ELECTC626 ECJ3VB1C474K 3.5KV
ELECTC627 ECJ3VB1C474K 3.5KV
ELECT C628 ECA1CM100GB 16V
S.M. CAPC629 ECUV1H104KBX 50V
S.M. CAPC630 ECUV1H100DCX 50V
S.M. CAPC631 ECUV1H683ZFX 50V
S.M. CAPC632 ECUV1H270JCX 50V
1.5nF
1.5nF
470µF
10nF
10µF
10µF
10µF
10µF
10µF
220µF
2.2nF
2.2nF
27pF
1µF
100µF
100µF
68nF
1nF
1nF
10nF
33nF
470pF
470µF
470µF
470µF
470µF
100pF
20µF
20µF
20µF
470pF
470pF
470pF
1nF
1nF
100µF
1nF
22nF
100µF
3.3µF
100nF
15nF
15nF
15nF
15nF
15nF
15nF
50pF
50pF
10µF
22nF
220µF
47nF
100µF
100nF
68nF
1nF
470nF
470nF
470nF
470nF
10µF
10µF
10pF
68nF
27pF
S.M. CAPC633 ECUV1H271JCX 50V
S.M. CAPC634 ECUV1H271JCX 50V
S.M. CAPC635 ECUV1H180JCX 50V
S.M. CAPC636 ECUV1H271JCX 50V
S.M. CAPC637 ECUV1H101JCX 50V
S.M. CAPC638 ECUV1H471JCX 50V
S.M. CAPC639 ECUV1H332KBM 50V
ELECT C701 ECA1HHG101B 50V
S.M. CAPC702 ECUV1H103KBX 50V
ELECT C703 ECEA1HGE100 50V
FILMC704 ECQB1H223K 50V
FILMC705 ECQB1H222J 50V
FILMC804 ECQE2A474MWB 100V
CERAMICC806 ECKWNA101MBC 400V
CERAMIC C807 ECKC2H472J 500V
CERAMIC C808 ECKC2H472J 500V
CERAMIC C809 ECKC2H472J 500V
CERAMIC C810 ECKC2H472J 500V
ELECT C811 ECOS2GG181NG 400V
CERAMIC C814 ECKC3D102J 2KV
CERAMICC815 ECKC1H471J 50V
ELECT C816 ECA1EM101GB 25V
FILMC817 ECQE6104K 600V
CERAMIC C818 ECKWNA332MEC 250V
FILMC819 ECQB1H152K 50V
CERAMIC C850 ECKC3D471JB 2KV
ELECTC851 ECA2CM221E 160V
ELECTC852 ECA2CHG101E 160V
CERAMIC C853 ECKC2H471J 500V
ELECT C854 ECA1EM102GB 25V
CERAMIC C855 ECKC2H471J 500V
ELECTC856 ECA1AHG222B 10V
CERAMIC C857 ECKC2H471J 500V
ELECT C858 ECEA1HGE102 50V
ELECTC859 ECJ2VF1H104Z 350V
ELECT C860 ECA1HM101GB 50V
ELECTC862 ECJ2VF1H104Z 350V
ELECT C863 ECA1HM101GB 50V
ELECTC864 ECJ2VF1H104Z 350V
ELECT C865 ECA1CM100GB 16V
ELECTC866 ECJ2VF1H104Z 350V
ELECT C867 ECA1CM100GB 16V
ELECT C868 ECA1CM100GB 16V
ELECT C869 ECA1EM101GB 25V
ELECT C870 ECA1EM471GB 25V
ELECTC871 ECA1CM102B 16V
ELECT C872 ECA1CM471GB 16V
ELECT C873 ECA1CM100GB 16V
ELECTC875 ECA2CM4R7B 160V
ELECTC876 ECA1AHG471E 10V
ELECT C902 ECA1VM101GB 35V
S.M. CAPC903 ECUV1H472KBX 50V
S.M. CAPC904 ECUV1H472KBX 50V
S.M. CAPC906 ECUV1H471KBX 50V
S.M. CAPC908 ECUV1H151JCX 50V
CERAMIC C909 ECKC2H472J 500V
CERAMIC C910 ECKC2H472J 500V
S.M. CAPC911 ECUV1H151JCX 50V
ELECT C912 ECEA2CU100 160V
ELECT C913 ECA1HM101GB 50V
ELECT C914 ECA1HM101GB 50V
ELECTC916 ECEA2CGE100 160V
ELECTC950 ECJ2VB1C104K 350V
S.M. CAPC1071 ECUV1H331JCX 50V
S.M. CAPC1072 ECUV1H103KBX 50V
ELECT C1073 ECA1HM101GB 50V
270pF
270pF
18pF
270pF
100pF
470pF
470pF
100µF
10nF
10µF
22nF
2.2nF
470nF
100µF
4.7nF
4.7nF
4.7nF
4.7nF
180µF
1nF
470pF
100µF
100nF
3.3nF
1.5nF
470pF
220µF
100µF
470pF
100µF
470pF
470pF
470pF
470pF
100nF
100µF
100nF
100µF
100nF
10µF
100nF
10µF
10µF
100µF
470µF
470µF
470µF
10µF
10µF
470pF
100µF
4.7nF
4.7nF
470pF
150pF
4.7nF
4.7nF
150pF
10µF
100µF
100µF
10µF
100nF
330pF
10nF
100µF
23
Page 26
DescriptionCct Ref Parts Number DescriptionCct Ref Parts Number
ELECTC1101 ECJ2VF1H104Z 350V
ELECTC1102 ECA0JM101G 6.3V
S.M. CAPC1103 ECUV1H220JCX 50V
S.M. CAPC1104 ECUV1H220JCX 50V
S.M. CAPC1105 ECUV1H101JCX 50V
ELECTC1108 ECJ2VB1H333K 350V
ELECT C1111 ECA1CM100GB 16V
S.M. CAPC1112 ECUV1H103KBX 50V
ELECTC1115 ECJ3VB1C474K 3.5KV
S.M. CAPC1116 ECUV1H472KBX 50V
ELECTC1117 ECJ2VF1H104Z 350V
S.M. CAPC1118 ECUV1H103KBX 50V
S.M. CAPC1119 ECUV1H221JCX 50V
ELECTC1120 ECJ2VF1H104Z 350V
S.M. CAPC1121 ECUV1H221JCX 50V
S.M. CAPC1123 ECUV1H101JCX 50V
S.M. CAPC1124 ECUV1H101JCX 50V
S.M. CAPC1125 ECUV1H101JCX 50V
S.M. CAPC1126 ECUV1H101JCX 50V
S.M. CAPC1127 ECUV1H221JCX 50V
S.M. CAPC1128 ECUV1H223KBX 50V
S.M. CAPC1129 ECUV1H270JCX 50V
S.M. CAPC2101 ECUV1H102JCX 50V
S.M. CAPC2102 ECUV1H102JCX 50V
S.M. CAPC2103 ECUV1H102JCX 50V
S.M. CAPC2104 ECUV1H102JCX 50V
S.M. CAPC2105 ECUV1H102JCX 50V
S.M. CAPC2106 ECUV1H102JCX 50V
S.M. CAPC2107 ECUV1H102JCX 50V
S.M. CAPC2108 ECUV1H102JCX 50V
S.M. CAPC2109 ECUV1H102JCX 50V
S.M. CAPC2110 ECUV1H102JCX 50V
ELECT C2111 ECA1CM100GB 16V
ELECT C2112 ECA1CM100GB 16V
ELECT C2113 ECA1HM3R3GB 50V
ELECTC2114 ECJ2VF1H104Z 350V
S.M. CAPC2115 ECUV1H221JCX 50V
S.M. CAPC2116 ECUV1H221JCX 50V
S.M. CAPC2117 ECUV1H221JCX 50V
S.M. CAPC2118 ECUV1H221JCX 50V
S.M. CAPC2119 ECUV1H221JCX 50V
S.M. CAPC2120 ECUV1H221JCX 50V
ELECT C2121 ECA1CM100GB 16V
ELECTC2122 ECJ2VF1H104Z 350V
S.M. CAPC2123 ECUV1H221JCX 50V
S.M. CAPC2124 ECUV1H070DTX 50V
S.M. CAPC2125 ECUV1H470JCX 50V
S.M. CAPC2126 ECUV1H070DTX 50V
S.M. CAPC2127 ECUV1H010CCX 50V
S.M. CAPC2128 ECUV1H010CCX 50V
ELECTC2129 ECA1CM102B 16V
ELECT C2130 ECA1CM331B 16V
S.M. CAPC2131 ECUV1H103ZFX 50V
S.M. CAPC2132 ECUV1H103ZFX 50V
S.M. CAPC2134 ECUV1H103ZFX 50V
ELECT C2135 ECA1HM101GB 50V
ELECTC2136 ECJ2VF1H104Z 350V
ELECT C2137 ECA1CM100GB 16V
S.M. CAPC2138 ECUV1H471KBX 50V
S.M. CAPC2139 ECUV1H221JCX 50V
ELECT C2140 ECA1HM101GB 50V
S.M. CAPC2141 ECUV1H152JCX 50V
S.M. CAPC2301 ECUV1H222JCX 50V
ELECT C2302 ECA1CM470GB 16V
S.M. CAPC2303 ECUV1H222JCX 50V
ELECT C2304 ECA1CM470GB 16V
100nF
100µF
22pF
22pF
100pF
33nF
10µF
10nF
470nF
4.7nF
100nF
10nF
220pF
100nF
220pF
100pF
100pF
100pF
100pF
220pF
22nF
27pF
1nF
1nF
1nF
1nF
1nF
1nF
1nF
1nF
1nF
1nF
10µF
10µF
3.3µF
100nF
220pF
220pF
220pF
220pF
220pF
220pF
10µF
100nF
220pF
70pF
47pF
70pF
1pF
1pF
1pF
330µF
10nF
10nF
10nF
100µF
100nF
10µF
470pF
220pF
100µF
1.5pF
2.2nF
47µF
2.2nF
47µF
TERMINALS AND LINKS
SWITCHES
DIFFERENCES FOR MODEL TX-25XD4F
MECHANICAL PARTS
S.M. CAPC3001 ECUV1H222JCX 50V
S.M. CAPC3002 ECUV1H222JCX 50V
ELECT C3003 ECA1CM470GB 16V
S.M. CAPC3005 ECUV1H561JCX 50V
ELECTC3006 ECJ3VB1C474K 3.5KV
S.M. CAPC3007 ECUV1H222JCX 50V
S.M. CAPC3008 ECUV1H222JCX 50V
S.M. CAPC3009 ECUV1H222JCX 50V
ELECT C3010 ECA1CM470GB 16V
S.M. CAPC3012 ECUV1H561JCX 50V
ELECTC3013 ECJ3VB1C474K 3.5KV
S.M. CAPC3014 ECUV1H222JCX 50V
S.M. CAPC3015 ECUV1H222JCX 50V
S.M. CAPC3016 ECUV1H222JCX 50V
ELECT C3017 ECA1CM470GB 16V
S.M. CAPC3019 ECUV1H561JCX 50V
ELECTC3020 ECJ3VB1C474K 3.5KV
S.M. CAPC3021 ECUV1H222JCX 50V
S.M. CAPC3022 ECUV1H222JCX 50V
S.M. CAPC3023 ECUV1H222JCX 50V
ELECT C3024 ECA1CM470GB 16V
S.M. CAPC3026 ECUV1H561JCX 50V
ELECTC3027 ECJ3VB1C474K 3.5KV
S.M. CAPC3028 ECUV1H222JCX 50V
ELECT C3029 ECA1HM101GB 50V
S.M. CAPC3032 ECUV1H271JCX 50V
S.M. CAPC3033 ECUV1H271JCX 50V
S.M. CAPC3034 ECUV1H271JCX 50V
S.M. CAPC3035 ECUV1H271JCX 50V
S.M. CAPC3101 ECUV1H104KBX 50V
S.M. CAPC3102 ECUV1H104KBX 50V
S.M. CAPC3103 ECUV1H561JCX 50V
S.M. CAPC3104 ECUV1H561JCX 50V
S.M. CAPC3105 ECUV1H561JCX 50V
S.M. CAPC3106 ECUV1H561JCX 50V
ELECT C3107 ECA1HM470GB 50V
ELECT C3108 ECA1HM470GB 50V
S.M. CAPC3111 ECUV1H222KBX 50V
S.M. CAPC3112 ECUV1H271JCX 50V
FILMC3401 ECQM1H224J 50V
S.M. CAPC3402 ECUV1H101JCX 50V
ELECT C3403 ECA1HM101GB 50V
FILMC3404 ECQM1H224J 50V
S.M. CAPC3405 ECUV1H180JCX 50V
S.M. CAPC3406 ECUV1H271JCX 50V
S.M. CAPC3407 ECUV1H271JCX 50V
ELECT C3408 ECA1HM101GB 50V
ELECT C3601 ECA1HM101GB 50V
S.M. CAPJSE28 ECUV1H104KBX 50V
RCA / HEADPHONE JACK JK2301 JPJ841101320
A.V. TERMINAL JK3101 TJB16673
SWITCH S801 ESB92S11B
SWITCHS1201 EVQ23405R
SWITCHS1202 EVQ23405R
SWITCHS1203 EVQ23405R
SWITCHS1204 EVQ23405R
SWITCHS1205 EVQ23405R
BACK COVER 12 TKU8E00310
C.R.T. 13 A59ECF50X41
2.2nF
2.2nF
47µF
560pF
470nF
2.2nF
2.2nF
2.2nF
47µF
560pF
470nF
2.2nF
2.2nF
2.2nF
47µF
560pF
470nF
2.2nF
2.2nF
2.2nF
47µF
560pF
470nF
2.2nF
100µF
270pF
270pF
270pF
270pF
270pF
270pF
560pF
560pF
560pF
560pF
47µF
47µF
2.2nF
270pF
220nF
100pF
100µF
220nF
18pF
270pF
270pF
100µF
100µF
100µF
24
Page 27
DescriptionCct Ref Parts Number DescriptionCct Ref Parts Number
CABINET 14 TKY8E150
DEGAUSS COIL 15 TLK8E05138
DOOR LID 16 TKP8E1170
E P.C.B. 17 TNP8EE009BE
LEFT PANEL 18 TKP8E1173
MODEL LABEL 19 TQF8E2673
POWER BUTTON 20 TBX8E040
POWER CORD 21 TSX8E0028
RIGHT PANEL 22 TKP8E1174
TOP PANEL 23 TKP8E1171
Y P.C.B. 24 TNP8EY012AA
MISCELLANEOUS COMPONENTS
OUTER CARTON TPC8E4660-1
TOP CUSHION TPD8E631
BOTTOM CUSHION TPD8E632
INSTRUCTION BOOKS
PORTUGUESE TQB8E2562J
I.C.s
EAROM * IC1103 XGL2-02GF
CAPACITORS
CERAMIC C551 ECKC3D152J 2KV
DIFFERENCES FOR MODEL TX-25XD4F/A
MECHANICAL PARTS
BACK COVER 12 TKU8E00310
C.R.T. 13 A59ECF50X41
CABINET 14 TKY8E150
DEGAUSS COIL 15 TLK8E05138
DOOR LID 16 TKP8E1180
E P.C.B. 17 TNP8EE009BE
LEFT PANEL 18 TKP8E1192
MODEL LABEL 19 TQF8E2684
POWER BUTTON 20 TBX8E045
POWER CORD 21 TSX8E0028
RIGHT PANEL 22 TKP8E1194
TOP PANEL 23 TKP8E1190
Y P.C.B. 24 TNP8EY012AA
MISCELLANEOUS COMPONENTS
OUTER CARTON TPC8E4660-1
TOP CUSHION TPD8E631
BOTTOM CUSHION TPD8E632
I.C.s
EAROM * IC1103 XGL2-02GF
CAPACITORS
CERAMIC C551 ECKC3D152J 2KV
1.5nF
1.5nF
Y P.C.B. 24 TNP8EY012AF
MISCELLANEOUS COMPONENTS
OUTER CARTON TPC8E4659
TOP CUSHION TPD8E633
BOTTOM CUSHION TPD8E634
I.C.s
EAROM * IC1103 XGL2-02HF
CAPACITORS
CERAMIC C551 ECKC3D122J 2KV
DIFFERENCES FOR MODEL TX-28XD4F/A
MECHANICAL PARTS
BACK COVER 12 TKU8E00320
C.R.T. 13 A66ECF50X41
CABINET 14 TKY8E160
DEGAUSS COIL 15 TLK8E05140
DOOR LID 16 TKP8E1180
E P.C.B. 17 TNP8EE009BF
LEFT PANEL 18 TKP8E1182
MODEL LABEL 19 TQF8E2685
POWER BUTTON 20 TBX8E045
POWER CORD 21 TSX8E0027
RIGHT PANEL 22 TKP8E1186
TOP PANEL 23 TKP8E1184
Y P.C.B. 24 TNP8EY012AF
MISCELLANEOUS COMPONENTS
OUTER CARTON TPC8E4659
TOP CUSHION TPD8E633
BOTTOM CUSHION TPD8E634
I.C.s
EAROM * IC1103 XGL2-02HF
CAPACITORS
CERAMIC C551 ECKC3D122J 2KV
1.2nF
1.2nF
DIFFERENCES FOR MODEL TX-28XD4F
MECHANICAL PARTS
BACK COVER 12 TKU8E00320
C.R.T. 13 A66ECF50X41
CABINET 14 TKY8E160
DEGAUSS COIL 15 TLK8E05140
DOOR LID 16 TKP8E1170
E P.C.B. 17 TNP8EE009BF
LEFT PANEL 18 TKP8E1175
MODEL LABEL 19 TQF8E2674
POWER BUTTON 20 TBX8E040
POWER CORD 21 TSX8E0027
RIGHT PANEL 22 TKP8E1176
TOP PANEL 23 TKP8E1172
25
Page 28

NOTE:
FOR MODELS WITH THE DARK WALNUT FINISH
PLEASE REFER TO THE TX-28XD4F/A AND
TX-25XD4F/A DIFFERENCE LI ST S.
NOTE:
POUR LES MODELES FINITION NOYER FONCE
SE REFERER A LA LISTE DES PIECES
DIFFERENTES POUR LES MODELES
TX-28XD4F/A ET TX-25XD4F/A.
Page 29
SCHEMATIC DIAGRAMS FOR MODELS SCHEMA TECHNIQUE POUR MODELE
REMARQUE IMPORTANTE POUR LA SÉCURITÉ
TX-28XD4F / TX-25XD4F TX-28XD4F / TX-25XD4F
(EURO-4 CHASSIS) (EURO-4 CHASSIS)
IMPORTANT SAFETY NOTICE
Components identified by mark have special
characteristics important for safety. When replacing any of
these components, use only manufacturer's specified parts.
NOTES NOTA
1. RESISTOR
All resistors are carbon ¼ W resistor, unless marked
otherwise.
Unit of resistance is OHM (Ω) (k=1,000, M=1,000,000)
2. CAPACITORS
All capacitors are ceramic 50V unless marked otherwise.
Unit of capacitance is µF unless otherwise stated.
3. COIL
Unit of inductance is µH, unless otherwise stated.
Les éléments portant la marque possèdent des
caractéristiques de sécurite spécialises. Lors du
remplacement de l'une quelconque de ces pièces n'utiliser
que celles spécifiées par la fabricant.
1. RESISTANCE
Toutes les résistances sont des résistance au carbone ¼W,
sauf indication contraire par les indications suivantes.
L'unité de résistance est l'OHM (Ω) (k=1,000, M=1,000,000)
2. CONDENSATEUR
Toutes les condensateurs sont de s condensateurs
céramique 50V, sauf indication contraire par les indications
suivantes:L'unité de capacitié est le µF, sauf indication
contraire.
3. BOBINE
L'unité d'inductance est le µH, sauf indication contraire.
4. Components marked "L" on the schematic diagram shows
leadless parts.
5. TEST POINT
Test Point Position
6. EARTH SYMBOL
Chassis Earth (Cold) Line Earth (Hot)
7. VOLTAGE MEASUREMENT
Voltage is measured by a DC voltmeter.
Measurement conditions are as follows:
Power source AC 220V-240V, 50Hz
Receiving Signal Colour Bar signal (RF)
All customer controls Maximum position.
8. Indicates the Video signal path
Indicates the Audio signal path
These schematic diagrams are the latest at time of printing and
are subject to change without notice.
4. Les composants entourés de pointillés, sur le schéma,
représentent des éléments non câblés.
5. POINT D'ESSAI
Position du point d'essai
6. SYMBOL DE TERRE
Terre du châssis (froid) Terre de ligne (chaud)
7. MESURE DE TENSION
La tension est mesurée avec un voltmètre c.c.
Les conditions de mesure sont les suiv antes:
Source d'alignmentation CA 220V-240V, 50Hz
Signal de réception Signal barre couleur (RF)
Toutes les commandes utilisateur Position maximum.
8. Vidéo
Ca schéma est à jour moment de l'impression et modifiable sans
préavis.
REMARKS REMARQUE
1. The Power Supply Circuit contains a circuit area which uses
a separate power supply to isolate the earth connection.
The circuit is defined by HOT and COLD indications in the
schematic diagram. All circuits except the Power Circuit, are
COLD. Take the following precautions :-
a. Do not touch the hot part, or the hot and cold parts at the
same time, as you are liable to a shock hazard.
b. Do not short circuit the hot and cold circuits as electrical
components may be damaged.
c. Do not connect an instrument, such as an oscilloscope, to
the hot and cold circuits simutaneously as this may cause
fuse failure. Connect the earth of the instruments to the
earth connection of the circuit being measured.
d. Always disconnect the power plug before removing the
chassis.
1. Le circuit d'alimentation contient une zone de qui utilise une
alimentaion séparée pour isoler la connexion à la terre. Le
circuit est défini par les indications chaud (HOT) et froid
(COLD) dans le diagramme schématique. Prendre les
précautions suivantes. Tous les circuits, sauf le circuit
d'alimentation, sont froids.
a. Ne pas toucher la partie chaude ou en même temps les
parties chaud et froide. Cela présente un risque de
décharge électrique.
b. Ne pas court-circuiter les circuits chaud et froid car un
fusible peut sauter et des pièces se casser.
c. Ne pas raccorder un instrument, comme un oscilloscope,
simultanément aux circuits chaud et froid car un fusible peut
sauter. Raccorder la terre des instruments à la connexion
de terre du circuit mesuré.
d. Toujours débrancher la fiche d'alimentation avant de
déposer le châssis.
Audio
26
Page 30
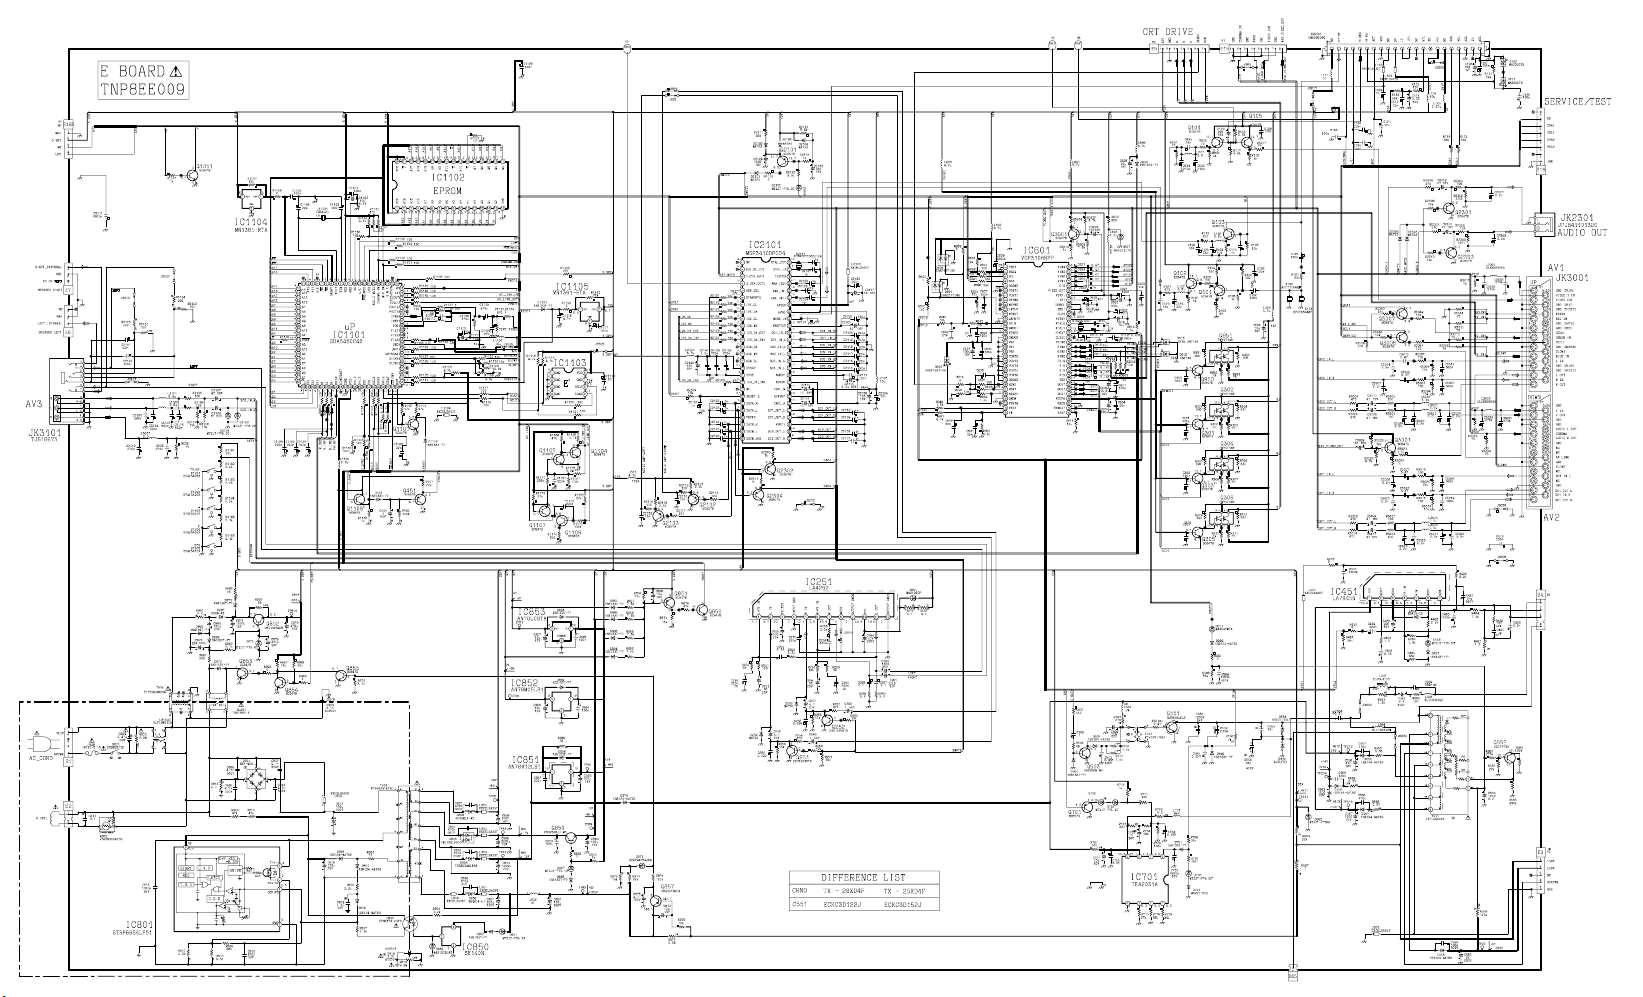
Page 31
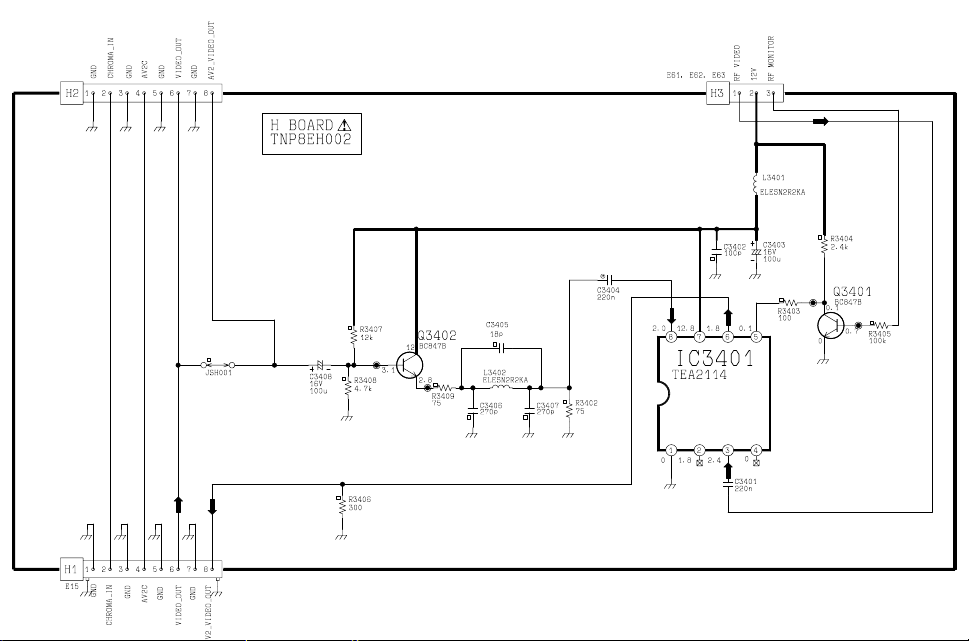
Page 32
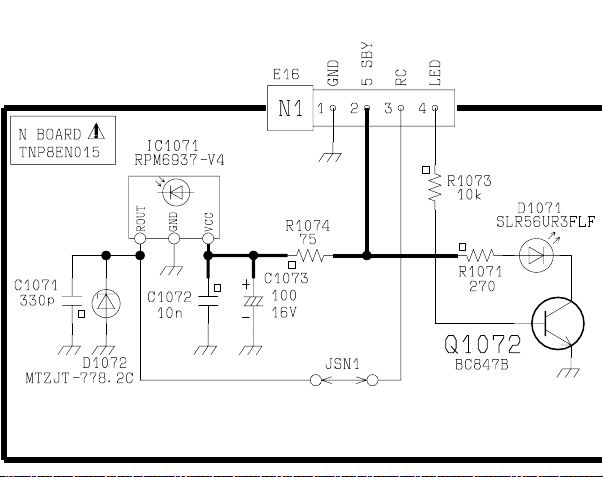
Page 33
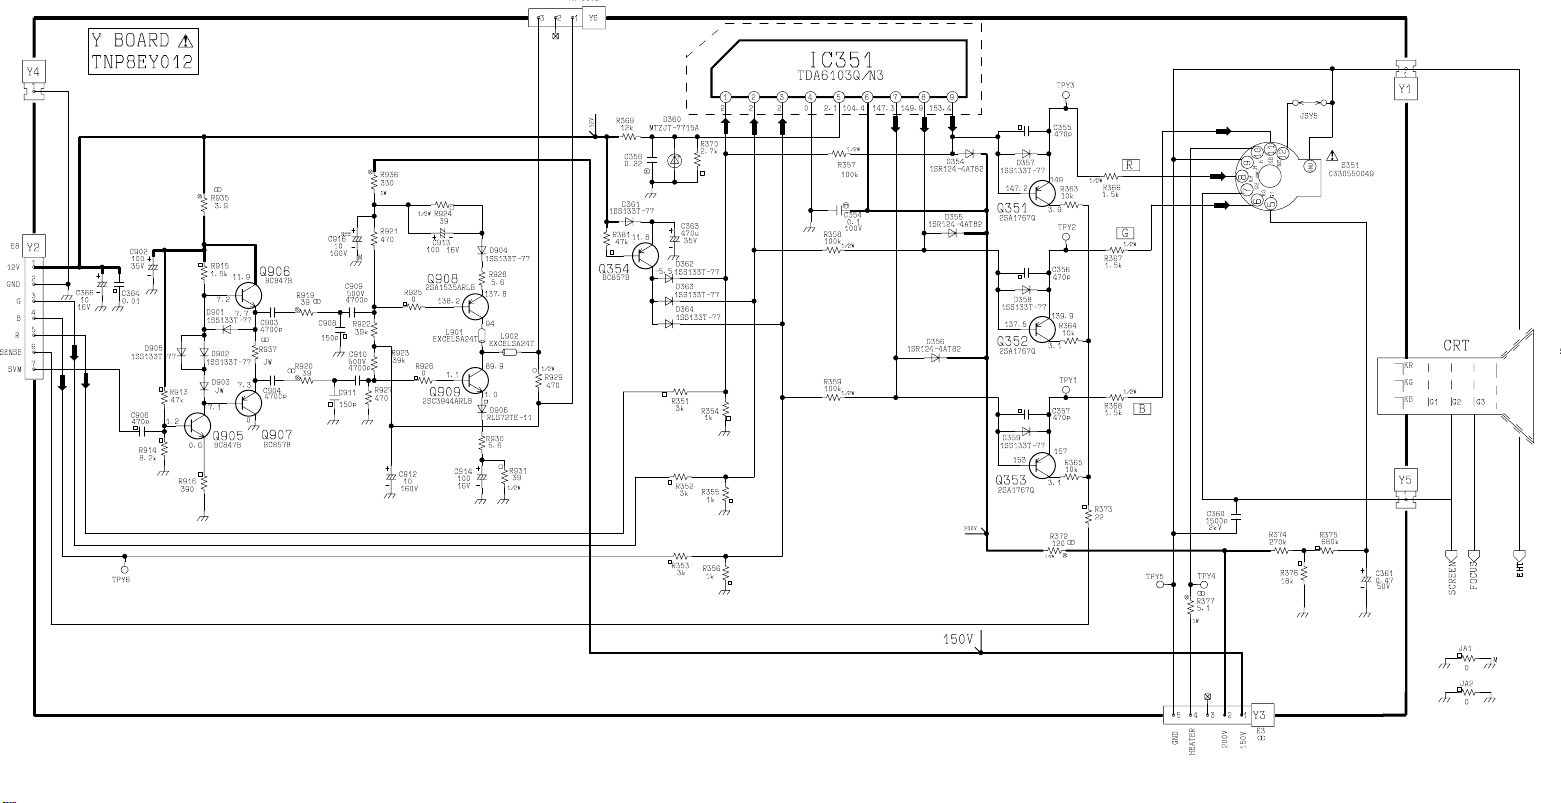
Page 34
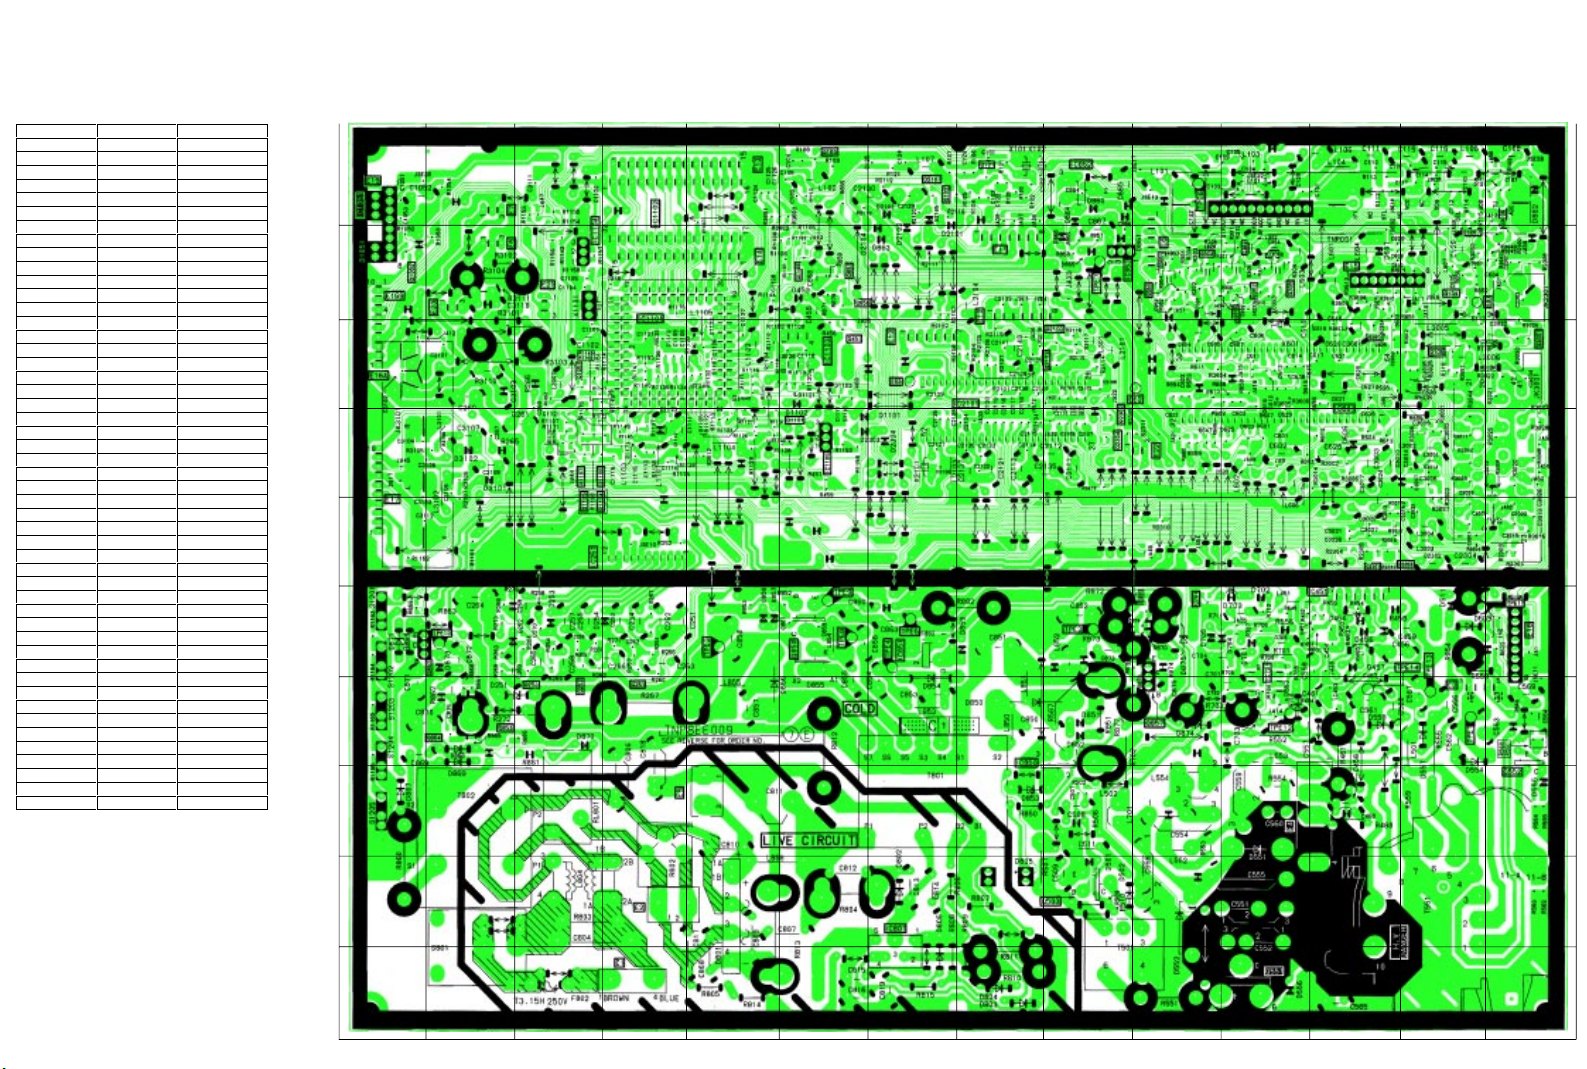
E - BOARD TNP8EE009
CONDUCTOR VIEWS VUE DU CIRCUIT IMPRIMÉ
TRAN’S DIODES
Q3601 L8 D3103 B7 D557 M4
Q3007 M9 D3101 B7 D556 K1
Q3001 N8 D3102 B7 D555 N3
Q3006 N10 D2161 G9 D554 M4
Q2304 I7 D2105 G10 D553 K4
Q2303 M6 D2104 F9 D552 J2
Q2301 I7 D2103 G10 D551 K3
Q2103 I8 D2102 G9 D511 M5
Q2102 H8 D1103 F8 D502 I2
Q2101 G10 D1102 F7 D501 I2
Q1108 F9 D1101 G7 D457 L5
Q1107 C7 D1051 A9 D456 L5
Q1106 C7 D875 J5 D454 L5
Q1105 C7 D874 J4 D453 F9
Q1104 C7 D873 B5 D254 C5
Q1101 F7 D871 A5 D253 C5
Q1052 A9 D870 871 D252 B5
Q1051 C8 D869 B4 D251 B4
Q951 J9 D868 B4
Q950 J9 D867 A3 IC2101 H8
Q857 J4 D866 I9 IC1105 F7
Q856 F9 D865 I9 IC1104 C9
Q855 J5 D864 I10 IC1103 F8
Q854 B4 D863 G9 IC1102 D10
Q853 B4 D862 N10 IC1101 D8
Q852 B5 D861 J9 IC1051 A10
Q850 F5 D860 I10 IC852 I10
Q701 J5 D859 H5 IC851 G5
Q552 N3 D858 E5 IC850 H4
Q551 K1 D857 E5 IC801 G2
Q503 I2 D855 F4 IC701 K5
Q451 F8 D854 G4 IC601 L7
Q394 K9 D853 H3 IC451 L5
Q305 K9 D852 I4 IC251 D6
Q303 K9 D851 I4
Q302 J9 D850 H4 TPE14 M5
Q301 K9 D806 G2 TPE13 M4
Q253 C4 D805 H2 TPE12 K4
Q252 C4 D804 H1 TPE11 N5
Q252 C4 D803 H1 TPE10 B5
Q251 D4 D802 G2 TPE9 E5
Q105 M8 D801 E1 TPE8 F5
Q104 M9 D705 J5 TPE7 I9
Q103 F10 D704 K5 TPE6 J10
Q102 G10 D703 K5 TPE5 G5
Q101 H10 D702 K5 TPE4 G5
D701 K5 TPE3 E5
D609 M5 TPE2 I5
D607 L9 TPE1 M4
D558 L4
IC’S
TP’S
10
9
8
7
6
5
4
3
2
1
1
ABC D E
F
GH I J K L M N
Page 35
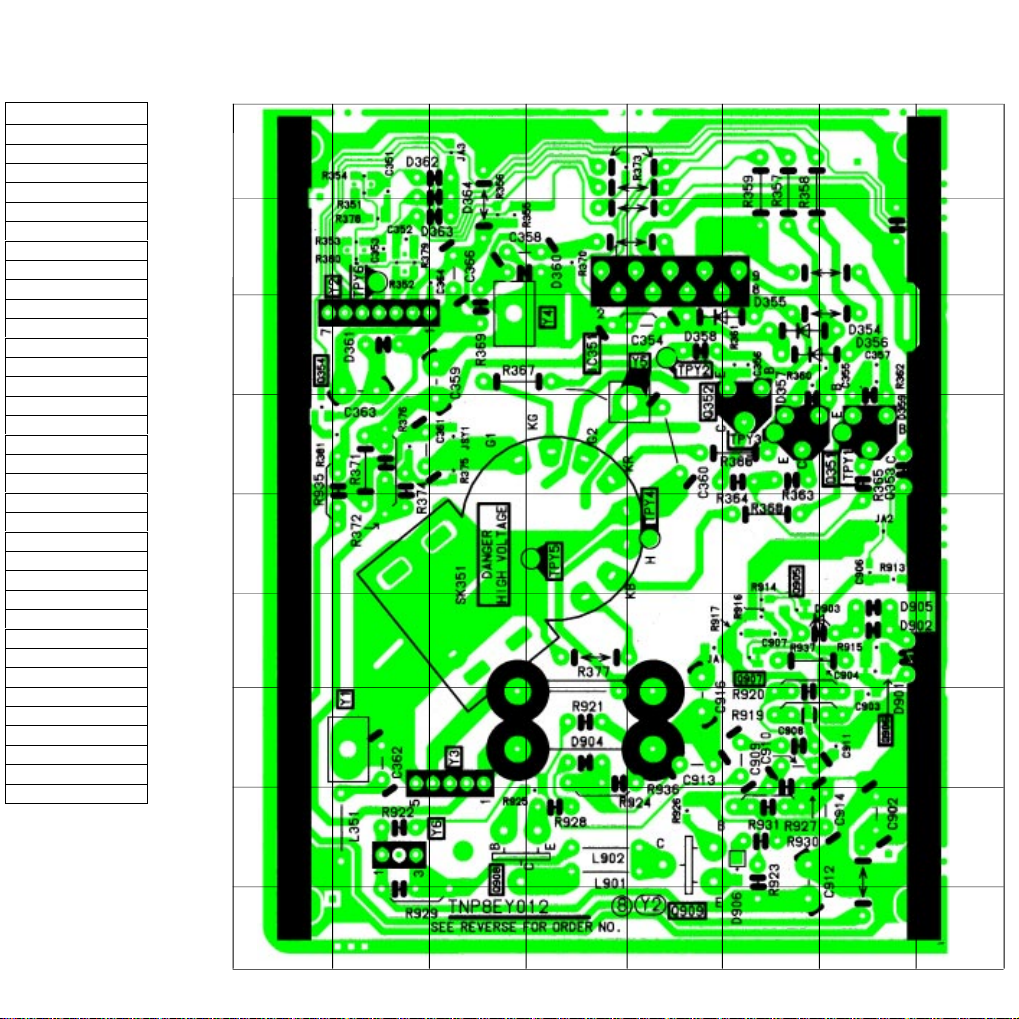
TRANSISTORS
Q909 E1
Q908 C2
Q907 F4
Q906 G3
Q905 F5
Q354 A7
Q353 G6
Q352 F6
Q351 F6
DIODES
D906 F1
D905 G4
D904 D3
D902 G4
D901 G3
D364 C9
D363 C8
D362 B9
D361 B7
D360 D8
D359 G6
D358 E7
D357 F7
D356 G7
D355 F7
D354 G7
TEST POINTS
TPY6 B8
TPY5 D5
TPY4 E5
TPY3 F6
TPY2 E7
TPY1 G6
IC’S
IC351 E8
Y - BOARD TNP8EY012
9
8
7
6
5
4
3
2
1
HGFEDCBA
 Loading...