

Panasonic TH-LB30NT, TH-LB20NT, PT-LB90NT User Manual
Windows
Network Operation Manual
(Wireless Manager mobile edition 5.5)
※ The projectors illustrated as examples are PT-FW300NTE.
ENGLISH
TQBH0205-4 (E/U/EA)

Contents
Software Licensing Agreement …………………… 3
Notes on Using Wireless Connection …………… 4
Request Regarding Security ……………………… 6
Software requirements ……………………………… 12
System requirements …………………………………………… 12
Installation free set up ……………………………… 14
Connecting with wireless LAN …………………… 15
Preparations ……………………………………………………… 15
Easy Wireless Set Up …………………………………………… 15
Parts name in search screen …………………………………… 15
“S-MAP” Connection …………………………………………… 18
“1-4/U” Connection ……………………………………………… 19
Connecting with Wired LAN ……………………… 28
Other operations for connection ………………… 29
Operations when password entry is required
for connection …………………………………………………… 29
Various projection methods ……………………… 32
Description of the launcher ……………………………………… 32
Live Mode …………………………………………………………… 34
Multi Live Mode …………………………………………………… 35
Switching from one style to another …………………………… 35
What you can do with Wireless Manager mobile edition 5.5
… 7
Check your computer ……………………………… 10
Necessary environment for computers to be connected …… 10
Installing and using software ……………………… 13
[1. Wireless Manager ME 5.5] ………………………………… 13
[Installation free set up] ………………………………………… 14
“PC Search” Connection ………………………………………… 20
Connection error messages …………………………………… 22
Connecting through the access point ………………………… 24
When logging on without administrator authority ………… 25
Other search ……………………………………………………… 29
Automatic connection by “One-click connection” …………… 30
Exit Wireless Manager ………………………………………… 31
4-screen multi style ……………………………………………… 36
4-screen index style ……………………………………………… 37
16-screen index style …………………………………………… 39
Multiple Source Live Mode ……………………………………… 40
Multiple Source Multi Live Mode ……………………………… 42
Useful Functions …………………………………… 44
Selective Area Transmission …………………………………… 44
Secondary display transmission ……………………………… 45
Secondary Viewer ……………………………………………… 45
Setting options ……………………………………… 48
Setting options …………………………………………………… 48
Transmission ……………………………………………………… 48
Network/Security setting of the projector ……… 51
Displaying the Network Menu …………………………………… 51
Wired LAN settings ……………………………………………… 52
Default wired LAN settings ……………………………………… 52
Setting network number (for wireless LAN) ………………… 53
[USER] settings …………………………………………………… 53
Setting IP ………………………………………………………… 53
Wireless settings ………………………………………………… 54
Default settings of [USER1] - [USER3]………………………… 55
Using WebBrowser ………………………………… 60
Before using the WebBrowser control ………………………… 60
Accessing from the WebBrowser ……………………………… 61
Monitor information window …………………………………… 62
Using PJLink™ protocol …………………………… 68
AV Mute function ………………………………………………… 46
Pointer function …………………………………………………… 46
List of connectable projectors/available functions in each
projection method ………………………………………………… 47
Key setting ………………………………………………………… 49
Other1 …………………………………………………………… 49
Other2 …………………………………………………………… 50
Version information ……………………………………………… 50
Changing the projector name …………………………………… 56
Password setting ………………………………………………… 56
Network standby ………………………………………………… 57
Network control …………………………………………………… 57
Live mode cut-in …………………………………………………… 58
Computer search ………………………………………………… 58
Multi-live …………………………………………………………… 58
Verifying settings ………………………………………………… 59
Returning to the initial settings ………………………………… 59
Projector control window ………………………………………… 63
Detailed settings window ……………………………………… 64
Switching Languages …………………………………………… 67
Applicable commands …………………………………………… 68
Software Uninstall …………………………………… 69
Wireless Manager ME 5.5 ………………………………………… 69
Glossary ……………………………………………… 70 Frequently Asked Questions ……………………… 72
2

Software Licensing Agreement
Use of this Software is governed by the terms defined in this Software Licensing Agreement.
Article 1 License
The users obtain the license of the software (i.e. the information recorded or contained in CD-ROM, operation manual or
others), but the copyright or intellectual property right of the software does not transfer to the users.
Article 2 Use by a Third Party
Licensee may not transfer or allow any third party, to use or copy the Software, whether free of charge or not.
Article 3 Restrictions on Copying the Software
Licensee may make a single copy of the Software in whole or in part solely for backup purposes.
Article 4 Computer
Licensee may install and use the Software on more than one computer owned or managed by Licensee.
Article 5 Reverse Engineering, Decompiling or Disassembly
Licensee may not reverse engineer, decompile or disassemble the Software. Panasonic shall not be bound by warranty for
any defects in the Software caused by Licensee’s reverse engineering, decompiling or disassembly of the Software.
Furthermore, Panasonic or its distributors or dealers will not be responsible for any damage to the Licensee caused by
Licensee’s reverse engineering, decompiling or disassembly of the Software.
Article 6 After-sales Service
If you have a problem with the software, please contact the customer support center by telephone. Panasonic shall undertake
to notify Licensee of whether the problem is a known error in the program (“bug”), or whether the way in which the Software is
to be used should be modified.
Furthermore, the Software is subject to revision without prior notice.
Article 7 Indemnification
Panasonic’s liability with respect to this Software is limited to the conditions defined in Article 6 herein.
Panasonic or any of its distributors or dealers shall not be liable for any damage suffered by Licensee, either directly or
through claims from a third party, arising from or in connection with Licensee’s use of the Software.
Furthermore, Panasonic Corporation does not guarantee the successful operation of the software unless it is used with any of
Panasonic projectors.
Article 8 Export Control
Licensee agrees not to export or re-export the Software to any county other than the country of purchase of the projector in
any form without the appropriate export licenses under the regulations of the country where Licensee resides or of any other
country as may be required by such export or re-export.
Wireless Manager mobile edition 5.5 (hereinafter called “Wireless Manager ME 5.5”) uses the following software programs:
Portion of this software are based in part on the work of the Independent JPEG Group
Please note the following.
• Panasonic cannot be held liable for any direct or indirect damages resulting from the use or malfunction of this projector.
• Panasonic cannot be held liable for damages arising from data corruption or loss as a result of using this projector.
3

Notes on Using Wireless Connection
Wireless connection function of the projector uses radio waves in the 2.4 GHz band.
A radio station license is not required, but be sure to read and fully understand the following items before use.
Do not use near other wireless equipment.
The following equipment may use radio waves in the same band as the projector.
When the projector is used near these devices, radio wave interference may make communication impossible, or the
communication speed may become slower.
• Microwave ovens, etc.
• Industrial, chemical and medical equipment, etc.
• In-plant radio stations for identifying moving objects such as those used in factory manufacturing lines, etc.
• Designated low-power radio stations
If at all possible, avoid the use of cellular phones, TV sets or radios near the projector.
Cellular phones, TV sets, radios and similar devices use different radio bands from
wireless communication or the transmission and reception of these devices. However, radio waves from the projector may produce
audio or video noise.
Wireless communication radio waves cannot penetrate steel reinforcements, metal, concrete,
etc.
Communication is possible through walls and floors made from materials such as wood and glass (except glass containing
wire mesh), but not through walls and floors made from steel reinforcements, metal, concrete, etc.
Avoid using the projector in locations prone to static electricity.
If the projector is used in a location prone to static electricity, such as on a carpet, the wireless LAN or wired LAN connection
may be lost.
If this happens, eliminate the source of static electricity or electromagnetic noise and reconnect to the wireless LAN or wired
LAN.
In rare cases static electricity or electromagnetic noise may make it impossible to establish a connection to the LAN.
If this happens, press the power button on the remote control or on the projector to power off the projector temporarily.
After the cooling fan stops operating (after the power monitor on the projector changes from orange to red), power on the
projector and reconnect to the LAN.
the projector, so there is no effect on
Using the projector outside the country
It is forbidden to take the projector outside the country or region where you purchased it, so use it only in the said country or
region. Also, note that depending on countries or regions there are restrictions on the channels and frequencies at which you
can use the wireless LAN.
4

Notes on Using Wireless Connection (cont.)
Channels that can be used
The channels (frequency range) that can be used differ according to the country or region. Refer to the table below.
Country or region Standard Channels used
Japan ARIB STD-T66
China SRRC
England, Germany, France, Spain,
Italy, Belgium, Austria, Sweden, Norway,
Denmark, Switzerland, Holland, Finland,
Portugal, Greece, Thailand, South Korea
Singapore IDA
Australia,
New Zealand
Malaysia SIRIM
United States FCC part 15
Taiwan DGT
ETSI 300.328
1 - 13
C-Tick
1 - 11
Frequency band
(Center frequency)
2,412 MHz 2,472 MHz
2,412 MHz 2,462 MHz
Wired LAN
Use straight or crossover LAN cable that is compatible with category 5 or above.
※1: Use category 5e or above when using 1000BASE-T.
※2: Whether straight cable, crossover cable or both can be used varies depending on the system configuration. For details,
consult your system administrator.
5

Request Regarding Security
When using this product, security breaches of the type described below are conceivable.
• Leakage of your private information via this product
• Illegal operation of this product by a malicious third-party
• Harm to or cessation of operation of this product by a malicious third-party
Be sure to implement sufficient security measures.
• Set passwords, and limit the users that are permitted login access.
• Make sure the password is as hard to guess as possible.
• Change the password periodically.
• Panasonic Corporation and its affiliated companies never directly ask customers for their password.
Do not give out your password even if directly asked by a third-party representing themselves as Panasonic Corporation.
• Always use on a network that has safety protection such as a firewall implemented.
About Wireless LANs
The advantage of a wireless LAN is that information can be exchanged between a PC or other such equipment and an
access point using radio waves as long as you are within range for radio transmissions.
On the other hand, because the radio waves can travel through obstacles (such as walls) and are available everywhere
within a given range, problems of the type listed below may occur if security-related settings are not made.
• A malicious third-part may intentionally intercept and monitor transmitted data including the content of e-mail and personal
information such as your ID, password, and/or credit card numbers.
• A malicious third-party may access your personal or corporate network without authorization and engage in the following
types of behavior.
Retrieve personal and/or secret information (information leak)
Spread false information by impersonating a particular person (spoofing)
Overwrite intercepted communications and issue false data (tampering)
Spread harmful software such as a computer virus and crash your data and/or system (system crash)
Since most wireless LAN adapters or access points are equipped with security features to take care of these problems, you
can reduce the possibility of these problems occurring when using this product by making the appropriate security settings for
the wireless LAN device.
Some wireless LAN devices may not be set for security immediately after purchase. To decrease the possibility of occurrence
of security problems, before using any wireless LAN devices, be absolutely sure to make all security-related settings
according to the instructions given in the operation manuals supplied with them.
Depending on the specifications of the wireless LAN, a malicious third-party may be able to break security settings by special
means.
Please contact Panasonic if you need help taking care of security settings or other such.
If you cannot perform security settings for your wireless LAN by yourself, please contact the Panasonic Support Center.
Panasonic asks customers to thoroughly understand the risk of using this product without making security settings, and
recommends that the customer make security settings at their own discretion and responsibility.
6
What you can do with Wireless Manager mobile edition 5.5
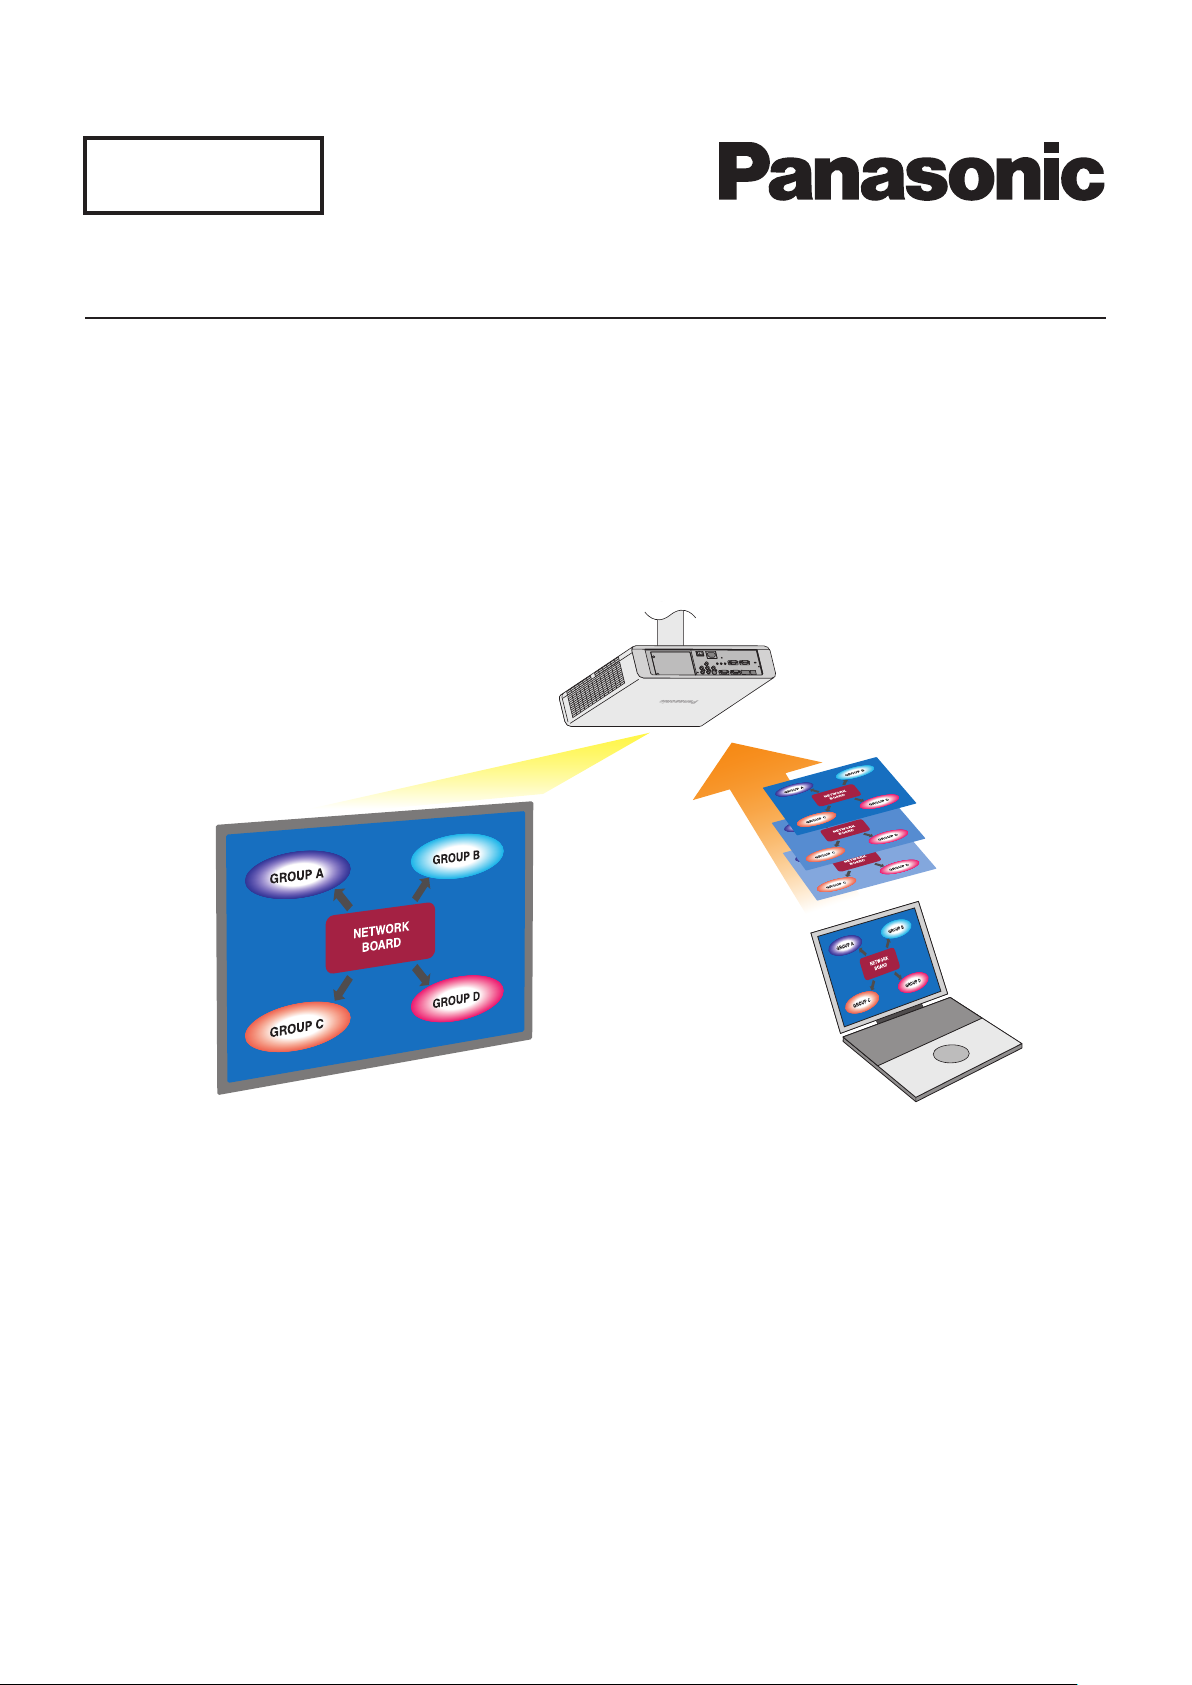
Network Transmission
You can connect the projector to a computer via the wireless LAN or the wired LAN, and send moving and still images.
For information on the connection, refer to the description on page 15 for wireless LAN, and page 28 for wired LAN.
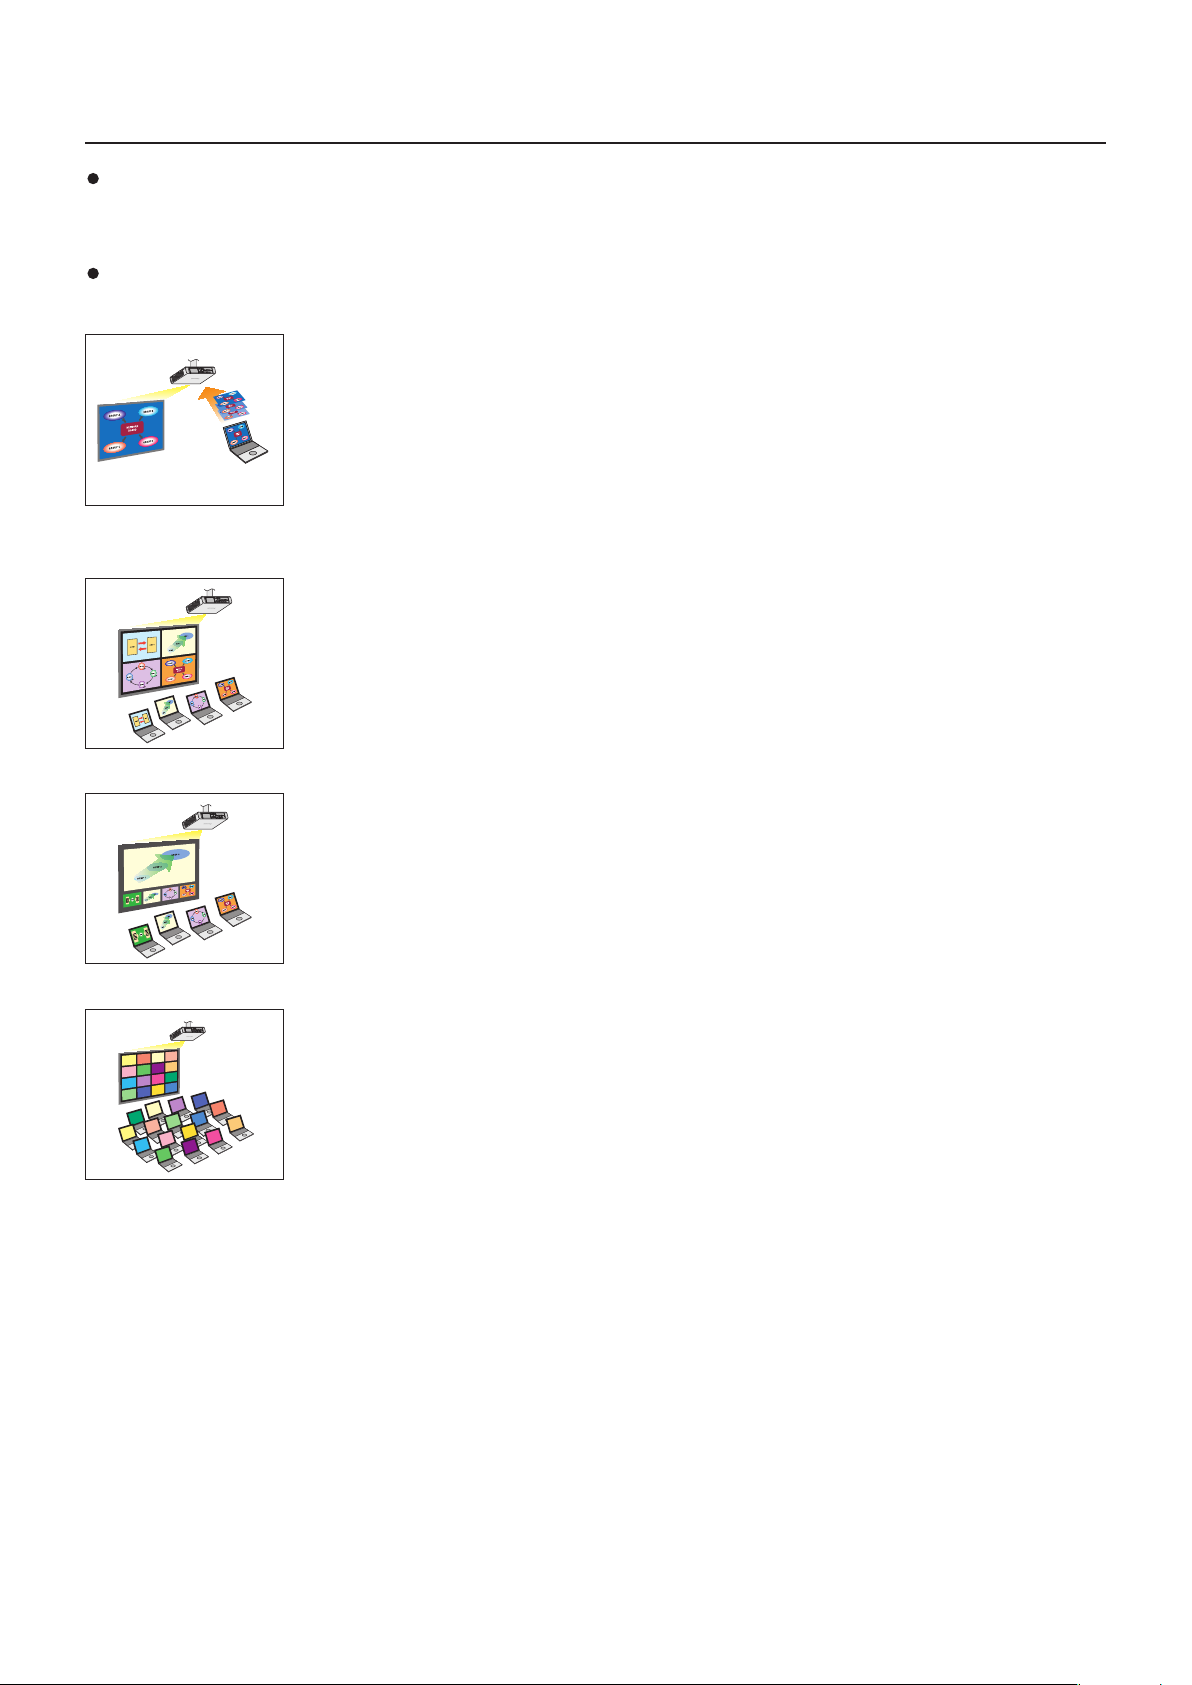
Project with various methods
<Live mode> (See page 34)
Used for normal presentations.
<Multi live mode> (See page 35)
• 4-screen multi style (See page 36)
Used for presentations involving multiple computers.
• 4-screen index style (See page 37)
This style is convenient in cases where you wish to focus attention on one of four presentations
displayed simultaneously.
• 16-screen index style (See page 39)
This style is convenient in cases where you wish to display a large number of presentations as a
list.
7
What you can do with Wireless Manager mobile edition 5.5 (cont.)
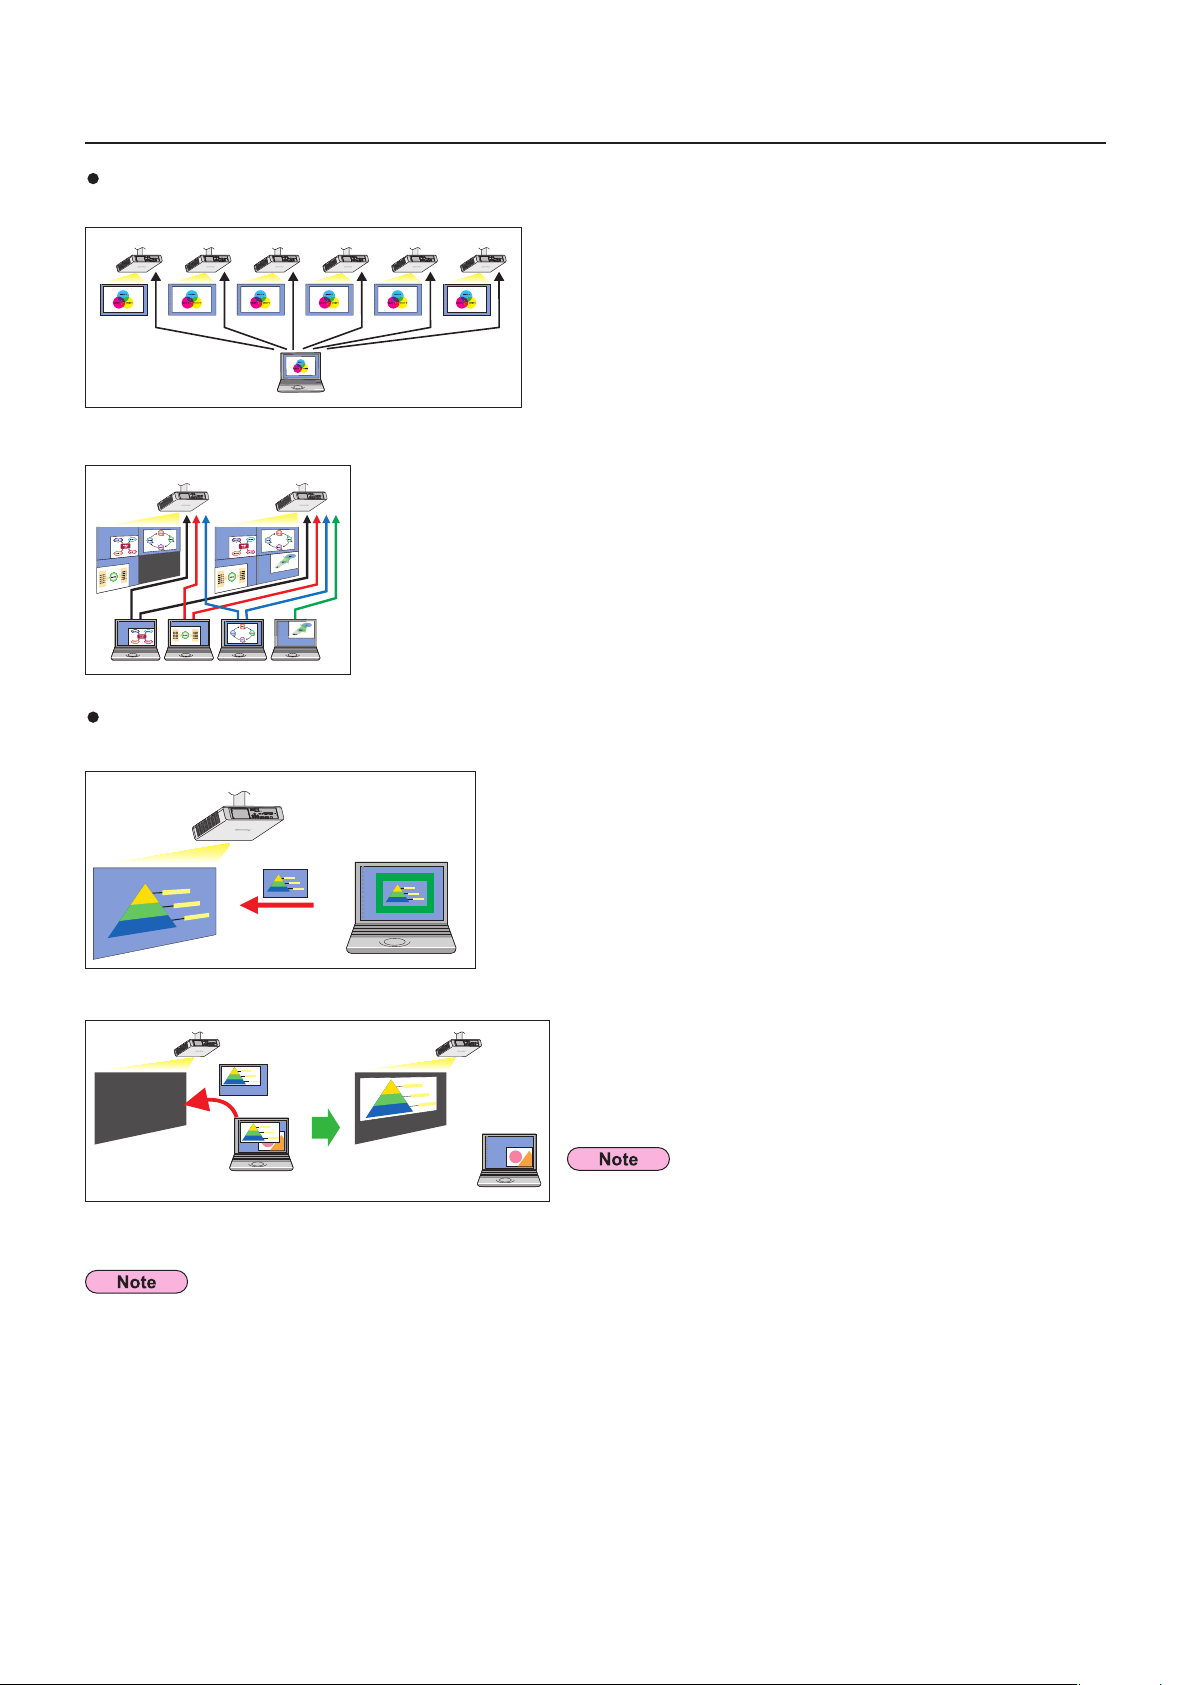
Project with multiple projectors
<Multiple source live mode> (See page 40)
This arrangement can be used when a number of projectors are
installed in a large conference room, or when holding simultaneous
presentations in several conference rooms, for example.
<Multiple source multi live mode> (See page 42)
This arrangement can be used when you wish to simultaneously display multiple
presentations using multiple projectors.
Useful functions
<Selective area transmission> (See page 44)
By using the selective area window, you can specify the necessary
information alone from the computer screen, and display it on the projection
screen.
<Secondary display transmission> (See page 45)
Moving the cursor outside the computer screen with the mouse
You can set the computer screen and the projector screen to the
multi-monitor mode, and use the computer screen as the primary
monitor and the projector screen as the secondary monitor. This
is convenient for when holding a presentation using the projector
screen while displaying reference material on the computer screen.
For details on the secondary display transmission function, see the
application section for the secondary display transmission function
in the instruction manual.
For connectable projectors and functions available for Wireless Manager ME 5.5, see “List of connectable projectors/available
functions in each projection method” on page 47.
8

What you can do with Wireless Manager mobile edition 5.5 (cont.)
<WebBrowser control> (See page 60)
The following operations are possible when using WebBrowser.
• Setting and adjusting the projector
• Displaying the projector status
• Setting for message transmission
<PJLink™> (See page 68)
Compatible with PJLink™ Class 1. The following operations can be performed from a computer when PJLink™ protocol is used.
• Setting the projector
• Querying the projector status
<Command control> (Refer to “Serial terminals” in the operation manual for the projector.)
You can control the projector from a PC, using the control commands of the serial terminals.
<Virtual remote control function> (See page 33)
You can perform the following operation from a PC, using the virtual remote control in stead of the remote control.
• Changing the channels
• Turning the power on and off
<One-click Connection> (See page 30)
You can connect to the projector by double-clicking or using drag-and-drop.
<Live mode cut-in function> (See page 58)
During live mode or multi live mode, a different computer can interrupt and project images in live mode.
If you use “Web control,” “PJLink™” or “Command control,” turn on [NETWORK CONTROL] in the network menu for the
projector. (See page 57)
9

Check your computer
Necessary environment for computers to be connected
• First, check your computer to see whether or not it has a wired LAN※ or a built-in wireless LAN function.
※LAN : “Glossary” (See page 70)
• Before connecting the projector to the computer, be sure to check the following settings.
• Operation is not guaranteed for all wireless LAN adapters and built-in wireless LAN adapters.
Wireless LAN
Check 1
<Computer with a built-in wireless LAN function>
• Is your wireless LAN switched on?
<Computer without a built-in wireless LAN function>
• Is your wireless LAN adapter properly recognized?
• Is the wireless LAN adapter switched on?
• Install the wireless LAN adapter driver beforehand.
For details on how to install the driver, refer to the instructions accompanying the wireless card.
Check 2
• Have you logged in as the Administrator?
Check 3
•
When security (firewall) software and utilities for network cards are installed, these may prevent connection of the projector.
<Windows XP/Windows Vista>
• Is Network Bridge enabled? (
• Has your firewall been disabled? (
Wireless LAN settings
Logon user’s settings
Computer’s settings
See page 73)
See page 74)
10

Check your computer (cont.)
Wired LAN
Check 1
<For wired LAN>
• Is the cable properly connected?
• The specifications for cables vary depending on the system configurations. Confirm the projector settings and the cable
specification.
Check 2
<Computer with a built-in wired LAN function>
• Is your wired LAN switched on?
<Computer without a built-in wired LAN function>
• Is your wired LAN adapter properly recognized?
• Is your wired LAN adapter switched on?
• Install the wired LAN adapter driver beforehand.
For details on how to install the driver, refer to the instructions accompanying the wired LAN adapter.
Wired LAN settings
11

Software requirements
System requirements
The computer must meet the following requirements in order to use the supplied software.
®
OS: Microsoft Windows
Windows® XP Tablet PC Edition 2005/Microsoft Windows® Vista® Ultimate 32 bit/Windows® Vista® Business 32 bit/
Windows® Vista® Home Premium 32 bit/Windows® Vista® Home Basic 32 bit
CPU: Intel
RAM: 256 MB or more
Empty hard disk capacity: 60 MB or more
Hardware conditions: CD or DVD drive (for installing software and viewing the operation manual)
LAN terminal (10BASE-T/100BASE-TX)
An IEEE802.11 b/g built-in wireless LAN system or an IEEE802.11 b/g wireless LAN adapter must be
However, some IEEE802.11 b/g wireless LAN may not allow connection to IEEE802.11 g projectors.
WebBrowser:
Netscape Communicator 7.0 or newer
®
Pentium® III 800 MHz or faster, or compatible processor
(1 GHz or faster is recommended when using live mode)
installed and running properly.
Internet Explorer® 6.0 or newer
2000 Professional SP4/Microsoft Windows® XP Home Edition/Windows® XP Professional/
• Note that operation is not guaranteed when used with system environments other than the above or on homemade computers.
• Compatibility of Microsoft Windows
Microsoft Windows® XP: SP3 or before
Microsoft Windows
®
Vista®: SP2 or before
®
XP and Vista
®
Precautions when using Windows Vista
• The following limitation is applied to the projection of Launcher to the projector screen:
– Software installed: Launcher is displayed.
– Software not installed: When Windows Aero is engaged, the launcher is projected.
When Windows Aero is disengaged, the launcher is not projected.
• When using a Windows
display transmission function.
Note that this function cannot be used in some operating environments.
®
Vista® computer, you must be logged in to an administrator account in order to use the secondary
Operation is not guaranteed for all computers that meet the above
conditions.
The illustrations and screenshots in this manual may be different from those on your computer.
12

Installing and using software
• Exit all the application software programs that are running on Windows. Otherwise, installation may not be possible.
• Administrator authority is required for installation.
•Iftheinstallerdoesnotstartupautomatically,double-click[EasyInstall]→[Easy_Inst.exe]intheCD-ROM.
• If Wireless Manager ME 1.0, 2.0, 3.0, 4.0, 4.5 or 5.0 has been installed, uninstall it by following the method below.
Fromthedesktop,select[Start]→[AllPrograms]→[PanasonicWirelessDisplay]→[UninstallWirelessManagermobile
edition *.*]. (*.* in the menu is 1.0, 2.0, 3.0, 4.0, 4.5 or 5.0)
Follow the instructions appearing on the screen and uninstall the software.
• If Wireless Manager is used immediately after installation, some functions (secondary display transmission, etc.) may not work.
In such a case, restart the computer once and then use Wireless Manager.
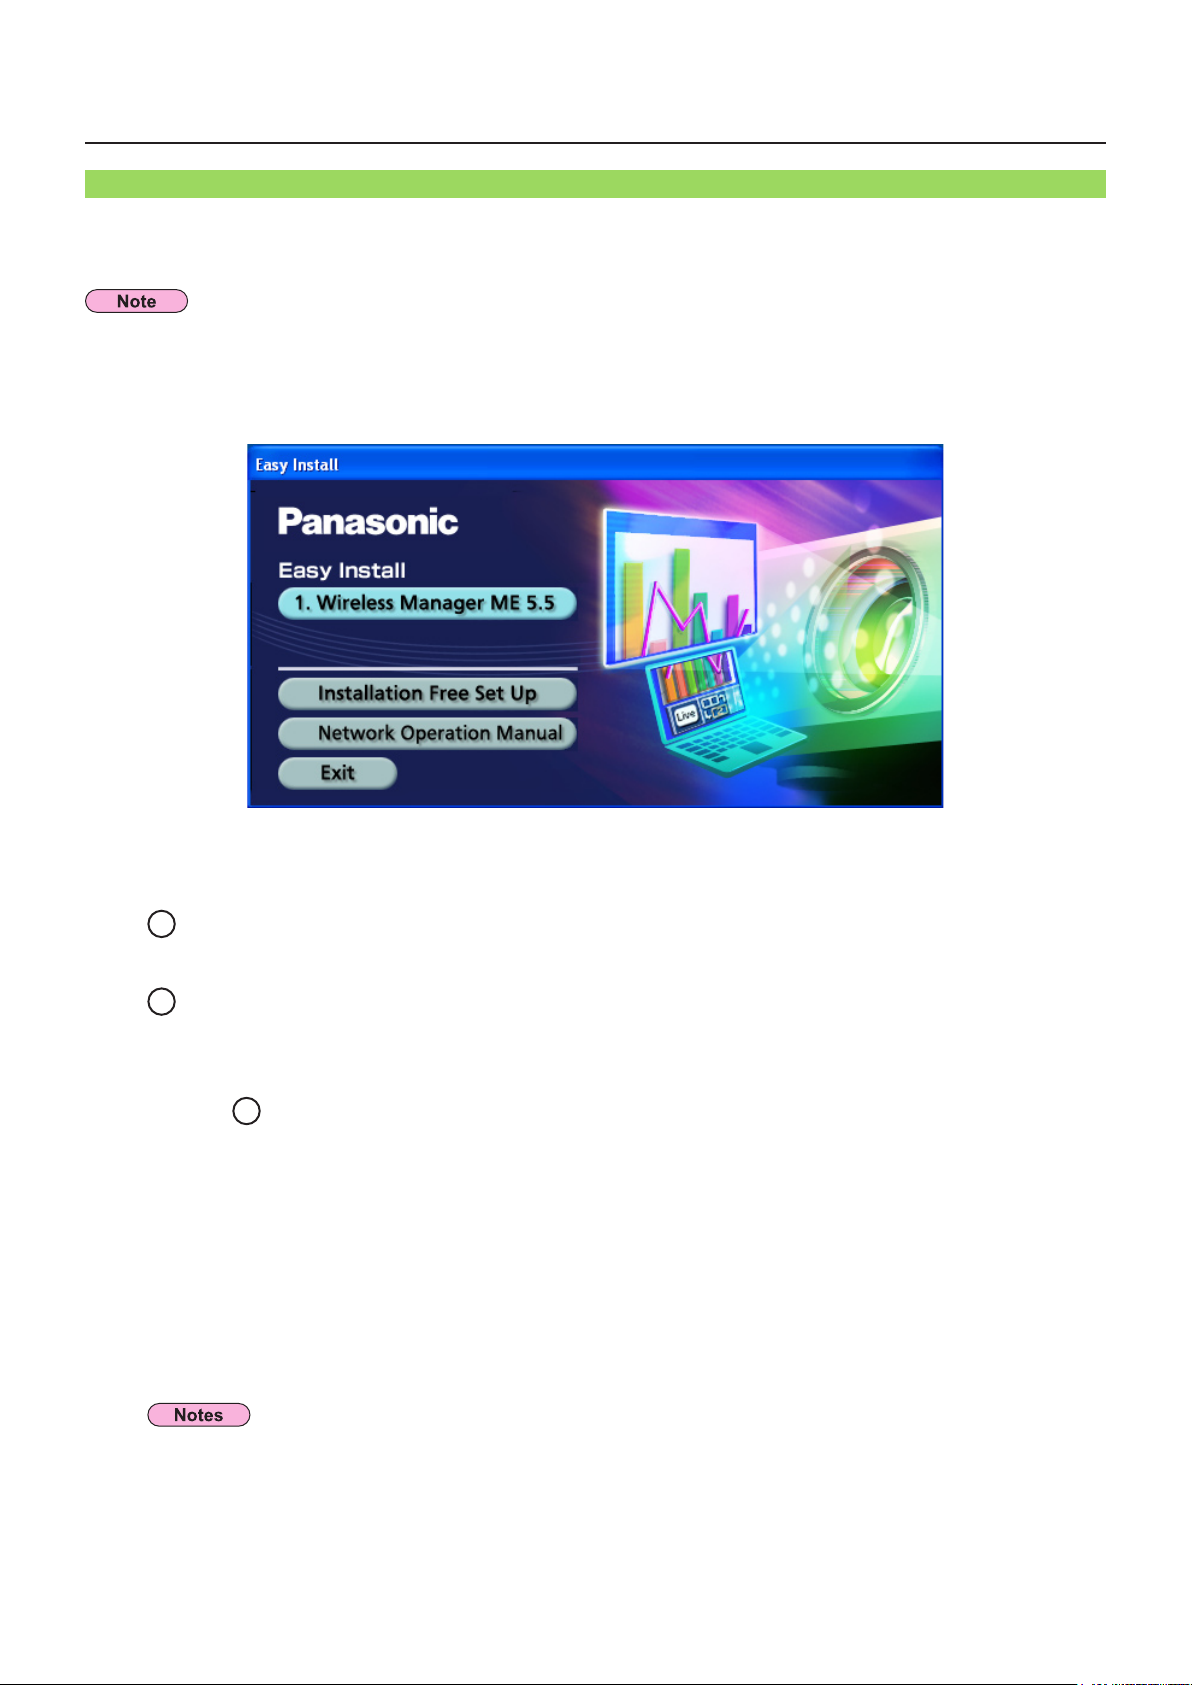
[1. Wireless Manager ME 5.5]
Wireless Manager ME 5.5 is used to send a screen from a PC to the projector via wireless or wired LAN.
Click [1. Wireless Manager ME 5.5].
1
Follow the instructions on the screen and install the software.
13
Installation free set up
[Installation free set up]
You can use Wireless Manager ME 5.5 without installing it in the computer.
If your PC can access the removable media such as SD card on which Wireless Manager ME 5.5 is copied, you can use without
installing it.
When copying Wireless Manager ME 5.5 to a removable medium, empty capacity of at least 32 MB is required.
Insert provided CD-ROM into the CD-ROM drive.
1
The install program starts.
Click [Installation Free Set Up].
2
[Direct CD-ROM Startup] and [Other Media Source Startup, Make Copy Here] appear on the window.
A
3
When using without copying the program: Click [Direct CD-ROM Startup].
Wireless Manager ME 5.5 starts.
Operation is the same as when operating after installing CD-ROM.
B
When using after copying the program: Click [Other Media Source Startup, Make
Copy Here].
A window opens to select the destination to save.
<If you chose B in step 3, follow steps 4 - 5.>
Select the destination to save, and click [OK].
4
CD-ROM data is copied to the destination.
Once Wireless Manager ME 5.5 has been copied, click [Close] in Easy Install dialog box.
Double-click the Wireless Manager ME 5.5 icon (WMStart.exe) for the destination
5
folder “WMme5.5” you selected in step 4.
Wireless Manager ME 5.5 starts up.
Operation is the same as when operating after installing CD-ROM.
If selecting removable medium as the destination to save, ensure that the removable medium is recognized by the
computer to which you wish to connect the projector.
• When using without installing, following functions are not available.
• Secondary display transmission (
• Producing audio along with video at live mode (
• Automatic connection by double-clicking (
• Operation is slower compared to when the computer is used with Wireless Manager ME 5.5 installed.
• If you have logged in as a [GUEST] or other user that has no [Administrator] authority, use [U (user)] for the network
number.
See page 45)
See page 48)
See page 49)
14
Connecting with wireless LAN
0COG
2TQL
Current
Preparations
Make sure or prepare for the following items:
A The wireless LAN adapter is recognized. (See page 72)
• The wireless LAN adapter you want to use is enabled. (Otherwise, enable it.)
• Make sure the power supply for the wireless LAN adapter is turned on; the hardware switch or the software setting might
have turned it off.
B
When using it via the infrastructure connection: Make sure the network setting for the projector has been done by the
administrator. (For detailed information, refer to [USER] setting on page 53.)
C
If you log in with [User authority], select a projector network number from [USER1] to [USER3]. (For detailed information, refer
to [USER] setting on page 53.)
Easy Wireless Set Up
There are 3 different connection methods, “S-MAP” (Projector Signal Map) Connection, “1-4/U” Connection, and “PC Search”
Connection.
These connections enable easy search and connection to the projector.
(Refer to “1-4/U” connection on page 19 to establish an easy wireless connection with projectors that have no S-MAP function.)
• [S-MAP] Connection: Search and connect to the projectors set up using [Network Number] [S-MAP] (
Connectable projectors are displayed in order of wireless reception strength. (See page 18).
Operation is performed in [S-MAP] or [S-MAP] (list display) view on the <Projector Search> window.
• [1-4/U] Connection: Search and connect to the projectors set up using [Network Number] [1]-[4] or [USER1]-[USER3].
Projectors that can be connected to are displayed in a list (See page 19).
Operation is performed in [1-4/U] view on the <Projector Search> window.
• [PC Search] Connection: Use the [Computer search] function on the projector to search and connect (
See page 53).
See page 20).
Parts name in search screen
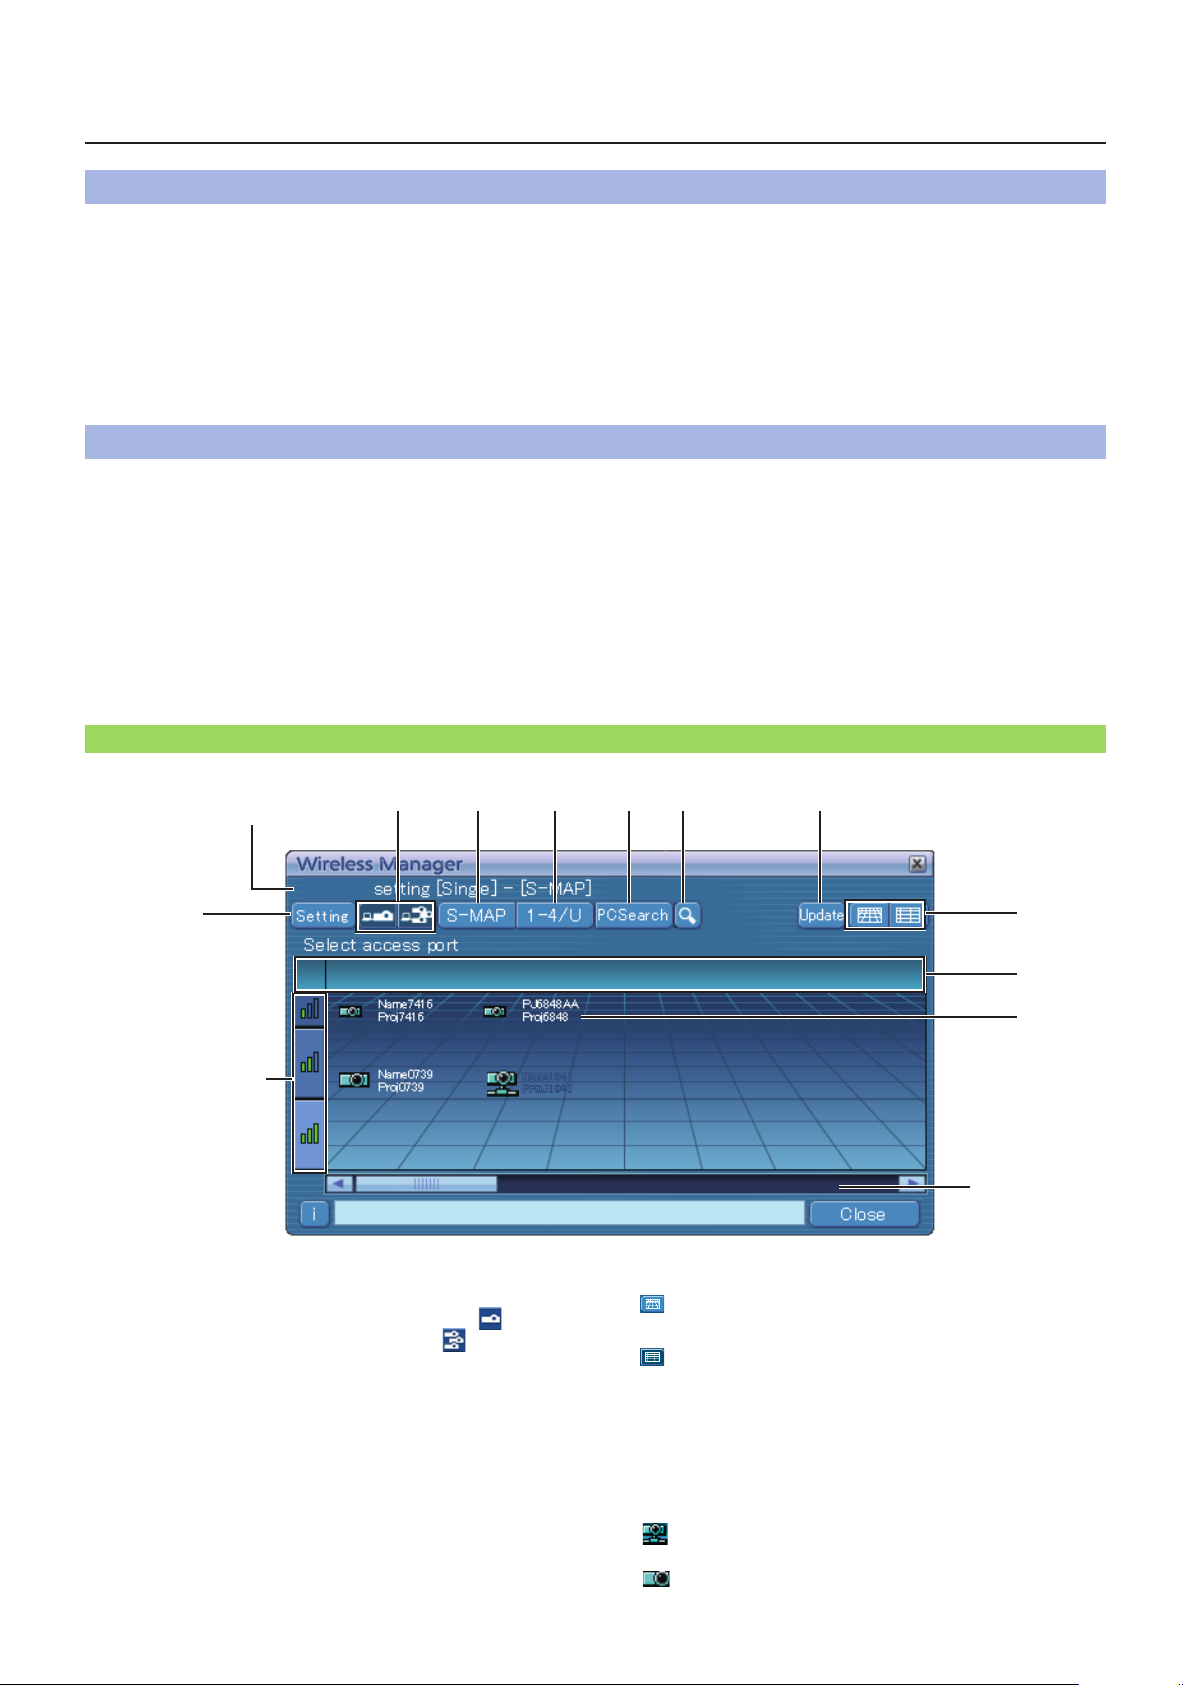
n <Projector Search> window – [S-MAP] (See page 18)
Current settings
A
Weak
↑
Signal strength level
↓
Strong
A Setting menu display
Choose to display or hide the
B Access Devices (See pages 34, 40, 42)
When only one projector is connected, select [
multiple projectors are connected, select [ ].
※ Multiple projectors [(Multiple projectors icon)] are
available when “1-4/U” is selected.
C S-MAP (See page 18)
Display <Projector Search> window – [S-MAP].
D 1-4/U (See page 19)
Display <Projector Search> window – [1-4/U].
E PC Search (See page 20)
Display <PC Search> window.
F Other search (See page 29)
From the projectors that are currently switched on, search
for the projector of specified IP address, domain name,
and ID.
B C D E F G
B to F buttons
]. When
H
I
J
Scrollbar
G Updates the list of found projectors.
H Switching Display Window
: <Projector Search> window – [S-MAP] is displayed.
(Upper figure)
: <Projector Search> window – [S-MAP] (list display)
is displayed. (See page 16)
I Found projectors
• Projector found on a wired LAN
• Projector found using [U (user)]
• Projectors searched by a network number of 1 to 4.
J Projectors searched and found by S-MAP.
The name and ID of projectors are displayed.
represents the projectors that were searched and
found through wired LAN.
represents the projectors that were searched and
found through wireless LAN.
15
PCSearch
Setting
Current setting [Single] - [S-MAP]
Select access port
Standby Live Mode
Update
Close Connect Connectability
Connecting with wireless LAN (cont.)
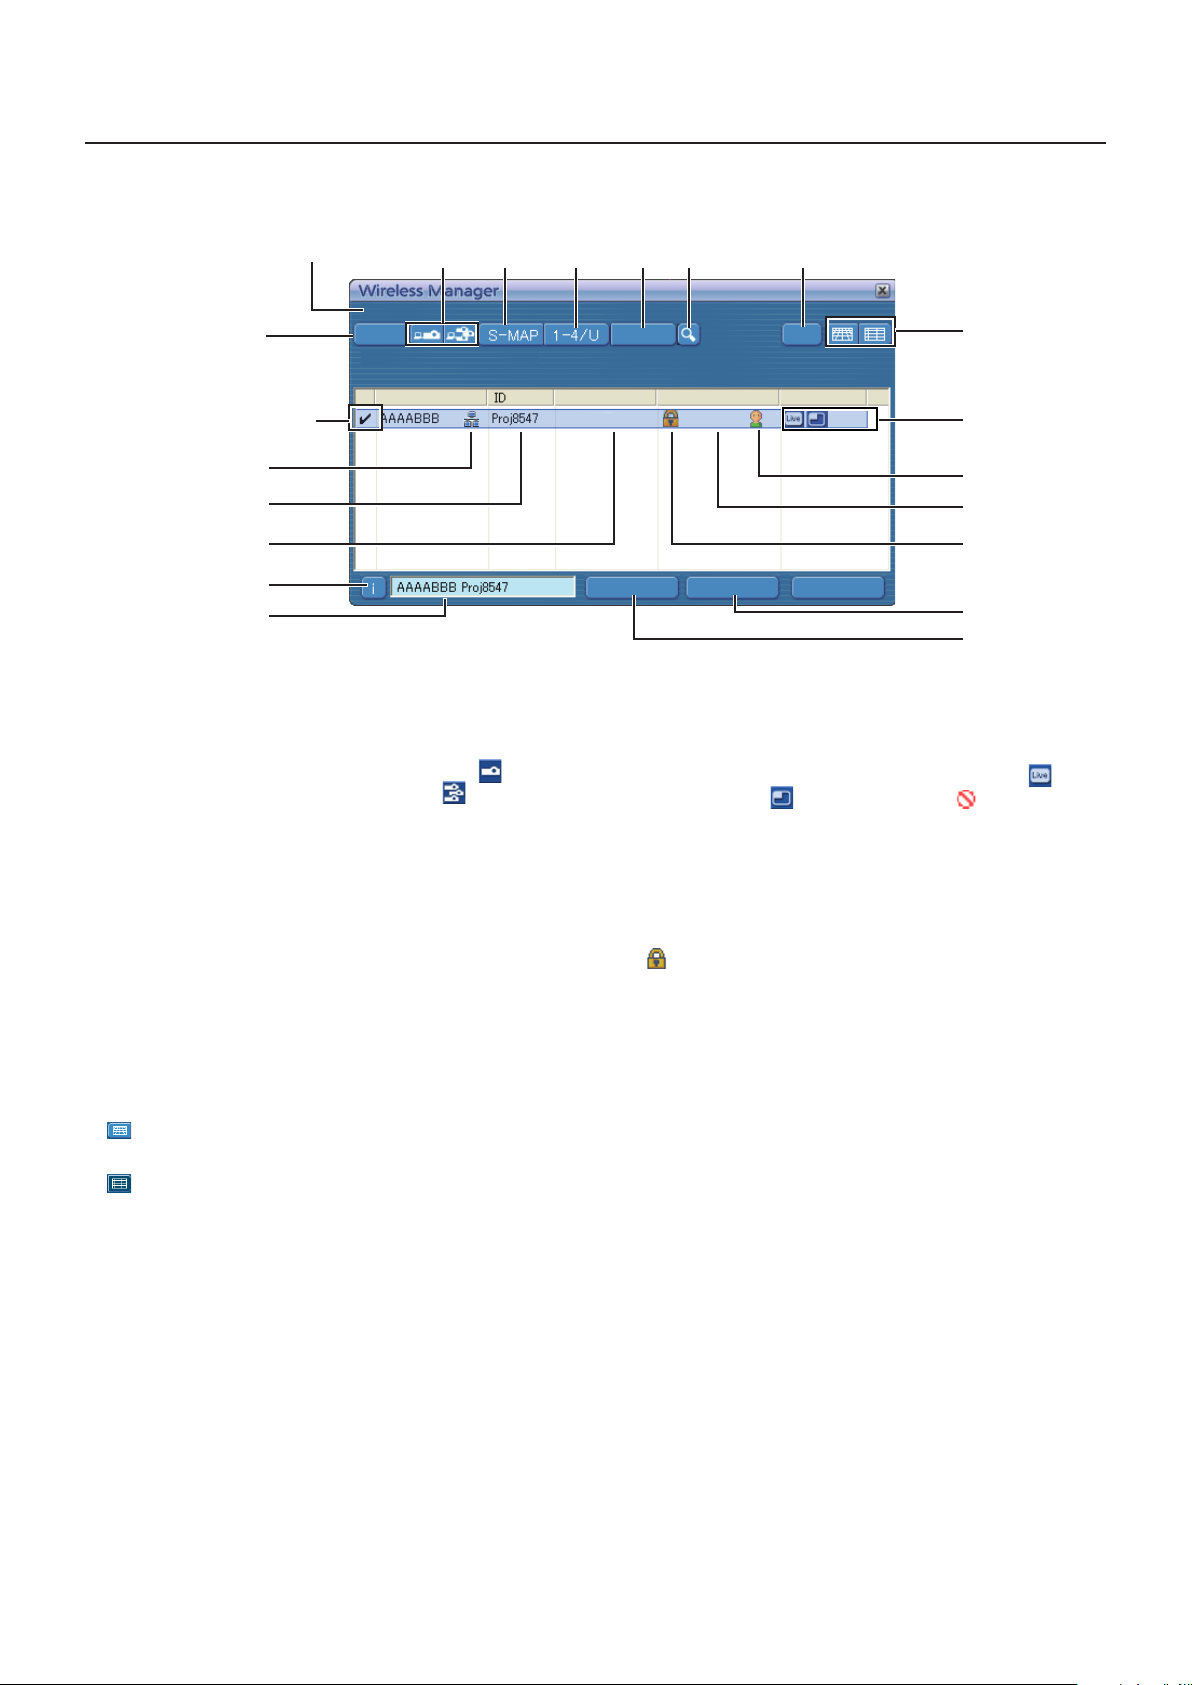
n <Projector Search> Window – [S-MAP] (List display) (See page 18)
Current settings
B C D E F G
A
Selected
projector
I
J
K
P
Q
A Setting menu display
Choose to display or hide the
B to F buttons
B Access Devices (See pages 34, 40, 42)
When only one projector is connected, select [
]. When
multiple projectors are connected, select [ ].
※ Multiple projectors [(Multiple projectors icon)] are
available when “1-4/U” is selected.
C S-MAP (See page 18)
Display <Projector Search> window – [S-MAP].
D 1-4/U (See page 19)
Display <Projector Search> window – [1-4/U].
E PC Search (See page 20)
Display <PC Search> window.
F Other search (See page 29)
From the projectors that are currently switched on, search
for the projector of specified IP address, domain name,
and ID. (From all network numbers except for [U (user)])
G Updates the list of found projectors.
H Switching Display Window
: <Projector Search> window – [S-MAP] is displayed.
(See page 15)
: <Projector Search> window – [S-MAP] (list display)
is displayed. (Upper figure)
I This mark appears for the projectors that have been
searched and found through wired LAN.
J ID (See page 29)
Display projector’s ID.
H
L
M
N
O
S
R
K Mode (See page 34)
Display projector’s mode or style.
L Available modes and functions
Unavailable modes/functions among [Live mode
] and
[Multi live mode ] are displayed with [ ] overlaid on
them.
M The number of people connected to this projector
Display the number of people that are connected to this
projector.
N The status of this projector
Display the projector’s connection status.
O [ ] will be displayed when password is required for
the connection. (See page 29)
P Connection message
Blinks when connection is not possible. Click to display
information on resolving the issue. (See page 22)
Q
The [Projector Name] of the selected projector and the
name given in the favorites are displayed (See page 49).
Guides for the operating status and connection method
etc are also displayed.
R Connectability
The name and ID of projectors are displayed on the upper
left of the selected projector’s projection screen.
Once it is confirmed as connectable, the message
“Projector is available.” will appear on the PC screen.
S Connection
Connect to the selected projector.
16
PCSearch
Setting
Current setting [Single] - [1-4/U]
Select access port
Standby Live Mode
Update
Close Connect Connectability
All
Connecting with wireless LAN (cont.)
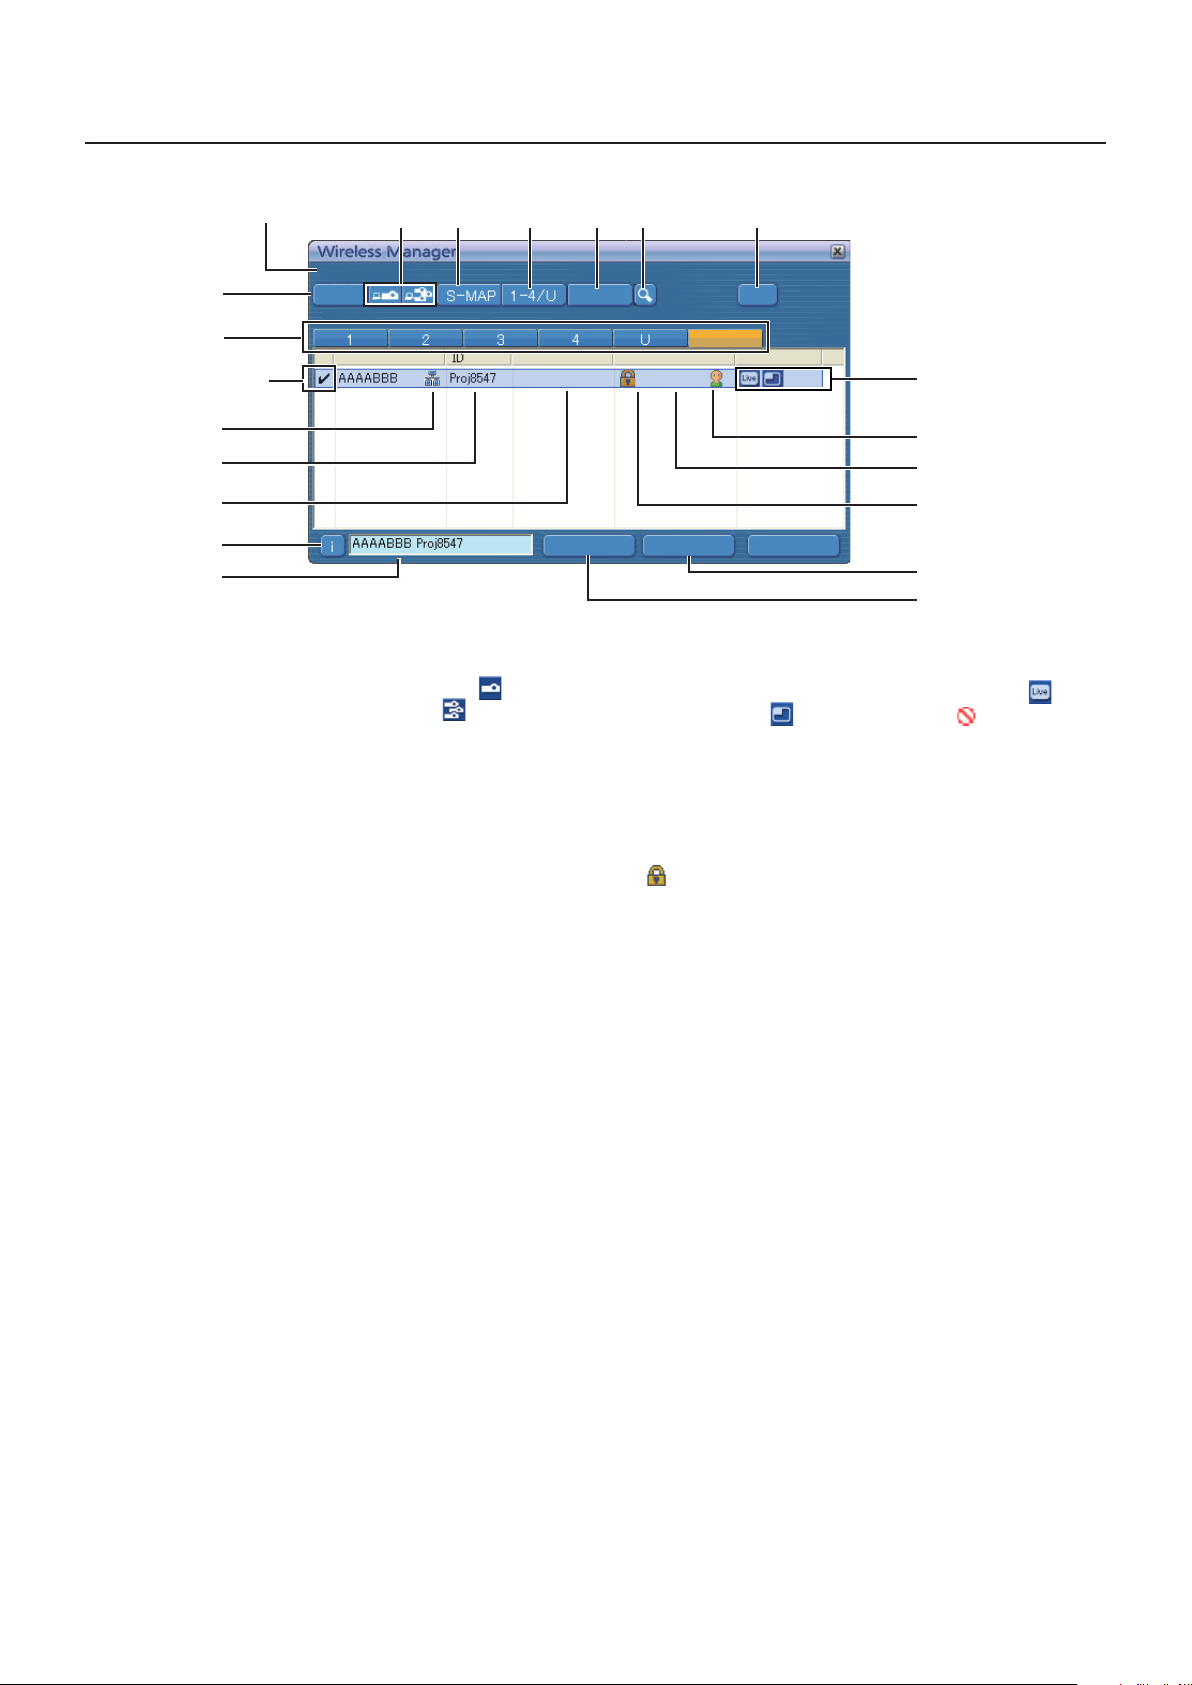
n <Projector Search> Window – [1-4/U] (See page 19)
Current settings
A
H
Selected
projector
B C D E F G
L
A Setting menu display
Choose to display or hide the
B Access Devices (See pages 34, 40, 42)
When only one projector is connected, select [
multiple projectors are connected, select [ ].
※ Multiple projectors [(Multiple projectors icon)] are
available when “1-4/U” is selected.
C S-MAP (See page 18)
Display <Projector Search> window – [S-MAP].
D 1-4/U (See page 19)
Display <Projector Search> window – [1-4/U].
E PC Search (See page 20)
Display <PC Search> window.
F Other search (See page 29)
From the projectors that are currently switched on, search
for the projector of specified IP address, domain name,
and ID. (From all network numbers except for [U (user)])
G Update the connection status display
H “Network” number
If you specify [1], [2], [3], [4], [U (user)]※1 or [Display all],
the projector(s) assigned with the corresponding network
number(s) will be displayed in [Projector name] field (See
page 53). The default value is [S-MAP]※2 for both PC and
projector.
I This mark appears for the projectors that have been
searched and found through wired LAN.
J ID (See page 29)
Display projector’s ID.
※1
• In the following situations, connections other than [U (user)] are not possible.
- Not logged in with Administrator authority
• Depending on the computer and wireless LAN adapter used, Easy Wireless Set Up may not be possible. If this is the case,
the [Network] number of <Projector Search> window automatically switches to [U (user)]. For details of the connection
procedure, first close Wireless Manager ME 5.5, and then refer to pages 25 - 27.
※2
• The network number is [S-MAP], when Wireless Manager ME 5.5 starts. These numbers must match for the connection. To
check the network number, refer to the network menu of the projector.
• When importance is placed on security, select the network number [2] - [4], because WEP (wireless communication
encryption)※ is set on these network numbers.
• If [U (user)] is used for the network number, important video/audio data is protected because AES
takes place in advance for all network numbers, even though [ENCRYPTION] is set to [NONE].
• Other network adapters may not be usable under Easy Wireless Set Up connections.
• Connections to other networks connected through the wireless LAN adapter are broken under Easy Wireless Set Up connections.
※ “Glossary” (See page 71)
I
J
K
P
Q
B to F buttons
]. When
M
N
O
S
R
K Mode (See page 34)
Display projector’s mode or style.
L Available modes and functions
Unavailable modes/functions among [Live mode
] and
[Multi live mode ] are displayed with [ ] overlaid on
them.
M The number of people connected to this projector
Display the number of people that are connected to this
projector.
N The status of this projector
Display the projector’s connection status.
O [ ] will be displayed when password is required for
the connection. (See page 29)
P Connection message
Blinks when connection is not possible. Click to display
information on resolving the issue. (See page 22)
Q
The [Projector Name] of the selected projector and the
name given in the favorites are displayed (See page 49).
Guides for the operating status and connection method
etc are also displayed.
R Connectability
The name and ID of projectors are displayed on the upper
left of the selected projector’s projection screen.
Once it is confirmed as connectable, the message
“Projector is available.” will appear on the PC screen.
S Connection
Connect to the selected projector.
※
encryption processing
17
PCSearch
Setting
Current setting [Single] - [S-MAP]
Select access port
Standby Live Mode
Update
Close Connect Connectability
Name2345
Proj2345
Name2212
Proj2212
AAAABBB
PRJ02555
Name8833
Proj8833
Name6679
Proj6679
Name7771
Proj7771
Name1234
Proj1234
Name6789
Proj6789
PCSearch
Close
Setting
Current setting [Single] - [S-MAP]
Select access port
Connect
Connectability
Cancel
Update
Connecting with wireless LAN (cont.)
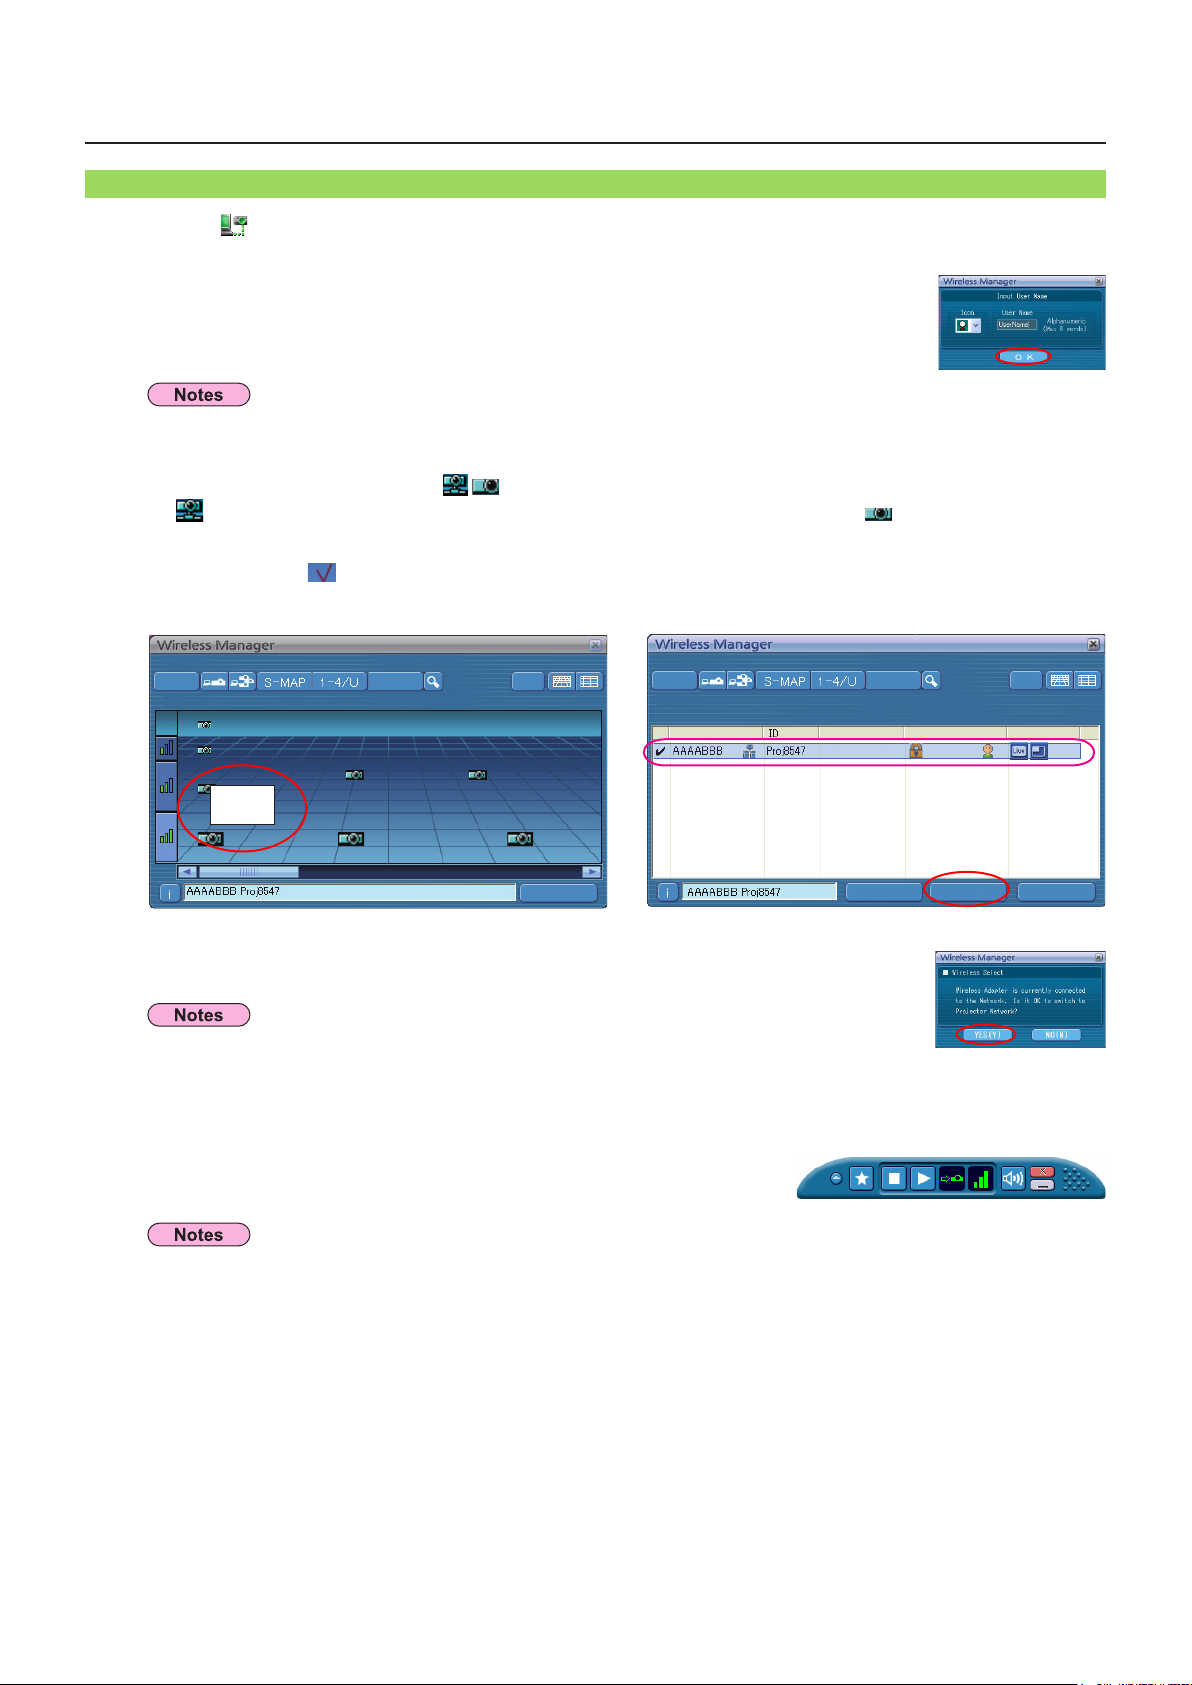
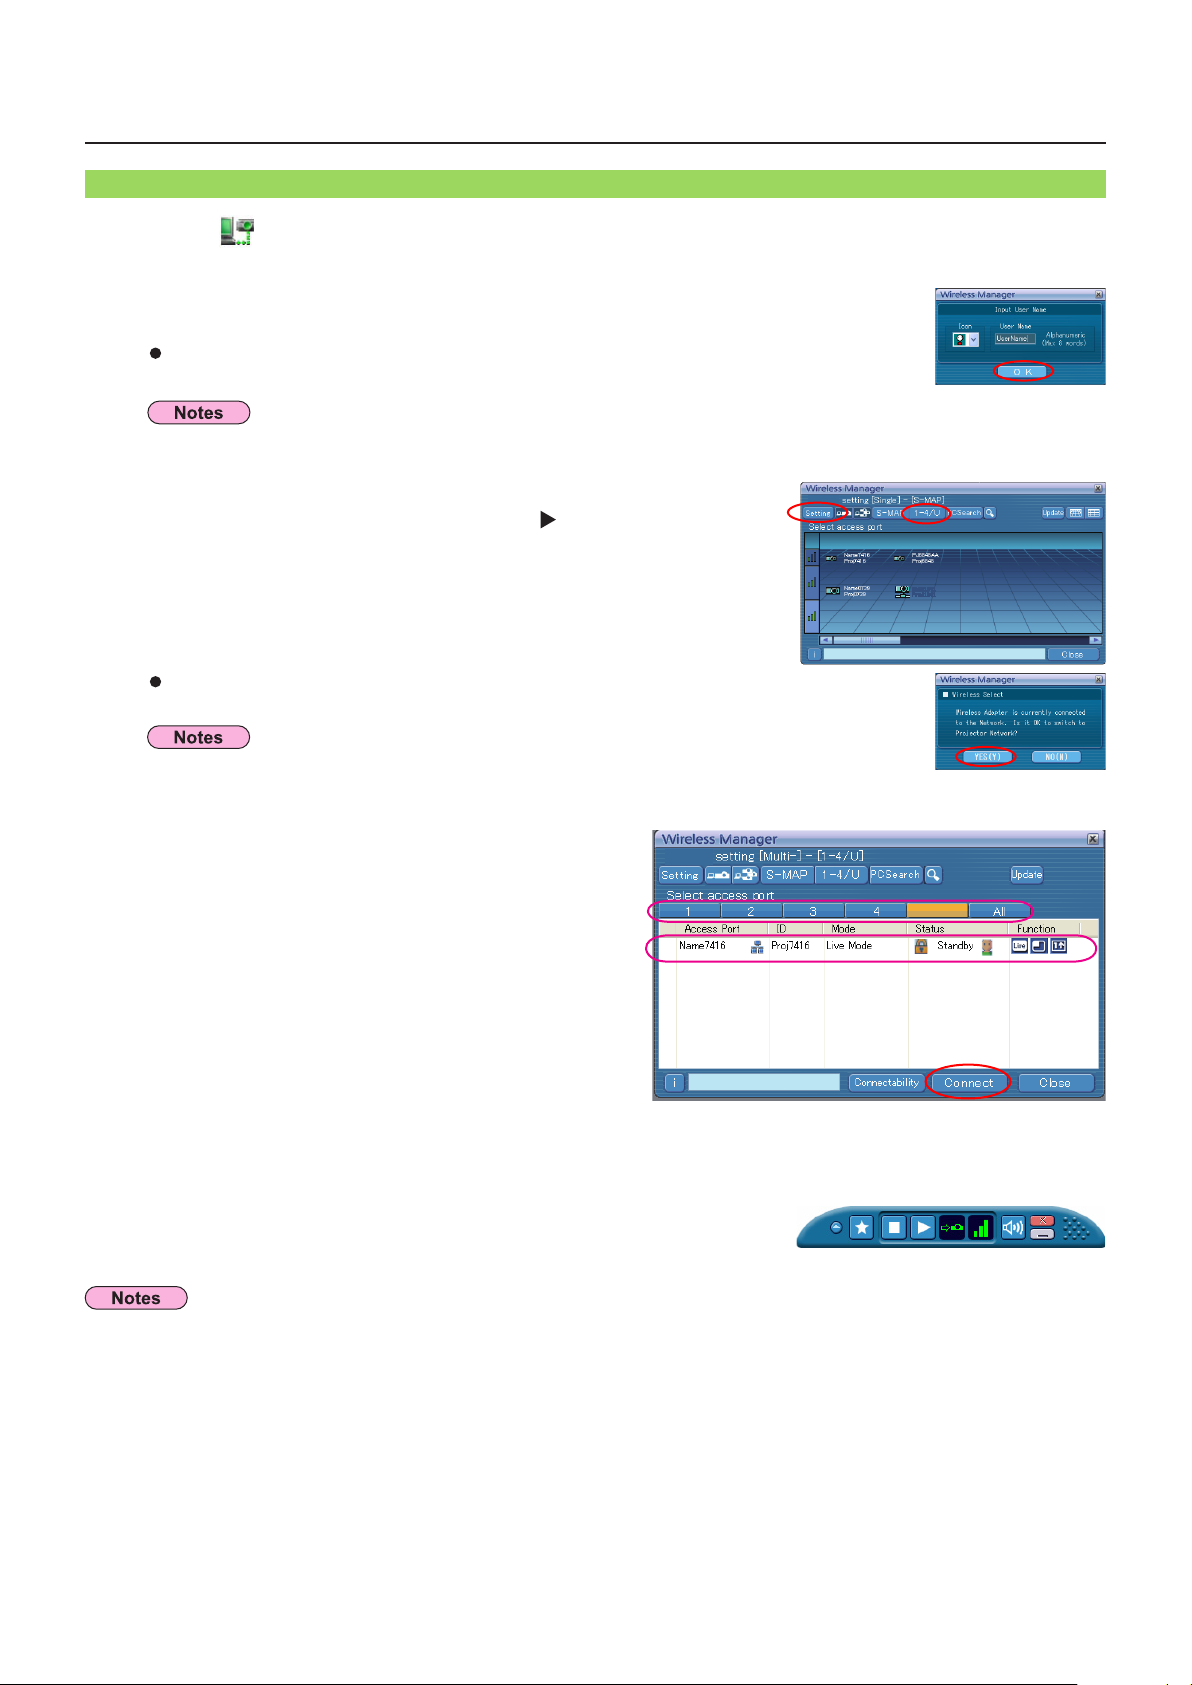
“S-MAP” Connection
Click [ ] on the desktop.
1
Alternatively,select[Start]→[AllPrograms]→[PanasonicWirelessDisplay]→
[Wireless Manager mobile edition 5.5].
<ProjectorSearch>window–[S-MAP]isdisplayed.(Partsname→See page 15)
●Whenthe<InputUserName>windowappears
Set the icon and user name, and click [OK].
• The icon and user name are set when Wireless Manager mobile edition 5.5 is first launched.
• The icon and user name settings can be changed in the <Option> window. (
Select and click the icon [ ] of the projector you want to connect to.
2
( represents the projectors that were searched and found through wired LAN, while indicates those found
through wireless LAN.)
The Connect/Connectability menu is displayed.
For List Display, [ ] is displayed in the selected projector.
(In list view, select a projector you want to connect from the list and press [Connect].)
See page 50)
<Projector Search> Window – [S-MAP] (List display)<Projector Search> Window – [S-MAP]
3
4
Select and click [Connect].
●Ifthe<ConfirmationDialog>boxisdisplayed
Click [Yes(Y)].
• For details on how to connect, refer to page 50.
•
Refer to the models on page 47 supporting the wired LAN that is compatible with this software.
• If you want to enable the network adapter after starting the Wireless Manager, you should do it
after exiting the Wireless Manager.
Connection completed.
When the connection with the projector is established, the launcher
appears.(“Descriptionofthelauncher”→
• The “Signal strength level” is just a guide. As differences occur due to conditions such as the communication
environment, this does not always display accurate values.
• Enter the user name in up to 8 alphanumerics.
• The launcher is not projected on the projector. However, if you are using Windows Vista, the installed launcher is
projected.
• If you cannot connect the projector and computer using Easy Wireless Setup (
• If you do not find a projector you want to connect, press [Update] button.
• When a firewall is active, a window may open prompting to deactivate a network block. (See screen A on page 75.)
• When a network connection is established by using the connection utility, a window may open prompting to halt the
connection utility. (See screen B on page 76.)
See page 32)
See page 72).
18
Connecting with wireless LAN (cont.)
0COG
2TQL
Current
Current
U
“1-4/U” Connection
Click [ ] on the desktop,
1
orselect[Start]→[AllPrograms]→[PanasonicWirelessDisplay]→
[Wireless Manager mobile edition 5.5].
<Projector Search> window – [S-MAP] is displayed.
When the <Input User Name> window appears
Set the icon and user name, and click [OK].
• The icon and user name are set when Wireless Manager ME 5.5 is first launched.
• The icon and user name settings can be changed in the <Option> window. (
Click [1-4/U] from the setting menu.
2
If the setting menu is not displayed, click [Setting ].
When the <Confirmation dialog> box appears
Click [YES (Y)].
See page 50)
• Refer to the models on page 47 supporting the wired LAN that is compatible with this software.
• If you want to enable the network adapter after starting the Wireless Manager, you should do it
after exiting the Wireless Manager.
A list of projectors that can be connected
3
to are displayed in the <Projector Search>
window – [1-4/U].
Select the same Network number as the [Network number] for the projector you
4
want to connect to (see page 53).
Projectors powered on in the chosen network group are listed.
Select the desired projectors, and click [Connect].
5
The launcher appears and the connection with the projector is established.
(“Descriptionofthelauncher”→
• Enter the user name in up to 8 alphanumerics.
• The launcher is not projected on the projector. However, if you are using Windows Vista, the installed launcher is projected.
• If you cannot connect the projector and the computer using Easy Wireless Setup (
• If you do not find a projector you want to connect, press [Update] button.
• You can search through all the network numbers from 1 through 4, if you select [All].
• When a firewall is active, a window may open prompting to deactivate a network block. (See screen A on page 75.)
• When a network connection is established by using the connection utility, a window may open prompting to halt the connection
utility. (See screen B on page 76.)
See page 32)
See page 72).
19
Connecting with wireless LAN (cont.)
0COG
2TQL
Current
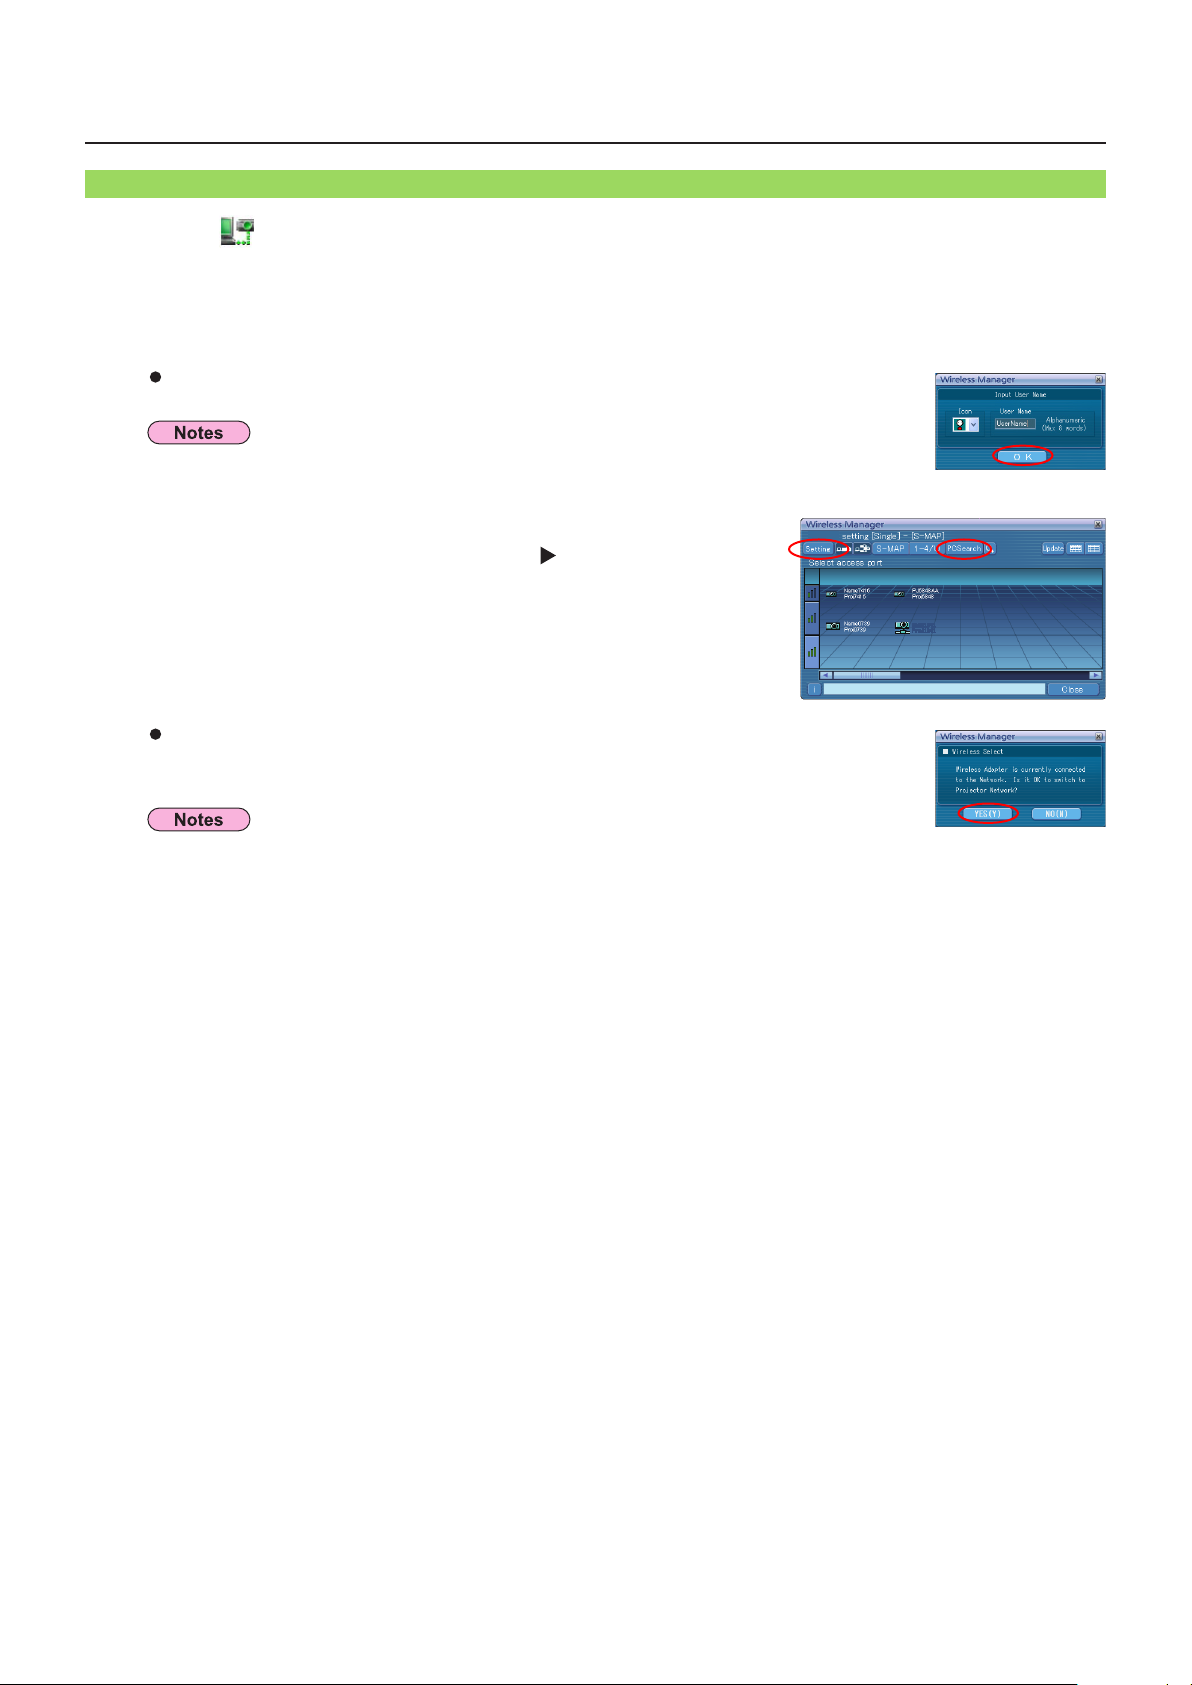
“PC Search” Connection
Click [ ] on the desktop,
1
orselect[Start]→[AllPrograms]→[PanasonicWirelessDisplay]→
[Wireless Manager mobile edition 5.5].
<Projector Search> window – [S-MAP] is displayed.
When the <Input User Name> window appears
Set the icon and user name, and click [OK].
• The icon and user name are set when Wireless Manager ME 5.5 is first launched.
• The icon and user name settings can be changed in the <Option> window. (See page 50)
Click [PC Search] from the setting menu.
2
If the setting menu is not displayed, click [Setting ].
When the <Confirmation dialog> box appears
Click [YES (Y)].
• Enter the user name in up to 8 alphanumerics.
• If you want to enable the network adapter after starting the Wireless Manager, you should do it after exiting Wireless
Manager.
• When a firewall is active, a window may open prompting to deactivate a network block. (See screen A on page 75.)
• When a network connection is established by using the connection utility, a window may open prompting to halt the
connection utility. (See screen B on page 76.)
20
Connecting with wireless LAN (cont.)
PCSearch
Current setting > - [Single] - [PCSearch]
Select the computer to connect from the projector.
Turn on the projector power.
Please select user name [ UserName ] from list.
Press the [ ] button on the remote control.
Close
Setting
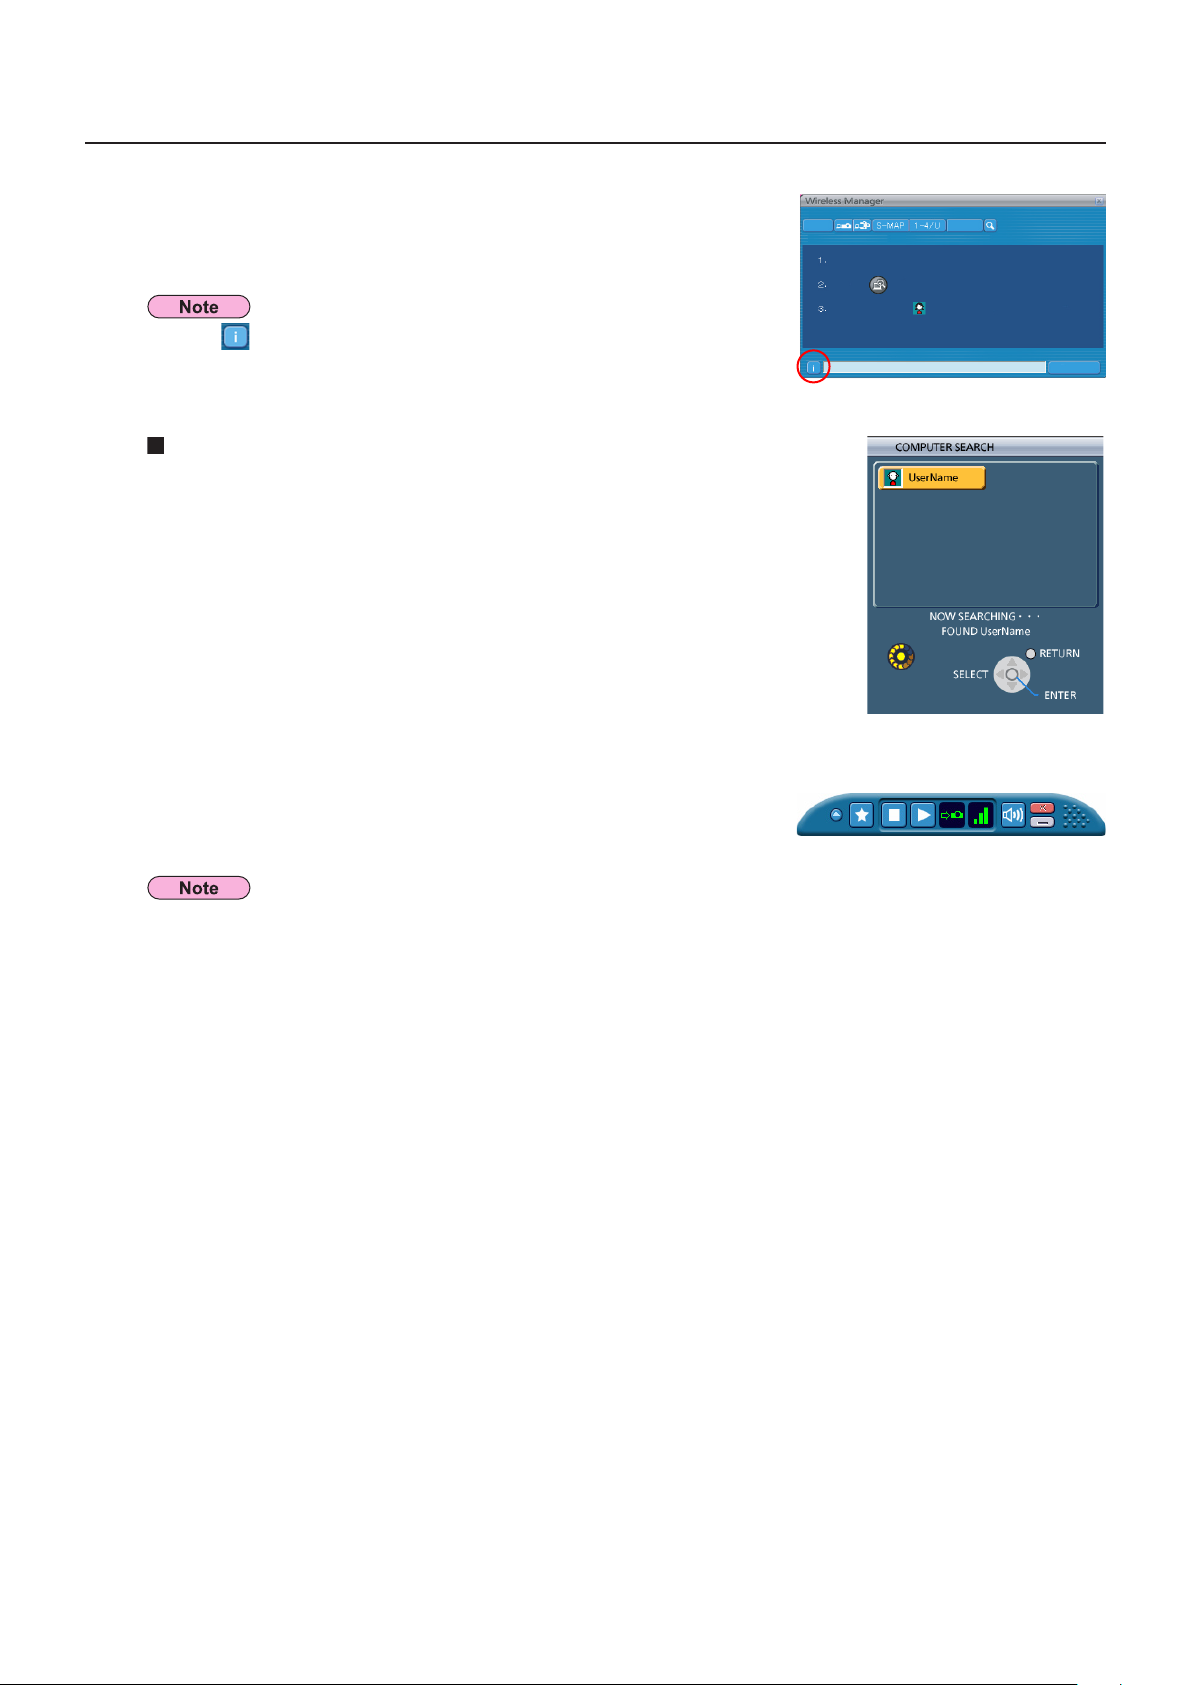
Select the projector to connect.
3
<PC Search> window appears.
Click on [ ] in the <PC Search> window, and the models of projector that can
perform [PC Search] are displayed. (See page 47)
Operations on the projector
A Turn on the power to the projector unit.
B Press the [COMPUTER SEARCH] button on the remote control.
(You can also search from [COMPUTER SEARCH] from the network menu.
→
See page 58)
The computers that can be connected to the projector are displayed in a list.
C Select from the list displayed on the projector an item with the same icon/
user name as is displayed on the computer <PC Search> screen.
Connection completed.
4
When the connection with the projector is established, the launcher appears.
(“Descriptionofthelauncher”→
The launcher is not projected on the projector.
However, if you are using Windows Vista, the installed launcher is projected.
See page 32)
21
Connecting with wireless LAN (cont.)
PCSearch
Setting
Current setting [Single] - [1-4/U]
Select access port
Update
Close Connect Connectability
All
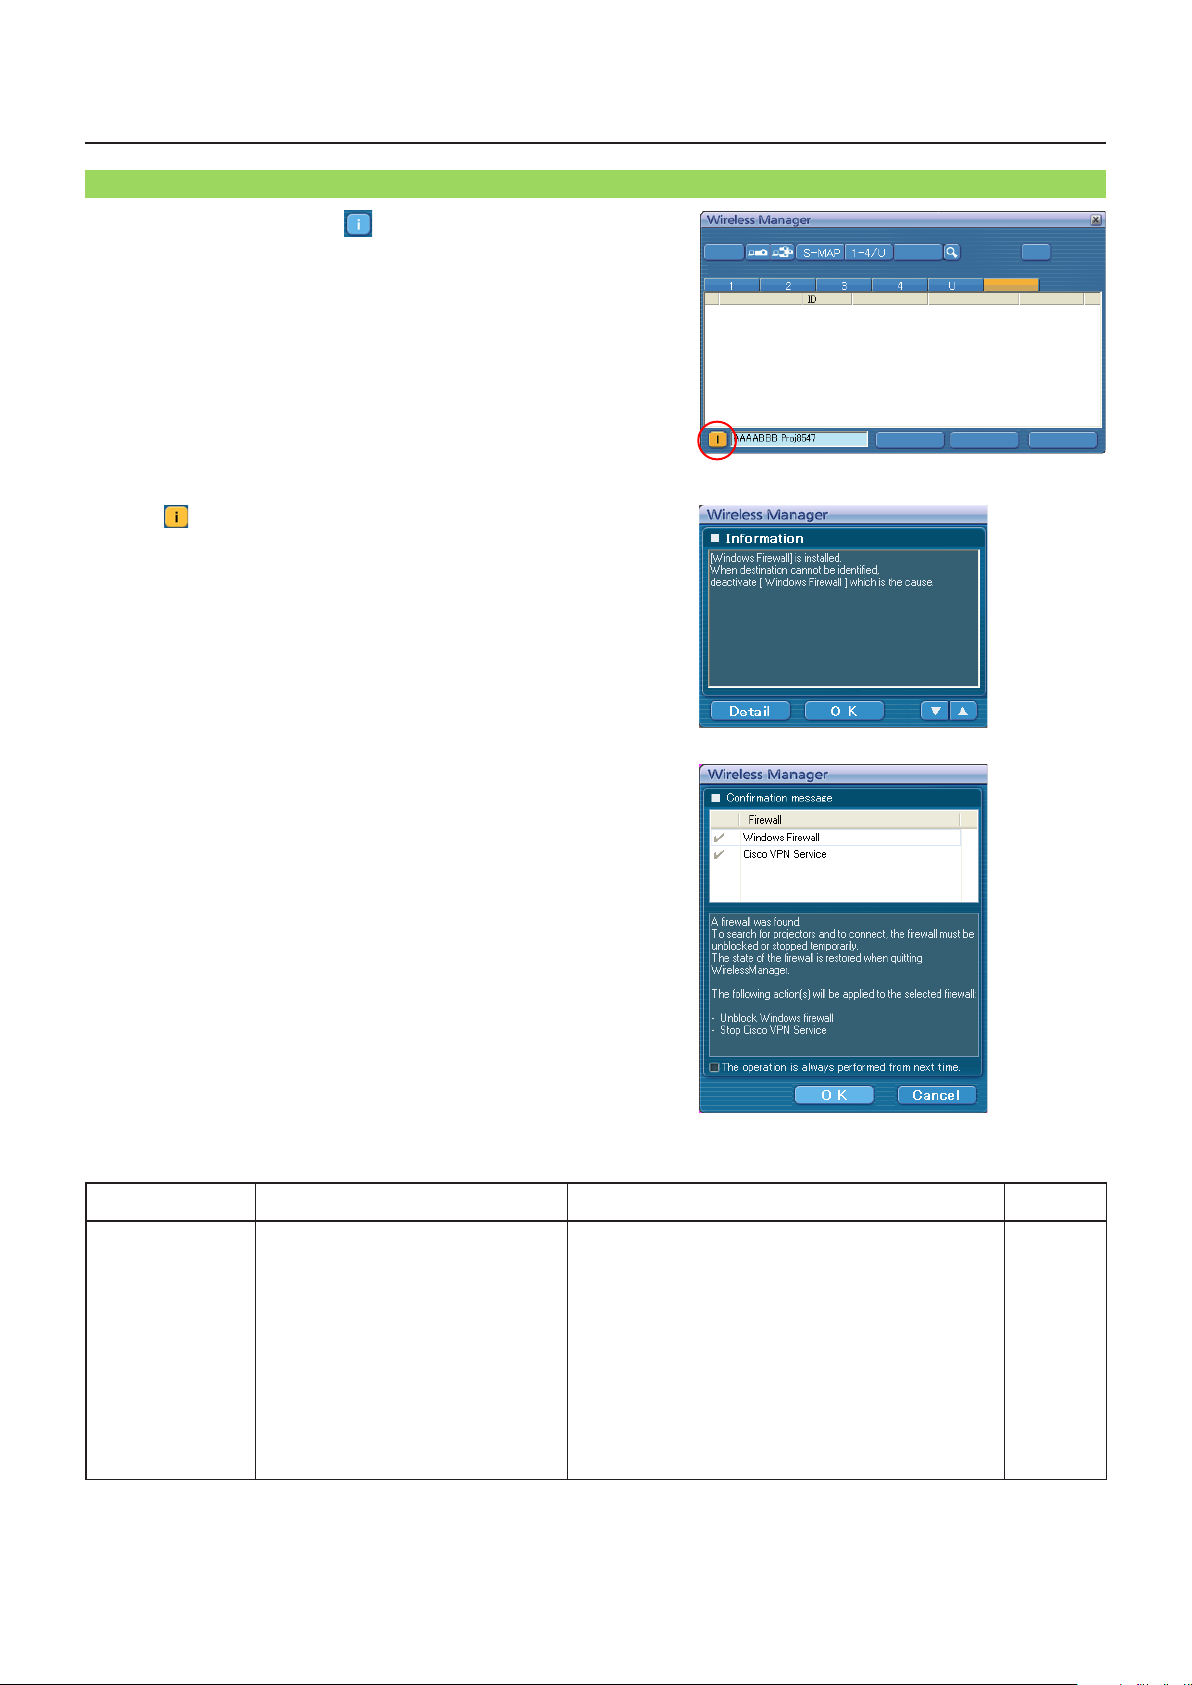
Connection error messages
If wireless LAN is not available, [ ] will blink in lower left corner of the
<Projector Search> window ([S-MAP] or [1-4/U]).
Click the [ ] button at this time to display information on resolving the
issue as shown below.
Click the [Detail] button to display detailed information.
Note that the [Detail] button is available only when the Firewall/
Connection Utility is found active.
To perform the selected Firewall/Connection Utility process every
time, check [The operation is always performed from next time.]. This
message will no longer be displayed from the next time the software
is launched. If you want to display the message when the software is
launched, check the corresponding item of <Firewall/Wireless LAN
Utility Message> on the [Other2] tab of [Option]. (See page 50)
The displayed information is as follows.
Detected issue Displayed information Remarks
A firewall or
network bridge is
detected
[****]※ is installed.
When destination cannot be
identified, deactivate [****] which is
the cause.
• Has your firewall in Windows XP been disabled?
• Is Wireless Manager mobile edition 5.5 registered
in[Exceptions]([ControlPanel]→[SecurityCenter]
→[Windowsfirewall])withtheWindowsXPSP2?
• Is this software registered in the [Exceptions] tab
in [Control Panel] – [Windows Firewall] – [Allow
program through Windows firewall] in Windows
Vista?
• Are any firewall-containing applications installed?
• If you do not expect ever to use Network Bridge
and see no need for it, delete it from your system.
“Windows Firewall”, “Network Bridge” and other security software found will appear in [****].
※
Reference page
P.73 - P.76
22

Connecting with wireless LAN (cont.)
Detected issue Displayed information Remarks
When a change in
the settings made
by the utility has
been detected
When a setting
error for the
wireless LAN
adapter has been
detected
When the user
does not have
the administrator
authority
Issues other than
the above
The settings of Wireless Network
connection have been changed.
When a Wireless LAN adapter utility
or any other utilities are active,
stop the operation of such utilities,
then restart the Wireless Manager
ME 5.5.
No response from the wireless LAN
adapter.
• Wireless LAN adapter conditions
• Driver version (Latest)
Please execute “Easy Connection”
using the administrator authorization
mode.
Please perform the following checks,
when the projector cannot be found.
[Projector setup]
(1) Is the power on for the projector?
(2) Is the Network capability on?
(3) Has the network channel number
correctly been set up?
[Computer setup]
(1) Is Wireless capability on?
(2) Is the Firewall application
causing a network block?
(3) Is wireless enabled?
The wireless LAN adapter utility used by the
computer may have changed the wireless settings.
Close the utility, and then make the connection again
using Easy Wireless Set Up connection.
• Is the wireless LAN adapter effective?
• Is your wireless LAN adapter properly recognized?
• Some wireless LAN adapters may allow Easy
Wireless Set Up connections to function if drivers
are updated.
If you have logged in as a user that does not have
administrator permission or as [GUEST], you cannot
use easy wireless setup [S-MAP]/network numbers
[1]-[4].
If you must perform Easy Wireless Set Up without
administrator authority, designate [U (user)] as the
network number.
• Is the power of the projector on?
• Is the network capability of the projector ON?
• Do the network settings of the projector and the
network of Wireless Manager ME 5.5 match?
• Is the wireless capability of the computer ON?
• Is communication being blocked by a Firewall
application installed on the computer?
• Is wireless/wired enabled?
Reference page
-
P.72
P.25
23

Connecting with wireless LAN (cont.)
Connecting through the access point
You can make the setting for infrastructure mode※ (connection through the access point※); however, confirm to your system
administrator on network settings before changing any settings.
※“Glossary” (See pages 70 - 71)
A Projector settings
Turn on the projector and press the [NETWORK] button on the remote control.
1
Press the menu button to open the [NETWORK] menu, and then select from among
2
[USER 1] through [USER 3] for [WIRELESS LAN] and press [ENTER].
Set the details of network and select [OK].
3
As for network setting items, see pages 53 - 55.
Confirm to your system administrator on network settings before changing any settings.
The projector’s MAC address※ can be checked with [STATUS] in the network menu of the projector unit.
(“Verifyingsettings”→
See page 59) ※“Glossary” (See page 70)
B Computer settings
Turn on the computer.
4
Make the network setting according to your system administrator.
5
Connect to your access point.
6
Start Wireless Manager ME 5.5.
7
A confirmation message appears asking whether to switch the projector to the network or not. Select [No].
Select a projector you want to connect on the <Projector Search> window ([S-MAP]
8
or [1-4/U]), and click [Connect]. (See pages 18, 19)
The launcher appears and the connection with the projector is established.
(“Descriptionofthelauncher”→
If no projector is displayed, click [ ] to start searching by IP address. (See page 29)
See page 32)
If you cannot establish wireless LAN connection via an access point after performed the right steps described in “A Setting
projector”, contact the manufacturer of your access point (i.e. radio relay device).
24
 Loading...