

Panasonic TH-42PX80A, TH-50PX80A User Manual
Operating Instructions
Plasma Television
Model No.
TH-42PX80A
TH-50PX80A
Please read these instructions before operating your set and retain them for future reference.
The images shown in this manual are for illustrative purposes only.
English
TQBC2286-1
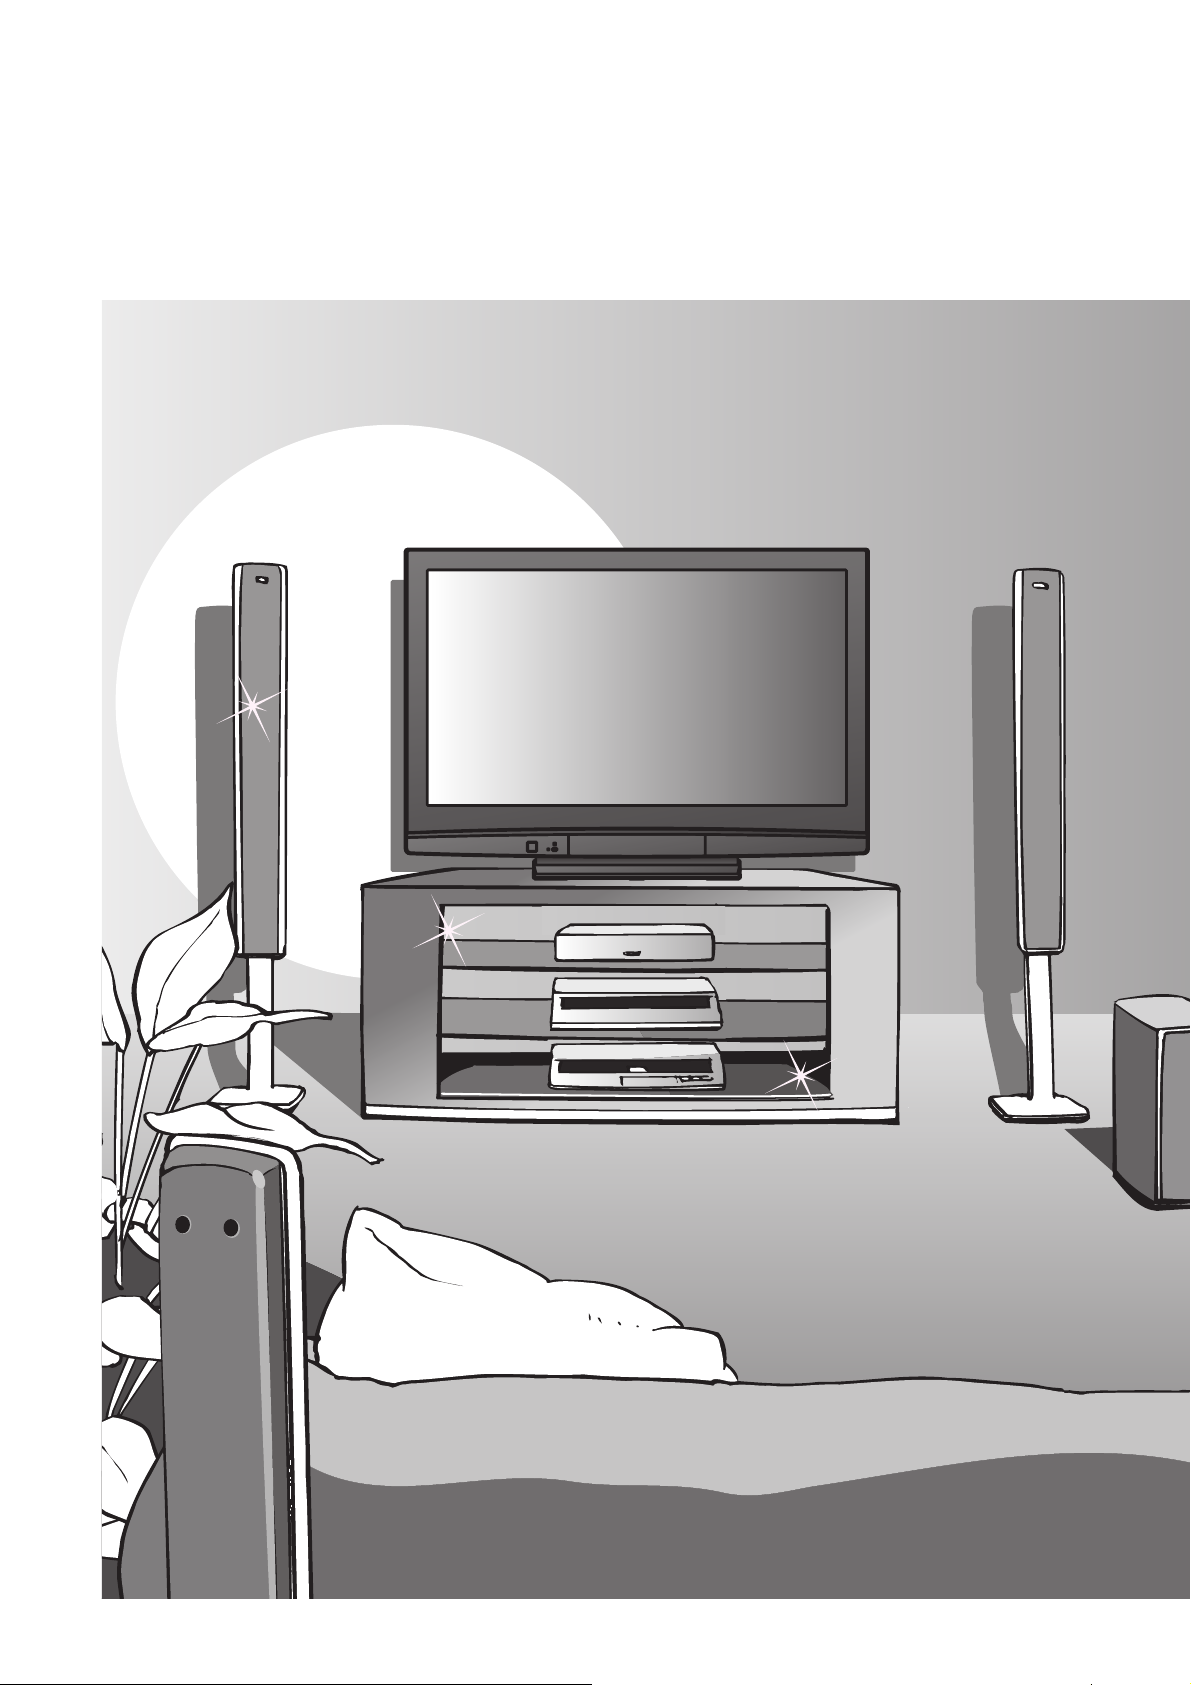
Turn your own living room into a movie theatre!
Experience an amazing level of multi-
■ Receives digital terrestrial broadcastings using an integrated DVB (Digital Video
Broadcasting) tuner
■ Sharp pictures with HDMI connection
■ Links up and controls the connected equipment with “VIERA Link”
2

media excitement
Enjoy rich multi-media
SD memory Card
Camcorder
Personal
computer
Amplifi er with
Speaker system
VCR
DVD Recorder
Set top box
DVD player
Contents
Be Sure to Read
Safety Precautions ······································ 4
•
(Warning / Caution)
Notes ··························································· 5
•
Maintenance ··············································· 5
•
Quick Start Guide
Accessories / Options ········· 6
•
Basic Connection ·················· 8
•
Identifying Controls ············ 11
•
Auto Tuning ··························· 12
•
Enjoy your TV!
Basic Features
Watching TV ·············································· 14
•
Using TV Guide ········································· 17
•
Viewing Teletext ········································ 18
•
Watching Videos and DVDs ······················ 20
•
Quick Start Guide
Viewing Advanced FAQs, etc.
Advanced Features
How to Use Menu Functions ····················· 22
•
(picture, sound quality, etc.)
DVB Settings (DVB) ·································· 26
•
Editing Programmes ································· 28
•
Tuning Programmes ··································30
•
Restore Settings ······································ 32
•
Input Labels ·············································· 33
•
Displaying PC Screen on TV ·····················34
•
HDMI Functions ········································35
•
Viewing from SD Card (Photos) ················ 36
•
VIERA Link “HDAVI ControlTM” ··················· 38
•
External Equipment ··································· 42
•
FAQs, etc.
Technical Information ································44
•
FAQs ·························································47
•
Licence ······················································ 49
•
Specifi cations ············································ 50
•
WARRANTY ·············································· 51
•
3
Safety Precautions
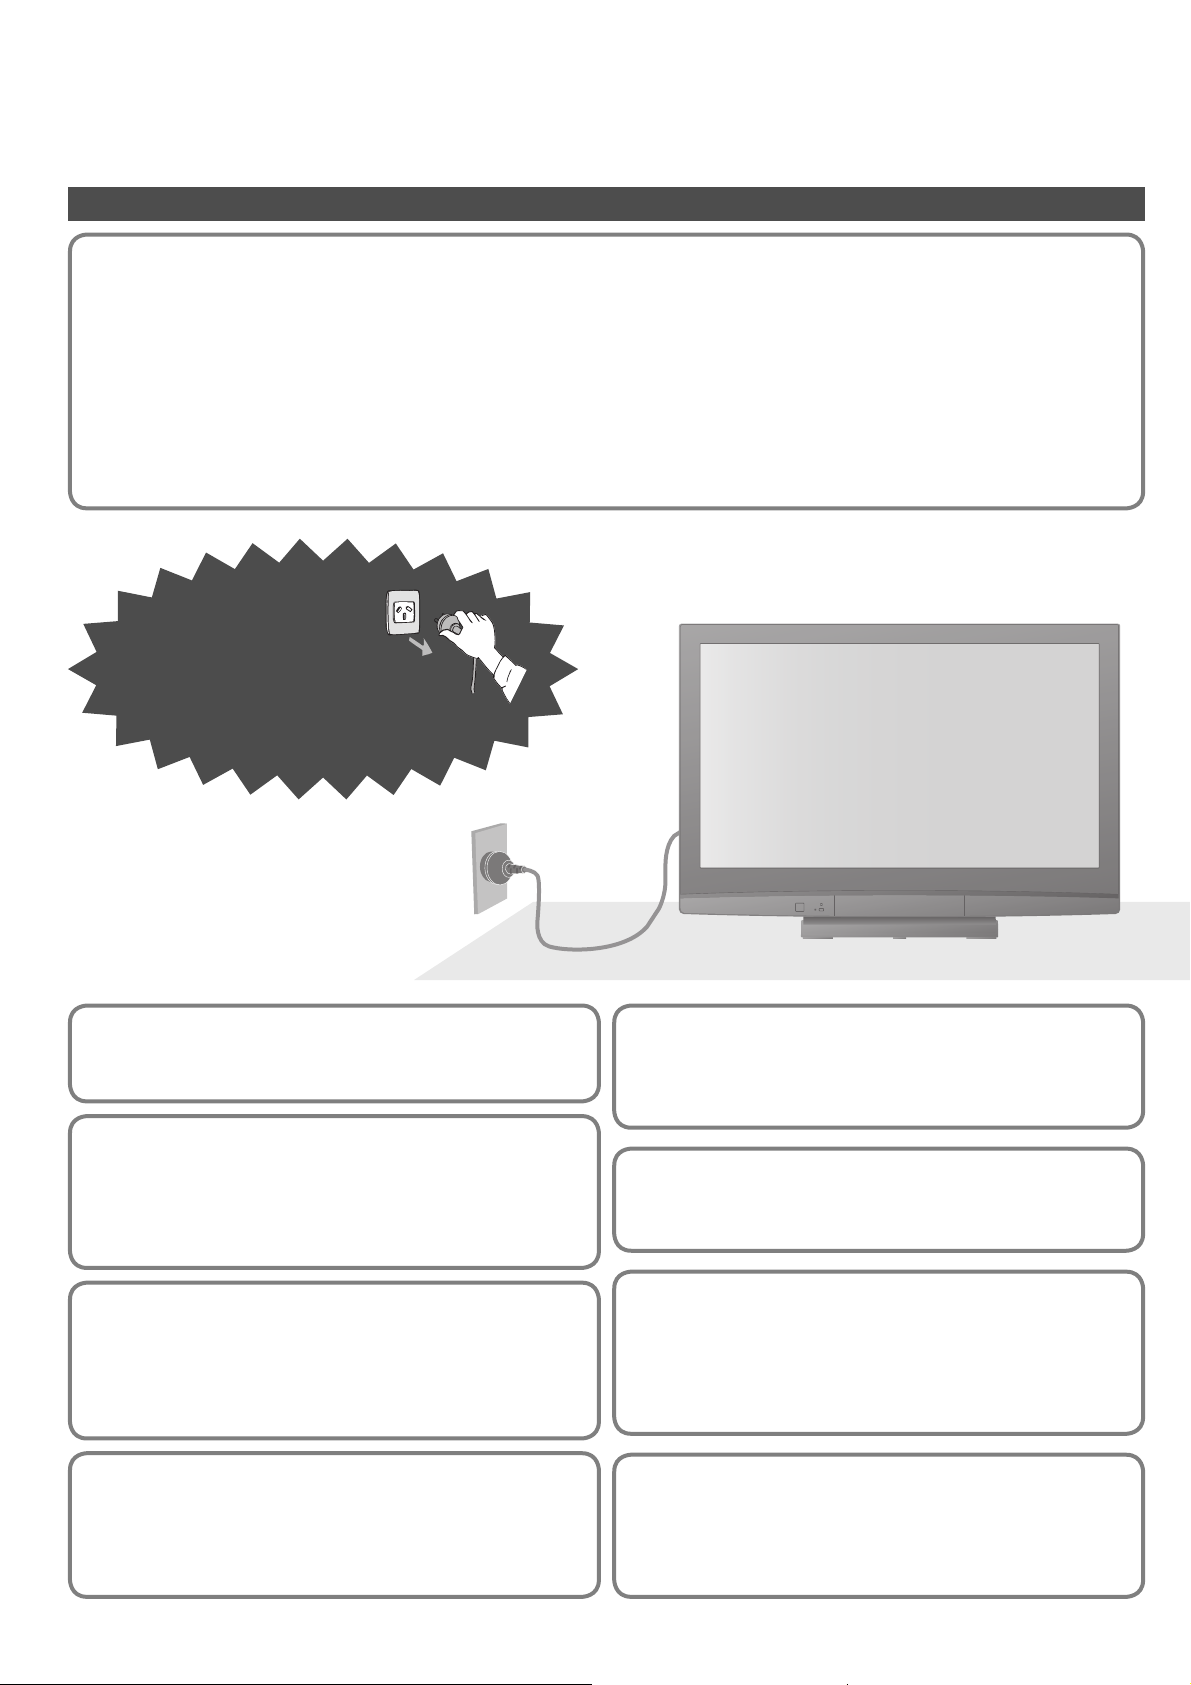
Warning
Handling the mains plug and lead
Insert the mains plug fully into the socket outlet. (If the mains plug is loose, it could generate heat and cause fi re.)
•
Ensure that the mains plug is easily accessible.
•
Ensure the earth pin on the mains plug is securely connected to prevent electrical shock.
•
Do not touch the mains plug with a wet hand. (This may cause electrical shock.)
•
Do not use any mains lead other than that provided with this TV. (This may cause fi re or electrical shock.)
•
Do not damage the mains lead. (A damaged lead may cause fi re or electrical shock.)
•
Do not move the TV with the lead plugged in the socket outlet.
•
Do not place a heavy object on the lead or place the lead near a high-temperature object.
•
Do not twist the lead, bend it excessively, or stretch it.
•
Do not pull on the lead. Hold onto the mains plug body when disconnecting lead.
•
Do not use a damaged mains plug or socket outlet.
•
If you fi nd any
abnormality,
remove the mains plug
immediately!
AC 220-240 V
50 / 60 Hz
Power source
This TV is designed to operate on 220-240 V,
•
50 / 60 Hz AC.
Do not remove covers
NEVER modify the TV yourself
(High-voltage components may cause serious electrical shock.)
Have the TV checked, adjusted, or repaired at your
•
local Panasonic dealer.
Keep liquids away from the TV
To prevent damage which may result in fi re or shock hazard,
•
do not expose this appliance to dripping or splashing.
Do not place containers with water (fl ower vase, cups,
•
cosmetics, etc.) above the TV. (including on shelves
above, etc.)
Do not place foreign objects
inside the TV
Do not allow any objects to drop into the TV through
•
the air vents (fi re or electrical shock may result).
Do not place the TV on sloped or
unstable surfaces
The TV may fall off or tip over.
•
Use only the dedicated pedestals
/ mounting equipment
Using an unapproved pedestal or other fi xtures may
•
make the TV unstable, risking injury. Be sure to ask
your local Panasonic dealer to perform setup.
Use approved pedestals / mounts (p. 6).
•
Do not expose to direct sunlight
and other sources of heat
Avoid exposing the TV to direct sunlight and other
•
sources of heat. To prevent fi re never place any type of
candle or naked fl ame on top or near the TV.
4
Do not allow children to handle
SD Card
As with any small object, SD Cards can be swallowed
•
by young children. Please remove SD Card immediately
after use and store out of reach of children.
Notes
Caution
■ When cleaning the TV, remove the
mains plug
Cleaning an energized TV may cause electrical shock.
•
■
When the TV is not going to be used for a
long period of time, remove the mains plug
This TV will still consume some power even in
•
the Off mode, as long as the mains plug is still
connected to a live socket outlet.
■ Transport only in upright position
Transporting the TV with its display panel facing upright
•
or downward may cause damage to the internal circuitry.
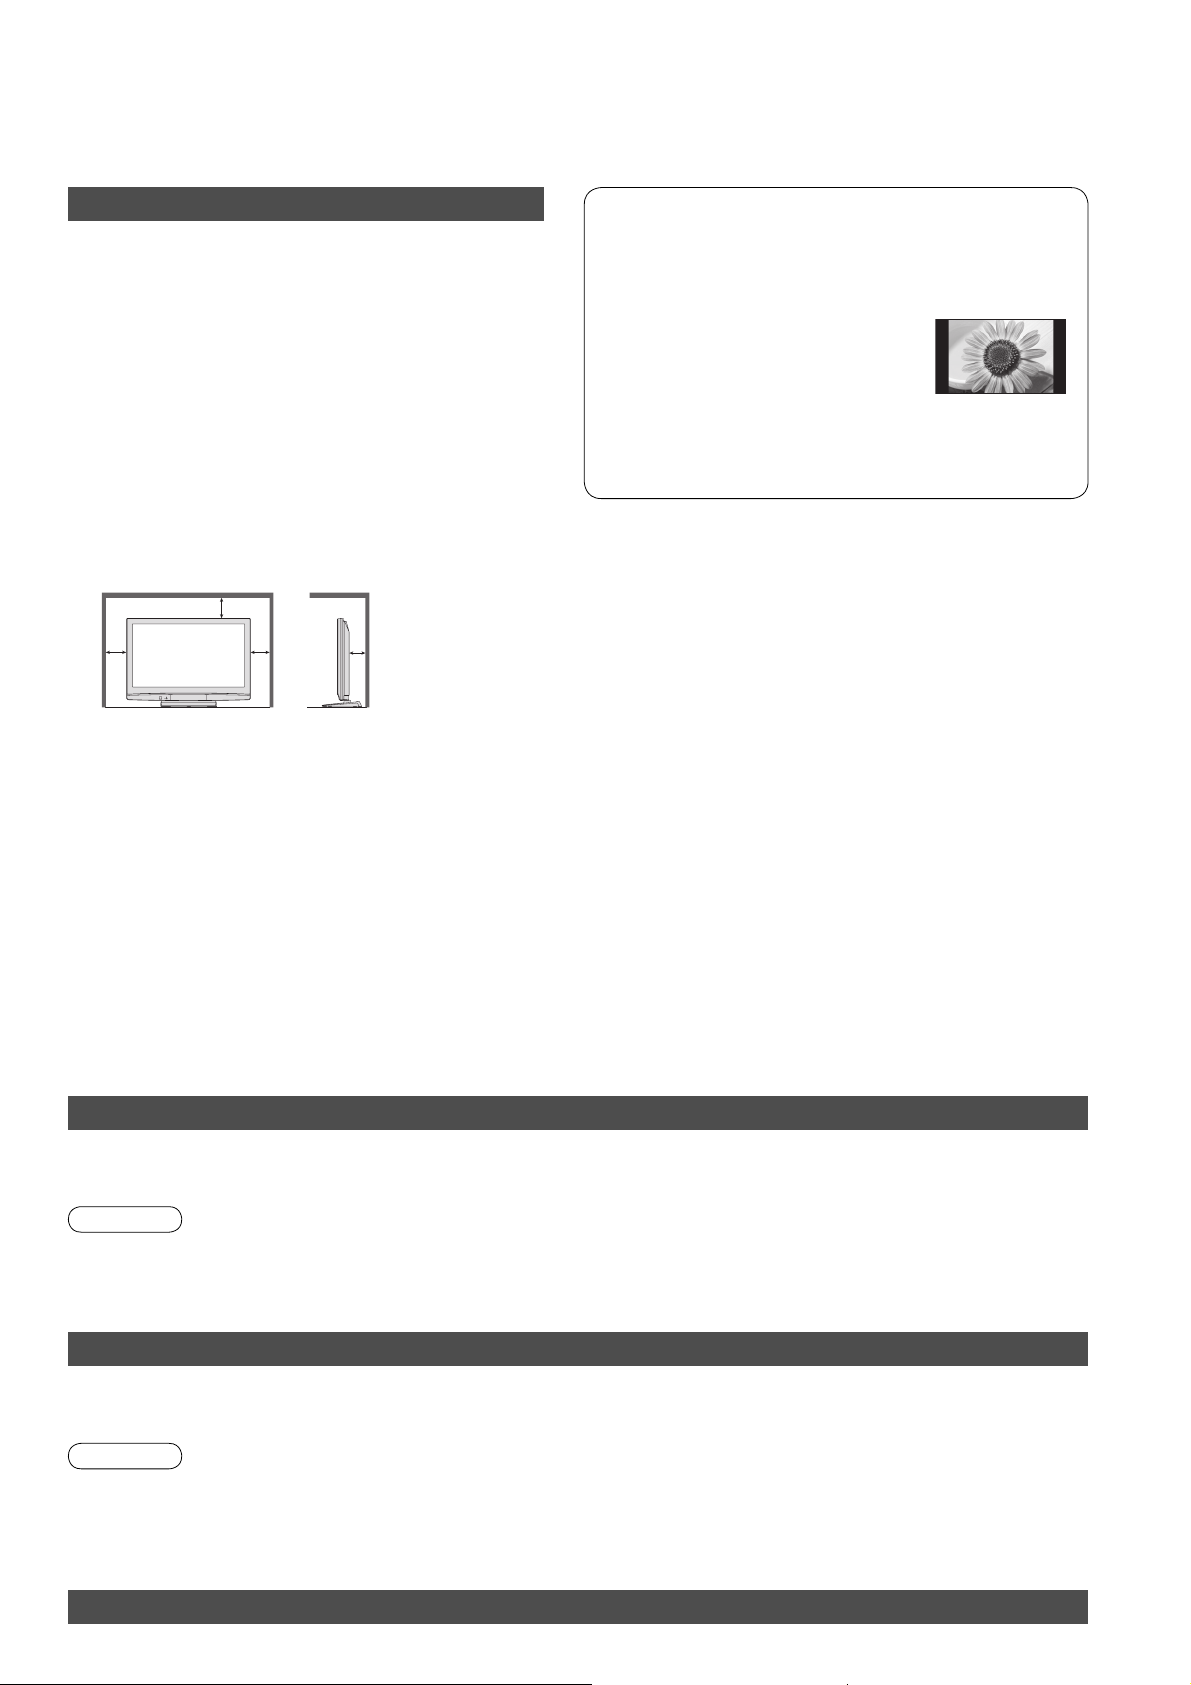
■ Allow suffi cient space around the
TV for radiated heat
Minimum distance
10
10
When using the pedestal, keep the space between
•
the bottom of the TV and the fl oor surface.
In case of using Wall-hanging bracket, follow the
•
manual of it.
10 7
(cm)
■ Do not block the rear air vents
Blocked ventilation by newspapers, table cloths, curtains,
•
etc. may cause overheating, fi re or electrical shock.
■
Do not expose your ears to excessive
volume from the headphones
Irreversible damage can be caused.
•
Do not display a still picture for a long time
This causes the image to remain on the plasma
screen (“image retention”).
This is not considered a malfunction and is not
covered by the warranty.
Typical still images
Programme number and other logos
•
Image displayed in 4:3 mode
•
Video game
•
Computer image
•
To prevent image retention, contrast is lowered
automatically after a few minutes if no signals are
sent or no operations are performed. (p. 47)
■ Auto power standby function
If no signal is received and no operation is
•
performed in Analogue TV mode for 30 minutes,
the TV will automatically go to standby mode.
■ Keep the TV away from these types of
equipment
Electronic equipment
•
In particular, do not place video equipment near
the TV (electromagnetic interference may distort
images / sound).
Equipment with an infrared sensor
•
This TV also emits infrared rays (this may affect
operation of other equipment).
Maintenance
First, remove the mains plug from the socket outlet.
Display panel
Regular care: Gently wipe the surface clean of dirt by using a soft cloth.
Major contamination: Wipe the surface clean using a soft cloth dampened with clean water or diluted neutral detergent
(1 part detergent to 100 parts water). Then, using a soft dry cloth, evenly wipe the surface clean until it is dry.
Caution
The surface of the display panel has been specially treated and may be easily damaged.
•
Do not tap or scratch the surface with your fi ngernail or other hard object.
Take care not to subject the surface to insect repellent, solvent, thinner, or other volatile substances
•
(this may degrade surface quality).
Cabinet, Pedestal
Regular care: Wipe the surface clean using a soft dry cloth.
Major contamination: Dampen a soft cloth with clean water or water containing a small amount of neutral detergent.
Then, wring the cloth and wipe the surface clean with it. Finally, wipe the surface clean with a dry cloth.
Caution
Take care not to subject the TV's surfaces to detergent.
•
(A liquid inside the TV could lead to product failure.)
Take care not to subject surfaces to insect repellent, solvent, thinner, or other volatile substances
•
(this may deteriorate the surface by peeling the paint).
Do not allow the cabinet and pedestal to make contact with a rubber or PVC substance for a long time.
•
Mains plug
Wipe the mains plug with a dry cloth at regular intervals. (Moisture and dust may lead to fi re or electrical shock.)
5
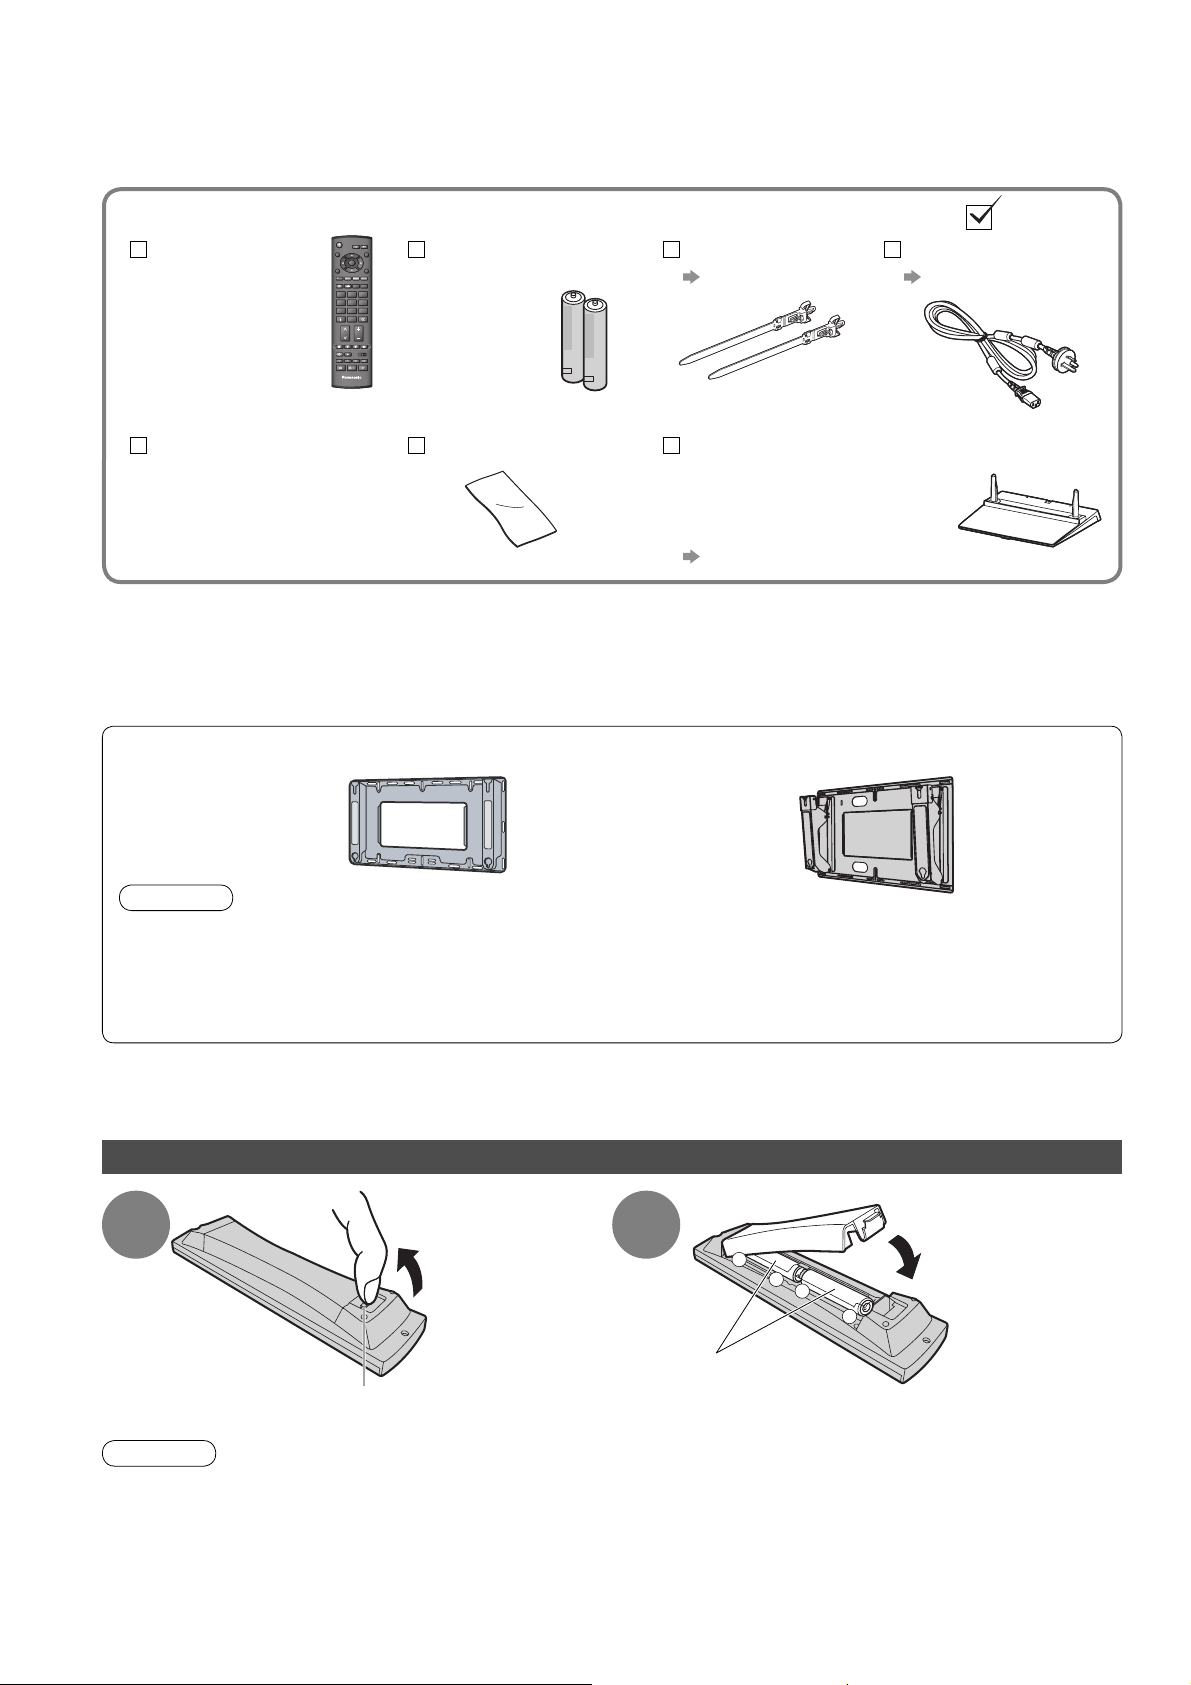
Accessories / Options
Standard accessories
Remote Control
N2QAYB000228
•
Operating Instructions
with Warranty
statement
This product contains possibly dangerous parts (such as plastic bags), that can be breathed in or swallowed by
•
young children accidentally. Keep these parts out of reach of young children.
Optional accessories
Wall-hanging bracket
(vertical)
TY-WK42PV3W
•
TY-WK42PV4W
•
Caution
In order to maintain the unit’s performance and safety, be absolutely sure to ask your dealer or a licenced
•
contractor to secure the wall-hanging brackets.
Carefully read the instructions accompanying the pedestal, and be absolutely sure to take steps to prevent
•
the TV from tipping over.
Handle the TV carefully during installation since subjecting it to impact or other forces may cause product
•
damage.
OK
132
465
798
0
CH VOL
TV
Check that you have the accessories and items shown
Batteries for the
Remote Control (2)
R6 (AA)
•
Cleaning cloth
Clamper (2)
p. 10
Pedestal (ST-42R4-WG / ST-50R4-WG)
TBLX0049
•
(TH-42PX80A)
TBLX0051
•
(TH-50PX80A)
p. 7
(angle)
TY-WK42PR3W
•
TY-WK42PR4W
•
Mains Lead
p. 8
6
Installing remote’s batteries
1
Pull open
Hook
Caution
Incorrect installation may cause battery leakage and corrosion, resulting in damage to the remote control.
•
Do not mix old and new batteries.
•
Do not mix different battery types (such as alkaline and manganese batteries).
•
Do not use rechargeable (Ni-Cd) batteries.
•
Do not burn or breakup batteries.
•
Batteries must not be exposed to excessive heat such as sunshine, fi re or the like.
2
Note the correct
polarity (+ or -)
+
+
-
Close

Attaching the pedestal
Warning
Do not disassemble or modify the pedestal.
Otherwise the TV may fall over and become damaged, and personal injury may result.
•
Caution
Do not use any other TV and displays.
Otherwise the TV may fall over and become damaged, and personal injury may result.
•
Do not use the pedestal if it becomes warped or physically damaged.
If you use the pedestal while it is physically damaged, personal injury may result. Contact your nearest
•
Panasonic dealer immediately.
During set-up, make sure that all screws are securely tightened.
If insuffi cient care is taken to ensure screws are properly tightened during assembly, the pedestal will not be
•
strong enough to support the TV, and it might fall over and become damaged, and personal injury may result.
Ensure that the TV does not fall over.
If the TV is knocked or children climb onto the pedestal with the TV installed, the TV may fall over and personal
•
injury may result.
Two or more people are required to install and remove the TV.
If two or more people are not present, the TV may be dropped, and personal injury may result.
•
Quick Start Guide
Assembly screw (4)
(silver)
M5 × 18 mm M5 × 25 mm
Assembly screw (4)
(black)
■ Assembling the pedestal
Use the four assembly screws to fasten the left and
right poles to the base securely.
Make sure that the screws are securely tightened.
•
Forcing the assembly screws the wrong way will
•
strip the threads.
“L” or “R” mark is stamped on the bottom of the pole.
•
■ Securing the TV
Use the assembly screws to fasten securely.
Make sure that the screws are securely tightened.
•
Carry out the work on a horizontal and level surface.
•
Pole (2) Base
L
R
D
M5 × 25 mm
B
R
A
M5 × 18 mm
•
Accessories / Options
L
Front
View from the bottom
Hole for pedestal installation
Arrow mark
D
7
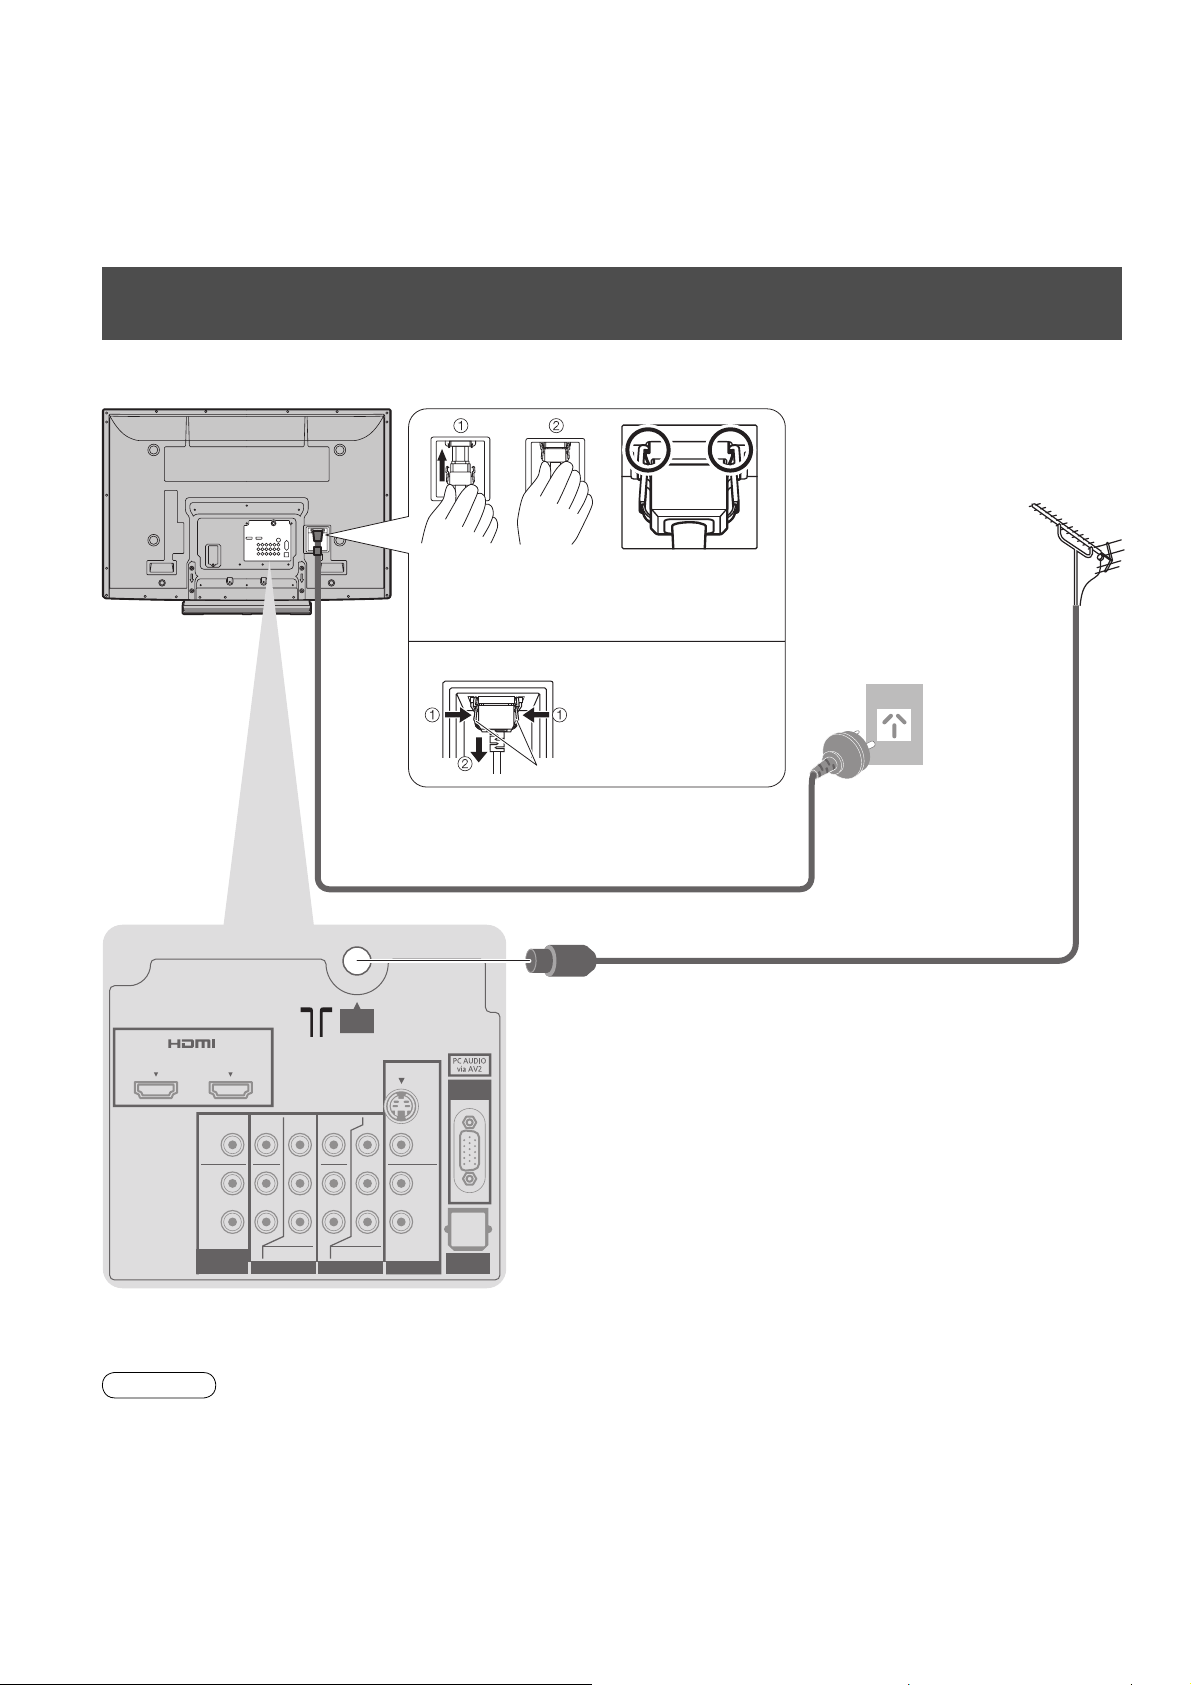
Basic Connection
External equipment and cables shown are not supplied with this TV.
Please ensure that the unit is disconnected from the mains socket before attaching or disconnecting any leads.
When disconnecting the mains lead, be absolutely sure to disconnect the mains plug at the socket outlet fi rst.
Example 1
Connecting aerial
TV only
Rear of the TV
Aerial
AV IN
12
VIDEO VIDEO
Y
LRL
PB/CB
Push until both
side tabs click
Make sure that
the mains lead is
securely fi xed.
To remove from the TV:
•
Press both tabs
and pull on
mains connector
to release
AC 220-240 V
50 / 60 Hz
tabs
Mains lead (supplied)
RF cable
ANT
S VIDEO
PC
VIDEO
Y
L
PB/CB
AUDIOAUDIOAUDIO
VIDEO
L
AUDIO
8
R
MONITOR
OUT
P
R
COMPONENT
AV1 IN
R
/
CR
R
P
R
/
CR
COMPONENT
AV2 IN AV3 IN
DIGITAL
AUDIO OUT
Note
Do not put the RF cable close to the mains lead to avoid noise.
•
Do not place the RF cable under the TV.
•
To obtain optimum quality picture and sound, an Aerial, the correct cable (75 Ω coaxial) and the correct
•
terminating plug are required.
If a communal Aerial system is used, you may require the correct connection cable and plug between the wall
•
Aerial socket and the TV.
Your local Television Service Centre or dealer may be able to assist you in obtaining the correct Aerial system for
•
your particular area and the accessories required.
Any matters regarding Aerial installation, upgrading of existing systems or accessories required, and the costs
•
incurred, are the responsibility of you, the Customer.
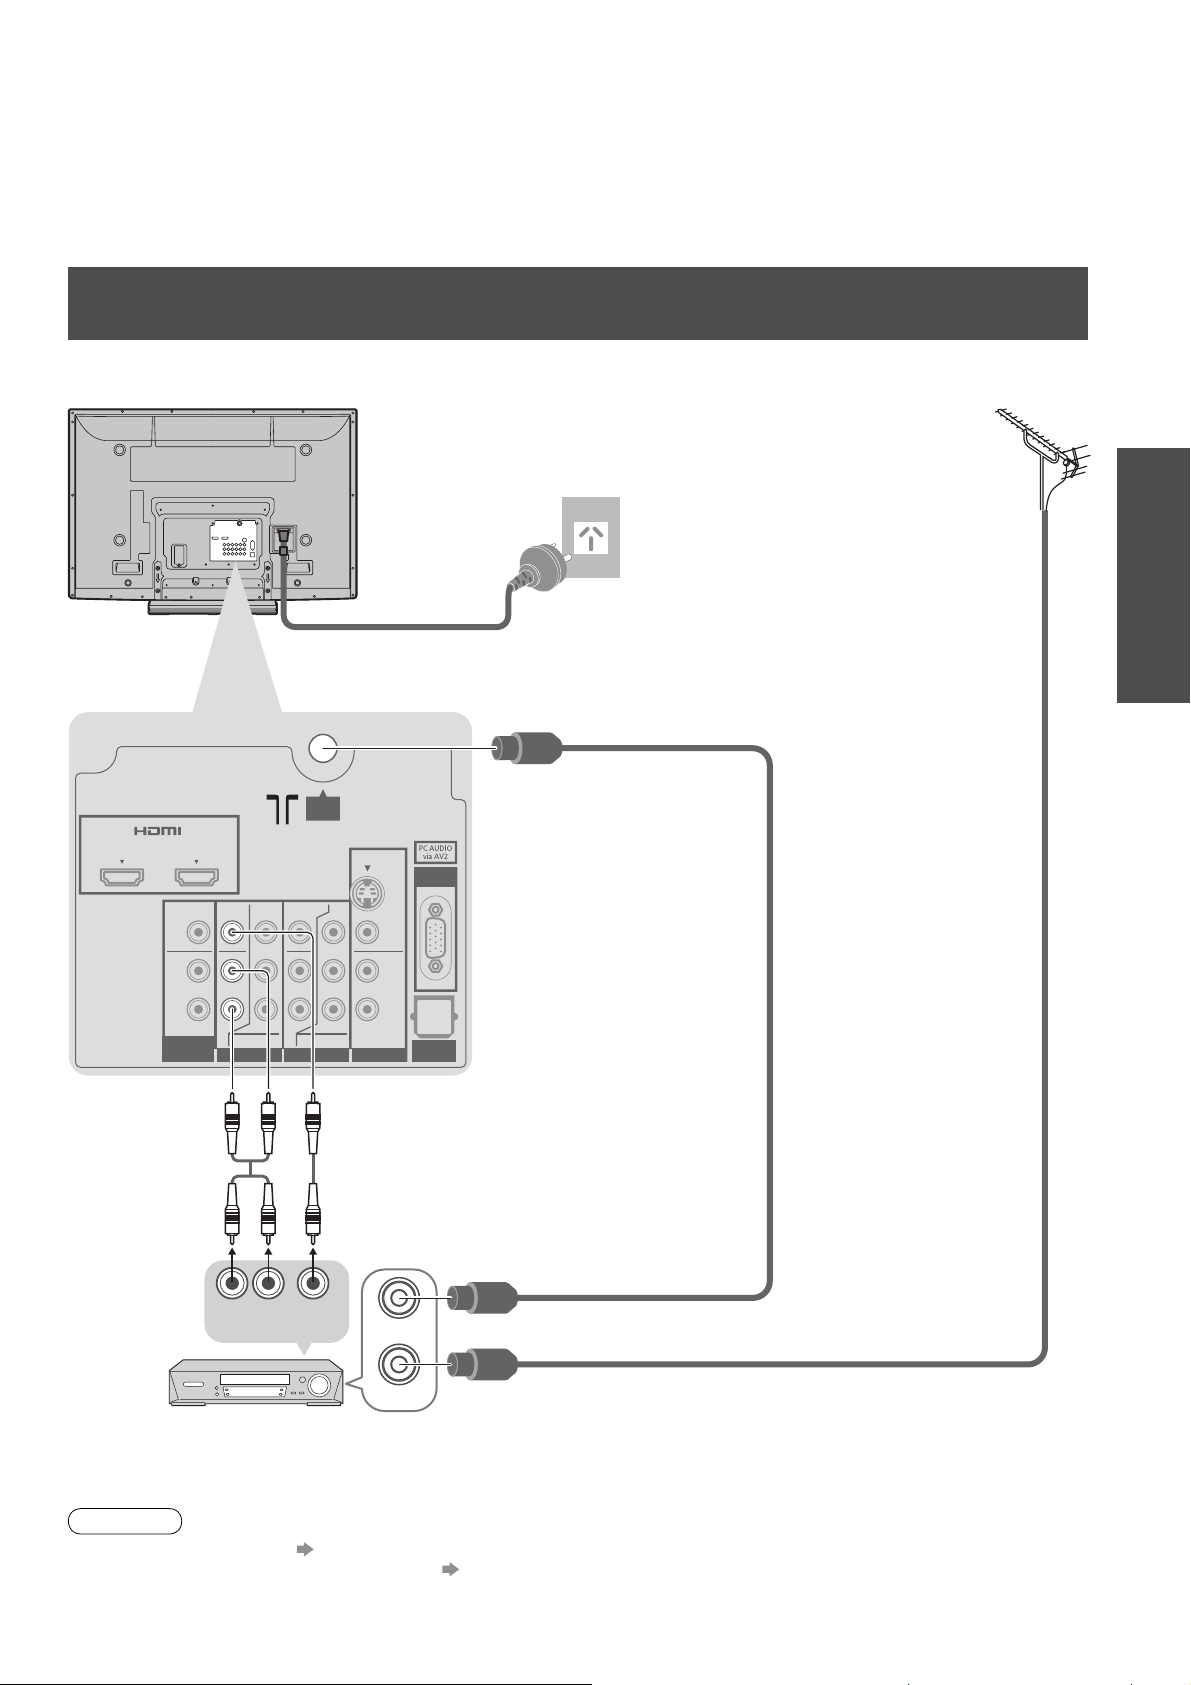
Example 2
Connecting DVD Recorder / VCR
TV, DVD Recorder or VCR
AerialRear of the TV
AV IN
12
VIDEO VIDEO
LRL
PB/CB
R
MONITOR
OUT
P
COMPONENT
AV1 IN
Mains lead (supplied)
ANT
S VIDEO
VIDEO
L
AUDIOAUDIOAUDIO
R
CR
COMPONENT
AV2 IN AV3 IN
Y
PB/CB
P
L
R
R
/
CR
Y
R
/
VIDEO
AUDIO
PC
DIGITAL
AUDIO OUT
AC 220-240 V
50 / 60 Hz
Quick Start Guide
•
Basic Connection
RCA cable
AUDIO
OUT
VIDEO
OUT
RF OUT
RF IN
DVD Recorder or VCR
Note
VIERA Link connection p. 38
•
If your recorder is not available for DVB p. 48
•
Read the manual of the equipment too.
•
RF cable
RF cable
9
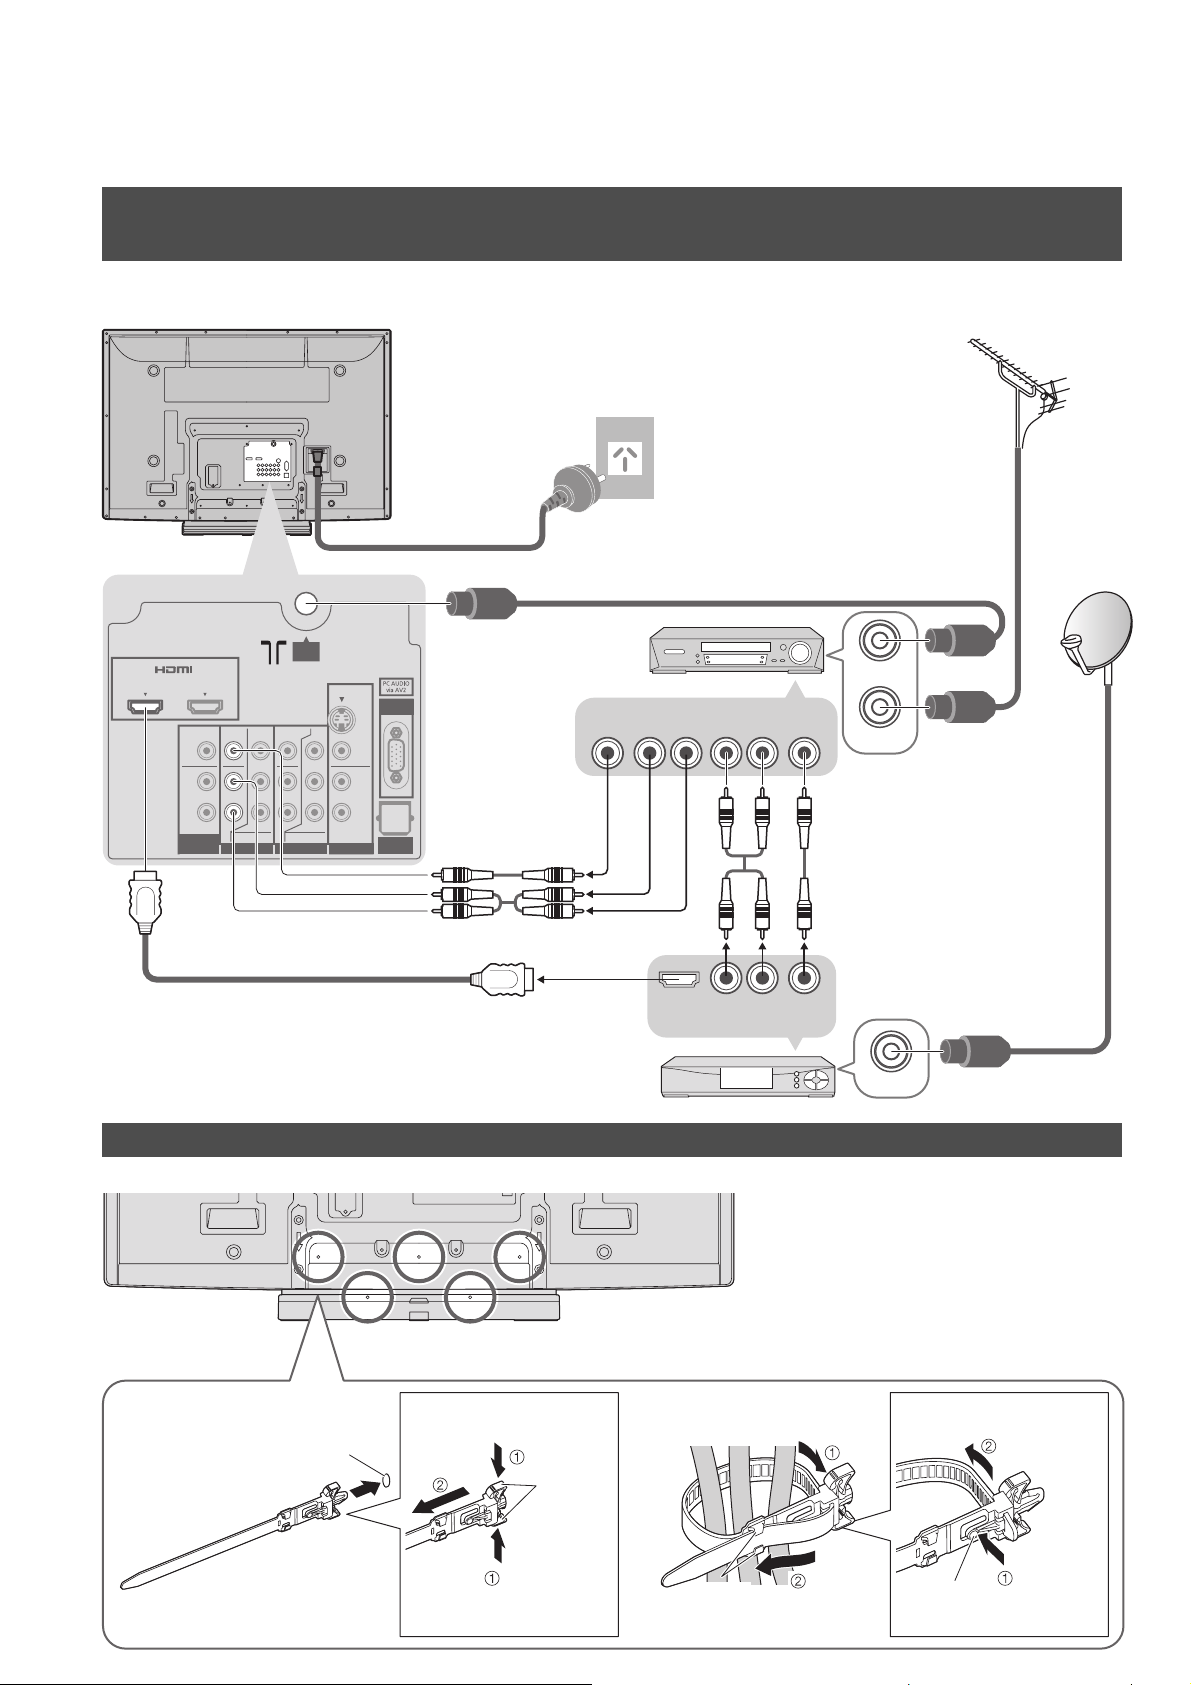
Basic Connection
Example 3
Connecting DVD Recorder / VCR and Set top box
TV, DVD Recorder / VCR and Set top box
Rear of the TV
AC 220-240 V
50 / 60 Hz
Mains lead
(supplied)
RF cable
Aerial
AV IN
12
VIDEO VIDEO
R
MONITOR
OUT
Fully wired HDMI
compliant cable
Rear of the TV
LRL
COMPONENT
AV1 I N
Y
PB/CB
P
R
/
CR
ANT
VIDEO
Y
L
PB/CB
AUDIOAUDIOAUDIO
R
P
R
/
CR
COMPONENT
AV2 I N AV3 I N
S VIDEO
L
R
VIDEO
AUDIO
PC
DIGITAL
AUDIO OUT
DVD Recorder
or VCR
AUDIO
VIDEO
OUT
RCA cable
OUT
RCA cable
HDMI
OUT
Set top box
Using the clamper
RF OUT
AUDIO
AUDIO
VIDEO
IN
IN
RF IN
RF cable
VIDEO
OUT
OUT
RF IN
Do not bundle the RF cable and mains
•
lead together (could cause distorted
RF cable
image).
Fix cables with clampers as necessary.
•
When using the optional accessory,
•
follow the option’s assembly manual to
fi x cables.
10
■ Attach the clamper ■ Bundle the cables
To remove
from the TV:
hole
snaps
Insert the clamper
in a hole
Keep
pushing both
side snaps
Set the
tip in the
hooks
To loosen:
knobhooks
Keep
pushing
the knob

P
ULL
Identifying Controls
TV
Function select
Volume / Contrast / Brightness / Colour /
•
Mains power
On / Off switch
Switch On to turn on the TV
•
or turn the TV to standby
mode by the remote control
Sharpness / Tint (NTSC mode) / Bass /
Treble / Balance / Auto Tuning (p. 30)
AV4 IN
VIDEO
S VIDEO
Changes the
input mode
Increases or decreases the programme position by one. When a
function is already displayed, press to increase or decrease the
selected function. When in Standby mode, switches TV On.
C.A.T.S. (Contrast Automatic Tracking System) sensor
Senses brightness to adjust picture quality in “Eco” mode in Picture Menu (p. 24)
•
Remote control signal receiver
Power LED
Standby: red
•
On: green
When using the remote control, indicates the TV has received a command.
•
Headphones
jack
(p. 42)
AV4
terminals
(p. 42)
Lift door to open
AUDIO
L
AV I N
3
R
HDMI3
terminal
(p. 42)
SD Card
slot
(p. 37)
Quick Start Guide
•
•
Identifying Controls
Basic Connection
Remote Control
Standby On / Off switch
Switches TV On or Off standby
•
Guide (p. 17)
Displays TV Guide
•
OK
Confi rms selections and choices
•
Press after selecting programme positions to
•
quickly change programme (DVB) (p. 14)
Main Menu (p. 22)
Press to access VIERA Link, Picture,
•
Sound and Setup Menus
Aspect (p. 16)
Changes aspect ratio from Aspect Selection list
•
Also possible by pressing this button
•
repeatedly until you reach the desired aspect
VIERA Link Menu (p. 39)
Press to access VIERA Link Menu directly
•
Numeric buttons
Changes programme and teletext pages
•
When in Standby mode, switches TV On
•
Programme Information
Displays programme information
•
Programme Up / Down
Selects programme in sequence
•
When in Standby mode, switches TV On
•
Teletext (p. 18)
Switches to teletext mode
•
Subtitles (p. 14)
Displays Subtitles
•
VCR / DVD Panasonic equipment
operations
(p. 21)
(p. 15)
POWER
GUIDE
MENU
R G Y B
132
465
798
INFO MUTE
CH VOL
TEXT STTL INDEX HOLD
PROGRAMME
INPUT
OK
OPTION SD CARDASPECT
0
RECPOWER
VCR DVD
TV
EXIT
RETURN
Input mode selection
TV - switches DVB / Analogue mode (p. 14)
•
AV - switches to AV input mode from Input
•
Selection list (p. 20)
Exit
Returns to the normal viewing screen
•
Cursor buttons
Makes selections and adjustments
•
Return
Returns to the previous menu
•
Coloured buttons
Used for the selection, navigation and
•
operation of various functions
SD Card (p. 36)
Switches to SD Card viewing mode
•
Option Menu (p. 15)
Easy setting for viewing and sound options
•
Sound Mute
Switches sound mute On or Off
•
Volume Up / Down
Hold
Freeze / unfreeze picture (p. 14)
•
Holds the current teletext page (teletext
•
mode) (p. 19)
Index (p. 19)
Returns to the teletext index page
•
(teletext mode)
11
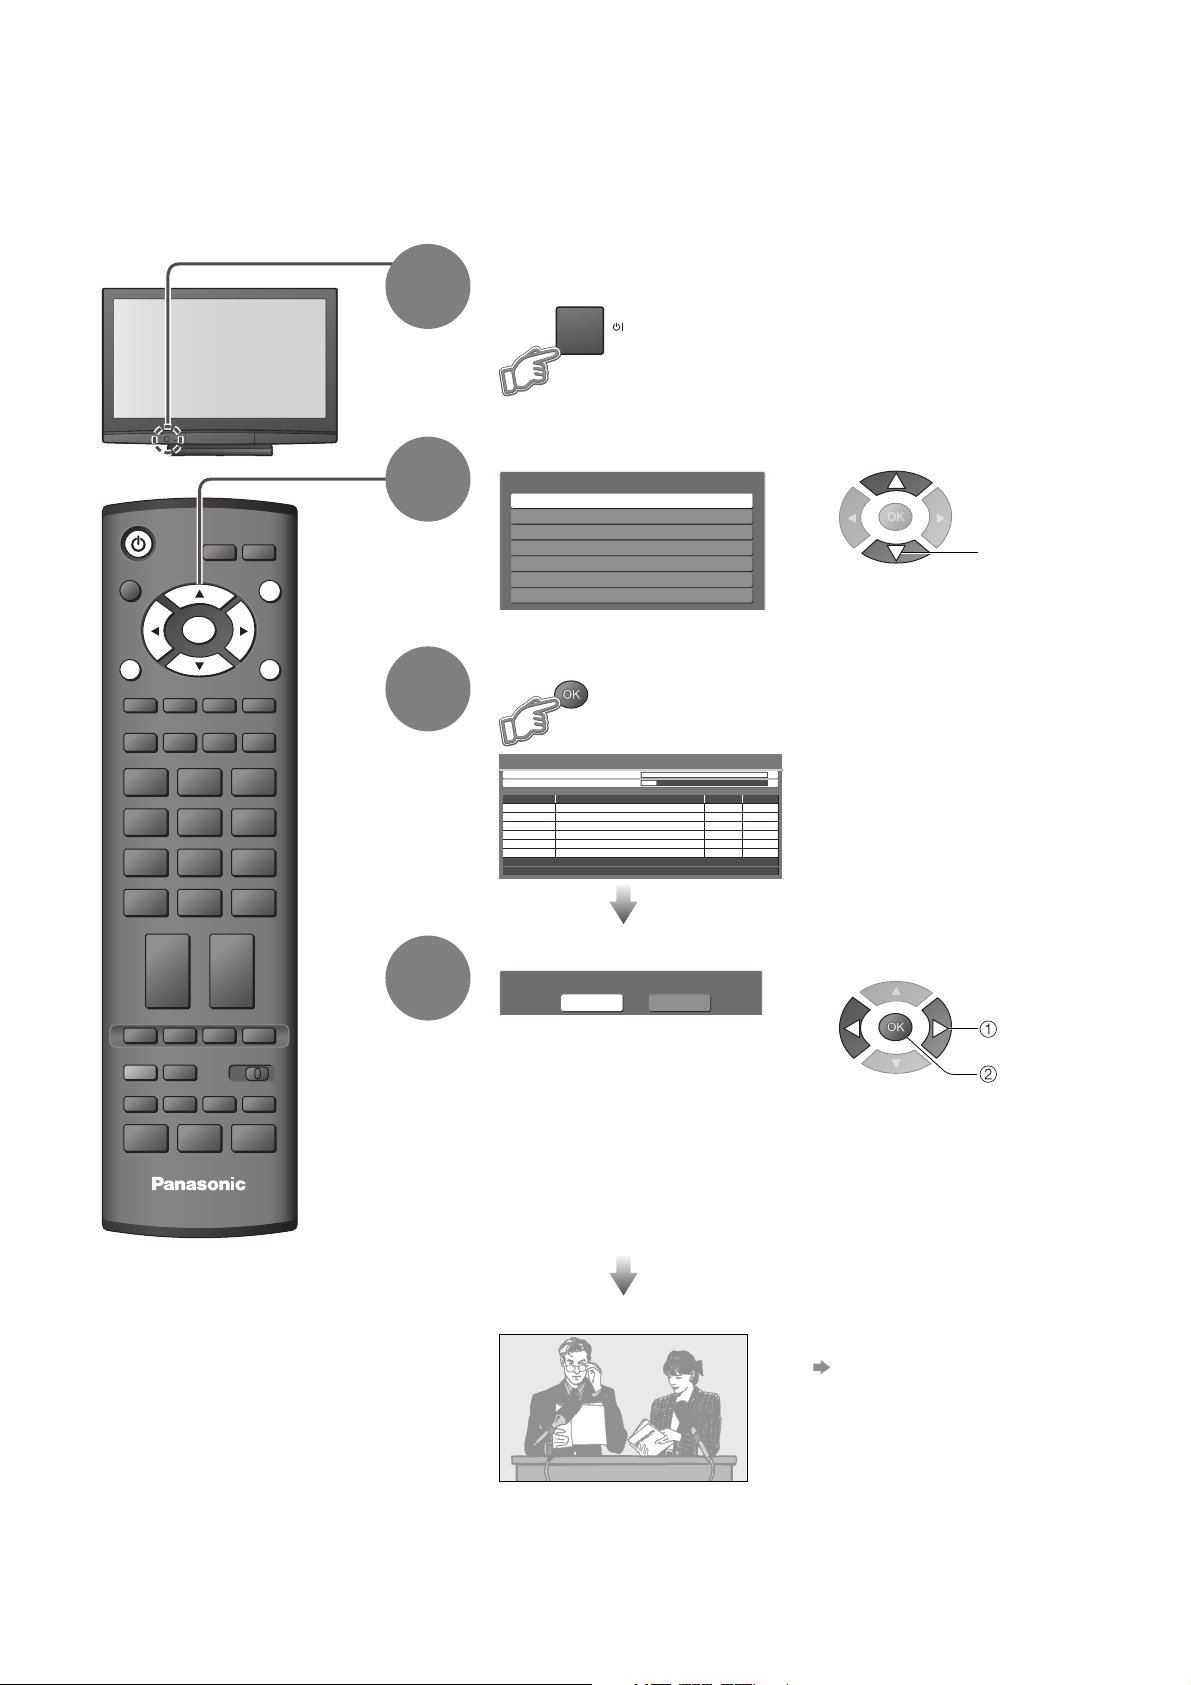
Auto Tuning
Search and store TV programmes automatically.
These steps are not necessary if the setup has been completed by your local dealer.
Plug the TV into mains socket and switch On
(Takes a few seconds to be displayed)
1
You can now use the remote
•
control to turn On the TV or turn
the TV to standby mode.
(Power LED: On)
Select your state
Select State / Territory
POWER
ASPECT
MENU
2
INPUT
EXIT
OK
RETURN
New South Wales / Australian Capital Territory
Victoria
Queensland
South Australia
Western Australia
Northern Territory
Tasmania
Start Auto Tuning
select
OPTION
DIRECT TV REC
132
465
798
0
VCR
TEXT F.P. INDEX HOLD
REC
VCR DVD
PROGRAMME
TV
3
4
Auto Tuning - Digital (DVB) and Analogue
Digital (DVB) Tuning 6 69
Analogue Tuning 0 75
This will take about 6 minutes.
RF Ch Service Name Type Quality
2
ABC TV Sydney DVB 10
3 SBS DIGITAL 1 DVB 10
4 FTV guide DVB 10
7 7 Digital DVB 10
CH 29 Analogue
CH 33
DVB: 4 Analogue: 2
Searching
Analogue
-
-
Auto Tuning will start to search for
•
TV programmes and store them in
the numbered order as specifi ed
by the broadcasters.
Select the picture setting
Please select your viewing environment.
•
•
Home: “Viewing Mode” is set as
Shop: “Viewing Mode” is set as
Home Shop
“Home” is the recommended mode for
viewing at home. Select “Home” for
optimal picture / power consumption.
“Shop” is for in-store display.
If “Shop” is selected, the word
“Shop” appears every time the TV is
switched on. (p. 14)
“Normal”. (p. 24)
“Dynamic”. (p. 24)
select
set
12
Auto Tuning is now complete and your TV is ready for viewing.
To edit programmes
•
“Editing Programmes” (p. 28)

Many features available on this TV can be accessed via the On Screen Display
menu.
■ How to use remote control
Using the
On Screen
Displays
MENU
OK
RETURN
EXIT
Open the main menu
Move the cursor / select the menu
Move the cursor / adjust levels / select from a range of options
Access the menu / store settings after adjustments have been made or options
have been set
Return to the previous menu
Exit the menu system and return to the normal viewing screen
■ ON SCREEN HELP Instructions box
(example: Sound Menu)
Sound Menu 1/2
Mode Music
Bass
Treble
Balance
Headphone Volume
Surround Off
Volume Correction
Speaker Distance to Wall
MPX
Select
EXIT
Change
RETURN
Over 30cm
Stereo
16
16
12
Page up
Page down
Quick Start Guide
•
Auto Tuning
On-screen operation guide
will help you.
Note
If tuning has failed “Auto Tuning” (p. 31)
•
To initialize all settings “Shipping Condition” (p. 32)
•
If you turned the TV Off during Standby mode last time, the TV will be in Standby mode when you turn the TV On
•
with Mains power On / Off switch.
13
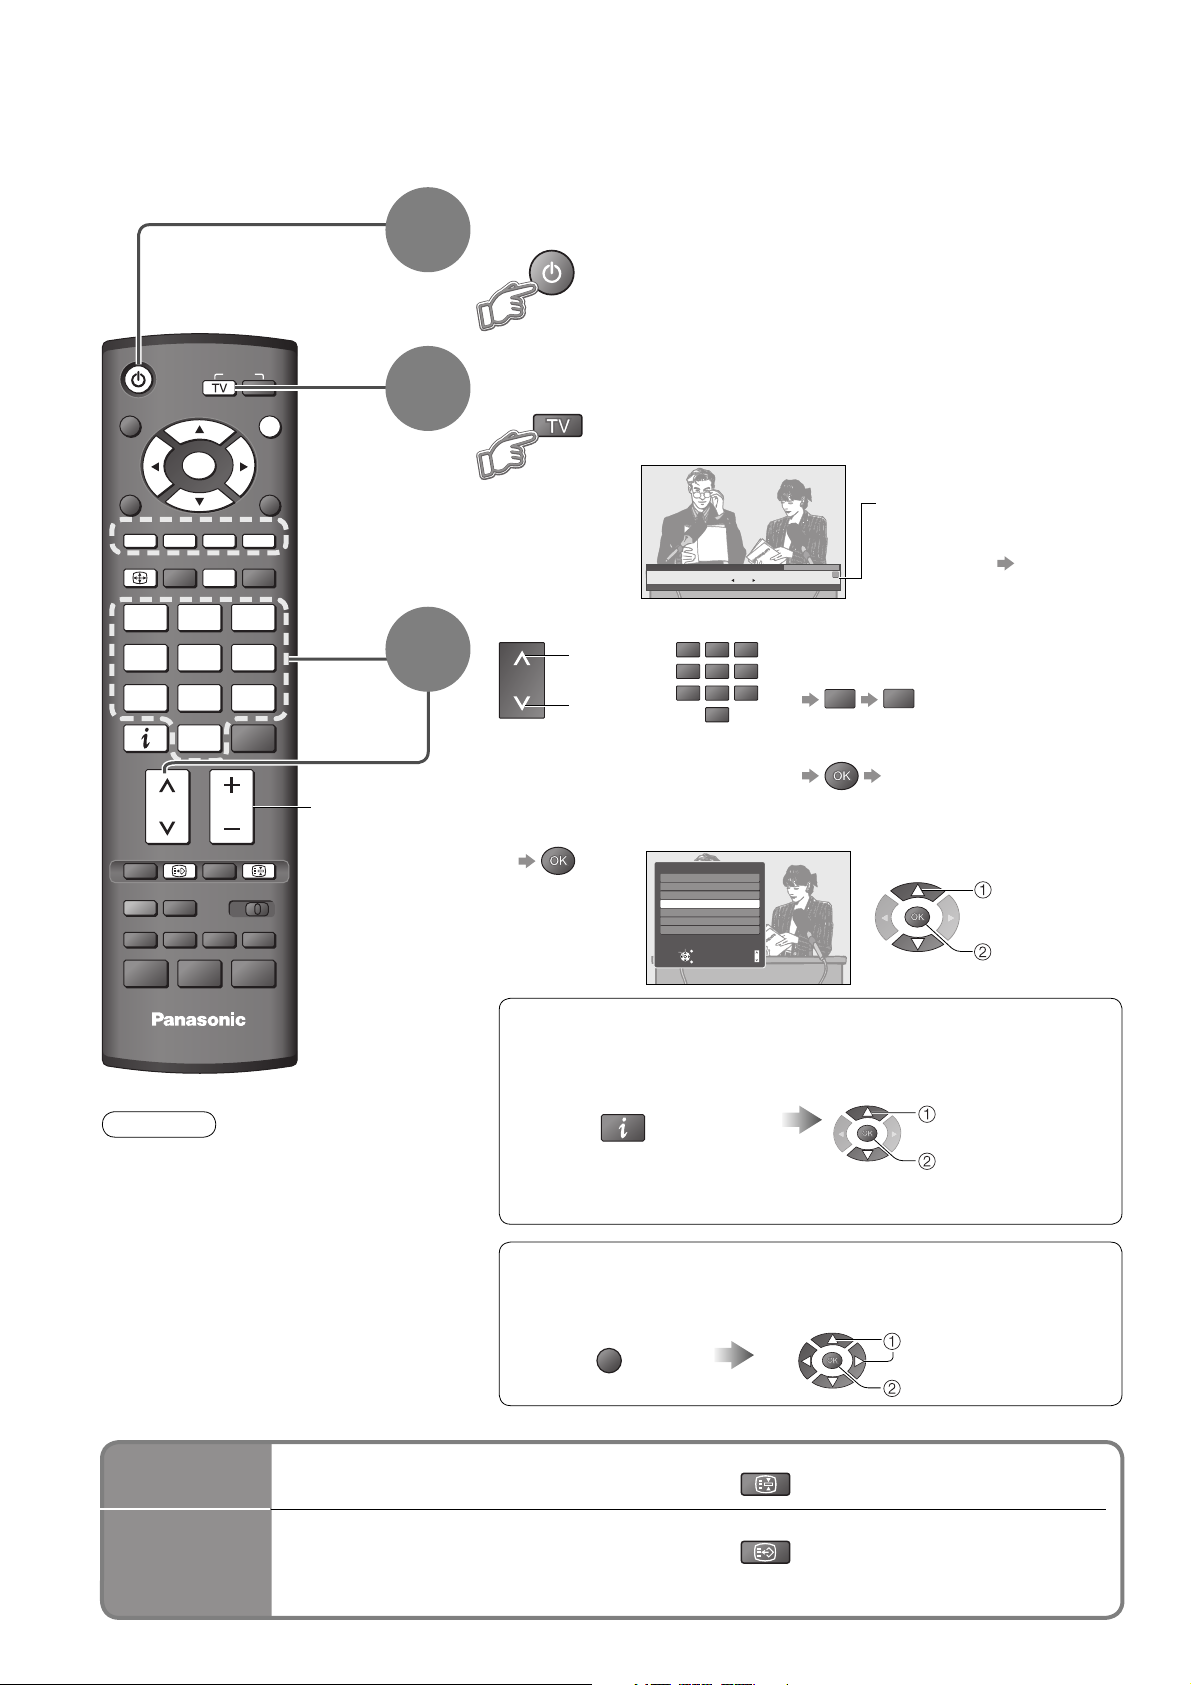
Watching TV
Turn power on
POWER
ASPECT
MENU
RGYB
ASPECT
INPUT
OK
OPTION
132
465
798
0
INFO
CH VOL
TEXT INDEX
STTL
REC
VCR DVD
PROGRAMME
EXIT
RETURN
DIRECT TV REC
HOLD
Volume
1
2
3
POWER
Mains power On / Off switch should be On. (p. 11)
•
If “Shop” is displayed on the top right of the screen,
•
reset settings in “Shipping Condition” (p. 32), and
select “Home” in “Auto Tuning” (p. 12).
Select DVB (Digital Video Broadcasting) or
Analogue mode
Also possible to select the mode using the
•
TV button on the front panel of the TV. (p. 11)
Information banner
appears whenever you
1 TEN Digital
Coronation Street
9:00 am - 11:00 am
All DVB Services
10:30 am
Select FAV List
Now
select a programme
For details p. 15
•
Select a programme
or
132
465
798
All DVB Services
6
Cartoon Nwk
7
BBC Radio Wales
BBC Radio Cymru
8
BBC ONE Wales
1
BBC THREE
2
BBCi
3
CBBC Channel
4
Select
EXIT
Connect
RETURN
0
Page up
Page down
up
CH
down
To select from the Programme List
•
To select the two or three-digit
•
programme number, e.g. 39
3 9
If one or two-digit programme
•
number
quickly changes the
programme
(in a short time)
select
programme
watch
TV
Note
When the TV is switched
•
to standby, there will be a
clicking sound after a short
delay. This is normal.
■ Other useful functions
Hold
Display
subtitles
Freeze / unfreeze picture
Display / hide subtitles (if available)
Channel changing is also possible when this function is active.
•
■ Select a programme using Information banner (p. 15)
Possible to confi rm the programme name before selecting programmes.
Display Information banner
if it is not displayed
INFO
Possible to set display
•
timeout in “Banner Display
Timeout” (p. 25).
While the banner is displayed,
select the programme
select programme
watch
■ Select a programme using TV Guide (p. 17)
Possible to confi rm the TV Guide (EPG) before selecting programmes.
Display TV Guide
GUIDE
Select the programme
select programme
watch
HOLD
STTL
14
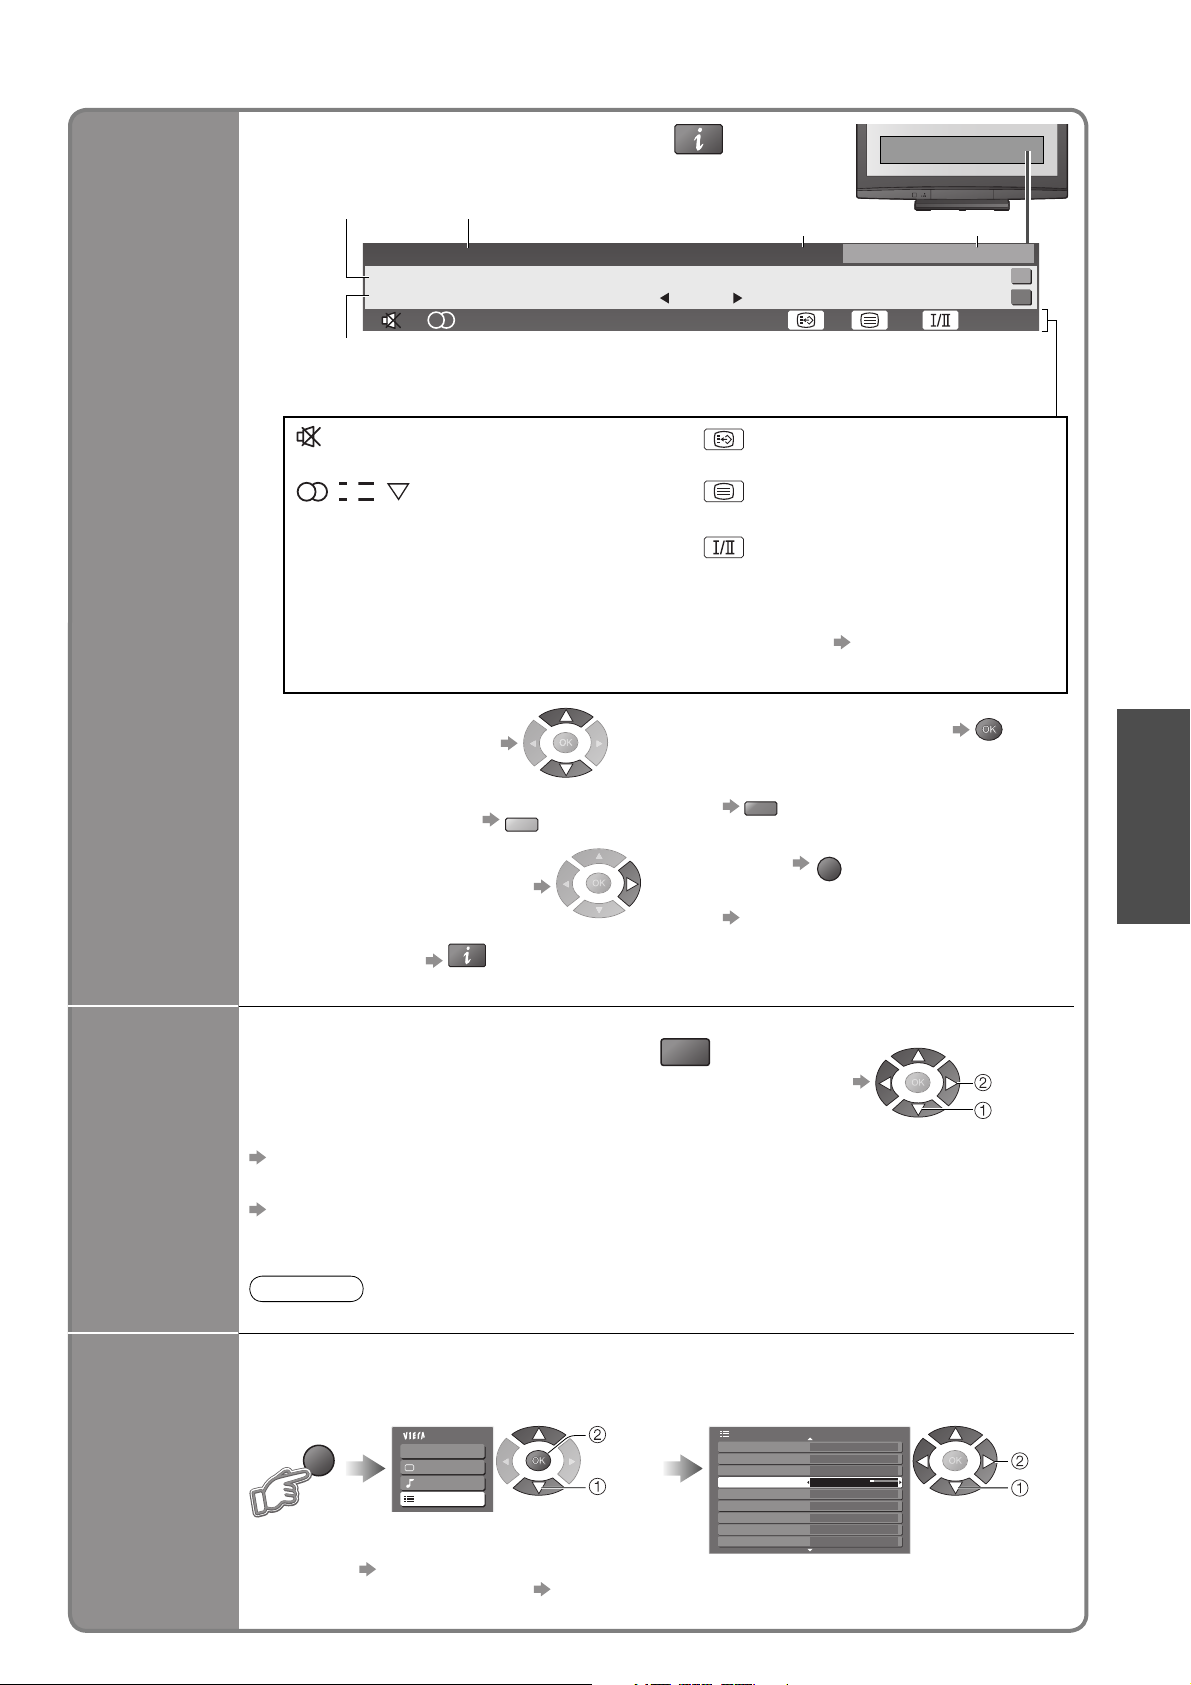
■ Other useful functions
Display
Information
banner
Display Information banner
Also appears when changing a programme
•
ProgrammeEvent
Example:
1 TEN Digital
Coronation Street
9:00 am - 11:00 am
Rating: PG Bad Signal
DVB: Event Start / Finish time
Analogue: Programme status
Features available / Message meanings
Sound mute On
II
, I,
,
Audio mode (Analogue mode) (p. 45)
Rating:
Rating information (p. 44)
Bad signal
Poor TV signal quality
Encrypted
Scrambled programme
To confi rm another tuned
•
programme name
To change the category
•
( To select a Fav List
if you have defi ned)
Information on the next event
•
(DVB mode)
Extra information
•
(DVB mode)
INFO
B
(press again to hide the banner)
INFO
Current time Category
10:30 am
Now
Subtitle service available
Teletext service available
Multiple audio available (DVB mode)
1 - 90
Off Timer remaining time
For settings see below
•
To watch the programme
•
listed in the banner
To download new software to TV
•
R
•
•
“System Update Search Now”
(p. 27)
To hide
To set display timeout
“Banner Display Timeout” (p. 25)
EXIT
All DVB Services
Select FAV List
Software update
45
Viewing
•
Watching TV
Display the
selectable
settings for
the current
programme
Off Timer
Check or change the current
OPTION
programme status instantly
MPX (Analogue mode)
Sound Menu (p. 24)
Audio selection (DVB mode)
Sound Menu (p. 24)
Allows you to select between alternative
language for sound tracks (if available)
Note
Also possible to change the settings in Menu list (p. 24 and p. 25).
•
Volume Correction
Adjusts volume of individual programme or
input mode
To change
•
Turn the TV off automatically after a fi xed period
Display the
menu
MENU
To cancel Set to “Off” or turn the TV off.
•
To display the remaining time Information banner (above)
•
When the remaining time is within 3 minutes, the remaining time will fl ash on screen.
•
Select “Setup”
Main Menu
VIERA Link
Picture
Sound
Setup
access
select
Select “Off Timer” and set the time
Setup Menu
DVB Favourites Edit
DVB Service List
Tuning Menu
Off Timer
Teletext TOP
Shipping Condition
System Update
Power Save Off
Side Panel Off
Off
1/2
change
select
set
select
15
Watching TV
A
A
A
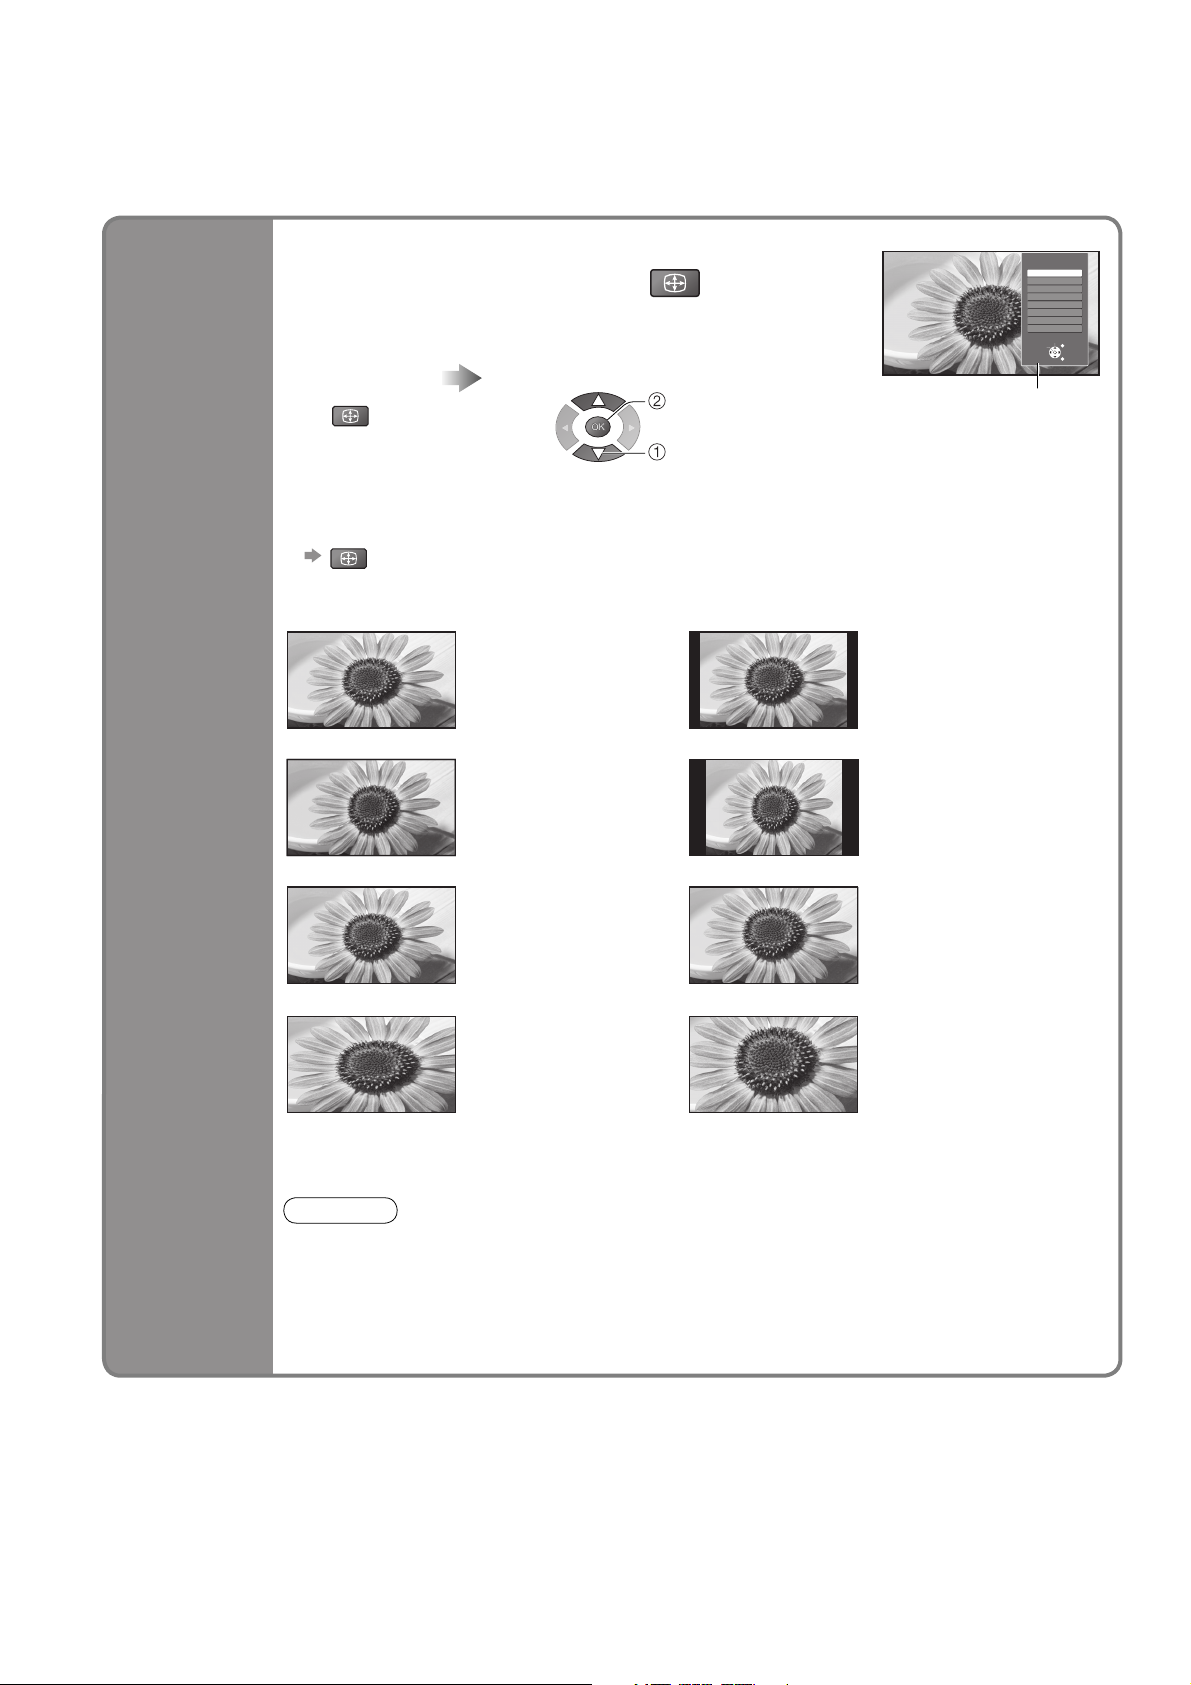
■ Other useful functions
Change
aspect
ratio
Change the aspect ratio
Enjoy viewing the picture at its optimum size and aspect.
Display Aspect
Selection list
SPECT
To change the mode using the ASPECT button only
•
SPECT
(Press repeatedly until you reach the desired mode)
16:9 14:9
Just 4:3
While the list is displayed,
select the mode
Directly displays the
image at “16:9” without
distortion (anamorphic).
Displays a “4:3”
image full-screen.
Stretching is only
noticeable at the left and
right edges.
SPECT
store
select
Aspect Selection
16:9
14:9
Just
4:3
4:3 Full
Zoom1
Zoom2
Zoom3
Select
Change
Aspect
Selection list
Displays the
image at the standard
“14:9” without distortion.
Displays the image at the
standard “4:3” without
distortion.
EXIT
RETURN
4:3 Full Zoom1
Zoom2 Zoom3
Displays a “4:3” image
enlarged horizontally to fi t
the screen.
Only available in DVB
•
mode or HD signal
Displays a “16:9” letterbox
(anamorphic) image
full-screen without
distortion.
Displays a “16:9” letterbox
or “4:3” image without
distortion.
Displays a “2.35:1”
letterbox (anamorphic)
image full-screen
without distortion. At “16:9”,
displays the image at its
maximum (with slight
enlargement).
Note
Only “16:9” and “4:3 Full” are available in DVB mode.
•
Only “16:9” and “4:3” are available in PC mode.
•
Not available in teletext mode.
•
Aspect mode can be memorized separately for SD (Standard defi nition) and HD (High
•
defi nition) signals. (except DVB mode)
16
 Loading...