

Panasonic TC-32LX60, TC-32LE60, TC-26LX60, TC-26LE60 Owner’s Manual

Panasonic
Operating instructions
LCD Television
Manual de instrucciones
Televisor LCD
Modo,No.TC'26 LX60
N0morodomo_o,oTC'26LE60
TC'32LX60
TC'32LE60
I,
[
English
EspaSol
DOro-_ ° H_ml ....
DIGITAL ..................................
For assistance, please call : 1-800-211-PANA (7262)
or contact us at www.panasonic.com/contactinfo (U.S.A.)
For assistance, please call : 787-750-4300
or visit us at www.panasonic.com (Puerto Rico)
For assistance, please call : 1-800-561-5505
or visit us at www.panasonic.ca (Canada)
Para solicitar ayuda, Ilame al: 1-800-211 -PANA (7262)
o visitenos en www.panasonic.com/contactinfo (EE.UU.)
Para solicitar ayuda, Ilame al: 787-750-4300
o visitenos en www.panasonic.com (Puerto Rico)
)
] [Resumen]
Please read these instructions before operating your set and retain them for future reference.
Lea estas instrucciones antes de utilizar su televisor y guardelas para consultarlas en el futuro.
The images shown in this manual are for illustrative purposes only.
Las imagenes mostradas en este manual tienen solamente fines ilustrativos.
TQB2AA0661
Turn your own living room into a movie theater!
Experience an amazing level ofmulti-media
excitement
DB_ °
DiGiTAL
Manufactured under license from Dolby Laboratories.
"Dolby" and the double-D symbols are trademarks of Dolby
Laboratories.
HDMI, the HDMI logo and High-Definition Multimedia
or registered trademarks of HDMI Licensing LLC.
Hi_llrlril| ,,_
_,_-_E_i_mONM_LTiMED,_,_T_R_A_E
Interface are trademarks
2
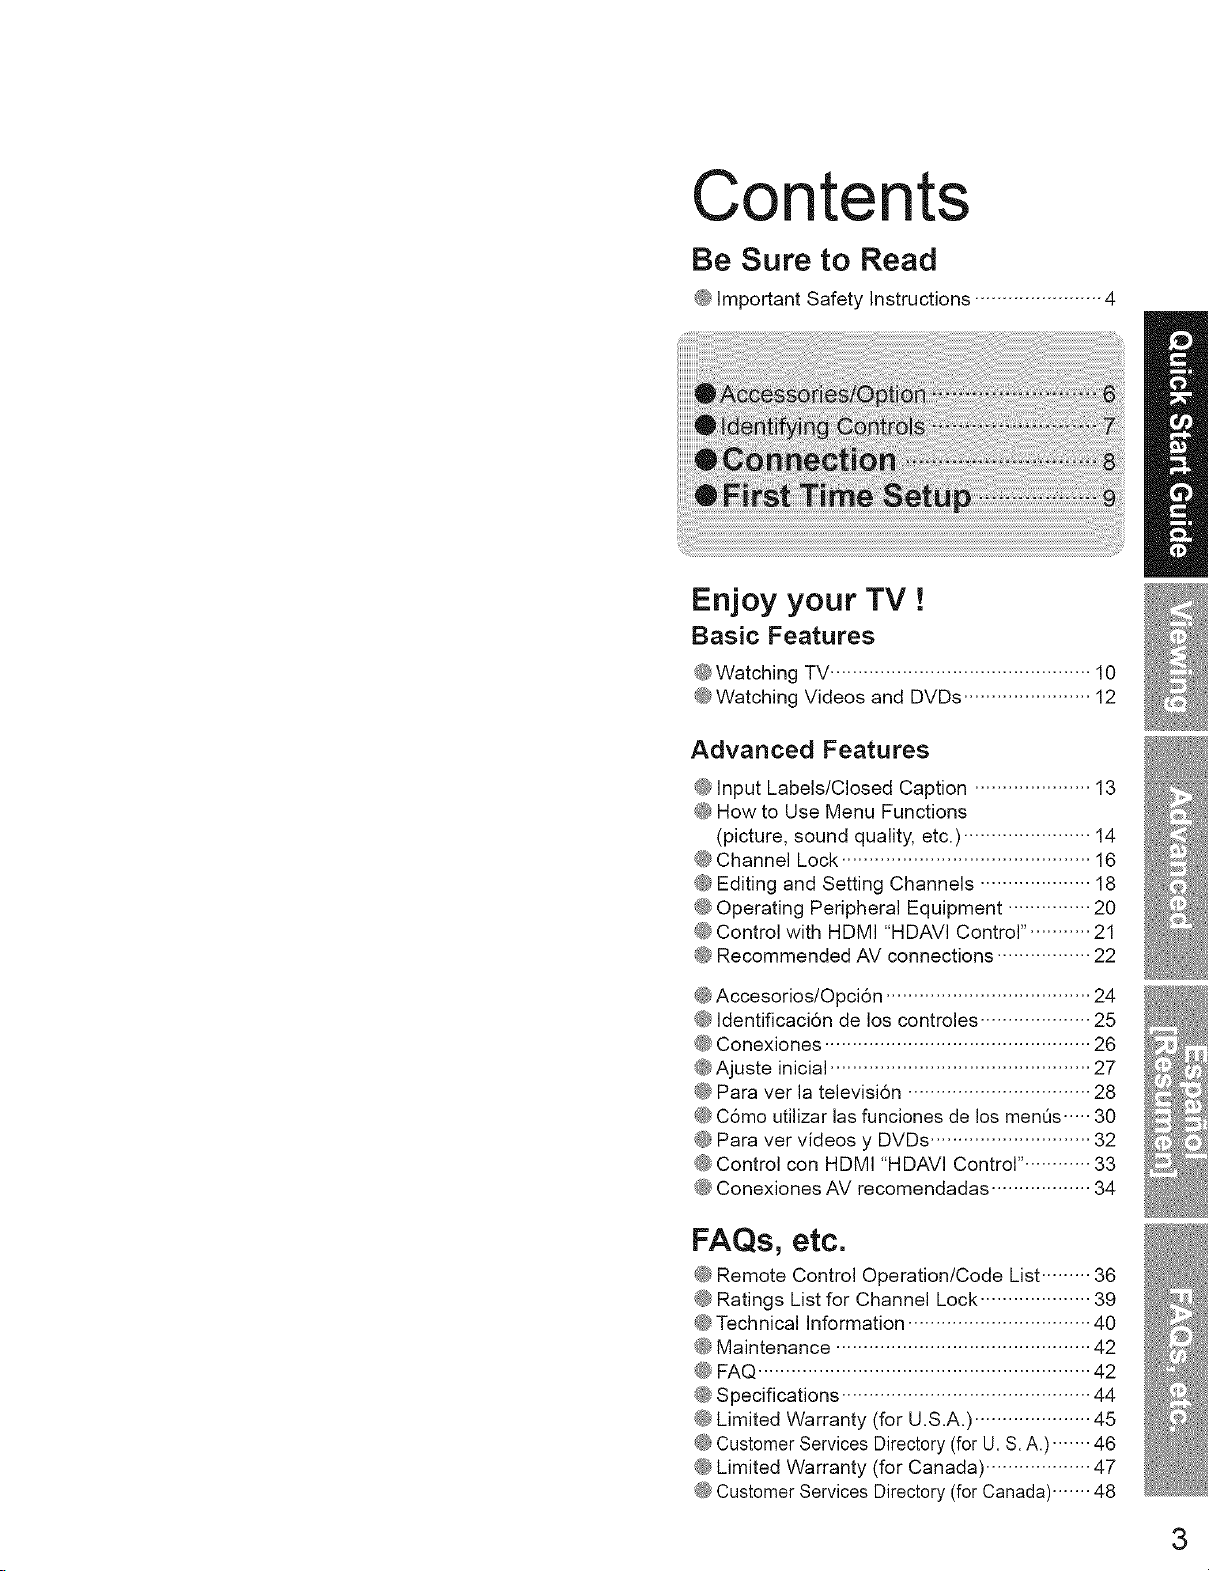
Contents
Be Sure to Read
@Important Safety Instructions ....................... 4
Enjoy your TV !
Basic Features
@Watching TV ............................................... 10
@Watching Videos and DVDs ....................... 12
Advanced Features
@Input Labels/Closed Caption ..................... 13
@How to Use Menu Functions
(picture, sound quality, etc.) ....................... 14
@Channel Lock ............................................. 16
@Editing and Setting Channels .................... 18
@Operating Peripheral Equipment ............... 20
@Control with HDMI "HDAVI Control". .......... 21
@Recommended AV connections ................. 22
@Accesorios/Opci6n ..................................... 24
@Identificaci6n de los controles .................... 25
@Conexiones ................................................ 26
@Ajuste inicial ............................................... 27
@Para ver la televisi6n ................................. 28
@C6mo utilizar las funciones de los menOs..... 30
@Para ver videos y DVDs ............................. 32
@Control con HDMI "HDAVI Control". ........... 33
@Conexiones AV recomendadas .................. 34
FAQs, etc.
@Remote Control Operation/Code List ......... 36
@Ratings List for Channel Lock .................... 39
@Technical Information ................................. 40
@Maintenance .............................................. 42
@FAQ ............................................................ 42
@Specifications ............................................. 44
@Limited Warranty (for U.S.A.) ..................... 45
@CustomerServices Directory (for U. S.A.) ....... 46
@Limited Warranty (for Canada) ................... 47
@CustomerServices Directory (for Canada)....... 48
3
I
portant Safety I
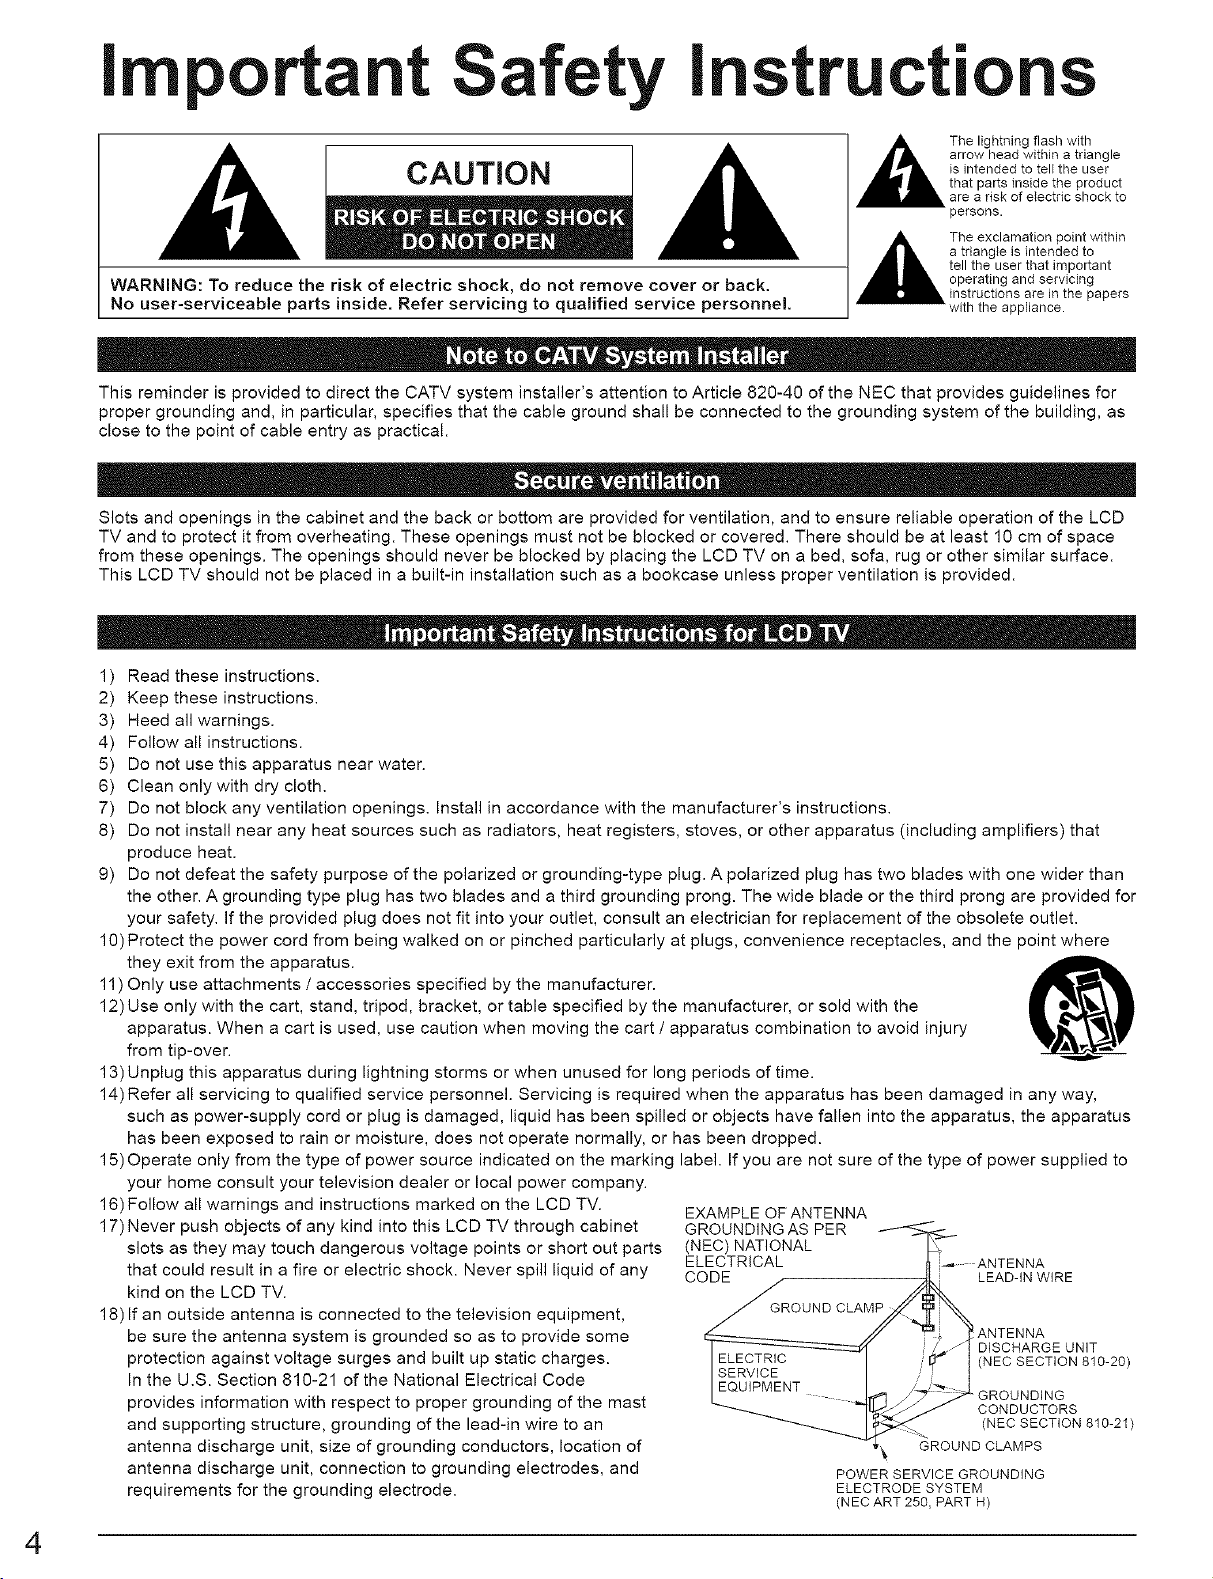
CAUTION
WARNING: To reduce the risk of electric shock, do not remove cover or back.
No user-serviceable parts inside. Refer servicing to qualified service personnel.
This reminder is provided to direct the CATV system installer's attention to Article 820-40 of the NEC that provides guidelines for
proper grounding and, in particular, specifies that the cable ground shall be connected to the grounding system of the building, as
close to the point of cable entry as practical.
Slots and openings in the cabinet and the back or bottom are provided for ventilation, and to ensure reliable operation of the LCD
TV and to protect it from overheating. These openings must not be blocked or covered. There should be at least 10 cm of space
from these openings. The openings should never be blocked by placing the LCD TV on a bed, sofa, rug or other similar surface.
This LCD TV should not be placed in a built-in installation such as a bookcase unless proper ventilation is provided.
structi
,_The lightning flash with
,_The exclamation point within
arrow head within a triangle
is intended to tell the user
that parts inside the product
are a risk of electdc shock to
persons.
a triangle is intended to
tell the user that important
operating and servicing
instructions are in the papers
with the appliance.
1) Read these instructions.
2) Keep these instructions.
3) Heed all warnings.
4) Follow all instructions.
5) Do not use this apparatus near water.
6) Clean only with dry cloth.
7) Do not block any ventilation openings. Install in accordance with the manufacturer's instructions.
8) Do not install near any heat sources such as radiators, heat registers, stoves, or other apparatus (including amplifiers) that
produce heat.
9) Do not defeat the safety purpose of the polarized or grounding-type plug. A polarized plug has two blades with one wider than
the other. A grounding type plug has two blades and a third grounding prong. The wide blade or the third prong are provided for
your safety. If the provided plug does not fit into your outlet, consult an electrician for replacement of the obsolete outlet.
10) Protect the power cord from being walked on or pinched particularly at plugs, convenience receptacles, and the point where
they exit from the apparatus.
11) Only use attachments / accessories specified by the manufacturer.
12) Use only with the cart, stand, tripod, bracket, or table specified by the manufacturer, or sold with the
apparatus. When a cart is used, use caution when moving the cart / apparatus combination to avoid injury
from tip-over.
13) Unplug this apparatus during lightning storms or when unused for long periods of time.
14) Refer all servicing to qualified service personnel. Servicing is required when the apparatus has been damaged in any way,
such as power-supply cord or plug is damaged, liquid has been spilled or objects have fallen into the apparatus, the apparatus
has been exposed to rain or moisture, does not operate normally, or has been dropped.
15) Operate only from the type of power source indicated on the marking label. If you are not sure of the type of power supplied to
your home consult your television dealer or local power company.
16) Follow all warnings and instructions marked on the LCD TV.
17) Never push objects of any kind into this LCD TV through cabinet
slots as they may touch dangerous voltage points or short out parts
that could result in a fire or electric shock. Never spill liquid of any
kind on the LCD TV.
18) If an outside antenna is connected to the television equipment,
be sure the antenna system is grounded so as to provide some
protection against voltage surges and built up static charges.
In the U.S. Section 810-21 of the National Electrical Code
provides information with respect to proper grounding of the mast
and supporting structure, grounding of the lead-in wire to an
antenna discharge unit, size of grounding conductors, location of
antenna discharge unit, connection to grounding electrodes, and
requirements for the grounding electrode.
EXAMPLE OF ANTENNA
GROUNDING AS PER
(NEC) NATIONAL
ELECTRICAL
CODE
POWER SERVICE GROUNDING
ELECTRODE SYSTEM
(NEC ART 250, PART H)
i.... ANTENNA
LEAD-IN WIRE
ANTENNA
DISCHARGE UNIT
(NEC SECTION 810-20)
GROUNDING
CONDUCTORS
(NECSECTION810-21)
GROUND CLAMPS
4
19)An outside antenna system should not be located in the vicinity of overhead power lines or other electric light or power circuits,
or where it can fall into such power lines or circuits. When installing an outside antenna system extreme care should be taken
to keep from touching such power lines or circuits as contact with them might be fatal.
20) Unplug this LCD TV from the wall outlet, and refer servicing to qualified service personnel under the following conditions:
a. When the power cord or plug is damaged or frayed.
b. If liquid has been spilled into the LCD TV.
c. If the LCD TV has been exposed to rain or water.
d. If the LCD TV does not operate normally by following the operating instructions.
Adjust only those controls that are covered by the operating instructions as improper adjustment of other
controls may result in damage and will often require extensive work by a qualified technician to restore the LCD
TV to normal operation.
e. If the LCD TV has been dropped or the cabinet has been damaged.
f. When the LCD TV exhibits a distinct change in performance - this indicates a need for service.
21 )When replacement parts are required, be sure the service technician uses replacement parts specified by the manufacturer
that have the same characteristics as the original parts. Unauthorized substitutions may result in fire, electric shock, or other
hazards.
22)WARNING : TO REDUCE THE RISK OF FIRE OR ELECTRIC SHOCK, DO NOT EXPOSE THIS APPARATUS TO RAIN
OR MOISTURE.
DO NOT PLACE LIQUID CONTAINERS (FLOWER VASES, CUPS, COSMETICS, ETC.) ABOVE THE SET.
(INCLUDING ON SHELVES ABOVE, ETC.)
23)WARNING : SMALL PARTS CAN PRESENT CHOKING HAZARD IF ACCIDENTALLY SWALLOWED. KEEP SMALL
PARTS AWAY FROM YOUNG CHILDREN.
DISCARD UNNEEDED SMALL PARTS AND OTHER OBJECTS, INCLUDING PACKAGING MATERIALS
AND PLASTIC BAGS/SHEETS TO PREVENT THEM FROM BEING PLAYED WiTH BY YOUNG CHILDREN,
CREATING THE POTENTIAL RISK OF SUFFOCATION.
24) CAUTION : TO PREVENT ELECTRIC SHOCK DO NOT USE THIS PLUG WITH A RECEPTACLE OR OTHER OUTLET
UNLESS THE BLADES CAN BE FULLY INSERTED TO PREVENT BLADE EXPOSURE.
25)CAUTION : USE WITH OTHER STAND MAY RESULT IN INSTABILITY POSSIBLY CAUSING INJURY.
26) CAUTION : DANGER OF EXPLOSION IF BATTERY IS INCORRECTLY REPLACED. REPLACE ONLY WITH THE SAME
OR EQUIVALENT TYPE.
[] This product utilizes tin-lead solder, and has a fluorescent lamp containing a small amount of mercury. Disposal of
these materials may be regulated in your community due to environmental considerations. For disposal or recycling
information please contact your local authorities, or the Electronics Industries Alliance: www.eiae.org.
Federal Communication Commission Information
This equipment has been tested and found to comply with the limits for a TV Broadcast Receiver, pursuant to Part 15 of
the FCC Rules. These limits are designed to provide reasonable protection against harmful interference in a residential
installation. This equipment generates, uses and can radiate radio frequency energy and, if not installed and used in
accordance with the instructions, may cause harmful interference to radio communications. However, there is no guarantee
that interference will not occur in a particular installation. If this equipment does cause or receive interference, which can be
determined by turning equipment off and on, the user is encouraged to try to correct the interference by one or more of the
following measures:
Reorient or relocate the TV antenna.
Increase the separation between TV and other equipment.
Connect TV into separate outlet from other equipment.
Consult the dealer or an experienced radio / TV technician for help.
FCC Caution: Any changes or modifications not expressly approved by the party responsible for compliance could void
the user's authority to operate this equipment.
5
Accesso "es/O 3ti
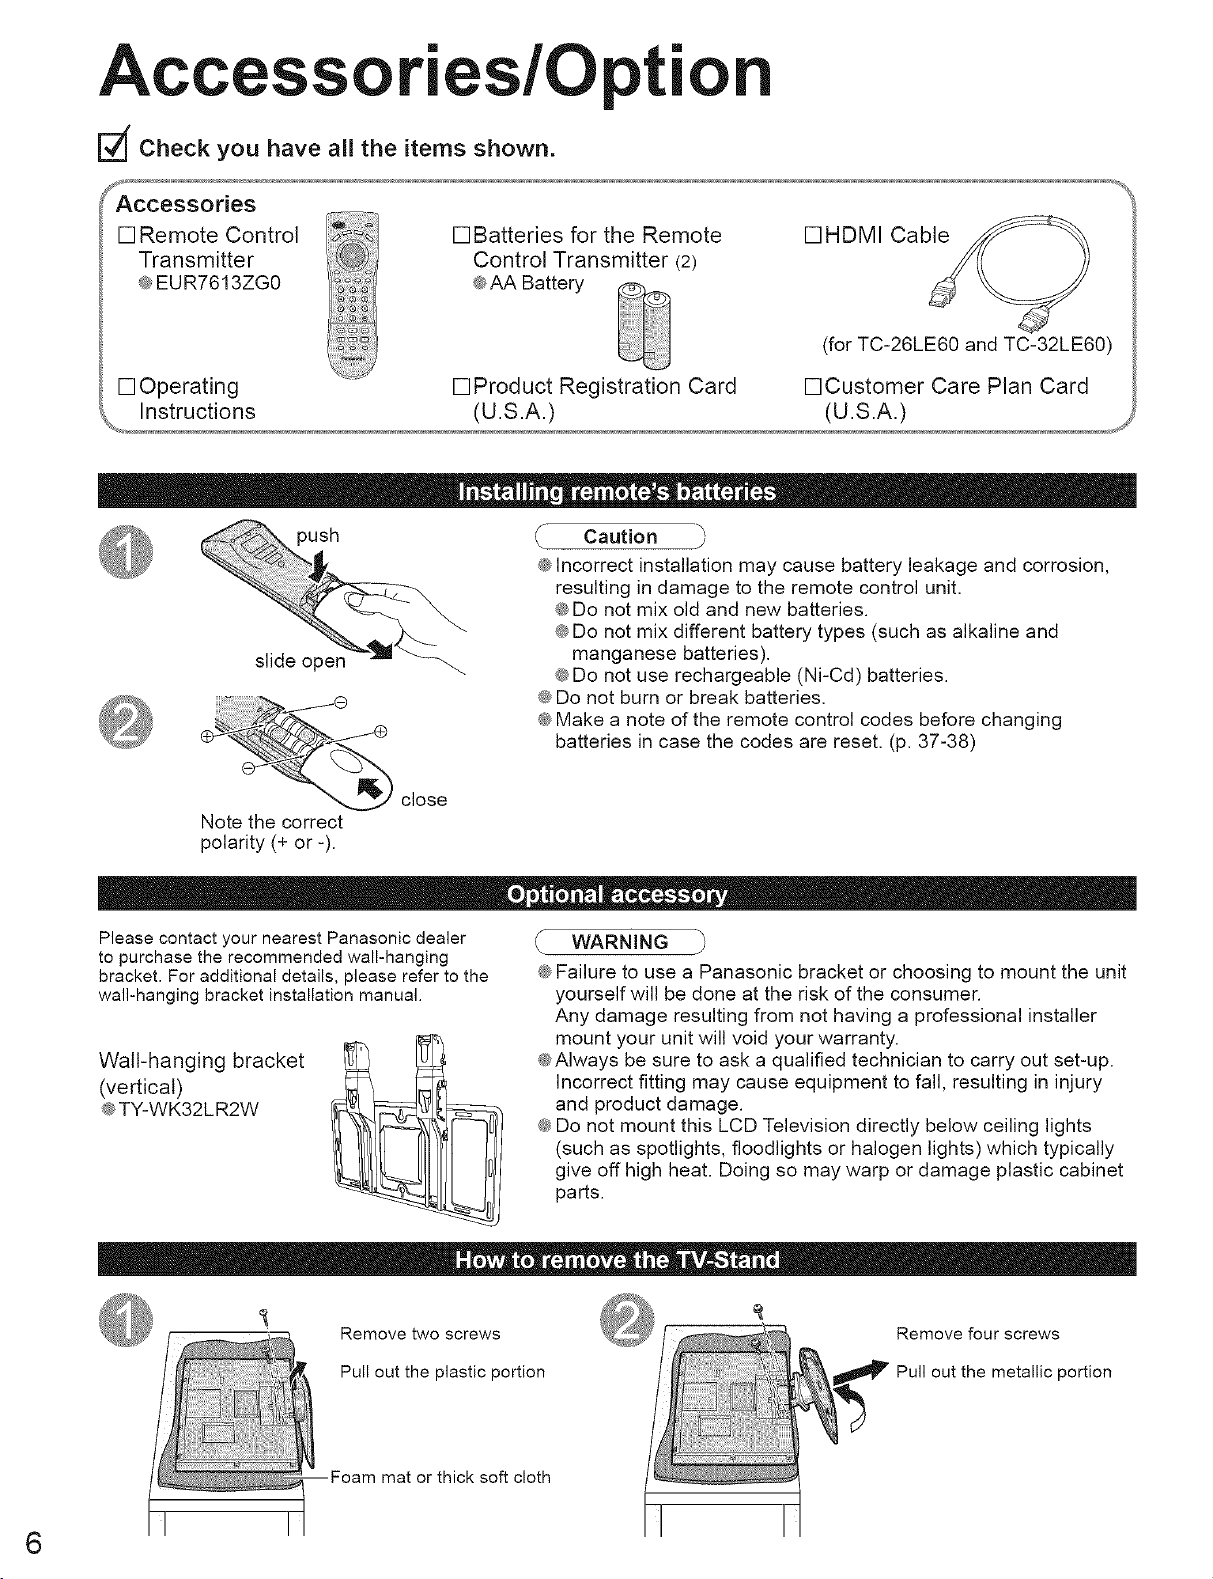
Check you have all the items shown.
J
Accessories
[] Remote Control
Transmitter
eEUR7613ZG0
[] Batteries for the Remote
Control Transmitter (2)
@AA Battery
[]HDMI Cable
(for TC-26LE60 and TC-32LE60)
[] Operating
Instructions
push
slide open
Note the correct
polarity (+ or -).
Please contact your nearest Panasonic dealer
to purchase the recommended wall-hanging
bracket. For additional details, please refer to the
wall-hanging bracket installation manual.
Watt-hanging bracket
(vertical)
e TY-WK32LR2W
[]Product Registration Card
(U.S.A.)
e Incorrect installation may cause battery leakage and corrosion,
e Do not burn or break batteries.
e Make a note of the remote control codes before changing
e Failure to use a Panasonic bracket or choosing to mount the unit
@Always be sure to ask a qualified technician to carry out set-up.
e Do not mount this LCD Television directly below ceiling lights
[]Customer Care Plan Card
(U.S.A.)
Caution -_
resulting in damage to the remote control unit.
@Do not mix old and new batteries.
e Do not mix different battery types (such as alkaline and
manganese batteries).
e Do not use rechargeable (Ni-Cd) batteries.
batteries in case the codes are reset. (p. 37-38)
WARNING
yourself will be done at the risk of the consumer.
Any damage resulting from not having a professional installer
mount your unit will void your warranty.
Incorrect fitting may cause equipment to fall, resulting in injury
and product damage.
(such as spotlights, floodlights or halogen lights) which typically
give off high heat. Doing so may warp or damage plastic cabinet
parts.
Remove two screws
Pull out the plastic portion
or thick soft cloth
Remove four screws
Pull out the metallic portion
6
Locate at a comfortable distance for viewing. Avoid placing where sunlight or other bright light (including reflections)
will fall on the screen.
Use of some types of fluorescent lighting can reduce remote control transmitter range.
Adequate ventilation is essential to prevent internal component failure. Keep away from areas of excessive heat or
moisture.
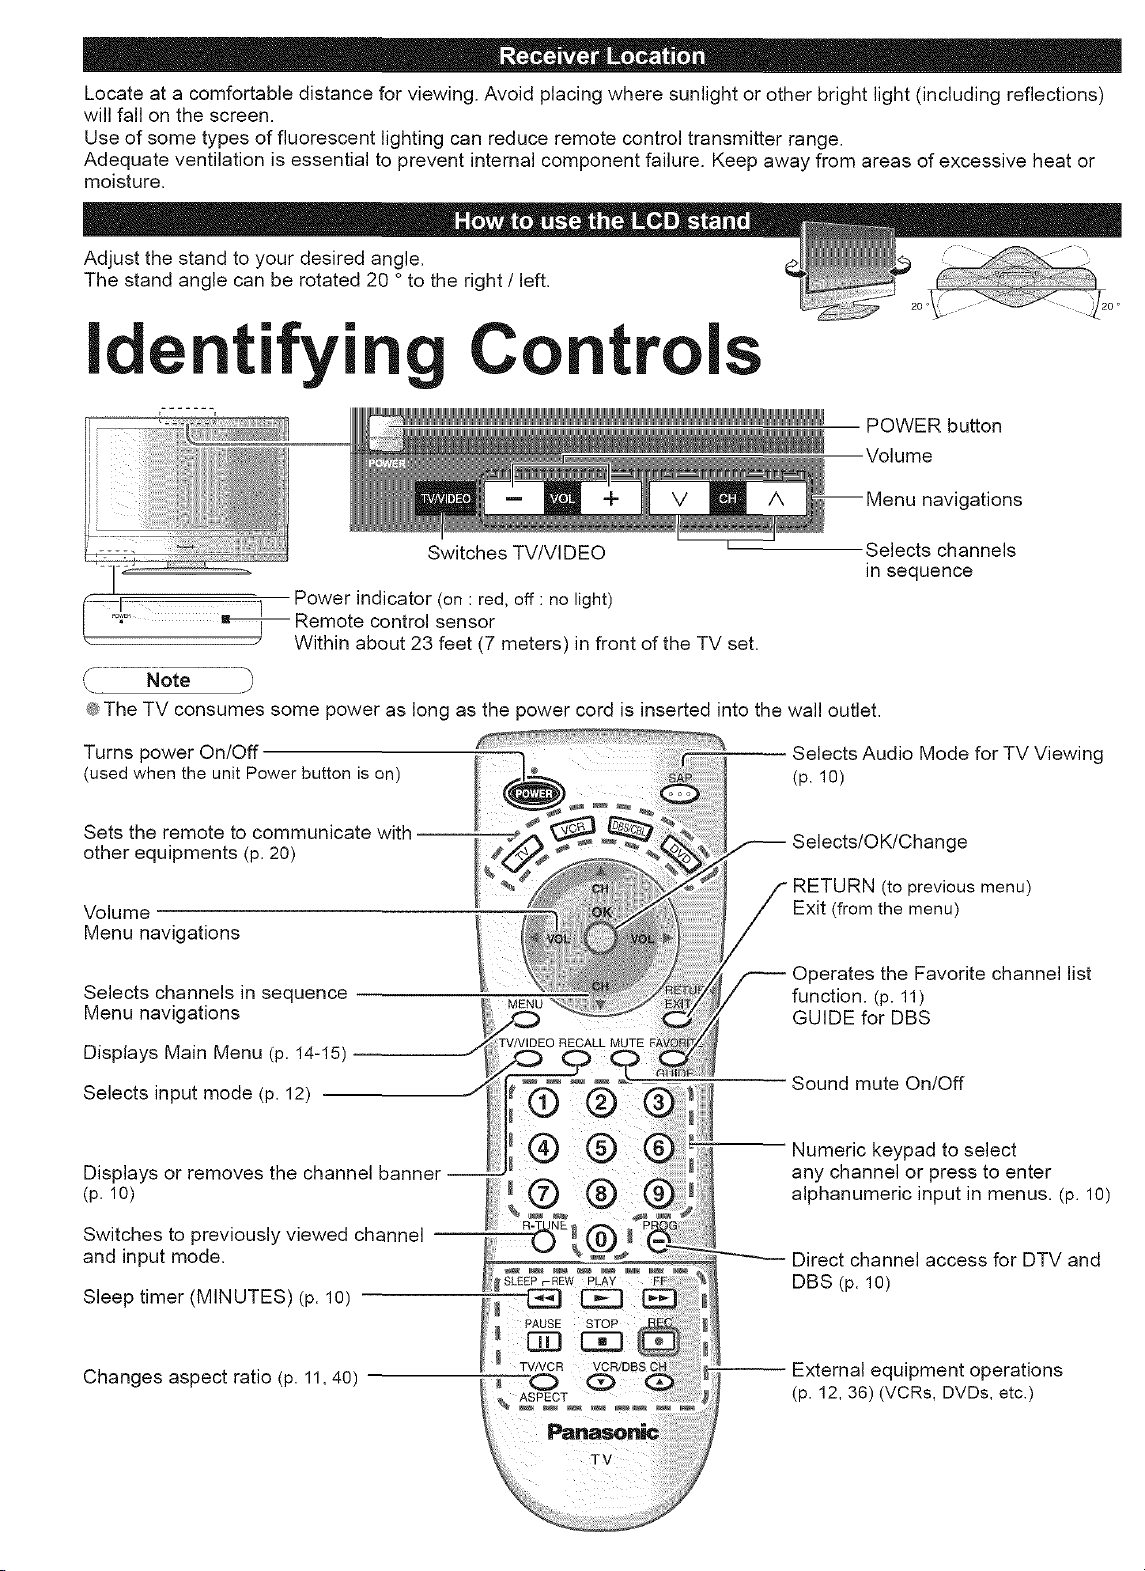
Adjust the stand to your desired angle.
The stand angle can be rotated 20 ° to the right / left.
Identifyi
J]ol ........ I Power indicator (on:red, off: no light)
/
€The TV consumes some power as long as the power cord is inserted into the wall outlet.
Turns power On/Off
(used when the unit Power button is on)
Sets the remote to communicate with
other equipments (p. 20)
Volume
Menu navigations
Remote control
_ Within about 23 feet (7 meters) in front of the TV set.
C rol
Switches TV/VIDEO
sensor
Selects Audio Mode for TV Viewing
(p. 10)
Selects/OK/Change
RETURN (to previous menu)
Exit (from the menu)
POWER button
Volume
navigations
Selects channels
in sequence
Selects channels in sequence
Menu navigations
Displays Main Menu (p. 14-15)
Selects input mode (p. 12)
Displays or removes the channel banner
(p. 10)
Switches to previously viewed channel
and input mode.
Sleep timer (MINUTES) (p. 10)
Changes aspect ratio (p. 11,40)
Operates the Favorite channel list
function. (p. 11)
GUIDE for DBS
Sound mute On/Off
Numeric keypad to select
any channel or press to enter
alphanumeric input in menus. (p. 10)
Direct channel access for DTV and
DBS (p. 10)
External equipment operations
(p. 12, 36) (VCRs, DVDs, etc.)
C
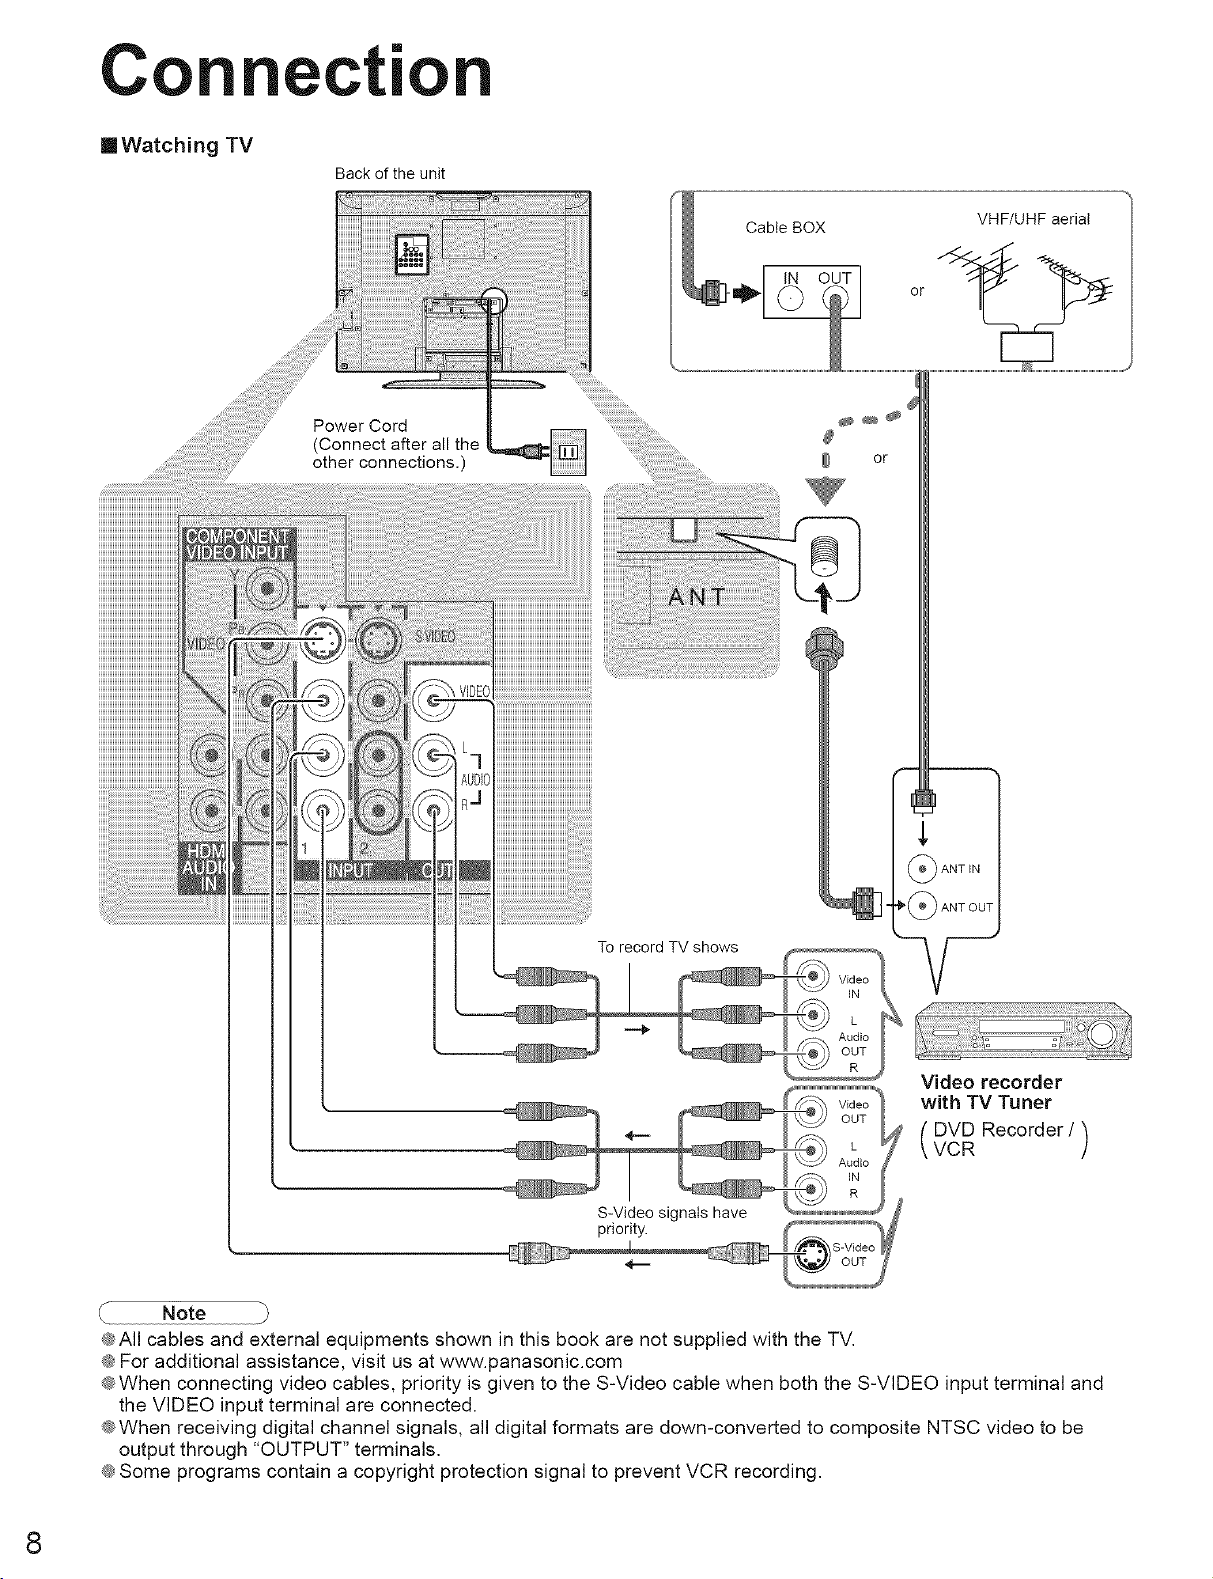
mWatching TV
nect"
Back of the unit
Power Cord
(Connect after all the
other connections.)
Cable BOX
IN OUT
VHF/UHF aerial
or
#
or
ANT IN
"_(_ ANT OUT
To record TV shows
Video recorder
with TV Tuner
DVD Recorder/VCR )
S-Video signals have
priority.
Note
@All cables and external equipments shown in this book are not supplied with the TV.
@For additional assistance, visit us atwww.panasonic.com
@When connecting video cables, priority is given to the S-Video cable when both the S-VIDEO input terminal and
the VIDEO input terminal are connected.
@When receiving digital channel signals, all digital formats are down-converted to composite NTSC video to be
output through "OUTPUT" terminals.
@Some programs contain a copyright protection signal to prevent VCR recording.
8
First Ti Setup
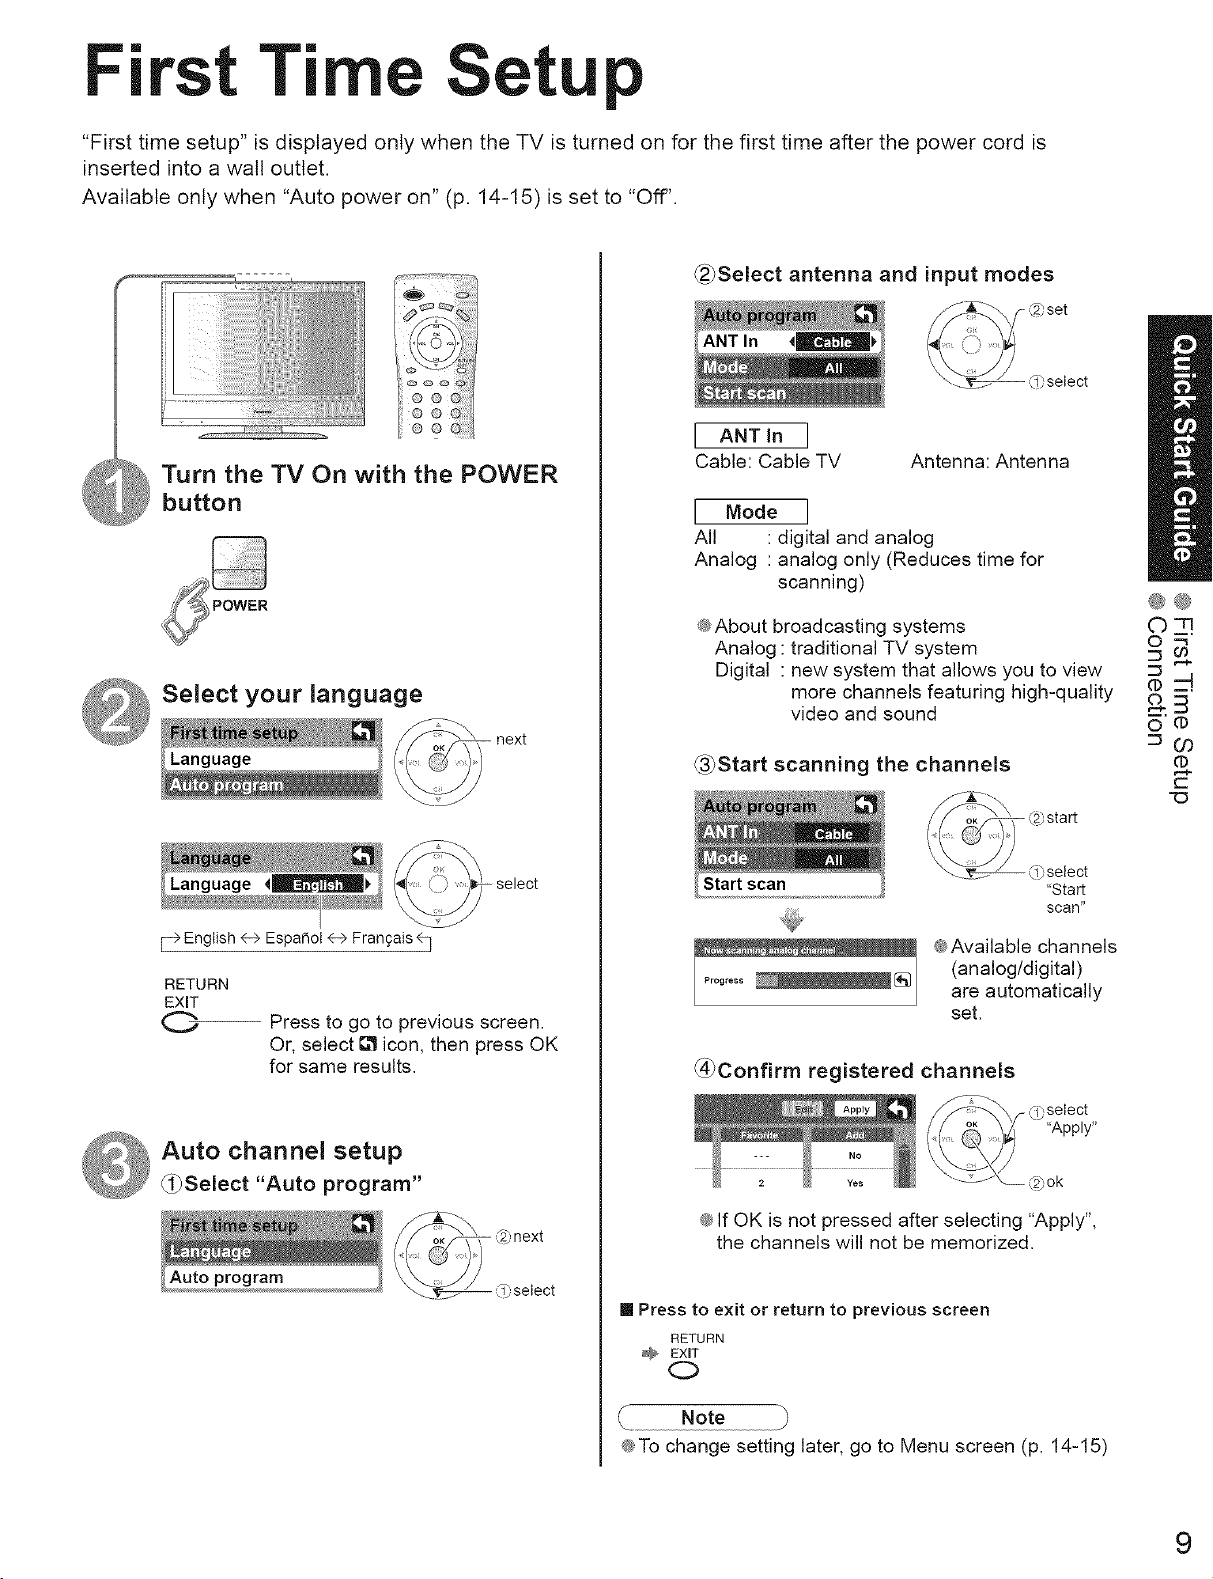
"First time setup" is displayed only when the TV is turned on for the first time after the power cord is
inserted into a wall outlet.
Available only when "Auto power on" (p. 14-15) is set to "Off".
_Select antenna and input modes
oj
o_
Turn the TV On with the POWER
button
Select your language
@
I ANT In I
Cable: Cable TV Antenna: Antenna
I Mode I
All • digital and analog
Analog • analog only (Reduces time for
scanning)
@About broadcasting systems
Analog : traditional TV system
Digital : new system that allows you to view
more channels featuring high-quality
video and sound
(_Start scanning the channels
@@
co
c_ "*
®_-d.
O'¢
=03
¢
r--
t_ O select
F_ English _ Espa_ol 4-> Frangais e q
RETURN
EXIT
0 Press to go to previous screen.
Or, select _ icon, then press OK
for same results.
Auto channel setup
_l_Select "Auto program"
- r'z)next
- ,,f)select
"Start
scan"
@Available channels
(analog/digital)
are automatically
set.
@Confirm registered channels
-,0_ select
"Apply"
@ok
@If OK is not pressed after selecting "Apply",
the channels will not be memorized,
[] Press to exit or return to previous screen
RETURN
@ EXIT
C)
f Note ")
@To change setting later, go to Menu screen (p. 14-15)
9
==
Watt
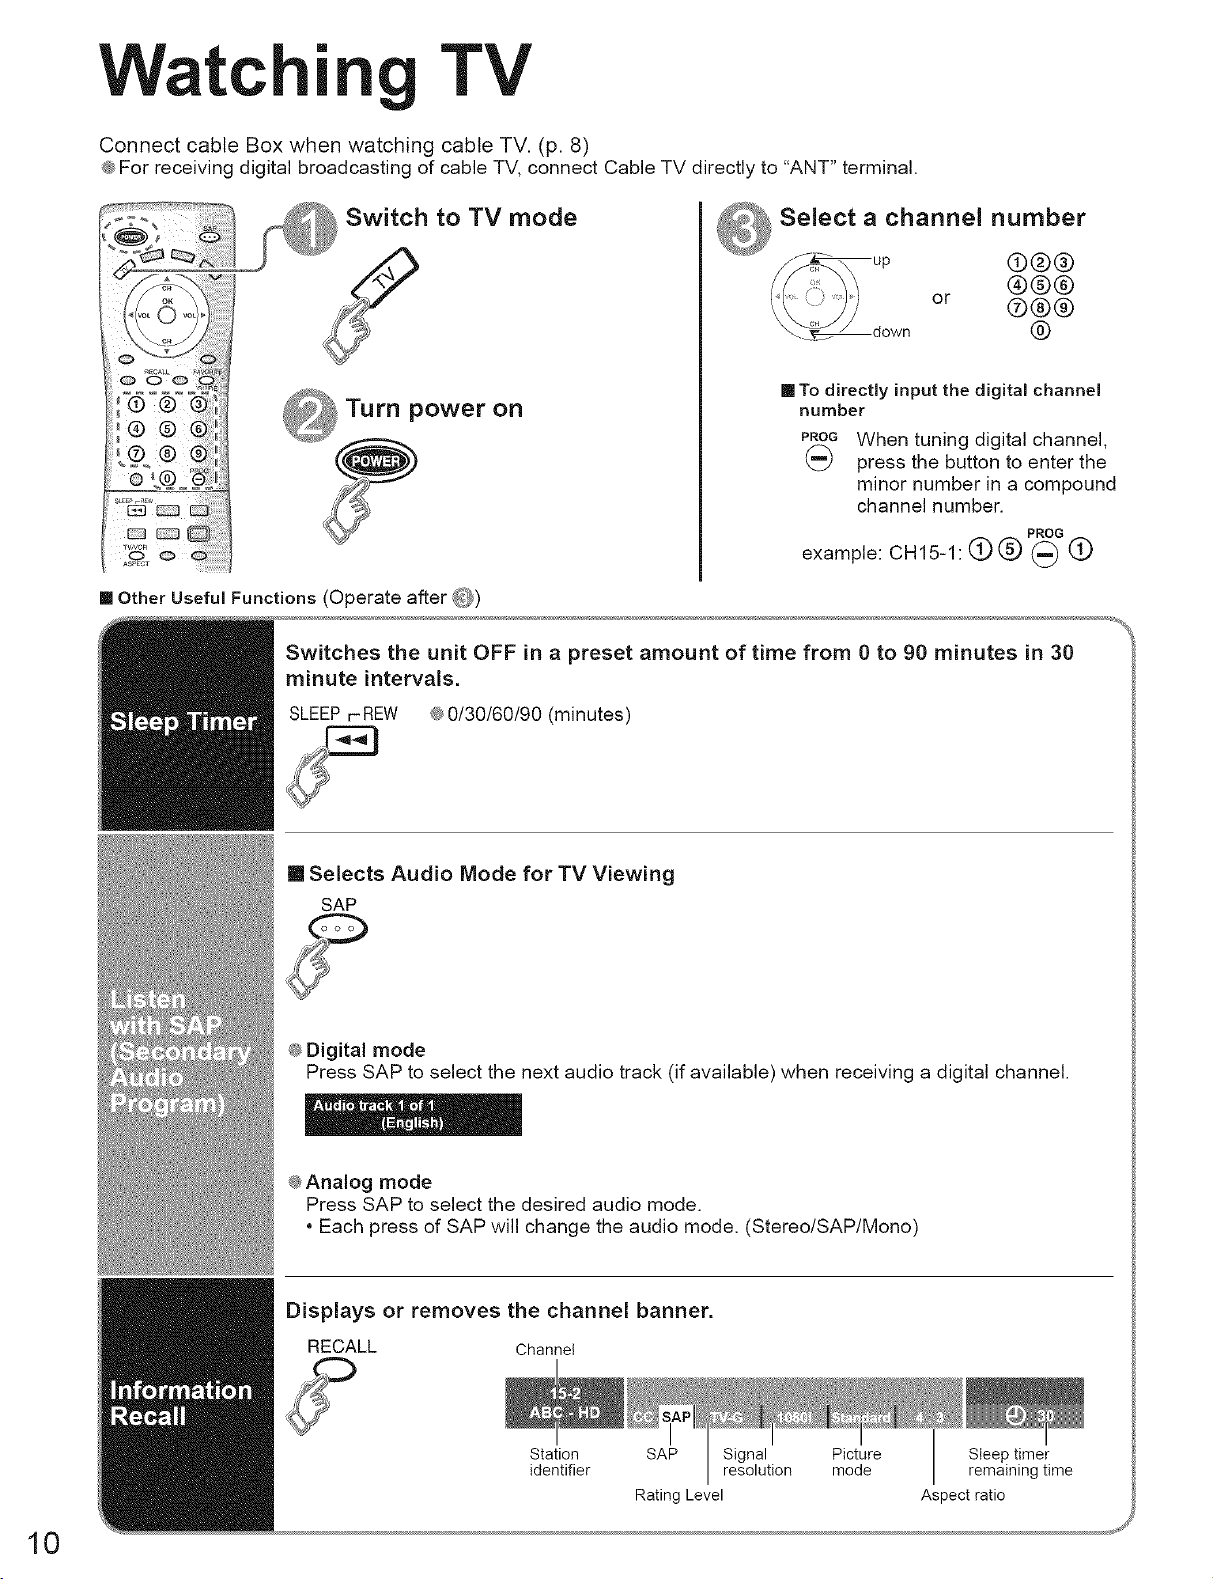
Connect cable Box when watching cable TV. (p. 8)
® For receiving digital broadcasting of cable TV, connect Cable TV directly to "ANT" terminal.
[] Other Useful Functions (Operate after 0_)
|
TV
a channel number
[] To directly input the digital channel
number
PROG
When tuning digital channel,
press the button to enter the
minor number in a compound
channel number.
example: CH15-1" (_ (_ p(_c (_
@®®
®®®
or ®®®
@
Switches the unit OFF in a preset amount of time from 0 to 90 minutes in 30
minute intervals.
SLEEP r- REW ® 0/30/60/90 (minutes)
[] Selects Audio Mode for TV Viewing
SAP
® Digital mode
Press SAP to select the next audio track (if available) when receiving a digital channel.
@Analog mode
Press SAP to select the desired audio mode.
• Each press of SAP will change the audio mode. (Stereo/SAP/Mono)
10
Displays or removes the channel banner.
RECALL Channel
Station SAP Signal Picture Sleep timer
identifier resolution mode remaining time
Rating Level Aspect ratio
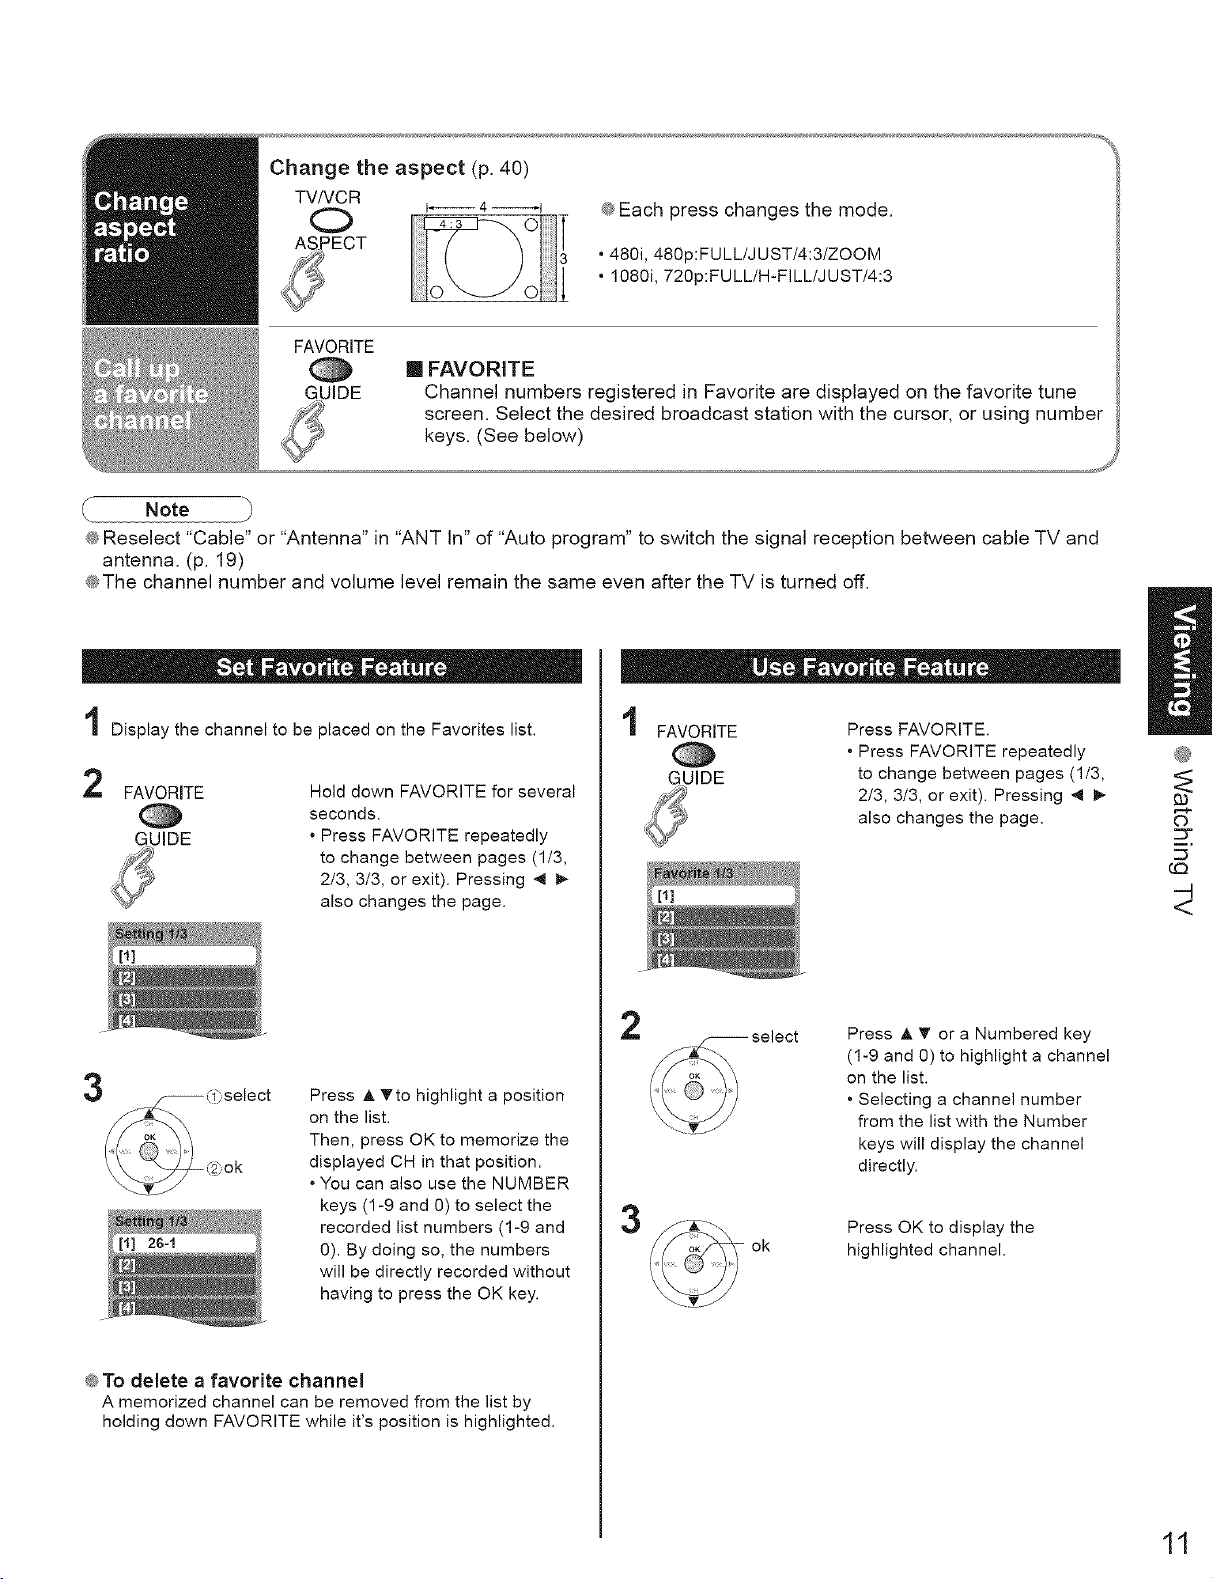
Change the aspect (p. 40)
TV/VCR
O b_ 4 _J
FAVORITE
_ Each press changes the mode.
• 480i, 480p:FULL/JUST/4:3/ZOOM
• 1080i, 720p:FULL/H-FILL/JUST/4:3
[] FAVORITE
GUIDE
Channel numbers registered in Favorite are displayed on the favorite tune
screen. Select the desired broadcast station with the cursor, or using number
keys. (See below)
)
® Reselect "Cable" or "Antenna" in "ANT In" of "Auto program" to switch the signal reception between cable TV and
antenna. (p. 19)
®The channel number and volume level remain the same even after the TV is turned off.
Display the channel to be placed on the Favorites list.
2
FAVORITE
GUIDE
Hold down FAVORITE for several
seconds.
• Press FAVORITE repeatedly
to change between pages (1/3,
2/3, 3/3, or exit). Pressing 4 _-
also changes the page.
Press A Tto highlight a position
on the list.
Then, press OK to memorize the
displayed CH in that position.
• You can also use the NUMBER
keys (1-9 and 0) to select the
recorded list numbers (1-9 and
0). By doing so, the numbers
will be directly recorded without
having to press the OK key.
2
3
FAVORITE
GUIDE
ok
Press FAVORITE.
• Press FAVORITE repeatedly
to change between pages (1/3,
2/3, 3/3, or exit). Pressing 4 _-
also changes the page.
Press A _' or a Numbered key
(1-9 and 0) to highlight a channel
on the list.
• Selecting a channel number
from the list with the Number
keys will display the channel
directly.
Press OK to display the
highlighted channel.
®
93
C)
C_
---4
<
® To delete a favorite channel
A memorized channel can be removed from the list by
holding down FAVORITE while it's position is highlighted.
11
m
Watt
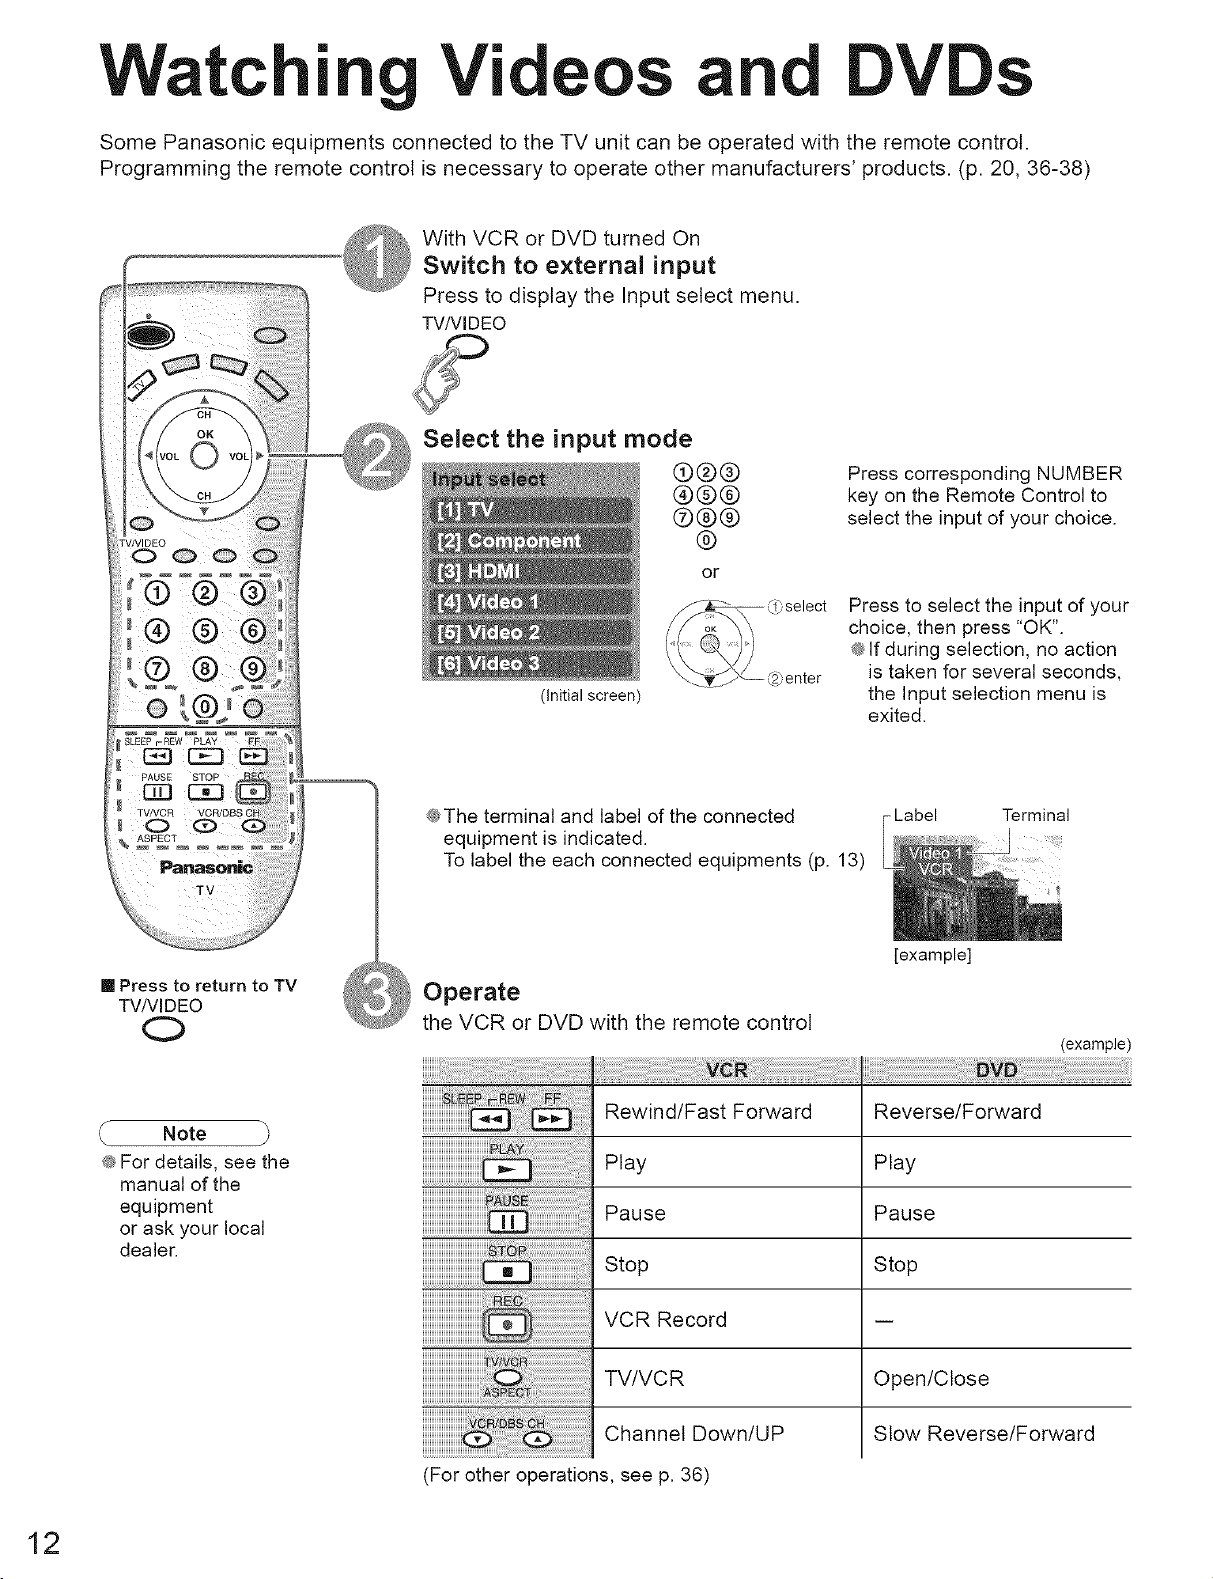
Some Panasonic equipments connected to the TV unit can be operated with the remote control.
Programming the remote control is necessary to operate other manufacturers' products. (p. 20, 36-38)
|
Videos and DVDs
With VCR or DVD turned On
Switch to external input
Press to display the Input select menu.
TV/VlDEO
Select the input mode
®@@
@@@
®®@
Press corresponding NUMBER
key on the Remote Control to
select the input of your choice.
®
or
select Press to select the input of your
choice, then press "OK".
® If during selection, no action
enter is taken for several seconds,
(initial screen)
the Input selection menu is
exited.
[] Press to return to TV
TVNIDEO
0
Note
@For details, see the
manual of the
equipment
or ask your local
dealer.
®The terminal and label of the connected
equipment is indicated.
To label the each connected equipments (p. 13)
Operate
the VCR or DVD with the remote control
Rewind/Fast Forward
Play
Pause
Stop
VCR Record
TV/VCR
- Label Terminal
[example]
(example)
Reverse/Forward
Play
Pause
Stop
Open/Close
12
Channel Down/UP
(For other operations, see p. 36)
Slow Reverse/Forward
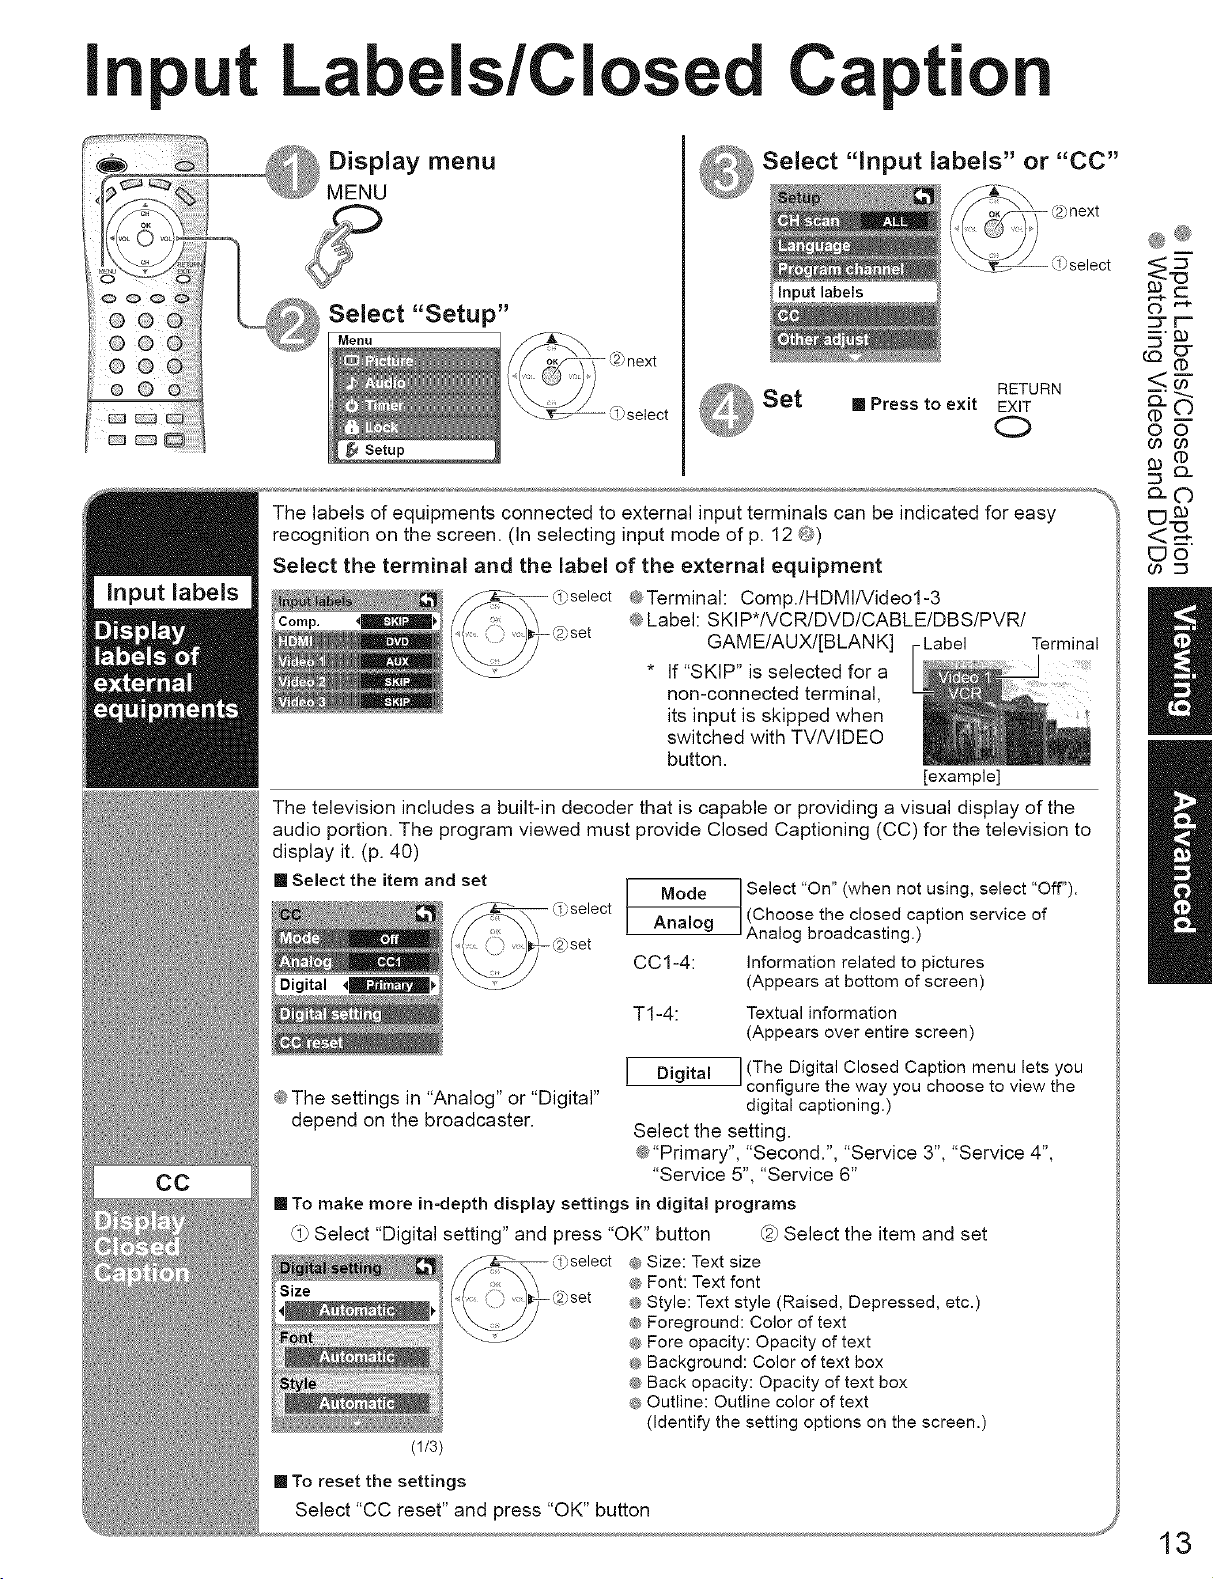
Labels/Closed Capti
_ Select "input labels" or "CC"
input labels
@®
5
:3-r-
CC3(1)
' '_ Set [] Press to exit EXIT
RETURN
0
Setup
The labels of equipments connected to external input terminals can be indicated for easy
recognition on the screen. (In selecting input mode of p. 12 @)
Select the terminal and the label of the external equipment
¢ Terminal: Comp./HDMI!Videol-3
@Label: SKIP*/VCR/DVD/CABLE/DBS/PVR/
GAM E/AUX!iBLAN K] -Label
* If "SKIP" is selected for a
non-connected terminal,
its input is skipped when
switched with TV/VIDEO
button.
[example]
The television includes a built-in decoder that is capable or providing a visual display of the
audio portion. The program viewed must provide Closed Captioning (CC) for the television to
display it. (p. 40)
[] Select the item and set
fS_ 0; select
IViode
Analog
CC1-4:
T1-4:
Select "On" (when not using, select "Off").
(Choose the closed caption service of
Ana og broadcast ng.)
Information related to pictures
(Appears at bottom of screen)
Textual information
(Appears over entire screen)
Terminal
o_©
('D-
O0
Oo Co
eL©
___.
C?o
CC
I Digital
@The settings in "Analog" or "Digital"
depend on the broadcaster.
[] To make more in-depth display settings in digital programs
Select "Digital setting" and press "OK" button @ Select the item and set
(1/3)
[] To reset the settings
Select "CC reset" and press "OK" button
Select the setting.
@"Primary", "Second.", "Service 3", "Service 4",
"Service 5", "Service 6"
® Size: Text size
® Font: Text font
® Style: Text style (Raised, Depressed, etc.)
® Foreground: Color of text
® Fore opacity: Opacity of text
® Background: Color of text box
® Back opacity: Opacity of text box
® Outline: Outline color of text
(Identify the setting options on the screen.)
I(The Digital Closed Caption menu lets you
configure the way you choose to view the
digital captioning.)
13
cti
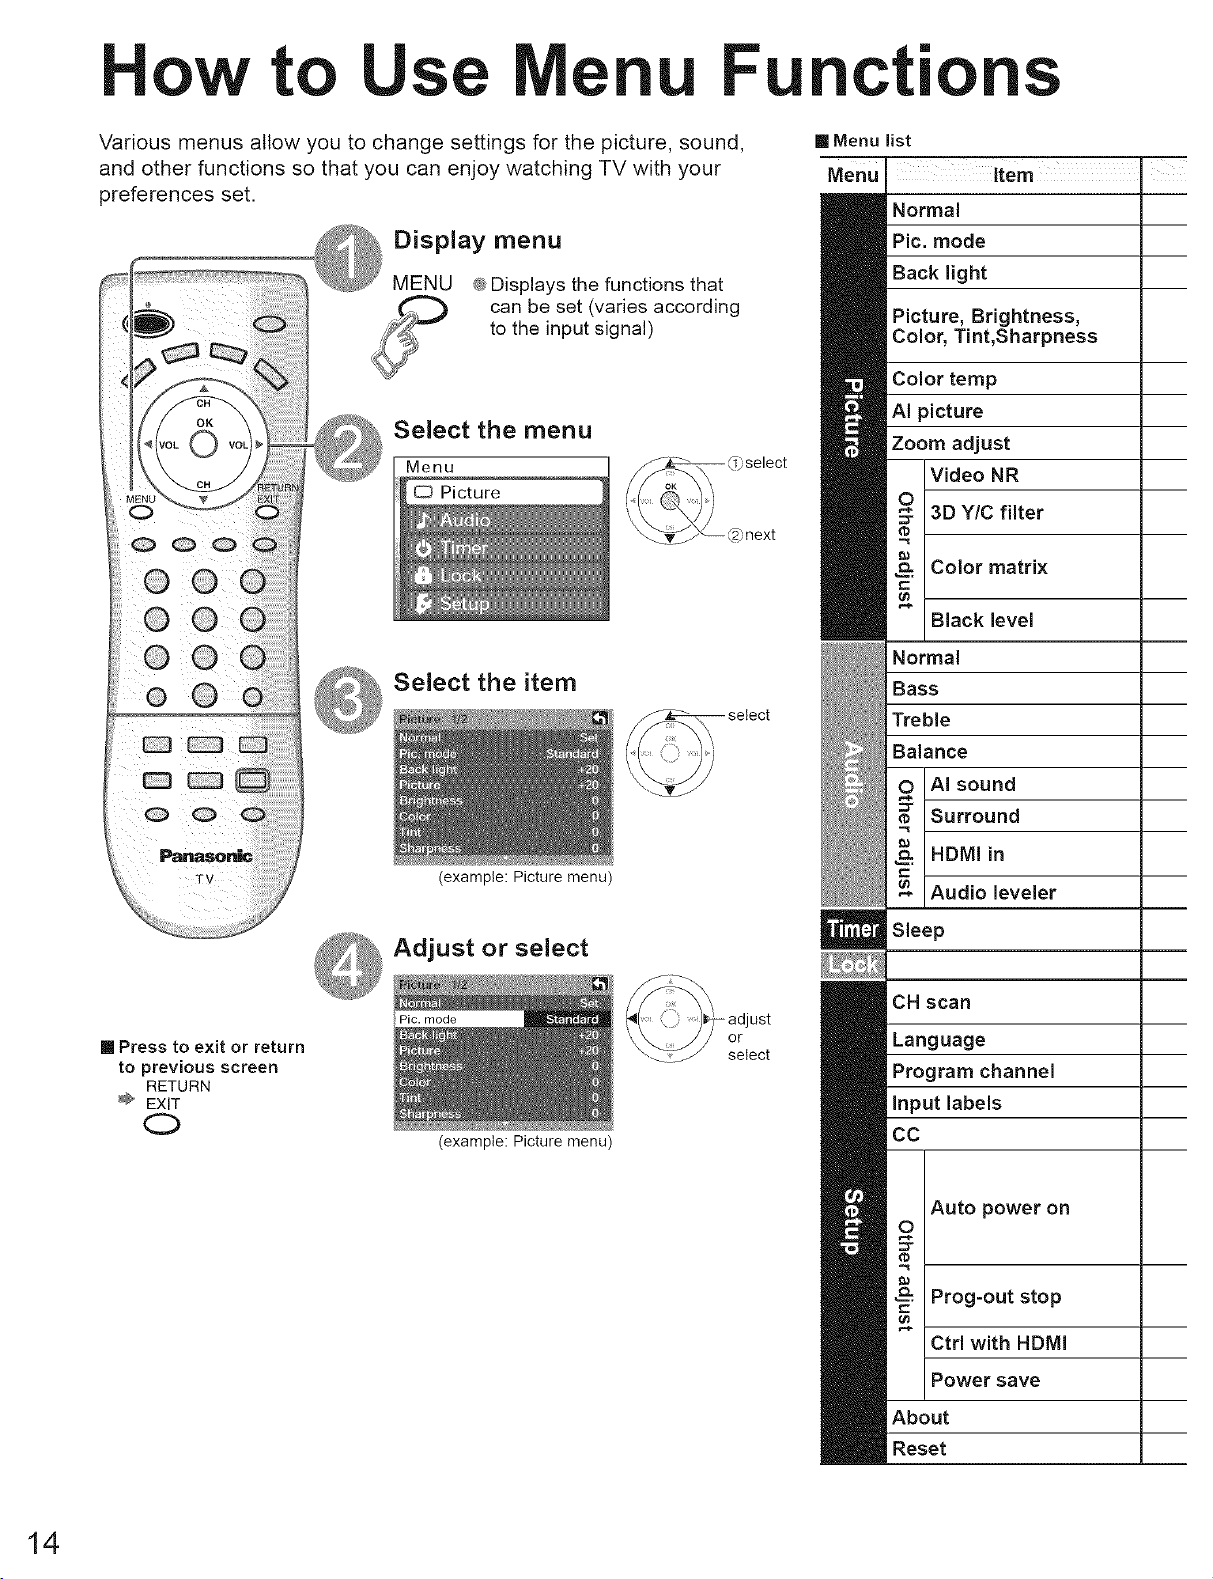
Various menus allow you to change settings for the picture, sound,
and other functions so that you can enjoy watching TV with your
preferences set.
Display menu
MENU ® Displays the functions that
can be set (varies according
to the input signal)
Select the menu
Menu
Picture
Select the item
[]Menu
Menu
list
L¸ii'Li item
Normal
Pic. mode
Back light
Picture, Brightness,
Color, Tint,Sharpness
Color temp
AI picture
Zoom adjust
Video NR
3D Y/C filter
Color matrix
Black level
Normal
Bass
Treble
Balance
AI sound
Surround
[] Press to exit or return
to previous screen
RETURN
EXIT
(example: Picture menu)
Adjust or select
Pic. mode
(example: Picture menu)
or
select
HDMI in
Audio leveler
Sleep
CH scan
Language
Program channel
input labels
CC
Auto power on
Prog-out stop
Ctrl with HDMI
Power save
About
Reset
14
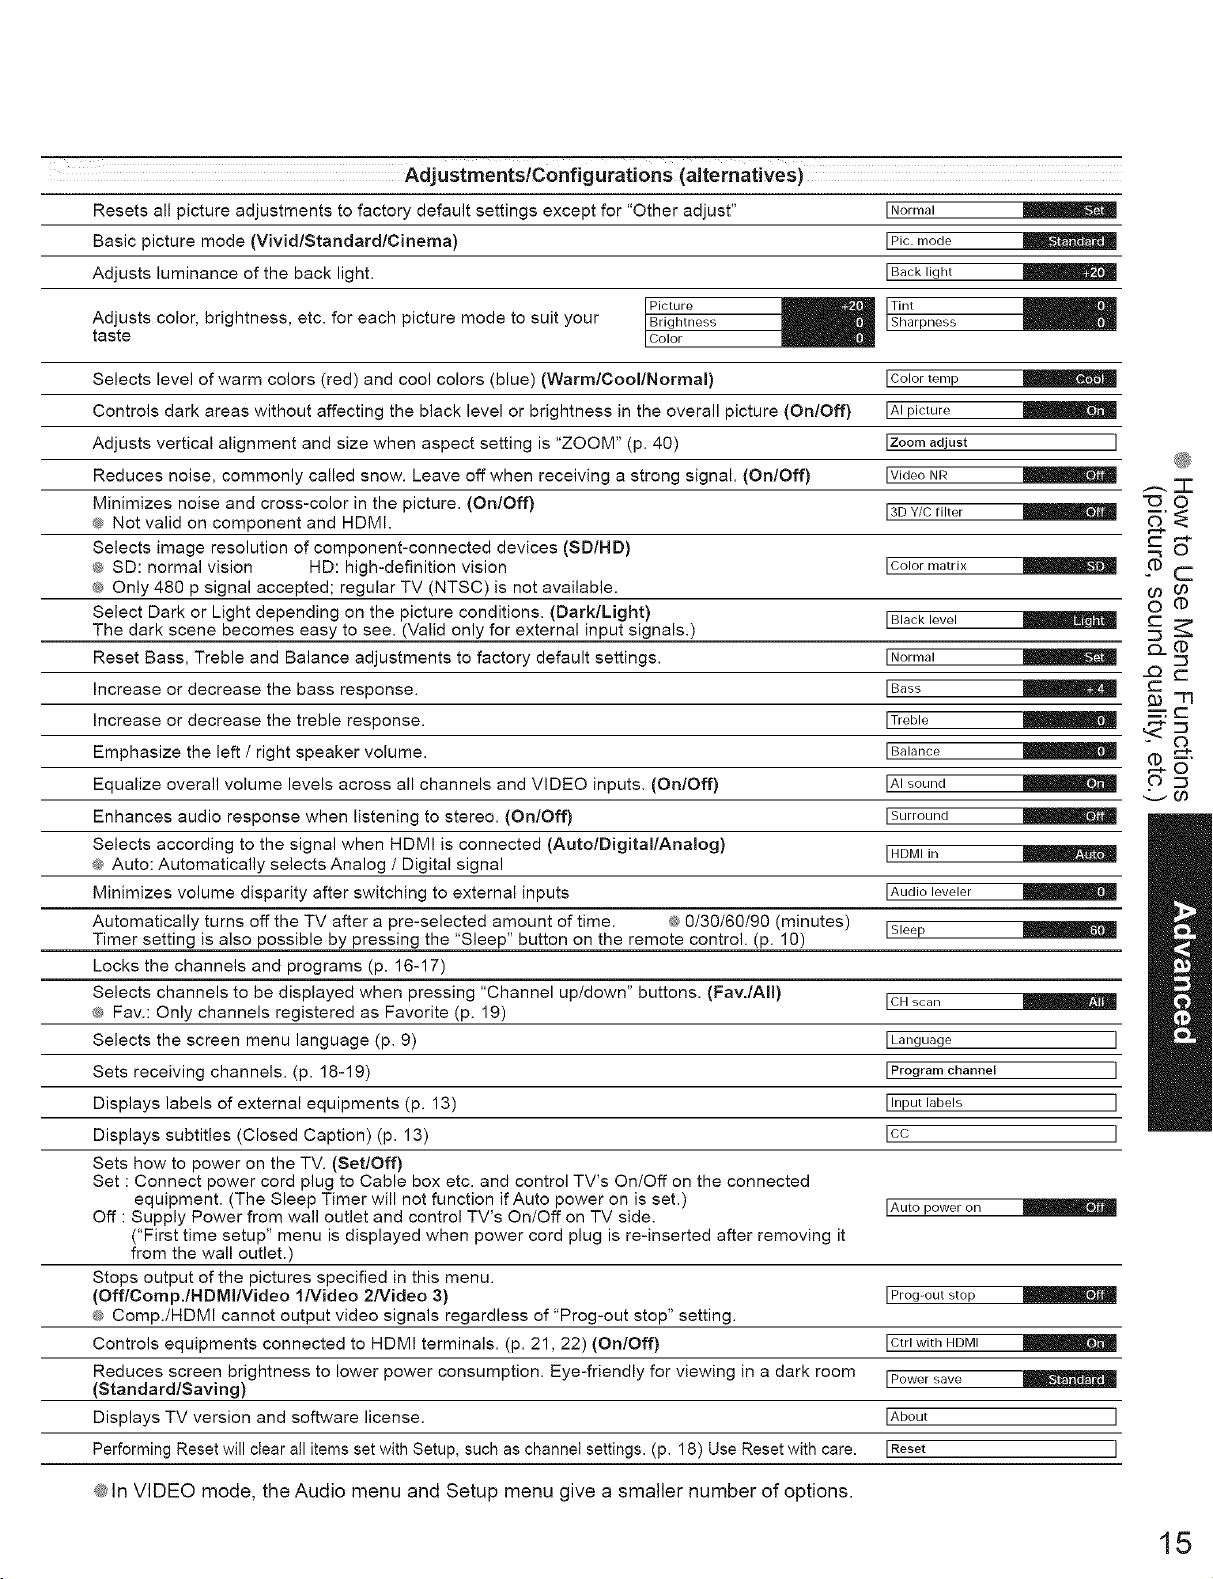
Resets all picture adjustments to factory default settings except for "Other adjust"
Basic picture mode (Vivid/Standard/Cinema)
Adjusts luminance of the back light.
I Normal
I Pic. mode
IBack light
Adjusts color, brightness, etc. for each picture mode to suit your
taste
Selects level of warm colors (red) and cool colors (blue) (Warm/Cool/Normal)
Controls dark areas without affecting the black level or brightness in the overall picture (On/Off)
Adjusts vertical alignment and size when aspect setting is "ZOOM" (p. 40)
Reduces noise, commonly called snow. Leave off when receiving a strong signal. (On/Off)
Minimizes noise and cross-color in the picture. (On/Off)
® Not valid on component and HDMI.
Selects image resolution of component-connected devices (SD/HD)
® SD: normal vision HD: high-definition vision
® Only 480 p signal accepted; regular TV (NTSC) is not available.
Select Dark or Light depending on the picture conditions. (Dark/Light)
The dark scene becomes easy to see. (Valid only for external input signals.)
Reset Bass, Treble and Balance adjustments to factory default settings.
Increase or decrease the bass response.
Increase or decrease the treble response.
Emphasize the left / right speaker volume.
Equalize overall volume levels across all channels and VIDEO inputs. (On/Off)
Enhances audio response when listening to stereo. (On/Off)
Selects according to the signal when HDMI is connected (Auto/Digital/Analog)
® Auto: Automatically selects Analog / Digital signal
Minimizes volume disparity after switching to external inputs
Automatically turns off the TV after a pre-selected amount of time. ® 0/30/60/90 (minutes)
Timer setting is also possible by pressing the "Sleep" button on the remote control. (p. 10)
Locks the channels and programs (p. 16-17)
Selects channels to be displayed when pressing "Channel up/down" buttons. (Fav./AII)
® Fav.: Only channels registered as Favorite (p. 19)
Selects the screen menu language (p. 9)
Sets receiving channels. (p. 18-19)
Displays labels of external equipments (p. 13)
Displays subtitles (Closed Caption) (p. 13)
Sets how to power on the TV. (Set/Off)
Set : Connect power cord plug to Cable box etc. and control TV's On/Off on the connected
equipment. (The Sleep Timer will not function if Auto power on is set.)
Off : Supply Power from wall outlet and control TV's On/Off on TV side.
("First time setup" menu is displayed when power cord plug is re-inserted after removing it
from the wall outlet.)
Stops output of the pictures specified in this menu.
(OfflComp.IHDMIIVideo l/Video 2Nideo 3)
® Comp./HDMI cannot output video signals regardless of "Prog-out stop" setting.
Controls equipments connected to HDMI terminals. (p. 21,22) (On/Off)
Reduces screen brightness to lower power consumption. Eye-friendly for viewing in a dark room
(Standard/Saving)
Displays TV version and software license.
Performing Reset will clear all items set with Setup, such as channel settings. (p. 18) Use Reset with care.
_rt_/ess / _pness
I Color temp
IAI picture
[Zoom adjust J
IVideo NR
13D Y/C tilter
I Color matrix
I Black level
I Normal
IBa_ I_1
ITreble I_
IBalance
IAI sound
ISurround
IHDMIin
IAudio leveler
ISleep
I CH scan
[Language
[Program channel
[Input labels
[cc
IAuto power on
IProg-out stop
ICtrl with HDMI
IPower save
[About J
LReset J
@
..-.. "T"
"(3O
Pc
0
0_
,:_..co
J
J
J
J
® In VIDEO mode, the Audio menu and Setup menu give a smaller number of options.
15
Cha
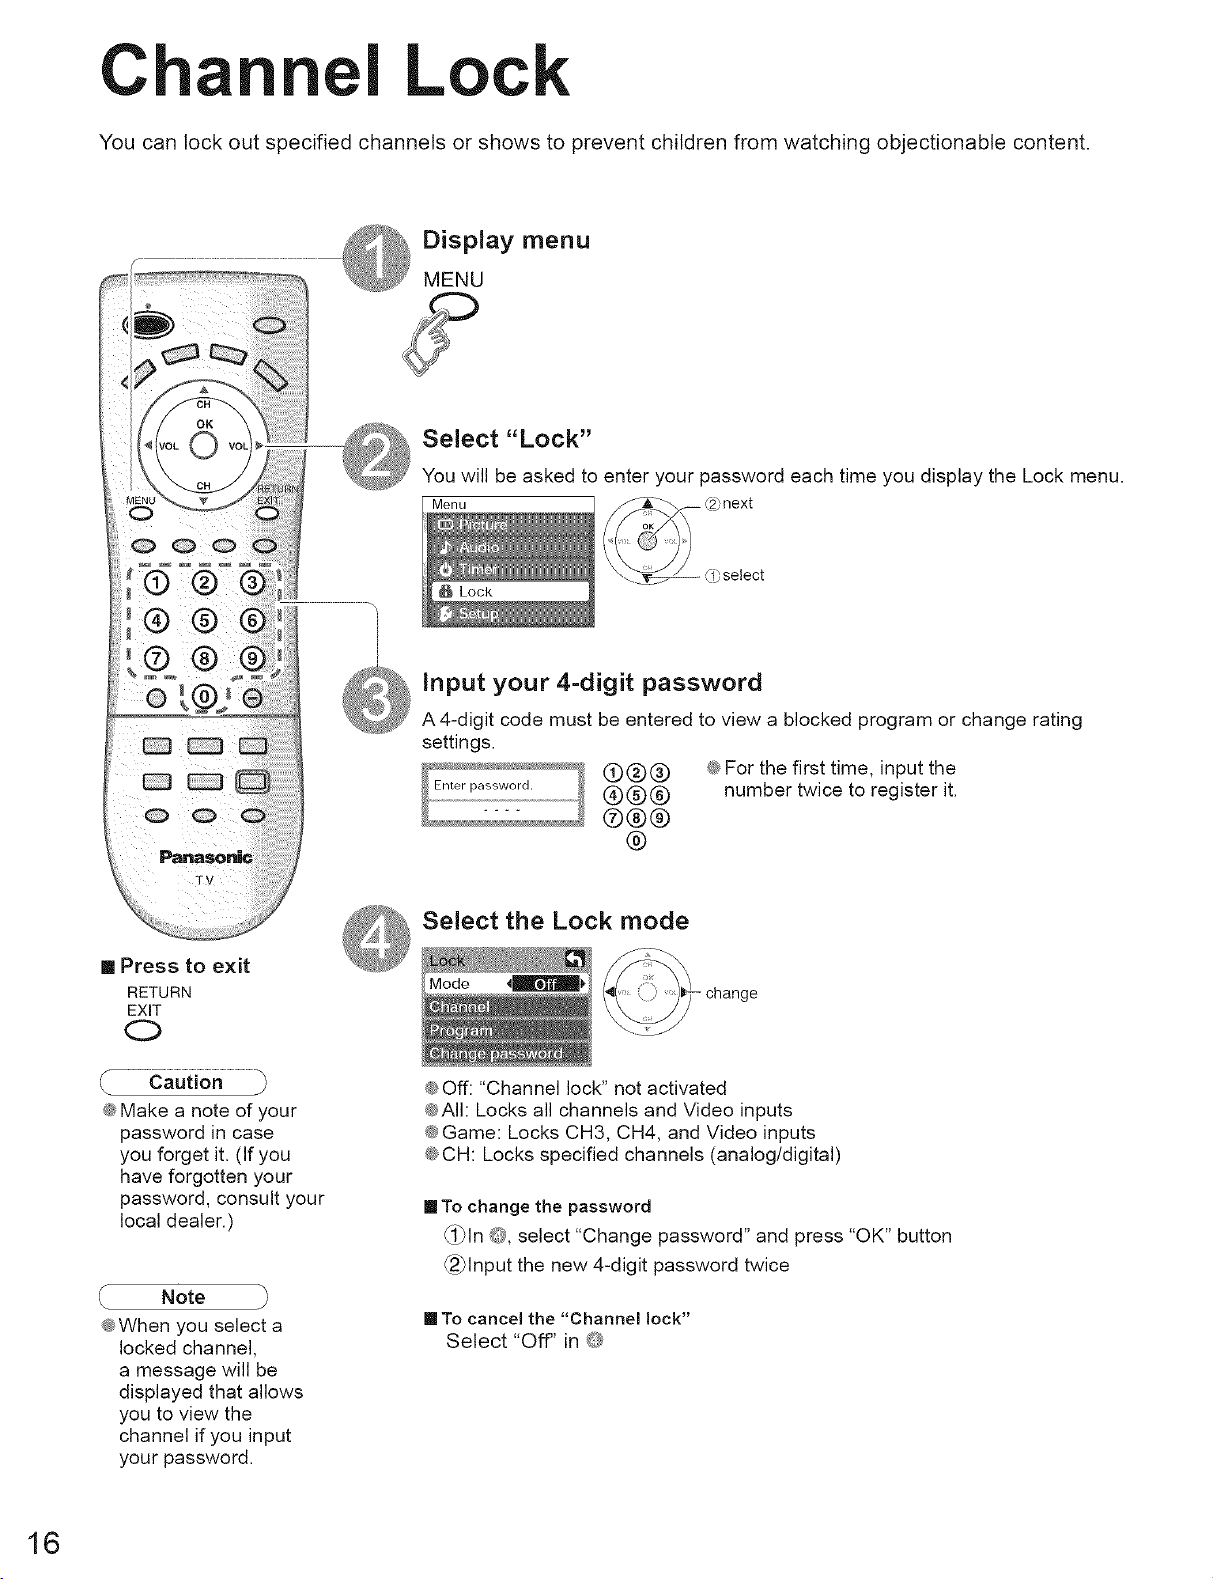
You can lock out specified channels or shows to prevent children from watching objectionable content.
I Lo
Display menu
MENU
Select "Lock"
You will be asked to enter your password each time you display the Lock menu.
Menu //'_'_ -_'- , ,_2_next
_ =_select
TV
\
[] Press to exit
RETURN
EXIT
0
@Make a note of your
password in case
you forget it. (If you
have forgotten your
password, consult your
local dealer.)
Note
@When you select a
locked channel,
a message will be
displayed that allows
you to view the
channel if you input
your password.
Input your 4-digit password
A4-digit code must be entered to view a blocked program or change rating
settings.
(_®® @For the first time, input the
®®® number twice to register it.
®®®
®
Select the Lock mode
change
@Off: "Channel lock" not activated
@All: Locks all channels and Video inputs
@Game: Locks CH3, CH4, and Video inputs
@CH: Locks specified channels (analog/digital)
[] To change the password
_i_ln Q, select "Change password" and press "OK" button
(_lnput the new 4-digit password twice
[]To cancel the Channel lock"
Select "Off' in O
16
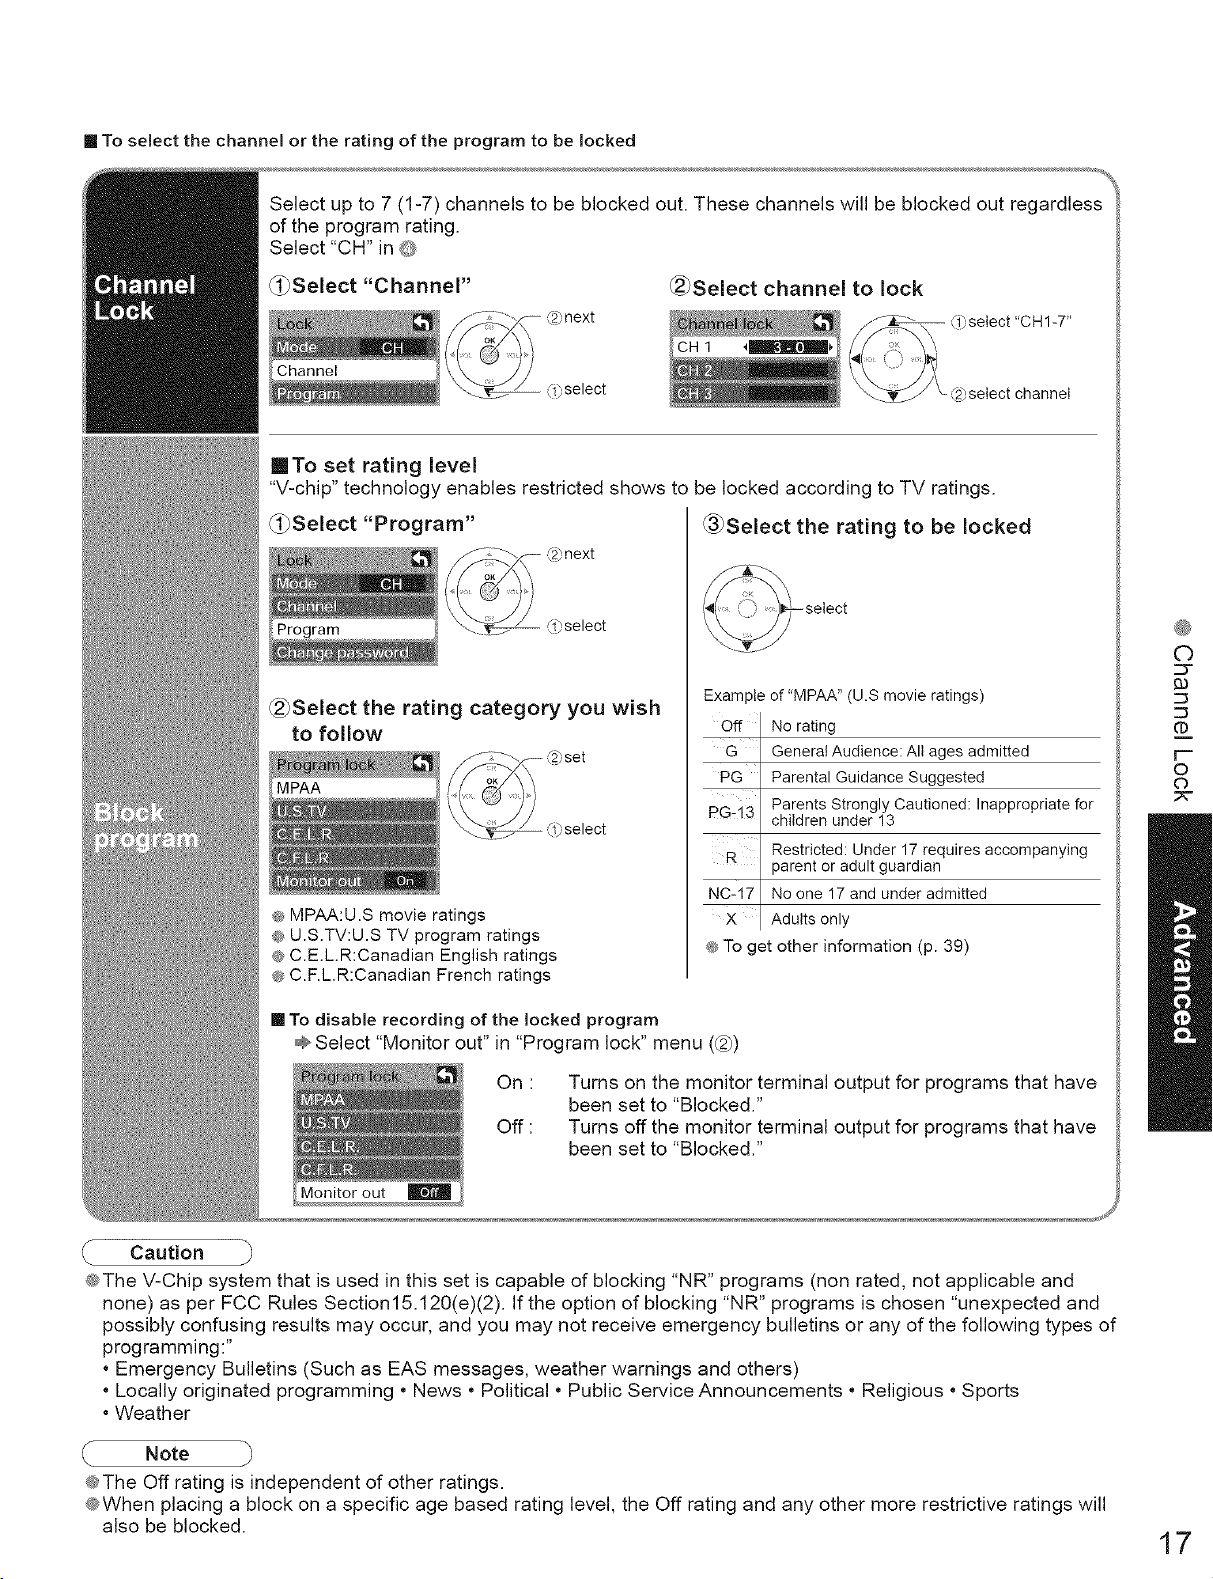
[] To se(ect the channel or the rating of the program to be (ocked
Select up to 7 (1-7) channels to be blocked out. These channels will be blocked out regardless
of the program rating.
Select "CH" in Q
_i_Select "Channel"
next
into set rating level
"V-chip" technology enables restricted shows to be locked according to TV ratings.
(_0Select "Program"
@Select the rating category you wish
to follow
® MPAA:U.S movie ratings
® U.S.TV:U.S TV program ratings
® C.E.L.R:Canadian English ratings
@ C.F.L.R:Canadian French ratings
[] To disable recording of the locked program
Select "Monitor out" in "Program lock" menu (_)
On : Turns on the monitor terminal output for programs that have
been set to "Blocked."
Off : Turns off the monitor terminal output for programs that have
been set to "Blocked."
_Select the rating to be locked
Example of "MPAA" (U.S movie ratings)
Off I No rating
i
G I GeneralAudience:Alt ages admitted
PG I Parental Guidance Suggested
i
PG:131 children under I3
NC-i71 Noone17andunderadmitted
® To get other information (p. 39)
Parents Strongly Cautioned: Inappropriate for
i
R I Restricted: Under 17 requires accompanying
parent or adult guardian
I
I
x I Adults only
©
cy
93
(1)
F-
o
C)
f
k Caution
@The V-Chip system that is used in this set is capable of blocking "NR" programs (non rated, not applicable and
none) as per FCC Rules Section15.120(e)(2). If the option of blocking "NR" programs is chosen "unexpected and
possibly confusing results may occur, and you may not receive emergency bulletins or any of the following types of
programming:"
• Emergency Bulletins (Such as EAS messages, weather warnings and others)
• Locally originated programming • News • Political • Public Service Announcements • Religious • Sports
• Weather
)
@The Off rating is independent of other ratings.
@When placing a block on a specific age based rating level, the Off rating and any other more restrictive ratings will
also be blocked.
17
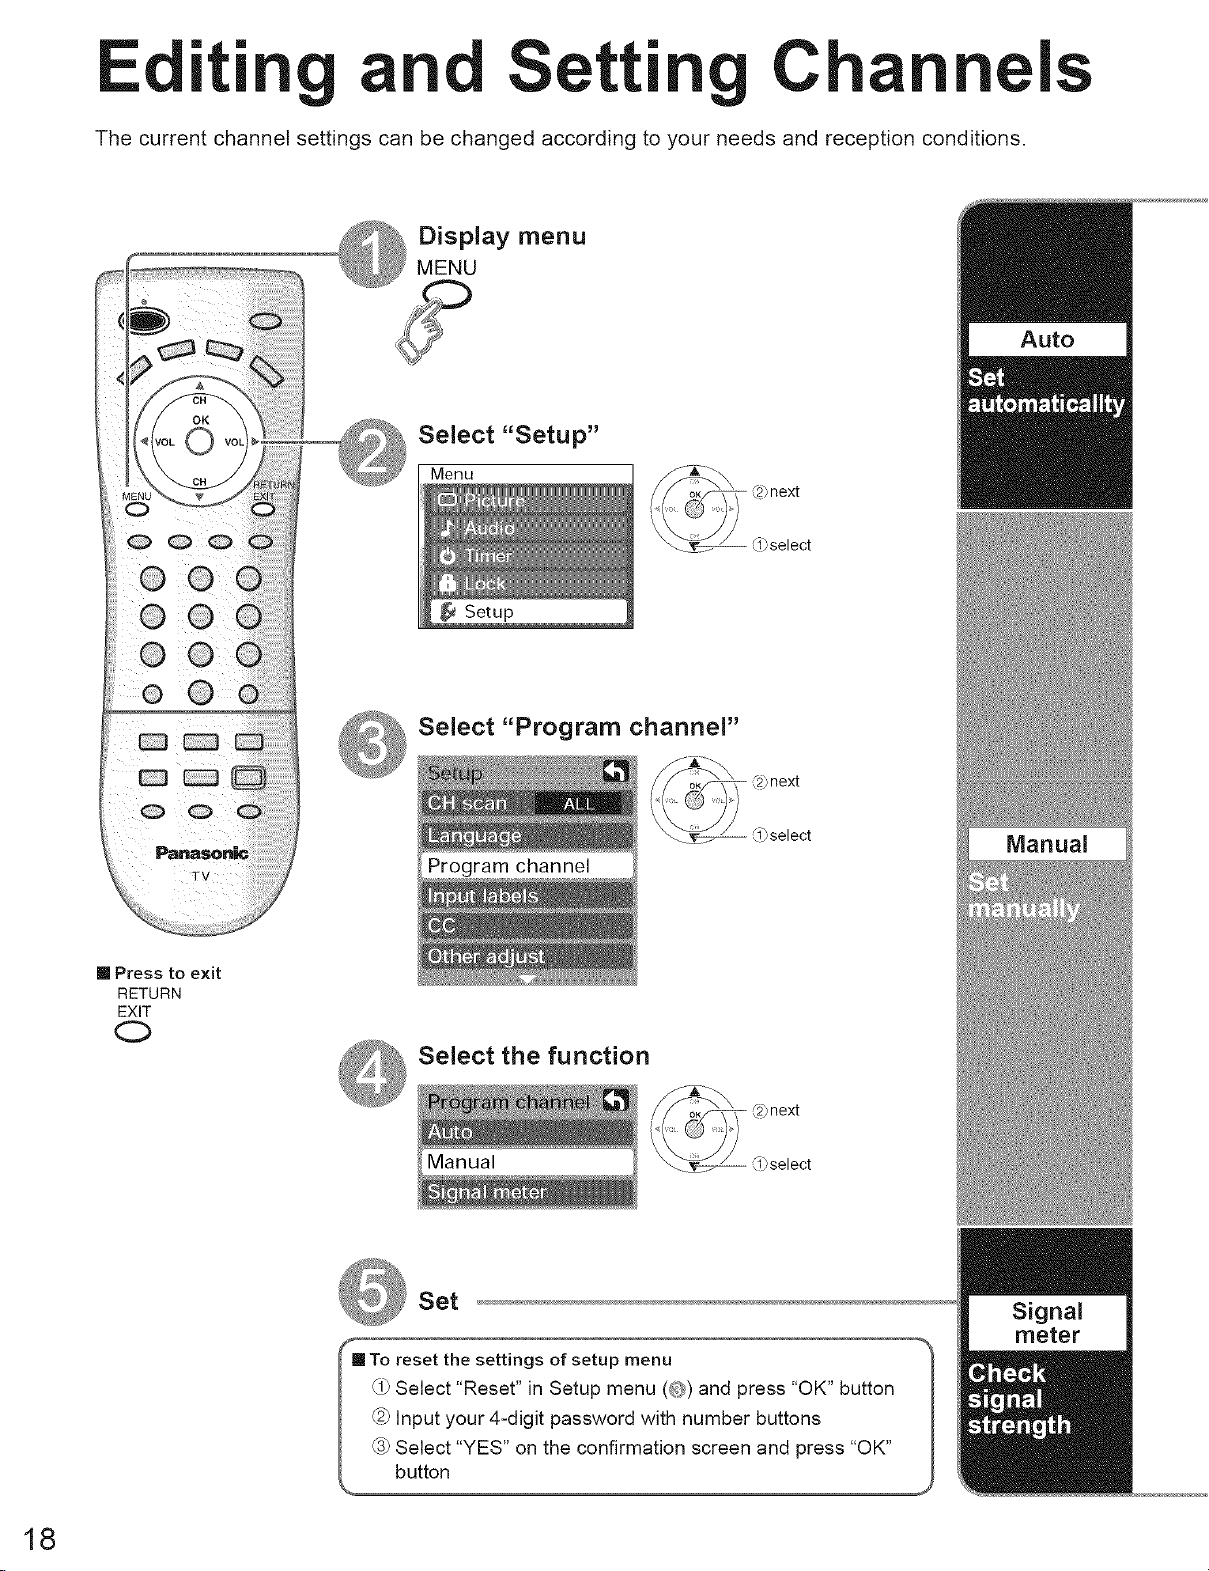
Setting C
The current channel settings can be changed according to your needs and reception conditions.
I
_ Display menu
MENU
Select "Setup"
Menu
Select "Program channel"
[] Press to exit
RETURN
EXIT
0
Program channel
Select the function
@)next
(l_,select
Set
_ T°resett",tsetti_os°'set°pme°° , ,, "1
Select'Reset in Setup menu (@) and press 'OK button /
®Inputyour 4:,digit password with number buttons , ,, /
® bSeltoCt'YES on the c°nfirmation screen and Press'°K
18
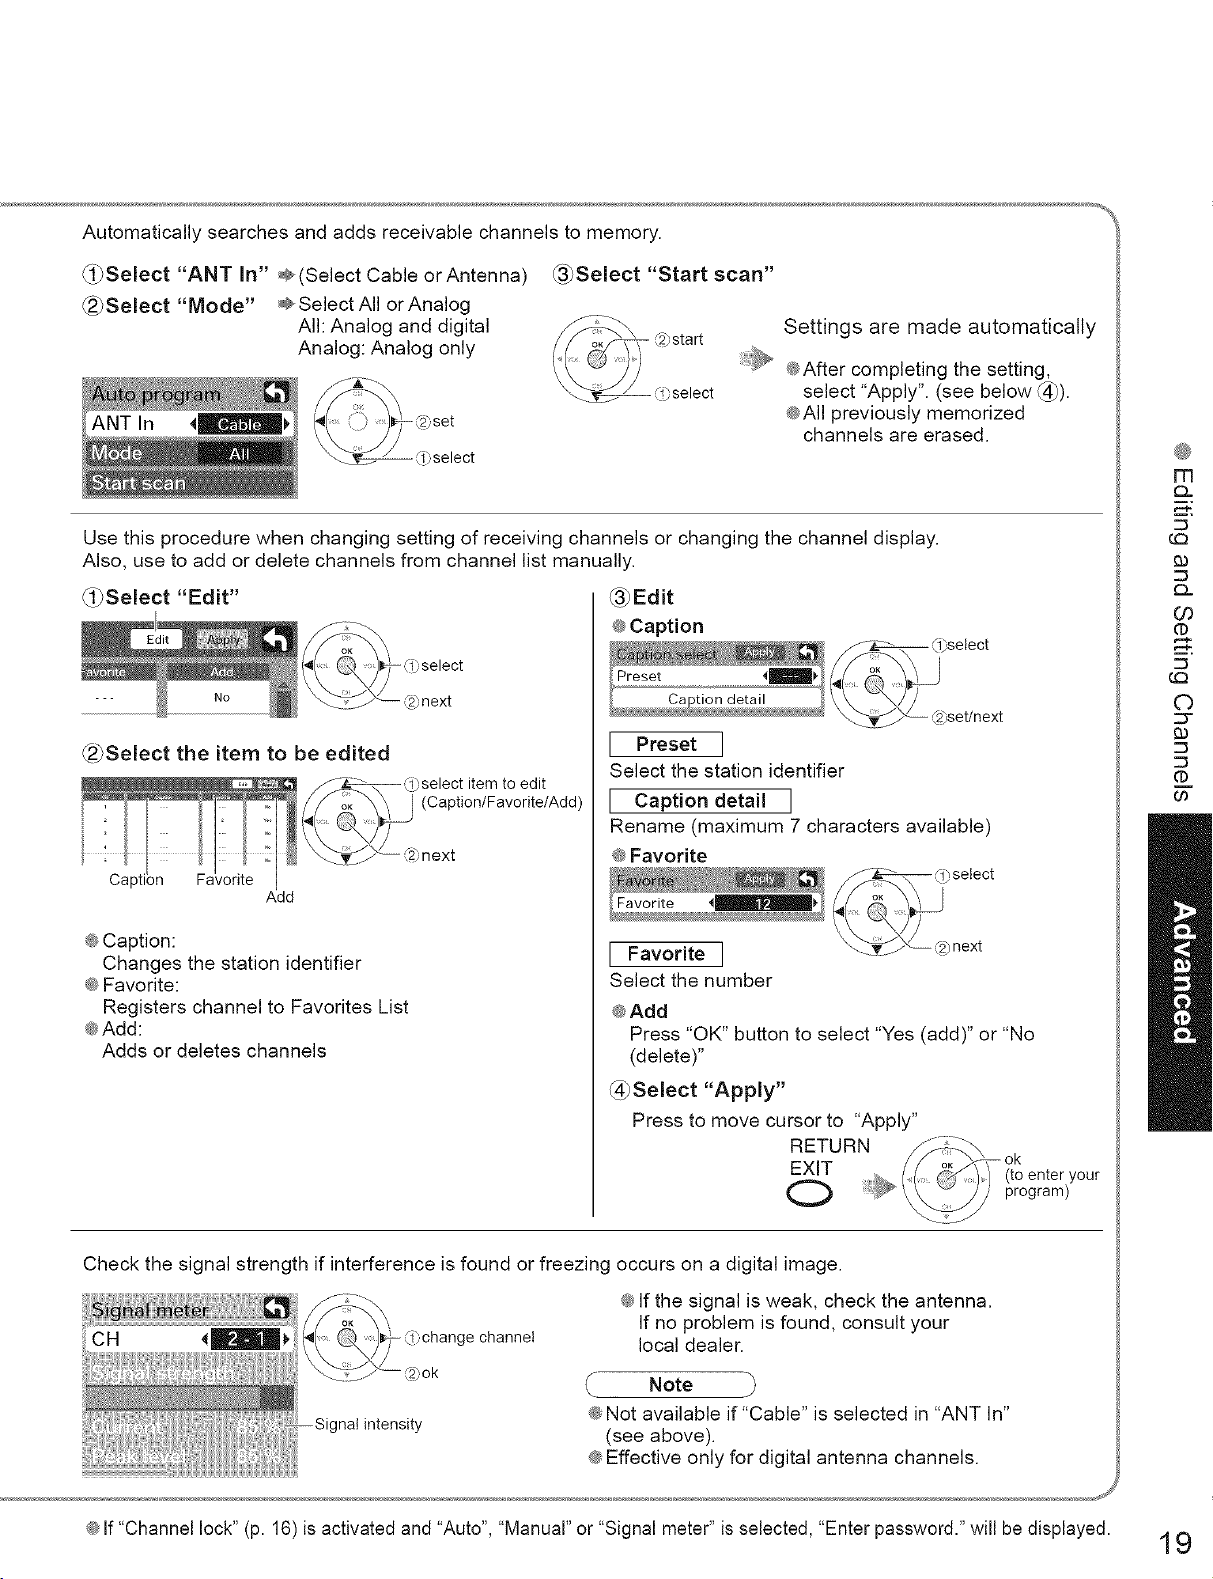
Automatically searches and adds receivable channels to memory.
_Select "ANT In" _-(Select Cable orAntenna
_3_Select "Start scan"
_2_Select "Mode" ÷SelectAII orAnalog
All: Analog and digital
Settings are made automatically
Analog: Analog only
@After completing the setting,
select "Apply". (see below @).
@All previously memorized
channels are erased.
Use this procedure when changing setting of recewing channels or changing the channel display.
Also, use to add or delete channels from channel list manually.
_0Select "Edit" _3_Ed it
@Caption
select
No
<2)Select the item to be edited
next
[ Preset ]
Select the station identifier
__'_ (Caption/Favorite/Add)
[ Caption detail ]
Rename (maximum 7 characters available)
/F_ 0)select item to edit
_#Favorite
m
93
tm
03
G:3
©
::3-
93
Add
@Caption:
Changes the station identifier
@Favorite:
Registers channel to Favorites List
@Add:
Adds or deletes channels
[ Favorite ]
Select the number
@Add
Press "OK" button to select "Yes (add)" or "No
(delete)"
@Select "Apply"
Press to move cursor to "Apply"
RETURN /_--\
EXIT (to enter your
Check the signal strength if interference is found or freezing occurs on a digital image.
@If the signal is weak, check the antenna.
CH
channel
If no problem is found, consult your
local dealer.
Note
nat intensity
@Not available if "Cable" is selected in "ANT In"
(see above).
@Effective only for digital antenna channels.
oK _ ok
....._# \_/ program)
@If"Channel lock" (p. 16) is activated and "Auto", "Manual" or "Signal meter" is selected, "Enter password." will be displayed. 19
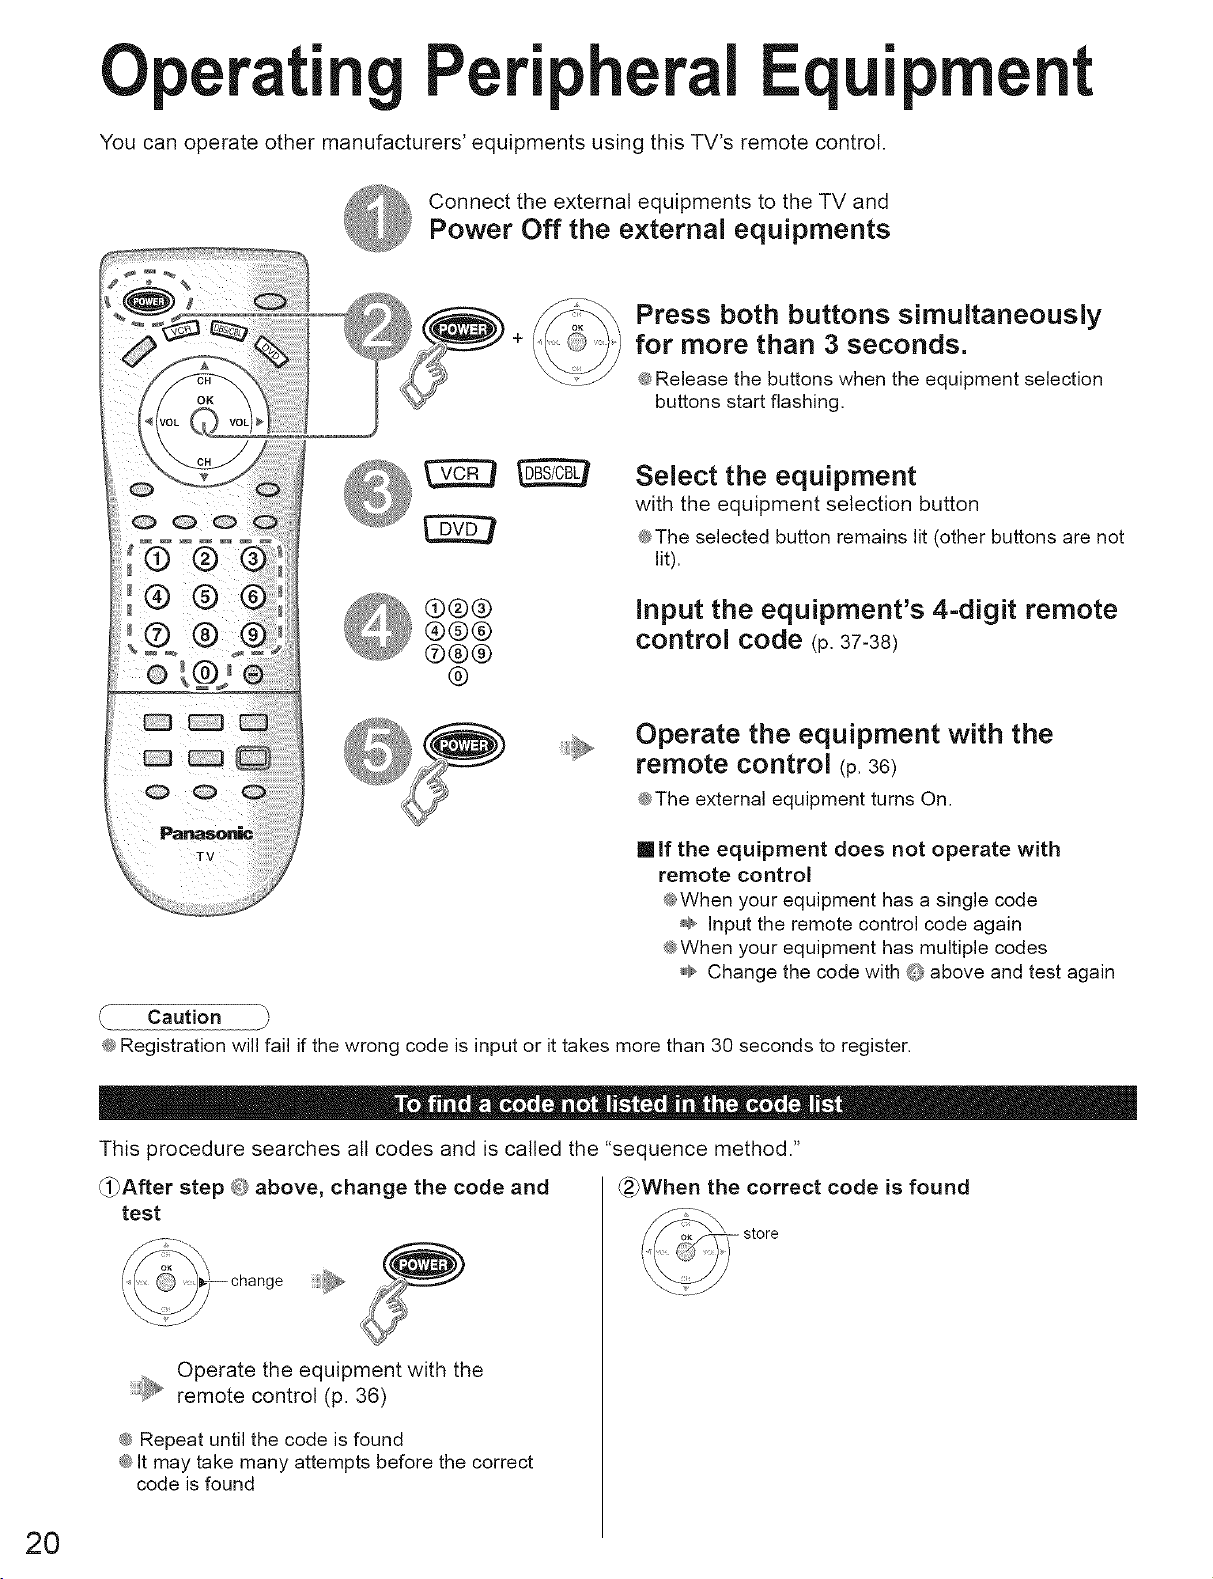
perating Peri heral Eq ='prnent
You can operate other manufacturers' equipments using this TV's remote control.
Connect the external equipments to the TV and
Power Off the external equipments
Press both buttons simultaneously
for more than 3 seconds.
@Release the buttons when the equipment selection
buttons start flashing.
Select the equipment
with the equipment selection button
@The selected button remains lit (other buttons are not
lit).
®®®
®@®
®®®
input the equipment's 4-digit remote
control code (p.37-38)
@
Operate the equipment with the
remote control (p. 36)
@The external equipment turns On.
[] If the equipment does not operate with
remote control
@When your equipment has a single code
@ Input the remote control code again
@When your equipment has multiple codes
@ Change the code with @ above and test again
@Registration will fail if the wrong code is input or it takes more than 30 seconds to register.
This procedure searches all codes and is called the "sequence method."
_After step @ above, change the code and @_When the correct code is found
test
20
Operate the equipment with the
remote control (p. 36)
@Repeat until the code is found
@It may take many attempts before the correct
code is found
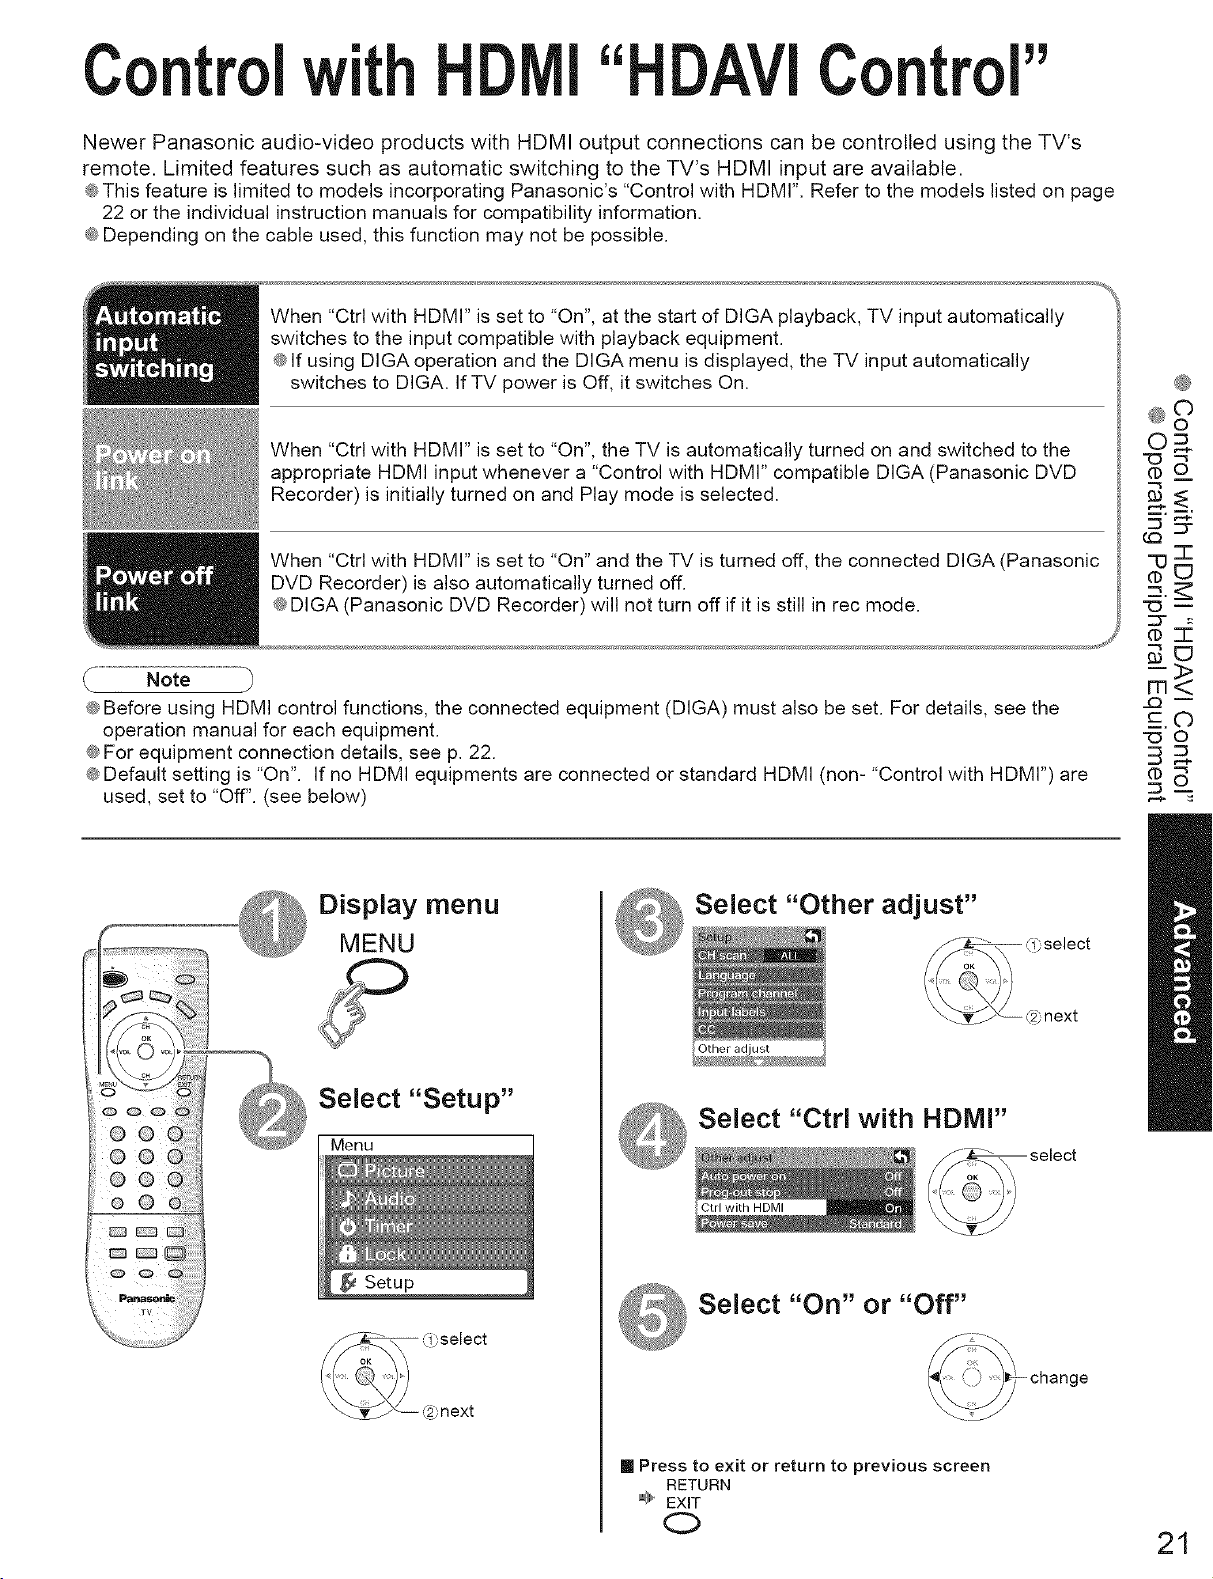
Control ControJ"
Newer Panasonic audio-video products with HDMI output connections can be controlled using the TV's
remote. Limited features such as automatic switching to the TV's HDMI input are available.
@This feature is limited to models incorporating Panasonic's "Control with HDMI". Refer to the models listed on page
22 or the individual instruction manuals for compatibility information.
@Depending on the cable used, this function may not be possible.
When "Ctrl with HDMI" is set to "On", at the start of DIGA playback, TV input automatically
switches to the input compatible with playback equipment.
@If using DIGA operation and the DIGA menu is displayed, the TV input automatically
switches to DIGA. IfTV power is Off, it switches On.
When "Ctrl with HDMI" is set to "On", the TV is automatically turned on and switched to the
appropriate HDMI input whenever a "Control with HDMI" compatible DIGA (Panasonic DVD
Recorder) is initially turned on and Play mode is selected.
When "Ctrl with HDMI" is set to "On" and the TV is turned off, the connected DIGA (Panasonic
DVD Recorder) is also automatically turned off.
@DIGA (Panasonic DVD Recorder) will not turn off if it is still in rec mode.
®
®oo
O3
_o
"O --
@Before using HDMI control functions, the connected equipment (DIGA) must also be set. For details, see the
operation manual for each equipment.
@For equipment connection details, see p. 22.
@Default setting is "On". If no HDMI equipments are connected or standard HDMI (non- "Control with HDMI") are
used, set to "Off". (see below)
Select "Other adjust"
Display menu
MENU
Other adjust
OQQ
® ®
@ @(
® @ (
Select "Setup"
Select "Ctrl with HDMI"
Menu
Ctrl with HDMI
m<>
..Q --
B_
Select "On" or "Off"
[] Press to exit or return to previous screen
RETURN
EXIT
0
21
Recom endedAV nnecti
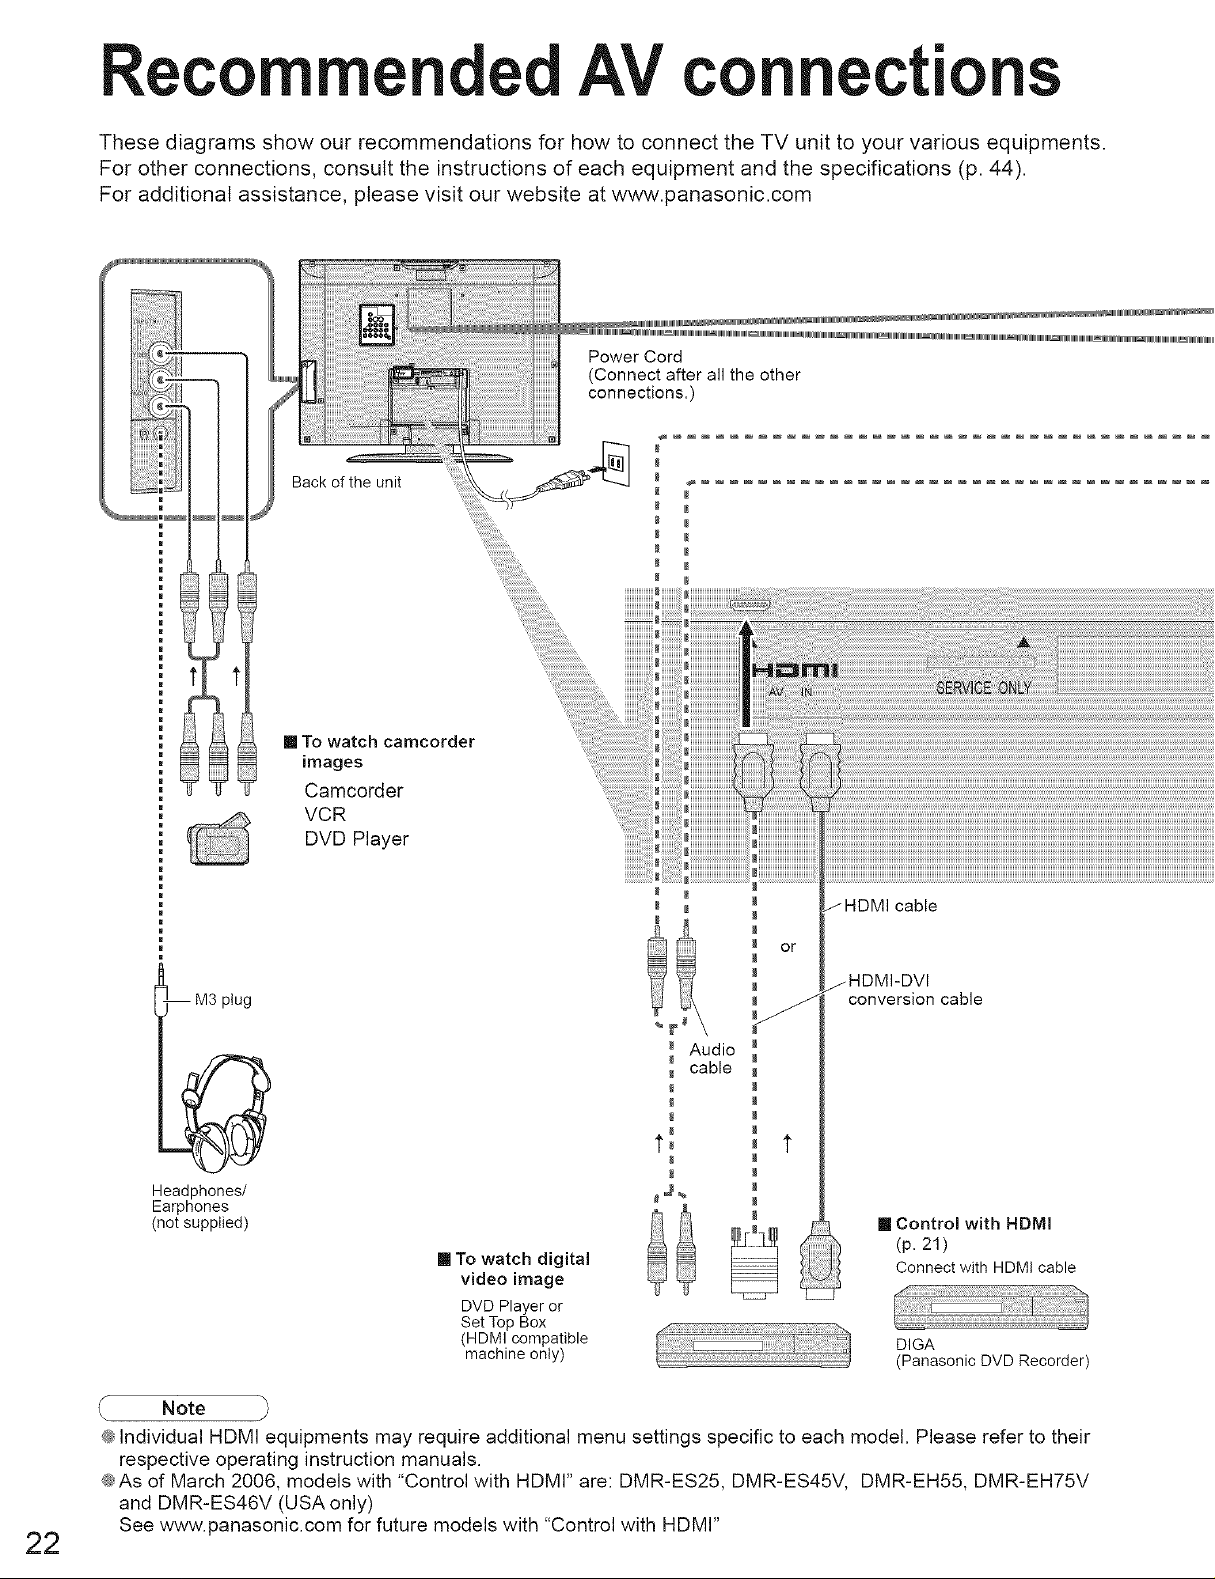
These diagrams show our recommendations for how to connect the TV unit to your various equipments.
For other connections, consult the instructions of each equipment and the specifications (p. 44).
For additional assistance, please visit our website at www. 3anasonic.com
-- M3 plug
9
Headphones/
Earphones
(not supplied)
[] To watch camcorder
images
Camcorder
VCR
DVD Player
[] To watch digital
video image
DVD Player or
Set Top Box
(HDMI compatible
machine only)
cable
or
conversion cable
Audio
cable
[] Control with HDMI
(p. 21)
Connect with HDM! cable
DIGA
(Panasonic DVD Recorder
22
Note
¢ Individual HDMI equipments may require additional menu settings specific to each model. Please refer to their
respective operating instruction manuals.
@As of March 2006, models with "Control with HDMI" are: DMR-ES25, DMR-ES45V, DMR-EH55, DMR-EH75V
and DMR-ES46V (USA only)
See www.panasonic.com for future models with "Control with HDMI"
I
@
::0
0
O
3
3
<-
©
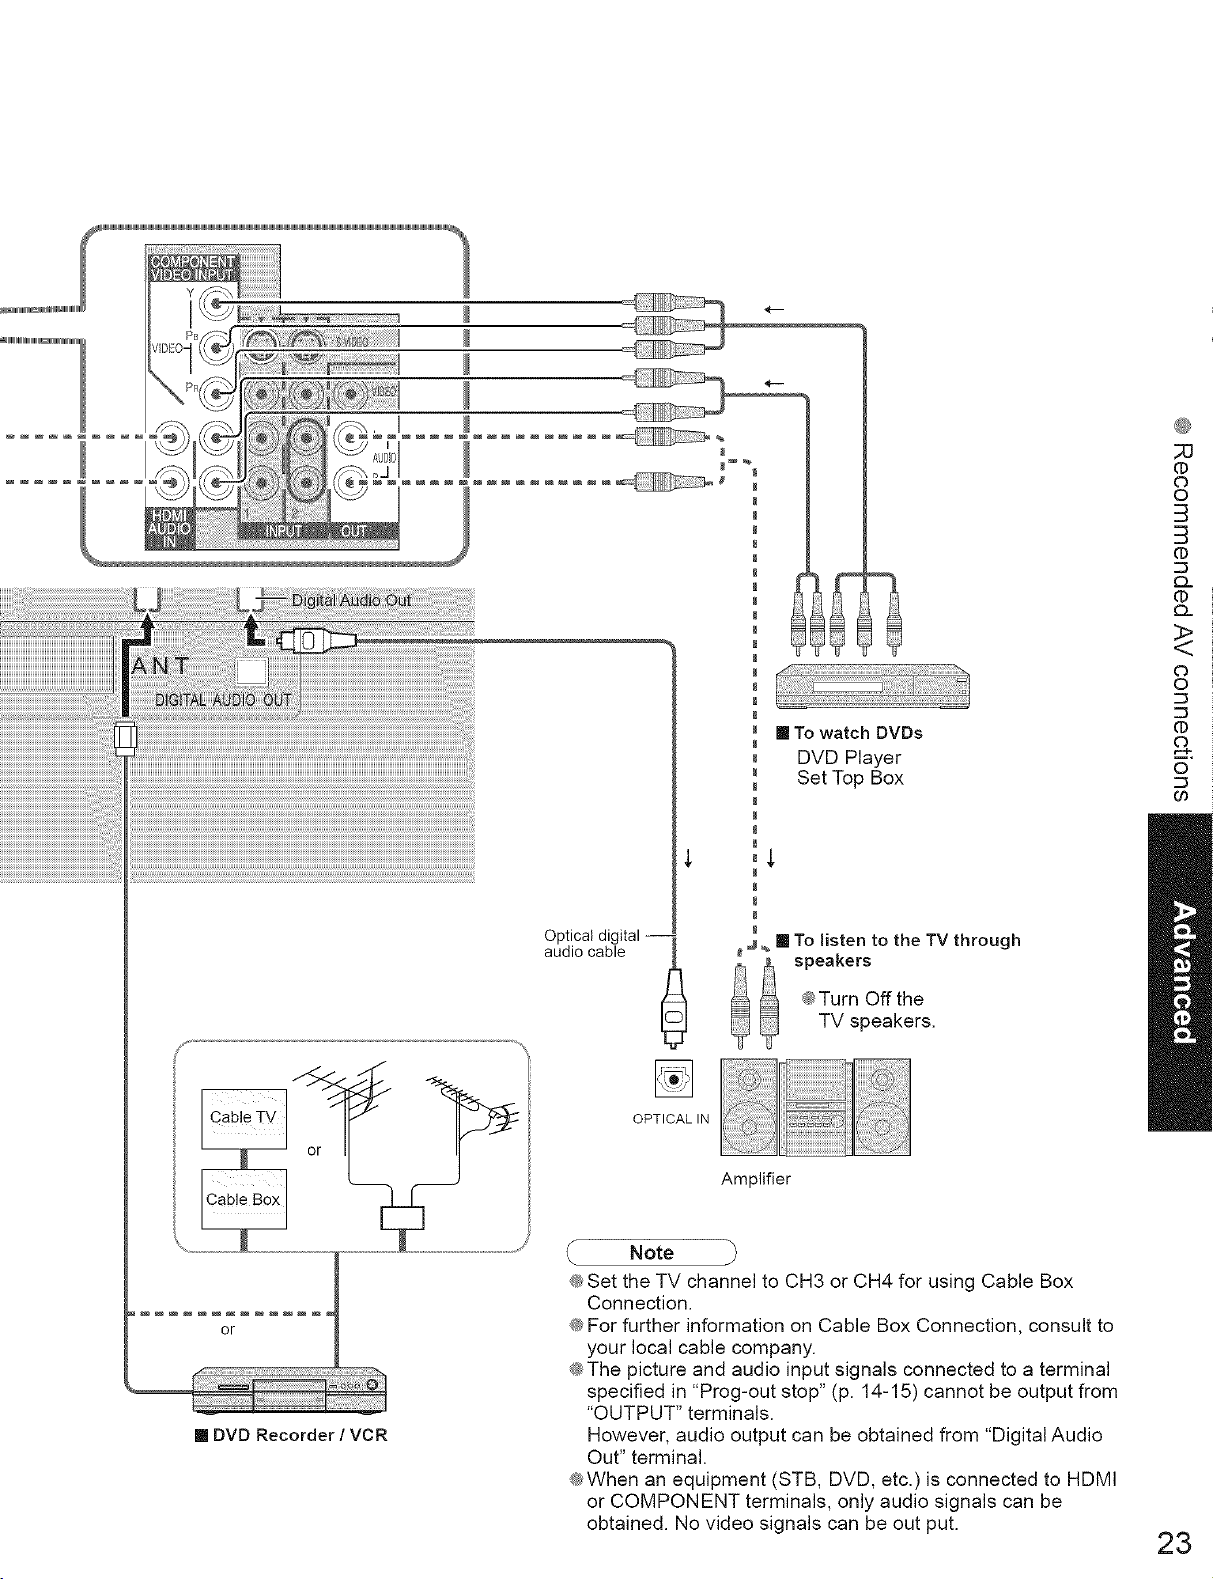
[] DVD Recorder / VCR
[] To watch DVDs
DVD Player
Set Top Box
audio cable
Optical digital
OPTICAL IN
j _ [] To listen to the TV through
_ speakers
TV speakers.
_ Turn Offthe
Amplifier
Note
@Set the TV channel to CH3 or CH4 for using Cable Box
Connection.
@For further information on Cable Box Connection, consult to
your local cable company.
@The picture and audio input signals connected to a terminal
specified in "Prog-out stop" (p. 14-15) cannot be output from
"OUTPUT" terminals.
However, audio output can be obtained from "Digital Audio
Out" terminal.
@When an equipment (STB, DVD, etc.) is connected to HDMI
or COMPONENT terminals, only audio signals can be
obtained. No video signals can be out put.
0
©
23
Accesorios/O
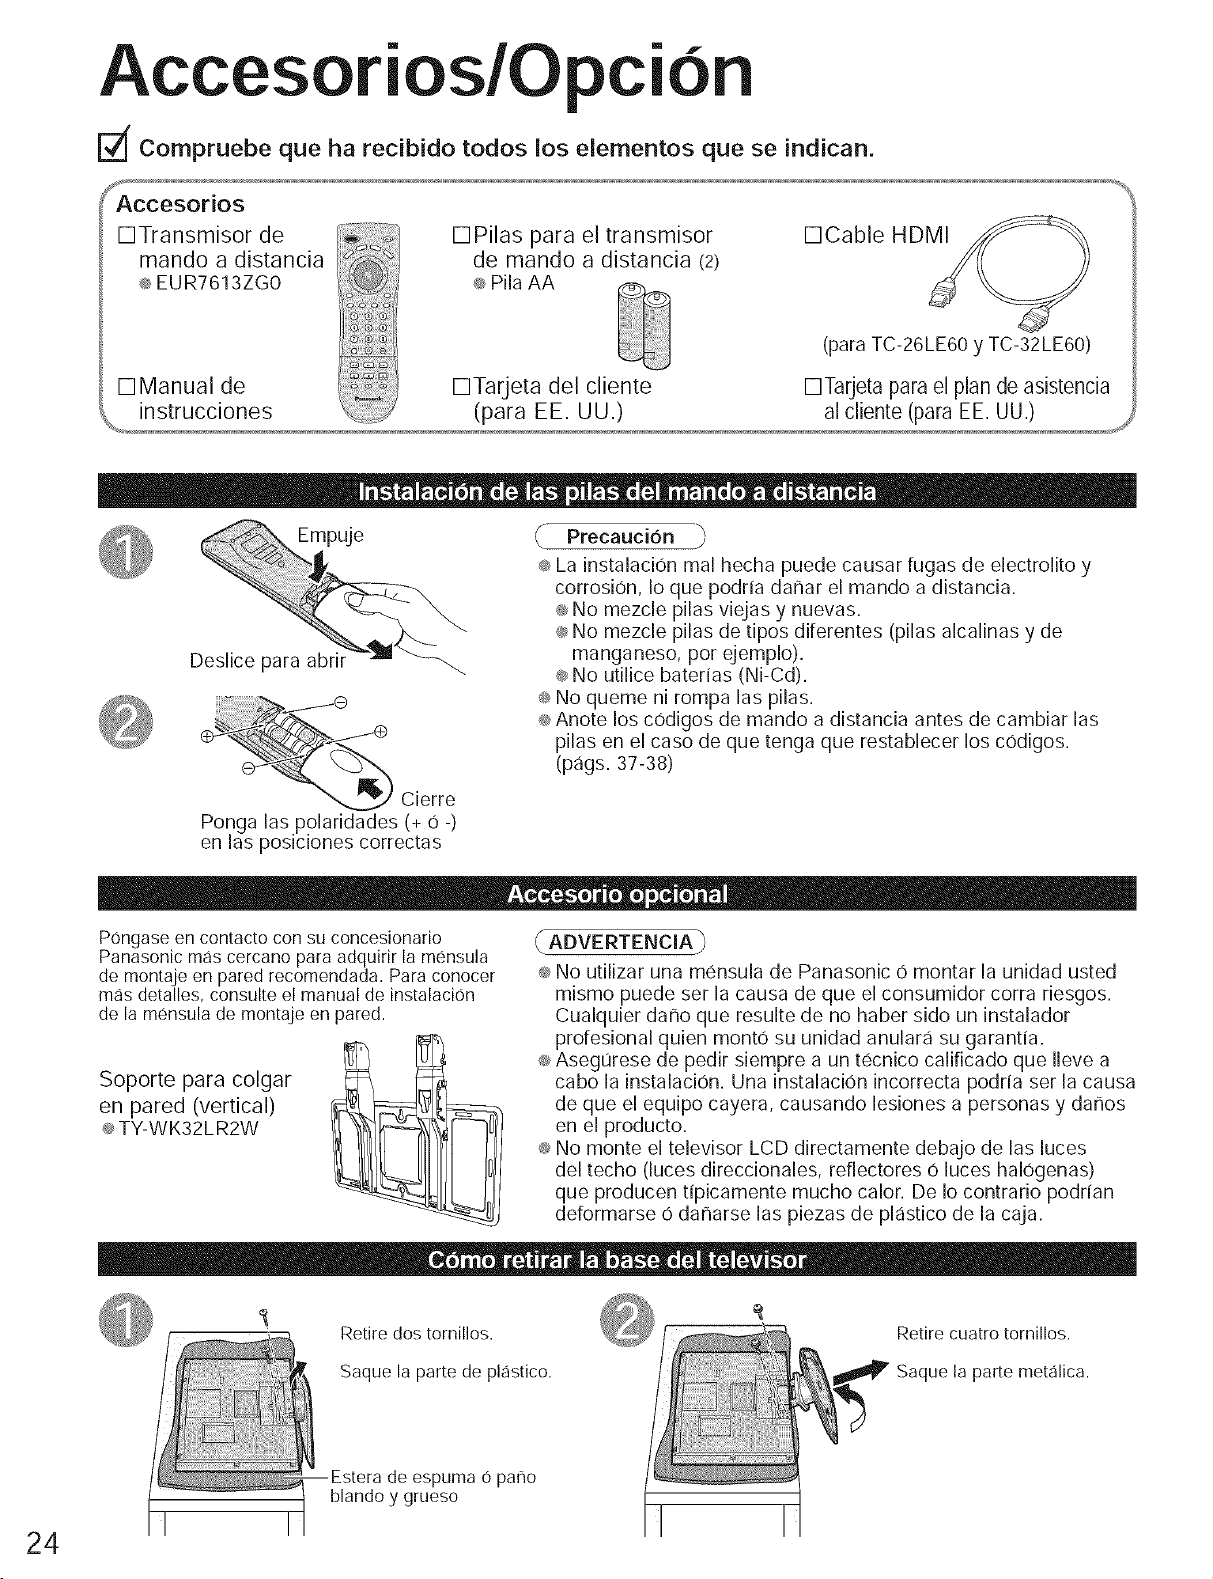
[_ Compruebe que ha recibido todos los elementos que se indican.
y
Accesorios
FITransmisor de
mando a distancia
® EUR7613ZGO
FIPilas para el transmisor
de mando a distancia (2)
® Pila AA
FICable HDMI
(para TC-26LE60 y TC-32LE60)
FIManual de FITarjeta del cliente
instrucciones (para EE. UU.)
Precaucion -_
® La instalaciOn mal hecha puede causar fugas de electrolito y
corrosion, Io que podria dar_ar el mando a distanda.
_ No mezcle pilas viejas y nuevas.
® No mezcle pilas de tipos diferentes (pilas alcalinas y de
manganeso, pot ejemplo).
® No utilice baterias (Ni-Cd).
_ No queme ni rompa las pilas.
® Anote los cOdigos de mando a distancia antes de cambiar las
pilas en el caso de que tenga que restablecer los cOdigos.
(pags. 37-38)
Ponga las polaridades (+ O -)
en las posiciones correctas
Pongase en contacto con su concesionario
Panasonic mas cercano para adquirir la mensula
de montaje en pared recomendada. Para conocer
mas detalles, consulte el manual de instalacion
de la mensula de montaje en pared.
Soporte para colgar
en pared (vertical)
® TY-WK32LR2W
(ADVERTENCIA_
® No utilizar una mensula de Panasonic 0 montar la unidad usted
mismo puede ser la causa de que el consumidor corra riesgos.
Cualquier dano que resulte de no haber sido un instalador
profesional quien monto su unidad anulara su garantia.
¢ Asegurese de pedir siempre a un tecnico calificado que Ileve a
cabo la instalaciOn. Una instalaciOn incorrecta podria ser la causa
de que el equipo cayera, causando lesiones a personas y danos
en el producto.
¢ No monte el televisor LCD directamente debajo de las luces
del techo (luces direcdonales, reflectores 0 luces halOgenas)
que producen tipicamente mucho calor. De Io contrario podrian
deformarse 0 danarse las piezas de plastico de la caja.
FITarjeta para el plan de asistencia
al cliente (para EE. UU.)
24
Retire dos tornillos.
Saque la parte de plastico.
de espuma O pano
blando y grueso
Retire cuatro tornillos.
Saque la parte metalica.
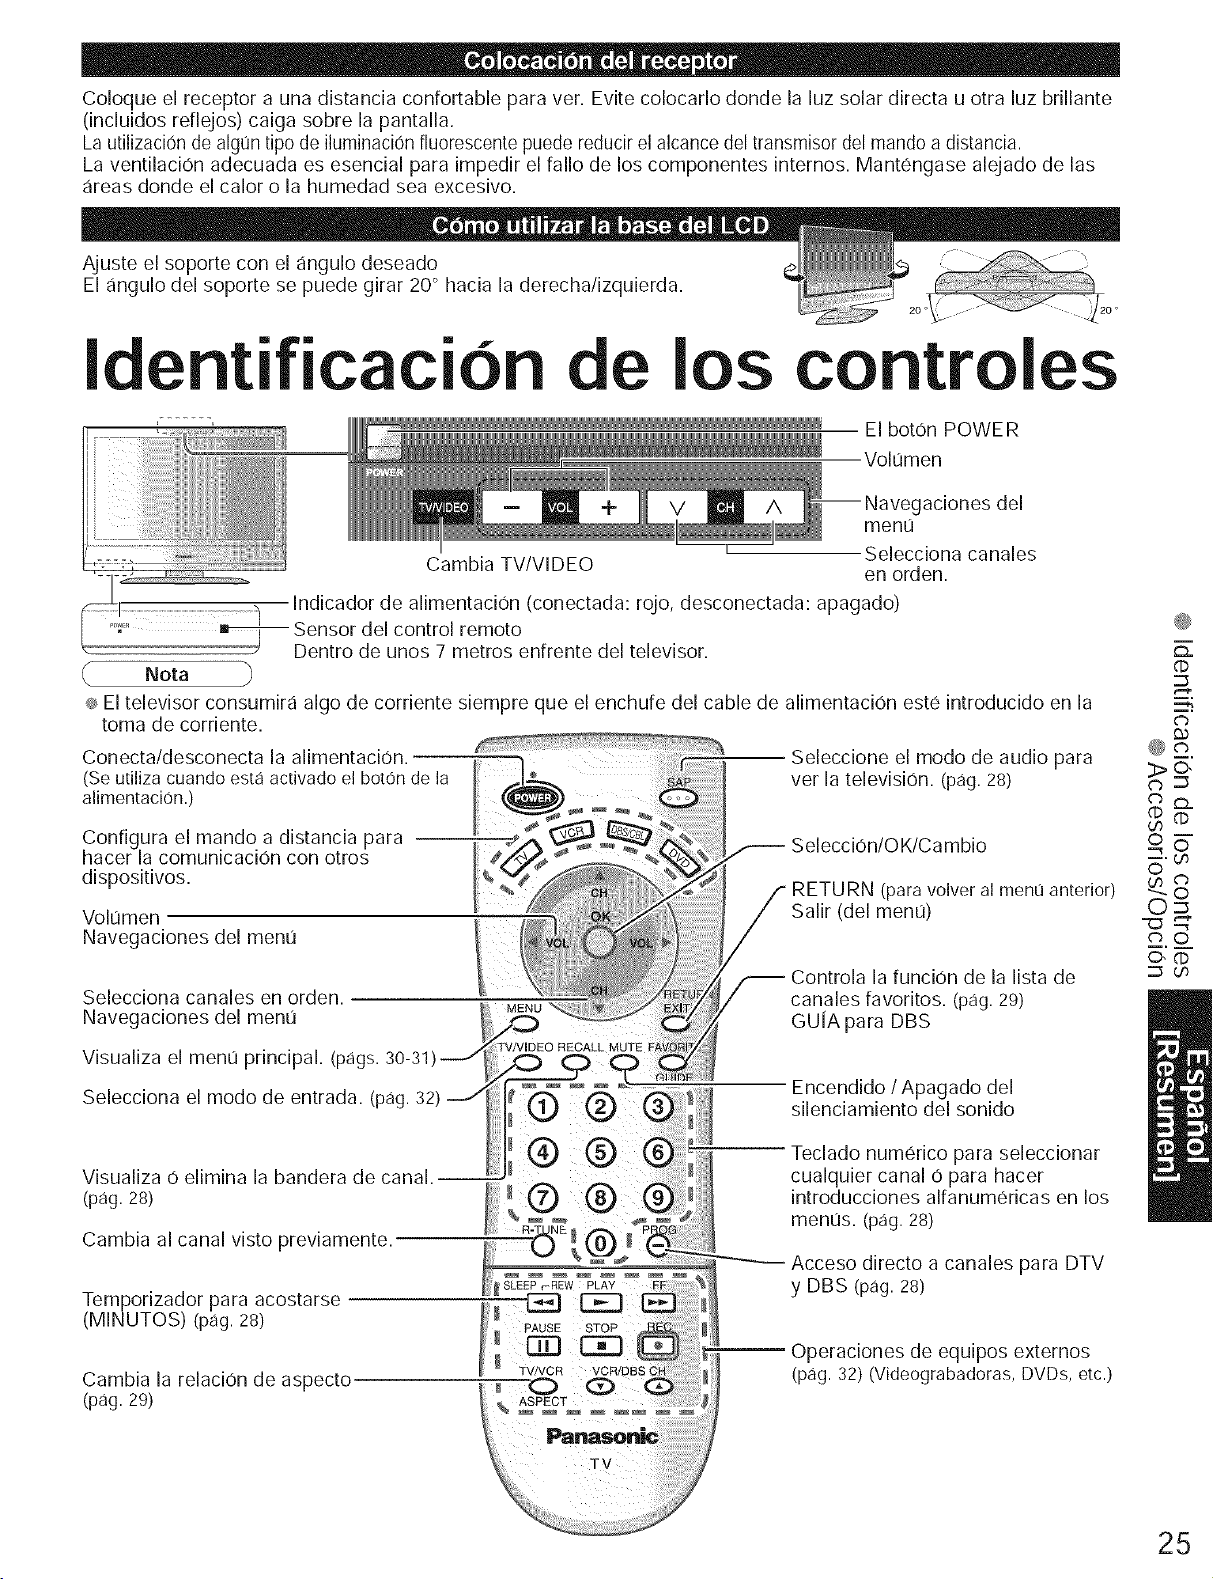
Coloque el receptor a una distancia confortable para ver. Evite colocarlo donde la luz solar directa u otra luz brillante
(incluidos reflejos) caiga sobre la pantalla.
La utilizaci0n de algt]n tipo de iluminaci0n fluorescente puede reducirel alcance del transmisor del mando adistancia,
La ventilaciOn adecuada es esencial para impedir el fallo de los componentes internos. Mantengase alejado de las
areas donde el calor o la humedad sea excesivo.
Ajuste el soporte con el angulo deseado
El angulo del soporte se puede girar 20° hacia la derecha/izquierda.
I
f
t Nota
®_Eltelevisor consumira algo de corfiente siempre que el enchufe del cable de alimentaciOn este introducido en la
toma de corfiente.
tit
Cambia TV/VIDEO
Indicador de alimentaciOn (conectada: rojo, desconectada: apagado)
control remoto
Dentro de unos 7 metros enfrente del televisor.
de los controles
El boton POWER
Volumen
aciones del
menu
t Selecciona canales
en orden.
Seleccione el modo de audio para
ver la television. (pag. 28)
SelecciOn/OK/Cambio
f RETURN (para volver al menu anterior)
Salk (del menti)
f-- Controla la funcion de la lista de
/ canales favofitos. (pag. 29)
GUiA para DBS
3>0,
°g-d)
gh
oS
_.u_
o_ db
""- O
O3
_.o
©,_
m
d)
m.
db
Selecciona el modo de entrada. (pag.32)
Visualiza O elimina la bandera de canal.-
(pag. 28)
Cambia al canal visto previamente.
Tempofizador para acostarse
(MINUTOS) (pag.28)
Cambia la relaciOn de aspecto
(pag. 29)
_AUSE
TV/VCR
ASPECT
Panasonic
%
Encendido / Apagado del
silenciamiento del sonido
]-eclado numerico para seleccionar
cualquier canal O para hacer
introducciones alfanumeficas en los
menus. (pag. 28)
directo a canales para DTV
y DBS (pag. 28)
Operaciones de equipos externos
(pag. 32) (Videograbadoras, DVDs, etc.)
TV
25
 Loading...