

Page 1

Panasonic
Colour Television
TC-29V50R
Operating Instructions
Please read these instructions completely before operating this set
TQB620981
Page 2

Contents
Warnings and Cautions
Battery Installation and Replacement
Locations of Control (Front View)
Locations of Control (Rear View)______________________________________ 7
Remote Control (TV Operation)
Remote Control {VCR Operation)
How to Connect an Externa! Antenna---------------------------------------------------------- 10
How to Connect the Audio and Video Terminals
How to Connect the Audio and S-Video Terminals
How to Connect the Audio, Video and S-Video Terminals
_____________________________________________
__________________________________
_____________________________________
_______________________________________
--------------------------------------------------------------
_________________________
_______________________
_________________
4
5
6
8
9
11
12
13
How to Tune in Your TV Set (Automatic and Manual Search)_______________ 14
Fine Tuning Operation________________________________________________ 15
Page 3

Contents
General Operation on the TV Set
Remote Control Operation_____________________________________________18-22
VCR Operation
Troubleshooting
Specifications_______________________________________________________26-27
General Information
______________________________________________________
_____________________________________________________
__________________________________________________
______________________________________
16*^17
24
25
27
Page 4

Dear Panasonic Customer
Welcome to the Panasonic family of customers. We hope that you will have many years of enjoyment
from your new colour television.
Warnings and Cautions
1Tie TV set can be operated on
AC Auto 110 - 240 V, 50/60 Hz.
AC 230 V, 50 Hz {Only for
New Zealand)
To prevent damage which may
result in fire or electrical shock,
do not expose the TV set to rain
or excessive moisture.
High Voltage :
Do not remove the rear cover,
as live parts are accessible
when it is removed.
The cabinet and picture tube
can be kept in good condition
by simply wiping with a clean,
soft cloth moistened with mild
detergent and water. Do not
use solutions containing ben
zol, petroleum or a chemical
cloth. For safety, remove the
plug from the wall outlet.
Adequate ventilation is es
sential to prevent failure of
electrical components.
Avoid exposing the TV set to
direct sunlight and other source
of heat.
Remove the plug from the wall
outlet (Power point) when the
TV set is not used for a pro
longed period of time.
Do not used this set if abnormal
operation occurs.
EX: smoke, odd sounds or
smells, turn the power switch off
and disconnect the AC power if
you notice any unusual operation.
Page 5
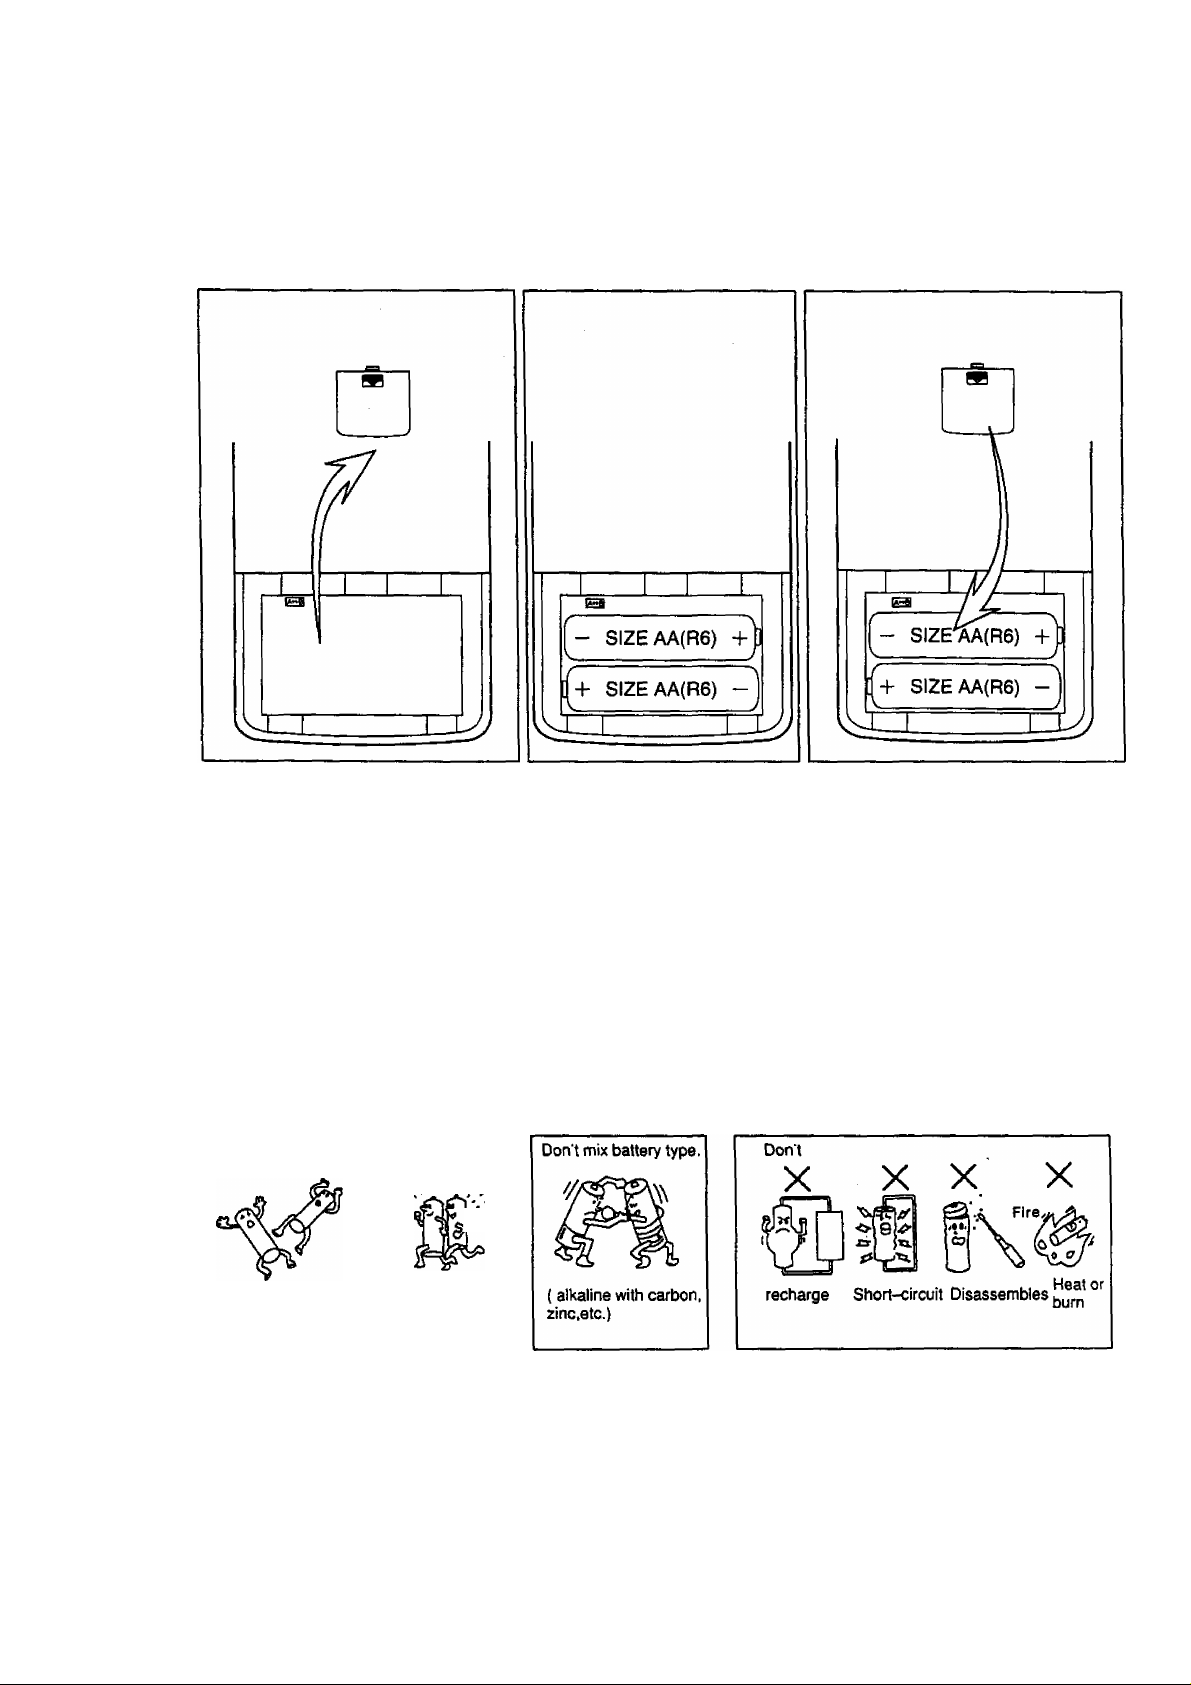
Battery Installation and Replacement
Battery Installation
Batteries : Use two" R6" size dry cells.
1. Remove the remote control 2. Insert the batteries correctly 3. Replace the cover,
battery compartment lid by by observing the polarities
pressing it to the bottom side. ( + ) and (-).
Battery Precautions
Incorrect use of batteries can cause electrolyte leakage which will corrode the remote control
transmitter or cause the batteries to burst.
The following precautions must be carefully observed.
Old batteries batteries
V:
Replace both batteries at the same
time. Dispose of them immediately.
Page 6
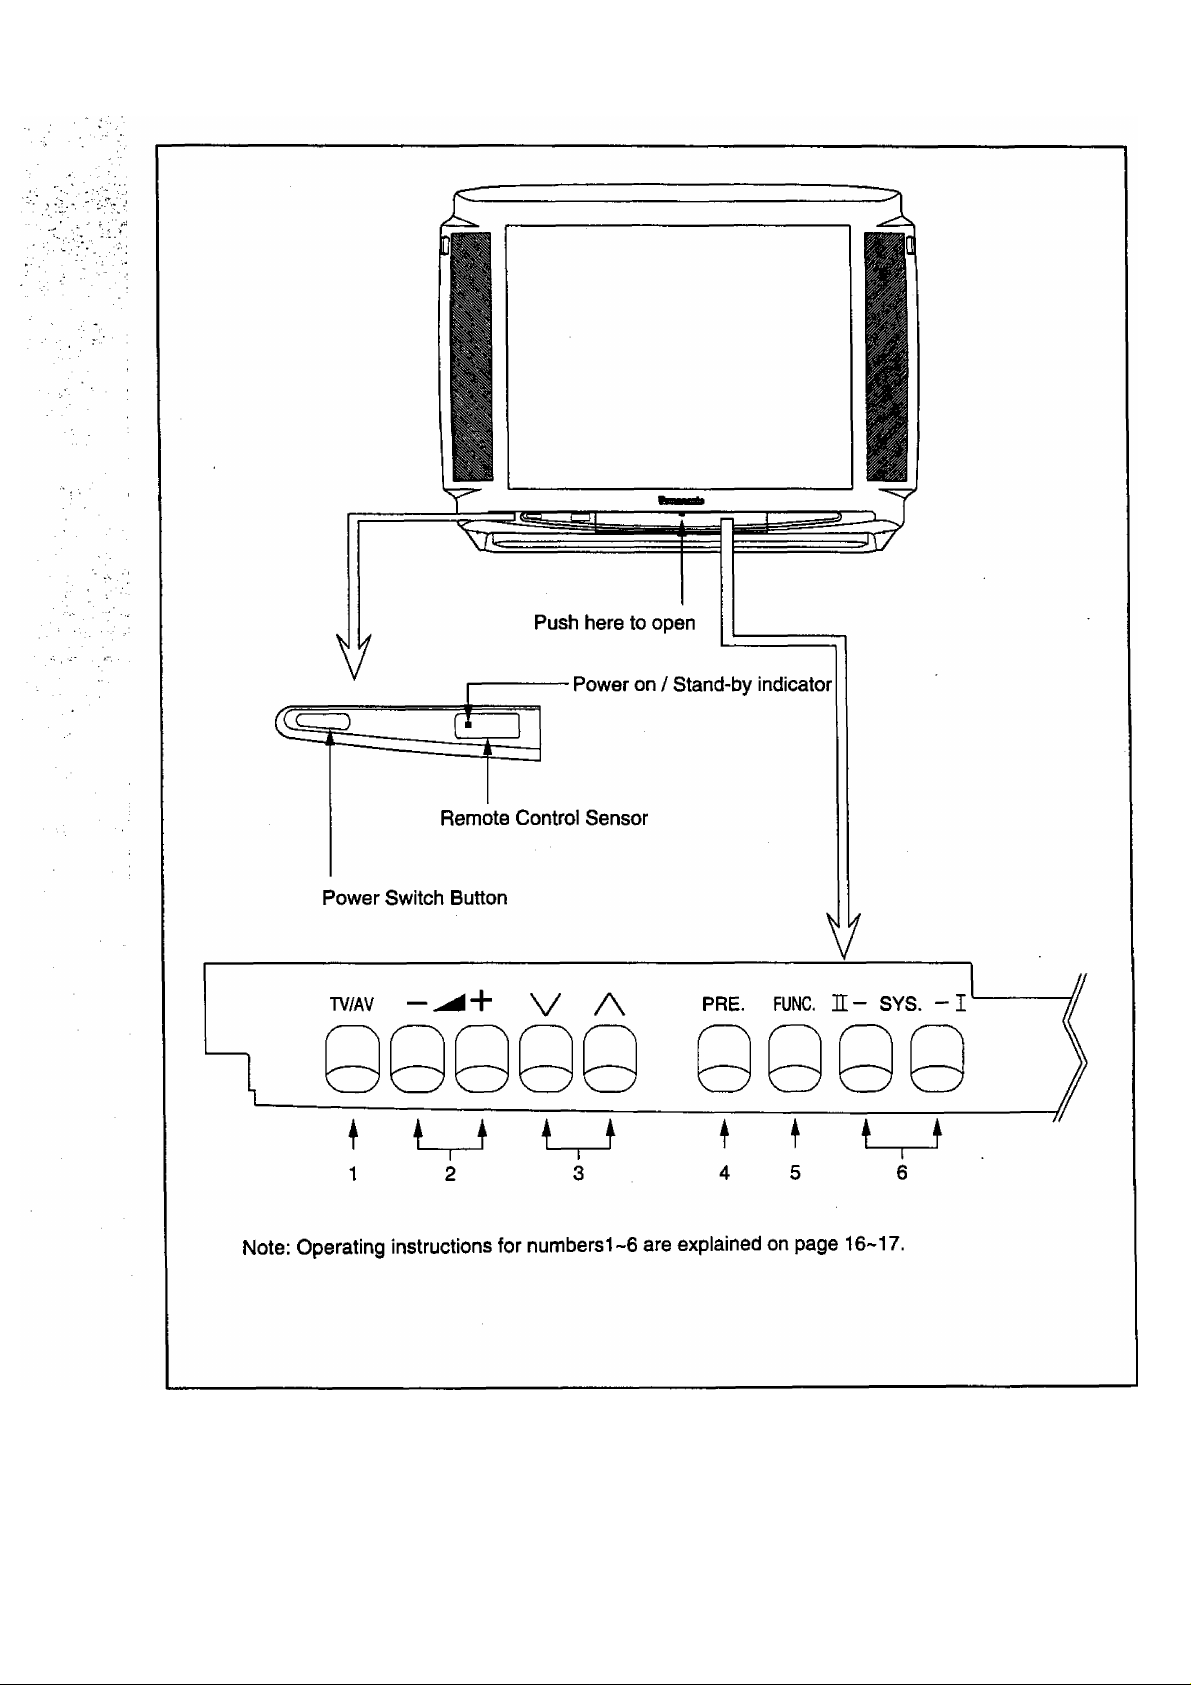
Locations of Control (Front View)
Page 7
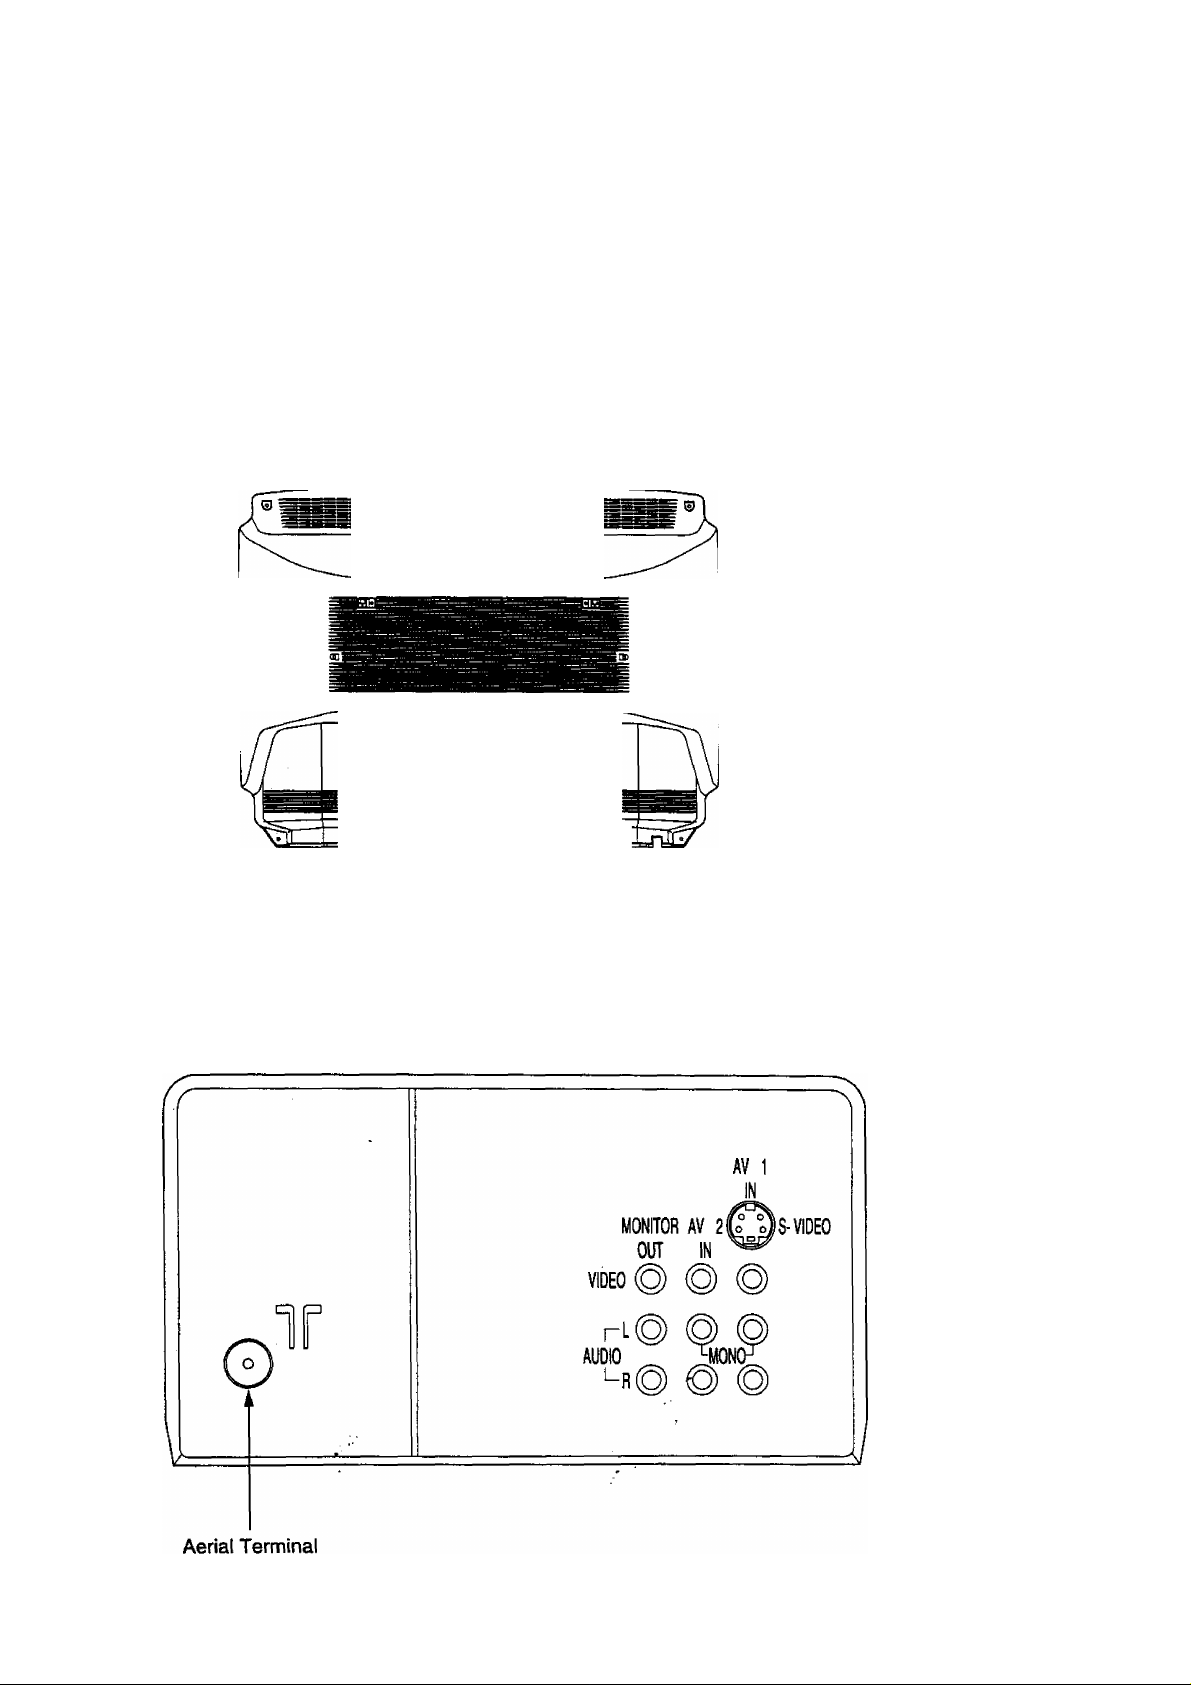
Locations of Control ( Rear View)
o
ooo.* w w ^
INN Ml III B
V
Page 8
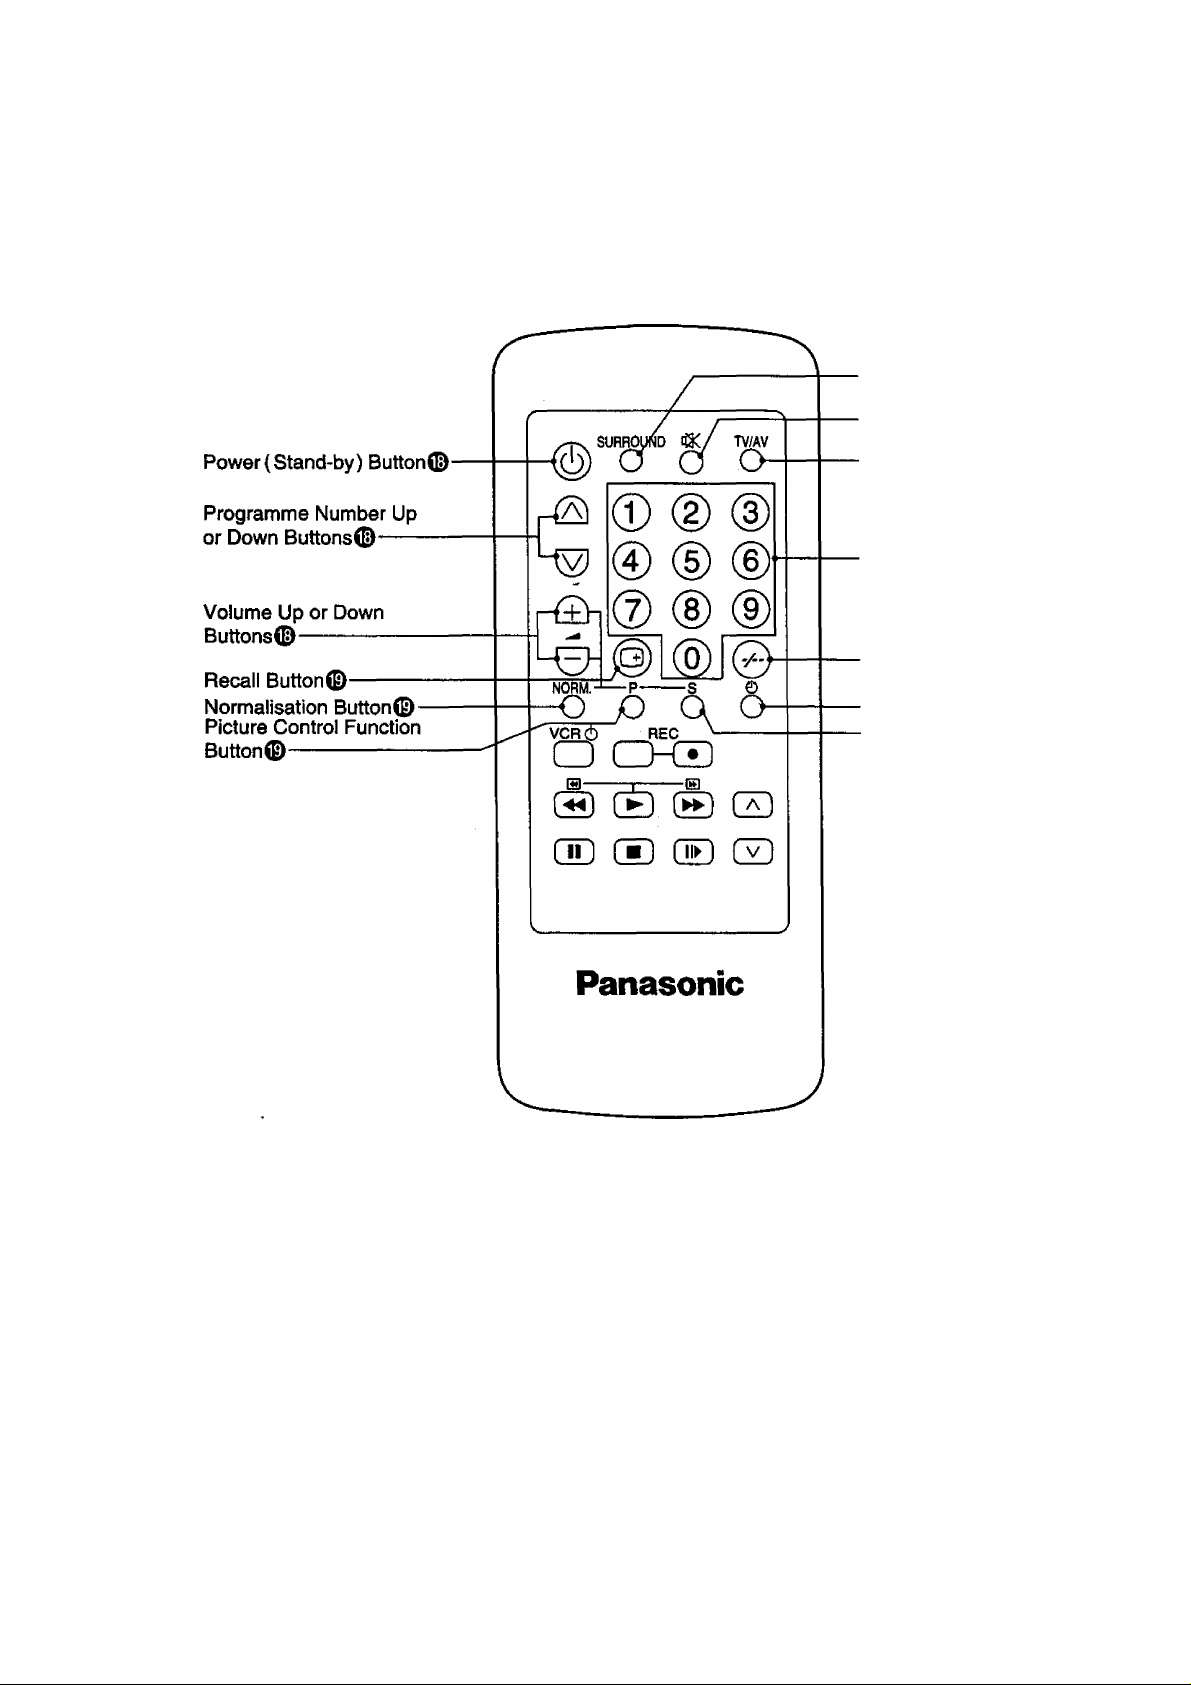
Remote Control
Refer to the pages indicated in#for details.
Surround Button®
Sound Mute Button®
TV/AV Selection Button®
Direct Programme Number
Seiection Buttons®
Two digit Programme
Number Selection Button®
Off-Timer Button®
Sound Controi
Function Button®
8
Page 9

Remote Control
Refer to the pages indicated in#for detaiis.
NORM.-Ì
VCRÒ REC
VCR Power(Stand-by) Button©
Rewind/Review Button©Play Button©Pause/Still Button©-
Stop Button©
----------
■O n-T^
■& fÈ) (Én^
■®JX) CE( CZ>^
SURROUND TV/AV
o o o
iS)
© (D @
® ® ®
Oh
® ® ®
EHg) L©j©
----P----------
S 0
o o o o
(3
---------
----------(g
Rec(Record) Button©
Fast Fonward Button©
Programme Number Up/
Down Buttons for VCR©
Still Advance Button©
Panasonic
9.
Page 10

How to Connect an External Antenna
To obtain the best quality picture and sound, an external antenna, the correct cables (75 Ohm coaxial)
and the correct terminating plug will be required.
If a communal antenna system is used, you may require the correct connection cable and plugs
between the wall.antenna socket and your television receiver.
Your local Television Service Dealer may be able to assist you in obtaining the correct antenna
system for your particular area and accessories required.
Any matters about antenna installation, upgrading of existing systems or accessories required,
and the cost incurred, are the responsibility of the customer.
RF in Terminai
Coaxial aerial plug
10
Page 11

Connections ( Audio and Video Terminais )
Connect the AV 1 and AV2 (VIDEO and AUDIO terminals) on the TV set with playback
equipments as follows:
e.g. To connect the AV1 with playback equipments.
Playback equipment
{VHS VCR)
.ODO ODO
o
_______OD______
CD
AUDIO
I I 1
OUT
VIDEO
OUT
S-VIDEO
OUT
AVI
IN
J
o) S-VlDEO
MONITOR AV 2
VIDEO
r'
AUDIO
OUT
( Rear of TV )
..................
IN
r
L MONO J
AVI
IN
U o)) S-VIDEO
11
Lp
1.........
_________________________
.......
_______________
______
Page 12

Connections ( Audio and S-Video Terminais )
Connect the AV 1 (AUDIO and S-VIDEO terminals) on the TV set with playback
equipments as follows:
e.g. To connect the AVI with S VHS VCR.
Playback equipment
(S VHS VCR)
►ooo ooo
O
cn
AUDIO
OUT
R L
I I
VIDEO
OUT
S-VIDEO
OUT
AVI
IN
J
S-VIDEO
MONITOR AV 2
OUT
VIDEO
AUDIO}IO
( Rear of TV )
AVI
IN
S-VIDEO
IN
L MONO J
12
I
_______
U
______________________________________
Page 13

Connections ( Audio, Video and S-Video Terminais )
Connect the AUDIO, VIDEO and S-VIDEO ( e.g. via AV1 Terminais ) as follows :
“b
AUDIO
IN
R L
o
VIDEO
IN
Recording Equipment
(Rear TV)
AVI
IN
1. Never connect the same video recorder with both the VIDEO IN and VIDEO OUT Terminals on
the TV set, as this could cause incorrect operation.
2. "MONITOR OUT" Terminals contain signal which are on the TV screen at that time,
e.g. TV programmes or signal from AV2 input.
13
Page 14

Tuning Procedure
How to Tune in Your TV Set
(Automatic Search)
1. The TV set must be turned on.
PRE.
2. Press the "PRE." button until the on-screen
display appears as follows :
Programme
Number
{0-59)
Sound System
Colour
System
SEARCH Vl-
1
4.5MHz
AUTO
k
— Band
Indicator
Vl:VHF Low Sand
Vh;VHF High Band
U ;UHF Band
How to Tune in Your TV Set
( Manuai Search )
1. The TV set must be turned on.
PRE.
2. Press the "PRE." button until the on-screen
display appears as shown in Figure 1.
V A
3. Press either the Programme Number Up
“a” or Down "v" Button, to select the
Programme Number in which you wish to
store the desired broadcast transmission
channel tuning.
3. Press the "FUNCTION" button .
The on-screen display appears
as shown:
/—
1
Searching
SEARCH Vl
A
j
0 SEARCH Vl
4.5MHz
AUTO
MONO SURROUND
Completion
The best tuning position is automatically
memorized.
4. Press the "PRE.” button twice to return the
TV set to the normal operating mode.
A maximum of 60 Programme Numbers
(0-59) can be programmed.
Note:
When the colour or sound is not clear is
produced on a Programme Number,
press the “SYSTEM I or 11” Button.
(Refer to page 17)
01
4. Press either the Level Adjusment Up ” +"
or Down " - ” buttons, the TV station
broadcasting on the next higher or lower
frequency will be automatically tuned and
memorized.
1 SEARCH Vl
1 SEARCH Vl
4.5MHz
AUTO
i
Searching
Completion
If an undesired TV station is received, press
the same button again until the desired TV
station is tuned.
5. Repeat step 3 and 4 to tune all the available
TV stations on the remaining channel.
Ensure that a new programme number is set
(step 2) before tuning the next station.
6. Press the "PRE." button twice to return the
TV set to the normal operating mode.
14
Page 15

Fine Tuning Operation
Under normal reception condition, this function is not used. However, in areas of poor reception or
constant interference, a slight adjustment on the fine tuning can improve the picture and sound quality.
How to set the Fine Tuning Operation
PRE.
1. Press the " PRE." button twice.
The on-screen will appear as shown :
--------------------
—
1
4.5MHz
AUTO
L
____
First press
SEARCH VL
—
1
FINE VL
-i
— -J
.................
Second press
How to Cancel the Fine Tuning Operation
These procedure is used when to reset the
Programme Number to the automatically
tuned condition with the AFC activated.
PRE.
1. Press the ” PRE." button once.
The on-screen will appear as shown
■ 1 SEARCH VL
4.5MHz
AUTO
2. Press either the Level Adjustment Up" + ”
or Down " -" button (Volume Button)
continuously.
When the above fine tuning operation has
been performed, the " ■" symbol appear on
the left of Programme Number.
The AFC function is deactivated.
—
AFC OFF Symbol
■"•I
FINE VL
-1
-----------
3. Press the " PRE." button once to return the
TV set to the normal operating mode.
2. Press either the Level Adjustment Up" + " or
Down" -" button (Volume Button).
3. Press the " PRE. ” button twice.
15
Page 16

General Operation on the TV Set
1. TV / AV Selection Button
TV/AV
Press the button to select the TV mode, AV1
mode, or AV2 mode.
The sequence is as below :
1
4.5 MHz
AUTO
^ MONO SURROUND ^
------------MONO
S
f N
AV1
AUTO
^ MONO SURROUND ^
2. Volume Up / Down Button
0*
Press these buttons to adjust the sound level.
These buttons also can be used for level Up
or Down adjustment in the Picture Control
Function mode and Sound Control Function
mode.
3. Programme Number Up / Down
Buttons
Note:
When TV mode is selected, the last Programme
Number, Sound System, Colour System,
Surround mode and Sound output {depending
on type of broadcasting transmission) mode
will appear.
When AV mode is selected, the last AV mode.
Colour System and Surround mode will appear.
If the S-Video cable is connected to S-Video
Terminal (for AV1 only) the selected AV mode,
S-Video symbol “d*-" (AVI only) will appear
on the screen.
e.g. S-Video cable is connected to S-Video
terminal and AV1 is selected.
AviCB-
AUTO
SURROUND OFF
Press these buttons to select next higher
or next lower Programme Number.
4. Preset ( PRE.) Button
PRE.
Please refer to pages 14-15 about this button.
16
Page 17

General Operation on the TV Set
5. Function ( FUNC.) Button
FUNC.
By pushing this button repeatedly, the Picture
Control Function and Sound Control Function
will be displayed.
All functions are set at factory preset level (is
showed in yellow colour).
Press the Volume Up " + " or Down ” - ”
buttons to adjust the level of selected functions.
The sequence is as follows ;
COLOUR
NTSC^-TINT
NTSC-TINT will appear
if AUTO and NTSC
BRIGHT
CON*JRAST
4.43 or NTSC 3.58
is selected.
The System button is automatically set
to the AUTO mode. If a clear picture
cannot be obtained when receiving
broadcast or AV signal, push this button
repeatedly until the optimum picture is
received. Push System 1 button to the
appropriate mode if black and white
picture received is shaking slightly.
When this button is pushed, you change
the on-screen display as shown below ;
NTSC 3.50
NTSC 4.43 ^
'SECAM
' PAL
' AUTO
4
f
A
>
y
j
^—
^—
System n Select Operation
(for TV mode only)
H-SYS.- I
SHARPNESS
BAsi
t
TREBLE
BALANCE
6. System Buttons
System 1 Select Operation
It-SYS-I
0
When the sound is not dear or no sound
is produced on channel number selected,
push this button repeatedly until the
optimum sound is obtained.
The selected system mode on each chan
nel number position is automatically
memorized.
The on-screen change as follows :
17
Page 18

Remote Control Operation
1. Power (Stand-by) Button
Press the button to switch the TV set off.
To switch back on perform one of the following :
©
2
©
@
1. Press Stand-by button again.
2. Press one of these Direct Programme Number Selection
buttons on the remote control.
3. Press Programme Number Up / Down buttons on the TV set
or on the remote control.
©
2. Programme Number Up/Down
Buttons
%'s
®
Press these buttons to select next higher
or next lower Programme Number.
Note
Do not leave your TV set in stand-by mode for a long period
of time. It is better to switch your TV off when you are away.
3. Volume Up/Down Buttons
% ( ®
® ’ %
Press these buttons to adjust the sound level.
These buttons also can be used for level Up
or Down adjustment in the Picture Control
Function mode and Sound Control Function
mode.
18
Page 19

Remote Control Operation
4. Recall Button
Press the Recall button to activate the on-screen
display.
The current Programme Number, Sound System,
Colour System, Surround mode and Sound
output mode (depending on type of broadcasting
transmission system ) will be displayed on
the screen.
After few seconds, the on-screen display of
Sound System, Colour System, Surround mode
and Sound output will disappear autamatically.
Press it again to cancel the current Programme
Number.
--------------------------1
4.5 MHr MONO
AUTO
MONO SURROUND
N
______________
First push
Note : In the AV mode, a blue colour screen
appear, if there is no AV signal, when
the recall function is off.
J
<>
r
1
________
After few seconds
J
When this button is pressed, all functions
setting are normalized or reset to the factory
preset level (is showed in yellow colour).
e.g. When this button is pressed after adjusting
colour function.
green colour yellow colour
6. Picture Control Function (P)
Button
%
By pressing the Picture Control Function
button repeatedly, the on-screen display will
be changed as shown below.
5. Normalization (NORM.) Button
NORM.
%
This button can be used for setting the Colour,
Tint {Auto, NTSC only), Brightness, Contrast,
Sharpness, Bass, Treble and Balance.
COLOUR—► NTSC-TINT—►BRlGHT-i
SHARPNESS- CONTRAST-
Press the Volume Up" + ” or Down ” -" buttons
during display to adjust the level selected function
Note:
NTSC -TINT will appear on the screen
if AUTO and NTSC 4.43 or NTSC 3.58
is selected.
19.
Page 20

Remote Control Operation
7. Sound Control Function ( S )
Button
By pressing this button, the Sound Control
function will be displayed on the factory preset
level (is showed in yellow colour).
The sequence is as below ;
BASS-------►TREBLE—► BALANCE
t
_____________
The level can be adjusted by pressing Volume
Up " + " or Down" -" buttons.
L+À
BALANCE
-r "1
--------------
I
balance
*r - -r “
b ) If MONO mode is activated.
2. VIDEO mode
Yellow colour
Green colour
8. Surround Button
SURROUND
%
By pressing this button, the surround effect
can be changed. On-screen display as below
1. TV mode
a) If STEREO mode is activated.
___^
---
STEREO SURROUND
k
_______________
J
SURROUND OFF
V
_______
________
9. Sound Mute Button
'è
Press the button to mute sound completely.
To cancel sound mute :
1. Press it again.
2. Press Volume Up ” + ” or Down ” -"
buttons.
J
20
Page 21

Remote Control Operation
10. TV/AV Selection Button
TV/AV
Press the button to select the TV mode, AV1
mode or AV2 mode.
The sequence is as below ;
f 1
4.5 MHz
AUTO
MONO SURROUND
V
_________
_______
MONO
X
AVI
AUTO
MONO SURROUND
11. Direct Programme Number
Selection Buttons
Press one of these buttons to select the
required Programme Number between
0 to 9.
12. Two Digit Programme Number
Selection Button
Note;
When TV rhode is selected, the last Programme
Number, Sound System, Colour System,
Surround mode and Sound output {depending
on type of broadcasting transmission) mode
will appear.
When AV mode is selected, the last AV mode,
Colour System and Surround mode will appear.
If the S-Video cable is connected to S-Video
Terminal (for AVI only), the selected AV
mode, S-Video symbol “(H*- ” (AV1 only) will
appear on the screen.
e.g. S-Video cable is connected to S-Video
terminal and AV1 Is selected.
AVldi-
AUTO
SURROUND OFF
Press the button and following by the required
numbers to select Programme Number from
10 to 59.
e.g. To select Programme Number 12.
1. Press this button once.
2. Press button number ” 1
3. Press button number ’* 2
21
Page 22

Remote Control Operation
13. Off-Timer Button
©
ö
The TV set can be preset to switch off
after a fixed period of time.
Press the Off-Timer button will set the TV
set for 30 minutes. Press again to set 60
minutes and so on. The selected time
will be displayed on the bottom right of the
screen.
The sequence is as follows :
30ci>60 i^>90 c£>AUTO
‘
e.g. Setting 30 minutes off-timer.
Note : Setting Off - Timer to AUTO mode.
If the set is not switched off, when
the TV station ends broadcasting, it
will automatically go to stand-by
condition after 5 minutes.
This AUTO mode will not operate
when the TV receiver is in AV mode.
How to cancel the off-timer setting
1. Set the pre-set time condition to "O" mode
by pushing the "off-timer" button.
2. Turning the TV set off, using the button on
the remote control or the power switch
button on the TV set.
The selected time disappear after a few
seconds and it's will be displayed when
the Recall button is pressed. This will
give you the remaining time.When the
Off-Timer reaches its last 3 minutes, it
start blinking before go to stand-by
condition.
—
tSso
J
k
______
( after 6 minutes)
The selected time start blinking
at last 3 minutes before
standHby condition.
0 24 ^
22
Page 23

23
Page 24

VCR Operation
Your Remote Control is designed to be used
with selected Panasonic/National VCRs.
Some model VCRs have different functions,
so please refer to the individual VCR Instruc
tion Booklet to ensure compatibility.
1. Power (Stand-by) Button
VCRCi)
VCR power button.
2. Rewind / Review Button
5. Stop Button
Press to stop the tape.
6. Rec (Record) Button
REC
Press these buttons together to record.
7. Fast Forward Button
Press to rewind the tape.
During the playback mode, press this
button to view the picture in reverse rapidly.
3. Piay Button
Press to playback the tape.
4.'Pause/Stiii Button
By pressing in playback mode, the tape will
be stopped temporarily.
The picture will pause.
Press to fast forward the tape.
During the playback mode, press this
button to view the picture in forward rapidly.
8. Programme Number Up / Down
Buttons
CZ)
Press these buttons to increase or decrease
the VCR programme position to tune to a TV
station.
9. Stiii Advance Button
While PAUSE / STILL mode, press to
advance the picture one frame at a time.
24
Page 25

Troubleshooting
Before calling for service, determine the symptoms and make a few simple checks as shown below.
Symptoms
Picture
Sound
Aerial Location, direction
Checks
Snowy Picture
Noisy Sound
»
Multiple Image Normal Sound
Interference
Noisy Sound
«1^
Normal Picture
No Sound
B
. No Picture
No Sound
Connection
Aerial Location, direction
Connection
Electrical Appliances
Cars / Motorcycles
Fluorescent Lamps
Volume .
(Check whether the mute function has
been activated on the Remote Control.)
Not plugged into AC outlet
Not switched on
Contrast and Brightness / Volume Setting
{ Check by pushing the Power Switch or
Stand-by Button on the Remote Control.)
No Colour
Scrambled
Colour Patches
No Colour Rolling Picture H-Line
d
\
Nor
mal Sound
Normal ar Weak Sound
\
Normal Sound
Noisy Sound
25
Colour Control
Re-tune Channels
Magnetic interference from unshielded
equipment.
Receiver moved while "ON”.
System Button
Page 26

Specifications
Power Source
AC Auto 110 - 240 V, 50 / 60 Hz
AC 230 V, 50 Hz (Only for NEW ZEALAND)
Power Consumption
165 W
9 W ( Stand-by Condition )
Receiving System
1
2
3
A
5
6
7 NTSCM
8
9
10
11
12
13
14
15
16
17
Receiving Channeis
System
PAL B. G, H
PALI
PAL D, K
SECAM B, G
SECAM D, K
SECAM K1
(NTSC 3.58/4.5MHz)
NTSC 4.43/5.5MHz
NTSC 4.43/6.0MHz
NTSC 4.43/6.5MHz
NTSC 3.58/5.5MHz
NTSC 3.58/6.0MHz
NTSC 3.58/6.5MHz
SECAM 1
PAL 60Hz / 5.5MHz
PAL 60Hz / 6.0MHz
PAL 60Hz/6.5MHz
Function
Reception of broadcasts and
Playback from Video Tape Recorders
Playback from Special VCR's
Playback from Special Disc Players and
Special VCR's
VHP BAND
2-12
1-12
0-11
1 -9
1-12
2-13
3
o>
0}
cc
UHF BAND
21-69
28-69
13-57
13-62
14-69
CATV
PAL/SECAM B, K1
PAL/SECAMD
PAL B (AUST)
PAL B (N.Z)
NTSC M Japan
NTSC M U.S.A
PALG.H, l/SECAMG.K, K1
PAL B (AUST)
PAL D, K
NTSC M Japan
NTSC M U.S.A
SI - S20 (OSCAR)
26
Page 27

Specifications
Picture Tube
Overall Picture tube measured diagonally 72 cm
Viewable Picture tube measured diagonally 68 cm
CRT Deflection 108*
Audio Output
5W(MAX.)x2
Aerial Impedance
75 Í2 Unbalanced coaxial
Video / Audio Termináis
AVI S-Video In Y: 1.0 Vp-p, 75il
AV2
Monitor Out
Video In
Audio In
Video In
Audio In
Video Out
Audio Out
C: 0.3 Vp-p, 75Q
1 Vp-p, 750
Approx. 400 mV
1 Vp-p, 750
Approx. 400 mV
1 Vp-p. 750
Approx. 400 mV
Accessories Supplied
Remote Control (EUR 641952M)
R6(AA) Battery x 2
Dimensions (W x D x H )
779.4x496x591 mm
Weight
40 kg
Note:
Design and Specifications are subject to change without notice.
Weight and Dimensions shown are approximate.
Generai Information
1. If the set is not switched off when the TV stations stop transmitting at the end of the evening,
it will automatically go to stand-by mode after 5 minutes, only in Auto shut-off mode. This
function will not operate when the TV is in AV mode.
2. Before calling for service, please refer to the troubleshooting guide on page 25 to determine
the symptoms.
3. VCR Mode Select Switch is located on the rear side of the remote control. Please set to “A”
when using National/Panasonic VCR. If operation cannot be carried out, set to “B".
________
27
Page 28

Customer's Record
The serial number of this product can be found on its rear cover. You should note the serial number
of this unit in the space provided below and retain this book as a permanent record of your
purchase to aid in identification in the event of theft or lose.
Model Number TC-29V50R Serial Number
Matsushita Electric Industrial Co., Ltd.
Centra) P. O. Box 288, Osaka 530*91, Japan
Printed in Japan
S0694
 Loading...