

Page 1
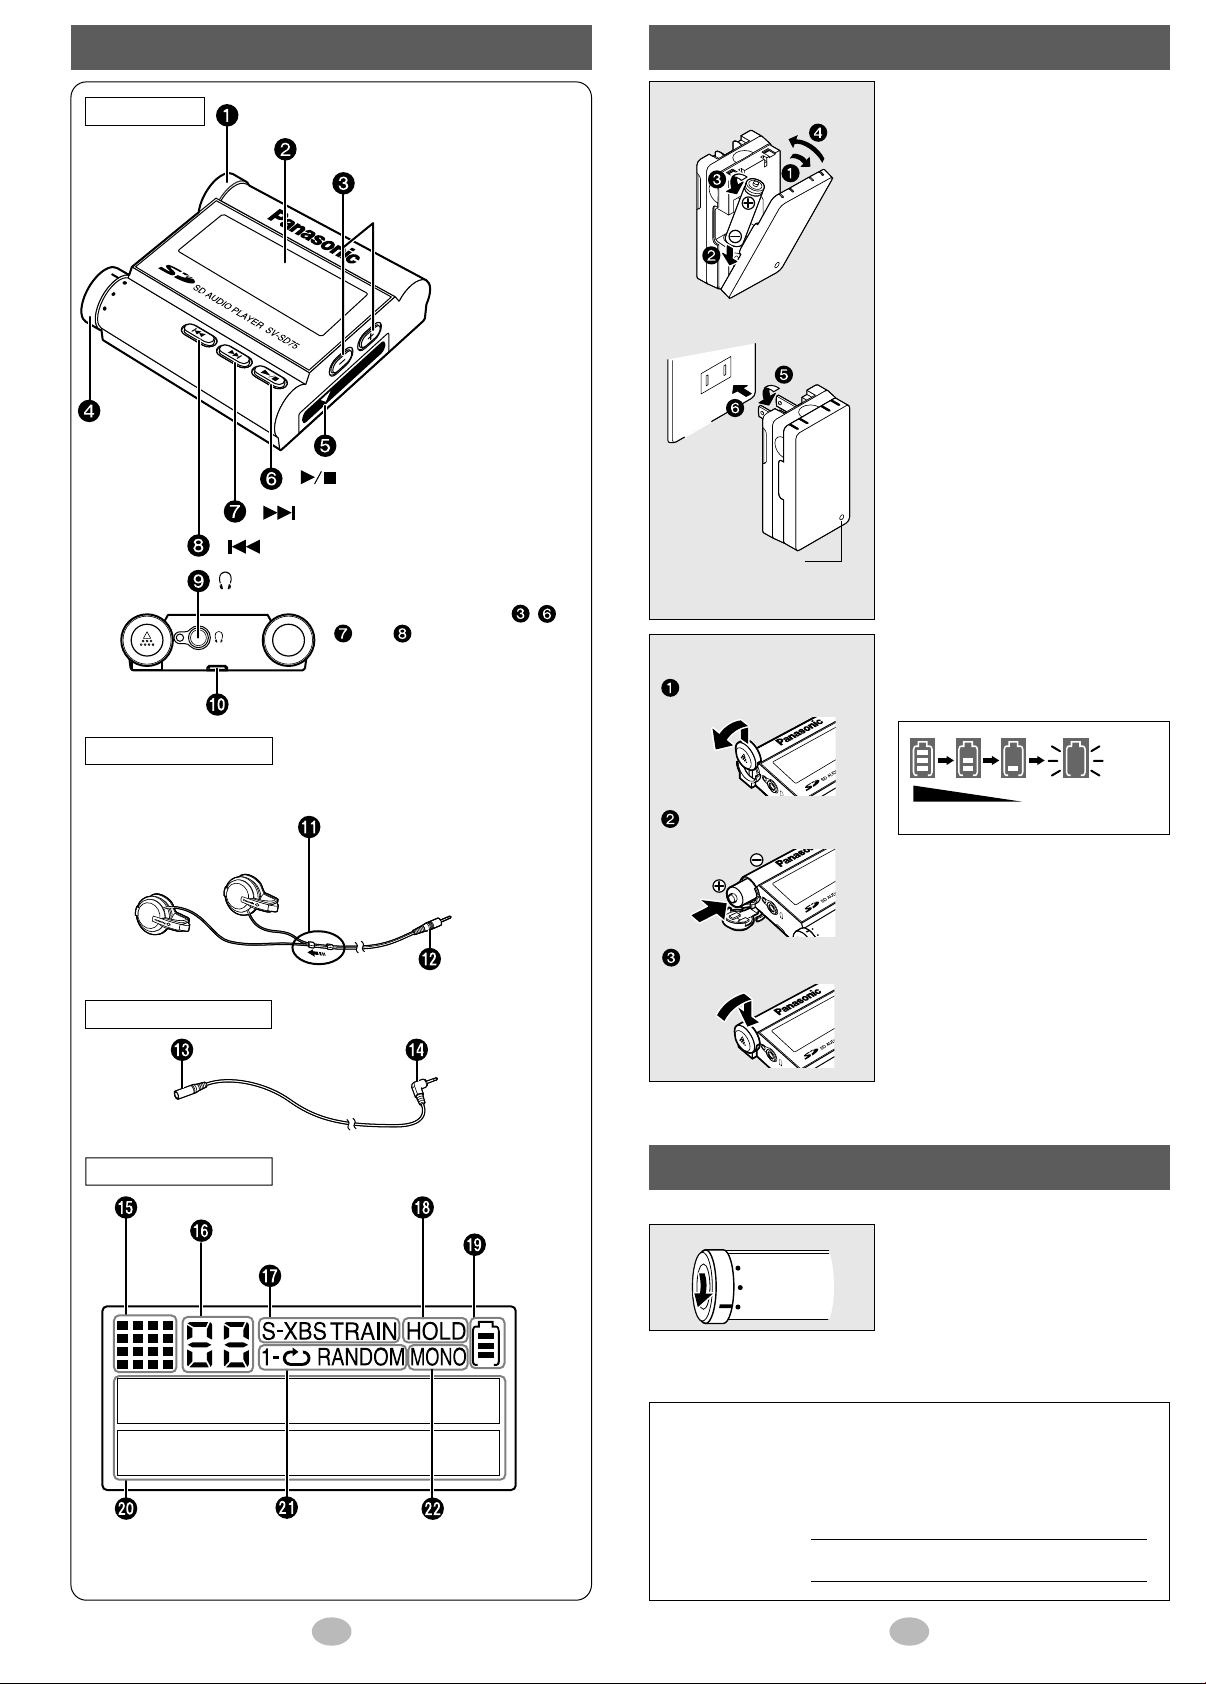
Jack
Plug
SD CARD
V
O
L
U
M
E
NORMAL
M
O
D
E
HOLD
N
O
R
M
A
L
M
O
D
E
HOLD
V
O
L
U
M
E
SD CARD
Battery lid
Display panel
※
[–] and [+]
VOLUME buttons
SD memory card cover
MODE
dial
(Side view)
(skip/search forward) button
※
※
※
(skip/search backward) button
(headphones) jack
Neck strap ring
(play/stop) button
※The functions of buttons , ,
, and depend on the position
of the MODE dial. Refer to the
operation guide (page 9) for details.
Battery
indicator
Operation display
Playlist number
display
Sound quality
indicator
HOLD indicator
Text information/play time
display
Play mode
indicators
Monaural
indicator
(Indicates that the
track was recorded
in monaural mode.)
L
R
L (left)
R (right)
Plug
Anti-tangle slider
(Slide up to prevent tangling when
the headphones are not in use.)
Location of controls
Full
Low
Flashes
Recharge
or Replace
D
L
L
To AC120 V
※
Batteries
Main unit
Using the charger
※
Close the cover completely,
or the charger will not work.
Charging indicator
During charge: Lights in red
Fully charged: Turns off
Inserting the battery
Slide the battery lid up
and out.
■ Rechargeable battery
(included)
• For initial use after purchase or after
an interval of three months or
longer, be sure to charge.
• Use only the included charger and
insert the battery in the correct
polarities when charging.
• It takes approximately two hours to
fully charge the included battery.
• The included battery can be recharged about 300 times. The battery has reached the end of its life if
play time dramatically reduces after
recharging.
• The battery may heat up while
charging, but this is normal.
• When not in use, be sure to disconnect the battery charger from the AC
power outlet.
• Do not use the rechargeable batteries (side-baring type) designed for
use with Panasonic’s portable CD
players. If using this type of the battery, a short circuit may occur.
■ Dry cell battery
(not included)
Use alkaline batteries. You cannot
use manganese batteries.
■ Battery indicator
The long cord is for your right ear.
(Pass the cord behind your head.)
Extension cord
Headphones
Display panel
2
Insert the battery in the
correct polarities.
When the indicator flashes, recharge
the rechargeable battery or replace
the dry cell battery with a new one.
• Change the battery while the unit is
NORMA
E
D
O
M
Close the lid and press
down to lock.
off (refer to page 5) to preserve the
contents of the SD memory card’s
memory.
• To save the clock, change the battery within 30 seconds. When
removing the rechargeable battery
for its recharge, insert a dry cell bat-
A
tery within 30 seconds. If necessary,
refer to page 8 for setting the clock.
Hold function
This function stops the unit from responding when a button is pressed.
Set the mode dial to HOLD.
NORMAL
MODE
HOLD
The model number and serial number of this product can be found
on either the back or the bottom of the unit.
Please note them in the space provided below and keep for future
reference.
MODEL NUMBER
SERIAL NUMBER
It prevents the following:
• The unit turning on unexpectedly,
causing the battery to go flat.
• Play being interrupted when a button
is accidentally pressed.
3
Page 2
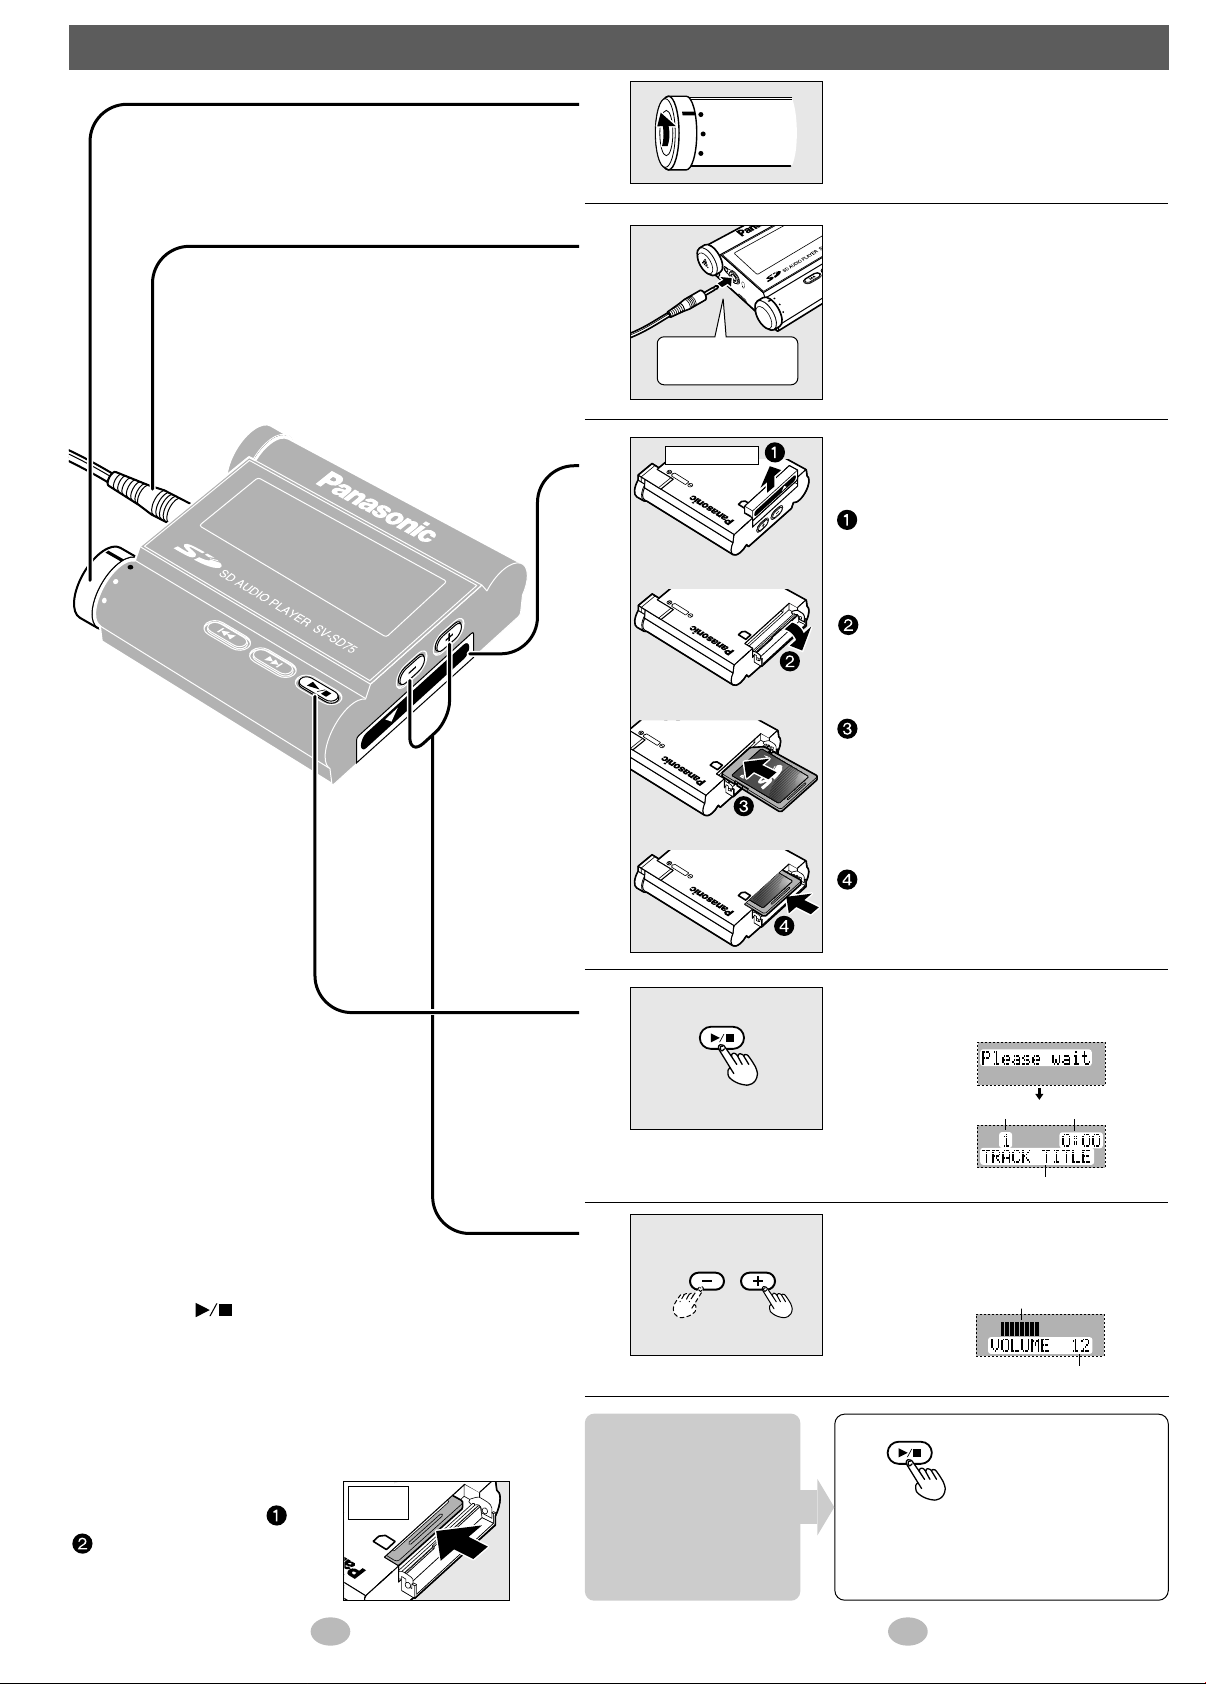
Listening
NORMAL
MODE
HOLD
VOLUME
SD CARD
SD CARD
V
O
L
U
M
E
CARD:PUSH RELEASE
S
V
-SD
75
V
O
L
U
M
E
CARD:PUSH RELEASE
1
2
3
NORMAL
MODE
HOLD
Plug in firmly.
Bottom view
V-SD75
S
75
-SD
V
S
CARD:PUSH RELEASE
CARD:PUSH RELEASE
Set to NORMAL.
Connect the headphones.
NORMAL
MODE
D
L
O
H
Refer to page 9 if you want to know
how to put on the headphones and
how to use the extension cord.
Insert an SD card with
tracks checked out.
SD CARD
V
O
L
U
M
E
Push the card cover up.
V
O
L
U
M
E
Open the cover.
■
Resume
If you press [
]
after you have stopped play,
play resumes from where you stopped it. This
works even if the unit turned off automatically.
Play starts from track 1 if you replace the card or
battery.
■
To remove the SD card
After stopping play, open the
card cover (step 3, and
Bottom
view
, on page 5), and press on
the center of the card to
unlock it.
45
D75
-S
V
S
4
5
Reduce Increase
VOLUME
To stop play
and turn the
unit off
CARD:PUSH RELEASE
Insert the card so the label is
facing up and the end with the
corner cut off is facing in.
V
O
L
U
M
E
Press on the center of the card so
it locks into place and close the
cover.
Press.
The unit comes on and
starts play.
Immediately
after pressing
Track number Elapsed play time
After about
two seconds
Track title
Adjust the volume.
Press and hold to adjust continuously.
Volume meter
Volume (0 to 25)
Press.
The unit turns off about ten
seconds later.
Page 3
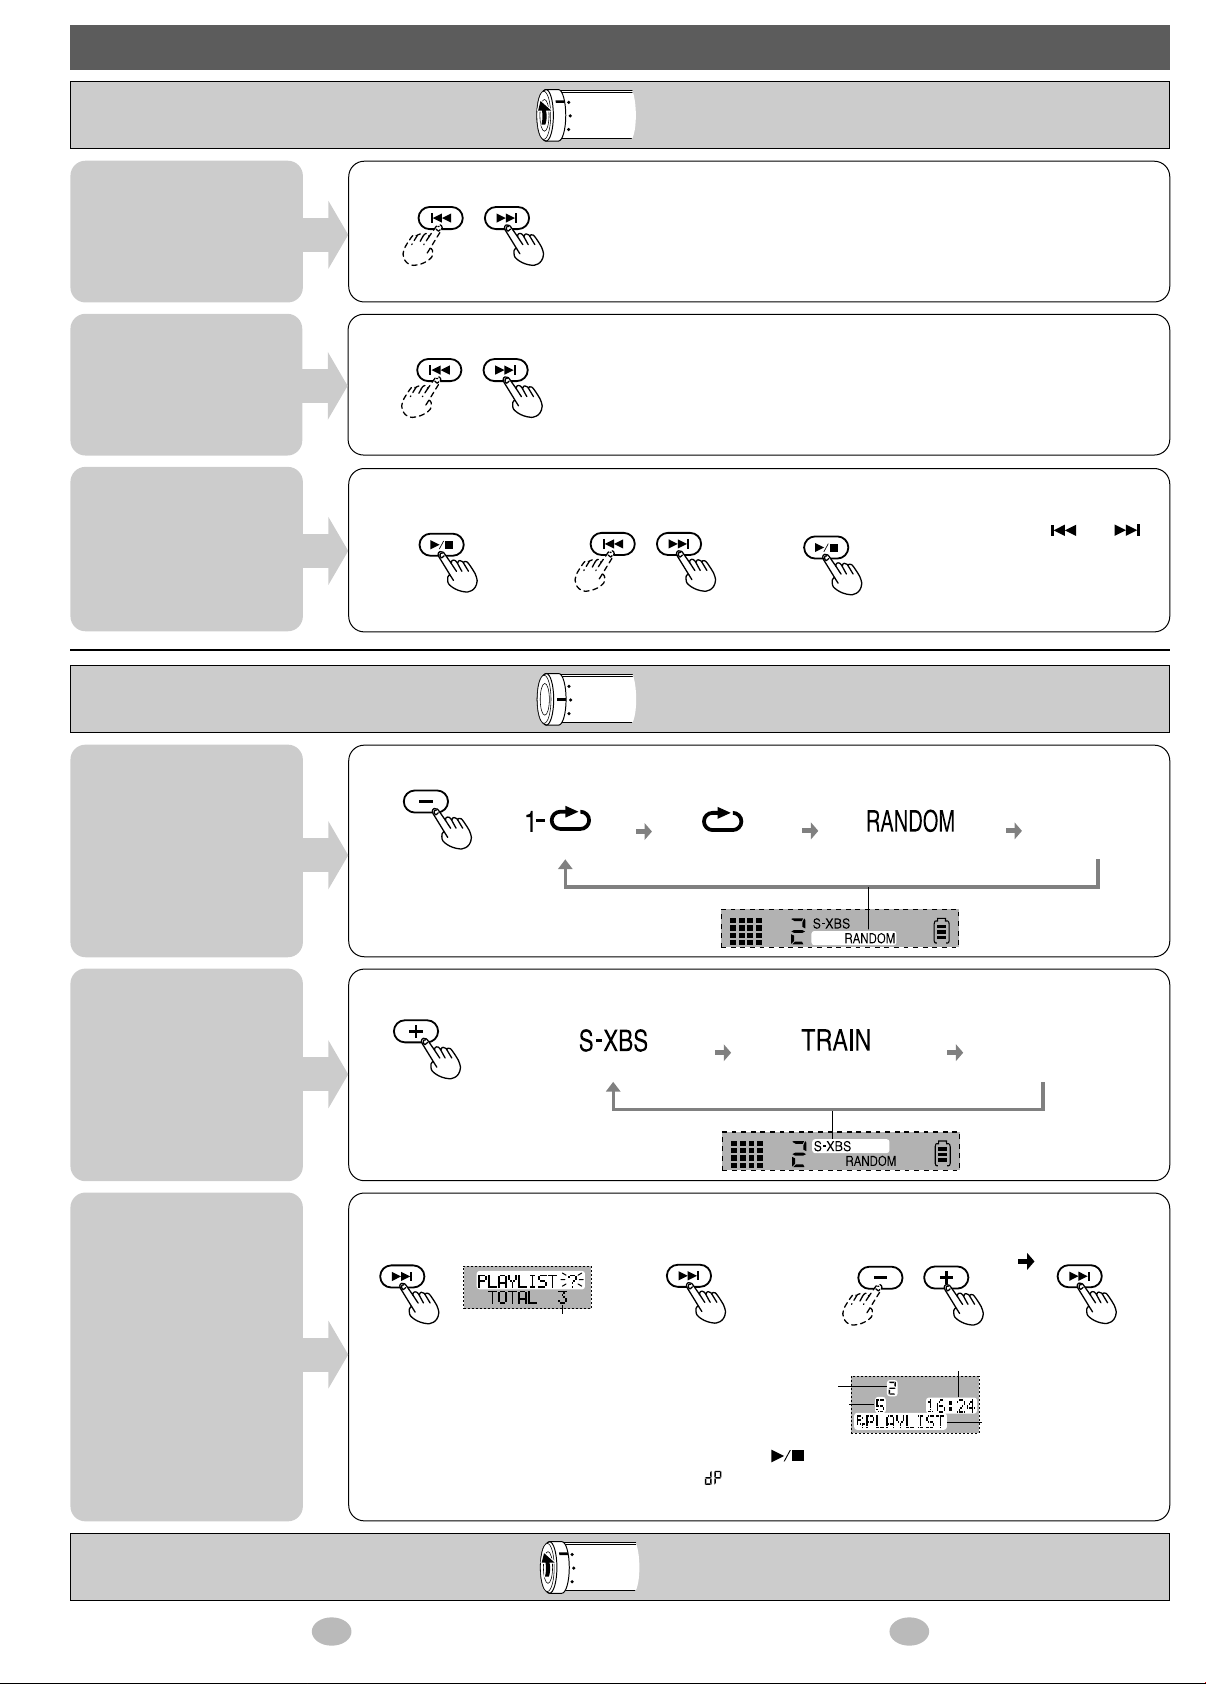
(Adds powerful bass)
no display
(Cancel)
(Reduces sounds that
may annoy others)
(1 track repeat)
no display
(Cancel)(All track repeat) (All tracks played
once in random order)
Other operations
Flashes
▼
Number of playlists
Total time of playlist
Number of tracks
Playlist title
Playlist number
NORMAL
Preparation: Set the mode dial to NORMAL.
MODE
HOLD
Skipping tracks
Search
Direct play
Preparation: Set the mode dial to MODE.
Press during play.
(Backward) (Forward)
Press and hold during play.
(Backward) (Forward)
1 Press during play.
Play stops.
2 Select the track. 3 Play the track.
(Backward) (Forward)
NORMAL
MODE
HOLD
• In the all track repeat mode (see below), you can skip from the last
track to the first track.
• You cannot skip back to a track in random play (see below) if it has
been played.
• In the all track repeat mode (see below), you can search from the last
track to the first track.
• You cannot search back to a track in random play (see below) if it has
been played.
• Tracks change faster if you
press and hold [ ] or [ ].
• If the unit is left stopped for 10
seconds, even after selecting
a track, it turns off.
Repeat play
Random play
Changing
sound quality
Using playlists
(When playlists are on
the card)
※ Playlists created with
RealJukebox cannot
be played.
Press during play.
Each time you press the button
(VOLUME button)
These modes work within the playlist
when one is being played.
Press during play.
Each time you press the button
(VOLUME button)
1
Press during play.
2
Press.
3 Select the
playlist number. Press.
This is the clock/playlist setting
mode.
• If you select a playlist while the unit is stopped, press [ ] to start play.
• To play all the tracks on the SD card, select “” (default playlist) in step 3.
• If you want to stop the above operation partway, set the mode dial to NORMAL.
(VOLUME buttons)
The tracks in the
playlist are played.
NORMAL
After changing the mode : Set the mode dial to NORMAL.
MODE
HOLD
67
Page 4

※Bitrate display
Track number
Elapsed play time
Track
title
Total number
of tracks
Total play time
Playlist title
Artist information
Setting the clock
LEA
upper
hook
lower
hook
Cut here
Cut here
※Keep this card in your wallet
or purse for quick reference.
SD Audio Player
Operation Guide
Model No. SV-SD75
Skip/serch
backward
Play/stop
MODE dial
position
NORMAL
MODE
HOLD
Skip/serch
forward
Volume Volume
Display
change
Play/stop
Sound
quality
Play mode
Cancel
selection
Clock
Clock/playlist
setting mode
Confirm
selection
Selection in
clock/playlist
setting mode
Using the supplied accessories
1
2
NORMAL
MODE
HOLD
Set to MODE during play.
If you want to stop the following operation partway, set to NORMAL.
Press.
Flashes
▼
■ Headphones
This is the clock/playlist
setting mode.
3
4
(VOLUME)
(VOLUME)
Select “”.
This is the clock
Press.
Select the
display mode.
setting mode.
12 hour
clock
Flashes
▼
■ Extension cord
or
24 hour
clock
5
(VOLUME)
Press.
Set the
time.
The time flashes
■ Arm belt / Holder
Press.
6
NORMAL
MODE
HOLD
The clock is displayed for about 2 seconds after the following operations.
• When you set the mode dial to HOLD during play.
• When you press [ ] while the mode dial is set to HOLD.
To continue the accuracy, adjust the clock regularly.
Set to NORMAL.
The clock starts
Adjusting and changing the display
Adjusting the contrast
1 Set the mode dial to HOLD during play.
■ Neck strap
Press on the base of the
clip to open it.
Fit the clip from behind so
the upper hook comes
slightly over your ear.
Fit the lower hook so it fits
just behind your earlobe.
Plug in firmly.
NORMAL
MODE
D
L
O
H
Headphones
Extension cord
Do up the
fabric fastener.
H
N
MODE
O
O
L
R
D
M
A
L
Put the
unit into
the holder.
Adjust the
length of
the belt
Insert the holder's clip
into the loop on the belt
• Remove the unit from the holder when changing the SD card.
• To prevent the unit from falling, ensure that the unit is firmly fitted
into the holder and that the belt is firmly attached to your arm so the
end with the battery lid is facing up.
Pull out the neck strap ring.
Undo the fabric
fastener and fit
the belt onto your arm.
Do up the
fabric fastener.
Attach the neck strap.
2 While pressing and holding [ ], press [ ]
(lighter) or [ ] (darker) volume button.
3 Set the mode dial to NORMAL.
Changing the display
1
Set the mode dial to MODE during play.
2 Press [ ] to change the display.
Track titles, playlist titles, and artist information scroll from right to left if
they do not fit on the display.
Changes with
:
each press
:
Changes after
a few seconds
Press and hold if you
want to maintain the
display.
The above bitrate display is an example of the
※
AAC data. An example of the MP3 data is shown
to the right.
3 Set the mode dial to NORMAL.
8
RQT5491
Bottom view
5
7
D
-S
V
S
CARD:PUSH RE
NORMAL
DE
O
M
O
H
D
L
Take care that the strap does not get caught and choke you.
9
Page 5

Product service
DATE OF PURCHASE
DEALER NAME
DEALER ADDRESS
TELEPHONE NUMBER
Do not attempt to remove the cover(s) or repair the unit
yourself. Refer servicing to qualified personnel only.
■ Product information
For product service, product information or assistance
with product operation, refer to the servicenter directory.
User memo:
12 13
Page 6

If you ship the product
Carefully pack and send it prepaid, adequately insured and preferably in the original carton.
Attach a postage-affixed letter, detailing the complaint, to the outside of the carton.
Do NOT send the product to the Executive or Regional Sales offices. They are NOT equipped to make repairs.
Customer’s Record
Model
No.
Serial
No.
or
Code
No.
Date
of
Purchase
Dealer’s
Name
Dealer’s
Address
SD AUDIO PLAYER—labor and parts for one (1) year
14 15
Page 7

NORM
AL
MODE
H
O
L
D
V
O
L
U
M
E
SD CARD
CAUTION:
This Manual is an overseas version and some details may
differ from Instructions enclosed with products sold in
Australia
This equipment has been tested and found to comply with the limits
for a Class B digital device, pursuant to Part 15 of the FCC Rules.
These limits are designed to provide reasonable protection against
harmful interference in a residential installation. This equipment generates, uses and can radiate radio frequency energy and, if not
installed and used in accordance with the instructions, may cause
harmful interference to radio communications. However, there is no
guarantee that interference will not occur in a particular installation. If
this equipment does cause harmful interference to radio or television
reception, which can be determined by turning the equipment off and
on, the user is encouraged to try to correct the interference by one of
the following measures:
• Reorient or relocate the receiving antenna.
• Increase the separation between the equipment and receiver.
• Connect the equipment into an outlet on a circuit different from that
to which the receiver is connected.
• Consult the dealer or an experienced radio/TV technician for help.
Any unauthorized changes or modifications to this equipment would
void the user’s authority to operate this device.
This device complies with Part 15 of the FCC Rules. Operation is sub-
ject to the following two conditions: (1) This device may not cause
harmful interference, and (2) this device must accept any interference
received, including interference that may cause undesired operation.
Optional accessories
■ SD memory card (as of October 31, 2000)
• RP-SD064 (64 MB) • RP-SD032 (32 MB) • RP-SD016 (16 MB)
■ Personal computer card adapter
A personal computer card adapter (part number: BN-SDABPU/1B) is also
available so you can connect to a personal computer card slot instead of
a USB connector.
■ USB reader-writer
Obtain part number BN-SDCAPU/1B for the replacement part.
■ Nickel metal hydride battery
Obtain part number HHR-4UPA/2B for the replacement part.
SD Audio Player
Operating Instructions
Model No. SV-SD75
Dear Customer
Thank you for purchasing this product. For optimum performance and
safety, please read these instructions carefully.
READ BEFORE USE
After checking the included accessories (see below), follow these
steps to record onto (checkout) the included SD memory card.
1. Connect the USB reader-writer to your personal computer.
2. Install the driver software for the USB reader-writer and the
RealJukebox software from the included CD-ROM.
3. Checkout (record) some music to the SD memory card with
RealJukebox.
Read the operating instructions for RealJukebox for details.
Before connecting, operating or adjusting this product, please
read these instructions completely. Please keep this manual for
future reference.
Panasonic Consumer Electronics Company, Division of
Matsushita Electric Corporation of America
One Panasonic Way Secaucus, New Jersey 07094
http://www.panasonic.com
Panasonic Sales Company, Division of Matsushita Electric of
Puerto Rico, Inc. (“PSC”)
Ave. 65 de Infantería, Km. 9.5 San Gabriel Industrial Park,
Carolina, Puerto Rico 00985
C 2000 Matsushita Electric Industrial Co., Ltd
RQT5491-P M1100YN0
Printed in Japan
P
En
Supplied accessories
Specifications
Sampling rate: 32 kHz, 44.1 kHz, and 48 kHz
Compression/decompression: AAC and MP3
No. of channels: Stereo, 2 channels
Frequency response: 20 Hz to 20,000 Hz (+0 dB, -6 dB)
Output terminal: M3 headphone jack
Output level: 3.5 mW + 3.5 mW (22 Ω)
Power supply:
Approximate play time: 5 hours (When the included recharge-
Max dimensions (WxHxD): 50.8 x 49.2 x 15.0 mm
Cabinet dimensions (WxHxD): 46.0 x 48.0 x 15.0 mm
Mass: 55 g (1.94 oz.) with battery
• Specifications are subject to change without notice.
• The play times shown depend on operating conditions.
(Low temperatures can reduce the operational life of the alkaline battery.)
• Mass and dimensions are approximate.
DC 1.2 V (Included rechargeable battery)
DC 1.5 V (one LR03, AAA, AM-4 battery)
able battery is fully charged)
6 hours (Panasonic alkaline battery)
(2" x 115/16" x 19/32")
(includes projecting parts)
(113/16" x 17/8" x 19/32")
43 g (1.52 oz.) without battery
□ Stereo headphones □ Arm belt (RFC0064-A)—1 pc.
(L0BAE0000023)—1pc. □ Holder (RFA1585-A)—1 pc.
R
L
□ Extension cord □ Neck strap
(K2KC3AC00001)—1 pc. (RFA1575-A)—1 pc.
□*SD memory card—1 pc.
□*USB reader-writer—1 pc.
*
□
Nickel metal hydride battery—1 pc.
□ Battery charger □ CD-ROM
(DE-820BA)—1 pc. (RFE0066)—1 pc.
• SD logo is a trademark.
• Portions of this product are protected under
copyright law and are provided under
license by ARIS/SOLANA/4C.
16
This manual was printed
with soy based ink.
Use numbers indicated in parentheses when asking for replacement parts.
Refer to page 16 for the parts marked with an asterisk (*).
1
 Loading...