

Page 1
Web Site: http://panasonic.net
Panasonic Corporation 2014
Panasonic Corporation
Cn Ru Ur
GS
Operating Instructions
Thank you for purchasing this product.
Please read these instructions carefully before using this product, and save this
manual for future use.
感谢您购买本产品。
请于使用前仔细阅读操作使用说明书 , 并妥善保管。
Благодарим вас за покупку изделия нашей фирмы.
Перед использованием этого изделия, пожалуйста, внимательно прочитайте
данные инструкции и сохраните это руководство для дальнейшего
использования.
Дякуємо за купівлю цього продукту.
Перед використанням цього продукту уважно прочитайте ці інструкції і
збережіть посібник для подальшого використання.
使用说明书
Инструкция по эксплуатации
Інструкція з експлуатації
CD Stereo System
CD 立体声组合音晌
CD-стереосистема
CD-стереосистема
Model No. SC-MAX770
VQT5F33
F0214KY0
ENGLISHРУССКИЙ
中文 (简体)
УКРАЇНСЬКА
Page 2
Do the procedures with the remote control. You can also
use the buttons on the main unit if they are the same.
Your system and the illustrations can look differently.
These operating instructions are applicable to the
following system.
System SC-MAX770
Main unit SA-MAX770
Speakers SB-MAX770
About descriptions in these Operating Instructions
• Titles to be referred to are indicated as “> ±±”.
• Unless otherwise indicated, operations are
described using the remote control.
Table of contents
Safety precautions............................................................2
Note on AC mains lead.....................................................3
Supplied accessories .......................................................3
Attaching the speaker feet...............................................3
Placement of speakers.....................................................4
Maintenance ......................................................................4
Preparing the remote control...........................................4
Making the connections...................................................5
Overview of controls ........................................................6
Disc ....................................................................................8
USB and internal memory................................................9
Radio................................................................................12
Bluetooth
Clock and timers.............................................................15
Sound and illumination ..................................................15
DJ functions ....................................................................16
KARAOKE........................................................................17
Using a microphone .......................................................17
Using the auxiliary input ................................................17
Troubleshooting..............................................................18
VQT5F33
System memory reset (initialization) ............................20
Remote control code ......................................................20
2
Reference ........................................................................20
Specifications .................................................................21
2
Limited Warranty (ONLY FOR AUSTRALIA) .................22
®
.......................................................................13
Safety precautions
WARNING!
Unit
• To reduce the risk of fire, electric shock or product damage,
- Do not expose this unit to rain, moisture, dripping or
splashing.
- Do not place objects filled with liquids, such as vases, on
this unit.
- Use only the recommended accessories.
- Do not remove covers.
- Do not repair this unit by yourself. Refer servicing to
qualified service personnel.
• Do not let metal objects fall inside this unit.
CAUTION!
Unit
• To reduce the risk of fire, electric shock or product damage,
- Do not install or place this unit in a bookcase, built-in
cabinet or in another confined space. Ensure this unit is
well ventilated.
- Do not obstruct this unit’s ventilation openings with
newspapers, tablecloths, curtains, and similar items.
- Do not place sources of naked flames, such as lighted
candles, on this unit.
• Set this unit up on an even surface away from direct
sunlight, high temperatures, high humidity, and excessive
vibration.
• This unit is intended for use in tropical climates.
• The mains plug is the disconnecting device.
Install this unit so that the mains plug can be unplugged
from the socket outlet immediately.
• This unit may receive radio interference caused by mobile
telephones during use. If such interference occurs, please
increase separation between this unit and the mobile
telephone.
• This unit utilizes a laser. Use of controls or adjustments or
performance of procedures other than those specified
herein may result in hazardous radiation exposure.
Battery
• Danger of explosion if battery is incorrectly replaced.
Replace only with the type recommended by the
manufacturer.
• When disposing of the batteries, please contact your local
authorities or dealer and ask for the correct method of
disposal.
• Do not heat or expose to flame.
• Do not leave the battery(ies) in a car exposed to direct
sunlight for a long period of time with doors and windows
closed.
• Do not break open or short-circuit the battery.
• Do not charge the alkaline or manganese battery.
• Do not use the battery if the cover has peeled off.
• Remove the battery if you do not use the remote control for
a long period of time. Keep in a cool, dark area.
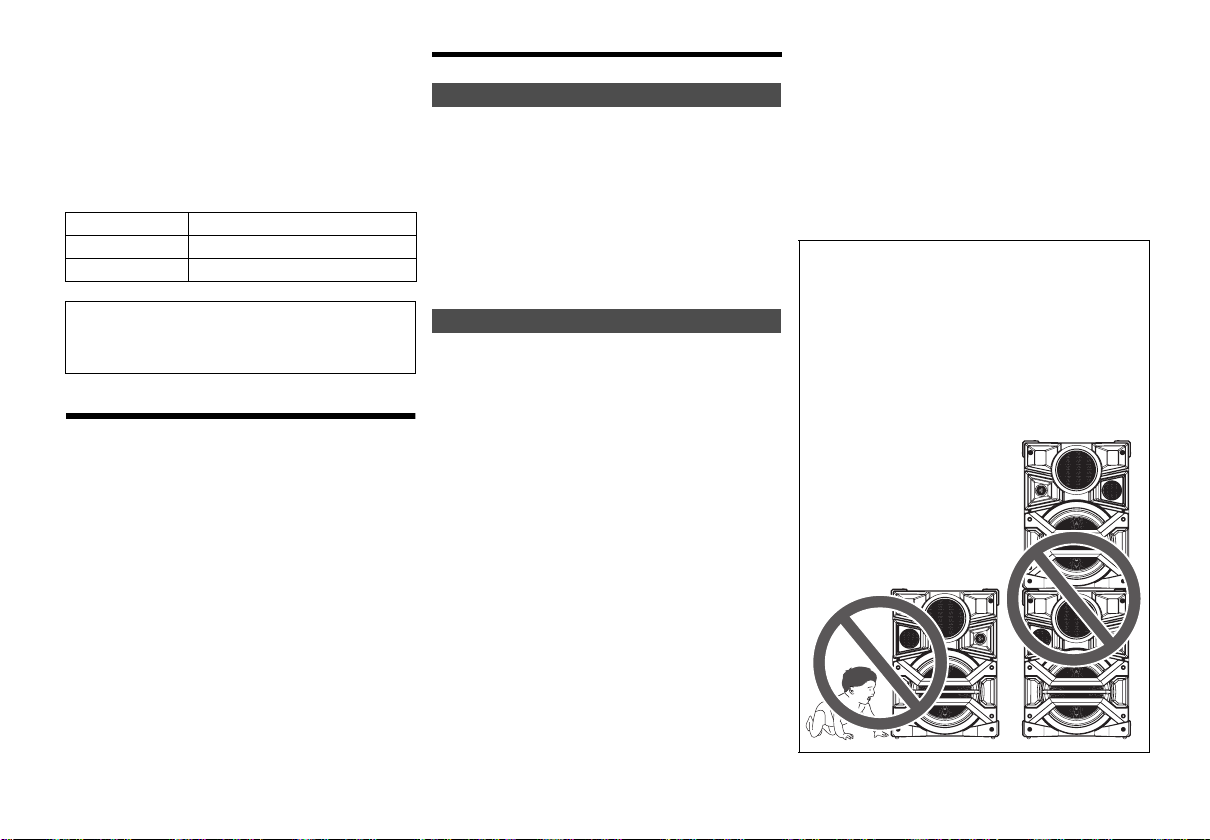
CAUTION!
• Use the speakers only with the recommended
system. If not, you can cause damage to the
amplifier and speakers and can cause a fire.
• Consult an approved service personnel if damage
occurs or if there is a sudden apparent change in
performance.
• Do the procedures included in these instructions
when you attach the speakers.
• Be careful when babies or children are near.
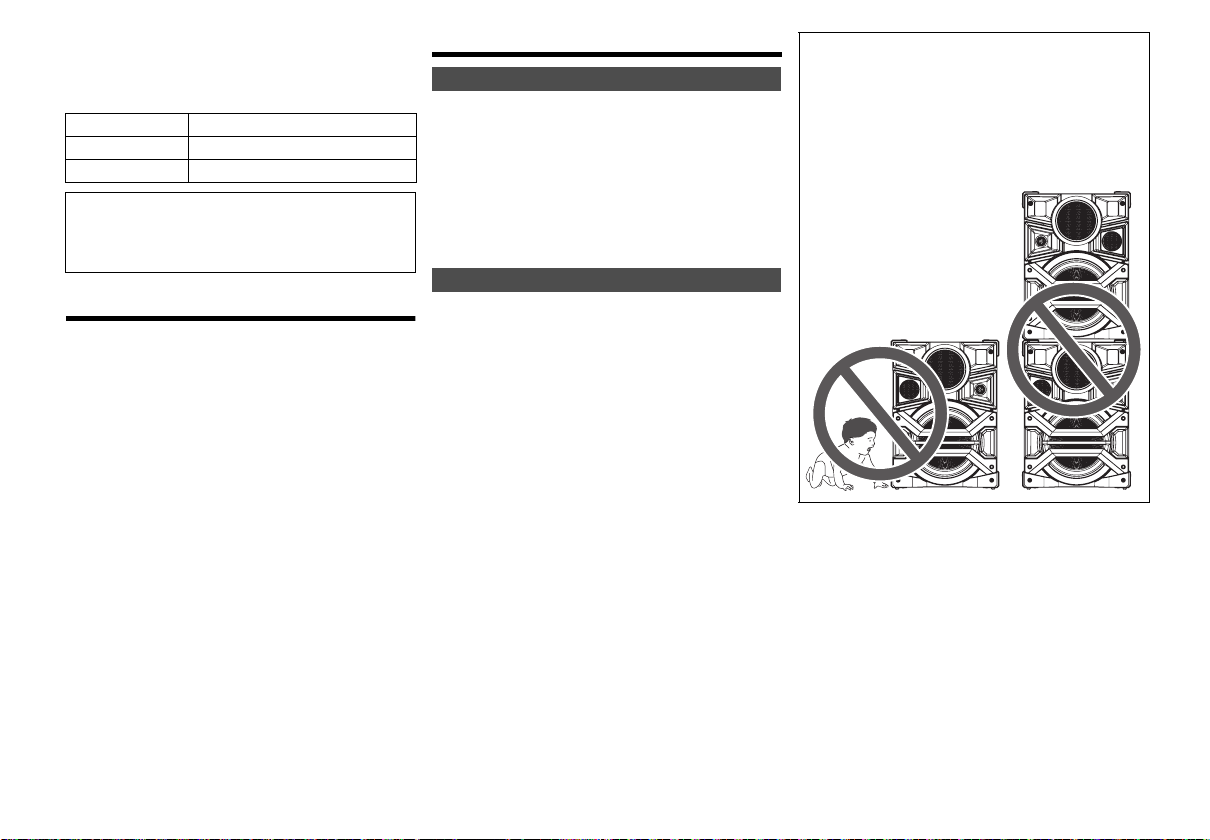
• Do not stack the speakers.
Page 3
Note on AC mains lead
Fuse cover
Fuse (5 ampere)
Fuse (5 ampere)
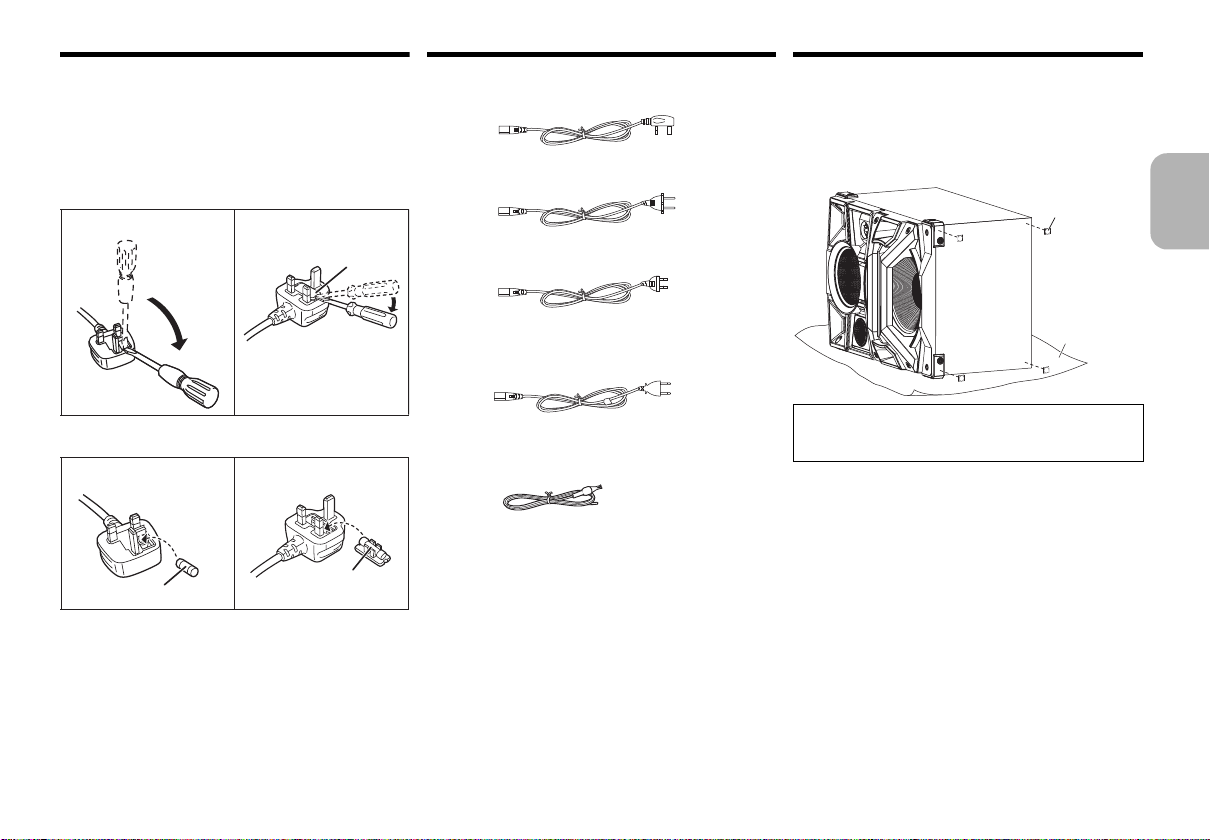
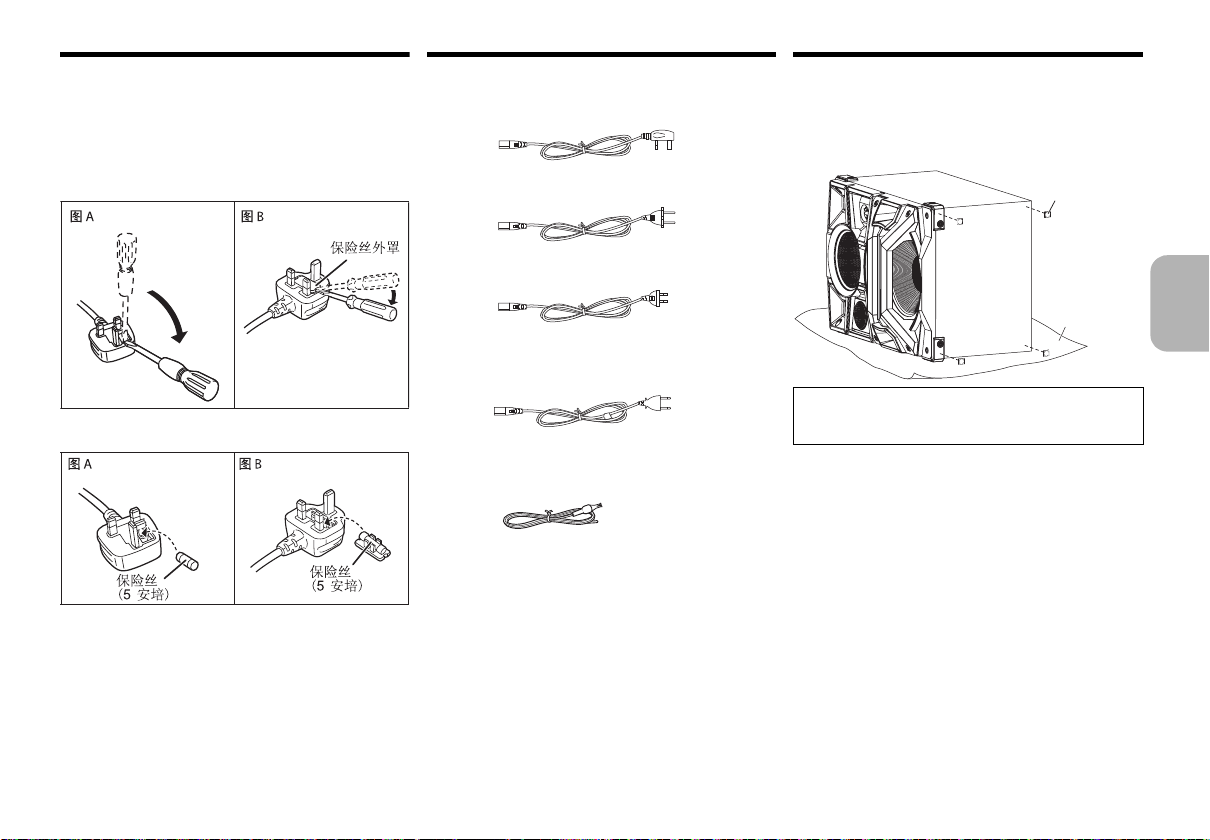
Speaker f oo t
Protection layer
(not supplied)
(For the AC mains plug of three pins)
How to replace the fuse
The location of the fuse differ according to the type of AC
mains plug (figures A and B). Confirm the AC mains plug
fitted and follow the instructions below.
Illustrations may differ from actual AC mains plug.
1. Open the fuse cover with a screwdriver.
Supplied accessories
Check and identify the supplied accessories.
4 x AC mains lead
Attaching the speaker feet
For stability and to prevent damage to the floor, attach
the speaker feet to the bottom of the speakers.
Preparation
Put a protection layer below the speakers to prevent
scratches.
Figure A Figure B
2. Replace the fuse and close or attach the fuse cover.
Figure A Figure B
(For Thailand)
1 x AM loop antenna
1 x FM indoor antenna
8x Speaker foot
1 x Remote control battery
1 x Remote control
(N2QAYB000915)
Note:
Please use the supplied AC mains lead suitable for the
household mains socket.
In Saudi Arabia, please use the moulded three pin mains
plug.
ENGLISH
CAUTION!
Keep the speaker feet out of reach of children to
prevent swallowing.
VQT5F33
3
3
Page 4
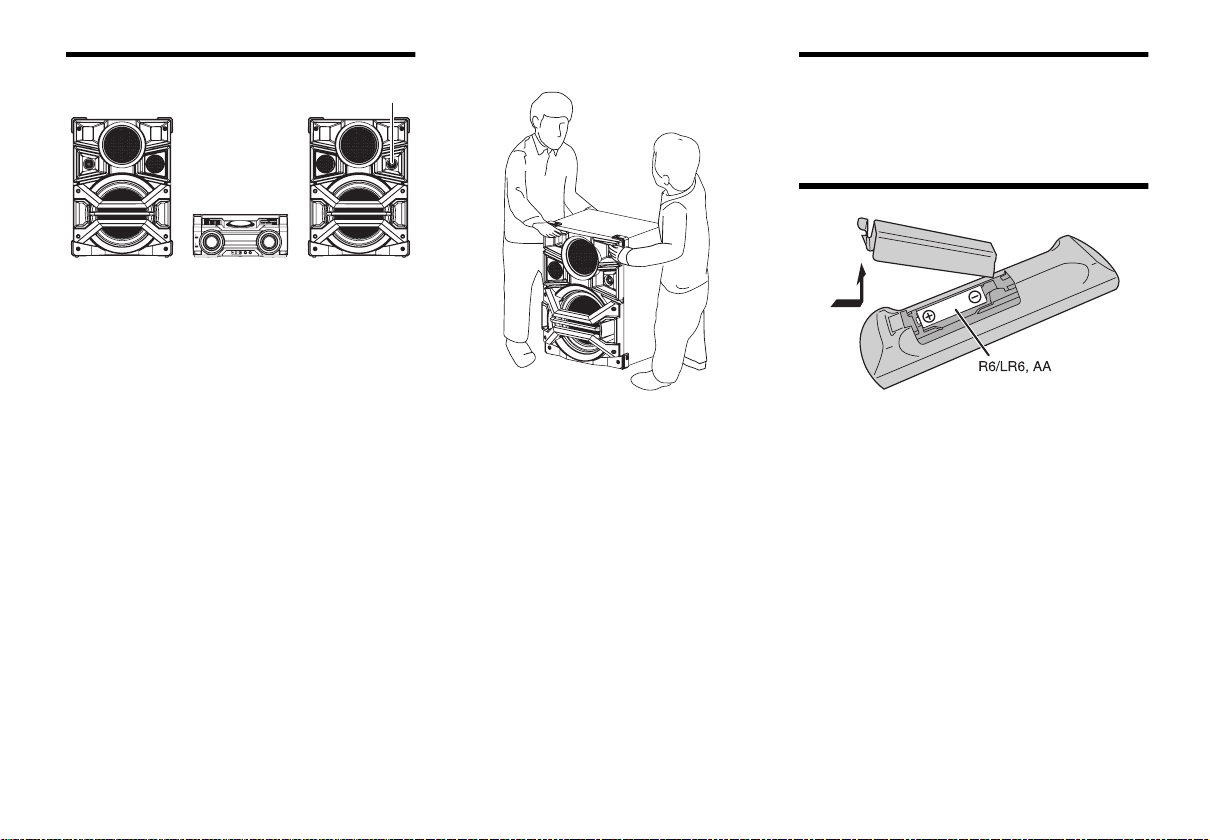
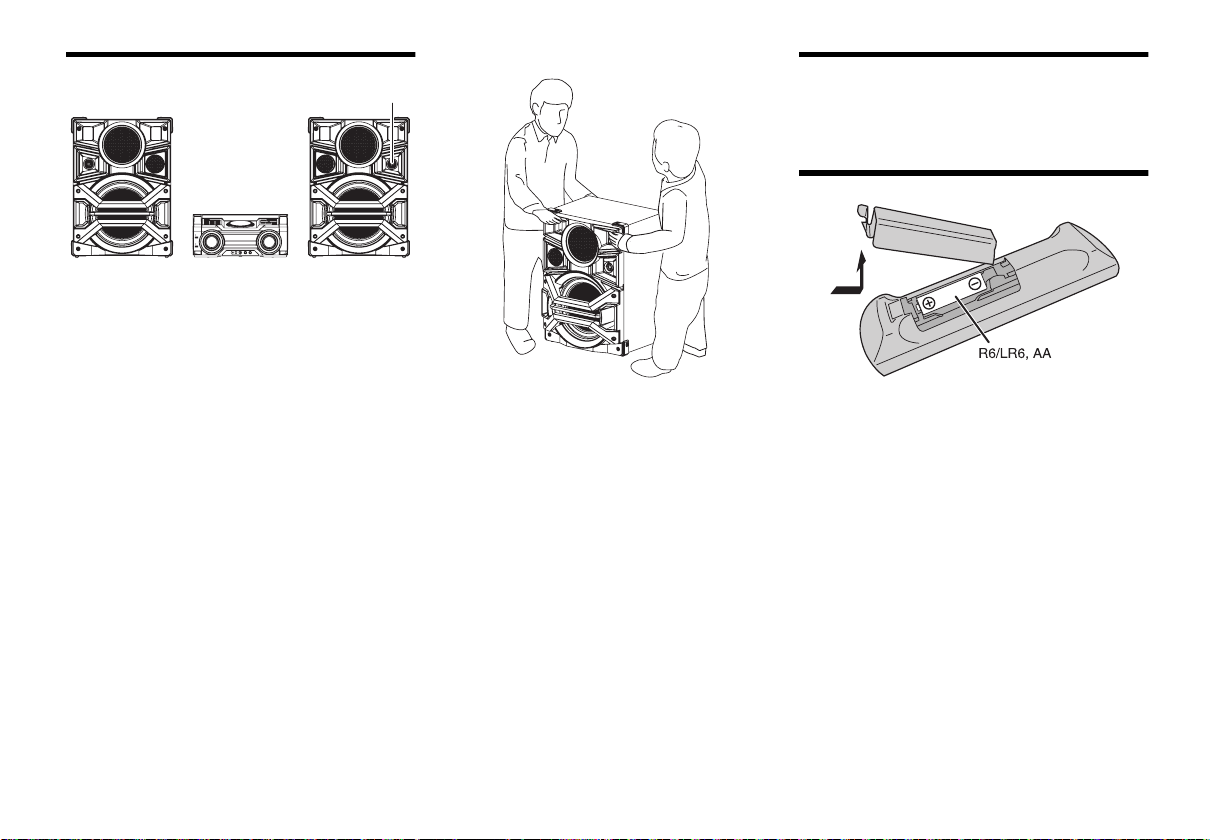
Placement of speakers
Twe eter
Put the speakers so that the tweeter is on the outside.
Use only the supplied speakers.
You can cause damage to the system and decrease the
sound quality if you use other speakers.
Note:
• More than one person is required to move, tilt or carry
the speaker.
Maintenance
To clean this system, wipe with a soft, dry cloth.
• Never use alcohol, paint thinner or benzine to clean
this system.
• Before using chemically treated cloth, read the
instructions that came with the cloth carefully.
Preparing the remote control
• Keep your speakers more than 10 cm from the main
unit for ventilation.
• Put the speakers on a flat safe surface.
• These speakers do not have magnetic shielding. Do
not put them near TVs, PCs or other equipment easily
influenced by magnetism.
• When you play at high levels for a long period, it can
cause damage to the speakers and decrease the life of
the speakers.
• Decrease the volume in these conditions to prevent
damage:
- When the sound is distorted.
- When you adjust the sound quality.
VQT5F33
Use alkaline or manganese battery.
Install the battery so that the poles (+ and –) align with
those in the remote control.
4
4
Page 5
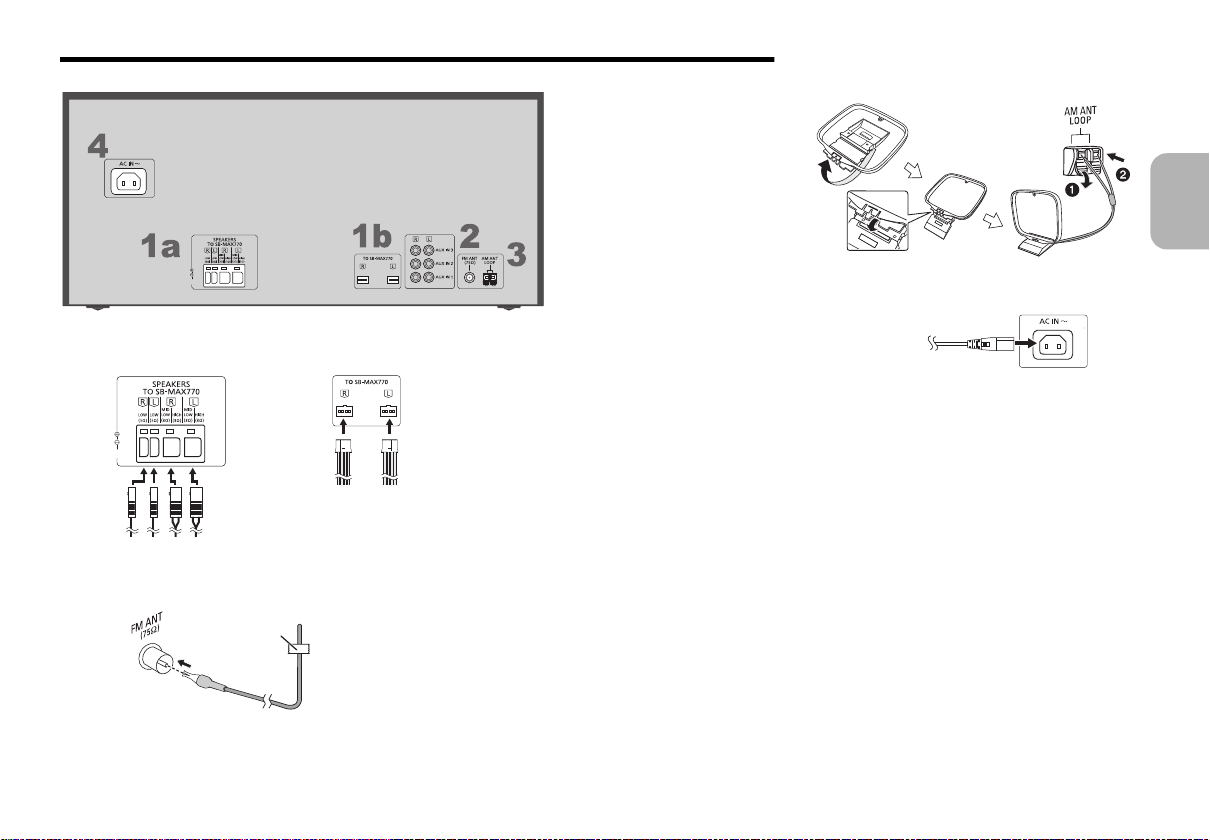
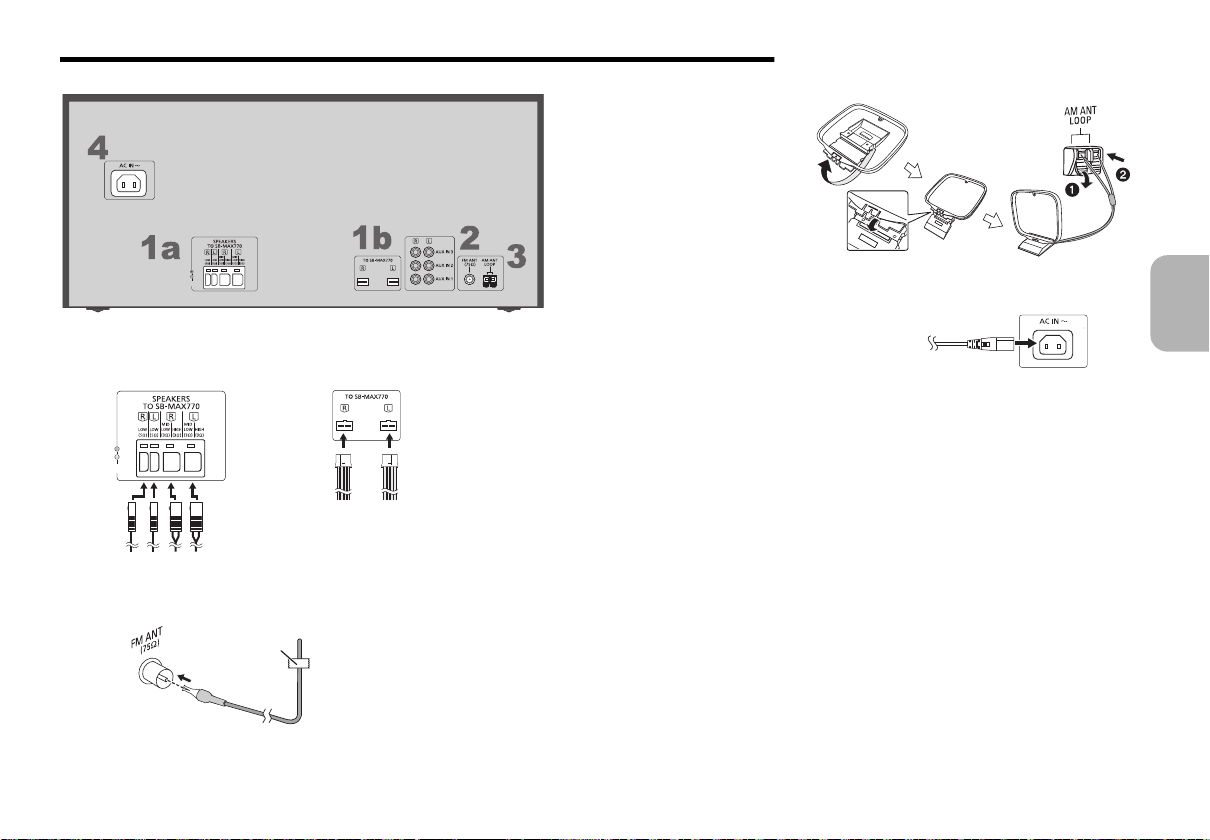
Making the connections
1a
1b
Ta pe
(not supplied)
To household
mains socket
Connect the AC mains lead only after all the other connections have been made.
1 Connect the speakers.
Connect the speaker cables to the terminals of the same colour.
2 Connect the FM indoor antenna.
Put the antenna where reception is best.
3 Connect the AM loop antenna.
Stand the antenna up on its base until it clicks.
ENGLISH
4 Connect the AC mains lead.
Do not use AC mains lead with other equipment.
Conserving power
The system consumes approximately 0.3 W when it
is in standby mode. Disconnect the power supply if
you do not use the system.
Some settings will be lost after you disconnect the
system. You have to set them again.
VQT5F33
5
5
Page 6
Overview of controls
SOUND PRESET EQ
EDIT
MODE
USB
CD HI-SPEED
MEMORY
MODE
DISPLAY
DIMMER
SLEEP
PLAY/
REC
AUTO OFF
ABC
TUV
JKL
P
QRS
GHI
W
XYZ
MNO
DEF
T
I
T
L
E
S
E
A
R
C
H
P
L
A
Y
L
I
S
T
PRESET EQ
VOCAL CANCEL ECHO KEY-CON
MEMORY PLAYLIST / DJ FUNCTION
123
4
DJ JUKEBOX DJ SAMPLER DJ EFFECT
-KARAOKE
56
MANUAL EQ
ALBUM / TRACK
TUNE MODE
/MEMORY
- PAIRING
USB / CD
RADIO/EXT-IN
USB REC MEMORY REC
OPEN CLOSE
MULTI CONTROL
D.BASS
- SUPER WOOFER
LOCAL
ILLUMINATION
PLAY
A
B
REC/PLAY
- VOLUME +
AUX IN4 MIC1 MIC2 MIN MAX MIN MAX
MIC
VOL 1
MIC
VOL 2
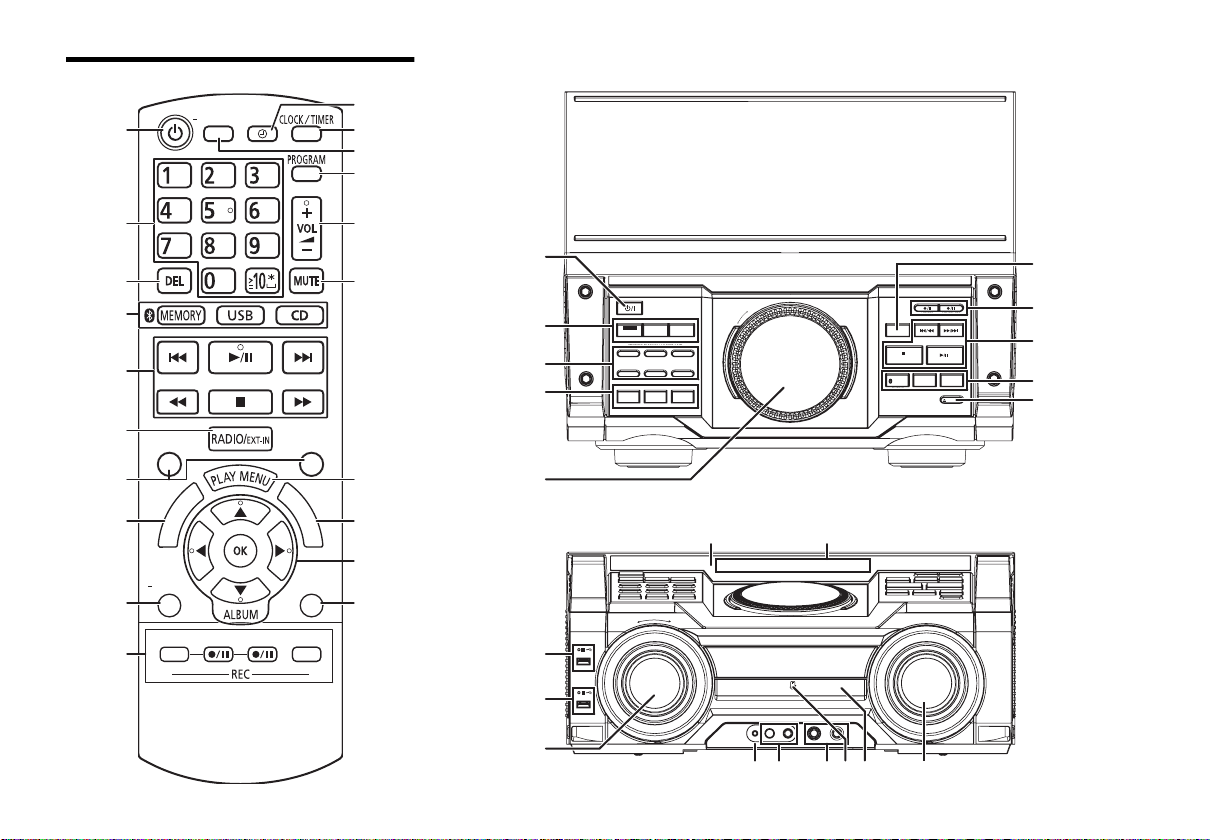
Remote control
Top v i ew
VQT5F33
6
6
Front view
Page 7
1 Standby/on switch [Í], [Í/I]
Press to switch the unit from on to standby mode or
vice versa. In standby mode, the unit is still
consuming a small amount of power.
2 Alphanumeric buttons
To select a 2-digit number
Example: 16: [S10]
To set a character
Example: B: [2]
3 Delete a programmed track
Delete a selected track in a playlist
4 Select audio source
5 Basic playback control
6 Select the sound effects
7 Start the title search for internal memory
8 View content information
Press and hold the button: Decrease the
brightness of the display panel and turn off the DJ
function buttons and illumination, etc.
9 Recording operation control
: Set the play timer or record timer
; Set the clock and timer
< Set the sleep timer
Press and hold the button: Automatically switch off
function switches off the system if you do not use the
system for 20 minutes. (Except radio)
>[1]>[6]
>[2]
= Set the programme function
> Adjust the volume of the system
? Mute the sound of the system
To cancel, press the button again.
“MUTE” is also cancelled when you adjust the
volume or when you switch off the system.
@ Set the play menu item
A Internal memory playlist operation
B Select and enter buttons
C Set the edit mode for and internal memory
D Internal memory playlist direct buttons
Press and hold to add a track to the corresponding
playlist.
Press to select the playlist.
DJ function direct buttons
Press [DJ JUKEBOX], [DJ SAMPLER] or [DJ
EFFECT-KARAOKE] to switch on the DJ function.
Press [1] to [6] on main unit to select the desired
function.
To cancel, press the selected [1] to [6] again.
E Switch on the DJ function
To cancel, press the button again.
F Turntable for DJ and multi control
G Browse playlist of the internal memory
Browse tracks or albums
Turn [MULTI CONTROL] to browse the track.
Press [1/;] to start playback from the selection.
H Open or close the disc tray
I Remote control sensor
Distance: Within approximately 7 m
Angle: Approximately 20° up and down, 30° left and
right
J Display panel
K PLAY
USB port ( )
USB status indicator
L REC/PLAY
USB port ( )
USB status indicator
M Select the illumination effect
N AUX IN 4 terminal
O Microphone jack
P Adjust the volume of the microphone
Q NFC touch area
R Disc tray
ENGLISH
Press [ALBUM/TRACK] to select album or track and
then turn [MULTI CONTROL] to browse.
Press [1/;] to start playback from the selection.
VQT5F33
7
7
Page 8
Disc
Playing disc
1
Press [ OPEN/CLOSE] on the main unit to open
the disc tray.
Put in a disc with the label facing up.
Press [ OPEN/CLOSE] again to close the disc
tray.
2 Press [CD] and then press [1/;] to start
playback.
• Stop playback
Press [∫].
• Pause playback
Press [1/;].
Press again to continue playback.
• Skip album
Press [3, 4].
• Skip track
Press [:] or [9]
(main unit: [:/6] or [5/9]).
• Search through track
Press and hold [6] or [5]
(main unit: [:/6] or [5/9]).
Viewing available information
You can view the available information on the display
panel.
Press [DISPLAY-DIMMER] during playback.
Note:
• Maximum characters that can be shown:
approximately 32
• This system supports ver. 1.0, ver. 1.1 and ver. 2 ID3 tags.
• Text data that the system does not support can show
VQT5F33
differently.
8
8
Play menu
1 Press [PLAY MENU] to select “PLAYMODE” or
“REPEAT”.
2 Press [2, 1] and then press [OK] to select the
desired mode.
PLAYMODE
•OFF PLAYMODE
Play all tracks.
• 1-TRACK
Play one selected track on the disc.
Press the alphanumeric buttons to select the track.
• 1-ALBUM
Play one selected album on the disc.
Press [3, 4] to select the album.
• RANDOM
Play a disc randomly.
• 1-ALBUM RANDOM
Play all tracks in one selected album randomly.
Press [3, 4] to select the album.
REPEAT
• ON REPEAT
Repeat playback.
“`” appears.
• OFF REPEAT
Cancel repeat playback.
Note:
The setting returns to the default “OFF PLAYMODE” when
you open the disc tray.
Programme playback
This function allows you to programme up to 24 tracks.
1 Press [PROGRAM] in the stop mode.
“PGM” or “PROGRAM” is shown.
2
Press the alphanumeric buttons to select the
desired track.
Do this step again to programme other tracks.
1 Press [3, 4] to select the desired album.
2 Press [9] and then press the alphanumeric
buttons to select the desired track.
3 Press [OK].
Do these steps again to programme other tracks.
3 Press [1/;] to start playback.
• Cancel programme mode
Press [PROGRAM] in the stop mode.
• Check programme contents
Press [:] or [9] when “PGM” is shown in the
stop mode.
• Clear the last track
Press [DEL] in the stop mode.
• Clear all programmed tracks
Press [∫] in the stop mode.
“CLR ALL” is shown.
Within 5 seconds, press [∫] again.
Page 9
Note:
ILLUMINATION
PLAY
A
B
REC/PLAY
USB device
(not supplied)
USB status indicator
• You cannot use programme playback together with
“PLAYMODE” function.
• The programme memory is cleared when you open the
disc tray.
Note on disc
• This system can play CD-R/RW with CD-DA or MP3 format
content.
• Some CD-R/RW cannot be played because of the
condition of the recording.
• MP3 files are defined as tracks and folders are defined as
albums.
• This system can access up to:
- CD-DA: 99 tracks
- MP3: 999 tracks, 255 albums
• Disc must conform to ISO9660 level 1 or 2 (except for
extended formats).
• Recordings will not necessarily be played in the order you
recorded them.
USB and internal memory
You can connect and play music tracks from your USB
device.
You can also record sound or music tracks into the
internal memory in “.mp3” format.
This system can play or record up to 800 folders
(maximum 999 tracks in an album) or a total of
8000 tracks, depending on the available storage
capacity.
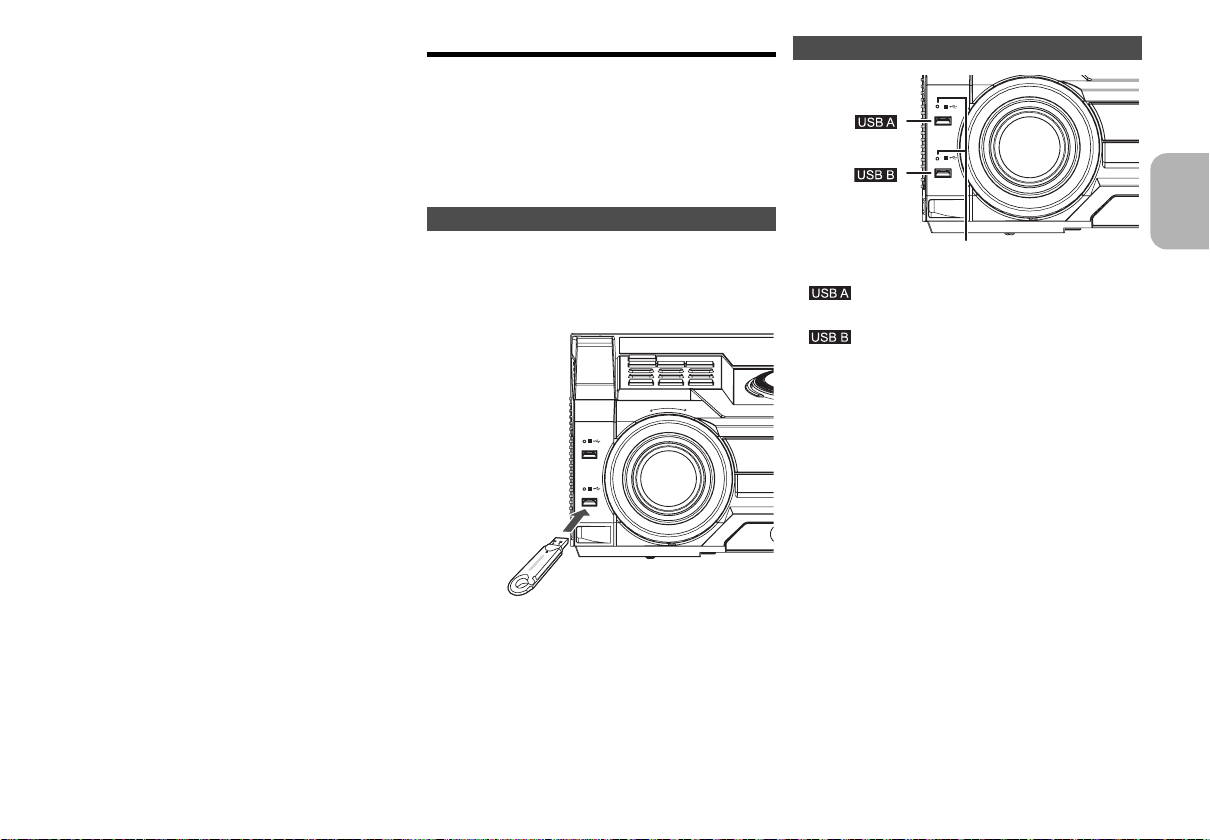
Connecting a USB device
Preparation
Before you connect a USB device to the system, make
sure you do a backup of the data.
Do not use a USB extension cable. The system cannot
recognise USB device connected through a cable.
USB at a glance
A
PLAY
B
REC/PLAY
•
• Play MP3 tracks.
•
• Record/play MP3 tracks.
Note:
USB status indicator blinks during USB recording.
Note:
USB status indicator lights up when selected.
ENGLISH
Decrease the volume and connect the USB device to
the USB port.
Hold the main unit when connecting or disconnecting the
USB device.
VQT5F33
9
9
Page 10
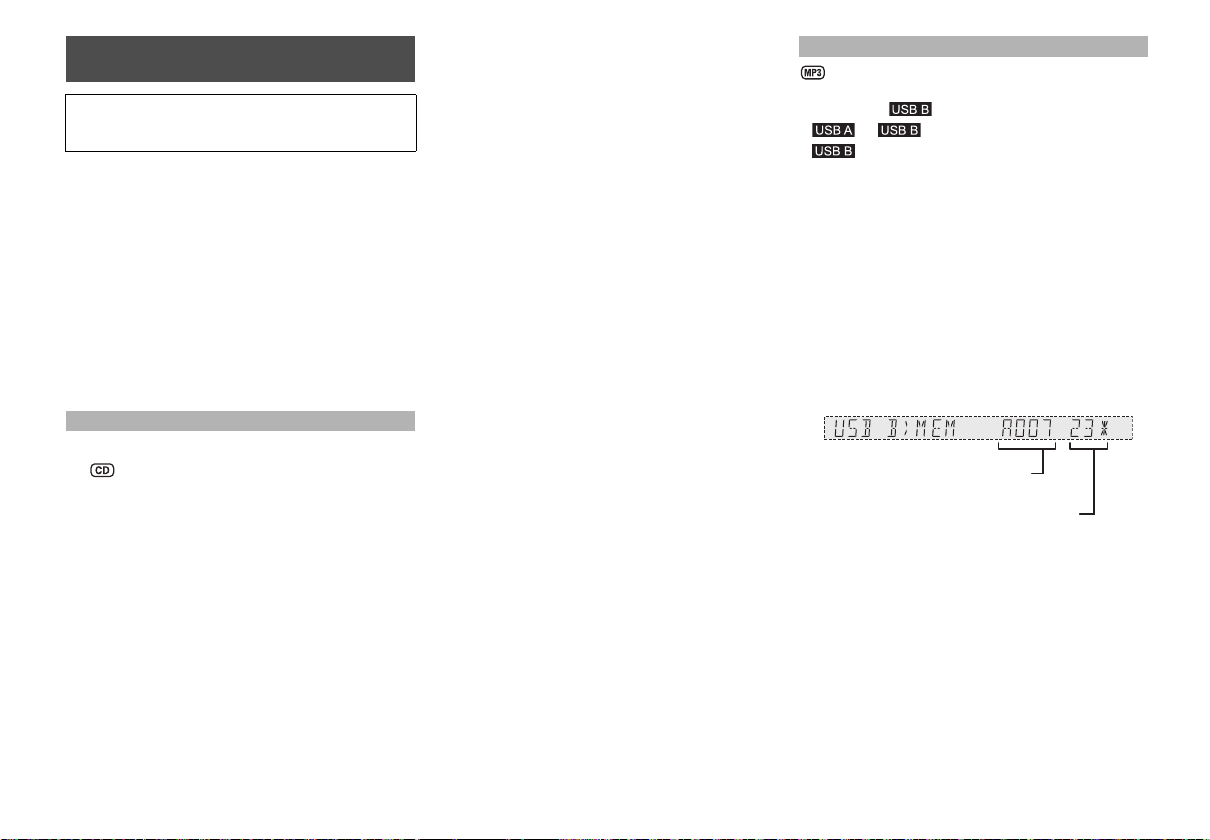
Recording to a USB device or the
Album being recorded
Percentage of the recording process
internal memory
Panasonic cannot be held responsible on the action of
consumer to record copyrighted contents which can
cause copyright infringement.
Note:
• All recordings are in “.mp3” format.
• You cannot do recording when you are using random
playback mode.
• Repeat playback mode is off during recording.
• A new album is added each time you do a recording.
• The sequence of album can change after the recording.
• The recordings are kept in a folder named “REC_DATA” in
the USB device or the internal memory.
• The recorded tracks will be sorted in the following order
automatically.
- Recorded tracks from Audio CD, radio or external input
(Sorted by recorded)
- Recorded mp3 tracks from CD or USB device (Sorted by
alphabet)
Basic recording
1 Select the source you want to record.
Prepare the disc playback mode.
• Record all tracks
Select “OFF PLAYMODE” (> “Play menu”).
• Record programmed tracks
Programme the tracks you want (> “Programme
playback”).
• Record a single track
Select “1-TRACK” (> “Play menu”).
Make sure the disc is stopped.
Radio
Tune in to the radio station.
External equipment
Connect and play the equipment (> “Using the
VQT5F33
auxiliary input”).
10
10
2 Press [MEMORY REC ¥/;] or [USB REC ¥/;] to
start recording.
The name of the folder that keeps the recording is
shown.
• Stop recording
Press [∫]. “WRITING” is shown.
• Pause recording
Press [MEMORY REC ¥/;] or [USB REC ¥/;]
during recording.
Press again to continue recording.
Note:
You can pause during recording from the radio or
AUX (except in SYNCHRO mode). A track mark is
added every time you pause (
marks”).
Note:
• Wait for a few seconds for the system to prepare the USB
device before you start recording.
• USB status indicator blinks during USB recording.
> “Adding track
Recording MP3 tracks
You can record MP3 tracks from:
• MP3 disc to or internal memory
• to or internal memory
• to internal memory, or vice versa
1 Prepare the source you want to record.
• Record all tracks
Select “OFF PLAYMODE” (> “Play menu”).
• Record programmed tracks
Programme the tracks you want (> “Programme
playback”).
• Record specified album or track
Select “1-ALBUM” or “1-TRACK” (> “Play menu”).
2 Press [MEMORY REC ¥/;] or [USB REC ¥/;] to
start recording.
Example: Recording an album from the USB device
• Stop recording
Note:
• Some tracks can use a longer time to record.
• Some tracks cannot be recorded because of the condition
of the source.
• The recorded folder name may be different from the
original folder because of the auto rename function.
to the internal memory.
Press [∫].
Recording stops at the last fully recorded track in
the album.
For example, if you stop recording during the fourth
track, only the first three tracks are recorded.
“NO FILE RECORDED” is shown if no track is
recorded.
Page 11
Basic playback
Title search Playlist
1 Press [ , MEMORY] (main unit: [ /MEMORY]) to
select “MEMORY”.
2 Press [1/;] to start playback.
1 Press [USB] to select “USB B” or “USB A”.
2 Press [1/;] to start playback.
• Stop playback
Press [∫]. “RESUME” is shown.
Press [1/;] to continue playback.
OR
Press [∫] two times to stop the playback fully.
For other operations, refer to “Disc”.
Viewing available information
You can view the available information on the display
panel.
Press [DISPLAY-DIMMER].
• In the stop mode
Available storage space or remaining recording time of
the internal memory or the USB device in .
• During recording
Information that is related to recording.
• During playback or pause
Information of the current track.
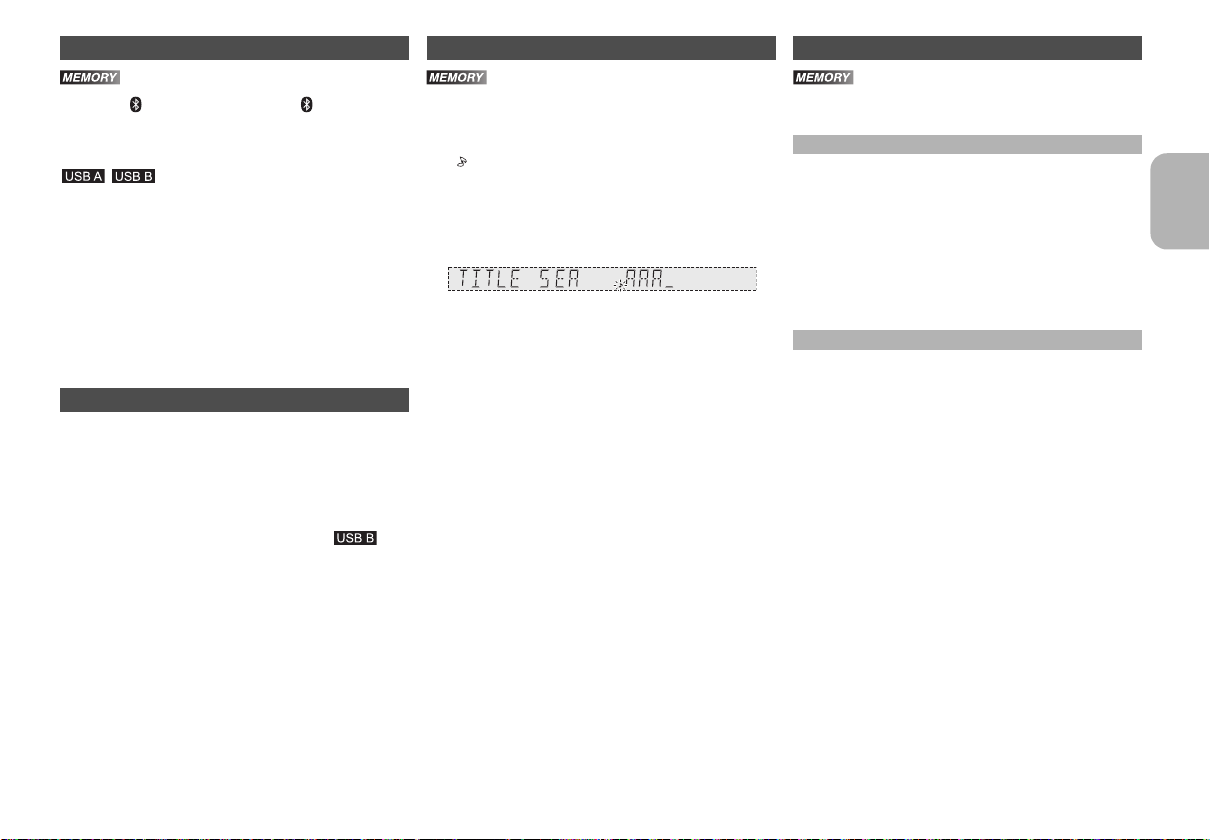
You can search for the desired track in the internal
memory with title search.
1 Press [TITLE SEARCH].
“ ” blinks.
2 Press the alphanumeric buttons or [3, 4] to
select the desired character then press [1] to
select next character.
To delete a character, press [DEL].
3 Press [OK].
Press [2, 1] to search for previous or next match.
“NOT FOUND” is shown if there is no match.
4 Press [OK] to confirm and play the track.
To cancel, press [TITLE SEARCH].
Note:
• This function skip tracks that are created with basic
recording (> “Basic recording”).
• This function does not work with random or programme
playback.
• The character is not case sensitive.
• A same track title display will be shown for tracks with the
same title.
You can keep up to 6 playlists in the internal memory.
Each playlist can keep up to 99 tracks.
Adding tracks to the playlist
1 Select the track you want to add to the playlist.
2 Press [PLAY LIST].
3 Press and hold the alphanumeric button (1 to 6)
to add the track to the corresponding playlist.
Or press and hold [1] to [6] on the main unit to add
the track to the corresponding playlist.
Do steps 1 through 3 again to add more tracks.
Listening to the playlist
1 Press [PLAY LIST] and then the alphanumeric
button (1 to 6) to select the playlist.
Or press [1] to [6] on the main unit to select the
playlist.
2 Press [1/;] to start playback.
• Cancel playlist playback
Press [PLAY LIST] two times.
OR
Press the selected [1] to [6] on the main unit.
• View contents of the playlist
Press [:] or [9] in the stop mode.
OR
Turn [MULTI CONTROL] in the stop mode.
• Clear a single track
In the stop mode, press [:] or [9] to select
the desired track you want to clear and then press
[DEL].
“DELETE?” is shown.
Within 5 seconds, press [OK].
• Clear all tracks in a playlist
In the stop mode, press [∫].
“CLEAR?” is shown.
Within 5 seconds, press [OK].
ENGLISH
VQT5F33
11
11
Page 12
Advanced recording functions
High-speed recording
Recording speed:
CD, CD-R: Up to three times (3x) of the normal speed.
CD-RW: Up to two times (2x) of the normal speed.
1 Put in the disc you want to record.
2 Press [CD].
3 Press [CD HI-SPEED REC] and [USB REC ¥/;]
or [MEMORY REC ¥/;] together to start
recording.
Note:
• If you cannot record at high-speed because of the condition
of the disc, record the CD at normal speed.
• The sound is muted during high-speed recording.
Adding track marks
When recording from radio or external equipment, you
can divide tracks using various modes.
Before recording
Press [REC MODE] to select the desired setting.
• MANUAL
Add a track mark manually.
Press [OK] during recording to add a track mark.
• TIME MARK
A track is automatically divided at 5-minute intervals.
• SYNCHRO
(For AUX source)
Recording starts automatically when the other
equipment starts to play.
Recording pause when it detects silence for
3 seconds.
Note:
• During recording, if you press [OK] or pause recording
VQT5F33
while using TIME MARK mode, the 5-minute counter is
reset.
12
• You cannot add track marks manually in SYNCHRO mode.
12
Deleting the recorded tracks
1
Press [ , MEMORY] (main unit: [ /MEMORY]) to
select “MEMORY”.
Press [USB] (main unit: [USB/CD]) to select “USB B”.
2 Press [3, 4] to select the desired album.
3 Press [:] or [9] to select the desired track.
4 Press [EDIT MODE] to select the desired mode.
• TRACK DEL
Delete a single track.
• ALBUM DEL
Delete one album (maximum 999 tracks).
•FORMAT
Format the USB device.
•ALL DEL
Delete all albums in the internal memory.
5 Press [OK].
The selected item to be deleted is shown.
6 Press [OK].
“SURE? NO” is shown.
7 Press [2, 1] to select “YES” or “NO” and then
press [OK].
Select “YES” to confirm the deletion.
“WRITING” is shown.
Note on USB
Compatible USB devices which are defined as mass
storage class:
• USB devices that support bulk-only transfer.
• USB devices that support USB 2.0 full speed.
Note:
• Folders are defined as album.
• Files are defined as track.
• Track must have the extension “.mp3” or “.MP3”.
• CBI (Control/Bulk/Interrupt) is not supported.
• NTFS file system is not supported (only FAT 12/16/32 file
system is supported).
• Some files can fail to work because of the sector size.
Radio
Manual tuning
1
Press [RADIO/EXT-IN] to select “FM” or “AM”.
2 Press [6] or [5] to select the frequency of
the required station.
To tune automatically, press and hold the button until
the frequency starts changing quickly.
“STEREO” is shown when a stereo broadcast is
being received.
Using the main unit
1 Press [RADIO/EXT-IN] to select “FM” or “AM”.
2 Press [TUNE MODE] to select “MANUAL”.
3 Press [:/6] or [5/9] to select the
frequency of the required station.
Improving the sound quality
When “FM” is selected
1 Press [PLAY MENU] to select “FM MODE”.
2 Press [2, 1] to select “MONO” and then press
[OK].
To cancel, select “STEREO”.
“MONO” is also cancelled when you change the
frequency.
When “AM” is selected
1 Press [PLAY MENU] to select “BEATPROOF”.
2 Press [2, 1] to select from “BP 1” to “BP 4” tha t
provides the best reception and then press [OK].
Page 13
Memory presetting
30 FM and 15 AM stations can be preset.
Automatic presetting
1 Press [OK] to select “LOWEST” or “CURRENT”
frequency.
2 Press [PLAY MENU] to select “A.PRESET” and
then press [OK].
“START?” is shown.
3 Press [OK] to start presetting.
To cancel, press [∫].
Manual presetting
1 Press [6] or [5] to tune in to the station.
2 Press [PROGRAM].
3 Press the alphanumeric buttons to select a
preset number.
Do steps 1 through 3 again to preset more stations.
The new station replaces any station that occupies
the same preset number.
Selecting a preset station
Press the alphanumeric buttons, [:] or [9] to
select the preset station.
Using the main unit
1 Press [TUNE MODE] to select “PRESET”.
2 Press [:/6] or [5/9] to select the preset
station.
AM allocation setting
By main unit only
This system can also receive AM broadcasts allocated in
10 kHz steps.
1 Press [RADIO/EXT-IN] to select “FM” or “AM”.
2 Press and hold [RADIO/EXT-IN].
After a few seconds, the display panel shows the current
minimum radio frequency. Release the button when the
minimum frequency changes.
• To go back to the initial setting, do the above steps
again.
• After you change the setting, preset frequencies are
erased.
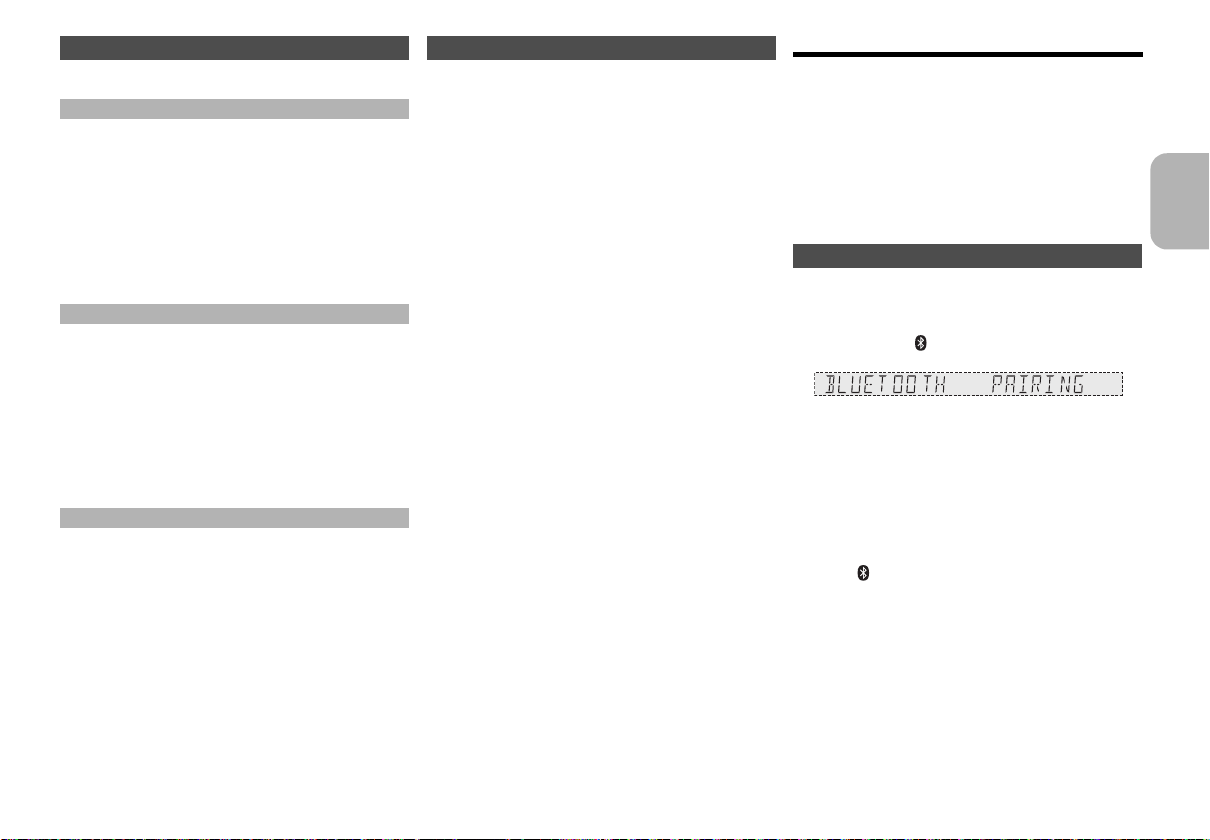
Bluetooth
You can connect and play an audio device wirelessly
through Bluetooth
• Refer to the operating instructions of the Bluetooth
device for details.
• If you intend to use an NFC (Near Field
Communication)-compatible Bluetooth
proceed to “One-Touch Connection (Connecting by
NFC)”.
• Decrease the volume before connect the Bluetooth
device.
®
®
.
®
device,
Pairing a device
Preparation
• Turn on the Bluetooth
the device near this unit.
1
Press and hold [ /MEMORY,-PAIRING] on main unit.
2 Select “SC-MAX770” from the Bluetooth
of the device.
The device connects with this system automatically
after pairing is complete.
3 Start playback on the Bluetooth
For other operations on main unit, refer to “Playing disc”.
Note:
• You can also operate with the remote control.
1 Press [ , MEMORY] to select “BLUETOOTH”.
2 Press [PLAY MENU] to select “PAIRING”.
3 Press [2, 1] to select “OK? YES” and then press [OK].
4 Select “SC-MAX770” from the Bluetooth
device.
• If prompted for a passkey, input “0000”.
• A device must be paired to connect.
• You can register up to 8 devices with this unit. If a 9th
device is paired, the device that has not been used for the
longest time will be replaced.
• This system can only connect to one device at a time.
• When “BLUETOOTH” is selected as the source, this
system will automatically try and connect to the last
connected device.
®
feature of the device and place
®
menu
®
device.
®
menu of the
®
®
ENGLISH
VQT5F33
13
13
Page 14
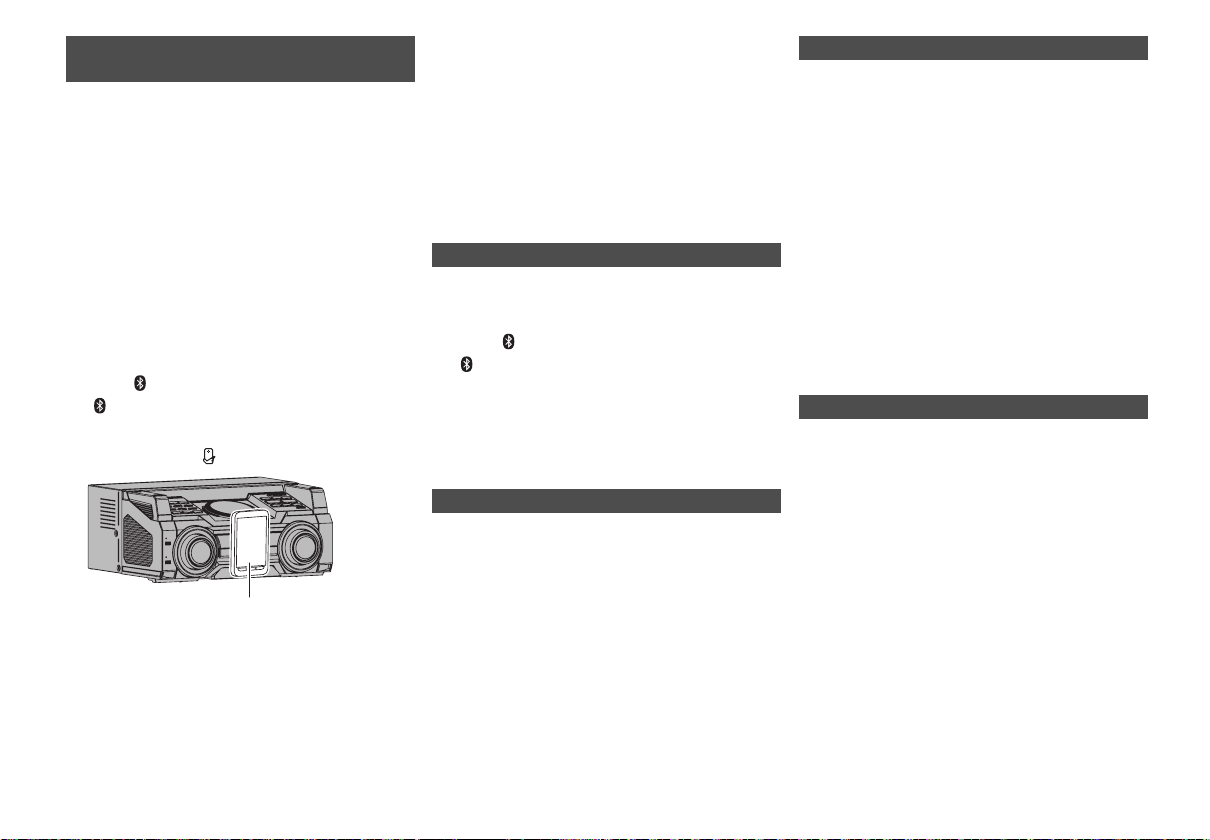
One-Touch Connection
Bluetooth® device
(Connecting by NFC)
For NFC-compatible AndroidTM devices only
Simply by touching an NFC (Near Field
Communication)-compatible Bluetooth
unit, you can complete all preparations, from registering
a Bluetooth
Preparation
• Turn on the NFC feature of the device.
• Android device version lower than 4.1 requires the
1
®
device to establishing a connection.
installation of the app “Panasonic MAX Juke” (Free of
charge).
1 Enter “Panasonic MAX Juke” in the search box of
Google Play
“Panasonic MAX Juke”.
2 Start the app “Panasonic MAX Juke” on the device.
- Follow on-screen instructions on your device.
- Always use the latest version of the app.
Press [ , MEMORY] (main unit:
[ /MEMORY,-PAIRING]) to select “BLUETOOTH”.
TM
to search, and then select
®
device by the
2 Touch and hold your device on the NFC touch
area of this unit [ ].
• Once the registration and connection of the
Bluetooth
connected device is indicated on the display. Move
the device away from the unit.
• When the connection is not established even if
your device has touched the NFC touch area,
VQT5F33
change its touching position.
3 Start playback on the Bluetooth
14
14
®
device is complete, the name of the
®
device.
Note:
• If you touch another device to this unit, you can update the
• If the image and sound are out of sync during playback,
• When the connection is established, the playback may start
• The One-Touch Connection may not work properly
®
Bluetooth
will be disconnected automatically.
restart the playback app you are using. If the problem
persists, connect the Bluetooth
an audio cable (not supplied).
automatically depending on the type of device being used.
depending on the type of device being used.
connection. The previously connected device
®
device and this unit with
Bluetooth® standby mode
If you enable this function, even when the main unit is
turned off, it will turn on automatically when a Bluetooth
device sends a connection request.
1 Press [ , MEMORY] (main unit:
[ /MEMORY,-PAIRING]) to select
“BLUETOOTH”.
2 Press [PLAY MENU] to select “STANDBY
MODE”.
3 Press [2, 1] to select “ON STANDBY MODE” or
“OFF STANDBY MODE” and then press [OK].
Viewing available information
You can view the following information on the display
panel:
• Name of the connected device (maximum
16 characters).
• Bluetooth
Press [DISPLAY-DIMMER].
®
profile used.
Link mode
You can change the transmission speed to prioritize
transmission quality or sound quality.
Preparation
If this system is connected to a Bluetooth
disconnect it (> “Disconnecting a device”).
®
device,
1 Press [PLAY MENU] to select “LINK MODE”.
2 Press [2, 1] to select “MODE 1” or “MODE 2”
and then press [OK].
•MODE 1
®
Emphasis on connectivity.
•MODE 2
Emphasis on sound quality.
Note:
The default setting is “MODE 2”.
Disconnecting a device
1 Press [PLAY MENU] repeatedly to select
“DISCONNECT?”.
2 Press [2, 1] to select “OK? YES” and then
press [OK].
Note:
A device is disconnected when you:
• Select a different source.
• Move the device out of the maximum range.
• Disable the Bluetooth
• Switch off the system or the device.
®
transmission of the device.
Page 15
Clock and timers
Setting the clock
This is a 24-hour clock.
1 Press [CLOCK/TIMER] to select “CLOCK”.
2 Within 20 seconds, press [3, 4] to set the time.
3 Press [OK].
Press [CLOCK/TIMER] to show the clock for a few
seconds.
Note:
• Reset the clock regularly to maintain accuracy.
• The clock is reset when there is a power failure or when the
AC mains lead is removed.
Play and record timer
Except for Bluetooth® source
You can set the timer to come on at a certain time to:
• Wake you up (play timer)
• Record from the radio or the external equipment
(record timer)
Play timer and record timer cannot be used together.
Preparation
Set the clock.
1 Press [CLOCK/TIMER] to select “ PLAY” or
“REC”.
2 Within 10 seconds, press [3, 4] to set the start
time.
3 Press [OK].
4 Do steps 2 and 3 again to set the end time.
5 Press [3, 4] to select the source you want to
play or record and then press [OK].
6 For record timer
Press [3, 4] to select “MEMORY” or “USB B” to
keep the recording and then press [OK].
To start the timer
1 Prepare the audio source.
• Play timer
Prepare the music source you want to listen to
(disc, USB, internal memory, radio or external
equipment) and set the volume.
• Record timer
Connect the USB device to (for USB
recording) and tune to the radio station or select
the external equipment.
2 Press [PLAY/REC ] to select “ PLAY ON” or
“ REC ON”.
“ PLAY ON” or “ REC ON” is shown.
To cancel, press [PLAY/REC ] to select “TIMER OFF”.
The system must be switched off for the timer to
operate.
To check the settings
Press [CLOCK/TIMER] to select “ PLAY” or
“REC”.
Note:
• The play timer starts at a low volume and increases
gradually to the preset level.
• The record timer starts 30 seconds before the set time with
the volume muted.
• The timer comes on at the set time every day if the timer is on.
Sleep timer
The sleep timer switches off the system after the set
time.
Press [SLEEP-AUTO OFF] to select the setting (in
minutes).
To cancel, select “OFF”.
30 MIN>60 MIN>90 MIN>120 MIN>OFF
^=================n
Note:
• The play and sleep timer or the record and sleep timer can
be used together.
• The sleep timer always comes first. Be sure not to set an
overlap of timers.
Sound and illumination
Adjust the sound effect
You can adjust the sound effect.
1 Press [SOUND] to select the sound effect.
2 Press [2, 1] to select the desired setting.
• BASS/MID/TREBLE
-4 to +4
• SURROUND
“ON SURROUND” or “OFF SURROUND”
• INPUT LEVEL
(For AUX IN 4)
“NORMAL” or “HIGH”
Note:
Select “NORMAL” if the sound is distorted during
“HIGH” input level.
• SUPER WOOFER
“SW1”, “SW2”, “SW3” or “OFF”
• D.BASS
“D.BASS ON”, “D.BASS BEAT” or “D.BASS OFF”
Preset EQ
Press [PRESET EQ]
to select desired preset.
(main unit:
[ PRESET EQ
ENGLISH
])
VQT5F33
15
15
Page 16

Using the main unit
You can adjust certain sound effect using the controls on
the main unit.
1 Press the button to select the sound effect.
•PRESET EQ
Press [PRESET EQ] (main unit: [ PRESET
EQ])
• BASS/MID/TREBLE
Press [MANUAL EQ]
• D.BASS
Press [D.BASS,-SUPER WOOFER]
• SUPER WOOFER
Press and hold [D.BASS,-SUPER WOOFER]
2 Turn [MULTI CONTROL] to select the desired
setting.
Illumination effects
By main unit only
You can change the illumination pattern or colour on this
system.
Turn [ILLUMINATION] to select pattern or colour.
•PATTERN
Illuminate with pattern in multiple colours.
• COLOR
Illuminate in one colour.
•OFF
Note:
To ensure the illumination effects are shown properly, make
sure to arrange the speakers accordingly as in “Placement of
speakers”.
VQT5F33
16
16
DJ functions
DJ functions has the following functions
- DJ jukebox
- DJ sampler
- DJ effects
Using these functions, you can add various effects to the
track you are playing back.
If you use the app “Panasonic MAX Juke”
By installing the app “Panasonic MAX Juke” (free of
charge) on your Android device, you can use a wider
variety of functions.
Download the app “Panasonic MAX Juke” to your
Android device. Enter “Panasonic MAX Juke” in the
search box of Google Play to search, and then select
“Panasonic MAX Juke”.
Note:
When recording, the DJ function is cancelled.
DJ jukebox
This mode adds a crossfade effect or sample sound mix
to the intervals between the tracks you play back.
This function works when you play back the tracks in the
USB device or the internal memory.
, ,
1 Press [DJ JUKEBOX] on main unit.
• The setting of the unit switches to repeat mode
automatically.
• (In the stop mode only) You can change the
desired repeat setting by turning [MULTI
CONTROL] on main unit.
-RANDOM REPEAT
Play all tracks randomly.
-ALL TITLE REPEAT
Repeat all tracks.
• When displayed "WAITING REQUEST" on the
display, you can proceed to the next step unless
you use the app "Panasonic MAX Juke".
2 Press [1] to [6] on main unit to select the desired
function.
•[1]
Crossfade:
becomes small and next track volume becomes large.
• [2] to [6]
Sample Sound Mix: This effect is sounding a
sample sound to the intervals between the tracks
you play back.
To cancel, press the button again.
To cancel the DJ jukebox
Press [DJ JUKEBOX] on main unit.
Note:
• To change DJ jukebox function ON or OFF with the remote
control
1 Press [PLAY MENU] to select “JUKEBOX”.
2 Press [2, 1] to select “ON JUKEBOX” or “OFF
JUKEBOX“ and then press [OK].
• To change the desired repeat setting with the remote
control
1 Press [PLAY MENU] twice to select “PLAYMODE”.
2 Press [2, 1] to select desired mode and then press
[OK].
If you use the app “Panasonic MAX Juke”
You can call up the tracks you want to play back through
the app.
• When displayed “MAKING LIST” on the display, you
can call up a part of tracks.
• When displayed "WAITING REQUEST" on the
display, You can call up the tracks you want to play
back through the app.
The playback track volume gradually
Page 17
DJ sampler
By main unit only
By turning [MULTI CONTROL], you can apply a scratch
sound or sample sound to the track you are playing
back.
1 Press [DJ SAMPLER].
2 Press [1] to [6] to select the desired sound.
3 Turn [MULTI CONTROL].
To cancel the DJ sampler
Press [DJ SAMPLER].
If you use the app “Panasonic MAX Juke”
• You can change the sample sound on the app.
(To return all sample sounds to the factory preset, press and
hold [DJ SAMPLER] when the DJ sampler is turned off.)
DJ effects
By main unit only
You can use the DJ effect function to add the sound
effects.
1 Press [DJ EFFECT-KARAOKE].
2 Press [1] to [6] to select the desired DJ effect.
•[1] PHASER
Add space and dimension to the sound.
•[2] FILTER
Enhance or filter specific ranges of the sound.
•[3] SOUND CHOPPER
Cut off the sound periodically.
•[4] ELECTRO ECHO
Add digital echo to the sound.
•[5] PITCH SHIFTER
Adjust the keys of the sound.
•[6] HARMONIZER
Add notes to the sound to create harmony.
To cancel, press the button again.
3 Turn [MULTI CONTROL] to select the desired
setting.
To cancel the DJ effect
Press [DJ EFFECT-KARAOKE].
KARAOKE
By main unit only
1 Press and hold [DJ EFFECT-KARAOKE].
[DJ EFFECT-KARAOKE] button light up in blue.
2 Press [1] to [3] to select the desired KARAOKE
effect.
[1] Vocal cancel
“VOCAL CANCEL”, “L”, “R”, “L+R” or “OFF”
[2] Ec ho
“ECHO 1”, “ECHO 2”, “ECHO 3” or “OFF”
[3] Key-control
Turn turntable to select “-6” to “+6”.
To cancel the KARAOKE
Press and hold [DJ EFFECT-KARAOKE].
Using a microphone
Preparation
Decrease the volume of the system to its minimum
before you connect or disconnect a microphone.
1 Connect a microphone (not supplied) to the
microphone jack.
Plug type: ‰ 6.3 mm monaural
2 Turn [MIC VOL, MIN/MAX] on the main unit to
adjust the volume of the microphone.
3 If you want to sing with the background music.
Play the music source and adjust the volume of
the system.
Note:
• If a strange noise (howling) is emitted, move the
microphone away from the speakers, or decrease the
volume of the microphone.
• When you do not use the microphone, disconnect it from
the microphone jack, and decrease the volume of the
microphone level to “MIN”.
• This system cannot record from microphone.
Using the auxiliary input
Before connection
• Disconnect the AC mains lead.
• Switch off all equipment and read the appropriate
operating instructions.
Note:
Components and cables are sold separately.
To connect a portable audio equipment etc.
You can play music from a portable audio equipment.
Preparation
Switch off the equalizer (if any) of the portable audio
equipment to prevent sound distortion.
Decrease the volume of the system and the portable
audio equipment before you connect or disconnect the
portable audio equipment.
1 Connect the portable audio equipment to
AUX IN 4.
Plug type: ‰ 3.5 mm stereo (not supplied)
2 Press [RADIO/EXT-IN] to select “AUX 4”.
3 Play the portable audio equipment.
ENGLISH
VQT5F33
17
17
Page 18
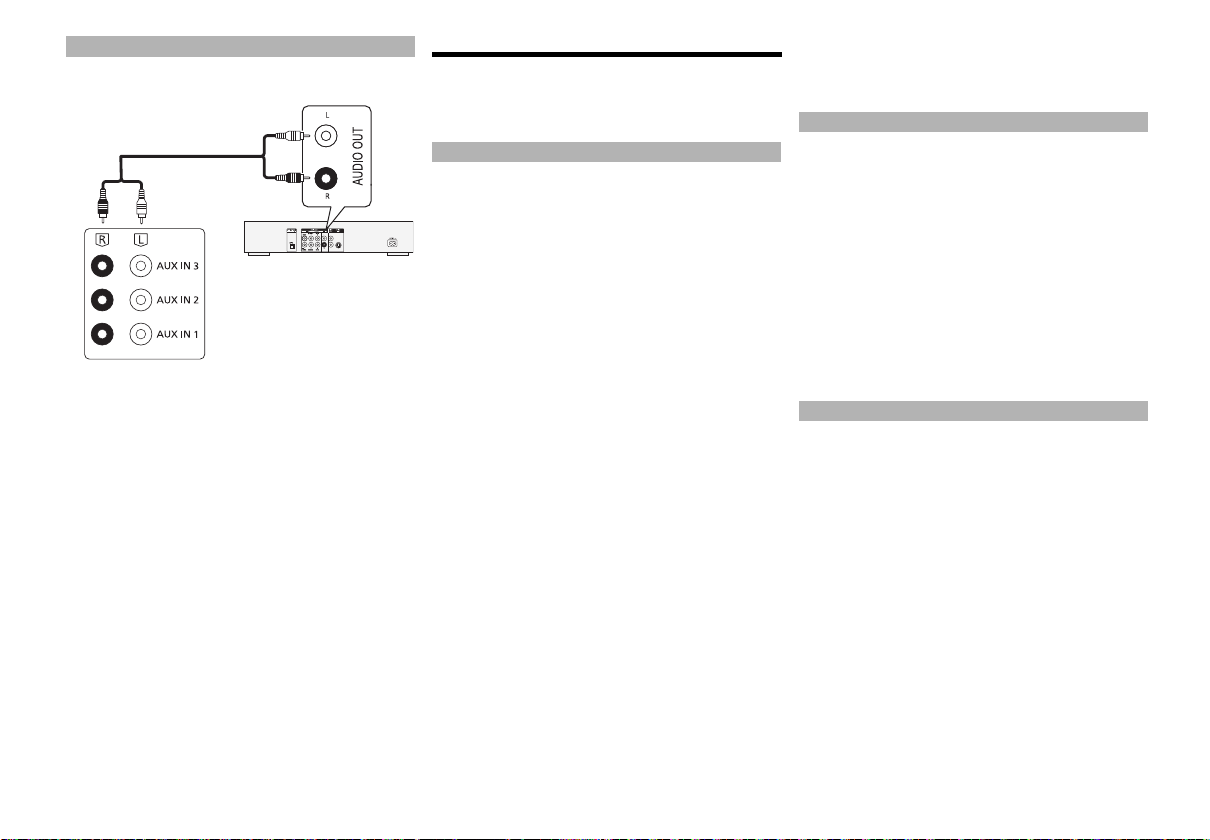
To connect a VCR, DVD player etc.
DVD player (not supplied)
Audio cable
(not supplied)
Rear panel of this main unit
You can connect a VCR, DVD player etc. and listen to
the audio through this system.
1 Connect the external equipment.
2 Press [RADIO/EXT-IN] to select “AUX”.
3 Play the external equipment.
Note:
• If you want to connect equipment other than those
described, refer to the audio dealer.
• Sound distortion can occur when you use an adapter.
VQT5F33
18
18
Troubleshooting
Before requesting service, make the following checks.
If you are in doubt about some of the check points, or if
the solutions indicated do not solve the problem, consult
your dealer for instructions.
Common problems
The unit does not work.
• One of the unit’s safety devices may have been
activated.
Reset the unit as follows:
1 Press [Í/I] on the main unit to switch the unit to
standby.
• If the unit does not switch to standby, press [Í/I]
on the main unit for a few seconds. The unit is
forcibly switched to standby. Alternatively,
disconnect the AC mains lead, wait one minute,
then reconnect it.
2 Press [Í/I] on the main unit to switch it on. If the
unit still cannot be operated, consult the dealer.
The display panel lights up and changes
continuously in standby mode.
• Press and hold [∫] on the main unit to select “DEMO
OFF”.
No operations can be done with the remote control.
• Examine that the battery is installed correctly.
Sound is distorted or no sound.
• Adjust the volume of the system.
• Switch off the system, determine and correct the
cause, then switch the system on again. It can be
caused by straining of the speakers through excessive
volume or power, and when using the system in a hot
environment.
A humming sound can be heard during playback.
• An AC mains lead or fluorescent light is near the
cables. Keep other appliances and cords away from
the cables of this system.
The sound level reduces.
• The protection circuit has been activated due to the
continuous use at high volume output. This is to
protect the system and maintain the sound quality.
Disc
Display not shown correctly.
Playback does not start.
• You have not put in the disc correctly. Put it in correctly.
• Disc is dirty. Clean the disc.
• Replace the disc if it is scratched, warped, or
non-standard.
• There is condensation. Let the system dry for 1 to
2hours.
The total number of tracks displayed is incorrect.
The disc cannot be read.
Distorted sound is heard.
• You put in a disc that the system cannot play. Change
to a playable disc.
• You put in a disc that has not been finalised.
USB
The USB device or the contents in it cannot be read.
• The format of the USB device or the contents in it
is/are not compatible with the system.
• USB devices with storage capacity of more than 32 GB
cannot work in some conditions.
Slow operation of the USB device.
• Large content size or large memory USB device takes
longer time to read.
Page 19

Radio
Sound is distorted.
• Use an optional FM outdoor antenna. The antenna
should be installed by a competent technician.
A beat sound is heard.
• Switch off the TV or move it away from the system.
• When in AM tuner mode, select from “BP 1” to “BP 4”
that provides the best reception.
A low hum is heard during AM broadcasts.
• Move the antenna away from other cables and cords.
Bluetooth
Pairing cannot be done.
• Check the Bluetooth
®
®
device condition.
The device cannot be connected.
• The pairing of the device was unsuccessful.
Do pairing again.
• The pairing of the device has been replaced.
Do pairing again.
• This system might be connected to a different device.
Disconnect the other device and try pairing the device
again.
The device is connected but audio cannot be heard
through the system.
• For some built-in Bluetooth
®
devices, you have to set
the audio output to “SC-MAX770” manually. Read the
operating instructions of the device for details.
Sound from the device is interrupted.
• The device is out of the 10 m communication range.
Move the device nearer to the system.
• Remove any obstacle between the system and the
device.
• Other devices that use the 2.4 GHz frequency band
(wireless router, microwaves, cordless phones, etc.)
are interfering. Move the device nearer to the system
and distance it from the other devices.
• Select “MODE 1” for stable communication.
The One-Touch Connection (NFC feature) is not
working.
• Make sure the unit and the NFC feature of the device
are turned on. (> 14)
Main unit displays
“USB A NO DEVICE”
“USB B NO DEVICE”
• The USB device is not connected. Examine the
connection.
“DEVICE FULL”
• You cannot do recording because the remaining
recording time of the USB device is less than the total
time of the music source.
Change to a USB device which has enough recording
time and do the recording again.
“ERROR”
• An incorrect operation was done. Read the instructions
and try again.
“ERROR” (during recording)
• You cannot select other playback source (example:
radio, USB etc.) or press [:] or [9] during
recording. Stop the recording function.
• You cannot open the disc tray when recording from an
AM source.
“F61”
• Examine and correct the speaker cords connection.
• Disconnect the USB device. Switch off the system and
then switch it on again.
“F70”
• Examine the Bluetooth
• Disconnect the Bluetooth
®
device.
®
device. Switch off the
system and then switch it on again.
“F77”
• Switch off the system and then switch it on again.
“NO PLAY”
“UNSUPPORT”
• Examine the content. You can only play supported
format.
• The files in the USB device can be corrupted. Format
the USB device and try again.
• The unit may have a problem. Turn the unit off and
then on again.
“NO TRACK”
• There is no album or track in the USB device or the
internal memory.
“PLAYERROR”
• You played an unsupported MP3 file. The system will
skip that track and play the next one.
“REMOTE 1”
“REMOTE 2”
• The remote control and the main unit are using
different codes. Change the code of the remote
control.
- When “REMOTE 1” is shown, press and hold [OK]
and [1] for a minimum of 4 seconds.
- When “REMOTE 2” is shown, press and hold [OK]
and [2] for a minimum of 4 seconds.
“TEMP NG”
• The temperature protection circuit has been activated,
and the system will switch off. Let the unit cool down
before switching it on again.
• Check that the ventilation opening of the unit is not
obstructed.
• Ensure this unit is well ventilated.
“USB OVER CURRENT ERROR”
• The USB device is using too much power.
Disconnect the USB device, switch off the system and
then switch on again.
“VBR”
• The system cannot show the remaining play time for
variable bit rate (VBR) tracks.
ENGLISH
VQT5F33
19
19
Page 20
System memory reset (initialization)
Reset the memory when the following situations occur:
• There is no response when buttons are pressed.
• You want to clear and reset the memory contents.
1 Disconnect the AC mains lead.
2 While you press and hold [Í/I] on the main unit,
connect the AC mains lead again.
Continue to press and hold the button (approximately
10 seconds) until “- - - - - - - -” is shown.
3 Release [Í/I].
All the settings are set back to the factory preset.
It is necessary to set the memory items again.
Remote control code
When other Panasonic equipment responds to the
remote control of this system, change the remote control
code for this system.
Preparation
Press [RADIO/EXT-IN] to select AUX input.
To set the code to “REMOTE 2”
1 Press and hold [RADIO/EXT-IN] on the main unit
and [2] on the remote control until “REMOTE 2”
is shown.
2 Press and hold [OK] and [2] for a minimum of
4seconds.
To set the code to “REMOTE 1”
1 Press and hold [RADIO/EXT-IN] on the main unit
and [1] on the remote control until “REMOTE 1”
is shown.
2 Press and hold [OK] and [1] for a minimum of
4seconds.
VQT5F33
20
20
Reference
Operation is subject to the following two conditions:
(1) This device may not cause harmful interference, and (2) this
device must accept any interference received, including
interference that may cause undesired operation.
Software update
Occasionally, Panasonic may release updated software
for this unit that may add or improve the way a feature
operates. These updates are available free of charge.
For more details, refer to the following website.
http://panasonic.jp/support/global/cs/
(This site is in English only.)
About Bluetooth
Panasonic bears no responsibility for data and/or
information that can possibly be compromised during a
wireless transmission.
Frequency band
• This system uses the 2.4 GHz frequency band.
Certification
• This system conforms to the frequency restrictions and
has received certification based on frequency laws.
Thus, a wireless permit is not necessary.
• The actions below are punishable by law:
- Taking apart or modifying the main unit.
- Removing specification indications.
Restrictions of use
• Wireless transmission and/or usage with all Bluetooth
equipped devices is not guaranteed.
• All devices must conform to standards set by Bluetooth
SIG, Inc.
• Depending on the specifications and settings of a
device, it can fail to connect or some operations can be
different.
• This system supports Bluetooth
depending on the operating environment and/or
settings, this security is possibly not sufficient.
Transmit data wirelessly to this system with caution.
• This system cannot transmit data to a Bluetooth
device.
®
®
security features. But
®
Range of use
• Use this device at a maximum range of 10 m.
• The range can decrease depending on the
environment, obstacles or interference.
Interference from other devices
• This system may not function properly and troubles
such as noise and sound jumps may arise due to radio
wave interference if this unit is located too close to
other Bluetooth
2.4 GHz band.
• This system may not function properly if radio waves
from a nearby broadcasting station, etc. is too strong.
Intended usage
• This system is for normal, general use only.
• Do not use this system near an equipment or in an
environment that is sensitive to radio frequency interference
(example: airports, hospitals, laboratories, etc.).
®
devices or the devices that use the
Licenses
MPEG Layer-3 audio coding technology licensed from
Fraunhofer IIS and Thomson.
The Bluetooth® word mark and logos are owned by the Bluetooth
SIG, Inc. and any use of such marks by Panasonic Corporation is
under license.
Other trademarks and trade names are those of their respective
owners.
Google Play and Android are trademarks of Google Inc.
To dispose or transfer this system
®
This system may keep the user settings information
internally. If you discard this system either by disposal or
transfer, then follow the procedure to return all the
settings to the factory presets to delete the user settings.
- To delete all recorded tracks in the internal memory
(refer to page 12).
- To return all sample sounds to the factory preset (refer
to page 17).
- To reset system memory (refer to page 20).
Note:
• The operation history may be recorded in the memory of
this system.
Page 21

Specifications
Amplifier section
RMS output power (each channel driven)
High 400+400 W
(3 ™, 1 kHz, 30% THD)
Mid-Low 400+400 W
(3 ™, 1 kHz, 30% THD)
Low 850+850 W
(5 ™, 100 Hz, 30% THD)
Total RMS output power 3300 W (30% THD)
Disc section
Disc played
8 cm CD, CD-R/RW
12 cm CD, CD-R/RW
Pick up
Wavelength 790 nm (CD)
Laser power CLASS 1
Audio output (disc) 2 ch (FL, FR)
FL = Front left channel
FR = Front right channel
Format CD-DA, MP3
Speaker section
Typ e 4 way, 4 speaker system (bass reflex)
Speaker unit(s)
Super Woofer (Low) 38 cm cone type
Super Woofer (Mid-Low) 20 cm cone type
Woofer 10 cm cone type
Tweeter 6 cm cone type
Impedance High 3 ™/ Mid-Low 3 ™/ Low 5 ™
Output sound pressure 91 dB/W (1 m)
Frequency range 25 Hz to 23 kHz (-16 dB)
Bluetooth® section
Versio n Bluetooth
Output Class 2 (2.5 mW)
Communication distance
Prospective communication distance: About 10 m*
Communication method 2.4 GHz band FH-SS
Correspondence profile A2DP/AVRCP/SPP
* Prospective communication distance
Measurement environment: Temperature 25 °C/
Measure in “MODE 1”
Tuner section
Frequency modulation (FM)
Preset memory 30 stations
Frequency range
87.50 MHz to 108.00 MHz (50 kHz step)
Antenna terminals 75 ™ unbalanced
Amplitude modulation (AM)
Preset memory 15 stations
Frequency range 522 kHz to 1629 kHz (9 kHz step)
520 kHz to 1630 kHz (10 kHz step)
Memory section
Memory size 2GB
Media file format support MP3
Memory record
Bit rate 128 kbps
Memory recording speed 1x,
From CD, MP3, USB recording file format
30 Hz to 20 kHz (-10 dB)
®
Ver.2 .1 + E DR
Height 1.0 m
3x max (CD only)
MP3 (*.mp3)
Terminals section
Microphone jack Mono, ‰ 6.3 mm (2 systems)
USB port
USB standard USB 2.0 full speed
Media file format support MP3 (*.mp3)
USB device file system FAT12, FAT16, FAT32
USB ripping
Bit rate 128 kbps
Recording speed 1x, 3x max (CD only)
Recording file format MP3 (*.mp3)
AUX input
Terminal Stereo, ‰ 3.5 mm jack
Stereo, Pin jack
General
Power supply AC 220 V to 240 V, 50/60 Hz
SA-MAX770GSK
Power consumption 330 W
Dimensions (W x H x D)
Mass Approx. 7.1 k
SB-MAX770GSK
Dimensions (W x H x D)
Including the speaker feet:
Excluding the speaker feet:
Mass Approx. 37.4 k
Operating temperature range 0 °C to +40 °C
Operating humidity range
Power consumption in standby mode
Note:
• Specifications are subject to change without notice. Mass
and dimensions are approximate.
• Total harmonic distortion is measured by the digital
spectrum analyzer.
492 mm x 221 mm x 421 mm
576 mm x 794 mm x 542 mm
576 mm x 786 mm x 542 mm
35% to 80% RH (no condensation)
0.3 W (approximate)
ENGLISH
g
g
VQT5F33
21
21
Page 22

Limited Warranty (ONLY FOR AUSTRALIA)
Panasonic Warranty
1. The product is warranted for 12 months from the date of purchase. Subject to the conditions of this warranty Panasonic or its
Authorised Service Centre will perform necessary service on the product without charge for parts or labour, if in the opinion of
Panasonic, the product is found to be faulty within the warranty period.
2. This warranty only applies to Panasonic products purchased in Australia and sold by Panasonic Australia or its Authorised
Distributors or Dealers and only where the products are used and serviced within Australia or it's territories. Warranty cover only
applies to service carried out by a Panasonic Authorised Service Centre and only if valid proof of purchase is presented when
warranty service is requested.
3. This warranty only applies if the product has been installed and used in accordance with the manufacturer’s recommendations (as
noted in the operating instructions) under normal use and reasonable care (in the opinion of Panasonic). The warranty covers normal
domestic use only and does not cover damage, malfunction or failure resulting from use of incorrect voltages, incorrect installation,
accident, misuse, neglect, build-up of dirt or dust, abuse, maladjustment of customer controls, mains supply problems, thunderstorm
activity, infestation by insects or vermin, tampering or repair by unauthorised persons (including unauthorised alterations),
introduction of sand, humidity or liquids, commercial use such as hotel, office, restaurant, or other business or rental use of the
product, exposure to abnormally corrosive conditions or any foreign object or matter having entered the product.
5. Some products may be supplied with Ethernet connection hardware. The warranty is limited on such products and will not cover
6. To claim warranty service, when required, you should:
7. The warranties hereby conferred do not extend to, and exclude, any costs associated with the installation, de-installation or
re-installation of a product, including costs related to the mounting, de-mounting or remounting of any screen, (and any other
ancillary activities), delivery, handling, freighting, transportation or insurance of the product or any part thereof or replacement of and
do not extend to, and exclude, any damage or loss occurring by reason of, during, associated with, or related to such installation,
de-installation, re-installation or transit.
Panasonic Authorised Service Centres are located in major metropolitan areas and most regional centres of Australia, however,
coverage will vary dependant on product. For advice on exact Authorised Service Centre locations for your product, please telephone
our Customer Care Centre on 132600 or visit our website and use the Service Centre Locator.
In addition to your rights under this warranty, Panasonic products come with consumer guarantees that cannot be excluded under the
Australian Consumer Law. If there is a major failure with the product, you can reject the product and elect to have a refund or to have
the product replaced or if you wish you may elect to keep the goods and be compensated for the drop in value of the goods. You are
also entitled to have the product repaired or replaced if the product fails to be of acceptable quality and the failure does not amount to a
major failure.
If there is a major failure in regard to the product which cannot be remedied then you must notify us within a reasonable period by
contacting the Panasonic Customer Care Centre. If the failure in the product is not a major failure then Panasonic may choose to repair
or replace the product and will do so in a reasonable period of time from receiving notice from you.
If you require assistance regarding warranty conditions or any other enquiries, please visit the
Panasonic Australia
website www.panasonic.com.au or contact by phone on 132 600
If phoning in, please ensure you have your operating instructions available.
(a) Internet and or DLNA connection / setup related problems
(b) Access fees and or charges incurred for internet connection
(c) The use of incompatible software or software not specifically stipulated in the product operations manual;
and
(d) Any indirect or consequential costs associated with the incorrect use or misuse of the hardware, its connection to the internet or
any other device.
4. This warranty does not cover the following items unless the fault or defect existed at the time of purchase:
(a) Cabinet Part(s) (e) DVD, Blu-ray or Recordable Discs
(b) Video or Audio Tapes (f) Video / Audio Heads from wear and tear in normal use
(c) SD cards or USB devices (g) Information stored on Hard Disk Drive, USB stick or SD card
(d) User replaceable Batteries (h) DTV reception issues caused by TV Aerial / Cabling / Wall socket(s)
etc
Telephone Panasonic’s Customer Care Centre on 132600 or visit our website referred to below and use the Service Centre
Locator for the name/address of the nearest Authorised Service Centre.
Send or take the product to a Panasonic Authorised Service Centre together with your proof of purchase receipt as a proof of
purchase date. Please note that freight and insurance to and / or from your nearest Authorised Service Centre must be arranged
by you.
Note that home or pick-up/delivery service is available for the following products in the major metropolitan areas of Australia or the
normal operating areas of the nearest Authorised Service Centres:
Plasma/LCD televisions / displays (screen size greater than 103 cm)
THIS WARRANTY CARD AND THE PURCHASE DOCKET (OR SIMILAR PROOF OF PURCHASE)
SHOULD BE RETAINED BY THE CUSTOMER AT ALL TIMES
Panasonic Australia Pty. Limited
ACN 001 592 187 ABN 83 001 592 187
1 Innovation Road, Macquarie Park NSW 2113
PRO-031-F11 Issue: 4.0 01-01-2011
VQT5F33
22
22
Page 23

23
ENGLISH
VQT5F33
23
Page 24
使用遥控器来操作,若按钮相同,您也可以使用主机上
的按钮来操作。
您的系统可能与插图有所不同。
本使用说明书适用于下列系统 :
音响组合
主机
扬声器
SC-MAX770
SA-MAX770
SB-MAX770
关于本使用说明书中的说明
• 参照标题表示为 “> ±±”。
• 除非另作说明,否则操作是以使用遥控器的操作记
载着说明。
目录
安全注意事项 ......................................................................2
交流电源线注意事项 ...........................................................3
提供附件 .............................................................................3
安装扬声器脚 ......................................................................3
扬声器布置..........................................................................4
维护保养 .............................................................................4
准备遥控器..........................................................................4
连接.....................................................................................5
控制概要 .............................................................................6
光碟.....................................................................................8
USB 和内置内存 .................................................................9
收音机 ...............................................................................12
Bluetooth
时钟和定时器 ....................................................................15
声音和照明........................................................................15
DJ 功能 .............................................................................16
卡拉 OK ............................................................................17
使用麦克风........................................................................17
使用辅助输入 ....................................................................17
故障排除指南 ....................................................................18
系统记忆重设 (初始化)..................................................20
遥控器代码........................................................................20
参考...................................................................................20
技术规格 ...........................................................................21
VQT5F33
®
.......................................................................13
2
24
安全注意事项
警告!
主机
• 为减低火灾,触电或产品损坏的危险,
- 不要将本机暴露在雨水、潮湿、滴水或溅水下。
- 不要将盛满液体的物体,例如花瓶等放置在本机上。
- 只使用被推荐的附件。
- 勿拆开机壳。
- 切勿自行修理本机。任何有关维修的问题请咨询合格人
员。
• 切勿让金属物体掉落到本机内。
注意!
主机
• 为减低火灾、触电或产品损坏的危险,
- 为了确保良好的通风条件,切勿将本机安装或置于书柜、
内藏式机柜或其它密闭的空间里。
- 切勿让报纸、桌布、窗帘等物品堵塞住本机的通风孔。
- 切勿将诸如点燃的蜡烛等明火火源置于本机上。
• 本机应置于水平面上且应远离阳光直射、高温、潮湿及过度
振动之处。
• 本机被设计为在热带气候地区使用。
• 电源插头为断开装置。
请安装本机,以便可以立即从电源插座上拔下电源插头。
• 本机在使用过程中,可能会受到行动电话的无线电波干扰。
如果干扰出现,增加本机和行动电话之间的距离。
• 本机使用激光射线。控制器的使用、调整及操作等如不遵照
此处的说明进行,很可能会受到激光辐射的危害。
电池
• 如果电池放置错误,有发生爆炸的危险。更换电池时,只使
用制造商建议的类型的电池。
• 当处理废旧电池时,请联络当地政府单位或经销商以洽询正
确的弃置方法。
• 切勿让电池遇热或触火。
• 切勿将电池长时间留在车门和车窗被关紧同时被阳光直接照
射的车子内。
• 切勿将电池解体或使其短路。
• 切勿对碱或锰电池进行充电。
• 切勿使用覆层已脱落的电池。
• 若长期不使用遥控器,请取出电池。储存于凉快、阴暗之
处。
注意!
• 此扬声器只能与推荐的装置一起使用。否则可能会损
坏放大器和扬声器,并引起火灾。
• 若出现损坏或感到性能上有明显的突变时,请向专业
维修人员咨询。
• 请按照本使用说明书内的步骤连接扬声器。
• 小心勿让婴儿或儿童接近。
• 请勿堆叠扬声器。
Page 25
交流电源线注意事项
扬声器脚
保护层
(非附件)
(对于 3 针的 AC 电源插头)
如何更换保险丝
保险丝的位置根据交流电源插头类型而可能有所不同 ( 图
A 和 B)。确认所安装的电源插头,并按照下面的说明。
插图可能会和实际的交流电源插头不同。
1. 用螺丝刀打开保险丝的盖子。
2. 更换保险丝然后关闭或盖上保险丝的盖子。
提供附件
请检查并确认所提供的附件。
4x
AC 电源线
(适用于泰国)
1x
AM 环状天线
1x
FM 室内天线
8x
扬声器脚
1x
遥控器电池
1x
遥控器
(N2QAYB000915)
安装扬声器脚
为了稳固和为了防止对地板造成损坏,请将扬声器脚安
装到扬声器的底部。
准备
为了防止划伤,在扬声器的下面放上保护层。
中文 (简体)
注意!
请将扬声器脚放在儿童接触不到的地方,以防儿童吞
食。
VQT5F33
3
25
Page 26
扬声器布置
高音扩音器
放置扬声器,使得高音扩音器在外侧。
请仅使用提供的扬声器。
如果使用其他扬声器,可能会对系统造成损坏并降低音
质。
注意 :
• 要移动、倾斜或搬运扬声器,人数需要超过 1 人。
维护保养
清洗本系统时,请使用柔软的干布。
• 切勿使用酒精、涂料稀释剂或挥发剂等清洗本系统。
• 使用经化学浸处理的布前,请仔细阅读该布附带的说
明。
准备遥控器
• 为了通风,请使扬声器距离主机 10 cm 以上。
• 请将扬声器放置在安全的平面上。
• 该扬声器不具有磁屏蔽功能。 请勿将其放置在电视机、
PC 或其他容易受磁力影响的设备附近。
• 长时间以大音量播放时,可能会对扬声器造成损坏并缩
短扬声器的使用寿命。
• 为了防止损坏,在这些情况下请降低音量 :
- 声音失真时。
- 调整音质时。
VQT5F33
使用碱或锰性干电池。
插入电池时,确保对准其极性 ( + 和 – )。
4
26
Page 27
连接
1a
1b
胶布
(不提供)
至家用交流电
源插座
仅在进行了所有其他连接后再连接 AC 电源线。
3 连接 AM 环状天线。
将天线竖立在其基座上,直到发出喀哒声。
4 连接 AC 电源线。
1 连接扬声器。
将扬声器电缆连接到相同颜色的端子。
2 连接 FM 室内天线。
将天线放置在接收最好的位置。
中文 (简体)
请勿使用其他任何 AC 电源线,只使用提供的 AC 电
源线。
省电
处于待机模式时,系统消耗约 0.3 W。 如果不使用系
统,请拔开电源。
拔开系统后,某些设置会丢失。 必须重新进行设置。
VQT5F33
5
27
Page 28

控制概要
SOUND PRESET EQ
EDIT
MODE
USB
CD HI-SPEED
MEMORY
MODE
DISPLAY
DIMMER
SLEEP
PLAY/
REC
AUTO OFF
ABC
TUV
JKL
P
QRS
GHI
W
XYZ
MNO
DEF
T
I
T
L
E
S
E
A
R
C
H
P
L
A
Y
L
I
S
T
PRESET EQ
VOCAL CANCEL ECHO KEY-CON
MEMORY PLAYLIST / DJ FUNCTION
123
4
DJ JUKEBOX DJ SAMPLER DJ EFFECT
-KARAOKE
56
MANUAL EQ
ALBUM / TRACK
TUNE MODE
/MEMORY
- PAIRING
USB / CD
RADIO/EXT-IN
USB REC MEMORY REC
OPEN CLOSE
MULTI CONTROL
D.BASS
- SUPER WOOFER
LOCAL
ILLUMINATION
PLAY
A
B
REC/PLAY
- VOLUME +
AUX IN4 MIC1 MIC2 MIN MAX MIN MAX
MIC
VOL 1
MIC
VOL 2
遥控器
顶视图
VQT5F33
6
28
正视图
Page 29
1 待机 / 开机开关 [Í], [Í/I]
按此开关可将本机从开机切换到待机状态或相反。在
待机状态下,本机仍将消耗少量电力。
2 文数字键
欲选择一个 2 位数的数字
例 : 16: [S10]
欲设定字符
例 : B: [2]
3 删除编排曲目
删除播放列表中选择的曲目
4 选择音源
5 基本播放操控
6 选择音效
7 开始内置内存的标题搜索
8 查看内容信息
按住该按钮 : 降低显示屏的亮度,使 DJ 功能按钮和
照明等熄灭。
9 录制操作控制
: 设置播放定时器或录制定时器
; 设定时钟和定时器
< 设定睡眠定时器
按住该按钮 : 如果 20 分钟不使用本系统,自动关闭
功能会关闭系统。 (收音机模式除外)
>[1]>[6]
>[2]
= 设定编排功能
> 调整系统音量
? 静音系统
欲取消,再按一次按钮。
调节音量或关闭本系统时,“MUTE”也会被取消。
@ 设置播放菜单项
A 内置内存播放列表操作
B 选择并确认按钮
C 设置 和内置内存的编辑模式
D 内置内存播放列表直接按钮
按住将曲目添加到相应的播放列表。
按下按钮以选择播放列表。
DJ 功能直接按钮
按 [DJ JUKEBOX]、 [DJ SAMPLER] 或 [DJ
EFFECT-KARAOKE] 开启 DJ 功能。
按主机上的 [1] 至 [6] 选择所需的功能。
欲取消,再按所选的 [1] 至 [6]。
E 开启 DJ 功能
要取消,请再次按该按钮。
F DJ 和多控制的转盘
G 浏览内置内存的播放列表
浏览曲目或专辑
转动 [MULTI CONTROL] 浏览曲目。
按 [1/;] 从选项开始播放。
H 打开或关闭光盘托盘
I 遥控传感器
距离 : 约 7m以内
角度 : 约 20°上下, 30°左右
J 显示屏
K PLAY
USB 端口 ()
USB 状态指示灯
L REC/PLAY
USB 端口 ()
USB 状态指示灯
M 选择照明效果
N AUX IN 4 端子
O 麦克风插孔
P 调节麦克风的音量
Q NFC 接触区域
R 光盘托盘
中文 (简体)
按 [ALBUM/TRACK] 选
[MULTI CONTROL] 浏览。
按 [1/;] 从选项开始播放。
择专辑或曲目
,然后转动
VQT5F33
7
29
Page 30
光碟
光碟播放
按主机上的 [ OPEN/CLOSE] 以开启托盘。
1
将标志朝上放入光碟。
再按 [ OPEN/CLOSE] 以关闭托盘。
2 按 [CD],然后按 [1/;] 以开始播放。
• 停止播放
按 [∫]。
• 暂停播放
按 [1/;]。
再按一次按钮以恢复播放。
• 跳越专辑
按 [3, 4]。
• 跳越曲目
按 [:] 或 [9]
( 主机 : [:/6] 或 [5/9])。
• 在曲目中搜索
按住 [6] 或 [5]
( 主机 : [:/6] 或 [5/9])。
查看曲目信息
您可在显示幕上查看当前曲目的信息。
在播放过程中,按 [DISPLAY-DIMMER]。
备注 :
• 可显示的最多字元数 :
约 32 个
• 本系统支持 1.0 版本、 1.1 版本和 2 版本的 ID3 标签。
• 不支援的文字资料显示将有差异。
播放选单
1 按 [PLAY MENU] 以选择 “PLAYMODE” 或
“REPEAT”。
2 按 [2, 1],然后按 [OK] 以选择所要的模式。
PLAYMODE
• OFF PLAYMODE
播放所有曲目。
• 1-TRACK
播放光碟中一首所选的曲目。
按文数字键以选择曲目。
• 1-ALBUM
播放光碟中一张所选的唱片集。
按 [3, 4] 以选择唱片集。
• RANDOM
随机播放光碟。
• 1-ALBUM RANDOM
随机播放所选的唱片集中的所有曲目。
按 [3, 4] 以选择唱片集。
REPEAT
• ON REPEAT
重复播放。
显示 “`”。
• OFF REPEAT
取消重复播放。
备注 :
开启托盘后,设定将回复厂家预设的 “
PLAYMODE
”。
OFF
编排播放
此功能可让您编排 24 首曲目。
1 在停止模式中,按 [PROGRAM]。
显示 “PGM”或 “PROGRAM”。
2
按文数字键以选择所要的曲目。
重复此步骤以编排其它曲目。
1 按 [3, 4] 以选择所要的唱片集。
2 按 [9],然后按文数字键以选择所要的 曲目。
3 按 [OK]。
重复这些步骤以编排其它曲目。
3 按 [1/;] 以开始播放。
• 取消编排模式
在停止模式中,按 [PROGRAM]。
• 确认编排内容
当“PGM” 显示在停止模式中时,按 [:] 或
[9]。
• 清除最后的曲目
在停止模式中,按 [DEL]。
• 清除所有编排的曲目
在停止模式中,按 [∫]。
“CLR ALL” 显示。
在 5 秒钟内,再按 [∫]。
VQT5F33
8
30
Page 31

备注 :
ILLUMINATION
PLAY
A
B
REC/PLAY
USB 设备
( 非附件 )
USB 状态指示灯
• 编排播放不能与 “PLAYMODE” 功能同时使用。
• 开启托盘后,编排记忆将被清除。
光碟备注
• 本系统可播放内容为 CD-DA 或 MP3 格式的 CD-R/RW。
• 视录音状态而定,某些 CD-R/RW 将无法播放。
• MP3 文件被定义为曲目,文件夹被定义为唱片集。
• 本系统可读取多达 :
- CD-DA: 99 首曲目
- MP3: 999 首曲目、 255 张专辑
• 光碟必须符合 ISO9660 等级 1 或 2 ( 扩展格式 除外 )。
• 录音不一定会按照所录制的顺序播放。
USB 和内置内存
您可以连接 USB 设备,并播放其中的音乐曲目。
也可以以 “.mp3”格式将声音或音乐曲目录制到内置内
存中。
视可用的存储容量而定,本系统可以播放或录制最多
800 个文件夹 (1 张专辑中最多 999 首曲目)或总计
8000 首曲目。
连接 USB 设备
准备
连接 USB 设备前,务必将资料存档。
请勿使用 USB 延长电缆。 本系统无法识别通过延长电缆
连接的 USB 设备。
降低音量,并将 USB 设备连接至 USB 端口。
连接或断开 USB 设备时,请握住主机。
USB 概览
A
PLAY
B
REC/PLAY
•
• 播放 MP3 曲目。
•
• 录制 / 播放 MP3 曲目。
备注 :
在 USB 录制过程中, USB 状态指示灯闪烁。
备注 :
选中了时, USB 状态指示灯点亮。
中文 (简体)
VQT5F33
9
31
Page 32

USB 设备或内置记忆体的录制
正在录制的专辑
录制过程的百分率
Panasonic 对用户录制受版权保护的内容等侵权举动一
概不负责。
备注 :
• 所有录制是以 “.mp3”格式进行。
• 正在使用随机播放模式时,无法进行录制。
• 录制过程中,重复播放模式关闭。
• 每次进行录制,就会添加 1 张新专辑。
• 录制后,可以更改专辑的顺序。
• 录制内容会被保存在 USB 设备或内置内存中名字为
“REC_DATA”的文件夹中。
• 录制的曲目会自动按以下顺序分类。
- 从 Audio CD、收音机或外部输入录制的曲目 (按录制分
类)
- 从 CD 或 USB 设备录制的 mp3 曲目 (按字母分类)
基本录制
1 选择想要录制的讯源。
准备光盘播放模式。
• 录制所有曲目
录制所有曲目选择 “OFF PLAYMODE”
(> “ 播放选单 ”)。
• 录制编排的曲目
编排您想要的曲目
(> “编排播放” )。
• 录制 1 首曲目
选择 “1-TRACK” (> “播放选单” )。
请确保光盘已停止。
收音机
调谐到广播电台。
外部设备
连接并播放设备 (> “使用辅助输入” )。
VQT5F33
10
32
2 按 [MEMORY REC ¥/;] 或 [USB REC ¥/;] 开始录
制。
显示保存录制内容的文件夹的名字。
• 停止录制
按 [∫]。“ WRITING” 显示。
• 暂停录制
录制时,按 [MEMORY REC ¥/;] 或
[USB REC ¥/;]。
再按一次按钮以继续录制。
备注 :
从收音机或 AUX (在 SYNCHRO 模式下除外)录制
时,可以暂停。 每次暂停,会添加曲目标记 (
曲目标记” )。
备注 :
• 开始录制前,由于系统要准备 USB 设备,因此请等待数秒。
• 在 USB 录制过程中, USB 状态指示灯闪烁。
> “添加
录制 MP3 曲目
可以如下那样录制 MP3 曲目 :
• 从 MP3 光盘向 或内置内存
• 从 向 或内置内存
• 从 向内置内存,或与之相反
1 准备想要录制的讯源。
• 录制所有曲目
选择 “OFF PLAYMODE”
(> “播放选单” )。
• 录制编排的曲目
编排您想要的曲目
(> “编排播放” )。
• 录制特定的专辑或曲目
选择 “1-ALBUM” 或“1-TRACK” (> “播放选
单” )。
2 按 [MEMORY REC ¥/;] 或 [USB REC ¥/;] 开始录
制。
例如 : 从 USB 设备向内置内存中录制专辑。
• 停止录制
按 [∫]。
录制将停止于上一首已完成录制的曲目。
例如,若您在录制第四首曲目中停止录制,本系统
只储存首三首已完成录制的曲目。若没有录音,
“NO FILE RECORDED” 显示。
备注 :
• 某些曲目会使用较长的时间录制。
• 由于讯源的状态,无法录制某些曲目。
• 由于自动重命名功能,录制的文件夹名可能与原来的文件夹
名不同。
Page 33

基本播放
标题搜寻 播放列表
1 按 [, MEMORY](主机 : [ /MEMORY])选择
“MEMORY”。
2 按 [1/;] 开始播放。
1 按 [USB] 选择 “USB B”或 “USB A”。
2 按 [1/;] 以开始播放。
• 停止播放
按 [∫]。“ RESUME” 显示。
按 [1/;] 以继续播放。
或
按 [∫] 两次以完全停止播放。
其余的操作功能,参阅 “ 光碟 ”。
查看曲目信息
您可在显示幕上查看当前曲目的信息。
按 [DISPLAY-DIMMER]。
• 在停止模式下
内置内存或 的 USB 设备的可用存储空间或剩余
录制时间。
• 在录制过程中
有关录制的信息。
• 在播放或暂停过程中
当前曲目的信息。
可以用标题搜索在内置内存中搜索所需的曲目。
1 按 [TITLE SEARCH]。
“”闪烁。
2 按字母数字按钮或 [3, 4] 选择所需的字符,然后按
[1] 选择下一个字符。
要删除字符,请按 [DEL]。
3 按 [OK]。
按 [2, 1] 搜索上一个或下一个符合的曲目。
如果没有符合的曲目,会显示 “NOT FOUND”。
4 按 [OK] 确认并播放曲目。
要取消,请按 [TITLE SEARCH]。
备注 :
• 本功能会跳越用基本录制 (> “基本录制” ) 创建的曲目。
• 随机播放或编排播放时,本功能不工作。
• 字符不区分大小写。
• 对于具有相同标题的曲目,会显示相同的曲目标题显示。
可以在内置内存中保存最多 6 个播放列表。 各播放列表
可以保存最多 99 首曲目。
加入曲目
1 选择想要添加到播放列表的曲目。
2 按 [PLAY LIST]。
3 按住字母数字按钮 (1 至 6)将曲目添加到相应的播
放列表。
或者按住主机上的 [1] 至 [6] 将曲目添加到相应的播放
列表。
再次执行步骤 1 至 3 添加更多曲目。
收听播放列表
1 按 [PLAY LIST] 然后按字母数字按钮(1 至 6)选择播
放列表。
或者按主机上的 [1] 至 [6] 选择播放列表。
2 按 [1/;] 开始播放。
• 取消播放列表播放
按两次 [PLAY LIST]。
或
按主机上所选择的 [1] 至 [6]。
• 查看播放列表的内容
在停止模式中,按 [:] 或 [9]。
或
在停止模式下,转动 [MULTI CONTROL]。
• 清除 1 首曲目
在停止模式中,按 [:] 或 [9] 以选择所要删除
的曲目,然后按 [DEL]。
“DELETE?” 显示。
在 5 秒钟内,按 [OK]。
• 清除播放列表中的所有曲目
在停止模式中,按 [∫]。
“CLEAR?” 显示。
在 5 秒钟内,按 [OK]。
中文 (简体)
VQT5F33
11
33
Page 34

高级录制功能
高速录制
录制速度 :
CD, CD-R: 最多正常速度的 3 倍 (3x)。
CD-RW: 最多正常速度的 2 倍 (2x)。
1 放入想要录制的光盘。
2 按 [CD]。
3 同时按 [CD HI-SPEED REC] 和 [USB REC ¥/;] 或
[MEMORY REC ¥/;] 开始录制。
备注 :
• 如果因光盘的状态而无法以高速录制,以正常速度录制
CD。
• 在高速录制过程中,声音会被静音。
添加曲目标记
从收音机或外部设备录制时,可以用各种方法区分曲目。
录制前
按 [REC MODE] 选择所需的设置。
• MANUAL
手动添加曲目标记。
录制时,按 [OK] 以添加曲目标记。
• TIME MARK
每隔 5 分钟,曲目将自动划分。
• SYNCHRO
(对于 AUX 讯源)
当其它设备开始播放时,录制将自动开始。
若录制功能检测到至少 3 秒钟的寂静,录制将暂停。
备注 :
• 录制过程中,如果在使用 TIME MARK 模式时按 [OK] 或暂停
录制,会重设 5 分钟计数器。
• 在 SYNCHRO 模式下,无法手动添加曲目标记。
VQT5F33
12
34
删除录制的曲目
1
按 [, MEMORY](主机 : [ /MEMORY])选择
“MEMORY”。
按 [USB] (主机 : [USB/CD])选择 “USB B”。
2 按 [3, 4] 选择所需的专辑。
3 按 [:] 或 [9] 选择所需的曲目。
4 按 [EDIT MODE] 选择所需的模式。
• TRACK DEL
删除一首曲目。
• ALBUM DEL
删除一张唱片集
( 最多 999 首曲目 )。
• FORMAT
格式化 USB 设备。
• ALL DEL
删除内置记忆体中的所有唱片集。
5 按 [OK]。
显示所选择的要删除的项目。
6 按 [OK]。
显示 “SURE? NO”。
7 按 [2, 1] 选择 “YES”或 “NO”,然后按 [OK]。
选择 “YES”确认删除。
显示 “WRITING”。
USB 备注
被定义为海量存储类的兼容的 USB 设备 :
• 支持 Bulk-Only 传输的 USB 设备。
• 支持 USB 2.0 全速的 USB 设备。
备注 :
• 文件夹被定义为专辑。
• 文件被定义为曲目。
• 曲目必须带扩展名 “.mp3”或 “.MP3”。
• 不支持 CBI (Control/Bulk/Interrupt)。
• 不支持 NTFS 文件系统(仅支持 FAT 12/16/32 文件系统)。
• 由于区段大小的原因,某些文件可能无法工作。
收音机
手动调谐
按 [RADIO/EXT-IN] 选择 “FM”或 “AM”。
1
2 按 [6] 或 [5] 以选择所要的电台频率。
欲自动调谐,按住按钮直到频率开始迅速改变。
正在接收立体声广播时,会显示 “STEREO”。
使用主机
1 按 [RADIO/EXT-IN] 选择 “FM”或 “AM”。
2 按 [TUNE MODE] 以选择 “MANUAL”。
3 按 [:/6] 或 [5/9] 以选择所要的电台频率。
改进音色品质
选择了 “FM”时
1 按 [PLAY MENU] 以选择 “FM MODE”。
2 按 [2, 1] 以选择 “MONO”, 然 后 按 [OK]。
欲取消,选择 “STEREO”。
改变频率时,也会取消 “MONO”。
选择了 “AM”时
1 按 [PLAY MENU] 选择 “BEATPROOF”。
2 按 [2, 1] 从“BP 1”至 “BP 4”中选择提供最佳接
收效果的项目,然后按 [OK]。
Page 35

记忆预设
可以预设 30 个 FM 和 15 个 AM 电台。
自动预设
1 按 [OK] 以选择 “LOWEST” ( 最低 ) 或
“CURRENT” ( 当前 ) 频率。
2 按 [PLAY MENU] 以选择 “A.PRESET”,然后按
[OK]。
“START?” 显示。
3 按 [OK] 以开始预设。
欲取消,按 [∫]。
AM 定位设定
仅通过主机
本系统也可以以 10 kHz 步级接收 AM 广播。
1 按 [RADIO/EXT-IN] 选择 “FM”或 “AM”。
2 按住 [RADIO/EXT-IN]。
数秒后,显示屏会显示当前最小的无线电频率。 最小频
率改变时,松开此按钮。
• 要返回到初始设置,请再次执行上述步骤。
• 改变设置后,预设频率会被删除。
Bluetooth
可以通过 Bluetooth®无线连接并播放音频设备。
• 有关详情,请参阅 Bluetooth
• 如果想要使用与 NFC(Near Field Communication)兼
容的 Bluetooth
NFC 连接) ”。
• 连接 Bluetooth
®
®
设备的使用说明书。
®
设备,请进入到 “ 一触连接 (通过
®
设备前,请降低音量。
配对设备
准备
• 开启设备的 Bluetooth
®
功能,将设备放置在本机附近。
1 按住主机上的 [ /MEMORY,-PAIRING]。
手动预设
1 按 [6] 或 [5] 以调谐至所要的电台。
2 按 [PROGRAM]。
3 按文数字键以选择一个预设频道。
重复步骤 1 至 3 以预设更多电台。
若将另一个电台预设于一个已预设的频道上,原来的
预设电台将被删除。
选择预设电台
按文数字键、 [:] 或 [9] 以选择预设电台。
使用主机
1 按 [TUNE MODE] 以选择 “PRESET”。
2 按 [:/6] 或 [5/9] 以选择预设电台。
2 从设备的 Bluetooth
配对完成后,设备自动与本系统连接。
3 在 Bluetooth
有关主机上的其他操作,请参阅 “ 光碟播放 ”。
备注 :
• 也可以用遥控器操作。
1 按 [ , MEMORY] 选择 “BLUETOOTH”。
2 按 [PLAY MENU] 选择 “PAIRING”。
3 按 [2, 1] 选择 “OK? YES”,然后按 [OK]。
4 从设备的 Bluetooth
• 如果提示需要密钥,请输入 “0000”。
• 必须配对设备以进行连接。
• 本机可以登录最多 8 个设备。如果与第 9 个设备配对,最长
时间没有使用的设备会被替换。
• 本系统 1 次仅可以连接到 1 个设备。
• 选择 “BLUETOOTH”作为讯源时,本系统会自动试着连
接到上次连接的设备。
®
菜单选择 “SC-MAX770”。
®
设备上开始播放。
®
菜单选择 “SC-MAX770”。
中文 (简体)
VQT5F33
13
35
Page 36

一触连接 (通过 NFC 连接)
Bluetooth®设备
仅对于与 NFC 兼容的 AndroidTM设备
只需用本机接触与 NFC (Near Field Communication)
兼容的 Bluetooth
设备到建立连接的所有准备。
准备
• 开启设备的 NFC 功能。
• 版本低于 4.1 的 Android 设备需要安装应用程序
“Panasonic MAX Juke”(免费)。
1 将“Panasonic MAX Juke”输入到 Google Play
的搜索框中进行搜索,然后选择 “Panasonic MAX
Juke”。
2 在设备上启动应用程序 “Panasonic MAX Juke”。
-请按照设备上的画面上的指示进行操作。
-请务必使用应用程序的最新版本。
®
设备,就可以完成从登录 Bluetooth
®
TM
1 按 [, MEMORY](主机 :
[ /MEMORY,-PAIRING])选择 “BLUETOOTH”。
2 在本机的 NFC 接触区域 []上持续接触一会儿设备。
®
• Bluetooth
会显示所连接的设备的名称。 请将设备远离本机。
• 即使设备接触了 NFC 接触区域,也不建立连接时,
请改变接触位置。
3 在 Bluetooth
设备的登录和连接一完成,显示屏上就
®
设备上开始播放。
备注 :
• 如果向本机接触其他设备,可以更新 Bluetooth®连接。 先前
连接的设备会被自动断开。
• 如果在播放过程中影像和声音不同步,请重新启动所使用的
播放应用程序。 如果问题仍然存在,请用音频电缆 (
件
)连接 Bluetooth®设备和本机。
• 建立了连接时,根据所使用的设备的类型,播放可能会自动
开始。
• 根据所使用的设备的类型,一触连接可能无法正常工作。
非附
Bluetooth®待机模式
如果将本功能设为有效,即使主机关闭, Bluetooth®设备
发送连接请求时也会自动开启。
1 按 [, MEMORY](主机 :
[ /MEMORY,-PAIRING])选择 “BLUETOOTH”。
2 按 [PLAY MENU] 选择 “STANDBY MODE”。
3 按 [2, 1] 选择 “ON STANDBY MODE”或 “OFF
STANDBY MODE”,然后按 [OK]。
查看曲目信息
可以在显示屏上查看以下信息 :
• 所连接的设备的名称 (最多 16 个字符)。
• 所使用的 Bluetooth
按 [DISPLAY-DIMMER]。
®
规范。
连接模式
可以更改传输速度以优先传输品质或音质。
准备
如果本系统连接到了 Bluetooth
设备” )。
®
设备,请断开 (> “断开
1 按 [PLAY MENU] 选择 “LINK MODE”。
2 按 [2, 1] 选择 “MODE 1”或 “MODE 2”,然后按
[OK]。
• MODE 1
强调连通性。
• MODE 2
强调音质。
备注 :
初始设置为 “MODE 2”。
断开设备
1 重复按 [PLAY MENU] 选择 “DISCONNECT?”。
2 按 [2, 1] 选择 “OK? YES”, 然 后 按 [OK]。
备注 :
在以下情况时,设备会被断开 :
• 选择其他讯源。
• 将设备移出最大范围。
• 禁用设备的 Bluetooth
• 关闭本系统或设备。
®
传输。
14
36
VQT5F33
Page 37

时钟和定时器
设定时钟
此为 24 小时显示时钟。
1 按 [CLOCK/TIMER] 以选择 “CLOCK”。
2 在 20 秒内,按 [3, 4] 设置时间。
3 按 [OK]。
按 [CLOCK/TIMER] 以显示时间几秒钟。
备注 :
• 请定期重设时钟以保持时间的准确性。
• 断电时或拔下 AC 电源线时,时钟会被重设。
播放和录音定时器
Bluetooth®源除外
您可以设定定时器在特定的时间以 :
• 唤醒 (播放定时器)
• 从收音机或外部设备录制 (录制定时器)
播放定时器和录制定时器不能同时使用。
准备
设定时钟。
1 按 [CLOCK/TIMER] 选择 “ PLAY”或
“ REC”。
2 在 10 秒钟内,按 [3, 4] 以设定开始时间。
3 按 [OK]。
4 重复步骤 2 和 3 以设定完成时间。
5 按 [3, 4] 选择想要播放或录制的讯源,然后按 [OK]。
6 对于录制定时器
按 [3, 4] 选择将保存录制内容的 “MEMORY”或
“USB B”,然后按 [OK]。
启动定时器
1 准备音源。
• 播放定时器
准备您想要收听的音乐源 ( 光碟、 USB、内置记忆
体、广播电台或其它设备 ) 并设定音量。
• 录制定时器
将 USB 设备连接到 (USB 录制用),调谐
到广播电台或选择外部设备。
2 按 [PLAY/REC ] 选择 “ PLAY ON”或
“ REC ON”。
显示 “ PLAY ON”或 “ REC ON”。
要取消,请按 [PLAY/REC ] 选择 “TIMER OFF”。
必须关闭本系统,定时器方能操作。
检查设定
按 [CLOCK/TIMER] 选择 “ PLAY”或 “ REC”。
备注 :
• 播放定时器将在预设时间启动,其音量将逐渐增加至预设水
平。
• 录制定时器将在所设置时间的 30 秒前在音量静音的状态下
开始。
• 定时器若被设定,将在每日预设时间启动。
睡眠定时器
睡眠定时器使本系统在预设时间自动关闭。
按 [SLEEP-AUTO OFF] 选择设置 (以分钟为单位)。
欲取消,选择 “OFF”。
30 MIN>60 MIN>90 MIN>120 MIN>OFF
^=================n
备注 :
• 播放和睡眠定时器或录制和睡眠定时器可以同时使用。
• 睡眠定时器总是优先启动。切勿使定时器设定重叠。
声音和照明
调整音效
可以调整音效。
1 按 [SOUND] 以选择音效。
2 按 [2, 1] 以选择所要的设定。
• BASS/MID/TREBLE
-4 至 +4
• SURROUND
“ON SURROUND” 或
“OFF SURROUND”
• INPUT LEVEL
(对于 AUX IN 4)
“NORMAL” ( 正常 ) 或“HIGH” ( 高 )
备注 :
若“HIGH” ( 高 ) 输入水平导致声音失真,选择
“NORMAL” ( 正常 )。
• SUPER WOOFER
“SW1”、“ SW2”、“ SW3” 或 “OFF”
• D.BASS
“D.BASS ON”、“D.BASS BEAT”或 “D.BASS
OFF”
预设 EQ (Preset EQ)
按 [PRESET EQ]
所需的预设。
(主机: [ PRESET EQ])
中文 (简体)
选择
VQT5F33
15
37
Page 38

使用主机
您可以使用主机上的按钮以调整特定的音效。
1 按下按钮以选择音效。
• PRESET EQ
按 [PRESET EQ](主机 : [ PRESET EQ])
• BASS/MID/TREBLE
按 [MANUAL EQ]
• D.BASS
按 [D.BASS,-SUPER WOOFER]
• SUPER WOOFER
按住 [D.BASS,-SUPER WOOFER]
2 转动 [MULTI CONTROL] 选择所需的设置。
光照效果
只限主机
可以更改本系统的照明模式或颜色。
转动 [ILLUMINATION] 选择模式或颜色。
• PA TT ER N
以多种颜色的模式照明。
• COLOR
以单色光照。
• OFF
备注 :
为了确保照明效果正确显示,请务必按照 “ 扬声器布置 ” 中那
样排列扬声器。
VQT5F33
16
38
DJ 功能
DJ 功能有以下功能
-DJ点唱机
-DJ取样机
-DJ效果
使用这些功能,可以给播放中的曲目添加各种效果。
如果使用应用程序 “Panasonic MAX Juke”
通过在 Android 设备上安装应用程序 “Panasonic MAX
Juke”(免费),可以使用更广泛的功能。
将应用程序 “Panasonic MAX Juke”下载到 Android
设备上。 将“Panasonic MAX Juke”输入到 Google
Play 的搜索框中进行搜索,然后选择 “Panasonic
MAX Juke”。
备注 :
录制时, DJ 功能会被取消。
DJ 点唱机
本模式可以给播放的曲目间的间隔添加淡入淡出效果或
样本音混合。
本功能在播放 USB 设备或内置内存中的曲目时工作。
, ,
1 按主机上的 [DJ JUKEBOX]。
• 本机的设置自动切换到重复模式。
• (仅在停止模式中)通过转动主机上的 [MULTI
CONTROL],可以更改所需的重复设置。
-RANDOM REPEAT
随机播放全部曲目。
-ALL TITLE REPEAT
重复全部曲目。
• 显示屏上显示 “WAITING REQUEST”时,除非使
用应用程序 “Panasonic MAX Juke”,否则进入到
下一步。
2 按主机上的 [1] 至 [6] 选择所需的功能。
• [1]
淡入淡出 : 播放曲目音量逐渐变小,下一首曲目音
量变大。
• [2] 至 [6]
样本音混合 : 本效果使播放的曲目间的间隔发出样
本音。
欲取消,再按一次按钮。
要取消DJ点唱机
按主机上的 [DJ JUKEBOX]。
备注 :
• 使用遥控器切换 DJ 点唱机功能的 ON 或 OFF
1 按 [PLAY MENU] 选择 “JUKEBOX”。
2 按 [2, 1] 选择 “ON JUKEBOX”或 “OFF
JUKEBOX”,然后按 [OK]。
• 使用遥控器更改所需的重复设置
1 按 [PLAY MENU] 两次以选择 “PLAYMODE”。
2 按 [2, 1] 选择所需的模式,然后按 [OK]。
如果使用应用程序 “Panasonic MAX Juke”
可以通过该应用程序调出想要播放的曲目。
• 显示屏上显示 “MAKING LIST”时,可以调出部分曲
目。
• 显示屏上显示 “WAITING REQUEST”时,可以通过
该应用程序调出想要播放的曲目。
Page 39

DJ 取样机
只限主机
通过转动 [MULTI CONTROL],可以将刮擦声或样本音应
用到播放中的曲目。
1 按 [DJ SAMPLER]。
2 按 [1] 至 [6] 选择所需的声音。
3 转动 [MULTI CONTROL]。
要取消DJ取样机
按 [DJ SAMPLER]。
如果使用应用程序 “Panasonic MAX Juke”
• 可以通过该应用程序改变样本音。
(要将全部样本音恢复为出厂时的初始设置,请在 DJ
取样机关闭时按住 [DJ SAMPLER]。)
DJ 效果
只限主机
可以使用 DJ 效果功能添加音效。
1 按 [DJ EFFECT-KARAOKE]。
2 按 [1] 至 [6] 以选择所要的 DJ 效果。
• [1] PHASER
给声音添加空间和维度。
• [2] FILTER
增强或过滤声音的特定范围。
• [3] SOUND CHOPPER
规律性切断声音。
• [4] ELECTRO ECHO
给声音添加数字回声。
• [5] PITCH SHIFTER
调节声音的音调。
• [6] HARMONIZER
给声音添加音符以创造和声效果。
欲取消,再按一次按钮。
3 转动 [MULTI CONTROL] 选择所需的设置。
欲取消
DJ
按 [DJ EFFECT-KARAOKE]。
效果
卡拉 OK
只限主机
1 按住 [DJ EFFECT-KARAOKE]。
[DJ EFFECT-KARAOKE] 按钮以蓝色点亮。
2 按 [1] 至 [3] 选择所需的卡拉 OK 效果。
[1]
原歌声消除
“VOCAL CANCEL”、“ L”、“ R”、“ L+R”
或“OFF”
[2]
回声
“ECHO 1”、“ ECHO 2”、“ECHO 3”或
“OFF”
[3]
音调控制
转动转盘选择 “-6”至 “+6”。
要取消卡拉
按住 [DJ EFFECT-KARAOKE]。
OK
使用麦克风
准备
连接或断开麦克风前,将系统音量降到最低。
1 将麦克风 ( 非附件 ) 连接至麦克风插孔。
插头类型 : ‰ 6.3 mm 单声道
2 转动主机上的 [MIC VOL, MIN/MAX] 以调整麦克风音
量。
3 若您想要跟着背景音乐一起唱。
播放音乐源,并调整系统音量。
备注 :
• 若扬声器发出奇怪的噪音 ( 啸叫 ),将麦克风远离扬声器或降
低麦克风音量。
• 若不使用麦克风,请断开麦克风,并将其音量降到
“MIN”。
• 本系统不能从麦克风录制。
使用辅助输入
连接前
• 拔下 AC 电源线。
• 关闭所有设备,并参阅有关说明书。
备注 :
设备和电线需另行添购。
要连接便携式音频设备等
您可从便携式音频设备播放音乐。
准备
关闭便携式设备的音频平衡器功能 ( 若有 ),以避免声音
失真。
连接或断开便携式设备前,降低本系统和便携式设备的
音量。
1 将便携式音频设备连接到 AUX IN 4。
插头类型 : ‰3.5 mm 立体声 ( 非附件 )
2 按 [RADIO/EXT-IN] 选择 “AUX 4”。
3 启动便携式音频设备。
中文 (简体)
VQT5F33
17
39
Page 40

要连接 VCR、 DV D 播放机等
DVD 播放机 (非附件)
音频电线
( 非附件 )
主机背面板
您可以连接 VCR、 DVD 播放机或其它设备,并通过本系
统享受音乐。
1 连接其它设备。
2 按 [RADIO/EXT-IN] 选择 “AUX”。
3 启动其它设备。
备注 :
• 若您想要连接此处没有描述的设备,请向当地经销商咨询。
• 使用适配器可能会导致声音失真。
故障排除指南
要求维修前,请确认下列各项。
若您无法按照下述方式修理好本系统或出现某些此处未
列出的问题时,请向当地经销商咨询。
常见问题
本机不工作。
• 本机的某个安全装置可能已被启动。
按以下步骤重设本机 :
1 按主机上的 [Í/I] 将本机切换到待机状态。
• 如果本机没有切换到待机状态,请按主机上的
[Í/I] 数秒。 本机被强制切换到待机状态。 或者,
断开 AC 电源线,等待一分钟,然后重新连接。
2 按主机上的 [Í/I] 将其开启。 如果仍然无法操作本
机,请向经销商咨询。
显示幕在待机状态下亮起并持续改变。
• 按住主机上的 [∫] 以选择 “DEMO OFF”。
遥控器无法操作。
• 检查电池是否正确插入。
声音失真或无声。
• 调整系统音量。
• 关闭本系统,检查并修正导因,然后再次开机。这可能
是由于扬声器受压于过大音量或功率,或在炎热环境中
使用本系统所导致。
播放时可听到嗡嗡声。
• 电缆附近有 AC 电源线或荧光灯。 请将其他设备和缆线
远离本系统的电缆。
音量降低。
• 由于本系统持续使用大音量输出,电路保护机制已启动
以保护本系统,并保持其音质。
光碟
显示有误。
无法开始播放。
• 您没正确放入光碟,请正确放入。
• 光碟肮脏,请擦拭干净。
• 若光碟出现划痕、弯曲或非标准型,要予以更换。
• 结露形成,等 1 至 2 个小时到其蒸发。
显示不正确的曲目总数。
无法读取光碟。
声音失真。
• 您放入本系统无法播放的光碟,更换可播放的光碟。
• 放入了未封边的光盘。
USB
无法读取 USB 设备或其内容。
• USB 设备格式或其内容与本系统不兼容。
• 在某些情况下,储存容量超过 32 GB 的 USB 设备将无
法操作。
USB 设备操作缓慢。
• 大文件或高位存储 USB 设
备需较长的时间读取。
VQT5F33
18
40
Page 41

收音机
声音失真。
• 使用另购的 FM 室外天线。此天线应由合格的技术人员
进行安装。
听到拍声。
• 关闭电视机或将其远离本系统。
• 在 AM 调谐模式下时,从 “BP 1”至 “BP 4”中选择
提供最佳接收效果的项目。
AM 广播时听到低低的嗡嗡声。
• 请将天线远离其他电缆和缆线。
Bluetooth
®
无法进行配对。
请确认 Bluetooth®设备状态。
•
无法连接设备。
• 设备的配对不成功。
请重新进行配对。
• 设备的配对已被替换。
请重新进行配对。
• 本系统可能连接到了其他设备。
请断开其他设备,试着重新配对设备。
连接了设备,但无法通过系统听到声音。
• 对于某些内置 Bluetooth
®
设备,必须手动将音频输出设
为“SC-MAX770”。 有关详情,请阅读设备的使用说
明书。
来自设备的声音中断。
• 设备在 10 m 通信范围之外。
请将设备更靠近本系统。
• 请移走本机与设备之间的任何障碍物。
• 正在受到使用 2.4 GHz 频段的其他设备 (无线路由器、
微波炉、无绳电话等)的干扰。 请将 Bluetooth
®
设备更
靠近本机,使其远离其他设备。
• 要获得稳定的通信,请选择 “MODE 1”。
一触连接 (NFC 功能)不工作。
• 请确保本机和设备的 NFC 功能被开启。 (>14)
主机显示
“USB A NO DEVICE”
“USB B NO DEVICE”
• USB 设备连接不良。检查连接。
“DEVICE FULL”
• 由于 USB 设备的剩余录制时间少于音源的总时间,因此
无法进行录制。
请更改为有足够录制时间的 USB 设备,然后重新进行
录制。
“ERROR”
• 操作不正确。阅读本使用说明书,然后再次操作。
“ERROR”(录制时)
• 录制过程中,无法选择其他播放源 (例如 : 收音机、
USB 等)或者按 [:] 或 [9]。请停止录制功能。
• 从 AM 源录制时,无法打开光盘托盘。
“F61”
• 检查并更正扬声器电线连接。
• 断开 USB 设备。关闭系统,然后再次开机。
“F70”
• 检查 Bluetooth
• 断开 Bluetooth
®
设备。
®
设备。 关闭本系统,然后再重新开启。
“F77”
• 关闭本系统,然后再重新开启。
“NO PLAY”
“UNSUPPORT”
• 检查内容。您只可播放受支援的文件格式。
• USB 设备中的文件可能已损坏。格式化 USB 设备,然
后再次操作。
• 本机可能出了问题。 关闭本机,然后再重新开启。
“NO TRACK”
• USB 设备或内置记忆体中没有唱片集或曲目。
“PLAYERROR”
• 您播放不受支援的 MP3 格式。本系统将跳越此曲目,
并播放下一首。
“REMOTE 1”
“REMOTE 2”
• 遥控器和主机使用不同代码。更改遥控器代码。
- 当“REMOTE 1” 显示时,按住 [OK] 和 [1] 至少 4
秒钟。
- 当“REMOTE 2” 显示时,按住 [OK] 和 [2] 至少 4
秒钟。
“TEMP NG”
• 温度电路保护机制已启动。本系统将关闭。等主机冷却
后再开机。
• 检查通风孔是否受堵塞。
• 确保主机通风良好。
“USB OVER CURRENT ERROR”
• USB 设备使用过多电源。
断开 USB 设备并关闭本系统,然后再次开机。
“VBR”
• 本系统无法显示 VBR 格式曲目剩余的播放时间。
中文 (简体)
VQT5F33
19
41
Page 42

系统记忆重设 (初始化)
当发生下列情况时,请重设记忆 :
• 按下按钮后没有反应。
• 您想要清除并重设记忆内容。
1 拔下 AC 电源线。
2 按住主机上的 [Í/I] 的同时,再次连接交流电源线。
持续按住按钮 ( 约 10 秒钟 ) 直到 “ - - - - - - - -” 显
示。
3 放开 [Í/I]。
所有设定将回复厂家预设。
您需重设各项目。
遥控器代码
若其它 Panasonic 设备对此遥控器产生反应,更改本系
统的遥控器代码。
准备
按 [RADIO/EXT-IN] 选择 AU X 输入。
欲切换到 “REMOTE 2”
1 按住主机上的 [RADIO/EXT-IN] 和遥控器上的 [2] 直
到“REMOTE 2” 显示。
2 按住 [OK] 和 [2] 至少 4 秒钟。
欲切换到 “REMOTE 1”
1 按住主机上的 [RADIO/EXT-IN] 和遥控器上的 [1] 直
到“REMOTE 1” 显示。
2 按住 [OK] 和 [1] 至少 4 秒钟。
VQT5F33
20
42
参考
操作要遵守以下 2 个条件 :
(1) 本设备不要引起有害干扰,以及 (2) 本设备必须顺应包括可能
会引起不希望的运转的干扰在内的受到的任何干扰。
软件更新
为了追加功能或改善工作, Panasonic 可能会不定期发布
本机的更新软件。 这些更新免费提供。
有关更多详情,请参阅下面的网站。
http://panasonic.jp/support/global/cs/
(本网站为英文网站。)
关于 Bluetooth
对于无线传输时发生的数据和 / 或信息的泄漏,
Panasonic 公司不承担任何责任。
频段
• 本系统使用 2.4 GHz 频段。
认证
• 本系统符合频率限制并且接受了基于频率法的认证。 因
此,不需要无线许可。
• 下述行为会受法律处罚 :
- 拆卸或改装本机。
- 取下规格指示。
使用的限制
• 不保证与所有具有Bluetooth
用。
• 所有设备都必须符合由Bluetooth SIG, Inc.制定的标准。
• 根据设备的规格和设置内容,可能会无法连接或者某些
操作可能会不同。
• 本系统支持 Bluetooth
或设置内容,该安全性可能不足。 将数据无线传输到本
系统时,请注意。
• 本系统无法将数据传输到 Bluetooth
®
®
的设备的无线传输和 /或使
®
安全性功能。 但根据使用环境和/
®
设备。
使用的范围
• 本设备的最大使用范围是 10 m。
• 根据环境、障碍物或干扰,范围可能会减小。
来自其他设备的干扰
• 如果将本机放置得太靠近其他 Bluetooth
2.4 GHz 频段的设备,由于无线电波干扰,本系统可能
无法正确工作和可能会发生噪音和跳音等异常。
• 如果来自附近的广播电台等的无线电波太强,本系统可
能无法正确工作。
预期的用途
• 本系统只用于正常、一般用途。
• 请勿在易于受到无线电频率干扰的设备附近或环境中
(例如 : 飞机场、医院、实验室等)使用本系统。
®
设备或使用
许可
MPEG Layer-3 音频编码技术经 Fraunhofer IIS 及 Thomson 许
可。
Bluetooth®文字商标和标志归 Bluetooth SIG, Inc. 所有,
Panasonic Corporation 使用这些商标都经过授权。
其他商标和商品名均属于各自所有者。
Google Play 和 Android 是 Google Inc. 的商标。
要废弃或转让本系统
本系统可能会将用户设置信息保留在内部。 如果要放弃
本系统,不论是废弃还是转让,请按照将所有设置恢复
为出厂时的初始设置的步骤操作,以删除用户设置。
- 要删除内置内存中所有录制的曲目 (参阅第 12 页)。
- 要将全部样本音恢复为出厂时的初始设置 (参阅第 17
页)。
- 要重设系统记忆 (参阅第 20 页)。
备注 :
• 操作历史记录可能会被记录在本系统的内存中。
Page 43

技术规格
扩音器部份
RMS 输出功率 (各声道驱动)
高 400+400 W
(3 ™, 1kHz, 30% 全谐波失真)
中低 400+400 W
(3 ™, 1kHz, 30% 全谐波失真)
低 850+850 W
(5 ™, 100 Hz, 30% 全谐波失真)
总 RMS 输出功率 3300 W (30% 全谐波失真)
光碟部份
播放的光盘
8cm CD、 CD-R/RW
12 cm CD、 CD-R/RW
激光头
波长 790 nm (CD)
激光功率 1 级
音频输出 (光盘) 2 声道 (FL、 FR)
FL = 前置左声道
FR = 前置右声道
格式 CD-DA、 MP3
调谐器部分
调频 (FM)
预设记忆 30 个电台
频率范围
87.50 MHz 至 108.00 MHz (50 kHz 频率间隔 )
天线端子 75 ™ 不平衡
调幅 (AM)
预设记忆 15 个电台
频率范围 522 kHz 至 1629 kHz (9kHz步级)
520 kHz 至 1630 kHz (10 kHz 步级)
扬声器部份
(低音反射)
类型 4路, 4 扬
扬声器单元
超低音扩音器 (低) 38 cm 锥型
超低音扩音器 (中低) 20 cm 锥型
低音扩音器 10 cm 锥型
高音扩音器 6cm锥型
阻抗 高 3 ™/ 中低 3 ™/ 低 5 ™
输出声压 91 dB/W (1 m)
频率范围 25 Hz 至 23 kHz (-16 dB)
声器系统
30 Hz 至 20 kHz (-10 dB)
Bluetooth®部分
®
版本 Bluetooth
输出 2 级 (2.5 mW)
通信距离
通信方式 2.4 GHz 频段 FH-SS
对应协议 A2DP/AVRCP/SPP
* 预期通信距离
测量环境 : 温度 25 oC/
在“MODE 1”下测量
版本 2.1 + EDR
预期通信距离 : 约 10 m*
高度 1.0 m
内存部分
存储容量 2GB
支持的媒体文件格式 MP3
内存录制
比特率 128 kbps
内存录制速度 1x、
从 CD、 MP3、 USB 录制的文件格式
3x 最大 (仅 CD)
MP3 (*.mp3)
端子部分
麦克风插孔 单声道, ‰ 6.3 mm (2 系统 )
USB 端口
USB 标准 USB 2.0 全速
支援的音频文件格式 MP3 (*.mp3)
USB 设备文件系统 FAT1 2 , FAT1 6 , FAT3 2
USB 录制
比特率 128 kbps
录制速度 1x、 3x 最大 (仅 CD)
录制文件格式 MP3 (*.mp3)
AUX 输入
端子 立体声, ‰ 3.5 mm 插孔
立体声,针式插孔
一般规格
电源 AC 220 V 至 240 V, 50/60 Hz
SA-MAX770GSK
功耗 330 W
尺寸 (宽 x 高 x 深)
492 mm x 221 mm x 421 mm
重量 约 7.1 k
SB-MAX770GSK
尺寸 (宽 x 高 x 深)
包括扬声器脚 :
576 mm x 794 mm x 542 mm
不包括扬声器脚 :
576 mm x 786 mm x 542 mm
重量 约 37.4 k
作温度范围 0oC 至 +40 oC
操作湿度范围
35% 至 80% 相对湿度 ( 无形成水珠 )
待机状态下的耗电量
0.3 W ( 大约 )
备注 :
• 规格若有变更,恕不另行通知。重量和尺寸为近似值。
• 全谐波失真由数码波谐分析器测量。
中文 (简体)
g
g
VQT5F33
21
43
Page 44

Выполняйте процедуры с помощью пульта
дистанционного управления. Также можно использовать
кнопки на основном устройстве, если они такие же.
Ваша система может выглядеть иначе, чем на
иллюстрациях.
Данная инструкция по эксплуатации относится к
следующей системе.
Система SC-MAX770
Основное
SA-MAX770
устройство
Колонки SB-MAX770
Об описаниях в данной инструкции по
эксплуатации
• Заголовки, на которые приводится ссылка,
обозначаются как “> ±±”.
• Если не указано иное, описанные операции
выполняются с помощью пульта дистанционного
управления.
Содержание
Меры предосторожности...............................................2
Принадлежности, входящие в комплект.....................3
Прикрепление ножек колонок .......................................3
Размещение колонок......................................................4
Обслуживание .................................................................4
Подготовка пульта дистанционного управления......4
Выполнение подключений............................................5
Обзор элементов управления ......................................6
Диск ...................................................................................8
USB и внутренняя память .............................................9
Радио ...............................................................................12
Bluetooth
Часы и таймеры ........................... .................................15
Звук и подсветка ...........................................................15
Диджейские функции ...................................................16
KARAOKE........................................................................17
Использование микрофона ........................................17
Использование дополнительного входа..................17
Поиск и устранение неполадок ..................................18
Сброс памяти системы (инициализация) .................20
VQT5F33
Код пульта ДУ ................................................................20
Справочный материал.................................................20
2
Характеристики .............................................................21
44
®
.......................................................................13
Меры предосторожности
ПРЕДУПРЕЖДЕНИЕ!
Уст рой ство
• Во избежание возникновения пожара, удара
электрическим током или повреждения изделия
- берегите данное устройство от воздействия дождя,
влажности, капель и брызг.
- Не ставьте на данное устройство емкости с водой,
например вазы.
- Используйте только рекомендуемое дополнительное
оборудование.
- Не снимайте крышки.
- Не ремонтируйте данное устройство самостоятельно.
Обращайтесь к квалифицированным специалистам
по техобслуживанию.
ед
ите за тем, чтобы внутрь данного устройства не
• Сл
попадали металлические предметы.
ВНИМАНИЕ!
Уст рой ство
• Во избежание возникновения пожара, удара
электрическим током или повреждения изделия
- Не устанавливайте и не размещайте данное устройство
в книжном стеллаже, встроенном шкафу или в другом
ограниченном пространстве. Обеспечьте хорошую
вентиляцию для данного устройства.
- Не закрывайте вентиляционные отверстия данного
устройства газетами, скатертями, шторами и
подобными предметами.
- Не помещайте источники открытого огня, такие как
горящие свечи, на данное устройство.
• Данное устройство следует устанавливать на ровную
поверхность и не подвергать воздействию прямых
солнечных лучей, высокой температуры, высокой
влажности и сильных вибраций.
• Сетевая вилка является отключающим у
Ус
тановите данный продукт таким образом, чтобы
сетевую вилку можно было быстро отключить от
розетки.
• Во время эксплуатации данное устройство может
подвергаться воздействию радиопомех, вызванных
мобильными телефонами. При возникновении таких
помех увеличьте расстояние между данным
устройством и мобильным телефоном.
• В данном устройстве используется лазер. Применение
регулировок и настроек или выполнение проце
отличающихся от описанных в данном руководстве,
может привести к опасному облучению.
стройством.
дур
,
Элемент питания
• В случае неправильной замены элемента питания
существует опасность взрыва. Используйте для замены
исключительно рекомендованный изготовителем тип
элемента питания.
• При утилизации элементов питания запросите в
местных органах власти или у продавца информацию
по правильному способу утилизации.
• Не нагревайте и не подвергайте воздействию огня.
• Не оставляйте элементы питания на длительное время в
автомобиле с закрытыми окнами и дверями на солнце.
• Не вскрывайте и не замыкайте накоротко элемент питания.
• Не заряжайте щелочные или марганцевые элементы питания.
• Не используйте элемент питания со снятой оболочкой.
• Извлеките элемент питания, если не будете использовать
пульт дистанционного управления в течение длительного
времени. Храните в прохладном темном месте.
ВНИМАНИЕ!
• Используйте колонки только с рекомендованной системой.
В противном случае это может привести к повреждению
усилителя и колонок, а также вызвать возгорание.
• При поломках или неожиданных изменениях
рабочих характеристик устройства обращайтесь к
специалистам по техобслуживанию с
соответствующим разрешением.
• При прикреплении колонок следуйте порядку
действий, описанному в данной инструкции.
• Соблюдайте осторожность, когда рядом находятся дети.
• Не ставьте одну колонку на другую.
Page 45

Принадлежности, входящие в
Ножка колонки
Защитный
слой (не
входит в
комплект)
комплект
Проверьте наличие принадлежностей, входящих в
комплект поставки.
4x Сетевой шнур
Прикрепление ножек колонок
Чтобы обеспечить устойчивость и не повредить пол,
прикрепите ножки к нижней стороне колонок.
Подготовка
Поместите под колонки защитный слой во избежание
царапин.
(Для Таиланда)
1x Рамочная AM-антенна
1x Комнатная FM-антенна
8x Ножка колонки
1x Элемент питания пульта дистанционного
управления
1x Пульт дистанционного управления (ДУ)
(N2QAYB000915)
ВНИМАНИЕ!
Храните ножки колонок в недоступном для детей
месте во избежание их проглатывания детьми.
РУССКИЙ
VQT5F33
3
45
Page 46

Размещение колонок
Высокочастотный
динамик
Разместите колонки таким образом, чтобы
высокочастотный динамик находился снаружи.
Используйте только колонки, входящие в
комплект.
Использование других колонок может привести к
повреждению системы и ухудшению качества звука.
Примечание:
• Для перемещения, наклона или переноски колонок
требуется несколько человек.
• Размещайте колонки на расстоянии более 10 см от
основного устройства для обеспечения
вентиляции.
• Размещайте ко
поверхности.
• Эти колонки не оснащены магнитным
экранированием. Не располагайте их возле
телевизора, ПК или других устройств,
подверженных воздействию магнитного излучения.
• Воспроизведение на высоком уровне громкости в
течение длительного времени может повредить
колонки и сократить срок их службы.
• Во избежание повреждений уменьшите громкость в
следующих ситуациях:
гд
- Ко
- Во время настройки качества звука.
ло
нки на прочной ровной
а звук искажается.
Обслуживание
Для чистки данной системы протирайте ее сухой
мягкой тканью.
• Для чистки данной системы нельзя использовать
спирт, разбавитель для красок или бензин.
• Прежде чем использовать химически
обработанную ткань, внимательно прочтите
прилагаемую к ней инструкцию.
Подготовка пульта
дистанционного управления
Используйте щелочной или марганцевый элемент
питания.
Вставьте элемент питания, так чтобы полюса (+ и –)
совпадали с обозначениями на пульте
дистанционного управления.
VQT5F33
4
46
Page 47

Выполнение подключений
1a
1b
Лента
(не входит в
комплект)
К сетевой
розетке
Подключите сетевой шнур только после выполнения всех других подключений.
1 Подключите колонки.
Подключите кабели для подключения колонок к разъемам такого же цвета.
3 Подключите рамочную AM-антенну.
Поставьте антенну на основание до щелчка.
4 Подключите сетевой шнур.
Не используйте какие-либо другие сетевые
шнуры питания, кроме входящего в комплект.
2 Подключите комнатную FM-антенну.
Расположите антенну в месте наилучшего приема.
Экономия электроэнергии
Данная система потребляет примерно 0,3 Вт в
режиме ожидания. Отключите подачу питания,
если не используете данную систему.
После отключения системы некоторые настройки
будут утрачены. Их необходимо выполнить снова.
РУССКИЙ
VQT5F33
5
47
Page 48

Обзор элементов управления
SOUND PRESET EQ
EDIT
MODE
USB
CD HI-SPEED
MEMORY
MODE
DISPLAY
DIMMER
SLEEP
PLAY/
REC
AUTO OFF
ABC
TUV
JKL
P
QRS
GHI
W
XYZ
MNO
DEF
T
I
T
L
E
S
E
A
R
C
H
P
L
A
Y
L
I
S
T
PRESET EQ
VOCAL CANCEL ECHO KEY-CON
MEMORY PLAYLIST / DJ FUNCTION
123
4
DJ JUKEBOX DJ SAMPLER DJ EFFECT
-KARAOKE
56
MANUAL EQ
ALBUM / TRACK
TUNE MODE
/MEMORY
- PAIRING
USB / CD
RADIO/EXT-IN
USB REC MEMORY REC
OPEN CLOSE
MULTI CONTROL
D.BASS
- SUPER WOOFER
LOCAL
ILLUMINATION
PLAY
A
B
REC/PLAY
- VOLUME +
AUX IN4 MIC1 MIC2 MIN MAX MIN MAX
MIC
VOL 1
MIC
VOL 2
Пульт дистанционного управления (ДУ)
Вид сверху
VQT5F33
6
48
Вид спереди
Page 49

1 Переключатель режима ожидания/включения
[Í], [Í/I]
Нажмите, чтобы перевести устройство из режима
работы в режим ожидания или наоборот. В
режиме ожидания устройство продолжает
потреблять небольшое количество энергии.
2 Буквенно-цифровые кнопки
Выбор 2-значного числа
Пример: 16: [S10]
Ввод буквы
Пример: B: [2]
3 Удален и е запрограммированной композиции
Уда л е ние выбранной композиции из списка
воспроизведения
4 Выбор аудиоисточника
5 Основные кнопки управления воспроизведением
6 Выбор звуковых эффектов
7 Запуск поиска записей во внутренней памяти
8 Просмотр информации о содержимом
Нажатие и удерживание кнопки: уменьшается
яркость панели дисплея, отключаются кнопки
диджейских функций, подсветка и т. п.
9 Кнопки управления записью
: Установ ка таймера воспроизведения или та
иси
зап
; Установ ка часов и таймера
< Установ ка таймера перехода в режим сна
Нажатие и удерживание кнопки:
автоматического выключения системы, если она
не используется в течение 20 минут. (Кроме радио)
>[1]>[6]
>[2]
ймера
функция
= Установка функции программирования
> Настройка громкости звука системы
? Отключение звука системы
Для отмены повторно нажмите кнопку.
“MUTE” также отменяется при настройке
громкости или выключении системы.
@ Установка пункта меню воспроизведения
A Операции со списками воспроизведения во
внутренней памяти
B Кнопки выбора и ввода
C Установка режима редактирования для и
внутренней памяти
D Кнопки прямого доступа к спискам
воспрои
зведения во внутренней памяти
Нажмите и удерживайте для добавления композиции
к соответствующему списку воспроизведения.
Нажмите для выбора списка воспроизведения.
Кнопки прямого доступа к диджейским функциям
Нажмите [DJ JUKEBOX], [DJ SAMPLER] или [DJ
EFFECT-KARAOKE], чтобы включить диджейскую
функцию.
Нажимайте кнопки [1] до [6] на основном
устройстве, чтобы выбрать нужную функцию.
Для отмены повторно нажмите выбранную кнопку
[1] до [6].
E Включение диджейской функции
Для отмены повторно нажмите кнопку.
F Диджейская вертушка и диск
многофункционального управления
Поиск списка воспроизведения во внутренней памяти
G
Поиск композиций или альбомов
H Открытие или закрытие лотка для дисков
I Датчик дистанционного управления
Расстояние: в пределах приблизительно 7 м
Угол: приблизительно 20° вверх и вниз, 30° влево
и вправо
J Панель дисплея
K PLAY
Порт USB ( )
Индикатор состояния USB
L REC/PLAY
Порт USB ( )
Индикатор состояния USB
M Выбор эффекта подсветки
N Разъем AUX IN 4
O Гнезд о для микрофона
P Настройка громкости звука микрофона
Q Участок касания NFC
R Лоток для дисков
РУССКИЙ
Поверните [MULTI CONTROL], чтобы найти
композицию.
Нажмите [1/;], чтобы начать воспроизведение с
выбранного места.
Нажмите [ALBUM/TRACK], чтобы выбрать альбом
или композицию, а затем поверните [MULTI
CONTROL] для поиска.
Нажмите [1/;], чтобы начать воспроизведение с
выбранного места.
VQT5F33
7
49
Page 50

Диск
Воспроизведение диска
1
Нажмите [ OPEN/CLOSE] на основном
устройстве, чтобы открыть лоток для дисков.
Вставьте диск этикеткой вверх.
Еще раз нажмите [ OPEN/CLOSE] , чтобы
закрыть лоток для дисков.
2 Нажмите [CD], а затем нажмите [1/;], чтобы
начать воспроизведение.
• Остановка воспроизведения
Нажмите [∫].
• Пауза при воспроизведении
Нажмите [1/;].
Нажмите еще раз, чтобы продолжить
воспроизведение.
• Пропускание альбома
Нажмите [3, 4].
• Пропускание композиции
Нажмите [:] или [9]
(основное устройство: [:/6] или
[5/9]).
• Поиск по композиции
Нажмите и удерживайте [6] или [5]
(основное устройство: [
Просмотр доступной информации
Доступную информацию можно посмотреть на
панели дисплея.
Нажмите [DISPLAY-DIMMER] во время
воспроизведения.
Примечание:
• Максимальное количество отображаемых символов:
приблизительно 32
VQT5F33
• Данная система поддерживает теги ID3 версий 1.0, 1.1 и 2.
• Тек стов ые данные, не поддерживаемые системой,
8
могут отображаться по-другому.
50
:/6
] или [5/9]).
Меню воспроизведения
1 Нажмите [PLAY MENU], чтобы выбрать
“PLAYMODE” или “REPEAT”.
2 Нажмите [2, 1], а затем нажмите [OK], чтобы
выбрать нужный режим.
PLAYMODE
•OFF PLAYMODE
Воспроизведение всех композиций.
• 1-TRACK
Воспроизведение одной выбранной
композиции на диске.
Для выбора композиции нажимайте
буквенно-цифровые кнопки.
• 1-ALBUM
Воспроизведение одного выбранного альбома
на диске.
Нажатием [3, 4] выберите альбом.
• RANDOM
Воспроизведение диска в случайном порядке.
• 1-ALBUM RANDOM
Воспроизведение всех композиций в одном
выбранном альбоме в случайном порядке.
Нажатием [3, 4] выберите альбом.
REPEAT
• ON REPEAT
По
орное воспроизведение.
вт
Появляется значок “`”.
• OFF REPEAT
Отмена повторного воспроизведения.
Примечание:
Настройка возвращается к режиму по умолчанию “OFF
PLAYMODE”, когда открывается лоток для дисков.
Программное воспроизведение
Эта функция позволяет программировать до 24
композиций.
1 Нажмите [PROGRAM] при остановленном
воспроизведении.
Отобразится “PGM” или “PROGRAM”.
2
Для выбора нужной композиции нажимайте
буквенно-цифровые кнопки.
Повторите этот шаг для программирования
других композиций.
1 Нажатием [3, 4] выберите нужный альбом.
2 Нажмите [9], а затем нажимайте
буквенно-цифровые кнопки для выбора
нужной композиции.
3 Нажмите [OK].
Повторите эти шаги для программирования
других композиций.
3 Нажмите [1/;], чтобы начать
воспроизведение.
• Отмена программного воспроизведения
Нажмите [PROGRAM] при остановленном
воспроизведении.
• Проверка содержимого программы
Нажмите [:] или [9], когда отображается
“PGM” при остановленном воспроизведении.
• Удален ие последней композиции
Нажмите [DEL] при остановленном
воспроизведении.
• Удален ие всех запрограммированных
композиций
Нажмите [∫] при остановленном
воспроизведении.
Отобразится “CLR ALL”.
До истечения 5 секунд еще раз нажмите [∫].
Page 51

Примечание:
ILLUMINATION
PLAY
A
B
REC/PLAY
Устройство USB
(не входит в комплект)
Индикатор состояния USB
• Программное воспроизведение невозможно
использовать вместе с функцией “PLAYMODE”.
• Память программы очищается при открывании лотка
для дисков.
Примечание о дисках
• Данная система может воспроизводить диски CD-R/RW
с данными формата CD-DA или MP3.
• Некоторые диски CD-R/RW нельзя воспроизвести из-за
условий записи.
• Файлы MP3 определяются как композиции, а папки
определяются как альбомы.
• Максимальная возможность воспроизведения для
данной системы:
- CD-DA: 99 композиций
- MP3: 999 композиций, 255 альбомов
• Диски должны соответствовать стандарту ISO9660
уровня 1 или 2 (кроме расширенных форматов).
• Записи необязательно будут воспроизводиться в то
же поряд
ке, в котором выполнены.
м
USB и внутренняя память
Вы можете подключить устройство USB и
воспроизводить с него музыкальные композиции.
Кроме того, можно записывать звук или музыкальные
композиции во внутреннюю память в формате “.mp3”.
Данная система может воспроизводить или
записывать до 800 папок (максимум 999 композиций
в альбоме) или в целом 8000 композиций, в
зависимости от доступного объема памяти.
Подключение устройства USB
Подготовка
Прежде чем подключать к данной системе
тр
ойство USB, обязательно выполните резервное
ус
копирование данных.
Не используйте удлинительный кабель USB. Данная
система не может распознать устройство USB,
подключенное с помощью кабеля.
Краткое описание USB
A
PLAY
B
REC/PLAY
•
• Воспроизведение композиций MP3.
•
• Запись/воспроизведение композиций MP3.
Примечание:
Индикатор состояния USB мигает во время записи с
помощью USB.
Примечание:
Индикатор состояния USB загорается в случае выбора
устройства.
РУССКИЙ
Уменьшите громкость и подключите устройство
USB к порту USB.
Придерживайте основное устройство во время
подключения или отключения устройства USB.
VQT5F33
9
51
Page 52

Запись на устройство USB или во
Записываемый альбом
Процент процесса записи
внутреннюю память
Panasonic не несет ответственности за действия
потребителей в случае записи материалов,
защищенных авторским правом, которые могут
привести к нарушению авторских прав.
Примечание:
• Все записи выполняются в формате “.mp3”.
• Выполнение записи во время использования режима
воспроизведения в случайном порядке невозможно.
• Режим повторного воспроизведения во время записи
отключается.
• При каждом выполнении записи добавляется новый
альбом.
• Последовательность альбомов может измениться
после записи.
• Записи хранятся в папке под названием “REC_DATA” на
устройстве USB или во внутренней памяти.
исанные
• Зап
следующем порядке.
- Записанные композиции с аудио компакт-диска,
радио или внешнего входа (сортируются по записи).
- Записанные композиции mp3 с компакт-диска или
устройства USB (сортируются по алфавиту).
композиции автоматически сортируются в
Основные операции записи
1 Выберите источник, с которого хотите
выполнить запись.
Внешнее оборудование
Подключите оборудование и выполните
воспроизведение (> “Использование
дополнительного входа”).
2 Нажмите [MEMORY REC ¥/;] или
[USB REC ¥/;], чтобы начать запись.
Отобразится название папки для хранения
записи.
• Остановка записи
Нажмите [∫]. Отобразится “WRITING”.
• Пауза во время записи
Во время записи нажмите [MEMORY REC ¥/;]
или [USB REC ¥/;].
Нажмите еще раз, чтобы продолжить запись.
Примечание:
Вы можете сделать паузу во время записи с радио
или
AUX (кроме использования в режиме
SYNCHRO). При каждой паузе добавляется метка
композиции (
Примечание:
• Прежде чем начинать запись, подождите несколько
секунд, чтобы система могла подготовить устройство
USB.
• Индикатор состояния USB мигает во время записи с
помощью USB.
> “Добавление меток композиций”).
Запись композиций MP3
Композиции MP3 можно записывать с:
• диска MP3 на или во внутреннюю память;
• на или во внутреннюю память;
• во внутреннюю память или наоборот.
1 Подготовьте источник, с которого хотите
выполнить запись.
• Запись всех композиций
Выберите “OFF PLAYMODE” (>“Меню воспроизведения”).
• Запись запрограммированных композиций
Запрограммируйте нужные композиции
(
>
“Программное воспроизведение”).
• Запись определенного альбома или композиции
Выберите “1-ALBUM” или “1-TRACK” (> “Меню
воспроизведения”).
2 Нажмите [MEMORY REC ¥/;] или
[USB REC ¥/;], чтобы начать запись.
Пример: запись альбома с устройства USB во
внутреннюю память.
Подготовьте режим воспроизведения диска.
• Запись всех композиций
Выберите “OFF PLAYMODE” (> “Меню
воспроизведения”).
• Запись запрограммированных композиций
Запрограммируйте нужные композиции
(> “Программное воспроизведение”).
• Запись одной композиции
Выберите “1-TRACK” (> “Меню
VQT5F33
10
воспроизведения”).
Убедитесь, что диск остановлен.
Радио
52
Выполните настройку радиостанции.
• Остановка записи
Нажмите [∫].
Запись останавливается на последней полностью
записанной композиции в альбоме.
Например, если остановить запись во время четвертой
композиции, запишутся только первые три композиции.
Если не записана ни одна композиция, отображается “NO
FILE RECORDED”.
Примечание:
• Для записи некоторых композиций может потребоваться
более длительное время.
• Некоторые композиции невозможно записать из-за
состояния источника.
• Название записанной папки может отличаться от названия
исходной папки из-за функции автоматического переименования.
Page 53

Основные операции воспроизведения
1 Нажмите [ , MEMORY] (основное устройство:
[ /MEMORY]), чтобы выбрать “MEMORY”.
2
Нажмите [1/;], чтобы начать воспроизведение.
1 Нажмите [USB], чтобы выбрать “USB B” или
“USB A”.
2
Нажмите [1/;], чтобы начать воспроизведение.
• Остановка воспроизведения
Нажмите [∫]. “Отобразится “RESUME”.
Нажмите [1/;], чтобы продолжить
воспроизведение.
ИЛИ
Нажмите [∫] дважды, чтобы полностью
остановить воспроизведение.
Информацию о других операциях см. в разделе
“Диск”.
Просмотр доступной информации
Доступную информацию можно посмотреть на
панели дисплея.
Нажмите [DISPLAY-DIMMER].
• При остановленном воспроизведении
Доступный объем памяти или оставшееся время
записи для внутренней памяти или устройства
USB в .
• Во время записи
Информация, которая касается записи.
• Во время воспроизведения или паузы
Информация о текущей композиции.
Поиск записей
С помощью функции поиска записей можно найти
нужную композицию во внутренней памяти.
1 Нажмите [TITLE SEARCH].
“” мигает.
2
Нажимайте буквенно-цифровые кнопки или
3,4
] для выбора нужного символа, а затем
[
нажмите [
Чтобы удалить символ, нажмите [DEL].
1
] для выбора следующего символа.
3 Нажмите [OK].
Нажмите [2, 1] для поиска предыдущего или
следующего результата поиска.
Если поиск не дал результатов, нажмите “NOT
FOUND”.
4 Нажмите [OK] для подтверждения и
воспроизведите композицию.
Для отмены нажмите [TITLE SEARCH].
Примечание:
• Эта функция пропускает композиции, созданные с
помощью основных операций записи (> “Основные
операции записи”).
• Эта функция не работает во время воспроизведения в
случайном порядке или программного воспроизведения.
• При вводе символов регистр не учитывается.
• Для композиций с одинаковым названием
отображается одинаковая информация на дисплее.
Список воспроизведения
Во внутренней памяти можно хранить до 6 списков
воспроизведения. Каждый список воспроизведения
может содержать до 99 композиций.
Добавление композиций к списку воспроизведения
1 Выберите композицию, которую хотите
добавить к списку воспроизведения.
2 Нажмите [PLAY LIST].
3 Нажмите и удерживайте одну из
буквенно-цифровых кнопок (с 1 по 6) для
добавления композиции к соответствующему
списку воспроизведения.
Либо нажмите и удерживайте одну из кнопок [1] до [6]
на основном устройстве, чтобы добавить композицию
к соответствующему списку воспроизведения.
Повторите шаги с 1 по 3, чтобы добавить другие
композиции.
Прослушивание списка воспроизведения
1 Нажмите [PLAY LIST], а затем одну из
буквенно-цифровых кнопок (с 1 по 6) для
выбора списка воспроизведения.
Либо нажмите одну из кнопок [1] до [6] на основном
устройстве, чтобы выбрать список воспроизведения.
2
Нажмите [1/;], чтобы начать воспроизведение.
• Отмена воспроизведения списка
воспроизведения
Дважды нажмите [PLAY LIST].
ИЛИ
Нажмите выбранную кнопку [1] до [6] на
основном устройстве.
• Просмотр содержания списка воспроизведения
Нажмите [:] или [9] при остановленном
воспроизведении.
ИЛИ
Поверните [MULTI CONTROL] при
остановленном воспроизведении.
• Уд але ние одной композиции
При остановленном воспроизведении нажмите
:
] или [9], чтобы выбрать композицию,
[
которую хотите удалить, а затем нажмите [DEL].
Отобразится “DELETE?”.
До истечения 5 секунд нажмите [OK].
• Уд але ние всех композиций из списка
воспроизведения
При остановленном воспроизведении нажмите [∫].
Отобразится “CLEAR?”.
До истечения 5 секунд нажмите [OK].
РУССКИЙ
VQT5F33
11
53
Page 54

Расширенные функции записи
Высокоскоростная запись
Скорость записи:
CD, CD-R: до трех раз (3x) выше обычной скорости.
CD-RW: до двух раз (2x) выше обычной скорости.
1 Вставьте диск, с которого хотите выполнить
запись.
2 Нажмите [CD].
3 Одновременно нажмите [CD HI-SPEED REC] и
[USB REC ¥/;] или [MEMORY REC ¥/;],
чтобы начать запись.
Примечание:
• Если высокоскоростная запись невозможна из-за
состояния диска, записывайте содержимое
компакт-диска (CD) на обычной скорости.
• Во время высокоскоростной записи звук отключается.
Добавление меток композиций
При записи с радио или внешнего оборудования можно
разделить композиции с использованием различных режимов.
До записи
Нажмите [REC MODE], чтобы выбрать нужную настройку.
• MANUAL
Добавление метки композиции вручную.
Нажмите [OK] во время записи, чтобы добавить
метку композиции.
• TIME MARK
Композиции автоматически разделяются с
5-минутным интервалом.
• SYNCHRO
(Для источника AUX)
Запись начинается автоматически, когда начинается
воспроизведение на другом оборудовании.
Запись приостанавливается, когда определяется
VQT5F33
отсутствие звука в течение 3 секунд.
Примечание:
12
• Если во время записи нажать [OK] или приостановить запись во время
использования режима TIME MARK, 5-минутный счетчик сбрасывается.
54
• Метки композиций нельзя добавить вручную в режиме SYNCHRO.
Уда лен ие записанных композиций
1
Нажмите [, MEMORY] (основное устройство: [ /MEMORY]),
чтобы выбрать “MEMORY”.
Нажмите [USB] (основное устройство: [USB/CD]),
чтобы выбрать “USB B”.
2 Нажатием [3, 4] выберите нужный альбом.
3 Нажмите [:] или [9], чтобы выбрать
нужную композицию.
4
Нажмите [EDIT MODE], чтобы выбрать нужный режим.
• TRACK DEL
Удален ие одной композиции.
• ALBUM DEL
Удален ие одного альбома (максимум
999 композиций).
•FORMAT
Форматирование устройства USB.
•ALL DEL
Удаление всех альбомов из внутренней памяти.
5 Нажмите [OK].
Отобразится выбранный для удаления элемент.
6 Нажмите [OK].
Отобразится “SURE? NO”.
7 Нажмите кнопку [2, 1], чтобы выбрать “YES”
или “NO”, а затем нажмите [OK].
Выберите “YES”, чтобы подтвердить удаление.
Отобразится “WRITING”.
Примечание о USB
Совместимые устройства USB, относящиеся к
классу запоминающих устройств большой емкости:
• Устройства USB, поддерживающие передачу только массивов данных.
• Устройства USB, поддерживающие полную скорость USB 2.0.
Примечание:
• Папки определяются как альбомы.
• Файлы определяются как композиции.
• Композиции должны иметь расширение “.mp3” или “.MP3”.
• Стандарт CBI (Control/Bulk/Interrupt — передача
управления/передача массивов/прерывания) не поддерживается.
• Файловая система NTFS не поддерживается (поддерживается
только файловая система FAT 12/16/ 32).
• Работа с определенным файлами может оказаться
невозможной из-за размера сектора.
Радио
Ручная настройка
1
Нажмите [RADIO/EXT-IN], чтобы выбрать “FM”
или “AM”.
2 Нажимайте [6] или [5], чтобы выбрать
частоту нужной станции.
Для автоматической настройки нажмите и
удерживайте, пока частота не начнет быстро
меняться.
“STEREO” отображается во время приема
стереотрансляции.
Использование основного устройства
1 Нажмите [RADIO/EXT-IN], чтобы выбрать “FM”
или “AM”.
2 Нажмите [TUNE MODE] для выбора “MANUAL”.
3 Нажимайте [:/6] или [5/9], чтобы
выбрать частоту нужной станции.
Улу ч ш ени е качества звука
При выборе “FM”
1 Нажмите [PLAY MENU] для выбора “FM
MODE”.
2 Нажмите [2, 1], чтобы выбрать “MONO”, а
затем нажмите [OK].
Для отмены выберите “STEREO”.
“MONO” также отменяется при изменении
частоты.
При выборе “AM”
1 Нажмите [PLAY MENU] для выбора
“BEATPROOF”.
2 Нажатием [2, 1] выберите один из вариантов
“BP 1” до “BP 4” с наилучшим приемом, а
затем нажмите [OK].
Page 55

Предварительная настройка памяти
Вы можете предварительно настроить 30 станций в
диапазоне FM и 15 станций в диапазоне AM.
Автоматическая предварительная настройка
1 Нажмите [OK], чтобы выбрать частоту
“LOWEST” или “CURRENT”.
2 Нажмите [PLAY MENU], чтобы выбрать
“A.PRESET”, а затем нажмите [OK].
Отобразится “START?”.
3 Нажмите [OK], чтобы начать
предварительную настройку.
Для отмены нажмите [∫].
Ручная предварительная настройка
1 Нажимайте [6] или [5], чтобы настроить
станцию.
2 Нажмите [PROGRAM].
3 Для выбора заранее заданного номера
нажимайте буквенно-цифровые кнопки.
Повторите шаги с 1 по 3, чтобы предварительно
настроить другие станции.
Новая станция заменяет любую станцию, которая
занимает тот же заранее заданный номер.
Выбор предварительно настроенной станции
Для выбора предварительно настроенной
станции нажимайте буквенно-цифровые кнопки,
[:] или [9].
Использование основного устройства
1 Нажмите [TUNE MODE] для выбора “PRESET”.
2 Нажатием [:/6] или [5/9] выберите
предварительно настроенную станцию.
Настройка распределения
диапазона AM
Толь ко с помощью основного устройства
Данная система также может принимать передачи в
диапазоне AM, распределенном с шагом 10 кГц.
1 Нажмите [RADIO/EXT-IN], чтобы выбрать “FM”
или “AM”.
2 Нажмите и удерживайте [RADIO/EXT-IN].
Через несколько секунд на дисплее отобразится
текущая минимальная радиочастота. Отпустите
кнопку, когда минимальная частота изменится.
• Чтобы вернуться к исходной настройке, повторите
перечисленные выше шаги.
• После изменения настройки предварительно
заданные частоты стираются.
Bluetooth
Вы можете подключить аудиоустройство и выполнять
с него воспроизведение по беспроводной связи через
Bluetooth
• Подробную информацию см. в инструкции по
эксплуатации устройства Bluetooth
• Если вы собираетесь использовать устройство
Bluetooth
Communication), перейдите к разделу “Соединение
одним касанием (соединение по NFC)”.
• Прежде чем подключать устройство Bluetooth
уменьшите громкость.
®
®
.
®
с поддержкой NFC (Near Field
®
.
®
,
Парное соединение устройства
Подготовка
• Включите функцию Bluetooth
расположите его рядом с данным устройством.
®
устройства и
1 Нажмите и удерживайте
[ /MEMORY,-PAIRING] на основном
устройстве.
2 Выберите “SC-MAX770” из меню Bluetooth
подключаемого устройства.
®
Уст рой ств о автоматически подключится к данной
системе после выполнения парного соединения.
3 Начните воспроизведение на устройстве
Bluetooth
Информацию о других операциях на основном
устройстве см. в разделе “Воспроизведение диска”.
Примечание:
• Операции также можно выполнять с помощью пульта
дистанционного управления.
1 Нажмите [ , MEMORY] для выбора “BLUETOOTH”.
2 Нажмите [PLAY MENU] для выбора “PAIRING”.
3 Нажмите [2, 1], чтобы выбрать “OK? YES”, а затем
нажмите [OK].
4 Выберите “SC-MAX770” из меню Bluetooth
подключаемого устройства.
• Если запрашивается пароль, введите “0000”.
• Для подключения устройства должно быть выполнено
парное соединение.
• На данном устройстве можно зарегистрировать до 8
устройств. Если выполняется парное соединение с 9-м
устройством, устройство, которое не использовалось
дольше всего, заменяется.
• Данная система может подключиться только к одному
устройству за раз.
• В случае выбора “BLUETOOTH” в качестве источника данная
система автоматически выполняет попытку соединения с
устройством, которое подключалось последним.
®
.
®
РУССКИЙ
VQT5F33
13
55
Page 56

Соединение одним касанием
Устр ойство Bluetooth
®
(соединение по NFC)
Только для AndroidTM-совместимых устройств
Простым прикосновением устройства Bluetooth
поддержкой NFC (Near Field Communication) к
данному устройству можно выполнить все
подготовительные действия, от регистрации
устройства Bluetooth
®
до установления соединения.
Подготовка
• Включите функцию NFC подключаемого устройства.
• Для устройства Android более ранней версии, чем
4.1, требуется установка приложения “Panasonic
MAX Juke” (бесплатно).
1 Введите “Panasonic MAX Juke” в поле поиска
Google Play
выберите “Panasonic MAX Juke”.
2 Запустите приложение “Panasonic MAX Juke” на
подключаемом устройстве.
-Следуйте указаниям на экране своего устройства.
-Всегда используйте последнюю версию
приложения.
TM
для выполнения поиска, а затем
1 Нажмите [ , MEMORY] (основное устройство:
[ /MEMORY,-PAIRING]), чтобы выбрать
“BLUETOOTH”.
2 Коснитесь и удерживайте свое устройство на
участке касания NFC данного устройства [].
• После выполнения регистрации и подключения
устройства Bluetooth
название подключенного устройства. Отдалите
VQT5F33
устройство от данного устройства.
• Если соединение не установилось даже после
14
прикосновения вашим устройством к участку
касания NFC, измените положение касания.
56
®
на дисплее отображается
3 Начните воспроизведение на устройстве
Bluetooth
®
.
Примечание:
• Если прикоснуться другим устройством к данному
®
с
устройству, можно обновить соединение Bluetooth
подключенное устройство будет отключено автоматически.
• Если изображение и звук не воспроизводятся синхронно,
повторно запустите приложение, используемое для
воспроизведения. Если проблема не устраняется,
подключите устройство Bluetooth
помощью аудиокабеля (не входит в комплект).
• При установленном подключении воспроизведение
может начаться автоматически. Это зависит от типа
используемого устройства.
• Соединение одним касанием может не работать
надлежащим образом в зависимости от типа
используемого устройства.
®
и данное устройство с
Режим ожидания Bluetooth
Если включить эту функцию, основное устройство
будет автоматически включаться, даже если
выключено, в случае отправки устройством
®
Bluetooth
запроса соединения.
1 Нажмите [ , MEMORY] (основное устройство:
[ /MEMORY,-PAIRING]), чтобы выбрать
“BLUETOOTH”.
2 Нажмите [PLAY MENU] для выбора “STANDBY
MODE”.
3 Нажмите кнопку [2, 1], чтобы выбрать “ON
STANDBY MODE” или “OFF STANDBY MODE”, а
затем нажмите [OK].
Просмотр доступной информации
На панели дисплея можно посмотреть следующую
информацию:
• Название подключенного устройства (максимум
16 символов).
• Используемый профиль Bluetooth
Нажмите [DISPLAY-DIMMER].
Режим соединения
Можно менять скорость передачи, отдавая приоритет
качеству передачи или качеству звука.
®
. Ранее
Подготовка
Если данная система подключена к устройству
®
Bluetooth
, отключите ее (> “Отключение
устройства”).
1 Нажмите [PLAY MENU] для выбора “LINK
MODE”.
2 Нажмите кнопку [2, 1], чтобы выбрать
“MODE 1” или “MODE 2”, а затем нажмите [OK].
•MODE 1
®
Приоритетный выбор надежности соединения.
•MODE 2
Приоритетный выбор качества звука.
Примечание:
Настройка по умолчанию: “MODE 2”.
Отключение устройства
1 Нажмите [PLAY MENU] несколько раз, чтобы
выбрать “DISCONNECT?”.
2 Нажмите [2, 1], чтобы выбрать “OK? YES”, а
затем нажмите [OK].
Примечание:
Устройство отключается, если вы:
• Выбираете другой источник.
• Перемещаете подключенное устройство за пределы
максимального расстояния.
• Отключаете передачу Bluetooth
устройства.
• Выключаете систему или подключенное устройство.
®
.
®
подключенного
Page 57

Часы и таймеры
Настройка часов
Это 24-часовые часы.
1
Нажмите [CLOCK/TIMER] для выбора “CLOCK”.
2 В течение 20 секунд нажмите кнопку [3, 4],
чтобы установить время.
3 Нажмите [OK].
Нажмите [CLOCK/TIMER], чтобы отобразить часы в
течение нескольких секунд.
Примечание:
• Регуля рно проверяйте правильность установки часов.
• В случае отключения электропитания или извлечения
сетевого шнура питания настройки часов сбрасываются.
Таймер воспроизведения и записи
Кроме источника Bluetooth
Таймер можно установить на срабатывание в
определенное время, чтобы:
• Разбудить вас (таймер воспроизведения).
• Выполнить запись с радио или внешнего
оборудования (таймер записи).
Одновременное использование таймера
воспроизведения и таймера записи невозможно.
Подготовка
Установите часы.
®
1 Нажмите [CLOCK/TIMER], чтобы выбрать
“PLAY” или “REC”.
2 До истечения 10 секунд нажмите [3, 4],
чтобы установить время начала.
3 Нажмите [OK].
4 Повторите шаги с 2 по 3, чтобы установить
время окончания.
5 Нажатием [3, 4] выберите нужный источник
для воспроизведения или записи, а затем
нажмите [OK].
6 Для таймера записи
Нажатием [3, 4] выберите “MEMORY” или
“USB B” для хранения записи, а затем
нажмите [OK].
Для запуска таймера
1 Подготовьте аудиоисточник.
• Таймер воспроизведения
Подготовьте музыкальный источник для прослушивания
(диск, USB, внутреннюю память, радио или внешнее
оборудование) и установите громкость.
• Таймер записи
Подключите устройство USB к (для
записи на USB) и настройтесь на радиостанцию
или выберите внешнее оборудование.
2 Нажмите [PLAY/REC ], чтобы выбрать
“PLAY ON” или “REC ON”.
Отобразится “PLAY ON” или “ REC ON”.
Для отмены нажмите [PLAY/REC ] и выберите
“TIMER OFF”.
Чтобы таймер сработал, система должна быть
выключена.
Для проверки настроек
Нажмите [CLOCK/TIMER], чтобы выбрать
“PLAY” или “REC”.
Примечание:
• Таймер воспроизведения запускается на низкой
громкости и постепенно повышает громкость звука до
заданного уровня.
• Таймер записи запускается за 30 секунд до
установленного времени с отключенным звуком.
• Таймер срабатывает в заданное время каждый день,
если включен.
Таймер перехода в режим сна
Таймер перехода в режим сна выключает систему
через заданное время.
Нажмите [SLEEP-AUTO OFF], чтобы выбрать
настройку (в минутах).
Для отмены выберите “OFF”.
30 MIN>60 MIN>90 MIN>120 MIN>OFF
^=================n
Примечание:
• Таймер воспроизведения и таймер перехода в режим
сна или таймер записи и таймер перехода в режим сна
можно использовать одновременно.
• Приоритетным всегда является таймер перехода в режим
сна. Следите за тем, чтобы не произошло частичное
наложение времени при установке таймеров.
Звук и подсветка
Настройка звукового эффекта
Вы можете настроить звуковой эффект.
1 Нажмите [SOUND] для выбора звукового
эффекта.
2 Нажмите [2, 1], чтобы выбрать нужную
настройку.
• BASS/MID/TREBLE
От -4 до +4
• SURROUND
“ON SURROUND” или “OFF SURROUND”
• INPUT LEVEL
(Для AUX IN 4)
“NORMAL” или “HIGH”
Примечание:
Выберите “NORMAL”, если звук искажается во
время использования уровня “HIGH” входного
сигнала.
• SUPER WOOFER
“SW1”, “SW2”, “SW3” или “OFF”
• D.BASS
“D.BASS ON”, “D.BASS BEAT” или “D.BASS
OFF”
Предварительная настройка эквалайзера
Нажмите [PRESET EQ]
[ PRESET EQ
предварительную настройку.
(основное устройство:
]),
чтобы выбрать нужную
РУССКИЙ
VQT5F33
15
57
Page 58

Использование основного устройства
Определенные звуковые эффекты можно настроить
с помощью элементов управления на основном
устройстве.
1 Нажмите кнопку для выбора звукового
эффекта.
•PRESET EQ
Нажмите [PRESET EQ] (основное устройство:
[ PRESET EQ])
• BASS/MID/TREBLE
Нажмите [MANUAL EQ]
• D.BASS
Нажмите [D.BASS,-SUPER WOOFER]
• SUPER WOOFER
Нажмите и удерживайте
[D.BASS,-SUPER WOOFER]
2 Поверните [MULTI CONTROL], чтобы выбрать
нужную настройку.
Эффекты подсветки
Толь ко с помощью основного устройства
Вы можете изменить схему или цвет подсветки на
данной системе.
Поверните [ILLUMINATION] для выбора схемы
или цвета.
•PATTERN
Подсветка со схемой в нескольких цветах.
• COLOR
Подсветка в одном цвете.
•OFF
Примечание:
Чтобы обеспечить правильное отображение эффектов
подсветки, соответствующим образом разместите
VQT5F33
колонки, как указано в разделе “Размещение колонок”.
16
58
Диджейские функции
Диджейские функции включают следующие:
- Диджейский автомат
- Диджейский сэмплер
- Диджейские эффекты
С помощью этих функций можно добавлять
различные эффекты к композициям во время
воспроизведения.
Если вы используете приложение “Panasonic
MAX Juke”
Установив приложение “Panasonic MAX Juke”
(бесплатно) на свое устройство Android, вы сможете
использовать больше различных функций.
Загрузите приложение “Panasonic MAX Juke” на
свое устройство Android. Введите “Panasonic MAX
Juke” в поле поиска Google Play для выполнения
поиска, а затем выберите “Panasonic MAX Juke”.
Примечание:
Во время записи диджейские функции отменяются.
Диджейский автомат
Этот режим позволяет добавить эффект перекрестного
затухания или совмещение звукового фрагмента к
интервалам между воспроизводимыми композициями.
Эта функция работает при воспроизведении
композиций, которые хранятся на устройстве USB
или во внутренней памяти.
1
, ,
Нажмите [DJ JUKEBOX] на основном устройстве.
• Настройка устройств автоматически
переключает режим повтора.
•(Только при остановленном воспроизведении)
Настройку повтора можно изменить на нужную,
поворачивая [MULTI CONTROL] на основном
устройстве.
-RANDOM REPEAT
Воспроизведение всех композиций в случайном
порядке.
-ALL TITLE REPEAT
Повтор всех композиций.
• Когда на дисплее отображается “WAITING
REQUEST”, можно перейти к следующему шагу,
если не используется приложение “Panasonic
MAX Juke”.
2 Нажимайте кнопки [1] до [6] на основном
устройстве, чтобы выбрать нужную функцию.
•[1]
Перекрестное затухание: громкость
воспроизведения композиции постепенно
уменьшается, а громкость следующей
композиции увеличивается.
•[2] до [6]
Совмещение звукового фрагмента:
эффекта к интервалам между воспроизводимыми
композициями добавляется звуковой фрагмент.
Для отмены повторно нажмите кнопку.
Для отмены функции диджейского автомата
Нажмите [DJ JUKEBOX] на основном устройстве.
Примечание:
• Для включения или выключения функции диджейского
автомата с помощью пульта дистанционного
управления
1 Нажмите [PLAY MENU] для выбора “JUKEBOX”.
2 Нажмите кнопку [2,1], чтобы выбрать “ON JUKEBOX”
или “OFF JUKEBOX”, а затем нажмите [OK].
• Для изменения настройки повтора на нужную с
помощью пульта дистанционного управления
1 Дважды нажмите [PLAY MENU] для выбора
“PLAYMODE”.
2 Нажмите [2, 1] для выбора нужного режима, а
затем нажмите [OK].
Если вы используете приложение “Panasonic MAX Juke”
С помощью этого приложения можно вызвать из памяти
композиции, которые нужно воспроизвести.
• Когда на дисплее отображается “MAKING LIST”,
можно вызвать из памяти часть композиций.
• Когда на дисплее отображается “WAITING REQUEST”,
с
помощью этого приложения можно вызвать из
памяти композиции, которые нужно воспроизвести.
с помощью этого
Page 59

Диджейский сэмплер
Только с помощью основного устройства
Поворачивая [MULTI CONTROL], можно добавить царапающий
звук или звуковой фрагмент к воспроизводимой композиции.
1 Нажмите [DJ SAMPLER].
2 Нажмите одну из кнопок [1] до [6] для выбора
нужного звука.
3 Поверните [MULTI CONTROL].
Для отмены функции диджейского сэмплера
Нажмите [DJ SAMPLER].
Если вы используете приложение “Panasonic MAX Juke”
• С помощью этого приложения можно изменить звуковой фрагмент.
(Чтобы вернуть все звуковые фрагменты к заводским
настройкам, нажмите и удерживайте [DJ SAMPLER],
когда функция диджейского сэмплера выключена.)
Диджейские эффекты
Только с помощью основного устройства
Вы можете использовать функцию диджейских
эффектов для добавления звуковых эффектов.
1 Нажмите [DJ EFFECT-KARAOKE].
2 Нажмите одну из кнопок [1] до [6] для выбора
нужного диджейского эффекта.
•[1]
PHASER
Добавление к звуку объемности и размаха.
•[2]
FILTER
Усиление или фильтрация определенных
диапазонов звука.
•[3]
SOUND CHOPPER
Периодическое прерывание звука.
•[4]
ELECTRO ECHO
Добавление к звуку цифрового эха.
•[5]
PITCH SHIFTER
Настройка тональностей звука.
•[6]
HARMONIZER
Добавление нот к звуку для создания гармонии.
Для отмены повторно нажмите кнопку.
3 Поверните [MULTI CONTROL], чтобы выбрать
нужную настройку.
Для отмены диджейского эффекта
Нажмите [DJ EFFECT-KARAOKE].
KARAOKE
Толь ко с помощью основного устройства
1 Нажмите и удерживайте
[DJ EFFECT-KARAOKE].
Кнопка [DJ EFFECT-KARAOKE] загорается синим
цветом.
2 Нажмите одну из кнопок [1] до [3] для выбора
нужного эффекта KARAOKE.
[1]
Отмена вокала
“VOCAL CANCEL”, “L”, “R”, “L+R” или “OFF”
[2]
Эхо
“ECHO 1”, “ECHO 2”, “ECHO 3” или “OFF”
[3]
Управление тональностью
Поверните вертушку для выбора “-6” до “+6”.
Для отмены KARAOKE
Нажмите и удерживайте [DJ EFFECT-KARAOKE].
Использование микрофона
Подготовка
Перед подключением или отключением микрофона
уменьшите громкость звука системы до
минимального уровня.
1 Подключите микрофон (не входит в комплект)
к гнезду для микрофона.
Тип штекера: ‰ 6,3 мм, монофонический
2
Поверните [MIC VOL, MIN/MAX] на основном устройстве
для настройки громкости звука микрофона.
3 Если вы хотите петь с музыкальным
сопровождением.
Воспроизведите музыкальный источник и
настройте громкость звука системы.
Примечание:
• Если раздается странный шум (подвывания), отдалите
микрофон от колонок или уменьшите громкость звука
микрофона.
• Когда микрофон не используется, отключите его от
гнезда для микрофона и уменьшите громкость звука
микрофона до “MIN”.
• Данная система не может выполнять запись с
микрофона.
Использование дополнительного
входа
До подключения
• Отключите сетевой шнур.
• Выключите всю аппаратуру и изучите
соответствующие инструкции по эксплуатации.
Примечание:
Компоненты и кабели продаются отдельно.
Для подключения к портативной
аудиоаппаратуре и т. п.
Вы можете воспроизводить музыку с портативной
аудиоаппаратуры.
Подготовка
Выключите эквалайзер (если имеется) портативной
аудиоаппаратуры, чтобы избежать искажения звука.
Перед подключением или отключением портативной
аудиоаппаратуры уменьшите громкость звука
системы и портативной аудиоаппаратуры.
1 Подключите портативную аудиоаппаратуру к
AUX IN 4.
Тип штекера: ‰ 3,5 мм, стереофонический (не
входит в комплект)
2 Нажмите [RADIO/EXT-IN] для выбора “AUX 4”.
3 Выполните воспроизведение на портативной
аудиоаппаратуре.
РУССКИЙ
VQT5F33
17
59
Page 60

Для подключения видеомагнитофона,
DVD-плейер (не входит в
комплект)
Аудиокабель
(не входит в комплект)
Задняя панель основного устройства
DVD-плейера и т. п.
Вы можете подключить видеомагнитофон,
DVD-плейер и т. п. и слушать звук через данную
систему.
1 Подключите внешнюю аппаратуру.
2 Нажмите [RADIO/EXT-IN] для выбора “AUX”.
3 Выполните воспроизведение на внешней
аппаратуре.
Примечание:
• Если вы хотите подключить аппаратуру, отличную от
описанной, обратитесь в пункт продажи
аудиоаппаратуры.
• В случае использования адаптера может произойти
искажение звука.
VQT5F33
18
60
Поиск и устранение неполадок
Перед обращением к специалисту по техобслуживанию
выполните следующие проверки.
Если вы не уверены в отношении каких-либо пунктов проверки
или если приведенные рекомендации не помогли разрешить
проблему, обратитесь за указаниями к консультанту пункта
продажи.
Общие проблемы
Уст рой ство не работает.
• Возможно, сработало одно из предохранительных устройств
аппарата.
Восстановите исходное состояние аппарата следующим
образом:
1 Нажмите [
2 Нажмите [
Панель дисплея загорается и постоянно
изменяется в режиме ожидания.
• Нажмите и удерживайте [∫] на основном
устройстве для выбора “DEMO OFF”.
Невозможно выполнять операции с помощью
пульта дистанционного управления.
• Проверьте, правильно ли установлен элемент
питания.
Звук искажается или отсутствует.
• Настройте громкость звука системы.
• Выключите систему, определите и устраните причину, а
затем снова включите систему. Причиной может быть
перегрузка колонок из-за чрезмерной громкости или
мощности, а также использование системы при слишком
высокой окружающей температуре.
Во время воспроизведения слышен гудящий звук.
• Рядом с кабелями расположен сетевой шнур или
флуоресцентная лампа. Размести те другие электроприборы
и шнуры на расстоянии от кабелей данной системы.
Í
переключить устройство в режим ожидания.
• Если устройство не переключается в режим ожидания,
его. Если устройство по-прежнему не работает,
обратитесь к консультанту пункта продажи.
/I] на основном устройстве, чтобы
Í
нажимайте [
нескольких секунд. Устройство принудительно
переключится в режим ожидания. Или же отключите
сетевой шнур, подождите одну минуту, а затем снова
его подключите.
/I] на основном устройстве в течение
Í
/I] на основном устройстве, чтобы включить
Уровень звука снижается.
• Сработала цепь защиты из-за непрерывного
использования устройства при высокой громкости
выходного сигнала. Предназначена для защиты
системы и сохранения качества звука.
Диск
Дисплей неправильно отображает данные.
Воспроизведение не начинается.
• Диск вставлен неправильно. Вставьте его
правильно.
• Диск загрязнен. Очистите диск.
• Если диск поцарапан, деформирован или
нестандартного типа, замените ег
икла конденсация. Оставьте систему для
• Возн
высыхания на 1 до 2 часа.
Общее количество композиций отображается
неверно.
Диск не считывается.
Слышен искаженный звук.
• Вставлен диск, который невозможно воспроизвести
на данной системе. Замените его диском,
пригодным для воспроизведения.
• Вставлен нефинализированный диск.
USB
Не удается считать устройство USB или его
содержимое.
• Формат устройства USB или его с
естимы с данной системой.
совм
• Устройства USB емкостью более 32 ГБ могут не
работать в некоторых условиях.
Медленная работа устройства USB.
• Для считывания содержимого большого объема
или устройств USB большой емкости требуется
более длительное время.
о.
одержимое не
Page 61

Радио
Звук искажается.
• Используйте наружную FM-антенну (поставляется
отдельно). Антенну должен устанавливать
квалифицированный технический специалист.
Слышен звук биения.
• Выключите телевизор или отдалите его от системы.
• В режиме приема в диапазоне AM выберите один из
вариантов “BP 1” до “BP 4” с наилучшим приемом.
Во время приема передач в диапазоне AM
слышится тихое гудение.
• Переместите антенну подальше от других кабелей и шнуров.
Bluetooth
Невозможно выполнить парное соединение.
• Проверьте состояние устройства Bluetooth
®
®
.
Невозможно подключить устройство.
• Парное соединение с устройством не удалось.
Еще раз выполните парное соединение.
• Парное соединение с устройством было заменено.
Еще раз выполните парное соединение.
•
Возможно, данная система подключена к другому устройству.
Отключите другое устройство и повторите попытку
парного соединения с подключаемым устройством.
Устройство подключено, но звук не выводится
через систему.
• Для некоторых встроенных устройств Bluetooth® требуется
вручную установить выходной аудиосигнал на “SC-MAX770”.
Подробную информацию см. в инструкции по эксплуатации
подключаемого устройства.
Звук с подключаемого устройства прерывается.
• Устройство находится за пределами 10 м диапазона связи.
Переместите устройство ближе к системе.
• Уд али т е все препятствия между системой и подключаемым
устройством.
• Другие устройства, использующие частотный диапазон
2,4 ГГц (беспроводной маршрутизатор, микроволновые печи,
беспроводные телефоны и т. п.), создают помехи.
Переместите устройство ближе к системе и подальше от
других устройств.
• Выберите “MODE 1” для стабил
Соединение одним касанием (функция NFC) не работает.
ьной свя
зи.
• Убедитесь, что данное устройство и функция NFC
подключаемого устройства включены. (> 14)
Указания на дисплее основного устройства
“USB A NO DEVICE”
“USB B NO DEVICE”
• Ус трой ство USB не подключено. Проверьте
подключение.
“DEVICE FULL”
• Запись невозможно выполнить, потому что
оставшееся время записи для устройства USB
меньше общего времени музыкального источника.
Замените устройством USB с достаточным
временем записи и еще раз выполните запись.
“ERROR”
• Выполнена неверная операция. Прочитайте
инструкции и повторите по
“ERROR”
(во время записи)
пытку.
• Нельзя выбирать другой источник воспроизведения
(например, радио, USB и т. п.) либо нажимать [:]
или [9] во время записи. Остановите функцию
записи.
• Нельзя открывать лоток для дисков во время
записи с источника AM.
“F61”
• Проверьте и правильно выполните подключение
шнуров колонок.
• Отключите устройство USB. Выключите систему, а
м снова ее включите.
те
за
“F70”
• Проверьте устройство Bluetooth
• Отключите устройство Bluetooth
®
.
®
. Выключите
систему, а затем снова ее включите.
“F77”
• Выключите систему, а затем снова ее включите.
“NO PLAY”
“UNSUPPORT”
• Проверьте содержимое. Можно воспроизводить
содержимое только поддерживаемого формата.
• Файлы на устройстве USB могут быть повреждены.
Выполните форматирование устройства USB и
повторите попытку.
• Возможно, возникла проблема в работе устройства.
Выключите устройство, а затем снова включите.
“NO TRACK”
• На уст
ройстве USB ил
и во внутренней памяти
отсутствуют альбомы или композиции.
“PLAYERROR”
• Вы воспроизводите неподдерживаемый файл MP3.
Система пропустит эту композицию и
воспроизведет следующую.
“REMOTE 1”
“REMOTE 2”
• На пульте дистанционного управления и основном
устройстве используются разные коды. Измените
код пульта дистанционного управления.
- Во время отображения “REMOTE 1” нажмите и
удерживайте [OK] и [1] не менее 4 секунд.
- Во время от
ображения “R
EMOTE 2” нажмите и
удерживайте [OK] и [2] не менее 4 секунд.
“TEMP NG”
• Сработала цепь тепловой защиты, и система
выключится. Дайте устройству остыть, прежде чем
включать его снова.
• Убедитесь, что вентиляционное отверстие
устройства ничем не закрыто.
• Обеспечьте хорошую вентиляцию для данного
устройства.
“USB OVER CURRENT ERROR”
• Устройство USB потребляет слишком много
энергии.
Отключите устройство USB, выключите систему, а
затем сн
ова ее вклю
чите.
“VBR”
• Система не может показать оставшееся время
воспроизведения для композиций с переменной
скоростью передачи данных (VBR).
РУССКИЙ
VQT5F33
19
61
Page 62

Сброс памяти системы (инициализация)
Выполните сброс памяти в следующих ситуациях:
• Ус трой ство не реагирует на нажатия кнопок.
• Нужно удалить и сбросить содержимое памяти.
1 Отключите сетевой шнур.
2
Нажав и удерживая кнопку [Í/I] на основном
устройстве, снова подключите шнур электропитания.
Продолжайте нажимать и удерживать кнопку (примерно
10 секунд), пока не отобразится “- - - - - - - -”.
3 Отпустите кнопку [Í/I].
Все настройки возвращаются к заводским.
Необходимо заново установить параметры памяти.
Код пульта ДУ
Если на пульт дистанционного управления данной системы
реагируют другие устройства Panasonic, смените код
пульта дистанционного управления для данной системы.
Подготовка
Нажмите [RADIO/EXT-IN] для выбора входа AUX.
Для установки кода на “REMOTE 2”
1 Нажмите и удерживайте [RADIO/EXT-IN] на
основном устройстве и [2] на пульте
дистанционного управления, пока не
появится “REMOTE 2”.
2 Нажмите и удерживайте [OK] и [2] не менее
4 секунд.
Для установки кода на “REMOTE 1”
1 Нажмите и удерживайте [RADIO/EXT-IN] на
основном устройстве и [1] на пульте
дистанционного управления, пока не
появится “REMOTE 1”.
2
Нажмите и удерживайте [OK] и [1] не менее 4 секунд.
Справочный материал
VQT5F33
Эксплуатация устройства подлежит двум следующим условиям:
(1) Данное устройство не должно причинять вредные помехи и (2)
20
данное устройство должно принимать любые помехи, в том числе те,
которые могут привести к нежелательной эксплуатации.
62
Обновление программного обеспечения
Периодически Panasonic может выпускать
обновленное программное обеспечение для данного
устройства, добавляющее функции или улучшающее
их работу. Эти обновления доступны бесплатно.
Для получения дальнейшей информации посетите
следующий веб-сайт.
http://panasonic.jp/support/global/cs/
(Информация на сайте приведена только на
английском языке.)
Информация о Bluetooth
Компания Panasonic не несет никакой
ответственности за возможную утечку данных и/или
информации во время беспроводной передачи.
Частотный диапазон
• Данная система использует частотный диапазон 2,4 ГГц.
Сертификация
• Данная система соответствует ограничениям
частоты и сертифицирована согласно законам об
использовании радиочастот. Поэтому в разрешении
на беспроводную передачу данных нет
необходимости.
• Следующие действия запрещены законом:
- Разбирание основного устройства или внесение в
него изменений.
- Удаление обозначений технических характеристик.
Ограничения использования
• Не гарантируется беспроводная передача данных
и/или использование со всеми устройствами,
оснащенными Bluetooth
• Все устройства должны соответствовать стандартам,
установленным компанией Bluetooth SIG, Inc.
• В зависимости от технических характеристик и настроек
устройства, подключение может не удаваться или
некоторые операции могут отличаться.
• Данная система поддерживает функции
безопасности Bluetooth
условий эксплуатации и/или настроек такой
степени безопасности может оказаться
недостаточно. Соблюдайте осторожность при
беспроводной передаче данных на эту систему.
• Передача данных с данной системы на устройство
Зона действия
• Используйте данное устройство на максимальном
®
Bluetooth
расстоянии 10 м.
невозможна.
®
®
. Однако в зависимости от
®
.
• Зона действия может сократиться в зависимости от
условий, препятствий или помех.
Помехи от других устройств
• Данная система может не работать надлежащим
образом, а также могут возникать такие проблемы, как
шумы и искажения звука из-за воздействия радиоволн,
если данное устройство находится слишком близк о к
другим устройствам Bluetooth
использующим радиочастотный диапазон 2,4 ГГц.
• Данная система может не работать надлежащим
образом, если радиоволны от ближай шей
радиостанции и т. п. слишком интенсивные.
Использование по назначению
• Данная система предназначена только для
обычного общего использования.
• Не используйте данную систему рядом с
оборудованием или в среде, реагирующей на
радиочастотные помехи (например, в аэропортах,
больницах, лабораториях и т. п.).
®
или к устройствам,
Лицензии
Te xнолoгия кодирования звука MPEG Layer-3 лицензирована
у Fraunhofer IIS и Thomson.
Словесное обозначение и логотипы Bluetooth® принадлежат
компании Bluetooth SIG, Inc. и используются Panasonic
Corporation по лицензии.
Другие торговые марки и наименования принадлежат
соответствующим владельцам.
Google Pla y и Android являются товарными знаками Google Inc.
Утилизация или передача данной системы
Д
я система может сохранять информацию о
анна
пользовательских настройках. Если вы утилизируете
или передаете данную систему, то выполните
процедуру возврата всех настроек к заводским и
удаления пользовательских настроек.
- Как удалить все записанные композиции из
внутренней памяти (см. на стр. 12).
- Как вернуть настройки всех звуковых фрагментов к
заводским (см. на стр. 17).
к сбросить па
- Ка
Примечание:
• Хронология операций может быть записана в
памяти данной системы.
мять системы (см. на стр. 20).
Page 63

Характеристики
Данные об усилителе
Выходная среднеквадратичная мощность
(работает каждый канал)
Высокочастотный 400+400 Вт
— суммарный коэффициент гармоник)
Среднечастотный 400+400 Вт
— суммарный коэффициент гармоник)
Низкочастотный 850+850 Вт
— суммарный коэффициент гармоник)
Общая выходная среднеквадратичная мощность
— суммарный коэффициент гармоник)
Данные о дисках
Воспроизводимые диски
8 см CD, CD-R/RW
12 см CD, CD-R/RW
Чувствительный элемент
Длина волны 790 нм (CD)
Мощность лазера КЛАССА 1
Выходной аудиосигнал (диск)
FL = фронтальный левый канал
FR = фронтальный правый канал
Формат
Данные о приемнике
Частотная модуляция (FM)
Предварительная настройка памяти 30 станций
Частотный диапазон
87,50 МГц до 108,00 МГц (шаг 50 кГц)
Разъемы антенны 75™, несимметричные
Амплитудная модуляция (AM)
Предварительная настройка памяти 15 станций
Частотный диапазон 522 кГц
520 кГц
™, 1 кГц, 30% THD
(3
(3 ™, 1 кГц, 30% THD
(5 ™, 100 Гц, 30% THD
3300 Вт (30% THD
2 канала (FL, FR)
CD-DA, MP3
до
1629 кГц (шаг 9 кГц)
до
1630 кГц (шаг 10 кГц)
Данные о динамиках
Тип 4-канальная система с 4 динамиками
(фазоинверторного типа)
Динамик(-и) колонок
Супервуфер (низкочастотный) 38 см, конического типа
Супервуфер (среднечастотный) 20 см, конического типа
Низкочастотный динамик 10 см, конического типа
Высокочастотный динамик 6см, конического типа
Полное сопротивление
Выходная мощность звукового давления
Частотный диапазон
Данные о Bluetooth
Версия
Выходной сигнал
Диапазон связи
Способ связи
Профиль соответствия
* Потенциальный диапазон связи
Усл о вия измерений: Температура 25 °C/
Измерение в режиме “MODE 1”
При высоких частотах 3™/
25 Гц до 23 кГц (-16 дБ)
®
Потенциальный диапазон связи: около 10 м*
средних частотах 3
низких частотах 5
91 дБ/Вт (1 м)
до
20 кГц (-10 дБ)
30 Гц
Bluetooth® версии 2.1 + EDR
Класс 2 (2,5 мВт)
2,4 ГГц диапазон FH-SS
A2DP/AVRCP/SPP
Высота 1,0 м
Данные о памяти
Объем памяти
Поддержка форматов медиафайлов
Запись в память
Скорость передачи данных 128 кбит/с
Скорость записи в память 1x,
3x макс. (только CD)
Формат файла при записи с CD, MP3, USB
2 ГБ
MP3
MP3 (*.mp3)
Данные о разъемах
Гнездо для микрофона
Порт USB
Монофонического типа, ‰ 6,3 мм (2 Система
Стандарт USB USB 2.0 полноскоростной
Поддержка форматов медиафайлов MP3 (*.mp3)
Файловая система устройств USB
FAT12, FAT16, FAT32
Импортирование на USB
Скорость передачи данных 128 кбит/с
™
/
Скорость записи 1x, 3x макс. (только CD)
™
Формат файла при записи MP3 (*.mp3)
Вход AUX
Разъем Стереофонического типа, гнездо ‰3,5 мм
Стереофонического типа, штекерное гнездо
Общие данные
Питание От 220 В до 240 В перем. тока, 50/60 Гц
SA-MAX770GSK
Энергопотребление
Размеры (Ш x В x Г)
Масса
Около 7,1 кг
SB-MAX770GSK
Размеры (Ш x В x Г)
Включая ножки колонок:
Исключая ножки колонок:
Масса
Около 37,4 кг
Диапазон рабочих температур От
Рабочий диапазон влажности
oт 35% до 80% относительной влажности (без конденсации)
330 Вт
492 мм x 221 мм x 421 мм
576 мм x 794 мм x 542 мм
576 мм x 786 мм x 542 мм
0°C до +40 °C
Энергопотребление в режиме ожидания
0,3 Вт (примерно)
Примечание:
• Технические характеристики могут быть изменены без
предварительного уведомления. Для массы и размеров
указаны приблизительные значения.
• Суммарный коэффициент гармоник измеряется с
помощью цифрового анализатора спектра.
)
РУССКИЙ
VQT5F33
21
63
Page 64

Виконуйте вказані операції за допомогою пульта
ДК. Так само можна використовувати кнопки на
основному апараті, якщо засоби керування такі
самі.
Ваша конкретна система може мати інший вигляд,
аніж наведено на ілюстраціях.
Ця інструкція з експлуатації чинна для наступної
системи.
Система SC-MAX770
Головний блок SA-MAX770
Колонки SB-MAX770
Про описи в даній інструкції з експлуатації
• Заголовки розділів, на які робиться посилання,
позначаються як “> ±±”.
• Якщо не зазначено інше, описано виконання
операцій за допомогою пульта ДК.
Зміст
Заходи безпеки................................................................2
Приладдя, що постачається в комплекті ....................3
Прикріплення підставок динаміків ..............................3
Розташування динаміків................................................4
Обслуговування..............................................................4
Підготовка пульта ДК до використання ...................... 4
Підключення обладнання..............................................5
Огляд елементів управління.........................................6
Диск ...................................................................................8
Пам'ять USB та внутрішня пам'ять.............................. 9
Радio ................................................................................12
Bluetooth
Годинник та таймери ....................................................15
Звук та освітлення ........................................................15
Функції діджея ...............................................................16
Караоке ...........................................................................17
Використання мікрофона ............................................17
Використання додаткового входу .............................17
Пошук і усунення несправностей...............................18
Скидання пам'яті системи (ініціалізація) ..................20
Код пульта ДК ................................................................20
Довідка............................................................................20
VQT5F33
Характеристики .............................................................21
®
.......................................................................13
2
64
Заходи безпеки
ПОПЕРЕДЖЕННЯ!
Пристрій
• Для зниження ризику виникнення пожежі, ураження
електри чним струмом або пошкодження виробу,
- Бережіть пристрій від дощу, вологи, крапель, бризок.
- Не ставте на пристрій речі, наповнені рідиною, наприклад вази.
- Використовуйте лише з рекомендованим додатковим
обладнанням.
- Не знімайте кришку.
- Не ремонтуйте пристрій самостійно. Звертайтеся до
кваліфікованих фахівців.
• Не допускайте потрапляння всередину пристрою
металевих предметів.
УВАГА!
Пристрій
• Для зниження ризику виникнення пожежі, ураження
електри чним струмом або пошкодження виробу,
- Не встановлюйте і не розміщуйте цей пристрій у
обмеженому просторі: на книжкових полицях,
вбудованих шафах та ін. Переконайтеся, що пристрій
добре вентилюється.
- Не загороджуйте вентиляційні отвори газетами,
скатертинами, завісками та подібними предметами.
- Не ставте джерела відкритого полум’я, наприклад,
алені свічки, на апарат.
зап
• Установіт ь цей пристрій на рівній поверхні подалі від
прямого сонячного проміння, а також дії високих
значень температури й вологості та сильних вібрацій.
• Вилка є пристроєм відключення.
Розташовуйте обладнання таким чином, щоб вилку
можна було швидко відключити від електричної
розетки.
• Використання мобільних телефонів поблизу пристрою
же
викликати радіоперешкоди у його роботі. Якщо
мо
трапляються такі радіоперешкоди, збільшіть відстань
між пристроєм і мобільним телефоном.
• У цьому пристрої використовується лазер. Використання
органів керування або регулювання чи виконання процедур
інших, ніж зазначено тут, може призвести до небезпечного
радіоактивного випромінювання.
Акумулятор
• У випадку некоректної заміни елементу живлення існує
ризик вибуху. Використовуйте для заміни лише
рекомендовані типи елементів живлення.
• Щодо утилізації елементів живлення зверніться до
місцевих органів влади або дилера за інформацією
щодо правильного способу утилізації.
• Не нагрівайте їх та не кидайте у вогонь.
• Не залишайте елемент(и) живлення в автомобілі під
мими сонячними променями впродовж тривалого
пря
часу при зачинених дверях та вікнах.
• Не розламуйте елементи живлення та уникайте їхнього
короткого замикання.
• Не заряджайте лужні чи марганцеві елементи живлення.
• Не використовуйте елемент живлення із пошкодженим
покриттям.
• Витягніть елемент живлення, якщо ви не плануєте
використовувати пульт ДК протягом тривалого часу.
Зберігайте його в прохолодному та темному місці.
УВАГА!
• Використовуйте динаміки лише спільно з
рекомендованою системою. В іншому разі
можливе пошкодження підсилювача та
динаміків, що може спричинити пожежу.
• У разі пошкодження або відчутної зміни в
характеристиках роботи пристрою
проконсультуйтеся в уповноваженого фахівця
із технічного обслуговування.
• При під'єднанні динаміків виконуйте операції,
зазначені в чинній інструкції.
• Будьте уважні, якщ
перебувають діти малого та шкільного віку.
• Не складайте динаміки до стоси.
о поряд із об
ладнанням
Page 65

Приладдя, що постачається в
Підставка
динаміка
Захисне
покриття (не
постачається в
комплекті)
комплекті
Перевірте та ідентифікуйте аксесуари, що
постачаються в комплекті.
4x Шнур живлення
(Для Таїланду)
1x Рамкова антена діапазону AM
1x Кімнатна антена діапазону FM
8x Підставка динаміка
1x Батарейка для пульта ДК
1x Пульт ДК
(N2QAYB000915)
Прикріплення підставок динаміків
Для забезпечення стійкості обладнання та для
запобігання пошкодження підлоги слід прикріпити
підставку динаміка до нижньої частини кожного
динаміка.
Підготовка
Помістіть захисне покриття під динаміками, аби
уникнути подряпин.
УВАГА!
Трима йте підставки динаміків недосяжними для
дітей, щоб діти не проковтнули їхні деталі.
УКРАЇНСЬКА
VQT5F33
3
65
Page 66

Розташування динаміків
Високочастотний
динамік
Розташуйте динаміки таким чином, щоб
високочастотний динамік опинився із зовнішнього
боку.
Використовуйте лише динаміки, що входять до
комплекту обладнання.
У разі використання інших динаміків можливе
пошкодження системи та зниження якості звуку.
Примітка:
• Пересування, нахиляння та перенесення динаміків
мають здійснювати кілька людей.
• Для достатньої вентиляції слід забезпечити
мінімальну відстань між динаміками та основним
атом у 10 см.
апар
• Розташуйте динаміки на рівній горизонтальній
поверхні.
• Зазначені динаміки не оснащено магнітним
екрануванням. Не слід розташовувати їх біля
телевізорів, персональних комп'ютерів та іншого
обладнання, що легко намагнічується.
• Програвання аудіо за високих рівнів гучності
упродовж тривалого часу може призвести до
пошкодження динаміків та зниження їхнього ст
би.
служ
• Для уникнення пошкодження в наступних ситуаціях
слід зменшити гучність:
- Якщо звук спотворюється.
- Якщо ви регулюєте якість звуку.
року
Обслуговування
Для очищення даної системи її слід протирати
м’якою сухою тканиною.
• Не використовуйте для чищення спирт, розчинники
або бензин.
• Перед використанням для чищення хімічно
обробленої тканини ознайомтеся з інструкцією, яка
входить до її комплекту.
Підготовка пульта ДК до
використання
Використовуйте лужний або марганцевий елемент
живлення.
Вставте елемент живлення таким чином, щоб полюси
(+ та –) відповідали аналогічним полюсам пульта ДК.
VQT5F33
4
66
Page 67

Підключення обладнання
1a
1b
Стрічка
(не постачається
в комплекті)
До побутової
розетки
змінного струму
Підключайте шнур живлення лише після виконання всіх інших підключень.
1 Підключіть динаміки.
Підключайте кабелі колонок до роз’ємів того самого кольору.
2 Підключення кімнатної антени діапазону FM.
Розташуйте антену в місці з найкращим прийомом.
3 Підключення рамкової антени діапазону AM.
Поставте антену вертикально, щоб вона
встановилася на основі з клацанням.
4 Підключіть шнур живлення.
Не використовуйте інші кабелі змінного струму,
окрім того, що входить до комплекту системи.
Енергозбереження
У режимі очікування система споживає приблизно
0,3 Вт електроенергії. Якщо ви не збираєтеся
використовувати систему, від'єднайте її від
мережі живлення.
Після від'єднання системи від живлення деякі
налаштування буде втрачено. У цьому разі
необхідно буд
е повторно вст
ановити їх.
УКРАЇНСЬК
VQT5F33
5
67
Page 68

Огляд елементів управління
SOUND PRESET EQ
EDIT
MODE
USB
CD HI-SPEED
MEMORY
MODE
DISPLAY
DIMMER
SLEEP
PLAY/
REC
AUTO OFF
ABC
TUV
JKL
P
QRS
GHI
W
XYZ
MNO
DEF
T
I
T
L
E
S
E
A
R
C
H
P
L
A
Y
L
I
S
T
PRESET EQ
VOCAL CANCEL ECHO KEY-CON
MEMORY PLAYLIST / DJ FUNCTION
123
4
DJ JUKEBOX DJ SAMPLER DJ EFFECT
-KARAOKE
56
MANUAL EQ
ALBUM / TRACK
TUNE MODE
/MEMORY
- PAIRING
USB / CD
RADIO/EXT-IN
USB REC MEMORY REC
OPEN CLOSE
MULTI CONTROL
D.BASS
- SUPER WOOFER
LOCAL
ILLUMINATION
PLAY
A
B
REC/PLAY
- VOLUME +
AUX IN4 MIC1 MIC2 MIN MAX MIN MAX
MIC
VOL 1
MIC
VOL 2
Пульт ДК
Вигляд зверху
VQT5F33
6
68
Вигляд спереду
Page 69

1 Перемикач режимів очікування/ввімкнено [Í],
[Í/I]
Натисніть вимикач, щоб переключити апарат з
режиму “ввімкнено” до режиму “Очікування” і
навпаки. Навіть у режимі очікування апарат
споживає невелику кількість електроенергії.
2 Літерно-цифрові кнопки
Вибір 2-значного числа
Приклад: 16: [S10]
Введення символу
Приклад: B: [2]
3 Видалення запрограмованої доріжки
Видалення обраної доріжки зі списку відтворення
4 Вибір аудіоджерела
5 Основні елементи керування відтворенням
6 Вибір звукових ефектів
7 Запуск пошуку за заголовком у внутрішній пам'яті
8 Перегляд відомостей про вміст
Натисніть та утримуйте кнопку: Зменшіть
яскравість панелі дисплея та вимкніть кнопки
функцій діджея, освітлення тощо.
9 Управління операціями запису
: Установлення таймера відтворення аб
запису
; Установлення годинника та таймера
< Установлення таймера сну
Натисніть та утримуйте кнопку: Функція
автоматичного вимкнення вимикає систему, якщо
ви не використовуєте її упродовж 20 хвилин.
(Окрім радіо)
>[2]
>[1]>[6]
о тай
мера
= Установлення функції програмування
> Регулювання гучності системи
? Вимкнення звуку системи
Щоб скасувати вибір, повторно натисніть кнопку.
Параметр “MUTE” так само скасовується у разі
регулювання гучності або
@ Установлення пункту меню відтворення
A
Робота зі списком відтворення у внутрішній пам'яті
B Кнопки вибору та введення
C Установлення режиму редагування для та
внутрішньої пам'яті
D Кнопки безпосереднього доступу до списку
відтворення у внутрішній пам'яті
Натисніть та утримуйте для додавання доріжки до
відповідного списку відтворення.
Натисніть для вибору списку відтворення.
Кнопки безпосереднього доступу до функцій
діджея
Щоб увімкнути функції діджея, натисніть
[DJ JUKEBOX], [DJ SAMPLER] або [DJ
EFFECT-KARAOKE].
Для вибору бажаної фу
[1] до [6] на основному апараті.
Щоб скасувати вибір, повторно натисніть вибрану
кнопку від [1] до [6].
E Увімкнення функцій діджея
Щоб скасувати вибір, повторно натисніть кнопку.
F Діджейські вертушки та багатофункціональне
управління
G Перегляд списку відтворення у внутрішній пам'яті
Перегляд доріжок або альбомів
при вимкненні системи.
нк
ції натискайте кнопки від
H Відчинення й зачинення лотка для дисків
I Датчик пульта ДК
Відстань: приблизно до 7 м
Кут: прибл. 20° вгору та вниз, 30° ліворуч та праворуч
J Панель дисплея
K PLAY
Порт USB ( )
Індикатор стану USB
L REC/PLAY
Порт USB ( )
Індикатор стану USB
M Вибір ефекту освітлення
N Роз’єм AUX IN 4
O Мікрофонне гніздо
P Регулювання гучності мікрофона
Q Зона з'єднання по NFC
R Лоток для дисків
УКРАЇНСЬКА
Щоб переглянути доріжку, поверніть
[MULTI CONTROL].
Щоб розпочати відтворення з вибраного місця,
тисніть [1/;].
на
Натисніть [ALBUM/TRACK] для вибору альбому
або доріжки, після чого поверніть
[MULTI CONTROL] для здійснення перегляду.
Щоб розпочати відтворення з вибраного місця,
натисніть [1/;].
VQT5F33
7
69
Page 70

Диск
Відтворення диска
1 Натисніть [ OPEN/CLOSE] на основному
апараті, щоб відкрити лоток для дисків.
Розмістіть у лотку диск етикеткою догори.
Повторно натисніть [ OPEN/CLOSE], щоб
закрити лоток для дисків.
2 Щоб розпочати відтворення, натисніть [CD],
після чого натисніть [1/;].
• Зупиніть відтворення
Натисніть [∫].
• Пауза у відтворенні
Натисніть [1/;].
Натисніть клавішу знову, щоб відновити відтворення.
• Пропустити альбом
Натисніть [3, 4].
• Пропуск доріжки
Натисніть [:] або [9]
(основний апарат: [
• Пошук в межах доріжки
Натисніть та утримуйте [6] або [5]
(основний апарат: [
:/6
:/6
] або [5/9]).
] або [5/9]).
Перегляд доступних відомостей
Ви можете переглядати доступні відомості на панелі
дисплея.
Натисніть [DISPLAY-DIMMER] протягом
відтворення.
Примітка:
• Максимальна кількість символів, що можуть
відображатися:
приблизно 32
• Ця система підтримує теги ID3 версій 1.0, 1.1 та 2.
VQT5F33
• Тек стов і дані, що не підтримуються системою, можуть
відображатися не так, як очікується.
8
70
Меню відтворення
1 Натисніть [PLAY MENU] для вибору
“PLAYMODE” або “REPEAT”.
2 Для вибору бажаного режиму натисніть
[2, 1], після чого натисніть [OK].
PLAYMODE
•OFF PLAYMODE
Відтворення всіх доріжок.
• 1-TRACK
Відтворення однієї вибраної доріжки з диска.
Виберіть доріжку за допомогою
літерно-цифрових кнопок.
• 1-ALBUM
Відтворення одного вибраного альбому з диска.
Натисніть [
• RANDOM
Відтворення диска у довільному порядку.
• 1-ALBUM RANDOM
Відтворення всіх доріжок одного вибраного
альбому в довільному порядку.
Натисніть [3, 4] для вибору альбому.
REPEAT
• ON REPEAT
Повторення відтворення.
“`” з’являється.
• OFF REPEAT
Скасування повторення відтворення.
Примітка:
Коли ви відкриваєте лоток для дисків, зазначений
параметр повертається до значення за замовчуванням
“OFF PLAYMODE”.
3,4
] для вибору альбому.
Запрограмоване відтворення
Зазначена функція дозволяє запрограмувати до 24
доріжок.
1 Натисніть [PROGRAM] під час зупинки.
Відображається “PGM” або “PROGRAM”.
2
Натискайте літерно-цифрові кнопки, щоб
вибрати бажану доріжку.
Повторіть зазначений крок, щоб запрограмувати
інші доріжки.
1 Натисніть [3, 4] для вибору бажаного альбому.
2 Щоб вибрати бажану доріжку, натисніть [9],
після чого натискайте літерно-цифрові
символи.
3 Натисніть [OK].
Повторіть зазначені кроки, щоб запрограмувати
інші доріжки.
3 Натисніть [1/;], щоб розпочати відтворення.
• Скасування режиму програми
Натисніть [PROGRAM] під час зупинки.
• Перевірка вмісту програми
Натисніть [:] або [9], якщо в режимі
зупинки відображається “PGM”.
• Очищення останньої доріжки
Натисніть [DEL] під час зупинки.
• Очищення всіх запрограмованих доріжок
Натисніть [∫] під час зупинки.
“CLR ALL” відображається.
Протягом 5 секунд натисніть повторно [∫].
Page 71

Примітка:
ILLUMINATION
PLAY
A
B
REC/PLAY
Пристрій USB
(не постачається в комплекті)
Індикатор стану USB
• Неможливо використовувати запрограмоване
відтворення разом із функцією “PLAYMODE”.
• Пам’ять програмування очищується при відкриванні
лотка для дисків.
Примітки щодо дисків
• Система здатна відтворювати диски CD-R/RW із
вмістом у форматі CD-DA або MP3.
• Деякі диски CD-R/RW не можуть програватися через
конкретні умови запису.
• Файли MP3 визначаються в якості доріжок, а папки — в
якості альбомів.
• Дана система забезпечує доступ до:
- CD-DA: 99 доріжок
- MP3: 999 доріжок, 255 альбомів
• Диск має відповідати стандарту ISO9660 рівня 1 або 2
(окрім розширених форматів).
• Записи не обов'яз
порядку, в якому їх записували.
дтворюватимуться у тому
ково ві
Пам'ять USB та внутрішня пам'ять
Можна встановлювати з’єднання з пристроєм USB і
відтворювати музичні доріжки з нього.
Також можна записувати звук або музичні доріжки до
внутрішньої пам'яті у форматі .mp3.
Дана система забезпечує відтворення або запис до
800 папок (максимально 999 доріжок в альбомі) або
загалом 8000 доріжок (у залежності від доступного
для зберігання обсягу пам'яті).
Підключення пристрою USB
Підготовка
ідключенням прис
Перед п
переконайтеся, що зроблено резервне копіювання
даних.
Не слід використовувати подовжувальний кабель
USB. Система не зможе розпізнати пристрій USB,
якщо його підключено за допомогою кабелю.
трою USB до системи,
Загальний вигляд інтерфейсу USB
A
PLAY
B
REC/PLAY
•
• Відтворення доріжок MP3.
•
• Запис/відтворення доріжок MP3.
Примітка:
Протягом записування через інтерфейс USB миготить
індикатор стану USB-підключення.
Примітка:
При виборі інтерфейсу USB миготить індикатор стану
USB-підключення.
УКРАЇНСЬКА
Зменшіть гучність та підключіть пристрій USB до
порту USB.
Притримуйте основний апарат у момент під'єднання
або від'єднання пристрою USB.
VQT5F33
9
71
Page 72

Запис до пристрою USB або до
Альбом, що записується
Завершення процесу запису у відсотках
внутрішньої пам'яті
Компанія Panasonic не бере на себе відповідальність за дії
користувачів, пов'язані із записом захищеного авторським
правом вмісту, що може призвести до порушення
авторського права.
Примітка:
• Усі записи зберігаються у форматі “.mp3”.
• Неможливо здійснювати запис протягом використання
режиму випадкового порядку відтворення.
• Протягом здійснення запису режим випадкового
порядку відтворення вимкнено.
• Щоразу при здійсненні запису додається новий альбом.
• Послідовність альбомів може змінитися по завершенні
запису.
• Записи зберігаються на пристрої USB або у внутрішній
пам'яті у папці із на
• Записані доріжки буде автоматично відсортовано у
зазначеному порядку.
- Записані доріжки з Audio CD, радіо або із зовнішнього
виходу (сортування за порядком запису)
- Записані доріжки mp3 з диску CD або пристрою USB
(сортування за абеткою)
звою “REC_DAT
A”.
Звичайний запис
1 Виберіть бажане джерело запису.
Підготуйте режим відтворення диску.
• Запис всіх доріжок
Виберіть “OFF PLAYMODE” (>“Меню відтворення”).
• Запис запрограмованих доріжок
Програмування бажаних доріжок
(> “Запрограмоване відтворення”).
• Запис окремої доріжки
Виберіть “1-TRACK” (>“Меню відтворення”).
Переконайтеся, що диск зупинився.
Радio
VQT5F33
Здійснення налаштування на радіостанцію.
Зовнішнє обладнання
10
Підключення до обладнання та відтворення із
нього (> “Використання додаткового входу”).
72
2 Натисніть [MEMORY REC ¥/;] або
[USB REC ¥/;], щоб розпочати запис.
Відображається ім'я папки, в якій містяться
записи.
• Припинення запису
Натисніть [∫]. Відображається “WRITING”.
• Пауза в записуванні
Натисніть [MEMORY REC ¥/;] або
[USB REC ¥/;] під час здійснення запису.
Натисніть клавішу знову, щоб відновити
записування.
Примітка:
Можна робити паузи протягом записування з радіо
або з
AUX (окрім режиму SYNCHRO). Щоразу при
використанні паузи додається маркер доріжки
(
> “Додавання маркерів доріжок”).
Примітка:
• Зачекайте протягом кількох секунд, поки система
підготує пристрій USB перед початком запису.
• Протягом записування через інтерфейс USB миготить
індикатор стану USB-підключення.
Запис доріжок MP3
Можна записувати доріжки MP3 з наступних джерел:
• З диску MP3 до або внутрішньої пам'яті
• З до або внутрішньої пам'яті
• З до внутрішньої пам'яті або навпаки
1 Підготуйте джерело, на яке планується
здійснювати запис.
• Запис всіх доріжок
Виберіть “OFF PLAYMODE” (>“Меню відтворення”).
• Запис запрограмованих доріжок
Програмування бажаних доріжок
(> “Запрограмоване відтворення”).
• Запис визначеного альбому або доріжки
Виберіть “1-ALBUM” або “1-TRACK” (> “Меню
відтворення”).
2 Натисніть [MEMORY REC ¥/;] або
[USB REC ¥/;], щоб розпочати запис.
Приклад: Записування альбому з пристрою USB до
• Припинення запису
Примітка:
• Запис деяких доріжок може зайняти відносно більше часу.
• Деякі доріжки можуть не записатися через конкретні
умови джерела запису.
• Ім'я записаної папки може відрізнятися від імені оригінальної
папки через використання функції автоматичного
перейменування.
внутрішньої пам'яті.
Натисніть [∫].
Процес запису припиняється на останній повністю
записаній доріжці альбому.
Наприклад, якщо запис припиняється на четвертій
доріжці, то записаними будуть лише перші три доріжки.
“NO FILE RECORDED” відображається, якщо не
записано жодну доріжку.
Page 73

Основне відтворення
Пошук за заголовком Список відтворення
1 Натисніть [ , MEMORY] (основний апарат:
[ /MEMORY]) для вибору “MEMORY”.
2 Натисніть [1/;], щоб розпочати відтворення.
1 Натисніть [USB] для вибору “USB B” або
“USB A”.
2 Натисніть [1/;], щоб розпочати відтворення.
• Зупиніть відтворення
Натисніть [∫]. Відображається “RESUME”.
Натисніть [1/;], щоб продовжити відтворення.
АБО
Для остаточного припинення відтворення двічі
натисніть [∫].
Для отримання відомостей щодо виконання
інших операцій див. “Диск”.
Перегляд доступних відомостей
Ви можете переглядати доступні відомості на панелі
дисплея.
Натисніть [DISPLAY-DIMMER].
• У режимі зупинки
Доступний обсяг пам'яті для зберігання або
залишковий час запису на внутрішній пам'яті або
на пристрої USB для .
• Під час запису
Відомості, пов'язані із записуванням.
• Протягом відтворення або паузи
Відомості про поточну доріжку.
За допомогою пошуку за заголовком можна
здійснювати пошук бажаної доріжки у внутрішній
пам'яті.
1 Натисніть [TITLE SEARCH].
Миготить “”.
2 Натискайте літерно-цифрові кнопки або
[3, 4] для вибору бажаного символу, після
чого натисніть [1] для вибору наступного
символу.
Для видалення символу натисніть [DEL].
3 Натисніть [OK].
Натисніть [2, 1] для пошуку попереднього або
наступного збігу.
“NOT FOUND” відображається у разі відсутності
збігів.
4 Натисніть [OK] для підтвердження та
відтворення доріжки.
Для скасування натисніть [TITLE SEARCH].
Примітка:
• Зазначена функція пропускає доріжки, що
створювалися в режимі основного запису
(> “Звичайний запис”).
• Ця функція не працює під час відтворення у довільному
порядку або програмного відтворення.
• Значення символів нечутливі до регістру.
• У разі доріжок з ідентичним заголовком
відображатиметься однаковий заголовок доріжки.
Можна зберігати до 6 списків відтворення у внутрішній пам'яті.
Кожен список відтворення може містити до 99 доріжок.
Додавання доріжок до списку відтворення
1 Виберіть доріжку, яку необхідно додати до
списку відтворення.
2 Натисніть [PLAY LIST].
3 Натисніть та утримуйте літерно-цифрову
кнопку (від 1 до 6) для додавання доріжки до
відповідного списку відтворення.
Або натисніть та утримуйте кнопку (від [1] до [6])
на основному апараті для додавання доріжки до
відповідного списку відтворення.
Для того, щоб додати більше доріжок, повторно
виконуйте кроки від 1 до 3.
Прослуховування списку відтворення
1
Для вибору списку відтворення натисніть [PLAY
LIST] та літерно-цифрову кнопку (від 1 до 6).
Також вибір списку відтворення здійснюється шляхом
натиснення кнопки (від [1] до [6]) на основному апараті.
2 Натисніть [1/;], щоб розпочати відтворення.
• Скасування відтворення списку відтворення
Двічі натисніть [PLAY LIST].
АБО
Натисніть вибрану клавішу (від [1] до [6]) на
основному апараті.
• Перегляд вмісту списку відтворення
Натисніть [:] або [9] під час зупинки.
АБО
Поверніть [MULTI CONTROL] в режимі зупинки.
• Очищення окремої доріжки
Перебуваючи в режимі зупинки, натисніть [:]
або [9], щоб вибрати бажану доріжку, яку
необхідно очистити. Після цього натисніть
[DEL].
“DELETE?” відображається.
Протягом 5 секунд на
• Оч
ищення усіх доріжок списку відтворення
У режимі зупинки натисніть [∫].
“CLEAR?” відображається.
Протягом 5 секунд натисніть [OK].
тисніть [OK].
УКРАЇНСЬКА
VQT5F33
11
73
Page 74

Розширені функції запису
Високошвидкісний запис
Швидкість запису:
CD,CD-R: До трикратного значення (3x) звичайної швидкості.
CD-RW: До двократного значення (2x) звичайної швидкості.
1 Вставте диск, на який слід здійснити запис.
2 Натисніть [CD].
3 Натисніть [CD HI-SPEED REC] та
[USB REC ¥/;] або одночасно натисніть
[MEMORY REC ¥/;], щоб розпочати запис.
Примітка:
• Якщо через стан диску неможливо здійснювати запис на
високій швидкості, запишіть диск CD за звичайної швидкості.
• Під час високошвидкісного записування звук вимкнений.
Додавання маркерів доріжок
При здійсненні запису з радіо або із зовнішнього обладнання можна
робити нарізку доріжок, використовуючи різноманітні режими.
Перед початком запису
Натисніть [REC MODE] для вибору бажаної настройки.
• MANUAL
Ручне додавання маркеру доріжки.
Для додавання маркеру доріжки натисніть [OK]
протягом здійснення запису.
• TIME MARK
Доріжка автоматично розділяється на 5-хвилинні інтервали.
• SYNCHRO
(Для джерела запису AUX)
Запис розпочинається автоматично тоді, коли
починається відтворення на іншому обладнанні.
Записування встановлюється на паузу, якщо
протягом 3 секунд фіксується тиша.
Примітка:
• У разі натиснення [OK] або встановлення паузи записування
VQT5F33
при використанні режиму TIME MARK протягом запису
5-хвилинний лічильник скидає своє значення.
12
• У режимі SYNCHRO неможливо додавати маркери
доріжок вручну.
74
Видалення записаних доріжок
1
Натисніть [, MEMORY] (основний апарат: [ /MEMORY]) для
вибору “MEMORY”.
Натисніть [USB] (основний апарат: [USB/CD]),
щоб вибрати “USB B”.
2 Натисніть [3, 4] для вибору бажаного альбому.
3
Натисніть [:] або [9] для вибору бажаної доріжки.
4
Натисніть [EDIT MODE] для вибору бажаного режиму.
• TRACK DEL
Видалення окремої доріжки.
• ALBUM DEL
Видалення одного альбому (максимально 999 доріжок).
•FORMAT
Форматування пристрою USB.
•ALL DEL
Видалення усіх альбомів із внутрішньої пам'яті.
5 Натисніть [OK].
Відображається вибраний пункт, який слід видалити.
6 Натисніть [OK].
Відображається “SURE? NO”.
7
Натисніть [2,1] для вибору “YES” або “NO” і потім
натисніть [OK].
Виберіть “YES” для підтвердження видалення.
Відображається “WRITING”.
Примітки щодо USB
Сумісні пристрої USB, які визначаються як пристрої класу
великого обсягу пам'яті:
• Пам’ять USB, що підтримує тільки безперервну
передачу даних.
• Пристрої USB, які підтримують повношвидкісний USB 2.0.
Примітка:
• Папки визначаються в якості альбому.
• Файли визначаються в якості доріжок.
• Доріжка повинна мати розширення “.mp3” або “.MP3”.
•CBI (керуючі посилання/групове
пересилання/переривання) не підтримується.
• Файлова система NTFS не підтримується (гарантовано
підтримку лише файлової системи FAT 12/16/32).
• Деякі з файлів можуть не запускатися через
невідповідність розміру сектора.
Радio
Ручне настроювання
1
Натисніть [RADIO/EXT-IN] для вибору “FM” або
“AM”.
2 Натисніть [6] або [5] для вибору частоти
потрібної станції.
Для автоматичної настройки натисніть і
утримуйте кнопку, поки частота не почне швидко
змінюватися.
“STEREO” відображується, коли приймається
стереомовлення.
За допомогою основного апарату
1 Натисніть [RADIO/EXT-IN] для вибору “FM” або
“AM”.
2 Натисніть [TUNE MODE], щоб вибрати
“MANUAL”.
3 Натисніть [:/6] або [5/9] для вибору
частоти потрібної станції.
Покращення якості звуку
Якщо вибрано “FM”
1 Натисніть [PLAY MENU], щоб вибрати “FM
MODE”.
2 Натисніть [2, 1] для вибору “МОNО” і потім
натисніть [OK].
Для скасування виберіть “STEREO”.
“MONO” також скасовується при зміні частоти.
Якщо вибрано “AM”
1 Натисніть [PLAY MENU], щоб вибрати
"BEATPROOF".
2 Натисніть [2, 1] для вибору між діапазонами
від “BP 1” до “BP 4”, що має забезпечити
найкращу якість прийому. Після цього
натисніть [OK].
Page 75

Налаштування пам’яті
Можна налаштувати до 30 FM-станцій та до 15
AM-станцій.
Автоматичне налаштування
1 Натисніть [OK], щоб вибрати частоту
“LOWEST” або “CURRENT”.
2 Натисніть [PLAY MENU] для вибору
“A.PRESET” і потім натисніть [OK].
“START?” відображається.
3 Натисніть [OK], щоб розпочати налаштування.
Для скасування натисніть [∫].
Ручне налаштування
1 Натисніть [6] або [5] для настроювання
на станцію.
2 Натисніть [PROGRAM].
3 Натискайте літерно-цифрові кнопки, щоб
вибрати номер налаштування.
Для того, щоб налаштувати більше станцій,
повторно виконуйте кроки від 1 до 3.
Воднораз нова станція замінюватиме будь-яку
станцію, що займає той самий номер
налаштування.
Вибір зареєстрованої станції
Натискайте літерно-цифрові кнопки, [:] або
[9], щоб вибрати налаштовану станцію.
За допомогою основного апарату
1 Натисніть [TUNE MODE], щоб вибрати
“PRESET”.
2 Натисніть [:/6] або [5/9] для вибору
налаштованої станції.
Настройка розподілення діапазону
AM
За допомогою лише основного апарату
Апарат може також приймати мовлення AM,
розподілене з кроком 10 кГц.
1 Натисніть [RADIO/EXT-IN] для вибору “FM” або
“AM”.
2 Натисніть та утримуйте [RADIO/EXT-IN].
Після кількох секунд на панелі дисплея
відобразиться поточне мінімальне значення
радіочастоти. Відпустіть кнопку, коли мінімальна
частота зміниться.
• Для повернення до початкової настройки повторіть
зазначені вище кроки.
• Після зміни настройки налаштовані частоти
видаляються.
Bluetooth
Можна встановлювати з’єднання з аудіопристроєм і
відтворювати звукові дані з нього, використовуючи
бездротовий зв'язок Bluetooth
• Див. інструкцію з експлуатації пристрою Bluetooth®
для більш докладної інформації.
• Якщо ви маєте намір використовувати
NFC-сумісний (Near Field Communication) пристрій
Bluetooth
дотик (Підключення за допомогою NFC)”.
• Перед підключенням пристрою Bluetooth
зменшити гучність.
®
®
.
®
, перейдіть до розділу “З’єднання в один
®
слід
Створення пари із пристроєм
Підготовка
• Ув імкн іть функцію Bluetooth
пристрій біля цього пристрою.
®
пристрою та покладіть
1 Натисніть і утримуйте [ /MEMORY,-PAIRING]
на основному апараті.
2 Виберіть “SC-MAX770” у меню Bluetooth
пристрою.
По завершенні створення пари пристрій
автоматично з'єднається із системою.
3 Розпочніть відтворення на пристрої
Bluetooth
Для отримання відомостей щодо інших операцій з
основним апаратом див. “Відтворення диска”.
Примітка:
• Можна також виконувати операції за допомогою пульта
ДК.
1 Натисніть [ , MEMORY], щоб вибрати “BLUETOOTH”.
2 Натисніть [PLAY MENU], щоб вибрати “PAIRING”.
3 Натисніть [2, 1] для вибору “OK? YES” і потім
натисніть [OK].
4 Виберіть “SC-MAX770” у меню Bluetooth
• Якщо з’явиться запит на ключ доступу, введіть “0000”.
• Для встановлення підключення має бути створено пару
із пристроєм.
• Можна зареєструвати до 8 пристроїв за допомогою
цього пристрою. Якщо створити пару з 9-м пристроєм,
буде замінено той пристрій, яким не користувалися
найдовше.
• Система може підключатися одночасно лише до одного
пристрою.
що “BLUETOOTH” в
• Як
система автоматично спробує під’єднатися до
останнього пристрою, з яким був зв’язок.
®
.
ибрано в якості джерела, ця
®
®
пристрою.
УКРАЇНСЬКА
VQT5F33
13
75
Page 76

З’єднання в один дотик
Пристрій Bluetooth
®
(Підключення за допомогою NFC)
Лише для NFC-сумісних пристроїв із ОС Android
Просто торкнувшись NFC-сумісного (Near Field
Communication) пристрою Bluetooth
ви можете виконати всі підготовчі операції від реєстрації
пристрою Bluetooth
®
до встановлення підключення.
®
на даному пристрої,
Підготовка
• Ув імкн іть функцію NFC на пристрої.
• Для пристрою з ОС Android версії нижче 4.1 має
бути встановлена програма “Panasonic MAX Juke”
(безкоштовна).
1 Щоб здійснити пошук, введіть “Panasonic MAX
Juke” в полі пошуку Google Play
TM
, після чого
виберіть “Panasonic MAX Juke”.
2 Запустіть програму “Panasonic MAX Juke” на
пристрої.
-Виконайте інструкції, які відображатимуться на
екрані вашого пристрою.
-Завжди використовуйте останню версію програми.
1
Натисніть [ , MEMORY] (основний апарат:
[ /MEMORY,-PAIRING]) для вибору “BLUETOOTH”.
2 Торкніться та утримуйте ваш пристрій в зоні
з'єднання NFC цього пристрою [].
• Одразу по завершенні реєстрації та підключення
пристрою Bluetooth
підключеного пристрою. Можна перемістити пристрій
подалі від системи.
• Якщо підключення не встановлено навіть після
VQT5F33
входження пристрою в зону з'єднання через NFC,
14
спробуйте змінити положення з'єднання пристрою.
3 Розпочніть відтворення на пристрої
76
Bluetooth
®
на екрані відобразиться ім'я
®
.
Примітка:
• Якщо торкнутися іншим пристроєм до цього пристрою,
можна оновити з’єднання Bluetooth
TM
було встановлено з’єднання раніше, автоматично
відключиться.
• Якщо під час відтворення зображення і звук не
синхронізовані, перезапустіть програму відтворення,
яку ви використовуєте. Якщо проблема не зникне,
з’єднайте пристрій Bluetooth
допомогою аудіокабелю (не постачається в комплекті).
• Коли встановлено підключення, відтворення може
розпочатися автоматично. Це залежить від типу
пристрою, що використовується.
• Залежно від типу пристрою, який використовується,
технологія “ З’єднання в один дотик” може не працювати
належним чином.
Режим очікування Bluetooth
®
. Пристрій, з яким
®
і цей пристрій за
®
У разі увімкнення вказаної функції, навіть якщо
основний апарат вимкнено, він автоматично
увімкнеться тоді, коли пристрій Bluetooth
®
надішле
запит на підключення.
1 Натисніть [ , MEMORY] (основний апарат:
[ /MEMORY,-PAIRING]) для вибору
“BLUETOOTH”.
2 Натисніть [PLAY MENU], щоб вибрати
“STANDBY MODE”.
3 Натисніть [2, 1] для вибору “ON STANDBY
MODE” або “OFF STANDBY MODE” і потім
натисніть [OK].
Перегляд доступних відомостей
Ви можете переглядати наступні відомості на панелі
дисплея:
• Назва підключеного пристрою (максимально
16 символів).
• Профіль Bluetooth
Натисніть [DISPLAY-DIMMER].
®
, що використовується.
Режим зв'язку
Можна змінити швидкість передачі для створення
вищого пріоритету для якості передачі чи якості звуку.
Підготовка
Якщо цю систему підключено до пристрою Bluetooth
відключіть його (> “Від’єднання пристрою”).
1 Натисніть [PLAY MENU], щоб вибрати “LINK
MODE”.
2 Натисніть [2, 1] для вибору “MODE 1” або
“MODE 2” і потім натисніть [OK].
•MODE 1
Особливе значення надається якості зв’язку.
•MODE 2
Особливе значення надається якості звуку.
Примітка:
Настройка за умовчанням: “MODE 2”.
Від’єднання пристрою
1 Натисніть [PLAY MENU] кілька разів, щоб
вибрати “DISCONNECT?”.
2 Натисніть [2, 1] для вибору “OK? YES” і
потім натисніть [OK].
Примітка:
Пристрій від'єднується в наступних випадках:
• Вибір іншого джерела.
• Переміщення пристрою за межі діапазону
максимальної досяжності.
• Вимкнення передачі Bluetooth
• Вимкнення системи або пристрою.
®
на пристрої.
®
,
Page 77

Годинник та таймери
Настройка годинника
Це 24-годинний годинник.
1
Натисніть [CLOCK/TIMER], щоб вибрати “CLOCK”.
2 Упродовж 20 секунд натисніть [3, 4] для
виставлення часу.
3 Натисніть [OK].
Натисніть [CLOCK/TIMER], щоб відобразити годинник
упродовж кількох секунд.
Примітка:
• Щоб забезпечити точність годинника, регулярно коригуйте час.
• Годинник потрібно налаштувати знову після перебою з
електропостачанням або від'єднання шнура живлення
змінного струму.
Таймер відтворення та запису
Окрім джерела Bluetooth
Можна встановити таймер на ввімкнення в певний час:
• Для пробудження (таймер відтворення)
• Для здійснення запису з радіо або із зовнішнього
обладнання (таймер запису)
Таймери відтворення та запису не можуть
використовуватися разом.
Підготовка
Встановіть годинник.
®
1 Натисніть [CLOCK/TIMER] для вибору
“PLAY” або “REC”.
2 Упродовж 10 секунд натисніть [3, 4] для
виставлення часу запуску.
3 Натисніть [OK].
4 Для встановлення кінцевого часу виконайте
повторно кроки 2 та 3.
5
Натисніть [3,4] для вибору джерела відтворення
або запису, після чого натисніть [OK].
6 Для таймеру запису
Натисніть [3, 4], щоб вибрати “MEMORY” або
“USB B” для збереження запису, після чого
натисніть [OK].
Для запуску таймера
1 Підготуйте аудіоджерело.
• Таймер відтворення
Підготуйте джерело музики, яку бажаєте
прослуховувати (диск, USB-накопичувач,
внутрішню пам'ять, радіо або зовнішнє
обладнання), після чого встановіть гучність.
• Таймер запису
Під'єднайте пристрій USB до (для
запису через інтерфейс USB), після чого
налаштуйтеся на необхідну радіостанцію або
виберіть зовнішнє обладнання.
2 Натисніть [PLAY/REC ] для вибору “PLAY
ON” або “ REC ON”.
Відображається “PLAY ON” або “REC ON”.
Для скасування операції натисніть [PLAY/REC ],
щоб вибрати “TIMER OFF”.
Для роботи таймеру система має перебувати у
вимкненому стані.
Для перевірки налаштувань
Натисніть [CLOCK/TIMER] для вибору “PLAY”
або “REC”.
Примітка:
• Таймер відтворення запускається за низької гучності, після
чого гучність поступово зростає до налаштованого рівня.
• Таймер запису запускається за 30 секунд до заданого
часу з нульовою гучністю.
• Якщо таймер увімкнено, то він вмикається у встановлений час щодня .
Таймер режиму очікування
Таймер режиму очікування вимикає систему через
встановлений інтервал часу.
Натисніть [SLEEP-AUTO OFF] для вибору
настройки (у хвилинах).
Для скасування виберіть “OFF”.
30 MIN>60 MIN>90 MIN>120 MIN>OFF
^=================n
Примітка:
• Таймери відтворення та режиму очікуван ня або таймери
запису та режиму очікування можна використовувати разом.
• Таймер режиму очікування завжди запускається
першим. Щоразу перевіряйте, щоб часові
налаштування таймерів не накладалися.
Звук та освітлення
Регулювання звукового ефекту
Дозволяє регулювати звуковий ефект.
1 Натисніть [SOUND], щоб вибрати звуковий
ефект.
2 Натисніть [2, 1] для вибору бажаної
настройки.
• BASS/MID/TREBLE
-4 до +4
• SURROUND
“ON SURROUND” або “OFF SURROUND”
• INPUT LEVEL
(Для AUX IN 4)
“NORMAL” або “HIGH”
Примітка:
Виберіть “NORMAL”, якщо звук для рівня вхідного
сигналу “HIGH” спотворений.
• SUPER WOOFER
“SW1”, “SW2”, “SW3” або “OFF”
• D.BASS
“D.BASS ON”, “D.BASS BEAT” або “D.BASS
OFF”
Попереднє встановлення еквалайзера
Натисніть [PRESET EQ]
PRESET EQ
настройки.
])
для вибору бажаної попередньої
(основний апарат:
[
УКРАЇНСЬКА
VQT5F33
15
77
Page 78

За допомогою основного апарату
Можна регулювати обраний звуковий ефект за
допомогою елементів управління основного апарату.
1 Натисніть кнопку, щоб вибрати звуковий
ефект.
•PRESET EQ
Натисніть [PRESET EQ] (основний апарат:
[ PRESET EQ])
• BASS/MID/TREBLE
Натисніть [MANUAL EQ]
• D.BASS
Натисніть [D.BASS,-SUPER WOOFER]
• SUPER WOOFER
Натисніть та утримуйте
[D.BASS,-SUPER WOOFER]
2 Поверніть [MULTI CONTROL] для вибору
бажаної настройки.
Ефекти освітлення
За допомогою лише основного апарату
Для даної системи можна змінювати шаблон або
колір освітлення.
Повертайте [ILLUMINATION], щоб вибрати шаблон
або колір.
•PATTERN
Освітлення за шаблоном із кількома кольорами.
• COLOR
Освітлення з одним кольором.
•OFF
Примітка:
Аби переконатися, що ефекти освітлення
відображатимуться належним чином, перевірте
VQT5F33
правильність розташування динаміків у відповідності до
“Розташування динаміків”.
16
78
Функції діджея
До функцій діджея належать наступні функції
- Діджейський програвач
- Діджейський семплер
- Діджейські ефекти
Використовуючи зазначені функції, можна додавати
різноманітні ефекти до доріжки, що програється.
Якщо використовується додаток “Panasonic
MAX Juke”
Після встановлення додатку “Panasonic MAX Juke”
(розповсюджується безкоштовно) на пристрій із ОС
Android можна використовувати ще ширший
діапазон функцій.
Завантажте додаток “Panasonic MAX Juke” на
пристрій із ОС Android. Для здійснення пошуку
введіть “Panasonic MAX Juke” до поля пошуку
Google Play, після чого виберіть “Panasonic MAX
Juke”.
Примітка:
У разі здійснення запису функції діджея скасовуються.
Діджейський програвач
Зазначений режим дозволяє використовувати ефект
плавного переходу або використовувати
семпльований звуковий мікс у проміжках між
доріжками, що програються.
Ця функція працює під час відтворення доріжок на
пристрої USB або із внутрішньої пам’яті.
1
, ,
Натисніть [DJ JUKEBOX] на основному апараті.
• Зазначений в апараті параметр перемикає
режим повторення автоматично.
•(Тільки в режимі зупинки) Потрібний параметр
повторення можна змінити, повернувши [MULTI
CONTROL] на основному апараті.
-RANDOM REPEAT
Відтворення всіх доріжок у довільному порядку.
-ALL TITLE REPEAT
Повторення всіх доріжок.
• Якщо на дисплеї відображається напис
“WAITING REQUEST”, можна перейти до
наступного кроку, якщо програма "Panasonic
MAX Juke" не використовується.
2 Для вибору бажаної функції натискайте
кнопки від [1] до [6] на основному апараті.
•[1]
Плавний перехід: Гучні с ть доріжки, що
програється, поступово знижується, а гучність
наступної доріжки збільшується.
•[2] до [6]
Семпльований звуковий мікс: Зазначений
режим додає семпльований звук до проміжків
між доріжками, що відтворюються.
Щоб скасувати вибір, повторно натисніть кнопку.
Для скасування функцій діджейського програвача
Натисніть [DJ JUKEBOX] на основному апараті.
Примітка:
• Для зміни функції діджейського програвача за
допомогою пульта ДК
1 Натисніть [PLAY MENU], щоб вибрати
“JUKEBOX”.
2 Натисніть [2, 1] для вибору “ON JUKEBOX” або
“OFF JUKEBOX”, а потім натисніть [OK].
• Для зміни потрібної настройки повторення за
допомогою пульта ДК
1 Двічі натисніть [PLAY MENU], щоб вибрати
“PLAYMODE”.
2 Натисніть [2, 1] для вибору потрібного режиму,
а потім натисніть [OK].
Якщо використовується додаток “Panasonic MAX Juke”
Можна виводити на екран доріжки, які ви бажаєте
відтворити за допомогою додатку.
• При відображенні на дисплеї “MAKING LIST”
виводитиметься частина доріжок.
• Якщо на дисплеї відображається напис “WAITING
REQUEST”, можна виводити на екран доріжки, які
ви бажаєте відтворити за допомогою додатку.
Page 79

Діджейський семплер
За допомогою лише основного апарату
Повертаючи [MULTI CONTROL], можна додавати звук
скрипіння платівки або семпльований звук до
доріжки, яка програється.
1 Натисніть [DJ SAMPLER].
2 Для вибору бажаного звуку натискайте кнопки
від [1] до [6].
3 Повертайте [MULTI CONTROL].
Для скасування функ цій діджейського семплера
Натисніть [DJ SAMPLER].
Якщо використовується додаток “Panasonic MAX
Juke”
• Можна змінювати семпльований звук за
допомогою додатку.
(Для повернення всіх семпльованих звуків до
заводських налаштувань натисніть та утримуйте
[DJ SAMPLER] у той час, поки діджейський
семплер вимкнено.)
Діджейські ефекти
За допомогою лише основного апарату
Для додавання звукових ефектів можна
використовувати функції діджейських ефектів.
1 Натисніть [DJ EFFECT-KARAOKE].
2 Для вибору бажаного діджейського ефекту
натискайте кнопки від [1] до [6].
•[1] PHASER
Додавання до звуку простору та об'ємності.
•[2] FILTER
Посилення або фільтрація визначених
діапазонів звуку.
•[3] SOUND CHOPPER
Періодичне урізання звуку.
•[4] ELECTRO ECHO
Додавання до звуку цифрового відлуння.
•[5] PITCH SHIFTER
Регулювання звукових клавіш.
•[6] HARMONIZER
Додавання до звуку нот для створення гармонії.
Щоб скасувати вибір, повторно натисніть кнопку.
3 Поверніть [MULTI CONTROL] для вибору
бажаної настройки.
Для скасування діджейських ефектів
Натисніть [DJ EFFECT-KARAOKE].
Караоке
За допомогою лише основного апарату
1
Натисніть та утримуйте [DJ EFFECT-KARAOKE].
Кнопка [DJ EFFECT-KARAOKE] підсвічується синім.
2 Для вибору бажаного ефекту караоке
натискайте кнопки від [1] до [3].
[1] Скасування вокалу
“VOCAL CANCEL”, “L”, “R”, “L+R” або “OFF”
[2] Відлуння
“ECHO 1”, “ECHO 2”, “ECHO 3” або “OFF”
[3] Клавішне управління
Повертайте вертушку для вибору значення
від “-6” до “+6”.
Для скасування режиму караоке
Натисніть та утримуйте [DJ EFFECT-KARAOKE].
Використання мікрофона
Підготовка
Зменшіть гучність системи до мінімуму, перш ніж
під'єднувати або від'єднувати мікрофон.
1 Під'єднайте мікрофон (не входить до
комплекту) до мікрофонного гнізда.
Тип штекера: ‰ 6,3 мм, монофонічний
2 Для регулювання гучності мікрофону
повертайте [MIC VOL, MIN/MAX] на основному
апараті.
3 При бажанні співати з музикою в якості тла.
Відтворюйте музику з джерела та
відрегулюйте гучність системи.
Примітка:
• При додаванні до звуку незрозумілого шуму (схожого на
гудіння) слід перемістити мікрофон подалі від динаміків
або знизити гучність мікрофону.
• Якщо ви не користуєтеся мікрофоном, від'єднайте його
від мікрофонного гнізда та зменшіть гучність рівня
мікрофону до значення “MIN”.
• Дана система не підтримує запис із мікрофону.
Використання додаткового входу
Перед підключенням
• Від'єднайте шнур живлення.
• Вимкніть усе обладнання та ознайомтесь із
відповідною інструкцією з експлуатації.
Примітка:
Компоненти та кабелі реалізуються окремо.
Для підключення переносного звукового та
іншого обладнання.
Можна програвати музику з переносного звукового
обладнання.
Підготовка
Вимкніть еквалайзер (за наявності) переносного
звукового обладнання, щоб запобігти спотворенню
звуку.
Зменшіть гучність системи та переносного звукового
обладнання перед під'єднанням аб
реносного звукового обладнання.
пе
о від'єднанням
1 Під'єднайте переносне звукове обладнання до
AUX IN 4.
Тип штекера: ‰ 3,5 мм, стерео (не входить до
комплекту)
2 Натисніть [RADIO/EXT-IN], щоб вибрати
"AUX 4".
3 Відтворюйте аудіо з переносного звукового
обладнання.
УКРАЇНСЬКА
VQT5F33
17
79
Page 80

Для підключення відеомагнітофона,
DVD-програвач (не
постачається в комплекті)
Аудіокабель
(не постачається в
комплекті)
Задня панель цього основного апарату
DVD-програвача тощо.
Можна підключати відеомагнітофон, DVD-програвач
тощо та прослуховувати аудіо за допомогою даної
системи.
1 Під'єднайте зовнішнє обладнання.
2 Натисніть [RADIO/EXT-IN], щоб вибрати "AUX".
3 Відтворюйте аудіо із зовнішнього
обладнання.
Примітка:
• За необхідності під'єднати обладнання, що
відрізняється від описаного, проконсультуйтеся з
дилером цього звукового обладнання.
• При використанні перехідника звук може
спотворюватися.
VQT5F33
18
80
Пошук і усунення несправностей
Перш ніж звертатися до сервісної служби, виконайте
наступні перевірки.
При виникненні сумнівів щодо деяких пунктів перевірки,
або якщо за допомогою зазначених рішень не вдалося
вирішити проблему, зверніться за інструкціями до дилера.
Звичайні проблеми
Пристрій не працює.
• Ймовірно увімкнений один із пристроїв захисту апарата.
Переустановіть апарат, виконавши наступне:
1 Натисніть клавішу [Í/I] на основному апараті
для переведення апарата в режим очікування.
• Якщо пристрій не переходить в режим
очікування, натисніть [Í/I] на основному
апараті упродовж кількох секунд. Пристрій
буде примусово переведено в режим
очікування. Також можна від'єднати живлення
змінного струму, зачекати одну хвилини, та
повторно пі
2 Натисніть [Í/I] на основному апараті, щоб
увімкнути його. Якщо апарат і далі не працює,
тоді зверніться до дилера.
У режимі очікування панель дисплея неперервно
підсвічується та змінюється.
• Натисніть та утримуйте [∫] на основному апараті,
щоб вибрати “DEMO OFF”.
За допомогою пульта ДК не можна виконати
жодну операцію.
• Перевірте правильність встановлення елементу
живлення.
Звук спотворено, або немає звуку.
• Відрегулюйте гучність системи.
• Вимкніть систему, визначте та усуньте причину,
після чого повторно увімкніть систему. Зазначена
несправність може бути спричинена деформацією
динаміків через занадто високу гучність або
потужність, а також використанням системи в
середовищах із високою температурою.
Під час відтворення чу
• Поруч із кабелями знаходяться шнур живлення або
флуоресцентне світло. Три майте інші прилади та
шнури подалі від кабелів цієї системи.
д'єднати пр
ти зву
истрій до живлення.
к гудіння.
Рівень звуку спадає.
• Активовано захисний ланцюг у зв'язку із тривалим
використанням системи за високого значення
виходу гучності. Вказаний ланцюг захищає систему
та підтримує якість звуку.
Диск
Дисплей не відображає відомості належним чином.
Відтворення не починається.
• Неправильно вставлено диск. Вставте диск
належним чином.
• Диск забруднений. Очистіть диск.
• Замініть диск, якщо він подряпаний, деформований
або нестандартний.
• Всередині системи волога. Дайте системі
просохнути 1 до 2 години.
Відображається неправильна загальна кількість
доріжок.
Диск не доступний для зчитування.
Чути спотворений звук.
• Вставлено диск, який система не мо
Замініть його на диск, що можна програвати.
• Вставлено нефіналізований диск.
USB
Пристрій USB або його вміст не читаються.
• Формат пристрою USB або його вміст несумісні з
системою.
• Пристрої USB з обсягом пам'яті для зберігання понад
32 Гб можуть не працювати у деяких випадках.
Повільна робота пристрою USB.
• Зчитування триває довше у разі великого розміру
вмісту або використання пристрою USB з великим
обсягом пам'яті.
же прог
равати.
Page 81

Радio
Звук спотворений.
• Використовуйте додаткову зовнішню FM-антену. Антену
має встановлювати компетентний технічний фахівець.
Чути звук ударів.
• Вимкніть телевізор або перемістіть його подалі від
системи.
• Якщо система працює в режимі AM-приймача, то
найкращий прийом забезпечується при виборі опцій
від “BP 1” до “BP 4”.
Під час прийому мовлення в діапазоні AM чутно
тихе гудіння.
• Розташуйте антену подалі від інших кабелів і шнурів.
Bluetooth
Створити пару неможливо.
• Перевірте стан пристрою Bluetooth
®
®
.
Неможливо підключити пристрій.
• Створення пари із пристроєм завершилося невдало.
Створіть пару заново.
• Створення пари із пристроєм видалено.
Створіть пару заново.
• Цю систему підключено до іншого пристрою.
Від’єднайте інший пристрій і спробуйте створити
пару з пристроєм знову.
Пристрій підключено, але звук не чути з системи.
• Для деяких пристроїв із вбудованим Bluetooth
®
потрібно встановити аудіовихід “SC-MAX770”
вручну. Див. докладну інформацію в інструкції з
експлуатації пристрою.
Звук із пристрою переривається.
• Пристрій перебуває за межами відстані зв'язку 10 м.
Перемістіть пристрій бли жче до системи.
• Усу ньте всі перешкоди між цією системою і пристроєм.
• Інші пристрої, що використовують частоту 2,4 Гц
(бездротові маршрутизатори, мікрохвильові печі,
бездротові телефони тощо) створюють завади.
Перемістіть пристрій бл ижче до системи і збільшіть
відстань між ним та іншими пристроями.
• Виберіть “MODE 1” для стабільного зв'язку.
Опція з'єднання в один дотик (функція NFC) не
працює.
• Переконайтеся, що пристрій та функцію NFC на
пристрої ввімкнено. (> 14)
Відображення на дисплеї основного апарата
USB A NO DEVICE”
“
“USB B NO DEVICE”
• Пристрій USB не підключено. Перевірте
підключення.
“DEVICE FULL”
• Неможливо здійснювати запис через те, що
залишковий час запису для пристрою USB менший
від загального часу джерела музики.
Замініть USB-пристрій на такий, що вміщає
достатньо часу запису, та повторіть запис.
“ERROR”
• Виконано некоректну операцію. Прочитайте
інструкцію та повторіть спробу.
“ERROR” (протягом запису)
пису не
• Протягом за
можливо вибирати інше
джерело відтворення (приклади: радіо, пристрій
USB тощо) або натискати [:] чи [9].
Призупиніть функцію запису.
• Неможливо відкрити лоток для дисків протягом
запису з джерела AM-сигналу.
“F61”
• Перевірте та за необхідності зміцніть підключення
шнурів динаміка.
• Від'єднайте пристрій USB. Вимкніть систему, після
чого увімкніть її повторно.
“F70”
ист
• Перевірте пр
• Від'єднайте пристрій Bluetooth
рій Bluetooth®.
®
. Вимкніть систему,
після чого увімкніть її повторно.
“F77”
• Вимкніть систему і ввімкніть її знову.
“NO PLAY”
“UNSUPPORT”
• Перевірте вміст. Можна програвати лише ті
формати, що підтримуються.
• Файли на пристрої USB можуть бути
пошкодженими. Відформатуйте пристрій USB та
повторіть спробу.
• Можливо, виникла проблема з пристроєм. Вимкніть
пристрій і ввімкніть його знову.
“NO TRACK”
• На пристрої USB або у вн
утрішній пам'яті від
сутні
альбоми або доріжки.
“PLAYERROR”
• Ви запустили на відтворення файл MP3, що не
підтримується. Система пропустить зазначену
доріжку та відтворить наступний файл.
“REMOTE 1”
“REMOTE 2”
• Пульт ДК та основний апарат використовують різні
коди. Змініть код на пульті ДК.
- При відображенні “REMOTE 1” натисніть та
утримуйте [OK] і [1] щонайменше 4 секунди.
сніть та
- При відображенні “REMOTE 2” на
ти
утримуйте [OK] і [2] щонайменше 4 секунди.
“TEMP NG”
• Активовано ланцюг температурного захисту,
система вимкнеться. Дайте пристрою охолонути
перед тим, як вмикати його знову.
• Перевірте, щоб вентиляційний отвір пристрою не
перекривався.
• Переконайтеся, що цей пристрій достатньо добре
вентилюється.
“USB OVER CURRENT ERROR”
• Пристрій USB споживає занадто багато енергії.
Від'єднайте пристрій USB, вимкніть систему та
увімкніть її по
вторно.
“VBR”
тема не в змозі відображати залишковий час
• Сис
відтворення для доріжок зі змінною швидкістю
передачі бітів (VBR).
УКРАЇНСЬКА
VQT5F33
19
81
Page 82

Скидання пам'яті системи
(ініціалізація)
У разі виникнення наступних ситуацій слід скинути
значення пам'яті:
• Апарат не реагує на натискання клавіш.
• Ви бажаєте очистити та скинути пам'ять.
1 Від'єднайте шнур живлення.
2 Утримуючи натиснутою клавішу [Í/I] на
основному апараті, повторно приєднайте
шнур живлення змінного струму.
Продовжуйте натискати та утримувати кнопку
(приблизно 10 секунд), поки не відобразиться
рядок “- - - - - - - -”.
3 Відпустіть клавішу [Í/I].
Усі налаштування повертаються до заводських
налаштувань за замовчуванням.
Необхідно буде повторно задати елементи пам'яті.
Код пульта ДК
Якщо на пульт ДК реагує інше обладнання Panasonic,
змініть код пульта ДК для системи.
Підготовка
Натисніть [RADIO/EXT-IN] для вибору входу AUX.
Для встановлення коду в значення “REMOTE 2”
1 Натисніть і утримуйте [RADIO/EXT-IN] на
основному апараті та [2] на пульті ДК, поки на
дисплеї не відобразиться “REMOTE 2”.
2 Натисніть та утримуйте [OK] і [2] щонайменше
4 секунди.
Для встановлення коду в значення “REMOTE 1”
1 Натисніть і утримуйте [RADIO/EXT-IN] на
основному апараті та [1] на пульті ДК, поки на
VQT5F33
дисплеї не відобразиться “REMOTE 1”.
2 Натисніть та утримуйте [OK] і [1] щонайменше
20
4 секунди.
82
Довідка
Робота системи відповідає двом зазначеним умовам:
(1) Даний пристрій не спричиняє шкідливі завади, та (2)
даний пристрій має витримувати дію прийнятих завад,
зокрема завад, що можуть спричиняти небажані операції.
Оновлення програмного
забезпечення
Час від часу Panasonic може випускати оновлене
програмне забезпечення для цього пристрою, яке
може додати або покращити способи виконання
операцій. Ці оновлення доступні безкоштовно.
Для отримання докладної інформації відвідайте веб-сайт.
http://panasonic.jp/support/global/cs/
(Ця веб-сторінка доступна тільки англійською мовою.)
Інформація Bluetooth
Компанія Panasonic не несе відповідальності за
ризик, якому можуть піддаватися дані та/або
інформація під час бездротової передачі.
Частотна смуга
• У цій системі використовується частотний діапазон 2,4 ГГц.
Сертифікати
• Ця система відповідає частотним обмеженням і
пройшла сертифікацію на основі частотного
законодавства, тому дозвіл на виконання
бездротового зв’язку не є обов’язковим.
• Перелічені нижче дії можуть переслідуватися згідно
чинного законодавства:
- Розбирання/модифікування основного апарату.
- Видалення вказівок щодо характеристик.
Обмеження щодо застосування
• Бездротова передача та/або використання з усіма
пристроями, обладнаними Bluetooth
• Ус і пристрої мають відповідати стандартам,
установленим Bluetooth SIG, Inc.
• За деяких характеристик і параметрів пристрою
неможливо встановити підключення або деякі
операції можуть виконуватися інакше.
• Ця система підтримує функції безпеки Bluetooth®. Але
за певного робочого середовища та/або параметрів
цього захисту, ймовірно, недостатньо. Передавайте
дані бездротовим способом на цю систему обережно.
• Ця система не може передавати дані на пристрій
Bluetooth
®
.
®
®
, не гарантуються.
Радіус застосування
• Використовуйте цей пристрій на відстані, що не
перевищує 10 м.
• Радіус дії може зменшуватися залежно від умов
навколишнього середовища, наявності завад або перешкод.
Перешкоди від інших пристроїв
• Ця система може не функціонувати належним чином,
а також можуть виникнути проблеми на кшталт шуму,
нерівного звучання тощо через інтерференцію
радіохвиль, якщо цей пристрій розташувати занадто
близько до інших пристроїв Bluetooth
пристроїв, що використовують діапазон 2,4 ГГц.
• Ця система може не функціонувати належним
чином, якщо радіохвилі з розташованої поблизу
станції мовлення тощо будуть занадто сильними.
Заплановане використання
• Цю систему призначено для звичайного
використання в загальних цілях.
• Не користуйтеся системою поблизу обладнання або в
середовищі, чутливому до радіочастотних перешкод
(наприклад, в аеропорту, лікарнях, лабораторіях тощо).
®
або до
Ліцензії
Техноло гію кодування звуку MPEG Laye r-3 отримано за
ліцензією від Fraunhofer IIS та Thomson.
Словесний товарний знак і логотипи Bluetooth® є власністю
Bluetooth SIG, Inc., у всіх випадках корпорація Panasonic
Corporation використовує такі знаки за ліцензією.
Інші товарні знаки та торгові назви належать відповідним власникам.
Google Play і Android є торговельними марками Google Inc.
Утилізація або передача системи
Ця система може містити в собі настройки користувача.
Якщо ви утилізуєте або передаєте цю систему, то
виконайте процедуру повернення усіх настройок до
заводських для видалення настройок користувача.
- Для видалення всіх записаних доріжок у внутрішній
пам’яті (див. стор. 12).
- Для повернення всіх семпльованих звуків до
заводських налаштувань (див. стор. 17).
- Для скидання пам’яті системи (див. стор. 20).
Примітка:
• Хронологія операцій може бути записана в пам’яті
цієї системи.
Page 83

Характеристики
Характеристики підсилювача
Середньоквадратична вихідна потужність (задіяно
кожен канал)
Високий 400 + 400 Вт
(3 ™, 1 кГц, повний коефіцієнт гармонік 30%)
Середній-низький 400 + 400 Вт
(3 ™, 1 кГц, повний коефіцієнт гармонік 30%)
Низький 850 + 850 Вт
(5 ™, 100 Гц, повний коефіцієнт гармонік 30%)
Загальна середньоквадратична вихідна потужність
Секція дисків
Диск, що відтворюється
8 см CD, CD-R/RW
12 см CD, CD-R/RW
Підбирання
Довжина хвилі 790 нм (CD)
Аудіовихід (диск) 2 канали (
FL = передній лівий канал
FR = передній правий канал
Формат CD-DA, MP3
Секція приймача
Частотна модуляція (FM)
Пам’ять налаштувань 30 станцій
Частотний діапазон
Роз'єми антени 75 ™, незбалансовані
Амплітудна модуляція (АM)
Пам’ять налаштувань 15 станцій
Частотний діапазон 522 кГц до 1629 кГц (крок 9 кГц)
3300 Вт (повний коефіцієнт гармонік 30%)
Клас потужності лазера 1
FL , FR)
87,50 МГц до 108,00 МГц (крок 50 кГц)
520 кГц до 1630 кГц (крок 10 кГц)
Дані колонок
Тип системи: 4 смуги, 4 динаміки
Колонка(и)
Супер-сабвуфер (низький) 38 см, конічного типу
Супер-сабвуфер (середній-низький) 20 см,
Сабвуфер 10 см, конічного типу
Високочастотний динамік 6см, конічного типу
Імпенданс Високий 3 ™/ Середній-низький 3 ™/
Вихідний звуковий тиск 91 дБ/Вт (1 м)
Частотний діапазон Від 25 Гц до 23 кГ
Розділ Bluetooth
Версія Bluetooth
Вихід Клас 2 (2,5 мВт)
Радіус зв'язку
Передбачуваний радіус зв'язку: близь ко 10 м*
Спосіб зв'язку Діапазон 2,4 ГГц FH-SS
Профіль відповідності A2DP/AVRCP/SPP
* Передбачуваний радіус зв'язку
Середовище проведення
вимірювань: Температура 25 °C/
Вимірювання в “РЕЖИМІ 1”
(низькочастотне відлуння)
30 Гц до 20 кГц (-10 дБ)
®
Висота 1,0 м
конічного типу
Низький 5 ™
ц (–16 дБ)
®
Ver.2.1 + EDR
Секція пам’яті
Обсяг пам'яті 2 ГБ
Підтримка форматів медіафайлів MP3
Запис до пам'яті
Швидкість передачі бітів 128 кбіт/с
Швидкість запису до пам'яті 1x,
Формат запису файлів із CD, MP3, USB-пристрою
3x максимально (лише CD)
MP3 (*.mp3)
Секція роз’ємів
Мікрофонне гніздо Моно, ‰ 6,3 мм (2 Система)
Порт USB
Стандартний USB Повношвидкісний USB 2.0
Підтримка форматів медіафайлів MP3 (*.mp3)
Файлова система пристроїв USB FAT12, FAT16, FAT32
Вилучення інформації з пристрою USB
Швидкість передачі бітів 128 кбіт/с
Швидкість запису 1x, 3x максимально (лише CD)
Формат файлів, що записуються MP3 (*.mp3)
Вхід AUX
Роз'єм Стерео, ‰ 3,5 мм, гніздо
Стерео, контактне гніздо
Загальні характеристики
Електроживлення
SA-MAX770GSK
Енергоспоживання 330 Вт
Розміри (Ш x В x Г)
Вага: Прибл. 7,1 кг
SB-MAX770GSK
Розміри (Ш x В x Г)
З урахуванням підставок динаміків
Без урахування підставок динаміків
Вага: Прибл. 37,4 кг
Діапазон робочих температур: Від 0°C до +40 °C
Відносна вологість:
Енергоспоживання в режимі очікування
Примітка:
• Техн іч ні характеристики можуть бути змінені без
попереднього повідомлення. Маса та розміри є
приблизними.
• Загальні нелінійні спотворення вимірювались за
допомогою цифрового аналізатора спектра.
Змін. струм від 220 В до 240 В, 50/60 Гц
492 мм x 221 мм x 421 мм
576 мм x 794 мм x 542 мм
576 мм x 786 мм x 542 мм
35% до 80% RH (без утворення конденсату)
0,3 Вт (приблизно)
УКРАЇНСЬКА
VQT5F33
21
83
Page 84

Информaция для покупaтeля
ɂɇɎɈɊɆȺɐɂəɈɋȿɊɌɂɎɂɄȺɐɂɂɉɊɈȾɍɄɌȺ
&'ɫɬɟɪɟɨɫɢɫɬɟɦɚɦɨɞɟɥɶ6&0$;«
ɨɫɧɨɜɧɨɟɭɫɬɪɨɣɫɬɜɨ6$0$;«ɤɨɥɨɧɤɢ6%0$;«³3DQDVRQLF´
ɋȿɊɌɂɎɂɐɂɊɈȼȺɇɈɋȻȿɅɅɂɋɊȻɆɢɧɫɤɭɥɄɪɚɫɧɚɹɞȻ
©ªɦɨɝɭɬɛɵɬɶɥɸɛɵɟ ɛɭɤɜɟɧɧɨɰɢɮɪɨɜɵɟ ɫɢɦɜɨɥɵɨɛɨɡɧɚɱɚ ɸɳɢɟɤɨɧɟɱɧɵɣɩɭɧɤɬɞɨɫɬɚɜɤɢɢɢɥɢɰɜɟɬɤɨɪɩɭɫɚɢɡɞɟɥɢɹ
ɋɟɪɬɢɮɢɤɚɬɫɨɨɬɜɟɬɫɬɜɢɹ ʋ7&%<
ɋɟɪɬɢɮɢɤɚɬɫɨɨɬɜɟɬɫɬɜɢɹɜɵɞɚɧ 04.02.2014
ɋɟɪɬɢɮɢɤɚɬɫɨɨɬɜɟɬɫɬɜɢɹ
ɞɟɣɫɬɜɢɬɟɥɟɧɞɨ 03.02.2019
Panasonic AVC Networks Johor Malaysia Sdn. Bhd.
ɉɚɧɚɫɨɧɢɤɗɣȼɢɋɢɇɟɬɜɨɪɤɫȾɠɨɯɨɪɆɚɥɚɣɡɢɹɋɞɧȻɯɞ
IE PLO 460, Jalan Bandar, 81700, Pasir Gudang, Johor, Malaysia
ȺɣɂɉɅɈȾɠɚɥɚɧȻɚɧɞɚɪɉɚɡɢɪȽɭɞɚɧɝȾɠɨɯɨɪɆɚɥɚɣɡɢɹ
ɂɦɩɨɪɬɺɪ
ɈɈɈ©ɉɚɧɚɫɨɧɢɤɊɭɫªɊɎɝɆɨɫɤɜɚ
ɭɥȻɨɥɶɲɚɹɌɭɥɶɫɤɚɹɞɷɬɚɠɬɟɥ
Нaзвaниe пpодyкции:
Нaзвaниe cтpaны пpоизводитeля: Малайзия
Нaзвaниe пpоизводитeля: Пaнacоник Kоpпоpэйщн
Юpидичecкий aдpec: 1006 Kaдoмa, Ocaкa, Япония
Дaтa пpоизводcтвa: Вы можeтe yточнить год и мecяц по cepийномy номepy нa тaбличкe.
Пpимep мapкиpовки — Сepийный номep
Год : Тpeтья цифpa в cepийном номepe (1
Mecяц: Чeтвepтaя бyквa в cepийном номepe (A—Янвapь, B—Фeвpaль, ...L—Дeкaбpь)
Примечание: Сентябрь может указываться как “S” вместо “I”.
Дополнитeльнaя инфоpмaция: Пожaлyйcтa внимaтeльно пpочитaйтe инcтpyкцию по
Уcтaнoвлeнный пpоизводитeлeм в поpядкe п. 2 cт. 5 фeдepaльнoгo зaкoнa PФ “O зaщитe пpaв пoтpeбитeлeй” cpoк cлyжбы дaннoгo издeлия paвeн 7 гoдaм
c дaты пpоизводcтвa пpи ycлoвии, чтo издeлиe иcпoльзyeтc
тexничecкими cтaндapтaми.
Импортёр:
ООО « Панасоник Рус », РФ, 115191, г. Москва,
ул. Большая Тульская, д. 11, 3 эта
тел. 8-800-200-21-00
ж.
№ XX1AXXXXXXX (X-любaя цифpa или бyквa)
— 2011, 2 — 2012, ...0 — 2020)
я в cтpoгoм cooтвeтcтвии c нacтoящeй инcтpyкциeй пo экcплyaтaции и пpимeнимыми
CD-стереосистема
экcплyaтaции.
VQT5F33
22
84
Page 85

ȱɇɎɈɊɆȺɐȱəɉɊɈɉȱȾɌȼȿɊȾɀȿɇɇəȼȱȾɉɈȼȱȾɇɈɋɌȱɉɊɈȾɍɄɌɍ
&'ɫɬɟɪɟɨɫɢɫɬɟɦɚ
ɦɨɞɟɥɿ6&0$;
ɬɨɪɝɨɜɨʀɦɚɪɤɢ3DQDVRQLF
ɜɿɞɩɨɜɿɞɚɽɜɢɦɨɝɚɦɌɟɯɧɿɱɧɨɝɨɊɟɝɥɚɦɟɧɬɭɡɟɥɟɤɬɪɨɦɚɝɧɿɬɧɨʀɫɭɦɿɫɧɨɫɬɿɨɛɥɚɞɧɚɧɧɹ
ɡɚɬɜɟɪɞɠɟɧɨɦɭɩɨɫɬɚɧɨɜɨɸɄɚɛɿɧɟɬɭɆɿɧɿɫɬɪɿɜɍɤɪɚʀɧɢʋɜɿɞɥɢɩɧɹ
ɜɢɦɨɝɚɦɌɟɯɧɿɱɧɨɝɨɊɟɝɥɚɦɟɧɬɭɛɟɡɩɟɤɢɧɢɡɶɤɨɜɨɥɶɬɧɨɝɨɟɥɟɤɬɪɢɱɧɨɝɨɨɛɥɚɞɧɚɧɧɹ
ɡɚɬɜɟɪɞɠɟɧɨɦɭɩɨɫɬɚɧɨɜɨɸɄɚɛɿɧɟɬɭɆɿɧɿɫɬɪɿɜɍɤɪɚʀɧɢʋɜɿɞɠɨɜɬɧɹɬɚɜɢɦɨɝɚɦ
ɌɟɯɧɿɱɧɨɝɨɊɟɝɥɚɦɟɧɬɭɪɚɞɿɨɨɛɥɚɞɧɚɧɧɹɿɬɟɥɟɤɨɦɭɧɿɤɚɰɿɣɧɨɝɨɤɿɧɰɟɜɨɝɨɬɟɪɦɿɧɚɥɶɧɨɝɨɨɛɥɚɞɧɚɧɧɹ
ɡɚɬɜɟɪɞɠɟɧɨɦɭɩɨɫɬɚɧɨɜɨɸɄɚɛɿɧɟɬɭɆɿɧɿɫɬɪɿɜɍɤɪɚʀɧɢɜɿɞɱɟɪɜɧɹɪʋ
Ɇɨɞɟɥɶ6&0$;ɬɨɪɝɨɜɨʀ
ɦɚɪɤɢ3DQDVRQLFɜLɞɩɨɜLɞɚɽ
ɜɢɦɨɝɚɦɧɨSɦɚɬɢɜɧɢɯ
ɞɨɤɭɦɟɧɬLɜ
ȾɋɌɍȱ(ɋ
ȱȿɋ,'7
ȾɋɌɍȱȿɋ
ȱȿɋ,'7
ȾɋɌɍ(1
(1,'7
ȾɋɌɍ(1
(1,'7
ȾɋɌɍ,(&
ȱȿɋ,'7
ȾɋɌɍ(1
(1,'7
ȾɋɌɍ(76,(1±
(76ȱ(1ȱ'7
ȾɋɌɍ(76,(1
(76ȱ(1ȱ'7
ȾɋɌɍ(76,(1
(76ȱ(1ȱ'7
ȾɋɌɍ(76,(1
(76,(1,'7
(76,(19
ɉɪɢɦɿ ɬɤɚ ±ɜɿɞ ɞɜɨɯɞɨɬɪɶɨɯɛɭɞɶɹɤɢɯɥɿɬɟɪɥɚɬɢɧɫɶɤɨɝɨɚɥɮɚɜɿɬɭɬɚɚɛɨɰɢɮɪɧɚɩɨɡɧɚɱɟɧɧɹɤɪɚʀɧɢɩɪɢɡɧɚɱɟɧɧɹɜɢɪɨɛɭ
ȾɟɤɥɚɪɚɰɿɸɩɪɨɜɿɞɩɨɜɿɞɧɿɫɬɶɦɨɠɧɚɩɟɪɟɝɥɹɧɭɬɢɧɚKWWSVHUYLFHSDQDVRQLFXDɭɪɨɡɞɿɥɿ©Ⱦɨɤɭɦɟɧɬɢª
ȼɢɪɨɛɧɢɤ 3DQDVRQLF&RUSRUDWLRQ ɉɚɧɚɫɨɧɿɤɄɨɪɩɨɪɟɣɲɧ
Ɂɚɚɞɪɟɫɨɸ
0DWVXRFKR.DGRPDVKL
2VDND-DSDQ
ɆɚɬɫɭɨɱɨɄɚɞɨɦɚɲɿ
Ɉɫɚɤɚəɩɨɧɿɹ
Ʉɪɚʀɧɚɩɨɯɨɞɠɟɧɧɹ 0DOD\VLD Ɇɚɥɚɣɡɿɹ
ɍɩɨɜɧɨɜɚɠɟɧɢɣɉɪɟɞɫɬɚɜɧɢɤ ɌɈȼɉȺɇȺɋɈɇȱɄɍɄɊȺȲɇȺɅɌȾ
Ⱥɞɪɟɫɚɍɩɨɜɧɨɜɚɠɟɧɨɝɨ
ɉɪɟɞɫɬɚɜɧɢɤɚ
ɩɪɨɜɭɥɨɤɈɯɬɢɪɫɶɤɢɣɛɭɞɢɧɨɤɦɿɫɬɨɄɢʀɜɍɤɪɚʀɧɚ
Ɍɟɪɦɿɧɫɥɭɠɛɢ ɪɨɤɿɜ
Ⱦɚɬɭɜɢɝɨɬɨɜɥɟɧɧɹɜɢɦɨɠɟɬɟɜɢɡɧɚɱɢɬɢɡɚɤɨɦɛɿɧɚɰɿɽɸɰɢɮɪɬɚɥɿɬɟɪɫɟɪɿɣɧɨɝɨɧɨɦɟɪɚɳɨ
ɪɨɡɬɚɲɨɜɚɧɿɧɚɡɚɞɧɿɣɱɚɫɬɢɧɿɜɢɪɨɛɭ
ɉɪɢɤɥɚɞ
ɏɏɏɏɏɏɏɏɏɏɏ
Ɋɿɤɨɫɬɚɧɧɹɰɢɮɪɚɪɨɤɭ«
ɆɿɫɹɰɶȺ±ɋɿɱɟɧɶȼ±Ʌɸɬɢɣ«/±Ƚɪɭɞɟɧɶ
РУССКИЙ
УКРАЇНСЬКА
VQT5F33
23
85
Page 86

- If you see this symbol -
-ﺰﻣﺮﻟﺍ ﺍﺬﻫ ﺖﻳﺃﺭ ﺍﺫﺇ -
ﻕﺎﻄﻧ ﺝﺭﺎﺧ ﻯﺮﺧﺃ ﻥﺍﺪﻠﺑ ﻲﻓ ﺕﺎﻔﻠﺨﻤﻟﺍ ﻦﻣ ﺺﻠﺨﺘﻟﺍ ﻝﻮﺣ ﺕﺎﻣﻮﻠﻌﻣ
ﻲﺑﻭﺭﻭﻷﺍ ﺩﺎﺤﺗﻻﺍ
ﺩﺎﺤﺗﻻﺍ ﻕﺎﻄﻧ ﻞﺧﺍﺩ ﻂﻘﻓ ﻱﺭﺎﺳ ﺰﻣﺮﻟﺍ ﺍﺬﻫ
.ﻲﺑﻭﺭﻭﻷﺍ
ﻰﺟﺮﻳ ،ﺞﺘﻨﻤﻟﺍ ﺍﺬﻫ ﻦﻣ ﺺﻠﺨﺘﻟﺍ ﻲﻓ ﺖﺒﻏﺭ ﺍﺫﺈﻓ
ﻱﺬﻟﺍ ﻉﺯﻮﻤﻟﺍ ﻭﺃ ،ﻚﻳﺪﻟ ﺔﻴﻠﺤﻤﻟﺍ ﺕﺎﻬﺠﻻﺑ ﻝﺎﺼﺗﻻﺍ
ﺺﻠﺨﺘﻟﺍ ﺔﻘﻳﺮﻃ ﻦﻋ ﺭﺎﺴﻔﺘﺳﻼﻟ ؛ﻪﻌﻣ ﻞﻣﺎﻌﺘﺗ
.ﺔﺤﻴﺤﺼﻟﺍ
Information on Disposal in other Countries
outside the European Union
This symbol is only valid in the
European Union.
If you wish to discard this product,
please contact your local
authorities or dealer and ask for
the correct method of disposal.
- 如果看到此符号的话 -
在欧盟以外其它国家的废物处置信息
如果要废弃此产品,请与当
地机构或经销商联系,获取
此符号仅在欧盟有效。
正确的废弃方法。
VQT5F33
24
86
- Если вы увидите такой символ -
Информация по обращению с отходами
для стран, не входящих в Европейский
Союз
Действие этого символа
распространяется только на
Европейский Союз.
Если вы собираетесь выбросить
данный продукт, узнайте в
местных органах власти или у
дилера, как следует поступать с
отходами такого типа.
– За наявності цього знаку –
Інформація щодо утилізації в країнах, які
не входять в Європейський Союз
Даний символ дійсний тільки на
території Європейського Союзу.
При потребі утилізації даного
виробу зверніться до місцевого
керівництва або дилера щодо
правильного методу її
здійснення.
Page 87

VQT5F33
25
87
Page 88

ﻞﻴﺻﻮﺘﻟﺍ ﻑﺍﺮﻃﺃ ﻢﺴﻗ
(ﻡﺎﻈﻧ 2) ﻢﻣ 6.3 ،ﻱﺩﺎﺣﺃ ﻥﻮﻓﻭﺮﻜﻴﻣ ﺲﺒﻘﻣ
ﺔﻋﺮﺴﻟﺍ ﻞﻣﺎﻛ USB 2.0 ﺬﻔﻨﻣ USB ﺭﺎﻴﻌﻣ
(*.mp3) MP3 ﻂﺋﺎﺳﻮﻟﺍ ﺕﺎﻔﻠﻣ ﻖﻴﺴﻨﺗ ﻢﻋﺩ
FAT32 ،FAT16 ،FAT12 USB ﺓﺰﻬﺟﺃ ﺕﺎﻔﻠﻣ ﻡﺎﻈﻧ
ﺔﻴﻧﺎﺜﻟﺍ ﻲﻓ ﺖﺑ ﻮﻠﻴﻛ 128 ﺖﺒﻟﺍ ﻝﺪﻌﻣ
(ﻂﻘﻓ CD ﻁﻮﻐﻀﻣ ﺹﺮﻗ) ﻰﺼﻗﺃ ﺪﺤﻛ 3x ،1x ﻞﻴﺠﺴﺘﻟﺍ ﺔﻋﺮﺳ
(*.mp3) MP3 ﻞﻴﺠﺴﺘﻟﺍ ﻒﻠﻣ ﻖﻴﺴﻨﺗ
3.5 ﺱﺎﻘﻣ ﺲﺒﻘﻣ ،ﻮﻳﺮﺘﺳﺍ ﻞﻴﺻﻮﺘﻟﺍ ﻑﺮﻃ
ﻦﻨﺴﻣ ﺲﺒﻘﻣ ،ﻮﻳﺮﺘﺳﺍ
ﺰﺗﺮﻫ 50/60 ،ﺩﺩﺮﺘﻣ ﺭﺎﻴﺗ ﺖﻟﻮﻓ 240 ﻰﻟﺇ ﺖﻟﻮﻓ 220 ﺔﻗﺎﻄﻟﺎﺑ ﺩﺍﺪﻣﻹﺍ ﺓﺪﺣﻭ
ﺕﺍﻭ 330 ﺔﻗﺎﻄﻟﺍ ﻙﻼﻬﺘﺳﺍ
ﻢﻣ 421 x ﻢﻣ 221 x ﻢﻣ 492
SA-MAX770GSK
(ﻚﻤ
ﺴﻟﺍ x ﻉﺎﻔﺗﺭﻻﺍ x ﺽﺮﻌﻟﺍ) ﺩﺎﻌﺑﻷﺍ
ُ
ﺎًﺒﻳﺮﻘﺗ ﻢﺠﻛ 7.1 ﻥﺯﻮﻟﺍ
SB-MAX770GSK
(ﻚﻤ
ﺴﻟﺍ x ﻉﺎﻔﺗﺭﻻﺍ x ﺽﺮﻌﻟﺍ) ﺩﺎﻌﺑﻷﺍ
ُ
ﻢﻣ 542 x ﻢﻣ 794 x ﻢﻣ 576
ﻢﻣ 542 x ﻢﻣ 786 x ﻢﻣ 576
:ﺕﺎﻋﺎﻤﺴﻟﺍ ﺪﻋﺍﻮﻗ ﻚﻟﺫ ﻲﻓ ﺎﻤﺑ
:ﺕﺎﻋﺎﻤﺴﻟﺍ ﻞﺟﺭﺃ ءﺎﻨﺜﺘﺳﺎﺑ
ﺎًﺒﻳﺮﻘﺗﻢﺠﻛ 37.4 ﻥﺯﻮﻟﺍ
ﺔﻳﻮﺌﻣ ﺔﺟﺭﺩ +40 ﻰﻟﺇ ﺔﻳﻮﺌﻣ ﺔﺟﺭﺩ 0 ﻞﻴﻐﺸﺘﻟﺍ ﺓﺭﺍﺮﺣ ﺔﺟﺭﺩ ﻕﺎﻄﻧ
(ﻒﺜﻜﺗ ﻥﻭﺪﺑ) 80% ﻭ 35% ﻦﻴﺑ ﺔﻴﺒﺴﻨﻟﺍ ﺔﺑﻮﻃﺮﻟﺍ ﻊﻘﺗ
ﻲﺑﺮﻋ
(ﺎًﺒﻳﺮﻘﺗ) ﺕﺍﻭ 0.3
VQT5F33
.ﺔﻴﺒﻳﺮﻘﺗ ﺩﺎﻌﺑﻷﺍﻭ ﻥﺯﻮﻟﺍ .ﺭﺎﻌﺷﺇ ﻥﻭﺪﺑ ﺮﻴﻴﻐﺘﻠﻟ ﺔﺿﺮﻋ ﺕﺎﻔﺻﺍﻮﻤﻟﺍ •
.ﻲﻤﻗﺮﻟﺍ ﻒﻴﻄﻟﺍ ﻞﻠﺤﻣ ﺔﻄﺳﺍﻮﺑ ﻲﻘﻓﺍﻮﺘﻟﺍ ﺐﻴﻛﺮﺘﻠﻟ ﻲﻠﻜﻟﺍ ﻩﻮﺸﺘﻟﺍ ﺔﺒﺴﻧ ﺭّﺪﻘُﺗ •
ﻞﻴﻐﺸﺘﻠﻟ ﺔﻤﺋﻼﻤﻟﺍ ﺔﺑﻮﻃﺮﻟﺍ ﻕﺎﻄﻧ
ﺩﺍﺪﻌﺘﺳﻻﺍ ﻊﺿﻭ ﻲﻓ ﺔﻗﺎﻄﻟﺍ ﻙﻼﻬﺘﺳﺍ
21
88
USB ﺬﻔﻨﻣ
USB ﺝﻮﻤﺗ
AUX ﻞﺧﺩ
ﻡﺎﻋ
:ﺔﻈﺣﻼﻣ
ﺕﺎﻋﺎﻤﺴﻟﺍ ﻢﺴﻗ
(ﺔﻀﻔﺨﻨﻤﻟﺍ ﺕﺎﺑﺬﺑﺬﻟﺍ ﺱﺎﻜﻌﻧﺍ) ﺕﺎﻋﺎﻤﺳ 4 ﻦﻣ ﻥﻮﻜﻣ ﻩﺎﺠﺗﻻﺍ ﻲﻋﺎﺑﺭ ﻡﺎﻈﻧ ﻉﻮﻨﻟﺍ
ﻢﺳ 38 ﺱﺎﻘﻣ ﻉﻮﻨﻟﺍ ﺔﻴﻃﻭﺮﺨﻣ (ﺾﻔﺨﻨﻣ) ﺩﺩﺮﺘﻟﺍ ﺔﻀﻔﺨﻨﻣ ﺔﻋﺎﻤﺳ
ﻢﺳ 20 ﺱﺎﻘﻣ ﻉﻮﻨﻟﺍ ﺔﻴﻃﻭﺮﺨﻣ
ﻢﺳ 10 ﺱﺎﻘﻣ ﻉﻮﻨﻟﺍ ﺔﻴﻃﻭﺮﺨﻣ ﺩﺩﺮﺘﻟﺍ ﺔﻀﻔﺨﻨﻣ ﺔﻋﺎﻤﺳ
ﻢﺳ 6 ﺱﺎﻘﻣ ﻉﻮﻨﻟﺍ ﺔﻴﻃﻭﺮﺨﻣ ﺩﺩﺮﺘﻟﺍ ﺔﻴﻟﺎﻋ ﺔﻋﺎﻤﺳ
5 ﺾﻔﺨﻨﻣ /3 ﺽﺎﻔﺨﻧﻻﺍ ﻂﺳﻮﺘﻣ /3 ﻊﻔﺗﺮﻣ ﺔﻗﻭﺎﻌﻤﻟﺍ
(ﻡ 1) ﺕﺍﻭ/ﻞﺒﺴﻳﺩ 91 ﺭﺩﺎﺼﻟﺍ ﺕﻮﺼﻟﺍ ﻂﻐﺿ
(ﻞﺒﺴﻳﺩ -16) ﺰﺗﺮﻫ ﻮﻠﻴﻛ 23 ﻰﻟﺇ ﺰﺗﺮﻫ 25 ﺩﺩﺮﺘﻟﺍ ﻕﺎﻄﻧ
(ﻞﺒﺴﻳﺩ -10) ﺰﺗﺮﻫ ﻮﻠﻴﻛ 20 ﻰﻟﺇ ﺰﺗﺮﻫ 30
(ﺽﺎﻔﺨﻧﻻﺍ ﺔﻄﺳﻮﺘﻣ) ﺩﺩﺮﺘﻟﺍ ﺔﻀﻔﺨﻨﻣ ﺔﻋﺎﻤﺳ
ﺕﺎﻋﺎﻤﺴﻟﺍ (ﺕﺍﺪﺣﻭ) ﺓﺪﺣﻭ
Bluetooth® ﻢﺴﻗ
EDR + 2.1 ﺭﺍﺪﺻﺇ Bluetooth
(ﺕﺍﻭ ﻲﻠﻣ 2.5) 2 ﺔﺌﻔﻟﺍ ﺝﺍﺮﺧﻹﺍ
*ﺎًﺒﻳﺮﻘﺗ ﻡ 10 :ﺔﻌﻗﻮﺘﻤﻟﺍ ﻝﺎﺼﺗﻻﺍ ﺔﻓﺎﺴﻣ
FH-SS ﺰﺗﺮﻫ ﺎﺠﻴﺟ 2.4 ﺩﺩﺮﺘﻟﺍ ﻕﺎﻄﻧ ﻝﺎﺼﺗﻻﺍ ﺔﻘﻳﺮﻃ
SPP/AVRCP/A2DP ﺔﻠﺳﺍﺮﻤﻟﺍ ﻒﻳﺮﻌﺗ ﻒﻠﻣ
ﻡ 1.0 ﻉﺎﻔﺗﺭﻻﺍ
®
ﺭﺍﺪﺻﻹﺍ
ﻝﺎﺼﺗﻻﺍ ﺔﻓﺎﺴﻣ
ﺓﺭﺪﻘﻤﻟﺍ ﻝﺎﺼﺗﻻﺍ ﺔﻓﺎﺴﻣ *
:ﺱﺎﻴﻘﻟﺍ ﺔﺌﻴﺑ/ﺔﻳﻮﺌﻣ ﺔﺟﺭﺩ 25 ﺓﺭﺍﺮﺤﻟﺍ ﺔﺟﺭﺩ
"MODE 1" ﻲﻓ ﺱﺎﻴﻘﻟﺍ
ﺓﺮﻛﺍﺬﻟﺍ ﻢﺴﻗ
ﺖﻳﺎﺑﺎﺠﻴﺟ 2 ﺓﺮﻛﺍﺬﻟﺍ ﻢﺠﺣ
MP3 ﻂﺋﺎﺳﻮﻟﺍ ﺕﺎﻔﻠﻣ ﻖﻴﺴﻨﺗ ﻢﻋﺩ
ﺔﻴﻧﺎﺜﻟﺍ ﻲﻓ ﺖﺑ ﻮﻠﻴﻛ 128 ﺖﺒﻟﺍ ﻝﺪﻌﻣ
،1x ﺓﺮﻛﺍﺬﻟﺍ ﻰﻠﻋ ﻞﻴﺠﺴﺘﻟﺍ ﺔﻋﺮﺳ
(ﻂﻘﻓ CD ﻁﻮﻐﻀﻣ ﺹﺮﻗ) ﻰﺼﻗﺃ ﺪﺤﻛ 3x
USB ﻞﻴﺠﺴﺘﻟﺍ ﻒﻠﻣ ﻖﻴﺴﻨﺗﻭ MP3 ﻖﻴﺴﻨﺗﻭ CD ﻁﻮﻐﻀﻤﻟﺍ ﺹﺮﻘﻟﺍ ﻦﻣ
(*.mp3) MP3
ﺓﺮﻛﺍﺬﻟﺍ ﻰﻠﻋ ﻞﻴﺠﺴﺘﻟﺍ
ﺕﺎﻔﺻﺍﻮﻤﻟﺍ
ﺕﻮﺼﻟﺍ ﺮﺒﻜﻣ ﻢﺴﻗ
(ﺓﺎﻨﻗ ﻞﻛ ﺐﺴﺣ) RMS ﺝﺍﺮﺧﺇ ﺔﻗﺎﻃ
ﺕﺍﻭ 400+400 ﻲﻟﺎﻋ
((THD) ﻲﻘﻓﺍﻮﺘﻟﺍ ﺐﻴﻛﺮﺘﻠﻟ ﻲﻠﻜﻟﺍ ﻩﻮﺸﺘﻟﺍ ﻦﻣ 30% ،ﺰﺗﺮﻫ ﻮﻠﻴﻛ 1 ،3 )
ﺕﺍﻭ 400+400 ﺽﺎﻔﺨﻧﻻﺍ ﻂﺳﻮﺘﻣ
((THD) ﻲﻘﻓﺍﻮﺘﻟﺍ ﺐﻴﻛﺮﺘﻠﻟ ﻲﻠﻜﻟﺍ ﻩﻮﺸﺘﻟﺍ ﻦﻣ 30% ،ﺰﺗﺮﻫ ﻮﻠﻴﻛ 1 ،3 )
ﺕﺍﻭ 850+850 ﺾﻔﺨﻨﻣ
((THD) ﻲﻘﻓﺍﻮﺘﻟﺍ ﺐﻴﻛﺮﺘﻠﻟ ﻲﻠﻜﻟﺍ ﻩﻮﺸﺘﻟﺍ ﻦﻣ 30% ،ﺰﺗﺮﻫ 100 ،5 )
ﺕﺍﻭ 3300 RMS ﺝﺮﺧ ﺔﻗﺎﻃ ﻲﻟﺎﻤﺟﺇ
((THD) ﻲﻘﻓﺍﻮﺘﻟﺍ ﺐﻴﻛﺮﺘﻠﻟ ﻲﻠﻜﻟﺍ ﻩﻮﺸﺘﻟﺍ ﻦﻣ 30%)
ﺹﺍﺮﻗﻷﺍ ﻢﺴﻗ
ﻞّﻐﺸُﻤﻟﺍ ﺹﺮﻘﻟﺍ
CD-R/RW ،CD ﻢﺳ 8
CD-R/RW ،CD ﻢﺳ 12
ﻁﺎﻘﺘﻟﻻﺍ
(CD) ﺮﺘﻣﻮﻧﺎﻧ 790 ﺔﺟﻮﻤﻟﺍ ﻝﻮﻃ
CLASS 1 ﺔﺌﻔﻟﺍ ﺭﺰﻴﻠﻟﺍ ﺔﻗﺎﻃ
(FR ،FL) ﺓﺎﻨﻗ 2 (ﺹﺮﻘﻟﺍ) ﺕﻮﺼﻟﺍ ﺝﺍﺮﺧﺇ
ﻯﺮﺴﻴﻟﺍ ﺔﻴﻣﺎﻣﻷﺍ ﺓﺎﻨﻘﻟﺍ = FL
ﻰﻨﻤﻴﻟﺍ ﺔﻴﻣﺎﻣﻷﺍ ﺓﺎﻨﻘﻟﺍ = FR
MP3 ،CD-DA ﻖﻴﺴﻨﺘﻟﺍ
ﻒﻟﺍﻮﻤﻟﺍ ﻢﺴﻗ
(FM) ﺩﺩﺮﺘﻟﺍ ﻦﻴﻤﻀﺗ
ﺔﻄﺤﻣ 30 ﻂﺒﻀﻟﺍ ﺔﻘﺒﺴﻤﻟﺍ ﺓﺮﻛﺍﺬﻟﺍ
ﺩﺩﺮﺘﻟﺍ ﻕﺎﻄﻧ
ﺰﺗﺮﻫ ﺎﺠﻴﻣ 108.00 ﻰﻟﺇ ﺰﺗﺮﻫ ﺎﺠﻴﻣ 87.50
(ﺰﺗﺮﻫ ﻮﻠﻴﻛ 50 ﺎﻫﺭﺪﻗ ﺔﻴﺠﻳﺭﺪﺗ ﺩﺎﻳﺰﺑ)
ﻥﺯﺍﻮﺘﻣ ﺮﻴﻏ 75 ﻲﺋﺍﻮﻬﻟﺍ ﻑﺍﺮﻃﺃ
(AM) ﻉﺎﺴﺗﻻﺍ ﻦﻴﻤﻀﺗ
ﺔﻄﺤﻣ 15 ﻂﺒﻀﻟﺍ ﺔﻘﺒﺴﻤﻟﺍ ﺓﺮﻛﺍﺬﻟﺍ
ﺩﺩﺮﺘﻟﺍ ﻕﺎﻄﻧ
(ﺰﺗﺮﻫ ﻮﻠﻴﻛ 9 ﺎﻫﺭﺪﻗ ﺔﻴﺠﻳﺭﺪﺗ ﺩﺎﻳﺰﺑ) ﺰﺗﺮﻫ ﻮﻠﻴﻛ 1629 ﻰﻟﺇ ﺰﺗﺮﻫ ﻮﻠﻴﻛ 522
(ﺰﺗﺮﻫ ﻮﻠﻴﻛ 10 ﺎﻫﺭﺪﻗ ﺔﻴﺠﻳﺭﺪﺗ ﺩﺎﻳﺰﺑ) ﺰﺗﺮﻫ ﻮﻠﻴﻛ 1630 ﻰﻟﺇ ﺰﺗﺮﻫ ﻮﻠﻴﻛ 520
Page 89

.ﻰﺼﻗﺃ ﺪﺤﺑ ﺭﺎﺘﻣﺃ •10 ﻕﺎﻄﻧ ﻲﻓ ﺯﺎﻬﺠﻟﺍ ﺍﺬﻫ ﻡﺪﺨﺘﺳﺍ
.ﻞﺧﺍﺪﺘﻟﺍ ﻭﺃ ﻖﺋﺍﻮﻌﻟﺍ ﻭﺃ ﺔﺌﻴﺒﻟﺍ ﺐﺴﺤﺑ ﻕﺎﻄﻨﻟﺍ ﻞﻘﻳ ﺪﻗ •
ﻊﻄﻘﺗﻭ ﺶﻳﻮﺸﺘﻟﺎﻛ ،ﺕﻼﻜﺸﻣ ﺄﺸﻨﺗ ﺪﻘﻓ ؛ﻢﻴﻠﺳ ﻮﺤﻧ ﻰﻠﻋ ﻡﺎﻈﻨﻟﺍ ﺍﺬﻫ ﻞﻤﻌﻳ ﻻ ﺪﻗ •
ﺔﻘﺻﻼﻣ ﺓﺪﺣﻮﻟﺍ ﺖﻧﺎﻛ ﺍﺫﺇ ﻚﻟﺫﻭ ،ﺔﻴﻜﻠﺳﻼﻟﺍ ﺕﺎﺟﻮﻤﻟﺍ ﻞﺧﺍﺪﺗ ﺐﺒﺴﺑ ﺕﻮﺼﻟﺍ
ﻩﺭﺪﻗ ﺩﺩﺮﺗ ﻕﺎﻄﻧ ﻡﺪﺨﺘﺴﺗ ﺓﺰﻬﺟﺃ ﻭﺃ ،Bluetooth
ﺔﻳﺎﻐﻠﻟ ﺔﻳﻮﻗ ﺔﻴﻜﻠﺳﻻ ﺕﺎﺟﻮﻣ ﺙﺎﻌﺒﻧﺍ ﺔﻟﺎﺣ ﻲﻓ ،ﻲﻐﺒﻨﻳ ﺎﻤﻛ ﻡﺎﻈﻨﻟﺍ ﺍﺬﻫ ﻞﻤﻌﻳ ﻻ ﺪﻗ •
.ﻂﻘﻓ ﻡﺎﻌﻟﺍ ﻱﺩﺎﻌﻟﺍ ﻡﺍﺪﺨﺘﺳﻼﻟ ﺺﺼﺨﻣ ﻡﺎﻈﻨﻟﺍ ﺍﺬﻫ •
ﺕﺍﺩﺩﺮﺘﻟﺍ ﻞﺧﺍﺪﺘﻟ ﺔﺳﺎﺴﺣ ﺔﺌﻴﺑ ﻲﻓ ﻭﺃ ،ﺓﺰﻬﺟﺃ ﻦﻣ ﺏﺮﻘﻟﺎﺑ ﻡﺎﻈﻨﻟﺍ ﺍﺬﻫ ﻡﺪﺨﺘﺴﺗ ﻻ •
.(ﻪﺑﺎﺷ ﺎﻣﻭ ﻞﻣﺎﻌﻤﻟﺍﻭ ﺕﺎﻴﻔﺸﺘﺴﻤﻟﺍﻭ ﺕﺍﺭﺎﻄﻤﻟﺍ :ﻝﺎﺜﻣ) ﺔﻴﻜﻠﺳﻼﻟﺍ
®
ﺔﻴﻨﻘﺘﺑ ﺓﺩﻭﺰﻣ ﻯﺮﺧﺃ ﺓﺰﻬﺟﻷ
.ﻚﻟﺫ ﻰﻟﺇ ﺎﻣ ﻭﺃ ﺔﺒﻳﺮﻗ ﺚﺑ ﺔﻄﺤﻣ ﻦﻣ
ﻡﺍﺪﺨﺘﺳﻻﺍ ﻕﺎﻄﻧ
ﻯﺮﺧﺃ ﺓﺰﻬﺟﺃ ﻦﻣ ﻞﺧﺍﺪﺘﻟﺍ
.ﺰﺗﺮﻫ ﺎﺠﻴﺟ 2.4
ﺩﻮﺸﻨﻤﻟﺍ ﻡﺍﺪﺨﺘﺳﻻﺍ
ﺺﻴﺧﺍﺮﺘﻟﺍ
ﻭ Fraunhofer IIS ﺔﻛﺮﺷ ﻦﻣ ﺔﺼﺧﺮﻤﻟﺍ MPEG Layer-3 ﺕﻮﺼﻟﺍ ﺰﻴﻣﺮﺗ ﺔﻴﻨﻘﺗ
ﻡﺍﺪﺨﺘﺳﺍ ﻱﺃ Panasonic Corporation ﺔﻛﺮﺸﻟ ﺺ
. ﺔﻛﺮﺸﻟ Bluetooth® ـﻟ ﺔﻳﺰﻣﺮﻟﺍ ﺕﺍﺭﺎﻌﺸﻟﺍﻭ ﺔﻴﺼﻨﻟﺍ ﺔﻣﻼﻌﻟﺍ ﺔﻴﻜﻠﻣ ﻝﻭﺆﺗ
.ﺔﻠﺼﻟﺍ ﻱﻭﺫ ﺎﻬﺑﺎﺤﺻﻷ ﺎﻬﺘﻴﻜﻠﻣ ﻝﻭﺆﺘﻓ ،ﻯﺮﺧﻷﺍ ﺔﻳﺭﺎﺠﺘﻟﺍ ءﺎﻤﺳﻷﺍﻭ ﺔﻳﺭﺎﺠﺘﻟﺍ ﺕﺎﻣﻼﻌﻟﺍ ﺎﻣﺃ
.Google Inc. ﺔﻛﺮﺸﻟ ﺔﻳﺭﺎﺠﺗ ﺕﺎﻣﻼﻋ Androidﻭ Google Play ﺪﻌﺗ
ّ
َ
ﺧﺮُﻣﻭ ، Bluetooth SIG, Inc
.Thomson
.ﺕﺎﻣﻼﻌﻟﺍ ﻩﺬﻬﻟ
ﻪﻨﻋ ﻝﺯﺎﻨﺘﻟﺍ ﻭﺃ ﻡﺎﻈﻨﻟﺍ ﺍﺬﻫ ﻦﻣ ﺺﻠﺨﺘﻠﻟ
.ﺔﻴﻠﺧﺍﺪﻟﺍ ﺓﺮﻛﺍﺬﻟﺍ ﻲﻓ ﻡﺪﺨﺘﺴﻤﻟﺍ ﺕﺍﺩﺍﺪﻋﺈﺑ ﺔﺻﺎﺨﻟﺍ ﺕﺎﻣﻮﻠﻌﻤﻟﺎﺑ ﻡﺎﻈﻨﻟﺍ ﺍﺬﻫ ﻆﻔﺘﺤﻳ ﺪﻗ
ﺕﺍءﺍﺮﺟﻹﺍ ﻊﺒﺗﺎﻓ ،ﻪﻨﻋ ﻝﺯﺎﻨﺘﻟﺍ ﻭﺃ ،ﻪﻨﻣ ﺺﻠﺨﺘﻟﺎﺑ ﻡﺎﻈﻨﻟﺍ ﺍﺬﻫ ﻦﻋ ﻲﻠﺨﺘﻟﺍ ﺕﺩﺭﺃ ﺍﺫﺈﻓ
ﺕﺎﻣﻮﻠﻌﻤﻟﺍ ﺢﺴﻤﻟ ؛ﻊﻨﺼﻤﻟﺎﺑ ﻂﺒﻀﻟﺍ ﺔﻘﺒﺴﻤﻟﺍ ﺕﺍﺩﺍﺪﻋﻹﺍ ﻊﻴﻤﺟ ﻰﻟﺇ ﻉﻮﺟﺮﻟﺎﺑ ﺔﺻﺎﺨﻟﺍ
.( -12 ﺔﺤﻔﺻ ﻊﺟﺍﺭ) ﺔﻴﻠﺧﺍﺪﻟﺍ ﺓﺮﻛﺍﺬﻟﺍ ﻲﻓ ﺔﻠﺠﺴﻤﻟﺍ ﺕﺍﺭﺎﺴﻤﻟﺍ ﻊﻴﻤﺟ ﻑﺬﺤﻟ
.( -17 ﺔﺤﻔﺻ ﻊﺟﺍﺭ) ﻊﻨﺼﻤﻟﺎﺑ ﻖﺒﺴﻤﻟﺍ ﻂﺒﻀﻟﺍ ﻰﻟﺇ ﺔﻴﺟﺫﻮﻤﻨﻟﺍ ﺕﺍﻮﺻﻷﺍ ﻊﻴﻤﺟ ﺓﺩﺎﻋﻹ
.( -20 ﺔﺤﻔﺻ ﻊﺟﺍﺭ) ﻡﺎﻈﻨﻟﺍ ﺓﺮﻛﺍﺫ ﻂﺒﺿ ﺓﺩﺎﻋﻹ
.ﻡﺎﻈﻨﻟﺍ ﺓﺮﻛﺍﺫ ﻲﻓ ﻞﻴﻐﺸﺘﻟﺍ ﻞﺠﺳ ﻆﻔﺤُﻳ ﺪﻗ •
.ﺔﻠﺠﺴﻤﻟﺍ
:ﺔﻈﺣﻼﻣ
ﻊﺟﺮﻤﻟﺍ
ﻱﺮﺠﻳ ﻞﺧﺍﺪﺗ ﻱﻷ ﺯﺎﻬﺠﻟﺍ ﻝﻮﺒﻗ ﺐﺠﻳ (2)ﻭ ،ﺭﺎﺿ ﻞﺧﺍﺪﺗ ﻲﻓ ﺯﺎﻬﺠﻟﺍ ﺍﺬﻫ ﺐﺒﺴﺘﻳ ﻻ ﺪﻗ (1)
؛ﺓﺪﺣﻮﻟﺍ ﻩﺬﻬﺑ ﺹﺎﺨﻟﺍ ﺞﻣﺎﻧﺮﺒﻠﻟ ﺎًﺜﻳﺪﺤﺗ ﺮﺧﻵ ﻥﺁ ﻦﻣ Panasonic ﺔﻛﺮﺷ ﺭﺪﺼﺗ ﺪﻗ
.ﻞﻌﻔﻟﺎﺑ ﺓﺩﻮﺟﻮﻤﻟﺍ ﺕﺍﺰﻴﻤﻟﺍ ﻞﻤﻋ ﺔﻘﻳﺮﻃ ﻦﻴﺴﺤﺗ ﻭﺃ ،ﺓﺪﻳﺪﺟ ﺕﺍﺰﻴﻣ ﺔﻓﺎﺿﺇ ﻪﻧﺄﺷ ﻦﻣ
ﻲﺘﻟﺍ ﺕﺎﻣﻮﻠﻌﻤﻟﺍ ﻭﺃ/ﻭ ﺕﺎﻧﺎﻴﺒﻟﺍ ﻦﻋ ﺔﻴﻟﻭﺆﺴﻣ ﻱﺃ Panasonic ﺔﻛﺮﺷ ﻞﻤﺤﺘﺗ ﻻ
ﻦﻴﻧﺍﻮﻘﻟﺍ ﻰﻠﻋ
.ﻲﻜﻠﺳﻻ ﺚﺑ ﺺﻴﺧﺮﺗ ﻢﻳﺪﻘﺗ ﻱﺭﻭﺮﻀﻟﺍ ﻦﻣ ﺲﻴﻟ ،ﻪﻴﻠﻋ
•Bluetooth® ﺔﻴﻨﻘﺘﺑ ﺓﺩﻭﺰﻤﻟﺍ ﺓﺰﻬﺟﻷﺍ ﻊﻴﻤﺠﻟ ﻲﻜﻠﺳﻼﻟﺍ ﻡﺍﺪﺨﺘﺳﻻﺍ ﻭﺃ/ﻭ ﻝﺎﺳﺭﻹﺍ
ﻥﻮﻜﺗ ﺪﻗ ﻭﺃ ،ﻝﺎﺼﺗﻻﺍ ﻲﻓ ﻞﺸﻔﻳ ﺪﻗ ،ﻪﺗﺍﺩﺍﺪﻋﺇﻭ ﺯﺎﻬﺠﻟﺍ ﺕﺎﻔﺻﺍﻮﻣ ﻰﻠﻋ ﺍًﺩﺎﻤﺘﻋﺍ •
ﻭﺃ/ﻭ ﺔﺌﻴﺑ ﻰﻠﻋ ًءﺎﻨﺑ ﻦﻜﻟﻭ . •Bluetooth® ﺔﻴﻨﻘﺘﻟ ﻥﺎﻣﻷﺍ ﺕﺍﺰﻴﻣ ﻡﺎﻈﻨﻟﺍ ﺍﺬﻫ ﻢﻋﺪﻳ
ﺕﺎﻧﺎﻴﺒﻟﺍ ﻞﻘﻧ ءﺎﻨﺛﺃ ﺭﺬﺤﻟﺍ ﱠﺥﻮﺘﻓ .ٍﻑﺎﻛ ﺮﻴﻏ ﻥﺎﻣﻷﺍ ﺍﺬﻫ ﻥﻮﻜﻳ ﺪﻗ ،ﻞﻴﻐﺸﺘﻟﺍ ﺕﺍﺩﺍﺪﻋﺇ
.ﻪﻴﻓ ﺏﻮﻏﺮﻣ ﺮﻴﻏ ﻞﻴﻐﺸﺗ ﻰﻟﺇ ﻱﺩﺆﻳ ﺪﻗ ﻱﺬﻟﺍ ﻞﺧﺍﺪﺘﻟﺍ ﻚﻟﺫ ﻲﻓ ﺎﻤﺑ ،ﻪﻟﺎﺒﻘﺘﺳﺍ
.ﻲﻟﺎﺘﻟﺍ ﺐﻳﻮﻟﺍ ﻊﻗﻮﻣ ﻊﺟﺍﺭ ،ﻞﻴﺻﺎﻔﺘﻟﺍ ﻦﻣ ﺪﻳﺰﻣ ﻰﻠﻋ ﻝﻮﺼﺤﻠﻟ
http://panasonic.jp/support/global/cs/
.ﻲﻜﻠﺳﻼﻟﺍ ﻝﺎﺳﺭﻹﺍ ءﺎﻨﺛﺃ ﺎﻬﻨﻋ ﻒﺸﻜﻟﺍ ﻱﺮﺠﻳ ﺪﻗ
.ﺰﺗﺮﻫ ﺎﺠﻴﺟ •2.4 ﻩﺭﺪﻗ ﺩﺩﺮﺗ ﻕﺎﻄﻧ ﻡﺎﻈﻨﻟﺍ ﺍﺬﻫ ﻡﺪﺨﺘﺴﻳ
ءﺎﻨﺑ ﺩﺎﻤﺘﻋﺍ ﻰﻠﻋ ﻞﺼﺣ ﺪﻗﻭ ،ﺩﺩﺮﺘﻟﺍ ﺕﺍﺪﻴﻴﻘﺗ ﻊﻣ ﻡﺎﻈﻨﻟﺍ ﺍﺬﻫ ﻖﻓﺍﻮﺘﻳ •
ً
ﺔﻛﺮﺷ ﻞﺒِﻗ ﻦﻣ ﺔﻋﻮﺿﻮﻤﻟﺍ ﺮﻴﻳﺎﻌﻤﻟﺎﺑ ﺓﺰﻬﺟﻷﺍ ﻊﻴﻤﺟ ﻡﺰﺘﻠﺗ ﻥﺃ ﺐﺠﻳ •
. •Bluetooth® ﺔﻴﻨﻘﺘﺑ ﺩﻭﺰﻣ ﺯﺎﻬﺟ ﻰﻟﺇ ﺕﺎﻧﺎﻴﺑ ﻞﻘﻧ ﻡﺎﻈﻨﻟﺍ ﺍﺬﻬﻟ ﻦﻜﻤﻳ ﻻ
:ﻦﻴﻴﻟﺎﺘﻟﺍ ﻦﻴﻃﺮﺸﻠﻟ ﻞﻴﻐﺸﺘﻟﺍ ﻊﻀﺨﻳ
ﺞﻣﺎﻧﺮﺒﻟﺍ ﺚﻳﺪﺤﺗ
.ﺎًﻧﺎﺠﻣ ﺔﺣﺎﺘﻣ ﺕﺎﺜﻳﺪﺤﺘﻟﺍ ﻩﺬﻫﻭ
(.ﻂﻘﻓ ﺔﻳﺰﻴﻠﺠﻧﻹﺍ ﺔﻐﻠﻟﺎﺑ ﺡﺎﺘﻣ ﻊﻗﻮﻤﻟﺍ ﺍﺬﻫ)
Bluetooth® ﺔﻴﻨﻘﺗ ﻝﻮﺣ
ﺩﺩﺮﺘﻟﺍ ﻕﺎﻄﻧ
ﺩﺎﻤﺘﻋﻻﺍ
ءﺎﻨﺑﻭ .ﺩﺩﺮﺘﻟﺎﺑ ﺔﻴﻨﻌﻤﻟﺍ
ً
:ﺔﻴﻟﺎﺘﻟﺍ ﻝﺎﻌﻓﻷﺍ ﻰﻠﻋ ﻥﻮﻧﺎﻘﻟﺍ ﺐﻗﺎﻌُﻳ •
.ﺎﻬﻠﻳﺪﻌﺗ ﻭﺃ ﺔﻴﺴﻴﺋﺮﻟﺍ ﺓﺪﺣﻮﻟﺍ ﻚﻴﻜﻔﺗ -
.ﺕﺎﻔﺻﺍﻮﻤﻟﺍ ﺕﺎﻘﺼﻠﻣ ﺔﻟﺍﺯﺇ -
ﻡﺍﺪﺨﺘﺳﻻﺍ ﺕﺍﺪﻴﻴﻘﺗ
.ﻦﻴﻧﻮﻤﻀﻣ ﺮﻴﻏ
.Bluetooth SIG, Inc.
.ﺔﻔﻠﺘﺨﻣ ﺕﺎﻴﻠﻤﻌﻟﺍ ﺾﻌﺑ
.ﻡﺎﻈﻨﻟﺍ ﺍﺬﻫ ﻰﻟﺇ ﺎًﻴﻜﻠﺳﻻ
(ﺪﻴﻬﻤﺘﻟﺍ) ﻡﺎﻈﻨﻟﺍ ﺓﺮﻛﺍﺫ ﻂﺒﺿ ﺓﺩﺎﻋﺇ
:ﺔﻴﻟﺎﺘﻟﺍ ﺕﻻﺎﺤﻟﺍ ﺙﺪﺤﺗ ﺎﻣﺪﻨﻋ ﺓﺮﻛﺍﺬﻟﺍ ﻂﺒﺿ ﺪﻋﺃ
.ﺭﺍﺭﺯﺃ ﻰﻠﻋ ﻂﻐﻀﻟﺍ ﺪﻨﻋ ﺔﺑﺎﺠﺘﺳﺍ ﺩﻮﺟﻭ ﻡﺪﻋ •
.ﺎﻬﻄﺒﺿ ﺓﺩﺎﻋﺇﻭ ﺓﺮﻛﺍﺬﻟﺍ ﺕﺎﻳﻮﺘﺤﻣ ﺢﺴﻣ ﻲﻓ ﺔﺒﻏﺮﻟﺍ •
.ﺩﺩﺮﺘﻤﻟﺍ ﻲﺋﺎﺑﺮﻬﻜﻟﺍ ﺭﺎﻴﺘﻟﺍ ﺲﺑﺎﻗ ﻞﺼﻓﺍ
ﺭﺎﻴﺘﻟﺍ ﺲﺑﺎﻗ ﻞﱢﺻﻭ ،ﺔﻴﺴﻴﺋﺮﻟﺍ ﺓﺪﺣﻮﻟﺎﺑ [/I] ﻰﻠﻋ ًﻻﻮﻄﻣ ﻂﻐﻀﺗ ﺎﻤﻨﻴﺑ 2
.ﻯﺮﺧﺃ ﺓﺮﻣ ﺩﺩﺮﺘﻤﻟﺍ ﻲﺋﺎﺑﺮﻬﻜﻟﺍ
ﺮﻬﻈﻳ ﻥﺃ ﻰﻟﺇ (ﺎًﺒﻳﺮﻘﺗ ٍﻥﺍﻮﺛ 10 ﺓﺪﻤﻟ) ﺭﺰﻟﺍ ﻰﻠﻋ ًﻻﻮﻄﻣ ﻂﻐﻀﻟﺍ ﻊﺑﺎﺗ
."- - - - - - - -"
.[/I] ﺭﱢﺮﺣ
.ﻊﻨﺼﻤﻟﺎﺑ ﻖﺒﺴﻤﻟﺍ ﻂﺒﻀﻟﺍ ﻰﻟﺇ ﺕﺍﺩﺍﺪﻋﻹﺍ ﻊﻴﻤﺟ ﺩﻮﻌﺗ
.ﻯﺮﺧﺃ ﺓﺮﻣ ﺔﻤﺋﺎﻘﻟﺍ ﺮﺻﺎﻨﻋ ﻂﺒﺿ ﻱﺭﻭﺮﻀﻟﺍ ﻦﻣ
ﺪﻌﺑ ﻦﻋ ﻢﻜﺤﺘﻟﺍ ﺯﺎﻬﺟ ﺰﻣﺭ
ﺹﺎﺨﻟﺍ ﺪﻌﺑ ﻦﻋ ﻢﻜﺤﺘﻟﺍ ﺯﺎﻬﺠﻟ ﻯﺮﺧﻷﺍ Panasonic ﺓﺰﻬﺟﺃ ﺐﻴﺠﺘﺴﺗ ﺎﻣﺪﻨﻋ
.ﻡﺎﻈﻨﻟﺎﺑ ﺹﺎﺨﻟﺍ ﺪﻌﺑ ﻦﻋ ﻢﻜﺤﺘﻟﺍ ﺯﺎﻬﺟ ﺰﻣﺭ ﺮﻴﻴﻐﺘﺑ ﻚﻴﻠﻋ ،ﻡﺎﻈﻨﻟﺎﺑ
ﺩﺍﺪﻌﺘﺳﻻﺍ
.AUX ﻞﺧﺩ ﺭﺎﻴﺘﺧﻻ [RADIO/EXT-IN] ﻰﻠﻋ ﻂﻐﺿﺍ
"REMOTE 2" ﻰﻠﻋ ﺰﻣﺮﻟﺍ ﻂﺒﻀﻟ
،ﺔﻴﺴﻴﺋﺮﻟﺍ ﺓﺪﺣﻮﻟﺍ ﻰﻠﻋ [RADIO/EXT-IN] ﻰﻠﻋ ًﻻﻮﻄﻣ ﺎًﻄﻐﺿ ﻂﻐﺿﺍ
."REMOTE 2" ﺮﻬﻈﻳ ﻰﺘﺣ ﺪﻌﺑ ﻦﻋ ﻢﻜﺤﺘﻟﺍ ﺯﺎﻬﺠﺑ [2] ﻰﻠﻋﻭ
.ﻰﻧﺩﺃ ﺪﺤﺑ ٍﻥﺍﻮﺛ 4 ﺓﺪﻤﻟ [2] ﻰﻠﻋﻭ [OK] ﻰﻠﻋ ًﻻﻮﻄﻣ ﺎًﻄﻐﺿ ﻂﻐﺿﺍ
"REMOTE 1" ﻰﻠﻋ ﺰﻣﺮﻟﺍ ﻂﺒﻀﻟ
،ﺔﻴﺴﻴﺋﺮﻟﺍ ﺓﺪﺣﻮﻟﺍ ﻰﻠﻋ [RADIO/EXT-IN] ﻰﻠﻋ ًﻻﻮﻄﻣ ﺎًﻄﻐﺿ ﻂﻐﺿﺍ
."REMOTE 1" ﺮﻬﻈﻳ ﻰﺘﺣ ﺪﻌﺑ ﻦﻋ ﻢﻜﺤﺘﻟﺍ ﺯﺎﻬﺠﺑ [1] ﻰﻠﻋﻭ
.ﻰﻧﺩﺃ ﺪﺤﺑ ٍﻥﺍﻮﺛ 4 ﺓﺪﻤﻟ [1] ﻰﻠﻋﻭ [OK] ﻰﻠﻋ ًﻻﻮﻄﻣ ﺎًﻄﻐﺿ ﻂﻐﺿﺍ
1
3
1
2
1
2
VQT5F33
20
89
Page 90

.ﺔﻴﻠﺧﺍﺪﻟﺍ ﺓﺮﻛﺍﺬﻟﺍ ﻭﺃ ، •USB
ﺭﺎﺴﻤﻟﺍ ﻞﱢﻐﺸﻳﻭ ،ﺭﺎﺴﻤﻟﺍ ﺍﺬﻫ ﻡﺎﻈﻨﻟﺍ ﻰﻄﺨﺘﻴﺴﻓ .ﻡﻮﻋﺪﻣ ﺮﻴﻏ •MP3 ﻒﻠﻣ ﺖﻠﱠﻐﺷ
ﺰﻣﺮﻟﺍ ﺮّﻴﻏ .ﺔﻔﻠﺘﺨﻣ ﺯﻮﻣﺭ ﺔﻴﺴﻴﺋﺮﻟﺍ ﺓﺪﺣﻮﻟﺍﻭ ﺪﻌﺑ ﻦﻋ ﻢﻜﺤﺘﻟﺍ ﺯﺎﻬﺟ ﻡﺪﺨﺘﺴﻳ •
[ -1] ﻭ [OK] ﻰﻠﻋ ًﻻﻮﻄﻣ ﺎًﻄﻐﺿ ﻂﻐﺿﺍ ،"REMOTE 1" ﺽﺮﻋ ﺪﻨﻋ
[
ﻭ [OK] ﻰﻠﻋ ًﻻﻮﻄﻣ ﺎًﻄﻐﺿ ﻂﻐﺿﺍ ،"REMOTE 2" ﺽﺮﻋ ﺪﻨﻋ
ﻉﺪﻓ .ﻡﺎﻈﻨﻟﺍ ﻞﻴﻐﺸﺗ ﻒﻗﻮﺘﻴﺳﻭ ،ﺓﺭﺍﺮﺤﻟﺍ ﺔﺟﺭﺩ ﻦﻣ ﺔﻳﺎﻤﺤﻟﺍ ﺓﺮﺋﺍﺩ ﻂﻴﺸﻨﺗ ﻯﺮﺟ ﺪﻗ •
.ﻯﺮﺧﺃ ﺓﺮﻣ ﺎﻬﻠﻴﻐﺸﺗ ﻞﺒﻗ ﺎﻬﺗﺭﺍﺮﺣ ﺔﺟﺭﺩ ﺾﻔﺨﻨﺗ ﻰﺘﺣ ﺓﺪﺣﻮﻟﺍ
.ﺓﺪﺣﻮﻟﺎﺑ ﺔﻳﻮﻬﺘﻟﺍ ﺔﺤﺘﻓ ﻡﺎﻣﺃ ﻖﺋﺍﻮﻋ ﺩﻮﺟﻭ ﻡﺪﻋ ﻦﻣ ﻖﻘﺤﺗ •
.ﻯﺮﺧﺃ ﺓﺮﻣ ﻪﻠﱢﻐﺷ ﻢﺛ ،ﻡﺎﻈﻨﻟﺍ ﻞﻴﻐﺸﺗ ﻒﻗﻭﺃﻭ ،USB ﺯﺎﻬﺟ ﻞﺼﻓﺍ
ﺮﻴﻐﺘﻤﻟﺍ ﺖﺒﻟﺍ ﻝﺪﻌﻣ ﺕﺍﺫ ﺕﺍﺭﺎﺴﻤﻠﻟ ﻲﻘﺒﺘﻤﻟﺍ ﻞﻴﻐﺸﺘﻟﺍ ﺖﻗﻭ ﻡﺎﻈﻨﻟﺍ ﺽﺮﻌﻳ ﻻ •
ﺯﺎﻬﺟ ﻰﻠﻋ
.ﺓﺪﺣﻮﻠﻟ ﺓﺪﻴﺟ ﺔﻳﻮﻬﺗ ﺮﻴﻓﻮﺗ ﻦﻣ ﺪﻛﺄﺗﻭ •
"USB OVER CURRENT ERROR"
.ﺔﻗﺎﻄﻟﺍ ﻦﻣ ًﻼﺋﺎﻫ ﺍًﺭﺪﻗ •USB
"NO TRACK"
ﺭﺎﺴﻣ ﻭﺃ ﻡﻮﺒﻟﺃ ﺪﺟﻮﻳ ﻻ
"PLAYERROR"
"REMOTE 1"
"REMOTE 2"
.ﺪﻌﺑ ﻦﻋ ﻢﻜﺤﺘﻟﺍ ﺯﺎﻬﺠﺑ
.ﻰﻧﺩﺃ ﺪﺤﺑ ٍﻥﺍﻮﺛ 4 ﺓﺪﻤﻟ
.ﻰﻧﺩﺃ ﺪﺤﺑ ٍﻥﺍﻮﺛ 4 ﺓﺪﻤﻟ
"TEMP NG"
ﺯﺎﻬﺟ ﻚﻠﻬﺘﺴﻳ
.(VBR)
ﻲﺑﺮﻋ
VQT5F33
ﺔﻴﺴﻴﺋﺮﻟﺍ ﺓﺪﺣﻮﻟﺍ ﻰﻠﻋ ﺔﺿﻭﺮﻌﻤﻟﺍ ﻞﺋﺎﺳﺮﻟﺍ
.ﻲﻟﺎﺘﻟﺍ
ﻦﻣ ﻞﻗﺃ •USB ﺯﺎﻬﺠﻟ ﻲﻘﺒﺘﻤﻟﺍ ﻞﻴﺠﺴﺘﻟﺍ ﺖﻗﻭ ﻥﻷ ؛ﻞﻴﺠﺴﺘﻟﺍ ءﺍﺮﺟﺇ ﻦﻜﻤﻳ ﻻ
ﺓﺮﻣ ﻞﻴﺠﺴﺘﻟﺍ ِﺮﺟﺃ ﻢﺛ ،ٍﻑﺎﻛ ﻞﻴﺠﺴﺗ ﺖﻗﻭ ﺢﻴﺘﻳ USB ﺯﺎﻬﺠﺑ ﻚﻳﺪﻟ ﺯﺎﻬﺠﻟﺍ ﻝﺪﺒﺘﺳﺍ
-2]
،
"VBR"
، •USB ﺯﺎﻬﺟ ﺔﺌﻴﻬﺘﺑ ﻢﻘﻓ ؛ﻒﻠﺘﻠﻟ USB ﺯﺎﻬﺟ ﻰﻠﻋ ﺔﻧﺰﺨﻤﻟﺍ ﺕﺎﻔﻠﻤﻟﺍ ﺽﺮﻌﺘﺗ ﺪﻗ
.ﻯﺮﺧﺃ ﺓﺮﻣ ﻝﻭﺎﺣ ﻢﺛ ،ﺕﺎﻤﻴﻠﻌﺘﻟﺍ ﺃﺮﻗﺍ .ﺢﻴﺤﺻ ﺮﻴﻏ ﻞﻴﻐﺸﺗ ﺙﺪﺣ •
(ﻪﺑﺎﺷ ﺎﻣ ﻭﺃ •USBﺯﺎﻬﺟ ﻭﺃ ﻮﻳﺩﺍﺭ :ﻝﺎﺜﻣ) ﺮﺧﺁ ﻞﻴﻐﺸﺗ ﺭﺪﺼﻣ ﺭﺎﻴﺘﺧﺍ ﻚﻨﻜﻤﻳ ﻻ
.ﻞﻴﺠﺴﺘﻟﺍ ﺔﻔﻴﻇﻭ ﻒﻗﻭﺄﻓ .ﻞﻴﺠﺴﺘﻟﺍ ءﺎﻨﺛﺃ [] ﻭﺃ [] ﻰﻠﻋ ﻂﻐﺿﺍ ﻢﺛ
ﻞﻴﻐﺸﺗ ﻒﻗﻭﺃ .ﻯﺮﺧﺃ ﺓﺮﻣ ﻪﻠﱢﻐﺷ ﻢﺛ ،ﻡﺎﻈﻨﻟﺍ ﻞﻴﻐﺸﺗ ﻒﻗﻭﺃ .
.ﻯﺮﺧﺃ ﺓﺮﻣ ﻪﻠﱢﻐﺷ ﻢﺛ ،ﻡﺎﻈﻨﻟﺍ ﻞﻴﻐﺸﺗ ﻒﻗﻭﺃﻭ ، •Bluetooth® ﺯﺎﻬﺟ ﻞﺼﻓﺍ
.ﻂﻘﻓ ﻡﻮﻋﺪﻤﻟﺍ ﻖﻴﺴﻨﺘﻟﺍ ﻞﻴﻐﺸﺗ ﻚﻨﻜﻤﻳ ﺚﻴﺣ ؛ﻯﻮﺘﺤﻤﻟﺍ ﺺﺤﻓﺍ •
.ﺎﻬﻠﻴﻐﺸﺗ ﺪﻋﺃ • ﻢﺛ ،ﺓﺪﺣﻮﻟﺍ ﻞﻴﻐﺸﺗ ﻒﻗﻭﺃ .ﺓﺪﺣﻮﻟﺎﺑ ﺔﻠﻜﺸﻣ ﺪﺟﻮﺗ ﺪﻗ
.ﻝﺎﺼﺗﻻﺍ ﺺﺤﻓﺎﻓ .ﻞﺼﺘﻣ ﺮﻴﻏ •USB ﺯﺎﻬﺟ
.ﻰﻘﻴﺳﻮﻤﻟﺍ ﺭﺪﺼﻣ ﻰﻠﻋ ﺡﺎﺘﻤﻟﺍ ﺖﻗﻮﻟﺍ ﻲﻟﺎﻤﺟﺇ
. •AM ﺭﺪﺼﻣ ﻦﻣ ﻞﻴﺠﺴﺘﻟﺍ ﺪﻨﻋ ﺹﺍﺮﻗﻷﺍ ﺝﺭﺩ ﺢﺘﻓ ﻦﻜﻤﻳ ﻻ
.ﺎﻬﺣﻼﺻﺈﺑ ﻢﻗﻭ ،ﺕﺎﻋﺎﻤﺴﻟﺍ ﻙﻼﺳﺃ ﺕﻼﻴﺻﻮﺗ ﺺﺤﻓﺍ •
.ﻯﺮﺧﺃ ﺓﺮﻣ ﻪﻠﱢﻐﺷ ﻢﺛ ،ﻡﺎﻈﻨﻟﺍ ﻞﻴﻐﺸﺗ ﻒﻗﻭﺃ •
"USB A NO DEVICE"
"USB B NO DEVICE"
"DEVICE FULL"
.ﻯﺮﺧﺃ
"ERROR"
(ﻞﻴﺠﺴﺘﻟﺍ ءﺎﻨﺛﺃ)
.ﻯﺮﺧﺃ ﺓﺮﻣ ﻪﻠﱢﻐﺷ ﻢﺛ ،ﻡﺎﻈﻨﻟﺍ
. •Bluetooth
"ERROR"
"F61"
ﺯﺎﻬﺟ ﻞﺼﻓﺍ
"F70"
®
ﺯﺎﻬﺟ ﺺﺤﻓﺍ
"F77"
"NO PLAY"
"UNSUPPORT"
.ﻯﺮﺧﺃ ﺓﺮﻣ ﻝﻭﺎﺣ ﻢﺛ
ﻲﻨﻓ ﺔﻓﺮﻌﻤﺑ ﻲﺋﺍﻮﻬﻟﺍ ﺐﻴﻛﺮﺗ ﻲﻐﺒﻨﻳﻭ .ﻱﺭﺎﻴﺘﺧﺍ ﻲﺟﺭﺎﺧ •FM ﻲﺋﺍﻮﻫ ﻡﺪﺨﺘﺳﺍ
ﺔﻔﻟﺍﻮﻣ ﻊﺿﻭ ﻲﻓ ﻝﺎﺒﻘﺘﺳﺍ ﻞﻀﻓﺃ ﺮﻓﻮﻳ ﺎﻣ " •BP 4" ﻰﺘﺣ "BP 1" ﻦﻣ ﺮﺘﺧﺍ
•USB
ﺓﺮﻣ ﺔﻠﺼﻟﺍ ﻱﺫ ﺯﺎﻬﺠﻟﺎﺑ ﻥﺍﺮﺘﻗﻻﺍ ﻝﻭﺎﺣ ﻢﺛ ،ﺮﺧﻵﺍ ﺯﺎﻬﺠﻟﺎﺑ ﻝﺎﺼﺗﻻﺍ ﻊﻄﻗﺎﻓ
ﻚﻴﻠﻋ ﻦﻴﻌﺘﻳ ،ﺔﻴﻠﺧﺍﺩ •Bluetooth® ﺔﻴﻨﻘﺘﺑ ﺓﺩﻭﺰﻤﻟﺍ ﺓﺰﻬﺟﻷﺍ ﺾﻌﺒﺑ ﻖﻠﻌﺘﻳ ﺎﻤﻴﻓ
ﻞﻴﻐﺸﺘﻟﺍ ﺕﺎﻤﻴﻠﻌﺗ ﺃﺮﻗﺍ .ﺎًﻳﻭﺪﻳ "SC-MAX770" ﻰﻠﻋ ﺕﻮﺼﻟﺍ ﺝﺮﺧ ﻂﺒﺿ
ﻩﺭﺪﻗ ﺩﺩﺮﺗ ﻕﺎﻄﻧ ﻡﺪﺨﺘﺴﺗ ﻲﺘﻟﺍ ﻯﺮﺧﻷﺍ ﺓﺰﻬﺟﻷﺍ ﻦﻣ ﻞﺧﺍﺪﺗ ﺙﺪﺤﻳ •
ﺔﻴﻜﻠﺳﻼﻟﺍ ﻒﺗﺍﻮﻬﻟﺍﻭ ﻒﻳﻭﻭﺮﻜﻴﻤﻟﺍ ﻥﺍﺮﻓﺃﻭ ﻲﻜﻠﺳﻼﻟﺍ ﻪﺟﻮﻤﻟﺍ) ﺰﺗﺮﻫ ﺎﺠﻴﺟ 2.4
ﺓﺰﻬﺟﻷﺍ ﻦﻴﺑﻭ ﻪﻨﻴﺑ ﺪﻋﺎﺑﻭ ،ﻡﺎﻈﻨﻟﺍ ﻦﻣ ﺏﺮﻘﻟﺎﺑ ﺯﺎﻬﺠﻟﺍ ﻞﻘﻧﺍ .(ﻚﻟﺫ ﻰﻟﺇ ﺎﻣﻭ
.ﻡﺎﻈﻨﻟﺍ ﻦﻴﺑﻭ ﻪﻨﻴﺑ ﺪﻋﺎﺑ ﻭﺃ ،ﻥﻮﻳﺰﻔﻠﺘﻟﺍ ﻞﻴﻐﺸﺗ ﻒﻗﻭﺃ •
.AM ﺚﺑ ءﺎﻨﺛﺃ ﺾﻔﺨﻨﻣ ﻦﻴﻨﻃ ﺕﻮﺻ ﺭﺪﺼﻳ
.ﻯﺮﺧﻷﺍ ﻙﻼﺳﻷﺍﻭ ﺕﻼﺒﻜﻟﺍ ﻦﻴﺑﻭ ،ﻲﺋﺍﻮﻬﻟﺍ ﻦﻴﺑ ﺪﻋﺎﺑ •
. •Bluetooth
.ﻒﻠﺘﺨﻣ ﺯﺎﻬﺠﺑ ًﻼﺼﺘﻣ ﻡﺎﻈﻨﻟﺍ ﺍﺬﻫ ﻥﻮﻜﻳ ﺪﻗ •
.ﻡﺎﻈﻨﻟﺍ ﺮﺒﻋ ﺕﻮﺼﻟﺍ ﻉﺎﻤﺳ ﺭﺬﻌﺘﻳ ﻦﻜﻟﻭ ،ﻞﺼﺘﻣ ﺯﺎﻬﺠﻟﺍ
.ﻞﻴﺻﺎﻔﺗ ﻰﻠﻋ ﻝﻮﺼﺤﻠﻟ ﺯﺎﻬﺠﻟﺎﺑ ﺔﺻﺎﺨﻟﺍ
.ﺭﺎﺘﻣﺃ •10 ﺎﻫﺭﺪﻗ ﺔﻓﺎﺴﻣ ﺪﺘﻤﻳ ﻱﺬﻟﺍ ﻝﺎﺼﺗﻻﺍ ﻕﺎﻄﻧ ﺝﺭﺎﺧ ﺯﺎﻬﺠﻟﺍ
.(NFC
( •14 ?) .ﺯﺎﻬﺠﻟﺎﺑ NFC ﺓﺰﻴﻣﻭ ﺓﺪﺣﻮﻟﺍ ﻞﻴﻐﺸﺗ ﻦﻣ ﺪﻛﺄﺗ
.ﻡﺎﻈﻨﻟﺍ ﻰﻟﺇ ﺏﺮﻗﺃ ﻥﺎﻜﻣ ﻲﻓ ﺯﺎﻬﺠﻟﺍ ﻞﻘﻧﺍ
.ﺖﺑﺎﺛ ﻝﺎﺼﺗﺍ ءﺍﺮﺟﻹ " •MODE 1" ﺮﺘﺧﺍ
ﺔﻴﺻﺎﺧ) ﻞﻤﻌﺗ ﻻ ﺓﺪﺣﺍﻭ ﺔﺴﻤﻠﺑ ﻝﺎﺼﺗﻻﺍ ﺔﻔﻴﻇﻭ
.ﺕﺎﻀﺒﻧ ﺕﻮﺻ ﻉﺎﻤﺳ ﻢﺘﻳ
.ﻥﺍﺮﺘﻗﻻﺍ ءﺍﺮﺟﺇ ﻦﻜﻤﻳ ﻻ
®
ﺯﺎﻬﺟ ﺔﻟﺎﺣ ﻦﻣ ﻖﻘﺤﺗ
.ﺯﺎﻬﺠﻟﺎﺑ ﻝﺎﺼﺗﻻﺍ ﻦﻜﻤﻳ ﻻ
.ﺯﺎﻬﺠﻟﺍ ﻥﺍﺮﺘﻗﺍ ﻞﺸﻓ •
.ﻯﺮﺧﺃ ﺓﺮﻣ ﻥﺍﺮﺘﻗﻻﺍ ِﺮﺟﺃ
.ﺯﺎﻬﺠﻟﺍ ﻥﺍﺮﺘﻗﺍ ﻝﺍﺪﺒﺘﺳﺍ ﻯﺮﺟ ﺪﻗ •
.ﻯﺮﺧﺃ ﺓﺮﻣ ﻥﺍﺮﺘﻗﻻﺍ ِﺮﺟﺃ
.ﻉﻮﻄﻘﻣ ﺯﺎﻬﺠﻟﺍ ﻦﻣ ﺭﺩﺎﺼﻟﺍ ﺕﻮﺼﻟﺍ
.ﺯﺎﻬﺠﻟﺍﻭ ﻡﺎﻈﻨﻟﺍ ﻦﻴﺑ ﺰﺟﺍﻮﺣ ﻱﺃ ﻝِﺯﺃ •
ﻮﻳﺩﺍﺮﻟﺍ
.ٌﺵﻮﺸﻣ ﺕﻮﺼﻟﺍ
.ﺺﺼﺨﺘﻣ
.AM
Bluetooth®
.ﻯﺮﺧﺃ
.ﻯﺮﺧﻷﺍ
19
90
Page 91

ﺕﻮﺻ ﻯﻮﺘﺴﻤﺑ ﻞﺻﺍﻮﺘﻤﻟﺍ ﻡﺍﺪﺨﺘﺳﻻﺍ ﺐﺒﺴﺑ ﺔﻳﺎﻤﺤﻟﺍ ﺓﺮﺋﺍﺩ ﻂﻴﺸﻨﺗ ﻯﺮﺟ ﺪﻗ •
.ﺽﺎﻔﺨﻧﻼﻟ ﺕﻮﺼﻟﺍ ﻯﻮﺘﺴﻣ ﺽﺮﻌﺘﻳ
.ﺕﻮﺼﻟﺍ ﺓﺩﻮﺟ ﺔﻧﺎﻴﺻﻭ ،ﻡﺎﻈﻨﻟﺍ ﺔﻳﺎﻤﺣ ﻰﻟﺇ ﺓﺮﺋﺍﺪﻟﺍ ﻩﺬﻫ ﻑﺪﻬﺗﻭ .ﻊﻔﺗﺮﻣ
ﺹﺮﻘﻟﺍ
.ﺢﻴﺤﺻ ﻮﺤﻧ ﻰﻠﻋ ﺽﺮﻌﻟﺍ ﺮﻬﻈﻳ ﻻ
.ﺃﺪﺒﻳ ﻻ ﻞﻴﻐﺸﺘﻟﺍ
.ﺢﻴﺤﺻ ﻮﺤﻧ ﻰﻠﻋ ﻪﻠﺧﺩﺄﻓ ؛ﺍًﺪﻴﺟ ﺹﺮﻘﻟﺍ ﻞﺧﺪُﺗ ﻢﻟ •
.ﻪﻔﱢﻈﻨﻓ ؛ﺦﺴﺘﻣ ﺹﺮﻘﻟﺍ •
.ﻲﺳﺎﻴﻗ ﺮﻴﻏ ﻭﺃ ﺎًﻳﻮﺘﻠﻣ ﻭﺃ ﺎًﺷﻭﺪﺨﻣ ﻥﺎﻛ ﺍﺫﺇ ،ﺹﺮﻘﻟﺍ ﻝﺪﺒﺘﺳﺍ •
.ﻦﻴﺘﻋﺎﺳ ﻰﻟﺇ ﺔﻋﺎﺳ ﻦﻣ ﺡﻭﺍﺮﺘﺗ ﺓﺪﻤﻟ ﻒﺠﻳ ﻡﺎﻈﻨﻟﺍ ﻉﺩ ؛ٌﻒﺜﻜﺗ ﺪﺟﻮﻳ •
.ﺢﻴﺤﺻ ﺮﻴﻏ ﺽﻭﺮﻌﻤﻟﺍ ﺕﺍﺭﺎﺴﻤﻠﻟ ﻲﻟﺎﻤﺟﻹﺍ ﺩﺪﻌﻟﺍ
.ﺹﺮﻘﻟﺍ ﺓءﺍﺮﻗ ﻦﻜﻤﻳ ﻻ
.ٌﺵﻮﺸﻣ ٌﺕﻮﺻ ﺭﺪﺼﻳ
.ﻞﻴﻐﺸﺘﻠﻟ ﺢﻟﺎﺻ ﺹﺮﻘﺑ ﻪﻟﺪﺒﺘﺳﺎﻓ .ﻪﻠﻴﻐﺸﺗ ﻡﺎﻈﻨﻟﺍ ﻰﻠﻋ ﺭﺬﻌﺘﻳ ﺎًﺻﺮﻗ ﺖﻠﺧﺩﺃ •
.ﻩﺅﺎﻬﻧﺇ ﻢﺘﻳ ﻢﻟ ﺎًﺻﺮﻗ ﺖﻠﺧﺩﺃ •
USB
.ﻪﻴﻠﻋ ﺓﺩﻮﺟﻮﻤﻟﺍ ﺕﺎﻳﻮﺘﺤﻤﻟﺍ ﻭﺃ USB ﺯﺎﻬﺟ ﺓءﺍﺮﻗ ﺭﺬﻌﺘﻳ
.ﻡﺎﻈﻨﻟﺍ ﻊﻣ ﺔﻘﻓﺍﻮﺘﻣ ﺮﻴﻏ ﻪﻴﻠﻋ ﺓﺩﻮﺟﻮﻤﻟﺍ ﺕﺎﻳﻮﺘﺤﻤﻟﺍ ﻭﺃ •USB ﺯﺎﻬﺟ ﺔﺌﻴﻬﺗ
ﻲﻓ ﺖﻳﺎﺑﺎﺠﻴﺟ •32 ﻦﻋ ﺔﻴﻨﻳﺰﺨﺘﻟﺍ ﺎﻬﺘﻌﺳ ﺪﻳﺰﺗ ﻲﺘﻟﺍ USB ﺓﺰﻬﺟﺃ ﻞﻤﻌﺗ ﻻ ﺪﻗ
.ﺕﻻﺎﺤﻟﺍ ﺾﻌﺑ
.ءﻂﺒﺑ USB ﺯﺎﻬﺟ ﻞﻤﻌﻳ
ﺎًﺘﻗﻭ ﺓﺮﻴﺒﻛ ﺓﺮﻛﺍﺬﺑ ﺩﻭﺰﻤﻟﺍ •USB ﺯﺎﻬﺟ ﻭﺃ ﻢﺠﺤﻟﺍ ﺮﻴﺒﻜﻟﺍ ﻯﻮﺘﺤﻤﻟﺍ ﺓءﺍﺮﻗ ﻕﺮﻐﺘﺴﺗ
.ﻝﻮﻃﺃ
ﺎﻬﺣﻼﺻﺇﻭ ﻝﺎﻄﻋﻷﺍ ﻑﺎﺸﻜﺘﺳﺍ
ﺔﺣﺮﺘﻘﻤﻟﺍ ﻝﻮﻠﺤﻟﺍ ﺪﻋﺎﺴﺗ ﻢﻟ ﺍﺫﺇ ﻭﺃ ،ﺺﺤﻔﻟﺍ ﻁﺎﻘﻧ ﺾﻌﺒﺑ ﻖﻠﻌﺘﻳ ﺎﻤﻴﻓ ﻚﺸﻟﺍ ﻙﺭﻭﺎﺳ ﺍﺫﺇ
.ﺕﺍﺩﺎﺷﺭﺇ ﻰﻠﻋ ﻝﻮﺼﺤﻠﻟ ﻪﻌﻣ ﻞﻣﺎﻌﺘﺗ ﻱﺬﻟﺍ ﻉﺯﻮﻤﻟﺍ ﺮﺸﺘﺳﺎﻓ ،ﺔﻠﻜﺸﻤﻟﺍ ﻞﺣ ﻰﻠﻋ
.ﺩﺍﺪﻌﺘﺳﻻﺍ ﻊﺿﻭ ﻰﻟﺇ ﺎﻬﻠﻳﻮﺤﺘﻟ ﺔﺴﻴﺋﺮﻟﺍ ﺓﺪﺣﻮﻟﺎﺑ [/I] ﻰﻠﻋ ﻂﻐﺿﺍ 1
ﺓﺪﺣﻮﻟﺎﺑ [ •/I] ﻰﻠﻋ ﻂﻐﺿﺍ ،ﺩﺍﺪﻌﺘﺳﻻﺍ ﻊﺿﻭ ﻰﻟﺇ ﺓﺪﺣﻮﻟﺍ ﻝﻮﺤﺘﺗ ﻢﻟ ﺍﺫﺇ
ﻰﻟﺇ ﻝﺎﻘﺘﻧﻻﺍ ﺓﺪﺣﻮﻟﺍ ﻰﻠﻋ ﺽﺮﻔُﻳ .ٍﻥﺍﻮﺛ ﻊﻀﺒﻟ ًﻻﻮﻄﻣ ﺎًﻄﻐﺿ ﺔﻴﺴﻴﺋﺮﻟﺍ
ﺔﻘﻴﻗﺩ ﺮﻈﺘﻧﺍﻭ ،ﺩﺩﺮﺘﻤﻟﺍ ﺭﺎﻴﺘﻟﺍ ﻞﺼﻓﺍ ،ﻞﻳﺪﺑ ءﺍﺮﺟﺈﻛ .ﺩﺍﺪﻌﺘﺳﻻﺍ ﻊﺿﻭ
ﺭﺬﻌﺘﻤﻟﺍ ﻦﻣ ﻝﺍﺰﻳ ﻻ ﻥﺎﻛ ﺍﺫﺇ .ﺎﻬﻠﻴﻐﺸﺘﻟ ﺔﺴﻴﺋﺮﻟﺍ ﺓﺪﺣﻮﻟﺎﺑ [/I] ﻰﻠﻋ ﻂﻐﺿﺍ
.ﺩﺍﺪﻌﺘﺳﻻﺍ ﻊﺿﻭ ﻲﻓ ﺍًﺮﻤﺘﺴﻣ ﺍًﺮﻴﻐﺗ ﺮﻴﻐﺘﺗﻭ ،ﺽﺮﻌﻟﺍ ﺔﺷﺎﺷ ءﻲﻀﺗ
." •DEMO OFF" ﺭﺎﻴﺘﺧﻻ ﺔﻴﺴﻴﺋﺮﻟﺍ ﺓﺪﺣﻮﻟﺎﺑ [] ﻰﻠﻋ ًﻻﻮﻄﻣ ﺎًﻄﻐﺿ ﻂﻐﺿﺍ
.ﻯﺮﺧﺃ ﺓﺮﻣ ﻡﺎﻈﻨﻟﺍ ﻞﻐﺷ ﻢﺛ ،ﺎﻬﺠﻟﺎﻋﻭ ﺔﻠﻜﺸﻤﻟﺍ ﺐﺒﺳ ﺩﺪﺣﻭ ،ﻡﺎﻈﻨﻟﺍ ﻞﻴﻐﺸﺗ ﻒﻗﻭﺃ •
ﻭﺃ ،ﻁﺮﻔﻤﻟﺍ ﺕﻮﺼﻟﺍ ﻉﺎﻔﺗﺭﺍ ﺐﺒﺴﺑ ﺕﺎﻋﺎﻤﺴﻟﺍ ﺩﺎﻬﺟﻹ ﺔﺠﻴﺘﻧ ﻚﻟﺫ ﺙﺪﺤﻳ ﻥﺃ ﻦﻜﻤﻳﻭ
.ﺕﻼﺒﻜﻟﺍ ﻦﻣ ﺏﺮﻘﻟﺎﺑ ﺖﻨﺳﺭﻮﻠﻓ ﺡﺎﺒﺼﻣ ﻭﺃ ﺩﺩﺮﺘﻣ ﻲﺋﺎﺑﺮﻬﻛ ﺭﺎﻴﺗ ﺲﺑﺎﻗ ﺪﺟﻮﻳ •
.ﻡﺎﻈﻨﻟﺍ ﺕﻼﺒﻛ ﻦﻋ ﺍًﺪﻴﻌﺑ ﻯﺮﺧﻷﺍ ﻙﻼﺳﻷﺍﻭ ﺓﺰﻬﺟﻷﺎﺑ ﻆﻔﺘﺣﺎﻓ
.ﺔﻴﻟﺎﺘﻟﺍ ﺺﺤﻔﻟﺍ ﺕﺍءﺍﺮﺟﺈﺑ ﻢﻗ ،ﺔﻧﺎﻴﺼﻟﺍ ﺐﻠﻃ ﻞﺒﻗ
ﺔﻌﺋﺎﺸﻟﺍ ﺕﻼﻜﺸﻤﻟﺍ
.ﻞﻤﻌﺗ ﻻ ﺓﺪﺣﻮﻟﺍ
.ﺓﺪﺣﻮﻟﺎﺑ ﻥﺎﻣﻷﺍ ﺓﺰﻬﺟﺃ ﺪﺣﺃ ﻂﻴﺸﻨﺗ ﻯﺮﺟ ﺪﻗ ﺎﻤﺑﺭ •
:ﻲﻠﻳ ﺎﻤﻛ ﺓﺪﺣﻮﻟﺍ ﻂﺒﺿ ﺪﻋﺃ
.ﻪﻠﻴﺻﻮﺗ ﺪﻋﺃ ﻢﺛ ،ﺓﺪﺣﺍﻭ
2
.ﻉﺯﻮﻤﻟﺍ ﺮﺸﺘﺳﺎﻓ ،ﺓﺪﺣﻮﻟﺍ ﻞﻴﻐﺸﺗ
.ﺪﻌﺑ ﻦﻋ ﻢﻜﺤﺘﻟﺍ ﺯﺎﻬﺟ ﺔﻄﺳﺍﻮﺑ ﺕﺎﻴﻠﻤﻋ ﻱﺃ ءﺍﺮﺟﺇ ﻦﻜﻤﻳ ﻻ
.ﺎًﺤﻴﺤﺻ ﺎًﺘﻴﺒﺜﺗ ﺔﻳﺭﺎﻄﺒﻟﺍ ﺖﻴﺒﺜﺗ ﻦﻣ ﻖﻘﺤﺗ •
.ﺱﺎﺳﻷﺍ ﻦﻣ ﺕﻮﺻ ﺭﺪﺼﻳ ﻻ ﻭﺃ ،ﺵﻮﺸﻣ ﺕﻮﺼﻟﺍ
.ﻡﺎﻈﻨﻟﺎﺑ ﺕﻮﺼﻟﺍ ﻯﻮﺘﺴﻣ ﻂﺒﺿﺍ •
.ﺓﺭﺎﺣ ﺔﺌﻴﺑ ﻲﻓ ﻡﺎﻈﻨﻟﺍ ﻡﺍﺪﺨﺘﺳﺍ ﺔﻟﺎﺣ ﻲﻓﻭ ،ﺔﻃﺮﻔﻤﻟﺍ ﺔﻗﺎﻄﻟﺍ
.ﻞﻴﻐﺸﺘﻟﺍ ءﺎﻨﺛﺃ ﻦﻴﻨﻃ ﺕﻮﺻ ﻉﺎﻤﺳ ﻦﻜﻤﻳ
ﺎﻣ ﻭﺃ DVD ﺹﺍﺮﻗﺃ ﻞﻐﺸﻣ ﻭﺃ VCR ﺖﻴﺳﺎﻛ ﻮﻳﺪﻴﻓ ﺔﻃﺮﺷﺃ ﻞﺠﺴﻣ ﻞﻴﺻﻮﺘﻟ
ﺎﻣ ﻭﺃ DVD ﺹﺍﺮﻗﺃ ﻞﻐﺸﻣ ﻭﺃ VCR ﺖﻴﺳﺎﻛ ﻮﻳﺪﻴﻓ ﺔﻃﺮﺷﺃ ﻞﺠﺴﻣ ﻞﻴﺻﻮﺗ ﻚﻨﻜﻤﻳ
.ﻡﺎﻈﻨﻟﺍ ﺍﺬﻫ ﻦﻣ ﺭﺩﺎﺼﻟﺍ ﺕﻮﺼﻟﺍ ﻰﻟﺇ ﻉﺎﻤﺘﺳﻻﺍﻭ ،ﻪﺑﺎﺷ
ﺕﻮﺻ ﻞﺒﻛ
(ﻖﺤﻠﻣ ﺮﻴﻏ)
(ﻖﺤﻠﻣ ﺮﻴﻏ) DVD ﺹﺍﺮﻗﺃ ﻞﻐﺸﻣ
ﺔﻴﺴﻴﺋﺮﻟﺍ ﺓﺪﺣﻮﻠﻟ ﺔﻴﻔﻠﺨﻟﺍ ﺔﺣﻮﻠﻟﺍ
.ﻲﺟﺭﺎﺨﻟﺍ ﺯﺎﻬﺠﻟﺍ ﻞﱢﺻﻭ
."AUX" ﺭﺎﻴﺘﺧﻻ [RADIO/EXT-IN] ﻰﻠﻋ ﻂﻐﺿﺍ 2
.ﻲﺟﺭﺎﺨﻟﺍ ﺯﺎﻬﺠﻟﺍ ﻞﱢﻐﺷ 3
ﻉﺯﻮﻣ ﻊﺟﺍﺮﻓ ،ﺓﺭﻮﻛﺬﻤﻟﺍ • ﺓﺰﻬﺟﻷﺍ ﻑﻼﺨﺑ ﺮﺧﺁ ﺯﺎﻬﺟ ﻞﻴﺻﻮﺗ ﻲﻓ ﺐﻏﺮﺗ ﺖﻨﻛ ﺍﺫﺇ
.ﺎًﺌﻳﺎﻬﻣ ﻡﺪﺨﺘﺴﺗ ﺎﻣﺪﻨﻋ ﺕﻮﺼﻟﺍ ﻲﻓ ﺶﻳﻮﺸﺗ ﺙﻭﺪﺣ ﻦﻜﻤﻳ •
ﻪﺑﺎﺷ
:ﺔﻈﺣﻼﻣ
.ﺔﻴﺗﻮﺼﻟﺍ ﺓﺰﻬﺟﻷﺍ
1
VQT5F33
18
91
Page 92

ﻲﻓﺎﺿﻹﺍ ﻞﺧﺪﻟﺍ ﻡﺍﺪﺨﺘﺳﺍ
.ﺩﺩﺮﺘﻤﻟﺍ ﻲﺋﺎﺑﺮﻬﻜﻟﺍ ﺭﺎﻴﺘﻟﺍ ﺲﺑﺎﻗ ﻞﺼﻓﺍ •
.ﺔﻠﺼﻟﺍ ﺕﺍﺫ ﻞﻴﻐﺸﺘﻟﺍ ﺕﺎﻤﻴﻠﻌﺗ ﺃﺮﻗﺍﻭ ،ﺓﺰﻬﺟﻷﺍ ﻊﻴﻤﺟ ﻞﻴﻐﺸﺗ ﻒﻗﻭﺃ •
.ﻞﺼﻔﻨﻣ ﻮﺤﻧ ﻰﻠﻋ ﺕﻼﺒﻜﻟﺍﻭ ﺕﺎﻧﻮﻜﻤﻟﺍ ﻉﺎﺒُﺗ
ﻪﺑﺎﺸﻣ ﺯﺎﻬﺟ ﻭﺃ ﻝﻮﻤﺤﻣ ﺕﻮﺻ ﺯﺎﻬﺟ ﻞﻴﺻﻮﺘﻟ
.ﻝﻮﻤﺤﻣ ﺕﻮﺻ ﺯﺎﻬﺟ ﻦﻣ ﻰﻘﻴﺳﻮﻤﻟﺍ ﻞﻴﻐﺸﺗ ﻚﻨﻜﻤﻳ
ﺶﻳﻮﺸﺗ ﻦﻣ ﺔﻳﺎﻗﻮﻠﻟ ﻝﻮﻤﺤﻤﻟﺍ ﻲﺗﻮﺼﻟﺍ ﺯﺎﻬﺠﻠﻟ (ﺪﺟﻭ ﻥﺇ) ﻝﺩﺎﻌﻤﻟﺍ ﻞﻴﻐﺸﺗ ﻒﻗﻭﺃ
،ﻞﻴﺻﻮﺘﻟﺍ ءﺍﺮﺟﺇ ﻞﺒﻗ ﻝﻮﻤﺤﻤﻟﺍ ﻲﺗﻮﺼﻟﺍ ﺯﺎﻬﺠﻟﺍﻭ ،ﻡﺎﻈﻨﻠﻟ ﺕﻮﺼﻟﺍ ﻯﻮﺘﺴﻣ ﺾﻔﺧﺍ
.ﻝﻮﻤﺤﻤﻟﺍ ﻲﺗﻮﺼﻟﺍ ﺯﺎﻬﺠﻟﺍ ﻞﺼﻓﺍ ﻭﺃ
.AUX IN 4 ﻑﺮﻄﺑ ﻝﻮﻤﺤﻤﻟﺍ ﻲﺗﻮﺼﻟﺍ ﺯﺎﻬﺠﻟﺍ ﻞﱢﺻﻭ
(ﻖﺤﻠﻣ ﺮﻴﻏ) ﻢﻣ 3.5 ﺱﺎﻘﻣ ﻮﻳﺮﺘﺳﺍ :ﺲﺑﺎﻘﻟﺍ ﻉﻮﻧ
."AUX 4" ﺭﺎﻴﺘﺧﻻ [RADIO/EXT-IN] ﻰﻠﻋ ﻂﻐﺿﺍ
.ﻝﻮﻤﺤﻤﻟﺍ ﻲﺗﻮﺼﻟﺍ ﺯﺎﻬﺠﻟﺍ ﻞﱢﻐﺷ 3
ﻲﺑﺮﻋ
VQT5F33
17
92
ﻞﻴﺻﻮﺘﻟﺍ ﻞﺒﻗ
:ﺔﻈﺣﻼﻣ
ﺩﺍﺪﻌﺘﺳﻻﺍ
.ﺕﻮﺼﻟﺍ
KARAOKE
ﻂﻘﻓ ﺔﻴﺴﻴﺋﺮﻟﺍ ﺓﺪﺣﻮﻟﺎﺑ
.[DJ EFFECT-KARAOKE] ﻰﻠﻋ ًﻻﻮﻄﻣ ﺎًﻄﻐﺿ ﻂﻐﺿﺍ 1
.ءﺎﻗﺭﺯ ﺓءﺎﺿﺇ [DJ EFFECT-KARAOKE] ﺭﺯ ﺭﺪﺼﻳ
.ﺏﻮﻠﻄﻤﻟﺍ KARAOKE ﺮﻴﺛﺄﺗ ﺭﺎﻴﺘﺧﻻ [3] ﻰﻟﺇ [1] ﻰﻠﻋ ﻂﻐﺿﺍ
ﻭﺃ "L+R" ﻭﺃ "R" ﻭﺃ "L" ﻭﺃ "VOCAL CANCEL"
"OFF" ﻭﺃ "ECHO 3" ﻭﺃ "ECHO 2" ﻭﺃ "ECHO 1"
."+6" ﻰﺘﺣ "-6" ﺭﺎﻴﺘﺧﻻ ﺭﺍﻭّﺪﻟﺍ ﺹﺮﻘﻟﺍ ﺭِﺩﺃ
1
.[DJ EFFECT-KARAOKE] ﻰﻠﻋ ًﻻﻮﻄﻣ ﺎًﻄﻐﺿ ﻂﻐﺿﺍ
"OFF"
KARAOKE ﺮﻴﺛﺄﺗ ءﺎﻐﻟﻹ
2
ﻥﻮﻓﻭﺮﻜﻴﻣ ﻡﺍﺪﺨﺘﺳﺍ
ﻭﺃ ﻥﻮﻓﻭﺮﻜﻴﻤﻟﺍ ﻞﻴﺻﻮﺗ ﻞﺒﻗ ﻪﻟ ﺪﺣ ﻰﻧﺩﺃ ﻰﺘﺣ ﻡﺎﻈﻨﻟﺎﺑ ﺕﻮﺼﻟﺍ ﻯﻮﺘﺴﻣ ﺾﻔﺧﺍ
.ﻥﻮﻓﻭﺮﻜﻴﻤﻟﺍ ﺲﺒﻘﻤﺑ (ﻖﺤﻠﻣ ﺮﻴﻏ) ﻥﻮﻓﻭﺮﻜﻴﻣ ﻞﱢﺻﻭ
ﻯﻮﺘﺴﻣ ﻂﺒﻀﻟ ﺔﻴﺴﻴﺋﺮﻟﺍ ﺓﺪﺣﻮﻟﺎﺑ [MIC VOL, MIN/MAX] ﺭِﺩﺃ
.ﺔﻴﻔﻠﺨﻟﺍ ﻰﻓ ﻰﻘﻴﺳﻮﻣ ﻡﺎﻐﻧﺃ ﻰﻠﻋ ءﺎﻨﻐﻟﺍ ﻲﻓ ﺐﻏﺮﺗ ﺖﻨﻛ ﺍﺫﺇ
.ﻡﺎﻈﻨﻠﻟ ﺕﻮﺼﻟﺍ ﻯﻮﺘﺴﻣ ﻂﺒﺿﺍ ﻢﺛ ،ﻰﻘﻴﺳﻮﻤﻟﺍ ﺭﺪﺼﻣ ﻞﱢﻐﺷ
ﺾﻔﺧﺍ ﻭﺃ ،ﺕﺎﻋﺎﻤﺴﻟﺍ ﻦﻋ ﺍًﺪﻴﻌﺑ ﻥﻮﻓﻭﺮﻜﻴﻤﻟﺍ • ﻞﻘﻧﺎﻓ ،(ﺶﻳﻮﺸﺗ) ﺐﻳﺮﻏ ﺞﻴﺠﺿ ﺭﺪﺻ ﺍﺫﺇ
ﻯﻮﺘﺴﻣ ﺾﻔﺧﺍ ﻢﺛ ،ﻥﻮﻓﻭﺮﻜﻴﻤﻟﺍ ﺲﺒﻘﻣ ﻦﻋ ﻪﻠﺼﻓﺍ ،ﻥﻮﻓﻭﺮﻜﻴﻤﻟﺍ ﻡﺍﺪﺨﺘﺳﺍ ﻡﺪﻋ ﺔﻟﺎﺣ ﻲﻓ •
ﻢﻣ 6.3 ﺱﺎﻘﻣ ﻱﺩﺎﺣﺃ :ﺲﺑﺎﻘﻟﺍ ﻉﻮﻧ
.ﻥﻮﻓﻭﺮﻜﻴﻤﻠﻟ ﺕﻮﺼﻟﺍ
.ﻥﻮﻓﻭﺮﻜﻴﻤﻠﻟ ﺕﻮﺼﻟﺍ ﻯﻮﺘﺴﻣ
."MIN" ﻰﺘﺣ ﻥﻮﻓﻭﺮﻜﻴﻤﻟﺍ ﺕﻮﺻ
.ﻥﻮﻓﻭﺮﻜﻴﻤﻟﺍ ﺮﺒﻋ ﻞﻴﺠﺴﺘﻟﺍ ﻡﺎﻈﻨﻟﺍ ﺍﺬﻬﻟ ﻦﻜﻤﻳ ﻻ •
[1]ﺔﻴﺋﺎﻨﻐﻟﺍ ﺔﻤﻐﻨﻟﺍ ءﺎﻐﻟﺇ
[2]ﻯﺪﺼﻟﺍ
[3]ﺢﻴﺗﺎﻔﻤﻟﺍ ﻲﻓ ﻢﻜﺤﺘﻟﺍ
ﺩﺍﺪﻌﺘﺳﻻﺍ
.ﻪﻠﺼﻓ
:ﺔﻈﺣﻼﻣ
DJ ﺕﺎﻨﻴﻋ ﻊﻣﺎﺟ
ﺕﻮﺻ ﻭﺃ "scratch" ﺕﻮﺻ ﻖﻴﺒﻄﺗ ﻚﻨﻜﻤﻳ ،[MULTI CONTROL] ﺮﻳﻭﺪﺘﺑ
2
.ﺏﻮﻠﻄﻤﻟﺍ ﺕﻮﺼﻟﺍ ﺭﺎﻴﺘﺧﻻ [6] ﻰﻟﺇ [1] ﻰﻠﻋ ﻂﻐﺿﺍ 2
"Panasonic MAX Juke" ﻖﻴﺒﻄﺘﻟﺍ ﻡﺍﺪﺨﺘﺳﺍ ﺔﻟﺎﺣ ﻲﻓ
ًﻻﻮﻄﻣ ﻂﻐﺿﺍ ،ﻊﻨﺼﻤﻠﻟ ﻖﺒﺴﻤﻟﺍ ﻂﺒﻀﻟﺍ ﻰﻟﺇ ﺔﻴﺟﺫﻮﻤﻨﻟﺍ ﺕﺍﻮﺻﻷﺍ ﻊﻴﻤﺟ ﺓﺩﺎﻋﻹ)
(.DJ ﺕﺎﻨﻴﻌﻟﺍ ﻊﻣﺎﺟ ﻞﻴﻐﺸﺗ ﻑﺎﻘﻳﺇ ﺔﻟﺎﺣ ﻲﻓ [DJ SAMPLER] ﻰﻠﻋ
.ﻪﻠﻴﻐﺸﺗ ﻱﺭﺎﺠﻟﺍ ﺭﺎﺴﻤﻟﺍ ﻰﻠﻋ ﻲﺟﺫﻮﻤﻧ
.[DJ SAMPLER] ﻰﻠﻋ ﻂﻐﺿﺍ
.[MULTI CONTROL] ﺭِﺩﺃ 3
.ﻖﻴﺒﻄﺘﻟﺎﺑ ﻲﺟﺫﻮﻤﻨﻟﺍ ﺕﻮﺼﻟﺍ ﺮﻴﻴﻐﺗ ﻚﻨﻜﻤﻳ •
ﻂﻘﻓ ﺔﻴﺴﻴﺋﺮﻟﺍ ﺓﺪﺣﻮﻟﺎﺑ
DJ ﺕﺎﻨﻴﻌﻟﺍ ﻊﻣﺎﺟ ﺮﻴﺛﺄﺗ ءﺎﻐﻟﻹ
.[DJ SAMPLER] ﻰﻠﻋ ﻂﻐﺿﺍ
DJ ﺕﺍﺮﻴﺛﺄﺗ
.ﺕﻮﺼﻟﺍ ﺕﺍﺮﻴﺛﺄﺗ ﺔﻓﺎﺿﻹ DJ ﺮﻴﺛﺄﺗ ﺔﻔﻴﻇﻭ ﻡﺍﺪﺨﺘﺳﺍ ﻚﻟ ﻰﻨﺴﺘﻳ
.[DJ EFFECT-KARAOKE] ﻰﻠﻋ ﻂﻐﺿﺍ
.ﺏﻮﻠﻄﻤﻟﺍ DJ ﺮﻴﺛﺄﺗ ﺭﺎﻴﺘﺧﻻ [6] ﻰﻟﺇ [1] ﻰﻠﻋ ﻂﻐﺿﺍ 2
.ﺕﻮﺼﻠﻟ ﺪﻌُﺑﻭ ﺔﻓﺎﺴﻣ ﺔﻓﺎﺿﺇ
1
2
3
ﺎﻬﺤﻴﺷﺮﺗ ﻭﺃ ﺕﻮﺼﻠﻟ ﺓﺩﺪﺤﻤﻟﺍ ﺕﺎﻗﺎﻄﻨﻟﺍ ﺰﻳﺰﻌﺗ
.ﻱﺭﻭﺩ ﻮﺤﻧ ﻰﻠﻋ ﺕﻮﺼﻟﺍ ﻊﻄﻗ
.ﺕﻮﺼﻟﺍ ﻰﻟﺇ ﻲﻤﻗﺭ ﻯﺪﺻ ﺔﻓﺎﺿﺇ
.ﻢﻏﺎﻨﺘﻟﺍ ﻖﻠﺧ ﻞﺟﺃ ﻦﻣ ﺕﻮﺼﻟﺍ ﻰﻟﺇ ﺔﻴﻘﻴﺳﻮﻣ ﺕﺎﺗﻮﻧ ﺔﻓﺎﺿﺇ
.ﻯﺮﺧﺃ ﺓﺮﻣ ﺭﺰﻟﺍ ﻰﻠﻋ ﻂﻐﺿﺍ ،ءﺎﻐﻟﻺﻟ
.ﺏﻮﻠﻄﻤﻟﺍ ﺩﺍﺪﻋﻹﺍ ﺭﺎﻴﺘﺧﻻ [MULTI CONTROL] ﺭِﺩﺃ
.[DJ EFFECT-KARAOKE] ﻰﻠﻋ ﻂﻐﺿﺍ
ﻂﻘﻓ ﺔﻴﺴﻴﺋﺮﻟﺍ ﺓﺪﺣﻮﻟﺎﺑ
.ﺕﻮﺼﻟﺍ ﺢﻴﺗﺎﻔﻣ ﻞﻳﺪﻌﺗ
1
1
[ •1]PHASER
[ •2]FILTER
[ •3]SOUND CHOPPER
[ •4]ELECTRO ECHO
[ •5]PITCH SHIFTER
[ •6]HARMONIZER
3
DJ ﺮﻴﺛﺄﺗ ءﺎﻐﻟﻹ
Page 93

[ •1]
ﻲﻓ ،ﻲﺠﻳﺭﺪﺗ ﻞﻜﺸﺑ ﺍًﺮﻴﻐﺻ ﻞﻴﻐﺸﺘﻟﺍ ﺪﻴﻗ ﺭﺎﺴﻤﻟﺍ ﻢﺠﺣ ﺮﻴﺼﻳ :ﻞﺧﺍﺪﺘﻤﻟﺍ ﻲﺷﻼﺘﻟﺍ
ﻲﺟﺫﻮﻤﻧ ﺕﻮﺻ ءﺎﻔﺿﺇ ﻰﻠﻋ ﺮﻴﺛﺄﺘﻟﺍ ﺍﺬﻫ ﻞﻤﻌﻳ :ﻲﺟﺫﻮﻤﻧ ﻲﺗﻮﺻ ﺝﺰﻣ
.ﺎﻬﻠﻐﺸﺗ ﻲﺘﻟﺍ ﺕﺍﺭﺎﺴﻤﻟﺍ ﻦﻴﺑ ﺔﻴﻨﻣﺰﻟﺍ ﻞﺻﺍﻮﻔﻟﺍ ﻰﻠﻋ
ﻦﻋ ﻢﻜﺤﺘﻟﺍ ﺯﺎﻬﺟ ﺔﻄﺳﺍﻮﺑ •OFF ﻭﺃ ON ﻲﻌﺿﻭ ﻦﻴﺑ DJ jukebox ﺔﻔﻴﻇﻭ ﻞﻳﺪﺒﺘﻟ
."JUKEBOX" ﺭﺎﻴﺘﺧﻻ [PLAY MENU] ﻰﻠﻋ ﻂﻐﺿﺍ 1
ﻭﺃ "ON JUKEBOX" ﺭﺎﻴﺘﺧﻻ [،] ﻰﻠﻋ ﻂﻐﺿﺍ 2
ﺪﻌﺑ ﻦﻋ ﻢﻜﺤﺘﻟﺍ ﺯﺎﻬﺟ ﺔﻄﺳﺍﻮﺑ ﺏﻮﻠﻄﻤﻟﺍ ﺭﺍﺮﻜﺘﻟﺍ ﺩﺍﺪﻋﺇ ﺮﻴﻴﻐﺘﻟ
ﻰﻠﻋ ﻂﻐﺿﺍ ﻢﺛ ،ﺏﻮﻏﺮﻤﻟﺍ ﻂﻤﻨﻟﺍ ﺭﺎﻴﺘﺧﻻ [،] ﻰﻠﻋ ﻂﻐﺿﺍ
"Panasonic MAX Juke" ﻖﻴﺒﻄﺘﻟﺍ ﻡﺍﺪﺨﺘﺳﺍ ﺔﻟﺎﺣ ﻲﻓ
.ﻖﻴﺒﻄﺘﻟﺍ ﺔﻄﺳﺍﻮﺑ ﺎﻬﻠﻴﻐﺸﺗ ﻲﻓ ﺐﻏﺮﺗ ﻲﺘﻟﺍ ﺕﺍﺭﺎﺴﻤﻟﺍ ءﺎﻋﺪﺘﺳﺍ ﻚﻨﻜﻤﻳ
ءﺎﻋﺪﺘﺳﺍ ﻚﻨﻜﻤﻳ ،ﺽﺮﻌﻟﺍ ﺔﺷﺎﺷ ﻰﻠﻋ " •MAKING LIST" ﺽﺮﻋ ﺔﻟﺎﺣ ﻲﻓ
،ﺽﺮﻌﻟﺍ ﺔﺷﺎﺷ ﻰﻠﻋ " •WAITING REQUEST" ﺔﻟﺎﺳﺭ ﺽﺮﻌُﺗ ﺎﻣﺪﻨﻋ
.ﻖﻴﺒﻄﺘﻟﺍ ﺔﻄﺳﺍﻮﺑ ﺎﻬﻠﻴﻐﺸﺗ ﻲﻓ ﺐﻏﺮﺗ ﻲﺘﻟﺍ ﺕﺍﺭﺎﺴﻤﻟﺍ ءﺎﻋﺪﺘﺳﺍ ﻚﻨﻜﻤﻳ
.ﺍًﺮﻴﺒﻛ ﻲﻟﺎﺘﻟﺍ ﺭﺎﺴﻤﻟﺍ ﻢﺠﺣ ﺢﺒﺼﻳ ﻦﻴﺣ
[ •6] ﻰﻟﺇ [2]
.ﻯﺮﺧﺃ ﺓﺮﻣ ﺭﺰﻟﺍ ﻰﻠﻋ ﻂﻐﺿﺍ ،ءﺎﻐﻟﻺﻟ
DJ jukebox ﺮﻴﺛﺄﺗ ءﺎﻐﻟﻹ
.ﺔﻴﺴﻴﺋﺮﻟﺍ ﺓﺪﺣﻮﻟﺎﺑ [DJ JUKEBOX] ﻰﻠﻋ ﻂﻐﺿﺍ
:ﺔﻈﺣﻼﻣ
.[OK] ﻰﻠﻋ ﻂﻐﺿﺍ ﻢﺛ ،"OFF JUKEBOX"
ﺭﺎﻴﺘﺧﻻ ﻦﻴﺗﺮﻣ [PLAY MENU] ﻰﻠﻋ ﻂﻐﺿﺍ 1
."PLAYMODE"
.[OK]
.ﺕﺍﺭﺎﺴﻤﻟﺍ ﻦﻣ ءﺰﺟ
ﺔﻴﻟﺎﺘﻟﺍ ﻒﺋﺎﻇﻮﻟﺍ DJ ﺔﻔﻴﻇﻭ ﻦﻤﻀﺘﺗ
.ﻪﻠﻴﻐﺸﺗ ﻱﺭﺎﺠﻟﺍ ﺭﺎﺴﻤﻟﺍ ﻰﻟﺇ ﺔﻋﻮﻨﺘﻣ ﺕﺍﺮﻴﺛﺄﺗ ﺔﻓﺎﺿﺇ ﻒﺋﺎﻇﻮﻟﺍ ﻩﺬﻫ ﻡﺍﺪﺨﺘﺳﺎﺑ ﻚﻨﻜﻤﻳ
ﺯﺎﻬﺟ ﻰﻠﻋ (ﺎًﻧﺎﺠﻣ) "Panasonic MAX Juke" ﻖﻴﺒﻄﺘﻟﺍ ﺖﻴﺒﺜﺗ ﻖﻳﺮﻃ ﻦﻋ
ﺪﻌﺑ
•
2
"Panasonic MAX Juke" ﻖﻴﺒﻄﺘﻟﺍ ﻡﺍﺪﺨﺘﺳﺍ ﺔﻟﺎﺣ ﻲﻓ
.ﻒﺋﺎﻇﻮﻟﺍ ﻦﻣ ﺮﺒﻛﺃ ﺔﻋﻮﻤﺠﻣ ﻡﺍﺪﺨﺘﺳﺍ ﻚﻨﻜﻤﻳ ،Android
ﻞﺧﺩﺃ .Android ﺯﺎﻬﺟ ﻰﻠﻋ "Panasonic MAX Juke" ﻖﻴﺒﻄﺗ ﻝﱢﺰﻧ
Google Play ﻊﻗﻮﻤﻟ ﺚﺤﺒﻟﺍ ﻊﺑﺮﻣ ﻲﻓ "Panasonic MAX Juke"
."Panasonic MAX Juke" ﺮﺘﺧﺍ ﻢﺛ ،ﺚﺤﺒﻟﺍ ءﺍﺮﺟﻹ
.ﻞﻴﺠﺴﺘﻟﺍ ﺪﻨﻋ DJ ﺔﻔﻴﻇﻭ ﻰﻐﻠُﺗ
DJ jukebox
ﻰﻟﺇ ﻲﺟﺫﻮﻤﻧ ﻲﺗﻮﺻ ﺝﺰﻣ ﻭﺃ ،ﻞﺧﺍﺪﺘﻣ ﻲﺷﻼﺗ ﺮﻴﺛﺄﺗ ﺔﻓﺎﺿﺇ ﻰﻠﻋ ﻊﺿﻮﻟﺍ ﺍﺬﻫ ﻞﻤﻌﻳ
.ﺎﻬﻠﻴﻐﺸﺗ ﻱﺮﺠﻳ ﻲﺘﻟﺍ ﺕﺍﺭﺎﺴﻤﻟﺍ ﻦﻴﺑ ﺔﻴﻨﻣﺰﻟﺍ ﻞﺻﺍﻮﻔﻟﺍ
ﺓﺮﻛﺍﺬﻟﺍ ﻭﺃ USB ﺯﺎﻬﺟ ﻰﻠﻋ ﺔﻧﺰﺨﻤﻟﺍ ﺕﺍﺭﺎﺴﻤﻟﺍ ﺽﺮﻌﺗ ﺎﻣﺪﻨﻋ ﺔﻔﻴﻇﻮﻟﺍ ﻩﺬﻫ ﻞﻤﻌﺗ
.ﺔﻴﺴﻴﺋﺮﻟﺍ ﺓﺪﺣﻮﻟﺎﺑ [DJ JUKEBOX] ﻰﻠﻋ ﻂﻐﺿﺍ
.ﺎًﻴﺋﺎﻘﻠﺗ ﺭﺍﺮﻜﺘﻟﺍ ﻂﻤﻧ ﺮﻴﻴﻐﺗ ﻰﻠﻋ ﺍﺮﻴﻣﺎﻜﻟﺍ ﻂﺒﺿ ﻞﻤﻌﻳ •
ﻖﻳﺮﻃ ﻦﻋ ﺏﻮﻠﻄﻤﻟﺍ ﺭﺍﺮﻜﺘﻟﺍ ﺩﺍﺪﻋﺇ ﺮﻴﻴﻐﺗ ﻚﻨﻜﻤﻳ (ﻂﻘﻓ ﻑﺎﻘﻳﻹﺍ ﻊﺿﻭ ﻲﻓ) •
.ﺔﻴﺴﻴﺋﺮﻟﺍ ﺓﺪﺣﻮﻟﺎﺑ [MULTI CONTROL] ﺮﻳﻭﺪﺗ
.ﻲﺋﺍﻮﺸﻋ ﻮﺤﻧ ﻰﻠﻋ ﺕﺍﺭﺎﺴﻤﻟﺍ ﻊﻴﻤﺟ ﻞﻴﻐﺸﺗ
ﺔﺷﺎﺷ ﻰﻠﻋ " •WAITING REQUEST" ﺔﻟﺎﺳﺭ ﺽﺮﻌُﺗ ﺎﻣﺪﻨﻋ
ﻖﻴﺒﻄﺘﻟﺍ ﻡﺪﺨﺘﺴﺗ ﻦﻜﺗ ﻢﻟ ﺎﻣ ﺔﻴﻟﺎﺘﻟﺍ ﺓﻮﻄﺨﻟﺍ ﻰﻟﺇ ﻝﺎﻘﺘﻧﻻﺍ ﻚﻨﻜﻤﻳ ،ﺽﺮﻌﻟﺍ
."Panasonic MAX Juke"
.ﺔﺑﻮﻠﻄﻤﻟﺍ ﺔﻔﻴﻇﻮﻟﺍ ﺭﺎﻴﺘﺧﻻ ﺔﻴﺴﻴﺋﺮﻟﺍ ﺓﺪﺣﻮﻟﺎﺑ [6] ﻰﺘﺣ [1] ﻰﻠﻋ ﻂﻐﺿﺍ
، ،
.ﺕﺍﺭﺎﺴﻤﻟﺍ ﻊﻴﻤﺟ ﺭﺍﺮﻜﺗ
DJ ﻒﺋﺎﻇﻭ
:ﺔﻈﺣﻼﻣ
.ﺔﻴﻠﺧﺍﺪﻟﺍ
-RANDOM REPEAT
-ALL TITLE REPEAT
.ﺔﻴﺴﻴﺋﺮﻟﺍ ﺓﺪﺣﻮﻟﺎﺑ ﻢﻜﺤﺘﻟﺍ ﺮﺻﺎﻨﻋ ﻡﺍﺪﺨﺘﺳﺎﺑ ﻦﻴﻌﻣ ﺕﻮﺻ ﺮﻴﺛﺄﺗ ﻞﻳﺪﻌﺗ ﻚﻨﻜﻤﻳ
-DJ jukebox
-DJ ﺕﺎﻨﻴﻋ ﻊﻣﺎﺟ
-DJ ﺕﺍﺮﻴﺛﺄﺗ
([PRESET EQ
[D.BASS,-SUPER WOOFER] ﻰﻠﻋ ﻂﻐﺿﺍ
ً
ﻻﻮﻄﻣ ﺎًﻄﻐﺿ [D.BASS,-SUPER WOOFER] ﻰﻠﻋ ﻂﻐﺿﺍ
.ﺏﻮﻠﻄﻤﻟﺍ ﺩﺍﺪﻋﻹﺍ ﺭﺎﻴﺘﺧﻻ [MULTI CONTROL] ﺭِﺩﺃ
.ﺕﻮﺼﻟﺍ ﺮﻴﺛﺄﺗ ﺭﺎﻴﺘﺧﻻ ﺭﺰﻟﺍ ﻰﻠﻋ ﻂﻐﺿﺍ 1
[PRESET EQ] ﻰﻠﻋ ﻂﻐﺿﺍ
[MANUAL EQ] ﻰﻠﻋ ﻂﻐﺿﺍ
ﺔﻴﺴﻴﺋﺮﻟﺍ ﺓﺪﺣﻮﻟﺍ ﻡﺍﺪﺨﺘﺳﺍ
] :ﺔﻴﺴﻴﺋﺮﻟﺍ ﺓﺪﺣﻮﻟﺍ)
ﺓءﺎﺿﻹﺍ ﺕﺍﺮﻴﺛﺄﺗ
.ﻡﺎﻈﻨﻟﺍ ﺍﺬﻫ ﻲﻓ ﺎﻬﻧﻮﻟ ﻭﺃ ﺓءﺎﺿﻹﺍ ﻞﻜﺷ ﺮﻴﻴﻐﺗ ﻚﻨﻜﻤﻳ
.ﻥﻮﻠﻟﺍ ﻭﺃ ﻞﻜﺸﻟﺍ ﺭﺎﻴﺘﺧﻻ [ILLUMINATION] ﺭِﺩﺃ
1
ﺎًﻘﻓﻭ ﺕﺎﻋﺎﻤﺴﻟﺍ ﺐﻴﺗﺮﺗ ﻰﻠﻋ ﺹﺮﺣﺍ ،ﻢﺋﻼﻣ ﻮﺤﻧ ﻰﻠﻋ ﺓءﺎﺿﻹﺍ ﺕﺍﺮﻴﺛﺄﺗ ﺽﺮﻋ ﻦﻣ ﺪﻛﺄﺘﻠﻟ
ﻂﻘﻓ ﺔﻴﺴﻴﺋﺮﻟﺍ ﺓﺪﺣﻮﻟﺎﺑ
.ﺓﺩﺪﻌﺘﻣ ﻥﺍﻮﻟﺄﺑ ﻞﻜﺸﻟﺍ ﺓءﺎﺿﺇ
.ﺪﺣﺍﻭ ﻥﻮﻠﺑ ﺓءﺎﺿﻹﺍ
."ﺕﺎﻋﺎﻤﺴﻟﺍ ﺖﻴﺒﺜﺗ" ﻲﻓ ﺩﺭﻭ ﺎﻤﻟ
2
•PRESET EQ
•TREBLE/MID/BASS
•D.BASS
•SUPER WOOFER
2
•PATTERN
•COLOR
•OFF
:ﺔﻈﺣﻼﻣ
VQT5F33
16
93
Page 94

ﺓءﺎﺿﻹﺍﻭ ﺕﻮﺼﻟﺍ
ﺕﻮﺼﻟﺍ ﺮﻴﺛﺄﺗ ﻞﻳﺪﻌﺗ
.ﺕﻮﺼﻟﺍ ﺮﻴﺛﺄﺗ ﻞﻳﺪﻌﺗ ﻚﻨﻜﻤﻳ
.ﺕﻮﺼﻟﺍ ﺮﻴﺛﺄﺗ ﺭﺎﻴﺘﺧﻻ [SOUND] ﻰﻠﻋ ﻂﻐﺿﺍ
.ﺏﻮﻠﻄﻤﻟﺍ ﺩﺍﺪﻋﻹﺍ ﺭﺎﻴﺘﺧﻻ [،] ﻰﻠﻋ ﻂﻐﺿﺍ 2
+4 ﻰﻟﺇ -4 ﻦﻣ
"OFF SURROUND" ﻭﺃ "ON SURROUND"
(AUX IN 4 ﻞﺧﺪﺑ ﺹﺎﺧ)
"HIGH" ﻭﺃ "NORMAL"
ﻞﺧﺪﻟﺍ ﻯﻮﺘﺴﻣ ﻂﺒﺿ ءﺎﻨﺛﺃ ﺎًﺷﻮﺸﻣ ﺕﻮﺼﻟﺍ ﻥﺎﻛ ﺍﺫﺇ ،"NORMAL" ﺮﺘﺧﺍ
"OFF" ﻭﺃ "SW3" ﻭﺃ "SW2" ﻭﺃ "SW1"
"D.BASS OFF" ﻭﺃ "D.BASS BEAT" ﻭﺃ "D.BASS ON"
ﻝﺩﺎﻌﻤﻠﻟ ﻖﺒﺴﻤﻟﺍ ﻂﺒﻀﻟﺍ
ﻖﺒﺴﻤﻟﺍ ﻂﺒﻀﻟﺍ ﺭﺎﻴﺘﺧﻻ
([
PRESET EQ ]
[PRESET EQ] ﻰﻠﻋ ﻂﻐﺿﺍ
ﻲﺑﺮﻋ
•TREBLE/MID/BASS
•SURROUND
•INPUT LEVEL
:ﺔﻈﺣﻼﻣ
."HIGH"
•SUPER WOOFER
•D.BASS
:ﺔﻴﺴﻴﺋﺮﻟﺍ ﺓﺪﺣﻮﻟﺍ)
.ﺏﻮﻠﻄﻤﻟﺍ
ﺯﺎﻬﺟ ﻭﺃ ﺹﺮﻗ) ﻪﻴﻟﺇ ﻉﺎﻤﺘﺳﻻﺍ ﻲﻓ ﺐﻏﺮﺗ ﻱﺬﻟﺍ ﻰﻘﻴﺳﻮﻤﻟﺍ ﺭﺪﺼﻣ ﺰﱢﻬﺟ
ﻯﻮﺘﺴﻣ ﻂﺒﺿﺍ ﻢﺛ ،(ﻲﺟﺭﺎﺧ ﺯﺎﻬﺟ ﻭﺃ ﻮﻳﺩﺍﺭ ﻭﺃ ﺔﻴﻠﺧﺍﺩ ﺓﺮﻛﺍﺫ ﻭﺃ USB
1
90 MIN
ﺬﻔﻨﻤﺑ USB ﺯﺎﻬﺟ ﻞﱢﺻﻭ
] ﻰﻠﻋ ﻂﻐﺿﺍ ،ءﺎﻐﻟﻺﻟ
60 MIN
ﻢﻗ ﻢﺛ ،(USB ﻞﻴﺠﺴﺘﺑ ﺹﺎﺧ)
ﻭﺃ "
." REC" ﻭﺃ " PLAY" ﺭﺎﻴﺘﺧﻻ [CLOCK/TIMER]
ﻯﻮﺘﺴﻤﻟﺍ ﻰﻟﺇ ﻞﺼﻴﻟ ﺎًﻴﺠﻳﺭﺪﺗ • ﺩﺍﺩﺰﻳﻭ ،ﺾﻔﺨﻨﻣ ﺕﻮﺻ ﻯﻮﺘﺴﻤﺑ ﻞﻴﻐﺸﺘﻟﺍ ﺖﻗﺆﻣ ﺃﺪﺒﻳ
ﺕﻮﺼﻟﺍ ﻥﻮﻜﻳ ﻥﺃ ﻰﻠﻋ ﺔﻴﻧﺎﺛ •30 ﺓﺪﻤﺑ ﻁﻮﺒﻀﻤﻟﺍ ﺖﻗﻮﻟﺍ ﻞﺒﻗ ﻞﻴﺠﺴﺘﻟﺍ ﺖﻗﺆﻣ ﺃﺪﺒﻳ
.ﻞﻴﻐﺸﺘﻟﺍ ﻊﺿﻭ ﻰﻠﻋ ﺎًﻃﻮﺒﻀﻣ ﻥﺎﻛ ﺍﺫﺇ ،ﺎًﻴﻣﻮﻳ ﻁﻮﺒﻀﻤﻟﺍ ﺖﻗﻮﻟﺍ ﻲﻓ ﺖﻗﺆﻤﻟﺍ ﻞﻤﻌﻳ •
OFF
.ﻲﺟﺭﺎﺨﻟﺍ ﺯﺎﻬﺠﻟﺍ ﺭﺎﻴﺘﺧﺍ ﻭﺃ ،ﻮﻳﺩﺍﺮﻟﺍ ﺔﻄﺤﻣ ﺔﻔﻟﺍﻮﻤﺑ
PLAY ON" ﺭﺎﻴﺘﺧﻻ [PLAY/REC ] ﻰﻠﻋ ﻂﻐﺿﺍ 2
." REC ON" ﻭﺃ " PLAY ON" ﺔﻟﺎﺳﺭ ﺽﺮﻌُﺗ
ﺭﺎﻴﺘﺧﻻ [PLAY/REC
.ﺖﻗﺆﻤﻟﺍ ﻞﻴﻐﺸﺗ ﻞﺟﺃ ﻦﻣ ﻡﺎﻈﻨﻟﺍ ﻞﻴﻐﺸﺗ ﻑﺎﻘﻳﺇ ﺐﺠﻳ
.ﻁﻮﺒﻀﻤﻟﺍ ﺖﻗﻮﻟﺍ ﺪﻌﺑ ﻡﺎﻈﻨﻟﺍ ﻞﻴﻐﺸﺗ ﻑﺎﻘﻳﺇ ﻰﻠﻋ ﻡﻮﻨﻟﺍ ﺖﻗﺆﻣ ﻞﻤﻌﻳ
.(ﻖﺋﺎﻗﺪﻟﺎﺑ) ﺩﺍﺪﻋﻹﺍ ﺭﺎﻴﺘﺧﻻ [SLEEP-AUTO OFF] ﻰﻠﻋ ﻂﻐﺿﺍ
120 MIN
.ٍﺪﺣﺍﻭ ٍﻥﺁ ﻲﻓ • ﻡﻮﻨﻟﺍﻭ ﻞﻴﺠﺴﺘﻟﺍ ﺖﻗﺆﻣ ﻭﺃ ،ﻡﻮﻨﻟﺍﻭ ﻞﻴﻐﺸﺘﻟﺍ ﺖﻗﺆﻣ ﻡﺍﺪﺨﺘﺳﺍ ﻦﻜﻤﻳ
.ﺕﺎﺘﻗﺆﻤﻟﺍ ﻂﺒﺿ ﺏﺭﺎﻀﺗ ﻱﺩﺎﻔﺗ ﻦﻣ ﺪﻛﺄﺘﻓ .ﺎًﻤﺋﺍﺩ ﺔﻳﻮﻟﻭﻷﺎﺑ ﻡﻮﻨﻟﺍ ﺖﻗﺆﻣ ﻰﻈﺤﻳ •
ﺖﻗﺆﻤﻟﺍ ءﺪﺒﻟ
.ﺕﻮﺼﻟﺍ ﺭﺪﺼﻣ ﺰﱢﻬﺟ 1
ﻞﻴﻐﺸﺘﻟﺍ ﺖﻗﺆﻣ •
.ﺕﻮﺼﻟﺍ
ﻞﻴﺠﺴﺘﻟﺍ ﺖﻗﺆﻣ •
." REC ON"
."TIMER OFF"
ﺕﺍﺩﺍﺪﻋﻹﺍ ﻦﻣ ﻖﻘﺤﺘﻠﻟ
ﻰﻠﻋ ﻂﻐﺿﺍ
:ﺔﻈﺣﻼﻣ
.ﻂﺒﻀﻟﺍ ﻖﺒﺴﻤﻟﺍ
.ﺎًﻣﻮﺘﻜﻣ
ﻡﻮﻨﻟﺍ ﺖﻗﺆﻣ
."OFF" ﺮﺘﺧﺍ ،ءﺎﻐﻟﻺﻟ
30 MIN
:ﺔﻈﺣﻼﻣ
ﺕﺎﺘﻗﺆﻤﻟﺍﻭ ﺔﻋﺎﺴﻟﺍ
ﺔﻋﺎﺴﻟﺍ ﻂﺒﺿ
.ﺔﻋﺎﺳ 24 ﺔﻐﻴﺼﺑ ﺔﻋﺎﺴﻟﺍ ﻩﺬﻫ
."CLOCK" ﺭﺎﻴﺘﺧﻻ ﺕﺍﺮﻣ ﺓﺪﻋ [CLOCK/TIMER] ﻰﻠﻋ ﻂﻐﺿﺍ
.ﺖﻗﻮﻟﺍ ﻂﺒﻀﻟ [،] ﻰﻠﻋ ﻂﻐﺿﺍ ،ٍﻥﺍﻮﺛ 20 ﻝﻼﺧ 2
.ٍﻥﺍﻮﺛ ﺾﻌﺒﻟ ﺔﻋﺎﺴﻟﺍ ﺽﺮﻌﻟ [CLOCK/TIMER] ﻰﻠﻋ ﻂﻐﺿﺍ
ﻲﺋﺎﺑﺮﻬﻜﻟﺍ ﺭﺎﻴﺘﻟﺍ ﺲﺑﺎﻗ ﻞﺼﻓ ﺪﻨﻋ ﻭﺃ ،ﺔﻗﺎﻄﻟﺍ ﻲﻓ ﻞﻄﻋ ﺪﺟﻮﻳ ﺎﻣﺪﻨﻋ ﺔﻋﺎﺴﻟﺍ ﻂﺒﺿ ﺩﺎﻌُﻳ •
:ﻦﻴﻌﻣ ﺖﻗﻭ ﻲﻓ ﻪﻠﻴﻐﺸﺗ ﻱﺮﺠﻳ ﺚﻴﺤﺑ ﺖﻗﺆﻤﻟﺍ ﻂﺒﺿ ﻚﻨﻜﻤﻳ
(ﻞﻴﺠﺴﺘﻟﺍ ﺖﻗﺆﻣ) ﻲﺟﺭﺎﺨﻟﺍ ﺯﺎﻬﺠﻟﺍ ﻭﺃ ﻮﻳﺩﺍﺮﻟﺍ ﻦﻣ ﻞﻴﺠﺴﺘﻟﺍ •
.ٍﺪﺣﺍﻭ ٍﻥﺁ ﻲﻓ ﻞﻴﺠﺴﺘﻟﺍ ﺖﻗﺆﻣﻭ ﻞﻴﻐﺸﺘﻟﺍ ﺖﻗﺆﻣ ﻡﺍﺪﺨﺘﺳﺍ ﻦﻜﻤﻳ ﻻ
PLAY" ﺭﺎﻴﺘﺧﻻ [CLOCK/TIMER] ﻰﻠﻋ ﻂﻐﺿﺍ 1
ﻭﺃ "
.ءﺪﺒﻟﺍ ﺖﻗﻭ ﻦﻴﻴﻌﺘﻟ ٍﻥﺍﻮﺛ 10 ﻝﻼﺧ [،] ﻰﻠﻋ ﻂﻐﺿﺍ
.ءﺎﻬﺘﻧﻻﺍ ﺖﻗﻭ ﻂﺒﻀﻟ ﻯﺮﺧﺃ ﺓﺮﻣ 3ﻭ 2 ﻦﻴﺗﻮﻄﺨﻟﺍ ِﺮﺟﺃ 4
ﻞﻴﺠﺴﺘﻟﺍ ﻭﺃ ﻞﻴﻐﺸﺘﻟﺍ ﻲﻓ ﺐﻏﺮﺗ ﻱﺬﻟﺍ ﺭﺪﺼﻤﻟﺍ ﺭﺎﻴﺘﺧﻻ [،] ﻰﻠﻋ ﻂﻐﺿﺍ 5
ﻆﻔﺤﻟ "USB B" ﻭﺃ "MEMORY" ﺭﺎﻴﺘﺧﻻ [،] ﻰﻠﻋ ﻂﻐﺿﺍ
.ﺎﻬﺘﻗﺪﺑ ﻅﺎﻔﺘﺣﻼﻟ ﻡﺎﻈﺘﻧﺎﺑ ﺔﻋﺎﺴﻟﺍ ﻂﺒﺿ ﺪﻋﺃ •
.[OK] ﻰﻠﻋ ﻂﻐﺿﺍ ﻢﺛ ،ﻪﻘﻳﺮﻃ ﻦﻋ
.[OK] ﻰﻠﻋ ﻂﻐﺿﺍ 3
:ﺔﻈﺣﻼﻣ
.ﺩﺩﺮﺘﻤﻟﺍ
ﻞﻴﺠﺴﺘﻟﺍﻭ ﻞﻴﻐﺸﺘﻟﺍ ﺖﻗﺆﻣ
Bluetooth® ﺭﺪﺼﻣ ءﺎﻨﺜﺘﺳﺎﺑ
(ﻞﻴﻐﺸﺘﻟﺍ ﺖﻗﺆﻣ) ﻅﺎﻘﻴﺘﺳﻻﺍ •
ﺩﺍﺪﻌﺘﺳﻻﺍ
.ﺔﻋﺎﺴﻟﺍ ﻂﺒﺿﺍ
." REC"
.[OK] ﻰﻠﻋ ﻂﻐﺿﺍ 3
ﻞﻴﺠﺴﺘﻟﺍ ﺖﻗﺆﻤﺑ ﻖﻠﻌﺘﻳ ﺎﻤﻴﻓ
.[OK] ﻰﻠﻋ ﻂﻐﺿﺍ ﻢﺛ ،ﻞﻴﺠﺴﺘﻟﺍ
1
2
6
15
94
VQT5F33
Page 95

ﻝﺎﺼﺗﻻﺍ ﻊﺿﻭ
.ﺕﻮﺼﻟﺍ ﺓﺩﻮﺟ ﻭﺃ ﻝﺎﺳﺭﻹﺍ ﺓﺩﻮﺠﻟ ﺔﻳﻮﻟﻭﻷﺍ ﺢﻨﻤﻟ ﻝﺎﺳﺭﻹﺍ ﺔﻋﺮﺳ ﺮﻴﻴﻐﺗ ﻚﻨﻜﻤﻳ
®
ﻪﻠﺼﻓﺎﻓ ،Bluetooth
."LINK MODE" ﺭﺎﻴﺘﺧﻻ [PLAY MENU] ﻰﻠﻋ ﻂﻐﺿﺍ
ﻢﺛ ،"MODE 2" ﻭﺃ "MODE 1" ﺭﺎﻴﺘﺧﻻ [،] ﻰﻠﻋ ﻂﻐﺿﺍ 2
ﺯﺎﻬﺠﺑ ًﻼﺼﺘﻣ ﻡﺎﻈﻨﻟﺍ ﻥﺎﻛ ﺍﺫﺇ
.("ﺯﺎﻬﺠﺑ ﻝﺎﺼﺗﻻﺍ ﻊﻄﻗ" ?)
.[OK] ﻰﻠﻋ ﻂﻐﺿﺍ
.ﻝﺎﺼﺗﻻﺍ ﻰﻠﻋ ﺰﻴﻛﺮﺘﻟﺍ
.ﺕﻮﺼﻟﺍ ﺓﺩﻮﺟ ﻰﻠﻋ ﺰﻴﻛﺮﺘﻟﺍ
."MODE 2" ﻮﻫ ﻲﺿﺍﺮﺘﻓﻻﺍ ﺩﺍﺪﻋﻹﺍ
ﺩﺍﺪﻌﺘﺳﻻﺍ
:ﺔﻈﺣﻼﻣ
ﺯﺎﻬﺠﺑ ﻝﺎﺼﺗﻻﺍ ﻊﻄﻗ
ﺭﺎﻴﺘﺧﻻ ﺭﺮﻜﺘﻣ ﻞﻜﺸﺑ [PLAY MENU] ﻰﻠﻋ ﻂﻐﺿﺍ 1
.[OK] ﻰﻠﻋ ﻂﻐﺿﺍ ﻢﺛ ،"OK? YES" ﺭﺎﻴﺘﺧﻻ ؛[،] ﻰﻠﻋ ﻂﻐﺿﺍ
.ﺯﺎﻬﺠﻟﺎﺑ •Bluetooth® ﺔﻴﻨﻘﺗ ﺮﺒﻋ ﻝﺎﺳﺭﻹﺍ ﻂﻤﻧ ﻞﻴﻄﻌﺗ
."DISCONNECT?"
:ﺔﻟﺎﺣ ﻲﻓ ﺯﺎﻬﺠﻟﺎﺑ ﻝﺎﺼﺗﻻﺍ ﻊﻄﻘﻨﻳ
.ﺡﺎﺘﻤﻟﺍ ﻕﺎﻄﻨﻠﻟ ﻰﺼﻗﻷﺍ ﺪﺤﻟﺍ ﺝﺭﺎﺧ ﺯﺎﻬﺠﻟﺍ ﻞﻘﻧ •
.ﻒﻠﺘﺨﻣ ﺭﺪﺼﻣ ﺭﺎﻴﺘﺧﺍ •
.ﺯﺎﻬﺠﻟﺍ ﻭﺃ ﻡﺎﻈﻨﻟﺍ ﻞﻴﻐﺸﺗ ﻑﺎﻘﻳﺇ •
:ﺔﻈﺣﻼﻣ
ﻱﺮﺠﻴﺳ ﺚﻴﺣ . •Bluetooth® ﻝﺎﺼﺗﺍ ﺚﻳﺪﺤﺗ ﻚﻨﻜﻤﻳ ،ﺓﺪﺣﻮﻟﺎﺑ ﺮﺧﺁ ﺯﺎﻬﺟ ﺖﺴﻣﻻ ﺍﺫﺇ
ﻡﺪﺨﺘﺴﻤﻟﺍ ﻖﻴﺒﻄﺘﻟﺍ ﻞﻴﻐﺸﺗ ﺪﻋﺄﻓ ،ﻞﻴﻐﺸﺘﻟﺍ ءﺎﻨﺛﺃ ﻦﻴﻨﻣﺍﺰﺘﻣ ﺕﻮﺼﻟﺍﻭ ﺓﺭﻮﺼﻟﺍ ﻥﻮﻜﺗ ﻢﻟ ﺍﺫﺇ •
ﻞﺒﻛ ﺮﺒﻋ ﺓﺪﺣﻮﻟﺍ ﻩﺬﻬﺑ Bluetooth® ﺯﺎﻬﺟ ﻞﱢﺻﻮﻓ ،ﺔﻠﻜﺸﻤﻟﺍ ﺕﺮﻤﺘﺳﺍ ﺍﺫﺇﻭ .ﺎﻤﻬﻠﻴﻐﺸﺘﻟ
ﺯﺎﻬﺠﻟﺍ ﻉﻮﻧ ﺐﺴﺤﺑ ﻚﻟﺫﻭ ،ﺎًﻴﺋﺎﻘﻠﺗ • ﻞﻴﻐﺸﺘﻟﺍ ﺃﺪﺒﻳ ﺪﻗ ،ﺎًﻤﺋﺎﻗ ﻝﺎﺼﺗﻻﺍ ﻥﻮﻜﻳ ﺎﻣﺪﻨﻋ
ﺯﺎﻬﺠﻟﺍ ﻉﻮﻧ ﻰﻠﻋ ﺍًﺩﺎﻤﺘﻋﺍ ﻢﻴﻠﺳ ﻮﺤﻧ ﻰﻠﻋ ﺓﺪﺣﺍﻭ ﺔﺴﻤﻠﺑ ﻝﺎﺼﺗﻻﺍ ﺔﻴﺻﺎﺧ ﻞﻤﻌﺗ ﻻ ﺪﻗ •
1
•MODE 1
ﺎًﻴﺋﺎﻘﻠﺗ ﻞﻤﻌﺘﺴﻓ ،ﺔﻴﺴﻴﺋﺮﻟﺍ ﺓﺪﺣﻮﻟﺍ ﻞﻴﻐﺸﺗ ﻑﺎﻘﻳﺇ ﺔﻟﺎﺣ ﻲﻓ ﻰﺘﺣ ،ﺔﻔﻴﻇﻮﻟﺍ ﻩﺬﻫ ﺖﻠﱠﻌﻓ ﺍﺫﺇ
•MODE 2
."BLUETOOTH" ﺭﺎﻴﺘﺧﻻ ([ /MEMORY,-PAIRING]
."STANDBY MODE" ﺭﺎﻴﺘﺧﻻ [PLAY MENU] ﻰﻠﻋ ﻂﻐﺿﺍ
ﻭﺃ "ON STANDBY MODE" ﺭﺎﻴﺘﺧﻻ [،] ﻰﻠﻋ ﻂﻐﺿﺍ 3
.[OK] ﻰﻠﻋ ﻂﻐﺿﺍ ﻢﺛ ،"OFF STANDBY MODE"
.ﻲﺋﺎﻘﻠﺗ ﻮﺤﻧ ﻰﻠﻋ ﻪﺑ ﻝﺎﺼﺗﻻﺍ ﻖﺒﺳ ﻱﺬﻟﺍ ﺯﺎﻬﺠﻟﺍ ﻞﺼﻓ
Bluetooth® ﺩﺍﺪﻌﺘﺳﺍ ﻊﺿﻭ
.ﻝﺎﺼﺗﺍ ﺐﻠﻃ Bluetooth® ﺯﺎﻬﺟ ﻞﺳﺮﻳ ﺎﻣﺪﻨﻋ
:ﺔﻴﺴﻴﺋﺮﻟﺍ ﺓﺪﺣﻮﻟﺍ) [
, MEMORY] ﻰﻠﻋ ﻂﻐﺿﺍ 1
ﺔﺣﺎﺘﻤﻟﺍ ﺕﺎﻣﻮﻠﻌﻤﻟﺍ ﺽﺮﻋ
2
:ﺽﺮﻌﻟﺍ ﺔﺷﺎﺷ ﻰﻠﻋ ﺔﻴﻟﺎﺘﻟﺍ ﺕﺎﻣﻮﻠﻌﻤﻟﺍ ﺓﺪﻫﺎﺸﻣ ﻚﻨﻜﻤﻳ
.(ﻰﺼﻗﺃ ﺪﺤﺑ ﺰﻣﺭ •16) ﻞﺼﺘﻤﻟﺍ ﺯﺎﻬﺠﻟﺍ ﻢﺳﺍ
.ﻡﺪﺨﺘﺴﻤﻟﺍ •Bluetooth® ﻒﻳﺮﻌﺗ ﻒﻠﻣ
.[DISPLAY-DIMMER] ﻰﻠﻋ ﻂﻐﺿﺍ
:ﺔﻈﺣﻼﻣ
.(ﻖﺤﻠﻣ ﺮﻴﻏ) ﺕﻮﺻ
.ﻡﺪﺨﺘﺴﻤﻟﺍ
.ﻡﺪﺨﺘﺴﻤﻟﺍ
ﺓﺪﺣﺍﻭ ﺔﺴﻤﻠﺑ ﻝﺎﺼﺗﻻﺍ ﺔﻴﺻﺎﺧ
(NFC ﺔﻴﻨﻘﺗ ﺔﻄﺳﺍﻮﺑ ﻝﺎﺼﺗﻻﺍ)
ﻂﻘﻓ NFC ﻊﻣ ﺔﻘﻓﺍﻮﺘﻤﻟﺍ AndroidTM ﺓﺰﻬﺟﺄﺑ ﺹﺎﺧ
NFC ﺔﻔﻴﻇﻭ ﻊﻣ ﻖﻓﺍﻮﺘﻣ Bluetooth® ﺯﺎﻬﺟ ﺔﺴﻣﻼﻣ ﺩﺮﺠﻤﺑ
ﻊﻴﻤﺟ ﻝﺎﻤﻜﺘﺳﺍ ﻚﻨﻜﻤﻳ ،ﻂﻘﻓ ﺓﺪﺣﻮﻟﺎﺑ (Near Field Communication)
.ﻝﺎﺼﺗﺍ ءﺍﺮﺟﺇ ﻰﺘﺣ Bluetooth® ﺯﺎﻬﺟ ﻞﻴﺠﺴﺗ ﻦﻣ ﺍًءﺪﺑ ،ﺕﺍﺩﺍﺪﻌﺘﺳﻻﺍ
ﻖﻴﺒﻄﺗ • ﺖﻴﺒﺜﺗ 4.1 ﻦﻣ ﻞﻗﺃ ﺭﺍﺪﺻﺈﺑ Android ﺯﺎﻬﺟ ﺐﻠﻄﺘﻳ
ﻊﻗﻮﻤﺑ ﺚﺤﺒﻟﺍ ﻞﻘﺣ ﻲﻓ "Panasonic MAX Juke" ﻞﺧﺩﺃ 1
.ﺯﺎﻬﺠﻟﺎﺑ "Panasonic MAX Juke" ﻖﻴﺒﻄﺗ ﻞﻴﻐﺸﺗ ﺃﺪﺑﺍ 2
2
."BLUETOOTH" ﺭﺎﻴﺘﺧﻻ ([ /MEMORY,-PAIRING]
ﺓﺪﺣﻮﻟﺎﺑ NFC ﺔﻴﻨﻘﺘﻟ ﺲﻤﻠﻟﺍ ﺔﻘﻄﻨﻤﺑ ﻝﻮﻄﻣ ﻮﺤﻧ ﻰﻠﻋ ﻚﻳﺪﻟ ﺯﺎﻬﺠﻟﺍ ﺲﻣﻻ
ﻢﺳﺍ ﺽﺮﻌُﻳ ،ﻪﺑ ﻝﺎﺼﺗﻻﺍﻭ •Bluetooth
.ﺓﺪﺣﻮﻟﺍﻭ ﺯﺎﻬﺠﻟﺍ ﻦﻴﺑ ﺪﻋﺎﺒﻓ .ﺽﺮﻌﻟﺍ ﺔﺷﺎﺷ ﻰﻠﻋ ﻞﺼﺘﻤﻟﺍ ﺯﺎﻬﺠﻟﺍ
ﺲﻤﻟ ﺔﻘﻄﻨﻤﺑ ﻚﻳﺪﻟ ﺯﺎﻬﺠﻟﺍ ﺖﺴﻣﻻ ﺍﺫﺇ ﻰﺘﺣ ﻝﺎﺼﺗﻻﺍ ءﺎﺸﻧﺇ ﻱﺮﺠﻳ ﻻ ﺎﻣﺪﻨﻋ •
ﺮﺘﺧﺍ ﻢﺛ ،ﺚﺤﺒﻟﺍ ءﺍﺮﺟﻹ Google Play
.ﻚﻳﺪﻟ ﺯﺎﻬﺠﻟﺍ ﺔﺷﺎﺷ ﻰﻠﻋ ﺔﺿﻭﺮﻌﻤﻟﺍ ﺕﺎﻤﻴﻠﻌﺘﻟﺍ ﻊﺒﺗﺍ -
:ﺔﻴﺴﻴﺋﺮﻟﺍ ﺓﺪﺣﻮﻟﺍ) [ , MEMORY] ﻰﻠﻋ ﻂﻐﺿﺍ 1
Bluetooth® ﺯﺎﻬﺟ
.Bluetooth
.ﺯﺎﻬﺠﻟﺎﺑ •NFC ﺔﻴﺻﺎﺧ ﻞ
.(ﺎًﻧﺎﺠﻣ) "Panasonic MAX Juke"
."Panasonic MAX Juke"
®
ﺯﺎﻬﺟ ﻞﻴﺠﺴﺗ ﻝﺎﻤﺘﻛﺍ ﺭﻮﻓ
.ﺲﻤﻠﻟﺍ ﻊﺿﻮﻣ ﺮّﻴﻏ ،NFC
®
ﺯﺎﻬﺟ ﻰﻠﻋ ﻞﻴﻐﺸﺘﻟﺍ ﺃﺪﺑﺍ 3
ﻣﻭﺩ ﺹﺮﺣﺍ
ً
ﺩﺍﺪﻌﺘﺳﻻﺍ
TM
-.ﻖﻴﺒﻄﺘﻠﻟ ﺭﺍﺪﺻﺇ ﺙﺪﺣﺃ ﻡﺍﺪﺨﺘﺳﺍ ﻰﻠﻋ ﺎ
.[ ]
ّ
ﻐﺷ
ِ
2
VQT5F33
14
95
Page 96

Bluetooth®
.Bluetooth® ﺔﻴﻨﻘﺗ ﺮﺒﻋ ﺎًﻴﻜﻠﺳﻻ ﻪﻠﻴﻐﺸﺗﻭ ﺕﻮﺻ ﺯﺎﻬﺠﺑ ﻝﺎﺼﺗﻻﺍ ﻚﻨﻜﻤﻳ
.ﻞﻴﺻﺎﻔﺗ ﻰﻠﻋ ﻝﻮﺼﺤﻠﻟ •Bluetooth
•NFC ﺔﻴﻨﻘﺗ ﻊﻣ ﻖﻓﺍﻮﺘﻤﻟﺍ Bluetooth® ﺯﺎﻬﺟ ﻡﺍﺪﺨﺘﺳﺍ ﻡﺰﺘﻌﺗ ﺖﻨﻛ ﺍﺫﺇ
ﺔﺴﻤﻠﺑ ﻝﺎﺼﺗﻻﺍ ءﺍﺮﺟﺇ" ﻰﻟﺇ ﻞﻘﺘﻧﺎﻓ ،(Near Field Communication)
. •Bluetooth® ﺯﺎﻬﺠﺑ ﻝﺎﺼﺗﻻﺍ ﻞﺒﻗ ﺕﻮﺼﻟﺍ ﻯﻮﺘﺴﻣ ﺾﻔﺧﺍ
.ﺓﺪﺣﻮﻟﺍ ﻦﻣ ﺏﺮﻘﻟﺎﺑ ﻪﻌﺿ ﻢﺛ ،ﺯﺎﻬﺠﻟﺎﺑ •Bluetooth® ﺔﻴﺻﺎﺧ ﻞﱢﻐﺷ
.ﺔﻴﺴﻴﺋﺮﻟﺍ ﺓﺪﺣﻮﻟﺎﺑ [ /MEMORY,-PAIRING] ﻰﻠﻋ ًﻻﻮﻄﻣ ﺎًﻄﻐﺿ ﻂﻐﺿﺍ
.ﺯﺎﻬﺠﻟﺎﺑ Bluetooth® ﺔﻤﺋﺎﻗ ﻦﻣ "SC-MAX770" ﺮﺘﺧﺍ 2
.ﻥﺍﺮﺘﻗﻻﺍ ﻝﺎﻤﺘﻛﺍ ﺪﻌﺑ ﺎًﻴﺋﺎﻘﻠﺗ ًﻻﺎﺼﺗﺍ ﻡﺎﻈﻨﻟﺍ ﺍﺬﻬﺑ ﺯﺎﻬﺠﻟﺍ ﻞﺼﺘﻳ
."ﺹﺮﻗ ﻞﻴﻐﺸﺗ" ﻊﺟﺍﺭ ،ﺔﻴﺴﻴﺋﺮﻟﺍ ﺓﺪﺣﻮﻟﺍ ﺔﻄﺳﺍﻮﺑ ﻯﺮﺧﺃ ﺕﺎﻴﻠﻤﻋ ءﺍﺮﺟﻹ
."BLUETOOTH" ﺭﺎﻴﺘﺧﻻ [ , MEMORY] ﻰﻠﻋ ﻂﻐﺿﺍ 1
."PAIRING" ﺭﺎﻴﺘﺧﻻ [PLAY MENU] ﻰﻠﻋ ﻂﻐﺿﺍ 2
.[OK] ﻰﻠﻋ ﻂﻐﺿﺍ ﻢﺛ ،"OK? YES" ﺭﺎﻴﺘﺧﻻ ؛[،] ﻰﻠﻋ ﻂﻐﺿﺍ 3
.ﺯﺎﻬﺠﻟﺎﺑ Bluetooth
ﺯﺎﻬﺠﻟﺎﺑ ﻥﺍﺮﺘﻗﻻﺍ ﻯﺮﺟ ﺍﺫﺇﻭ .ﺓﺪﺣﻮﻟﺍ ﻩﺬﻫ ﺔﻄﺳﺍﻮﺑ ﺓﺰﻬﺟﺃ •8 ﻰﻟﺇ ﻞﺼﻳ ﺎﻣ ﻞﻴﺠﺴﺗ ﻚﻨﻜﻤﻳ
.ﺔﻴﻨﻣﺯ ﺓﺪﻣ ﻝﻮﻃﺃ ﻪﻣﺪﺨﺘﺳﺍ ﻡﺪﻋ ﻰﻠﻋ ﻰﻀﻣ ﻱﺬﻟﺍ ﺯﺎﻬﺠﻟﺍ ﻝﺍﺪﺒﺘﺳﺍ ﻱﺮﺠﻴﺴﻓ ،ﻊﺳﺎﺘﻟﺍ
ﻝﺎﺼﺗﻻﺍ ﺎًﻴﺋﺎﻘﻠﺗ ﻡﺎﻈﻨﻟﺍ ﻝﻭﺎﺤﻴﺳ ،ﺍًﺭﺪﺼﻣ ﻩﺭﺎﺒﺘﻋﺎﺑ " •BLUETOOTH" ﺭﺎﻴﺘﺧﺍ ﺪﻨﻋ
®
ﺯﺎﻬﺠﺑ ﺔﺻﺎﺨﻟﺍ ﻞﻴﻐﺸﺘﻟﺍ ﺕﺎﻤﻴﻠﻌﺗ ﻊﺟﺍﺭ
."(NFC ﺔﻴﻨﻘﺗ ﺔﻄﺳﺍﻮﺑ ﻝﺎﺼﺗﻻﺍ) ﺓﺪﺣﺍﻭ
ﺯﺎﻬﺠﺑ ﻥﺍﺮﺘﻗﻻﺍ
ﺩﺍﺪﻌﺘﺳﻻﺍ
®
.Bluetooth
.ﺪﻌﺑ ﻦﻋ ﻢﻜﺤﺘﻟﺍ ﺯﺎﻬﺟ ﺔﻄﺳﺍﻮﺑ ﻞﻴﻐﺸﺘﻟﺍ ءﺍﺮﺟﺇ ﺎًﻀﻳﺃ ﻚﻨﻜﻤﻳ •
." •0000" ﻞﺧﺩﺄﻓ ،ﺭﻭﺮﻣ ﺡﺎﺘﻔﻤﺑ ﺔﺒﻟﺎﻄﻤﻟﺍ ﺕﺮﺟ ﺍﺫﺇ
.ﻝﺎﺼﺗﻻﺍ ءﺍﺮﺟﺇ ﻞﺟﺃ ﻦﻣ ﺯﺎﻬﺠﻟﺍ ﻥﺍﺮﺘﻗﺍ ﺐﺠﻳ •
.ﻪﺗﺍﺫ ﺖﻗﻮﻟﺍ ﻲﻓ ﻂﻘﻓ ﺪﺣﺍﻭ ﺯﺎﻬﺠﺑ ﻝﺎﺼﺗﻻﺍ ﻡﺎﻈﻨﻟﺍ ﺍﺬﻬﻟ ﻦﻜﻤﻳ •
ﺯﺎﻬﺟ ﻰﻠﻋ ﻞﻴﻐﺸﺘﻟﺍ ﺃﺪﺑﺍ 3
:ﺔﻈﺣﻼﻣ
®
ﺔﻤﺋﺎﻗ ﻦﻣ "SC-MAX770" ﺮﺘﺧﺍ 4
.ﻪﺑ ﻝﺎﺼﺗﻻﺍ ﻯﺮﺟ ﺯﺎﻬﺟ ﺮﺧﺂﺑ
AM ﺺﻴﺼﺨﺗ ﺩﺍﺪﻋﺇ
ﺔﺟﺭﺪﺘﻣ ﻢﻴﻘﺑ ﺔﺼﺼﺨﻤﻟﺍ AM ﺚﺑ ﺕﺍﺭﺎﺷﺇ ﻞﺒﻘﺘﺴﻳ ﻥﺃ ﺎًﻀﻳﺃ ﻡﺎﻈﻨﻟﺍ ﺍﺬﻬﻟ ﻦﻜﻤﻳ
."AM" ﻭﺃ "FM" ﺭﺎﻴﺘﺧﻻ ؛[RADIO/EXT-IN] ﻰﻠﻋ ﻂﻐﺿﺍ
.[RADIO/EXT-IN] ﻰﻠﻋ ًﻻﻮﻄﻣ ﻂﻐﺿﺍ 2
ﺎﻣﺪﻨﻋ ﺭﺰﻟﺍ ﺭﱢﺮﺣ .ﻲﻟﺎﺣ ﻮﻳﺩﺍﺭ ﺩﺩﺮﺗ ﻰﻧﺩﺃ ﺽﺮﻌﻟﺍ ﺔﺷﺎﺷ ﺽﺮﻌﺗ ،ٍﻥﺍﻮﺛ ﻊﻀﺑ ﺪﻌﺑ
.ﻯﺮﺧﺃ ﺓﺮﻣ ﺔﻘﺑﺎﺴﻟﺍ ﺕﺍﻮﻄﺨﻟﺍ ءﺍﺮﺟﺈﺑ ﻢﻗ ،ﻲﻟﻭﻷﺍ ﺩﺍﺪﻋﻹﺍ ﻰﻟﺇ ﻉﻮﺟﺮﻠﻟ •
1
.ﻂﺒﻀﻟﺍ ﺔﻘﺒﺴﻤﻟﺍ ﺕﺍﺩﺩﺮﺘﻟﺍ ﺢﺴﻣ ﻱﺮﺠﻳ ،ﺩﺍﺪﻋﻹﺍ ﺮﻴﻐُﺗ ﺎﻣﺪﻌﺑ •
ﻂﻘﻓ ﺔﻴﺴﻴﺋﺮﻟﺍ ﺓﺪﺣﻮﻟﺎﺑ
.ﺰﺗﺮﻫ ﻮﻠﻴﻛ 10 ﺎﻫﺭﺪﻗ
.ﻰﻧﺩﻷﺍ ﺩﺩﺮﺘﻟﺍ ﺮﻴﻐﺘﻳ
ﺓﺮﻛﺍﺬﻟﺎﺑ ﻖﺒﺴﻤﻟﺍ ﻂﺒﻀﻟﺍ
.ﺎًﻘﺒﺴﻣ ﺎًﻄﺒﺿ AM ﺔﻄﺤﻣ 15ﻭ FM ﺔﻄﺤﻣ 30 ﻂﺒﺿ ﻦﻜﻤﻳ
."CURRENT" ﻭﺃ "LOWEST" ﺩﺩﺮﺗ ﺭﺎﻴﺘﺧﻻ [OK] ﻰﻠﻋ ﻂﻐﺿﺍ
1
ﻂﻐﺿﺍ ﻢﺛ ،"A.PRESET" ﺭﺎﻴﺘﺧﻻ [PLAY MENU] ﻰﻠﻋ ﻂﻐﺿﺍ 2
."START?" ﺔﻟﺎﺳﺭ ﺮﻬﻈﺗ
.ﻖﺒﺴﻤﻟﺍ ﻂﺒﻀﻟﺍ ءﺪﺒﻟ [OK] ﻰﻠﻋ ﻂﻐﺿﺍ
.ﺔﻄﺤﻤﻟﺍ ﺔﻔﻟﺍﻮﻤﻟ [] ﻭﺃ [] ﻰﻠﻋ ﻂﻐﺿﺍ
.ﻂﺒﻀﻟﺍ ﻖﺒﺴﻣ ﻢﻗﺭ ﺭﺎﻴﺘﺧﻻ ﺔﻴﻤﻗﺮﻟﺍ ﺔﻴﺋﺎﺠﻬﻟﺍ ﺭﺍﺭﺯﻷﺍ ﻰﻠﻋ ﻂﻐﺿﺍ 3
ﺎًﻄﺒﺿ ﺕﺎﻄﺤﻤﻟﺍ ﻦﻣ ﺪﻳﺰﻤﻟﺍ ﻂﺒﻀﻟ ﻯﺮﺧﺃ ﺓﺮﻣ 3 ﻰﺘﺣ 1 ﻦﻣ ﺕﺍﻮﻄﺨﻟﺎﺑ ﻢﻗ
.ﻪﺗﺍﺫ ﻂﺒﻀﻟﺍ ﻖﺒﺴﻤﻟﺍ ﻢﻗﺮﻟﺍ ﻞﻐﺸﺗ ﺔﻄﺤﻣ ﻱﺃ ﺓﺪﻳﺪﺠﻟﺍ ﺔﻄﺤﻤﻟﺍ ﻝﺪﺒﺘﺴﺗ
ﺔﻄﺤﻤﻟﺍ ﺭﺎﻴﺘﺧﻻ [] ﻭﺃ [] ،ﺔﻴﻤﻗﺮﻟﺍ ﺔﻴﺋﺎﺠﻬﻟﺍ ﺭﺍﺭﺯﻷﺍ ﻰﻠﻋ ﻂﻐﺿﺍ
."PRESET" ﺭﺎﻴﺘﺧﻻ [TUNE MODE] ﻰﻠﻋ ﻂﻐﺿﺍ 1
ﺔﻘﺒﺴﻤﻟﺍ ﺔﻄﺤﻤﻟﺍ ﺭﺎﻴﺘﺧﻻ [/] ﻭﺃ [/] ﻰﻠﻋ ﻂﻐﺿﺍ 2
.[] ﻰﻠﻋ ﻂﻐﺿﺍ ،ءﺎﻐﻟﻺﻟ
.[PROGRAM] ﻰﻠﻋ ﻂﻐﺿﺍ 2
ﻂﺒﻀﻟﺍ ﺔﻘﺒﺴﻣ ﺔﻄﺤﻣ ﺭﺎﻴﺘﺧﺍ
ﺔﻴﺴﻴﺋﺮﻟﺍ ﺓﺪﺣﻮﻟﺍ ﻡﺍﺪﺨﺘﺳﺍ
ﺎًﻴﺋﺎﻘﻠﺗ ﻖﺒﺴﻤﻟﺍ ﻂﺒﻀﻟﺍ
1
.[OK] ﻰﻠﻋ
3
ﺎًﻳﻭﺪﻳ ﻖﺒﺴﻤﻟﺍ ﻂﺒﻀﻟﺍ
1
.ﺎًﻘﺒﺴﻣ
.ﻂﺒﻀﻟﺍ ﺔﻘﺒﺴﻤﻟﺍ
.ﻂﺒﻀﻟﺍ
13
96
ﻲﺑﺮﻋ
VQT5F33
Page 97

ﻮﻳﺩﺍﺮﻟﺍ
ﺔﻳﻭﺪﻴﻟﺍ ﺔﻔﻟﺍﻮﻤﻟﺍ
."AM" ﻭﺃ "FM" ﺭﺎﻴﺘﺧﻻ ؛[RADIO/EXT-IN] ﻰﻠﻋ ﻂﻐﺿﺍ 1
.ﺔﺑﻮﻠﻄﻤﻟﺍ ﺔﻄﺤﻤﻟﺍ ﺩﺩﺮﺗ ﺭﺎﻴﺘﺧﻻ [] ﻭﺃ [] ﻰﻠﻋ ﻂﻐﺿﺍ 2
ﺩﺩﺮﺘﻟﺍ ﺃﺪﺒﻳ ﻥﺃ ﻰﻟﺇ ﺭﺰﻟﺍ ﻰﻠﻋ ًﻻﻮﻄﻣ ﺎًﻄﻐﺿ ﻂﻐﺿﺍ ،ﺔﻴﺋﺎﻘﻠﺘﻟﺍ ﺔﻔﻟﺍﻮﻤﻟﺍ ءﺍﺮﺟﻹ
.ﻮﻳﺮﺘﺳﺍ ﺚﺑ ﻝﺎﺒﻘﺘﺳﺍ ﺪﻨﻋ "STEREO" ﺔﻤﻠﻛ ﺽﺮﻌُﺗ
."AM" ﻭﺃ "FM" ﺭﺎﻴﺘﺧﻻ ؛[RADIO/EXT-IN] ﻰﻠﻋ ﻂﻐﺿﺍ 1
."MANUAL" ﺭﺎﻴﺘﺧﻻ [TUNE MODE] ﻰﻠﻋ ﻂﻐﺿﺍ 2
ﺔﻄﺤﻤﻟﺍ ﺩﺩﺮﺗ ﺭﺎﻴﺘﺧﻻ [/] ﻭﺃ [/] ﻰﻠﻋ ﻂﻐﺿﺍ 3
."FM MODE" ﺭﺎﻴﺘﺧﻻ [PLAY MENU] ﻰﻠﻋ ﻂﻐﺿﺍ 1
.[OK] ﻰﻠﻋ ﻂﻐﺿﺍ ﻢﺛ ،"MONO" ﺭﺎﻴﺘﺧﻻ [،] ﻰﻠﻋ ﻂﻐﺿﺍ 2
.ﺩﺩﺮﺘﻟﺍ ﺮﻴﻴﻐﺗ ﺪﻨﻋ ﺎًﻀﻳﺃ "MONO" ﻂﻤﻧ ﻰﻐﻠُﻳﻭ
."BEATPROOF" ﺭﺎﻴﺘﺧﻻ [PLAY MENU] ﻰﻠﻋ ﻂﻐﺿﺍ 1
ﺮﻓﻮﺗ ﻲﺘﻟﺍ "BP 4" ﻰﺘﺣ "BP 1" ﻦﻣ ﺭﺎﻴﺘﺧﻼﻟ [،] ﻰﻠﻋ ﻂﻐﺿﺍ 2
.[OK] ﻰﻠﻋ ﻂﻐﺿﺍ ﻢﺛ ،ﻝﺎﺒﻘﺘﺳﺍ ﻞﻀﻓﺃ
.ﺔﻋﺮﺴﺑ ﺮﻴﻐﺘﻟﺍ ﻲﻓ
ﺔﻴﺴﻴﺋﺮﻟﺍ ﺓﺪﺣﻮﻟﺍ ﻡﺍﺪﺨﺘﺳﺍ
.ﺔﺑﻮﻠﻄﻤﻟﺍ
ﺕﻮﺼﻟﺍ ﺓﺩﻮﺟ ﻦﻴﺴﺤﺗ
"
FM " ﺭﺎﻴﺘﺧﺍ ﺪﻨﻋ
."STEREO" ﺮﺘﺧﺍ ،ءﺎﻐﻟﻺﻟ
"
AM " ﺭﺎﻴﺘﺧﺍ ﺪﻨﻋ
ﺔﻠﺠﺴﻤﻟﺍ ﺕﺍﺭﺎﺴﻤﻟﺍ ﻑﺬﺣ
([ /MEMORY] :ﺔﻴﺴﻴﺋﺮﻟﺍ ﺓﺪﺣﻮﻟﺍ) [ , MEMORY] ﻰﻠﻋ ﻂﻐﺿﺍ
ﺭﺎﻴﺘﺧﻻ ([USB/CD] :ﺔﻴﺴﻴﺋﺮﻟﺍ ﺓﺪﺣﻮﻟﺍ) [USB] ﻰﻠﻋ ﻂﻐﺿﺍ
.ﺏﻮﻠﻄﻤﻟﺍ ﻡﻮﺒﻟﻷﺍ ﺭﺎﻴﺘﺧﻻ [،] ﻰﻠﻋ ﻂﻐﺿﺍ
.ﺏﻮﻠﻄﻤﻟﺍ ﺭﺎﺴﻤﻟﺍ ﺭﺎﻴﺘﺧﻻ [] ﻭﺃ [] ﻰﻠﻋ ﻂﻐﺿﺍ 3
.ﺏﻮﻠﻄﻤﻟﺍ ﻊﺿﻮﻟﺍ ﺭﺎﻴﺘﺧﻻ [EDIT MODE] ﻰﻠﻋ ﻂﻐﺿﺍ 4
.(ﻰﺼﻗﺃ ﺪﺤﻛ ﺭﺎﺴﻣ 999) ﺪﺣﺍﻭ ﻡﻮﺒﻟﺃ ﻑﺬﺣ
.ﺔﻴﻠﺧﺍﺪﻟﺍ ﺓﺮﻛﺍﺬﻟﺍ ﻲﻓ ﺔﻧﺰﺨﻤﻟﺍ ﺕﺎﻣﻮﺒﻟﻷﺍ ﻊﻴﻤﺟ ﻑﺬﺣ
ﻰﻠﻋ ﻂﻐﺿﺍ ﻢﺛ ،"NO" ﻭﺃ "YES" ﺭﺎﻴﺘﺧﻻ [،] ﻰﻠﻋ ﻂﻐﺿﺍ
:ﺔﻌﺴﻟﺍ ﺓﺮﻴﺒﻛ ﻦﻳﺰﺨﺗ ﺕﺍﺪﺣﻭ ﺔﺌﻓ ﻦﻤﺿ ﺓﺩﺪﺤﻤﻟﺍ ﺔﻘﻓﺍﻮﺘﻤﻟﺍ USB ﺓﺰﻬﺟﺃ
ﻢﻋﺪﻟﺎﺑ •FAT 12/16/32 ﺕﺎﻔﻠﻣ ﻡﺎﻈﻧ ﻰﻈﺤﻳ) ﻡﻮﻋﺪﻣ ﺮﻴﻏ NTFS ﺕﺎﻔﻠﻣ ﻡﺎﻈﻧ
.ﻂﻘﻓ ﺓﺮﻴﺒﻛ ﺕﺎﻴﻤﻛ ﻞﻘﻧ ﻢﻋﺪﺗ ﻲﺘﻟﺍ •USB ﺓﺰﻬﺟﺃ
. •USB 2.0 ﺭﺎﻴﻌﻤﻟ ﺔﻠﻣﺎﻜﻟﺍ ﺔﻋﺮﺴﻟﺍ ﻢﻋﺪﺗ ﻲﺘﻟﺍ USB ﺓﺰﻬﺟﺃ
.". •MP3" ﻭﺃ ،".mp3" ﺭﺎﺴﻤﻟﺍ ﺩﺍﺪﺘﻣﺍ ﻥﻮﻜﻳ ﻥﺃ ﺐﺠﻳ
.ﺔﻣﻮﻋﺪﻣ ﺮﻴﻏ ( •Interrupt/Bulk/Control) CBI ﺔﻴﻨﺑ
.ﻉﺎﻄﻘﻟﺍ ﻢﺠﺣ ﺐﺒﺴﺑ ﺕﺎﻔﻠﻤﻟﺍ ﺾﻌﺑ ﻞﻤﻋ ﺭﺬﻌﺘﻳ ﺪﻗ •
."MEMORY" ﺭﺎﻴﺘﺧﻻ
."USB B"
.ﺪﺣﺍﻭ ﺭﺎﺴﻣ ﻑﺬﺣ
.USB ﺯﺎﻬﺟ ﺔﺌﻴﻬﺗ
.ﻪﻓﺬﺣ ﺩﺍﺮﻤﻟﺍ ﺩﺪﺤﻤﻟﺍ ﺮﺼﻨﻌﻟﺍ ﺽﺮﻌُﻳ
."SURE? NO" ﺔﻟﺎﺳﺭ ﺽﺮﻌُﺗ
.[OK] ﻰﻠﻋ ﻂﻐﺿﺍ
.[OK] ﻰﻠﻋ ﻂﻐﺿﺍ
.ﻑﺬﺤﻟﺍ ﺪﻴﻛﺄﺘﻟ "YES" ﺮﺘﺧﺍ
."WRITING" ﺔﻟﺎﺳﺭ ﺮﻬﻈﺗ
USB ﺯﺎﻬﺟ ﻝﻮﺣ ﺔﻈﺣﻼﻣ
.ﺕﺎﻣﻮﺒﻟﺃ ﺎﻫﺭﺎﺒﺘﻋﺎﺑ ﺕﺍﺪﻠﺠﻤﻟﺍ ﻞﻣﺎﻌُﺗ •
.[OK]
:ﺔﻈﺣﻼﻣ
.ﺕﺍﺭﺎﺴﻣ ﺕﺎﻔﻠﻤﻟﺍ ﺪﻌﺗ •
ﺔﻣﺪﻘﺘﻤﻟﺍ ﻞﻴﺠﺴﺘﻟﺍ ﻒﺋﺎﻇﻭ
1
.ﺔﻳﺩﺎﻌﻟﺍ ﺔﻋﺮﺴﻟﺍ (3x) ﻑﺎﻌﺿﺃ ﺔﺛﻼﺛ ﻰﻟﺇ ﻞﺼﻳ ﺎﻣ :CD-R,CD
.ﺔﻳﺩﺎﻌﻟﺍ ﺔﻋﺮﺴﻟﺍ (2x) ﻦﻴﻔﻌﺿ ﻰﻟﺇ ﻞﺼﻳ ﺎﻣ :CD-RW
2
ﻭﺃ [USB REC /] ﻭ [CD HI-SPEED REC] ﻰﻠﻋ ﻂﻐﺿﺍ 3
•TRACK DEL
ﺹﺮﻘﻟﺍ ﻞﱢﺠﺴﻓ ،ﺹﺮﻘﻟﺍ • ﺔﻟﺎﺣ ﺐﺒﺴﺑ ﺔﻴﻟﺎﻋ ﺔﻋﺮﺴﺑ ﻞﻴﺠﺴﺘﻟﺍ ءﺍﺮﺟﺇ ﻙﺭﻭﺪﻘﻤﺑ ﻦﻜﻳ ﻢﻟ ﺍﺫﺇ
•ALBUM DEL
•FORMAT
•ALL DEL
ﻡﺍﺪﺨﺘﺳﺎﺑ ﺕﺍﺭﺎﺴﻤﻟﺍ ﻢﻴﺴﻘﺗ ﻚﻨﻜﻤﻳ ،ﻲﺟﺭﺎﺧ ﺯﺎﻬﺟ ﻭﺃ ﻮﻳﺩﺍﺮﻟﺍ ﻦﻣ ﻞﻴﺠﺴﺘﻟﺍ ﺔﻟﺎﺣ ﻲﻓ
.ﻞﻴﺠﺴﺘﻟﺍ ءﺪﺒﻟ ٍﺪﺣﺍﻭ ٍﻥﺁ ﻲﻓ [MEMORY REC /]
.ﻪﻴﻠﻋ ﻞﻴﺠﺴﺘﻟﺍ ﻲﻓ ﺐﻏﺮﺗ ﻱﺬﻟﺍ ﺹﺮﻘﻟﺍ ﻞﺧﺩﺃ
.ﺔﻋﺮﺴﻟﺍ ﻲﻟﺎﻌﻟﺍ ﻞﻴﺠﺴﺘﻟﺍ ءﺎﻨﺛﺃ ﺕﻮﺼﻟﺍ ﻢﺘﻛ ﻱﺮﺠﻳ •
.ﺔﻳﺩﺎﻌﻟﺍ ﺔﻋﺮﺴﻟﺎﺑ CD ﻁﻮﻐﻀﻤﻟﺍ
5
6
7
ﻊﺿﻭ ﻡﺍﺪﺨﺘﺳﺍ • ءﺎﻨﺛﺃ ﺎًﺘﻗﺆﻣ ﻞﻴﺠﺴﺘﻟﺍ ﻒﻗﻮﺗ ﻭﺃ [OK] ﻰﻠﻋ ﺖﻄﻐﺿ ﺍﺫﺇ ،ﻞﻴﺠﺴﺘﻟﺍ ءﺎﻨﺛﺃ
.(ﻂﻘﻓ
.ﺏﻮﻠﻄﻤﻟﺍ ﺩﺍﺪﻋﻹﺍ ﺭﺎﻴﺘﺧﻻ [REC MODE] ﻰﻠﻋ ﻂﻐﺿﺍ
.ﺭﺎﺴﻣ ﺔﻣﻼﻋ ﺔﻓﺎﺿﻹ ﻞﻴﺠﺴﺘﻟﺍ ءﺎﻨﺛﺃ [OK] ﻰﻠﻋ ﻂﻐﺿﺍ
.ﻖﺋﺎﻗﺩ 5 ﻩﺭﺪﻗ ﻲﻨﻣﺯ ﻞﺻﺎﻔﺑ ﺎًﻴﺋﺎﻘﻠﺗ ﺎًﻤﻴﺴﻘﺗ ﺭﺎﺴﻣ ﻢﻴﺴﻘﺗ ﻱﺮﺠﻳ
.ﻞﻴﻐﺸﺘﻟﺍ ﻲﻓ ﻯﺮﺧﻷﺍ ﺓﺰﻬﺟﻷﺍ ﺃﺪﺒﺗ ﺎﻣﺪﻨﻋ ﺎًﻴﺋﺎﻘﻠﺗ ﻞﻴﺠﺴﺘﻟﺍ ﺃﺪﺒﻳ
.ٍﻥﺍﻮﺛ 3 ﺓﺪﻤﻟ ﺖﻤﺼﻟﺍ ﺩﻮﺴﻳ ﺎﻣﺪﻨﻋ ﺎًﺘﻗﺆﻣ ﻞﻴﺠﺴﺘﻟﺍ ﻒﻗﻮﺘﻳ
.ﻖﺋﺎﻗﺩ 5 ﻪﺗﺪﻣ ﻱﺬﻟﺍ ﺩﺍﺪﻌﻟﺍ ﻂﺒﺿ ﺩﺎﻌُﻳ ،TIME MARK
. •SYNCHRO ﻊﺿﻭ ﻲﻓ ﺎًﻳﻭﺪﻳ ﺭﺎﺴﻣ ﺕﺎﻣﻼﻋ ﺔﻓﺎﺿﺇ ﻚﻨﻜﻤﻳ ﻻ
ﺔﻋﺮﺴﻟﺍ ﻲﻟﺎﻌﻟﺍ ﻞﻴﺠﺴﺘﻟﺍ
:ﻞﻴﺠﺴﺘﻟﺍ ﺔﻋﺮﺳ
1
.[CD] ﻰﻠﻋ ﻂﻐﺿﺍ 2
:ﺔﻈﺣﻼﻣ
ﺭﺎﺴﻣ ﺕﺎﻣﻼﻋ ﺔﻓﺎﺿﺇ
.ﺔﻋﻮﻨﺘﻣ ﻉﺎﺿﻭﺃ
ﻞﻴﺠﺴﺘﻟﺍ ﻞﺒﻗ
•MANUAL
.ﺎًﻳﻭﺪﻳ ﺭﺎﺴﻣ ﺔﻣﻼﻋ ﺔﻓﺎﺿﺇ
•TIME MARK
•SYNCHRO
(AUX ﺭﺪﺼﻤﺑ ﺹﺎﺧ)
:ﺔﻈﺣﻼﻣ
VQT5F33
12
97
Page 98

ﻞﻴﻐﺸﺗ ﺔﻤﺋﺎﻗ
ﻥﺍﻮﻨﻌﻟﺎﺑ ﺚﺤﺒﻟﺍ
ﻲﺳﺎﺳﻷﺍ ﻞﻴﻐﺸﺘﻟﺍ
ﺔﻤﺋﺎﻗ ﻞﻜﻟ ﻦﻜﻤﻳﻭ .ﺔﻴﻠﺧﺍﺪﻟﺍ ﺓﺮﻛﺍﺬﻟﺍ ﻲﻓ ﻞﻴﻐﺸﺗ ﻢﺋﺍﻮﻗ 6 ﻰﻟﺇ ﻞﺼﻳ ﺎﻣ ﻆﻔﺣ ﻚﻨﻜﻤﻳ
.ﻞﻴﻐﺸﺘﻟﺍ ﺔﻤﺋﺎﻗ ﻰﻟﺇ ﻪﺘﻓﺎﺿﺇ ﻲﻓ ﺐﻏﺮﺗ ﻱﺬﻟﺍ ﺭﺎﺴﻤﻟﺍ ﺮﺘﺧﺍ
ﺭﺎﺴﻤﻟﺍ ﺔﻓﺎﺿﻹ (6 ﻰﺘﺣ 1) ﻲﻤﻗﺮﻟﺍ ﻲﺋﺎﺠﻬﻟﺍ ﺭﺰﻟﺍ ﻰﻠﻋ ًﻻﻮﻄﻣ ﺎًﻄﻐﺿ ﻂﻐﺿﺍ 3
ﺭﺎﺴﻤﻟﺍ ﺔﻓﺎﺿﻹ ﺔﻴﺴﻴﺋﺮﻟﺍ ﺓﺪﺣﻮﻟﺎﺑ ًﻻﻮﻄﻣ ﺎًﻄﻐﺿ [6] ﻰﺘﺣ [1] ﻰﻠﻋ ﻂﻐﺿﺍ ﻭﺃ
.ﺕﺍﺭﺎﺴﻤﻟﺍ ﻦﻣ ﺪﻳﺰﻤﻟﺍ ﺔﻓﺎﺿﻹ ﻯﺮﺧﺃ ﺓﺮﻣ 3 ﻰﺘﺣ 1 ﻦﻣ ﺕﺍﻮﻄﺨﻟﺎﺑ ﻢﻗ
(6 ﻰﺘﺣ 1) ﻲﻤﻗﺮﻟﺍ ﻲﺋﺎﺠﻬﻟﺍ ﺭﺰﻟﺍ ﻢﺛ ،[PLAY LIST] ﻰﻠﻋ ﻂﻐﺿﺍ 1
.ﻞﻴﻐﺸﺘﻟﺍ ﺔﻤﺋﺎﻗ ﺭﺎﻴﺘﺧﻻ ﺔﻴﺴﻴﺋﺮﻟﺍ ﺓﺪﺣﻮﻟﺎﺑ [6] ﻰﺘﺣ [1] ﻰﻠﻋ ﻂﻐﺿﺍ ﻭﺃ
.ﺔﻴﺴﻴﺋﺮﻟﺍ ﺔﻤﺋﺎﻘﻟﺎﺑ [6] ﻰﺘﺣ [1] ﻦﻣ ﺩﺪﺤﻤﻟﺍ ﺭﺰﻟﺍ ﻰﻠﻋ ﻂﻐﺿﺍ
.ﻑﺎﻘﻳﻹﺍ ﻊﺿﻭ ﻲﻓ [] ﻭﺃ [] ﻰﻠﻋ ﻂﻐﺿﺍ
.ﻑﺎﻘﻳﻹﺍ ﻊﺿﻭ ﻲﻓ [MULTI CONTROL] ﺭِﺩﺃ
ﺭﺎﺴﻤﻟﺍ ﺭﺎﻴﺘﺧﻻ [] ﻭﺃ [] ﻰﻠﻋ ﻂﻐﺿﺍ ،ﻑﺎﻘﻳﻹﺍ ﻊﺿﻭ ﻲﻓ
.[DEL] ﻰﻠﻋ ﻂﻐﺿﺍ ﻢﺛ ،ﻪﺤﺴﻣ ﻲﻓ ﺐﻏﺮﺗ ﻱﺬﻟﺍ ﺏﻮﻠﻄﻤﻟﺍ
ﻲﺑﺮﻋ
VQT5F33
.ٍﻥﺍﻮﺛ 5 ﻥﻮﻀﻏ ﻲﻓ [OK] ﻰﻠﻋ ﻂﻐﺿﺍ
ﻞﻴﻐﺸﺗ ﺔﻤﺋﺎﻗ ﻦﻤﺿ ﺕﺍﺭﺎﺴﻤﻟﺍ ﻊﻴﻤﺟ ﺢﺴﻣ •
.ٍﻥﺍﻮﺛ 5 ﻥﻮﻀﻏ ﻲﻓ [OK] ﻰﻠﻋ ﻂﻐﺿﺍ
.ﺭﺎﺴﻣ 99 ﻰﺘﺣ ﻅﺎﻔﺘﺣﻻﺍ ﻞﻴﻐﺸﺗ
ﻞﻴﻐﺸﺘﻟﺍ ﺔﻤﺋﺎﻗ ﻰﻟﺇ ﺕﺍﺭﺎﺴﻣ ﺔﻓﺎﺿﺇ
.[PLAY LIST] ﻰﻠﻋ ﻂﻐﺿﺍ 2
.ﺔﻘﻓﺍﻮﺘﻤﻟﺍ ﻞﻴﻐﺸﺘﻟﺍ ﺔﻤﺋﺎﻗ ﻰﻟﺇ
.ﺔﻘﻓﺍﻮﺘﻤﻟﺍ ﻞﻴﻐﺸﺘﻟﺍ ﺔﻤﺋﺎﻗ ﻰﻟﺇ
ﻞﻴﻐﺸﺘﻟﺍ ﺔﻤﺋﺎﻗ ﻰﻟﺇ ﻉﺎﻤﺘﺳﻻﺍ
.ﻞﻴﻐﺸﺘﻟﺍ ﺔﻤﺋﺎﻗ ﺭﺎﻴﺘﺧﻻ
.ﻞﻴﻐﺸﺘﻟﺍ ءﺪﺒﻟ [/] ﻰﻠﻋ ﻂﻐﺿﺍ
ﻞﻴﻐﺸﺘﻟﺍ ﺔﻤﺋﺎﻗ ﻞﻤﻋ ءﺎﻐﻟﺇ •
.ﻦﻴﺗﺮﻣ [PLAY LIST] ﻰﻠﻋ ﻂﻐﺿﺍ
ﻞﻴﻐﺸﺘﻟﺍ ﺔﻤﺋﺎﻗ ﺕﺎﻳﻮﺘﺤﻣ ﺽﺮﻋ •
ﺪﺣﺍﻭ ﺭﺎﺴﻣ ﺢﺴﻣ •
."DELETE?"
.ﻑﺎﻘﻳﻹﺍ ﻊﺿﻭ ﻲﻓ [] ﻰﻠﻋ ﻂﻐﺿﺍ
."CLEAR?" ﺔﻟﺎﺳﺭ ﺮﻬﻈﺗ
ﺔﻟﺎﺳﺭ ﺮﻬﻈﺗ
.ﻥﺍﻮﻨﻌﻟﺎﺑ ﺚﺤﺒﻟﺍ ﺔﻄﺳﺍﻮﺑ ﺔﻴﻠﺧﺍﺪﻟﺍ ﺓﺮﻛﺍﺬﻟﺍ ﻲﻓ ﺏﻮﻠﻄﻤﻟﺍ ﺭﺎﺴﻤﻟﺍ ﻦﻋ ﺚﺤﺒﻟﺍ ﻚﻨﻜﻤﻳ
.[TITLE SEARCH] ﻰﻠﻋ ﻂﻐﺿﺍ
،ﺏﻮﻠﻄﻤﻟﺍ ﺰﻣﺮﻟﺍ ﺭﺎﻴﺘﺧﻻ [،] ﻭﺃ ﺔﻴﻤﻗﺮﻟﺍ ﺔﻴﺋﺎﺠﻬﻟﺍ ﺭﺍﺭﺯﻷﺍ ﻰﻠﻋ ﻂﻐﺿﺍ
1
.ﺔﻴﻟﺎﺘﻟﺍ ﻭﺃ ﺔﻘﺑﺎﺴﻟﺍ ﺔﻘﺑﺎﻄﺘﻤﻟﺍ ﺔﺠﻴﺘﻨﻟﺍ ﻦﻋ ﺚﺤﺒﻠﻟ [،] ﻰﻠﻋ ﻂﻐﺿﺍ
.ﺔﻘﺑﺎﻄﻣ ﺔﺠﻴﺘﻧ ﺔﻤﺛ ﻦﻜﻳ ﻢﻟ ﺍﺫﺇ ،"NOT FOUND" ﺔﻟﺎﺳﺭ ﺮﻬﻈﺗ
ﻲﺳﺎﺳﻷﺍ • ﻞﻴﺠﺴﺘﻟﺍ ﺔﻄﺳﺍﻮﺑ ﺓﺄﺸﻨﻤﻟﺍ ﺕﺍﺭﺎﺴﻤﻟﺍ ﺔﻔﻴﻇﻮﻟﺍ ﻩﺬﻫ ﻲﻄﺨﺘﺗ
2
ﻭﺃ
ﻭﺃ
.ﺞﻣﺮﺒﻤﻟﺍ ﻞﻴﻐﺸﺘﻟﺍ ﻭﺃ ﻲﺋﺍﻮﺸﻌﻟﺍ ﻞﻴﻐﺸﺘﻟﺍ ﺔﻄﺳﺍﻮﺑ ﺔﻔﻴﻇﻮﻟﺍ ﻩﺬﻫ ﻞﻤﻌﺗ ﻻ •
.ﻪﺴﻔﻧ ﻥﺍﻮﻨﻌﻟﺍ ﻞﻤﺤﺗ ﻲﺘﻟﺍ ﺕﺍﺭﺎﺴﻤﻠﻟ ﻪﺗﺍﺫ ﺭﺎﺴﻤﻟﺍ ﻥﺍﻮﻨﻋ ﺽﺮﻋ ﺮﻬﻈﻴﺳ •
.ﻲﻟﺎﺘﻟﺍ ﺰﻣﺮﻟﺍ ﺭﺎﻴﺘﺧﻻ [] ﻰﻠﻋ ﻂﻐﺿﺍ ﻢﺛ
.[DEL] ﻰﻠﻋ ﻂﻐﺿﺍ ،ﺎﻣ ﺰﻣﺭ ﻑﺬﺤﻟ
.ﻪﻠﻴﻐﺸﺗﻭ ﺭﺎﺴﻤﻟﺍ ﺪﻴﻛﺄﺘﻟ [OK] ﻰﻠﻋ ﻂﻐﺿﺍ
.[TITLE SEARCH] ﻰﻠﻋ ﻂﻐﺿﺍ ،ءﺎﻐﻟﻺﻟ
.ﺎًﻀﻴﻣﻭ " " ﺭﺪﺼﻳ
.[OK] ﻰﻠﻋ ﻂﻐﺿﺍ
:ﺔﻈﺣﻼﻣ
.("ﻲﺳﺎﺳﻷﺍ ﻞﻴﺠﺴﺘﻟﺍ" ?)
.ﻑﺮﺣﻷﺍ ﺔﻟﺎﺤﻟ ﺱﺎﺴﺣ ﺮﻴﻏ ﺰﻣﺮﻟﺍ •
([ /MEMORY] :ﺔﻴﺴﻴﺋﺮﻟﺍ ﺓﺪﺣﻮﻟﺍ) [ , MEMORY] ﻰﻠﻋ ﻂﻐﺿﺍ 1
1
."MEMORY" ﺭﺎﻴﺘﺧﻻ
.ﻞﻴﻐﺸﺘﻟﺍ ءﺪﺒﻟ [/] ﻰﻠﻋ ﻂﻐﺿﺍ
2
."USB A" ﻭﺃ "USB B" ﺭﺎﻴﺘﺧﻻ [USB] ﻰﻠﻋ ﻂﻐﺿﺍ 1
.ﻞﻴﻐﺸﺘﻟﺍ ءﺪﺒﻟ [/] ﻰﻠﻋ ﻂﻐﺿﺍ 2
ﻞﻴﻐﺸﺘﻟﺍ ﻑﺎﻘﻳﺇ •
3
4
ﺯﺎﻬﺟ ﻭﺃ ﺔﻴﻠﺧﺍﺪﻟﺍ ﺓﺮﻛﺍﺬﻠﻟ ﻲﻘﺒﺘﻤﻟﺍ ﻞﻴﺠﺴﺘﻟﺍ ﺖﻗﻭ ﻭﺃ ﺔﺣﺎﺘﻤﻟﺍ ﻦﻳﺰﺨﺘﻟﺍ ﺔﺣﺎﺴﻣ
."RESUME" ﺔﻟﺎﺳﺭ ﺮﻬﻈﺗ .[] ﻰﻠﻋ ﻂﻐﺿﺍ
.ﻞﻴﻐﺸﺘﻟﺍ ﺔﻌﺑﺎﺘﻤﻟ [/] ﻰﻠﻋ ﻂﻐﺿﺍ
.ﻞﻣﺎﻜﻟﺎﺑ ﻞﻴﻐﺸﺘﻟﺍ ﻑﺎﻘﻳﻹ ﻦﻴﺗﺮﻣ [] ﻰﻠﻋ ﻂﻐﺿﺍ
."ﺹﺮﻘﻟﺍ" ﻊﺟﺍﺭ ،ﻯﺮﺧﻷﺍ ﺕﺎﻴﻠﻤﻌﻟﺍ ﻰﻠﻋ ﻑﺮﻌﺘﻠﻟ
ﺔﺣﺎﺘﻤﻟﺍ ﺕﺎﻣﻮﻠﻌﻤﻟﺍ ﺽﺮﻋ
.ﺽﺮﻌﻟﺍ ﺔﺷﺎﺷ ﻰﻠﻋ ﺔﺣﺎﺘﻤﻟﺍ ﺕﺎﻣﻮﻠﻌﻤﻟﺍ ﺓﺪﻫﺎﺸﻣ ﻚﻨﻜﻤﻳ
.[DISPLAY-DIMMER] ﻰﻠﻋ ﻂﻐﺿﺍ
ﻑﺎﻘﻳﻹﺍ ﻂﻤﻧ ﻲﻓ •
.
.ﻞﻴﺠﺴﺘﻟﺎﺑ ﺔﻘﻠﻌﺘﻤﻟﺍ ﺕﺎﻣﻮﻠﻌﻤﻟﺍ
ﺖﻗﺆﻤﻟﺍ ﻒﻗﻮﺘﻟﺍ ﻭﺃ ﻞﻴﻐﺸﺘﻟﺍ ءﺎﻨﺛﺃ •
.ﻲﻟﺎﺤﻟﺍ ﺭﺎﺴﻤﻟﺍ ﺕﺎﻣﻮﻠﻌﻣ
2
ﻭﺃ
ﻲﻓ USB
ﻞﻴﺠﺴﺘﻟﺍ ءﺎﻨﺛﺃ •
11
98
Page 99

MP3 ﻊﻃﺎﻘﻣ ﻞﻴﺠﺴﺗ
ﺔﻴﻠﺧﺍﺪﻟﺍ ﺓﺮﻛﺍﺬﻟﺍ ﻭﺃ • ﻰﻟﺇ MP3 ﺹﺮﻗ
ﺔﻴﻠﺧﺍﺪﻟﺍ ﺓﺮﻛﺍﺬﻟﺍ ﻭﺃ •
.ﻪﻴﻠﻋ ﻞﻴﺠﺴﺘﻟﺍ ﻲﻓ ﺐﻏﺮﺗ ﻱﺬﻟﺍ ﺭﺪﺼﻤﻟﺍ ﺰﱢﻬﺟ
.("ﻞﻴﻐﺸﺘﻟﺍ ﺔﻤﺋﺎﻗ" ?) "OFF PLAYMODE" ﺮﺘﺧﺍ
.("ﺞﻣﺍﺮﺒﻟﺍ ﻞﻴﻐﺸﺗ" ?) ﺎﻫﺪﻳﺮﺗ ﻲﺘﻟﺍ ﺕﺍﺭﺎﺴﻤﻟﺍ ﺔﺠﻣﺮﺒﺑ ﻢﻗ
.("ﻞﻴﻐﺸﺘﻟﺍ ﺔﻤﺋﺎﻗ" ?) "1-TRACK" ﻭﺃ "1-ALBUM" ﺮﺘﺧﺍ
[USB REC /] ﻭﺃ [MEMORY REC /] ﻰﻠﻋ ﻂﻐﺿﺍ
.ﺔﻴﻠﺧﺍﺪﻟﺍ ﺓﺮﻛﺍﺬﻟﺍ ﻰﻟﺇ USB ﺯﺎﻬﺟ ﻦﻣ ﻡﻮﺒﻟﺃ ﻞﻴﺠﺴﺗ :ﻝﺎﺜﻣ
ﻪﻠﻴﺠﺴﺗ ﻱﺭﺎﺠﻟﺍ ﻡﻮﺒﻟﻷﺍ
ﻞﻴﺠﺴﺗ ﻱﺮﺠﻳ ،ﻊﺑﺍﺮﻟﺍ ﺭﺎﺴﻤﻟﺍ ءﺎﻨﺛﺃ ﻞﻴﺠﺴﺘﻟﺍ ﺖﻔﻗﻭﺃ ﺍﺫﺇ ،ﻝﺎﺜﻤﻟﺍ ﻞﻴﺒﺳ ﻰﻠﻌﻓ
ﻞﻴﺠﺴﺗ ﻡﺪﻋ ﺔﻟﺎﺣ ﻲﻓ ،"NO FILE RECORDED" ﺔﻟﺎﺳﺭ ﺽﺮﻌُﺗ
.ﺔﻴﺋﺎﻘﻠﺘﻟﺍ ﺔﻴﻤﺴﺘﻟﺍ ﺓﺩﺎﻋﺇ ﺔﻔﻴﻇﻭ ﺐﺒﺴﺑ ﻲﻠﺻﻷﺍ ﺪﻠﺠﻤﻟﺍ ﻦﻋ ﺎًﻔﻠﺘﺨﻣ ﻞﺠﺴﻤﻟﺍ ﺪﻠﺠﻤﻟﺍ ﻭﺪﺒﻳ ﺪﻗ •
.ﻡﻮﺒﻟﻷﺍ ﻲﻓ ﻞﻣﺎﻜﻟﺎﺑ ﻞﺠﺴﻣ ﺭﺎﺴﻣ ﺮﺧﺁ ﺪﻨﻋ ﻞﻴﺠﺴﺘﻟﺍ ﻒﻗﻮﺘﻳ
.ﺭﺪﺼﻤﻟﺍ ﺔﻟﺎﺣ ﺐﺒﺴﺑ ﺕﺍﺭﺎﺴﻤﻟﺍ ﺾﻌﺑ ﻞﻴﺠﺴﺗ ﻦﻜﻤﻳ ﻻ •
:ﻦﻣ MP3 ﻊﻃﺎﻘﻣ ﻞﻴﺠﺴﺗ ﻚﻨﻜﻤﻳ
ﺲﻜﻌﻟﺍ ﻭﺃ ﺔﻴﻠﺧﺍﺪﻟﺍ ﺓﺮﻛﺍﺬﻟﺍ ﻰﻟﺇ •
ﺩﺪﺤﻣ ﺭﺎﺴﻣ ﻭﺃ ﻡﻮﺒﻟﺃ ﻞﻴﺠﺴﺗ •
ﻞﻴﺠﺴﺘﻟﺍ ﻡﺪﻘﺗ ﺔﺒﺴﻧ
.ﻂﻘﻓ ﻰﻟﻭﻷﺍ ﺔﺛﻼﺜﻟﺍ ﺕﺍﺭﺎﺴﻤﻟﺍ
.ﻝﻮﻃﺃ ﺎًﺘﻗﻭ ﺕﺍﺭﺎﺴﻤﻟﺍ ﺾﻌﺑ ﻞﻴﺠﺴﺗ ﻕﺮﻐﺘﺴﻳ ﺪﻗ •
ﻰﻟﺇ ﻦﻣ
ﻦﻣ
ﺕﺍﺭﺎﺴﻤﻟﺍ ﻊﻴﻤﺟ ﻞﻴﺠﺴﺗ •
ﺔﺠﻣﺮﺒﻣ ﺕﺍﺭﺎﺴﻣ ﻞﻴﺠﺴﺗ •
.ﻞﻴﺠﺴﺘﻟﺍ ءﺪﺑ ﻞﺟﺃ ﻦﻣ
ﻞﻴﺠﺴﺘﻟﺍ ﻑﺎﻘﻳﺇ •
.[] ﻰﻠﻋ ﻂﻐﺿﺍ
.ﺭﺎﺴﻣ ﻱﺃ
:ﺔﻈﺣﻼﻣ
[USB REC /] ﻭﺃ [MEMOR
.ﻞﻴﺠﺴﺘﻟﺎﺑ ﻆﻔﺘﺤﻳ ﻱﺬﻟﺍ ﺪﻠﺠﻤﻟﺍ ﻢﺳﺍ ﺽﺮﻌُﻳ
."WRITING" ﺔﻟﺎﺳﺭ ﺮﻬﻈﺗ .[] ﻰﻠﻋ ﻂﻐﺿﺍ
[USB REC /] ﻭﺃ [MEMORY REC /] ﻰﻠﻋ ﻂﻐﺿﺍ
1
ﻊﺿﻭ ءﺎﻨﺜﺘﺳﺎﺑ) AUX ﻭﺃ ﻮﻳﺩﺍﺮﻟﺍ ﻦﻣ ﻞﻴﺠﺴﺘﻟﺍ ءﺎﻨﺛﺃ ﺎًﺘﻗﺆﻣ ﻒﻗﻮﺘﻟﺍ ﻚﻨﻜﻤﻳ
.ﻞﻴﺠﺴﺘﻟﺍ ءﺪﺑ ﻞﺒﻗ • USB ﺯﺎﻬﺟ ﺩﺍﺪﻋﺇ ﻰﻠﻋ ﻡﺎﻈﻨﻟﺍ ﻞﻤﻌﻳ ﺎﻤﺜﻳﺭ ٍﻥﺍﻮﺛ ﻊﻀﺒﻟ ﺮﻈﺘﻧﺍ
2
.ﻞﻴﺠﺴﺘﻟﺍ ﺔﻌﺑﺎﺘﻤﻟ ﻯﺮﺧﺃ ﺓﺮﻣ ﺭﺰﻟﺍ ﺍﺬﻫ ﻰﻠﻋ ﻂﻐﺿﺍ
ﺎًﺘﻗﺆﻣ ﺎًﻔﻗﻮﺗ ﺖﻔﻗﻮﺗ ﺎﻤﻠﻛ ﺭﺎﺴﻣ ﺔﻣﻼﻋ ﻑﺎﻀُﺗ .(SYNCHRO
. •USB ﻞﻴﺠﺴﺗ ءﺎﻨﺛﺃ ﺎًﻀﻴﻣﻭ USB ﺔﻟﺎﺣ ﺮﺷﺆﻣ ﺭﺪﺼﻳ
/] ﻰﻠﻋ ﻂﻐﺿﺍ 2
Y REC
ﻞﻴﺠﺴﺘﻠﻟ ﺖﻗﺆﻤﻟﺍ ﻒﻗﻮﺘﻟﺍ •
.("ﺭﺎﺴﻣ ﺕﺎﻣﻼﻋ ﺔﻓﺎﺿﺇ"
.ﻞﻴﺠﺴﺘﻟﺍ ءﺪﺒﻟ
ﻞﻴﺠﺴﺘﻟﺍ ﻑﺎﻘﻳﺇ •
.ﻞﻴﺠﺴﺘﻟﺍ ءﺎﻨﺛﺃ
:ﺔﻈﺣﻼﻣ
?)
:ﺔﻈﺣﻼﻣ
ﺔﻴﻠﺧﺍﺪﻟﺍ ﺓﺮﻛﺍﺬﻟﺍ ﻭﺃ USB ﺯﺎﻬﺟ ﻰﻠﻋ ﻞﻴﺠﺴﺘﻟﺍ
ﺕﺎﻳﻮﺘﺤﻣ ﻞﻴﺠﺴﺘﺑ ﻚﻠﻬﺘﺴﻤﻟﺍ ﻡﺎﻴﻗ ﻦﻋ ﺔﻟﻭﺆﺴﻣ Panasonic ﺔﻛﺮﺷ ﺪﻌﺗ ﻻ
ﻊﺒﻄﻟﺍ ﻕﻮﻘﺣ ﻰﻠﻋ ﻱﺪﻌﺘﻟﺍ ﻲﻓ ﺐﺒﺴﺘﻳ ﺪﻗ ﺎﻤﻣ ؛ﺮﺸﻨﻟﺍﻭ ﻊﺒﻄﻟﺍ ﻕﻮﻘﺤﻟ ﺔﻌﺿﺎﺧ
.ﻡﺍﺪﺨﺘﺳﻻﺍ ﺪﻴﻗ ﻲﺋﺍﻮﺸﻌﻟﺍ ﻞﻴﻐﺸﺘﻟﺍ ﻊﺿﻭ ﻥﻮﻜﻳ ﺎﻣﺪﻨﻋ ﻞﻴﺠﺴﺘﻟﺍ ءﺍﺮﺟﺇ ﻚﻨﻜﻤﻳ ﻻ •
ﺓﺮﻛﺍﺬﻟﺍ ﻭﺃ •USB ﺯﺎﻬﺟ ﻲﻓ "REC_DATA" ﻢﺳﺎﺑ ﺪﻠﺠﻣ ﻲﻓ ﺕﻼﻴﺠﺴﺘﻟﺍ ﻆﻔﺤُﺗ
ﻭﺃ ﻲﺟﺭﺎﺨﻟﺍ ﻝﺎﺧﺩﻹﺍ ﻭﺃ ﺔﻃﻮﻐﻀﻤﻟﺍ ﺕﻮﺼﻟﺍ ﺔﻧﺍﻮﻄﺳﺃ ﻦﻣ ﺔﻠﺠﺴﻤﻟﺍ ﺕﺍﺭﺎﺴﻤﻟﺍ -
ﺐﺴﺣ ﻒﻴﻨﺼﺘﻟﺍ ﻱﺮﺠﻳ) -USB
.ﻞﻴﺠﺴﺘﻟﺍ ءﺎﻨﺛﺃ ﻑﺎﻘﻳﻹﺍ ﻊﺿﻭ ﻲﻓ ﺭﺮﻜﺘﻤﻟﺍ ﻞﻴﻐﺸﺘﻟﺍ ﻂﻤﻧ ﻥﻮﻜﻳ •
.("ﻞﻴﻐﺸﺘﻟﺍ ﺔﻤﺋﺎﻗ" ?) "OFF PLAYMODE" ﺮﺘﺧﺍ
.("ﺞﻣﺍﺮﺒﻟﺍ ﻞﻴﻐﺸﺗ" ?) ﺎﻫﺪﻳﺮﺗ ﻲﺘﻟﺍ ﺕﺍﺭﺎﺴﻤﻟﺍ ﺔﺠﻣﺮﺒﺑ ﻢﻗ
.("ﻲﻓﺎﺿﻹﺍ ﻞﺧﺪﻟﺍ ﻡﺍﺪﺨﺘﺳﺍ" ?) ﺎﻬﻠﻴﻐﺸﺗﻭ ﺓﺰﻬﺟﻷﺍ ﻞﻴﺻﻮﺗ
.". •mp3" ﻖﻴﺴﻨﺘﺑ ﺔﻠﺠﺴﻣ ﺕﻼﻴﺠﺴﺘﻟﺍ ﻊﻴﻤﺟ
.ﻞﻴﺠﺴﺘﻟﺍ ﻦﻣ ءﺎﻬﺘﻧﻻﺍ ﺪﻌﺑ ﻡﻮﺒﻟﻸﻟ ﻲﻟﺎﺘﺘﻤﻟﺍ ﺐﻴﺗﺮﺘﻟﺍ ﺮﻴﻐﺘﻳ ﺪﻗ •
.ﺎًﻴﺋﺎﻘﻠﺗ ﻲﻟﺎﺘﻟﺍ ﺐﻴﺗﺮﺘﻟﺎﺑ ﺔﻠﺠﺴﻤﻟﺍ ﺕﺍﺭﺎﺴﻤﻟﺍ ﻒﻴﻨﺼﺗ ﻱﺮﺠﻳ •
.("ﻞﻴﻐﺸﺘﻟﺍ ﺔﻤﺋﺎﻗ" ?) "1-TRACK" ﺮﺘﺧﺍ
.ًﻼﻴﺠﺴﺗ ﺖﻳﺮﺟﺃ ﺎﻤﻠﻛ ﺪﻳﺪﺟ ﻡﻮﺒﻟﺃ ﻑﺎﻀُﻳ •
(ﻞﻴﺠﺴﺘﻟﺍ ﺐﺴﺣ ﻒﻴﻨﺼﺘﻟﺍ ﻱﺮﺠﻳ) ﻲﻜﻠﺳﻼﻟﺍ
ﺯﺎﻬﺟ ﻭﺃ ﺔﻧﺍﻮﻄﺳﻻﺍ ﻦﻣ ﺔﻠﺠﺴﻤﻟﺍ mp3 ﺕﺍﺭﺎﺴﻣ
.ﻪﻨﻣ ﻞﻴﺠﺴﺘﻟﺍ ﺪﻳﺮﺗ ﻱﺬﻟﺍ ﺭﺪﺼﻤﻟﺍ ﺩﺪﺣ 1
.ﺹﺍﺮﻗﻷﺍ ﻞﻴﻐﺸﺗ ﻊﺿﻭ ﺩﺍﺪﻋﺈﺑ ﻢﻗ
(ﺔﻴﺋﺎﺠﻬﻟﺍ ﻑﻭﺮﺤﻟﺍ
ﻲﺳﺎﺳﻷﺍ ﻞﻴﺠﺴﺘﻟﺍ
ﺕﺍﺭﺎﺴﻤﻟﺍ ﻊﻴﻤﺟ ﻞﻴﺠﺴﺗ •
ﺔﺠﻣﺮﺒﻣ ﺕﺍﺭﺎﺴﻣ ﻞﻴﺠﺴﺗ •
ﺪﺣﺍﻭ ﺭﺎﺴﻣ ﻞﻴﺠﺴﺗ •
.ﺹﺮﻘﻟﺍ ﻑﺎﻘﻳﺇ ﻦﻣ ﺪﻛﺄﺗ
.ﻮﻳﺩﺍﺮﻟﺍ ﺕﺎﻄﺤﻣ ﺔﻔﻟﺍﻮﻣ ِﺮﺟﺃ
ﺔﻴﺟﺭﺎﺨﻟﺍ ﺓﺰﻬﺟﻷﺍ
.ﺮﺸﻨﻟﺍﻭ
:ﺔﻈﺣﻼﻣ
.ﺔﻴﻠﺧﺍﺪﻟﺍ
ﻮﻳﺩﺍﺮﻟﺍ
VQT5F33
10
99
Page 100

A
PLAY
B
REC/PLAY
USB ﺔﻟﺎﺤﻟﺍ ﺮﺷﺆﻣ
ﻊﻳﺮﺴﻟﺍ USB ﻞﻴﺻﻮﺗ
ﺔﻴﻠﺧﺍﺪﻟﺍ ﺓﺮﻛﺍﺬﻟﺍﻭ USB ﺬﻔﻨﻣ
.ﻪﻴﻠﻋ ﻰﻘﻴﺳﻮﻤﻟﺍ ﻊﻃﺎﻘﻣ ﻞﻴﻐﺸﺗﻭ USB ﺯﺎﻬﺟ ﻞﻴﺻﻮﺗ ﻚﻨﻜﻤﻳ
ﻖﻴﺴﻨﺘﺑ ﺔﻴﻠﺧﺍﺪﻟﺍ ﺓﺮﻛﺍﺬﻟﺍ ﻰﻠﻋ ﻰﻘﻴﺳﻮﻤﻟﺍ ﻭﺃ ﺕﻮﺼﻟﺍ ﺕﺍﺭﺎﺴﻣ ﻞﻴﺠﺴﺗ ﺎًﻀﻳﺃ ﻚﻨﻜﻤﻳ
.".mp3"
ﻲﻓ ﺭﺎﺴﻣ 999) ﻢﻬﻠﻴﺠﺴﺗ ﻭﺃ ﺪﻠﺠﻣ 800 ﻪﻴﻟﺇ ﻞﺼﻳ ﺎﻣ ﻞﻴﻐﺸﺗ ﻡﺎﻈﻨﻟﺍ ﺍﺬﻬﻟ ﻦﻜﻤﻳ
ﺔﻌﺳ ﻰﻠﻋ ﺍًﺩﺎﻤﺘﻋﺍ ﻚﻟﺫﻭ ،ﺭﺎﺴﻣ 8000 ﻲﻟﺎﻤﺟﺇ ﻭﺃ ،(ﻰﺼﻗﺃ ﺪﺤﺑ ﺪﺣﺍﻮﻟﺍ ﻡﻮﺒﻟﻷﺍ
.ﺔﺣﺎﺘﻤﻟﺍ ﻦﻳﺰﺨﺘﻟﺍ
USB ﺯﺎﻬﺟ ﻞﻴﺻﻮﺗ
ﺩﺍﺪﻌﺘﺳﻻﺍ
.ﺕﺎﻧﺎﻴﺒﻟﺍ ﻦﻣ ﺔﻴﻃﺎﻴﺘﺣﺍ ﺔﺨﺴﻨﺑ ﻅﺎﻔﺘﺣﻻﺍ ﻦﻣ ﺪﻛﺄﺗ ،ﻡﺎﻈﻨﻟﺎﺑ USB ﺯﺎﻬﺟ ﻞﻴﺻﻮﺗ ﻞﺒﻗ
ﻞﱠﺻﻮﻣ USB ﺯﺎﻬﺟ ﻰﻠﻋ ﻑﺮﻌﺘﻟﺍ ﻡﺎﻈﻨﻠﻟ ﻦﻜﻤﻳ ﻼﻓ .USB ﻞﻳﻮﻄﺗ ﻞﺒﻛ ﻡﺪﺨﺘﺴﺗ ﻻ
.ﻞﺒﻛ ﺔﻄﺳﺍﻮﺑ
." •PLAYMODE" ﺔﻔﻴﻇﻭ ﺐﻧﺎﺟ ﻰﻟﺇ ﻞﻴﻐﺸﺘﻟﺍ ﺔﺠﻣﺮﺑ ﻡﺪﺨﺘﺳﺍ ﻚﻨﻜﻤﻳ ﻻ
.ﺹﺍﺮﻗﻷﺍ ﺝﺭﺩ ﺢﺘﻓ ﺪﻨﻋ ﺔﺠﻣﺮﺒﻟﺍ ﺓﺮﻛﺍﺫ ﺢﺴﻤُﺗ •
ﺹﺮﻘﻟﺍ ﻝﻮﺣ ﺔﻈﺣﻼﻣ
:ﺔﻈﺣﻼﻣ
ﻭﺃ • CD-DA ﻖﻴﺴﻨﺗ ﻱﺫ ﻯﻮﺘﺤﻤﺑ CD-R/RW ﺹﺮﻗ ﻞﻴﻐﺸﺗ ﻡﺎﻈﻨﻟﺍ ﺍﺬﻬﻟ ﻦﻜﻤﻳ
.ﻞﻴﺠﺴﺘﻟﺍ ﺔﻟﺎﺤﻟ ﺍًﺮﻈﻧ •CD-R/RW ﺹﺍﺮﻗﺃ ﺾﻌﺑ ﻞﻴﻐﺸﺗ ﻦﻜﻤﻳ ﻻ
.ﺕﺎﻣﻮﺒﻟﺃ ﺕﺍﺪﻠﺠﻤﻟﺍ ﺪﻌُﺗ ﻦﻴﺣ ﻲﻓ ،ﺕﺍﺭﺎﺴﻣ ﺎﻫﺭﺎﺒﺘﻋﺎﺑ •MP3 ﺕﺎﻔﻠﻣ ﻞﻣﺎﻌُﺗ
ﺕﺎﻘﻴﺴﻨﺘﻟﺍ ءﺎﻨﺜﺘﺳﺎﺑ) •ISO9660 2 ﻭﺃ 1 ﻯﻮﺘﺴﻤﻟﺍ ﻊﻣ ﺹﺮﻘﻟﺍ ﻖﻓﺍﻮﺘﻳ ﻥﺃ ﺐﺠﻳ
:ﻰﻟﺇ ﻝﻮﺻﻮﻟﺍ ﻡﺎﻈﻨﻟﺍ ﺍﺬﻬﻟ ﻦﻜﻤﻳ •
ﺍًﺭﺎﺴﻣ -99 :CD-DA
ﻡﻮﺒﻟﺃ -255 ،ﺍًﺭﺎﺴﻣ 999 :MP3
.ﻪﺑ ﺎﻬﻠﻴﺠﺴﺗ ﻯﺮﺟ ﻱﺬﻟﺍ ﺐﻴﺗﺮﺘﻟﺎﺑ ﺕﻼﻴﺠﺴﺘﻟﺍ ﻞﻴﻐﺸﺗ ﺓﺭﻭﺮﻀﻟﺎﺑ ﻱﺮﺠﻳ ﻦﻟ •
.MP3
.(ﺔﻌﺳﻮﻤﻟﺍ
ﻲﺑﺮﻋ
9
100
VQT5F33
. •MP3 ﺕﺍﺭﺎﺴﻣ ﻞﻴﻐﺸﺗ
. •MP3 ﺕﺍﺭﺎﺴﻣ ﻞﻴﻐﺸﺗ/ﻞﻴﺠﺴﺗ
:ﺔﻈﺣﻼﻣ
.USB ﻞﻴﺠﺴﺗ ءﺎﻨﺛﺃ ﺎًﻀﻴﻣﻭ USB ﺔﻟﺎﺣ ﺮﺷﺆﻣ ﺭﺪﺼﻳ
:ﺔﻈﺣﻼﻣ
.ﺭﺎﻴﺘﺧﻻﺍ ءﺍﺮﺟﺇ ﺪﻨﻋ USB ﺔﻟﺎﺣ ﺮﺷﺆﻣ ءﻲﻀﻳ
•
•
A
PLAY
B
REC/PLAY
ILLUMINATION
USB ﺯﺎﻬﺟ
(ﻖﺤﻠﻣ ﺮﻴﻋ)
.USB ﺬﻔﻨﻤﺑ USB ﺯﺎﻬﺟ ﻞﱢﺻﻭ ،ﺕﻮﺼﻟﺍ ﻯﻮﺘﺴﻣ ﺾﻔﺧﺍ
.ﻪﻠﺼﻓ ﻭﺃ USB ﺯﺎﻬﺟ ﻞﻴﺻﻮﺗ ﺪﻨﻋ ﺔﻴﺴﻴﺋﺮﻟﺍ ﺓﺪﺣﻮﻟﺍ ﻚﺴﻣﺍ
 Loading...