

Page 1
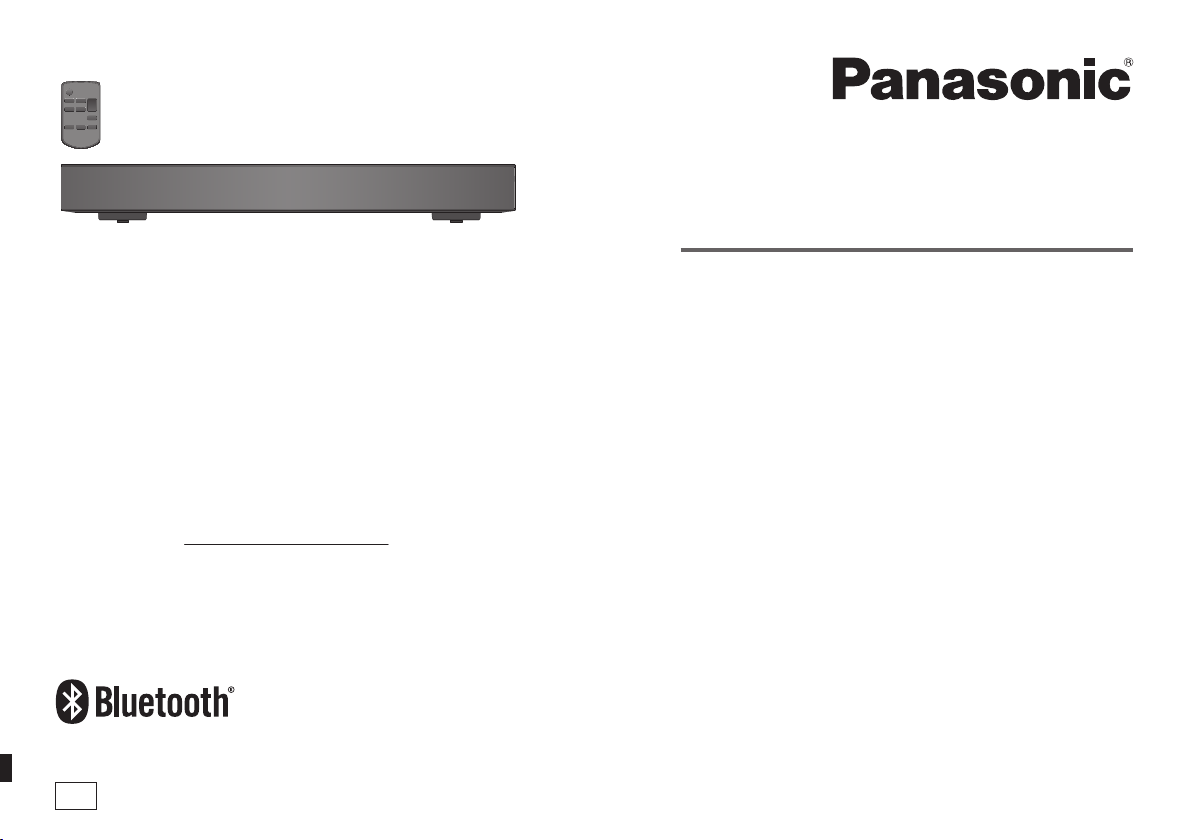
Owner’s Manual
Home Theater Audio System
Thank you for purchasing this product.
For optimum performance and safety, please read these instructions
carefully.
Please keep this manual for future reference.
If you have any questions, visit:
U.S.A. and Puerto Rico: www.panasonic.com/support
Canada: www.panasonic.ca/english/support
Register online at www.panasonic.com/register (U.S. customers only)
PP
Model No.
SC-HTE80
RQT9860-1Y
Page 2
Do the procedures with the remote control. You can
also use the buttons on the main unit if they are the
same.
Your system and the illustrations can look differently.
The model number and serial number of this product
can be found on either the back or the bottom of the
unit. Please note them in the space provided below and
keep for future reference.
MODEL NUMBER SC-HTE80
SERIAL NUMBER
User memo:
DATE OF PURCHASE
DEALER NAME
DEALER ADDRESS
TELEPHONE NUMBER
Supplied accessories
Check and identify the supplied accessories.
Use numbers indicated in parentheses when asking for
replacement parts. (Product numbers correct as of
November 2013. This may be subject to change.)
For U.S.A. and Puerto Rico: To order accessories, refer
to “Accessory Purchases (United States and Puerto
Rico)” on page 16.
For Canada: To order accessories, call the dealer from
whom you have made your purchase.
1 AC power supply cord
(K2CB2CB00022)
1 Remote control (with a battery)
(N2QAYC000098)
(Only for Canada)
RQT9860
The included Canadian French label sheet corresponds
2
to the English printing on the main unit and remote
control.
IMPORTANT SAFETY
INSTRUCTIONS
Read these operating instructions carefully before using the unit. Follow the safety instructions on the unit and the
applicable safety instructions listed below. Keep these operating instructions handy for future reference.
1. Read these instructions.
2. Keep these instructions.
3. Heed all warnings.
4. Follow all instructions.
5. Do not use this apparatus near water.
6. Clean only with dry cloth.
7. Do not block any ventilation openings. Install in
accordance with the manufacturer’s instructions.
8. Do not install near any heat sources such as
radiators, heat registers, stoves, or other apparatus
(including amplifiers) that produce heat.
9. Do not defeat the safety purpose of the polarized or
grounding-type plug. A polarized plug has two blades
with one wider than the other. A grounding-type plug
has two blades and a third grounding prong. The wide
blade or the third prong are provided for your safety.
If the provided plug does not fit into your outlet,
consult an electrician for replacement of the obsolete
outlet.
10. Protect the power cord from being walked on or
pinched particularly at plugs, convenience
receptacles, and the point where they exit from the
apparatus.
11. Only use attachments/accessories specified by the
manufacturer.
12. Use only with the cart, stand, tripod,
bracket, or table specified by the
manufacturer, or sold with the
apparatus. When a cart is used,
use caution when moving the
cart/apparatus combination to
avoid injury from tip-over.
13. Unplug this apparatus during lightning storms or
when unused for long periods of time.
14. Refer all servicing to qualified service personnel.
Servicing is required when the apparatus has been
damaged in any way, such as power-supply cord or
plug is damaged, liquid has been spilled or objects
have fallen into the apparatus, the apparatus has
been exposed to rain or moisture, does not operate
normally, or has been dropped.
Page 3
Safety precautions
ENGLISH
WARNING!
Unit
• To reduce the risk of fire, electric shock or product
damage,
– Do not expose this unit to rain, moisture, dripping or
splashing.
– Do not place objects filled with liquids, such as
vases, on this unit.
– Use only the recommended accessories.
– Do not remove covers.
– Do not repair this unit by yourself. Refer servicing to
qualified service personnel.
AC power supply cord
• The power plug is the disconnecting device.
Install this unit so that the power plug can be
unplugged from the socket outlet immediately.
Button-type battery (Lithium battery)
• Risk of fire, explosion and burns. Do not disassemble,
heat above 60°C (140°F) or incinerate.
CAUTION!
Unit
• To reduce the risk of fire, electric shock or product
damage,
– Do not install or place this unit in a bookcase, built-in
cabinet or in another confined space. Ensure this
unit is well ventilated.
– Do not obstruct this unit’s ventilation openings with
newspapers, tablecloths, curtains, and similar items.
– Do not place sources of naked flames, such as
lighted candles, on this unit.
• Do not touch the bottom of the unit. It might be hot
when you use it for a long period.
Button-type battery (Lithium battery)
• Insert with poles aligned.
• Do not touch the terminals (+ and –) with metal objects.
• Do not recharge, disassemble, remodel, heat or throw
into fire.
• Keep out of reach of children.
• If any electrolyte should come into contact with your
hands or clothes, wash it off thoroughly with water.
• If any electrolyte should come into contact with your
eyes, never rub the eyes. Rinse eyes thoroughly with
water, and then consult a doctor.
• Danger of explosion if battery is incorrectly replaced.
Replace only with the type recommended by the
manufacturer.
• When disposing the batteries, please contact your
local authorities or dealer and ask for the correct
method of disposal.
• Do not heat or expose to flame.
• Do not leave the battery(ies) in a car exposed to direct
sunlight for a long period of time with doors and
windows closed.
DO NOT INGEST BATTERY,
CHEMICAL BURN HAZARD
This product contains a coin/button cell battery. If the
coin/button cell battery is swallowed, it can cause
severe internal burns in just 2 hours and can lead to
death. Keep new and used batteries away from
children. If the battery compartment does not close
securely, stop using the product and keep it away from
children. If you think batteries might have been
swallowed or placed inside any part of the body, seek
immediate medical attention.
<For USA-California only>
This product contains a CR Coin Cell Lithium Battery
which contains Perchlorate Material ‒ special handling
may apply.
See www.dtsc.ca.gov/hazardouswaste/perchlorate
.
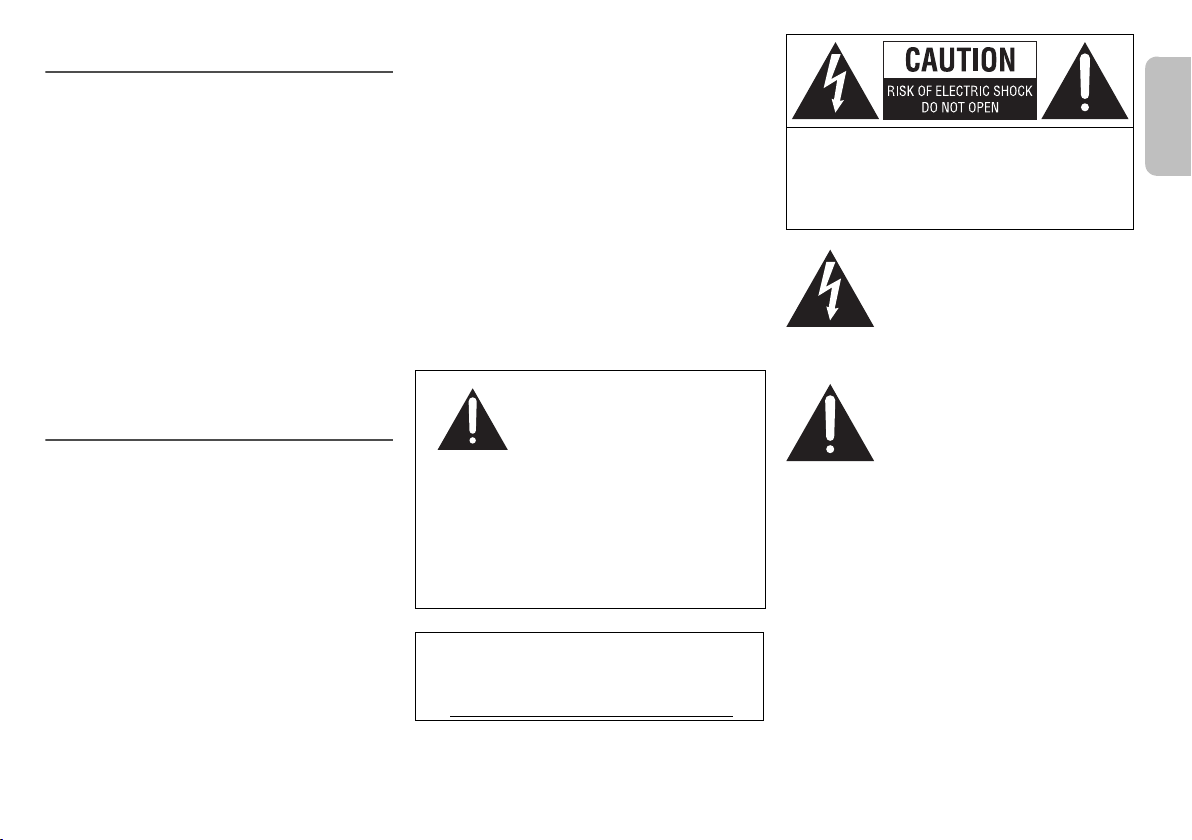
CAUTION: TO REDUCE THE RISK OF ELECTRIC
SHOCK, DO NOT REMOVE SCREWS.
NO USER-SERVICEABLE PARTS
INSIDE.
REFER SERVICING TO QUALIFIED
SERVICE PERSONNEL.
The lightning flash with arrowhead
symbol, within an equilateral triangle, is
intended to alert the user to the
presence of uninsulated “dangerous
voltage” within the product’s enclosure
that may be of sufficient magnitude to
constitute a risk of electric shock to
persons.
The exclamation point within an
equilateral triangle is intended to alert
the user to the presence of important
operating and maintenance (servicing)
instructions in the literature
accompanying the appliance.
RQT9860
3
Page 4
THE FOLLOWING APPLIES ONLY IN THE U.S.A. THE FOLLOWING APPLIES ONLY IN CANADA
FCC Note:
This equipment has been tested and found to comply
with the limits for a Class B digital device, pursuant to
Part 15 of the FCC Rules.
These limits are designed to provide reasonable
protection against harmful interference in a residential
installation. This equipment generates, uses and can
radiate radio frequency energy and, if not installed and
used in accordance with the instructions, may cause
harmful interference to radio communications.
However, there is no guarantee that interference will
not occur in a particular installation. If this equipment
does cause harmful interference to radio or television
reception, which can be determined by turning the
equipment off and on, the user is encouraged to try to
correct the interference by one or more of the following
measures:
• Reorient or relocate the receiving antenna.
• Increase the separation between the equipment and
receiver.
• Connect the equipment into an outlet on a circuit
different from that to which the receiver is connected.
• Consult the dealer or an experienced radio/TV
technician for help.
Any unauthorized changes or modifications to this
equipment would void the user’s authority to operate
this device.
This device complies with Part 15 of the FCC Rules.
Operation is subject to the following two conditions:
(1) This device may not cause harmful interference,
and (2) this device must accept any interference
received, including interference that may cause
undesired operation.
Responsible Party:
Panasonic Corporation of North America
Two Riverfront Plaza, Newark, NJ 07102-5490
Support Contact:
http://www.panasonic.com/contactinfo
CAN ICES-3(B)/NMB-3(B)
Certified to CAN-CSA STD C22.2 No.60065.
This device complies with RSS-GEN, RSS-210 of the
IC Rules. Operation is subject to the following two
conditions: (1) This device may not cause harmful
interference, (2) This device must accept any
interference received, including interference that may
cause undesired operation of the device.
THE FOLLOWING APPLIES IN THE U.S.A. AND
CANADA
This transmitter must not be co-located or operated in
conjunction with any other antenna or transmitter.
This equipment complies with FCC/IC radiation
exposure limits set forth for an uncontrolled
environment and meets the FCC radio frequency (RF)
Exposure Guidelines in Supplement C to OET65 and
RSS-102 of the IC radio frequency (RF) Exposure
rules. This equipment has very low levels of RF energy
that is deemed to comply without maximum permissive
exposure evaluation (MPE). But it is desirable that it
should be installed and operated keeping the radiator
at least 20 cm (7⅞”) or more away from person’s body
(excluding extremities: hands, wrists, feet and ankles).
Table of contents
Supplied accessories . . . . . . . . . . . . . . . . . . . . . 2
IMPORTANT SAFETY INSTRUCTIONS. . . . . . . . 2
Safety precautions. . . . . . . . . . . . . . . . . . . . . . . . 3
About Bluetooth®. . . . . . . . . . . . . . . . . . . . . . . . . 5
Overview of controls . . . . . . . . . . . . . . . . . . . . . . 6
Preparing the remote control . . . . . . . . . . . . . . . 7
Placement. . . . . . . . . . . . . . . . . . . . . . . . . . . . . . . 7
Connection . . . . . . . . . . . . . . . . . . . . . . . . . . . . . . 8
Basic controls . . . . . . . . . . . . . . . . . . . . . . . . . . 10
One-Touch Connection (NFC). . . . . . . . . . . . . . 10
Sound menu . . . . . . . . . . . . . . . . . . . . . . . . . . . . 10
Setup Menu. . . . . . . . . . . . . . . . . . . . . . . . . . . . . .11
Linked operations with the TV (VIERA Link™
HDAVI Control™) . . . . . . . . . . . . . . . . . . . . . . . . 12
Troubleshooting. . . . . . . . . . . . . . . . . . . . . . . . . 13
Maintenance . . . . . . . . . . . . . . . . . . . . . . . . . . . . 14
Specifications. . . . . . . . . . . . . . . . . . . . . . . . . . . 15
Limited Warranty (ONLY FOR U.S.A. AND
PUERTO RICO). . . . . . . . . . . . . . . . . . . . . . . . . . 16
Limited Warranty (ONLY FOR CANADA) . . . . . 17
Conforms to UL STD 60065.
RQT9860
4
Page 5
About Bluetooth
ENGLISH
Panasonic bears no responsibility for data and/or
information that can possibly be compromised during a
wireless transmission.
Frequency band
• This system uses the 2.4 GHz frequency band.
Certification
• This system conforms to the frequency restrictions and
has received certification based on frequency laws.
Thus, a wireless permit is not necessary.
• The actions below are punishable by law:
– Taking apart or modifying the main unit.
– Removing specification indications.
Restrictions of use
• Wireless transmission and/or usage with all Bluetooth
equipped devices is not guaranteed.
• All devices must conform to standards set by Bluetooth
SIG, Inc.
• Depending on the specifications and settings of a
device, it can fail to connect or some operations can be
different.
• This system supports Bluetooth
depending on the operating environment and/or
settings, this security is possibly not sufficient.
Transmit data wirelessly to this system with caution.
• This system cannot transmit data to a Bluetooth
device.
Range of use
• Use this device at a maximum range of 10 m (33 ft).
• The range can decrease depending on the
®
®
security features. But
®
environment, obstacles or interference.
Interference from other devices
• This system may not function properly and troubles
such as noise and sound jumps may arise due to radio
wave interference if this unit is located too close to
other Bluetooth
2.4 GHz band.
• This system may not function properly if radio waves
from a nearby broadcasting station, etc. is too strong.
Intended usage
• This system is for normal, general use only.
• Do not use this system near an equipment or in an
environment that is sensitive to radio frequency
interference (example: airports, hospitals, laboratories,
®
devices or the devices that use the
etc.).
®
Manufactured under license from Dolby Laboratories.
Dolby, Pro Logic, and the double-D symbol are
trademarks of Dolby Laboratories.
Manufactured under license under U.S. Patent Nos:
5,956,674; 5,974,380; 6,487,535 & other U.S. and
worldwide patents issued & pending. DTS, the Symbol,
& DTS and the Symbol together are registered
trademarks & DTS Digital Surround and the DTS logos
are trademarks of DTS, Inc. Product includes software.
© DTS, Inc. All Rights Reserved.
HDMI, the HDMI Logo, and High-Definition Multimedia
Interface are trademarks or registered trademarks of
HDMI Licensing LLC in the United States and other
countries.
HDAVI Control™ is a trademark of Panasonic
Corporation.
VIERA LINK™ is a trademark of Panasonic
Corporation.
EZ Sync™ is a trademark of Panasonic Corporation.
®
The Bluetooth
Bluetooth SIG, Inc. and any use of such marks by
Panasonic Corporation is under license. Other
trademarks and trade names are those of their
word mark and logos are owned by the
respective owners.
Google Play and Android are trademarks of Google Inc.
RQT9860
5
Page 6
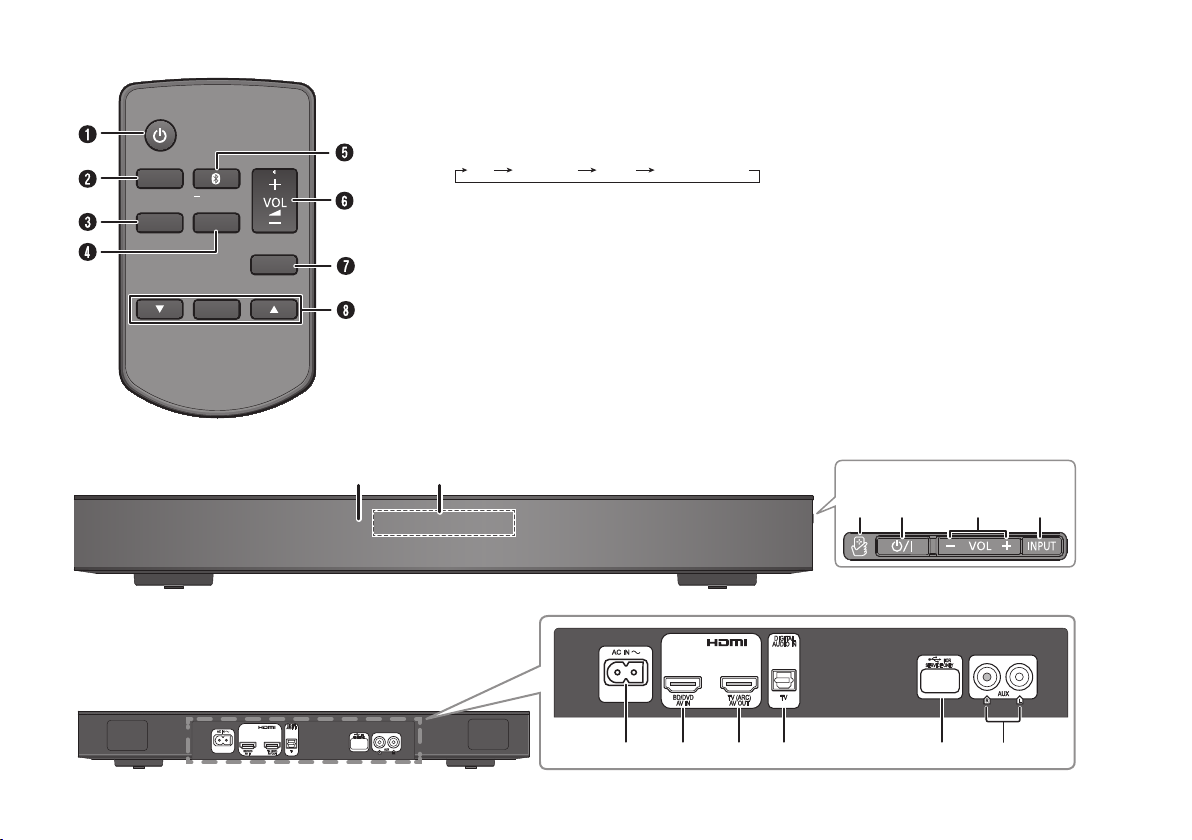
Overview of controls
MUTE
SETUP
INPUT
SOUND
OK
PAIRING
IJ
BFAK
Front panel
Side view
L
M
NO P Q
Rear panel
TV BD/DVD
BLUETOOTH
AUX
A Standby/on switch [`], [1]
Press to turn the unit from on to standby mode or vice
versa. In standby mode, the unit is still consuming a
small amount of power.
B Select input source
C View setup menu
D View sound menu
E Select Bluetooth
Start Bluetooth
®
mode
®
pairing mode
F Adjust the volume of the system
G Mute the sound of the system
To cancel, press the button again.
“MUTE” is also canceled when you adjust the volume
or when you turn off the system.
H Select and confirm the option
I Remote control sensor
Distance: Within approximately 7 m (23 ft)
Angle: Approximately 20° up and down, 30° left and
right
J Display panel
K NFC touch area
L AC IN terminal
M HDMI IN terminal (BD/DVD)
N HDMI OUT terminal (ARC compatible)
O DIGITAL AUDIO IN (TV) terminal
P USB port (for service use only)
Q AUX IN terminal
RQT9860
6
Page 7
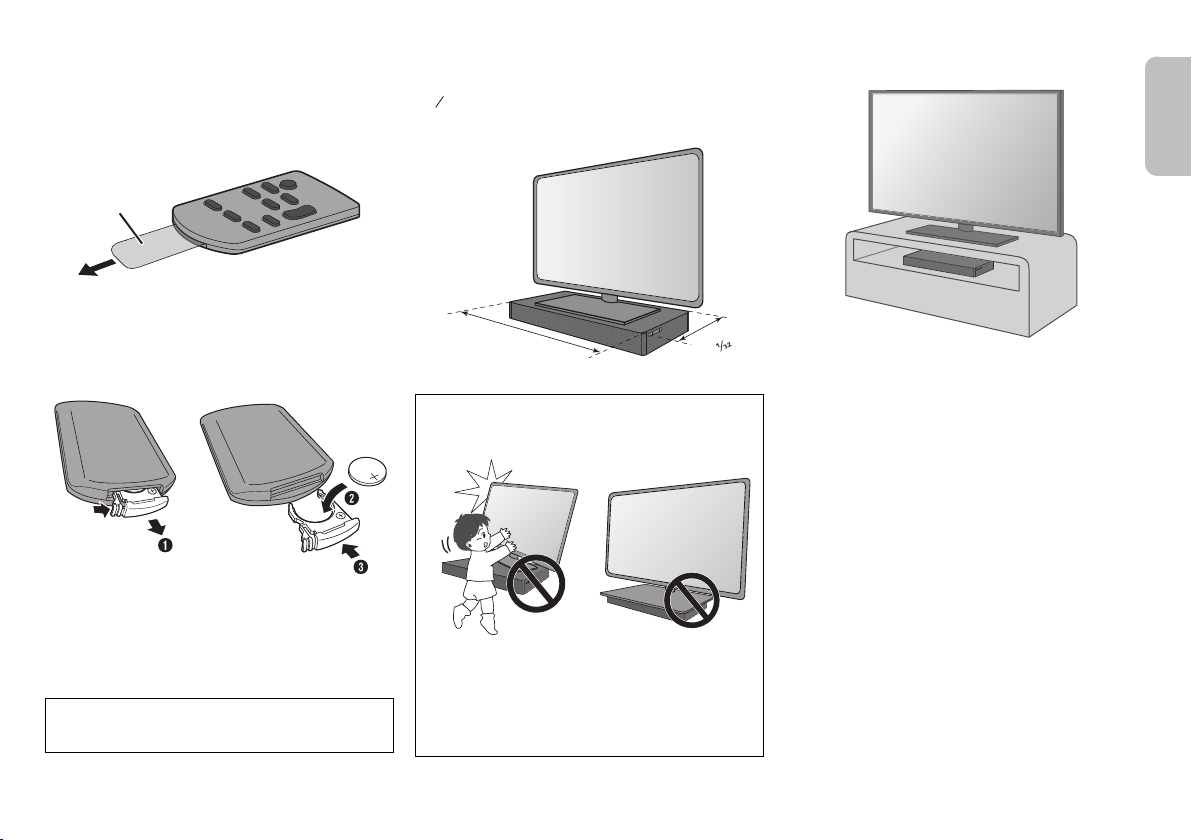
Preparing the remote control
Insulation
sheet
32
1
460 mm (18ǩƎ)
280 mm
Ǝ
ENGLISH
Before using
Remove the insulation sheet before you use the remote
control for the first time.
Replacing the battery
Replace the remote control battery when it stops working
or when the range is decreased. Replace with a new
battery (CR2025 3V lithium battery) only.
1 While pressing the stopper, pull out the battery
holder.
2 Insert a new battery with the (+) side facing up.
3 Push back battery holder completely.
CAUTION!
Keep the button-type battery out of reach of children to
prevent swallowing.
Placement
When the TV is less than 30 kg (66 lbs), and the pedestal
of the TV is within 460 mm (18⅛″) (width) by 280 mm
(11 ″) (depth), then you can put the TV on top of the
system.
CAUTION!
• Keep the TV within the distance of the system. Be
careful not to tip over the TV as it can cause injury.
• Install the anti-tip device for your TV. For installation
details, refer to the owner’s manual for the TV. If your
TV does not come with an anti-tip device, consult
your dealer.
• Moving the TV on the surface of the system can
scratch the system. Lift the TV when you need to
move it.
Otherwise, put the system on the right side
(recommended) of the TV or on a rack.
Note:
• Do not put the system in a metal cabinet.
• Keep other 2.4 GHz frequency band electronic devices
such as wireless router, cordless phone, etc. at least
2 m (6½ ft) away from this system to avoid wireless
interference.
• If uneven colors are displayed on the TV, turn off the
TV for 30 minutes. If the demagnetizing of the TV does
not correct the problem, increase the distance between
this system and the TV.
• Keep magnetized items away from the system.
Magnetized cards, watches, etc., can be damaged if it
is too near to the system.
RQT9860
7
Page 8
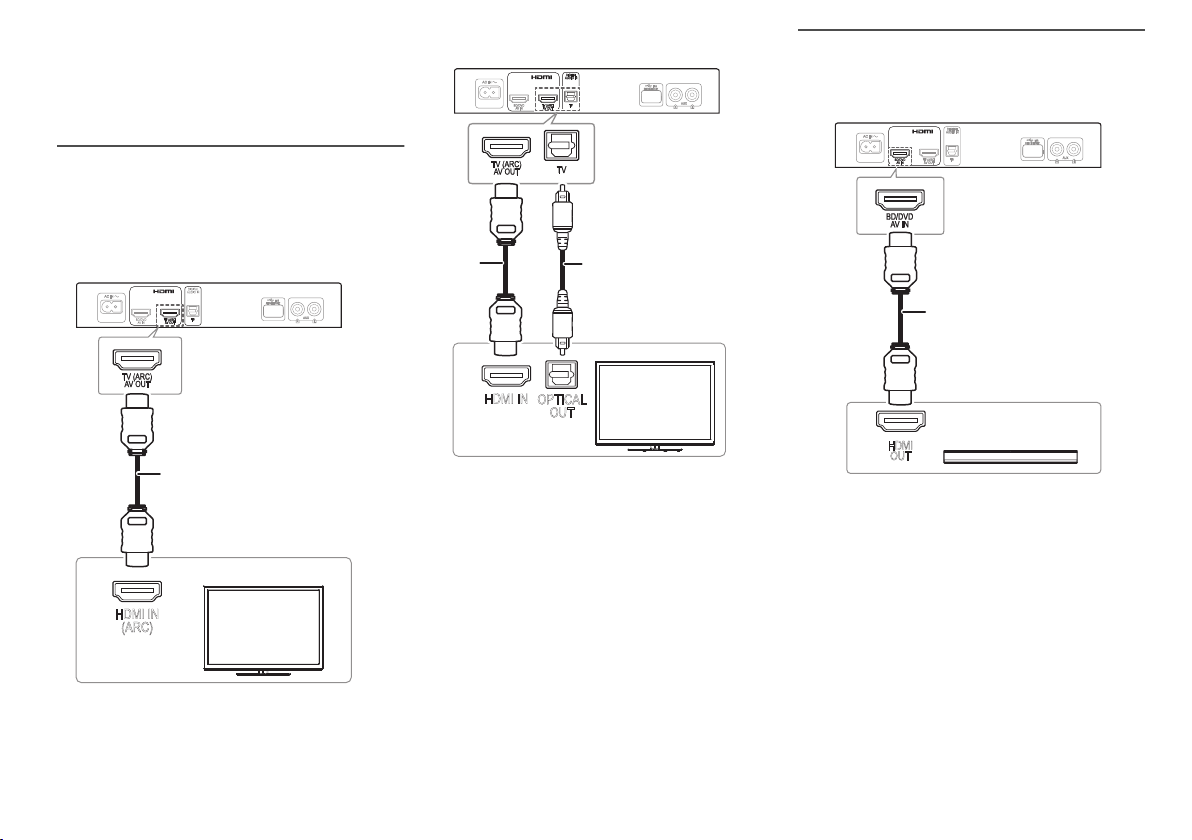
Connection
HDMI IN
(ARC)
HDMI cable
HDMI IN
OPTICAL
OUT
Optical digital audio
cable
HDMI
cable
HDMI
OUT
HDMI cable
e.g., Blu-ray Disc player
Turn off all equipment before connecting.
Components and cables are sold separately.
Connect the AC power supply cord only after all the
other connections have been made.
Connecting the TV
Connect an ARC compatible TV
Connect an ARC compatible terminal of the TV with an
ARC compatible high speed HDMI cable.
Connect a non-ARC compatible TV
Note:
The HDMI connection supports VIERA Link “HDAVI
Control” when connected with a Panasonic TV
(Z“Linked operations with the TV (VIERA Link™ HDAVI
Control™)”).
Connecting an HDMI compatible device
You can connect a Blu-ray Disc Player or DVD Player
and listen to the audio through this system.
HDMI standby pass-through
In standby mode, the audio and video signal from the
connected device can be sent to the connected TV. No
sound will be output from this system.
3D compatibility
The system can pass through the 3D video signal of a 3D
compatible Blu-ray Disc player to a FULL HD 3D TV.
Note:
Refer to the operating instructions of the device for video
and audio signal output settings.
ARC (Audio Return Channel)
ARC is an HDMI function that lets you enjoy both sound
and TV pictures with one HDMI cable.
RQT9860
8
Page 9
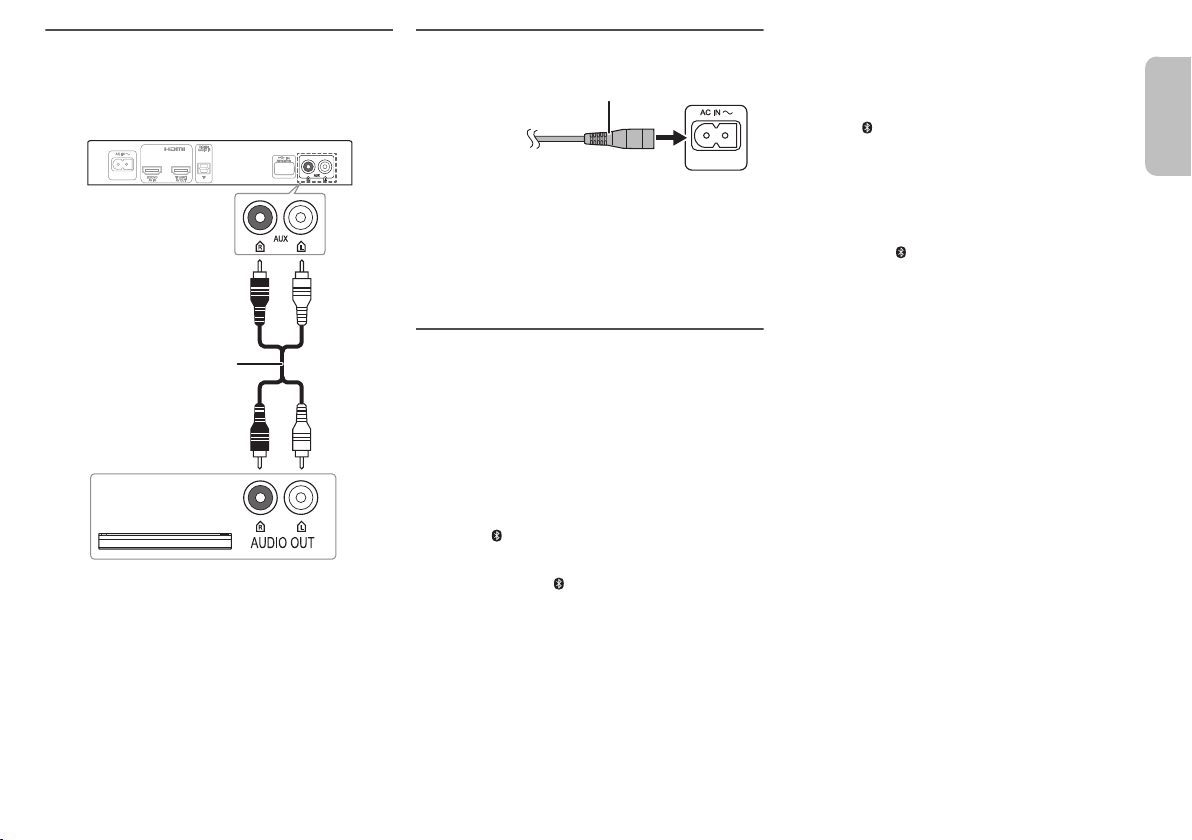
Connecting other equipment (AUX)
Audio cable
e.g., Set-top box
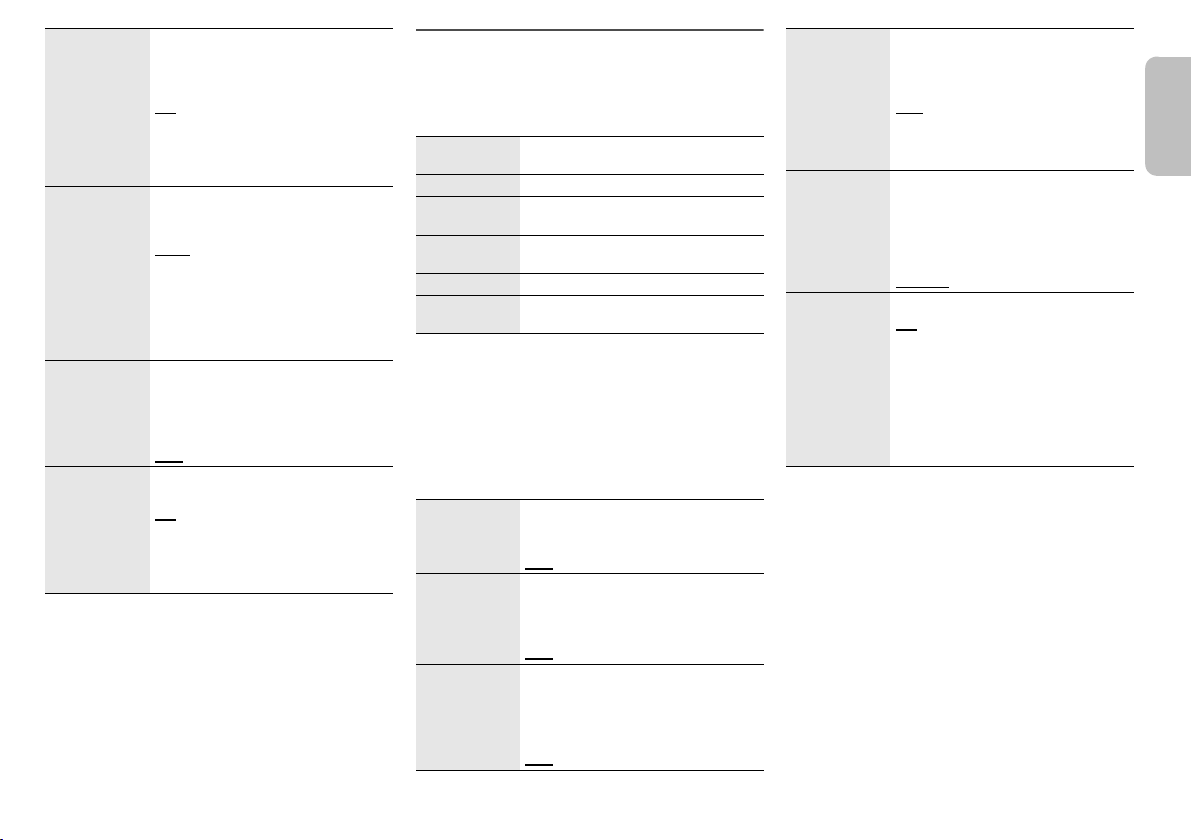
AC power supply cord (supplied)
To AC outlet
ENGLISH
You can connect other equipment such as Blu-ray
Players, DVD Players, game consoles, set-top boxes,
etc., and listen to the audio through this system.
Connecting the AC power supply cord
Do not use an AC power supply cord from other
equipment.
Conserving power
The system consumes a small amount of power
(Z“Specifications”) when it is in standby mode.
Disconnect the power supply cord if you do not use the
system.
Bluetooth® connection
You can connect and play an audio device wirelessly
through Bluetooth
Preparation
• Turn on the Bluetooth
the device near the system.
• Press [`] to turn on the system.
®
.
®
feature on the device and place
Pairing a device
1 Press [ ] to select “BLUETOOTH”.
If “PAIRING” is shown, continue with step 3.
2 Press and hold [ ] until “PAIRING” is shown.
3 Select “SC-HTE80” from the Bluetooth
the device.
If prompted for a passkey, input “0000”.
The device connects with this system automatically
after pairing is complete.
The name of the connected device is shown.
Note:
• A device must be paired to connect.
• You can pair up to 8 devices with this system.
If a 9th device is paired, the device that has not been
used the longest will be replaced.
®
menu of
Connecting a paired device
Preparation
If this system is connected to a Bluetooth
disconnect it.
1 Press [ ] to enter Bluetooth
“BLUETOOTH READY” is shown.
2 Select “SC-HTE80” from the Bluetooth
the device.
The name of the connected device is shown.
Disconnecting a device
Press and hold [ ] until “BLUETOOTH READY” is
shown.
Note:
• The system can only connect to one device at a time.
• When “BLUETOOTH” is selected as the source, this
system will automatically try to connect to the last
connected device.
• The Bluetooth
select another source.
®
device will be disconnected when you
®
mode.
®
device,
®
menu of
RQT9860
9
Page 10

Basic controls
TV BD/DVD
BLUETOOTH
AUX
VOL
Preparation
Turn on the TV and/or connected device.
1 Press [`] to turn on the system.
2 Press [INPUT] repeatedly to select the desired
source.
3 Press [ ] to adjust the volume of the
system.
Volume range: 0 to 100.
When “BLUETOOTH” is selected as the source
Select this system as the output speaker from the menu
of the connected Bluetooth
When “BD/DVD” is selected as the source
On the TV, select the corresponding input of the TV that
is connected to this system.
®
device.
One-Touch Connection (NFC)
For NFC-compatible Android™ devices only
When you touch an NFC (Near Field Communication)compatible Bluetooth
this system, this system will automatically turn on, pair
and connect to the Bluetooth
About NFC
NFC (Near Field Communication) is a short-range
wireless technology that allows communication between
NFC enabled devices with a touch.
Preparation
• Download and install the free Android™ app
“Panasonic Music Streaming” on Google Play™.
• Enable “NFC” on your device.
RQT9860
10
®
device on the NFC touch-area of
®
device.
1 Start the “Panasonic Music Streaming” app.
The application screen is shown. Follow the
instructions to complete the settings.
Make sure to use the latest version of the app.
2 Touch and hold your device on the NFC touch
area of this system until the Bluetooth
connection is done.
- The device will beep.
- A pop-up window is shown on the device.
- The name of the connected device is shown on the
system.
Once the registration and connection of the
®
Bluetooth
away from the unit.
device is complete, move the device
3 Start playback on your Bluetooth
Connecting another device
While connected, you can connect to another Bluetooth
device by simply touching and holding it on the NFC
touch area of this system. The previous device will be
disconnected automatically.
®
device.
®
Sound menu
1 Press [SOUND] repeatedly to select the desired
sound effect.
2 Press [R, T] repeatedly to select the desired
setting and then press [OK].
SOUND
MODE
®
SUBWOOFER LEVEL 1
DIALOG Adjust the dialog level.
H.BASS Enhance the harmonic bass effect.
The various sound modes are
enhanced with Dolby
and 3D Surround effect to provide a
surround effect similar to 5.1ch.
To cancel the Dolby Virtual Speaker
and 3D Surround effect, select
“STEREO”.
STANDARD
and comedy shows.
STADIUM: Produces a realistic sound
for live sports broadcasts.
MUSIC: Enhance the sound of
musical instruments and songs.
CINEMA: Produces
three-dimensional sound unique to
movies.
NEWS: Enhance the voice of news
and sports commentaries.
STEREO: Play any source of sound in
stereo.
LEVEL 2
LEVEL 3
LEVEL 4
LEVEL 1
LEVEL 2
LEVEL 3
LEVEL 4
“DIALOG” is not shown when “3D
CLR DIALOG” is set to “OFF”.
ON
OFF
®
Virtual Speaker
: Best suited for dramas
Page 11
3D CLR
ENGLISH
DIALOG
DUAL AUDIO Sets the preferred audio channel
AGC Auto gain control prevents sudden
LOW VOL
MODE
Note:
The default setting is underlined. Changed settings will
be kept until it is changed again, unless otherwise
indicated.
The 3D Clear Mode Dialog feature
creates a sound field similar to the
sound coming from a TV screen and
makes dialogues clearer.
: 3D Surround, Clear Mode Dialog
ON
and Dolby Virtual Speaker effect
OFF: Dolby Virtual Speaker effect
The setting is set back to “ON” every
time you turn on the system.
mode when there are two audio
modes received by the unit.
: Main
MAIN
SAP: Secondary
MAIN+SAP: Main + secondary
This effect only works if the audio
output of the TV or player is set to
“Bitstream” and “Dolby Dual Mono” is
available in the sound source.
loud sound by reducing the sound
level automatically when the input is
too high.
ON
OFF
Enhance the dialogue in low volume
condition.
ON
OFF
Select “OFF” to cancel this effect if the
dialog does not sound natural in low
volume condition.
Audio format
You can view the current audio format.
Press and hold [SOUND] for a minimum of
4 seconds.
DOLBY
DIGITAL
DTS DTS is the audio source.
PCM MULTI Linear pulse-code modulation is the
PCM 2 channel pulse-code modulation is
ANALOG Analog is the audio source.
SBC Sub-band Coding is the audio source.
Dolby Digital is the audio source.
audio source.
the audio source.
®
(Bluetooth
mode only.)
Setup Menu
1 Press [SETUP] repeatedly to select the item.
2 Press [R, T] repeatedly to select the desired
setting and then press [OK].
DIMMER Dims the display panel after
AUTO POWER
DOWN
VOL
LIMITATION
5 seconds of inactivity.
ON
OFF
The system automatically turns off if
there is no audio input and when you
do not use it for 30 minutes.
ON
OFF
Sets the volume limit to 50 when you
turn on the system although the
volume is set to above 50 before it is
turned off.
ON
OFF
BLUETOOTH
STANDBY
LINK MODE Change the Bluetooth® connection
VIERA LINK Turn on the VIERA Link function.
Note:
The default setting is underlined. Changed settings will
be kept until it is changed again, unless otherwise
indicated.
This function allows you to connect a
paired Bluetooth
system is in standby mode.
ON
OFF
The system will turn on automatically
when you connect a paired Bluetooth
device.
link mode to suit the connection type.
Make sure to disconnect the current
connected device (“BLUETOOTH
READY” is shown).
MODE 1: Emphasis on connectivity.
MODE 2
ON
OFF
Select “OFF” when your HDAVI
Control device does not work correctly
with this system. ARC will be disabled.
Connect an optical digital audio cable.
Turn off all connected devices and
then turn them on again after
changing the setting.
®
device when this
: Emphasis on sound quality.
®
RQT9860
11
Page 12

Linked operations with the
TV (VIERA Link™ HDAVI
Control™)
What is VIERA Link “HDAVI Control”?
VIERA LinkTM is a new name for EZ SyncTM.
VIERA Link “HDAVI Control” is a convenient
function that offers linked operations of this
system, and a Panasonic TV (VIERA) under “HDAVI
Control”.
You can use this function by connecting the
equipment with an HDMI cable. See the operating
instructions for connected equipment for
operational details.
Preparation
A Confirm that the HDMI connection has been made.
B Set the “HDAVI Control” operations on the connected
equipment (e.g., TV).
C For the optimal “HDAVI Control” operations change
the following settings on the connected TV*
– Set the default speaker settings to this system.*
– Set the speaker selection settings to this system.
D Turn on all “HDAVI Control” compatible equipment
and select the TV’s input for this system so that the
“HDAVI Control” function works properly.
E If a device is connected to the HDMI IN terminal, start
play to check that the picture is shown on the TV
correctly.
When the connection or settings are changed, repeat
this procedure.
1
The availability and function of the settings may vary
*
depending on the TV. Refer to the operating
instructions for the TV for details.
2
If the TV has a default speaker setting within the
*
VIERA Link setting items, choosing this system as the
default speaker will automatically change the speaker
selection to this system.
RQT9860
12
Note:
• VIERA Link “HDAVI Control”, based on the control
functions provided by HDMI which is an industry
standard known as HDMI CEC (Consumer Electronics
Control), is a unique function that we have developed
and added. As such, its operation with other
manufacturers’ equipment that supports HDMI CEC
cannot be guaranteed.
• This unit supports “HDAVI Control 5” function. “HDAVI
Control 5” is the standard for Panasonic’s HDAVI
Control compatible equipment. This standard is
compatible with Panasonic’s conventional HDAVI
equipment.
• Refer to individual manuals for other manufacturers’
equipment supporting VIERA Link function.
What you can do with VIERA Link™
HDAVI Control™
To make sure that the audio is output from this system,
turn the main unit on by using the TV’s remote control
and selecting home cinema from the speaker menu of
1
.
VIERA Link menu.
The availability and function of the settings may vary
2
depending on the TV. Refer to the operating instructions
for the TV for details.
Automatic input switching
When the following operations are performed, the main
unit will automatically change the input to the
corresponding source.
• When play starts on an HDMI connected device.*
• When the TV input or the TV channel is changed.
3
*
If the speaker output setting on the TV is set to this
system, the TV and the main unit turn on automatically
(Power on link).
3
Power off link
When the TV is turned off, the main unit also turns off
automatically. (This function does not work when
Bluetooth
®
is the source.)
Automatic lip-sync function
(For HDAVI Control 3 or later)
Delay between audio and video is automatically adjusted
by adding time-lag to the audio output, enabling you to
enjoy smooth audio for the picture.
Note:
The delay information is automatically set if the TV is
compatible to VIERA Link “HDAVI Control 3” or later and
the VIERA Link is set to on.
Speaker control
You can select whether audio output is from this system
or the TV speakers by using the TV menu settings.
Home theater
This system is active.
• When the main unit is in standby mode, changing the
TV speakers to this system in the VIERA Link menu
will automatically turn the main unit on.
• You can control the volume setting of this system using
the volume or mute button on the TV remote control.
• If you turn off the main unit, TV speakers will be
automatically activated.
• Audio will automatically be output from this system if
the TV is compatible to VIERA Link “HDAVI Control 4”
or later.
TV
TV speakers are active.
• The volume of this system is set to minimum.
Page 13

Troubleshooting
ENGLISH
Before requesting service, make the following checks. If
you are uncertain about some of the check points, or if
the solutions indicated do not solve the problem, refer to
“Customer Services Directory (United States and Puerto
Rico)” on page 16 if you reside in the U.S.A. or Puerto
Rico, or refer to “WARRANTY SERVICE” on page 17 if
you reside in Canada.
Common problems
No sound.
• Check the connections.
• Change the cables if the connections are correct.
• Increase the volume of the system.
• Check the audio output settings on the connected
device.
• Turn off the connected device and then turn it on again.
• The system may be overheated. Turn off the system.
Wait a few moments for system to cool down then turn
the system on again. Turn down the volume to prevent
overheating.
• Turn off the system, disconnect the HDMI cable,
connect it again, and turn the system on again.
• If the system is connected to the TV with an HDMI
cable only, make sure that the HDMI terminal of the TV
is labeled “HDMI (ARC)”. If not, connect an optical
digital audio cable.
• If the system is connected to a Panasonic TV, try
turning on this system by using the remote control of
the TV.
No operations can be done with the remote control.
• Remove the insulation sheet before you use the
remote control for the first time.
• Examine that the battery is installed correctly.
• The battery is weak. Replace it with a new one.
• Set the remote control code again after replacing the
battery.
• Change the code of the remote control to match the
code shown on the main unit when they do not match.
The system automatically switched to standby mode.
• You have turned on the “AUTO POWER DOWN”
feature. The system automatically turns off if there is
no audio input. Also, when you do not use the feature
for 30 minutes or more.
• You have turned the speaker’s control to the TV’s
speakers. This is a feature of VIERA Link (HDAVI
Control 4 or later). Refer to the TV’s owner manual for
its power saving feature.
HDMI
This system does not operate correctly.
• Check the HDMI connections.
• Turn off the system, disconnect the AC power supply
cord, disconnect the HDMI cable and re-connect.
VIERA Link related operations no longer function
correctly.
• Check the VIERA Link setting on the connected
devices.
• Check the “VIERA LINK” setting of this system.
• When the HDMI connections are changed, after a
power failure or after the AC power supply cord has
been removed, VIERA Link operations may not
function properly.
– Turn on all the devices that are connected to the TV
with an HDMI cable and then turn on the TV.
– Turn off the VIERA Link settings of the TV and then
turn it on again. For details refer to the TV’s owner’s
manual.
– While the system and the TV are connected with an
HDMI cable, turn on the TV, disconnect the AC
power supply cord of this system and then
re-connect.
The first few seconds of audio cannot be heard when
using the HDMI connection.
• This can occur during a DVD video chapter playback.
Change the digital audio output setting on the
connected device from “Bitstream” to “PCM”.
When operating an HDMI compatible device of a
different brand, the system reacts in an unwanted
manner.
• HDAVI Control commands can use a different signal
depending on the device. In this case, set “VIERA
LINK” to “OFF”.
Bluetooth
Pairing cannot be done.
• Check the Bluetooth
• The device is out of the 10 m (33 ft) communication
range. Move the device closer to the system.
The device cannot be connected.
• The pairing of the device was unsuccessful. Re-do
pairing.
• The pairing of the device has been replaced. Re-do
pairing.
• This system might be connected to a different device.
Disconnect the other device and try re-pairing the
device.
The device is connected but audio cannot be heard
through the system.
• For some built-in Bluetooth
the audio output to “SC-HTE80” manually. Read the
owner’s manual of the device for details.
Sound from the device is interrupted.
• The device is out of the 10 m (33 ft) communication
range. Move the device closer to the system.
• Remove any interference between the system and the
device.
• Other devices that use the 2.4 GHz frequency band
(wireless router, microwaves, cordless phones, etc.)
are interfering with the sound from the device. Move
the device closer to the system and distance it from the
other devices.
• Select “MODE 1” for stable communication.
The one-touch connection (NFC) is not working.
• Make sure the NFC feature of the NFC-compatible
device is turned on. Touch and hold the device to the
NFC touch-area of this system again.
®
®
device status.
®
devices, you have to set
RQT9860
13
Page 14

Main unit displays
“F61”
• There is a problem with the amplifier of the system.
• Disconnect the AC power supply cord and consult the
dealer.
“F70 HDMI”
• Check HDMI connection.
• Turn off the system and then turn it on again.
• Disconnect the HDMI cable.
“F76”
• There is a problem with the power supply.
• Disconnect the AC power supply cord and consult the
dealer.
System memory reset
Reset the memory when the following situations occur:
• There is no response when buttons are pressed.
• You want to clear and reset the memory contents.
1 While the system is turned on, press and hold
[1] on the main unit for a minimum of
4 seconds.
2 Release [1].
“RESET” is shown.
3 Turn off the system and then turn it on again.
All the settings are reset to the factory defaults.
Note:
The remote control code will set back to “REMOTE 1”
after memory reset, refer “Remote control code” on how
to change to “REMOTE 2”.
Remote control code
When other Panasonic equipment responds to the
remote control of this system, change the remote control
code for this system.
Preparation
• Turn off all other Panasonic products.
• Turn on this system.
• Aim the remote control at the remote control sensor of
this system.
To set the code to “REMOTE 2”
Press and hold [MUTE] and [OK] for a minimum of
4 seconds.
“REMOTE 2” is shown.
To set the code to “REMOTE 1”
Press and hold [MUTE] and [T] for a minimum of
4 seconds.
“REMOTE 1” is shown.
Maintenance
To clean this system, wipe with a soft, dry cloth.
• Never use alcohol, paint thinner or benzine to clean
this system.
• Before using chemically treated cloth, read the
instructions that came with the cloth carefully.
14
RQT9860
Page 15

Specifications
32
17
32
5
32
1
ENGLISH
Amplifier section
RMS output power: Dolby Digital mode
Front Ch 30 W per channel (6 Ω), 1 kHz, 10% THD
Subwoofer Ch
Total RMS Dolby Digital mode power 120 W
FTC output power: Dolby Digital mode
Front Ch
Subwoofer Ch
Total FTC Dolby Digital mode power 60 W
Terminals section
HDAVI Control
HDMI AV input
Input connector Type A (19 pin)
HDMI AV output
Output connector Type A (19 pin)
Digital audio input
Optical digital input Optical terminal
Sampling frequency 32 kHz, 44.1 kHz, 48 kHz
Audio format
Analog audio input
Audio input Pin jack (1 system)
USB port For service use only
60 W per channel (3 Ω), 100 Hz, 10% THD
16 W per channel (6 Ω), 170 Hz to 20 kHz, 1% THD
28 W per channel (3 Ω), 45 Hz to 170 Hz, 1% THD
This unit supports “HDAVI Control 5” function
88.2 kHz, 96 kHz (only LPCM)
Dolby Digital, DTS Digital Surround, LPCM
Bluetooth® section
Bluetooth® system specification Version 3.0
Wireless equipment classification Class 2
Supported profiles A2DP
Operating frequency 2402 MHz to 2480 MHz
Operation distance 10 m (33 ft) line of sight
Speaker section
Front speaker (built-in)
Type 1 way, 1 speaker system (bass reflex)
Speaker unit(s)
Full range
3.8 cm x 9 cm (1½″ x 3 ″) cone type x 2
Subwoofer (built-in)
Type 1 way, 2 speaker system (bass reflex)
Speaker unit(s)
Woofer 8 cm (3 ″) cone type x 2
General
Power supply AC 120 V, 60 Hz
Power consumption 27 W
Dimensions (W x H x D) 460 mm x 60 mm x 280 mm
Mass (Weight) 3.2 kg (7.1 lbs)
Maximum loading weight 30 kg (66 lbs)
Operating temperature range 0°C to +40°C
Operating humidity range
20% to 80% RH (no condensation)
Power consumption in standby mode
(With “BLUETOOTH STANDBY” set to “OFF”)
Note:
• Specifications are subject to change without notice.
Mass (weight) and dimensions are approximate.
• Total harmonic distortion is measured by the digital
spectrum analyzer.
(18⅛″ x 2⅜″ x 11 ″)
(+32°F to +104°F)
0.2 W (approximate)
RQT9860
15
Page 16

Limited Warranty (ONLY FOR U.S.A. AND PUERTO RICO)
IF REPAIR IS NEEDED DURING THE WARRANTY PERIOD,
THE PURCHASER WILL BE REQUIRED TO FURNISH A
SALES RECEIPT/PROOF OF PURCHASE INDICATING
DATE OF PURCHASE, AMOUNT PAID AND PLACE OF
PURCHASE. CUSTOMER WILL BE CHARGED FOR THE
REPAIR OF ANY UNIT RECEIVED WITHOUT SUCH PROOF
OF PURCHASE.
Limited Warranty Limits And Exclusions
This warranty ONLY COVERS failures due to defects in
materials or workmanship, and DOES NOT COVER normal
wear and tear or cosmetic damage. The warranty ALSO DOES
NOT COVER damages which occurred in shipment, or failures
which are caused by products not supplied by the warrantor, or
failures which result from accidents, misuse, abuse, neglect,
mishandling, misapplication, alteration, faulty installation, set-up
adjustments, misadjustment of consumer controls, improper
maintenance, power line surge, lightning damage, modification,
introduction of sand, humidity or liquids, commercial use such
as hotel, office, restaurant, or other business or rental use of the
product, or service by anyone other than a Factory Service
Center or other Authorized Servicer, or damage that is
attributable to acts of God.
THERE ARE NO EXPRESS WARRANTIES EXCEPT AS
LISTED UNDER “LIMITED WARRANTY COVERAGE”.
THE WARRANTOR IS NOT LIABLE FOR INCIDENTAL OR
CONSEQUENTIAL DAMAGES RESULTING FROM THE USE
OF THIS PRODUCT, OR ARISING OUT OF ANY BREACH OF
THIS WARRANTY.
(As examples, this excludes damages for lost time, travel to and
from the servicer, loss of or damage to media or images, data or
other memory or recorded content. The items listed are not
exclusive, but for illustration only.)
ALL EXPRESS AND IMPLIED WARRANTIES, INCLUDING
THE WARRANTY OF MERCHANTABILITY, ARE LIMITED TO
THE PERIOD OF THE LIMITED WARRANTY.
Some states do not allow the exclusion or limitation of incidental
or consequential damages, or limitations on how long an implied
warranty lasts, so the exclusions may not apply to you.
This warranty gives you specific legal rights and you may also
have other rights which vary from state to state. If a problem with
this product develops during or after the warranty period, you
may contact your dealer or Service Center. If the problem is not
handled to your satisfaction, then write to the warrantor’s
Consumer Affairs Department at the addresses listed for the
During the “Labor” warranty period there will be no charge for
labor. During the “Parts” warranty period, there will be no
charge for parts. This Limited Warranty excludes both parts
and labor for non-rechargeable batteries, antennas, and
cosmetic parts (cabinet). This warranty only applies to products
purchased and serviced in the United States or Puerto Rico.
This warranty is extended only to the original purchaser of a
new product which was not sold “as is”.
Mail-In Service
-- Online Repair Request
Online Repair Request
To submit a new repair request and for quick repair status
visit our Web Site at www.panasonic.com/repair.
When shipping the unit, carefully pack, include all supplied
accessories listed in the Owner's Manual, and send it prepaid,
adequately insured and packed well in a carton box. When
shipping Lithium Ion batteries please visit our Web Site at
www.panasonic.com/BatteryHandling as Panasonic is
committed to providing the most up to date information. Include
a letter detailing the complaint, a return address and provide a
daytime phone number where you can be reached. A valid
registered receipt is required under the Limited Warranty.
Not
Applicable
10 DaysOnly Non-Rechargeable Batteries
Not
Applicable
90 DaysAll included Accessories
(Except Non-Rechargeable Batteries)
1 Year1 YearHome Theater Audio System
LaborPartsProduct or Part Name
Limited Warranty Coverage
(For USA and Puerto Rico Only)
If your product does not work properly because of a defect in
materials or workmanship, Panasonic Corporation of North
America (referred to as “the warrantor”) will, for the length of
the period indicated on the chart below, which starts with the
date of original purchase (“warranty period”), at its option either
(a) repair your product with new or refurbished parts,
(b) replace it with a new or a refurbished equivalent value
product, or (c) refund your purchase price. The decision to
repair, replace or refund will be made by the warrantor.
As of November 2013
For hearing or speech impaired TTY users, TTY: 1-866-605-1277
Purchase Parts, Accessories and Owner’s Manual online for
all Panasonic Products by visiting our Web Site at:
http://www.pstc.panasonic.com
or, send your request by E-mail to:
npcparts@us.panasonic.com
You may also contact us directly at:
1-800-237-9080 (Fax Only)
(Monday-Friday 9am-9pm EST)
Panasonic National Parts Center
20421 84th Avenue South, Kent, WA 98032
(We accept Visa, MasterCard, Discover Card, American
Express)
Accessory Purchases (United States and Puerto Rico)
For hearing or speech impaired TTY users, TTY: 1-877-833-8855
Obtain Product Information and Operating Assistance;
locate your nearest Dealer or Service Center; purchase
Parts and Accessories; or make Customer Service and
Literature requests by visiting our Web Site at:
http://www.panasonic.com/support
or, contact us via the web at:
http://www.panasonic.com/contactinfo
Customer Services Directory (United States and Puerto Rico)
PARTS AND SERVICE, WHICH ARE NOT COVERED BY
THIS LIMITED WARRANTY, ARE YOUR RESPONSIBILITY.
Panasonic Products Limited Warranty
RQT9860
16
Page 17

Limited Warranty (ONLY FOR CANADA)
Panasonic Canada Inc.
5770 Ambler Drive, Mississauga, Ontario L4W 2T3
PANASONIC PRODUCT – LIMITED WARRANTY
Panasonic Canada Inc. warrants this product to be free from defects in material and workmanship under normal use and for a period as stated below from the date of original
purchase agrees to, at its option either (a) repair your product with new or refurbished parts, (b) replace it with a new or a refurbished equivalent value product, or (c) refund your
purchase price. The decision to repair, replace or refund will be made by Panasonic Canada Inc.
This warranty is given only to the original purchaser, or the person for whom it was purchased as a gift, of a Panasonic brand product mentioned above sold by an authorized
Panasonic dealer in Canada and purchased and used in Canada, which product was not sold “as is”, and which product was delivered to you in new condition in the original
packaging.
IN ORDER TO BE ELIGIBLE TO RECEIVE WARRANTY SERVICE HEREUNDER, A PURCHASE RECEIPT OR OTHER PROOF OF DATE OF ORIGINAL PURCHASE,
SHOWING AMOUNT PAID AND PLACE OF PURCHASE
IS REQUIRED
LIMITATIONS AND EXCLUSIONS
This warranty ONLY COVERS failures due to defects in materials or workmanship, and DOES NOT COVER normal wear and tear or cosmetic damage. The warranty ALSO DOES
NOT COVER damages which occurred in shipment, or failures which are caused by products not supplied by Panasonic Canada Inc., or failures which result from accidents,
misuse, abuse, neglect, mishandling, misapplication, alteration, faulty installation, set-up adjustments, misadjustment of consumer controls, improper maintenance, power line
surge, lightning damage, modification, introduction of sand, humidity or liquids, commercial use such as hotel, office, restaurant, or other business or rental use of the product, or
service by anyone other than an Authorized Servicer, or damage that is attributable to acts of God.
Dry cell batteries are also excluded from coverage under this warranty.
THIS EXPRESS, LIMITED WARRANTY IS IN LIEU OF ALL OTHER WARRANTIES, EXPRESS OR IMPLIED, INCLUDING ANY IMPLIED WARRANTIES OF
MERCHANTABILITY AND FITNESS FOR A PARTICULAR PURPOSE. IN NO EVENT WILL PANASONIC CANADA INC. BE LIABLE FOR ANY SPECIAL, INDIRECT OR
CONSEQUENTIAL DAMAGES RESULTING FROM THE USE OF THIS PRODUCT OR ARISING OUT OF ANY BREACH OF ANY EXPRESS OR IMPLIED WARRANTY. (As
examples, this warranty excludes damages for lost time, travel to and from the Authorized Servicer, loss of or damage to media or images, data or other memory or recorded
content. This list of items is not exhaustive, but for illustration only.)
In certain instances, some jurisdictions do not allow the exclusion or limitation of incidental or consequential damages, or the exclusion of implied warranties, so the above
limitations and exclusions may not be applicable. This warranty gives you specific legal rights and you may have other rights which vary depending on your province or territory.
WARRANTY SERVICE
For product operation, repairs and information assistance, please visit our Support page:
www.panasonic.ca/english/support
IF YOU SHIP THE PRODUCT TO A SERVICENTRE
Carefully pack and send prepaid, adequately insured and preferably in the original carton.
Include details of the defect claimed, and proof of date of original purchase.
Technics Audio Product One (1) year, parts and labour
Panasonic BD/DVD Product One (1) year, parts and labour
Panasonic Audio Receivers One (1) year, parts and labour
Home Theater Systems Product One (1) year, parts and labour
ENGLISH
RQT9860
17
Page 18

L1113C H1014
En
Panasonic Corporation of North America
Two Riverfront Plaza, Newark,
New Jersey 07102-5490
http://www.panasonic.com
© Panasonic Corporation 2013
Printed in Malaysia
Panasonic Canada Inc.
5770 Ambler Drive
Mississauga,Ontario
L4W 2T3
www.panasonic.ca
– If you see this symbol –
Information on Disposal in other Countries outside the
European Union
This symbol is only valid in the European Union.
If you wish to discard this product, please contact
your local authorities or dealer and ask for the
correct method of disposal.
RQT9860-1Y
Page 19

L1113C H1014
Cf
Panasonic Canada Inc.
5770 Ambler Drive
Mississauga,Ontario
L4W 2T3
www.panasonic.ca
© Panasonic Corporation 2013
Imprimé en Malaisie
– Si ce symbole apparaît –
Information sur la mise au rebut dans les pays
n’appartenant pas à l’Union européenne
Ce symbole est uniquement valide dans l’Union
européenne.
Si vous désirez mettre ce produit au rebut,
contactez l’administration locale ou le revendeur
et informez-vous de la bonne façon de procéder.
RQT9860-1Y
Page 20

RQT9860
FRANÇAIS
17
Page 21

Certificat de garantie limitée
Panasonic Canada Inc.
5770 Ambler Drive, Mississauga, Ontario L4W 2T3
PRODUIT PANASONIC – GARANTIE LIMITÉE
Panasonic Canada Inc. garantit que ce produit est exempt de défauts de matériaux et de main-d’œuvre dans un contexte d’utilisation normale pendant la période indiquée ci-après
à compter de la date d’achat original et, dans l’éventualité d’une défectuosité, accepte, à sa discrétion, de (a) réparer le produit avec des pièces neuves ou remises à neuf,
(b) remplacer le produit par un produit neuf ou remis à neuf d’une valeur équivalente ou (c) rembourser le prix d’achat. La décision de réparer, remplacer ou rembourser appartient
à Panasonic Canada Inc.
Appareils audio Technics Un (1) an, pièces et main-d’œuvre
Lecteurs BD/DVD Panasonic Un (1) an, pièces et main-d’œuvre
Récepteurs audio Panasonic Un (1) an, pièces et main-d’œuvre
Appareils cinéma maison Panasonic Un (1) an, pièces et main-d’œuvre
La présente garantie n’est fournie qu’à l’acheteur original d’un des produits de marque Panasonic indiqués plus haut, ou à la personne l’ayant reçu en cadeau, vendu par un
détaillant Panasonic agréé au Canada et utilisé au Canada. Le produit ne doit pas avoir été «vendu tel quel» et doit avoir été livré à l’état neuf dans son emballage d’origine.
POUR ÊTRE ADMISSIBLE AUX SERVICES AU TITRE DE LA PRÉSENTE GARANTIE, LA PRÉSENTATION D’UN REÇU D’ACHAT OU DE TOUTE AUTRE PIÈCE
JUSTIFICATIVE DE LA DATE D’ACHAT ORIGINAL, INDIQUANT LE MONTANT PAYÉ ET LE LIEU DE L’ACHAT,
RESTRICTIONS ET EXCLUSIONS
La présente garantie COUVRE SEULEMENT les défaillances attribuables à un défaut des matériaux ou à un vice de fabrication et NE COUVRE PAS l’usure normale ni les
dommages esthétiques. La présente garantie NE COUVRE PAS NON PLUS les dommages subis pendant le transport, les défaillances causées par des produits non fournis par
Panasonic Canada Inc. ni celles résultant d’un accident, d’un usage abusif ou impropre, de négligence, d’une manutention inadéquate, d’une mauvaise application, d’une
altération, d’une installation ou de réglages impropres, d’un mauvais réglage des contrôles de l’utilisateur, d’un mauvais entretien, d’une surtension temporaire, de la foudre, d’une
modification, de la pénétration de sable, de liquides ou d’humidité, d’une utilisation commerciale (dans un hôtel, un bureau, un restaurant ou tout autre usage par affaires ou en
location), d’une réparation effectuée par une entité autre qu’un centre de service Panasonic agréé ou encore d’une catastrophe naturelle.
Les piles sèches sont également exclues de la présente garantie.
CETTE GARANTIE LIMITÉE ET EXPRESSE REMPLACE TOUTE AUTRE GARANTIE, EXPRESSE OU IMPLICITE, INCLUANT LES GARANTIES IMPLICITES DU
CARACTÈRE ADÉQUAT POUR LA COMMERCIALISATION ET UN USAGE PARTICULIER. PANASONIC CANADA INC. N’AURA D’OBLIGATION EN AUCUNE
CIRCONSTANCE POUR TOUT DOMMAGE DIRECT, INDIRECT OU CONSÉCUTIF RÉSULTANT DE L’UTILISATION DE CE PRODUIT OU DÉCOULANT DE TOUTE
DÉROGATION À UNE GARANTIE EXPRESSE OU IMPLICITE. (À titre d’exemples, cette garantie exclut les dommages relatifs à une perte de temps, le transport jusqu’à et depuis
un centre de service agréé, la perte ou la détérioration de supports ou d’images, de données ou de tout autre contenu en mémoire ou enregistré. Cette liste n’est pas exhaustive
et n’est fournie qu’à des fins explicatives.)
Certaines juridictions ne reconnaissent pas les exclusions ou limitations de dommages indirects ou consécutifs, ou les exclusions de garanties implicites. Dans de tels cas, les
limitations stipulées ci-dessus peuvent ne pas être applicables. La présente garantie vous confère des droits précis; vous pourriez aussi avoir d’autres droits pouvant varier selon
votre province ou territoire de résidence.
SERVICE SOUS GARANTIE
Pour tout renseignement sur les produits, réparation ou assistance technique, veuillez visiter notre page Soutien :
www.panasonic.ca/french/support
EXPÉDITION D’UN PRODUIT À UN CENTRE DE SERVICE
16
RQT9860
Emballez soigneusement, de préférence dans son carton d’origine, et expédiez, franco de port, suffisamment assuré.
Accompagnez le tout d’une description de la défectuosité présumée et d’une pièce justificative de la date d’achat original.
EST REQUISE.
Page 22

Spécifications
FRANÇAIS
Section amplificateur
Puissance de sortie efficace : Mode Dolby Digital
Canal avant
Canal d’extrêmes-graves
Puissance eff. totale en mode Dolby Digital
Puissance de sortie FTC : Mode Dolby Digital
Canal avant
16 W par canal (6 Ω), 170 Hz à 20 kHz, 1 % DHT
Canal d’extrêmes-graves
Puissance totale FTC en mode Dolby Digital
Section prises
HDAVI Control
Entrée AV HDMI
Connecteur d’entrée Type A (19 broches)
Sortie AV HDMI
Connecteur de sortie Type A (19 broches)
Entrée audio numérique
Sortie numérique optique Borne optique
Fréquence d’échantillonnage
Format audio
Entrée audio analogique
Entrée audio Prise à broches (1 système)
Port USB Pour le service technique seulement
30 W par canal (6 Ω), 1 kHz, 10 % DHT
60 W par canal (3 Ω), 100 Hz, 10 % DHT
120 W
28 W par canal (3 Ω), 45 Hz à 170 Hz, 1 % DHT
60 W
Cet appareil prend en charge la fonction
88,2 kHz, 96 kHz (LPCM seulement)
« HDAVI Control 5 »
32 kHz, 44,1 kHz, 48 kHz
Dolby Digital, DTS Digital Surround, LPCM
Section Bluetooth
Spécification du système Bluetooth
®
®
Version 3.0
Classification de l’équipement sans fil
Classe 2
Profils pris en charge A2DP
Fréquence de fonctionnement
Aire de fonctionnement
2402 MHz à 2480 MHz
10 m (33 pi) Observation directe
Section haut-parleurs
Haut-parleurs avant (intégrés)
Type 1 voie, 1 haut-parleur (évent réflex)
Haut-parleur(s)
Pleine gamme
3,8 cm x 9 cm (1½ po x 3 po) de type cône x 2
Haut-parleurs d’extrêmes-graves avec amplificateur
(Intégrés)
Type 1 voie, 2 haut-parleurs (évent réflex)
Haut-parleur(s)
Graves 8 cm (3 po) de type cône x 2
17
32
5
32
Données générales
Alimentation 120 V a.c., 60 Hz
Consommation 27 W
Dimensions (L x H x P) 460 mm x 60 mm x 280 mm
(18⅛ po x 2⅜ po x 11 po)
Poids 3,2 kg (7,1 lb)
Poids de chargement maximum 30 kg (66 lb)
Température de fonctionnement 0°C à +40°C
Hygrométrie
Humidité relative de 20% à 80 % (sans condensation)
Consommation en mode attente
(Avec « BLUETOOTH STANDBY » réglé sur « OFF »)
(+32 °F à +104 °F)
0,2 W (environ)
Nota :
• Données sous réserve de modifications.
Le poids et les dimensions sont approximatifs.
• Distorsion harmonique totale mesurée avec
spectroscope numérique.
1
32
RQT9860
15
Page 23

Si un dispositif compatible avec HDMI de marque
différente est utilisé, l’appareil réagit de manière
intempestive.
• Les commandes HDAVI Control peuvent utiliser un
signal différent en fonction du dispositif. Dans ce cas,
régler « VIERA LINK » sur « OFF » (Z« Menu de
configuration »).
Bluetooth
Le pairage n’est pas possible
• Vérifier l’état du dispositif Bluetooth
• Le dispositif est à une distance plus grande que le
rayon d’action de 10 m (33 pi). Le rapprocher de
l’appareil.
La connexion du dispositif n’est pas possible.
• Le pairage a échoué. Recommencer le pairage.
• Le pairage du dispositif a été remplacé par un autre.
Recommencer le pairage.
• Cet appareil est peut-être connecté à un dispositif
différent. Déconnecter l’autre dispositif et essayer de
l’appairer à nouveau.
Le dispositif est connecté mais aucun son n’est
entendu sur l’appareil.
• Dans le cas de certains dispositifs Bluetooth
nécessaire de régler manuellement la sortie audio sur
« SC-HTE80 ». Pour de plus amples détails, se
reporter à la notice d’utilisation du dispositif.
Le son en provenance du dispositif est intermittent.
• Le dispositif est à une distance plus grande que le
rayon d’action de 10 m (33 pi). Le rapprocher de
l’appareil.
• Éliminer tout obstacle qu’il pourrait y avoir entre la
chaîne et le dispositif.
• D’autres dispositifs utilisant la bande de fréquence
2,4 GHz (routeur sans fil, micro-ondes, téléphones
sans fil, etc.) créent des interférences. Rapprocher le
dispositif de l’appareil et l’éloigner des autres
dispositifs.
• Pour assurer une communication stable, sélectionner
« MODE 1 ».
La connexion par simple contact (NFC) ne fonctionne
pas.
RQT9860
• Vérifier que la fonction NFC est activée sur le dispositif
compatible avec NFC. Remettre le dispositif en contact
14
avec la zone NFC de cet appareil.
®
®
.
®
, il est
Messages affichées
« F61 »
• Il y a un problème avec l’amplificateur de l’appareil.
• Débrancher le cordon d’alimentation secteur et
consulter le revendeur.
« F70 HDMI »
• Vérifier le raccordement HDMI.
• Mettre l’appareil hors marche, puis le remettre en
marche.
• Débrancher le câble HDMI.
« F76 »
• Il y a un problème d’alimentation électrique.
• Débrancher le cordon d’alimentation secteur et
consulter le revendeur.
Réinitialisation de la mémoire système
Réinitialiser la mémoire dans les situations suivantes :
• Absence de réponse aux pressions sur les touches.
• Pour vider la mémoire et en réinitialiser le contenu.
1 Lorsque le système est en marche, appuyer et
maintenir la touche [1] de l’appareil principal
enfoncée pendant au moins 4 secondes.
2 Relâcher [1].
« RESUME » est affiché.
3 Mettre l’appareil hors marche, puis le remettre
en marche.
Tous les paramétrages sont remis à leur valeur par
défaut.
Nota :
Le code de télécommande sera de nouveau
« REMOTE 1 » après réinitialisation de la mémoire,
référez-vous à « Code de télécommande » pour savoir
comment passer à « REMOTE 2 ».
Code de télécommande
Si d’autres appareils Panasonic réagissent au signal de
la télécommande, changer le code sur cet appareil.
Préparatifs
• Mettre hors marche tous les autres produits
Panasonic.
• Mettre cet appareil en marche.
• Pointer la télécommande vers le capteur de la
télécommande de cet appareil.
Réglage du code « REMOTE 2 »
Maintenir les touches [MUTE] et [OK] enfoncées
pendant au moins 4 secondes.
« REMOTE 2 » est affiché.
Réglage du code « REMOTE 1 »
Maintenir les touches [MUTE] et [T] enfoncées
pendant au moins 4 secondes.
« REMOTE 1 » est affiché.
Entretien
Pour nettoyer l’appareil, utiliser un chiffon doux et
sec.
• Ne jamais utiliser d’alcool, de diluant pour peinture ni
de benzène pour nettoyer l’appareil.
• Avant d’utiliser un chiffon traité chimiquement, lire
attentivement les directives sur l’emballage du chiffon.
Page 24

À propos de la commutation du signal
FRANÇAIS
d’entrée
Lorsque les opérations suivantes sont effectuées,
l’appareil principal commute automatiquement le signal
d’entrée sur la source correspondante.
• Lorsque la lecture est lancée sur un appareil connecté
par câble HDMI.*
• Lors du changement de l’entrée télé ou de canal.
3
*
Si cet appareil a été sélectionné comme sortie audio
sur le téléviseur, le téléviseur et l’appareil principal
sont automatiquement mis en marche (Lien en
marche).
3
Lien hors marche
Lorsque le téléviseur est mis hors marche, l’appareil
principal est aussi mis hors marche automatiquement.
(Cette fonction n’est pas disponible lorsque la source est
®
Bluetooth
.)
Fonction de synchronisation automatique
(Pour HDAVI Control 3 ou ultérieur)
Le délai entre les signaux audio et vidéo est
automatiquement ajusté en ajoutant un délai à la sortie
audio, ce qui permet de tirer profit d’un signal sonore
accordé à l’image.
Nota :
L’information de délai est réglée automatiquement si le
téléviseur est compatible avec VIERA Link « HDAVI
Control 3 » ou ultérieur et si la fonction VIERA Link est
activée.
Dépannage
Avant d’appeler un centre de service, faire les
vérifications décrites ci-dessous. En cas de doute sur
certains des points de vérification, ou si les solutions
proposées dans ce guide ne règlent pas le problème, se
reporter à la section « SERVICE SOUS GARANTIE » à
la page 16.
Problèmes communs
Absence de son.
• Vérifier les raccordements.
• Si les raccordements sont corrects, changer les
câbles.
• Monter le volume.
• Vérifier les réglages de sortie audio du dispositif
connecté.
• Mettre le dispositif connecté hors marche et le remettre
en marche.
• L'appareil est peut-être en surchauffe. Mettre l'appareil
hors marche. Attendre le refroidissement de l'appareil
pendant quelques instants puis remettre l'appareil en
marche. Réduire le volume pour éviter la surchauffe.
• Mettre l'appareil hors marche, débrancher le câble
HDMI et le rebrancher, puis remettre l'appareil en
marche.
• Si l'appareil est raccordé au téléviseur avec un câble
HDMI seulement, vérifier que la borne HDMI du
téléviseur est étiquetée « HDMI (ARC) ». Si ce n’est
pas le cas, raccorder un câble audio numérique
optique.
• Si l’appareil est connecté à un téléviseur Panasonic,
essayer de mettre cet appareil en marche en utilisant
la télécommande du téléviseur.
Aucune fonctionnalité ne peut être pilotée au moyen
de la télécommande.
• Retirer le feuillet protecteur avant d’utiliser la
télécommande.
• Vérifier la mise en place de la pile.
• La pile est faible. La remplacer.
• Définir à nouveau le code de la télécommande après
avoir remplacé la pile.
• Changer le code de la télécommande pour qu'il
corresponde au code affiché sur l'appareil principal
s'ils ne correspondent pas (Z« Code de
télécommande »).
L’appareil passe automatiquement en mode veille.
• Vous devez activer la fonction « AUTO POWER
DOWN ». Cet appareil se met automatiquement hors
marche en l’absence d’entrée audio et si vous ne
l’utilisez pas depuis 30 minutes.
• Vous avez passé le contrôle des haut-parleurs sur les
ceux du téléviseur. Il s’agit d’une fonction de VIERA
Link (HDAVI Control 4 ou ultérieur). Se référer aux
instructions de fonctionnement du téléviseur pour plus
de détails sur sa fonction d’économie d’énergie.
HDMI
Cet appareil ne fonctionne pas correctement.
• Vérifier les raccordements HDMI.
• Mettre l'appareil hors marche, débrancher le cordon
d’alimentation secteur, débrancher le câble HDMI et le
rebrancher.
Les opérations associées à VIERA Link ne
fonctionnent plus correctement.
• Vérifier le paramètre VIERA Link sur les dispositifs
connectés.
• Vérifier le paramètre « VIERA LINK » de cet appareil
(Z« Menu de configuration »).
• Lorsque les connexions HDMI sont modifiées, après
une coupure de courant ou lorsque le cordon
d’alimentation a été débranché, les opérations liées à
VIERA Link peuvent ne pas s’effectuer adéquatement.
– Mettre en marche tous les dispositifs raccordés au
téléviseur par câble HDMI et remettre le téléviseur
en marche.
– Désactiver les paramètres VIERA Link du téléviseur
et les réactiver. Pour en savoir plus, se référer au
mode d'emploi du téléviseur.
– Alors que l'appareil et le téléviseur sont raccordés
par un câble HDMI, mettre le téléviseur en marche,
débrancher le cordon d'alimentation secteur de cet
appareil et le rebrancher.
Pendant les quelques premières secondes, le son ne
s’entend pas si un raccordement HDMI est utilisé.
• Cela peut se produire au cours de la lecture d’un
chapitre de DVD vidéo. Changer le réglage de sortie
audio numérique du dispositif connecté en remplaçant
« Bitstream » par « PCM ».
RQT9860
13
Page 25

Opérations liées avec le
téléviseur (VIERA Link™
HDAVI Control™)
Qu’est-ce que la fonction VIERA Link
« HDAVI Control »?
L’appellation EZ SyncTM est maintenant remplacée
par VIERA Link
Il s’agit d’une fonction pratique qui permet de lier le
pilotage des opérations sur cet appareil et un
téléviseur Panasonic (VIERA) sous la fonction
« HDAVI Control ».
Il est possible d’utiliser cette fonction en
raccordant ces appareils au moyen d’un câble
HDMI. Pour plus de détails, se reporter au manuel
d’utilisation de chaque appareil utilisé.
Préparatifs
A Vérifier que la connexion HDMI a été établie.
B Régler les opérations « HDAVI Control » sur
l’équipement raccordé (Ex. : téléviseur).
C Pour des opérations optimales « HDAVI Control »,
changer les réglages suivants sur le téléviseur
raccordé.*
– Commuter les réglages par défaut du haut-parleur
sur cet appareil.*
– Commuter les réglages de sélection du
haut-parleur sur cet appareil.
D Mettre en marche tous les appareils compatibles
avec « HDAVI Control » et sélectionner l’entrée télé
pour cet appareil de manière que la fonction de
« HDAVI Control » fonctionne adéquatement.
E Si un dispositif est connecté à la prise HDMI IN,
lancer la lecture afin de vérifier que l’image est
correctement affichée à l’écran du téléviseur.
TM
.
1
2
Recommencer cette procédure si la connexion ou les
réglages sont modifiés.
1
La disponibilité et la fonction des paramètres peuvent
*
varier selon le téléviseur. Consulter le manuel
d’utilisation du téléviseur pour plus de détails.
2
Si le téléviseur a un réglage du haut-parleur par défaut
*
parmi les rubriques de réglage VIERA Link, choisir cet
appareil comme haut-parleur par défaut commutera
automatiquement la sélection du haut-parleur sur cet
appareil.
Nota :
• La fonction VIERA Link « HDAVI Control », basée sur
les fonctions de pilotage fournies par HDMI qui est une
norme de l’industrie aussi connue sous le nom de
HDMI CEC (Consumer Electronics Control/Comité des
télécommunications et de l’électronique), est une
fonction unique que nous avons développée et ajoutée
à nos appareils. De ce fait, son pilotage avec les
appareils d’autres fabricants qui prennent en charge
HDMI CEC n’est pas garanti.
• Cet appareil prend en charge la fonction « HDAVI
Control 5 ». « HDAVI Control 5 » est la norme pour les
appareils compatibles avec HDAVI Control de
Panasonic. Cette norme est compatible avec les
appareils HDAVI traditionnels de Panasonic.
• Se rapporter aux manuels afférents à l’équipement
utilisé prenant en charge la fonction VIERA Link.
Opérations possibles avec VIERA Link™
HDAVI Control™
Pour s’assurer que le signal audio est reproduit sur cet
appareil, mettre l’appareil principal en marche au moyen
de la télécommande du téléviseur et sélectionner la
fonction cinéma maison dans le menu de sélection des
enceintes du menu VIERA Link.
La disponibilité et la fonctionnalité des réglages peuvent
varier selon le téléviseur. Consulter le manuel
d’utilisation du téléviseur pour plus de détails.
Contrôle des haut-parleurs
Il est possible de choisir, à partir du menu des
paramétrages du téléviseur, quels haut-parleurs sont en
circuit, ceux du téléviseur ou ceux de cet appareil.
Cinéma maison
Les haut-parleurs de cet appareil sont activés.
• Lorsque l’appareil principal est dans le mode veille,
activer les haut-parleurs de cet appareil à partir du
menu des paramétrages du menu VIERA Link a pour
effet de mettre automatiquement l’appareil principal en
marche.
• Il est possible de régler le volume sur cet appareil en
utilisant la touche volume ou sourdine (MUTE) de la
télécommande.
• Lorsque l’appareil principal est mis hors marche, les
haut-parleurs du téléviseur sont automatiquement
activés.
• Le signal audio est automatiquement restitué par cet
appareil si le téléviseur est compatible avec « HDAVI
Control 4 » VIERA Link ou une version subséquente.
Téléviseur
Les haut-parleurs du téléviseur sont activés.
• Le volume sur cet appareil est réglé à son minimum.
12
RQT9860
Page 26

3D CLR
FRANÇAIS
DIALOG
DUAL AUDIO Définit le mode de canal audio favori
AGC Le contrôle automatique du gain évite
LOW VOL
MODE
Nota :
Le réglage par défaut est souligné. Sauf indication
contraire, les réglages modifiés seront conservés jusqu’à
une prochaine modification.
La fonction de mode dialogue clair 3D
(3D CLR DIALOG) crée un champ
sonore similaire au son provenant d’un
écran de téléviseur et rend les
dialogues plus clairs.
: Effet ambiophonique 3D, mode
ON
dialogue clair et haut-parleur virtuel
Dolby
OFF : Effet de haut-parleur virtuel
Dolby
Le réglage est remis sur « ON » à
chaque fois que vous mettez l'appareil
en marche.
lorsque deux modes audio sont reçus
par l'appareil.
: Principal
MAIN
SAP : Secondaire
MAIN+SAP : Principal + secondaire
Cet effet ne fonctionne que si la sortie
audio du téléviseur ou du lecteur est
réglée sur « Bitstream » et si « Dolby
Dual Mono » est disponible dans la
source sonore.
les sons soudainement forts en
réduisant automatiquement le niveau
sonore lorsque l’entrée est trop
puissante.
ON
OFF
Améliore les dialogues en cas de
volume faible.
ON
OFF
Sélectionner « OFF » pour annuler cet
effet si les dialogues ne semblent pas
naturels en cas de volume faible.
Format audio
Vous pouvez visualiser le format audio en cours.
Maintenir la touche [SOUND] enfoncée pendant au
moins 4 secondes.
DOLBY
DIGITAL
DTS DTS est la source audio.
PCM MULTI La modulation linéaire par impulsions
PCM La modulation 2 canaux par
ANALOG L’analogique est la source audio.
SBC Le codage en sous-bande est la
Dolby Digital est la source audio.
codées est la source audio.
impulsions codées est la source
audio.
source audio.
(Mode Bluetooth
®
uniquement.)
Menu de configuration
1 Appuyer à plusieurs reprises sur [SETUP] pour
sélectionner l’élément à configurer.
2 Appuyer à plusieurs reprises sur [R, T] pour
sélectionner le réglage souhaité et appuyer sur
[OK].
DIMMER Atténue l’afficheur au bout de
AUTO POWER
DOWN
5 secondes d’inactivité.
ON
OFF
Cet appareil est mis hors marche
automatiquement en l’absence
d’entrée audio et si vous ne l’utilisez
pas depuis 30 minutes.
ON
OFF
VOL
LIMITATION
BLUETOOTH
STANDBY
LINK MODE Change le mode de liaison de la
VIERA LINK Active la fonction VIERA Link.
Nota :
Le réglage par défaut est souligné. Sauf indication
contraire, les réglages modifiés seront conservés jusqu’à
une prochaine modification.
Règle la limite de volume à 50 lorsque
vous mettez l'appareil en marche
même si le volume été réglé
au-dessus de 50 avant d’avoir été mis
hors marche.
ON
OFF
Cette fonction vous permet de
connecter un dispositif apparié
®
Bluetooth
mode veille.
ON
OFF
Cet appareil se met en marche
automatiquement lorsque vous
connecter un dispositif Bluetooth
apparié.
connexion Bluetooth
au type de connexion.
Veiller à déconnecter le dispositif
actuellement connecté
(« BLUETOOTH READY » s'affiche).
MODE 1 : Accent sur la connectivité.
MODE 2
sonore.
ON
OFF
Sélectionner « OFF » si votre
dispositif HDAVI Control ne fonctionne
pas correctement avec cet appareil.
La fonction ARC est désactivée.
Raccorder un câble audio numérique
optique.
Mettre hors marche tous les
dispositifs connectés et les remettre
en marche après avoir modifié le
réglage.
lorsque l’appareil est en
®
pour l’adapter
: Accent sur la qualité
®
RQT9860
11
Page 27

Commandes de base
TV BD/DVD
BLUETOOTH
AUX
VOL
Préparatifs
Mettre le téléviseur et/ou le dispositif connecté en
marche.
1 Appuyer sur [`] pour mettre l'appareil en
marche.
2 Appuyer à plusieurs reprises sur [INPUT] pour
sélectionner la source.
3 Appuyer sur [ ] pour ajuster le volume
de l’appareil.
Plage de volume : 0 à 100
Si la source sélectionnée est « BLUETOOTH »
Sélectionner cet appareil en tant qu’enceinte de sortie
depuis le menu du dispositif Bluetooth
Si la source sélectionnée est « BD/DVD »
Sur le téléviseur, sélectionner l’entrée correspondante du
téléviseur connecté à cet appareil.
®
connecté.
Connexion par simple
contact (NFC)
Pour les dispositifs Android™ compatibles
avec NFC uniquement
Dès que vous mettez un dispositif Bluetooth® compatible
avec NFC (Near Field Communication) en contact avec
la zone NFC de cet appareil, ce dernier se met en
marche, s’apparie et se connecte automatiquement au
dispositif Bluetooth
À propos de la fonction NFC
La fonction NFC (Near Field Communication) est une
technologie sans fil de courte portée qui permet la
communication entre les dispositifs NFC par un simple
contact.
RQT9860
10
®
.
Préparatifs
• Télécharger et installer l’application gratuite
« Panasonic Music Streaming » d’Android™ depuis
Google Play™.
• Activer la fonction « NFC » sur votre dispositif.
1 Démarrer l'application « Panasonic Music
Streaming ».
L’écran de l’application s’affiche. Suivre les
instructions pour effectuer les réglages.
S'assurer d'utiliser la dernière version de
l'application.
2 Toucher et maintenir votre dispositif sur la zone
de contact NFC de cet appareil jusqu’à ce que la
connexion Bluetooth
- L'appareil émet un bip.
- Une fenêtre contextuelle s'affiche sur le dispositif.
- Le nom du dispositif connecté s’affiche sur
l'appareil.
Une fois l'enregistrement et la connexion du
dispositif Bluetooth
de l'appareil.
®
soit établie.
®
terminés, éloigner le dispositif
3 Lancer la lecture sur votre dispositif Bluetooth
Connexion d’un autre dispositif
Si un dispositif Bluetooth
pouvez en connecter un autre en le mettant en contact
avec la zone NFC de cet appareil. Le dispositif précédent
est automatiquement déconnecté.
®
est déjà connecté, vous
Menu du son
1 Appuyer sur [SOUND] pour sélectionner un effet
sonore.
2 Appuyer à plusieurs reprises sur [R, T] pour
sélectionner le réglage souhaité et appuyer sur
[OK].
SOUND
MODE
SUBWOOFER
®
.
DIALOG Ajuster le niveau de dialogue.
H.BASS Améliorer l’effet des graves
Les divers modes sonores sont
renforcés par un effet de haut-parleur
virtuel Dolby
pour produire un effet sonore similaire
au 5.1 canaux.
Pour annuler l'effet de haut-parleur
virtuel Dolby et d'ambiophonie 3D,
sélectionner « STEREO ».
STANDARD
au théâtre et aux spectacles.
STADIUM : produit un son réaliste pour
les émissions sportives en direct.
MUSIC : renforce le son des
instruments de musique et des
chansons.
CINEMA : produit un son en trois
dimensions unique pour les films.
NEWS : améliore la voix des
journalistes et commentateurs sportifs.
STEREO : lit n’importe quelle source
sonore en stéréo.
LEVEL 1
LEVEL 2
LEVEL 3
LEVEL 4
LEVEL 1
LEVEL 2
LEVEL 3
LEVEL 4
« DIALOG » ne s’affiche pas lorsque
« 3D CLR DIALOG » est réglé sur
« OFF ».
harmoniques.
ON
OFF
®
et d'ambiophonie 3D
: particulièrement adapté
Page 28

Connexion d’un autre équipement (AUX)
Câble audio
Ex. : Décodeur
Cordon d’alimentation (fourni)
Vers une prise
de courant
FRANÇAIS
Vous pouvez connecter un autre équipement tel qu’un
lecteur de Blu-ray, un lecteur de DVD, une console de
jeux, un décodeur, etc. et écouter de l’audio via cet
appareil.
Branchement du cordon d’alimentation
Ne pas utiliser le cordon d’alimentation d'un autre
appareil.
Économie d’énergie
L’appareil consomme une petite quantité d’électricité
(Z« Spécifications ») quand il est en mode veille.
Débrancher le cordon d'alimentation si l’appareil n’est
pas utilisé.
Connexion Bluetooth
Vous pouvez connecter et lire un dispositif audio sans fil
via Bluetooth
Préparatifs
• Activer la fonction Bluetooth
le dispositif du système.
• Appuyer sur [`] pour mettre l'appareil en marche.
®
.
®
®
du dispositif et approcher
Appairage d’un dispositif
1 Appuyer sur [ ] et sélectionner
« BLUETOOTH ».
Si « PAIRING » s'affiche, passer à l'étape 3.
2 Appuyer et maintenir [ ] enfoncée jusqu’à ce
que « PAIRING » s’affiche.
3 Sélectionner « SC-HTE80 » dans le menu
Bluetooth
Si un message demande à entrer un mot de passe,
entrer « 0000 ».
Une fois le pairage effectué, le dispositif est
connecté à l’appareil.
Le nom du dispositif connecté s’affiche.
®
du dispositif.
Nota :
• Pour qu’il y ait connexion, le dispositif doit avoir été
pairé.
• Il est possible de pairer jusqu’à 8 dispositifs auprès de
cet appareil.
Si un 9ᵉ dispositif est apparié, le dispositif resté le plus
longtemps inutilisé est remplacé.
Connexion d’un dispositif apparié
Préparatifs
Si cet appareil est connecté à un dispositif Bluetooth
déconnecter (Zvoir ci-dessous)
1 Appuyer sur [ ] pour entrer en mode
Bluetooth
« BLUETOOTH READY » est affiché.
2 Sélectionner « SC-HTE80 » dans le menu
Bluetooth
Le nom du dispositif connecté s’affiche.
Déconnexion d’un dispositif
Appuyer et maintenir [ ] enfoncée jusqu’à ce que
« BLUETOOTH READY » s’affiche.
Nota :
• Cet appareil ne peut être connectée qu’à un seul
dispositif à la fois.
• Si la source « BLUETOOTH » est sélectionnée, cet
appareil essaie automatiquement de se connecter au
dernier dispositif connecté.
• Le dispositif Bluetooth
sélectionnez une autre source.
®
.
®
du dispositif.
®
se déconnecte lorsque vous
®
, le
RQT9860
9
Page 29

Raccordements
HDMI IN
(ARC)
Câble HDMI
HDMI IN
OPTICAL
OUT
Câble audio optique
numérique
Câble
HDMI
HDMI
OUT
Câble HDMI
Ex. : Lecteur Blu-ray Disc
Mettre tous les équipements hors marche avant le
raccordement.
Les composants et câbles sont vendus séparément.
Brancher le cordon d’alimentation secteur dans la
prise secteur une fois que tous les autres
raccordements ont été effectués.
Connexion du téléviseur
Connecter un téléviseur compatible avec ARC
Connecter la borne compatible avec ARC du téléviseur à
un câble HDMI haute vitesse compatible avec ARC.
ARC (Canal de retour audio)
La fonction ARC est une fonction HDMI qui vous permet
RQT9860
de profiter du son et des images du téléviseur avec un
8
seul câble HDMI.
Connecter un téléviseur non compatible
avec ARC
Nota :
La connexion HDMI prend en charge la fonction VIERA
Link « HDAVI Control » si le téléviseur est de marque
Panasonic (Z« Opérations liées avec le téléviseur
(VIERA Link™ HDAVI Control™) »).
Connexion d’un dispositif compatible
avec HDMI
Vous pouvez connecter un lecteur de disques Blu-ray, un
lecteur de DVD, etc., et écouter de l’audio grâce à cet
appareil.
Passage du signal HDMI en mode veille
En mode veille, le signal audio et/ou vidéo du dispositif
connecté peut être envoyé au téléviseur connecté.
Aucun son n’est émis par cet appareil.
Compatibilité 3D
L’appareil peut envoyer le signal vidéo 3D d’un lecteur de
disques Blu-ray compatible avec 3D vers un téléviseur
3D pleine HD.
Nota :
Se référer au mode d'emploi du dispositif pour en savoir
plus sur les paramètres de sortie des signaux vidéo et
audio.
Page 30

Préparatifs pour la
Feuillet
protecteur
32
1
460 mm (18ǩSR)
280 mm
SR
FRANÇAIS
télécommande
Avant utilisation
Retirer le feuillet protecteur avant d’utiliser la
télécommande.
Remplacement de la pile
Remplacer la pile lorsque la télécommande ne
fonctionne plus ou lorsque sa portée est diminuée.
Remplacer qu’avec une pile neuve (modèle CR2025 3V
pile au lithium).
Positionnement
Si le téléviseur pèse moins de 30 kg (66 lb) et que les
dimensions de son socle sont au maximum de 460 mm
(18⅛ po) (largeur) par 280 mm (11 po) (profondeur), le
téléviseur peut être posé sur l'appareil.
ATT ENTIO N !
• Ne pas faire dépasser le téléviseur de la surface de
l’appareil. Veiller à ne pas renverser le téléviseur, car
cela pourrait occasionner des blessures.
Sinon, poser l’appareil sur le côté droit du téléviseur
(recommandé) ou dans un meuble.
Nota :
• Ne pas placer l’appareil dans un meuble en métal.
• Éloigner les autres appareils électroniques à bande de
fréquence 2,4 GHz tels que routeur sans fil, téléphone
sans fil, etc. d'au moins 2 m (6½ pi) de ce système
pour éviter les interférences électromagnétiques.
• Si des couleurs anormales apparaissent sur le
téléviseur, le mettre hors marche pendant 30 minutes.
Si la démagnétisation du téléviseur ne corrige pas le
problème, augmenter la distance entre cet appareil et
le téléviseur.
• Éloigner les objets magnétiques. Les cartes
magnétiques, les montres etc. peuvent être
endommagées si elles sont posées trop près de
l’appareil.
1 Tout en appuyant sur la butée, tirer sur le plateau
de la pile.
2 Mettre une nouvelle pile en place, côté positif (+)
vers le haut.
3 Refermer le plateau de la pile en le poussant
jusqu’au fond.
ATTENTION !
Garder la pile de type bouton hors de la portée des
enfants pour éviter qu’ils ne l’avalent.
• Installer le dispositif anti-basculement du téléviseur.
Pour plus d’informations sur l’installation, se référer
au mode d'emploi du téléviseur. Si le téléviseur n’est
pas fourni avec un dispositif anti-basculement,
consulter votre revendeur.
• Déplacer le téléviseur sur la surface de l’appareil
peut occasionner des rayures sur la surface. S’il doit
être déplacé, soulever le téléviseur.
RQT9860
7
Page 31

Emplacement des commandes
MUTE
SETUP
INPUT
SOUND
OK
PAIRING
IJ
BFAK
Panneau avant
Vue latérale
L
M
NO P Q
Panneau arrière
TV BD/DVD
BLUETOOTH
AUX
A Interrupteur de marche/attente [`], [1]
Appuyer sur cet interrupteur pour commuter l’appareil
du mode de marche au mode attente et vice versa.
En mode attente, l’appareil continue de consommer
une petite quantité de courant.
B Sélection de la source d'entrée
C Affichage du menu de configuration
D Affichage du menu son
E Sélectionne le mode Bluetooth
Lance le mode de pairage Bluetooth
®
®
F Réglage du volume
G Mise en sourdine
Pour annuler, appuyer de nouveau sur la touche.
La fonction de sourdine est aussi annulée lors du
réglage du volume ou de la mise hors marche.
H Sélection et confirmation de l'option
I Capteur de signal de la télécommande
Distance : à une distance d'environ 7 m (23 pi)
Angle : environ 20° en haut et en bas, 30° à gauche
et droite
J Afficheur
K Zone de contact NFC
L Prise d’alimentation c.a.
M Prise HDMI IN (BD/DVD)
N Prise de sortie HDMI OUT (compatible avec ARC)
O Prise DIGITAL AUDIO IN (TV)
P Port USB (pour le service technique seulement)
Q Prise AUX IN
RQT9860
6
Page 32

À propos de Bluetooth
FRANÇAIS
Panasonic décline toute responsabilité pour la
compromission de données ou de renseignements qui
pourrait survenir pendant une transmission sans fil.
Bande de fréquences
• Cet appareil fonctionne sur la bande de fréquence de
®
2,4 GHz.
Certification
• Cet appareil satisfait aux restrictions en matière des
bandes de fréquences et a été certifié en vertu des lois
sur l’utilisation des bandes de fréquences. Par
conséquent, l’obtention d’un permis de transmission
sans fil n’est pas requise.
• Les actions décrites ci-dessous sont punissables en
vertu de la loi :
– Démontage et/ou modification de l’appareil.
– Retrait des indications relatives aux spécifications.
Restrictions à l’utilisation
• La liaison sans fil et/ou l’utilisation avec tous les
dispositifs compatibles avec Bluetooth
garantis.
• Tous les dispositifs doivent être conformes aux normes
établies par Bluetooth SIG, Inc.
• Selon les spécifications et paramétrages d’un
dispositif, la connexion pourrait être impossible ou
certaines opérations pourraient être différentes.
• Cet appareil prend en charge les fonctionnalités de
sécurité Bluetooth
l’environnement d’exploitation et/ou les paramétrages,
ces mesures de sécurité pourraient ne pas être
suffisantes. La transmission de données vers cet
appareil doit se faire avec le plus grand discernement.
• Cet appareil ne peut transmettre de données à un
dispositif Bluetooth
Rayon d’action
• Utiliser ce dispositif à une distance maximum de 10 m
(33 pi).
• Le rayon d’action peut être réduit en raison de
l’environnement, d’obstacles ou d’interférence.
®
. Cependant, selon
®
.
®
ne sont pas
Interférence en provenance d’autres appareils
• Cet appareil pourrait ne pas fonctionner adéquatement
et des problèmes tels que des sauts de son et du bruit
pourraient survenir en raison d'ondes
électromagnétiques si cet appareil est placé trop près
d'autres dispositifs Bluetooth
fonctionnant sur la bande de fréquence de 2,4 GHz.
• Cet appareil pourrait ne pas fonctionner adéquatement
si des ondes électromagnétiques en provenance d'une
station émettrice avoisinante, etc., sont trop fortes.
Utilisation prévue
• Cet appareil est conçu pour un usage général.
• Ne pas utiliser cet appareil près d’un équipement ou
dans un milieu sensible à l’interférence radio
(exemples : aéroports, hôpitaux, laboratoires, etc.).
®
ou des dispositifs
Fabriqué sous licence de Dolby Laboratories.
Dolby, Pro Logic, et le symbole double-D sont des
marques déposées de Dolby Laboratories.
Ce produit est fabriqué sous licence et en vertu des
brevets américains nos 5,956,674; 5,974,380;
6,487,535 et d’autres brevets émis et en instance aux
États-Unis et dans le monde. Le symbole DTS, DTS et
son symbole utilisés ensemble sont des marques
déposées et DTS Digital Surround et les logos DTS
sont des marques de commerce de DTS, Inc. Logiciel
inclus avec ce produit. © DTS, Inc. Tous droits
réservés.
HDMI, le logo HDMI et High-Definition Multimedia
Interface sont des marques de commerce ou des
marques déposées de HDMI Licensing LLC aux
États-Unis et dans d’autres pays.
HDAVI Control™ est une marque de commerce de
Panasonic Corporation.
VIERA Link™ est une marque de commerce de
Panasonic Corporation.
EZ Sync™ est une marque de commerce de Panasonic
Corporation.
Le nom de marque et les logos Bluetooth
propriété de Bluetooth SIG, Inc. et leur utilisation par
Panasonic Corporation fait l’objet d’une licence. Les
autres marques de commerce sont la propriété de leurs
®
sont la
détenteurs respectifs.
Google Play et Android sont des marques de
commerce de Google Inc.
RQT9860
5
Page 33

CE QUI SUIT S’APPLIQUE AU CANADA
CAN ICES-3(B)/NMB-3(B)
Conforme à la norme CAN-CSA STD C22.2 N° 60065.
Cet appareil est conforme aux normes CNR-Gen et
CNR-210 du règlement de la IC. L’utilisation de ce
dispositif est autorisée seulement aux deux conditions
suivantes :
(1) il ne doit pas produire de brouillage, et
(2) l’utilisateur du dispositif doit être prêt à accepter tout
brouillage radioélectrique reçu, même si ce brouillage
est susceptible de compromettre le fonctionnement du
dispositif.
CE QUI SUIT S’APPLIQUE AU CANADA ET AUX
ÉTATS-UNIS
Cet émetteur ne doit pas être placé à proximité d’une
autre antenne ou d’un autre émetteur, ni être utilisé de
pair avec de tels autres appareils.
Cet équipement est conforme aux limites d’exposition
aux radiations FCC/IC établies pour un environnement
non contrôlé et se conforme aux exigences de
conformité pour l’exposition aux RF IC, dans le
supplément C, aux normes OET65 et CNR-102. Cet
appareil présente de très faibles niveaux d’énergie RF
jugés conformes sans évaluation de l’expostion
permise maximale (MPE). Mais il est souhaitable de
l’installer et de l’utiliser à une distance d’au moins
20 cm (7⅞ po) du corps (extrémités non comprises :
mains, poignets, pieds et chevilles).
Table des matières
Accessoires fournis. . . . . . . . . . . . . . . . . . . . . . . 2
IMPORTANTES MISES EN GARDE. . . . . . . . . . . 2
Mesures de sécurité . . . . . . . . . . . . . . . . . . . . . . 3
À propos de Bluetooth®. . . . . . . . . . . . . . . . . . . . 5
Emplacement des commandes . . . . . . . . . . . . . 6
Préparatifs pour la télécommande. . . . . . . . . . . 7
Positionnement . . . . . . . . . . . . . . . . . . . . . . . . . . 7
Raccordements . . . . . . . . . . . . . . . . . . . . . . . . . . 8
Commandes de base . . . . . . . . . . . . . . . . . . . . . 10
Connexion par simple contact (NFC) . . . . . . . . 10
Menu du son. . . . . . . . . . . . . . . . . . . . . . . . . . . . 10
Menu de configuration . . . . . . . . . . . . . . . . . . . .11
Opérations liées avec le téléviseur
(VIERA Link™ HDAVI Control™) . . . . . . . . . . . 12
Dépannage . . . . . . . . . . . . . . . . . . . . . . . . . . . . . 13
Entretien . . . . . . . . . . . . . . . . . . . . . . . . . . . . . . . 14
Spécifications. . . . . . . . . . . . . . . . . . . . . . . . . . . 15
Certificat de garantie limitée. . . . . . . . . . . . . . . 16
RQT9860
4
Page 34

Mesures de sécurité
FRANÇAIS
AVERTISSEMENT !
Appareil
• Pour réduire les risques d’incendie, de choc électrique
ou de dommage à l’appareil,
– Ne pas exposer cet appareil à la pluie, à l’humidité,
à l’égouttement ou aux éclaboussements.
– Ne placer sur l’appareil aucun objet rempli de
liquide, comme par exemple des vases.
– Utiliser exclusivement les accessoires
recommandés.
– Ne pas retirer les couvercles.
– Toute réparation doit être faite par un personnel
qualifié et non par l’usager.
Cordon d’alimentation
• La fiche d’alimentation permet de déconnecter
l’appareil. L’appareil doit être installé à proximité d’une
prise secteur facile d’accès.
Pile bouton (pile au lithium)
• Risque d’incendie, d’explosion et brûlures. Ne pas
démonter, chauffer à plus de 60 °C (140 °F) ou mettre
au feu.
ATTENTION !
Appareil
• Pour réduire les risques d’incendie, de choc électrique
ou de dommage à l’appareil,
– Ne pas installer cet appareil dans une bibliothèque,
une armoire ou tout autre espace confiné. S’assurer
que la ventilation de l’appareil est adéquate.
– Ne pas obstruer les évents d’aération de l’appareil
avec des journaux, des nappes, des rideaux ou
d’autres objets similaires.
– Ne placer aucune source de flamme nue, telles des
bougies allumées, sur l’appareil.
• Ne pas toucher le fond de l’appareil. Il pourrait être
chaud après une période d'utilisation prolongée.
Pile bouton (pile au lithium)
• Insérer la pile en respectant la polarité.
• Ne pas permettre aux terminaux (+ et –) d’entrer en
contact avec des objets de métal.
• Ne pas recharger, démonter, remonter, chauffer ou
jeter au feu.
• Garder hors de la portée des enfants.
• Si de l’électrolyte entre en contact avec la peau ou les
vêtements, laver méticuleusement à l’eau.
• Si de l’électrolyte entre en contact avec les yeux, ne
pas frotter les yeux. Rincer les yeux méticuleusement
à l’eau, puis consulter un médecin.
• Danger d’explosion si la pile n’est pas remplacée
correctement. La remplacer uniquement par une pile
de type recommandé par le fabricant.
• Lors de la mise au rebut de la pile, contacter
l’administration locale ou le revendeur et s’informer de
la bonne façon de procéder.
• Ne pas chauffer ou exposer au feu.
• Ne pas laisser la(les) pile(s) dans un véhicule exposé
au soleil avec vitres et portes fermées pendant une
longue période de temps.
N’INGÉREZ PAS LA PILE. RISQUE
DE BRÛLURE CHIMIQUE.
Ce produit contient une pile bouton. En cas d’ingestion,
une telle pile peut provoquer de sévères brûlures
internes en seulement deux (2) heures, lesquelles
peuvent être mortelles. Rangez les piles, neuves ou
usagées, hors de la portée des enfants. Dans le cas où
le logement de la pile ne fermerait pas de manière
sécuritaire, cessez d’utiliser l’appareil et rangez-le hors
de la portée des enfants. Si vous soupçonnez que la
pile a été ingérée ou insérée dans une partie du corps,
sollicitez immédiatement une aide médicale.
ATTENTION : AFIN DE PRÉVENIR LE RISQUE DE
CHOCS ÉLECTRIQUES, NE PAS
RETIRER LES VIS.TOUTE
RÉPARATION DEVRAIT ÊTRE
CONFIÉE À UN PERSONNEL
QUALIFIÉ.
Le symbole de l’éclair dans un triangle
équilatéral indique la présence d’une
tension suffisamment élevée pour
engendrer un risque de chocs
électriques.
Le point d’exclamation dans un triangle
équilatéral indique que le manuel
d’utilisation inclus avec l’appareil
contient d’importantes
recommandations quant au
fonctionnement et à l’entretien de ce
dernier.
RQT9860
3
Page 35

Les opérations décrites dans ce manuel sont
pilotées à partir de la télécommande, mais il est
possible d’utiliser les mêmes commandes sur
l’appareil.
Votre appareil et les illustrations pourraient ne pas avoir
exactement la même apparence que ce qui est montré
dans le présent manuel.
Il est recommandé de noter, dans l’espace prévu
ci-dessous, le numéro de modèle et le numéro de série
inscrits à l’arrière, ou sous le fond de l’appareil, et de
conserver ce manuel pour référence ultérieure.
NUMÉRO DE MODÈLE SC-HTE80
NUMÉRO DE SÉRIE
Homologation :
DATE D’ACHAT
DÉTAILLANT
ADRESSE DU DÉTAILLANT
N° DE TÉLÉPHONE
Accessoires fournis
Vérifier les accessoires en les cochant.
Utiliser les numéros indiqués entre parenthèses lors de
la commande de pièces de rechange. (Les numéros de
produits sont en date de novembre 2013. Ces numéros
peuvent être modifiés sans préavis.)
Pour la commande d’accessoires, contacter le détaillant
où l’appareil a été acheté.
1 cordon d’alimentation
(K2CB2CB00022)
1 télécommande (avec une pile)
(N2QAYC000098)
RQT9860
La feuille d’autocollants en français ci-incluse correspond
aux noms des touches, prises ou voyants indiqués en
2
anglais sur le boîtier de l’appareil et la télécommande.
IMPORTANTES MISES EN
GARDE
Avant d’utiliser l’appareil, lire attentivement les instructions qui suivent. Se conformer tout particulièrement aux
avertissements inscrits sur l’appareil et aux consignes de sécurité indiquées ci-dessous. Conserver le présent manuel
pour consultation ultérieure.
1. Lire attentivement ces instructions.
2. Conserver ces instructions.
3. Lire toutes les mises en garde.
4. Suivre toutes les instructions.
5. Ne pas utiliser cet appareil près d’une source d’eau.
6. Ne nettoyer qu’avec un chiffon sec.
7. Ne pas bloquer les évents d’aération. Installer
l’appareil selon les instructions du fabricant.
8. Ne pas installer l’appareil près d’un appareil de
chauffage tel qu’un radiateur, une cuisinière, un
registre de chaleur ou tout dispositif émettant de la
chaleur (y compris un amplificateur).
9. Pour des raisons de sécurité, ne pas modifier la fiche
polarisée ou celle de mise à la terre. Une fiche
polarisée est une fiche à deux lames, dont une plus
large. Une fiche de mise à la terre est une fiche à
deux lames avec une broche de masse. La lame plus
large ou la broche de masse procure une protection
accrue. Si ce genre de fiche ne peut être inséré dans
une prise de courant, communiquer avec un
électricien pour remplacer la prise.
10. S’assurer que le cordon est placé dans un endroit où
il ne risque pas d’être écrasé, piétiné ou coincé. Faire
particulièrement attention à ses extrémités de
branchement, y compris sa fiche.
11. N’utiliser que les accessoires ou périphériques
recommandés par le fabricant.
12. N’utiliser l’appareil qu’avec une baie,
support, trépied, gabarit
d’installation, etc. recommandé par
le fabricant ou vendu avec l’appareil.
Si une baie ou un support est utilisée
et que l’appareil doit être déplacé,
faire attention à ne pas les renverser.
13. Débrancher cet appareil lors d’un orage ou en cas de
non-utilisation prolongée.
14. Confier l’appareil à un technicien qualifié pour toute
réparation : cordon d’alimentation ou fiche
endommagé, liquide renversé ou objet tombé dans
l’appareil, exposition à la pluie ou à une humidité
excessive, mauvais fonctionnement ou échappement
de l’appareil.
Page 36

Manuel d’utilisation
Chaîne audio cinéma maison
Modèle
SC-HTE80
PP
Nous vous remercions d’avoir arrêté votre choix sur cet appareil.
Pour en tirer un rendement optimal et par mesure de sécurité, lire
attentivement le présent manuel.
Conserver ce manuel pour référence ultérieure.
Pour toute assistance supplémentaire, visiter :
www.panasonic.ca/french/support
RQT9860-1Y
 Loading...