

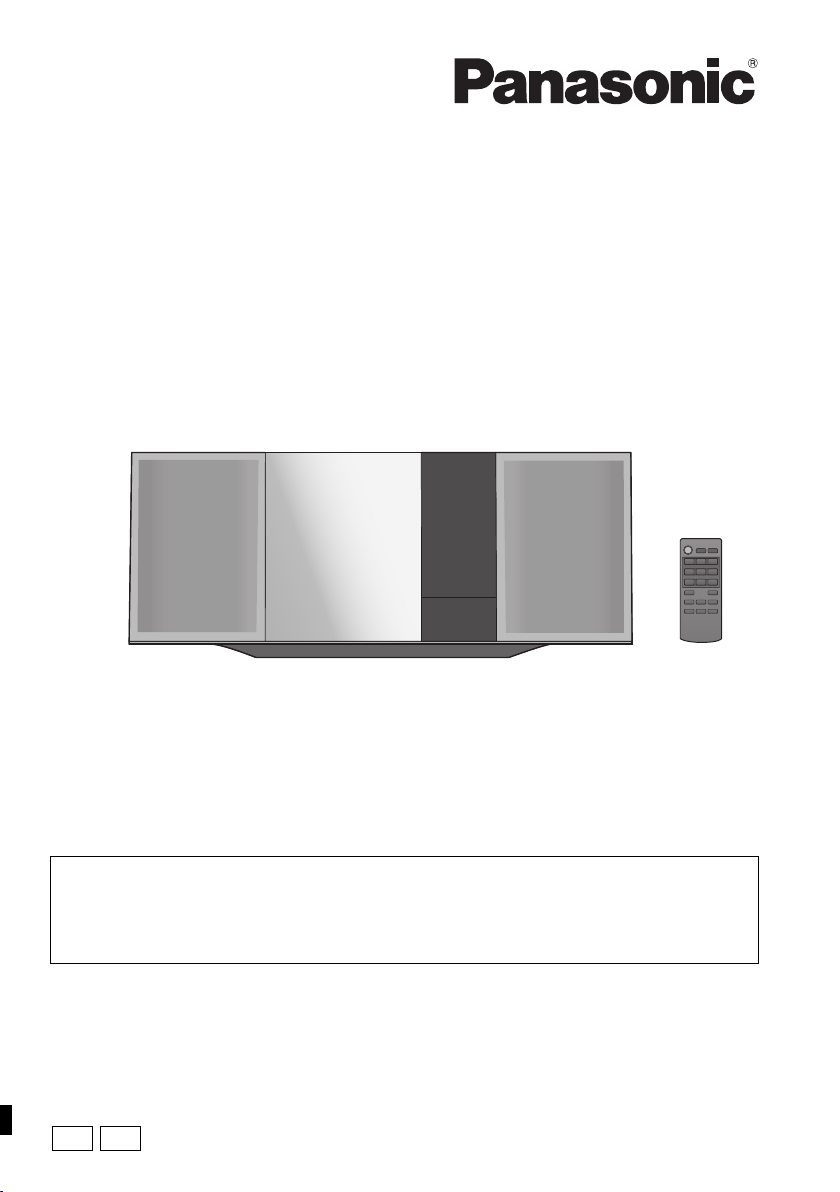
Panasonic SC-HC49, SC-HC49DB User Manual
GN
GS
Operating Instructions
Compact Stereo System
Thank you for purchasing this product.
Please read these instructions carefully before using this product,
and save this manual for future use.
Model No. SC-HC49DB
SC-HC49
Included Installation Instructions (l 2 and 20, 21)
The installation work should be done by a qualified installation specialist.
Before commencing work, carefully read these installation instructions and the operating
instructions to ensure that installation is performed correctly.
(Please keep these instructions. You may need them when maintaining or moving this unit.)
RQT9883-1B
Safety precautions
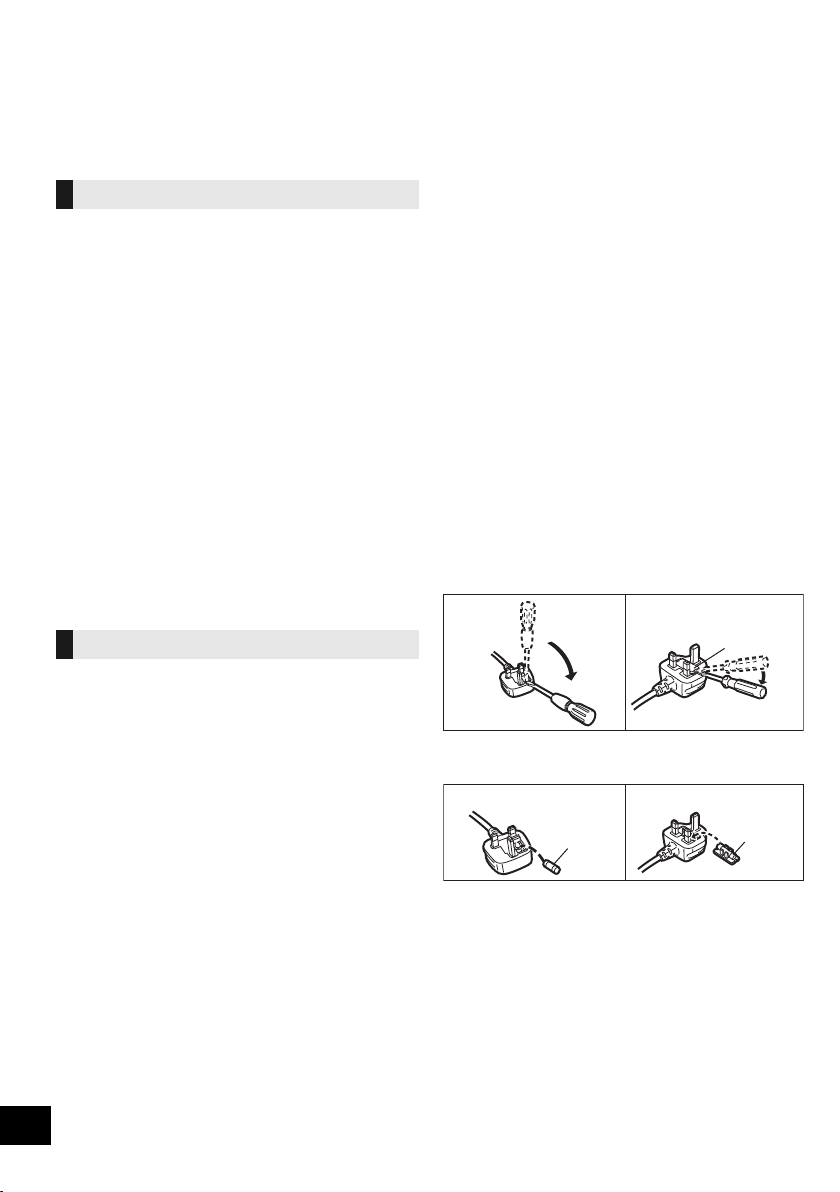
Figure A Figure B
Fuse cover
Figure A
Fuse
(5 ampere)
Figure B
Fuse
(5 ampere)
WARNING
Unit
≥ To reduce the risk of fire, electric shock or product damage,
– Do not expose this unit to rain, moisture, dripping or
splashing.
– Do not place objects filled with liquids, such as vases, on
this unit.
– Use only the recommended accessories.
– Do not remove covers.
– Do not repair this unit by yourself. Refer servicing to
qualified service personnel.
– Do not let metal objects fall inside this unit.
– Do not place heavy items on this unit.
AC mains lead
≥ To reduce the risk of fire, electric shock or product damage,
– Ensure that the power supply voltage corresponds to the
voltage printed on this unit.
– Insert the mains plug fully into the socket outlet.
– Do not pull, bend, or place heavy items on the lead.
– Do not handle the plug with wet hands.
– Hold onto the mains plug body when disconnecting the
plug.
– Do not use a damaged mains plug or socket outlet.
≥ The mains plug is the disconnecting device.
Install this unit so that the mains plug can be unplugged from
the socket outlet immediately.
CAUTION
Unit
≥ This unit utilizes a laser. Use of controls or adjustments or
performance of procedures other than those specified herein
may result in hazardous radiation exposure.
≥ Do not place sources of naked flames, such as lighted
candles, on this unit.
≥ This unit may receive radio interference caused by mobile
telephones during use. If such interference occurs, please
increase separation between this unit and the mobile
telephone.
≥ (For Australia and New Zealand) This unit is intended for use
in moderate climates.
≥ (For Asia and the Middle East) This unit is intended for use in
tropical climates.
Placement
≥ Place this unit on an even surface.
≥ To reduce the risk of fire, electric shock or product damage,
– Do not install or place this unit in a bookcase, built-in
cabinet or in another confined space. Ensure this unit is
well ventilated.
– Do not obstruct this unit’s ventilation openings with
newspapers, tablecloths, curtains, and similar items.
– Do not expose this unit to direct sunlight, high
temperatures, high humidity, and excessive vibration.
Battery
≥ Danger of explosion if battery is incorrectly replaced.
Replace only with the type recommended by the
manufacturer.
≥ Mishandling of batteries can cause electrolyte leakage and
may cause a fire.
– Remove the battery if you do not intend to use the remote
control for a long period of time. Store in a cool, dark
place.
– Do not heat or expose to flame.
– Do not leave the battery(ies) in a car exposed to direct
sunlight for a long period of time with doors and windows
closed.
– Do not take apart or short circuit.
– Do not recharge alkaline or manganese batteries.
– Do not use batteries if the covering has been peeled off.
≥ When disposing of the batteries, please contact your local
authorities or dealer and ask for the correct method of
disposal.
(For the AC mains plug of three pins)
How to replace the fuse
The location of the fuse differ according to the type of
AC mains plug (figures A and B). Confirm the AC
mains plug fitted and follow the instructions below.
Illustrations may differ from actual AC mains plug.
1. Open the fuse cover with a screwdriver.
2. Replace the fuse and close or attach the fuse
cover.
2
RQT9883
Product Identification Marking is located on the bottom of the
unit.
-If you see this symbol-
Information on Disposal in other Countries
outside the European Union
This symbol is only valid in the European
Union.
If you wish to discard this product, please
contact your local authorities or dealer and
ask for the correct method of disposal.
Table of contents
Safety precautions ............................................ 2
Accessories....................................................... 3
Control reference guide ................................... 4
Connections ...................................................... 5
Inserting media ................................................. 6
Bluetooth
Media playback controls .................................. 8
[SC-HC49DB] Listening to DAB+ ....................... 10
Listening to FM/AM radio ............................... 12
Sound adjustment .......................................... 13
Clock and Timer .............................................. 13
Others .............................................................. 14
Troubleshooting .............................................. 15
Unit and media care........................................ 17
About Bluetooth
Playable media ................................................ 18
Licenses .......................................................... 18
Attaching the support pad to this unit.......... 19
Attaching the unit to a wall (optional) ........... 20
Specifications.................................................. 22
Limited Warranty (ONLY FOR AUSTRALIA)
®
operations ...................................... 7
®
............................................ 17
... 23
Accessories
Check the supplied accessories before using this unit.
∏ 1 Remote control
(N2QAYB000945)
∏ 1 Battery for remote control
(For Australia and New Zealand)
∏
1 AC mains lead
∏
(For Asia and the Middle East)
3 AC mains leads
[SC-HC49DB]
∏
1 DAB indoor antenna
∏ [SC-HC49]
1 FM indoor antenna
∏
[SC-HC49] (Australia and New
Zealand only)
1 AM loop antenna
∏ 1 Pad sheet
(support pad)
Wall mounting accessories
∏ 1 Safety holder
∏ 2 Wall mount
brackets
About descriptions in these operating
instructions
≥ Pages to be referred to are indicated as “l ±±”.
≥ Unless otherwise indicated, operations are described using
the remote control.
≥ These operating instructions are applicable to models
SC-HC49DB and SC-HC49. Unless otherwise indicated,
illustrations in these operating instructions are of
SC-HC49DB.
[SC-HC49DB] :indicates features applicable to SC-HC49DB
only.
[SC-HC49] :indicates features applicable to SC-HC49 only.
∏ 1 Screw
≥ Do not use AC mains lead with other equipment.
≥ Product numbers provided in these operating instructions are
correct as of February 2014. These may be subject to
change.
≥ (For Asia and the Middle East)
Please use the supplied AC mains lead suitable for the
household mains socket.
RQT9883
3
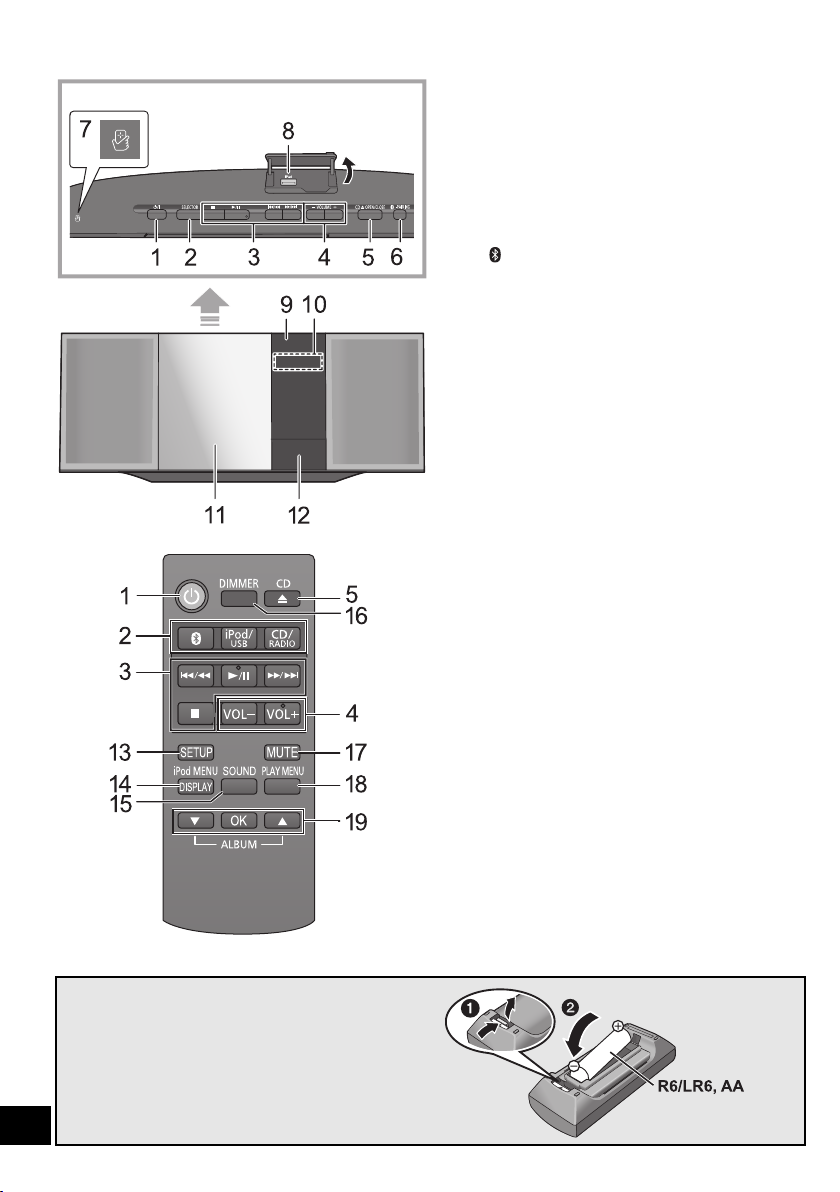
Control reference guide
Top view
(Alkaline or manganese
battery)
1 Standby/on switch (Í/I) (Í)
Press to switch the unit from on to standby mode or vice
versa.
In standby mode, the unit is still consuming a small
amount of power.
2 Select the audio source
On this unit:
“CD” ---. “BLUETOOTH” ---. “IPOD_DOCK” ---. “USB”*
^"--" (“AM”)*2 ,------- “FM” ,------- (“DAB+”)*3 ,"----}
On the remote control:
[ ]: “BLUETOOTH”
[iPod/USB]: “IPOD_DOCK” ,. “USB”*
[CD/RAD IO]: “CD” ------------. (“DAB+”)*
^"""--""" (“AM”)*
1
3
-----------. “FM”
2
(""--"""}
3 Basic playback control buttons
4 Adjust the volume (0 (min) to 50 (max))
5 Open or close the sliding door
6 Bluetooth
≥ Press to select “BLUETOOTH” as the audio source.
≥ Press and hold to enter pairing mode (l 7) or
®
-pairing button
disconnect a Bluetooth
®
device (l 8).
7 NFC touch area (l 7)
8 Port for iPhone/iPad/iPod and USB devices (l 6)
Select “USB”*1 as the audio source.
9 Remote control signal sensor
Distance: Within approx. 7 m directly in front
Angle: Approx. 30o left and right
10 Display
11 Sliding door
12 Dock for iPhone/iPod
Select “IPOD_DOCK” as the audio source.
13 Enter setup menu
14 Enter the iPhone/iPod menu /
Change the displayed information
15 Enter sound menu
16 Dim the display panel
Press again to cancel.
17 Mute the sound
Press again to cancel. “MUTE” is also cancelled when the
volume is adjusted or the unit is turned off.
18 Enter playback menu
19 Selection/OK
1
∫ Using the remote control
Insert the battery so the terminals (i and j) match those
in the remote contr ol.
Point it at the remote control signal sensor on this unit.
≥ To avoid interference, please do not put any objects in front of
signal sensor.
4
RQT9883
*1: The display will automatically change to “IPOD_PORT”
when a compatible iPhone/iPad/iPod is connected to the
port for iPhone/iPad/iPod.
*2: Only available for [SC-HC49] (Australia and New Zealand
only)
*3: Only available for [SC-HC49DB]
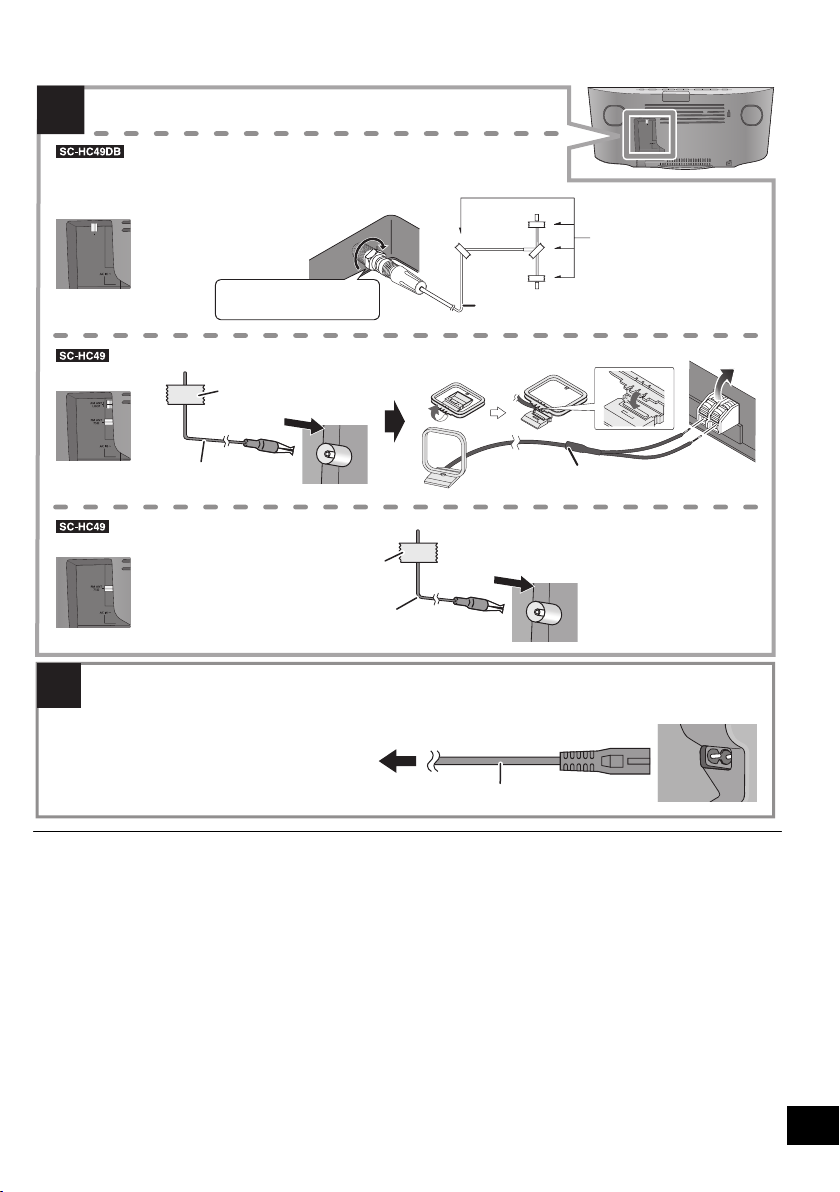
Connections
ュモャチモワヵバ
ョヮチモワヵ
ヘブ
2
1
(Asia and the Middle East only)
(Australia and New Zealand only)
DAB indoor antenna
(supplied)
Be sure to tighten the nut
fully.
Adhesive tape
(not supplied)
AM loop antenna (supplied)
Adhesive tape
(not supplied)
FM indoor antenna
(supplied)
To a mains socket
AC mains lead (supplied)
Connect the AC mains lead after all other connections are completed.
This unit consumes a small amount of AC power (l 22) even when turned off.
≥
In the interest o f energy con servation , if you will not be using this unit for an extended period o f time,
unplug it from the mains socket.
This unit can receive DAB+ and FM stations with the DAB antenna.
Connect the antenna(s).
Adhesive tape
(not supplied)
FM indoor antenna
(supplied)
ュモャチモワヵバ
ョヮチモワヵ
ヘブ
≥ These speakers do not have magnetic shielding. Do not place them near a TV, personal computer or other magnetic devices.
≥ Tape the DAB/FM antenna to a wall or column in a position with the least amount of interference.
≥ [SC-HC4 9DB] If radio reception is poor, use a DAB outdoor antenna (not supplied).
≥ [SC-HC49] If radio reception is poor, use a FM outdoor antenna with a right angle type connector (not supplied).
5
RQT9883

Inserting media
∫ Connecting an iPhone/iPod* with Lightning connector
When you connect a compatible device to the port or the dock during “USB” or
“IPOD_DOCK” mode, the selector will automatically select the corresponding source for
the device.
Press [iPod/USB] to select “IPOD_DOCK”.
To close the dock
Press and hold [PUSH CLOSE] while closing the dock.
Press [iPod/USB] to select “USB”.
The display will automatically change to “IPOD_PORT” when a compatible iPhone/
iPad/iPod is connected to the port.
≥ When connecting an iPhone/iPad/iPod, use the dedicated USB cable (not supplied).
≥ Insert the USB device directly. Do not use any USB extension cable.
≥ Please disconnect the USB device if you finish using.
≥ Before removing the USB device, select a source other than “USB”.
≥ Make sure to tilt the disc so as not to touch the sliding door.
≥ Do not open the sliding door manually.
The label side
Pad (supplied)
≥ Attach the pad before using the dock. (l 19)
Lightning
connector
∫ Inserting a CD
≥ Be sure to remove the iPhone/iPod from its case.
≥ Make sure that the iPhone/iPod is fully inserted and its back is resting against the pad.
≥ Make sure to hold the dock when removing the iPhone/iPod.
∫ Connecting an iPhone/iPad/iPod* or USB device
When you connect a compatible device to the port or the dock during “USB” or “IPOD_DOCK” mode, the
selector will automatically select the corresponding source for the device.
* Refer to “Playable media” for compatible models. (l 18)
∫ Charging an iPhone/iPad/iPod
During unit on, charging starts when an iPhone/iPad/iPod is connected to this unit.
≥ To continue charging from the USB cable connection during standby mode, make sure the iPhone/iPad/iPod has started charging
before turning the unit to standby mode.
≥ During standby mode, charging will start as usual from the Lightning connector.
≥ Check the iPhone/iPad/iPod to see if the battery is fully charged. (Once fully charged, remove the iPhone/iPad/iPod.)
≥ Make sure that the unit does not fall when inserting or removing media.
6
≥ When moving this unit, be sure to remove all media and turn this unit to standby mode.
RQT9883
Bluetooth® operations
You can listen to the sound from the Bluetooth® audio device from this unit wirelessly.
≥ Refer to the operating instructions of the Bluetooth
≥ If you intend to use an NFC (Near Field Communication)-compatible Bluetooth
Connection (Connecting by NFC)”.
®
device for details.
®
device, proceed to “One-Touch
Connecting via Bluetooth® menu
Preparation
≥ Turn on the Bluetooth
place the device near this unit.
®
feature of the device and
∫ Pairing with Bluetooth® devices
1 Press [ ] to select “BLUETOOTH”.
{. If “PAIRING” is indicated on the display, go to step 4.
To enter pairing mode*
2 Press [PLAY MENU] to select “PAIRING”.
3 Press [ 3, 4] to select “OK? YES” and then press
[OK].
To pair with a device
®
device.
®
device’s
4 Select “SC-HC49” from the Bluetooth
®
Bluetooth
{. The name of the connected device is indicated on the
menu.
display for a few seconds.
5 Start playback on the Bluetooth
* You can also enter pairing mode by pressing and holding
[ -PAIRING] on the unit.
∫ Connecting a paired Bluetooth® device
1 Press [ ] to select “BLUETOOTH”.
{. “READY” is indicated on the display.
2 Select “SC-HC49” from the Bluetooth
®
Bluetooth
{. The name of the connected device is indicated on the
menu.
display for a few seconds.
3 Start playback on the Bluetooth
≥ If prompted for the passkey, input “0000”.
≥ You can register up to 8 devices with this unit. If a 9th device
is paired, the device that has not been used the longest will
be replaced.
≥ This unit can only be connected to one device at a time.
≥ When “BLUETOOTH” is selected as the source, this unit will
automatically try and connect to the last connected
®
Bluetooth
device.
®
device.
®
device’s
One-Touch Connection
(Connecting by NFC)
For NFC-compatible AndroidTM devices only
Simply by touching an NFC (Near Field
Communication)-compatible Bluetooth
unit, you can complete all preparations, from
registering a Bluetooth
®
device to establishing a
®
device on the
connection.
Preparation
≥ Turn on the NFC feature of the device.
≥ An droid device version lower than 4.1 requires the
installation of the app “Panasonic Music Streaming”
(Free of charge).
1 Enter “Panasonic Music Streaming” in the search box of
Google Play
Music Streaming”.
2 Start the app “Panasonic Music Streaming” on the device.
– Follow on-screen instructions on your device.
– Always use the latest version of the app.
TM
to search, and then select “Panasonic
1 Press [ ] to select “BLUETOOTH”.
2 Touch and hold your device on the NFC touch area
of this unit [ ]. (l 4)
{. Once the registration and connection of the Bluetooth®
device is complete, the name of the connected device is
indicated on the display for a few seconds. Move the
device away from the unit.
≥ When the connection is not established even if your
device has touched the NFC touch area, move the
device so it can be detected.
3 Start playback on the Bluetooth
≥ If you touch another device to this unit, you can update the
≥ If the image and sound are out of sync during playback,
≥ When the connection is established, the playback may start
≥ The One-Touch Connection may not work prop erly
®
Bluetooth
be disconnected automatically.
restart the playback app you are using.
automatically depending on the type of device being used.
depending on the type of device being used.
connection. The previously connected device will
®
device.
7
RQT9883

Bluetooth® transmission mode
You can change the transmission mode to prioritise
transmission quality or sound quality.
Preparation
≥ Press [ ] to select “BLUETOOTH”.
≥ If a Bluetooth
disconnect it.
®
device is already connected,
1 Press [PLAY MENU] repeatedly to select
“LINK MO DE”.
2 Press [3, 4] to select the mode and then press
[OK].
MODE 1: Emphasis on connectivity
MODE 2: Emphasis on sound quality
≥ Select “MODE 1” if the sound is interrupted.
≥ The factory default is “MODE 2”.
Bluetooth® input level
If the sound input level from the Bluetooth® device is
too low, change the input level setting.
Preparation
≥ Connect a Bluetooth
®
device.
1 Press [PLAY MENU] repeatedly to select “INPUT
LEVEL”.
2 Press [3, 4] to select the level and then press
[OK].
“LEVEL 0”
^---------------------------------------------------------J
≥ Select “LEVEL 0” if the sound is distorted.
≥ The factory default is “LEVEL 0”.
,. “LEVEL i1” ,. “LEVEL i2”
Media playback controls
The following marks indicate the availability of the
feature.
[CD]: CD audio in CD-DA format and a CD that
[iPod]: Compatible iPhone/iPad/iPod (l 18 )
[USB]: USB devices co ntaining MP3 files (l 18)
[Bluetooth]: Connected Bluetooth
Preparation
≥ Turn the unit on.
≥ Insert the media or connect the Bluetooth
≥ Press [CD/RADIO], [iPod/USB] or [ ] to select the
audio source.
≥ When using iPhone/iPad/iPod, the operation may vary
among those models.
Play Press [1/;].
Stop Press [∫].
Pause Press [1/;].
Skip Press [:/6] or [5/9] to skip
Search During play or pause, press and hold
contains MP3 files (l 18)
Basic controls
(
[CD], [iPod], [USB], [Bluetooth])
≥ [USB]: The position is memorised and
“RESUME” is displayed.
Press again to restart play.
track.
[CD], [USB] Press [3] or [4] to skip the
MP3 album.
[:/6] or [5/9].
≥ [iPod]: Backwards search is only within the
curren t track.
®
device
®
device.
Disconnecting a Bluetooth® device
1 While a Bluetooth
Press [PLAY MENU] repeatedly to select
“DISCONNECT?”.
®
device is connected:
2 Press [3, 4] to select “OK? YES” and then press
[OK].
≥ You can also disconnect the Bluetooth® device by pressing
and holding [ -PAIRING] on the unit.
≥ The Bluetooth
audio source (e.g., “CD”) is selected.
®
device will be disconnected if a different
8
RQT9883
 Loading...