

Page 1

GS
Operating Instructions
Instrucciones de funcionamiento
Compact Stereo System
Sistema Estéreo Compacto
Model No. SC-HC1000
Thank you for purchasing this product.
Please read these instructions carefully before using this product,
and save this manual for future use.
Included Installation Instructions (l 2, 3 and 28, 29)
The installation work should be done by a qualified installation specialist.
Before commencing work, carefully read these installation instructions and the operating
instructions to ensure that installation is performed correctly.
(Please keep these instructions. You may need them when maintaining or moving this unit.)
ENGLISHESPAÑOL
Muchísimas gracias por haber adquirido este aparato.
Lea cuidadosamente estas instrucciones antes de usar este producto,
y guarde este manual para usarlo en el futuro.
Se incluyen instrucciones de instalación (l 42, 43 y 68, 69)
La instalación debe ser realizada por un especialista calificado.
Antes de comenzar la instalación, lea cuidadosamente estas instrucciones de instalación y el
manual de instrucciones para asegurarse de que la instalación se realice correctamente.
(Conserve estas instrucciones. Puede necesitarlas al momento de realizar mantenimiento o trasladar esta unidad)
TQBJ2036-1
Page 2

Safety precautions
WARNING
Unit
≥ To reduce the risk of fire, electric shock or product damage,
– Do not expose this unit to rain, moisture, dripping or
splashing.
– Do not place objects filled with liquids, such as vases, on
this unit.
– Use only the recommended accessories.
– Do not remove covers.
– Do not repair this unit by yourself. Refer servicing to
qualified service personnel.
– Do not let metal objects fall inside this unit.
– Do not place heavy items on this unit.
AC mains lead
≥ To reduce the risk of fire, electric shock or product damage,
– Ensure that the power supply voltage corresponds to the
voltage printed on this unit.
– Insert the mains plug fully into the socket outlet.
– Do not pull, bend, or place heavy items on the lead.
– Do not handle the plug with wet hands.
– Hold onto the mains plug body when disconnecting the
plug.
– Do not use a damaged mains plug or socket outlet.
≥ The mains plug is the disconnecting device.
Install this unit so that the mains plug can be unplugged from
the socket outlet immediately.
CAUTION
Unit
≥ This unit utilizes a laser. Use of controls or adjustments or
performance of procedures other than those specified herein
may result in hazardous radiation exposure.
≥ Do not place sources of naked flames, such as lighted
candles, on this unit.
≥ This unit may receive radio interference caused by mobile
telephones during use. If such interference occurs, please
increase separation between this unit and the mobile
telephone.
For Latin America
≥ This unit is intended for use in moderate climates.
For others
≥ This unit is intended for use in moderate and tropical
climates.
Placement
≥ Place this unit on an even surface.
≥ To reduce the risk of fire, electric shock or product damage,
– Do not install or place this unit in a bookcase, built-in
cabinet or in another confined space. Ensure this unit is
well ventilated.
– Do not obstruct this unit’s ventilation openings with
newspapers, tablecloths, curtains, and similar items.
– Do not expose this unit to direct sunlight, high
temperatures, high humidity, and excessive vibration.
Battery
≥ Danger of explosion if battery is incorrectly replaced.
Replace only with the type recommended by the
manufacturer.
≥ Mishandling of batteries can cause electrolyte leakage and
may cause a fire.
– Remove the battery if you do not intend to use the remote
control for a long period of time. Store in a cool, dark
place.
– Do not heat or expose to flame.
– Do not leave the battery(ies) in a car exposed to direct
sunlight for a long period of time with doors and windows
closed.
– Do not take apart or short circuit.
– Do not recharge alkaline or manganese batteries.
– Do not use batteries if the covering has been peeled off.
≥ When disposing of the batteries, please contact your local
authorities or dealer and ask for the correct method of
disposal.
For Thailand
This telecommunication equipment conforms to NTC/NBTC
technical requirement.
2
TQBJ2036
Page 3
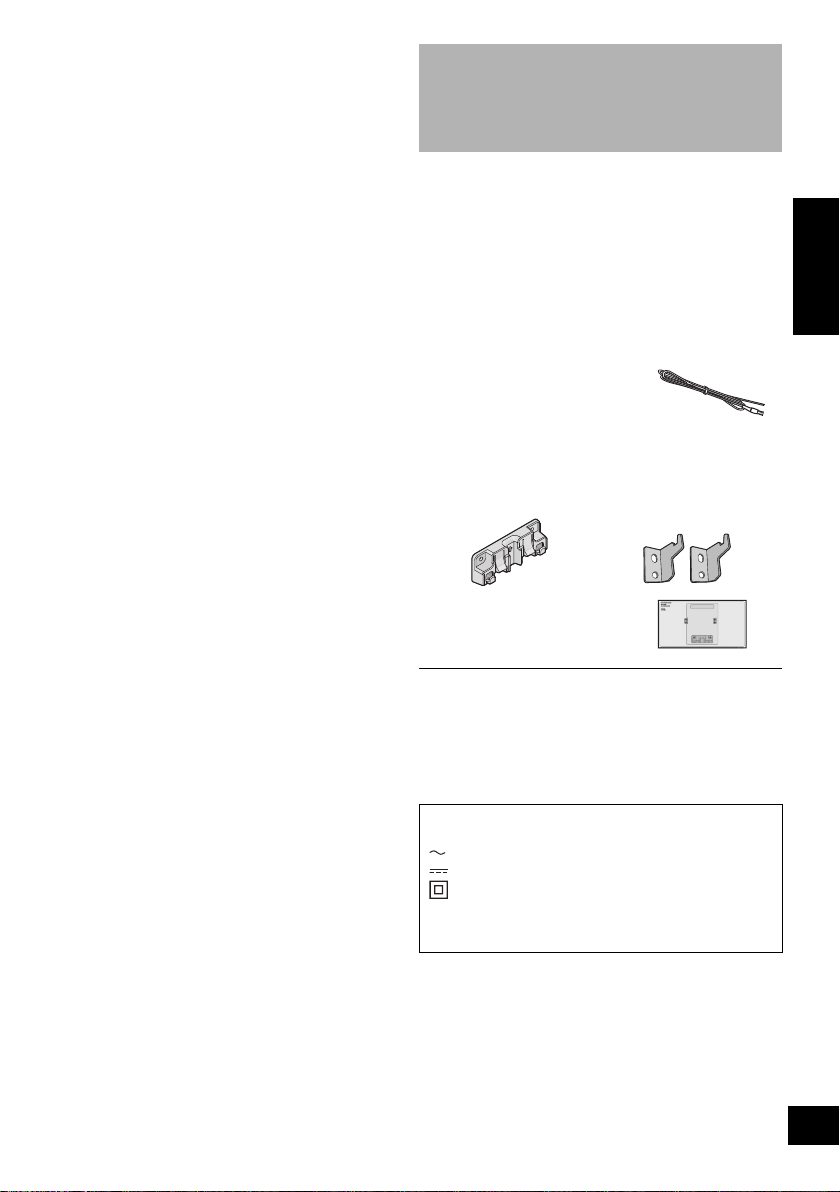
Table of contents
Safety precautions............................................ 2
Accessories....................................................... 3
Control reference guide ................................... 4
Using the remote control ................................. 5
Connections ...................................................... 6
Inserting media .................................................7
Network settings............................................... 8
Streaming music over the network ............... 11
Bluetooth
About Bluetooth
Media playback controls ................................ 16
Listening to FM radio ..................................... 18
Sound adjustment .......................................... 19
Clock and Timer.............................................. 19
Firmware updates ........................................... 20
Others .............................................................. 21
Troubleshooting.............................................. 23
Licenses .......................................................... 25
Unit and media care........................................ 26
Playable media................................................ 26
Specifications..................................................27
Attaching the unit to a wall (optional)........... 28
Useful Information (For Customers in Latin
America) .......................................................... 41
®
operations .................................... 14
®
............................................ 15
About descriptions in these operating
instructions
≥ Pages to be referred to are indicated as “l ±±”.
≥ Unless otherwise indicated, operations are described using
the remote control. You can also use the controls on this
unit if they are the same.
Accessories
Check the supplied accessories before using this unit.
∏ 1 Remote control
(N2QAYB001139)
∏ 1 Battery for remote control
∏ 2 AC mains leads
∏ 1 FM indoor antenna
∏ 1 AC plug adaptor
Wall mounting accessories
∏ 1 Safety holder
∏ 1 Wall mounting sheet
≥ Use this sheet for wall mounting.
(l 28)
∏ 2 Wall mount
brackets
ENGLISH
≥ Do not use AC mains lead with other equipment.
≥ Product numbers provided in these operating instructions are
correct as of January 2017. These may be subject to change.
≥ Please use the supplied AC mains lead suitable for the
household mains socket.
The symbols on this product (including the
accessories) represent the following:
AC
DC
Class II equipment (The construction of the
product is double-insulated.)
IOn
Í Standby
TQBJ2036
3
Page 4
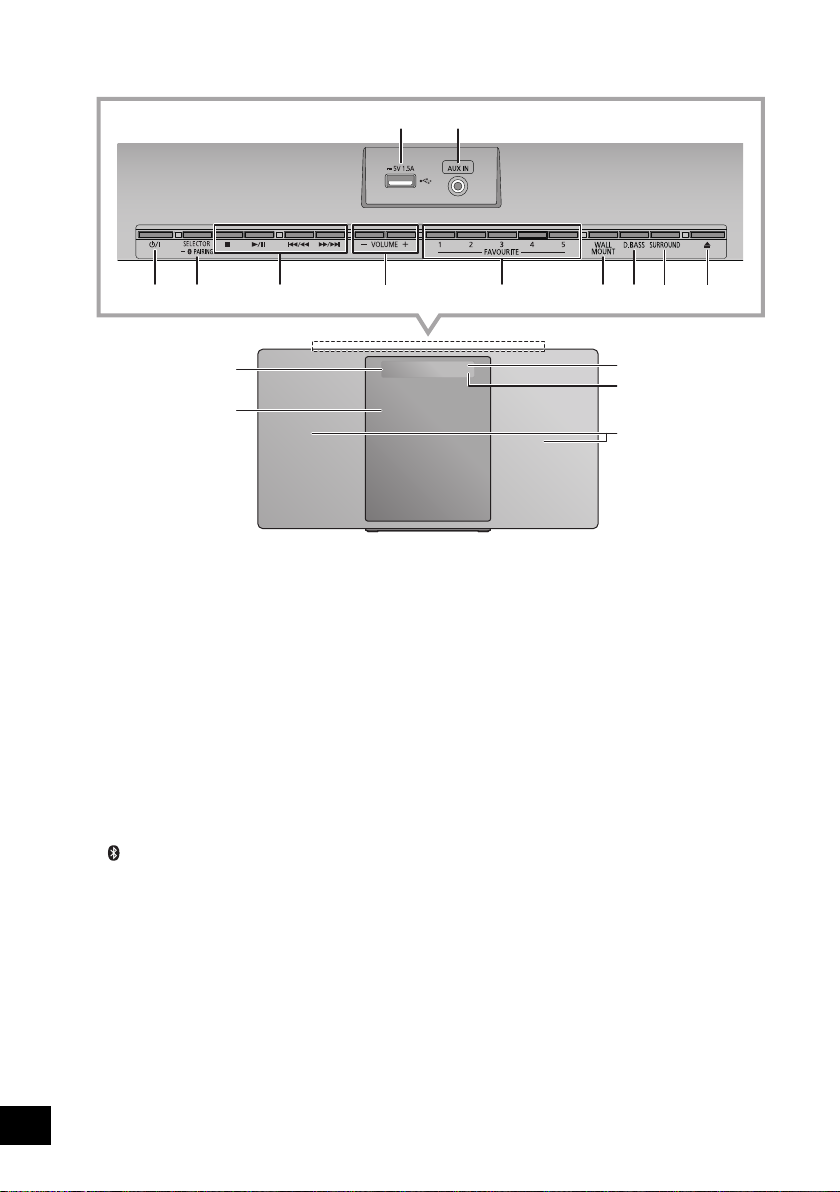
Control reference guide
Top view
12
53 64
12
13
1 USB port (l 7)
2 AUX IN jack (l 6)
3 Standby/on switch (Í/I)
Press to switch the unit from on to standby mode or vice
versa. In standby mode, the unit is still consuming a small
amount of power.
4 Select the audio source
On this unit:
“CD” ---------------------. “FM” --------------------. “AUX”
:;
“NETWORK” (--- “BLUETOOTH” (--- “USB”
≥ Press and hold to enter pairing mode (l 14) or
disconnect a Bluetooth
On the remote control:
[ ]: “BLUETOOTH”
[CD/USB]: “CD” ,. “USB”
[RADIO, EXT-IN]: “FM” -------------------. “AUX”
®
device (l 15).
^" “NETWORK”(}
5 Basic playback control buttons
78910 11
14
15
16
6 Adjust the volume (0 (min) to 50 (max))
7 FAVOURITE buttons for storing or selecting radio
station ([1] to [5]) (l 13, 18)
8 Set wall mount mode
9 Select D.BASS
10 Adjust surround
11 Open or close the sliding door
12 Display
13 Sliding door
14 Remote control signal sensor
Distance: Within approx. 7 m directly in front
Angle: Approx. 30o left and right
15 Network indicator
16 Speakers
These speakers do not have magnetic shielding. Do not
place them near a TV, personal computer or other
magnetic devices.
4
TQBJ2036
Page 5
EXT-IN
17
18
19
4
5
9
21
20
22
23
24
6
25
27
28
26
29
30
7
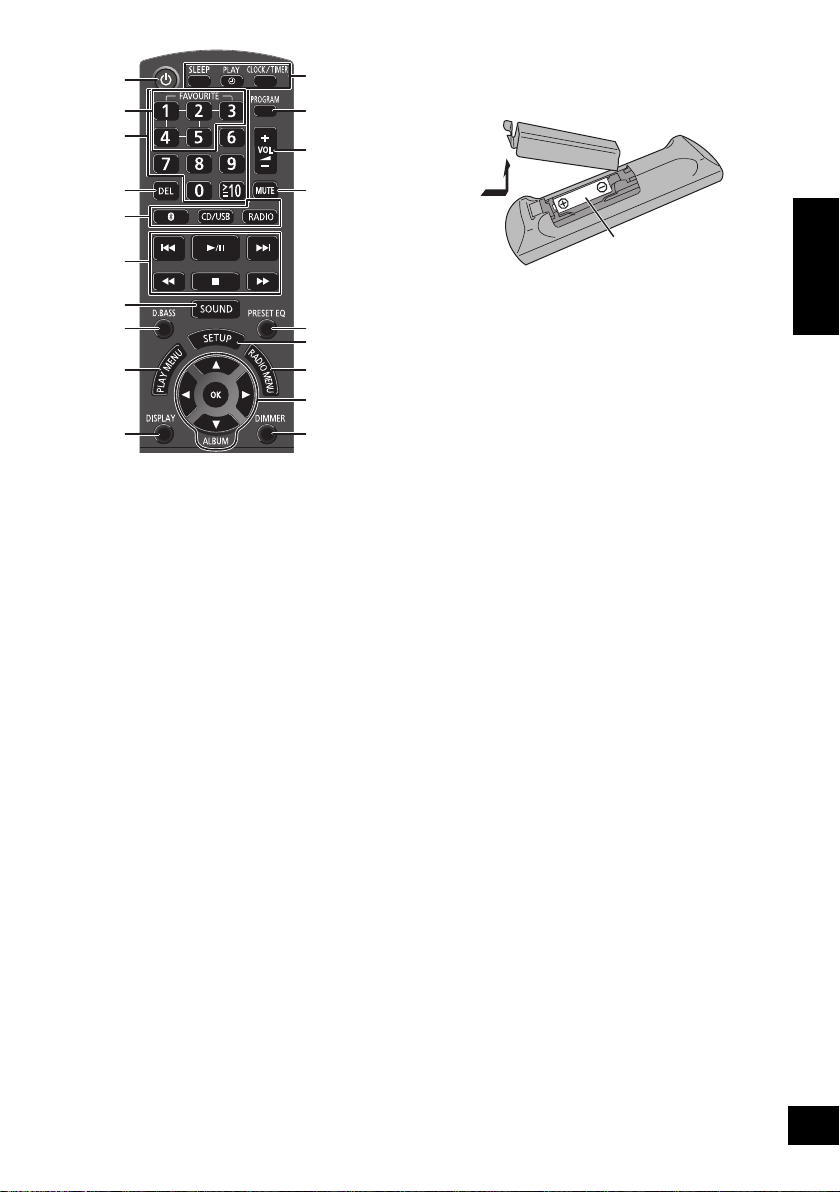
(Alkaline or manganese
battery)
Using the remote control
Insert the battery so the terminals (i and j) match
those in the remote control.
R6/LR6, AA
17 Turn the unit on or off
18 Select number
≥ To select a 2-digit number
Example: 16: [S10]
≥ To select a 3-digit number
Example: 124: [S10]
> [1] > [6]
> [S10] >[1] > [2]> [4]
19 Delete a programmed track
20 Enter sound menu
21 Set the play menu item
22 Change the displayed information
23 Clock and timer operation
24 Set the programme function
25 Mute the sound
Press again to cancel. “MUTE” is also cancelled when the
volume is adjusted or the unit is turned off.
26 Select preset EQ
27 Enter setup menu
28 Set the radio menu item
29 Selection/OK
30 Dim the display panel and indicator
Press again to cancel.
Point it at the remote control signal sensor on this unit.
≥ To avoid interference, please do not put any objects in front
of signal sensor.
ENGLISH
5
TQBJ2036
Page 6
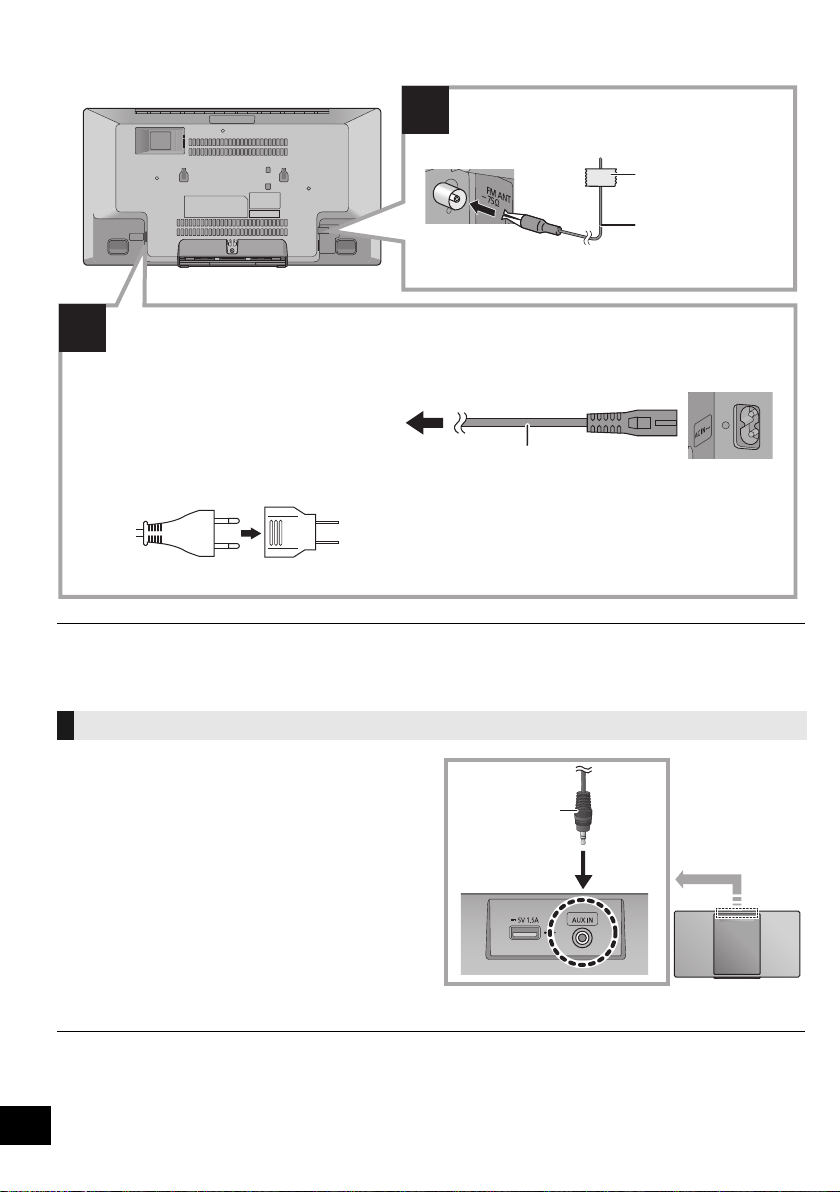
Connections
1
2
Connect the antenna.
Adhesive tape
(not supplied)
FM indoor antenna
(supplied)
To a mains socket
AC mains lead (supplied)
Connect the AC mains lead after all other connections are completed.
This unit consumes a small amount of AC power (l 27) even when turned off.
≥ In the interest of energy conservation, if you will not be using this unit for an extended period of time,
unplug it from the mains socket.
≥ Some settings will be lost after you disconnect the system. You have to set them again.
If the power plug does not fit your socket, use the supplied power plug adaptor.
Do not use any other AC mains lead except the supplied one.
Audio cable
(not supplied)
≥ Tape the antenna to a wall or column in a position with the least amount of interference.
≥ If radio reception is poor, use a FM outdoor antenna (not supplied).
Connect an external music device
1 Connect an external music device using an audio
cable (not supplied).
≥ Plug type: ‰3.5 mm stereo
2 Press [RADIO, EXT-IN] repeatedly to select “AUX”
and start playback on the connected device.
∫ To select the sound input level of the
external device
1 While in AUX mode, press [SOUND] repeatedly to
select “INPUT LEVEL”.
2 Press [2, 1] to select “NORMAL” or “HIGH” and
then press [OK].
≥ The factory default is “NORMAL”.
≥ To improve sound distortion when “HIGH” is selected, select “NORMAL”.
≥ Switch the equalizer off or turn the volume of the external device down to reduce the input signal. High level of input signal will
distort the sound.
≥ For details, refer to the operating instructions of the device.
6
TQBJ2036
Page 7
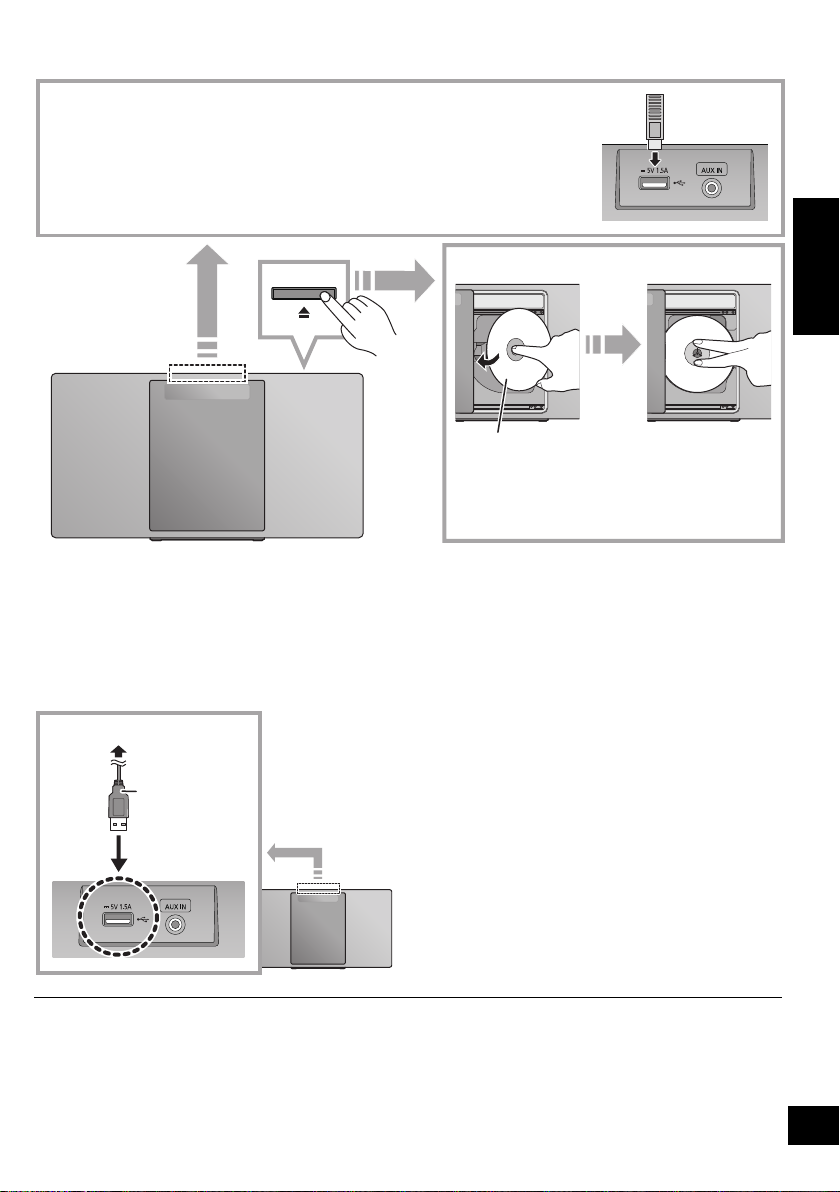
Inserting media
≥ Make sure to tilt the disc so as not to touch the sliding
door.
≥ Do not open the sliding door manually.
The label side
∫ Connecting a USB device
≥ Insert the USB device directly. Do not use any USB extension cable.
≥ Please disconnect the USB device if you finish using.
≥ Before removing the USB device, select a source other than “USB”.
∫ Inserting a CD
USB cable
(not supplied)
To the compatible device
∫ Charging a device
Charging starts when a device (rated value: 5 V/1.5 A) is connected to the USB port of this unit.
ENGLISH
1 Turn the unit on.
2 Connect a device.
{. Confirm from the screen of the connected device, etc. to
make sure charging has started.
≥ Make sure that the unit does not fall when inserting or removing media.
≥ When moving this unit, be sure to remove all media and turn this unit to standby mode.
≥ A cable compatible with your device is required. Use the
cable that comes with your device.
≥ Even if you connect a cable compatible with the USB port of
this unit, your device may not be charged. In that case, use
the charger that comes with the device.
≥ Depending on your device, using other chargers may not
work. Check the operating instructions of your device before
use.
≥ Do not connect a device with a rated value higher than 5 V/
1.5 A to this unit.
≥ To check if charging is complete, look at the screen of the
connected device, etc.
≥ Once fully charged, remove the USB cable from the USB
port.
≥ After the device has started charging, you can turn the unit to
standby mode.
– When charging a depleted device, do not turn the unit to
standby mode until the device becomes operational.
7
TQBJ2036
Page 8
Network settings
Wireless LAN connection
Method 1: “Using the app “Panasonic Music
Streaming”” (l right)
• You can make the wireless network settings with
the app, “Panasonic Music Streaming” (free of
charge).
Method 2: “Using an Internet browser” (l 9)
• You can access this unit’s network settings from
the Internet browser on your smartphone or PC,
etc.
Method 3: “Using WPS (Wi-Fi Protected
Setup
TM
)” (l 10)
• If your wireless router supports WPS, you can set
up a connection by either pressing the WPS
button, or entering the WPS PIN code.
Wired LAN connection
Method 4: “Using a LAN cable” (l 10)
• You can make a stable connection to the network
with a LAN cable.
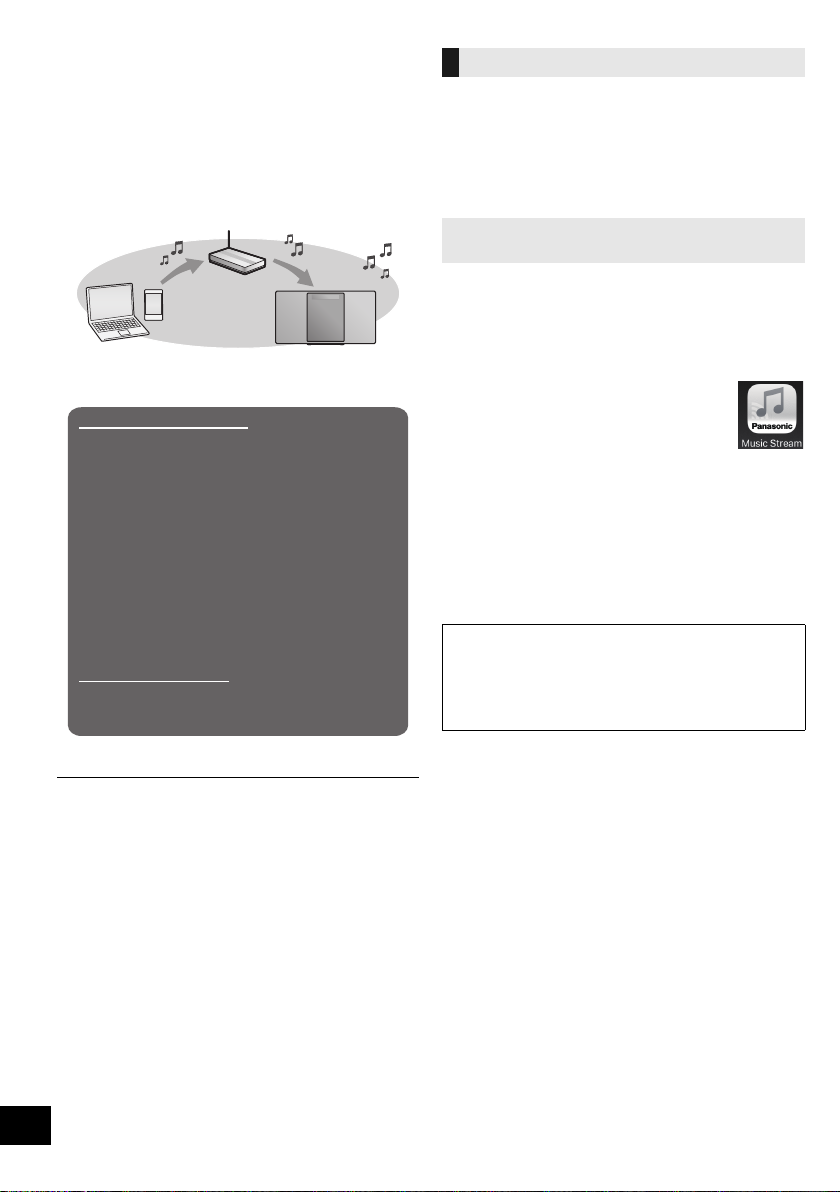
You can stream music from an iOS device (iPhone/
iPad/iPod), an AndroidTM device or a PC (Windows) to
this system’s speakers by using the Qualcomm®
AllPlayTM smart media platform. To use these features,
this system must join the same network as the
compatible device.
Qualcomm® AllPlayTM is a product of Qualcomm Technologies, Inc.
≥ Please update the system’s firmware after the
network settings are complete. (l 20)
Choose a network setting method from the
following.
Wireless LAN connection
This system has built-in Wi-Fi® and can be connected
to a wireless router.
Preparation
≥ Place this system as close to the wireless router as
possible.
≥ Do not connect a LAN cable. Doing so will disable
the Wi-Fi® function.
Method 1:
Using the app “Panasonic Music Streaming”
You can also refer to the supplied “Wi-Fi® QUICK
SETUP GUIDE”.
1 Download the app “Panasonic Music Streaming”
(free of charge) on your smartphone/tablet.
(Always use the latest version of the app.)
≥ [iOS] : App Store
≥ [Android] : Google Play
TM
2 Start the app and follow the on-screen
instructions.
3 Check that the connection has completed.
≥ On the unit’s display, “SUCCESS” appears when the
connection is established. (The network indicator (l 4)
lights up.)
– If “FAIL” is displayed press [OK], check the network
name (SSID) and the password, and then try the
setting again.
The operations and on-screen display items, etc. of
the app “Panasonic Music Streaming” are subject to
change.
For the latest information, visit
http://panasonic.jp/support/global/cs/audio/app/
(This site is in English only.)
≥ The setting will be cancelled after the set time limit. In that
case, try the setting again.
To cancel this setting in the middle, press [∫].
8
TQBJ2036
Page 9
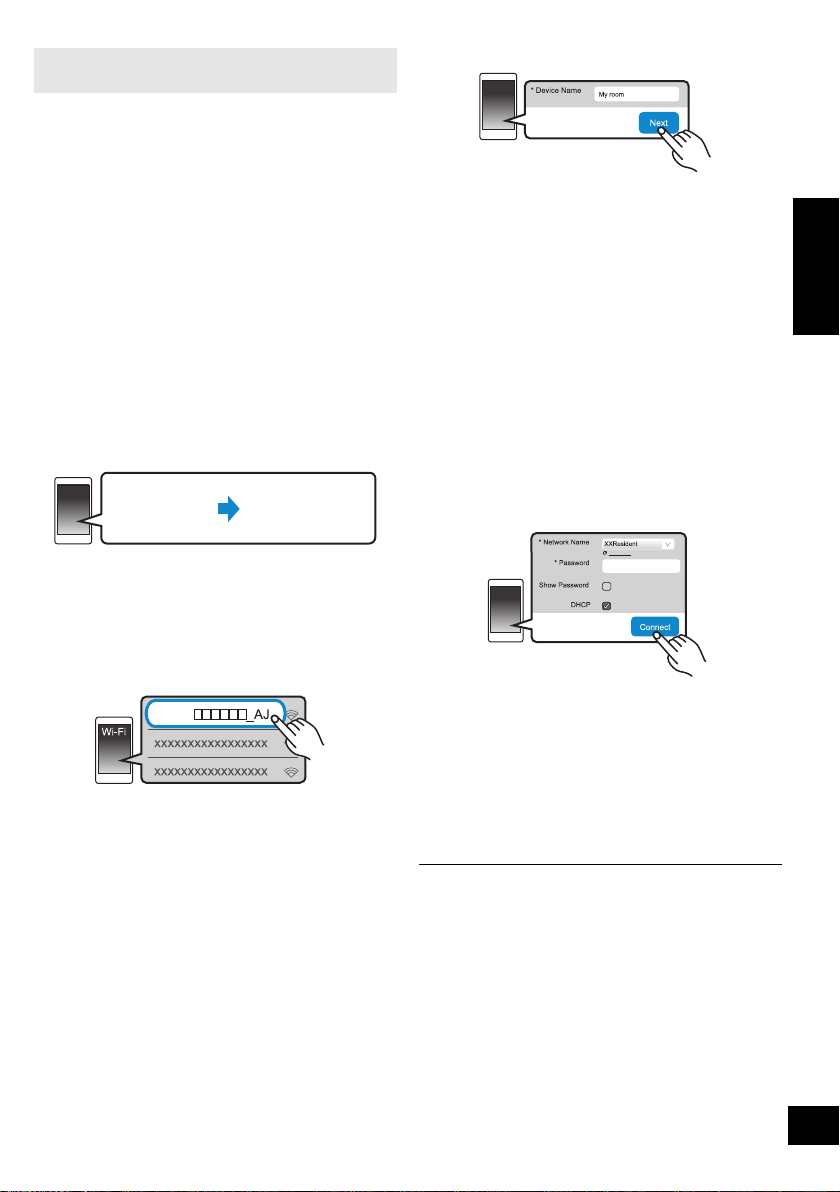
Method 2:
Settings
Wi-Fi settings
●●●●●●●●
Refresh list
Using an Internet browser
≥
The following explanations are based on a smartphone.
1 Turn this system on.
2 Press [RADIO, EXT-IN] on the remote control
repeatedly to select “NETWORK”.
3 To enter “SETTING” mode
1 Press [SETUP] on the remote control repeatedly to
select “NET SETUP” and then press [OK].
2Press [2, 1] on the remote control to select
“MANUAL” and then press [OK].
3Press [2, 1] on the remote control to select
“OK? YES” and then press [OK].
≥ After pressing [OK] to confirm “OK? YES”, the
previous network connection you have set with this
unit will be cleared.
≥ Alternatively, while pressing and holding down [<] on
the unit, press and hold down [1/;] on the unit for at
least 4 seconds.
“SETTING” blinks on the display.
4 Go to Wi-Fi settings on your compatible device.
5 Select “HC1000 _AJ” to connect to this
system.
≥ “ ” stands for a character that is unique to each set.
≥ This can take up to 1 minute to appear in your Wi-Fi list.
≥ If this operation does not work correctly, please repeat it
several times.
≥ Make sure that DHCP is enabled for the network setting
on your compatible device.
HC1000
About the network setting page:
iOS device: The settings page will be automatically
displayed in the Internet browser.
Except the iOS device: Swipe down the device’s
notification bar to check for “Sign in to Wi-Fi network”
notification and tap on it to display the settings page.
≥ If there is no notification, open the Internet browser and
refresh the page to display the settings page. If the
settings page is not displayed, type
“http://172.19.42.1/” into the URL address field.
6 Type a device name and then select “Next”.
≥ The device name will be displayed as this system’s
name on the network.
≥ Maximum characters that can be shown: 32
≥ Emoji characters are not supported.
≥ The device name is set when “Next” is selected.
≥ You can also change the device name after the network
connection is set up. (l 11, “To make network-related
settings”)
7
Select your network name (SSID) and type the password.
≥ Check the wireless router for the network name (SSID)
and the password.
≥ A list of network names (SSIDs) will be appeared when
you select the “Network Name” box.
≥ To show the characters typed in the “Password” box,
select “Show Password”.
≥ If your network requires specific settings, deselect
“DHCP” to disable DHCP.
– You can use specific IP address, subnet mask,
default gateway, primary DNS, etc.
≥ To update the network name (SSID) list, select “Refresh
list”.
8 Select “Connect” to apply the settings.
≥ On the unit’s display, “SUCCESS” appears when the
connection is established. (The network indicator (l 4)
lights up.)
– If “FAIL” is displayed press [OK], check the network
name (SSID) and the password, and then try the
setting again.
≥ Depending on the device, the connection complete
screen may not be displayed.
9 Make sure to connect your compatible device back
to your home wireless network.
≥ Enable Java and Cookies in your browser settings.
ENGLISH
9
TQBJ2036
Page 10
Method 3:
e.g.,
LAN cable
(not supplied)
Broadband router, etc.
e.g.,
Using WPS (Wi-Fi Protected Setup
A compatible wireless router may have the WPS
identifier mark.
1 Turn this system on.
2 Press [RADIO, EXT-IN] on the remote control
repeatedly to select “NETWORK”.
3 To enter “WPS PUSH” mode
1 Press [SETUP] on the remote control repeatedly to
select “NET SETUP” and then press [OK].
“WPS PUSH” is indicated on the display.
2Press [OK].
3Press [2, 1] on the remote control to select “OK?
YES” and then press [OK].
≥ Alternatively, while pressing and holding down [<] on
the unit, press and hold down [5/9] on the unit for
at least 4 seconds.
≥
If the unit is already connected to a wireless LAN network,
“NETWORK INITIALIZING” is displayed for about 1 minute.
“WPS” flashes on the display.
4 Activate the WPS button on the wireless router.
≥ On the unit’s display, “SUCCESS” appears when the
connection is established. (The network indicator (l 4)
lights up.)
– “FAIL” may be displayed if the connection was not
made within the set time limit. Press [OK]. Try the
setting again. If “FAIL” is still displayed, try other
methods.
∫ Using the WPS PIN code
1 Turn this system on.
2 Press [RADIO, EXT-IN] on the remote control
repeatedly to select “NETWORK”.
3 To enter “WPS PIN” mode
1 Press [SETUP] on the remote control repeatedly to
select “NET SETUP” and then press [OK].
2Press [2, 1] on the remote control to select “WPS
PIN” and then press [OK].
≥ Alternatively, while pressing and holding down [<] on
the unit, press and hold [:/6] on the unit for at
least 4 seconds.
≥
If the unit is already connected to a wireless LAN network,
“NETWORK INITIALIZING” is displayed for about 1 minute.
The PIN code is indicated on the display.
4 Enter the PIN code into the wireless router.
≥ Once the system enters WPS PIN code mode, you cannot
set up using the WPS button. To use the WPS button, turn
the system off and then on, and redo the network settings.
≥ Depending on a router, other connected devices may
temporarily lose their connection.
10
≥
For details, refer to the operating instructions of the wireless router.
TQBJ2036
TM
)
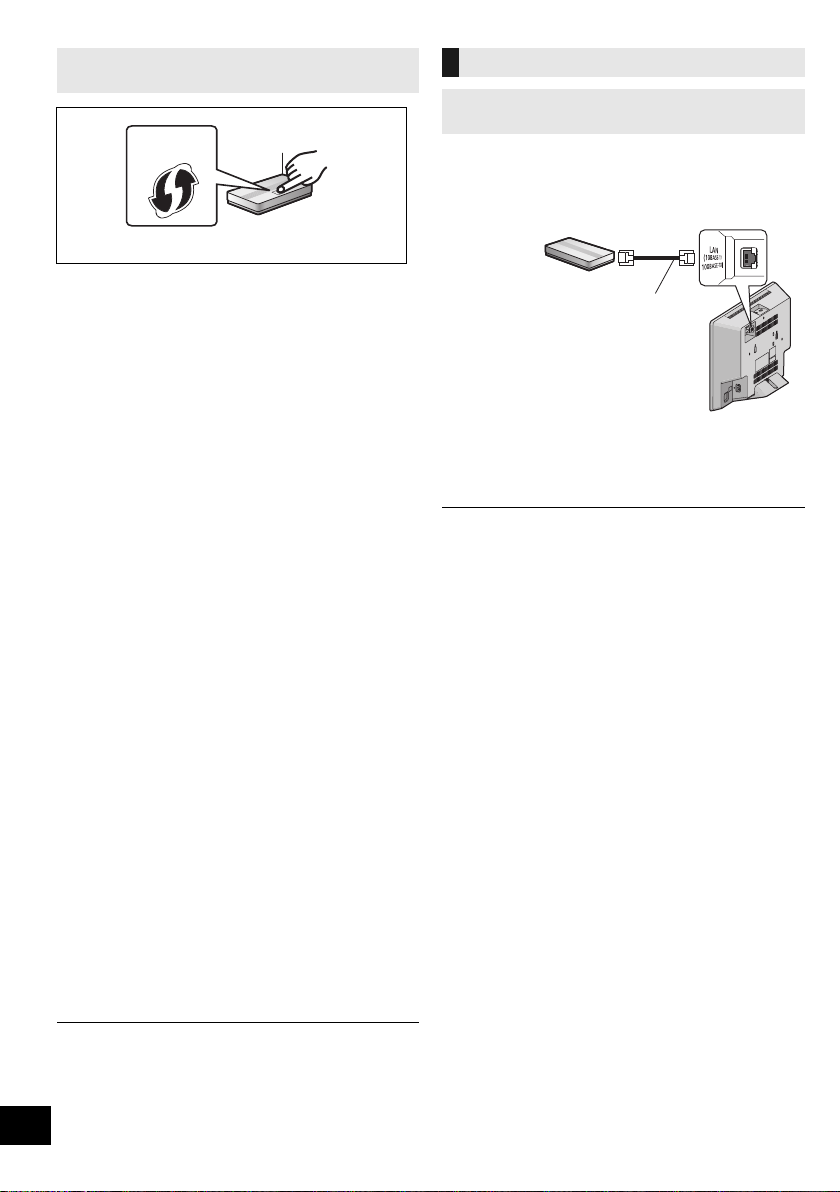
Wired LAN connection
Method 4:
Using a LAN cable
1 Disconnect the AC mains lead.
2 Connect the unit to a broadband router, etc. using
a LAN cable.
3 Connect the AC mains lead to the unit and turn
this system on.
≥ When the connection is established, the network
indicator (l 4) lights up.
≥ Use category 5 or above straight LAN cables (STP) when
connecting to peripheral devices.
≥ The LAN cable must be connected or disconnected while the
AC mains lead is disconnected.
≥ Inserting any cable other than a LAN cable in the LAN port
can damage the system.
≥ If the LAN cable is disconnected, the network-related
settings (l 11) will be initialized. In that case, make the
settings again.
≥ When a LAN cable is connected, the Wi-Fi function will be
disabled.
Page 11

To make network-related settings
You can change this system’s name on the network,
and use specific IP address, subnet mask, default
gateway, primary DNS, etc.
You can also change the name of this system by
changing a setting in the app “Panasonic Music
Streaming” (l right). For details on the app, refer to
the site below.
http://panasonic.jp/support/global/cs/audio/app/
(This site is in English only.)
Preparation
≥ Complete the network settings. (l 8)
≥ Connect your device to the same network as this
system.
≥ Check this system’s IP address (l 22), and note it
down.
1 Start an Internet browser on your device and then
type this system’s IP address into the address field
to display the settings page.
≥ It may take a few minutes until the settings page is
displayed depending on the environment. In that case,
reload the browser.
≥ If the unit is connected with Wi-Fi, only a device name
can be changed. Close the settings page after changing
the device name.
– To change the device name, select “Change”, and
type a new device name, and then select “Apply”.
2 Type a device name and then select “Next”.
≥ Refer to the step 6 of “Using an Internet browser” (l 9)
for details on a device name.
3 Select and input the details.
≥ If your network requires specific settings, deselect
“DHCP” to disable DHCP.
– You can use specific IP address, subnet mask,
default gateway, primary DNS, etc.
4 Select “Connect” to apply the settings.
≥ When the connection is established, “SUCCESS”
appears on the unit’s display.
Streaming music over the
network
You can stream music from your devices or online
music services to this system’s speakers and other
speakers powered by AllPlay.
You can also stream music source of this system to
other speakers powered by AllPlay.
Streaming music on network
devices
You can use the AllPlay function to stream music from
the device on the network to this system’s speakers by
using the app “Panasonic Music Streaming” (free of
charge), etc.
≥
[iOS]
: App Store
≥
[Android]
: Google Play
The operations and on-screen display items, etc. of the app
“Panasonic Music Streaming” are subject to change.
For the latest information, visit
http://panasonic.jp/support/global/cs/audio/app/
More apps are available. For details, visit
www.panasonic.com/global/consumer/homeav/
allseries/service
(These sites are in English only.)
Preparation
≥ Complete the network settings. (l 8)
≥ Connect the following devices to the same network
as this system.
– Device with “Panasonic Music Streaming”, etc.
installed
– Device containing music
The following steps are based on “Panasonic Music
Streaming”.
TM
1 Turn this system on.
≥ Check that the network indicator (l 4) lights up.
≥ If it does not light up, check the network settings. (l 8)
2 Start the app “Panasonic Music Streaming”.
≥ Always use the latest version of the app.
3 From “Speaker”, select this system as the output
speakers.
≥ If you have multiple speakers powered by AllPlay, you
can enjoy synchronised sound from them.
To group speakers, drag e.g., “ ” of the desired
speakers over each other.
– You can also play different songs on other speakers
powered by AllPlay at the same time.
– The number of speakers powered by AllPlay that can
perform playback at the same time differs depending
on the situation of use.
– When you turn off one of the speakers powered by
AllPlay, other speakers in the same group may stop
the playback.
4 Select a music source.
5 Select a song.
ENGLISH
11
TQBJ2036
Page 12
≥ This system will be displayed as “Panasonic HC1000” if the
device name is not set.
≥ When playing back music from the DLNA server (PC with
Windows 7 or later installed, smartphone, Network Attached
Storage (NAS) device, etc.), add the contents and folder to
the libraries of the Windows Media
or the NAS device, etc.
≥ Playlist of Windows Media
contents that are stored in the libraries.
≥ About supported format, refer to “Specifications” (l 27).
– File formats that are not supported by your DLNA server
cannot be played.
≥ Depending on the contents and the connected equipment,
playback may not be performed properly.
≥ Ensure to stop playback on your device before turning it off.
®
Player, the smartphone,
®
Player can play back only the
Streaming online music
This system is compatible with several online music
services.
Visit the following website for the compatibility
information.
www.panasonic.com/global/consumer/homeav/
allseries/service
Preparation
≥ Make sure that the network is connected to the
Internet.
≥ Connect a device with a compatible app installed to
the same network as this system.
1 Turn this system on.
≥ Check that the network indicator (l 4) lights up.
≥ If it does not light up, check the network settings. (l 8)
2 Start the app, and select a song to playback.
∫ Using Spotify
You will need Spotify Premium. For details, visit the
following website.
www.spotify.com/connect/
After step 2
3 Select the square image of the song’s cover art in
the bottom left of the playback screen.
4 From “ ”, select this system as the output
speakers.
≥ To enjoy synchronised sound from the multiple
speakers powered by AllPlay, you need to group the
speakers using the app “Panasonic Music Streaming”.
(l 11 )
∫
Using online music services other than Spotify
After step 2
3
From “ ”, select this system as the output speakers.
≥ Depending on the service, you might need to open full
screen player to display “ ”.
≥ If you have multiple speakers powered by AllPlay, you
can enjoy synchronised sound from them. Select
“Group” and then select the speakers to group.
12
TQBJ2036
≥ This system will be displayed as “Panasonic HC1000” if the
device name is not set.
≥ Registration/subscription is required.
≥ Fees may apply.
≥ Services, icons, and specifications are subject to change.
≥ For details, visit the individual music service’s website.
Page 13

Streaming music on this system Storing stations under (FAVOURITE)
You can use the app “Panasonic Music Streaming”
(l 11) to stream this system’s music source (radio/CD/
Bluetooth®/AUX/USB source) to other speakers
powered by AllPlay.
Preparation
≥ Complete the network settings. (l 8)
≥ Prepare the desired audio source on this system
(e.g. insert a CD, etc.)
≥ Install the app “Panasonic Music Streaming” on your
device.
≥ Connect your device and your speakers powered by
AllPlay to the same network as this system.
1 Turn this system on.
≥
Check that the network indicator
≥ If it does not light up, check the network settings. (l 8)
(l 4
) lights up.
2 Start the app “Panasonic Music Streaming”.
≥ Always use the latest version of the app.
3 From “Speaker”, select the speaker to stream this
system’s audio.
≥ To stream this system’s audio to other speakers
powered by AllPlay, drag e.g., “ ” of the desired
speakers over each other.
4 Select your desired music source from the list.
5 Select this system.
The device will start to read the selected music
source’s information from this system.
≥ This system will change to the selector mode for the
selected music source.
≥ The speaker selected in step 3 and this system will be
automatically grouped together.
≥ Depending on the selected music source, playback may
start. If a content list appears on your device, select the
desired content to start playback.
≥ The number of speakers powered by AllPlay that can
perform playback at the same time differs depending on
the situation of use.
≥ When you turn off one of the speakers powered by
AllPlay, other speakers in the same group may stop the
playback.
≥ This system will be displayed as “Panasonic HC1000” if the
device name is not set.
≥ When enjoying video contents with this function, the video
and audio output may not be synchronised.
[1] to [5]
(Only when playback using internet
radio app)
This unit is compatible with the Qualcomm® AllPlayTM
Radio powered by TuneIn.
You can preset stations when playback using
internet radio app “AllPlay Radio”.
Qualcomm
product of Qualcomm Technologies, Inc.
You can store up to 5 stations under (FAVOURITE) [1]
to [5].
≥ A station previously stored is overwritten when
another station is stored under the same
(FAVOURITE) [1] to [5].
Preparation
≥ Make sure that the network is connected to the
Internet.
≥ Connect a device with an “AllPlay Radio” app
installed to the same network as this system.
®
AllPlayTM Radio powered by TuneIn is a
1 Turn this system on.
≥ Check that the network indicator (l 4) lights up.
≥ If it does not light up, check the network settings. (l 8)
2 Start the app “AllPlay Radio”, and select a station
to playback.
≥ Always use the latest version of the app.
3 Press and hold one of [1] to [5] until “P ” appears
on the display.
(“ ” stands for a number.)
∫ Listening to a stored station
Press one of [1] to [5].
≥ If the selected preset channel has not been preset, “NO
PRESET” is displayed.
ENGLISH
13
TQBJ2036
Page 14

Bluetooth® operations
You can listen to the sound from the Bluetooth® audio
device from this unit wirelessly.
≥ Refer to the operating instructions of the Bluetooth®
device for details.
Connecting via Bluetooth® menu
Preparation
≥ Turn on the Bluetooth® feature of the device and
place the device near this unit.
∫ Pairing with Bluetooth® devices
1 Press [ ] to select “BLUETOOTH”.
≥ If “PAIRING” is indicated on the display, go to step 3.
2 Press [PLAY MENU] to select “PAIRING” and then
press [OK].
≥
Alternatively, press and hold [SELECTOR,sPAIRING]
on the unit.
®
device.
®
device’s
3 Select “SC-HC1000” from the Bluetooth
Bluetooth® menu.
≥ The MAC address (e.g., 6C:5A:B5:B3:1D:0F) may be
displayed before “SC-HC1000” is displayed.
≥ The name of the connected device is indicated on the
display for a few seconds.
4 Start playback on the Bluetooth
∫ Connecting a paired Bluetooth® device
1 Press [ ] to select “BLUETOOTH”.
≥ “READY” is indicated on the display.
2 Select “SC-HC1000” from the Bluetooth
Bluetooth® menu.
≥ The name of the connected device is indicated on the
display for a few seconds.
3 Start playback on the Bluetooth
®
device.
®
device’s
Bluetooth® transmission mode
You can change the transmission mode to prioritise
transmission quality or sound quality.
Preparation
≥ Press [ ] to select “BLUETOOTH”.
≥ If a Bluetooth® device is already connected,
disconnect it.
1 Press [PLAY MENU] repeatedly to select
“LINK MODE”.
2 Press [2, 1] to select the mode and then press
[OK].
MODE 1: Emphasis on connectivity
MODE 2: Emphasis on sound quality
≥ Select “MODE 1” if the sound is interrupted.
≥ When enjoying video contents with this function, the video
and audio output may not be synchronised. In this case,
select “MODE 1”.
≥ The factory default is “MODE 2”.
≥ If prompted for the passkey, input “0000”.
≥ You can register up to 8 devices with this unit. If a 9th device
is paired, the device that has not been used the longest will
be replaced.
≥ This unit can only be connected to one device at a time.
≥ When “BLUETOOTH” is selected as the source, this unit will
automatically try and connect to the last connected
®
Bluetooth
during this process.) If the connection attempt fails, try to
establish a connection again.
device. (“LINKING” is indicated on the display
14
TQBJ2036
Page 15

Bluetooth® input level
If the sound input level from the Bluetooth® device is
too low, change the input level setting.
Preparation
≥ Connect a Bluetooth® device.
1 Press [PLAY MENU] repeatedly to select “INPUT
LEVEL”.
2 Press [2, 1] to select the level and then press
[OK].
“LEVEL 0” ,. “LEVEL i1” ,. “LEVEL i2”
^--------------------------------------------------J
≥ Select “LEVEL 0” if the sound is distorted.
≥ The factory default is “LEVEL 0”.
Disconnecting a Bluetooth® device
1 While a Bluetooth
Press [PLAY MENU] repeatedly to select
“DISCONNECT?”.
®
device is connected:
2 Press [2, 1] to select “OK? YES” and then press
[OK].
≥ You can also disconnect the Bluetooth® device by pressing
and holding [SELECTOR, s PAIRING] on the unit.
≥ The Bluetooth
audio source (e.g., “CD”) is selected.
®
device will be disconnected if a different
About Bluetooth
Panasonic bears no responsibility for data and/or
information that is compromised during a
wireless transmission.
®
∫ Frequency band used
≥ This system uses the 2.4 GHz frequency band.
∫ Certification of this device
≥ This system conforms to frequency restrictions and
has received certification based on frequency laws.
Thus, a wireless permit is not necessary.
≥ The actions below are punishable by law in some
countries:
– Taking apart or modifying the system.
– Removing specification indications.
∫ Restrictions of use
≥ Wireless transmission and/or usage with all
Bluetooth® equipped devices is not guaranteed.
≥ All devices must conform to standards set by
Bluetooth SIG, Inc.
≥ Depending on the specifications and settings of a
device, it can fail to connect or some operations can
be different.
≥ This system supports Bluetooth® security features.
But depending on the operating environment and/or
settings, this security is possibly not sufficient.
Transmit data wirelessly to this system with caution.
≥ This system cannot transmit data to a Bluetooth®
device.
∫ Range of use
≥ Use this device at a maximum range of 10 m. The
range can decrease depending on the environment,
obstacles or interference.
∫ Interference from other devices
≥ This system may not function properly and troubles
such as noise and sound jumps may arise due to
radio wave interference if this system is located too
close to other Bluetooth
use the 2.4 GHz band.
≥ This system may not function properly if radio waves
from a nearby broadcasting station, etc. is too
strong.
®
devices or the devices that
∫ Intended usage
≥ This system is for normal, general use only.
≥ Do not use this system near an equipment or in an
environment that is sensitive to radio frequency
interference (example: airports, hospitals,
laboratories, etc).
ENGLISH
15
TQBJ2036
Page 16

Media playback controls
The following marks indicate the availability of the
feature.
[CD]: CD audio in CD-DA format or a CD that
contains MP3 files (l 26)
[USB]: USB devices containing MP3 file (l 26)
[BLUETOOTH]: Connected Bluetooth® device (l 14)
[NETWORK]: When connected to an AllPlay/DLNA
compatible device (l 11 )
Basic play
([CD], [USB], [BLUETOOTH], [NETWORK])
Preparation
≥ Turn the unit on.
≥ Insert the media or connect the Bluetooth®/AllPlay/
DLNA compatible device. (l 7, 11, 14)
1 Select the audio source.
For disc:
Press [CD/USB] repeatedly to select “CD”.
For USB device:
Press [CD/USB] repeatedly to select “USB”.
For Bluetooth® device:
Press [ ] to select “BLUETOOTH”.
For AllPlay/DLNA compatible device:
When this system is selected as the output
speakers, the audio source will change to the
network source.
≥ Alternatively, press [RADIO, EXT-IN] repeatedly
to select “NETWORK”.
(When selecting using this unit, press
[SELECTOR, s PAIRING] repeatedly.)
2 Press [1/;] to start playback.
Basic controls
Stop Press [∫].
Pause Press [1/;].
≥ [USB]: The position is memorised and
“RESUME” is displayed.
≥ [USB]: Press [∫] twice to stop the
playback fully.
Press again to continue playback.
Skip Press [:] or [9] to skip track.
(This unit: [:/6] or [5/9])
[CD] (MP3), [USB]
Press [3] or [4] to skip the album.
Search
(Except
[NETWORK])
During play or pause, press and hold
[6] or [5].
(This unit: [:/6] or [5/9])
∫ To display information
([CD], [USB], [BLUETOOTH])
You can display the track, artist, album name, file type,
bit rate, and other information. (The information varies
depending on the audio source.)
Press [DISPLAY] repeatedly.
e.g. [USB] (MP3)
“A”: MP3 album number.
“T”: MP3 track number.
(“ ” stands for a number.)
≥ To use this unit’s remote control with a Bluetooth® device, the
≥ [NETWORK]: Some controls may not work depending on the
≥ [CD], [USB]:Tracks can be selected by pressing the numeric
≥ Maximum number of displayable characters:
≥ This system supports ver. 1 and 2 ID3 tags.
≥ Text data that is not supported will not be displayed or will be
®
Bluetooth
device must support AVRCP (Audio Video
Remote Control Profile).
Depending on the status of the device, some controls may
not work.
app in use, etc.
buttons.
Approx. 32
shown differently.
16
TQBJ2036
Page 17

Playback modes ([CD], [USB])
Select the playback mode.
1 Press [PLAY MENU] repeatedly to select
“PLAYMODE” or “REPEAT”.
2 Press [2, 1] to select the setting and then press
[OK].
PLAYMODE
OFF
PLAYMODE
1-TRACK Only plays the selected track.
1-ALBUM Only plays the selected album.
RANDOM Plays the contents randomly.
1-ALBUM
RANDOM
REPEAT
ON REPEAT Turns on repeat mode.
OFF
REPEAT
≥ During random playback, you cannot skip to tracks which
have been played or press the numeric buttons.
≥ Playmode function does not work with “Programme play”.
≥ The mode is cancelled when you open the sliding door or
remove the USB device.
Cancels the play mode setting.
≥ “1”, “ ” is displayed.
(Skip to the desired track.)
≥ Press [3] or [4] to select the album.
≥ “1”, “ ” is displayed.
≥ “RND” is displayed.
Plays the tracks in the selected
album randomly.
≥ Press [3] or [4] to select the album.
≥ “1”, “ ”, “RND” is displayed.
≥ “`” is displayed.
Turns off repeat mode.
Programme play
([CD], [USB])
This function allows you to programme up to 24 tracks.
[CD] (CD-DA)
1 Press [PROGRAM] in the stop mode.
≥ “PROGRAM” is shown for a few seconds.
2 Press the numeric buttons to select the desired
track.
≥ Do this step again to programme other tracks.
3 Press [1/;] to start playback.
[CD] (MP3), [USB]
1 Press [PROGRAM] in the stop mode.
≥ “PROGRAM” is shown for a few seconds.
2 Press [3, 4] to select the desired album.
3 Press [9] and then press the numeric buttons to
select the desired track.
4 Press [OK].
≥ Do steps 2 through 4 again to programme other tracks.
5 Press [1/;] to start playback.
Check
programme
contents
Clear the last
track
Cancel
programme
mode
Clear all
programmed
tracks
≥ The programme memory is cleared when you open the
sliding door or remove the USB device.
Press [:] or [9] in the stop
mode.
Press [DEL] in the stop mode.
Press [PROGRAM] in the stop mode.
≥ “PGM OFF” is shown for a few seconds.
Press [∫] in the stop mode. “CLEAR
ALL” is shown. Within 5 seconds, press
[∫] again.
ENGLISH
17
TQBJ2036
Page 18

Listening to FM radio
You can preset up to 30 channels.
Channel 1 to 5 will be set as the favourite stations
under (FAVOURITE) [1] to [5]. (l right, “Changing the
stations stored under (FAVOURITE) [1] to [5]”)
Preparation
≥ Make sure that the antenna is connected. (l 6)
≥ Turn the unit on.
≥ Press [RADIO, EXT-IN] repeatedly to select “FM”.
Presetting stations automatically
1 Press [RADIO MENU] to select “A.PRESET”.
2 Press [2, 1] to select “LOWEST” or “CURRENT”
and then press [OK].
LOWEST:
To begin auto preset with the lowest frequency
(“FM 87.50”).
CURRENT:
To begin auto preset with the current frequency.*
≥ The tuner starts to preset all the stations it can receive
into the channels in ascending order.
*1: To change the frequency, refer to “Manual tuning”.
Listening to a preset channel
Press the numeric buttons, [:] or [9] to select
the preset station.
≥ Alternatively, press [:/6] or [5/9] on this unit
when “PRESET” is selected as the tune mode*
≥ You can select channel 1 to 5 by pressing one of
(FAVOURITE) [1] to [5] on this unit.
∫ Manual tuning
Press [6] or [5] to tune in to the station.
≥ Alternatively, press [:/6] or [5/9] on this unit
when “MANUAL” is selected as the tune mode*
To tune automatically, press and hold the button until the
frequency starts changing quickly.
*2: To change the tune mode
1 Press [RADIO MENU] repeatedly to select “TUNE
MODE”.
2 Press [2, 1] to select “MANUAL” or “PRESET”, and
then press [OK].
2
.
2
.
Presetting stations manually
1 While listening to the radio broadcast
Press [PROGRAM].
2 Press the numeric buttons to select a preset
number.
≥ Do steps 1 through 2 again to preset more stations.
≥ A station previously stored is overwritten when another
station is stored in the same channel preset.
Changing the stations stored under
(FAVOURITE) [1] to [5]
You can change the stations stored under
(FAVOURITE) [1] to [5] easily.
While listening to the radio broadcast
Press and hold one of [1] to [5] until “P ” appears on
the display.
1
(“ ” stands for a number.)
≥ When you change the stations stored under (FAVOURITE)
[1] to [5], channel 1 to 5 are also changed to the same
corresponding stations.
∫ To display the current FM signal status
Press [DISPLAY].
“FM ST”: FM stereo broadcast is being received.
“FM - - - -”: No broadcast is received or FM
“FM MONO”: You have set the “FM MODE” to
≥ “STEREO” is displayed when this unit tunes to a stereo
broadcast.
broadcast received is weak or in
monaural.
“MONO”. (l 23, “If noise is excessive
during FM reception.”)
18
TQBJ2036
Page 19
Sound adjustment
The following sound effects can be added to the audio
output.
1 Press [SOUND] repeatedly to select the effect.
2 Press [2, 1] to select the setting and then press
[OK].
“MY SOUND”
(My sound)
“BASS” (Bass) or
“TREBLE” (Treble)
“SURROUND”
(Surround)
“CLEAR-MODE
DIALOG”
(Clear-mode
Dialogue)
“WALL MOUNT”
(Wall mount)
≥ You may experience a reduction in sound quality when these
effects are used with some sources. If this occurs, turn the
sound effects off.
≥ When “AUX” is selected as the source, you can select
“INPUT LEVEL” to adjust the sound input level of the
external device. (l 6)
“SOUND 1”, “SOUND 2”, or
“SOUND 3”.
(l below, “Saving the sound
settings”)
Adjust the level (j4 to i4).
“ON SURROUND” or
“OFF SURROUND”.
≥ Alternatively, press [SURROUND]
on this unit.
“ON CLEAR-MODE DIALOG” or
“OFF CLEAR-MODE DIALOG”.
“MODE 1 WALL MOUNT”,
“MODE 2 WALL MOUNT” or
“OFF WALL MOUNT”.
≥ Alternatively, press [WALL
MOUNT] on this unit.
Saving the sound settings
You can save your desired sound settings to
“SOUND 1”, “SOUND 2” or “SOUND 3” as
“MY SOUND”.
1 Adjust your desired sound effects. (l above)
2 Press [SETUP] to select “SAVE MY SOUND”.
3 Press [2, 1] to select a setting number and then
press [OK].
≥ “SAVED” is displayed.
≥ The sound settings previously saved will be replaced
when you save new settings to the same setting
number.
Recalling the sound settings you have
saved
1 Press [SOUND] to select “MY SOUND”.
2 Press [2, 1] to select the desired sound setting
number and then press [OK].
D.Bass
Press [D.BASS] to select “ON D.BASS” or
“OFF D.BASS”.
≥ Alternatively, press [D.BASS] on the unit.
Preset EQ
Press [PRESET EQ] repeatedly to select “HEAVY”
(heavy), “SOFT” (soft), “CLEAR” (clear), “VOCAL”
(vocal) or “FLAT” (flat/off).
≥ When “PRESET EQ” is selected, Bass and Treble settings
will be changed to the settings in preset EQ setting.
Clock and Timer
Setting the clock
This is a 24-hour clock.
Using clock information from a network device
You can stream the clock information from the device
to this unit by using the app “Panasonic Music
Streaming” (l 11 ).
Preparation
≥ Complete the network settings. (l 8)
≥ Install the app “Panasonic Music Streaming” on your
device.
≥ Connect your device to the same network as this
system.
1 Turn this system on.
≥ Check that the network indicator (l 4) lights up.
≥ If it does not light up, check the network settings. (l 8)
2 Start the app “Panasonic Music Streaming”.
≥ Always use the latest version of the app.
≥ The clock information will be sent to this system.
Adjusting the clock manually
1 Press [CLOCK/TIMER] to select “CLOCK”.
2 Press [3, 4] to set the time and then press [OK].
∫ To check the time
Press [CLOCK/TIMER].
≥ The clock is reset when there is a power failure or when the
AC mains lead is removed.
≥ Reset the clock regularly to maintain accuracy.
ENGLISH
19
TQBJ2036
Page 20
Sleep timer
The sleep timer can turn the unit off after a set time.
Press [SLEEP] repeatedly to select the setting
(in minutes).
“SLEEP 30” -. “SLEEP 60” -. “SLEEP 90” -. “SLEEP 120”
^---------------- “OFF” (Cancel) (""""""}
≥ The remaining time is indicated on the unit’s display at every
minute except when other operations are performed.
“SLEEP 1” is always shown when only 1 minute remains.
≥ The play timer and sleep timer can be used together. The
sleep timer is always the main timer on the unit.
Play timer
You can set the timer so this unit turns on at a certain
time every day.
Preparation
Set the clock.
1 Press [CLOCK/TIMER] repeatedly to select
“TIMER ADJ”.
2 Press [3, 4] to set the starting time (“ON TIME”)
and then press [OK].
3 Press [3, 4] to set the finishing time
(“OFF TIME”) and then press [OK].
4 Press [3, 4] to select the music source*
press [OK].
and then
Turning the timer on
1 Prepare the selected music source and set the
desired volume.
2 Press [F, PLAY].
≥ “F” is displayed.
To cancel, press [F, PLAY] again.
3 Press [Í] to turn the unit to standby mode.
∫ To check the settings
Press [CLOCK/TIMER] repeatedly to select
“TIMER ADJ”.
(During standby, press [CLOCK/TIMER] twice.)
≥ The timer starts at a low volume and increases gradually to
the preset level.
≥ The timer comes on at the set time every day if the timer is
on.
≥ If you turn off the unit and turn it on again while a timer is in
operation, the timer will not stop at the end time.
* “CD”, “USB” and “FM” can be set as the music source.
Firmware updates
Occasionally, Panasonic may release updated
firmware for this system that may add or improve the
way a feature operates. These updates are available
free of charge.
You can also update the firmware from a pop-up
prompting you to do so on-screen within the app
“Panasonic Music Streaming” (l 11). For details on
the app, refer to the site below.
http://panasonic.jp/support/global/cs/audio/app/
(This site is in English only.)
Downloading takes approx. 10 minutes.
DO NOT DISCONNECT the AC mains lead
while one of the following messages is
displayed.
“UPDATING” or “UPD%”
(“ ” stands for a number.)
≥ During the update process, no other operations can be
performed.
Preparation
≥ Turn this system on.
≥ Connect this system to the home network. (l 8)
– Make sure that the network is connected to the
Internet.
1 Press [RADIO, EXT-IN] repeatedly to select
“NETWORK”.
2 Press [SETUP] repeatedly to select “FW UPDATE”
and then press [OK].
3 Press [2, 1] to select “OK? YES” and then press
[OK] to start the update.
≥ Select “OK? NO” to cancel the update.
When the update begins, “UPDATING” is
displayed.
The progress is displayed as “UPD%” while
updating. (“ ” stands for a number.)
4 After the update has finished, “SUCCESS” is
displayed.
Disconnect the AC mains lead and reconnect it
after 1 minute.
≥ If there are no updates, “NO NEED” is displayed.
≥ Downloading may take longer or may not work properly
depending on the connection environment.
Checking the firmware version
Press [SETUP] repeatedly to select “FW VER.” and
then press [OK].
The version of the installed firmware is displayed.
≥ Press [OK] to exit.
20
TQBJ2036
Page 21

Others
Auto off function
As a factory default, this unit will turn to standby mode
automatically if there is no sound and it is not being
used for approximately 20 minutes.
To cancel this function
1 Press [SETUP] repeatedly to select “AUTO OFF”.
2 Press [2, 1] to select “OFF” and then press [OK].
≥ To turn the function on, select “ON” in step 2.
≥ This setting cannot be selected when radio is the source or
when “NET STANDBY” is “ON”.
≥ If “NET STANDBY” is set to “ON”, this function will also be
set to “ON”. To change the setting, set “NET STANDBY” to
“OFF”. (l right)
≥ When connected to a Bluetooth
not work.
Bluetooth® standby
When “SC-HC1000” is selected from a paired
Bluetooth® device’s Bluetooth® menu, this unit will turn
on automatically from standby mode and establish a
Bluetooth® connection.
®
device, the function does
1 Press [SETUP] repeatedly to select “BLUETOOTH
STANDBY”.
2 Press [2, 1] to select “ON” and then press [OK].
≥ To turn the function off, select “OFF” in step 2.
≥ The factory default is “OFF”. If this function is set to “ON”, the
standby power consumption will increase.
Changing the unit and remote
control code
When other Panasonic equipment responds to the
supplied remote control, change the remote control
code.
1 Press [CD/USB] repeatedly to select “CD”.
2 Press and hold [∫] on the unit and [2] on the
remote control until the unit’s display shows
“REMOTE 2”.
3 Press and hold [OK] and [2] on the remote control
for at least 4 seconds.
Network standby
This system can turn on automatically from standby
mode when this system is selected as the network
device’s output speakers.
As a factory default, the network standby is off before
you connect this system to the home network.
When you connect it to the home network for the first
time, this function will automatically switch to on.
You can also turn the network standby on by the
following steps:
1 Press [SETUP] repeatedly to select
“NET STANDBY” and then press [OK].
2 Press [2, 1] to select “ON” and then press [OK].
≥ When “NET STANDBY” is “ON”
– The network (wired LAN/Wi-Fi) will be active even
in standby mode.
– The power consumption in standby mode will
increase. To reduce the power consumption in
standby mode, turn off the network standby.
To turn off the network standby
Select “OFF” in step 2.
≥ When you have turned “NET STANDBY” to “OFF”
– The network (wired LAN/Wi-Fi) will be disabled in
standby mode if the system is switched to standby
mode at a source other than “NETWORK”.
The network (wired LAN/Wi-Fi) will be enabled
when the system is turned on.
– Network standby will be active if the system is
switched to standby mode at “NETWORK”
selector mode and this system is connected to the
network.
– To keep the network standby turned off, select a
source other than “NETWORK” before switching
the unit to standby mode.
≥ This function will return to default setting if you have
performed the operation for network reset. (l 22)
≥ When the system is turned on by this feature, the beginning
part of the music may not be played back.
≥ Depending on the app, the conditions for activating this
function may differ.
≥ The system may not turn on even when selected as the
output speakers. In that case, start playback.
ENGLISH
≥ To change the mode back to “REMOTE 1”, repeat the steps
above but replace [2] with [1].
21
TQBJ2036
Page 22

Wireless LAN setting
The wireless LAN function can be enabled or disabled.
1 Press [RADIO, EXT-IN] repeatedly to select
“NETWORK”.
2 Press [SETUP] repeatedly to select
“WIRELESS LAN” and then press [OK].
3 Press [2, 1] to select “ON” or “OFF” and then
press [OK].
≥ The factory default is “ON”.
Wi-Fi signal strength
To check the Wi-Fi signal strength where this system is
located.
Preparation
Connect this system to the wireless network. (l 8)
1 Press [RADIO, EXT-IN] repeatedly to select
“NETWORK”.
2 Press [SETUP] repeatedly to select “SIGNAL
LEVEL” and then press [OK].
“LEVEL ” is indicated on the display.
(“ ” stands for a number.)
≥ Press [OK] to exit this display mode.
≥ It is recommended to have a signal strength of “3”. Change
the position or angle of your wireless router or this system if
the indication is “2” or “1” and see if the connection improves.
≥ If “LEVEL 0” is displayed, this system cannot establish a link
with the wireless router. (l 24)
IP/MAC Address
To check this system’s IP address or the Wi-Fi MAC
address.
1 Press [RADIO, EXT-IN] repeatedly to select
“NETWORK”.
2 Press [SETUP] repeatedly to select “NET INFO”
and then press [OK].
3 Press [2, 1] repeatedly to select “IPADDR.” or
“MAC ADDR.” and then press [OK].
≥ The IP address or the MAC address is partially
displayed.
4 Press [2, 1] on the remote control to show the
rest of the IP address or the MAC address.
≥ Press [OK] to exit.
≥ The “ – ” displayed on the top or bottom left of the
display indicate the first and last units respectively.
Network reset
To reset the network settings.
1 Press [RADIO, EXT-IN] repeatedly to select
“NETWORK”.
2 Press [SETUP] repeatedly to select “NET RESET”
and then press [OK].
3 Press [2, 1] to select “OK? YES” and then press
[OK].
≥ “NETWORK INITIALIZING” is indicated on the display.
When the display returns to “NETWORK”, the network
settings are reset.
≥ This function does not affect the “WIRELESS LAN” setting.
Wireless network name (SSID)
Display the name for the connected wireless network
(SSID).
1 Press [RADIO, EXT-IN] repeatedly to select
“NETWORK”.
2 Press [SETUP] repeatedly to select “NET INFO”
and then press [OK].
3 Press [2, 1] repeatedly to select “SSID” and then
press [OK].
≥ Press [OK] to exit.
≥ If “NO CONNECT” is displayed this system is not connected
to a wireless network.
≥ Characters that cannot be displayed are replaced with “£”.
22
TQBJ2036
Page 23

Troubleshooting
Before requesting service, make the following checks.
If you are uncertain about some of the check points, or
if the solutions indicated in the following guide does not
resolve the issue, then consult your dealer for
instructions.
Do you have the latest firmware installed?
Panasonic is constantly improving the system’s
firmware to ensure that our customers are enjoying
the latest technology. (l 20)
For further dedicated help, support and advice about
your product please visit:
http://panasonic.jp/support/global/cs/audio/
(This site is in English only.)
To return all settings to the factory defaults
When the following situations occur, reset the memory:
≥ There is no response when buttons are pressed.
≥ You want to clear and reset the settings.
1 Disconnect the AC mains lead. (Wait for at least
30 seconds before proceeding to step 2.)
2 While pressing and holding down [Í/I] on the
unit, reconnect the AC mains lead.
≥ Keep holding down [Í/I] until “---------” appears on the
display.
3 Release [Í/I].
≥ The settings are returned to the factory defaults. It is
necessary to set the settings again.
≥ To reset the network settings, perform the operation for
network reset. (l 22)
General
Cannot turn on the unit.
≥ After connecting the AC mains lead, wait about 10 seconds before
turning on the unit.
Humming heard during playback.
≥ If an AC mains lead or fluorescent lights are near the cords, then
keep other appliances and cords away from the cables.
The unit does not work.
≥ One of the unit’s safety devices may have been activated.
1 Press [Í/I] on the unit to switch the unit to standby.
≥ If the unit does not turn off, disconnect the AC mains lead
from the AC outlet, reconnect it to the outlet after about
30 seconds. Then wait for about 10 seconds.
2 Press [Í/I] on the unit to switch it on. If the unit still cannot be
operated, consult the dealer.
Charging does not start during standby mode.
≥ Turn the unit on. Check the charging has started, and then turn
the unit to standby mode. (l 7)
Noise is heard.
≥ When a device is connected to both the AUX IN jack and the USB
port, noise may be generated depending on the device. In this
case, remove the USB cable from the USB port.
Remote control
The remote control does not work properly.
≥ The battery is depleted or inserted incorrectly. (l 5)
Disc
Incorrect display or play does not start.
≥ Make sure that the disc is compatible with this unit. (l 26)
≥ There is moisture on the lens. Wait for about an hour and then try
again.
USB
No response when [1/;] is pressed.
≥ Disconnect the USB device and then reconnect it. Alternatively,
turn the unit off and on again.
The USB drive or its contents cannot be read.
≥ The USB drive format or its contents is/are not compatible with the
unit (l 26).
≥ The USB host function of this product may not work with some
USB devices.
Slow operation of the USB flash drive.
≥ Large file size or high memory USB flash drive takes longer time
to read.
The elapsed time displayed is different from the
actual play time.
≥ Copy the data to another USB device or backup the data and
reformat the USB device.
Radio
If noise is excessive during FM reception.
≥ Change the audio to be output as monaural.
1 Press [RADIO MENU] repeatedly to select “FM MODE”.
2 Press [2, 1] to select “MONO” and then press [OK].
The sound becomes monaural.
≥ To cancel, select “STEREO” or change the frequency.
In normal circumstances, select “STEREO”.
Static or noisy reception is heard while listening to
a radio broadcast.
≥ Confirm the antenna is properly connected. (l 6)
≥ Adjust the position of the antenna.
≥ Try to keep a certain amount of distance between the antenna and
AC mains lead.
≥ Try using an outdoor antenna if there are buildings or mountains
nearby.
≥ Turn the TV or other audio players off or separate it from this unit.
≥ Keep this unit away from mobile phones if there is interference.
Bluetooth
Pairing cannot be completed.
≥ Check the Bluetooth® device condition.
The device cannot be connected.
≥ The pairing of the device was unsuccessful or the registration has
been replaced. Try re-pairing the device. (l 14)
≥ This unit might be connected to a different device. Disconnect the
other device and try re-pairing the device. (l 14)
≥
If “MODE 2” is selected in “LINK MODE”, select “MODE 1”. (l14)
≥ If the problem persists, turn the unit off and on, then try again.
The device is connected, but audio cannot be
heard through this unit.
≥ For some built-in Bluetooth® devices, you have to set the audio
output to “SC-HC1000” manually. Read the operating instructions
for the device for details.
The sound is interrupted.
≥ The device is out of the 10 m communication range. Place the
Bluetooth® device closer to this unit.
≥ Remove any interference between this unit and the device.
≥ Other devices that use the 2.4 GHz frequency band, such as
wireless routers, microwaves, cordless phones, etc. are
interfering. Place the Bluetooth® device closer to this unit and
distance it from the other devices.
≥ Select “MODE 1” for stable communication. (l 14)
®
TQBJ2036
ENGLISH
23
Page 24

Network
Cannot connect to the network.
≥ Confirm the network connection and settings. (l 8)
≥ If the network is set to be invisible, make the network visible while
you set up the network for this unit or make a wired LAN
connection. (l 10)
≥ This system’s Wi-Fi security supports WPA2TM only. Your wireless
router must therefore be WPA2TM compatible. For details on the
security supported by your router and how to change the settings,
please refer to the operating instructions or contact your Internet
service provider.
≥ Make sure that the multicast function on the wireless router is
enabled.
≥ Depending on the routers, WPS button may not work. Try other
methods. (l 8)
≥ Check the “WIRELESS LAN” setting. (l 22)
Cannot select this system as the output speakers.
≥ Make sure that the devices are connected to the same network as
this system.
≥ Reconnect the devices to the network.
≥ Turn the wireless router off and then on.
≥ Turn this system off and on, and then select this system as the
output speakers again.
Playback does not start.
The sound is interrupted.
≥ If using the 2.4 GHz band on the wireless router, simultaneous
use with other 2.4 GHz devices, such as microwaves, cordless
telephones, etc., may result in connection interruptions. Increase
the distance between this unit and these devices.
– If your wireless router supports 5 GHz band, try using the
5 GHz band.
To change to the 5 GHz band, redo the network settings using
an Internet browser (l 9). On the step 8, make sure to select
your network name (SSID) for the 5 GHz band.
≥ Do not place this system inside a metal cabinet, for it might block
the Wi-Fi signal.
≥ Place this system closer to the wireless router.
≥ If several wireless devices are simultaneously using the same
wireless network as this system, try turning off the other devices
or reducing their wireless network usage.
≥ If the playback stops, check the playback status on the device.
≥ Reconnect the devices to the network.
≥ Turn the wireless router off and then on.
≥ Try a wired LAN connection. (l 10)
Messages
The following messages or service numbers may
appear on the unit’s display.
“--:--”
≥ You plugged the AC mains lead in for the first time or there was a
power failure recently. Set the time (l 19).
“ADJUST CLOCK”
≥ Clock is not set. Adjust the clock accordingly.
“ADJUST TIMER”
≥ Play timer is not set. Adjust the play timer accordingly.
“AUTO OFF”
≥ The unit has been left unused for about 20 minutes and will shut
down within a minute. Press any button to cancel it.
“ERROR”
≥
Incorrect operation is performed. Read the instructions and try again.
“F” / “F” (“ ” stands for a number.)
≥ There is a problem with this unit.
Disconnect the AC mains lead from the AC outlet, reconnect it to
the outlet after about 30 seconds. Wait for about 10 seconds, then
turn on the unit. If the problem still persists, disconnect the AC
24
mains lead and consult your dealer.
TQBJ2036
“FAIL”
≥ Updating or setting has failed. After turning off the unit, disconnect
the AC mains lead from the AC outlet, reconnect it to the outlet
after about 30 seconds. Wait for about 10 seconds, then turn on
the unit and redo the update.
≥ The firmware download has failed. Press any button to exit.
Please try again later.
≥ The server cannot be found. Press any button to exit. Make sure
that the wireless network is connected to the Internet.
“ILLEGAL OPEN”
≥ Sliding door is in the wrong position. After turning off the unit,
disconnect the AC mains lead from the AC outlet, reconnect it to
the outlet after about 30 seconds. Wait for about 10 seconds, then
turn on the unit. If the message is still displayed, disconnect the
AC mains lead and consult your dealer.
“INVALID TO PRESET”
≥ You cannot preset during Spotify playback.
“LEVEL 0”
≥ There is no link between this system and the wireless router.
Try the following operations:
– Check that the wireless router is turned on.
– Turn this system off and on again.
– Reset the wireless network settings. (l 8)
If the problem persists, consult your dealer.
“LINKING”
≥ This system is trying to connect to the last connected Bluetooth®
device when “BLUETOOTH” is selected.
≥ This system is communicating with the wireless router to complete
the network settings.
Depending on the wireless router this process may take a few
minutes. Try moving this system closer to the wireless router.
“NETWORK INITIALIZING”
“SETUP IN PROGRESS, TRY AGAIN”
≥ The system is carrying out an internal process.
– Wait for approximately 3 minutes.
– Do not disconnect the AC mains lead. Doing so may cause
malfunction.
“NO CONNECT”
≥ This system cannot connect to the network.
Check the network connection. (l 8)
“NO DEVICE”
≥ The USB device is not inserted correctly. Read the instructions
and try again (l 7).
“NO DISC”
≥ Insert the disc to be played (l 7).
“NO PLAY”
≥ Examine the content. You can only play supported format. (l 27)
≥ The files in the USB device can be corrupted. Format the USB
device and try again.
≥ The unit may have a problem. Turn the unit off and then on again.
“NO PRESET”
≥ The selected preset channel has not been preset. Preset some
channels. (l 13)
“NOT SUPPORTED”
≥ You have connected an unsupported USB device.
“PGM FULL”
≥ The number of programmed tracks is more than 24.
Page 25

“PLAYERROR”
≥ You played an unsupported file. The system will skip that track
and play the next one.
“READING”
≥ The unit is checking the “CD”/“USB” information. After this display
has disappeared, start operating.
“REMOTE ” (“ ” stands for a number.)
≥ The remote control and this unit are using different codes. Change
the code on the remote control.
– When “REMOTE 1” is displayed, press and hold [OK] and [1]
for at least 4 seconds.
– When “REMOTE 2” is displayed, press and hold [OK] and [2] for at
least 4 seconds.
“SOUND NOT SET” (“ ” stands for a number.)
≥ There is no saved setting under the selected sound setting
number. Save the sound settings. (l 19)
“USB OVER CURRENT ERROR”
≥ The USB device is drawing too much power. Select a source other
than “USB”, remove the USB and turn the unit off.
“VBR”
≥ The system cannot show the remaining play time for variable bit
rate (VBR) tracks.
“WAIT”
≥ This is displayed, for example, when this unit is turning off.
≥ This is flashing when the system is trying to enter a network
setting mode.
The network indicator (l 4) blinks
≥ This may occur when, for instance, the network connection is
interrupted.
Licenses
The Bluetooth® word mark and logos are registered trademarks
owned by Bluetooth SIG, Inc. and any use of such marks by
Panasonic Corporation is under license.
Other trademarks and trade names are those of their respective
owners.
DLNA, the DLNA Logo and DLNA CERTIFIED are trademarks,
service marks, or certification marks of the Digital Living
Network Alliance.
Windows is a trademark or a registered trademark of Microsoft
Corporation in the United States and other countries.
Google Play and Android are trademarks of Google Inc.
MPEG Layer-3 audio coding technology licensed from
Fraunhofer IIS and Thomson.
iPad, iPhone, iPod, and iPod touch are trademarks of Apple
Inc., registered in the U.S. and other countries.
App Store is a service mark of Apple Inc.
FLAC Decoder
Copyright (C)
2000,2001,2002,2003,2004,2005,2006,2007,
2008,2009 Josh Coalson
Redistribution and use in source and binary forms, with or
without modification, are permitted provided that the
following conditions are met:
- Redistributions of source code must retain the above copyright
notice, this list of conditions and the following disclaimer.
- Redistributions in binary form must reproduce the above
copyright notice, this list of conditions and the following
disclaimer in the documentation and/or other materials provided
with the distribution.
- Neither the name of the Xiph.org Foundation nor the names of its
contributors may be used to endorse or promote products
derived from this software without specific prior written
permission.
THIS SOFTWARE IS PROVIDED BY THE COPYRIGHT HOLDERS
AND CONTRIBUTORS “AS IS” AND ANY EXPRESS OR IMPLIED
WARRANTIES, INCLUDING, BUT NOT LIMITED TO, THE IMPLIED
WARRANTIES OF MERCHANTABILITY AND FITNESS FOR A
PARTICULAR PURPOSE ARE DISCLAIMED. IN NO EVENT SHALL
THE FOUNDATION OR CONTRIBUTORS BE LIABLE FOR ANY
DIRECT, INDIRECT, INCIDENTAL, SPECIAL, EXEMPLARY, OR
CONSEQUENTIAL DAMAGES (INCLUDING, BUT NOT LIMITED
TO, PROCUREMENT OF SUBSTITUTE GOODS OR SERVICES;
LOSS OF USE, DATA, OR PROFITS; OR BUSINESS
INTERRUPTION) HOWEVER CAUSED AND ON ANY THEORY OF
LIABILITY, WHETHER IN CONTRACT, STRICT LIABILITY, OR TORT
(INCLUDING NEGLIGENCE OR OTHERWISE) ARISING IN ANY
WAY OUT OF THE USE OF THIS SOFTWARE, EVEN IF ADVISED
OF THE POSSIBILITY OF SUCH DAMAGE.
ENGLISH
The Wi-Fi CERTIFIEDTM Logo is a certification mark of Wi-Fi
Alliance®.
The Wi-Fi Protected Setup
mark of Wi-Fi Alliance
“Wi-Fi®” is a registered trademark of Wi-Fi Alliance®.
“Wi-Fi Protected SetupTM”, “WPATM”, and “WPA2TM” are
trademarks of Wi-Fi Alliance®.
Qualcomm is a trademark of Qualcomm Incorporated,
registered in the United States, and other countries. AllPlay is a
trademark of Qualcomm Connected Experiences, Inc.,
registered in the United States, and other countries.
TuneIn is a trademark of TuneIn Inc., registered in the United
States and other countries and used with permission.
The Spotify software is subject to third party licenses found
here:
www.spotify.com/connect/third-party-licenses
TM
Identifier mark is a certification
®
.
25
TQBJ2036
Page 26

Unit and media care
Lens
Pull out the AC mains lead from the outlet before
maintenance.
∫ Clean this unit with a soft, dry cloth
≥ When dirt is heavy, wring a wet cloth tightly to wipe the dirt,
and then wipe it with a dry cloth.
≥ When cleaning the speaker covers, use a fine cloth.
Do not use tissues or other materials that can fall apart.
Small pieces may get stuck inside the speaker cover.
≥ Never use alcohol, paint thinner or benzine to clean this unit.
≥ Before using chemically treated cloth, carefully read the
cloth’s instructions.
∫ Maintenance of the lens
≥ Clean the lens regularly to prevent malfunctions. Use a dust
blower to remove dust and a cotton swab if it is extremely
dirty.
≥ You cannot use a CD type lens cleaner.
≥ Do not leave the sliding door open for prolonged periods of
time. This will cause the lens to get dirty.
≥ Be careful not to touch the lens with your fingers.
∫ Clean discs
DO DO NOT
Wipe with a damp cloth and then wipe dry.
∫ Disc handling precautions
≥ Handle discs by the edges to avoid inadvertent scratches or
fingerprints on the disc.
≥ Do not attach labels or stickers to discs.
≥ Do not use record cleaning sprays, benzine, thinner, static
electricity prevention liquids or any other solvent.
≥ Do not use the following discs:
– Discs with exposed adhesive from removed stickers or
labels (rented discs etc.).
– Discs that are badly warped or cracked.
– Irregularly shaped discs, such as heart shapes.
∫ To dispose or transfer this unit
The unit may keep the user settings information in the
unit. If you discard this unit either by disposal or
transfer, then follow the procedure to return all the
settings to the factory defaults to delete the user
settings.
(l 23, “To return all settings to the factory defaults”)
Playable media
Compatible CD
≥ A disc with the CD Logo.
≥ This unit can play back discs that conform to the CD-DA
format.
≥ This system can play back CD-R/RW with CD-DA or MP3
format content.
≥ The unit may not be able to play some discs due to the
condition of the recording.
≥ Before playback, finalise the disc on the device it was
recorded on.
≥ If the disc includes both MP3 and normal audio data
(CD-DA), the unit plays the type recorded in the inner part of
the disc.
≥ This unit cannot play files recorded using packet write.
≥ Disc must conform to ISO9660 level 1 or 2 (except for
extended formats).
≥ Some CD-R/RW cannot be played because of the condition
of the recording.
≥ MP3 files are defined as tracks and folders are defined as
albums.
≥ This system can access up to:
– CD-DA: 99 tracks
– MP3: 999 tracks, 255 albums (including root folder)
≥ Recordings will not necessarily be played in the order you
recorded them.
Compatible USB devices
≥ This unit does not guarantee connection with all USB
devices.
≥ FAT12, FAT16 and FAT32 file systems are supported.
≥ This unit supports USB 2.0 Full Speed.
≥ USB devices with storage capacity of more than 32 GB
cannot work in some conditions.
≥ Supported format: Files with the extension “.mp3” or “.MP3”.
≥ Depending on how you create the files, they may not play in
the order you numbered them or may not play at all.
≥ Files are defined as tracks and folders are defined as
albums.
≥ This system can access up to:
– 800 albums (including root folder)
– 8000 tracks
– 999 tracks in one album
26
TQBJ2036
Page 27

Specifications
∫ GENERAL
Power consumption 25 W
Power consumption in standby mode
(When “BLUETOOTH STANDBY” is “OFF”)*
(When “BLUETOOTH STANDBY” is “ON”)*
(When “NET STANDBY” is “ON”)*
1
Power supply AC 110 V to 240 V, 50/60 Hz
Dimensions (WkHkD)
420 mmk225 mmk102 mm
Mass Approx. 2.5 kg
Operating temperature range 0 oC to r40 oC
Operating humidity range
35% to 80% RH (no condensation)
∫ AMPLIFIER SECTION
Output power
RMS Output Power
Front Ch (both ch driven)
20 W per channel (8 ≠), 1 kHz, 10% THD
Total RMS power 40 W
PMPO output power 300 W
∫ TUNER SECTION
Preset Memory FM 30 stations
Frequency Modulation (FM)
Frequency range
87.50 MHz to 108.00 MHz (50 kHz step)
Antenna terminals 75 ≠ (unbalanced)
∫ DISC SECTION
Disc played (8 cm or 12 cm)
Pick up
Wavelength 790 nm (CD)
CD, CD-R/RW (CD-DA, MP3*3)
∫ SPEAKER SECTION
Speaker unit(s)
Full Range
1, 2
Approx. 0.2 W
1, 2
Approx. 0.3 W
Approx. 2 W
8cmconetypek2
∫ TERMINAL SECTION
USB Port
USB Port power DC OUT 5V 1.5A
USB Standard USB 2.0 full speed
Media file format support MP3*3 (¢.mp3)
Audio support format
3
MP3*
Sampling frequency 32/44.1/48 kHz
Audio word size 16 bits
Channel count 2ch
USB device file system FAT12, FAT16, FAT32
Ethernet interface
LAN (10BASE-T/100BASE-TX)
AUX IN Stereo, 3.5 mm jack
∫ Bluetooth® SECTION
Version Bluetooth® Ver.2.1+EDR
Class Class 2
Supported Profiles A2DP, AVRCP
Frequency band 2.4 GHz band FH-SS
Operation Distance 10 m Line of sight
Supported Codec SBC
∫ Wi-Fi SECTION
Wi-Fi
WLAN Standard IEEE802.11a/b/g/n
Frequency range 2.4 GHz band/5 GHz band
Security WPA2
WPS version Version 2.0
Audio support format (AllPlay)
MP3*3/AAC
Sampling frequency 32/44.1/48 kHz
Audio word size 16 bits
Channel count 2ch
FLAC*4/ALAC/WAV
Sampling frequency
32/44.1/48/88.2/96/176.4/192 kHz
Audio word size 16 bits/24 bits
Channel count 2ch
≥ Specifications are subject to change without notice.
≥ Mass and dimensions are approximate.
≥ Total harmonic distortion is measured by a digital spectrum
analyzer.
*1: No device is connected to the USB port before turning to
standby mode.
*2: Network standby is inactive.
*3: MPEG-1 Layer 3, MPEG-2 Layer 3
*4: Uncompressed FLAC files may not operate correctly.
ENGLISH
TM
27
TQBJ2036
Page 28

Attaching the unit to a wall
Stand
Fixing screw
Soft blanket or cloth
(optional)
This unit can be wall mounted using the supplied wall
mount brackets, safety holder, etc. Make sure that the
wall and the screws used for securing to the wall are
capable of supporting at least 36 kg. The screws and
other items are not supplied as the type and size will
vary with each installation.
≥ Refer to step 6 and step 7 of “Wall mount
instructions” for details about the required screws.
≥ As an additional protective measure, attach the unit
to the wall with the fall prevention cord.
Installation accessories
∫ Supplied accessories
≥ 2 Wall mount brackets
≥ 1 Safety holder
≥ 1 Wall mounting sheet
∫ Additionally required accessories
(commercially available)
≥ 4 Wall mount bracket fixing screws
≥ 2 Safety holder fixing screws
≥ 1 Fall prevention cord*
≥ 1 Screw eye
* Use a cord that is capable of supporting over 36 kg
(with a diameter of about 1.5 mm).
≥ Keep the screws out of reach of children to prevent
swallowing.
≥ Keep the wall mount brackets out of reach of children
to prevent swallowing.
≥ Keep the screw eye out of reach of children to prevent
swallowing.
Safety precautions
Professional installation is required.
The installation should never be done by any
other than a qualified installation specialist.
PANASONIC DISCLAIMS ANY PROPERTY
DAMAGE AND/OR SERIOUS INJURY,
INCLUDING DEATH RESULTING FROM
IMPROPER INSTALLATION OR INCORRECT
HANDLING.
WARNING:
To prevent injury, this apparatus must be securely
attached to the wall in accordance with the
installation instructions.
Wall mount instructions
Before installation, turn the unit off and disconnect the
AC mains lead from the mains socket.
1 Unscrew the fixing screw at the rear of the unit.
2 Detach the stand from the unit while pressing the
catches upward.
≥ While lifting the catches upwards, gently pull the stand
forward.
Keep the removed screw and stand for future use.
≥ When using the unit in a non-wall-mounted position again,
be sure to reattach the stand to the unit and secure it with
its screw.
3 Attach the fall prevention cord (not supplied) to this
unit.
28
TQBJ2036
A Fall prevention cord (not supplied)
≥ Bend the cord twice from the tip, each at 45o and 5 mm
apart for it to go through the holes.
B 5mm
Page 29

4 Put up the wall mounting sheet on the wall where
Wall mounting sheet
Adhesive tape (not supplied)
Wall
420 mm
102.5 mm
130.5 mm
141 mm
100 mm
118.5 mm
300 mm
100 mm
39 mm
73 mm
Space required
At least 30 mm
‰7.5 mm to
‰9.4 mm
‰4.0 mm
Wall mount bracket
At least 30 mm
‰7.5 mm to
‰9.4 mm
‰4.0 mm
Safety holder
Wall
AC mains lead
Wall
Hook
Wall mount bracket
Safety holder
Cord (not supplied)
Screw eye (not supplied)
Wall
Catches
the unit is to be mounted.
≥ Before deciding the location to place the unit, be sure to
check that the Wi-Fi signal strength is sufficient. (l 22)
≥ Spread out the wall mounting sheet when tapping it to
the wall.
5 Make holes on the wall at the center of each cross
mark on the sheet.
≥ Take the sheet away from the wall after its use.
6 Attach each wall mount bracket to the wall with two
screws (not supplied).
≥ Use a level to ensure both wall mount brackets are
level.
8 Attach the unit.
1 Hook the unit securely onto the wall mount brackets
with both hands.
≥ Connect the antenna and the AC mains lead to the unit
before hanging the unit onto the wall. (l 6)
2 Slightly uplift the unit vertically until reaching the
hook of the safety holder, and push lower so that
the unit is hooked and locked in the safety holder.
≥
The unit will be locked onto the safety holder with a click sound.
≥ After hanging the unit, release your hands carefully to
confirm the unit sits securely on the wall mount brackets
and the safety holder.
9
Attach the fall prevention cord (not supplied) to the wall.
≥ Make sure that the slack of the cord is minimal.
ENGLISH
7 Attach the safety holder with two screws (not
supplied) to the wall.
∫
To release the unit from the safety holder
While pressing two catches of the safety holder, uplift
the unit vertically.
29
TQBJ2036
Page 30

Software Licenses
This product incorporates the following s oftware:
(1) the software developed independently by or for Panasonic Corporation,
(2) the software owned by third party and licensed to Panasonic Corporation,
(3) the software licensed under the GNU General Public License, Version 2.0 (GPL
V2.0),
(4) the software licensed under the GNU LESSER General Publi c License, Version
2.1 (LGPL V2.1), and/or
(5) open source software other than the software licensed under the GPL V2.0
and/or LGPL V2.1.
The software categorized as (3) - (5) are distributed i n the hope that it will be
useful, but WITHOUT ANY WARRANTY, without even the implied warranty of
MERCHANTABILITY or FITNESS FOR A PARTICULAR PURPOSE.
At least three (3) years from delivery of this product, Panasonic will give to any
third party who contacts us at the contact information provided below, for a charge
no more than our cost of physically performing source code distribution, a
complete machine-readable copy of the c orresponding source code covered under
GPL V2.0, LGPL V2.1 or the other licenses with the obligation to d o so, as well as
the respective copyright notice thereof.
Contact Information:
oss-cd-request@gg.jp.panasonic.com
The source code and the copyright notice are also availab le for free in our web site
below.
http://panasonic.net/avc/oss/
GNU LESSER GENERAL PUBLIC LICENSE
Version 2.1, February 1999
Copyright (C) 1991, 1999 Free Software Foundation, Inc.
51 Franklin Street, Fifth Floor, Boston, MA 02110-1301 USA
Everyone is permitted to copy and distribute verbatim copies
of this license document, but changing it is not allowed.
[This is the first released version of the Lesser GPL. It also counts as the
successor of the GNU Library Public License, vers ion 2, hence the version number
2.1.]
Preamble
The licenses for most software are designed to take away your freedom to share
and change it. By contrast, the GNU General Publi c Licenses are intended to
guarantee your freedom to share and change free software--to make sure the
software is free for all its users.
This license, the Lesser General Public License, applies to some specially
designated software packages--typically librarie s--of the Free Software Foundation
and other authors who decide to use it. You can use it too, but we suggest you firs t
think carefully about whether this license or th e ordinary General Public License is
the better strategy to use in any particular case, based on the explanations below.
When we speak of free software, we are referring to freedom of use, not price.
Our General Public Licenses are designed to make sure that you have the
freedom to distribute copies of free software (and charge for this service if you
wish); that you receive source code or can get it if you want it; that you can change
the software and use pieces of it in new free programs; and tha t you are informed
that you can do these things.
To protect your rights, we need to make restrictions that forbid distributors to d eny
you these rights or to ask you to surrender these rights. These restrictions
translate to certain responsibilities for you if you distribute copies of the library or if
you modify it.
For example, if you distribute copies of the library, whether gratis or for a fee, you
must give the recipients all the rights that we gave you. You must make sure that
they, too, receive or can get the source code. If you link other code with the library,
you must provide complete object files to the recipients, so that they can relink
them with the library after making changes to the li brary and recompiling it. And
you must show them these terms so they kn ow their rights.
We protect your rights with a two-step method: (1) we copyright the library, and
(2) we offer you this license, which gives you legal permiss ion to copy, distribute
and/or modify the library.
To protect each distributor, we want to make it very clear that there is no warranty
for the free library. Also, if the library is modified by someon e else and passed on,
the recipients should know that what they have is not the original version, so that
the original author's reputation will not be affected by proble ms that might be
introduced by others.
Finally, software patents pose a constant threat to the existence of any free
program. We wish to make sure that a company cannot effectively restrict the
users of a free program by obtaining a restrictive license from a patent holder.
Therefore, we insist that any patent license obtained for a version of the library
must be consistent with the full freedom of use spe cified in this license.
Most GNU software, including some libraries, is covered by the ordinary GNU
General Public License. This license , the GNU Lesser General Public License,
applies to certain designated libraries, and is qu ite different from the ordinary
General Public License. We use this license for certain libraries in order to permit
linking those libraries into non-free programs.
When a program is linked with a library, whether statically or using a shared
library, the combination of the two is legally speaking a combined work, a
derivative of the original library. The ordinary General Public License therefore
permits such linking only if the entire combination fits its criteria of freedom. The
Lesser General Public License permits more lax c riteria for linking other code with
30
the library.
TQBJ2036
We call this license the "Lesser" General P ublic License because it does Less to
protect the user's freedom than the ordinary General Public License. It also
provides other free software developers Less of an adva ntage over competing
non-free programs. These disadvantages are the reason we use the ordinary
General Public License for many libraries. How ever, the Lesser license provides
advantages in certain special circumstances.
For example, on rare occasions, there may be a spec ial need to encourage the
widest possible use of a certain library, so that it becomes a de-facto standard. To
achieve this, non-free programs must be allowed to us e the library. A more
frequent case is that a free library does the same job as widely used non-free
libraries. In this case, there is little to gain by limiting the free library to free
software only, so we use the Lesser General Public License.
In other cases, permission to use a particular library in non-free programs
enables a greater number of people to use a large body of free software. For
example, permission to use the GNU C Library in non-free programs enables
many more people to use the whole GNU operating system, as well as its variant,
the GNU/Linux operating system.
Although the Lesser General Public License is Less protective of the users'
freedom, it does ensure that the user of a program that is linked with the Library
has the freedom and the wherewithal to run that program using a modified version
of the Library.
The precise terms and conditions for copying , distribution and modification follow.
Pay close attention to the difference between a "work based on the library" and a
"work that uses the library". The former contains code derived from the library,
whereas the latter must be combined with the library in order to run.
GNU LESSER GENERAL PUBLIC LICENSE
TERMS AND CONDITIONS FOR COPYING, DISTRIBUTION AND MODIFICATION
0. This License Agreement applies to any software library or other pr ogram which
contains a notice placed by the copyright holder or other authorized party saying it
may be distributed under the terms of this Lesser Ge neral Public License (also
called "this License").
Each licensee is addressed as "you".
A "library" means a collection of software functions and/o r data prepared so as to
be conveniently linked with application programs (which use some of those
functions and data) to form executables.
The "Library", below, refers to any such software library or work which has b een
distributed under these terms. A "work based on the Library" means either the
Library or any derivative work under copyrigh t law: that is to say, a work containing
the Library or a portion of it, either verbatim or with modifications and/or translated
straightforwardly into another language. (Hereinafter, translation is included
without limitation in the term "modification".)
"Source code" for a work means the preferred form of the work for making
modifications to it. For a library, complete source code means all the so urce code
for all modules it contains, plus any associated int erface definition files, plus the
scripts used to control compilation and installation of the library.
Activities other than copying, distribution and modification are not covered b y this
License; they are outside its scope. The act of running a program using the Lib rary
is not restricted, and output from such a program is covered only if its contents
constitute a work based on the Library (independent of the use of the Library in a
tool for writing it). Whether that is true depends on what the Library does and what
the program that uses the Library does.
1. You may copy and distribute verbatim copies of the Library's complete source
code as you receive it, in any medium, provided that you conspicuously and
appropriately publish on each copy an ap propriate copyright notice and disclaimer
of warranty; keep intact all the notices that refer to this License and to the absence
of any warranty; and distribute a copy of this Lice nse along with the Library.
You may charge a fee for the physical act of transferring a copy, and you may at
your option offer warranty protection in exchange for a fee.
2. You may modify your copy or copies of the Library or any portion of it, thus
forming a work based on the Library, and copy and distribute such modifications or
work under the terms of Section 1 above, provided that you also meet all of these
conditions:
a) The modified work must itself be a software library.
b) You must cause the files modified to carry prominent notices stating that you
changed the files and the date of any change.
c) You must cause the whole of the work to be licensed at no charge to all third
parties under the terms of this License.
d) If a facility in the modified Library refers to a function or a table of data to be
supplied by an application program that uses the facility, other than as an
argument passed when the facility is invoked, then you must make a good faith
effort to ensure that, in the event an application does no t supply such function or
table, the facility still operates, and performs whatever part of its purpose
remains meaningful.
(For example, a function in a library to compute sq uare roots has a purpose that
is entirely well-defined independent of the application. Theref ore, Subsection 2d
requires that any application-supplied function or table used by this function
must be optional: if the application does not sup ply it, the square root function
must still compute square roots.)
Page 31

These requirements apply to the modified work as a whole. If identifiable sections
of that work are not derived from the Library, and can be reasonably considered
independent and separate works in themselves, then this License, and its terms,
do not apply to those sections when you distribute them as separate works. But
when you distribute the same sections as part of a whole which is a work based on
the Library, the distribution of the whole must be on the terms of this License,
whose permissions for other licensees extend to the entire whole, and thus to each
and every part regardless of who wrote it.
Thus, it is not the intent of this section to cl aim rights or contest your rights to work
written entirely by you; rather, the intent is to exercise the right to control the
distribution of derivative or collective works based on the Library.
In addition, mere aggregation of another work not based on the Library with the
Library (or with a work based on the Library) on a v olume of a storage or
distribution medium does not bring the other work under th e scope of this License.
3. You may opt to apply the terms of the ordinary GNU General Public License
instead of this License to a given copy of the Library. To do this, you must alter all
the notices that refer to this License, so that they refer to the ordinary GNU
General Public License, version 2, inst ead of to this License. (If a newer version
than version 2 of the ordinary GNU General Public License has appeared, then
you can specify that version instead i f you wish.) Do not make any other change in
these notices.
Once this change is made in a given copy, it is irreversible for that c opy, so the
ordinary GNU General Public License applies to all subsequent copies and
derivative works made from that copy.
This option is useful when you wish to copy part of the code of the Library into a
program that is not a library.
4. You may copy and distribute the Library (or a portion or derivative of it, under
Section 2) in object code or executable form under t he terms of Sections 1 and 2
above provided that you accompany it with the complete corresponding
machine-readable source code, which must be distributed under the terms of
Sections 1 and 2 above on a medium customarily used for software interchange.
If distribution of object code is made by offering access to copy from a designated
place, then offering equivalent access to copy the sourc e code from the same
place satisfies the requirement to distribute the source code, even though third
parties are not compelled to copy the source along with the object code.
5. A program that contains no derivative of any portion o f the Library, but is
designed to work with the Library by being compiled or linked with it, is called a
"work that uses the Library". Such a work, in isolation, is not a derivative work of
the Library, and therefore falls outside the scope of this License.
However, linking a "work that uses the Library" with the Library creates an
executable that is a derivative of the Library (because it contains portions of the
Library), rather than a "work that uses the library". The executable is therefore
covered by this License.
Section 6 states terms for distribution of such executables.
When a "work that uses the Library" uses material from a header file that is part of
the Library, the object code for the work may be a derivative work of the Library
even though the source code is not.
Whether this is true is especially significant if the work can be linked without the
Library, or if the work is itself a library. The threshold for this to be true is not
precisely defined by law.
If such an object file uses only numerical parameters, data structure layouts and
accessors, and small macros and sm all inline functions (ten lines or less in length),
then the use of the object file is unrestricted, regardless of whether it is legally a
derivative work. (Executables containing this object code plus portions of the
Library will still fall under Section 6.)
Otherwise, if the work is a derivative of the Libra ry, you may distribute the object
code for the work under the terms of Section 6.
Any executables containing that work also fall under Section 6, whether or not they
are linked directly with the Library itself.
6. As an exception to the Sections above, yo u may also combine or link a "work
that uses the Library" with the Library to produce a work containing portions of the
Library, and distribute that work under terms of your choice, provided that the
terms permit modification of the work for the customer's own use and reverse
engineering for debugging such modifications.
You must give prominent notice with each copy of the work that the Library is
used in it and that the Library and its use are covered by this License. You must
supply a copy of this License. If the work during execution displays copyright
notices, you must include the copyright notice for the Library among them, as well
as a reference directing the user to the copy of this License. Also, you must do
one of these things:
a) Accompany the work with the complete corresponding machine-readable
source code for the Library including whatever chan ges were used in the work
(which must be distributed under Sections 1 and 2 above); and, if the work is an
executable linked with the Library, with the complete machine-readable "work
that uses the Library", as object code and/or source code, so that the user can
modify the Library and then relink to produce a m odified executable containing
the modified Library. (It is understood that the user who changes the contents of
definitions files in the Library will not necessarily be able to recompile the
application to use the modified definitions.)
b) Use a suitable shared library mechanism for linking with the Library.
A suitable mechanism is one that (1) uses at run time a copy of the library
already present on the user's computer system, rather than copying library
functions into the executable, and (2) will operate proper ly with a modified
version of the library, if the user installs one, as long as the modified version is
interface-compatible with the version that the work was made with.
c) Accompany the work with a written offer, valid for at least three years, to give
the same user the materials specified in Subsection 6a, above, for a charge no
more than the cost of performing this distribution.
d) If distribution of the work is made by offering access to copy from a
designated place, offer equivalent access to cop y the above specified materials
from the same place.
e) Verify that the user has already received a copy of these m aterials or that you
have already sent this user a copy.
For an executable, the required form of the "work that uses the Library" must
include any data and utility programs needed for reproducing the executable from
it. However, as a special exception, the materials to be distributed nee d not
include anything that is normally distributed (in either source or binary form) with
the major components (compiler, kernel, and so on) of the operating system on
which the executable runs, unless that component itself ac companies the
executable.
It may happen that this requirement contradicts the license restrictions of other
proprietary libraries that do not normally accompany the operating system. Such a
contradiction means you cannot use both them and the Library together in an
executable that you distribute.
7. You may place library facilities that are a work based on the Library
side-by-side in a single library together with other library facilities not covered by
this License, and distribute such a combined library, provided that the separate
distribution of the work based on the Library and of the other library facilities is
otherwise permitted, and provided that you do these two things:
a) Accompany the combined library with a copy of the same work based on the
Library, uncombined with any other library facilities. This must be distributed
under the terms of the Sections above.
b) Give prominent notice with the combined library of th e fact that part of it is a
work based on the Library, and explaining where to find the accompanying
uncombined form of the same work.
8. You may not copy, modify, sublicense, link with, or distribute the Libr ary except
as expressly provided under this License. Any attempt otherwise to copy, modify,
sublicense, link with, or distribute the Library is void, and will automatically
terminate your rights under this License. However, parties who have received
copies, or rights, from you under this License will not have their licenses
terminated so long as such parties remain in f ull compliance.
9. You are not required to accept this License, since you have not signed it.
However, nothing else grants you permission to modify or distribute the Library or
its derivative works. These actions are prohi bited by law if you do not accept this
License. Therefore, by modifying or distri buting the Library (or any work based on
the Library), you indicate your acce ptance of this License to do so, and all its terms
and conditions for copying, distributin g or modifying the Library or works based on
it.
10. Each time you redistribute the Librar y (or any work based on the Library), the
recipient automatically receives a license from the original licensor to copy,
distribute, link with or modify the Library subject to these terms and conditions.
You may not impose any further restrictions on the recipients' exercise of the rights
granted herein.
You are not responsible for enforcing compliance by third parties with this License.
11. If, as a consequence of a court judgment or allegation of patent infringement
or for any other reason (not limited to patent issu es), conditions are imposed on
y
ou (whether by court order, agreement or otherwise) that contradict the conditions
of this License, they do not excuse you from the cond itions of this License. If you
cannot distribute so as to satisfy simultaneou sly your obligations under this
License and any other pertinent obligations, then as a consequence you may not
distribute the Library at all. For example, if a patent license would not permit
royalty-free redistribution of the Library by all those who receive copies directly or
indirectly through you, then the only way you could satisfy both it and this License
would be to refrain entirely from distribution of the Library.
If any portion of this section is held invalid or unenforceable under any particular
circumstance, the balance of the section is intended to apply, and the section as a
whole is intended to apply in other circumstances.
It is not the purpose of this section to induce you to infringe any patents or other
property right claims or to contest validity of any such claims; this section has the
sole purpose of protecting the integrity of the free software distribution system
which is implemented by public license practices. Many people have made
generous contributions to the wide range of software distributed through that
system in reliance on consistent application of that system; it is up to the author/
donor to decide if he or she is willing to distri bute software through any other
system and a licensee cannot impose that choice.
This section is intended to make thoroughly cle ar what is believed to be a
consequence of the rest of this License.
12. If the distribution and/or use of the Library is r estricted in certain countries
either by patents or by copyrighted interfaces, the origina l copyright holder who
places the Library under this License may add an expl icit geographical distribution
limitation excluding those countries, so that distribution is permitted only in or
among countries not thus excluded. In such case, this License incorporates the
limitation as if written in the body of this License.
TQBJ2036
ENGLISH
31
Page 32

13. The Free Software Foundation may publish revised and/or new versions of
the Lesser General Public License from time to time.
Such new versions will be similar in spirit to the present version, but may differ in
detail to address new problems or concerns.
Each version is given a distinguishing version number. If the Library specifies a
version number of this License which appli es to it and "any later version", you have
the option of following the terms and conditions either of that version or of any late r
version published by the Free Software Foundation. If the Library does not specify
a license version number, you may choose any version ever published by the Free
Software Foundation.
14. If you wish to incorporate parts of the Library into oth er free programs whose
distribution conditions are incompatible with these, write to the author to ask for
permission. For software which is copyrighted by t he Free Software Foundation,
write to the Free Software Foundation; we sometimes make exceptions for this.
Our decision will be guided by the two goals of preserving the free status of all
derivatives of our free software and of promotin g the sharing and reuse of software
generally.
NO WARRANTY
15. BECAUSE THE LIBRARY IS LICENSED FREE OF CHARGE, THERE IS NO
WARRANTY FOR THE LIBRARY, TO THE EXTENT PERMITTED BY
APPLICABLE LAW.
EXCEPT WHEN OTHERWISE STATED IN WRITING TH E COPYRIGHT
HOLDERS AND/OR OTHER PARTIES PROVIDE THE LIBRARY "AS IS"
WITHOUT WARRANTY OF ANY KIND, EITHER EXPRESSED OR IMPLIED,
INCLUDING, BUT NOT LIMITED TO, THE IMPLIED WARRANTIES OF
MERCHANTABILITY AND FITNESS FOR A PARTICULAR PURPOSE. THE
ENTIRE RISK AS TO THE QUALITY AND PERFORMANCE OF THE LIBRARY IS
WITH YOU. SHOULD THE LIBRARY PROVE DEFECTIVE, YOU ASSUME THE
COST OF ALL NECESSARY SERVICING, REPAIR OR CORRECTION.
16. IN NO EVENT UNLESS REQUIRED BY APPLICABLE LAW OR AGREED
TO IN WRITING WILL ANY COPYRIGHT HOLDER, OR ANY OTHER PARTY
WHO MAY MODIFY AND/OR REDISTRIBUTE THE LIBRARY AS PERMITTED
ABOVE, BE LIABLE TO YOU FOR DAMAGES, INCLUDING ANY GENERAL,
SPECIAL, INCIDENTAL OR CONSEQUENTIAL DAMAGES ARISING OUT OF
THE USE OR INABILITY TO USE THE LIBRARY (INCLUDING BUT NOT
LIMITED TO LOSS OF DATA OR DATA BEING RENDERED INACCURATE OR
LOSSES SUSTAINED BY YOU OR THIRD PARTIES OR A FAILURE OF THE
LIBRARY TO OPERATE WITH ANY OTHER SOFTWARE), EVEN IF SUCH
HOLDER OR OTHER PARTY HAS BEEN ADVISED OF THE POSSIBILITY OF
SUCH DAMAGES.
END OF TERMS AND CONDITIONS
How to Apply These Terms to Your New Libraries
If you develop a new library, and you want it to be of the greatest possible u se to
the public, we recommend making it free software that everyone can redistribute
and change. You can do so by permitting redistribution under these terms (or,
alternatively, under the terms of the ordinary General Public License).
To apply these terms, attach the following notices to the library. It is safest to
attach them to the start of each source file to most effectively convey the exclusion
of warranty; and each file should have at least the "copyright" line and a pointer to
where the full notice is found.
<one line to give the library's name and a brief idea of what it does.>
Copyright (C) <year> <name of author>
This library is free software; you can redistribute it and/or modify it under the
terms of the GNU Lesser General Public License a s published by the Free
Software Foundation; either version 2.1 of the License, or (at your option) any
later version.
This library is distributed in the hope that it will be useful, but WITHOUT ANY
WARRANTY; without even the implied warranty of MERCHANTABILITY or
FITNESS FOR A PARTICULAR PURPOSE. See the GNU Lesser General
Public License for more details.
You should have received a copy of the GNU Lesser General Public Lice nse
along with this library; if not, write to the Free Software Founda tion, Inc., 51
Franklin Street, Fifth Floor, Boston, MA 02110-1301 USA
Also add information on how to contact you by electronic an d paper mail.
You should also get your employer (if you work as a programmer) or your school, if
any, to sign a "copyright disclaimer" for the library, if necessary. Here is a sample;
alter the names:
Yoyodyne, Inc., hereby disclaims all copyright interest in the library `Frob' (a
library for tweaking knobs) written by James Random Ha cker.
<signature of Ty Coon>, 1 April 1990
Ty Coon, President of Vice
That's all there is to it!
GNU GENERAL PUBLIC LICENSE
Version 2, June 1991
Copyright (C) 1989, 1991 Free Software Foundation, Inc.,
32
51 Franklin Street, Fifth Floor, Boston, MA 02110-1301 USA
Everyone is permitted to copy and distribute verbatim copies
TQBJ2036
of this license document, but changing it is not allowed.
Preamble
The licenses for most software are designed to take away your freedom to share
and change it. By contrast, the GNU General Public License is intended to
guarantee your freedom to share and change free software--to make sure the
software is free for all its users. This General Public Licen se applies to most of the
Free Software Foundation's software and to any other program whose a uthors
commit to using it. (Some other Free Software Foundation software is covered by
the GNU Lesser General Public License instead.) You can apply it to your
programs, too.
When we speak of free software, we are referring to freedom, n ot price. Our
General Public Licenses are designed to make sure that you have the freedom to
distribute copies of free software (and charge for this service if you wish), that you
receive source code or can get it if you want it, that you can change the software or
use pieces of it in new free programs; and that you know you can do these things.
To protect your rights, we need to make restrictions that forbid anyone to deny
you these rights or to ask you to surrender the rights. These res trictions translate
to certain responsibilities for you if you distribute copies of the software, or if you
modify it.
For example, if you distribute copies of such a program, whether gratis or for a
fee, you must give the recipients all the rights that you have. You must make sure
that they, too, receive or can get the source code. And you must show them these
terms so they know their
rights.
We protect your rights with two steps: (1) copyright the software, and (2) offer you
this license which gives you legal permission to copy, distribute and/or modify the
software.
Also, for each author's protection and ours, we want to make certain that
everyone understands that there is no warranty for this free software. If the
software is modified by someone else and passed on, we want its recipients to
know that what they have is not the original, so that an y problems introduced by
others will not reflect on the original authors' reputations .
Finally, any free program is threatened constantly by software patents. We wish
to avoid the danger that redistributors of a free program will individually obtain
patent licenses, in effect making the program proprietary. To prevent this, we have
made it clear that any patent must be licensed for everyone's free use or not
licensed at all.
The precise terms and conditions for co pying, distribution and modification follow.
GNU GENERAL PUBLIC LICENSE
TERMS AND CONDITIONS FOR COPYING, DISTRIBUTION AND MODIFICATION
0. This License applies to any program or other wo rk which contains a notice
placed by the copyright holder saying it may be d istributed un der the terms of this
General Public License. The "Program", below, refers to any such program or
work, and a "work based on the Program" means e ither the Program or any
derivative work under copyright law: that is to say, a work containing the Program
or a portion of it, either verbatim or with modificatio ns and/or translated into
another language. (Hereinafter, translation is included without limitation in the term
"modification".) Each licensee is addressed as "you".
Activities other than copying, distribution and modification are not covered by this
License; they are outside its scope. The act of running the Program is not
restricted, and the output from the Progr am is covered only if its contents constitute
a work based on the Program (independent of having be en made by running the
Program).
Whether that is true depends on what the Program does.
1. You may copy and distribute verbatim copies of the Program's source code as
you receive it, in any medium, provided that you conspicuously and appropriately
publish on each copy an appropriate copyright notice and disclaimer of warranty;
keep intact all the notices that refer to this License and to the absence of any
warranty; and give any other recipients of the Program a copy of this License along
with the Program.
You may charge a fee for the physical act of transferring a copy, and you may at
your option offer warranty protection in exchange for a fee.
2. You may modify your copy or copies of the Program or any portion of it, thus
forming a work based on the Program, and copy and distribute such modifications
or work under the terms of Section 1 above, provided th at you also meet all of
these conditions:
a) You must cause the modified files to carry prominent notices stating that you
changed the files and the date of any change.
b) You must cause any work that you distribute or publish, that in whole or in part
contains or is derived from the Program or any part thereof, to be licensed as a
whole at no charge to all third parties under the terms o f this License.
c) If the modified program normally reads commands inte ractively when run, you
must cause it, when started running for such interact ive use in the most ordinary
way, to print or display an announcement including an appropriate copyri ght
notice and a notice that there is no warranty (or else, saying that you provide a
warranty) and that users may redistribute the program under these conditions,
and telling the user how to view a copy of this License. (Exception: if the
Program itself is interactive but does not normall y print such an announcement,
your work based on the Program is not required to prin t an announcement.)
Page 33

These requirements apply to the modified work as a whole. If identifiable sections
of that work are not derived from the Program, and can b e reasonably considered
independent and separate works in themselves, then this License, and its terms,
do not apply to those sections when you distribute them as separate works. But
when you distribute the same sections as part of a whole which is a work based on
the Program, the distribution of the whole must be on the terms of this License,
whose permissions for other licensees extend to the entire whole, and thus to each
and every part regardless of who wrote it.
Thus, it is not the intent of this section to cl aim rights or contest your rights to work
written entirely by you; rather, the intent is to exercise the right to control the
distribution of derivative or collective works b ased on the Program.
In addition, mere aggregation of another work not based on the Program with the
Program (or with a work based on the Program) on a volume of a storage or
distribution medium does not bring the other work under th e scope of this License.
3. You may copy and distribute the Program (or a work based on it, under Section
2) in object code or executable form under the terms of S ections 1 and 2 above
provided that you also do one of the following:
a) Accompany it with the complete corresponding machin e-readable source
code, which must be distributed under the terms of Sections 1 and 2 above on a
medium customarily used for software interchange; or,
b) Accompany it with a written offer, valid for at least three years, to give any
third party, for a charge no more than your cost of physically performin g source
distribution, a complete machine-readable copy of t he corresponding source
code, to be distributed under the terms of Sections 1 and 2 above on a medium
customarily used for software interchange; or,
c) Accompany it with the information you received a s to the offer to distribute
corresponding source code. (This alternative is allowed only for non commercial
distribution and only if you received the program in object code or executable
form with such an offer, in accord with Subsection b above.)
The source code for a work means the preferred form o f the work for making
modifications to it. For an executable work, complete source code means all the
source code for all modules it contains, plus any associated interface definition
files, plus the scripts used to control compilation and installation of the exec utable.
However, as a special exception, the source code distributed need not include
anything that is normally distributed ( in either source or binary form) with the major
components (compiler, kernel, and so on) of the operating system on which th e
executable runs, unless that component itself accompanies the executable.
If distribution of executable or object code is made by offering access to copy fr om
a designated place, then offering equivalent access to copy the source code from
the same place counts as distribution of the source code, even thoug h third parties
are not compelled to copy the source along with the object code.
4. You may not copy, modify, sublicense, or dist ribute the Program except as
expressly provided under this License. Any attempt otherwise to copy, modify,
sublicense or distribute the Program is void, and wi ll automatically terminate your
rights under this License. However, parties who have received copies, or rights,
from you under this License will not hav e their licenses terminated so long as such
parties remain in full compliance.
5. You are not required to accept this License, since you have not signed it.
However, nothing else grants you permission to modify or distr ibute the Program or
its derivative works. These actions are prohibited by law if you do not accept this
License. Therefore, by modifying or distributing the Program (or any work based
on the Program), you indicate your acceptance of this License to do so, and all its
terms and conditions for copying, distribu ting or modifying the Program or works
based on it.
6. Each time you redistribute the Program (or any work based on the Program),
the recipient automatically receives a lice nse from the original licensor to copy,
distribute or modify the Program subject to these terms and conditions. You may
not impose any further restrictions on the recipients' exercise of the rights granted
herein.
You are not responsible for enforcing compliance by third parties to this License.
7. If, as a consequence of a court judgment or allegation of patent infringement or
for any other reason (not limited to patent issues), con ditions are imposed on you
(whether by court order, agreement or otherwise) that contradict the conditions of
this License, they do not excuse you from the conditions of this License. If you
cannot distribute so as to satisfy simultaneously your obligations under this
License and any other pertinent obligations, then as a consequence you may not
distribute the Program at all. For example, if a patent license would not permit
royalty-free redistribution of t he Program by all those who receive copies directly or
indirectly through you, then the only way you coul d satisfy both it and this License
would be to refrain entirely from distribution of the Program.
If any portion of this section is held invalid or unenforceable under any particular
circumstance, the balance of the section is intended to apply and the section as a
whole is intended to apply in other circum stances.
It is not the purpose of this section to induce you to infringe any patents or other
property right claims or to contest validity of any such claims; this section has the
sole purpose of protecting the integrity of the f ree software distribution system,
which is implemented by public license practices. Many people have made
generous contributions to the wide range of software distribut ed through that
system in reliance on consistent application of that system; it is up to the author/
donor to decide if he or she is willing to distribute software through any other
system and a licensee cannot impose that choice.
This section is intended to make thoroughly clear what is believed to be a
consequence of the rest of this License.
8. If the distribution and/or use of the Program is res tricted in certain countries
either by patents or by copyrighted interfaces, the origina l copyright holder who
places the Program under this License may add an explicit geographical
distribution limitation excluding those countries, so that distribution is permitted
only in or among countries not thus excluded. In such case, this License
incorporates the limitation as if written in the body of this License.
9. The Free Software Foundation may publish revised and/or new versions of the
General Public License from time to time. Such new versions will be similar in
spirit to the present version, but may differ in detail to address new problems or
concerns.
Each version is given a distinguishin g version number. If the Program specifies a
version number of this License which applies t o it and "any later version", you have
the option of following the terms and conditions either of that version or of any later
version published by the Free Software Foundation. If the Program does not
specify a version number of this License, you may cho ose any version ever
published by the Free Software Foundation.
10. If you wish to incorporate parts of the Program into other free programs
whose distribution conditions are different, write to the author to ask for
permission. For software which is copyrighted by the Free Software Foundation,
write to the Free Software Foundation; we sometimes make exceptions for this.
Our decision will be guided by the two goals of preserving the free status of all
derivatives of our free software and of promoting the sharing and reuse of software
generally.
NO WARRANTY
11. BECAUSE THE PROGRAM IS LICENSED FREE OF CHARGE, THERE IS
NO WARRANTY FOR THE PROGRAM, TO THE EXTENT PERMITTED BY
APPLICABLE LAW. EXCEPT WHEN OTHERWISE STATED IN WRITING THE
COPYRIGHT HOLDERS AND/OR OTHER PARTIES PROVIDE THE PROGRAM
"AS IS" WITHOUT WARRANTY OF ANY KIND, EITHER EXPRESSED OR
IMPLIED, INCLUDING, BUT NOT LIMITED TO, THE IMPLIED WARRANTIES OF
MERCHANTABILITY AND FITNESS FOR A PARTICULAR PURPOSE. THE
ENTIRE RISK AS TO THE QUALITY AND PERFORMANCE OF THE PROGRAM
IS WITH YOU. SHOULD THE PROGRAM PROVE DEFECTIVE, YOU ASSUME
THE COST OF ALL NECESSARY SERVICING, REPAIR OR CORRECTION.
12. IN NO EVENT UNLESS REQUIRED BY APPLICABLE LAW OR AGREED
TO IN WRITING WILL ANY COPYRIGHT HOLDER, OR ANY OTHER PARTY
WHO MAY MODIFY AND/OR REDISTRIBUTE THE PROGRAM AS PERMITTED
ABOVE, BE LIABLE TO YOU FOR DAMAGES, INCLUDING ANY GENERAL,
SPECIAL, INCIDENTAL OR CONSEQUENTIAL DAMAGES ARISING OUT OF
THE USE OR INABILITY TO USE THE PROGRAM (INCLUDING BUT NOT
LIMITED TO LOSS OF DATA OR DATA BEING RENDERED INACCURATE OR
LOSSES SUSTAINED BY YOU OR THIRD PARTIES OR A FAILURE OF THE
PROGRAM TO OPERATE WITH ANY OTHER PROGRAMS), EVEN IF SUCH
HOLDER OR OTHER PARTY HAS BEEN ADVISED OF THE POSSIBILITY OF
SUCH DAMAGES.
END OF TERMS AND CONDITIONS
How to Apply These Terms to Your New Programs
If you develop a new program, and you want it to be o f the greatest possible use
to the public, the best way to achieve this is to mak e it free software which
everyone can redistribute and change under these terms.
To do so, attach the followi ng notices to the program. It is safest to attach them to
the start of each source file to most effectively convey the ex clusion of warranty;
and
each file should have at least the "copyright" line and a pointer to where the
full notice is found.
<one line to give the program's name and a brief idea of what it does.>
Copyright (C) <year> <name of author>
This program is free software; you can redistribute it and/or modify it under the terms
of the GNU General Public License as published by the Free Software Foundation;
either version 2 of the License, or (at your option) any later version.
This program is distributed in the hope that it will be useful, but WITHOUT ANY
WARRANTY; without even the implied warranty of MERCHANTABILITY or
FITNESS FOR A PARTICULAR PURPOSE. See the GNU General Public
License for more details.
You should have received a copy of the GNU General Public License along with
this program; if not, write to the Free Software Foundation, Inc., 51 Franklin
Street, Fifth Floor, Boston, MA 02110-1301 USA.
Also add information on how to contact you by electro nic and paper mail.
If the program is interactive, make it output a short notice like this when it starts in
an interactive mode:
Gnomovision version 69, Copyright (C) year name of au thor Gnomovision
comes with ABSOLUTELY NO WARRANTY; for details type `show w'.
This is free software, and you are welcome to redistribute it under certain
conditions; type `show c' for details.
The hypothetical commands `show w' and `show c' should show the appropriate
parts of the General Public License. Of course, the commands you use may be
called something other than `show w' and `show c'; they could even be
mouse-clicks or menu items--whatever suits your program.
You should also get your employer (if you work as a programmer) or your school, if
any, to sign a "copyright disclaimer" for the program, if necessary. Here is a
sample; alter the names:
TQBJ2036
ENGLISH
33
Page 34

Yoyodyne, Inc., hereby disclaims all copyright interest in the program
`Gnomovision' (which makes passes at compilers) written by James Hacker.
<signature of Ty Coon>, 1 April 1989
Ty Coon, President of Vice
This General Public License does not permit incorporating your program into
proprietary programs. If your program is a subroutine library, you may consider it
more useful to permit linking proprietary applications with the library. If this is what
you want to do, use the GNU Lesser General Public License instead of this
License.
This document contains certain notices that Qualcomm Connected Experiences,
Inc.
("QCE") is required to provide you regarding software components included with
the software provided herein. Notwithstanding anything in t he notices in this file,
your use of these software components together with the QCE software
(hereinafter referred to as "Software") is subject to the terms of your license from
QCE or its affiliates, as the case may be. Compliance with all copyright laws and
license terms included in the notice section of this file are the responsibility of the
user. Except as may be granted under a copyright license by separate express
written agreement, this file provides no rights under or l icense to any QCE or its
affiliate’s patents, trademarks, copyrights, or other intellectual property.
No part of the Software is a Contribution and QCE has made no Contribution under
the Apache 2.0 license. Notifications and licenses are retained for attribution
purposes only.
If the version of this software you are using is for running on iOS, it is developed
using unmodified iOS SDK header files included in Apple’s iOS SDK and such use
is not a Modification.
Copyright (c) 2013-2014 Qualcomm Connected Experiences, Inc.
All rights reserved. Confidential and Proprietary.
QUALCOMM is a trademark of Qualcomm Incorpor ated. Other trademarks are the
property of their respective owners.
=============================================================
=============================================================
Copyright AllSeen Alliance. All rights reserved.
Permission to use, copy, modify, and/or distribute this software for any purpose
with or without fee is hereby granted, provided that the above copyrigh t notice and
this permission notice appear in all copies.
THE SOFTWARE IS PROVIDED "AS IS" AND THE AUTHOR DISCLA IMS ALL
WARRANTIES WITH REGARD TO THIS SOFTWARE INCLUDING ALL IMPLIED
WARRANTIES OF MERCHANTABILITY AND FITNESS. IN NO EVENT SHALL
THE AUTHOR BE LIABLE FOR ANY SPECIAL, DIRECT, INDIRECT, OR
CONSEQUENTIAL DAMAGES OR ANY DAMAGES WHATSOEVER RESULTING
FROM LOSS OF USE, DATA OR PROFITS, WHETHER IN AN ACTION OF
CONTRACT, NEGLIGENCE OR OTHER TORTIOUS ACTION, ARISING OUT OF
OR IN CONNECTION WITH THE USE OR PERFORMANCE OF THIS
SOFTWARE.
=============================================================
=============================================================
Boost Software License - Version 1.0 - August 17th, 2003
Permission is hereby granted, free of charge, to an y person or organization
obtaining a copy of the software and accompanying documentation covered by thi s
license (the "Software") to use, reproduce, display, distribute, execute, and
transmit the Software, and to prepare derivative works of the Software, and to
permit third-parties to whom the Software is furnished to do so, all subject to the
following:
The copyright notices in the Software and this entire statement, including the
above license grant, this restriction and the following disclaimer, must be included
in all copies of the Software, in whole or in part, and all derivative works of the
Software, unless such copies or derivative works are solely in the form of
machine-executable object code generated by a source language processor.
THE SOFTWARE IS PROVIDED "AS IS", WITHOUT WARRANTY OF ANY KIND,
EXPRESS OR IMPLIED, INCLUDING BUT NOT LIMITED TO THE WARRANTIES
OF MERCHANTABILITY, FITNESS FOR A PARTICULAR PURPOSE, TITLE AND
NON-INFRINGEMENT. IN NO EVENT SHALL THE COPYRIGHT HOLDERS OR
ANYONE DISTRIBUTING THE SOFTWARE BE LIABLE FOR ANY DAMAGES
OR OTHER LIABILITY, WHETHER IN CONTRACT, TORT OR OTHERWISE,
ARISING FROM, OUT OF OR IN CONNECTION WITH THE SOFTWARE OR
THE USE OR OTHER DEALINGS IN THE SOFTWARE.
=============================================================
=============================================================
// Copyright (c) 2001-2009 Peter Dimov
//
// Distributed under the Boost Software License, Version 1.0.
// See accompanying file LICENSE_1_0.txt or copy at
// http://www.boost.org/LICENSE_1_0.txt
//
// See http://www.boost.org/libs/smart_ptr/weak_ptr.htm for documentation.
//
=============================================================
=============================================================
// Copyright Douglas Gregor 2001-2004. Use, modificati on and
// distribution is subject to the Boost Software License, Version
// 1.0. (See accompanying file LICENSE_1_0.txt or copy at
// http://www.boost.org/LICENSE_1_0.txt)
34
=============================================================
TQBJ2036
=============================================================
// Copyright (C) 2007, 2008 Steven Watanabe, Joseph Gauterin, Niels Dekker
//
// Distributed under the Boost Software License, Version 1.0. (See
// accompanying file LICENSE_1_0.txt or copy at
// http://www.boost.org/LICENSE_1_0.txt)
// For more information, see http://www.boost.org
=============================================================
=============================================================
// Copyright (C) 2003, Fernando Luis Cacciola Carballal.
// Copyright (C) 2007, Tobias Schwinger.
//
// Use, modification, and distribution is subject to the B oost Software
// License, Version 1.0. (See accompanying file LICENSE_1_0.txt or copy at
// http://www.boost.org/LICENSE_1_0.txt)
=============================================================
=============================================================
// Copyright 2003 (c) The Trustees of Indiana University.
// Use, modification, and distribution is subject to the B oost Software
// License, Version 1.0. (See accompanying file LICENSE_1_0.txt or copy at
// http://www.boost.org/LICENSE_1_0.txt)
=============================================================
=============================================================
/ Copyright (C) 2003, Fernando Luis Cacciola Carball al.
// Copyright (C) 2007, Tobias Schwinger.
//
// Use, modification, and distribution is subject to the B oost Software
// License, Version 1.0. (See accompanying file LICENSE_1_0.txt or copy at
// http://www.boost.org/LICENSE_1_0.txt)
//
// See http://www.boost.org/libs/optional for documentation.
//
// You are welcome to contact the author at:
// fernando_cacciola@hotmail.com
//
=============================================================
=============================================================
// Copyright 2010 Vicente J. Botet Escriba
// Di
stributed under the Boost Software License, Version 1.0.
// See http://www.boost.org/LICENSE_1_0.txt
=============================================================
=============================================================
// Copyright (C) 2003, 2008 Fernando Luis Cacciola Carballal.
//
// Use, modification, and distribution is subject to the B oost Software
// License, Version 1.0. (See accompanying file LICENSE_1_0.txt or copy at
// http://www.boost.org/LICENSE_1_0.txt)
//
// See http://www.boost.org/libs/optional for documentation.
//
// You are welcome to contact the author at:
// fernando_cacciola@hotmail.com
//
=============================================================
=============================================================
// Copyright 2001, 2003, 2004 Daryle Walker. Use, modification, and
// distribution are subject to the Boost Software License, Version 1.0. (See
// accompanying file LICENSE_1_0.txt or a copy at
// <http://www.boost.org/LICENSE_1_0.txt>.)
=============================================================
=============================================================
// Copyright (C) 2002 Brad King (brad.king@kitware.com)
// Douglas Gregor (gregod@cs.rpi.edu)
//
// Copyright (C) 2002, 2008 Peter Dimov
//
// Distributed under the Boost Software License, Version 1.0. (See
// accompanying file LICENSE_1_0.txt or copy at
// http://www.boost.org/LICENSE_1_0.txt)
// For more information, see http://www.boost.org
=============================================================
=============================================================
// (C) Copyright John Maddock 2000.
// Use, modification and distribution are subject to the B oost Software License,
// Version 1.0. (See accompanying file LICENSE_1_0.txt or copy at
// http://www.boost.org/LICENSE_1_0.txt).
//
// See http://www.boost.org/libs/type_traits for most recent version including
documentation.
=============================================================
=============================================================
// (C) Copyright Steve Cleary, Beman Dawes, Howard Hinnant & John Maddock
2000.
// Use, modification and distribution are subject to the B oost Software License,
Page 35

// Version 1.0. (See accompanying file LICENSE_1_0.txt or copy at
// http://www.boost.org/LICENSE_1_0.txt).
//
// See http://www.boost.org/libs/type_traits for most recent version includin g
documentation.
=============================================================
=============================================================
// (C) Copyright Dave Abrahams, Steve Cleary, Beman Dawes, Howard
// Hinnant & John Maddock 2000.
// Use, modification and distribution are subject to the Boost Software License,
// Version 1.0. (See accompanying file LICENSE_1_0.txt or copy at
// http://www.boost.org/LICENSE_1_0.txt).
//
// See http://www.boost.org/libs/type_traits for most recent version includin g
documentation.
=============================================================
=============================================================
// (C) Copyright Dave Abrahams, Steve Cleary, Beman Dawes,
// Howard Hinnant and John Maddock 2000-2003.
// (C) Copyright Mat Marcus, Jesse Jones and Ad obe Systems Inc 2001
// Use, modification and distribution are subject to the Boost Software License,
// Version 1.0. (See accompanying file LICENSE_1_0.txt or copy at
// http://www.boost.org/LICENSE_1_0.txt).
//
// See http://www.boost.org/libs/type_traits for most recent version includin g
documentation.
=============================================================
=============================================================
// Copyright 2000 John Maddock (john@johnmaddock.co.uk)
// Copyright 2002 Aleksey Gurtovoy (agurtovoy@ meta-comm.com)
//
// Use, modification and distribution are subject to the Boost Software License,
// Version 1.0. (See accompanying file LICENSE_1_0.txt or copy at
// http://www.boost.org/LICENSE_1_0.txt).
//
=============================================================
=============================================================
// Copyright 2000 John Maddock (john@johnmaddock.co.uk)
// Copyright 2000 Jeremy Siek (jsiek@lsc.nd.edu)
// Copyright 1999, 2000 Jaakko Jarvi (jaakko.jar vi@cs.utu.fi)
//
// Use, modification and distribution are subject to the Boost Software License,
// Version 1.0. (See accompanying file LICENSE_1_0.txt or copy at
// http://www.boost.org/LICENSE_1_0.txt).
=============================================================
=============================================================
//
// (C) Copyright 2002 Rani Sharoni (rani_sharoni@hotmail.com) and Robert Ramey
// Use, modification and distribution is subje ct to the Boost Software
// License, Version 1.0. (See accompanying file LICENSE_1_0.txt or copy at
// http://www.boost.org/LICENSE_1_0.txt)
//
=============================================================
=============================================================
// (C) Copyright John Maddock and Steve Cleary 2000.
// Use, modification and distribution are subject to the Boost Software License,
// Version 1.0. (See accompanying file LICENSE_1_0.txt or copy at
// http://www.boost.org/LICENSE_1_0.txt).
//
=============================================================
=============================================================
// Copyright Aleksey Gurtovoy 2001-2008
//
// Distributed under the Boost Software License, Version 1.0.
// (See accompanying file LICENSE_1_0.txt or copy at
// http://www.boost.org/LICENSE_1_0.txt)
=============================================================
=============================================================
// Copyright David Abrahams 2001-2002.
// Use, modification and distribution are subject to the Boost Software License,
// Version 1.0. (See accompanying file LICENSE_1_0.txt or copy at
// http://www.boost.org/LICENSE_1_0.txt).
//
=============================================================
=============================================================
// (C) Copyright John Maddock & Thorsten Ottosen 2 005.
// Use, modification and distribution are subject to the Boost Software License,
// Version 1.0. (See accompanying file LICENSE_1_0.txt or copy at
// http://www.boost.org/LICENSE_1_0.txt).
//
=============================================================
=============================================================
// Copyright 2010 Vicente J. Botet Escriba
// Distributed under the Boost Software License, Version 1.0.
// See http://www.boost.org/LICENSE_1_0.txt
=============================================================
=============================================================
// Copyright (c) 2002 Peter Dimov and Multi Media Ltd.
// Copyright (c) 2008-2009 Emil Dotchevski and Reverge Studios, Inc.
//
// Distributed under the Boost Software License, Version 1.0. (See
// accompanying file LICENSE_1_0.txt or copy at
// http://www.boost.org/LICENSE_1_0.txt)
//
=============================================================
=============================================================
// Copyright Beman Dawes 1999-2003, 2006, 2010
// Distributed under the Boost Software License, Version 1.0. (See accompanying
// file LICENSE_1_0.txt or copy at http://www.boost.org/LICENSE_1_0.txt)
=============================================================
=============================================================
// Copyright Beman Dawes 2006, 2007
// Copyright Christoper Kohlhoff 2007
// Distributed under the Boost Software License, Version 1.0. (See accompanying
// file LICENSE_1_0.txt or copy at http://www.boost.org/LICENSE_1_0.txt)
=============================================================
=============================================================
// (C) Copyright Greg Colvin and Beman Dawes 1998, 1999.
// Copyright (c) 2001-2008 Peter Dimov
//
// Distributed under the Boost Software License, Version 1.0. (See
// accompanying file LICENSE_1_0.txt or copy at
// http://www.boost.org/LICENSE_1_0.txt)
=============================================================
=============================================================
// Copyright (c) 2001, 2002, 2003 Peter Dimov and Multi Media Ltd.
// Copyright 2004-2005 Peter Dimov
//
// Distributed under the Boost Software License, Version 1.0. (See
// accompanying file LICENSE_1_0.txt or copy at
// http://www.boost.org/LICENSE_1_0.txt)
//
=============================================================
=============================================================
// Copyright (c) 2009, Spirent Communications, Inc.
//
// Distributed under the Boost Software License, Version 1.0. (See
// accompanying file LICENSE_1_0.txt or copy at
// http://www.boost.org/LICENSE_1_0.txt)
//
=============================================================
=============================================================
// Copyright (c) 2001, 2002, 2003 Peter Dimov and Multi Media Ltd.
//
// Distributed under the Boost Software License, Version 1.0. (See
// accompanying file LICENSE_1_0.txt or copy at
// http://www.boost.org/LICENSE_1_0.txt)
//
=============================================================
=============================================================
// Copyright (C) 1999, 2000 Jaakko Jarvi (jaakko .jarvi@cs.utu.fi)
// Copyright (C) 2001, 2002 Peter Dimov
// Copyright (C) 2002 David Abrahams
//
// Distributed under the Boost Software License, Version 1.0. (See
// accompanying file LICENSE_1_0.txt or copy at
// http://www.boost.org/LICENSE_1_0.txt)
=== ==========================================================
=== ==========================================================
# /* ******************************* *******************************************
# * *
# * (C) Copyright Edward Diener 2011. *
# * (C) Copyright Paul Mensonides 2011. *
# * Distributed under the Boost Software License, Version 1.0. (See *
# * accompanying file LICENSE_1_0.txt or copy at *
# * http://www.boost.org/LICENSE_1_0.txt) *
# * *
# ******************************** ****************************************** */
#
=============================================================
=============================================================
# /* Copyright (C) 2001
# * Housemarque Oy
# * http://www.housemarque.com
# *
# * Distributed under the Boost Software License, Version 1.0. (See
# * accompanying file LICENSE_1_0.txt or copy at
# * http://www.boost.org/LICENSE_1_0.txt)
# */
#
# /* Revised by Paul Mensonides (2002-2011) */
# /* Revised by Edward Diener (2011) */
#
TQBJ2036
ENGLISH
35
Page 36

=============================================================
=============================================================
# /* ************************************ ******************************* *******
# * *
# * (C) Copyright Paul Mensonides 2002-2011. *
# * (C) Copyright Edward Diener 2011. *
# * Distributed under the Boost Software License, Version 1.0. (See *
# * accompanying file LICENSE_1_0.txt or copy at *
# * http://www.boost.org/LICENSE_1_0.txt) *
# * *
# ******************************* ******************************************* */
#
=============================================================
=============================================================
# /* ************************************ ******************************* *******
# * *
# * (C) Copyright Paul Mensonides 2002.
# * Distributed under the Boost Software License, Version 1.0. (See
# * accompanying file LICENSE_1_0.txt or copy at
# * http://www.boost.org/LICENSE_1_0.txt)
# * *
# ******************************* ******************************************* */
#
=============================================================
=============================================================
// (C) Copyright David Abrahams, Jeremy Siek, Daryle Walker 1999-2001.
// Distributed under the Boost Software License, Version 1.0. (See
// accompanying file LICENSE_1_0.txt or copy at
// http://www.boost.org/LICENSE_1_0.txt)
=============================================================
=============================================================
// Copyright Peter Dimov 2001-2003
// Copyright Aleksey Gurtovoy 2001-2004
//
// Distributed under the Boost Software License, Version 1.0.
// (See accompanying file LICENSE_1_0.txt or copy at
// http://www.boost.org/LICENSE_1_0.txt)
=============================================================
=============================================================
// Copyright Aleksey Gurtovoy 2002-2006
// Copyright David Abrahams 2002-2003
// Copyright Daniel Walker 2007
//
// Distributed under the Boost Software License, Version 1.0.
// (See accompanying file LICENSE_1_0.txt or copy at
// http://www.boost.org/LICENSE_1_0.txt)
=============================================================
=============================================================
// Copyright Aleksey Gurtovoy 2002-2004
// Copyright David Abrahams 2002-2003
//
// Distributed under the Boost Software License, Version 1.0.
// (See accompanying file LICENSE_1_0.txt or copy at
// http://www.boost.org/LICENSE_1_0.txt)
//
=============================================================
=============================================================
// (C) Copyright John maddock 1999.
// (C) David Abrahams 2002. Distributed under the Boost
// Software License, Version 1.0. (See accompanying file
// LICENSE_1_0.txt or copy at http://www.boost.org/LICENSE_1_0.txt)
//
=============================================================
=============================================================
// (C) Copyright David Abrahams 2002.
// (C) Copyright Jeremy Siek 2002.
// (C) Copyright Thomas Witt 2002.
// Distributed under the Boost Software License, Version 1.0. (See
// accompanying file LICENSE_1_0.txt or copy at
// http://www.boost.org/LICENSE_1_0.txt)
==========================================================
==========================================================
// (C) Copyright Jeremy Siek 2002.
// Distributed under the Boost Software License, Version 1.0. (See
// accompanying file LICENSE_1_0.txt or copy at
// http://www.boost.org/LICENSE_1_0.txt)
=============================================================
=============================================================
// (C) Copyright Thomas Witt 2002.
// Distributed under the Boost Software License, Version 1.0. (See
// accompanying file LICENSE_1_0.txt or copy at
// http://www.boost.org/LICENSE_1_0.txt)
=============================================================
=============================================================
// Copyright 2002, 2005 Daryle Walker. Use, modification, and distribution are subject
36
// to the Boost Software License, Version 1.0. (See accompanying file
// LICENSE_1_0.txt or a copy at <http://www.boost.org/LICENSE_1_0.txt>.)
TQBJ2036
=============================================================
/* boost integer_traits.hpp header file
*
* Copyright Jens Maurer 2000
* Distributed under the Boost Software License, Version 1.0. (See
* accompanying file LICENSE_1_0.txt or copy at
* http://www.boost.org/LICENSE_1_0.txt)
=============================================================
=============================================================
// (C) Copyright Dave Abrahams and Daryle Walker 2001. Distributed under the
Boost
// Software License, Version 1.0. (See accompanying file
// LICENSE_1_0.txt or copy at http://www.boost.org/LICENSE_1_0.txt)
==========================================================
==========================================================
// Copyright Beman Dawes and Daryle Walker 1999. Distributed under the Boost
// Software License, Version 1.0. (See accompanying file
// LICENSE_1_0.txt or copy at http://www.boost.org/LICENSE_1_0.txt)
==========================================================
==========================================================
// Copyright Peter Dimov and David Abrahams 2002.
// Distributed under the Boost Software License, Version 1.0. (See
// accompanying file LICENSE_1_0.txt or copy at
// http://www.boost.org/LICENSE_1_0.txt)
==========================================================
==========================================================
// Copyright 2005-2009 Daniel James.
// Distributed under the Boost Software License, Version 1.0. (See accompanying
// file LICENSE_1_0.txt or copy at http://www.boost.org/LICENSE_1_0.txt)
==========================================================
==========================================================
// Copyright Douglas Gregor 2004.
// Copyright 2005 Peter Dimov
// Use, modification and distribution is subject to
// the Boost Software License, Version 1.0.
// (See accompanying file LICENSE_1_0.txt or copy at
// http://www.boost.org/LICENSE_1_0.txt)
==
========================================================
==========================================================
// Copyright Douglas Gregor 2001-2006
// Copyright Emil Dotchevski 2007
// Use, modification and distribution is subject to the B oost Software License,
Version 1.0.
// (See accompanying file LICENSE_1_0.txt or copy at
// http://www.boost.org/LICENSE_1_0.txt)
=============================================================
=============================================================
// Copyright Samuel Krempp 2003. Use, modification, and distribution are
// subject to the Boost Software License, Version 1.0. (See accompanying
// file LICENSE_1_0.txt or copy at http://www.boost.org/LICENSE_1_0.txt)
=============================================================
=============================================================
// Copyright Beman Dawes 2002-2005, 2009
// Copyright Vladimir Prus 2002
// Distributed under the Boost Software License, Version 1.0.
// See http://www.boost.org/LICENSE_1_0.txt
=============================================================
=============================================================
// Copyright Beman Dawes 2002-2009
// Copyright Jan Langer 2002
// Copyright Dietmar Kuehl 2001
// Copyright Vladimir Prus 2002
// Distributed under the Boost Software License, Version 1.0.
// See http://www.boost.org/LICENSE_1_0.txt
=============================================================
=============================================================
//Copyright (c) 2006-2009 Emil Dotchevski and Reverge Studios, Inc.
//Distributed under the Boost Software License, Version 1.0. (See accompanying
//file LICENSE_1_0.txt or copy at http://www.boost.org/LICENSE_1_0.txt)
=============================================================
// Copyright (c) 2003
// Eric Friedman
//
// Distributed under the Boost Software License, Version 1.0. (See
// accompanying file LICENSE_1_0.txt or copy at
// http://www.boost.org/LICENSE_1_0.txt)
=============================================================
Page 37

=============================================================
// (C) Copyright 2004 Pavel Vozenilek.
// Use, modification and distribution is subject to the Boost Software
// License, Version 1.0. (See accompanying file LICENSE_1_0.txt
// or copy at http://www.boost.org/LICENSE_1_0.txt)
/
=============================================================
=============================================================
// (C) Copyright Beman Dawes 1999.
// (C) Copyright Jens Mauer 2001
// (C) Copyright John Maddock 2001
// Distributed under the Boost
// Software License, Version 1.0. (See accompanying file
// LICENSE_1_0.txt or copy at http://www.boost.org/LICENSE_1_0.txt)
=============================================================
=============================================================
// Copyright (c) 2001-2003 John Maddock
// Copyright (c) 2001 Darin Adler
// Copyright (c) 2001 Peter Dimov
// Copyright (c) 2002 Bill Kempf
// Copyright (c) 2002 Jens Maurer
// Copyright (c) 2002-2003 David Abrahams
// Copyright (c) 2003 Gennaro Prota
// Copyright (c) 2003 Eric Friedman
// Copyright (c) 2010 Eric Jourdanneau, Joel Fa lcou
// Distributed under the Boost Software License, Version 1.0. (See
// accompanying file LICENSE_1_0.txt or copy at
// http://www.boost.org/LICENSE_1_0.txt)
=============================================================
=============================================================
// (C) Copyright John Maddock 2001-2003.
// (C) Copyright Jens Maurer 2001-2002.
// Use, modification and distribution are subject to the
// Boost Software License, Version 1.0. (See accompanying file
// LICENSE_1_0.txt or copy at http://www.boost.org/LICENSE_1_0.txt)
=============================================================
=============================================================
// (C) Copyright John Maddock 2001 - 2003.
// (C) Copyright Martin Wille 2003.
// (C) Copyright Guillaume Melquiond 2003.
//
=============================================================
=============================================================
// (C) Copyright John Maddock 2001 - 2003.
// (C) Copyright Darin Adler 2001 - 2002.
// (C) Copyright Jens Maurer 2001 - 2002.
// (C) Copyright Beman Dawes 2001 - 2003.
// (C) Copyright Douglas Gregor 2002.
// (C) Copyright David Abrahams 2002 - 2003.
// (C) Copyright Synge Todo 2003.
// Use, modification and distribution are subject to the
// Boost Software License, Version 1.0. (See accompanying file
// LICENSE_1_0.txt or copy at http://www.boost.org/LICENSE_1_0.txt)
=============================================================
=============================================================
/ Copyright (c) 2002, 2003 Peter Dimov
// Copyright (c) 2003 Daniel Frey
// Copyright (c) 2003 Howard Hinnant
//
// Distributed under the Boost Software License, Version 1.0. (See
// accompanying file LICENSE_1_0.txt or copy at
// http://www.boost.org/LICENSE_1_0.txt)
//
==================================================
// Copyright (c) 2001-2004 Peter Dimov and Multi Media Ltd.
// Copyright (c) 2001 David Abrahams
// Copyright (c) 2003-2005 Peter Dimov
//
// Distributed under the Boost Software License, Version 1.0. (See
// accompanying file LICENSE_1_0.txt or copy at
// http://www.boost.org/LICENSE_1_0.txt)
//
=============================================================
=============================================================
// Copyright (c) 2001, 2002 Peter Dimov and Multi Me dia Ltd.
// Copyright (c) 2007 Peter Dimov
// Copyright (c) Beman Dawes 2011
//
// Distributed under the Boost Software License, Version 1.0. (See
// accompanying file LICENSE_1_0.txt or copy at
// http://www.boost.org/LICENSE_1_0.txt)
//
=============================================================
=============================================================
www.sourceforge.net/projects/tinyxml
Original code (2.0 and earlier )copyright (c) 200 0-2006 Lee Thomason
(www.grinninglizard.com)
This software is provided 'as-is', without any express or i mplied warranty. In no
event will the authors be held liable for any damages arising from the use of this
software.
Permission is granted to anyone to use this software f or any purpose, including
commercial applications, and to alter it and redistribute it freely, subject to the
following restrictions:
1. The origin of this software must not be misrepresented; you must not claim that
you wrote the original software. If you use this software in a product, an
acknowledgment in the product documentation would be a ppreciated but is not
required.
2. Altered source versions must be plainly marked as such, and must not be
misrepresented as being the original software.
3. This notice may not be removed or altered from any source distribution.
=============================================================
=============================================================
libxml2-2.7.8/Copyright
Except where otherwise noted in the source code (e.g. th e files hash.c, list.c and
the trio files, which are covered by a similar li cence but with different Copyright
notices) all the files are:
Copyright (C) 1998-2003 Daniel Veillard. All Rights Reserved.
Permission is hereby granted, free of charge, to any person obtaining a copy of
this software and associated documentation files (the "Software"), to deal in the
Software without restriction, including without limitation the rights to use, copy,
modify, merge, publish, distribute, sublicense, and/or sell copies of the Software,
and to permit persons to whom the Software is fur-nished to do so, subject to the
following conditions:
The above copyright notice and this permission no tice shall be included in all
copies or substantial portions of the Software.
THE SOFTWARE IS PROVIDED "AS IS", WITHOUT WARRANTY OF ANY KIND,
EXPRESS OR IMPLIED, INCLUDING BUT NOT LIMITED TO THE WARRANTIES
OF MERCHANTABILITY, FIT-NESS FOR A PARTICULAR PURPOSE AND
NONINFRINGEMENT. IN NO EVENT SHALL THE DANIEL VEILLARD BE
LIABLE FOR ANY CLAIM, DAMAGES OR OTHER LIABILITY, WHETHER IN AN
ACTION OF CONTRACT, TORT OR OTHERWISE, ARISING FROM, OUT OF OR
IN CON-NECTION WITH THE S
IN THE SOFTWARE.
Except as contained in this notice, the name of Daniel Veillard shall not be used in
advertising or otherwise to promote the sale, use or other deal-ings in this
Software without prior written authorization from him
=============================================================
=============================================================
LICENSE ISSUES
==============
The OpenSSL toolkit stays under a dual license, i .e. both the conditions of
the OpenSSL License and the original SSLeay license apply to the toolkit.
See below for the actual license texts. Actually both licenses are BSD-style
Open Source licenses. In case of any license issues related to OpenSSL
please contact openssl-core@openssl.org.
OpenSSL License
---------------
/* ==========================================================
* Copyright (c) 1998-2011 The OpenSSL Project. All rights reserved.
*
* Redistribution and use in source and binary forms , with or without
* modification, are permitted provided that the following conditions
* are met:
*
* 1. Redistributions of source code must retain the above copy right
* notice, this list of conditions and the following disclaimer.
*
* 2. Redistributions in binary form must reproduce the above copyright
* notice, this list of conditions and the following disclaimer in
* the documentation and/or other materials provided with the
* distribution.
*
* 3. All advertising materials mentioning featur es or use of this
* software must display the following acknowledgment:
* "This product includes software developed by the OpenSSL Project
* for use in the OpenSSL Toolkit. (http:www.openssl.org/)"
*
* 4. The names "OpenSSL Toolkit" and "OpenSSL Project" must not be used to
* endorse or promote products derived from this software witho ut
* prior written permission. For written permis sion, please contact
* openssl-core@openssl.org.
*
* 5. Products derived from this software may not be called "OpenSSL"
* nor may "OpenSSL" appear in their names without prior written
* permission of the OpenSSL Project.
*
* 6. Redistributions of any form whatsoever must retain the following
* acknowledgment:
OFTWARE OR THE USE OR OTHER DEALINGS
TQBJ2036
ENGLISH
37
Page 38

* "This product includes software developed by the OpenSSL Project
* for use in the OpenSSL Toolkit (http:www.openssl.org/)"
*
* THIS SOFTWARE IS PROVIDED BY THE OpenSSL PROJECT ``AS IS'' AND ANY
* EXPRESSED OR IMPLIED WARRANTIES, INCLUDING, BUT NOT LIMITED TO, THE
* IMPLIED WARRANTIES OF MERCHANTABILITY AND FITNESS FOR A PARTICULAR
* PURPOSE ARE DISCLAIMED. IN NO EVENT SHALL THE OpenSSL PROJECT OR
* ITS CONTRIBUTORS BE LIABLE FOR ANY DIRECT, INDIRECT, INCIDENTAL,
* SPECIAL, EXEMPLARY, OR CONSEQUENTIAL DAMAGES (INCLUDING, BUT
* NOT LIMITED TO, PROCUREMENT OF SUBSTITUT E GOODS OR SERVICES;
* LOSS OF USE, DATA, OR PROFITS; OR BUSINESS INTERRUPTION)
* HOWEVER CAUSED AND ON ANY THEORY OF LIABILITY, WHETHER IN CONTRACT,
* STRICT LIABILITY, OR TORT (INCLUDING NEGLIGENCE OR OTHERWISE)
* ARISING IN ANY WAY OUT OF THE USE OF THIS SOFTWARE, EVEN IF ADVISED
* OF THE POSSIBILITY OF SUCH DAMAGE.
*=========================================================
*
* This product includes cryptographic software writt en by Eric Young
* (eay@cryptsoft.com). This product includes software written by Tim
* Hudson (tjh@cryptsoft.com).
*
*/
==========================================================
==========================================================
Original SSLeay License
-----------------------
/* Copyright (C) 1995-1998 Eric Young (eay@cryptsoft.com)
* All rights reserved.
*
* This package is an SSL implementation written
* by Eric Young (eay@cryptsoft.com).
* The implementation was written so as to conform with Netscapes SSL.
*
* This library is free for commercial a nd non-commercial use as long as
* the following conditions are aheared to. The foll owing conditions
* apply to all code found in this distribution, be it the RC4, RSA,
* lhash, DES, etc., code; not just the SSL code. The SSL documentation
* included with this distribution is covered by the same copyright terms
* except that the holder is Tim Hudson (tjh@cryptsoft.com).
*
* Copyright remains Eric Young's, and as such any Copyright notices in
* the code are not to be removed.
* If this package is used in a product, Eric Young should be given attribution
* as the author of the parts of the library used.
* This can be in the form of a textual message at program startup or
* in documentation (online or textual) provided with the package.
*
* Redistribution and use in source and binary forms, with or without
* modification, are permitted provided that the following conditions
* are met:
* 1. Redistributions of source code must retain the copyright
* notice, this list of conditions and the following disclaimer.
* 2. Redistributions in binary form must reproduc e the above copyright
* notice, this list of conditions and the following disclaimer in the
* documentation and/or other materials provided with the distribution.
* 3. All advertising materials mentioning features or use of this software
* must display the following acknowledgement:
* "This product includes cryptographic software written by
* Eric Young (eay@cryptsoft.com)"
* The word 'cryptographic' can be left out if the rouin es from the library
* being used are not cryptographic related :-).
* 4. If you include any Windows specific code (or a derivative thereof) from
* the apps directory (application code) you must include an acknowledgement:
* "This product includes software written by Tim Hudson (tjh@cryptsoft.com)"
*
* THIS SOFTWARE IS PROVIDED BY ERIC YOUNG ``AS IS'' AND
* ANY EXPRESS OR IMPLI ED WARRANTIES, INCLUDING, BUT NOT LIMITED TO, THE
* IMPLIED WARRANTIES OF MERCHANTABILITY AND FITNESS FOR A PARTICULAR PURPOSE
* ARE DISCLAIMED. IN NO EVENT SHALL THE AUTHOR OR CONTRIBU TORS BE LIABLE
* FOR ANY DIRECT, INDIRECT, INCIDENTAL, SPECIAL, EXEMPLARY, OR CONSEQUENTIAL
* DAMAGES (INCLUDI NG, BUT NOT LIMI TED TO, PROCUREMENT OF SUBSTITUTE GOOD S
* OR SERVICES; LOSS OF USE, DATA, OR PROFITS; OR BUSINESS INTERRUPTION)
* HOWEVER CAUSED AND ON ANY THEORY OF LIABILITY, WHETHER IN CONTRACT, STRICT
* LIABILITY, OR TORT (INCLUDING NEGLIGENCE OR OTHERWISE) ARISING IN ANY WAY
* OUT OF THE USE OF THIS SOFTWARE, EVEN IF ADVISED OF THE POSSIB ILITY OF
* SUCH DAMAGE.
*
* The licence and distribution terms for any publi cally available version or
* derivative of this code cannot be changed. i. e. this code cannot simply be
* copied and put under another distribution l icence
* [including the GNU Public Licence.]
*/
==========================================================
==========================================================
==========================================================
Apache License
Version 2.0, January 2004
http:www.apache.org/licenses/
TERMS AND CONDITIONS FOR USE, REPRODUCTION, AND
DISTRIBUTION
1. Definitions.
38
"License" shall mean the terms and conditions for use, reproduction,
TQBJ2036
and distribution as defined by Sections 1 through 9 of this document.
"Licensor" shall mean the copyright owner or entity authorized by
the copyright owner that is granting the License.
"Legal Entity" shall mean the union of the acting entity and all
other entities that control, are controlled by, or are under common
control with that entity. For the purposes of this definition,
"control" means (i) the power, direct or indirect, to cause the
direction or management of such entity, whether by contract or
otherwise, or (ii) ownership of fifty percent (50%) or more of the
outstanding shares, or (iii) beneficial ownership of such entity.
"You" (or "Your") sh all mean an individual or Legal Entity
exercising permissions granted by this Licens e.
"Source" form shall mean the preferred form for making modifications,
including but not limited to software source code, docume ntation
source, and configuration files.
"Object" form shall mean any form resulting from mechanical
transformation or translation of a Source form, including but
not limited to compiled object code, generated do cumentation,
and conversions to other media types.
"Work" shall mean the work of authorship, whether in Sou rce or
Object form, made available under the License, as indicated by a
copyright notice that is included in or attached to the work
(an example is provided in the Appendix below).
"Derivative Works" shall mean any work, whether in Source or Object
form, that is based on (or derived from) the Work and for which the
editorial revisions, annotations, elaborations, or other modifications
represent, as a whole, an original work of authorship. For the purposes
of this License, Derivative Works shall not includ e works that remain
separable from, or merely link (or bind by name) to the interfaces of,
the Work and Derivative Works thereof.
"Contribution" shall mean any work of authorshi p, including
the original version of the Work and any modificati ons or additions
to that Work or Derivative Works thereof, that is intentionally
submitted to Licensor for inclusion in the Work by the copyright owner
or by an individual or Legal Entity authorized to submit on behalf of
the copyright owner. For the purposes of this definition, "submitted"
means any form of electronic, verbal, or written communication sent
to the Licensor or its representatives, including but not limited to
communication on electronic mailing li sts, source code control systems,
and issue tracking systems that are managed by, or on behalf of, the
Licensor for the purpose of discussing and improving the Work, but
excluding communication that is conspicuous ly marked or otherwise
designated in writing by the copyright owner as "Not a Contribution."
"Contributor" shall mean Licensor and any individual or Legal Entity
on behalf of whom a Contribution has been received by Licensor and
subsequently incorporated within the Work.
2. Grant of Copyright License. Subject to the terms and conditions of
this License, each Contributor hereby grants to You a perpetual,
worldwide, non-exclusive, no-charge, royalty-free, irrevocable
copyright license to reproduce, prepare Derivative Works of,
publicly display, publicly perform, sublicense, and distribute the
Work and such Derivative Works in Source or Object form.
3. Grant of Patent License. Subject to the terms a nd conditions of
this License, each Contributor hereby grants to You a perpetual,
worldwide, non-exclusive, no-charge, royalty-free, irrevocable
(except as stated in this section) patent license to make, have made,
use, offer to sell, sell, import, and otherwise transfer the Work,
where such license applies only to those patent claims licensable
by such Contributor that are necessarily infringed by their
Contribution(s) alone or by combination of their Contribution(s)
with the Work to which such Contribution(s) was submitted. If You
institute patent litigation against any entity (including a
cross-claim or counterclaim in a lawsuit) alleging that the Work
or a Contribution incorporated within the Work constitut es direct
or contributory patent infringement, then any patent licenses
granted to You under this License for that Work shall terminate
as of the date such litigation is filed.
4. Redistribution. You may reproduce and distribute copies of the
Work or Derivative Works thereof in any medium, with or without
modifications, and in Source or Object form, provided that You
meet the following conditions:
(a) You must give any other recipients of the Work or
Derivative Works a copy of this License; and
(b) You must cause any modified files to carry prominent notices
stating that You changed the files; and
(c) You must retain, in the Source form of any Derivative Works
that You distribute, all copyright, patent, trademark, and
attribution notices from the Source form of the Work,
excluding those notices that do not pertain to any part of
the Derivative Works; and
(d) If the Work includes a "NOTICE" text file as part of its
distribution, then any Derivative Works that You distribute must
include a readable copy of the attribution notices contained
within such NOTICE file, excluding those notices that do not
pertain to any part of the Derivative Works, in at least one
Page 39

of the following places: within a NOTICE text file distributed
as part of the Derivative Works; within the Source form or
documentation, if provided along with the Derivative Works; or,
within a display generated by the Derivative Works, if a nd
wherever such third-party notices normally appear. The contents
of the NOTICE file are for informational purposes only and
do not modify the License. You may add Your own attribution
notices within Derivative Works that You distribute, alongside
or as an addendum to the NOTICE text from the Work, provided
that such additional attribution notices cannot be construed
as modifying the License.
You may add Your own copyright statement to Your modifications and
may provide additional or different license terms and conditions
for use, reproduction, or distribution of Your modifications, or
for any such Derivative Works as a whole, provided Your use,
reproduction, and distribution of the Work otherwise comp lies with
the conditions stated in this License.
5. Submission of Contributions. Unless You explicitly state otherwise,
any Contribution intentionally submitted for inclusion in the Work
by You to the Licensor shall be under the terms and conditions of
this License, without any additional terms or conditions.
Notwithstanding the above, nothing herein shall supersede or modify
the terms of any separate license agreement you may have executed
with Licensor regarding such Contributions.
6. Trademarks. This License does not grant permission to use th e trade
names, trademarks, service marks, or product names of the Licensor,
except as required for reasonable and custom ary use in describing the
origin of the Work and reproducing the content of the NO TICE file.
7. Disclaimer of Warranty. Unless required by applicable law or
agreed to in writing, Licensor provides the Work (and each
Contributor provides its Contributions) on an "AS IS" BASIS,
WITHOUT WARRANTIES OR CONDITIONS OF ANY KIND, either express or
implied, including, without limitation, any warranties or conditions
of TITLE, NON-INFRINGEMENT, MERCHANTABILITY, or FITNESS FOR A
PARTICULAR PURPOSE. You are solely responsible for determining the
appropriateness of using or redistributing the Work and assume any
risks associated with Your exercise of permissions under this License.
8. Limitation of Liability. In no event and under no legal theory,
whether in tort (including negligence), contract, or otherwise,
unless required by applicable law (such a s deliberate and grossly
negligent acts) or agreed to in writing, shall any Contributor be
liable to You for damages, including any direct, indirect, special,
incidental, or consequential damages of any charac ter arising as a
result of this License or out of the use or inabili ty to use the
Work (including but not limited to damages for loss of goodwill,
work stoppage, computer failure or malfunction, or any and all
other commercial damages or losses), even if such Contributor
has been advised of the possibility of such damages.
9. Accepting Warranty or Additional Liability. While redistributing
the Work or Derivative Works thereof, You may choose to offer,
and charge a fee for, acceptance of support, warranty, indemnity,
or other liability obligations and/or rights consistent with this
License. However, in accepting such obligations, You may act only
on Your own behalf and on Your sole responsibility, not on behalf
of any other Contributor, and only if You agree to indemnify,
defend, and hold each Contributor harmless for any liability
incurred by, or claims asserted against, such Contributor by reason
of your accepting any such warranty or addit ional liabil ity.
END OF TERMS AND CONDITIONS
==========================================================
==========================================================
generated automatically by aclocal 1.11.3 Autoconf
Copyright (C) 1996, 1997, 1998, 1999, 2000, 2001, 2002, 2003, 2004,
2005, 2006, 2007, 2008, 2009, 2010, 2011 Free Software Foundation,Inc.
This file is free software; the Free Software Foundation
gives unlimited permission to copy and/or distribute it,
with or without modifications, as long as this notice is preserved.
This program is distributed in the hope that it will be u seful,
but WITHOUT ANY WARRANTY, to the extent permitted by law; without
even the implied warranty of MERCHANTABILITY or FITNESS FOR A
PARTICULAR PURPOSE.
==========================================================
==========================================================
Copyright 2013 jQuery Foundation and other contributor s
http:jquery.com/
Permission is hereby granted, free of charge, to any person obtaining a copy of
this software and associated documentation files (the "Software"), to deal in the
Software without restriction, including without limitation the rights to use, copy,
modify, merge, publish, distribute, sublicense, and/or sell copies of the So ftware,
and to permit persons to whom the Software is furnished to do so, subject to
the following conditions: The above copyright noti ce and this permission notice
shall be included in all copies or substantial portions of the Software.
THE SOFTWARE IS PROVIDED "AS IS", WITHOUT WARRANTY OF ANY KIND,
EXPRESS OR IMPLIED, INCLUDING BUT NOT LIMITED TO THE WARRANTIES
OF MERCHANTABILITY, FITNESS FOR A PARTICULAR PURPOSE AND
NONINFRINGEMENT. IN NO EVENT SHALL THE AUTHORS OR COPYRIGHT
HOLDERS BE LIABLE FOR ANY CLAIM, DAMAGES OR OTHER LIABILITY,
WHETHER IN AN ACTION OF CONTRACT, TORT OR OTHERWISE, ARISING
FROM, OUT OF OR IN CONNECTION WITH THE SOFTWARE OR THE USE OR
OTHER DEALINGS IN THE SOFTWARE.
==========================================================
==========================================================
LuCI - Lua Configuration Interface
Copyright 2008 Steven Barth <steven@midlink.org>
Copyright 2008-2011 Jo-Philipp Wich <xm@leipzig.freifunk.net>
Licensed under the Apache License, Version 2.0 (the "License");
you may not use this file except in compliance with the License.
You may obtain a copy of the License at
http:www.apache.org/licenses/LICENSE-2.0
==========================================================
==========================================================
LuCI - Lua Configuration Interface
Copyright 2009 Jo-Philipp Wich <xm@subsignal.org>
Licensed under the Apache License, Version 2.0 (the "License");
you may not use this file except in compliance with the License.
You may obtain a copy of the License at
http://www.apache.org/licenses/LICENSE-2.0
==========================================================
==========================================================
COPYRIGHT:
2002 Joseph M. O'Leary. This code is 100% free. Use it anywhere you want.
Rewrite it, restructure it, whatever. If you can write software that makes mone y off
of it, good for you. I kinda like capitalism. Please don't blame me if it causes your
$30 billion dollar satellite explode in orbit. If you redistribute it in any form, I'd
appreciate it if you would leave this notice here. M IT-Style Notice.
==========================================================
==========================================================
ConfigFile.h
Class for reading named values from configuration files
Richard J. Wagner v2.1 24 May 2004 wagnerr@umich.edu
Copyright (c) 2004 Richard J. Wagner
Permission is hereby granted, free of charge, to any person obtaining a copy of
this software and associated documentation files (the "Software"), to deal in the
Software without restriction, including without limitation the rights to use, copy,
modify, merge, publish, distribute, sublicense, and/or sell copies of the Software,
and to permit persons to whom the Software is furnished to do so, subject to the
following conditions:
The above copyright notice and this permission no tice shall be included in all
copies or substantial portions of the Software.
THE SOFTWARE IS PROVIDED "AS IS", WITHOUT WARRANTY OF ANY KIND,
EXPRESS OR IMPLIED, INCLUDING BUT NOT LIMITED TO THE WARRANTIES
OF MERCHANTABILITY, FITNESS FOR A PARTICULAR PURPOSE AND
NONINFRINGEMENT. IN NO EVENT SHALL THE AUTHORS OR COPYRIGHT
HOLDERS BE LIABLE FOR ANY CLAIM, DAMAGES OR OTHER LIABILITY,
WHETHER IN AN ACTION OF CONTRACT, TORT OR OTHERWISE, ARISING
FROM, OUT OF OR IN CONNECTION WITH THE SOFTWARE OR THE USE OR
OTHER DEALINGS IN THE SOFTWARE.
==========================================================
==========================================================
Copyright (c) 1990, 1993
* The Regents of the University of California. All rights reserved.
*
* Redistribution and use in source and binary forms , with or without
* modification, are permitted provided that the following conditions
* are met:
* 1. Redistributions of source code must retain the above copy right
* notice, this list of conditions and the following disclaimer.
* 2. Redistributions in binary form must reproduce the above copyright
* notice, this list of conditions and the following disclaimer in the
* documentation and/or other materials provided with the distribution.
* 3. All advertising materials mentioning featur es or use of this software
* must display the following acknowledgement:
* This product includes software developed by the University of
* California, Berkeley and its contributors.
* 4. Neither the name of the University nor the names of its contributors
* may be used to endorse or promote products derived from this software
* without specific prior written permission.
*
* THIS SOFTWARE IS PROVIDED BY THE REGENTS AND CONTRIBUTORS ``AS IS'' AND
* ANY EXPRESS OR IMPLIED WARRANTIES, INCLUDING, BUT NOT LIMITED TO, THE
* IMPLIED WARRANTIES OF MERCHANTABILITY AND FITNESS FOR A PARTICULAR PURPOSE
* ARE DISCLAIMED. IN NO EVENT SHALL THE REGENTS OR CONTRIBUTORS BE LIABLE
* FOR ANY DIRECT, INDIRECT, INCIDENTAL, SPECIAL, EXEMPLARY, OR CONSEQUENTIAL
* DAMAGES (INCLUDING, BUT NOT LIMITED TO, PROCUREMENT OF SUBSTITUTE GOODS
* OR SERVICES; LOSS OF USE, DATA, OR PROFITS; OR BUSINESS INTERRUPTION)
* HOWEVER CAUSED AND ON ANY THEORY OF LIABILITY, WHETHER IN CONTRACT, STRICT
* LIABILITY, OR TORT (INCLUDING NEGLIGENCE OR OTHERWISE) ARISING IN ANY WAY
* OUT OF THE USE OF THIS SOFTWARE, EVEN IF ADVISED OF THE POSSIBILITY OF
* SUCH DAMAGE.
*
* @(#)if_dl.h 8.1 (Berkeley) 6/10/93
* $FreeBSD: src/sys/net/if_dl.h,v 1.12 2002/05/07 22:14 :06 kbyanc Exp $
*/
==========================================================
==========================================================
Disclaimer: IMPORTANT: This App le software is su pplied to you by Apple Inc.
("Apple") in consideration of your agreement to the following terms, and your use,
TQBJ2036
ENGLISH
39
Page 40

installation, modification or redistribution of this Apple software constitu tes
acceptance of these terms. If you do not agree with these terms, please do not
use, install, modify or redistribute this Apple software.
In consideration of your agreement to abide by the following terms, and subject to
these terms, Apple grants you a personal, non-exclusive license, under Apple's
copyrights in this original Apple software (the "Apple Software"), to use, reproduce,
modify and redistribute the Apple Software, with or without modifications, in source
and/or binary forms;
provided that if you redistribute the Apple So ftware in its entirety and without
modifications, you must retain this notice and the following text and disclaimers in
all such redistributions of the Apple Software.
Neither the name, trademarks, service marks or logos of Apple Inc. may be used to
endorse or promote prxoducts derived from the Apple Software withou t specific
prior written permission from Apple. Except as expressly stated in this notice, no
other rights or licenses, express or implied, are granted b y Apple herein, including
but not limited to any patent rights that may be infringed by your derivative works or
by other works in which the Apple Software may be incorporated.
The Apple Software is provided by Apple on an "AS IS" basis. APPLE
MAKES NO WARRANTIES, EXPRESS OR IMPLIED, INCLUDING WITHOUT
LIMITATION THE IMPLIED WARRANTIES OF NON-INFRINGEMENT,
MERCHANTABILITY AND FITNESS FOR A PARTICULAR PURPOSE,
REGARDING THE APPLE SOFTWARE OR ITS USE AND OPERATION ALONE
OR IN COMBINATION WITH YOUR PRODUCTS.
IN NO EVENT SHALL APPLE BE LIABLE FOR ANY SPECIAL, INDIRECT,
INCIDENTAL OR CONSEQUENTIAL DAMAGES (INCLUDING, BUT NOT
LIMITED TO, PROCUREMENT OF SUBSTITUTE GOODS OR SERVICES; LOSS
OF USE, DATA, OR PROFITS; OR BUSINESS INTERRUPTION) ARISING IN
ANY WAY OUT OF THE USE, REPRODUCTION, MODIFICATION AND/OR
DISTRIBUTION OF THE APPLE SOFTWARE, HOWEVER CAUSED AND
WHETHER UNDER THEORY OF CONTRACT, TORT (INCLUDING
NEGLIGENCE), STRICT LIABILITY OR OTHERWISE, EVEN IF APPLE HAS
BEEN ADVISED OF THE POSSIBILITY OF SUCH DAMAGE.
Copyright (C) 2012 Apple Inc. All Rights Reserved.
==========================================================
==========================================================#
Copyright (C) 1996, 1997, 1998, 1999, 2000, 2001, 2002, 20 03, 2004,
# 2005, 2006, 2007, 2008, 2009, 2010, 2011 Free Software Foundation,
# Inc.
# This file is free software; the Free Software Foundation
# gives unlimited permission to copy and/or distribute it,
# with or without modifications, as long as this notice is preserved.
# This program is distributed in the hope that it will be useful,
# but WITHOUT ANY WARRANTY, to the extent permitted by law; without
# even the implied warranty of MERCHANTABILITY or FITNESS FOR A
# PARTICULAR PURPOSE.
==========================================================
==========================================================
/**
* \file spotify_embedded.h
* \brief The public Spotify Embedded API
* \copyright Copyright 2015 Spotify AB. All rights reserved.
*
* Licensed to the Apache Software Foundation (ASF) under one
* or more contributor license agreements. See the NOTICE file
* distributed with this work for additional information
* regarding copyright ownership. The ASF licenses this file
* to you under the Apache License, Version 2.0 (the
* "License"); you may not use this file except in compliance
* with the License. You may obtain a copy of the License at
*
* http://www.apache.org/licenses/LICENSE-2.0
*
* Unless required by applicable law or agreed to i n writing,
* software distributed under the License is distribute d on an
* "AS IS" BASIS, WITHOUT WARRANTIES OR CONDITIONS OF ANY
* KIND, either express or implied. See the Licens e for the
* specific language governing permissions and limitations
* under the License.
*/
==========================================================
==========================================================
COPYRIGHT:
2002 Joseph M. O'Leary. This code is 100% free. Use it anywhere you want.
Rewrite it, restructure it, whatever. If you can write software that makes money off
of it, good for you. I kinda like capitalism.
Please don't blame me if it causes your $30 billion dollar satellite explode in orbit.
If you redistribute it in any form, I'd appreciate it if you would leave this notice here.
==========================================================
==========================================================
Copyright (c) 2004 Richard J. Wagner
Permission is hereby granted, free of charge, to an y person obtaining a copy of
this software and associated documentation files (the " Software"), to deal in the
Software without restriction, including without limitation the rights to use, copy,
modify, merge, publish, distribute, sublicense, and/or sell copies of the So ftware,
and to permit persons to whom the Software is furnished to do so, subject to the
following conditions:
The above copyright notice and this permission notice shall be included in all
40
copies or substantial portions of the Software.
TQBJ2036
THE SOFTWARE IS PROVIDED "AS IS", WITHOUT WARRANTY OF ANY KIND,
EXPRESS OR IMPLIED, INCLUDING BUT NOT LIMITED TO THE WARRANTIES
OF MERCHANTABILITY, FITNESS FOR A PARTICULAR PURPOSE AND
NONINFRINGEMENT. IN NO EVENT SHALL THE AUTHORS OR COPYRIGHT
HOLDERS BE LIABLE FOR ANY CLAIM, DAMAGES OR OTHER LIABILITY,
WHETHER IN AN ACTION OF CONTRACT, TORT OR OTHERWISE, ARISING
FROM, OUT OF OR IN CONNECTION WITH THE SOFTWARE OR THE USE OR
OTHER DEALINGS IN THE SOFTWARE.
==========================================================
==========================================================
* * Copyright (c) 2000 The NetBSD Foundation, Inc.
* All rights reserved.
*
* This code is derived from software contributed to The NetBSD Foundation
* by Dieter Baron and Thomas Klausner.
*
* Redistribution and use in source and binary forms , with or without
* modification, are permitted provided that the following conditions
* are met:
* 1. Redistributions of source code must retain the above copy right
* notice, this list of conditions and the following disclaimer.
* 2. Redistributions in binary form must reproduce the above copyright
* notice, this list of conditions and the following disclaimer in the
* documentation and/or other materials provided with the distribution.
* 3. All advertising materials mentioning features or use of this software
* must display the following acknowledgement:
* This product includes software developed by the NetBSD
* Foundation, Inc. and its contributors.
* 4. Neither the name of The NetBSD Foundation nor the names of its
* contributors may be used to endorse or promot e products derived
* from this software without specific prior written permission.
*
* THIS SOFTWARE IS PROVIDED BY THE NETBSD F OUNDATION, INC. AND CONTRIBUTORS
* ``AS IS'' AND ANY EXPRES S OR IMPLIED WARRANTIES, INCLUDING, BUT NOT LIMITED
* TO, THE IMPLIED WARRANTIES OF MERCHANTABILITY AND FITNESS FOR A PARTICULAR
* PURPOSE ARE DISCLAIMED. I N NO EVENT SHALL THE FOUNDATION OR CONTRIBUTORS
* BE LIABLE FOR ANY DIRECT, INDIRECT, INCIDENTAL, SPECIAL, EXEMPLARY, OR
* CONSEQUENTIAL DAMAGES (INCL UDING, BUT NOT LIMITED TO, P ROCUREMENT OF
* SUBSTITUTE GOODS OR SERVICES; LOSS OF USE, DATA, OR PROFITS; OR BUSI NESS
* INTERRUPTION) HOWEVER CAUSED AND ON ANY THEORY OF LI ABILITY, WHETHER IN
* CONTRACT, STRICT LIABILITY, OR TORT (INCLUDING NEGLIGENCE OR OTHERWISE)
* ARISING IN ANY WAY OUT OF THE USE OF THIS SOFTWARE, EVEN IF ADVISED OF THE
* POSSIBILITY OF SUCH DAMAGE.
*/
==========================================================
Copyright (c) 2015, Randall Stewart and Michael Tuexen
All rights reserved.
Redistribution and use in source and binary forms, with or without
modification, are permitted provided that the foll owing conditions are met:
* Redistributions of source code must retain the above copyright notice, this
list of conditions and the following disclaimer.
* Redistributions in binary form must reproduc e the above copyright notice,
this list of conditions and the following disclaimer in the documentation
and/or other materials provided with the distribution.
* Neither the name of usrsctp nor the names of its
contributors may be used to endorse or promote products derived from
this software without specific prior written permission.
THIS SOFTWARE IS PROVIDED BY THE COPYRIGHT HOLDERS AND
CONTRIBUTORS "AS IS" AND ANY EXPRESS OR IMPLIED WARRANTIES,
INCLUDING, BUT NOT LIMITED TO, THE IMPLIED WARRANTIES OF
MERCHANTABILITY AND FITNESS FOR A PARTICULAR PURPOSE ARE
DISCLAIMED. IN NO EVENT SHALL THE COPYRIGHT HOLDER OR
CONTRIBUTORS BE LIABLE FOR ANY DIRECT, INDIRECT, INCIDENTAL,
SPECIAL, EXEMPLARY, OR CONSEQUENTIAL DAMAGES (INCLUDING, BUT
NOT LIMITED TO, PROCUREMENT OF SUBSTITUTE GOODS OR SERVICES;
LOSS OF USE, DATA, OR PROFITS; OR BUSINESS INTERRUPTION)
HOWEVER CAUSED AND ON ANY THEORY OF LIABILITY, WHETHER IN
CONTRACT, STRICT LIABILITY, OR TORT (INCLUDING NEGLIGENCE OR
OTHERWISE) ARISING IN ANY WAY OUT OF THE USE OF THIS SOFTWARE,
EVEN IF ADVISED OF THE POSSIBILITY OF SUCH DAMAGE.
==========================================================
Page 41

Useful Information (For Customers in Latin America)
Customer Service
Customer Service Directory
Obtain products information and operative assistant; localize the closer
distributor or Service Center; buy spare parts and accessories by our
Web Site to Latin American:
COUNTRY WEB SITE CONTACT CENTER
Panama www.panasonic.com/pa/soporte/ 800-7262
Colombia
www.panasonic.com/co/soporte/ 01-8000-947262
Ecuador www.panasonic.com/ec/soporte/ 1-800-726276
Costa Rica www.panasonic.com/cr/soporte/ 800-7262737
El Salvador www.panasonic.com/sv/soporte/ 800-7262
Guatemala www.panasonic.com/gt/soporte/ 1-801-811-7262
Uruguay www.panasonic.com/uy/soporte/ 0-800-7262
Paraguay www.panasonic.com/uy/soporte/ 0-800-11-7262
Chile www.panasonic.com/cl/soporte/ 800-390-602
022-797-5000
Peru www.panasonic.com/pe/soporte/ 0800-00726
Venezuela www.panasonic.com/ve/soporte/ 800-7262-800
Mexico www.panasonic.com/mx/soporte/ 01800-847-7262
55-5000-1200
Argentina www.panasonic.com/ar/soporte/ 0800-333-7262
0810-321-7262
Dominican Republic
www.panasonic.com/do/soporte/ 809-200-8000
ENGLISH
41
TQBJ2036
Page 42

Precauciones de seguridad
AVISO
Unidad
≥ Para reducir el riesgo de incendio, descarga eléctrica o daño
del producto,
– No exponga esta unidad a la lluvia, humedad, goteo ni salpicaduras.
– No coloque objetos llenos con líquidos, como floreros,
sobre esta unidad.
– Use solamente los accesorios recomendados.
– No saque las cubiertas.
– No repare esta unidad usted mismo. Consulte al personal
de servicio calificado para la reparación.
– No permita que objetos de metal caigan dentro de esta unidad.
– No ponga objetos pesados en esta unidad.
Cable de alimentación de CA
≥ Para reducir el riesgo de incendio, descarga eléctrica o daño
del producto,
– Asegúrese de que el voltaje de alimentación corresponda
al voltaje impreso en esta unidad.
– Inserte por completo el enchufe del cable de alimentación
en la toma de CA.
– No tire, doble o coloque elementos pesados sobre el
cable de alimentación.
– No manipule el enchufe con las manos mojadas.
– Agarre el cuerpo del enchufe del cable de alimentación al
desconectar el enchufe.
– No use un enchufe del cable de alimentación o toma de
CA dañado.
≥ El enchufe de conexión a la red eléctrica es el dispositivo de
desconexión.
Instale esta unidad de forma que el enchufe de conexión a la red
eléctrica pueda desenchufarse de la toma de forma inmediata.
ADVERTENCIA
Unidad
≥
Esta unidad utiliza un láser. El usar los controles, hacer los reglajes
o los pasos requeridos en forma diversa de la aquí expuesta puede
redundar en exposición peligrosa a la radiación.
≥ No coloque objetos con llama descubierta, una vela por
ejemplo, encima de la unidad.
≥ Esta unidad puede tener interferencias de radio causadas
por teléfonos móviles durante su utilización. Si tales
interferencias resultan evidentes, aumente la separación
entre la unidad y el teléfono móvil.
≥ La operación de este equipo está sujeta a las siguientes dos
condiciones: (1) es posible que este equipo o dispositivo no
cause interferencia perjudicial y (2) este equipo o dispositivo
debe aceptar cualquier interferencia, incluyendo la que
pueda causar su operación no deseada.
Para México
≥ Información de Conformidad con las Normas sobre
Conexiones Inalámbricas
Marca: Panasonic
Modelo (s): SC-HC1000
IFT No.: RCPPASC17-0020
Para Latinoamérica
≥ Esta unidad ha sido diseñada para ser utilizada en climas
moderados.
Para otros
≥ Esta unidad se diseñó para ser utilizada en climas
moderados y tropicales.
Ubicación
≥ Coloque esta unidad sobre una superficie pareja.
≥ Para reducir el riesgo de incendio, descarga eléctrica o daño
del producto,
– Para mantener bien ventilada esta unidad, no la instale ni
ponga en un estante de libros, mueble empotrado u otro
espacio de dimensiones reducidas.
– No obstruya las aberturas de ventilación de la unidad con
periódicos, manteles, cortinas u objetos similares.
– No exponga esta unidad a la luz solar directa, altas
temperaturas, mucha humedad y vibración excesiva.
Pila
≥ Existe un daño de explosión si la batería no se reemplaza
correctamente. Reemplace sólo con el tipo recomendado por
el fabricante.
≥ La mala manipulación de las baterías puede causar una
pérdida de electrolito y puede causar un incendio.
– Retire la batería si piensa no usar el mando a distancia
durante un período largo de tiempo. Almacene en lugares
oscuros y frescos.
– No caliente ni exponga las pilas a las llamas.
– No deje la(s) batería(s) en un automóvil expuesto a la luz
solar directa por un período prolongado de tiempo con las
puertas y ventanas cerradas.
– No las desarme ni coloque en cortocircuito.
– No intente recargar baterías alcalinas o de manganeso.
– No utilice baterías si se ha pelado la cubierta.
≥ Al desechar las baterías, comuníquese con sus autoridades
locales o distribuidores y pregunte por el método de
eliminación correcto.
Para Tailandia
Este equipo de telecomunicaciones cumple los requisitos
técnicos NTC/NBTC.
42
TQBJ2036
Page 43

Contenidos
Precauciones de seguridad ........................... 42
Accesorios ......................................................43
Guía de referencia del control remoto.......... 44
Uso del control remoto .................................. 45
Conexiones ..................................................... 46
Colocación de los medios ............................. 47
Ajustes de red ................................................. 48
Transmisión de música a través de la red.... 51
Operaciones Bluetooth
Acerca de Bluetooth
Controles de reproducción de medios .........56
Escuchar la radio FM...................................... 58
Ajuste del sonido............................................ 59
Reloj y temporizador ...................................... 59
Actualizaciones de firmware ......................... 60
Otros ................................................................61
Solución de problemas .................................. 63
Licencias ......................................................... 65
Cuidado de la unidad y los medios............... 66
Medios reproducibles..................................... 66
Especificaciones............................................. 67
Montaje de la unidad a la pared (opcional)
Información Útil (Para los clientes de América
............................................................... 70
Latina)
®
................................. 54
®
..................................... 55
...... 68
Acerca de las descripciones en este manual de
instrucciones
≥ Las páginas de consulta se indican del siguiente modo
“l ±±”.
≥ A menos que se indique lo contrario, las operaciones se
describen usando el control remoto. También puede usar
los controles en este aparato si son los mismos.
Accesorios
Compruebe los accesorios antes de utilizar esta unidad.
∏ 1 Mando a distancia
(N2QAYB001139)
∏ 1 Pila del mando a distancia
∏ 2 Cables de suministro de energía CA
∏ 1 Antena interior para
FM
∏ 1 Adaptador de enchufe de CA
Accesorios de montaje en la pared
∏ 1
Soporte de seguridad
∏ 1 Ficha de montaje en
la pared
≥ Utilice esta ficha para el montaje
en la pared. (l 68)
∏ 2 Soportes de
montaje en la pared
ESPAÑOL
≥ No utilice el cable de suministro de energía CA con otros
equipos.
≥ Los números de productos que se suministran en estas
instrucciones de funcionamiento son correctos a partir de
enero de 2017. Pueden estar sujetos a cambios.
≥ Utilice el cable de alimentación de CA suministrado que sea
adecuado para la toma de corriente de casa.
Los símbolos en este producto (incluidos los
accesorios) representan lo siguiente:
CA
CC
Equipo de Clase II (La construcción del
producto es de doble aislamiento.)
I On (encendido)
Í En espera
TQBJ2036
43
Page 44

Guía de referencia del control remoto
Vista superior
12
53 64
12
13
1 Puerto USB (l 47)
2 Clavija AUX IN (l 46)
3 Interruptor de alimentación en espera/
encendida (Í/I)
Pulse este interruptor para cambiar del modo de
alimentación conectada al modo de alimentación en
espera o viceversa. En el modo de alimentación en
espera, el aparato consume una pequeña cantidad de
corriente.
4 Seleccione la fuente de audio
En este aparato:
“CD” ---------------------. “FM” --------------------. “AUX”
:;
“NETWORK” (--- “BLUETOOTH” (--- “USB”
≥ Mantenga pulsado para entrar en el modo de
sincronización (l 54) o desconecte un dispositivo
®
(l 55).
Bluetooth
En el control remoto:
[ ]: “BLUETOOTH”
[CD/USB]: “CD” ,. “USB”
[RADIO, EXT-IN]: “FM” -------------------. “AUX”
^" “NETWORK”(}
5 Botones de control de reproducción básica
78910 11
14
15
16
6 Ajuste el volumen (de 0 (min) a 50 (máx))
7 Botones FAVOURITE para el almacenamiento o
selección de emisoras de radio ([1] a [5])
(l 53, 58)
8 Ajuste el modo para montaje en la pared
9 Seleccione D.BASS
10 Ajuste el modo envolvente
11 Abra o cierre la tapa deslizante
12 Pantalla
13 Puerta deslizante
14 Sensor de señales del mando a distancia
Distancia:dentro de 7 m aproximadamente directamente
enfrente de la unidad
Ángulo: Aproximado 30o izquierda y derecha
15 Indicador de red
16 Altavoces
Estos altavoces no disponen de protección magnética. No
los coloque cerca de una televisión, un ordenador y otros
dispositivos magnéticos.
44
TQBJ2036
Page 45

EXT-IN
17
18
19
4
5
9
21
20
22
23
24
6
25
27
28
26
29
30
7
(Pila alcalina o de
manganeso)
17 Enciende o apaga la unidad principal
18 Seleccionar número
≥ Para seleccionar un número de 2 dígitos;
Ejemplo: 16: [S10]
≥ Para seleccionar un número de 3 dígitos
Por ejemplo: 124: [S10]
> [1] > [6]
> [S10] >[1] > [2]> [4]
19 Elimine una pista programada
20 Ingrese el menú del audio
21 Poner el elemento de reproducción del menú
22 Cambie la información que aparece en pantalla
23 Funcionamiento del reloj y del temporizador
24 Ajuste la función de programa
25 Silencie el sonido
Presione nuevamente para cancelar. “MUTE” también se
cancela cuando el volumen se ajusta o la unidad se
apaga.
26 Seleccione el ecualizador preestablecido
27 Ingrese el menú de configuración
28 Configure el elemento del menú de la radio
29 Selección/OK
30 Atenúe la pantalla y el indicador
Presione nuevamente para cancelar.
Uso del control remoto
Introduzca la pila de modo que los polos (i y j)
coincidan con los del mando a distancia.
R6/LR6, AA
Dirija hacia el sensor del control remoto de esta
unidad.
≥ Para evitar interferencia, no coloque objetos en frente del
sensor de señal.
ESPAÑOL
45
TQBJ2036
Page 46

Conexiones
1
2
Conecte la antena.
Cinta adhesiva
(no suministrado)
Antena interior para FM
(suministrado)
A una toma de corriente
Cable de suministro de
energía CA (suministrado)
Conecte el cable de alimentación de CA luego de haber completado todas las otras conexiones.
Esta unidad consume poca corriente CA (l 67) incluso cuando se encuentra apagada.
≥ Para ahorrar energía, si no va a usar este dispositivo durante un período prolongado de tiempo,
desenchufarlo de la toma de corriente.
≥
Algunos ajustes se perderán después de que desconecta el sistema. Tiene que fijarlos de nuevo.
Si el conector de la alimentación no encaja en su toma, utilice el adaptador suministrado.
No use ningún cable de alimentación de CA que no sea el suministrado.
Cable de audio
(no suministrado)
≥ Pegue con cinta adhesiva la antena a una pared o columna en la posición que presente menor interferencia.
≥ Si la recepción de radio es mala, utilice una antena exterior de FM (no suministrado).
Conecte un dispositivo externo de música
1 Conecte un dispositivo de música externa con un
cable de audio (no suministrado).
≥ Tipo de enchufe: ‰3,5 mm estéreo
2 Presione [RADIO, EXT-IN] repetidamente para
seleccionar “AUX” y comenzar a reproducir en el
dispositivo conectado.
∫ Para seleccionar el nivel de entrada de
46
TQBJ2036
sonido del dispositivo externo
1 Mientras está en modalidad AUX, pulse [SOUND]
repetidamente para seleccionar “INPUT LEVEL”.
2 Pulse [2, 1] para seleccionar “NORMAL” o
“HIGH” y a continuación pulse [OK].
≥ El ajuste de fábrica es “NORMAL”.
≥ Para mejorar la distorsión del sonido cuando se selecciona “HIGH”, seleccione “NORMAL”.
≥ Desconecte el ecualizador o baje el volumen de sonido del dispositivo externo para reducir la señal de entrada. Un nivel alto de
la señal de entrada distorsionará el sonido.
≥ Para obtener más información, consulte las instrucciones de funcionamiento del dispositivo.
Page 47

Colocación de los medios
≥ Asegúrese de inclinar el disco para no tocar la puerta
deslizante.
≥ No abra la puerta deslizante manualmente.
El lado de la etiqueta
∫ Conexión de un dispositivo USB
≥ Inserte el dispositivo USB directamente. No use un cable de extensión USB.
≥ Desconecte el dispositivo USB si ha terminado de utilizarlo.
≥ Antes de retirar el dispositivo USB, seleccione una fuente que no sea “USB”.
∫ Insertar un CD
Cable USB
(no suministrado)
En el dispositivo compatible
∫ Cargar un dispositivo
La carga comienza cuando se conecta un dispositivo (valor nominal: 5 V/1,5 A) al puerto USB de este aparato.
ESPAÑOL
1 Encienda la unidad.
2 Conecte un dispositivo.
{. Confirmar en la pantalla del dispositivo conectado, etc.
para comprobar que ha comenzado la carga.
≥ Se requiere cable compatible con su dispositivo. Utilice el
cable que viene con el dispositivo.
≥ Incluso si conecta un cable compatible con el puerto USB de
este aparato, es posible que su dispositivo no se cargue. En
ese caso, utilice el cargador que viene con el dispositivo.
≥ Según el dispositivo, es posible que otros cargadores no
funcionen. Compruebe las instrucciones de funcionamiento
del aparato antes de usar.
≥ No conecte un dispositivo con un valor nominal superior a
5 V/1,5 A a este aparato.
≥ Para verificar si la carga está completa, mire la pantalla del
dispositivo conectado, etc.
≥ Una vez se ha completado la carga, retire el cable USB del
puerto USB.
≥ Después de que el dispositivo haya empezado a cargarse,
puede cambiar la unidad al modo en espera.
– Cuando se carga un dispositivo agotado, no cambie el
dispositivo al modo en espera hasta que el aparato sea
operativo.
≥ Tenga cuidado de que el aparato no se caiga cuando se inserten o saquen medios.
≥ Al mover este aparato, asegúrese de retirar todos los medios y ponerla en modo de espera.
47
TQBJ2036
Page 48

Ajustes de red
Conexión LAN inalámbrica
Método 1: “Uso de la aplicación “Panasonic
Music Streaming”” (l derecha)
• Usted puede hacer un ajuste de la red
inalámbrica con la aplicación “Panasonic Music
Streaming” (gratuita).
Método 2: “Uso de un buscador de Internet” (l49)
• Se puede acceder a la configuración de red de
este aparato desde el buscador de Internet en su
teléfono inteligente u ordenador, etc.
Método 3: “Uso de WPS (Wi-Fi Protected
Setup
TM
)” (l 50)
• Si el router inalámbrico es compatible con WPS,
se puede instalar una conexión al pulsar el botón
WPS, o al introducir el código PIN WPS.
Conexión LAN convencional
Método 4: “Uso de un cable de red LAN” (l 50)
• Se puede realizar una conexión estable a la red
con un cable de red LAN.
Puede transmitir música desde un dispositivo iOS
(iPhone/iPad/iPod), un dispositivo AndroidTM o un PC
(Windows) a los altavoces de este sistema utilizando
la plataforma de medios inteligentes Qualcomm®
AllPlayTM. Para usar estas funciones, el sistema debe
estar conectado a la misma red que los dispositivos
compatibles.
Qualcomm® AllPlayTM es un producto de Qualcomm Technologies,
Inc.
≥ Actualice el firmware del sistema una vez que se
haya completado la configuración de la red. (l 60)
Seleccione uno de los métodos de configuración
de red que aparecen a continuación.
Conexión LAN inalámbrica
Este sistema tiene Wi-Fi® incorporado y puede
conectarse a un router inalámbrico.
Preparación
≥ Coloque este sistema lo más cerca posible del
router inalámbrico.
≥ No conecte un cable de red LAN. Si lo hace, se
desactivará la función Wi-Fi®.
Método 1:
Uso de la aplicación “Panasonic Music
Streaming”
También puede consultar la “Wi-Fi® GUÍA DE
CONFIGURACIÓN RÁPIDA” provista.
1 Descárguese la aplicación “Panasonic Music
Streaming” (gratuita) en su teléfono inteligente/
tableta.
(Utilice siempre la última versión de la aplicación.)
≥ [iOS] : App Store
≥ [Android] : Google Play
TM
2 Inicie la aplicación y siga las
instrucciones en pantalla.
3 Compruebe que la conexión se haya establecido.
≥ En la pantalla de la unidad, aparece “SUCCESS”
cuando se ha establecido la conexión. (Se enciende el
indicador de red (l 44).)
– Si aparece “FAIL” pulse [OK], compruebe el nombre
de red (SSID) y la contraseña, y a continuación,
intente la configuración de nuevo.
Las operaciones y los elementos que aparecen en la
pantalla y otros aspectos de la aplicación “Panasonic
Music Streaming” están sujetos a cambios.
Para obtener la información más actualizada, visite
http://panasonic.jp/support/global/cs/audio/app/
(En este sitio sólo se utiliza el idioma inglés.)
≥ La configuración se cancelará una vez ha transcurrido el
límite de tiempo establecido. En ese caso, intente la
configuración de nuevo.
Para cancelar este ajuste a la mitad, pulse [∫].
48
TQBJ2036
Page 49

Método 2:
Configuración
Configuración Wi-Fi
●●●●●●●●
Refresh list
Uso de un buscador de Internet
≥ Las siguientes explicaciones se basan en un
teléfono inteligente.
1 Encienda este sistema.
2 Pulse [RADIO, EXT-IN] en el mando a distancia
varias veces para seleccionar “NETWORK”.
3 Para entrar en el modo “SETTING”
1 Pulse [SETUP] en el mando a distancia reiteradas
veces para seleccionar “NET SETUP” y luego
pulse [OK].
2 Pulse [2, 1] en el mando a distancia para
seleccionar “MANUAL” y luego pulse [OK].
3 Pulse [2, 1] en el mando a distancia para
seleccionar “OK? YES” y luego pulse [OK].
≥ Tras pulsar [OK] para confirmar “OK? YES”, la
conexión de red previa que haya configurado con
este aparato se borrará.
≥ Como alternativa, mientras mantiene pulsado [<],
presione [1/;] en la unidad durante un mínimo de 4
segundos.
“SETTING” aparece parpadeando en la pantalla.
4 Vaya a la configuración Wi-Fi en su dispositivo
compatible.
5 Seleccione “HC1000 _AJ” para conectar
a este sistema.
≥ “ ” representa un carácter que es único para cada set.
≥ Puede tardar hasta 1 minuto en aparecer en su lista
Wi-Fi.
≥ Si esta operación no funciona correctamente, repítala
varias veces.
≥ Asegúrese de que DHCP esté activado para el ajuste
de red en el dispositivo compatible.
6 Escriba el nombre del dispositivo y a continuación
seleccione “Next”.
≥ El nombre del dispositivo aparecerá como el nombre de
este sistema en la red.
≥ Número máximo de caracteres que se pueden mostrar:
32
≥ Los emojis no son compatibles.
≥ Se establece el nombre del dispositivo cuando se
selecciona “Next”.
≥ También se puede cambiar el nombre del dispositivo
después de la instalación de la conexión de red. (l 51,
“Para establecer configuraciones relacionadas con la
red”)
7 Seleccione su nombre de red (SSID) y escriba la
contraseña.
≥ Compruebe el router inalámbrico del nombre de red
(SSID) y la contraseña.
≥ Aparecerá una lista de nombres de red (SSIDs) cuando
seleccione el cuadro “Network Name”.
≥ Para ver los caracteres que escribe en el cuadro
“Password”, seleccione “Show Password”.
≥ Si la red necesita una configuración específica,
deseleccione “DHCP” para deshabilitar DHCP.
– Puede utilizar la dirección IP específica, la máscara
de subred, la puerta de enlace por defecto, el DNS
primario, etc.
≥ Para actualizar la lista de nombres de red (SSID),
seleccione “Refresh list”.
8 Seleccione “Connect” para aplicar los ajustes.
ESPAÑOL
HC1000
Acerca de la página de configuración de red:
Dispositivo iOS: La página de configuración aparecerá
automáticamente en el buscador de Internet.
Excepto el dispositivo iOS: Deslice hacia abajo la barra de
notificaciones del dispositivo para ver la notificación “Sign
in to Wi-Fi network” y tóquela para mostrar la página de
configuración.
≥ Si no hay ninguna notificación, abra el navegador de
Internet y actualice la página para mostrar la página de
configuración. Si la página de configuración no se
muestra, escriba “http://172.19.42.1/” en el campo de la
dirección URL.
≥ En la pantalla de la unidad, aparece “SUCCESS”
cuando se ha establecido la conexión. (Se enciende el
indicador de red (l 44).)
– Si aparece “FAIL” pulse [OK], compruebe el nombre
de red (SSID) y la contraseña, y a continuación,
intente la configuración de nuevo.
≥ En función del dispositivo, es posible que no aparezca
la pantalla de conexión completa.
9 Asegúrese de volver a conectar su dispositivo
compatible a su red inalámbrica doméstica.
≥ Habilite Java y Cookies en los ajustes del navegador.
49
TQBJ2036
Page 50

Método 3:
por ej.
Cable de red LAN
(no suministrado)
Router de banda ancha, etc.
por ej.
Uso de WPS (Wi-Fi Protected Setup
Un router inalámbrico puede tener la marca de
identificación WPS.
1 Encienda este sistema.
2 Pulse [RADIO, EXT-IN] en el mando a distancia
varias veces para seleccionar “NETWORK”.
3 Para entrar en el modo “WPS PUSH”
1 Pulse [SETUP] en el control remoto reiteradas veces
para seleccionar “NET SETUP” y luego pulse [OK].
Aparece “WPS PUSH” en la pantalla.
2Pulse [OK].
3Pulse [2, 1] en el mando a distancia para
seleccionar “OK? YES” y luego pulse [OK].
≥
Como alternativa, mientras mantiene pulsado [<], presione
[
5/9
≥ Si la unidad ya está conectada a una red LAN
“WPS” parpadea en el visualizador.
] en la unidad durante un mínimo de 4 segundos.
inalámbrica, se mostrará el mensaje “NETWORK
INITIALIZING” durante aproximadamente 1 minuto.
4 Active el botón WPS del router inalámbrico.
≥ En la pantalla de la unidad, aparece “SUCCESS”
cuando se ha establecido la conexión. (Se enciende el
indicador de red (l 44).)
– Podría aparecer el mensaje “FAIL” si no se hizo la
conexión dentro del límite de tiempo establecido.
Pulse [OK]. Intente repetir el ajuste. Si el mensaje
“FAIL” sigue apareciendo, pruebe otros métodos.
∫ Uso del código PIN WPS
1 Encienda este sistema.
2 Pulse [RADIO, EXT-IN] en el mando a distancia
varias veces para seleccionar “NETWORK”.
3 Para entrar en el modo “WPS PIN”
1 Pulse [SETUP] en el control remoto reiteradas veces
para seleccionar “NET SETUP” y luego pulse [OK].
2Pulse [2, 1] en el mando a distancia para
seleccionar “WPS PIN” y luego pulse [OK].
≥
Como alternativa, mientras mantiene pulsado [<], presione
[
:/6
≥ Si la unidad ya está conectada a una red LAN
El código PIN se indica en la pantalla.
4
Ingrese el código PIN en el router de red inalámbrico.
≥
Una vez que el sistema entre al modo de código PIN WPS, no
podrá hacer la configuración usando el botón WPS. Para usar el
botón WPS, apague el sistema y vuelva a encenderlo, después
vuelva a realizar la configuración de la red.
≥ En función del router, puede que otros dispositivos
conectados pierdan la conexión temporalmente.
≥ Para obtener más información, consulte las instrucciones de
50
funcionamiento del router inalámbrico.
TQBJ2036
] en la unidad durante un mínimo de 4 segundos.
inalámbrica, se mostrará el mensaje “NETWORK
INITIALIZING” durante aproximadamente 1 minuto.
TM
)
Conexión LAN convencional
Método 4:
Uso de un cable de red LAN
1 Desconecte el cable de alimentación de CA.
2 Conecte la unidad a un router de banda ancha,
etc. con un cable de red LAN.
3 Conecte el cable de alimentación de CA a la
unidad y encienda el sistema.
≥ Cuando se establece la conexión, se enciende el
indicador de red (l 44).
≥ Use la categoría 5 o superior de cables LAN derechos (STP)
al conectar a dispositivos periféricos.
≥ El cable de red LAN debe estar conectado o desconectado
mientras el cable de alimentación de CA está desconectado.
≥ Si inserta cualquier otro cable distinto del cable LAN en el
terminal LAN, puede dañar la unidad.
≥ Si se desconecta el cable de red LAN, la configuración
relacionada con la red (l 51) se inicializará. En ese caso,
realice la configuración de nuevo.
≥ Cuando se conecta un cable de red LAN, se deshabilitará la
función Wi-Fi.
Page 51

Para establecer configuraciones relacionadas
con la red
Se puede cambiar el nombre de este sistema en la
red, y utilizar la dirección IP específica, la máscara de
subred, la puerta de enlace por defecto, el DNS
primario, etc.
También puede cambiar el nombre de este sistema
cambiando un ajuste en la aplicación “Panasonic
Music Streaming” (l derecha). Para obtener más
información sobre la aplicación, consulte el sitio
web mencionado a continuación.
http://panasonic.jp/support/global/cs/audio/app/
(En este sitio sólo se utiliza el idioma inglés.)
Preparación
≥ Complete los ajustes de la red. (l 48)
≥ Conecte el dispositivo a la misma red que este
sistema.
≥ Compruebe la dirección IP de este sistema (l 62), y
anótela.
1 Abra un buscador de Internet en el dispositivo y a
continuación escriba la dirección IP de este
sistema en el campo de la dirección para que
aparezca la página de configuración.
≥ Es posible que la página de configuración tarde algunos
minutos en aparecer en función del entorno. En ese
caso, vuelva a cargar el buscador.
≥ Si la unidad está conectada con Wi-Fi, sólo se puede
cambiar el nombre de un dispositivo. Cierre la página
de configuración después de cambiar el nombre del
dispositivo.
– Para cambiar el nombre del dispositivo, seleccione
“Change”, y escriba el nuevo nombre del dispositivo,
a continuación seleccione “Apply”.
2 Escriba el nombre del dispositivo y a continuación
seleccione “Next”.
≥ Consulte el paso 6 de “Uso de un buscador de Internet”
(l 49) para obtener más información sobre el nombre
del dispositivo.
3 Seleccione e introduzca los detalles.
≥ Si la red necesita una configuración específica,
deseleccione “DHCP” para deshabilitar DHCP.
– Puede utilizar la dirección IP específica, la máscara
de subred, la puerta de enlace por defecto, el DNS
primario, etc.
4 Seleccione “Connect” para aplicar los ajustes.
≥ Cuando la conexión se ha establecido, aparece
“SUCCESS” en la pantalla de la unidad.
Transmisión de música a
través de la red
Puede transmitir música desde sus dispositivos o
servicios de música en línea a los altavoces de este
sistema y a otros altavoces con tecnología AllPlay.
También puede transmitir la fuente de música de este
sistema a otros altavoces con tecnología AllPlay.
Transmisión de música en
dispositivos en red
Puede usar la función AllPlay para transmitir música
desde el dispositivo en la red a los altavoces de este
sistema usando la aplicación “Panasonic Music
Streaming” (gratuita), etc.
≥
[iOS]
: App Store
≥
[Android]
: Google Play
Las operaciones y los elementos que aparecen en la pantalla
y otros aspectos de la aplicación “Panasonic Music
Streaming” están sujetos a cambios.
Para obtener la información más actualizada, visite
http://panasonic.jp/support/global/cs/audio/app/
Se encuentran a su disposición más aplicaciones. Para más
información, visite
www.panasonic.com/global/consumer/homeav/
allseries/service
(Estas páginas sólo se encuentran en idioma inglés.)
Preparación
≥ Complete los ajustes de la red. (l 48)
≥ Conecte los siguientes dispositivos a la misma red
que este sistema.
– Dispositivo con “Panasonic Music Streaming”, etc.
instalado
– Dispositivo que contiene música
Los siguientes pasos se basan en “Panasonic Music
Streaming”.
TM
1 Encienda este sistema.
≥ Verifique que el indicador de red (l 44) se encienda.
≥
Si no se enciende, compruebe los ajustes de red. (l48)
2 Inicie la aplicación “Panasonic Music Streaming”.
≥ Utilice siempre la última versión de la aplicación.
3 En “Speaker”, seleccione este sistema como los
altavoces de salida.
≥ Si dispone de varios altavoces con tecnología AllPlay,
puede disfrutar del sonido sincronizado desde ellos.
Para agrupar altavoces, arrastre por ej. “ ” de los
altavoces deseados uno sobre otro.
– También se pueden reproducir diferentes canciones
en otros altavoces con tecnología AllPlay al mismo
tiempo.
– El número de altavoces con tecnología AllPlay que
pueden realizar la reproducción al mismo tiempo
varía en función de la situación de uso.
– Cuando se apaga uno de altavoces con tecnología
AllPlay, otros altavoces en el mismo grupo pueden
detener la reproducción.
4 Seleccione la fuente de música.
5 Seleccione una canción.
TQBJ2036
ESPAÑOL
51
Page 52

≥ Este sistema aparecerá como “Panasonic HC1000” si no se
establece el nombre del dispositivo.
≥ Cuando reproduzca música desde el servidor DLNA
(ordenador con Windows 7 o una versión posterior instalada,
teléfono inteligente, dispositivo de almacenamiento
conectado a la red (NAS), etc.), añada los contenidos y la
carpeta a las bibliotecas de Windows Media
teléfono inteligente o el dispositivo NAS, etc.
≥ La lista de reproducción de Windows Media
solamente puede reproducir los contenidos que se
almacenan en las bibliotecas.
≥ Puede encontrar información sobre el formato compatible en
“Especificaciones” (l 67).
– Los formatos de archivos que no se admiten para su
servidor DLNA no se pueden reproducir.
≥ En función de los contenidos y el equipo conectado, es
posible que no se efectúe la reproducción correctamente.
≥ Asegúrese de detener la reproducción en su dispositivo
antes de apagarlo.
®
Player, el
®
Player
Transmisión de música en línea
Este sistema es compatible con varios servicios de
música en línea.
Visite la siguiente página web para obtener
información sobre compatibilidad:
www.panasonic.com/global/consumer/homeav/
allseries/service
Preparación
≥ Asegúrese de que la red esté conectada a Internet.
≥ Conecte su dispositivo con una aplicación
compatible instalada en la misma red inalámbrica
que este sistema.
1 Encienda este sistema.
≥ Verifique que el indicador de red (l 44) se encienda.
≥ Si no se enciende, compruebe los ajustes de red.
(l 48)
2 Abra la aplicación, y seleccione una canción para
reproducir.
∫ Usar Spotify
Necesitará Spotify Premium. Para obtener más
información, visite la siguiente página web.
www.spotify.com/connect/
Después del paso 2
3 Seleccione la imagen cuadrada de la portada de la
canción en la parte inferior izquierda de la pantalla
de reproducción.
4 En “ ”, seleccione este sistema como los
altavoces de salida.
≥ Para disfrutar de sonido sincronizado de varios
altavoces con tecnología AllPlay, es necesario agrupar
los altavoces con la aplicación “Panasonic Music
Streaming”. (l 51)
∫ Uso de servicios de música en línea
que no sean Spotify
Después del paso 2
3 En “ ”, seleccione este sistema como los
altavoces de salida.
≥ En función del servicio, puede que tenga que abrir el
reproductor de pantalla completa para visualizarlo
“”.
≥ Si dispone de varios altavoces con tecnología AllPlay,
puede disfrutar del sonido sincronizado desde ellos.
Seleccione “Group” y a continuación seleccione los
altavoces que desee agrupar.
52
TQBJ2036
≥ Este sistema aparecerá como “Panasonic HC1000” si no se
establece el nombre del dispositivo.
≥ Se requiere una inscripción/suscripción.
≥ Pueden aplicarse cargos.
≥ Los servicios, iconos y especificaciones están sujetos a
modificaciones.
≥ Para obtener más información, visite la página web del
servicio de música individual.
Page 53

Transmisión de música en este
sistema
Puede usar la aplicación “Panasonic Music Streaming”
(l 51) para transmitir la fuente de música de este
sistema (radio/CD/Bluetooth®/AUX/USB) a otros
altavoces con tecnología AllPlay.
Preparación
≥ Complete los ajustes de la red. (l 48)
≥ Prepare la fuente de audio deseada en este sistema
(por ejemplo, inserte un CD, etc.).
≥ Instale la aplicación “Panasonic Music Streaming” en
su dispositivo.
≥ Conecte su dispositivo y sus altavoces con
tecnología AllPlay a la misma red que este sistema.
1 Encienda este sistema.
≥ Verifique que el indicador de red (l 44) se encienda.
≥ Si no se enciende, compruebe los ajustes de red.
(l 48)
2 Inicie la aplicación “Panasonic Music Streaming”.
≥ Utilice siempre la última versión de la aplicación.
3 Desde “Speaker”, seleccione el altavoz para
transmitir el audio de esta sistema.
≥ Para transmitir el audio de este sistema a otros
altavoces con tecnología AllPlay, arrastre por ej. “ ”
de los altavoces deseados uno sobre otro.
4 Seleccione la fuente de música deseada de la
lista.
5 Seleccione este sistema
El dispositivo comenzará a leer la información de
la fuente de música seleccionada desde este
sistema.
≥ El sistema cambiará al modo selector para la fuente de
música seleccionada.
≥ El altavoz seleccionado en el paso 3 y este sistema se
agruparán automáticamente.
≥ Dependiendo de la fuente de música seleccionada,
puede iniciarse la reproducción. Si aparece una lista de
contenido en su dispositivo, seleccione el contenido
deseado para iniciar la reproducción.
≥ El número de altavoces con tecnología AllPlay que
pueden realizar la reproducción al mismo tiempo varía
en función de la situación de uso.
≥ Cuando se apaga uno de altavoces con tecnología
AllPlay, otros altavoces en el mismo grupo pueden
detener la reproducción.
≥ Este sistema aparecerá como “Panasonic HC1000” si no se
establece el nombre del dispositivo.
≥ Cuando visualice contenido de vídeo con esta función,
puede que la salida del vídeo y el audio no estén
sincronizadas.
Almacenamiento de emisoras en
(FAVOURITE) del [1] al [5]
(Únicamente cuando se reproduce
mediante una aplicación de radio
por Internet)
Esta unidad es compatible con la radio Qualcomm®
TM
AllPlay
con la tecnología de TuneIn.
Puede programar emisoras durante la reproducción
mediante la aplicación de radio por Internet “AllPlay
Radio”.
Qualcomm
un producto de Qualcomm Technologies, Inc.
Puede almacenar hasta 5 emisoras en (FAVOURITE)
del [1] al [5].
≥ Una emisora almacenada previamente se
sobrescribe cuando otra emisora se almacena en el
mismo (FAVOURITE) del [1] al [5].
Preparación
≥ Asegúrese de que la red esté conectada a Internet.
≥ Conecte su dispositivo con una aplicación “AllPlay
Radio” instalada en la misma red inalámbrica que
este sistema.
®
AllPlayTM Radio con la tecnología TuneIn es
1 Encienda este sistema.
≥ Verifique que el indicador de red (l 44) se encienda.
≥ Si no se enciende, compruebe los ajustes de red.
(l 48)
2 Abra la aplicación “AllPlay Radio” y seleccione una
emisora para reproducir.
≥ Utilice siempre la última versión de la aplicación.
3 Mantenga pulsado uno del [1] al [5] hasta que “P
” aparezca en la pantalla.
(“ ” significa un número.)
∫ Escuchar una emisora almacenada
Pulse uno de los botones del [1] al [5].
≥ Si el canal seleccionado no ha sido presintonizado,
aparecerá “NO PRESET”.
ESPAÑOL
53
TQBJ2036
Page 54

Operaciones Bluetooth
Se puede escuchar música del dispositivo de audio
Bluetooth® de forma inalámbrica.
≥ Consulte las instrucciones de funcionamiento del
dispositivo Bluetooth® para obtener más detalles.
Conexión vía menú de Bluetooth
Preparación
≥ Encienda la función Bluetooth® del dispositivo y
coloque el dispositivo cerca de este aparato.
∫ Sincronización con dispositivos
Bluetooth
®
®
®
1 Pulse [ ] para seleccionar “BLUETOOTH”.
≥ Si se indica “PAIRING” en la pantalla, vaya al paso 3.
2 Pulse [PLAY MENU] para seleccionar “PAIRING” y
después pulse [OK].
≥ O bien, mantenga pulsado
en el aparato.
[SELECTOR,sPAIRING]
3 Seleccione “SC-HC1000” desde el menú
Bluetooth® del dispositivo Bluetooth®.
≥ Es posible que la dirección MAC (por ejemplo,
6C:5A:B5:B3:1D:0F) aparezca antes de que se muestre
“SC-HC1000”.
≥ El nombre del dispositivo conectado aparece en la
pantalla durante algunos segundos.
4 Inicie la reproducción en el dispositivo Bluetooth
®
∫ Conexión de un dispositivo Bluetooth®
sincronizado
1 Pulse [ ] para seleccionar “BLUETOOTH”.
≥ “READY” se indica en la pantalla.
2 Seleccione “SC-HC1000” desde el menú
Bluetooth® del dispositivo Bluetooth®.
≥ El nombre del dispositivo conectado aparece en la
pantalla durante algunos segundos.
3 Inicie la reproducción en el dispositivo Bluetooth
®
Bluetooth® modo de transmisión
Puede cambiar el modo de transmisión para priorizar
la calidad de la transmisión o la calidad de sonido.
Preparación
≥ Pulse [ ] para seleccionar “BLUETOOTH”.
≥ Si un dispositivo Bluetooth® ya está conectado,
desconéctelo.
1 Presione [PLAY MENU] repetidamente para
seleccionar “LINK MODE”.
2 Pulse [2, 1] para seleccionar el modo y luego
pulse [OK].
MODE 1: Énfasis en la conectividad
MODE 2: Énfasis en la calidad de sonido
≥ Seleccione “MODE 1” si se interrumpe el sonido.
≥ Cuando visualice contenido de vídeo con esta función,
puede que la salida del vídeo y el audio no estén
sincronizadas. En este caso, seleccione “MODE 1”.
≥ El ajuste de fábrica es “MODE 2”.
.
.
≥ Si se le solicita la contraseña, ingrese “0000”.
≥ Puede registrar hasta 8 dispositivos con este aparato. Si se
sincroniza un noveno dispositivo, se reemplazará el
dispositivo que menos se ha utilizado.
≥ Esta unidad se puede conectar solamente a un dispositivo
por vez.
≥ Cuando se selecciona “BLUETOOTH” como fuente, este
aparato intentará conectarse automáticamente con el último
dispositivo conectado Bluetooth
pantalla durante este proceso.) Si el intento de conexión
falla, intente volver a establecer al conexión.
®
. (“LINKING” aparece en la
54
TQBJ2036
Page 55

Nivel de entrada Bluetooth
Si el nivel de entrada de sonido del dispositivo
Bluetooth® es demasiado bajo, cambie la
configuración del nivel de entrada.
Preparación
≥ Conecte un dispositivo Bluetooth®.
®
1 Presione [PLAY MENU] repetidamente para
seleccionar “INPUT LEVEL”.
2 Pulse [2, 1] para seleccionar el nivel y luego
pulse [OK].
“LEVEL 0” ,. “LEVEL i1” ,. “LEVEL i2”
^--------------------------------------------------J
≥ Seleccione “LEVEL 0” si el sonido resultara distorsionado.
≥ El ajuste de fábrica es “LEVEL 0”.
Desconexión del dispositivo
Bluetooth
1 Mientras se conecta un dispositivo Bluetooth
Presione [PLAY MENU] repetidamente para
seleccionar “DISCONNECT?”.
®
®
:
2 Presione [2, 1] para seleccionar “OK? YES” y
luego presione [OK].
≥ Se puede desconectar el dispositivo Bluetooth® al mantener
pulsado
≥ El dispositivo Bluetooth
[SELECTOR,sPAIRING] en el aparato.
una fuente de audio diferente (por ej. “CD”).
®
se desconectará si se selecciona
Acerca de Bluetooth
Panasonic no se hace responsable de los daños
y/o información que se pueda poner en peligro
durante una transmisión inalámbrica.
®
∫ Banda de frecuencia utilizada
≥ Este sistema usa la banda de frecuencia 2,4 GHz.
∫ Certificación de este dispositivo
≥ Este sistema se adecua a las restricciones de
frecuencia y ha sido certificado en base a las leyes
de frecuencia de modo que no es necesario contar
con una licencia para productos inalámbricos.
≥ Las siguientes acciones son castigables legalmente
en algunos países:
– Desarmar o modificar el sistema.
– Retirar las indicaciones de las especificaciones.
∫ Restricciones de uso
≥ La transmisión inalámbrica y/o uso de los
dispositivos equipados con Bluetooth® no se
encuentra garantizada.
≥ Todos los dispositivos deben cumplir con las normas
establecidas por Bluetooth SIG, Inc.
≥ De acuerdo con las especificaciones o
configuraciones de un dispositivo, es posible que la
conexión no se establezca o que varíen algunas
operaciones.
≥ Este sistema admite las funciones de seguridad
Bluetooth®. Pero según el ambiente de
funcionamiento o los ajustes, esta seguridad
posiblemente no sea suficiente. Transmita los datos
de forma inalámbrica a este sistema y con cuidado.
≥ Este sistema no puede transmitir datos hacia un
dispositivo Bluetooth®.
∫ Rango de uso
≥ Use el dispositivo a un rango máximo de 10 m. El
rango puede disminuir según el ambiente, los
obstáculos o la interferencia.
∫ Interferencia desde otros dispositivos
≥ Este sistema puede no funcionar adecuadamente y
pueden surgir problemas como ruidos o elevaciones
del sonido debido a la interferencia de ondas
radiales si el sistema está ubicado demasiado cerca
de otros dispositivos Bluetooth® o los dispositivos
que usan la banda de 2,4 GHz.
≥ Este sistema no funcionará adecuadamente si las
ondas radiales de estaciones de emisión, etc.,
cercanas son demasiado intensas.
∫ Uso específico
≥ Este sistema es para uso normal y general
únicamente.
≥ No use este sistema cerca de un equipo ni en un
entorno que sea sensible a la interferencia de
frecuencia de radio (por ejemplo: aeropuertos,
hospitales, laboratorios, etc.)
ESPAÑOL
55
TQBJ2036
Page 56

Controles de reproducción
de medios
Las siguientes marcas indican la disponibilidad de la
función.
[CD]: Audio de CD en formato CD-DA o un CD
[USB]: Dispositivos USB que contengan
[BLUETOOTH]: Dispositivo Bluetooth® conectado (l 54)
[NETWORK]: Cuando se conecta a un dispositivo
que contiene archivos MP3 (l 66)
archivos MP3 (l 66)
compatible con AllPlay/DLNA (l 51)
Reproducción básica
([CD], [USB], [BLUETOOTH], [NETWORK])
Preparación
≥ Encienda la unidad.
≥ Inserte los medios o conecte el dispositivo
Bluetooth®/AllPlay/DLNA compatible. (l 47, 51, 54)
1 Seleccione la fuente de audio.
Para disco:
Pulse [CD/USB] repetidamente para seleccionar
“CD”.
Para un dispositivo USB:
Pulse [CD/USB] repetidamente para seleccionar
“USB”.
Para un dispositivo Bluetooth®:
Pulse [ ] para seleccionar “BLUETOOTH”.
Para dispositivos compatibles con AllPlay/DLNA:
Cuando este sistema esté seleccionado como
los altavoces de salida, la fuente de audio
cambiará a la fuente de la red.
≥ Como alternativa, pulse [RADIO, EXT-IN]
repetidamente para seleccionar “NETWORK”.
(Cuando seleccione usando este aparato, pulse
[SELECTOR, s PAIRING] repetidamente.)
2 Pulse [1/;] para iniciar la reproducción.
Controles básicos
Parada Pulse [∫].
Pausa Pulse [1/;].
Avance Presione [:] o [9] para avanzar
Búsqueda
(Excepto
[NETWORK])
≥ [USB]: La posición se memoriza mientras
se visualiza “RESUME”.
≥ [USB]: Pulse [∫] dos veces para detener
por completo la reproducción.
Vuelva a pulsar para continuar la
reproducción.
una pista.
(Este aparato: [:/6] o [5/
9])
[CD] (MP3), [USB]
Pulse [3] o [4] para avanzar el
álbum.
Durante la reproducción o pausa
mantenga pulsado [6] o [5].
(Esta unidad: [:/6] o [5/9])
∫ Para visualizar la información
([CD], [USB], [BLUETOOTH])
Puede visualizar la pista, el artista, el título del álbum,
el tipo de archivo, la velocidad de bits y otra
información. (La información varía dependiendo de la
fuente de audio.)
Presione [DISPLAY] repetidamente.
ej. [USB] (MP3)
“A”: Número de álbum MP3.
“T”: Número de pista MP3.
(“ ” significa un número.)
≥ Para usar el control remoto de este aparato con un
dispositivo Bluetooth
AVRCP (Audio Video Remote Control Profile – Perfil de
control remoto de audio y video.)
Según el estado del dispositivo, es posible que algunos
controles no funcionen.
≥ [NETWORK]: Algunos controles podrían no funcionar
dependiendo de la aplicación usada, etc.
≥ [CD], [USB]: Para seleccionar las pistas, presione los botones
numéricos.
≥ El número máximo de caracteres que se pueden visualizar
es de aproximadamente 32
≥ Esta unidad admite etiquetas ID3 de versiones 1 y 2.
≥ Los datos de texto que no se admiten no se visualizarán o se
mostrarán de forma diferente.
®
, el dispositivo Bluetooth® debe admitir
56
TQBJ2036
Page 57

Modos de reproducción ([CD], [USB])
Seleccione el modo de grabación.
1 Pulse [PLAY MENU] repetidamente para
seleccionar “PLAYMODE” o “REPEAT”.
2 Pulse [2, 1] para seleccionar el ajuste y luego
pulse [OK].
PLAYMODE
OFF
PLAYMODE
1-TRACK Solamente se reproduce la pista
1-ALBUM Solamente se reproduce el álbum
RANDOM Selecciona los contenidos de
1-ALBUM
RANDOM
REPEAT
ON REPEAT Encienda el modo de repetición.
OFF
REPEAT
≥ Durante la reproducción aleatoria, no se puede saltar a
pistas que ya hayan sido reproducidas o pulse los botones
numéricos.
≥ Esta función no funciona con “Reproducción del programa”.
≥ El modo se cancela cuando abre la tapa deslizante o se
retira el dispositivo USB.
Cancelar la configuración del modo
de reproducción.
seleccionada.
≥ “1”, “ ” se visualizará.
(Saltar a la pista deseada.)
seleccionado.
≥ Pulse [3] o [4] para seleccionar el
álbum.
≥ Se visualiza “1”, “ ”.
manera aleatoria.
≥ “RND” se visualizará.
Reproduce de manera aleatoria las
pistas del álbum seleccionado.
≥ Pulse [3] o [4] para seleccionar el
álbum.
≥ “1”, “ ”, “RND” se visualizará.
≥ “`” se visualizará.
Apague el modo de repetición.
Reproducción del programa
([CD], [USB])
Esta función le permite programar hasta 24 pistas.
[CD] (CD-DA)
1 Pulse [PROGRAM] en el modo de paro.
≥ “PROGRAM” se muestra durante unos segundos.
2 Pulse los botones numéricos para seleccionar la
pista deseada.
≥ Realice este paso para programar otras pistas.
3 Pulse [1/;] para iniciar la reproducción.
[CD] (MP3), [USB]
1 Pulse [PROGRAM] en el modo de paro.
≥ “PROGRAM” se muestra durante unos segundos.
2 Pulse [3, 4] para seleccionar el álbum deseado.
3 Pulse [9] y después pulse los
botonesnuméricos para seleccionar la pista
deseada.
4 Pulse [OK].
≥ Repita los pasos del 2 al 4 para programar otras pistas.
5 Pulse [1/;] para iniciar la reproducción.
Comprobar el
contenido del
programa
Borrar la
última pista
Cancelar el
modo de
programación
Borrar todas
las pistas
≥ La memoria del programa se borra cuando abre la puerta
corrediza o retira el dispositivo USB.
Pulse [:] o [9] en el modo de
parada.
Pulse [DEL] en modo de parada.
Pulse [PROGRAM] en el modo de
paro.
≥ “PGM OFF” se muestra durante unos
segundos.
Pulse [∫] en el modo paro. Se
muestra “CLEAR ALL”. En un lapso
de 5 segundos, vuelva a pulsar [∫].
ESPAÑOL
57
TQBJ2036
Page 58

Escuchar la radio FM
Puede predeterminar hasta 30 canales.
Un canal del 1 al 5 se establecerá como las emisoras
favoritas en (FAVOURITE) [1] a [5]. (l derecha,
“Cambiar las emisoras almacenadas en (FAVOURITE)
[1] a [5]”)
Preparación
≥ Asegúrese de que la antena esté conectada. (l 46)
≥ Encienda el aparato.
≥ Presione [RADIO, EXT-IN] repetidamente para
seleccionar “FM”.
Presintonización automática de
emisoras
1 Pulse [RADIO MENU] para seleccionar
“A.PRESET”.
2 Presione [2, 1] para seleccionar “LOWEST” o
“CURRENT” y luego presione [OK].
LOWEST:
Para iniciar la auto-presintonización con la
frecuencia más baja (“FM 87.50”)
CURRENT:
Para iniciar la auto-presintonización con la
frecuencia actual.*
≥ El sintonizador comienza a predeterminar de manera
ascendente todas las estaciones que pueda recibir en
los canales.
*1: Para cambiar la frecuencia, consulte “Sintonización
manual”.
Escuchar un canal predeterminado
Pulse los botones numéricos, [:] o [9] para
seleccionar la estación programada.
≥ O bien, pulse [:/6] o [5/9] en este aparato
cuando "PRESET" este seleccionado como el modo de
sintonizacion
≥ Puede seleccionar un canal del 1 al 5 pulsando uno del
(FAVOURITE) [1] al [5] en este aparato.
*
∫ Sintonización manual
Pulse [6] o [5] para sintonizar la emisora.
≥ O bien, pulse [:/6] o [5/9] en este aparato
cuando “MANUAL” esté seleccionado como el modo de
sintonización*
Para sintonizar automáticamente, mantenga pulsado el
botón hasta que la frecuencia comience a cambiar
rápidamente.
*2: Para cambiar el modo de sintonización
1 Pulse [RADIO MENU] repetidamente para seleccionar
“TUNE MODE”.
2 Pulse [2, 1] para seleccionar “MANUAL” o “PRESET”
y a continuación pulse [OK].
1
2
.
2
.
Presintonización manual de
emisoras
1 Mientras se escucha la emisión de la radio
Pulse [PROGRAM].
2 Pulse los botones numéricos para seleccionar un
número predefinido.
≥ Siga los pasos 1 a 2 de nuevo para presintonizar más
emisoras.
≥ Una estación almacenada previamente se sobrescribe
cuando otra estación se almacena en la misma
presintonización del canal.
Cambiar las emisoras almacenadas
en (FAVOURITE) [1] a [5]
Puede cambiar las emisoras almacenadas en
(FAVOURITE) [1] a [5] fácilmente.
Mientras escuchar la emisión de la radio
Mantenga pulsado uno del [1] al [5] hasta que “P ”
aparezca en la pantalla.
(“ ” significa un número.)
≥ Cuando cambie las emisoras almacenadas en (FAVOURITE)
[1] a [5], los canales del 1 al 5 también se cambian a las
mismas emisoras correspondientes.
∫ Para ver el estado de la señal de FM
actual
Pulse
[DISPLAY].
“FM ST”: Se está recibiendo una emisión FM
“FM - - - -”: No se está recibiendo ninguna emisión o
“FM MONO”: Ha configurado “FM MODE” como
≥ “STEREO” se visualiza cuando esta unidad está sintonizada
a una emisión estéreo.
estéreo.
la emisión FM recibida es débil o está en
modo monaural.
“MONO”. (l 63, “Si el ruido es excesivo
durante la recepción de FM.”)
58
TQBJ2036
Page 59

Ajuste del sonido
Los siguientes efectos de sonido se pueden añadir a la
salida de audio.
1 Pulse repetidamente [SOUND] para seleccionar el
efecto.
2 Pulse [2, 1] para seleccionar el ajuste y luego
pulse [OK].
“MY SOUND”
(Mi sonido)
“BASS” (Bajos) o
“TREBLE”
(Agudos)
“SURROUND”
(Envolvente)
“CLEAR-MODE
DIALOG”
(Diálogo del modo
de cancelación)
“WALL MOUNT”
(Montaje en la
pared)
≥ Es posible que experimente una reducción en la calidad de
sonido cuando estos efectos se utilizan con algunas fuentes.
Si esto ocurre, apague los efectos de sonido.
≥ Cuando se selecciona “AUX” como la fuente, se puede
seleccionar “INPUT LEVEL” para ajustar el nivel de la
entrada de sonido del dispositivo externo. (l 46)
“SOUND 1”, “SOUND 2”, o
“SOUND 3”.
(l a continuacion, “Cómo
guardar los ajustes de sonido”)
Ajuste el nivel (j4 a i4).
“ON SURROUND” o
“OFF SURROUND”.
≥ Como alternativa, pulse
[SURROUND] en esta unidad.
“ON CLEAR-MODE DIALOG” o
“OFF CLEAR-MODE DIALOG”.
“MODE 1 WALL MOUNT”,
“MODE 2 WALL MOUNT” o
“OFF WALL MOUNT”.
≥ Como alternativa, pulse [WALL
MOUNT] en esta unidad.
Cómo guardar los ajustes de sonido
Puede guardar los ajustes de sonido que desee en
“SOUND 1”, “SOUND 2” o “SOUND 3” como
“MY SOUND”.
1 Ajuste los efectos de sonido que desee. (l arriba)
2 Pulse [SETUP] para seleccionar “SAVE MY
SOUND”.
3 Pulse [2, 1] para seleccionar un número de
ajuste y después pulse [OK].
≥ “SAVED” se visualizará.
≥ Si guarda los nuevos valores con el mismo número de
ajuste, estos reemplazarán los ajustes de sonido
previamente guardados.
Recuperación de los ajustes de sonido
guardados
1 Pulse [SOUND] para seleccionar “MY SOUND”.
2 Pulse [2, 1] para seleccionar el número de
ajuste de sonido que desee y luego pulse [OK].
D.Bass
Pulse [D.BASS] para seleccionar “ON D.BASS” o
“OFF D.BASS”.
≥ Como alternativa, pulse [D.BASS] en la unidad.
Predeterminación del ecualizador
Pulse [PRESET EQ] reiteradas veces para seleccionar
“HEAVY” (fuerte), “SOFT” (suave), “CLEAR” (claro),
“VOCAL” (vocal) o “FLAT” (plano/apagado).
≥ Cuando se selecciona “PRESET EQ”, los ajustes de bajos y
agudos le seguirán a “PRESET EQ” en conformidad.
Reloj y temporizador
Configuración del reloj
Este es un reloj de 24 horas.
Uso de la información del reloj procedente de
un dispositivo de red
Puede transmitir la información del reloj desde el
dispositivo a este aparato a través de la aplicación
“Panasonic Music Streaming” (l 51).
Preparación
≥ Complete los ajustes de la red. (l 48)
≥ Instale la aplicación “Panasonic Music Streaming” en
su dispositivo.
≥ Conecte el dispositivo a la misma red que este
sistema.
1 Encienda este sistema.
≥ Verifique que el indicador de red (l 44) se encienda.
≥ Si no se enciende, compruebe los ajustes de red.
(l 48)
2 Inicie la aplicación “Panasonic Music Streaming”.
≥ Utilice siempre la última versión de la aplicación.
≥ La información del reloj se enviará a este sistema.
Ajuste manual del reloj
1 Pulse [CLOCK/TIMER] para seleccionar
“CLOCK”.
2 Presione [3, 4] para seleccionar la hora y luego
presione [OK].
∫ Para comprobar la hora
Pulse [CLOCK/TIMER].
≥ El reloj se reinicia cuando hay una falla de energía o cuando
se desconecta el cable de alimentación CA.
≥ Reinicie el reloj con regularidad para mantener la precisión.
TQBJ2036
ESPAÑOL
59
Page 60

Apagado automático
El apagado automático puede apagar la unidad luego
de un tiempo predeterminado.
Pulse repetidamente [SLEEP] para seleccionar el
ajuste (en minutos).
“SLEEP 30” -. “SLEEP 60” -. “SLEEP 90” -. “SLEEP 120”
^---------------- “OFF” (Cancelar) (""""""}
≥ El tiempo restante se indica en la pantalla de la unidad a
cada minuto, salvo cuando se realicen otras operaciones.
Cuando solo resta 1 minuto, se muestra “SLEEP 1”
continuamente.
≥ El temporizador de reproducción y el temporizador de
apagado automático se pueden usar juntos. El temporizador
de apagado automático es siempre el temporizador principal
del dispositivo.
Temporizador de reproducción
Puede fijar el temporizador para que esta unidad se
encienda a una determinada hora cada día.
Preparación
Ajuste el reloj.
1 Presione [CLOCK/TIMER] repetidamente para
seleccionar “TIMER ADJ”.
2 Pulse [3, 4] para establecer la hora de inicio
(“ON TIME”) y luego pulse [OK].
3 Presione [3, 4] para seleccionar la hora de
finalización (“OFF TIME”) y luego presione [OK].
4 Pulse [3, 4] para seleccionar la fuente de
música* y a continuación pulse [OK].
Encienda el temporizador
1 Prepare la fuente de música seleccionada y ajuste
el volumen deseado.
2 Pulse [F, PLAY].
≥ Se visualiza “F”.
Para cancelar, vuelva a pulsar [F, PLAY].
3 Pulse [Í] para cambiar el dispositivo a modo en
espera.
∫ Para comprobar la configuraciós
Pulse [CLOCK/TIMER] repetidamente para
seleccionar “TIMER ADJ”.
(Durante modo de espera, pulse [CLOCK/TIMER] dos
veces.)
≥ El temporizador arrancará con un volumen bajo que se
incrementará gradualmente hasta alcanzar el nivel
predeterminado.
≥ El temporizador se activa a la hora configurada todos los
días si está encendido.
≥ Si apaga la unidad y la enciende de nuevo mientras el
temporizador se encuentra en funcionamiento, el
temporizador no se detendrá a la hora de finalización.
* “CD”, “USB” y “FM” se pueden fijar como fuente de música.
60
TQBJ2036
Actualizaciones de
firmware
En ocasiones, Panasonic puede lanzar
actualizaciones del firmware para este sistema que
pueden agregar u optimizar el funcionamiento de
ciertas características. Estas actualizaciones se
encuentran disponibles de forma gratuita.
También puede actualizar el firmware a través del
mensaje emergente que se le presenta solicitándole
que lo haga en la pantalla dentro de la aplicación
“Panasonic Music Streaming” (l 51). Para obtener
más información sobre la aplicación, consulte el sitio
web mencionado a continuación.
http://panasonic.jp/support/global/cs/audio/app/
(En este sitio sólo se utiliza el idioma inglés.)
La descarga dura aprox. 10 minutos.
NO DESCONECTE el cable de
alimentación CA cuando aparezca uno de
los siguientes mensajes.
“UPDATING” o “UPD%”
(“ ” significa un número.)
≥ Durante el proceso de actualización, no se podrán realizar
otras operaciones.
Preparación
≥ Encienda este sistema.
≥ Conecte este sistema a la red hogareña. (l 48)
– Asegúrese de que la red esté conectada a
Internet.
1 Pulse [RADIO, EXT-IN] repetidamente para
seleccionar “NETWORK”.
2 Presione [SETUP] reiteradas veces para
seleccionar “FW UPDATE” y luego presione [OK].
3 Pulse [2, 1] para seleccionar “OK? YES” y luego
pulse [OK] para iniciar la actualización.
≥ Seleccione “OK? NO” para cancelar la actualización.
Cuando se inicia la actualización, se visualiza
“UPDATING”.
El progreso se muestra como “UPD%” durante
la actualización. (“ ” representa un número.)
4 Una vez concluida la actualización, se visualiza
“SUCCESS”.
Desconecte el cable de alimentación de CA y
reconéctelo después de 1 minuto.
≥ Si no hay actualizaciones, se visualizará “NO NEED”.
≥ La descarga podría tardar más o no funcionar
correctamente; depende del entorno de conexión.
Verificación de la versión de
firmware
Presione [SETUP] reiteradas veces para seleccionar
“FW VER.” y luego presione [OK].
Se visualizará la versión del firmware instalado.
≥ Pulse [OK] para salir.
Page 61

Otros
Función de apagado automático
Como configuración de fábrica, este dispositivo se
cambiará a modo en espera automáticamente si no
hay sonido y no se utiliza durante 20 minutos
aproximadamente.
Para cancelar esta función
1 Presione [SETUP] repetidamente para seleccionar
“AUTO OFF”.
2 Presione [2, 1] para seleccionar “OFF” y luego
presione [OK].
≥
Para encender el temporizador, seleccione “ON” en el paso 2.
≥ Este ajuste no se puede realizar cuando la radio es la fuente
o cuando “NET STANDBY” está configurado como “ON”.
≥ Si “NET STANDBY” está configurado en “ON”, esta función
también estará configurada en “ON”. Para cambiar el ajuste,
configure “NET STANDBY” en “OFF”. (l derecha)
≥ Cuando se conecta a un dispositivo Bluetooth
funciona.
Bluetooth® en espera
Cuando se selecciona “SC-HC1000” desde un menú
Bluetooth® de dispositivo Bluetooth® sincronizado, este
aparato se encenderá automáticamente desde el
modo en espera y se establecerá una conexión
Bluetooth®.
®
, la función no
1 Pulse [SETUP] repetidamente para seleccionar
“BLUETOOTH STANDBY”.
2 Pulse [2, 1] para seleccionar “ON” y a
continuación pulse [OK].
≥ Para apagar la función, seleccione “OFF” en el paso 2.
≥ El ajuste de fábrica es “OFF”. Si esta función está
configurada en “ON”, aumentará el consumo de energía en
espera.
Cambio de la unidad y del código de
mando a distancia
Cuando otro equipo Panasonic responda a mando a
distancia provisto, cambie el código de mando a
distancia.
1 Pulse [CD/USB] repetidamente para seleccionar
“CD”.
2 Mantenga pulsado [∫] en la unidad y [2] en el
mando a distancia hasta que la pantalla de la
unidad muestre “REMOTE 2”.
3 Mantenga pulsado [OK] y [2] en el control remoto
durante al menos 4 segundos.
Modo en espera de la red
Este sistema puede encenderse automáticamente
desde el modo de espera cuando se seleccione este
sistema como los altavoces de salida de los
dispositivos de la red.
Según la configuración de fábrica, el modo de espera
de red está desactivado antes de que conecte este
sistema a una red local.
Cuando lo conecte a la red local por primera vez, esta
función se activará automáticamente.
También puede activar el modo de espera de red
siguiendo los siguientes pasos:
1 Presione [SETUP] reiteradas veces para
seleccionar “NET STANDBY” y luego presione
[OK].
2 Pulse [2, 1] para seleccionar “ON” y después
pulse [OK].
≥ Cuando “NET STANDBY” se encuentra en “ON”
– La red (con cable LAN/Wi-Fi) estará activa incluso
en el modo de espera.
– El consumo de energía en el modo de espera
aumentará. Para reducir el consumo de energía
en modo de espera, apague el modo de espera de
la red.
Para apagar el modo de espera de la red
Seleccione “OFF” en el paso 2.
≥ Cuando ha ajustado “NET STANDBY” en “OFF”
– La red (con cable LAN/Wi-Fi) se desactivará en el
modo de espera si el sistema se cambia al modo
de espera en otra fuente distinta a “NETWORK”.
La red (con cable LAN/Wi-Fi) se activará cuando
el sistema se encienda.
– El modo de espera de la red estará activo si el
sistema se cambia al modo de espera en el modo
selector de “NETWORK” y este sistema está
conectado a la red.
– Para mantener el modo de espera de la red
apagado, seleccione una fuente distinta a
“NETWORK” antes de cambiar el aparato al modo
de espera.
≥ Esta función volverá a la configuración por defecto si ha
realizado la operación de restablecimiento de la red. (l 62)
≥ Cuando se encienda el sistema a través de esta función, es
posible que no se reproduzca la parte inicial de la música.
≥ En función de la aplicación, las condiciones para la
activación de esta función pueden ser diferentes.
≥ Es posible que el sistema no se encienda incluso cuando
esté seleccionado como los altavoces de salida. En ese
caso, inicie la reproducción.
ESPAÑOL
≥ Para cambiar nuevamente a “REMOTE 1”, repita los pasos
anteriores pero reemplace [2] con [1].
61
TQBJ2036
Page 62

Conexión LAN inalámbrica
La función LAN inalámbrica puede habilitarse o
deshabilitarse.
1 Pulse [RADIO, EXT-IN] repetidamente para
seleccionar “NETWORK”.
2 Presione [SETUP] reiteradas veces para
seleccionar “WIRELESS LAN” y luego presione
[OK].
3 Pulse [2, 1] para seleccionar “ON” o “OFF” y a
continuación pulse [OK].
≥ El ajuste de fábrica es “ON”.
Fuerza de la señal Wi-Fi
Para verificar la fuerza de señal Wi-Fi donde se
encuentra ubicado este sistema.
Preparación
Conecte este sistema a la red inalámbrica. (l 48)
1 Pulse [RADIO, EXT-IN] repetidamente para
seleccionar “NETWORK”.
2 Presione [SETUP] reiteradas veces para
seleccionar “SIGNAL LEVEL” y luego presione
[OK].
“LEVEL ” se indica en la pantalla.
(“ ” representa un número.)
≥ Pulse [OK] para salir del modo de visualización.
Dirección IP/MAC
Para revisar la dirección IP del sistema o la dirección
MAC Wi-Fi.
1 Pulse [RADIO, EXT-IN] repetidamente para
seleccionar “NETWORK”.
2 Presione [SETUP] reiteradas veces para
seleccionar “NET INFO” y luego presione [OK].
3 Pulse [2, 1] reiteradas veces para seleccionar
“IP ADDR.” o “MAC ADDR.” y luego pulse [OK].
≥ Se visualizará parcialmente la dirección IP o la
dirección MAC.
4 Presione [2, 1] en el control remoto para ver el
resto de la dirección IP o la dirección MAC.
≥ Pulse [OK] para salir.
≥ Esto,“ – ”, que aparece en la parte superior o inferior
izquierda del visualizador indica las primeras y últimas
unidades respectivamente.
Restablecimiento de la red
Para restablecer los ajustes de la red.
1 Pulse [RADIO, EXT-IN] repetidamente para
seleccionar “NETWORK”.
2 Presione [SETUP] reiteradas veces para
seleccionar “NET RESET” y luego presione [OK].
3 Pulse [2, 1] para seleccionar “OK? YES” y
después pulse [OK].
≥ “NETWORK INITIALIZING” se indica en la pantalla.
Cuando la pantalla regresa a “NETWORK”, se
restablece la configuración de la red.
≥ Se recomienda tener una fuerza de señal de “3”. Cambie la
posición o ángulo de su router inalámbrico o este sistema si
la indicación es “2” o “1” y cerciórese de que la conexión
haya mejorado.
≥ Si se visualiza “LEVEL 0”, este sistema no puede establecer
un enlace con el router inalámbrico. (l 64)
Nombre de red inalámbrica (SSID)
Muestre el nombre para la red inalámbrica conectada
(SSID).
1 Pulse [RADIO, EXT-IN] repetidamente para
seleccionar “NETWORK”.
2 Presione [SETUP] reiteradas veces para
seleccionar “NET INFO” y luego presione [OK].
3 Presione [2, 1] reiteradas veces para
seleccionar “SSID” y luego presione [OK].
≥ Pulse [OK] para salir.
≥ Si se visualiza “NO CONNECT”, este sistema no está
conectado a una red inalámbrica.
≥ Los caracteres que no se puedan mostrar se remplazarán
con “£”.
62
TQBJ2036
≥ Esta función no afecta al ajuste “WIRELESS LAN”.
Page 63

Solución de problemas
Haga las comprobaciones siguientes antes de solicitar el
servicio de reparaciones. Si tiene alguna duda acerca de
los puntos de comprobación, o si las soluciones indicadas
en la siguiente guía no solucionan el problema, consulte a
su concesionario para recibir instrucciones.
¿Tiene instalada la versión actualizada del firmware?
Panasonic está constantemente mejorando el
firmware del sistema para asegurar que nuestros
clientes disfruten de la última tecnología. (l 60)
Para obtener ayuda, soporte y consejos más
detallados sobre el producto, visite:
http://panasonic.jp/support/global/cs/audio/
(En este sitio sólo se utiliza el idioma inglés.)
Para volver a la configuración de fábrica
Cuando ocurran las siguientes situaciones, reinicie la memoria:
≥ No hay respuesta al presionar los botones.
≥ Desea limpiar y reiniciar los contenidos de los ajustes.
1 Desconecte el cable de alimentación de CA.
(Espere al menos 30 segundos antes de
proceder con el paso 2).
2
Mientras mantiene pulsado [Í/I] en el aparato,
vuelva a conectar el cable de alimentación de CA.
≥ Mantenga pulsado [Í/I] hasta que “---------” aparezca
en la pantalla.
3 Libere [Í/I].
≥ Los ajustes vuelven a la configuración de fábrica. Es
necesario establecer los ajustes de nuevo.
≥ Para restablecer los ajustes de red, realice la operación
para el restablecimiento de la red. (l 62)
General
No puede encender la unidad.
≥ Después de conectar el cable de alimentación de CA, espere
unos 10 segundos antes de encender la unidad.
Se escucha zumbido durante la reproducción.
≥ Si un cable de alimentación de CA o luz fluorescente se
encuentra cerca de los cables, entonces mantenga otros aparatos
y cables alejados de los cables.
La unidad no funciona.
≥ Se ha activado uno de los dispositivos de seguridad de la unidad.
1
Pulse [Í/I] en la unidad para cambiar la unidad al modo de espera.
≥ Si la unidad no se apaga, desconecte el cable de
alimentación de CA de la toma de corriente de CA, vuelva a
conectarlo transcurridos aproximadamente 30 segundos y
espere unos 10 segundos.
2 Pulse [Í/I] en la unidad para encenderla. Si la unidad sigue sin
funcionar, consulte a su concesionario.
La carga no comienza durante el modo en espera.
≥ Encienda el aparato. Compruebe que ha comenzado la carga, y a
continuación cambie el dispositivo al modo en espera. (l 47)
Se escucha un ruido.
≥ Cuando se conecta un dispositivo a la clavija AUX IN y al puerto
USB, se puede generar ruido en función del dispositivo. En este
caso, retire el cable USB del puerto USB.
Mando a distancia
El mando a distancia no funciona correctamente.
≥ La pila está gastada o se ha insertado incorrectamente. (l 45)
Disco
La pantalla no es correcta o no comienza la reproducción.
≥
Asegúrese de que el disco sea compatible con esta unidad. (l66)
≥ Hay humedad en la lente. Aguarde por aproximadamente una
hora y vuelva a intentarlo.
USB
No hay respuesta cuando se presiona [1/;].
≥ Desconecte el dispositivo USB y vuelva a conectarlo.
Alternativamente, apague la unidad y vuelva a encenderla.
La unidad USB o sus contenidos no se pueden leer.
≥ El formato de la unidad USB o sus contenidos no son compatibles
con la unidad. (l 66)
≥ Es posible que la función del host USB de este producto no
funcione con algunos dispositivos USB.
Operación lenta de la memoria USB.
≥ La lectura de las unidades grandes de memoria USB insume
mucho tiempo.
El tiempo transcurrido visualizado es diferente al
tiempo de reproducción real.
≥ Copie los datos a otro dispositivo USB o realice una copia de
seguridad de los datos y vuelva a formatear el dispositivo USB.
Radio
Si el ruido es excesivo durante la recepción de FM.
≥ Cambie el audio para que se reproduzca como monoaural.
1
Pulse [RADIO MENU] repetidamente para seleccionar “FM MODE”.
2
Pulse [2,1] para seleccionar “MONO” y a continuación pulse [OK].
El sonido se convierte en monoaural.
≥
Para cancelar, seleccione “STEREO” o cambie la frecuencia.
En circunstancias normales, seleccione “STEREO”.
Se oye la recepción estática o ruido mientras se
escucha una emisión de radio.
≥ Confirme que la antena esté conectada correctamente. (l 46)
≥ Ajuste la posición de la antena.
≥ Intente de mantener cierta distancia entre la antena y el cable de
alimentación CA.
≥ Intente utilizar una antena para exteriores si hay edificios o
montañas cerca.
≥ Apague la televisión u otro reproductor de audio o sepárelo de
este aparato.
≥
Mantenga este aparato alejado de teléfonos móviles si hay alguna interferencia.
Bluetooth
No se puede completar la sincronización.
≥ Verifique la condición del dispositivo Bluetooth®.
El dispositivo no se puede conectar.
≥ La sincronización del dispositivo no tuvo éxito o se ha sustituido el
registro. Intente sincronizar de nuevo el dispositivo. (l 54)
≥
Este aparato puede estar conectado a un dispositivo diferente.
Desconecte el otro dispositivo e intente sincronizarlo de nuevo. (
≥
Si se ha seleccionado “MODE 2” en “LINK MODE”, seleccione “MODE 1”. (l54)
≥ Si el problema continúa, apague la unidad y vuelva a encenderla,
después inténtelo otra vez.
El dispositivo está conectado pero el audio no se
puede escuchar en este aparato.
≥
Para algunos dispositivos Bluetooth® incorporados, tiene que fijar
manualmente la salida de audio a “SC-HC1000”. Lea las instrucciones de
funcionamiento del dispositivo para obtener más detalles.
Se interrumpe el sonido.
≥ El dispositivo está fuera del rango de comunicación de 10 m.
Sitúe el dispositivo Bluetooth® más cerca de este aparato.
≥ Retire los obstáculos entre este aparato y el dispositivo.
≥
Otros dispositivos que usan la banda de frecuencia de 2,4 GHz, tales
como (router inalámbrico, microondas, teléfonos inalámbricos, etc.)
están interfiriendo. Coloque el dispositivo Bluetooth® más cerca de
este aparato y lejos de otros dispositivos.
≥ Seleccione “MODE 1” para la comunicación estable. (l 54)
®
l
54)
TQBJ2036
ESPAÑOL
63
Page 64

Red
No se puede conectar a una red.
≥ Verifique la conexión a la red y la configuración. (l 48)
≥
Si la red está establecida para ser invisible, haga visible la red mientras configura
la red de este aparato o realice una conexión de red LAN con cable. (l50)
≥
La seguridad Wi-Fi de este sistema solamente es compatible con WPA2TM. Por
lo tanto, su router inalámbrico debe ser compatible con WPA2TM. Para obtener
información sobre las funciones de seguridad compatibles con su router y sobre
cómo modificar su configuración, consulte las instrucciones de funcionamiento o
póngase en contacto con su proveedor de servicios de Internet.
≥
Compruebe que la función multidifusión del router inalámbrico esté habilitada.
≥ En función de los routers, es posible que el botón WPS no
funcione. Pruebe otros métodos. (l 48)
≥ Compruebe la configuración “WIRELESS LAN”. (l 62)
No se puede seleccionar este sistema como los
altavoces de salida.
≥ Compruebe que los dispositivos están conectados a la misma red
que este sistema.
≥ Vuelva a conectar los dispositivos a la red.
≥ Apague el router inalámbrico y luego vuelva a encenderlo.
≥ Apague y encienda este sistema, después vuelva a seleccionar
este sistema como los altavoces de salida.
La reproducción no arranca.
Se interrumpe el sonido.
≥ Si utiliza simultáneamente la banda de 2,4 GHz en el router
inalámbrico con otros dispositivos 2,4 GHz tales como
microondas, teléfonos inalámbricos, etc. puede causar
interrupciones en la conexión. Aumente la distancia entre este
aparato y esos dispositivos.
– Si su router inalámbrico soporta la banda de 5 GHz, intente
utilizar una banda de 5 GHz.
Para cambiar a la banda de 5 GHz, vuelva a establecer la configuración
de la red usando un navegador de Internet (l49). En el paso 8,
asegúrese de seleccionar su nombre de red (SSID) para la banda 5 GHz.
≥ No coloque este sistema dentro de un gabinete metálico, ya que
puede bloquear la señal Wi-Fi.
≥ Coloque este sistema cerca del router inalámbrico.
≥ Si varios dispositivos inalámbricos usan simultáneamente la
misma red inalámbrica que este sistema, intente apagar los otros
dispositivos o reducir el uso de la red inalámbrica.
≥
Si la reproducción se detiene, revise el estado de reproducción en el dispositivo.
≥ Vuelva a conectar los dispositivos a la red.
≥ Apague el router inalámbrico y luego vuelva a encenderlo.
≥ Pruebe con una conexión LAN convencional. (l 50)
Mensajes
Los siguientes mensajes o números de servicio
pueden aparecer en la pantalla de la unidad.
“--:--”
≥ Ha conectado por primera vez el cable de alimentación de CA o
ha habido una falla de energía reciente. Configure la hora (l 59).
“ADJUST CLOCK”
≥
El reloj no se encuentra configurado. Ajuste el reloj como corresponda.
“ADJUST TIMER”
≥ El temporizador de reproducción no se encuentra configurado.
Ajuste el temporizador de reproducción como corresponda.
“AUTO OFF”
≥ La unidad no ha sido utilizada por aproximadamente 20 minutos y
se apagará en un minuto. Presione cualquier botón para cancelar.
“ERROR”
≥
Se realiza una operación incorrecta. Lea las instrucciones e inténtelo nuevamente.
“F” / “F” (“ ” significa un número.)
≥ Hay un problema con este aparato.
Desconecte el cable de alimentación de CA de la toma de
corriente de CA, vuelva a conectarlo transcurridos
aproximadamente 30 segundos, espere unos 10 segundos y
encienda la unidad. Si el problema persiste, desconecte el cable
64
de alimentación de CA y consulte a su distribuidor.
TQBJ2036
“FAIL”
≥ La actualización o ajuste ha fallado. Una vez apagada la unidad,
desconecte el cable de alimentación de CA de la toma de
corriente de CA, vuelva a conectarlo transcurridos
aproximadamente 30 segundos, espere unos 10 segundos,
encienda la unidad y repita la actualización.
≥ Falló la descarga del firmware. Pulse cualquier botón para salir.
Vuelva a intentarlo más tarde.
≥
No se puede encontrar el servidor. Pulse cualquier botón para salir.
Asegúrese de que la red inalámbrica esté conectada a Internet.
“ILLEGAL OPEN”
≥ La tapa deslizante no se encuentra en la posición correcta. Una
vez apagada la unidad, desconecte el cable de alimentación de
CA de la toma de corriente de CA, vuelva a conectarlo
transcurridos aproximadamente 30 segundos, espere unos 10
segundos y encienda la unidad. Si se sigue visualizando el
mensaje, desconecte el cable de alimentación de CA y consulte a
su distribuidor.
“INVALID TO PRESET”
≥ No se puede presintonizar durante la reproducción de Spotify.
“LEVEL 0”
≥ No hay un enlace entre este sistema y el router inalámbrico.
Pruebe las siguientes operaciones:
– Verifique que el router inalámbrico esté encendido.
– Apague y vuelva a encender este sistema.
– Reajuste las funciones de la red inalámbrica. (l 48)
Si el problema persiste, consulte su distribuidor.
“LINKING”
≥
Este sistema está intentando conectarse al último dispositivo Bluetooth®
conectado cuando está seleccionada la opción “BLUETOOTH”.
≥ Este sistema se comunica con el router inalámbrico para
completar los ajustes de la red.
Según el router inalámbrico, este proceso puede llevar algunos
minutos. Intente mover este sistema más cerca del router inalámbrico.
“NETWORK INITIALIZING”
“SETUP IN PROGRESS, TRY AGAIN”
≥ El sistema está realizando un proceso interno.
– Espere 3 minutos aproximadamente.
– No desconecte el cable de alimentación de CA. Si lo hace,
podría haber errores en el funcionamiento.
“NO CONNECT”
≥ Este sistema no se puede conectar a la red.
Verifique la conexión de red. (l 48)
“NO DEVICE”
≥ El dispositivo USB no se ha insertado correctamente. Lea las
instrucciones e inténtelo de nuevo (l 47).
“NO DISC”
≥ Inserte el disco que quiere reproducir (l 47).
“NO PLAY”
≥ Examine el contenido. Sólo se pueden reproducir formatos
compatibles. (l 67)
≥ Los archivos en el dispositivo USB pueden estar dañados.
Formatee el dispositivo USB y vuelva a intentarlo.
≥ Es posible que el aparato tenga algún tipo de problema. Apague
el aparato y a continuación vuelva a encenderlo.
“NO PRESET”
≥ El canal seleccionado no ha sido presintonizado. Presintonice
algunos canales. (l 53)
“NOT SUPPORTED”
≥ Ha conectado un dispositivo USB que no es compatible.
“PGM FULL”
≥ El número de pistas programadas son más de 24.
Page 65

“PLAYERROR”
≥ Se ha reproducido un archivo no compatible. El sistema se saltará
esa canción y reproducirá la siguiente.
“READING”
≥ La unidad está verificando la información del “CD”/“USB”. Luego
de que esta pantalla desaparece, comienza a funcionar.
“REMOTE ” (“ ” significa un número.)
≥ El mando a distancia y esta unidad están usando diferentes
códigos. Cambie el código en el mando a distancia.
– Cuando aparece “REMOTE 1”, mantenga pulsado [OK] y [1]
durante más de 4 segundos.
– Cuando aparece “REMOTE 2”, mantenga pulsado [OK] y [2]
durante más de 4 segundos.
“SOUND NOT SET” (“ ” significa un número.)
≥ No hay ningún ajuste de sonido guardado con el número
seleccionado. Guarde los ajustes de sonido. (l 59)
“USB OVER CURRENT ERROR”
≥
El dispositivo USB está consumiendo demasiada energía. Seleccione
otra fuente distinta a “USB”, extraiga el USB y apague el aparato.
“VBR”
≥ El sistema no puede mostrar el tiempo de reproducción restante
de las canciones de velocidad de bits variable (VBR).
“WAIT”
≥ Este ajuste se muestra, por ejemplo, cuando este aparato se esté
apagando.
≥ Esto parpadea cuando el sistema está intentando entrar a un
modo de configuración de red.
El indicador de red (l 44) parpadea
≥
Esto puede ocurrir cuando, por ejemplo, la conexión a la red se interrumpe.
Licencias
La marca denominativa Bluetooth® y sus logos son marcas
comerciales registradas de Bluetooth SIG, Inc. y cualquier uso
de dichas marcas por parte de Panasonic Corporation se realiza
bajo licencia.
Otros nombres de marcas y marcas comerciales son propiedad
de sus respectivos propietarios.
DLNA, the DLNA Logo and DLNA CERTIFIED are trademarks,
service marks, or certification marks of the Digital Living
Network Alliance.
Windows es una marca comercial o una marca registrada de
Microsoft Corporation en Estados Unidos y otros países.
Google Play y Android son marcas comerciales de Google Inc.
La tecnología de decodificación de audio MPEG Layer-3
autorizada por Fraunhofer IIS y Thomson.
iPad, iPhone, iPod y iPod touch son marcas registradas de
Apple Inc., registradas en EE. UU y otros países.
App Store es una marca de servicio de Apple Inc.
FLAC Decoder
Copyright (C)
2000,2001,2002,2003,2004,2005,2006,2007,
2008,2009 Josh Coalson
Redistribution and use in source and binary forms, with or
without modification, are permitted provided that the
following conditions are met:
- Redistributions of source code must retain the above copyright
notice, this list of conditions and the following disclaimer.
- Redistributions in binary form must reproduce the above
copyright notice, this list of conditions and the following
disclaimer in the documentation and/or other materials provided
with the distribution.
- Neither the name of the Xiph.org Foundation nor the names of its
contributors may be used to endorse or promote products
derived from this software without specific prior written
permission.
THIS SOFTWARE IS PROVIDED BY THE COPYRIGHT HOLDERS
AND CONTRIBUTORS “AS IS” AND ANY EXPRESS OR IMPLIED
WARRANTIES, INCLUDING, BUT NOT LIMITED TO, THE IMPLIED
WARRANTIES OF MERCHANTABILITY AND FITNESS FOR A
PARTICULAR PURPOSE ARE DISCLAIMED. IN NO EVENT SHALL
THE FOUNDATION OR CONTRIBUTORS BE LIABLE FOR ANY
DIRECT, INDIRECT, INCIDENTAL, SPECIAL, EXEMPLARY, OR
CONSEQUENTIAL DAMAGES (INCLUDING, BUT NOT LIMITED
TO, PROCUREMENT OF SUBSTITUTE GOODS OR SERVICES;
LOSS OF USE, DATA, OR PROFITS; OR BUSINESS
INTERRUPTION) HOWEVER CAUSED AND ON ANY THEORY OF
LIABILITY, WHETHER IN CONTRACT, STRICT LIABILITY, OR TORT
(INCLUDING NEGLIGENCE OR OTHERWISE) ARISING IN ANY
WAY OUT OF THE USE OF THIS SOFTWARE, EVEN IF ADVISED
OF THE POSSIBILITY OF SUCH DAMAGE.
ESPAÑOL
El logotipo Wi-Fi CERTIFIEDTM es una marca de certificación de
Wi-Fi Alliance®.
La marca de identificador Wi-Fi Protected SetupTM es una marca
de certificación de Wi-Fi Alliance®.
“Wi-Fi®” es una marca registrada de Wi-Fi Alliance®.
“Wi-Fi Protected SetupTM”, “WPATM”, y “WPA2TM” son marcas
comerciales de Wi-Fi Alliance®.
Qualcomm es una marca comercial de Qualcomm Incorporated,
registrada en los Estados Unidos y otros países. AllPlay es una
marca comercial de Qualcomm Connected Experiences, Inc.,
registrada en los Estados Unidos y otros países.
TuneIn es una marca comercial de TuneIn Inc., registrada en
los Estados Unidos y otros países, y se debe utilizar con
permiso.
El software Spotify está sujeto a licencias de terceros que se
pueden encontrar aquí:
www.spotify.com/connect/third-party-licenses
65
TQBJ2036
Page 66

Cuidado de la unidad y los
Lente
medios
Desconecte el cable de energía CA antes de realizar el
mantenimiento.
∫ Limpie esta unidad con un paño suave
y seco
≥ Cuando esté muy sucio, humedezca un paño en agua para
limpiar el aparato; a continuación limpie otra vez con un paño
seco.
≥ Use un paño fino para limpiar los altavoces.
No use pañuelos de papel u otros materiales que se puedan
deshacer. Las pequeñas partículas pueden quedar
atrapadas dentro de la cubierta del altavoz.
≥ No utilice alcohol, diluyente de pintura o bencina para limpiar
esta unidad.
≥ Antes de utilizar un paño tratado químicamente, lea
cuidadosamente las instrucciones que lo acompañan.
∫ Mantenimiento de la lente
≥ Limpie el objetivo de forma regular para un correcto
funcionamiento. Utilice un ventilador para eliminar el polvo y
un bastoncillo de algodón si está muy sucio.
≥ No utilice un limpiador de lentes de CD.
≥ No deje la tapa deslizante abierta por períodos de tiempo
prolongados. Esto hará que la lente se ensucie.
≥ Tenga cuidado de no tocar la lente con sus dedos.
∫ Discos limpios
SÍ NO
Medios reproducibles
CD compatible
≥ Un disco con el logo CD.
≥ Esta unidad puede reproducir discos que cumplen con el
formato CD-DA.
≥ Este sistema puede reproducir CD-R/RW con contenido de
formato CD-DA o MP3.
≥ Es posible que esta unidad no reproduzca algunos discos
debido a la condición de grabado.
≥ Antes de la reproducción, finalice el disco en el dispositivo
en el que estaba grabado.
≥ Si el disco incluye MP3 y datos de audio normales (CD-DA),
la unidad reproducirá el tipo de audio grabado en la parte
interna del disco.
≥ Esta unidad no puede reproducir archivos grabados por
medio de escritura por paquetes.
≥ El disco debe cumplir con ISO9660 nivel 1 o nivel 2 (excepto
los formatos extendidos).
≥ Algunos CD-R/RW no se pueden reproducir debido a la
condición de la grabación.
≥ Los archivos MP3 se definen como pistas y las carpetas se
definen como álbum.
≥ Este sistema puede acceder a un máximo:
– CD-DA: 99 pistas
– MP3: 999 pistas, 255 álbumes (incluyendo la carpeta raíz)
≥ Las grabaciones no se reproducirán necesariamente en el
orden de grabación.
Limpie con un paño húmedo y luego con un paño seco.
∫ Precauciones al manipular el disco
≥ Tome los discos por los bordes para evitar rayones o marcas
de huellas digitales en los mismos.
≥ No pegue etiquetas o autoadhesivos en los discos.
≥ No utilice rociadores para la limpieza de discos, bencina,
diluyente, líquidos para prevenir la electricidad estática o
cualquier otro solvente.
≥ No utilice los siguientes discos:
– Discos que presenten adhesivos expuestos provenientes
de autoadhesivos o etiquetas que hayan sido removidos
(discos rentados, etc.).
– Discos que se encuentren mal empaquetados o rotos.
– Discos que presenten formas irregulares, tales como
discos con forma de corazón.
∫ Para tirar o transferir esta unidad
Este aparato puede guardar información de la
configuración del usuario. Si decide deshacerse de
esta unidad ya sea eliminándola o transfiriéndola, siga
los procedimientos para restablecer todos los ajustes
de fábrica para así borrar la configuración del usuario.
(l 63, “Para volver a la configuración de fábrica”)
66
TQBJ2036
Compatible con dispositivos USB
≥ Esta unidad no garantiza la conexión con todos los
dispositivos USB.
≥ Se soportan los sistemas de archivo FAT12, FAT16 y FAT32.
≥ Esta unidad es compatible con la tecnología USB 2.0 de
velocidad total.
≥ Puede que los dispositivos USB con capacidad de
almacenamiento superior a 32 GB no funcionen en
determinadas condiciones.
≥ Formato admitido: archivos con extensión “.mp3” o “.MP3”.
≥ De acuerdo con el modo en el que se encuentran creados
los archivos, es posible que no se reproduzcan en el orden
en que los haya numerado o que no se reproduzcan en lo
absoluto.
≥ Los archivos se definen como pistas y las carpetas se
definen como álbum.
≥ Este sistema puede acceder a un máximo:
– 800 álbumes (incluida la carpeta raíz)
– 8000 pistas
– 999 pistas en un álbum
Page 67

Especificaciones
∫ GENERAL
Consumo de energía 25 W
Consumo de energía en modo de espera
(Cuando “BLUETOOTH STANDBY” se encuentra en “OFF”)
Aprox. 0,2 W
(Cuando “BLUETOOTH STANDBY” se encuentra en “ON”)
Aprox. 0,3 W
(Cuando “NET STANDBY” se encuentra en “ON”)
Suministro de energía
110 V a 240 V CA, 50/60 Hz
*
Dimensiones (AnkAlkProf)
420 mmk225 mmk102 mm
Masa Aprox. 2,5 kg
Rango de temperatura de operación
0 oC a r40 oC
Rango de humedad de operación
35% a 80% RH (sin condensación)
∫ SECCIÓN DEL AMPLIFICADOR
Potencia de salida
Potencia de salida RMS
Canal frontal (se accionan ambos canales)
20 W por canal (8 ≠), 1 kHz, 10% THD
Potencia RMS total 40 W
Potencia de salida PMPO 300 W
∫ SECCIÓN DEL SINTONIZADOR
Reinicio de la memoria 30 estaciones FM
Frecuencia Modulada (FM)
Rango de frecuencia
87,50 MHz a 108,00 MHz (50 kHz paso)
Terminales de la antena 75 ≠ (sin balance)
∫ SECCIÓN DE DISCO
Discos reproducidos (8 cm o 12 cm)
Detector
Longitud de onda 790 nm (CD)
CD, CD-R/RW (CD-DA, MP3*3)
∫ SECCIÓN DEL ALTAVOZ
Unidad(es) de altavoz
Rango completo 8cmTipoconok2
*
1, 2
*
1
Aprox. 2 W
1, 2
∫ SECCIÓN TERMINAL
Puerto USB
Alimentación del puerto USB
Estándar USB
USB para USB 2.0 de velocidad total
SALIDA DE CC 5 V 1,5 A
Soporte de formato de archivo multimedia
MP3*3 (¢.mp3)
Formato admitido de audio
3
MP3*
Frecuencia de muestreo 32/44,1/48 kHz
Tamaño de palabra del audio 16 bits
Cantidad de canales 2 canales
Sistema de archivo del dispositivo USB
FAT12, FAT16, FAT32
Interfaz de Ethernet
LAN (10BASE-T/100BASE-TX)
AUX IN Estéreo, clavija 3,5 mm
∫ SECCIÓN DE Bluetooth
®
Versión Bluetooth® Ver.2.1+EDR
Clase Clase 2
Perfiles admitidos A2DP, AVRCP
Banda de frecuencia
Distancia de funcionamiento
Banda de 2,4 GHz FH-SS
10 m Línea de visión
Códec admitido SBC
∫ SECCIÓN Wi-Fi
Wi-Fi
Norma WLAN IEEE802.11a/b/g/n
Rango de frecuencia
Banda de 2,4 GHz/Banda de 5 GHz
Seguridad WPA2
Versión WPS Versión 2.0
Formato admitido de audio (AllPlay)
MP3*3/AAC
Frecuencia de muestreo
Tamaño de palabra del audio
Cantidad de canales 2 canales
4
/ALAC/WAV
FLAC*
32/44,1/48 kHz
16 bits
Frecuencia de muestreo
32/44,1/48/88,2/96/176,4/192 kHz
Tamaño de palabra del audio
16 bits/24 bits
Cantidad de canales 2 canales
≥ Las especificaciones se encuentran sujetas a cambio sin
previo aviso.
≥ La masa y las dirmensiones son aproximadas.
≥ La distorsión armónica total se mide por medio de un
analizador digital del espectro.
*1: No hay ningún dispositivo conectado al puerto USB antes
de cambiar al modo en espera.
*2: El modo de espera de red está inactivo.
*3: MPEG-1 Layer-3, MPEG-2 Layer-3
*4: Es posible que los archivos FLAC sin comprimir no
funcionen correctamente.
ESPAÑOL
TM
67
TQBJ2036
Page 68

Montaje de la unidad a la
Tornillo de sujeción
Soporte
Paño o tela suave
pared (opcional)
Esta unidad se puede montar en la pared usando los
soportes de montaje en pared suministrados, el
soporte de seguridad, etc. Asegúrese de que la pared
y los tornillos que se utilizan para instalar en la pared
pueden soportar al menos 36 kg. Los tornillos y otros
elementos no se suministran ya que el tipo y el tamaño
varían con cada instalación.
≥ Consulte el paso 6 y el paso 7 de “Instrucciones de
montaje a la pared” para obtener información sobre
los tornillos necesarios.
≥ Como una medida de protección adicional, conecte
el aparato a la pared con un cable de prevención de
caídas.
Accesorios de instalación
∫ Accesorios suministrados
≥ 2 Soportes de montaje en la pared
≥ 1 Soporte de seguridad
≥ 1 Ficha de montaje en la pared
∫ Accesorios requeridos adicionalmente
(disponible en comercios)
≥ 4 Tornillos de sujeción a la pared
≥ 2 Tornillos de fijación del soporte de seguridad
≥ 1 Cable de prevención contra las caídas*
≥ 1 Armella roscada
* Use un cable que sea capaz de soportar más de 36 kg
(con un diámetro de aproximadamente 1,5 mm).
≥ Mantenga los tornillos lejos del alcance de los niños
para evitar que sean tragados.
≥ Mantenga los soportes de montaje en la pared fuera
del alcance de los niños para evitar que sean tragados.
≥ Mantenga el armella roscada lejos del alcance de los
niños para evitar que sea tragado.
Medidas de seguridad
Instrucciones de montaje a la pared
Antes de realizar la instalación, apague la unidad y
desconecte el cable de alimentación de CA de la toma de CA.
1 Retire el tornillo de fijación de la parte posterior de
la unidad.
2 Retire el soporte de la unidad mientras presiona
los cierres hacia arriba.
≥ Mientras levanta los cierres, tire suavemente del
soporte hacia delante.
Conserve el tornillo y el soporte retirados por si necesita
usarlos en el futuro.
≥ Cuando vuelva a usar la unidad en una posición que no
sea montada en la pared, asegúrese de volver a colocar el
soporte a la unidad y fíjelo con su tornillo.
3 Monte el cable de prevención de caídas
(no suministrado) a esta unidad.
Es imprescindible un montaje profesional.
El montaje nunca debe ser realizado por una
persona quien no sea especialista cualificado
para la instalación.
PANASONIC RECHAZA TODO DAÑO A LA
PROPIEDAD Y/O SERIAS LESIONES
INCLUYENDO LA MUERTE DEBIDOS A UN
MONTAJE ERRÓNEO O UN MANEJO
INCORRECTO.
AVI SO:
Para evitar lesiones, la unidad debe sujetarse con
firmeza siguiendo las instrucciones de instalación.
68
TQBJ2036
A Cable de prevención contra las caídas (no
suministrado)
≥ Doble el cable dos veces desde las puntas a unos 45o y
5 mm de separación para que puedan introducirse en
los orificios.
B 5mm
Page 69

4 Sitúe la ficha de referencia para el montaje en la
Ficha de montaje
en la pared
Cinta adhesiva
(no suministrado)
Pared
420 mm
102,5 mm
130,5 mm
141 mm
100 mm
118,5 mm
300 mm
100 mm
39 mm
73 mm
Espacio requerido
Al menos 30 mm
‰7,5 mm a
‰9,4 mm
‰4,0 mm
Soporte de montaje
en la pared
Al menos 30 mm
‰7,5 mm a
‰9,4 mm
‰4,0 mm
Soporte de
seguridad
Pared
Cable de suministro de energía CA
Pared
Gancho
Soporte de montaje
en la pared
Soporte de seguridad
Armella roscada (no suministrado)
Pared
Cable (no suministrado)
Cierres
pared sobre la pared en la que vaya a montar la
unidad.
≥ Antes de decidir la ubicación de la unidad, asegúrese
de comprobar que la fuerza de la señal Wi-Fi es
suficiente. (l 62)
≥ Extienda la ficha de referencia para el montaje en la
pared cuando la adhiera a la pared.
8 Coloque la unidad.
1 Asegure con las manos la unidad dentro de los
soportes de montaje de la pared.
≥ Conecte la antena y el cable de alimentación de CA a la
unidad antes de colgarla a la pared. (l 46)
2 Levante ligeramente la unidad en posición vertical
hasta llegar al gancho del soporte de seguridad y
bájela de modo que se enganche y bloquee en el
soporte de seguridad.
≥ La unidad quedará bloqueada en el soporte de
seguridad con un clic.
≥ Después de colgar el aparato, retire sus manos
cuidadosamente para verificar que el aparato se
encuentra correctamente asegurado a los soportes de
la pared y el soporte de seguridad.
ESPAÑOL
5 Practique los orificios en la pared en cada una de
las marcas en cruz de la ficha.
≥ Retire la ficha de la pared después de su uso.
6 Fije cada uno de los soportes de montaje en la
pared con dos tornillos (no suministrados).
≥ Utilice un nivel de burbuja de aire para asegurar que
ambos soportes se encuentren nivelados.
7 Fije el soporte de seguridad en la pared con dos
tornillos (no suministrados).
9 Monte el cable de prevención de caídas (no
suministrado) a la pared.
≥ Asegúrese de que el huelgo de la cuerda sea mínimo.
∫ Para quitar la unidad del soporte de
seguridad
Mientras presiona los cierres del soporte de seguridad,
levante la unidad verticalmente.
69
TQBJ2036
Page 70

Información Útil (Para los clientes de América Latina)
Atención al Cliente
Directorio de Atención al cliente
Obtenga información de productos y asistencia operativa, localice el Centro
de Servicio más cercano y compre repuestos y accesorios a través de
nuestro Sitio Web o llamando a nuestro Contact Center:
PAIS SITIO WEB CONTACT CENTER
Panamá www.panasonic.com/pa/soporte/ 800-7262
Colombia
www.panasonic.com/co/soporte/ 01-8000-947262
Ecuador www.panasonic.com/ec/soporte/ 1-800-726276
Costa Rica www.panasonic.com/cr/soporte/ 800-7262737
El Salvador www.panasonic.com/sv/soporte/ 800-7262
Guatemala www.panasonic.com/gt/soporte/ 1-801-811-7262
Uruguay www.panasonic.com/uy/soporte/ 0-800-7262
Paraguay www.panasonic.com/uy/soporte/ 0-800-11-7262
Chile www.panasonic.com/cl/soporte/ 800-390-602
022-797-5000
Perú www.panasonic.com/pe/soporte/ 0800-00726
Venezuela www.panasonic.com/ve/soporte/ 800-7262-800
México www.panasonic.com/mx/soporte/ 01800-847-7262
55-5000-1200
Argentina www.panasonic.com/ar/soporte/ 0800-333-7262
0810-321-7262
R. Dominicana www.panasonic.com/do/soporte/ 809-200-8000
70
TQBJ2036
Page 71

ESPAÑOL
71
TQBJ2036
Page 72

Panasonic Corporation
Web Site: http://www.panasonic.com
pr
C Panasonic Corporation 2017
TQBJ2036-1
F0117YM2037
 Loading...