

Page 1
The radio: manual tuning
AUX
TUNER/BAND
TUNING M ODE
LIVE VIRT UALIZER
PLAY MODE
VOLUME
DISP
SLEEP
PGM/
CLEAR
CD
CK
TIMER ADJ
TIMER
ON/OFF
AUX
TUNER/BAND
TUNING M ODE
LIVE VIRT UALIZER
PLAY MODE
VOLUME
DISP
SLEEP
PGM/
CLEAR
CD
CK
TIMER ADJ
TIMER
ON/OFF
PLAY MODE
1
3
4
TIMER ADJ
DISP
LAYAYSLEEP
EQEQLIVE VIRTUALIZER
AUX
TUNER/BAND
TUNING MODE
CLCLOCK
PGM/
VOLUME
TIMER
ON/OFF
–CLEAR
PLAY MODE
CD
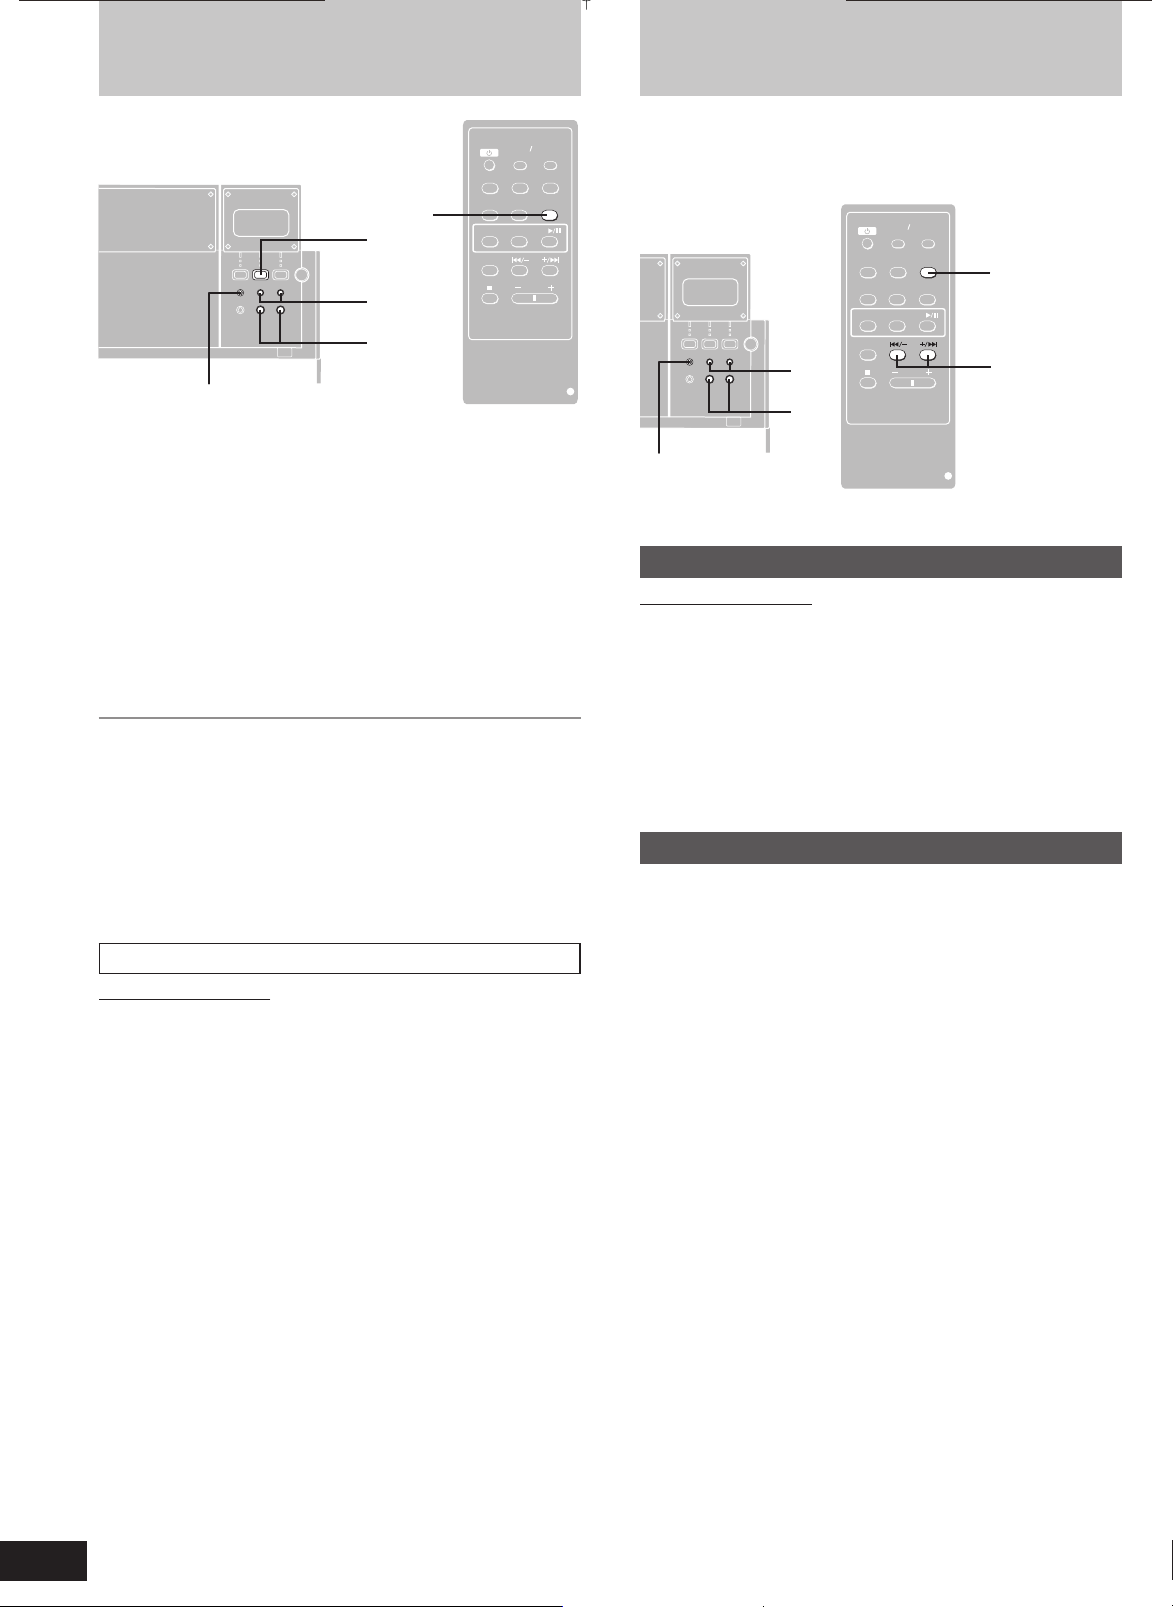
The radio: preset tuning
Up to 12 stations each can be set in the FM and AM bands.
Preparation:
Press [TUNER/BAND] to select “FM” or “AM”.
CLCLOCK
TIMER
ON/OFF
TIMER ADJ
DISP
LAYAYSLEEP
PGM/
2
EQEQLIVE VIRTUALIZER
AUX
TUNER/BAND
TUNING MODE
–CLEAR
PLAY MODE
CD
VOLUME
PGM/–CLEAR
g/∂, µ/f
2
1 Press [TUNER/BAND] to select “FM” or “AM”.
The unit comes on.
Every time you press the button:
FM ↔ AM
2 Press [TUNING MODE] to select “MANUAL”.
Every time you press the button:
MANUAL ↔ PRESET
∂∂
3 Press [g/
the required station.
4 Adjust the volume.
Auto tuning
Press and hold [g/∂] or [µ/f] for a moment until the frequency
starts changing rapidly. The unit begins auto tuning, stopping when it
finds a station.
Auto tuning may not function when there is excessive interference.
•
To cancel auto tuning, press [g/∂] or [µ/f] once again.
•
To improve reception
Extend the whip antenna and adjust its direction.
Cassette deck operations
If noise is excessive in FM
Remote control only
Press [PLAY MODE] to display “MONO”.
This mode improves sound quality if reception is weak, but broadcasts
will be heard in monaural.
Press [PLAY MODE] again to cancel the mode.
“MONO” goes out. MONO is also cancelled if the frequency is changed.
Turn off “MONO” for normal listening. Stereo and monaural broadcasts are automatically played as they are received.
µµ
∂] or [
µ/f] to select the frequency of
∂∂
µµ
3
1
Manual pre-setting
Remote control only
Pre-set the stations one at a time.
∂∂
1 Press [PGM/–CLEAR] then press [g/
to tune to the required station.
2 Press [PGM/–CLEAR] then press [g/
to select a channel.
3 Press [PGM/–CLEAR].
The station occupying a channel is erased if another station is preset
in that channel.
Selecting channels
1 Press [TUNING MODE] to select “PRESET”.
∂∂
2 Press [g/
3 Adjust the volume.
µµ
∂] or [
µ/f] to select the channel.
∂∂
µµ
∂] or [
∂∂
∂∂
∂] or [
∂∂
µµ
µ/f]
µµ
µµ
µ/f]
µµ
8
RQT6736
Page 2
Sound quality
AUX
TUNER/BAND
TUNING M ODE
LIVE VIRT UALIZER
PLAY MODE
DISP
SLEEP
PGM/
CLEAR
CD
CK
TIMER ADJ
TIMER
ON/OFF
AUX
TUNER/BAND
TUNING M ODE
LIVE VIRT UALIZER
PLAY MODE
VOLUME
DISP
SLEEP
PGM/
CLEAR
CD
CK
TIMER ADJ
TIMER
ON/OFF
Using an external unit
CLCLOCK
TIMER
ON/OFF
TIMER ADJ
DISP
LAYAYSLEEP
PGM/
–CLEAR
EQEQLIVE VIRTUALIZER
EQ
AUX
TUNER/BAND
TUNING MODE
PLAY MODE
CD
LIVE
VIRTUALIZER
Using the built-in sound quality
Remote control only
You can choose one of four types of sound quality.
D.BASS: Adds punch to rock
CLEAR: Clarifies higher sounds
SOFT: For background music
VOCAL: Adds gloss to vocal
Press [EQ] to select a setting.
Every time you press the button:
3-D sound with the Live Virtualizer
Remote control only
You can create a three-dimensional sound field when listening to stereo
sound.
Press [LIVE VIRTUALIZER].
Press again to cancel.
Note
The actual effect depends on the source played.
External unit connections
Analogue player
(not included)
You can boost up the “AUX” output level.
Press and hold [AUX].
Every time you press and hold the button:
NORMAL ↔ HIGH
NORMAL: Normal output signal level
(Use when external source’s signal level is normal).
HIGH: To boost up to a higher output signal level
(Use when external source’s signal level is low, for example
portable CD/MD player).
Using headphones (not included)
PHONES
Reduce the volume level and connect the headphones to the
[PHONES] jack.
Plug type: 3.5 mm stereo
Note
Avoid listening for prolonged periods of time to prevent hearing damage.
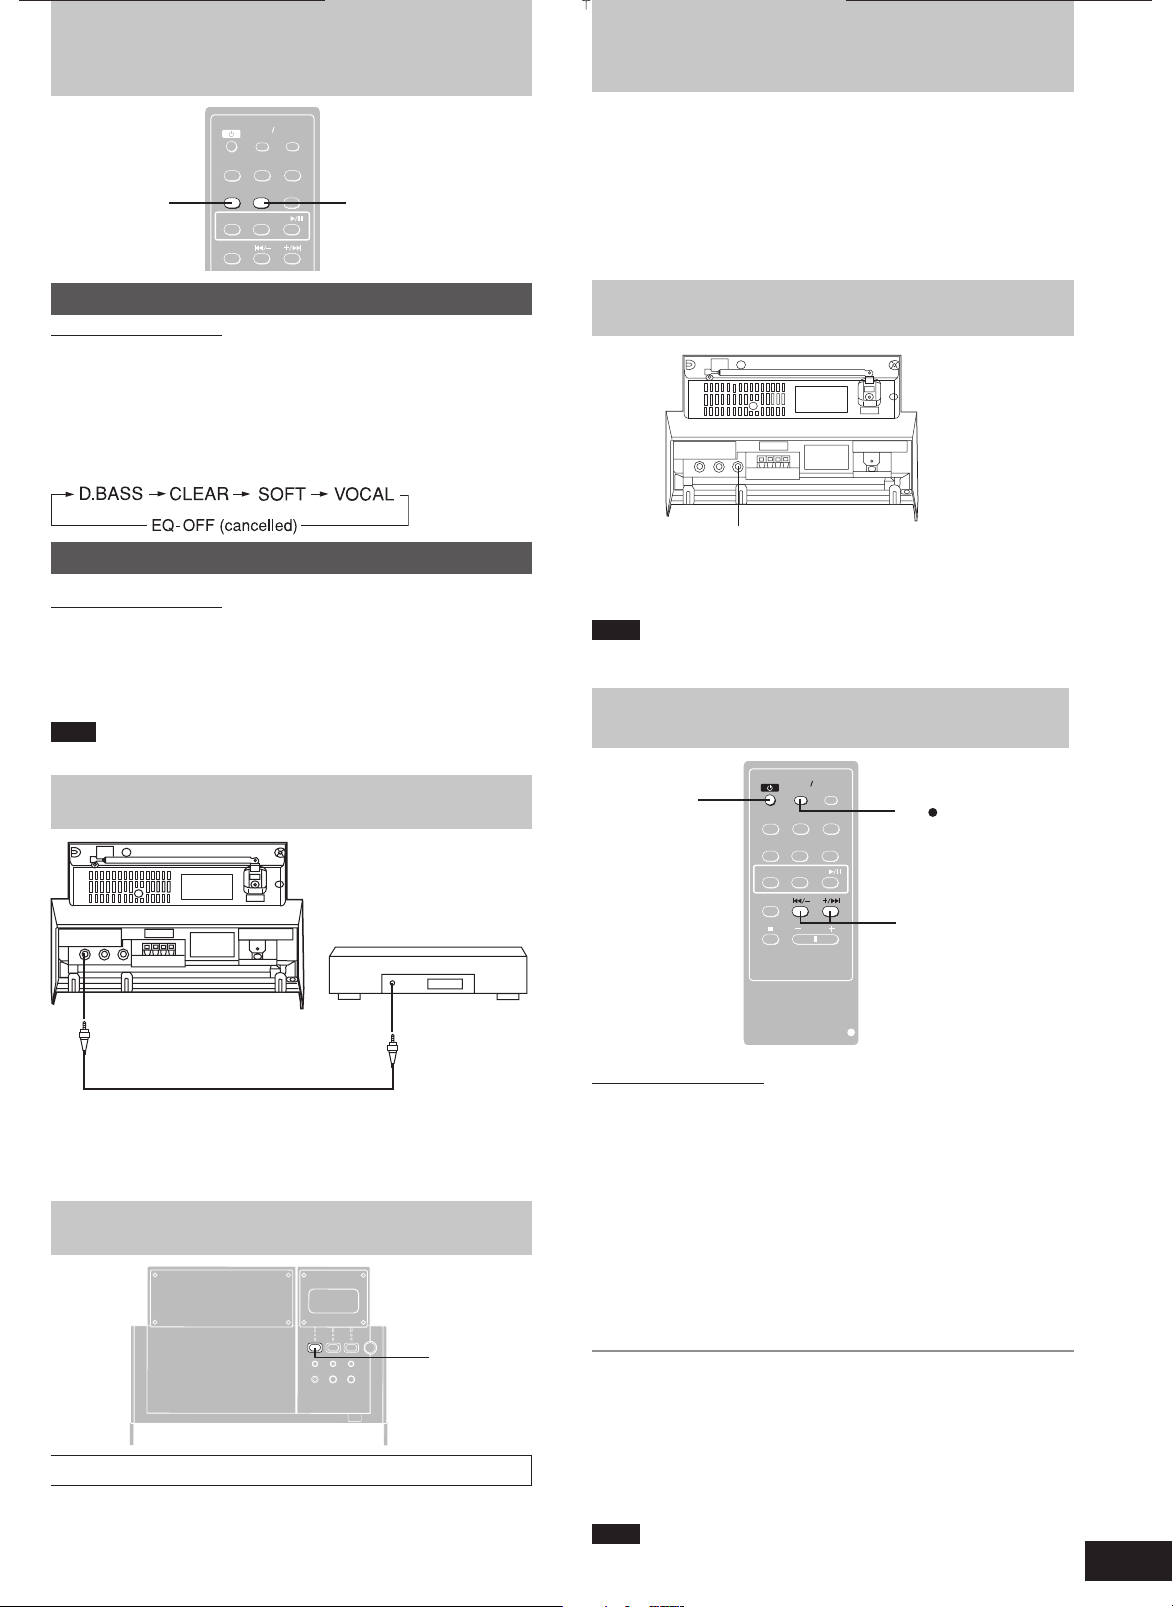
Setting the time
CLCLOCK
TIMER
ON/OFF
TIMER ADJ
1
DISP
LAYAYSLEEP
EQEQLIVE VIRTUALIZER
AUX
TUNER/BAND
TUNING MODE
PGM/
VOLUME
–CLEAR
PLAY MODE
CD
2 4
3
AUX
An analog player with a built-in phono equalizer can be connected.
•
For details, refer to the instruction manual of the units which are to
•
be connected.
When units other than those described above are to be connected,
•
please consult your audio dealer.
Using an external unit
Listening to an external source
(See above for external unit connection)
1. Press [AUX].
The unit comes on.
2. Start playback from the external source. (For details, refer to the
external unit’s instruction manual.)
AUX
Remote control only
This is a 24-hour clock.
1 Press [
ff
f] to turn the unit on.
ff
2 Press [CLOCK/TIMER ADJ] to select “CLOCK”.
3 Within 10 seconds
gg
Press [
g/∂] or [µ/
gg
Press and hold to change the time faster.
ff
f] to set the time.
ff
4 Press [CLOCK/TIMER ADJ].
The time is set and the original display is restored.
To switch to clock display
Press [DISPLAY].
Every time you press the button:
Clock display ↔ Current display
Displaying the clock when the unit is ON:
Press [CLOCK/TIMER ADJ].
The clock is shown for about 10 seconds.
Note
The clock is accurate to within ±60 seconds a month.
Readjust if necessary.
Timer operations
Reference
9
RQT6736
Page 3

Using the timers
y
AUX
TUNER/BAND
TUNING M ODE
LIVE VIRT UALIZER
PLAY MODE
VOLUME
DISP
SLEEP
PGM/
CLEAR
CD
CK
TIMER ADJ
TIMER
ON/OFF
CLCLOCK
TIMER
ON/OFF
5
TIMER ADJ
DISP
LAYAYSLEEP
EQEQLIVE VIRTUALIZER
AUX
TUNER/BAND
TUNING MODE
PGM/
VOLUME
–CLEAR
PLAY MODE
CD
Using the play timer
Remote control only
The play timer can be set to on at a certain time to wake you up.
Preparations:
Turn the unit on and set the clock (A page 9).
•
Prepare the music source you want to listen to: CD, radio or aux,
•
and set the volume.
1 Press [CLOCK/TIMER ADJ] to select the timer function.
Every time you press the button:
CLOCK OFF TIMEON TIME
Previous displa
ON TIME: to set the start time
OFF TIME: to set the finish time
Setting the start and finish times
4
To cancel the timer
Press [TIMER ON/OFF] to clear the timer indicator from the display.
The timer comes on at the set time everyday if the timer is on.
To change the settings (when the unit is on)
To change the play times
Do steps 1, 2, 3 and 5.
To change the source or volume
1. Press [TIMER ON/OFF] to clear the timer indicator from the display.
2. Make changes to the source or volume.
3. Do steps 4 to 5.
To check the settings (when the unit is off)
Press [CLOCK/TIMER ADJ].
The settings are shown in the following order:
start time→finish time→source→volume→current time
You can enjoy other sources after you have set the timer.
Turn the unit off before the timer’s start time.
Note
If you turn the unit off and on again while a timer is functioning, the
•
finish time setting will not be activated.
If the unit is on, the timer will not function. The unit must be in the
•
standby mode.
If AUX is selected as the source, when the timer comes on, the
•
system turns on and engages AUX as the source. If you want to
playback from a connected unit, set that unit’s timer to the same
time. (See the connected unit’s instruction manual.)
Using the sleep timer
Remote control only
Set the unit to stop and turn off after a certain time.
While enjoying the desired source:
Press [SLEEP] to select the desired time.
Every time you press the button:
SLEEP 90 SLEEP 120SLEEP 60SLEEP 30
OFF
2 During “ON TIME” display
(within 10 seconds or so)
1 Press [
gg
g/∂] or [µ/
gg
2 Press [CLOCK/TIMER ADJ].
3 During “OFF TIME” display
1 Press [
2 Press [CLOCK/TIMER ADJ].
The start and finish times are now set.
Turning the timer on
gg
g/∂] or [µ/
gg
4 Press [TIMER ON/OFF] to display “
Timer operations
The settings are shown in the following order:
Start time → Finish time
(The indicator doesn’t appear if the clock hasn’t been set.)
5 Press [
ff
f] to turn the unit off.
ff
The unit must be off for the timer to operate.
Play will start in the set condition at the set time with volume
increasing gradually to the set level.
ff
f] to select the start time.
ff
ff
f] to select the finish time.
ff
rr
rPLAY”
rr
To cancel the sleep timer
Press [SLEEP] to select “OFF”.
To confirm the remaining time
(only while unit is ON)
Press [SLEEP].
The remaining time is shown for about 5 seconds.
To change the setting
Press [SLEEP] to select the new setting.
Note
The play and sleep timer can be used together.
The sleep timer always has priority. Be sure not to overlap timer
settings.
10
RQT6736
Page 4

Troubleshooting guide
Before requesting service, make the checks below. If you can’t fix the system as described below, or if something not listed here occurs, refer to the
enclosed directory to locate an Authorized Service Center convenient to you or contact your dealer.
Reference pages are shown as black circled numbers 4.
Common Problems
No sound.
Sound stops.
Sound is unfixed, reversed or
comes from one speaker
only.
Humming heard during play.
“ERROR” is displayed.
“– –:– –” appears on the
display at standby mode.
“F76” is displayed.
Listening to the radio
A beat sound is heard.
Turn the volume up.
Switch off the unit, determine and correct the cause, then switch the unit on. Causes include shorting of
the positive and negative speaker wires, straining of the speakers through excessive volume or power,
and using the unit in a hot environment.
Check the speaker connections. 4
An AC mains lead or fluorescent light is near the cables. Keep other appliances and cords away from this
unit’s cables.
Incorrect operation performed. Read the instructions and try again.
You plugged the AC adaptor in for the first time or there was a power failure recently. Set the time. 9
There is a power supply problem. Consult the dealer.
Turn the TV off or separate it from the unit.
A low hum or noise is heard
during AM broadcasts.
Separate the antenna from other cables and cords. Keep the AM antenna away from the unit.
When there is a television set nearby
The picture on the TV
disappears or stripes
appear on the screen.
The location and orientation of the antenna are incorrect.
The TV antenna wire is too close to the unit. Separate the antenna wire of the TV set from the unit.
Playing discs
The display is wrong or
play won’t start.
CD-RW cannot be read.
The disc may be upside down. 6
Wipe the disc.
Replace the disc if it is scratched, warped, or non-standard.
Condensation may have formed inside the unit due to a sudden change in temperature. Wait about an
hour for it to clear and try again.
The disc was incompletely formatted. Use the recording equipment to fully format the disc before recording.
Remote control
Remote control doesn’t
work.
Check that the battery is inserted correctly. 4
Replace the battery if it is worn.
Specifications
Radio
Frequency range
FM 87.50–108.00 MHz (50 kHz steps)
AM 522–1629 kHz (9 kHz steps)
CD Player
Sampling frequency 44.1 kHz
Decoding 16 bit linear
Beam source Semiconductor laser (wavelength 780 nm)
(For Norge)
Bølgelengde 780 nm
Laserstyrke Ingen farlig stråling
(med sikkerhets - beskyttelse)
Number of channels 2 channel, stereo
Wow and flutter Below measurable limit
D/A converter MASH (1 bit DAC)
sendes ut
General
Speakers
Full range 7 cm, 4 Ω x 2
Ceramic tweeter 1.52 cm x 2
Jacks
Output PHONES: 3.5 mm stereo (32 Ω)
Power requirement
AC adaptor DC 10V, 1.2A
Power consumption 18W
AC
For Europe 230 V, 50 Hz
For the United Kingdom, Australia and N.Z.
230–240 V, 50 Hz
Dimensions (WxHxD) 298 x 197 x 141 mm
Mass
With speakers 2.7 kg
Without speakers 1.5 kg
Power consumption in standby mode: 1.3 W
Note
Specifications are subject to change without notice.
Mass and dimensions are approximate.
Timer operations
Reference
11
RQT6736
Page 5

CAUTION!
THIS PRODUCT UTILIZES A LASER.
USE OF CONTROLS OR ADJUSTMENTS OR PERFORMANCE OF PROCEDURES OTHER THAN THOSE SPECIFIED HEREIN MAY RESULT IN HAZARDOUS RADIATION
EXPOSURE.
DO NOT OPEN COVERS AND DO NOT REPAIR YOURSELF. REFER SERVICING TO QUALIFIED PERSONNEL.
CAUTION!
DO NOT INSTALL OR PLACE THIS UNIT IN A
•
BOOKCASE, BUILT-IN CABINET OR IN ANOTHER
CONFINED SPACE. ENSURE THE UNIT IS WELL
VENTILATED. TO PREVENT RISK OF ELECTRIC
SHOCK OR FIRE HAZARD DUE TO OVERHEATING,
ENSURE THAT CURTAINS AND ANY OTHER
MATERIALS DO NOT OBSTRUCT THE VENTILATION
VENTS.
DO NOT OBSTRUCT THE UNIT’S VENTILATION
•
OPENINGS WITH NEWSPAPERS, TABLECLOTHS,
CURTAINS, AND SIMILAR ITEMS.
DO NOT PLACE SOURCES OF NAKED FLAMES, SUCH
•
AS LIGHTED CANDLES, ON THE UNIT.
DISPOSE OF BATTERIES IN AN ENVIRONMENTALLY
•
FRIENDLY MANNER.
WARNING:
TO REDUCE THE RISK OF FIRE, ELECTRIC SHOCK OR
PRODUCT DAMAGE, DO NOT EXPOSE THIS APPARATUS
TO RAIN, MOISTURE, DRIPPING OR SPLASHING AND
THAT NO OBJECTS FILLED WITH LIQUIDS, SUCH AS
VASES, SHALL BE PLACED ON THE APPARATUS.
THIS UNIT IS INTENDED FOR USE IN MODERATE
CLIMATES.
TÄMÄ LAITE ON TARKOITETTU KÄYTETTÄVÄKSI
LEUDOSSA ILMASTOSSA.
DETTE APPARATET ER BEREGNET TIL BRUK UNDER
MODERATE KLIMAFORHOLD.
Maintenance
Timer operations
If the surfaces are dirty
To clean this unit, wipe with a soft, dry cloth.
• Never use alcohol, paint thinner or benzine to clean this unit.
• Before using a chemically treated cloth, read the instructions that
came with the cloth carefully.
SUOMI
VAROITUS!
LAITTEEN KÄYTTÄMINEN MUULLA KUIN TÄSSÄ KÄYTTÖOHJEESSA MAINITULLA TAVALLA SAATTAA ALTISTAA KÄYTTÄJÄN TURVALLISUUSLUOKAN 1 YLITTÄVÄLLE NÄKYMÄTTÖMÄLLE LASERSÄTEILYLLE.
VAROITUS!
ÄLÄ ASENNA TAI LAITA TÄTÄ LAITETTA KABINET-
•
TITYYPPISEEN KIRJAKAAPPIIN TAI MUUHUN SULJETTUUN TILAAN, JOTTA TUULETUS ONNISTUISI. VARMISTA,
ETTÄ VERHO TAI MIKÄÄN MUU MATERIAALI EI HUONONNA TUULETUSTA, JOTTA VÄLTETTÄISIIN YLIKUUMENEMISESTA JOHTUVA SÄHKÖISKU- TAI TULIPALOVAARA.
ÄLÄ PEITÄ LAITTEEN TUULETUSAUKKOJA SANOMALEH-
•
DELLÄ, PÖYTÄLIINALLA, VERHOLLA TAI MUULLA
VASTAAVALLA ESINEELLÄ.
ÄLÄ ASETA PALAVAA KYNTTILÄÄ TAI MUUTA AVOTULEN
•
LÄHDETTÄ LAITTEEN PÄÄLLE.
HÄVITÄ PARISTOT LUONTOA VAHINGOITTAMATTOMAL-
•
LA TAVALLA.
VAROITUS:
TULIPALO-, SÄHKÖISKUVAARAN TAI TUOTETTA KOHTAAVAN
MUUN VAHINGON VÄHENTÄMISEKSI EI LAITETTA SAA
ALTISTAA SATEELLE, KOSTEUDELLE, VESIPISAROILLE TAI
ROISKEELLE, EIKÄ NESTETTÄ SISÄLTÄVIÄ ESINEITÄ, KUTEN
ESIMERKIKSI MALJAKOITA, SAA ASETTAA LAITTEEN PÄÄLLE.
NORSK
ADVARSEL!
DETTE PRODUKTET ANVENDER EN LASER.
BETJENING AV KONTROLLER, JUSTERINGER ELLER
ANDRE INNGREP ENN DE SOM ER BESKREVENT I DENNE
BRUKSANVISNING, KAN FØRE TIL FARLIG BESTRÅLING.
DEKSLER MÅ IKKE ÅPNES, OG FORSØK ALDRI Å REPARERE APPARATET PÅ EGENHÅND. ALT SERVICE OG
REPARASJONSARBEID MÅ UTFØRES AV KVALIFISERT
PERSONELL.
ADVARSEL!
APPARATET MÅ IKKE PLASSERES I EN BOKHYLLE, ET
•
INNEBYGGET KABINETT ELLER ET ANNET LUKKET
STED HVOR VENTILASJONSFORHOLDENE ER
UTILSTREKKELIGE. SØRG FOR AT GARDINER ELLER
LIGNENDE IKKE FORVERRER VENTILASJONSFORHOLDENE, SÅ RISIKO FOR ELEKTRISK SJOKK ELLER BRANN
FORÅRSAKET AV OVERHETING UNNGÅS.
APPARATETS VENTILASJONSÅPNINGER MÅ IKKE
•
DEKKES TIL MED AVISER, BORDDUKER, GARDINER OG
LIGNENDE.
PLASSER IKKE ÅPEN ILD, SLIK SOM LEVENDE LYS,
•
OPPÅ APPARATET.
BRUKTE BATTERIER MÅ KASSERES UTEN FARE FOR
•
MILJØET.
ADVARSEL:
FOR Å REDUSERE FAREN FOR BRANN, ELEKTRISK STØT
ELLER SKADER PÅ PRODUKTET, MÅ DETTE APPARATET IKKE
UTSETTES FOR REGN, FUKTIGHET, VANNDRÅPER ELLER
VANNSPRUT. DET MÅ HELLER IKKE PLASSERES
GJENSTANDER FYLT MED VANN, SLIK SOM BLOMSTERVASER,
OPPÅ APPARATET.
12
RQT6736
Matsushita Electric Industrial Co., Ltd.
Web Site: http://www.panasonic.co.jp/global/
En
RQT6736-B
G0203CP0
 Loading...