

Page 1
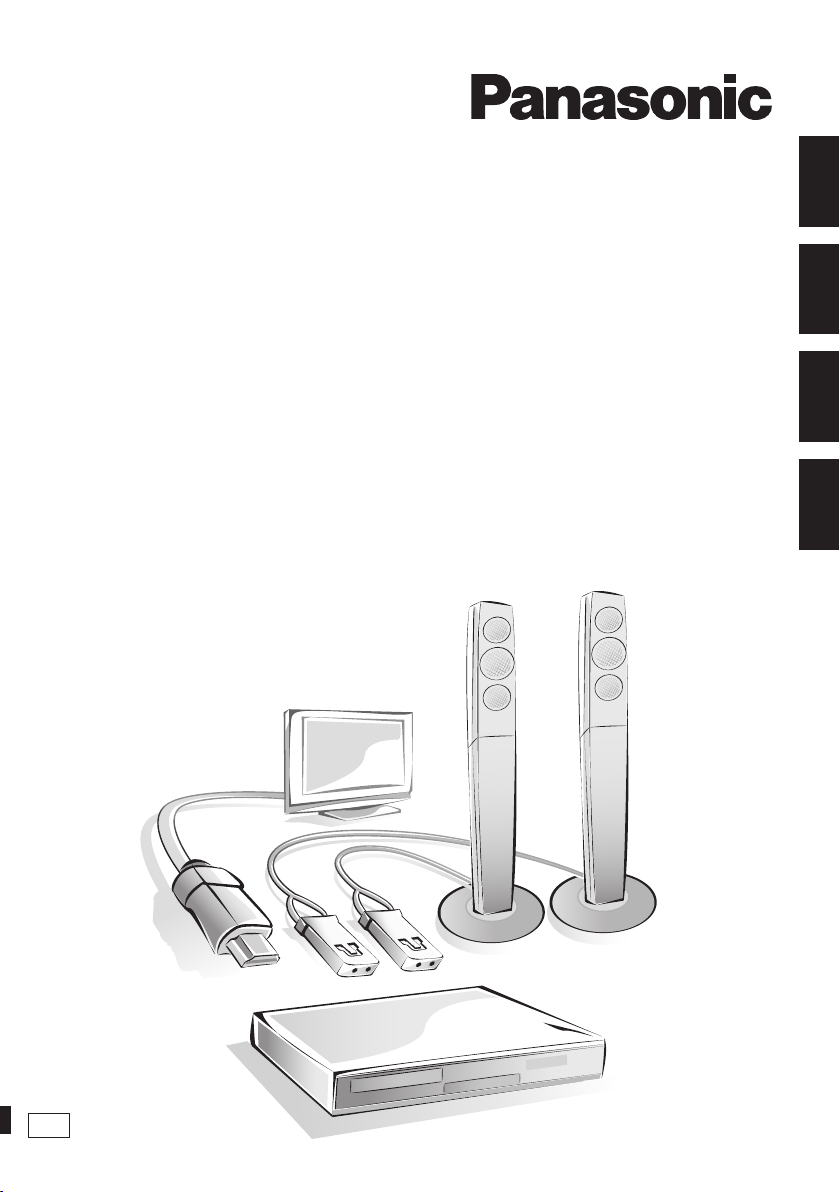
Easy Setting Guide
Blu-ray Disc™ Home Theater Sound System
Przewodnik ułatwionego ustawiania
Zestaw kina domowego Blu-ray Disc™
Prvodce Snadným Nastavením
Zvuková aparatura domácího kina Blu-ray Disc™
Gyors ismertető
Blu-ray™ lemez Házi Mozi Hangrendszer
Model No./Nr Modelu/Model č./Típusszám
SC-BTT195
ENGLISH
POLSKIČESKYMAGYAR
EP
VQC8847
Page 2
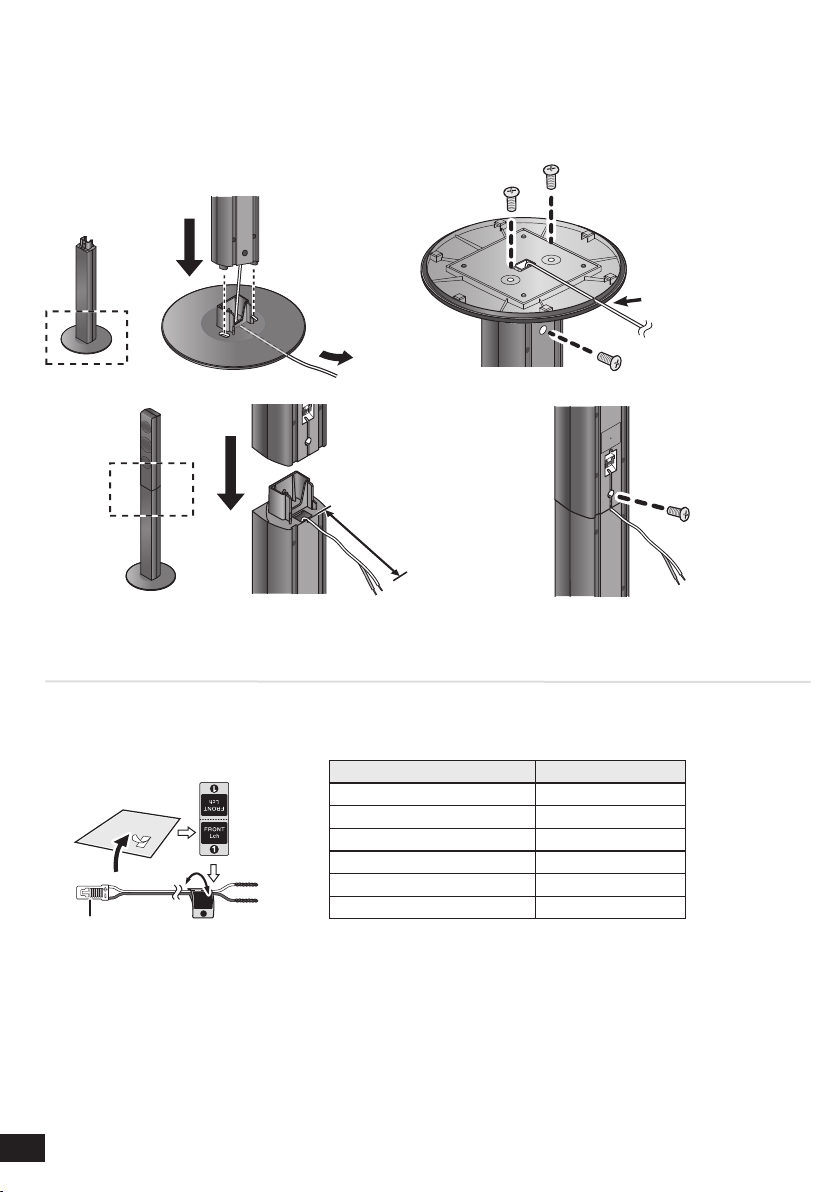
1
FRONT
Lch
→
Easy Setting Guide
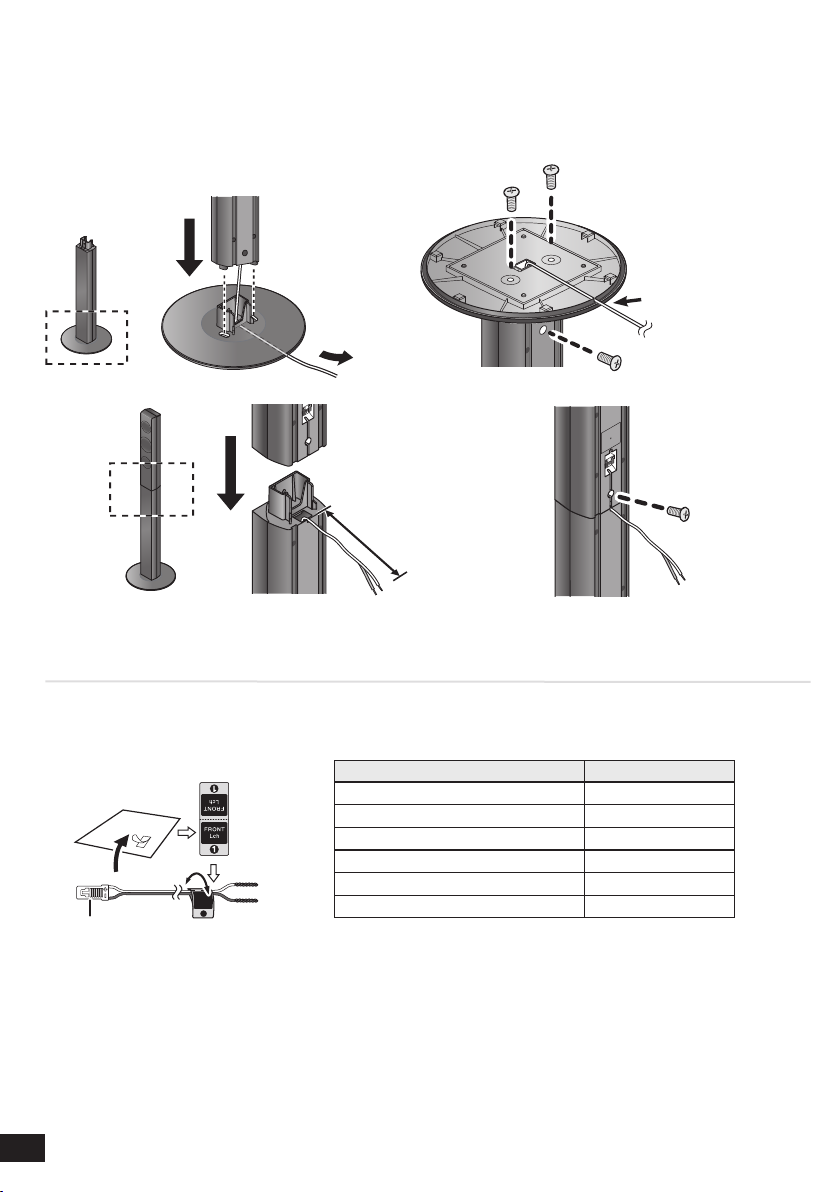
STEP 1: Assembling the front speakers
Back of the base
Leave the space of
about 80 mm.
Slide the speaker
cable into the groove.
STEP 2:
e.g., Front speaker Lch
WHITE
2
2
Attaching the sticker to the speaker cables
Speaker cable sticker Connector
Speaker
FRONT Lch
FRONT Rch
SURROUND Lch
SURROUND Rch
CENTER
SUBWOOFER
5
1
2
6
3
4
WHITE
RED
BLUE
GREY
GREEN
PURPLE
Page 3
120°
60°
FRONTSURROUND
CENTER
STEP 3: Connecting the speaker cables
Surround speakers have no difference between right and left.
ENGLISH
Insert the wire fully.
STEP 4: Placing the speakers
WHITE
GREEN
CENTER
5
BLUE
SURROUND Lch
3
FRONT Lch
1
PUSH!
RED
FRONT Rch
2
SUBWOOFER
GREY
SURROUND Rch
4
White (i)
Blue line (
PURPLE
6
ITALIANOFRANÇAISESPAÑOL
j)
NEDERLANDS
SVENSKADANSK
SUOMI
3
3
Page 4
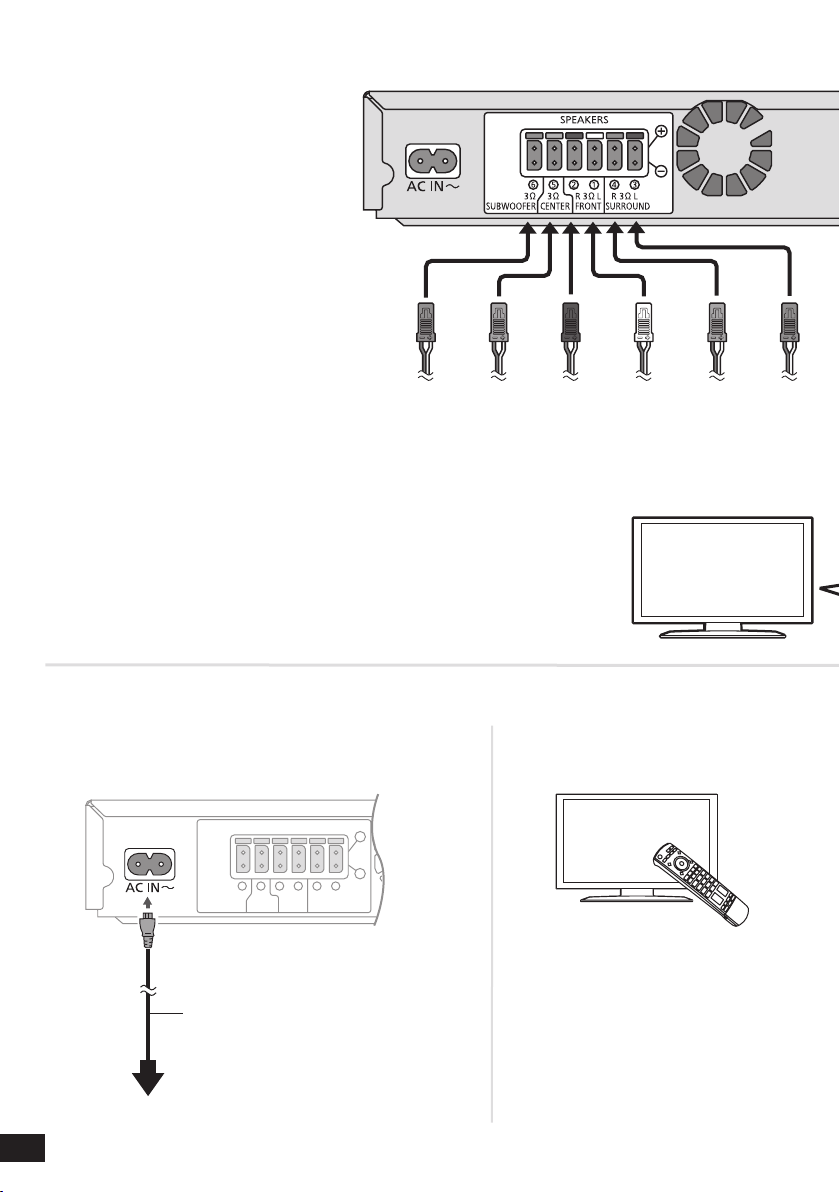
OPTICAL OUT
HDMI
HDMI
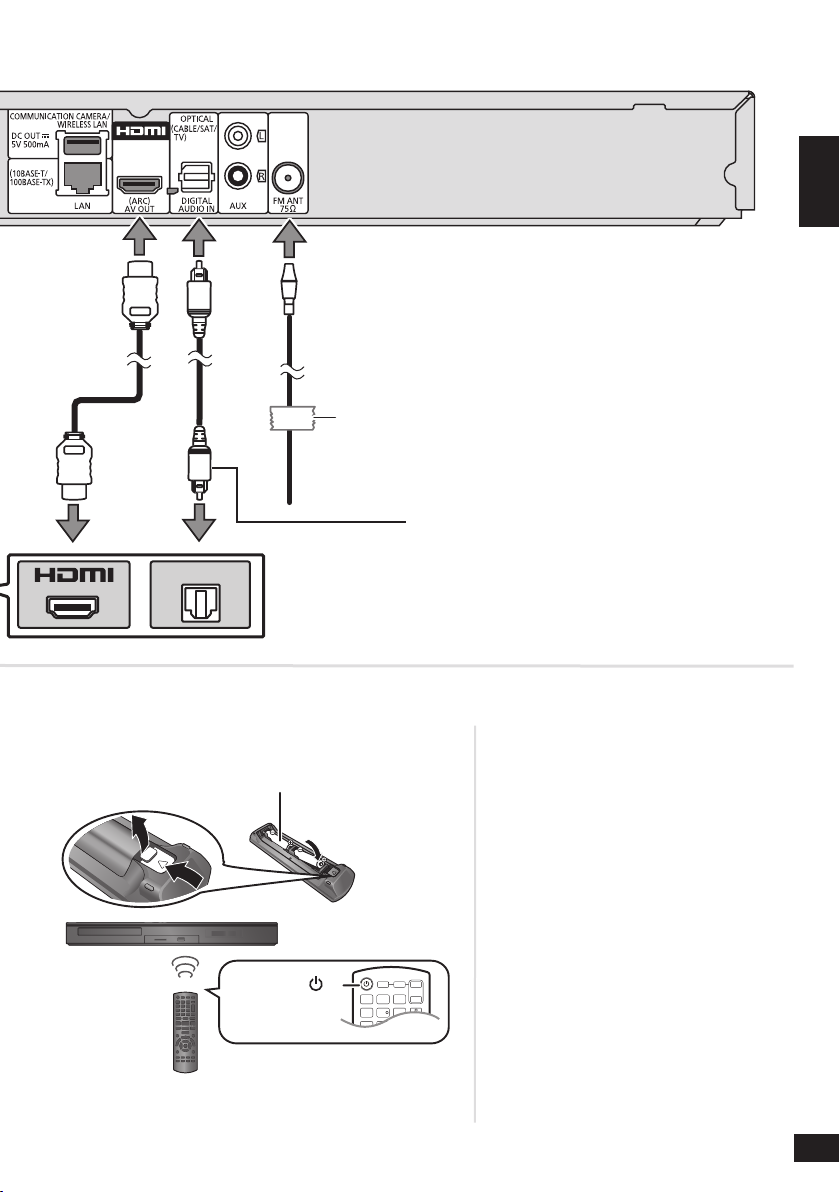
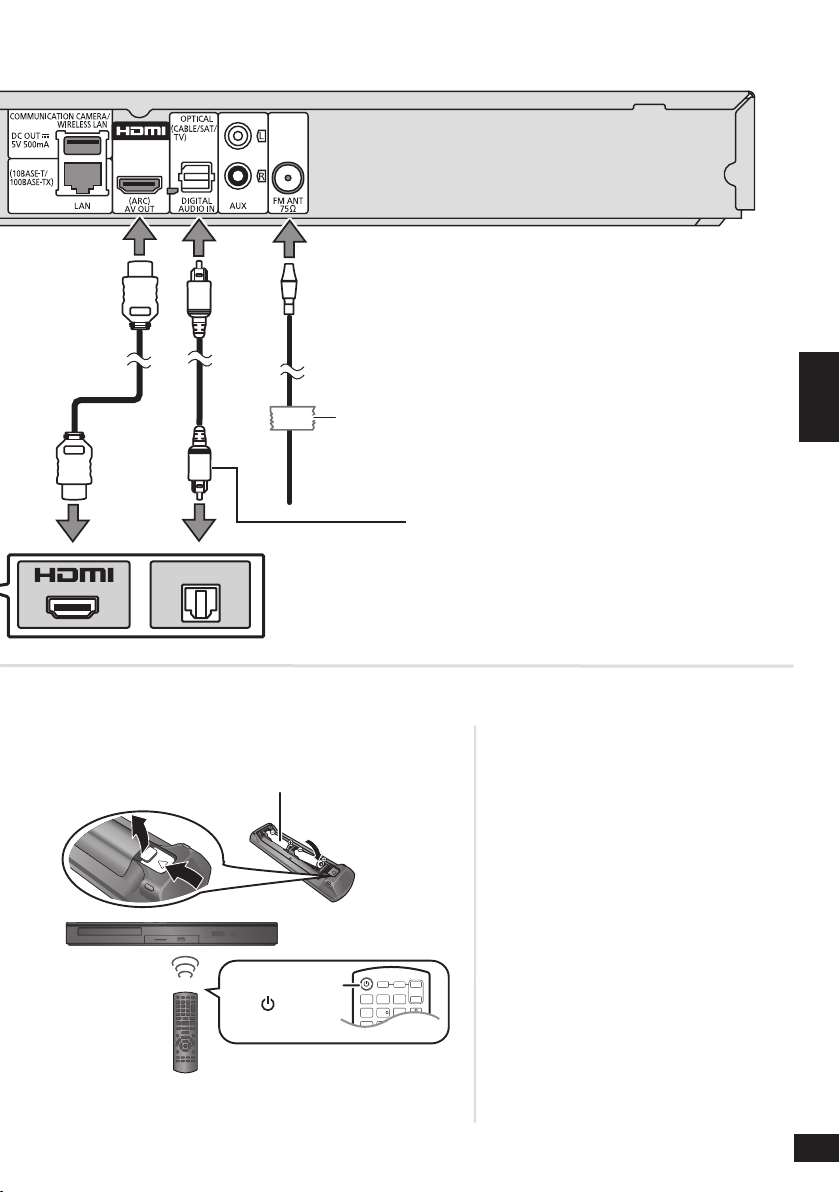
STEP 5: Connecting the cables
For information on other connection methods and the internet features, refer to the operating instructions.
GREY BLUEPURPLE GREEN RED WHITE
Connect the speaker cables to the terminals of the same
colour.
STEP 6: Turning on the system
Connect the AC mains lead.
1
AC mains lead (supplied)
4
4
To a household mains socket
Turn on the TV.
2
Set the video input mode to
HDMI, etc.
Page 5
ENGLISH
OPTICAL OUT
R6/LR6, AA
HDMI cable
(not supplied)
Turn on the system.
3
FM indoor antenna (supplied)
Afx this end of the antenna to a wall or pillar where the
reception is best.
Optical digital audio cable (not supplied)
Not required if the HDMI terminal of the TV is
labelled “HDMI (ARC)”.
The Easy setting starts.
4
Follow on-screen instructions.
ITALIANOFRANÇAISESPAÑOL
NEDERLANDS
SVENSKADANSK
Press [
].
SUOMI
5
5
Page 6
1
FRONT
Lch
→
Przewodnik ułatwionego
ustawiania
KROK 1: Montaż głośników przednich
Tylna część podstawy
Pozostaw około
80 mm miejsca
Wsuń kabel głośnikowy
w rowek.
KROK 2: Przyczepianie etykiety do kabli
np., Głośnika przedniego Lch
BIAŁY
Głośnika
2
6
Etykietka na przewód głośnika Złącze
FRONT Lch
FRONT Rch
SURROUND Lch
SURROUND Rch
CENTER
SUBWOOFER
5
1
2
6
3
4
BIAŁY
CZERWONY
NIEBIESKI
SZARY
ZIELONY
FIOLETOWY
Page 7

120°
60°
FRONTSURROUND
CENTER
KROK 3: Podłączanie przewodów głośnika
Lewy i prawy głośnik dźwięku przestrzennego nie różnią się od siebie.
DEUTSCH
KROK 4: Rozmieść głośniki
BIAŁY
ZIELONY
CENTER
5
NIEBIESKI
FRONT Lch
1
Włóż kabel do końca.
Niebieska linia (
CZERWONY
FRONT Rch
2
SZARY
Biały (i)
Wciśnij
FIOLETOWY
SUBWOOFER
POLSKIFRANÇAISESPAÑOL
j)
NEDERLANDS
SVENSKADANSK
6
SUOMI
SURROUND Lch
3
SURROUND Rch
4
3
7
Page 8

OPTICAL OUT
HDMI
HDMI
KROK 5: Podłącz kable
Informacje na temat innych metod podłączania i funkcji internetowych można znaleźć w instrukcji obsługi.
SZARY NIEBIESKIFIOLETOWY ZIELONY CZERWONY BIAŁY
Podłącz kable głośnikowe do złączy w tym samym kolorze.
KROK 6: Włącz system
Podłącz przewód sieciowy AC.
1
Przewód zasilania (w zestawie)
4
8
Do ściennego gniaza zasilania sieciowego
Włącz telewizor.
2
Ustaw tryb wejścia wideo
na HDMI itp.
Page 9

DEUTSCH
OPTICAL OUT
R6/LR6, AA
Kabel HDMI
(brak w zestawie)
Włącz system.
3
Antena pokojowa FM (w zestawie)
Ten koniec anteny przymocuj do ściany lub słupa w
miejscu, w którym odbiór jest najlepszy.
Optyczny kabel cyfrowy audio
(brak w zestawie)
Nie jest potrzebny, gdy złącze HDMI telewizora
ma oznaczenie “HDMI (ARC)”.
Rozpoczyna się procedura
4
Łatwego ustawienia.
Postępuj według instrukcji na
ekranie.
POLSKIFRANÇAISESPAÑOL
NEDERLANDS
SVENSKADANSK
Wciśnij [ ].
SUOMI
5
9
Page 10

1
FRONT
Lch
→
Prvodce Snadným Nastavením
KROK 1: Montáž čelních reproduktorů
Zadní část podstavce
Ponechte prostor
kolem 80 mm
Zasuňte kabel
reproduktoru do
drážky.
KROK 2: Označení kabelů nálepkami
např., Čelní reproduktory Lch
BÍLÝ
Reproduktor
2
10
Nálepka na kabel reproduktoru Konektor
FRONT Lch
FRONT Rch
SURROUND Lch
SURROUND Rch
CENTER
SUBWOOFER
1
2
3
4
5
6
BÍLÝ
ČERVENÝ
MODRÝ
ŠEDÝ
ZELENÝ
FIALOVÝ
Page 11

120°
60°
FRONTSURROUND
CENTER
KROK 3: Připojení kabelů reproduktoru
U prostorových reproduktorů není žádný rozdíl mezi pravým a levým reproduktorem.
DEUTSCH
Vodič zcela zasuňte.
KROK 4: Rozmístěte reproduktory
BÍLÝ
ZELENÝ
CENTER
5
MODRÝ
SURROUND Lch
3
FRONT Lch
1
Stiskněte
Modrá linie (
ČERVENÝ
FRONT Rch
2
SUBWOOFER
ŠEDÝ
SURROUND Rch
4
Bílý (i)
ITALIANOČESKYESPAÑOL
j)
NEDERLANDS
SVENSKADANSK
FIALOVÝ
6
SUOMI
3
11
Page 12

OPTICAL OUT
HDMI
HDMI
KROK 5: Zapojte kabely
Ohledně informací o jiném způsobu připojení a ohledně internetových funkcí si přečtěte návod.
FIALOVÝ ZELENÝ
Připojte kabely reproduktoru ke svorkám stejné barvy.
KROK 6: Zapněte systém
Zapojte hlavní přívodní šňůru.
1
ČERVENÝ
Zapněte televizi.
2
Nastavte režim vstupu
videa na HDMI apod.
BÍLÝ
ŠEDÝ
MODRÝ
Napájecí kabel (dodávají se)
Do elektrické zásuvky
4
12
Page 13
DEUTSCH
OPTICAL OUT
R6/LR6, AA
Kabel HDMI
(nedodává se)
Zapněte systém.
3
Pokojová anténa FM (dodává se)
Připevněte tento konec antény ke stěně nebo ke
sloupu, kde je příjem nejlepší.
Optický digitální audiokabel (nedodává se)
Nevyžaduje se, když je zásuvka HDMI na
televizoru označena “HDMI (ARC)”
Dojde ke spuštění
4
Snadného nastavení.
Postupujte podle pokynů na
obrazovce.
ITALIANOČESKYESPAÑOL
NEDERLANDS
SVENSKADANSK
Stiskněte
].
[
SUOMI
5
13
Page 14

Gyors ismertető
1
FRONT
Lch
→
1. LÉPÉS: Az elülső hangszórók összeszerelése
Az alap hátoldala
Csúsztassa be a
hangszóró kábelt a
vájatba.
Hagyjon kb.
80 mm helyet
2. LÉPÉS: A matrica felhelyezése a kábelekre
példa Első hangszórók Lch
FEHÉR
2
14
Hangszóró
Hangszóró kábel matrica Csatlakozó
FRONT Lch
FRONT Rch
SURROUND Lch
SURROUND Rch
CENTER
SUBWOOFER
5
1
2
6
3
4
FEHÉR
PIROS
KÉK
SZÜRKE
ZÖLD
LILA
Page 15

120°
60°
FRONTSURROUND
CENTER
3. LÉPÉS: A hangszóró kábelek csatlakoztatása
A háttér hangszórók között nincs különbség bal és jobb oldalon.
DEUTSCH
Dugja be teljesen.
4. LÉPÉS: Helyezze el a hangszórókat
ZÖLD
CENTER
5
KÉK
SURROUND Lch
3
FEHÉR
FRONT Lch
1
PIROS
FRONT Rch
2
SZÜRKE
SURROUND Rch
Fehér (i)
Nyomja
Kék vonal (
SUBWOOFER
4
ITALIANOFRANÇAISMAGYAR
j)
NEDERLANDS
SVENSKADANSK
LILA
6
SUOMI
3
15
Page 16

OPTICAL OUT
HDMI
HDMI
5. LÉPÉS: Vezetékek csatlakoztatása
Az egyéb csatlakoztatási módszerekre és az internetes funkciókra vonatkozó részleteket a használati
útmutató tartalmazza.
SZÜRKE KÉKLILA ZÖLD PIROS FEHÉR
Dugja be a hangszóró kábeleket az ugyanolyan színű aljzatokba.
6. LÉPÉS: Kapcsolja be a rendszert
Az AC hálózati vezeték csatlakoztatása.
1
Hálózati csatlakozókábel (tartozék)
4
16
Háztartási fali konnektor
Átkapcsolás a TV-re.
2
Állítsa a videóbemenet
módot HDMI stb. helyzetbe.
Page 17

DEUTSCH
OPTICAL OUT
R6/LR6, AA
HDMI kábel
(nem tartozék)
Kapcsolja be a rendszert.
3
FM beltéri antenna (tartozék)
Az antenna ezen végét erősítse olyan falra vagy tartóhoz,
ahol kiváló a vétel.
Optikai digitális audiókábel (nem tartozék)
Nem szükséges, ha a TV HDMI-aljzatának
felirata “HDMI (ARC)”.
Elindul az egyszerű
4
beállítás.
Kövesse a képernyőn megjelenő
utasításokat.
ITALIANOFRANÇAISMAGYAR
NEDERLANDS
SVENSKADANSK
Nyomja
meg a [
gombot.
]
SUOMI
5
17
Page 18

18
Page 19

19
Page 20

Panasonic Corporation
Po CzEn Hu
Web Site: http://panasonic.net
Panasonic Corporation 2012
VQC8847
F0112MH0
 Loading...