

Page 1

CD Stereo System
CD n
"‘"‘J '¿jlghxtaj ^UàJ
SC-AK57
Operating Instructions
J .^:.v‘A\ tljlaLujI
■ 'V Nv;
Si №*»SÈS::®S?Sa|Jtó SKSsSS
GC
nCOMRftCT
[o]D§©
DIGITAL MJDiO
iSiiliiliiili®^
-X- ' ■■'■■■'
' cannafeiihbj 'oDaifSftmfl''brlàiiiÌÌi^rtó
SÌÌ®IÌSÌÌÌ*^^^W
Page 2

Dear customer
Thank you for purchasing this product.
For optimum performance and safety, please read these instruc
tions carefully.
These operating instructions are applicable to the following system.
INVISIBLE LASBI RAD lATlO« WHO< OP0I.
DANGER
AVOID DIRECT EXPOSURE TO BEAM.
USmiG LASEflSmiHliVED iB№ kSB SIKKEITOSAfBfmiEfE
ADVAflSEL
ERUffiAFfUmiK UNMAUESiErTELSEFOBSrallUHG.
AVATTAESSA.]ASU[)JALUK1TUS ОИТЕПАЕЗЗАаВТ AlTniNA
VARO!
NtaMittHiTitASERSATEILVUE. ALAXATSOSATEESEEN.
OSYMLBlAMflSTflAlMNG NAB DENI« DEL AR flPPNAO OCH
VARNING
SPARMnABURKOPPLAO. BETRAKTAEJSmAlfN.
USYNLIG lASfflSIRALIKGNARffiKSa APHESOG SIKKMDSlAS
ADVARSEL
ШЕЗ. UNHUAEmNERiNGFOBSTBALER.
UKSIcmBABE UmSTHAHLUNG, WENNABDECXUMS GEdFRIEr.
VORSICHT
NICHE DOASTBAHLAIiSSElTEN.
(Inside of prodgct)
(Indersiden at apparatet)
(Tuotteen sisäflä)
(Apparatens insida)
(Pmduktats inns Ida)
(Im Inneren des Gerätes)
Speakers
System
Main unit SA-AK57
Front
Surround
Center
SC-AK57
SB-AK57
SB-PS70
SB-PC70
Table of contents
Supplied accessories.............................................................................................. 2
Suggestions for safety ........................................................................................... 4
Concerning the remote control............................................................................... 6
Placement of speakers........................................................................................... 8
Connections........................................................................................................ 10
Front pane! controls ........................................................................................... 18
Turning the demo function off............................................................................. 22
Economy mode................................................................................................... 22
Setting the time................................................................................................... 24
Presetting radio broadcasts................................................................................ 2€
Listening to radio broadcasts............................................................................. 2C
Listening to compact discs................................................................................. 3C
Listening to tapes............................................................................................... 4C
Before recording (Deck 2 only)........................................................................... 44
Recording from radio broadcasts....................................................................... 4E
Recording from compact discs
Tape-to-tape recording
Boosting the super woofer.................................................................................. 5^
Using the built-in sound quality/sound field settings........................................... 5^
Varying the sound quality with the manual equalizer......................................... 5£
Varying the sound quality with the acoustic image (Al)
equalizer......................................................................................................... 5i
Surround systems............................................................................................. 6C
6CH DISCRETE INPUT mode............................................................................ 6f
Enjoying sound with DOLBY PRO LOGIC
Enjoying sound with stereophonies.................................................................... 7(
Enjoying sound with simulated stereo................................................................ 7(
Using the virtual rear surround effect
Using the multi rear surround effect
Using the center focus effect ............................................................................. 7-
Using the seat position function......................................................................... 7*
Singing along with KARAOKE .......................................................................... 71
Using the timer.................................................................................................. 8<
Using an external unit......................................................................................... 8i
Convenient functions ......................................................................................... 8i
Concerning compact discs................................................................................. 9(
Concerning cassette tapes................................................................................. 9i
Troubleshooting guide ....................................................................................... 9:
Maintenance........................................................................................................ 9:
Technical specifications....................................................................................... 9'
.................
......................................................................................
........................................................ 4C
.........................................................
.................................................................
...................................................................
5S
6f
7f
7:
HQT4808
Supplied accessories
a
Please check and identify the
supplied accessories.
. kiiI lia-li 1 jjj
n~j
f
□
AC power supply cord......................1 pc.
AC .....................................................1#
S 4а1вЛ
............
jLuJI jj3
□
Remote control
transmitter................................. 1 pc.
......................................И It
ЛЛы1 I ■ ■ ■■ *
□
Remote control
batteries
................................
2 pc
.............................2 I
Page 3

Suggestions for safety
Avoid placing the unit in areas of;
•direct suniight
•high temperature
•high humidity
•excessive vibration
•uneven surfaces (Place the unit on a flat
level surface.)
Such conditions might damage the cabinet
and/or other component parts and thereby
shorten the unit’s service life.
To protect the unit against sound distortion
and acousticai effects, please place the unit
at least 15 cm away from wall surfaces etc.
:5facl^in
Never place heavy items on top of the unit
or the AC power cord.
yolfqge
• it is very dangerous to use an AC power
source of high voltage such as for an air
conditioner,
A fire might be caused by such a con
nection.
•A DC power source can not be used.
Be sure to check the power source care
fully, especially if on a ship or other place
where DC is used.
. Pbw.ér;;;çbrâ;;:p,r^
•Avoid cuts, scratches or poor connection
of the AC power cord, as this may result in
fire or electric shock.
Excessive bending, pulling or slicing of the
cord should also be avoided.
• Do not pull on the cord when you are
disconnecting the power, as this could
cause an electric shock. Grasp the plug
firmly when you disconnect the power
supply.
• Never touch the plug with wet hands or a
serious electric shock could result.
• Ensure that no foreign objects, such as
needles, coins, screwdrivers etc., acci
dentally fall into the unit.
Otherwise, a serious electric shock or
malfunction could occur.
• Be extremely careful about spilling water
or liquid on/into the unit, as a fire or
electric shock could occur.
(Disconnect the power plug and contact
your dealer immediately if this occurs.)
•Avoid spraying insecticides onto the unit
as they contain flammable gases which
can be Ignited.
• Insecticides, alcohol, paint thinner and
similar chemicals should never be used to
clean the unit as they can cause flaking or
cloudiness to the cabinet finish.
• Never attempt to repair, disassemble or
reconstruct the unit if there seems to be a
problem.
A serious electric shock couid result if you
ignore this precautionary measure.
• If a problem occurs during operation (the
sound is interrupted, indicators fail to light
up, smoke is detected, etc.) contact your
dealer or Authorized Service Center
immediately.
• Disconnect the power supply if the unit will
not be used for a long time. Otherwise the
operation life could be shortened.
CAUTION!
THIS PRODUCT UTILIZES A LASER.
USE OF CONTROLS OR ADJUST
MENTS OR PERFORMANCE OF
PROCEDURES OTHER THAN THOSE
SPECIFIED HEREIN MAY RESULT IN
HAZARDOUS RADIATION
EXPOSURE.
DO NOT OPEN COVERS AND DO
NOT REPAIR YOURSELF. REFER
SERVICING TO QUALIFIED PER
SONNEL
CAUTION!
DO NOT INSTALL OR PLACE THIS
UNIT IN A BOOKCASE, BUILT IN
CABINET OR IN ANOTHER CON
FINED SPACE IN ORDER TO KEEP
WELL VENTILATED CONDITION.
ENSURE THAT CURTAINS AND ANY
OTHER MATERIALS DO NOT
OBSTRUCT THE VENTILATION
CONDITION TO PREVENT RISK OF
ELECTRIC SHOCK OR FIRE HAZARD
DUE TO OVERHEATING.
Mmm
® ’ )
iscm ■
miSÆ Dc m *
Ü •
№T4a08
CAUTION:
The AC voltage is different according
to the area.
Be sure to set the proper voltage in
your area before use.
(For details, please refer to page 12.)
Page 4

Cmcerning the remote control
Use of batteries
•Do not mix oid and new batteries, or batteries of different types
(manganese and alkaiine, etc.).
• Never subject batteries to excessive heat or fiame; do not attempt
to disassembie them; and be sure they are not short-circuited.
• if the remote controi is not to be used for a iong period of time,
remove the batteries and store them in a cooi, dark piace.
• Do not attempt to recharge aikaiine or manganese batteries.
•Do not use rechargeabie type batteries.
Battery life
The battery iife is about one year.
The batteries should be repiaced if commands from the remote
controi transmitter do not operate the unit even when the transmit
ter is held close to the front panel.
0
(a) R6, AA size, UM“3
® Insert the batteries observing the correct poiarities (+, -).
© Remote control
signai sensor
Gorrect method of usé
01
Operation notes
• Do not place obstacles between the remote control signal sensor
and remote control unit.
• Do not expose the remote control signal sensor to direct sunlight
or to the bright tight of an invertor fluorescent light.
•Take care to keep the remote control signal sensor and end of the
remote control unit free from dust.
• If this system is installed in a rack with glass doors, the glass
doors' thickness or color might make It necessary to use the re
mote control a shorter distance from the system.
To prevent damage
• Never place heavy items on top of the unit.
• Do not disassemble or reconstruct the unit.
•Do not spill water or other liquids into the unit.
№T480a
® Transmission
window
® About 7 meters in front of the
signai sensor
.
..
Page 5

Placement oí speakers
fcfe"rri^nÌi':òf|fjra
aí,&a;s/í*í-.'.
Place the speakers so that the superwoofer is on the outside. El
Superwoofer
2.Ì* La
Center speaker
I ft I nil
Front speaker (Left)
(£)
^^Laj
I Surround speaker (Lett)
I C£)
¡1 jiTiTin jjtljk itLojjj
TV (not included)
[3^j^ jtf^)
Main unit
±t/l
Surround speaker (Right)
(^ip^fli) j itiVl r, ^LoéUü
Front speaker
(Right)
(^)
(^)
•Keep your speakers at least 10 mm away from the system for
proper ventilation.
•To avoid damage to the speakers, do not touch the speaker
cones if you have taken the nets off.
m
Center speoker
Place the center speaker above your TV, as close to it TV as pos
sible.
Surround speakers
As well as enjoying normal stereo reproduction with the left and
right front speakers, surround speakers can also be connected to
the system in order to enjoy a feeling of depth and movement of
sound.
Place the speakers with the Panasonic logo facing toward the lis
tening position.
We recommend that surround speakers be placed on the side of or
slightly behind the listener at ear level.
However, the position should be adjusted to your personal prefer
ence, because the effect varies to some degree depending upon
the type of music and the music source.
Attaching to a wall B
Set speaker onto screws and slide through bracket to lock into po
sition.
The wall or pillar on which the speaker systems are to be attached
should be capable of supporting a weight of 5 kg.
Caution
•Use the speakers only with the recommended system.
Failure to do so may lead to damage to the amplifier
and/or the speakers, and may result in the risk of fire.
Consult a qualified service person If damage has oc
curred or if you experience a sudden change In perfor
mance.
•Do not attempt to attach these speakers to walls using
methods other than those described in this manual.
The speakers are made so they can be used in close proximity of a
TV, but irregular coloring may result due to how the system is
placed. If such distortion occurs, turn off the TV for between 15 and
30 minutes. The demagnetizing function of the TV will eliminate the
distortion. If the irregular coloring is stili visible, when the TV is
turned on again move the speakers further away from the TV.
;|cqT4ao8
Page 6
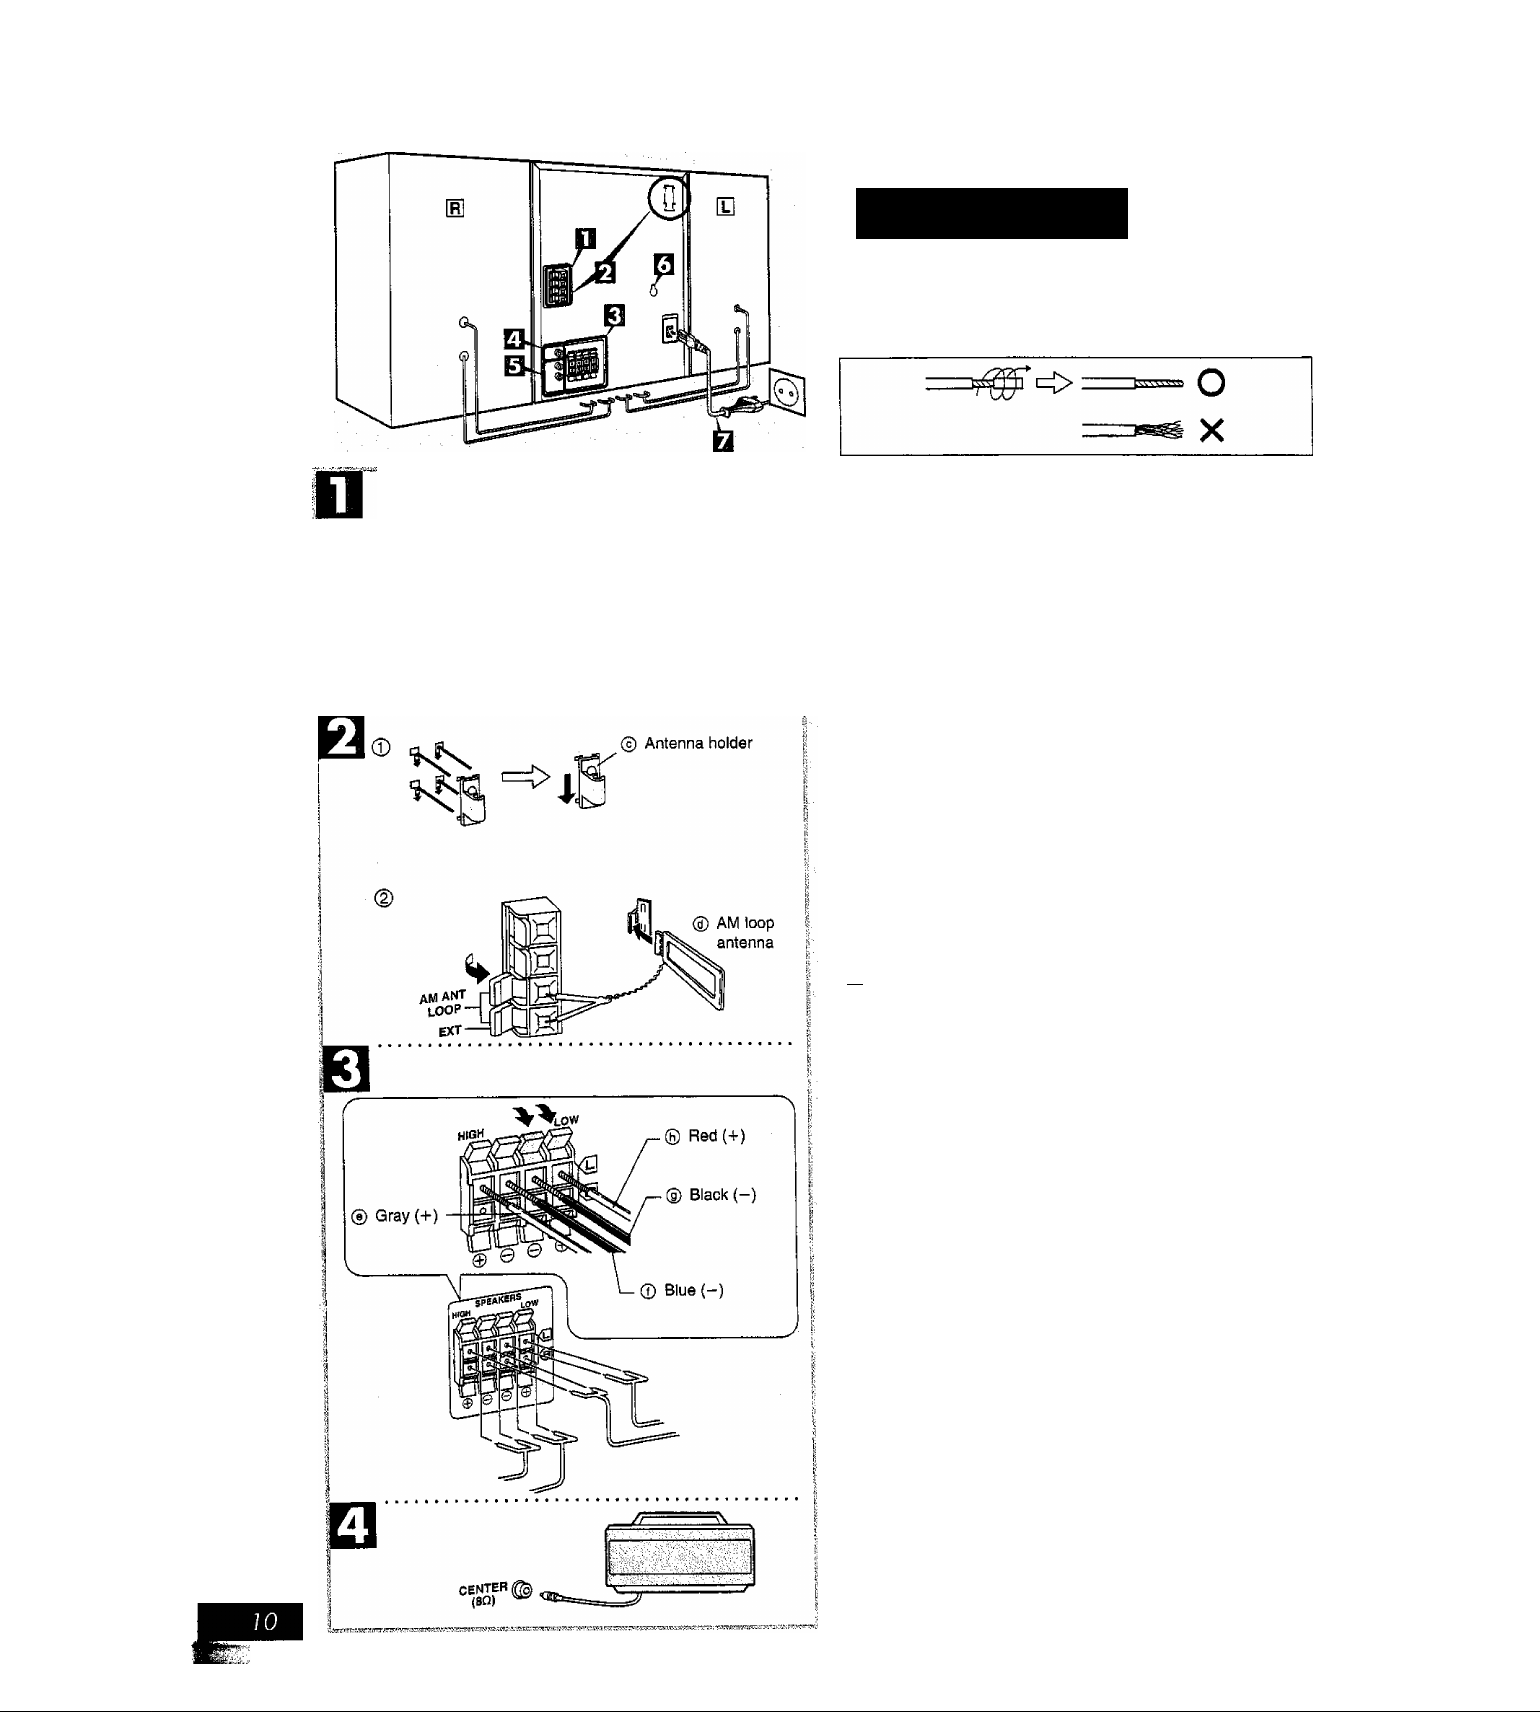
Cotihecfions
Bosic connections (for supplijedioc
• Plug the AC power cord into a househoid AC outlet only after all
other connections have been nrtade.
•To prepare the antenna wires and speaker cords, twist the vinyl
cover tip and pull off.
© FM indoor antenna
®hi
FMAg
® Adhesive tape
©
Connect the FM indoor antenna.
Tape the antenna to a wall or column, in a position where ra
dio signals are received with the least amount of interference.
CEQSi
For best reception:
An FM outdoor antenna is recommended. page 14.)
Connect the AM loop antenna.
After attaching the antenna, turn on the system and tune in a
broadcast station. Then, turn the antenna to the angle of best
reception and least interference.
Connect the front speakers.
Connect each end of the speaker cables to the terminal levers
of the same color.
Use only the supplied front speakers.
The combination of the main unit and front speakers provide
the best sound. Using other front speakers can damage the
unit and sound quality will be negatively effected.
To prevent damage to circuitry, never short-circuit positive (+)
and negative (-) speaker wires.
FI Connect the center speaker.
(Continued on next page)
fliaT4808
Page 7

Connecfions
Q Connect the surround speakers.
Set the voltage.
Use a flat-head screwdriver to turn the voltage selector on the
rear panel to the appropriate position for the area in which this
system is used.
If the power supply in your area is 115 V or 120 V, please set
the voltage selector as follows:
• ForllSV; SettollOV.
• For 120 V: Set to 127 V.
Connect the AC power cord.
If the power plug does not fit your socket, use the power plug
adaptor (included). El
insertion of connector
Even when the connector is perfectly inserted, depending on
the type of inlet used, the front part of the connector may jut
out as shown in the drawing.
However there is no problem in using the unit.
RQT4806
Page 8
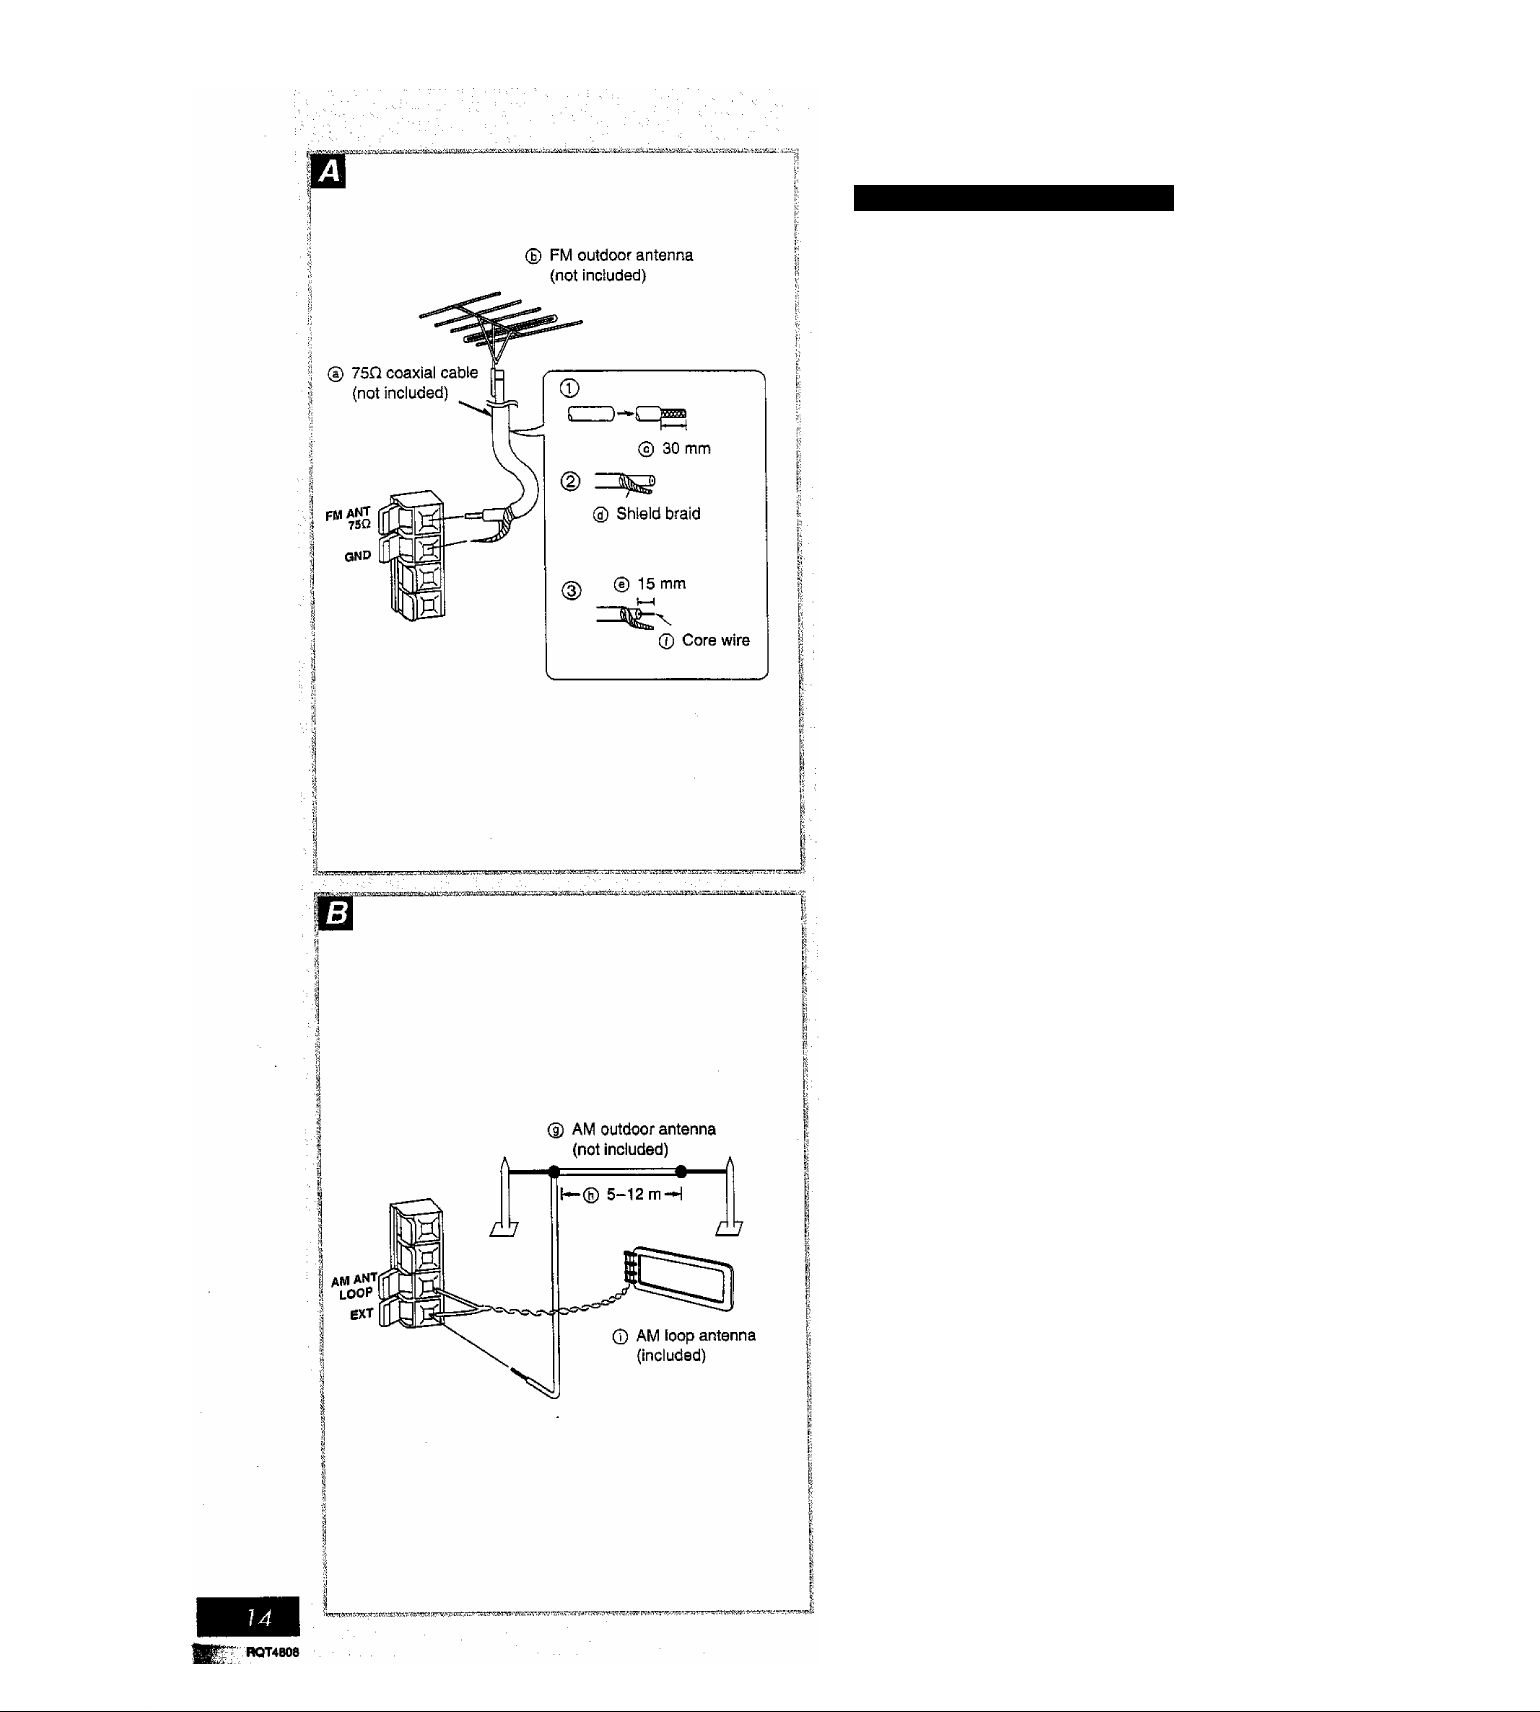
Connections
Qpliòhai anténna connections
You may need an outdoor antenna if you use this system in a
mountainous region or inside a reinforced-concrete building, etc.
FM outdoor antenna Ei
Disconnect the FM indoor antenna if an FM outdoor antenna is in
stalled.
® Remove a piece of the outer vinyl insulator.
Cg) Twist the shield braid.
@ Expose the core wire.
An outdoor antenna should be installed by a qualified technician
only.
AM outdoor antenna @
Connect the outdoor antenna without removing the AM loop anten
na. Run 5 to 12 m of vinyl-covered wire horizontally along a window
or other convenient iocation.
When the unit is not in use, disconnect the outdoor antenna to pre
vent possibie damage that may be caused by lightning. Never use
an outdoor antenna during an electrical storm.
Page 9

Connections
® DVD player with 5.1 ch OUT
(not included) (E) Rear panei of this unit
SURROUND
© Laserdisc player (not included) © Rear panel of this unit
□□
*-■ ■
--------------------
i ..1
о
External ünit conheclioh
• For details, refer to the manual of the units which are to be con
nected.
• When units other than those described below are to be connect
ed, please consult with your dealer.
DVD player with 5.1 ch OUT Ш
Sound cannot be produced unless an DOLBY DIGITAL decoder is
connected.
A DVD player with a built-in DOLBY DIGITAL decoder is recom
mended.
This will allow you to enjoy the brilliant images and powerful sounds
available on DVD software.
Laser disc player/DVD player
[without 5.1 ch OUT) E]
This unit has Dolby Pro Logic circuitry. If the audio output of video
equipment is connected to the AUX1 or 2 terminal of this unit, the
sound will be reproduced with the same powerful stereophonic ef
fects found in movie theaters.
N^deo cassette recorder В
© Video cassette recorder
(not included)
© Record player (not included) ® Rear panel of this unit
© Rear panel of this unit
You can enjoy only sound of the video cassette recorder.
Record player Ш
Sound cannot be produced unless an phono equalizer (not includ
ed) is connected.
A record player with a built-in phono equalizer is recommended.
This example shows how to connect a record player with a
[PHONO OUT/LINE OUT] switch. Set the switch on the back of the
record player to “LINE OUT’.
To Improve the sound effect
The front speakers have built-in subwoofers, but it is possible to
connect another subwoofer (not included) to the SUBWOOFER
OUT terminal on the rear panel of this unit.
The extra subwoofer can produce sound only when [6CH DIS
CRETE INPUT] is selected.
ЙОТ4808
© LINE OUT position
Page 10

Front panel controls
I
Main unit E]
No. Name Ref. page
0 CD manager button (CD MANAGER) ...
(2) Random play button (RANDOM)
(3) Disc tray
@ AC supply indicator (AC IN)
This indicator lights when the unit is connected to the AC mains
supply.
(D Standby/on switch (POWER, CÌJ/I)
Press to switch the unit from on to standby mode or vice versa.
In standby mode, the unit is still consuming a small amount of
power.
(6) Eco mode button (ECO)...........................
© Input select buttons and indicators
(CD, TUNER/BAND, TAPE DECK1/2,
AUX1/2, 6CH DISCRETE INPUT)
(8) Headphones jack (PHONES)...................
0 Deck 1 cassette holder
® Disc select buttons and indicators
(DiSC1-DISCS).........................................
(Q) Disc tray open/close button
(OPEN/CLOSE -*^1-5)
® Display select/demonstration button
(-DISPLAY/-DEMO)..................................
.....................................................
...............................
.............................
@ Volume control (VOLUME)
@ KARAOKE effect button
(KARAOKE EFFECT)...............................
@ Karaoke button (KARAOKE).....................
(g) Microphone volume control (MIC VOL)
® Microphone jacks (MIXING MIC)
® Deck 2 cassette holder
..............................
................
........................
..........
............
.......................
...............
..............
..............
..............
..............
..............
..............
26, 32, 40, 88
..............
................
................
................
..........
................
................
. ..............
................
................
................
38
34
30
22
22
22
88
40
32
30
22,88
28
78
76
76
76
40
---------------------------
____
® ® ® @ @
l.r-.
aU
-^1
------
Center console UÌ
® 3D EQ indicator (3D EQ)
3D At indicator (3D Al)
@ DOLBY PRO LOGIC on/off button and indicator
(□□ PRO LOGIC) ....................................................... 68
@ Super surround on/off button and indicator
(SUPER SURROUND)............................................... 70
@ Simulated stereo on/off button and indicator
(SIMULATED STEREO)
@ Display
(g) AV effect buttons and indicators
(CENTER FOCUS, VIRTUAL REAR SRND,
MULTI REAR SRND, SEAT POSITION).............. 72, 74
@ 3D Al EQ button (3D A! EQ)
@ Jog control and joy stick
(SOUND CONTROL JOG)......................................... 54
@ Play timer/record timer button and indicator
(© PLAY/© REC)
(g) Deck1 open button DECK1 OPEN)
@ Clock/timer button (CLOCK/TIMER)
@ Tape edit button (TAPE EDIT).................................... 52
@ Recording start/stop button (• REC/STOP)
® DOLBY NR button (DOLBY NR)
@ Reverse mode select button (REV MODE)
® Basic operating buttons
Functions change according to the source.
@ Deck2 open button (A DECK2 OPEN)
@ Super woofer on/off button and indicator
(S.WOOFER)
.............................................................
............................................
.......................................
..................................................
...........................
...............
.................................
24, 80, 82
................
................
.......................
70
58
80, 82
40
46
40
40
40
54
Page 11

Front panel controls
Remote control
Buttons such as © function in exactly the same way as the buttons
on the main unit.
No. Name Ref. page
© Standby/on button (cl))
................................................
22
O Input select buttons
(CD, TUNER, TAPE, AUX1/2).................. 26, 32, 40, 88
© DOLBY PRO LOGIC on/off button
{□□ PRO LOGIC) ....................................................... 68
Channel select, test button
(CH SELECT, TEST).................................................. 66
© 3D A1 select button(3D At).......................................... 58
@) Select buttons (SELECT *^ ►).................................. 74
@ EQ select button (EQ)................................................. 54
© Super woofer on/off button (S.WOOFER)
...................
54
© Reverse side playback button (◄/v)............................ 40
® Numeric buttons (>10,1-0)........................................... 34
@ Program button (PROGRAM)
® Cancel button (CANCEL)
.....................................
............................................
36
36
@ Shift button (SHIFT).................................................... 66
[6CH] (6CH DISCRETE INPUT):
Hold down [SHIFT] and press [AUX1/2].
[TEST] (Test signal output);
Hold down [SHIFT] and press [CH SELECT],
® Muting button (MUTING)
® Sleep button (SLEEP)
.............................................
.................................................
88
86
0 Simulated stereo on/off button
(SIMULATED STEREO)............................................. 70
© Super surround on/off button
(SUPER SURROUND)............................................... 70
® AV effect button (AV EFFECT)
® UP/ON, DOWN/OFF buttons (▼ A)
..............................
............................
72, 74
66
(E> KARAOKE effect button
(KARAOKE EFFECT)................................................. 78
© Skip/search buttons ►►/►►!)
____
32, 42
© Play/pause button (►/! 1/ a )................................. 32, 40
© Stop button (■)....................................................... 32, 40
® Disc button (DISC)....................................................... 34
© Random button (RANDOM)......................................... 34
@ Repeat button (REPEAT)
0 Volume buttons (VOLUME +, —)
...........................................
.................................
34
28
Page 12

Turning the demo function off
(DEMO)m
If the clock has not been set, a demonstration of the display is
shown when the unit Is off.
This function is set to on at the time of purchase.
To get the most from the economy mode (see below), turn the
demo function off.
Press and hold [-DISPLAY/-DEMO] until “NO DEMO” is displayed.
Every time you press and hold the button;
NO DEMO (0ff):;rDEMO (on)
Economy mode (ECO) m
When this mode is used the power consumed when the unit is
switched to standby mode reduces from a maximum of 13 W to
1 w.
This mode is set to on at the time of purchase.
NORMAL (off) ECO (on)
Display
Power consumption
in standby mode
The demonstration is shown if DEMO is on, regardless of the condi
tion of the ECO mode. Turn DEMO off if ECO is used.
Clock display, etc. Blank
13W 1 W
Turning ECO on and off;
Press [POWER] to turn the unit on.
Press [ECO].
The display changes each time the button is pressed;
NORMAL (oH):;::ECO (on)
When ECO is on:
When the unit is turned off, the display panel remains blank but the
AC IN indicator stays alight to show the unit is still connected to the
AC mains.
When the unit is off, the mode can be switched from NORMAL to
ECO, but not the other way.
Page 13

Setting the time
This is a 24-hour display clock.
The example in the figure shows how to set the time for 16:25
{4:25 p.m.).
n Press [POWER] to turn the unit on.
^ Press [CLOCK/TIMER] to select “CLOCK”.
Every time you press the button:
CLOCKS© PLAY->©REC
—Previous display-«—I
{within 5 seconds or so)
Press [TUNE/TIME ADJ (v or a)] to set the present time.
^ Press [CLOCK/T9MER] to finish setting the
time.
The display will return to whatever was displayed before you
set the time.
Displaying the clock
When the unit is off
When ECO mode is off;
The clock is displayed constantly.
When ECO mode is on;
Press [-DISPLAY/-DEM01.
The clock is displayed for about 5 seconds and then the display
goes blank again.
When the unit is on
Press [CLOCKTriMER] so “CLOCK” is shown.
The clock is shown for about 5 seconds then the previous display is
restored.
Page 14

Ц TUNER/
BAND
! I~ h ft
; 7 ' '
n n n ri
Presetting radio broadcasts
• Up to 12 stations can be set in each band with automatic or man
ual memory presetting.
• If broadcast frequencies are preset in the memory, you can easily
tune in any of these frequencies from the system or remote con
trol unit.
•You can preset just those stations you like. (See “Presetting only
your favorite stations” below.)
Press [TUNER/BAND] to select band.
The power will come on automatically.
Every time you press the button; “FM"«—»“AM".
Press [a, TUNE MODE] to select “MANUAL”.
Every time you press the button; "MANUAL"<—»“PRESET’.
Q Press [TUNE/TIME ADJ (v or л)] until the dis
play shows the frequency from which you
want to begin automatic memory presetting.
Tips on tuning in radio stations
ф Hold down either iJUNE/TIME ADJ (v or л)] untii the fre
quency numbers start scrolling.
Ф When near to the frequency you are looking for, press
[ТиМЕЯ!МЕ ADJ (v or л)] repeatediy untii the station is
tuned in.
Q Press and hold [►►/►►!, MEMORY] until the
frequency begins to change.
This will start presetting automatically. When finished, the ra
dio will tune in the last station memorized.
MEMORY
C 'i о о f >~i
t f f и и. t и
_ Г h/(
J I I
@ Preset channel
О О in
U O. IU
If auto presetting Is not possible because radio signals are
weak or for some other reason, do the following,
Presetting only your favorite stations
Preset the stations one at a time.
1. Perform step Q above. Then, press [►►/►►!, MEMORY]
(“MEMO" flashes) and select a station with [TUNE/TIME ADJ (v
or
a)].
While “MEMO” is flashing press [►►/►►i, MEMORY] again
2.
and select a preset channel with [TUNE/TIME ADJ (v or a)].
Press [►► /► W, MEMORY] to preset the station.
3.
Memory retention
The preset stations are retained in memory for about 2 weeks even
if the system is unplugged.
AM allocation settings:
This system comes equipped with an electronic digital tuner that di
vides the broadcast band into many small steps. These steps
match the assignable broadcast frequencies and intervals in be
tween.
Each country allocates broadcast bands according to their particu
lar needs.
By adjusting the allocation, you can enable the tuner to receive AM
Ч
broadcasts allocated in 10 kHz steps.
Press and hold [TUNER/BAND]. After a few seconds the display
will change to a flashing display of the current minimum AM fre
quency. If you continue to hold [TUNER/BAND] down, the minimum
frequency will change. Release the button at this time.
CT/'W
О no n
I I I О Л-tu
To return to the original frequency indication, repeat above.
;
After changing the allocation setting, the frequencies you previously
preset in the memory will be cleared.
Page 15

Listening to radio broadcasts
Press [TUNER/BAND] to select band.
The unit comes on and the radio begins to play.
Every time you press the button; “FM”t—»■“AM''.
Press [■, TUNE MODE] to select “PRESET’ or “MANUAL”.
Every time you press the button: “MANUAL"«—>“PRESET”,
PRESET: For preset stations
MANUAL: For non-preset stations
Press [TUNE/TIME ADJ (v or a)] to select the desired broadcast.
"STEREO” lights when an FM stereo broadcast is being re
ceived. “TUNED" lights when you precisely tune in a broadcast
station.
Turn [VOLUME] to adjust the volume level.
¿
TUNE MODE
f~ it'/
> f I
p ~f о n
О i.^iu
n n l~ r~ г T
г гг л _Í í_ '
/t '/ /”? it / / / o /
M / f / t/ U M í_
Auto tuning
Auto tuning is an easy way to tune in non-preset stations in the
manual mode.
Hold down [TUNE/TIME ADJ (v or a)], and release the button when the frequency starts scrolling.
The radio will stop automatically on the first station it picks up.
•When there is outside interference, the radio sometimes stops on
a certain frequency where no station is broadcasting.
To stop auto tuning
Press [TUNE/TIME ADJ (v or a)] again.
If noise is excessive in the FM stereo mode El
Press FM MODE/BP]. (“MONO” will light up.)
Sound will be produced in monaural, but this also reduces noise.
Press the button again to cancel. “MONO" will go out.
Normally, you'll want to listen in stereo, so leave “MONO" off. This
way, you can listen to stereo broadcasts in stereo, and monaural
broadcasts in mono.
You can preset an FM station in monaural by following the steps
under “Presetting only your favorite stations" on page 26, After se
lecting the station in step 1, select “MONO" with FM
MODE/BP], then continue with steps 2 and 3.
Ш
DOWN
VOLUME
FM MODE/BP
I //)”//
; f' и и
:
! TUNED '
; MONO
-dB
OdB
„ Í / n J T( \
t U i-/ 2J ;
• If you preset stations in memory they can be easily selected from
the remote control with [►/11/л] or the numeric buttons.
1, Press [TUNER] to select the band.
2. Press [◄/v] or [►/H/a] to select the channel, or select the re
quired channel directly with the numeric buttons.
To select a two-digit channel;
Press [510] and then the two numbers you want within 10 sec
onds or so.
• Sound is momentarily interrupted if you load/unload tapes while
listening to an AM broadcast.
Page 16

fasHI ífoisni ÍDBC4I HoiScit
Listehing to compact dises
Always stop the changer before loading or changing CDs. You can
not change CDs while a disc is playing.
How to load CDs
Press an [OPEN/CLOSE ^ (1-5)] button.
The selected tray will open.
Set CD in the tray.
Press the same [OPEN/CLOSE A (1-5)] but
ton.
The tray will close and the disc No., number of tracks and total
playing time will be shown on the display.
To continue loading CDs in the other trays
Press another [OPEN/CLOSE ^ (1-5)] button to open the required
tray.
The current tray closes and the selected tray automatically opens.
Disc indicators (DISC 1-DISC 5)
The disc indicators light whenever the tray is in the playing position,
whether it is loaded or not.
To prevent damage
Always observe the following points.
• Load only 1 CD per tray. El
•Load CDs as shown in figure B.
•An adapter is not needed with 8 cm CDs (singles).
• Set the system on a flat, level surface.
Do not set it on top of magazines, inclined surfaces, etc.
• Do not move the system while trays are opening/closing, or when
loaded.
• Do not put anything except CDs in trays.
• Do not use cleaning CDs or CDs which are badly warped or
cracked.
• Do not use CDs with poorly attached labels or stickers.
Adhesive protruding from underneath stickers or left over from
peeled off stickers can cause your stereo to malfunction.
•Do not use irregular shape CDs. B
Page 17

iisfening fo compact discs
Press [CD].
The power will come on automatically.
If the unit was off and a CD was loaded, piay will start auto
matically (One touch ptay function).
Insert CDs in the trays.
(•• see page 30.)
gel Press [DISC 1]-[DISC 5] to select the disc you
want.
(If the desired CD is indicated on the display panel, the same
operation can be accomplished by pressing [►/! I],)
Play will start from the first track on the selected disc and will
continue until the last track of the final disc is played (see
below).
FI Turn [VOLUME] to adjust the volume level.
IpiSTil iSscII ioisc^ (iEiscil liPiscsl
© Disc number © Track number © Elapsed playing time i
VOLUME
DOWN JP
in
Tl T c r
±l ±
n-n
u-u I
(Of current track
number)
^
I '/u
-dB
I / o / (f o .j V
i> u i_ / u u JJ
To stop the disc El
Press [■].
When “ ^ ” appears on the display
it indicates there are 13 or more tracks on the disc in the playing
position.
What Is meant by “final disc"?
For example, if play starts from disc 4, disc 3 will be the ‘linal disc”.
Order of progression:
Disc 4->5'->-1-»-2^3
To pause
/
t'
OdB
To search forward/
backward (Search)
To skip forward/
backward
•During random play (^ page 34), you cannot skip to tracks which
have already been played.
•During program play (■• page 36) or random play, you can search
forward or backward only within the current track.
• During program play, skipping is always in the programmed order,
whether forward or backward.
Press [►/! 1] during playback.
To resume playback, press [►/11].
Hold down (backward) or
[►►/►w] (forward) during playback
or pause mode.
Press (backward) or
[►►/►w] (forward) during playback
or pause mode.
m
z
TUNE MODE
ti? ( f
..........
© Total number ® Total playing;
I C LJ n-n LJ
I u I nu 1
1---
of tracks time
...............
Reference:
•After you have turned a surround system on when listening to an
other source, the surround system is automatically turned off
when CD is selected as the source and the unit switches to two
channel stereo mode. (The surround system can be turned on
again after CD is selected.)
• Use the CD manager function if you want to listen to one CD only.
(• page 38)
1-
Page 18

lisfenfng to compact (fiscs
Random plq;^^
El
Press [RANDOM].
All tracks on the loaded CDs will be played in random order. Play
back will stop automatically when all tracks have been played.
To cancel random play
Press [RANDOM] once again.
You can use random play with your program. Only the programmed
tracks will be played, but in random order.
by remote control only
Press [REPEAT] before or during play.
All tracks on the loaded CDs are repeated.
To cancel repeat play
Press [REPEAT] once again.
To repeat your favorite tracks
1. Program the tracks you want page 36).
2. Press [REPEAT] and make sure" ” is displayed.
3. Press [►/11]. Playback will start.
CD
“o
CO Twn TAPI AMXW
"è ¿¡^."o
“^0E3”
^(¡KDiaci
c5
i1NI0f9n«.^ M-.p*f
OCDOO
o O CZ) CD
oo o
,c5
MUTWO you—
To repeat Just one track
Set the 1-TRACK mode page 38), press [REPEAT] before or
during playback, and make sure “ ciD ” 'S displayed.
by remote oontrol only
Press [CD].
Q Press [DISC].
(within 10 seconds or so)
Press [1]-[5] to select the disc you want.
Press the numeric button to select the desired
track number.
The CD will be played from the selected track to the last track
of the final disc.
To select a two-digit track
Press [210] and then the two numbers you want within 10 seconds
or so.
For example
Track no. 20: [>10]^[2]“>[0]
Track no. 35; [>10H[3]^[5]
%
CD CD CD CD
Page 19

listening to compact dises
by remote control only
You can program up to 24 tracks.
Press [CD].
Ensure CD is stopped.
Press [PROGRAM]. Press [DISC].
£ I (within 10 seconds or so)
Press [1]-[5] to select the disc you want.
iS Press the numeric button to select the desired
track.
Repeat steps 0-0 until you have programmed the desired
track(s).
Press [►/! 8/a].
Play will start in the programmed sequence.
To cancel program play mode
Press [PROGRAM] In the stop mode.
Programmed contents wiii be saved in memory.
Pressing [■] will cancel program play, but it will also erase the en
tire program.
To select a two-digit track
Press [>io] and then the two numbers you want.
When “CD FULL” appears El
The number of programmed tracks is limited to 24. No further
tracks can be programmed.
You can do the following during program mode EH
• Check program contents.
Press or [►►/►►!].
Everytime you press one of the buttons, the track and program
No. are shown on the display.
•Add to the program.
Repeat steps Q through 0,
•Cancel entries.
From the last
programmed track
A specified track
only
Press [CANCEL],
Select the track with [M^/-*^] or
[►►/►►1], and press [CANCEL] within
3 seconds.
.i? c r V 000
^ L. JL/ , i- J
® Indicates program mode
All tracks
Press [■].
Memory retention
Your program is retained in memory for about 2 weeks while the
system is unplugged.
To replay your program
If you turned off your program with [PROGRAM], you can play it
again as explained below.
1, Press [PROGRAM].
2. Press [►/II/a],
if you program a track not on your CDs
The track is initially programmed, but during program play, the play
er wilt skip that track and will continue playing from the next pro
grammed item.
Page 20

Listening to compact discs
This function makes it easier for you to select specific CDs and
tracks from amongst those ioaded in the player.
You can use this function to make recordings as weii.
There are 3 CD/track selection modes.
• For piaying back 1 track oniy from aii ioaded CDs
1-Track mode (1-TRACK)
• For piaying back 1 CD only from all loaded CDs
1-Disc mode (1-DISC)
• For playing back 1 track on all loaded CDs
1-Track All-Disc mode (1-ALL)
TUNE MODE
CD MANAGER
^ I T o p r i/
'' f I / Í W 7L / '
íáscTl ípisc^ tniSC 5|
^ ~l n
_7
7
.........................................
@ specified disc number
A
Press [CD].
Ensure CD is stopped.
Press [CD MANAGER] to select the desired mode.
Every time you press the button;
1 -TRACKS 1 -DISC-»-1 -ALL
----------
NORMAL^--------------1
(OFF)
1 -TRACK: Only one particular track is played.
1 -DISC: The tracks on oniy one particular disc are played,
1-ALL: The same track numbers on each of the CDs are
(NORMAL; The original display is restored in about
played in succession.
3 seconds.)
Press [DISC 1]-[DISC 5] to select the disc you want.
This step is not required if 1 -ALL was selected in step Q.
i I Press or [►►/►►I] to select the de
sired track.
U
This step is not required if 1-DISC was selected in step |
Press [►/■!].
The selected track will start.
FM MODE/6P
MEMORY
® specified track number
To stop play
Press (■].
When playback ends
“NORMAL" will appear on the display for about 3 seconds, then the
CD MANAGER function will turn off automatically.
During play in the 1-ALL mode:
• It is not possible to skip back to a CD whose track has already
been played.
• If a CD does not have the designated track number, it is skipped
and play continues.
You can use the repeat function (^ page 34) and random play
(«• page 34) at the same time. However, only the repeat function is
available for 1 -TRACK mode.
Page 21

Listening fo topes
Types of tapes which can be played correctly:
The unit automatically identifies the type of tape.
‘TOO C
I ni i.
NORMAL POSITIONn'YPE 1
HIGH РОЗтОМЛТРЕ II
METAL POSITIONЛ'YPE IV
You can use either deck 1 or deck 2 for tape playback.
О
0
0
Press [TAPE DECK1/2].
The power will come on automatically,
If the unit was off and a cassette was loaded, play will start au
tomatically (One touch play function).
^ Press [A DECK1 OPEN] or [a DECK2 OPEN]
and insert the tape.
Insert the tape with the exposed tape facing down.
Close the holder by hand.
Q Press [DOLBY NR],
You have to turn DOLBY NR ON/OFF according to the type of
recording you made.
Every time you press the button: □□ NR-»(OFF)
Press [REV MODE] to select the reverse mode.
Every time you press the button;
□
DOLBY HR
—I IT n о c
RBVMODI
VOLUME
DOWN iP
irapp
Z о
□□NR
(S’
;dé>
00 МЯ
ШМП
;
.......
® Tape direction
-dB OdB
© Deck in use
X: One side is played, then playback stops automatically.
Both sides (front side^ reverse side) are played one
time each, then playback stops automatically.
c:^y. Both sides are played 8 times each, then playback
stops automatically.
Press [<\ or [>/^ I] to start playback.
i]; The forward side (front side) will play.
[◄]: The reverse side will play.
Q Turn [VOLUME] to adjust the volume level.
To stop tape playback
Press [■].
To change the deck to be used SI
Press [TAPE DECK1/2] to select the deck you want to use when
you load cassettes into both decks.
To listen to 2 tapes consecutively
Load a tape into each deck and select c:^d. Both tapes will be
played 8 times each.
m
Playback is interrupted while playing back tapes if you open the
other deck.
Reference;
After you have turned a surround system on when listening to an
other source, the surround system is automatically turned off when
TAPE is selected as the source and the unit switches to two chan
nel stereo mode.
T Q О О
/ ni L-
Page 22

Listening to topes
To fast-forward or rewind the tape El
Press or [►►/►►!] in the stop mode.
Tape direction To rewind To fast-forward
FM MOOE/BP
MEMORY
JI
To find the beginning of a program
(TPS: Tape Program Sensor] E)
Press or [►►/►w] during play.
Tape
direction
The TPS function searches for silent parts of about 4 seconds in
length which are normally found between tunes. As a result, it may
not function properly in the foilowing cases
•With short silent parts
•When noise occurs between tunes
•With silent parts found within tunes
To play the current tune
from the beginning
[►►/►wl
To play the next tune
from the beginning
About the Dolby noise-reduction system @
The Dolby noise-reduction system is designed to effectively reduce
the annoying high-frequency “hissing" noise typical of cassette
tapes.
During recording, the system functions to increase the high-fre
quency sound level, and then, during playback, that same portion is
weakened to bring it back to the previous level.
The DOLBY NR effect is obtained by selecting the same type of
Dolby during playback as was used during recording.
This unit includes the Dolby B NR-type.
Dolby B NR-type
Noise is reduced to about one-third.
Dolby noise reduction manufactured under license from
Dolby Laboratories Licensing Corporation.
“DOLBY” and the double-D symbol □□ are trademarks of
Dolby Laboratories Licensing Corporation.
Page 23

Before recording (Deck 2 only)
I
(D Recording
Types of tapes which can record correctly
The unit automatically identifies the type of tape.
NORMAL POSiTIONn'YPE 1
HIGH POSITIONrrYPE 11
METAL POSITION/TYPE IV
This system cannot make a recording or erasing correctly, if metal
position tapes are used.
0
0
X
To record from the beginning of the tape El
You cannot record on the leader part of the tape. Before recording,
wind the tape past the leader to a point where recording can start
immediately.
To start recording from a particular position
on the tope
Wind the tape on to the position you want recording to start from.
To start recording from the reverse side SD
Insert the cassette into deck 2 and follow these steps to change the
side.
® Press [TAPE DECK1/2] so the deck 2 indicator lights.
© Press [-^] then [■]. Tape direction will be shown as
How volume, sound quality/surround effect
recording
The tape you are recording is not effected whatsoever by changes
in volume, sound quality, suround effect and surround system.
In recording, sound quality, surround effect and surround system
are set automatically to “FLAT.
To erase a recorded sound Q
® Disconnect the microphone(s).
@ Press [TAPE DECK1/2].
(3) Insert the recorded tape into deck 2.
@ Press [DOLBY NR] so that the Dolby NR indicator goes off.
® Press [REV MODE] to select reverse mode.
(D Press [• REC/STOP].
•You cannot record when [6CH DISCRETE INPUT] is selected.
•You cannot open deck 1 while recording.
•You cannot fast-forward or rewind one deck while recording with
the other.
Page 24

Recording from radio hroadcasfs
Preparation:
Insert the tape to be recorded onto into deck 2.
Tape direction is automaticaily set to
Change the tape direction if you want to start recording from the re
verse side. page 44)
Select a radio station.
(■• page 28, steps Q-Qj)
a Press [DOLBY NR].
You have to turn Dolby NR ON/OFF according to the type of
recording you want to make.
Every time you press the button: DO NR-^(OFF)
Q Press [REV MODE] to select the reverse mode.
Every time you press the button;
One side is recorded, then recording stops automaticaiiy.
7*~i, c^y. Both sides (front side-»'reverse side) are record
ed, then recording stops automatically.
Press [• REC/STOP] to start recording.
If you selected in step Q, the direction will automatically
change to when recording starts.
t
__________
!
To stop recording
Press [• REC/STOP] again.
Recording can also be stopped by pressing [■].
To cut an unnecessary part while recording
1. Press [• REC/STOP] during the unnecessary part. The cas
sette deck will stop.
2. Press [• REC/STOP] to resume recording again. Recording will
continue in the same direction as before.
When recording an AM broadcast, volume is momentarily inter
rupted when you start and stop the recording.
To reduce noise while AM recording
(Beat proof function) El
Press FM MODE/BP] while recording.
Each time you press the button, BP 1 and BP 2 will be displayed
alternately.
Select the position where there is less noise.
\
ni^'l
till
Qt^^i
nil
VO ii
J?/ / ;
VOO :
±11 U :
Page 25

® B B B IBis^ tE^
Retording Jrom compact discs
Preparation;
1. Insert the tape to be recorded onto into deck 2,
Tape direction is automaticaliy set to
Change the tape direction if you want to start recording from the
reverse side. (■* page 44)
2. Insert the CD.
0 Press [DISC 1]-[DISC 5] to select the disc.
0 Press [B] to stop the CD.
Press [DOLBY NR].
You have to turn Dolby NR ON/OFF according to the type of
recording you want to make.
Every time you press the button: □□ NR->(OFF)
Press [REV MODE] to select the reverse mode.
Every time you press the button:
t_____________I
One side is recorded, then recording stops auto
matically.
Both sides (front side-^reverse side) are record
ed, then recording stops automatically.
t
__________
i
REV MODE
%
lE
Press [• REC/STOP] to start recording.
• If you selected in step £|, the direction will automatical
ly change to when recording starts,
•The recording wiil proceed from the first track on the selected
CD and will continue on through the last track of the final
disc.
•The tape deck stops automatically when the CD is finished.
To stop recording
•To add a 4 second silent interval before stopping
Press [■]. The CD will stop automaticaliy too.
•To stop recording without a silent interval
Press [• REC/STOP]. The CD will stop automatically too.
To record programmed tracks
1. After step Q, program the track you want (performs steps
on page 36).
2. Press [• REC/STOP] to start recording.
ir
r
lO
® Tape direction
Page 26

Recortimg from compact discs
r——
\ o c
c
To record: special CDs ond tracks
(CD Mariqger
This function makes it easier for you to select special CDs and
tracks from amongst those loaded in the player.
•While recording, if a track is cut off in the middle at the end of the
front side, it is re-recorded from the beginning on the reverse side.
Front side
Reverse side
The interrupted track is re-recorded in its entirety
on the reverse side.
•At the end of the reverse side recording stops and the current
track wilt be interrupted.
1 2 3
8 1 7 6
4
^ 5
Preparation:
1. Insert the tape to be recorded onto into deck 2.
Tape direction is automatically set to
Change the tape direction if you want to start recording from the
reverse side. (• page 44)
2. Insert the CD.
Press [CD].
iI:
§■■■
w.
1-
Press [CD MANAGER] to select the desired mode.
Every time you press the button;
1 -TRACKS 1 -DISC^ 1 -ALL
t
----------
" c : u
FM MODE/BP MEMOFIY
T)
NORMAL^
1-TRACK: Only one particular track Is recorded.
1-DISC: The tracks on only one particular disc are
n
;ai> :
1-ALL: The same track numbers on each of the CDs are
V ■ E- ■
(NORMAL: The original display is restored in about
Q Press [DISC 1]-[DiSC 5] to select the disc.
This step is not required if 1 -ALL was selected in step Q.
-------------
(OFF)
recorded.
recorded in succession.
3 seconds.)
1
Q Press [M^/^] or to select the de
«a -}
L
1
: 1
:3E>
(P).
sired track.
This step is not required if 1-D!SC was selected in step Q.
a Press [DOLBY NR].
1
1
■i
You have to turn Dolby NR ON/OFF according to the type of
recording you make.
Every time you press the button: DD NR->(OFF)
t
__________
!
Press [• REC/STOP] to start recording.
To stop recording
•To add a 4 second silent interval before stopping
Press [■]. The CD will automatically stop too.
•To stop recording without a silent interval
Press [• REC/STOP]. The CD will stop automatically too.
Page 27

tape~U>-tape recording
The recording level and the Dolby effect will be recorded as they
are on the tape being played back.
Preparation:
Insert the cassettes.
For playback: into deck 1
For recording: Into deck 2
Tape direction is automatically set to
Change the tape direction if you want to start recording from the re
verse side. page 44)
Press [TAPE DECK1/2].
Press [REV MODE] to select the reverse mode.
Every time you press the button;
X.
__
One side is recorded, then recording stops auto
^0, Both sides (front side-»reverse side) are record
Press [TAPE EDIT] to start recording.
• If you selected in step Q, the direction will automatical
ly change to when recording starts.
matically.
ed, then recording stops automatically.
REV MODE
TAPE EDIT
%
T n
/ 111 i_
T ill
O
C
fsn I
; >
To stop recording:
Press [■].
Both decks will stop.
;o>
© Tape direction of the tape you are
recording onto
TRPE
Page 28

Boosting the super Woofer Q
I
I I ± ±1
T V
S. WOOFER
Press [S.WOOFER].
•When listening to the sound through the speakers
MID (med!Uin)-»MAX (high)-»-Light off (OFF)
•When listening to the sound through the headphones
Light on (ON):;:::Light off (OFF)
Aii recordings are performed at the fiat setting even if an alternative
sound quaiiiy/sound fieid setting has been selected and the super
woofer effect is set to ON.
Using the builHn sound quality/
sound field settings m
Turn [SOUND CONTROL JOG] to select the sound
quality or sound fieid.
When it is turned clockwise, the settings are selected in the follow
ing sequence.
® HEAVY (sound quality)
Select this when playing rock or other kinds of music that sound
better with an added punch.
® CLEAR (sound quality)
Select this for jazz or other kinds of music for which clarity in the
trebie range is desired.
(D SOFT (sound quality)
Select this when listening to background music.
@ DISCO (sound field)
Select this to produce sound with the same kind of lengthy re
verberations heard at a disco.
(D LIVE (sound field)
Select this to make vocals more alive.
© HALL (sound field)
Select this to add an expansiveness to the sound to produce the
atmosphere of a great concert hall.
© MANUAL (see page 56)
© Al EQ (see page 58)
© FLAT
The original display is restored on the display panel in about
5 seconds.
To release the equalizer
Turn [SOUND CONTROL JOG] to select “FLAT".
When using the remote control to perform the operations de
scribed above
Press [EQ].
Each time this button is pressed, the setting is changed in the se
quence described above.
Page 29

yàryihg the sound qvaïity with
the manual equalizer (Manual EQ)
Turn [SOUND CONTROL JOG] to select “MANUAL”.
When it is turned clockwise, the settings are selected in the
following sequence.
(T) HEAVY ^
(D CLEAR
(3) SOFT
@ DISCO
(D LIVE
© HALL
@ MANUAL
© AI EQ
@ FLAT
Adjust the sound quality.
© ■*—>• direction: For selecting the range of the sound to be
Characteristics of each sound range
100 Hz: Superwoofer range
Around 330 Hz: Bass to midrange
1 kHz: Midrange
Around 3.3 kHz: Midrange to treble
10 kHz: Treble
©it direction; For adjusting the level
Repeat steps © and © to set the desired sound quality.
The original display is restored on the display panel in about
5 seconds.
adjusted
CONTBO''^
control
hylQUI int
. J f ri i, V U / 7 i_
yi/
To release the equalizer
Turn [SOUND CONTROL JOG] to select “FLAT".
•The sound quality setting is stored automatically. It is recalled
when “MANUAL” is next selected.
•All recordings are performed at the flat setting even if an alterna
tive sound quality setting has been selected.
‘*0/, —
CONTROL'
aytOh II I QI
I II IntU llL .
\ I /
-¿ïiii—
Page 30

Varying the sound quality with
thè acoustic image (ÀI) equalizer
(3DAIEO)
It is possible to use the acoustic image equalizer (Al EQ) together
with the surround effect to create your own sound effect.
The Al EQ equalizer uses the SOFT, SHARP, HEAVY and LIGHT
sound quality coordinates to achieve subtle sound quality settings
with ease.
n Pfess [3D Ai EQ] to adjust the surround level.
Everytime you press the button;
Al EQ^3D AI1^3D A12
t
____________________
Adjust the sound quality.
¡3) ^> direction: SOFT-SHARP setting
©it direction: LIGHT-HEAVY setting
Repeat steps © and © to set the desired sound quality.
The original display is restored on the display panel in about
5 seconds.
To release the equalizer
Turn [SOUND CONTROL JOG] to select “FLAT'.
lilHH
•The sound quality setting is stored automatically. It is recalled
when “Al EQ’* is next selected.
•“3D Air and “3D A12" cannot be used while the karaoke effects
are in use.
•Ait recordings are performed at the flat setting even if an alterna
tive sound quality setting has been selected.
I
Page 31

Surroùttd systèhis
•Select the surround mode appropriate to the source you are using. Read the foiiowing explanations to aid your selection.
Recognizing the sound sources and software that can be used
6CH DISCRETE INPUT
(Dolby Digital)
DOLBY PRO-LOGIC
• Dolby Digital is a discrete 6 (5,1) channel
surround system developed for cinema use.
The sound signals in Dolby Digital format
are compressed to 1/10 their original size,
allowing an entire movie to be recorded on
a singie DVD.
•You will need a DVD player that has a built
in decoder to enjoy DVDs with this unit.
•Connect a subwoofer (not inciuded) to the
line out terminal on the rear panel of this
system to increase the effect.
•This system was developed to get a better
sense of presence from sources encoded
with Dolby Surround.
•The feeling of position has been improved •DVD
by the addition of a separate center speaker
channel.
•This unit has built-in Dolby Pro-Logic
circuity so you can enjoy Dolby Surround by
connecting the speakers.
Discs with the following mark are recorded
in Dolby Digital:
• DVD
• Laser Disc
Software with the following mark is
recorded in Dolby Pro Logic:
• Laser Disc
•Video tape (VCR)
•CD
nn I DOLBY
D I G
TAL
n n 1 DOLBY SURROUND
MOVIE mode
SUPER
SURROUND
MUSIC mode
SIMULATED STEREO
•This mode adds surround effects to movie
software that isn't recorded with the above
systems. In MOVIE mode you can adjust
the volume of the surround speaker to get
the best surround effect.
•This mode adds surround effects to normal
music sources.
•This mode adds stereo-like effects to
monaural sound sources.
This mode cannot be used with the radio
and 6CH DISCRETE INPUT mode.
Any general sound source can be used.
•CD
•TAPE
•AUX
This mode cannot be used with the radio
and 6CH DISCRETE INPUT mode.
Any general sound source recorded in
monaural can be used.
•CD
•TAPE
•AUX
This mode cannot be used with the radio
and 6CH DISCRETE INPUT mode.
Page 32

Add these audio effects to improve the experience
•Check the set-up of your speakers.
Set your speakers up to suit the surround mode you have selected to get the best surround effect.
These modes cannot be used with the radio.
Virtual rear surround effect
•This mode is useful if you have to place your surround
speakers on the front speakers because of the room’s
layout.
•This mode makes it seem like the sound from the surround
speakers is coming from behind you.
Center focus effect
•This mode makes it seem like the sound from the center
speaker channel {dialogue, etc.) is coming from within the
television.
• The center speaker must be placed on top of the television.
Multi rear surround effect
•Through processing of the surround sound signals, this
mode makes it seem like there are multiple surround
speakers in your room.
•This mode increases the cinema-like sense of presence.
Seat position function
•This function helps maintain the sound signal position even
if the listening position itself is changed,
• It is effective when using 6CH DISCRETE INPUT, DOLBY
PRO-LOGIC, or SUPER SURROUND.
Page 33

S“5KDVD± "
^^TÌÈ iS fi ® ^ tt tbfc^:^ ^
■ ttfct
• DVD
6CH DiSCRETE INPUT
(Dolby Digital)
DOLBY PRO-LOGIC
(tì:tbÌihaiSS)
DvDsiMm ■
Rr#-3EMfóW
ìir,É^l|Ì5:^^mìfa?fÌèai65 •
iÌìl«-ÌÌ2LÉiì^*S^^^W0C#
T&aM ■
’ SMWW
□□| DOLBY]
DIGITAL
• litÌBiSg
• DVD
• Ì:^^{VCR)
• CD
DOLBY SlffiRPUND
MOVIE
SUPER
(m)
SURROUND
MUSIC
(w.fO
SIMULATED STEREO
(m^:iLi$n)
movie c*
^«S^l^ilÌtt^ÌiliaeCH DISCRETE
INPUT (Mit6^»A)
arUUÈffliÌÌEI-jfeÉ^^ÌI ■
• CD
• TAPE ( W)
• AUX (MB)])
discrete
INPUT
• CD
• TAPE (W)
• AUX (MiÌI)
6CH DISCRETE
INPUT(i>M^6^jIttilAm^l^0Tffiffl '
Page 34

jtsijÀii
.jLlaVI cJlujLitX ■‘■■I" -~j"H 1^1 li A ...~ ^^1 j '. — -it j■I j—M ^-»àj jil^i *
^^1 iljl.t>yii j^lg i^g^l jaLeu
^^-jj J L . .a" ^ \ iJ-Q^J 1 I^V 1
(DVD) 4-uAj aj_5**a *
□Pl DOLBY 1
DIGITAL
1a.<iIbv ;...l
SjA\ cUljk^l •
jhlÌiJXo Cj^iJ*a ,^j£- àjLj.£- iJLu^J ^
^ 1 H . .S1 JaI ij.4 ¿jyJeu ^ Ò Lìa ( 0 . \ ^ a jAftj n
CijurfcJ E oEjLwij ,Ui,ii*a ^bU y^L^u-uJ 1
Jji^dtij Lu 1 E J ^ /^ t Jh 4-^ 11
DVD <uAj ajjdL^
jdì ^ \t 1 nvn ^E Ps" >.4^[ ji J^ L àj.*
DVD EhJ ^ [ 1 ft" 4 1 J jjyidkAd
aò J^^E
jJC.j[ d a Ji <,0.^ ^ E J^ Laj.u J-iutijZu ^ *
^LtuJE Ej^ <jÀ1a1E 44^E^Li iaàJE ^jJa , ^JE
■ jjaGJE
ji»'i Irjt ugoJI (sUaJ
6CH DISCRETE INPUT
(Dolby Digital)
hJIuJI <j^lxlE ol^Mj-JE
DVD A^LjìAj àjj-hd ^^EjAI ^
.
.....
E^ *
(
□□
^ ^.6^ DISCRETE INPÙT
>UidUI 4 4j j3 JI A-a A-id JI lij-A Ja-Luj I /¿aj V
^ ‘^.eCHDISORETEÌNPÙT
DOLBY SURROUND
^ ^ ^ * d ‘a 1J L ■ . ■ 1 ^
AadJIa ujlJI ^ UdJI Ijj *lj-^i iJ 'i
dytJi jJ I iirt ^1 III
Ja^yLÌi •
4^ Ld i J JI —' - *
jjJ *
H ^UàHI 1^ ^LuaI ^
òjAhÌIa _jJ l-iAfl jjiiÀailLj
^jjjJa j*ìtiìL I Ijdi I Oj ■ o>l ^ ^ 11 ft" I iiV ^
^ > * ^i£rlj_À Oj,iiO qI'J ^ii"i ■ ^ J ' J ^ < J*>3-i I I JJt
Lj d 1 ■ ^ ■ ■ ^ ■ ^ j ! I I
Ja-u^ ¿jl MOVIE .<jLLuìM
^Jj > It j L^.1 >11 I .^ij. 1 ^ Lacu j ^
, joialll iJptwfihAl
j-ulLJLÌ I CifjiiuG »^«XArfSipJ ^ I iijl I
aLjijJI jjLaI
MOVIE
SUPER
SURROUND
MUSIC
Ojjdlt Ja I iin CjJ—o jJ-dj (_f ) jkl JaJjjij ¿ji^^
.^jUVi
Xd-6jj 4'»ljL>. .if ^
<.kjU^I jjl^
^ DISCRETE INPÙT
^ j 1- 'y> ^ << ■ ' Ti ^
a isSi i Cjj-1-J I
SIMULATED STEREO
Page 35

Milldj AUX1/2
VOLUME
a
BLH
) / r~( I
f' U L
T (W n M T
± l^i U t
U O
I t_J Lf »/
IS
-J
6CH DIsatETE INPUT mode
Preparation:
If you have connected a subw/oofer (not included), press and hold
[S.WOOFER] for about 2 seconds so “SUB W ON" is shown on the
display.
Hold down [SHIFT] and press [AUX1/2].
The [6CH DISCRETE INPUT] lamp lights.
Adjust the volume of each speaker.
Sit in the normal listening position and make the adjustments
with the remote control.
® Output the test signal from the DVD player (not in
cluded).
Set the channel level to 0 dB on the DVD player, and ad
just the channel level on this system.
CD Press (VOLUME (- or -i-)].
Set the volume to the norma! listening level.
The following steps are for setting the output level of the front
speakers and the other speakers to approximately the same
level.
@ Press [CH SELECT].
Select the speaker channel to be adjusted.
L: Front speaker (Left)
R: Front speaker (Right)
C; Center speaker
RS: Surround speaker (Right)
LS: Surround speaker (Left)
SW: Subwoofer
® Press [A, UP] or [T.DOWN].
Adjust the output level
UP: increases the ou^ut level
DOWN: Decreases the output level
Repeat steps (5) and @ to adjust the level accordingly.
V
@
CH SELECT
¿¡X“
a :
Dd'J:
^ a
L£-P -EdS
E
d]
Reference:
Add audio effects to improve the surround effect. (^ pages 72, 74)
m
You cannot record sound when [6CH DISCRETE INPUT] is se
lected.
s
To record from DVDs, reconnect the DVD player (MIXED OUT) to
AUX1 or 2 terminal on this unit.
Page 36

Enid^ng souhd wfh bdtB^^
¿OGiCYDOifir rao LOG/g
Press [□□, PRO LOGIC].
The PRO LOGIC] lamp lights.
Adjust the volume of each speaker.
Sit in the normal listening position and make the adjustments
with the remote control.
(1) Hold down [SHIFT] and press [CH SELECT].
A test signal is output.
The speaker outputting the test signal is displayed while
the test is running.
L: Front speaker (Left)
C: Center speaker
R: Front speaker (Right)
S: Surround speakers
(2) Press [VOLUME (- or +)].
Set the volume to the normal listening level.
The following steps are for setting the output level of the front
speakers and the other speakers to the same listening level.
@ Press [CH SELECT],
Select the speaker channel to be adjusted.
® Press [A, UP] or [▼, DOWN],
Adjust the output level.
UP: Increases the output level
DOWN: Decreases the output level
Repeat steps (|) and 0 to adjust the level accordingly.
To stop the test signal
Hold down [SHIFT] and press [CH SELECT] again.
To playback a DOLBY PRO LOGIC source
Press [□□, PRO LOGIC].
The [□□, PRO LOGIC] lamp lights.
Playback the source.
To turn off the DOLBY PRO LOGIC systems
Press [DO, PRO LOGIC].
The [DO, PRO LOGIC] lamp goes out.
Reference;
Add audio effects to improve the surround effect. pages 72, 74}
Manufactured under license from Dolby Laboratories
Licensing Corporation.
DOLBY, the doubie-D symbol □□ and “PRO LOGIC” are
trademarks of Dolby Laboratories Licensing Corporation.
Page 37

SUPER
SURROUND
Mfll/ TC
I f U V J. 1_
B3
Enjoying sound With
stereophonies (SUPEk SURROUND)
0
•This mode adds the 5ch surround effect to the normal stereo
sources.
• SUPER SURROUND Is only effective if speakers are used. No
discernable effect will be heard through headphones.
n Press [SUPER SURROUND] and select MOVIE
mode or MUSIC mode.
Each time the button is pressed:
MUSiC^MOViE^NORMAL
t
_______________________
B Playback the source.
To turn off the SUPER SURROUND mode
Press [SUPER SURROUND] to select “NORMAL".
To adjust the volume of surround speakers
You can change the output level of surround speakers manually.
While enjoying the desired source:
1. Press [CH SELECT],
The output ievei of surround speakers is dispiayed.
2. Press [A, UP] or [▼, DOWN].
Adjust the output level. The level can be adjusted between +6
and -10.
[S
UP: Increase the output level
DOWN: Decrease the output level
I
C" Tftrf) // O TCr 7)
[
iu>-n 1 L M
■ U s ■
CD TUHIP TAH MM
CHinBCT U» WtffECr
/a\m CD
Ô
udom M-/PM
oo o
C - 3 C --}
p(T)-f55^
¡(T) @
CD ® CD CD
CD CD CD CD
Hou MutMft vww
CD CDOŒ)
♦
SIMULATED
STEREO
' : E' ■ ' E '
5TE RE0
Reference:
Add audio effects to improve the surround effect. (• pages 72, 74)
Enjoying sound with simulated
sterOo (SIMULATED
This mode adds stereo effect to monaural sources.
Press [SIMULATED STEREO].
The [SIMULATED STEREO] lamp lights.
To turn off the SIMULATED STEREO mode
Press [SIMULATED STEREO].
The [SIMULATED STEREO] lamp goes out.
Page 38

VIRTUAL REAR 5RKD
Using the virtual reòr surround
efifecf fVIRn/AL HEAR SRNDJ b
•When the surround speakers are put on the front speakers, this
mode makes it seem like the sound from the surround speakers is
coming from behind you,
•This mode can only be turned on or off if the “VIRTUAL REAR
SRND” lamp is green. The mode cannot be used if the lamp is off.
Press [VIRTUAL REAR SRND].
The [VIRTUAL REAR SRND] lamp lights.
To turn off the VIRTUAL REAR SRND mode
Press (VIRTUAL REAR SRND],
With the remote control
1. Press [AV EFFECT].
2. Press [<] or [►] so the [VIRTUAL REAR SRND] button flashes.
3. Press [V] (OFF) or [A] (ON).
‘/IRTURL
S'
■ ^[53;
, RRRR
è
r
- g
SRNJÌ
.. ■
Using the: multi rear surround
effect (MULTI REAR SRND) m
•This mode makes it seem like there are multiple surround speak
ers in your room.
•This mode can only be turned on or off if the "MULTI REAR
SRND” lamp is green. The mode cannot be used if the lamp is off.
Press [MULTI REAR SRND].
The [MULTI REAR SRND] lamp lights.
To turn off the MULTI REAR SRND mode
Press [MULTI REAR SRND].
With the remote control
1. Press [AV EFFECT].
2. Press [-^] or [►] so the [MULTI REAR SRND] button flashes.
3. Press [T] (OFF) or [A] (ON).
Page 39

I
CENTER FMUS
Using the center focus eHecf
(CENTBR FOCUS) m
•When the center speaker is put on the TV set, this mode makes it
seem !ike the sound from the center speaker is coming from with
in the television.
•This mode can only be turned on or off if the "CENTER FOCUS"
iamp is green. The mode cannot be used if the lamp is off.
Press [CENTER FOCUS].
The [CENTER FOCUS] lamp Sights.
To turn off the CENTER FOCUS mode
Press [CENTER FOCUS],
With the remote control
1. Press [AV EFFECT],
2. Press [-4] or [►] so the [CENTER FOCUS] button flashes.
I
3. Press [▼] (OFF) or [A] (ON).
S- ■■ i -:. ■
si-. ■ ■ TB ■
a “ a
pnn ip
1 UUU J
' m-. -- ' EE- .
Using the seat position function
(SEAT POSITION) m ^
•This function lets you ad]ust the listening position for better effect.
•This mode can only be turned on or off if the "SEAT POSITION"
lamp is green. The mode cannot be used if the lamp is off.
□ [SEAT POSITION].
The [SEAT POSITION] lamp lights.
While the lamp is flashing change the seat position.
B Within 10 seconds
Adjust the seat position.
To turn off the SEAT POSITION mode
Press [SEAT POSITION] once to select the function and once
again to turn it off.
With the remote control
1. Press [AV EFFECT].
2. Press [◄] or [►] so the [SEAT POSITION] button flashes.
3. Press [A] (ON).
4. Press [◄], [►!< [▼]. or [A] to adjust the seat position.
When used with virtual rear surround, seat position is changed in
3 horizontal steps.
a ^
a
a]
■.V®"
Page 40

Singing along with iCARAOKB
This system lets you enjoy KARAOKE with audio CDs and audio
tapes. (Karaoke cannot be done to the radio or when the unit is in
6CH DISCRETE INPUT mode.)
© Lower volume with [MIC VOL].
©Connectthe mlcrophone(s).
Plug type: 3.5 mm monaura!
Press [KARAOKE] to select the voice mode.
Every time you press the button;
V.MUTE^MONO L-^MONO R
\----------------(OFF)
Voice mode selection
If you want to play with the KARAOKE function, check first
whether or not your software is formatted for KARAOKE and
then select the voice mode as indicated below.
O: Appropriate
•; For practice, etc.
---------------------
1
\ Soft-
\ware
Voices
modes\
(OFF)
V.MUTE —
MONOL
MONOR
A bar is indicated in the above table when the voice mode is
least effective. It is better to avoid using the mode In such
cases.
KARAOKE
Sound
multiplex
•
(Background
music & Voice)
0
(Background
music)
•
(Voice)
Stereo
O
—
—
_
Non-
KARAOKE
•
(For singing
along)
0
—
—
V.MUTE function
The voice portion of the track is blocked out but not the back
ground music.
You need software recorded in stereo sound if you want to use
the voice mute function. Voice and/or static may be repro
duced with the foliowing types of software.
•Software recorded in monaural
•Classical music, or works performed by a limited number of
instruments
• Chorus works or duets
Q Start the source (CD, etc.).
Q© Adjust volume with [VOLUME] and [MIC
VOLJ.
© Sing along.
To cancel the KARAOKE
Press [KARAOKE] to select "(OFF)" mode.
•if a strange noise (squealing or howling) is emitted during use,
move the microphone away from the speakers, or turn down the
microphone volume.
•When you are not using the microphone, disconnect it from the
MIC jack, and turn down the microphone volume levei to MIN.
•Sound quality and sound field can be adjusted when using
KARAOKE but recording will be uneffected.
Page 41

ilngirig along with KAMOKE
I
t^ERBJJKE..
Q
As well as adjusting the key, you can also add echo, make it sound
like you are singing in a karaoke bar, or like you have a chorus
singing along with you.
Press [KARAOKE EFFECT].
Select the desired KARAOKE EFFECT mode.
B
KEYCON^ECHO^CHORUS^LOUNGE
i
_____________________________________
KEYCON: To change the key
ECHO; To adjust the reverberation sound
CHORUS: To add voices staggered slightly from the singer,
giving the effect of singing in a chorus
LOUNGE: To output voices from al! speakers, giving the ef
fect of singing at a karaoke bar
i
Select the level of the effect.
KEYCON: -3<-^-2 ^-1 ^0 ^
ECHO: 1 ^2^3-1—^OFF
t
_________________
CHORUS: 1<
1L
LOUNGE:
To cancel the KARAOKE effect mode
Press [KARAOKE EFFECT],
The current mode is displayed. Press again to cancel the mode.
^OFF
__
i
f
.OFF
--I-2-
• -I-3
KEumi
..........
u.
n
Reference;
Karaoke effect cannot be done to the radio or when the unit is in
6CH DISCRETE INPUT mode.
;jpei#D'rmGnfe.-
0 Lower volume with [MIC VOL].
0 Connect the microphone(s).
.. ■ r^i i
Press [^ DECK 2 OPEN] and insert the tape.
Close the holder by hand.
Press [REV MODE] to select the reverse mode.
71 Press [KARAOKE] to select the voice mode.
Start recording and KARAOKE performance.
•When singing off CDs
Press [• REC/STOP] and start KARAOKE performance.
•When singing off tapes
Press [TAPE EDIT] and start KARAOKE performance.
•To playback the recorded tape, be sure to press [KARAOKE] to
select the “(OFF)" mode.
•You cannot play or record KARAOKE with [TUNER] or [6CH
DISCRETE INPUT] backing.
To record your voice
Do steps D to B above.
1. Press [TAPE].
2. Press [• REC/STOP] to start recording.
3. Speak through the microphone and adjust volume with
[VOLUME] and [MIC VOL].
Page 42

Using the timer
Using the play timers
Preparations
• Switch on the power,
• Make sure that you have completed “Setting the time’’ on page 24.
The figure shows how to set the play timer to play from 6:30 to
7:40,
U Press [CLOCIOTIMER] to select “© PLAY”.
Every time you press the button;
CLOCKS© PLAY^© REC
— Previous display
@
CLOCK/
CLOCK/
VOLUME
SPLR'd
OFF
- -l U n 1
l‘OL -FBdO
, r 1 u ^
'ON" time setting
{Within 8 seconds or so)
©Press [TUNEyriME ADJ (v or a)] to select
the starting time.
© Press [CLOCK/TIMER].
"OFF" time setting
©Press [TUNE/TIME ADJ (v or a)] to seiect
the ending time.
© Press [CLOCIVTIMER].
Source selection
Select the desired source and then prepare for playing.
To play CD{s)
Press [CD] and insert CD(s).
If more than 1 CD is loaded
Press [DISC 1]-[DISC 5] to select the CD you want to hear
first, and press [■].
Disc selection does not become part of the timer memory.
i Í
To play tape(s)
Press [TAPE] and insert tape(s).
If tapes are loaded in both decks, playback will start from
deck 2.
To play the radio
Press [TUNER] and tune in the desired station.
To play the external unit
Press [AUX1/2] or [6CH DISCRETE INPUT],
®PU¥/
0REC
POWER
(i)/l
©PLAY
Ploy volume setting
Turn [VOLUME] to adjust the playback
volume.
Press [© PLAY/© REC] to select “© PLAY”.
Every time you press the button;
© PLAY
----------{OFF)<
REC
---------
i
't
-------
Press [POWER] to switch off the power.
The timer play will start at the preset time with volume increas
ing gradually up to the volume level you preset.
To switch the timer OFF
Press [© PLAY/® REC] and check “® PLAY" goes out.
Page 43

Using the timer
Preparations
«Switch on the power.
• Make sure that you have completed “Setting the time" on page 24.
Set the timer at least 2 minutes before you want to start recording.
The figure shows how to set the record timer for recording from
18:30 to 20:00.
Press [CLOCK/TIMER] to select “© REC”.
Every time you press the button:
CLOCKS© PLAY^© REC
— Previous display ■«—I
Wi "ON" time setting
(Within 8 seconds or so)
©Press (TUNE/TIME ADJ (v or a)] to select
the starting time.
CD Press [CLOCK/TIMER].
'OFF" time setting
©Press [TUNE/TIME ADJ (v or a)] to select
the ending time.
©Press [CLOCK/TIMER].
Source selection
Select the desired source and then prepare for
recording.
To record from the radio
Press [TUNER] and tun© in the desired station.
To record the externai unit
Press IAUX1/2].
You cannot record sound when [6CH DISCRETE INPUT] is
selected.
Prepare for recording.
1. Insert a tape into deck 2 with the side on which the record
ing wilt start facing you.
2. Select Dolby NR.
3. Select the reverse mode.
Dolby NR and reverse mode do not become part of the timer
memory.
Press [© PLAY/© REC] to select “© REC”.
Every time you press the button;
© PLAY
----------(OFF).
>© REC
-----------
1
t
-------
Press [POWER] to switch off the power.
About 30 seconds before the set time, the stereo mutes all
sound automatically.
To switch the timer OFF
Press [© PLAY/© REC] and check “® REC" goes out.
Page 44

Using th& timer
Using the iptay/record timer
If you set the timer incorrectly
Repeat the procedure from step Q.
To check settings
While the unit is on and the “Ф PLAY" (or “© REC") indicator is on,
press [CLOCK/TIMER] so "© PLAY” (or “© REC") appears on the
display.
Two seconds after “© PLAY” (or “© REC") appear, the settings are
displayed in the following order.
• For play timer
Ф Play start time
® Play end time
(5) Play source
eg) Playback volume
• For record timer
© Recording start time
(5) Recording end time
© Recording source
To enjoy the desired source after the timer setting is com
pleted
The volume level and music source are stored in the timer memory
and the timer will start in these preset conditions. However the Disc
number, Dolby NR and reverse mode do not get stored in the timer
memory.
1. After step Q, turn on the unit and start playing the desired
source.
2. Reset the Disc number, Dolby NR and reverse mode if you have
changed any of them, confirm that a Disc or cassette is inserted,
then press [POWER] to put the unit on standby.
Turning the timer ON/OFF
One of the timers is on when the [® PLAY/® REC] button is alight.
When the unit is on (or off and in NORMAL mode) you can confirm
which is on by checking which indicator is on the display.
When the unit is off and in ECO mode, press [CLOCK/TIMER], The
display will then show which timer is on and the settings that have
been made (see above).
To change the timer, press [Ф PLAY/© REC].
Each time the button is pressed the setting changes as follows.
0 PLAY^ О REC^(off)
t
____________________
• If the power is on, the timer will not function. The system must be
in the standby mode.
• if you switch the power to the standby mode while the play/record
timer is functioning, the OFF time setting will not be activated.
• If "AUX1/2” or “6CH DISCRETE INPUT is selected as the source,
when the timer comes ON, the system will turn ON and will en
gage "AUX1/2” or “6CH DISCRETE INPUT” as the source. If you
want to playback or record from a connected component, set the
component’s timer to the same time. (See the instruction manual
that came with the component.)
•The play timer cannot be used in combination with the record
timer.
•
I
Page 45

Using the timer
Usjng the sleep: timer
This timer turns power to your system OFF at the set time {Max.
2 hours, settable at 30 minute intervals). It lets you fall asleep lis
tening to music.
by remote control only
The figure shows how to set the system to standby mode after
30 minutes.
While enjoying the desired source:
Press [SLEEP] to select the desired time.
Every time you press the button;
30-^60^90^120^0FF-
e:
The system is turned off after the set time has elapsed.
To cancel the sleep timer:
Press [SLEEP] to select “OFF".
To confirm the remaining time:
(only while power is ON)
Press [SLEEP],
To change the time remaining during operation:
Press [SLEEP] to show the remaining time then press [SLEEP] to
select the desired time.
•Tfie steep timer turns OFF automatically the moment you attempt
to edit-record a CD using CD Manager function.
•The sleep timer can be used in combination with the play/record
timer.
The sleep timer always has priority.
Be sure not to overlap timer settings.
Page 46

U$ing on e>^rnoriifìif
Listening to an external source E]
(See page 16 for external unit connection,)
□ Press [AUX1/2] or [6CH DISCRETE INPUT].
The power will come on automatically.
Q Start playback from the external source. (For details, refer to the
owner’s manual of the equipment.)
Recording from an external source
1. Press {A DECK 2 OPEN] and insert the tape.
Close the holder by hand.
2. Press [DOLBY NR],
You have to turn Dolby NR ON/OFF according to the type of re
cording you want to make.
3. Press [REV MODE] to select the reverse mode.
4. Press [AUX1/2] to select the external source.
5. Press [• REC/STOP],
Recording starts.
6. Start playback from the external source.
(For details, refer to the owner's manual of the equipment.)
You cannot record sound when [6CH DISCRETE INPUT] Is se
lected.
Listening with headphones m
Reduce the volume level, and connect the headphones.
Plug type: 3.5 mm stereo
Avoid listening for prolonged periods of time to prevent hearing
damage.
Convehfehf functions
Switching displays B
Press [-DISPLAY/-DEMO] to select the desired spec
trum analyzer.
Every time you press the button;
Aurora->(OFF)->Normal
^— Peak hold<—I
To mute the volume Q
by romotp control only
This feature is convenient when you have a telephone call, etc.
Press [MUTING].
Press the button again to cancel.
“MUTING" goes out.
Muting can also be cancelled by lowering the volume all the way
(-dB).
When the system is turned off, the muting operation will be auto
matically cancelled.
Page 47

Concer7fin0 compocf cfóc5
How to hold CDs
CD SÜÍ
üuu ìLljJadJ n ¡¿ I
o
5íi5ST5NTí3stíSiii;;:taL\-ííiíJ
How ío clean CDs
CD Milíh:Í3';í
iu_03-ii üLIgiallij hSitiln ili aiuàiij**!
Do not touch the recorded surface.
With this player, you can only play compact
discs having this mark.
However, do not use irregular shape CDs.
CDs of the sort can damage the unit. 0
nCOMPACT
iOi®
DIGITAL AUDIO
Handling precautions El-E3
• if you are taking the disc from a cold to a warm environment,
moisture may form on the disc. Wipe this off with a soft, dry, lintfree cloth before using the disc.
• Do not write on the label side with a bail-point or other writing in
strument.
• Do not use record cleaning sprays, benzine, thinner, static elec
tricity prevention liquids or any other solvent.
• Do not attach labels or stickers to CDs. (Do not use CDs with ex
posed adhesive from tape or left over peeled off stickers.)
• Do not use scratch-proof protectors or covers other than those
specified for use with this system.
Storage precautions
Be sure to store discs in their cases to protect them from dust,
scratches, and warping.
Do not place or store discs In the following places
• Locations exposed to direct sunlight
• Humid or dusty locations
• Locations directly exposed to a heat vent or heating appliance
• In the glove compartment or on the rear deck of an automobile
Cbntem/hg casse^ iai9es
Selection of cassette tapes
Tapes can get caught on the capstans. Use caution with the follow
ing types of tapes.
Cassette tapes exceeding 100 minutes
Tapes are made of a thin film material. Do not repeatedly advance
and stop the tape, fast-forward it or rewind it.
Endless-tapes
For this unit, it is recommended to use the tape which is appropri
ate to the auto reverse mechanism,
Always read the instructions provided with your tapes.
Tape slack 13
Tape slack may cause the tape to break.
Use a pencil or similar object to take up the slack.
Erasure prevention Q
Use a screwdriver or similar object to break out the tab.
To re-record on a protected cassette
Cover the hole with adhesive tape
Do not cover the detection hole on hi-position tapes
Storage precautions
Do not place or store tapes In the following places;
• In high temperature or higher) or high humidity (80% or
higher) areas
• In a strong magnetic field (near a speaker, on top of a TV, etc.)
This can erase a recording.
• Locations exposed to direct sunlight.
Page 48

tir^M^feshoofiiig
Before requesting service for this unit, check the chart beiow for a possible cause of the problem you are experiencing. Some simple checks or
a minor adjustment on your part may eliminate the problem and restore proper operation.
If you are in doubt about some of the check points, or if the remedies indicated in the chart do not soive the problem, refer to the directory of
Authorized Service Centers (enclosed with this unit) to locate a convenient service center, or consult your dealer for instructions.
Problem
Problems common to all systems
ECO mode is on but the
display panel still lights
up.
The location of the various
musical instruments Is not
well defined.
The left and right sounds
are reversed.
LOW frequency sounds
cannot be heard.
When listening to the
external unit, the left and
right sounds are reversed.
There is no sound when a
source is being played.
“ERROR” message
appears on the display,
“—;—” appears on the
display.
“F61” appears on the
display.
DEMO mode is on.
The (+) and (-) connections to one of the
speakers are reversed.
The left and right connections to the
speaker are reversed.
Either the left or the right LOW speaker
cable is not connected.
The left and right connections to the
external unit are reversed.
The (+) and {-) wire of the speaker cords
are shorted.
Wrong operation has been done.
•You plugged the power cord in for the first
time.
•There was a power failure recently.
Check if the speaker cords have shorted.
Probable cause(s)
Suggested remedy
Turn DEMO mode off.
Connect the speaker cords correctly.
Connect the speaker cords correctly.
Connect the left and right speaker cables to
the LOW terminals.
Connect the external unit's cord correctly.
Switch the system to the standby mode,
and reconnect the speaker cords so that
they are not shorted. Then switch on the
power.
Operate the unit correctly by following the
operating instructions.
Set the time. 24
If they are not shorted then there is a power
supply problem. Consult your dealer for
assistance.
Reference
page(s)
10, 12
10, 12
22
10
16
10
While listening to FM broadcasts
There is a “rushing noise”
during a stereo broadcast
which is not audible
during a monaural
broadcast.
You hear excessive noise
during a stereo broadcast,
and occasionally the
sound disappears.
The stereo indicator
(“STEREO”) flickers and
does not light completely.
The sound during a stereo
broadcast is highly
distorted.
The transmitting station is distant.
The installation location and orientation of
the antenna are unsuitable.
The transmitting station is distant.
The power of the TV set or VCR is ON. Try switching off the TV set or VCR.
There is a building or mountain nearby.
[Distortion is caused by interference
between the signal from the transmitting
station (direct wave) and the signal
reflected from the building or mountain
(reflected wave).]
While listening to AM broadcasts
You hear an unusual beat
sound.
You hear a iow-frequency
hum.
You are using the system at the same time
you are playing a JV set.
The antenna wire is near the power cord.
If you are using an indoor antenna, change
to an outdoor antenna.
Use a high-grade outdoor antenna, and
install it in a good location, height, and
orientation for reception.
Switch off the TV set, or use the system
further away from it.
Separate the antenna wire from the power
cord.
14
14
Page 49

Problem Probable cause(s)
When there is a television set nearby
The picture on the TV
disappears or stripes
appear on the screen.
The location and orientation of the antenna
are incorrect.
The wiring at the back of the system is
unsuitable.
When listening to tapes
Sound is low, intermittent,
poor quality, noisy,
scratchy, or unsteady.
The deck does not enter
the recording mode.
Heads are dirty.
Dolby NR is set incorrectly.
The erase-prevention tabs have been
removed from the cassette.
Suggested remedy
If you are using an indoor antenna, change
to an outdoor antenna.
Separate the antenna wire of the TV set
from the system.
Clean the heads.
Match Dolby NR ON/OFF according to the
type of recording you made.
Attach tape to cover the space left by
removal of the erase-prevention tabs.
Reference
page(s)
14
93
40
90
While listening to com
The display does not
show the correct
indication.
Disc play does not start
when you press the play
button.
A certain music passage
can’t be played correctly.
“TAKE OUT/ DISC”
appears on the display.
pact discs
The disc is upside down.
The disc is dirty.
The disc is scratched.
The disc is badly warped.
The disc is a nonstandard one.
There is condensation inside the CD
changer.
The disc is dirty.
There is a problem with the CD mechanism,
(A power failure may be occurred.)
While using the remote control
The system cannot be
operated with the remote
, control.
The batteries are installed in the reverse
polarity.
The batteries are run-down.
Set the disc with the label facing upward.
Wipe the disc with a soft cloth.
Replace the disc with a new one.
Replace the disc with a different one.
Wait for 60 minutes before using CDs.
Wipe the disc with a soft cloth.
The tray will open automatically. Remove
the CD from the tray, and after ensuring
there is no CD in the tray close it. The unit
will make the disc changing noises for a few
moments and then it should operate
normally.
Re-insert the batteries in the correct
polarity.
Replace the batteries with new batteries.
30
90
90
90
/
6
■6
Maintenance
If the surfaces are dirty
I; To clean this unit, wipe with a soft, dry cloth. '
I' If the surfaces are extremely dirty, use a soft cloth dipped in a
^ soap-and-water solution or a weak detergent solution,
•Never use alcohol, paint thinner or benzine to clean this unit.
•Before using chemically impregnated ctoth, read the instructions
that came with the cloth carefully.
For a cleaner crisper sound
We recommend that you periodically clean parts (the shaded por
tion in the figure below) the tape contacts like the heads.
Do not use any solution other than alcohol for head cleaning.
Page 50

f^-
ш щтш
Ш-ШпШ
ECO (lït) ts cff fâ x^ i ' ea sp ffij âî s •
ÆÆ ÎÏ ÎS ffi^ ■
RFf ^í íLf fiM ^S ■
ШЯ Я ЙЯ 'Ш 4 [Ц фВ ^ ' ■
Шй сй ^з йИ ■ îÿ r^ m sw •
“ЕН В ОЯ (Ш Ш ) " ‘
“F61" ■
iföEIff FM rSIflí
jt№lsr«'F№]íiTffií^)S»rñl4’£lí^m
й “№ п-
шшшш #=#mííc
DEM0CíSm)1«jta:i^X№ttS ’ Ш ОЕМО(^?Й)ШЙ - 23
Ж'1"Й?в^0Э(+)?а(-)ШЙШЙ^ШТ • 11, 13
шршш'шшт ■ itiEK&ükâiS^m^fêÈS • 11, 13
LOW {{Ш) •
Й^^0Э(+)^П(-)ШШа^Й •
а^т тш ш № •
•■
гшй ?» й 1й £а *ш а шй (й ^^ ?± •
ffiÄ^^iäfr • «e #í T? í% a i ■
11
17
11
25
ипшш^ ■ ■ таи
/
’ üscffisi-h^a •
15
йй:|&ГШ^в|ШРЖ ■ Ж16«ЙШ!Й5^ •
“STEREO" BÍ*B4iíí '
^ЬЙВйЖiSО ‘
Ä№ir»i>^»ÄÄifeE ■ №ГЙ^ЙЖ^ШЙ •
iföüfrAMBi
№Я#«ЙЙ*•
jÉÇÂii^2Ëffi*a ■
ÍG0SsSELiJ№jíM&lí1I^
íiE"Ftt№itri£áíJ ■ ]
^штш^ ■
15
giftamâifâfifôt ' ж«Шй± •
Page 51

<1 cLu L^ ¿ya tnj III111 Iri n ^ j I ^Jiaa*ph*J I О fli t 1 < Ц*4^ Lh ^ ^ ^ * IT J I
1
. I ^ lö] I Jj ijJ I Jj Г» I ûÀA f ¿ул **1^11 ,_ гН" J >д
^ I I Ü j Li^biv<u Í j I
r^J^Lü Чль12ь JjJ*^ il ^4 j £¿ojit,i \ j^ljid ^1 ^^1^ " IT Jj JaJ I ^jA ^ j_ij_T T Í ^ ÜI jl ^T T ^^yoXi ,^yt. ^^1'"' l¿)j(jL*u 3 jI
.^Ijt-UljV^ I ^JJi LlL-Û 4^Jjâlf ^.iÍkJ-LJjl JI
Ö£&l^l
\T
¿>Idj(|l jttMl
•j^i j[ DEMO ^jii jjl
J» 1*^ 1 (wLbmfJI) yuiiJl
ij^iijiüj! ^(.ìhàj ^ 0EI\/I0
\r Л\ »i^Lfcl n 1 III 1 ( ] J (+^ O^Ai^jöi 1 ^^ul¿lUll
\r , \\
■ 4'*^ 6jJybAi i^LüLùAaJÎ JiAiâjl
\\
W
\\
To
1 <,iô ьДдЛ í о 1 Jhijji 1 ^ Laau O^T_i^ J ' ' ^
• LOV\/ J-kAdjllI ujljJaf ^1 ^^jjj-Jlj
Ct^ l¿ Jjduûjj ^ Ij J UaüjV 1 ^Iai ^ 1 j 1 J^j
küjj&J) J-bd^l ^ 1 rtü ¿ya 4üLitiJl
.Jjtnilll obLuj! A ЧJ-^ r fl äjJjjCJ Jxu ■ ^^JaL^ Jjjuiuj |bL¿] 1 ^
ti^fcäjlf T*- ‘ - -^1
! j-д^д ^4 ^ к 1* Д tilLiA 4j j| 0^ ^ l'^l
gîjtmt Jil ^ ^1 JSJ\
w -b-JJ- ij ^-i. Д. *T 1 1-'"^^^- Ì. J-Aj 1 T J ^JJJ * J 1
Jl¿¿
jT j IÍ d ..iMj Д gl 1 ¿j^Lu^jíI 1 ,^J-til¿jLll
<Чс.1 ft mU kZï^Ljl^ J l+J (J^igfayuV 1
. Sj^V Í <jjV Í ^ Sj-ftJ ^ oa.lciüS 1 *
w1- ■*■"■* I--" ■^ 1 J 4^4L£ 1J1 L4 1^
JjV Ajâll *
ügtn ;[|l ÖiLä ,g«Ij JâUu
iU}J j.âJ J.ifin'ill £âg ^ ECO £ÔjJI
.Ï^JIpUübjbJ!
аал^ ^ iULüjji ;i ¡ïjiHg^l ::,|jy| ¿Ül^
■ dA^
.J1,fiu^l| Jt;»ij| ijlgajJI jiilÀa^j
■ rtn ¡l\jl .IdbapJI ¿iilÿa] jU»i [J
J1jAlJI|
gl a iiiijl 1
.jinijl JijfiÎi'i aie üÿiaJI jjJJUuJ ,aaE
iL¿jUljd«“ERR0R”
.niàjLell J1I« â^^Lill jÿAla
.ààjUJI jda “F61” j-àJâ^
4I ¿UlaJI J[U
\o
^û
1даА-1 jL^é^I ^jAiLwj jl ¿^jÿüilll ¿J^ ^jÂlI
jÀLi 4JjjIx4iU LajA^L-iiA CbïS Ijl
.¿¿yjjjit) JniiiiJ.I jl ¿Jjjjitlí je Âjïll ^Jbô JjLa.
^ üfU£ jj ^ajIâ ^Ij4 ^jÀJuAij
. Jl 'ÎTrii^ .La «Lu|j ^ liûjj ijiaj ji^
.»jiJi Jjt^j id 11 II tjuLa jeL
■ ^IjgJl bL^yij i_L*-aJI Ç^jya
JLmjj^I <laA.4 ¿ya SJjÍjÍI ^jL^Vl tjoLa JÀÎjIII
jl ^lïdJT ¿ya <tiií*lll ÂjUÎtVU Σ 4a Д1)
■ CaAjJ 1 ^JЛ ^JiJj Д ^ ^ 11 JjÀauJJ jl-j ^T1 ^ 1лЗь4*А|)
*4^
*£j^ 1 J-i¿ya Tj4^ I '*11 ' ■■ ■jâiLLa aaj^ üla я«A»* ¿Um
g¿iJI <]a^A .AXj Jl j^>Ui>i,[)l ¿JI J|)À 'üAla aLágjá ' a^9
^}и,^1ш1,1|1 ilaJI jm ‘‘ijjiàâa aLà^"
, t J» A
Л éIî^ Laa^jJ 3»J ''“J)^
J^ iiiU jl ,‘njjàhl[ SjUl JjAâjj
¿j^ Í ^ L JI <j Uj as^j
¡.L^liulyl) j^l
■âJI jm iLJlc üjgJSLJ ügjojl dgâü
.ш>в ^jLâj
,^aLÎ|l iJI JUi £«ш0
,^L^i ,::iÿaJI iLàiÂj j
Page 52

technical ^pedficatiohs
AMPLIFIER SECTION
Front speaker
Power output
PWlPO 2200 W
RMS power output
THD {at 1 kHz) 10%, both channels driven
Power output In
105 W per channel (60)
Dolby Pro Logic mode
PMPO Total 3300 W
RMS power output
THD (at 1 kHz) 10% both channels
driven
Front
Center
Surround
105 W per channel (6Ì1)
45 W per channel (8Q)
Total 390 W
90 W per channel (80)
Input sensitivity
AUX
MIC
250 mV
0.7 mV
Input Impedance
AUX
MIC
lOkCl
600n
FM TUNER SECTION
Frequency range
Sensitivity 1.8mV(IHF)
S/N26dB 1.5 pV
Antenna termtnal(s) 750 (unbalanced)
87.50-108.00 MHz (50 kHz Steps)
AM TUNER SECTION
Frequency range 522-1629 kHz (9 kHz steps)
Sensitivity
S/N 20 dB 500 pV/m
520-1630 kHz (10 kHz steps)
CASSETTE DECK SECTION
Track system
Heads
Record/playback
Erasure
Motor
Recording system
Erasing system
Tape speed
Overall frequency response
(+3, -6 dB at DECK OUT)
NORMAL (TYPE I)
HIGH (TYPE II)
S/N
Dolby NR off
Dolby NR on
Wow and flutter
Fast forward and rewind times
Approx. 120 seconds with C-60 cassette tape
4 track, 2 channel
Solid permalloy head
Double gap ferrite head
DC servo motor
AC bias 100 kHz
AC erase 100 kHz
4.8 cm/s
35 Hz-14 kHz
35 Hz-14 kHz
50 dB (A_WTD)
60 dB (CCIR)
0.18% (WRMS)
CD SECTION
Sampling frequency
Decoding
Frequency response
Wow and flutter
Digital filter
D/A converter
20 Hz-20 kHz (+1,-2dB)
Below measurable limit
44.1 kHz
16 bit linear
MASH (1 bit DAC)
SPEAKER SECTION
ITront speakers (SB-AK57) \
Type
Speaker(s)
Super woofer
Woofer
Midrange
Tweeter
Impedance
Input power
Output sound pressure level
Cross over frequency
Frequency range
Dimensions (WxHxD) 250x330x307mm
Weight 5.0 kg
ISuiTound speakers (SB-PS70)~|
Type
Speaker
Full range
Impedance
Input power
Output sound pressure level
Frequency range 120 Hz-20 kHz (-16 dB)
Dimensions (WxHxD) 170x106x118 mm
Weight 0.9 kg
I Canter a peaks r fSB-PC70) |
Type
Speaker
Woofer
Tweeter
Impedance
Input power
Output sound pressure level
Cross over frequency
Frequency range
Dimensions (WxHxD)
Weight
4 way speaker system
17 cm cone type
12 cm cone type
6 cm ring shaped dome type
Piezo type
Total 6D
Total 160 W (Music)
84 dB/W(1.0 m)
200 Hz, 3.5 kHz
45 Hz-40 kHz (-16 dB)
55 Hz-36 kHz (-10 dB)
1 way, 1 speaker
8 cm cone type
60 W (Music)
84 dBAY(1.0 m)
2 way, 2 speaker
10 cm cone type
6 cm cone type
120 W (Music)
85 dB/W(1.0m)
4 kHz
75 Hz-22 kHz (-16 dB)
250x121 X147 mm
1.6 kg
8fS
GENERAL
Power supply
AC 110 V/127V/220 V/230-240 V, 50/60 Hz
Power consumption
Standby
Normal mods
ECO mode
Dimensions (WXHXD)
Weight
Note:
1. Specifications are subject to change without
notice.
Weight and dimensions are approximate.
2. Total harmonic distortion is measured by the
digital spectrum analyzer.
80
80
184 W
13W
1 W
270x331x338 mm
8.6 kg
Page 53

(SB^PC70) ìLiiatiigJI a*l^*iiJI
(uU.mJ1
^.j_u \ * Ad^iJL^I ¿slmili
^ ^ '^^Lj^l OcL^dU
I ^ ^ Lfl^ f . " ' ¿3 j L^iJ f
Llj \ T. JiiJUjaà
,^nfrì
Ao'
jjjJì^J^ l ■ aaj^l
aajJlH jiu
(¿«j « glàJjJ K jàji) alfij<Jl
UV X \1\ X Xo-
fÀS ^-ЗcpiíJI.
(uLf
SjajJl SiS-d
Ti. -Tr.7cJJiTT./cJ>^TV/oJJi^^• jJjlijU'
^ / 0 . * c4^
^Ij \AÌ- cijaiìJI .¿H*'liiij
aiaju^.tll
L^j W ^alcJI^MgJt
Llj ^ ECO aln'i^.})! £¿9
* £ÌMjjI ’< j»>e) aLe^ÌII
^ TTA X TT\ X TV.
H^A,-T . iijJt
jLt-LU 1 JiJljj.iJl 4j.Aj.fr 4jk II j‘lj I i O IAi j Ijl ^ ^
•4uj&ì * 'S. jLajVIj
■ I^.^J ^ 1.;^ ^ 6J*ÌlÌI I ^J n-y n iju ^ . T
AAÌi^ I ’<lj|j IgJsiUJ^y j
jjjA7f^ ii.A ¿jl i irli °3.H
^ U"h tfj.lMrli
aa^l ÌLI ^"iiiil
11'^^ T.— , ^ *
4ujI^ tjfj.ll
fS A \
(DACou \)MASH
(SB-AK57) fl^LiQi -LeUiJ!
oLibl^t 1 oLfrLajji £9jJt.
iuLlLUI "•~.;**J^ ^laa^l n —
Lfksjàj £.jj A*" ^
Lfki>^ ^ jj 7 '
ari.. j'ìjl .•'. 1...|j •;11 jfl j...
aJaju9lùtjl iljlaajjJI ofrl^aii
...tjfrin I ^-w.u ^
Ij Ivi I ò òjJ[^[ .;jta3^.lJ| ari f-..
jujl *V 7^.^!.' oJigLiqll
. (^jijiiijj) Llj ÌT. ^Ua| ,.■■ JfraJliija9
( jla T .... ) ^ !j/J “ ' ‘ ' A i
t , 0 ‘¿JjA ■ ■ ^fùij.»<0l aa.^1
,( JoAaJUj \ "V—^ £ . — jjjjl i 0
{J'.■ ■.. ' ^ .—^
(¿*i X ¿Ujj!*’* jà^ì aLfrj{||.
T.V x.rr. X To.
(SB-PS70) jAfrLl^r^fcéljjijl ¿jIbL»!«»
ìfrLniII ida.lja'-L^I
¿.jj A*" ^ jtaj
A frJjLBiqll
Joljr• JiaJI itjaj
(jj.® \ ; . ) Jalj/Jui,iijj Ai
^t_l I 11 lai J T ^ ^ ^ ^ T .
\\Ax \-l X W.
D/A J9^l
.jj‘l*‘l fi “Il jdLiàJ
(uUIaiJI] uU^JI
jk^l àjga ^sà jtfluui
aa.flJI jia.a
(*AS 0 , .¿ijJI
uLiHlJI
• '3" l-»*™ j.j'l...a
aa>^l jtaa
(¿^ * flij'jl * jàjx) aUd[|l
.a^-V fit I Jfr .*■ tt
ìì^ La ||l iLcL»aull
itjajiJI
Jalj TT- .
PMPO
RMS ajaiJI ¿A
ji.t'il iiiill|{^f71 ■ I
(f.jì 't)SUÌjSJialj ^.0
k) oLi^M
iijIoLa
^ iijaJUi ^ A
Wj TT. ,. JL^l
£‘^9
PMPO
RM5 àjaJill ^A
(/'ì il iiH ¡Jià (XI'
ialj T<\. ypJLa.1
(aj* '^) .^b ^ °
j^jT A)SUiJSlialj^.
A| àLjì J£] Jalj i 0
k) ^^uuig^oj^
ajlak
ii^UI
jÀaJt «LjiiiLitfr
IL n ,T 0.
‘ . V' ■ .
AUX LkLàJ Ljlafrj
MIC
JiaJI iii jLa.a .*•
AJ' ) ‘
^ji 1..
AUX ÌuiLbJ lidtaAg
MIC .
(d I ^1 I ^4) ^
aaAll jiu
f jjjA^L^ ^ I^) N * A. . . — AV, 0 .
(IHP) ^ .i A a-^É.IjÉ^I
iji4Àj_^.® T , 0 J1'^ 7 .j.a‘:ll/ajl J. yi
{jjijifl jA) fy^^ljkll( jlA»l) kA“
,dl jlT i.àJl0^JI ffrdd
^ \'\r\ - orr
^ ® nr* ~
tuwj Iéì^aJ I
^/fi 0^ * r *
¿jllLiJ <oÌjLwi.a i jLai^JI fdU^
- U^b daLsI/ J I> ut'ìli ■
L^U 9-^^
^jjb ^ * • JhIjIa jL^ jU^kul (sUs^
^jjb ji^ \ ^ ^ jjjld jLu giLi^
4^Ll^^twUj 1 fA Ìs^^mJI U^dll
93^1 iijLrìdlJ
(DECK OUT >"+)
\i — ^jJb To <1 £3-lJI) '
Matsushita Electric Industriai Co., Ltd.
Osaka 542-8588, Japan
(A_WTD) Jjj^j 0 ^ jtiljàJI J
^CClR) Jjui-iuJ * ¿UiXèjl J '^*”1 J iiTii *
(WRMS) X'. ^A -9^1
3 ¡a I Ti'ill hitLii^l
C~60 Ci-lujIÌ|I Jaj^^kÌi 4-ùIj ^ X * ^ IjA
(© @) ©
RQT4808-G
F1198B0(D)
 Loading...