

Page 1
Panasonic
Stereo Radio Cassette Recorder
RX-FT570
Operating Instructions
\gm
Before connecting, operating or adjusting this product,
please read these instruction completely.
RQT2491-L
Page 2

■vi.Vi:
Dear Customer
Thank you for purchasing this product.
For optimum performance and safety, please read these
instructions carefully.
Table of Contents
Precautions.......................................................2
Supplied Accessory
Power Sources
Location of Controls..........................................4
Listening to Radio Broadcasts
Listening to Tapes
Making a Recording..........................................8
Care & Use
.....................................................
Technical Specifications.................................11
..........................................
.................................................
..........................
............................................
10
Precautions
WARNING;
TOREDUCETHERISKOFFIREORELECTRIC
SHOCK, DO NOT EXPOSE THIS APPLIANCE
TO RAIN OR MOISTURE.
• If the set is not used for a long period of time or is
3
3
5
6
used only from an AC power source, remove all the
batteries to prevent potential damage due to possible
battery leakage.
• Avoid using or placing this unit near sources of heat. Do
not leave it in an automobile exposed to direct sunlight for
a long time with the doors and windows closed as this
may deform the cabinet.
• Avoid cuts, scratches, or poor connections in the AC
power cord, as they may result in possible fire or electric
shock hazard: Also, excessive bending, pulling or splicing
of the cord should be avoided,
• Do not unplug the AC power cord by pulling the lead. To
do so may cause premature failure or shock hazard.
• Do not operate the set on AC mains in a bathroom, as a
potential shock hazard may result.
• When not in use, disconnect the AC power cord from the
AC power outlet.
The function selector switch does not separate entire unit
from mains even if in ‘TAPE/|2i3 ” position.
Page 3
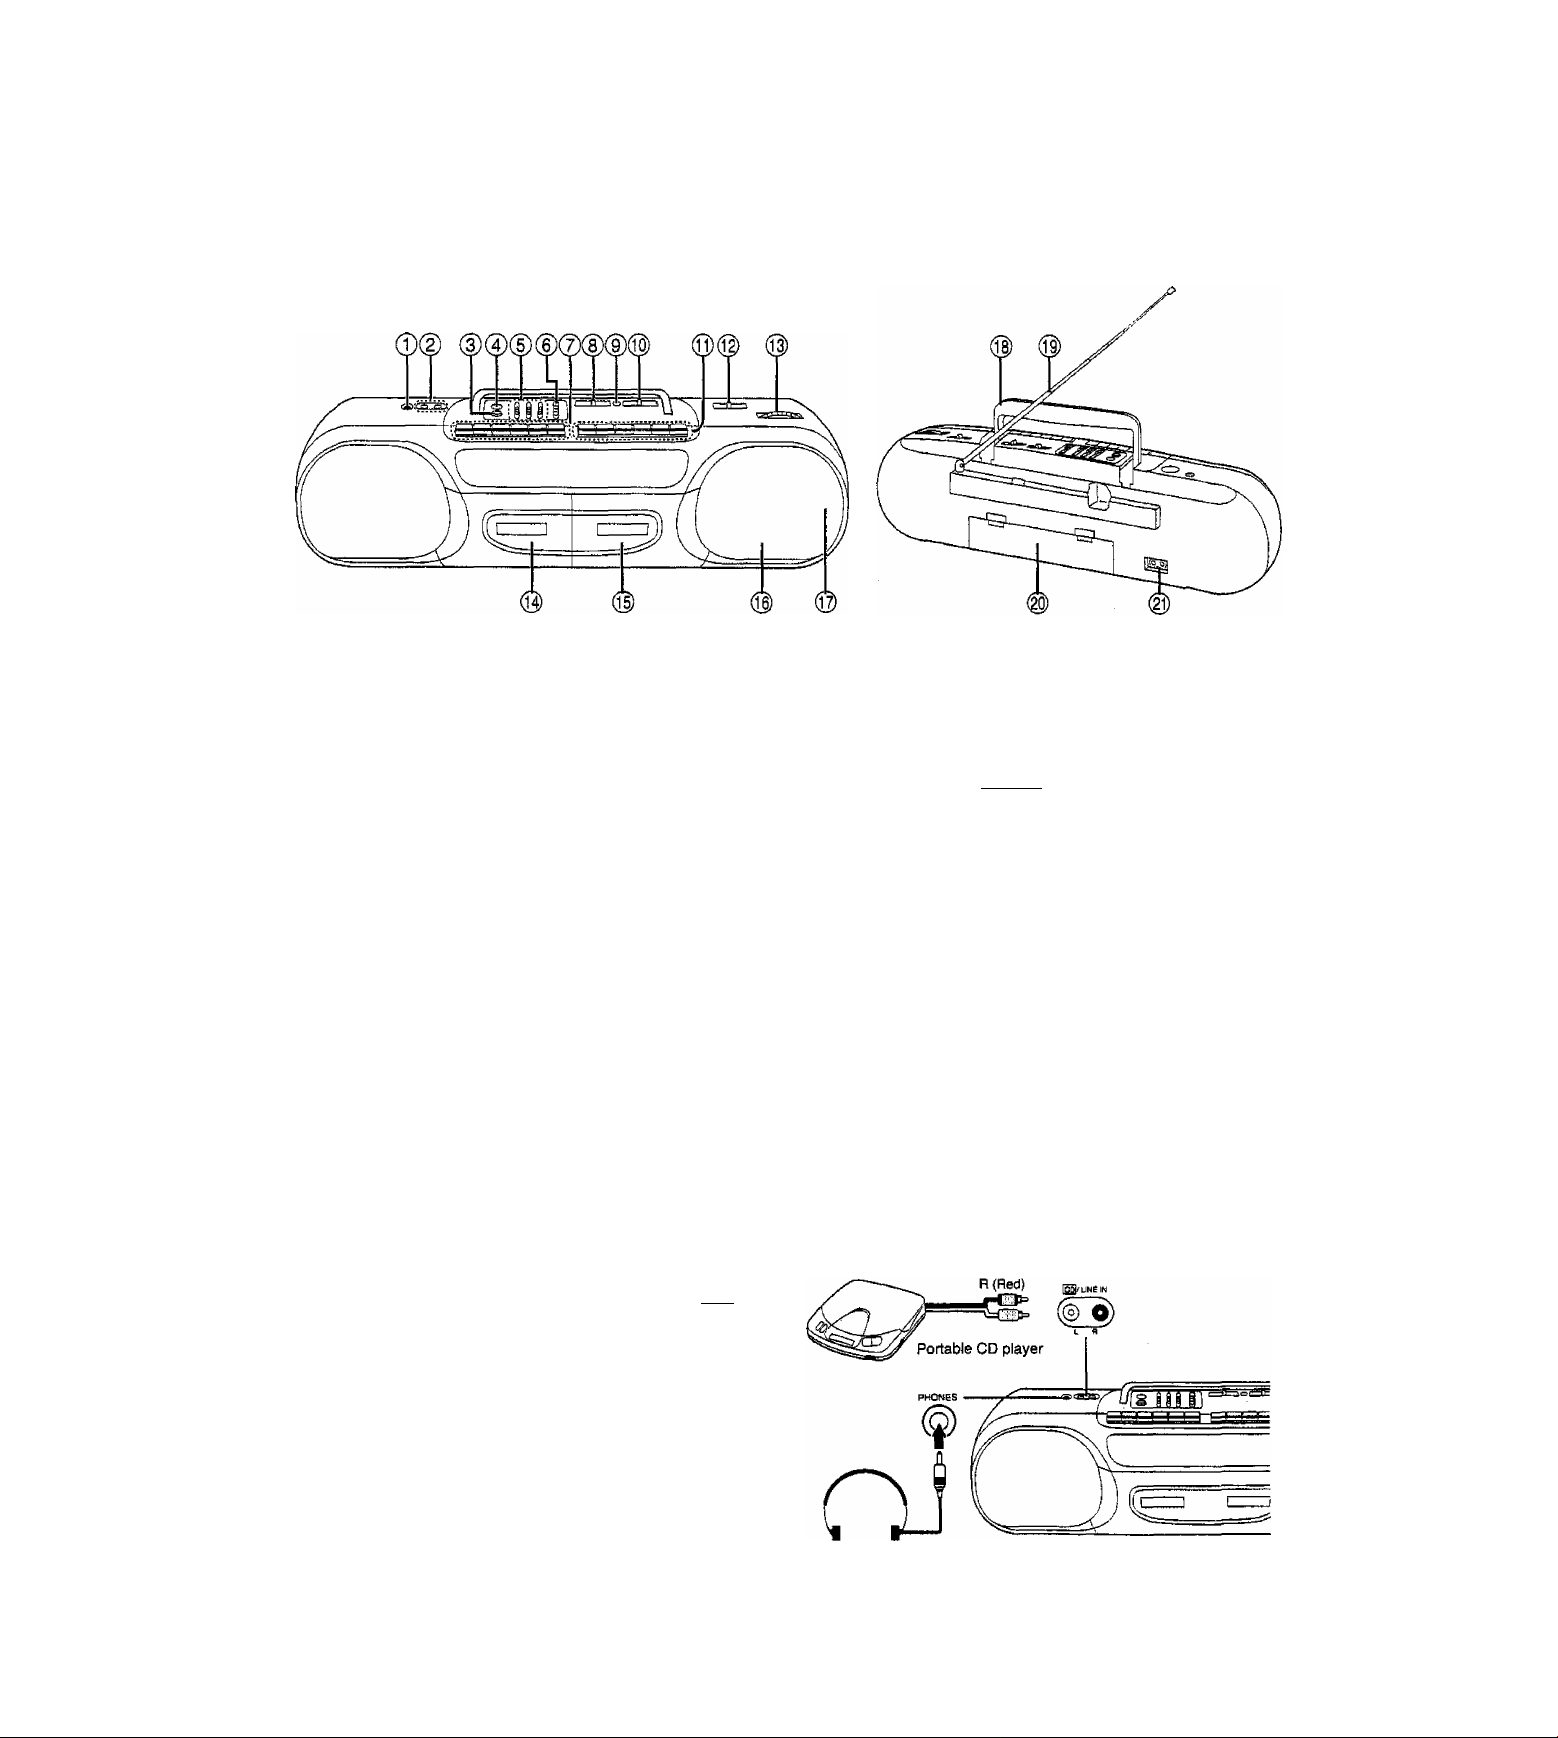
Headphones Jack (PHONES)
©
CD/Line input jacks ({^/LINE IN)
XBS (Extra Bass System) button (XBS)
Built-in microphone (MIC)
Graphic equalizer controls (GRAPHIC EQUALIZER)
Volume control (VOLUME)
Deck 1 (For playback)
Reverse mode select button
(REVMODEAq±> m-3)
Stop/eject button (BSTOP/EJECT)
Fast buttons (- FAST- ►►)
Playback button (o PLAY)
Direction button (DIR)
Function selector (SELECTOR)
(TAPE/BSa, RADIO.ICDl/LINE^
FM stereo indicator (FM ST)
Editing mode selector/beat proof switch
(EDITING/B.P) (MIC/I NORMAUll HIGH/II)
Connections
® Deck 2 (For recording and playback)
Pause button (ii PAUSE)
Stop/eJect button (B STOP/EJECT)
Fast forward/cue button (<44 /CUE)
Rewind/review button ( /REV)
Playback button (< PLAY)
Record button (SQ^EEQ)
Band selector (BAND)
® Tuning control (TUNING)
® Deck 1 cassette compartment
® Deck 2 cassette compartment
@ Speaker (Woofer)
(0) Speaker (Tweeter)
@ Handle
(H) Telescopic antenna
@ Battery compartment
@ AC socket (AC IN-)
How to connect portable CD player (not included)
When listening or recording CD, set SELECTOR to ICDl/
LINE.
• When not using the l£D|/LiNE IN jacks, disconnect the
connector from it.
How to use headphones (not included)
Reduce the volume level. Connect the headphones to the
headphones jack.
• Avoid listening for prolonged periods of time to prevent
hearing damage.
• Speakers are automatically cut off when the headphones
are connected.
* •
L (White)
Page 4

Listen^ io Éadw Bro€bdcàst$
Set SELECTOR to RADIO.
le 1111 II
Set BAND to the desired radio band.
FM STEREO: To receive FM
stereo broadcasts
(if you have tuned
into an FM stereo
broadcast, the FM
indicator wiil light.)
AM: To receive AM
broadcasts
if FM stereo reception is poor, set BAND to FM. This
will reduce the noise and provide ciear reception:
however, the broadcast wiil not be heard in stereo.
Use TUNiNG to tune into a desired broadcast.
I Adjust VOLUME, GRAPHIC
iCliitLMOCHl nw
The radio can be turned off by setting SELECTOR to TAPE/
XBS (extra bass system) El
EQUALiZER and XBS.
When the XBS button is set to "ON”, the dynamic low fre
quency ranges are boosted. Adjust the level by using the
XBS level control. Using this system with graphic equalizer
helps you to get more dynamic sounds.
Graphic Equalizer Q
It allows you to edit the frequency response of the unit to
compensate for room acoustics and other factors which
affect frequency response. The overall tone can be altered
by adjusting the controls at the three frequency bands;
100Hz, 1 kHz, 10 kHz.
For increased amplification of the corresponding frequency
band, position the switch towards “+10” marking and like
wise towards the “-10" marking to attenuate the correspond
ing frequency band.
If the XBS button is set to “ON”, the 100 Hz control functions
as the XBS level control.
Adjust the antennas {0
FM;
Pull out the telescopic antenna and adjust its length and
angle for optimum reception.
AM:
Turn the unit in the direction which gives the best results.
FM
AM
Page 5

You can use normai tapes only.
You can use either deck 1 or deck 2 for tape playback by
following the same steps. (This page shows an example
using deck 1.)
Single tape playback E
i li" I Set SELECTOR to TAPE/gaa .
----
TAf e GD HADQ j^iLINl
* I i
y BsTOP/EJECT Press STOP/EJECT, and then
^ ' I insert the tape.
Insert the cassette with the
exposed tape facing up.
Playback side
REV MODE
Set REV MODE (For deck 1 only)
to select desired playback mode
in deck 1.
*-3 : Two side playback mode
3L q±> : Repeat two-side playback
mode
<>PUY
4
№Pri>CEOU.LIZtA
To stop the playback:
Press PLAY to start playback.
Adjust VOLUME, GRAPHIC
EQUALIZER and XBS level con
trols as desired.
Press STOP/EJECT.
Auto stop:
During playback, when the tape reaches its end, the auto
matic stop system will release PLAY and automatically turn
the unit off. During tape playback, if the deck 1 REV MODE
is set to " position, the automatic stop system does not
function.
When the tape reaches the end by pressing FAST, the auto
matic stop system does not function. The tape will stop, but
as the motor continues to turn, do not leave the set in this
condition. Be sure to press STOP/EJECT.
To fast forward or rewind the tape UI
Deck 1
Press -«4 -FAST-►► while the tape is stopped.
Deck 2
Press -44/CUE or ^/REV while the tape is stopped.
The tape will start moving forward or reverse direction at
high speed. To stop the fast forward or rewind operation,
press STOP/EJECT.
Note;
Do not press PLAY during fast forward or rewind, as this
may jam the tape. Always press STOP/EJECT first between
functions.
To cue or review the tape 0
For deck 2 only
During playback, press and hold <4/CUE or >^/REV.
The recorded sound on the tape can be monitored at high speed.
Page 6

îüpes (contimied)
Automatic playback relay E
(deck 1 to deck 2)
When deck 1 playback has finished, deck 2 playback starts
automatically.
Insert the playback tapes
into deck 1 and deck 2.
Set deck 1 REV MODE
dlf
Oplay
II PAUSE <]PUY
Press PLAY of deck 1.
Press PAUSE of deck 2,
then press PLAY.
Auto Reverse System B
Deck 1 is equipped with an auto reverse function that allows
you to perform two-side playback or repeat two-side play
back. If DIR is pressed during the tape playback, the reverse
side of the cassette tape can be heard.
To listen to side A and side B with auto reverse at
Deck 1
Select “Two-side REV MODE [.» -a ]” of deck 1 before
pressing PLAY of deck 1.
Be sure to start playback from the forward direction (side A).
If playback is started from the reverse direction (side B). only
side B will be played, after which auto stop will operate.
To listen to side A and side B repeatedly at Deck 1
Select “Repeat two-side REV MODE [ Jl 1” of
deck 1 before pressing PLAY of deck 1.
Playback will be repeated until STOP/EJECT is pressed.
Direction memory function:
if STOP/EJECT is pressed during playback, the direction in
which the tape was running will be memorized.
When PLAY is pressed once again, the same side of the
tape will be played back.
Page 7

Making ^ Recording (deck 2 only)
You can use normal tapes only.
The recording level is automatically adjusted.
Recording and erasure of recording can be made only in the
forward direction (Deck 2 only)
Recording from radio broadcasts Q
BsTOPfEJECT
□
When recording AM broadcasts:
The beat-proof function is able to reduce unwanted beat
signals (whistle) which may occur.
Set B.P to the position which gives best results.
To stop the recording:
Press STOP/EJECT.
To briefly interrupt recording:
Press PAUSE.
To resume recording, press PAUSE again.
Press STOP/EJECT of deck 2 to insert the tape.
Recording side
Tune into the desired Radio
broadcast. (Foilow the proce
dure 1 - 4 of “Listening to Radio
Broadcasts”.)
Press
RECORD
Recording through the built-in
microphone 0
f SEUCTOH
1 ODD
Ml
QaaOKI Щи*
i_j—I
EDIT1NG/B.P
£DmN6/B.P
2
iutci'l nOAuu;s >
EIstop/eject
3
Pause button;
Before beginning a recording, first press and lock PAUSE.
Then press (The tape will not move.)
When ready to record, press PAUSE to release It. This will
start tape movement for immediate recording. Do not use
PAUSE to stop the tape for a long period of time. The unit is
not turned off when PAUSE is pressed.
Set SELECTOR to TAPE/
[Л
Set EDITING to MiC.
Insert the tape into deck 2,
and press
RECORD
8
Monitoring:
The monitor system enables you to listen, through the
speakers or headphones, to the sound as It is being
recorded.
When recording from the built-in microphone the sound
being recorded cannot be monitored.
Page 8

(continued^
Recording from deck 1 to deck 2 0
When PAUSE and of deck 2 are pressed, tape
editing starts by pressing the deck 1 playback button.
(Synchro-start function)
J B li|^ 1 I
^ EDmNQ/B,P
J lU-Jl
MiCi'l NaMiAcn woH/ii
II PAUSE
4
gSLECTPH
[—• Playback side
n -j- ^ tape into deck 2.
Recording side
Set SELECTOR to “TAPE/
Insert the playback tape
into deck 1 and the editing
Set EDITING to the desired
position.
"NORMAL”; Normal speed
“HIGH”: High speed
Press PAUSE of deck 2,
then press
]□
Oplay
5
To stop editing:
Press STOP/EJECT (deck 1 and deck 2).
Press PLAY of deck 1.
Editing is started by means
of the Synchro-Start func
tion.
RECORD
• Do not change the tape speed during editing. The play
back sound may flutter.
• Be sure to set SELECTOR to “TAPE/SS3” during edit
ing. Do not change any other position.
• If the unit is brought near a TV set during recording, noise
may be recorded due to the effects of the signals from the
TV set. Maintain a distance of at least 1.5 meters between
the unit and a TV set.
Erasure of tape
To erase a tape without re-recording, use the following pro
cedure. (Make no connections to [^/LINE IN jacks)
1 Set SELECTOR to f^/LINE. 2 Insert the tape into deck 2 and press
____
RECORD
Recording from external equipment
Connect the output of the external equipment to
1
[^/LINE IN jacks (Refer to page 4).
Set SELECTOR to “ICDl/LINE” and Insert the
2
recording tape into deck 2.
^ Press PAUSE of deck 2, then press
^ Start playing the external equipment (ex. portable
^ CD player).
Release PAUSE.
RECORD
Page 9

.
........
::H§mmmmmm§im№Simmm:mmmimmmm
,gMMì№:ISmstsmmmBSSm^^^^
S8::Ì|S:;felSÌlÌ«i8SW
iSiSilìSsf4fiiSlf::5i'3Ìi*
SSSIfiiiìS
■ ;ì^ì!:V'4--'
Concerning cassette tapes
Selection of cassette tapes
You can use normal tapes only.
Cassette tapes exceeding 90 minutes;
These tapes are handy for their iong playback and recording
time but be careful about repeatedly stopping and starting,
rewinding and fast forwarding these tapes in short intervals
as they are thin, tend to stretch and may become entangled
in the mechanism.
If the tape loosens, take up the stack
Tape stack may cause the tape to break.
To prevent erasure of recorded sounds
Remove the erase-prevention tabs with a screwdriver or a
similar object.
Tape head care
To assure sound quality for recording and playback, be sure
to clean the tape heads after approximately every 10 hours
of use.
Open the cassette compartment cover by
1
pressing STOP/EJECT.
(Deck 1)
2
Press PLAY.
(Deck 2)
While pushing erase prevention lever down
wards as shown, press
Clean the head(s), pinch roller and the capstan with a cotton swab (or a soft, lint-free cloth) slightly moistened with isopropyl alcohol.
Do not use any solution other than alcohol for head
cleaning.
RECORD
To re-record on a protected cassette, cover the slot with
adhesive tape.
Adhesive tape
Improper tape storage:
You can damage tapes if you store them in the following
places;
• In high temperature [35'’C (95°F) or higher] or high humid
ity (80% or higher) areas.
• In a strong magnetic field (near a speaker, on top of a TV,
etc.)
This can erase a recording.
• Areas exposed to direct sunlight.
It Is recommended that the head assembly be demagnet
ized if distortion or poor sound quality persists after cleaning
the heads.
Demagnetize them using a demagnetizer available from an
audio store.
Avoid contact of any type of metal objects or tools such as
magnetic screwdriver with the Heads.
10
Page 10

Technical Speci^^
Radio
Frequency range:
Tape recorder
Track system:
Recording system:
Monitor system:
Frequency range:
General
Power requirement:
Power output:
Speakers:
Jacks:
Input;
Output:
Dimensions (W x H x D):
Weight:
FM: 88-108 MHz
AM; 525-1705 kHz
4 track, 2 channel, stereo
AC bias, magnet erase
Variable sound monitor
70-12000 Hz (Normal)
AC; 230 - 240 V, 50 Hz
Battery; 9 V
20W(10Wx2)... PMPO
8W(4Wx2)... RMS (max.)
2 Woofers; 10 cm
2 Tweeters; 1.5 cm
CD/LINE IN; 398 mV/47 kil
HEADPHONES; 32a
566 X 146 X 160 mm
3.0 kg without batteries
Power consumption:
16 W
(six UM-1. R20/LR20
size batteries)
Note:
Specifications are subject to change without notice.
Weight and dimensions are approximate.
11
 Loading...