

Page 1
Panasonic
Portable Stereo Component System
RX-DT650
Operating Instructions
ipipK
Before connecting, operating or adjusting this product, please read
these instructions completely.
COMPACT
ÉI
DIOnAI
DIOnAL AUDIO
RQT2839-B
Page 2

Thank you for purchasing this system.
For optimum performance and safety, please read these instructions
carefully.
WARNING:
TO REDUCE THE RISK OF FIRE OR ELEC
TRIC SHOCK, DO NOT EXPOSE THIS APPLI
ANCE TO RAIN OR MOISTURE.
CAUTION!
THIS PRODUCT UTILIZES A LASER.
USE OF CONTROLS OR ADJUSTMENTS OR PER
FORMANCE OF PROCEDURES OTHER THAN
THOSE SPECIFIED HEREIN MAY RESULT IN HAZ
ARDOUS RADIATION EXPOSURE.
DO NOT OPEN COVERS AND DO NOT REPAIR
YOURSELF. REFER SERVICING TO QUALIFIED
PERSONNEL.
(Back of product)
IdVISIfllE LASER BAOlATIOttWHEN OPEN ANO ItdlftLOCKOdtATED.
DANGER
AVOID OIBECTEXPOSURETO KAM.
USVNLIS mSERSIBAlJftVED ABWNG, nM SIKKERHEDSAf BRVOEBE
ADVAfiSEL
EBUDEAf FUNKTION ONDfitUOStTTaSfFORSrBUKe.
AVAÌIAESSA JASUOJALJKIUJS OmrtnAESSAOLETALmiNA
VARO!
NlKYMilONTA LASERSÄTEILYLLE. Ali KATSO SÄTEESEEN
OSYNLIG LASEBSIRÄLNIMG NÀF DEMNA DEL ÄR OPWiAO OCH
VARNING
SPiRREN ÄR URKOPPLAt). BETRAKTA EJ STFÄIEN.
USYNIIG LAEERSmtLIt« NÄR OEKSEl ÄPNES OG SIKKfflHEDSLÄS
ADVARSEL
BRYTES. UNNGÄEKSPONEBINGFQfiSTHÄLEN.
UNSICHTBARE tASEBSIRAHLUNG. WENNABOECKUNG GEÖFFNET.
VORSICHT
UND SICHERHBTSVERBIEGELUNG ÜBEBBBilCKT.
NICHTOEM STRAHL AUSSETZEN.
(Inside of product)
(Irtdersfden at apparate!)
(Tuotteen sisal la)
(Apparatene insida)
(Produktets innside)
(Im Inneren des Gerätes)
Page 3
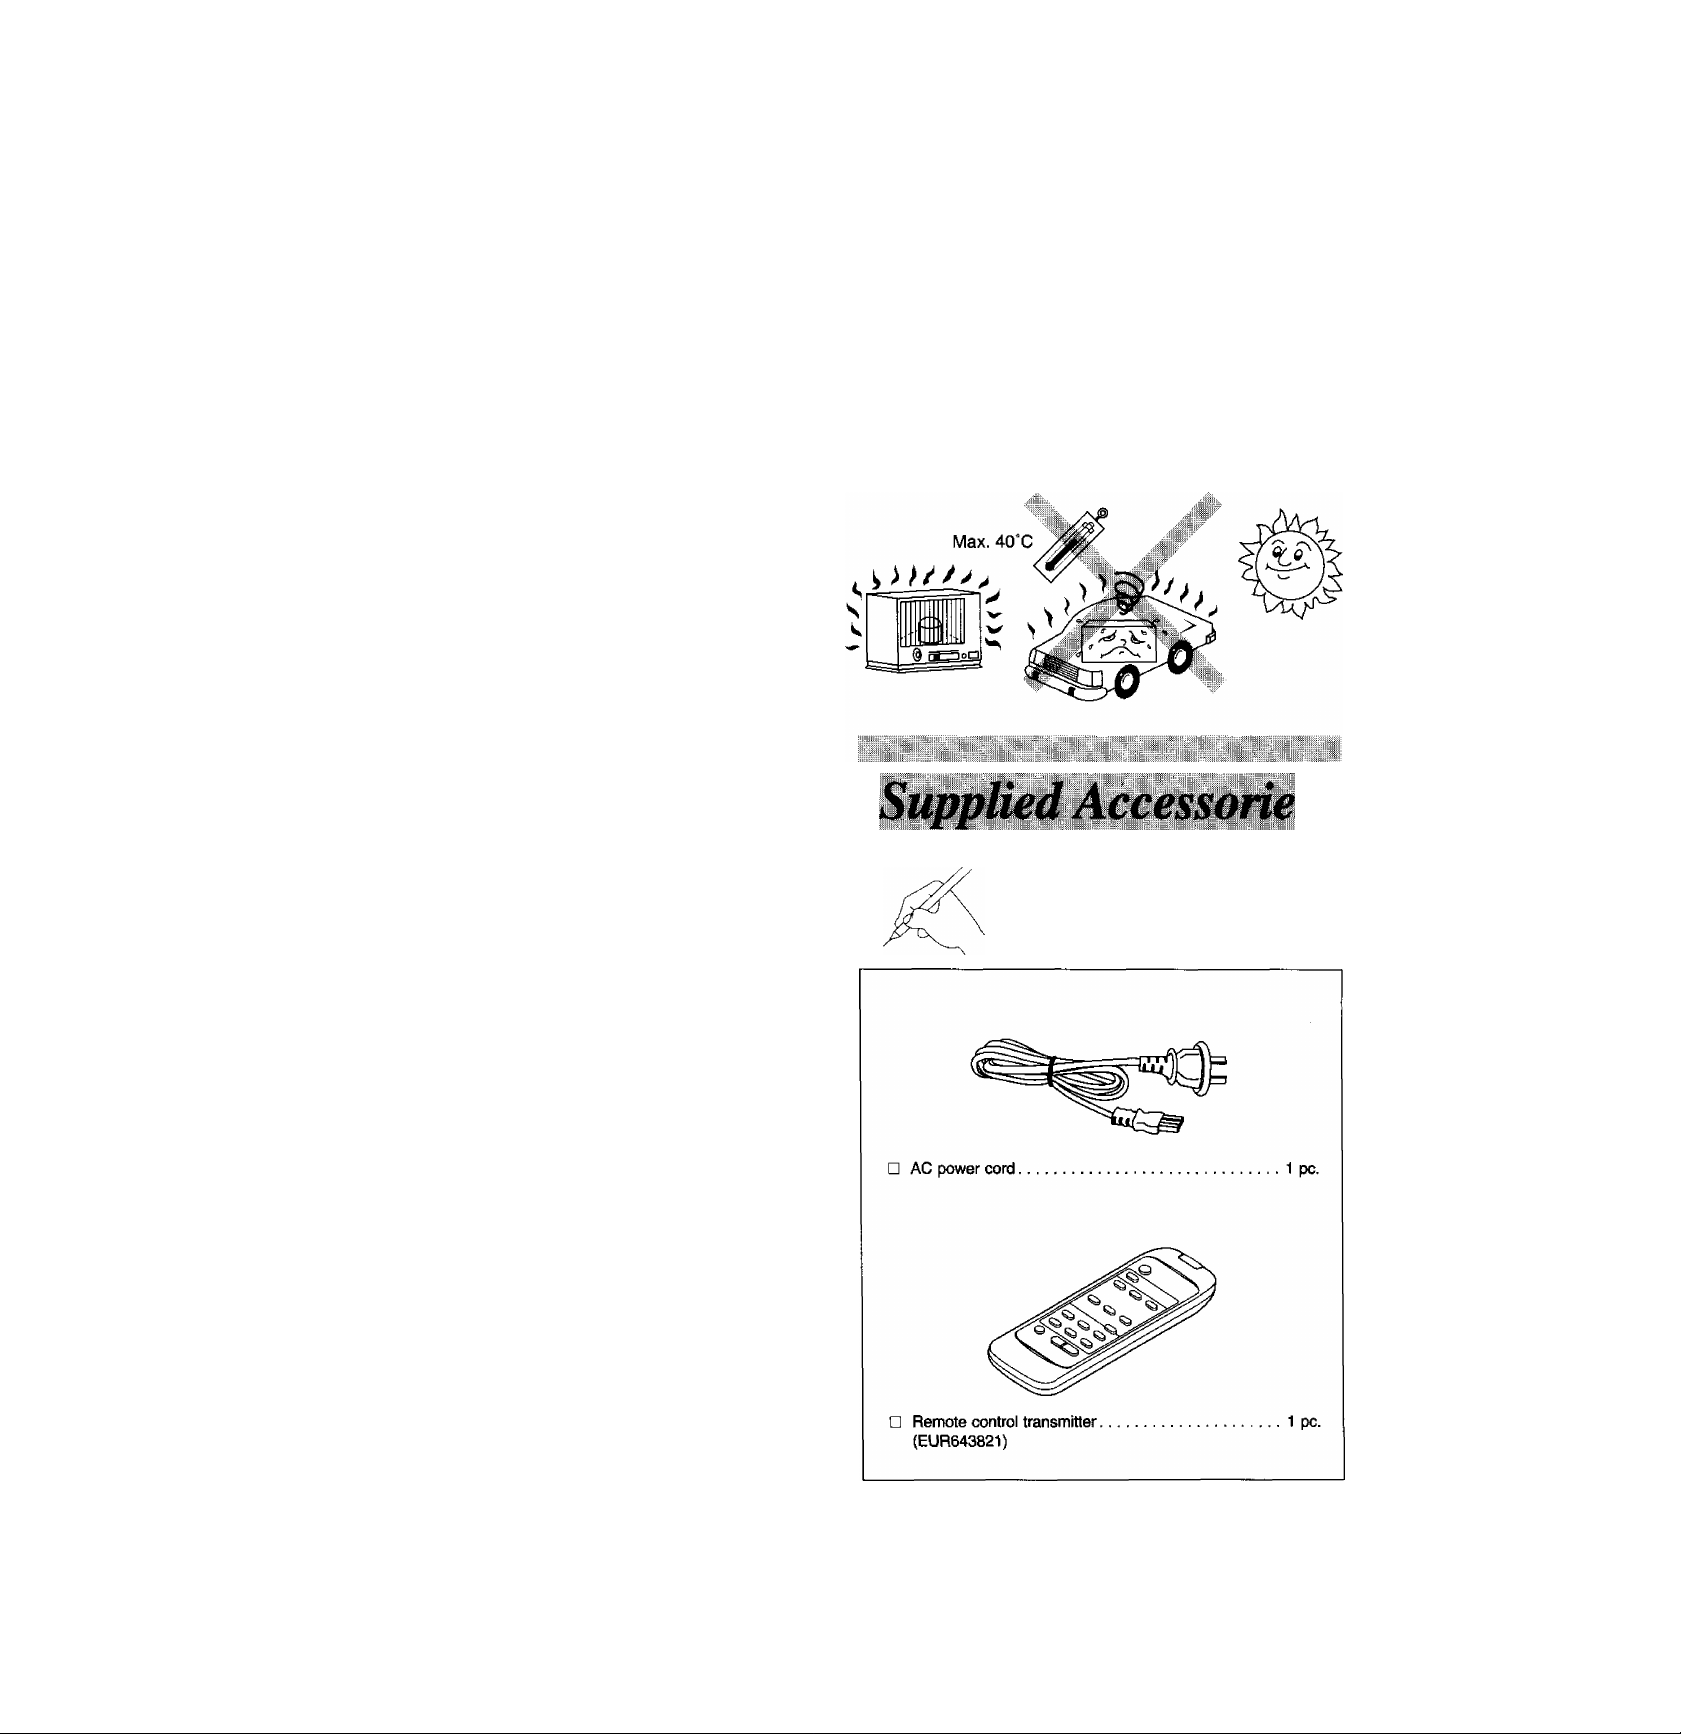
Table of Contents
Precautions
Before use
Precautions
Supplied Accessories
Power Sources
Connecting the Speaker System
Concerning the Remote Control.
Location of Controls
Common Operations
.......................................
........................
..................................
..........................
.........................
Operations
Programming Broadcast Stations
Listening to Radio Broadcasts ...
Listening to CDs
Listening to Tapes
..................................
...............................
Recording
Recording Compact Discs .
Recording Radio Programs.
Recording Tape to Tape ...
3
3
4
6
7
8
11
12
13
14
18
19
20
21
If the set is not used for a long period of time or is used only
from an AC power source, remove all the batteries to prevent
potential damage due to possible battery leakage.
Avoid using or placing this unit near sources of heat. Do not leave it
in an automobiie exposed to direct sunlight for a long time with the
doors and windows closed as this may deform the cabinet.
Avoid cuts, scratches, or poor connections in the AC power cord, as
they may result in possible fire or electric shock hazard, Also,
excessive bending, pulling or splicing of the cord should be avoided.
Do not unplug the AC power cord by pulling on the cord. To do so
may cause premature failure or shock hazard.
Do not operate the set on AC power in a bathroom, as a potential
shock hazard may result.
When not in use, disconnect the AC power cord from the household
AC outlet.
General Information
Enjoying the Microphone Mixing ...
Quick Reference of Remote Control
Operations............................................
Troubleshooting Guide...........................
Maintenance
Concerning Compact Discs
Concerning Cassette Tapes
Technical Specifications
..........................................
...................
.....................
..........................
.
.
.
...............
...............
...............
...............
...............
Back Cover
23
25
26
27
27
22
Please check and identify the supplied accessories.
0
Page 4
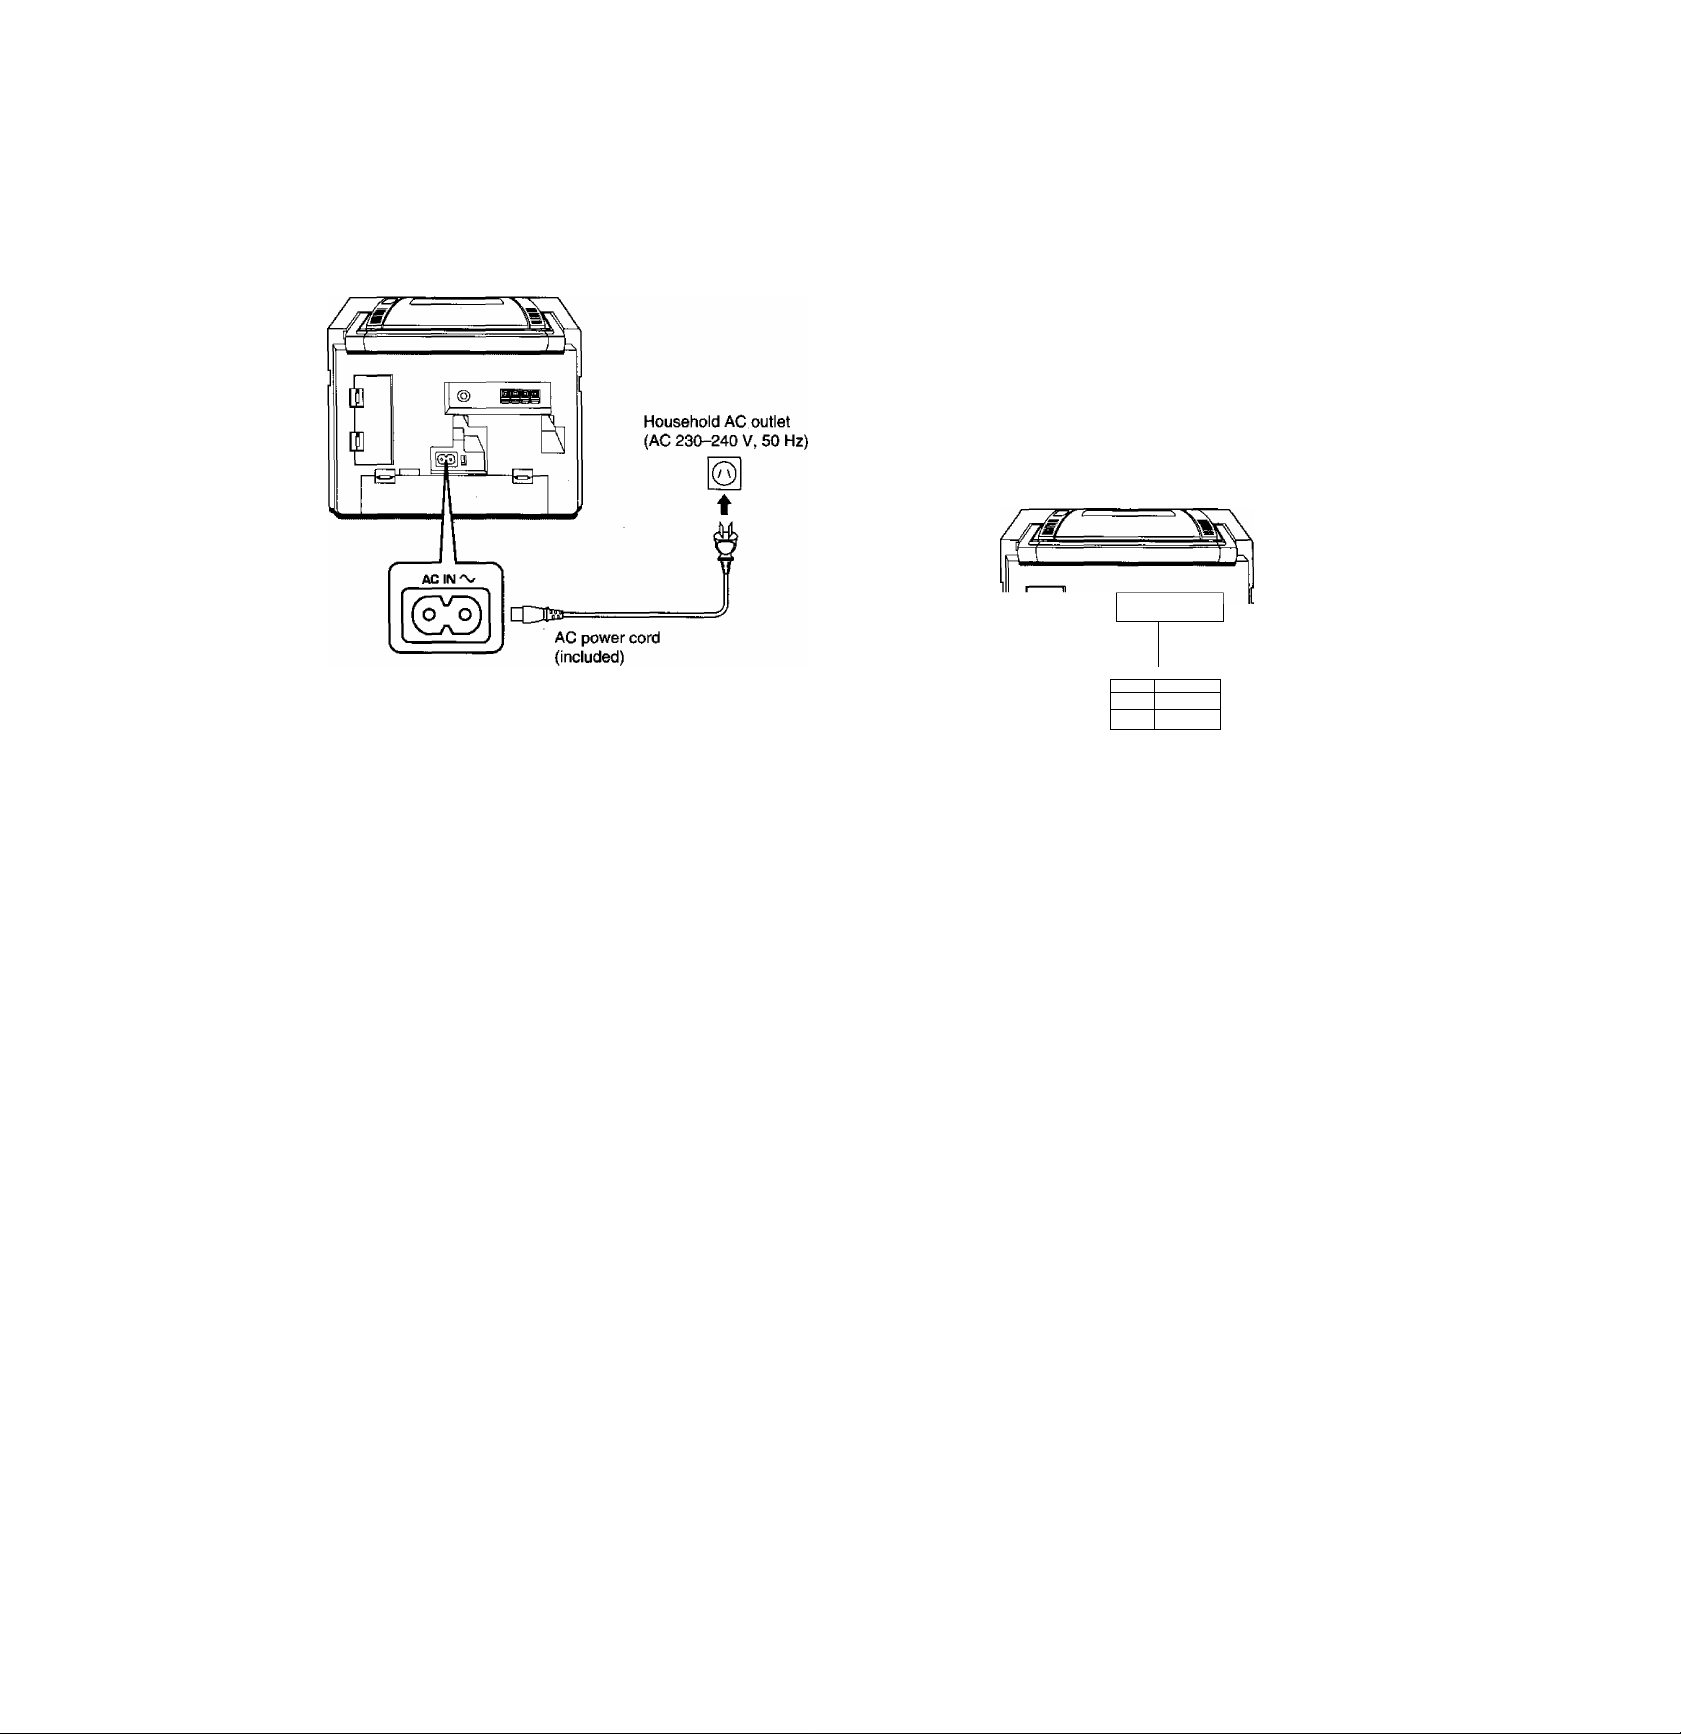
Power Sources
To operate AC power
Connect the included AC power cord to the AC socket of this unit and
your household AC outlet.
To operate on battery power
When using the memory back-up batteries (see the next page), insert
them first.
Please read “Use of batteries" on page 7.
Battery installation
Unplug the AC power cord from the household AC outlet and the
AC socket of the unit.
Insert ten R20/LR20 (UM-1 or equivalent, not included) batteries
into the battery compartment, making sure that the batteries are
installed in the designated numerical order and that the proper
polarities are maintained.
®
wm
h©
----
OlM.
'
Outer row 0 (5]{9D(ÏE(Z] ©
0 CD® CD® ©
Inner row
• Batteries installed with incorrect polarities may leak and damage
this unit.
• Do not mix batteries (old and new) or types (manganese and
alkaline, etc.).
• If the unit is not used for a long period of time or is used only from
an AC power source, remove the batteries to prevent potential
damage from possible battery leakage.
Battery life
When to replace the batteries:
When the POWER/BATT STDBY <!) indicator goes off (or dims)
during play, replace all the batteries with new ones. If you continue
using the batteries, it will automatically turn itself off.
©dDGDe
Page 5
Battery removal
Memory back-up batteries
Remove as shown in the figure below.
Outer row
aaoi
Inner row
In the event of a power failure, or if the AC power cord is disconnected
from the household AC power outlet (during AC operation), or should
the batteries fail, the memory back-up batteries will preserve the preset
memory of this unit.
Please read “Use of batteries” on page 7.
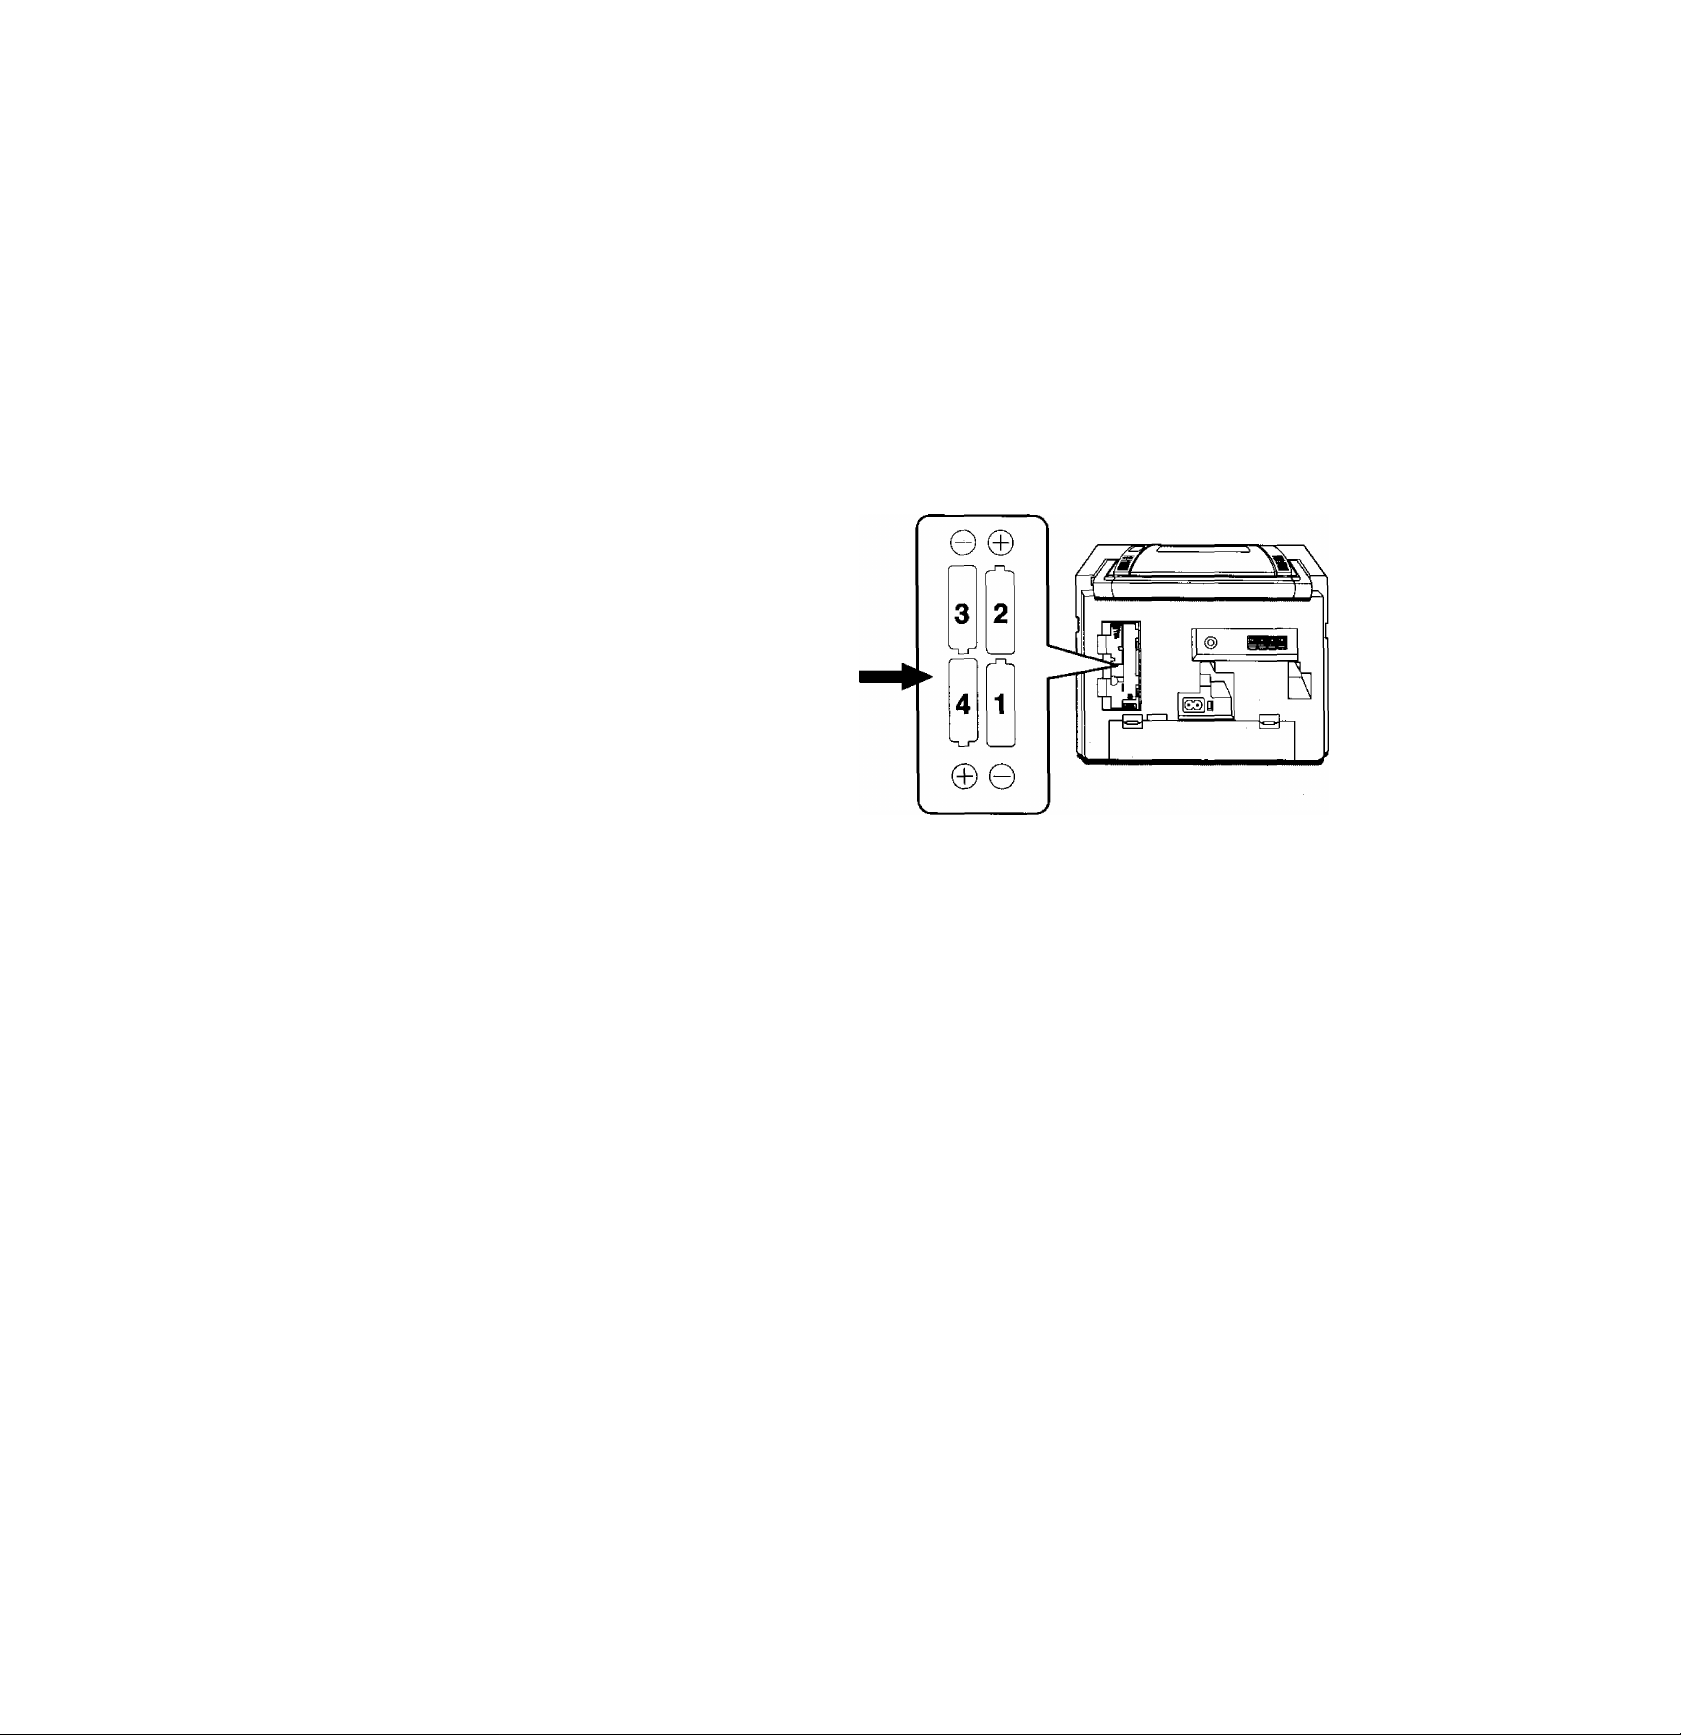
Battery installation
Insert four R6/LR6 (UM-3 or equivalent, not included) batteries into
the battery compartment, making sure that the batteries are installed
in the designated numerical order that the proper polarities are
maintained.
Qa
Battery removal
Press the © side of the battery No. 4.
Battery life
The life of the memory back-up batteries is about one year.
• The life of the memory back-up batteries can be prolonged by
keeping the AC power cord plugged in the household power outlet
at all times.
• When disconnecting the AC power cord, switch off the power first
using the power button.
• The life of the memory back-up batteries is reduced if the AC
power cord is disconnected from a household AC outlet with the
power still supplied.
• While exchanging the memory back-up batteries, be sure to
connect the AC power cord both to the unit and to the household
AC outlet.
Page 6
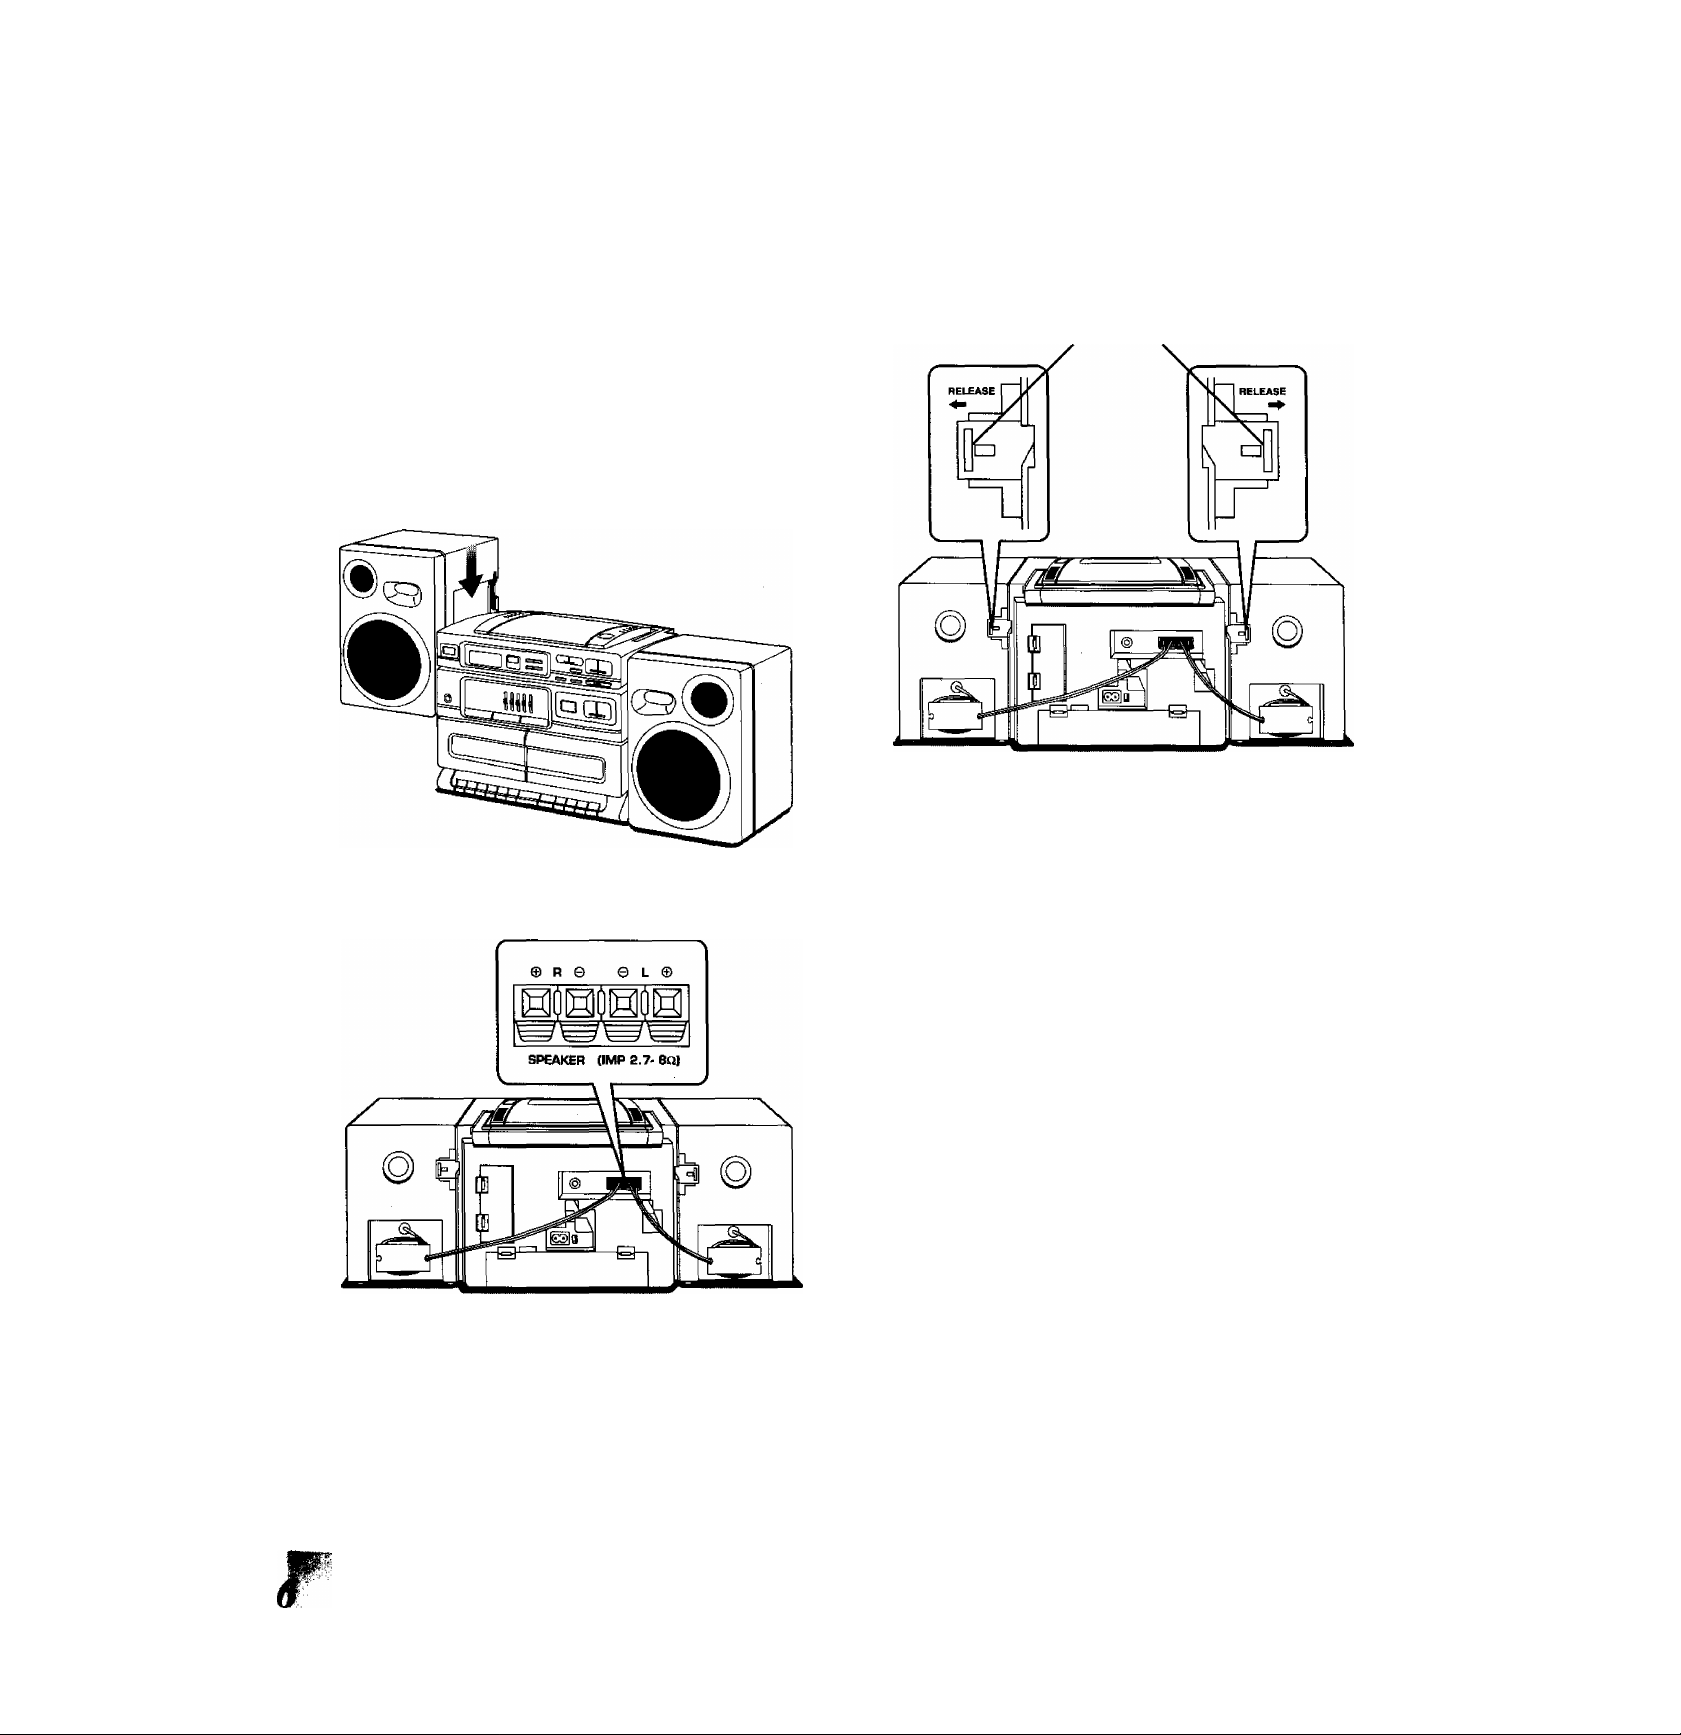
Connecting the Weaker System
Speaker system connection
This unit can be used as a one-piece portable stereo radio cassette
recorder, or a three-piece component system, by attaching or de
taching the speaker system.
Before attaching or detaching the speakers, be sure to disconnect
the speaker cables from the speaker terminals.
Be sure to press STDBY (!) (AC)/ON to turn the unit off before
connecting or disconnecting the speaker cables.
Attaching the speakers
1. Align the speaker with the main unit as shown
in the figure, interlock the grooves and press
down.
Detaching the speakers
Speaker release levers
Unlock the speaker release levers by pulling them
in the direction shown above, and slide each
speaker up.
2. Connect the speaker cables (black) to the 0
(negative) speaker terminal, and the other
speaker cable (red) to the © (positive) speaker
terminal.
3. When using the unit with the speakers attached,
wind the speaker cables as shown.
Since a strong magnet is used for the speaker, keep magnetized
commuter passes, tickets or personal credit cards, recorded tapes,
watches, etc. away from the speaker. The speaker magnet in the unit
may damage them.
Page 7
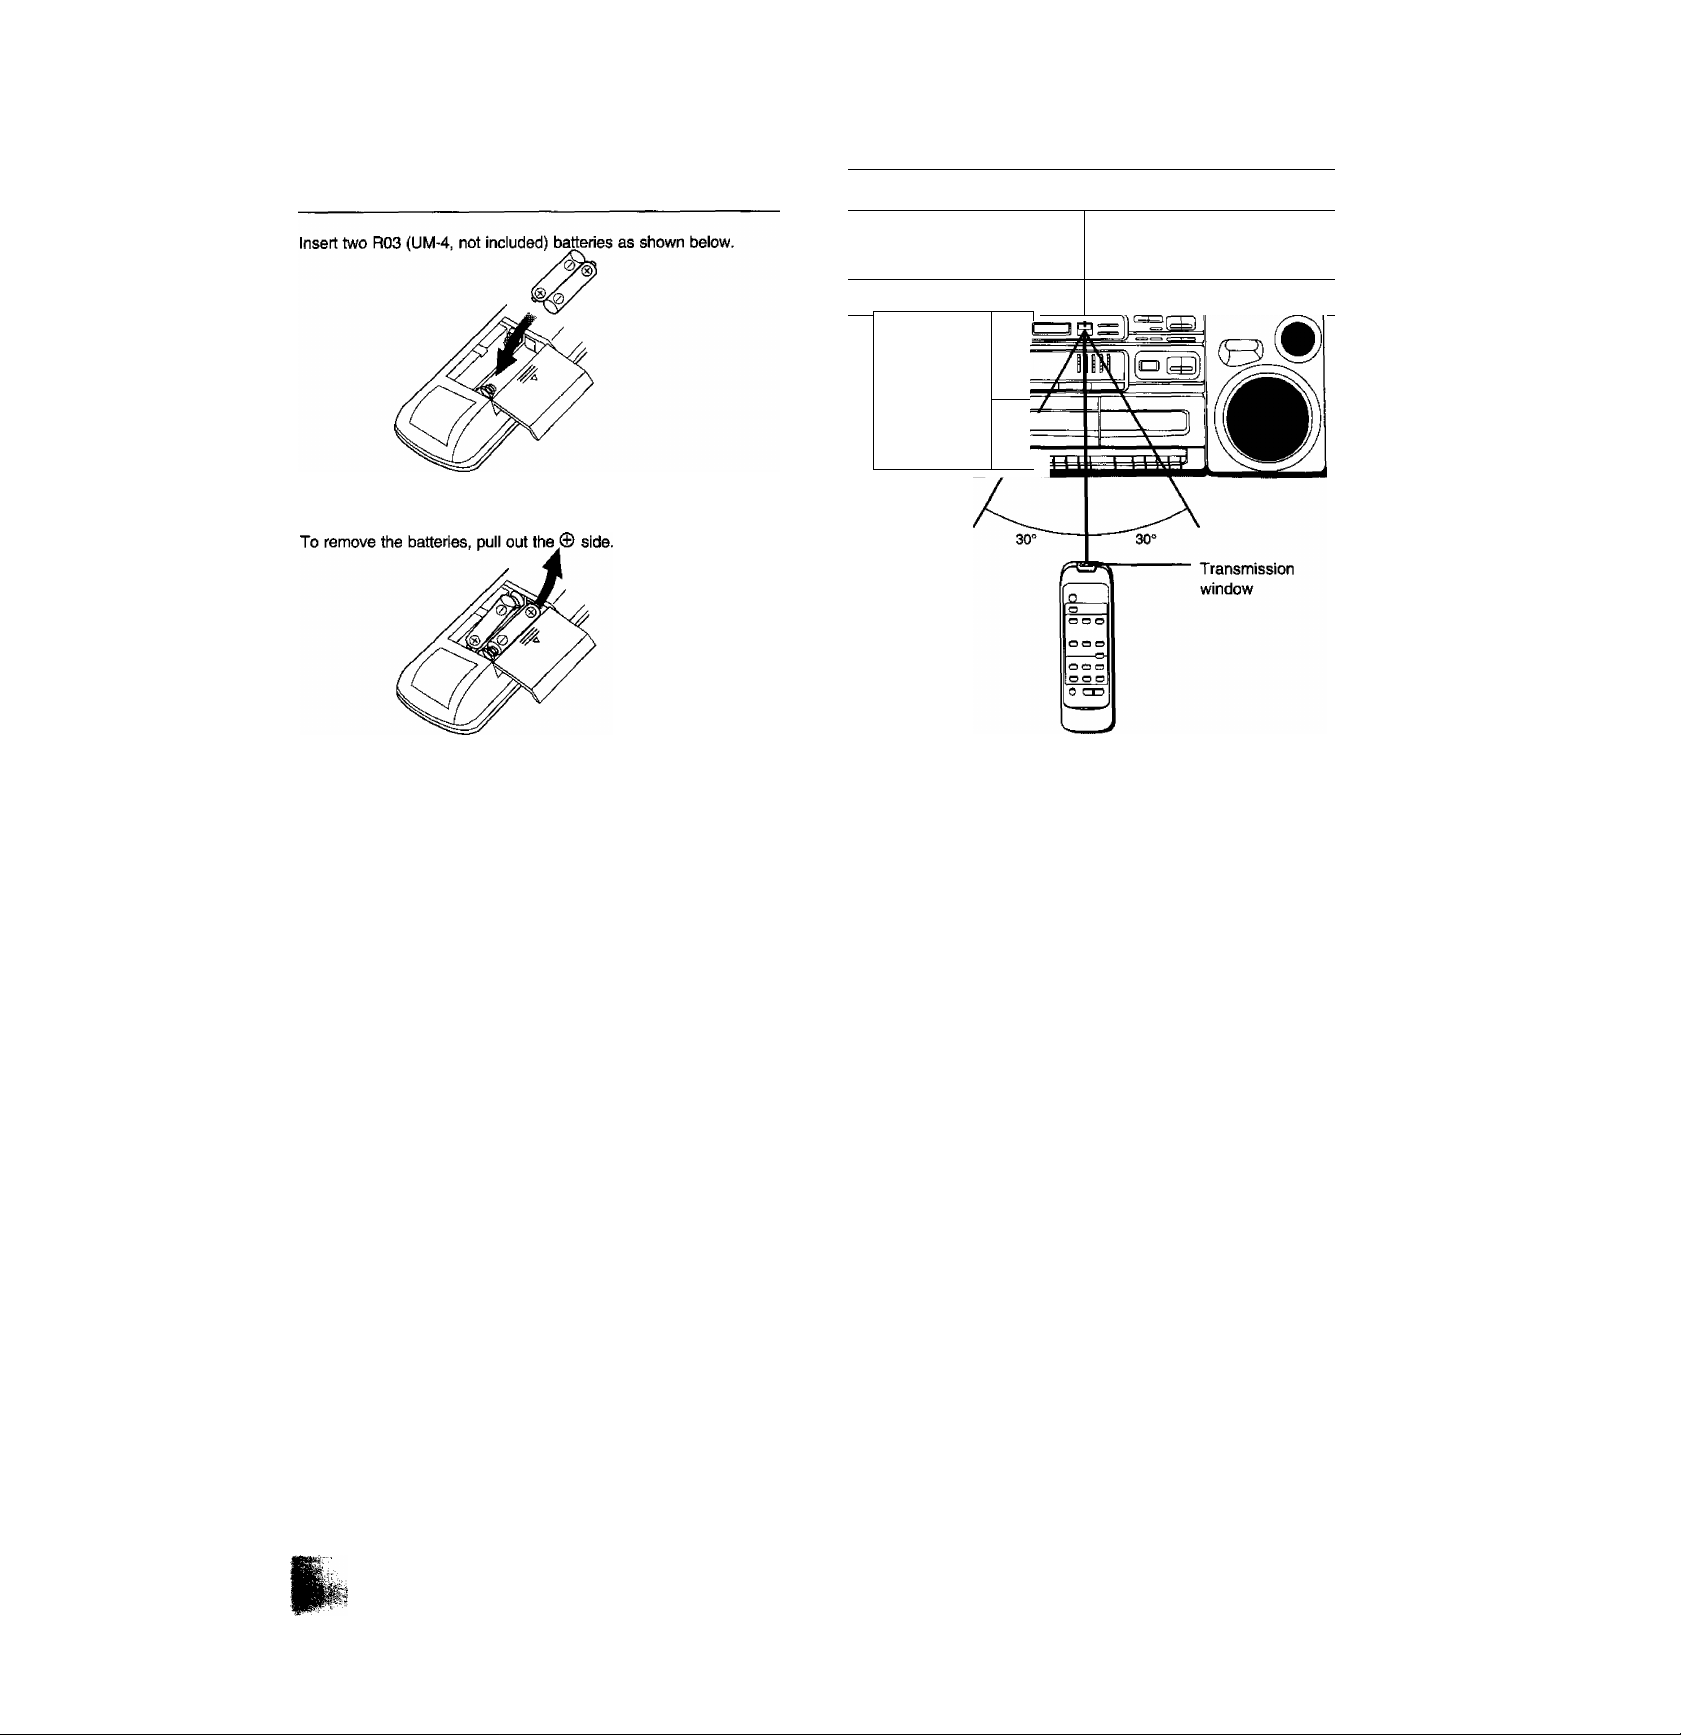
Concerning the Remote CoMnot:
t.?:- W^S.
Battery installation
Insert the batteries in the correct polarities (©, ©).
Remote control unites operation range
Remote Control Signal S
B[T
11/
w
Face about 7 meters in front of the sensor.
ensor (REMOTE SENSOR)
Use of batteries
Do not mix old and new batteries, or batteries of different types
(manganese with alkaline, etc.).
Always remove old, weak or worn-out batteries promptly and dispose
of them properly.
Never subject batteries to excessive heat or flame; do not attempt
to disassemble them; and be sure they are not short-circuited.
If the unit is not to be used for a long period of time, remove the
batteries and store them in a cool, dark place.
If a battery teaks, remove all batteries and dispose of them properly.
Thoroughly clean the battery compartment before inserting new
batteries.
If the electrolyte comes into contact with skin or clothes, flush with
water immediately.
Keep batteries out of reach of children.
Do not use rechargeable (nickel-cadmium) type batteries.
Do not attempt to recharge alkaline or manganese batteries.
How to use the remote control unit properly
• Do not place obstacles between the remote control signal sensor
and remote control unit.
• Do not expose the remote control signal sensor to direct sunlight
or to the bright light of an inverter fluorescent light.
• Take care by keeping the remote control signal sensor and the
transmission window free from dust.
To prevent malfunctioning of the remote control unit:
• Do not disassemble or reconstruct the unit.
• Do not place heavy objects on top of it.
• Do not leave it where it will be exposed to direct sunlight.
• Do not spill beverages or other liquids over it.
Battery Ufe
The batteries life is about one year.
Although the battery life varies depending on how often the device
is used, the batteries should be replaced about once every year on
the average.
The batteries should be replaced if commands from the remote
control transmitter do not operate the unit even when the transmitter
is held close to the front panel.
Page 8
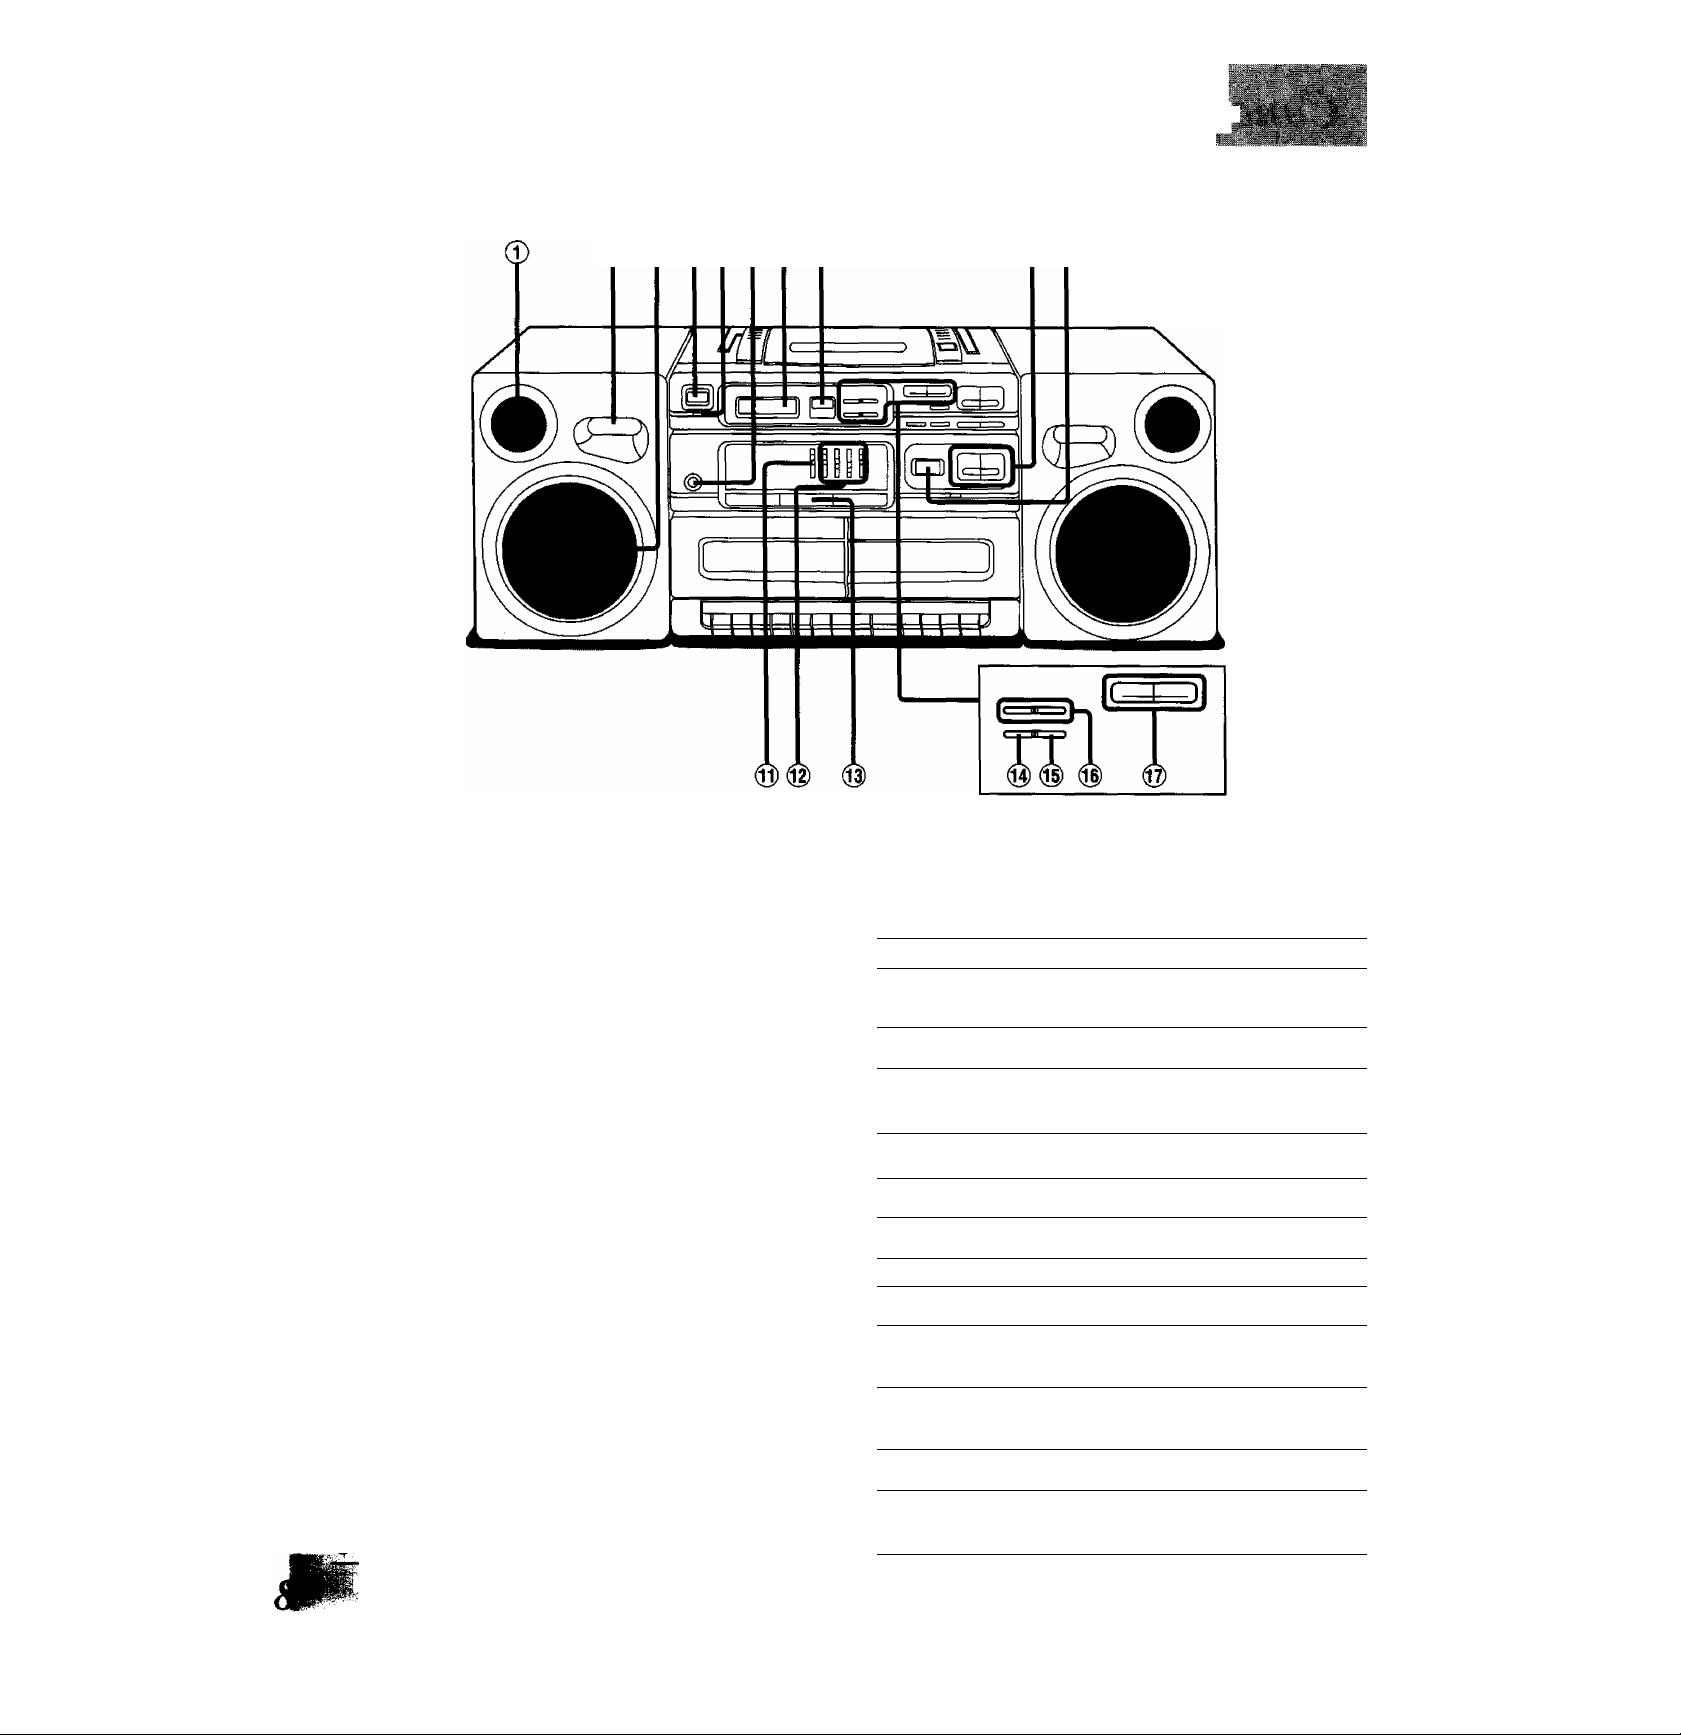
Location of Controh
® ® (4) ®®(7) ®
i i *-'i
Basic controls
No. Name Ref. page
® Speakers (Tweeter)
Bass reflex ports
® Speakers (Woofer)
® Power “STDBY c!) (AC)/ON” switch
[STDBY (!) (AC)/ON] 11
Press to switch the unit from on to standby mode or vice
versa. In standby mode, the unit is still consuming a small
amount of power.
® Power/battery, standby indicator
(POWER/BATT, STDBY CD)
The indicator lights green when the unit is turned on. When
the AC power supply is used, it functions as an AC connection
indicator. (The indicator colour changes to red when the unit
is turned off.) When the unit is operated on batteries, it
functions as a battery check indicator. (See page 4.)
® Headphones jack (PHONES)
(7) Display panel
® Remote control signal sensor
(REMOTE SENSOR)
Volume control buttons (- VOLUME +)
11
11
No. Name
® Extra bass system control button
(XBS MULTI-POSITION) 11
(0) Balance control (BALANCE) 11
® Graphic equalizer controls
(GRAPHIC EQUALIZER)
Ref page
11
Tuner controls
No. Name
® Tuner button (TUNER/BAND) 12
® FM mode/ beat proof button
(FM MODE/ B.P)
® Tuning memory button
(TUNING MEMORY)
® Tuning buttons (- TUNING +) 12
® Preset tuning button
(v PRESET TUNING a)
Ref page
14,20
12,13
12
Page 9
@ @
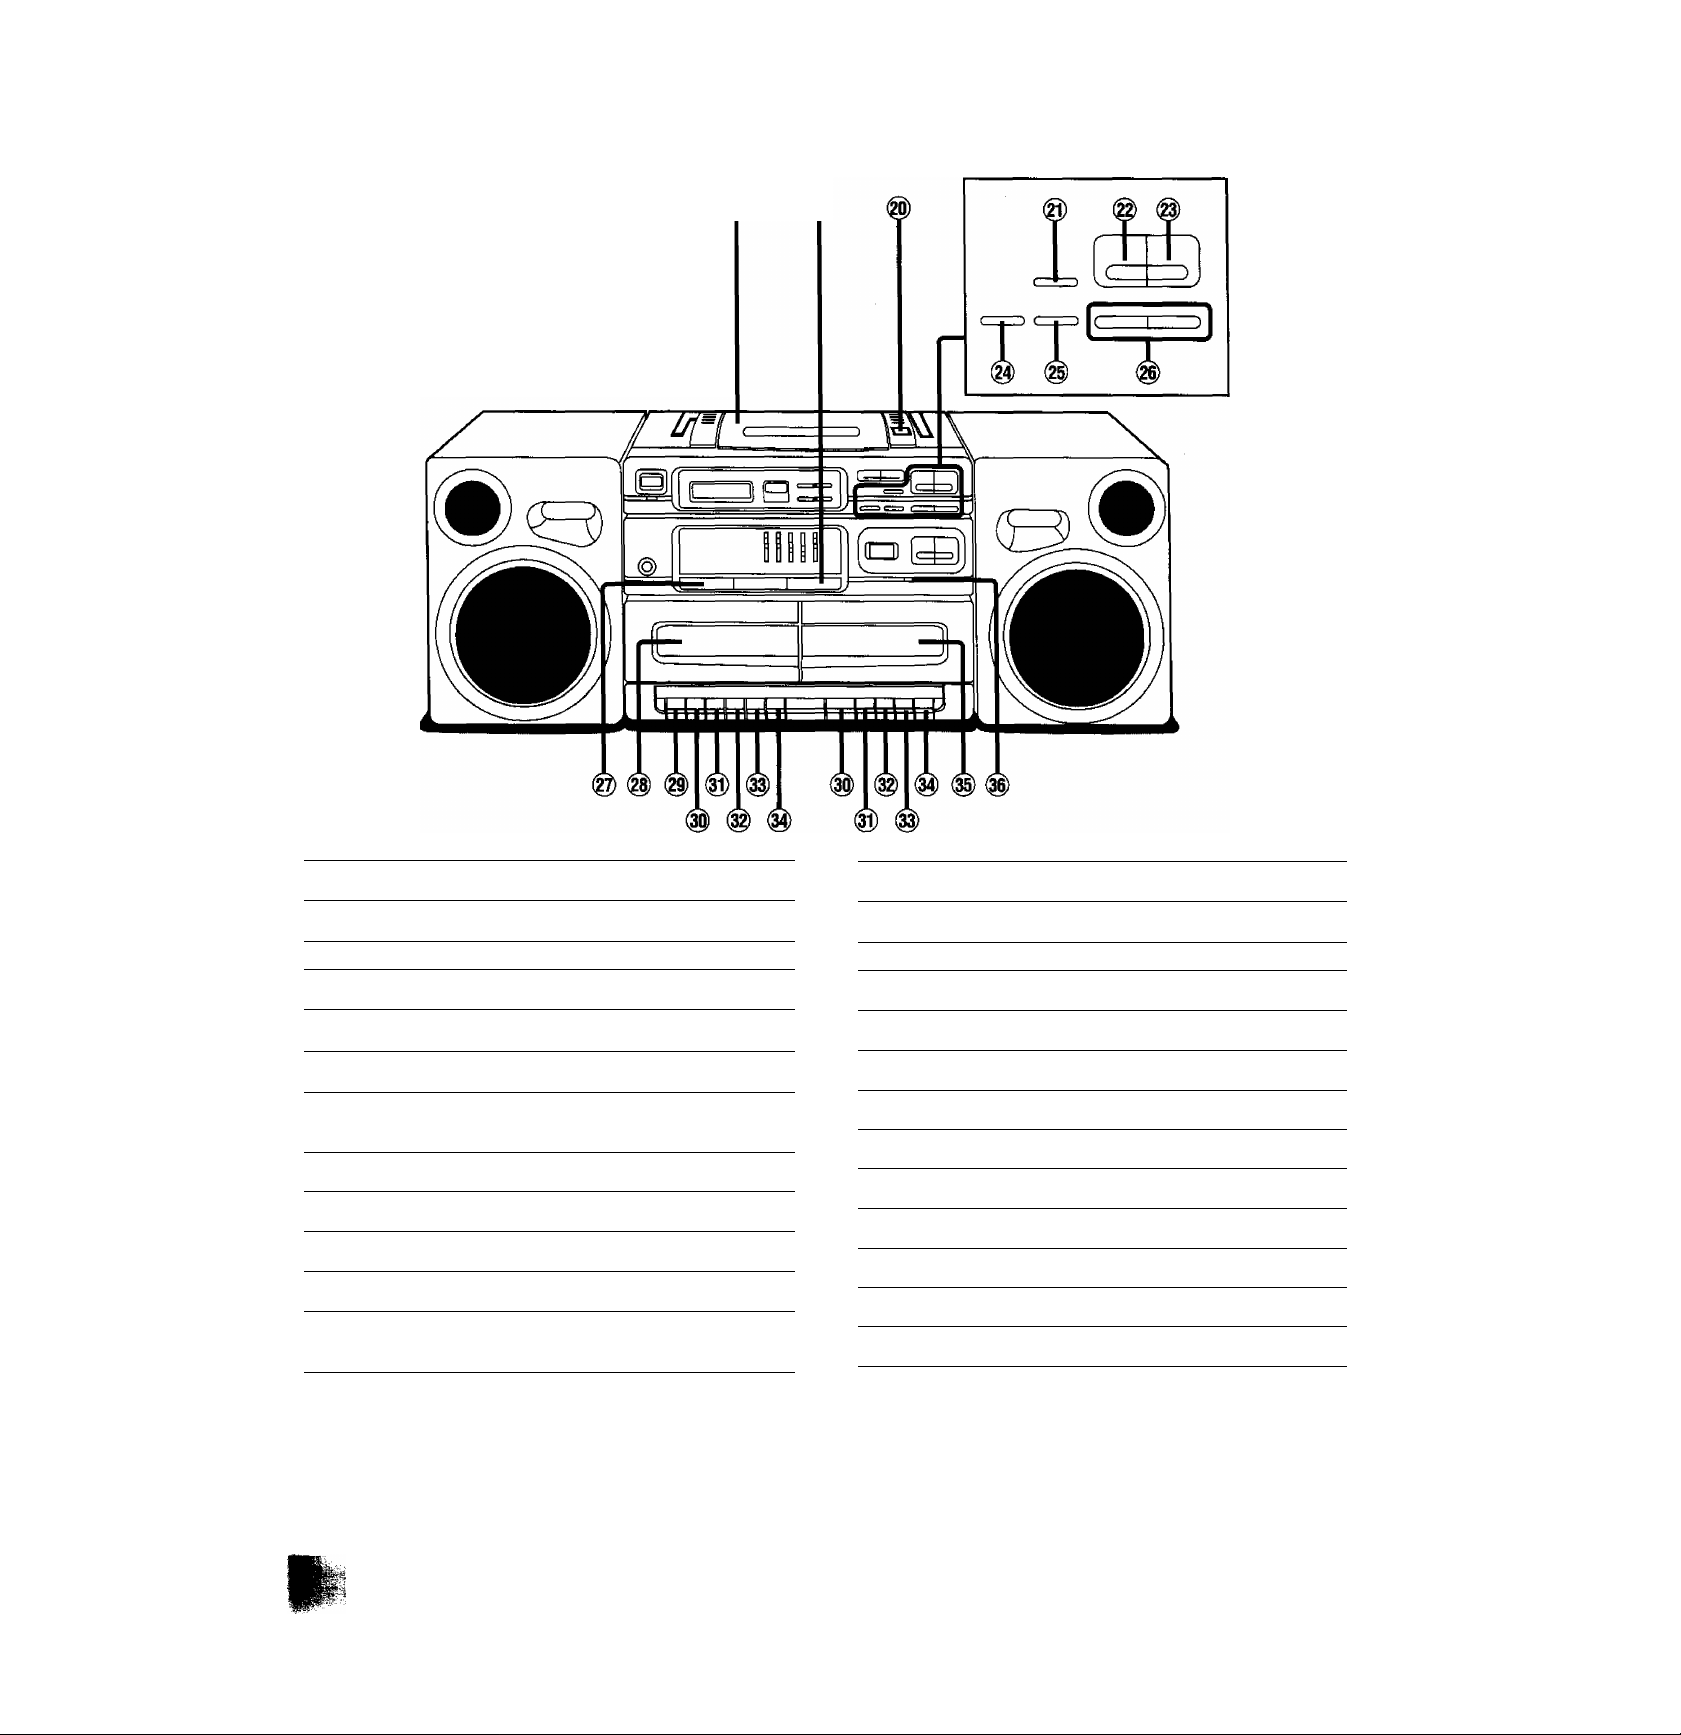
CD controls
No. Ncme Ref. page
® CD lid
® CD button (CD)
® CD lid open button (±)
14
14
14
@ Easy CD recording button
(EASY CD REC)
19
@ Stop/clear button (H/CLEAR) 14
© Play/pause button (Ml)
14
® Memory button (MEMORY) 15
® Repeat button (REPEAT)
® Skip/search buttons
(I◄◄SKIP/SEARCH►►I)
16
17
Cassette deck controls
No. Name
@ Tape button (TAPE)
@ Deck 1 cassette holder (DECK 1)
® Record button (• REC)
® Playback button (^ PLAY) 18
@ Rewind/review button (◄◄ REW/REV)
® Fast forward/cue button (►► FF/CUE) 18
® Stop/eject button (B/± STOP/EJECT)
@ Pause button
® Deck 2 cassette holder (DECK 2)
® Edit recording selector (EDITING)
(II
PAUSE)
Ref page
18
18
21
18
18
18
21
21
Page 10

Rear panel section
No. Name
® Speaker cable compartments
® Speaker release levers (RELEASE)
® Handle
® Mixing microphone jack (MIX MIC)
@ Speaker terminals
® Telescopic antenna
Ref. page
22
14
No. Name Ref page
6
6
6
® Memory back-up battery
compartment cover
@ AC socket (AC IN-)
® Battery compartment cover 4
® Speaker cables
5
4
6
Page 11

STO0YO (ACyON
BALAt^E 330Hz 1kHz 3.3kHz 10i(H2
GRAPHIC EQUALIZER
■ '=^;
f
—
+
■>
{
Turning the unit ON/OFF
STDSV O (AC)/ON
ST06Y 0 (ACyON
To turn the unit ON:
Press STDBY c!) (AC)/ON.
To turn the unit OFF:
Press STDBY <!) (AC)/ON.
When using an AC power, the unit is
turned to standby mode. (STDBY (!)
indicator lights red.)
Adjusting the volume
Press VOLUME buttons to
adjust the volume to the
desired level.
+ : Press this to increase the volume.
- : Press this to decrease the volume.
Adjusting the extra bass (XBS)
Press XBS to select the extra
bass to the desired level.
The display changes each time the button
is pressed.
‘XBS 0—XBS 1 —XBS 2 —XBS 3
IZ
Adjusting the graphic equalizer controls
—^ Adjust the graphic equalizer
=. controls to the desired settings.
330hlz 1kHz 3.3kMz lOhHz
GRAPHIC EQUALIZER
Adjusting the balance control
Adjust the balance of sound
heard from the left and right.
J R
BALANCE
Listening through headphones
(not included)
Reduce the volume and
connect the headphones to
the PHONES jack.
Plug type: Stereo mini
Avoid listening for prolonged periods of
time to prevent hearing damage.
to
Reference
When you adjust the volume level at -5 dB or higher, the XBS level
cannot be set at XBS 3.
11
Page 12

Once broadcast stations have been programmed, they can easily be tuned
Up to ten FM and AM stations each can be programmed.
12 4
Example; Programming FM 88.1 MHz in preset channel 2.
in at the touch of a button on the unit or on the remote control.
4
3*5
TUNER/Bj^D^^
- TUNING +
TUNING
MEMORY
Press TUNER/BAND to display
“FM” or “AM”.
AM—FM
□
{The display changes each time the
button is pressed.)
Press - TUNING + to tune in
the broadcast station.
FM stations can be selected automatically
(see the right).
—
CM
ru
^
_______
Press TUNING MEMORY.
Press V PRESET TUNING a to
display the preset channel in
which the station is to be
programmed.
!!l
00 1
UO. t
_______
-
6
the other stations.
Selecting FM stations automatically:
Repeat steps 2 to 5 to program
Keep pressing - TUNING + until the frequency display starts to change.
A station with good reception is automatically selected and the selection
process then stops.
To stop the selection at any time;
Press - TUNING + again.
The selection may stop without tuning into any station if there is
interference in the vicinity. In such case, tap - TUNING + until a
station's frequency is picked up.
Programming AM stations:
1. Press TUNER/BAND in steps 1 to display AM.
2. Perform steps 2 to 5.
TUNING
MEMORY
When IPGMj is flashing, press
TUNING MEMORY.
Page 13

<J1-:
Mk
Preset tuning
Make sure you have completed the procedure for “Programming
Broadcast Stations”. (See page 12 beforehand.)
To listen to a station without programming it first, refer to “Listening to
broadcast stations which have not been programmed". (See right.)
Using the main unit
tuner/bjj^d I Pr©ss TUNER/BAND to display
“FM” or “AM”.
AM—FM
□
(The dispiay changes each time the button
is pressed.)
Listening to broadcast stations which have not been programmed (Manual tuning)
TUNERm
Press TUNER/BAND to display
“FM” or “AM”.
j—► AM—►FM—I
(The display changes each time the
button is pressed.)
Press PRESET TUNING to select
the preset channel.
The station is changed each time the button
is pressed.
Using the remote control
C/w
I tl
O 1 c
tj t.J
Press - TUNING + to tune in
the broadcast station.
+ : Press this to increase the broadcast
frequency.
-: Press this to decrease the broadcast
frequency.
FM stations can be selected automatically
(see below).
Lights when an FM stereo
program is picked up.
Lights when a station is
tuned in properly
Seiecting FM stations automaticaliy;
Keep the button depressed until the frequency display starts to change.
A station with good reception is automatically selected and the selection
process then stops.
Frequency display steps:
The frequency display changes in the following steps:
FM: 100 kHz steps
AM: 9 kHz steps
pp
13
Page 14

: ^
(B)|
SfiSE
1 _1
[1
1
(0'S)
j
. >1 111 M 1 .
For better reception
When there is too much intetference during an
FM stereo broadcast
Reduce the interference by setting the sound to monaural.
FM MODE Press FM MODE/B.P.
/B.P
» 4
#0
iiA
1 2
f
------------WO.EAR
3
------------\
^fll
)
To return to stereo reception, repeat the same procedure and turn off
the lH5Fi51 display.
12^3
The display will not light in the monaural mode even when a
stereo broadcast is received.
Adjusting the antenna for better reception
FM
Pull out the telescopic antenna and adjust its length and angle for
optimum reception.
AM
Turn the unit in the direction which gives the best results.
Reference
Radio broadcasts may be hard to receive in a moving vehicle or
building because their signals are weak. Whenever possible, use the
unit by a window.
To stop play:
To stop play temporarily:
t n C 3
t C J J
die
U J
^ 1
Total number Total play time
of tracks
Press ^/11 to start play.
Play now starts in sequence from track 1
to the last track, after which it will stop
automatically.
1 t-r
1 f'L
k.
The track number Elapsed play time
currently plaiflng of track now playing
Press B/CLEAR.
—\
Ì t
t
J
Press Ml.
To resume play, press ^/11
again.
Interference may affect radio or TV reception when CDs are played
close to a radio or TV set. If this occurs, place tìie unit as far away
from the set as possible.
Page 15

■ .-f ■•' , - -7 •-=--• --V .-:,"i,-,,4 ,:' ^^f S^JLl'-i ',
; ■; .iiV ''
Selecting and listening to your favourite tracks (Program play)
up to 16 tracks can be programmed.
3
2
Using the main unit
Example: Selecting tracks 2, 5 and then 7.
«^sKip/sEARCH^w Press HMSKIP/SEARCH^W
3
select the desired tracks.
Press MEMORY.
f
c'
IBii 1
V.
Programmed track Play sequence
« - n
u
,]
1
J
Using the remote control
Example: Selecting tracks 2,5 and then 7.
■/CLEAR
Press WCLEAR.
o
'i!' Press or to select the
^desired tracks.
MEM0R'
3
MEMORY Press MEMORY.
o
5
To release program play:
Total play time of programmed track
Repeat steps 2 and 3 to
program other tracks as
well.
Press ^/11.
The programmed tracks are played in the
programmed sequence, and play stops
automatically.
In the stop mode, press B/CLEAR.
►/II
o
Repeat steps 2 and 3 to
program other tracks as
well.
Press ^/11 to start play.
15
Page 16

'--•■■■-■ . .-^r-.'--... ->v
.; ' * ' ' * '--t : -fTr " ' ^
s
X -» " '**■. _ ' " « *» ;
M^SKIP/SEARCH^W
1 lilBi
IL.
When “FULL” appears on the display:
The number of programmed tracks has exceeded 16. No more tracks
can be programmed.
When appears on the display:
The total time of the programmed tracks has exceeded 120 minutes.
However, programming and play are still possible.
Memory retention of programmed tracks;
The contents of the memory will be retained even if play is stopped or
if the power is turned off before its completion.
This appears when tracks have been programmed in the memory.
[am)
--------------------
1
1—
//!■
p
,ru-
IP51
Total play time of programmed track
To check what has been programmed:
Press or WH while the above display appears.
Each time this button is pressed, the number of the track and the play
sequence can be checked.
REPEAT
o
To repeat tracks (Repeat)
Before play or during play:
Press REPEAT.
i Z*
*C
To cancel repeat play:
Press REPEAT again to turn {o] indicator off.
For your reference:
• In program play (see page 15), the unit plays the programmed
tracks In the programmed sequence repeatedly.
• You can enjoy the same track over and over by programming only
one track.
c jnc
J JU J
rsi
-t
Lights
The programmed is erased in the following circumstances:
• When ± has been pressed.
• When the AC power cord is disconnected or the batteries are
removed without inserting memory back-up batteries beforehand.
References
If you leave the unit In the stop mode for about four minutes, it will
automatically turn itself off.
Page 17

W^SKIPySEARCHW
3
4
Starting CD play from a desired track
(Direct play)
Example: Starting disc play from track 9.
i't...................................................................................
CD
HMSKIP/SEARCHMH «◄SKIP/SEARCH^W
Press CD to select the CD
mode.
Press a/CLEAR.
to display track number (9).
(
-----0
J
Press ^/11 to start play.
r
nn t
UU 1
<
____
0
D
To skip tracks
W^SKIPySEARCH^*H
For your reference:
In program play (see page 15), you can skip forward and backward in
the programmed sequence.
Rapid forwarding and reversing (Search)
\
J
For your reference:
During program play (see page 15) search will orily take place within
the track in play.
J
K44SKIP/SEARCH»«4
Press to skip ahead to the
start of the next track.
Press \« to skip back to the
start of the current track.
By repeating this operation, you can skip
tracks in the number of times you pressed
the button.
During play:
Keep pressing to advance
the disc play rapidly.
Keep pressing to review
disc play rapidly.
Release the button when the desired
position on the disc Is reached.
All the tracks starting from the track
selected and ending with the last track
are played in sequence, and play
automatically stops.
17
Page 18

You can use either deck 1 or deck 2 for tape playback by following the same steps.
RÉW/HEV FF/CUE PAUSE
1 C
"'
2
To stop play:
STOP/
TAPE
STOPfiJECT
STOP/DECr
Press TAPE.
Press STOP/EJECT, insert the
tape and close the cassette
holder.
Reverse side
With the side
to be played
facing you
Press PLAY to start play.
Press STOP/EJECT.
Type of tape which can be played on this unit:
Normal/TYPE I
Cr02/TYPE II X
Metal/TYPE IV X
0
To rewind or fast forward the tape
REW/REV FF/CUE
Do not press PLAY during rewinding or fast forwarding, as this may
jam the tape. Be sure to press STOP/EJECT before proceeding to the
next operation.
In the stop mode, press REVWREV
or FF/CUE.
To search a particular spot on a tape
REW/REV FF/CUE
During playback, press REW/REV
or FF/CUE.
Tape play is resumed when the button is
released.
To stop play temporarily:
PAUSE
To resume play:
Press PAUSE again.
Press PAUSE.
References
If you leave the unit in the stop mode for about four minutes, it will
lly turn itself off.
Automatic playback relay
(Deck 2 to Deck 1)
When Deck 2 playback has finished. Deck 1 playback starts
automatically.
1 Insert the playback tapes into Deck 1 and Deck 2.
2 Press Deck 2 PLAY.
3 Press Deck 1 PAUSE, then press PLAY.
Full autostop
During playback, recording, fast forward or rewind when the tape
reaches its end, the automatic stop system will release the operation
buttons.
Page 19

tscs
Only normal tapes can be used with this unit.
Easy CD recording
Aii the tracks are recorded in their original sequence onto a single tape.
If your recording of the last track on the top side is incomplete, this track will be re-recorded at the beginning of the reverse side.
Preparation: Insert the CD.
> JT-V'’
1
............................................
EASY CD REC
CD
STOP/EJECT
Press CD.
Press EASY CD REC to display
the length of tape required.
Length of tape required
Lights to record all tr^ks
Press Deck 1 STOP/EJECT and
insert the tape which is longer
than the length displayed in
step 2.
• Insert the tape with the side to be recorded
facing you.
• Rewind the tape completely before
reoorcfing.
Press • REC.
The CD is set to the pause mode at the
start of the first track.
After a 10-second blank is recorded on the
leader tape, recording starts automatically.
STOP/EJECT
Press STOP/EJECT and
turn
the tape over.
6
REC
Press • REC.
After a 10-second blank is recorded on
the tape, the track which was partially
recorded on the end of the tape is
recorded from its beginning.
To stop recording:
■reUEAR I
STOPtJECT
Press l/CLEAR
EJECT.
and STOP/
%
Recording your favourite tracks:
After programming your favourite tracks (see page 15), perform
steps 2 to 6 above.
Type of tape which can be used for recording:
Normal/TYPE I
CrOa/TYPE II
Metal/TYPE IV
O
X
X
The tape stops when the end of top side is
reached. Tlie CD is set to the pause mode.
If the unit is brought near a TV set during recording, noise may be
recorded due to the effects of the signals from the TV set. Maintain
a distance of a least 1.5 meters between the unit and a TV set.
For your reference:
• Any change made to the volume or tone quality during recording
will not affect the recording.
• In order to prevent trouble caused by flat batteries, it is recom
mended that you either supply power to the unit from the house
hold AC outlet or replace all the batteries with new ones when you
are recording something which is important to you.
19
Page 20

.1.^ ! r«.'
Recording using an alternative method
(not easy CD recording)
Tracks on a CD can also be recorded in the following ways.
• CD tracks can be recorded onto the remainder of a recorded tape.
• Tracks can be recorded from the start of the tape’s reverse side.
• Tracks with a long play time can be recorded in their originai
sequence.
Preparation; Insert the CD.
CD
3 2
Press CD.
Program
Only normal tapes can be used with this unit.
Preparation: Take up the leader tape before proceeding.
.•■Í. lu r, %•••.
Tune in the broadcast station.
1
2
STOP/EJECT
(See page 13.)
Press Deck 1 STOP/EJECT and
insert the tape.
Insert the tape with the side to be
recorded facing you.
STOP/EJECT
Press Deck 1 STOP/EJECT and
insert the tape.
• insert the tape with the side to be
recorded facing you.
• Either have the leader tape wound up
in advance or locate the position where
recording is to begin. (See beiow).
Press REC to start recording on
the tape.
CD play starts simultaneously.
To take up the ieader tape:
Magnetic part of tape
(Recording can be made.)
Leader tape
(Recording cannot be made.)
To erase sound previousiy recorded on a tape:
Recording new sound onto a pre-recorded tape automatically erases
what was previously recorded.
To erase all the sound on a tape:
1. Insert the tape wth the side whose recording is to be erased facing you.
2. Press TAPE.
REC.
Press • REC.
To stop the recording:
STOP/EKCT
To stop the recording temporarily:
Press PAUSE.
To resume recording, press PAUSE again.
Press STOP/EJECT.
When too much noise is heard whiie recording an
AM broadcast:
FM MODE
/B.P
Set FM MODE/B.P to whichever
position yieids less noise.
The display changes each time the button
is pressed.
BP1 —- BP2-I
t 1
For your reference:
• Any change made to the volume or tone quality during recording will
not affect the recording.
• In order to prevent trouble caused by flat batteries, it is recommended
that you either supply power to the unit from the household AC
outlet or replace all the batteries with new ones when you are
recording something which is important to you.
Page 21

When the Deck 1 pause and record buttons are pressed, tape editing starts by pressing the Deck 2 playback button.
Only normal tape can be used with this unit.
Take up the leader tape before proceeding. (Refer to page 20).
Press the Deck 2 PLAY.
STOREJECT
1 C
TAPE
STOP/EJECT
Press TAPE.
Press Deck 1 STOP/EJECT
and insert the tape to be re
corded.
Insert the tape with the side to be re
corded facing you.
STOP/EJECT
Press Deck 2 STOP/EJECT
and insert the tape to be
played back.
Insert the tape with the side to be played
facing you.
r~n~i Select the editing speed by
setting EDITiNG.
HIGH : High speed
NORMAL : Normal speed
Press Deck 1 PAUSE, then
press REC.
Editing is started by means of the synchro-start function.
Do not set the “CD” or “RADIO” function selector during editing.
Do not change the editing selector during editing. The playback
sound may flutter.
Some TV sets generate noise that could be recorded during editing.
To prevent the possibility of this, do not use this unit closer than
1.5 m to a TV set.
To stop the editing:
SrOP£JECT
Press the Deck 1 and Deck 2
STOP/EJECT.
For your reference;
Recording is not affected by changes made to the volume or tone
quality during the recording.
The recording level and the noise reduction effect of the original
(playback) tape will be recorded on the new tape.
21
Page 22

:'s=ifc ;•
Mixing is the combination of a voice or instrumental sound {through a microphone connected to the mixing microphone jack) and the sound from
a CD, tape or radio.
icrTTinilini
@
MIX MIC
w-^'-
2 3
Mixing playback
1. Connect the microphone to MIX MIC after reducing the volume
level.
2. Set the desired source to the playback mode.
3. Start microphone mixing and adjust the volume level.
Mixing recording with CD or radio broadcast
1. Connect the microphone to MIX MIC after reducing the volume
level.
2. Insert a tape for recording in cassette Deck 1.
3. Set the desired source,
4. Press • REC.
• When not using a microphone, disconnect it from the microphone
jack.
• While using the microphone, howling or squealing may sometime
occur. When it occurs, separate the microphone from the speaker,
or turn down the volume level.
• When microphone mixing, if the CD or cassette tape is stopped or
CD is paused, the voiced sounds from the speaker also stop.
Page 23

Quick Reference of Rem^Ue Conirol
Common operations
Turning the power ON/OFF
(when a household power outlet is used)
Adjusting the volume
Adjusting the XBS level
Selecting the input sound source
Tuner operations
l:friVJd=l
o
-VOLL ME-I-
XBS
o
TUNER TAPE CD
o o CD
BAND
Listening to a programmed radio station
(See page 13.)
Listening to a radio station which has not been
programmed
Programming Broadcast station
(See page 12.)
To reduce the interference during FM Stereo
broadcast. (See page 14.)
TUNER V PRESET TUNE A
CD ^ CD CD
BAND
„ „ TUNING
TUNER - +
BAND
TUNER - +
BAND
MEMORY V PRESET TUNE A
0^0 0
TUNING
0-^00
MEMORY
FM MODE
CD
O CD ^
23
Page 24

CD operations
■■
lii
■
Starting play
(See page 15.)
Temporarily stopping play
Stopping play
To clear program play (See page 15.)
To skip tracks
(See page 17.)
To search forward or backwards
(See page 17.)
CD ►/■■
o-»o
►/II
o
■/CLEAR
o
oo
o o
Listening to favourite tracks
(See page 15.)
Listening to a track repeatedly
(See page 16.)
Listening from a particular track
(See page 17.)
■/CLEAR \MA »X MEMORY ►/!■
0-A00-*0^0
REPEAT
o
CD »►< ►/!!
o-»oo-*o
Page 25

Troubleshooting Guide
Before requesting service for this unit, check the chart below for a possible cause of the problem you are experiencing. Some simple checks or a
minor adjustment on your part may eliminate the problem and restore proper operation.
If you are in doubt about some of the check points, or if the remedies indicated in the chart do not solve the problem, refer to the directory of
Authorized Service Centers (enclosed with this unit) to locate a convenient service center, or consult your dealer for instructions.
Problem
Common problems
No operation when unit is
powered by batteries.
“U01” appears.
“U02” appears.
While listening to CDs
Play does not start.
No display of track
numbers, etc.
Certain sections are not
played properly.
While listening to ta
No recording.
High level of noise; poor
sound quality.
Probable cause(s)
Is the AC power cord still connected to the unit
while batteries are being used?
Are the batteries flat?
Have the batteries been installed incorrectly with
their (+) and {-) polarities reversed?
The batteries are flat.
Preparations have not been made to supply
power to the unit
Has the CD been installed upside down?
Has condensation formed on the unit’s CD
section?
Is the CD dirty?
Is the CD scratched?
pes
Have the erase-prevention tabs been removed?
Are the heads dirty?
Have the heads been magnetized?
Suggested Remedy
Disconnect the AC power cord.
Replace them with new ones. Alternatively, use a
household AC outlet as the power source.
Align the (+) and (-) polarities correctly.
Replace them with new ones. Alternatively, use a
household AC outlet as the power source.
Install the batteries or connect the AC mains lead.
Install the CD with the label side facing up.
Turn the unit on and leave it on for about an hour
before further operation.
Wipe it with a soft cloth.
Replace it with a new CD.
Cover the holes with adhesive tape.
Clean them.
Demagnetize them using a demagnetizer available
from an audio store.
While listening to the radio
High level of noise; stations
cannot be tuned in weli.
Noise heard during AM
reception.
Has the antenna been adjusted properly? Try changing its direction.
Are you operating the unit and a TV set at the
same time?
Are you using a remote controller for other
appliances near the unit?
While using the remote control
No operation.
Are the batteries flat?
Have the batteries been installed incorrectly with
their (+) and (-) polarities reversed?
Is the remote control’s transmitter pointed at the
unit’s sensor?
Is the unit’s sensor exposed to direct sunlight or
strong fluorescent light?
Place the unit at a distance from the TV.
Alternatively, turn off the TV’s power.
Use the remote controller at a distance.
Replace them with new ones.
Align the (+) and (-) polarities correctly.
Check whether anything is obstructing the path
between the two and point the remote control squarely
at the unit’s sensor and operate.
Shield the sensor from strong sources of light.
25
Page 26

Maintenance
Maintenance of external surfaces
To clean this unit, use a soft, dry cloth.
If the surfaces are extremely dirty, use a soft cloth dipped in a soap-
and-water solution or a weak detergent solution.
Wring the cloth well before wiping the unit.
Wipe once again with a soft, dry cloth.
Never use alcohol, paint thinner, benzine, or chemically treated
cloths to clean this unit. Such chemicals may damage the finish of
your unit.
Lens care
Open the disc lid and clean the lens with a blower (not included). If
the lens is extremely dirty, clean it with a cotton swab.
Tape head care
To assure sound quality for recording and playback, be sure to clean
the tape heads after approximately every 10 hours of use.
1. Press STDBY c!) (AC)/ON to turn the unit off.
2. Press STOP/EJECT to open the cassette holder.
3. Clean the tape heads, pinch rollers and the capstan shafts with a
cotton swab (or a soft, lint-free cloth) slightly moistened with
isopropyl alcohol.
Do not use any solution other than alcohol for head cleaning.
Tape head demagnetization
In order to maintain good sound quality, it is recommended that the
head assembly be demagnetized when distortion or poor sound quality
persists after cleaning the head. If the head assembly becomes
magnetized, it could create loss of high frequency response.
Several types of head demagnetizers are available and may be
purchased separately at local electronics supply stores. Follow the
instructions that are supplied with the device.
Do not bring any type of metal objects or tools such as magnetic
screwdrivers in contact with the head assembly.
Page 27

Concerning
Concerning
Compact Discs
Only compact discs having this mark can be used ncoMPACT
with this unit.
To remove a disc from its case
Press the center holder and lift the disc holding by the edges.
To hold the disc
Hold the disc by the edges so the surface is not soiled with finger
prints.
Fingerprints, dirt and scratches can cause skipping and distorUon,
(Correct)
ncc
m
DIGITAL AUDIO
Cassette
Selection of cassette tapes
Only normal tapes can be used with this unit.
Cassette tape exceeding 90 minutes:
These tapes are handy for their long playback and recording time
but be careful about repeatedly stopping and starting, rewinding and
fast forwarding these tapes in short intervals as they are thin, tend
to stretch and may become entangled in the deck mechanism.
Endless tapes:
Failure to operate these tapes correctly may cause the tape to wind
around the revolving parts.
If the tape loosens, take up the slack
Tape slack may cause the tape to break.
To store a disc in its case
Insert the disc with label facing upwards and press downward at the
center.
Label
If the surface is soiled
Wipe gently with a soft, damp (water only) cloth.
(Correct) (Incorrect)
o
If the disc is brought from a cold to a
warm environment^ moisture may form
on the disc
Wipe this moisture off with a soft, dry, lint-free cloth before using the
disc.
Improper disc storage:
You can damage discs if you store them in the following places;
• Areas exposed to direct sunlight.
• Humid or dusty areas.
• Areas directly exposed to a heat outlet or heating appliance.
Handling precautions;
• Do not write on the label side with a ball-point pen or other writing
utensils.
• Do not use record cleaning sprays, benzine, thinner, static electricity
prevention liquids or any other solvent.
• Do not soil with fingerprints.
To prevent erasure of recorded sounds
Remove the erase-prevention tabs with a screwdriver or a similar
object.
To re-record on a protected cassette, cover the slot with adhesive
tape.
Adhesive tape
Improper tape storage:
You can damage tapes if you store them in the following places;
• In high temperature [36°C (95°F) or higher] or high humidity (80% or
higher) areas.
• In a strong magnetic field (near a speaker, on top of a TV, etc.)
This can erase a recording.
• Areas exposed to direct sunlight.
27
Page 28

Technical
Specifkatàons
Radio
Frequency range
AM
FM
CD player
Sampling frequency
Decoding
Beam source
No. of channels
Frequency response
Wow and Flutter
D/A converter
Tape recorder
Track system
Recording system
Erasing system
Monitor system
Frequency range
Normal
General
Power requirement
AC
Battery
Memory back-up for
computer
Power output
Speakers
Jacks
Output
Dimensions (WxHxD)
Weight
Semiconductor iaser (wavelength 780 nm)
Less than possibie measurement data
15 V (Ten R20/LR20, UM-1 batteries)
522-1611 kHz (9 kHz steps)
87.5-108.0 MHz (100 kHz steps)
44.1 kHz
16 bit linear
2 channel, stereo
20 Hz-20 kHz (0. -2 dB)
MASH (1 bit DAC)
4 track, 2 channel, stereo
AC bias
Muiti poie magnet
Variabie sound monitor
80-14,000 Hz
230-240 V, 50Hz
Power consumption: 25 W
6 V (Four R6/LR6, UM-3 batteries)
60 W(30Wx2)...PMPO
2 Woofer; 12 cm
2 Tweeter; 1.5 cm
Speaker; 2.7-8 Q
Headphones: 32 fi
643 X 251 X 239 mm
Main unit; 313 x 251 x 223 mm
Speaker box; 170 x 240 x 201 mm
6.9 kg without batteries
Note:
Specifications are subject to change without notice.
Weight and dimensions are approximate.
MASH is a trademark of NTT.
Matsushita Electric Industrial Co., Ltd.
Central P.O. Box 288, Osaka 530-91, Japan
Printed ill Singapore
RQT2839-B
P0295LO
 Loading...