

Page 1
Operating
■nstmctions
Portable Stereo Component System
MODELNO
RX-CS710
.
.....
PaiuKonic
Read these instructions oompietely before operating this unit.
Page 2
> 999 99
Page 3

Thank you for purchasing this unit.
For optimum performance, follow these operating instructions carefully.
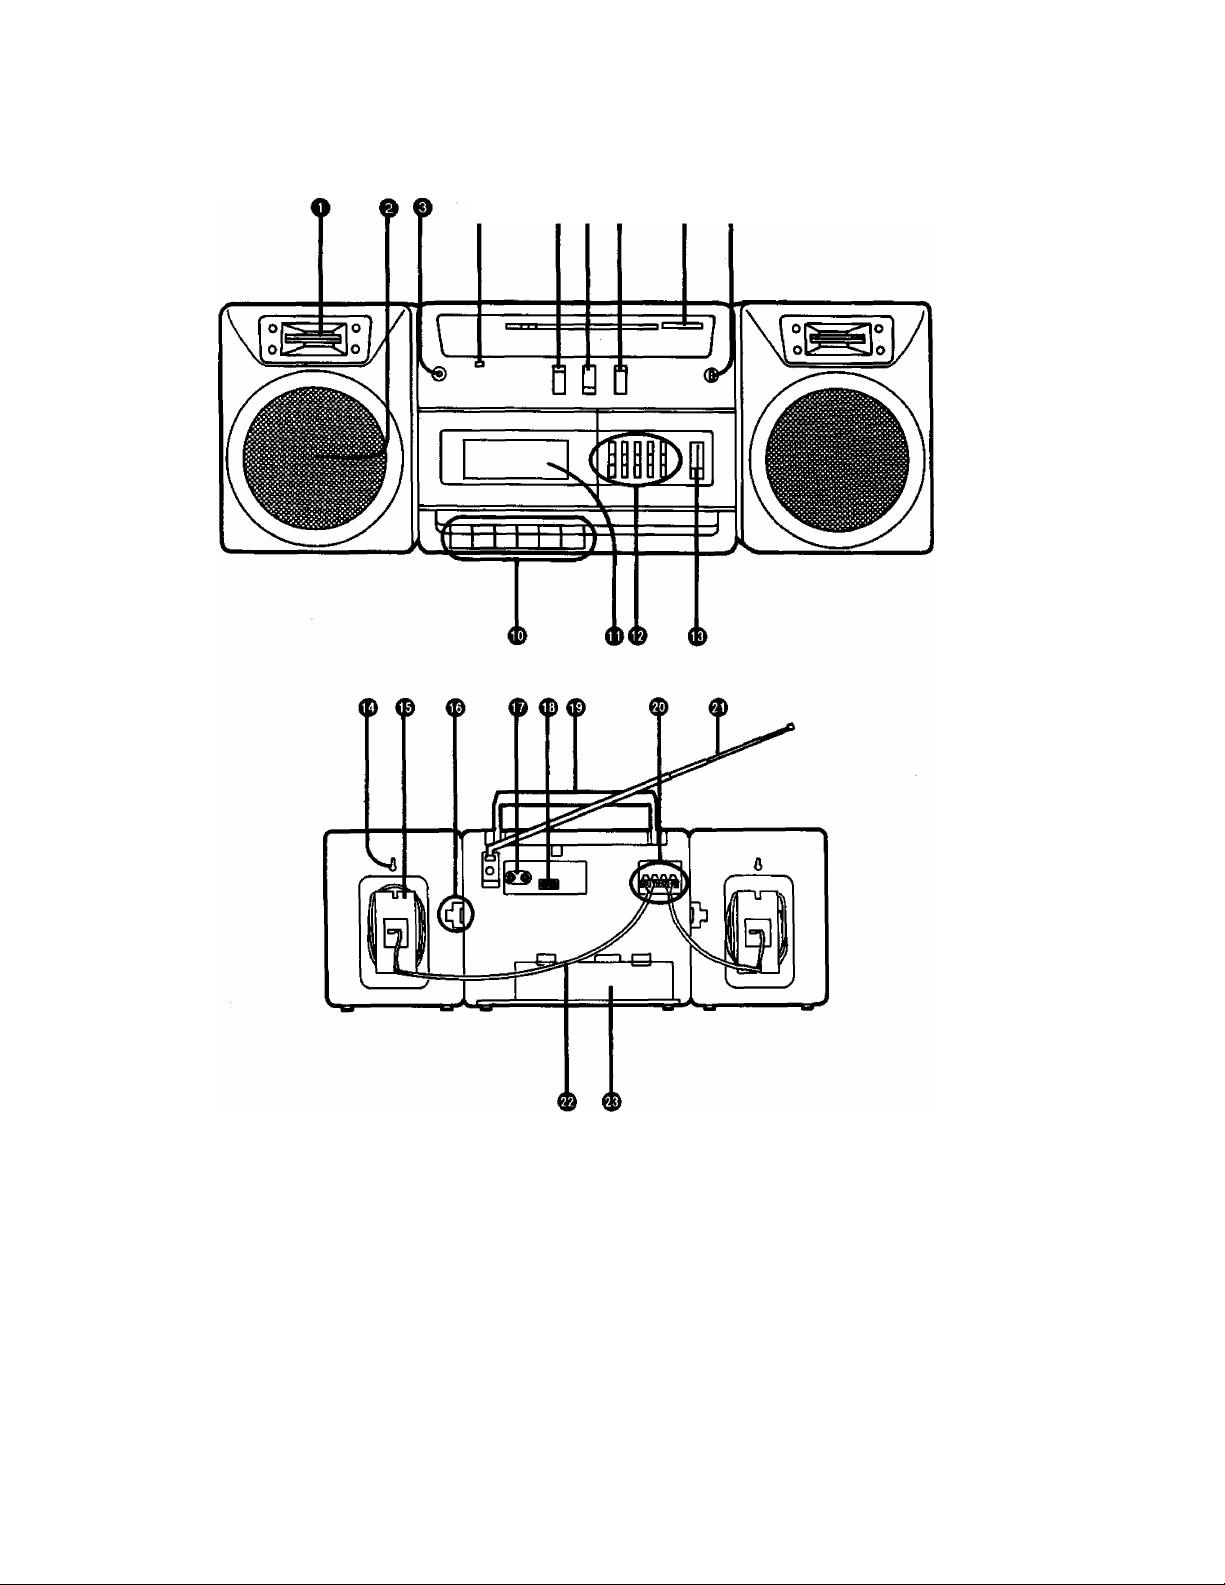
LOCATION OF CONTROLS
O Speakers [Tweeter]
O Speakers [Woofer]
O Headphones Jack (PHONES)
•When using the headphones, avoid listening to sound
at excessive volume levels, because it may injure your
ears.
•Speakers are automatically cut off when headphones
are connected.
O FM Stereo Indicator (FM STEREO)
0 FM Mode Selector/Beat Proof Switch
(FM MODE/B.P)
O Function Selector (SELECTOR)
O Band Selector (BAND)
O Tuning Control (TUNING)
O BuilHn Microphone (MIC)
0 Tape Operation Buttons
'^Record Button (• IRECORDI)
Playback Button (P- PLAY)
Rewind/Review Button (<4'4 REW/REV)
Fast Forward/Cue Button (P>P> FF/CUE)
Stop/Eject Button (B/^ STOP/EJECT)
Pause Button (I I PAUSE)
\
0 Cassette Compartment
0 Graphic Equalizer Controls
(GRAPHIC EQUALIZER)
0 Volume Control (VOLUME)
0 Speaker Wall Mounts
0 Speaker Cable Compartments
0 Speaker Release Levers (RELEASE)
0 CD/LINE Input Jacks (CD/LINE IN)
0AC Socket (AC IN ~)
0 Handle
0 Speaker Terminals [SPEAKER (IMP 2.7-80)]
0 Telescopic Antenna
0 Speaker Cables
0 Battery Compartment
PRECAUTIONS
•If the set is not used for a long period of time or Is
used only from an AC power source, remove all the
batteries to prevent potential damage due to possible
battery lealmge.
•Avoid using or placing this unit near sources of heat. Do
not leave it in an automobile exposed to direct sunlight for
a long time with the doors and windows closed as this may
deform the cabinet.
•Avoid cuts, scratches, or poor connections in the AC
power cord, as they may result in possible tire or electric
shock hazard. Also, excessive bending, pulling or splicing
of the cord should be avoided,
•Do not unplug the AC power cord by pulling on the cord.
To do so may cause premature failure or shock hazard.
•Do not operate the set on AC power in a bathroom, as a
potential shock hazard may result.
WARNING:
TO REDUCE THE RISK OF FIRE OR
ELECTRIC SHOCK, DO NOT EXPOSE
THIS APPLIANCE TO RAIN OR MOIS
TURE.
•When not In use, disconnect the AC power cord from the
AC power outlet.
•The Function Selector switch does not separate entire unit
from mains even if in “TAPE/[o^’' position.
Max. 40“C
Page 4
POWER SOURCE
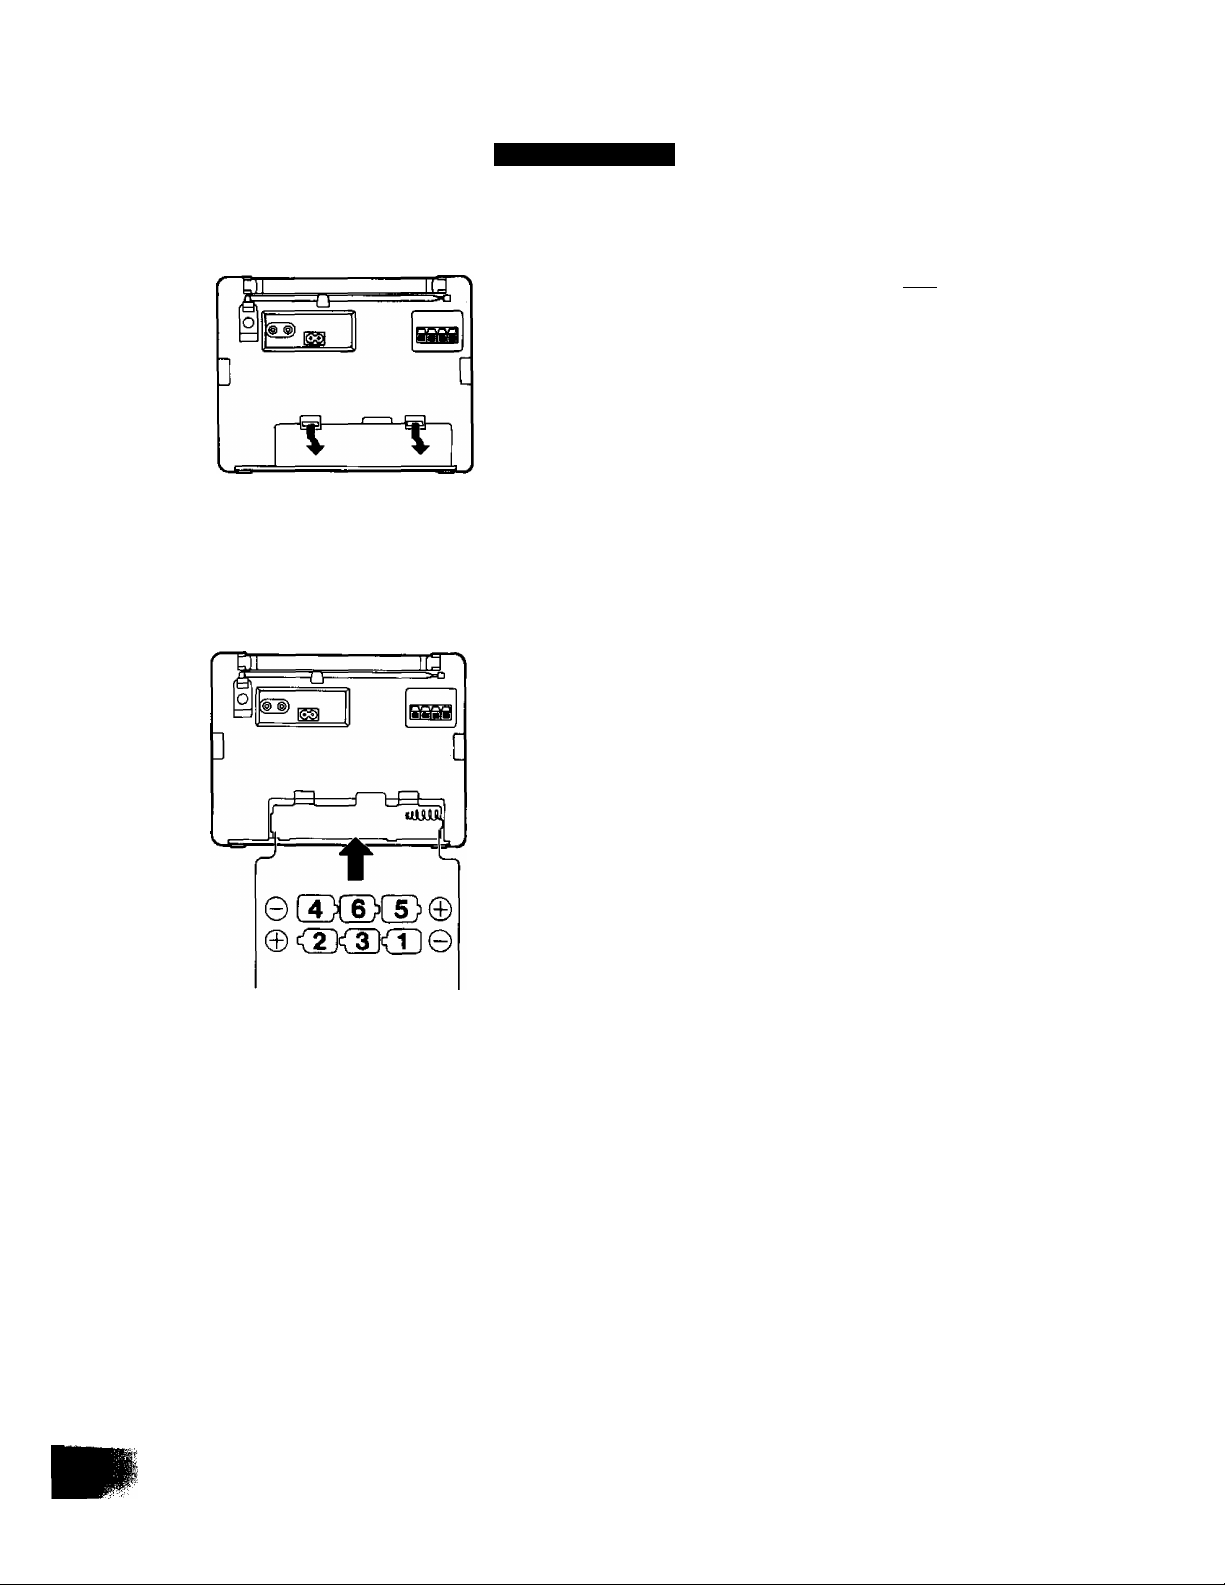
■ Battery Operation
1. open the Battery Compartment cover as shown in the
figure below.
2. Insert 6 UM-1 size (Panasonic R20P/LR20 or equivalent,
not included) batteries into the Battery Compartment,
making sure that the batteries are installed in the
designated numerical order and that the proper polarities
are maintained.
•Battery life
When the batteries are weak, the tape speed will slow down,
the sound will become distorted, and the volume will
decrease.
Set the Function Selector to “TAPEyfoFFj”. Press the
Playback Button. When the sound is distorted, it is time to
replace all the batteries with new ones.
OK
NORMAL
■=> ^ NO
REPLACE
■ AC Power Operation
Connect the included AC power cord to the AC Socket in the
unit and your household AC power outlet.
AC power cord
ACIN~
AC power outlet
->©
3. Replace the compartment cover.
To Prevent Possible Damage to This Unit
•Load new batteries with their polarities (0 and 0)
aligned correctly.
•Do not apply heat to batteries, or internal shortcircuit may occur.
•If this unit is not to be used for a long period of time,
or used on AC power supply, remove all batteries
and store them in a cool and dry place.
•Remove spent batteries immediately.
•Do not use old and new batteries together. Also
never use an alkaline battery with a manganese
battery.
Note:
To operate on battery power, unplug the AC power
cord from the household AC power outlet and the AC
Socket on the unit.
•Important note:
If you cannot open the cassette compartment cover and
eject the cassette tape when running this unit on batteries,
replace the batteries with new ortes, or use AC power
source, and then press the Operation switch to turn on the
unit, then perform the operation once again.
Page 5

SPEAKER SYSTEM CONNECTION
This unit can be used as a one-piece portable stereo radio cassette recorder, or a three-piece component system, by attaching or
detaching the speaker system.
•Before attaching or detaching the Speakers, be sure to disconnect the Speaker Cables from the Speaker Terminals.
•Be sure to set the Function Selector to “TAPE/[ot^’’ before connecting the Speaker Cables.
■ Attaching the Speakers
1. Align the speaker with the main unit as shown in the
figure, interlock the grooves and press down.
2. Connect the speaker cord end, marked by a coloured
line, to the © speaker terminal and the other cord to the
© speaker terminal.
•Stereo effect and tonal quality are likely to be impaired
if the polarities (© and ©) are not properly maintained.
■ Detaching the Speakers
1. Unlock the Speaker Release Levers by pulling them in
the direction shown below, and slide up each Speaker.
2. Connect the Speaker Cables to the Speaker Terminals.
Note:
Since a strong magnet is used for the Speaker, keep
magnetized commuter passes, tickets or personal
credit cards, recorded tapes, watches, etc. away
from the set. The speaker magnet in the set may
damage them.
■ Speaker Wall Mounts
1. Drive one screw into the wail for each speaker, as shown
in the figure. Ensure that both the screws and the wall
can support a 5 kg load.
2. Mount the Speakers to the wall by hanging the Speaker
Wall Mounts (built into the speaker cabinet) onto the
screws.
Page 6

RADIO TAPE PLAYBACK
1. Set the Function Selector to “RADIO"’.
2. Set the Band Selector to the desired radio band.
3. Tune in your favourite station using the Tuning Control.
4. Adjust the Volume and Graphic Equalizer Controls to
the desired settings.
(Refer to "Graphic Equalizer’’.)
5. The radio can be turned off by setting the Function
Selector to “TAPE/[o^’’.
Notes:
•To receive FM stereo broadcasts, set the FM Mode
Selector to “STEREO ”.
The FM Stereo Indicator will light during stereo
broadcasts.
• If FM stereo reception is poor (excessive noise, FM
Stereo Indicator flickers), set the FM Mode Selector
to “MONO”.
This will reduce the noise and provide clear
reception; however, the broadcast will not be heard
in stereo.
■ Graphic Equalizer
it allows you to tailor the frequency response of the unit to
compensate for room acoustics and other factors which
affect frequency response. The overall tone can be altered
by adjusting the five controls which control the following
frequency bands:
100 Hz, 330 Hz, 1 kHz, 3.3 kHz, 10 kHz.
Positioning the control to the “+" side of the detent will
amplify the corresponding frequency band; the side
will attenuate it.
1. Open the Cassette Compartment cover by pressing the
Stop/Eject Button. Insert the cassette as shown in the
figure, and then close the Cassette Compartment cover.
Note:
Make sure the exposed part of the cassette tape
faces down. If it Is upside down, the Cassette
Compartment cannot be closed. Do not try to force it
shut.
2. Set the Function Selector to “TAPE/joF^".
3. Press the Playback Button to begin tape playback.
4. Adjust the Volume and Graphic Equalizer Controls to
the desired settings.
5. To stop playback, press the Stop/Eject Button.
Otherwise, at the end of the tape, the Playback Button
will be refeased and the unit will be shut off automatically.
■ Full Auto-Stop
During playback, recording, fast forward or rewind when the
tape reaches its end, the automatic stop system will release
the operation buttons and automatically turn the unit off.
Note that the unit is not turned off if the Function Selector is
set to “RADIO" or "rcDl/LINE”. it must be set to “TAPE/
■ Antennas
FM;
Pull out the Telescopic Antenna and adjust its length and
angle for optimum reception.
AM:
The sensitive ferrite core antenna inside the set will provide
excellent AM reception in most areas. For optimum recep
tion, turn the set in the direction which gives the best results,
since the ferrite core antenna is directional.
■ Fast Forward and Rewind
The tape will move rapidly forward when the Fast Forward/
Cue Button is pressed.
The tape will be rewound rapidly when the Rewind/Review
Button is pressed.
Note:
Do not press the Playback Button during fast forward
or rewind, as this may jam the tape. Always press the
Stop/Eject Button first, between functions.
■ Cue and Review
If the Fast Forward/Cue Button (or Rewind/Review Button)
is pressed during playback, the recorded sound on the tape
can be monitored at a fast speed.
When the button is released, playback will resume.
■ Pause Button
The Pause Button can be used to temporarily stop the tape
from moving during recording or playback.
Before beginning a recording, first press and lock the Pause
Button. Then, press the Record Button. (The tape will not
move.) When ready to record, press the Pause Button to
release it. This will start tape movement for immediate
recording.
Note:
Do not use the Pause Button to stop the tape for a
long period of time.
The unit is not turned off when the Pause Button is
pressed. Always use the Stop/Eject Button to turn the
unit off.
Page 7

RECORDING
•This unit has an Automatic Level Control (the recxirding
level is automatically adjusted.)
■ Recording Radio Broadcasts
1. Follow the procedure described in "RADIO”.
2. Insert the cassette into the Cassette Compartment.
3. Press the Record Button and the recording will begin.
4. To stop the recording, press the Stop/Eject Button.
5. Set the Function Selector to “TAPE/Toff]” to turn the unit
off.
Note:
The Graphic Equalizer does not function when
recording. Only the monitor sound is affected.
•Beat Proof Switch
When an AM broadcast is recorded, the Beat Proof Switch
can be used to reduce unwanted "beat” signals (whistle)
which are sometimes present. Set the switch to the position
where these “beat" signals are best reduced.
■ Recording through the Built-in Microphone
(Monaural only)
The condenser microphone in this unit is omni-directional
(all directions), so that recordings can be made from any
direction.
1. Set the Function Selector to “TAPE/[of^”.
2. Follow the procedure described in steps 2-4 of “Record
ing Radio Broadcasts”.
■ Recording from Externai Equipment
(Refer to page 9.)
1. Connect the output of the external equipment to the
CD/Line Input Jacks.
2. Set the Function Selector to “] co l/LINE’’.
3. Follow the procedure described in steps 2-5 of “Record
ing Radio Broadcasts".
■ Monitoring
The monitor system enables you to listen, through the
Speakers or headphones, to the sound as it is being
recorded.
If It is necessary to adjust the volume level of the sound
being monitored, do so by using the Volume Control.
•When recording from the Built-in Microphone, the sound
being recorded cannot be monitored.
■ Erasure of Recordings
When recording, previously recorded signals on the tape will
be erased automatically.
To erase a tape without re-recording, use the following
procedure.
(Make no connections to the CD/Llne Input Jacks.)
1. Set the Function Selector to “| co l/LINE”.
2. Press the Record Button.
USING THE SET AS AN AMPLIFIER
1. Connect the equipment to be amplified to the CD/Line
Input Jacks.
2. Set the Function Selector to ‘TcdI/LINE”.
3. Adjust the Volume and Graphic Equalizer Controis to
the desired settings.
4. Set the Function Selector to "TAPE/fo^” to turn the unit
off.
Use only good-quality tapes up to the length of C-90.
Do not use C-120 tapes with this unit because these tapes
can easily become broken or stretched if not used with
extreme care and may get tangled with the capstan and
pressure roller.
Notes:
•Use normal types of cassette tapes only. If other
tapes are used, you may not obtain optimum
performance.
•Cassettes, both recorded and unrecorded, should
not be stored in locations with high temperature,
high humidity or direct sunlight. Never place a
recorded cassette near a magnetic source, such as
a magnet or a TV set as this may affect tape
performance.
CASSETTE TAPES
Page 8

RECORD PREVENTION TABS
Cassettes are provided with plastic tabs (as illustrated) to
prevent accidental erasing of a recording.
Recordings can be made only when the tab is intact.
There is one tab for each side of the tape. To preserve a
valuable recording, the tab(s) should be broken off with a
small screwdriver.
If you want to record on a track whose tab has already been
broken off, use cellophane tape to cover the hole, and
record.
Screwdriver | RECORD
I
NO
I
RECORD
I O K
For side 1
For side 2
Tab
MAINTENANCE
The head assembly, Capstan, and Pressure roller are in
constant contact with the tape. If these parts are dirty, the
sound quality will be impaired. Get into the habit of cleaning
the parts regularly (after every 10 hours or so of use) in
accordance with the procedure outlined below.
1, Open the Cassette Compartment cover by pressing the
Stop/Eject Button.
2. Press the Record Button while pushing the Erase
prevention lever (see the figure) located inside the
Cassette Compartment.
The Recording/playback head. Erase head, Capstan and
the Pressure roller can be seen. Clean them with a Cotton
swab.
Notes:
•If the heads are extremely dirty, clean them with a
soft cloth dampened with a little alcohol.
•Do not bring any type of metal objects or tools such
as magnetic screwdrivers in contact with the head
assembly.
•Do not clean the plastic cabinet with benzine or
thinner. Clean it with a solution of soap and water.
•Avoid spray-type insecticides. Some insecticides
contain chemicals that could cause cabinet de
formation.
Cellophane tape
Erase head
Erase
prevention , R«or<ling/playba*
I-.,-.. ' head
lever
otton swab
Capstan
Pressure
roller
Page 9

Compact disc player
Headphones
(EAH-S18, optional)
CONNECTIONS
Function Selector...“I co l/LINE"
Page 10

SPECIFICATIONS
■ Radio
Frequency Range;
■ Tape recorder
Track System:
Recording System:
Monitor System:
Frequency
Response:
Normal;
■ General
Power Requirement;
FM; 88-108 MHz
AM; 525-1705 kHz
4-track, 2-channel, stereo
AC bias, magnet erase
Variable sound monitor
70 Hz-9000 Hz
AC; 230-240 V, 50 Hz
Power consumption; 15 W
Battery; 9V
(6 UM-1 size, R20/LR20 size
batteries)
Speakers;
Jacks:
Input;
Output;
Dimensions
(WxHxD):
Weight:
Design and specifications are subject to change without
notice.
2-Woofers; 12 cm
2-Tweeters; 2 cm
CD/LINEIN; -8dB/47ka
SPEAKER; 2.7-80
HEADPHONES; 320
552x199x163 mm
Main unit; 260 x 199 x 163 mm
Speakerbox; 150x198xi54mm
3.2 kg without batteries
Page 11

Matsushita Electric industrial Co., Ltd.
Central P.O. Box 288, Osaka 530-91, Japan
RQT1264-1L
F0591G0
Page 12

 Loading...