

Page 1
E
Manufactured by:
Panasonic Corporation
Kadoma, Osaka, Japan
Importer for Europe:
Panasonic Marketing Europe GmbH
Panasonic Testing Centre
Winsbergring 15, 22525 Hamburg, Germany
EU
Operating Instructions
Bedienungsanleitung
Mode d’emploi
Istruzioni per l’uso
Instrucciones de funcionamiento
Gebruiksaanwijzing
Bruksanvisning
Betjeningsvejledning
Návod k obsluze
Instrukcja obsługi
Kezelési útmutató
Návod na obsluhu
Инструкция по эксплуатации
使⽤说明书
使用說明書
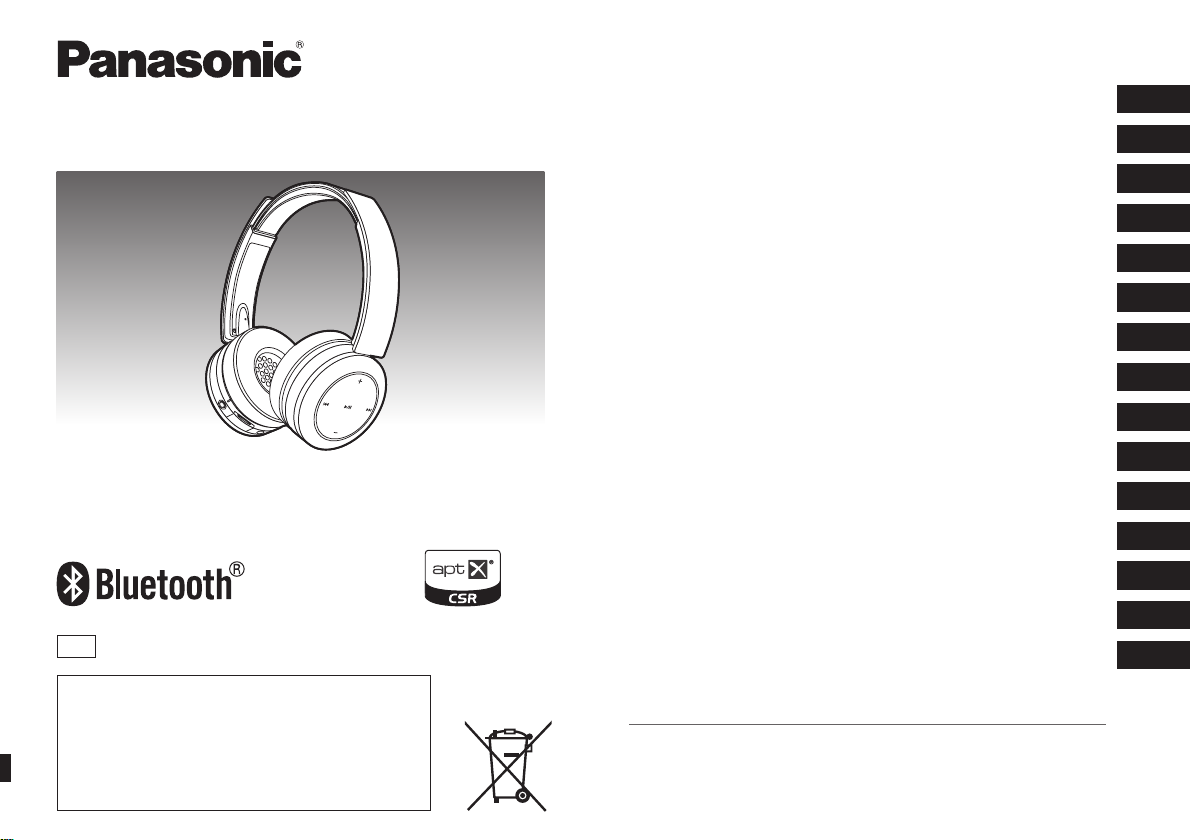
Digital Wireless Stereo Headphones
ENGLISH
DEUTSCH
FRANÇAIS
ITALIANO
ESPAÑOL
NEDERLANDS
SVENSKA
DANSK
Digitale drahtlose Stereo-Kopfhörer
Casque d’écoute stéréo sans fil numérique
Cuffie stereo senza fili digitali
Cascos auriculares estéreo inalámbricos digitales
Digitale draadloze stereo-hoofdtelefoon
Digitala trådlösa stereohörlurar
Digital trådløse stereo hovedtelefoner
Digitální bezdrátová stereofonní sluchátka
ČESKY
POLSKI
MAGYAR
SLOVENSKY
РУССКИЙ ЯЗЫК
Bezprzewodowe cyfrowe słuchawki nagłowne stereo
Digitális vezeték nélküli sztereó fejhallgató
Digitálne bezdrôtové stereo slúchadlá
Цифровые беспроводные стереонаушники
中⽂(简体)
中文(繁體)
数码⽆线⽴体声头戴式⽿机
數碼無線立體聲頭戴式耳機
Model No. RP-BTD10
VQT5J79-1
Page 2
Dear customer
Thank you for purchasing this product.
Please read these instructions carefully
before using this product, and save this
manual for future use.
Table of
contents
Before use
Accessories ........................................ 2
Part names ......................................... 2
Preparation
Charging ............................................. 3
Turning the power on/off ..................... 3
Connecting a Bluetooth
One-Touch Connection
(Connecting by NFC) .....................4
Operation
Listening to music ............................... 4
Making a phone call............................ 5
Useful functions ..................................5
Other
Restoring to the factory settings .........5
Safety precautions .............................. 6
Maintenance ....................................... 6
About Bluetooth
Specifications ..................................... 7
Troubleshooting guide ........................8
Copyright, etc. ....................................9
To remove the battery when
disposing of this unit ....................... 9
Limited Warranty
(ONLY FOR AUSTRALIA)
VQT5J79
2
2
®
device ......... 3
®
................................ 7
... Back cover
Accessories
Please check and identify the supplied
accessories.
Use numbers indicated in parentheses
when asking for replacement parts.
(As of February 2014)
1 Detachable cord [RFX0H75]
1 USB charging cord [RFX0H76]
For the United Kingdom and Ireland
customers
Sales and Support Information
Customer Communications Centre
• For customers within the U.K.:
0844 844 3899
• For customers within Ireland:
01289 8333
• Monday - Friday 9:00am - 5:00pm
(Excluding public holidays).
• For further support on your product,
please visit our website:
www.panasonic.co.uk
Direct Sales at Panasonic U.K.
• Order accessory and consumable
items for your product with ease and
confidence by phoning our Customer
Communications Centre Monday - Friday 9:00am - 5:00pm
(Excluding public holidays).
• Or go on line through our Internet
Accessory ordering application at
www.pas-europe.com
• Most major credit and debit cards
accepted.
• All enquiries transactions and
distribution facilities are provided
directly by Panasonic U.K.
• It couldn’t be simpler!
• Also available through our Internet is
direct shopping for a wide range of
finished products. Take a browse on
our website for further details.
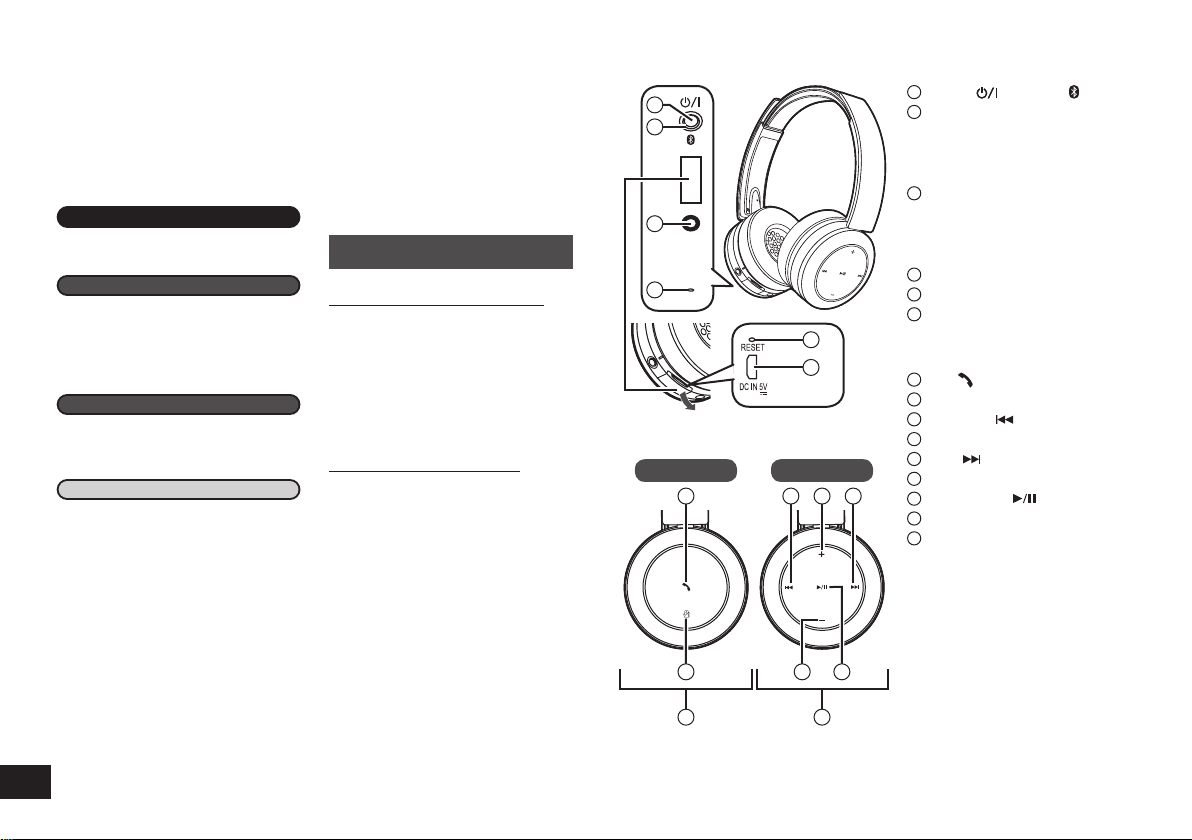
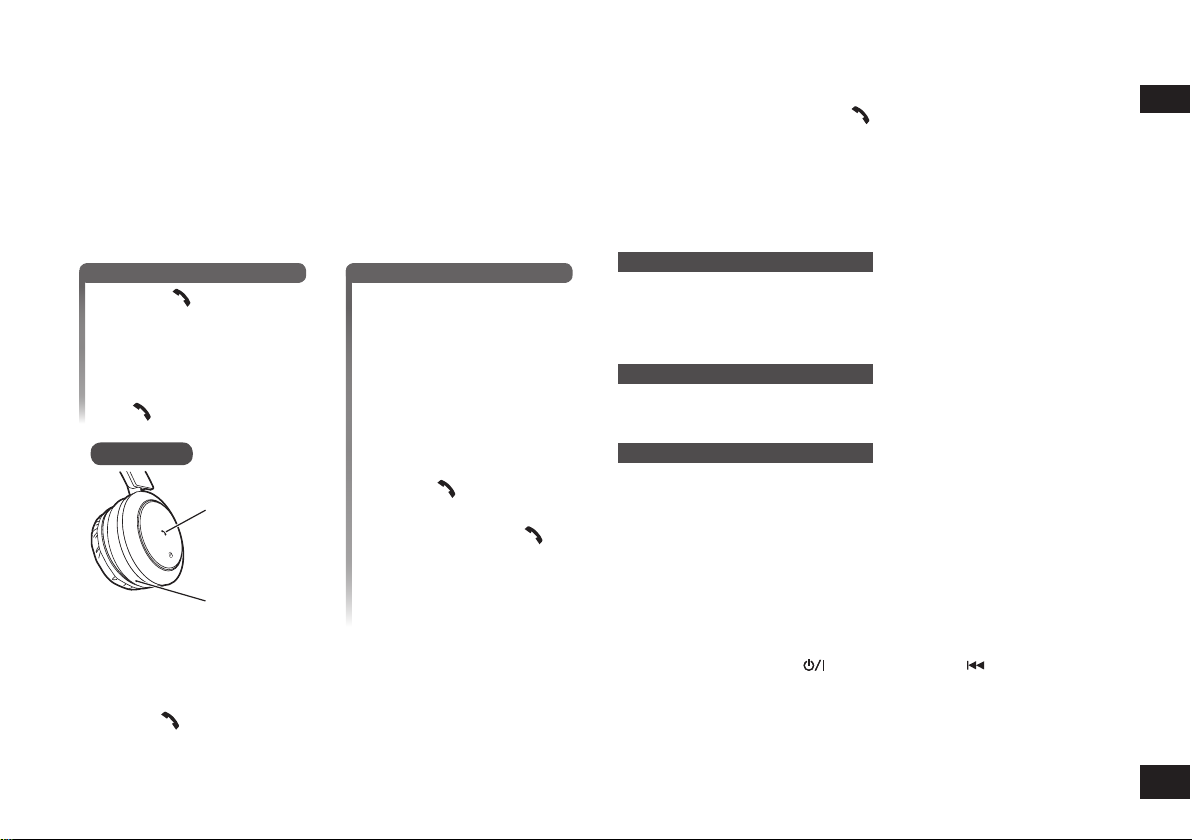
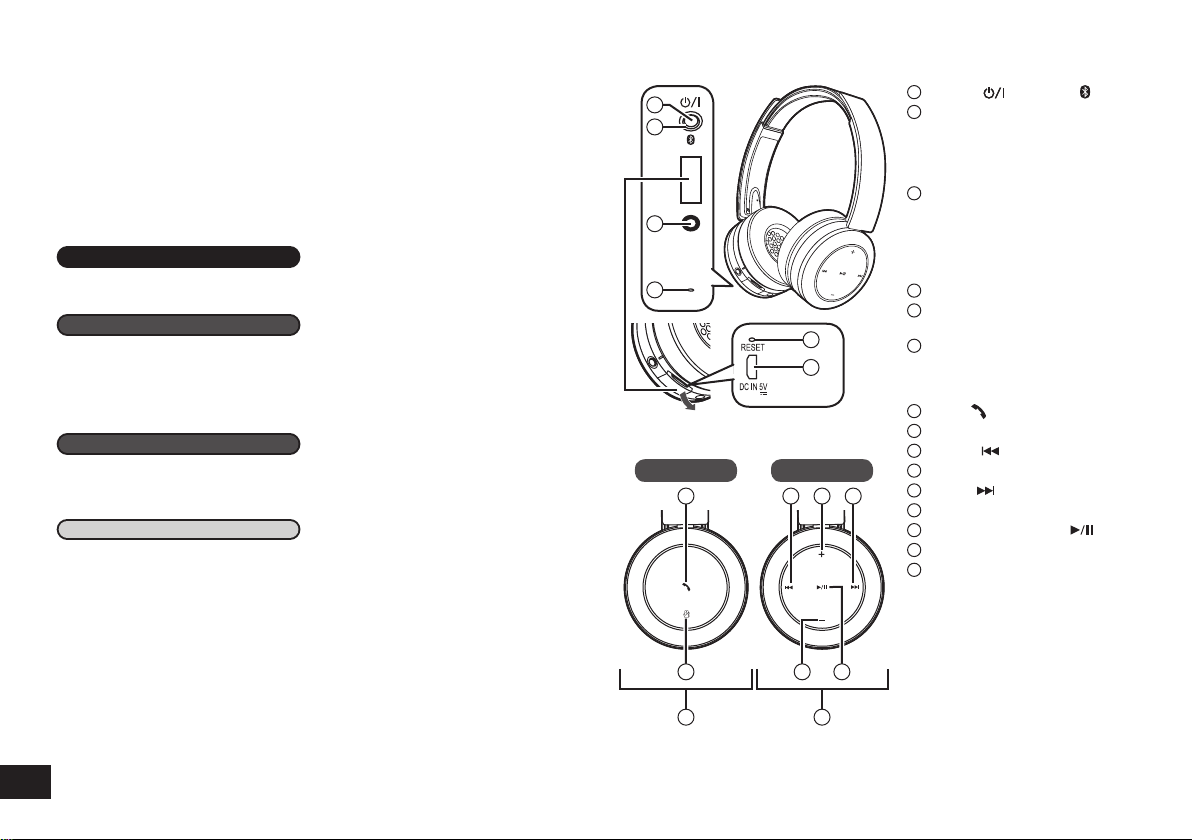
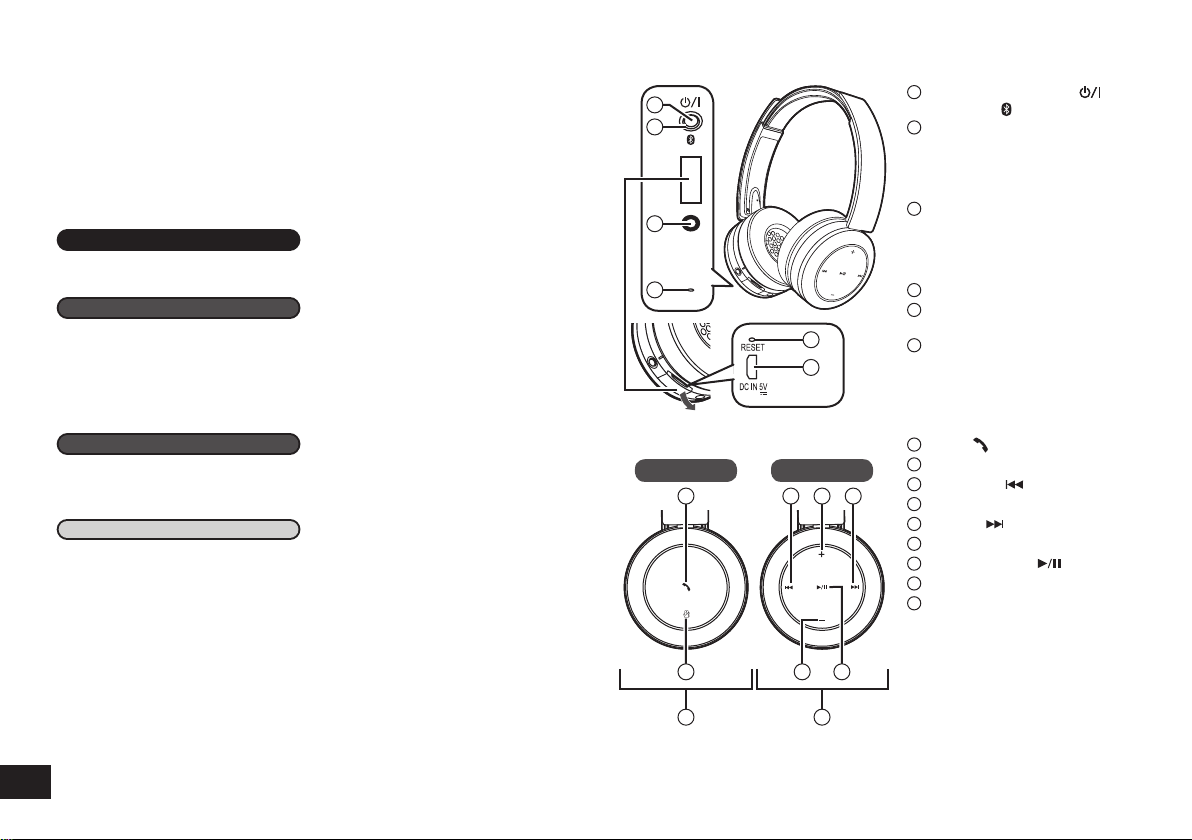
Part names
1
2
3
4
5
6
Open the cover
Left Right
7
8
14 15
The product illustrations may differ from
the actual product.
9
10 11
12 13
1
Power / Pairing button
LED indicator light*
2
• The number of blinks or colour
notifies the status of the unit.
(* hereafter referred to as
“LED”)
Audio input terminal
3
• Connect the detachable cord
(supplied) to this terminal
when using the unit as wired
headphones.
Microphone
4
RESET hole
5
Charging terminal (DC IN)
6
• Connect the USB charging
cord (supplied) to this terminal
when charging. (→ P. 3)
7
Call
NFC touch area
8
Previous
9
Volume +
10
Next
11
Volume –
12
Play/Pause
13
Left speaker
14
Right speaker
15
■
Note
• Do not use any other USB
charging cords except the
supplied one.
• Do not use any other detachable
cords except the supplied one.
• When using the unit, do not cover
the left speaker with the palm
of your hand. The Bluetooth
connection may be blocked.
®
Page 3
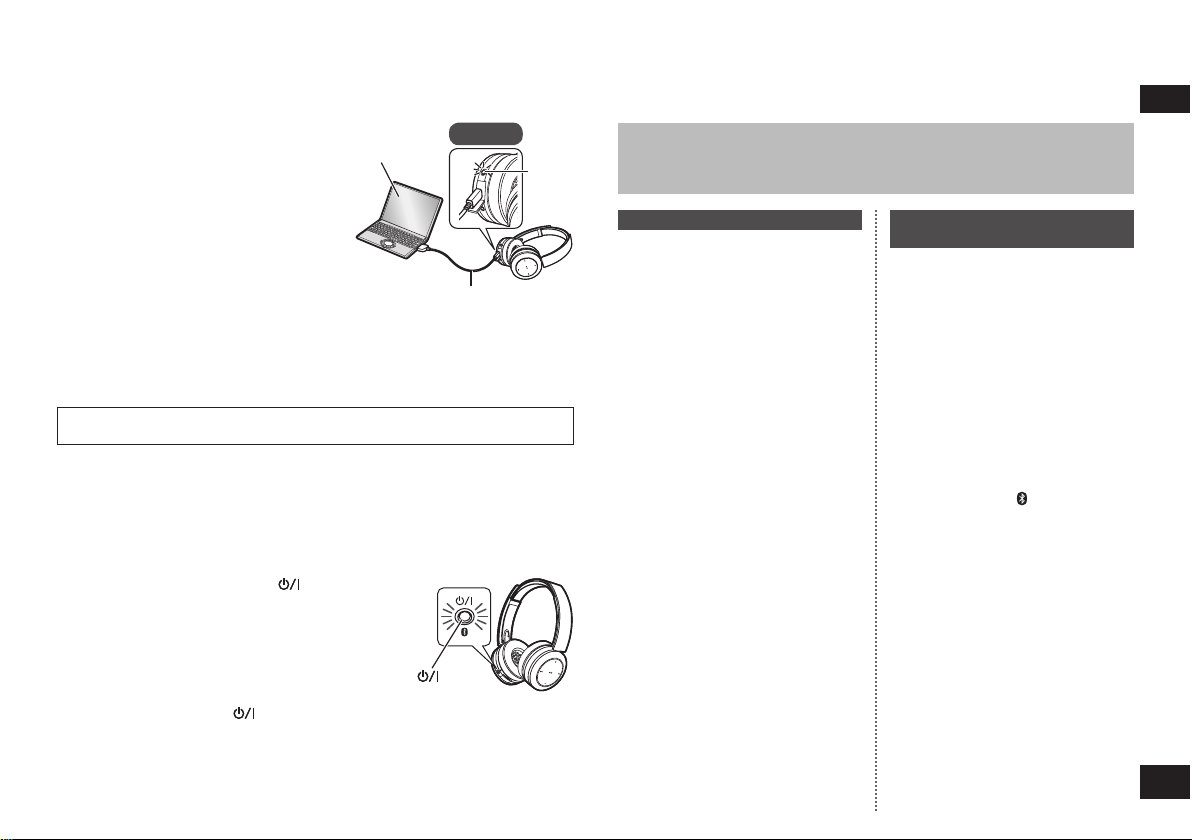
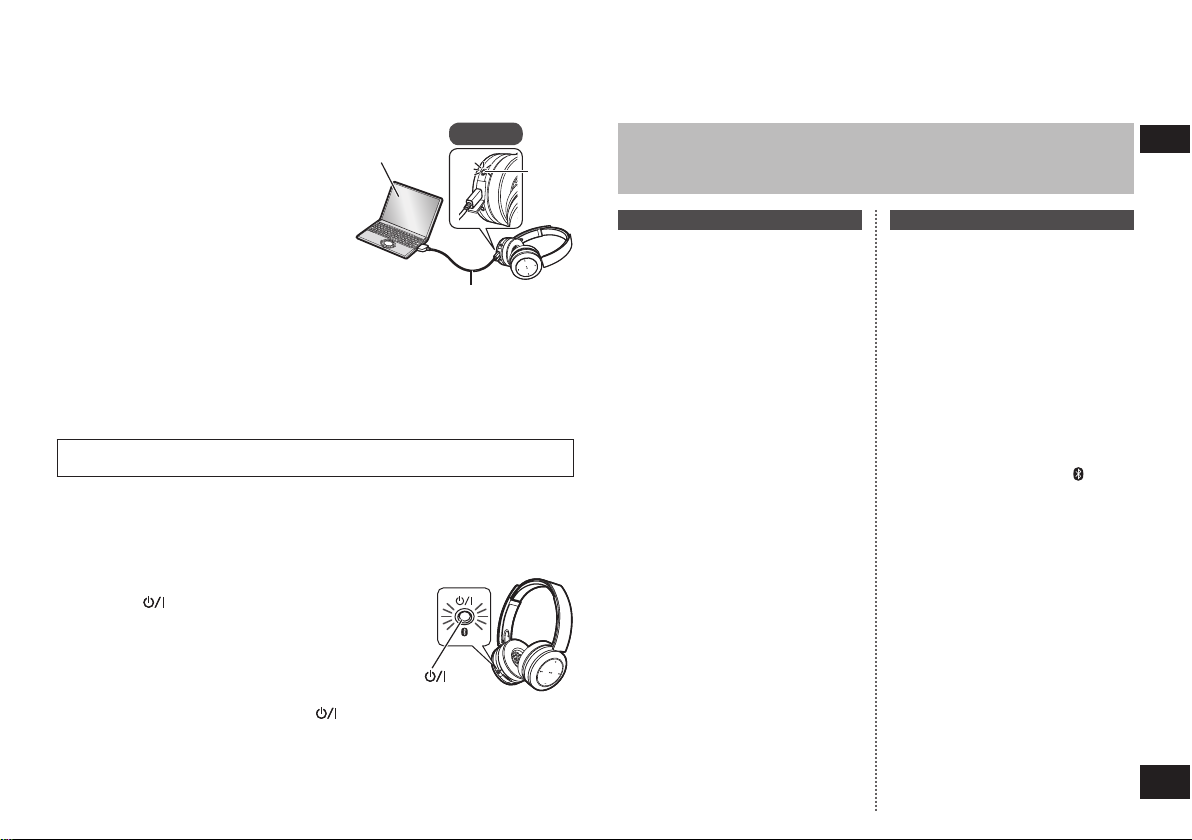
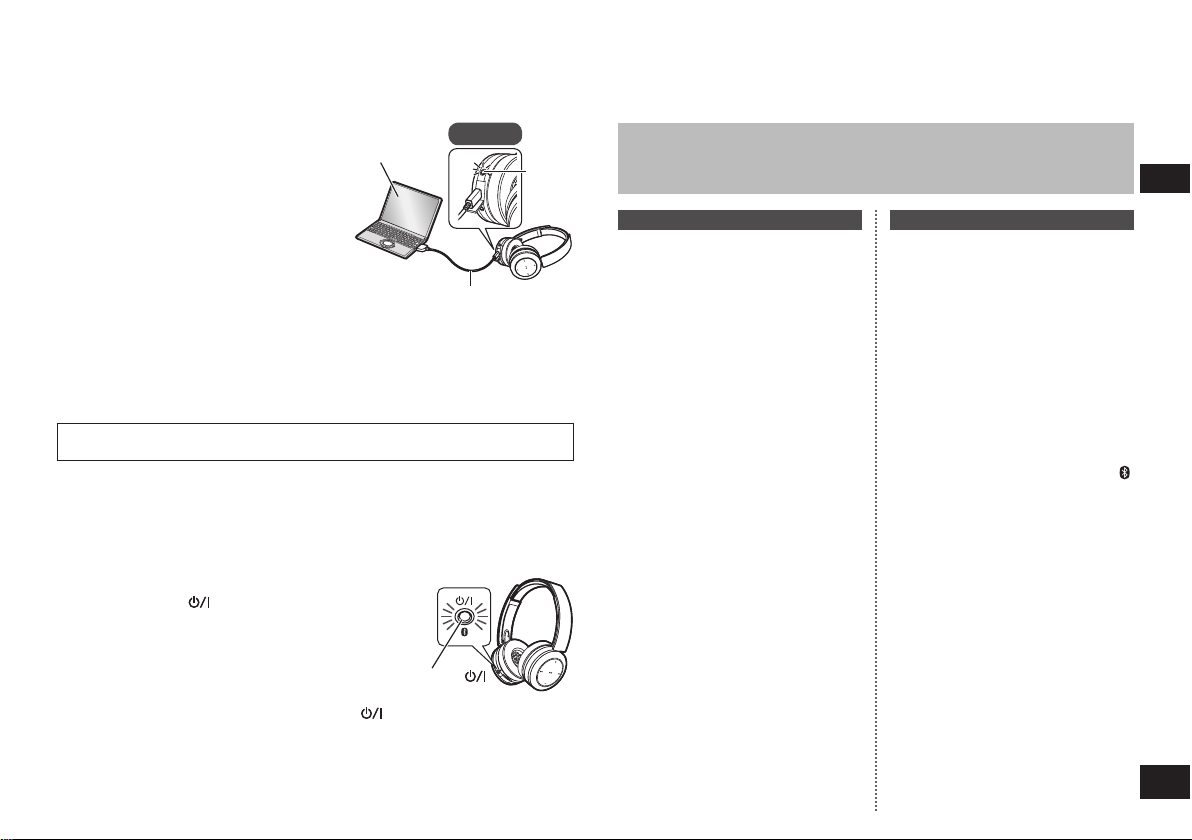
Charging
The rechargeable battery (installed in the unit) is not charged initially. Charge
the battery before using the unit.
Connect this unit to a computer
1
using the USB charging cord
• During charging, the LED on the left
speaker will light in red. When charging
is completed, the LED will go out.
• Charging will take approximately
4.5 hours from empty state to fully
charged.
■
Note
• The Bluetooth® feature cannot be used when this unit is connected to a computer
using the USB charging cord.
• Recharge in a room temperature between 10 °C and 35 °C.
• The power cannot be turned on while charging.
• Do not use any other USB charging cords except the supplied one.
Caution: Use only the supplied USB charging cord when connecting to a
computer.
Computer
USB charging cord (supplied)
Left
LED
Turning the power on/off
Press and hold the power button for
1
approximately 2 seconds
• A beep will sound and the LED on the left speaker
will blink.
Power button
To turn the power off
• Press and hold the power
and the power will be turned off.
■
Note
• When the unit is not operated for approximately 5 minutes, the power will
automatically turn off. (See “Auto power off” (→ P. 5))
button for 2 seconds or more. A beep will sound
Connecting a Bluetooth® device
To establish a wireless connection, register the unit with Bluetooth® compatible
devices.
Preparation on the Bluetooth® device
• Turn on the power, and enable the Bluetooth® feature.
• Place the device within 1 m from the unit.
• Check the device operation in its operation instructions, as required.
Power on for the first time
Turn on the unit
1
• The unit will start searching for
the Bluetooth
to, and the LED on the left
speaker will blink in blue and red
alternately. (Only one operation
after purchase)
When the unit (“RP-BTD10”)
2
is detected by the Bluetooth®
®
device to connect
device, select it
• If prompted for a passkey, input
“0000 (four zeros)”.
• If the Bluetooth
screen appears, select the
“A2DP” profile. If “A2DP” is not
supported or if you want to just
use phone calls, select the “HSP”
or “HFP” profile. (For details on
profiles, see “Listening to music”
(→ P. 4) and “Making a phone
call” (→ P. 5))
Check the connection with
3
the Bluetooth® device on the
®
profile selection
unit
• First the LED on the left speaker
lights in blue and repeats on
and off. When the connection is
established, blinking pattern will
change.
Connection after the second
time
<Connect the same Bluetooth® device>
When the unit is turned on, it will
search for the previously setup
®
Bluetooth
start connecting to it. First the LED
on the left speaker lights in blue
and repeats on and off. When the
connection is established, blinking
pattern will change.
<Connect a different Bluetooth
device>
Disable the Bluetooth
the previously connected device.
Check that the unit is turned off. Press
and hold the pairing
approximately 5 seconds. The unit will
start searching for other Bluetooth
device. The LED on the left speaker
will blink in blue and red alternately. A
beep will sound.
Continue steps 2 and 3.
device and automatically
®
®
feature on
button for
®
■
Note
• If connection to a device is not
established within approximately
5 minutes, the unit will be turned off.
Start from step 1 again.
• 2 or more Bluetooth
be connected to the unit at the same
time.
• You can pair up to 8 devices with
this unit. If a 9th device is paired, the
device with the oldest connection will
be replaced. To use it, pair it again.
®
devices cannot
ENGLISH
VQT5J79
3
3
Page 4
Operating time of battery
One-Touch Connection (Connecting by NFC)
For NFC-compatible Android™ devices only
The NFC (Near Field Communication) feature allows this unit to connect easily to
an NFC-compatible Bluetooth
device to automatically turn on this unit, pair the Bluetooth
connection.
®
device. Just touch this unit with your Bluetooth®
®
device, and establish a
Preparation
Turn on the NFC feature of the Bluetooth® device.
Start the application to play music/video on the Bluetooth®
1
device
• Follow on-screen instructions on your device.
Touch and hold your device on the NFC touch area of this
2
unit (until a pop-up window on your device indicates that the
connection is established)
• The unit is turned on. First the LED on the left speaker lights in blue and
repeats on and off. When the connection is established, blinking pattern will
change.
• If the connection is not established, change the position to touch.
Start playing music/video on your Bluetooth® device
3
■
Connecting to another device
Touch this unit with another device to establish a new Bluetooth® connection.
The previously connected device will be automatically disconnected.
Listening to music
If the Bluetooth® compatible device supports the “A2DP” and “AVRCP” Bluetooth®
profiles, music can be played back with remote control operations on the unit.
• A2DP (Advanced Audio Distribution Profile): Transmits audio to the unit.
• AVRCP (Audio/Video Remote Control Profile):
Allows remote control of the device using the unit.
Connect the Bluetooth® device and the unit (→ P. 3)
1
Select and play the music on the Bluetooth® device
2
• The selected music is output to the speakers of the unit.
VQT5J79
4
4
Rechargeable battery (installed in the unit) Approx. 30 hours
Operating time may be less depending on the operating conditions.
■
Note
• Bluetooth® devices that support aptX® can transmit higher quality music.
■
Attention
• The unit might leak sound depending on the volume level.
• When the volume is increased to near maximum level, music may sound
distorted. Decrease the volume until the distortion is cleared.
Remote controlling
You can control the Bluetooth® device using the unit.
• Depending on Bluetooth
differently via operation of the unit.
(Operation example)
Play/Pause
Press Play/Pause
Previous/Next
Press during
playback
Press and hold Rewind
Press during
playback
Press and hold Fast forward
Volume
Press
+
Press and hold
Press
−
Press and hold
Battery type Operating time
®
devices, some functions below do not work, or work
Right
Volume +
Return to the start
of current track
Forward to the
start of next track
Increase the
volume
Increase
the volume
continuously
Decrease the
volume
Decrease
the volume
continuously
Previous
Volume –
■
Note
• The volume can be adjusted in
15 levels.
When the maximum or minimum
volume is reached, a beep will
sound.
Play/Pause
Next
Page 5
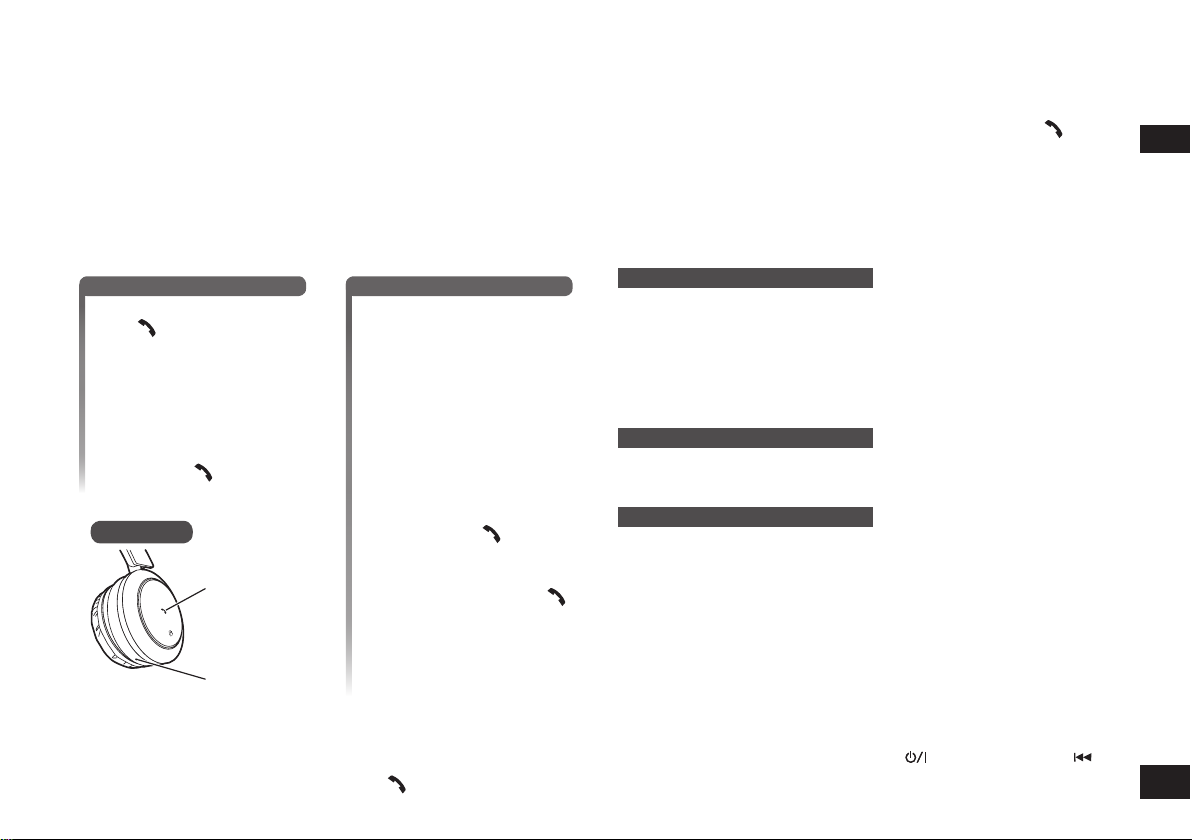
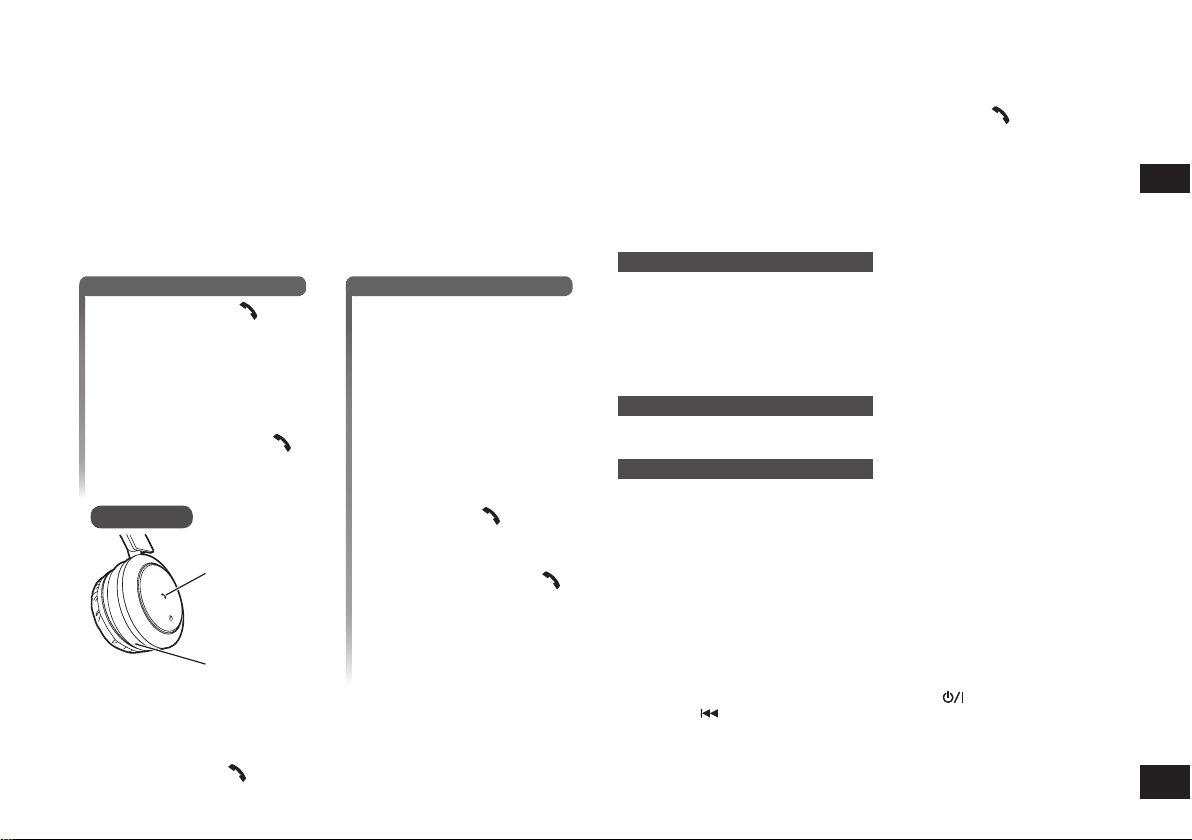
Making a phone call
With Bluetooth® enabled phones (cell phones or smartphones) that support the
“HSP” or “HFP” Bluetooth
• HSP (Headset Profile):
This profile can be used to receive monaural sounds and establish two-way
communication using the microphone on the unit.
• HFP (Hands-Free Profile):
In addition to the HSP functions, this profile has the incoming and outgoing calls
function.
Connect the Bluetooth® enabled phone and unit (→ P. 3)
1
When answering an incoming call
2
Press Call on the unit
and answer the call
• During an incoming call,
ringtone will sound from the
speaker and the LED will blink.
•(HFP only) To reject the
incoming call, press and hold
until the ringtone stops.
Call
Left
Start talking
3
• The LED will repeatedly blink 2 times during a call.
• The volume can be adjusted during a phone call. For setting instructions, see
page 4.
Press Call to end the phone call
4
• A beep will sound.
®
profile, you can use the unit for phone calls.
When making an outgoing call
Make an outgoing call on
the Bluetooth® enabled
phone
• Also refer to the operating
manual for the Bluetooth
enabled phone.
(Checking and operation steps on the
unit are explained below)
• During an outgoing call, ringtone
will sound from the speaker and
the LED will blink.
• To cancel the outgoing call,
press Call
Call
Microphone
A beep will sound.
•(HFP only) When the phone is
idle, press and hold Call
approximately 2 seconds. An
outgoing call will be made to the
last dialed number. One short
click will sound from the speaker
and the LED will blink.
®
.
for
■
Note
• There may be instances when hands free setting needs to be done on the
• Depending on the Bluetooth
•(HFP only) Press and hold the Call
®
Bluetooth
outgoing call ringtones of the phone from the unit.
The calling device will be switched between the Bluetooth
the unit.
enabled phone.
®
enabled phone, you may hear incoming and
on the unit for approximately 2 seconds.
®
enabled phone and
ENGLISH
Useful functions
Resetting the unit
This unit can be reset when all operations are rejected. Connect the unit to a
computer using the USB charging cord. Then press the RESET hole with a thin,
pointed object. Check that the LED (red) goes out. Keep pressing the RESET hole
(→ P. 2) for approximately 5 seconds to reset the unit. All the previous operations
will be cancelled. (The pairing device information will not be deleted.)
Auto power off
If the unit is silent for approximately 5 minutes and operations for Bluetooth®
devices are idle during that period, a beep will sound and the power will be
automatically turned off.
LED indicator light
When the battery level is low during use of the unit, the blue blinking LED on the
left speaker will change to red. A beep will sound every 1 minute. When the battery
runs out, the power will turn off.
Restoring to the factory settings
When you want to delete all pairing device information, etc., you can restore the
unit to the factory settings (original settings upon purchase).
1 Turn off the unit
2 Press and hold the power
more simultaneously
• The LED on the left speaker will light in red for approximately 2 seconds. The
unit will restore to the factory settings.
button and Previous for 5 seconds or
VQT5J79
5
5
Page 6
Safety precautions
■
Unit
• Avoid using or placing this unit near sources of heat.
• Do not listen with this unit at high volume in places where you need to hear
sounds from the surrounding environment for safety, such as at railroad
crossings, and construction sites.
• Wide band characteristic voltage equal or larger than 75 mV.
WARNING:
To reduce the risk of fire, electric shock or product damage,
• Do not expose this unit to rain, moisture, dripping or splashing.
• Do not place objects filled with liquids, such as vases, on this unit.
• Use only the recommended accessories.
• Do not remove covers.
• Do not repair this unit by yourself. Refer servicing to qualified service
personnel.
■
Allergies
• Discontinue use if you experience discomfort with the speakers or any other
parts that directly contact your skin.
• Continued use may cause rashes or other allergic reactions.
■
Precautions for listening with the Headphones
• Do not use your headphones at a high volume. Hearing experts advise against
continuous extended play.
• If you experience a ringing in your ears, reduce volume or discontinue use.
• Do not use while operating a motorised vehicle. It may create a traffic hazard
and is illegal in many areas.
• You should use extreme caution or temporarily discontinue use in potentially
hazardous situations.
This unit may receive radio interference caused by mobile telephones during use.
If such interference occurs, please increase separation between this unit and the
mobile telephone.
Maintenance
Clean this unit with a dry and soft cloth.
• Do not use solvents including benzine, thinner, alcohol, kitchen detergent, a
chemical wiper, etc. This might cause the exterior case to be deformed or the
coating to come off.
Declaration of Conformity (DoC)
Hereby, “Panasonic Corporation” declares that this product is in compliance with
the essential requirements and other relevant provisions of Directive 1999/5/EC.
Customers can download a copy of the original DoC to our R&TTE products from
our DoC server:
http://www.doc.panasonic.de
Contact to Authorised Representative: Panasonic Marketing Europe GmbH,
Panasonic Testing Centre, Winsbergring 15, 22525 Hamburg, Germany
This product is intended to be used in the following countries.
The UK, FRANCE, GERMANY, ITALY, SWITZERLAND, AUSTRIA,
NETHERLANDS, BELGIUM, SPAIN, SWEDEN, NORWAY, DENMARK, FINLAND,
HUNGARY, CZECH REPUBLIC, SLOVAKIA, SLOVENIA, BULGARIA, POLAND,
GREECE, PORTUGAL, ROMANIA
This product is intended for general consumer. (Category 3)
Complies with
IDA Standards
DB01017
VQT5J79
6
6
Page 7
About Bluetooth
Panasonic bears no responsibility for data and/or information that is
compromised during a wireless transmission.
■
Frequency band used
This unit uses the 2.4 GHz frequency band.
■
Certification of this unit
• This unit conforms to frequency restrictions and has received certification
based on frequency laws. Thus, a wireless permit is not necessary.
• The actions below are punishable by law in some countries:
– Taking apart/modifying the unit.
– Removing specification indications.
■
Restrictions of use
• Wireless transmission and/or usage with all Bluetooth® equipped devices is
not guaranteed.
• All devices must conform to standards set by Bluetooth SIG, Inc.
• Depending on the specifications and settings of a device, it can fail to connect
or some operations can be different.
• This system supports Bluetooth
operating environment and/or settings, this security may not be sufficient.
Transmit data wirelessly to this system with caution.
• This system cannot transmit data to a Bluetooth
■
Range of use
Use this unit at a maximum range of 10 m.
The range can decrease depending on the environment, obstacles or
interference.
■
Interference from other devices
• This unit may not function properly and troubles such as noise and sound
jumps may arise due to radio wave interference if this unit is located too close
to other Bluetooth
• This unit may not function properly if radio waves from a nearby broadcasting
station, etc. is too strong.
■
Intended usage
• This unit is for normal, general use only.
• Do not use this system near an equipment or in an environment that is
sensitive to radio frequency interference (example: airports, hospitals,
laboratories, etc).
®
devices or the devices that use the 2.4 GHz band.
®
®
security features. But depending on the
®
device.
Specifications
■
General
Power supply
1
Operating time*
Charging time*
Charging temperature range 10 ºC to 35 ºC
Operating temperature range 0 ºC to 40 ºC
Operating humidity range 35%RH to 80%RH (no condensation)
Mass Approx. 198 g
1
It may be shorter depending on the operating conditions.
*
2
Time taken to recharge from empty to full.
*
■
Bluetooth® section
Bluetooth® system specification Ver. 3.0
Wireless equipment classification Class 2 (2.5 mW)
Frequency band 2.4 GHz band FH-SS
Supported profiles A2DP, AVRCP, HSP, HFP
Supported codec SBC, aptX
Operating distance Up to 10 m
■
Speaker section
Driver units Φ 40 mm
Impedance 32 Ω
■
Terminal section
DC IN DC 5 V, 500 mA
Audio input Stereo jack Φ 3.5 mm
■
Microphone section
Type Mono
■
Accessory section
USB charging cord 1.0 m
Detachable cord 1.5 m
Specifications are subject to change without notice.
●
(SBC mode) Approx. 30 hours
2
(25 ºC) Approx. 4.5 hours
DC 5 V, 500 mA
(Internal battery : 3.6 V (Li-ion 690 mAh))
®
ENGLISH
VQT5J79
7
7
Page 8

Troubleshooting guide
Before requesting service, make the following checks. If you are in doubt about
some of the check points, or if the remedies indicated do not solve the problem,
consult your dealer for instructions.
Bluetooth® device connection
The device cannot be connected
• Delete the pairing information for this unit from the Bluetooth® device, then pair
them again. (→ P. 3)
General
The unit does not respond
• Press RESET hole while connecting the USB charging cord to the charging
terminal (DC IN). (→ P. 5)
Power supply and charging
Cannot charge the unit
• Make sure the computer is turned on and is not on standby or sleep mode.
• Is the USB port you are currently using working properly? If your computer has
other USB ports, unplug the connector from its current port and plug it into one of
the other ports.
• If the measures mentioned above are not applicable, unplug the USB charging
cord and plug it in again.
• Is the LED blinking in red ? There is a charging malfunction if the LED is blinking.
• If the LED is blinking fast in red even when the unit is being recharged in a room
temperature within 10 °C and 35 °C, the battery may have run down. (Number of
recharging times of the included battery: Approximately 500.)
LED does not light during charging / Charging takes longer
• Is the USB charging cord (supplied) connected firmly to the USB terminal of the
computer? (→ P. 3)
The power does not turn on
• Is the unit being charged? The power cannot be turned ON during charging.
(→ P. 3)
• Is the detachable cord connected? The power cannot be turned on when the
detachable cord is connected to the unit.
Sound and audio volume
No sound
•
Make sure that the unit and the Bluetooth® device are connected correctly. (→ P. 3)
• Check if music is playing on the Bluetooth® device.
• Make sure that the unit is turned on and the volume is not set too low.
• Pair and connect the Bluetooth
®
device and the unit again. (→ P. 3)
Low volume
• Increase the volume of the unit. (→ P. 4)
• Increase the volume on the Bluetooth
®
device.
Sound from the device is cut off / Sound quality is bad
• Sound may be disrupted if signals are blocked. Do not fully cover this unit with
the palm of your hand, etc.
• The device may be out of the 10 m communication range. Move the device
closer to this unit.
• Remove any obstacle between this unit and the device.
• Switch off any wireless LAN device when not in use.
• A communication problem may arise if the battery is not fully charged. Charge
the unit. (→ P. 3)
Phone Calls
You cannot hear the other person
• Make sure that the unit and the Bluetooth® enabled phone are turned on.
• Check if the unit and the Bluetooth
• Check the audio settings of the Bluetooth
device to the unit if it is set to the Bluetooth
• If the volume of the other person’s voice is too low, increase the volume of both
the unit and the Bluetooth
®
enabled phone are connected. (→ P. 3)
®
enabled phone.
®
enabled phone. Switch the calling
®
enabled phone. (→ P. 3)
VQT5J79
8
8
Page 9
Copyright, etc.
aptX® software is copyright CSR plc or its
●
group companies. All rights reserved.
®
The aptX
trademarks of CSR plc or one of its group
companies and may be registered in one or
more jurisdictions.
The Bluetooth® word mark and logos are
●
owned by the Bluetooth SIG, Inc. and any use
of such marks by Panasonic Corporation is
under license.
Other trademarks and trade names are those
of their respective owners.
Other system names and product names
●
appearing in this document are in general the
registered trademarks or trademarks of the
respective developer companies.
Note that the ™ mark and ® mark do not
appear in this document.
Disposal of Old Equipment and Batteries
Only for European Union and countries with
recycling systems
mark and the aptX logo are
These symbols on the products, packaging,
and/or accompanying documents mean that
used electrical and electronic products and
batteries must not be mixed with general
household waste.
For proper treatment, recovery and recycling
of old products and used batteries, please
take them to applicable collection points in
accordance with your national legislation.
By disposing of them correctly, you will help
to save valuable resources and prevent any
potential negative effects on human health
and the environment.
For more information about collection
and recycling, please contact your local
municipality.
Penalties may be applicable for incorrect
disposal of this waste, in accordance with
national legislation.
Note for the battery symbol (bottom
symbol):
This symbol might be used in combination
with a chemical symbol. In this case it
complies with the requirement set by the
Directive for the chemical involved.
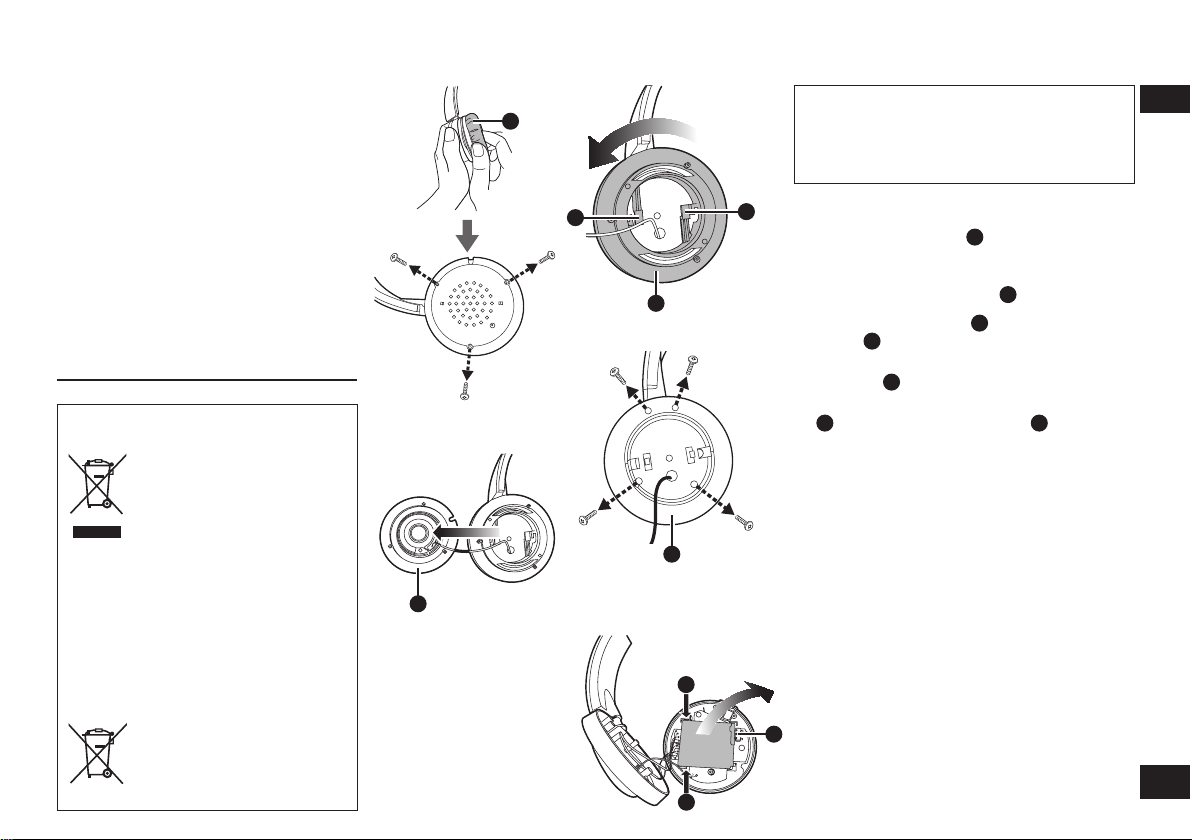
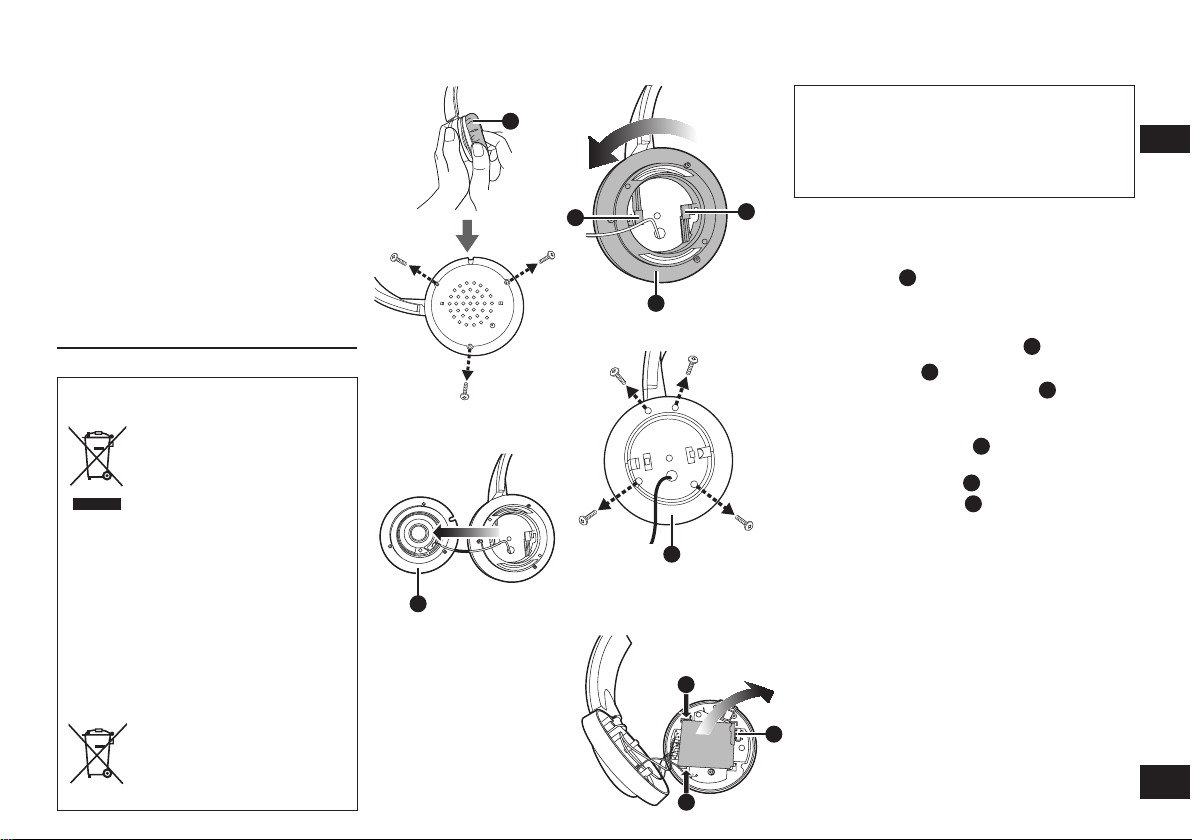
To remove the battery when disposing of this unit
1
2
3
A
D
C
4
E
B
5
G
G
The following instructions are not intended
for repairing purposes but for the disposal
of this unit. This unit is not restorable once
disassembled.
When disposing of this unit, take out the battery installed
in this unit and recycle it.
D
• Disassemble after the battery runs out.
• Keep disassembled parts out of reach of children.
Take off the earpad A from the right
1
speaker and remove the 3 screws
• Use a cross-slot screwdriver (commercially available).
Remove the front cover
2
Lifting the 2 latches D, rotate the back
3
cover C in the anticlockwise direction
Remove the 4 screws and remove the
4
housing
Hold both sides of the battery at position
5
G
E
(away from the terminals F) and
remove it
Regarding the handling of used batteries
• Insulate the terminals with adhesive tape or similar material.
• Do not disassemble.
■
Batteries
• Do not heat or expose to flame.
• Do not leave the battery(ies) in a car exposed to direct
sunlight for a long period of time with doors and windows
closed.
• Battery mishandling can cause electrolyte leakage which
can damage items the leaked fluid comes into contact
with. If electrolyte leaks from the battery, consult your
dealer. Wash thoroughly with water if electrolyte comes in
contact with any part of your body.
• When disposing of the batteries, please contact your local
authorities or dealer and ask for the correct method of
disposal.
F
ENGLISH
B
VQT5J79
9
9
Page 10
Sehr geehrter Kunde
Wir danken Ihnen, dass Sie sich
für dieses Produkt unseres Hauses
entschieden haben.
Bitte lesen Sie diese Anleitung vor
der Inbetriebnahme dieses Produkts
aufmerksam durch, und bewahren
Sie dieses Handbuch für spätere
Bezugnahme griffbereit auf.
Inhaltsverzeichnis
Vor der Benutzung
Zubehör .............................................. 2
Teilebezeichnungen ............................ 2
Vorbereitung
Aufladen ............................................. 3
Ein- und ausschalten ..........................3
Ein Bluetooth
One-Touch-Verbindung
(Verbindung per NFC) .................... 4
Betrieb
Musik hören ........................................4
Telefonieren ........................................ 5
Praktische Funktionen ........................5
Andere
Wiederherstellen der
Werkseinstellungen ........................ 5
Sicherheitshinweise ............................ 6
Wartung .............................................. 6
Über Bluetooth
Technische Daten ...............................7
Anleitung zur Fehlersuche .................. 8
Copyright usw. .................................... 9
Zur Entsorgung des Geräts sollte
der Akku entfernt werden ...............9
VQT5J79
2
10
®
-Gerät verbinden .......... 3
®
.................................. 7
Zubehör
Bitte überprüfen Sie das gelieferte
Zubehör auf Vollständigkeit.
1 Abtrennbares Kabel
1 USB-Ladekabel
Teilebezeichnungen
1
1
2
3
4
5
6
Die Abdeckung öffnen
Links Rechts
7
8
9
10 11
12 13
14 15
Die Abbildungen können vom realen
Aussehen des Produkts abweichen.
Ein/Aus / Koppeln -Taste
LED-Anzeige*
2
•
Der Status des Kopfhörers wird
signalisiert durch die Farbe der
LED und die Anzahl ihres Blinkens.
(* nachfolgend als „LED“ bezeichnet)
Anschluss Audio-Eingang
3
• Um den Kopfhörer als
kabelgebundenen Kopfhörer zu
verwenden, schließen Sie das
abtrennbare Kabel (gelieferte)
an diesen Anschluss an.
Mikrofon
4
Öffnung für Zurücksetzen
5
(RESET)
Lade-Anschluss (DC IN)
6
• Zum Aufladen das
USB-Ladekabel (gelieferte)
hier anschließen. (→ S. 3)
7
Anruf
NFC-Touch-Bereich
8
Zurück
9
Lautstärke +
10
Weiter
11
Lautstärke –
12
Wiedergabe/Pause
13
Linker Kopflautsprecher
14
Rechter Kopflautsprecher
15
■
Hinweis
• Zum Aufladen ausschließlich das
zum Lieferumfang gehörende
USB-Ladekabel verwenden.
• Ausschließlich das zum
Lieferumfang gehörende
abtrennbare Kabel verwenden.
• Bei Benutzung des Kopfhörers
darauf achten, dass der linke
Kopflautsprecher nicht durch Ihre
Handfläche abgedeckt wird. Die
Bluetooth
blockiert werden.
®
-Verbindung könnte
Page 11
Aufladen
Zu Anfang ist der (im Kopfhörer installierte) Akku nicht aufgeladen. Laden
Sie erst den Akku auf, bevor Sie das Gerät in Betrieb nehmen.
Schließen Sie diesen Kopfhörer
1
mit dem USB-Ladekabel an einen
Computer an
• Während des Aufladens leuchtet die
LED am linken Kopflautsprecher in Rot.
Sobald der Akku aufgeladen ist, erlischt
die LED.
• Es dauert ungefähr 4,5 Stunden,
um einen leeren Akku vollständig
aufzuladen.
■
Hinweis
• Solange dieses Gerät mit dem USB-Ladekabel an einem Computer
angeschlossen ist, kann die Bluetooth
• Das Aufladen sollte bei einer Raumtemperatur zwischen 10 °C und 35 °C
erfolgen.
• Während des Aufladens kann das Gerät nicht eingeschaltet werden.
• Zum Aufladen ausschließlich das zum Lieferumfang gehörende USB-Ladekabel
verwenden.
Vorsicht: Zum Anschließen an einen Computer nur das zum Lieferumfang
gehörende USB-Ladekabel verwenden.
Computer
USB-Ladekabel (gelieferte)
®
-Funktion nicht benutzt werden.
Links
LED
Ein- und ausschalten
Ungefähr 2 Sekunden lang die
1
Ein/Aus -Taste gedrückt halten
• Es wird ein Signalton ausgegeben, und die LED auf
dem linken Kopflautsprecher blinkt.
Ein/Aus -Taste
Ausschalten
• Ungefähr 2 Sekunden lang die Ein/Aus
Signalton ausgegeben, und das Gerät wird ausgeschaltet.
■
Hinweis
• Wird das Gerät ungefähr 5 Minuten lang nicht bedient oder betrieben, schaltet es
sich automatisch aus. (Siehe „Automatisches Ausschalten“ (→ S. 5))
-Taste gedrückt halten. Es wird ein
Ein Bluetooth®-Gerät verbinden
Um eine drahtlose Verbindung herzustellen, müssen Sie den Kopfhörer beim
entsprechenden Bluetooth
Vorbereitung beim Bluetooth®-Gerät
• Das Gerät einschalten und die Bluetooth®-Funktion aktivieren.
• Das Gerät so platzieren, dass es maximal 1 m Abstand vom Kopfhörer hat.
Bei Bedarf den Betrieb des Geräts anhand von dessen Betriebsanleitung überprüfen.
•
Erstmalige Inbetriebnahme
Den Kopfhörer einschalten
1
•
Der Kopfhörer beginnt, nach dem
®
-Gerät zu suchen, zu dem
Bluetooth
die Verbindung hergestellt werden
soll. Dabei blinkt die LED auf dem
linken Kopflautsprecher abwechselnd
in Blau und Rot. (Nach dem Kauf nur
ein Mal durchzuführen)
Wenn das Bluetooth®-Gerät
2
den Kopfhörer („RP-BTD10“)
erkennt, diesen auswählen
• Wenn Sie aufgefordert werden,
einen Hauptschlüssel (Passkey)
einzugeben, geben Sie „0000
(vier Nullen)“ ein.
Wenn das Fenster zur Auswahl
•
des Bluetooth
wird, wählen Sie das Profil „A2DP“.
Falls „A2DP“ nicht unterstützt wird,
oder falls Sie den Kopfhörer nur
für Telefongespräche benutzen
wollen, wählen Sie das Profil
„HSP“ oder „HFP“. (Für weitere
Informationen über Profile siehe
„Musik hören“ (→ S. 4) und
„Telefonieren“ (→ S. 5))
Beim Kopfhörer die
3
Verbindung zum Bluetooth®Gerät überprüfen
•
Zuerst leuchtet die LED auf dem
linken Kopflautsprecher in Blau und
schaltet sich wiederholt ein und
aus. Ist die Verbindung hergestellt,
wechselt das Blinkmuster.
®
-kompatiblen Gerät registrieren.
®
-Profils angezeigt
Verbindung ab dem zweiten Mal
<Mit demselben Bluetooth®-Gerät verbinden>
Nach Einschalten des Kopfhörers sucht
dieser nach dem zuvor eingerichteten
®
Bluetooth
automatisch die Verbindung zu ihm her.
Zuerst leuchtet die LED auf dem linken
Kopflautsprecher in Blau und schaltet sich
wiederholt ein und aus. Ist die Verbindung
hergestellt, wechselt das Blinkmuster.
<Mit einem anderen Bluetooth
Die Bluetooth®-Funktion bei dem Gerät
deaktivieren, zu dem zuvor die Verbindung
hergestellt worden ist. Überprüfen, dass
dieses Gerät ausgeschaltet ist. Dann für
ungefähr 5 Sekunden die Koppeln
gedrückt halten. Der Kopfhörer beginnt,
nach einem anderen Bluetooth
suchen. Dabei blinkt die LED auf dem linken
Kopflautsprecher abwechselnd in Blau und
Rot. Ein akustisches Signal wird ausgegeben.
Fahren Sie fort mit Schritt 2 und 3.
-Gerät und stellt dann
®
-Gerät verbinden>
-Taste
®
-Gerät zu
■
Hinweis
•
Wird innerhalb ungefähr 5 Minuten keine
Verbindung zu einem Gerät hergestellt,
schaltet sich der Kopfhörer aus.
Beginnen Sie erneut ab Schritt 1.
•
Es kann nur ein einziges Bluetooth®-Gerät
verbunden werden, nicht mehrere gleichzeitig.
•
Sie können den Kopfhörer mit bis zu
8 Geräten koppeln. Wird ein 9. Gerät
angekoppelt, werden die
Kopplungsinformationen zu dem Gerät,
zu dem eine Verbindungsherstellung am
längsten zurückliegt, ersetzt. Um es dennoch
zu benutzen, müssen Sie es erneut koppeln.
DEUTSCH
VQT5J79
3
11
Page 12
One-Touch-Verbindung
(Verbindung per NFC)
Nur bei NFC-kompatiblen Android™-Geräten
Über die NFC-Funktion (NFC - Near Field Communication) ist es möglich, den Kopfhörer
auf einfache Weise mit einem NFC-kompatiblen Bluetooth
den Kopfhörer mit dem Bluetooth
mit dem Bluetooth
®
-Gerät gekoppelt und es wird die Verbindung hergestellt.
®
-Gerät berühren, dann wird der Kopfhörer eingeschaltet,
®
-Gerät zu verbinden. Einfach
Vorbereitung
Schalten Sie beim Bluetooth®-Gerät die NFC-Funktion ein.
Beim Bluetooth®-Gerät die entsprechende Anwendung starten,
1
so dass es Musik/Video wiedergibt
• Folgen Sie den Anweisungen auf dem Bildschirm des Geräts.
Den Kopfhörer mit dem NFC-Touch-Bereich so halten, dass er
2
das andere Gerät berührt (und so lange halten, bis beim Gerät
durch ein Popup-Fenster angezeigt wird, dass die Verbindung
hergestellt ist)
• Der Kopfhörer wird eingeschaltet. Zuerst leuchtet die LED auf dem linken
Kopflautsprecher in Blau und schaltet sich wiederholt ein und aus. Ist die
Verbindung hergestellt, wechselt das Blinkmuster.
• Falls keine Verbindung aufgebaut wird, wählen Sie eine andere Stelle zum
Berühren.
Beim Bluetooth®-Gerät die Musik / das Video abspielen
3
■
Mit einem anderen Gerät verbinden
Berühren Sie mit dem Kopfhörer das andere Gerät, um eine Bluetooth®-Verbindung
zu ihm herzustellen.
Das zuvor verbundene Gerät wird automatisch getrennt.
Musik hören
Wenn das Bluetooth®-kompatible Gerät die Bluetooth®-Profile „A2DP“ und
„AVRCP“ unterstützt, können Sie das Gerät mit dem Kopfhörer bei der Wiedergabe
fernbedienen.
• A2DP (Advanced Audio Distribution Profile):
Überträgt Audiosignale zum Kopfhörer.
• AVRCP (Audio/Video Remote Control Profile):
Ermöglicht, das Gerät per Kopfhörer fernzubedienen.
Das Bluetooth®-Gerät und den Kopfhörer verbinden (→ S. 3)
1
VQT5J79
Beim Bluetooth®-Gerät die gewünschte Musik auswählen und
2
4
wiedergeben
12
• Die ausgewählte Musik wird über den Kopfhörer wiedergegeben.
Akku-Betriebsdauer
Batterie-Typ Betriebsdauer
Akku (wiederaufladbare Batterie) (im Gerät installiert) Ungefähr 30 Stunden
Je nach Betriebsbedingungen kann die Betriebsdauer kürzer sein.
■
Hinweis
• Bluetooth®-Geräte, die aptX® unterstützen, können Musik in besserer Qualität
übertragen.
■
Vorsicht
• Je nach Lautstärke kann das Gerät Töne nach außen abstrahlen.
• Wird die Lautstärke sehr hoch oder auf Maximum gestellt, ist es möglich,
dass der Ton verzerrt klingt. Stellen Sie dann die Lautstärke leiser, bis keine
Verzerrungen mehr zu hören sind.
Fernbedienung
Sie können das Bluetooth®-Gerät mit dem Kopfhörer fernbedienen.
• Je nach Bluetooth
einige der unten angegebenen Funktionen nicht arbeiten oder anders reagieren.
(Fernbedienungs-Beispiel)
Wiedergabe/Pause
Drücken Wiedergabe/Pause
Zurück/Weiter
Während der
Wiedergabe
drücken
Gedrückt halten Schneller Rücklauf
Während der
Wiedergabe
drücken
Gedrückt halten Schneller Vorlauf
Lautstärke
Drücken Lauter
+
Gedrückt halten
Drücken Leiser
−
Gedrückt halten
®
-Gerät ist es möglich, dass bei Bedienschritten am Kopfhörer
Rechts
Lautstärke +
Kehrt zu Beginn
des derzeitigen
Titels zurück
Springt zum
Beginn des
nächsten Titels
Zunehmend lauter
stellen
Zunehmend leiser
stellen
Zurück
Lautstärke –
■
Hinweis
• Zur Einstellung der Lautstärke
gibt es 15 Stufen.
Wird das Maximum oder
das Minimum der Lautstärke
erreicht, wird ein Signalton
ausgegeben.
Wiedergabe/
Pause
Weiter
Page 13
Telefonieren
Zusammen mit einem Bluetooth®-fähigen Telefon (Mobiltelefon oder Smartphone),
das das Bluetooth
zum Telefonieren benutzen.
• HSP (Headset Profile):
Dieses Profil kann zum einohrigen Hören und zum Einrichten einer ZweiwegKommunikation mithilfe des im Gerät integrierten Mikrofons benutzt werden.
• HFP (Hands-Free Profile):
Zusätzlich zur HSP-Funktion verfügt dieses Profil über die Funktion für
eingehende und ausgehende Anrufe.
Das Bluetooth®-fähige Telefon und den Kopfhörer verbinden (→ S. 3)
1
Einen eingehenden Anruf annehmen
2
Auf dem Kopfhörer auf
Anruf
Anruf annehmen
• Bei der Signalisierung eines
eingehenden Anrufs wird
über die Kopflautsprecher
das Klingeln ausgegeben und
zusätzlich blinkt die LED.
(Nur bei HFP) Wollen Sie einen
•
eingehenden Anruf zurückweisen,
die Taste Anruf
halten, bis das Klingeln verstummt.
Sprechen Sie
3
• Während eines Telefonats blinkt die LED wiederholt 2 Mal.
• Während eines Telefonats kann die Lautstärke geändert werden.
Informationen zur Durchführung von Einstellungen siehe Seite 4.
Um das Telefonat zu beenden, auf Anruf drücken
4
• Ein akustisches Signal wird ausgegeben.
®
-Profil „HSP“ oder „HFP“ unterstützt, können Sie den Kopfhörer
Einen ausgehenden Anruf durchführen
Mit dem Bluetooth®-fähigen
drücken und den
Telefon eine Gegenstelle
anrufen
• Informationen dazu finden Sie
in der Betriebsanleitung zum
®
-fähigen Telefon.
Links
gedrückt
Anruf
Mikrofon
Bluetooth
(Wie ein Gespräch beendet wird und weitere
Bedienschritte werden unten erläutert)
•
Während der ausgehende Anruf
signalisiert wird, wird über die
Kopflautsprecher der Rufton
ausgegeben und zusätzlich blinkt
die LED.
•
Wollen Sie den ausgehende Anruf
beenden, auf Anruf
Ein akustisches Signal wird
ausgegeben.
•
(Nur bei HFP) Wenn das Telefon
nicht belegt ist, die Taste Anruf
ungefähr 2 Sekunden lang gedrückt
halten. Die zuletzt angewählte
Rufnummer wird erneut angerufen.
Über die Kopflautsprecher wird ein
kurzes Klickgeräusch ausgegeben,
und zusätzlich blinkt die LED.
drücken.
■
Hinweis
• Gegebenenfalls muss beim benutzten Bluetooth®-fähigen Telefon
Freisprechbetrieb eingeschaltet werden.
• Je nach Bluetooth
Signalisierung eines eingehenden oder ausgehenden Anrufs beim Telefon über
den Kopfhörer ausgegeben wird.
• (Nur bei HFP) Auf dem Gerät ungefähr 2 Sekunden lang auf Anruf
Das zum Telefonieren benutzte Gerät wechselt zwischen Bluetooth
Telefon und dem Gerät.
®
-fähigen Telefon kann es sein, dass die akustische
drücken.
®
-fähigen
Praktische Funktionen
Kopfhörer zurücksetzen
Falls der Kopfhörer auf Bedienschritte nicht mehr reagiert, kann er zurückgesetzt
werden. Schließen Sie den Kopfhörer mit dem USB-Ladekabel an einen Computer
an. Nehmen Sie dann einen dünnen spitzen Gegenstand und drücken Sie
die Spitze in die Öffnung für Zurücksetzen (RESET). Achten Sie darauf, dass
die LED (Rot) erlischt. Halten Sie den spitzen Gegenstand in der Öffnung für
Zurücksetzen (RESET) (→ S. 2) ungefähr 5 Sekunden lang gedrückt, um das
Gerät zurückzusetzen. Alle zuvor ausgeführten Bedienschritte werden aufgehoben.
(Die Daten zum Koppeln von Geräten werden nicht gelöscht.)
Automatisches Ausschalten
Wenn der Kopfhörer ungefähr 5 Minuten keinen Ton überträgt und wenn während
dieser Zeit beim Bluetooth
sich der Kopfhörer nach Ausgabe eines Signaltons automatisch aus.
®
-Gerät keine Bedienschritte ausgeführt werden, schaltet
LED-Anzeige
Wenn während des Betriebs des Kopfhörers die Ladung des Akkus zur Neige geht,
wechselt die blau blinkende LED auf dem linken Kopflautsprecher die Farbe und
wird rot. Nach jeweils 1 Minute wird ein akustisches Signal ausgegeben. Wenn der
Akku vollständig leer ist, schaltet sich das Gerät aus.
Wiederherstellen der Werkseinstellungen
Wollen Sie alle Daten zu gekoppelten Geräten usw. löschen, können Sie den
Kopfhörer auf die Werkseinstellungen zurücksetzen (die Einstellungen, wie sie vor
dem Kauf bestanden haben).
1 Den Kopfhörer einschalten
2 Mindestens 5 Sekunden lang die Ein/Aus
zusammen gedrückt halten
• Die LED auf dem linken Kopflautsprecher leuchtet ungefähr 2 Sekunden lang
in Rot. Der Kopfhörer wird auf die Werkseinstellungen zurückgesetzt.
-Taste und die Zurück -Taste
DEUTSCH
VQT5J79
5
13
Page 14
Sicherheitshinweise
■
Kopfhörer
• Das Gerät nicht in der Nähe von Heiz- oder Wärmequellen ablegen.
• Die Lautstärke des Geräts nicht zu hoch stellen, wenn Sie aus
Sicherheitsgründen Geräusche und Töne aus der äußeren Umgebung hören
sollten, z. B. bei Eisenbahnübergängen und auf Baustellen.
• Breitband-Spannungseigenschaften gleich oder höher als 75 mV.
WARNUNG:
Um Brand- oder Stromschlaggefahr und Beschädigungen am Produkt zu
vermeiden, sollten folgende Regeln beachtet werden:
• Das Gerät nicht Regen oder Feuchtigkeit aussetzen, auch nicht in tropfender
oder spritzend Form.
• Kein mit Flüssigkeit gefülltes Gefäß wie z. B. eine Vase auf das Gerät setzen.
• Verwenden Sie nur empfohlenes Zubehör.
• Abdeckungen und Gehäuseteile nicht entfernen.
• Das Gerät nicht selber reparieren. Reparatur-und Instandsetzungsarbeiten
dürfen nur von dazu qualifiziertem und befugtem Personal durchgeführt
werden.
■
Allergien
• Falls Sie bemerken, dass der direkte Hautkontakt durch die Kopflautsprecher
oder durch andere Teile Ihnen nicht gut tut, dann sollten Sie das Gerät nicht
länger benutzen.
• Bei Weiterbenutzung drohen sonst Hautausschlag oder andere allergische
Reaktionen.
■
Sicherheitshinweise zur Benutzung von Kopfhörern
• Kopfhörer nur mit gemäßigter Lautstärke verwenden. Experten warnen vor zu
langem und ununterbrochenem Hören per Kopfhörer.
• Wenn Sie ein Klingeln im Ohr vernehmen, die Lautstärke reduzieren oder den
Gebrauch einstellen.
• Nicht in einem Kraftfahrzeug verwenden, wenn Sie am Steuer sitzen. Das
könnte eine Gefahr im Straßenverkehr sein und ist in vielen Gebieten
gesetzlich verboten.
• In möglicherweise gefährlichen Situationen sollten Sie äußerst vorsichtig sein
oder vorübergehend die Nutzung unterbrechen.
Bei Gebrauch kann das Gerät gegebenenfalls Funkstörungen ausgesetzt sein,
die durch Mobiltelefone verursacht werden. Falls solche Störungen auftreten,
vergrößern Sie den Abstand zwischen dem Gerät und dem Mobiltelefon.
VQT5J79
6
14
Wartung
Zum Reinigen des Geräts ein sauberes und weiches Tuch verwenden.
• Keine Lösungsmittel wie Benzin, Verdünner, Alkohol, Küchen-Reinigungsmittel,
einen mit Chemikalien getränkten Abstreifer usw. benutzen. Sonst könnte das
Äußere des Gehäuses deformiert werden, oder die Beschichtung könnte sich
lösen.
Konformitätserklärung
Hiermit erklärt Panasonic Corporation, dass dieses Gerät alle Grundanforderungen
und sonstigen relevanten Aufl agen der Direktive 1999/5/EC erfüllt.
Kunden können eine Kopie des Originals der Konformitätserklärung unserer
R&TTE-Produkte von der folgenden Webseite herunterladen:
http://www.doc.panasonic.de
Kontaktadresse: Panasonic Marketing Europe GmbH, Panasonic Testing Centre,
Winsbergring 15, 22525 Hamburg, Bundesrepublik Deutschland
Dieses Gerät ist ausschließlich für den Gebrauch in den folgenden Ländern
vorgesehen:
Großbritannien, Frankreich, Deutschland, Italien, Schweiz, Österreich,
Niederlande, Belgien, Spanien, Schweden, Norwegen, Dänemark, Finnland,
Ungarn, Tschechische Republik, Slowakien, Slowenien, Bulgarien, Polen,
Griechenland, Portugal, Rumänien
Dieses Produkt ist für allgemeine Verbraucher bestimmt (Kategorie 3).
Page 15
Über Bluetooth
Panasonic ist nicht verantwortlich zu machen, wenn bei einer drahtlosen
Übertragung Daten und/oder Informationen beeinträchtigt werden.
■
Verwendetes Frequenzband
Diese Gerät benutzt das 2,4 GHz-Frequenzband.
■
Zertifizierung dieses Geräts
• Dieses Gerät erfüllt die auferlegten Frequenzbeschränkungen und ist auf
Grundlage der entsprechenden Gesetze entsprechend zertifiziert. Darum ist
die Erteilung einer Funkerlaubnis nicht erforderlich.
• In einigen Ländern sind Handlungen, wie sie unten beschrieben sind,
gesetzlich verboten und können bestraft werden:
– Das Gerät auseinandernehmen/modifizieren.
– Das Etikett mit den Spezifikationen entfernen.
■
Nutzungseinschränkungen
• Die reibungslose drahtlose Übertragung zu oder von Bluetooth®-fähigen
Geräten und/oder deren Nutzung kann nicht in jedem Fall garantiert werden.
• Alle Geräte müssen den Standards entsprechen, die von Bluetooth SIG, Inc.
festgelegt sind.
Je nach Spezifikationen oder Einstellungen eines Gerätes kann möglicherweise keine
•
Verbindung hergestellt werden, oder einige Betriebsvorgänge unterscheiden sich.
• Dieses Gerät unterstützt Bluetooth®-Sicherheitsfunktionen. Aber je nach
Betriebsumgebung und/oder Einstellungen reichen diese
Sicherheitsfunktionen möglicherweise nicht aus. Seien Sie vorsichtig, wenn
Sie Daten drahtlos zu diesem System übertragen.
• Dieses System kann keine Daten zu einem Bluetooth
■
Einsatzbereich
Verbindungen können nur im Umkreis von maximal 10 m hergestellt und aufrecht
erhalten werden.
Je nach Umgebung, Hindernissen oder Interferenzen kann der Bereich auch
kleiner sein.
■
Interferenzen durch andere Geräte
• Wird dieses Gerät in zu großer Nähe zu anderen Bluetooth®-Geräten oder
Geräten betrieben, die das 2,4 GHz-Frequenzband benutzen, kann es sein,
dass aufgrund von Funkwellen-Interferenzen, die durch diese Geräte
hervorgerufen werden, das Gerät nicht ordnungsgemäß arbeitet und dass
Störungen wie Störgeräusche oder Tonsprünge auftreten.
Dieses Gerät funktioniert möglicherweise nicht ordnungsgemäß, wenn die von einer
•
in der Nähe befindlichen Sendestation ausgestrahlten Funkwellen zu stark sind.
■
Bestimmungsgemäßer Gebrauch
• Dieses Gerät ist nur für den normalen, allgemeinen Einsatz.
• Benutzen Sie dieses Gerät nicht in der Nähe von Geräten oder in
Umgebungen, die auf Funkwellen-Interferenzen empfindlich regieren (zum
Beispiel in Flughäfen, in Hospitälern, in Forschungsstätten usw.)
®
®
-Gerät übertragen.
Technische Daten
■
Allgemein
Stromversorgung
1
Betriebsdauer*
Aufladezeit*
Temperaturbereich bei Aufladen 10 ºC bis 35 ºC
Temperaturbereich bei Betrieb 0 ºC bis 40 ºC
Luftfeuchtigkeit bei Betrieb 35%RH bis 80%RH (nicht kondensierend)
Masse Ungefähr 198 g
1
Je nach Betriebsbedingungen kann die Betriebsdauer kürzer sein.
*
2
Erforderliche Zeit für das Aufladen von Leer zu Voll.
*
■
Bluetooth
Bluetooth®-Systemspezifikationen Version 3.0
Klassifizierung des Funkgeräts Klasse 2 (2,5 mW)
Verwendetes Frequenzband 2,4 GHz-Band FH-SS
Unterstützte Profile A2DP, AVRCP, HSP, HFP
Unterstützter Codec SBC, aptX
Betriebsdistanz Bis zu 10 m
■
Kopflautsprecher
Treiber-Einheiten Φ 40 mm
Impedanz 32 Ω
■
Anschlüsse
DC EINGANG 5 V DC, 500 mA
Audio-Eingang Stereo-Buchse Φ 3,5 mm
■
Mikrofon
Typ Mono
■
Zubehör
USB-Ladekabel 1,0 m
Abtrennbares Kabel 1,5 m
Technische Daten können ohne vorherige Ankündigung jederzeit geändert
●
werden.
(SBC-Modus) Ungefähr 30 Stunden
2
(25 ºC) Ungefähr 4,5 Stunden
®
5 V DC, 500 mA
(Interner Akku: 3,6 V (Li-ion 690 mAh))
®
DEUTSCH
VQT5J79
7
15
Page 16

Anleitung zur Fehlersuche
Bevor Sie den Kundendienst in Anspruch nehmen, prüfen Sie erst folgende Punkte.
Falls Sie sich bei einigen Punkten nicht sicher sind oder falls die vorgeschlagenen
Maßnahmen das Problem nicht lösen, fragen Sie Ihren Fachhändler.
Bluetooth®-Gerät verbinden
Zum Gerät kann keine Verbindung hergestellt werden
• Löschen Sie beim Bluetooth®-Gerät die Kopplungsinformationen zu diesem
Gerät und versuchen Sie es dann noch einmal. (→ S. 3)
Allgemein
Das Gerät reagiert nicht
• Schließen Sie an den lade-Anschluss (DC IN) das USB-Ladekabel an und
drücken Sie einen spitzen Gegenstand in die Öffnung für Zurücksetzen
(RESET). (→ S. 5)
Stromversorgung und Aufladen
Das Gerät kann nicht aufgeladen werden
• Achten Sie darauf, dass der angeschlossene PC eingeschaltet ist und dass er
sich nicht im Standbymodus oder im Energiesparmodus befindet.
• Funktioniert der USB-Anschluss, den Sie derzeit benutzen? Falls Ihr PC weitere
USB-Anschlüsse hat, schließen Sie das Kabel an einen anderen USB-Anschluss
an.
• Falls diese Maßnahmen das Problem nicht lösen, ziehen Sie das
USB-Ladekabel vom Gerät ab und schließen Sie es dann wieder an.
• Blinkt die LED in Rot? Falls die LED blinkt, liegt ein Fehler bei der Funktion zum
Aufladen vor.
• Falls die LED schnell rot blinkt, auch wenn das Gerät bei einer Raumtemperatur
im Bereich von 10 °C bis 35 °C neu aufgeladen wird, ist der Akku
möglicherweise zu abgenutzt. (Anzahl der Ladezyklen des eingebauten Akkus:
Ungefähr 500.)
Beim Aufladen leuchtet die LED nicht / Das Aufladen dauert länger
• Ist das (gelieferte) USB-Ladekabel fest am USB-Anschluss des Computers
angeschlossen? (→ S. 3)
Das Gerät lässt sich nicht einschalten
• Ist das Gerät aufgeladen? Während des Aufladens kann das Gerät nicht
eingeschaltet werden. (→ S. 3)
• Ist das abtrennbare Kabel angeschlossen? Das Gerät kann nicht eingeschaltet
werden, wenn das abtrennbare Kabel am Gerät angeschlossen ist.
VQT5J79
8
16
Ton und Audio-Lautstärke
Kein Ton
• Vergewissern Sie sich, dass dieses Gerät und das Bluetooth®-Gerät
ordnungsgemäß verbunden sind. (→ S. 3)
• Überzeugen Sie sich, dass auf dem Bluetooth
wird.
• Überzeugen Sie sich, dass das Gerät eingeschaltet ist und die Lautstärke nicht
zu leise gestellt ist.
• Koppeln Sie noch einmal das Bluetooth
Sie die Verbindung her. (→ S. 3)
®
-Gerät Musik wiedergegeben
®
-Gerät und den Kopfhörer und stellen
Leise
• Stellen Sie das Gerät lauter. (→ S. 4)
• Stellen Sie die Lautstärke des Bluetooth
®
-Geräts lauter.
Aussetzer im Ton vom Gerät / Schlechte Tonqualität
• Werden Signale blockiert, können Aussetzer im Ton auftreten. Achten Sie darauf,
dass Sie das Gerät nicht mit Ihrer Handfläche usw. abdecken.
• Möglicherweise ist das Gerät weiter als 10 m entfernt. Bringen Sie die Geräte
näher zusammen.
• Beseitigen Sie Hindernisse, die sich zwischen den beiden Geräten befinden.
• Schalten Sie WLAN-Geräte aus, wenn sie nicht benutzt werden.
• Wenn der Akku erschöpft ist, kann es zu Übertragungsproblemen kommen.
Laden Sie das Gerät neu auf. (→ S. 3)
Telefonieren
Sie können die andere Person nicht hören
• Vergewissern Sie sich, dass dieses Gerät und das Bluetooth®-fähige Telefon
eingeschaltet sind.
• Vergewissern Sie sich, dass dieses Gerät und das Bluetooth
miteinander verbunden sind. (→ S. 3)
• Überprüfen Sie die Audio-Einstellungen beim Bluetooth
Schalten Sie das zum Telefonieren benutzte Gerät auf den Kopfhörer, falls es auf
das Bluetooth
• Wenn Sie die Stimme der anderen Person zu leise vernehmen, dann stellen Sie
sowohl beim Kopfhörer aus auch beim Bluetooth
lauter.
®
-fähige Telefon geschaltet ist. (→ S. 3)
®
-fähigen Telefon die Lautstärke
®
-fähige Telefon
®
-fähigen Telefon.
Page 17
Copyright usw.
aptX® software is copyright CSR plc or its group
●
companies. All rights reserved.
®
mark and the aptX logo are trademarks
The aptX
of CSR plc or one of its group companies and
may be registered in one or more jurisdictions.
Die Wortmarke Bluetooth® und das Bluetooth®-Logo
●
sind Eigentum der Bluetooth SIG, Inc. und werden von
der Panasonic Corporation unter Lizenz verwendet.
Andere Markenzeichen und Markennamen sind
Schutzmarken der jeweiligen Eigentümer.
Bei allen anderen in diesem Dokument
●
erwähnten System- und Produktbezeichnungen
handelt es sich generell um eingetragene Marken
bzw. Marken der betreffenden Unternehmen.
Die Symbole ™ und ® werden in diesem
Dokument nicht verwendet.
Entsorgung von Altgeräten und Batterien
Nur für die Europäische Union und Länder mit
Recyclingsystemen
Dieses Symbol, auf den Produkten, der
Verpackung und/oder den Begleitdokumenten,
bedeutet, dass gebrauchte elektrische und
elektronische Produkte sowie Batterien nicht
in den allgemeinen Hausmüll gegeben werden
dürfen.
Bitte führen Sie alte Produkte und verbrauchte
Batterien zur Behandlung, Aufarbeitung bzw. zum
Recycling gemäß den gesetzlichen Bestimmungen
den zuständigen Sammelpunkten zu.
Indem Sie diese Produkte und Batterien
ordnungsgemäß entsorgen, helfen Sie dabei,
wertvolle Ressourcen zu schützen und eventuelle
negative Auswirkungen auf die menschliche
Gesundheit und die Umwelt zu vermeiden.
Für mehr Informationen zu Sammlung und
Recycling, wenden Sie sich bitte an Ihren
örtlichen Abfallentsorgungsdienstleister.
Gemäß Landesvorschriften können wegen nicht
ordnungsgemäßer Entsorgung dieses Abfalls
Strafgelder verhängt werden.
Hinweis für das Batteriesymbol (Symbol unten):
Dieses Symbol kann in Kombination mit
einem chemischen Symbol abgebildet sein.
In diesem Fall erfolgt dieses auf Grund der
Anforderungen derjenigen Richtlinien, die für
die betreffende Chemikalie erlassen wurden.
Zur Entsorgung des Geräts sollte der Akku entfernt werden
1
2
3
A
D
C
4
E
B
5
G
G
Die folgenden Instruktionen dienen nicht
Reparaturzwecken, sondern der Entsorgung des
Geräts. Ist dieses Gerät auseinandergenommen
worden, kann es nicht wieder zusammengebaut werden.
Wenn Sie das Gerät entsorgen wollen, entfernen Sie
den darin installierten Akku und führen Sie ihn der
Wiederverwertung zu.
D
• Falls der Akku ausläuft, sollten Sie ihn herausnehmen.
• Demontierte Teile außerhalb der Reichweite von Kindern
aufbewahren.
Vom rechten Kopflautsprecher das
1
Ohrkissen A abnehmen und die
3 Schrauben entfernen
• Verwenden Sie einen (handelsüblichen)
Kreuzschlitzschraubendreher.
Frontabdeckung entfernen
2
Die 2 Klinken D nach oben drücken und
3
dabei die hintere Abdeckung C nach
B
links drehen
Die 4 Schrauben entfernen und das
4
Gehäuse abnehmen
Den Akku an beiden Seiten so halten,
5
dass er in Position G kommt (weg
von den Kontakten
E
), und ihn dann
F
herausnehmen
Beachten Sie die Vorschriften zum Umgang mit
verbrauchten Akkus/Batterien
• Isolieren Sie die Anschlüsse mit Klebeband oder einem
ähnlichen Material.
• Nicht auseinandernehmen.
■
Akkus und Batterien
• Nicht Hitze oder offenem Feuer aussetzen.
• Batterien nicht für längere Zeit im Auto lassen, wenn
dieses direkter Sonnenbestrahlung ausgesetzt ist und
Türen und Fenster geschlossen sind.
Falscher Umgang mit Batterien kann dazu führen, dass die
•
Elektrolyt-Flüssigkeit ausläuft und Gegenstände beschädigt
werden, die mit dieser Flüssigkeit in Berührung kommen.
F
Falls eine Batterie ausläuft, fragen Sie Ihren Fachhändler,
was zu tun ist. Falls Elektrolyt-Flüssigkeit mit einem Körperteil
in Berührung kommt, diesen mit Wasser gründlich waschen.
• Informieren Sie sich bei den zuständigen Stellen vor
Ort oder bei Ihrem Fachhändler darüber, wie Batterien
vorschriftsmäßig entsorgt werden.
DEUTSCH
VQT5J79
9
17
Page 18
Cher client
Merci d’avoir porté votre choix sur cet
appareil.
Veuillez lire attentivement les
présentes instructions avant d’utiliser
ce produit, et conserver ce manuel
pour utilisation ultérieure.
Table des
matières
Avant utilisation
Accessoires ........................................ 2
Noms des pièces ................................2
Préparation
Chargement ........................................ 3
Mettre sur marche/arrêt ......................3
Connexion d’un dispositif
Connexion une touche
Fonctionnement
Écouter de la musique ........................ 4
Passer un appel téléphonique ............5
Fonctions utiles................................... 5
Autre
Réinitialisation aux réglages
Précautions de sécurité ......................6
Entretien ............................................. 6
À propos du Bluetooth
Spécifications ..................................... 7
Guide de dépannage ..........................8
Droits d’auteur, etc..............................9
Pour retirer la batterie lors de la
VQT5J79
2
18
®
Bluetooth
(connexion par NFC) ...................... 4
d’usine ............................................ 5
mise aux rebuts de cet appareil ..... 9
...................................... 3
®
...................... 7
Accessoires
Veuillez vérifier et identifier les
accessoires fournis.
1 Cordon détachable
1 Cordon de chargement USB
Noms des pièces
1
2
3
4
5
6
Ouvrir le couvercle
Gauche Droite
7
8
14 15
Les illustrations du produit peuvent différer
du produit actuel.
9
10 11
12 13
Bouton Interrupteur /
1
Couplage
Voyant LED*
2
• Le nombre de clignotements
ou la couleur indique l’état de
l’appareil.
(* ci-après appelé « voyant LED »)
Borne d’entrée audio
3
• Branchez le cordon détachable
(fourni) à cette borne lorsque
vous utilisez l’appareil en tant
que casque d’écoute câblé.
Microphone
4
Trou RÉINITIALISATION
5
(RESET)
Borne de chargement
6
(DC IN)
• Branchez le cordon de
chargement USB (fourni)
à cette borne lors du
chargement. (→ P. 3)
7
Appel
Zone tactile NFC
8
Précédent
9
Volume +
10
Suivant
11
Volume –
12
Lecture/Pause
13
Écouteur gauche
14
Écouteur droit
15
■
Note
• N’utilisez pas d’autres cordons de
chargement USB que celui fourni.
• N’utilisez pas d’autres cordons
détachables que celui fourni.
• Lorsque vous utilisez l’appareil,
ne couvrez pas l’écouteur gauche
avec la paume de la main.
Ceci peut gêner la connexion
®
Bluetooth
.
Page 19
Chargement
La batterie rechargeable (installée dans l’appareil) est fournie déchargée.
Chargez la batterie avant d’utiliser l’appareil.
Connectez cet appareil à un
1
ordinateur en utilisant le cordon
de chargement USB
• Pendant le chargement, le voyant LED
sur l’écouteur gauche s’allume en rouge.
Une fois le chargement terminé, le
voyant LED s’éteint.
• Le chargement complet prend environ
4,5 heures une batterie complètement
déchargée.
■
Note
• La fonctionnalité Bluetooth® ne peut pas être utilisée lorsque cet appareil est
connecté à un ordinateur au moyen du cordon de chargement USB.
• Effectuez le rechargement dans une pièce dont la température est comprise
entre 10 °C et 35 °C.
• Vous ne pouvez pas mettre l’appareil en marche pendant le chargement.
• N’utilisez pas d’autres cordons de chargement USB que celui fourni.
Attention : Utilisez uniquement le cordon de chargement USB fourni pour la
connexion à un ordinateur.
Ordinateur
Cordon de chargement USB (fourni)
Gauche
Voyant
LED
Mettre sur marche/arrêt
Appuyez et maintenez le bouton
1
d’interrupteur enfoncé pendant environ
deux secondes
• Un signal sonore retentit et le voyant LED sur
l’écouteur gauche clignote.
Bouton d’interrupteur
Pour mettre sur arrêt
• Appuyez et maintenez le bouton d’interrupteur
deux secondes. Un signal sonore retentit et l’appareil s’éteint.
■
Note
• Au bout de cinq minutes d’inactivité, l’appareil s’éteint automatiquement.
(Voir « Arrêt automatique » (→ P. 5))
enfoncé pendant environ
Connexion d’un dispositif Bluetooth
Pour établir une connexion sans fil, enregistrez l’appareil à l’aide de dispositifs
®
Bluetooth
Préparation sur le dispositif Bluetooth
Première mise en marche
1
2
3
compatibles.
®
• Mettez en marche et activez la fonctionnalité Bluetooth®.
• Placez le dispositif dans un rayon d’un mètre de l’appareil.
Contrôlez le fonctionnement du dispositif en consultant son mode d’emploi, le cas échéant.
•
Connexion après la seconde fois
Mettez l’appareil en marche
• L’appareil commence à
rechercher le dispositif
®
Bluetooth
et le voyant LED sur l’écouteur
gauche clignote alternativement
en bleu et en rouge. (Première
mise en marche depuis l’achat)
auquel se connecter
Lorsque l’appareil
(« RP-BTD10 ») est détecté
par le dispositif Bluetooth®,
sélectionnez-le
• Si vous êtes invité à entrer une
clé de connexion, entrez « 0000
(quatre zéros) ».
Si l’écran de sélection du profil
•
®
Bluetooth
le profil « A2DP ». Si « A2DP »
n’est pas pris en charge ou
si vous souhaitez seulement
passer des appels téléphoniques,
sélectionnez le profil « HSP » ou
« HFP ». (Pour en savoir plus sur
les profils, voir « Écouter de la
musique » (→ P. 4) et « Passer
un appel téléphonique » (→ P. 5))
s’affiche, sélectionnez
Contrôlez la connexion avec
le dispositif Bluetooth® sur
l’appareil
• Le voyant LED sur l’écouteur
gauche commence par s’allumer
en bleu, puis s’allume et s’éteint.
Une fois la connexion établie, le
clignotement change.
<Connexion du même dispositif Bluetooth
Une fois l’appareil mis en marche, il
recherchera le dispositif Bluetooth
précédemment configuré et lancera
automatiquement la connexion à ce
dernier. Le voyant LED sur l’écouteur
gauche commence par s’allumer en
bleu, puis s’allume et s’éteint. Une fois la
connexion établie, le clignotement change.
<Connexion d’un dispositif
Bluetooth
Désactivez la fonctionnalité Bluetooth®
sur le dispositif précédemment connecté.
Vérifiez que l’appareil est éteint. Appuyez et
maintenez enfoncé le bouton de couplage
pendant environ cinq secondes. L’appareil
commence à rechercher d’autres dispositifs
Bluetooth
gauche clignote alternativement en bleu et
en rouge. Un signal sonore retentit.
Poursuivez avec les étapes 2 et 3.
®
différent>
®
. Le voyant LED sur l’écouteur
■
Note
• Si une connexion à un dispositif
n’est pas établie dans un délai de
cinq minutes, l’appareil s’éteint.
Recommencez à partir de l’étape 1.
• Vous ne pouvez pas connecter en
même temps plusieurs dispositifs
®
Bluetooth
• Vous pouvez associer jusqu’à huit
dispositifs à cet appareil. Si un
neuvième dispositif est associé, le
dispositif dont la connexion est la
plus ancienne est remplacé. Pour
l’utiliser, associez-le à nouveau.
à l’appareil.
®
®
>
®
FRANÇAIS
VQT5J79
3
19
Page 20
Autonomie de la batterie
Connexion une touche (connexion par NFC)
Uniquement pour les dispositifs Android™ compatibles NFC
La fonctionnalité NFC (Communication en champ proche) permet à cet appareil
de se connecter facilement à un dispositif Bluetooth
de toucher cet appareil avec votre dispositif Bluetooth
automatiquement en marche, associer un dispositif Bluetooth
connexion.
®
compatible NFC. Il vous suffit
®
pour mettre cet appareil
®
et établir une
Préparation
Activez la fonctionnalité NFC du dispositif Bluetooth®.
Démarrez l’application de lecture de musique/vidéos sur le
1
dispositif Bluetooth
• Suivez les instructions sur l’écran de votre dispositif.
Touchez et maintenez votre dispositif sur la zone tactile NFC de
2
cet appareil (jusqu’à ce qu’une fenêtre contextuelle sur votre
®
dispositif indique que la connexion est établie)
• L’appareil est mis en marche. Le voyant LED sur l’écouteur gauche
commence par s’allumer en bleu, puis s’allume et s’éteint. Une fois la
connexion établie, le clignotement change.
• Si la connexion n’est pas établie, touchez à un autre endroit.
Commencez à lire de la musique/vidéos sur votre dispositif
3
Bluetooth
■
Connexion à un autre dispositif
Touchez cet appareil avec un autre dispositif pour établir une nouvelle connexion
Bluetooth
Le dispositif précédemment connecté sera automatiquement déconnecté.
®
®
.
Écouter de la musique
Si le dispositif compatible Bluetooth® prend en charge les profils Bluetooth®
« A2DP » et « AVRCP », vous pouvez écouter de la musique en utilisant les
commandes à distance de l’appareil.
• A2DP (Profil de distribution audio avancé) : Transmet du son à l’appareil.
• AVRCP (Profil de contrôle à distance audio/vidéo) :
Permet de contrôler le dispositif à distance avec l’appareil.
Connectez le dispositif Bluetooth® et l’appareil (→ P. 3)
1
Sélectionnez et lisez la musique sur le dispositif Bluetooth
VQT5J79
2
• La musique sélectionnée sort par les écouteurs de l’appareil.
4
20
®
Batterie rechargeable (installée dans l’appareil) Environ 30 heures
L’autonomie de la batterie dépend des conditions d’utilisation.
■
Note
• Les dispositifs Bluetooth® équipés aptX® peuvent diffuser une musique de qualité
supérieure.
■
Attention
• Le niveau sonore peut entraîner des fuites acoustiques de l’appareil.
• Le son de la musique peut être déformé si le volume est poussé au maximum.
Réduisez le volume jusqu’à ce qu’il n’y ait plus de déformations.
Télécommande
Vous pouvez contrôler le dispositif Bluetooth® en utilisant l’appareil.
• Selon les dispositifs Bluetooth
fonctionnent pas ou fonctionnent différemment lorsqu’elles sont utilisées par
l’intermédiaire de l’appareil.
(Exemple de fonctionnement)
Lecture/Pause
Appuyez Lecture/Pause
Précédent/Suivant
Appuyez pendant
la lecture
Appuyez et
maintenez enfoncé
Appuyez pendant
la lecture
Appuyez et
maintenez enfoncé
Volume
Appuyez
+
Appuyez et
maintenez enfoncé
Appuyez
−
Appuyez et
maintenez enfoncé
Type de batterie Autonomie
®
, certaines des fonctions ci-dessous ne
Retourner au
début de la piste
choisie
Retour
Avance au
début de la piste
suivante
Avance rapide
Augmenter le
volume
Augmenter le
volume en continu
Diminuer le
volume
Diminuer le
volume en continu
Précédent
Volume –
■
Note
• Il existe 15 niveaux
d’ajustement du volume.
Lorsque le volume minimum ou
maximum est atteint, un signal
sonore retentit.
Droite
Volume +
Lecture/
Pause
Suivant
Page 21
Passer un appel téléphonique
Avec des téléphones équipés Bluetooth® (mobiles ou smartphones) prenant en
charge le profil Bluetooth
passer des appels.
• HSP (Profil casque d’écoute) :
Ce profil peut être utilisé pour recevoir des sons en mono et établir une
communication bidirectionnelle à l’aide du microphone de l’appareil.
• HFP (Profil mains libres) :
En plus des fonctions HSP, ce profil dispose de la fonction d’appels entrants et
sortants.
Connectez le téléphone équipé Bluetooth® et l’appareil (→ P. 3)
1
Lorsque vous répondez à un appel entrant
2
Appuyez sur Appel sur
l’appareil et répondez à
l’appel
•
Lors d’un appel entrant, la
sonnerie retentit dans l’écouteur et
le voyant LED se met à clignoter.
•(HFP uniquement) Pour refuser
un appel entrant, appuyez et
maintenez la touche Appel
enfoncée jusqu’à ce que la
sonnerie s’arrête.
Gauche
Commencez à parler
3
• Le voyant LED clignote deux fois de suite pendant un appel.
• Le volume peut être ajusté pendant un appel téléphonique. Pour obtenir les
instructions de réglage, voir la page 4.
Appuyez sur Appel pour terminer l’appel téléphonique
4
• Un signal sonore retentit.
®
« HSP » ou « HFP », vous pouvez utiliser l’appareil pour
Lorsque vous passez un appel sortant
Passer un appel sortant
Appel
Microphone
sur le téléphone équipé
Bluetooth
• Veuillez également consulter
(Les étapes de contrôle et
d’utilisation de l’appareil sont
expliquées ci-dessous)
•
•
•
®
le mode d’emploi du téléphone
équipé Bluetooth
Lors d’un appel sortant, la
sonnerie retentit dans l’écouteur et
le voyant LED se met à clignoter.
Pour annuler un appel sortant,
appuyez sur Appel
Un signal sonore retentit.
(HFP uniquement) Lorsque le
téléphone est occupé, appuyez
et maintenez la touche Appel
enfoncée pendant environ deux
secondes. Un appel sortant
sera passé au dernier numéro
composé. Un bref clic retentit dans
l’écouteur et le voyant LED se met
à clignoter.
®
.
.
■
Note
• Vous devrez peut-être effectuer un paramétrage sur le téléphone équipé
• Avec certains téléphones équipés Bluetooth
•(HFP uniquement) Appuyez et maintenez la touche Appel
®
Bluetooth
entrantes et sortantes du téléphone dans l’appareil.
enfoncée pendant environ deux secondes. Le dispositif d’appel passera du
téléphone équipé Bluetooth
.
®
à l’appareil.
®
,vous entendrez les sonneries
de l’appareil
Fonctions utiles
Réinitialisation de l’appareil
Lorsque toutes les opérations sont refusées, vous pouvez réinitialiser cet appareil.
Connectez l’appareil à un ordinateur en utilisant le cordon de chargement
USB. Puis enfoncez un objet fin et pointu dans le trou RÉINITIALISATION
(RESET). Continuez d’appuyer sur trou RÉINITIALISATION (RESET) (→ P. 2)
pendant environ cinq secondes pour réinitialiser l’appareil. Toutes les opérations
précédentes seront annulées. (Les informations de couplage du dispositif ne seront
pas supprimées.)
Arrêt automatique
Si l’appareil reste silencieux et si les dispositifs Bluetooth® restent inactifs pendant
environ cinq minutes, un signal sonore retentit et l’appareil s’arrête.
Voyant LED
Si vous utilisez l’appareil avec un niveau de batterie faible, le voyant LED
clignotant en bleu sur l’écouteur gauche passe au rouge. Un signal sonore retentit
toutes les minutes. Une fois la batterie épuisée, l’appareil s’éteint.
Réinitialisation aux réglages d’usine
Lorsque vous souhaitez supprimer toutes les informations de couplage des
dispositifs, etc., vous pouvez réinitialiser l’appareil aux réglages d’usine (réglages
au moment de l’achat).
1 Éteignez l’appareil
2 Appuyez et maintenez le bouton d’interrupteur
Précédent
• Le voyant LED sur l’écouteur gauche s’allume en rouge pendant environ deux
secondes. L’appareil sera réinitialisé aux réglages d’usine.
enfoncés en même temps pendant cinq secondes ou plus
et le bouton
FRANÇAIS
VQT5J79
5
21
Page 22
Précautions de sécurité
■
Appareil
• Évitez d’utiliser ou de placer cet appareil près de sources de chaleur.
• N’écoutez pas cet appareil au niveau de volume maximum dans les endroits
dans lesquels vous devez entendre les sons alentours pour des raisons de
sécurité, comme à des carrefours et sur des chantiers.
• Tension caractéristique de la bande large équivalente ou supérieure à 75 mV.
AVERTISSEMENT :
Afin de réduire le risque d’incendie, de choc électrique ou de dommage,
• N’exposez pas cet appareil à la pluie, l’humidité, l’égouttement ou les
éclaboussures.
• Ne posez pas sur cet appareil des objets contenant des liquides, comme des
vases.
• Utilisez uniquement les accessoires recommandés.
• Ne retirez pas les couvercles.
• Ne réparez pas cet appareil vous-même. Faites appel à des professionnels
qualifiés.
■
Allergies
• Cessez d’utiliser l’appareil si les écouteurs ou toute autre partie en contact
avec votre peau cause une gêne.
• Une utilisation prolongée peut entraîner des éruptions cutanées ou d’autres
réactions allergiques.
■
Précautions d’utilisation du casque d’écoute
• N’utilisez pas votre casque d’écoute à un niveau de volume élevé. Les experts
de l’audition déconseillent l’écoute prolongée.
• Si vos oreilles bourdonnent, diminuez le volume ou cessez l’utilisation.
• Ne l’utilisez pas en conduisant un véhicule motorisé. Ceci peut être dangereux
et est interdit par la loi dans de nombreux pays.
• Veuillez prendre d’extrêmes précautions ou cesser temporairement l’utilisation
dans des situations potentiellement dangereuses.
Certains téléphones mobiles peuvent causer des interférences radio avec cet
appareil pendant l’utilisation. Dans ce cas, veuillez augmenter la distance entre
cet appareil et le téléphone mobile.
Entretien
Nettoyez cet appareil avec un linge doux et sec.
• N’utilisez pas de solvants contenant du benzène, un diluant, de l’alcool, un
détergent de cuisine, une lingette nettoyante, etc. Ceci peut déformer le
logement extérieur ou peut faire se détacher le revêtement.
Déclaration de Conformité (DoC)
Par la présente, “Panasonic Corporation” déclare que cet appareil est conforme
aux exigences essentielles et autres dispositions pertinentes de la Directive
1999/5/CE.
Les clients peuvent télécharger une copie de la DoC originale de nos appareils
R&TTE depuis notre serveur DoC :
http://www.doc.panasonic.de
Contactez le représentant autorisé : Panasonic Marketing Europe GmbH,
Panasonic Testing Centre, Winsbergring 15, 22525 Hamburg, Germany
Cet appareil est conçu pour l’utilisation dans les pays suivants.
ROYAUME-UNI, FRANCE, ALLEMAGNE, ITALIE, SUISSE, AUTRICHE,
PAYS-BAS, BELGIQUE, ESPAGNE, SUÈDE, NORVÈGE, DANEMARK,
FINLANDE, HONGRIE, RÉPUBLIQUE TCHÈQUE, SLOVAQUIE, SLOVÉNIE,
BULGARIE, POLOGNE, GRÈCE, PORTUGAL, ROUMANIE
Cet appareil est conçu pour les consommateurs en général. (Catégorie 3)
VQT5J79
6
22
Page 23
À propos du Bluetooth
Panasonic ne sera en aucun cas responsable quant à toute interception de
données et/ou informations pendant une transmission sans fil.
■
Bande de fréquences utilisée
Cet appareil utilise une bande de fréquences de 2,4 GHz.
■
Certification de cet appareil
• Cet appareil se conforme aux limites relatives aux fréquences et a obtenu une
certification reposant sur les lois relatives aux fréquences. Par conséquent, un
permis sans fil n’est pas nécessaire.
Les actions ci-dessous peuvent être sanctionnées par les lois de certains pays :
•
– Démonter/modifier l’appareil.
– Retirer les indications des spécifications.
■
Limites d’utilisation
• La transmission sans fil et/ou l’utilisation avec des dispositifs équipés
• Tous les dispositifs doivent se conformer aux normes définies par Bluetooth
• Selon les spécifications et les réglages d’un dispositif particulier, la connexion
• Ce système prend en charge les fonctionnalités de sécurité Bluetooth
• Ce système ne peut pas transmettre de données à un dispositif Bluetooth
■
Portée d’utilisation
Utilisez cet appareil à une portée maximum de 10 m.
La portée peut diminuer en fonction de l’environnement, des obstacles ou des
interférences.
■
Interférences d’autres dispositifs
• Cet appareil peut ne pas fonctionner correctement et des problèmes comme
• Cet appareil peut ne pas fonctionner correctement si les ondes radio d’une
■
Usage prévu
• Cet appareil est uniquement prévu à l’usage normal et général.
• N’utilisez pas ce système près d’un équipement ou dans un environnement
®
Bluetooth
SIG, Inc.
peut échouer ou certaines opérations peuvent différer.
Toutefois, en fonction de l’environnement d’utilisation et/ou des réglages, cette
sécurité peut ne pas suffire. Transmettez des données sans fil à ce système
avec précautions.
du bruit et des coupures de son peuvent survenir à cause d’interférences
radio si cet appareil est placé trop près d’autres dispositifs Bluetooth
dispositifs utilisant une bande de 2,4 GHz.
station de diffusion proche, etc. sont trop fortes.
sensible à des interférences radio (exemple : aéroports, hôpitaux, laboratoires,
etc.).
n’est pas garantie.
®
®
®
.
®
ou de
Spécifications
■
Généralités
Interrupteur électrique
1
Autonomie*
Temps de chargement*
Plage de températures de
chargement
Plage de températures de
fonctionnement
Gamme d’humidité de fonctionnement
Masse Environ 198 g
1
Peut être plus court selon les conditions d’utilisation.
*
2
Temps de recharge complet d’une batterie vide.
*
■
Section Bluetooth
Spécifications du système Bluetooth®Ver. 3.0
Classification de l’équipement sans fil
Bande de fréquences Bande FH-SS 2,4 GHz
Profils pris en charge A2DP, AVRCP, HSP, HFP
Codecs pris en charge SBC, aptX
.
Distance de fonctionnement Jusqu’à 10 m
■
Section écouteur
Excitateur Φ 40 mm
Impédance 32 Ω
■
Section borne
EN CC CC 5 V, 500 mA
Entrée audio Jack stéréo Φ 3,5 mm
■
Section microphone
Type Mono
■
Section accessoires
Cordon de chargement USB 1,0 m
Cordon détachable 1,5 m
Les spécifications sont soumises aux changements sans préavis.
●
(Mode SBC) Environ 30 heures
2
(25 ºC) Environ 4,5 heures
®
CC 5 V, 500 mA
(Batterie interne : 3,6 V (Li-ion 690 mAh))
10 °C à 35 °C
0 °C à 40 °C
35%HR à 80%HR (sans condensation)
Classe 2 (2,5 mW)
®
FRANÇAIS
VQT5J79
7
23
Page 24

Guide de dépannage
Avant de contacter un réparateur, effectuez les contrôles suivants. Si vous avez
des doutes sur certains points de contrôle, ou si les solutions proposées ne
résolvent pas le problème, veuillez prendre contact avec votre revendeur.
Connexion du dispositif Bluetooth
®
Le dispositif ne peut pas être connecté
• Supprimez les informations de couplage de cet appareil du dispositif Bluetooth®,
puis associez-les à nouveau. (→ P. 3)
Généralités
L’appareil ne répond pas
• Pressez le trou RÉINITIALISATION (RESET) tout en branchant le cordon de
chargement USB à la borne de chargement (DC IN). (→ P. 5)
Interrupteur électrique et chargement
Chargement de l’appareil impossible
• Veillez à ce que l’ordinateur soit en marche et non pas en veille ou en veille
prolongée.
• Le port USB que vous utilisez fonctionne-t-il correctement ? Si votre ordinateur
dispose d’autres ports USB, débranchez le connecteur du port choisi et
branchez-le aux autres ports.
• Si les mesures susmentionnées ne s’appliquent pas, débranchez le cordon de
chargement USB et rebranchez-le.
• Le voyant LED clignote-t-il en rouge ? Un clignotement du voyant LED indique
un chargement défectueux.
• Si le voyant LED clignote rapidement en rouge même lorsque l’appareil est
en cours de chargement à une température ambiante comprise entre 10 °C
et 35 °C, la batterie est peut-être défaillante. (Nombre de chargements de la
batterie incluse : Environ 500.)
Le voyant LED ne s’allume pas pendant le chargement /
Le chargement prend davantage de temps
• Le cordon de chargement USB (fourni) est-il bien branché à la borne USB de
l’ordinateur ? (→ P. 3)
L’appareil ne s’allume pas
• L’appareil est-il en cours de chargement ? Vous ne pouvez pas mettre l’appareil
en MARCHE pendant le chargement. (→ P. 3)
• Le cordon détachable est-il branché ? Vous ne pouvez pas mettre l’appareil en
marche lorsque le cordon détachable est branché à l’appareil.
Son et volume audio
Aucun son
•
Veillez à ce que l’appareil et le dispositif Bluetooth® soient bien connectés. (→ P. 3)
• Vérifiez que la musique est diffusée sur le dispositif Bluetooth®.
• Veillez à ce que l’appareil soit mis en marche et à ce que le volume ne soit pas
trop bas.
• Associez et connectez à nouveau le dispositif Bluetooth
®
et l’appareil. (→ P. 3)
Volume bas
• Augmentez le volume de l’appareil. (→ P. 4)
• Augmentez le volume du dispositif Bluetooth
®
.
Le son du dispositif est coupé / La qualité du son est mauvaise
• Le son peut être interrompu si les signaux sont bloqués. Ne couvrez pas
complètement cet appareil avec la paume de la main, etc.
• Le dispositif est peut-être hors de portée de communication 10 m. Rapprochez le
dispositif de cet appareil.
• Retirez tout obstacle entre cet appareil et le dispositif.
• Éteignez tous les dispositifs LAN non utilisés.
• Un problème de communication peut survenir si la batterie est déchargée.
Rechargez l’appareil. (→ P. 3)
Appels
Vous ne parvenez pas à entendre l’autre personne
• Veillez à ce que l’appareil et le téléphone équipé Bluetooth® soient en marche.
• Vérifiez que l’appareil et le téléphone équipé Bluetooth
• Contrôlez les réglages audio du téléphone équipé Bluetooth
dispositif d’appel sur l’appareil s’il est réglé sur le téléphone équipé Bluetooth
(→ P. 3)
• Si le volume de la voix de l’autre personne est trop bas, augmentez le volume de
l’appareil et du téléphone équipé Bluetooth
®
.
®
sont connectés. (→ P. 3)
®
. Permutez le
®
.
VQT5J79
8
24
Page 25
Droits d’auteur, etc.
aptX® software is copyright CSR plc or its group
●
companies. All rights reserved.
®
mark and the aptX logo are trademarks
The aptX
of CSR plc or one of its group companies and
may be registered in one or more jurisdictions.
Le nom et la marque Bluetooth® ainsi que les
●
logos sont la propriété de Bluetooth SIG, Inc. et
toute utilisation de ces marques par Panasonic
Corporation est effectuée sous licence.
Les autres marques et noms commerciaux
appartiennent à leurs propriétaires respectifs.
En règle générale, les autres noms de systèmes
●
et de produits mentionnés dans ce document
sont des marques, déposées ou non, de leurs
développeurs respectifs.
Noter que les symboles ™ et ® n’apparaissent
pas dans ce document.
L’élimination des équipements et des batteries usagés
Applicable uniquement dans les pays membres de l’Union
européenne et les pays disposant de systèmes de recyclage.
Apposé sur le produit lui-même, sur
son emballage, ou figurant dans la
documentation qui l’accompagne, ce
pictogramme indique que les piles, appareils
électriques et électroniques usagés, doivent
être séparées des ordures ménagères.
Afin de permettre le traitement, la valorisation
et le recyclage adéquats des piles et des
appareils usagés, veuillez les porter à l’un
des points de collecte prévus, conformément
à la législation nationale en vigueur.
En les éliminant conformément à la réglementation
en vigueur, vous contribuez à éviter le gaspillage
de ressources précieuses ainsi qu’à protéger la
santé humaine et l’environnement.
Pour de plus amples renseignements sur
la collecte et le recyclage, veuillez vous
renseigner auprès des collectivités locales.
Le non-respect de la réglementation
relative à l’élimination des déchets est
passible d’une peine d’amende.
Note relative au pictogramme à apposer
sur les piles (pictogramme du bas) :
Si ce pictogramme est combiné avec un
symbole chimique, il répond également
aux exigences posées par la Directive
relative au produit chimique concerné.
Pour retirer la batterie lors de la mise aux rebuts de cet appareil
1
2
3
A
D
C
4
Les instructions suivantes n’ont pas été conçues
pour la réparation mais pour la mise aux rebuts
de cet appareil. Cet appareil ne peut pas être
restauré une fois démonté.
Lorsque vous jetez cet appareil, retirez la batterie
installée dans cet appareil et recyclez-la.
D
• Démontez après l’extraction de la batterie.
• Gardez les pièces démontées hors de portée des enfants.
Enlevez la protection A de l’écouteur
1
droit et retirez les trois vis
• Utilisez un tournevis cruciforme (vendu dans le
commerce).
Retirez le couvercle frontal
2
En soulevant les deux attaches D,
3
tournez le couvercle arrière C dans le
FRANÇAIS
B
sens inverse des aiguilles d’une montre
Retirez les quatre vis et retirez le
4
logement
Maintenez les deux côtés de la batterie
5
en position G (du côté opposé aux
E
bornes F), et retirez-la
Concernant la manipulation de batteries usagées
• Isolez les bornes avec du ruban adhésif ou un autre matériau
similaire.
E
B
5
G
• Ne démontez pas.
■
Batteries
• Ne les chauffez pas et ne les exposez pas à des flammes.
• Ne laissez pas la ou les batteries dans une voiture au
soleil pendant une période prolongée avec les portières et
les vitres fermées.
• Une mauvaise manipulation de la batterie peut entraîner
une fuite de l’électrolyte, susceptible d’endommager les
articles avec lesquels le liquide entre en contact. Si de
l’électrolyte fuit de la batterie, contactez votre revendeur.
Si de l’électrolyte entre en contact avec votre peau, lavezvous abondamment à l’eau.
• Lorsque vous jetez les batteries, veuillez contacter les
autorités locales ou votre revendeur pour connaître la
F
méthode d’élimination appropriée.
VQT5J79
9
G
25
Page 26
Gentile cliente
Grazie per aver acquistato questo
prodotto.
Leggere attentamente queste istruzioni
prima di utilizzare il presente prodotto,
e conservare questo manuale per usi
futuri.
Indice
Prima dell’uso
Accessori ............................................ 2
Definizione dei componenti ................2
Predisposizione
Carica ................................................. 3
Accensione e spegnimento ................3
Connessione di un dispositivo
Connessione One-Touch
Funzionamento
Riproduzione di musica ...................... 4
Esecuzione di una chiamata............... 5
Funzioni utili........................................ 5
Varie
Ripristino delle impostazioni
Precauzioni di sicurezza ..................... 6
Manutenzione ..................................... 6
Informazioni su Bluetooth
Specifiche ........................................... 7
Guida per la risoluzione dei
Copyright, ecc..................................... 9
Rimozione della batteria in caso
VQT5J79
2
26
®
Bluetooth
(connessione con NFC) .................4
di fabbrica ....................................... 5
problemi ......................................... 8
di smaltimento dell’unità ................. 9
...................................... 3
®
................. 7
Accessori
Controllare e identificare gli accessori
forniti.
1 Cavo estraibile
1 Cavo di ricarica USB
Definizione dei componenti
Pulsante di accensione /
1
2
3
4
5
6
Aprire il coperchio
Sinistra Destra
7
8
9
10 11
12 13
14 15
Le immagini del prodotto possono differire
dal prodotto effettivo.
1
associazione
Spia di segnalazione LED*
2
• Il numero di lampeggi o il
colore notificano lo stato
dell’unità.
(* di seguito indicata come “LED”)
Terminale di input audio
3
• Collegare il cavo estraibile
(fornito in dotazione) al
presente terminale se l’unità
viene utilizzata come cuffie
con fili.
Microfono
4
Foro RESET
5
Terminale di carica (DC IN)
6
• Collegare il cavo di ricarica
USB (fornito in dotazione) al
presente terminale durante la
ricarica. (→ pag. 3)
7
Chiamata
Area touch NFC
8
Precedente
9
Volume +
10
Successivo
11
Volume –
12
Play/Pausa
13
Altoparlante sinistro
14
Altoparlante destro
15
■
Nota
• Utilizzare esclusivamente il
cavo di ricarica USB fornito in
dotazione.
• Utilizzare esclusivamente il cavo
estraibile fornito in dotazione.
• Durante l’utilizzo dell’unità, non
coprire l’altoparlante sinistro
con il palmo della mano. La
connessione Bluetooth
bloccarsi.
®
potrebbe
Page 27
Carica
La batteria ricaricabile (installata nell’unità) non è caricata inizialmente.
Caricare la batteria prima di utilizzare l’unità.
Collegare l’unità a un computer
1
utilizzando il cavo di ricarica USB
• Durante la carica, il LED sull’altoparlante
sinistro si accende di colore rosso. Una
volta completata la carica, il LED si
spegne.
• La carica dura 4,5 ore circa dallo stato di
batteria scarica a completamente carica.
Cavo di ricarica USB (fornito in dotazione)
■
Nota
• La funzione Bluetooth® non può essere utilizzata se tale unità è collegata a un
computer con un cavo di ricarica USB.
• Ricaricare a una temperatura ambiente compresa tra 10 °C e 35 °C.
• Non è possibile accendere l’unità durante la carica.
• Utilizzare esclusivamente il cavo di ricarica USB fornito in dotazione.
Attenzione: Utilizzare esclusivamente il cavo di ricarica USB fornito in dotazione
in caso di collegamento a un computer.
Computer
Sinistra
LED
Accensione e spegnimento
Tenere premuto il pulsante di accensione
1
per circa 2 secondi
• Verrà emesso un segnale acustico e il LED
sull’altoparlante sinistro lampeggerà.
Pulsante di accensione
Spegnimento
• Tenere premuto il pulsante di accensione
un segnale acustico e l’unità si spegnerà.
■
Nota
• Se l’unità non viene azionata per un intervallo di circa 5 minuti, essa si spegnerà
automaticamente (consultare “Spegnimento automatico” (→ pag. 5)).
per 2 o più secondi. Verrà emesso
Connessione di un dispositivo Bluetooth
Per stabilire una connessione wireless, registrare l’unità con i dispositivi Bluetooth®
compatibili.
Predisposizione del dispositivo Bluetooth
• Accendere il dispositivo e attivare la funzione Bluetooth®.
• Posizionare il dispositivo entro 1 m dall’unità.
Verificare il funzionamento del dispositivo nelle apposite istruzioni, se necessario.
•
Prima accensione
Accendere l’unità
1
• L’unità inizierà la ricerca
del dispositivo Bluetooth
quale connettersi e il LED
sull’altoparlante sinistro
lampeggerà alternando i colori
rosso e blu (Una sola operazione
dopo l’acquisto).
Selezionare l’unità (“RP-BTD10”),
2
una volta rilevata dal dispositivo
Bluetooth
Controllare la connessione
3
con il dispositivo Bluetooth®
®
• In caso di richiesta di una chiave
di accesso, immettere “0000
(quattro zeri)”.
Se appare la schermata di
•
selezione del profilo Bluetooth
selezionare il profilo “A2DP”. Se
“A2DP” non è supportato o se si
desidera utilizzare solo le chiamate
telefoniche, selezionare il profilo
“HSP” o “HFP” (per i dettagli sui
profili, consultare “Riproduzione di
musica” (→ pag. 4) e “Esecuzione
di una chiamata” (→ pag. 5)).
®
al
®
,
sull’unità
• Per prima cosa il LED
sull’altoparlante sinistro si
accende di colore blu e ripete
l’operazione di accensione/
spegnimento. Una volta stabilita
la connessione, lo schema di
lampeggiamento cambierà.
®
Connessione successiva alla
seconda volta
<Connessione dello stesso
dispositivo Bluetooth
Se l’unità è accesa, ricercherà il dispositivo
®
precedentemente configurato
Bluetooth
e inizierà a connettersi ad esso in modo
automatico. Per prima cosa il LED
sull’altoparlante sinistro si accende di colore
blu e ripete l’operazione di accensione/
spegnimento. Una volta stabilita la connessione,
lo schema di lampeggiamento cambierà.
<Connessione di un dispositivo
Bluetooth
Disattivare la funzione Bluetooth® sul
dispositivo connesso in precedenza. Verificare
che l’unità sia spenta. Tenere premuto
il pulsante di associazione
5 secondi. L’unità inizierà la ricerca dell’altro
dispositivo Bluetooth
sinistro lampeggerà alternando i colori rosso e
blu e verrà emesso un segnale acustico.
Proseguire con le fasi 2 e 3.
®
diverso>
■
Nota
•
Se la connessione a un dispositivo non
è stabilita entro 5 minuti circa, l’unità si
spegnerà.
Ricominciare dalla fase 1.
•
Non è possibile collegare
contemporaneamente 2 o più dispositivi
®
Bluetooth
•
È possibile associare fino a 8 dispositivi
alla presente unità. Associando un
nono dispositivo, verrà sostituito quello
con la connessione meno recente. Per
utilizzarlo, associarlo nuovamente.
all’unità.
®
>
per circa
®
. Il LED sull’altoparlante
®
ITALIANO
VQT5J79
3
27
Page 28
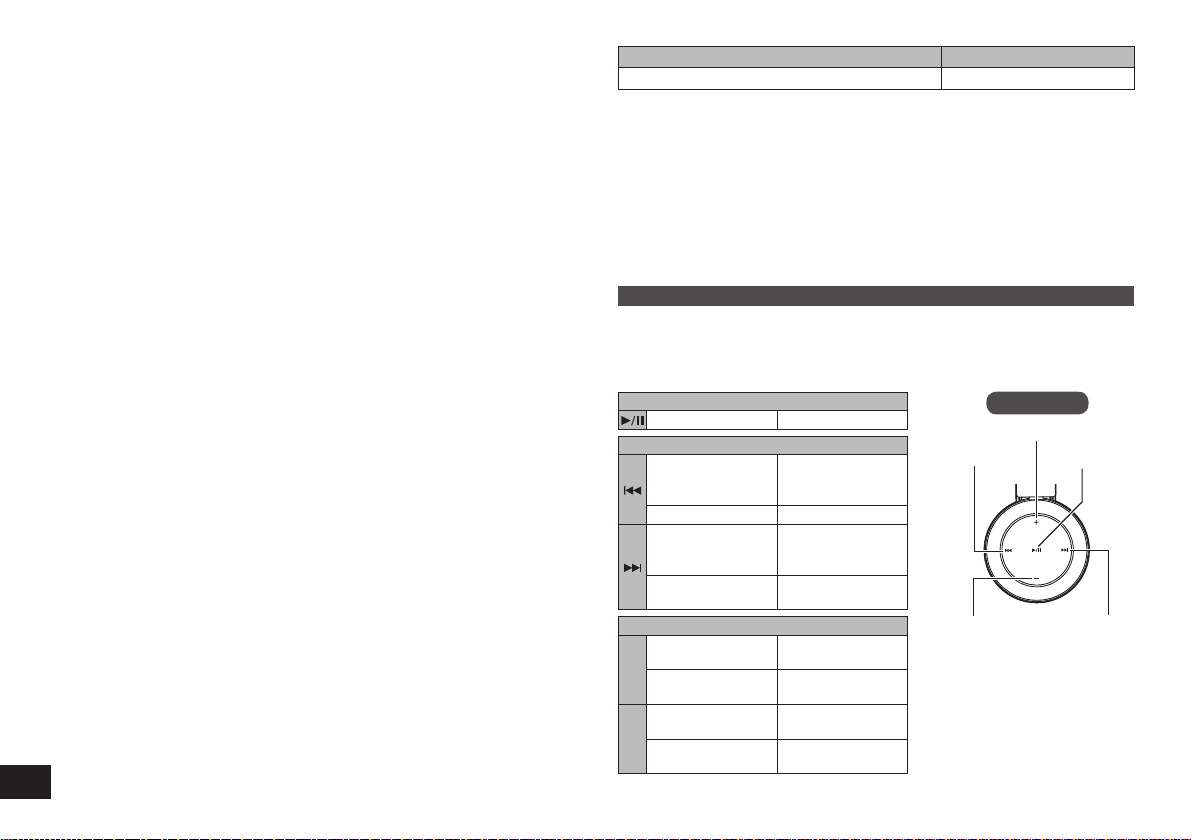
Durata operativa della batteria
Connessione One-Touch (connessione con NFC)
Solo per dispositivi Android™ compatibili con NFC
La funzione NFC (Near Field Communication) consente all’unità di
connettersi facilmente a un dispositivo Bluetooth
Toccare semplicemente l’unità con il dispositivo Bluetooth
automaticamente, associare il dispositivo Bluetooth
®
compatibile con NFC.
®
per accenderla
®
e stabilire una connessione.
Predisposizione
Attivare la funzione NFC sul dispositivo Bluetooth®.
Avviare l’applicazione per riprodurre musica/video sul
1
dispositivo Bluetooth
• Seguire le istruzioni sullo schermo del proprio dispositivo.
Toccare e tenere premuto il dispositivo sull’area touch NFC
2
dell’unità (finché una finestra pop-up sul dispositivo non indichi
®
la connessione stabilita)
• L’unità è accesa. Per prima cosa il LED sull’altoparlante sinistro si accende
di colore blu e ripete l’operazione di accensione/spegnimento. Una volta
stabilita la connessione, lo schema di lampeggiamento cambierà.
• Se la connessione non è stabilita, cambiare la posizione di contatto.
Avviare la riproduzione di musica/video sul dispositivo
3
Bluetooth
■
Connessione a un altro dispositivo
Toccare l’unità con un altro dispositivo per stabilire una nuova connessione
Bluetooth
Il dispositivo connesso in precedenza verrà automaticamente scollegato.
®
®
.
Riproduzione di musica
Se il dispositivo Bluetooth® compatibile supporta i profili Bluetooth® “A2DP” e
“AVRCP”, la musica può essere riprodotta con le funzioni di controllo remoto
dell’unità.
• A2DP (Profilo di distribuzione audio avanzata): Trasmette l’audio all’unità.
• AVRCP (Profilo di controllo remoto audio/video):
Consente il controllo remoto del dispositivo utilizzando l’unità.
Connettere il dispositivo Bluetooth® all’unità (→ pag. 3)
1
Selezionare e riprodurre la musica sul dispositivo Bluetooth
2
• La musica selezionata viene trasmessa agli altoparlanti dell’unità.
VQT5J79
4
28
®
Batteria ricaricabile (installata sull’unità) Circa 30 ore
La durata operativa può essere inferiore in base alle condizioni di esercizio.
■
Nota
• I dispositivi Bluetooth® che supportano aptX® sono in grado di trasmettere
musica di qualità superiore.
■
Attenzione
• L’unità può disperdere il suono a seconda del livello del volume.
• Aumentando il volume fino al livello pressoché massimo, la musica può risultare
distorta. Ridurre il volume fino alla scomparsa della distorsione.
Controllo remoto
È possibile controllare il dispositivo Bluetooth® utilizzando l’unità.
• In base ai dispositivi Bluetooth
disponibili o operano in modo differente con il funzionamento dell’unità.
(Esempio operativo)
Play/Pausa
Pressione Play/Pausa
Precedente/Successivo
Pressione durante
la riproduzione
Pressione continua Riavvolgimento
Pressione durante
la riproduzione
Pressione continua
Volume
Pressione
+
Pressione continua
Pressione
−
Pressione continua
Tipo di batteria Durata operativa
®
, alcune delle seguenti funzioni non sono
Destra
Volume +
Indietro all’inizio
della traccia
attuale
Avanti all’inizio
della traccia
successiva
Avanzamento
rapido
Aumento del
volume
Aumento continuo
del volume
Riduzione del
volume
Riduzione continua
del volume
Precedente
Volume –
■
Nota
• Il volume è regolabile in
15 livelli.
Raggiungendo il volume
massimo o minimo, viene
emesso un segnale acustico.
Play/Pausa
Successivo
Page 29
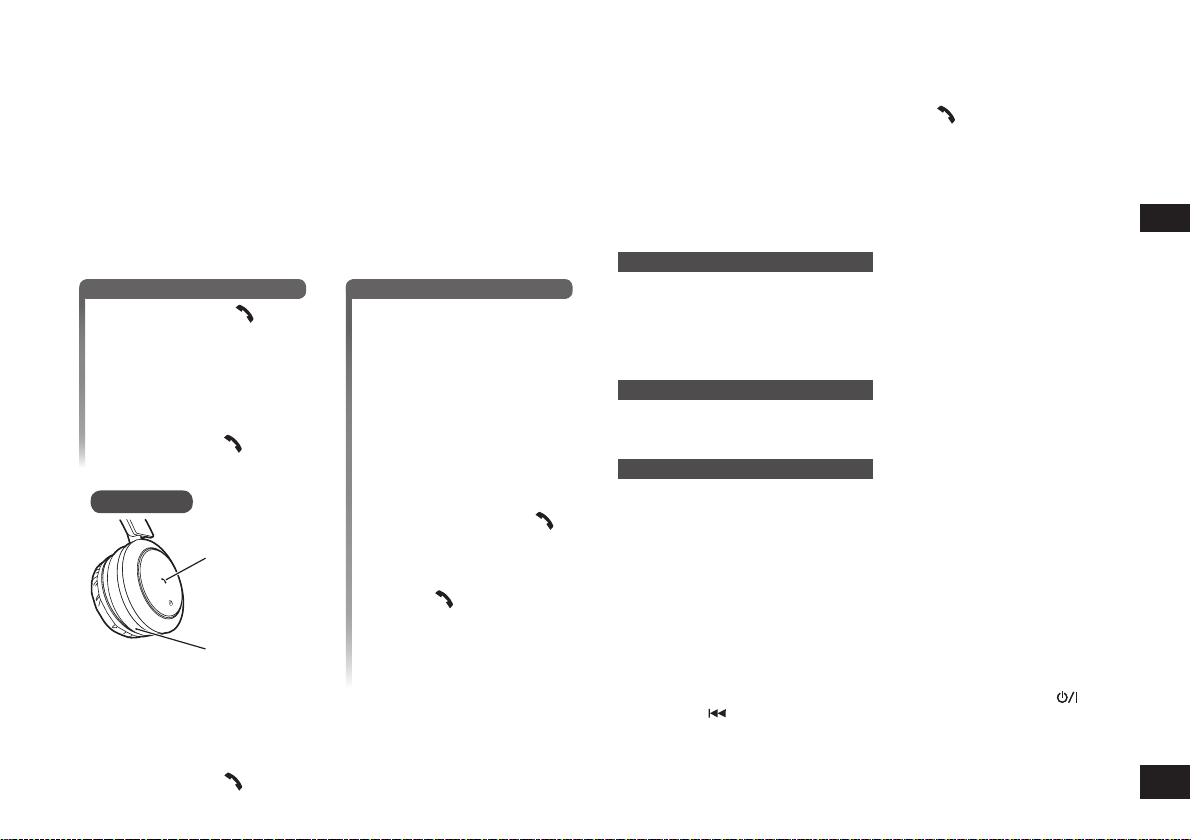
Esecuzione di una chiamata
I telefoni con funzione Bluetooth® (telefoni cellulari o smartphone), che supportano
il profilo Bluetooth
chiamate.
• HSP (Profilo auricolare):
Questo profilo può essere utilizzato per ricevere suoni monoaurali e stabilire una
comunicazione bidirezionale utilizzando il microfono presente sull’unità.
• HFP (Profilo viva-voce):
Oltre alle funzioni HSP, questo profilo è dotato della funzione delle chiamate in
entrata e in uscita.
Connettere il telefono con funzione Bluetooth® all’unità (→ pag. 3)
1
Risposta a una chiamata in entrata
2
Premere Chiamata
sull’unità e rispondere
• Durante una chiamata in
entrata, la suoneria verrà
emessa dall’altoparlante e il
LED lampeggerà.
• (Solo HFP) Per rifiutare una
chiamata in entrata, tenere
premuto Chiamata
all’interruzione della suoneria.
Avviare la comunicazione
3
• Il LED lampeggerà ripetutamente per due volte durante una chiamata.
• Il volume è regolabile durante una chiamata. Per le istruzioni di
impostazione, consultare pagina 4.
Premere Chiamata per terminare la telefonata
4
• Verrà emesso un segnale acustico.
®
“HSP” o “HFP”, consentono l’utilizzo dell’unità per effettuare
Esecuzione di una chiamata
Eseguire una chiamata
dal telefono con funzione
Bluetooth
• Fare riferimento anche al
manuale operativo del telefono
con funzione Bluetooth
(Le fasi operative e di controllo
sull’unità sono descritte a seguire)
fino
Sinistra
Chiamata
Microfono
• Durante una chiamata in
uscita, il tono verrà emesso
dall’altoparlante e il LED
lampeggerà.
• Per annullare la chiamata in
uscita, premere Chiamata
e verrà emesso un segnale
acustico.
• (Solo HFP) Se il telefono è
inattivo, mantenere premuto
Chiamata
2 secondi. Verrà eseguita una
chiamata all’ultimo numero
composto. Un solo scatto breve
verrà emesso dall’altoparlante e
il LED lampeggerà.
®
per circa
®
.
■
Nota
• In alcuni casi può essere necessario eseguire l’impostazione della funzione
viva-voce sul telefono con funzione Bluetooth
• In base alla telefono con funzione Bluetooth
di chiamata in entrata e in uscita del telefono.
• (Solo HFP) Premere e tenere premuta Chiamata
2 secondi. Il dispositivo chiamante sarà commutato fra il telefono con funzione
®
Bluetooth
e l’unità.
®
.
®
, è possibile sentire dall’unità i toni
sull’unità per circa
Funzioni utili
Ripristino dell’unità
L’unità può essere ripristinata se tutte le operazioni sono rifiutate. Collegare
l’unità a un computer utilizzando il cavo di ricarica USB. Premere quindi il foro
RESET con un oggetto appuntito e sottile. Verificare che il LED (rosso) si spenga.
Mantenere premuto il foro RESET (→ pag. 2) per circa 5 secondi per ripristinare
l’unità. Tutte le operazioni precedenti saranno annullate. (Le informazioni del
dispositivo associato non verranno eliminate.)
ITALIANO
Spegnimento automatico
Se l’unità è inattiva per circa 5 minuti e le operazioni per i dispositivi Bluetooth®
sono sospese durante questo periodo, verrà emesso un segnale acustico e l’unità
si spegnerà automaticamente.
Spia di segnalazione LED
Se il livello della batteria è insufficiente durante l’utilizzo dell’unità, il LED blu
lampeggiante sull’altoparlante sinistro diventerà rosso. Verrà emesso un segnale
acustico ogni minuto. Se la batteria si esaurisce, l’unità si spegne.
Ripristino delle impostazioni di fabbrica
Se si desidera eliminare tutte le informazioni del dispositivo associato e altro
ancora, è possibile ripristinare l’unità alle impostazioni di fabbrica (impostazioni
originali al momento dell’acquisto).
1 Spegnere l’unità
2 Tenere premuto contemporaneamente il pulsante di accensione
Precedente
• Il LED sull’altoparlante sinistro si accenderà di colore rosso per circa
2 secondi. L’unità verrà ripristinata alle impostazioni di fabbrica.
per 5 o più secondi
e
VQT5J79
5
29
Page 30
Precauzioni di sicurezza
■
Unità
• Evitare l’utilizzo o il posizionamento dell’unità vicino a fonti di calore.
• Non utilizzare l’unità a volume alto in luoghi dove occorre sentire, per motivi di
sicurezza, i suoni provenienti dall’ambiente circostante, come in prossimità di
passaggi a livello e nei cantieri.
• Tensione di riconoscimento banda larga uguale o superiore a 75 mV.
AVVERTENZA:
Per ridurre il rischio di incendio, scosse elettriche o di danni al prodotto:
• Non esporre l’unità a pioggia, umidità, gocciolamento o schizzi.
• Non posizionare oggetti contenenti liquidi, come vasi, sull’unità.
• Utilizzare solo accessori raccomandati.
• Non rimuovere i coperchi.
• Non riparare autonomamente l’unità. Fare riferimento all’assistenza di
personale qualificato.
■
Allergie
• Sospendere l’utilizzo se si avverte fastidio con gli altoparlanti o con qualsiasi
altro componente a diretto contatto con la pelle.
• L’uso protratto può causare eruzioni cutanee o altre reazioni allergiche.
■
Precauzioni per l’ascolto con cuffie
• Non utilizzare le cuffie a volume elevato. Gli esperti dell’udito sconsigliano la
riproduzione continua prolungata.
• Se si avverte un ronzio nelle orecchie, ridurre il volume o sospendere l’utilizzo.
• Non utilizzare durante la marcia con un veicolo a motore: potrebbe creare un
rischio per il traffico stradale ed è illegale in molte aree.
• Prestare estrema attenzione o sospendere temporaneamente l’utilizzo in
situazioni potenzialmente pericolose.
L’unità può ricevere interferenze radio causate dall’utilizzo di telefoni cellulari. Se
si verifica tale circostanza, aumentare la distanza tra l’unità e il telefono cellulare.
Manutenzione
Pulire l’unità con un panno morbido e asciutto.
• Non utilizzare solventi tra cui benzina, diluente, alcool, detergente per cucina,
tergicristalli chimico ecc.: questi ultimi possono causare la deformazione della
custodia esterna o la rimozione del rivestimento.
Dichiarazione di Conformità
“Panasonic Corporation” dichiara qui che questo prodotto è conforme ai requisiti
essenziali e altre relative norme della Direttiva 1999/5/CE.
I clienti possono scaricare una copia della DdC originale dei nostri prodotti R&TTE
dal nostro server DdC:
http://www.doc.panasonic.de
Rivolgersi al Rappresentante autorizzzato: Panasonic Marketing Europe GmbH,
Panasonic Testing Centre, Winsbergring 15, 22525 Hamburg, Germany
Questo prodotto è progettato per l’uso nei Paesi seguenti.
REGNO UNITO, FRANCIA, GERMANIA, ITALIA, SVIZZERA, AUSTRIA, OLANDA,
BELGIO, SPAGNA, SVEZIA, NORVEGIA, DANIMARCA, FINLANDIA, UNGHERIA,
REPUBBLICA CECA, SLOVACCHIA, SLOVENIA, BULGARIA, POLONIA,
GRECIA, PORTOGALLO e ROMANIA
Questo prodotto è progettato per la clientela generale. (Categoria 3)
VQT5J79
6
30
Page 31

Informazioni su Bluetooth
Panasonic declina qualsiasi responsabilità per dati e/o informazioni
compromesse durante una trasmissione wireless.
■
Banda di frequenza utilizzata
L’unità utilizza la banda di frequenza da 2,4 GHz.
■
Certificazione dell’unità
• L’unità è conforme alle limitazioni di frequenza e ha ottenuto la certificazione in
base alle leggi sulle frequenze. Pertanto, non è necessaria un’autorizzazione
wireless.
• Le azioni indicate a seguire sono punibili per legge in alcuni paesi:
– Smontare/modificare l’unità.
– Rimuovere le indicazioni delle specifiche.
■
Limitazioni d’uso
• Non è garantita la trasmissione wireless e/o l’utilizzo con tutti i dispositivi dotati
di Bluetooth
• Tutti i dispositivi devono essere conformi alle norme stabilite da Bluetooth SIG,
Inc.
• In base alle specifiche e alle impostazioni di un dispositivo, è possibile che
quest’ultimo non riesca a connettersi o che alcune operazioni siano differenti.
• Il sistema supporta le funzioni di sicurezza Bluetooth
all’ambiente operativo e/o alle impostazioni, tale sicurezza può risultare
insufficiente. Trasmettere i dati al sistema via wireless con cautela.
• Il sistema non può trasmettere dati a un dispositivo Bluetooth
■
Raggio d’azione
Utilizzare l’unità a una distanza massima di 10 m.
La distanza può diminuire in base ad ambiente, ostacoli o interferenze.
■
Interferenze causate da altri dispositivi
• L’unità può non funzionare correttamente e possono verificarsi problemi
quali rumore o sbalzi sonori a causa di interferenze di onde radio se l’unità è
posizionata troppo vicino ad altri dispositivi Bluetooth
utilizzano la banda da 2,4 GHz.
• L’unità può non funzionare correttamente se le onde radio, provenienti da una
vicina stazione trasmittente ecc., sono troppo forti.
■
Utilizzo previsto
• L’unità è destinata esclusivamente a un utilizzo normale e generale.
• Non utilizzare il sistema in prossimità di un’apparecchiatura o in un ambiente
sensibile alle interferenze delle frequenze radio (ad es. aeroporti, ospedali,
laboratori ecc.).
®
.
®
. Tuttavia, in base
®
o ad altri dispositivi che
®
®
.
Specifiche
■
Informazioni generali
Alimentazione
1
Durata operativa*
Tempo di carica*
Intervallo di temperatura di carica 10 ºC a 35 ºC
Intervallo di temperatura di
esercizio
Intervallo di umidità di esercizio 35%UR a 80%UR (assenza di condensa)
Peso Circa 198 g
1
Può essere inferiore in base alle condizioni operative.
*
2
Tempo impiegato per una ricarica completa.
*
■
Sezione Bluetooth
Specifiche del sistema Bluetooth®Ver. 3.0
Classificazione
dell’apparecchiatura wireless
Banda di frequenza Banda 2,4 GHz modulazione FH-SS
Profili supportati A2DP, AVRCP, HSP, HFP
Codec supportato SBC, aptX
Distanza operativa Fino a 10 m
■
Sezione altoparlanti
Unità driver Φ 40 mm
Impedenza 32 Ω
■
Sezione terminale
DC IN DC 5 V, 500 mA
Input audio Jack stereo Φ 3,5 mm
■
Sezione microfono
Modello Singolo
■
Sezione accessori
Cavo di ricarica USB 1,0 m
Cavo estraibile 1,5 m
Le specifiche sono soggette a variazioni senza alcun preavviso.
●
(modalità SBC) Circa 30 ore
2
(25 ºC) Circa 4,5 ore
®
DC 5 V, 500 mA
(Batteria interna: 3,6 V (Li-ion 690 mAh))
0 ºC a 40 ºC
Classe 2 (2,5 mW)
®
ITALIANO
VQT5J79
7
31
Page 32

Guida per la risoluzione dei problemi
Prima di richiedere assistenza, eseguire le seguenti verifiche. In caso di dubbi su
alcuni dei punti di verifica o se i rimedi indicati non risolvono il problema, rivolgersi
al rivenditore per ottenere istruzioni.
Connessione del dispositivo Bluetooth
Impossibile connettere il dispositivo
• Eliminare le informazioni di associazione per l’unità dal dispositivo Bluetooth®,
quindi riassociarli. (→ pag. 3)
®
Informazioni generali
L’unità non risponde
• Premere il foro RESET durante il collegamento del cavo di ricarica USB al
terminale di carica (DC IN). (→ pag. 5)
Alimentazione e carica
Impossibile ricaricare l’unità
• Verificare che il computer sia acceso e non in modalità standby o sospensione.
• La porta USB, attualmente in uso, funziona correttamente? Se il computer
dispone di altre porte USB, scollegare il connettore dalla porta attualmente in
uso e collegarlo a una delle altre disponibili.
• Se le azioni sopracitate non sono applicabili, scollegare il cavo di ricarica USB e
ricollegarlo.
• Il LED lampeggia in colore rosso? È presente un malfunzionamento di ricarica se
il LED lampeggia.
• Se il LED lampeggia velocemente in colore rosso nonostante l’unità sia sotto
carica a una temperatura ambiente compresa tra 10 °C e 35 °C, la batteria può
essersi esaurita (numero di ricariche della batteria inclusa: circa 500).
Il LED non si accende durante la ricarica / Il tempo di ricarica è
maggiore
• Il cavo di ricarica USB (fornito in dotazione) è ben collegato al terminale USB del
computer? (→ pag. 3)
L’unità non si accende
• L’unità è sotto carica? Non è possibile accendere l’unità durante la carica.
(→ pag. 3)
• Il cavo estraibile è collegato? Non è possibile accendere l’unità se il cavo
estraibile è collegato ad essa.
VQT5J79
8
32
Volume suono e audio
Assenza di suono
• Verificare che l’unità e il dispositivo Bluetooth® siano collegati correttamente.
(→ pag. 3)
• Verificare che la musica sia riprodotta sul dispositivo Bluetooth
• Verificare che l’unità sia accesa e che il volume non sia impostato a un valore
troppo basso.
• Associare e connettere nuovamente il dispositivo Bluetooth
®
.
®
e l’unità. (→ pag. 3)
Volume basso
• Aumentare il volume dell’unità. (→ pag. 4)
• Aumentare il volume sul dispositivo Bluetooth
®
.
Il suono proveniente dal dispositivo è interrotto / La qualità del
suono è scadente
• Il suono può essere interrotto se i segnali sono bloccati. Non coprire
completamente l’unità con il palmo della mano ecc.
• Il dispositivo può trovarsi oltre la distanza di comunicazione di 10 m. Posizionare
il dispositivo più in prossimità dell’unità.
• Rimuovere qualsiasi ostacolo tra l’unità e il dispositivo.
• Spegnere tutti i dispositivi wireless LAN se non in funzione.
• Può verificarsi un problema di comunicazione se la batteria è esaurita. Caricare
l’unità. (→ pag. 3)
Chiamate
Impossibile sentire l’interlocutore
• Verificare che l’unità e il telefono con funzione Bluetooth® siano accesi.
• Verificare che l’unità e il telefono con funzione Bluetooth
(→ pag. 3)
• Verificare le impostazioni audio del telefono con funzione Bluetooth
il dispositivo chiamante all’unità se è impostato sul telefono con funzione
®
Bluetooth
• Se il volume della voce dell’interlocutore è troppo basso, aumentare il volume
dell’unità e del telefono con funzione Bluetooth
. (→ pag. 3)
®
siano collegati.
®
. Cambiare
®
.
Page 33

Copyright, ecc.
aptX® software is copyright CSR plc or its
●
group companies. All rights reserved.
®
The aptX
trademarks of CSR plc or one of its group
companies and may be registered in one or
more jurisdictions.
Il marchio denominativo Bluetooth® e i loghi
●
sono di proprietà di Bluetooth SIG, Inc. e
qualsiasi utilizzo di tali marchi da parte di
Panasonic Corporation è concesso in licenza.
Altri marchi registrati e nomi di marchi sono di
proprietà dei rispettivi proprietari.
Altri nomi di sistemi e nomi di prodotti
●
che appaiono in questo documento sono
generalmente marchi o marchi registrati delle
rispettive imprese di sviluppo.
Tenere presente che il marchio ™ e il marchio
® non appaiono in questo documento.
Smaltimento di vecchie apparecchiature e
batterie usate
Solo per Unione Europea e Nazioni con sistemi
di raccolta e smaltimento
mark and the aptX logo are
Questi simboli sui prodotti, sull’imballaggio e/o
sulle documentazioni o manuali accompagnanti
i prodotti indicano che i prodotti elettrici,
elettronici e le batterie usate non devono
essere buttati nei rifiuti domestici generici.
Per un trattamento adeguato, recupero
e riciclaggio di vecchi prodotti e batterie
usate vi invitiamo a portarli negli appositi
punti di raccolta secondo la legislazione
vigente nel vostro paese.
Con uno smaltimento corretto,
contribuirete a salvare importanti risorse e
ad evitare i potenziali effetti negativi sulla
salute umana e sull’ambiente.
Per ulteriori informazioni su raccolta e riciclaggio,
vi invitiamo a contattare il vostro comune.
Lo smaltimento non corretto di questi rifiuti
potrebbe comportare sanzioni in accordo
con la legislazione nazionale.
Note per il simbolo batterie
(simbolo sotto):
Questo simbolo può essere usato in
combinazione con un simbolo chimico. In
questo caso è conforme ai requisiti indicati dalla
Direttiva per il prodotto chimico in questione.
Rimozione della batteria in caso di smaltimento dell’unità
1
2
3
A
D
C
4
E
B
5
G
G
Le seguenti istruzioni non sono destinate a
interventi di riparazione bensì allo smaltimento
dell’unità. L’unità non è ripristinabile una volta
smontata.
Durante lo smaltimento, rimuovere la batteria installata
nell’unità e riciclarla.
D
• Smontare dopo l’esaurimento della batteria.
• Tenere le parti smontate fuori dalla portata dei bambini.
Rimuovere il rivestimento auricolare A
1
dall’altoparlante destro ed estrarre le
3 viti
• Utilizzare un cacciavite a intaglio a croce (disponibile in
commercio).
Rimuovere il coperchio frontale
2
Sollevando i 2 ganci D, ruotare il
3
coperchio posteriore C in senso
antiorario
Rimuovere le 4 viti e l’alloggiamento
4
Afferrare entrambi i lati della batteria alla
5
posizione G (lontano dai terminali F) e
rimuoverla
Informazioni relative alla gestione delle batterie
usate
• Isolare i terminali con nastro adesivo o materiale simile.
• Non smontare.
■
Batterie
• Non riscaldare o esporre a fiamme.
• Non lasciare la batteria all’interno di un’automobile con
porte e finestrini chiusi ed esposta a raggi solari diretti per
un periodo di tempo prolungato.
• L’utilizzo non conforme della batteria può causare la
perdita di elettroliti che, a sua volta, può danneggiare i
componenti entrati in contatto con il liquido. Se l’elettrolita
fuoriesce dalla batteria, rivolgersi al rivenditore. Lavare
con abbondante acqua se l’elettrolita entra in contatto con
parti del corpo.
• In caso di smaltimento delle batterie, contattare le autorità
F
locali o il rivenditore per conoscere il metodo corretto di
smaltimento.
ITALIANO
B
E
VQT5J79
9
33
Page 34

Estimado cliente
Le agradecemos haber adquirido este
producto.
Lea cuidadosamente estas
instrucciones antes de usar este
producto, y guarde este manual para
usarlo en el futuro.
Índice
Antes de la utilización
Accesorios .......................................... 2
Nombres de las piezas .......................2
Preparación
Carga .................................................. 3
Encendido/Apagado de la
alimentación ................................... 3
Conexión de un dispositivo
Conexión de un toque
Operación
Escuchando música ...........................4
Realizar una llamada telefónica .........5
Funciones útiles.................................. 5
Otros
Restauración de los ajustes
Precauciones de seguridad ................6
Mantenimiento .................................... 6
Acerca de Bluetooth
Especificaciones ................................. 7
Guía de resolución de problemas....... 8
Copyright, etc. ....................................9
Para sacar la batería cuando se
VQT5J79
2
34
®
Bluetooth
(Conexión por NFC) .......................4
de fábrica .......................................5
elimina esta unidad ........................ 9
...................................... 3
®
.......................... 7
Accesorios
Compruebe e identifique los
accesorios suministrados.
1 Cable desmontable
1 Cable de carga USB
Nombres de las piezas
Botón de Encendido /
1
2
3
4
5
6
Abra la cubierta
Izquierda Derecha
7
8
9
10 11
12 13
14 15
Las ilustraciones del producto pueden
variar del producto real.
1
Emparejado
Luz indicadora LED*
2
• El número de parpadeos o
colores notifica el estado de la
unidad.
(* en lo sucesivo se menciona
como “LED”)
Terminal de entrada audio
3
• Conecte el cable desmontable
(suministrado) a este terminal
cuando utilice la unidad con
cascos auriculares cableados.
Micrófono
4
Orificio RESET
5
Terminal de carga (DC IN)
6
• Conecte el cable de carga USB
(suministrado) a este terminal
cuando cargue. (→ P. 3)
7
Llamada
Área táctil NFC
8
Anterior
9
Volumen +
10
Siguiente
11
Volumen –
12
Reproducir/Pausa
13
Altavoz izquierdo
14
Altavoz derecho
15
■
Nota
• No utilice ningún otro cable de
carga USB salvo el suministrado.
• No utilice ningún otro cable
desmontable salvo el
suministrado.
• Cuando utilice la unidad, no cubra
el altavoz izquierdo con la palma
de la mano. Se puede bloquear la
conexión Bluetooth
®
.
Page 35

Carga
La batería recargable (instalada en la unidad) se entrega sin carga. Cargue la
batería antes de usar la unidad.
Conecte esta unidad a un
1
ordenador usando el cable de
carga USB
• Durante la carga, el LED del altavoz
izquierdo se iluminará en rojo. Cuando
se haya completado la carga, el LED se
apagará.
• La carga tardará aproximadamente
4,5 horas desde el estado vacío a
totalmente cargado.
■
Nota
• La característica Bluetooth® no se puede utilizar cuando esta unidad está
conectada a un ordenador con el cable de carga USB.
• Recargue a temperatura ambiente entre 10 °C y 35 °C.
• No se puede encender la alimentación durante la carga.
• No utilice ningún otro cable de carga USB salvo el suministrado.
Precaución: Utilice solamente el cable de carga USB cuando se conecte a un
ordenador.
Ordenador
Cable de carga USB (suministrado)
Izquierda
LED
Encendido/Apagado de la alimentación
Pulse y mantenga pulsado el botón de
1
encendido durante aproximadamente
2 segundos
• Sonará un pitido y el LED del altavoz izquierdo
parpadeará.
Botón de encendido
Para apagar la alimentación
• Pulse y mantenga pulsado el botón de encendido
más. Sonará un pitido y se apagará la alimentación.
■
Nota
•
Cuando la unidad no se opera durante aproximadamente 5 minutos, la
alimentación se apagará automáticamente. (Véase “Apagado automático” (→ P. 5))
durante 2 segundos o
Conexión de un dispositivo Bluetooth
Para establecer una conexión inalámbrica, registre la unidad con dispositivos
compatibles Bluetooth
Preparación en el dispositivo Bluetooth®
• Encienda la alimentación y habilite la característica Bluetooth®.
• Coloque el dispositivo a 1 m de la unidad.
• Compruebe el funcionamiento del dispositivo en sus instrucciones de
funcionamiento, según sea necesario.
Encendido por primera vez
Encienda la unidad
1
•
La unidad empezará a buscar
el dispositivo Bluetooth
conectarse, y el LED del altavoz
izquierdo parpadeará en azul y
rojo alternadamente. (Solo una
operación después de la compra)
Cuando la unidad
2
(“RP-BTD10”) ha sido
detectada por el dispositivo
Bluetooth®, selecciónela
• Si se le solicita una clave,
introduzca “0000 (cuatro ceros)”.
• Si aparece la pantalla de
selección de perfil Bluetooth
seleccione el perfil “A2DP”. Si
“A2DP” no es compatible o si
desea simplemente utilizar las
llamadas telefónicas, seleccione
el perfil “HSP” o “HFP”. (Para
obtener detalles sobre los
perfiles, véase “Escuchar
música” (→ P. 4) y “Realizar una
llamada telefónica” (→ P. 5))
Comprobar la conexión con
3
el dispositivo Bluetooth
la unidad
• Primero el LED del altavoz
izquierdo se ilumina en azul y
repite el encendido y apagado.
Cuando se ha establecido la
conexión, el patrón de parpadeo
cambiará.
®
®
.
Conexión después de la segunda vez
<Conecte el mismo dispositivo Bluetooth®>
®
al que
®
®
,
en
Cuando se enciende la unidad, buscará
el dispositivo Bluetooth
previamente e iniciará automáticamente
la conexión al mismo. Primero el LED
del altavoz izquierdo se ilumina en
azul y repite el encendido y apagado.
Cuando se ha establecido la conexión,
el patrón de parpadeo cambiará.
<Conecte un dispositivo Bluetooth
Deshabilite la característica
®
Bluetooth
anteriormente. Compruebe que la
unidad está apagada. Pulse y mantenga
pulsado el botón de emparejamiento
durante aproximadamente 5 segundos.
La unidad empezará a buscar otro
dispositivo Bluetooth
altavoz izquierdo parpadeará en azul y
rojo alternadamente. Sonará un pitido.
Continúe a los pasos 2 y 3.
en el dispositivo conectado
■
Nota
•
Si no se establece una conexión a
un dispositivo en aproximadamente
5 minutos, la unidad se apagará.
Empiece otra vez desde el paso 1.
•
No puede haber 2 o más dispositivos
®
conectados a la unidad al
Bluetooth
mismo tiempo.
•
Puede emparejar hasta 8 dispositivos
con esta unidad. Si se empareja un
9º dispositivo, se sustituirá el dispositivo
con la conexión más antigua. Para
usarlo, emparéjelo de nuevo.
®
configurado
®
. El LED del
®
diferente>
ESPAÑOL
VQT5J79
3
35
Page 36

Tiempo de funcionamiento de la batería
Conexión de un toque (Conexión por NFC)
Solamente para dispositivos Android™ compatibles con NFC
La característica NFC (Comunicación de campo cercano) permite a esta
unidad conectarse fácilmente a un dispositivo Bluetooth
Simplemente toque esta unidad con su dispositivo Bluetooth
automáticamente esta unidad, empareje el dispositivo Bluetooth
conexión.
®
compatible con NFC.
®
para encender
®
y establezca una
Preparación
Encienda la característica NFC del dispositivo Bluetooth®.
Inicie la aplicación para reproducir música/vídeo en el
1
dispositivo Bluetooth
• Siga las instrucciones en pantalla de su dispositivo.
Toque y mantenga su dispositivo en el área táctil NFC de esta
2
unidad (hasta que la ventana emergente de su dispositivo
®
indique que se ha establecido la conexión)
• La unidad se enciende. Primero el LED del altavoz izquierdo se ilumina en
azul y repite el encendido y apagado. Cuando se ha establecido la conexión,
el patrón de parpadeo cambiará.
• Si la conexión no se ha establecido, cambie la posición a tocar.
Empezar a reproducir la música/vídeo en su dispositivo
3
Bluetooth®
■
Conexión a otro dispositivo
Toque esta unidad con otro dispositivo para establecer una nueva conexión
®
Bluetooth
El dispositivo conectado anteriormente se desconectará automáticamente.
.
Escuchando música
Si el dispositivo compatible Bluetooth® soporta los perfiles Bluetooth® “A2DP” y
“AVRCP”, la música se puede reproducir con las operaciones de control remoto de
la unidad.
• A2DP (Perfil de distribución audio avanzado): Transmite audio a la unidad.
• AVRCP (Perfil de control remoto audio/vídeo):
Permite el control remoto del dispositivo usando la unidad.
Conecte el dispositivo Bluetooth® y la unidad (→ P. 3)
1
Seleccione y reproduzca la música en el dispositivo Bluetooth®
VQT5J79
2
• La música seleccionada sale por los altavoces de la unidad.
4
36
Batería recargable (instalada en la unidad) Aprox. 30 horas
El tiempo de funcionamiento puede ser menos dependiendo de las condiciones de
funcionamiento.
■
Nota
• Los dispositivos Bluetooth® compatibles con aptX® pueden transmitir música de
mayor calidad.
■
Atención
• La unidad puede tener fugas de sonido dependiendo del nivel de volumen.
• Cuando el volumen se aumenta casi al máximo, la música puede sonar
distorsionada. Reduzca el volumen hasta que se elimine la distorsión.
Control remoto
Puede controlar el dispositivo Bluetooth® usando la unidad.
• Dependiendo de los dispositivos Bluetooth
funcionan o funcionan de manera diferente por la operación de la unidad.
(Ejemplo de funcionamiento)
Reproducir/Pausa
Pulsar Reproducir/Pausa
Anterior/Siguiente
Pulsar durante la
reproducción
Pulsar y mantener Rebobina
Pulsar durante la
reproducción
Pulsar y mantener Avance rápido
Volumen
Pulsar
+
Pulsar y mantener
Pulsar
−
Pulsar y mantener
Tipo de batería Tiempo de funcionamiento
®
, algunas de las funciones abajo no
Derecha
Volumen +
Vuelve al inicio de
la pista actual
Avanza al inicio de
la siguiente pista
Aumenta el
volumen
Aumenta
el volumen
continuamente
Disminuye el
volumen
Disminuye
el volumen
continuamente
Anterior
Volumen –
■
Nota
• El volumen se puede ajustar en
15 niveles.
Cuando se alcanza el volumen
máximo o mínimo, sonará un
pitido.
Reproducir/
Pausa
Siguiente
Page 37

Realizar una llamada telefónica
Con los teléfonos con Bluetooth® (móviles o teléfonos inteligentes) que son
compatibles con el perfil Bluetooth
llamadas telefónicas.
• HSP (Perfil de cascos):
Este perfil puede utilizarse para recibir sonidos monoaurales y establecer
comunicación bidireccional utilizando el micrófono de la unidad.
• HFP (Perfil manos libres):
Además de las funciones HSP, este perfil dispone de la función de llamadas
entrantes y salientes.
Conecte el teléfono con Bluetooth® y la unidad (→ P. 3)
1
Cuando se responde una llamada entrante
2
Pulse Llamada en la
unidad y responda la llamada
• Durante una llamada entrante,
el tono de llamada sonará
desde el altavoz y el LED
parpadeará.
•(HFP solamente) Para rechazar
una llamada entrante, pulse y
mantenga pulsado Llamada
hasta que el tono de llamada
se pare.
Izquierda
Llamada
Micrófono
Empiece a hablar
3
• El LED parpadeará repetidamente 2 veces durante una llamada.
• El volumen se puede ajustar durante una llamada de teléfono. Para obtener
las instrucciones de configuración, véase la página 4.
Pulse Llamada para terminar la llamada telefónica
4
• Sonará un pitido.
®
“HSP” o “HFP”, puede utilizar la unidad para
Cuando se realiza una llamada saliente
Realizar una llamada
saliente en el teléfono con
Bluetooth
• Asimismo consulte el manual de
(Los pasos de comprobación y
funcionamiento en la unidad se
explican abajo)
• Durante una llamada saliente, el
• Para cancelar una llamada
•(HFP solamente) Cuando el
®
funcionamiento para el teléfono
con Bluetooth
tono de llamada sonará desde
el altavoz y el LED parpadeará.
saliente, pulse Llamada
Sonará un pitido.
teléfono está en reposo, pulse y
mantenga pulsado Llamada
durante aproximadamente
2 segundos. Se realizará una
llamada saliente al último
número marcado. Sonará
un chasquido corto desde el
altavoz y el LED parpadeará.
®
.
.
■
Nota
• Puede haber casos en que la configuración de manos libres se deba realizar en
el teléfono con Bluetooth
• Dependiendo del teléfono con Bluetooth
llamadas entrantes y salientes del teléfono desde la unidad.
•(HFP solamente) Mantenga pulsado el Llamar
aproximadamente 2 segundos. El dispositivo de llamada cambiará entre el
teléfono Bluetooth
®
.
®
y la unidad.
®
, puede oír los tonos de llamada de las
de la unidad durante
Funciones útiles
Reiniciar la unidad
Esta unidad se puede reiniciar cuando se rechazan todas las operaciones.
Conecte la unidad a un ordenador con el cable de carga USB. A continuación
pulse el orificio RESET con un objeto puntiagudo, fino. Compruebe que el
LED (rojo) se apague. Siga pulsando el orificio RESET (→ P. 2) durante
aproximadamente 5 segundos para reiniciar la unidad. Se cancelarán todas las
operaciones anteriores. (La información de emparejamiento de dispositivos no se
borrará.)
ESPAÑOL
Apagado automático
Si la unidad está silenciosa durante aproximadamente 5 minutos y las operaciones
para los dispositivos Bluetooth
pitido y la alimentación se apagará automáticamente.
®
están en reposo durante ese periodo, sonará un
Luz indicadora LED
Cuando el nivel de batería es bajo durante el uso de la unidad, el LED que
parpadea en azul en el altavoz izquierdo cambiará a rojo. Sonará un pitido cada
1 minuto. Cuando la batería se agota, la alimentación se apaga.
Restauración de los ajustes de fábrica
Si desea borrar toda la información de emparejamiento de dispositivos, etc., puede
restaurar la unidad a los ajustes de fábrica (ajustes originales cuando lo adquirió).
1 Apague la unidad
2 Pulse y mantenga pulsado el botón de encendido
5 segundos o más simultáneamente
• El LED del altavoz izquierdo se encenderá en rojo durante aproximadamente
2 segundos. La unidad se restaurará a los ajustes de fábrica.
y Anterior durante
VQT5J79
5
37
Page 38

Precauciones de seguridad Mantenimiento
■
Unidad
• Evite el uso o colocación de esta unidad cerca de fuentes de calor.
• No escuche con esta unidad a alto volumen en lugares donde necesita oír
sonidos del entorno colindante por seguridad, tal como cruces de ferrocarril y
lugares de construcción.
• La tensión característica de banda ancha es igual o superior a 75 mV.
ADVERTENCIA:
Para reducir el riesgo de incendio, descarga eléctrica o daños del producto,
• No exponga esta unidad a la lluvia, la humedad, goteo o salpicaduras.
• No coloque objetos llenos de líquidos, tal como jarrones, sobre esta unidad.
• Utilice solo los accesorios recomendados.
• No retire las cubiertas.
• No repare esta unidad usted mismo. Remita las reparaciones al personal del
servicio cualificado.
■
Alergias
• Interrumpa el uso si experimenta molestias con los altavoces o cualquier otra
parte que esté en contacto directo con su piel.
• El uso continuado puede provocar erupciones u otras reacciones alérgicas.
■
Precauciones para escuchar con los auriculares
• No haga funcionar sus auriculares a alto volumen. Los entendidos en el oído
aconsejan contra una audición prolongada y continua.
• Si Vd. experimenta un silbido en sus oídos, reduzca el volumen o descontinúe
el uso.
• No los utilice mientras maneja un vehículo motorizado. Podría ser causa de
un accidente de tráfico y es ilegal en muchos lugares.
• Tenga extrema precaución o eventualmente interrumpa su uso en situaciones
potencialmente peligrosas.
Este producto puede tener interferencias causadas por teléfonos móviles durante
su utilización. Si tales interferencias resultan evidentes, aumente la separación
entre el producto y el teléfono móvil.
Limpie esta unidad con un paño seco y suave.
• No utilice disolventes incluidos bencina, diluyente, alcohol, detergente de
cocina, un limpiador químico, etc. Esto podría provocar deformaciones en la caja
exterior o desprendimiento del recubrimiento.
Declaración de conformid (DoC)
Por la presente, “Panasonic Corporation” declara que este producto cumple con
los requerimientos esenciales y otras provisiones pertinentes de la Directiva
1999/5/EC.
Los clientes pueden descargar una copia de la DoC original de nuestros productos
R&TTE de nuestro servidor DoC:
http://www.doc.panasonic.de
Póngase en contacto con el representante autorizado: Panasonic Marketing
Europe GmbH, Panasonic Testing Centre, Winsbergring 15, 22525 Hamburg,
Alemania
Este producto ha sido diseñado para ser utilizado en los países siguientes:
REINO UNIDO, FRANCIA, ALEMANIA, ITALIA, SUIZA, AUSTRIA,
PAÍSES BAJOS, BÉLGICA, ESPAÑA, SUECIA, NORUEGA, DINAMARCA,
FINLANDIA, HUNGRÍA, REPÚBLICA CHECA, ESLOVAQUIA, ESLOVENIA,
BULGARIA, POLONIA, GRECIA, PORTUGAL y RUMANIA
Este producto ha sido diseñado para el consumidor en general. (Categoría 3)
VQT5J79
6
38
Page 39

Acerca de Bluetooth
Panasonic no asume ninguna responsabilidad por datos y/o información que se
comprometan durante una transmisión inalámbrica.
■
Banda de frecuencia utilizada
Esta unidad usa la banda de frecuencia 2,4 GHz.
■
Certificación de esta unidad
• Esta unidad cumple las restricciones de frecuencia y ha sido certificada en
función de las leyes de uso de frecuencia. Por lo tanto, no es necesario un
permiso inalámbrico.
• Las acciones siguientes son penadas por la ley en algunos países:
– Desmontar/modificar la unidad.
– Eliminar las indicaciones de la especificación.
■
Restricciones de uso
• No se garantiza la transmisión inalámbrica y/o uso con todos los dispositivos
equipados con Bluetooth
• Todos los dispositivos deben cumplir las normas establecidas por Bluetooth
SIG Inc.
• Dependiendo de las especificaciones y ajustes de un dispositivo, puede fallar
al conectarse o algunas operaciones pueden ser diferentes.
• Este sistema es compatible con las funciones de seguridad de Bluetooth
Pero dependiendo del entorno y/o ajustes operativos, esta seguridad
posiblemente no es suficiente. Transmita datos inalámbricamente a este
sistema con precaución.
• Este sistema no puede transmitir datos a un dispositivo Bluetooth
■
Rango de aplicación
Utilice esta unidad en un rango máximo de 10 m.
El rango puede disminuir dependiendo del entorno, obstáculos o interferencias.
■
Interferencia de otros dispositivos
• Es posible que esta unidad no funcione correctamente y pueden surgir
problemas como ruidos y saltos de sonido debido a interferencias de ondas
de radio si esta unidad se coloca demasiado cerca de otros dispositivos
®
Bluetooth
• Es posible que esta unidad no funcione correctamente si las ondas de radio
de las estaciones de radiodifusión cercanas etc. son demasiado fuertes.
■
Uso previsto
• Esta unidad sirve solo para el uso general, normal.
• No utilice este sistema cerca de un equipo o en un entorno que es sensible
a la interferencia entre radiofrecuencias (ejemplo: aeropuertos, hospitales,
laboratorios, etc.).
o de los dispositivos que usan la banda de 2,4 GHz.
®
.
®
®
.
Especificaciones
■
Generalidades
Suministro de alimentación
Tiempo de funcionamiento*
(modo SBC)
Tiempo de carga*
Gama de temperatura de carga 10 ºC a 35 ºC
Gama de temperatura de
funcionamiento
Rango de humedad de funcionamiento
Masa Aprox. 198 g
1
Puede ser mas corto dependiendo de las condiciones de funcionamiento.
*
2
Tiempo que tarda en recargar desde vacío a lleno.
*
■
Sección Bluetooth®
Especificación del sistema Bluetooth®Ver. 3.0
®
.
Clasificación de equipo inalámbrico
Banda de frecuencia 2,4 GHz banda FH-SS
Perfiles compatibles A2DP, AVRCP, HSP, HFP
Codec compatible SBC, aptX
Distancia de funcionamiento Hasta 10 m
■
Sección altavoz
Unidades del controlador Φ 40 mm
Impedancia 32 Ω
■
Sección terminal
DC IN CC 5 V, 500 mA
Entrada audio Conector estéreo Φ 3,5 mm
■
Sección micrófono
Tipo Mono
■
Sección accesorios
Cable de carga USB 1,0 m
Cable desmontable 1,5 m
Las especificaciones están sujetas a cambios sin previo aviso.
●
2
(25 ºC) Aprox. 4,5 horas
CC 5 V, 500 mA
(Batería interna: 3,6 V (Li-ion 690 mAh))
1
Aprox. 30 horas
0 ºC a 40 ºC
35%HR a 80%HR (sin condensación)
Clase 2 (2,5 mW)
®
ESPAÑOL
VQT5J79
7
39
Page 40

Guía de resolución de problemas
Antes de solicitar servicio, haga las comprobaciones siguientes. Si tiene dudas
sobre algunos de los puntos de comprobación, o si las soluciones indicadas en
la tabla no resuelven el problema, consulte con su concesionario para que le dé
instrucciones.
Generalidades
La unidad no responde
• Pulse el orificio de RESET mientras conecta el cable de carga USB al terminal
de carga (DC IN). (→ P. 5)
Suministro de alimentación y carga
No puede cargar la unidad
• Asegúrese de que el ordenador está encendido y no está en modo de espera o
de reposo.
• ¿Funciona correctamente el puerto USB que está usando actualmente? Si su
ordenador tiene otros puertos USB, desconecte el conector de su puerto actual
y conéctelo a otro de los demás puertos.
• Si las medidas mencionadas anteriormente no son aplicables, desconecte el
cable de carga USB y conéctelo de nuevo.
• ¿Está el LED parpadeando en rojo? Hay un mal funcionamiento de carga si el
LED parpadea.
• Si el LED parpadea rápido en rojo incluso cuando la unidad se recarga a
temperatura ambiente entre 10 °C y 35 °C, puede que la batería se haya
agotado. (Número de veces de recarga de la batería incluida: aproximadamente
500.)
LED no se enciende durante la carga / La carga tarda más tiempo
• ¿Está conectado el cable de carga USB (suministrado) con firmeza al terminal
USB del ordenador? (→ P. 3)
La alimentación no se enciende
• ¿Se está cargando la unidad? NO se puede encender la alimentación durante la
carga. (→ P. 3)
• ¿Está conectado el cable desmontable? La alimentación no se puede encender
cuando el cable desmontable está conectado a la unidad.
Conexión del dispositivo Bluetooth
®
El dispositivo no se puede conectar
• Elimine la información de emparejamiento para esta unidad del dispositivo
Bluetooth
®
, a continuación emparéjelos de nuevo. (→ P. 3)
Volumen de sonido y audio
Sin sonido
• Asegúrese de que la unidad y el dispositivo Bluetooth® están conectados
correctamente. (→ P. 3)
• Compruebe si se está reproduciendo música en el dispositivo Bluetooth
• Asegúrese de que la unidad está encendida y el volumen no se ha ajustado
demasiado bajo.
• Empareje y conecte de nuevo el dispositivo Bluetooth
®
y la unidad. (→ P. 3)
®
.
Volumen bajo
• Aumente el volumen de la unidad. (→ P. 4)
• Aumente el volumen en el dispositivo Bluetooth
®
.
Sonido del dispositivo se corta / La calidad del sonido es mala
• El sonido se puede interrumpir si las señales se bloquean. No cubra
completamente esta unidad con la palma de la mano, etc.
• El dispositivo puede estar fuera del rango de comunicación de 10 m. Mueva el
dispositivo más cerca de esta unidad.
• Elimine cualquier obstáculo entre esta unidad y el dispositivo.
• Desconecte cualquier dispositivo LAN inalámbrico cuando no se use.
• Es posible que se produzca un problema de comunicación si la batería está
agotada. Cargue la unidad. (→ P. 3)
llamada telefónicas
No puede oír a la otra persona
• Asegúrese de que la unidad y el teléfono con Bluetooth® están encendidos.
• Compruebe si la unidad y el teléfono con Bluetooth
• Compruebe los ajustes de audio del teléfono con Bluetooth
dispositivo que llama a la unidad si está ajustado al teléfono con Bluetooth
(→ P. 3)
• Si el volumen de la voz de la otra persona es demasiado bajo, aumente el
volumen tanto en la unidad como en el teléfono con Bluetooth
®
están conectados. (→ P. 3)
®
. Cambie el
®
.
®
.
VQT5J79
8
40
Page 41

Copyright, etc.
aptX® software is copyright CSR plc or its group
●
companies. All rights reserved.
®
mark and the aptX logo are trademarks
The aptX
of CSR plc or one of its group companies and may
be registered in one or more jurisdictions.
La marca Bluetooth® y sus logos son propiedad
●
de Bluetooth SIG, Inc. y cualquier uso de dichas
marcas por parte de Panasonic Corporation se
realiza bajo licencia.
Otros nombres de marcas y marcas comerciales
son propiedad de sus respectivos propietarios.
Otros nombres de sistemas y nombres de
●
productos que aparecen en este documento son en
general marcas registradas o marcas comerciales
de las empresas desarrolladoras respectivas.
Tenga en cuenta que los símbolos ™ y ® no
aparecen en este documento.
Eliminación de Aparatos Viejos y de Pilas y Baterías
Solamente para la Unión Europea y países con
sistemas de reciclado.
Estos símbolos en los productos, su
embalaje o en los documentos que los
acompañen significan que los productos
eléctricos y electrónicos y pilas y baterías
usadas no deben mezclarse con los
residuos domésticos.
Para el adecuado tratamiento,
recuperación y reciclaje de los productos
viejos y pilas y baterías usadas llévelos a
los puntos de recogida de acuerdo con su
legislación nacional.
Si los elimina correctamente ayudará a
preservar valuosos recursos y evitará
potenciales efectos negativos sobre la salud
de las personas y sobre el medio ambiente.
Para más información sobre la recogida
u reciclaje, por favor contacte con su
ayuntamiento.
Puede haber sanciones por una incorrecta
eliminación de este residuo, de acuerdo
con la legislación nacional.
Nota para el símbolo de pilas y baterías
(símbolo debajo):
Este símbolo puede usarse en
combinación con el símbolo químico. En
este caso, cumple con los requisitos de la
Directiva del producto químico indicado.
Para sacar la batería cuando se elimina esta unidad
1
2
3
A
D
C
4
E
B
5
G
G
Las siguientes instrucciones no están indicadas
para fines de reparación sino para la eliminación
de esta unidad. Esta unidad no se puede
restaurar una vez que se haya desmontado.
Cuando vaya a eliminar esta unidad, saque la batería
instalada en esta unidad y recíclela.
D
• Desmonte después de que se haya agotado la batería.
• Mantenga las piezas desmontadas fuera del alcance de los
niños.
Saque la almohadilla para los oídos A
1
del altavoz derecho y quite los 3 tornillos
• Utilice un destornillador para tornillo de cabeza en cruz
(disponible comercialmente).
Retire la cubierta frontal
2
Levantando los 2 pasadores D, gire la
3
cubierta posterior C en sentido contrario
a las agujas del reloj
Quite los 4 tornillos y saque la carcasa
4
Mantenga los dos lados de la batería en
5
la posición G, lejos de los terminales F,
y sáquela
Respecto a la manipulación de baterías usadas
• Aísle los terminales con cinta adhesiva o similar.
• No desmonte.
■
Baterías
• No calentar ni exponer a llamas.
• No deje la/s batería/s en un coche, expuesta/s a la luz
solar directa con puertas y ventanas cerradas durante un
largo periodo de tiempo.
• La mala manipulación de la batería puede provocar fugas
de electrolitos que pueden dañar elementos con los que
el fluido fugado se ponga en contacto. Si hay escape de
electrolitos de la batería, consulte a su distribuidor. Lave
a fondo con agua si el electrolito entra en contacto con
cualquier parte del cuerpo.
• Cuando deseche la batería, póngase en contacto con las
autoridades locales o el distribuidor y pregunte el método
F
correcto de eliminación.
B
ESPAÑOL
E
VQT5J79
99
41
Page 42

Geachte klant
Hartelijk dank voor uw aankoop van
dit product.
Lees deze instructies zorgvuldig door
voordat u dit product gebruikt en
bewaar deze handleiding, zodat u deze
later kunt raadplegen.
Inhoudsopgave
Vóór gebruik van het toestel
Accessoires ........................................ 2
Namen van onderdelen ...................... 2
Voorbereiding
Opladen .............................................. 3
Het toestel in- en uitschakelen ...........3
Verbinding maken met een
Verbinding maken door eenmaal
Bediening
Naar muziek luisteren ......................... 4
Telefoneren ......................................... 5
Handige functies ................................. 5
Overige
De fabrieksinstellingen herstellen ....... 5
Veiligheidsvoorzorgen ........................ 6
Onderhoud.......................................... 6
Informatie over Bluetooth
Specificaties ....................................... 7
Problemen oplossen ........................... 8
Copyright, enz. ...................................9
De batterij verwijderen wanneer
VQT5J79
2
42
®
Bluetooth
aanraken (NFC) .............................4
u het toestel weggooit .................... 9
-apparaat ....................... 3
®
.................. 7
Accessoires
Controleer of alle meegeleverde
accessoires aanwezig zijn.
1 Losse kabel
1 USB-oplaadkabel
Namen van onderdelen
Hoofdschakelaar /
1
2
3
4
5
6
Open het deksel
Links Rechts
7
8
9
10 11
12 13
14 15
De illustraties kunnen verschillen van het
echte product.
1
Koppelen
Led-indicatielampje*
2
• De status van het toestel wordt
aangegeven door de kleur van
het lampje en hoe het knippert.
(* wordt verder “led” genoemd)
Audio-ingang
3
• Sluit de losse kabel
(meegeleverd) hierop aan als
u dit toestel met een kabel wilt
gebruiken.
Microfoon
4
RESET-knop
5
Oplaadaansluiting (DC IN)
6
• Sluit de USB-oplaadkabel
(meegeleverd) hierop aan
als u het toestel wilt opladen.
(→ P. 3)
7
Telefoneren
NFC-sensor
8
Vorige
9
Volume +
10
Volgende
11
Volume –
12
Afspelen/Pauzeren
13
Linkerluidspreker
14
Rechterluidspreker
15
■
Opmerking
• Gebruik uitsluitend de
meegeleverde USB-oplaadkabel
en geen andere kabel.
• Gebruik uitsluitend de
meegeleverde losse kabel en
geen andere kabel.
• Bedek de linkerluidspreker
tijdens gebruik niet met uw hand.
De Bluetooth
gestoord worden.
®
-verbinding kan
Page 43

Opladen
De oplaadbare batterij (die in het toestel is geplaatst) is aanvankelijk niet
opgeladen. Laad de batterij op voordat u het toestel gebruikt.
Sluit dit toestel met de
1
USB-oplaadkabel op een
computer aan
• Tijdens het opladen licht de led op de
linkerluidspreker rood op. Wanneer het
opladen is voltooid, gaat de led uit.
• Het vol opladen van een lege batterij
duurt ongeveer 4,5 uur.
■
Opmerking
• De Bluetooth®-functie kan niet worden gebruikt wanneer het toestel met de
USB-oplaadkabel op een computer is aangesloten.
• Voer het opladen uit bij een kamertemperatuur tussen 10 °C en 35 °C.
• Tijdens het opladen kan het toestel niet worden ingeschakeld.
• Gebruik uitsluitend de meegeleverde USB-oplaadkabel en geen andere kabel.
Let op: Gebruik alleen de meegeleverde USB-oplaadkabel om het toestel op een
computer aan te sluiten.
Computer
USB-oplaadkabel (meegeleverd)
Links
Led
Het toestel in- en uitschakelen
Houd de hoofdschakelaar ongeveer
1
2 seconden ingedrukt
• Er klinkt een pieptoon en de led op de
linkerluidspreker gaat knipperen.
Hoofdschakelaar
Het toestel uitschakelen
• Houd de hoofdschakelaar
pieptoon en het toestel wordt uitgeschakeld.
■
Opmerking
• Het toestel wordt automatisch uitgeschakeld als het ongeveer 5 minuten lang
niet wordt gebruikt. (Zie “Automatisch uitschakelen” (→ P. 5))
2 seconden of langer ingedrukt. Er klinkt een
Verbinding maken met een Bluetooth
U kunt verbinding maken met een Bluetooth®-apparaat als dit toestel op dat
apparaat geregistreerd is.
®
-apparaat
Voorbereiding op het Bluetooth®-apparaat
• Schakel het apparaat in en schakel de Bluetooth®-functie in.
• Houd het apparaat op minder dan 1 meter afstand van dit toestel.
• Raadpleeg indien nodig de gebruiksaanwijzing van het apparaat.
De eerste keer inschakelen
Schakel het toestel in
1
• Het toestel zoekt naar het
Selecteer het toestel
2
(“RP-BTD10”) wanneer het
®
Bluetooth
u verbinding wilt maken. De
led op de linkerluidspreker
knippert afwisselend blauw en
rood. (Eenmalige bediening na
aankoop)
-apparaat waarmee
wordt gedetecteerd door het
Bluetooth®-apparaat
• Als om het wachtwoord wordt
gevraagd, voert u “0000 (vier
nullen)” in.
• Als het selectiescherm voor
het Bluetooth
weergegeven, selecteert u het
profiel “A2DP”. Als “A2DP” niet
wordt ondersteund of als u
alleen wilt kunnen telefoneren,
selecteert u het profiel “HSP” of
“HFP”. (Raadpleeg voor details
over profielen het gedeelte “Naar
muziek luisteren” (→ P. 4) en
“Telefoneren” (→ P. 5))
Controleer op het toestel
3
de verbinding met het
®
-profiel wordt
Bluetooth®-apparaat
•
De led op de linkerluidspreker
licht eerst blauw op en gaat
herhaaldelijk aan en uit. Wanneer
er verbinding is gemaakt,
verandert het knipperpatroon.
Vanaf de tweede keer verbinding maken
<Verbinding maken met hetzelfde
Bluetooth
Wanneer het toestel wordt ingeschakeld,
zoekt het automatisch het eerder ingestelde
Bluetooth
mee. De led op de linkerluidspreker licht
eerst blauw op en gaat herhaaldelijk aan
en uit. Wanneer er verbinding is gemaakt,
verandert het knipperpatroon.
<Verbinding maken met een ander
Bluetooth
Schakel de Bluetooth®-functie van
het eerder aangesloten apparaat uit.
Controleer of dit toestel is uitgeschakeld.
Houd de knop voor koppelen
5 seconden ingedrukt. Het toestel begint
te zoeken naar het andere Bluetooth
apparaat. De led op de linkerluidspreker
gaat afwisselend blauw en rood
knipperen. Er klinkt een pieptoon.
Ga verder met stappen 2 en 3.
®
-apparaat>
®
-apparaat en maakt er verbinding
®
-apparaat>
ongeveer
®
-
■
Opmerking
•
Als er geen verbinding met een apparaat
kan worden gemaakt binnen ongeveer
5 minuten, wordt het toestel uitgeschakeld.
Begin opnieuw vanaf stap 1.
•
Er kunnen niet 2 of meer Bluetooth®apparaten tegelijkertijd op dit toestel
worden aangesloten.
•
Er kunnen maximaal 8 apparaten met
dit toestel gekoppeld worden. Als u een
9e apparaat koppelt, wordt het apparaat
met de oudste verbinding vervangen. U
moet dat apparaat opnieuw koppelen als u
het wilt gebruiken.
3
43
NEDERLANDS
VQT5J79
Page 44

Verbinding maken door
eenmaal aanraken (NFC)
Alleen voor Android™-apparaten die compatibel zijn met NFC
U kunt de NFC-functie (Near Field Communication) van dit toestel gebruiken om
eenvoudig verbinding te maken met een NFC-compatibel Bluetooth
Raak met het Bluetooth
schakelen, koppel het Bluetooth
®
-apparaat dit toestel aan om het automatisch in te
®
-apparaat, en maak verbinding.
®
-apparaat.
Voorbereiding
Schakel de NFC-functie van het Bluetooth®-apparaat in.
Start de muziek of video af op het Bluetooth®-apparaat
1
• Volg de instructies op het scherm van het apparaat.
Houd het apparaat even tegen de NFC-sensor van dit toestel (tot
2
een pop-upvenster op het apparaat aangeeft dat er verbinding is
gemaakt)
• Het toestel wordt ingeschakeld. De led op de linkerluidspreker licht eerst
blauw op en gaat herhaaldelijk aan en uit. Wanneer er verbinding is gemaakt,
verandert het knipperpatroon.
• Als er geen verbinding kan worden gemaakt, probeert u het nog eens met
een andere aanraakpositie.
Speel muziek of video af op het Bluetooth®-apparaat
3
■
Verbinding maken met een ander apparaat
Raak dit toestel met een ander apparaat aan om een nieuwe Bluetooth®-verbinding
te maken.
Het eerder verbonden apparaat wordt automatisch ontkoppeld.
Naar muziek luisteren
Als het Bluetooth®-apparaat de Bluetooth®-profielen “A2DP” en “AVRCP”
ondersteunt, kunt u de muziekweergave via dit toestel op afstand bedienen.
• A2DP (Advanced Audio Distribution Profile):
Maakt geluidsoverdracht naar het toestel mogelijk.
• AVRCP (Audio/Video Remote Control Profile):
Maakt afstandsbediening van het apparaat via dit toestel mogelijk.
Maak verbinding tussen het Bluetooth®-apparaat en het toestel
1
(→ P. 3)
VQT5J79
Speel de gewenste muziek af op het Bluetooth®-apparaat
2
• De muziek wordt weergegeven via de luidsprekers van het toestel.
4
44
Gebruiksduur van de batterij
Type batterij Gebruiksduur
Oplaadbare batterij (in het toestel geplaatst) Ongeveer 30 uur
De gebruiksduur kan korter zijn afhankelijk van de gebruiksomstandigheden.
■
Opmerking
• Bluetooth®-apparaten die aptX® ondersteunen, kunnen een betere
muziekkwaliteit weergeven.
■
Opgelet
• Afhankelijk van het volume kan geluid van het toestel voor omstaanders
hoorbaar zijn.
• Als het volume naar (bijna) het maximum wordt gezet, kan het geluid vervormd
worden. Verlaag het volume tot er geen vervorming meer optreedt.
Afstandsbediening
U kunt het Bluetooth®-apparaat met dit toestel bedienen.
• Afhankelijk van het Bluetooth
onderstaande functies van het toestel niet werken of verschillend werken.
(Voorbeeld)
Afspelen/Pauzeren
Indrukken Afspelen/Pauzeren
Vorige/Volgende
Indrukken tijdens
afspelen
Indrukken en
vasthouden
Indrukken tijdens
afspelen
Indrukken en
vasthouden
Volume
Indrukken
+
Indrukken en
vasthouden
Indrukken
−
Indrukken en
vasthouden
®
-apparaat is het mogelijk dat sommige van
Terugkeren naar
begin van huidige
track
Terugspoelen
Vooruitgaan
naar begin van
volgende track
Vooruitspoelen
Het volume
verhogen
Het volume blijven
verhogen
Het volume
verlagen
Het volume blijven
verlagen
Vorige
Volume –
■
Opmerking
• Er zijn 15 volumeniveaus.
Er klinkt een pieptoon
wanneer het maximum- of
minimumvolume wordt bereikt.
Rechts
Volume +
Afspelen/
Pauzeren
Volgende
Page 45

Telefoneren
U kunt het toestel voor telefoongesprekken gebruiken in combinatie met een
telefoon (mobiel of smartphone) die geschikt is voor Bluetooth
biedt voor het Bluetooth
• HSP (Headset Profile):
Dit profiel biedt ondersteuning voor ontvangst van monogeluid en het opzetten
van tweewegcommunicatie via de microfoon op het toestel.
• HFP (Hands-Free Profile):
Dit profiel biedt ondersteuning voor de HSP-functies en bovendien voor
binnenkomende en uitgaande gesprekken.
Maak verbinding tussen de Bluetooth®-telefoon en het toestel
1
(→ P. 3)
2
Als u opgebeld wordt
Druk op het toestel op
Telefoneren om het
gesprek te beantwoorden
• Als u wordt opgebeld, klinkt de
beltoon via de luidspreker en
gaat de led knipperen.
(alleen HFP) Als u een
•
inkomend gesprek wilt weigeren,
houdt u Telefoneren
ingedrukt tot de beltoon stopt.
Links
Voer het telefoongesprek
3
• De led knippert herhaaldelijk 2 keer tijdens een telefoongesprek.
• U kunt tijdens een telefoongesprek het volume aanpassen. Zie pagina 4 voor
instructies over het instellen.
Druk op Telefoneren om het gesprek te beëindigen
4
• Er klinkt een pieptoon.
®
-profiel “HSP” of “HFP”.
Telefoneren
Microfoon
Opbellen vanaf de
Bluetooth®-telefoon
• Raadpleeg ook de
bedieningshandleiding van de
Bluetooth
(Hieronder wordt de controle en
bediening op dit toestel uitgelegd)
•
Tijdens een uitgaand gesprek
klinkt de beltoon via de luidspreker
en gaat de led knipperen.
•
Als u een uitgaand gesprek
wilt afbreken, drukt u op
Telefoneren
Er klinkt een pieptoon.
•
(alleen HFP) Houd
Telefoneren
2 seconden ingedrukt terwijl de
telefoon niet in gebruik is. Het
laatst gebelde nummer wordt
gebeld. Er klinkt een korte klik
uit de luidspreker en de led gaat
knipperen.
®
en ondersteuning
Als u opbelt
®
-telefoon.
.
ongeveer
■
Opmerking
• Het kan nodig zijn om handenvrij telefoneren in te stellen op de
• Afhankelijk van de Bluetooth
• (alleen HFP) Houd Telefoneren
®
Bluetooth
binnenkomende en uitgaande gesprekken via dit toestel worden weergegeven.
ingedrukt. Het oproepapparaat wordt overgeschakeld tussen de
Bluetooth
-telefoon.
®
-telefoon en het toestel.
®
-telefoon kan de beltoon van de telefoon bij
op het toestel ongeveer 2 seconden
Handige functies
Het toestel opnieuw instellen
Als het toestel niet meer reageert, kunt u het opnieuw instellen. Sluit het toestel
met de USB-oplaadkabel op een computer aan. Druk met een dun, puntig
voorwerp op de RESET-knop. Controleer of de led (rood) uitgaat. Houd de
RESET-knop (→ P. 2) ongeveer 5 seconden ingedrukt. Het toestel wordt opnieuw
ingesteld. Alle voorgaande handelingen worden geannuleerd. (De informatie over
gekoppelde apparaten wordt niet gewist.)
Automatisch uitschakelen
Als het toestel ongeveer 5 minuten lang stil is en er gedurende die tijd geen
®
Bluetooth
automatisch uitgeschakeld.
-communicatie plaatsvindt, klinkt er een pieptoon en wordt het toestel
NEDERLANDS
Led-indicatielampje
Als de batterij tijdens gebruik leeg raakt, wordt de blauwe knipperende led op de
linkerluidspreker rood. Er klinkt elke minuut een pieptoon. Wanneer de batterij leeg
is, wordt het toestel uitgeschakeld.
De fabrieksinstellingen herstellen
Als u alle informatie over gekoppelde apparaten enz. wilt verwijderen, moet u het
toestel terugzetten naar de fabrieksinstellingen (de begininstellingen bij aanschaf
van het toestel).
1 Schakel het toestel uit
2 Houd de hoofdschakelaar
tegelijk ingedrukt
• De led op de linkerluidspreker licht ongeveer 2 seconden rood op. Het toestel
wordt teruggezet naar de fabrieksinstellingen.
en de knop Vorige 5 seconden of langer
VQT5J79
5
45
Page 46

Veiligheidsvoorzorgen
■
Toestel
• Gebruik of plaats het toestel niet in de buurt van een warmtebron.
• Zet het volume van het toestel niet hoog op plaatsen waar u omgevingsgeluid
moet kunnen horen voor uw of andermans veiligheid (bijvoorbeeld bij een
spoorwegovergang of een bouwplaats).
• De breedband-karakteristieke spanning is 75 mV of hoger.
WAARSCHUWING:
Let op het volgende om het risico op brand, een elektrische schok of
productschade te beperken:
• Stel het toestel niet bloot aan regen, vocht, en druppelend of spetterend
water.
• Plaats geen voorwerpen die gevuld zijn met een vloeistof (zoals een vaas)
op het toestel.
• Gebruik alleen de aanbevolen accessoires.
• Open of verwijder de behuizing niet.
• Probeer het toestel niet zelf te repareren. Laat reparaties uitvoeren door een
erkende vakman.
■
Allergieën
• Stop gebruik van het product als u ongemak ervaart op plaatsen waar de
luidsprekers of andere onderdelen uw huid raken.
• Voortgezet gebruik kan huiduitslag of een andere allergische reactie
veroorzaken.
■
Voorzorgen voor luisteren met de hoofdtelefoon
• Gebruik de hoofdtelefoon niet met een hoog volume. Gehoorexperts raden
continue geluidsweergave af.
• Als uw oren suizen moet u het volume verlagen of het gebruik stoppen.
• Gebruik het product niet terwijl u een voertuig bestuurt. Dat creëert risico's in
het verkeer en is in veel landen verboden.
• Wees bijzonder voorzichtig of stop het gebruik tijdelijk in mogelijk gevaarlijke
situaties.
Dit toestel kan tijdens gebruik gestoord worden door interferentie van een
mobiele telefoon. Interferentie kunt u voorkomen door de afstand tussen dit
toestel en de mobiele telefoon te vergroten.
Onderhoud
Reinig dit toestel met een droge, zachte doek.
• Gebruik geen oplosmiddelen zoals wasbenzine, verdunner, alcohol,
keukenafwasmiddel, een chemische reinigingsdoek, e.d. Door zulke producten
kan de behuizing vervormen of de coating loslaten.
Verklaring van overeenstemming
Hierbij verklaart “Panasonic Corporation” dat dit product voldoet aan de essentiële
vereisten en andere relevante bepalingen van Richtlijn 1999/5/EC.
Een exemplaar van de oorspronkelijke verklaring van overeenstemming bij onze
R&TTE-producten is te downloaden van:
http://www.doc.panasonic.de
Contact met de erkende vertegenwoordiger: Panasonic Marketing Europe GmbH,
Panasonic Testing Centre, Winsbergring 15, 22525 Hamburg, Duitsland
Dit product is geschikt voor gebruik in de volgende landen:
GROOT-BRITTANNIË, FRANKRIJK, DUITSLAND, ITALIË, ZWITSERLAND,
OOSTENRIJK, NEDERLAND, BELGIË, SPANJE, ZWEDEN, NOORWEGEN,
DENEMARKEN, FINLAND, HONGARIJE, TSJECHIË, SLOWAKIJE, SLOVENIË,
BULGARIJE, POLEN, GRIEKENLAND, PORTUGAL EN ROEMENIE
Dit product is bedoeld als consumentenproduct. (Categorie 3)
VQT5J79
6
46
Page 47

Informatie over Bluetooth
Panasonic is niet verantwoordelijk voor de veiligheid van gegevens en/of
informatie tijdens draadloze communicatie.
■
Frequentieband
Dit toestel gebruikt de frequentieband van 2,4 GHz.
■
Productcertificering
• Dit toestel voldoet aan frequentiebeperkingen en is gecertificeerd op basis van
de frequentiewetgeving. Een vergunning voor draadloze communicatie is dus
niet vereist.
• Onderstaande handelingen zijn in sommige landen strafbaar bij wet:
– Het toestel demonteren of wijzigen.
– Informatie over de specificaties verwijderen.
■
Gebruiksbeperkingen
• Draadloze communicatie en/of gebruik met alle Bluetooth®-apparaten worden
niet gegarandeerd.
• Alle apparaten moeten voldoen aan de normen van Bluetooth SIG, Inc.
• Afhankelijk van de specificaties en instellingen van een apparaat kan er
mogelijk geen verbinding worden gemaakt of werken functies verschillend.
• Dit systeem biedt ondersteuning voor Bluetooth
Afhankelijk van de gebruiksomgeving en/of instellingen biedt dit mogelijk niet
voldoende veiligheid. Wees voorzichtig bij het versturen van gegevens via
draadloze communicatie.
• Dit systeem kan geen gegevens versturen naar een Bluetooth
■
Gebruiksbereik
Het maximale bereik van dit toestel is 10 meter.
Het bereik kan kleiner zijn afhankelijk van de omgeving, obstakels of
interferentie.
■
Interferentie van andere apparaten
• Het toestel werkt mogelijk niet correct als het te dicht wordt gebruikt bij andere
• Het toestel werkt mogelijk niet correct in de buurt van een zendstation e.d. met
■
Bestemd gebruik
• Dit toestel is uitsluitend bestemd voor normaal, algemeen gebruik.
• Gebruik het systeem niet nabij apparatuur of in een omgeving die gevoelig is
®
Bluetooth
dan problemen optreden door radio-interferentie zoals ruis of een gestoorde
muziekweergave.
te sterke signalen.
voor radio-interferentie (bijvoorbeeld een luchthaven, ziekenhuis, laboratorium,
e.d.).
-apparaten of apparaten in de 2,4 GHz-frequentieband. Er kunnen
®
-veiligheidsfuncties.
®
®
-apparaat.
Specificaties
■
Algemeen
Voeding
1
Gebruiksduur*
Oplaadduur*
Omgevingstemperatuur voor
opladen
Omgevingstemperatuur voor gebruik
Omgevingsvochtigheid voor gebruik
Gewicht Ongeveer 198 g
1
Kan korter zijn afhankelijk van de gebruiksomstandigheden.
*
2
Tijd voor volledig opladen vanuit lege toestand.
*
■
Bluetooth
Specificatie van Bluetooth®-systeem
Classificatie van draadloze
apparatuur
Frequentieband 2,4 GHz FH-SS
Ondersteunde profielen A2DP, AVRCP, HSP, HFP
Ondersteunde codecs SBC, aptX
Gebruiksafstand Max. 10 m
■
Luidsprekers
Aansturing Φ 40 mm
Impedantie 32 Ω
■
Aansluitingen
DC IN DC 5 V, 500 mA
Audio-ingang Stereostekker Φ 3,5 mm
■
Microfoon
Type Mono
■
Accessoires
USB-oplaadkabel 1,0 m
Losse kabel 1,5 m
De specificaties kunnen zonder kennisgeving gewijzigd worden.
●
(SBC-stand) Ongeveer 30 uur
2
(25 ºC) Ongeveer 4,5 uur
®
DC 5 V, 500 mA
(Interne batterij: 3,6 V (Li-ion 690 mAh))
10 ºC tot 35 ºC
0 ºC tot 40 ºC
35%RV tot 80%RV (geen condensatie)
Versie 3.0
Klasse 2 (2,5 mW)
®
NEDERLANDS
VQT5J79
7
47
Page 48

Problemen oplossen
Controleer de volgende punten voordat u hulp inroept bij een probleem. Neem
contact op met uw verkooppunt als u een controlepunt niet begrijpt of als de
voorgestelde oplossingen het probleem niet verhelpen.
Bluetooth®-verbinding
Ik kan geen verbinding maken met een ander apparaat
• Verwijder de koppelinformatie voor dit toestel van het andere
Bluetooth
®
-apparaat, en koppel beide apparaten opnieuw. (→ P. 3)
Algemeen
Het toestel reageert niet
• Sluit de USB-oplaadkabel aan op de oplaadaansluiting (DC IN) van het toestel,
en druk op de RESET-knop. (→ P. 5)
Voeding en opladen
Ik kan het toestel niet opladen
• Controleer of de computer is ingeschakeld en niet in de stand-bystand of
slaapstand staat.
• Werkt de gebruikte USB-poort correct? Als de computer nog andere
USB-poorten heeft, haalt u de stekker uit de huidige poort en steekt u hem in
een andere poort.
• Als u de bovenstaande oplossingen niet kunt gebruiken, ontkoppelt u de
USB-oplaadkabel en sluit u hem opnieuw aan.
• Knippert de led rood? Als de led knippert, is er een fout opgetreden bij het
opladen.
• Als de led snel rood knippert hoewel het opladen plaatsvindt bij een
kamertemperatuur tussen 10 °C en 35 °C, heeft de batterij mogelijk het einde
van zijn levensduur bereikt. (Aantal keer dat de meegeleverde batterij kan
worden opgeladen: ongeveer 500 keer.)
De led licht niet op tijdens het opladen / Het opladen duurt langer
dan gewoonlijk
• Is de USB-oplaadkabel (meegeleverd) stevig aangesloten op de USB-poort van
de computer? (→ P. 3)
Het toestel kan niet worden ingeschakeld
• Is de batterij opgeladen? Tijdens het opladen kan het toestel niet worden
ingeschakeld. (→ P. 3)
• Is de losse kabel aangesloten? Het toestel kan niet worden ingeschakeld
wanneer de losse kabel erop is aangesloten.
VQT5J79
8
48
Geluid en volume
Er is geen geluid
• Controleer of het toestel en het Bluetooth®-apparaat correct zijn verbonden.
(→ P. 3)
• Controleer of er muziek wordt afgespeeld op het Bluetooth
• Vergewis u ervan dat het toestel is ingeschakeld en het volume niet te laag staat.
• Koppel en verbind het Bluetooth
®
-apparaat en het toestel opnieuw. (→ P. 3)
®
-apparaat.
Het volume is laag
• Zet het volume hoger op dit toestel. (→ P. 4)
• Zet het volume hoger op het Bluetooth
®
-apparaat.
De geluidsweergave wordt onderbroken / De geluidskwaliteit is
slecht
• De geluidsweergave kan worden onderbroken als het signaal geblokkeerd wordt.
Dek dit toestel niet helemaal af met uw hand of een voorwerp.
• Het apparaat bevindt zich mogelijk buiten het communicatiebereik van 10 meter.
Breng het apparaat dichter bij dit toestel.
• Verwijder obstakels tussen dit toestel en het apparaat.
• Schakel draadloze netwerkapparaten uit die niet worden gebruikt.
• Er kunnen communicatieproblemen optreden wanneer de batterij leeg is. Laad
de batterij op. (→ P. 3)
Telefoneren
Ik kan mijn gesprekspartner niet horen
• Controleer of het toestel en de Bluetooth®-telefoon zijn ingeschakeld.
• Controleer of het toestel en de Bluetooth
(→ P. 3)
• Controleer de geluidsinstellingen van de Bluetooth
toestel in als oproepapparaat als de Bluetooth
oproepapparaat. (→ P. 3)
• Als het stemvolume van uw gesprekspartner te laag is, verhoogt u het volume
van zowel het toestel als de Bluetooth
®
-telefoon met elkaar zijn verbonden.
®
-telefoon. Schakel dit
®
-telefoon nog is ingesteld als
®
-telefoon.
Page 49

Copyright, enz.
aptX® software is copyright CSR plc or its group
●
companies. All rights reserved.
®
mark and the aptX logo are trademarks
The aptX
of CSR plc or one of its group companies and
may be registered in one or more jurisdictions.
Het woordmerk en de logo’s van Bluetooth®
●
zijn het eigendom van Bluetooth SIG, Inc. en
ieder gebruik van die merken door Panasonic
Corporation vindt plaats onder licentie.
Andere handelsmerken en handelsnamen zijn die
van de respectievelijke eigenaren.
Alle andere namen van systemen en producten
●
die in dit document worden gebruikt, zijn
gedeponeerde handelsmerken of handelsmerken
van de bedrijven die ze ontwikkeld hebben.
In dit document worden de symbolen ™ en ® niet
gebruikt.
Het ontdoen van oude apparatuur en batterijen.
Enkel voor de Europese Unie en landen met
recycle systemen.
Deze symbolen op de producten,
verpakkingen en/of begeleidende documenten
betekenen dat gebruikte elektrische en
elektronische producten en batterijen niet
samen mogen worden weggegooid met de
rest van het huishoudelijk afval.
Voor een juiste verwerking, hergebruik
en recycling van oude producten en
batterijen, gelieve deze in te leveren
bij de desbetreffende inleverpunten in
overeenstemming met uw nationale wetgeving.
Door ze op de juiste wijze weg te gooien,
helpt u mee met het besparen van kostbare
hulpbronnen en voorkomt u potentiële negatieve
effecten op de volksgezondheid en het milieu.
Voor meer informatie over inzameling en
recycling kunt u contact opnemen met uw
plaatselijke gemeente.
Afhankelijk van uw nationale wetgeving
kunnen er boetes worden opgelegd bij het
onjuist weggooien van dit soort afval.
Let op: het batterij symbool
(Onderstaand symbool).
Dit symbool kan in combinatie met een chemisch
symbool gebruikt worden. In dit geval volstaan
de eisen, die zijn vastgesteld in de richtlijnen van
de desbetreffende chemische stof.
De batterij verwijderen wanneer u het toestel weggooit
1
2
3
A
D
C
4
E
B
5
G
G
De volgende instructies zijn niet voor reparatie
maar voor wanneer u het toestel weggooit. Als
het toestel uit elkaar wordt gehaald, kan het niet
meer hersteld worden.
Als u het toestel weggooit, moet u de batterij eruit halen
en recycleren.
D
• Haal het toestel uit elkaar als de batterij het einde van zijn
levensduur bereikt heeft.
• Houd losse onderdelen uit de buurt van kinderen.
Haal het oorkussen A van de
1
rechterluidspreker en verwijder de
3 schroeven
• Gebruik een kruiskopschroevendraaier (in de handel
verkrijgbaar).
Verwijder het voordeksel
2
Til de 2 lipjes D op, en draai het
3
achterdeksel C tegen de wijzers van de
klok in
Verwijder de 4 schroeven en verwijder de
4
behuizing
Neem de batterij aan weerszijden vast bij
5
positie G (niet bij de aansluitpunten F)
E
en verwijder hem
Informatie over de behandeling van gebruikte
batterijen
• Isoleer de contactpunten met tape of gelijkaardig materiaal.
• Niet uit elkaar halen.
■
Batterijen
• Niet blootstellen aan hitte of vuur.
• Laat batterijen niet achter in een voertuig dat gedurende
langere tijd in direct zonlicht staat met gesloten deuren
en ramen.
• Door verkeerde behandeling van batterijen kan de
elektrolyt eruit gaan lekken. Andere voorwerpen kunnen
beschadigd worden door de lekkende vloeistof. Neem
contact op met uw verkooppunt als er elektrolyt uit de
batterij lekt. Als u met elektrolyt in aanraking komt, moet u
F
de huid grondig met water spoelen.
• Lever gebruikte batterijen op de juiste wijze in. Neem
contact op met uw plaatselijke overheid of verkooppunt
voor meer informatie hoe u batterijen moet weggooien.
B
NEDERLANDS
VQT5J79
9
49
Page 50

Bästa kund
Tack för att du har köpt den här
produkten.
Läs igenom de här anvisningarna
noggrant innan du använder produkten
och spara bruksanvisningen för
framtida bruk.
Tillbehör
Var vänlig kontrollera och identifiera de
medföljande tillbehören.
1 Löstagbar sladd
1 USB-laddningssladd
Innehållsförteckning
Före användning
Tillbehör .............................................. 2
Delarnas namn ................................... 2
Förberedelser
Laddning ............................................. 3
Slå på/stänga av enheten ................... 3
Ansluta en Bluetooth
Anslutning med ett tryck
(Anslutning med NFC) .................... 4
Drift
Lyssna på musik ................................. 4
Ringa ett samtal.................................. 5
Användbara funktioner .......................5
Övrigt
Återställa till fabriksinställningarna .....5
Försiktighetsåtgärder .......................... 6
Underhåll ............................................ 6
Om Bluetooth
Specifikationer .................................... 7
Felsökningsguide................................ 8
Upphovsrätt etc. .................................9
Ta bort batteriet vid kassering av
enheten .......................................... 9
VQT5J79
2
50
®
-anordning ........ 3
®
.................................... 7
Delarnas namn
1
2
3
4
5
6
Öppna höljet
Vänster Höger
7
8
14 15
Produktillustrationerna kan skilja sig åt från
den faktiska produkten.
9
10 11
12 13
Strömknapp /
1
Parningsknapp
LED-indikatorlampa*
2
• Antalet blinkningar eller färg
meddelar enhetens status.
(* hädanefter kallad ”LED”)
Terminal för ljudingång
3
• Anslut den löstagbara
sladden (medföljer) till den här
terminalen när du använder
enheten som trådbundna
hörlurar.
Mikrofon
4
Hål för ÅTERSTÄLLNING
5
(RESET)
Laddningsterminal (DC IN)
6
• Anslut USB-laddningssladden
(medföljer) till den här
terminalen vid laddning.
(→ s. 3)
7
Ring
NFC-pekområde
8
Föregående
9
Volym +
10
Nästa
11
Volym –
12
Spela/Pausa
13
Vänster hörlur
14
Höger hörlur
15
■
Obs
• Använd inte andra
USB-laddningssladdar än den
medföljande.
• Använd inte andra löstagbara
sladdar än den medföljande.
• Täck inte för vänster hörlur med
handflatan när du använder
enheten. Bluetooth
kan blockeras.
®
-anslutningen
Page 51

Laddning
Det laddningsbara batteriet (installerat i enheten) är inte laddat i förväg.
Ladda batteriet innan du använder enheten.
Anslut enheten till en dator med
1
hjälp av USB-laddningssladden
• Under laddning kommer LED-lampan
på vänster hörlur att lysa rött. När
laddningen är klar kommer LED-lampan
att slockna.
• Laddningen tar ca 4,5 timme från tomt
läge till fulladdat.
■
Obs
• Bluetooth®-funktionen kan inte användas när den här enheten är ansluten till en
dator med hjälp av USB-laddningssladden.
• Ladda i rumstemperatur mellan 10 °C och 35 °C.
• Strömmen kan inte slås på vid laddning.
• Använd inte andra USB-laddningssladdar än den medföljande.
Försiktighet: Använd endast den medföljande USB-laddningssladden för
anslutning till en dator.
Dator
USB-laddningssladd (medföljer)
Vänster
LED
Slå på/stänga av enheten
Tryck och håll inne strömknappen i ca
1
2 sekunder
• Ett pip kommer att ljuda och LED-lampan på vänster
hörlur kommer att blinka.
Strömknapp
För att stänga av enheten
• Tryck och håll inne strömknappen
ljuda och strömmen kommer att stängas av.
■
Obs
• När enheten inte har använts på ca 5 minuter kommer strömmen automatiskt att
stängas av. (Se ”Automatisk avstängning” (→ s. 5))
i 2 sekunder eller mer. Ett pip kommer att
Ansluta en Bluetooth®-anordning
Registrera enheten med Bluetooth®-kompatibla anordningar för att etablera en
trådlös anslutning.
Förberedelser på Bluetooth®-anordningen
• Slå på anordningen och aktivera Bluetooth®-funktionen.
• Placera anordningen inom 1 m från enheten.
• Kontrollera vid behov anordningens användning i dess bruksanvisning.
Slå på enheten för första
gången
Slå på enheten
1
• Enheten börjar söka efter
När enheten (”RP-BTD10”)
2
har upptäckts av Bluetooth®-
®
Bluetooth
ansluta till och LED-lampan på
vänster hörlur kommer att blinka
omväxlande i blått och rött.
(Endast första användningen
efter köp)
-anordningen den ska
anordningen, välj den
• Om du ombes att ange ett
lösenord, ange ”0000 (fyra
nollor)”.
• Om skärmen för Bluetooth
profilval visas, välj ”A2DP”profilen. Om ”A2DP” inte stöds
eller om du bara vill använda
telefonsamtal, välj ”HSP” eller
”HFP”-profilen. (Se ”Lyssna
på musik” (→ s. 4) och ”Ringa
ett samtal” (→ s. 5) för mer
information om profiler)
Kontrollera anslutningen
3
med Bluetooth®-anordningen
på enheten
• Först tänds LED-lampan
på vänster hörlur i blått
och upprepar av/på. När
anslutningen är etablerad
kommer blinkningsmönstret att
ändras.
®
-
Anslutning för andra gången
<Anslutning till samma Bluetooth®anordning>
När enheten är påslagen kommer
den att söka efter tidigare installerade
®
Bluetooth
automatiskt ansluta till dem. Först
tänds LED-lampan på vänster hörlur
i blått och upprepar av/på. När
anslutningen är etablerad kommer
blinkningsmönstret att ändras.
<Anslutning till en annan
Bluetooth
Inaktivera Bluetooth
den tidigare anslutna anordningen.
Kontrollera att enheten är avstängd.
Tryck och håll inne parningsknappen
i ca 5 sekunder. Enheten kommer
att söka efter en annan Bluetooth
anordning. LED-lampan på vänster
hörlur kommer omväxlande att blinka i
blått och rött. Ett pip kommer att höras.
Fortsätt med steg 2 och 3.
-anordningar och
®
-anordning>
®
-funktionen på
®
-
■
Obs
• Om en anslutning till anordningen
inte etableras inom ca 5 minuter
kommer enheten att stängas av.
Starta från steg 1 igen.
• 2 eller fler Bluetooth
kan inte anslutas till enheten
samtidigt.
• Du kan para upp till 8 olika
anordningar till den här enheten. Om
en nionde anordning paras kommer
den äldsta apparaten att ersättas.
Para den igen för att använda den.
®
-anordningar
SVENSKA
VQT5J79
3
51
Page 52

Anslutning med ett tryck
(Anslutning med NFC)
Endast för NFC-kompatibla Android™-anordningar
Funktionen NFC (Near Field Communication) gör att den här enheten enkelt kan
ansluta till NFC-kompatibla Bluetooth
med din Bluetooth
Bluetooth
®
-anordning för att automatiskt slå på den här enheten, para
®
-anordningen och upprätta en anslutning.
®
-anordningar. Rör bara vid den här enheten
Förberedelser
Slå på NFC-funktionen på Bluetooth®-anordningen.
Starta programmet för att spela musik/video på Bluetooth®-
1
anordningen
• Följ instruktionerna på skärmen på din anordning.
Vidrör och håll din anordning på NFC-pekområdet på den här
2
enheten (tills ett popup-fönster på din anordning indikerar att
anslutningen har upprättats)
• Enheten slås på. Först tänds LED-lampan på vänster hörlur i blått och
upprepar av/på. När anslutningen är etablerad kommer blinkningsmönstret
att ändras.
• Ändra positionen du vidrör den med om anslutningen inte etableras.
Spela upp musik/video på din Bluetooth®-anordning
3
■
Ansluta till en annan anordning
Vidrör den här enheten med en annan anordning för att etablera en ny Bluetooth®anslutning.
Den tidigare anslutna anordningen kommer automatiskt att kopplas bort.
Lyssna på musik
Om den Bluetooth®-kompatibla anordningen stöder Bluetooth®-profilerna ”A2DP”
och ”AVRCP” kan musik spelas medan enheten fjärrstyrs.
• A2DP (Profil för avancerad ljuddistribution): Överför ljud till enheten.
• AVRCP (Profil för fjärrstyrning av ljud/video):
Möjliggör fjärrstyrning av anordningen via enheten.
Anslut Bluetooth®-anordningen till enheten (→ s. 3)
1
Välj och spela musik på Bluetooth®-anordningen
2
• Den valda musiken skickas till enhetens hörlurar.
VQT5J79
4
52
Batteriets drifttid
Batterityp Drifttid
Laddningsbart batteri (installerat i enheten) Ca 30 timmar
Drifttiden kan påverkas något av driftförhållandena.
■
Obs
• Bluetooth®-anordningar som stöder aptX® kan överföra musik av högre kvalitet.
■
Varning
• Enheten kan läcka ljud beroende på volymnivå.
• När volymen ökar till nära maximal nivå kan musiken låta förvrängd. Minska
volymen tills förvrängningen försvinner.
Fjärrstyrning
Du kan kontrollera Bluetooth®-anordningen med hjälp av den här enheten.
• Beroende på Bluetooth
fungerar eller fungerar på andra sätt via användningen av enheten.
(Driftexempel)
Spela/Pausa
Tryck Spela/Pausa
Föregående/Nästa
Tryck vid
uppspelning
Tryck och håll inne Spola tillbaka
Tryck vid
uppspelning
Tryck och håll inne Snabbspolning
Volym
Tryck Öka volymen
+
Tryck och håll inne
Tryck Minska volymen
−
Tryck och håll inne
®
-anordningarna kanske vissa av funktionerna nedan inte
Höger
Volym +
Återgå till början
av aktuellt spår
Gå vidare till
början av nästa
spår
Öka volymen
kontinuerligt
Minska volymen
kontinuerligt
Föregående
Volym –
■
Obs
• Volymen kan justeras i
15 nivåer.
När max- eller miniminivån har
nåtts kommer ett pip att ljuda.
Spela/Pausa
Nästa
Page 53

Ringa ett samtal
Med Bluetooth®-aktiverade telefoner (mobiltelefoner eller smarta telefoner) som
stöder Bluetooth
telefonsamtal.
• HSP (Headset-profil):
Den här profilen kan användas för att ta emot monoljud och för att upprätta
tvåvägskommunikation via mikrofonen på enheten.
• HFP (Handsfree-profil):
Utöver HSP-funktionerna har den här profilen även funktionerna inkommande
och utgående samtal.
Anslut den Bluetooth®-aktiverade telefonen och enheten (→ s. 3)
1
Svara på inkommande samtal
2
Tryck på Ring på enheten
för att ta emot samtalet
Börja prata
3
• LED-lampan kommer att blinka 2 gånger i rad under ett samtal.
• Volymen kan justeras under ett telefonsamtal. Se sida 4 för instruktioner om
inställningar.
Tryck Ring för att avsluta telefonsamtalet
4
• Ett pip kommer att höras.
®
-profilerna ”HSP” eller ”HFP” kan du använda den här enheten till
• Under ett inkommande samtal
kommer ringsignalen att ljuda
i hörlurarna och LED-lampan
kommer att blinka.
• (Endast HFP) För att avvisa det
inkommande samtalet, tryck och
håll inne Ring
tystnar.
Vänster
tills ringtonen
Ring
Mikrofon
Ringa ett utgående samtal
Att ringa ett utgående
samtal på en Bluetooth
®
aktiverad telefon
• Se även bruksanvisningen för
(Stegen för kontroll och användning
av enheten förklaras nedan)
• Under ett utgående samtal
• Tryck Ring
• (Endast HFP) När telefonen är
®
Bluetooth
kommer ringsignalen att ljuda
i hörlurarna och LED-lampan
kommer att blinka.
utgående samtalet.
Ett pip kommer att höras.
i viloläge, tryck och håll inne
Ring
utgående samtal kommer att
ringas till det senast uppringda
numret. Ett kort klick kommer
att ljuda i hörlurarna och
LED-lampan kommer att blinka.
-aktiverade telefoner.
för att avbryta det
i ca 2 sekunder. Ett
■
Obs
• Det kan förekomma fall då handsfree-inställning måste göras på den
• Beroende på den Bluetooth
• (Endast HFP) Tryck och håll inne Ring
®
Bluetooth
inkommande och utgående samtal från telefonen från enheten.
Samtalsanordningen kommer att växla mellan den Bluetooth
telefonen och enheten.
-aktiverade telefonen.
®
-aktiverade telefonen kan du höra ringsignaler för
på enheten i ca 2 sekunder.
®
-aktiverade
Användbara funktioner
Återställning av enheten
Den här enheten kan återställas när alla åtgärder inte fungerar. Anslut enheten
till en dator med hjälp av USB-laddningssladden. Tryck sedan i hålet för
-
ÅTERSTÄLLNING (RESET) med ett tunt föremål. Kontrollera att LED-lampan
(den röda) slocknar. Fortsätt att trycka i hålet för ÅTERSTÄLLNING (RESET)
(→ s. 2) i ca 5 sekunder för att återställa enheten. Alla tidigare åtgärder kommer att
återställas. (Informationen om parningen av anordningen kommer inte att tas bort.)
Automatisk avstängning
Om enheten är tyst i ca 5 minuter och funktionen hos Bluetooth®-anordningar är i
viloläge under den tidsperioden kommer ett pip att ljuda och enheten kommer att
stängas av automatiskt.
SVENSKA
LED-indikatorlampa
När batterinivån är låg medan enheten används kommer den blå blinkande
LED-lampan på vänster hörlur att växla till rött. En pip kommer att ljuda varje minut.
När batteriet tar slut kommer enheten att stängas av.
Återställa till
fabriksinställningarna
När du vill ta bort all information om parade anordningar etc. kan du återställa
enheten till fabriksinställningarna (originalinställningarna vid köp).
1 Stäng av enheten
2 Tryck och håll inne strömknappen
mer samtidigt
• LED-lampan på vänster hörlur kommer att lysa röd i ca 2 sekunder. Enheten
kommer att återställas till fabriksinställningarna.
och Föregående i 5 sekunder eller
VQT5J79
5
53
Page 54

Försiktighetsåtgärder
■
Enhet
• Undvik att placera den här enheten nära värmekällor.
• Lyssna inte på enheten på hög volym på platser där du måste höra ljud
från omgivningen för att vara säker, såsom järnvägsövergångar och
byggarbetsplatser.
• Bredbandsspänningen är lika med eller större än 75 mV.
VARNING:
För att minska risken för brand, elstötar eller skador på produkten,
• Exponera inte enheten för regn, fukt eller droppande eller skvättande vatten.
• Placera inte objekt fyllda med vätska, såsom vaser, ovanpå den här enheten.
• Använd endast rekommenderade tillbehör.
• Ta inte bort höljena.
• Reparera inte enheten själv. Överlåt service till kvalificerad servicepersonal.
■
Allergier
• Sluta använda enheten om du upplever obehag av hörlurarna eller andra delar
som är i direkt kontakt med din hud.
• Fortsatt användning kan orsaka hudutslag eller andra allergiska reaktioner.
■
Försiktighetsåtgärder för att lyssna med hörlurarna
• Använd inte hörlurarna på hög volym. Hörselexperter avråder från att lyssna
kontinuerligt på hög volym.
• Om du upplever att det ringer i öronen bör du minska volymen eller sluta
använda enheten.
• Använd inte när du driver ett motoriserat fordon. Det kan leda till trafikfara och
är olagligt i många områden.
• Du bör nyttja extrem försiktighet eller sluta använda enheten tillfälligt i
potentiellt farliga situationer.
Enheten kan ta emot radiostörningar som orsakas av mobiltelefoner vid
användning. Om sådana störningar förekommer, öka avståndet mellan enheten
och mobiltelefonen.
Underhåll
Rengör enheten med en torr och mjuk trasa.
• Använd inte lösningsmedel, inklusive tvättbensin, thinner, alkohol,
köksrengöringsmedel, kemiskt rengöringsmedel etc. Detta kan leda till att
ytterhöljet kan deformeras eller att beläggningen kan lossna.
Deklaration om överensstämmande (DoC)
”Panasonic Corporation” garanterar att denna produkt överensstämmer med
tillämpbara krav och andra föreskrifter i enlighet med direktiv 1999/5/EC.
Kunder kan ladda ner en kopia av original DoC till våra R&TTE-produkter från vår
DoC-server:
http://www.doc.panasonic.de
Kontakta den auktoriserade representanten: Panasonic Marketing Europe GmbH,
Panasonic Testing Centre, Winsbergring 15, 22525 Hamburg, Tyskland
Denna produkt är avsedd att användas i följande länder.
STORBRITANNIEN, FRANKRIKE, TYSKLAND, ITALIEN, SCHWEIZ, ÖSTERRIKE,
HOLLAND, BELGIEN, SPANIEN, SVERIGE, NORGE, DANMARK, FINLAND,
UNGERN, TJECKIEN, SLOVAKIEN, SLOVENIEN, BULGARIEN, POLEN,
GREKLAND, PORTUGAL, RUMÄNIEN
Denna produkt är avsedd för allmän försäljning. (Kategori 3)
VQT5J79
6
54
Page 55

Om Bluetooth
Panasonic frånsäger sig ansvar för data och/eller information som äventyras
under trådlös överföring.
■
Använt frekvensband
Den här enheten använder frekvensbandet 2,4 GHz.
■
Enhetens certifiering
• Den här enheten efterföljer frekvensrestriktioner och har certifierats baserat på
frekvenslagar. Därmed är ett trådlöst tillstånd inte nödvändigt.
• Åtgärderna nedan är straffbara enligt lag i vissa länder:
– Att ta isär/modifiera enheten.
– Att ta bort specifikationsindikationer.
■
Användningsrestriktioner
• Trådlös överföring och/eller användning med alla Bluetooth®-utrustade
anordningar garanteras inte.
• Alla anordningar måste efterfölja de standarder som har fastställts av
Bluetooth SIG, Inc.
• Beroende på en anordnings specifikationer och inställningar kanske den inte
fungerar eller så kan vissa användningar vara annorlunda.
• Det här systemet stödjer Bluetooth
användningsområdet och/eller inställningar kanske den här säkerheten inte
räcker till. Överför information trådlöst till det här systemet med försiktighet.
• Det här systemet kan inte överföra information till en Bluetooth
■
Räckvidd för användning
Den här enheten har en maximal räckvidd på 10 m.
Räckvidden kan minska beroende på miljön, hinder eller störningar.
■
Störningar från andra anordningar
• Den här enheten kanske inte fungerar ordentligt och problem såsom oljud
eller ljudhopp kan förekomma på grund av störningar från radiovågor om den
här enheten befinner sig för nära andra Bluetooth
anordningar som använder 2,4 GHz-bandet.
• Den här enheten kanske inte fungerar ordentligt om radiovågor från en
närliggande sändningsstation etc. är för starka.
■
Avsedd användning
• Den här enheten är endast till för normalt, allmänt bruk.
• Använd inte systemet nära en utrustning eller i en miljö som är känslig för
störningar från radiofrekvenser (till exempel: flygplatser, sjukhus, laboratorier,
etc.).
®
®
-säkerhetsfunktioner. Men beroende på
®
-anordning.
®
-anordningar eller andra
Specifikationer
■
Allmänt
Strömförsörjning
1
(SBC-läge) Ca 30 timmar
Drifttid*
Laddningstid*
Intervall för laddningstemperatur 10 ºC till 35 ºC
Intervall för drifttemperatur 0 ºC till 40 ºC
Intervall för luftfuktighet vid drift 35%RH till 80%RH (ingen kondens)
Massa Ca 198 g
1
Den kan vara kortare beroende på driftförhållandena.
*
2
Tid som krävs för att ladda från tomt till fullt.
*
■
Bluetooth®-sektion
Bluetooth® systemspecifikationer Ver. 3.0
Klassificering av trådlös
utrustning
Frekvensband 2,4 GHz band FH-SS
Profiler som stöds A2DP, AVRCP, HSP, HFP
Kodec som stöds SBC, aptX
Räckvidd för drift Upp till 10 m
■
Hörlurssektion
Drivrutinsenheter Φ 40 mm
Impedans 32 Ω
■
Terminalsektion
DC IN DC 5 V, 500 mA
Ljudingång Stereouttag Φ 3,5 mm
■
Mikrofonsektion
Typ Mono
■
Sektion för tillbehör
USB-laddningssladd 1,0 m
Löstagbar sladd 1,5 m
Specifikationer kan ändras utan föregående meddelande.
●
2
(25 ºC) Ca 4,5 timmar
DC 5 V, 500 mA
(Internt batteri: 3,6 V (Li-ion 690 mAh))
Klass 2 (2,5 mW)
®
SVENSKA
VQT5J79
7
55
Page 56

Felsökningsguide
Gör följande kontroller innan du begär service. Om du har tvivel om några av
kontrollpunkterna eller om de åtgärder som anges inte löser problemet, rådfråga
din återförsäljare för instruktioner.
Anslutning av Bluetooth®-anordningen
Anordningen kan inte anslutas
• Radera parningsinformationen för denna enhet från Bluetooth®-anordningen och
para dem sedan igen. (→ s. 3)
Allmänt
Enheten svarar inte
• Tryck in hålet för ÅTERSTÄLLNING (RESET) samtidigt som du ansluter
USB-laddningssladden till laddningsterminalen (DC IN). (→ s. 5)
Strömförsörjning och laddning
Kan inte ladda enheten
• Se till att datorn på påslagen och att den inte är i viloläge.
• Fungerar den USB-port du använder för närvarande? Om din dator har andra
USB-portar, koppla från kontakten från dess nuvarande port och anslut den i en
av de andra portarna.
• Om åtgärderna ovan inte är tillämpliga, koppla från USB-laddningssladden och
anslut den igen.
• Blinkar LED-lampan rött? Det förekommer ett laddningsfel om LED-lampan
blinkar.
• Om LED-lampan blinkar snabbt i rött även när enheter laddar i en
omgivningstemperatur på mellan 10 °C och 35 °C kan batteriet vara utslitet.
(Antalet uppladdningar för det medföljande batteriet: ca 500.)
LED-lampan lyser inte vid laddning / Laddning tar längre tid
• Är USB-laddningssladden (medföljer) ansluten ordentligt till USB-terminalen på
datorn? (→ s. 3)
Strömmen slås inte på
• Laddas enheten? Strömmen kan inte slås PÅ vid laddning. (→ s. 3)
• Är den löstagbara sladden ansluten? Strömmen kan inte slås på när den
löstagbara sladden är ansluten till enheten.
Ljud och ljudvolym
Inget ljud
• Se till att enheten och Bluetooth®-anordningen är korrekt anslutna. (→ s. 3)
• Kontrollera om musik spelas på Bluetooth
• Se till att enheten på påslagen och att volymen inte är för låg.
• Para och anslut Bluetooth
®
-anordningen och enheten igen. (→ s. 3)
®
-anordningen.
Låg volym
• Öka volymen på enheten. (→ s. 4)
• Öka volymen på Bluetooth
®
-anordningen.
Ljudet från anordningen avbryts / Ljudkvaliteten är dålig
• Ljud kan avbrytas om signaler blockeras. Täck inte över enheten helt med
handflatan etc.
• Anordningen kan vara utanför kommunikationsgränsen på 10 m. Flytta
anordningen närmre enheten.
• Ta bort alla hinder mellan den här anordningen och enheten.
• Stäng av alla trådlösa LAN-enheter när de inte används.
• Ett kommunikationsproblem kan förekomma om batteriet är urladdat. Ladda
enheten. (→ s. 3)
Telefonsamtal
Du kan inte höra den andra personen
• Se till att enheten och den Bluetooth®-aktiverade telefonen är påslagna.
• Kontrollera om enheten och Bluetooth
(→ s. 3)
• Kontrollera ljudinställningarna på den Bluetooth
Ställ in den ringande anordningen till enheten om den är inställd på den
®
Bluetooth
• Öka volymen både på enheten och den Bluetooth
andra personens röstvolym är för låg.
-aktiverade telefonen. (→ s. 3)
®
-aktiverade telefonen är anslutna.
®
-aktiverade telefonen.
®
-aktiverade telefonen om den
VQT5J79
8
56
Page 57

Upphovsrätt etc. Ta bort batteriet vid kassering av enheten
aptX® software is copyright CSR plc or its
●
group companies. All rights reserved.
®
The aptX
trademarks of CSR plc or one of its group
companies and may be registered in one or
more jurisdictions.
Bluetooth®-ordmärket och logotyper ägs av
●
Bluetooth SIG, Inc. och all användning av
sådana märken av Panasonic Corporation
sker under licens.
Andra varumärken och varunamn tillhör deras
repsektive ägare.
Andra systemnamn och produktnamn
●
som förekommer i det här dokumentet är
i allmänhet de registrerade varumärkena
eller varumärken som tillhör respektive
utvecklingsföretag.
Observera att ™-märket och ®-märket inte
förekommer i det här dokumentet.
Avfallshantering av produkter och batterier
Endast för Europeiska Unionen och länder med
återvinningssystem
mark and the aptX logo are
Dessa symboler på produkter,
förpackningar och/eller medföljande
dokument betyder att förbrukade elektriska
och elektroniska produkter och batterier
inte får blandas med vanliga hushållssopor.
För att gamla produkter och använda
batterier ska hanteras och återvinnas på
rätt sätt ska dom lämnas till passande
uppsamlingsställe i enlighet med nationella
bestämmelser.
Genom att ta göra det korrekt hjälper du till
att spara värdefulla resurser och förhindrar
eventuella negativa effekter på människors
hälsa och på miljön.
För mer information om insamling och
återvinning kontakta din kommun.
Olämplig avfallshantering kan beläggas
med böter i enlighet med nationella
bestämmelser.
Notering till batterisymbolen
(nedanför):
Denna symbol kan användas i
kombination med en kemisk symbol. I
detta fall uppfyller den de krav som ställs i
direktivet för den aktuella kemikalien.
1
2
3
A
D
C
4
E
B
5
G
G
Följande instruktioner är inte avsedda för
reparationssyften utan för kassering av den här
enheten. Den här enheten kan inte lagas när den
är demonterad.
Ta ut det installerade batteriet ur den här enheten och
återvinn det vid kassering av den här enheten.
D
• Demontera efter att batteriet slits ut.
• Förvara demonterade delar utom räckhåll för barn.
Ta av öronmuffen A från höger hörlur
1
och avlägsna de 3 skruvarna
• Använd en stjärnskruvmejsel (tillgänglig i handeln).
Ta bort fronthöljet
2
Lyft de 2 hakarna D, rotera det bakre
3
höljet C motsols
Avlägsna de 4 skruvarna och avlägsna
4
5
E
höljet
Håll båda sidorna av batteriet vid
position G (undan från terminalerna F)
B
och avlägsna det
Gällande hanteringen av använda batterier
• Isolera terminalerna med vidhäftande tejp eller liknande
material.
• Demontera inte.
■
Batterier
• Värm inte upp eller exponera för lågor.
• Lämna inte batteri(er) i en bil som exponeras för direkt
solljus under lång tid med dörrar och fönster stängda.
• Felaktig hantering av batterier kan orsaka
elektrolytläckage som kan skada föremål som den läckta
vätskan kommer i kontakt med. Rådfråga återförsäljaren
om elektrolyt läcker från batteriet. Tvätta noggrant med
vatten om elektrolyt kommer i kontakt med någon del av
din kropp.
• Kontakta de lokala myndigheterna eller återförsäljaren
vid kassering av batterierna och fråga om korrekt
kasseringsmetod.
F
SVENSKA
VQT5J79
9
57
Page 58

Kære kunde
Tak fordi du købte dette produkt.
Læs venligst disse instruktioner
omhyggeligt igennem, før du anvender
dette produkt, og gem vejledningen til
fremtidig brug.
Tilbehør
Kontrollér venligst, at det medfølgende
tilbehør svarer til det bestilte.
Indholdsfortegnelse
Inden brug
Tilbehør .............................................. 2
Navne på komponenter ...................... 2
Forberedelse
Opladning ........................................... 3
Tænde/slukke ..................................... 3
Tilslutning af Bluetooth
One-touch-forbindelse
(forbindelse via NFC) ..................... 4
Betjening
Aflytning af musik ...............................4
Foretag et telefonopkald ..................... 5
Praktiske funktioner ............................5
Andet
Nulstilling til fabriksindstillinger ...........5
Sikkerhedsregler................................. 6
Vedligeholdelse .................................. 6
Om Bluetooth
Specifikationer .................................... 7
Fejlfinding ........................................... 8
Copyright, etc. ....................................9
Udtagning af batteriet, når
enheden skal bortskaffes ............... 9
VQT5J79
2
58
®
-apparat ........ 3
®
.................................... 7
1 Aftagelig ledning
1 USB-opladerledning
Navne på komponenter
Tænd/sluk-knap /
1
2
3
4
5
6
Åbn dækslet
Venstre Højre
7
8
9
10 11
12 13
14 15
Billederne af produktet kan afvige fra det
aktuelle produkt.
1
Parringsknap
LED-indikator*
2
• Antallet af blink eller farver
angiver enhedens status.
(* i det følgende kaldet “LED”)
Lydindgangsstik
3
• Forbind den aftagelige ledning
(medfølger) med dette stik,
når enheden skal bruges med
hovedtelefoner.
Mikrofon
4
NULSTIL-hul (RESET)
5
Opladningsstik (DC IN)
6
• Forbind USB-opladerledningen
(medfølger) til stik for
opladning. (→ s. 3)
7
Opkald
NFC touch-område
8
Tidligere
9
Lydstyrke +
10
Næste
11
Lydstyrke –
12
Afspil/Pause
13
Venstre højttaler
14
Højre højttaler
15
■
Bemærk
• Undlad at bruge andre
USB-opladerledninger end den
medfølgende.
• Undlad at bruge andre aftagelige
ledninger end den medfølgende.
• Når man bruger enheden, skal
man udlade at tildække venstre
højttaler med håndfladen.
®
Bluetooth
blokeret.
-forbindelsen kan være
Page 59

Opladning
Det genopladelige batteri (installeret i enheden) er ikke opladet ved levering.
Batteriet skal oplades, inden enheden tages i brug.
Forbind denne enhed til
1
en computer ved hjælp af
USB-opladerledningen
• Under opladningen lyser LED’en på
venstre højttaler rødt. Når opladningen
er færdig, slukker LED’en.
• Opladningen tager ca. 4,5 timer fra
afladet til fuldt opladet tilstand.
■
Bemærk
• Bluetooth®-funktionen kan ikke bruges, når denne enhed er forbundet til en
computer ved hjælp af USB-opladerledningen.
• Genopladningen skal ske ved rumtemperatur mellem 10 °C og 35 °C.
• Strømmen kan ikke tilsluttes under opladning.
• Undlad at bruge andre USB-opladerledninger end den medfølgende.
Forsigtig: Brug kun den medfølgende USB-opladerledning til at forbinde enheden
til en computer.
Computer
USB-opladerledning (medfølger)
Venstre
LED
Tænde/slukke
Hold tænd/sluk-knappen inde i ca.
1
2 sekunder
• Der lyder en biplyd, og LED’en på venstre højttaler
blinker.
Tænd/sluk-knap
Slukning
• Hold tænd/sluk-knappen
strømmen afbrydes.
■
Bemærk
• Når enheden ikke anvendes i ca. 5 minutter, slukker den automatisk.
(Se “Automatisk slukning” (→ s. 5))
inde i 2 sekunder eller mere. Der lyder en biplyd, og
Tilslutning af Bluetooth®-apparat
Inden du kan etablere en trådløs forbindelse, skal du registrere enheden med
®
Bluetooth
Forberedelse på Bluetooth®-apparatet
Tænding af enheden for første
gang
1
2
3
-kompatible apparater.
• Tænd for strømmen, og aktivér Bluetooth®-funktionen.
• Anbring enheden maks. 1 m fra enheden.
• Kontrollér evt. betjeningen af enheden ifølge brugsanvisningen.
Forbindelse efter anden gang
<Forbind den samme Bluetooth®-
Tænd enheden
• Enheden vil begynde med
at søge efter det Bluetooth
apparat, der skal forbindes,
og LED’en på venstre højttaler
blinker skiftevist blåt og rødt.
(Kun én operation efter køb)
®
-
Når enheden (“RP-BTD10”)
er detekteret af Bluetooth®enheden, vælger man denne
• Hvis systemet kræver password,
indtast “0000 (fire nuller)”.
• Hvis Bluetooth
skærmbilledet vises, vælg
profilen “A2DP”. Hvis “A2DP”
ikke er understøttet, eller
hvis du kun ønsker at bruge
telefonopkald, vælg profilen
“HSP” eller “HFP”.
(For oplysninger om profiler:
Se “Aflytning af musik” (→ s. 4)
og “Foretag et telefonopkald”
(→ s. 5))
®
-profilvalg-
Kontrollér forbindelse med
Bluetooth®-apparatet på
enheden
• Først lyser LED’en på venstre
højttaler blåt og begynder
derefter at blinke. Når
forbindelsen er oprettet, ændres
blinkmønsteret.
enhed>
Når enheden tændes, vil den
søge efter den tidligere forbundne
®
Bluetooth
begynde at oprette forbindelse til
denne. Først lyser LED’en på venstre
højttaler blåt og begynder derefter at
blinke. Når forbindelsen er oprettet,
ændres blinkmønsteret.
<Forbind en anden Bluetooth®-enhed>
Deaktivér Bluetooth®-funktionen
på det tidligere forbundne apparat.
Kontrollér, at enheden er slukket.
Hold parringsknappen
5 sekunder. Enheden vil begynde at
søge efter andre Bluetooth
LED’en på venstre højttaler blinker
skiftevist blåt og rødt. Der lyder en
biplyd.
Fortsæt med trin 2 og 3.
-enhed og automatisk
■
Bemærk
• Hvis der ikke oprettes forbindelse til
et apparat inden for ca. 5 minutter,
slukker enheden.
Start forfra fra trin 1.
• Der kan forbindes 2 eller flere
• Man kan parre op til 8 apparater
®
Bluetooth
samme tid.
med denne enhed. Hvis der parres
et 9. apparat, vil apparatet med den
ældste forbindelse blive udskiftet.
For at bruge dette apparat skal det
parres igen.
-apparater til enheden på
inde i ca.
®
-apparater.
DANSK
VQT5J79
3
59
Page 60

Batteriets driftstid
One-touch-forbindelse (forbindelse via NFC)
Kun for NFC-kompatible Android™-apparater
Med funktionen NFC (Near Field Communication) kan denne enhed nemt oprette
forbindelse til et NFC-kompatibelt Bluetooth
med dit Bluetooth
apparatet og opretter forbindelse.
®
-apparat, så enheden tændes automatisk, parrer Bluetooth®-
®
-apparat. Rør blot denne enhed
Forberedelse
Aktivér NFC-funktionen på Bluetooth®-apparatet.
Start applikationen til afspilning af musik/video på
1
Bluetooth®-apparatet
• Følg vejledningen på skærmen af apparatet.
Rør og fasthold apparatet i denne enheds NFC touch-område
2
(til der vises et popup-vindue på apparatet, som angiver, at der
er oprettet forbindelse)
• Enheden tændes. Først lyser LED’en på venstre højttaler blåt og begynder
derefter at blinke. Når forbindelsen er oprettet, ændres blinkmønsteret.
• Hvis der ikke oprettes forbindelse, ændrer man berøringspositionen.
Start afspilning af musik/video på dit Bluetooth®-apparat
3
■
Oprettelse af forbindelse til et andet apparat
Berør denne enhed med et andet apparat for at oprette en ny Bluetooth®-forbindelse.
Det tidligere forbundne apparat frakobles automatisk.
Aflytning af musik
Hvis det Bluetooth®-kompatible apparat understøtter Bluetooth®-profilerne “A2DP”
og “AVRCP”, kan man afspille musik via fjernbetjeningen på enheden.
• A2DP (Advanced Audio Distribution Profile): Overfører lyd til enheden.
• AVRCP (Audio/Video Remote Control Profile):
Tillader fjernbetjening af apparatet via enheden.
Opret forbindelse til Bluetooth®-apparatet og enheden (→ s. 3)
1
Vælg, og afspil musik på Bluetooth®-apparatet
2
• Den valgte musik udlæses til enhedens højttalere.
VQT5J79
Genopladeligt batteri (installeret i enheden) Ca. 30 timer
Driftstiden kan være kortere afhængig af de givne forhold.
■
Bemærk
• Bluetooth®-apparater, som understøtter aptX®, kan afspille musik af høj kvalitet.
■
Forsigtig
• Enheden kan lække lyd afhængig af lydstyrkens niveau.
• Hvis lydstyrken øges til nær det maksimale niveau, kan musikken lyde
forvrænget. Reducér lydstyrken, til forvrængningen ophører.
Fjernbetjening
Man kan betjene Bluetooth®-apparatet ved hjælp af enheden.
• Afhængig af Bluetooth
funktioner ikke virker (eller virker forskelligt) via betjening af enheden.
(Betjeningseksempel)
Afspil/Pause
Tryk Afspil/Pause
Tidligere/Næste
Tryk under
afspilning
Tryk og hold inde Spol tilbage
Tryk under
afspilning
Tryk og hold inde Hurtig fremspoling
Lydstyrke
Tryk Forøg lydstyrken
+
Tryk og hold inde
Tryk
−
Tryk og hold inde
Batteritype Driftstid
4
60
®
-apparaterne er det muligt, at nogle at nedenstående
Højre
Lydstyrke +
Kør tilbage til
starten at den
aktuelle sang
Kør frem til starten
af næste sang
Forøg lydstyrken
kontinuerligt
Reducer
lydstyrken
Reducér lydstyrken
kontinuerligt
Tidligere
Lydstyrke –
■
Bemærk
• Lydstyrken kan indstilles i
15 niveauer.
Når man har nået maksimum
eller minimum, lyder der en
biplyd.
Afspil/Pause
Næste
Page 61

Foretag et telefonopkald
Med Bluetooth®-aktiverede hovedtelefoner (mobiltelefoner eller smartphones), som
understøtter Bluetooth
telefonopkald.
• HSP (Headset Profile):
Denne profil kan anvendes til at modtage monaurale lyde og oprette tovejs
kommunikation vha. mikrofonen på enheden.
• HFP (Hands-Free Profile):
Ud over HSP-funktioner har denne profil også indgående og udgående
opkaldsfunktioner.
Forbind Bluetooth®-aktiveret telefon og enhed (→ s. 3)
1
Når man besvarer et indgående opkald
2
Tryk på Opkald på
enheden, og besvar
opkaldet
• Under et indgående opkald
lyder ringetonen fra højttaleren,
og LED’en blinker.
• (kun HFP) Du afviser et
indgående opkald ved at holde
Opkald
ophører.
Venstre
Start samtale
3
• LED’en blinker 2 gange under et opkald.
• Lydstyrken kan justeres under et telefonopkald. For indstillingsvejledning: Se
side 4.
Tryk på Opkald for at afslutte opkaldet
4
• Der lyder en biplyd.
®
-profilen “HSP” eller “HFP”, kan man benytte enheden til
Når man foretager et udgående opkald
Foretag et udgående
opkald på den Bluetooth
aktiverede telefon
• Se også brugsvejledningen
for den Bluetooth
telefon.
(Kontrol- og betjeningstrin på
enheden er forklaret nedenstående)
inde, til ringetonen
Opkald
Mikrofon
• Under et udgående opkald lyder
ringetonen fra højttaleren, og
LED’en blinker.
• Man annullerer et udgående
opkald ved at trykke på
Opkald
Der lyder en biplyd.
• (kun HFP) Når telefonen
er inaktiv, holder man
Opkald
2 sekunder. Der foretages et
udgående opkald til det senest
opkaldte nummer. Der lyder
et kort klik fra højttaleren, og
LED’en blinker.
.
inde i ca.
®
-aktiverede
®
-
■
Bemærk
• Der kan være situationer, hvor der skal indstilles håndfri betjening på den
• Afhængig af den Bluetooth
• (kun HFP) Tryk og hold Opkald
®
Bluetooth
udgående opkalds-ringetoner fra enheden.
Opkaldsenheden bliver skiftet mellem den Bluetooth
enheden.
-aktiverede telefon.
®
-aktiverede telefon kan du høre indkommende og
på enheden i ca. 2 sekunder.
®
-aktiverede telefon og
Praktiske funktioner
Nulstilling af enheden
Denne enhed kan nulstilles, når alle operationer er afvist. Forbind enheden til en
computer ved hjælp af USB-opladerledningen. Tryk dernæst i NULSTIL-hullet
(RESET) med en tynd, spids genstand. Kontrollér, at LED’en (rød) slukker. Bliv ved
med at presse i NULSTIL-hullet (RESET) (→ s. 2) i ca. 5 sekunder for at nulstille
enheden. Alle tidligere operationer vil blive annulleret. (Oplysninger om parringsapparatet vil ikke blive slettet.)
Automatisk slukning
Hvis enheden er tavs i ca. 5 minutter, og der ikke foretages betjening af
®
Bluetooth
automatisk.
-apparater i denne periode, lyder der en biplyd, og strømmen slukkes
DANSK
LED-indikator
Når batteriniveauet er lavt under brug af enheden, vil den blåt blinkende LED på
venstre højttaler skifte til rødt. Der lyder en biplyd hvert minut. Når batteriet bliver
fladt, afbrydes strømmen.
Nulstilling til fabriksindstillinger
Hvis man ønsker at slette alle parrings-oplysninger osv. kan man nulstille enheden
til fabriksindstillingerne (oprindelige indstillinger ved køb).
1 Sluk enheden
2 Hold tænd/sluk-knappen
samtidigt
• LED’en på venstre højttaler vil lyse rødt i ca. 2 sekunder. Enheden gendannes
til fabriksindstillingerne.
og Tidligere inde i 5 sekunder eller mere
VQT5J79
5
61
Page 62

Sikkerhedsregler
■
Enhed
• Undgå at benytte eller anbringe denne enhed i nærheden af varmekilder.
• Undgå at lytte med denne enhed skruet op til høj lydstyrke på steder, hvor du
har brug for at høre lyde fra det omgivende miljø af hensyn til sikkerhed, som
fx ved jernbaneoverskæringer og på byggepladser.
• Bredbånds-spændingskarakteristik lig med eller større end 75 mV.
ADVARSEL:
For at reducere faren for brand, elektrisk stød eller produktskader,
• Må denne enhed ikke udsættes for regn, dråber eller stænk.
• Undgå at anbringe genstande fyldt med væske, som fx vaser, på denne
enhed.
• Brug kun det anbefalede tilbehør.
• Undgå at fjerne dæksler.
• Undlad at reparere denne enhed selv. Overlad servicearbejde til autoriserede
fagfolk.
■
Allergier
• Ophør med at bruge produktet, hvis du oplever ubehag med højttalerne eller
andre dele, som er i direkte kontakt med din hud.
• Fortsat brug kan forårsage udslæt eller andre allergiske reaktioner.
■
Forholdsregler ved aflytning med hovedtelefoner
• Undlad at benytte hovedtelefonerne ved høj lydstyrke. Fagfolk advarer imod
kontinuerlig, længerevarende afspilning.
• Hvis du oplever en ringen for ørerne, skal du reducere lydstyrken eller ophøre
med at bruge produktet.
• Må ikke anvendes, mens du fører et motorkøretøj. Det kan skabe farlige
trafiksituationer, og det er ulovligt i mange områder.
• Du skal udvise ekstrem forsigtighed eller midlertidigt ophøre med at bruge
produktet i potentielt farlige situationer.
Denne enhed kan opfange radiointerferens forårsaget af mobiltelefoner under
brug. Hvis der opstår en sådan interferens, skal du øge afstanden mellem denne
enhed og mobiltelefonen.
Vedligeholdelse
Denne enhed skal rengøres med en tør og blød klud.
• Undgå brug af opløsningsmidler, herunder benzin, fortynder, alkohol,
køkkenvaskemidler, kemisk rens osv. Dette kan bevirke, at den udvendige
beklædning deformeres, eller at belægningen går af.
Konformitetetserklæring (DoC)
“Panasonic Corporation” erklærer herved, at dette produkt er i overensstemmelse
med de essentielle krav og andre relevante bestemmelser i Direktiv 1999/5/EC.
Kunderne kan nedhente en kopi fra den originale konformitetserklæring til vore
R&TTE-produkter fra vores DoC-server:
http://www.doc.panasonic.de
Kontakt den autoriserede repræsentant: Panasonic Marketing Europe GmbH,
Panasonic Testing Centre, Winsbergring 15, 22525 Hamburg, Tyskland
Dette produkt er beregnet til anvendelse i de følgende lande.
STORBRITANNIEN, FRANKRIG, TYSKLAND, ITALIEN, SCHWEIZ, ØSTRIG,
HOLLAND, BELGIEN, SPANIEN, SVERIGE, NORGE, DANMARK, FINLAND,
UNGARN, TJEKKIET, SLOVAKIET, SLOVENIEN, BULGARIEN, POLEN,
GRÆKENLAND, PORTUGAL, RUMÆNIEN
Dette produkt er beregnet til almindelige forbrugere. (Kategori 3)
VQT5J79
6
62
Page 63

Om Bluetooth
Panasonic påtager sig intet ansvar for data og/eller oplysninger, som måtte blive
udsat for fare under trådløs transmission.
■
Anvendt frekvensbånd
Denne enhed bruger 2,4 GHz-frekvensbånd.
■
Certificering af denne enhed
• Denne enhed er i overensstemmelse med frekvensrestriktioner og er blevet
certificeret på basis af frekvenslove. Der kræves således ingen godkendelse
for trådløs brug.
• Nedenstående handlinger er strafbare ved lov i nogle lande:
– Demontering/ændring af enheden.
– Fjernelse af specifikationsoplysninger.
■
Anvendelsesbegrænsninger
• Der er ikke garanti for mulig trådløs transmission og/eller anvendelse sammen
med alle Bluetooth
• Alle apparater skal være i overensstemmelse med standarder fastsat af
Bluetooth SIG, Inc.
• Afhængigt af specifikationerne og indstillingerne for et apparat kan det ikke
udelukkes, at der ikke kan oprettes forbindelse, eller at visse operationer kan
være anderledes.
• Dette system understøtter Bluetooth
af driftsmiljøet og/eller indstillingerne er det muligt, at denne sikkerhed ikke er
tilstrækkelig. Overfør data trådløst til systemet med forsigtighed.
• Dette system kan ikke overføre data til et Bluetooth
■
Anvendelsesrækkevidde
Denne enhed har en anvendelsesrækkevidde på 10 m.
Rækkevidden kan være mindre afhængig af miljø, forhindringer eller interferens.
■
Interferens fra andre apparater
• Denne enhed vil muligvis ikke fungere ordentligt, og der kan opstå problemer
såsom støj og lydspring pga. radiobølgeinterferens, hvis denne enhed er
placeret for tæt på andre Bluetooth
2,4 GHz-båndet.
• Denne enhed fungerer muligvis ikke korrekt, hvis radiobølger fra en
nærliggende tv-station, etc. er for stærke.
■
Tilsigtet anvendelse
• Denne enhed er kun beregnet til normal, generel brug.
• Undlad at bruge dette system i nærheden af udstyr eller i et miljø, der er
følsomt over for radiofrekvens-interferens (fx: lufthavne, hospitaler, laboratorier
osv.).
®
-enheder.
®
®
-sikkerhedsfunktioner. Men afhængigt
®
-apparat.
®
-apparater eller apparater, der bruger
Specifikationer
■
Generelt
Strømforsyning
1
Driftstid*
Ladetid*
Opladningstemperaturområde 10 ºC til 35 ºC
Driftstemperaturområde 0 ºC til 40 ºC
Driftsfugtighedsområde 35%RH til 80%RH (ingen kondensering)
Vægt Ca. 198 g
1
Kan være kortere afhængig af driftsforholdene.
*
2
Nødvendig tid til genopladning fra helt afladet til helt opladet.
*
Bluetooth®-systemspecifikation Ver. 3.0
Klassificering af trådløst udstyr Klasse 2 (2,5 mW)
Frekvensbånd 2,4 GHz-bånd FH-SS
Understøttede profiler A2DP, AVRCP, HSP, HFP
Understøttet codec SBC, aptX
Anvendelsesafstand Op til 10 m
Driver-enheder Φ 40 mm
Impedans 32 Ω
Jævnstrøm IND Jævnstrøm 5 V, 500 mA
Lydindgang Stereo-jackstik Φ 3,5 mm
Type Mono
USB-opladerledning 1,0 m
Aftagelig ledning 1,5 m
(SBC-modus) Ca. 30 timer
2
(25 ºC) Ca. 4,5 timer
■
Bluetooth®-sektion
■
Højttalersektion
■
Stiksektion
■
Mikrofonsektion
■
Tilbehørssektion
Specifikationer kan ændres uden varsel.
●
Jævnstrøm 5 V, 500 mA
(Internt batteri: 3,6 V (Li-ion 690 mAh))
®
DANSK
VQT5J79
7
63
Page 64

Fejlfinding
Inden man tilkalder service, skal man kontrollere følgende. Hvis du er i tvivl om
nogle af kontrolpunkterne, eller hvis de anbefalede løsninger ikke løser problemet,
skal du kontakte din forhandler for at få vejledning.
Bluetooth®-apparat opretter forbindelse
Apparatet kan ikke forbindes
• Slet parringsoplysningerne for denne enhed fra Bluetooth®-apparatet, og par
dem dernæst igen. (→ s. 3)
Generelt
Enheden svarer ikke
• Tryk i NULSTIL-hullet (RESET), mens du tilslutter USB-opladerledningen til
opladningsstikket (DC IN). (→ s. 5)
Strømforsyning og opladning
Kan ikke oplade enheden
• Kontrollér, at computeren er tændt og ikke er i standby- eller hviletilstand.
• Fungerer den USB-port du bruger i øjeblikket korrekt? Hvis computeren har
andre USB-porte, tager du stikket ud af den nuværende og sætter det i en af de
andre porte.
• Hvis ovennævnte foranstaltninger ikke er relevante, udtager du
USB-opladerledningen og isætter den igen.
• Blinker LED’en rødt? Der er en opladningsfunktionsfejl, hvis LED’en blinker.
• Hvis LED’en blinker rødt hurtigt, selv når enheden er ved at blive genopladet i
en rumtemperatur inden for 10 °C og 35 °C, kan batteriet være nedslidt. (Antal
genopladninger for det medfølgende batteri: Ca. 500.)
LED lyser ikke under opladning / Opladningen varer længere
• Er USB-opladerledningen (medfølger) ordentligt forbundet med USB-stikket på
computeren? (→ s. 3)
Enheden vil ikke starte
• Er enheden ved at blive opladet? Strømmen kan ikke tilsluttes under opladning.
(→ s. 3)
• Er den aftagelige ledning forbundet? Strømmen kan ikke tilsluttes, når den
aftagelige ledning er forbundet med enheden.
Lyd og lydstyrke
Ingen lyd
• Kontrollér, at enheden og Bluetooth®-apparatet er forbundet korrekt. (→ s. 3)
• Kontrollér, om der spiller musik på Bluetooth
• Kontrollér, at enheden er tændt, og at lydstyrken ikke er indstillet for lavt.
• Par og forbind Bluetooth
®
-apparatet og enheden igen. (→ s. 3)
®
-apparatet.
Lav lydstyrke
• Forøg enhedens lydstyrke. (→ s. 4)
• Forøg lydstyrken på Bluetooth
®
-apparatet.
Lyd fra apparatet er afbrudt / Lydkvalitet er dårlig
• Lyden kan være afbrudt, hvis signalerne blokeres. Undgå at tildække denne
enhed fuldstændigt med håndfladen osv.
• Apparatet kan være uden for kommunikationsafstanden på 10 m. Flyt apparatet
nærmere denne enhed.
• Fjern evt. forhindringer mellem denne enhed og apparatet.
• Sluk for et evt. trådløst LAN-apparat, hvis dette ikke anvendes.
• Der kan opstå et kommunikationsproblem, hvis batteriet er afladet. Oplad
enheden. (→ s. 3)
Telefonopkald
Man kan ikke høre den anden person
• Kontrollér, at enheden og den Bluetooth®-aktiverede telefon er tændt.
• Kontrollér, at enheden og den Bluetooth
(→ s. 3)
• Kontrollér lydindstillingerne for den Bluetooth
opkaldende apparat til enheden, hvis denne er indstillet til den Bluetooth
aktiverede telefon. (→ s. 3)
• Hvis lydstyrken af den anden persons stemme er for lav, kan man forøge
lydstyrken for både enheden og den Bluetooth
®
-aktiverede telefon er forbundet.
®
-aktiverede telefon. Skift det
®
-aktiverede telefon.
®
-
VQT5J79
8
64
Page 65

Copyright, etc.
aptX® software is copyright CSR plc or its
●
group companies. All rights reserved.
®
The aptX
trademarks of CSR plc or one of its group
companies and may be registered in one or
more jurisdictions.
Bluetooth®-ordmærket og -logoerne tilhører
●
Bluetooth SIG, Inc. og enhver brug af
sådanne mærker af Panasonic Corporation er
givet under licens.
Andre varemærker og handelsnavne tilhører
deres respektive ejere.
Andre system- og produktnavne, der
●
forekommer i dette dokument, er generelt de
registrerede varemærker eller varemærker
tilhørende de respektive udviklingsselskaber.
Bemærk, at mærket ™ og mærket ® ikke
forekommer i dette dokument.
Indsamling af elektronikskrot og brugte batterier
Kun for Den Europæiske Union og lande med
retursystemer
mark and the aptX logo are
Disse symboler på produkter, emballage
og/eller ledsagedokumenter betyder, at
brugte elektriske og elektroniske produkter
og batterier ikke må blandes med almindeligt
husholdningsaffald.
For korrekt behandling, indsamling og genbrug
af gamle produkter og batterier, skal du tage
dem til indsamlingssteder i overensstemmelse
med den nationale lovgivning.
Ved at skaffe sig af med dem på korrekt
vis hjælper du med til at spare værdifulde
ressourcer og forhindre eventuelle negative
påvirkninger af menneskers sundhed og
miljøet.
Ønsker du mere udførlig information om
indsamling og genbrug skal du kontakte din
kommune.
Usagkyndig bortskaffelse af elektronikskrot
og batterier kan eventuelt udløse
bødeforlæggelse.
Information om batterisymbol
(eksempler nedenfor):
Dette symbol kan anvendes sammen
med et kemisk symbol. I så fald opfylder
det kravene for det direktiv, som er blevet
fastlagt for det pågældende kemikalie.
Udtagning af batteriet, når enheden skal bortskaffes
1
2
3
A
D
C
4
E
B
5
G
G
Følgende vejledning er ikke beregnet til
reparationsformål, men til bortskaffelse af denne
enhed. Denne enhed kan ikke genmonteres, når
først den er demonteret.
Når man bortskaffer denne enhed, skal man udtage
batteriet og genbruge det.
D
• Demonteres, efter at batteriet er afladet.
• De demonterede dele skal opbevares utilgængeligt for børn.
Fjern ørepuden A fra højre højttaler, og
1
fjern de 3 skruer
• Brug en stjerneskruetrækker (almindelig i handlen).
Fjern frontdækslet
2
Samtidigt med at man løfter de
3
2 låsemekanismer D, drejer man
B
bagdækslet C mod uret
Fjern de 4 skruer, og fjern huset
4
Hold begge sider af batteriet på
5
position G (på afstand af polerne F),
og fjern det
Mht. håndtering af brugte batterier
• Isoler polerne med tape eller lignende materiale.
• Undlad at demontere.
■
Batterier
• Undgå at opvarme eller udsætte dem for ild.
• Undgå at efterlade batteriet/batterierne i en bil i direkte
sollys i en længere periode med lukkede døre og vinduer.
• Forkert håndtering af batterier kan forårsage lækage, som
igen kan beskadige materialer, som den lækkede væske
måtte komme i kontakt med. Hvis der lækker elektrolyt
fra batteriet, skal man kontakte sin forhandler. Der skal
vaskes grundigt med vand, hvis elektrolyt kommer i
kontakt med legemsdele.
• Ved bortskaffelse af batterier skal man kontakte de lokale
myndigheder eller forhandleren og få anvist den korrekte
bortskaffelsesmetode.
F
E
DANSK
VQT5J79
9
65
Page 66

Vážený zákazníku
Blahopøejeme vám ke koupi tohoto
produktu.
Před použitím tohoto produktu si
pečlivě přečtěte tyto pokyny a celý
návod si uložte pro pozdější použití.
Obsah
Před použitím
Příslušenství ....................................... 2
Názvy součástí ................................... 2
Příprava
Nabíjení .............................................. 3
Zapnutí/vypnutí ................................... 3
Připojení zařízení Bluetooth
Připojení jedním dotykem
(připojení pomocí NFC) .................. 4
Používání
Poslech hudby ....................................4
Telefonování ....................................... 5
Užitečné funkce ..................................5
Ostatní
Obnova výrobních nastavení .............. 5
Bezpečnostní opatření........................ 6
Údržba ................................................ 6
O funkci Bluetooth
Specifikace ......................................... 7
Průvodce řešením problémů .............. 8
Autorská práva apod. .........................9
Odstranění baterie při likvidaci
jednotky .......................................... 9
VQT5J79
2
66
®
.............. 3
®
............................. 7
Příslušenství
Zkontrolujte a ověřte dodané
příslušenství.
1 Odpojitelný kabel
1 Nabíjecí kabel USB
Názvy součástí
1
2
3
4
5
6
Otevřete kryt
Levý Pravý
7
8
14 15
Obrázky produktu se mohou od
skutečného produktu lišit.
9
10 11
12 13
Tlačítko Napájení /
1
Párování
LED kontrolka*
2
•Počet zablikání nebo barva
popisují stav jednotky.
(* dále označována výrazem „LED“)
Vstupní zvukový konektor
3
• Když jednotku používáte jako
kabelová sluchátka, připojte
odpojitelný kabel (je součástí
dodávky) k tomuto konektoru.
Mikrofon
4
Otvor RESET
5
Nabíjecí konektor (DC IN)
6
•Při nabíjení připojte nabíjecí
kabel USB (je součástí
dodávky) k tomuto konektoru.
(→ str. 3)
7
Hovor
Dotyková oblast NFC
8
Předchozí
9
Hlasitost +
10
Další
11
Hlasitost –
12
Přehrávání/Pozastavení
13
Levý reproduktor
14
Pravý reproduktor
15
■
Poznámka
• Nepoužívejte jiný nabíjecí kabel
USB než dodaný kabel.
• Nepoužívejte jiný odpojitelný
kabel než dodaný kabel.
• Když jednotku používáte,
nezakrývejte levý reproduktor
dlaní ruky. Mohlo by dojít k
blokování připojení Bluetooth
®
.
Page 67

Nabíjení
Nabíjecí baterie (instalovaná v jednotce) není v okamžiku zakoupení nabitá.
Před použitím jednotky baterii nabijte.
Připojte tuto jednotku k počítači
1
pomocí nabíjecího kabelu USB
•Během nabíjení bude LED na levém
reproduktoru svítit červeně. Jakmile
bude nabíjení dokončeno, LED zhasne.
• Nabití vybité baterie do plně nabitého
stavu trvá přibližně 4,5 hodiny.
■
Poznámka
• Funkci Bluetooth® nelze použít, když je tato jednotka připojena k počítači pomocí
nabíjecího kabelu USB.
• Nabíjení provádějte při okolní teplotě v rozmezí od 10 °C do 35 °C.
•Během nabíjení nelze zapnout napájení.
• Nepoužívejte jiný nabíjecí kabel USB než dodaný kabel.
Upozornění: Při připojování k počítači použijte pouze dodané nabíjecí kabel USB.
Počítač
Nabíjecí kabel USB (je součástí dodávky)
Levý
LED
Zapnutí/vypnutí
Stiskněte tlačítko napájení a přidržte je
1
stisknuté po dobu přibližně 2 sekund
• Ozve se pípnutí a LED na levém reproduktoru začne
blikat.
Tlačítko napájení
Vypnutí
• Stiskněte tlačítko napájení
déle. Ozve se pípnutí a napájení se vypne.
■
Poznámka
• Když nebudete jednotku po dobu přibližně 5 minut používat, napájení se
automaticky vypne. (Viz „Automatické vypnutí“ (→ str. 5))
a přidržte je stisknuté po dobu 2 sekund nebo
Připojení zařízení Bluetooth
Chcete-li navázat bezdrátové připojení, zaregistrujte jednotku se zařízeními
kompatibilními s funkcí Bluetooth
Příprava na zařízení Bluetooth
• Zapněte napájení a aktivujte funkci Bluetooth®.
• Umístěte zařízení do vzdálenosti 1 metr nebo blíže od zařízení.
V případě potřeby zkontrolujte fungování zařízení v příslušném návodu k použití.
•
První zapnutí
Zapněte jednotku
1
• Jednotka začne vyhledávat
zařízení Bluetooth
by se mohla připojit, a LED na
levém reproduktoru bude blikat
střídavě modře a červeně.
(Pouze jedno použití po
zakoupení)
Když zařízení Bluetooth®
2
rozpozná jednotku
(„RP-BTD10“), zvolte ji
• Pokud budete vyzváni k zadání
kódu, zadejte „0000 (čtyři nuly)“.
• Pokud se objeví obrazovka
výběru profilu Bluetooth
profil „A2DP“. Pokud není profil
„A2DP“ podporován nebo
pokud chcete používat pouze
telefonní hovory, zvolte profil
„HSP“ nebo „HFP“. (Podrobnosti
o profilech naleznete v části
„Poslech hudby“ (→ str. 4) a
„Telefonování“ (→ str. 5))
Zkontrolujte připojení
3
zařízení Bluetooth® k
jednotce
• LED na levém reproduktoru
bude nejprve svítit modře, potom
se bude střídavě rozsvěcet a
zhasínat. Když bude spojení
navázáno, způsob blikání se
změní.
®
, ke kterým
®
, zvolte
®
.
®
Připojení napodruhé
<Připojení stejného zařízení
Bluetooth
Když jednotku zapnete, vyhledá
dříve nastavené zařízení Bluetooth
a automaticky se k němu začne
připojovat. LED na levém reproduktoru
bude nejprve svítit modře, potom se
bude střídavě rozsvěcet a zhasínat.
Když bude spojení navázáno, způsob
blikání se změní.
<Připojení jiného zařízení
Bluetooth
Deaktivujte funkci Bluetooth
připojeném zařízení. Zkontrolujte, zda
je jednotka vypnutá. Stiskněte tlačítko
párování
dobu přibližně 5 sekund. Jednotka
začne vyhledávat další zařízení
Bluetooth
bude blikat střídavě modře a červeně.
Ozve se pípnutí.
Pokračujte kroky 2 a 3.
®
>
®
>
a přidržte je stisknuté po
®
. LED na levém reproduktoru
■
Poznámka
• Pokud nebude spojení se zařízením
navázáno přibližně do 5 minut,
jednotka se vypne.
Začněte znovu od kroku 1.
• K jednotce nelze zároveň připojit
2 nebo více zařízení Bluetooth
• S touto jednotkou můžete spárovat
až 8 zařízení. Pokud spárujete 9.
zařízení, bude nahrazeno zařízení
s nejstarším připojením. Abyste ho
mohli použít, znovu ho spárujte.
®
®
na dříve
®
ČESKY
®
.
VQT5J79
3
67
Page 68

Připojení jedním dotykem
(připojení pomocí NFC)
Pouze pro zařízení se systémem Android™ kompatibilní s NFC
Funkce NFC (Near Field Communication) umožňuje, abyste tuto jednotku
jednoduše připojili k zařízení Bluetooth
dotknout této jednotky zařízením Bluetooth
spáruje se se zařízením Bluetooth
®
kompatibilnímu s funkcí NFC. Stačí se
®
®
a jednotka se automaticky zapne,
a naváže s ním spojení.
Příprava
Zapněte funkci NFC na zařízení Bluetooth®.
Spusťte na zařízení Bluetooth® aplikaci pro přehrávání hudby/
1
videa
• Řiďte se pokyny na displeji svého zařízení.
Dotkněte se svým zařízením dotykové oblasti NFC této jednotky
2
a přidržte je tam (dokud vás vyskakovací okno na zařízení
neupozorní, že bylo vytvořeno připojení)
• Jednotka se zapne. LED na levém reproduktoru bude nejprve svítit modře,
potom se bude střídavě rozsvěcet a zhasínat. Když bude spojení navázáno,
způsob blikání se změní.
• Pokud nedojde k navázání připojení, změňte polohu dotyku.
Spusťte na svém zařízení Bluetooth® přehrávání hudby/videa
3
■
Připojení k jinému zařízení
Dotkněte se touto jednotkou jiného zařízení, abyste navázali nové připojení
®
Bluetooth
Dříve připojené zařízení bude automaticky odpojeno.
.
Poslech hudby
Pokud zařízení kompatibilní s funkcí Bluetooth® podporuje Bluetooth® profily
„A2DP“ a „AVRCP“, lze hudbu přehrávat pomocí funkcí dálkového ovládání
jednotky.
• A2DP (Advanced Audio Distribution Profile): Přenáší hudbu do jednotky.
• AVRCP (Audio/Video Remote Control Profile):
Umožňuje dálkové ovládání zařízení pomocí jednotky.
Spojte zařízení Bluetooth® a jednotku (→ str. 3)
1
Zvolte a přehrajte hudbu na zařízení Bluetooth
2
VQT5J79
• Zvolená hudba bude vysílána do reproduktorů jednotky.
4
68
®
Provozní doba baterie
Typ baterie Provozní doba
Nabíjecí baterie (instalovaná v jednotce) Přibl. 30 hodin
Provozní doba může být kratší v závislosti na podmínkách používání.
■
Poznámka
•Zařízení Bluetooth®, která podporují funkci aptX®, mohou přenášet hudbu ve
vyšší kvalitě.
■
Pozor
• Z jednotky může v závislosti na úrovni hlasitosti unikat zvuk ven.
• Když se úroveň hlasitosti přiblíží maximální úrovni, může znít hudba zkresleně.
Snižujte hlasitost, dokud zkreslení nezmizí.
Dálkové ovládání
Pomocí této jednotky můžete ovládat zařízení Bluetooth®.
• V závislosti na zařízeních Bluetooth
fungovat, případně mohou při použití s jednotkou fungovat jinak.
(Příklad používání)
Přehrávání/Pozastavení
Stiskněte
Předchozí/Další
Stiskněte během
přehrávání
Stiskněte a
přidržte
Stiskněte během
přehrávání
Stiskněte a
přidržte
Hlasitost
Stiskněte Zvýšení hlasitosti
+
Stiskněte a
přidržte
Stiskněte Snížení hlasitosti
−
Stiskněte a
přidržte
Přehrávání/
Pozastavení
Návrat na počátek
aktuální stopy
Posun vzad
Posun na počátek
další stopy
Posun vpřed
Plynulé zvyšování
hlasitosti
Plynulé snižování
hlasitosti
®
nemusí některé z funkcí uvedených níže
Pravý
Hlasitost +
Předchozí
Hlasitost –
■
Poznámka
• Hlasitost lze upravit v
15 úrovních.
Když bude dosaženo maximální
úrovně hlasitosti, ozve se
pípnutí.
Přehrávání/
Pozastavení
Další
Page 69

Telefonování
S telefony (mobilními telefony nebo smartphony) s aktivní funkcí Bluetooth®,
které podporují Bluetooth
telefonovat.
• HSP (Headset Profile):
Tento profil lze použít k příjmu monofonního zvuku a navázání obousměrné
komunikace s využitím mikrofonu na jednotce.
• HFP (Hands-Free Profile):
Kromě funkcí HSP tento profil obsahuje funkce příchozích a odchozích hovorů.
Spojte telefon s aktivní funkcí Bluetooth® a jednotku (→ str. 3)
1
Přijetí příchozího hovoru
2
Stiskněte na jednotce
tlačítko Hovor a přijměte
hovor
•Během příchozího hovoru
se bude zvonění ozývat z
reproduktoru a LED bude blikat.
• (Pouze pro HFP) Chcete-li
příchozí hovor odmítnout,
stiskněte tlačítko Hovor
a držte je stisknuté, dokud
zvonění nepřestane.
Levý
Začněte hovořit
3
• LED bude během hovoru opakovaně 2krát blikat.
•Během telefonátu můžete upravovat hlasitost. Pokyny pro nastavení
naleznete na straně 4.
Pro ukončení telefonátu stiskněte Hovor
4
• Ozve se pípnutí.
®
profil „HSP“ nebo „HFP“, můžete pomocí této jednotky
Navázání odchozího hovoru
Navažte odchozí hovor
prostřednictvím telefonu s
aktivní funkcí Bluetooth
• Další informace naleznete v
Hovor
Mikrofon
návodu k použití telefonu s
aktivní funkcí Bluetooth
(Kroky pro navázání a ovládání
hovoru pomocí jednotky jsou
vysvětleny níže)
•Během odchozího hovoru
se bude zvonění ozývat z
reproduktoru a LED bude blikat.
• Chcete-li odchozí hovor zrušit,
stiskněte Hovor
Ozve se pípnutí.
• (Pouze pro HFP) Když je telefon
nečinný, stiskněte tlačítko
a přidržte je stisknuté
Hovor
po dobu přibližně 2 sekund.
Bude navázán odchozí hovor
na naposledy vytočené číslo.
Z reproduktoru se ozve jedno
krátké cvaknutí a LED bude
blikat.
®
.
■
Poznámka
•V některých případech může být nezbytné nastavit funkci hands free na telefonu
s aktivní funkcí Bluetooth
• V závislosti na telefonu s aktivní funkcí Bluetooth
odchozích hovorů telefonu ozývat z jednotky.
• (Pouze pro HFP) Stiskněte a přibližně na 2 sekundy přidržte tlačítko Hovor
na jednotce. Volající zařízení se přepne mezi telefonem s aktivní funkcí
®
Bluetooth
a jednotkou.
®
.
®
se může zvonění příchozích a
Užitečné funkce
Resetování jednotky
Když dochází k odmítnutí všech operací, můžete tuto jednotku resetovat. Připojte
jednotku k počítači pomocí nabíjecího kabelu USB. Potom stiskněte otvor RESET
®
.
tenkým špičatým předmětem. Zkontrolujte, zda LED (červená) zhasla. Aby došlo k
resetování jednotky, tiskněte otvor RESET (→ str. 2) po dobu přibližně 5 sekund.
Všechny předchozí operace budou zrušeny. (Informace o párování se zařízeními
nebudou vymazány.)
Automatické vypnutí
Pokud tato jednotka po dobu přibližně 5 minut nepřehrává zvuk a pokud během
této doby nedochází k ovládání zařízení Bluetooth
bude automaticky vypnuto.
®
, ozve se pípnutí a napájení
LED kontrolka
Když začne být během používání jednotky baterie slabá, změní se modře blikající
LED na levém reproduktoru na červenou. Každou 1 minutu se ozve pípnutí. Když
se baterie vybije, vypne se napájení.
ČESKY
Obnova výrobních nastavení
Pokud budete chtít vymazat všechny informace o párování se zařízeními apod.,
můžete obnovit výrobní nastavení jednotky (původní nastavení, která platila v
okamžiku jejího zakoupení).
1 Vypněte jednotku
2 Stiskněte zároveň tlačítka napájení
stisknutá po dobu 5 sekund nebo déle
• LED na levém reproduktoru se přibližně na 2 sekundy rozsvítí červeně. Budou
obnovena výrobní nastavení jednotky.
a Předchozí a přidržte je
VQT5J79
5
69
Page 70

Bezpečnostní opatření
■
Jednotka
• Jednotku nepoužívejte ani neumisťujte v blízkosti zdrojů tepla.
• Neposlouchejte zvuk z této jednotky při vysokých hlasitostech na místech,
kde je z důvodu bezpečnosti nutné, abyste slyšeli okolní zvuky, například na
železničních přejezdech a stavbách.
• Širokopásmové charakteristické napětí rovné nebo větší než 75 mV.
VAROVÁNÍ:
Abyste omezili nebezpečí požáru, úrazu elektrickým proudem nebo poškození
produktu:
• Nevystavujte tuto jednotku dešti, vlhkosti, kapajícím nebo stříkajícím
kapalinám.
• Nestavte na tuto jednotku předměty naplněné kapalinami, například vázy.
• Používejte pouze doporučené příslušenství.
• Neodstraňujte kryty.
• Nepokoušejte se jednotku opravovat sami. Servis přenechte kvalifikovaným
pracovníkům servisu.
■
Alergie
• Pokud začnete mít nepříjemné pocity, zatímco budou reproduktory nebo jiné
části v přímém kontaktu s vaší kůží, přestaňte jednotku používat.
• Pokračující používání by mohlo mít za následek vznik vyrážek nebo
alergických reakcí.
■
Bezpečnostní opatření pro poslech se sluchátky
• Nepoužívejte sluchátka při nastavení vysoké hlasitosti. Odborníci na sluch
varují před dlouhodobým poslechem.
• Pokud vám začne zvonit v uších, snižte hlasitost nebo jednotku přestaňte
používat.
• Jednotku nepoužívejte při řízení motorového vozidla. Mohlo by dojít k
nebezpečné dopravní situaci, v mnoha oblastech je to navíc proti zákonu.
• V potenciálně nebezpečných situacích buďte extrémně opatrní nebo jednotku
přestaňte dočasně používat.
Jednotka může být během používání ovlivněná rádiovým rušením z mobilních
telefonů. Pokud dojde k takovému rušení, zvyšte vzdálenost mezi touto jednotkou
a mobilním telefonem.
Údržba
Tuto jednotku čistěte suchým a měkkým hadříkem.
• Nepoužívejte rozpouštědla, jako je benzín, ředidla, alkohol, kuchyňské čistící
prostředky, chemické utěrky apod. Mohlo by dojít k deformaci vnějšího povrchu
nebo k odloupnutí laku.
Prohlášení o shodě (DoC)
Společnost „Panasonic Corporation“ tímto prohlašuje, že tento výrobek splňuje
požadavky a ostatní souvisící ustanovení směrnice EU 1999/5/ES.
Zákazníci si mohou stáhnout kopii originálního DoC k našim produktům „Radiová a
telekomunikační koncová zařízení (R&TTE)“ z našeho serveru DoC:
http://www.doc.panasonic.de
Kontaktujte autorizovaného představitele: Panasonic Marketing Europe GmbH,
Panasonic Testing Centre, Winsbergring 15, 22525 Hamburg, Germany
Tento produkt je určen pro použití v těchto zemích.
VELKÁ BRITÁNIE, FRANCIE, NĚMECKO, ITÁLIE, ŠVÝCARSKO, RAKOUSKO,
NIZOZEMSKO, BELGIE, ŠPANĚLSKO, ŠVÉDSKO, NORSKO, DÁNSKO,
FINSKO, MAĎARSKO, ČESKÁ REPUBLIKA, SLOVENSKO, SLOVINSKO,
BULHARSKO, POLSKO, ŘECKO, PORTUGALSKO, RUMUNSKO
Tento produkt je určen pro běžného spotřebitele. (Kategorie 3)
VQT5J79
6
70
Page 71

O funkci Bluetooth
Společnost Panasonic nenese žádnou odpovědnost za vyzrazení dat a/nebo
informací během bezdrátového přenosu.
■
Použité kmitočtové pásmo
Tato jednotka využívá kmitočtové pásmo 2,4 GHz.
■
Certifikace této jednotky
• Tato jednotka odpovídá omezením kmitočtů a získala certifikaci založenou na
zákonech týkajících se kmitočtů. Povolení pro bezdrátový přenos proto není
zapotřebí.
• Činnosti uvedené níže jsou v některých zemích postihovány podle zákona:
– Rozebírání/úpravy této jednotky.
– Odstranění štítků se specifikacemi.
■
Omezení používání
• Bezdrátový přenos a/nebo použití se všemi zařízeními s funkcí Bluetooth®
nejsou zaručeny.
• Všechna zařízení musí odpovídat standardům stanoveným společností
Bluetooth SIG, Inc.
• V závislosti na specifikacích a nastaveních zařízení se může stát, že se
připojení nepodaří navázat nebo že budou některé operace odlišné.
• Tento systém podporuje bezpečnostní funkce Bluetooth
prostředí používání a/nebo nastaveních však toto zabezpečení nemusí být
dostatečné. Bezdrátový přenos dat do tohoto systému provádějte opatrně.
• Tento systém nemůže přenášet data do zařízení Bluetooth
■
Dosah pro používání
Tuto jednotku používejte na vzdálenost maximálně 10 m.
Dosah se může snížit v závislosti na prostředí, překážkách nebo rušení.
■
Rušení z jiných zařízení
• Tato jednotka nemusí fungovat správně nebo se mohou objevovat problémy,
jako je šum nebo přeskakování zvuku, pokud bude docházet k rušení
rádiovými vlnami v situaci, kdy se bude jednotka nacházet příliš blízko
k dalším zařízením Bluetooth
2,4 GHz.
• Tato jednotka nemusí fungovat správně, pokud budou rádiové vlny z nedaleké
vysílací stanice apod. příliš silné.
■
Účel použití
• Tato jednotka slouží pouze k normálnímu běžnému používání.
• Nepoužívejte tento systém v blízkosti vybavení nebo v prostředí, které je citlivé
na rušení rádiovými vlnami (například na letištích, v nemocnicích, laboratořích
apod.).
®
nebo k zařízením, která využívají pásmo
®
®
. V závislosti na
®
.
Specifikace
■
Obecné
Napájení
1
Provozní doba*
Doba nabíjení*
Rozsah teplot pro nabíjení 10 ºC až 35 ºC
Rozsah provozních teplot 0 ºC až 40 ºC
Rozsah provozní vlhkosti
Hmotnost Přibl. 198 g
1
Může být kratší v závislosti na podmínkách používání.
*
2
Doba nezbytná pro plné nabití vybité baterie.
*
■
Sekce Bluetooth
Specifikace systému Bluetooth®Ver. 3.0
Klasifikace bezdrátového
vybavení
Kmitočtové pásmo Pásmo 2,4 GHz FH-SS
Podporované profily A2DP, AVRCP, HSP, HFP
Podporovaný kodek SBC, aptX
Provozní vzdálenost Až 10 m
■
Sekce reproduktorů
Měniče Φ 40 mm
Impedance 32 Ω
■
Sekce konektorů
DC IN DC 5 V, 500 mA
Audio vstup Stereofonní konektor Φ 3,5 mm
■
Sekce mikrofonu
Typ Monofonní
■
Sekce příslušenství
Nabíjecí kabel USB 1,0 m
Odpojitelný kabel 1,5 m
Specifikace se mohou měnit bez upozornění.
●
(režim SBC) Přibl. 30 hodin
2
(25 ºC) Přibl. 4,5 hodin
®
DC 5 V, 500 mA
(Vestavěná baterie 3,6 V (Li-ion 690 mAh))
Relativní vlhkost 35% až 80%
(bez kondenzace)
Třída 2 (2,5 mW)
®
ČESKY
VQT5J79
7
71
Page 72

Průvodce řešením problémů
Než si vyžádáte opravu, zkontrolujte následující. Pokud máte o některých
kontrolních bodech pochybnosti nebo pokud uvedená řešení problém nevyřeší,
zeptejte se svého prodejce, jak máte postupovat.
Připojení zařízení Bluetooth
®
Zařízení nelze připojit
• Vymažte informace o párování této jednotky ze zařízení Bluetooth®, potom je
znovu spárujte. (→ str. 3)
Obecné
Jednotka nereaguje
• Stiskněte otvor RESET, zároveň připojte nabíjecí kabel USB k nabíjecímu
konektoru (DC IN). (→ str. 5)
Napájení a nabíjení
Jednotku nelze nabít
• Ujistěte se, že je počítač zapnutý a že se nenachází v pohotovostním režimu
nebo v režimu spánku.
• Je USB port, který právě používáte, funkční? Pokud je počítač vybaven dalšími
USB porty, odpojte konektor ze stávajícího portu a zapojte ho do některého z
ostatních portů.
• Pokud nelze problém vyřešit pomocí opatření uvedených výše, odpojte nabíjecí
kabel USB a poté jej znovu zapojte.
• Bliká LED červeně? Pokud LED bliká, došlo k poruše nabíjení.
• Pokud LED rychle bliká červeně, i když jednotku nabíjíte za pokojové teploty
mezi 10 °C a 35 °C, je možné, že baterie dosáhla konce své životnosti. (Počet
nabití vestavěné baterie: přibližně 500.)
LED během nabíjení nesvítí / Nabíjení trvá déle
• Je nabíjecí kabel USB (je součástí dodávky) pevně připojen ke konektoru USB
počítače? (→ str. 3)
Napájení nelze zapnout
• Neprobíhá nabíjení jednotky? Během nabíjení nelze zapnout napájení. (→ str. 3)
• Je připojený odpojitelný kabel? Napájení nelze zapnout, pokud je k jednotce
připojen odpojitelný kabel.
Zvuk a hlasitost
Neozývá se zvuk
• Ujistěte se, že jsou jednotka a zařízení Bluetooth® správně spojeny. (→ str. 3)
• Zkontrolujte, zda na zařízení Bluetooth
• Ujistěte se, že je jednotka zapnutá a že není hlasitost nastavena na příliš nízkou
úroveň.
• Znovu spárujte a připojte zařízení Bluetooth
®
probíhá přehrávání hudby.
®
a jednotku. (→ str. 3)
Nízká hlasitost
• Zvyšte hlasitost jednotky. (→ str. 4)
• Zvyšte hlasitost na zařízení Bluetooth
®
.
Zvuk ze zařízení je přerušovaný / Kvalita zvuku je špatná
• Zvuk může být přerušovaný, pokud je signál blokovaný. Nezakrývejte tuto
jednotku dlaní apod.
•Zařízení se může nacházet mimo 10 m dosah pro komunikaci. Přesuňte zařízení
blíže k jednotce.
• Odstraňte překážky mezi touto jednotkou a zařízením.
• Vypněte bezdrátová zařízení LAN, která nepoužíváte.
• Pokud je vybitá baterie, může docházet k problémům s komunikací. Nabijte
jednotku. (→ str. 3)
Telefonní hovory
Druhá osoba není slyšet
• Ujistěte se, že jsou jednotka a telefon s aktivní funkcí Bluetooth® zapnuté.
• Zkontrolujte, zda jsou jednotka a telefon s aktivní funkcí Bluetooth
(→ str. 3)
• Zkontrolujte nastavení zvuku telefonu s aktivní funkcí Bluetooth
zařízení pro hovor nastaveno na telefon s aktivní funkcí Bluetooth
na jednotku. (→ str. 3)
• Pokud je hlasitost hlasu druhé osoby příliš nízká, zvyšte hlasitost na jednotce i
na telefonu s aktivní funkcí Bluetooth
®
.
®
spojené.
®
. Pokud je
®
, nastavte je
VQT5J79
8
72
Page 73

Autorská práva apod.
aptX® software is copyright CSR plc or its group
●
companies. All rights reserved.
®
The aptX
trademarks of CSR plc or one of its group
companies and may be registered in one or
more jurisdictions.
Slovní označení a loga Bluetooth® jsou
●
majetkem společnosti Bluetooth SIG, Inc. a
veškeré jejich používání společností Panasonic
Corporation se řídí licenčními podmínkami.
Ostatní obchodní značky a názvy jsou
majetkem příslušných majitelů.
Jiné názvy systémů a jména výrobků
●
uvedených v tomto dokumentu jsou,
všeobecně, registrované obchodní známky
nebo obchodní značky příslušných vývojových
společností.
Upozorňujeme, že v tomto dokumentu se
nevyskytují značky ™ a ®.
Likvidace použitých zařízení a baterií
Jen pro státy Evropské unie a země s fungujícím
systémem recyklace a zpracování odpadu.
mark and the aptX logo are
Tyto symboly na výrobcích, jejich obalech
a v doprovodné dokumentaci upozorňují na
to, že se použitá elektrická a elektronická
zařízení, včetně baterií, nesmějí likvidovat
jako běžný komunální odpad.
Aby byla zajištěna správná likvidace a
recyklace použitých výrobků a baterií,
odevzdávejte je v souladu s národní
legislativou na příslušných sběrných místech.
Správnou likvidací přispějete k úspoře
cenných přírodních zdrojů a předejdete
možným negativním dopadům na lidské
zdraví a životní prostředí.
O další podrobnosti o sběru a recyklaci
odpadu požádejte místní úřady.
Při nesprávné likvidaci tohoto druhu
odpadu se vystavujete postihu podle
národní legislativy.
Poznámka k symbolu baterie
(značka pod symbolem):
Tento symbol může být použitý v
kombinaci s chemickou značkou. Takový
případ je souladu s požadavky směrnice
pro chemické látky.
Odstranění baterie při likvidaci jednotky
1
2
3
A
D
C
4
E
B
5
G
Následující pokyny se netýkají oprav, ale
likvidace výrobku. Jakmile bude jednotka
rozebrána, není ji možné obnovit.
Při likvidaci této jednotky vyjměte baterii, která je v
jednotce umístěna, a recyklujte ji.
• Rozebírání provádějte, až bude baterie vybitá.
D
• Rozebrané části uchovávejte mimo dosah dětí.
Sejměte náušník A z pravého
1
reproduktoru a povolte 3 šrouby
• Použijte křížový šroubovák (běžně dostupný v
obchodech).
Sejměte přední kryt
2
Zdvihněte 2 jazýčky D, otočte zadní kryt
3
C
proti směru hodinových ručiček
Povolte 4 šrouby a sejměte plášť
4
Přidržte obě strany baterie v poloze G
5
(mimo konektorů F) a baterii vyjměte
Manipulace s použitými bateriemi
• Konektory izolujte lepicí páskou nebo podobným materiálem.
• Baterii nerozebírejte.
■
Baterie
• Nevystavujte teplu ani ohni.
• Baterii/baterie nenechávejte po delší dobu v autě
vystaveném přímému slunečnímu světlu se zavřenými
okny a dveřmi.
• Nesprávné zacházení s baterií může způsobit únik
elektrolytu, který může poškodit předměty, se kterými
by přišel do kontaktu. Pokud z baterie uniká elektrolyt,
obraťte se na prodejce. Pokud se elektrolyt dostane do
kontaktu s některou částí vašeho těla, důkladně ji omyjte
vodou.
•Při likvidaci baterií se obraťte na místní úřady nebo na
prodejce a informujte se na správný způsob likvidace.
F
B
E
ČESKY
VQT5J79
9
G
73
Page 74

Szanowni Klienci
Dziêkujemy za zakup opisywanego
produktu.
Przed przystąpieniem do eksploatacji
opisywanego produktu należy dokładnie
przeczytać niniejsze zalecenia i
zachować instrukcję obsługi do wglądu.
Spis treści
Przed użyciem
Akcesoria ............................................ 2
Nazwy części ...................................... 2
Przygotowanie
Ładowanie .......................................... 3
Włączanie/wyłączanie zasilania .........3
Połączanie zurządzeniem
z funkcją Bluetooth
Połączenie za jednym dotknięciem
(połączenie przy użyciu funkcji NFC)
Obsługa
Słuchanie muzyki................................ 4
Wykonywanie połączenia
telefonicznego ................................ 5
Funkcje użyteczne .............................. 5
Pozostałe informacje
Przywracanie ustawień
fabrycznych .................................... 5
Środki ostrożności dotyczące
bezpieczeństwa .............................. 6
Konserwacja ....................................... 6
O Bluetooth
Specyfikacje ....................................... 7
Wskazówki dotyczące wykrywania
Prawa autorskie itp. ............................9
Demontaż baterii w przypadku
VQT5J79
®
i usuwania usterek .........................8
usuwania słuchawek ...................... 9
2
74
®
....................... 3
....................................... 7
Akcesoria
Sprawdź i zidentyfikuj dołączone
akcesoria.
1 Przewód odłączany
1 Przewód ładujący USB
..... 4
Nazwy części
1
2
3
4
5
6
Otwórz pokrywę
Lewy Prawy
7
8
14 15
Rysunki produktu mogą odbiegać od jego
rzeczywistego wyglądu.
9
10 11
12 13
Przycisk Zasilanie /
1
Parowanie
Wskaźnik LED*
2
• Liczba mignięć lub kolor
informuje o stanie słuchawek.
(* dalej zwany „diodą LED”)
Wejście audio
3
• Podłącz przewód odłączany
(w zestawie) do tego wejścia
w przypadku korzystania ze
słuchawek jako słuchawek
przewodowych.
Mikrofon
4
Otwór RESET
5
Wejście ładowania (DC IN)
6
•
Podłącz przewód ładujący USB
(w zestawie) do tego wejścia, aby
rozpocząć ładowanie. (→ Pkt. 3)
7
Połącz
Obszar dotykowy NFC
8
Poprzedni
9
Głośność +
10
Następny
11
Głośność –
12
Odtwórz/Pauza
13
Lewy głośnik
14
Prawy głośnik
15
■
Uwaga
• Nigdy nie stosuj żadnych innych
przewodów ładujących USB
poza przewodem dołączonym do
opakowania.
• Nigdy nie stosuj żadnych innych
odłączanych przewodów poza
przewodem dołączonym do
opakowania.
Podczas korzystania ze słuchawek
•
nie zasłaniaj lewego głośnika
dłonią. Połączenie Bluetooth
może zostać zablokowane.
®
Page 75

Ładowanie
Bateria wielokrotnego ładowania (zamontowana w słuchawkach) nie została
wstępnie naładowana. Naładuj baterię przed użyciem słuchawek.
Podłącz niniejsze słuchawki do
1
komputera przy użyciu przewodu
ładującego USB
• Podczas ładowania dioda LED na
lewym głośniku będzie świeciła się na
czerwono. Po zakończeniu ładowania
dioda LED zgaśnie.
• Czas ładowania wynosi około
4,5 godziny od stanu całkowitego
rozładowania do pełnego naładowania.
■
Uwaga
• Funkcji Bluetooth® nie można włączać podczas podłączenia słuchawek do
komputera przy użyciu przewodu ładującego USB.
Ładuj akumulator w pomieszczeniu o temperaturze w zakresie od 10 °C do 35 °C.
•
• Nie włączaj zasilania podczas ładowania.
• Nigdy nie stosuj żadnych innych przewodów ładujących USB poza przewodem
dołączonym do opakowania.
Uwaga! Podczas podłączania urządzenia do komputera stosuj wyłącznie
dołączony do zestawu przewód ładujący USB.
Komputer
Przewód ładujący USB (w zestawie)
Lewy
Dioda
LED
Włączanie/wyłączanie zasilania
Naciśnij i przytrzymaj przez około 2 sekundy
1
przycisk zasilanie
• Rozlegnie się sygnał dźwiękowy, a dioda LED na
lewym głośniku zacznie migać.
Przycisk zasilanie
Wyłączanie zasilania
• Naciśnij i przytrzymaj przez około 2 sekundy lub dłużej przycisk zasilanie
Rozlegnie się sygnał dźwiękowy, a zasilanie zostanie wyłączone.
■
Uwaga
•
W przypadku niekorzystania ze słuchawek przez około 5 minut zasilanie zostanie
automatycznie wyłączone. (Patrz „Automatyczne wyłączanie zasilania” (→ Pkt. 5))
.
Połączanie zurządzeniem z funkcją Bluetooth
Aby ustanowić połączenie bezprzewodowe, skonfiguruj słuchawki w urządzeniu
kompatybilnym z funkcją Bluetooth
Konfiguracja na urządzeniu z funkcją Bluetooth
•Włącz zasilanie oraz funkcję Bluetooth®.
• Umieść urządzenie w promieniu do 1 metra od słuchawek.
• Sprawdź obsługę urządzenia w jego instrukcji obsługi, zgodnie z wymaganiami.
Pierwsze uruchomienie słuchawek
Włącz słuchawki
1
•
Słuchawki rozpoczną wyszukiwanie
urządzenia z funkcją Bluetooth
którego mają zostać podłączone,
a dioda LED na lewym głośniku
zacznie migać na niebiesko i
czerwono naprzemiennie. (Czynność
wykonywana jednokrotnie po
dokonaniu zakupu produktu)
Po wykryciu słuchawek
2
(„RP-BTD10”) przez
urządzenie z funkcją
Bluetooth®, należy je wybrać
•
W przypadku poproszenia o podanie
kodu wprowadź kod „0000 (cztery zera)”.
•
Po wyświetleniu ekranu wyboru
profilu Bluetooth
„A2DP”. Jeśli profil „A2DP” nie jest
obsługiwany lub jeśli chcesz korzystać
wyłącznie z połączeń telefonicznych,
wybierz profil „HSP” lub „HFP”.
(W celu uzyskania szczegółowych
informacji dotyczących profili patrz
punkt „Słuchanie muzyki” (→ Pkt. 4)
oraz „Wykonywanie połączenia
telefonicznego” (→ Pkt. 5))
Sprawdź połączenie z
3
urządzeniem z funkcją
®
wybierz profil
Bluetooth® na słuchawkach
•
W pierwszej kolejności sprawdź, czy
dioda LED na lewym głośniku świeci
się na niebiesko, zapalając się i
gasnąć na przemian. Po ustanowieniu
połączenia zmieni się wzorzec migania.
®
, do
®
.
®
Połączenie przy drugim
włączeniu słuchawek
<Podłącz to samo urządzenie z
funkcją Bluetooth
Po włączeniu słuchawki rozpoczną
wyszukiwanie ostatnio skonfigurowanego
urządzenia z funkcją Bluetooth
automatycznie połączą się z nim. W pierwszej
kolejności sprawdź, czy dioda LED na lewym
głośniku świeci się na niebiesko, zapalając
się i gasnąć na przemian. Po ustanowieniu
połączenia zmieni się wzorzec migania.
<Podłącz inne urządzenie z funkcją Bluetooth®>
Wyłącz funkcję Bluetooth
urządzenia. Sprawdź, czy słuchawki są wyłączone.
Naciśnij i przytrzymaj przez około 5 sekund
przycisk parowanie
wyszukiwanie innego urządzenia z funkcją
®
. Dioda LED na lewym głośniku zacznie
Bluetooth
migać naprzemiennie w kolorze niebieskim i
czerwonym. Rozlegnie się sygnał dźwiękowy.
Wykonać krok 2 i 3.
■
Uwaga
•
Jeśli połączenie z urządzeniem nie zostanie
ustanowione w ciągu około 5 minut,
słuchawki zostaną wyłączone.
Rozpocznij ponownie od kroku 1.
•
Jednoczesne podłączenie 2 lub więcej
urządzeń z funkcją Bluetooth
nie jest możliwe.
•
Słuchawki można sparować maksymalnie z
8 urządzeniami. W przypadku sparowania
9. urządzenia urządzenie z najstarszym
połączeniem zostanie nadpisane. Aby
ponownie ustanowić połączenie z tym
urządzeniem, należy je ponownie sparować.
®
>
®
ostatnio podłączonego
. Słuchawki rozpoczną
®
i
®
do słuchawek
®
POLSKI
VQT5J79
3
75
Page 76

Połączenie za jednym dotknięciem
(połączenie przy użyciu funkcji NFC)
Dotyczy tylko urządzeń z systemem operacyjnym Android™
kompatybilnych z NFC
Funkcja NFC (komunikacja bliskiego zasięgu) umożliwia słuchawkom łatwe
łączenie się z urządzeniem z funkcją Bluetooth
przyłóż do słuchawek swoje urządzenie z funkcją Bluetooth
włączyć, sparuj urządzenie z funkcją Bluetooth
®
kompatybilnym z NFC. Po prostu
®
i ustanów połączenie.
®
, aby automatycznie je
Przygotowanie
Włącz funkcję NFC w urządzeniu z funkcją Bluetooth®.
Uruchom aplikację, aby odtworzyć muzykę/wideo na urządzeniu
1
z funkcją Bluetooth
• Postępuj zgodnie z zaleceniami na ekranie urządzenia.
Przyłóż i przytrzymaj swoje urządzenie w obszarze dotykowym
2
NFC słuchawek (do momentu wyświetlenia wyskakującego okna
®
na ekranie urządzenia wskazującego na ustanowienie połączenia)
•Słuchawki muszą być włączone. W pierwszej kolejności sprawdź, czy dioda
LED na lewym głośniku świeci się na niebiesko, zapalając się i gasnąć na
przemian. Po ustanowieniu połączenia zmieni się wzorzec migania.
• W przypadku braku ustanowienia połączenia zmień pozycję przyłożenia
urządzenia.
Uruchom odtwarzanie muzyki/wideo na urządzeniu z funkcją
3
Bluetooth
■
Połączenie z innym urządzeniem
Przyłóż słuchawki do innego urządzenia w celu ustanowienia nowego połączenia
Bluetooth
Poprzednie połączenie z innym urządzeniem zostanie automatycznie zerwane.
®
®
.
Słuchanie muzyki
Jeśli urządzenie kompatybilne z funkcją Bluetooth® obsługuje profile Bluetooth®
„A2DP” i „AVRCP”, istnieje możliwość odtwarzania muzyki poprzez zdalne
sterowanie bezpośrednio ze słuchawek.
A2DP (Profil Advanced Audio Distribution): Przesyła dźwięk do słuchawek.
•
• AVRCP (Profil Audio/Video Remote Control):
Umożliwia zdalne sterowanie urządzeniem przy użyciu słuchawek.
VQT5J79
Połącz urządzenie z funkcją Bluetooth® ze słuchawkami (→ Pkt. 3)
1
4
Wybierz i odtwórz muzykę na urządzeniu z funkcją Bluetooth
2
76
• Wybrana muzyka jest przesyłana do głośników słuchawek.
®
Czas pracy baterii
Bateria wielokrotnego ładowania (zamontowana w słuchawkach) Ok. 30 godzin
Czas pracy może być krótszy w zależności od warunków pracy.
■
Uwaga
• Urządzenia z funkcją Bluetooth® obsługujące technologię aptX® umożliwiają
przesyłanie wyższej jakości muzyki.
■
Uwaga
•Słuchawki w zależności od poziomu głośności mogą powodować zniekształcenia
dźwięku.
• W przypadku ustawienia głośności blisko maksymalnego poziomu dźwięk
odtwarzanej muzyki może zostać zniekształcony. Zmniejsz poziom głośności do
momentu wyeliminowania zniekształceń dźwięku.
Typ baterii Czas pracy
Zdalne sterowanie
Za pomocą tych słuchawek istnieje możliwość sterowania urządzeniem z funkcją
®
Bluetooth
(Przykład obsługi)
.
• W zależności od urządzenia z funkcją Bluetooth
poniżej mogą nie działać lub działać w inny sposób w wyniku obsługi za
pośrednictwem tych słuchawek.
Odtwórz/Pauza
Naciśnij Odtwórz/Pauza
Poprzedni/Następny
Naciśnij podczas
odtwarzania
Naciśnij i
przytrzymaj
Naciśnij podczas
odtwarzania
Naciśnij i
przytrzymaj
Głośność
Naciśnij Zwiększ głośność
+
Naciśnij i
przytrzymaj
Naciśnij Zmniejsz głośność
−
Naciśnij i
przytrzymaj
Powróć do początku
aktualnie odtwarzanej
ścieżki dźwiękowej
Przewiń
Przesuń do
początku następnej
ścieżki dźwiękowej
Szybko w przód
Zwiększ głośność
w trybie ciągłym
Zmniejsz głośność
w trybie ciągłym
®
niektóre funkcje wymienione
Prawy
Głośność +
Poprzedni
Głośność –
■
Uwaga
•Głośność można regulować w
zakresie 15 poziomów.
Po ustawieniu maksymalnej lub
minimalnej głośności rozlegnie
się sygnał dźwiękowy.
Odtwórz/
Pauza
Następny
Page 77

■
Uwaga
Wykonywanie połączenia telefonicznego
W przypadku telefonów (telefonów komórkowych i smartfonów) z włączoną funkcją
®
Bluetooth
użycia słuchawek do wykonywania połączeń telefonicznych.
1
2
3
4
, które obsługują profil Bluetooth® „HSP” lub „HFP”, istnieje możliwość
• HSP (Profil Headset):
Profil ten może być używany do odbierania dźwięku monofonicznego oraz
nawiązywania dwukierunkowej komunikacji przy użyciu mikrofonu słuchawek.
• HFP (Profil Hands-Free):
Oprócz funkcji HSP profil ten obsługuje funkcję połączeń przychodzących i
wychodzących.
Połącz telefon włączoną funkcją Bluetooth® ze słuchawkami (→ Pkt. 3)
Odbieranie połączenia przychodzącego
Naciśnij Połącz na
słuchawkach i odbierz rozmowę
• Podczas połączenia
przychodzącego rozlegnie się
sygnał dźwiękowy z głośnika, a
dioda LED zacznie migać.
• (Dotyczy tylko HFP)
Aby odrzucić połączenie
przychodzące, naciśnij i
przytrzymaj przycisk Połącz
aż dzwonek przestanie dzwonić.
Lewy
Połącz
Mikrofon
Wykonywanie połączenia wychodzącego
Wykonaj połączenie
wychodzące na telefonie z
włączoną funkcją Bluetooth
• Patrz również instrukcja obsługi
telefonu z włączoną funkcją
®
Bluetooth
(Instrukcja sprawdzania i obsługi
słuchawek została podana poniżej)
•
Podczas połączenia wychodzącego
,
rozlegnie się sygnał dźwiękowy z
głośnika, a dioda LED zacznie migać.
•
Aby anulować połączenie
wychodzące, naciśnij przycisk
Połącz
Rozlegnie się sygnał dźwiękowy.
•
(Dotyczy tylko HFP) Gdy telefon nie
jest używany, naciśnij i przytrzymaj
przez około 2 sekundy przycisk
Połącz
połączenie wychodzące z ostatnio
wybieranym numerem. Rozlegnie
się jeden krótki dźwięk kliknięcia z
głośnika, a dioda LED zacznie migać.
.
.
. Nawiązane zostanie
Rozpocznij rozmowę
• Dioda LED będzie wielokrotnie migać w cyklach po 2 mignięcia podczas
rozmowy telefonicznej.
• Podczas wykonywania połączenia telefonicznego istnieje możliwość
regulowania poziomu głośności. Aby uzyskać więcej informacji dotyczących
dalszych instrukcji patrz strona 4.
Naciśnij Połącz , aby zakończyć połączenie telefoniczne
• Rozlegnie się sygnał dźwiękowy.
®
•Może być wymagane ustawienie funkcji zestawu głośnomówiącego w telefonie z
włączoną funkcją Bluetooth
• W zależności od rodzaju telefonu z włączoną funkcją Bluetooth
może usłyszeć dźwięk połączenia przychodzącego i wychodzącego telefonu w
słuchawkach.
• (Dotyczy tylko HFP) Naciśnij i przytrzymaj przez około 2 sekundy przycisk
Połącz
pomiędzy telefonem z włączoną funkcją Bluetooth
Funkcje użyteczne
Resetowanie słuchawek
Słuchawki można zresetować w przypadku odrzucenia wszystkich operacji.
Podłącz słuchawki do komputera przy użyciu przewodu ładującego USB.
Następnie wsuń w otwór RESET cienki, ostro zakończony przedmiot. Sprawdź, czy
(czerwona) dioda LED zgaśnie. Przytrzymaj wsunięty przedmiot w otworze RESET
(→ Pkt. 2) przez około 5 sekund w celu zresetowania słuchawek. Wszystkie
poprzednie operacje zostaną anulowane. (Informacje dotyczące urządzeń
sparowanych nie zostaną usunięte.)
Automatyczne wyłączanie zasilania
Jeśli słuchawki nie będą używane przez około 5 minut, a urządzenia z funkcją
Bluetooth
a zasilanie zostanie automatycznie wyłączone.
Wskaźnik LED
Gdy poziom naładowania baterii jest niski podczas użytkowania słuchawek,
niebieska, migająca dioda LED na lewym głośniku zacznie świecić na czerwono.
Co minutę rozlegnie się sygnał dźwiękowy. Po wyczerpaniu się baterii zasilanie
zostanie wyłączone.
Przywracanie ustawień fabrycznych
W przypadku chęci usunięcia wszystkich informacji dotyczących sparowanych
urządzeń itp. możesz przywrócić ustawienia słuchawek do ustawień fabrycznych
(oryginalne ustawienia podczas zakupu słuchawek).
1 Wyłącz słuchawki
2 Jednocześnie naciśnij i przytrzymaj przez około 5 sekund lub dłużej
przycisk zasilanie
• Dioda LED na lewym głośniku zapali się na czerwono na około 2 sekundy. W
słuchawkach zostaną przywrócone ustawienia fabryczne.
®
.
na słuchawkach. Urządzenie dzwoniące zostanie przełączone
®
nie będą działały podczas tego okresu, rozlegnie się sygnał dźwiękowy,
i przycisk Poprzedni
®
a słuchawkami.
®
użytkownik
POLSKI
VQT5J79
5
77
Page 78

Środki ostrożności dotyczące bezpieczeństwa
■
Słuchawki
• Unikać używania słuchawek lub umieszczania ich w pobliżu źródeł ciepła.
• Nie słuchać bardzo głośno muzyki w słuchawkach w miejscach, w których
konieczne jest usłyszenie dźwięków pochodzących z otoczenia w celu
zapewnienia bezpieczeństwa, takich jak przejazdy kolejowe i place budowy.
• Napięcie szerokopasmowe jest równe lub większe od 75 mV.
OSTRZEŻENIE:
W celu zmniejszenia ryzyka pożaru, porażenia prądem elektrycznym lub
uszkodzenia produktu:
• Nie wystawiać słuchawek na działanie deszczu, wilgoci, cieknących lub
rozpryskiwanych płynów.
• Nie stawiać na słuchawkach przedmiotów napełnionych cieczą, takich jak
naczynia.
• Stosować wyłącznie zalecane akcesoria.
• Nie usuwać żadnych osłon.
• Nie naprawiać słuchawek we własnym zakresie. Przekazać słuchawki do
naprawy wykwalifikowanemu personelowi serwisowemu.
■
Alergie
• Zaprzestać użytkowania słuchawek w przypadku odczuwania dyskomfortu
związanego z głośnikami lub innymi częściami, które mają bezpośredni
kontakt ze skórą.
• Kontynuowanie użytkowania słuchawek może spowodować wysypkę lub
wywołać inne reakcje alergiczne.
■
Środki ostrożności dotyczące słuchania muzyki przez słuchawki
• Nie słuchać bardzo głośnej muzyki przez słuchawki. Eksperci ds. słuchu
odradzają słuchania muzyki przez dłuższy czas przez słuchawki.
• W przypadku wystąpienia dzwonienia w uszach należy zmniejszyć poziom
głośności lub zaprzestać użytkowania słuchawek.
• Nie korzystać ze słuchawek podczas prowadzenia pojazdów
zmotoryzowanych. Może to spowodować zagrożenie w ruchu i jest nie zgodne
z prawem na wielu obszarach.
• Należy zachować szczególną ostrożność lub tymczasowo zaprzestać
korzystania ze słuchawek w sytuacjach potencjalnie niebezpiecznych.
Słuchawki mogą być podatne na interferencje radiowe powodowane przez
telefony komórkowe znajdujące się w użytku. W przypadku wystąpienia
interferencji należy zwiększyć odległość pomiędzy słuchawkami a telefonem
VQT5J79
komórkowym.
6
78
Konserwacja
Słuchawki należy czyścić suchą i miękką szmatką.
• Nie należy stosować rozpuszczalników, włączając benzynę, rozcieńczalnik,
alkohol, środki kuchenne, chusteczki nasączone środkiem chemicznym itp.
Stosowanie tych środków mogłoby zdeformować zewnętrzną obudowę lub
spowodować odchodzenie powłoki.
Deklaracja zgodności (DoC)
Firma „Panasonic Corporation“ oświadcza niniejszym, że opisywany produkt jest
zgodny z zasadniczymi wymogami i innymi stosownymi klauzulami Dyrektywy
1999/5/EC.
Kopię oryginalnego dokumentu DoC dotyczącego naszych wyrobów objętych
dyrektywą R&TTE klienci mogą pobrać z naszego serwera DoC:
http://www.doc.panasonic.de
Kontakt z autoryzowanym przedstawicielem: Panasonic Marketing Europe GmbH,
Panasonic Testing Centre, Winsbergring 15, 22525 Hamburg, Niemcy
Ten produkt jest przeznaczony do eksploatacji w następujących krajach.
ZJEDNOCZONE KRÓLESTWO, FRANCJA, NIEMCY, WŁOCHY, SZWAJCARIA,
AUSTRIA, HOLANDIA, BELGIA, HISZPANIA, SZWECJA, NORWEGIA, DANIA,
FINLANDIA, WĘGRY, REPUBLIKA CZESKA, SŁOWACJA, SŁOWENIA,
BUŁGARIA, POLSKA, GRECJA, PORTUGALIA, RUMUNIA
Opisywany produkt jest przeznaczony dla użytkownika ogólnego. (Kategoria 3)
Page 79

O Bluetooth
Firma Panasonic nie ponosi odpowiedzialności za zakłócenia podczas transmisji
bezprzewodowej danych i/lub informacji.
■
Wykorzystywane pasmo częstotliwości
Słuchawki wykorzystują pasmo częstotliwości 2,4 GHz.
■
Świadectwo zgodności dotyczące słuchawek
• Niniejsze słuchawki są zgodne z ograniczeniami dotyczącymi częstotliwości
oraz posiadają świadectwo zgodności wydane w oparciu o przepisy
dotyczące częstotliwości. W związku z powyższym pozwolenie na transmisję
bezprzewodową nie jest konieczne.
• Poniższe postępowanie jest karalne w świetle prawa obowiązującego w
niektórych krajach:
– Demontaż/modyfikowanie słuchawek.
– Usuwanie etykiet specyfikacji.
■
Ograniczenia dotyczące użytkowania
• Bezprzewodowa transmisja i/lub użytkowanie wszystkich urządzeń z funkcją
• Wszystkie urządzenia muszą spełniać normy ustanowione przez Bluetooth
• W zależności od specyfikacji i ustawień urządzenia uzyskanie połączenia
• Niniejszy system obsługuje funkcje zabezpieczające Bluetooth
• System ten nie może przesyłać danych do urządzenia z funkcją Bluetooth
■
Zakres użytkowania
Słuchawki należy używać maksymalnie w promieniu 10 m.
Promień ten może ulec skróceniu w zależności od warunków otoczenia,
przeszkód lub interferencji.
■
Interferencje pochodzące od innych urządzeń
•Słuchawki mogą nie działać prawidłowo oraz może pojawić się hałas lub
•Słuchawki mogą nie działać prawidłowo, jeśli fale radiowe z najbliższej stacji
■
Przeznaczenie
•Słuchawki przeznaczone są wyłącznie do standardowego, podstawowego
• Nie stosować niniejszego systemu w pobliżu urządzenia lub w środowisku
®
Bluetooth
SIG, Inc.
może nie być możliwe lub niektóre funkcje mogą działać inaczej.
w zależności od warunków pracy i/lub ustawień ochrona ta może nie być
wystarczająca. Dane do tego systemu należy przesyłać przy zachowaniu
ostrożności.
przeskoki w odtwarzaniu muzyki w wyniku interferencji fal radiowych,
jeśli słuchawki będą znajdowały się zbyt blisko innych urządzeń z funkcją
Bluetooth
radiowej itp. są zbyt silne.
użytkowania.
wrażliwym na interferencje częstotliwości radiowej (na przykład: porty lotnicze,
szpitale, laboratoria itp.).
nie jest gwarantowane.
®
lub urządzeń wykorzystujących pasmo 2,4 GHz.
®
®
. Jednak
Specyfikacje
■
Informacje ogólne
Zasilanie
Czas pracy*1 (tryb SBC) Ok. 30 godzin
Czas ładowania*
Zakres temperatury ładowania Od 10 °C do 35 °C
Zakres temperatury pracy Od 0 °C do 40 °C
Zakres wilgotności pracy
Masa Ok. 198 g
1
Czas pracy może być krótszy w zależności od warunków pracy.
*
2
Czas ładowania baterii od poziomu całkowicie rozładowanego do pełnego
*
naładowania.
■
Bluetooth
Specyfikacja systemu Bluetooth®Wer. 3.0
Klasyfikacja urządzenia
bezprzewodowego
Pasmo częstotliwości Pasmo 2,4 GHz FH-SS
Obsługiwane profile A2DP, AVRCP, HSP, HFP
Obsługiwany kodek SBC, aptX
®
.
Zakres pracy Do 10 m
■
Głośniki
Średnica głośników Φ 40 mm
Impedancja 32 Ω
■
Wejścia
Wejście DC IN Prąd stały 5 V, 500 mA
Wejście audio Stereo jack Φ 3,5 mm
■
Mikrofon
Typ Mono
■
Akcesoria
Przewód ładujący USB 1,0 m
Przewód odłączany 1,5 m
Dane w ramach specyfikacje podlegają zmianom bez powiadomienia.
●
2
(25 °C) Ok. 4,5 godzin
®
Prąd stały 5 V, 500 mA
(Bateria wewnętrzna: 3,6 V (Li-ion 690 mAh))
Od 35% do 80% wilgotności względnej
(bez kondensacji)
Klasa 2 (2,5 mW)
®
POLSKI
VQT5J79
7
79
Page 80

Wskazówki dotyczące
wykrywania i usuwania usterek
Przed skontaktowaniem się z serwisem wykonaj poniższe czynności kontrolne. W
przypadku wątpliwości dotyczących niektórych punktów kontroli lub gdy zalecane
czynności naprawcze nie rozwiązały problemu, skontaktuj się ze sprzedawcą w
celu uzyskania dalszych zaleceń.
Informacje ogólne
Słuchawki nie reagują
• Po podłączeniu przewodu ładującego USB do wejścia ładowania (DC IN) wsuń
w otwór RESET ostro zakończony przedmiot. (→ Pkt. 5)
Zasilanie i ładowanie
Brak możliwość naładowania słuchawek
• Upewnij się, że komputer jest włączony i nie znajduje się w trybie czuwania ani
uśpienia.
• Czy port USB obecnie używany działa prawidłowo? Jeśli komputer został
wyposażony w inne porty USB, wyjmij wtyczkę z aktualnie używanego portu i
podłącz ją do innego portu.
•Jeśli powyższe czynności nie są możliwe do wykonania, odłącz wtyczkę
przewodu ładującego USB i podłącz ją ponownie.
• Czy dioda LED miga na czerwono? Migająca dioda LED oznacza usterkę
ładowania.
•Jeśli dioda LED miga szybko na czerwono, również wtedy gdy słuchawki zostały
naładowane w temperaturze pokojowej wynoszącej od 10 °C do 35 °C, może to
oznaczać, że bateria wyczerpała się. (Liczba ładowań wbudowanej baterii: okoł
500.)
Dioda LED nie pali się podczas ładowania / Ładowanie trwa dłużej
• Czy przewód ładujący USB (w zestawie) został prawidłowo podłączony do
wejścia USB w komputerze? (→ Pkt. 3)
Zasilanie nie włącza się
• Czy słuchawki zostały naładowane? Nie można włączyć zasilania podczas
ładowania. (→ Pkt. 3)
• Czy przewód odłączany został podłączony? Nie można włączyć zasilania, gdy
przewód odłączany jest podłączony do słuchawek.
VQT5J79
8
80
Połączenie z urządzeniem z funkcją Bluetooth
Nie można podłączyć urządzenia
• Usuń dane parowania dot. słuchawek z urządzenia z funkcją Bluetooth®, a
następnie sparuj je ponownie. (→ Pkt. 3)
Głośność dźwięku i fonii
Brak dźwięku
• Upewnij się, że słuchawki i urządzenie z funkcją Bluetooth® zostały prawidłowo
połączone. (→ Pkt. 3)
• Sprawdź, czy muzyka jest odtwarzana w urządzeniu z funkcją Bluetooth
• Upewnij się, że słuchawki zostały włączone oraz że głośność nie jest ustawiona
na niski poziom.
• Ponownie sparuj i podłącz urządzenie z funkcją Bluetooth
(→ Pkt. 3)
Niski poziom głośności
• Zwiększ poziom głośności słuchawek. (→ Pkt. 4)
• Zwiększ poziom głośności urządzenia z funkcją Bluetooth
Dźwięk z urządzenia jest odłączany / Jakość dźwięku jest niska
• Mogą wystąpić zakłócenia dźwięku w przypadku zablokowanych sygnałów. Nie
zasłaniaj całkowicie słuchawek dłonią itp.
• Urządzenie może znajdować się poza zakresem komunikacji wynoszącym 10 m.
Umieść urządzenie bliżej słuchawek.
• Usuń wszelkie przeszkody pomiędzy słuchawkami i urządzeniem.
•Wyłącz wszelkie nieużywane bezprzewodowe urządzenia LAN.
•Może pojawić się problem z komunikacją, jeśli bateria jest częściowo
o
wyczerpana. Naładuj słuchawki. (→ Pkt. 3)
Połączenia telefoniczne
Nie słychać drugiej osoby
• Upewnij się, że słuchawki i telefon z włączoną funkcją Bluetooth® są włączone.
• Upewnij się, że słuchawki i telefon z włączoną funkcją Bluetooth
połączone. (→ Pkt. 3)
• Sprawdź ustawienia audio w telefonie z włączoną funkcją Bluetooth
urządzenie dzwoniące na słuchawki, jeśli jest ustawione na telefon z włączoną
funkcją Bluetooth
•Jeśli poziom głośności głosu drugiej osoby jest zbyt niski, zwiększ poziom
głośności zarówno w słuchawkach, jak i w telefonie z włączoną funkcją
Bluetooth
®
.
®
. (→ Pkt. 3)
®
ze słuchawkami.
®
.
®
zostały
®
. Przełącz
®
®
.
Page 81

Prawa autorskie itp.
aptX® software is copyright CSR plc or its group
●
companies. All rights reserved.
®
mark and the aptX logo are trademarks
The aptX
of CSR plc or one of its group companies and may
be registered in one or more jurisdictions.
Nazwa marki Bluetooth® i logotypy są własnością
●
firmy Bluetooth SIG, Inc. I wszelkie ich użycie przez
firmę Panasonic Corporation jest objęte licencją.
Pozostałe znaki towarowe i nazwy handlowe są
własnością ich posiadaczy.
Nazwy innych systemów i wyrobów pojawiające się
●
w instrukcji obsługi są zasadniczo zarejestrowanymi
znakami handlowymi lub znakami handlowymi
odpowiednich podmiotów, które je opracowały.
Proszę zwrócić uwagę, że znaki ™ i ® nie
pojawiają się w niniejszym dokumencie.
Pozbywanie się zużytych urządzeń elektrycznych
i elektronicznych oraz baterii.
Dotyczy wyłącznie obszaru Unii Europejskiej oraz
krajów posiadających systemy zbiórki i recyklingu.
Niniejsze symbole umieszczane na produktach,
opakowaniach i/lub w dokumentacji towarzyszącej
oznaczają, że nie wolno mieszać zużytych
urządzeń elektrycznych i elektronicznych oraz
baterii z innymi odpadami domowymi/komunalnymi.
W celu zapewnienia właściwego przetwarzania,
utylizacji oraz recyklingu zużytych urządzeń
elektrycznych i elektronicznych oraz zużytych
baterii, należy oddawać je do wyznaczonych
punktów gromadzenia odpadów zgodnie z
przepisami prawa krajowego.
Poprzez prawidłowe pozbywanie się zużytych
urządzeń elektrycznych i elektronicznych oraz
zużytych baterii pomagasz oszczędzać cenne
zasoby naturalne oraz zapobiegać potencjalnemu
negatywnemu wpływowi na zdrowie człowieka
oraz na stan środowiska naturalnego.
W celu uzyskania informacji o zbiórce oraz recyklingu
zużytych urządzeń elektrycznych i elektronicznych
oraz baterii prosimy o kontakt z władzami lokalnymi.
Za niewłaściwe pozbywanie się tych odpadów mogą
grozić kary przewidziane przepisami prawa krajowego.
Dotyczy symbolu baterii (symbol poniżej):
Ten symbol może występować wraz z
symbolem pierwiastka chemicznego. W takim
przypadku wymagania Dyrektywy w sprawie
określonego środka chemicznego są spełnione.
Demontaż baterii w przypadku usuwania słuchawek
1
2
3
A
D
C
4
E
B
5
G
Poniższe zalecenia nie odnoszą się do
czynności naprawczych, a jedynie są związane
z usuwaniem słuchawek. Słuchawki te nie są
przeznaczone do ponownego montażu po ich
zdemontowaniu.
Przed usunięciem słuchawek należy wyjąć zamontowaną
w nich baterię i przekazać ją do utylizacji.
D
• Zdemontować po wyczerpaniu się baterii.
• Zdemontowane części przechowywać poza zasięgiem dzieci.
Usuń nakładkę A z prawego głośnika i
1
odkręć 3 śruby
•Użyj śrubokręta krzyżakowego (dostępny w handlu).
Usuń przednią osłonę
2
Unosząc 2 zaczepy D, obróć tylną
3
osłonę C w lewo
Odkręć 4 śruby i zdejmij obudowę
4
Przytrzymaj obydwie strony baterii w
5
pozycji G (z dala od wejść F) i wyjmij ją
Obchodzenie się ze zużytymi bateriami
• Zaizoluj wejścia za pomocą taśmy przylepnej lub podobnego
materiału.
• Nie demontuj.
■
Baterie
• Nie nagrzewaj ani nie wrzucaj baterii do ognia.
• Nie pozostawiaj baterii przez dłuższy czas w samochodzie
zaparkowanym w miejscu wystawionym na bezpośrednie
działanie promieni słonecznych, w którym drzwi i okna są
zamknięte.
• Nieprawidłowe obchodzenie się z baterią może prowadzić
do wycieku elektrolitu, który może spowodować
uszkodzenie części, z którymi ciecz miała kontakt.
W przypadku wycieku elektrolitu z baterii należy
skontaktować się ze sprzedawcą. Przemyj dokładnie wodą
części ciała, które miały kontakt elektrolitem.
• W celu usunięcia baterii należy skontaktować się z
władzami lokalnymi lub sprzedawcą w celu uzyskania
wytycznych dotyczących prawidłowej metody usuwania.
F
B
E
POLSKI
VQT5J79
9
G
81
Page 82

Tisztelt vásárló!
Köszönjük, hogy termékünket
választotta.
Mielőtt használatba venné a terméket,
olvassa el figyelmesen az utasításokat;
őrizze meg a kézikönyvet a jövőbeli
használat céljából.
Tartalomjegyzék
A használat előtt
Kiegészítők ......................................... 2
Az eszköz részei................................. 2
Előkészületek
Töltés .................................................. 3
Be- és kikapcsolás.............................. 3
®
Bluetooth
Egyérintéses kapcsolódás
Zenehallgatás ..................................... 4
Telefonhívás indítása .......................... 5
Hasznos funkciók ...............................5
A gyári beállítások visszaállítása ........ 5
Biztonsági előírások ........................... 6
Karbantartás ....................................... 6
A Bluetooth
Műszaki jellemzők .............................. 7
Hibaelhárítási útmutató....................... 8
Szerzői jogok stb. ............................... 9
Az akkumulátor eltávolítása a
VQT5J79
2
82
-eszköz csatlakoztatása ..... 3
(kapcsolódás NFC-n keresztül) ...... 4
Használat
Egyéb
®
-ról .................................. 7
fejhallgató hulladékosítása előtt ..... 9
Kiegészítők
Kérjük, ellenőrizze, és azonosítsa be a
csomagban található kiegészítőket.
1 Leválasztható kábel
1 USB-töltőkábel
Az eszköz részei
1
2
3
4
5
6
Nyissa ki a fedelet
Bal Jobb
7
8
14 15
Elképzelhető, hogy a termékillusztrációk
nem teljesen felelnek meg magának a
terméknek.
9
10 11
12 13
Be-/kikapcsolás /
1
Párosítás gomb
LED-jelzőfény*
2
• A villanások száma és a fény
színe a jelzik a fejhallgató
állapotát.
(* a továbbiakban „LED”)
Audiobemeneti aljzat
3
• Csatlakoztassa a leválasztható
kábelt (tartozék) ehhez az
aljzathoz, ha vezetékes
fejhallgatóként kívánja
használni az eszközt.
Mikrofon
4
RESET lyuk
5
Töltőaljzat (DC IN)
6
• A feltöltés idejére ehhez az
aljzathoz kell csatlakoztatnia
az USB-töltőkábelt (tartozék).
(→ 3. oldal)
7
Hívás
NFC érintési terület
8
Előző
9
Hangerő +
10
Következő
11
Hangerő –
12
Lejátszás/Szüneteltetés
13
Bal oldali hangszóró
14
Jobb oldali hangszóró
15
■
Megjegyzés
• Csak a csomagban található
USB-töltőkábelt használja.
• Csak a csomagban található
leválasztható zsinórt használja.
• A fejhallgató használata közben
ne takarja el tenyerével a bal
oldali hangszórót. Ellenkező
esetben előfordulhat, hogy
leblokkolja a Bluetooth
kapcsolatot.
®
-
Page 83

Töltés
A tölthető akkumulátor (amely a fejhallgató beépített része) a csomag
kibontásakor nincs feltöltve. Töltse fel az akkumulátort a fejhallgató
használatának megkezdése előtt.
Csatlakoztassa a fejhallgatót
1
számítógéphez az USB-töltőkábel
használatával
• A töltés során a fejhallgató bal oldali
hangszóróján lévő LED pirosan világít.
Amikor a töltés befejeződött, a LED
kialszik.
• A lemerült állapottól teljesen feltöltött
állapotig végzett töltés körülbelül
4,5 órát vesz igénybe.
■
Megjegyzés
• A Bluetooth® funkció nem használható olyankor, amikor a fejhallgató az
USB-töltőkábelen keresztül számítógéppel áll kapcsolatban.
• Az akkumulátor töltését 10 °C és 35 °C közötti hőmérsékletű helyiségben
végezze.
• Az eszköz töltés közben nem kapcsolható be.
• Csak a csomagban található USB-töltőkábelt használja.
Figyelmeztetés: Csak a csomagban megtalálható USB-töltőkábelt használja a
számítógéphez való csatlakoztatáshoz.
Számítógép
USB-töltőkábel (tartozék)
Bal
LED
Be- és kikapcsolás
Nyomja le a be-/kikapcsolás gombot,
1
majd tartsa azt körülbelül 2 másodpercen át
lenyomva
• Ekkor hangjelzés hallható, és a fejhallgató bal oldali
hangszóróján lévő LED villogni kezd.
Be-/kikapcsolás gomb
Kikapcsolás
Nyomja le a be-/kikapcsolás gombot, majd tartsa azt legalább 2 másodpercen
•
át lenyomva. Ekkor hangjelzés hallható, majd a fejhallgató kikapcsolódik.
■
Megjegyzés
•
Ha a fejhallgatót mintegy 5 perces időtartamon keresztül nem használják, akkor az
automatikusan kikapcsol. (Lásd az „Automatikus kikapcsolás” című részt (→ 5. oldal))
Bluetooth®-eszköz csatlakoztatása
Vezeték nélküli kapcsolat létrehozásához regisztrálja a fejhallgatót
®
Bluetooth
Előkészületek a Bluetooth®-eszközön
Első bekapcsolás
1
2
3
-kompatibilis eszközön.
• Kapcsolja be az eszközt, és aktiválja a Bluetooth® funkciót.
Gondoskodjon arról, hogy az eszköz a fejhallgató egy méteres körzetén belül legyen.
•
•
Szükség szerint nézzen utána az eszköz megfelelő kezelésének annak kézikönyvében.
Kapcsolódás a második alkalom után
Kapcsolja be a fejhallgatót
• A fejhallgató elkezdi keresni a
®
Bluetooth
csatlakozhat, a bal oldali
hangszórón található LED pedig
felváltva kéken és vörösen villog.
(Csak a vásárlást követő első
használatnál)
-eszközt, amelyhez
Miután a Bluetooth®-eszköz
megtalálja a fejhallgatót
(„RP-BTD10”), válassza azt ki
• Ha a rendszer jelszót kér be, írja
be a „0000-t (néy nulla)”.
• Ha megjelenik a Bluetooth
profilválasztási képernyő,
válassza ki az „A2DP” profilt.
Ha az „A2DP” nem támogatott,
vagy Ön csak telefonhívásokat
szeretne lebonyolítani, a „HSP”
vagy a „HFP” profilt válassza
ki. (A profilokról részletek a
„Zenehallgatás” (→ 4. oldal)
és a „Telefonhívás indítása”
(→ 5. oldal) című fejezetekben
olvashatók)
®
-
A Bluetooth®-eszközzel való
kapcsolat ellenőrzése a
fejhallgatón
• A fejhallgató bal oldali
hangszóróján lévő LED
először kéken világít, majd
be- és kikapcsol. A kapcsolat
létrejötte után a villogás üteme
megváltozik.
<Kapcsolódás ugyanahhoz a
Bluetooth
Bekapcsolása után a fejhallgató elkezdi
keresni a korábban már beállított
Bluetooth
kapcsolatot kezdeményez vele. A
fejhallgató bal oldali hangszóróján lévő
LED először kéken világít, majd be- és
kikapcsol. A kapcsolat létrejötte után a
villogás üteme megváltozik.
<Kapcsolódás egy másik
Bluetooth
Kapcsolja ki a Bluetooth® funkciót a
korábban csatlakoztatott eszközön.
Ellenőrizze, hogy ki van-e kapcsolva a
fejhallgató. Nyomja le a párosítás
majd tartsa azt körülbelül 5 másodpercen
át lenyomva. Ekkor a fejhallgató keresni
kezdi a további Bluetooth
fejhallgató bal oldali hangszóróján lévő LED
felváltva kéken és vörösen villog. Ekkor
hangjelzés is hallható.
A továbbiakban kövesse a 2. és 3. lépést.
®
-eszközhöz>
®
-eszközt, és automatikusan
®
-eszközhöz>
gombot,
®
-eszközöket. A
■
Megjegyzés
•
Ha körülbelül 5 perc alatt semmilyen
eszközhöz sem sikerül kapcsolódnia,
akkor a fejhallgató kikapcsolódik.
Kezdje újra a műveletet az 1. lépéstől.
•
A fejhallgatóhoz nem kapcsolódhat
egyszerre egynél több Bluetooth
•
A fejhallgatóhoz legfeljebb 8 eszköz
párosítható. Amennyiben kilencedik eszközt
párosít, úgy az új eszköz a legrégebben
kapcsolódott eszköz helyét veszi át. Az újbóli
használathoz párosítsa újra az eszközt.
®
-eszköz.
MAGYAR
VQT5J79
3
83
Page 84

Egyérintéses kapcsolódás
(kapcsolódás NFC-n keresztül)
Csak NFC-kompatibilis Android™-eszközöknél
Az NFC (Near Field Communication – kis hatótávolságú kommunikáció) funkció
lehetővé teszi, hogy a fejhallgató egyszerűen csatlakozzon az NFC-kompatibilis
®
Bluetooth
az előbbi automatikus bekapcsolásához, az utóbbi párosításához, és végül a
kapcsolat létrehozásához.
-eszközökhöz. Egyszerűen érintse a fejhallgatót a Bluetooth®-eszközhöz
Előkészületek
Kapcsolja be az NFC funkciót a Bluetooth®-eszközön.
Indítsa el a Bluetooth®-eszköz zene-/videolejátszó alkalmazását
1
• Kövesse az eszköz képernyőn megjelenő utasításait.
Érintse az eszközt a fejhallgató NFC érintési területéhez (amíg
2
meg nem jelenik az eszközön egy előugró ablak, amely értesíti a
kapcsolat létrejöttéről)
• A fejhallgató ekkor bekapcsolódik. A fejhallgató bal oldali hangszóróján lévő
LED először kéken világít, majd be- és kikapcsol. A kapcsolat létrejötte után
a villogás üteme megváltozik.
• Ha nem jön létre kapcsolat, módosítsa az érintési pozíciót.
Indítsa el a Bluetooth®-eszközön a zene-/videolejátszást
3
■
Egy másik eszköz csatlakoztatása
Érintse a fejhallgatót egy másik eszközhöz, ha új Bluetooth®-kapcsolatot kíván
létrehozni.
A korábban csatlakoztatott eszköz kapcsolata ekkor automatikusan megszűnik.
Zenehallgatás
Ha a Bluetooth®-kompatibilis eszköz támogatja az „A2DP” és „AVRCP” Bluetooth®profilokat, akkor a zenehallgatás távolról, a fejhallgatóról is irányítható.
• A2DP (Advanced Audio Distribution Profile – továbbfejlesztett audioközvetítő
képesség): Audiojeleket közvetít a fejhallgató felé.
• AVRCP (Audio/Video Remote Control Profile – audio/video távoli vezérlés profil):
Lehetővé teszi az eszköznek a fejhallgatóról való távirányítását.
Csatlakoztassa egymáshoz a fejhallgatót és a
1
Bluetooth®-eszközt (→ 3. oldal)
VQT5J79
Válassza ki, majd játssza le a zeneszámot a Bluetooth®-eszközön
2
• A kijelölt zeneszám a fejhallgató hangszóróiból hallható.
4
84
Az akkumulátor üzemideje
Akkumulátor típusa Üzemidő
Újratölthető akkumulátor (a fejhallgató beépített része) Körülbelül 30 óra
Az üzemidő a működtetés körülményeitől függően rövidebb is lehet.
■
Megjegyzés
• Az aptX® technológiát támogató Bluetooth®-eszközök jobb minőségű
zeneátvitelre képesek.
■
Figyelmeztetés
•
Magas hangerő-beállítás mellett előfordulhat, hogy a hang kiszűrődik a fejhallgatóból.
• A maximálishoz közeli hangerőszinten megtörténhet, hogy a zene eltorzulva
szól. Csökkentse a hangerőt, amíg meg nem szűnik a torzulás.
Irányítás távirányítással
A Bluetooth®-eszközt a fejhallgatóról is vezérelheti.
• A használt Bluetooth
némelyike nem működik, vagy máshogyan működik, amikor a fejhallgatóról
vezérli az eszközt.
(Példa a használatra)
Lejátszás/Szüneteltetés
Lenyomás
Előző/Következő
Lenyomás a
lejátszás során
Lenyomva tartás Visszatekerés
Lenyomás a
lejátszás során
Lenyomva tartás Csévélés előre
Hangerő
Lenyomás
+
Lenyomva tartás
Lenyomás
−
Lenyomva tartás
®
-eszköztől függően előfordulhat, hogy az alábbi funkciók
Lejátszás/
Szüneteltetés
Vissza a jelenlegi
szám elejéhez
Előretekerés a
következő szám
elejéhez
A hangerő
növelése
A hangerő
folyamatos
növelése
A hangerő
csökkentése
A hangerő
folyamatos
csökkentése
Előző
Hangerő –
■
Megjegyzés
• A hangerő 15 fokozatban
módosítható.
A maximális és a minimális szint
elérésekor hangjelzés hallható.
Jobb
Hangerő +
Lejátszás/
Szüneteltetés
Következő
Page 85

Telefonhívás indítása
A „HSP” és a „HFP” Bluetooth®-profilt támogató Bluetooth®-kompatibilis
telefonokkal (mobil- és okostelefonokkal) párosítva a fejhallgató telefonhívások
lebonyolítására is alkalmas.
• HSP (Headset Profile – fejhallgató profil):
Ezzel a profillal monó hangokat fogadhat, és kétirányú kommunikációt folytathat
a fejhallgatón lévő mikrofon segítségével.
• HFP (Hands-Free Profile – kéz nélküli profil):
A HSP-funkciókon kívül ez a profil bejövő és kimenő hívásokat is kezel.
Csatlakoztassa egymáshoz a fejhallgatót és a Bluetooth®-
1
telefont (→ 3. oldal)
Bejövő hívások kezelése
2
Nyomja le a Hívás
gombot a fejhallgatón a
hívás fogadásához
• Beérkező hívás esetén a
fejhallgató hangszórójából
csengőhang hallatszik, és a
LED villog.
• (Csak HFP esetén) A beérkező
hívás elutasításához nyomja
le a Hívás
ne engedje fel addig, amíg a
csengés abba nem marad.
Kezdjen el beszélni
3
• A LED telefonhívás közben kétszer, ismétlődően villog.
• Hívás közben a hangerő szintje módosítható. A beállításokról a 4. oldalon
olvashat bővebben.
Nyomja le a Hívás gombot a hívás befejezéséhez
4
• Ekkor hangjelzés is hallható.
gombot, és
Bal
Hívás
Mikrofon
Kimenő hívások kezdeményezése
Kimenő hívások
kezdeményezése a
Bluetooth®-kompatibilis
telefonról
•
Olvassa el a Bluetooth®-kompatibilis
telefon használati útmutatóját is.
(Az alábbiakban a fejhallgatóról
végzett ellenőrzési és működtetési
lépések magyarázata szerepel)
•
Kimenő hívás esetén a fejhallgató
hangszórójából csengőhang
hallatszik, a LED pedig villog.
•
A kimenő hívás törléséhez nyomja
meg a Hívás
Ekkor hangjelzés is hallható.
•
(Csak HFP esetén) Ha a telefon
éppen nincs használatban, nyomja
le a Hívás
azt körülbelül 2 másodpercen át
lenyomva. Ekkor a telefon hívni
kezdi az utoljára tárcsázott számot.
A fejhallgató hangszórójából
egyetlen rövid kattanás hallatszik,
a LED pedig villog.
gombot.
gombot, majd tartsa
■
Megjegyzés
•Előfordulhat, hogy Bluetooth®-kompatibilis telefonján be kell állítania a kéz nélküli
használatot.
• Alkalmas típusú Bluetooth
kimenő hívások csengőhangjai hallhatók a fülhallgatóból.
• (Csak HFP esetén) Nyomja meg és tartsa lenyomva a Hívás
fejhallgatón körülbelül 2 másodpercig, hogy a hívóeszköz a fejhallgatóról a
®
Bluetooth
-kompatibilis telefonra váltson.
®
-kompatibilis telefon esetében a beérkező és a
gombot a
Hasznos funkciók
A fejhallgató alaphelyzetbe állítása
Olyankor, amikor semmilyen műveletet sem lehet rajta végrehajtani, a fejhallgató
alaphelyzetbe állítható. Csatlakoztassa a fejhallgatót számítógéphez az
USB-töltőkábel használatával. Ezt követően nyomja meg a RESET lyukat
valamilyen vékony, hegyes tárggyal. Tartsa benyomva a RESET lyukat (→ 2. oldal)
körülbelül 5 másodpercen át a fejhallgató alaphelyzetbe állításához. Minden
korábban beállított művelet törlődni fog. (A párosított eszköz adatai nem törlődnek.)
Automatikus kikapcsolás
Ha a fejhallgató körülbelül 5 percen át nem közvetít hangot, és ez idő alatt a
®
Bluetooth
kíséretében automatikusan kikapcsol.
-eszközök sincsenek használatban, akkor a fejhallgató hangjelzés
LED-jelzőfény
Ha a fejhallgató használata során az akkumulátor merülni kezd, akkor a bal oldali
hangszórón lévő LED kék villogó fénye vörösre vált. Percenként 1 alkalommal
hangjelzés is hallható. Ha az akkumulátor teljesen lemerül, a fejhallgató kikapcsol.
MAGYAR
A gyári beállítások visszaállítása
Ha törölni kíván minden eszközpárosítási és egyéb adatot, akkor visszaállíthatja a
gyári beállításokat (a vásárláskor érvényes eredeti beállításokat).
1 Kapcsolja ki a fejhallgatót
2 Nyomja le a be-/kikapcsolás
legalább 5 másodpercen át lenyomva
• Ezután a fejhallgató bal oldali hangszóróján lévő LED kb. 2 másodpercen át
vörösen világít. A fejhallgató érvényesíti a gyári beállításokat.
és az Előző gombot, majd tartsa azokat
VQT5J79
5
85
Page 86

Biztonsági előírások
■
Fejhallgató
• Tartsa és használja a fejhallgatót a hőforrásoktól távol.
• Ne hallgassa magas hangerővel a fejhallgatót olyan helyeken, ahol a
biztonság érdekében figyelnie kell a környezet zajaira is, így például vasúti
átjáróknál és építkezéseken.
• A szélessávra jellemző feszültség 75 mV vagy annál több.
FIGYELEM:
A tűz, áramütés és termékkárosodás elkerülése érdekében:
• Ne tegye ki a fejhallgatót eső, nedvesség, csepegő vagy fröccsenő folyadék
hatásának.
• Ne helyezzen a fejhallgatóra semmilyen vízzel teli tárgyat, így például vázát.
• Csak a javasolt kiegészítőket használja.
• Ne távolítsa el a borításokat.
• Ne próbálja megjavítani a fejhallgatót. A javítást képesített szakemberrel
végeztesse.
■
Allergiák
• Hagyjon fel a használattal, ha a hangszórók vagy a termék bármely más,
bőrével érintkező része kellemetlen érzetet okoz.
• A további használat kiütéseket vagy más allergiás tüneteket okozhat.
■
Biztonságos zenehallgatás a fejhallgatóval
• Ne használja a fejhallgatót túl magas hangerő-beállítással. A hallásszakértők
ellenjavallják a huzamosabb időn át tartó, folyamatos lejátszást.
• Ha fülcsengést tapasztal, csökkentse a hangerőt, vagy hagyja abba a
fejhallgató használatát.
• Ne használja járművezetés közben. Az ilyen magatartás könnyen forgalmi
veszélyhez vezethet, így számos ország törvényei tiltják.
• Potenciálisan veszélyes helyzetekben különösen óvatosan járjon el, vagy
függessze fel a fejhallgató használatát.
A fejhallgatóban a használat során a mobiltelefonok rádióinterferenciát
okozhatnak. Ha ilyen interferencia lép fel, növelje a távolságot a fejhallgató és a
mobiltelefon között.
Karbantartás
A fejhallgató tisztítását száraz, puha ruhával végezze.
• Ne használjon oldószereket, például benzint, hígítót, alkoholt, konyhai
tisztítószert, vegyi anyaggal átitatott törlőkendőt stb. Ellenkező esetben a
fejhallgató külső váza deformálódhat, vagy a borítás felválhat.
Megfelelőségi nyilatkozat (DoC)
Ezennel a „Panasonic Corporation” kijelenti, hogy a jelen termék megfelel az
1999/5/EC irányelvben meghatározott alapvető követelményeknek és más,
vonatkozó előírásoknak.
Az ügyfelek letölthetik az R&TTE termékeink eredeti megfelelőségi nyilatkozatát a
DoC kiszolgálónkról:
http://www.doc.panasonic.de
Lépjen kapcsolatba a hivatalos képviselettel: Panasonic Marketing Europe GmbH,
Panasonic Testing Centre, Winsbergring 15, 22525 Hamburg, Németország
A terméket a következő országokban történő használatra szánták:
Egyesült Királyság, Franciaország, Németország, Olaszország, Svájc, Ausztria,
Hollandia, Belgium, Spanyolország, Svédország, Norvégia, Dánia, Finnország,
Magyarország, Cseh Köztársaság, Szlovákia, Szlovénia, Bulgária, Lengyelország,
Görögország, Portugália, Románia
A terméket az általános fogyasztói rétegnek szánták. (3. kategória)
VQT5J79
6
86
Page 87

A Bluetooth®-ról
A Panasonic nem vállal felelősséget a vezeték nélküli átvitel során megsérült
adatokért és/vagy információkért.
■
A használt frekvenciatartomány
A fejhallgató a 2,4 GHz-es frekvenciasávot használja.
■
A fejhallgató tanúsítványa
• Ez a fejhallgató megfelel a frekvenciakorlátozásoknak, és a
frekvenciaszabályokon alapuló tanúsítványt is kapott. Ennek következtében
vezeték nélküli használata nem engedélyhez kötött.
• Az alábbi műveletek bizonyos országokban törvényellenesek:
– A fejhallgató szétszerelése/módosítása.
– A műszaki jellemzők azonosítóinak eltávolítása.
■
A használatra vonatkozó korlátozások
• A vezeték nélküli átvitel és/vagy használat nem minden egyes
• Minden eszköznek meg kell felelnie a Bluetooth SIG, Inc. által előírt
• Az eszköz specifikációitól és beállításaitól függően előfordulhat, hogy a
• Ez a rendszer támogatja a Bluetooth
• A rendszer nem képes adatok Bluetooth
■
A használat hatóköre
A fejhallgatót 10 méteres távolságon belül használja.
Ez a távolság a környezettől, akadályoktól és interferenciától függően
csökkenhet.
■
Interferencia más eszközökkel
• Más Bluetooth®-eszközök, illetve a 2,4 GHz-es sávot használó egyéb
• A közeli közvetítőállomásoktól stb. érkező, túlságosan erős rádiójelek képesek
■
Szándékolt használat
• A fejhallgatót csak normál, általános használatra tervezték.
• Ne használja a rendszert olyan berendezés közelében, vagy olyan
®
Bluetooth
szabványoknak.
csatlakozás sikertelen lesz, vagy egyes funkciók eltérnek.
környezetétől és/vagy a beállításoktól függően azonban előfordulhat, hogy a
biztonsági beállítások nem elegendőek. Óvatosan járjon el, amikor vezeték
nélkül visz át adatokat erre a rendszerre.
eszközök túlságosan szoros körzetén belül a fejhallgató nem feltétlenül
működik megfelelően, és ilyen körülmények között előfordulhat, hogy
problémák, például zörejek vagy hangakadozás tapasztalhatók.
a fejhallgató működésében zavart okozni.
környezetben, amely érzékeny a rádiófrekvencia-interferenciára (pl.
repülőterek, kórházak, laboratóriumok stb.).
-eszköz esetében garantált.
®
biztonsági funkcióit. A használat
®
-eszközre való továbbítására.
Műszaki jellemzők
■
Általános
Tápellátás
Üzemidő*1 (SBC üzemmód) Körülbelül 30 óra
Töltéshez szükséges idő*
Töltési hőmérséklet-tartomány 10 ºC-tól 35 ºC-ig
Üzemi hőmérséklet-tartomány 0 ºC-tól 40 ºC-ig
Üzemi páratartalom-tartomány
Tömeg Körülbelül 198 g
1
A működtetés körülményeitől függően rövidebb is lehet.
*
2
A lemerülttől a teljesen feltöltött állapotig végzett töltéshez szükséges idő.
*
■
Bluetooth®-adatok
A Bluetooth®-rendszer verziója 3.0- ás verzió
Vezeték nélküli berendezés
besorolása
Frekvenciatartomány 2,4 GHz-es sáv, FH-SS
Támogatott profilok A2DP, AVRCP, HSP, HFP
Támogatott kodekek SBC, aptX
Hatótávolság Legfeljebb 10 m
■
Hangszórók adatai
Hangszórófejek átmérője Φ 40 mm
Impedancia 32 Ω
■
Bemenetek adatai
DC IN DC 5 V, 500 mA
Audiobemenet Sztereó jack Φ 3,5 mm
■
Mikrofonadatok
Típus Mono
■
Kiegészítők adatai
USB-töltőkábel 1,0 m
Leválasztható kábel 1,5 m
A műszaki adatok külön bejelentés nélkül megváltozhatnak.
●
2
(25 ºC) Körülbelül 4,5 óra
DC 5 V, 500 mA
(Belső akkumulátor: 3,6 V (Li-ion 690 mAh))
35% tot 80% relatieve vochtigheid
(nem lecsapódó)
2. osztály (2,5 mW)
®
MAGYAR
VQT5J79
7
87
Page 88

Hibaelhárítási útmutató
Mielőtt a szervizhez fordulna, hajtsa végre a következő ellenőrzéseket. Ha az
ellenőrzés valamely pontjával kapcsolatban bizonytalan, illetve ha a feltüntetett
műveletek nem oldják meg a problémát, forduljon kereskedőjéhez.
Bluetooth®-eszköz csatlakoztatása
Az eszköz nem csatlakoztatható
• Törölje a fejhallgatóra vonatkozó párosítási adatokat a Bluetooth®-eszközről,
majd párosítsa össze azokat újra. (→ 3. oldal)
Általános
A fejhallgató nem válaszol
• Nyomjon egy hegyes tárgyat a RESET lyukba, az USB-töltőkábelnek a
töltőaljzathoz (DC IN) csatlakoztatott állapota mellett. (→ 5. oldal)
Tápellátás és töltés
Nem sikerül feltölteni a fejhallgatót
•Győződjön meg arról, hogy a számítógép be van kapcsolva, és nem készenléti
vagy alvó állapotban van.
• Megfelelően működik az az USB port, amelyet jelenleg használ? Ha
számítógépén több USB port is található, húzza ki a kábelt a jelenlegi aljzatból,
és dugja be egy másikba.
• Ha a fenti műveletek végrehajtására nincs mód, húzza ki az USB-töltőkábelt,
majd dugja vissza újra.
• A LED vörösen villog? Ha a LED villog, akkor töltési probléma lépett fel.
• Ha a LED vörösen, gyorsan villog olyankor is, amikor a fejhallgatót 10 °C
és 35 °C közötti szobahőmérsékleten tölti, akkor lehet, hogy lemerült az
akkumulátor. (A fejhallgatóhoz mellékelt akkumulátor újratöltési kapacitása:
körülbelül 500 alkalom.)
A LED nem világít töltés közben / A töltés a szokásosnál hosszabb
ideig tart
• Megfelelően csatlakozik az USB-töltőkábel (tartozék) a számítógép USB
bemenetéhez? (→ 3. oldal)
Nem kapcsolódik be a fejhallgató
• Töltés alatt áll a fejhallgató? Az eszköz töltés közben nem kapcsolható BE.
(→ 3. oldal)
• Csatlakoztatva van a leválasztható kábel? Csatlakoztatott leválasztható kábellel
a fejhallgató nem kapcsolható be.
VQT5J79
8
88
Hang és hangerő
Nincs hang
•Győződjön meg arról, hogy megfelelő a kapcsolat a fejhallgató és a Bluetooth®eszköz között. (→ 3. oldal)
• Ellenőrizze, játszik-e le zenét a Bluetooth
•Győződjön meg arról, hogy a fejhallgató be van kapcsolva, és a beállított
hangerőszint nem túl alacsony.
• Párosítsa, majd csatlakoztassa újra a fejhallgatót és a Bluetooth
(→ 3. oldal)
®
-eszköz.
®
-eszközt.
A hangerő túl alacsony
• Növelje a fejhallgató hangerejét. (→ 4. oldal)
• Növelje a hangerőt a Bluetooth
®
-eszközön.
Az eszközről érkező hang leáll / Rossz a hangminőség
• Ha a jel átvitele nem megfelelő, akkor a hang eltűnhet. A fejhallgatót se a
tenyerével, se más módon ne takarja el.
• Lehet, hogy az eszköz kívül esik a 10 méteres kommunikációs hatókörön.
Helyezze az eszközt közelebb a fejhallgatóhoz.
• Távolítsa el az esetleges akadályokat a fejhallgató és az eszköz közül.
• Kapcsolja ki az összes használaton kívüli vezeték nélküli eszközt.
• Kommunikációs probléma léphet fel olyankor is, amikor az akkumulátor lemerül.
Töltse fel a fejhallgatót. (→ 3. oldal)
Telefonhívások
Nem hallja a másik személyt
•Győződjön meg arról, hogy a fejhallgató és a Bluetooth®-kompatibilis telefon is
be van kapcsolva.
• Ellenőrizze, hogy van-e kapcsolat a fejhallgató és a Bluetooth
telefon között. (→ 3. oldal)
• Ellenőrizze a Bluetooth
hívóeszközként a fejhallgatót, ha az párosítva van a Bluetooth
telefonhoz. (→ 3. oldal)
• Ha a másik személy hangereje túl alacsony, a fejhallgató és a Bluetooth
kompatibilis telefon hangerejét is növelje meg.
®
-kompatibilis telefon audiobeállításait. Állítsa be
®
-kompatibilis
®
-kompatibilis
®
-
Page 89

Szerzői jogok stb.
aptX® software is copyright CSR plc or its group
●
companies. All rights reserved.
®
mark and the aptX logo are trademarks of
The aptX
CSR plc or one of its group companies and may be
registered in one or more jurisdictions.
A Bluetooth® szó, megjelölés és logó tulajdonosa
●
a Bluetooth SIG, Inc., és ezeknek a Panasonic
Corporation általi minden használata licenc alapján
történik.
A további védjegyek és nevek a megfelelő
tulajdonosok birtokában állnak.
A dokumentumban előforduló további rendszernevek
●
és terméknevek általában a megfelelő fejlesztő
vállalatok bejegyzett védjegyei vagy védjegyei.
Kérjük, vegye figyelembe, hogy a ™ és az ® jelölést
nem tüntetjük fel ebben a dokumentumban.
Tájékoztatás felhasználók számára az
elhasználódott készülékek, szárazelemek és
akkumulátorok begyűjtéséről és ártalmatlanításáról.
Csak az Európai Unió és olyan országok részére,
amelyek begyűjtő rendszerekkel rendelkeznek
A termékeken, a csomagoláson és/vagy a kísérő
dokumentumokon szereplő szimbólumok azt jelentik,
hogy az elhasználódott elektromos és elektronikus
termékeket, szárazelemeket és akkumulátorokat
tilos az általános háztartási hulladékkal keverni.
Az elhasználódott készülékek, szárazelemek
és akkumulátorok megfelelő kezelése,
hasznosítása és újrafelhasználása céljából,
kérjük, hogy a helyi törvényeknek, megfelelően
juttassa el azokat a kijelölt gyűjtőhelyekre.
E termékek, szárazelemek és akkumulátorok
előírásszerű ártalmatlanításával Ön
hozzájárul az értékes erőforrások
megóvásához, és megakadályozza az emberi
egészség és a környezet károsodását.
Amennyiben a begyűjtéssel és újrafelhasználással
kapcsolatban további kérdése lenne, kérjük,
érdeklődjön a helyi önkormányzatnál.
E hulladékok szabálytalan elhelyezését a
nemzeti jogszabályok büntethetik.
Megjegyzés a szárazelem- és
akkumulátor-szimbólummal
kapcsolatban (alsó szimbólumpélda):
Ezek a szimbólumok kémiai szimbólummal együtt
alkalmazhatók. Ebben az esetben teljesíti az EU
irányelvnek vegyi anyagra vonatkozó követelményét.
Az akkumulátor eltávolítása a fejhallgató hulladékosítása előtt
1
2
3
A
D
C
4
E
B
5
G
G
Az itt következő utasítások nem a javítás, hanem
az ártalmatlanítás célját szolgálják. A fejhallgató
a szétszerelés után már nem állítható helyre.
Mielőtt ártalmatlanítaná a fejhallgatót, vegye ki a benne
található akkumulátort, és vigye azt el egy újrahasznosító
gyűjtőponthoz.
• A szétszerelést azután végezze el, hogy az akkumulátor
D
lemerült.
• A szétszerelt részek gyermekektől távol tartandók.
Vegye le a fülpárnát A a jobb oldali
1
hangszóróról, és távolítsa el a 3 csavart
• Használjon csillagcsavarhúzót (kereskedelmi
forgalomban is kapható).
Távolítsa el az elülső borítást
2
Emelje fel a 2 reteszt D, és forgassa el a
3
hátsó borítást C az óramutató járásával
ellenkező irányban
Távolítsa el a 4 csavart, majd a keretet
4
A G helyzetben (az érintkezők F
5
ellentétes végénél), két oldalról fogva
távolítsa el az akkumulátort
Az elhasználódott akkumulátorok kezeléséről
• Az érintkezőket szigetelje ragasztószalaggal vagy más,
hasonló anyaggal.
• Ne szerelje szét.
■
Akkumulátor
• Ne tegye ki hőhatásnak, és ne dobja tűzbe.
• Ne hagyja az akkumulátort/akkumulátorokat közvetlen
napfénynek kitett autóban hosszabb ideig úgy, hogy nem
hagyja nyitva az ajtókat és ablakokat.
• Az akkumulátor nem megfelelő kezelése az elektrolit
kiszivárgásához, így az a vele érintkezésbe lépő
tárgyak károsodásához vezethet. Ha elektrolit szivárog
az akkumulátorból, forduljon a helyi kereskedőhöz.
Amennyiben az elektrolit rákerül teste bármely részére, az
érintett területet alaposan, tiszta vízzel mossa le.
• Kérjük, az akkumulátor ártalmatlanításakor forduljon a
F
helyi hatósághoz vagy kereskedéshez, és kérdezze meg,
mi a helyes eljárás.
B
E
MAGYAR
VQT5J79
9
89
Page 90

Vážený zákazník
Ďakujeme, že ste si zakúpili tento
výrobok.
Prosím, pred používaním tohto
výrobku si dôkladne prečítajte tieto
pokyny a tento návod uschovajte pre
možnú potrebu v budúcnosti.
Obsah
Pred použitím
Príslušenstvo ...................................... 2
Názvy dielov ....................................... 2
Príprava
Nabíjanie ............................................ 3
Zapnutie/vypnutie ............................... 3
Pripájanie zariadenia Bluetooth
Spojenie jedným dotykom
(spojenie cez NFC) ........................4
Prevádzka
Počúvanie hudby ................................4
Uskutočnenie telefonátu .....................5
Užitočné funkcie ................................. 5
Iné
Obnovenie výrobných nastavení ........ 5
Bezpečnostné opatrenia ..................... 6
Údržba ................................................ 6
Informácie o Bluetooth
Špecifikácie ........................................ 7
Pokyny k odstraňovaniu porúch .........8
Autorské práva, atď. ........................... 9
Odstránenie batérie pri likvidácii
tejto jednotky ..................................9
VQT5J79
2
90
®
...................... 7
®
........ 3
Príslušenstvo
Skontrolujte a identifikujte dodané
príslušenstvo.
1 Odpojiteľný kábel
1 USB nabíjací kábel
Názvy dielov
1
2
3
4
5
6
Otvorte kryt
Vľavo Pravý
7
8
14 15
Zobrazenia výrobku sa môžu líšiť od
samotného výrobku.
9
10 11
12 13
Tlačidlo hlavného
1
vypínača / párovania
Svetelný LED indikátor*
2
•Počet bliknutí alebo farba
udáva stav jednotky.
(* ďalej označovaný ako „LED“)
Vstupná audio koncovka
3
•Keď jednotku používate ako
drôtové slúchadlá, zapojte
odpojiteľný kábel (pribalený) do
tejto koncovky.
Mikrofón
4
Otvor na RESETOVANIE
5
(RESET)
Koncovka pre nabíjanie
6
(DC IN)
• Pri nabíjaní zapojte USB
nabíjací kábel (pribalený) do
tejto koncovky. (→ Str. 3)
7
Volať
Dotyková oblasť NFC
8
Predchádzajúce
9
Hlasitosť +
10
Ďalšie
11
Hlasitosť –
12
Prehrávanie/Pauza
13
Vľavo reproduktor
14
Pravý reproduktor
15
■
Poznámka
• Okrem dodaného nabíjacieho
kábla nepoužívajte žiaden iný
USB nabíjací kábel.
• Okrem dodaného odpojiteľného
kábla nepoužívajte žiaden iný
odpojiteľný kábel.
• Pri používaní jednotky
nezakrývajte dlaňou vľavo
reproduktor. Spojenie Bluetooth
môže byť blokované.
®
Page 91

Nabíjanie
Nabíjateľná batéria (nainštalovaná v jednotke) nie je zo začiatku nabitá. Pred
používaním jednotky batériu nabite.
Pripojte jednotku k počítaču
1
pomocou USB nabíjacieho kábla
•Počas nabíjania bude LED na ľavom
reproduktore svietiť na červeno. Po
dokončení nabíjania LED zhasne.
• Nabíjanie zo stavu vybitia po plné
nabitie bude trvať približne 4,5 hodiny.
■
Poznámka
• Funkcia Bluetooth® sa nedá používať keď je jednotka pripojená k počítaču
pomocou USB nabíjacieho kábla.
• Jednotku nabíjajte pri teplote medzi 10 °C a 35 °C.
•Počas nabíjania sa zariadenie nedá zapnúť.
• Okrem dodaného nabíjacieho kábla nepoužívajte žiaden iný USB nabíjací kábel.
Pozor: Pri pripájaní jednotky k počítaču používajte len dodaný USB nabíjací
kábel.
Počítač
USB nabíjací kábel (pribalený)
Vľavo
LED
Zapnutie/vypnutie
Stlačte a podržte tlačidlo hlavného
1
vypínača približne na 2 sekundy
• Ozve sa pípnutie a indikátor LED na ľavom
reproduktore bude blikať.
Tlačidlo hlavného vypínača
Vypnutie slúchadiel
• Stlačte a podržte tlačidlo hlavného vypínača
Ozve sa pípnutie a indikátor LED na ľavom reproduktore zhasne.
■
Poznámka
• Jednotka sa automaticky vypne, ak nie je v prevádzke po dobu približne 5 minút.
(Pozri „Automatické vypnutie“ (→ Str. 5))
na 2 sekundy alebo dlhšie.
®
na
®
®
.
®
Pripájanie zariadenia Bluetooth
Pre vytvorenie bezdrôtového spojenia zaregistrujte jednotku so zariadeniami
kompatibilnými s Bluetooth
Príprava na zariadení Bluetooth
• Zapnite zariadenie a aktivujte funkciu Bluetooth®.
• Zariadenie umiestnite vo vzdialenosti do 1 m od jednotky.
• V prípade potreby skontrolujte prevádzku zariadenia v návode na použitie.
Prvé zapnutie
Zapnite jednotku
1
•S účelom nadviazania spojenia
začne jednotka vyhľadávať
zariadenie Bluetooth
ľavom reproduktore bude blikať
striedavo na modro a červeno.
(Len jedna prevádzka po kúpe)
Keď zariadenie Bluetooth®
2
rozpozná jednotku
(„RP-BTD10“), zvoľte ju
• Po výzve na zadanie hesla,
zadajte „0000 (štyri nuly)“.
• Ak sa zobrazí obrazovka voľby
profilu Bluetooth
„A2DP“. Ak profil „A2DP“ nie je
podporovaný alebo ak chcete
uskutočňovať len telefonáty,
zvoľte profil „HSP“ alebo
„HFP“. (Podrobné informácie
o profiloch nájdete v časti
„Počúvanie hudby“ (→ Str. 4)
a „Uskutočnenie telefonátu“
(→ Str. 5))
Na jednotke skontrolujte
3
spojenie so zariadením
Bluetooth
• LED na ľavom reproduktore
svieti najprv na modro a
opakovane sa zapne a vypne.
Po nadviazaní spojenia sa zmení
schéma blikania indikátora.
®
®
.
®
a LED na
®
, zvoľte si profil
®
Spojenie na druhý raz
<Pripojenie toho istého zariadenia
Bluetooth
Keď je jednotka zapnutá, bude hľadať
naposledy nastavené zariadenie
Bluetooth
spojenie. LED na ľavom reproduktore
svieti najprv na modro a opakovane sa
zapne a vypne. Po nadviazaní spojenia
sa zmení schéma blikania indikátora.
<Pripojenie iného zariadenia
Bluetooth
Deaktivujte funkciu Bluetooth
naposledy pripojenom zariadení.
Skontrolujte, či je zariadenie vypnuté.
Stlačte a podržte tlačidlo párovania
približne na 5 sekúnd. Jednotka začne
vyhľadávať iné zariadenia Bluetooth
LED na ľavom reproduktore bude
blikať striedavo na modro a červeno.
Ozve sa pípnutie.
Pokračujte v krokoch 2 a 3.
®
k jednotke>
®
a automaticky s ním nadviaže
®
k jednotke>
■
Poznámka
• Ak sa približne do 5 minút
nenadviaže spojenie so zariadením,
jednotka sa vypne.
Začnite znovu od kroku 1.
• K jednotke nemôžu byť pripojené
2 alebo viac zariadení Bluetooth
zároveň.
• Jednotka môže byť spárovaná až
s 8 zariadeniami. Ak sa jednotka
spáruje s deviatym zariadením,
najstaršie spojenie bude nahradené.
V prípade opätovného použitia
zariadenie znova spárujte.
SLOVENSKY
VQT5J79
3
91
Page 92

Spojenie jedným dotykom
(spojenie cez NFC)
Len pre zariadenia Android™ kompatibilné s NFC
Funkcia NFC (Near Field Communication) umožňuje jednoduché pripojenie
tejto jednotky k zariadeniu Bluetooth
Na automatické zapnutie, spárovanie so zariadením Bluetooth
spojenia, stačí tejto jednotke dotyk s vaším zariadením Bluetooth
®
, ktoré je kompatibilné s funkciou NFC.
®
a nadviazanie
®
.
Príprava
Zapnite funkciu NFC na zariadení Bluetooth®.
Spustite aplikáciu na prehrávanie hudby/videa na zariadení
1
Bluetooth
• Riaďte sa pokynmi na obrazovke vášho zariadenia.
Dotknite sa vášho zariadenia v dotykovej oblasti NFC tejto
2
jednotky a pridržte ho (kým sa neobjaví vysúvacie okno na
®
vašom zariadení a neoznámi, že spojenie je nadviazané)
• Jednotka je zapnutá. LED na ľavom reproduktore svieti najprv na modro a
opakovane sa zapne a vypne. Po nadviazaní spojenia sa zmení schéma
blikania indikátora.
• Ak spojenie nie je vytvorené, zmeňte polohu dotyku.
Spustite prehrávanie hudby/videa na vašom zariadení Bluetooth
3
■
Spojenie s iným zariadením
Dotknite sa touto jednotkou iného zariadenia pre vytvorenie nového spojenia
®
Bluetooth
Predchádzajúce pripojené zariadenie bude automaticky odpojené.
.
Počúvanie hudby
Ak zariadenie kompatibilné s Bluetooth® podporuje profily Bluetooth® „A2DP“ a
„AVRCP“, hudbu môžete prehrávať pomocou diaľkového ovládania na jednotke.
• A2DP (Profil pokročilej distribúcie zvuku): Vysiela zvuk k jednotke.
• AVRCP (Profil diaľkového ovládania zvuku/videa):
Umožňuje diaľkové ovládanie zariadenia pomocou jednotky.
Pripojte zariadenie s funkciou Bluetooth® k jednotke (→ Str. 3)
1
Zvoľte a spustite hudbu na zariadení Bluetooth
2
• Zvolená hudba sa prehráva cez reproduktory jednotky.
VQT5J79
4
92
®
Doba prevádzky batérie
Typ batérie Doba prevádzky
Nabíjateľná batéria (nainštalovaná v jednotke) Pribl. 30 hodín
Doba prevádzky môže byť kratšia v závislosti od prevádzkových podmienok.
■
Poznámka
• Zariadenia Bluetooth® podporujúce aptX® dokážu vysielať hudbu vo vyššej
kvalite.
■
Pozor
• Jednotka môže byť príliš hlučná, v závislosti od úrovne hlasitosti.
•Keď sa hlasitosť zvýši na takmer maximálnu úroveň, hudba môže znieť rušivo.
Znížte úroveň hlasitosti, kým rušenie nezmizne.
Diaľkové ovládanie
Zariadenie Bluetooth® môžete ovládať pomocou slúchadiel.
• V závislosti od zariadení Bluetooth
nefungujú alebo fungujú odlišne.
(Príklad prevádzky)
Prehrávanie/Pauza
®
Stlačenie Prehrávanie/Pauza
Predchádzajúce/Ďalšie
Stlačenie počas
prehrávania
Stlačenie a
podržanie
Stlačenie počas
prehrávania
Stlačenie a
podržanie
Hlasitosť
Stlačenie Zvýšenie hlasitosti
+
Stlačenie a
podržanie
Stlačenie Zníženie hlasitosti
−
Stlačenie a
podržanie
Návrat na začiatok
aktuálnej skladby
Rýchly posun
dozadu
Dopredu
na začiatok
nasledujúcej
skladby
Rýchly posun
dopredu
Nepretržité
zvyšovanie
hlasitosti
Nepretržité
znižovanie
hlasitosti
®
niektoré nižšie uvedené funkcie cez jednotku
Predchádzajúce
Hlasitosť –
■
Poznámka
• Nastavenie hlasitosti sa
uskutočňuje na 15 úrovniach.
Keď sa dosiahne maximálna
alebo minimálna hlasitosť, ozve
sa pípnutie.
Pravý
Hlasitosť +
Prehrávanie/
Pauza
Ďalšie
Page 93

Uskutočnenie telefonátu
Jednotku môžete použiť na telefonovanie spolu s telefónmi s funkciou Bluetooth®
(mobilné telefóny alebo smartfóny), ktoré podporujú profil Bluetooth
„HFP“.
• HSP (Profil Headset):
Tento profil je možné použiť na prijímanie monoaurálnych zvukov a nastavenie
dvojcestnej komunikácie pomocou mikrofónu jednotky.
• HFP (Profil Hands-Free):
Okrem funkcií HSP má tento profil aj funkciu prijímania a uskutočňovania
hovorov.
Pripojte telefón s funkciou Bluetooth® k jednotke (→ Str. 3)
1
Prijatie prichádzajúceho hovoru
2
Na jednotke stlačte tlačidlo
Volať
Začnite hovoriť
3
• LED počas telefonátu 2-krát zabliká.
• Hlasitosť môžete nastaviť počas telefonátu. Pokyny týkajúce sa nastavenia
nájdete na strane 4.
Ak chcete telefonát ukončiť, stlačte tlačidlo Volať
4
• Ozve sa pípnutie.
a prijmite hovor
• Pri prichádzajúcom hovore bude
z reproduktora znieť vyzváňací
tón a blikať indikátor LED.
• (Len HFP) Na odmietnutie
prichádzajúceho hovoru stlačte
a podržte tlačidlo Volať
do ukončenia vyzváňacieho
tónu.
Vľavo
Volať
Mikrofón
až
Uskutočnenie odchádzajúceho hovoru
Uskutočnite hovor
pomocou telefónu s
funkciou Bluetooth
• Pozrite si aj návod na použitie
telefónu s funkciou Bluetooth
(Kontrola a používateľské kroky na
jednotke sú vysvetlené nižšie)
• Pri odchádzajúcom hovore bude
z reproduktora znieť vyzváňací
tón a indikátor LED bude blikať.
• Pre zrušenie odchádzajúceho
hovoru stlačte tlačidlo Volať
Ozve sa pípnutie.
• (Len HFP) Keď je telefón
nečinný, približne na 2 sekundy
stlačte a podržte tlačidlo
Volať
odchádzajúci hovor na posledné
volané číslo. Z reproduktora
bude znieť tón klikania a
indikátor LED bude blikať.
®
„HSP“ alebo
. Uskutoční sa
®
■
Poznámka
• V niektorých prípadoch bude potrebné nastaviť prevádzku typu hands free na
telefóne s funkciou Bluetooth
• V závislosti od telefónu s funkciou Bluetooth
prichádzajúce a odchádzajúce vyzváňacie tóny.
• (Len HFP) Stlačte a približne 2 sekundy podržte tlačidlo Volať
Volajúce zariadenie sa prepne medzi telefónom s funkciou Bluetooth
jednotkou.
®
.
®
môžete z jednotky slúchadiel počuť
na jednotke.
®
a
Užitočné funkcie
Resetovanie jednotky
Táto jednotka môže byť resetovaná, keď sú odmietnuté všetky operácie.
Pripojte jednotku k počítaču pomocou USB nabíjacieho kábla. Stlačte otvor na
RESETOVANIE (RESET) tenkým špicatým predmetom. Skontrolujte, že LED
indikátor (červený) zhasne. Ak chcete jednotku resetovať, naďalej stláčajte otvor na
RESETOVANIE (RESET) (→ Str. 2) približne na 5 sekúnd. Všetky predchádzajúce
®
.
operácie sa zrušia. (Informácie o spárovaných zariadeniach nebudú vymazané.)
Automatické vypnutie
Ak je jednotka nečinná na približne 5 minút a operácie všetkých Bluetooth®
zariadení sú počas tejto doby taktiež nečinné, ozve sa pípnutie a hlavný vypínač sa
automaticky vypne.
Svetelný LED indikátor
.
Keď je úroveň nabitia batérie počas používania jednotky nízka, modrý blikajúci
LED indikátor na ľavom reproduktore zmení farbu na červenú. Každú 1 minútu
zaznie pípnutie. Keď bude batéria vybitá, jednotka sa vypne.
Obnovenie výrobných nastavení
Keď chcete vymazať informácie o všetkých spárovaných zariadeniach a pod.,
môžete obnoviť výrobné nastavenia jednotky (pôvodné nastavenia pri kúpe).
1 Vypnite jednotku
2 Na 5 sekúnd alebo dlhšie stlačte a zároveň podržte tlačidlo hlavného
vypínača
• Indikátor LED na ľavom reproduktore zasvieti na červeno približne na
2 sekundy. Výrobné nastavenia jednotky budú obnovené.
a tlačidlo Predchádzajúce
SLOVENSKY
VQT5J79
5
93
Page 94

Bezpečnostné opatrenia
■
Jednotka
• Nepoužívajte ani neumiestňujte túto jednotku v blízkosti zdrojov tepla.
• Nepoužívajte jednotku pri vysokej hlasitosti na miestach, kde z
bezpečnostných dôvodov musíte počuť zvuky z okolitého prostredia, napríklad
na železničných priecestiach a staveniskách.
• Charakteristický prúd širokého pásma sa rovná alebo je väčší ako 75 mV.
VAROVANIE:
Pre zníženie rizika požiaru, elektrického šoku alebo poškodenia výrobku:
• Nevystavujte túto jednotku dažďu, vlhku, kvapkajúcej alebo striekajúcej
tekutine.
• Neumiestňujte predmety naplnené kvapalinami, napríklad vázy, na túto
jednotku.
• Používajte len odporúčané príslušenstvo.
• Neodstraňujte kryty.
• Sami neopravujte túto jednotku. Opravu prenechajte kvalifikovanému
personálu.
■
Alergie
• V prípade, že vám reproduktory alebo ktorékoľvek iné časti prichádzajúce
do styku s vašou pokožkou spôsobujú nepríjemný pocit, prestaňte jednotku
používať.
• Pretrvávajúce používanie môže spôsobiť vyrážky alebo iné alergické reakcie.
■
Preventívne opatrenia týkajúce sa počúvania so slúchadlami
• Nepoužívajte slúchadlá pri vysokej hlasitosti. Odborníci na sluch neodporúčajú
nepretržité nadmerné prehrávanie.
• V prípade, že začujete zvonenie v ušiach, znížte hlasitosť alebo prestaňte
slúchadlá používať.
• Nepoužívajte pri vedení motorového vozidla. Môže to viesť k dopravnej
nehode a v mnohých oblastiach je to zakázané.
• V potenciálne nebezpečných situáciách by ste mali byť mimoriadne opatrní
alebo by ste ich dočasne mali prestať používať.
Počas použitia môže táto jednotka zachytiť rušenie rádiovými vlnami spôsobené
mobilnými telefónmi. V prípade výskytu spomínaného rušenia, zvýšte, prosím,
vzdialenosť medzi touto jednotkou a mobilným telefónom.
Údržba
Jednotku čistite mäkkou suchou utierkou.
• Nepoužívajte rozpúšťadlá ako benzín, riedidlo, alkohol, kuchynské čistiace
prostriedky, chemické prípravky a podobne. Ich použitie by mohlo spôsobiť
deformácie vonkajšieho puzdra a odlupovanie povrchovej vrstvy.
Prehlásenie o zhode (DoC)
Spoločnosť Panasonic Corporation týmto prehlasuje, že tento výrobok je v zhode
so základnými požiadavkami a ostatnými nariadeniami smernice 1999/5/EC.
K našim R&TTE výrobkom si zákazníci môžu prevziať kópiu originálneho
prehlásenia o zhode z nášho DoC servera.
http://www.doc.panasonic.de
Kontakt na autorizovaného zástupcu: Panasonic Marketing Europe GmbH,
Panasonic Testing Centre, Winsbergring 15, 22525 Hamburg, Germany
Tento výrobok sa smie používať len v týchto krajinách.
VEĽKÁ BRITÁNIA, FRANCÚZSKO, NEMECKO, TALIANSKO, ŠVAJČIARSKO,
RAKÚSKO, HOLANDSKO, BELGICKO, ŠPANIELSKO, ŠVÉDSKO, NÓRSKO,
DÁNSKO, FÍNSKO, MAĎARSKO, ČESKÁ REPUBLIKA, SLOVENSKO,
SLOVINSKO, BULHARSKO, POĽSKO, GRÉCKO, PORTUGALSKO, RUMUNSKO
Tento výrobok je určený pre všeobecných spotrebiteľov. (Kategória 3)
VQT5J79
6
94
Page 95

Informácie o Bluetooth
Spoločnosť Panasonic nenesie žiadnu zodpovednosť za údaje a/alebo
informácie skompromitované počas bezdrôtového prenosu.
■
Použité frekvenčné pásmo
Táto jednotka využíva frekvenčné pásmo 2,4 GHz.
■
Certifikácia tejto jednotky
• Táto jednotka vyhovuje frekvenčným obmedzeniam a certifikácia jej bola
udelená na základe frekvenčných zákonov. Z toho dôvodu nie je potrebné
povolenie na bezdrôtový prenos.
• Nižšie uvedené činnosti sú v niektorých krajinách postihnuteľné zákonom:
– Rozobratie/úprava jednotky,
– Odstránenie údajov o špecifikácii.
■
Obmedzenia vzťahujúce sa na použitie
• Bezdrôtový prenos a/alebo možnosť použitia so všetkými zariadeniami
vybavenými funkciou Bluetooth
• Všetky zariadenia musia vyhovovať štandardom stanoveným spoločnosťou
Bluetooth SIG, Inc.
• Pripojenie zariadenia môže zlyhať, prípadne sa môžu niektoré operácie líšiť v
závislosti od jeho špecifikácií a nastavení.
• Tento systém podporuje bezpečnostné prvky Bluetooth
operačného prostredia a/alebo nastavení je však možné, že táto bezpečnosť
niekedy nie je dostatočná. Buďte opatrní pri bezdrôtovom prenose údajov na
tento systém.
• Tento systém nedokáže preniesť údaje na zariadenie Bluetooth
■
Rozsah použitia
Túto jednotku používajte v maximálnom rozsahu 10 m.
Rozsah sa môže znížiť v závislosti od prostredia, prekážok alebo rušenia.
■
Rušenie z iných zariadení
• V prípade, že je táto jednotka umiestnená v blízkosti iných zariadení
• V prípade, že rádiové vlny z neďalekej vysielacej stanice a pod. sú príliš silné,
■
Určené použitie
• Táto jednotka je určená len na bežné, všeobecné použitie.
• Nepoužívajte tento systém v blízkosti príslušenstva alebo v prostredí,
®
Bluetooth
jednotka náležite fungovať a môžu sa vyskytnúť problémy, ako napríklad šum
alebo výkyvy zvuku z dôvodu rušenia rádiovými vlnami.
nemusí táto jednotka náležite fungovať.
ktoré je citlivé na rušenie rádiovými frekvenciami (napríklad: na letiskách, v
nemocniciach, laboratóriách atď.).
alebo zariadení, ktoré využívajú pásmo 2,4 GHz, nemusí táto
®
nie sú garantované.
®
®
. V závislosti od
®
.
Špecifikácie
■
Všeobecné informácie
Napájanie
1
Prevádzková doba*
Doba nabíjania*
Rozsah teploty nabíjania 10 ºC až 35 ºC
Rozsah prevádzkovej teploty 0 ºC až 40 ºC
Rozsah prevádzkovej vlhkosti 35%RH až 80%RH (bez kondenzácie)
Hmotnosť Približne 198 g
1
Môže byť kratšia v závislosti od prevádzkových podmienok.
*
2
Doba nabíjania z prázdneho na plný stav.
*
■
Časť týkajúca sa Bluetooth
Systémové špecifikácie
Bluetooth
Klasifikácie bezdrôtového
zariadenia
Frekvenčné pásmo Pásmo 2,4 GHz FH-SS
Podporované profily A2DP, AVRCP, HSP, HFP
Podporovaný kodek SBC, aptX
Prevádzková vzdialenosť Do 10 m
■
Riadiace jednotky Φ 40 mm
Impedancia 32 Ω
■
DC IN DC 5 V, 500 mA
Audio vstup Stereo konektor Φ 3,5 mm
■
Typ Mono
■
USB nabíjací kábel 1,0 m
Odpojiteľný kábel 1,5 m
®
Časť týkajúca sa reproduktora
Časť týkajúca sa koncovky
Časť týkajúca sa mikrofónu
Časť týkajúca sa príslušenstva
Špecifikácie podliehajú zmenám bez upozornenia.
●
(režim SBC) Pribl. 30 hodín
2
(25 ºC) Pribl. 4,5 hodín
DC 5 V, 500 mA
(Vnútorná batéria: 3,6 V (Li-ion 690 mAh))
®
Verzia 3.0
Trieda 2 (2,5 mW)
®
SLOVENSKY
VQT5J79
7
95
Page 96

Pokyny k odstraňovaniu porúch
Pred vyžiadaním servisu vykonajte nasledujúce kontroly. V prípade pochybností
týkajúcich sa niektorých kontrolných bodov, prípadne nevyriešenia problému
naznačenými opatreniami, sa obráťte na svojho obchodného zástupcu ohľadom
ďalších pokynov.
Všeobecné informácie
Jednotka nereaguje
•Počas pripájania USB nabíjacieho kábla do koncovky pre nabíjanie (DC IN),
stlačte otvor na RESETOVANIE (RESET). (→ Str. 5)
Prívod elektrického prúdu a nabíjanie
Jednotka sa nedá nabiť
• Uistite sa, že počítač je zapnutý a nie je v úspornom režime alebo v režime
spánku.
• Funguje port USB, ktorý momentálne používate, správne? V prípade, že má
váš počítač ďalšie porty USB, odpojte konektor z portu, v ktorom je momentálne
zapojený, a zapojte ho do jedného z ďalších portov.
• V prípade, že sa vyššie uvedené opatrenia nedajú použiť, odpojte USB nabíjací
kábel a znova ho zapojte.
• Bliká LED na červeno? V prípade blikania LED ide o poruchu nabíjania.
• V prípade rýchleho blikania LED na červeno je možné, že sa vybila batéria, a to
napriek tomu, že sa jednotka opätovne nabíja pri izbovej teplote v rozmedzí od
10 °C do 35 °C. (Počet možných nabíjaní priloženej batérie: približne 500.)
LED počas nabíjania nesvieti / Nabíjanie trvá dlhšie
• Je USB nabíjací kábel (pribalený) pevne zapojený do USB koncovky počítača?
(→ Str. 3)
Zariadenie sa nezapne
• Nabíja sa v tejto chvíli jednotka? Zariadenie počas nabíjania nemôže byť
ZAPNUTÉ. (→ Str. 3)
• Je odpojiteľný kábel zapojený? Zariadenie nemožno zapnúť, keď je odpojiteľný
kábel zapojený do jednotky.
Pripojenie zariadenia Bluetooth
®
Zariadenie sa nedá pripojiť
• Zo zariadenia Bluetooth® vymažte párovacie informácie o tejto jednotke, a potom
ich znova spárujte. (→ Str. 3)
Zvuk a hlasitosť
Žiadny zvuk
• Uistite sa, že jednotka a zariadenie Bluetooth® sú správne pripojené. (→ Str. 3)
• Skontrolujte, či na zariadení Bluetooth
• Uistite sa, že je jednotka zapnutá a hlasitosť nie je nastavená príliš nízko.
• Znova spárujte a pripojte zariadenie Bluetooth
®
hrá hudba.
®
a jednotku. (→ Str. 3)
Nízka hlasitosť
• Zvýšte hlasitosť jednotky. (→ Str. 4)
• Zvýšte hlasitosť na zariadení Bluetooth
®
.
Zvuk zo zariadenia je prerušený / Kvalita zvuku je zlá
• V prípade blokovania signálov môže byť zvuk prerušovaný. Nezakrývajte úplne
túto jednotku svojou dlaňou a pod.
• Zariadenie sa môže nachádzať mimo komunikačného rozsahu 10 m. Posuňte
zariadenie bližšie k tejto jednotke.
• Odstráňte akékoľvek prekážky medzi touto jednotkou a zariadením.
•Keď sa akékoľvek bezdrôtové zariadenie LAN nepoužíva, vypnite ho.
• V prípade vybitej batérie môže vzniknúť komunikačný problém. Nabite jednotku.
(→ Str. 3)
Telefónne hovory
Nepočujete druhú osobu
• Uistite sa, že jednotka a telefón podporujúci funkciu Bluetooth® sú zapnuté.
• Skontrolujte, či jednotka a telefón podporujúci funkciu Bluetooth
(→ Str. 3)
• Skontrolujte nastavenia zvuku na telefóne podporujúcom funkciu Bluetooth
Pripojte telefonické zariadenie k jednotke, ak je nastavená na telefón podporujúci
funkciu Bluetooth
• V prípade, že hlasitosť hlasu druhej osoby je príliš nízka, zvýšte hlasitosť
jednotky aj telefónu podporujúceho funkciu Bluetooth
®
. (→ Str. 3)
®
®
sú spojené.
®
.
.
VQT5J79
8
96
Page 97

Autorské práva, atď.
aptX® software is copyright CSR plc or its group
●
companies. All rights reserved.
®
mark and the aptX logo are trademarks
The aptX
of CSR plc or one of its group companies and
may be registered in one or more jurisdictions.
Slovné označenie Bluetooth® a logá sú majetkom
●
spoločnosti Bluetooth SIG, Inc. a akékoľvek
použitie takých označení spoločnosťou Panasonic
Corporation je možné na základe licencie.
Iné ochranné známky a obchodné názvy patria
ich príslušným majiteľom.
Mená iných systémov a mená výrobkov
●
objavujúce sa v tomto dokumente sú vo
všeobecnosti registrovanými ochrannými
známkami alebo ochrannými známkami
príslušných vývojárskych spoločností.
Všimnite si, že značenia ™ a ® sa v tomto
dokumente neobjavujú.
Likvidácia opotrebovaných zariadení a batérií
Len pre Európsku úniu a krajiny so systémom recyklácie
Tieto symboly uvádzané na výrobkoch,
balení a/alebo v sprievodnej dokumentácii
informujú o tom, že opotrebované elektrické
a elektronické výrobky a batérie sa nesmú
likvidovať ako bežný domový odpad.
V záujme zabezpečenia správneho
spôsobu likvidácie, spracovania a recyklácie
odovzdajte opotrebované výrobky a batérie
na špecializovanom zbernom mieste v
súlade s platnou legislatívou.
Správnym spôsobom likvidácie týchto
výrobkov a batérií prispejete k zachovaniu
cenných zdrojov a predídete prípadným
negatívnym dopadom na ľudské zdravie a
životné prostredie.
Podrobnejšie informácie o zbere a
recyklácii vám poskytnú miestne úrady.
Pri nesprávnej likvidácii tohto druhu
odpadu môžu byť v súlade s platnou
legislatívou udelené pokuty.
Poznámka týkajúca sa symbolu batérie
(spodný symbol):
Tento symbol môže byť použitý spolu so
symbolom chemickej značky. V takom prípade
vyhovuje požiadavke stanovenej Smernicou
týkajúcou sa príslušnej chemikálie.
Odstránenie batérie pri likvidácii tejto jednotky
1
2
3
A
D
C
4
E
B
5
G
G
Nasledujúce pokyny nie sú určené na účely
opráv, ale na likvidáciu tejto jednotky. Po
demontovaní nie je táto jednotka obnoviteľná.
Pri likvidácii tejto jednotky z nej vyberte nainštalovanú
batériu a odovzdajte ju na recykláciu.
• Jednotku demontujte po vybití batérie.
D
• Demontované časti udržiavajte mimo dosahu detí.
Odstráňte náušník A z pravého
1
reproduktora a odskrutkujte 3 skrutky
• Použite krížový skrutkovač (dostupný v obchodnej sieti).
Odstráňte predný kryt
2
Nadvihnutím 2 západiek D točte zadným
3
krytom C proti smeru hodinových
B
ručičiek
Odskrutkujte 4 skrutky a odstráňte kryt
4
Držte obe strany batérie v polohe G
5
(vzdialené od koncoviek F) a odstráňte ju
Informácie týkajúce sa zaobchádzania s použitými
batériami
• Izolujte koncovky lepiacou páskou alebo podobným
materiálom.
• Nerozoberajte.
■
Batérie
• Nezohrievajte alebo nevystavujte otvorenému ohňu.
• Nenechávajte batériu(ie) v aute dlho vystavenú(é)
priamemu slnečnému žiareniu pri zatvorených oknách a
dverách.
• Nesprávne použitie batérií môže spôsobiť vytekanie
elektrolytu, ktorý môže poškodiť predmety prichádzajúce
do kontaktu s vytekajúcim elektrolytom. V prípade, že z
batérie vyteká elektrolyt, obráťte sa na svojho obchodného
zástupcu. V prípade, že elektrolyt príde do kontaktu s
ktoroukoľvek časťou vášho tela, umyte ju dôkladne vodou.
•Keď likvidujete batérie, kontaktujte, prosím, svoje miestne
úrady alebo obchodného zástupcu a informujte sa o
správnych spôsoboch likvidácie.
F
E
SLOVENSKY
VQT5J79
9
97
Page 98

Уважаемый покупатель!
Благодарим Вас за приобретение
данного изделия.
Перед использованием этого
изделия, пожалуйста, внимательно
прочитайте данные инструкции
и сохраните это руководство для
дальнейшего использования.
Содержание
Перед использованием
Дополнительные
принадлежности ........................... 2
Названия компонентов ..................... 2
Подготовка
Зарядка .............................................. 3
Включение / отключение питания .... 3
Подключение устройства
Подключение одним касанием
Эксплуатация
Прослушивание музыки ................... 4
Телефонный звонок .......................... 5
Полезные функции ...........................5
Другое
Восстановление заводских
Меры предосторожности .................. 6
Техническое обслуживание .............6
О Bluetooth
Технические характеристики............7
Поиск и устранение
Авторские права и т. д. ..................... 9
Чтобы извлечь батарею во время
VQT5J79
2
98
®
Bluetooth
(подключение с помощью NFC)
настроек ........................................ 5
неисправностей ............................ 8
утилизации этого устройства ....... 9
...................................... 3
®
....................................... 7
Дополнительные
принадлежности
Пожалуйста, проверьте и
идентифицируйте дополнительные
принадлежности, которые входят в
комплект поставки продукта.
1 Разъемный шнур
1 USB-кабель для зарядки
... 4
Названия компонентов
Кнопка питания /
1
2
3
4
5
6
Откройте крышку
Левый Правый
7
8
9
12 13
14 15
Иллюстрации продукта могут
отличаться от его фактического
внешнего вида.
10 11
1
сопряжения
Светодиодный индикатор*
2
• Количество миганий или
цвет указывают на состояние
устройства.
(* Далее по тексту “Светодиод”)
Разъем аудиовхода
3
•
Подсоедините разъемный
шнур (входит в комплект
поставки) к этому разъему при
использовании устройства в
качестве проводных наушников.
Микрофон
4
Отверстие RESET
5
Разъем для зарядки (DC IN)
6
•
Подсоедините USB-кабель для
зарядки (входит в комплект
поставки) к этому разъему для
зарядки устройства. (→ Стр. 3)
7
Звонок
Зона действия NFC
8
Предыдущий
9
Громкость +
10
Следующий
11
Громкость –
12
Воспроизведение / Пауза
13
Левый динамик
14
Правый динамик
15
■
Примечание
• Для зарядки устройства
используйте только USB-кабель
для зарядки, который входит в
комплект поставки.
• Используйте только разъемный
шнур, который входит в
комплект поставки.
Во время использования устройства
•
не закрывайте левый динамик
ладонью. Это может заблокировать
соединение Bluetooth
®
.
Page 99

Зарядка
Перезаряжаемая аккумуляторная батарея (установленная в устройство)
поставляется незаряженной. Перед использованием устройства
зарядите аккумуляторную батарею.
Подключите это устройство к
1
компьютеру с помощью
USB-кабеля для зарядки
• Во время зарядки светодиод на
левом динамике горит красным
светом. После завершения зарядки
светодиод гаснет.
• Полная зарядка устройства от
полностью разряженного состояния
занимает приблизительно 4,5 часа.
■
Примечание
• Функцию Bluetooth® невозможно использовать, если это устройство
подключено к компьютеру с помощью USB-кабеля для зарядки.
• Заряжайте при температуре окружающей среды от 10 °C до 35 °C.
• Во время зарядки питание устройства не включается.
• Для зарядки устройства используйте только USB-кабель для зарядки,
который входит в комплект поставки.
Предупреждение: Для подключения к компьютеру используйте только
USB-кабель для зарядки, который входит в комплект поставки.
Компьютер
(входит в комплект поставки)
Левый
Светодиод
USB-кабель для зарядки
Включение / отключение питания
Нажмите и удерживайте кнопку
1
питания
• Прозвучит звуковой сигнал, и замигает светодиод
на левом динамике.
Отключение питания
• Нажмите и удерживайте кнопку питания
звуковой сигнал, и питание отключится.
■
Примечание
•
Если данное устройство не используется приблизительно в течение 5 минут,
питание автоматически отключается. (См. “Автоотключение питания” (→ Стр. 5))
приблизительно 2 секунды
Кнопка питания
2 секунды или более. Прозвучит
Подключение устройства Bluetooth
Чтобы установить беспроводное соединение, зарегистрируйте это устройство
на других устройствах, совместимых с Bluetooth
Подготовка устройства Bluetooth
• Включите питание и активируйте функцию Bluetooth®.
Расположите устройство на расстоянии не более 1 м от данного устройства.
•
• В случае необходимости ознакомьтесь с техническими характеристиками
устройства в его инструкции по эксплуатации.
Включение питания в первый раз
Включите питание этого
1
устройства
•
Это устройство начнет поиск
другого устройства Bluetooth
подключения, и светодиод на левом
динамике замигает попеременно
синим и красным светом. (Только
один раз после покупки)
Когда это устройство
2
(“RP-BTD10”) обнаружено
®
для
устройством Bluetooth®,
выберите его
•
Если запрашивается ключ для
доступа, введите “0000 (четыре нуля)”.
•
Если появляется экран выбора
профиля Bluetooth
профиль “A2DP”. Если “A2DP” не
поддерживается или Вы хотите
использовать устройство только для
совершения телефонных звонков,
выберите профиль “HSP” или
“HFP”. (Для получения подробной
информации о профилях см.
“Прослушивание музыки” (→ Стр. 4)
и “Телефонный звонок” (→ Стр. 5))
Проверьте подключение
3
этого устройства к другому
устройству Bluetooth
• Сначала светодиод на
левом динамике загорается
синим светом и продолжает
загораться и гаснуть. После
установления соединения
манера мигания изменится.
®
, выберите
®
®
.
®
Подключение после второго раза
<Подключение того же устройства Bluetooth®>
После включения это устройство
ищет ранее подключенное устройство
®
и начинает автоматическое
Bluetooth
подключение к нему. Сначала светодиод
на левом динамике загорается синим
светом и продолжает загораться
и гаснуть. После установления
соединения манера мигания изменится.
<Подключение другого устройства Bluetooth®>
Отключите функцию Bluetooth® на ранее
подключенном устройстве. Проверьте,
чтобы это устройство было выключено.
Нажмите и удерживайте кнопку
сопряжения
Это устройство начнет поиск другого
устройства Bluetooth
динамике замигает попеременно синим и
красным светом. Прозвучит звуковой сигнал.
Выполните шаги 2 и 3.
■
Примечание
•
Если подключение к устройству не
устанавливается приблизительно в
течение 5 минут, данное устройство
отключается.
Снова начните с шага 1.
•
К данному устройству невозможно
одновременно подключить 2 или более
устройств Bluetooth
•
Вы можете установить сопряжение этого
устройства с 8 другими устройствами. При
сопряжении 9-го устройства оно заменяет
устройство, которое было подключено
самым первым. Чтобы его использовать,
необходимо снова установить сопряжение.
приблизительно 5 секунд.
®
. Светодиод на левом
®
.
®
99
РУССКИЙ ЯЗЫК
VQT5J79
3
Page 100

Подключение одним касанием
(подключение с помощью NFC)
Только для NFC-совместимых устройств Android™
Функция NFC (“коммуникация ближнего поля”) позволяет легко подключать
это устройство к NFC-совместимым устройствам Bluetooth
прикоснитесь к этому устройству другим устройством Bluetooth
автоматически включить это устройство, выполните сопряжение устройства
®
Bluetooth
и установите соединение.
®
. Просто
®
, чтобы
Подготовка
Включите функцию NFC на устройстве Bluetooth®.
Запустите приложение для воспроизведения музыки / видео
1
на устройстве Bluetooth
• Следуйте инструкциям на экране устройства.
Прикоснитесь и удерживайте устройство в зоне действия
2
NFC этого устройства (пока не появится всплывающее окно
®
на устройстве, указывающее на установление соединения)
• Это устройство включено. Сначала светодиод на левом динамике
загорается синим светом и продолжает загораться и гаснуть. После
установления соединения манера мигания изменится.
• Если соединение не установлено, измените место касания.
Начните воспроизведение музыки / видео на устройстве Bluetooth
3
■
Подключение к другому устройству
Чтобы установить новое подключение Bluetooth®, прикоснитесь к этому
устройству другим устройством.
Ранее подключенное устройство будет автоматически отключено.
Прослушивание музыки
Если устройство, совместимое с Bluetooth®, поддерживает профили Bluetooth®
“A2DP” и “AVRCP”, музыку можно воспроизводить с помощью дистанционного
управления на этом устройстве.
• A2DP (Расширенный профиль распространения аудио):
Передает аудиосигнал на это устройство.
• AVRCP (Профиль дистанционного управления аудио / видео):
Позволяет дистанционно управлять устройством с помощью этого устройства.
Подключите устройство Bluetooth® к этому устройству (→ Стр. 3)
VQT5J79
1
Выбирайте и воспроизводите музыку на устройстве Bluetooth
4
2
• Выбранная музыка выводится на динамики этого устройства.
100
Время работы аккумуляторной батареи
Перезаряжаемая аккумуляторная батарея (установлена в устройство)
Время работы может уменьшаться в зависимости от условий использования.
■
Примечание
• Устройства Bluetooth®, которые поддерживают aptX®, могут передавать
музыку более высокого качества.
■
Внимание
• Устройство может пропускать звук в зависимости от уровня громкости.
• Когда громкость увеличивается до уровня, близкого к максимальному,
музыка может звучать искаженно. Уменьшите громкость таким образом,
чтобы искажение исчезло.
Тип аккумуляторной батареи Время работы
Дистанционное управление
Вы можете управлять устройством Bluetooth® с помощью этого устройства.
• В зависимости от устройств Bluetooth
могут не работать или работать иначе через это устройство.
(Пример использования)
Воспроизведение / Пауза
Нажмите
®
Предыдущий / Следующий
Нажмите во время
воспроизведения
Нажмите и
удерживайте
Нажмите
во время
воспроизведения
Нажмите и
удерживайте
Громкость
Нажмите
+
Нажмите и
удерживайте
Нажмите
−
®
Нажмите и
удерживайте
Воспроизведение /
Пауза
Возврат к началу
текущей дорожки
Перемотка назад
Перемотка вперед к
началу следующей
дорожки
Быстрая
перемотка вперед
Увеличение
громкости
Непрерывное
увеличение
громкости
Уменьшение
громкости
Непрерывное
уменьшение
громкости
®
некоторые нижеуказанные функции
Громкость +
Предыдущий
Громкость –
■
Примечание
• Существует 15 уровней
регулировки громкости.
Когда достигается
максимальная или
минимальная громкость,
раздается звуковой сигнал.
Прибл. 30 часов
Правый
Воспроизведение /
Пауза
Следующий
 Loading...