

Panasonic PT-VW350 User Manual
Chapter 4 Settings - [NETWORK] menu
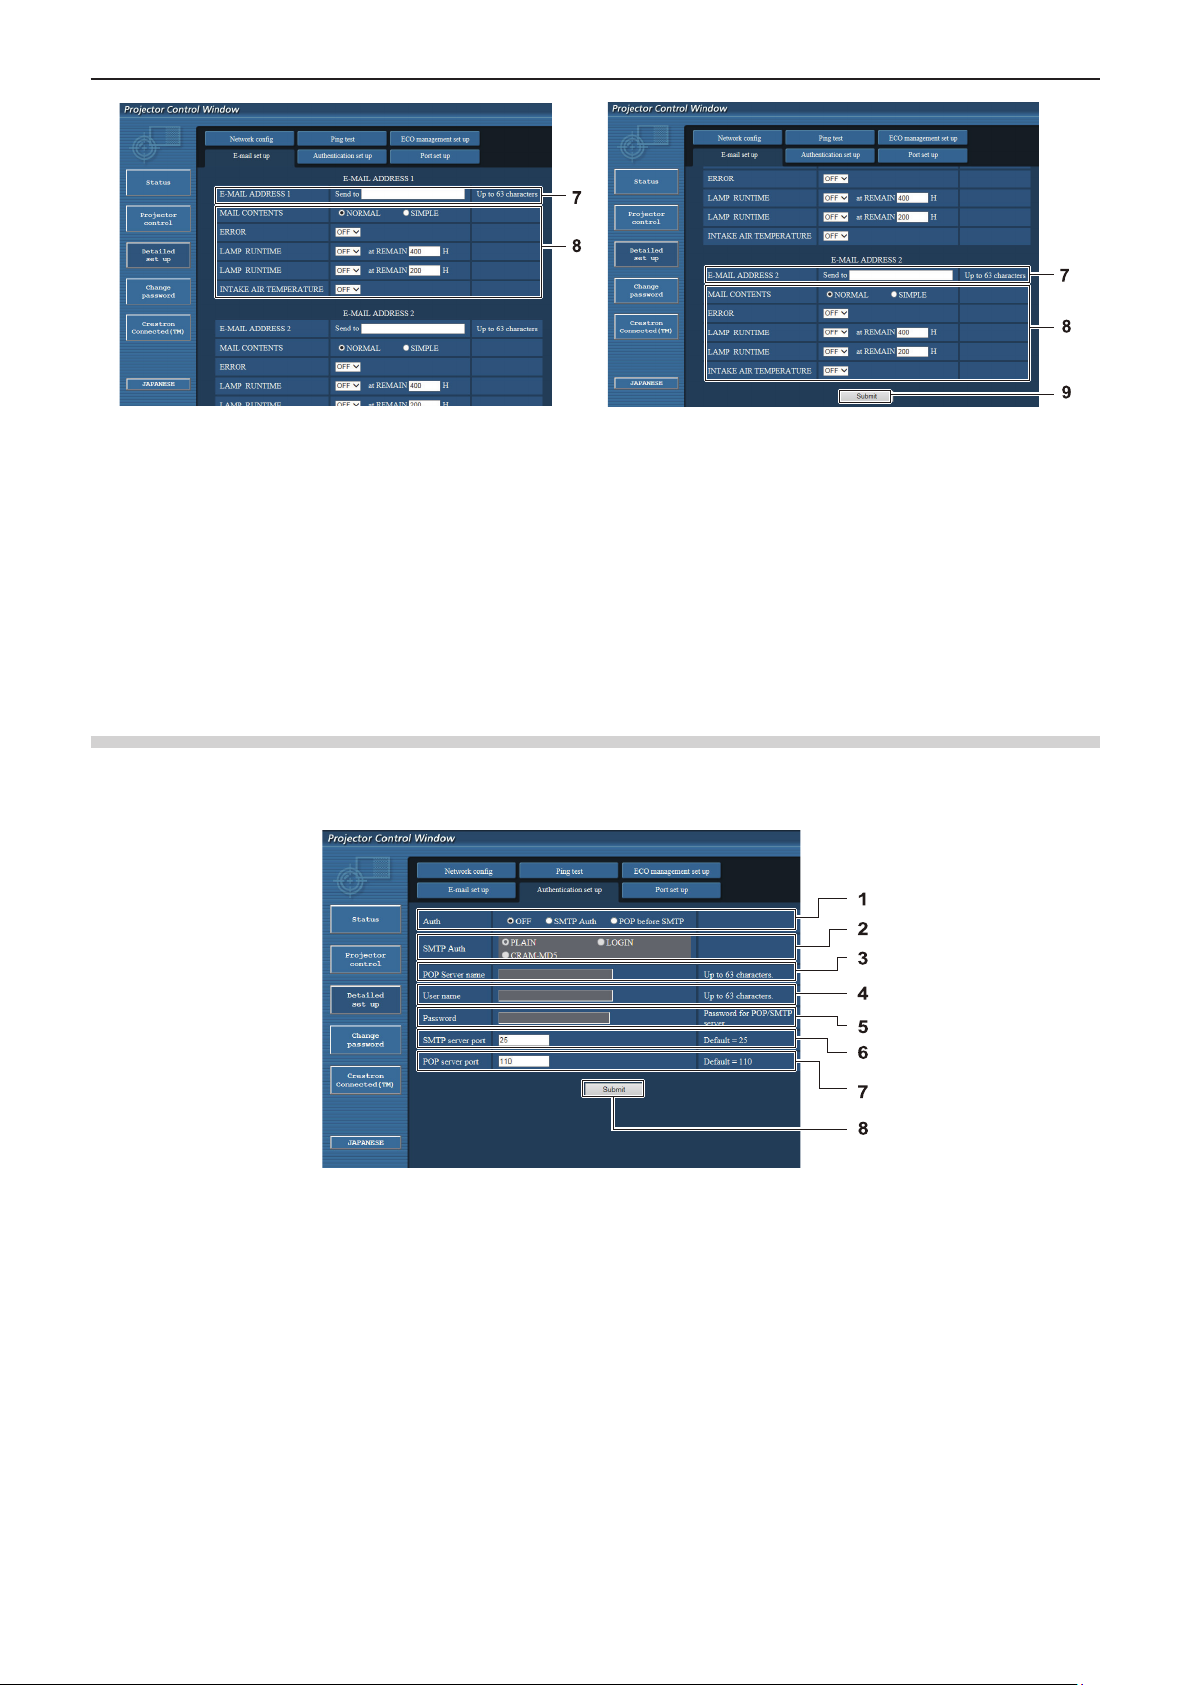
7 [E-MAIL ADDRESS 1]/[E-MAIL ADDRESS 2]
Enter the E-mail address to be sent. Leave [E-MAIL
ADDRESS 2] blank when two E-mail addresses are not
to be used.
8 Settings of the conditions to send E-mail
Select the conditions to send E-mail.
[MAIL CONTENTS]:
Select either [NORMAL] or [SIMPLE].
[ERROR]:
Send an E-mail when an error occurred in the selfdiagnosis.
[LAMP RUNTIME]:
An E-mail message is sent when the remaining lamp on
time for the lamp has reached the value set at the right
eld.
[INTAKE AIR TEMPERATURE]:
Send an E-mail when the air intake temperature has
reached the value set at the above eld.
9 [Submit]
Update the settings.
[Authentication set up] page
Set the authentication items when POP authentication or SMTP authentication is necessary to send an E-mail.
Click [Detailed set up] → [Authentication set up].
1 [Auth]
Select the authentication method specied by your
Internet service provider.
2 [SMTP Auth]
Set when the SMTP authentication is selected.
3 [POP server name]
Enter the POP server name.
Allowed characters:
Alphanumerics (A - Z, a - z, 0 - 9)
Minus sign (-) and period (.)
4 [User name]
Enter the user name for the POP server or the SMTP
server.
90 - ENGLISH
5 [Password]
Enter the password for the POP server or the SMTP
server.
6 [SMTP server port]
Enter the port number of the SMTP server.
(Normally 25)
7 [POP server port]
Enter the port number of the POP server.
(Normally 110)
8 [Submit]
Update the settings.

Chapter 4 Settings - [NETWORK] menu
Contents of mail sent
Example of E-mail sent when E-mail is set
Mail with the contents shown below is sent when the e-mail settings have been established.
=== Panasonic projector report(CONFIGURE) ===
Projector Type : PT-VW350
Serial No : 000000000
----- E-mail setup data ----TEMPERATURE WARNING SETUP
MINIMUM TIME at [ 60] minutes interval
INTAKE AIR TEMPERATURE Over [ 32degC / 89degF ]
ERROR [ OFF ]
LAMP RUNTIME [ OFF ] at REMAIN [ 400] H
LAMP RUNTIME [ OFF ] at REMAIN [ 200] H
INTAKE AIR TEMPERATURE [ OFF ]
----- check system -----
FAN [ OK ]
INTAKE AIR TEMPERATURE [ OK ]
EXHAUST AIR TEMPERATURE [ OK ]
OPTICS MODULE TEMPERATURE [ OK ]
LAMP REMAIN TIME [ OK ]
LAMP STATUS [ OK ]
APERTURE (CONTRAST-SHUTTER) [ OK ]
AIR FILTER [ OK ]
(Error code 00 00 00 00 00 00 00 00)
Intake air temperature : 31 degC / 87 degF
Exhaust air temperature : 37 degC / 98 degF
Optics module temperature : 39 degC / 102 degF
PROJECTOR RUNTIME 800 H
LAMP NORMAL 500 H
LAMP ECO 700 H
LAMP REMAIN 4000 H
-------- Current status --------MAIN VERSION 1.00
NETWORK VERSION 1.00
SUB VERSION 1.00
LAMP STATUS LAMP=ON
INPUT RGB
SIGNAL NAME XGA6
SIGNAL FREQUENCY 0.00kHz / 0.00Hz
----- Wired Network conguration -----
DHCP Client OFF
IP address 192.168.10.100
MAC address 04:20:9A:00:00:00
----- Memo -----
ENGLISH - 91
Chapter 4 Settings - [NETWORK] menu
Example of E-mail sent for an error
Mail with the contents shown below is sent when an error has occurred.
=== Panasonic projector report(ERROR) ===
Projector Type : PT-VW350
Serial No : 000000000
----- check system -----
FAN [ OK ]
INTAKE AIR TEMPERATURE [ OK ]
EXHAUST AIR TEMPERATURE [ OK ]
OPTICS MODULE TEMPERATURE [ OK ]
LAMP REMAIN TIME [ OK ]
LAMP STATUS [ OK ]
APERTURE (CONTRAST-SHUTTER) [ OK ]
AIR FILTER [ FAILED ]
(Error code 00 00 00 20 00 00 00 00)
Intake air temperature : 31 degC / 87 degF
Exhaust air temperature : 37 degC / 98 degF
Optics module temperature : 39 degC / 102 degF
PROJECTOR RUNTIME 800 H
LAMP NORMAL 500 H
LAMP ECO 700 H
LAMP REMAIN 4000 H
-------- Current status --------MAIN VERSION 1.00
NETWORK VERSION 1.00
SUB VERSION 1.00
LAMP STATUS LAMP=OFF
INPUT RGB
----- Wired Network conguration -----
DHCP Client OFF
IP address 192.168.10.100
MAC address 04:20:9A:00:00:00
----- Memo -----
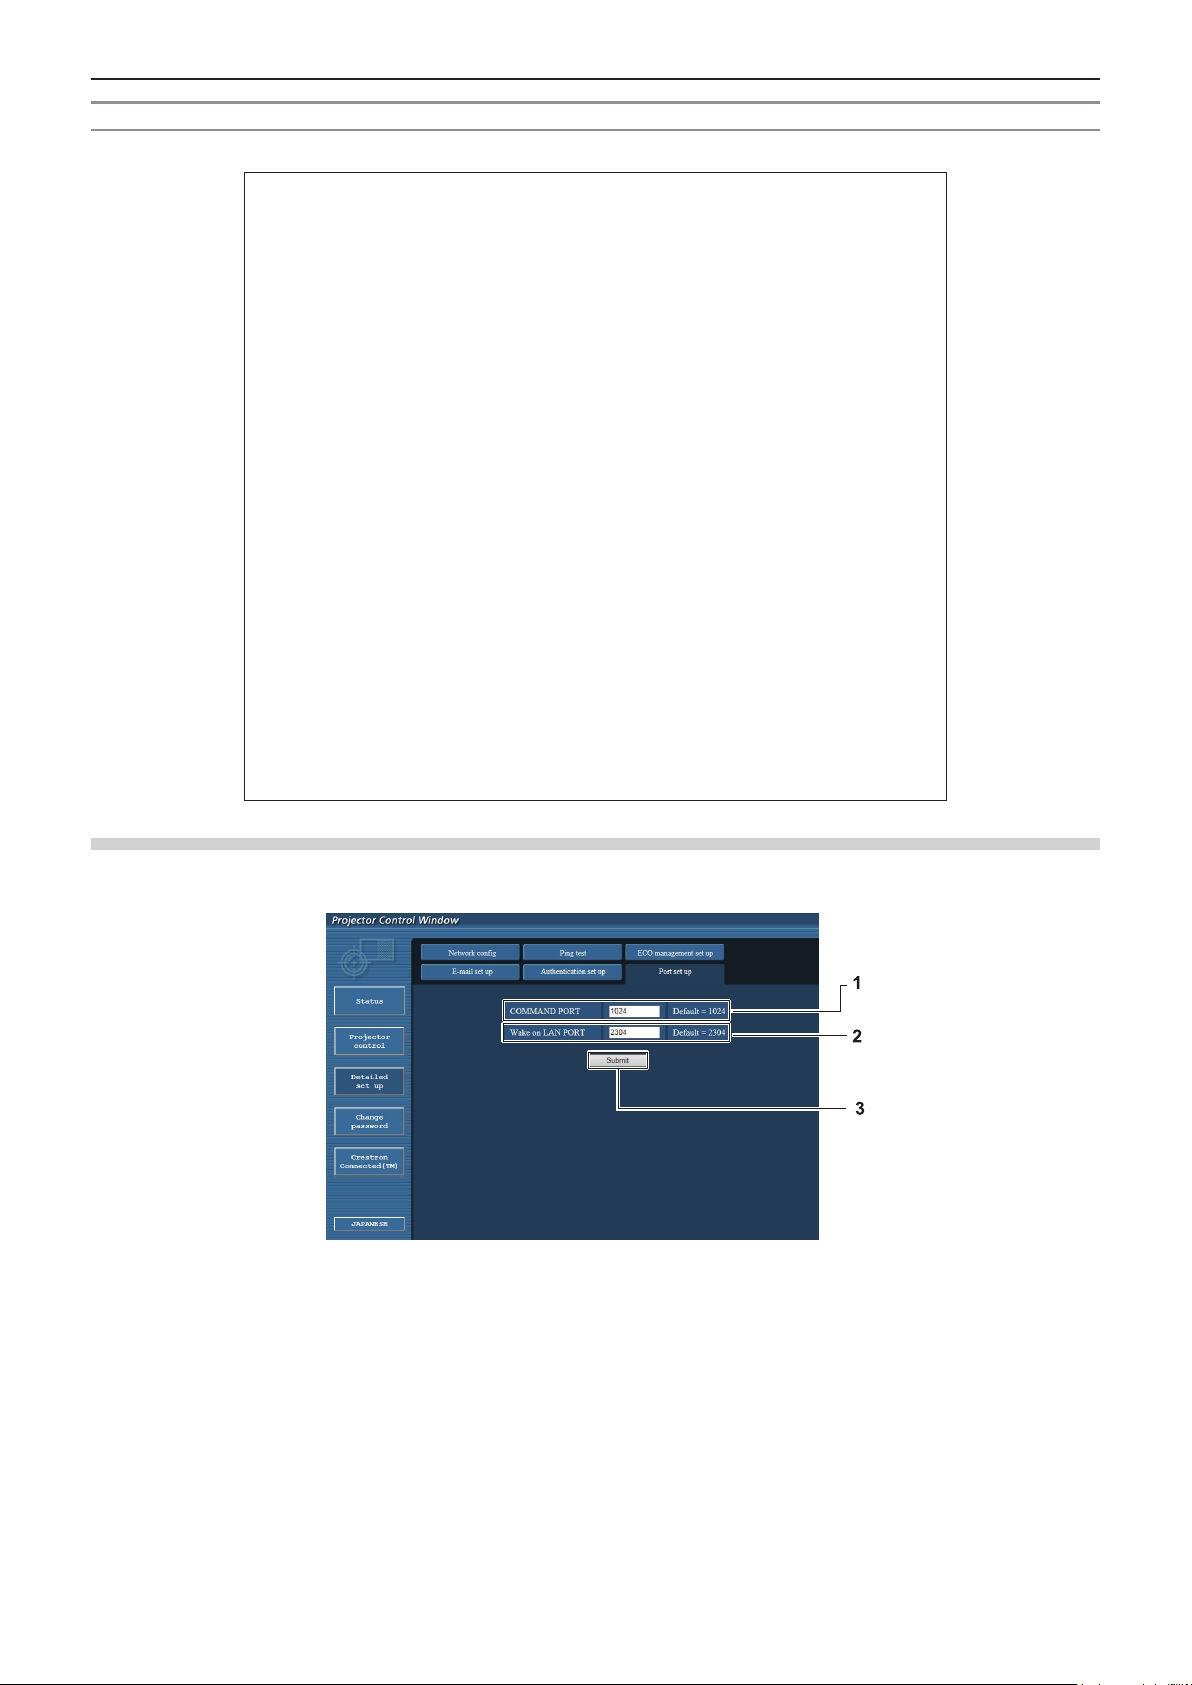
[Port set up] page
Set the port number used for command control.
Click [Detailed set up] → [Port set up].
1 [COMMAND PORT]
Set the port number used for command control.
2 [Wake on LAN PORT]
When [STANDBY MODE] is set to [NETWORK], set the
port number used for the Wake on LAN function.
3 [Submit]
Update the settings.
92 - ENGLISH

Chapter 4 Settings - [NETWORK] menu
[ECO management set up] page
You can make settings for the ECO management function of the projector.
Click [Detailed set up] → [ECO management set up].
1 [LAMP POWER]
Selects the [LAMP POWER] setting.
2 [AUTO POWER SAVE]
Select [ON] to set [AMBIENT LIGHT DETECTION],
[SIGNAL DETECTION], and [AV MUTE DETECTION].
3 [AMBIENT LIGHT DETECTION]
Enable ([ON])/disable ([OFF]) the ambient light
detection function.
4 [SIGNAL DETECTION]
Enable ([ON])/disable ([OFF]) the signal detection
function.
5 [AV MUTE DETECTION]
Enable ([ON])/disable ([OFF]) the AV mute detection
function.
6 [POWER MANAGEMENT]
Select the power consumption mode.
7 [TIMER]
Select the time that the lamp is turned off when the
POWER MANAGEMENT function is using.
8 [Submit]
Update the setting.
Note
f For detailed description of each setting item, refer to the [PROJECTOR SETUP] menu of the projector → [ECO
MANAGEMENT] (x page 71).
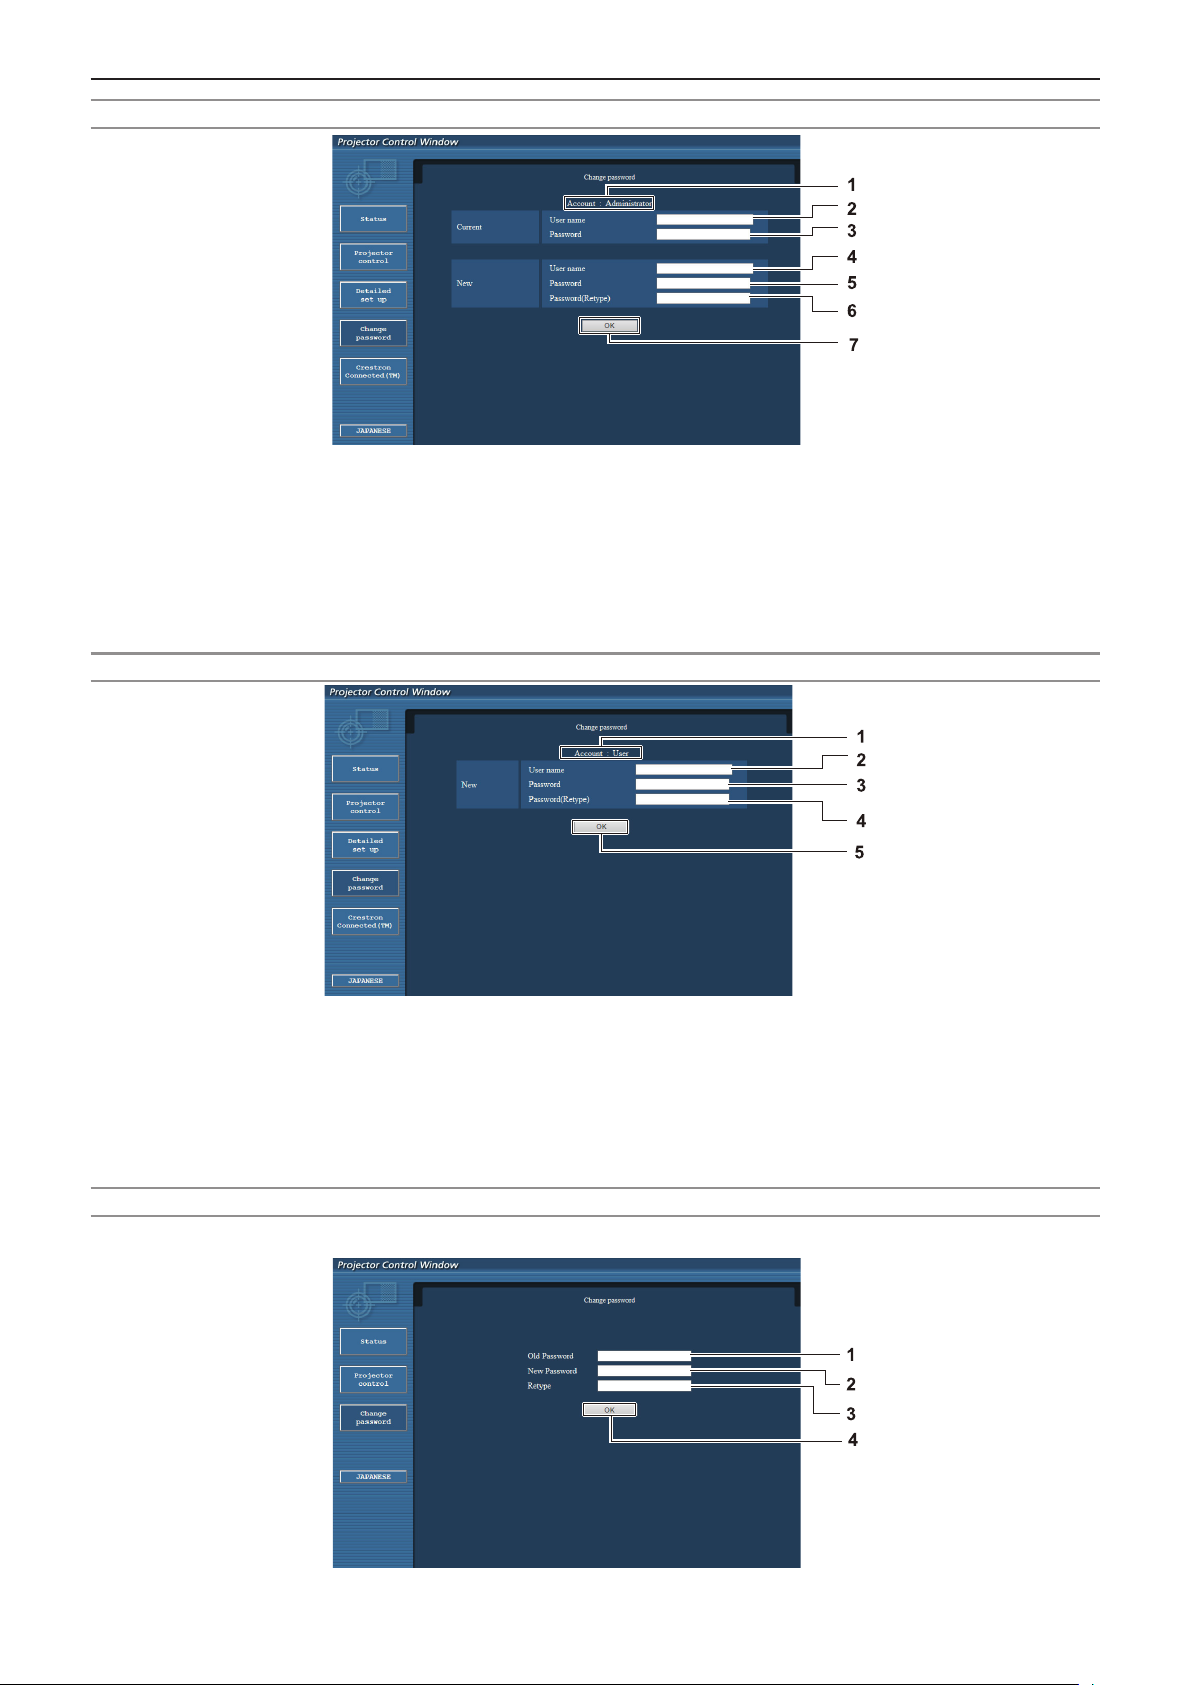
[Change password] page
Click [Change password].
1 [Administrator]
Used to change the setting of [Administrator].
2 [User]
Used to change the setting of [User].
3 [Next]
Used to change the setting of the password.
ENGLISH - 93
[Administrator] account
Chapter 4 Settings - [NETWORK] menu
1 [Account : Administrator]
Displays the account to change.
2 [Current] [User name]
Enter the user name before the change.
3 [Current] [Password]
Enter the current password.
4 [New] [User name]
Enter the desired new user name.
(Up to 16 characters in single byte)
[User] account
1 [Account : User]
Displays the account to change.
2 [New] [User name]
Enter the desired new user name.
(Up to 16 characters in single byte)
3 [New] [Password]
Enter the desired new password. (Up to 16 characters
in single byte)
5 [New] [Password]
Enter the desired new password.
(Up to 16 characters in single byte)
6 [New] [Password (Retype)]
Enter the desired new password again.
7 [OK]
Determines the change of password.
4 [New] [Password (Retype)]
Enter the desired new password again.
5 [OK]
Determines the change of password.
[Change password] (For user rights)
Only the change of password is enabled under the user rights.
94 - ENGLISH
Chapter 4 Settings - [NETWORK] menu
1 [Old Password]
Enter the current password.
2 [New Password]
Enter the desired new password. (Up to 16 characters
in single byte)
3 [Retype]
Enter the desired new password again.
4 [OK]
Determines the change of password.
Note
f To change the account of the administrator, you must enter the [User name] and [Password] in [Current].
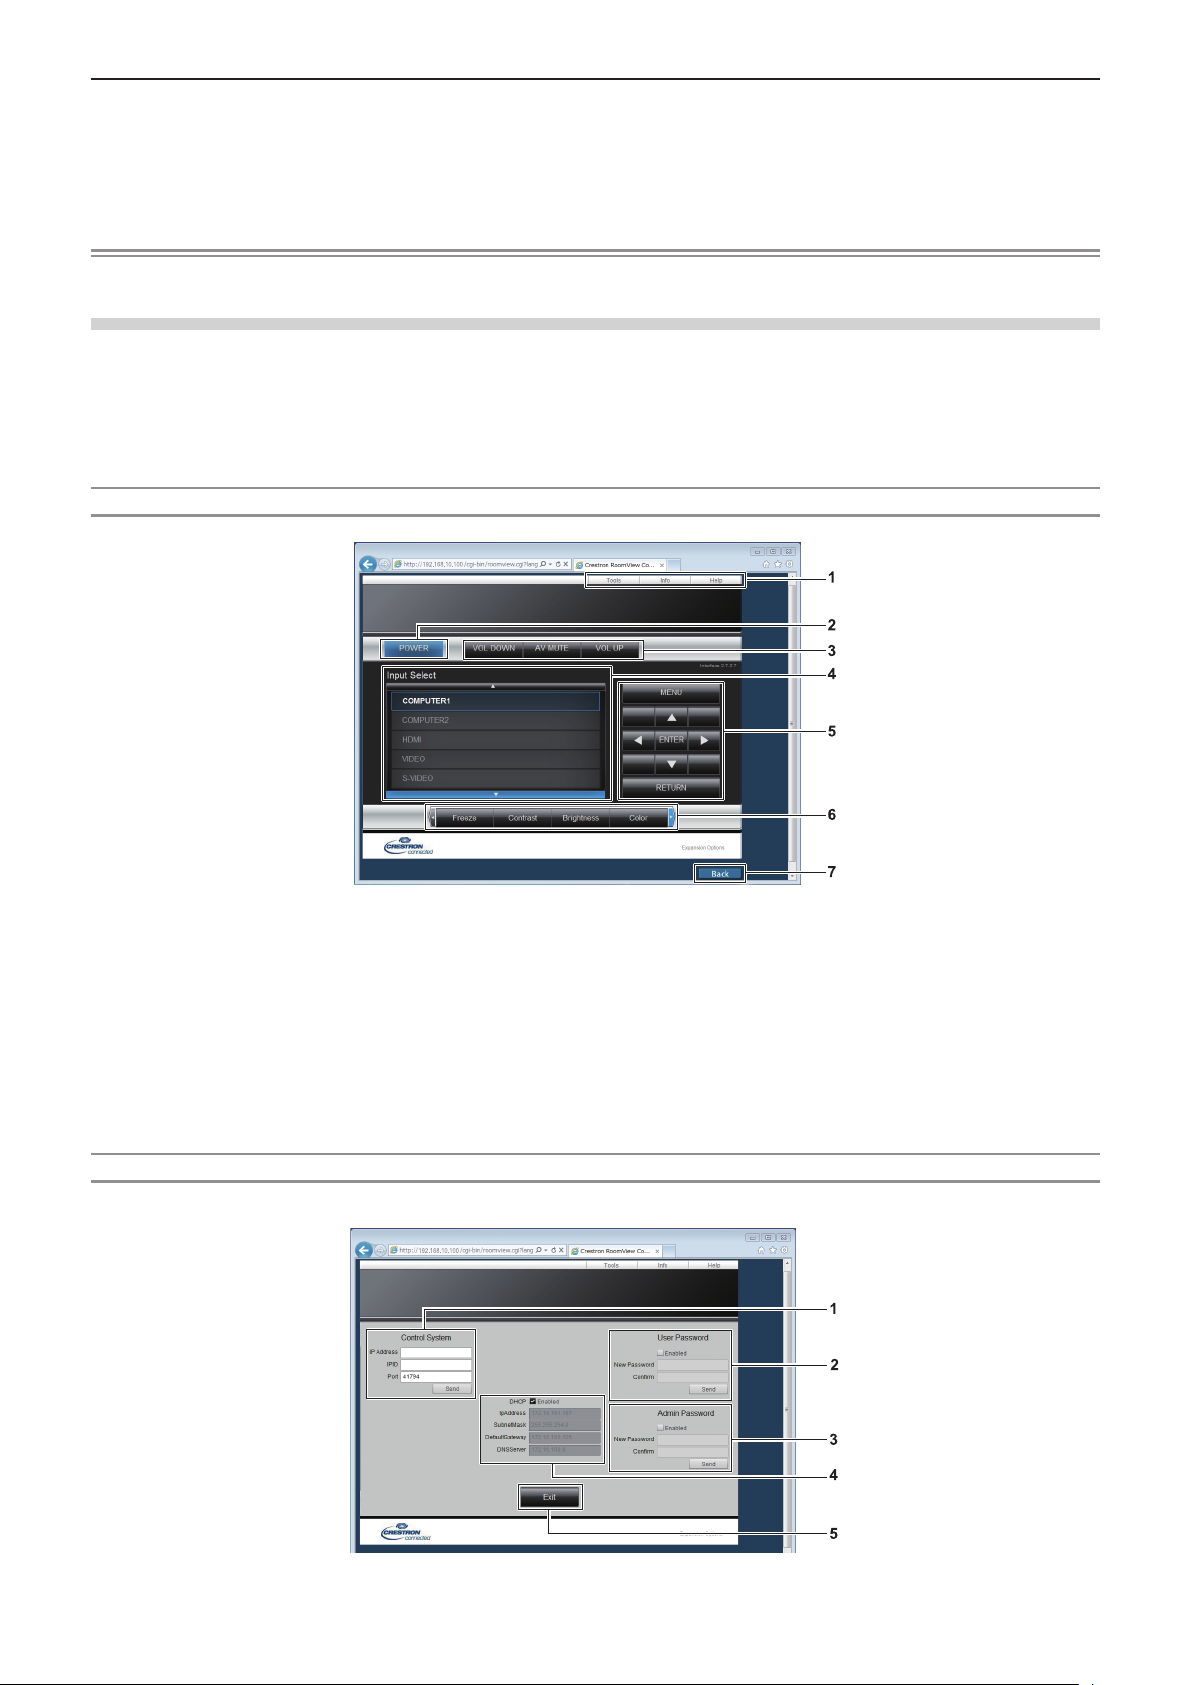
[Crestron Connected(TM)]
The projector can be monitored/controlled with Crestron Connected™.
To start the Crestron Connected™ control page from the web control screen, you need to access with the administrator rights.
(For user rights, the [Crestron Connected(TM)] button is not displayed on the web control screen.)
The control page of Crestron Connected™ is displayed by clicking [Crestron Connected(TM)].
It is not displayed if Adobe® Flash® Player is not installed on the computer used, or the browser used does not support Flash.
In that case, click [Back] on the control page to go back to the previous page.
page
Control page
1 [Tools], [Info], [Help]
Tabs for selecting the setting, information or help
page of the projector.
2 [POWER]
Turns on/off the power.
3 [VOL DOWN], [AV MUTE], [VOL UP]
Adjusts the volume.
Switches the AV mute function on/off.
[Tools] page
Click [Tools] on the control page.
4 [Input Select]
Controls input selection.
Not available when the power of the projector is turned off.
5 Menu screen control buttons
Navigates the menu screen.
6 Freeze/image quality adjustment
Controls items related to freeze/image quality.
7 [Back]
Performs return to the previous page.
ENGLISH - 95
Chapter 4 Settings - [NETWORK] menu
1 [Control System]
Set the information required for communicating with the
controller to be connected with the projector.
2 [User Password]
Set the user rights password for the Crestron
Connected™ control page.
3 [Admin Password]
Set the administrator rights password for the Crestron
Connected™ control page.
[Info] page
Click [Info] on the control page.
4 Network status
Displays the settings of wired LAN.
[DHCP]
Displays the current setting.
[IpAddress]
Displays the current setting.
[SubnetMask]
Displays the current setting.
[DefaultGateway]
Displays the current setting.
[DNSServer]
Displays the current setting.
5 [Exit]
Returns to the control page.
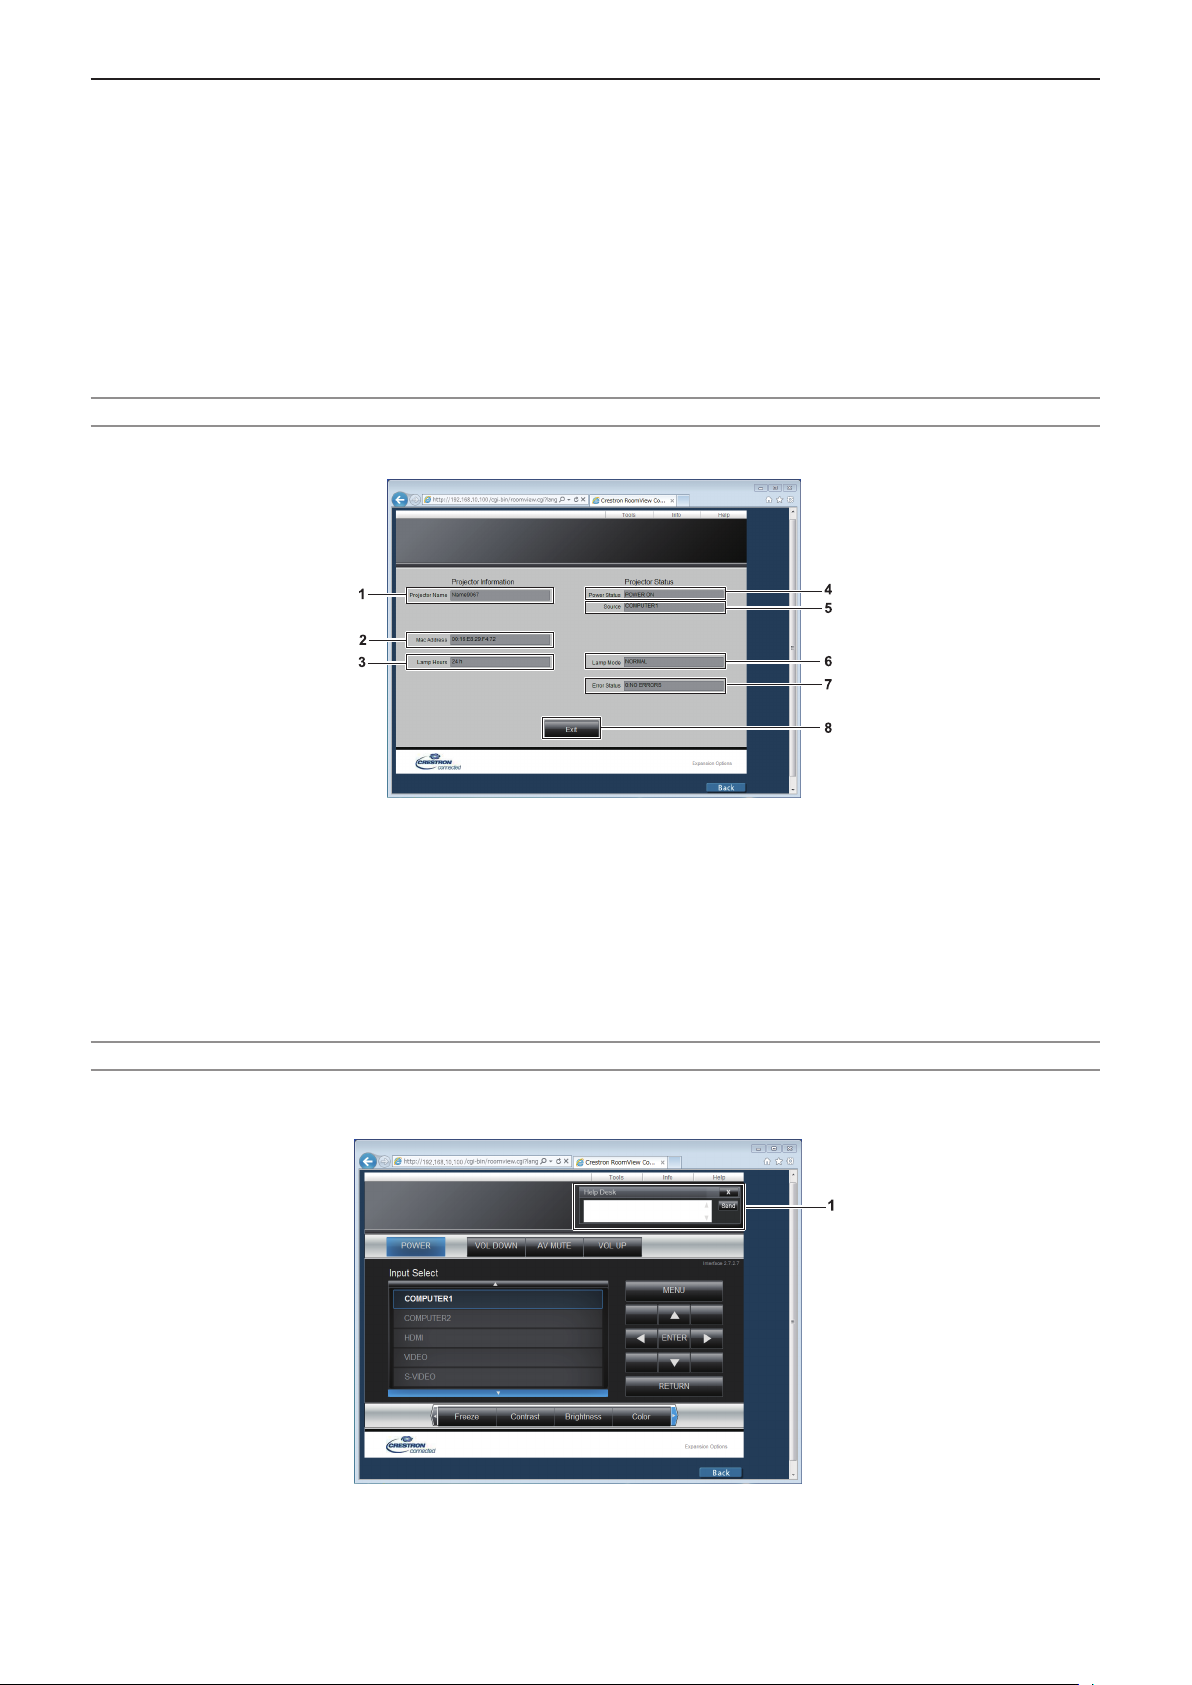
1 [Projector Name]
Displays the projector name.
2 [Mac Address]
Displays the MAC address.
3 [Lamp Hours]
Displays the runtime of the lamp (converted value).
4 [Power Status]
Displays the status of the power.
[Help] page
Click [Help] on the control page.
The [Help Desk] window is displayed.
5 [Source]
Displays the selected input.
6 [Lamp Mode]
Displays the setting status of [LAMP POWER]
(x page 71).
7 [Error Status]
Displays the error status.
8 [Exit]
Returns to the control page.
1 [Help Desk]
Send/receive messages to/from an administrator who uses
Crestron Connected™.
96 - ENGLISH

Chapter 5 Maintenance
This chapter describes methods of inspection when there are problems, maintenance, and
replacement of the units.
ENGLISH - 97

Chapter 5 Maintenance - Lamp and Warning Indicators
Lamp and Warning Indicators
When an indicator lights up
If a problem should occur inside the projector, the lamp indicator <LAMP> and the warning indicator <WARNING> will inform
you by lighting or blinking. Check the status of the indicators and remedy the indicated problems as follows.
Attention
f Before you take a remedial measure, follow the procedure of switching the power off indicated in “Powering Off the
projector”. (x page 39)
Lamp indicator <LAMP>
Warning indicator <WARNING>
Lamp indicator
Indicator Lighting in red. Blinking in red.
Status Time to replace the lamp unit.
f Was [REPLACE LAMP] displayed when
you turned on the power?
Check
Remedy f Replace the lamp unit.
f The indicator lights up when the
runtime of the lamp unit has reached
5 000 hours (when [LAMP POWER] is
set to [NORMAL]).
A problem is detected in the lamp or the power supply for the
lamp.
f Have you turned on the
power again immediately
after turning it off?
f Wait a while until the
luminous lamp cools off,
and then turn on the power.
f Some error has occurred in
the lamp circuit. Check for
uctuation (or drop) in the
source voltage.
f Turn off the projector, and
unplug the AC power cord,
and consult your dealer.
Note
f If the lamp indicator <LAMP> is still lighting or blinking after taking the preceding measures, ask your dealer for repair.
Warning indicator
Indicator Lighting in red. Blinking in red. Blinking in red. (Slow)
The projector detects an
abnormal condition and
cannot be turned on.
_
f If the projector is turned off
again, unplug the AC power
cord and contact the dealer
or the service center for
service and checkup.
Status Internal temperature is high (warning).
f Is the air intake/exhaust port blocked?
Check
Remedy
f Is the room temperature high?
f Is the air lter unit dirty?
f Remove any objects that are blocking the air intake / exhaust port.
f Install the projector in a location with an ambient temperature of 0 °C
(32 °F) to 40 °C (104 °F).
f Do not use the projector at high altitudes of 2 700 m (8 858') or higher
above sea level.
f Replace the air lter unit. (x page 99)
Internal temperature is high
(standby status).
Note
f If the warning indicator <WARNING> is still lighting or blinking after taking the preceding measures, ask your dealer for
repair.
98 - ENGLISH
 Loading...