

Panasonic PC-RD05C4 installation
®
®
U
L
CLASSIFIED
L
I
S
T
I
N
G
S
E
R
V
I
C
E
S
T
A
T
E
O
F
C
A
L
I
F
O
R
N
I
A
S
T
A
T
E
F
I
R
E
M
A
R
S
H
A
L
L
®
U
L
CLASSIFIED
ceiling radiation damper
PC-RD05C4
Panasonic
For fan model: FV-05VQ3, FV-08VQ3, FV-11VQ3, FV-15VQ4, FV-05VF2, FV-08VF2, FV-11VF2, FV-05VS1, FV-10VS1,
FV-08VKS1, FV-05VQ5, FV-08VQ5, FV-11VQ5, FV-15VQ5, FV-08VQL5, FV-11VQL5, FV-15VQL5, FV-05VFM2,
FV-08VFM2, FV-08VQC5, FV-11VQC5, FV-08VQCL5, FV-11VQCL5, FV-08VQL6, FV-11VQL6, FV-15VQL6,
FV-08VQCL6, FV-11VQCL6, FV-05VFL4, FV-08VFL4, FV-11VFL4, FV-08VSL3, FV-10VSL3, FV-05VS3,
FV-08VS3, FV-10VS3, FV-05-11VK1, FV-11-15VK1, FV-05-11VKL1, FV-11-15VKL1, FV-05-11VKS1, FV-05-11VKSL1
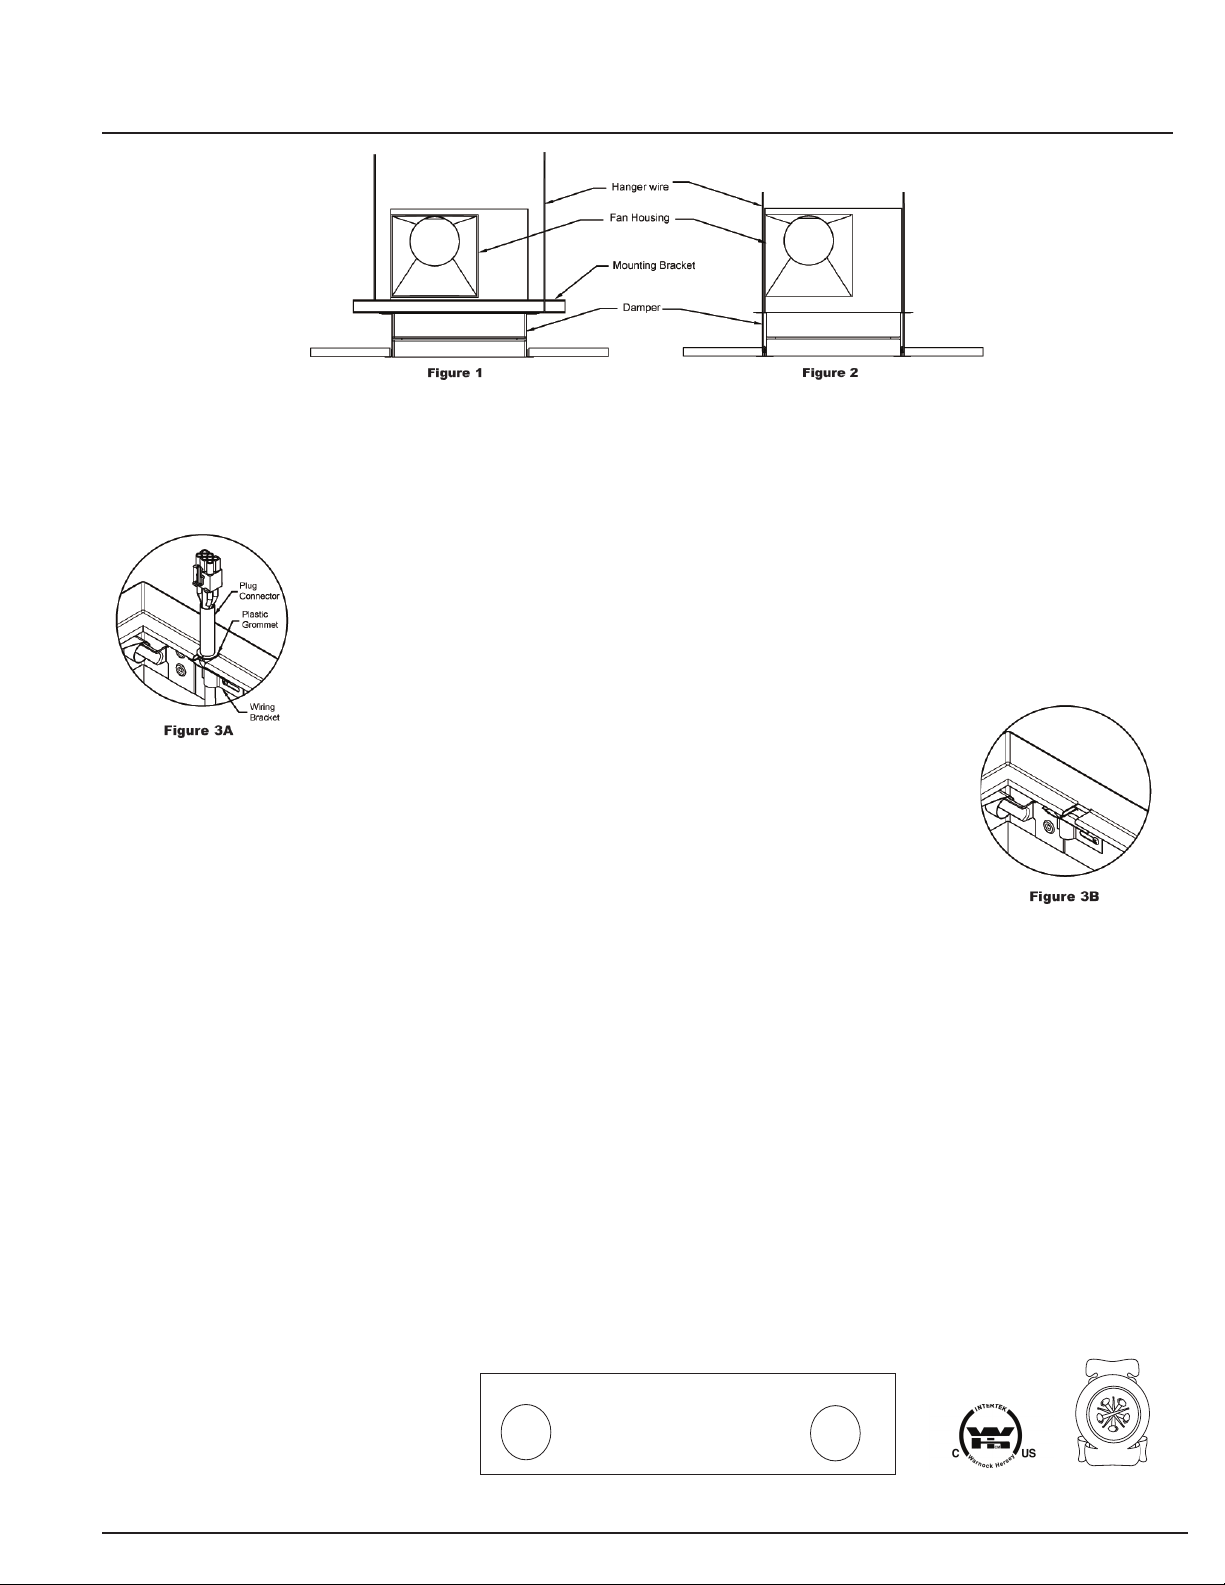
1. Position the ceiling radiation damper on the inlet side of the fan such that the holes in the damper
mounting straps line up with the holes in the flange of the fan housing. Secure the damper to the fan
housing using the four #8 machine screws/nuts supplied.
2A. For a damper used with a fan requiring a plug connector to pass through the damper, place
plastic grommet around plug connector and attach it to damper frame. Secure the plug connector
using the wiring bracket and a minimum #6 screw and nut supplied. (See Figure 3A) Make sure wire
lead or plug connector does not interfere with the closing of the damper.
2B. For a damper used with a fan that does not require a plug connector to
pass through the damper, secure the wiring bracket supplied to the damper
frame using the supplied #6 screw and nut. Make sure the wiring bracket
covers the notch in the frame. (See Figure 3B).
3. After securing the damper to the fan housing, turn it over such that the damper is on the bottom of
the assembly. The assembly can be attached to the structure above using the holes in the fan housing
flange (see step 4 below) or by using the supplied mounting brackets. If the mounting brackets are
used interconnect and position the damper/fan mounting brackets to the flanges opposite that to which
the damper is attached. Align the slot such that it aligns with the holes in the flange in the fan housing.
The brackets can be adjusted to accommodate the required installation. If the damper/fan is being attached to the adjacent
structure then the brackets must be used and should be adjusted to fit accordingly. If the damper/fan is being supported from
the structure above, the bracket should be adjusted so that the ends of the brackets align accordingly. Once the brackets have
been adjusted they should be attached to the flange of the fan housing with the #8 machine screw/nuts supplied. A minimum
of two fasteners per side is required.
4. The ceiling penetration should be located within ceiling tiles or panels without necessitating cuts in the ceiling suspension
main runners or cross tees. If required, a maximum of one runner or cross tee may be cut to enable proper damper location
and installation. Each cut end shall be supported by a min. 12 swg (2.7) vertical hanger wire. The opening in the ceiling should
be the same size as the outside of the damper frame.
5. Position the damper/fan assembly such that the bottom edge of the damper is flush with the finished surface of the ceiling.
Attach the damper/fan assembly to the structure above or adjacent to it. If the damper/fan is being attached to the assembly
above, a minimum of 12 swg. (2.7) hanger wire must be used. A minimum of two hanger wires on two opposite sides are
required. The hanger wires can be attached directly to the fan housing flange or to the ends of the mounting brackets. If the
damper/fan assembly is being directly mounted to the adjacent structure, a minimum #8 (M4) sheet metal screws or 1/2 " dia.
bolts/nuts must be used. If necessary, a min. 1/2" wide flange is to be attached to the damper using a minimum #8 (M4) sheet
metal screw, 3/16" pop rivets, welds or bolts at 6" (152) o.c. maximum. A minimum of 2 connections per side is required.
6. For other installation details see Panasonic Installation Instructions.
Ceiling Radiation Dampers PC-RD05C4 January 2014
installation instructions
SEE DETAILS ON UL
CLASSIFICATION
MARKING ON
ENCLOSED PRODUCT
C
The information is correct at the time of going to press. However, we reserve the right to make changes without notice.
Note: Dimensions given in () mm.
 Loading...