

Page 1
__________________t
• 0- i
-----------
--------- --------------------------------------------------------------
0 0 o
U
Panasonic
Video Cassette Recorder
NV-SJ230A
Operating Instructions
Conienis
Warning and Important Information
Controls and Components
Connections
Tuning the TV to Your VCR
Storing TV Broadcasts in Your VCR
Setting the Clock of Your VCR
Settings Using the On Screen Display
Option Setting
Playback
Recording
Timer Recording
Search Functions
Page
2
3
5
5
6
8
9
10
11
13
16
18
VQT9638
Before Requesting Service
Specifications
VMS SUPÊR DRIVM
PAL NTSC
Before attempting to connect, operate or adjust this
product, please read these instructions completely.
20
22
Page 2

Warning and ¡mportaní
Information
As this equipment gets hot during use, operate it
in a well ventilated place; do not install this
equipment in a confined space such as a book
case or similar unit.
WARNING:
To reduce the risk of fire electric shock or
product damage, do not expose this equipment
to rain, moisture, dripping or splashing and
ensure that no objects filled with liquids, such as
vases, shall be placed on the equipment.
Important
Your attention is drawn to the fact that the recording of
pre-recorded tapes or discs or other published or broadcast
material may infringe copyright laws.
For your safety
Do not remove outer cover.
Touching internal parts of the VCR is dangerous, and may
seriously damage it.
To prevent electric shock, do not remove cover. There are no
user serviceable parts inside. Refer all servicing to qualified
service personnel.
Inserting Remote Control Batteries
insert the batteries with the polarity (© and ©) correctly
aligned.
Cautions before you operate this VCR
Avoid;
- Humidity and dust.
- Covering the ventilation holes with soft materials such as
cloth or paper.
- Extreme heat such as direct sunlight.
- Magnets or electromagnetic objects.
- Touching internal parts of the VCR.
- Water or some other liquid.
- Lightning. (Disconnect the aerial plug from the VCR during
lightning storms.)
- Anything heavy on the VCR.
- Connecting or handling the equipment with wet hands.
- Using a ceil phone near the VCR because doing so may
cause noise to adversely affect the picture and sound.
Do:
- Wipe the VCR with a dean and dry cloth.
- Install the VCR in a horizontal position.
- Keep the VCR, TV and other equipment switched off until
you have finished al! connections.
Condensation may form in the following cases:
- The VCR is brought from cold surroundings into a
weil-heated room.
- The VCR is suddenly brought from cool surroundings, such
as an air-conditioned room or car, to a place which is hot
and humid.
Note:
- In any of the above-mentioned conditions, do not operate
the VCR for at least 1 hour.
This VCR is not equipped with a dew sensor.
Press the VCR POWER button 0 to switch the VCR from on
the standby mode or vice versa, in the standby mode, the
VCR is still connected to the mains.
Notes:
The service life of the batteries is approximately 1 year.
However, it varies considerably depending on the frequency
of use.
- When they are exhausted, replace them with two AA, UIVI3,
or R6 size batteries.
- When the batteries are exhausted, remove them
immediately and dispose of them correctly.
- Make sure that the batteries are inserted with the polarity
(© and 0) correctly aligned.
- Do not mix old battery with new battery.
- Do not mix different battery types, i.e. Alkaline and
Manganese.
- Do not use rechargeable (Ni-Cd) batteries.
- Do not heat or short-circuit the batteries.
- When you do not use the remote control tor a long time,
take out the batteries and store them in a cool, dry place.
Page 3
Controls and Components
VCR Operation
TV Operation
Page 4

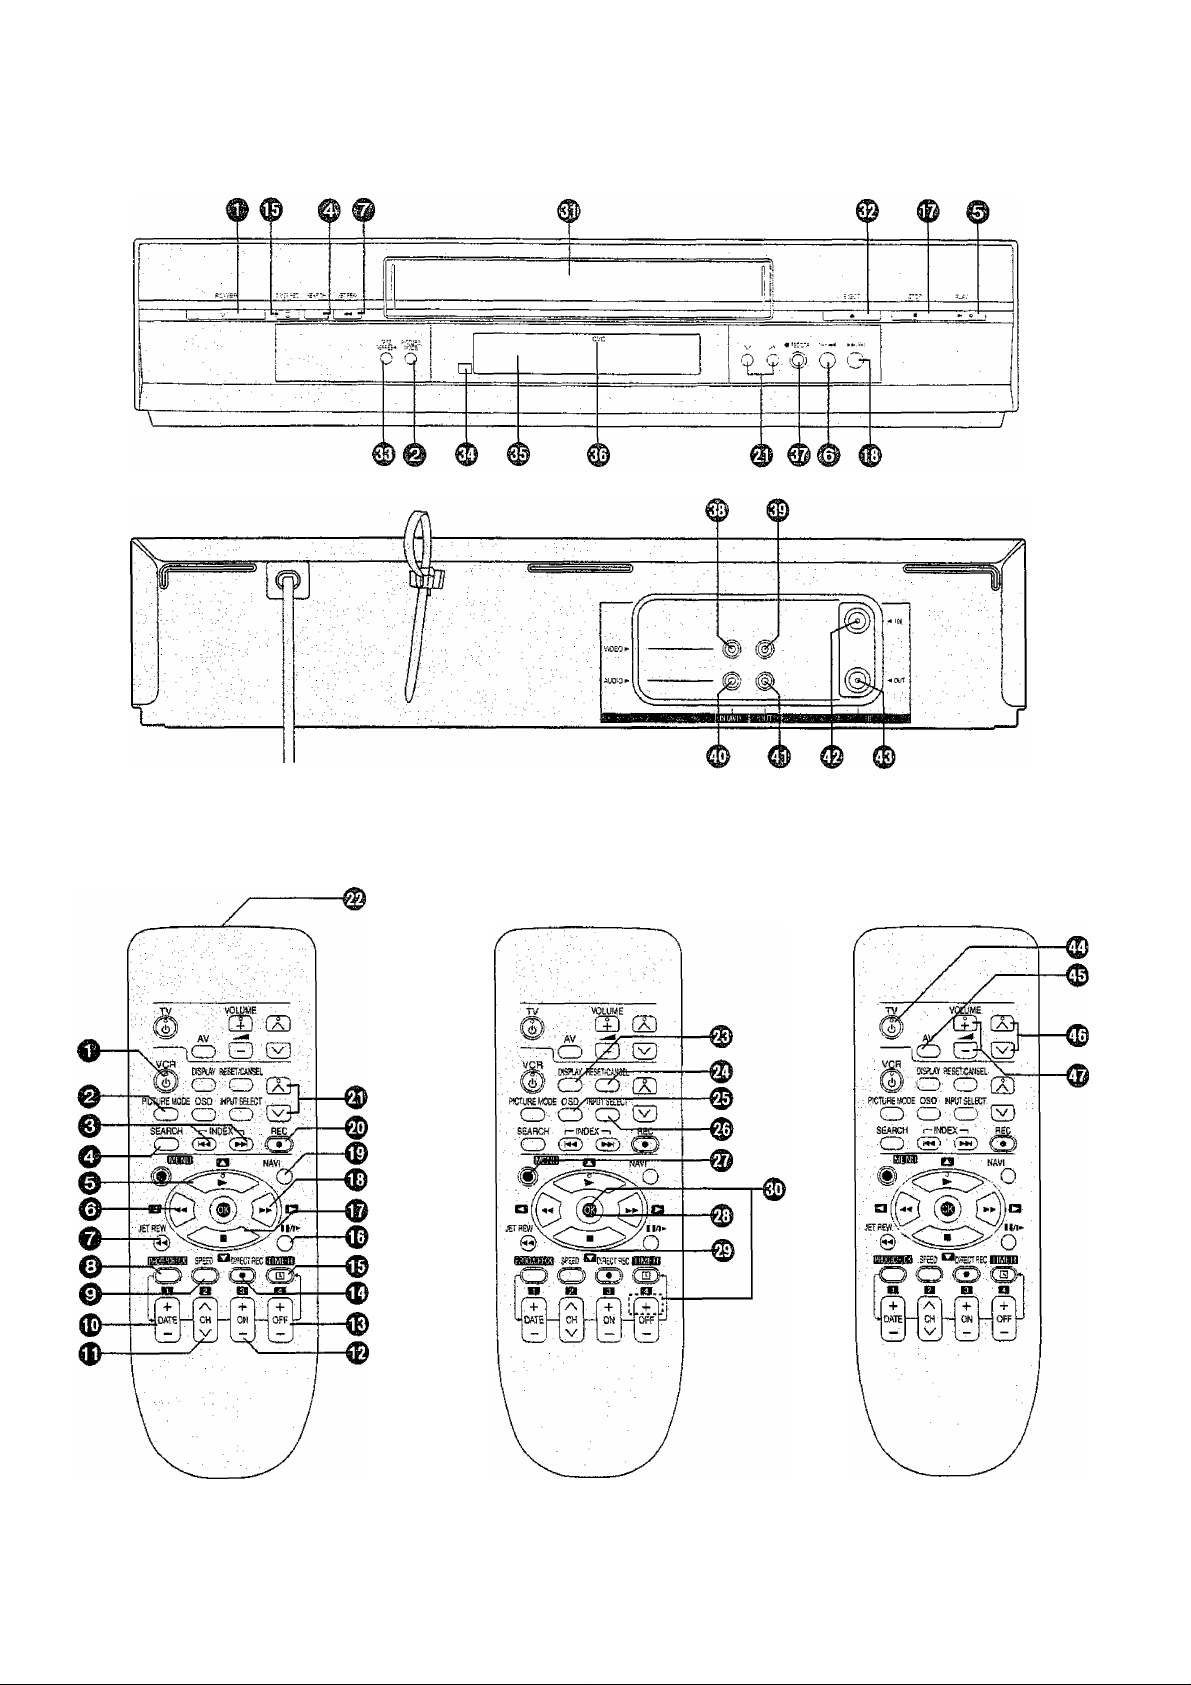
VCR Operation
0 VCR POWER button
© PICTURE MODE button
© INDEX button
0
SEARCH button
0 Play button
© Rewind button
0 JET REW button
© PROGJCHECK button
© SPEED button
0 DATE button
0 Channel button
0 ON button
0 OFF button
© DIRECT REC button
0 TIMER(REC) button
0 Pause/Slow button
0 Stop button
0 Fast Forward button
0 NAVI button
0 REC button
0 VCR Channel button
0 Infra-red transmitter
0 DISPLAY button
0 RESET/CANCEL button
0 OSD button
0 INPUT SELECT button
0 MENU button
0 OK button
0 Cursor buttons
0 Child Lock Function buttons
(Convenient function to prevent unauthorized use)
This function deactivates all buttons on the VCR and the
remote control. Use this function, when you do not want
other people to operate the VCR.
To Activate the Chiid Lock Function;
1 Hold down the OK and the OFF (+) buttons 0
simultaneously until the [Xi hold] Indication appears in
the VCR display.
- if you press a button while the Child Lock function is on,
the [X hold] indication appears in the VCR display to
inform you that no operation is possible.
To Cancel the Child Lock Function;
1 Hold down the OK and the OFF (+) buttons 0
simultaneously until the [X hold] indication
disappears.
0 Cassette compartment
0 EJECT button
© TAPE REFRESH button
0 infra-red Remote Control Receiver window
0 VCR display
0 CVC indicator
The crystal view control function ensure that you always
obtain the optimum picture quality so that you get the best
picture automatically.
While the VCR is turned on, the CVC indication 0 is
always displayed to show that the Crystal View Control is
activated
0 REC/OTR button
0 VIDEO IN socket
0 VIDEO OUT socket
0 AUDIO IN socket
0 AUDIO OUT socket
0 RF IN socket
0 RF OUT socket
TV Operation
Only Panasonic TVs can be operated with the provided
remote control.
The settings for operating the TV with the remote control
have already been made.
No additional settings need to be performed.
However, some Panasonic TVs cannot be operated using this
remote control.
0 TV POWER button
To switch the TV on from standby mode (OFF) or vice
versa.
On some TVs it is only possible to switch the TV to
standby mode (OFF) with this button, but not on. In this
case, try to turn the TV on with one of the following
buttons;
AV .button 0
TV Channel button 0
0 AV button
To select desired AV input on the TV.
0 TV Channel button
To select the desired programme position (TV station) on
the TV.
0 VOLUME button
To adjust the volume of the TV.
Page 5
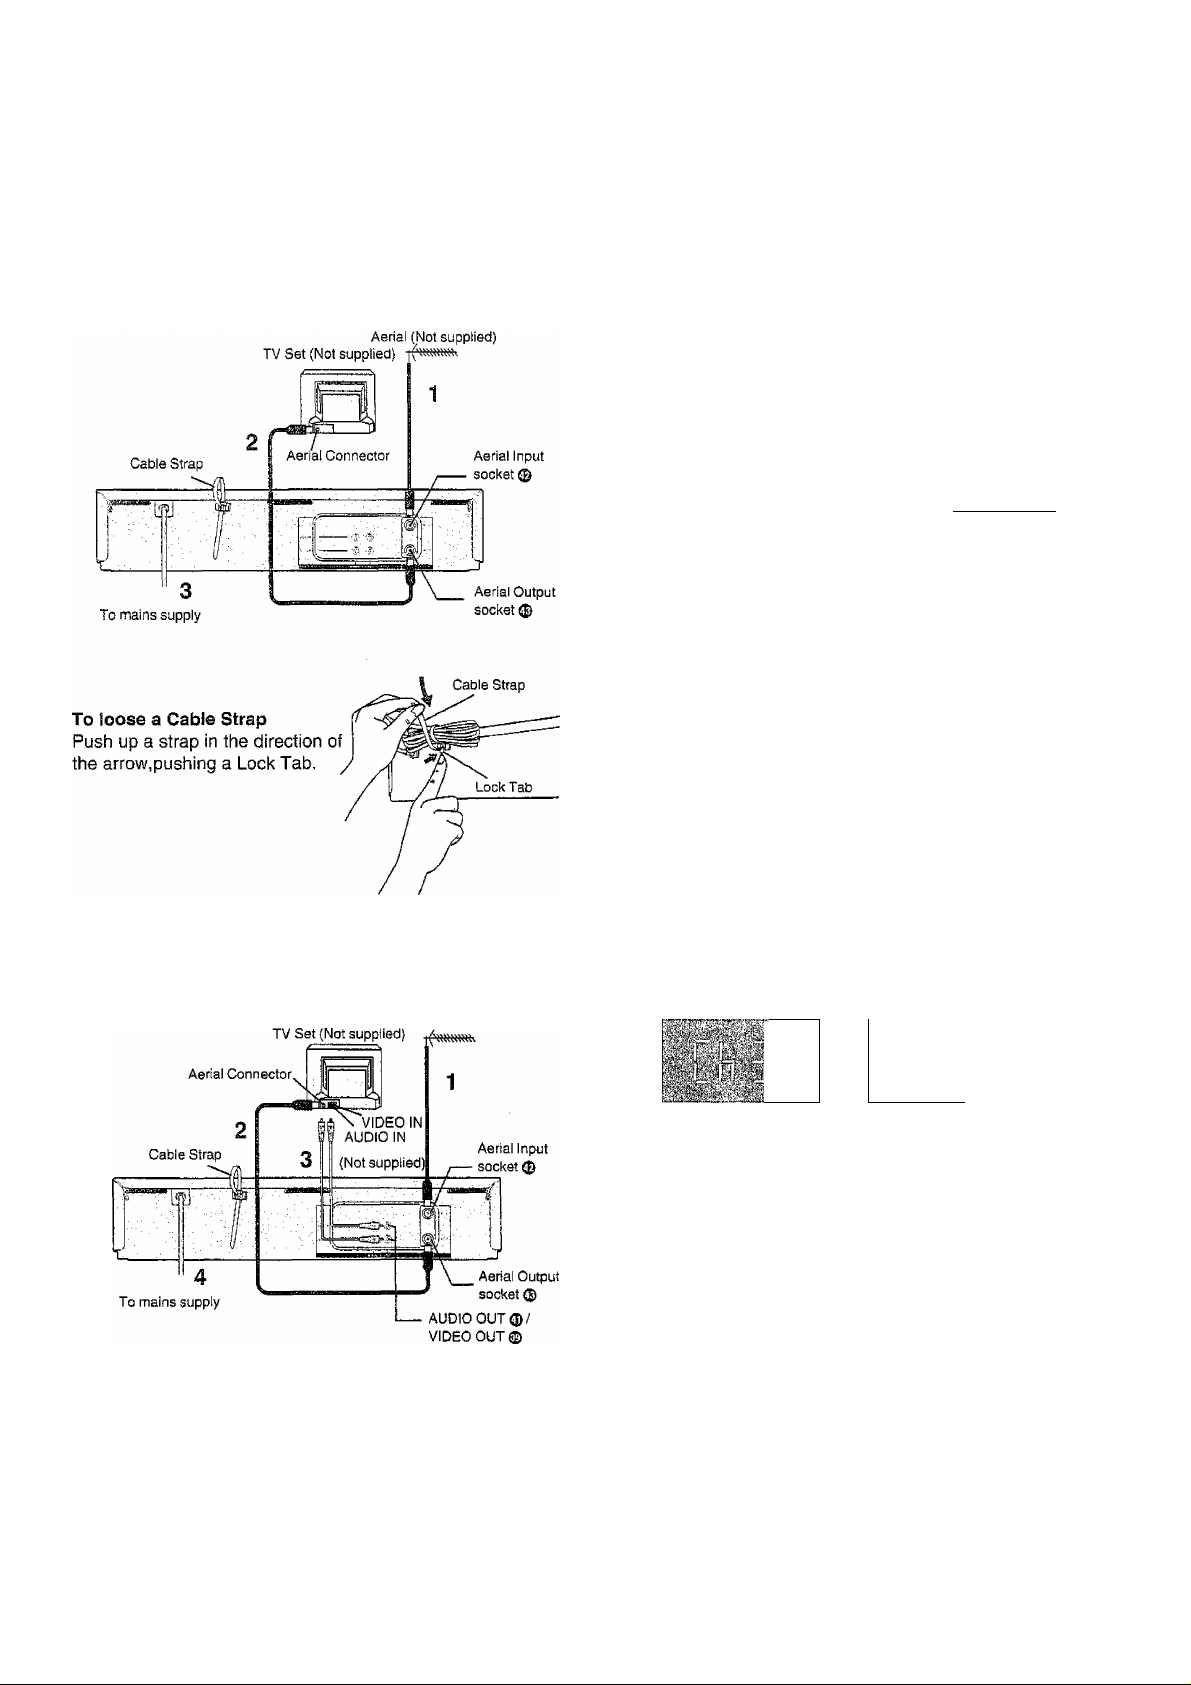
Connections
Tuning the TV to Your VCR
This section shows you how to connect the VCR to an aerial,
TV, etc.
Basic Connections
The following connections are required to record and play
back the video cassette through the TV.
The VCR supplies a signal to the TV via the RF coaxial cable
on channel AU28-69, or NZ21 -69.
It is possible to view the video picture on your TV in the same
way that you watch TV broadcasts,
if you have connected the VCR to the TV through the Audio/
Video input sockets, then you do not need to follow the
procedure below.
Preparation
- Turn on the TV and the VCR.
Operations
1 Hold down MENU button ® for 5 seconds or more.
Set the TV to an unused position which you wish to use for your video playback.
- Tune the TV until the display on screen Display
shown on the right appears on the
screen. (Please refer to the TV
manufacturers operating
instructions regarding tuning.)
3 Press the MENU button
Panasonic VCR
I I
3
Connection to a TV using the Audio/Video Input Socket:
Set the RF output channel of the VCR to [—] (RF OFF)
when the VCR is connected to the TV via the AudioA^ideo
cable. {See page 5.)
Aerial (Not supplied)
To Change the RF output Channel
In some rare cases after tuning the TV to your VCR,
interference may be visible on the picture. To get rid of this
interference, you can manually adjust the RF output channel
a few channels up and down from the current setting. The
procedure is described below.
Operations
1 Hold down MENU button m for 5 seconds or more.
- The VCR display changes as shown below and the VCR
picture on the TV displays this pattern.
VCR display
Panasonic VCR
I I
hf--
2 Enter the desired channel number (AU28-69, NZ21 -69) by
the VCR Channel button
- Set the RF output channel of the VCR to [—] (RF OFF)
when the VCR is connected to the TV via the Audio/
Video cable.
Press the VCR Channel button to display [—].
For New Zealand For Australia
21E
3 Press the MENU button m to finish the setting mode.
4 Retune your TV to the new RF channel for the VCR.
Note:
- Even if the RF output channel has been changed, it is not
necessary to perform Auto Tuning.
■69E- 28 37 —-€^69
----
(RF OFF)
(Initial position)
^
Page 6
Auto Tuning Using the On Screen Display
For Australia
The VCR is fitted with its own tuner (just like a normal TV) and
can be preset to receive up to 99 TV broadcast stations.
Pre-programmed TV Channels
(Australia only)
The local TV broadcast channels 2,7,9,10 and 28 are
factory-preset in this VCR.
That is, if you can receive television broadcasts on VHF
channels 2, 7, 9,10 and UHF channel 28, these are already
tuned on the programme positions with the matching
numbers. However, it is possible to cancel these settings and
tune the local TV broadcast channels to any desired
programme position.
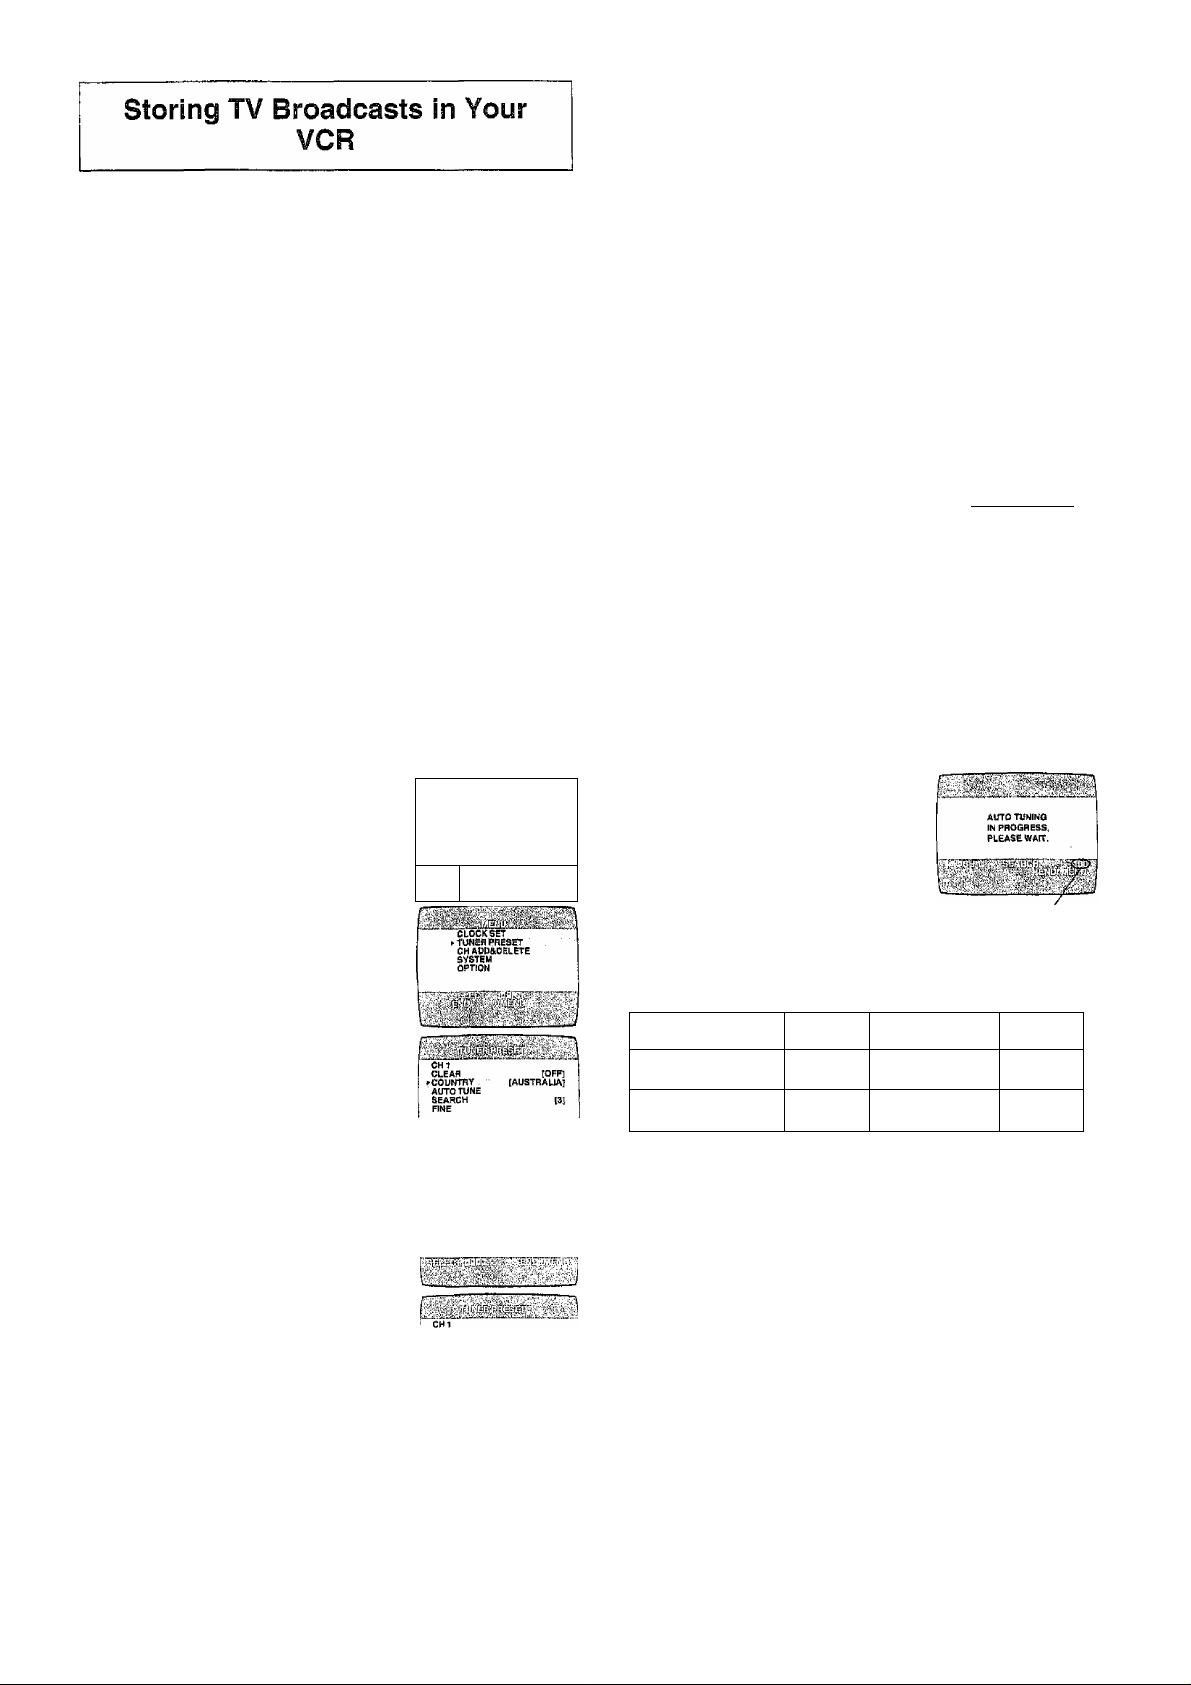
Auto Tuning Using the On Screen Display
For New Zealand
When you use this VCR in New Zealand, need to operate as
follows:
Preparations
- Confirm that the TV is on and the VCR viewing channel is
selected.
- Turn on the VCR and select any programme position
except AV.
Operations
1 Press the MENU button Q to
display the Main menu on
the TV screen.
On Screen Display
шшшщ
;lock set
UKER PRESET
;hadd&delet£
1
YSTEM
)PTI0N
<
Introduction
Auto Tuning using the On Screen Display should be
performed according to the following method if necessary.
Preparations
- Confirm that the TV is on and the VCR viewing channel is
selected,
- Turn on the VCR and select any programme position
except AV.
Operations
1 Press the MENU button © to display
‘■CLDCS SET
TUNER PRESET
CHADD&DELETE
SYSTEM
OPTION
the Main menu on the TV screen.
I__•• ■■ ■
Press the Cursor buttons (A V) ©
to select [TUNER PRESET] then
press OK button ©.
Press the Cursor buttons (A T) ©
to select [AUTO TUNE] then press
the Cursor buttons (■^►) © to start
the Auto Tuning.
CLOCK SET
»TUNER PRESET
СИ ADD&OELETE
SYSTEM
OPTION
CHI
CLEAR
COUNTRY
►AinOTUNE
SEARCH
FINE
(austrÍSÍa]
~ When Auto Tuning is completed,
the On Screen Display disappears
and programme position 1 is
selected.
[31
2 Press the Cursor buttons (A V) ©
to select [TUNER PRESET] then
press the OK button ©.
Press the Cursor buttons (A V) ©
to select [COUNTRY] then press
the Cursor buttons (< © to
select [NEW ZEALAND],
Press the Cursor buttons (A T)©
to select [AUTO TUNE] then press
the Cursor buttons {< >) © to
start the Auto Tuning.
- When Auto Tuning is completed,
the On Screen Display
disappears and programme
position 1 is selected.
►сошту [newzealS^
AUTO TUNE
SEARCH [2]
FINE
CLEAR [OFF!
COUNTRV [NEW ZEALAND)
► AUTO TUNE
SEARCH (31
FINS
AUTO TUNING
IN PROGRESS,
■ WAIT,
The number displayed here
is the number of channels
still to be auto tuned.
Channels that can be Received
VHF
AUSTRALIA
0-12
NEW ZEALAND 1-11
CATV
45-470MHZ 28-69
45-470MHZ 21-69
UHF
Notes:
- Auto Tuning searches for TV stations from VHF minimum to
UHF maximum and memorizes every tuned programme
position. Other programme positions are skipped.
- Auto Tuning takes five or more minutes to complete its
search.
~ If the VCR is not correctly tuned by Auto Tuning, follow the
procedure on page 7.
The number displayed here
is the number of channels
still to be auto tuned.
Page 7
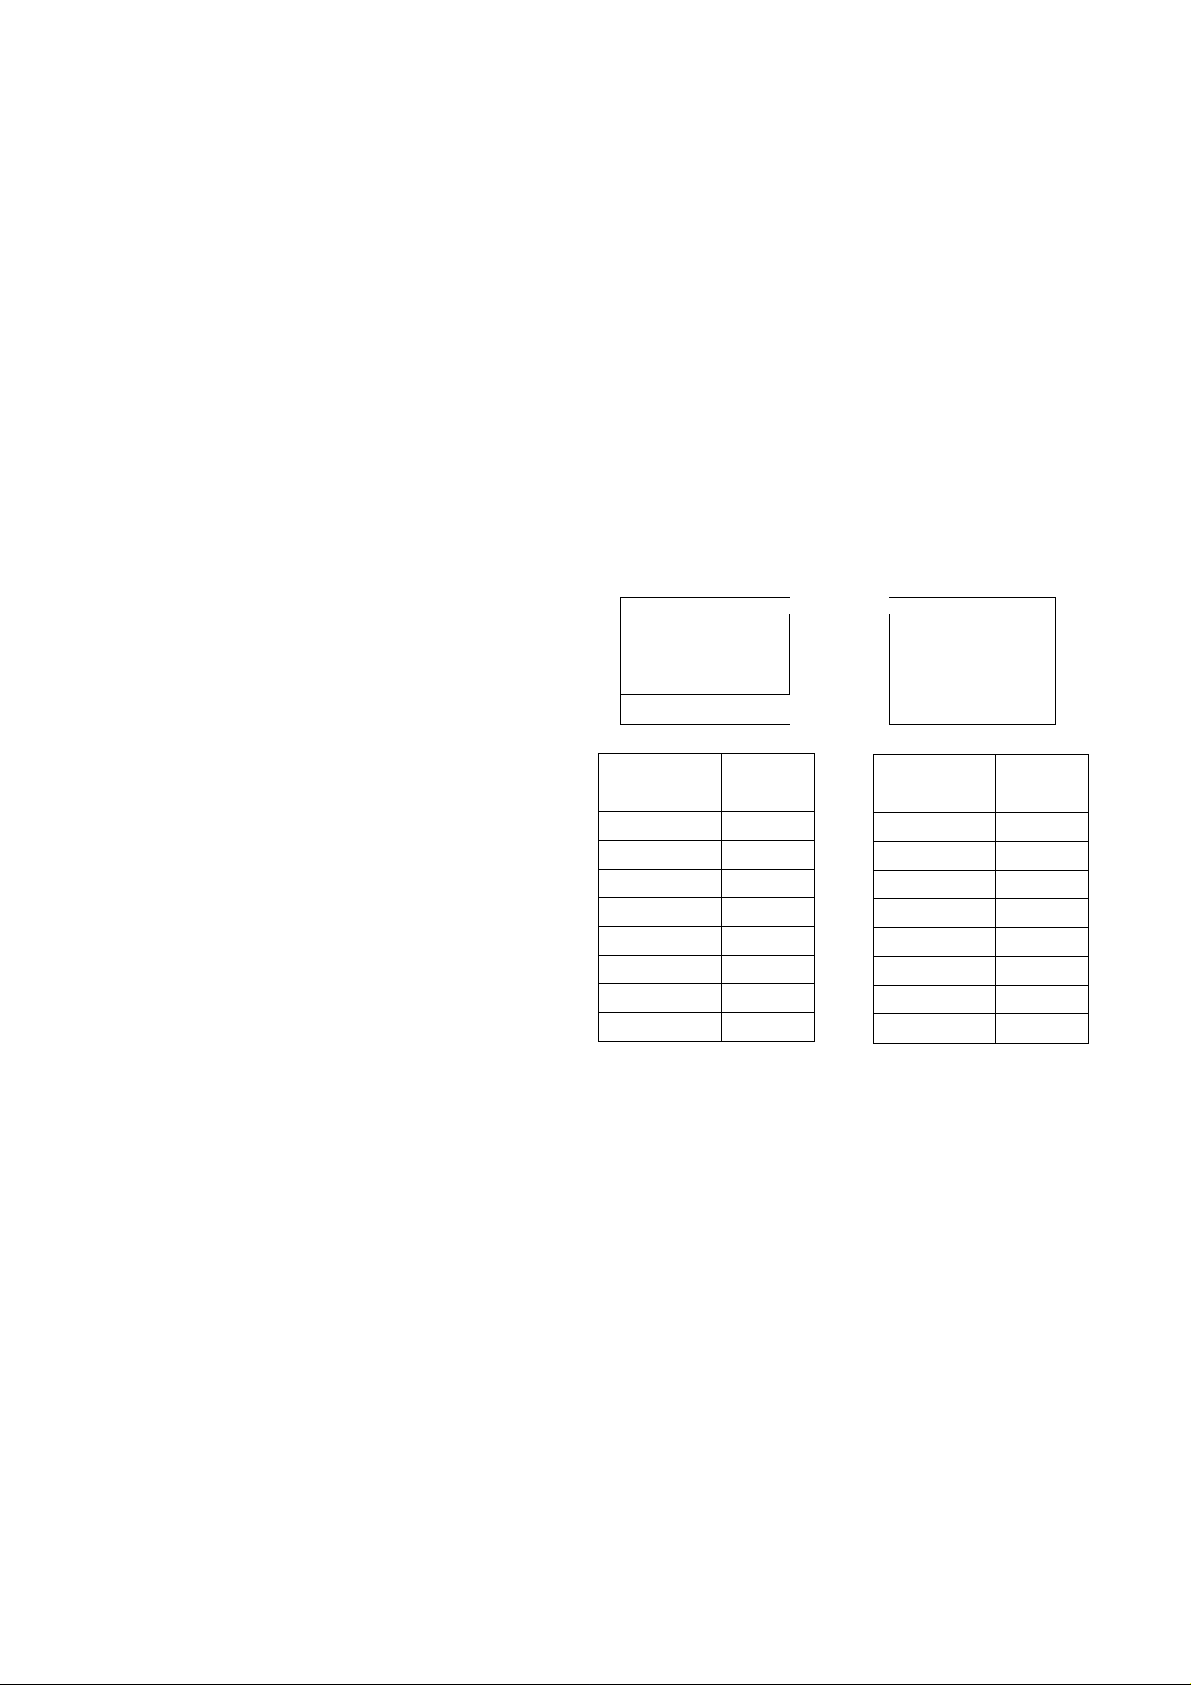
Manual Tuning Procedure
To Add and Delete the Channel
1 Press the MENU button m to display the Main menu on
the TV screen.
2 Press the Cursor buttons (A V) © to select [TUNER
PRESET] then press OK button
3 Press the Cursor buttons (A V) @ to select [CH] then
select the channel number you want tuned by pressing
the Cursor buttons {<3^)0.
4 Confirm that [CLEAR] is set to [OFF],
5 Press the Cursor buttons {A T) 0 to select [SEARCH]
then press the Cursor buttons 0 to start the
Manual Tuning.
- If the desired TV station has not been tuned, press the
Cursor buttons 0 again.
- Press the MENU button m and repeat steps 3-5 for
each programme position you want to tune to a station.
6 Press the MENU button 0 three times to exit the On
Screen Display.
Fine Tuning Procedure
Follow steps 1 to 3 of Manual Tuning Procedure.
4 Press the Cursor buttons (A T) 0 to select [FINE] then
press the Cursor buttons 0 to obtain the best
tuning condition.
- Press the OK button 0 to return the tuning to its former
state.
5 Press the MENU button 0 to exit r
the On Screen Display.
Example:
If you want to add a new channel between Channel 4 and
Channel 6,
1 Press the MENU button 0 to display the Main menu on
the TV screen.
•‘CLOCK SET
Press the Cursor buttons (AT) 0
to select [CH ADD&DELETE] then
TUNER PRESET
CH ADD&OBLETE
SYSTEM
OPTION
press the OK button 0.
^cDdcks^
TUNER PRESET
Press the Cursor buttons (A T) 0
to select the desired programme
»‘CHAOD&DEJ.rrE
SYSTEM
OPTION
position (example CH3) then press
the Cursor button (^ )© to select
[ADD].
( ~]
CH3
CK ADD&DBLETE
Prograrrime
Position
1
2 4
3
4
5
6 12
7
8
Channel
2
6
8
10
-
-
CH AODADELETE
ADD: a DELETE: B
^ CHS ELECT: OS END; MENU
Programme
Position
1
2
■ ■ 3
4
5
6
7
8
Channel
2
4
■■■■■
6
8
10
12
-
Blanking of Unused Programme Positions
Follow steps 1 to 3 of Manual Tuning Procedure.
4 Press the Cursor buttons (A T) 0 to select [CLEAR] then
press the Cursor buttons (◄►) 0 to select [ON].
- Repeat steps 3-4 for other unused programme
positions to skip during the selection of programme
positions.
- To cancel the blanking of a programme position select
that programme position then set [CLEAR] to [OFF],
5 Press the MENU button 0 twice to exit the On Screen
Display.
- Adding a channel shifts the programme positions of
Channel 6 to Channel 12 up, as shown in the list above.
- The list of the programme positions do not appear on
the On Screen Display.
4 After adding, tune the added channel. (See steps 3-5 in
Manual Tuning.)
- Press the MENU button 0 twice and repeat steps 3-4
for each of the other programme positions.
5 Press the MENU button four times to exit the On
Screen Display.
Page 8

Example:
If you want to delete Channel 6,
Press the MENU button to display the Main menu on
1
the TV screen.
On Screen Display
Press the Cursor buttons (A V) ©
to select [CH ADD&DELETE] then
press the OK button
. ....
CLOCK SET
TUNER PRESET
CH ADD60ELETE
SYSTEM
OPTION
Setting the Clock of Your VCR
The clock will operate for at least 3 years in total after it has
been set, - in the event of a power failure, it will operate on its
backup system. After 3 years, it will only operate for 1 hour on
its backup system.
Preparations
- Confirm that the TV is on and the VCR viewing channel is
selected.
- Turn on the VCR.
Press the Cursor buttons (AT) ^
to select the desired programme
position (example CH3) then press
the Cursor button (-4) © to select
[DELETE],
CHAOD&DELETH CHADO&DitETE
Programme
Position
1
2
4
5
6
7
8
Channel
2
4
8
10
12
-
-
CLOCKSET
TUNER PRESET
» CH ADD&OELETE
SYSTEM
OPTION
programme
Position
1
2
3
4
5
6 7
8 -
Channel
2
4
8
10
12
-
Example:
Date; 16 October, 2005
Time; 20:15
Operations
Press the MENU button © to display
the Main menu on the TV screen.
Press the Cursor buttons (AT) ©
to select [CLOCK SET] then press
the OK button 0.
Set each item by pressing the
Cursor buttons (ATP") ©. Press
the Cursor button i-^^) © to return to
the previous item.
At the set time (H:M) point:
- When it is kept pressed, the
indication changes in 30 minute
steps.
- There is no need to press the
Cursor button {>■) ©.
.....
•■CLOCK SET
TUNER PRESET
CH ADD&PELETE
SYSTEM
OPTION
■ ■-W "
^CLOCKSET
TUNER PRESET
CH ADD&DELETE
SYSTEM
OPTION
VCR display
- Deleting a channel shifts the programme positions of
Channel 8 to Channel 12 down, as shown in the list
above.
- The list of the programme positions do not appear on
the On Screen Display.
- Repeat step 3 for each of the other programme
positions.
4 Press the MENU button © twice to exit the On Screen
Display.
Press the MENU button ©.
- The clock starts.
Time Reset Function
If the clock is less than two minutes slow or fast, it can easily
be reset to the proper time.
Example:
Resetting the clock to 12:00.00
1 Press the MENU button © to display the Main menu on
the TV screen.
2 Press the Cursor buttons (AT) © to select [CLCCK SET]
then press the OK button ©.
3 When the current clock display on the VCR is between
11:58.00 and 12:01.59, press the MENU button © as
soon as you hear the 12:00.00 signal. This resets the time
to 12:00.00.
Page 9

Preparations
- Confirm that the TV is on and the VCR viewing channel is
selected.
- Turn on the VCR.
To Set the Colour TV System
1 Press the MENU button 0 to —
display the Main menu on the TV
screen.
Press the Cursor buttons {A T) ©
to select [SYSTEM] then press the
OK button
----------
► AUTO
SELECT-.QS
END :MENU
---------
PAL
NTSC
B/W
Present time/Tape counter/Remaining tape time/ Index
Search/OTR Indication/Play-Off Timer
Information
Display
Present time 17:24
Tape counter
Remaining tape time
-2:35.47
REMAIN 2:34
Index Search SOI
OTR indication OTR 60
Play-Off Timer OFF 60
JET Rewind
J : REW
(4) Tape speed indicator (SP/LP/EP)
(|) Cassette-in indicator
Press the Cursor buttons (A T) © to select [AUTO].
- The VCR automatically distinguishes between PAL or
NTSC signals. If the picture lacks colour during AV
external recording or playback, set to [PAL] or [NTSC].
- When you want to record or play back in black and
white, set to [BAA/].
Press the MENU button © twice to exit the On Screen
Display.
To Make Various indicators Appear On
Screen Display
At a press of the OSD button ©,
the following indications appear
? ^
^ CH1
on the TV screen.
- Press the OSD button m again to
make the On Screen Display
disappear.
(T)
Programme position
Q)
Tape running display
Stop, Eject
Rewind, Review,
Index Search \<^,
Jet Search
Jet Rewind
Fast Forward, Cue,
Index Search ,
Jet Search ►►
Playback
Recording
Recording pause 119
Repeat playback
P
1—
◄◄
(6) Colour system indicator
Any selected colour TV system except [AUTO] appears
on screen display. (See the To Set the Colour TV
System.)
® Picture mode indicator
At each press of the PICTURE MODE button the
selected picture mode is set and following picture mode
indicators appear.
Example:
STANDARD: For TV programme recorded
DYNAMIC: For Scenery, Sports
SOFT: For Rental soft tape
CARTOON: For Cartoon
Note:
~ The on screen display may be disturbed or disappear
during special playback.
►
•
Page 10

Option Setting
Press the MENU button © to display
the Main menu on the TV screen.
Press the Cursor buttons (AT)©
to select [OPTION] then press the
OK button ©.
Press the Cursor buttons (AT)©
to select the desired field.
TAPE SELECT: To select the corresponding video
cassette tape length to display the
approximate remaining tape
time.
- Press the Cursor buttons (◄►) ©to select the
corresponding video cassette tape length.
AUTO: The VCR automatically distinguishes E30, -60,
-90,-120,-180 and -240 tapes.
E195: For E195 tape
E260: For E260 tape
E300: For E300 tape
- The remaining tape time may not be displayed correctly
depending on the tape used.
NTSC INPUT SELECT: To select the colour TV system
used to record NTSC signals.
- Press the Cursor buttons ©to select [AUTO].
Allows NTSC [4.43] or [3.58] signals to be distinguished
automatically.
On Screen Display
CLOCKSET
TUNEA PRESET
CHAOO&DELETE
► OPTION
TAPE SELECT [AUTO)
NTSC INPUT SELECT fAUTOj
NTSC PB SELECT fonPALTVJ
JET NAVIGATOR [OFF]
DELETE NAVIDATA [NO]
OSD REC [OFF]
DIRECT REC [OFF]
...
___
DELETE NAVIDATA: To delete all the Jet Navigator
data stored in the VCR’s memory.
- Press the Cursor buttons {◄►) © to select [OK] then
press the OK button © to do the deletion.
NO:
END:
initially set at this position.
It is done to delete all the Jet Navigator data.
OSD REC: To set to the conditions for the
OSD Recording function.
- Press the Cursor buttons © to select [ON] or
[OFF].
OFF:
ON:
Initially set at this position.
This setting enables OSD Recording.
(See page 13.)
^
If you select [ON], [JET NAVIGATOR] is set to
[OFF] automatically.
DIRECT REC: To set to the conditions for Direct
TV Recording Function.
- Press the Cursor buttons (^^) © to select [ON] or
[OFF].
OFF; Initially set at this position.
ON; This setting enables Direct TV Recording.
AV Input becomes exclusive channel for Direct
TV Recording.
(See page 14.)
Press the MENU button © twice to exit the On Screen
Display.
- If the tape has not recorded correctly,
select 4.43 or 3.58.
4.43; When recording NTSC 4.43 signals.
3.58: When recording NTSC 3.58 signals.
Some programmes on NTSC 3.58 system
cannot be recorded correctly at this position.
NTSC PB SELECT; To select the colour TV system of
the TV used to play back a tape
recording NTSC signals.
- Press the Cursor buttons (■^►■) © to select the desired
position according to the colour TV system of the TV.
on PAL TV: For TVs that can receive PAL signals.
4.43: For TVs that can receive NTSC 4.43
signals.
3.58: For TVs that can receive NTSC 3.58
signals.
JET NAVIGATOR: To set to the conditions for the Jet
Navigator Function.
- Press the Cursor buttons © to select [ON] or
[OFF].
OFF: Initially set at this position.
ON; DSI appears on the VCR display and Jet
Navigator function works.
If you select [ON], [OSD REC] is set to [OFF]
automatically.
Page 11

Playback
Preparations
- Confirm that the VCR is on.
- Confirm that the TV is on and the VCR viewing channel is
selected.
“ Insert a recorded video cassette.
For Normal Playback:
Press the Play button ®.
For Cue or Review Playback:
During playback, tap the Fast Forward
button © or the Rewind button
- To return to normal playback, press
the Play button ®.
- If you press and hold down the Fast
Forward button © or the Rewind
button 0. cue or review playback
continues for as long as you keep the
button pressed, and operation returns
to normal playback when the button is
released.
For High speed Cue or Review Playback (JET SEARCH):
During playback, tap the Fast Forward button © or the
Rewind button ® twice.
For still Playback:
During playback, press the Pause/Siow button ©.
- To return to normal playback, press
the Play button ® or the Pause/Slow
button ©.
For Slow Playback:
During playback, keep the
Pause/Slow button © pressed for
2 seconds or more.
- To return to normal playback, press the Play button ®,
Fast-forwarding or Rewinding the Tape:
Press the Fast Forward button © or the Rewind button @ in
the stop mode.
- To stop fast-forwarding or rewinding, press the Stop button
©.
VCR display
'a',,'.!? .'-
Notes:
- JET SEARCH, Cue, review or slow playback will be
automatically cancelled after 10 minutes, and still playback
after 5 minutes.
- During playback function other than normal playback,
horizontal noise bars may appear in the picture, the colour
of the picture may be unstable, or the picture may be
otherwise distorted.
- When you play back a tape recorded in the LP mode, the
picture may be in black and white.
- When you play back a tape recorded in the EP mode, the
picture and the sound may be unstable.
However, these are not malfunctions.
To PSay Back a Recorded Pari Repeatedly
Keep the Play button ® on the remote control pressed for 5
seconds or more.
- Repeat Playback function does not work during Play-Off
Timer.
To Cancel the Repeat Playback Mode:
Press the Stop button ©.
To Stop Playback Automatically (Playback Off Timer Function)
If you set the playback duration, the playback will stop
automatically.
After the set playback time has elapsed, the VCR
automatically stops playback and switches off,
To Activate the Playback Off Timer Function:
During normal playback, press the Play button @ on the
VCR for more than 2 seconds to put the VCR in the Playback
Off Timer mode.
After that, press the Play button ® on the VCR repeatedly
until the desired playback duration is displayed on the VCR
display.
- Repeatedly pressing this button changes the indication in
the following order:
^Counter display
(normal playback mode) (min.) (min.)
_ 240 ^
____
(min.) (min.) (min.) (min.)
180 ,5
____
__
120
^30
__
__
^60
90 ^
To Obtain a Higher Speed Rewind (Jet Rewind):
Press the JET REW button 0.
The [J : REW] indication appears on the TV screen and VCR
display.(except when the remaining tape time indication
appears)
- Depending on a cassette or an operating condition, the
rewind speed may change somewhat.
- The tape counter is reset to [0:00.00] when the tape is
rewound to the beginning.
To Stop Playback
Press the Stop button ®.
- The VCR will automatically switch off when Play-Off Timer
is completed. To turn the VCR on again, press the VCR
POWER button
Notes:
- The Play-Off Timer function works during normal playback.
~ When the tape reaches its end during Play-Off Timer, the
tape will be rewound to the start and the VCR will turn itself
off.
To Stop Midway:
Press the Stop button ©.
0
.
11
Page 12

NTSC Playback
Tapes recorded in the NTSC system can be played back with
this VCR via a PAL system TV.
- Select [NTSC PB SELECT] from the on screen display
according to the colour TV system of the TV.
(See page 10.)
- NTSC 3.58 recording requires [NTSC INPUT SELECT] to
be in the AUTO or 3,58 position (see page 10), however if
[NTSC INPUT SELECT] is in this position when recording a
NTSC 3.58 signal, no colour is available for the PAL TV.
Once the recording is completed, you then need to select
[on PAL TV] to view the recording in colour on PAL TV.
- On some TVs, the playback picture may roll up or down; if
your TV has V-HOLD control or equivalent adjustment
function, use it to adjust the picture.
Note for only NTSC Playback on PAL system TV
This function is designed to allow only the playback of tapes
recorded by NTSC signals on a PAL system TV. The NTSC
signal is not completely converted to a PAL signal. For this
reason, images played back by this function cannot be
recorded correctly on other VCRs.
To Playback in the Desired Picture QuaSity (Picture Wlode)
This function reproduces optimum playback picture from
various kind of recorded tapes and contents.
Press the PICTURE MODE button ® and select the
corresponding Picture Mode as follows.
Convenient Automatic Functions
VCR Auto Power On
When you insert a video cassette, the VCR switches on
automatically.
Auto Playback Start
When you insert a video cassette with a broken erasure
prevention tab, playback start automatically without having to
press the Play button 0.
VCR-off Playback
When the VCR is off, an inserted cassette can be played
back by pressing the Play button ©.
Auto Rewind
When the tape reaches the end, the VCR automatically
rewinds it to the beginning.
- This function does not work during timer recording
and OTR Recording.
Automatic Switching Off and Ejection
When the VCR is switched off, an inserted cassette can be
ejected simply by pressing the EJECT button 0, The VCR
will eject the cassette and automatically turn itself off again.
VCR-off Search
When the VCR is off, the VCR starts intro-jet scan of an
inserted cassette by pressing the SEARCH button 0.
To Eject Video Cassette Using the Remote
Control
Keep pressing the Stop button 0 for at least 3 seconds.
Example:
Mode
STANDARD
DYNAMIC Clear & Vivid Scenery, Sports
SOFT
CARTOON
- Pressing the PICTURE MODE button @ once makes the
On Screen Display appear; after that, pressing it repeatedly
changes the indication in the following order:
Characteristic Example for Purpose
Normal
Mild
Delicate Cartoon
STANDARD .
(Initial Setting)
CARTOON
TV Programme recorded
Rental soft tape
-5- DYNAMIC —
— SOFT <
-------
12
Page 13

Recording
Preparations
- Confirm that the VCR is on.
- Confirm that the TV is on and the VCR viewing channel is
selected.
Operations
To Display the Approximate Remaining Tape Time
The remaining tape time can be displayed in the VCR display.
1 Select [TAPE SELECT] from the on screen display and
select the corresponding video cassette tape length.
See page 10.
2 Press the DISPLAY button 0 repeatedly until the
Remaining Tape Time appears on the VCR display.
1 insert a video cassette with an intact erasure
prevention tab.
- if it has already been inserted, press the VCR POWER
button 0 to turn the VCR on,
2 Select the TV station using the
VCR Channel buttons
3 Press the REC (REC/OTR) button
0 (0) to start recording.
4 Press the Stop button 0 to stop recording.
VCR display
To Select the Desired Tape Speed
Press the SPEED button ® before recording.
- SP provides standard recording time,
optimum picture and sound quality.
LP provides doubled recording time
with slightly reduced picture and
sound quality.
EP provides tripled recording time with slightly reduced
picture and sound quality.
When you play back a tape recorded in the EP mode, the
monaural sound may be unstable.
When you start the recording in the EP mode, [EP] indication
on the VCR display flashes for about 8 seconds.
EP mode means Super Long Play (SLP).
To Pause Recording
Press the Pause/Slow button 0
during recording.
Press it again to continue recording.
To View One TV Programme while
Recording Another TV Programme
After pressing the REC button ® to start recording, select on
your TV the programme position of the TV programme that
you want to view.
To Prevent Accidental Erasure of Recorded
Contents
Break out the erasure prevention tab after recording.
If you insert a video cassette with a broken out erasure
prevention tab and press the REC button 0, the m
indication flashes on the VCR display to indicate that
recording is not possible.
In this case, cover the tab hoie with two layers of adhesive
tape.
Clock
--------------------
— Remaining Tape Time <—
For certain cassettes, the remaining tape time may not be
displayed correctly.
> Counter
-----
1 ' ! ■f, 1 ‘ i Y" L' .
To reset the tape counter
Press the RESET/CANCEL button © to reset
the tape counter (elapsed time) to [0:00.00].
- The tape counter is automatically reset to [0:00.00]
when a video cassette is inserted.
- The tape counter is reset to [0:00.00] when you operate the
Jet Rewind function and the tape is rewound to the
beginning.
Notes:
- When playing back a cassette recorded in the LP or EP
mode, some picture and sound distortion may occur.
However, this is not a malfunction.
- The recording pause mode will be automatically cancelled
after 5 minutes and return to the stop mode.
- The tape recorded in the EP mode on this VCR cannot be
played back on the other VCR without EP mode function.
“ On the other VCR (even with EP mode function), when you
play back the tape recorded in the EP mode, the picture
and the sound may be distorted. However, this is not a
malfunction.
- When a video cassette with a broken off erasure prevention
tab is inserted, the [g^] indication will flash to indicate that
recording is not possible even if the REC (REC/OTR)
button 0 (0) is pressed.
To recorded on same screen a picture, the present date and time (OSD Recording)
This function allows the picture which you want to record on
videotape, the present date and time are recorded on the
same screen .
Operations
1 Set [OSD REC] to [ON] (see page 10).
2 Press the REC(REC/OTR)
buttons 0 (0).
3 Press the Stop button 0 to
stop recording.
Note:
- This function is also activated for Direct TV Recording,
OTR Recording and Timer Recording,
On Screen Display
13
Page 14

To Immediately Record the Same Scenes of Programme That You Are Viewing on the TV (Direct TV Recording)
This function allows you to immediately start recording the
same scenes of programme that you are viewing on the TV.
Conditions for correct operation of the Direct TV Recording
function:
- Set [DIRECT REC] to [ON] {see page 10).
- The VCR must be connected to the TV’s AudioA/ideo
output socket via AudioA/ideo cable as shown.
To Select the Recording Duration and
Perform Timer Recording (OTR Recording)
OTR means One-Touch Recording and is called this way,
because you can start recording and select the recording
duration by repeatedly pressing a single button. This is very
convenient, for example when you want to start recording
immediately but need to go out or want to go to bed.
After the selected recording duration has elapsed, recording
stops and the VCR automatically switches off.
To Perform an OTR Recording;
1 Display the VCR picture on the TV.
AV (AUDIO IN ® / VIDEO IN ©)
To Perform Direct TV Recording;
1 Insert a video cassette with an intact erasure prevention
tab.
2 Press the DIRECT REC button ©.
- Recording of the TV programme that you are viewing on
the TV starts.
- In some cases, it may not be possible to change the
programme position on the TV during Direct TV
Recording.
When viewing or displaying the programme from your TV:
- Do not press the AV button TV Channel button
during Direct TV Recording, othenwise the recording
may not be performed correctly.
When viewing or displaying the programme from your
VCR:
- It is possible to select and view any other TV
programme from your TV while the Direct TV Recording
continues.
After pressing the DIRECT REC button © to start
recording, select on your TV the programme position of
the TV programme that you want to view.
2 Insert a video cassette with an intact erasure prevention
tab.
3 Press the VCR Channel buttons Q) to select the
programme position on which the TV programme to be
recorded will be broadcast.
4 Press the REC/OTR button ® to start recording.
5 Press the REC/OTR button ® repeatedly to select the
desired recording duration.
- Every time you press this button, the recording duration
indicated in the VCR display changes in the following
order.
- For example, if you select [30], the VCR records a
programme from that moment on for 30 minutes.
^Counter display
(normal recording mode) (min.) (min.)
240 , 180 ,, 120 . 90 .
(min.)
To Stop the OTR Recording Before the End;
Press the Stop button
Notes:
- The OTR function works during norma! recording and Direct
TV Recording.
- When the tape reaches its end during OTR recording, the
VCR will turn itself off.
(min.)
__
(min,)
^ 30
____
^ 60
(min.)
3 Press the Stop button to stop recording.
Page 15

Recording from an external source
This function can be used to make up an edited tape from
other recordings or video sources.
A new scene can be added to the end of previous one.
To delete all of a cassette’s contents (Tape Refresh Function)
You can delete all of a cassette’s contents (the picture, the
sound and the Jet Navigator data} ail at once.
Recording VCR
Preparations
- Connect a video movie camera or another VCR to this VCR
as shown.
- Display the VCR picture on the TV.
- Insert the cassette on which the copying is to be performed,
and make sure that its erasure prevention tab is not broken
out.
- Select the audio source required by pressing the INPUT
SELECT button © to set AV.
AV (AUDIO IN © / VIDEO IN ©) Ope^'ations
Be sure to set [JET NAVIGATOR] to [ON] when you want
to delete all contents of a cassette that is recorded while
setting [JET NAVIGATOR] to [ON].
Be sure to set [JET NAVIGATOR] to [OFF] when you want
to delete all contents of a cassette that is recorded while
setting [JET NAVIGATOR] to [OFF] or is recorded on
another VCR. (See page 10.)
Insert a cassette that you want to delete the cassette’s
contents.
Press TAPE REFRESH button © for
5 seconds or more to put the VCR In
tape refresh standby mode.
Press TAPE REFRESH button @ for 2 seconds or more
to start the tape refresh function.
VCR display
On Screen Display
'...'.'T APE...rtEFnFBH:"
Operations
1 Press the Play button ® to start playback.
2 At the point where you want to join a new scene, press
the Pause/Slow button © to put it in the still playback
mode.
3 Press the REC button © to put it in the recording pause
mode.
4 Start playback on the source unit and search for the point
from which you want to record (copy) onto this VCR.
5 When that point is reached, press the Pause/Slow button
© again to start recording the new picture and sound from
the playback unit.
6 To record (copy) additional scenes, press the Pause/Slow
button © to put this VCR in the recording pause mode
and then perform above steps 4 and 5 again.
7 At the point where you want to stop recording, press the
Stop button © to finish recording.
Notes:
- If you leave the VCR in the recording pause mode for more
than 5 minutes in step 3 or 6, the VCR automatically
switches over to the stop mode to protect the video heads.
- If [DIRECT REC] is set to [ON], set to [OFF] and
disconnect Audio/Video cable from TV.
U
The tape is rewound to the beginning, and it is fast-forwarded
with the tape refresh function.
When the tape reaches the end, the VCR automatically
rewinds it to the beginning.
Note;
- When a video cassette with a broken off erasure prevention
tab is inserted, this function is not activated.
15
Page 16

Timer Recording
4-Key Programming
Up to 16 timer programmes, including weekly and daily
programmes, can be recorded up to one month in advance by
setting the timer.
Preparations
- Confirm that the VCR is on.
- Confirm that the TV is on and the VCR viewing channel is
selected.
- Insert a video cassette with an intact erasure prevention
tab.
- Check that the clock is set to the correct time. If it has not
been set, refer to page 8.
Example (In case of [JET NAVIGATOR] is set to [ON].):
Programme position (channel); 2
Date; 27 October
Starting time; 20:02
Ending time; 21:30
Tape speed; LP
Category: MUSIC ^
(Present date; 16 October)
Operations
1 Press the PROG./CHECK button 0 to display the
menu for timer programme on the TV screen.
2 Press the DATE button 0 to set the date on which the
TV programme will be broadcast,
- Every time you select the programme position, the
background changes.
On Screen Display
- The next item will flash after about 2 seconds.
Press the Cursor button (►) 0 to select the Category.
Then, select the desired category by pressing the
Cursor buttons (A V -<^) 0.
MOVIE v< SPORT f-'
MUSIC i- CHILD *
DRAMA V HEWS ^
EDUCA IÀ OTHER Ш
DOCUM ta •
-------------------
MOVIE SPORT -y
• MUSIC CHILD *
DRAMA HEWS ti
EDUCA OTHER St:
DocuM ca
■ ■■■-■ ■■ \ ”■■■ .■ - ■■■■
- Alternatively, you can set the category on the Navigator
list. (See page 18 for details.)
- This function is activated when [JET NAVIGATOR] is
set to [ON]. (See page 10.) When [JET NAVIGATOR] is
set to [OFF], proceed to the step 9.
Press the MENU button 0 to
make the previous display
appear.
Й- Й 0 t:j
CHECK : PROG /CHECK
9 Press the TIMER (REC) button 0 to switch the VCR
over to the timer recording standby mode.
- When [JET NAVIGATOR] is set to [ON], the
[PROGRAMME IS COMPLETE. REMAINING
PROGRAMME 49] message appers. (See page 10.)
- When [JET NAVIGATOR] is set to [OFF], the
[PROGRAMME IS COMPLETE.] message appears.
(See page 10.)
- The VCR will be set to the timer recording standby mode
after about 1 minute if the TIMER (REC) button 0 is not
pressed.
To Suspend the Timer Recording Standby
UoúB
When you want to use the VCR for playback, normal
recording or some other operation before the programmed
timer recording will be performed, you can temporarily
suspend the timer recording standby mode by pressing the
TIMER (REC) button 0 so that the [□] indication on the VCR
display disappears.
3 Press the Channel button 0 to select the programme
position of the desired TV station.
4 Press the ON button 0 to set the starting time.
- When it is kept pressed, the indication changes
in 30 minute intervals.
Press the OFF button 0 to set the
ending time.
Press the SPEED button 0 to set the desired tape speed.
- SP provides standard recording
time, optimum picture and sound
quality.
LP provides double recording time
with slightly reduced picture and
sound quality.
EP provides triple recording time with slightly reduced
picture and sound quality.
Regarding the [A] indication, refer to page 17.
When you play back a tape recorded in the EP mode,
the monaural sound may be unstable.
16
However, after you have finished using the VCR, be sure to
reactivate the timer recording standby mode by pressing the
TIMER (REC) button 0 again otherwise the programmed
timer recording will not be performed.
Weekly Timer Recording
In step 2 of 4-Key Programming,
select the desired day by pressing
the DATE button 0.
For example, SU (Sunday)
(SU=Sunday, MO=Monday, TU=Tuesday, WE=Wednesday,
TH=Thursday, FR=Friday, SA=Saturday)
Daily Timer Recording
In step 2 of 4-Key Programming,
select the desired days by pressing
the DATE button 0.
For example, (c)
® Daily recording from Monday to Friday (MO-FR)
d) Daily recording from Monday to Saturday (MO-SA)
© Daily recording from Sunday to Saturday (SU-SA)
Page 17

Tamer Recording from an Externa! Signal
Source
If timer recording is performed by a unit connected to the
Audio/Video input sockets, select the AV indicator in step 3 of
4-Key Programming for the programme position,
Checking a Timer Programme
- The VCR must be turned on, or in timer recording standby
mode.
- Confirm that the TV is on and the VCR viewing channel is
selected.
1 Press the PROG./CHECK button ©
twice.
- Every time you press the PROG./
CHECK button ©, the programme
shifts below.
27W6 2*20i0a' !1;30 S'P
ii SU-SA as 10:30 11:00 a
1 SU 14 lS:0Cf 16:Q0 SP
!|19TU 5 22:1$ 23:30 EP
I29TH AV 20:02 21:30 SP
f 3QSA 4 19:10 19:0$ EP
9
-------
- If the [DIRECT REC] is set to [ON], AV is skipped,
Setting other Programmes in Succession
Repeat steps 1-9 of 4-Key Programming,
Programming a Timer Recording of a TV
Programme Until its End
(Tape Speed Auto Change Function )
If the VCR determines that the remaining tape time is
insufficient to record the programme to its end during a timer
recording performed in the SP mode, this function
automatically changes the tape speed to ensure that the
whole programme will be recorded.
The tape speed will change as follows.
PAL system: SP —LP
NTSC system: SP EP
- This function cannot change the recording speed to the
EP mode for PAL system.
Depending on the remaining tape length, recording may be
performed in the LP (EP) mode from the start. However, if the
remaining tape time is still not sufficient in this case, the
programme cannot be recorded to the end.
- The tape length must be set correctly. (See page 10.)
- Some tapes may not work correctly.
- If the recording speed changes from SP to LP during a
timer recording, some brief picture distortion occurs at that
point.
To Activate the Tape Speed Auto Change Function:
Press the SPEED button @ to select [A],
, V-'.' >1.'.^; V ‘
Press the Cursor button (^) © to
display the Category. (When [JET
NAVIGATOR] is set to [ON].) Press
the Cursor button (l>) 0 again to
make the previous display appear
Press the MENU button 0 to exit
the On Screen Display.
■ 19TU
Í 2STH
f 3C5A
10;30 11:00
15:00 1S:0Q
22;15 23:30
21:;
4 19:10 19:55 ^
CancelEmg a Timer Programme
- The VCR must be turned on, or in timer recording standby
mode.
- Confirm that the TV is on and the VCR viewing channel is
selected.
1 Press the PROG./CHECK button 0
twice.
2 Press the PROG./CHECK button ©
repeatedly until the desired timer
programme is highlighted.
3 Press the RESET/CANCEL button
Press the MENU button 0 to exit
the On Screen Display.
Note:
- If timer recording is not completed (due to insufficient tape
or cancellation by the user), the programmed timer
recording data will be cancelled from the memory by
4 A.M two days later.
However, if the timer recording function is activated at that
time, the programmed timer recording data will not be
cancelled.
^ 27Wg 2 20:02 21:30 SP
] SU-SA 25 10:30 11:00 A
I SU 14 15:00 15:00 SP
I19TU 5 21.15 23:30 £P
I30TH AV 20:02 21:30 SP
I aOSA 4 19:10 19:56 SP
J
- Every time you press the SPEED button ©, the indication
changes in the following order:
PAL system:
NTSC system:
SP“> LP -
------
----- A
SP
A <-
EP
□
EP
□
17
Page 18

Search Functions
Jet Navigator
This VCR can display a list of the recorded programs on the
inserted video cassette on the TV screen. You can then
seiect the desired programme, and the VCR w^iil quickly
locate its beginning and start playback.
Conditions for correct operation of the Jet Navigator function:
- The tape length of the inserted cassette must be set
correctly.
- The VCR must not be in the timer recording standby mode.
- A programme of at least 15 minutes must be recorded on
the tape.
To Set the Category
The category setting allows you to find what kind of
programmes are recorded by the character and the icon
indications.
Press the Cursor button (►) © while
the Jet Navigator list appears.
Category
MOVIE
Indication Icon
MOVIE
MOVIE
MUSIC >
DRAMA ^
EDUCA ^
DOCUM
SPORT -f'
CHILD • 1
NEWS ^
OTHER ^
.
-------
Preparations
- Display the VCR picture on the TV.
- Be sure to set [JET NAVIGATOR] to [ON] {see page 10)
and preform recording.
Operations
1 Press the NAVi button <£) to display
the Jet Navigator list.
- Up to 14 programme data that
have been recorded last are
On Screen Display
10/16 1 10:30 MUSIC /
10/10 24 15:00 SPORT ^
10/21 5 22:15
10/23 AV 20t02
10/26 4 16:10 EDUCA |§
10/27 2 2D:D2
10/27 12 20:30
displayed on the Jet Navigator list.
(7 programme data for each page)
- When more than 15 programs have been recorded for
one cassette, the programme data are deleted from the
first one.
- When pressing NAVI button © during playback,
playback stops and the Jet Navigator list appears.
2 Press the NAVI button <£) several times to select the
programme that you want to locate and play back.
After more than 3 seconds, the VCR starts the search for
the beginning of the selected programme and playback
starts automatically,
- Every time you press the NAVI
button ©, the programme shifts
above.
- If, after playback has started, you
1D/1B 1 1D:3D MUSIC .I'
10/1B lA iB:oo SPOfiT y
10/21 5 !2:1B
10/23 AV 20:02
10/2E A 1S:10 EDUCA №
10/22 2 ZD:D2
10/27 1?. 20_
want to search for the beginning
of the same or another
programme, press the NAVI
button ,
Playback stops and the Jet
Navigator list appears.
10/10 1 10:20 MUSIC S-
10/10 20 15:00 SPORT V
10/21 5 22:15
..,./0/23 AV 20:02
« 10:10 EDUCA Oli
'"10/27 2 20:02
10/27 12 20:30
To cancel the Jet Navigator list:
Press the MENU button
MUSIC
DRAMA
EDUCATION
DOCUMENTARY
SPORTS
CHILDREN
NEWS
OTHERS
MUSIC
DRAMA
EDUCA
DOCUM
SPORT
CHILD
NEWS
OTHER
X
o
r
f
№
ETC.
To Delete the Jet Navigator Data of a Single Video
Cassette Tape:
Keep the RESET/CANCEL button ^ pressed for more than
5 seconds while the Jet Navigator list appears.
[- -] appears on the list.
- See page 10 on the way to delete all the Jet Navigator data
stored in the VCR’s memory.
Notes:
- The Jet Navigator list is stored in each cassette.
- Signals approximately 10 seconds before and after the
current tape position are checked. (During this checking,
[CHECKING JET NAVIGATOR DATA.] is displayed on the
TV screen.)
- Checking cannot be performed properly when signals are
attempted to be checked at portions of the tape where
there are no signals such as at unrecorded portions of the
tape. In this case, press the NAVI button ® at a portion of
the tape where a programme has been recorded of this
VCR. This will allow signal checking to be performed more
reliably. When a signal can still not be found, [CAN NOT
FIND JET NAVIGATOR DATA.] is displayed on the TV and
you cannot find the beginning of the programme.
- Up to 20 cassettes and 50 programmes can be registered.
- If 50 recorded programmes data is already stored in
memory and you attempt to store timer recording data for
another programme, the message [REMAINING
PROGRAMME 0. DELETE JET NAVIGATOR DATA.]
appears. If you attempt to make a new recording, this same
message also appears after you insert the cassette and the
Jet Navigator data is checked. As each timer recording or
manual recording is finished, the programme data is
deleted, starting from the oldest data.
- When a new programme is attempted to be recorded if
programmes equivalent to 20 cassettes are already stored
in memory, [REMAINING CASSETTE 0. FOR JET
NAVIGATOR.] is displayed. Programmes recorded without
deleting data as instructed are not registered in the list.
Page 19

When Recording Over the Same Location on a Tape:
- The originally recorded programme is deleted from the list.
- Programme contents starting near the start and end of the
newly recorded programme (within 10 minutes before the
start and after the end of the newly recorded programme)
are also erased.
(Although old programme contents are also similarly erased
in the case of ordinary recording, the newly recorded
programme is not registered in the list.)
-----------
Erased
Programme 1
Programme 1
Programme 1
Programme 2
New programme
Within 10 minutes
Programme 2
Mew programme
Within 10 minutes
Programme 2
■Mew programme
10 minutes or more
Programme 3
Erased
Programme 3
Not erased
Programme 3
To Demonstrate the Jet Navigator Function
Keep the NAVi button ® pressed for more than 5 seconds
without inserting a cassette tape.
To Check the Recorded Programming Data (Time Stamp Function)
When playback starts after searching
with Jet Navigator function or index
search function, recorded
programming data (called Time
Stamp) appears on the TV screen for
approx. 5 seconds.
Preparation
- Display the VCR picture on the TV.
Note;
“ Time Stamp does not appear if the beginning of the Jet
Navigator data are not recorded 10 minutes before and
after the current tape position even when index signals are
recorded.
CHJ 1W2T.SA ON!0:
ïOii
To Find the Beginning of Each Recording (VHS index Search System)
This VCR automatically records special index signals on the
tape every time a recording is started. The Index search
function makes use of these index signals to let you find the
beginning of a desired programme quickly and easily.
Index signals are automatically recorded in the following
cases:
- When you start a recording by pressing the REC button
REC/OTR button or DIRECT REC button ©.
- When a timer recording starts.
- When you press the REC button © on the remote control
during recording.
Conditions for correct operation of the Index search function:
- The VCR must be in the stop mode or in the playback
mode.
- Each programme recorded on the tape must be at least
5 minutes long.
Preparations
- Display the VCR picture on the TV,
~ Insert a recorded video cassette.
Operation
1 Press the INDEX button ® (that corresponds to the
direction from the current tape position in which the
desired programme is located on the tape) to start the
index search.
For example, if you want to
search for the 2nd recorded
programme in forward direction,
press the INDEX ►w button ®
twice,
- The VCR fast-forwards or rewinds the tape and
searches for the specified index signal (the beginning of
the desired recorded programme).
When it has been found, playback starts automatically.
To Cancel the Index Search or to Stop Playback;
Press the Stop button 0.
Notes:
- Searching in either direction is possible up to the 20th
index signal.
- If you press either of the INDEX button O too many times,
simply press the other INDEX button 0 (indicating the
opposite direction) to correct it. In this way, you can reduce
the displayed figure down to 1.
- The figure on the VCR display decreases by 1 every time
an index signal is located.
VCR display
19
Page 20

Searching while Checking the Video Cassette Contents (Intro-Jet Scan)
This VCR automatically records special index signals on the
tape every time a recording starts. The Intro-Jet Scan
function makes use of these index signals to play back the
beginning of each programme recorded on the cassette one
after another at high speed. This lets you quickly and easily
check the contents of a cassette and find a desired
programme.
Index signals are automatically recorded in the following
cases:
- When you start a recording by pressing the REC button
REC/OTR button or DIRECT REC button
- When a timer recording starts.
- When you press the REC button © on the remote control
during recording.
Conditions for correct operation of the Intro-Jet Scan function:
- VCR must be switched on, be in the playback mode or be
in the standby mode.
- Each programme recorded on the tape must be at least
15 minutes long.
Preparations
“ Display the VCR picture on the TV.
- Insert a recorded video cassette.
Operations
1
Press the SEARCH button @ to start the Intro-Jet Scan.
- After rewinding the tape to the beginning, the VCR
plays it back at high speed for approximately
10 seconds. It then fast-forwards the tape to the next
tape position marked by an index signal {beginning of a
programme), and every time an index signal is found,
the VCR switches over to high-speed playback (Cue)
for about 10 seconds.
On Screen Display
When you have found the programme that you want to
view, press the Play button @ to start normal playback.
To Cancel the Intro-Jet Scan or to Stop Playback:
Press the Stop button
Before Requesting Service
Message of On Screen Display
The error message is indicated in brackets [ ].
[PLEASE PUT IN A VIDEO CASSETTE.]
- REC/OTR button @ (REC button ©), TIMER (REC) button
© or DIRECT REC button has been pressed without a
video cassette inserted.
Insert a video cassette.
[PLEASE STOP THE TAPE.]
- [TUNER PRESET] has been selected during playback.
Stop the tape.
[PLEASE SET THE CLOCK.]
- TIMER (REC) button ©, PROG./CHECK button ® has
been pressed when the clock is not set.
Set the clock.
[PLEASE USE A CASSETTE WITH TAB.]
- REC/OTR button © (REC button ©), TIMER (REC) button
© or DIRECT REC button <|) has been pressed without a
video cassette with an intact erasure prevention tab.
Use a video cassette with an intact erasure prevention tab.
[NO TIMER RECORDING HAS BEEN SET.]
- TIMER (REC) button © has been pressed with no timer
programmes.
Set timer recording.
[VCR IS IN THE TIMER STANDBY MODE.]
- VCR POWER button ^ has been pressed during the timer
standby mode.
Press the TIMER (REC) button © to release the VCR from
the timer standby mode.
The VCR will not operate correctly
The symptom description is indicated in brackets [ ].
[The VCR display is not illuminated.]
- The mains lead has not been connected.
Connect the mains lead to the mains supply.
[The VCR display Is illuminated but the VCR will not operate.]
- The VCR is in the timer mode.
Press the TIMER (REC) button © to operate the VCR
manually.
- Safety devices are operating.
Disconnect the mains lead and wait for 1 minute.
Reconnect the mains supply and check functions.
- Dew may have formed.
Do not operate the VCR for 1 hour.
Playback will not operate correctly
The symptom description is indicated in brackets [ ].
[The picture is noisy or is not in color.
Horizontal bars or lines run down the screen.]
- Tracking is not correct.
Adjust the tracking. See page 21.
- The TV has not been tuned to the VCR.
Tune the TV to the VCR. See page 5.
- The video heads are clogged or worn.
Consult Panasonic Customer Care Centre for advice on
132600. (Australia only)
- The playback picture is distorted when using an E300 type
video cassette that was recorded in the LP or EP mode.
We recommend that you use video cassettes other than
type E300.
20
Page 21

Recording will not operate correctly
The symptom description is indicated in brackets [ ].
[The ISS indication flashes whenever recording is attempted.]
- The erasure prevention tab on the video cassette has been
broken off.
Use a tape with an intact erasure prevention tab, or cover
the tab hole with adhesive tape, if the original recording is
no longer required.
[The picture is recorded with noise or a blank screen.]
- The aerial or aerial cable is defective.
Check the aerial connection to the VCR. See page 5.
Check your normal TV picture. If there is no picture, check
your aerial.
- The VCR is not correctly tuned.
Retune the VCR. See pages 6-8.
- AV has been selected.
Select the required TV programme.
[Timer recording cannot be performed.]
- The clock or calendar has been incorrectly set.
Check the clock and calendar. Set them to the present
time. (Note that this is a 24-hour clock.)
See page 8.
- The recording starting or ending time setting is incorrect.
Set the recording starting and ending time correctly.
- The VCR has not been set for timer recording.
Press the TIMER (REC) button © after programming for
timer recording.
[AV externa! recordings cannot be made.]
- AV has not been selected.
Select AV by pressing the INPUT SELECT button ©.
- External AV connections are incorrect.
Check that the connections for external video and audio
sources are correct. See page 15.
- AV cannot been selected.
[DIRECT REC] is set to [ON],
Set [DIRECT REC] to [OFF].
See page 10.
The remote control will not operate correctly
The symptom description is indicated in brackets [ ].
[The remote control does not operate correctly.]
- The remote control transmitter beam is not reaching the
VCR.
Ensure that the remote control is being pointed at the VCR
and that the transmitter beam is not obstructed.
- The distance is too far.
Use the remote control within 7 m of the VCR.
- The batteries are exhausted.
Replace the batteries. Note the precautions for
replacement on page 2.
- The batteries are incorrectly fitted with (©/©) reversed.
Fit the batteries correctly as shown on page 2.
Adjusting the Playback Picture
Under normal conditions, the VCR automatically adjusts the
playback picture for optimum quality. However, in some
cases it may be necessary to adjust it manually,
If the Picture Contains Noise Bars and It Is Not Clear to See (Tracking adjustment):
If noise bars appear during norma! playback, slow playback
or still playback, follow the operations below.
During normal or slow playback, press
the VCR Channel button ® n/ or
until the bars noise disappear.
- If the noise bars appear during still
playback, switch the VCR over to the
slow playback mode and then adjust
the tracking as explained above.
To Return to Auto Tracking;
Press the VCR Channel button ® and simultaneously.
If the Still Picture Scrolls Up or Down (V-Lock Adjustment);
If the still picture scrolls up or down, perform the following
operation.
During still playback, keep the Channel button ® v or
pressed until the picture stops scrolling.
Precautions;
- With certain TV models and tapes, it may not be possible to
adjust the tracking.
- If you play back a cassette that was recorded on another
VCR, the picture quality may be inferior and it may be
necessary to adjust the tracking. Also, on some TVs, the
picture may scroll up and down in the special playback
functions.
However, these are not malfunctions.
scr0eri
Playback picture
containing noise bars
Dirt on the video heads
If the video heads get dirty, pictures will not be recorded or
played back clearly.
(See the following conditions.)
Normal picture
if this happens, insert and eject a cassette 5-10 times
successively to remove the dirt from the video heads.
If the problem still persists after performing above, contact a
service personnel to request assistance.
Small amount
of dirt
Large amount of dirt
Head cleaning by service agents is not covered by
warranty.
21
Page 22

NV-SJ230A
Specifications
Power Source:
Power Consumption:
Video Recording System:
Video Heads:
Tape Speed:
Tape Format:
Record/Playback Time:
FF/REW Time:
VIDEO
Television System;
Modulation System;
Input Level:
Output Level:
AUDIO
Input Level;
Output Level:
Audio Track:
220-240 V AC 50/60 Hz
11 W
2 rotary heads, helical scanning system
2 heads
PAL SP; 23.39 mm/s LP; 11.7 mm/s EP; 7.8mm/s
NTSC SP; 33.3 mm/s EP; 11.1 mm/s
VHS tape
PAL SP; 240 min with NV-E240
PAL LP; 480 min with NV-E240
approx. 60 s with NV-E180 (FF/REW)
approx. 43 s with NV-E180 (Jet Rewind)
CCiR; 625 iines, 50 fields, PAL colour signal
EIA; 525 lines, 60 fieids, NTSC colour signal
Luminance; FM azimuth recording
Colour signal; converted subcarrier phase shift recording
VIDEO IN (PHONO); 1.0 Vp-p,
VIDEO OUT (PHONO); 1.0 Vp-p,
RF Modulated;
UHF channel A28-A69/E21-E69,
AUDIO IN (PHONO);
AUDIO OUT (PHONO);
1 track (Normal-mono only)
-6 dBV,
-6 dBV,
75 ohm, terminated
75 ohm, terminated
more than 47 kohm
less than 1 kohm
75 ohm
Video Horizontal Resolution: Signai'tO'Noise Ratio:
Audio Frequency Response:
Operating Temperature:
Operating Humidity:
Weight:
Dimensions;
Standard Accessories:
Weight and dimensions shown are approximate.
Specifications are subject to change without notice.
Colour; more than 240 lines (SP)
Video; more than 43 dB (SP)
Audio; more than 43 dB (SP)
80 Hz-8 kHz/SP
5°C-40°C
35%-80%
3.5 kg
430 (W)x89 (H)x277 (D) mm
1 pc. RF Coaxial cable
1 pc. Remote Control
2 pcs. R6 size batteries
22
 Loading...