

Panasonic NV-S99A User Manual
I
Basic
Operations
3~
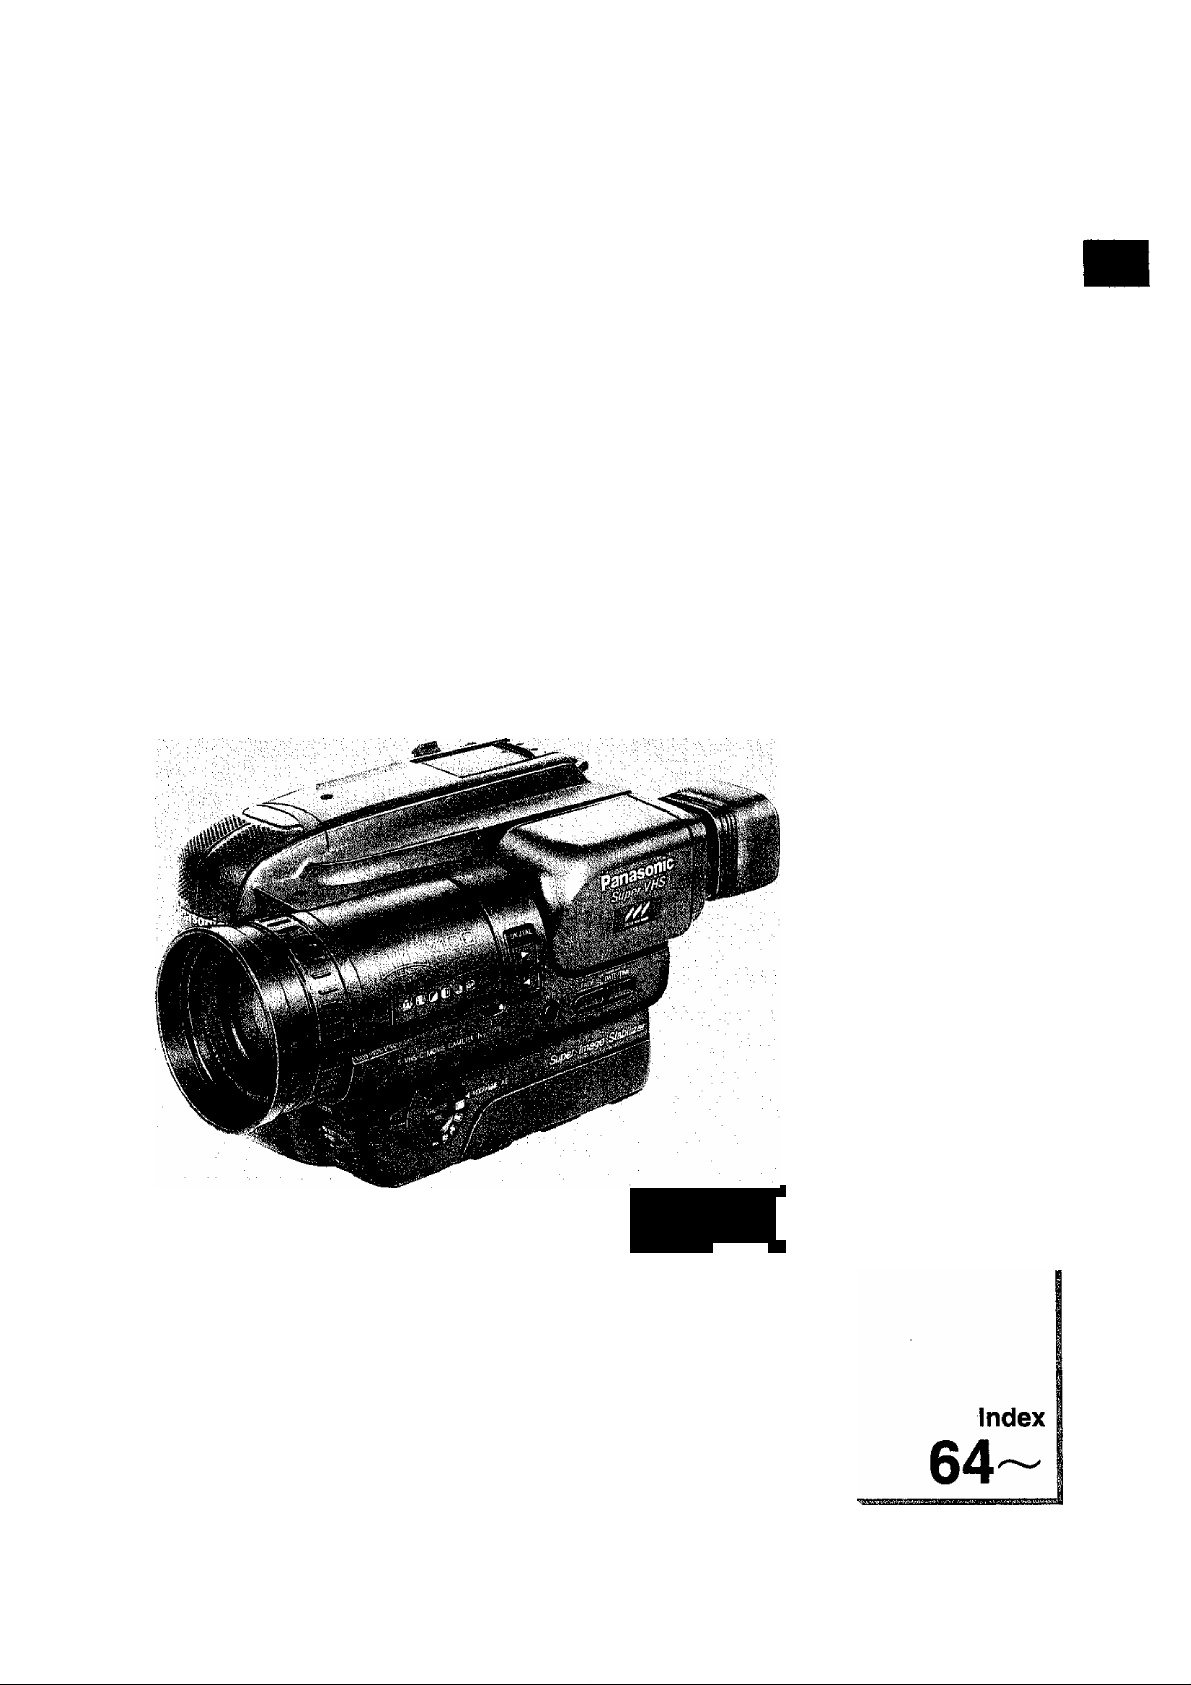
S-VHS-C Movie Camera
NV-S99A
Operating Instructions
Advanced
Operations
28
Eiac
625
Hi-Fi
&TBREO
VHS
PAL
Options/
Editing
51 ~
Miscetianeous/
Care of Unit
58
Before attempting to connect, operate or adjust
this product, please read these instructions
completely.
VQT6075

Dear Customer, We would like to take this opportunity to thank you for purchasing this Panasonic
Movie Camera.
Please read these Operating Instructions carefully and keep them handy for
future reference.
Please keep your receipt as proof of purchase for all warranty repairs.
Information for Your Safety
IMPORTANT
Your attention is drawn to the fact
that recording of pre-recorded tapes
or discs or other pubiished or
broadcast materiai may infringe
copyright laws.
WARNiNG
TO REDUCE THE RISK OF FIRE OR
SHOCK HAZARD, DO NOT EXPOSE
THIS EQUIPMENT TO RAIN OR
MOISTURE.
S-VHS-C Movie
•The rating plate is on the bottom side
of the Movie Camera.
AC Adaptor
•The rating plate is on the bottom side
of the AC Adaptor.
FOR YOUR SAFETY
■ DO NOT REMOVE THE OUTER
COVER.
To prevent electric shock, do not remove
the cover. There are no user serviceable
parts inside. Refer servicing to qualified
service personnel.
IF THE SUPPLY CORD OF THIS
EQUIPMENT IS DAMAGED, IT MUST
BE REPLACED BY THE SPECIAL
CORD.
CAUTION:
TO REDUCE THE RISK OF FIRE OR
SHOCK HAZARD AND ANNOYING
INTERFERENCE, USE THE
RECOMMENDED ACCESSORIES
ONLY.
Contents
Check List for the Standard Accessories
Controls and Functions ........................................................... 4
Using the Remote Controller .................................................. 6
Using the AC Adaptor as a Power Supply Unit .................... 8
Watching the Picture on a TV Set
Charging the Battery Pack
Attaching the Charged Battery Pack ....................................10
Powering the Movie Camera ON/OFF..................................12
Inserting a Video Cassette....................................................12
Adjusting the Viewfinder........................................................12
Setting the Date and Time
Inserting and Deleting the Date and Time
Starting Recording
Making the Subject Larger or Smaller During
Recording...........................................................................16
Using the Tape Counter Indication
Using the Memory Function..................................................18
Confirming the Remaining Tape Time
Quick Reference Guide to the Indications
in the Viewfinder.................................................................20
Playing Back on the Viewfinder or a TV
Rewinding or Fast-Forwarding the Tape
Using the Cue, Review and Still Playback
Functions During Normal Playback
Playing Back on a VTR, Using the Supplied
Cassette Adaptor
.....................................................
.....................................................
.................................................................
...............................................................
................................
........................................
............................
.......................................
...................................
................................
.............................
..................................
8
10
14
14
16
18
18
24
24
24
26
Recording Dark Scenes More Brightly.................................38
Fading In the Picture and Sound..........................................40
3
Fading Out the Picture and Sound
Adjusting the Shutter Speed and Iris ...................................40
Super Image Stabilizer Function
Digital Zoom Function
Digital Strobe Function.........................................................42
Digital Gain-up Function.......................................................42
Fading Over from the Last Recorded Scene
to the Next {Digital Wipe)
Fading Over from the Last Recorded Scene
to the Next (Digital Mix)
Checking the End of a Recorded Scene
Locating a Point Where You Wish to Add
a New Scene
Eliminating Picture Distortions by Adjusting the
Tracking ...........................................................................46
Using the Power Save Functions.........................................48
Lighting.................................................................................50
Standard Values of Brightness.............................................50
Using the Car Battery Cord (Optional)
Editing a Previously Recorded Tape ...................................52
Using the VITC Function
Using the Audio Dubbing Function
Optional Accessories............................................................56
.........................................................
...................................................................
.....................................................
...................................... 40
.........................................
................................................
...................................................
.............................
.................................
......................................
42
42
44
44
46
46
51
54
55
8.
o
O
«
<0
0)
V
Q.
o
■D
O
u
c
TO
<
Recording in the Auto Focus Mode
Recording in the Auto Focus Mode
Recording in the Manual Focus Mode
Recording with Automatic White Balance
Adjustment
Recording with Manual White Balance
Adjustment
Using the Menu Function......................................................36
Recording a Stilf Picture for 5 Seconds
(Snapshot) ........................................................................36
Recording Fast-Moving Subjects..........................................38
Making Subjects Stand out Sharply from the
Background.......................................................................38
........................................................................
........................................................................
.....................................
.....................................
..................................
28 Adjusting the Length of the Grip Belt...........................
28
28
32
32
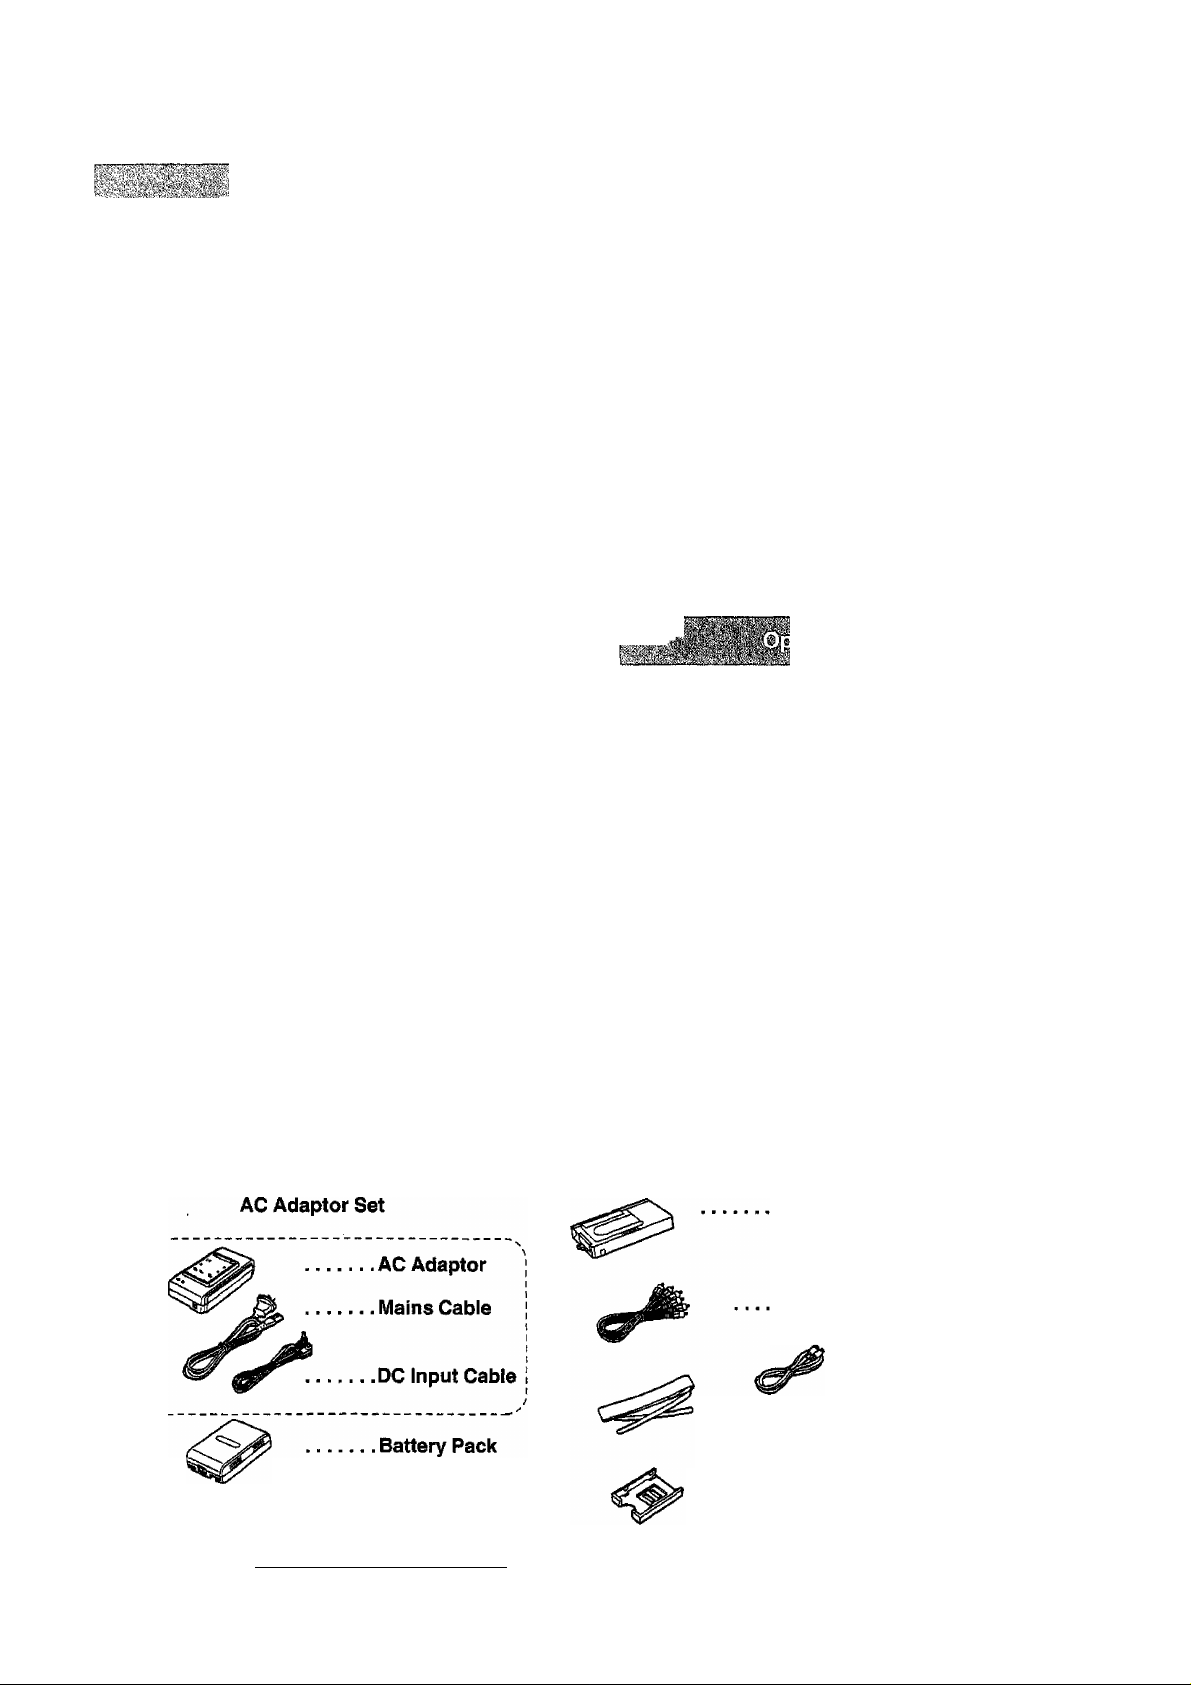
Check List for the Standard Accessories
Adjusting the Length of the Grip Belt
Attaching the Shoulder Strap
Storage.................................................................................58
Cleaning the Viewfinder
Preventing Accidental Erasure of
Recordings...............
Before Requesting Service
Cautions
Condensation
Index ...................................................................................64
Specifications.......................................................................65
.............................................................................
...
......................................................
........................................................
..................................................
................................................................. 63
...................................
...............................................
58
58
.59
59
60
62
Cassette Adaptor
^
.......
.. AudicA/ldeo Cable
..........
Shoulder Strap
............
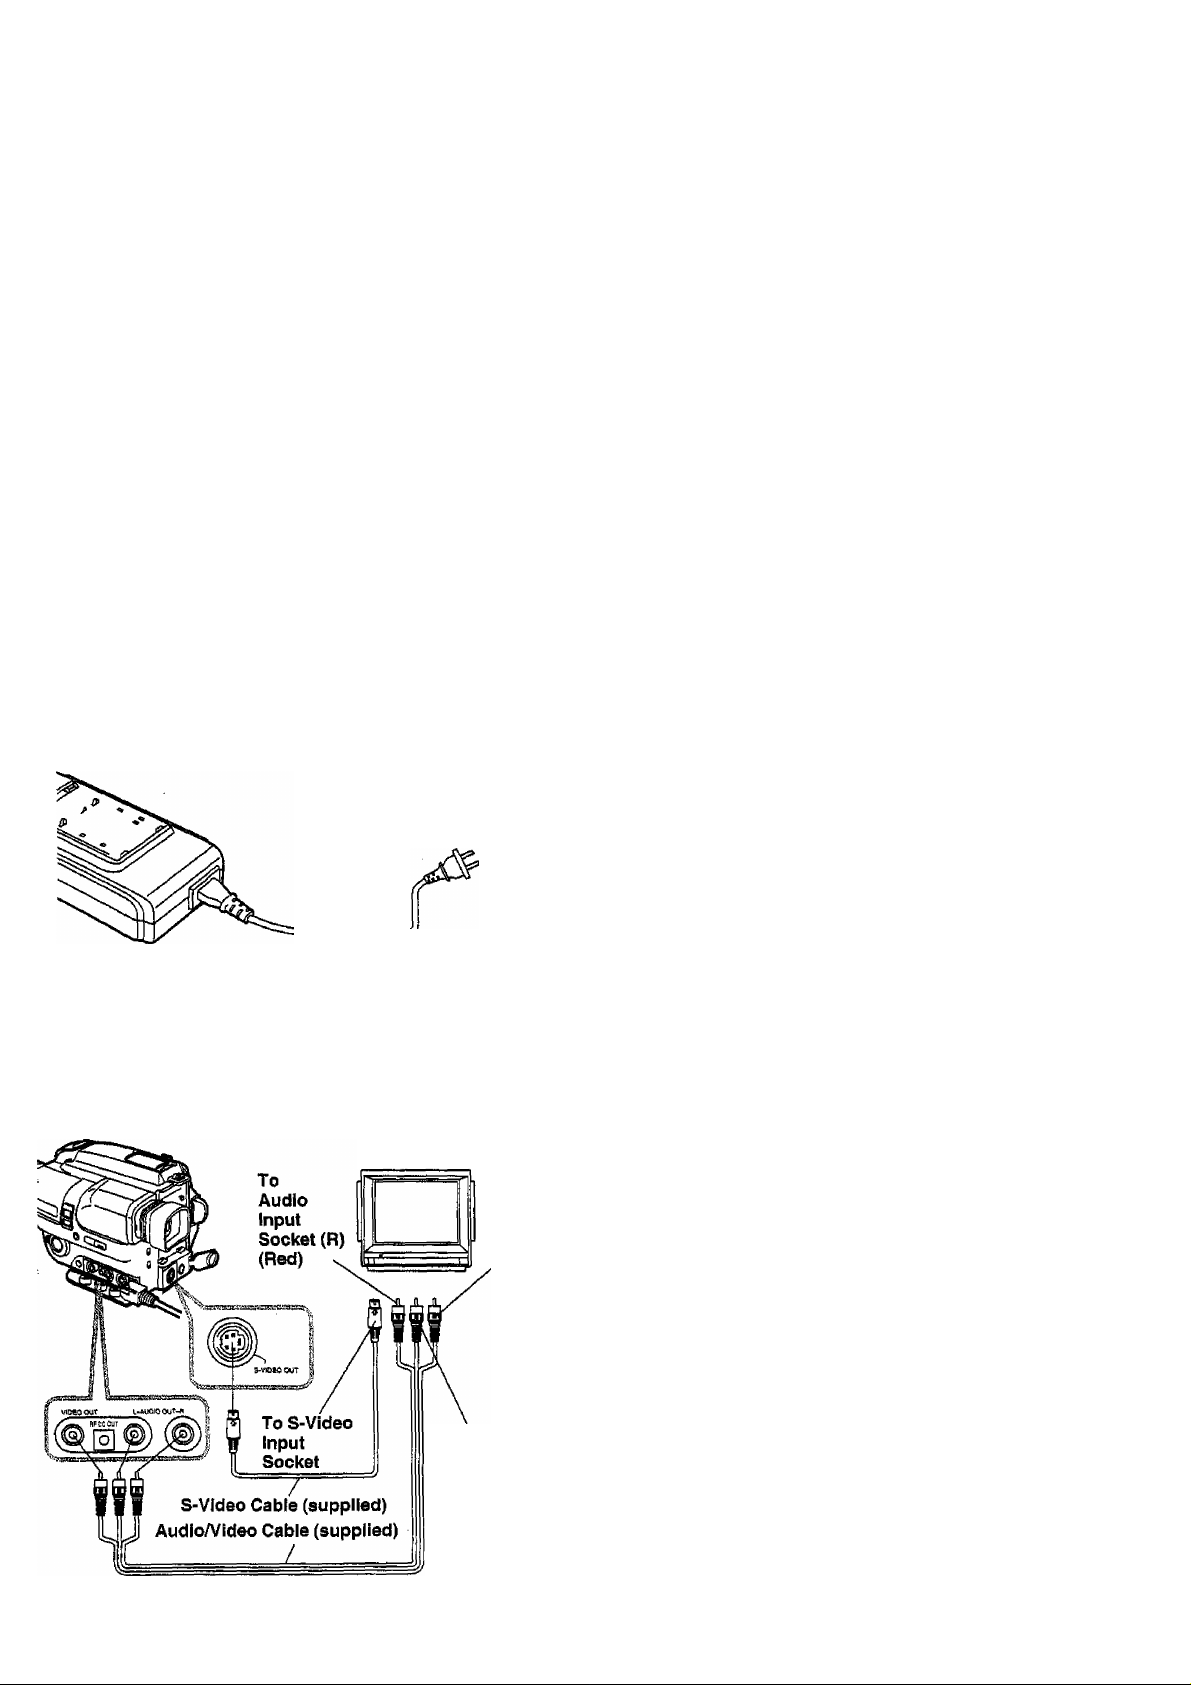
S-Vldeo Cable
O)
c
s
■o
c
a
O
"is
3
8 c
C
(0 ^
.s
sS
S U
•When purchasing an additional AC Adaptor,
order model number VW-AS4E.
• For Purchasing additional Battery Packs,
see the list of optional accessories on p. 56.
... Remote Controller
..........
Remote Controller Holder
..........
.Button-Type Battery
■a
X
o
c

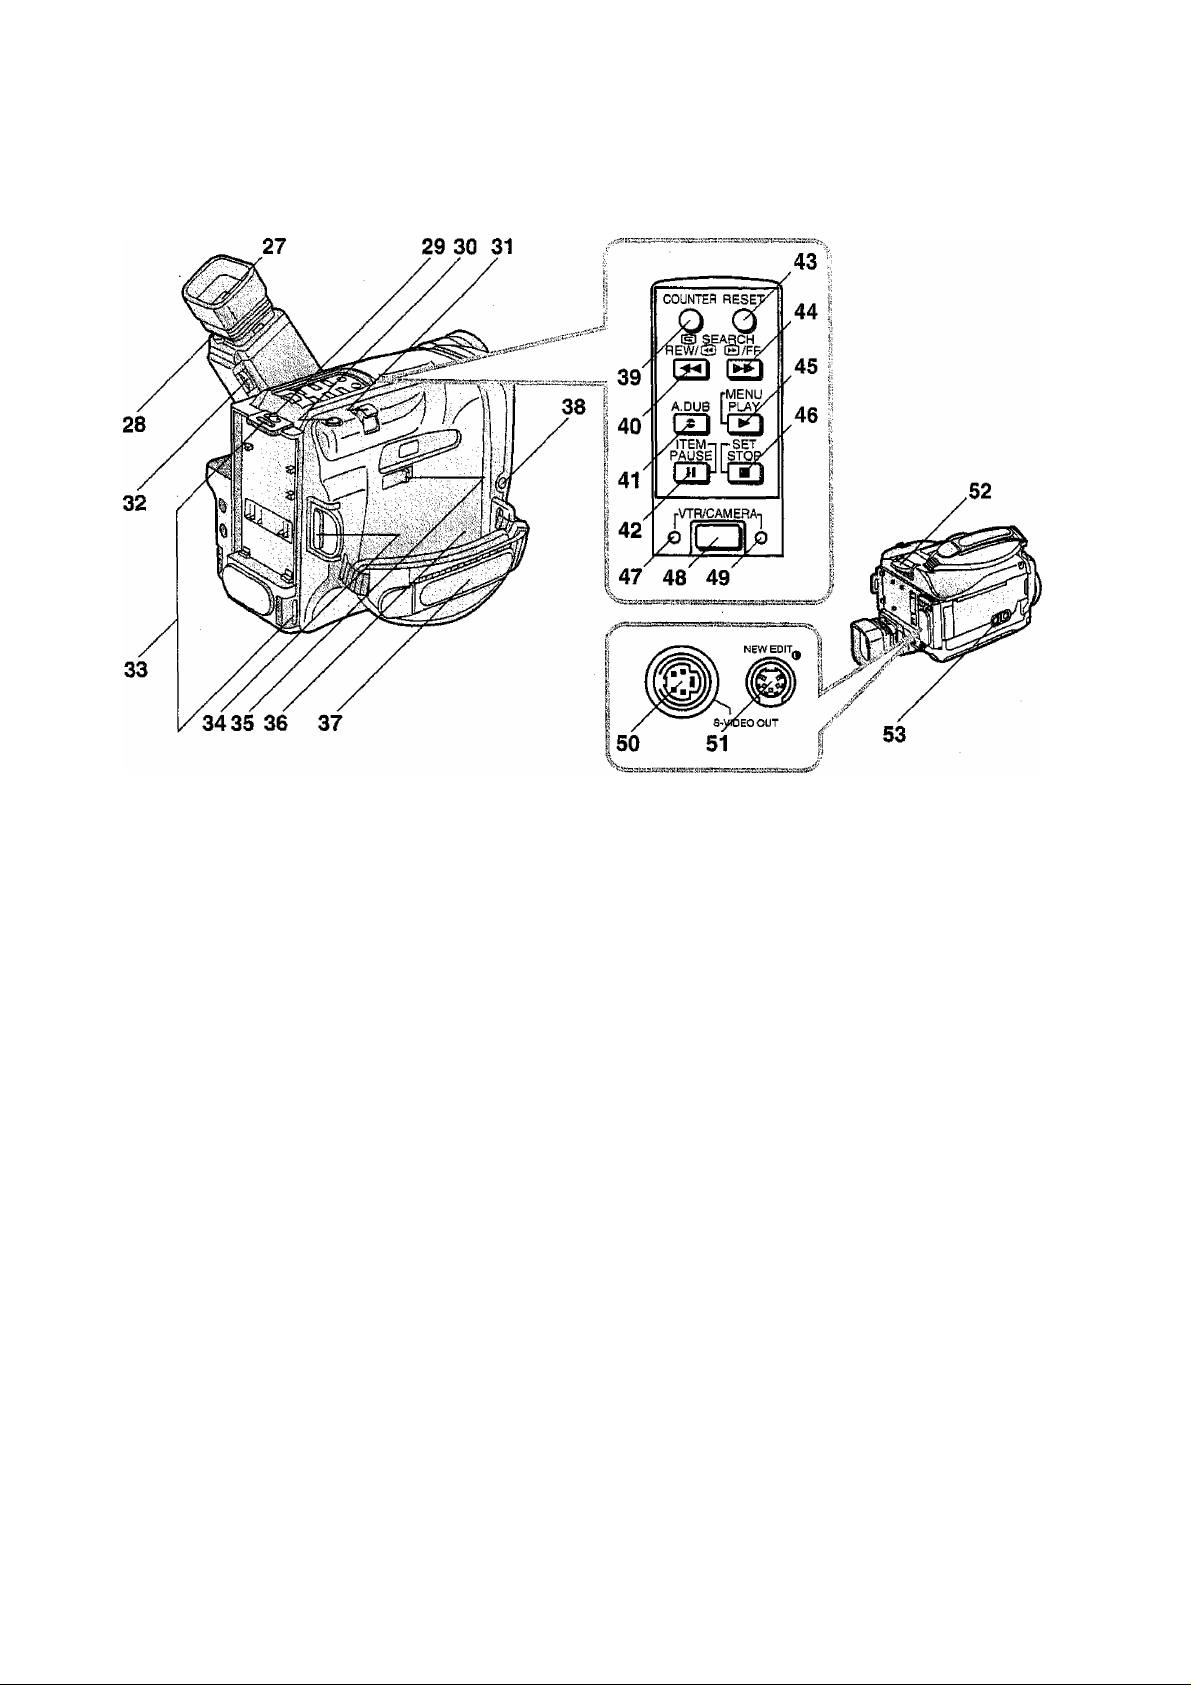
Controls and Functions
For more details, see the pages indicated in brackets.
1 White Balance Sensor (p. 32)
2 Remote Control Receiver Window (p. 7)
3 Recording indicating Lamp
This Lamp lights during recording.
4 Lens Cap (p. 12,32,58)
5 Focus Ring (p. 29)
6 [FOCUS] Button (p. 28)
7 [SHUTTER/IRIS]Controi(p.41)
8 [FADE] Button (p. 40)
9 [DATEH'IME] Button (p. 14)
10 Microphone
11 Digital Mode Indication Window (p. 43,44)
12 Digital Buttons (p. 43,44)
Press these buttons to select the desired
digital function.
13 [W.B] Button (p. 33)
Manual White Balance Button
14 Eyecup(p. 59)
15 [PHONES] Socket (p. 24)
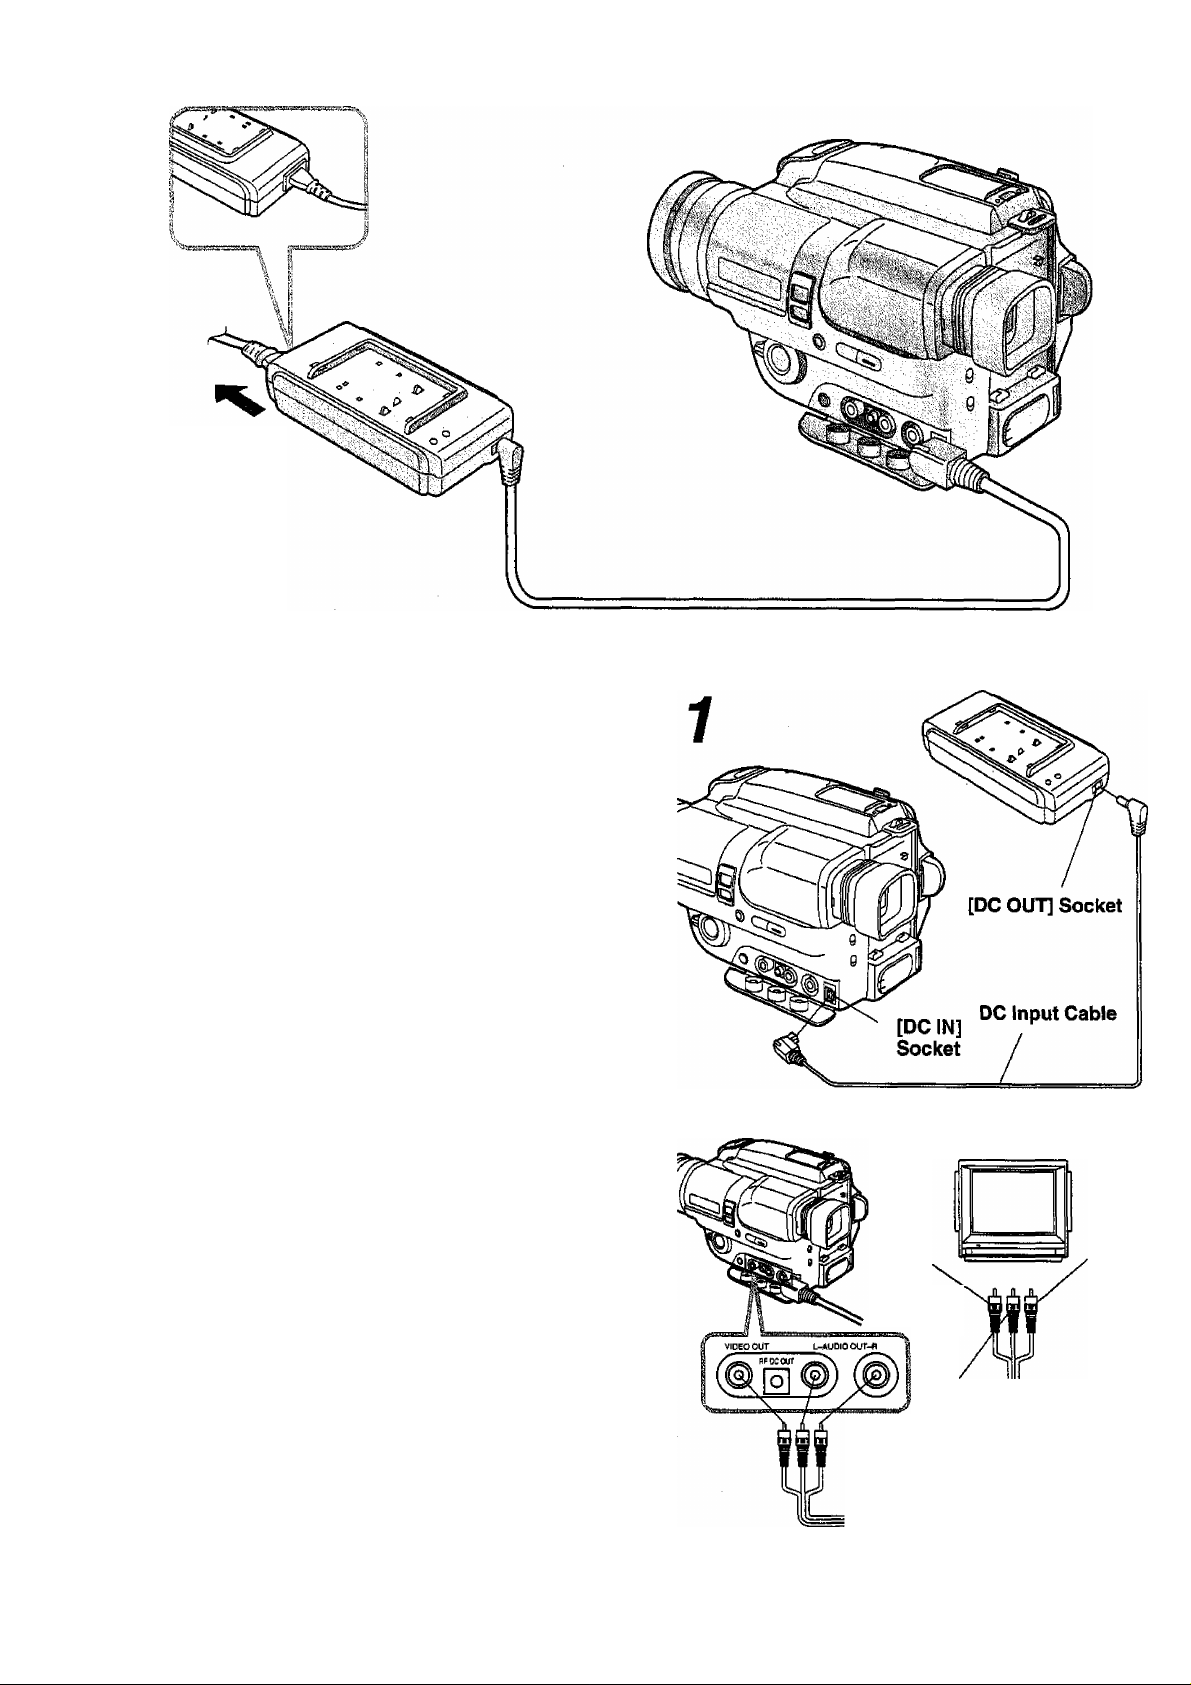
16 [VIDEO OUT] Socket (p. 8,52)
17 [RF DC OUT] Socket
To playback via a TV Set without AV Input
Socket, connect this Socket to the RF IN
Socket of the TV Set using an RF Adaptor
(optional).
18 [AUDIO OUT L/R] Sockets (p. 8, 52)
19 [DCIN]Socket(p. 8, 51)
20 Dew Sensor Slot
Through this slot, the Movie Camera detects
condensation. Take care not to let this slot
gets clogged with dirt and not to cover it with
your fingers, etc.
21 [AE] Selector (p. 17,28,32,39,40)
Use this selector to select the desired AE
mode.
22 [SHUTTER/IRIS] Button (p. 41)
23 [DATE/TIME/SHIFT.TRACKING] Button
(P-14,47)
Press this button to adjust the tracking in
order to eliminate distortions in the playback
picture (p. 47), or press it to advance to the
next item during the setting of the date and
time (p. 14).
24 [DATE/TIME/SET*TRACKING]Button
(p.14, 47)
Press this button to adjust the tracking in
order to eliminate distortions in the playback
picture (p. 47), or press it to set the correct
date and time (p. 14).
25 [POWER SAVE] Switch (p. 48)
Setting this switch to “ON” activates the
Power Save Function.
26 [AUDIO SELECT] Switch (p. 55)
0)
a
O
o
*«
(S
CD
27 Viewfinder (p. 20)
28 Eyepiece Correction Adjuster (p. 13)
29 [BATTERY EJECT] Lever (p. 11)
30 [SNAPSHOT REC] Button (p. 37)
31 [W*T] Zoom Lever (p. 17)
32 Viewfinder Brightness Control
[- < BRIGHTS +] (p.13)
33 Shoulder Strap Holders (p. S8)
34 Recording Start/Stop Button (Red) (p. 17)
35 [EJECT Lever (p, 12)
36 Cassette Compartment Cover (p. 13)
37 Grip Belt (p. 58)
38 [MIC] Socket
To record sound with an external microphone,
connect it to the [MIC] Socket. (Connecting an
external microphone automatically
disconnects the built-in microphone.) Ensure
that the microphone conforms with the
foliowing requirements:
•Connection Cable; M3-type plug
• Impedance: less than 4.7 kohm
•Type; Stereo-type
(If a mono-type microphone is connected, no
sound will be recorded on the right channel.)
•Sensitivity; Approx. -70 dB
• Microphone Power Source: A type that does
not require a
power source
39 [COUNTER] Button (p. 18)
40 [REW/ Q1 Button (p. 24,46)
Use this Button for:
• Recording Review
• Review
• REW (Rewind)
•Camera Search
41 [A.DUB] Button (p. 55)
42 [ITEM/PAUSE] Button (p. 25,37)
43 [RESET] Button (p. 18)
44 [ Q/FF] Button (p. 24,47)
Use this Button for:
•Cue
•FF (Fast-Forwarding)
•Camera Search
45 [MENU/PLAY] Button (p. 25,37)
46 [SET/STOP] Button (p. 25,37)
47 “VTR” Indication Lamp (p. 24)
48 [VTR/CAMERA] Button (p. 24)
Press this Button to select the “VTR” Mode for
playback or the "CAMERA” Mode for
recording.
49 “CAMERA” Indication Lamp (p. 16)
50 [S-VIDEO OUT] Socket (p. 9,52)
51 [NEW EDIT] Socket (p. 53)
52 [POWER] ON/OFF Switch (p. 12)
53 Tripod Receptacle
Attach a Tripod (optional) to this Receptacle.
ii;
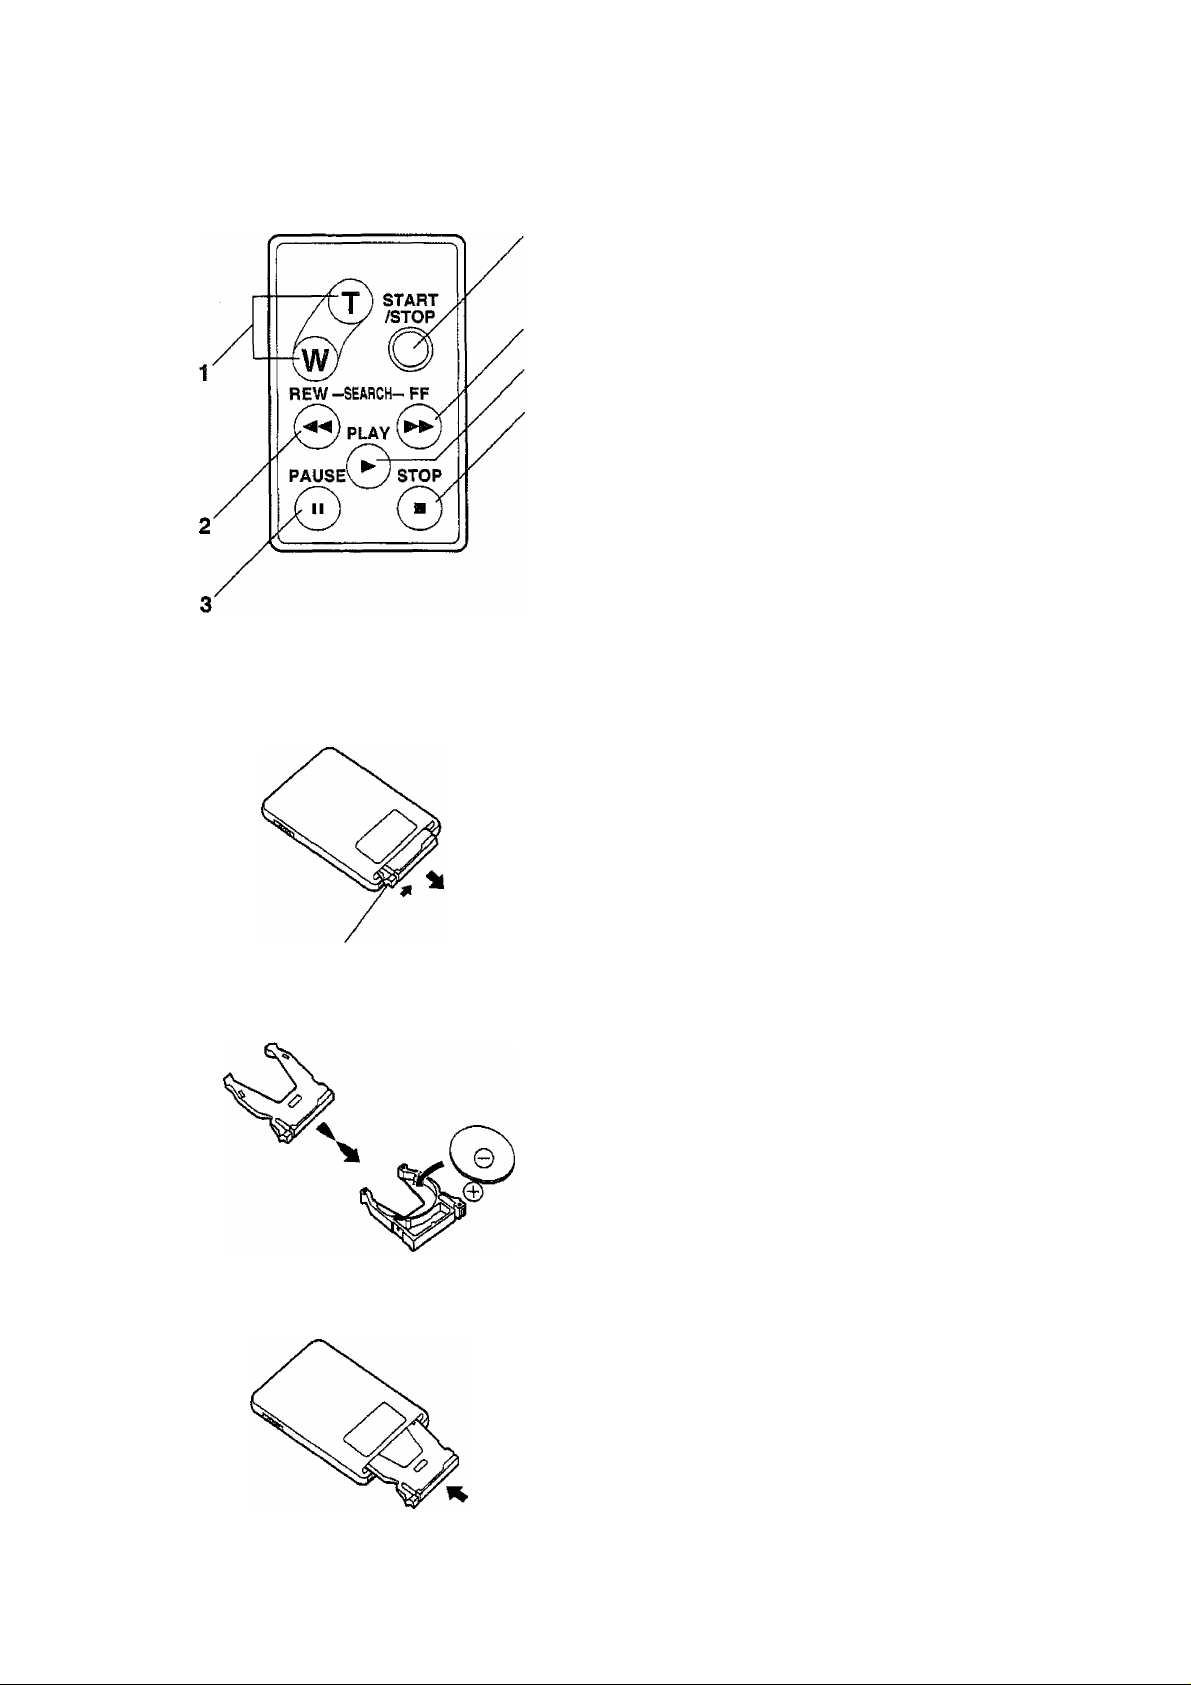
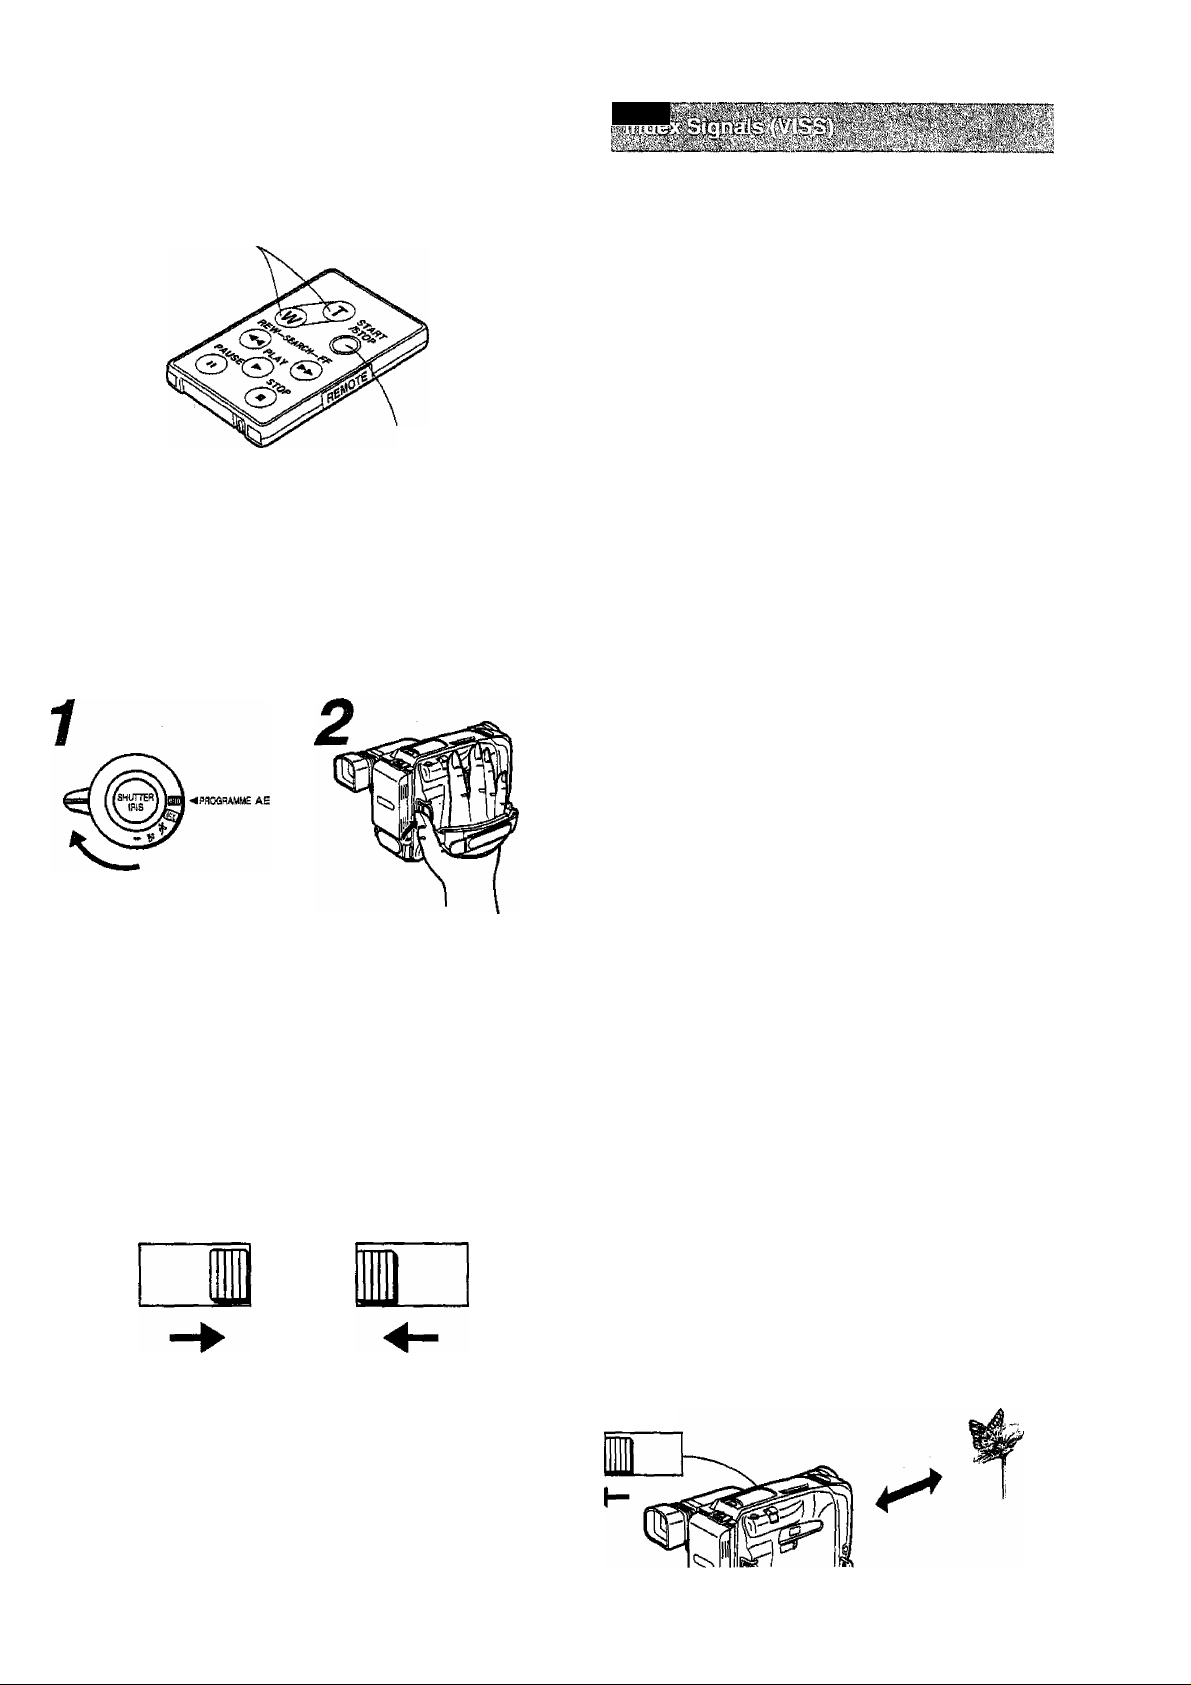
Using the Remote Controller
■ Controls and Functions
1 [W*T] Zoom Buttons (p. 17)
2 [REW] Button (p. 25,47)
Use this Button for:
• Recording Review
• Review
• REW (Rewind)
•Camera Search
3 [PAUSE] Button (p. 25)
4 Recording Start/Stop Button (p. 17)
5 [FF] Button (p. 25, 47)
Use this Button for:
•Cue
•FF (Fast-Forwarding)
•Camera Search
6 [PLAY] Button (p. 25)
7 [STOP] Button (p. 25)
■ How to Insert the Button-Type Battery
1 Pull out the Battery Holder white pushing
the stopper.
Stopper
2 Turn the Battery Holder upside down and
Insert the Battery with the (+) mark facing
downward until it locks with a click.
3 Insert the Battery Holder into the Remote
Controller.
■ Replacing the Button-Type Battery
The life of the battery is about one year.
Replace the exhausted battery with a new CR2025
Battery.
Information for your safety
WARNING
‘THE LITHIUM BATTERY” IS A CRITICAL
COMPONENT (TYPE NUMBER CR2025
MANUFACTURED BY PANASONIC).
IT MUST NEVER BE SUBJECTED TO
EXCESSIVE HEAT OR DISCHARGE. IT
MUST THEREFORE ONLY BE FITTED IN
EQUIPMENT DESIGNED SPECIFICALLY
FOR ITS USE
REPLACEMENT BATTERIES MUST BE OF
THE SAME TYPE AND MANUFACTURER.
THEY MUST BE FITTED IN THE SAME
MANNER AND LOCATION AS THE
ORIGINAL BATTERY, WITH THE
CORRECT POLARITY CONNECTIONS
OBSERVED.
DO NOT ATTEMPT TO RE-CHARGE THE
OLD BATTERY OR RE-USE IT FOR ANY
OTHER PURPOSE IT SHOULD BE
DISPOSED OF IN WASTE PRODUCTS
DESTINED FOR BURIAL RATHER THAN
INCINERATION".
□
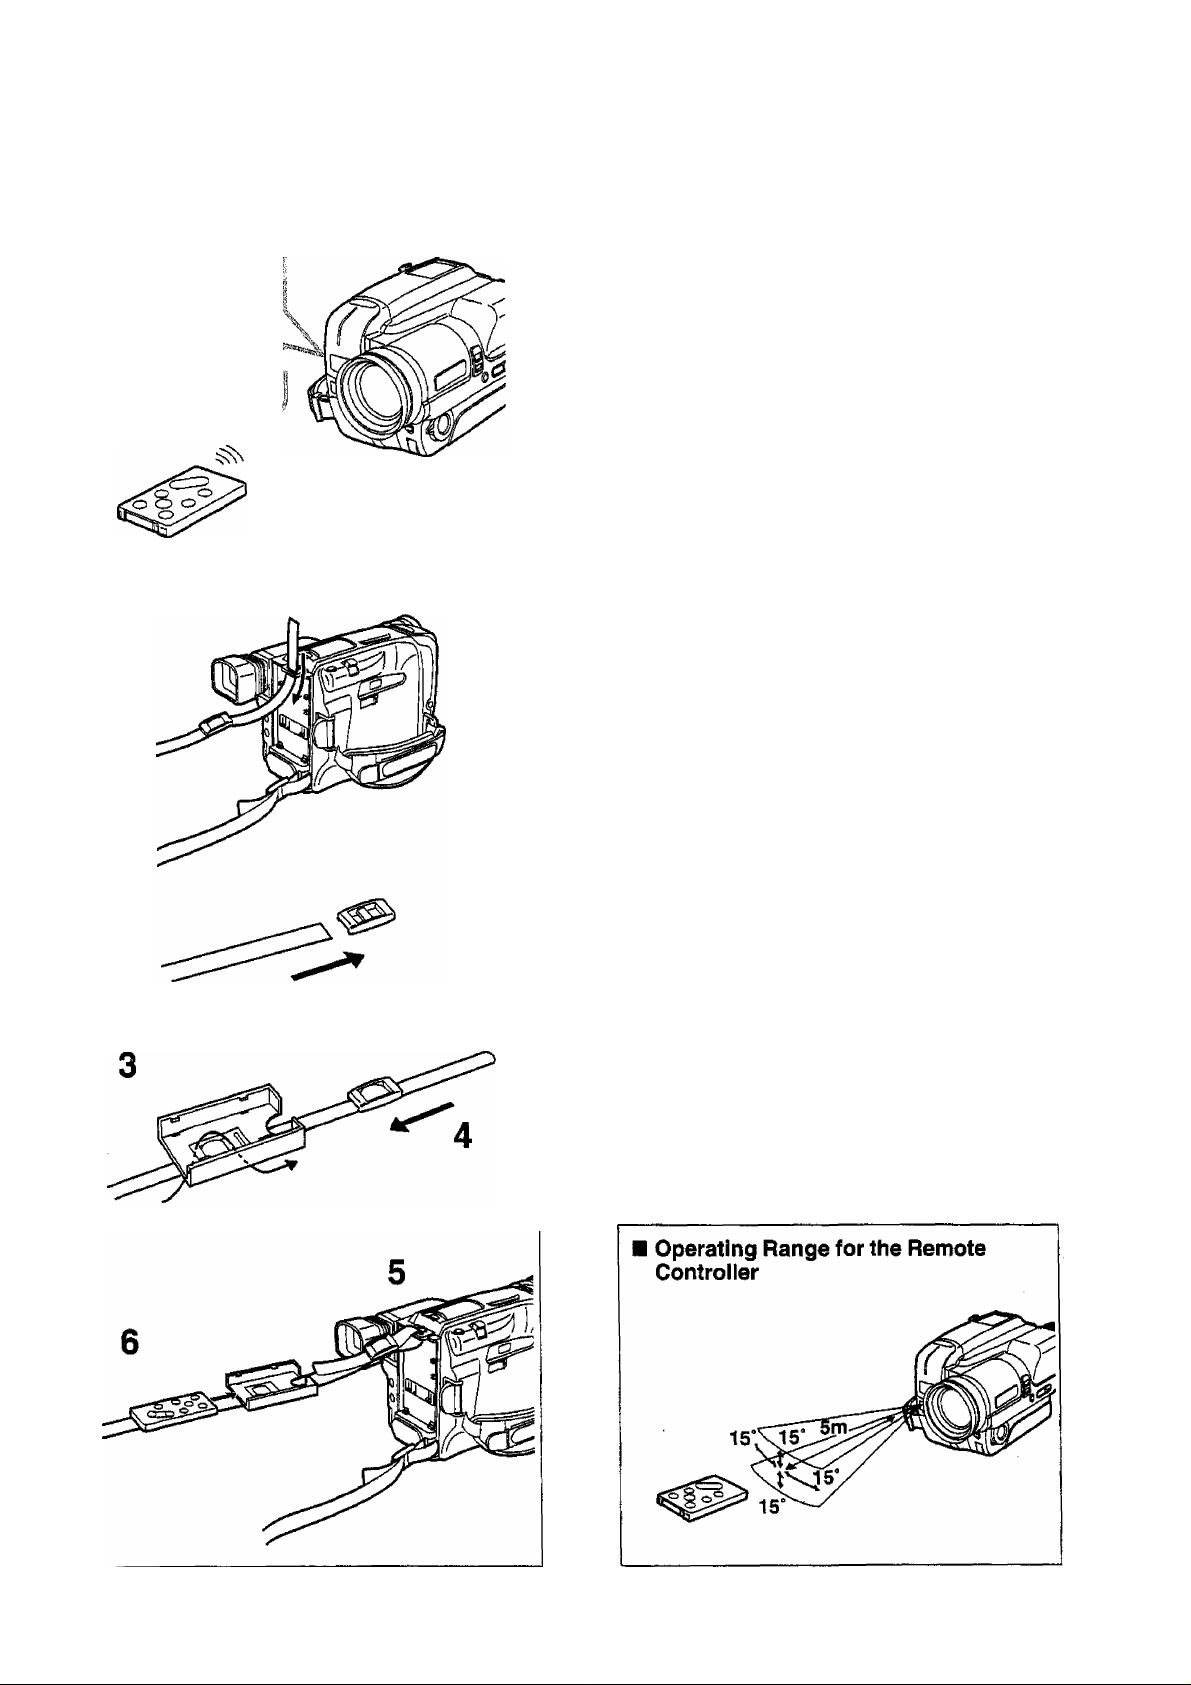
When you want to take part in the action that you
are recording, simply place the Movie Camera on
a tripod and then start and pause recording as well
as operate the zoom and other functions by
pressing a button on the Remote Controller
(supplied). Aim it at the Remote Control Receiver
Window on the front of the Movie Camera and
press the corresponding Button.
Remote Control
Receiver Window
1
Notes:
•Do not cover the Transmitter Window on the
Remote Controller with your hand, etc.
•The Remote Controller may not operate correctly
if It is used in direct sunlight, near fluorescent
lamps or too close to the Movie Camera.
•When using the Remote Controller outdoors,
operating range may become shorter than
5 metres.
■ Using the Remote Controller Holder
(To keep the Remote Controller handy when you
go out recording)
1 Remove one end of the Shoulder Strap
from the Movie Camera.
2 Remove the Shoulder Strap Adjuster. 3 Pull the Shoulder Strap in the direction of
the arrow through the two slits on the back
of the Remote Controller Holder.
4 Re-insert the Shoulder Strap Adjuster. 5 Re-attach the Shoulder Strap to the Movie
Camera.
(See “Attaching the Shoulder Strap” on
page 58.)
6 Insert the Remote Controller securely Into
the Holder,
To the
AC mains
socket
Title
Using the AC Adaptor as a Power Supply Unit
If you want to use the Movie Camera with the Battery
Pack, it is necessary to charge the Battery Pack first.
(P-10)
Watching the Picture on a TV
Set (Using the Audio/VIdeo
Cable or S-Video Cable)
Connect after turning off the Movie Camera and the TV
Set.
Procedure
To
Audio
Input
Socket (R)'
(Red)
(not supplied)
To
Video
Input
Socket
(Yellov
8
To
Audio
Input
Socket (L)
(White)
Audio/Video Cable
(supplied)
Connect the Movie Camera to the TV set.
Plug into AC Adaptor.
Plug into
AC mains
socket.
■ Cautions for Use
•This AC Adaptor works on any mains supply
voltage between 100 and 240 V, and any
frequency between 50 and 60 Hz. For use in
other countries, an adaptor plug may be
necessary.
• Do not handle the AC Adaptor with wet hands.
■ Caution for Cleaning
Before cleaning the AC Adaptor, make sure that it
is disconnected from the AC mains socket.
Remarks, eta
•When the AC Adaptor is used to supply the Movie
Camera with power, remove the Battery Pack from
the AC Adaptor as it cannot charge the Battery Pack
and provide power simultaneously.
•Do not use the AC adaptor tor any purposes other
than supplying the unit with power or charging the
Battery Pack.
•When listening to a radio while the AC Adaptor is in
operation, the radio reception may be distorted. In
this case, move the radio further away from the AC
Adaptor or move the adaptor away from the radio.
•When not using the AC Adaptor, unplug its mains
cable from the AC mains socket. To unplug, pull it by
the plug, not by the cable.
Mains Cable
(not supplied)
►if your TV set is not equipped with an AV Input
Socket, the RF Adaptor (optional) is necessary. For
its connection, read the operating instructions of the
RF Adaptor (VW-RF7E).
To
Video
Input
Socket
(Yellow)
To
Audio
Input
Socket (L)
(White)
J
“CHARGE” Lamp
On: During charging.
Off: Charging is finished.
{For maximum charge, continue charging for
2 hours after the “CHARGE" Lamp has gone off.)
BATTERV EJECT
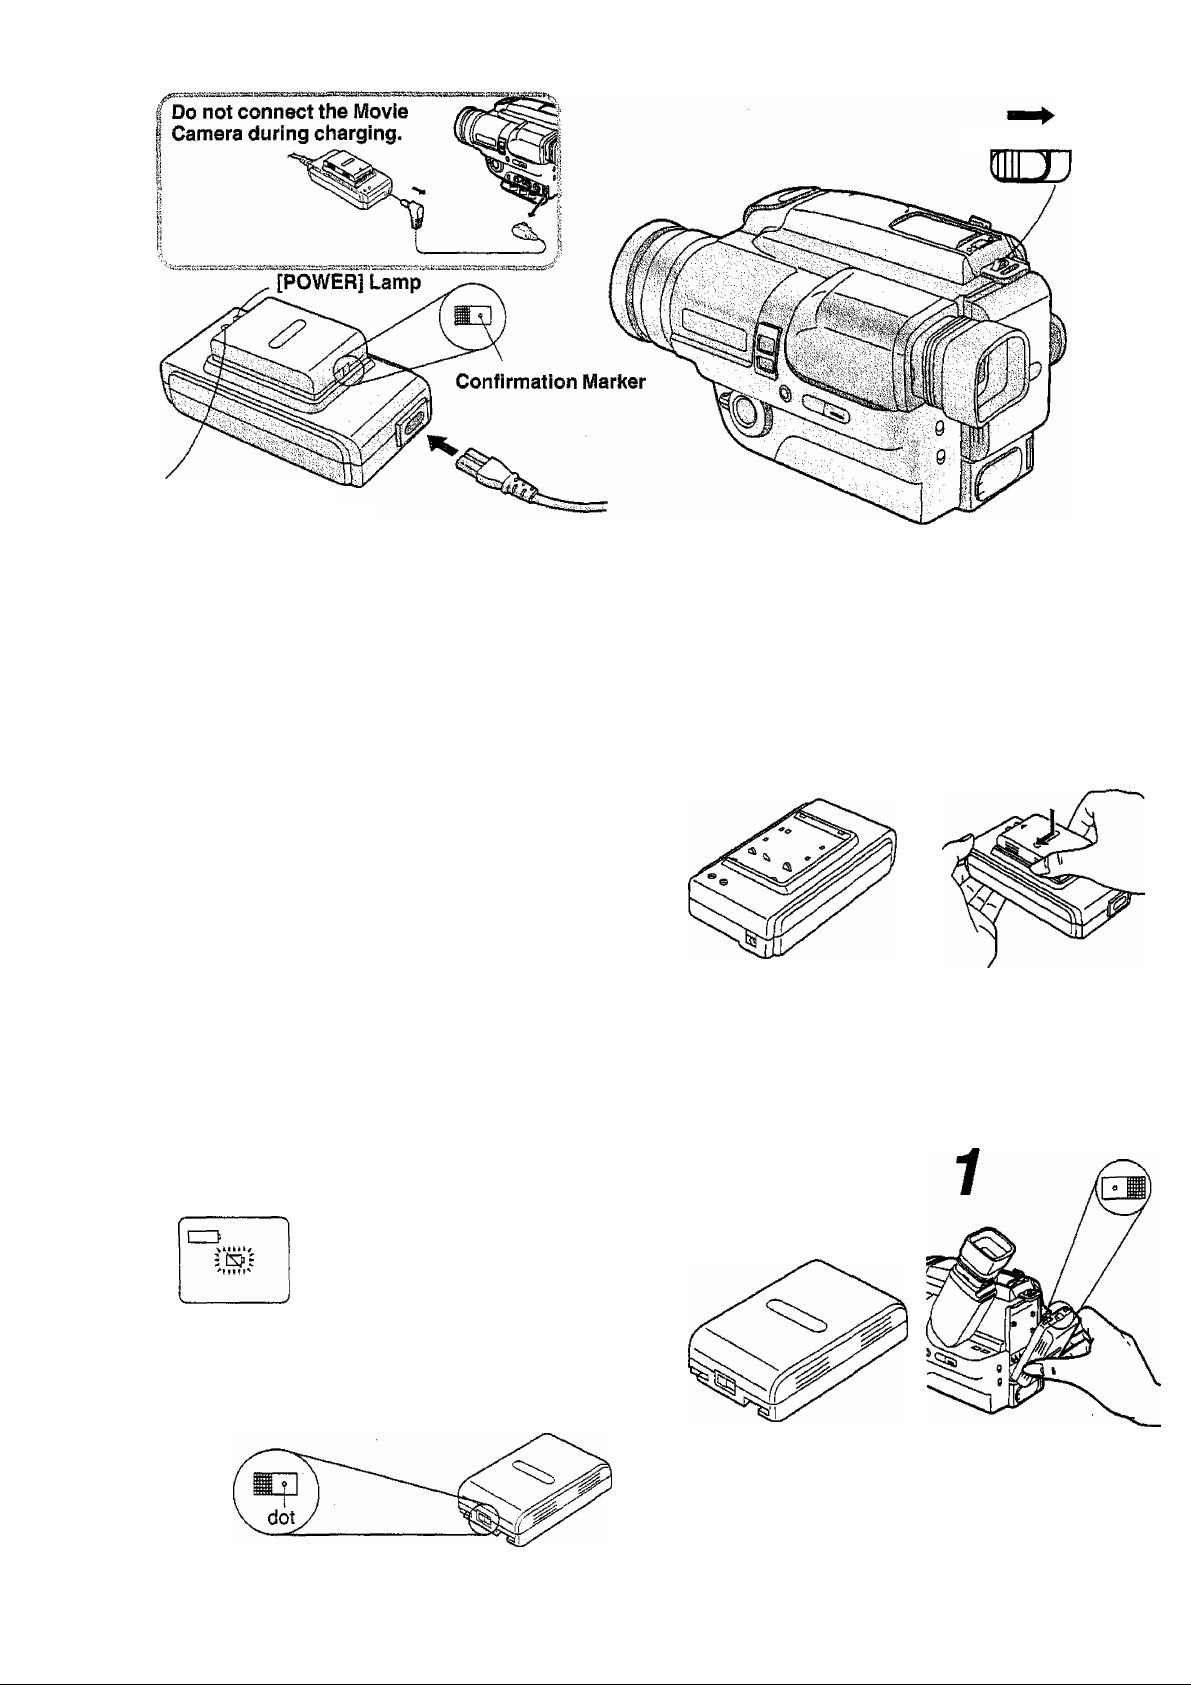
Title
Charging the Battery Pack
•Be sure to insert the mains plug completely into the
correct socket.
• Do not connect the DC input Cable to the AC Adaptor
otherwise the Battery Pack cannot be charged.
•Ni-MH (Nickei-Metal-Hydride) Battery Packs
(VW-VBH10E and VW-VBH20E) may not perform
very well in cold conditions (e.g. the snow).
• Never remove the Battery Pack during recording or
playback, because the tape would remain in contact
with the video heads and this could cause damage to
the heads and tape.
Attaching the Charged Battery
Pack
Procedure
Attach the Battery Pack.
If an exhausted Battery Pack Is
attached, the “S>" indication in the
Viewfinder flashes, when you turn the
Movie Camera on.
Charging Confirmation Marker
Use this marker to distinguish between charged and
discharged Battery Packs. For example, slide the
Button so that the dot is visible after charging is
completed.
10
Attach the Battery Pack
with Its Charge
Confirmation Marker
facing upward.

• If you want to improve the charge of a Battery
Pack whose operation time has become too
short for practical use or which has been stored
for a long time, continue charging for 24 hours
even after the “CHARGE" Lamp on the AC
Adaptor goes out. (If this does not result in an
operation time close to that shown in the table,
the service life of this Battery Pack has reached
its end. Replace it with a new one.)
•To prevent leakage, excessive rise in
temperature and explosion, be sure to observe
the following points:
1) Use only the specified AC Adaptor or Car
Battery Charger to charge the Battery Pack.
2) Make sure that no metal objects touch the
connectors of the Battery Pack,
• Do not charge the Battery Pack again when
it is already fully charged.
•During recording or charging, the
Pack may become warm. This if
a malfunction.
• Do not leave the Battery Pack in the Movie
Camera while it is in storage.
Do not heat the Battery Pack or throw it into a
fire.
Do not apply solder to the Battery Pack and
do not disassemble or reconstruct it.
RemarkSj etc.
«
c
o
S
<u
a
O
o
«
n
CQ
2
■ Removing the Battery Pack
Slide it in the opposite direction to step 1.
2
I Removing the Battery Pack
battery eject
mjD
When sliding the Lever to
the right, be sure to hold
the Battery Pack, to
prevent it from dropping.
Battery Pack
No.
Supplied
VW-VBS10E
VW-VBS20E
VW-VBH10E
VW-VBH20E
eDepending on the condition of the Battery Pack, the
charging time may be longer than listed above.
•The Battery Pack must be discharged in the Movie
Camera so that the “ tSJ ” Indication starts to flash
indicating an exhausted Battery Pack. Do not charge
the Battery Pack if it is not discharged, because to do
so would shorten the recording time that it can
provide.
•The figures in the table above are based on an
ambient temperature of 25“C.
•The use of the zoom and other functions increase the
power consumption, so that the actual recording time
per Battery Pack is 30%-50% less than for
continuous recording.
•Charge the Battery Pack at a room temperature
between 10“ and 35“C.
The Battery Pack’s ability to generate electric energy
is based on a chemical reaction. Because this
reaction can take place better at high temperature,
the maximum recording time may be considerably
shorter when recording at tow temperature.
•if the Movie Camera has turned off automatically
because the Battery Pack has become exhausted,
remove the Battery Pack before connecting the DC
Input Cable of the AC Adaptor to the Movie Camera
to continue recording, otherwise the Movie Camera
cannot be turned on.
Charging Time
Approx. 60 min.
Approx. 65 min.
Approx. 130 min.
Approx. 80 min.
Approx. 160 min.
Max. Continuous
Recording Time
Approx. 35 min.
Approx. 35 min.
Approx. 70 min.
Approx. 45 min.
Approx. 90 min.
11
m

|-VTR/CAMERA| When you turn out the
A [POWER] ON/OFF Switch, the
a
______
“CAMERA” Indication Lamp tights.
POWER
OFF
Title
Powering the Movie Camera ON/OFF
Inserting a Video Cassette
Before inserting the Video Cassette, make sure that
the tape is tight. If it is loose, turn the cog wheel in the
direction of the arrow to tighten it.
Cog Wheel
ON
Turn the [POWER]
ON/OFF Switch out.
1
I
►
I
mm±
Slide the [EJECT
Lever to the right.
Procedure
OFF
Turn the [POWER]
ON/OFF Switch in.
)
Cassette Window
Insert the video
cassette.
Adjusting the Viewfinder
12
Turn [POWER] ON/OFF
switch out.
Turn up the Viewfinder.
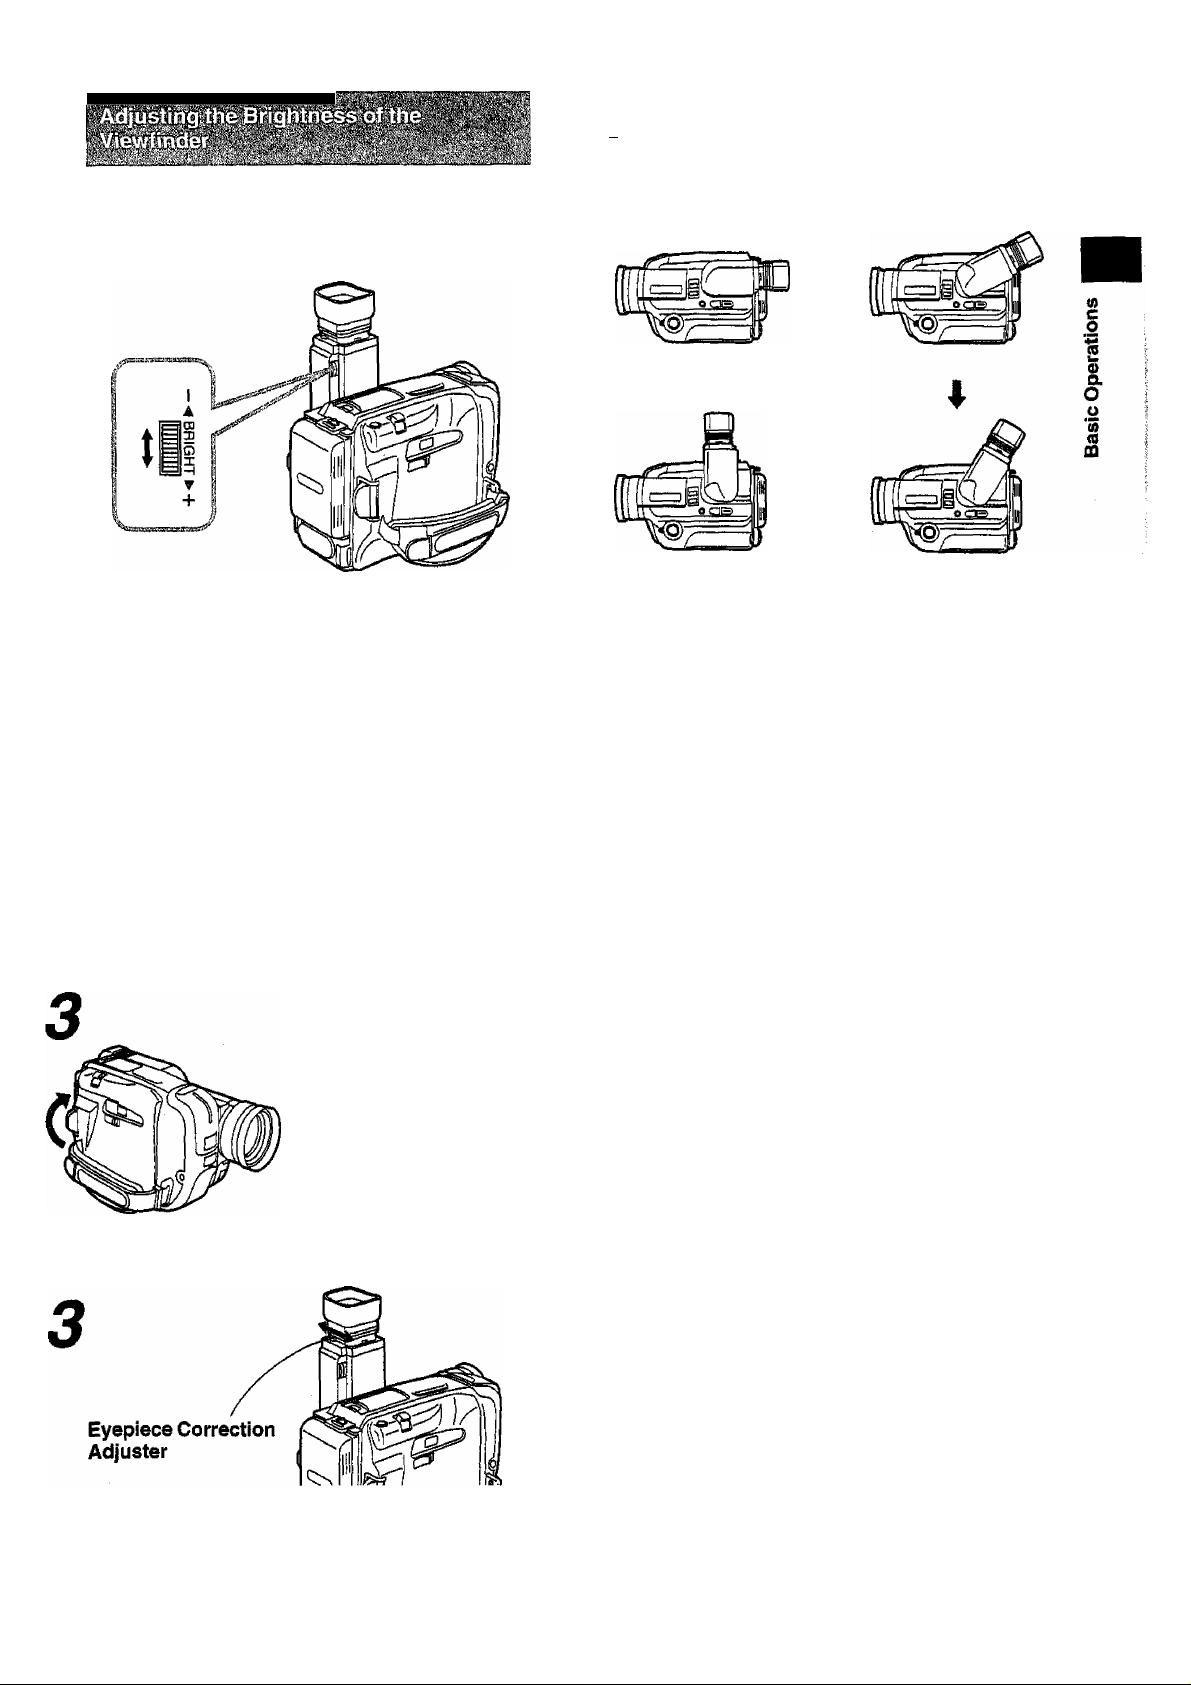
If the picture in the Viewfinder is too dark or too
bright, adjust by turnning the Viewfinder
Brightness Control.
'■ ■-'■ rt." .' j^ ■ 'j.i' 5» ‘v.t .1 '>•'■•.'■ 1
The tilting range of the Viewfinder is 90"
(4 positions are marked by click stops).
Remarks, etc.
•When you turn on the Movie Camera on while a
Video Cassette is already inside, the “READ”
Indication initially appears in the Viewfinder while it
reads the VITC address of the last recorded scene
from the Video Cassette. After a short moment, the
Movie Camera then switches over to the recording
Pause Mode and the "PAUSE” Indication appears,
•The “READ” Indication also appears in the Viewfinder
when you switch over from the "VTR” mode to the
"CAMERA” mode by pressing the [VTR/CAMERA]
Button and exchange a Video Cassette.
Close.
Look into the Viewfinder and slide the Adjuster
untii the indications in the Viewfinder are clear
and easy to read.
■ Ejecting the Video Cassette
After you have stopped recording, slide the [EJECT A]
Lever to the right. The Cassette Compartment Cover
opens after a few seconds and you can then take out
the Video Cassette.
•It is not possible to take out the video cassette during
recording,
•Do not repeatedly insert and take out the Video
Cassette. This could cause the tape to become loose
and damaged.
13
0JD
SHIFT SET
LDATETIMEJ
TRACKING
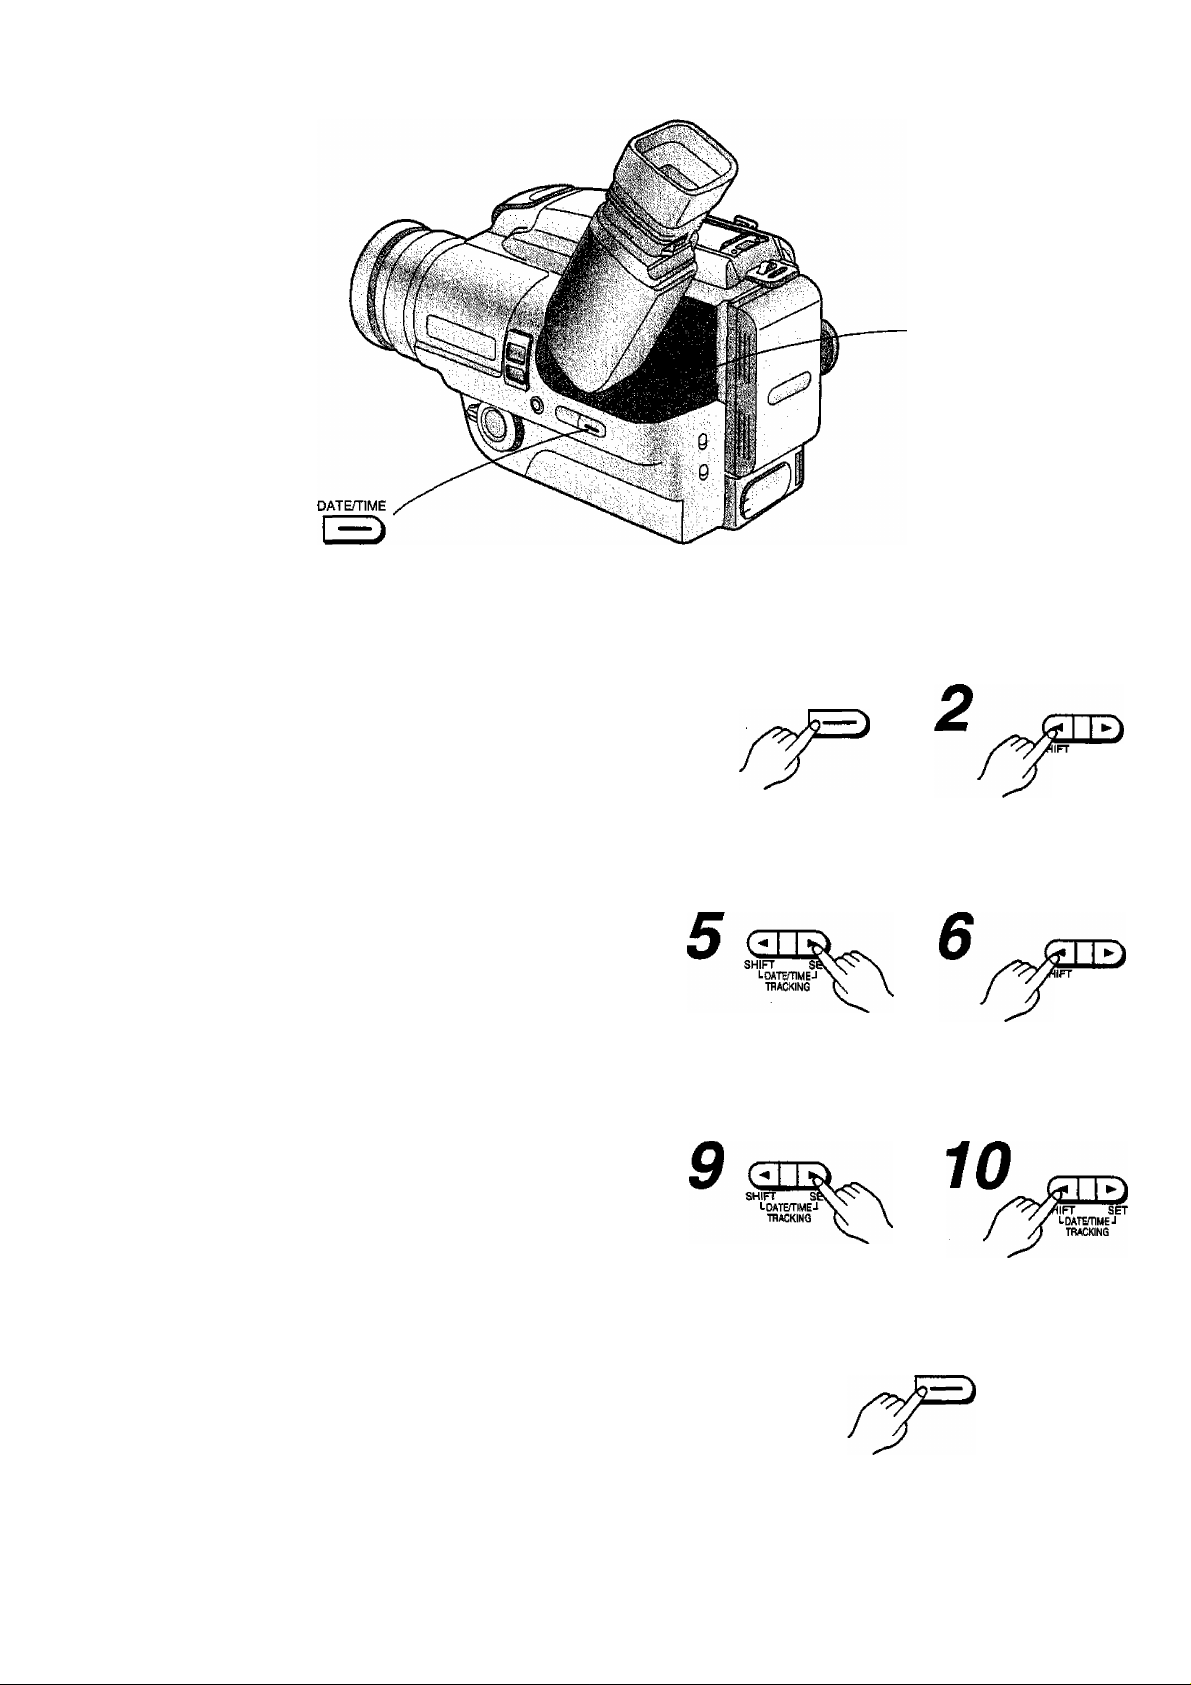
Title
Setting the Date and Time
Before setting, attach the charged Battery Pack or
connect the AC Adaptor to the Movie Camera and turn
the Movie Camera on.
For example; To set the clock to October 15,1996,
12:30...
DATDTIME
1
Press the [DATE/
TIME] Button.
Press to set to “10”.
Procedure
Press until the “Year’
portion flashes.
Press to make the “Day” portion flash.
SET
UDATEmMEJ
TBACKWG
SET
LQATETIMEJ
TRACKING
Inserting and Deleting the Date and Time
The Date and Time Indications can be inserted and
deleted during recording as well as in the Recording
Pause Mode.
V.
14
Press to setto “12”.
To insert or delete the Date and Time (or Date only)
Indication, press this button repeatedly. The indications
appear and disappear in the order shown on the right.
Press to make the “Minute” portion flash
DATE/rtME
A built-in rechargeable lithium battery inside the
Movie Camera maintains the operation of the
built-in clock when the Movie Camera is not in
operation. Whenever the Movie Camera is in
operation, it automatically recharges this battery.
However, if you don’t use the Movie Camera for a
very long time, the lithium battery can become
exhausted.
in this case, the Indication in the Viewfinder
flashes and the date returns to the initial Indication
“1.1.1990”.
if the Indication in the Viewfinder flashes for
approx. 10 seconds when you turn the Movie
Camera on, the lithium battery is exhausted and
must be charged as explained on the right.
3
TTIACKING K Y
Press to set to “1996”.
Press to make the
“Month” portion flash.
Connect the Movie Camera (with power off
condition) to the AC Adaptor and wait for
approx. 8 hours.
•After charging the lithium battery in this way, it
can maintain the operation of the clock for
approx, three months.
Information for your safety 2
WARNING
THE LITHIUM BATTERY IN THIS UNIT «
MUST ONLY BE REPLACED BY “
QUALIFIED PERSONNEL. IF THIS IS
NECESSARY, CONTACT THE
PANASONIC CUSTOMER CARE CENTRE
ON 132600 FOR YOUR NEAREST
AUTHORISED SERVICE CENTRE.
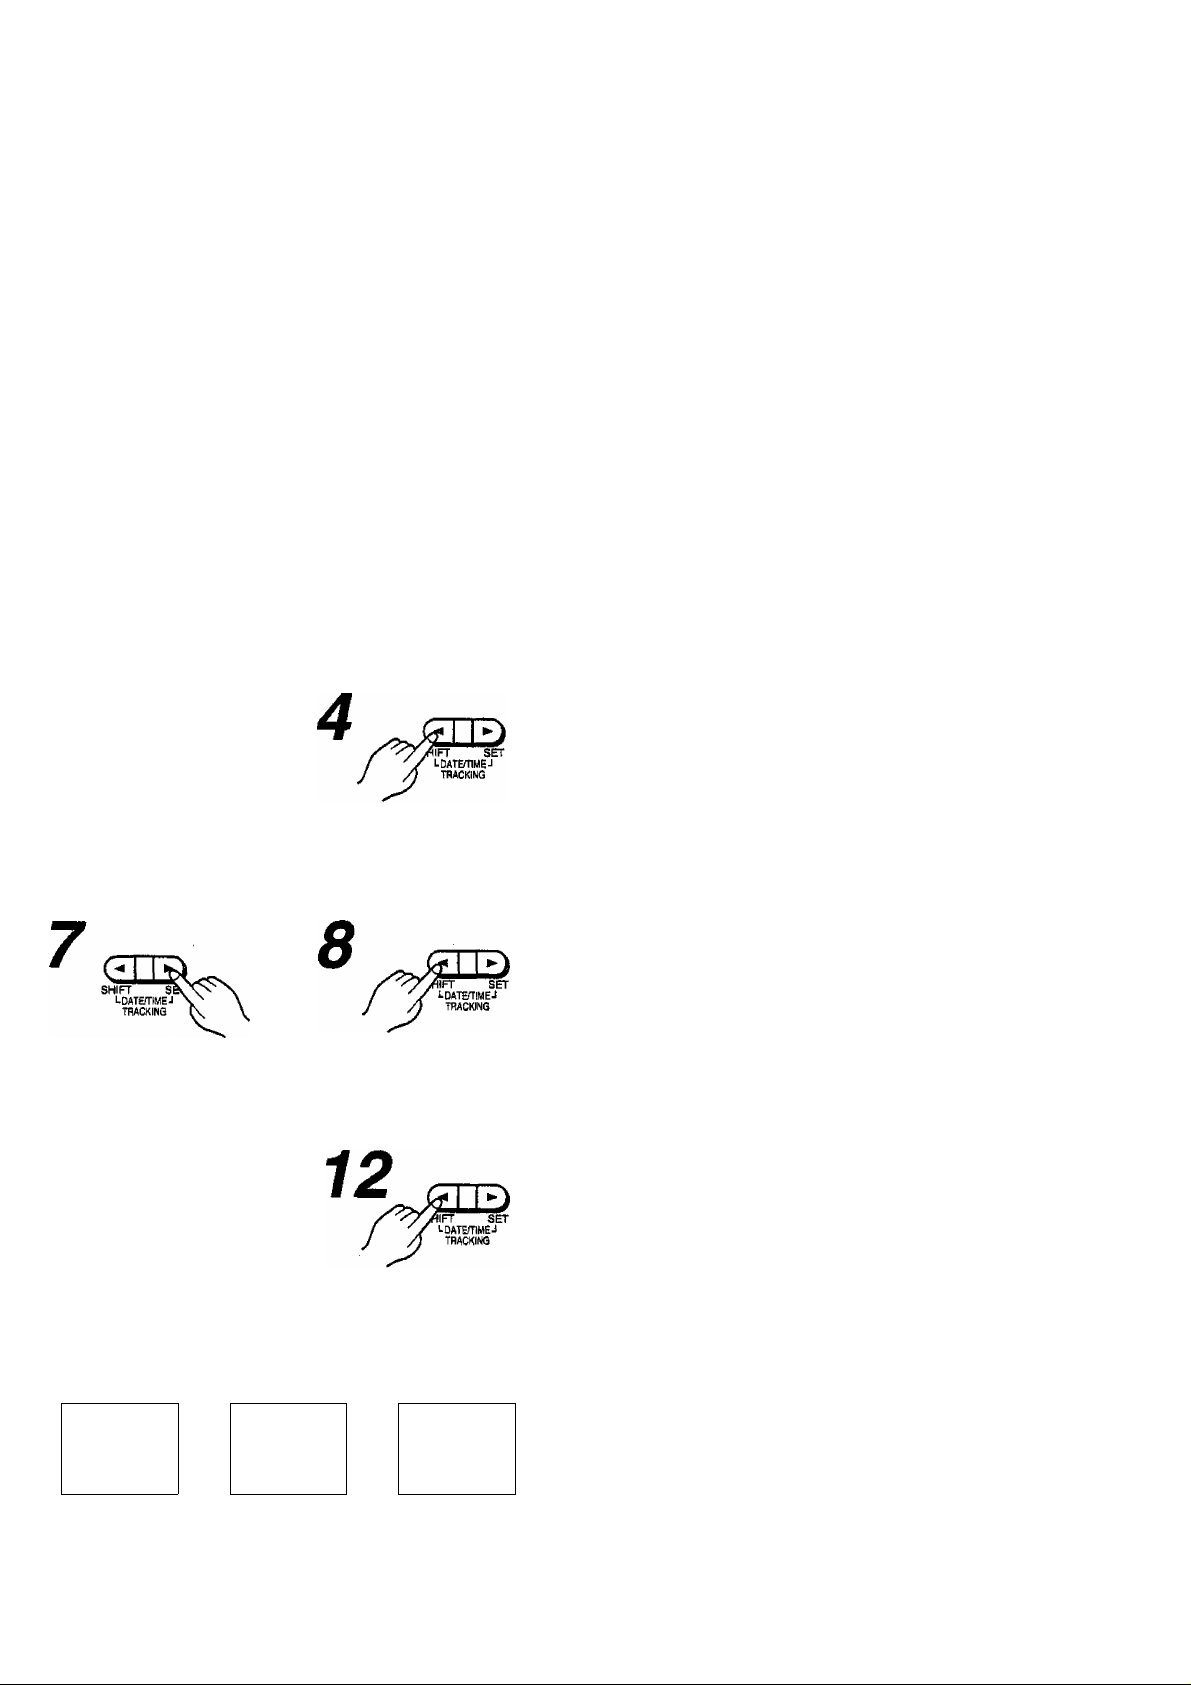
Remarks, etc.
■ Changing the Figures of the Date/Time
Indication
You can change the Date/Time Indication in the order
shown below by pressing the [SET] Button repeatedly.
For example:
Year; 1990-»-1991Month; 1
Day; i^2->....
Hour; ....
Minute; 00->01^ ..
___
2089^1990-
.. -H.12^1-
.. ^31->-1-
. . ^23-^0-
.. —>59->00-
w
c
o
O
Press to set to “15’
Press to make the
“Hour” portion flash.
11
SHIFT seOv^ N
LDATEmMEJ \
TRACKING K \
Press to set to “30”.
No indication Date and Time Date only
'
--------------------
12:30
, 15.10.1996
k
____
■
_
Press to start the clock.
^
•If you want to change the figures more quickly, keep
the [SET] Button pressed.
• If you make a mistake during setting, start again from
the beginning.
--------------------
15.10.1996
Movie Camera SeMJp complete, now ready to use. 15
Remote Controller
|-VTR/CAMERA-|
When you turn out the [POWER]
ON/OFF Switch, the “CAMERA”
Indication Lamp lights.
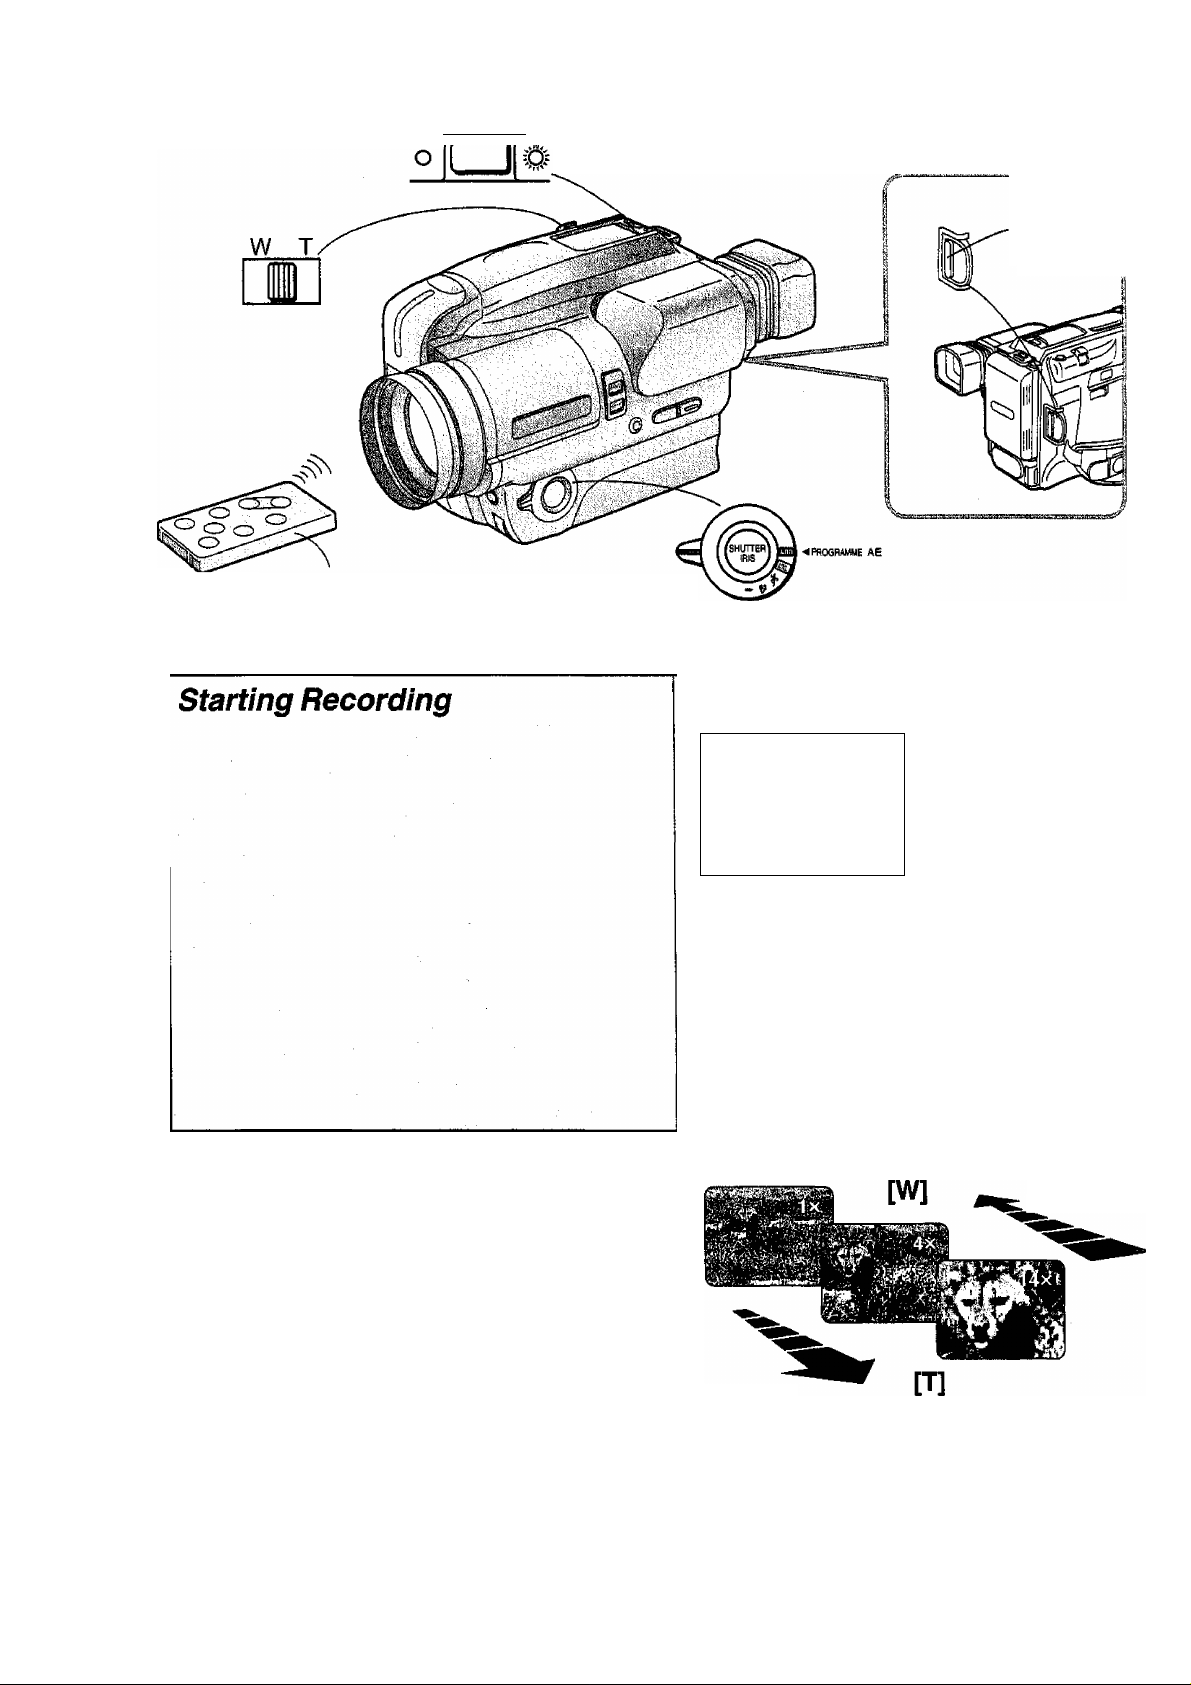
Recording f
Start/Stop I
Button
Title
Making the Subject Larger or Smaller During Recording (Zooming)
Viewfinder
---
r
RECORD
\
___
For the detailed explanations for each indication in the
Viewfinder, see p. 20. Shown above is a typical
example of the indications visible when recording in tf
Auto Mode.
.
0:12.34
n0:12
y
»
Zooming Out
REC
8x
Zooming is also possible in the Recording Pause
Mode, so you can select the desired zoom setting
before you start recording.
• In the maximum tele setting (14x), the minimum
recording distance is 1.5 m. If you want to approach
the subject closer, see p. 17 “Using the Macro
Close-up Function”.
•To prevent inadvertent operation of other infra-red
remote-controlled units, this Movie Camera needs to
receive each infra-red command 3 times.
For this reason, there is a slight delay between
pressing the [W] or [T] Button on the Remote
Controller and the actual operation of the mechanical
zoom function on the Movie Camera.
16
Zooming In
•The approximate selected zoom magnification is
indicated In the Viewfinder.
•The zoom range extends from the wide-angle
setting of the lens (lx) to the tele setting (14x).
■ Remote Controller
Recording Start and Stop as well as zooming in
and out can be operated with this Remote
Controller.
[W • T] Zoom Buttons
Recording
Start/Stop
Button
•It is not possible to turn the Digital Zoom
Function on and off.
•The zooming speed can not be changed.
n"
r M ,%
TnrnT Ì
iiNDEXc
Many VHS VTRs feature the Index Search and
Intro Scan Functions that make it easy to locate
the beginning of scenes marked with index
signals. This Movie Camera automatically records
an index signal in the following cases:
•When recording is started for the first time after
attaching the Battery Pack.
•When recording is restarted after exchanging the
cassette or after pressing the [VTR/CAMERA]
Button.
The “INDEX” Indication flashes briefly in the
Viewfinder white the Movie Camera records an
index signal.
(li
a
GQ
Procedure
Confirm that the [AE]
Selector is set to
"AUTO”.
I ■ Zooming in
W T
T” means Tele.
Press the Recording
Start/Stop Button.
Zooming Out
W T
*W” means Wide.
Remarks, etc.
■ To Stop (Pause) the Recording:
Press the Recording Start/Stop Button.
The “PAUSE” Indication appears in the Viewfinder.
•If you leave the Movie Camera in the Recording
Pause Mode for more than 6 minutes, it automatically
switches off to protect the tape and to conserve
battery power. If you want to resume recording from
this condition, turn the [POWER] ON/OFF Switch in
(the Movie Camera switches off) and then turn it out
again.
■ To Finish Recording;
Turn the [POWER] ON/OFF Switch in. (The Movie
Camera switches off.)
■ Using the Macro Close-up Function
After keeping the [W«T] Zoom Lever pressed toward
“W" to zoom to the maximum wide-angle setting, the
subject can be focussed down to a minimum distance
of only 5 mm between lens and subject.
•As the depth of field is very small in this mode, even
slight camera movements can cause the subject to go
out of focus. Therefore, it is recommended to use a
tripod (optional).
•If you want to record pictures in a photo album or a
similar situation with insufficient lighting, use a Video
DC Light (optional).
•The zooming speed varies depending on how far you
push the [W*T] Zoom Lever towards “W” or'T'. (The
further you push it, the faster the zooming speed
becomes.)
W T
17
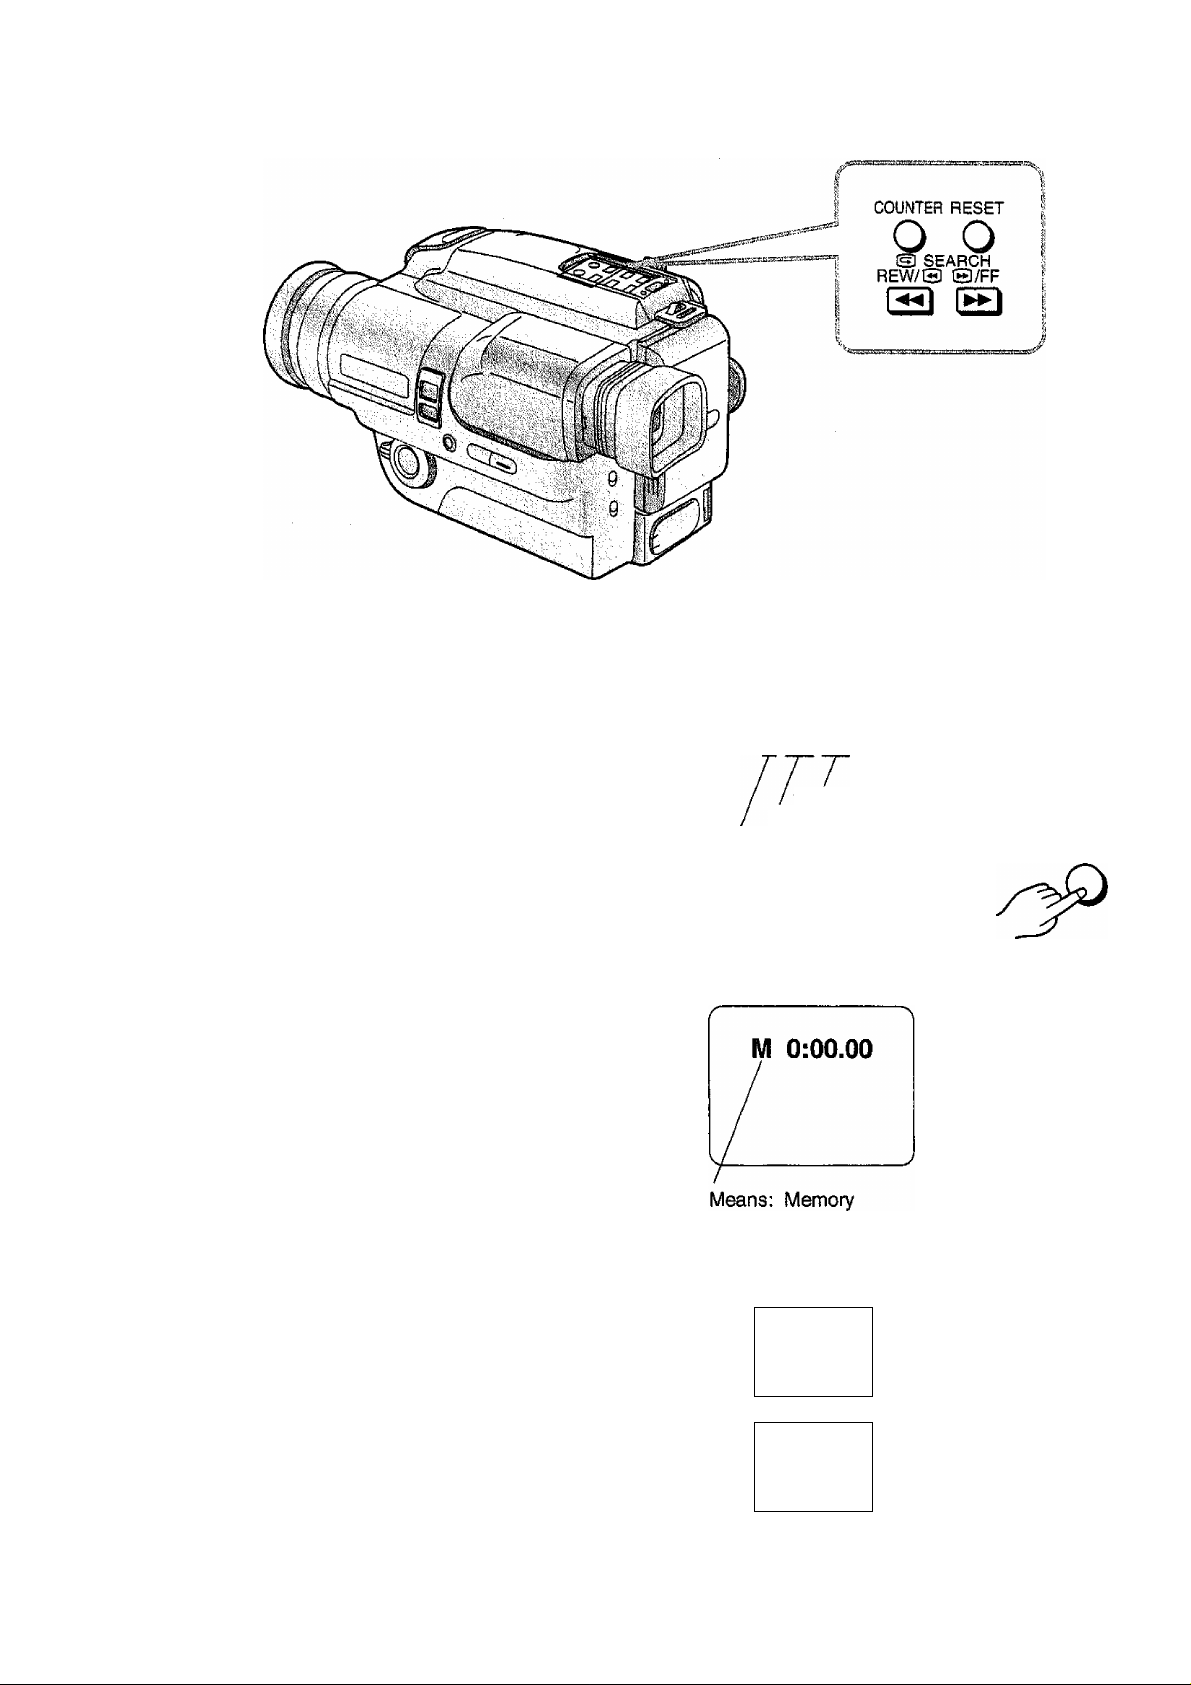
Title
Using the Tape Counter
Indication
The Tape Counter in the Viewfinder shows the elapsed
recording or playback time in hours, minutes and
seconds.
To make it easy to keep track of the elapsed recording
time, reset the Tape Counter to “0:00.00” by pressing
the [RESET] Button.
Using the Memory Function
Viewfinder
0:00.00
Seconds
Minutes
Hours
Procedure
To Reset the Tape Counter:
RESET
The Memory Function makes it easy to locate the
beginning of a desired scene or any other point during
recording.
To use this function, mark the desired point by
following steps 1 to 3 on the right. When you then
rewind or fast-forward the tape, it stops automatically at
the “0:00.00” position.
Confirming the Remaining Tape Time
During recording or playback, the Remaining Tape
Time is automatically displayed in the Viewfinder.
Note:
This function is only meant as a guide. The Remaining
Tape Time Indication is subject to imprecision due to
either customer error (such as incorrectly selected
Tape Length) or stretching of the tape.
18
1
To Make the “M”
Indication Appeal
COUNTER
—
^30
R 0:30
/
Means: Remaining

Video Cassette
When using a video cassette bearing the “P”
mark or an S-VHS-C video cassette, the
Remaining Tape Counter Indication may not be
very precise.
At every press of the [COUNTER] Button,
the Counter Indication will change as
follows;
0:00
00 Tape Counter indication
M 0:00.00
oHooMoosooF VITC value (p. 54)
Memory Indication “M” appears
with Tape Counter Indication
Remarks, etc.
• If you playback a tape on which no recording has
ever been made, the Tape Counter Indication does
not change.
•If you take out the Cassette or remove the Battery
Pack, the Tape Counter automatically resets to
“0:00.00”.
•If you rewind the tape further than the tape counter
position “0:00.00”, the minus sign appears in front
of the Tape Counter Indication.
o
a
O
«
CD
o
(Q
To Reset the Tape Counter:
RESET
3
REW/Q ®/FF
•When you start recording or playback, the “R”
Indication flashes for a few seconds in the Viewfinder,
while the Movie Camera calculates the Remaining
Tape Time.
•When the Remaining Tape Time becomes less than
2 minutes, the Indication “R” and the Remaining Tape
Time start to flash.
19
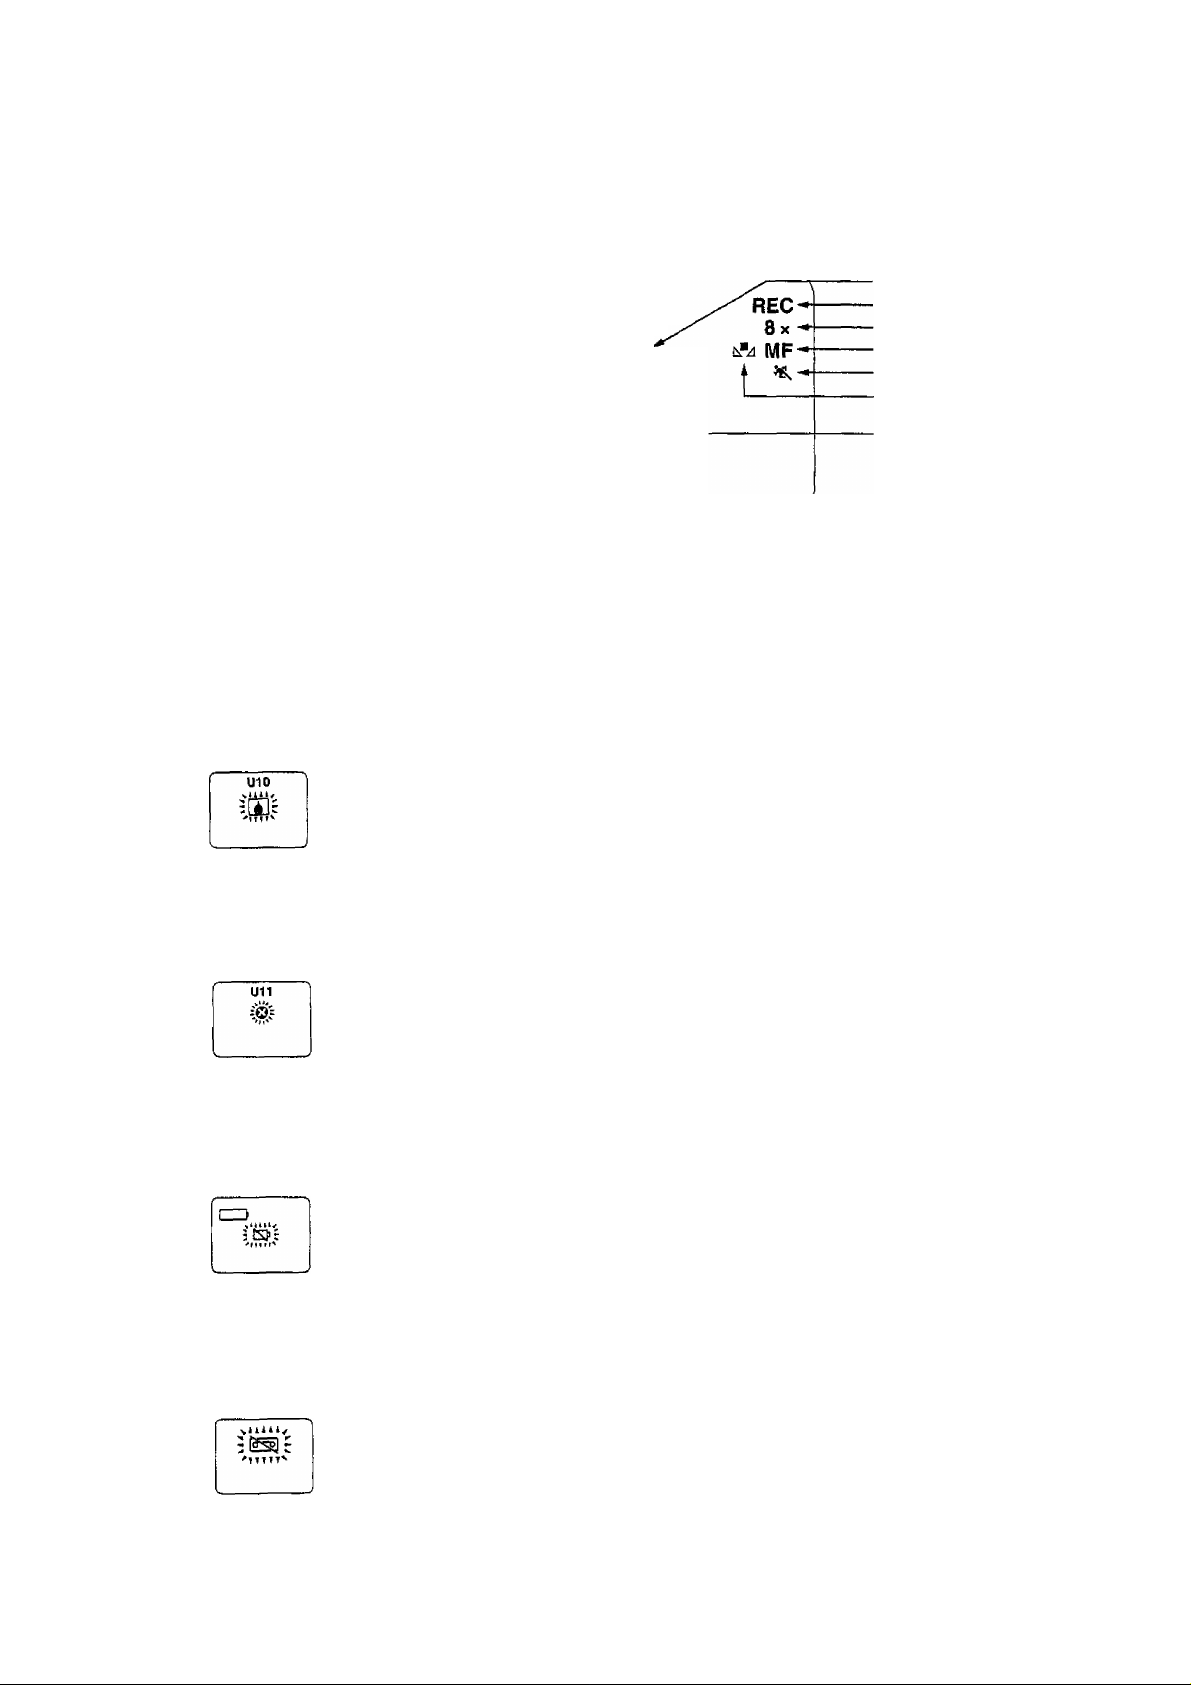
Quick Reference Guide to the indications in the Viewfinder
The following indications are displayed in the Viewfinder to inform you about the condition of the Movie Camera.
Tape Run Indication
Tape Counter/Error Code
Warning/Alarm
Remaining Battery Power-
Remaining Tape Time.
S-VHS Mode.
Digital Mode
Digital Zoom Mode
Power Save Mode
Date/Time
[J] Warning/Alarm Indications
0:12.34
-ROilZ
D.ZOOM
-APS
10:30
15.10.1996
(:
•The illustrations in the following explanations
show only the indication(s) pertaining to the
corresponding explanation.
O
RECORD
Tape Operation Mode
Zoom Magnification
Manual Focus Mode
AE Mode
Manual White Balance Mode
Record/Pause
Viewfinder Condition
Condensation
Condensation has formed inside the Movie Camera.
Wait until the “U10/[J]’' Indication disappears.
Video Head Clogging
Dirt, dust and particles of the tape coating have accumulated on the video
heads. Have the heads cleaned by qualified Service Personnel.
Remaining Battery Power
The 4 segments of the Remaining Battery Power Indication “1^^1=” begin to
disappear one after another as the power of the Battery Pack weakens.
When only the last segment remains, the “ tSJ ” Indication starts to flash in the
centre of the Viewfinder. When the last segment has disappeared, the
“CAMERA” Indication Lamp flashes for a few seconds, and then the Movie
Camera automatically switches itself off. Replace the exhausted Battery Pack
with a fully charged one.
Page
62
62
10
20
Tape
When no video cassette is inserted or when the tab of the Inserted video
cassette is broken out, this indication flashes.
Insert a video cassette with intact tab.
12, 59
 Loading...