

Page 1
Video Cassette Recorder
NV-HS860EE
Operating Instructions
Instrukcja obsługi
VQT8878
Before attempting to connect, operate or adjust this product,
please read these instructions completely.
Page 2

Dear Customer
May we take this opportunity to thank you for purchasing this Panasonic Video Cassette Recorder.
We would particularly advise that you carefully study the Operating Instructions before attempting to operate the unit and
that you note the listed precautions.
Contents
Before Use
Controls and Components ............................................. 03
Checking the Accessories/Preparing the Remote
Control .......................................................................... 05
Cautions ........................................................................... 06
Warning and Important Information .............................. 07
Setting the Remote Control to Operate Your TV .......... 08
Connecting and Setting Up
Connecting and Preparations for a TV Equipped with
the Q Link Function ..................................................... 10
Connecting and Preparations for a TV Not Equipped
with the Q Link Function ............................................ 12
When You Insert a Video Cassette ........ 16
Playback
Playback .......................................................................... 17
≥ To Ensure High Playback Picture Quality
(3D DNR Function) ...................................................... 18
≥ To Ensure a Stable and Shake-Free Playback Picutre
Quality (TBC Function) ................................................ 18
Recording
Recording ........................................................................ 19
≥ To Immediately Record the Same TV Programme
That You Are Viewing on the TV
(Direct TV Recording) ................................................ 19
≥ To Make an S-VHS Recording on a Video Cassette .... 20
≥ To Record a VHS Tape with S-VHS Quality
(S-VHS Expansion Technology) ................................ 20
≥ To Select the Recording Duration and Perform
Timer Recording (OTR Recording) ............................ 21
Tape Library System
Tape Library System ....................................................... 27
≥ To Check the Tape Library Data ................................ 28
≥ To Manually Enter or Editing a Title or Category ....... 30
≥ To Delete the Tape Library Data ................................ 31
≥ To Restore Deleted Tape Library Data ...................... 32
≥ To Demonstrate the Tape Library System ................. 32
Advanced Operations
Search Functions ............................................................ 33
≥ VISSlVHS Index Search System ............................. 33
≥ Intro-Jet Scan ............................................................. 33
Editing .............................................................................. 34
≥ Assemble Editing ....................................................... 34
≥ Album Function .......................................................... 35
≥ Audio Dubbing ........................................................... 36
Connecting the VCR to a Decoder/
Connecting the VCR to a Stereo Amplifier ............... 38
Connecting the VCR to a Satellite Receiver or Digital
Receiver ....................................................................... 39
Various Settings
Tuning and Assigning the TV Stations Available in
Your Area to the Programme Positions
(Manual Tuning) ........................................................... 42
Restarting the Auto Setup or Download/
Resetting the VCR to the Shipping Condition .......... 47
Setting the VCR’s Clock ................................................. 48
Other Convenient Functions (Various Settings) .......... 49
≥ Settings for the Main Menu Item “Display” ................. 49
≥ Settings for the Main Menu Item “Functions” ............. 51
≥ Language Setting ....................................................... 53
≥ Country Setting .......................................................... 53
Helpful Hints
Timer Recording
Timer Recording ............................................................. 22
≥ To Programme with the On Screen Display (OSD) ... 22
≥ To Programme with the ShowView Function ............. 23
Other Timer Recordings and Convenient Functions .. 24
Glossary ........................................................................... 54
Before Requesting Service ............................................ 56
≥ Adjusting the Playback Picture .................................. 58
Specifications .................................................................. 59
2
Page 3
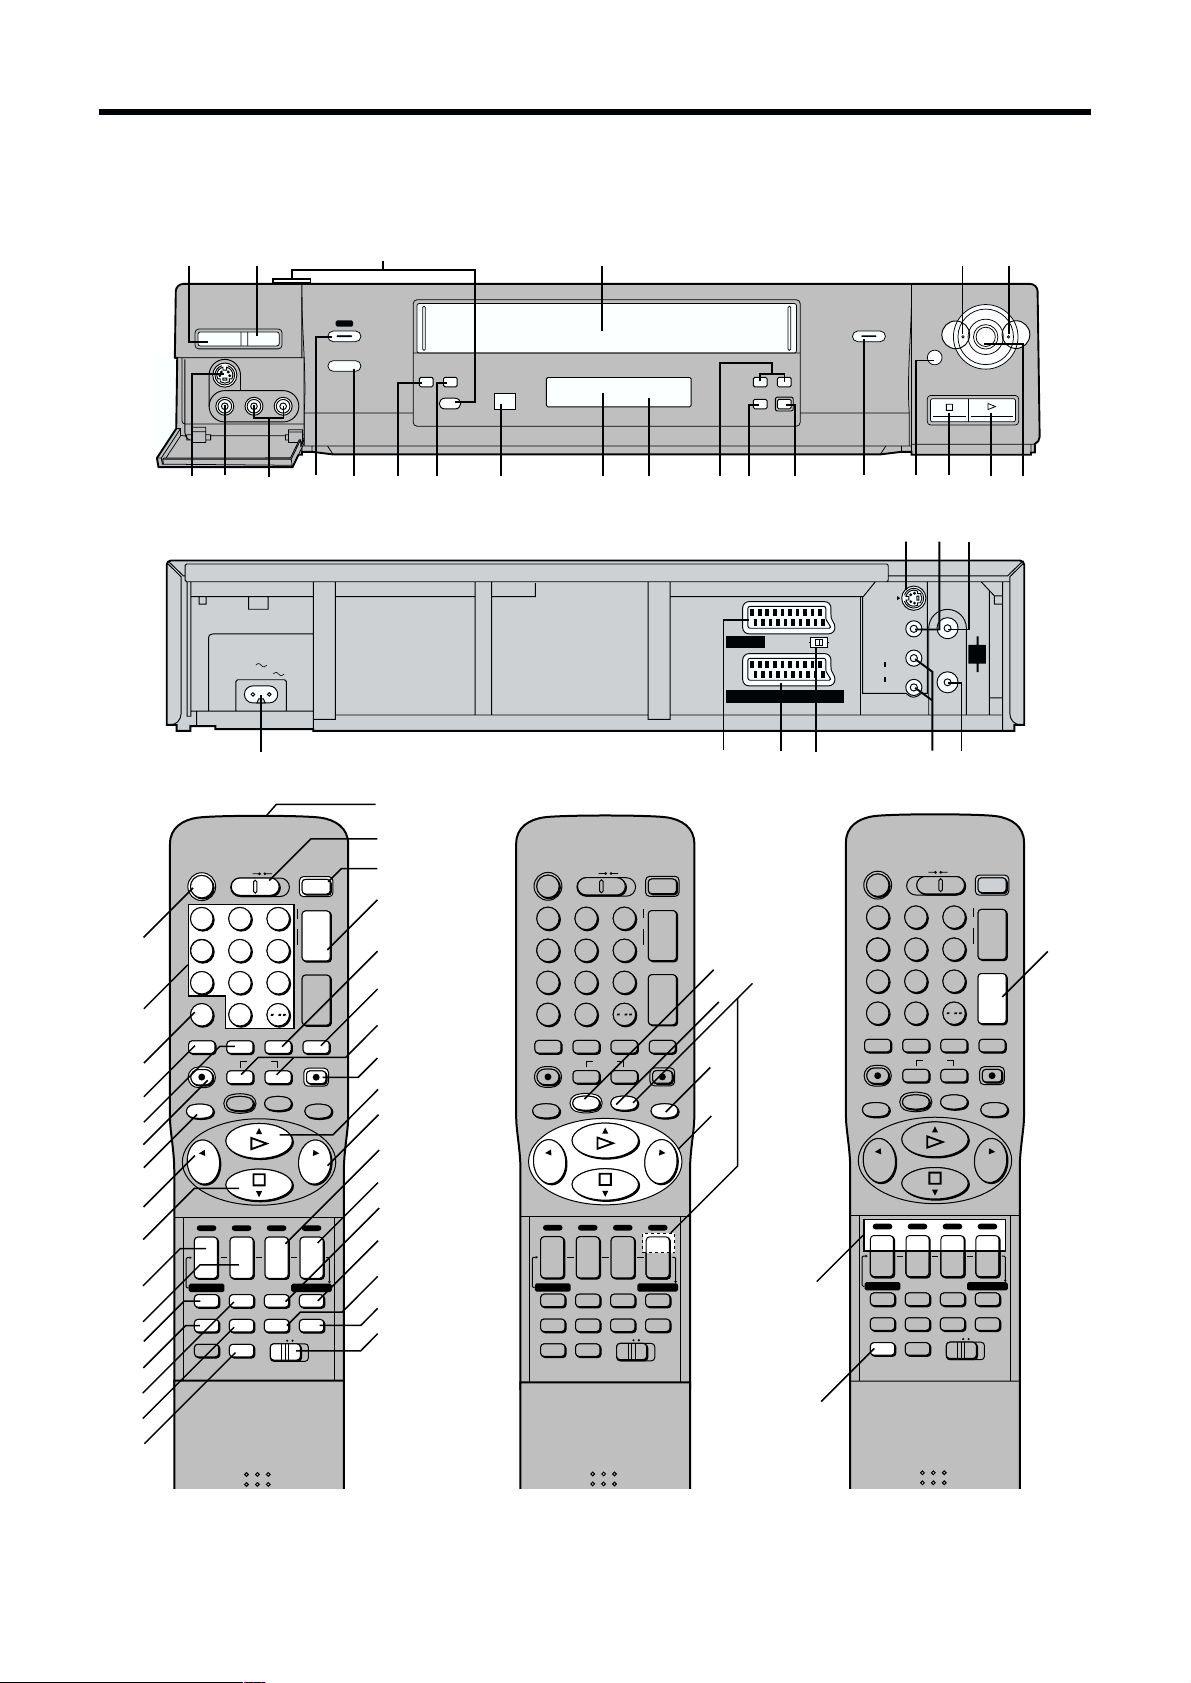
Controls and Components/Regulatory i komponenty
Keep this page open as you read through the Operating Instructions. Refer to it for the control and component names and
numbers which appear in the text.
Trzymaj tą stronę otwartą w trakcie czytania niniejszej instrukcji obsługi. Odwołuj się do niej dla sprawdzenia nazw
regulatorów i komponentów, które pojawiają się w tekście.
1Z
Í/I <
EJECT
^]_ a`
AC IN
SECTEUR
monp
TBC
S-VHS/S-VHS ET
[
DIRECT
A.DUB
TV REC
6 d
°c
°Q
°\
CVC
°e
CD
TIMER REC¥REC/OTR
Á
fN g h Ii9
Db
NORMAL
S-VIDEO
OUT/
SORTIE
)
)
AV1 (TV
AV2 (DECODER/DECODEUR/EXT
3D DNR
S-VIDEO
VIDEO
L/G
AUDIO
R/D
OUT/SORTIE
8H
6
6
INTRO-JET SCAN
j l
k
qr
IN/
ENT
RF/
ANT
OUT/
SORTIE
5
5
;
°°1
°/°°2
°°3
4
5
6
7
8
9
:
;
<
°=
>
?
@
VCR
Í
23
1
456
789
INPUT SELECT
SAT
AV
0
REPLAY
OSD/DISPLAY
DIRECT TV REC
KL
;/D
MENU OK
6
J
DATE
I
CANCEL
PROG./CHECK
AUDIORESET
STILL ALBUM
TV ASPECT
INDEX
r
s
SUBTITLE
TV/TEXT
TV
TRACKING/V-LOCK
r
s
VOLUME
/
LIBRARY
SHOW VIEW
r
ON
OFF
s
SP/LP
TIMER REC
TAPE AV LINK
VCR
12
J
I
r
N
s
REC
EXIT
r
s
Á
6
P
°/°°O
°°N
M
L
K
J
I
H
G
F
E
D
C
B
°A
VCR
Í
23
1
456
789
INPUT SELECT
SAT
AV
0
REPLAY
OSD/DISPLAY
DIRECT TV REC
KL
;/D
MENU OK
6
J
DATE
I
CANCEL
PROG./CHECK
AUDIORESET
STILL ALBUM
TV ASPECT
INDEX
r
s
SUBTITLE
TV/TEXT
TV
TRACKING/V-LOCK
r
J
s
I
VOLUME
N
/
LIBRARY
SHOW VIEW
r
r
ON
OFF
s
s
SP/LP
TIMER REC
Á
TAPE AV LINK
VCR
12
r
s
REC
EXIT
6
U
T
S
R
°V
°°W
°°X
VCR
Í
23
1
456
789
INPUT SELECT
SAT
AV
0
REPLAY
OSD/DISPLAY
DIRECT TV REC
KL
;/D
MENU OK
6
J
DATE
I
CANCEL
PROG./CHECK
AUDIORESET
STILL ALBUM
TV ASPECT
INDEX
rrr
sONs
SUBTITLE
TV/TEXT
TV
TRACKING/V-LOCK
r
s
VOLUME
/
LIBRARY
SHOW VIEW
OFF
SP/LP
TIMER REC
TAPE AV LINK
VCR
12
J
I
r
N
s
REC
EXIT
s
Á
°°Y
6
°°See page 4. (VCR Operation)
°°See page 8. (TV Operation)
°°Patrz strona 62. (Sterowanie magnetowidem)
°°Patrz strona 66. (Sterowanie odbiornikiem TV)
3
Page 4
VCR Operation
When you want to operate the VCR, set the VCR/TV switch
P to “VCR”.
°\ Cassette compartment
°c Infra-red Remote Control Receiver window
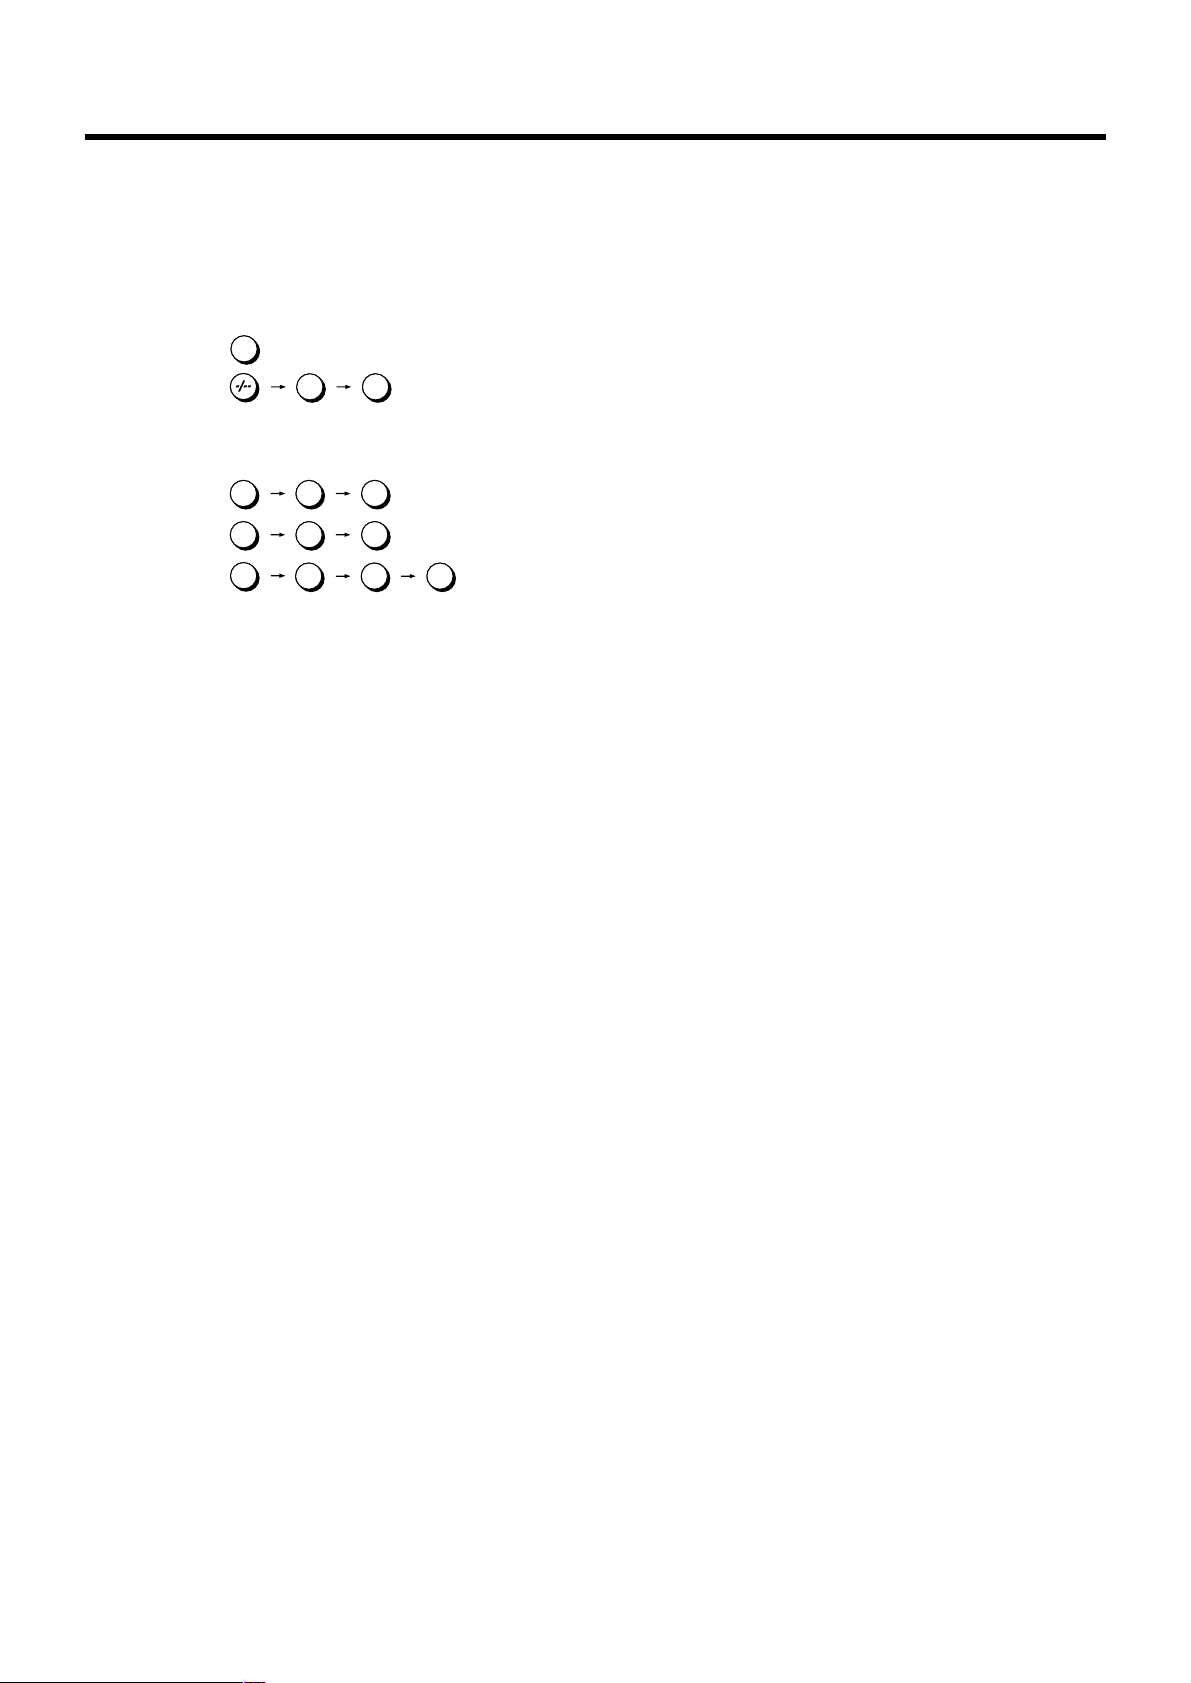
°2 Numeric buttons
To select the programme positions (1–99) of the VCR.
Example:
9:
9
19:
1
9
To select the satellite programme positions.
Example:
SAT 9:
SAT19:
SAT129:
SAT
0
SAT
0 1 9
SAT
0
SAT
0
1
9
2 9
≥ 3-digit programme positions can be selected with this
remote control only in case of a satellite receiver that is
1
marked with (°
) on the enclosed list of compatible
satellite receivers.
To enter a ShowView number.
To enter numbers for various settings.
°= RESET button
To reset the tape counter (elapsed time) to “0:00.00”.
≥ The tape counter is automatically reset to “0:00.00”
when a video cassette is inserted.
°e VCR display
°A VCR 1/2 switch
Set to the “VCR 2” position when using two Panasonic
VCRs. (See page 52.)
°O SUBTITLE button
This button does not operate on this VCR.
°Q Infra-red transmitter
°V Child Lock Function buttons
(Convenient function to prevent unauthorized use)
This function deactivates all buttons on the VCR and the
remote control. Use this function, when you do not want
other people to operate the VCR.
To Activate the Child Lock Function:
1 Hold down the OK and the OFF (i) buttons V
simultaneously until the “!" hold” indication appears
in the VCR display.
≥ If you press a button while the Child Lock function is
on, the “!" hold” indication appears in the VCR
display to inform you that no operation is possible.
To Cancel the Child Lock Function:
1 Hold down the OK and the OFF (i) buttons V
simultaneously until the “!" hold” indication
disappears.
≥ If you disconnect the power cable, the Child Lock
function is automatically cancelled after the power
backup time of approximately 60 minutes has
elapsed.
≥ If you cannot cancel the Child Lock function, press
the EXIT button S and perform the operation step 1.
4
Page 5
Checking the Accessories/Preparing the Remote Control
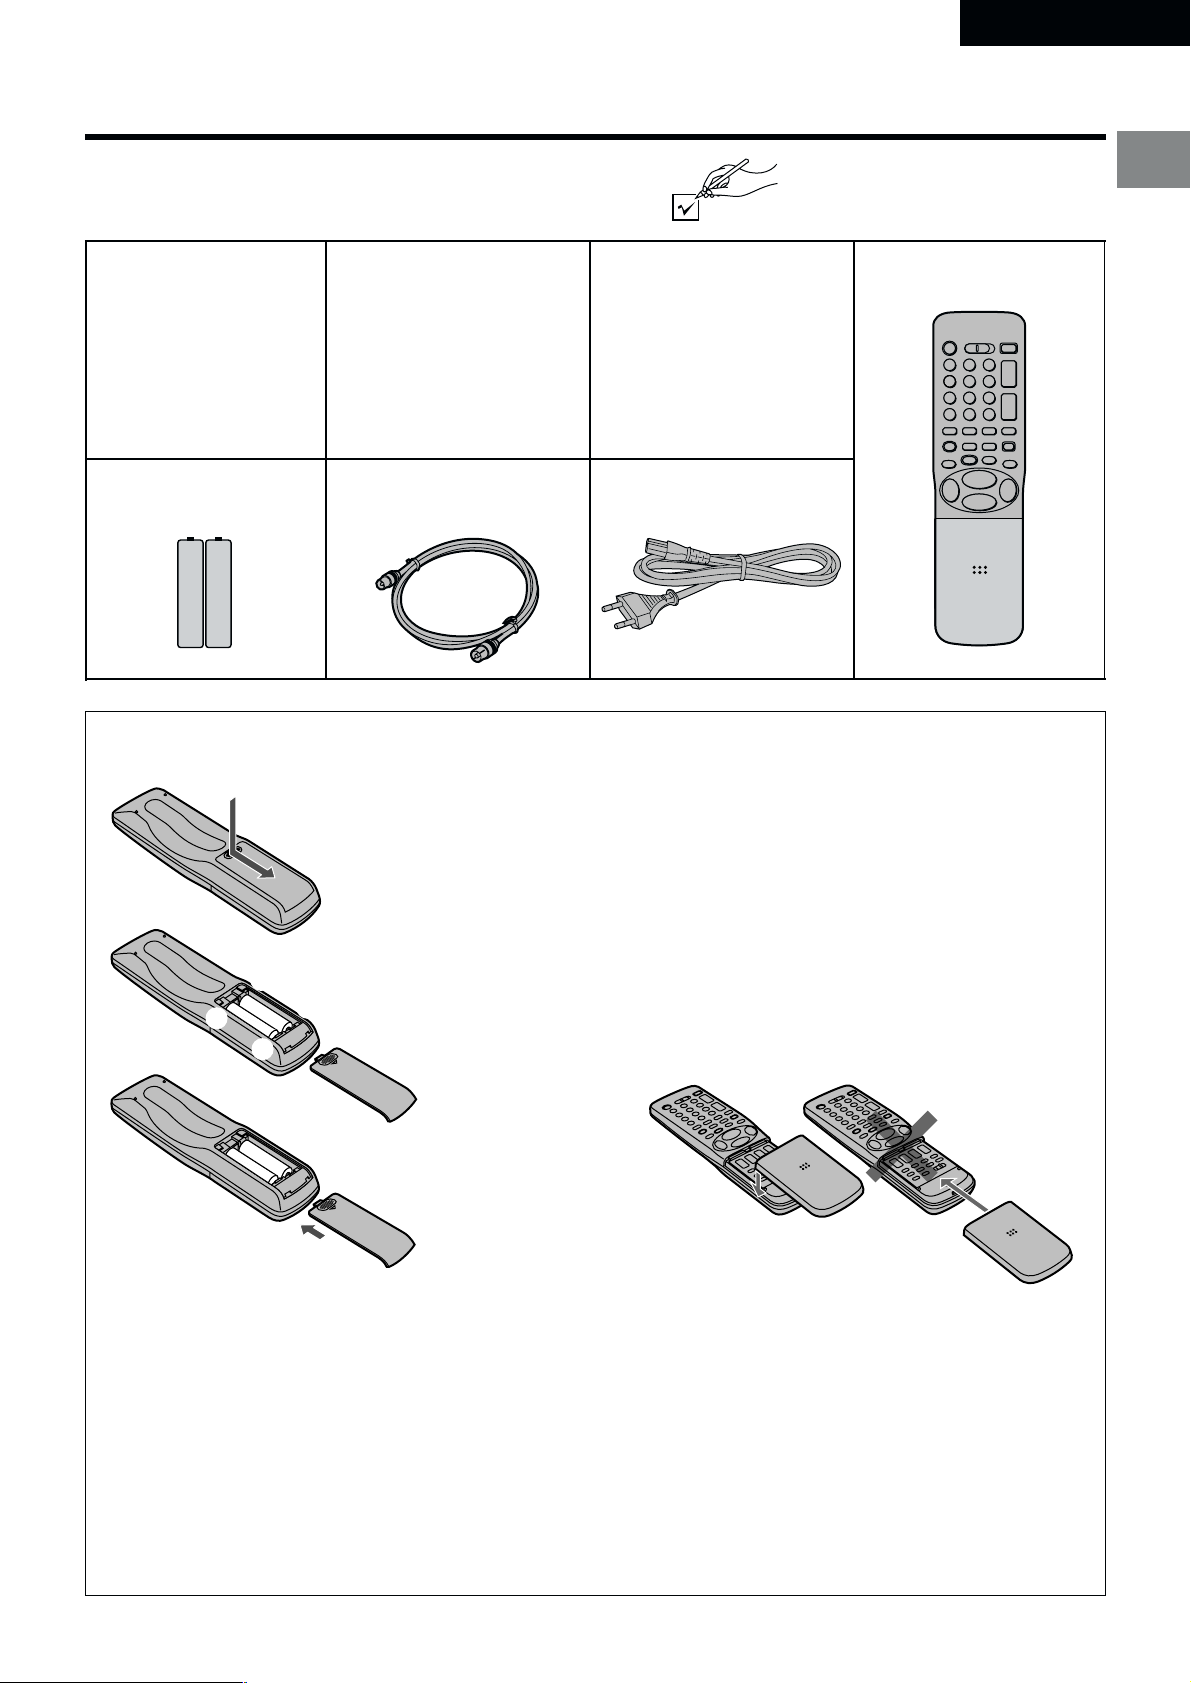
Check that you have the accessories shown below .
ENGLISH
∏ Operating
Instructions
∏ Batteries for the
Remote Control
∏ RF lead to connect VCR
and TV
Inserting Remote Control Batteries
1
1 Slide off the battery cover.
∏ S-VHS ET Sticker
(for cassette tape)
∏ AC Mains lead
≥ Do not heat or short-circuit the batteries.
≥ When you do not use the remote control for a long time,
take out the batteries and store them in a cool, dry
place.
∏ Remote Control∏ Satellite Receiver List
Before Use
2
-
+
3
Notes for Battery Replacement:
≥ The service life of the batteries is approximately 1 year.
However, it varies considerably depending on the
frequency of use.
≥ When they are exhausted, replace them with two AA,
UM3, or R6 size batteries.
≥ When the batteries are exhausted, remove them
immediately and dispose of them correctly.
≥ Make sure that the batteries are inserted with the
polarity (+ and -) correctly aligned.
≥ Do not mix old battery with new battery.
≥ Do not mix different battery types, i.e. Alkaline and
Manganese.
≥ Do not use rechargeable (Ni-Cd) batteries.
-
2 Insert the batteries with the
polarity (+ and -)
correctly aligned.
+
3 Replace the battery cover.
If the Sliding Cover of the Remote
Control Becomes Detached
If the sliding cover of the remote control becomes
detached accidentally, fit it securely in place by placing it
on the top of the remote control at the position shown in
the illustration below, and pushing it down until it clicks
into position.
≥ It is not possible to fit the sliding cover in place by
pushing or sliding it on from the bottom end of the
remote control.
WrongCorrect
5
Page 6

Cautions
Be sure to read the cautions carefully before you operate this
VCR.
Avoid sudden changes in temperature
If the VCR is moved suddenly from a cold to a warm place,
condensation may form on the tape surface and inside the
VCR. If this happens, leave the VCR at room temperature for
at least 1 hour before operating it.
Avoid humidity and dust
Do not use the VCR in very humid or dusty places. This may
cause damage to its internal parts.
Do not cover the ventilation holes
The ventilation holes prevents excessive heat build-up inside
the VCR during extended periods of use. Do not block these
holes; especially avoid covering them with soft materials such
as paper or cloth.
Keep the VCR away from high temperatures
Keep the VCR away from extreme heat such as direct
sunlight, heating radiators, or closed automobiles.
Keep away from magnets and electromagnetic objects
Never bring a magnet or electromagnetic object close to the
VCR because this could adversely affect the performance of
the VCR. When using the VCR together with other
equipment, keep as much distance as possible between them
to prevent them from adversely affecting each other’s
performance.
No fingers or other objects inside
Touching internal parts of the VCR is dangerous, and may
seriously damage it. Do not attempt to disassemble the VCR.
There are no user serviceable parts inside.
Video head clogging
The video heads record the picture signals on the tape during
recording and read picture signals from the tape during
playback. They are, therefore, of critical importance for the
picture quality. If the VCR is used for a very long time, these
heads may become dirty and clogged with dust and fine
particles from the tape coating. In such a case, the signals
can no longer be recorded correctly, and the playback picture
will be distorted accordingly. This is the case, for example, if
during the playback of a tape, which you know to have
excellent recording quality, the picture and sound quality are
inferior. When such a symptom occurs, have the recorder
checked by qualified service personnel.
Head cleaning by a service centre is not covered by
warranty.
Condensation may form in the following cases:
≥ If the VCR is in a room that was very cold before the heater
has just been turned on.
≥ If the VCR is in a room with steam or high humidity.
≥ If the VCR is brought from cold surroundings into a well-
heated room.
≥ The VCR is suddenly brought from cool surroundings, such
as an air-conditioned room or car, to a place which is hot
and humid.
Note:
≥ In any of the above-mentioned conditions, do not operate
the VCR for at least 1 hour.
This VCR is not equipped with a dew sensor.
Keep water away
Keep the VCR away from flower vases, tubs, sinks, etc.
Caution: If water or some other liquid is spilled into the VCR,
serious damage could occur. If you spill any liquid into the
VCR, consult qualified service personnel.
Lightning
To avoid damage by lightning, disconnect the aerial plug from
the VCR during lightning storms.
Cleaning the VCR
Wipe the VCR with a clean, dry cloth. Never use any cleaning
fluid or other chemicals. Also do not use compressed air to
remove dust.
Stacking
Install the VCR in a horizontal position and do not place
anything heavy on it.
6
Page 7

Warning and Important Information
As this equipment gets hot during use, operate it
in a well ventilated place; do not install this
equipment in a confined space such as a book
case or similar unit.
IMPORTANT
Your attention is drawn to the fact that the recording of
pre-recorded tapes or discs or other published or
broadcast material may infringe copyright laws.
WARNING
TO REDUCE THE RISK OF FIRE OR SHOCK HAZARD, DO
NOT EXPOSE THIS EQUIPMENT TO RAIN OR MOISTURE.
FOR YOUR SAFETY
∫ DO NOT REMOVE OUTER COVER.
To prevent electric shock, do not remove cover. There are
no user serviceable parts inside. Refer all servicing to
qualified service personnel.
Remarks
1. This VCR is also capable of receiving SECAM type
broadcasting programmes (SECAM B/G) and recording/
playing back its colour television signals.
2. When a cassette which has been recorded on this VCR
is played back on a SECAM VCR, the picture may be
reproduced in black and white. When it is played back
on a PAL VCR without SECAM capability, the picture
may not be reproduced in normal colour.
3. When cassettes recorded on a SECAM VCR or SECAM
pre-recorded cassettes are played back on this VCR, the
picture may be reproduced in black and white.
4. This VCR is not designed for use in France, where a
SECAM VCR should be used instead.
Before Use
Press the VCR-ON/OFF button 1 to switch the VCR from on
to standby mode or vice versa. In the standby mode, the VCR
is still connected to the mains.
HOWVIEW is a trademark of Gemstar Development
S
Corporation. The S
under licence from Gemstar Development Corporation.
If you dub still pictures from a conventional analogue video
movie camera or VCR, some picture distortion may occur in
the recorded picture.
Note:
≥ You will find the CE mark (conformity declaration for
Europe) on the shipping carton and on the rating plate (rear
side of the unit).
HOWVIEW system is manufactured
7
Page 8

Setting the Remote Control to Operate Your TV
This setting procedure allows you to operate the TVs of most
brands using the remote control supplied with this VCR.
≥ Some TV models cannot be operated with this remote
control.
Set the VCR/TV switch P to “TV”.
1
2 Look up your TV’s manufacturer in the list of TVs
compatible with the VCR’s remote control on the next
page.
3 While keeping the TV-ON/OFF button 1 pressed, use
the Numeric buttons 2 to enter the manufacturer’s code.
If there is more than one code listed for that
manufacturer, try the first code.
Be sure to enter the code in two digits.
Example: 01
4 Check whether you can operate the TV correctly with the
VCR’s remote control.
If the TV cannot be operated properly:
In step 3, enter the other code listed for that manufacturer
and repeat step 4.
TV Operation
The explanations below show you what functions individual
buttons have when the VCR/TV switch P is set to “TV”.
The 3 Methods for Switching
to the AV Input on Your Panasonic TV
Your Panasonic TV uses one of three different methods for
switching between TV reception and the AV input(s). Perform
the operations steps listed for the switching methods A, B and
C below to determine which one your Panasonic TV uses.
A 1 Set the VCR/TV switch P to “TV”.
2 Press the AV button 3 to switch to the AV Input.
Each press of the AV button 3 switches between
“TV reception” and “AV Input(s)”.
B 1 Set the VCR/TV switch P to “TV”.
2 Press the AV button 3.
Colour bars for selecting the AV Input appear on
the TV screen.
3 Follow the instructions displayed on the TV screen
to select the desired AV Input from the displayed
colour bars for the AV Input by pressing the
corresponding colour button J (red) :, DATEi
(green) ;, ONi (yellow) G or OFFi (blue) F on
the remote control.
C 1 Set the VCR/TV switch P to “TV”.
°°1 TV-ON/OFF button
To switch the TV on from standby mode (OFF) or vice
versa.
On some TVs it is only possible to switch the TV to
standby mode (OFF) with this button, but not on. In this
case, try to turn the TV on with one of the following
buttons:
Numeric buttons 2
AV button 3
Channel button N
°°2 Numeric buttons
To select the programme positions (1– 99) on the TV.
°°3 AV button
To select the desired AV input on the TV.
°°N Channel button
To select the desired programme position (TV station) on
the TV.
°°O TV/TEXT button
To switch between normal TV mode and teletext mode.
°°W Teletext buttons
If your TV is equipped for Teletext reception, you can use
these buttons to change the teletext information
displayed on the screen and select desired information.
For details, refer to your TV’s operating instructions.
2 Press the AV button 3.
The last previously selected AV Input indication
appears on the TV screen. The indications for
selecting another AV Input also appear,
but they disappear a few seconds later.
3 Before the indications for selecting another AV
Input disappear, press the I button :, DATEj
button ;, ONj button G or OFFj button F to
select the desired AV input.
With the following four buttons, you can move and
select as follows:
I :: Move left
DATEj ;: Move down
ONj G: Move up
OFFj F: Move right
°°X TV ASPECT button
To switch the screen format between the wide-screen
and other formats.
°°Y VOLUME button
To adjust the volume of the TV.
8
Page 9

List of TVs Compatible with the VCR’s
Remote Control
Manufacturer Code
Panasonic 01– 04
AIWA 35
AKAI 27, 30
BLAUPUNKT 09
BRANDT 10, 15
BUSH 05, 06
CURTIS 31
DESMET 05, 31, 33
DUAL 05, 06
ELEMIS 31
FERGUSON 10
GOLDSTAR/LG 31
GOODMANS 05, 06, 31
GRUNDIG 09
HITACHI 22, 23, 31, 40, 41, 42
INNO HIT 34
IRRADIO 30
ITT 25
JVC 17, 39
LOEWE 07
METZ 28, 31
MITSUBISHI 06, 19, 20
MIVAR 24
NEC 36
NOKIA 25– 27
NORDMENDE 10
ORION 37
PHILIPS 05, 06
PHONOLA 31, 33
PIONEER 38
PYE 05, 06
RADIOLA 05, 06
SABA 10
SALORA 26
SAMSUNG 31, 32
SANSUI 05, 31, 33
SANYO 21
SBR 06
SCHNEIDER 05, 06, 29, 30, 31
SELECO 06, 25
SHARP 18
Manufacturer Code
SIEMENS 09
SINUDYNE 05, 06, 33
SONY 08
TELEFUNKEN 10–14
THOMSON 10, 15
TOSHIBA 16
WHITE WESTINGHOUSE 05, 06
Before Use
9
Page 10
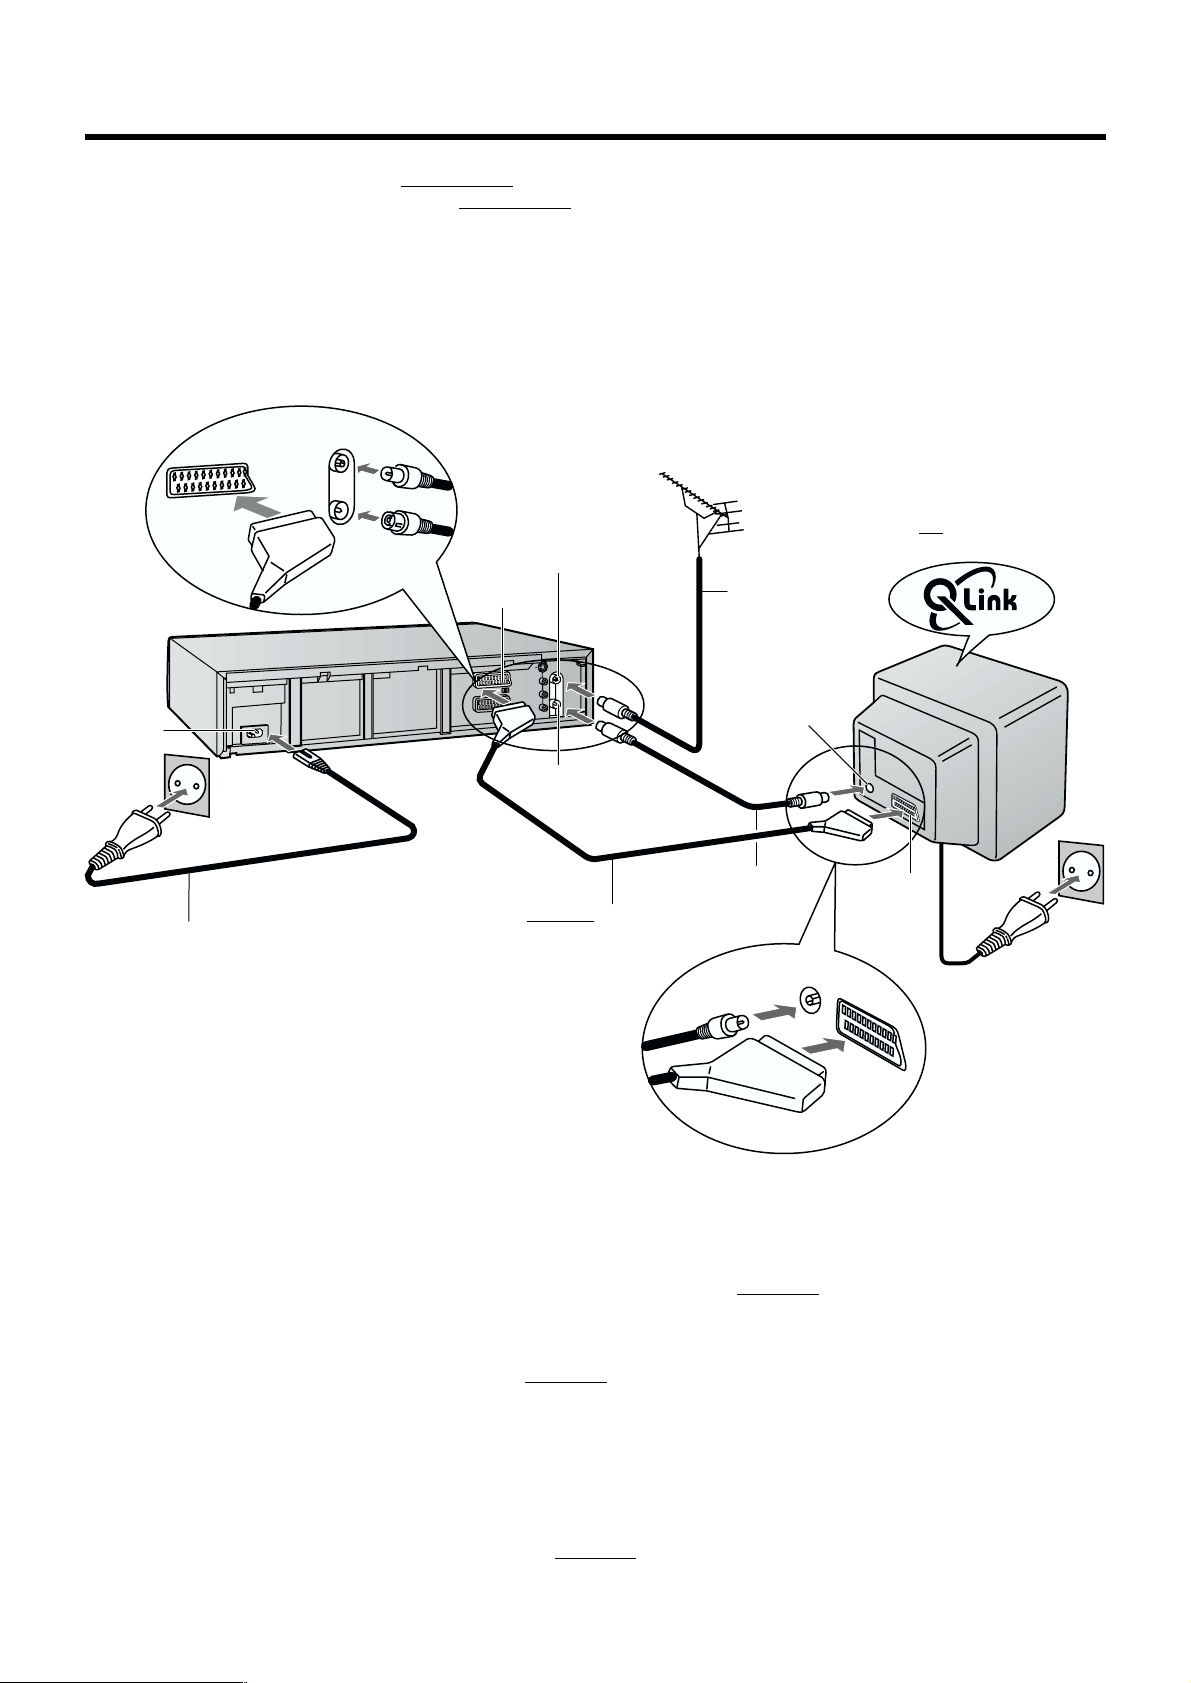
Connecting and Preparations for a TV Equipped with the
Q Link Function
Connections and preparations for a TV equipped with the “Q Link”°1 function and equipped with a 21-pin Scart socket.
For the connections and preparations for a TV
5
“SMARTLINK”°
function and with a 21-pin Scart socket, also read from this page.
For details about the connections, also read TV’s operating instructions.
Be sure to keep both the TV and VCR switched off until all connections have been made.
For your safety, be sure not to connect or handle the equipment with wet hands.
equipped with the “DATA LOGIC”°2, “Easy Link”°3, “Megalogic”°4 or
Aerial (not supplied)
TV
with Q Link function
(not supplied)
21-pin Scart
socket
n
Aerial Input
socket
l
Aerial lead
(not supplied)
AC Input
socket
m
AC mains lead
(supplied)
Aerial Output
socket
r
Fully-wired 21-pin Scart
cable (not supplied)
Aerial Input socket
RF coaxial cable
(supplied)
21-pin Scart
socket
To AC mains socket
Hints:
≥ If the TV set is equipped with a 21-pin Scart socket that features Y/C signal separation, set the Normal/S-Video Output switch
p to “S-VIDEO OUT” to record or play back with high picture quality and use a fully-wired 21-pin Scart cable (not supplied) to
connect the VCR to the TV.
≥ Q Link is an advanced system that offers a range of convenient functions such as automatic copying of the tuning position of
all available TV stations (in the same order as they are programmed on the TV) into your VCR’s memory (this is called
Download) if you connect the VCR to your TV with a
fully-wired 21-pin Scart cable (not supplied). Depending on the
manufacturer, the equivalent of the Q Link function has a different name and may not work exactly the same.
°1 “Q Link” is a registered trademark of Panasonic.
2
“DATA LOGIC” is a registered trademark of Metz.
°
3
°
“Easy Link” is a registered trademark of Philips.
4
“Megalogic” is a registered trademark of Grundig.
°
5
“SMARTLINK” is a registered trademark of Sony.
°
For details, refer to your TV’s operating instructions or consult your dealer.
≥ Unlike in most commercially sold 21-pin Scart cables, in fully-wired 21-pin Scart cables all 21 pins of one plug are connected
to the matching pin of the plug on the other end of the cable. This type of cable is necessary for the Preset Download
function to work.
10
Page 11
Preset Download Function
The Preset Download function automatically copies the tuning
position of all available TV stations into the VCR’s memory
when you connect the VCR using a
cable to a TV
equipped with the Q Link function.
fully-wired 21-pin Scart
To Simultaneously Set Up this VCR with a
New TV
Perform the following operation steps exactly as described to
ensure that the Preset Download function works correctly.
First of all, make sure that the VCR is switched off.
√
1 Switch the TV on.
The TV starts to tune all available TV stations and to
adjust the clock.
(This is called Auto Setup function.)
Hint:
≥ If you use a Panasonic TV and perform the operation step
1, starting the downloading of the setup data will
automatically display the “Download” indication. However,
in case of a TV of another make, the “Download” indication
may not appear. In this case, select the AV input on your
TV if you want to see the “Download” indication.
To Set Up this VCR with a TV Already in
Use
1 Switch the TV on.
2 Select the AV input on your TV.
3 Set the VCR/TV switch P to “VCR”.
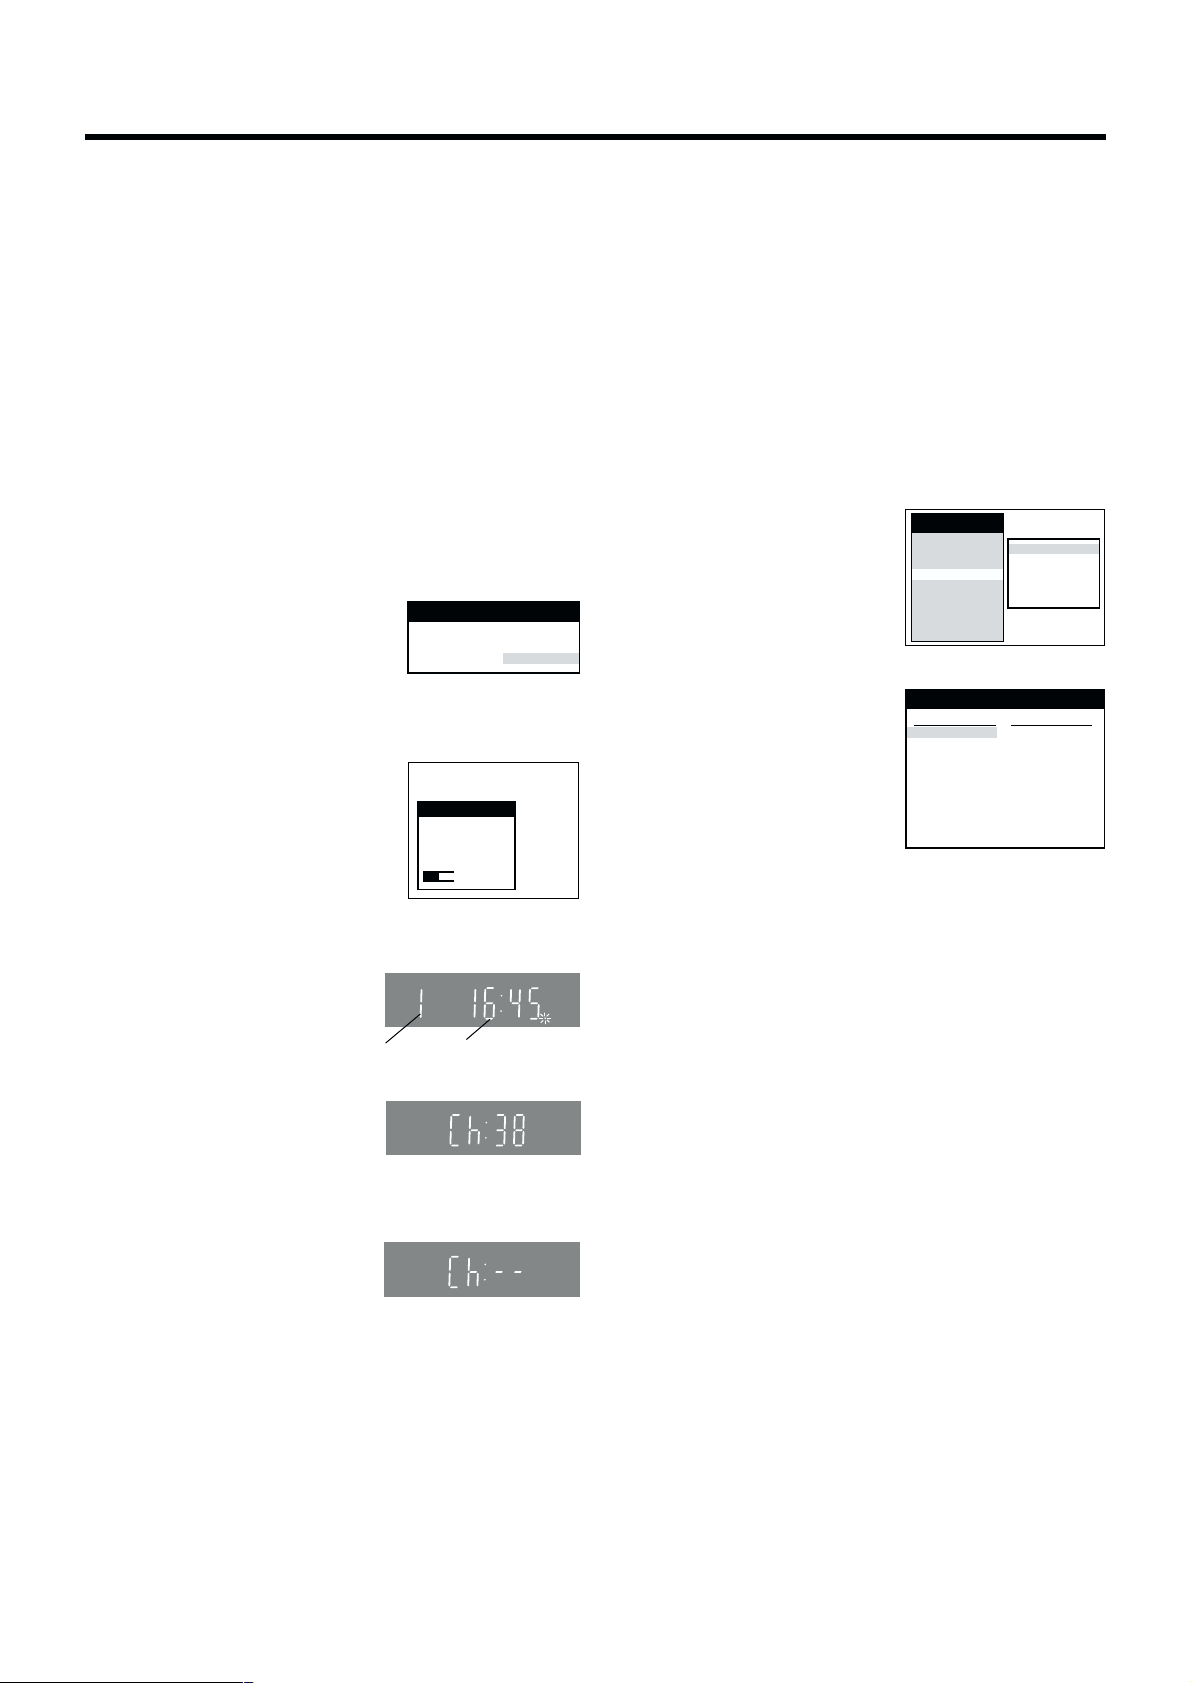
√ When the TV has finished its
On Screen Display
own auto setup, the VCR is
automatically switched on, and
the downloading of the setup
data from the TV to the VCR
starts. (Applicable to TVs with
“Q Link” or “DATA LOGIC”
function)
Download
Download in
progress,
please wait.
Position 67
Indication during downloading
If your TV is equipped with the “Easy Link”, “Megalogic”
or “SMARTLINK” function, the Country setting menu
appears on the TV screen before downloading.
Press the Cursor buttons
(3421) R to select the
desired country. Then, press the
OK button T and the
downloading automatically starts.
√ The VCR’s Auto Setup
(Downloading) is complete
Country
Deutschland
Česká Rep.
Magyarország
Menu for Country setting
CVC
Polska
Россия
others
VCR display
when the programme
position and the current
time appear in the VCR
display.
Programme
position
Indication when the
current time is 16:45
Note:
≥ If you accidentally switch on the VCR before the TV,
downloading of the setup data from the TV may not be
performed correctly. In this case, follow the operation steps
below.
4 Press the VCR-ON/OFF button
1 to switch the VCR on.
Downloading of the setup data
starts automatically. (Applicable
Download
Download in
progress,
please wait.
Position 67
to TVs with “Q Link” or “DATA
LOGIC” function)
If your TV is equipped with the “Easy Link”,
Indication during downloading
Connecting and Setting Up
“Megalogic”or “SMARTLINK” function, the Country
setting menu appears on the TV screen before
downloading.
Press the Cursor buttons
(3421) R to select the
desired country. Then, press the
OK button T and the
downloading automatically
Country
Deutschland
Česká Rep.
Magyarország
Menu for Country setting
Polska
Россия
others
starts.
SP
√ When the programme
CVC
SP
position and the current time
appear in the VCR display,
the VCR’s Auto Setup
(Downloading) is complete.
Programme
position
Indication when the
current time is 16:45
1 Wait until the Auto Setup is complete on both the TV and
the VCR.
2 Press the MENU button U to display the OSD Main
menu on the TV screen.
3 Press the Cursor buttons (3421) R to select
“Tuning” and then “Download”.
4 Press the OK button T twice. Downloading of the setup
data from the TV to the VCR starts.
5 When the programme position and the current time
appear in the VCR display, downloading is complete.
11
Page 12
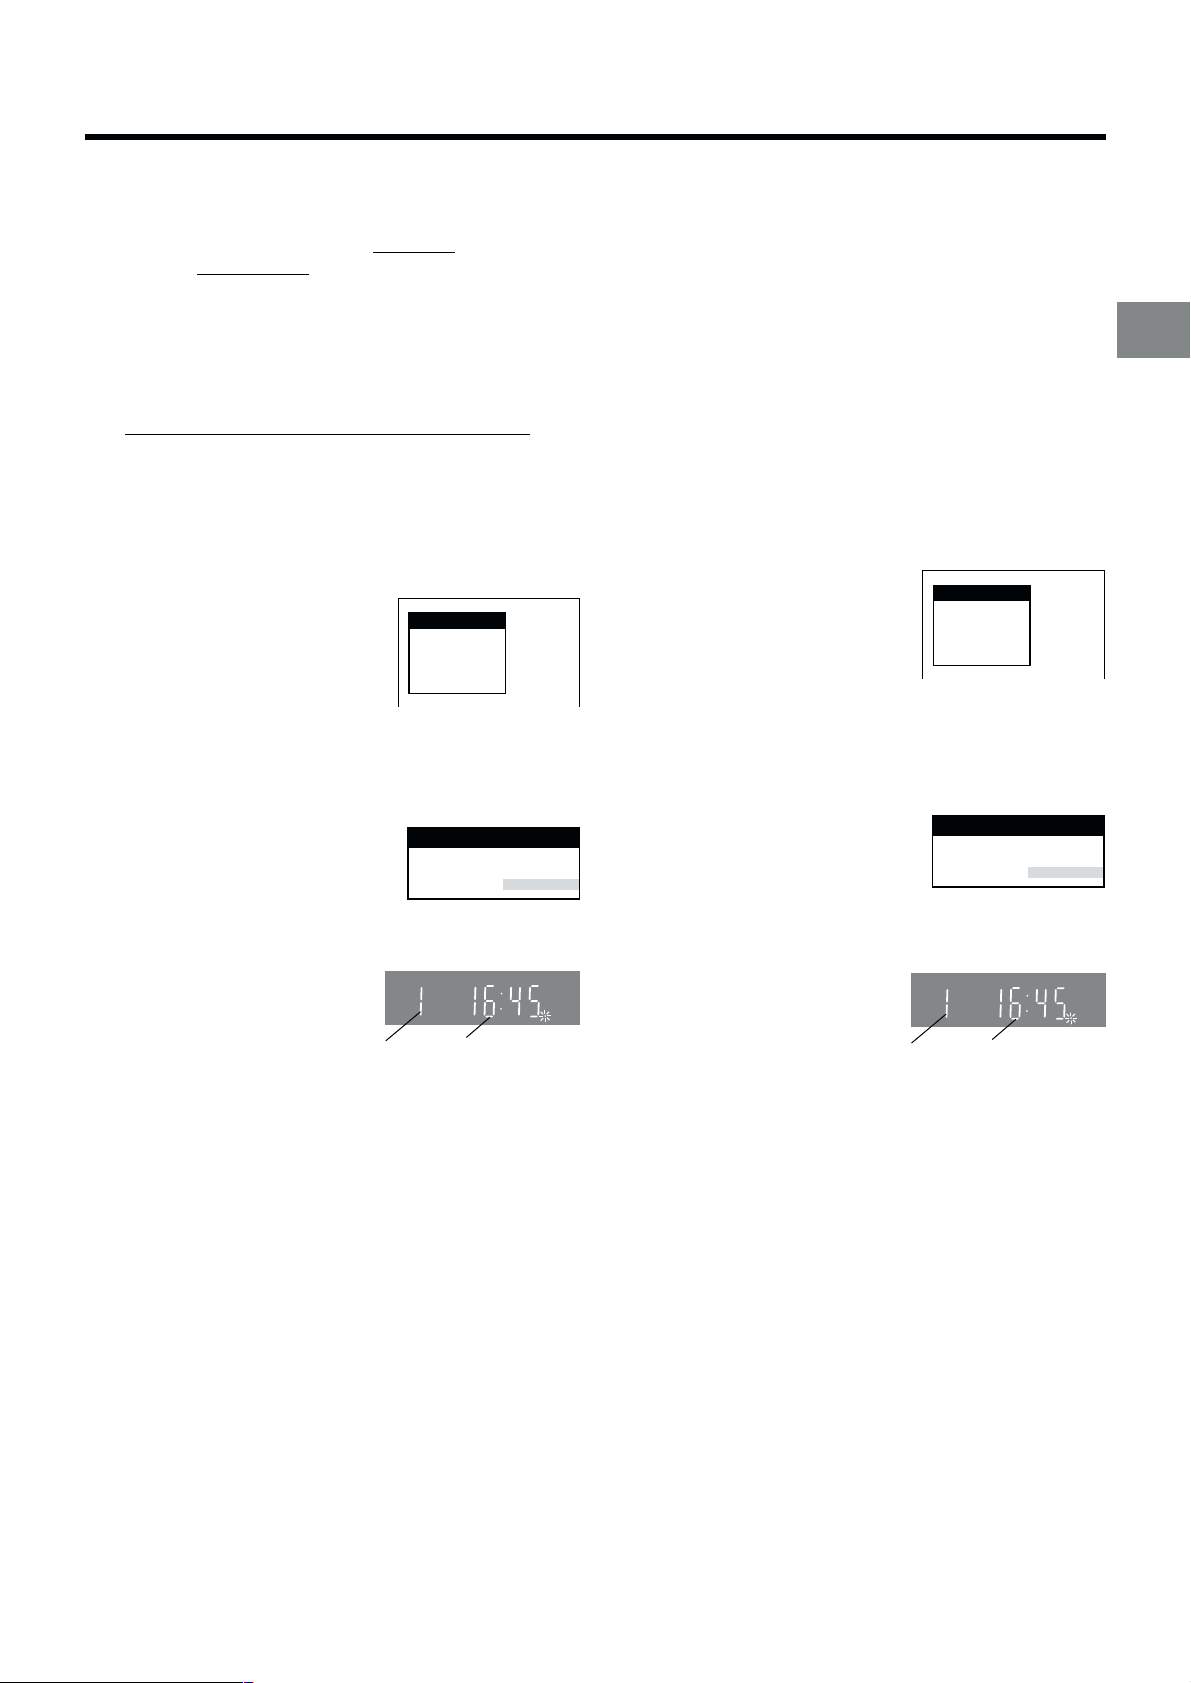
Connecting and Preparations for a TV Not Equipped with the
Q Link Function
Method 1.
AC Input
socket
m
AC Mains lead
(supplied)
If you are connecting your VCR to a TV using RF coaxial cable and 21-pin Scart cable, then
follow the steps below. (AV Connection)
Aerial (not supplied)
Aerial Input
socket
l
21-pin Scart
socket
n
Aerial Output
socket
21- Scart cable to AV1
(not supplied)
RF Coaxial cable (supplied)
≥ Must be connected to
watch TV channels even if
21-pin Scart cable is used
to connect VCR to TV.
r
Aerial lead
(not supplied)
Aerial Input
socket
TV (not supplied)
21-pin Scart
socket
To AC Mains socket
After completing the above connections, proceed to the Auto Setup page (Page 14).
If you are connecting your VCR to a TV using only RF coaxial cable, then follow the
or Method 2.
AC Input
socket
m
AC Mains lead
(supplied)
steps below. (RF Connection)
Aerial (not supplied)
Aerial Input
socket
l
Aerial Output
socket
r
RF Coaxial cable (supplied)
≥ Must be connected to
watch TV channels.
Aerial lead
(not supplied)
Aerial Input
socket
TV (not supplied)
To AC Mains socket
After completing the above connections, proceed to the Auto Setup page (Page 15).
12
Page 13
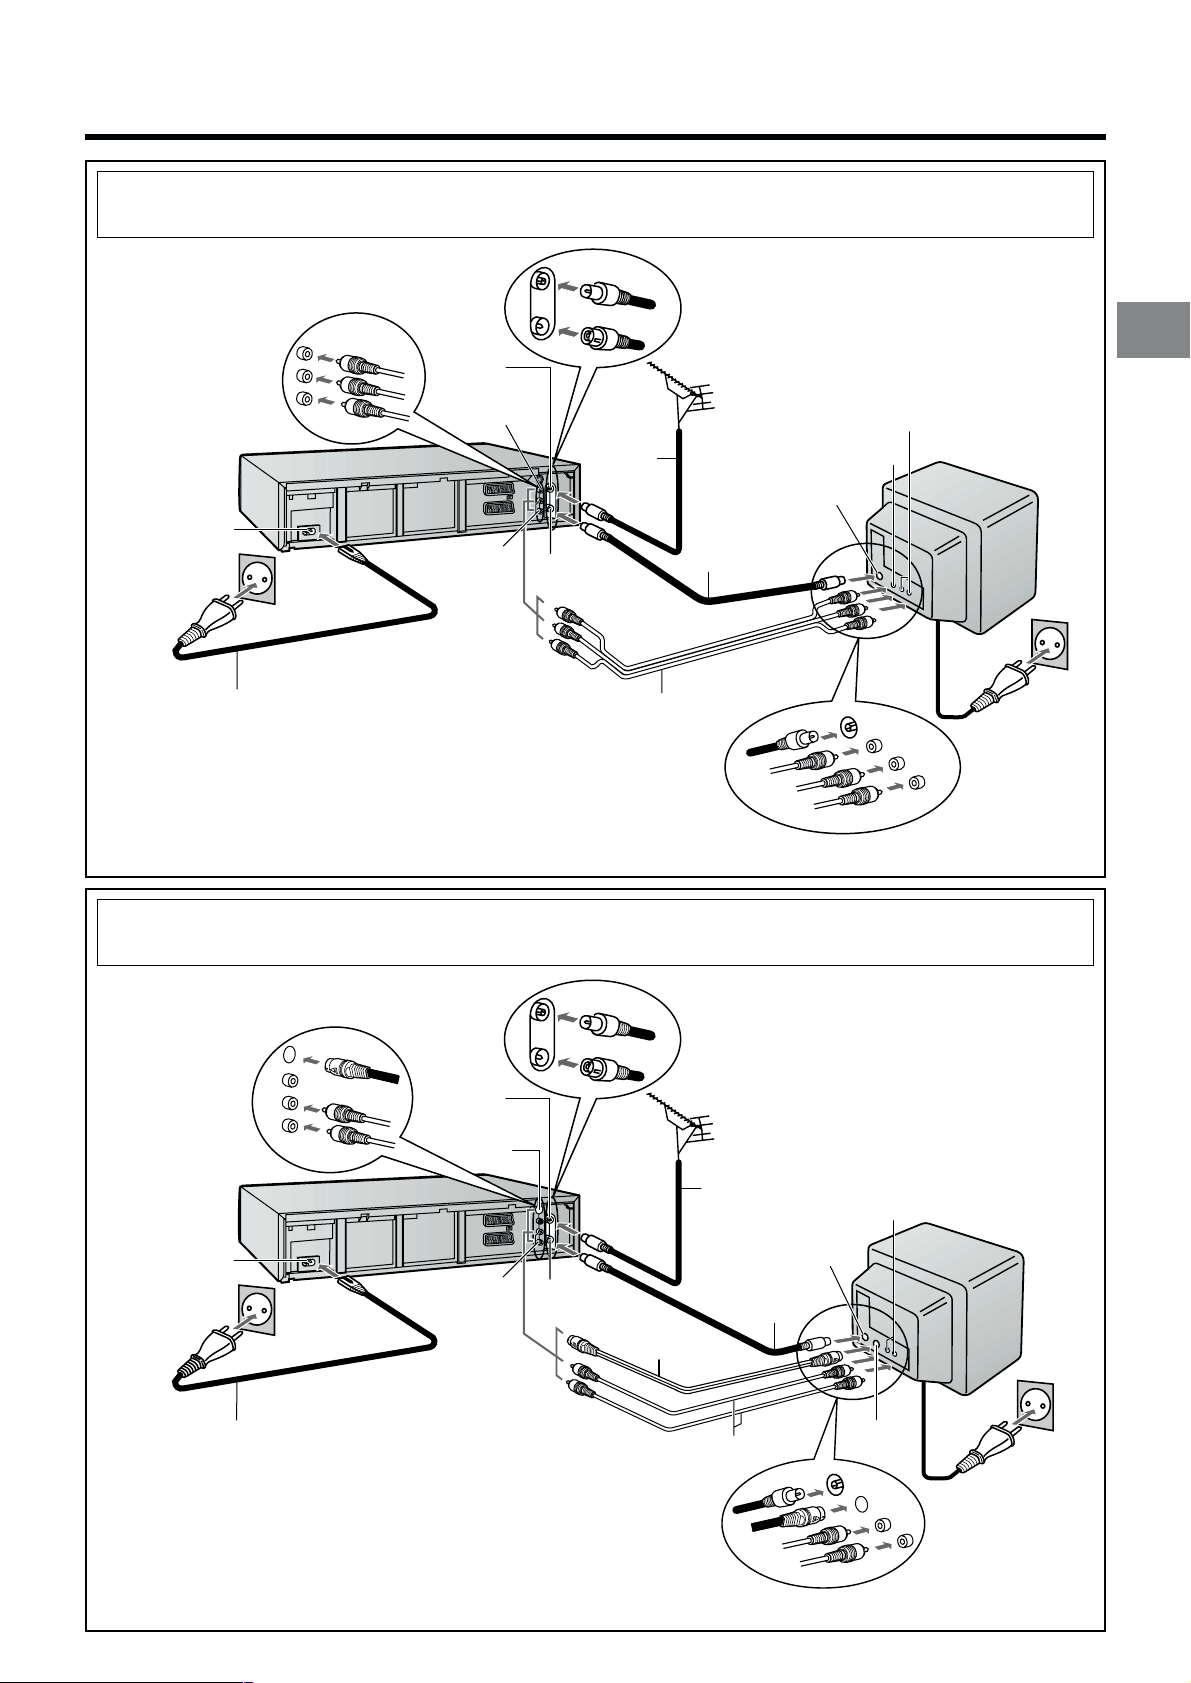
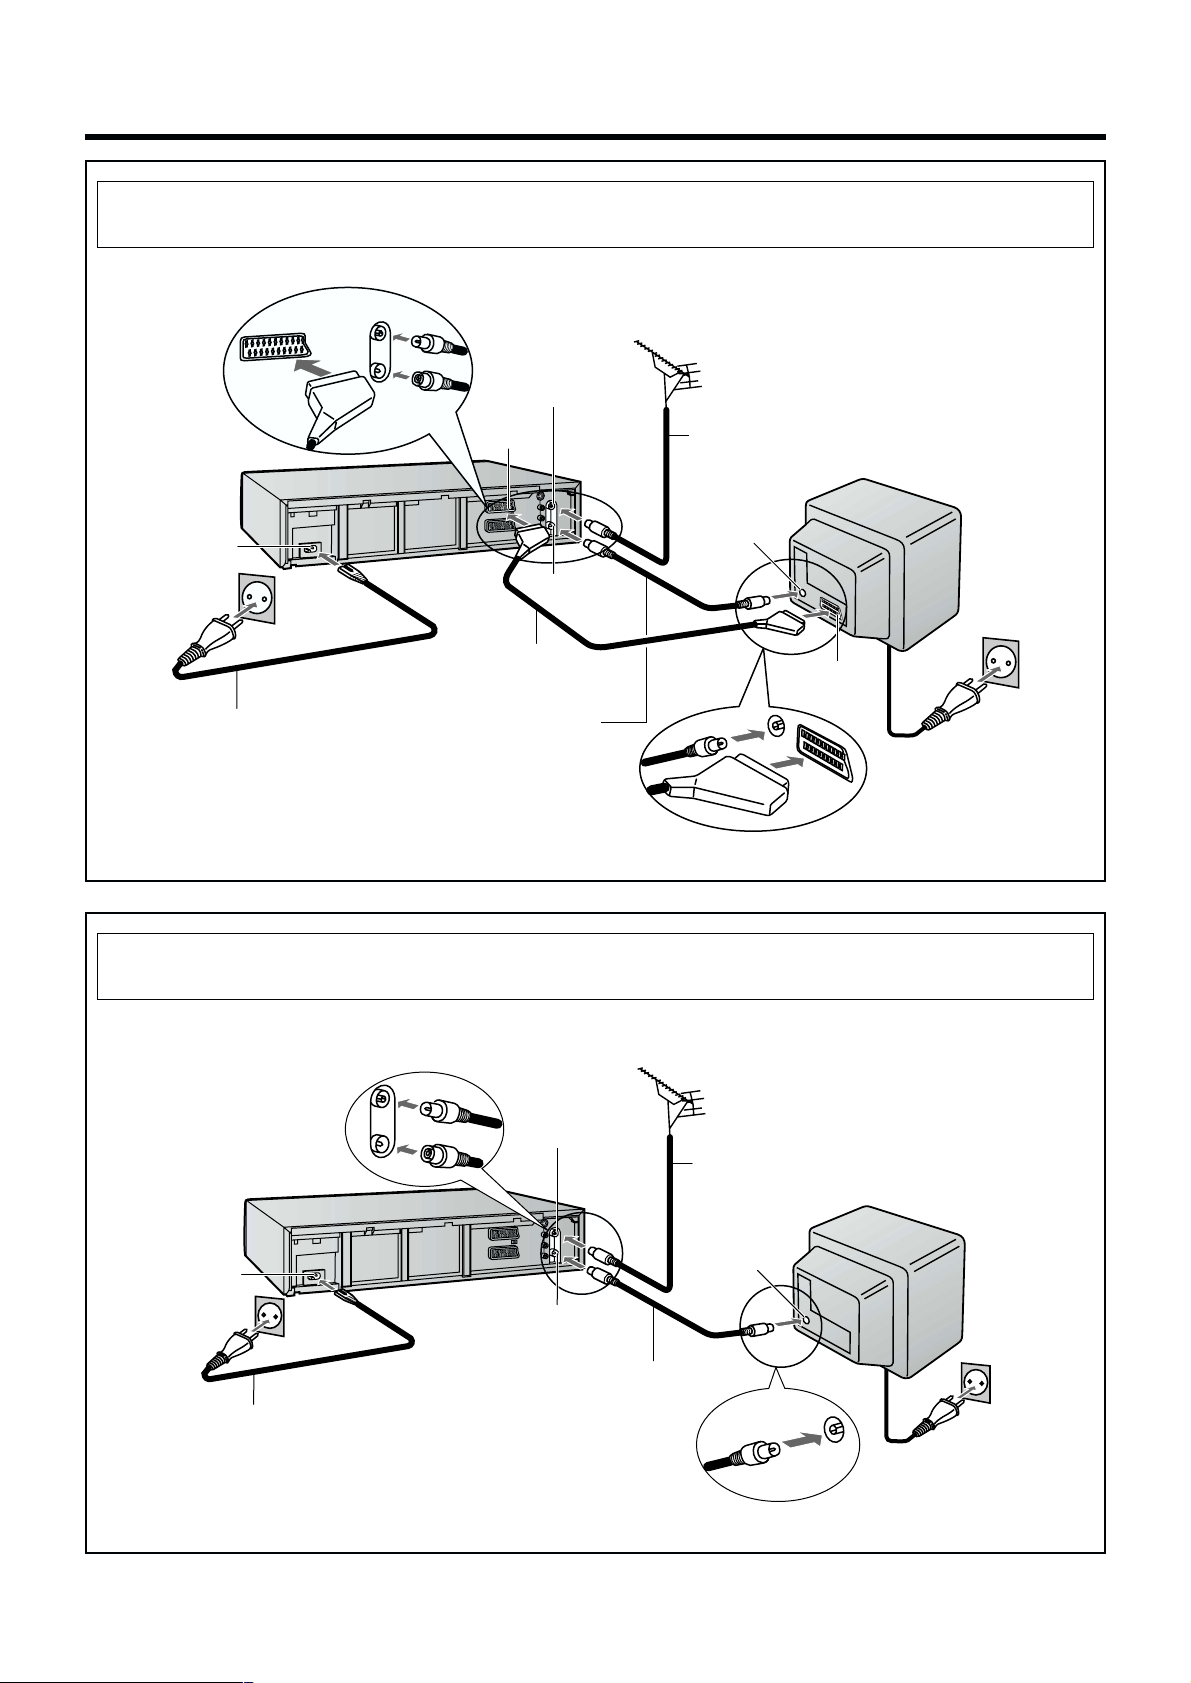
or Method 3.
If you are connecting your VCR to a TV using AV cable, then follow the steps below.
AC Input socket m
AC Mains lead
(supplied)
Aerial Input
socket l
Video Output
k
socket
Audio Output
sockets
q
Aerial lead
(not supplied)
Aerial Output
socket
r
AV cable (not supplied)
Aerial (not supplied)
Audio Input sockets
Video Input socket
Aerial Input socket
RF Coaxial cable
(supplied)
After completing the above connections, proceed to the Auto Setup page (Page 14).
If you are connecting your VCR to a TV using S-Video cable, then follow the steps
or Method 4.
below. (S-Video Connection)
TV (not supplied)
To AC Mains socket
Connecting and Setting Up
AC Input socket m
AC Mains lead
(supplied)
Aerial Input
socket
l
S-Video Output
socket
j
Audio Output
sockets
q
Aerial Output
socket
r
Aerial (not supplied)
Aerial lead
(not supplied)
Aerial Input socket
RF Coaxial cable
(supplied)
S-Video cable
(not supplied)
Audio cables (not supplied)
After completing the above connections, proceed to the Auto Setup page (Page 14).
Audio Input sockets
S-Video
Input socket
TV with S-Video
Input socket
(not supplied)
To AC Mains socket
13
Page 14
If you are connecting your VCR to a TV using Method 1, 3, or
s s s s s s s s
s s s s s s s s
s s s s s s s s
s s s s s s s s
s s s s s s s s
s s s s s s s s
s s s s s s s s
4 follow the operations explained below.
Auto Setup Function
The Auto Setup function automatically tunes all available TV
stations and sets the VCR’s clock to the current date and
time. If the tuning and time/date settings are not correct,
performing timer recordings is not possible.
≥ When “Россия” (Russia) is selected in the Country setting
menu, the names of TV stations may not be correctly
displayed and the Auto Clock Setting does not work.
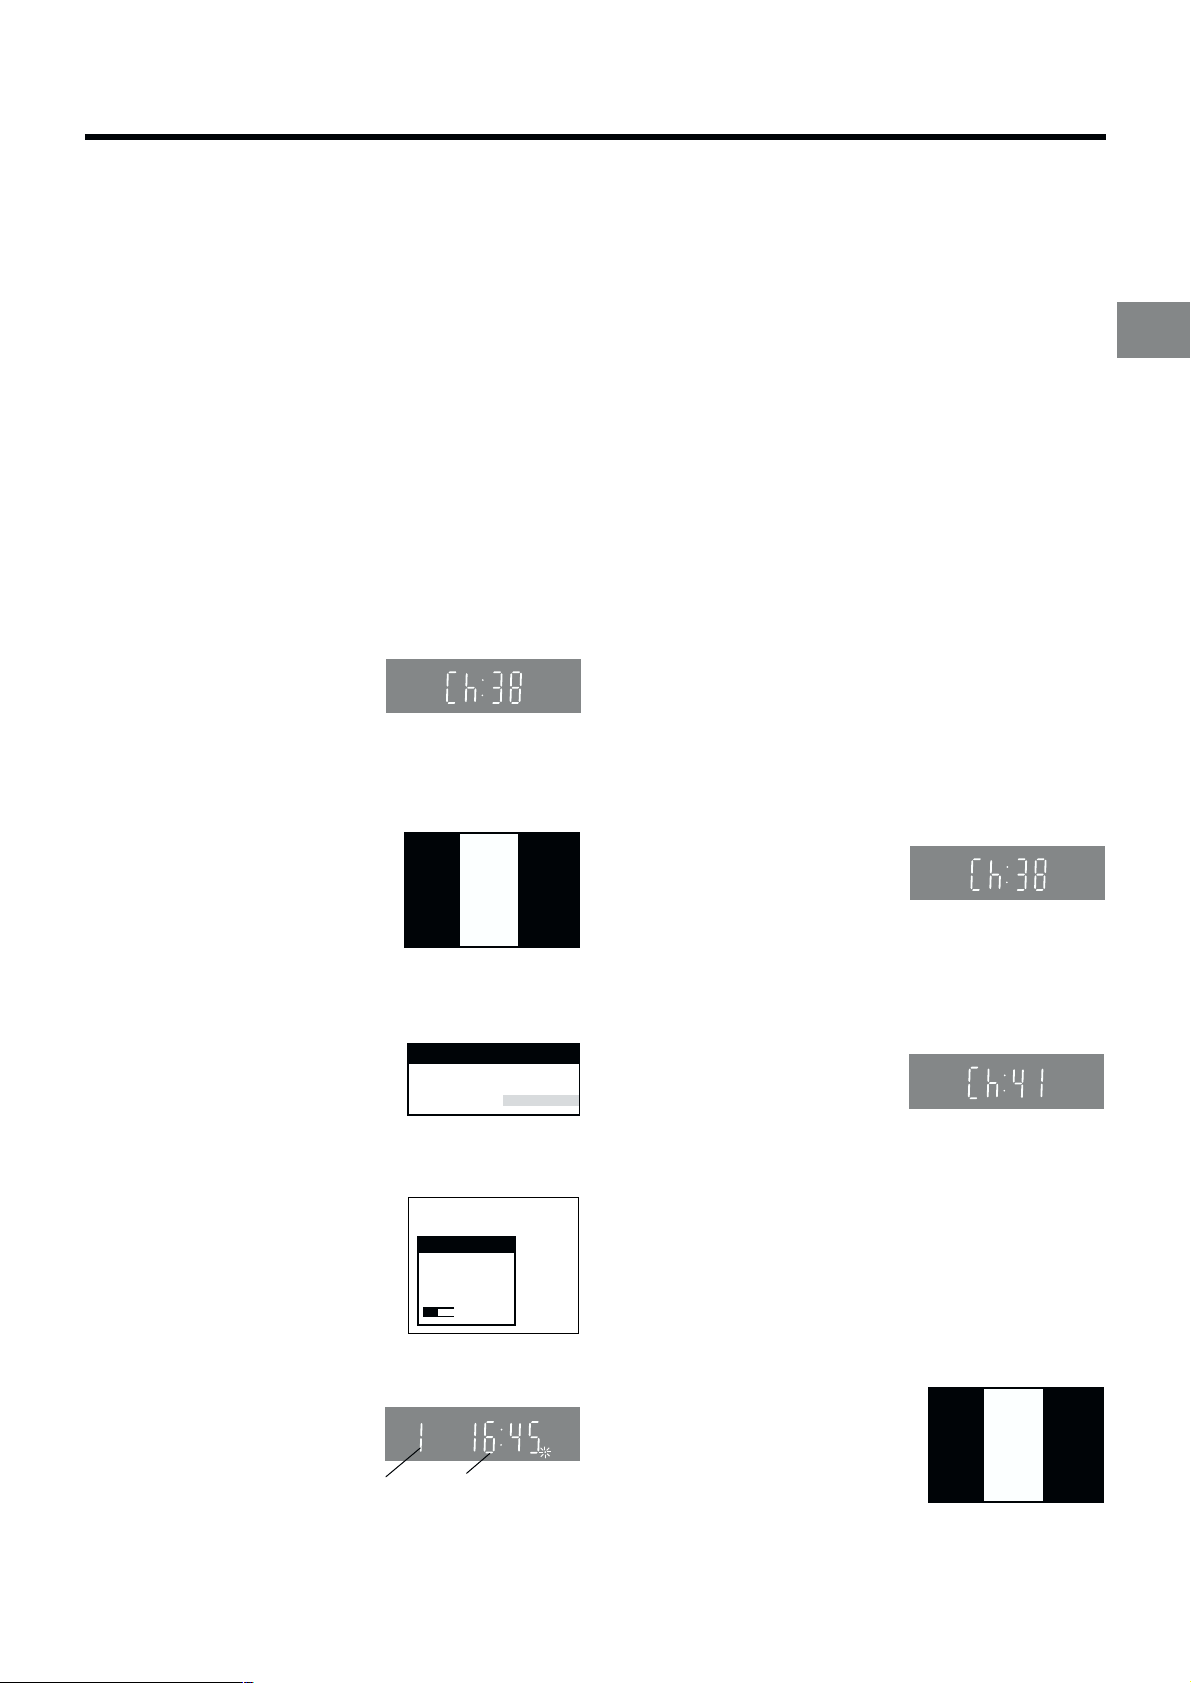
11 Switch the TV on.
12 Select the AV input on your TV.
13 Set the VCR/TV switch P to “VCR”.
14 Press the VCR-ON/OFF button
1 to switch the VCR on.
The Country setting menu
appears on the TV screen.
15 Press the Cursor buttons
(3421) R to select the
country where you are using the
VCR.
16 Press the OK button T and the
VCR’s Auto Setup automatically
starts and tunes all available TV
stations and also sets the clock.
This takes about 5 minutes.
17 When the indication shown
on the right appears on the
VCR display, the Auto Setup
is complete.
Programme
position
18 Press the MENU button U
for more than 5 seconds so
that the RF output channel
number appears on the
VCR display.
The initial setting is channel 38.
On Screen Display
Country
Deutschland
Česká Rep.
Magyarország
Menu for Country setting
Auto-Setup
Auto-Setup
in progress,
please wait.
Indication during Auto Setup
CVC
Indication when the RF output
channel is 38 (example)
Polska
Россия
others
Ch 21
VCR display
Indication when the
current time is 16:45
SP
When the clock setting menu appears after Auto Setup
has finished:
1 Press the Cursor buttons (3421) R to set the correct
time and date.
2 Press the OK button T to conclude the setting.
3 Press the EXIT button S to exit the On Screen Display.
To Confirm that the TV Stations Have Been
Tuned Correctly by the Auto Setup
Function
1 Press the MENU button U to
display the OSD Main menu
on the TV screen.
2 Press the Cursor buttons
(3421) R to select
“Tuning” and “Manual” in this
order.
3 Press the OK button T to
display the list of tuned TV
stations and confirm that all
available TV stations have
been set correctly.
4 Press the EXIT button S to exit the On Screen Display.
When the station names and/or channel numbers have
not been set correctly, or you want to change them:
See page 42 for details.
When no station has been set, confirm all connections of
the VCR again and restart the Auto Setup.
(See page 47 for details.)
Main menu
Timer record
Tape Library
Display
Tuning
Clock
Functions
Language
Country
Satellite
Tuning
Pos Name Ch
1 ARD 1
2 ZDF 2
3N3 19
4 HR3 26
5 BR3 18
6 RB3 3
7 SFB3 36
8 SW3 29
9 WDR3 17
10 MDR3 32
List of tuned TV stations
(example)
Manual
Auto-Setup Restart
Download
Shipping condition
Pos Name Ch
11 ORB 35
12 RTL+ 4
13 SAT1 5
14
15
16
17
18
19
20
c9 Press the Numeric button “0”
2 so that the displayed RF
output channel number
changes to “– –”.
Indication after changing the RF
output channel to “– –”
10 Press the OK button T to conclude the setting.
√ To Cancel the Auto Setup Before It Has Finished
Press the EXIT button S.
14
Page 15
If you are connecting your VCR to a TV using Method 2,
follow the operations explained below.
To be able to watch the VCR picture on the TV, RF
connection requires the video playback channel to be set on
the TV.
≥ When “Россия” (Russia) is selected in the Country setting
menu, the names of TV stations may not be correctly
displayed and the Auto Clock Setting does not work.
01 Switch the TV on.
02 Select an unoccupied programme position (which is not
tuned to a TV station).
If you are using a Panasonic TV, select programme
position “0”.
03 Set the VCR/TV switch P to “VCR”.
04 Press the VCR-ON/OFF button 1 to switch the VCR on.
05 Press the MENU button U for
VCR display
more than 5 seconds.
The number of the RF output
channel appears on the VCR
display.
The initial setting is
Indication when the RF output
channel is 38 (example)
channel 38.
06 Tune your TV until the test
pattern shown on the right
appears on the TV screen.
Now, the setting of the RF
On Screen Display
Panasonic
VCR
Ch:38
output channel is complete.
≥ As the tuning method differs
depending on the TV you are
using, refer to your TV’s
Indication of the test pattern
operating instructions for
details about tuning.
07 Press the OK button T.
The Country setting menu
appears on the TV screen.
Country
Deutschland
Česká Rep.
Magyarország
Menu for Country setting
Polska
Россия
others
08 Press the Cursor buttons
(3421) R to select the
country where you are using
the VCR.
09 Press the OK button T and
the VCR’s Auto Setup
automatically starts and tunes
all available TV stations and
also sets the clock. This
Auto-Setup
Auto-Setup
in progress,
please wait.
Ch 21
Indication during Auto Setup
takes about 5 minutes.
10 When the indication shown
CVC
SP
on the right appears on the
VCR display, the Auto Setup
is complete.
Programme
position
Indication when the
current time is 16:45
√ To Cancel the Auto Setup Before It Has Finished
Press the EXIT button S.
When the clock setting menu appears after Auto Setup
has finished:
See page 14.
RF select:
Set the VCR’s RFC system the same as the TV system of the
connected TV. (See page 51.)
To Confirm that the TV Stations Have Been
Tuned Correctly by the Auto Setup
Function
See page 14.
If the Picture on the TV’s Video Playback
Channel Is Distorted
If, after setup, you select the video playback channel
on the TV and view a TV programme on a programme
position selected on the VCR, some interference may occur
in certain cases. If this happens, you can minimise the
distortion by changing the RF output channel on the VCR to
another number. Follow the operations below.
1 Set the VCR/TV switch P to “VCR”.
2 Press the MENU button U for more than 5 seconds.
The number of the RF output channel appears on the
VCR display.
The initial setting is channel 38.
Indication when the RF output
channel is 38 (example)
3 Press the Numeric buttons 2 to change the RF output
channel.
Enter a channel number which differs by 2 or 3 from the
one initially set number. For example, as the original
number is 38, enter 41.
Indication after changing the RF
output channel to 41 (example)
4 Press the OK button T to conclude the setting.
Note When You Have Changed the RF Output Channel:
After changing the RF output channel to a different number,
be sure to retune your TV to the VCR’s new RF output
channel. (For details about tuning, refer to your TV’s
operating instructions.)
1 Press the MENU button U for more than 5 seconds.
2 When the test pattern shown
on the right appears sharp
and clear on the TV screen,
the tuning is complete.
3 Press the EXIT button S to exit the On Screen Display.
Panasonic
VCR
Ch:41
Test pattern indication
Connecting and Setting Up
15
Page 16
When You Insert a Video Cassette
The Tape Library System makes it easy to check what programmes are recorded on the inserted tape and lets you quickly
select a programme for playback. For further details about the Tape Library System, see page 27.
When you insert a cassette
with an erasure prevention tab:
As soon as you insert the cassette, the Cassette Number Check starts
automatically. Wait a few moments until this check is completed.
On Screen Display VCR display
Checking tape number...
Please wait !
When inserting a cassette that
was recorded on this VCR:
When the Cassette Number Check
is completed, the cassette number
and the cassette’s contents
(recorded programmes) appear on
the On Screen Display, and the
cassette number appears on the
VCR display.
Content of tape: 5 Page 1/2
Title
Football
ZDF (18:58)
¢¢¢03 (19:08) Ch 3
¢¢¢¢¢ (19:18)
(When loading cassette No. 5.)
To select a
programme
on the
inserted
cassette
and start
playback,
see page
28.
Date/Category
We 5.04.00
Sports
We 19.04.00
News
Sa 29.04.00
Movies
Fr 12.05.00
Music
To perform playback
without making use
of the Tape Library
functions, recording
or some other
function, press the
EXIT button S to
make the Tape
Library indications
The cassette number and tape contents are
not displayed for the following types of
cassettes:
a. New (never used) cassettes.
b. Cassettes recorded on another VCR.
c. Cassettes whose cassette number was
deleted from the Library data.
d. Certain other kinds of cassettes.
e. Cassettes which do not have a programme
recorded for at least 15 munites.
(25 minutes in the EP mode)
In the above cases, the following indications
appear:
Tape ID could not
be detected
(This indication appears for
several seconds.)
(This indication appears for
several seconds.)
To perform playback, recording or some other
function, operate the VCR for the desired
function.
disappear, and then
operate the VCR for
the desired function.
Pressing the EXIT
button S is
necessary even if
the TV is not turned
on.
When you insert a cassette without
an erasure prevention tab:
As soon as you insert the cassette,
playback starts and the cassette
number appears on the VCR display
for several seconds. However, the
cassette number and the cassette’s
contents (recorded programmes)
do not appear on the On Screen
Display.
(When loading cassette No. 5.)
If you want to cancel the
Cassette Number Check
midway:
Press the Play I, Stop 9,
EJECT Z or VCR-ON/OFF
button 1 after the check
has started.
≥ No Tape Library data
appears if you cancel the
Cassette Number Check.
(See page 28.)
≥ If you cancel the Cassette
Number Check midway
and then preform
recording, a different
cassette number may
additionally be recorded
on the cassette. However,
this VCR will
automatically cancel the
added cassette number(s)
when you play back the
tape from the beginning.
16
Page 17
Playback
Preparations
≥ Confirm that the VCR is on.
≥ Confirm that the TV is on and the VCR viewing channel is
selected.
≥ Insert a recorded video cassette.
As soon as the cassette is inserted, the Cassette Number
Check starts. Wait a few moments until it is completed.
(See page 16.)
For Normal Playback:
Press the Play button I.
VCR display
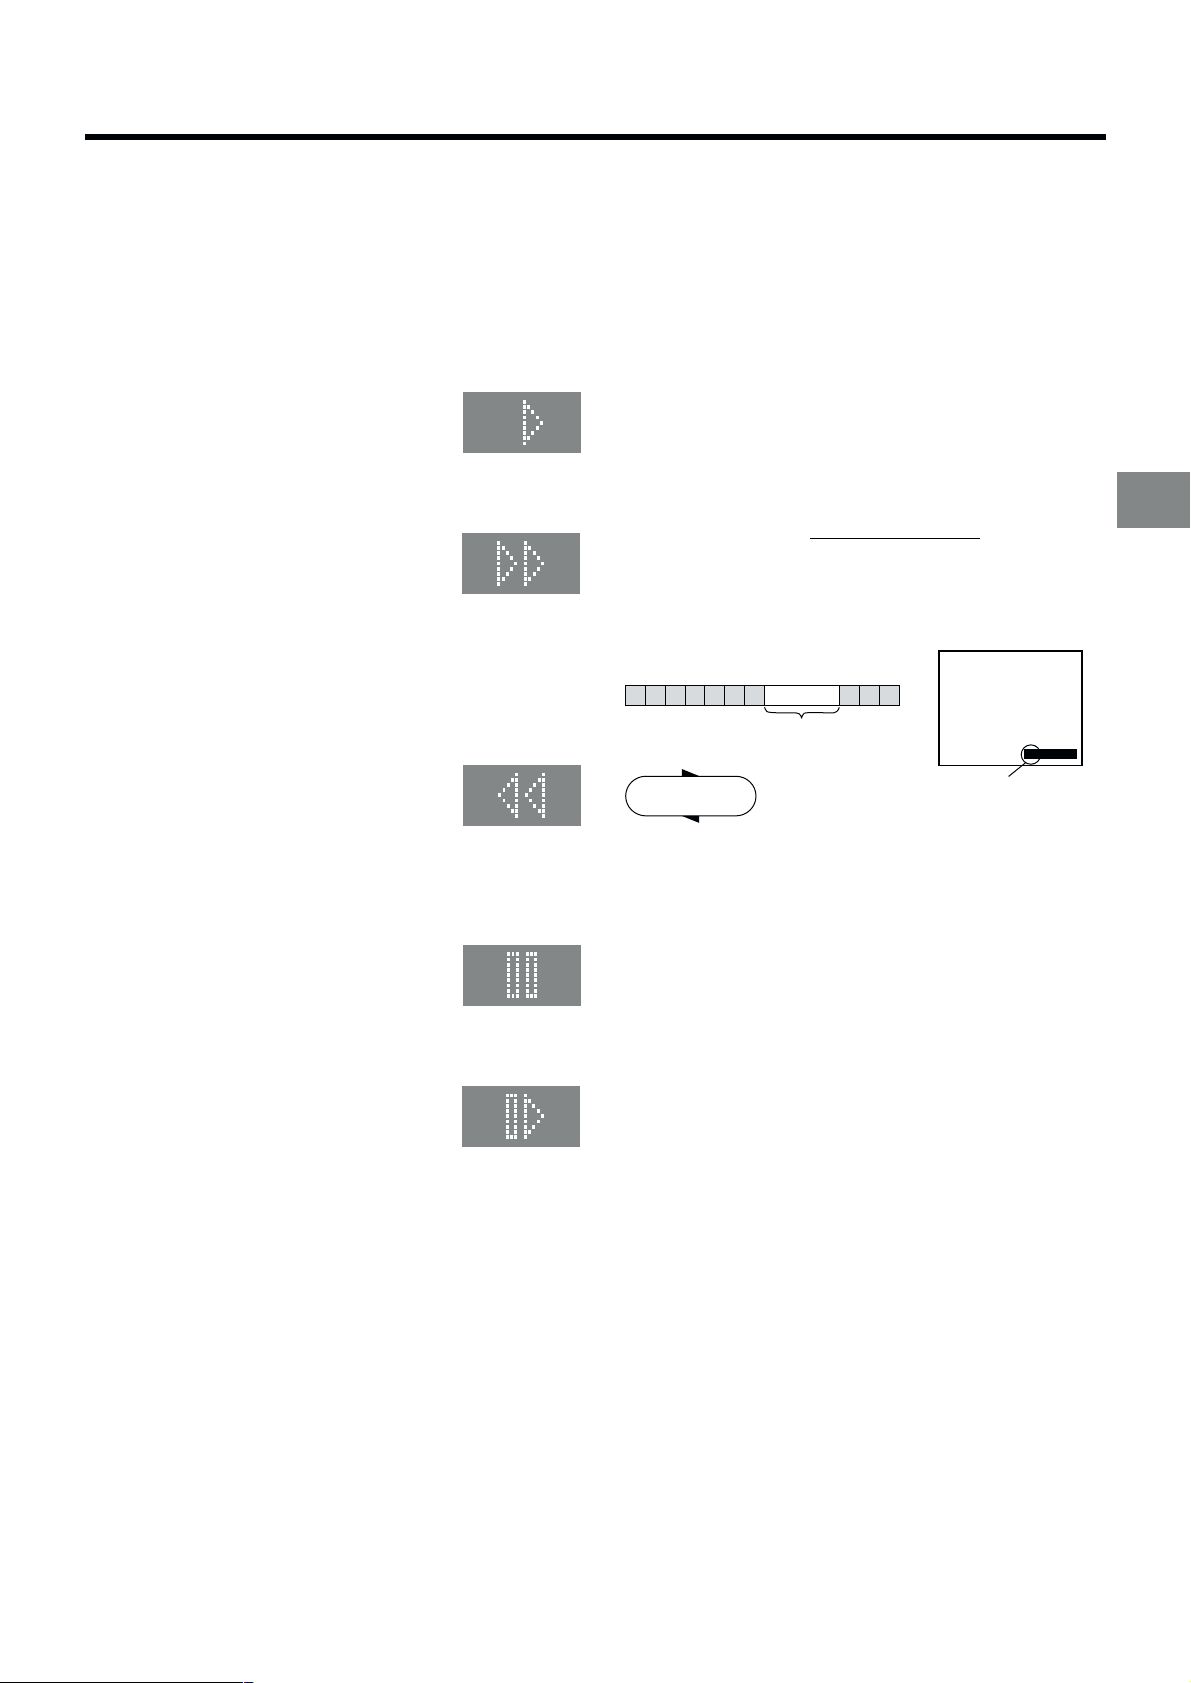
For Cue Playback:
During playback, tap the Fast Forward button H.
≥ To return to normal playback, press the
Play button I.
≥ If you press and hold down the Fast
Forward button H, cue playback
continues for as long as you keep the
button pressed.
For Review Playback:
During playback, tap the Rewind button 8.
≥ To return to normal playback, press the
Play button I.
≥ If you press and hold down the Rewind
button 8, review playback continues for
as long as you keep the button pressed.
Notes:
≥ Cue, review or slow playback will be automatically
cancelled after 10 minutes, and still playback after
5 minutes.
≥ During playback function other than normal playback,
horizontal noise bars may appear in the picture, the colour
of the picture may be unstable, or the picture may be
otherwise distorted.
When you play back a tape recorded in the LP mode, the
picture may be in black and white.
When you play back a tape recorded in the EP mode, the
picture and the sound may be distorted.
However, these are not malfunctions.
To Play Back a Recorded Part Repeatedly
Press the Play button I on the remote control for more than
5 seconds.
The “R” indication appears on the On Screen Display.
≥ If “OSD” is set to “OFF” (See page 49), the “R” indication
will not appear in repeat playback mode.
Beginning of Tape
Repeat Playback
PLAY
REWIND
End of
Recorded Part
Control Signal
Interruption
(at least 5 sec.)
0:00.29
R
Indication of the Repeat
Playback mode
Playback
For Still Playback:
During playback, press the Pause/Slow button 7.
≥ To return to normal playback, press the
Play button I or the Pause/Slow button 7.
For Slow Playback:
During playback, keep the Pause/Slow button 7 pressed
for 2 seconds or more.
≥ To return to normal playback, press the
Play button I.
Fast-forwarding or Rewinding the Tape:
To fast-forward the tape:
Press the Fast Forward button H in the stop mode.
To rewind the tape:
Press the Rewind button 8 in the stop mode.
≥ To stop fast-forwarding or rewinding, press the Stop button
9.
≥ To briefly view the picture during fast-forwarding or
rewinding, press and hold down the corresponding button.
To Stop Playback
Press the Stop button 9.
To Cancel the Repeat Playback Mode:
Press the Stop button 9.
To Rewind the Tape a Little to View the
Same Scene Again (Replay Function)
If you want to view the same scene again, for example
because you could not catch clearly what a person said,
simply press the REPLAY button 4, to rewind the tape a little
from its present position and play it back again.
The direction in which the tape is rewound depends on what
playback mode the VCR is in when you press the REPLAY
button 4.
≥ If you press the REPLAY button 4 when the VCR is in the
stop, rewind, fast-forward, slow playback, or standby (Off)
mode, the Replay function does not work.
During Normal Playback, Cue Playback and Still
Playback:
When you press the REPLAY button 4, the VCR switches
over to the review playback mode for a few seconds and then
resumes normal playback.
During Review Playback:
When you press the REPLAY button 4, the VCR briefly
switches over to Cue playback and then plays back at normal
speed in forward direction from the point where the REPLAY
button 4 was pressed.
17
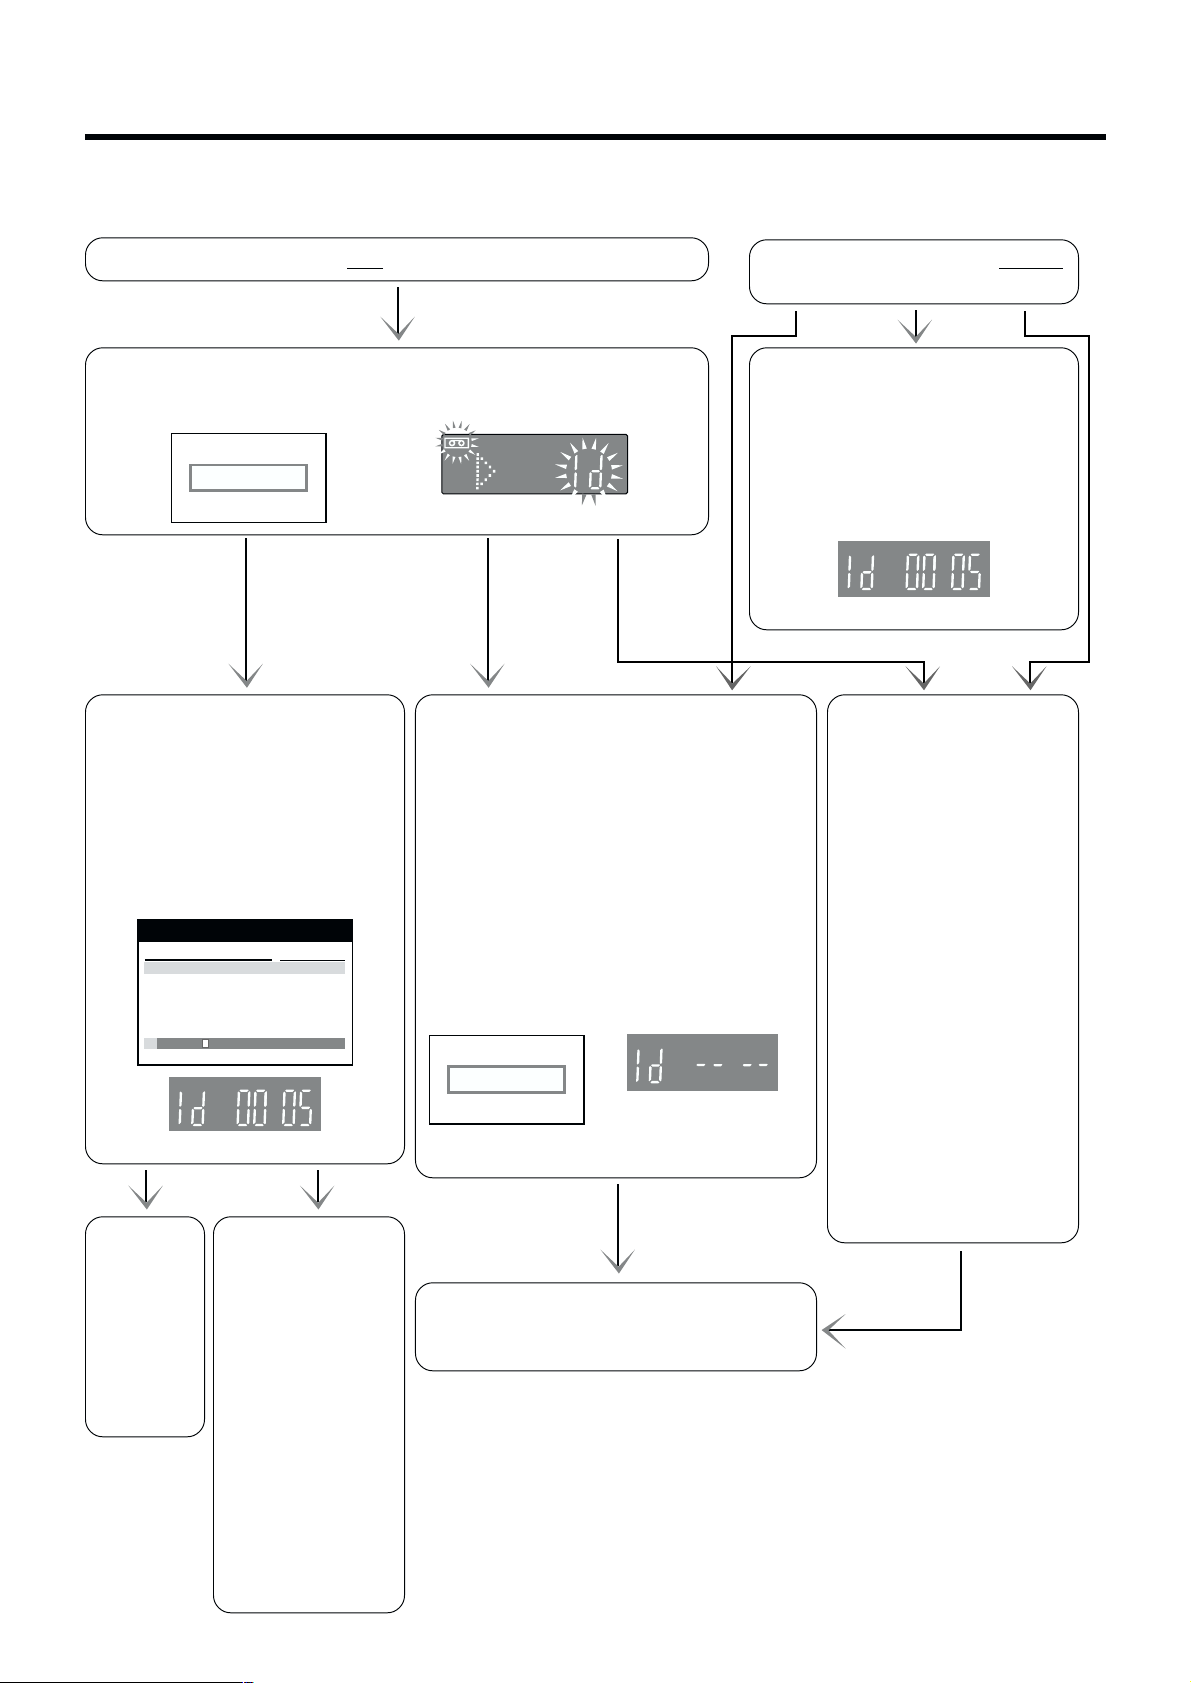
Page 18

To Stop Playback Automatically
(Playback Off Timer Function)
If you set the playback duration, the playback will stop
automatically.
After the set playback time has elapsed, the VCR
automatically stops playback and switches off.
To Ensure High Playback Picture
Quality (3D DNR Function)
To activate the 3-Dimensional Digital Noise Reduction
(3D DNR) function, press the 3D DNR button g, so that the
3D DNR lamp is lit.
To Activate the Playback Off Timer Function:
During normal playback, press the Play button I
for more than 2 seconds to put the VCR in the Playback Off
Timer mode.
After that, press the Play button I on the VCR repeatedly
until the desired playback duration is displayed on the VCR
display.
≥ Repeatedly pressing this button changes the indication in
the following order:
Counter display
(normal playback mode)
240
(min.)
To Stop Midway:
Press the Stop button 9.
180
(min.)
30
(min.)
on the VCR
60
(min.)
120
(min.)
To Play Back NTSC Video Cassettes on
Your PAL TV
(Quasi-NTSC Playback Function)
This VCR allows playback of tapes recorded in the NTSC
system on a normal PAL system TV with the same operations
as usual.
On some TVs, however, the playback picture may roll up or
down.
≥ If your TV has a V-HOLD control or equivalent adjustment
function, use it to try to stop the picture movement.
Convenient Automatic Functions
VCR Auto Power On
When you insert a video cassette, the VCR switches on
automatically.
Auto Playback Start
When you insert a video cassette with a broken erasure
prevention tab, playback start automatically without having to
press the Play button I.
VCR-off Playback
When the VCR is off, an inserted cassette can be played
back by pressing the Play button I.
Auto Rewind
When the tape reaches the end, the VCR automatically
rewinds it to the beginning.
≥ This function does not work during timer recording and
OTR.
Automatic Switching Off and Ejection
When the VCR is switched off, and inserted cassette can be
ejected simply by pressing the EJECT button Z. The VCR
will eject the cassette and automatically turn itself off again.
≥ When the 3D DNR function is activated, the 3D DNR lamp
is lit.
≥ We recommend that you leave this function activated for
normal use of the VCR. However, when performing editing,
press the 3D DNR button g to turn this function off so that
the 3D DNR lamp is not lit, to ensure editing with optimal
picture quality.
≥ The 3D DNR function does not work during playback of a
video cassette recorded in the NTSC system and
MESECAM system.
To Ensure a Stable and ShakeFree Playback Picutre Quality
(TBC Function)
TBC stands for Time Base Corrector.
This function improves the horizontal shaking and the stable
distortion in the vertical lines which tend to take place when
tapes are played back.
≥ When the TBC function is activated, the TBC lamp is lit.
≥ We recommend that you leave this function activated for
normal use of the VCR.
≥ The TBC function does not work during playback of a video
cassette recorded in the NTSC system.
≥ When you cannot ensure high playback picture quality,
press the TBC button ` to cancel this function so that the
TBC lamp is turned off.
≥ When switching the TBC function, the picture and the
sound may be distorted.
However, these are not malfunctions.
To Eject the Video Cassette Using the
Remote Control
Keep pressing the Stop button 9 for at least 3 seconds.
18
Page 19

Recording
Preparations
≥ Confirm that the VCR is on.
≥ Confirm that the TV is on and the VCR viewing channel is
selected.
≥ Set the VCR/TV switch P to “VCR”.
Operations
1 Insert a video cassette with an intact erasure
prevention tab.
≥ As soon as the cassette is inserted, the Cassette
Number Check starts. Wait a few moments until it is
completed. (See page 16.)
≥ If it has already been inserted, press the VCR-ON/
OFF button 1 to turn the VCR on.
2 Select the TV station using the
Channel button N.
≥ It is also possible to select by
pressing the Numeric buttons 2.
VCR display
3 Press the REC (REC/OTR) button
J (f) to start recording.
REC
4 Press the Stop button 9 to stop recording.
To Select the Desired Tape Speed
Press the SP/LP button E before recording.
≥ SP provides standard recording time and
optimum picture quality.
LP provides doubled recording time
with slightly reduced picture quality.
EP provides triple recording time with slightly reduced
picture quality.
When the recording starts in the EP mode, “EP” indication
on the VCR display blinks for about 8 seconds.
To Immediately Record the Same
TV Programme That You Are
Viewing on the TV
(Direct TV Recording)
This function allows you to immediately start recording the
same programme that you are viewing on the TV.
The programme position selected on the VCR automatically
changes to that of the TV programme that you are viewing on
the TV. When you stop the recording, the VCR automatically
switches back to the previously selected programme position.
Conditions for correct operation of the Direct TV Recording
function:
≥ Your TV must be equipped with the “Q Link” function.
≥ The VCR must be connected to the TV via a fully-wired
21-pin Scart cable.
To Perform Direct TV Recording:
1 Insert a video cassette with an intact erasure
prevention tab.
2 Press the DIRECT TV REC button 6.
≥ Recording of the TV programme that you are viewing
on the TV starts.
≥ In some cases, it may not be possible to change the
programme position on the TV during Direct TV
Recording.
≥ Do not press the AV LINK button B during Direct TV
REC, otherwise the recording may not be performed
correctly.
SP
3 Press the Stop button 9, to stop recording.
To Display the Approximate Remaining
Tape Time
The remaining tape time can be displayed in the VCR display.
Recording
To Pause Recording
Press the Pause/Slow button 7 during
recording.
Press it again to continue recording.
REC
To View One TV Programme while
Recording Another TV Programme
After pressing the REC button J to start recording, select on
your TV the programme position of the TV programme that
you want to view.
Notes:
≥ When playing back an E300 cassette recorded in the LP or
EP mode, some picture distortion may occur. However, this
is not a malfunction.
≥ The recording pause mode will be automatically cancelled
after 5 minutes and return to the stop mode.
≥ The tape recorded in the EP mode on this VCR cannot be
played back on the other VCR without EP mode function.
≥ On the other VCR (even with EP mode function), when you
play back the tape recorded in the EP mode, the picture
may be distorted. However, this is not a malfunction.
1 Press the TAPE button C and select the corresponding
cassette tape length.
See page 49.
2 Press the OSD/DISPLAY button 5 repeatedly until the
Remaining Tape Time appears on the VCR display.
≥ Pressing the OSD/DISPLAY button 5 once makes the
On Screen Display appear; after that, pressing it
repeatedly changes the indication in the following
order:
Clock Counter
Remaining Tape Time
For certain cassettes, the remaining tape time may not be
displayed correctly.
19
Page 20

To Make an S-VHS Recording on
a Video Cassette
For recordings that you intend to play back on this VCR or
another S-VHS VCR, we recommend that you record in the
S-VHS format to take advantage of this system’s superior
picture quality. Be sure to use a video cassette bearing the
S-VHS logo.
Insert a S-VHS cassette so that the S-VHS indicator is lit.
Recording is performed in the S-VHS format.
≥ When a cassette that was recorded in the S-VHS format is
played back on a VHS VCR without S-VHS quasi playback
function, noisy playback picture will appear.
≥ If you record in the S-VHS ET format, the picture quality
may not be very good with certain types of cassettes.
To avoid negative surprises, we recommend that you make
a trial recording and confirm that the quality of the recorded
picture is satisfactory.
To ensure optimum picture quality, we recommend the use
of high-quality type cassettes.
≥ We recommend applying the supplied S-VHS ET sticker to
the label on any cassette that you have recorded using the
S-VHS ET function so that you will be able to distinguish
such tapes from VHS tapes.
The following table lists the playback formats that are
compatible with this VCR’s recording standard.
If you want to make a recording in the VHS format in order to
play it back on a VHS VCR, press the S-VHS/S-VHS ET
button a, so that the S-VHS indicator goes out.
≥ Once a setting is selected, it remains in effect until the
power is turned off.
Notes:
≥ When you set “Video system” on the Manual tuning menu
or “TV system” on the Functions menu to “MESECAM” (see
pages 44 and 51), recording is automatically made in the
VHS format even if the S-VHS indicator is lit.
≥ Recording in the S-VHS format is not possible in the EP
mode.
To Record a VHS Tape with
S-VHS Quality
(S-VHS Expansion Technology)
S-VHS ET stands for Super-VHS Expansion Technology.
This function allows recording and playback in S-VHS picture
quality on a normal VHS cassette.
Recording in this format is only possible in the
SP mode.
If LP or EP mode is selected while setting up a timer
recording, the S-VHS ET indicator turns off and
S-VHS ET is cancelled.
Insert a VHS cassette and press the S-VHS/S-VHS ET button
a, so that the S-VHS ET indicator is lit.
Recording is performed in the S-VHS picture quality.
≥ When a cassette that was recorded using S-VHS ET
function is played back on a VHS VCR without S-VHS
quasi playback function, noisy playback picture will appear.
Notes:
≥ We recommend that you use video cassettes other than
type E300.
≥ When you set “Video system” on the Manual tuning menu
or “TV system” on the Functions menu to “MESECAM” (see
pages 44 and 51), recording is automatically made in the
VHS format even if the S-VHS ET indicator is lit.
≥ If you want to record and playback with highest possible
picture quality or store the cassettes for a long time, we
recommend that you use S-VHS cassettes and record in
the S-VHS format.
Cassette
VHS
S-VHS
°1SQPB stands for S-VHS Quasi Playback.
2
Some models are not compatible.
°
Recording
format
VHS
(SP/LP/EP)
S-VHS ET
(SP)
VHS
(SP/LP/EP)
S-VHS
(SP/LP)
Compatible Playback
Equipment
VHS, S-VHS,
VHS with SQPB°
S-VHS°2,
VHS with SQPB
VHS, S-VHS,
VHS with SQPB
S-VHS,
VHS with SQPB
1
To Prevent Accidental Erasure of Recorded
Contents
When you record again onto a
previously recorded video cassette,
the previous recording is
automatically erased and replaced
with the new recording.
Therefore, to prevent accidental
erasure of the recorded contents,
break out the erasure prevention
tab after recording.
Use a screwdriver or similar tool to break out the tab.
To Record Again onto the Video Cassette with a Broken
Out Erasure Prevention Tab:
If you insert a video cassette with a
broken out erasure prevention tab and
press the REC button J, the “1”
indication flashes on the VCR display to
indicate that recording is not possible.
In this case, cover the tab hole with two layers of adhesive
tape.
The adhesive tape substitutes for the prevention erasure tab
and makes it possible to record again on this cassette.
Erasure prevention tab
Adhesive tape
20
Page 21

To Select the Recording Duration
and Perform Timer Recording
(OTR Recording)
OTR means One-Touch Recording and is called this way,
because you can start recording and select the recording
duration by repeatedly pressing a single button. This is very
convenient, for example when you want to start recording
immediately but need to go out or want to go to bed.
After the selected recording duration has elapsed, recording
stops and the VCR automatically switches off.
To Perform an OTR Recording:
1 Display the VCR picture on the TV.
2 Insert a video cassette with an intact erasure prevention
tab.
3 Press the Channel buttons N to select the programme
position on which the TV programme to be recorded will
be broadcast.
4 Press the REC/OTR button f to start recording.
5 Press the REC/OTR button f repeatedly to select the
desired recording duration.
≥ Every time you press this button, the recording
duration indicated in the VCR display changes in the
following order.
≥ For example, if you select “30”, the VCR records a
programme from that moment on for 30 minutes.
Counter display
(normal recording mode)
240
(min.)
180
(min.)
30
(min.)
60
(min.)
120
(min.)
Recording
To Stop the OTR Recording Before the End:
Press the Stop button 9.
Note:
≥ This function also works during Direct TV Recording.
21
Page 22

Timer Recording
jjjjj jj/jj jj jj:jj jj:jj jj jjj jjj
jjjjj jj/jj jj jj:jj jj:jj jj jjj jjj
jjjjj jj/jj jj jj:jj jj:jj jj jjj jjj
jjjjj jj/jj jj jj:jj jj:jj jj jjj jjj
jjjjj jj/jj jj jj:jj jj:jj jj jjj jjj
This function lets you programme the VCR for unattended
automatic recording of desired TV programmes when you are
not at home or sleeping.
You can programme timer recordings in two different ways:
≥ By entering the necessary information with the remote
control while viewing the On Screen Display (OSD) on the
TV screen (explained below) or;
≥ By entering the ShowView number published alongside the
TV programme listings in newspapers and magazines.
(See page 23.)
This VCR lets you programme up to 8 TV programmes
(including weekly and daily programmes) for unattended
recording up to one month in advance.
To Programme with the On
Screen Display (OSD)
This method offers easy step-by-step programming with the
remote control while you view the prompts on the TV screen.
Preparations
≥ Confirm that the VCR is on.
≥ Confirm that the TV is on and the VCR viewing channel is
selected.
≥ Insert a video cassette with an intact erasure prevention
tab.
As soon as the cassette is inserted, the Cassette Number
Check starts. Wait a few moments until it is completed.
(See page 16.)
≥ Set the VCR/TV switch P to “VCR”.
Example:
Programming the timer recording of a TV programme
broadcast on programme position 2 (ZDF) from 20:00 to
21:30 on 27 October.
Follow the on screen operation guide.
Operations
01 Press the PROG./CHECK button < to display the
menu for programming timer recordings on the
TV screen.
≥ Alternatively, you can
press the MENU button U
and then select
“Timer record”.
02 Press the Channel button : to select the
programme position of the desired TV station.
≥ As an alternative method, after pressing the
Channel button :, you can use the Cursor buttons
(3421) R.
03 Press the DATE button ; to set the date on
which the TV programme will be broadcast.
On Screen Display
Timer recording
Pos Start Stop SP VPS
Name DATE ON OFF LP PDC Min
06 Press the SP/LP button E to set the desired tape
speed.
≥ SP provides standard recording time and optimum
picture quality.
LP provides doubled recording time with slightly
reduced picture quality.
EP provides triple recording time with slightly
reduced picture quality.
Regarding the “A” indication, refer to page 24.
07 Press the Cursor buttons (3421) R to set
VPS/PDC to ON or OFF (–––).
≥ See page 24 for VPS/PDC recording.
08 Press the TAPE button C to select the
corresponding cassette tape length.
≥ The tape length is displayed on the VCR display.
09 Press the OK button T to conclude the settings.
≥ To programme additional
timer recordings, repeat
operation steps 2–9.
Timer recording
Pos Start Stop SP VPS
Name DATE ON OFF LP PDC Min
ZDF 27/10We20:00 21:30 SP OFF 90
10 Press the TIMER REC button D to switch the VCR
over to the timer recording standby mode.
≥ Check that Á is lit on the VCR display.
If it is flashing, check the timer recording details
again. (See page 25.)
To Suspend the Timer Recording Standby
Mode
When you want to use the VCR for playback, normal
recording or some other operation before the programmed
timer recording will be performed, you can temporarily
suspend the timer recording standby mode by pressing the
TIMER REC button D so that the “Á” indication on the VCR
display disappears.
However, after you have finished using the VCR, be sure
to reactivate the timer recording standby mode by pressing
the TIMER REC button D again, otherwise the programmed
timer recording will not be performed.
Notes:
≥ If the VCR is not put in the timer recording standby mode at
the latest 10 minutes before the programmed timer
recording starting time, the “Á” indication flashes on the
VCR display. In this case, press the TIMER REC button D
to put the VCR in the timer recording standby mode.
≥ Recording in the S-VHS format is not possible in the EP
mode.
04 Press the ON button G to set the starting time.
≥ When it is kept pressed, the indication changes
05 Press the OFF button F to set the ending time.
22
in 30-minute intervals.
Page 23

To Programme with the
jjjjj jj/jj jj jj:jj jj:jj jj jjj jjj
jjjjj jj/jj jj jj:jj jj:jj jj jjj jjj
jjjjj jj/jj jj jj:jj jj:jj jj jjj jjj
jjjjj jj/jj jj jj:jj jj:jj jj jjj jjj
jjjjj jj/jj jj jj:jj jj:jj jj jjj jjj
jjjjj jj/jj jj jj:jj jj:jj jj jjj jjj
jj jjjjj
jjj
jjjjj jj/jj jj jj:jj jj:jj jj jjj jjj
jjjjj jj/jj jj jj:jj jj:jj jj jjj jjj
jjjjj jj/jj jj jj:jj jj:jj jj jjj jjj
jjjjj jj/jj jj jj:jj jj:jj jj jjj jjj
jjjjj jj/jj jj jj:jj jj:jj jj jjj jjj
ShowView Function
The ShowView numbers assigned to each TV programme
and published alongside the TV programme listings in
newspapers and magazines make it extremely easy to set the
VCR for timer recording.
The duration of a timer recording programmed with
ShowView number may be slightly longer than the actual
duration of the TV programme.
Preparations
≥ Confirm that the VCR is on.
≥ Confirm that the TV is on and the VCR viewing channel is
selected.
≥ Insert a video cassette with an intact erasure prevention
tab.
As soon as the cassette is inserted, the Cassette Number
Check starts. Wait a few moments until it is completed.
(See page 16.)
≥ Set the VCR/TV switch P to “VCR”.
Example:
Programming a timer recording of a TV programme with the
ShowView number 920126
Operations
1 Press the SHOW VIEW button L to display the
menu for entering the ShowView number on the TV.
7 Press the TIMER REC button D to switch the VCR
over to the timer recording standby mode.
≥ Check that “Á” is lit on the VCR display.
If it is flashing, check the timer recording details
again. (See page 25.)
If “– –” Appears under “Pos/Name” after
Entering a ShowView Number
Pos/Name stands for Programme Position/TV Station
Name.
Normally, the name of the TV station or the number of the
programme position is displayed under “Pos/Name”.
However, if the TV station information was not
automatically set during Download
or Auto Setup due to adverse
reception conditions, the “– –”
indication appears instead.
In such a case, follow the
operation steps below to correct it.
Press the Channel button : repeatedly to select the
programme position on which the TV programme to be
recorded will be broadcast.
After you have entered the information of a TV station, it
remains stored in the VCR’s memory, and you do not need
to enter it again in the future.
Timer recording
Pos Start Stop SP VPS
Name DATE ON OFF LP PDC Min
15:00 17:00 SP
“– –” indication
120
2 Press the Numeric buttons 2 to enter the
ShowView number.
≥ If you have entered a
wrong digit, press the
Cursor button (2) R
and then enter the
correct digit.
3 Press the OK button T to display the programmed
content.
4 Press the SP/LP button E to set the desired tape
speed.
≥ SP provides standard
recording time and optimum
picture quality.
LP provides doubled
recording time with slightly reduced picture quality.
EP provides triple recording time with slightly
reduced picture quality.
Regarding the “A” indication, refer to page 24.
≥ To extend the ending time or to make any
corrections, use the Cursor buttons (3421) R,
the Channel button :, the DATE button ;, the ON
button G, the OFF button F, the SP/LP button E.
≥ See page 24 for VPS/PDC recording.
5 Press the TAPE button C to select the
corresponding cassette tape length.
≥ The tape length is displayed on the VCR display.
6 Press the OK button T again to conclude the
settings.
≥ To programme additional
timer recordings, repeat
operation steps 1–6.
On Screen Display
ShowView
9 2 0 1 2 6
Timer recording
Pos Start Stop SP VPS
Name DATE ON OFF LP PDC Min
ZDF 27/10We20:00 21:30 SP OFF 90
Timer recording
Pos Start Stop SP VPS
Name DATE ON OFF LP PDC Min
ZDF 27/10We20:00 21:30 SP OFF 90
If “Pos/Name” (Programme Position) Is Not
Entered Correctly When Programming with
the ShowView Function
See steps 1– 3 on page 42.
14 Press the Cursor buttons (3421) R to select the TV
station which you want to delete.
15 Press the Channel button (J, red) : and the OK button
T to delete the incorrect programme position (Delete).
16 Press the DATE button (i, green) ; and the OK button
T to insert a blank programme position (Add).
17 Press the OK button T to display the Manual Tuning
menu.
18 Press the Numeric buttons 2 to enter the channel
number of the desired TV station and press the
OK button T.
19 Press the Cursor buttons (3421) R to select the
entry field for “Name”.
10 Use the Cursor buttons (3421) R and the OK button
T to enter the station name.
≥ If the station name needs a blank space, select the
blank between “Z” and “¢”.
11 Press the EXIT button S to exit the On Screen Display.
12 Perform the operation of the ShowView function.
To Suspend the Timer Recording Standby
Mode
See page 22.
Notes:
≥ If the VCR is not put in the timer recording standby mode at
the latest 10 minutes before the programmed timer
recording starting time, the “Á” indication flashes on the
VCR display. In this case, press the TIMER REC button D
to put the VCR in the timer recording standby mode.
≥ Recording in the S-VHS format is not possible in the EP
mode.
Timer Recording
23
Page 24

Other Timer Recordings and Convenient Functions
jjjjj jj/jj jj jj:jj jj:jj jj jjj jjj
jjjjj jj/jj jj jj:jj jj:jj jj jjj jjj
jjjjj jj/jj jj jj:jj jj:jj jj jjj jjj
jjjjj jj/jj jj jj:jj jj:jj jj jjj jjj
jjjjj jj/jj jj jj:jj jj:jj jj jjj jjj
Setting the Recording Date/Day(s)
Perform this operation in operation step 3 when programming
a timer recording with the On Screen Display, or in operation
step 4 when programming with the ShowView number.
(See pages 22 and 23.)
You can select the recording date (day of the month/day of
the week) by pressing the DATE button ;. If you repeatedly
i
press the
side of the DATE button ;, the indication
changes in the order shown below. If you press the j side of
the DATE button ;, the indication changes in the opposite
order.
≥ Programming a timer recording (setting the date) is
possible up to one month ahead of the TV programme’s
broadcasting date and time. Daily and weekly timer
recordings will continue until you cancel them.
<To Programme within 1 Month>
Example: 1 2 ..... 31
<To Programme a Daily Timer Recording>
Example: Daily recording from Sunday to Saturday
<To Programme a Weekly Timer Recording>
Example: Weekly recording every Sunday
(SulSunday, MolMonday, TulTuesday, WelWednesday
ThlThursday, FrlFriday, SalSaturday)
(Su–Sa).
Daily recording from Monday to Saturday
(Mo–Sa).
Daily recording from Monday to Friday
(Mo–Fr).
Weekly recording every Monday
Weekly recording every Saturday
Ensuring that a TV Programme Will Be
Recorded until Its End
(Auto SP/LP Change Function)
If, at the start of a timer recording, the VCR determines that
the remaining tape time is insufficient to record the whole
programme, the Auto SP/LP Change function automatically
selects LP mode to ensure that the whole programme will be
recorded. However, if the remaining tape time is still not
sufficient even in the LP mode, the programme cannot be
recorded to its end.
≥ This function cannot change the recording speed to the
EP mode.
≥ If you programme a daily or weekly timer recording,
recording will be performed in the LP mode from the start
regardless of the remaining tape time.
≥ In case of a timer recording programmed with the VPS/PDC
function, if the TV programme continues past the
programmed ending time, the VCR automatically switches
over to the LP mode at that moment. However, in some
cases it may not be possible to record the programme until
its end.
≥ Use a video cassette on which a few minutes more than the
total length of programmed timer recordings remain,
otherwise the programmed timer recordings may be
performed in the LP mode.
≥ Be careful that the broadcast times of the TV programmes
set for timer recording do not overlap, otherwise the
programmed timer recordings may be performed in the LP
mode.
≥ If the recording speed changes from SP to LP during a
timer recording, some brief picture distortion occurs at that
point.
Condition for correct operation of the Auto SP/LP Change
function:
≥ The tape length of the inserted cassette must be set
correctly. (See page 49.)
To Activate the Auto SP/LP Change Function:
In operation step 6 when programming a timer recording with
the On Screen Display (see page 22), or in operation step 4
when programming with the ShowView number (see
page 23), press the SP/LP button E to select “A”.
≥ When you press this button
repeatedly, the indication changes
in the following order:
SP
LP
EP
A
Timer recording
Pos Star t Stop SP VPS
Name DATE ON OFF LP PDC Min
ZDF 27/10 We 20:00 21:30 A OFF
Indication when “A” is
selected
90
Setting for Control of the Recording
Starting and Ending Time by Special Signal
Included in the Broadcasting Signal
(VPS/PDC Function)
VPS stands for Video Programme System.
PDC stands for Programme Delivery Control.
If a TV programme, for example a football game runs longer
than scheduled, is shortened or starts earlier or later, this
function synchronises the recording start and stop with the
actual broadcasting start and stop of the TV programme.
Conditions for correct operation of the VPS/PDC function:
≥ “ON” must be displayed under “VPS/PDC” on the On
Screen Display.
≥ The TV station must broadcast VPS/PDC signals.
≥ The programme starting time must be set correctly to the
starting time listed in the newspaper/magazine.
To Activate the VPS/PDC Function:
In operation step 7 when
programming a timer recording with
the On Screen Display (see page 22),
or in operation step 4 when
programming with the ShowView number (see page 23),
press the Cursor buttons (3421) R to make the ON
indication appear.
See page 54 for details.
Timer recording
Pos Start Stop SP VPS
Name DATE ON OFF LP PDC Min
ZDF 27/10 We 20:00 21:30 SP ON
90
24
Page 25

jjjjj jj/jj jj jj:jj jj:jj jj jjj jjj
jjjjj jj/jj jj jj:jj jj:jj jj jjj jjj
jjjjj jj/jj jj jj:jj jj:jj jj jjj jjj
jjjjj jj/jj jj jj:jj jj:jj jj jjj jjj
Programming a Timer Recording of a
pp:pp pp:ppSPppp ppp
ppppp pp/pp pp pp:pp pp:pp pp ppp ppp
ppppp pp/pp pp pp:pp pp:pp pp ppp ppp
ppppp pp/pp pp pp:pp pp:pp pp ppp ppp
ppppp pp/pp pp pp:pp pp:pp pp ppp ppp
ppppp pp/pp pp pp:pp pp:pp pp ppp ppp
ppppp pp/pp pp pp:pp pp:pp pp ppp ppp
Satellite Programme
The programming of a timer recording of a satellite
programme can be performed in the same way as for normal
(terrestrial) TV programmes.
For the connection to a satellite receiver and the necessary
settings, refer to pages 39 to 41.
Conditions for correct operation of this function:
≥ When selecting the programme position, be sure to use the
Numeric buttons 2 to select the satellite channel.
Example of selecting satellite programme
positions 9, 19 and 129:
SAT
SAT 9:
SAT 19:
SAT 129:
SAT
0
0
SAT
0
SAT
0
1 9
1
9
2 9
3-digit programme positions can be selected with this
remote control only in case of a satellite receiver that is
1
marked with (°
) on the enclosed list of compatible
satellite receivers.
Timer recording
Pos Start Stop SP VPS
Name DATE ON OFF LP PDC Min
AV2 SAT19
To Check the Contents of Timer Recording
Programmings
≥ Display the VCR picture on the TV.
≥ Set the VCR/TV switch P to “VCR”.
1 Press the PROG./CHECK button < to display the timer
recording programmings on the TV screen.
≥ When the VCR is in the timer recording standby
mode for a VPS/PDC recording, the On Screen
Display may be distorted.
2 Press the EXIT button S to exit
the On Screen Display.
Timer recording
Pos Start Stop SP VPS
Name DATE ON OFF LP PDC Min
ZDF 27/10We20:00 21:30 SP OFF 90
ARD 30/10 Sa 19:00
N3
ZDF
Su
21:00 23:30 SP OFF 150
Su-Sa
17:30 18:00 EP OFF 30
20:00 LP OFF 60
To Change a Timer Recording
Programming
It is not possible to change a programming while the timer
recording is being performed.
≥ Display the VCR picture on the TV.
≥ Set the VCR/TV switch P to “VCR”.
Notes for Programming a Timer Recording of a Satellite
Programme:
≥ When programming a timer recording of a satellite
programme, it is not possible to activate the VPS/PDC
function.
≥ On some satellite receivers, the power may be turned off
for a few seconds before a timer recording is actually
started and recording may not be performed for those first
few seconds. To ensure recording from the beginning of the
programme, we recommend that you set the recording start
time about a minute earlier than that listed in the
newspaper/magazine.
≥ After the timer recording has finished, some satellite
receivers switch off automatically, but the recording has
been performed as programmed.
≥ If a power failure occurs during the timer recording of a
satellite programme, the timer recording may not resume
when the power is restored.
≥ Timer recording of pay-per-view satellite programmes is not
possible.
≥ Timer recording of satellite programmes from a satellite
receiver or satellite receiver channel for which the PIN code
has been entered is not possible.
≥ Timer recording of satellite programmes for which the
parental control function has been activated is not possible.
1 Press the PROG./CHECK button < to display the timer
recording programmings on the TV screen.
2 Press the Cursor buttons (34) R to select the
programming that you want to change.
3 Follow the operations below to change the programmed
contents.
To change the broadcasting station:
Use the Channel button :.
To change the date of the timer
recording:
Use the DATE button ;.
To change the recording starting
Timer recording
Pos Start Stop SP VPS
Name DATE ON OFF LP PDC Min
ZDF 27/10We20:00 21:30 SP OFF 90
ARD 30/10 Sa 19:00 20:00 LP OFF 60
N3
Su
ZDF
21:00 23:30 SP OFF 150
Su-Sa
17:30 18:00 EP OFF 30
time:
Use the ON button G.
To change the recording ending time:
Use the OFF button F.
To change the recording speed:
Use the SP/LP button E.
4 Press the OK button T to conclude the setting.
5 Press the EXIT button S to exit the On Screen Display.
Timer Recording
25
Page 26

To Cancel the Programming of a Timer
jjjjj jj jj jj jj jj jj jj jj jjj jjj
jjjjj jj/jj jj jj:jj jj:jj jj jjj jjj
jjjjj jj/jj jj jj:jj jj:jj jj jjj jjj
jjjjj jj/jj jj jj:jj jj:jj jj jjj jjj
jjjjj jj/jj jj jj:jj jj:jj jj jjj jjj
jjjjj jj/jj jj jj:jj jj:jj jj jjj jjj
jjjjj jj/jj jj jj:jj jj:jj jj jjj jjj
Recording
It is not possible to cancel a programming while the timer
recording is being performed.
≥ Display the VCR picture on the TV.
≥ Set the VCR/TV switch P to “VCR”.
1 Press the PROG./CHECK
button < to display the timer
recording programmings on the
TV screen.
Timer recording
Pos Start Stop SP VPS
Name DATE ON OFF LP PDC Min
ZDF 27/10We20:00 21:30 SP OFF 90
ARD 30/10 Sa 19:00 20:00 LP OFF 60
N3
Su
21:00 23:30 SP OFF 150
Su-Sa
ZDF
17:30 18:00 EP OFF 30
2 Press the Cursor buttons (34) R to select the
programming that you want to cancel.
3 Press the CANCEL button >.
4 Press the EXIT button S to
exit the On Screen Display.
Timer recording
Pos Start Stop SP VPS
Name DATE ON OFF LP PDC Min
ZDF 27/10We20:00 21:30 SP OFF 90
ARD 30/10 Sa 19:00 20:00 LP OFF 60
ZDF
Su-Sa
17:30 18:00 EP OFF 30
Notes for Cancelling the Programming of a Timer
Recording
In some cases, for example as listed below, the programming
of a timer recording remains stored in the memory until 4 a.m.
the next day. However, this is not a malfunction.
≥ When a timer recording was not performed up to the TV
programme’s ending time because the remaining tape time
was not sufficient.
≥ When you have stopped the timer recording while it was
being performed.
To Check the Total Timer Recording
Programming Time
The total time indication for timer
recording programming lets you
check how many programmes can
be recorded by comparing with the
remaining tape time in the VCR
display.
6:07:30 16.10.05
Indication for a total timer
recording programming time
of 90 minutes
≥ The total time is calculated in the
SP mode.
≥ The total time cannot be calculated when setting Daily/
Weekly timer recording.
Total (SP) 90
26
Page 27

Tape Library System
This advanced system makes it quick and easy to check the contents of an inserted cassette. It can also be used to quickly find
out which cassette in your collection contains a desired programme.
Whenever a cassette with an intact erasure prevention tab is inserted, the VCR first performs a brief check and then shows the
number of the cassette and its contents on the On Screen Display. To start playback of the desired programme, simply select it
on the On Screen Display and press the LIBRARY button M.
To index each recorded programme for the Tape Library System, this VCR automatically records the Library data (cassette
number, title°
the recording is performed.
1
In case of TV stations that broadcast with EPG (Electronic Programme Guide) information, the title of the TV programme is
°
entered automatically. Otherwise, the name of the TV station or the programme position number is entered instead.
In case of a TV station without EPG information but with Teletext information, the title of the TV programme is entered
automatically, provided the “Title page” is correctly set. (See page 45.)
°2In case of a TV station with Teletext information, the name of the TV station is recorded automatically.
3
The VCR’s clock must be set correctly.
°
4
In case of a TV station with EPG information, the programme category will be recorded automatically.
°
5
°
The VCR’s memory can hold a maximum of 600 programmes with titles of 8 characters (or up to 900 programmes with titles
of fewer characters).
Precautions for Recording:
≥ We recommend that you use new tapes for recording.
≥ Each recorded programme should have length of at least 15 minutes in the SP or LP mode.
≥ Each recorded programme should have length of at least 25 minutes in the EP mode.
≥ If you copy a cassette with a cassette number, the tape library data may not be copied correctly. Therefore, the VCR’s Tape
Library System may not work correctly with such a copied cassette.
≥ When a new recording is made over existing recordings on a tape, the original programmes are deleted from the list.
≥ Before recording programmes, make sure that the tape length is set correctly on the On Screen Display. Otherwise, the tape
position bar of the Tape Library data does not display the actual tape position. With some tapes, the bar indication is not
accurate. (See page 49.)
≥ The VCR’s power back-up system protects the Tape Library data in the memory in case of a power failure and stores it for up
to 5 years when the VCR is not connected to an AC mains socket.
≥ When the recording is completed and you eject the cassette, the cassette number remains displayed on the VCR display for
approximately 30 seconds. Be sure to write this number on the cassette label.
1
, name of TV station°2, recording time/date°3, category°4, etc.) and stores the data in the VCR’s memory°5 when
≥ When the VCR’s entire memory area has been used up by the Tape Library data, or when cassette numbers 1 through 999
have all been used, the indication “Library memory full !” appears on the TV screen for several seconds when recording is
completed. After this, recording is still possible but no new Tape Library data can be stored. In this case, delete the numbers
of cassettes that you do not need any more before making further recordings. (See page 31.)
Library memory
full !
How to Read the Tape Library Contents
Title:
For a programme from a TV station that provides EPG
information; also from a TV station without EPG information
but with Teletext information, provided the “Title page” is
correctly set. (See page 45.)
Manually adding or editing the title is also possible.
TV Station Name:
For a TV programme that was broadcast with Teletext information
but without EPG information.
Programme Position Number:
For a TV programme that was broadcast with neither Teletext
information nor EPG information.
Direct TV Rec:
For a TV programme recorded with the Direct TV Recording function.
Programme Position Bar:
This shows the approximate position of the programme on the tape and
its length.
Recording Start Time
Tape Position Bar:
This shows the approximate present tape position on the inserted cassette.
Content of tape: 5 Page 1/2
Title
Football
ZDF (18:58)
¢¢¢03 (19:08) Ch 3
¢¢¢¢¢ (19:18)
Cassette Number
Channel Number
Date/Category
We 5.04.00
Sports
We 19.04.00
News
Sa 29.04.00
Movies
Fr 12.05.00
Music
Recording Date
Category:
For a programme from a TV station
that provides EPG information.
Manually adding or editing the
programme category is also possible.
Tape Library System
27
Page 28

To Check the Tape Library Data
To Check What Programmes Are Recorded
on the Inserted Video Cassette and To Play
Back a Desired Programme
First, perform the operation steps explained on page 16.
Then press the Cursor buttons (3421) R to select the
programme and then press the LIBRARY button M.
≥ After the selected programme
has been found, the current tape
contents list disappears and
playback starts automatically.
≥ When you select the “Find space to record” indication at the
bottom of the On Screen Display and press the LIBRARY
button M, the VCR automatically winds the tape to a
position from which you can start recording.
≥ When you select the “Intro-Jet Scan” indication at the
bottom of the On Screen Display and press the LIBRARY
button M, Intro-Jet Scan starts. (See page 33.)
Content of tape: 100
Title
ZDF (18:58)
5
Find space to record
Searching for
’ZDF (18:58)’
Please wait.
6
Date/Category
We 19.04.00
6
Note:
≥ In the case of certain cassettes, for example cassettes
recorded on another NV-HS860 model VCR or cassettes
whose cassette number was deleted from the Tape Library
data, the cassette number and contents (recorded
programmes) are not displayed.
To Check on Which Cassette a Desired
Programme Is Recorded
If you press the LIBRARY button M when no cassette is
inserted, operation steps 1 and 2 below are not necessary. In
this case, start from operation step 3.
1 Press the MENU button U and then press the Cursor
buttons (341) R to select “Tape Library” and “Library
contents” in this order.
Main menu
Timer record
Tape Library
Display
Tuning
Clock
Functions
Language
Country
Satellite
Library contents
Restore data
Delete data
Tape Library Demo
To Check the Cassette Number Again If the Cassette
Number Check of a Cassette that Has a Cassette Number
Did Not Work Correctly, or If You Cancelled the Cassette
Number Check Midway:
≥ Rewind the tape to its beginning.
1 Press the LIBRARY button M.
≥ The Cassette Number Check starts automatically.
Wait a few moments until the check is completed.
When it is completed, the
cassette number and its
contents (recorded
programmes) appear on the
Content of tape: 100
Title
ZDF (18:58)
5
Find space to record
5
Intro-Jet Scan
Date/Category
We 19.04.00
6
6
On Screen Display, and the
cassette number appears on
the VCR display.
(Example: When Cassette Number
Check was completed successfully)
If the cassette number does not appear and the following
indication is displayed:
Press the INDEX L button
K once to start the search for
a programme. When playback
starts, wait a few moments
Content of tape: ---
Title
5
Intro-Jet Scan
Tape ID could not
be detected
Date/Category
6
and then press the LIBRARY
button M.
≥ If the cassette number still does not appear, repeat
this process until it appears.
Hint:
≥ Even after you have pressed the Cursor buttons (34) R
to select the “Find space to record” and the VCR has
located the tape position from which to make a new
recording, we recommend you to confirm that this tape
position is really suitable, before you start recording.
2 Press the OK button T.
≥ If a cassette is already inserted, its cassette number
and contents appear.
Content of tape: 100
Title
ZDF (18:58)
5
Find space to record
5
Intro-Jet Scan
Date/Category
We 19.04.00
6
6
≥ If no cassette is inserted, the lowest cassette number
and its contents appear.
3 Press the Cursor buttons (21) R to display the
contents of each cassette one after another, and search
for the desired programme.
Library for tape: 5 Page 1/2
Title
A2 (10:52)
ARD ( 4:04)
¢¢¢03 ( 4:15) Ch 6
ARD (11:20)
Date/Category
Th 20.01.00
Movies
Fr 4.02.00
Sports
Fr 4.02.00
Music
Tu 8.02.00
Sports
4 After you have found out which cassette contains the
desired programme, insert that cassette into the VCR.
(See page 16.)
5 To play back the desired programme, press the Cursor
buttons (34) R to select that programme and then
press the LIBRARY button M.
≥ After the selected programme has been found,
playback starts automatically.
28
Page 29

To Check the Tape Library’s Contents by
Cassette Number, Title, Category, or
Recording Date
If you press the LIBRARY button M when no cassette is
inserted, operation steps 1 and 2 below are not necessary. In
this case, start from operation step 3.
1 Press the MENU button U and then press the Cursor
buttons (341) R to select “Tape Library” and “Library
contents” in this order.
2 Press the OK button T.
3 Press the Channel buttons (red) :, DATE button
(green) ;, ON button (yellow) G or OFF button (blue)
F .
Pressing the above buttons displays a list of the
recorded programmes as follows:
Channel (red) ::
By cassette number
DATE (green) ;:
By title in alphabetical order
ON (yellow) G:
The list of categories appears.
Press the Cursor buttons (34) R to select the
desired category and then press the OK button T .
The titles are now listed in alphabetical order.
OFF (blue) F:
By date (latest first)
Sorting by Tape Number
No. Title
Sorting in progress
Please wait.
1/1
Date
Library for tape: 5 Page 1/2
Title
A2 (10:52)
ARD ( 4:04)
¢¢¢03 ( 4:15) Ch 6
ARD (11:20)
S
orting by Tape Number
No. Title
1 ARD ( 9:07) 20.01.00
1 A3 ( 9:18) 20.01.00
1 A3 ( 9:23) 2.02.00
1 ¢¢¢04 ( 0:01) Ch 9 1.01.01
1 Football 1.02.01
1 ZDF (13:56) 10.02.00
1 BR3 (14:07) 10.02.00
2 ¢¢¢03 ( 9:32) Ch 6 20.01.00
2 ¢¢¢04 ( 9:42) Ch 9 20.01.00
2 ¢¢¢04 (11:39) Ch 9 5.02.00
3 ARD ( 9:58) 20.01.00
3 ARD (11:23) 3.02.00
3 ARD (12:11) 3.02.00
3 ARD ( 4:01) 4.02.00
Date/Category
Th 20.01.00
Movies
Fr 4.02.00
Sports
Fr 4.02.00
Music
Tu 8.02.00
Sports
1/16
Date
(By cassette number)
5 To play back the desired programme, insert the
corresponding cassette.
If the cassette that contains the desired programme is
already in the VCR, this operation step 5 is not
necessary.
≥ The Cassette Number Check starts immediately and
the list of programmes disappears temporarily until the
check is completed.
≥ If the cassette number does not appear on the VCR
display, see page 16.
6 Press the LIBRARY button M.
≥ After the selected
programme is found, the list
of Library contents menu
disappears and playback
Sorting by Tape Number
No. Title
96 ¢¢¢03 (15:05) Ch 6 10.02.00
97 ¢¢¢03 (15:27) Ch 6 10.02.00
98 ARD (15:53) 20.01.00
99 ARD (16:13) 20.01.00
100 ARD (19:35) 5.02.00
101 ARD (21:01) 20.01.00
101 ARD (17:18) 3.02.00
101 ¢¢¢04 (18:28) Ch 8 3.02.00
101 ¢¢¢04 (18:51) Ch 8 4.02.00
Searching for
’
¢¢¢04 (18:51) Ch 8
Please wait.
Date
’
starts automatically.
Hint:
≥ If you press the OK button T after performing operation
step 4, the menu for entering (or changing) a new title and
category appears and you can enter (or edit) a new title
and a category. (See page 30.)
16/16
4 Press the Cursor buttons
(34) R to select the desired
programme (title).
Sorting by Tape Number
No. Title
96 ¢¢¢03 (15:05) Ch 6 10.02.00
97 ¢¢¢03 (15:27) Ch 6 10.02.00
98 ARD (15:53) 20.01.00
99 ARD (16:13) 20.01.00
100 ARD (19:35) 5.02.00
101 ARD (21:01) 20.01.00
101 ARD (17:18) 3.02.00
101 ¢¢¢04 (18:28) Ch 8 3.02.00
101 ¢¢¢04 (18:51) Ch 8 4.02.00
Date
16/16
Tape Library System
29
Page 30

To Manually Enter or Editing a
Title or Category
If you press the LIBRARY button M when no cassette is
inserted, operation steps 1 and 2 below are not necessary. In
this case, start from operation step 3.
01 Press the MENU button U and then press the Cursor
buttons (341) R to select “Tape Library” and “Library
contents” in this order.
02 Press the OK button T.
03 Press the Cursor buttons (21) R to display the
contents of each cassette one after another, and search
for the programme whose title and/or category you want
to enter (or change).
04 Press the Cursor buttons
(34) R to select the desired
programme.
Library for tape: 1 Page 1/2
Title
ARD ( 9:07)
A3 ( 9:18)
A3 ( 9:23)
¢¢¢04 ( 0:01) Ch 9
Date/Category
Th 20.01.00
Sports
Th 20.01.00
News
We 2.02.00
News
Sa 1.01 .00
Children's
09 Press the Cursor buttons (34) R to select the desired
category and then press the OK button T.
Library Edit
Tape 1
Old title: A3 ( 9:18)
Old category: News
New title: FOOTBALL
New category:
Category
Movies
News
Politics
Entertainment
Hobbies
Sports
Children's
Educational
Music
Arts/Culture
Series
Others-1
Others-2
10 Press the MENU button U.
11 Press the OK button T.
≥ When you enter (or change)
the title, the recording start
time, which was displayed
before, disappears.
Library Edit
Tape 1
Old title: A3 ( 9:18)
Old category: News
New title: FOOTBALL
New category: Sports
Library Edit
Tape 1
Old title: A3 ( 9:18)
Old category: News
New title: FOOTBALL
New category: Sports
Really store changes?
Library for tape: 1 Page 1/2
Title
ARD ( 9:07)
FOOTBALL
A3 ( 9:23)
¢¢¢04 ( 0:01) Ch 9
Date/Category
Th 20.01.00
Sports
Th 20.01.00
Sports
We 2.02.00
News
Sa 1.01 .00
Children's
05 Press the OK button T.
≥ The menu for entering (or
changing) the title and/or
category appears.
Library Edit
Tape 1
Old title: A3 ( 9:18)
Old category: News
New title:
New category:
06 Press the Cursor button (1) R to select the entry field
for a new title and then press the Cursor buttons
(3421) R and the OK button T to enter (or change)
the title.
≥ Up to 22 characters can be entered for one title.
≥ To correct an input error,
press the CANCEL button >
and then enter the correct
character.
≥ If you have entered a full
22 characters, you can skip
operation step 7.
Library Edit
Tape 1
Old title: A3 ( 9:18)
Old category: News
New title: FOOTBALL
New category:
ABCDEFGHIJ
KLMNOPQRST
UVWXYZ ¢HG
0123456789
07 After you have entered the title, press the MENU button
U.
“New title” is now selected.
08 Press the Cursor button (4) R
to select “New category”, and
then press the Cursor button
(1) R.
Library Edit
Tape 1
Old title: A3 ( 9:18)
Old category: News
New title: FOOTBALL
New category:
Category
Movies
News
Politics
Entertainment
Hobbies
Sports
Children's
Educational
Music
Arts/Culture
Series
Others-1
Others-2
12 Press the EXIT button S to exit the On Screen Display.
30
Page 31

To Delete the Tape Library Data
Caution:
The Tape Library system offers a convenient back-up option,
in case you later regret having deleted the Tape Library data.
To have this option available, make sure you know on which
cassette you recorded last before the deletion. If that cassette
is not available, record for at least 15 minutes on any
cassette. (25 minutes in the EP mode)
Either of these two cassettes can then be used to restore the
Tape Library that you have deleted.
(To restore the Tape Library data, see page 32.)
To Delete the Tape Library Data of a Single
Video Cassette
If you press the LIBRARY button M when no cassette is
inserted, operation steps 1 and 2 below are not necessary. In
this case, start from operation step 3.
1 Press the MENU button U and then press the Cursor
buttons (341) R to select “Tape Library” and “Library
contents” in this order.
2 Press the OK button T.
3 Press the Cursor buttons (21) R to search for the
cassette whose Tape Library data you want to delete.
Library for tape: 5 Page 1/2
Title
A2 (10:52)
ARD ( 4:04)
¢¢¢03 ( 4:15) Ch 6
ARD (11:20)
Date/Category
Th 20.01.00
Movies
Fr 4.02.00
Sports
Fr 4.02.00
Music
Tu 8.02.00
Sports
Hint:
≥ Even if you delete a cassette’s contents from the Tape
Library while that cassette is in the VCR, this does not
erase the actual programmes recorded on the cassette.
To Delete All the Tape Library Data Stored
in the VCR’s Memory
1 Press the MENU button U and then the Cursor buttons
(34) R to select “Tape Library”.
2 Press the Cursor buttons (14) R to select
“Delete data”.
3 Press the OK button T.
4 Press the OK button T again.
5 Press the OK button T again if you are sure that you
want to delete all the stored data from the VCR’s Tape
Library.
≥ If you do not want to delete the stored data from the
VCR’s Tape Library after all, press the EXIT button S.
Main menu
Timer record
Tape Library
Display
Tuning
Clock
Functions
Language
Country
Satellite
Main menu
Timer record
Tape Library
Display
Tuning
Clock
Functions
Language
Country
Satellite
Library contents
Restore data
Delete data
Tape Library Demo
Warning--all stored
library data will be lost
Do you want to proceed ?
Library contents
Restore data
Delete data
Tape Library Demo
Are you sure ?
4 When you have found the desired cassette, press the
CANCEL button >.
Library for tape: 5 Page 1/2
Title
A2 (10:52)
ARD ( 4:04)
Really delete tape
UUU03 ( 4:15) Ch 6
ARD (11:20)
contents ?
Date/Category
Th 20.01.00
Movies
Fr 4.02.00
Sports
Th 4.02.00
Music
Tu 8.02.00
Sports
5 If you are sure to delete the cassette’s contents, press
the OK button T.
≥ The cassette’s Tape Library
Library for tape: 5
Title
Date/Category
data are now deleted from
the VCR’s Tape Library.
Really delete tape
from library ?
≥ If you also want to delete the cassette number from
the VCR’s Tape Library, press the OK button T again
to delete the cassette number.
If you want to keep the cassette number, press the
EXIT button S instead of the OK button T.
6 Press the EXIT button S to exit the On Screen Display.
6 Press the EXIT button S to exit the On Screen Display.
Tape Library System
31
Page 32

To Restore Deleted Tape Library
Data
Caution:
The Tape Library system offers a convenient back-up option,
in case you later regret having deleted the Tape Library data.
To have this option available, make sure you know on which
cassette you recorded last before the deletion. If that cassette
is not available, record for at least 15 minutes on any
cassette. (25 minutes in the EP mode)
Either of these two cassettes can then be used to restore the
Tape Library that you have deleted.
1 Press the MENU button U and then the Cursor buttons
(34) R to select “Tape Library”.
2 Press the Cursor buttons
(14) R to select “Restore
data”.
3 Press the OK button T.
4 The number of the cassette
which you need to restore the
Tape Library data appears.
≥ Make a note of this cassette
number.
Main menu
Timer record
Tape Library
Display
Tuning
Clock
Functions
Language
Country
Satellite
Library Restore
Please insert video tape
Library contents
Restore data
Delete data
Tape Library Demo
No. : 100
Hint:
≥ If you press the Stop button 9 while the Tape Library Data
is being restored, the warning indication “Restore not
successful!” appears.
To Demonstrate the Tape Library
System
1 Press the MENU button U and then the Cursor buttons
(34) R to select “Tape Library”.
2 Press the Cursor buttons
(14) R to select
“Tape Library Demo”.
3 Press the OK button T.
4 Follow the operations on
pages 28– 31 to demonstrate
checking, editing, or deleting
the Tape Library data.
≥ Any changes (Library Edit,
Delete) made to the data at
this time are not actually
reflected.
Main menu
Timer record
Tape Library
Display
Tuning
Clock
Functions
Language
Country
Satellite
Library for tape: 1 Page 1/2
Title
Vikings
The last frontier
World news
News digest
Library contents
Restore data
Delete data
Tape Library Demo
2 Library Demonstration 1
Date/Category
Sa 29.04.00
Movies
We 3.05.00
Movies
We 22.03.00
News
Su 12.03.00
News
5 Insert the cassette which has the indicated cassette
number.
≥ The restoration of Library data now starts
automatically. It takes some time for this process to be
completed.
Library Restore
Please insert video tape
Checking tape number...
Please wait !
No. : 100
Library Restore
Please insert video tape
Warning--all stored
library data will be lost
Do you want to proceed ?
No. : 100
≥ If you insert a cassette with the wrong cassette
number, the following indication appears.
In this case, the data cannot
be completely restored,
even if you continue by
performing operation step 6.
Library Restore
Please insert video tape
No or different
tape number !
Continue anyway?
No. : 100
6 Press the OK button T.
Library Restore
Please insert video tape
Restore in progress...
Please wait !
No. : 100
Restore
successful !
5 Press the EXIT button S to exit the On Screen Display.
7 Press the EXIT button S to exit the On Screen Display.
32
Page 33

Search Functions
Content of tape: 100
ZDF (18:58)
We 19.04.00
5 Find space to record 6
5 Intro-Jet Scan 6
Title
Date/Category
Content of tape: ---
5 Intro-Jet Scan 6
Title
Date/Category
VISSuVHS Index Search System
This VCR automatically records special index signals on the
tape every time a recording is started. The Index search
function makes use of these index signals to let you find the
beginning of a desired programme quickly and easily.
Index signals are automatically recorded in the following
cases:
≥ When you start a recording by pressing the REC button J,
REC/OTR button f or DIRECT TV REC button 6.
≥ When a timer recording starts.
≥ When you press the REC button J on the remote control
during recording.
Conditions for correct operation of the Index search function:
≥ The VCR must be in the stop mode or in the playback
mode.
≥ Each programme recorded on the tape must be at least
5 minutes long.
Preparations
≥ Display the VCR picture on the TV.
≥ Insert a recorded video cassette.
As soon as the cassette is inserted, the Cassette Number
Check starts. Wait a few moments until it is completed.
(See page 16.)
Operation
1 Press the INDEX button K (that corresponds to the
direction from the current tape position in which the
desired programme is located on the tape) to start the
index search. For example,
if you want to search for the
2nd recorded programme in
forward direction, press the INDEX L button K twice.
≥ The VCR fast-forwards or rewinds the tape and
searches for the specified index signal (the beginning
of the desired recorded programme).
When it has been found, playback starts automatically.
To Cancel the Index Search or to Stop Playback:
Press the Stop button 9.
Hints:
≥ Searching in either direction is possible up to the 20th
index signal.
≥ If you press either of the INDEX buttons K too many times,
simply press the other INDEX button K (indicating the
opposite direction) to correct it. In this way, you can reduce
the displayed figure down to 1.
≥ The figure on the VCR display decreases by 1 every time
an index signal is located.
Intro-Jet Scan
This VCR automatically records special index signals on the
tape every time a recording starts. The Intro-Jet Scan
function makes use of these index signals to play back the
beginning of each programme recorded on the cassette one
after another at high speed. This lets you quickly and easily
check the contents of a cassette and find a desired
programme.
Conditions for correct operation of the Intro-Jet Scan function:
≥ VCR must be switched on or be in the playback mode.
≥ Each programme recorded on the tape must be at least
15 minutes long.
Preparation
≥ Display the VCR picture on the TV.
Operations-A
1 Insert a pre-recorded video cassette.
If a cassette is already in the VCR, press the LIBRARY
button M.
≥ As soon as the cassette is inserted, the Cassette
Number Check starts. Wait a few moments until it is
completed. (See page 16.)
If the “Intro-Jet Scan” indication does not appear on
the TV screen, press the LIBRARY button M to make
it appear.
or
2 Press the Cursor buttons (34) R to select the “Intro-
Jet Scan” indication and then press the LIBRARY button
M to start the Intro-Jet Scan.
≥ After rewinding the tape to the beginning, the VCR
plays it back at high speed for approximately
10 seconds. It then fast-forwards the tape to the next
tape position marked by an index signal (beginning of
a programme), and every time an index signal is
found, the VCR switches over to high-speed playback
(Cue) for about 10 seconds.
Beginning of tape
Index signal
High-speed Playback
(Cue)
Programme 1 Programme 2 Programme 3
Rewinding
Fast-forwarding
Present tape position
3 When you have found the programme that you want to
view, press the Play button I to start normal playback.
Operations-B
1 Press the INTRO-JET SCAN button h to start the Intro-
Jet Scan with the cassette inserted.
2 When you have found the programme that you want to
view, press the Play button I to start normal playback.
To Cancel the Intro-Jet Scan or to Stop Playback:
Press the Stop button 9.
Advanced Operations
Index signals are automatically recorded in the following
cases:
≥ When you start a recording by pressing the REC button J,
REC/OTR button f or DIRECT TV REC button 6.
≥ When a timer recording starts.
≥ When you press the REC button J on the remote control
during recording.
33
Page 34

Editing
Assemble Editing
The assemble editing function makes it easy to record the
picture and sound of virtually any number of scenes or
programmes in succession.
Assemble editing from an external source, for example from a
video movie camera, can be performed in the same way.
Recording unit (this VCR)
Front
]
^
Preparations
≥ Connect a video movie camera or a VCR to this VCR with
an audio/video cable or a 21-pin Scart cable, as shown in
the illustration.
≥ Display the VCR picture on the TV.
≥ Insert the cassette on which the assemble editing is to be
performed, and make sure that its erasure prevention tab is
not broken out.
As soon as the cassette is inserted, the Cassette Number
Check starts. Wait a few moments until it is completed.
(See page 16.)
≥ Set the VCR/TV switch P to “VCR”.
≥ Press the INPUT SELECT button 3 to select the AV Input
(external input) “A1”, “A2” or “A3” according to the socket(s)
on the VCR to which the source unit has been connected.
A1: When connected to the AV1 21-pin Scart socket n
[AV1 (TV)]
A2: When connected to the AV2 21-pin Scart socket o
[AV2 (DECODER/EXT)]
≥ Make sure that “AV2” is set to “EXT”.
(See page 51.)
A3: When connected to the Video Input socket ^
[VIDEO IN (AV3)]/the S-Video Input socket ]
[S-VIDEO IN (AV3)] and Audio Input sockets _
[AUDIO IN (AV3)] on the front panel of this VCR
≥ When connecting a mono type movie camera or
VCR to this VCR’s front AV sockets, connect to the L
(white) audio socket.
≥ Press the 3D DNR button g to turn 3D DNR function off so
that 3D DNR lamp is not lit, to ensure editing with optimal
picture quality.
_
Video movie
camera
Rear
n
Other VCR
o
5 When that point is reached, press the Pause/Slow button
7 again to start recording the new picture and sound
from the playback unit.
6 To record (copy) additional scenes, press the Pause/
Slow button 7 to put this VCR in the recording pause
mode and then perform steps 4 and 5 again.
7 At the point where you want to stop recording, press the
Stop button 9 to finish recording.
Hint:
≥ The new sound is recorded on both the Hi-Fi audio tracks
and the normal audio track. The sound recorded on the
normal audio track is always in mono.
Note:
≥ If you leave the VCR in the recording pause mode for more
than 5 minutes in step 3 or 6, the VCR automatically
switches over to the stop mode to protect the video heads.
Operations
1 Press the Play button I to start playback.
2 At the point where you want to join a new scene, press
the Pause/Slow button 7 to put it in the still playback
mode.
3 Press the REC button J to put it in the recording pause
mode.
4 Start playback on the source unit and search for the
point from which you want to record (copy) onto this
VCR.
34
Page 35

Album Function
The album function lets you collect desired scenes (both
moving and still pictures) and create the equivalent of a photo
album, but on video cassette. The pictures can be copied
onto the cassette from a digital video movie camera, a digital
still camera or a digital VCR for any desired time that you can
preset.
To Change the Recording Time:
After step 1 or 3, press the
INDEX L or INDEX K
button K to change the
recording time. You can set any
time between “3” and “20”
seconds.
REC
Indication when the recording
time is set to “10”
Recording unit (this VCR) Recording unit (this VCR)
]
_
Digital still
camera
^
Digital Video
movie camera
Preparations
≥ Connect a digital still camera, a digital video movie camera
or another external digital source to the Video Input socket
^ [VIDEO IN (AV3)]/the S-Video Input socket ]
[S-VIDEO IN (AV3)] and Audio Input sockets _
[AUDIO IN (AV3)] on the front panel of this VCR.
≥ Display the VCR picture on the TV.
≥ Insert a cassette with intact erasure prevention tab.
As soon as the cassette is inserted, the Cassette Number
Check starts. Wait a few moments until it is completed.
(See page 16.)
≥ Press the 3D DNR button g to turn 3D DNR function off so
that 3D DNR lamp is not lit, to ensure editing with optimal
picture quality.
Hints:
≥ If you connect a digital still camera, use a camera equipped
with the video output socket. Use the cable supplied with
the still camera to connect it. For details, also read the
operating instructions of the equipment to be connected.
≥ If you leave the VCR in the recording pause mode for more
than 5 minutes in step 1 or 3, the VCR automatically
switches over to the stop mode to protect the video heads.
In this case, press the STILL ALBUM button @ again to put
the VCR in the recording pause mode again.
≥ If you want to add background music or narration to the
scenes recorded with the album function, perform Audio
Dubbing as explained on the page 36.
≥ Depending on the output system of the digital still camera,
the pictures may not be recorded correctly.
≥ If you dub still pictures from a conventional analogue video
movie camera or VCR, some picture distortion may occur in
the recorded picture.
Operations
1 Press the STILL ALBUM
button @ on the remote
REC
control to put the VCR in the
recording pause mode.
≥ The VCR automatically selects the AV Input (external
input) “A3” and then switches over to the recording
pause mode. The figure for the preset recording time
(seconds) appears on the VCR display. The initial
setting is “05” (5 seconds).
2 Start playback on the source unit to search for the point
from which you want to copy onto this VCR.
3 When that point is reached,
press the STILL ALBUM
button @ on the remote
REC
control of this VCR again to
start recording.
The VCR records the picture (and sound) for 5 seconds
and then automatically switches over to the recording
pause mode.
4 Repeat above steps 2 and 3 to record other scenes in
succession.
5 When you have recorded all desired scenes, press the
Stop button 9 to finish recording.
Advanced Operations
35
Page 36

Audio Dubbing
The audio dubbing function lets you record new sound onto
the normal (mono) audio track. Although this erases the
original sound on the normal audio track, the sound on the HiFi audio tracks remains unchanged. Use this function to add
narration or background music to a previously made
recordings.
Í/I
<
EJECT
AV3
S-VIDEO IN
AUDIO IN
Audio equipment or
Video movie camera
1
2
ADUB
3
ADUB
5
TBC
S-VHS/S-VHS ET
_
DIRECT
TV REC
A.DUB
b
6
Preparations
≥ Connect the audio equipment or a video movie camera to
this VCR with an audio cable.
≥ Display the VCR picture on the TV.
≥ Insert the cassette on which the audio dubbing is to be
performed, and make sure that its erasure prevention tab is
not broken out.
As soon as the cassette is inserted, the Cassette Number
Check starts. Wait a few moments until it is completed.
(See page 16.)
≥ Press the INPUT SELECT button 3 to select the AV Input
(external input) “A1”, “A2” or “A3” according to the socket(s)
on the VCR to which you have connected the source unit.
A1: When connected to the AV1 21-pin Scart socket n
[AV1 (TV)]
A2: When connected to the AV2 21-pin Scart socket o
[AV2 (DECODER/EXT)]
≥ Make sure that “AV2” is set to “EXT”.
(See page 51.)
A3: When connected to the Audio Input sockets _
[AUDIO IN (AV3)] on the front panel of this VCR
≥ When connecting a mono type movie camera or
VCR to this VCR’s front AV sockets, connect to the L
(white) audio socket.
Operations
1 Press the Play button I on this VCR to start playback to
search for the point from which you want to start audio
dubbing.
2 At the point from which you want to perform audio
dubbing, press the Pause/Still button i on this VCR to
put it in the still playback mode.
3 Press the A.DUB button b on this VCR to put it in the
recording pause mode.
4 Start playback on the source unit so that you can hear
the sound.
5 When you reach the point from
which you want to start audio
dubbing, press the Pause/Still
button i on this VCR again to
start recording the new sound or
ADUB 0:00.29
start your narration.
6 At the point where you want to stop audio dubbing, press
the Stop button 9 to finish recording.
Hints:
≥ The new sound is recorded on the normal audio track. The
original sound remains on the Hi-Fi audio tracks. The
sound recorded on the normal audio track is always in
mono.
≥ For audio dubbing with narration, you can use the built-in
microphone of the connected video movie camera.
≥ To listen to the sound recorded with audio dubbing, press
the AUDIO button ? during playback to select the normal
audio track. (For details, refer to page 49.)
≥ To listen to the sound recorded with audio dubbing together
with the original sound, first set “Audio mode” to “MIX” (for
details, refer to page 52) and then press the AUDIO button
? during playback to select the mixed sound.
36
Page 37

Audio Dubbing on a Panasonic Hi-Fi VCR
General
≥ The VHS format allows audio dubbing only on the normal (mono) audio track, as the Hi-Fi audio tracks cannot be
re-recorded without erasing the video signal.
≥ This VCR's audio dubbing function features automatic recording volume level adjustment, and manual adjustment is
not possible. Therefore, when performing audio dubbing on this VCR, the volume level must be considered in advance.
If necessary, make a trial audio dubbing on another tape containing some unneeded recording, to ensure that the
volume level of the audio dubbed sound will be satisfactory.
A. Audio Dubbing and then Playing Back the Audio-Dubbed Mono Sound Alone
1 Press the INPUT SELECT button 3 to select the AV input terminal to which the audio dubbing source unit is
connected.
2 Press the Play button I to search for the tape position at which the audio dubbing is to start.
3 Press the AUDIO button ? repeatedly until the “– –” indication appears.
≥ The normal audio track is now selected.
4 Press the Pause/Still button i at this position.
5 Press the A.DUB button b to switch the VCR over to the audio dubbing mode.
6 Press the Pause/Still button i to start audio dubbing.
7 After audio dubbing has been completed, rewind the tape, play it back and make sure that the normal audio track is
selected (see step 3 above).
8 Check if the audio dubbing was performed to your satisfaction.
B. Audio Dubbing and then Playing Back the Audio-Dubbed Mono Sound and
Original Hi-Fi Sound Together (Hi-Fi Mix Function)
1 Press the INPUT SELECT button 3 to select the AV input terminal to which the audio dubbing source unit is
connected.
2 Press the Play button I to search for the tape position at which the audio dubbing is to start.
3 Press the AUDIO button ? repeatedly until the “LR” indication appears.
≥ The Hi-Fi audio tracks are now selected.
4 Press the Pause/Still button i at this position.
5 Press the A.DUB button b to switch the VCR over to the audio dubbing mode.
6 Press the Pause/Still button i to start audio dubbing.
7 After audio dubbing has been completed, rewind the tape, play it back and set “Audio mode” to “MIX”.
(For details, refer to page 52.)
8 Check if the audio dubbing was performed to your satisfaction. The original sound and the new sound are heard
simultaneously (mixed together).
C. Externally Mixing the Sound from the Hi-Fi Tracks with the New Sound for Audio
Dubbing and then Playing It Back (To produce audio-dubbed tapes for playback on mono VCRs)
1 Press the INPUT SELECT button 3 to select the AV input terminal to which the audio dubbing source unit is
connected.
2 Press the Play button I to search for the tape position at which the audio dubbing is to start.
3 Press the AUDIO button ? repeatedly until the “LR” indication appears.
4 Press the Pause/Still button i at this position.
5 Press the A.DUB button b to switch the VCR over to the audio dubbing mode.
≥ Input both the original signals of the Hi-Fi tracks (from the AV1, AV2 or the Audio Output sockets) and the new
sound into a mixing console (optional), and then input the mixed sound back into the VCR for audio dubbing.
6 Press the Pause/Still button i to start audio dubbing.
7 After audio dubbing has been completed, rewind the tape, play it back and press the AUDIO button ? repeatedly until
the “– –” indication appears.
≥ The normal audio track is now selected.
8 Check if the audio dubbing was performed to your satisfaction. The original sound and the new sound are heard
simultaneously (mixed together).
Advanced Operations
37
Page 38

Connecting the VCR to a Decoder/
Connecting the VCR to a Stereo Amplifier
To connect this VCR to a decoder or a stereo amplifier, make
the connections shown in the illustration below.
For the connection to the TV, see pages 10, 12 and 13.
For details about the connection, also read the operating
instructions of the decoder or stereo amplifier.
Be sure to keep the VCR, TV and decoder or stereo amplifier
switched off until you have finished all connections.
For your safety, do not connect or handle the equipment with
wet hands.
To Connect the VCR to a Decoder
Decoder here refers to the device used to decode scrambled
broadcasts (Pay TV).
o
Decoder (not supplied)
1
≥ When you start playback on the VCR, the TV is
automatically switched to the VCR mode. However, during
playback, it is not possible to switch the TV back to the TV
mode.
≥ If a Pay TV station has been selected on the VCR when
you switch to the TV mode, the picture on the TV is
scrambled when you select a Pay TV station on the TV. In
this case, either switch to the VCR mode or select the AV
input on the TV.
Hint:
≥ “RGB” means separate Red/Green/Blue colour signals. If
you connect a TV equipped with RGB input capability to the
AV1 socket n on this VCR, and a decoder equipped with
RGB output capability to the AV2 socket o, the TV can
receive RGB signal input from the decoder via the VCR.
To Connect the VCR to a Stereo Amplifier
Audio cable
(not supplied)
1
Audio Input sockets
q
2
To an AC mains socket
1 Connect a 21-pin Scart cable (not supplied) to the AV2
21-pin Scart socket o on the VCR and to the 21-pin
Scart socket on the decoder.
2 Connect the decoder’s mains lead to an AC mains
socket.
3 Set “AV2” to “DECODER”.
For details, see page 51.
AV Link Function
If the VCR is connected to the TV via a 21-pin Scart cable,
you can use AV LINK button B to switch the TV from normal
TV reception over to the video playback channel (AV input)
(and vice versa). In the VCR mode (when the VCR indication
in the VCR display is lit), the TV is switched to the video
playback channel (AV input). In the TV mode (when the VCR
indication is not lit), the TV is switched to TV reception.
VCR Mode
TV Mode
VCR indication
is lit.
VCR indication
is not lit.
21-pin Scart socket
VCR
21-pin Scart cable
(not supplied)
TV
AV Input
is selected.
TV reception is
selected.
Stereo amplifier (not supplied)
2
To an AC mains socket
1 Connect an Audio cable (not supplied) to the Audio
Output sockets q on the VCR and to Audio Input
sockets on the stereo amplifier.
2 Connect the stereo amplifier’s mains lead to an AC
mains socket.
≥ When you press the MENU button U to display the menu
on the TV screen, the TV is also automatically switched to
the VCR mode, however, the VCR indication does not
appear in this case.
38
Page 39

Connecting the VCR to a Satellite Receiver or Digital Receiver
Satellite receiver here includes a digital receiver.
The connection method differs depending on the type of your
satellite receiver.
For details about the connection, also read the satellite
receiver’s operating instructions.
If the Satellite Receiver is Equipped with a
21-pin Scart Socket
If your satellite receiver is equipped with a 21-pin Scart
socket, use a 21-pin Scart cable to connect the VCR.
For the connection to the TV, refer to pages 10, 12 and 13.
Be sure to keep the VCR, TV and satellite receiver switched
off until you have finished all connections.
For your safety, do not connect or handle the equipment with
wet hands.
Satellite receiver
(not supplied)
o
If the Satellite Receiver Is Not Equipped
with a 21-Pin Scart Socket
In case your satellite receiver is not equipped with a 21-pin
Scart socket, use the RF coaxial cable to connect it to the
VCR.
For the connection to the TV, refer to pages 10, 12 and 13.
Be sure to keep the VCR, TV and satellite receiver switched
off until you have finished all connections.
For your safety, do not connect or handle the equipment with
wet hands.
Satellite receiver
(not supplied)
Aerial (not supplied)
Aerial Input socket
Aerial lead
(not supplied)
1
To an AC mains socket
3
Aerial Output
socket
2
1
2
To an AC Mains socket
1 Connect a 21-pin Scart cable (not supplied) to the AV2
21-pin Scart socket o on the VCR and to the 21-pin
Scart socket on the satellite receiver.
2 Connect the satellite receiver’s mains lead to an AC
mains socket.
3 Set “AV2” to “EXT”.
For details, see page 51.
21-pin Scart socket
≥ If your satellite
receiver has a VCR
socket, connect the
cable to it.
21-pin Scart cable
(not supplied)
l
1 Connect the aerial lead to the Aerial Input socket on the
satellite receiver.
2 Connect the RF coaxial cable to the Aerial Output socket
on the satellite receiver and to the Aerial Input socket l
on the VCR.
3 Connect the satellite receiver’s mains lead to an AC
mains socket.
Hint:
≥ The RF output channel of the satellite receiver should be
adjusted away from channel 38, which is used by the VCR,
e.g. re-adjust to channel 33.
Note:
How to install the satellite receiver
Carefully observe the following points so that you can control
the satellite receiver from the VCR.
1 Place the satellite receiver on top of the VCR.
2 Move the satellite receiver back a few centimetres so
that infra-red signals emitted from the top of the VCR’s
front panel can be received by the satellite receiver.
Satellite receiver
RF coaxial cable
(not supplied)
21-pin Scart cable or
RF coaxial cable
Advanced Operations
Infra-red signal
transmitter
[
VCR
39
Page 40

To Prepare the VCR for Remote-controlled
p p
p p
p p
Operation of the Satellite Receiver
(Setting the Tuner Type)
This VCR lets you change the programme position on the
satellite receiver and programme timer recordings of satellite
programmes— all with this VCR’s remote control. This is
called “satellite control”.
To enable the VCR to control the satellite receiver, you need
to set the tuner type of your satellite receiver. You can find
the tuner type numbers on the enclosed list of compatible
satellite receivers. However, if your satellite receiver is not
included in this list, it cannot be remote-controlled via this
VCR.
Preparation
≥ Set the VCR/TV switch P to “VCR”.
Operations
1 Press the MENU button U to display the Main menu
on the TV screen.
2 Press the Cursor buttons
(3421) R to select
“Satellite”, “Connection” and
“NO” in this order.
Main menu
Timer record
Tape Library
Display
Tuning
Clock
Functions
Language
Country
Satellite
Connection: NO
Position:
Tuner type: 1
Hint:
≥ If you select “RF” in step 3, “Satellite–Position” is set
automatically and it is not possible to change the satellite
programme position here. If you want to change it, refer to
page 42.
Note:
≥ If your satellite receiver is not included in the list of
compatible satellite receivers, this VCR cannot control it.
3 Press the Cursor buttons (34)
R to select the type of
connection according to the type
of socket on the VCR to which
the satellite receiver is
connected.
Main menu
Timer record
Tape Library
Display
Tuning
Clock
Functions
Language
Country
Satellite
Connection: AV2
Position:
Tuner type: 1
NO: When the satellite receiver is not connected to the
VCR
RF: When the satellite receiver is connected to the
VCR’s Aerial Input socket
AV1: When the satellite receiver is connected to the
VCR’s AV1 21-pin Scart socket
AV2: When the satellite receiver is connected to the
VCR’s AV2 21-pin Scart socket
4 Press the OK button T.
5 Press the Cursor buttons (3421) R to select “Tuner
type” and “1” in this order.
6 Find your receiver in the
enclosed list of compatible
satellite receivers and enter its
tuner type number by pressing
the Numeric buttons 2.
Main menu
Timer record
Tape Library
Display
Tuning
Clock
Functions
Language
Country
Satellite
Connection: AV2
Position:
Tuner type: 1
7 Press the OK button T to conclude the setting.
8 Press the EXIT button S to exit the On Screen Display.
40
Page 41

To Prepare the Satellite Receiver
To make it possible for the VCR to control the satellite
receiver, the satellite receiver must be left in a certain
condition. This condition is called standby type, and it differs
depending on the make and model of satellite receiver. There
are five standby types (A, B, C, D, E) as listed below.
Find your satellite receiver in the enclosed list of compatible
satellite receivers and note its standby type. Then look up this
standby type in the chart below and determine which
action(s) you need to take to prepare your satellite receiver
so that this VCR can control it.
Standby
Type
Action
1
2
3
Action 1: Switch the satellite receiver on.
Action 2: Twin-tuner type satellite receiver: Select on the
tuner which is connected to the VCR.
(Please also refer to the satellite receiver’s
operating instructions.)
Action 3: Switch the satellite receiver’s channel display to the
2-digit display mode.
A
Yes
No
No
B
No
No
No
C
Yes
No
Yes
D
Yes
Yes
No
E
Yes
Yes
Yes
≥ The range of satellite channels available for selection is
1 through 99.
≥ Some satellite receivers offer less than 99 channels. In this
case, the number of the satellite channels that can be
controlled from the VCR is the same.
≥ Some satellite receivers offer more than 99 satellite
channels, but even in this case, only the satellite channels
1 through 99 can be controlled from the VCR.
≥ With some satellite receivers, it is necessary to wait a few
seconds between selecting one channel and selecting
another one with the remote control of the VCR.
≥ If the display on the satellite receiver does not indicate the
channels, refer to its operating instructions and follow the
procedure for displaying the channels.
To Check that the Satellite Channels Can
Be Selected Correctly
Preparation
≥ Set the VCR/TV switch P to “VCR”.
Operations
1 Press the Numeric buttons 2 to select the satellite
channel.
Example:
To select “SAT 9”: Enter
SAT
SAT
To select “SAT 19”: Enter
SAT
To select “SAT 129”: Enter
3-digit programme positions can be selected with this
remote control only in case of a satellite receiver that is
1
marked with (°
) on the enclosed list of compatible
satellite receivers.
2 Check that the channel on the satellite receiver has
been changed to the channel that you selected.
Notes:
≥ After you have finished all settings and preparations, use
the VCR’s remote control to check that the satellite
programmes can be selected correctly and timer recordings
of satellite broadcast can be performed correctly.
≥ With some satellite receivers, correct control from the VCR
may not be possible.
≥ There may be a slight delay between pressing the Numeric
buttons 2 on the remote control and the changing of the
channel on the satellite receiver. This is due to the need for
signal conversion.
SAT
0 9
0
0
0
1
1
.
9
.
2 9
Advanced Operations
.
41
Page 42

Tuning and Assigning the TV Stations Available in Your Area
s s s s s s s s
s s s s s s s s
s s s s s s s s
s s s s s s s s
s s s s s s s s
s s s s s s s s
s s s s s s s s
s s s s s s s s
s s s s s s s s
s s s s s s s s
s s s s s s s s
s s s s s s s s
s s s s s s s s
s s s s s s s s
s s s s s s s s
s s s s s s s s
s s s s s s s s
s s s s s s s s
s s s s s s s s
s s s s s s s s
s s s s s s s s
s s s s s s s s
to the Programme Positions (Manual Tuning)
This VCR has 99 programme positions that can be preset to
receive TV stations.
Usually, if you switch the VCR on for the first time after
making the necessary connections, the VCR will start the
Download or Auto Setup function automatically so that all
available TV stations in the area can be received.
However, if Auto Setup is not successful due to extraordinary
transmission circumstances, or if you want to change the
name of a TV station or change a TV station from its regular
programme position to one of your preference, you can set it
up manually. This is called Manual Tuning.
If Download from the TV occurs after you have performed
Manual Tuning, the manually performed tuning may be
cancelled.
In that case, perform Manual Tuning again.
Preparation
≥ Set the VCR/TV switch P to “VCR”.
To Change the Order in Which the TV
Stations Are Assigned to the Programme
Positions
1 Press the MENU button U to
display the Main menu on the
TV screen.
2 Press the Cursor buttons
(3421) R to select “Tuning”
and “Manual” in this order.
3 Press the OK button T to
display the list of tuned TV
stations.
4 Press the Cursor buttons
(3421) R to select the TV
station that you want to assign
to a different programme
position.
Main menu
Timer record
Tape Library
Display
Tuning
Clock
Functions
Language
Country
Satellite
Tuning
Pos Name Ch
1 ARD 1
2 ZDF 2
3N3 19
4 HR3 26
5 BR3 18
6 RB3 3
7 ¢¢¢07 3 9
8
9
10
Manual
Auto-Setup Restart
Download
Shipping condition
Pos Name Ch
11
12
13
14
15
16
17
18
19
20
To Enter or Change the Name of a TV
Station
1 Press the MENU button U to display the Main menu on
the TV screen.
2 Press the Cursor buttons (3421) R to select
“Tuning” and “Manual” in this order.
3 Press the OK button T to display the list of tuned TV
stations.
Tuning
4 Press the Cursor buttons
(3421) R to select a
programme position whose TV
station name is indicated as
¢∑∑∑∑.
Pos Name Ch
1 ARD 1
2 ZDF 2
3N3 19
4 HR3 26
5 BR3 18
6 RB3 3
7 ¢¢¢07 3 9
8
5 Press the OK button T to display the Manual Tuning
menu.
6 Press the Cursor buttons
(3421) R to select the entry
field for “Name”.
≥ The character list appears.
Tuning
Pos : 7
Name : SFB3
Channel : 39
Fine tuning : AUTO
Decoder : OFF
Video system : AUTO
Mono : OFF
Audio mode : BG
Title page : – – –
7 Use the Cursor buttons (3421) R and OK button T
to enter the station name.
≥ If the station name needs a blank space, select the
blank between “Z” and “¢”.
8 Press the EXIT button S to exit the On Screen Display.
Pos Name Ch
11
12
13
14
15
16
17
18
ABCDEFGHIJ
KLMNOPQRST
UVWXYZ ¢sr
0123456789
5 Press the OK button T to display the Manual Tuning
menu.
6 Press the Cursor buttons
(3421) R to select the entry
field for “Pos”.
7 Press the Numeric buttons 2 to
enter the number of the desired
Tuning
Pos : 5
Name : BR3
Channel : 18
Fine tuning : AUTO
Decoder : OFF
Video system : AUTO
Mono : OFF
Audio mode : BG
Title page : 301
programme position.
8 Press the OK button T to conclude the setting.
9 Press the EXIT button S to exit the On Screen Display.
42
Page 43

To Enter Newly Available TV Stations
s s s s s s s s
s s s s s s s s
s s s s s s s s
s s s s s s s s
s s s s s s s s
s s s s s s s s
s s s s s s s s
s s s s s s s s
s s s s s s s s
s s s s s s s s
s s s s s s s s
To Obtain the Best Tuning Condition
1 Press the MENU button U to display the Main menu on
the TV screen.
2 Press the Cursor buttons (3421) R to select
“Tuning” and “Manual” in this order.
3 Press the OK button T to display the list of tuned TV
stations.
4 Press the Cursor buttons
(3421) R to select an
unused programme position.
5 Press the OK button T to
display the Manual Tuning
Tuning
Pos Name Ch
1 ARD 1
2 ZDF 2
3N3 19
4 HR3 26
5 BR3 18
6 RB3 3
7 ¢¢¢07 3 9
8
9
Pos Name Ch
11
12
13
14
15
16
17
18
19
menu.
6 Press the Numeric buttons 2 to
enter the channel number of the
desired TV station.
≥ Wait a few moments until the
desired TV station has been
tuned.
Tuning
Pos : 8
Name : ¢¢¢ 08
Channel : 2
Fine tuning : AUTO
Decoder : OFF
Video system : AUTO
Mono : OFF
Audio mode : BG
Title page : – – –
7 Press the OK button T to conclude the setting.
1 Press the MENU button U to display the Main menu on
the TV screen.
2 Press the Cursor buttons (3421) R to select
“Tuning” and “Manual” in this order.
3 Press the OK button T to display the list of tuned TV
stations.
4 Press the Cursor buttons (3421) R to select the TV
station for which you want to obtain the best tuning
condition.
5 Press the OK button T to display the Manual Tuning
menu.
6 Press the Cursor buttons
(3421) R to select the entry
field for “Fine tuning”.
7 Press the Cursor buttons (34)
R to obtain the best tuning
Tuning
Pos : 5
Name : BR3
Channel : 18
Fine tuning : MAN.
Decoder : OFF
Video system : AUTO
Mono : OFF
Audio mode : BG
Title page : 301
condition.
≥ If you do not want to change the tuning condition,
press the Cursor button (1) R to return to the original
condition (AUTO).
8 Press the EXIT button S to exit the On Screen Display.
To Change the Channel Number of an Already Tuned
TV Station:
You can change it in the same way as explained above.
However, in step 4 select the programme position of the TV
station that you want to change to another channel number,
and after pressing the OK button T in step 5, use the Cursor
buttons (3421) R to select the entry field for “Channel”.
List of TV Reception Channels
Channel TV Channel
Indication PAL/SECAM/B.G SECAM OIRT PAL I
1 — R1 —
2– 3 — R2– R3 —
4 — R4 —
5– 8 — R5– R8 —
9 — R9 —
10– 12 E10–E12 R10–R12 —
13– 20 E2–E9 ——
21– 69 21– 69 21– 69 21–69
74 S1 ——
75 S2 ——
76 S3 ——
79 ———
80– 89 M1–M10 ——
90– 99 U1–U10 ——
121–141 °S21– S41 ——
°Only for 8 MHz channel raster
8 Press the OK button T to conclude the setting.
9 Press the EXIT button S to exit the On Screen Display.
To Preset Pay TV Stations
Set “AV2” to “DECODER”. See page 51.
1 Press the MENU button U to display the Main menu on
the TV screen.
2 Press the Cursor buttons (3421) R to select
“Tuning” and “Manual” in this order.
3 Press the OK button T to display the list of tuned TV
stations.
4 Press the Cursor buttons (3421) R to select the pay
TV station.
5 Press the OK button T to display the Manual Tuning
menu.
6 Press the Cursor buttons
(3421) R to select the entry
field for “Decoder”.
7 Press the Cursor buttons (34)
R to select “ON”.
ON: To preset pay TV stations.
OFF: To preset normal TV stations.
8 Press the OK button T to conclude the setting.
9 Press the EXIT button S to exit the On Screen Display.
Tuning
Pos : 5
Name : BR3
Channel : 18
Fine tuning : AUTO
Decoder : ON
Video system : AUTO
Mono : OFF
Audio mode : BG
Title page : 301
Various Settings
43
Page 44

To Change the Type of Video System
(Colour TV system)
1 Press the MENU button U to display the Main menu on
the TV screen.
7 Press the Cursor buttons (34) R to select “OFF”.
≥ Select “ON” if you want to record the normal (mono)
sound on the Hi-Fi audio tracks during a stereo,
bilingual or NICAM broadcast, or if the stereo sound is
distorted due to inferior reception conditions.
2 Press the Cursor buttons (3421) R to select
“Tuning” and “Manual” in this order.
3 Press the OK button T to display the list of tuned TV
stations.
4 Press the Cursor buttons (3421) R to select the TV
station for which you want to change the type of video
system.
5 Press the OK button T to display the Manual Tuning
menu.
6 Press the Cursor buttons
(3421) R to select the entry
field for “Video system”.
7 Press the Cursor buttons (34)
R to select “AUTO”.
Tuning
Pos : 5
Name : BR3
Channel : 18
Fine tuning : AUTO
Decoder : OFF
Video system : AUTO
Mono : OFF
Audio mode : BG
Title page : 301
The VCR automatically
distinguishes between PAL,
SECAM/MESECAM signals. If the picture lacks colour,
press the Cursor buttons (34) R to change the type of
video system “PAL” or “MESECAM”.
PAL: For receiving PAL signals.
MESECAM: For receiving SECAM/MESECAM signals.
8 Press the OK button T to conclude the setting.
9 Press the EXIT button S to exit the On Screen Display.
To Select the Type of Sound to Be
Recorded
1 Press the MENU button U to display the Main menu on
the TV screen.
8 Press the OK button T to conclude the setting.
9 Press the EXIT button S to exit the On Screen Display.
To Change the Audio System
1 Press the MENU button U to display the Main menu on
the TV screen.
2 Press the Cursor buttons (3421) R to select
“Tuning” and “Manual” in this order.
3 Press the OK button T to display the list of tuned TV
stations.
4 Press the Cursor buttons (3421) R to select the TV
station for which you want to change the type of video
system.
5 Press the OK button T to display the Manual Tuning
menu.
6 Press the Cursor buttons
(3421) R to select the entry
field for “Audio mode”.
7 Press the Cursor buttons (34)
R to select the desired Audio
mode.
BG: PAL B.G.H/SECAM B.G
DK: PAL D/SECAM D.K.K1
I: PAL I
8 Press the OK button T to conclude the setting.
9 Press the EXIT button S to exit the On Screen Display.
Tuning
Pos : 5
Name : BR3
Channel : 18
Fine tuning : AUTO
Decoder : OFF
Video system : AUTO
Mono : OFF
Audio mode : BG
Title page : 301
2 Press the Cursor buttons (3421) R to select
“Tuning” and “Manual” in this order.
3 Press the OK button T to display the list of tuned TV
stations.
4 Press the Cursor buttons (3421) R to select the
desired TV station.
5 Press the OK button T to display the Manual Tuning
menu.
6 Press the Cursor buttons
(3421) R to select the entry
field for “Mono”.
Tuning
Pos : 5
Name : BR3
Channel : 18
Fine tuning : AUTO
Decoder : OFF
Video system : AUTO
Mono : OFF
Audio mode : BG
Title page : 301
44
Page 45

To Change the Title Teletext Page Number
(Title page)
TV stations broadcast the titles of their TV programmes on
special title Teletext pages. If a station does not broadcast
EPG (Electronic Programme Guide) information, this title
information can automatically be registered by the Tape
Library for recorded programmes.
This VCR automatically selects the correct title Teletext page
number of each terrestrial TV station. However, TV stations
may change this Teletext page number for technical reasons.
In such a case, you need to change the setting for the title
Teletext page to the new number as explained below,
otherwise the titles of recorded programmes cannot
automatically be registered in the VCR’s Tape Library.
For satellite TV stations, however, the title Teletext page
numbers cannot be set. Therefore, the titles of recorded
satellite TV programmes cannot automatically be registered
by the Tape Library from the Teletext pages. In this case,
enter the title manually after recording.
≥ From the Teletext service on your TV, make note of the
page number of the “Title page” service for the required
broadcaster.
1 Press the MENU button U to display the Main menu on
the TV screen.
2 Press the Cursor buttons (3421) R to select
“Tuning” and “Manual” in this order.
To Record the Title When Recording a Satellite TV or PayTV Programme:
After performing operation steps 1 to 3, perform the following
steps:
4 If the satellite receiver (or
decoder) is connected via
21-pin Scart cable:
Press the Cursor buttons
(3421) R to select AV2.
Tuning
Pos Name Ch
81
– – – – – – – –
82
– – – – – – – –
83
– – – – – – – –
84
– – – – – – – –
85
– – – – – – – –
86
– – – – – – – –
87
– – – – – – – –
88
– – – – – – – –
89
– – – – – – – –
90
– – – – – – – –
Pos Name Ch
91
– – – – – – – –
92
– – – – – – – –
93
– – – – – – – –
94
– – – – – – – –
95
– – – – – – – –
96
– – – – – – – –
97
– – – – – – – –
98
– – – – – – – –
99
– – – – – – – –
AV1
AV2
If the satellite receiver is connected via RF coaxial cable:
Press the Cursor buttons (3421) R to select the
desired TV station.
5 Press the OK button T to display the Manual Tuning
menu.
6 Press the Cursor buttons (21) R to select the entry
field for “Title page”.
≥ This step is not necessary, if the satelllite receiver (or
decoder) is connected via 21-pin Scart cable.
7 Press the Cursor buttons (34)
R to select “AUTO”.
This VCR records the title when
recording a programme.
If you do not want to record the
Tuning
Title page : AUTO
title, set to “OFF”.
3 Press the OK button T to display the list of tuned TV
stations.
4 Press the Cursor buttons (3421) R to select the TV
station whose title Teletext page number you want to
change.
5 Press the OK button T to display the Manual Tuning
menu.
6 Press the Cursor buttons
(3421) R to select the entry
field for “Title page”.
7 Press the Numeric buttons 2 or
the Cursor buttons (34) R to
Tuning
Pos : 5
Name : BR3
Channel : 18
Fine tuning : AUTO
Decoder : OFF
Video system : AUTO
Mono : OFF
Audio mode : BG
Title page : 301
select the correct Teletext page
number.
8 Press the OK button T to conclude the setting.
9 Press the EXIT button S to exit the On Screen Display.
8 Press the OK button T to conclude the setting.
9 Press the EXIT button S to exit the On Screen Display.
Note:
≥ Depending on broadcast signal condition, the titles may not
be got correctly.
Various Settings
45
Page 46

To Facilitate the Following Operations with
5 BR3 18
15 POS15 81
p p p p p p p p
p p p p p p p p
p p p p p p p p
p p p p p p p p
the Instruction Indications on the On
Screen Display
≥ To delete a programme position
≥ To insert a blank programme position
≥ To move a TV station to another programme position
Use the coloured instruction indications displayed below the
list of tuned TV stations and the corresponding coloured
buttons.
If downloading of the setup data has been performed, only
the instruction indication “
1 Press the MENU button U to display the Main menu on
the TV screen.
2 Press the Cursor buttons (3421) R to select
“Tuning” and “Manual” in this order.
3 Press the OK button T to display the list of tuned TV
stations.
4 Press the Cursor buttons
(3421) R to select the
desired TV station.
5 Follow the operations below.
To delete a programme position (Delete):
Press the Channel button (J, red) :.
To insert a blank programme position (Add):
Press the DATE button (i, green) ;.
To move a TV station to another programme position
(Move):
Press the ON button (i, yellow) G, and then use
the Cursor buttons (34) R to select the new
programme position to which you want to assign the
TV station.
Delete” appears.
Delete
Indications for Delete, Add
and Move
6 RB3 3
7 SFB3 36
8 SW3 29
9 WDR3 17
10 MDR3 32
Add
16 POS16 83
17
18
19
20
Move
6 Press the OK button T to conclude the setting.
7 Press the EXIT button S to exit the On Screen Display.
Hint:
≥ If you have performed Manual Tuning to enter TV stations,
the “– –” indication may appear under “Pos/Name” on the
On Screen Display when programming a ShowView timer
recording.
46
Page 47

Restarting the Auto Setup or Download/
Resetting the VCR to the Shipping Condition
Performing Auto Setup or Download automatically tunes all
TV stations available in your area for the VCR.
Restarting this function is convenient when you move to
another area and may need to set up the VCR again.
To Restart the Auto Setup
To perform the Auto Setup again, follow the operation steps
below.
1 Press the MENU button U to display the Main menu on
the TV screen.
Main menu
2 Press the Cursor buttons
(3421) R to select “Tuning”
and “Auto-Setup Restart” in this
order.
3 Press the OK button T to prepare for Auto Setup start.
4 Press the OK button T again to
actually start the Auto Setup.
Timer record
Tape Library
Display
Tuning
Clock
Functions
Language
Country
Satellite
Auto-Setup
Auto-Setup
in progress,
please wait.
Manual
Auto-Setup Restart
Download
Shipping condition
Ch 21
To Return the VCR to the Shipping
Condition
If you want to reset the VCR to the factory preset condition,
follow the operation steps below.
1 Press the MENU button U to display the Main menu on
the TV screen.
2 Press the Cursor buttons
(3421) R to select “Tuning”
and “Shipping condition” in this
order.
3 Press the OK button T to
prepare for resetting the VCR
to the shipping condition.
4 Press the OK button T two more times to actually
change the settings back to the shipping condition.
≥ To re-tune the VCR, disconnect and reconnect the AC
Mains Cable.
Main menu
Timer record
Tape Library
Display
Tuning
Clock
Functions
Language
Country
Satellite
Manual
Auto-Setup Restart
Download
Shipping condition
To Restart the Download
To perform the Download again, follow the operation steps
below.
1 Press the MENU button U to display the Main menu on
the TV screen.
2 Press the Cursor buttons
(3421) R to select “Tuning”
and “Download” in this order.
3 Press the OK button T to prepare for Download start.
4 Press the OK button T again to
actually start the Download.
Main menu
Timer record
Tape Library
Display
Tuning
Clock
Functions
Language
Country
Satellite
Download
Download in
progress,
please wait.
Position 67
Manual
Auto-Setup Restart
Download
Shipping condition
Various Settings
47
Page 48

Setting the VCR’s Clock
When “Россия” (Russia) is selected in the Country setting
menu, the “Automatic” field does not appear on Clock setting
menu.
Usually, the VCR’s Auto Setup or Download function
automatically adjusts the clock to the correct time.
Under some reception conditions, however, the VCR cannot
set the clock automatically.
In this case, follow the operation steps below to manually set
the clock.
To Manually Adjust the Clock
1 Press the MENU button U to display the Main menu on
the TV screen.
2 Press the Cursor buttons (34) R to select “Clock”.
≥ The Clock setting menu appears on the TV.
3 Use the Cursor button (1) R to
move to the Clock setting menu,
confirm that “Automatic” is set to
“OFF”, and then press the
OK button T.
Main menu
Timer record
Tape Library
Display
Tuning
Clock
Functions
Language
Country
Satellite
Automatic:OFF
Time : 20:30:24
Date : 16.10.05
To Activate the Automatic Time Correction
Function
If a TV station transmits a signal for time setting, performing
the operation steps below activates the Automatic time
correction function and the time is corrected automatically.
1 Press the MENU button U to display the Main menu on
the TV screen.
2 Press the Cursor buttons (34) R to select “Clock”.
≥ The Clock setting menu appears on the TV.
3 Use the Cursor button (1) R to
move to the Clock setting menu,
and then use the Cursor buttons
(34) R to set “Automatic” to
“ON”.
4 Press the OK button T to conclude the setting.
≥ Under adverse reception conditions, etc., the
Automatic time correction function may not work. In
this case, the indication for “Automatic” is
automatically reset to “OFF”.
If the reception conditions improve later on, it may be
possible to activate this function.
Main menu
Timer record
Tape Library
Display
Tuning
Clock
Functions
Language
Country
Satellite
Automatic:ON
Time : 20:30:24
Date : 16.10.05
4 Use the Cursor buttons
(3421) R to set the date and
time.
≥ Instead of the Cursor buttons
(3421) R, you can also
use the numeric buttons 2 to
Main menu
Timer record
Tape Library
Display
Tuning
Clock
Functions
Language
Country
Satellite
Automatic:OFF
Time : 20:30:24
Date : 16.10.05
set the date and time.
(Set the VCR/TV switch P to “VCR”.)
5 Press the OK button T to conclude the setting.
6 Press the EXIT button S to exit the On Screen Display.
5 Press the EXIT button S to exit the On Screen Display.
Hints:
≥ If “Automatic” is set to “ON” when you open the Clock
screen, do not set it to “OFF”, otherwise, the automatic time
correcting function is deactivated.
≥ The built-in clock employs the 24-hour system.
≥ In case of a power failure, an automatic back-up system
automatically maintains the operation of the clock for at
least 60 minutes.
≥ When “Automatic” on the Clock setting menu is set to “ON”,
the automatic time correction function checks and if
necessary adjusts the time several times every day.
The automatic time correction function only works when the
VCR is switched off; it does not work in the timer recording
standby mode.
≥ If “Automatic” is set to “OFF” and “Power save” to “ON” (see
page 50), the time may not be maintained correctly. In this
case, manually adjust the clock.
≥ If “Automatic” is set to “ON” and “Power save” to “ON”, the
Automatic time correction function does not work while the
VCR is turned off. However, as soon as it is turned on, the
Automatic time correction function is activated and the
clock is set correctly.
48
Page 49

Other Convenient Functions (Various Settings)
Settings for the Main Menu Item
“Display”
For Automatic Display of the Channel
Guide on the TV Screen Each Time You
Change the Programme Position
1 Press the MENU button U to display the Main menu on
the TV screen.
2 Press the Cursor buttons
(3421) R to select “Display”
and “Channel Guide” in this
order. Then, select the “Channel
Guide” field.
3 Press the Cursor buttons (34)
R to select “ON”.
≥ Each time you change the
programme position with the
Channel button N, the
Channel Guide indication
appears for a few seconds.
Set the VCR/TV switch P to
“VCR”.
4 Press the OK button T to conclude the setting.
5 Press the EXIT button S to exit the On Screen Display.
For Automatic Display on the TV Screen of
the TV Station Information, etc.
Main menu
Timer record
Tape Library
Display
Tuning
Clock
Functions
Language
Country
Satellite
8 SW3
7 SFB3
6 RB3
5 BR3
4 HR3
3N3
2ZDF
1 ARD
A3 AV3
A2 AV2
A1 AV1
Channel Guide indication
Channel Guide
OSD :4:3
Power save :OFF
VCR display :
: OFF
DIMMED
Indications that Can Be Displayed on the TV Screen with
This Function:
At a press of the OSD/DISPLAY button 5, the following
indications appear on the TV screen.
1 TV station name
12 3 4
ARD PAL STEREO
L R SP
2 Video system (colour TV system)
7
0:00.29
8
2
E-180
6
3 STEREO, M1 and M2 Indicator
When receiving a TV programme with the Stereo,
Bilingual or NICAM sound system, the type of sound
system in which it is broadcast is automatically indicated.
STEREO: When receiving a Stereo/NICAM stereo
broadcast.
M1/M2: When receiving a Bilingual/NICAM dual-sound
broadcast.
M1: When receiving a NICAM monaural broadcast.
4 Sound mode during playback (L/R)
At each press of the AUDIO button ?, the selected
playback sound is indicated with L (Left) and R (Right).
Stereo playback:
The L and R indications are displayed.
Left audio channel playback:
The L indication alone is displayed.
Right audio channel playback:
The R indication alone is displayed.
Playback of normal audio track:
Neither L nor R indication is displayed.
5
1 Press the MENU button U to display the Main menu on
the TV screen.
2 Press the Cursor buttons
(3421) R to select “Display”
and “OSD” in this order. Then,
select the “OSD” field.
Main menu
Timer record
Tape Library
Display
Tuning
Clock
Functions
Language
Country
Satellite
Channel Guide
OSD :4:3
Power save :OFF
VCR display :
: OFF
DIMMED
3 Press the Cursor buttons (34) R to select “4:3”, “OFF”
or “16:9”.
Normally set to “4:3”.
≥ When using wide type of TV screen and selecting the
wide screen mode on the TV setting, indications do
not appear.
Therefore, set to “16:9”.
≥ Even if setting to “16:9”, indications may be cut off
depending on the TV.
OFF: No indicators appear.
4 Press the OK button T to conclude the setting.
5 Press the EXIT button S to exit the On Screen Display.
5 Tape speed indicator
6 Tape length indicator
At each press of the TAPE button C, the selected tape
length is indicated.
2E-180: For E30, -60, -90, -120 and -180 tapes
2E-195: For E195 tape
2E-240: For E240 tape
E-2601: For E260 and -300 tapes
≥ Even if you have selected the correct tape length, the
remaining tape time may not be indicated correctly with
certain kinds of cassettes.
7 Tape running display
Stop ∑
Rewind 6
Fast Forward 5
Playback !
Recording ¥
Recording pause +
Repeat Playback R
Audio Dubbing ADUB
Various Settings
49
Page 50

8 Present time/Tape counter/Remaining tape time/Index
Search/One-Touch Recording (OTR)/Playback Off
Timer Function
Present time 17:24:31
Tape counter j2:35.47
Remaining tape time REMAIN: 2:34
Index Search 5 02
One-Touch Recording (OTR) OTR 60
Playback Off Timer Function 30
Notes:
≥ If “OSD” is set to “OFF”, none of the above indications
appear.
≥ None of the above indications appear during special
playback.
≥ During playback and when the AV input for the external
source is selected, indications 1, 2 and 3 do not appear.
≥ Some of the above indications do not appear when using
NTSC tapes.
For Automatic Change of the Brightness
of the VCR Display When the VCR Is
Switched Off
1 Press the MENU button U to display the Main menu on
the TV screen.
2 Press the Cursor buttons
(3421) R to select “Display”
and “VCR display” in this order.
Then, select the “VCR display”
field.
3 Press the Cursor buttons (34) R to select the desired
condition.
≥ When the VCR is switched off, the brightness of the
VCR display is as follows:
ON: Indications are brightly lit.
OFF: Indications are not lit.
DIMMED: Indications are dimly lit.
4 Press the OK button T to conclude the setting.
Main menu
Timer record
Tape Library
Display
Tuning
Clock
Functions
Language
Country
Satellite
Channel Guide
OSD :4:3
Power save :OFF
VCR display :
: OFF
DIMMED
For Reduced the VCR’s Power
Consumption When the VCR Is Switched
Off
1 Press the MENU button U to display the Main menu on
the TV screen.
2 Press the Cursor buttons
(3421) R to select “Display”
and “Power save” in this order.
Then, select the “Power save”
field.
3 Press the Cursor buttons (34) R to select “ON” or
“OFF”.
ON: In this setting, the power consumption is greatly
minimised when the VCR is turned off (Standby
mode). In this case, the following happens:
≥ The item “VCR display” is automatically set to
“OFF”.
≥ To turn the VCR on, keep the VCR-ON/OFF
button 1 pressed on the VCR main unit. It is not
possible to turn it on with the remote control.
≥ The Power save function works only when the
VCR is turned off (Standby mode). It does not
operate in the timer recording standby mode.
After all programmed timer recordings have
been made, and after all programmed data have
been erased, the VCR switches over to the
Power save mode.
≥ When the VCR is off, Pay TV programmes
cannot be watched on the TV because the
signal from the connected decoder is not looped
through. To watch them, turn on the VCR.
OFF: In this setting, the power consumption is not
reduced when the VCR is turned off (Standby
mode).
Main menu
Timer record
Tape Library
Display
Tuning
Clock
Functions
Language
Country
Satellite
Channel Guide
OSD :4:3
Power save :OFF
VCR display :
: OFF
DIMMED
5 Press the EXIT button S to exit the On Screen Display.
4 Press the OK button T to conclude the setting.
5 Press the EXIT button S to exit the On Screen Display.
50
Page 51

Settings for the Main Menu Item
“Functions”
To Set RFC System the same as the TV
system of the connected TV
To Set the Type of External Source
Equipment that Is Connected to the AV2
21-pin Scart Socket
1 Press the MENU button U to display the Main menu on
the TV screen.
2 Press the Cursor buttons
(3421) R to select
“Functions” and “AV2” in this
order. Then, select the “AV2”
field.
Main menu
Timer record
Tape Library
Display
Tuning
Clock
Functions
Language
Country
Satellite
AV2:
DECODER
TV system: AUTO
RFC system:DK
Colour mode: COLOUR
Picture: AUTO
Remote: VCR 1
Audio mode:NORMAL
S-VHS P.B.: AUTO
NTSC P.B.: PAL TV
3 Press the Cursor buttons (34) R to select the type of
external source equipment which is connected to the
VCR’s AV2 21-pin socket.
≥ Set the external source equipment as follows:
DECODER: When a decoder is connected.
EXT: When another VCR or a satellite receiver
is connected.
4 Press the OK button T to conclude the setting.
5 Press the EXIT button S to exit the On Screen Display.
To Set the Colour TV System Used During
Playback or Recording from an External
Source
1 Press the MENU button U to display the Main menu on
the TV screen.
2 Press the Cursor buttons
(3421) R to select
“Functions” and “TV system” in
this order. Then, select the
“TV system” field.
Main menu
Timer record
Tape Library
Display
Tuning
Clock
Functions
Language
Country
Satellite
AV2:
DECODER
TV system: AUTO
RFC system:DK
Colour mode: COLOUR
Picture: AUTO
Remote: VCR 1
Audio mode:NORMAL
S-VHS P.B.: AUTO
NTSC P.B.: PAL TV
1 Press the MENU button U to display the Main menu on
the TV screen.
2 Press the Cursor buttons
(3421) R to select
“Functions” and “RFC system” in
this order. Then, select the
“RFC system” field.
Main menu
Timer record
Tape Library
Display
Tuning
Clock
Functions
Language
Country
Satellite
AV2:
DECODER
TV system: AUTO
RFC system:DK
Colour mode: COLOUR
Picture: AUTO
Remote: VCR 1
Audio mode:NORMAL
S-VHS P.B.: AUTO
NTSC P.B.: PAL TV
3 Press the Cursor buttons (34) R to select the type of
RFC System the same as the TV system of the
connected TV.
TV system RFC system
PAL D/SECAM D.K.K1 DK
PAL B.G.H/SECAM B.G BG
PAL I I
4 Press the OK button T to conclude the setting.
5 Press the EXIT button S to exit the On Screen Display.
To Set the Colour Mode for Playback
1 Press the MENU button U to display the Main menu on
the TV screen.
Main menu
2 Press the Cursor buttons
(3421) R to select
“Functions” and “Colour mode”
in this order. Then, select the
“Colour mode” field.
Timer record
Tape Library
Display
Tuning
Clock
Functions
Language
Country
Satellite
3 Press the Cursor buttons (34) R to select the desired
Colour mode for playback.
COLOUR: Normally select this setting.
B/W: To play back a cassette recorded in black
and white.
AV2:
DECODER
TV system: AUTO
RFC system:DK
Colour mode: COLOUR
Picture: AUTO
Remote: VCR 1
Audio mode:NORMAL
S-VHS P.B.: AUTO
NTSC P.B.: PAL TV
3 Press the Cursor buttons (34) R to select the type of
colour TV system (AUTO, PAL or MESECAM) to be
used during playback or during recording from an
external source.
4 Press the OK button T to conclude the setting.
5 Press the EXIT button S to exit the On Screen Display.
4 Press the OK button T to conclude the setting.
5 Press the EXIT button S to exit the On Screen Display.
Various Settings
51
Page 52

To Set the Playback Picture Sharpness
(Sharper or Softer)
To Set the Audio Mode to Be Used During
Playback
1 Press the MENU button U to display the Main menu on
the TV screen.
2 Press the Cursor buttons
(3421) R to select
“Functions” and “Picture” in this
order. Then, select the “Picture”
field.
Main menu
Timer record
Tape Library
Display
Tuning
Clock
Functions
Language
Country
Satellite
AV2:
DECODER
TV system: AUTO
RFC system:DK
Colour mode: COLOUR
Picture: AUTO
Remote: VCR 1
Audio mode:NORMAL
S-VHS P.B.: AUTO
NTSC P.B.: PAL TV
3 Press the Cursor buttons (34) R to the desired picture
sharpness for playback.
Although the VCR adjusts the picture sharpness
automatically, you can change it, if necessary.
AUTO: To select automatic sharpness adjustment of
the playback picture.
SHARP: To make the playback picture sharper.
SOFT: To make the playback picture softer.
4 Press the OK button T to conclude the setting.
5 Press the EXIT button S to exit the On Screen Display.
To Set the Remote Control Mode
1 Press the MENU button U to display the Main menu on
the TV screen.
2 Press the Cursor buttons
(3421) R to select
“Functions” and “Remote” in this
order. Then, select the “Remote”
field.
3 Press the Cursor buttons (34) R to select the desired
remote control mode.
VCR 1: Select this setting on both the VCR and the
remote control for normal use with one VCR.
VCR 2: Select this setting on both the VCR and the
remote control when using this VCR and
another Panasonic VCR in the same place.
This ensures that you can operate both VCRs
independently with their respective remote
control.
It also allows you to operate both VCRs with a
single remote control, simply by changing the
remote control mode on the remote control.
Main menu
Timer record
Tape Library
Display
Tuning
Clock
Functions
Language
Country
Satellite
AV2:
DECODER
TV system: AUTO
RFC system:DK
Colour mode: COLOUR
Picture: AUTO
Remote: VCR 1
Audio mode:NORMAL
S-VHS P.B.: AUTO
NTSC P.B.: PAL TV
1 Press the MENU button U to display the Main menu on
the TV screen.
2 Press the Cursor buttons
(3421) R to select
“Functions” and “Audio mode” in
this order. Then, select the
“Audio mode” field.
Main menu
Timer record
Tape Library
Display
Tuning
Clock
Functions
Language
Country
Satellite
AV2:
DECODER
TV system: AUTO
RFC system:DK
Colour mode: COLOUR
Picture: AUTO
Remote: VCR 1
Audio mode:NORMAL
S-VHS P.B.: AUTO
NTSC P.B.: PAL TV
3 Press the Cursor buttons (34) R to select the type of
audio mode to be used during playback.
NORMAL: Normally select this setting.
MIX: Use this setting when playing back a
cassette tape on which audio dubbing has
been performed. The Hi-Fi sound track with
the original sound and the normal sound
track (mono) with the audio-dubbed sound
are played back together.
4 Press the OK button T to conclude the setting.
5 Press the EXIT button S to exit the On Screen Display.
To Play Back a Video Cassette in the Same
Format as That Used for Recording
1 Press the MENU button U to display the Main menu on
the TV screen.
Main menu
2 Press the Cursor buttons
(3421) R to select
“Functions” and “S-VHS P.B.”
and in this order. Then, select
the “S-VHS P.B.” field.
Timer record
Tape Library
Display
Tuning
Clock
Functions
Language
Country
Satellite
3 Press the Cursor buttons (34) R to select the format of
the cassette that you want to play back.
AUTO: In this setting, the VCR automatically detects the
format in which the recording was made and
selects the same format for playback.
Normally select this setting.
ON: To play back a cassette recorded in the S-VHS
format.
OFF: To play back a cassette recorded in the VHS
format.
AV2:
DECODER
TV system: AUTO
RFC system:DK
Colour mode: COLOUR
Picture: AUTO
Remote: VCR 1
Audio mode:NORMAL
S-VHS P.B.: AUTO
NTSC P.B.: PAL TV
4 Press the OK button T.
5 Press the OK button T again.
6 To change the remote control mode on the remote
control itself, change the position of the VCR 1/2 switch
A to match the setting made in step 3 above. If these
settings are not matched, the remote control cannot be
used to operate the VCR.
7 Press the EXIT button S to exit the On Screen Display.
52
4 Press the OK button T to conclude the setting.
5 Press the EXIT button S to exit the On Screen Display.
Page 53

To Play Back a Video Cassette Recorded in
the NTSC Signal
1 Press the MENU button U to display the Main menu on
the TV screen.
Main menu
2 Press the Cursor buttons
(3421) R to select
“Functions” and “NTSC P.B.”
and in this order. Then, select
the “NTSC P.B.” field.
Timer record
Tape Library
Display
Tuning
Clock
Functions
Language
Country
Satellite
3 Press the Cursor buttons (34) R to select the type of
colour TV system to be used during playback or during
recording from an external source.
PAL TV: For TVs that can receive PAL signal.
4.43: For TVs that can receive NTSC 4.43 signal.
AV2:
DECODER
TV system: AUTO
RFC system:DK
Colour mode: COLOUR
Picture: AUTO
Remote: VCR 1
Audio mode:NORMAL
S-VHS P.B.: AUTO
NTSC P.B.: PAL TV
Language Setting
1 Press the MENU button U to display the Main menu on
the TV screen.
Main menu
2 Press the Cursor buttons
(3421) R to select
“Language” and the entry field
for “Language” in this order.
Timer record
Tape Library
Display
Tuning
Clock
Functions
Language
Country
Satellite
3 Press the Cursor buttons (34) R to select the desired
language.
4 Press the OK button T to conclude the setting.
5 Press the EXIT button S to exit the On Screen Display.
English
Deutsch
Polski
Čeština
Magyar
Русский
4 Press the OK button T to conclude the setting.
5 Press the EXIT button S to exit the On Screen Display.
Country Setting
1 Press the MENU button U to display the Main menu on
the TV screen.
2 Press the Cursor buttons
(3421) R to select “Country”
and the entry field for “Country”
in this order.
3 Press the Cursor buttons (3421) R to select the
desired country.
4 Press the OK button T to conclude the setting.
5 Press the EXIT button S to exit the On Screen Display.
Main menu
Timer record
Tape Library
Display
Tuning
Clock
Functions
Language
Country
Satellite
Deutschland
Česká Rep.
Magyarország
Polska
Россия
others
53
Various Settings
Page 54

Glossary
VPS (Video Programme System)/
PDC (Programme Delivery Control)
The Video Programme System (VPS) or the Programme
Delivery Control (PDC) is a very convenient system which
assures that the TV programmes you have programmed for
timer recording will be recorded exactly from beginning to
end, even if the actual broadcasting time differs from the
scheduled time due to delayed start or extension of the
programme duration. Also, if a programme is interrupted and,
for example, some special news is inserted, the recording will
also be interrupted automatically and resumed when the
programme continues.
Depending on the signals sent from the TV stations,
the VPS/PDC system may not operate properly even when
“VPS/PDC” has been set to “ON”.
Please check with the broadcasters in your area for details.
≥ In the case of VPS/PDC recording, use the correct time
(VPS/PDC time) for recording the TV programmes.
Set “VPS/PDC” to “OFF” when the recording time is not the
correct time (VPS/PDC time).
VPS/PDC recording is not performed when the time
(VPS/PDC time) is incorrect, even if only by one minute.
To find out the correct time (VPS/PDC time), consult
Teletext, a newspaper or magazine, or other source.
≥ If the actual broadcasting times of timer recordings overlap
(regardless of whether they are VPS/PDC controlled), the
recording that starts first always has priority, and the
recording of the later beginning programme will start only
after the first timer recording has finished.
≥ When the VPS/PDC signal drops out because the
broadcast signal is weak, or when a TV station does not
transmit a regular VPS/PDC signal, the timer recording will
be performed in the normal mode (without VPS/PDC) even
if it was programmed for VPS/PDC.
In this case, even if the timer recording is performed,
whatever has been programmed will not be cancelled at
that particular time but at 4 a.m. on the following day.
≥ The start times of scheduled programmes listed in the
newspaper or magazine may be changed at a later date.
Set “VPS/PDC” to “OFF” when programming a programme
whose start time has been subsequently changed.
Particular care must be taken in this respect with
ShowView programming since “VPS/PDC” is automatically
set to “ON” in some countries.
≥ If a programme listed in a newspaper or magazine has two
ShowView numbers, use the ShowView number for
VPS/PDC if you wish to proceed with VPS/PDC recording
using ShowView programming.
≥ The default settings for “VPS/PDC” differ depending on the
country concerned. Refer to the table on the right.
Programming
method
Selected
Country
Germany,
Other Countries
Poland, Czech,
Hungary,
Russia
≥ If the broadcasting station is not transmitting VPS/PDC
signals, “– – –” appears in the menu for timer programming
under “VPS/PDC”.
ShowView
program-
ming
ON
OFF
Changes in
ShowView
program-
ming start
time
ON
OFF
Non-
ShowView
program-
ming
ON
OFF
NICAM Broadcasting System
This model features the NICAM digital sound system, a
2-channel sound broadcast system that provides either
2 high-quality stereo sound tracks or 2 independent mono
sound tracks, M1 and M2.
NICAM programmes are always accompanied by standard
(mono) sound broadcasts, and during playback, you can
select the desired sound with the AUDIO button ?.
≥ The NICAM stereo sound can only be recorded on the
Hi-Fi audio tracks.
≥ If, for some reason, you want to record a stereo, bilingual or
NICAM TV programme intentionally in mono on the Hi-Fi
audio tracks, set “Mono” to “ON” for the programme
position on which the desired programme is broadcast, as
described on page 44.
Important Note on the NICAM System
When this model is switched on, the tuner automatically
switches to a NICAM broadcast if NICAM is being
transmitted. During test transmissions, it is possible that the
sound received does not correspond to the picture being
viewed. In order to receive synchronised sound and picture,
select monaural sound with the AUDIO button ? or setting
“Mono” to “ON”. This applies only until NICAM transmissions
are fully operational.
Even if the sound track is in mono, the STEREO indication
will appear.
Crystal View Control (CVC)
The crystal view control function ensures that you always
obtain the optimum picture quality so that you get the best
picture automatically.
While the VCR is turned on, the CVC indication d is always
displayed to show that the Crystal View Control is activated.
54
Page 55

Q Link Function
This function works only if the VCR is connected via a fullywired 21-pin Scart cable to a TV featuring the Q Link or
similar function.
Q Link offers the following functions:
°(1) Download from the TV
When you connect the VCR to a TV, the station list data
is automatically copied from the TV to the VCR, and the
TV stations are assigned to the programme positions on
the VCR in the same order as on the TV.
°(2) Direct TV Recording
By simply pressing the DIRECT TV REC button 6, you
can at once record the same programme that you are
watching on the TV.
°The operations marked with asterisk are only available if the
VCR is connected to a TV featuring the Q Link or the DATA
LOGIC function.
Note:
≥ If “Power save” is set to “ON”, the Q Link functions do not
work when the VCR is switched off (standby mode).
21-pin Scart Socket
The 21-pin Scart socket transmits both input and output
signals for picture and sound. TVs equipped with the same
type of socket can be connected here.
This type of socket is also called Peritel, Euro Connector and
Euro AV.
1 3 5 7 9 1113151719
°(3) TV/VCR Auto Power On
Even if the TV and the VCR are off (standby mode),
pressing the Play I, SHOW VIEW L or PROG./CHECK
button < automatically turns on both the TV and the
VCR.
≥ When a cassette with a broken erasure prevention tab
is in the VCR, it turns on and starts playback. The TV
also turns on.
°(4) VCR Auto Power Off
When you turn the TV off, the VCR is turned off as well.
However, this function only works during rewinding, in
the stop mode, or when no cassette is inserted.
If the VCR receives the Auto Power Off command while
it is rewinding the tape, it turns off after the rewinding
has been finished.
This function does not work during the following
operations:
Preset Download, Auto Setup, Auto Clock Setting and
Manual Tuning.
°(5) On Screen Display Messages
When you are watching a TV programme, the following
VCR messages appear on the TV screen to inform you
of the VCR’s condition:
Message
This programme has
already started
Set VCR to timer
standby mode
VCR is in timer
standby mode
VCR is in timer
recording mode
≥ Depending on the type of TV used, the above
messages may not appear correctly.
Message appears when:
A timer recording has just started.
The VCR is not in the timer standby
mode 10 minutes before the
programmed recording start time of a
timer recording (message appears
every minute during these
10 minutes).
The VCR-ON/OFF 1, Play I,
EJECT Z or LIBRARY button M was
pressed, although the VCR is in the
timer standby mode.
The VCR-ON/OFF 1, Stop 9, REC/
OTR f, Pause/Still i (Pause/Slow
7), SHOW VIEW L or AUDIO ?
was pressed while the VCR is in the
timer recording mode.
21
2 4 6 8 10 12 14 16 18 20
AV1 Scart Socket (for Q Link connection)
01 Audio output CH2 (R) 12 No connection
02 Audio input CH2 (R) 13 Red ground
03 Audio output CH1 (L) 14 Blanking ground
04 Audio ground 15 Red
05 Blue ground 16 Blanking
06 Audio input CH1 (L) 17 Video output ground
07 Blue 18 Video input ground
08 Switching voltage 19 Video output
09 Green ground 20 Video input
10 Q Link data 21 Ground
11 Green
AV1 Scart Socket (S-VIDEO)
01 Audio output CH2 (R) 12 No connection
02 Audio input CH2 (R) 13 C Out ground
03 Audio output CH1 (L) 14 No connection
04 Audio ground 15 C Out
05 No connection 16 No connection
06 Audio input CH1 (L) 17 Y Out ground
07 No connection 18 Video input ground
08 Switching voltage 19 Y Out
09 No connection 20 Video input
10 Q Link data 21 Ground
11 No connection
AV2 Scart Socket
01 Audio output CH2 (R) 12 Reserved
02 Audio input CH2 (R) 13 Red ground
03 Audio output CH1 (L) 14 Blanking ground
04 Audio ground 15 Red
05 Blue ground 16 Blanking
06 Audio input CH1 (L) 17 Video output ground
07 Blue 18 Video input ground
08 Switching voltage 19 Video output
09 Green ground 20 Video input
10 Control signal 21 Ground
11 Green
The Red, Green and Blue (RGB) video signals are looped
through only from an external source unit, for example from a
connected a Pay-TV decoder, i.e. they are not from tape
playback.
Helpful Hints
55
Page 56

Before Requesting Service
Before requesting service, please check the following points.
√ On Screen Display Messages
The error messages are given in brackets [ ].
[Please insert video tape!]
‘ You pressed the REC button J (REC/OTR button f),
the DIRECT TV REC button 6, the Play button I, the
Fast Forward button H or the Rewind button 8 when
no cassette was inserted in the VCR.
You pressed the TIMER REC button D when no
cassette was inserted in the VCR with a timer recording
programmed.
Insert a video cassette.
[Please use tape with unbroken recording tab !]
‘ You pressed the REC button J (REC/OTR button f)
or the DIRECT TV REC button 6 when a cassette with
a broken out erasure prevention tab was inserted in the
VCR.
You pressed the TIMER REC button D when a cassette
with a broken out erasure prevention tab was inserted in
the VCR with a timer recording programmed.
Insert a video cassette with an intact erasure prevention
tab on which recording is possible.
[This action is not possible before time and date are set]
‘ You pressed the SHOW VIEW button L or the PROG./
CHECK button <, even though the time and date have
not yet been set on the VCR.
Set the time and date.
[No timer programmes to be done!]
‘ You pressed the TIMER REC button D even though no
timer recording has been programmed.
Programme a timer recording before pressing the
TIMER REC button D.
[Please put VCR into stop mode first]
‘ You attempted to change the contents of the timer
programming while a timer recording was being
performed.
Put the VCR into the stop mode first.
Other messages may also appear.
Follow the instructions given on the TV screen.
√ The VCR Does Not Work Correctly
The symptom descriptions are given between quotation
marks “”.
“The VCR display is not illuminated.”
‘ The AC mains lead is disconnected.
Connect the AC mains lead securely.
‘ VCR display setting is “OFF”. Set “VCR display” to “ON”
or “DIMMED”. (See page 50.)
‘ Power save setting is “ON”. Set “Power save” to “OFF”.
(See page 50.)
“The VCR display is illuminated, but the VCR cannot be
operated.”
‘ The VCR is in the timer recording standby mode.
Press the TIMER REC button D to cancel the standby
mode.
‘ Safety devices are operating.
Disconnect the AC mains lead and wait approximately
1 minute before reconnecting.
Then check if the VCR can be operated.
“The VCR picture does not appear on the TV screen.”
‘ The RF output channel is set to [––].
Change the RF output channel to a channel other than
[––]. (See page 15.)
“Auto clock setting does not work correctly.”
‘ Teletext information is not available or cannot be read.
Set the clock manually.
“Download cannot be performed.”
‘ The VCR is not connected to a TV equipped with the
Q Link (or a similar) function via a fully-wired 21-pin
Scart cable.
Be sure to use a fully wired 21-pin Scart cable to
connect the VCR to a TV with the Q Link (or a similar)
function.
√ Playback Does Not Work Properly
The symptom descriptions are given between quotation
marks “”.
“The playback picture is distorted or in black and white.
Or, horizontal noise bars appear in the picture or horizontal
lines move up and down.”
‘ The tracking adjustment is not correct.
Adjust the tracking. (See page 58.)
‘ The TV’s video playback channel has not been tuned
correctly.
Re-tune the video playback channel.
‘ The video heads are clogged or worn.
Consult your dealer for advice.
‘ The playback picture is distorted when using an E300
type video cassette that was recorded in the LP or EP
mode.
We recommend that you use video cassettes other than
type E300.
‘ The playback picture is distorted when you record the
tape in the EP mode using MESECAM system.
However, this is not a malfunction.
We recommend PAL system for recording in the EP
mode.
56
Page 57

√ Recording Is Not Possible or Does Not
Work Properly
The symptom descriptions are given between quotation
marks “”.
“When recording is attempted, the 1 indication flashes.”
‘ A video cassette with a broken out erasure prevention
tab is used.
Use a cassette with an intact tab, or if you want to erase
the previously recorded contents on the cassette, cover
the tab hole with two layers of adhesive tape.
“The playback picture of a recorded programme is distorted
or no picture can be seen.”
‘ The aerial or aerial lead connection is defective.
Check the connections. If the picture displayed on the
TV is also distorted, there is something wrong with the
installation of the aerial.
‘ No programme was recorded because the VCR is not
tuned correctly.
Tune it correctly.
‘ No programme was recorded because the AV input was
selected on the VCR.
Select the programme position of the desired TV
programme.
“Timer recording does not work correctly.”
‘ Time and date are not set or they are set incorrectly.
Set the time and date correctly.
‘ The starting time or ending time of the timer recording
were not programmed correctly.
Set the starting time or ending time correctly.
‘ The VCR was not put in the timer recording standby
mode.
After programming a timer recording, press the
TIMER REC button D to put the VCR in the timer
recording standby mode.
‘ The correct position will not appear when performing
ShowView programming.
When this happens, perform the following operations.
1 Delete the incorrect position.
2 Create a new position using the “Add” function.
3 Perform Manual Tuning.
4 Reset the guide channel.
(For details, see page 23.)
“Recording from an external source connected to the VCR’s
AV input cannot be made.”
‘ The correct AV input is not selected.
Select the correct AV input.
‘ The connections from the external source are not made
correctly. Correct them. (See page 34.)
√ The Remote Control Does Not Work
Correctly
The symptom descriptions are given between quotation
marks “”.
“The remote control does not work correctly.”
‘ The remote control signal cannot reach the VCR.
Aim the remote control at the VCR and make sure that
the infrared beam’s path is not obstructed.
‘ The distance to the VCR is too long.
Use the remote control within 7 metres from the VCR. If
you are using it within this range but the remote control
still cannot operate the VCR, replace the batteries.
‘ The batteries are exhausted.
Replace with new batteries.
‘ The batteries have been inserted with reversed
polarities (+/-).
Insert the batteries correctly. (See page 5.)
‘ Power save setting is “ON”. Set “Power save” to “OFF”.
(See page 50.)
‘ The wrong remote control mode has been selected.
Set the correct control mode. (See page 52.)
√ The Satellite Receiver Cannot Be
Controlled Correctly
The symptom descriptions are given between quotation
marks “”.
“The Satellite Receiver cannot be controlled.”
‘ The Satellite Receiver is not connected correctly to the
VCR. Connect the Satellite Receiver correctly.
‘ The settings on pages 39–41 for receiving satellite
broadcasts are not correct. Perform the settings on
pages 39–41 again correctly.
‘ The receiver in use is not on the attached list of
compatible satellite receivers. These settings are
supported only by the satellite receivers found on the
attached list of compatible satellite receivers.
√ The Tape Library System Does Not Work
Correctly
The symptom descriptions are given between quotation
marks “”.
“The Cassette Number Check has failed.”
‘ The Cassette Number Check was cancelled midway.
Try to perform the Cassette Number Check again.
(See page 28.)
‘≥The inserted cassette is new (unrecorded).
≥ The inserted cassette was recorded on another VCR
and does not have a cassette number.
≥ The inserted cassette was recorded on a
NV-HS860 model VCR other than this unit.
≥ The cassette number of the inserted cassette has
been deleted from the Tape Library data.
# The Cassette Number Check is designed to fail
whenever one of the above conditions applies; this
is not a malfunction.
“The recorded programme has not been registered in the
Tape Library data.”
‘ The length of the recorded programme is less than
15 minutes in the SP or LP mode.
Record for more than 15 minutes in the SP or LP mode.
‘ The length of the recorded programme is less than
25 minutes in the EP mode.
Record for more than 25 minutes in the EP mode.
Helpful Hints
57
Page 58

√ The Titles of the TV Programmes Are
Not Entered Correctly in the Tape
Library Data
The symptom descriptions are given between quotation
marks “”.
“The Titles of the TV Programmes Are Not Entered Correctly
in the Tape Library Data.”
‘ The “Title page” Teletext page number was not set
correctly.
Set it correctly. (See page 45.)
Adjusting the Playback
Picture
Under normal conditions, the VCR automatically
adjusts the playback picture for optimum quality.
However, in some cases it may be necessary to adjust
it manually.
If the Picture Contains Noise Bars and It Is Not
Clear to See (Tracking adjustment):
If noise bars appear during normal playback, slow
playback or still playback, follow the operations below.
During normal or slow playback,
press the Channel button N I
(j) or J (i) until the bars noise
disappear.
≥ If the noise bars appear during
still playback, switch the VCR
over to the slow playback mode
and then adjust the tracking as
explained above.
To Return to Auto Tracking:
Press the Channel buttons N I (j) and J (i)
simultaneously.
If the Still Picture Scrolls Up or Down
(V-Lock Adjustment):
If the still picture scrolls up or down, perform the
following operation.
During still playback, keep the Channel buttons N I
(j) or J (i) pressed until the picture stops scrolling.
Precautions:
≥ With certain TV models and tapes, it may not be
possible to adjust the tracking.
≥ If you play back a cassette that was recorded on
another VCR, the picture quality may be inferior and
it may be necessary to adjust the tracking. Also, on
some TVs, the picture may scroll up and down in the
special playback functions.
However, these are not malfunctions.
TV screen
Playback picture
containing noise bars
58
Page 59

Specifications
NV-HS860EE-S
Power Source: 220 –240 V AC 50/60 Hz
Power Consumption: 28 W
Power Consumption When
in Standby Mode: Approx. 3.5 W
(When Power save function is activated)
Video Recording System: 2 rotary heads, helical scanning system
Video Heads: 4 heads
Audio Heads: 2 heads (Hi-Fi)
Tape Speed: SP; 23.39 mm/s
LP; 11.7 mm/s
Tape Format: VHS/S-VHS tape
Record/Playback Time: SP; 240 min with NV-E240 SP; 240 min with NV-SE240
LP; 480 min with NV-E240 LP; 480 min with NV-SE240
FF/REW Time: approx. 60 s with NV-E180
VIDEO
Television System: CCIR; 625 lines, 50 fields, PAL colour signal
Modulation System: Luminance; FM azimuth recording
Colour signal; converted subcarrier phase shift recording
Input Level: AV1/AV2; 1.0 Vp-p, 75 ohm, terminated
VIDEO IN (AV3) (PHONO); 1.0 Vp-p, 75 ohm, terminated
S-VIDEO IN (AV3); 1.0 Vp-p, 75 ohm, terminated
Output Level: AV1/AV2; 1.0 Vp-p, 75 ohm, terminated
VIDEO OUT (PHONO); 1.0 Vp-p, 75 ohm, terminated
S-VIDEO OUT; 1.0 Vp-p, 75 ohm, terminated
RF Modulated; UHF channel (21– 69), 75 ohm
AUDIO
Input Level: AV1/AV2; j6 dBV, more than 10 kohm
AUDIO IN (AV3) (PHONO); j6 dBV, more than 10 kohm
Output Level: AV1/AV2; j6 dBV, less than 1 kohm
AUDIO OUT (PHONO); j6 dBV, less than 1 kohm
Audio Track: 1 track (Normal-mono only), 2 channels (Hi-Fi sound-stereo)
Video Horizontal Resolution: Colour; more than 240 lines (VHS/SP)
Colour; more than 400 lines (S-VHS/S-VHS ET/S-Video socket) (SP)
Signal-to-Noise Ratio: Video; more than 45 dB (S-VHS/SP/DNR ON)
Dynamic Range: Audio; more than 90 dB (Hi-Fi audio track) (SP)
Audio Frequency Response: 20 Hz –20 kHz/Hi-Fi (SP)
Wow and Flutter: 0.005% Wrms/Hi-Fi (SP)
Operating Temperature: 5oC –40oC
Operating Humidity: 35%–80%
Weight: 4.0 kg
Dimensions: 430 (W)k87 (H)k297 (D) mm
Standard Accessories: 1 pc. RF Coaxial cable
1 pc. Remote Control (EUR571750)
2 pcs. R6 size batteries
1 pc. AC mains lead
1 pc. S-VHS ET Sticker
Weight and dimensions shown are approximate.
Specifications are subject to change without notice.
Helpful Hints
59
 Loading...