

Page 1

VHS-Compact Movie
NV-G2E
Opcatinq Inslmctions Bodionungsanloitunq Morff- d empioi
VQT4084-1
ivy^
Before attempting to connect operate or
aOjusl thib product please read these
instructions completely
Page 2

Contents
Easy Operations............................................................ 3
Preparation
•Controls and Components......................... 3
•Indications in the Electronic Viewfinder
(EVF)
.......................................................
•Accessories
•Battery Pack
•Video Cassette
•Setting The Clock
• EVF, White Cap and Grip Belt
• Eyepiece .................................................. 9
Camera Recording ...................................................... 10
Shooting Techniques
•Focus
•Macro Close-Up
•White Balance
•High Speed Shutter
•Zooming .................................................. 12
• Fade-In and Fade-Out
• Recording a Title
Playback ...................................................................... 14
• Playback via TV Set (Connections)
...............................................
.............................................
.........................................
.....................................
.................
.....................................................
.....................................
.........................................
................................
...........................
....................................
.......
11
11
12
12
12
13
15
Other Functions
Editing
5
6
6
7
8
9
Accessories etc.
After Shooting
Cautions
Before Requesting Service
Specifications
•Memory Search Function
•Tape Counter Indication
•Assemble Editing .................................... 16
•Dubbing (Copying)
•Shoulder Strap ........................................ 17
•Tripod Mount
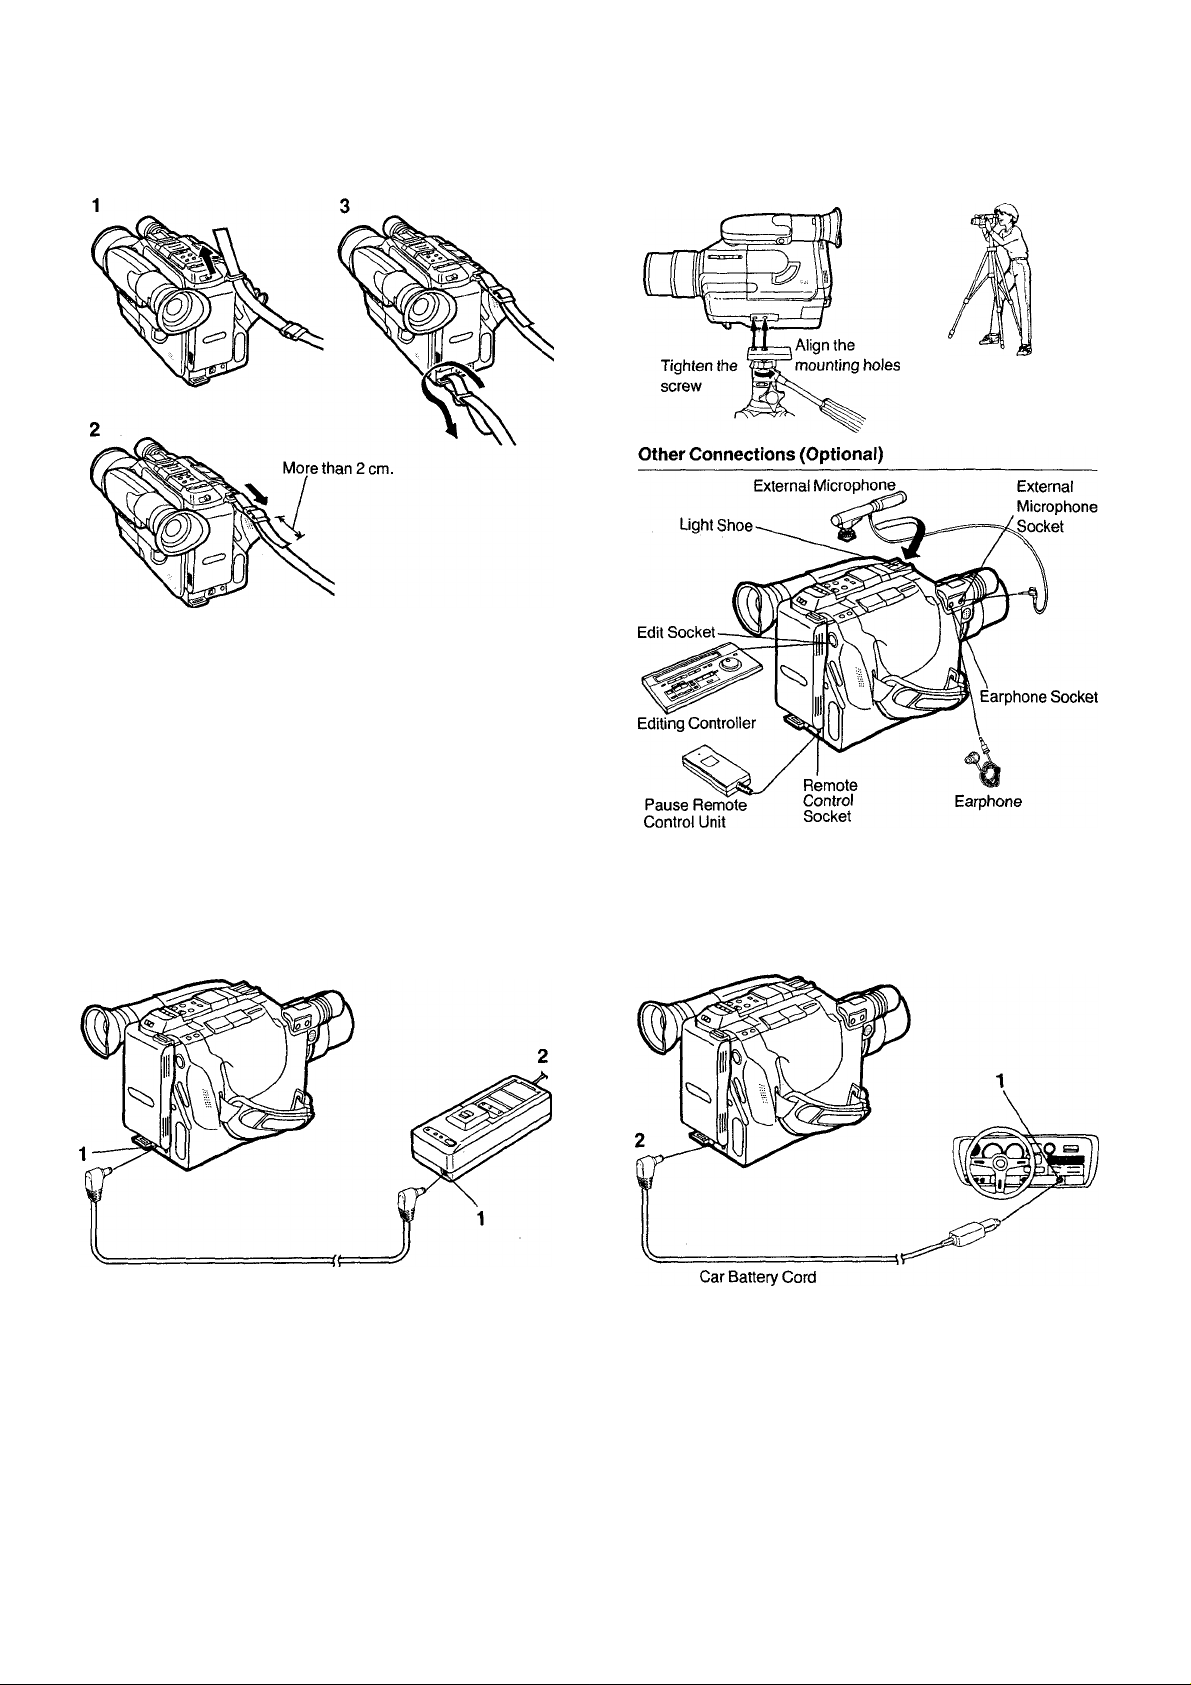
•Other Connections................................... 17
•AC Adaptor ............................................. 17
•Car Battery Cord...................................... 17
•Video Light .............................................. 18
•Character Generator
•Handgrip ................................................. 19
•VITC Signals ........................................... 19
•Cassette Adaptor
...........................................................
....................................................................
...........................................................
..........................................
....................................
......................................
.......................
...........................
..................................
...............................
15
15
16
17
19
21
21
22
24
25
Information for Your Safety.
IMPORTANT
Your attention is drawn to the fact that recording of
pre-recorded tapes or discs or other published or
broadcast material may infringe copyright laws.
WARNING
TO REDUCE THE RISK OF FIRE OR SHOCK
HAZARD, DO NOT EXPOSE THIS EQUIPMENT TO
RAIN OR MOISTURE.
VHS-C Movie NV-G2
•The rating plate is on the bottom side of the Movie
Camera.
AC Adaptor VW-AS1
•The rating plate is on the bottom side of the unit.
•This model conforms to the EC directive (for radio
interference) 87/308/EEC.
FOR YOUR SAFETY
■ DO NOT REMOVE THE OUTER COVER.
To prevent electric shock, do not remove the cover. No user
serviceable parts inside. Refer servicing to qualified service
personnel.
HQ (High Quality) Picture System
This system assures complete compatibility with Movies that use
the conventional VHS system.
CAUTION
Danger of explosion if battery is incorrectly replaced.
Replace only with the same or equivalent type
recommended by the equipment manufacturer. Discard
used batteries according to manufacturer’s instructions.
Page 3
Easy Operations
Camera Recording
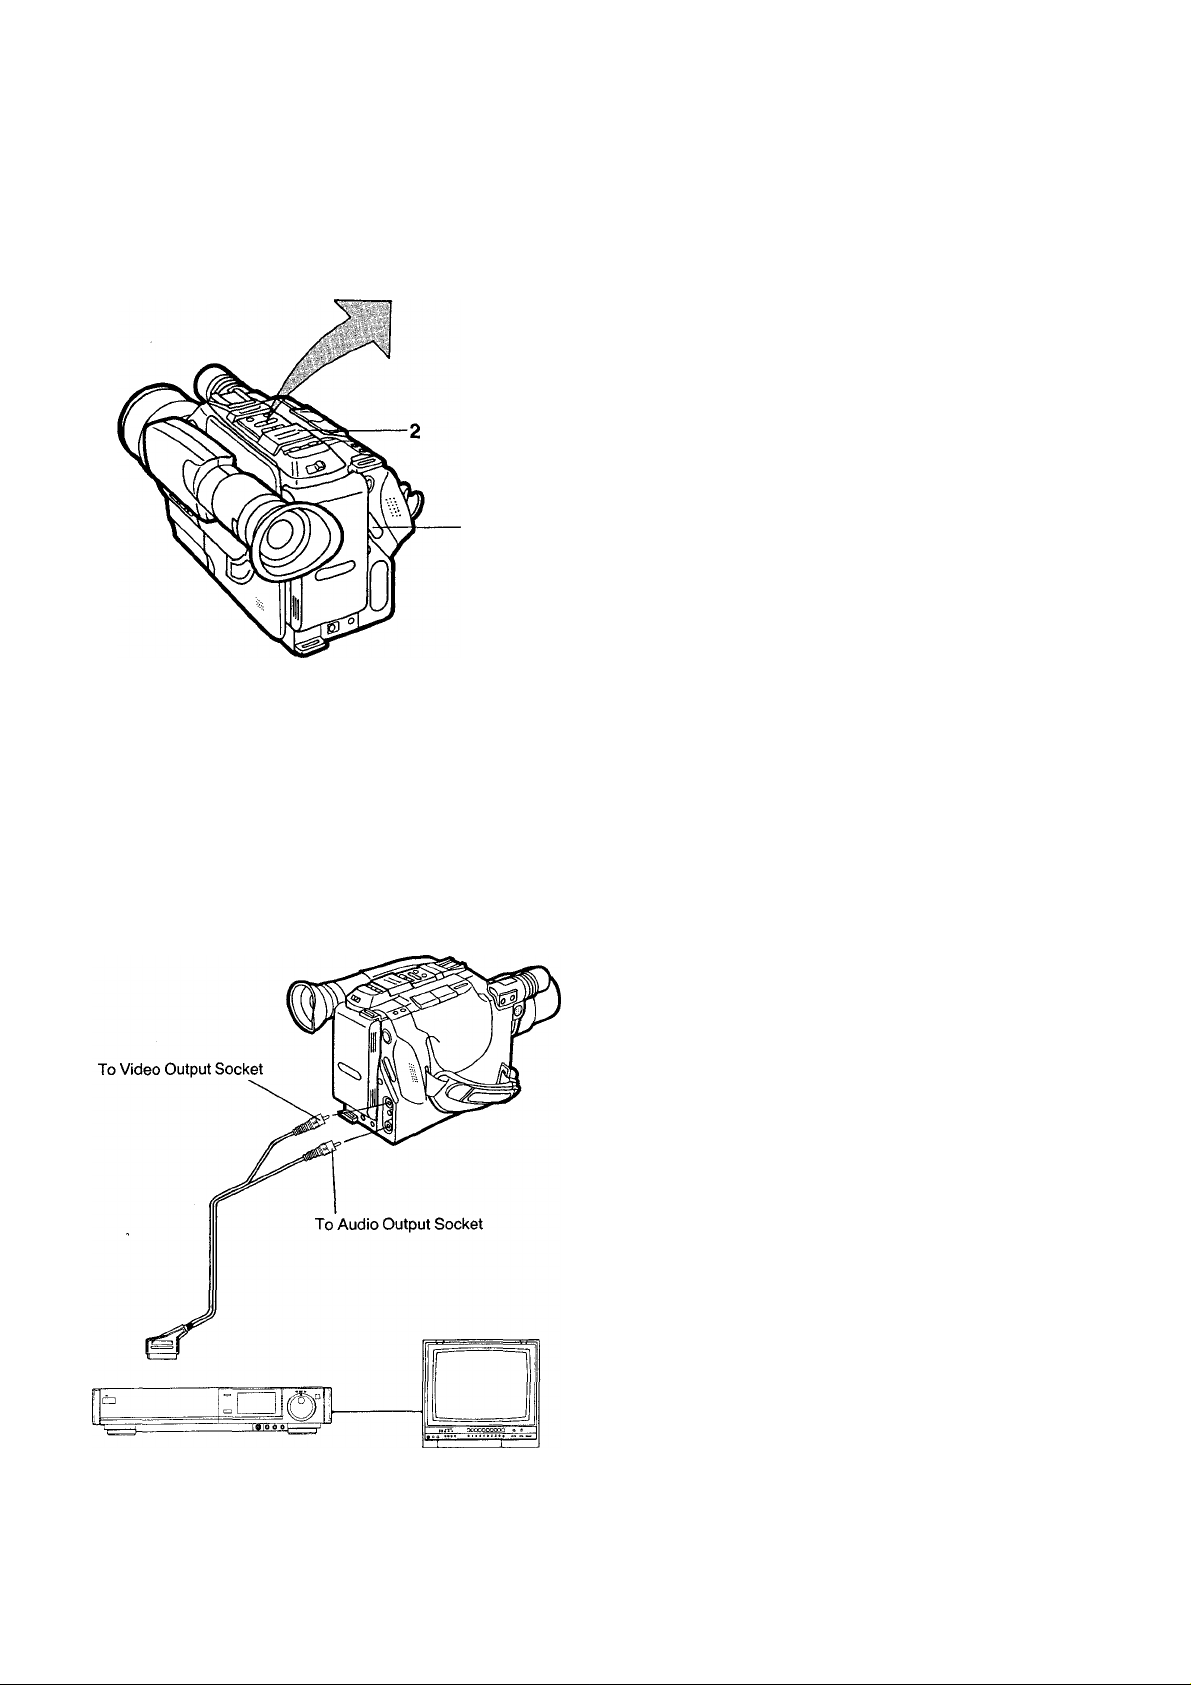
2 Turn the EVF by 180° towards the Lens, and press the Eject
Button.
3 Insert a Video Cassette.
4 Pull out the EVF to its fully extended position.
5 Set the CAMERA/VTR Selector Cover to “CAMERA" (slide the
CAMERA/VTR Selector Cover towards the Lens) until it stops.
6 Set the Recording Speed Selector to “SP" or “LP”.
7 Press the Start/Stop Button.
• Recording starts.
• Press this button again to stop recording.
Playback
Turn the EVF by 180° towards the Lens, and press the Eject
Button, then insert the recorded cassette.
Set the CAMERAA/TR Selector Cover to “VTR” (slide the
CAMERA/VTR Selector Cover towards the Battery Pack) until it
stops.
Press the Play Button.
• Playback starts.
•Press the Stop Button to stop playback.
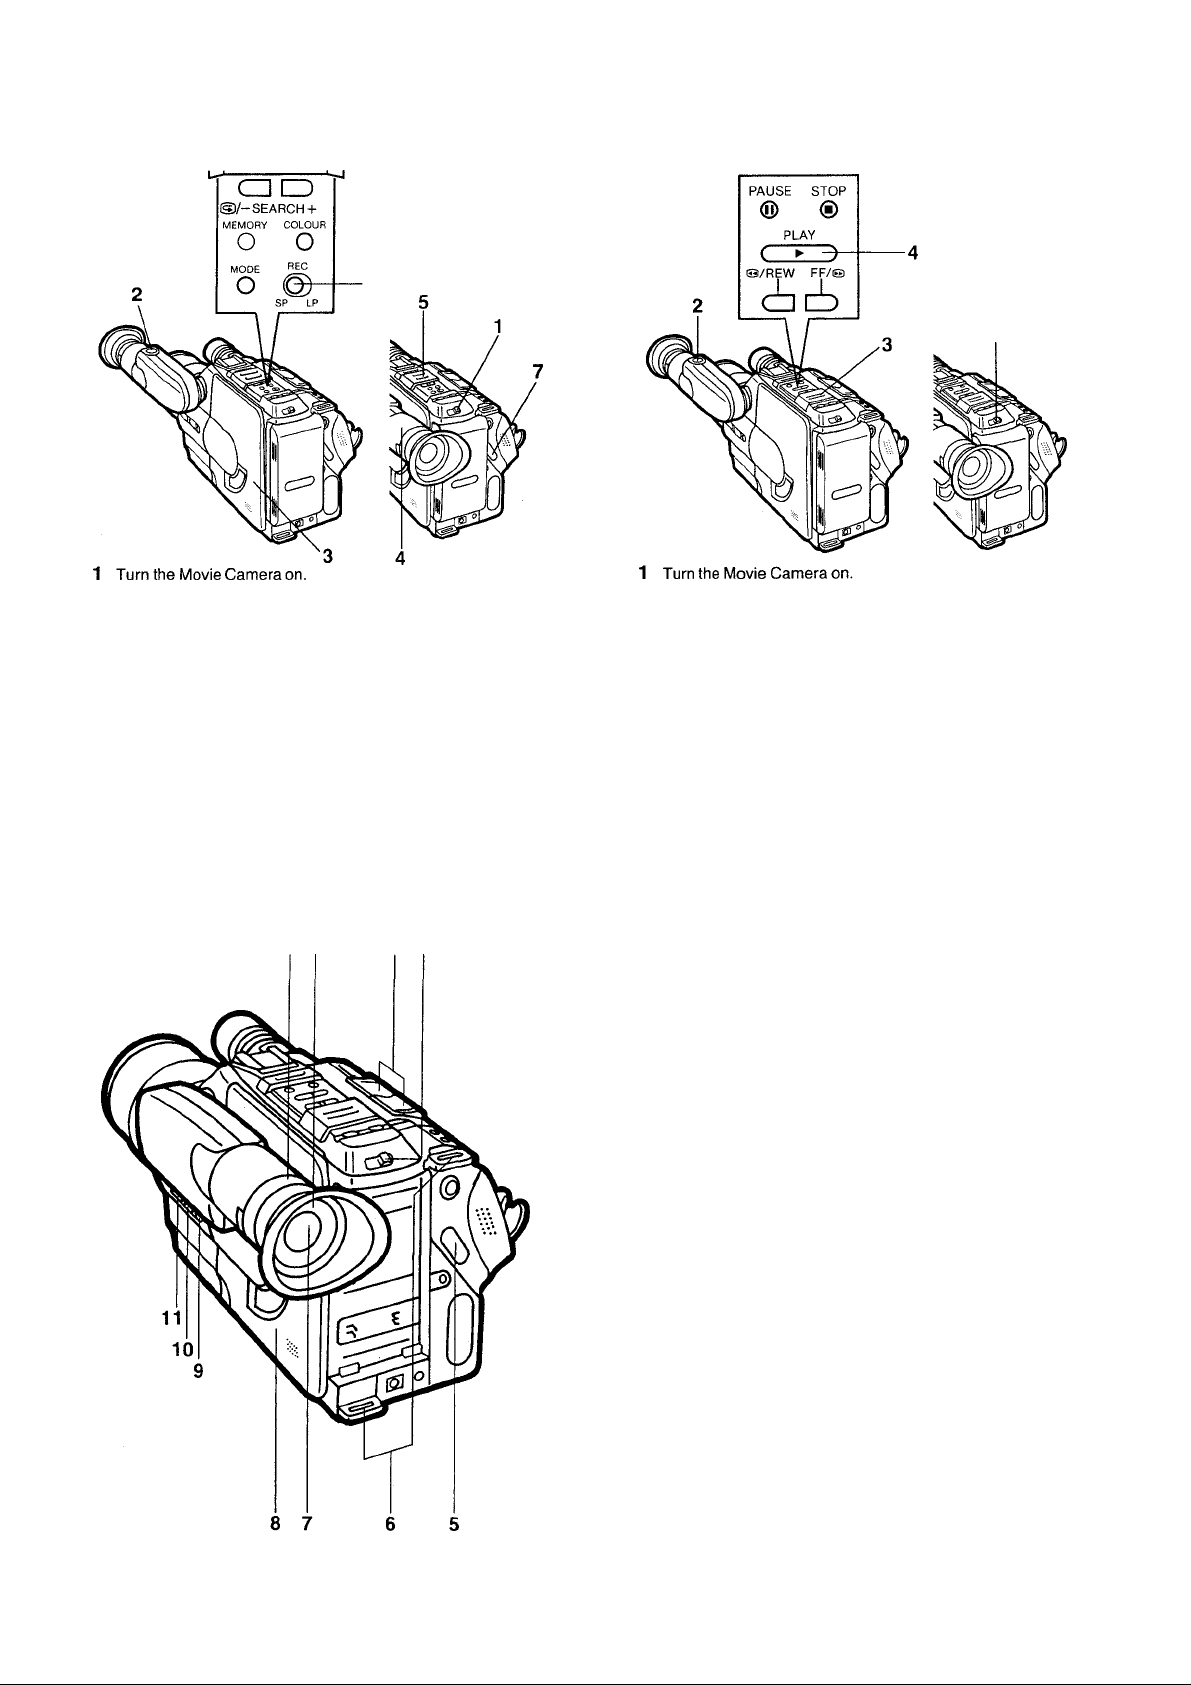
Controls and Components
1 2
3 4
No. Name Page
1 Eyepiece Corrector Control
2 Eyecup
................................................................
3 Power Zoom Control Buttons
4 Operation Switch
...............................................
..................................
.............................
9
9
12
—
5 Recording Start/Stop Buttons............................. —
6 Shoulder Strap Holder
7 Electronic Viewfinder ........................................... 5
8 Cassette Compartment ........................................ 7
9 Title Button.......................................................... 13
10 Fade Button ...................................................... 12
11 Date/Time Selector .............................................. 8
........................................
17
-3-
Page 4
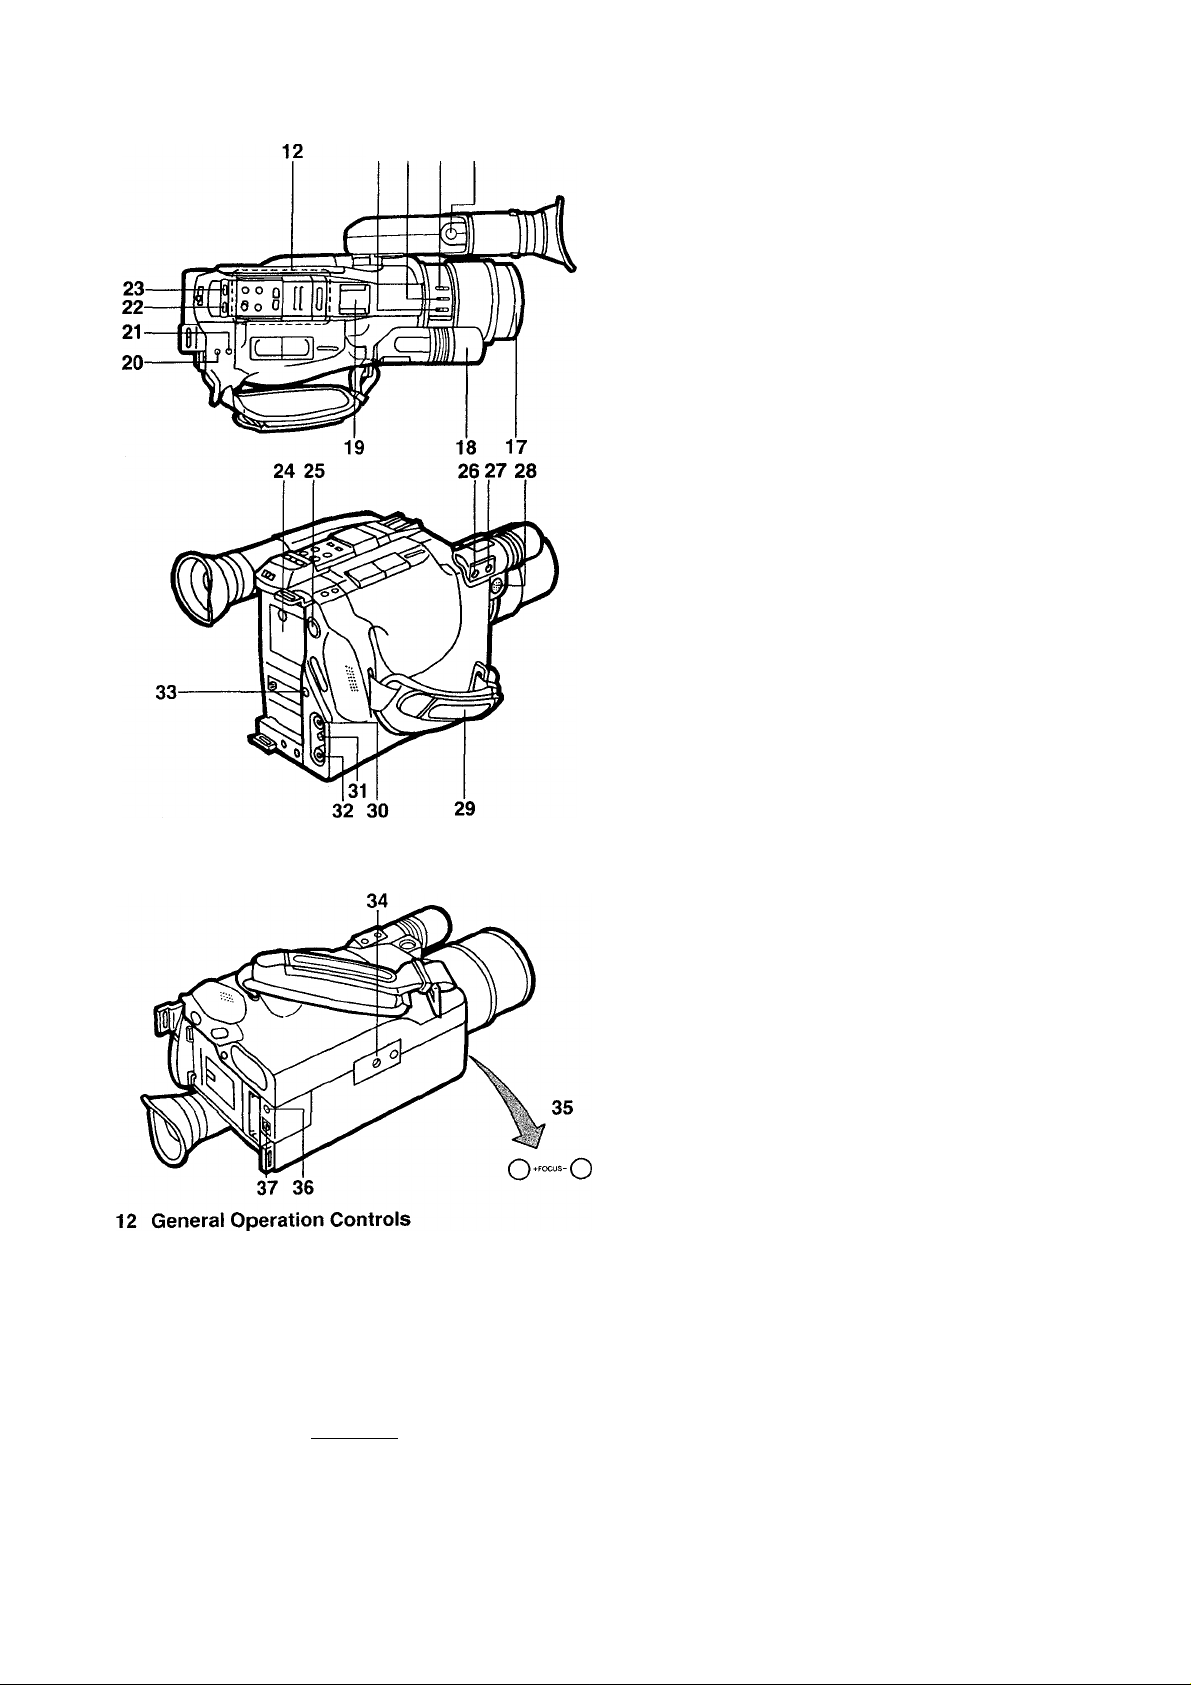
Controls and Compornents (Cont’d)
13 14 15 16
No.
Name
Page
12 General Operation Controls ............................... 14
13 White Balance Button
14 High Speed Shutter
.......................................
...........................................
12
12
15 Focus Button...................................................... 11
16 Eject Button
17 White Cap........................................................... 12
18 Microphone ....................................................... —
19 Light Shoe
........................................................
..........................................................
7
17
20 Tracking/Date/Time Shift Button ......................8,14
21 TrackingTTime Set Button
...............................
8,14
22 Reset Button....................................................... 15
23 Memory/Display Button
No. Name Page
24 Button Battery Compartment
25 Edit Socket
........................................................
.....................................
................................
15
8
17
26 Earphone Socket................................................ 17
27 External Microphone Socket
.............................
17
28 Character Generator Socket .............................. 19
29 Grip Belt
...............................................................
9
30 Video Output Socket .......................................... 15
31 RF DC Output Socket ........................................ 15
32 Audio Output Socket
.........................................
15
33 Battery Eject Button.............................................. 7
3839-
40-
41-
42-
43-
AUTO LIGHT
PAUSE STOP
0/REW FF/S3
-¿I
1S)/-SEARCH +
MEMORY COLOUR
MUUt ‘
-O ©-
No. Name Page
34 Tripod Receptacle
35 Focus +/- Buttons
36 Remote Control Socket
37 DC Input Socket
No. Name Page
.............................................
.............................................
.....................................
................................................
17
11
17
17
38 Auto Light Button ............................................... 18
39 Pause Button..................................................... 14
40 Play Button ........................................................ 14
41 Rewind/Review(-SEARCH) Button
...................
14
42 Memory Button................................................... 13
43 Titling Mode Selector Button
.............................
13
44 CameraA/TR Selector Cover................................ 3
-48
45 Recording Speed Selector Switch
46 Title Colour Selector Button
47 Fast Fon/vard/Cue (SEARCH+) Button ............. 14
.....................
..............................
10
13
48 Stop Button ........................................................ 14
J
44 Function of the Camera/VTR Selector Cover
o-
-47
-46
CAMERA position
VTR position (as illustrated)
....................
For camera recording.
.....
For other operations
than camera recording.
-45
44
-4-
Page 5

Indications in the Electronic Viewfinder (EVF)
The following indications are displayed in the Electronic Viewfinder
7 Tape Running Indications
(EVF) to inform you of the conditions of the Movie Camera.
3-
4-
5-
6-
-23:59
-25.12.1991
Warning/Alarm Indications
C3B[13-
C3-
-7
-8
-9
-10
8 Recording Mode Indications
9 Manual White Balance Indication
—WHITE- Manual Mode, Not adjusted
10 High Speed Shutter
Warning/Alarm Indications
^ I ^ When only one bar ” in the Battery Power Indication
remains, the Battery Indication “ •CP” starts to flash.
^ When the last bar has disappeared, the power lamp
will flash rapidly. In this condition, there is little power
left, and the Movie Camera wiil be turned off in a few
seconds. Replace the Battery Pack with a fully
recharged one.
•Some of the above indications may iight up alternately at the
same place in the EVF to indicate the corresponding operating
condition or warnings.
REC Recording mode
PAUSE Recording Pause mode, Rec Review
> Play mode, Camera Search (In fonward direction)
11 Still mode
>[> Fast Forward/Cue mode
« Rewind/Review mode. Camera Search (In reverse
direction)
SP SP mode
LP LP mode
^ I /
I ''
W.SET
Manual Mode, Hold Mode
Focus Mode Indication
Mode Indications
MF MFMode
1/120 1/120 sec.
1/250
1/500
1/1000
1/2000
1/4000
1/250 sec.
1/500 sec.
1/1000 sec.
1/2000 sec.
1/4000 sec.
^ I ^ There is no cassette tape inserted, or the tab of the
—TAPE— inserted cassette is broken out. The indications flashes
^ I to warn that recording is not possible.
^ I ^ During recording, the tape has almost reached its end.
— END — Replace the tape with a new one. The indication will
I ^ remain lit when the tape has reached its end.
\ I /
— DEW —
\ I /
— O — Video Head Clogging (see page 22.)
When condensation has formed inside the Movie
Camera, the “DEW” indication will flash and a few
I ^
seconds later, the unit turns itself off.
When the button type Battery for the Title Memory and
\ I /
-BACKUP-
Auto Date functions is not inserted or when it is
exhausted, the indication will flash for 10 seconds after
the Movie Camera is turned on.
1 Remaining Battery Power Indication
E—F The ” indications begin to disappear from right
to left as the power of the Battery Pack weakens.
•When attaching the Battery Pack to the Movie
Camera, the indication “E—F” will initially be
displayed for approx, one minute and then the
actual remaining battery power will then be
displayed.
2 Counter Indication
M 0:00.00 Tape Counter with Memory Indication
3 Auto Light Mode Indications
AUTO Auto Mode
•pD ON Video Light On
4 Digital Memory Indication
WHT Colour Indication
WIPE t Mode Indication (No indication in normal mode.)
5 Time Indication 6 Date Indication
Page 6
Accessories
Standard Accessories
AC Adaptor
Battery Pack
Cassette Adaptor
Shoulder Strap
AV Output Cable
DC Input Cable
Battery for Cassette Adaptor Operation
Battery for Clock Operation
Video Light
CAUTION: TO REDUCE THE RISK OF FIRE OR
SHOCK HAZARD AND ANNOYING
INTERFERENCE, USE ONLY THE
RECOMMENDED ACCESSORIES.
Information for your safety.
Optional Accessories
Battery Pack (VW-VBS2E)
Battery Pack Holder (VW-VH1E)
Car Battery Cord (VW-ACC11E)
Battery Charger (VW-BCS1E)
Travel Kit (VW-TKS1E)
Carrying Bag (VW-CBG2E)
Video DC Light (VZ-LDS15E)
Replacement Bulb for DC Light (VZ-LL5E)
Replacement Bulb for DC Light (VZ-LL15E)
Filter Kit (VW-LF43E)
Tele Conversion Lens (VW-LT4314E)
Tele Conversion Lens (VW-LT4320E)
Tele Conversion Lens (VW-LT4350E)
Wide Conversion Lens (VW-LW2E)
Wide Conversion Lens (VW-LW4307E)
Step Up Ring (VW-SUR1E)
Hand Grip (VW-GPC1E)
Pause Remote Control (VW-RM1E)
L-Shaped Shoe Adaptor (VW-SK3E)
RF-Adaptor (VW-RF7E)
Standard Tripod (VZ-CT55E)
Deluxe Tripod (VZ-CT75E)
Table Tripod (VZ-CTT1E)
Charactor Generator (VW-CG5E)
VITC Generator (VW-VG1E)
VITC Controller (VW-EC10E)
Editing Controller (VW-EC300E)
Editing Controller (VW-EC310E)
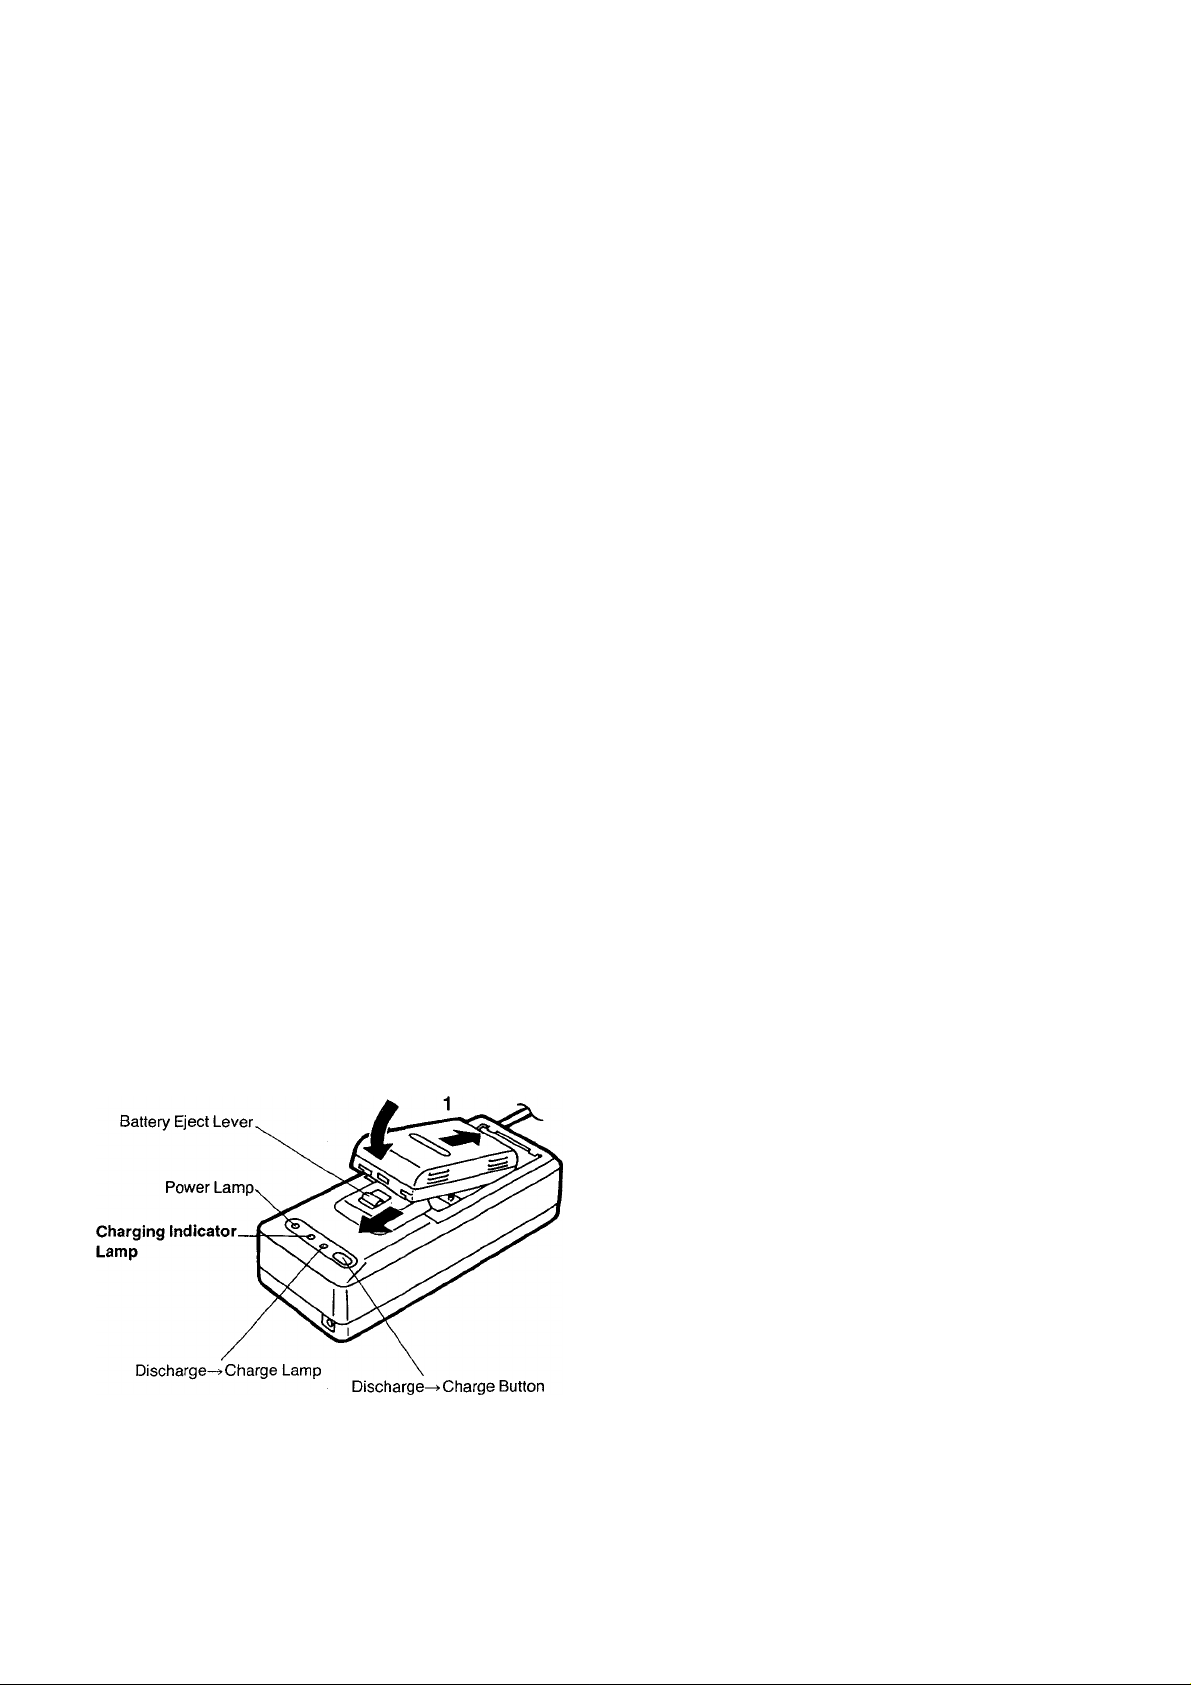
Battery Pack
Charging
1 Attach the Battery Pack.
2 Connect the AC Adaptor to the Mains.
•Charging Indicator Lamp
Lights whiie charging is taking piece and goes out when charging
is finished.
Note:
•The charging takes about 60 minutes.
•The Movie Camera can be used continuously for approx.
55 minutes with a fully charged Battery Pack, (without Video
Light.)
•With the VW-VBS2E Battery Pack (optionai), the charging as well
as possible recording time is twice as long as for the standard
supplied Battery Pack.
■ When the charging is completed, slide the Battery Eject Lever in
the direction of the arrow and remove the Battery Pack.
■ Discharge^ Charge Function
The Battery Pack can be recharged for repeated use. However, if it
is recharged repeatedly while there is still some charge left, its
charging capacity will be gradually reduced. Therefore, if you often
need to recharge semi-discharged Battery Packs, attach the
Battery Pack to the AC Adaptor, connect the AC Adaptor to the
Mains, and press the Discharge-^’Charge Button to compieteiy
discharge the Battery Pack. (The Discharge-i’Charge Lamp wiii
light up, and when the discharging is finished, the Charging
Indicator Lamp wiil light up instead.) This wiil increase the charging
capacity and extend the operating life of the Battery Pack.
Therefore, if the operating life of the Battery Pack becomes
noticeably shorter, refresh it. (It is recommended to refresh the
Battery Pack approx, once every five rechargings.)
-6-
Page 7
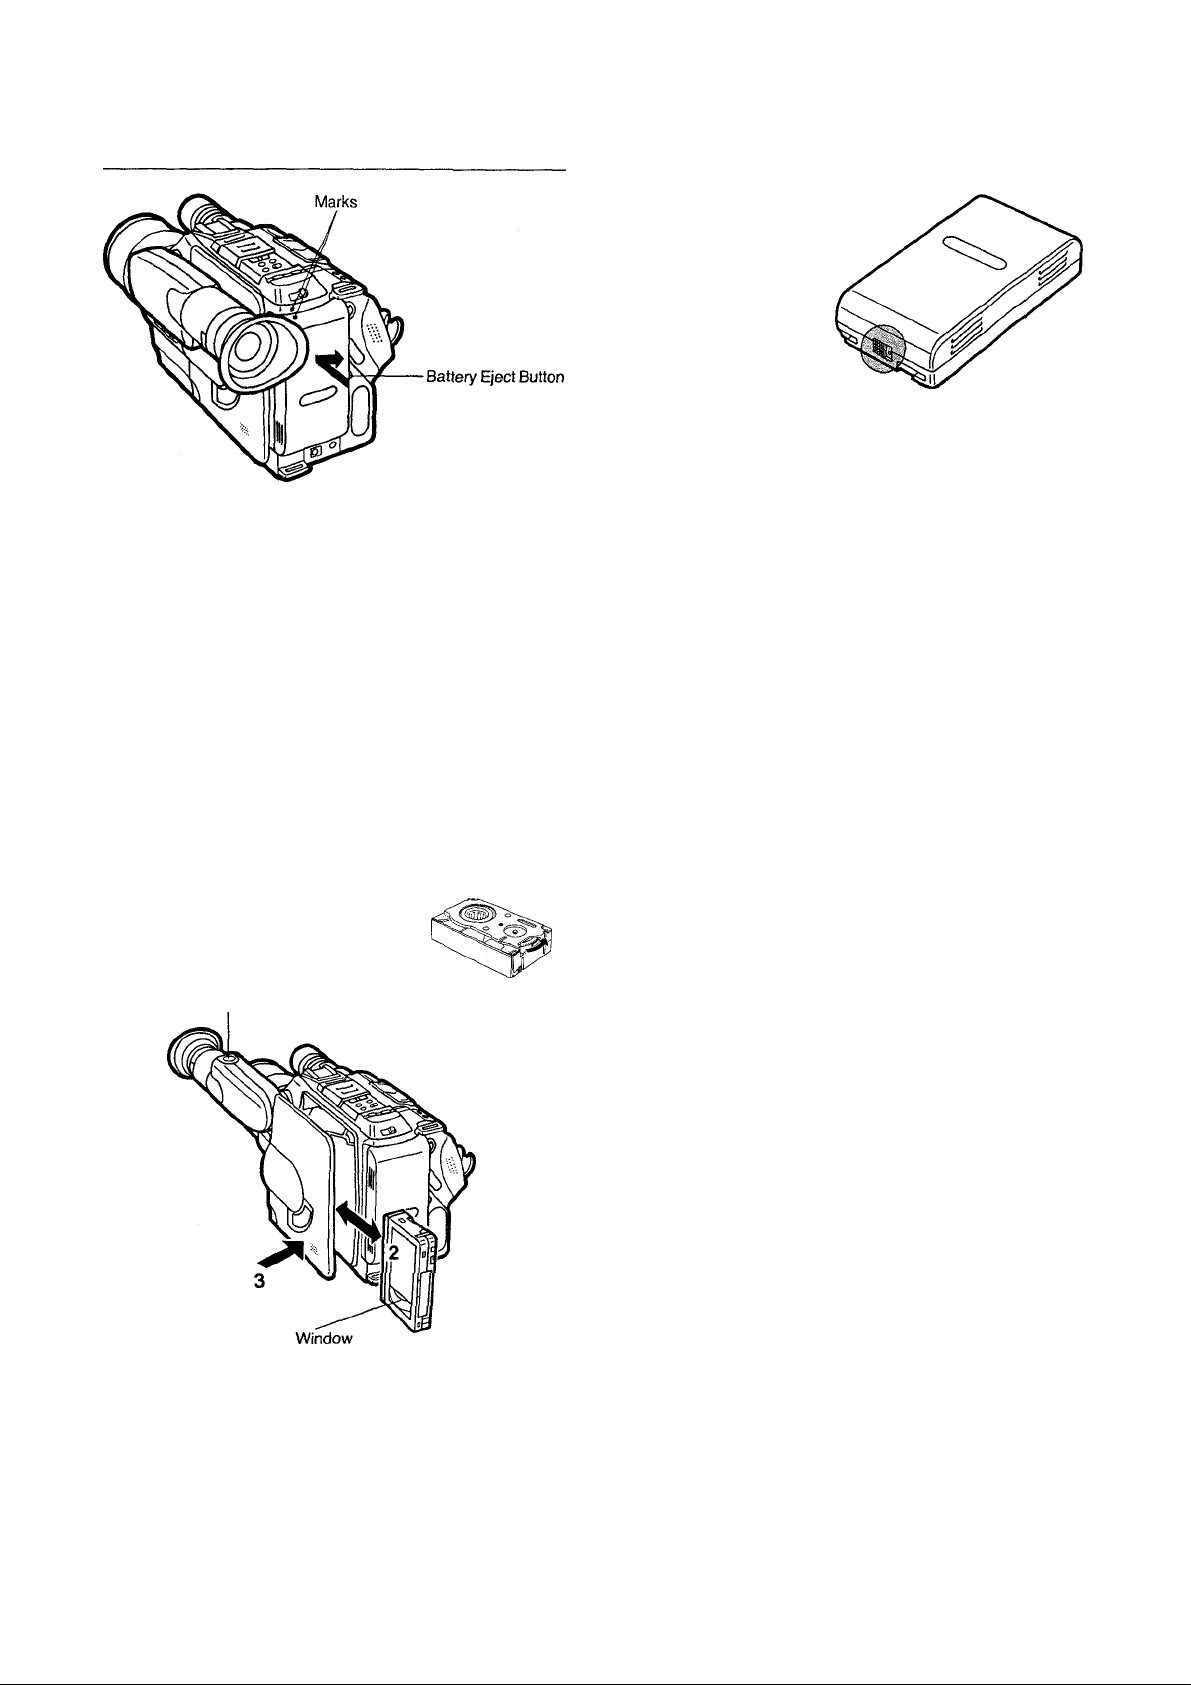
Attaching
Charging Confirmation Marker on the Battery Pack
Charging Confirmation Marker
1 Align the two marks of the Battery Pack and the Movie Camera,
then slide the Battery Pack to the right until it locks with a click.
•To remove the Battery Pack keep the Battery Eject Button
pressed and slide Battery to the left.
Caution;
•Wait about 10 seconds after turning the Movie Camera off, before
removing the Battery Pack.
• If the Battery Pack is removed during recording or playback, the
tape remains wound around the video head cylinder and could
become damaged.
Video Cassette
This marker makes it convenient to distinguish between charged
and discharged Battery Packs. For example, visible dot means
charged Battery Pack, and no dot means discharged Battery Pack.
Inserting the Video Cassette
Before Inserting the Cassette
Make sure that the tape is not loose. If it is loose, pull it in by turning
the cog wheel on the side of the cassette in the direction of the
arrow.
1 Turn the EVF by 180° towards the Lens, and press the Eject
Button.
• Do not move the EVF again before the cassette compartment
cover is in its fully extended position.
2 Insert the video cassette into the cassette compartment with its
window facing outside.
3 Push the cassette compartment cover inward until it locks with
a click and then turn the EVF back to its original position.
Removing a Video Cassette
1 Turn the EVF by 180° towards the Lens, and press the Eject
Button.
2 Pull out the video cassette.
3 Push the cassette compartment cover inward until it locks with
a click and then turn the EVF back to its original position.
Note:
•Use VHS-C video cassettes only.
-7-
Page 8
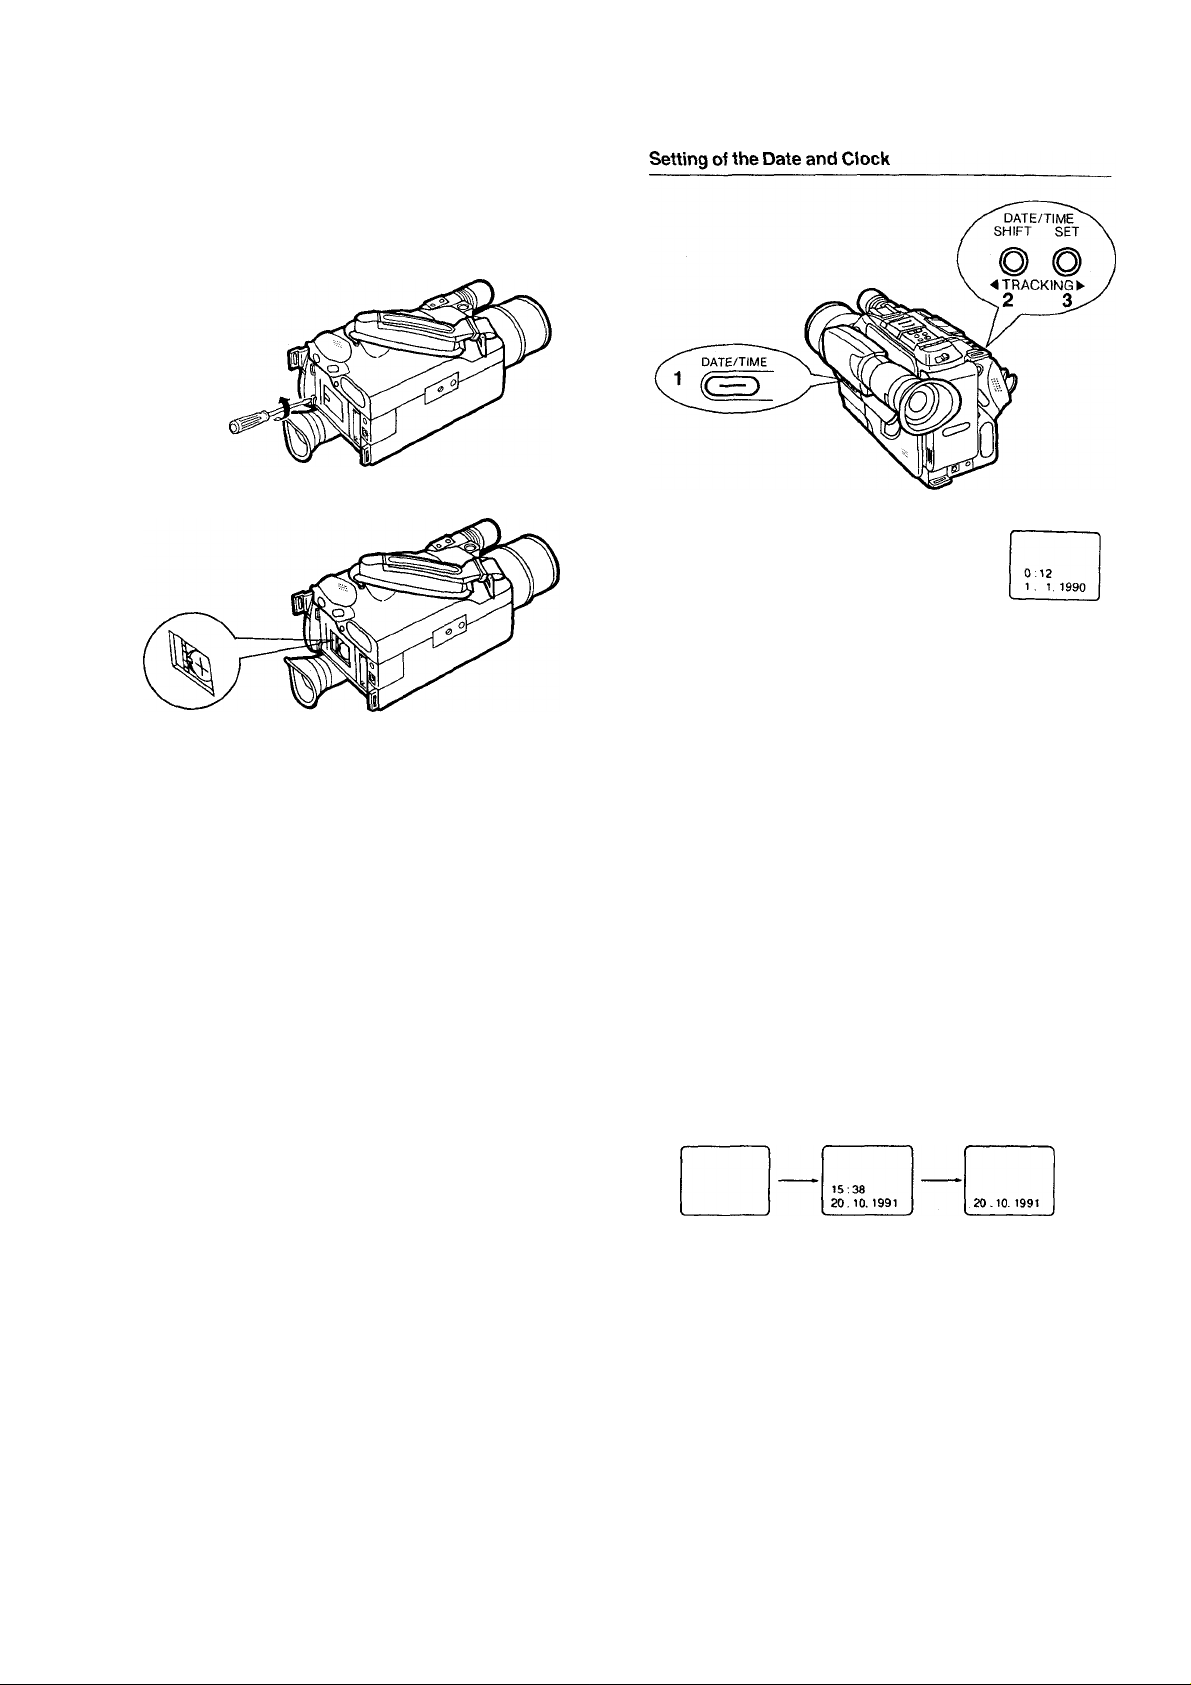
Setting the Clock
How to Insert the Battery for Clock Operation
The “CR2032” size battery is necessary for the date time and
title to be memorized by the Movie Camera.
1 Remove the lid.
2 Insert the “CR2032” size battery on the Battery Holder with (+)
mark facing upward.
Note;
• If the battery is not inserted or if it is exhausted, the indication
“BACKUP” in the EVF will flash for approximately 10 seconds
when turning the Movie Camera on.
•Before exchanging the battery, turn the Movie Camera oft.
CAUTION FOR BATTERY REPLACEMENT
•The life of the battery is about one year. Inspect and if necessary,
replace the Battery once a year.
• Load the new battery with its polarities (+ and -) aligned
correctly.
•Do not try to short-circuit, recharge or heat the battery and do not
throw it into a fire.
1 When the Date/Time Selector Button is
pushed, the indication shown on the right will
appear in the EVF.
• If no battery is inserted, the indication
“BACKUP” will flash.
2 When the Shift Button is kept pressed for more than about
2 seconds, the “Year” portion will start to flash. Then, at every
press of the shift Button, the items to be set will flash in the
following sequence.
Year-^ Months Date-» Hour-» Minute-»...
3 When the Set Button is pushed, the flashing portion displayed
will be changed in the following sequence.
YEAR: 1990^1991MONTH: 1-»2-» ...
DATE: 1-»2-» ...
HOUR: 0^1-» ...
MINUTE: 00^01-» .
»2089-»1990-»
,...-»12-»1-»
. .. .-»31^1-»
... .-»23-»0-»
. . -»59^00-»
•Repeat procedures 2 and 3 until all items have been set.
•Once the time and date are set, press the Shift Button in
response to a precise time signal so that the clock may begin to
function.
Recording the Date/Time indications
When the Date/Time Selector Button is pushed repeatedly, the
indications will change in the following sequence:
No Indication Date and Time
Date
Page 9
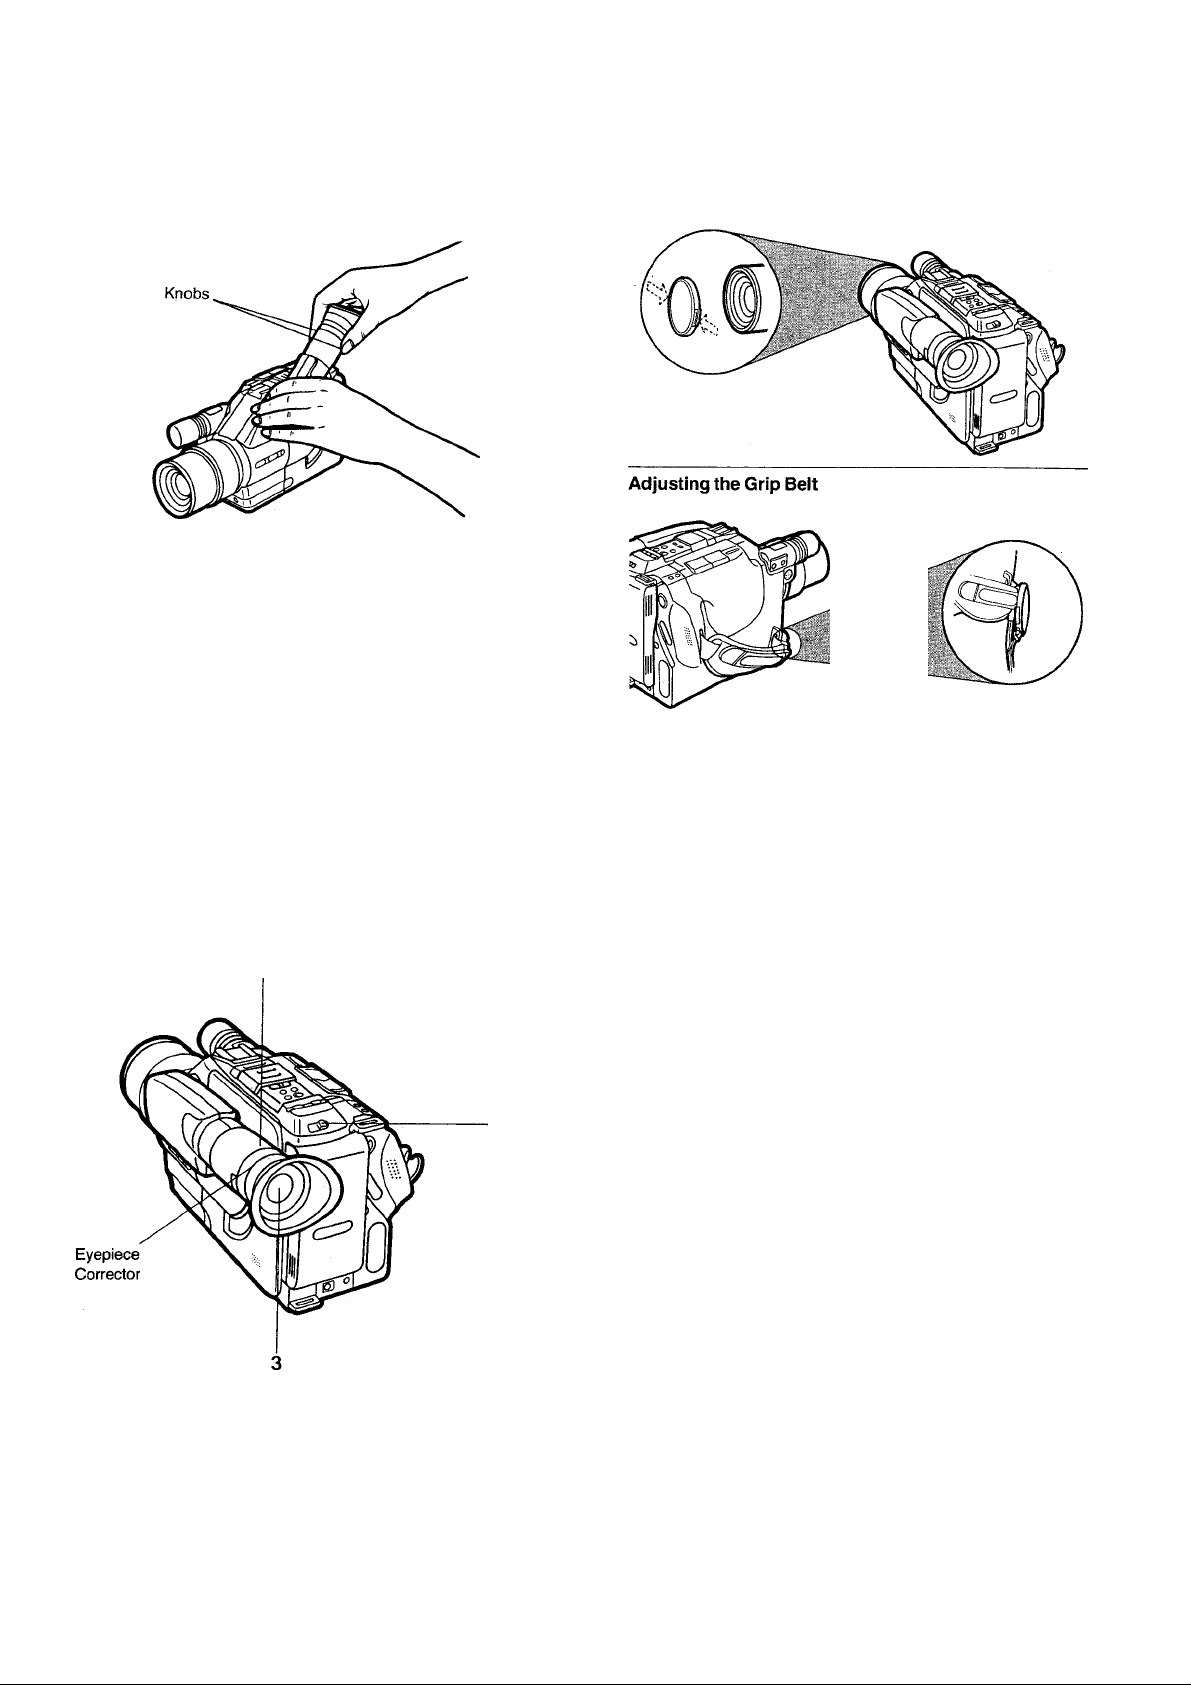
EVF, White Cap and Grip Belt
Pulling out the EVF
When pulling out the EVF, do not hold it by the Eyecup.
Note:
•Keep the EVF in its fully extended position during shooting.
•Do not apply any pressure on the EVF except for pulling it out and
pushing it back in again.
•Be sure to retract the EVF after shooting.
Removing the White Cap
To remove the White Cap, press the stoppers on both sides and
pull it off.
•Grasp the Handgrip.
•Adjust the length of the Grip Belt.
•Attach the White Cap to the Grip Belt.
Eyepiece
Eyepiece Corrector
With this control the eyepiece can be adjusted to the eyesight.
1 Pull out the EVF to its fully extended position.
2 Turn the Movie Camera on.
3 Adjust the Eyepiece corrector until the indications in the EVF
are clearly visible.
Page 10
Camera Recording
Rec Review
For checking the last few seconds of recorded scenes.
1 Put the Movie Camera in the recording pause mode.
2 Press the - SEARCH Button.
Camera Search
For checking recorded scenes.
1 Put the Movie Camera in the recording pause mode.
2 Keep the - SEARCH Button pressed to play back a scene at
high speed in reverse direction.
•The sound is not reproduced.
3 Keep the SERACH + Button pressed to play a scene at normal
speed in forward direction.
•The sound is reproduced.
Recording Lock Function
This function ensures smooth scene-to-scene continuation in
assemble recording. Even if the Movie Camera has been turned off
with the Operation Switch, the tape remains loaded around the
head cylinder. The recording lock mode is activated by turning the
Movie Camera off during recording pause. This will cancel the
White Balance setting.
• If the unit remains in the recording pause mode for more than
6 minutes, it will automatically turn itself off to protect the tape and
save battery power. (The tape remains wound around the head
cylinder. This condition is called “Recording Lock”.)
To use the Movie Camera again, turn it on with the Operation
Switch.
• If the recording lock mode continues for more than 48 hours, it will
be cancelled and the unit will be turned off.
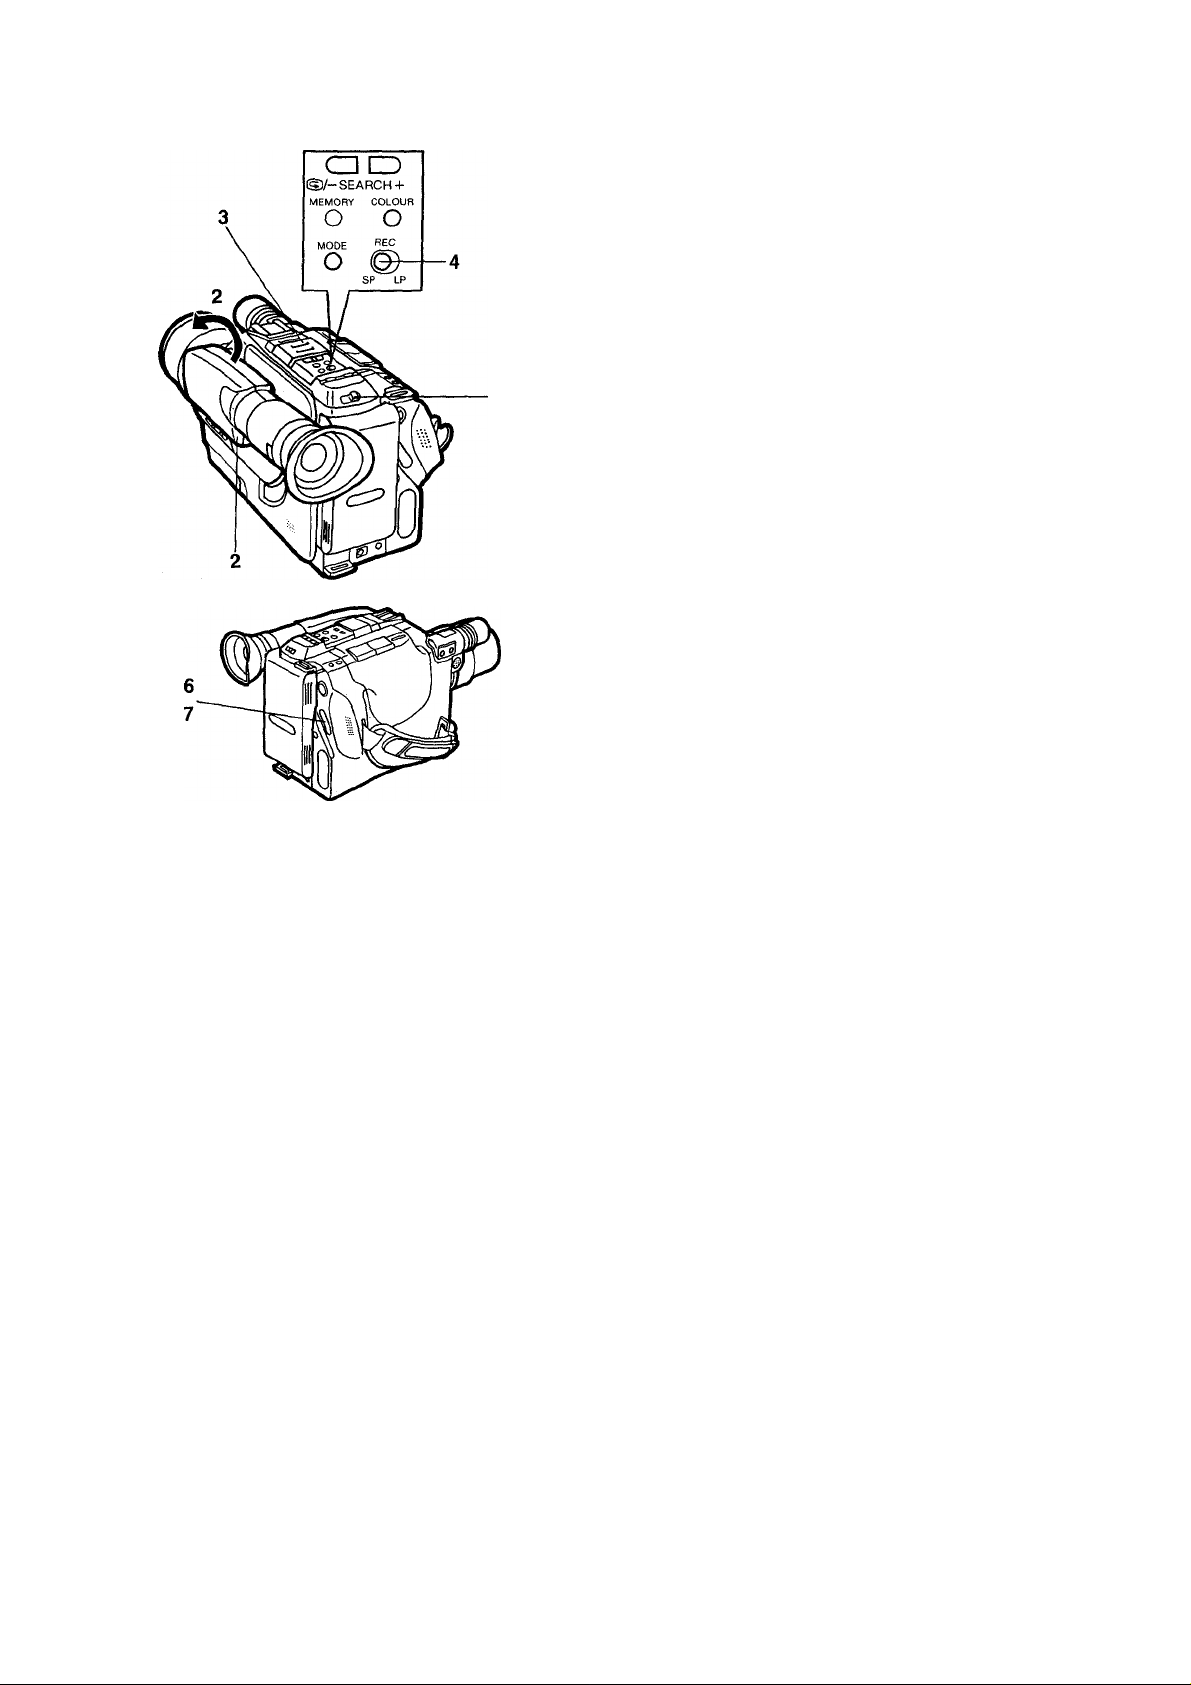
To Start Recording
1 Slide the Operation Switch to the right to turn the Movie Camera
on.
2 Turn the EVF by 180“ towards the Lens, press Eject Button and
insert a video cassette with the erasure prevention tab intact
then, turn the EVF back to its original position.
3 Set the CAMERA/VTR Selector Cover to the “CAMERA”
position.
•The Movie Camera will be in the recording pause mode.
4 Set the Recording Speed Selector to “SP” or “LP”.
•SP: For normal tape speed
•LP: For slow tape speed
5 Place the Movie Camera in the shooting position.
Press the Start/Stop Button.
•The recording starts.
Press the Start/Stop Button again to stop the recording
temporarily. (Recording pause mode)
• If the unit remains in the recording pause mode for more than
6 minutes, it will automatically turn itself off to protect the tape
and save battery power.
To Stop Recording
1 Put the Movie Camera in the recording pause mode.
2 Slide the Operation Switch to the right to turn the Movie Camera
off.
-10-
Page 11
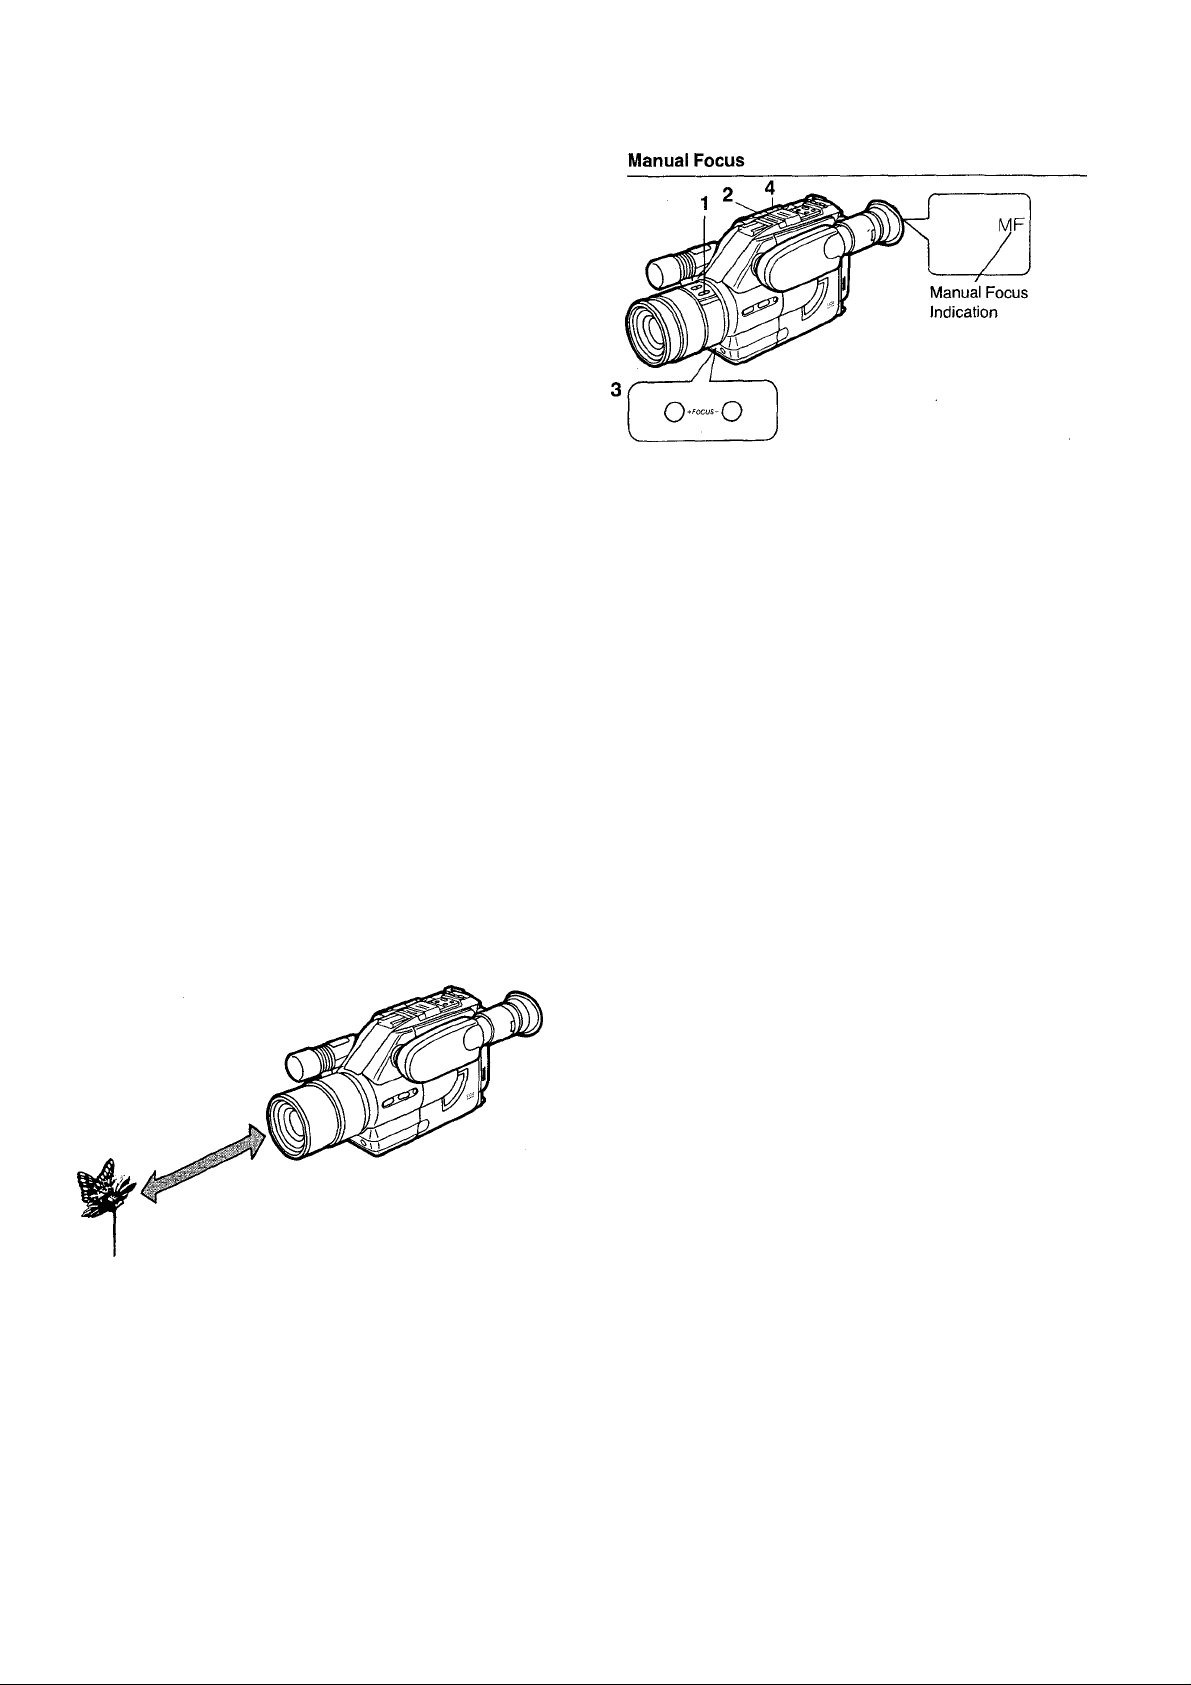
Focus
Continuous Auto Focus
For Continuous Automatic Focus adjustment, turn the Movie
Camera on and set the CAMERAA/TR Selector Cover to
“CAMERA”.
•The focus will automatically be adjusted to the subject in the
centre of the EVF,
1 Slide open the cover on the lens part and press the Focus
Button.
•The indication “MF” will appear in the EVF.
2 To zoom in on an object, press the “T” Zoom Button.
3 Adjust the focus with the Focus “+” or Button.
4 To zoom back from a subject to show more of it, press the “W”
Button.
•After putting the Movie Camera into the Recording Lock mode
or turning it off and then on again with the Operation Switch in
the Manual Focus mode, be sure to repeat operation steps 2
to 4.
Macro Close-Up
For close-up shots of small objects or photos.
Keep the “W" Power Zoom Control Button pressed.
•The focus will be adjusted up to a minimum distance of 5 mm
between lens and subject.
•After focusing all the way to the wide-angle position, the focus
can be adjusted simply by approaching the subject.
•The focus can be adjusted both in the Auto and Manual mode.
Practical Hint for Shooting
•To change the scale of the subject, change the distance from the
subject.
•As the depth of field is very small in macro shooting, even slight
camera movements can cause the subject to be out of focus.
Therefore, it is recommended to use a tripod,
•When shooting pictures in a photo album or a similar situation
with insufficient lighting, use a Video Light.
•When the “T” Power Zoom Control Button is pressed to zoom in
on a subject, the focus can be adjusted within a range of more
than 0.7 m from the subject.
-11-
Page 12
White Balance
Auto White Balance
This adjustment is necessary to assure natural colour rendition.
For continuous automatic White Balance adjustment, just turn the
Movie Camera on. This setting will automatically provide wellbalanced natural colour rendition under almost any shooting
condition.
Manual White Balance Adjustment
1 Attach the White Cap to the lens.
2 Keep pressing the “T” Button of the Power Zoom Control
Buttons until the screen in the EVF becomes completely white.
3 Slide open the cover on the lens part, then keep the White
Balance Button pressed for more than 1 second.
The “WHITE” Indication in the EVF informs about the state of
the adjustment;
Flashing slowly......................... Not set
Flashing rapidly ....................... During setting
The indication “W.SET’is lit
.....
Setting is finished
• How to Use the White Cap
If there is only one light source, attach the White Cap to the
lens for the manual white balance adjustment. If there are
several light sources or if the illuminations is weak (indoor,
etc.), remove the White Cap from the lens and point the Movie
Camera at a purely white subject, such as white paper, and
then adjust the White Balance.
•Automatic Recall of Previous White balance Setting
When the Operation Switch of the Movie Camera is turned off
and later on again, the “WHITE" Indication will flash slowly,
however, the last previous white balance setting is still
maintained. However, to ensure best possible colour
reproduction, adjust the white balance anew as explained
above. It is also maintained during Playback, Rec Review and
Camera Search. However, the previous white balance
setting will no longer be maintained when the AC Adaptor is
turned off or the Battery Pack is removed from the Movie
Camera.
•When moving the Movie Camera from indoors to outdoors or
vice versa, be sure to adjust the white balance anew, as the
colour of the light has changed considerably.
High Speed Shutter
A range.of different shutter speeds make possible videographing of
scenes with fast movements.
1 Slide open the cover on the lens part.
2 By repeatedly pushing the High Speed Shutter Button, the
shutter speed can be changed as follows;
(No indication):
1/120:
1/250:
1/500:
1/1000:
1/2000:
1/4000:
For Playback
1/50 sec. (normal)
1/120 sec.
1/250 sec.
1/500 sec.
1/1000 sec.
1/2000 sec.
1/4000 sec.
When scenes recorded with high shutter speed(s) are later played
back on a VTR equipped with the playback functions Super Still
and Super Fine Slow Motion, etc., still and slow motion pictures
with very sharp contours and full details can be obtained.
Note:
See page 24 for details.
Zooming
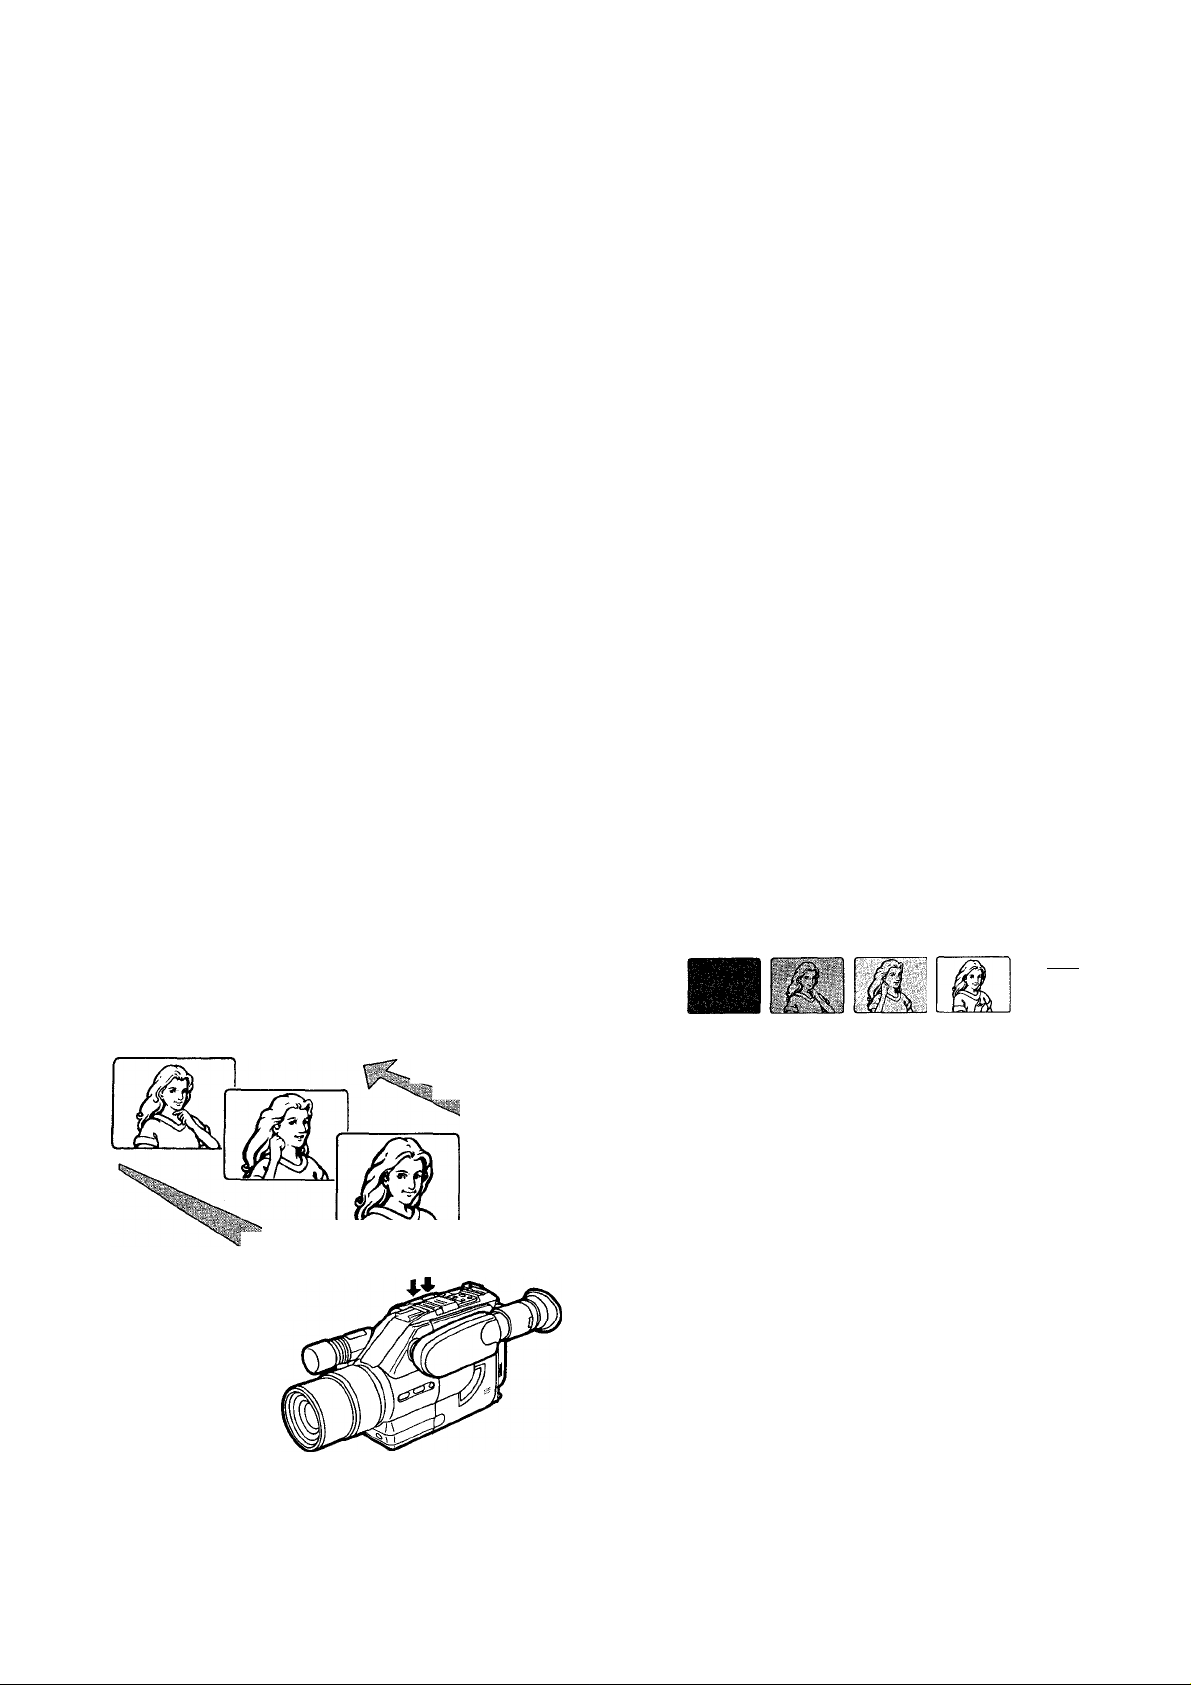
Fade-In and Fade-Out
Fade-In
Power Zooming
To make your zoom shots more impressive and give exactly the
desired effect, do it like the professionals: before recording,
mocked a trial run of the zooming.
Zoom Out (The subject
becomes smaller)
Fade-In
Fade-In is used, for example, at the beginning of a performance.
After recording the title, gradual fading-in of the first scene is very
effective.
1 With the Movie Camera in the recording pause mode, keep the
Fade Button pressed.
- *
Zoom In (The subject
2 After the picture has disappeared in the EVF, press the Start/
Stop Button.
3 3 seconds later, release the Fade Button.
•The picture will appear gradually.
becomes larger)
Fade-Out
Fade-Out is used to give a scene a soft ending or for a smooth
fade-out/fade-in transition from one scene to another.
During recording, keep the Fade Button pressed to the point
1
where you want to fade out.
After the picture has disappeared, press the Start/Stop Button
2
For wide-angle: Press the “W” Button.
For telephoto: Press the “T” Button.
to stop the recording.
3 Release the Fade Button.
FADE
Fade-Out
-12-
Page 13
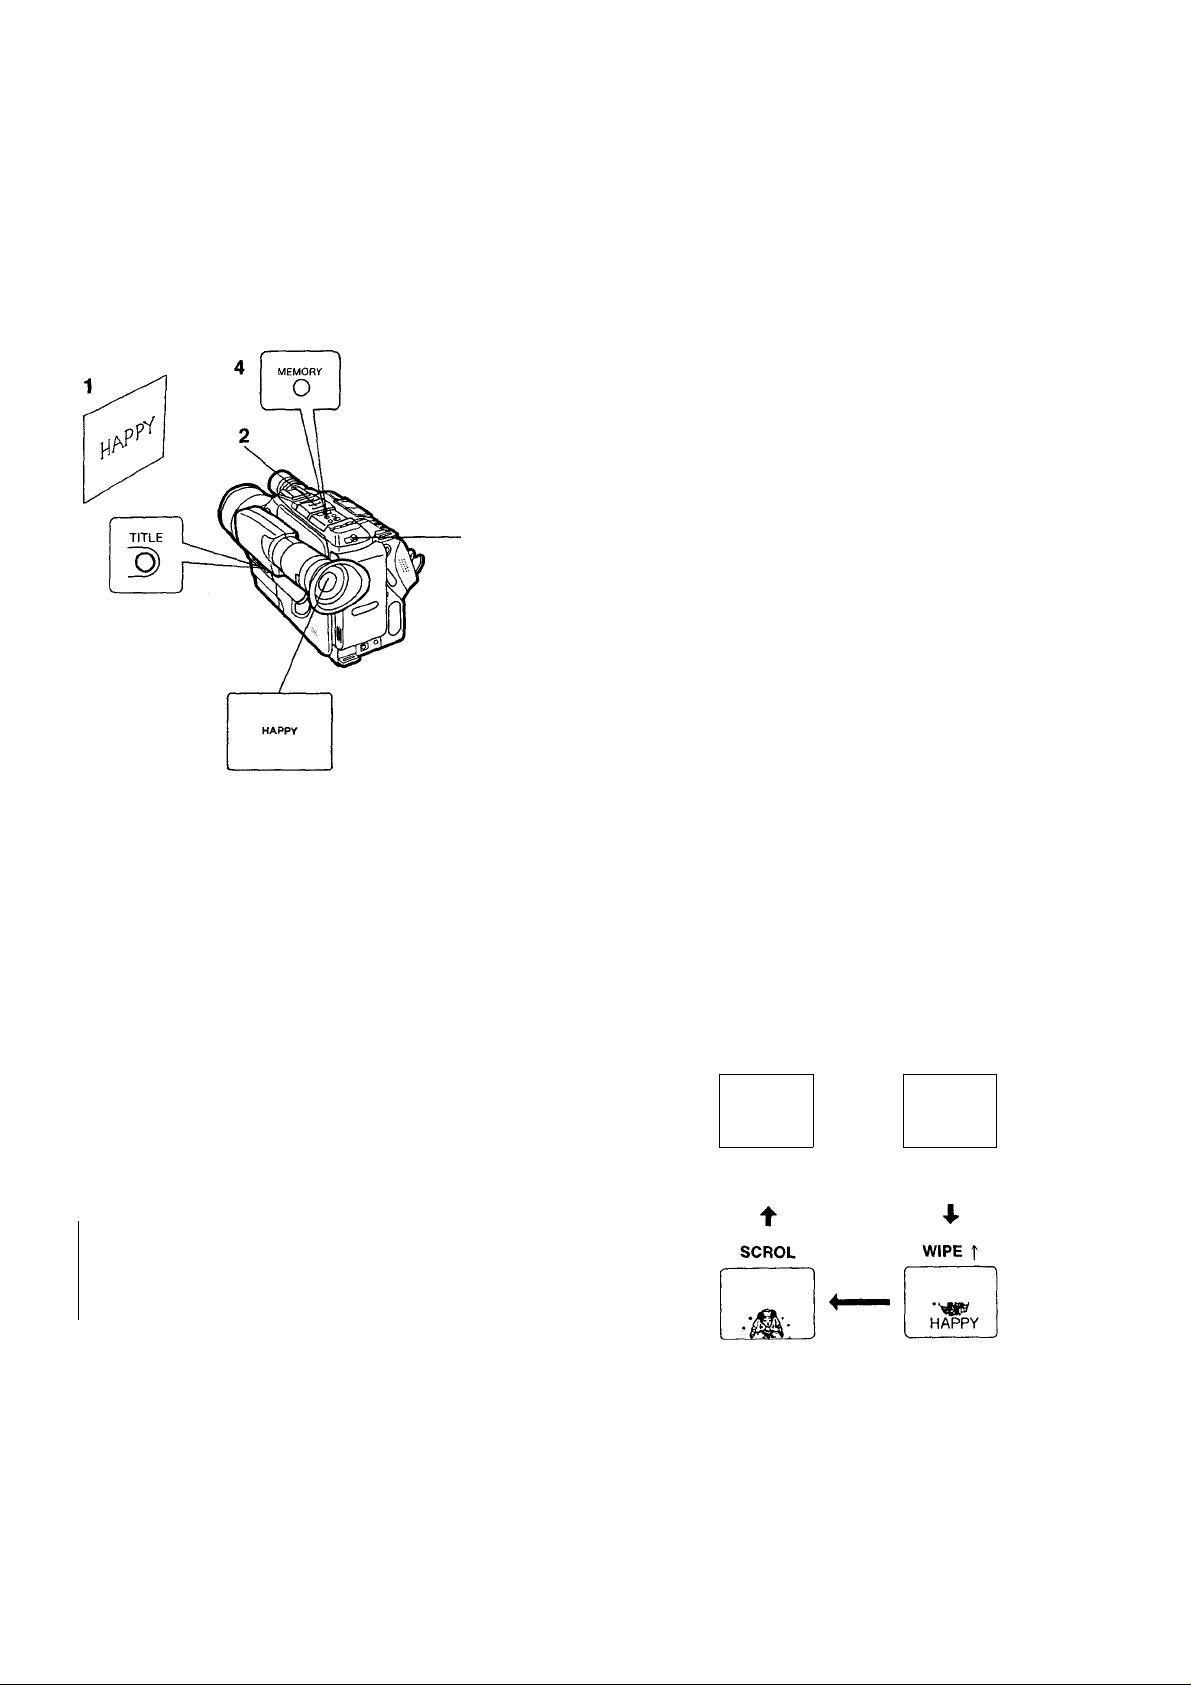
Recording a Title
The titling function makes it possible to input a title into memory
1 Prepare a printed illustration or a printed title.
and recall it later during shooting at the push of a button for
superimposition onto the normal picture (digital Title Memory
Function).
Inputting a Title into Memory
This operation can be performed while the Movie Camera is in the
recording pause mode.
2 Turn the Movie Camera on and set the CAMERAAn'R Selector
3 Adjust the focus.
4 Press the Memory Button.
Pressing this button repeatedly vyill make the title appear-»
disappear-^appear in the EVF.
If this button is pressed by mistake during shooting, the title will be
superimposed and recorded.
■ Remarks about Titling
The title remains stored in memory until the Button Type Battery is
exhausted. When a new title is input, the title previously memorized
title will be erased.
•Make a title with a black felt pen on white paper.
Cover to “CAMERA”.
•Keep the button pressed for more than half a second.
•The title is memorized.
While the title is displayed in the EVF, its colour and the titling
mode (the way it will be superimposed) can be selected.
•Press the Title Button to make the title in the EVF disappear.
Selecting the Colour of a Title
By repeatedly pressing the Title Colour Selector Button, the colour
of the title can be changed in the following order. (This function can
also be used while the title is being recorded.)
Titling Mode—
Selector Button
—> WHT
(White)
-----
BLK
(Black)
-» YEL
(Yellow)
^ GRN <-
(Green)
MEMORY COLOUR
O G-
MODE
-O
RED MAG
(Red)
CYN
(Cyan) (Blue)
- Title Colour
Selector Button
(Magenta)
i
<- BLU
Selecting the Titling Mode
By repeatedly pressing the Titling Mode Selector Button, the way in
which the title is superimposed onto the picture being recorded can
be changed in the following order. (This function can also be used
while the title is being recorded.)
NORMAL
_____
HAPPY
The title appears
immediately.
The title scrolls
in from the
bottom.
When pressing the Title Button, the Title is indicated in the selected
mode.
Note:
Since the top and bottom edge of the title screen will be cut off,
shoot the title so that it is in the centre of the screen.
WIPE i
^
■M:
The title appears
from the top.
The title appears
from the bottom.
-13-
Page 14
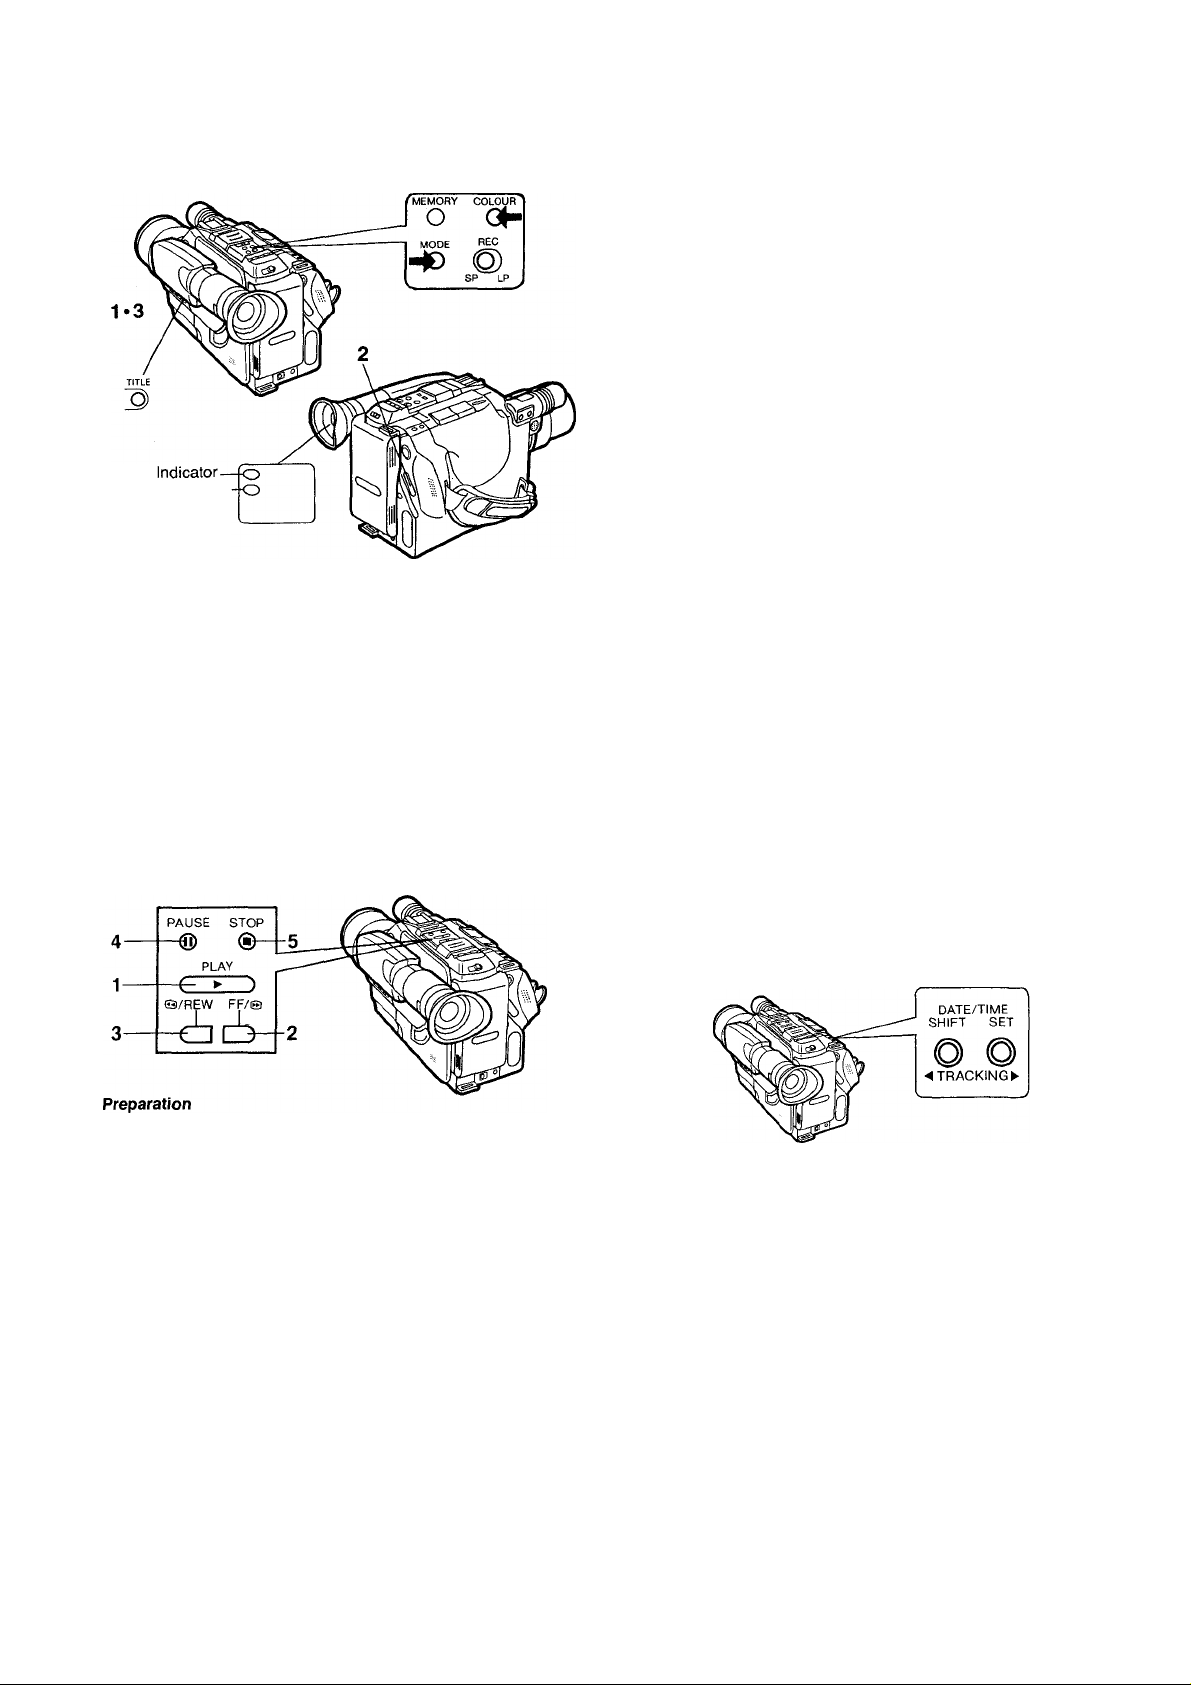
Recording a Title (Confd)
Recording a Title
Colour
Title Mode Indicator
■ Inserting a Title in the Normai Tiding Mode at the Beginning
of a Recording
1 Press the Title Button to make the title appear in the EVF.
•Confirm the Colour Indicator and the Title Mode Indicator. At
this time, it is possible to change the colour and titling mode
for the title.
2 Press the Start/Stop Button to start shooting.
•To stop the superimposition of the title, press the Title Button
again.
■ Inserting a Title in the Normal Titling Mode during
Recording
1 After having input a desired title into memory, press the Title
Button to make the title in the EVF disappear.
2 Press the Start/Stop Button to start shooting.
3 At the point where you want to insert the title, press the Title
Button. (The superimposed title can be seen in the EVF.)
•To stop the superimposition of the title, press the Title Button
again.
■ inserting a Titie in the Scroll or Wipe Mode at the Beginning
of a Recording
Perform the operation steps 1 and 2 above. After pressing the
Start-ZStop Button, wait approx. 2 seconds and then press the Title
Button.
Playback
•Insert the recorded cassette.
•Turn the Movie Camera on and set the CAMERA/VTR Selector
Cover to “VTR”.
Operations
1 Playback: Press the Play Button.
2 Cue playback: Keep the FF/(3 Button pressed during
playback.
3 Review playback: Keep the (3/REW Button pressed during
playback.
4 Still playback: Press the Pause Button during playback.
•To return to normal playback, press this button again.
5 Press the Stop Button to finish playback.
Fast Forward
Press the FFZ© Button to rapidly wind the tape forward.
Rewind
Press the ©ZREW Button to rapidly rewind the tape.
-14-
Tracking Control
When the Picture is distorted by noise bars during playback, the
Tracking needs to adjusted.
1 Press both the Tracking ◄ and ► Buttons simultaneously.
2 Adjust the Tracking with the Tracking ◄ or ► Button.
•When playing back a tape which has been recorded on another
movie camera, it may not be possible to completely eliminate this
distortion.
•Noise which takes the form of horizontal bars appears in the Cue,
Review and Still playback modes. This is not an indication of a
malfunction.
• In the Cue, Review and Still modes, the picture may become
black and white or distorted. This is not an indication of a
malfunction.
Note:
•The sound will be played back only during normal playback.
• Playback: The tape will be rewound automatically when it
reaches its end.
•Fast Forward: The tape will be rewound automatically when it
reaches its end.
• Rewind: The tape will stop automatically when it reaches its
beginning.
•Still Playback: If the Movie Camera is left in this mode for about
6 minutes, it will switch over to the stop mode, to protect the tape
and video heads.
Page 15
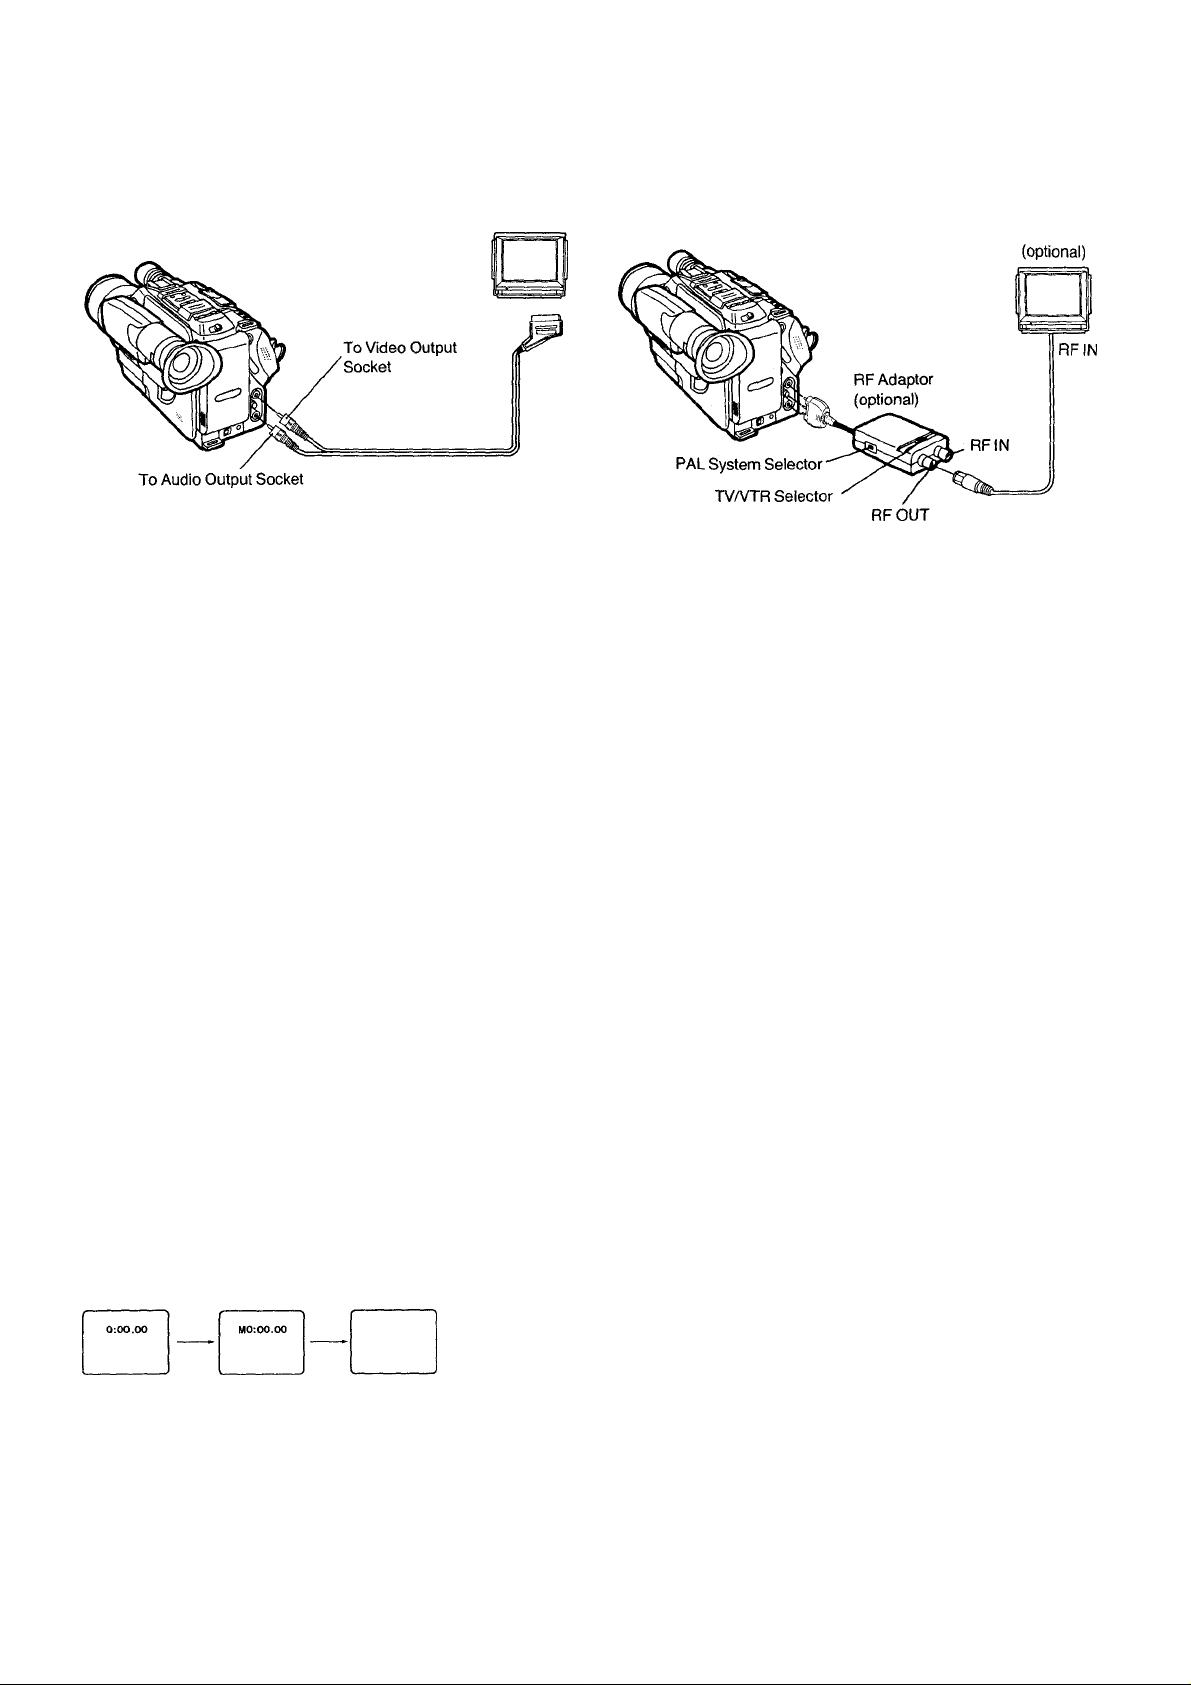
Playback via TV Set (Connections)
TV Set with AV Input TV Set without AV Socket
Before connecting the RF Adaptor, turn the Movie Camera off with
(optional)
the Operation Switch.
Playback on a table Type VTR
Use the Cassette Adaptor.
Other Functions
Memory Search Function
1 Press the Reset Button at the desired point,
•The Tape Counter is reset to “0:00.00”.
2 Press the Memory/Display Button.
•The “M” indication appears in the EVF.
3 After pressing the Stop Button, press the Q/REW Button.
•The tape will stop automatically at about the point where the
tape counter reads “0:00.00”.
Tape Counter Indication
At every push of the Memory/Display Button, the Counter
Indication will change as follows:
TV
T une to UHF channel 36.
TV/VTR Selector on the RF Adaptor
VTR: For playing back a cassette
TV: For watching TV.
PAL System Selector
G: For continental Europe
I: ForU.K.
Lap Time
Counter
Indication
(Real Time)
appears.
Memory appears
with Tape
Counter
Indication
no indication
-15-
Page 16
Assemble Editing
PAUSE STOP
PLAY
@/REW FF/®
i do
Э-
Preparation
• Insert a video cassette with intact erasure prevention tab.
•Set the CAMERA/VTR Selector Cover to “VTR”.
Operation
1 Play back the tape to locate the point where the new recording
is to be joined (Assemble Editing), and press the Pause Button
at the desired point.
2 Set the CAMERA/VTR Selector Cover to “CAMERA”.
3 Press the Start/Stop Button to start shooting the new scene.
Dubbing (Copying)
For Playback
Operation
1 Press the Play Button on the Movie Camera to start playback.
2 Press the Record Button on the VTR to start recording.
Note:
The picture quality of a copied tape is inferior to that of the original
tape.
• For details, refer to the operating instructions of the recording
VTR.
Synchro Editing
Use the Synchro Editing Cable (optional) to connect the Remote
Control Socket on the Movie Camera with the synchro edit socket
on the recording VTR.
• If the recording VTR is equipped with Synchro-Edit function, this
Movie Camera can be operated via the recording VTR, i.e.
playback start and stop of the Movie Camera will be synchronized
with the recording start and stop on the VTR.
•For details, refer to the operating instructions of the recording
VTR.
For Recording
-16-
Page 17
Accessories, etc.
Shoulder Strap
1 Pass the end of the Shoulder Strap through the slit of the
Shoulder Strap Holder on the upper part of the rear of the Movie
Camera.
2 Securely attach the end of the strap.
3 Attach the other end of the Shoulder Strap at the lower part of
the rear of the Movie Camera in the same way as mentioned
above.
Tripod Mount
Bottom side of the Movie Camera
a stable surface,
with its legs fully spread.
AC Adaptor
1 Connect the Power Supply Cable from the DC Output Socket
on the AC Adaptor to the DC Input Socket on the Movie
Camera.
2 Connect to the Mains.
Note:
When a Battery Pack is attached to the AC Adaptor, the Movie
Camera cannot be supplied with power.
•To attach Video DC light (VZ-LDS15E; optional), the L-shaped
Shoe Adapter (VW-SK3E; optional) is necessary.
Car Battery Cord
(optional)
1 Start the engine and insert the Car Battery Cord into the
cigarette lighter socket.
2 Connect the other end to the DC input Socket on the Movie
Camera.
Note:
•The Car Battery Cord can only be used with 12V DC negativegrounded vehicles.
•Do not start the car engine while the Movie Camera is powered by
the car battery.
•With this connection, the Video Light (supplied) cannot be used.
-17-
Page 18
Accessories, etc. (Cont’d)
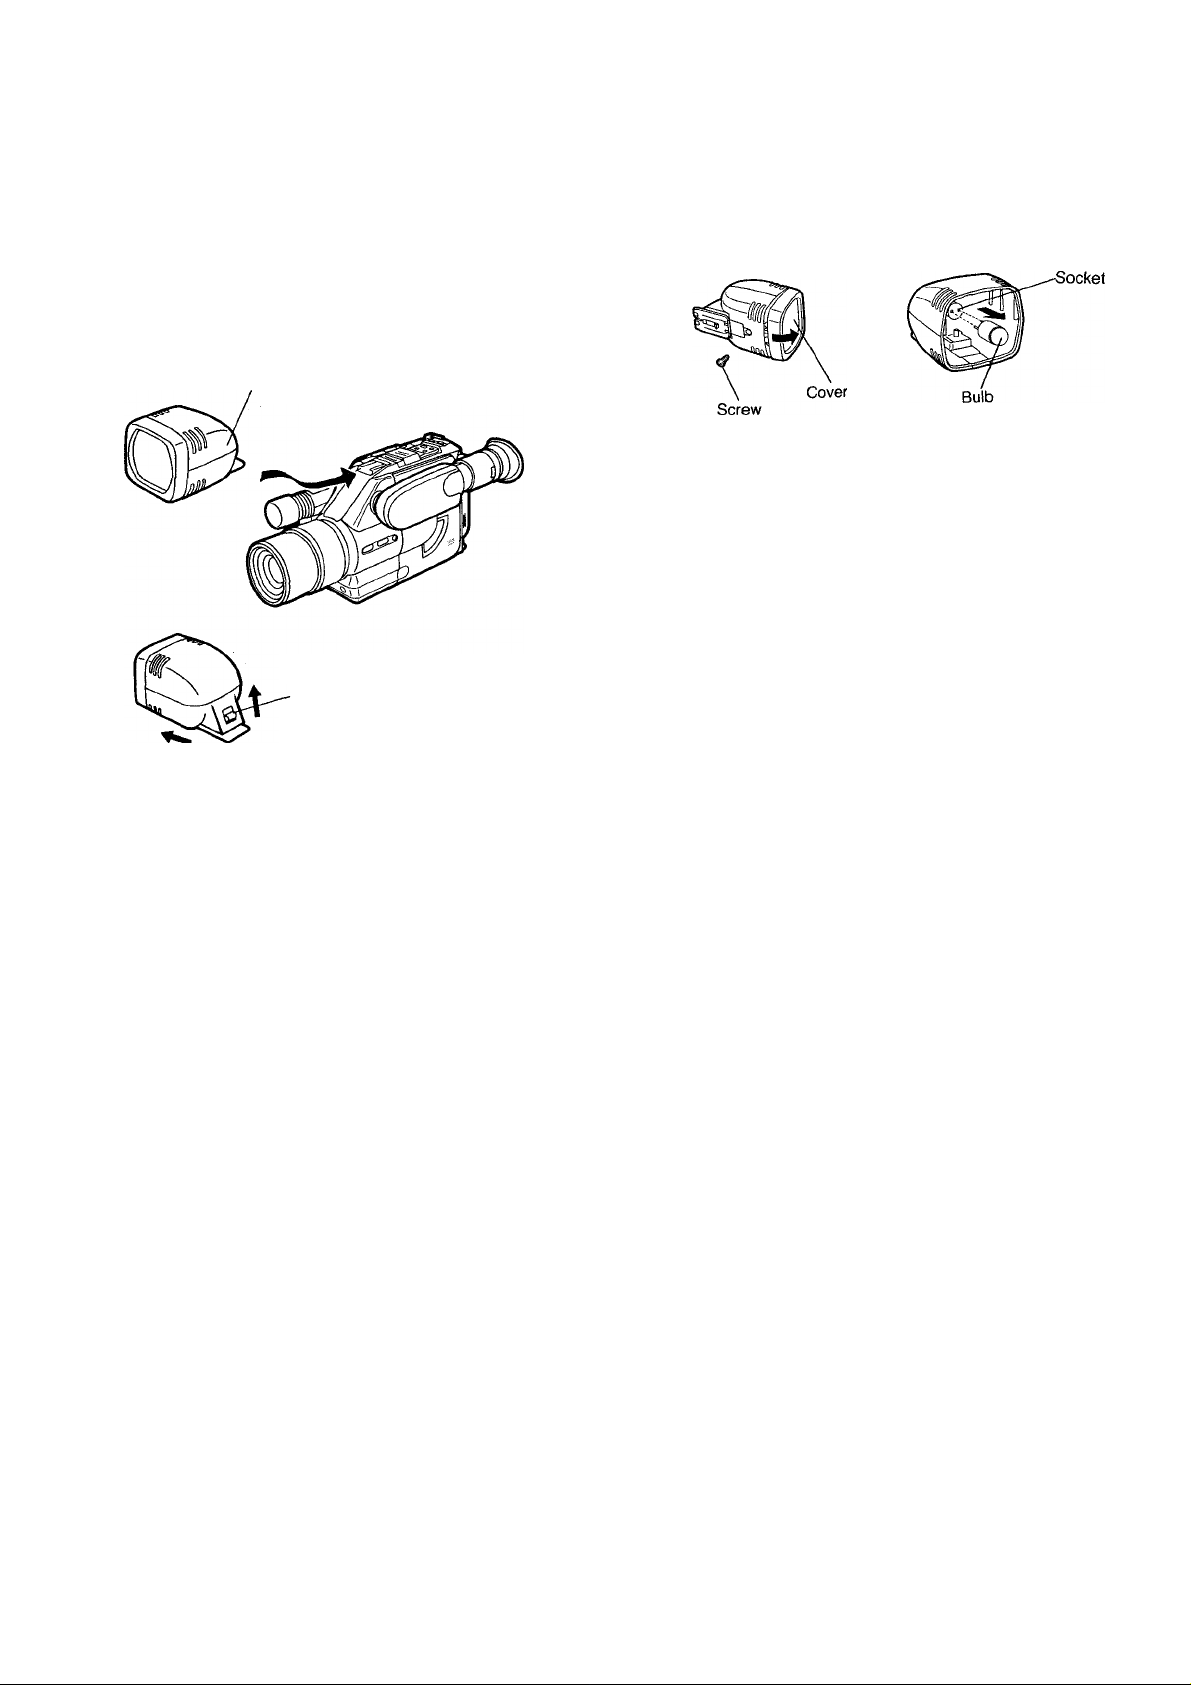
Video Light (Supplied)
To select the operation mode of the Video Light, press the Auto
Light Button of the Movie Camera.
ON: The Video Light turns on.
AUTO: When the Movie Camera is in recording Pause mode,
the Video Light automaticaiiy turns itself on, if the
surrounding light is not sufficient.
Video Light (Supplied)
To remove the
Video Light, pull it
off while pressing
up the button on
the back of the
Video Light.
Exchanging the Light Bulb of the Video Light
Before replacing a burned-out light bulb, make sure that the Video
Light is no longer hot.
1 2
1 Loosen the Screw on the bottom and remove the Cover
upwards in the direction of the arrow.
2 Pull out the old bulb in the direction of the arrow.
3 Hold the new bulb with a dry cloth and insert it into the socket.
•Do not touch the bulb without a cloth.
Fingerprints and dirt reduce the brightness and shorten the life
of the light bulb.
• Fingerprints on the bulb must be removed by wiping it with a
dry cloth.
4 Reattach the Cover and tighten the Screw.
•Do not touch the top of the light during and shortly after use. It
becomes extremely hot.
•When the Movie Camera is turned off, the Video Light reset to the
off mode.
•By pressing the Auto Light Button once, the Video Light is
switched to “AUTO”. (The “AUTO” indication will appear in the
EVF.) When the Auto Light Button is pressed once more, the
Video Light is switched to “ON”. (The “ON” indication will appear
in the EVF.)
Video Light “AUTO” mode
When the Movie Camera is in the Recording Pause mode and the
surrounding light is insufficient, the Video Light will automatically
light up, if it is in the AUTO mode. (If the surrounding light is
sufficient, the Video Light will not light up.)
•Once the Video Light is switched on, it will not go out until the
recording is stopped by pressing the Start/Stop Button (until the
next Recording Pause mode), even if the brightness of the scene
increases.
The Video Light will not light up in the course of a recording, even
if the scene becomes darker.
•The Video Light operates only when the CameraA/TR Selector
Cover is set to “CAMERA”.
•The Video Light should be attached after turning the Movie
Camera off.
• Before placing the Movie Camera in the Carrying Bag or another
bag, be sure to remove the Video Light.
•When turning on the Video Light, make sure that no other
equipment such as Editing Controller, VITC Generator, Character
Generator, RF Adaptor, etc. is connected to the Movie Camera.
-18-
Page 19
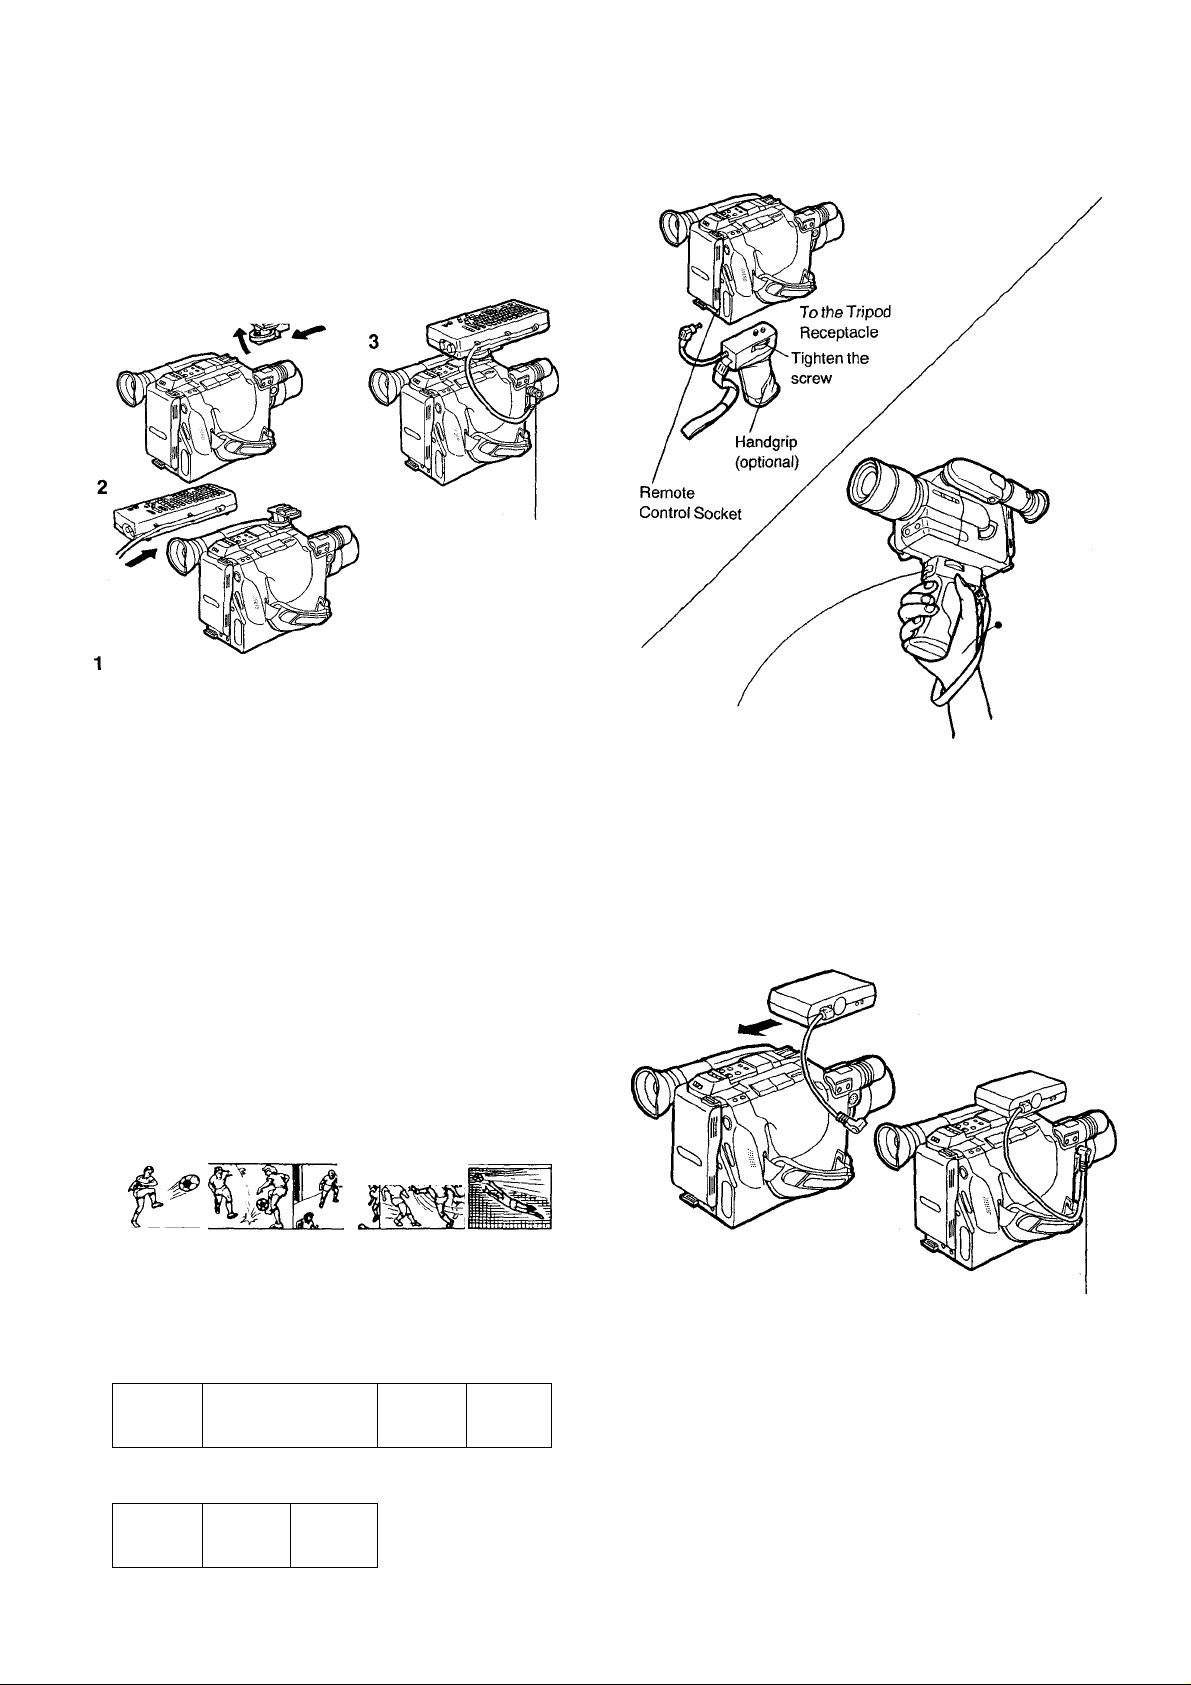
Character Generator
The use of the optional Character Generator makes it possible to
record titles, time, date and stopwatch while shooting.
Attaching
Use the Shoe Adaptor that is supplied with the Unit.
•Before attaching the Character Generator, turn the Movie
Camera off.
2 1
1
Character
Generator Socket
Attach the Shoe Adaptor and tighten the screw.
2 Attach the Character Generator to the Shoe Adaptor.
3 Insert the plug of the Character Generator Cord into the
Character Generator Socket.
• For the operation of the Character Generator, see the operating
instructions of the Character Generator.
Handgrip
Be sure to pull
the strap over
your wrist.
•This button also
functions as
Start/Stop Button.
VITC signals
This Movie Camera is designed for recording VITC signals
(Vertical Interval Time Code) from a VITC Generator which can be
mounted on top of the Movie Camera. Using VITC Editing
Controller System (optional), cassette tapes that have been
recorded with VITC signals can be edited conveniently with frameby-frame precision.
Note:
For actual editing, refer to the Operating Instructions of the VITC
Editing Controller System.
Editing Recorded Scenes into Finished Video Movies.
1 View the original tape to check the recorded content.
2 Locate the exact starting and ending points of all the scenes
that you want to edit into a finished movie onto another cassette
tape.
Make a log with descriptions as well as starting and ending
points of these scenes, and determine the order in which they
are to be edited.
Attaching the VITC Generator
•Before attaching the VITC Generator, turn the Movie Camera off.
Character
Generator Socket
1 Attach the VITC Generator to the Light Shoe.
2 Insert the plug of the VITC Generator Cord into the Character
Generator Socket.
Perform the editing.
-19-
Page 20
VITC Signals (ConVd)
Setting the cassette number
The time code additionally includes a cassette number for
distinguishing the time code of different cassettes.
• too
different cassette numbers are available (00 to 99).
Example for setting cassette number 23:
1 CASS. UNITS...............................................................3
2 CASS. TENS ............................................................... 2
3 Press the RESET key.
The VITC Generator is automatically switched on and off with
each push of the Start/Stop Button of the Movie Camera.
Resetting the Time Code to Zero
•When a new cassette tape is inserted into the Movie Camera, the
RESET Key should be pressed. This resets the time code value
to zero. If the time code is not reset, the VITC Generator will
continue counting up to a maximum of 24 hours. The time code
then automatically starts from zero—perhaps in the middle of a
cassette tape.
•An internal battery ensures that the last time code value before
the recording was interrupted is always retained in memory. Thus
when camera recording is resumed later, the time code sequence
continues from the point where it was halted, even if the Movie
Camera was switched off or the VITC Generator was
disconnected from the Movie Camera in the meantime.
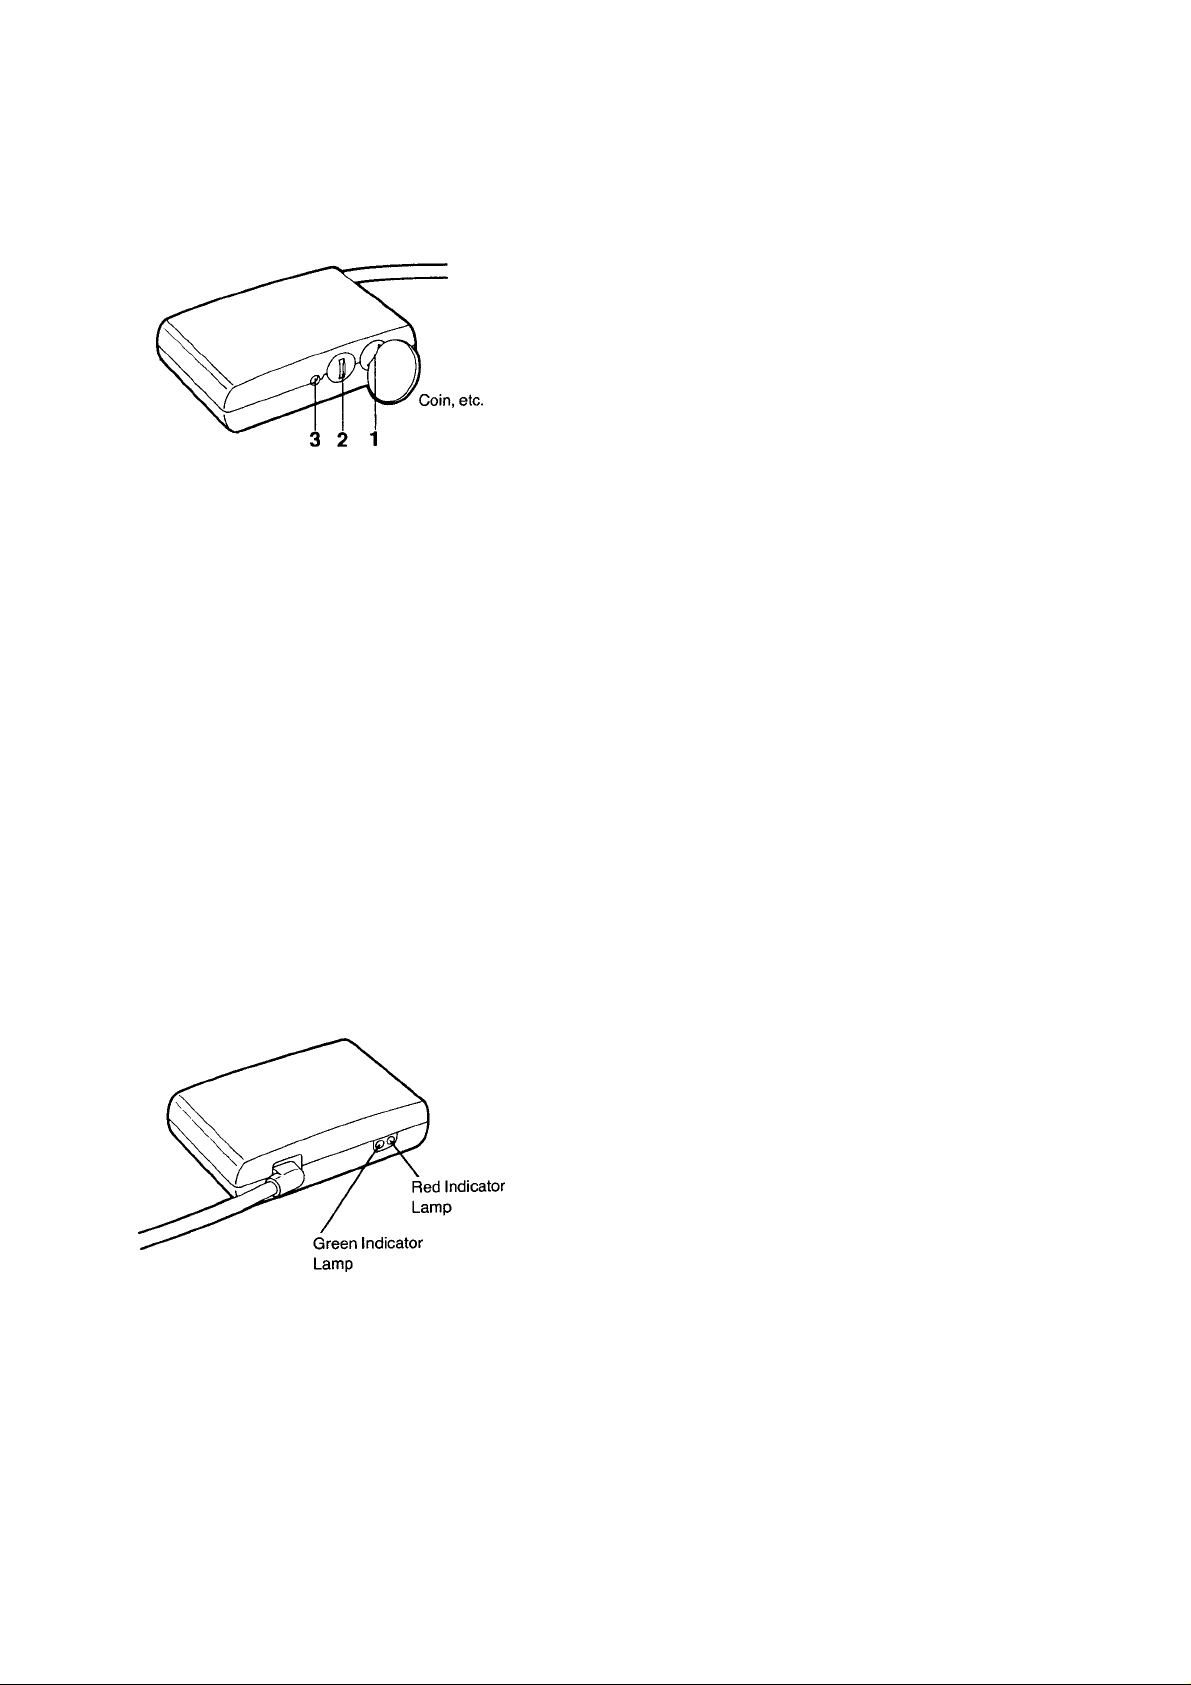
Indicator Lamps
•The green Indicator Lamp “GEN" is lit while the time code is
being recorded together with the video signal.
•The red Indicator Lamp “ВАТТ” lights up when the battery is
neariy exhausted.
Cautions for Making Camera Recordings with VITC Time Code.
To ensure that the desired scenes can be found during editing, the
time code must be recorded continuously without gaps.
1. Provide a leader for each video cassette. Leave the lens cover
on the camera lens and start recording with the VITC generator
connected. Let the Movie Camera run like this for at least
20 seconds.
2. Each time you start the Movie Camera, small jumps may appear
in the timecode. These jumps would make editing of the first
frames of a scene difficult. Thus get into the habit of always
starting the camera 5 seconds before the actions you wish to
record actually start.
3. Do not wind the tape in the video cassette forwards or
backwards after taking a shot. The successive shots must be
recorded in continuous sequence.
4. Do not use the Camera Search or Rec Review function.
5. Never make new recordings over parts of a recorded original
cassette.
Battery replacement
The battery in the VITC Generator has a life expectancy of 5 to
7 years.
If the red Indicator Lamp “ВАТТ” lights up, there is still enough
battery power to continue the time code recording untii the end of
the inserted video cassette. However, before starting to record on
the next cassette, have your video dealer insert a new battery.
-20-
Page 21

Cassette Adaptor
Loading the Cassette
Before loading the cassette into the Cassette Adaptor, turn the cog
wheel in the direction of the arrow to pull in the slack of the tape.
Slide the Open Button in the direction of the arrow, and the
Compartment Cover will pop open.
Insert the Cassette.
Close the Compartment Cover firmly.
(Tape loading starts automatically. During loading, do not touch
the rotating part on the underside of the Cassette Adaptor.)
The Stopper is retracted.
(When the Stopper is completely retracted, the tape loading in
the Cassette Adaptor is completed. It can now be inserted into a
VHS video recorder.)
Taking Out the Cassette
1 Slide the Open Button in the direction of the arrow.
2 Take out the cassette.
• Pushing the cassette from the underside of the adaptor will
make it easier to take it out.
3 Close the Compartment Cover.
How to Load the Battery
Slide the Battery Cover upward and remove it.
Load one “R6” size battery with the polarities correctly aligned
and replace the cover by pushing it down until it locks with a
click.
CAUTION FOR BATTERY REPLACEMENT
• If the tape loading time is getting longer, the battery is becoming
exhausted. Replace it with a new one.
• Load the new battery with its polarities (+ and -) aligned
correctly.
After Shooting
1 Eject the Cassette.
(See page 7 for details.)
2 Turn the Movie Camera off.
3 Remove the Battery Pack.
(See page 7 for details.)
4 Attachthe White Cap to the lens.
Push the EVP back
as shown in the
illustration.
Removing and Attaching the Eyecup
The Eyecup can be removed for cleaning or viewing the EVP with
the left eye.
Removing the Eyecup
Pull up the Eyecup by the line, and turn it counterclockwise.
Attaching the Eyecup
Align the marks, and insert the Eyecup and turn it clockwise.
Marks
-21-
Page 22

Cautions
Please read these cautions before operating the System.
Video Head Clogging
The video heads are the means by which the System places
picture signals on the tape during recording, and reads picture
signals from the tape during playback. If these heads become dirty
and clogged from long use, the signals can no longer be recorded
correctly, and the playback picture will be distorted accordingly.
This is the case, for example, during the playback of a tape, the
sound of which is reproduced normally, but no picture is seen, or
the picture is greatly distorted. When such symptoms occur, have
the System checked by qualified service personnel.
The System is equipped with a head clogging detection function.
When the heads are clogged, the O Indication in the EVF will
appear. As the accumulation of dirt on the heads may be dislodged
by the movement of the tape, it is possible that this indication
sometimes appears, but may not reappear on the next recording
starts.
The head clogging detection function will be activated when the
shooting is started from the recording pause mode. However, it will
not be activated when shooting immediately after replacing the
cassette and after performing Camera Search or Playback.
If Condensation Forms Inside the Movie Camera
Condensation (dew) forms when warm air comes in contact with a
cold object, for example on a window in a heated room in winter.
Condensation may form in the Movie Camera and damage the
tape and the video heads, if:
•The System is in a room where the heater has just been turned
on.
•The System is in a room with steam or high humidity.
•The System is brought from cold surroundings into a well-heated
room.
•The System Is suddenly brought from cool surroundings, such as
an air-conditioned room or car, to a place which is hot and humid.
•When condensation has formed inside the System, the “DEW”
indication in the EVF will flash and a few seconds later, the unit
will turn itself off to protect the tape and the video heads.
After a while, turn the unit on again and make sure that the Dew
Mark is not displayed any more. Then, wait about 1 hour before
operating the System again. Depending on the surrounding
conditions, it may take several hours before the System can be
used again.
•As condensation forms gradually, it may take about
10-15 minutes before the System turns itself off after a change of
working environment.
• In an extremely cold place, condensation may freeze and turn
into frost. In this case, it may take quite some time for the frost to
melt, turn into dew and evaporate.
•When you bring the System from a very cold place, e.g. the ski
slopes. Into a heated room, keep it in a tightly closed plastic bag
or similar to prevent condensation from forming inside the
System.
Keep the System away from Oily Smoke and Steam
Protect the System from Humidity and dust
Surrounding Conditions
Use the System under conditions where the temperatures are
between 0°C and 40°C, and where the humidity is between 20%
and 80%. To avoid deformation of the outer case or other damage,
do not leave it exposed to direct sunlight for any length of time, also
never leave It in a closed automobile.
Keep the System away from Heaters
Keep the System away from TV Sets
Do not place the System near a TV set because It might impair the
picture and sound quality of the recorded tape, and/or adversely
affect the performance of the Movie Camera.
Keep Magnets away
Never bring a magnet or magnetized object such as fluorescent
lamps, motors, electric clocks and battery operated toys etc. close
to the System.
Keep the System away from Areas with Strong Electric Fields
The picture may become distorted, when the System is used in
places with strong electric fields, such as near TV or radio
antennas.
Never Put any Objects inside
Never insert any object other than a video cassette into the
System. If any object is dropped into it or if any liquid is spilled into
it, consult qualified service personnel. Operating it with some
foreign matter inside may cause fire or electric shock.
No Fingers Inside
Touching internal parts of the System is very dangerous and may
cause serious damage to the System. Do not attempt to
disassemble it. For internal inspection, adjustment or repairs,
consult qualified service personnel.
Handle with Care
Never drop the System or expose it to strong physical shocks.
Shocks during use may result in abnormal operation and
performance.
Appearance of Smear Distortion
Smear distortion is a peculiar characteristic of the CCD device. It
appears as a bright verticai stripe on the screen when the System
is aimed at spot lights or other bright light and light reflecting
objects. To avoid this problem, make sure not to aim the System at
such strong light source during shooting.
-22-
Page 23

Cover the Lens with the White Cap after Shooting
Keep the System away from Strong light
Do not expose the System to strong light, because the heat from it
may cause deformation or other damage.
When the System Is Not Being Used
After removing the Video Cassette, turn the Movie Camera off and
detach the Battery Pack.
Never Place the System with the Cassette
Compartment Side Facing Down
Never use the System with the cassette compartment facing down
as this might cause uneven winding and slacking of the tape.
Cleaning the Movie Camera
Wipe the Movie Camera with a clean, dry cloth. Never use cleaning
fluid, or other chemicals.
•Clean the lens only with a blower brush (used for photo cameras)
or a special lens cleaning tissue (used for glasses and cameras).
For Handgrip
When using this Movie Camera for a long period, the grip portion
will get a little hot. However, this is normal and has no effect on the
operation.
The function of the Battery Pack is based on a chemical
reaction. Use it according to its characteristics.
•Charge the Battery Pack within a temperature range of
10°C-35°C. If charged at lower temperatures, the chemical
reaction cannot take place optimally, causing the performance of
the Battery Pack to deteriorate. At higher temperatures, the
Battery Pack cannot be charged completely.
•Store the Battery Pack in a cool and dry place. It exposed to high
temperatures for a long time, the battery life will be shortened and
the self-discharging process will be increased.
•Charge the Battery Pack before using it as self-discharging may
occur if it has not been used for a long period of time.
•When not using the Battery Pack, remove it from the Movie
Camera or the AC Adaptor.
For Cassette Adaptor
•Do not insert this Cassette Adaptor into a VTR and take it out
again without running the tape, because this could cause the tape
to get loose.
•When loading the cassette info the Cassette Adaptor, be careful
not to touch the tape directly. After use, take out the cassette from
the Cassette Adaptor.
• Never insert the Cassette Adaptor into a VTR without a video
cassette in it.
For AC Adaptor
•Do not place heavy objects on the unit.
•When unplugging the main cord or other connection cords, be
sure to grasp the plug, not the cord.
•When listening to a radio while the AC Adaptor is in operation, the
radio reception may be distorted. In this case, move the radio
away from the AC Adaptor.
For Battery Pack
Be sure to charge the Battery Pack before using it.
Pay attention to the following points to avoid danger.
•Do not throw the Battery Pack into fire.
• Do not short-circuit the poles of the connector.
• Do not disassemble or reconstruct the Battery Pack.
•Use only the supplied AC Adaptor to charge the Battery Pack.
Follow the instructions below to avoid damage to the Battery
Packs or reduction of their service life.
• Never subject the Battery Pack to strong shocks or drop it.
• Do not recharge a Battery Pack that is already fully charged.
•During operation of the System or during recharging, the Battery
Pack may become warm however this does not pose any
problem.
•The service life of a Battery Pack has its limits. If the operation
time of a Battery Pack in spite of normal recharging becomes so
short that its normal use for shooting is no longer possible, it
should be replaced with a new one.
-23-
Page 24

Cautions (Cont’d)
For Auto Focus
The Auto Focus System will not provide stable and accurate focus
adjustment if you are shooting:
1. A subject behind dirty glass.
2. Shiny surfaces.
3. A subject with a part of it near and another part far from the
Movie Camera.
4. An oblique subject.
5. A subject with horizontal stripes.
6. A flat surface, e.g. a white wall.
7. With the macro close-up function, special lenses or filters.
8. A fast-moving subject.
9. A subject having a dark surface.
In these cases, use manual focusing.
For White Balance
The Auto White Balance Adjustment may not be accurate when:
1. When shooting under mercury-vapor, natrium or some types of
fluorescent lamps.
2. When intense lighting is used, e.g. from a halogen lamp, or
when the colour temperature of the light source is low.
3. When shooting a subject of a single colour or a subject in front
of a single-colour background.
4. When shooting outdoors at sunrise or sunset.
5. When using a gray filter (ND) or other special filters.
6. When using a conversion lens.
7. When using the Movie Camera under weak illumination.
In these cases, use the manual white balance adjustment mode.
If it is moved from outdoors to indoors during recording, the picture
will initially take on a slightly reddish cast but it will gradually regain
its natural colours.
For High Speed Shutter
The following conditions are required for shooting with the High
Speed Shutter function:
•The subject must be brightly lit, with little shade, under sunlight or
some other illumination.
•If shooting under the illumination produced by fluorescent lamps,
the picture will be adversely influenced by flickering.
• If the picture is played back in the normal playback mode, the
movements may appear to be not very smooth.
•The playback picture will be slightly darker than the picture
recorded without using the High Speed Shutter function.
Before Requesting Service
Power Source
•The power does not turn on.
—Is the power supply unit correctly connected to the Movie
Camera?
•The power turns on, but it turns off again immediately.
—If the Battery Pack is exhausted, replace it with a fully charged
one.
—If condensation has formed, wait until it has dissolved.
Camera Recording
•The power is on, but no picture appears in the EVF.
—Is the lens covered with the lens cap?
•Camera recording cannot be performed.
—If the tab of the cassette is broken out, cover the tab hole with
adhesive tape.
•The picture is not clear.
—Is the eyepiece correctly adjusted to your eyesight?
—Is the lens surface dusty?
•The Auto Focus System does not provide optimum focus
adjustment.
When the focusing precision is not satisfactory in the Auto Focus
mode, press the Focus Button and adjust the focus manually.
Playback
•No playback picture is reproduced.
—Is the connection to the TV set correct?
—Is the TV set tuned to the video playback channel?
•The colours are not correct.
—Is the colour adjustment of the TV set correct?
•The playback picture is not in colour.
—Adjust the Tracking.
—If the tape is old, use a new tape.
-24-
Page 25

Specifications
NV-G2E
Power Source;
Power Consumption:
Video Recording System: Tape Speed;
Tape Format:
Recording/Playback Time:
Vìdeo
Teievision System:
Modulation System:
Output Level:
AUDIO
Output Level:
Audio Track:
Image Sensor:
Lens:
Viewfinder:
Standard Illumination;
Minimum Required
Illumination:
Video Horizontal
Resolution Colour:
Signal-to Noise Ratio:
Audio Frequency
Response:
Operating Temperature;
Operating Humidity:
Weight:
Dimensions:
Information for your safety
DC 6.0 V
Recording mode; 6.4 W (Battery Operation)
11.5 W (with Auto Light)
4 Rotary heads, helical scanning system
SP; 23.39 mm/s
LP; 11.7 mm/s
VHS-C
45 min. with NV-EC45E (SP)
90 min. with NV-EC45E (LP)
CCIR; 625 lines, 50 fields PAL colour signal
Luminance: FM azimuth recording
Colour signal; Converted subcarrier phase shift recording
VIDEO OUT (PHONO); I.OVp-p,
AUDIO OUT (PHONO); -8dB,
1 track (Normal-Mono)
Va-inch CCD Image Sensor
8:1 Power Zoom Lens with Digital Al Auto Focus
Focal Length 6-48 mm
FI .4
Auto Iris
Filter Diameter 43 mm
%-inch Electronic Viewfinder
1.400 lux
3 lux
VHS; More than 230 lines
Video; More than 40 dB
Audio; More than 41 dB
Normal; 80-8,000 Hz (SP)
0“C-40°C
20%-80%
Approx. 900 g (without Battery Pack)
142 (W) X120 (H) X 263 (D) mm
75 ohm unbalanced
600 ohm unbalanced
VW-AS1E
1: Power Source:
I Power Consumption:
I DC Output:
AC 100-240 V, 50-60 Hz (Automatic voltage adjustment) m
25 W i
DC 6 V 11.8 W (Movie Camera)
DC 6 V1.3 A (Battery Pack charging) ■»
Weight:
Dimensions:
Approx. 0.39 kg
70 (W) X 58 (H)x 178(D) mm
Weight and dimensions shown are approximate.
Specifications are subject to change without notice.
Information for your safety
-25-
Page 26

Inhalt
Einfache Bedienung .................................................... 27
Vorbereitung
•Bedienungselemente und Bauteile
.........
27
•Anzeigen im elektronischen Suchermonitor .. 29
• Das Zubehör
..........................................
30
• Der Akku ................................................ 30
• Die Videocassette
.................................
31
• Einstellen der Uhrzeit.............................. 32
• Elektronischer Suchermonitor, weißer
Objektivdeckel, Handgriff-Riemen
•Okular
.....................................................
.........
33
33
Kamera-Aufnahme....................................................... 34
Aufnahmetechnik
•Scharfeinstellung
•Makro-Nahaufnahmen
•Weißabgleich
• Hochgeschwindigkeits-Verschluß
..................................
............................
..........................................
..........
35
35
36
36
•Zoomen ................................................... 36
• Ein-und Ausblenden ............................... 36
•Aufnehmen eines Titels
...........................
37
Wiedergabe ................................................................. 38
•Wiedergabe mit Fernsehgerät
(Anschlußverbindungen)
........................
39
Weitere Funktionen
• Bandzählwerk-Speicherfunktion
.............
39
•Zählwerksanzeige ................................... 39
Editieren
•Assemble-Schnitt .................................... 40
• Überspielen (Kopieren)
..........................
40
Zubehör etc.
•Schultertrageriemen ............................... 41
•Stativanschluß
•Weitere Anschlußverbindungen
........................................
..............
41
41
• Netzadapter............................................ 41
•Auto-/Boots-Akku-Anschlußkabel
..........
41
•Videolampe.............................................. 42
•Titelgenerator
• Handgriff
•ViTC-Signale
•Cassettenadapter
Nach Beenden der Aufnahme
..........................................
................................................
..........................................
...................................
....................................
43
43
43
45
45
Vorsichtsmaßnahmen ................................................. 46
Vor Inanspruchnahme des Kundendienstes
...............
48
Technische Daten ....................................................... 49
Informationen für Ihre Sicherheit
WICHTIG
Beachten Sie bitte, daß das Aufnehmen von
bespielten Bändern oder Schallplatten bzw. von
anderem veröffentlichten oder gesendeten Material
Urheberrechte verletzen kann.
WICHTIGER HINWEIS
UM DIE GEFAHR VON FEUER ODER
ELEKTRISCHEM SCHLAG ZU VERRINGERN, DARF
DIESES GERÄT WEDER REGEN NOCH
FEUCHTIGKEIT AUSGESETZT WERDEN.
VHS-C-Movie NV-G2
•Das Datenschild befindet sich an der Unterseite des
Gerätes.
Netzadapter VW-AS1
•Das Datenschild befindet sich an der Unterseite des
Gerätes.
•Dieses Modell entspricht der EC-Richtiinie 87/308/EEC
(für Radiointerferenz).
FÜR IHRE SICHERHEIT
■ DAS GEHÄUSE NICHT ÖFFNEN.
Das Gehäuse darf nicht geöffnet werden, da dies
Hochspannungsgefahr in sich birgt. Im Geräteinneren gibt
es keine Teile, die von einem Nichtfachmann gewartet
werden können. Wenden Sie sich für Reparaturarbeiten
bitte an das Fachpersonal.
HO -(Hochqualitäts)-VHS-System
Dieses System gewährleistet vollständige Kompatibilität mit allen
kamerarecordern, die nach dem konventionellen VHS-System
arbeiten.
-26-
Page 27

Einfache Bedienung
Kamera-Aufnahme Wiedergabe
1 Den Kamerarecorder einschalten.
2 Den elektronischen Suchermonitor um 180° verstellen, so daß
er sich neben dem Objektiv befindet, und die
Cassettenauswurftaste drücken.
3 Eine Videocassetteeinlegen.
4 Den elektronischen Suchermonitor in die Position wie unten
bringen und das Okular bis zum Anschlag herausziehen.
5 Die Abdeckscheibe zur Wahl der Kamera-ZRecorderfunktion
auf,,CAMERA“ stellen, (bis zum Anschlag in Richtung Objektiv
schieben).
6 Den Aufnahmegeschwindigkeits-Wahlschalter auf ,,SP“ oder
„LP“ stellen.
7 Die Start-ZStop-Taste drücken.
•Die Aufnahme beginnt.
• Diese Taste erneut drücken, um die Aufnahme zu beenden.
•Siehe auch Seite 45 (Aufnahme-Ende).
2 Den elektronischen Suchermonitor um 180° verstellen, so daß
er sich neben dem Objektiv befindet, die
Cassettenauswurftaste drücken, und eine bespielte Cassette
einsetzen.
3 Die Abdeckscheibe zur Wahl der Kamera-ZRecorderfunktion
auf „VTR“ steilen (bis zum Anschlag in Richtung Akku
schieben).
4 Die Taste PLAY drücken.
• Die Wiedergabe beginnt.
•Die Taste STOP drücken, um die Wiedergabe zu beenden.
Hinweis:
Batterie-Einsetzen siehe S. 31.
Bedienungseiemente und Bauteile
1 2 3 4
Nr. Name Seite
1 Okularkorrektur-Regler
......................................
33
2 Augenmuschel.................................................... 33
3 Motor-Zoom-Tashten (W/T)
...............................
36
4 Betriebsart-Wahlschaiter..................................... —
5 Aufnahme-StartZStop-Taste
..............................
—
6 Halterung für Tragegurt ..................................... 41
7 Elektronischer Suchermonitor
8 Cassettenfach
9 Titel Taste........................................................... 37
10 EinZAusblend Taste
...................................................
...........................................
11 Dafum-ZUhrzeit-Wahltaste
...........................
................................
29
31
36
32
-27-
Page 28

Bedienungselemente und Bauteile (Fortsetzung)
12 13 14 15 16
Nr. Name Seite
12 Allgemeine Bedienungselemente
13 Weißabgleich-Taste
14 Wahltaste für den Hochgeschwindigkeits-Verschluß .. 36
15 Scharfeinstell-Taste............................................ 35
16 Cassettenauswurftaste (EJECT) ....................... 31
17 Weißer Objektivdeckel
18 Eingebautes Mikrofon
19 Schuh für Videolampe........................................ 41
20 Weiterschalt-Taste für Datum-ZUhrzeit-Einstellung
...........................................
.......................................
........................................
......................
38
36
36
—
(DATEATIME SHIFT) ....................................32.38
21 Einstelltaste für Datum/Uhrzeit(DATE/TIME SET) .. 32,38
22 Rückstelltaste (RESET) ..................................... 39
23 Umschalttaste für Speicherfunktion/
Zählwerkanzeige
...............................................
39
Nr. Name Seite
24 Knopfbatteriefach
25 Editierbuchse
26 Ohrhörerbuchse ................................................ 41
27 Mikrofonbuchse (MIC)........................................ 41
28 Titelgenerators-Anschlußbuchse
29 Handgriff-Riemen
30 Video-Ausgangsbuchse (VIDEO OUT)
31 HF-Gleichstrom-Ausgangsbuchse (RF DC OUT) .... 39
32 Tonausgangsbuchse (AUDIO OUT)
33 Akku-Auswurftaste
...............................................
....................................................
.......................
...............................................
..............
...................
............................................
32
41
43
33
39
39
31
3839-
40-
41-
42-
43-
AUTO LIGHT
-i
.......
PAUSE STOP
PLAY
EJ/REW FF/©
-¿J ^
©/-SEARCH +
MEMORY COLOUR
MODE 51p
-0
Nr. Name Seite
34 Stativ-Anschluß.................................................. 41
35 Scharfeinstell-Tasten (-t-/-) ................................ 35
36 Fernbedienungsbuchse
37 Gleichstrom-Eingangsbuchse
Nr. Name Seite
38 Videolampen-Automatiktaste
39 Pausentaste
......................................................
40 Wiedergabetaste (PLAY)
41 Rückspul-/Review-Taste (REW/Q)
....................................
...........................
..............................
....................................
...................
41
41
42
38
38
38
42 Speichertaste ..................................................... 37
43 Titelart-Wahltaste................................................ 37
44 Abdeckscheibe zur Wahl der Kamera- oder
...
)
Recorderfunktionen
............................................
27
45 Aufnahmegeschwindigkeits-Wahlschalter (SP/LP).... 34
46 Titelfarbe Wahltaste............................................ 37
47 Schnellvorlauf-/Cue-Taste (FF/(3)
48 Stoptaste (STOP)
...............................................
.....................
38
38
44 Funktion der Abdeckscheibe zur Wahi der Kamera- oder
Recorderfunktionen
Auf „CAMERA“ ......................... für Kameraaufnahme.
Auf „VTR“ (siehe Abbildung)
...............
für andere Funktionen
als Kameraaufnahme.
G-
-48
-47
-46
-45
44
-28-
Page 29

Anzeigen im elektronischen Suchermonitor
Die folgenden Anzeigen werden zur Information über den
Betriebszustand des Kamerarecorders im elektronischen
Suchermonitor eingeblendet.
Warn- und Alarm-Anzeigen
Warn- und Alarm-Anzeigen
\ » 1______
-m-
Wenn nur hoch ein Balken der Akkuspannungs-
^
Warnanzeige sichtbar ist, beginnt die Akku-Anzeige
zu blinken. Sobald der letzte Balken
verschwunden ist, blinkt die Stromanzeige schnell. Der
Akku ist fast vollständig erschöpft, und der
Kamerarecorder wird sich in wenigen Sekunden
ausschalten. Den Akku durch einen voll aufgeladenen
Akku ersetzen.
Es ist keine Cassette eingesetzt, oder die Lasche der
-TAPE—
eingesetzten Cassette ist herausgebrochen. Diese
Anzeige blinkt daher, um anzuzeigen, daß nicht
I \
aufgenommen werden kann.
5 Uhrzeit-Anzeige
6 Datums-Anzeige 7 Anzeige der Bandiaufwerk-Funktionen
REC Aufnahme-Betriebsart
PAUSE Aufnahmepause-Betriebsart, Rec Review
t> Wiedergabe-Betriebsart, Kamera-Suchlauf
(vonvärts)
11 Standbildwiedergabe-Betriebsart
[>1> Betriebsart Schnellvorlauf-/ Bildsuchlaüf vonwärts
«1 Betriebsart Rückspulen/Bildsuchlauf rückwärts,
Kamera-Suchlauf (rückwärts)
8 Aufnahme-Betriebsart-Anzeigen
SP SP-Betriebsart
LP LP-Betriebsart
9 Anzeige für manuellen Weißabgleich
\ I /
—WHITE - Manuelle Einstellung, nicht eingestellt
I
W.SET Manuelle Einstellung, Haltezustand
10 Anzeigen für hohe
Verschluß
geschwindigkeiten
t/120
1/250
1/500
1/1000
1/2000
1/4000
1/120-Sek.
1/250-Sek.
1/500-Sek.
1/1000-Sek.
1/2000-Sek.
1/4000 Sek.
Anzeige für ScharfeinsteiiBetriebsart
MF Manuelle
Scharfeinstellung
• Einige der obigen Anzeigen können abwechselnd an der gleichen
Stelle im Sucher aufleuchten und so auf die entsprechenden
Zustände aufmerksam machen.
^ I ^ Das Band ist schon fast zu Ende. Eine neue Cassette
— END — einsetzen. Nach dem Stoppen des Bandes leuchtet die
I ^ Anzeige dauernd.
Wenn sich im Innern des Kamerarecorders
-DEW-
Schwitzwasser gebildet hat, blinkt die Anzeige „DEW“
im Sucher, und einige Sekunden darauf schaltet sich
der Kamerarecorder aus.
\ I /
Verschmutzung der Videoköpfe (siehe Seite 46).
Wenn die Knopfbatterie für den Titelspeicher und die
-BACKUP-
Datums-Automatik nicht eingesetzt ist, oder wenn sie
erschöpft ist, blinkt diese Anzeige nach Einschalten
des Kamerarecorders ca. 10 Sekunden lang.
1 Akkuspannungs-Warnanzelge
E—F Beim Schwächerwerden des Akkus verschwinden
die “ Anzeigebalken nacheinander von rechts
nach links.
•Beim Anbringen des Akkus am Kamerarecorder
leuchtet zuerst die Anzeige “E—F” auf, und ca.
eine Minute später wird dann die effektive
verbleibende Akkuspannung angezeigt.
2 Zählwerkanzeige
M OiOO.OOBandzählwerk mit Speicheranzeige
3 Videolampen-Automatik-Anzeigen
AUTO Automatik-Betriebsart
ON Videolampe eingeschaltet
4 Digitalspeicher-Anzeige
WHT Farbenanzeige
WIPE t Betriebsart-Anzeige (keine Anzeige bei normaler
Betriebsart)
-29-
Page 30

Das Zubehör
Standard-Zubehör
Netzladeadapter
Akku
Cassettenadapter
Schultertrageriemen
AV-Anschlußkabel
Gleichstrom-Eingangskabel
Batterie für Cassettenadapter-Betrieb
Batterie für Uhrbetrieb
Videolampe
ACHTUNG: UM DIE GEFAHR VON FEUER,
ELEKTRISCHEM SCHLAG UND
FUNKTIONSSTÖRUNG ZU
VERRINGERN, DARF NUR
EMPFOHLENES ZUBEHÖR
VERWENDET WERDEN.
Information für Ihre Sicherheit
Sonderzubehör
Akkusatz (VW-VBS2E)
Akkusatz-Halterung (VW-VH1E)
Boots-/Autobatterie-Anschlu ßkabel (VW-ACC11E)
Akku-Ladegerät (VW-BCS1E)
Kleine Zubehörtasche (VW-TKS1E)
Tragetasche (VW-CBG2E)
Videolampe (VZ-LDS15E)
Ersatsglühbirne für videolampe (VZ-LL5E)
Ersatsglühbirne für videolampe (VZ-LL15E)
Filtersatz (VW-LF43E)
Tele-Vorsatzlinse (VW-LT4314E)
Tele-Vorsatzlinse (VW-LT4320E)
Tele-Vorsatzlinse (VW-LT4350E)
Weitwinkel-Vorsatzlinse (VW-LW2E)
Weitwinkel-Vorsatzlinse (VW-LW4307E)
Anpassungsring (VW-SUR1E)
Handgriff (VW-GPC1E)
Pausen-Fernbedienung (VW-RM1E)
Schuhadapter (mit Grift) (VW-SK3E)
HF-Adapter (VW-RF7E)
Normal-Stativ (VZ-CT55E)
Spezial-Stativ (VZ-CT75E)
Tisch-Stativ (VZ-CTT1E)
Titelgenerator (VW-CG5E)
VITC-Generator (VW-VG1E)
VITC-Schnittsteureinheit (VW-EC1 OE)
Schnittsteuereinheit (VW-EC300E)
Schnittsteuereinheit (VW-EC31 OE)
Der Akku
Aufladen
1 Den Akku am Netzadapter montieren.
2 Den Netzadapter ans Netz anschließen.
• Ladeanzeigelampe
Leuchtet während des Ladevorgangs auf und erlischt, sobald der
Ladevorgang beendet ist.
•Der Soderzubehör-Umfang kann je nach Land verschieden sein.
Hinweis:
•Der Ladevorgang dauert etwa 60 Minuten.
• Mit einem voll aufgeladenen Akku kann der Kamerarecorder im
Dauerbetrieb ca. 55 Minuten lang betrieben werden, (ohne
Videolampe.)
•Beim Akkusatz VW-VBS2E (Sonderzubehör) sind Ladezeit und
mögliche Aufnahmedauer doppelt so lang wie beim mitgelieferten
Standard- Akkusatz.
■ Nach Beendigung des Ladevorgangs den Akku-
Entriegelungshebel in Pfeilrichtung schieben und den Akku
abnehmen.
■ Entlade-» Lade-Funktion
Der Akku läßt sich für wiederholten Gebrauch wiederaufladen.
Wird er jedoch in nicht vollständig entladenem Zustand
wiederholt nachgeiaden, so nimmt seine Ladekapazität
langsam ab. Um dies zu vermeiden, den Akku an den
Netzadapter montieren und die Entlade—»Lade-Taste drücken.
(Die Entlade-» Lade-Anzeigelampe leuchtet auf. Sobald der
Entladevorgang beendet ist, leuchtet statt dessen die
Ladeanzeigelampe auf, und der Ladevorgang beginnt.) Durch
dieses Vorgehen wird die Ladekapazität des Akkus erhöht und
seine Betriebsdauer verlängert. Wenn also die Betriebsdauer
des Akkusatzes merklich abnimmt, sollte er regeneriert werden.
(Es empfiehlt sich, diesen Vorgang nach ca. jedem fünften
Nachladen durchzuführen.)
•Entlade- und Ladezeit:
für VW-VBS1E: ca. 5-7 Stunden
fürVW-VBS2E; ca. 10-12 Stunden
-30-
Page 31

Anstecken des Akkus Ladezustand-Markierung am Akku
- Akku-Auswurftasle
Ladezustand-Markierung; kann eingestellt werden
1 Die Markierungen auf dem Akku und auf dem Kamerarecorder
aufeinander ausrichten und den Akku nach rechts schieben, bis
er mit einem Klick verriegelt.
• Um den Akku abzunehmen, die Akku-Auswurftaste gedrückt
halten und den Akku nach links schieben.
Vorsicht:
• Nach dem Ausschalten des Kamerarecorders ca. 10 Sekunden
warten, bevor der Akku abgenommen wird.
•Wenn der Akku während der Aufnahme oder der Wiedergabe
abgenommen wird, bleibt das Band um die Kopftrommel
geschlungen und könnte beschädigt werden.
Die Videocassette
Mit Hilfe dieser Markierung lassen sich vollständig aufgeladene
Akkus problemlos von entladenen Akkus unterscheiden. Dazu wird
die Markierung so verschoben, daß z. B. voll aufgeladene Akkus
mit sichtbarem Punkt, ganz oder teilweise entladene Akkus
hingegen ohne sichtbaren Punkt gekennzeichnet sind.
Einsetzen einer Videocassette
Vor dem Einsetzen der Cassette:
Sicherstellen, daß das Band nicht lose ist. Falls es nicht straff ist,
das Zahnrad an der Seite in Pfeilrichtung drehen.
1 Den elektronischen Suchermonitor um 180° verstellen, so daß
er sich neben dem Objektiv befindet, und die
Cassettenauswurftaste drücken.
• Den elektronischen Suchermonitor solange nicht verstellen,
bis der Cassettenfachdeckel ganz aufgeklappt ist.
2 Die Videocassette so einsetzen, daß das Cassettenfenster
nach außen weist.
3 Den Cassettenfachdeckel nach Innen drücken, bis er mit
einem Klick verriegelt. Den elektronischen Suchermonitor
wieder in seine Ausgangsposition stellen.
Herausnehmen einer Videocassette
1 Den elektronischen Suchermonitor um 180° verstellen, so daß
er sich neben dem Objektiv befindet, und die
Cassettenauswurftaste drücken.
2 Die Cassette herausnehmen.
3 Den Cassettenfachdeckel nach innen drücken, bis er mit einem
Klick verriegelt. Den elektronischen Suchermonitor wieder in
seine Ausgangsposition stellen.
Hinweis:
• Nur VHS-C-Videocassetten venwenden.
Für Referenz- bzw. Masteraufnahmen sind auch
S-VHS-C-Cassetten zu empfehlen.
-31-
Page 32

Einstellen der Uhrzeit
Einsetzen der Batterie für den Uhrbetrieb
Die Knopfzelle „CR2032“ sorgt dafür, daß Datum, Zeit und
eingegebene Titel vom Kamerarecorder gespeichert werden.
1
1 Den Deckel abnehmen (Schraubendreher nicht im
Lieferumfang. Ihr Fachhändler hilft Ihnen gern).
2 Die Knopfbatterie „CFi2032“ so in die Batteriehalterung
einsetzen, daß das (+)- Zeichen nach oben zeigt.
Hinweis;
•Wenn diese Batterie nicht eingesetzt oder wenn sie erschöpft
ist, blinkt die Anzeige,,BACKUP“ beim Einschalten des
Kamerarecorders ca. 10 Sekunden im Sucher.
•Vor dem Auswechseln der Batterie muß der Kamerarecorder
ausgeschaltet werden.
WICHTIGE HINWEISE ZUM AUSWECHSELN DER BATTERIE
•Die Lebensdauer der Batterie beträgt etwa ein Jahr. Die Batterie
sollte einmal pro Jahr geprüft und gegebenenfalls ausgetauscht
werden.
• Beim Einsetzen der Batterie sicherstellen, daß die Polaritäten
(+ und -) nicht vertauscht werden.
•Verbrauchte Batterien sofort entfernen und an den Fachhändler
zum Recycling zurückgeben.
Einstellen von Uhrzelt und Datum
1 Wenn die Datum-ZUhrzeit-Wahltaste
gedrückt wird, erscheint die nebenstehende
Anzeige im Sucher.
•Wenn keine Batterie eingesetzt ist, blinkt
0:12
1 . 1. 1990
die Anzeige „BACKUP“ auf.
2 Wenn die Weiterschalt-Taste (SHIFT) länger als 2 Sekunden
lang gedrückt wird, beginnt der Jahrteil der Anzeige zu blinken.
Bei jedem weiteren Druck auf diese Taste wechselt der
blinkende Teil der Anzeige in folgender Reihenfolge:
Jahr^ Monate Tag-n. Stunde-» Minute^...
3 Die Einstelltaste für Datum/Uhrzeit (SET) drücken, bis der Teil
der Anzeige blinkt, der geändert werden soll. Bei jedem Druck
auf diese Taste wechselt der blinkende Teil der Anzeige in
folgender Reihenfolge:
Jahr: 1990-»1991-^
Monat: 1—»2—»
....................
-»2089-^1990-»
......................................
—»12—»1—»
Tag: 1^2^ ^31^1-»
Stunde: 0^1-» ..............................................^23^0-»
Minute: 00^01^ ....................................... -»59-»00^
•Die Schritte 2 und 3 wiederholen, bis alle Teile der Anzeige
korrekt eingestellt sind.
• Es empfiehlt sich, einige Minuten vor der tatsächlichen Uhrzeit
einzustellen. Sobald die tatsächliche Uhrzeit (z. B. telefonische
Zeitansage) genau mit der eingestellten Zeit übereinstimmt, die
Taste SHIFT erneut drücken, um die Uhr in Gang zu setzen.
Aufnehmen der Datums- und Uhrzeit-Anzeigen
Wenn die Datum-ZUhrzeit-Wahltaste wiederholt gedrückt wird,
ändert sich die Anzeige auf folgende Weise.
-32-
Keine Anzeige Datum und Uhrzeit
Datum
Page 33

Elektronischer Suchermonitor, weißer Objektivdeckel und Handgriff-Riemen
Herausziehen des Sucher-Monitors
Beim Herausziehen des elektronischen Suchermonitors diesen nie
an der Augenmuschel ziehen, da diese sich so vom Suchermonitor
lösen könnte.
Hinweis:
•Während der Aufnahme den Suchermonitor vollständig
herausgezogen sein.
•Keinen Druck auf den Suchermonitor ausüben, außer wenn er
ausgefahren, bzw. wieder in das Gehäuse geschoben wird.
•Nach dem Filmen den Suchermonitor auf jeden Fall wieder ganz
in das Kameragehäuse schieben.
Abnehmen des weißen Objektivdeckels
Um den weißen Objektivdeckel abzunehmen, an beiden Seiten die
Sperren drücken und den Deckel abziehen.
Verstellen des Handgriff-Riemens
•Den Handgriff fassen.
•Die Länge des Handgriffriemens einstellen.
• Den weißen Objektivdeckel am Handgriff-Riemen befestigen.
Okular
Okularkorrektur
Mit dieser Korrektur kann das Okular auf die Sehkraft des Auges
eingestellt werden.
1 Den elektronischen Suchermonitor bis zum Anschlag
herausziehen.
2 Den Kamerarecorder einschalten.
3 Den Okularkorrektur-Regler so einstellen, daß die Anzeigen im
elektronischen Sucher klar und deutlich lesbar sind.
-33-
Page 34

Kamera-Aufnahme
Beenden der Aufnahme
1 Den Kamerarecorder in die Betriebsart Aufnahmepause
bringen. (Siehe Aufnahmebeginn, Punkt/.)
2 Den Hauptschalter nach rechts schieben, um den
Kamerarecorder auszuschalten. (Siehe Aufnahme-Standby)
Aufnahmekontroll-Wiedergabe (Rec Review)
(Search
Zum Überprüfen der letzten Sekunden einer gedrehten Szene.
1 Den Kamerarecorder in die Betriebsart Aufnahmepause
bringen.
2 Die Rückspul-ZReview kurz antippen, warten und durch den
Schwarzweiß-Monitor die letzte Aufnahme (ca. 2 Sekunden)
anschauen. (Search,,-“)
Kamera-Suchlauf (Search „-I+“)
Zum Überprüfen von aufgenommenen Szenen.
1 Den Kamerarecorder in die Betriebsart Aufnahmepause
bringen.
2 Die Rückspul-ZReview-Taste gedrückt halten, um eine Szene
mit hoher Geschwindigkeit rückwärts wiederzugeben.
• DerTon wird dabei nicht wiedergegeben.
3 Die Schnellvorlauf-ZCue-Taste gedrückt halten, um eine Szene
in normaler Geschwindigkeit vorwärts wiederzugeben.
• DerTon wird dabei wiedergegeben.
Aufnahmebeginn
1 Den Hauptschalter nach rechts schieben, um den
Kamerarecorder einzuschalten.
2 Den elektronischen Suchermonitor um 180° verstellen, so daß
er sich neben dem Objektiv befindet, die
Cassettenauswurftaste drücken, und eine Cassette mit intakter
Löschschutzlasche einsetzen. Den electronischen
Suchermonitor wieder in seine Ausgangsposition stellen:
3 Die abdeckscheibe zur Wahl der Kamera-ZRecorderfunktion
auf “CAMERA” stellen.
• Den Kamerarecorder schaltet auf die Betriebsart
Aufnahmepause um.
4 Den Aufnahmegeschwindigkeits-Wahlschalter auf „SP“ oder
,,LP“ stellen.
•SP: Für normale Bandgeschwindigkeit
• LP: Für langsame Bandgeschwindigkeit
5 Den Kamerarecorder in Aufnahmestellung bringen.
6 Die Start-/Stop-Taste drücken.
• Die Aufnahme beginnt.
7 Die Start-Stop-Taste erneut drücken, um die Aufnahme
vorübergehend zu unterbrechen. (Aufnahmepause)
•Wenn der Kamerarecorder länger als 6 Minuten in der
Betriebsart Aufnahmepause bleibt, schaltet er sich zur
Schonung des Bandes und der Batterie selbsttätig ab.
Aufnahme-Standby-Funktion
Diese Funktion gewährleistet immer saubere, glatte Übergänge
zwischen den nacheinander aufgenommenen Szenen. Auch wenn
der Kamerarecorder mit dem Hauptschalter ausgeschaltet wird,
bleibt das Band um die Kopftrommel geschlungen. Um die
Standby-Aufnahmefunktion auszulösen, den Kamerarecorder
während der Aufnahme-Pause ausschalten. Es werden die
Einstellung für den Weißabgleich gelöscht.
•Wenn der Kamerarecorder länger als 6 Minuten in der Betriebsart
Aufnahmepause bleibt, schaltet er sich zu Schonung des Bandes
und der Batterie selbsttätig ab. (Das Band bleibt dabei um die
Kopftrommel geschlungen. Diese Betriebsart wird als
„Aufnahme-Standby-Funktion“ bezeichnet.)
Den Kamerarecorder mit dem Ein-ZAus-Schalter wieder
einschalten.
•Wenn das Gerät länger als 48 Stunden in der AufnahmeStandby-Funktion bleibt, wird diese Einstellung aufgehoben, und
der Recorder schaltet sich selbsttätig ab. (Stop-Funktion)
-34-
Page 35

Scharfeinstellung
Kontinuierliche automatische Scharfeinstellung (AutoFocus)
Für ständige automatische Scharfeinsteiiung den Kamerarecorder
einschalten und die Abdeckscheibe für Kamera-ZRecorderfunktion
auf „CAMERA" steilen.
• Die Scharfeinstellung erfolgt automatisch auf den
Bildgegenstand in der Mitte des Sucherbildes.
Manuelle Scharfeinstellung
1 Die Abdeckscheibe auf dem Objektiv aufschieben und die
Scharfeinstelitaste drücken.
•Die Anzeige „MF" erscheint im Suchermonitor.
2 Um auf einen Bildgegenstand zu zoomen, die Zoomtaste „T“
drücken.
3 Die Scharfeinstellung mit der Scharfeinstell- Taste oder
vornehmen.
4 Um von einem Bildgegenstand zurückzuzoomen und einen
größeren Bildausschnitt zu zeigen, die Zoomtaste ,,W“
drücken.
•Wird der Kamerarecorder in die Aufnahme-Standby-Funktion
geschaltet, mit dem Hauptschalter aus- und dann wieder
eingeschaltet, so müssen anschließend die
Bedienungsschritte 2-4 wiederholt werden.
Makro-Nahaufnahmen
Für Nahaufnahmen von Fotos oder kleinen Bildgegenständen.
Die Zoomtaste „W“ gedrückt halten.
• Die Scharfeinstellung kann bis auf einen Mindestabstand von
5 mm zwischen Objektiv und Bildgegenstand vorgenommen
werden.
•Nachdem auf die maximale Weitwinkelposition gezoomt
wurde, läßt sich die genaue Scharfeinstellung ganz einfach
durch Heranrücken an den Bildgegenstand vornehmen.
•Die Scharfeinstellung kann sowohl in der automatischen als
auch in der manuellen Betriebsart vorgenommen werden.
Praktische Hinweise für das Filmen
•Die Größe des Bildgegenstandes läßt sich ganz einfach durch
Veränderung der Entfernung zum Bildgegenstand variieren.
• Da bei Makro-Nahaufnahmen die Tiefenschärfe sehr gering ist,
können auch schon minimale Bewegungen der Kamera dazu
führen, daß der Bildgegenstand unscharf abgebildet wird. Die
Benutzung eines Stativs ist daher zu empfehlen.
•Für Bilder, die aus einem Fotoalbum gefilmt werden sollen, oder
für Aufnahmen unter schalechten Lichtverhältnissen sollte eine
Videolampe benutzt werden.
•Wenn die Zoomtaste ,,T‘‘ gedrückt wird, um einen
Bildgegenstand heranzuzoomen, kann innerhalb einer
Entfernung von 0,7 m scharfgestellt werden.
-35-
Page 36

Weißabgleich
Automatischer Weißabgleich
Diese Einstellung ist erforderlich, um Aufnahmen mit natürlichen
Farbtönen zu erzielen.
Für kontinuierlichen automatischen Weißabgleich einfach den
Kamerarecorder einschalten. Mit dieser Einstellung wird unter
nahezu allen Aufnahmebedingungen automatisch eine
ausgeglichene natürliche Farbwiedergabe erzielt.
Manueller Weißabgleich
1 Den weißen Objektivdeckel auf das Objektiv stecken.
2 Die Taste ,,T“ der Motorzoomtasten gedrückt halten, bis der
Bildschirm des elektronischen Suchers ganz weiß ist.
3 Die Abdeckscheibe auf dem Objektiv aufschieben und die
Wei ßabgleichtaste länger als 1 Sekunde drücken.
Die Anzeige „WHITE“ im Sucher informiert über den
Abgieichzustand:
Langsames Blinken..................Nicht eingestellt.
Schnelles Blinken ....................Während der Einstellung.
Anzeige,,WHITE“ leuchtet
•Verwendung des weißen Objektivdeckels
Wenn nur eine einzige Lichtquelle vorhanden ist, den
Objektivdeckel für den manuellen Weißabgleich auf das
Objektiv aufsetzen. Wenn mehrere Lichtquellen vorhanden
sind oder wenn die Beleuchtung schwach ist
(Innenaufnahme), den Objektivdeckel vom Objektiv
abnehmen und mit dem Kamerarecorder einen reinweißen
Bildgegenstand, wie z. B. ein Blatt Papier, anvisieren und den
manuellen Weißabgleich vornehmen.
•Automatischer Abruf der vorherigen WeißabgleichEinstellung Wenn der Kamerarecorder mit dem Betriebsart-
Wahlschalter ausgeschaltet und dann erneut eingeschaltet
wird, blinkt die Anzeige ,,WHITE“ langsam im Haltezustand,
die letzte vorherige Weißabgieich-Einstellung bleibt jedoch
.......
Einstellung ist beendet.
aufrechterhalten. Für optimale spätere Farbaufnahmen die
Weißabgieich-Einstellung erneut, wie oben erklärt,
vornehmen. Sie wird auch während der Wiedergabe,
Aufnahmekontrolle (Rec Review) und Kamerasuchlauf
aufrechterhalten. Die letzte vorherige WeißabgieichEinstellung wird jedoch nicht mehr aufrechterhalten, wenn der
Netzadapter ausgeschaltet oder der Akku vom
Kamerarecorder abgenommen wird.
•Wenn der Kamerarecorder von drinnen nach draußen oder
von draußen nach drinnen gebracht wird, darauf achten, daß
der Weißabgleich erneut vorgenommen wird, da sich die
Farbe des Lichts deutlich ändert.
Hochgeschwindigkeits-Verschluß
Verschiedene Verschlußgeschwindigkeiten ermöglichen das
Videografieren von Szenen mit schnellen Bewegungsabläufen.
1 Die Abdeckscheibe auf dem Objectiv aufschieben.
2 Durch wiederholtes Drücken der Wahltaste für den
Hochgeschwindigkeits-Verschluß läßt sich die Verschlußzeit
wie folgt variieren:
(Keine Anzeige): 1/50 Sek. (normai)
1/120: 1/120 Sek.
1/250: 1/250 Sek.
1/500: 1/500 Sek.
1/1000: 1/1000 Sek.
1/2000: 1/2000 Sek.
1/4000: 1/4000 Sek.
Für die Wiedergabe
Wenn mit hoher Verschlußgeschwindigkeit aufgenommene
Szenen später auf einem Videorecorder wiedergegeben werden,
der mit den Wiedergabe-Funktionen Super-Standbild und Super-
Feinzeitlupe ausgestattet ist, lassen sich damit hervorragend
konturenscharfe und detailstarke Bilder wiedergeben.
Hinweis:
Für nähere Information, siehe Seite 48.
Zoomen
Motorisiertes Zoomen
Um Ihre Zoom-Aufnahmen noch eindrucksvoller zu gestalten und
genau den gewünschten Effekt zu erzielen, empfiehlt es sich,
wie die Profis vor der Aufnahme einmal zur Probe zu zoomen.
Vom Bildgegenstand zurückzoomen
(Der Bildgegenstand wird kleiner.)
An den Biidgegenstand heranzoomen
(Der Bildgegenstand wird größer.)
Für Weitwinkel-Aufnahme:
Für Tele-Aufnahme:
Die Taste ,,W“ drücken.
Die Taste ,,T“ drücken.
-36-
Ein- und Ausblenden
Einblenden-
FADE
-Ausblenden
Einblenden
Die Einblendtechnik wird beispielsweise am Anfang eines Films
benutzt. Nach der Aufzeichnung des Titels ist dabei das langsame
Einblenden der Anfangsszene sehr eindrucksvoll.
1 Mit dem Kamerarecorder in der Betriebsart Aufnahmepause die
Ein-/Ausblend-Taste gedrückt halten.
2 Nachdem das Sucherbild schwarz geworden ist, die Start/Stop-
Taste drücken.
3 Nach drei Sekunden die Ein-/Ausblend-Taste loslassen.
• Das Bild erscheint allmählich von Schwarz.
Ausblenden
Die Ausblendtechnik wird oft benutzt, um eine Szene langsam
ausklingen zu lassen oder durch Überblenden einen glatten
Übergang zwischen zwei Szenen zu erzielen.
1 Während der Aufnahme an der Stelle, an der ausgeblendet
werden soll, die Ein-/Ausblend- Taste drücken.
2 Sobald das Sucherbild schwarz ist, die Start- Stopp-Taste
drücken, um die Aufnahme zu beenden.
3 Die Ein-/Ausblend-Taste loslassen.
Page 37

Aufnehmen eines Titels
Die Titelfunktion ermöglicht es, einen Titel zu speichern und diesen
später während des Aufnehmes auf Tastendruck in das laufende
Bild einzublenden (digitale Titelspeicher-Funktion).
Eingeben von Titelseiten in den Speicher
Das Eingeben kann auch in im Aufnahmepausen vorgenommen
werden.
1 Eine gedruckte Abbildung oder einen gedruckten Titel
vorbereiten.
• Einen Titel mit schwarzem Filzstift auf ein Blatt wei ßes Papier
schreiben.
2 Den Kamerarecorder einschalten und die Abdeckscheibe für
Kamera-ZRecorderfunktion auf „CAMERA“ stellen.
3 Die Scharfeinstellung vornehmen.
4 Die Taste MEMORY länger als eine halbe Sekunde drücken.
•Der Titel wird gespeichert.
Während der Titel im Sucher sichtbar ist, können seine Farbe
und die Art seiner Einblendung gewählt werden.
•Die Titelfunktions-Ein-/Aus-Taste drücken, um den Titel im
Sucher auszublenden.
Durch wiederholtes Drücken dieser Taste wird der Titel im
Suchermonitor eingeblendet^ausgeblendet-^eingebiendet.
Wird die Taste während der Aufnahme versehentlich gedrückt, so
wird der Titel eingeblendet und aufgezeichnet.
■ Hinweise zur Titelfunktion
Die Titel bleiben im Speicher erhalten, bis die Uhrenbatterie
erschöpft ist. Durch Eingeben eines neuen Titels wird der vorher
gespeicherte Titel gelöscht.
Oben und unten bleibt ein Rand, der nicht mit den Titeln
übereinstimmt.
Wahl der Farbe des Titels
Durch wiederholtes Drücken der Titelfarben-Wahltaste kann die
Farbe des Titels in folgender Reihenfolge geändert werden. (Diese
Funktion kann auch während der Aufnahme benutzt werden.)
MEMORY COLOUR
O G-
Titelbetriebsart- Wahltaste
(TITLE MODE)
----
.WHT YEL
(Weiß) (Gelb) (Rot)
BLK ^ GRN ^ CYN
(Schwarz)
MODE 5ÈS
-o
(Grün) (Zyan) (Blau)
RED
-Titelfarben-Wahltaste
(COLOUR)
MAG
(Magenta)
i
BLU
Wahl der Art der Einblendung des Titels
Durch wiederholtes Drücken der Titelbetriebsart-Wahltaste kann
die Art der Einblendung des Titels in das laufende Bild in folgender
Reihenfolge geändert werden. (Diese Funktion kann auch
während der Aufnahme benutzt werden.)
NORMAL
Der Titel
erscheint sofort.
t
SCROL
^
_____
Der Titel rollt von
unten ins Bild.
Wenn die Titeltaste gedrückt wird, wird der Titel in der gewählten
Art der Einblendung angezeigt.
Anmerkung:
Da das Titelbild am oberen und unteren Rand leicht beschnitten
wird, sollte der Titel beim Aufnehmen möglichst in der Mitte plaziert
werden.
WIPE 1
Der Titel
erscheint von
oben.
4r
WIPE t
HAPPY
Der Titel
erscheint von
unten.
-37-
Page 38

Aufnehmen eines Titels (Fortsetzung)
Aufnehmen eines Titels
Titelfarben-Anzeige
ntelbetriebsart-Anzeige
Wiedergabe
■ Einblenden eines Titels in normaler Einblendungsart am
Anfang einer Aufnahme
1 Die Tifeltaste drücken, damit der Titel im Sucher sichtbar wird,
• Die Information der Titelfarben-Anzeige und der
Titelbetriebsart-Anzeige überprüfen. Zu diesem Zeitpunkt
können Farbe und Einblendart noch geändert werden.
2 Die Start-/Stop-Taste drücken, um mit dem Aufnehmen zu
beginnen.
• Um die Einblendung des Titels aufzuheben, die Titeltaste
erneut drücken.
■ Einblenden eines Titels in normaler Einblendungsart
mitten in einer Aufnahme
1 Den gewünschten Titel in den Speicher eingeben und die
Titeltaste drücken, um den Titel aus dem Sucher
auszublenden.
2 Die Start-ZStop-Taste drücken, um mit dem Aufnehmen zu
beginnen.
3 An der Stelle, wo der Titel eingeblendet werden soll, die
Titeltaste drücken. (Der eingeblendete Titel ist im Sucher
sichtbar.)
•Um die Einblendung des Titels aufzuheben, die Taste TITLE
erneut drücken.
■ Einblenden eines Titels in der Betriebsart „Scroll“ oder
„Wipe“ am Aufnahmeanfang
Die obigen Bedienungsschritte 1 und 2 durchführen. Nach Drücken
der Start-ZStop-Taste ca. 2 Sekunden warten und dann die
Titeltaste drücken.
•Den Kamerarecorder einschalten und die Abdeckscheibe für
Kamera-ZRecorderfunktion auf „VTR“ stellen.
Bedienung
T Normale Wiedergabe: Die Wiedergabelaste PLAY drücken.
2 Bildsuchlauf von/värts (Cue): Während der Wiedergabe die
Taste FFZ(3 gedrückt halten.
3 Bildsuchlauf rückwärts (Review): Während der Wiedergabe die
Taste (3ZREW gedrückt halten.
4 Standbild-Wiedergabe: Während der Wiedergabe die Taste
PAUSE drücken.
• Um auf normale Wiedergabe zurückzustellen, diese Taste
erneut drücken.
5 Die Stoptaste drücken, um die Wiedergabe zu beenden.
Schnellvorlauf
Die Taste FFZ(3 drücken, um das Band mit großer
Geschwindigkeit vorzuspulen.
Rückspulen
Die Taste @/REW drücken, um das Band mit großer
Geschwindigkeit zurückzuspulen.
Spurregelung
Wenn die Bildwiedergabe durch Störstreifen beeinträchtigt ist, muß
die Spurregelung eingestellt werden.
1 Die beiden Spurreglertasten (TRACKING ◄ und ►)
gleichzeitig drücken.
2 Die Spurlage mit einer der Tasten regulieren.
•Wenn eine Cassette wiedergegeben wird, die auf einem anderen
Kamerarecorder aufgezeichnet wurde, lassen sich die
Slörstreifen u. U. nicht vollständig beseitigen.
•Bildstörungen in Form horizontaler Streifen können bei Suchlauf
vorwärts und rückwärts sowie Standbild-Wiedergabe auftreten.
Dies stellt jedoch keine Funktionsstörung dar.
• In der Bildsuchlauf- und der Standbild-Betriebsart können
Bildstörungen auftreten oder das Bild in Schwarz-Weiß
wiedergegeben werden.
Hinweis:
•Die Tonwiedergabe erfolgt nur bei normaler Wiedergabe.
•Wiedergabe: Sobald das Band sein Ende erreicht, wird es
automatisch zum Anfang zurückgespult.
•Schnellvorlauf: Sobald das Band sein Ende erreicht, wird es
automatisch zum Anfang zurückgespult.
• Rückspulen: Sobald das Band seinen Anfang erreicht, wird es
automatisch gestoppt.
•Standbild-Wiedergabe: Falls der Kamerarecorder länger als ca.
6 Minuten in diesem Zustand bleibt, schaltet er automatisch auf
Stop um, damit das Band und die Videoköpfe geschont werden.
-38-
Page 39

Wiedergabe mit Fernsehgerät (Anschiußverbindungen)
Fernsehgerät mit AV-Eingang
Wiedergabe mit einem Videorecorder
Den Cassettenadapter verwenden.
(Sonderzubehör)
Fernsehgerät ohne AV-Buchse
Vordem Anschließen des HF-Adapters muß die Kamerarecorder
mit dem Betriebsschalter ausgeschaltet werden.
(Sonderzubehör)
HF-Eingang
HF-Adapter
(Sonderzubehör) ^F-Eingangs-
buchse
PAL-System-Umschalter
TV-A/ideo-Umschalter
HF-Ausgangsbuchse (RF OUT)
TV
Auf UHF Kanal 36 einstellen.
TV-/Video-Umschalter am HF-Adapter
VTR: Für Wiedergabe einer Cassette.
TV: Zum normalen Fernsehen.
PAL-System-Umschalter: nur für Großbritannien
(RF IN)
Weitere Funktionen
Bandzählwerk-Speicherfunktion
1 Die Rückstelltaste (RESET) an einer Stelle drücken, die
nachher schnell und bequem wiederaufgefunden werden soll.
• Das Bandzählwerk wird dadurch auf ,,0:00.00“ zurückgestellt.
2 Die Umschalttaste für Speicherfunktion/Zählwerkanzeige
drücken.
• Die Anzeige „M“ erscheint im Sucher.
3 Die Taste STOP und dann die Taste f^REW drücken.
•Das Band wird automatisch ungefähr an der Stelle gestoppt
wo das Bandzählwerk ,,0:00.00“ anzeigt.
Zählwerksanzeige
Mit jedem Drücken der Umschalttaste für Speicherfunktion/
Zählwerkanzeige ändert sich die Zählwerksanzeige wie folgt:
Speicheranzeige
Bandlaufzeltanzeige
(Echlzeit)
erscheint.
„M" erscheint
zusammen mit
Bandzählwerk
anzeige
keine Anzeige
-39-
Page 40

Assemble-Schnitt
PAUSE STOP
PLAY
G3/REW FF/©
¿3 i
Vorbereitung
•Eine Videocassette mit intakter Löschschutzlasche einsetzen,
•Die Abdeckscheibe für Kamera-ZRecorderfunktion auf ,,VTR“
stellen.
Bedienung
1 Das Band wiedergeben, um die Stelle aufzufinden, wo die neue
Szene angefügt werden soll (Assemble-Schnitt), und dann an
dieser Stelle die Pause-Taste drücken.
2 Die Abdeckscheibe für Kamera-ZRecorderfunktion auf
,,CAMERA“ stellen.
3 Die Start-Stop-Taste drücken, um die neue Szene
aufzunehmen.
Überspielen (Kopieren)
Für Wiedergabe
Bedienung
1 Die Taste PLAY am Kamerarecorder drücken, um mit der
Wiedergabe zu beginnen.
2 Die REC-Taste am Videorecorder drücken, um mit der
Aufnahme zu beginnen.
Hinweis:
Die Bildqualität eines kopierten Bandes ist schlechter als die des
Original-Bandes.
•Für nähere Information bitte die Bedienungsanleitung des
Aufnahme-Recorders durchlesen.
Synchro-Überspielfunktion
Das Synchro-Überspielkabel (Sonderzubehör) verwenden, um die
Fernbedienungsbuchse am Kamerarecorder mit der SynchroÜberspielbuchse am Aufnahme-Recorder zu verbinden.
•Wenn der Aufnahme-Recorder mit der Synchro-Überspiel
funktion ausgerüstet ist, läßt sich dieser Kamerarecorder über
den Aufnahme-Recorder steuern, d.h. Wiedergabe-Start und
-Stop des Kamerarecorders werden präzis mit dem AufnahmeStart und- Stop des Aufnahmerecorders synchronisiert
ausgelöst.
• Für nähere Information bitte die Bedienungsanleitung des
Aufnahme-Recorders durchlesen.
Für Aufnahme
-40-
Page 41

Zubehör etc.
Schultertrageriemen (Lieferumfang)
Ca. 2cm des Riemens
verstehen lassen.
1 Das Ende des Schultertrageriemens durch den Schlitz an der
Halterung für Tragegurt oben an der Rückseite des
Kamerarecorders ziehen.
2 Das Ende des Riemens sicher befestigen (durch die Schlaufe
und die des Metailteilesl).
3 Das andere Ende des Schultertrageriemens unten an der
Rückseite der Kamerarecorder auf gleiche Weise befestigen,
wie oben beschrieben.
Stativ-Anschluß (Stativ: Sonderzubehör)
Unterseite des Kamerarecorders
Die Schraube
anziehen.
Weitere Anschlußverbindungen (Sonderzubehör)
Schuh für Videolampe
Editierbuchse
Pausen- Fernbedienung
• Für die Montage einer Videolampe (VZ-LDS15E;
Sonderzubehör) usw. ist der Schuhadapter (VW-SK3E;
Sonderzubehör) erforderlich.
Löcher auf Schraube
und Zapfen ausrichten.
Externes Mikrofon
Fernbedie
nungsbuchse
•Das Stativ in stabiler Stellung,
bringen.
Externe
Mikrofonbuchse
Ohrhörerbuchse
Ohrhörer
Netzadapter (Lieferumfang)
1 Das Stromversorgungskabel von der Gleichstrom-
Ausgangsbuchse am Netzadapter mit der GleichstromEingangsbuchse am Kamerarecorder verbinden.
2 Ans Netz anschließen.
Hinweis:
Wenn ein Akku am Netzadapter montiert ist, kann der
Kamerarecorder nicht mit Strom versorgt werden.
PKW-/Boots-Akku-Anschlußkabel (Sonderzubehör)
PKW-/Boots-AkkuAnschlußkabel
1 Den Motor einschalten und das PKW-/Boots- Akku-
Anschlußkabel an die Zigaretten- Anzünderbuchse
anschließen.
2 Das andere Ende des Kabels an die Gleichstrom-
Eingangsbuchse des Kamerarecorders anschließen.
Hinweis:
• Das PKW-/Boots-Akku-Anschlu ßkabel funktioniert nur an 12 V
Gleichstrom mit negativem Pol am Chassis.
• Den Motor nicht starten, während die Stromversorgung des
Kamerarecorders von der Autobatterie aus erfolgt.
•Während die Stromversorgungs des Kamerarecorders von der
Autobatterie aus erfolgt, kann die Videolampe (im Lieferumfang)
nicht benutzt werden.
-41-
Page 42

Zubehör etc. (Fortsetzung)
Videolampe (Standardzubehör)
Die Videolampen-Automatiktaste drücken, um die Betriebsart für
die Videolampe zu wählen.
ON: Die Videolampe wird eingeschaltet.
AUTO; Wenn der Kamerarecorder im Aufnahmepause-
Zustand ist, schaltet sich die Videolampe automatisch
ein, wenn das Umgebungslicht zu schwach ist.
Videolampe (Standardzubehör)
Zum Abnehmen
der Videolampe
diese abziehen,
während die Taste
hinten an der
Videoleuchte nach
oben gedrückt
gehalten wird.
• Da die Videolampe wird sehr heiß wird, diese während oder kurz
nach dem Gebrauch nicht berühren.
•Wenn der Kamerarecorder ausgeschaltet wird, wird die
Videolampe ebenfalls ausgeschaltet.
• Um die Videolampe in den Automatikbetrieb zu schalten, die
Videolampe-Automatiktaste einmal drücken. (Die Anzeige,,—
AUTO“ erscheint im elektronischen Suchermonitor.) Um die
Videoleuchte einzuschalten, die Videolampe-Automatiktaste
nochmals drücken. (Die Anzeige ,,ON“ erscheint im
elektronischen Suchermonitor.)
•Videoleuchten-Automatik-Betriebsart
In dieser Betriebsart schaltet sich die Videolampe automatisch
ein, wenn sich der Kamerarecorder in der Aufnahmepause
befindet und das Umgebungslicht nicht ausreicht. (Ist das
Umgebungslicht hingegen hell genug, so schaltet sich die
Videoleuchte nicht ein.)
•Wurde die Videolampe einmal eingeschaltet, so erlischt sie erst
wieder (bis zur nächsten Aufnahmepause), wenn die Aufnahme
durch Drücken der Start-Stop-Taste beendet wird, selbst wenn
die Beleuchtung inzwischen heller geworden ist.
Die Videolampe schaltet sich nicht mitten in einer Aufnahme ein,
selbst wenn die Beleuchtung schwächer wird.
•Die Videolampe funktioniert nur, wenn die Abdeckscheibe für
Kamera-ZRecorderfunktion auf „CAMERA“ steht.
•Die Videolampe erst nach dem Ausschalten des
Kamerarecorders anbringen.
• Bevor der Kamerarecorder in die Tragetasche oder irgendeine
andere Tasche eingesetzt wird, muß die Videolampe
abgenommen werden.
•Vor dem Elnschalten der Videolampe sich vergewissern, daß
kein anderes Zubehör, z. B. ein Editiergerät, ein VITC-Generator,
ein Titelgenerator, ein HF-Adapter o.a. an den Kamerarecorder
angeschlossen ist.
Auswechseln der Glühbirne in der Videolampe
Vor dem Auswechseln einer ausgebrannten Glühbirne unbedingt
darauf achten, daß die Videolampe genügend abgekühlt Ist.
Fassung
1 Die Schraube an der Unterseite lösen und die Abdeckung nach
oben in Reilrichtung abnehmen.
2 Die alte Glühbirne in Pfeilrichtung herausziehen.
3 Die neue Glühbirne mit einem trockenen Tuch halten und in die
Fassung einstecken.
• Die Glühbirne nie mit bloßen Händen anfassen.
Fingerabdrücke und Schmutz verringern die Helligkeit und
verkürzen die Lebensdauer der Glühbirne.
• Fingerabdrücke an der Glühbirne sind mit einem trockenen
Tuch zu entfernen.
4 Die Abdeckung wieder aufsetzen und mit der Schraube
befestigen.
-42-
Page 43

Titelgenerator (Sonderzubehör)
Die Verwendung des Titelgenerators (Sonderzubehör) ermöglicht
das Einblenden von Titeln, Zeit, Datum und Stopuhrzeit in
laufende Aufnahmen.
Montage
Den Schuhadapter verwenden, der mit dem Titelgenerator
mitgeliefert wurde.
•Vor dem Montieren des Titelgenerators ist der Kamerarecorder
mit dem Schalter OPERATE auszuschalten.
TitelgeneratorAnschlußbuchse
1 Den Schuhadapter aufsetzen und mit der Schraube befestigen.
2 Den Titelgenerator auf dem Schuhadapter befestigen.
3 Den Stecker des Titelgeneratorkabels in die Titelgenerator-
Anschlußbuchse (CHAR GEN) einstecken.
•Für die Bedienung des Titelgenerators, dessen
Bedienungsanleitung durchlesen.
Handgriff (Sonderzubehör)
funktioniert
auch als Start-/
Stop Taste.
Zur Sicherheit
die Schlaufe
immer über das
Handgelenk
ziehen.
VITC-SigndlB (Time-Code mitweltweitem Standard)
Dieser Kamerarecorder ist für die Aufnahme von VITC-Signalen
mit dem (Verticai Interval Time Code) VITC-Generators ausgelegt,
der oben am Kamerarecorder montiert werden kann. Unter
Verwendung des VITC-Schnittsteuer-Systems (Sonderzubehör)
lassen sich Cassetten, die mit VITC-Signalen aufgezeichnet
worden sind, bequem un mit Einzelbild-Schnittgenauigkeit
editieren.
Hinweis:
Für den Editiervorgang bitte die Bedienungsanleitung der VITCSchnittsteuereinheit beachten.
Vorgehen für das Editieren von Kameraaufnahmen in fertige
Videofilme
1 Die Cassette mit den Original-Aufnahmen wiedergeben, um
einen Überblick über das Geschehen zu bekommen.
Die exakten Start- und Endpunkte derjenigen Szenen
bestimmen, die in einen fertigen Videofilm auf einer anderen
Videocassette editiert werden sollen.
Eine Liste mit Beschreibungen der einzelnen Szenen und Ihren
Start- und Endpunkten erstellen und die Reihenfolge
bestimmen, in der sie editiert werden sollen.
Montage des VITC-Generators (Sonderzubehör)
•Vor dem Montieren des VITC-Generators ist der Kamerarecorder
auszuschalten.
TitelgeneratorAnschlußbuchse
1 Den VITC-Generator auf dem Schuhadapter befestigen.
2 Den Kabelstecker des VITC-Generators in die Titelgenerator-
Anschlußbuchse einstecken.
3 Den Schnittvorgang durchführen.
-43-
Page 44

VITC-Signale (Fortsetzung)
Einstellen der Cassettennummer
Der Zeitcode enthält zusätzlich auch eine Cassettennummer,
damit sich der Zeitcode verschiedener Cassetten unterscheiden
läßt.
• Es sind 100 verschiedene Cassettennummern verfügbar
(00 bis 99).
Vorsichtsmaßregeln für das Videofilmen mit VITC-Zeitcode
Um sicherzustellen, daß alle gewünschten Szenen beim Editieren
gefunden werden können, muß der Zeitcode kontinuierlich und
ohne Leerstellen mit aufgezeichnet werden.
1 Am Anfang jeder Cassette einen Vorspann machen. Dazu den
Objeklivdeckel aufgesetzt lassen, den VITC-Generator
anschließen und die Start-ZStop-Taste drücken. Mindestens
20 Sekunden lang so aufnehmen.
2 Bel jedem Aufnahmestart können kleine Sprünge in der
Zeitcode-Sequenz auftreten. Diese Sprüngen würden das
Editieren der ersten Vollbilder einer Szene erschweren. Daher
sollten Sie es sich zur Gewohnheit machen, die Aufnahme
immer etwa 5 Sekunden vor dem Beginn des Geschehens, das
Sie aufnehmen wollen, auszulösen.
3 Nach dem Aufnehmen einer Szene das Band nicht vor- oder
zurückspulen. Die aufeinanderfolgenden Szenen müssen in
Beispiel für Cassettennummer 23:
1 CASS. UNITS (Einer).................................................. 3
2 CASS. TENS (Zehner) ............................................... 2
3 Die Taste RESET drücken.
4 Bei jedem Drücken der Start-/Stop-Taste des Kamerarecorders
wird der VITC-Generator automatisch mit ein- bzw.
ausgeschaltet.
Rückstellen des Zeitcodes auf Null
•Bei jedem Austauschen der Videocassette im Kamerarecorder
sollte auch dieTaste RESET gedrückt werden. Dadurch wird der
Zeitcodewert auf Null zurückgestellt. Falls der Zeitcode nicht
zurückgestellt wird, zählt der VITC-Generator laufend weiter bis
auf maximal 24 Stunden. Der Zeitcode beginnt dann automatisch
wieder von Null, vielleicht mitten in einer Aufnahme.
•Eine Batterie im Innern des VITC-Generätors gewährleistet, daß
der vor dem Unterbrechen der Kameraaufnahme erreichte
Zeitcodewert immer automatisch gespeichert wird. Wenn die
Aufnahme später fortgesetzt wird, zählt der VITC-Generator
immer vom letzten Zeitcodewert weiter, selbst wenn der
Kamerarecorder in der Zwischenzeit ausgeschaitet oder der
Kabelstecker des VITC-Generators vom Kamerarecorder
herausgezogen wurde.
Anzeigelampen
• Die grüne Anzeigelampe ,,GEN“ leuchtet während der Zeitcode
zusammen mit dem Videosignal aufgenommen wird.
• Die rote Anzeigelampe „BATT“ leuchtet auf, wenn die Batterie
fast vollständig entladen ist.
kontinuierlicher Sequenz aufgenommen werden.
4 Die Funktionen Kamera-Suchlauf und Aufnahmekontrolle (Rec
Review) dürfen nicht verwendet werden.
5 Nie auf Teilen einer bespielten Cassette neue Aufnahmen
einfügen (INSERT).
Austauschen der Batterie
Die Batterie im VITC-Generator hat eine Lebensdauer von 5 bis
7 Jahren.
Wenn die rote Anzeigelampe ,,BATT“ aufleuchtet, ist noch
genügend Batteriespannung vorhanden, um die ZeitcodeAufnahme bis zum Ende der eingesetzten Cassette fortzusetzen.
Bevor Sie mit dem Aufnahmen auf einer neuen Cassette beginnen,
sollten Sie die Batterie jedoch von Ihrem Video-Fachhändler
austauschen lassen.
Der Zeitcode enthält zusätzlich auch eine Cassettennummer,
damit sich die Zeitcodes verschiedener Cassetten unterscheiden
lassen.
-44-
Page 45

Cassettenadapter
Einsetzen der Cassette Herausnehmen der Cassette
1 Die Öffnungstaste in Pfeilrichtung schieben und warten, bis das
Entladen beendet ist.
2 Die Cassette herausnehmen.
• Das Herausnahmen der Cassette kann durch Stoßen der
Cassette von unten her erleichtert werden (Loch im
Gehäuseunterteil).
3 Den Cassettenfachdeckel schließen.
Vor dem Einsetzen der Cassette in den Cassettenadapler ist das
Zahnrad an der Cassette in Pfeiirichtung zu drehen, um das Band
zu straffen.
Einsetzen der Batterie
1 Die Öffnungstaste in Pfeilrichtung schieben, worauf der
Cassettenfachdeckel aufspringt.
2 Die Cassette einsetzen.
3 Den Cassettenfachdeckel fest schließen.
(Das Laden des Bandes erfolgt automatisch. Während des
Ladens das rotierende Teil an der Unterseite des
Cassettenadapters nicht berühren.)
4 Der Stopper wird eingezogen.
(Wenn der Stopper vollständig in den Adapter zurückgezogen
ist, so ist das Laden des Bandes im Cassettenadapter beendet.
Nun kann der Adapter in einen VHS-Videorecorder eingelegt
werden.)
1 Den Batteriefachdeckel nach oben schieben und abziehen.
2 Eine Batterie (R6) einsetzen und auf richtige Polarität achten,
wie in der Abbildung gezeigt. Den Deckel nach unten schieben,
bis er mit einem Klick verriegelt.
WICHTIGE HINWEISE ZUM AUSWECHSELN DER BATTERIE
•Wenn das Laden bzw. Entladen des Bandes sehr langsam wird,
ist die Batterie erschöpft und muß durch eine neue ersetzt
werden.
•Beim Einsetzen einer neuen Batterie sichersteilen, daß die
Polarität (+ und -) nicht vertauscht wird.
Nach Beenden der Aufnahme
Den Suchermonitor mit der
Handfläche in den
Kamerarecorder
zurückstoßen, wie in der
Abbildung gezeigt.
1 Die Cassette auswerfen. (Näheres dazu siehe Seite 31.)
2 Den Kamerarecorder ausschalten.
3 Den Akku abnehmen. (Näheres dazu siehe Seite 31.)
4 Den wei ßen Objektivdeckel auf das Objektiv stecken.
Anbringen und Entfernen der Augenmuschel
Entfernen der Augenmuschel
Die Augenmuschel läßt sich abnehmen, um sie zu reinigen oder
den Suchermonitor mit dem linken Auge zu betrachten.
Den elektronischen Suchermonitor bis zur Linie herausziehen.
Anbringen der Augenmuschel
Die Markierungen aufeinander ausrichten, die Augenmuschel
aufstecken und durch Drehen im Uhrzeigersinn befestigen.
Markierung
-45-
Page 46

Vorsichtsmaßnahmen
Bitte lesen Sie diese Hinweise sorgfältig durch, bevor Sie den
Kamerarecorder in Betrieb nehmen bzw. Ihren Fachändler
aufsuchen.
Verschmutzung der Videoköpfe
Die Videoköpfe sind das Bauteil, mit dessen Hilfe der
Kamerarecorder die Bildsignale auf das Band aufzeichnet und bei
der Wiedergabe abtastet. Wenn diese Köpfe durch langen Betrieb
verschmutzt sind, können die Signale nicht mehr richtig
aufgenommen werden, und die Wiedergabe ist entsprechend stark
gestört. Dies ist zum Beispiel der Fall, wenn bei der Wiedergabe
eines Bandes der Ton einwandfrei zu hören, aber kein Bild zu
sehen oder das Bild stark gestört ist. In einem solchen Fall sollte
der Kamerarecorder von einer Kundendienstwerkstatt untersucht
werden.
Dieser Kamerarecorder ist mit einer Vorrichtung zur Feststellung
von Kopfverschmutzung ausgestattet. Wenn die Köpfe
verschmutzt sind, erscheint die Anzeige© im Sucher. Da sich
angesammelter Schmutz und Bandabrieb durch die
Bandbewegung lösen können, ist es möglich, daß diese Anzeige
einmal, jedoch beim nächsten Aufnahmebeginn nicht mehr
erscheint.
Die Vorrichtung zur Feststellung von Kopfverschmutzung
funktioniert bei jedem Aufnahmebeginn aus der Betriebsart
Aufnahmepause. Sie funktioniert jedoch nicht, wenn sofort nach
Auswechseln der Cassette mit dem Aufnehmen begonnen wird,
sowie nach Durchführen von Kamera-Suchlauf oder Wiedergabe.
Bei Feuchtigkeitsbildung im Kamerarecorder
Feuchtigkeitsniederschlag (Schwitzwasser) entsteht, wenn warme
Luft mit einem kalten Gegenstand in Berührung kommt, wie z. B.
im Falle einer Fensterscheibe in einem geheizten Zimmer im
Winter. Im Kamerarecorder kann sich Schwitzwasser bilden und
das Band und die Videoköpfe beschädigen, wenn;
•Der kalte Kamerarecorder sich in einem Zimmer befindet, in dem
gerade die Heizung eingeschaltet wurde.
• Der kalte Kamerarecorder sich in einem Raum mit Dampf oder
hoher Luftfeuchtigkeit befindet.
• Der kalte Kamerarecorder von einem kühlen Platz (Zimmer oder
Auto mit Klimaanlage) an einen heißen und feuchten Ort
gebracht wird.
•Wenn sich im Innern des Kamerarecorders Feuchtigkeit gebildet
hat, blinkt die Anzeige ,,DEW" im Sucher auf, und der
Kamerarecorder wird sich einige Sekunden darauf automatisch
ausschalten, um das Band und die Videoköpfe zu schonen.
Nach kurzer Zeit den Kamerarecorder wieder einschalten und
sich vergewissern, daß die Feuchtigkeitsanzeige nicht mehr
sichtbar ist.Anschliessend ca. 1 Stunde warten, bevor der
Kamerarecorder wieder in Betrieb genommen wird. Je nach den
Umgebungsbedingungen kann es mehrere Stunden dauern,
bevor der Kamerarecorder wieder einsatzbereit ist.
•Da sich Schwitzwasser allmählich bildet, kann es 10-15 Minuten
dauern, bevor sich der Kamerarecorder ausschaltet.
•An einem extrem kalten Ort könnte Schwitzwasser gefrieren und
Eis bilden. In diesem Fall könnte es ziemlich lange dauern, bis
das Eis geschmolzen und das Wasser verdunstet ist.
•Wenn der Kamerarecorder von einem sehr kalten Ort, z. B. einer
Skipiste, in ein geheiztes Zimmer gebracht wird, sollte er in einen
dicht verschlossenen Plastiksack oder dergleichen verpackt sein,
um Schwitzwasserbildung zu verhindern.
Den Kamerarecorder von öligem Rauch und von Dampf
fernhalten.
Den Kamerarecorder vor hoher Luftfeuchtigkeit und vor Staub schützen.
Umgebungsbedingungen
Der Kamerarecorder sollte nur bei Umgebungstemperaturen
zwischen 0°C und 40°C und einer Luftfeuchtigkeit zwischen 20%
und 80% benutzt werden. Um Verformung des Gehäuses und
andere Schäden zu vermeiden, darf er nie längere Zeit direkter
Sonnenbestrahlung ausgesetzt bleiben oder in einem
geschlossenen Auto gelassen werden.
Den Kamerarecorder von Heizkörpern fernhalten.
Den Kamerarecorder von Fernsehgeräten fernhalten.
Den Kamerarecorder nicht in die unmittelbare Nähe eines
Fernsehers stellen, da dies die Bild-und Tonqualität des
aufgezeichneten Bandes oder die Leistung des Kamerarecorders
beeinträchtigen kann.
Den Kamerarecorder von Magneten fernhalten.
Nie einen Magneten oder magnetisierten Gegenstand wie z. B.
Leuchtstofflampen, Motoren, Lautsprecher und
batteriebetriebenes Spielzeug zu nahe an den Kamerarecorder
heranbringen.
Den Kamerarecorder von Orten mit starken elektromagnetischen Feidern fernhalten.
Bei Benutzung des Kamerarecorders an Orten mit starken
elektromagnetischen Feldern, z. B. nahe bei Fernseh- oder
Radiosendeantennen, können Bildstörungen auftreten.
Keine Gegenstände in den Kamerarecorder stecken.
Außer Videocassetten dürfen nie irgendwelche Gegenstände in
den Kamerarecorder gesteckt werden. Falls ein Gegenstand
hineinfällt oder falls eine Flüssigkeit eindringt, muß der
Kamerarecorder von einem qualifizierten Kundendiensttechniker
auf mögliche Schäden hin untersucht werden. Die Inbetriebnahme
mit einem Fremdgegenstand im Inneren könnte Brand oder
Stromschlaggefahr sowie andere Kurzschlußschäden zur Folge
haben.
Finger gehören nicht ins Geräteinnere.
Das Berühren von Teilen im Inneren des Kamerarecorders ist
gefährlich und kann ernsthafte Beschädigungen verursachen. Auf
keinen Fall versuchen, den Kamerarecorder
auseinanderzunehmen. Untersuchungen des Geräteinneren,
Justierungen und Reparaturen können nur von einem qualifizierten
Kundendiensttechniker durchgeführt werden.
Sorgfältig handhaben.
Den Kamerarecorder nie fallenlassen und nie starken Stößen
aussetzen. Stöße während des Betriebs haben Bildstörungen zur
Folge.
-46-
Page 47

Erscheinen von Störstreifen
Das Auftreten von Streifen ist eine besondere Eigenschaft des
CCD-Bildaufnahme-Elementes. Es kann ein heller, vertikaler
Streifen auf dem Bildschirm erscheinen, wenn der Kamerarecorder
auf Scheinwerfer oder andere helle Lichtquellen oder
lichtreflektierende Objekte gerichtet wird. Um dies zu vermeiden,
nicht gegen grelle Lichtquellen aufnehmen.
Nach dem Aufnehmen den weißen Objektivdeckel
aufsetzen.
Den Kamerarecorder von starkem Licht fernhalten.
Den Kamerarecorder nicht starkem Licht aussetzen, denn die
dabei ausgestrahlte Wärme könnte Verformung des Gehäuses
und andere Schäden verursachen.
Wenn der Kamerarecorder nicht benutzt wird;
Nach dem Entnehmen der Videocassette den Kamerarecorder
ausschalten und den Akku abnehmen.
Den Kamerarecorder nie auf die Cassettenfachseite legen.
Den Kamerarecorder beim Gebrauch nicht so halten, daß das
Cassettenfach nach unten weist, da dies ungleichmäßiges Wickeln
des Bandes und damit lose Bandlagen verursachen kann.
Reinigen des Kamerarecorders
Den Kamerarecorder mit einem sauberen, trockenen Tuch
reinigen. Nie Reinigungsmittel oder andere Chemikalien
verwenden.
•Die Linse mit einem Blasepinsel (wie er auch für Photokameras
verwendet wird) oder Linsenreinigungspapier (für Brillen und
Kameras) reinigen.
Die folgenden Anweisungen beachten, um Beschädigung des Akkus oder Verkürzung seiner Lebensdauer zu vermeiden;
• Den Akku nie starken Stößen aussetzen oder fallen lassen.
• Einen bereits vollständig aufgeladenen Akku nicht erneut
aufladen.
• Der Akku kann beim Betrieb oder beim Aufladen warm werden;
dies ist normal.
• Die Lebensdauer eines Akkus hat ihre Grenzen. Falls sich die
Betriebsdauer eines Akkus trotz normalen Aufladens so stark
verkürzt, daß ein normaler Einsatz zum Aufnehmen nicht mehr
möglich ist, so ist er durch einen neuen Akku zu ersetzen.
Die Funktion des Akkus beruht auf einer chemischen
Reaktion. Bei der Verwendung sind seine Eigenschaften zu
berücksichtigen.
• Den Akku innerhalb des Temperaturbereichs von 10° bis 35°
aufladen. Wird bei niedrigeren Temperaturen aufgeladen, so
kann die chemische Reaktion nicht optimal auftreten, und die
Funktionsfähigkeit des Akkus wird dadurch verringert. Bei
höheren Temperaturen kann der Akku nicht vollständig
aufgeladen werden.
• Den Akku an einem kühlen und trockenen Ort aufbewahren. Wird
er längere Zeit an einem heißen Ort aufbewahrt, so verkürzt sich
die Lebensdauer und der Selbstentlade-Vorgang wird verstärkt.
• Den Akku vor dem Benutzen aufladen, da die Selbstentladung
schon nach mehreren Tagen auftreten kann.
•Wenn der Akku nicht benutzt wird, sollte er vom Kamerarecorder
oder vom Netzadapter abgenommen werden.
• Der Akku sollte erst nach absoluter Entladung durch den Betrieb,
z. B. wenn der Kamerarecorder abschaitet, wieder aufgeladen
werden. Bei 30% iger Entladung etwa wird nicht von 70% auf
100% aufgeladen, weil der sogenannte „Memory-Effekt” dies
verhindert, sondern nur um ein Drittel der 30%.
Hinweis zum Handgriff
Bei Verwenden dieses Kamerarecorders über lange Zeitabschnitte
hinweg kann der Handgriff leicht heiß werden. Dies ist jedoch
normal und hat keinen Einfluß auf das korrekte Funktionieren.
Hinweise zum Cassettenadapter
•Diesen Cassettenadapter nicht in einen Videorecorder einsetzen
und wieder herausnehmen, ohne daß eine Bandlauffunktion
betätigt wird, denn dadurch könnte sich das Band lockern.
•Beim Einsetzen der Cassette in den Cassettenadapter ist darauf
zu achten, daß das Band nicht direkt berührt wird. Nach dem
Gebrauch ist die Cassette aus dem Cassettenadapter
herauszunehmen.
•Den Cassettenadapter nie in einen Videorecorder einsetzen,
wenn keine VHS-C- Cassette im Cassettenadapter ist.
Hinweise zum Netzadapter
•Nie schwere Gegenstände auf den Kamerarecorder stellen.
•Beim Herausziehen des Netzkabels oder anderer Anschlußkabel
immer am Stecker ziehen, nicht am Kabel.
•Der Betrieb des Netzadapters könnte den Empfang von
Radiosendungen stören. In diesem Fall das Radio weiter vom
Netzadapter entfernen.
Hinweise zum Akku
Die folgenden Punkte beachten, um Gefahren zu vermeiden:
•Den Akku nie in ein Feuer werfen.
•Die Pole der Steckverbindung nie kurzschließen.
• Den Akku nie auseinandernehmen oder Änderungen daran
vornehmen.
•Nur den mitgelieferten Netzadapter zum Aufladen des Akkus
verwenden.
-47-
Page 48

Vorsichtsmaßnahmen (Fortsetzung)
Hinweise zum Auto-Focus-System
Beim Aufnehmen unter folgenden Bedingungen ist das AutoFocus-System nicht in der Lage, stabile und genaue
Scharfeinstellung zu liefern:
1. Durch ein verschmutztes Fenster.
2. Bei glänzenden Flächen.
3. Bei einem Bildgegenstand, der zum Teil nahe beim
Kamerarecorder und zum Teil weit davon entfernt ist.
4. Bei einem flachen Bildgegenstand (z. B. eine Wand oder ein
Plakat) schräg von der Seite.
5. Bei einem Bildgegenstand mit horizontalen Streifen.
6. Bei einem flachen Bildgegenstand, z. B. einer weißen Wand.
7. Bei Benutzung der Makro-Funktion oder bei Vera/endung von
Spezialeffekt-Objektiven oder -Filtern.
8. Bei einem sich schnell bewegenden Biidgegenstand.
9. Bei einem dunklen Bildgegenstand.
In solchen Fällen ist die Scharfeinstellung von Hand vorzunehmen.
Hinweise zum Weißabgleich
ln den folgenden Fällen ist der Weißabgleich in der ,,Auto“Betriebsartu. U. nicht genau:
1. Beim Aufnehmen unter Quecksilberdampf-, Natrium- oder
gewissen Arten von Leuchtstofflampen.
2.
Wenn extrem starke Beleuchtung verwendet wird, z. B
Halogenlampe, oder wenn die Farbtemperatur der Beleuchtung
niedrig ist.
3.
Beim Aufnehmen eines einfarbigen Motivs oder eines Motivs
vor einem einfarbigen Hintergrund.
4.
Beim Aufnehmen im Freien bei Sonnenaufgang oder
-Untergang.
5. Bei Venwendung eines Graufilters (ND) oder eines anderen
speziellen Filters.
6. Bei Verwendung einer Vorsatzlinse.
7. Beim Aufnehmen unter schwacher Beleuchtung.
In solchen Fällen ist der Weißabgleich von Hand vorzunehmen.
Wenn der Kamerarecorder während einer Aufnahme von draußen
nach innen getragen wird, hat das Bild zuerst einen leichten
Rotstich, doch behebt sich dieser Zustand allmählich von selbst.
Hinweise zum Hochgeschwindigkeits-Verschluß
Für das Aufnehmen mit hoher Verschlußgeschwindigkeit gelten
folgende Bedingungen:
•Der Bildgegenstand muß durch Sonnenlicht oder andere
Beleuchtung hell ausgeleuchtet sein.
•Beim Aufnehmen unter Leuchtstofflampen-Beleuchtung könnte
das Bild durch Flimmern beeinträchtigt werden (Netzfrequenz).
•Wenn das Bild in der normalen Wiedergabe-Betriebsart
wiedergegeben wird, könnten die Bewegungen im Bild
stroboskopartig erscheinen.
• Das Wiedergabebild ist ein wenig dunkler als ein Bild, das mit
normaler Verschlußgeschwindigkeit aufgenommen wurde.
•Die Wiedergabe hat auf 3- oder 4-Kopf-Heimgeräten zu erfolgen,
um die Highspeed-Aufnahmen per Superstandbild darzustellen.
Vor Inanspruchnahme des Kundendienstes
Stromversorgung
•Der Kamerarecorder kann nicht eingeschaltet werden.
—Ist die Stromversorgungseinheit richtig an den Kamerarecorder
angeschlossen?
• Die Stromzufuhr wird eingeschaltet, aber sie schaltet sich sofort
wieder aus.
—Falls der Akku erschöpft ist, diesen durch einen vollständig
aufgeiadenen Akku ersetzen.
—Falls sich im Innern Schwitzwasser gebildet hat, warten, bis es
verdunstet ist.
Kamera-Aufnahme
•Die Stromzufuhr ist eingeschaltet, aber im Sucher erscheint kein
Bild.
—Ist der Objektivdeckel aufgesetzt?
• Kameraaufnahme kann nicht durchgeführt werden.
—Falls die Lasche der Cassette herausgebrochen ist, das Loch
mit Klebeband überdecken.
• Das Bild ist nicht klar.
—Ist das Okular korrekt auf die Sehkraft Ihres Auges
abgestimmt?
—Ist die Objektivlinse verstaubt?
• Das Auto-Focus-System erbringt nicht optimale
Scharfeinstellung.
Wenn die automatische Scharfeinstellungs-Betriebsart nicht
genügende Präzision bietet, die Scharfeinstell-Taste drücken und
die Scharfeinstellung von Hand vornehmen.
Wiedergabe
• Es wird kein Bild wiedergegeben.
—Ist die Anschlußverbindung zum Fernsehgerät einwandfrei?
—Ist das Fernsehgerät auf den Video- Wiedergabekanal
abgestimmt?
•Verfälschte Farben im Wiedergabebild.
—Ist die Farbeinstellung am Fernsehgerät einwandfrei?
•Das Wiedergabebild ist nicht in Farbe.
Das Bild ist stark „verschneit“.
—Die Spurlage genau einstellen.
—Falls das Band alt ist, eine neue Cassette verwenden.
-48-
Page 49

Technische Daten
NV-G2E
Stromversorgung:
Leistungsaufnahme:
Video-Auf nahmesystem : Bandgeschwindigkeit:
Bandformat:
AufnahmeAViedergabe-Zeit:
Vìdeo
Fernsehsystem:
Modulationssystem:
Ausgangspegei:
AUDiO
Ausgangspegei:
Tonspur:
Biidwandier-System:
Objektiv:
Sucher:
Standardbeieuchtung:
Mindestbeleuchtung;
Horizontale Videoaufiösung
Farbe:
Signai/Störabstand :
Tonfrequenzgang:
Betriebstemperatur:
Luftfeuchtigkeit:
Gewicht:
Abmessungen:
Information für Ihre Sicherheit
6,0 V Gleichspannung
Aufnahme-Betriebsart; 6,4 W (Batteriebetrieb)
11,5 W (mit Automatik-Lampe) i;
4 Rotationsmagnetköpfe, Schrägspurverfahren
SP; 23,39 mm/s
LP; 11,7 mm/s
VHS-C
45 min. mit Cassette NV-EC45E (SP)
90 min. mit Cassette NV-EC45E (LP)
CCIR; 625 Zeilen, 50 Halbbilder, PAL-Farbsignal
Luminanz; FM-AzImut-Aufnahme
Farbsignal; Aufzeichnung mittels umgesetztem Hilfsträger mit rotierender Phasenlage
VIDEO OUT-Buchse (Cinch); 1,0 Vss, 75 Ohm asymmetrisch
AUDIO OUT-Buchsen (Cinch);
-8 dB,
600 Ohm, asymmetrisch
1 ,,Normal“-Spur(Mono)
Va-Zoll CCD-Bildwandler
8 fach Motor-Zoom mit digitalem Kl-Autofocus, Brenweite; 6-48 mm, Fl ,4, automatische
Blendeneinstellung, Objektiv-Durchmesser (vorne) 43 mm
%-Zoll elektronischer Sucher (schwarz/weiß)
1.400 lux
3lux
VHS; besser als 230 Linien horizontal
Video; besser als 40 dB
Audio; besser als 41 dB
Normal-Spur; 80-8.000 Hz (SP)
0‘’C-40°C
20%-80%
ca. 900 g (ohne Akku)
142 (B) X120 (H) X 263 (T) mm
VW-AS1E
Stromversorgung:
Leistungsaufnahme:
Gleichstrom-Ausgang:
Wechselstrom 100-240 V, 50-60 Hz (Automatische Spannungsregelung)
25 Watt
6 V 11,8 W (Kamerarecorder)
6 V1,3 A (Aufladen des Akkus)
Gewicht:
Abmessungen;
ca. 0,39 kg
70(B)x58(H)x178(T)mm
Bei Gewicht und Abmessungen handelt es sich um Näherungswerte.
Änderungen der technischen Daten Vorbehalten.
Information für Ihre Sicherheit
-49-
Page 50

Table des matières
Préparation
•Viseur électronique, capuchon blanc et
Techniques de prise de vues
•Zoom.
•Lecture sur un téléviseur (raccordements)
51
51
53
54
54
55
56
57
57
58
59
59
60
60
60
60
61
62
63
Autres fonctions
• Fonction de mémorisation
•Compteur
.......................................
............
Montage
•Montage par assemblage
•Copie
............................................
.............
Accessoires, etc.
•Bandoulière....................................
• Fixation du trépied
.......................
•Autres raccordements ...................
•Adaptateur secteur
•Cordon pour batterie de voiture
•Lampe video
•Générateur de caractères
........................
....
.................................
..............
•Poignée .........................................
•Signaux VITC ................................
•Adaptateur de cassette
.................
Après la prise de vues .......................................
Précautions .......................................................
Avant d’appeler un technicien
............................
Fiche technique .................................................
........
........
........
........
........
........
........
........
........
........
........
........
........
........
........
........
........
63
63
64
64
65
65
65
65
66
67
67
67
69
69
70
72
73
Informations relatives à votre sécurité
IMPORTANT
Nous attirons votre attention sur le fait que
l’enregistrement de bandes préenregistrées ou de
disques ainsi que d’informations publiées ou
transmises sur les ondes peut constituer une
violation des lois sur les droits d’auteur.
AVERTISSEMENT
N’EXPOSEZ PAS CET APPAREIL A LA PLUIE OU A
L’HUMIDITE AFIN D’ECARTER TOUT RISQUE
D’INCENDIE OU D’ELECTROCUTION.
Caméscope VHS-C NV-G2
•La plaque signalétique se trouve en dessous de
l’appareil.
Adaptateur CA VW-AS1
•La plaque signalétique se trouve en dessous de
l’appareil.
•Ce modèle est conforme à la directive de la CE (relative
aux interférences radio) 87/308/CEE.
POUR VOTRE SECURITE
■ N’ENLEVEZ JAMAIS LE CAPOT DE L’APPAREIL
Afin d’écarter les risques d'électrocution, ne retirez jamais le
capot de l'appareil. Le caméscope ne renferme aucune
pièce susceptible d’être réparée par vos soins. Confiez
toujours vos réparations à un technicien qualifié.
Système d’images HO (Haute Qualité)
Ce système est entièrement compatible avec le système VHS
conventionnel.
-50-
Page 51

Principes de fonctionnement
Enregistrement
2 Faire tourner le viseur électronique de 180° vers l’objectif et
appuyer sur la touche d’éjection.
3 Introduisez une cassette vidéo.
4 Tirer à fond sur le viseur électronique pour l’étendre
complètement.
5 Mettre le couvercle de sélection caméra/magnétoscope sur la
position “CAMERA". Le faire glisser dans la direction de
l’objectif jusqu’à ce qu’il s’arrête.
6 Placez le sélecteur de vitesse d’enregistrement sur la position
“SP” ou “LP".
7 Appuyez sur la touche marche/arrêt.
• L’enregistrement commence.
•Appuyez à nouveau sur cette touche pour mettre fin à
l’enregistrement.
Lecture
1 Mettre le caméscope en circuit.
2 Faire tourner le viseur électronique de 180° vers l’objectif et
appuyer sur la touche d’éjection.
Mettre la cassette enregistrée.
3 Mettre le couvercle de sélection caméra/magnétoscope sur la
position “VTR”. (Le faire glisser vers le bloc-batterie jusqu’à ce
qu’il s’arrête).
4 Appuyez sur la touche de lecture.
•La lecture commence.
•Appuyez sur la touche d’arrêt pour mettre fin à la lecture.
Commandes et éiéments constitutifs
1 2
3 4
No. Désignation Page
1 Bague de réglage de l’oculaire ............................ 57
2 Œilleton de visée ............................................... 57
3 Touches de commande du zoom assisté
4 Sélecteur de mode d'opération
5 Touche marche/arrêt d’enregistrement................. —
......................
6 Attache métaiique pour bandoulière
7 Viseur électronique
.............................................
..........
.................
60
—
65
53
8 Logement pour cassette ...................................... 55
9 Touche de titrage
10 Touche de fondu
11 Sélecteur calendrier/horloge
.................................................
.................................................
...............................
61
60
56
-51-
Page 52

Commandes et éléments constitutifs (Suite)
12 13 14 15 16
31
32 30 29
No. Désignation
12
Commande des fonctions générales
13
Touche de la balance des blancs ..................
14 Touche de l’obturateur ultra-rapide
15 Touche de mise au point
16 Touche d’ejection
17
Capuchon blanc
18
Micro
.............................................................
19
Griffe pour lampe vidéo
............................................
................................
...........................................
..................................
.............
...............
Page
.. 62
.. 60
.. 60
.. 59
.. 55
60
—
,. 65
20 Sélecteur de déplacement des chiffres du calendrier/
horloge
21 Touche de réglage du calendrier/horloge
22
Touche de remise à zéro
23 Touche de mémoire/affichage
No. Désignation
24
Logement de la pile bouton
..........................................................
......
.................................
........................
.............................
56, 62
56,62
.. 63
,. 63
Page
. 56
25 Prise pour copie .............................................. . 65
Prise d'écouteur .............................................. . 65
26
Prise pour micro extérieur ...............................
27
Prise pour générateur de caractères
28
...............
. 65
. 67
29 Courroie de la poignée..................................... . 57
30 Prise de sortie vidéo
Prise de sortie CC HP
31
32
Prise de sortie audio
Touche d’éjection du bloc-batterie
33
........................................
..........................
........................................
..........
..................
. 63
. 63
. 63
.. 55
3839-
40-
41-
42-
43-
AUTO LIGHT
PAUSE STOP
PLAY
S/REW FF/S3
ta/-SEARCH +
MEMORY COLOUR
-O G-
-O
I ®-
-48
-47
-46
-45
No. Désignation Page
34 Douille du trépied
35 Touche +/- de mise au point............................... 59
36 Prise pour commande à distance ...................... 65
37 Prise d’entrée CC
No. Désignation Page
38 Touche d’éclairage automatique
39 Touche de pause............................................... 62
40 Touche de lecture............................................... 62
41 Touche de rebobinage/survol arrière.................. 62
42 Touche de mémoire
43 Sélecteur de mode de titrage
44 Sélecteur caméra/magnétoscope
45 Sélecteur de vitesse d’enregistrement
46 Sélecteur de la couleur du titre
47 Touche de bobinage/survol avant....................... 62
48 Touche d’arrêt .................................................... 62
44 Fonction du sélecteur caméra/magnétoscope
Position (Comme illustrée)........ Pour l’enregistrement
Position CAMERA .................... Pour les opérations
...............................................
...............................................
.......................
...........................................
............................
......................
..............
.........................
avec le caméscope.
autres que
l’enregistrement avec le
caméscope.
65
65
66
61
61
51
58
61
44
-52-
Page 53

Indications du viseur électronique
Les conditions de fonctionnement de votre caméscope
apparaissent dans le viseur électronique sous la forme suivante;
Témoins
d’avertissement/alarme
Témoins d’avertissement/aiarme
^ 1 / Lorsqu’il ne reste qu’une seule barre ” dans
l'indication de la puissance restant à la batterie,
1 l’indicateur de batterie“ txi' ’commence à clignoter.
Le témoin d’alimentation clignote rapidement lorsque
la dernière barre a disparu. Lorsque ceci se produit, il
ne reste presque plus de puissance à la batterie et le
caméscope se met hors tension quelques secondes
plus tard.
Remplacez les bloc-batterie.
7 Témoins de déroulement de la bande
REC Enregistrement
PAUSE Pause d’enregistrement, visualisation des scènes
enregistrées
> Lecture, recherche (avant) sur caméra
11 Arrêt sur image
I>l> Bobinage/survol avant
«1 Rebobinage/survol arrière, recherche (arrière) sur
caméra
8 Témoins du mode d’enregistrement
SP Mode SP
LP Mode LP
9 Témoins de réglage manuel de la balance du blanc
\ I >
-WHITE- Mode manuel, non réglé
'' I ^
W. SET Mode manuel, mode enclenché
Témoins de l’obturateur
10
ultra-rapide
1/120
1/250
1/500
1/1000
1/2000
1/4000
1/120 sec.
1/250 sec.
1/500 sec.
1/1000 sec.
1/2000 sec.
1/4000 sec.
Indicateur de mode de mise au point MF
Mise au point
manuelle.
•Certains de ces témoins peuvent s’allumer alternativement au
même endroit dans le viseur électronique pour indiquer les
conditions de fonctionnement ou avertir l’utilisateur.
Il n’y a pas de cassette dans l’appareil ou la cassette
—TAPE-
^ I ^
n’a plus de languette. Cette indication clignote pour
avertir que l’enregistrement n’est pas possible.
La fin de la bande est pratiquement atteinte pendant
— END-
l’enregistrement. Remplacez la cassette.
Ce témoin reste illuminé jusqu’à ce que la fin de la
bande soit atteinte.
Ce témoin clignote pour signaler la formation de
— DEW-
/ I ^
—o-
/1 \
condensation dans le caméscope. L’appareil s’éteint
automatiquement après quelques secondes.
"'À/
Les têtes vidéo sont colmatées (voir page 70).
Lorsque'il n’y a pas de pile bouton pour les fonctions
-BACKUP-
/ I ^
de mémoire ou de datage automatique ou lorsque la
pile bouton est usée, cette indication clignote pendant
10 secondes lorsque le caméscope est mis en circuit.
1 Témoin de charge de l’accumulateur
E — F Les indications disparaissent une à une de
droite à gauche au fur et à mesure que la puissance
de l’accumulateur diminue.
•Après avoir fixé le bloc-batterie sur le caméscope,
l’indication “E—F’’ s’affichera en premier,
pendant une minute environ, puis la puissance
réelle restant au bloc-batterie sera indiquée.
2 Témoin du compteur
M 0:00.0 Compteur de bande avec indicateur de mémoire.
3 Indications du mode lampe vidéo automatique
éD AUTO Mode automatique
éD ON Lampe vidéo en circuit
4 Témoin mémoire numérique
WHT Couleur
WIPE î Type de mode
(En mode normal, le témoin ne clignote pas.)
Horloge
5
Calendrier
6
-53-
Page 54

Accessoires
Accessoires standard
Adaptateur secteur
Accumulateur
Adaptateur de cassette
Bandoulière
Câble de sortie AV
Câble d’entrée CC
Pile pour l’adaptateur de cassette
Pile pour l’alimentation de l’horloge
Lampe vidéo
ATTENTION: afin D’ECARTER LES RISQUES
D’INCENDIE, D’ELECTROCUTION, OU
D’INTERFERENCE, N’UTILISEZ QUE
LES ACCESSOIRES
RECOMMANDES.
Informations relatives à votre sécurité
Accessoires en option
Bloc-batterie (VW-VBS2E)
Porte bloc-batterie (VW-VH1E)
Cordon pour batterie de voiture (VW-ACC11 E)
Chargeur de blocs-batteries (VW-BCS1 E)
Kitdevovage (VW-TKS1E)
Sac de transport (VW-CBG2E)
Lampe vidéo (VZ-LDS15E)
Ampoule pour lampe vidéo (VZ-LL5E)
Ampoule pour lampe vidéo (VZ-LL15E)
Jeu de filtres (VW-LF43E)
Objectifs de conversion pour téléphoto (VW-LT4314E)
Objectifs de conversion pour téléphoto (VW-LT4320E)
Objectifs de conversion pour téléphoto (VW-LT4350E)
Objectifs de conversion pour grand angle (VW-LW2E)
Objectifs de conversion pour grand angle (VW-LW4307E)
Bague de raccora (VW-SUR1E)
Poignée (VW-GPC1E)
Commande à distance de pause (VW-RM1 E)
Adaptateur de grifte à accessoires en “L” (VW-SK3E)
Adaptateur HF (VW-RF7E)
Trépied standard (VZ-CT55E)
Trépied de luxe (VZ-CT75E)
T répied de table (VZ-CTT1 E)
Générateur de caractères (VW-CG5E)
Générateur VITC (VW-VG1 E)
Console de montage VITC (VW-EC1OE)
Module de commande de montage (VW-EC300E)
Module de commande de montage (VW-EC31 OE)
•Les accessoires disponibles peuvent varier selon les pays.
Accumulateur
Recharge
1 Fixez l’accumulateur.
2 Branchez l’adaptateur secteur sur une prise secteur.
•Témoins de recharge
S’allume pendant la recharge et s’éteint lorsque l’opération est
terminée.
Remarque:
•La recharge de l’accumulateur dure 60 minutes environ.
•Le caméscope peut être utilisé sans interruption pendant
55 minutes environ lorsque l’accumulateur est chargé au
maximum de sa capacité, (sans lampe vidéo.)
•Avec le bloc-batterie VW-VBS2E (en option) le temps de
recharge et le temps d’enregistrement effectif possible sont deux
fois plus longs qu’avec le bloc-batterie standard fourni avec le
caméscope.
■ L’opération de recharge étant terminée, faites glisser le levier
d’éjection de l’accumulateur dans la direction de la flèche et
retirez l’accumulateur.
■ Fonction de décharge-^ recharge
L’accumulateur peut être rechargé un grand nombre de fois.
Cependant, s’il est souvent rechargé alors qu’il reste de
l’énergie, sa capacité de recharge diminue graduellement. Pour
prévenir cela, fixez l’accumulateur non complètement déchargé
sur l’adaptateur secteur et appuyez sur la touche de
décharge-^recharge pour le décharger complètement avant de
le recharger. (Le témoin de décharge-»recharge s’allume et
lorsque la décharge est terminée, c’est le témoin de recharge
qui s’allume, et la recharge commence.) De cette manière,
l’accumulateur aura une meilleure capacité de recharge et il
pourra être utilisé plus longtemps. Régénérez-le, si son temps
d’utilisation diminue d’une manière visible. (Il est recommandé,
de régénérer les accumulateurs au moins une fois toutes les
cinq recharges).
-54-
Page 55

Fixation
Indicateur de confirmation de ia charge sur le blocbatterie
• Touche d’éjection
du bloc-batterie
Indicateur de confirmation de la charge
1 Aligner les rainures de l’accumulateur et du caméscope puis
faire glisser l’accumulateur vers la droite jusqu’à ce qu’il se
verrouille avec un déclic.
• Pour retirer l’accumulateur, appuyer et garder appuyée la
touche d’éjection tout en faisant glisser l’accumulateur vers la
gauche.
Attention:
•Avant de retirer l’accumulateur, mettez le caméscope hors
tension et attendrez 10 secondes environ.
•Si l’accumulateur est retiré pendant l’enregistrement ou la
lecture, la bande reste enroulée autour du tambour et elle risque
d’être endommagée.
Cassette vidéo
Cet indicateur permet de distinguer facilement entre les blocsbatteries chargés et les blocs-batteries déchargés. Lorsque le
point est visible, le bloc-batterie est chargé. Lorsqu’il n’y a pas de
point, le bloc-batterie est déchargé.
Introduction de la cassette
Avant d’introduire une cassette
Assurez-vous que la bande est bien tendue. Si ce n’est pas le cas,
tendez-la en tournant, dans le sens indiqué par la flèche, la roue
dentée située sur le côté de la cassette.
1 Faire tourner le viseur électronique de 180° vers l’objectif et
appuyer sur la touche d’éjection.
•Ne plus bouger le viseur électronique avant que le couvercle
du logement de cassette soit complètement ouvert.
-55-
2 Introduisez la cassette dans le logement pour cassette, la
fenêtre tournée vers l’extérieur.
3 Pousser le couvercle du logement de cassette vers l’intérieur
jusqu’à ce qu’il se verrouille avec un déclic et remettre le viseur
électronique dans sa position initiale.
Retrait de la cassette
1 Faire tourner le viseur électronique de 180° vers l’objectif et
appuyer sur la touche d’éjection.
2 Retirez la cassette.
3 Pousser le couvercle du logement de cassette vers l’intérieur
jusqu’à ce qu’il se verrouille avec un déclic et remettre le viseur
électronique dans sa position initiale.
Remarque;
•N’utilisez que des cassettes VHS-C.
Page 56

Réglage de l’horloge
Insertion de la pile d’alimentation de l’horloge
Une pile de format “CR2032” est nécessaire pour garder la date,
l’heure et les titres qui seront mémorisés par le caméscope.
1 Enlevez le couvercle.
2 Introduisez une pile de format “CR2032” sur le porte pile
bouton, la marque (+) étant tournée vers le haut.
Remarques:
•Si vous omettez d’introduire cette pile ou si elle est à plat, le
témoin “BACKUP” du viseur électronique clignote pendant
10 secondes environ lorsque vous mettez votre caméscope sous
tension.
•Mettre le caméscope hors circuit pour changer de batterie.
PRECAUTIONS A PRENDRE LORS DU REMPLACEMENT DE
LA PILE
•Cette pile possède une autonomie d’environ un an. Vérifiez-la
une fois par an et, si nécessaire, remplacez-la.
•Installez la pile neuve en respectant ses polarités (+ et -).
•N’essayez pas de court-circuiter, de recharger ou de chauffer la
pile et ne la jetez-pas au feu.
1 Lorsque vous appuyez sur le sélecteur
calendrier/horloge, l’indication ci-contre
apparaît dans le viseur électronique.
•Si votre caméscope ne contient pas de pile,
l’indication “BACKUP” clignote.
0; 12
1 . 1. 1990
2 Lorsque vous enfoncez le sélecteur de déplacement des
chiffres pendant plus de 2 secondes environ, la partie “Année”
clignote. Ensuite, chaque fois que vous enfoncez cette touche,
la partie suivante clignote dans l’ordre ci-dessous.
Année-» Mois-^ Jour—» Heures-^ Minutes-^...
3 Lorsque vous appuyez sur la touche de réglage, la partie
clignotante affichée change dans l'ordre suivant.
ANNEE; 1990-^1991-^
MOIS; 1-»2-»
JOUR: 1^2-^ ............................................-^31^1-
HEURE: 0^1^ -»23^0MINUTE; 00-»01-»
• Répétez les opérations 2 et 3 jusqu’à ce que toutes les
indications soient réglées.
• Une fois le réglage du calendrier et de l’horloge terminé, appuyez
sur la touche de déplacement des chiffres lorsque vous
entendrez un signal horaire diffusé à la radio ou à la télévision
afin de mettre l’horloge en marche.
Enregistrement du calendrier/horloge
Lorsque vous appuyez à plusieurs reprises sur le sélecteur
calendrier/horloge, les indications affichées changent dans l’ordre
suivant:
Aucune indication Date et heure
....................
...........................................
..................................
-»2089^1990-
-»59^00-
Date
^12^1-
-56-
Page 57

Oculaire, capuchon blanc et courroie de poignée
Comment tirer le viseur électronique à l’extérieur
Pour tirer le viseur électronique à l’extérieur, ne pas le tenir par
l’œilleton car celui-ci risque de se détacher du viseur électronique.
Remarques:
•Toujours garder le viseur électronique dans sa position
complètement déployée pendant les prises de vues.
•Ne jamais exercer de pression sur le viseur électronique sauf
pour le tirer à l’extérieur ou pour le rétracter.
•Toujours rétracter le viseur électronique après les prises de vues.
Comment enlever le capuchon blanc
Pour enlever le capuchon blanc, appuyer des deux côtés sur les
pièces de fixation et tirer pour l’enlever.
Réglage de la courroie de poignée
•Saisissez la poignée.
•Ajustez la longueur de la courroie.
•Attachez le capuchon blanc à la poignée de la courroie.
Oculaire
Oculaire
Cette commande permet de régler l’oculaire à la vue.
1 Tirer complètement le viseur électronique à l’extérieur.
2 Mettre le caméscope en circuit.
3 Régler le correcteur d’oculaire jusqu’à ce que les indications
dans le viseur électronique soient aussi nettes que possible.
-57-
Page 58

Enregistrement par caméra
Début d’enregistrement
1 Faire coulisser la commande de fonctionnement vers la droite
pour mettre le caméscope en circuit.
2 Faire tourner le viseur électronique de 180' vers l’objectif,
appuyer sur la touche d'éjection et mettre une cassette avec
une languette de prévention d’effacement, remettre le viseur
électronique dans la position initiale.
3 Mettre le couvercle de sélection caméra/magnétoscope sur la
position “CAMERA”.
•Votre caméscope passe en pause d’enregistrement.
4 Placez le sélecteur de vitesse d’enregistrement sur la position
“SP” ou “LP”.
•SP: vitesse normale
• LP: vitesse réduite
5 Placez votre caméscope en position de prise de vues.
6 Appuyez sur la touche marche/arrêt.
•L’enregistrement commence.
7 Appuyez à nouveau sur la touche marche/arrêt pour
interrompre l’enregistrement. (Pause d’enregistrement)
• Si le caméscope est laissé dans le mode pause
d’enregistrement pendant plus de 6 minutes, il se met
automatiquement hors circuit pour protéger la bande et pour
économiser l’énergie du bloc-batterie.
Visualisation des scènes enregistrées
Vérification des dernières secondes des séquences filmées.
1 Placez votre caméscope en mode pause d’enregistrement.
2 Appuyez sur la touche de rebobinage/repérage arrière.
Recherche sur caméra
Vérification des scènes enregistrées.
1 Placez votre caméscope en mode pause d’enregistrement.
2 Appuyer et garder appuyée la touche de rebobinage/repérage
arrière pour faire la lecture d’une séquence à grande vitesse en
marche arrière.
•Le son n’est pas reproduit.
3 Appuyer et garder appuyée la touche d’avance rapide/repérage
avant pour faire la lecture d’une séquence à grande vitesse en
avant.
•Le son est reproduit.
Verrouillage de la fonction d’enregistrement
Cette fonction assure une continuation entre les scène très douce
en montage par assemblage. La bande reste enroulée autour du
tambour même si le caméscope a été mis hors circuit avec la
commande de fonctionnement. Le mode verrouillage de
l’enregistrement est activé lorsque l’on met le caméscope hors
circuit en pause d’enregistrement. Cette fonction annule la balance
des blancs.
•Si l’appareil reste en mode pause d’enregistrement pendant plus
de 6 minutes, il se met automatiquement hors circuit pour
protéger la bande et pour économiser l’énergie du bloc-batterie.
(La bande reste autour du tambour. Cette position est appelée
“verrouillage de l’enregistrement”.)
Pour mettre le caméscope de nouveau en circuit, utiliser la
commande de fonctionnement.
•Si le mode verrouillage d’enregistrement se poursuit pendant
plus de 48 heures, il sera annulé et le caméscope se mettra
automatiquement hors circuit.
Arrêt de l’enregistrement
1 Placez votre caméscope en pause d’enregistrement.
2 Faire coulisser la commande de fonctionnement vers la droite
pour mettre la caméscope hors circuit.
-58-
Page 59

Mise au point
Mise au point automatique continue
Pour un réglage continu et automatique de la mise au point,
mettre le caméscope en circuit et mettre le couvercle de
sélection Camera/Magnetoscope dans la position CAMERA.
•La mise au point sera automatiquement réglée sur le sujet au
centre du viseur électronique.
1 Faire glisser le couvercle situé sur l’objectif pour l’ouvrir, puis
appuyer sur la touche de mise au point.
•L’indicateur “MF” apparaît dans le viseur électronique.
2 Pour faire une prise de vue en zoom vers un objet, appuyer sur
la touche de zoom “T”.
3 Régler la mise au point avec la touche de mise au point “+” ou
Pour faire une prise de vue en zoom en s’éloignant du sujet
pour le montrer complètement, appuyer sur la touche de zoom
“W”.
•Toujours refaire les opérations de 2 à 4 cidessus après avoir
mis le caméscope dans le mode verrouillage de
l’enregistrement ou après l’avoir mis hors circuit puis de
nouveau en circuit avec la commande de fonctionnement en
mode mise au point manuelle.
Macrocinématographie
Pour filmer de petits objets ou des photos.
Appuyer et garder appuyée la commande du zoom assisté
“W”.
•La mise au point peut être réglée jusqu’à la distance minimum
de 5 mm entre l’objectif et du sujet.
•Après la mise au point jusqu’à la position de grand angle, la
mise au point peut être réglée simplement en approchant du
sujet.
•La mise au point peut se faire aussi bien en mode manuel
qu’en mode automatique.
Conseils pratiques pour les prises de vues
• Pour changer la taille du sujet, il suffit de changer la distance par
rapport à ce sujet.
•La profondeur de champ étant très courte en prise de vues
macro, le moindre mouvement du caméscope déréglera la mise
au point.
Il est donc recommandé d’utiliser un trépied pour ce genre de
prise de vues.
•Pour filmer les photos d’un album ou pour toute prise de vues de
ce genre avec en éclairage insuffisant, utiliser une lampe vidéo.
•Lorsque l’on appuie sur la commande du zoom assisté “T” pour
faire une prise de vue en zoom vers un sujet, la mise au point
peut être réglée jusqu’à 0,7 m de ce sujet.
-59-
Page 60

Balance du blanc
Automatique balance du blanc
Ce réglage est nécessaire pour obtenir un rendu naturel des
couleurs. Il suffit de mettre le caméscope en circuit pour obtenir le
réglage automatique de la balance des blancs. Ce réglage
permettra d’obtenir un rendu de couleur naturel et bien équilibré
dans la plupart des conditions de prise de vues.
Réglage manuel de la balance du blanc
1 Mettre le capuchon blanc sur l’objectif.
2 Appuyer su r la touche “T” des commandes du zoom assisté
jusqu’à ce que l’écran dans le viseur électronique devienne
complètement blanc.
3 Faire glisser le couvercle situé sur l’objectif pour l’ouvrir et
appuyer sur la touche de la balance des blancs pendant plus
d’une seconde.
L’indicateur “WHITE" dans le viseur indique l’état du réglage:
Il clignote lentement .. Non réglé
Il clignote rapidement
Il ne clignote pas
...............
.....................
En réglage
Le réglage est terminé
•Comment utiliser le capuchon blanc
S’il n’y a qu’une source de lumière, fixez le capuchon blanc
sur l’objectif pour un réglage manuel de la balance du blanc.
Si par contre, il y a plusieurs sources de lumière ou si
l’éclairage est faible {prise de vues en intérieur, etc.) enlevez
le capuchon blanc de l’objectif et dirigez le caméscope vers un
sujet entièrement blanc comme une feuille de papier, et
réglez la balance du blanc.
• Rappel automatique du réglage de la balance du blanc
Lorsque l’interrupteur de fonctionnement du caméscope met
hors circuit pluis plus tard en circuit, l’indicateur “WHITE”
clignote lentement dans l’affichage à cristaux liquides.
Cependant, pour assurer la meilleure reproduction des
couleurs possible, rerégler la balance des blancs comme
expliqué ci-dessus.
Cependant, le réglage de la balance du blanc est maintenu. Il
est maintenu également pendant une opération de lecture, de
vérification d’un enregistrement et de recherche à la caméra.
Cependant, le réglage de la balance du blanc ne sera pas
maintenu si l’adaptateur secteur est mis hors tension ou si
l’accumulateur est retiré du caméscope.
• Pour passer de l’intérieur à l’extérieur ou vice versa, toujours
rerégler la balance des blancs car la couleur de la lumière
change considérablement.
Obturateur ultra-rapide
Votre caméscope possède plusieurs vitesses d’obturation
permettant de filmer des mouvements rapides.
1 Faire glisser le couvercle situé sur l’objectif pour l’ouvrir.
2 Si l’on appuie de manière répétée sur la touche de l’obturateur
ultra-rapide, les vitesses d’obturation changent dans l’ordre
suivant:
(Sans indication):
1/120:
1/250
1/500
1/1000:
1/2000:
1/4000:
1/50 s. (normal)
1/120 s,
1/250 s.
1/500 s.
1/1000 s.
1/2000 s.
1/4000 s.
Lors de la lecture
Lorsque vous visionnez des scènes enregistrées à l’aide de
l’obturateur ultra-rapide sur un magnétoscope équipé des au
ralenti, les images prises à l’arrêt ou au ralenti possèdent des
contours très nets et sont reproduites dans les moindres détails.
Remarque;
Reportez-vous à la page 72 pour plus de détails.
Zoom
Zoom assisté
Prise de vues avec le zoom assisté.
Pour faire des prises de vue en zoom plus impressionnantes et
pour obtenir l’effet désiré, faire exactement comme les
professionnels:
Faire un essai avant d’enregistrer réellement.
Prise de vue en zoom vers
le gros plan (le sujet
devient progressivement
plus grand).
Pour obtenir un grand angle: Appuyez sur la touche “W”.
Pour obtenir un gros plan: Appuyez sur la touche “T”.
Prise de vue en
zoom vers le plan
général (le sujet
devient
-60-
Fondu ouvert et fermé
-Fondu fermé
Ouverture en fondu
L’ouverture en fondu peut être utilisée par exemple au début d’une
représentation. Après l’enregistrement du titre, l’apparition
progressive de l’image et du son de la première scène fera un joli
petit effet.
1 Le caméscope étant dans le mode pause d’enregistrement,
appuyer et garder appuyée la touche de fondu.
2 L’image ayant disparu dans le viseur électronique, appuyer sur
la touche marche/arrêt.
3 Libérer la touche de fondu 3 secondes plus tard.
•L’image va apparaître progressivement.
Fermeture en fondu
La fermeture en fondu est utilisée pour terminer tout doucement un
enregistrement ou pour passer progressivement d’une séquence à
une autre.
Pendant l’enregistrement, appuyer et garder appuyée la touche
1
de fondu à l’endroit où la fermeture en fondu doit commencer.
L’image ayant disparu, appuyer sur la touche marche/arrêt pour
2
arrêter l’enregistrement.
3 Libérer la touche de fondu.
Page 61

Enregistrement d’un titre
La fonction de titrage permet de mettre un titre en mémoire et de le
rappeler ultérieurement pendant la prise de vues en appuyant
sur une touche afin qu’il se superpose à l’image filmée (fonction
de la mise en mémoire numérique du titre).
Mise en mémoire d’un titre
Cette opération peut être effectuée lorsque votre caméscope se
trouve en mode pause d’enregistrement.
1 Préparer une illustration imprimée ou un titre imprimé.
• Ecrire le titre avec un feutre noir sur un papier blanc.
2 Mettre le caméscope en circuit et mettre le couvercle de
sélection Camera/Magnetoscope dans la position CAMERA.
3 Régler la mise au point.
4 Appuyez sur la touche de mise en mémoire.
•Maintenez cette touche enfoncée pendant plus d’une demiseconde.
•Le titre est mémorisé.
Lorsqu’il est affiché dans le viseur électronique, vous
pouvez sélectionner sa couleur ainsi que le mode de titrage
(c’est-à-dire la façon dont il sera superposé à l’image).
•Appuyer sur le commutateur marche/arrêt du titrage pour faire
disparaître le titre dans le viseur.
Si l'on appuie d’une manière répétée sur cette touche le titre
apparaît^disparaît-^apparaît dans le viseur électronique.
Si l’on appuie par erreur sur cette touche pendant les prises de
vues, le titre se superposera a l’image et sera enregistré.
■ Remarques relatives au titrage
Les titres restent en mémoire jusqu’à ce que la plie au lithium soit à
plat. Lorsque vous entrez un nouveau titre, vous effacez celui qui
était précédemment mémorisé.
Sélection de la couleur d’un titre
En appuyant à plusieurs reprises sur le sélecteur de la couleur du
titre, vous modifiez la couleur du titre de la façon suivante. (Cette
fonction peut également être utilisée pendant l’enregistrement du
titre.)
MEMORY COLOUR
O Q-
Sélecteur de mode -
de titrage
WHT
(Blanc) (Jaune)
-----
BLK ^
(Noir) (Vert) (Cyan)
MODE
YEL
CRN ^
-O ©
-Sélecteur de la couleur du
titre
SP LP
RED -»
(Rouge) (Magenta)
CYN ^
MAG
i
BLU
(Bleu)
Sélection du mode de titrage
En appuyant à plusieurs reprises sur le sélecteur de mode de
titrage, vous modifiez la façon dont le titre est superposé à l’image
que vous enregistrez. (Cette fonction peut également être utilisée
pendant l’enregistrement du titre.)
NORMAL WIPE i
_____
^
Ф-
HÀ^Y
Le titre apparaît
immédiatement.
Le titre défile
de bas en haut.
Sélectionnez le mode désiré en appuyant sur le commutateur du
titrage.
Л:
Le titre apparaît
par le dessus.
Le titre apparaît
par le dessous.
Remarque:
La partie supérieure et inférieure de l'écran de titres étant coupées,
filmer le titre de manière à ce qu’il soit au centre de l’écran.
-61-
Page 62

Enregistrement d’un title (Suite)
Enregistrement d’un titre
Indicateur de
couleur
----
fo
Indicateur de
mode de titrage
■ Insertion d’un titre en mode de titrage normal au début d’un
enregistrement
---
O
V
_____________
J
1 Enfoncez la touche titrage pour afficher le titre dans le viseur
électronique.
•Vérifier l'indicateur de couleur et l’indicateur de mode de
titrage. Il est encore possible à cette étape de changer la
couleur du titre et le mode de titrage.
2 Appuyez sur la touche marche/arrêt pour commencer à filmer.
• Pour mettre fin à la surimpression du titre, appuyez à nouveau
sur la touche de titrage.
■ Insertion d’un titre en mode de titrage normal pendant
l’enregistrement
1 Après avoir entré un titre en mémoire, appuyer sur la touche de
titrage pour que le titre affiché dans le viseur électronique
disparaisse.
2 Appuyez sur la touche marche/arrêt et commencez à filmer.
3 A l’endroit où vous souhaitez insérer le titre, enfoncez la touche
de titrage. (Le titre superposé peut être vu dans le viseur
électronique.)
• Enfoncez à nouveau ce commutateur pour mettre fin à la
surimpression du titre.
■ Insertion d’un titre en mode déroutement ou fondu au
début d’un enregistrement
Effectuez les opérations des points 1 et 2 ci-dessus. Après avoir
enfoncé la touche marche/arrêt, attendez environ 2 secondes et
appuyez ensuite sur la touche de titrage.
Lecture
•Mettre le caméscope en circuit et mettre le couvercle de sélection
Camera/Magnetoscope dans la position CAMERA.
Fonctionnement
1 Lecture: Enfoncez la touche de lecture.
2 Sun/ol avant: Maintenez la touche FF/Q enfoncée pendant la
lecture.
3 Survol arrière: Maintenez la touche (3/REW enfoncée pendant
la lecture.
4 Arrêt sur image: Appuyez sur la touche de pause sur image
pendant la lecture.
•Appuyez à nouveau sur cette touche pour revenir au mode
normal de lecture.
5 Appuyez sur la touche d’arrêt pour mettre fin à la lecture.
Bobinage
Enfoncez la touche FF/@ pour bobiner la bande.
Rebobinage
Enfoncez la touche (3/REW pour rebobiner la bande.
-62-
Commande d’alignement
L’alignement doit être réglé si l’image présente des barres
parasites à la lecture.
1 Enfoncez simultanément les deux touches d’alignement ◄ et
2 Réglez ensuite l’alignement en appuyant sur l’une ou l’autre de
ces touches.
•S’il s’agit de la lecture d’une bande enregistrée sur un autre
caméscope, il se peut que ces distorsions ne puissent pas être
complètement éliminées.
•Des parasites en forme de barres horizontales se produisent
dans les modes repérage avant, repérage arrière et en lecture
avec arrêt sur image. Il ne s’agit pas d’un mauvais
fonctionnement.
•Dans les modes repérage avant et arrière et arrêt sur image,
l’image peut passer en noir et blanc ou peut présenter des
distorsions. Il ne s’agit pas d’un mauvais fonctionnement.
Remarque;
• Le son est reproduit à condition que l’appareil soit placé en mode
normal de lecture.
•Lecture: En fin de bande, le rebobinage est automatique.
•Bobinage: En fin de bande, le rebobinage est automatique.
• Rebobinage: En début de bande, le rebobinage s’arrête
automatiquement.
•Arrêt sur image: Après 6 minutes environ dans ce mode, le
caméscope s’arrête automatiquement pour protéger la bande et
les têtes vidéo.
Page 63

Lecture sur un téléviseur (raccordements)
Téléviseur avec entrée audio-vidéo
Lecture sur un magnétoscope de table
Utilisez un adaptateur de cassette.
(en option)
Téléviseur sans prise audio-vidéo
Mettre la caméscope hors circuit avec l’interrupteur de
fonctionnement (OPERATE) avand d’y raccorder l’adaptateur HF.
TV
Branchez votre téléviseur sur le canal UHF 36.
TV/magnétoscope Sélecteur de l’adaptateur HF
Mangétoscope: Pour visionner une cassette
TV: Pour regarder la télévision
Sélecteur de système PAL
G : Pour les pays d’Europe continentale
I: Pour le Royaume-Uni
Autres fonctions
Fonction de mémorisation
1 Appuyez sur la touche de remise à zéro à l’endroit souhaité.
•Le compteur de bande est remis à “0:00.00”.
2 Appuyer sur le sélecteur de mémoire/affichage.
• L’indication “M” apparaît dans le viseur électronique.
3 Appuyez sur la touche d’arrêt et ensuite sur la touche Q/REW
rebobinage/survol arrière.
•La bande s’arrête automatiquement aux environs de l’endroit
où le compteur indique “0:00.00”.
Compteur
A chaque pression sur le sélecteur de mémoire/affichage,
l’indication du compteur change dans l’ordre suivant:
Le temps restant
sur la bande est
Le témoin mémoire
est affiché avec le
compteur de bande
également affiché
dans le viseur
électronique.
pas d'indication
-63-
Page 64

Montage par assemblage
PAUSE STOP
PLAY
CZE3-
O/REW FF/®
cbô
Préparatifs
•Insérez une cassette en vous assurant que sa languette de
protection contre l’effacement est intacte.
•Mettre le couvercle de sélection Camera/Magnetoscope dan sla
position CAMERA.
Fonctionnement
1 Visionnez la cassette afin de repérer l’endroit où viendra
s’ajouter le nouvel enregistrement (montage par assemblage)
et appuyez ensuite sur la touche de pause sur image.
2 Mettre le couvercle de sélection Camera/Magnetoscope dans
la position CAMERA.
3 Appuyez sur la touche marche/arrêt et commencez à filmer la
nouvelle scène.
Copie
Pour la lecture
Fonctionnement
1 Enfoncez la touche de lecture de votre caméscope pour
commencer la lecture.
2 Appuyez sur la touche d’enregistrement du magnétoscope pour
enregistrer.
Remarque:
La qualité d’image de la copie est inférieure à celle de la bande
originale.
• Pour plus de détails, consultez le mode d’emploi de votre
magnétoscope.
Copie synchronisée
Utilisez le cordon de copie synchronisée (en option) pour relier la
prise de commande à distance de votre caméscope à la prise de
copie synchronisée du magnétoscope sur lequel vous allez
enregistrer.
•Si votre magnétoscope possède une fonction de copie
synchronisée, il peut commander directement votre caméscope.
Par exemple, l’appui de la touche d’enregistrement ou d’arrêt du
magnétoscope entraîne le passage du caméscope en mode de
lecture ou d’arrêt.
•Pour plus de détails, consultez le mode d’emploi de votre
magnétoscope.
Pour l’enregistrement
-64-
Page 65

Accessoires, etc.
Bandoutière
1 Passer l’extrémité de la bretelle à travers la fente de la patte
d’attache de la bretelle située à la partie supérieure et à l’arrière
de la caméscope.
2 Fixez solidement l’extrémité de la bandoulière.
3 Fixer l’autre extrémité de la bretelle à la partie inférieure et à
l’arrière de la caméscope de la même manière que ci-dessus.
Fixation du trépied
Partie inférieure de votre caméscope
JJ Faites correspondre les
Serrez la vis
Autres raccordements (en option)
Griffe pour lampe vidéo
Prise pour copie.
Unité de commande dé
postsynchronisation
Commande à distance de pause
•L’adaptateur de griffes à accessoires en forme de “L” (VWSK3E, en option) est nécessaire pour monter une lamp vidéo
(VZ-LDS15E; en option etc.).
ie orifices de fixation «Placez le trépied sur
une surface stable et
dépliez entièrement
ses pieds.
Micro extérieur
Prise pour
micro
extérieur
Prise
d’écouteur
Prise pour commande à
distance
Ecouteur
1 A l’aide du câble d’alimentation, reliez la prise de sortie CC de
l’adaptateur secteur à la prise d’entrée CC de votre
caméscope.
2 Raccordez sur le secteur.
Remarque:
Si vous branchez un accumulateur sur l’adaptateur secteur, vous
ne pouvez alimenter votre caméscope.
Cordon pour batterie de voiture
de voiture (en option)
1 Faites démarrer ie moteur de votre voiture et branchez le
cordon pour batterie de voiture sur la douille de l’allume-cigare.
2 Raccordez l’autre extrémité du cordon à la prise d’entrée CC de
votre caméscope.
Remarque:
•Le cordon pour batterie de voiture ne peut être utilisé que si votre
véhicule possède un circuit électrique 12 volts CC à masse
négative.
•Ne faites pas démarrer ie moteur lorsque votre caméscope est
alimenté par la batterie de votre véhicule.
•Avec ce type de branchement, la lampe vidéo (fournie) ne peut
être utilisée.
-65-
Page 66

Accessoires, etc. (Suite)
Lampe vidéo (fournie)
Appuyer sur la touche d’éclairage automatique du caméscope pour
sélectionner le mode éclairage par la lampe vidéo.
ON: Pour allumer la lampe vidéo.
AUTO: Lorsque le caméscope est en mode de pause
d'enregistrement, la lampe vidéo s’allumera
automatiquement si l'éclairage est insuffisant.
i Lampe vidéo
(fournie)
Pour enlever la
lampe vidéo, la tirer
tout en soulevant
sur le bouton qui se
trouve au dos.
Comment changer l’ampoule de la lampe vidéo
S’assurer d’abord que la lampe n'est plus chaude avant de
procéder au remplacement de l’ampoule.
1 2
Douille
1 Desserrer la vis qui se trouve sous la lampe vidéo et relever le
couvercle vers le haut dans le sens de la flèche.
2 Tirer l’ampoule à l’extérieur dans le sens de la flèche.
3 Tenir la nouvelle ampoule avec un chiffon sec et l’introduire
dans la douille.
•Ne pas la toucher avec les doigts. Toute saleté et même les
empreintes digitales réduisent son éclat et diminuent sa durée
de service.
•Toute empreinte digitale sur l’ampoule doit être enlevée avec
un chiffon sec.
4 Remettre le couvercle et serrer la vis de fixation.
• Ne pas toucher à la partie supérieure de la lampe pendant et
aussitôt après son utilisation car elle devient très chaude.
• Lorsque l’on met le caméscope hors tension la lampe vidéo
s’étaint hors circuit.
•Si l'on appuie une fois sur la touche d’éclairage automatique, la
lampe vidéo se met en mode “AUTO”. (L’indication “AUTO”
apparaît dans le viseur électronique.) Si l’on appuie une fois de
plus sur la touche d’éclairage automatique, la lampe vidéo se met
en circuit.
(L’indication “ON” apparaît dans le viseur électronique.)
Mode “AUTO” de la lampe vidéo
Lorsque le caméscope sera en mode pause d'enregistrement, si
l’éclairage est insuffisant, la lampe vidéo s’allumera
automatiquement si elle est en mode “AUTO”.
(Elle ne s’allumera pas si l’éclairage est suffisant.)
•Une fois allumée, la lampe ne s’éteint qu’à la tin de
l’enregistrement lorsque celui-ci est arrêté à l’interrupteur
marche/arrêt üusqu’à la prochaine pause d’enregistrement)
même si l’éclairage augmente.
La lampe vidéo ne s’allumera pas au cours d’un enregistrement
même si l’éclairage diminue.
• La lampe vidéo ne fonctionne que lorsque le couvercle de
sélection Caméra/Magnétoscope est sur la position “CAMERA”.
•La lampe vidéo doit être fixée après avoir mis le caméscope hors
tension.
•Toujours enlever la lampe vidéo avant de mettre la caméscope
dans son sac de transport ou tout autre sac.
•Avant d’allumer la lampe vidéo, veiller à ce qu’aucun appareil tel
qu’une table de montage, un générateur VITC, un générateur de
caractères, un adaptateur HF, etc. ne soit raccordé au
caméscope.
-66-
Page 67

Générateur de caractères
Le générateur de caractères disponible en option permet
d’enregistrer des titres, l'heure, la date et le temps chronométré
pendant la prise de vues.
Fixation
Utilisez l’adaptateur de sabot fourni avec l’appareil.
•Avant de fixer le générateur de caractères, mettez votre
caméscope hors tension.
Prise pour générateur
de caractères
1 Fixez l’adaptateur de sabot et serrez la vis.
2 Fixez le générateur de caractères sur l’adaptateur de sabot.
3 Branchez la fiche du câble du générateur de caractères dans la
prise pour générateur.
• Pour le fonctionnement du générateur de caractères, consultez
son mode d’emploi.
Poignée
Sur la fixation
du trépied
Serrez la vis
Poignée
(en option)
Prise de
commande à
distance
Passez la
bandoulière
autour
de votre
k Cette touche peut
poignet.
également faire office
de touche marche/arrét.
Signaux VITC
Ce caméscope est conçu pour l’enregistrement de signaux VITC
(Code temporel d’intervalles verticaux) à partir d’un générateur
VITC en option qui se fixe sur le dessus du caméscope. A l’aide du
système de montage VITC (en option), il est possible d’effectuer
des montages en utilisant des cassettes enregistrées avec des
signaux VITC. Cela est très efficace et précis (image par image)
étant donné que chaque image est codée.
Remarque:
Reportez-vous pour les opérations de montage au mode d’emploi
de la console de montage VITC.
Montage de vos enregistrements vidéo
1 Evaluez la qualité de vos prises de vues (contrôlez les scènes
enregistrées).
2 Sélectionnez les séquences (scènes) réussies. Cette opération
est appelée découpage.
Fixation du générateur VITC
•Avant de fixer le générateur VITC, mettez votre caméscope hors
tension.
Prise pour générateur
de caractères
1 Fixez le générateur VITC sur l’adaptateur de sabot.
2 Introduisez la fiche du cordon du générateur VITC dans la prise
pour générateur de caractères.
Assemblez les différentes séquences (scènes) qui
constitueront votre film.
-67-
Page 68

Signaux VITC (Suite)
Numérotation de la cassette
Le code temporel comprend aussi un numéro de cassette qui
permet de distinguer les codes temporels de chaque cassette.
• Il existe 100 numéros de cassette différents.
Exemple du numéro de cassette 23:
1 Chiffre des unités; ...................................................... 3
2 Chiffre des dizaines:
..................................................
2
3 Appuyez sur la touche de remise à zéro.
4 Le générateur VITC est activé/désactivé à l’aide de la touche
marche/arrêt de votre caméscope.
Remise à zéro du code temporel
• Enfoncez la touche de remise à zéro lorsque vous insérez une
nouvelle cassette dans votre caméscope. Le code temporel est
alors remis à zéro. Si vous n’enfoncez pas cette touche, la
comptabilisation des codes temporels se poursuit indéfiniment à
partir de la dernière valeur.
Le générateur VITC attribue des codes temporels pendant une
durée d’enregistrement maximale de 24 heures. Ensuite, il se
remet automatiquement à zéro - même en milieu de bande.
•Grâce à une pile incorporée, le dernier code est mémorisé.
Lorsqu’ultérieurement vous enregistrez à nouveau, la
comptabilisation du code temporel reprend à l’endroit où elle a
été interrompue, même si entre-temps votre caméscope a été
mis hors tension ou si le générateur VITC a été débranché.
Témoin lumineux
• Le témoin lumineux vert “GEN” clignote lorsque le code temporel
est enregistré en même temps que le signal vidéo.
• Le témoin lumineux rouge “ВАТТ” clignote lorsque la pile est
presque à plat.
Informations relatives à l’enregistrement avec code temporel
Le code temporel doit continuellement être enregistré sans
interruption si vous souhaitez retrouver aisément une séquence
déterminée lors de la lecture.
1. Sur chaque cassette, prévoyez une amorce. Laissez le
capuchon sur l’objectif, raccordez le générateur VITC et
enregistrez ainsi pendant 20 secondes au moins.
2. Chaque fois que vous mettez votre caméscope sous tension, le
code temporel peut subir un léger décalage qui rend la lecture
des premières images filmées difficile. Prenez donc l’habitude
de commencer votre enregistrement 5 secondes avant que
débute la scène que vous souhaitez effectivement filmer.
3. Evitez de bobiner ou de rebobiner la bande après chaque prise
de vues. Les séquences doivent être enregistrées les unes à la
suite des autres.
4. N’utilisez pas la fonction de recherche sur caméra ou de
visualisation des scènes enregistrées.
5. Ne filmez jamais une nouvelle séquence sur une cassette déjà
enregistrée.
Remplacement de la pile
La pile du générateur VITC à une durée de vie qui varie entre 5 et
7 ans.
Elle permet d’éviter les décalages de code temporel entre la
dernière prise de vues d’un enregistrement et la première de la
séquence suivante.
Si le témoin lumineux rouge “ВАТТ” clignote, vous avez encore le
temps de terminer l’enregistrement de la cassette insérée dans le
caméscope. Faites cependant remplacer la pile par votre
revendeur avant d’enregistrer une nouvelle cassette.
-68-
Page 69

Adaptateur de cassette
Chargement de la cassette
Avant de charger la cassette dans l’adaptateur, tournez la roue
dentée dans le sens indiqué par la flèche afin que la bande soit
bien tendue.
1 Glissez le bouton d’ouverture dans le sens indiqué par la flèche
afin d’ouvrir le couvercle du logement.
2 Insérez la cassette.
3 Rabattez fermement le couvercle du logement.
(La bande est automatiquement chargée. Pendant cette
opération, évitez de toucher la partie rotative située sur le
dessous de l’adaptateur de cassette.)
4 La pièce d’arrêt est entièrement rétractée.
(Le chargement de la cassette dans l’adaptateur est alors
terminé. Celui-ci peut ensuite être inséré dans votre
magnétoscope.)
Retrait de la cassette
1 Glissez le bouton d’ouverture dans le sens indiqué par la
flèche.
2 Retirez la cassette.
•Pour plus de facilité, poussez la cassette par le dessous de
l’adaptateur.
3 Rabattez le couvercle du logement.
Chargement de la pile
1 Giissez vers ie haut le couvercle du logement de la pile et
retirez-le.
2 Placez une pile de type “R6” en respectant les polarités et
refermez le couvercle en ie rabattant jusqu’à ce que vous
entendiez un déclic.
PRECAUTIONS LORS DU REMPLACEMENT DE LA PILE
•Si le temps de chargement de la cassette est très long, la pile est
presque entièrement déchargée. Dans ce cas, remplacez-la par
une piie neuve.
•Instaliez la nouvelle pile en respectant les polarités (-i- et -).
Apres la prise de vues terminée
Appuyer sur le viseur
électronique comme
montré sur
l’illustration.
1 Ejecter la cassette.
(Se reporter page 55 pour cette opération.)
2 Mettre le caméscope hors circuit.
3 Enlever le bloc-batterie.
(Se reporter page 55 pour cette opération.)
4 Mettre ie capuchon blanc sur l’objectif.
Comment enlever et remettre l’œilleton de visée
L'œilleton peut être enlevé pour ie nettoyage ou pour regarder
dans le viseur électronique avec l’œil gauche.
Comment enlever l’œilleton de visée
Tirer complètement le viseur électronique à la ligne.
„ Ligne
Comment remettre l’œilleton de visée
Aligner les repères, introduire l’œilleton et le tourner dans le sens
des aiguilles d’une montre dans la direction de la flèche.
Repères
-69-
Page 70

Précautions
Lisez ces précautions avant d’utiliser votre appareil.
Colmatage des têtes vidéo
Les têtes vidéo permettent au système d’envoyer des signaux
d’image sur la bande pendant l’enregistrement, et de lire ces
signaux pendant la lecture. Lorsque ces têtes sont encrassées ou
colmatées à la suite d’un usage intensif, les signaux enregistrés ne
sont plus corrects et l’image est par conséquent déformée lors de
la lecture. C’est le cas, par exemple, lorsqu’à la lecture d’une
cassette, le son est normal mais l'image est absente ou fortement
déformée. Si de tels symptômes apparaissent, confiez votre
appareil à un technicien qualifié.
Ce caméscope est équipé d’une fonction de détection du
colmatage. Lorsque les têtes sont colmatées, le témoin Q clignote
dans le viseur électronique. La poussière accumulée sur les têtes
peut être éliminée par le déplacement de la bande, ce qui explique
que le témoin s’allume parfois pour ensuite disparaître lors de
l’enregistrement suivant.
La fonction de détection du colmatage des têtes est activée
lorsque vous enregistrez en mode pause d’enregistrement. Elle ne
l’est cependant pas si vous filmez immédiatement après avoir
remplacé la cassette ou encore à la suite d’une recherche sur
caméra ou d’une lecture.
Formation de condensation à l’intérieur du caméscope
La condensation se forme lorsque l’air chaud entre en contact avec
un objet froid, par exemple une fenêtre dans une pièce chauffée en
hiver. La condensation se forme à l’intérieur du système et risque
d’endommager la bande et les têtes vidéo si:
•Votre caméscope se trouve dans une pièce dont le chauffage
vient juste d’être branché.
•Votre caméscope se trouve dans une pièce hautement humide
ou saturée de vapeur.
•Votre caméscope est transféré d’un endroit froid vers une pièce
bien chauffée.
•Votre caméscope est subitement transporté d’un endroit froid,
par exemple une pièce ou une voiture climatisée, vers un endroit
chaud et humide.
• Lorsque la condensation s’est formée à l’intérieur de l’appareil, le
témoin “DEW” clignote dans le viseur électronique et quelques
secondes plus tard, le caméscope se met automatiquement hors
tension afin de protéger la bande et les têtes vidéo. Après un
certain temps, remettez votre caméscope sous tension et
assurez-vous que le témoin “DEW” a disparu. Attendez ensuite
1 heure environ avant d’utiliser à nouveau votre appareil. Suivant
les conditions ambiantes, plusieurs heures sont parfois
nécessaires pour que votre caméscope puisse à nouveau être
opérationnel.
• La formation de condensation étant graduelle, 10 à 15 minutes
sont parfois nécessaires après un changement d’environnement
avant que l’appareil se mette hors tension.
•Dans une pièce extrêmement froide, la condensation peut geler
et se transformer en givre. Dans ce cas, il faudra un certain temps
avant que le givre fonde, se transforme en condensation et
s’évapore.
•Si vous transférez votre caméscope d’un endroit extrêmement
froid (une piste de ski par exemple) vers une pièce chauffée,
enfermez-le dans un sac plastique étanche, par exemple, afin
d’éviter la formation de condensation à l’intérieur de l’appareil.
Eloignez l’appareil des fumées et des vapeurs grasses
Protégez l’appareil de l’humidité et de la poussière
Conditions ambiantes
Utilisez votre caméscope à des températures comprises entre 0 et
40°C et à un taux d’humidité variant entre 20 et 80%. Afin d’éviter
une déformation du capot de l’appareil ou tout autre dommage,
n’exposez pas votre caméscope au soleil pendant une longue
période et évitez aussi de le laisser dans une voiture aux vitres
fermées.
Eloignez l’appareil des systèmes de chauffage
Eloignez l’appareil des téléviseurs
Ne pas placer l’appareil à proximité d’un téléviseur. Cela risque de
compromettre la qualité du son et de l’image de la bande
enregistrée, et/ou de nuire aux performances de l’appareil.
Attention aux aimants
N’approchez jamais un aimant ou tout autre objet magnétique de
l’appareil, qu’il s’agisse d’une lampe fluorescente, d’un moteur,
d’une montre électrique, d’un jouet à pile, etc.
Eloignez l’appareil des champs électriques puissants
L’image peut être déformée si vous utilisez votre caméscope à
proximité d’un objet émettant des champs électriques puissants
(une antenne TV ou un récepteur radio, par exemple).
N’introduisez jamais de corps étranger à l’intérieur de i’appareil
Mis à part une cassette vidéo, évitez d’introduire tout objet à
l’intérieur de votre caméscope. Si vous renversez du liquide ou
laissez tomber un objet à l’intérieur de l’appareil, consultez un
technicien qualifié. Si vous manipulez votre caméscope alors qu’il
contient un corps étranger, vous risquez d’y mettre le feu ou de
provoquer un court-circuit.
N’introduisez pas vos doigts dans l’appareil
Toucher les pièces internes de l’appareil est extrêmement
dangereux et peut provoquer de sérieux dommages à l’appareil.
N’essayez pas de les démonter. Pour toute vérification, réglage ou
réparation interne, consultez un technicien qualifié.
Manipulez l’appareil avec soin
Evitez de laisser tomber l’appareil ou de l’exposer à des chocs
violents. Ceux-ci peuvent altérer le fonctionnement et les
performances de votre caméscope.
Apparition de ia distorsion de traînage
La distorsion de traînage est une caractéristique propre au
système CCD. Elle se manifeste par l’apparition de traits verticaux
à l’écran lorsque l’appareil est dirigé vers des projecteurs
d’éclairage, une source lumineuse ou un objet réfléchissant. Pour
résoudre ce problème, évitez de diriger votre caméscope vers de
telles sources lumineuses pendant la prise de vues.
-70-
Page 71

Replacez le capuchon blanc sur l’objectif après la prise
de vues
Eloignez l’appareil des sources lumineuses intenses
Evitez d’exposer votre caméscope à une forte lumière, car la
chaleur qu’elle dégage peut déformer ou endommager l’appareil.
Lorsque vous n’employez pas votre appareil
Après avoir retiré la vidéocassette, mettre le caméscope hors
tension et détacher le bloc-batterie.
Evitez de faire reposer l’appareil sur le logement pour
cassette
Si vous faites reposer l’appareil sur le logement pour cassette
pendant l’utilisation, vous risquez de fausser le bobinage ou de
détendre la bande.
Nettoyage du caméscope
Dépoussiérez le caméscope à l’aide d’un chiffon propre et sec.
Evitez les détergents ou tout autre produit chimique.
• Nettoyez l’objectif exclusivement avec une brosse à air (utilisée
pour les appareils photo) ou avec un tissu spécial pour objectif
(utilisé pour les lunettes ou les appareils photo).
Au sujet de la poignée
Si l’on utilise ce caméscope assez longtemps, la poignée devient
un peu chaude. Ceci est tout à fait normal et n’a aucune incidence
sur le fonctionnement du caméscope.
•Ne rechargez pas un accumulateur qui est déjà complètement
chargé.
•Pendant l’utilisation du caméscope ou la recharge,
l’accumulateur peut parfois chauffer, mais cela ne pose aucun
problème.
• La longévité de l’accumulateur a des limites. Si en dépit d’un
chargement normal, le temps de fonctionnement de
l’accumulateur est réduit au point de ne plus pouvoir assurer une
prise de vues normale, il faut le remplacer.
Le principe de fonctionnement de l’accumulateur est basé sur
une réaction chimique. Agissez donc en conséquence.
•Chargez l’accumulateur à une température comprise entre 10 et
35°C. Si la température est inférieure à 10°C, la réaction chimique
n’a pas lieu dans des conditions optimales, ce qui entraîne une
détérioration des performances de l’accumulateur. Par contre si
la température est supérieure à 35°C, l’accumulateur ne peut pas
se charger entièrement.
• Rangez l’accumulateur dans un endroit frais et sec. S’il est
exposé à des températures élevées pendant une période
prolongée, sa longévité est raccourcie et le processus de
décharge automatique s’accélère.
•Chargez l’accumulateur avant de vous en sen/ir car s’il est resté
inutilisé pendant un certain temps, il risque de s’être déchargé.
• Retirez l’accumulateur de l’appareil ou de l’adaptateur secteur
lorsque vous ne l’utilisez pas.
Adaptateur de cassette
• Evitez d’insérer ou de retirer cet adaptateur de cassette dans un
magnétoscope lorsque la bande défile car celle-ci risque de se
détacher.
• Lorsque vous chargez la cassette dans l’adaptateur, évitez tout
contact direct avec la bande. Après utilisation, retirez la cassette
de l’adaptateur.
• N’insérez jamais l’adaptateur dans le magnétoscope s’il ne
contient aucune cassette.
Adaptateur secteur
• Evitez de déposer des objets lourds sur l’appareil.
•Lorsque vous débranchez le cordon secteur ou tout autre câble
de raccordement, empoignez la fiche et non le cordon.
•Si votre adaptateur secteur fonctionne à proximité d’un récepteur
radio, il peut provoquer de la distorsion. Dans ce cas, éloignez la
radio de l’adaptateur.
Accumulateur
Avant de vous servir de l’accumulateur, assurez-vous qu’il est
chargé.
Prêtez attention aux points suivants afin d’éviter tout accident
•Ne jetez pas l’accumulateur au feu.
• Ne court-circuitez pas les pôles du connecteur.
• Ne démontez ni ne remontez jamais l’accumulateur.
• N’utilisez que l’adaptateur secteur fourni pour recharger
l’accumulateur.
Suivez les instructions ci-dessous afin de ne pas
endommager i’accumuiateur et de ne pas abréger sa vie utile
•Ne laissez pas tomber l’accumulateur et ne l’exposez pas à des
chocs violents.
-71-
Page 72

Précautions (Suite)
Mise au point automatique
Le procédé de mise au point automatique est incapable de fournir
une mise au point stable et précise si vous filmez:
1. Un sujet derrière des vitres sales.
2. Une surface brillante.
3. Un sujet se trouvant en partie près et en partie loin du
caméscope.
4. Un sujet de biais.
5. Des traits horizontaux.
6. Une surface plane (par exemple, un mur blanc).
7. En macrocinématographie, avec des objectifs ou des filtres
spéciaux.
8. Un sujet extrêmement mobile.
9. Une surface sombre.
Dans ces cas précis, utilisez la mise au point manuelle.
Balance du blanc
Le réglage automatique de la balance du blanc ne sera peut-être
pas correct lorsque:
1. Lorsque les prises de vues seront faites sous des lampes à
vapeur de mercure, au natrium ou certaines lampes
fluorescentes.
2. Lorsque l’on utilisera un éclairage très fort comme une lampe à
halogène ou lorsque la température de couleur de la source de
lumière sera faible.
3. Lorsque l'on filmera un sujet monochrome ou un sujet situé
devant un fond monochrome.
4. Lorsque l'on filmera à l’extérieur au lever ou au coucher du
soleil.
5. Lorsque l’on utilisera un filtre gris (ND) ou tout autre filtre
spécial.
6. Lorsque l’on utilisera des objectifs de conversion.
7. Lorsque l’on filmera sous un éclairage faible.
Dans tous ies cas ci-dessus, utiliser le mode de réglage manuel de
la balance des blancs.
Lorsque l’on passera de l’extérieur à l’intérieur pendant un
enregistrement, l’image aura une teinte rougeâtre au début mais
redeviendra progressivement normale.
Obturateur ultra-rapide
La prise de vues avec l’obturateur ultra-rapide exige le respect des
conditions suivantes:
•Le sujet doit être brillamment éclairé, avec très peu d’ombre, par
le soleil ou par tout autre source de lumière.
•Si la prise de vues est effectuée sous un éclairage produit par des
lampes à incandescence, l’image peut subir l’influence négative
des lueurs vacillantes.
•Si l’image est reproduite en mode normal de lecture, les
mouvements peuvent sembler irréguliers.
•L’image reproduite est légèrement plus sombre que l’image
enregistrée lorsque vous n’utilisez pas l’obturateur ultra-rapide.
Avant d’appeler un technicien
Alimentation
• L’appareil ne se met pas sous tension.
—Le caméscope est-il correctement raccordé au secteur?
•L’appareil se met sous tension et s’éteint immédiatement après.
—L’accumulateur est peut-être à plat. Remplacez-le par un autre
entièrement chargé.
—De la condensation s’est peut-être formée. Attendez qu’elle
s’évapore.
Enregistrement par caméra
• L’appareil est sous tension mais aucune image n’apparaît dans le
viseur électronique.
—Le capuchon ne se trouve-t-il pas sur l’objectif?
•L’enregistrement par caméra ne s’effectue pas.
—La languette de la cassette est peut-être brisée. Couvrez
l’orifice avec un ruban adhésif.
• L’image n’est pas claire;
—L’oeilleton est-il correctement adapté à votre vue?
—L’objectif n’est-il pas couvert de poussière?
•Le système de mise au point automatique ne fonctionne pas de
façon optimale.
Lorsque la précision de la mise au point n’est pas satisfaisante
dans le mode automatique, appuyer sur la touche de mise au
point et faire une mise au point manuelle.
Lecture
• Les images de lecture ne sont pas reproduites.
—Le raccordement au téléviseur est-il correct?
—Le téléviseur est-il branché sur le canal de lecture vidéo?
• Les couleurs ne sont pas naturelles.
—Le réglage de la couleur du téléviseur est-il correct?
•L’image de lecture n’apparaît pas en couleur.
—Réglez l’alignement.
—La bande est peut-être usée. Utilisez une cassette neuve.
-72-
Page 73

Fiche technique
NV-G2E
Informations relatives à votre sécurité
Alimentation:
Consommation:
Système d’enregistrement vidéo: Vitesse de bande:
Format de bande :
Durée d’enregistrement/lecture:
VIDEO
Système de télévision :
Système de moduiation:
Niveau de sortie:
AUDIO
Niveau de sortie:
Piste audio:
Elément capteur:
Objectif:
Viseur:
Norme d’éciairage:
Eclairage minimum requis:
Couleur de la résolution
horizontaie vidéo:
Rapport signal/bruit:
Réponse en fréquence audio:
Température de fonctionnement:
Humidité de fonctionnement:
Poids:
Dimensions:
6,0 VCC
En mode enregistrement;
6,4 W (sur la batterie)
11,5 W (avec Auto Light)
Quatre têtes rotatives, système de balayage hélicoïdal
SP; 23,39 mm/s
LP; 11,7 mm/s
VHS-C
45 min. avec une cassette NV-EC45E (SP)
90 min. avec une cassette NV-EC45E (LP)
CCI R; système PAL couleur 625 lignes, 50 trames
Luminance; Enregistrement azimutal FM
Signal de chrominance; Enregistrement par déphasage de la sous-porteuse
SORTIE VIDEO (PHONO): 1,0Vp-p,
-8dB,
75 ohms asymétrique
600 ohms asymétriqueSORTIE AUDIO (PHONO);
1 piste (Normal-Mono)
Capteur photo-sensible CCD de Va pouce
Objectif Zoom motorisé 8:1 avec système de mise au point automatique numérique “Al”, diaphragme
automatique, système de mise au point automatique Fl ,4 (6 à 48 mm) diamètre frontal de l’objectif
43 mm
Viseur électronique de % pouce
1.400 lux
3lux
VHS; Plus de 230 lignes
Vidéo; Plus de 40 dB
Audio; Plus de 41 dB
Normal; 80 à 8.000 Hz (SP)
de 0 à 40°C
de 20 à 80%
Environ 900 g (sans le batterie)
142 (L) X120 (H) X263 (P) mm
VW-AS1E
:m Alimentation:
s Consommation:
Sortie CC:
100-240 V CA, 50-60 Hz (Réglage automatique de la tension)
25 W ■
6 V CC 11,8 W (Caméscope)
6 V CC 1,3 A (Chargement de l’accumulateur)
Poids:
Dimensions:
Environ 0,39 kg
70(L)x58 (H) X178 (P) mm
Les poids et dimensions sont approximatifs.
Cette fiche technique peut être modifiée sans avis préalable.
Informations relatives à votre sécurité
-73-
Page 74

-74-
Page 75

-75-
Page 76

Bescheinigung des Hersteliers/Importeurs
Hiermit wird bescheinigt, daß der/die/das
Netz-, Ladeadapter Panasonic yW-ASIE
(Gerät, Typ, Bezeichnung)
in Übereinstimmung mit den Bestimmungen der
yFG1046/1984
(Amtsbiattverfügung)
funk-entstört ist.
Der Deutschen Bundespost wurde das inverkehrbringen dieses Gerätes angezeigt
und die Berechtigung zur Überprütung der Serie auf Einhaitung der Bestimmungen
eingeräumt.
Panasonic Deutschland GmbH
Name des Hersteliers/Importeurs
Information für Ihre Sicherheit
Printed in Japan
VQT100I I
F1290N2031-14000(E)
Matsushita Electric Industrial Co.. Ltd.
Central P.O. Box 288 Osaka 530-91, Japan
 Loading...