

Panasonic NN-GM342WZTE User Manual [ru]
Operating Instructions and Cookbook
Инструкция по эксплуатации и рецепты приготовления блюд
Інструкція з експлуатації та книга рецептів
Microwave/Grill Oven
Микроволновая печь с грилем
Мікрохвильова піч з грилем
For home use
Для домашнего использования
Для домашнього використання
Model: NN-GM340W
Model No.
Before operating this oven, please read these instructions completely and keep for future reference.
Please read these instructions carefully before using this product, and save this manual for future use.
Перед началом эксплуатации данной микроволновой печи, пожалуйста, ознакомьтесь с инструкцией
Пожалуйста, перед началом эксплуатации данного продукта внимательно прочитайте инструкцию по эксплуатации
Будь ласка, перед початком експлуатації цього продукту уважно прочитайте інструкцію з експлуатації й збережіть її
Перед використанням цієї печі, будь ласка, повністю прочитайте ці інструкції і збережіть їх для
и сохраните ее для использования в дальнейшем.
и сохраните ее для использования в дальнейшем.
подальших довідок.
для використання у майбутньому.
NN-GM342W

Мікрохвильові печі моделей NN-GM340W відповідають вимогам Технічного Регламенту електромагнітної сумісності
(затвердженому постановою Кабінету Міністрів України від 29 липня 2009 р. № 785) та вимогам Технічного
Регламенту безпеки низьковольтного електричного обладнання (затвердженому постановою Кабінету Міністрів
України від 29 жовтня 2009 р. № 1149)
Моделі NN-GM340W торгової марки
Panasonic відповідають вимогам
ноpмативних документiв:
342W
342W
ДСТУ CISPR 11:2007 ДСТУ IEC 61000-3-2:2004
ДСТУ CISPR 14-1:2004 ДСТУ IEC 60335-2-25:2003
ДСТУ CISPR 14-2:2007 ДСТУ IEC 60335-2-9:2007
ДСТУ EN 61000-3-3:2004
Термін служби
Декларацію про відповідність можна переглянути на http://service.panasonic.ua у розділі «Документи»
Виробник:
Вироблено на підприємстві:
За адресою:
Уповноважений Представник:
Адреса Уповноваженого Представника:
Примітка
Дату виготовлення Ви можете визначити за комбінацією цифр та літер, що розташовані на маркувальній табличці
виробу.
Відповідно до ДСТУ CISPR 11:2007 виріб класифікується як:
• обладнання Групи 2, в якому спеціально генерована радіочастотна енергія використовується в якості
електромагнітного випромінювання для обробки продуктів харчування;
• обладнання Класу B, яке призначене для побутового використання і яке під’єднується безпосередньо до
низьковольтної мережі електроживлення у побутових приміщеннях.
Panasonic Appliances Microwave
Oven (Shanghai) Co., Ltd.
898 Long Dong Road, Pu Dong,
Shanghai, China 201203
Встановлений виробником термін служби (придатності) цього
виробу дорівнює 7 рокам з дати виготовлення за умови, що виріб
використовується у суворій відповідності до дійсної інструкції з
експлуатації та технічних стандартів, що застосовуються до цього
виробу.
Panasonic Corporation
Panasonic Corporation Панасонік Корпорейшн
1006 Kadoma, Osaka, Japan 1006 Кадома, Осака, Японія
ТОВ “ПАНАСОНІК УКРАЇНА ЛТД”
вулиця Фізкультури, будинок 30-В, місто Київ, 03680, Україна
Панасоник Эплаенсиз Майкровейв
Овен (Шанхай) Ко., Лтд.
898 Лонг Донг Роуд, Пу Донг,
Шанхай, Китай 201203
Панасонік Корпорейшн
Декларація про Відповідність
Вимогам Технічного Регламенту Обмеження Використання деяких Небезпечних Речовин в електричному та
електронному обладнанні
(затвердженого Постановою №1057 Кабінету Міністрів України)
Виріб відповідає вимогам Технічного Регламенту Обмеження Використання деяких Небезпечних Речовин в
електричному та електронному обладнанні (ТР ОВНР).
Вміст небезпечних речовин у випадках, не обумовлених в Додатку №2 ТР ОВНР:
1. свинець(Pb) – не перевищує 0,1% ваги речовини або в концентрації до 1000 частин на мільйон;
2. кадмій (Cd) – не перевищує 0,01% ваги речовини або в концентрації до 100 частин на мільйон;
3. ртуть(Hg) – не перевищує 0,1% ваги речовини або в концентрації до 1000 частин на мільйон;
4. шестивалентний хром (Cr6+) – не перевищує 0,1% ваги речовини або в концентрації до 1000 частин на мільйон;
5. полібромбіфеноли (PBB) – не перевищує 0,1% ваги речовини або в концентрації до 1000 частин на мільйон;
6. полібромдефенілові ефіри (PBDE) – не перевищує 0,1% ваги речовини або в концентрації до 1000 частин на мільйон.

English

Table of Contents
Before Operating
Installation and Connection.............................................................................................................................................2
Safety Instructions ..........................................................................................................................................................3
Important Information......................................................................................................................................................4
Feature Diagram .............................................................................................................................................................5
Control Panel ..................................................................................................................................................................6
Operation and Hints
Setting Micro Power and Time........................................................................................................................................7
To Defrost by setting weight of food ...............................................................................................................................7
To Cook on Grill by time setting......................................................................................................................................8
To Cook on Combination by time setting ........................................................................................................................8
Maintenance
Before Requesting Service .............................................................................................................................................9
Care of your Microwave Oven ......................................................................................................................................10
Technical Specifications ................................................................................................................................................11
English
English
Cooking Guide
Introduction ...................................................................................................................................................................12
Cookware and Utensil Guide ........................................................................................................................................13
Microwave Cooking Techniques ..............................................................................................................................14-15
To Reheat by Micro Power and Time............................................................................................................................16
Defrosting Guidelines....................................................................................................................................................17
Defrosting Tips and Techniques....................................................................................................................................18
Microwave Recipe Preparation and Techniques .....................................................................................................19-20
Common Queries Answered.........................................................................................................................................21
Everyday Basics ...........................................................................................................................................................22
Fish and Shellfish..........................................................................................................................................................23
Poultry......................................................................................................................................................................24-25
Main Fare Meats......................................................................................................................................................26-27
Vegetable Varieties ..................................................................................................................................................28-30
Rice, Pasta and Cereal............................................................................................................................................31-32
Desserts ........................................................................................................................................................................33
- Eng-1 -
Installation and Connection
Examine your microwave oven
Unpack the oven, remove all packing material, and examine
the oven for any damage such as dents, broken door latches
or cracks in the door. If you find any damage, notify your
dealer immediately. Do not install a damaged microwave
oven.
Earthing instructions
English
English
IMPORTANT: THIS UNIT HAS TO BE PROPERLY EARTHED FOR PERSONAL SAFETY.
If your AC outlet is not earthed, it is the personal responsibility of the customer to have it replaced with a properly earthed
wall socket.
Operation voltage
The voltage has to be the same as specified on the label on
the oven. If a higher voltage than specified is used, it may
cause a fire or other damages.
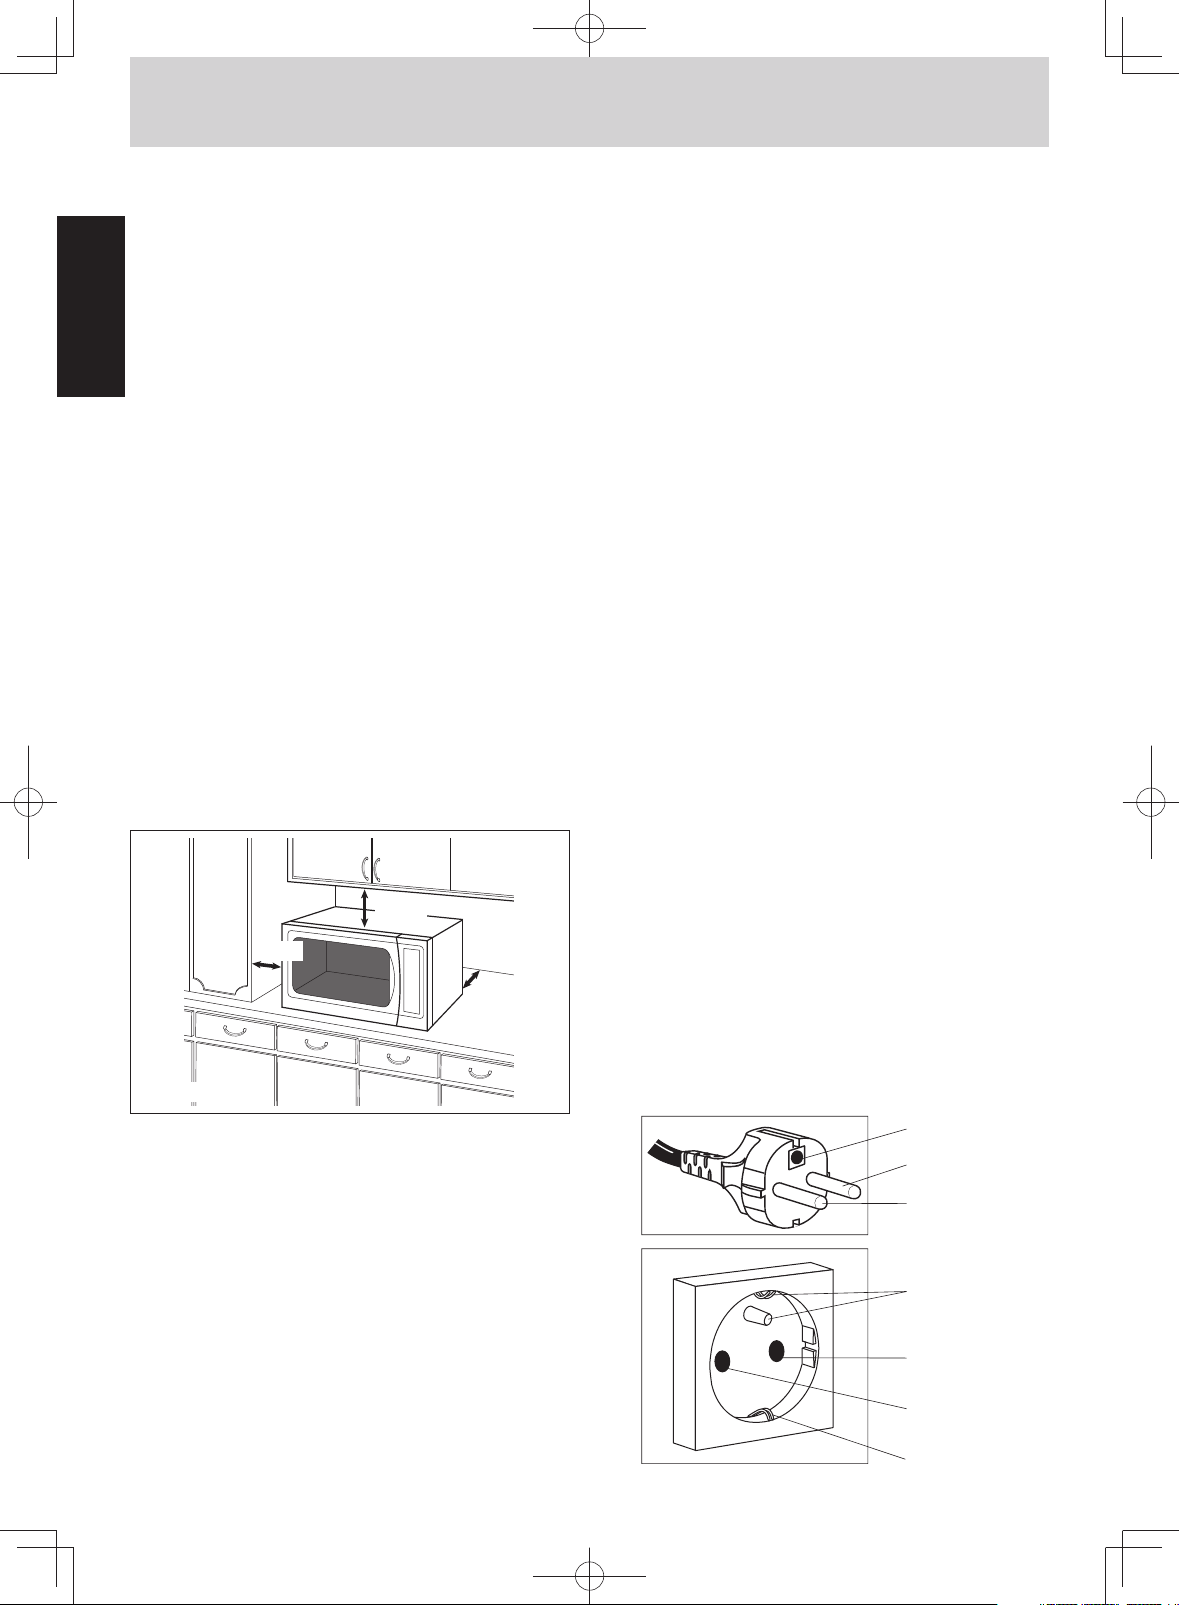
Placement of the Oven
1. Place the oven on a flat and stable surface, more than 85
cm above the floor.
2. When this oven is installed, it should be easy to isolate the
appliance from the electricity supply by pulling out the plug
or operating a circuit breaker.
3. For proper operation, ensure a sufficient air circulation for
the oven.
Counter-top use:
Allow 15 cm of space on the top of the oven, 10 cm at back
and 10 cm on both sides. If one side of the oven is placed
flush to a wall, the other side or top must not be blocked.
15 cm
10 cm
Counter-top
4. Do not place this oven near an electric or gas cooker
range.
5. The feet should not be removed.
6. This oven is only for household usage. Do not use out-
doors.
7. Avoid using the microwave oven in high humidity.
8. The power cord should not touch the outside of the oven.
Keep the cord away from hot surfaces. Do not let the cord
hang over the edge of table or work top. Do not immerse
cord, plug or oven in water.
9. Do not block the air vents. If they are blocked during
operation, the oven may be overheated or damaged.
When using any cloth over the oven, the air intake and
exhaust should not be blocked.
10.The microwave oven shall not be placed in a cabinet.
10 cm
OPEN
WARNING
1. The door seals and door seal areas should be cleaned
with a damp cloth.
The appliance should be inspected for damage to the door
seals and door seal areas and if these areas are damaged
the appliance should not be operated until it has been
repaired by a service technician trained by the manufacturer.
2. Do not operate this appliance if it has a damaged
CORD OR PLUG, if it is not working properly, or if it has
been damaged or dropped.
If the supply cord of this appliance is damaged, it must be
replaced by the manufacturer or its service agent or a similarly qualified person in order to avoid a hazard.
3. Do not attempt to tamper with or make any adjustments or
repairs to the door, control panel housing, safety interlock
switches or any other part of the oven. Do not remove the
outer panel from the oven which gives protection against
exposure to microwave energy.
It is dangerous for anyone other than a service technician trained by the manufacturer to perform repair
service.
4. The oven light must be replaced by a service technician
trained by the manufacturer. When it becomes necessary
to replace the oven light, please consult your dealer.
5. Liquids or other foods must not be heated in sealed containers since they are liable to explode.
6. Only allow children to use the oven without supervision
when adequate instructions have been given so that the
child is able to use the oven in a safe way and understands the hazards of improper use.
7. This appliance is not intended for use by persons (including children) with reduced physical, sensory or mental
capabilities, or lack of experience and knowledge, unless
they have been given supervision or instruction concerning
use of the appliance by a person responsible for their
safety.
8. Young children should be supervised to ensure that they
do not play with the appliance.
Attention!
This product is designed to plug to AC power outlet with (the
third) safety earth wire. For your safety, do not ignore that
safety earth wire, because in such case this product does
not provide with conditions of electric shock defense, foresaw by product’s design. You have to ask qualified specialist
to install required outlet as it is shown on the picture.
earth
neutral
phase
earth
phase
neutral
earth
- Eng-2 -

Safety Instructions
Use of your oven
1. Do not use the oven for any reason other than the
preparation of food. This oven is specifically designed to
heat or cook food. Do not use this oven to heat chemicals
or other non-food products.
2. Before use, check utensils/containers are suitable for
use in microwave ovens.
3. Do not attempt to use this microwave oven to dry newspaper, clothing or any other materials.
They may catch on fire.
4. When the oven is not being use, do not store any objects
other than oven accessories inside the oven in case it is
accidentally turned on.
5. The appliance shall not be operated by MICROWAVE or
COMBINATION WITHOUT FOOD IN THE OVEN, operation in this manner may damage the appliance.
6. If smoke is observed, turn the Timer to zero and leave the
door closed. Disconnect the power cord, or shut off power
at the fuse or the circuit breaker panel in order to stifle any
flames.
Heater Operation
1. Exterior oven surfaces, including air vents on the cabinet and the oven door will get hot during COMBINATION and GRILL, take care when opening or closing
door and when inserting or removing food and accessories.
2. The oven has a heater situated in the top of the oven.
After using the GRILL and COMBINATION functions, the
ceiling will be very hot.
N.B. After cooking by GRILL and COMBINATION the
accessories will be very hot.
3. The accessible parts may become hot when GRILL or
COMBINATION is in use. Children should be kept away.
4. Appliances are not intended to be operated by means
In accordance with para. 2 Cl. 5 of the Russian Federal
of an external timer or separate remote control system.
Law “On consumer rights protection”, the manufacturer
hereby assigns the use period of the present device to be 7
In accordance with para. 2 Cl. 5 of the Russian Federal
years from the date of production under the condition that
Law “On consumer rights protection”, the manufacturer
the present device is used in strict compliance with the
hereby assigns the use period of the present device to be 7
present manual and applicable technical standards.
years from the date of production under the condition that
the present device is used in strict compliance with the
present manual and applicable technical standards.
Accessories
The oven comes equipped with a variety of accessories.
Accessories
Always follow directions given for use of the accessories.
The oven comes equipped with a variety of accessories.
Always follow directions given for use of the accessories.
Glass Tray
1. Do not operate the oven without Roller Ring and Glass
Glass Tray
Tray in place.
2. Never use another type of glass tray than the one special-
1. Do not operate the oven without Roller Ring and Glass
ly designed for this oven.
Tray in place.
3. If Glass Tray is hot, let it to cool before cleaning or placing
2. Never use another type of glass tray than the one specialin water.
ly designed for this oven.
4. Glass Tray can turn in either direction.
3. If Glass Tray is hot, let it to cool before cleaning or placing
in water.
5. If the food or cooking vessel on Glass Tray touches the
oven walls and make the turntable stop rotating, the
4. Glass Tray can turn in either direction.
turntable will automatically rotate in the opposite direction.
5. If the food or cooking vessel on Glass Tray touches the
This is normal.
oven walls and make the turntable stop rotating, the
6. Do not cook foods directly on Glass Tray.
turntable will automatically rotate in the opposite direction.
This is normal.
6. Do not cook foods directly on Glass Tray.
Roller Ring
1. Roller Ring and the oven floor should be cleaned frequently to prevent noise and build-up of remaining food.
2. Roller Ring must always be used for cooking together with
Glass Tray.
Wire Rack
1. A Wire Rack is included with the oven in order to facilitate
browning of small dishes.
2. Wire Rack should be cleaned regularly.
3. When using Wire Rack in the manual GRILL or COMBINATION cooking modes, be careful to choose heat-proof
containers; containers made of plastic or paper may melt
or burn when exposed to the heat radiating from the grill.
4. When using the COMBINATION mode, never place any
aluminum or metal container directly on Wire Rack.
Always insert a glass plate or dish between Wire Rack
and the aluminum container. This will prevent sparking
that may damage the oven.
5. It is not recommended to use Wire Rack when cooking in
the MICROWAVE mode only.
Maintenance of your oven
1. Service
WHEN YOUR OVEN REQUIRES SERVICING call your
local Panasonic engineer (Customer Support). It is hazardous for anyone other than a competent person to carry
out any service or repair operation which involves the
removal of a cover which gives protection against exposure to microwave energy.
2. Door Seals
Do not attempt to tamper with or make any adjustments or
repairs to door, control panel housing, safety interlock
switches or any other part of the oven. Do not remove
outer panel from oven.
The door seals and door seal areas should always be kept
clean – use a damp cloth.
N.B. The appliance should be inspected for damage to the
door seals and door seal areas. If these areas are damaged the appliance should not be operated until it has
been repaired by a service technician trained by the manufacturer.
3. Oven Light
The oven lamp must be replaced by a service technician
trained by the manufacturer. DO NOT attempt to remove
the outer casing from the oven.
English
English
- Eng-3 -

Important Information
1
2
3
4
5
6
7
8
9
0
-
=
~
!
@
1) Cooking Times
• Cooking times given in the cookbook are approximate. The
cooking time depends on the condition, temperature and
amount of food and on the type of cooking ware.
• Begin with the minimum cooking time to help prevent overcooking. If the food is not sufficiently cooked you can
always cook it for a little longer.
English
N.B.: If the recommended cooking times are exceeded
English
the food will be spoiled and in extreme circumstances
could catch fire and possibly damage the interior of the
oven.
2) Small Quantities of Foods
• Small quantities of food or foods with low moisture content
can burn, dry out or catch on fire if cooked too long. If
materials inside the oven should ignite, keep the oven door
closed, turn the oven off and remove the plug from the
socket.
3) Eggs
• Do not cook eggs in their shells and whole hard-boiled
eggs by MICROWAVE. Pressure may build up and the
eggs will explode.
4) Piercing Skin
• Food with non porous skins, such as potatoes, egg yolks,
chicken wings and sausages must be pierced before cooking by MICROWAVE to prevent bursting.
5) Meat Thermometer
• Use a meat thermometer to check the degree of cooking of
roasts and poultry only when the meat has been removed
from the oven. Do not use a conventional meat thermometer when using MICROWAVE because it may cause
sparking.
6) Liquids
• When heating liquids, e.g. soup, sauces and beverages in
your microwave oven, overheating the liquid beyond boiling
point can occur without evidence of bubbling. This could
result in a sudden boil over of the hot liquid. To prevent this
possibility the following steps should be taken:
a) Avoid using straight-sided containers with narrow necks.
b) Do not overheat.
c) Stir the liquid before placing the container in the oven
and again halfway through the cooking time.
d) After heating, allow it to stand in the oven for a short
time, stirring again before carefully removing the
container.
e) Microwave heating of beverages can result in delayed
eruptive boiling, therefore care has to be taken when
handling the container.
7) Paper/Plastic
• When heating food in plastic or paper containers, check the
oven frequently as these types of containers ignite if overheated.
• Do not use recycled paper products (ex. Kitchen Roll)
unless the paper product is labeled as safe for microwave
oven use. Recycled paper products may contain impurities
which may cause sparks and/or fires when use.
• Remove wire twist-ties from roasting bags before placing
the bags in oven.
8) Utensils/Foil
• Do not heat any closed cans or bottles because they might
explode.
• Metal containers or dishes with metallic trim should not be
used during Microwave cooking. Sparking will occur.
• If you use any aluminum foil, meat spikes or metal ware,
the distance between them and the oven walls and door
should be at least 2 cm to prevent sparking.
9) Feeding Bottles/Baby Food Jars
• The top and teat or lid must be removed from feeding bottles or baby food jars before placing in the oven.
• The contents of feeding bottles and baby food jars are to
be stirred or shaken.
• The temperature has to be checked before consumption to
avoid burns.
10) Place in Use
This appliance is intended to be used in household and
similar applications such as:
• staff kitchen areas in shops, offices and other working
environments;
• farm houses;
• by clients in hotels, motels and other residential
environments;
• bed and breakfast type environments.
- Eng-4 -
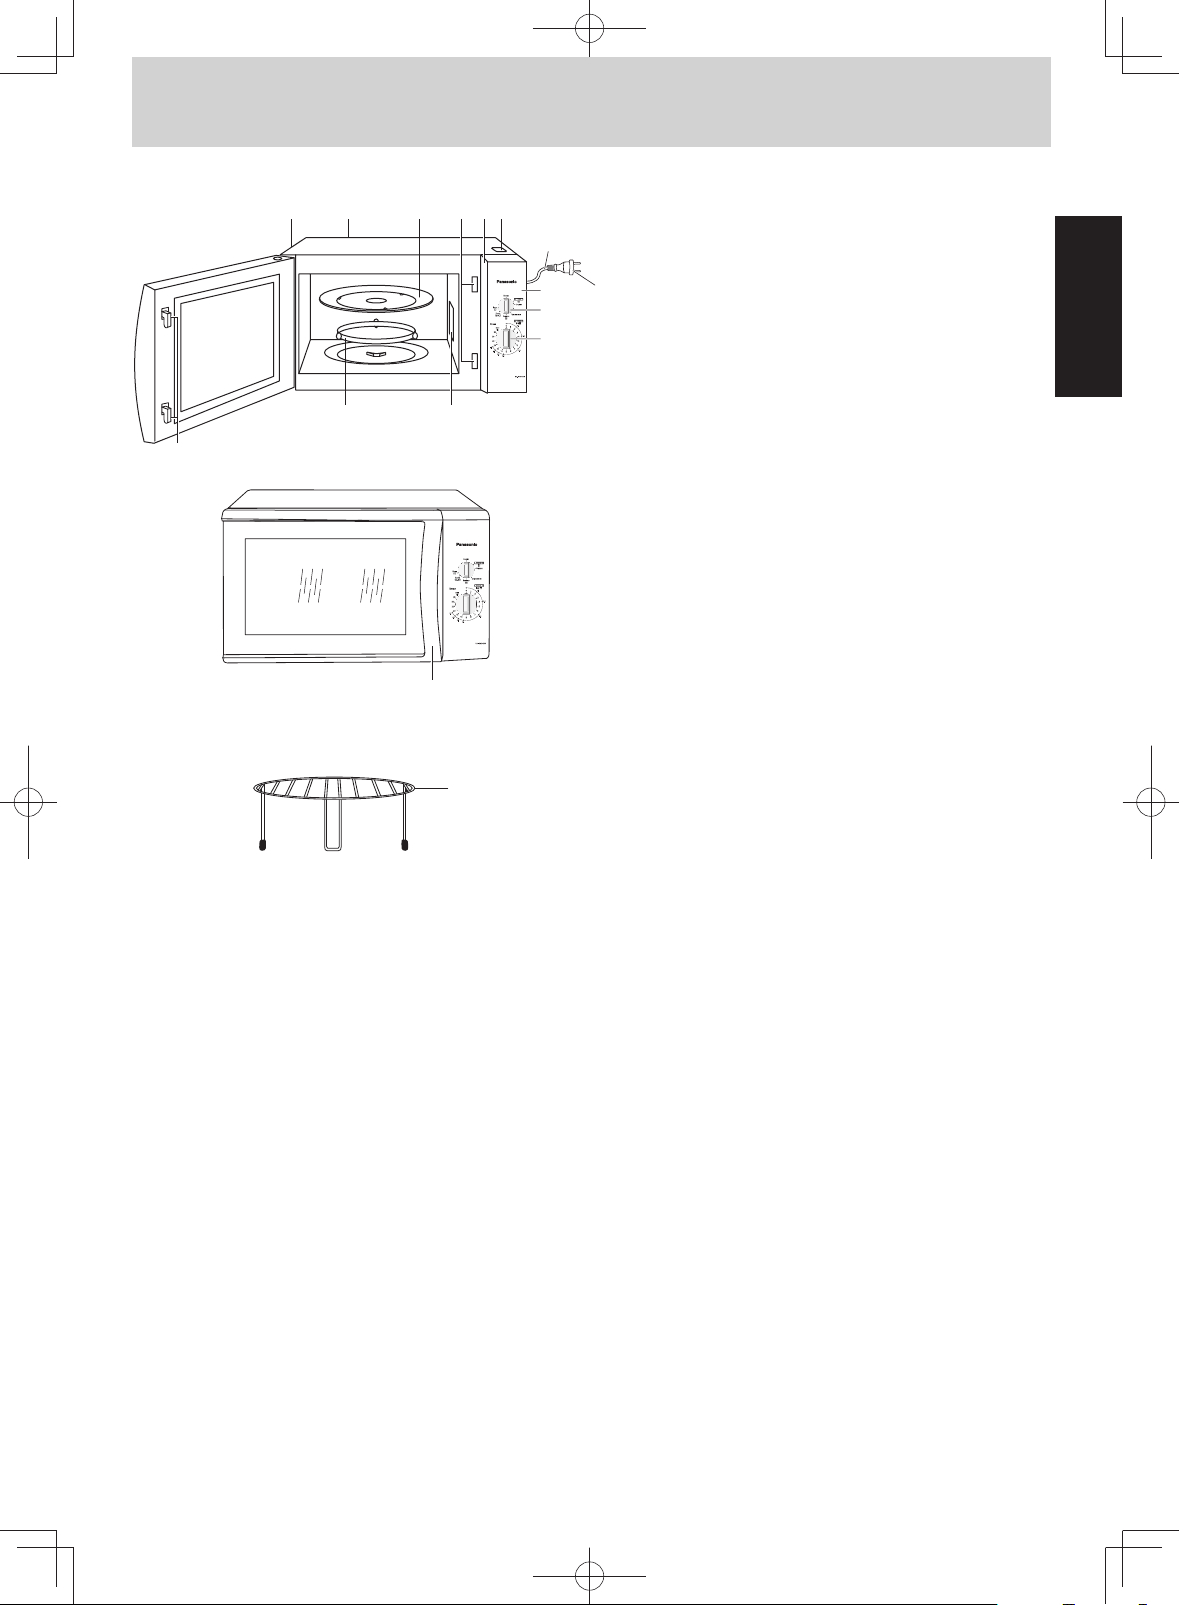
Feature Diagram
1
2
3
4
5
6
7
8
9
0
=
~
!
@
=
1
2
5
!!782
6-
4
~
0
9
3
2
3
1
8n 5
6
k
o
@
2
n7
l
m
4
j
9
Oven Window
Door Safety Lock System
Pull Door Handle
Pull to open the door. Opening the door during cooking will stop the cooking process without cancelling
the program. It is quite safe to open the door at any
time during a cooking program and there is no risk of
Microwave exposure.
Control Panel
Glass Tray
a. DO NOT operate the oven without the Roller Ring
and Glass Tray in place.
b. Only use the Glass Tray specifically designed for
this oven. Do not substitute any other Glass Tray.
c. If the Glass Tray is hot, allow to cool before clean-
ing or placing in water.
d. DO NOT cook directly on the Glass Tray. Always
place food on a microwave-safe dish, or on a rack
set in a microwave-safe dish.
e. If food or utensil on the Glass Tray touches oven
walls, causing the tray to stop moving, the tray will
automatically rotate in the opposite direction. This is
normal.
f. Glass Tray can rotate in either direction.
Roller Ring
a. Roller Ring should be cleaned regularly to avoid
excessive noise.
b. Roller Ring and Glass Tray should be used at the
same time.
Identification Plate
Oven Air Vent
Time/Weight Select Dial
Cook Mode Select Dial
Waveguide Cover (do not remove)
Power Supply Cord
Power Supply Plug
Warning Label
Wire Rack
Note:
The illustration is for reference only.
English
English
- Eng-5 -
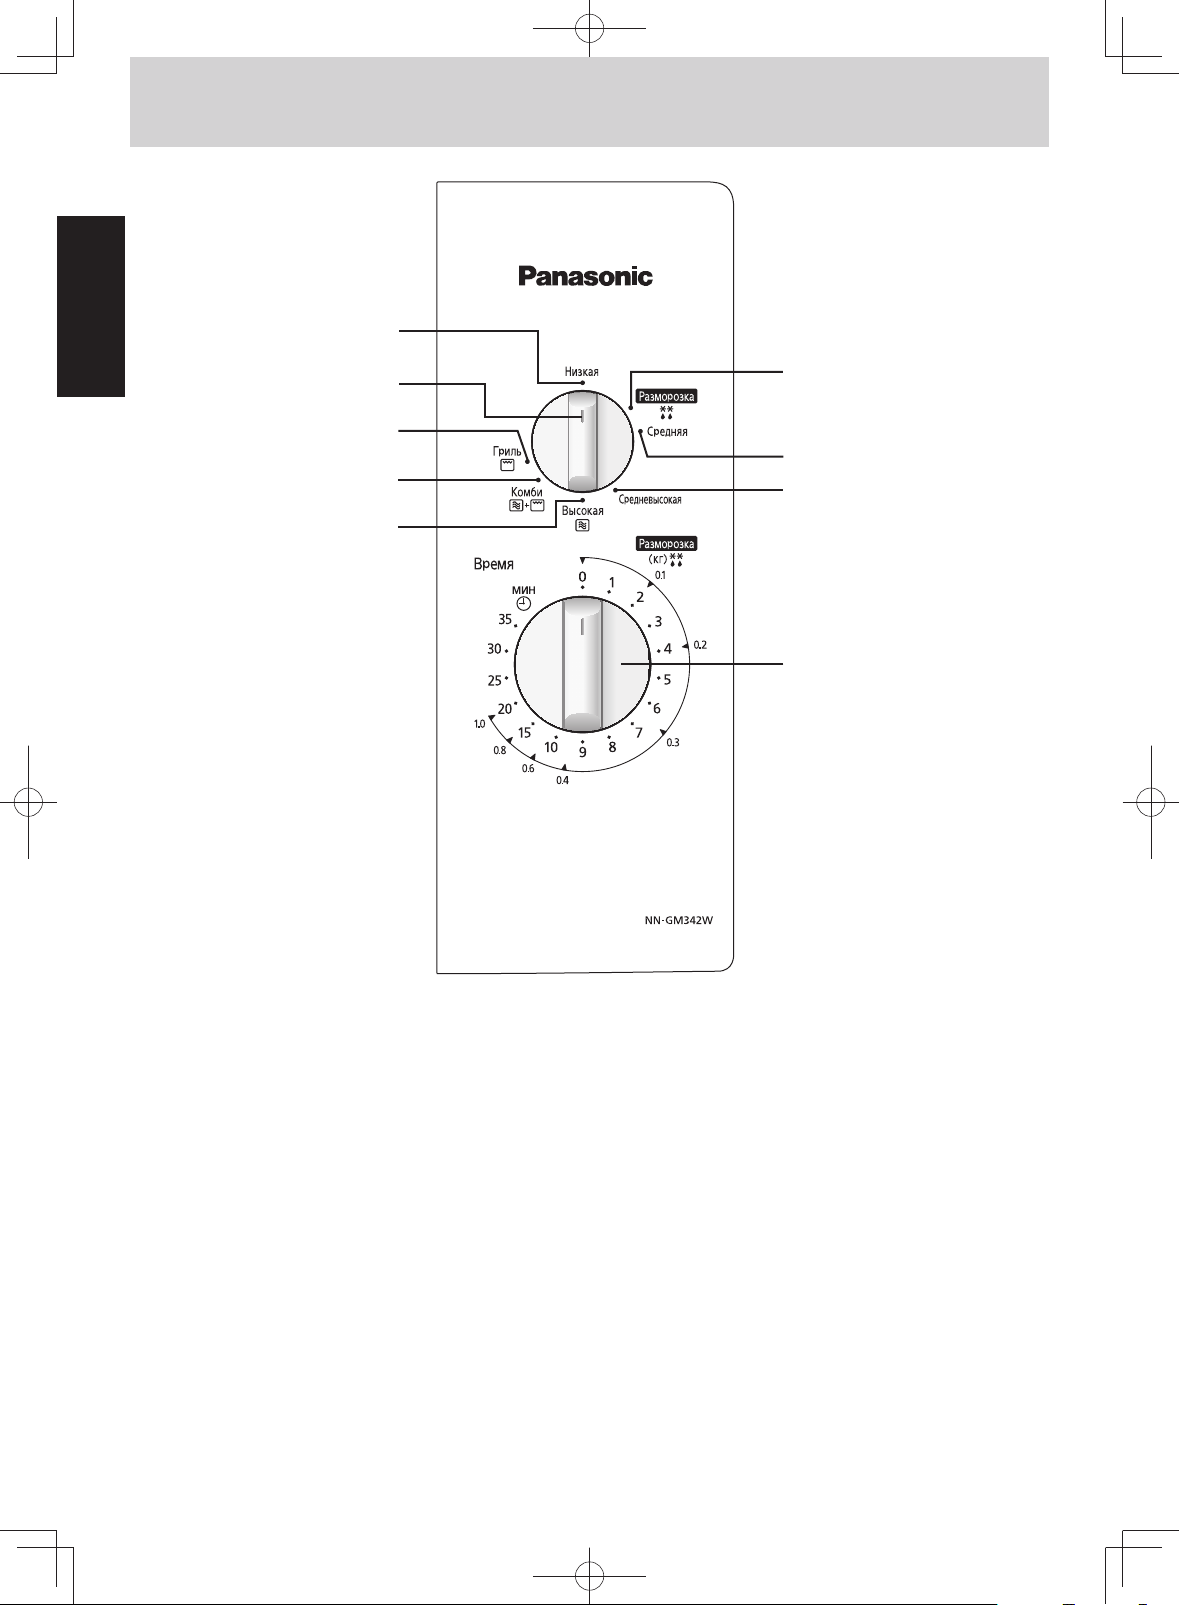
Control Panel
English
English
Medium-High Power
Cook Mode Select Dial
Combination Setting
Low Power
Medium Power
Defrost Power
Grill Setting
Low Power
High Power
High Power
Defrost Power
Grill Setting
Combination Setting
Medium Power
Cook Mode Select Dial
Medium-High Power
Time/Weight Select Dial
Time/Weight Select Dial
- Eng-6 -
Operation (Setting Micro Power and Time)
The glass tray must always be in position when using the oven.
English
English
• Turn dial to select power level.
Power Level Example of Use
HIGH Boil water. Cook fresh fruit, vegetables, rice, pasta, noodles and dessert.
MEDIUM-HIGH Cook fish, poultry, meat, cakes and heat milk.
MEDIUM Cook pot roasts, casseroles and meat loaves, melt chocolate. Cook eggs and cheeses.
DEFROST Thaw foods.
LOW Keep cooked foods warm, simmer slowly.
Notes:
1. If you wish to check the food during cooking simply open the door. The oven will automatically stop cooking. To continue
cooking, close the door.
2. To stop cooking, turn Time/Weight Select Dial to zero the “OFF” position. Cooking time can be reset at any time during the
cooking cycle by turning the time dial.
3. When food is removed from the oven after cooking is complete, check the Time/Weight Select Dial is in the zero position.
4. Turn over or remove or shield food during half of defrosting time.
• Set cooking time by turning dial. If the door is already closed, cooking time will begin immediately. When selecting the time for shorter
than 5 minutes, turn Time/Weight Select Dial past 5 minutes and
then return to the correct time.
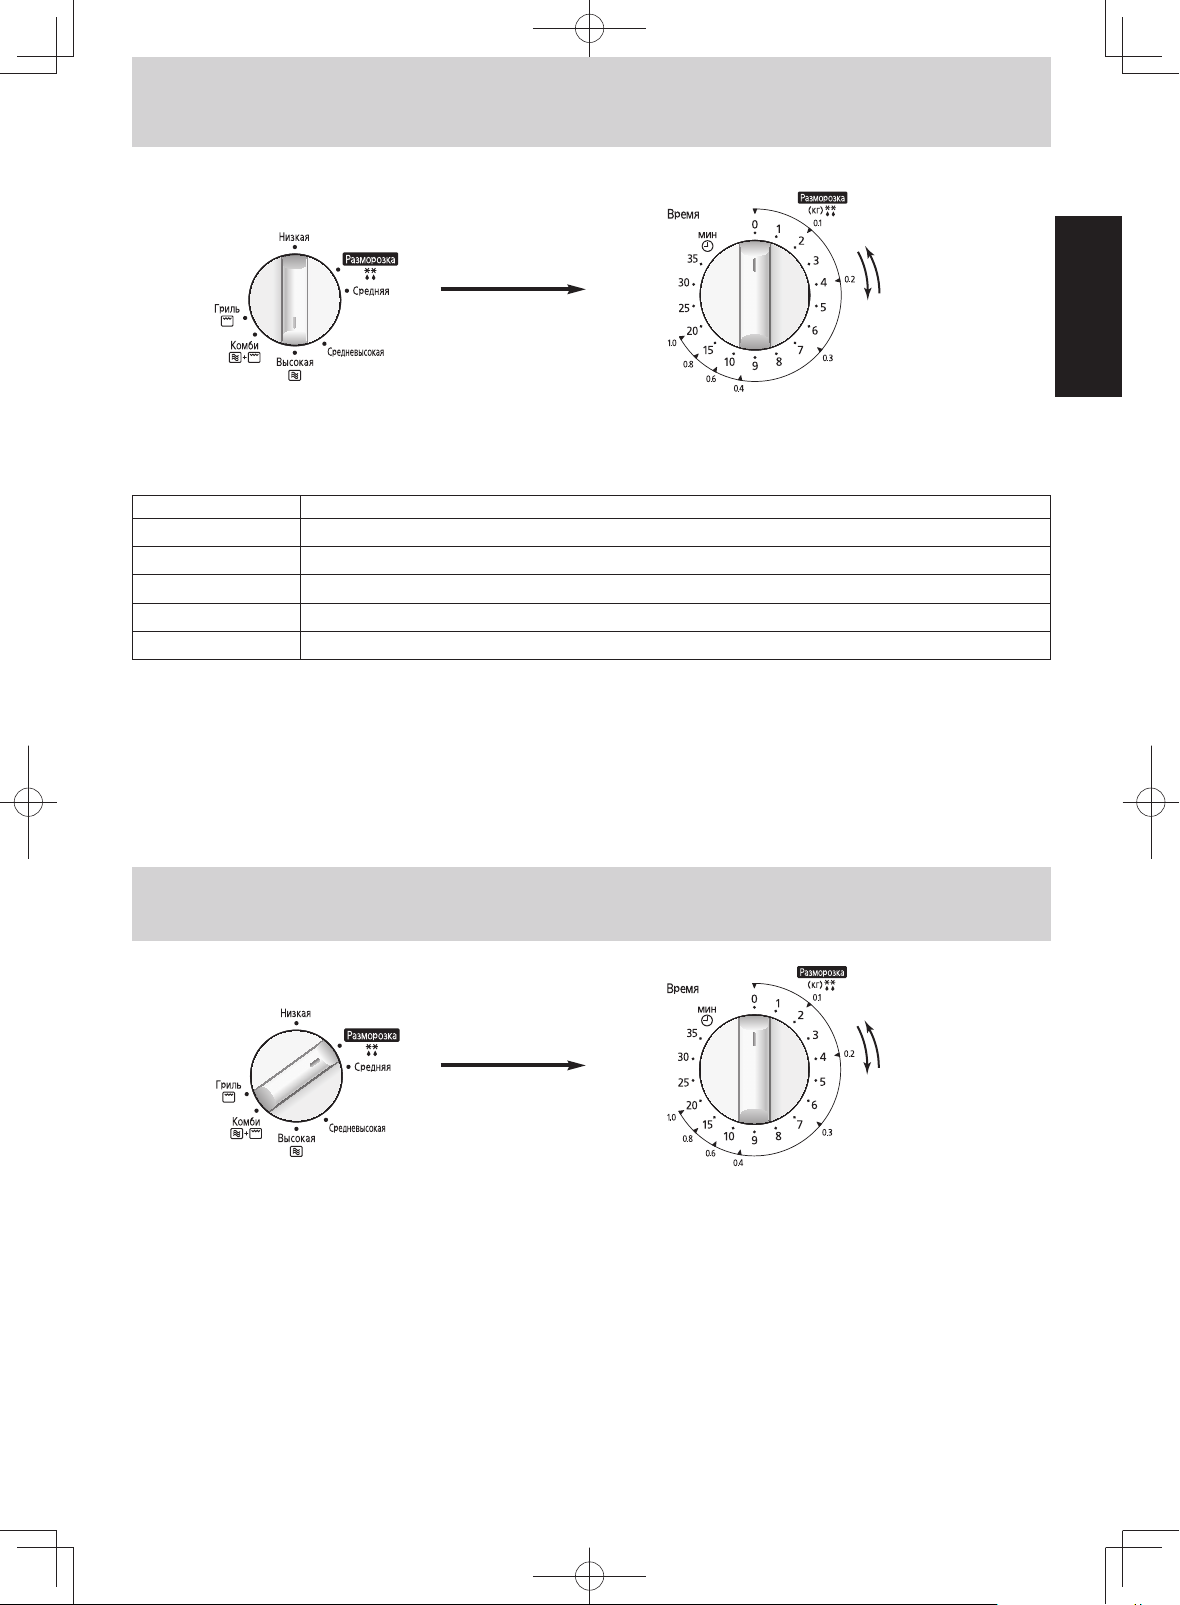
Operation (To Defrost by setting weight of food)
• Set the Power Level at Defrost.
• Set the weight of food. When selecting
weight for less than 0.2 kg, turn Time/Weight
Select Dial past 0.2 kg and then return to correct weight.
- Eng-7 -
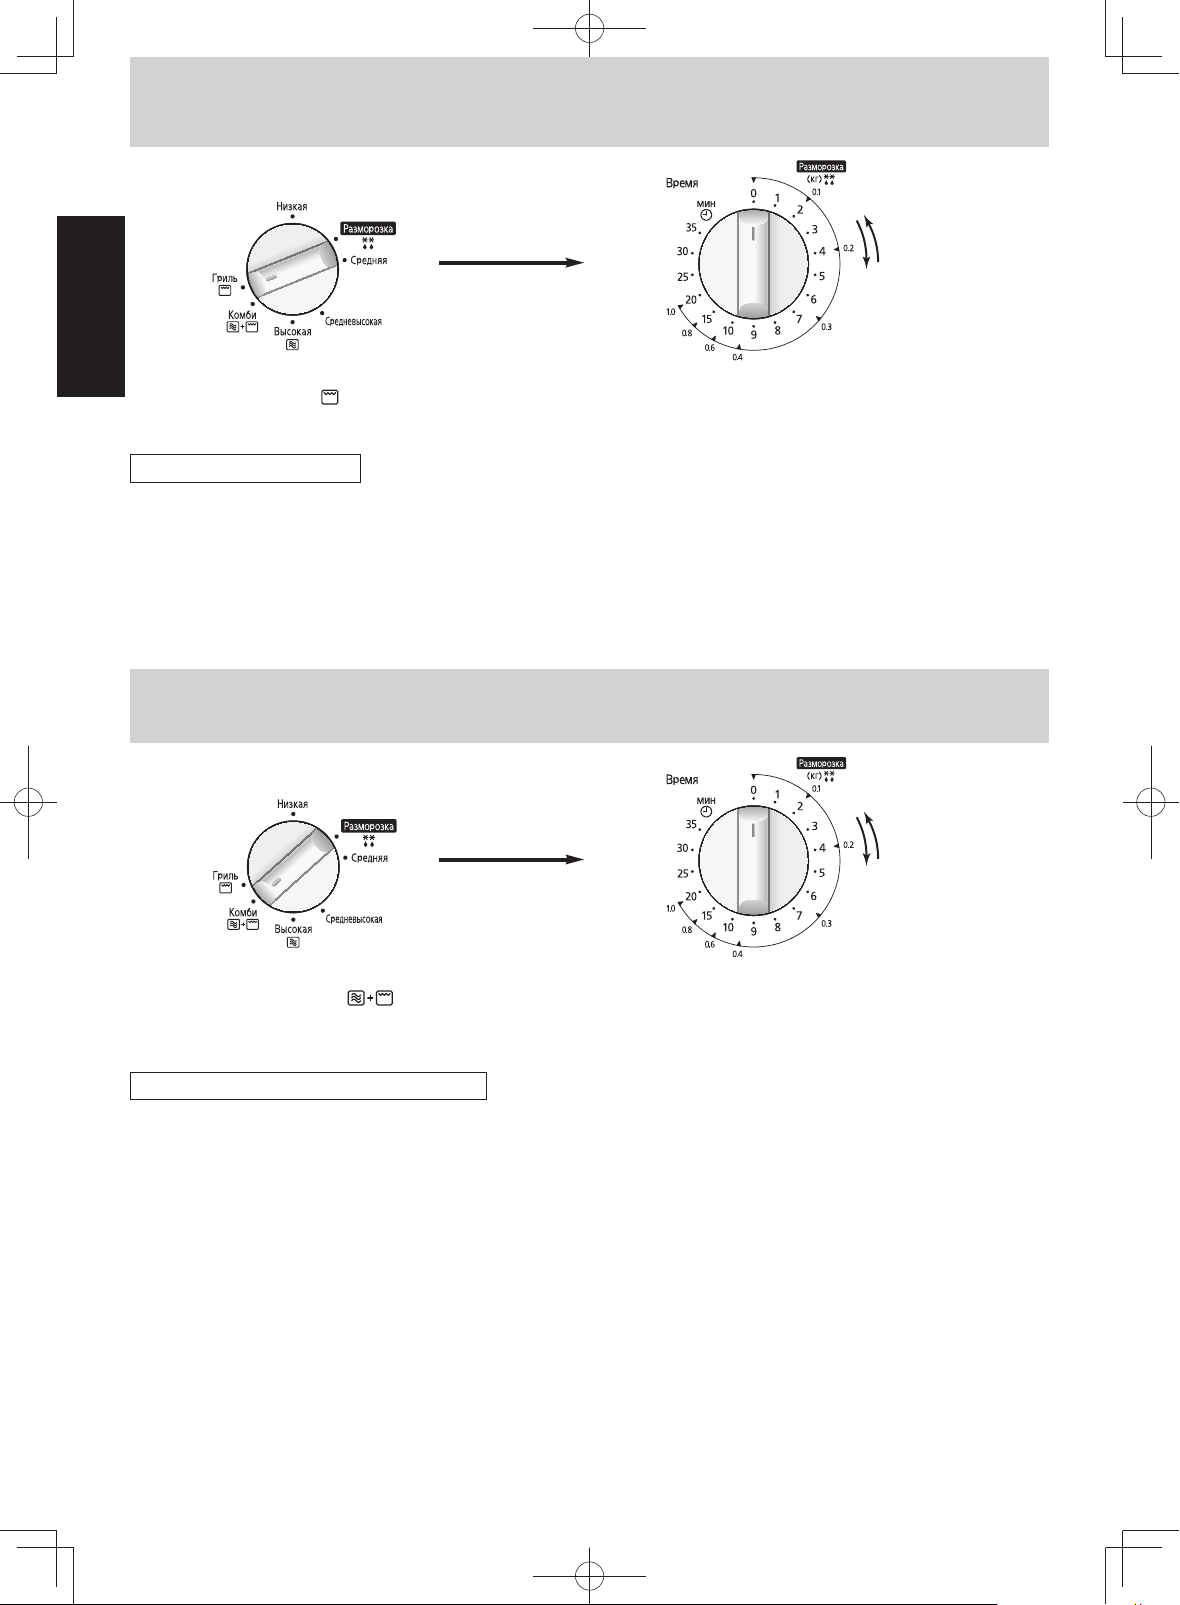
Operation (To Cook on Grill by time setting)
English
English
• Set Cook Mode Select Dial
to Grill position .
Directions for Grilling
When grilling, heat is radiated from the two quartz tubes at the top of the oven. The oven door must be kept closed to prevent
cooking odours from spreading in the kitchen and so as not to waste energy. The grill is particularly useful for thin slices of
meat, steaks chops, kebabs, sausages or pieces of chicken. It is also suitable for hot sandwiches and all gratin dishes.
Place food to be grilled on Wire Rack on Glass Tray. Select Grill setting, set the time and start the oven. The food being grilled
should normally be turned over after half the grilling time. When the oven door is opened the program is interrupted. Turn the
food over, place it back the oven, close the door and restart oven. While grilling, the oven door can be opened at any time to
check the food.
• Set grilling time by turning Time/Weight
Select Dial. If the door is already closed,
cooking time will begin immediately.
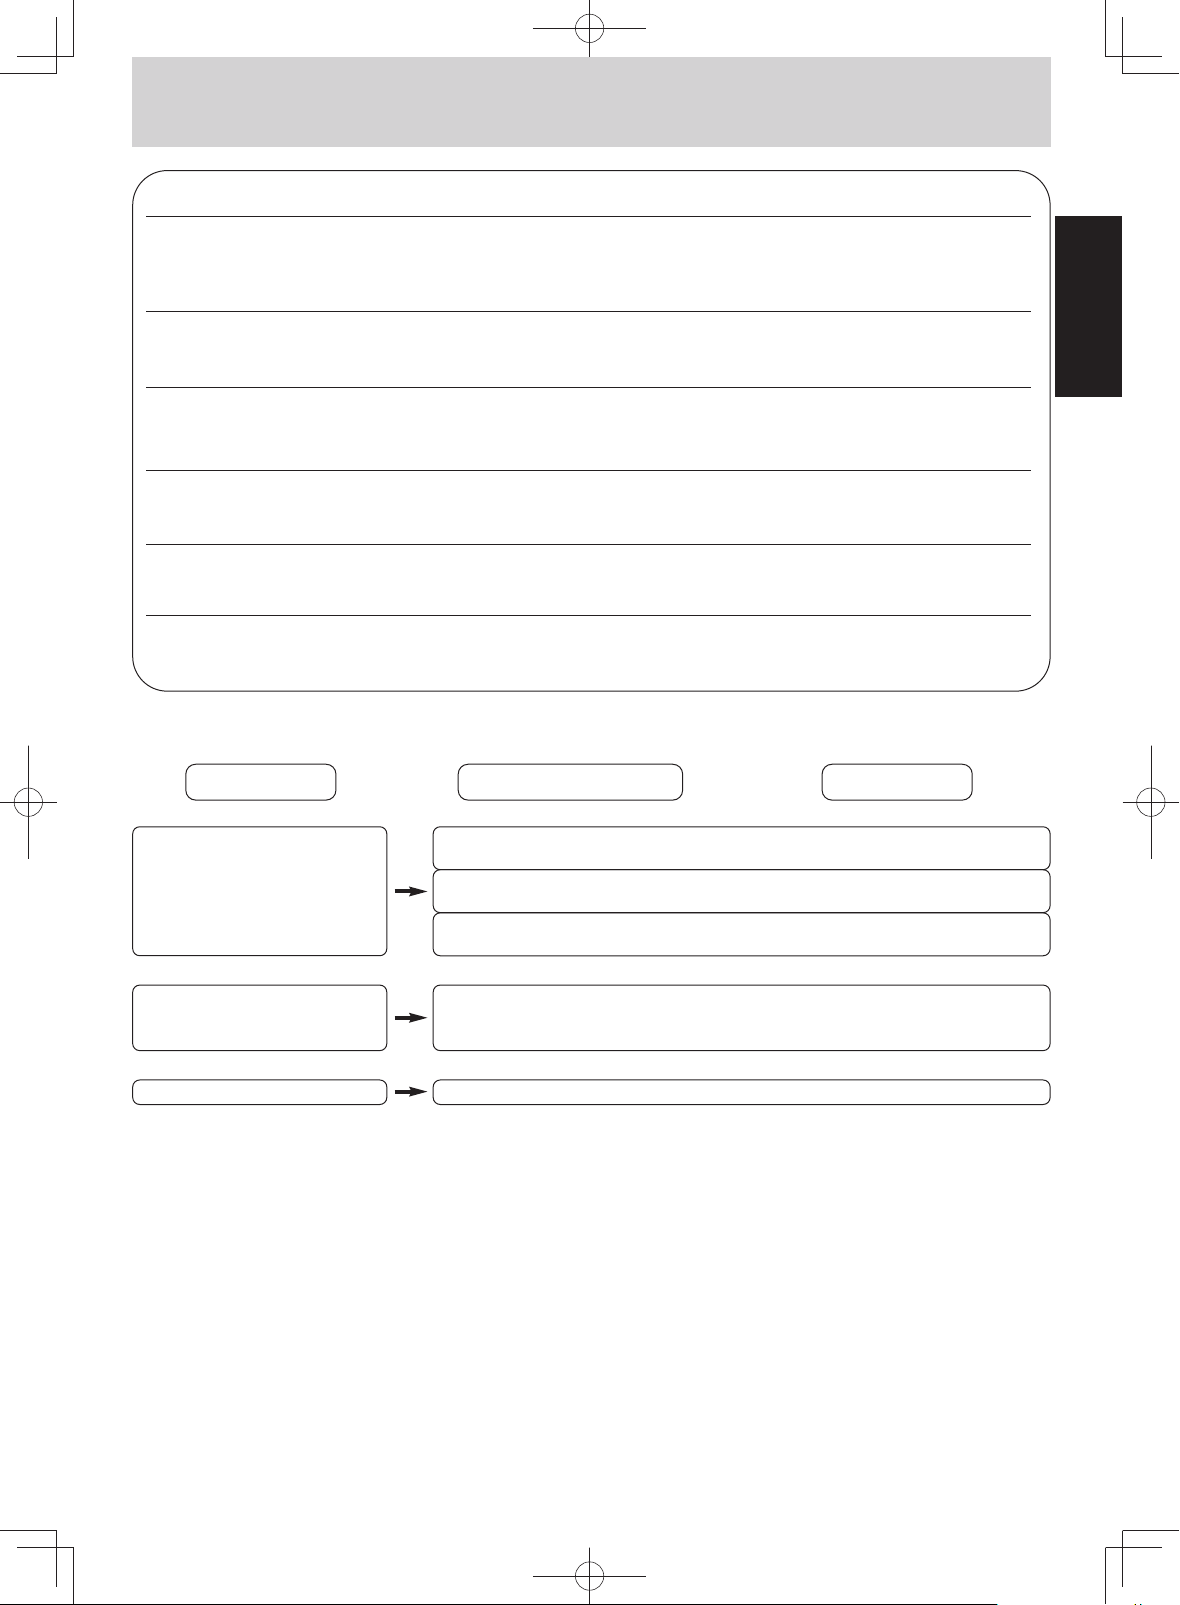
Operation (To Cook on Combination by time setting)
• Set Cook Mode Select Dial to
Combination position .
Directions for Combination Cooking
The Combination means that it is possible to combine the microwave and grill function for thawing, cooking, and heating foods.
There is a special program to keep the crispness of certain foods.
Place food on a Wire Rack on Glass Tray.
• Set combination cooking time by turning
Time/Weight Select Dial. If the door is
already closed, cooking time will begin
immediately.
- Eng-8 -
Before Requesting Service
ALL THESE THINGS ARE NORMAL:
The oven causes interference with Some radio and TV interference might occur when you cook with the microwave
my TV. oven. This interference is similar to the interference caused by small appliances
such as mixers, vacuums, hair dryers, etc. It does not indicate a problem with your
oven.
English
English
The oven lights dim. When cooking with a power other than HIGH, the oven must cycle to obtain the
Steam accumulates on the oven During cooking, steam and warm air are given off from the food. Most of the steam
door and warm air comes from and warm air are removed from the oven by the air which circulates in the oven
the oven vents. cavity. However, some steam will condense on cooler surfaces such as the oven
I accidentally operate my Operating the oven empty for a short time will not damage the oven.
microwave oven without any food However, we do not recommend this to be done.
in it.
There are humming and clicking These noise occur as the oven automatically switches from microwave power to
noises from my oven when I cook Grill, to create the Combination setting. This is normal.
by Combination.
The oven has an odor and generates It is essential that your oven is wiped out regularly particularly after cooking by
smoke when using Combination and Combination or Grill. Any fat and grease that builds up on the roof and walls of the
Grill function. oven will begin to smoke if not cleaned.
lower power levels. The oven light will dim and clicking noises can be heard when
the oven cycles.
door. This is normal.
PROBLEM POSSIBLE CAUSE REMEDY
Oven will not turn on.
The oven is not plugged in securely. Remove plug from outlet, wait 10 sec-
Circuit breaker or fuse is tripped or
blown.
There is a problem with the outlet. Plug another appliance into the outlet to
onds and re-insert.
Contact the specified service center.
check if the outlet is working.
When the oven is turning on,
there is noise coming from
Glass Tray.
Oven will not start cooking.
If it seems there is a problem with the oven, contact an authorized Service Centre.
The roller ring and oven bottom are dirty. Clean these parts according to care of
The door is not closed completely. Close the oven door securely.
- Eng-9 -
your oven (See next page).

Care of your Microwave Oven
1. The oven should be cleaned regularly and any food
deposits removed.
2. Turn the oven off and remove the power plug from the wall
socket before cleaning.
3. Keep the inside of the oven clean. When food splatters or
spilled liquids adhere to oven walls, wipe with a damp
cloth. Mild detergent may be used if the oven gets very
dirty. The use of harsh detergent or abrasives is not rec-
English
English
ommended.
4. The outside oven surfaces should be cleaned with a damp
cloth. To prevent damage to the operating parts inside the
oven, water should not be allowed to seep into the ventilation openings.
5. Do not allow the Control Panel to become wet. Clean with
a soft, damp cloth. Do not use detergents, abrasives or
sprayon cleaners on the Control Panel.
When cleaning the Control Panel, leave oven door open to
prevent oven from accidentally turning on. After cleaning,
make sure Time/Weight Select Dial is set to zero position.
6. If steam accumulates inside or around the outside of the
oven door, wipe with a soft cloth. This may occur when the
microwave oven is operated under high humidity conditions and in no way indicates malfunction of the unit.
7. It is occasionally necessary to remove the glass tray for
cleaning. Wash the tray in warm sudsy water or in a dishwasher.
8. The Roller Ring and oven cavity floor should be cleaned
regularly to avoid excessive noise. Simply wipe the bottom
surface of the oven with mild detergent, water or window
cleaner and dry. The Roller Ring may be washed in mild
sudsy water or dish washer. Cooking vapors collect during
repeated use but in no way affect the bottom surface or
Roller Ring wheels. When removing the Roller Ring from
cavity floor for cleaning, be sure to replace in the proper
position.
9. When using the GRILL or cooking in the COMBINATION
mode, some foods may inevitably splatter grease on to the
oven walls. If the oven is not cleaned, occasionally it may
start to "smoke" during use. These marks will be more difficult to clean later.
10. After GRILL or COMBINATION cooking the ceiling and
walls of the oven should be cleaned with a soft cloth
squeezed in soapy water. Particular care should be taken
to keep the window area clean particularly after cooking by
GRILL or COMBINATION. Stubborn spots inside the oven
can be removed by using a small amount of microwave
oven cleaner sprayed onto a soft damp cloth. Wipe onto
problem spots, leave for recommended time and then
wipe off. Avoid cleaning oven door and the microwave
feed guide area situated on the right hand side of the cavity wall.
DO NOT SPRAY DIRECTLY INSIDE THE OVEN.
A steam cleaner is not to be used for cleaning.
11. When it becomes necessary to replace the oven light,
please consult a dealer to have it replaced.
12. Failure to maintain the oven in a clean condition could
lead to deterioration of the surface that could adversely
affect the life of the appliance and possibly result in a hazardous situation.
- Eng-10 -

Technical Specifications
Power Source:
Power Consumption: Microwave:
Grill:
Cooking Power: Microwave*:
Grill
Outside Dimensions (W x H x D):
Oven Cavity Dimensions (W x H x D):
Operating Frequency:
Net Weight:
* IEC Test Procedure
Specifications subject to change without notice.
As for the voltage requirement, the production month, country and serial number, please refer to the identification plate on the
microwave oven.
220 V 50 Hz
5.3 A, 1,125 W
5.9 A, 1,270 W
4.8 A, 1,050 W
4.5 A, 1,000 W
700 W
800 W
1,000 W
488 mm x 279 mm x 405 mm
485 mm x 287 mm x 400 mm
315 mm x 178 mm x 353 mm
315 mm x 207 mm x 349 mm
2,450 MHz
Approx. 12.5 kg
13.2 kg
English
English
- Eng-11 -
Introduction
Cooking with Microwave Energy
Microwaves are a form of high frequency electromagnetic waves (approx 12cm wavelength) similar to those used by a
radio. Electricity is converted into microwave energy by the magnetron tube. The microwaves travel from the magnetron
tube to the oven cavity where they are reflected, transmitted or absorbed.
Reflection
English
English
Microwaves are reflected by metal
just as a ball is bounced off a wall.
A combination of stationary (interior
walls) and rotating metal (turntable
or stirrer fan) helps assure that the
microwaves are well distributed within the oven cavity to produce even
cooking.
Grill
Grilling is done at high temperatures
with the food close to the heat. This
gives meat a rich brown appearance.
Only use high-quality, well-marbled
meats for grilling since the high temperatures can dry out the less choice
meats.
Transmission
Microwaves pass through some
materials such as paper, glass and
plastic much like sunlight shining
through a window. Because these
substances do not absorb or reflect
the microwave energy, they are ideal
materials for microwave oven cooking containers.
Combination
Combination cooking is ideal for
roasting meats and poultry.
Combination cooking automatically
alternates between convection and
microwave heating.
The advantage to combination cooking is that it gives the browning of
convection and often shortens the
conventional cooking time.
Absorption
Microwaves are absorbed by food.
They penetrate to a depth of about 2
to 4cm. Microwave energy excites
the molecules in the food (especially
water, fat and sugar molecules), and
causes them to vibrate very quickly.
The vibration causes friction and heat
is produced. In large foods, the heat
which is produced by friction is conducted to the center to finish cooking.
- Eng-12 -

Cookware and Utensil Guide
Microwave Oven Combination Grill
Aluminuim Foil For Shielding For Shielding Yes
Grill Tray No No Yes
Browning Dish Yes No No
Browning Paper Bags No No No
Dinnerware: Oven/Microwave Safe Yes Yes No
Non Oven/Microwave Safe No No No
Disposable Polyeser Paperboard Dishes Yes * No No
Yes
Glassware: Oven Glassware & Ceramic Yes Yes for short term top
browning
Non-heat Resistant No No No
Metal Cookware No No Yes
Wire Rack No Yes Yes
English
English
Metal Twist-ties No No No
Oven Cooking Bag Yes Yes No
Oven Rack No No Yes
Paper Towels and Napkins Yes * No No
check mfg's.
Plastic Dishes: Microwave Safe Yes * recommendation, must No
with stand heat
Non-microwave Safe No No No
Plastic Wrap Yes * No No
Straw, Wicker, Wood Yes * No No
Thermometers: Microwave Safe Yes No No
Conventional No No No
Wax Paper Yes No No
*Caution
• Plastics:
Plastic dishes, cups and some freezer containers should be used with care in a microwave oven. Choose plastic
containers carefully, as some plastic containers may become soft, melt and scorch.
• Paper Products and Freezer Wrap:
Waxed paper, paper plates, cups and napkins should not be used for heating or cooking food by Combination and Grill.
Freezer wrap should not be used as it is not heat resistant and bake paper may be short periods of time for covering or
lining.
- Eng-13 -

Microwave Cooking Techniques
English
English
Dish Size
Follow the dish sizes given in the
recipes, as these affect the cooking
times. A quantity of food spread in a
bigger dish cooks more quickly.
Standing Time
Dense foods e.g. meat, jacket potatoes and cakes, require STANDING
TIME (inside or outside of the oven)
after cooking, to allow heat to finish
conducting to cook the centre completely.
Meat Joints
Stand 15 mins. wrapped in tin foil.
Jacket Potatoes
Stand 10 mins. wrapped in tin foil.
Light Cakes
Stand 5 mins. before removing from
dish.
Rich dense Cakes
Stand 15-20 mins.
Cling Film
Cling film helps keep the food moist
and the trapped steam assists in
speeding up cooking times. However,
it should be pierced before cooking,
to allow excess steam to escape.
Always take care when removing
cling film from a dish as the build-up
of steam will be very hot. Always purchase cling film that states on the
packet “suitable for microwave cooking” and use as a covering only. Do
not line dishes with cling film.
Quantity
Small quantities cook faster than
large quantities, also small meals will
reheat quicker than large portions.
If food is not cooked after STANDING
TIME, return to oven and cook for
additional time.
Moisture Content
Many fresh foods e.g. vegetables and
fruit, vary in their moisture content
throughout the season- jacket potatoes are a particular example of this.
For this reason cooking times may
have to be adjusted throughout the
year. Dry ingredients e.g. rice, pasta,
can dry out further during storage
and cooking times may differ from
ingredients freshly purchased.
Density
Porous airy foods heat quicker than
dense heavy foods.
Fish
Stand 2-5 mins.
Egg Dishes
Stand 2-3 mins.
Precooked Convenience Food
Stand for 5 mins.
Plated Meals
Stand for 2-5 mins.
Vegetables
Boiled potatoes benefit from standing
1-2 mins., however most other types
can be served immediately.
Piercing
The skin or membrane on some
foods will cause steam to build up
during cooking. These foods must be
pierced or a strip of skin should be
peeled before cooking to allow the
steam to escape. Eggs, potatoes,
apples, sausages etc, will all need to
be pierced before cooking. DO NOT
ATTEMPT TO BOIL EGGS IN THEIR
SHELLS.
- Eng-14 -
Microwave Cooking Techniques
English
English
Covering
Cover foods with microwave cling film
or a self-fitting lid. Cover fish, vegetables, casseroles, soups. Do not cover
cakes, sauces, jacket potatoes, pastry items.
Turning and Stirring
Some foods require stirring during
cooking. Meat and poultry should be
turned after half the cooking time. All
liquid must be stirred before and during heating. Water, especially must
be stirred before and during heating,
to avoid eruption.
Starting Temperature
The colder the food, the longer it
takes to heat up. Food from a fridge
takes longer to reheat than food at
room temperature.
Shape
Even shapes cook evenly. Food
cooks better by microwaves when in
a round container rather than a
square one.
Spacing
Foods cook more quickly and evenly
if spaced apart. NEVER pile foods on
top of each other.
Arranging
Individual foods e.g. chicken portions
or chops, should be placed on a dish
so that the thicker parts are on the
outside.
Checking Food
It is essential that food is checked during and after a recommended cooking time, even if an AUTO PROGRAM
has been used (just as you would check food cooked in a convectional oven). Return the food to the oven for
further cooking if necessary.
- Eng-15 -

To Reheat by
Micro Power and Time
Reheat by Setting Power and Time - Frozen Convenience Foods
FROZEN ITEM POWER TIME SPECIAL INSTRUCTIONS
(Pre-cooked) (in minutes)
BREAD &
BAKED PRODUCT
Bread 1 slice HIGH 10 - 15 sec Do not let bread get hot, or it will become rubbery and dry
English
English
1 loaf HIGH 2 - 5 out. Remove whole loaf from original wrapper.
6 rolls MEDIUM 1 - 2 Place on paper towel to absorb moisture.
Cheesecake (600 g) DEFROST 2 - 3 Remove from container. Defrost on plate.
Muffins - 4 (350 g) MEDIUM 2 - 3 Place onto paper towel lined plate.
Scones - 6 (400 g) MEDIUM 1 - 2 Defrost on paper lined plate. Stand 2 minutes.
PIES
Fruit Pie (500 g) DEFROST 6 - 8 Remove from foil container and place uncovered into a
Meat Pie (300 g) DEFROST 4 - 6 Place onto paper towel lined plate.
Pizza (350 g) HIGH 5 - 7 Remove from package and place onto paper towel or follow
FROZEN MEAL
Fish in Sauce (200 g) MEDIUM 6 - 7 Pierce corner of bag. Heat on a plate.
Instant Casserole MEDIUM 4 - 6 Pierce pouch.
in Pouch (serves 2) Heat on a plate or bowl.
Lasagne (300 g) MEDIUM 10 - 12 Remove from foil container, place into serving dish.
Plate Food DEFROST 3 - 4 Arrange food evenly on a dinner plate. Add butter or gravy
g
g
g
g
then pie dish.
HIGH 4 - 6
g
then
MEDIUM 2 - 3
g
manufacturer’s instructions.
g
g
then where desired. Cover plate with plastic wrap.
HIGH 2 - 3
TV style dinner (400 g) MEDIUM 8 - 10 Remove foil cover and replace with plastic wrap.
Vegetables & Sauce MEDIUM 8 - 10 Pierce corner of bag. Heat on a plate.
(in the bag) (400 g)
MISCELLANEOUS
Chicken Pieces (500 g) DEFROST 5 - 7 Place onto paper towel lined plate.
Croissants - 4 (250 g) MEDIUM 2 - 3 Place onto paper towel lined plate.
Fish Fingers - 8 (200 g) DEFROST 3 - 5 Place onto paper towel lined plate.
Sausage Rolls (250 g) MEDIUM 3 - 5 Place onto paper towel lined plate.
g
g
g
then
HIGH 6 - 8
g
g
then
HIGH 2 - 3
g
- Eng-16 -
Defrosting Guidelines
This feature allows you to enter the
weight in kilos and the oven will
select the correct defrosting time for
most foods. However, do not use for
Separate chops and small items e.g.
Quiche slice where possible.
porous foods e.g. bread and cakes
etc.
Tips for Defrosting
Give large joints of meat further
standing to ensure meat is not still icy
in the center.
During the defrosting process, the
oven will bleep to remind you to
check the food i.e. turn, shield or
break the food apart, as shown
below.
Break up small items e.g. scallops,
minced meat, halfway through
defrosting.
English
English
Remove wrappers from meat. Place
on microwave rack or up-turned
saucer.
Shield edges, back of fat of joints and
thin edges of fish with small pieces of
SMOOTH tin foil to prevent overdefrosting.
- Eng-17 -
Turn dense foods and meat 2-3 times
during defrosting.

Defrosting Tips and Techniques
g
Preparation for Freezing:
1. Heavy-duty plastic wraps, bags and freezer wrap are suitable.
2. Freeze meats, poultry and fish in packages with only 1 or 2 layers of food. To aid in separating layers, place two
pieces of wax paper between them.
3. REMOVE ALL AIR and seal securely.
4. LABEL package with type and cut of meat, date and weight.
5. Defrosting times given in the charts are for thoroughly frozen foods (i.e. at least 24 hours in freezer maintained at
-18°C or lower).
English
English
Defrosting Technique:
1. Remove from wrapper and set on a roasting rack in a dish on Glass Tray.
2. Throughout the defrosting time, remove any defrosted portions of mince or cubed meat, etc.
3. After defrosting, large roasts may still be icy in the centre. Let stand, 15 to 30 minutes, in refrigerator to complete
defrosting.
Defrosting Chart (by setting time):
FOOD APPROX. TIME INSTRUCTION
(minutes per 500 g)
MEAT
Beef
Minced Beef 8 - 11 Halfway through the defrost cycle, break apart minced beef, separate
Roast: Topside 12 - 15 chops and remove meat that is defrosted.
Beef Tenderloin 12 - 15
Chuck or Rump 10 - 13 Turn meat over two to three times during defrosting.
Sirloin, rolled 11 - 14
Steak 8 - 10 Shield edges and unevenly shaped ends of roasts halfway through the
Miscellaneous 8 - 12 defrost cycle.
Pork/Lamb
Roast 9 - 12 Large roasts may still be icy in centre. Let stand.
Chops 8 - 11
Ribs 8 - 12
POULTRY Turn poultry over two to four times during defrosting. Halfway through the
Chicken defrost cycle, shield end of drumsticks, wings, breast bones and ends of
whole 9 - 12 poultry with foil.
pieces 8 - 11
fillets 8 - 10 Break apart chicken pieces and remove small pieces such as wings,
Duck 10 - 12 which may be defrosted before larger pieces.
Turkey 10 - 13
Rinse poultry under cold water to remove ice crystals. Let stand 5 to 10
minutes, before cooking.
FISH & SHELLFISH
Fish Fillets 9 - 11 Halfway through the defrost cycle, turn whole fish or blocks of fillets over.
Whole Fish 9 - 12 Also, break apart prawns or scallops. Remove any pieces that are
Crabmeat 8 - 10 defrosted.
Lobster Tails 8 - 10
Sea Scallops 8 - 10 Let stand, 5 to 10 minutes, before cooking.
Green Prawns 10 - 12
- Eng-18 -

Microwave
Recipe Preparation
and
Techniques
Converting Your Favourite Conventional
Recipes for Microwave Cooking
When adapting conventional recipes for microwave cooking, reduce the conventional cooking time by one quarter
or one third.
e.g. A chicken which takes 1 hour to cook in a moderate
oven will take 15-20 minutes on MEDIUM Power in your
microwave oven.
Use similar microwave recipes to help you adapt conventional recipes. Remember, it is always best to undercook a
recipe and then add an extra minute or two to finish it off.
Here are some other tips that may help:
• Reduce liquids in a conventional recipe by one half to
two thirds, e.g. 1cup (250 ml) should be reduced to
cup (125 ml).
• Add more thickening such as flour or cornflour to sauces
and gravies if you do not reduce the liquid.
• Reduce seasonings slightly in a recipe where ingredients
do not have time to simmer by microwave.
• Do not salt meats, poultry or vegetables before cooking;
otherwise, they will toughen and dry out.
• If one ingredient takes longer to cook than the others,
precook it in the microwave oven first. Onion, celery and
potato are examples.
• If meat or vegetables are not being browned before
cooking, omit any oil or fat that would have been used
for browning.
• Reduce leavening agents for cakes by one quarter and
increase liquids by one quarter.
• Biscuits require a stiff dough. Increase flour by about 20
percent. Substitute brown sugar for white sugar and use
biscuit recipes that have dark spices or require icing.
Because of the short cooking time, biscuits don’t have to
brown. Chill dough for half an hour before baking. This
produces a crisper biscuit. Bake biscuits on a glass tray
lined with greaseproof paper.
• Since microwaves penetrate foods about two centimetres from the top, bottom and sides, mixtures in round
shapes and rings cook more evenly. Corners receive
more energy and may overcook.
• Items with a lot of water, such as rice and pasta, cook in
about the same time as they would on a conventional
stove. (Refer to Rice and Pasta chapter.)
Select recipes that convert easily to microwave cooking
such as casseroles, stews, baked chicken, fish and vegetable dishes. The results from foods such as grilled
meats, cooked souffles or two-crust pies could be less
than satisfactory. Never
microwave oven.
attempt to deep fry in your
1
/2
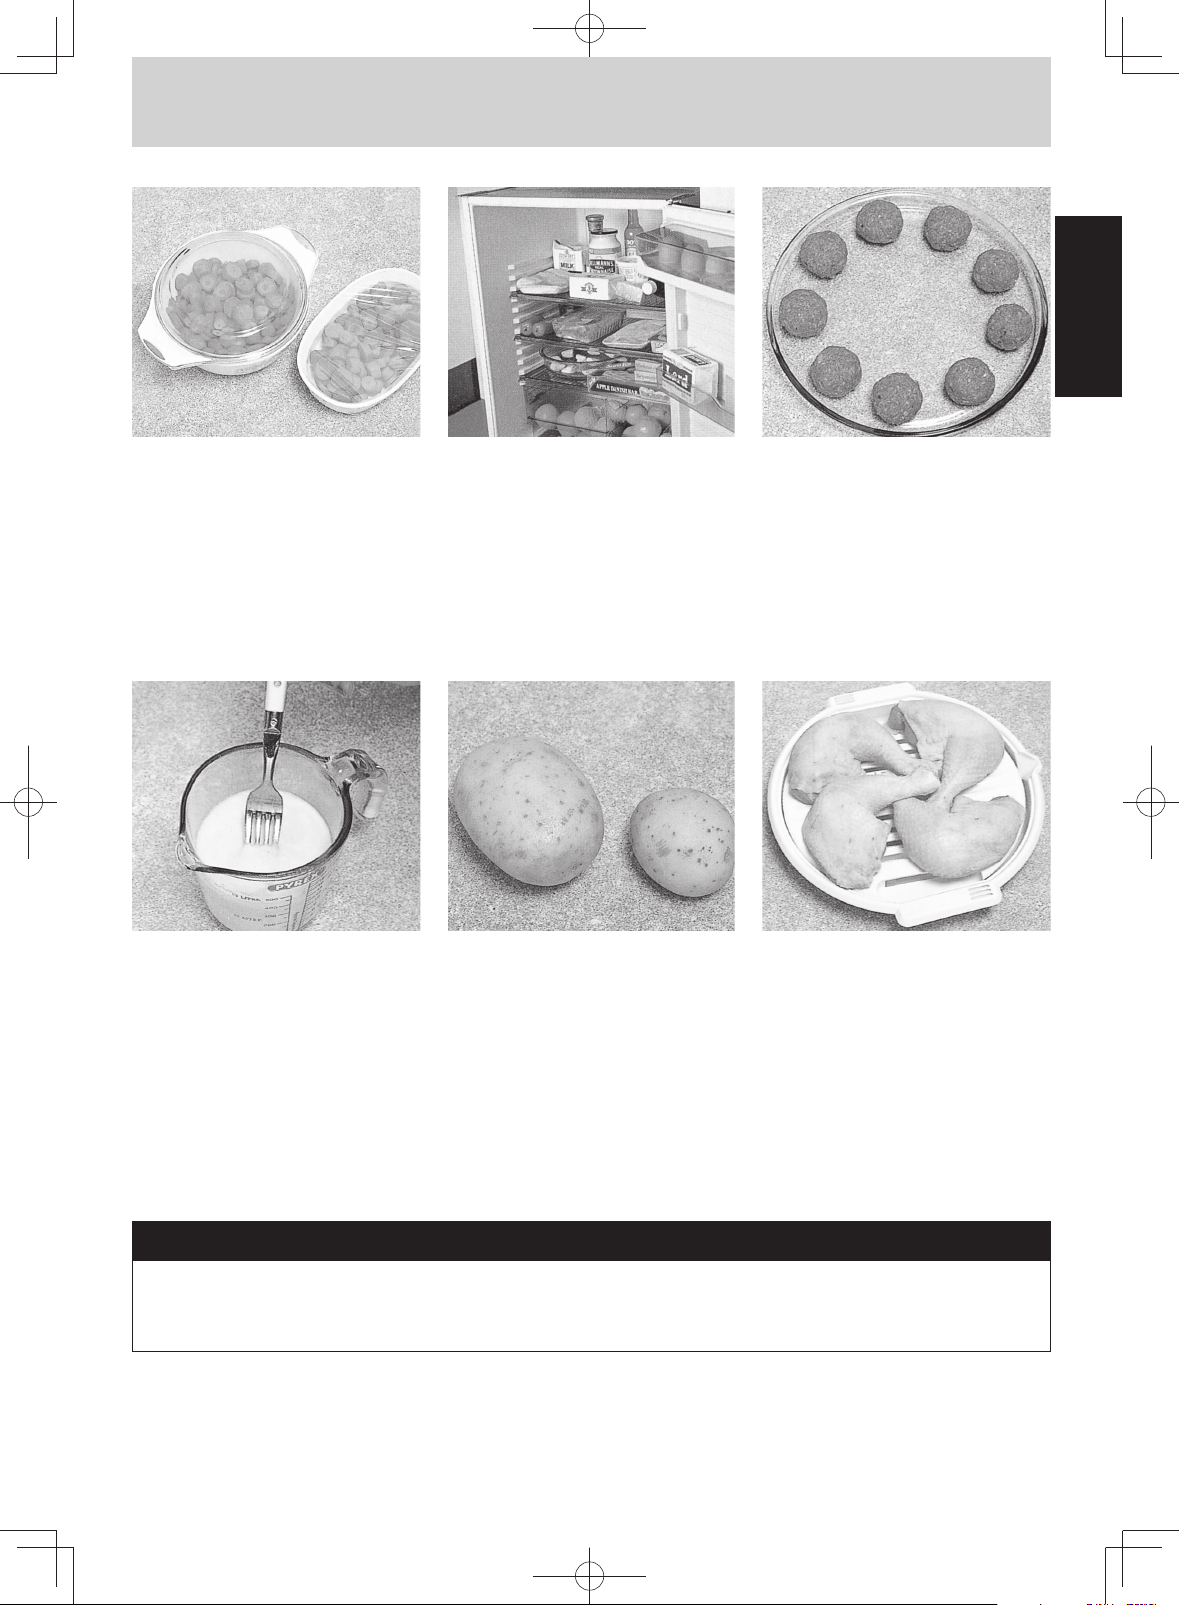
Menu Planning for Microwave Cooking
How to Keep Everything Hot at The Same Time
Plan your meals so that the food will not all need last
minute cooking or attention at the same time. The special
features of microwave cookery make it easy to serve
meals with everything piping hot. Cooking of some foods
may be interrupted while you start others, without harming
the nutritional value or flavour of either.
A recipe which requires standing time can be microwaved
first and another food cooked while it stands. Dishes prepared in advance can be reheated briefly before serving.
It does take some experience and time to cook with confidence. Microwaves are fast so you will have to do some
experimenting. You might find you will use your conventional range in conjunction with your microwave oven. For
example, while cooking the roast in the microwave oven,
you can be cooking the vegetables and gravy on the
range top. This can also be done the other way around.
Prepare your meals as follows.
1. Firstly, cook the most dense item (roast or casserole).
Drain and retain meat juice from joints then cover with
foil.
2. Cook the potatoes, rice or pasta.
3. Cover with foil for standing.
4. Cook greens and other vegetables.
5. Cover with foil for standing.
6. Cook the gravy with the retained meat juices, stock and
thickening.
7. Carve the roast and serve the vegetables and gravy.
While you are learning to plan meals, you may get a bit
behind time. Don’t worry. Dinner servings may be suitably
reheated on HIGH, at 1
If you prefer not to use foil, cover food with saucepan lids.
A metal lid will retain the heat for at least 15 minutes.
Meanwhile, how can you cook all the vegetables at the
same time? Simply place potatoes and pumpkin in one
dish and less dense vegetables such as broccoli, cabbage, cauliflower, beans and peas in another. Sprinkle
greens with water. Cover with a lid or plastic wrap. Cook
on HIGH for approximately 6-8 minutes for a serving for
four people. Remember, if you increase the quantity of
vegetables, increase the cooking time. Fresh and frozen
vegetables can be mixed on a vegetable platter, but
remember the latter are not as dense as fresh vegetables,
as they have been blanched before freezing.
If vegetables are cut to a similar size, they can be cooked
in separate ramekins or small dishes at the same time.
1
/2-2 minutes per serving.
English
English
- Eng-19 -

Microwave Recipe Preparation and Techniques
Microwave
Recipe Preparation
and
Techniques
(continued)
Increasing & Decreasing Recipes
Increasing
• To increase a recipe from 4 to 6 servings, increase each
ingredient listed by half.
• To increase a recipe from 4 to 8 servings, double each
ingredient listed.
• For larger quantities of a recipe, a large dish should be
used. Make sure that the dish is deep enough to prevent
English
English
the recipe from boiling over during cooking.
• Make sure to cover, stir or rearrange food as directed in
the recipe and always check the food during cooking.
• Increase standing times by 5 minutes per 500g.
• Use the same Power Level recommended in the original
recipe.
• Increase the cooking times by:
for 6 servings; and an extra 1/2 of original cooking time for
8 servings.
Decreasing
• To decrease a recipe from 4 to 2 servings, decrease each
ingredient listed by half.
• For small quantities, a small dish should be used. Make
sure that the dish is large enough to prevent the recipe
from boiling over during cooking.
• Use the same Power Level recommended in the original
recipe.
• Decrease the cooking times by
cooking time.
1
/3 of original cooking time
1
/2 to 2/3 of the original
g
.
Cooking for One
• To decrease a recipe from 4 to 1 serving, quarter each
ingredient listed.
• A smaller dish should be used, making sure that the dish
is still large enough to prevent the recipe from boiling
over.
• Use the same Power Level recommended in the original
recipe.
• Quarter the original cooking times, then add extra time, if
needed.
• Make sure to cover, stir or rearrange food as directed in
original recipe and always check the food during cooking.
Converting Recipes from Other Sources
When the recipe is written with a wattage different than
your oven, adjust the cooking time by approximately 10%
per 100 watts, e.g. 6 minutes would be adjusted by 36 seconds. Alternately, adjust the power level by one level. If
your wattage is higher than the recipe: (1) Adjust time
downward or (2) Adjust power level downward. If your
wattage is lower than the recipe: (1) adjust time upward or
(2) adjust power level upward (when possible).
- Eng-20 -

Common Queries Answered
Problem Cause Solution
Food cools quickly after being Food not cooked through. Put back in oven for extra time.
MICROWAVED. Remember foods at fridge temperature require
more cooking time than food at room
temperature.
Soup/Casserole boils over after Container too small. For liquid foods use container twice the volum
cooking by MICROWAVE or of food.
COMBINATION.
Food cooks too slowly when cooked Oven not receiving correct Oven should be on a separate 13 amp circuit.
by MICROWAVE. power.
Food temperature from fridge Extra time required for cooking colder foods.
colder than room temperature.
Meat is tough when cooked by Power setting too high. Use reduced power level for meats.
MICROWAVE.
Meat salted before cooking. Do not salt before cooking. Salt if necessary
after cooking.
Meat is tough when roasted by Wrong cut of meat used Always use the correct cut of meat for roasting.
COMBINATION. /incorrectly programmed oven.
Cakes remain uncooked in center Too short cooking and/or Add extra cooking time/standing time.
when cooked by MICROWAVE. standing time.
English
English
Scrambled or poached eggs tough Cooking time too long. Take care cooking small quantities of eggs,
and rubbery when cooked by once spoiled they cannot be saved.
MICROWAVE.
Quiche/Egg custards tough and Power level too high. Use reduced power levels for these items.
rubbery when cooked by
MICROWAVE.
Quiche/Egg custards tough and Cooked too long. Dish size Always check progress of food as it cooks.
rubbery when cooked by larger than stated in recipe.
COMBINATION.
Cheese sauce tough and stringy Cheese cooked with sauce. Add at the end of cooking time, the heat of the
when cooked by MICROWAVE. sauce will melt the cheese.
Vegetables are dry when cooked by Cooked uncovered. Low Cover with a lid or cling film. Add extra 2-4 tbsps
MICROWAVE. moisture content e.g. old root of water. Salt after cooking.
vegetables. Salt added before
cooking.
Condensation appears on the door This is normal and means the Wipe condensation off with a soft cloth.
of your oven. food is cooking faster than the
moisture can be expelled from
the oven.
Turntable rotates in both directions. This is normal.
- Eng-21 -

Everyday Basics
GRANOLA C
EREAL
Makes: approximately 4 cups (1 litre)
Ingredients:
500 ml (2 cups) oats
165 ml (
85 ml (
60 ml (
60 ml (
English
English
5 ml (1 teaspoon) vanilla essence
85 ml (
85 ml (
2
/3 cup) chopped nuts
1
/3 cup) wheat germ
1
/4 cup) brown sugar
1
/4 cup) honey
1
/3 cup) raisins
1
/3 cup) coconut
Method:
1. Place oats in 2-litre casserole dish, cook on HIGH for 2
to 3 minutes, stirring twice.
2. Add nuts, wheat germ, and brown sugar. Stir in honey
and vanilla. Cook on HIGH for 3 to 5 minutes, stirring
twice during cooking.
3. Add raisins, coconut and allow to cool. Stir to a crumble texture. Store in an airtight container.
TOMATO AND ONION
Serves 4
Ingredients:
approx. 3 tomatoes, thinly sliced
1 onion, thinly sliced
1
/2 teaspoon) basil
2 ml (
salt and pepper to taste
Method:
1. Place all ingredients into 2-litre casserole dish.
2. Cook, covered, on HIGH for 6 to 8 minutes. Serve with
barbequed steak or grilled meat.
SCRAMBLED EGGS
Serves: 2
Ingredients:
g
4 x 61 g eggs
60 ml (4 tablespoons) milk
pinch of salt
Method:
1. In 1-litre casserole dish, beat eggs lightly with
whisk. Add milk and salt. Whisk until well combined.
Cover dish with plastic wrap and cook on MEDIUM
for 2 to 2
2. Stir egg and cook for further 2
1
/2 minutes.
1
/2 to 3 minutes.
Stand, covered, for 1 minute before serving.
POACHED EGGS
Serves: 2
Ingredients:
125 ml (
2 x 61 g eggs
Method:
1. Place one quarter of a cup of water, dash of vinegar
2. Break egg into the water and with toothpick pierce the
1
/2 cup) hot tap water
dash of vinegar
pinch of salt
g
and pinch of salt into 2 ramekin dishes or small glass
bowls.
egg yolk twice and egg white several times.
3. Cover dish with plastic wrap and cook on MEDIUM for
1
/2 minutes. Stand, covered, for 1 minute before
1 to 1
serving.
Note: The size of the eggs will alter cooking time.
GRAVY
Makes: 500 ml (2 cups)
Ingredients:
30 ml (2 tablespoons) dripping or pan juice
1 small onion, finely chopped
30 ml (2 tablespoons) flour
15 ml (1 tablespoon) tomato paste
375 ml (1
1
/2 cups) beef stock, divided
salt and pepper
Method:
1. Place dripping or pan juices and onion in 2-cup (500 ml)
jug. Cook on HIGH for 2 minutes.
2. Add flour, tomato paste and half of the beef stock. Stir
well. Cook on HIGH for 2 minutes. Add remaining stock.
3. Stir well and cook on HIGH for a further 2 minutes.
Season with salt and pepper. Serve with the meat of
your choice.
BASIC WHITE SAUCE
Makes: 250 ml (1 cup)
Ingredients:
30 ml (2 tablespoons)butter
30 ml (2 tablespoons)flour
1
310 ml (1
/4 cups) milk
Method:
1. Place butter in 4-cup (1-litre) jug. Cook on HIGH for 30
to 40 seconds.
2. Stir in flour, salt and pepper. Gradually add milk,
stirring until smooth.
3. Cook on HIGH for 3 to 4 minutes, stirring twice.
Tip: For cheese sauce, stir in 125 ml (
cheese once sauce has thickened.
HINT:
TO COOK BACON RASHERS:
Place bacon between 2 sheets of paper towel on a pie
plate and cook on HIGH for 2 to 3 minutes.
HINT:
TO DRY FRESH BREADCRUMBS:
Place 250 ml (1 cup) of breadcrumbs on the base of
plate and heat on HIGH for 2 to 3 minutes, stirring once
during heating.
salt and white pepper
1
/2 cup) grated
- Eng-22 -

Fish and Shellfish
Directions for Cooking Fish and Shellfish by Microwave
Clean fish before starting the recipe. Arrange fish in a single layer, do not overlap edges. Prawns and scallops
should be placed in a single layer.
Fish and Shellfish Chart for Microwave Cooking by Time
Cover dish with plastic wrap. Cook on the power level
and for the minimum time recommended in the chart
below. Halfway through cooking rearrange or stir prawns
or scallops.
English
English
FISH OR SHELLFISH AMOUNT POWER
Fish Fillets 500 g MEDIUM 5 - 7
Scallops (sea) 500 g MEDIUM 5 - 7
Green Prawns medium
size (shelled and cleaned)
Whole Fish
(stuffed or unstuffed)
500 g to 900 g MEDIUM 6 - 8
LEMON FISH
Serves: 2
Ingredients:
g g
300g fish fillet ( with skin)
Lemon juice from
Salt and grated black pepper
Method:
Ware: 1-liter pot, plastic wrap
1. Place fish fillet (skin bottom), salt and lemon juice.
2. Cover with plastic warp and cook on AUTO or sensor
modes or on MEDIUM power for 4-6 minutes.
3. Let stand 3 minutes before serving. Sprinkle over
grinded black pepper.
1
/2 pieces
SWEET SCALLOP STIR FRY
Serves: 2 to 4
Ingredients:
15 ml (1 tablespoon) oil
1 onion, quartered
1
/2 teaspoon) crushed garlic
2 ml (
1
/2 red capsicum sliced
2 sticks celery sliced
30 ml (2 tablespoons) sliced water chestnuts
g
100 g snow peas
15 ml (1 tablespoon) honey
15 ml (1 tablespoon) sweet chilli sauce
15 ml (1 tablespoon) chopped coriander
g
500 g scallops
Method:
1. Place oil, onion and garlic into a 2-litre dish. Cook on
HIGH for 1-2 minutes.
2. Add remaining ingredients and cook on HIGH for 5-7
minutes, stir halfway through cooking.
3. Serve immediately.
g
g
g
500 g MEDIUM 5 - 7
g
g
SALMON FILLET WITH
Serves: 4
Ingredients:
500-600 g (4 fillet ) salmon
Salt and pepper on taste
Sauce “Rassol”
g
150 g (3-4pieces) pickled cucumbers, finely
g
100 g (1 large) onion, finely chopped
15 ml (1tablespoon) oil
125 ml white dry wine
Method:
Ware: square casserole dish
1. Place ingredients for sauce (except wine), coved and
cook on HIGH power for 4-5 minutes or until soft.
2. Add steaks and white dry wine, coved and cook on
MEDIUM power for 10-12 minutes. Let stand 2-3 minutes before serving.
GARLIC PRAWNS
Serves: 2
Ingredients:
g
60 g butter
1 clove garlic, crushed
15 ml (1 tablespoon) lemon juice
g
15 g (2 tablespoons) chopped parsley
g
500 g peeled prawns
Method:
Ware: 1 liter pot
1. Place butter and garlic in pot and cook on HIGH for
30-50 seconds.
2. Add lemon juice, parsley and prawns. Cook on MEDIUM for 5-7 minutes, stirring halfway through cooking.
Serving immediately.
APPROX. COOKING TIME
(in minutes)
chopped
- Eng-23 -
Poultry
g
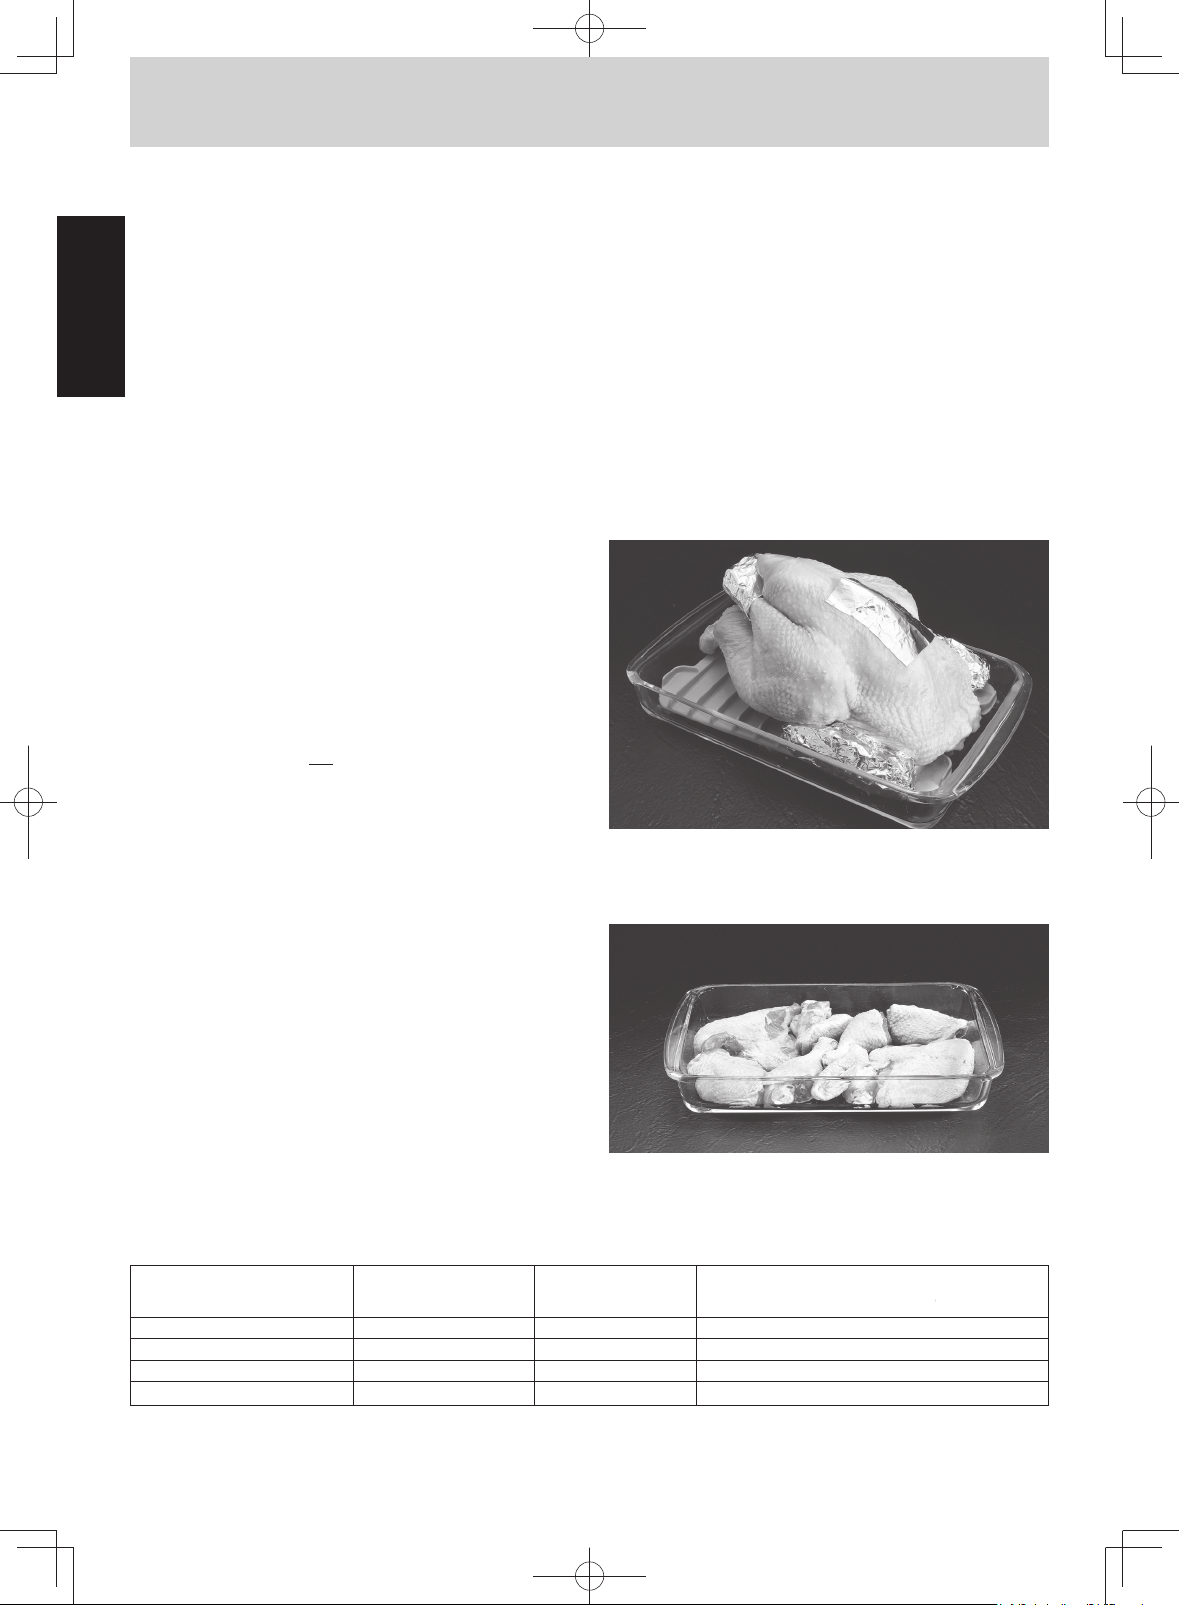
Directions for Cooking Whole Poultry by Microwave
Season as desired, but salt after cooking. Browning
sauce mixed with equal parts of butter will enhance the
appearance.
Poultry may be stuffed or unstuffed. Tie legs together with
cotton string. Place on a microwave rack set in a rectangular dish. Place poultry breast-side down: turn over
English
English
halfway through cooking. Cover with wax paper to prevent splattering.
If the poultry is not cooked enough, return it to the oven
and cook a few more minutes at the recommended power
level.
DO NOT USE A CONVENTIONAL MEAT THERMOMETER IN THE MICROWAVE OVEN.
Let stand, covered with foil, 10 -15 minutes after cooking.
Standing time allows the temperature to equalize throughout the food and finishes the cooking process.
If a large amount of juice accumulates in the bottom of
the baking dish, occasionally drain it. If desired, reserve
juices for making gravy.
Less-tender birds should be cooked in liquid such as
soup or broth. Use 1⁄4 cup per 500 g of poultry.
Use an oven cooking bag or a covered casserole. Select
a covered casserole deep enough so that bird does not
touch the lid.
If an oven cooking bag is used, prepare according to
package directions. Do not
bag. Use only nylon tie, a piece of cotton string, or a strip
cut from the open end of the bag. Make six 2 cm slits on
top of bag.
use wire twist-ties to close
g
Multiply the weight of the poultry by the minimum recommended minutes per 500 g. Programme Power and Time.
After cooking, check the internal temperature of the bird
with a microwave or conventional meat thermometer
inserted into the muscle. Check temperature in both muscles. The thermometer should not touch bone. If it does,
the reading could be inaccurate. A thermometer cannot
be accurately inserted into a small bird. To check desired
cooking of a small bird, juices should be clear and the
drumsticks should readily move up and down after standing time.
During cooking, it may be necessary to shield legs, wings
and the breast bone with foil to prevent overcooking.
Wooden toothpicks can be used to hold foil in place.
g
Directions for Cooking Poultry Pieces by Microwave
Cover with wax paper or paper towel. Use the chart
below to determine recommended minimum cooking
times.
Arrange pieces skin-side down and evenly spread in a
shallow dish.
Turn or rearrange halfway through cooking. Shield wing
tips, drumstick ends etc., if required.
Poultry Chart for Microwave Cooking by Time
POULTRY POWER
Chickens MEDIUM 87°C 12 - 16
Chicken (pieces) MEDIUM 87°C 10 - 12
Turkey MEDIUM 87°C 12 - 18
Duck MEDIUM 87°C 12 - 17
TEMPERATURE APPROX. COOKING TIME
AFTER COOKING (minutes per 500 g)
- Eng-24 -

Poultry
(continued)
CHICKEN S
Serves: 4
Ingredients:
10 dried chinese mushrooms
10 ml (2 teaspoons) sesame oil
1 clove garlic, chopped
g
500g minced chicken
10 water chestnuts, finely chopped
g
125 g bamboo shoots, chopped
15 ml (1 tablespoon) soy sauce
10 ml (2 teaspoons) oyster sauce
30 ml (2 tablespoons) sherry
1 small iceberge lettuce
Method:
1. Cover mushrooms with boiling water, stand for 30
minutes. Drain, remove stems and chop finely.
2. Place oil and garlic in a 2-litre casserole dish,
cook on HIGH for 50-60 seconds.
3. Add chicken and cook on MEDIUM for 10-12
minutes. Add remaining ingredients except lettuce
and cook on MEDIUM for 6-8 minutes.
4. Separate lettuce leaves, place tablespoons of
mixture into each lettuce leaf. Serve immediately.
AN CHOY BAU
CHICKEN LIVER WITH SOUR CREAM
Serves: 4
Ingredients:
g
200 g onion, sliced round
15 ml (1 tablespoon) vegetable oil
g
500 g chicken liver
g
10 g (1 tablespoon) flour
250 ml (1 cup) cour cream
Salt and pepper on taste
Method:
Ware: 1.5 -2.0 liter pot, plastic wrap
1. Cook onion with vegetable oil on HIGH for 5 minutes.
Stir in chicken liver, flour, then add sour cream, water,
salt, pepper and stir well.
2. Cook, covered, on HIGH power for 5-7minutes. Stir; go
on to cook on MEDIUM 2-3 minutes or until cook. Stand
for 5 min., stir well liver with sauce before serving.
HONEY S
Serves: 4-6
Ingredients:
kg
1 kg chicken wings
5 ml (1 teaspoon) chopped garlic
5 ml (1 teaspoon) chopped ginger
60 ml (
60 ml (
g
30 g (2 tablespoons) sesame seeds
Method:
Ware: 2-liter bowl, flat dish
1. Place all ingredients in bowl, stir until combined.
Marinate for at least 2 hours.
2. Remove chicken from marinade and place in a flat dish
cook on MED-HIGH for 18-20 minutes or until cook.
ESAME WINGS
1
/4 cup) coy sauce
1
/4 cup) honey
CHICKEN FILLET WITH SOUR CREAM
Serves: 4
Ingredients:
4 small single chicken breast fillet
15 ml (1 tablespoon) batter
Salt, spices mix for chicken
Sauce
15 ml (1 tablespoon) mustard
g
5 g (1 teaspoon) chicken stock powder
30 ml (2 tablespoons) lemon juice
125 ml (1/2 cup) sour cream
Method:
Ware: 2-liter pot, plastic wrap
1. Flatten chicken fillets. Place butter and chicken in a
ware and cook on MED-HIGH for 8-10 minutes. Turning
halfway through cooking.
2. Remove chicken and add remaining ingredients to dish,
stir well. Cook on HIGH power for 2-3 minutes. Serve
sauce over chicken.
CHAHOHBILI
Serves: 4
Ingredients:
440 g (1can) tomatoes
g
1
60 ml (
/4 cup) Tomato-paste
10 ml (2 teaspoons) copped garlic
2 onion, diced
10 ml (2 teaspoons) dry spices on taste
1 kg chicken drumsticks
kg
English
English
Method:
Ware: square casserole dish.
3. Place all ingredients in ware. Stir well. Cook on MED-
4. Turn chicken, go on cook on MED-HIGH for 10-12 min-
- Eng-25 -
HIGH power for 10-12 minutes.
utes or for cook.

Main Fare Meats
g
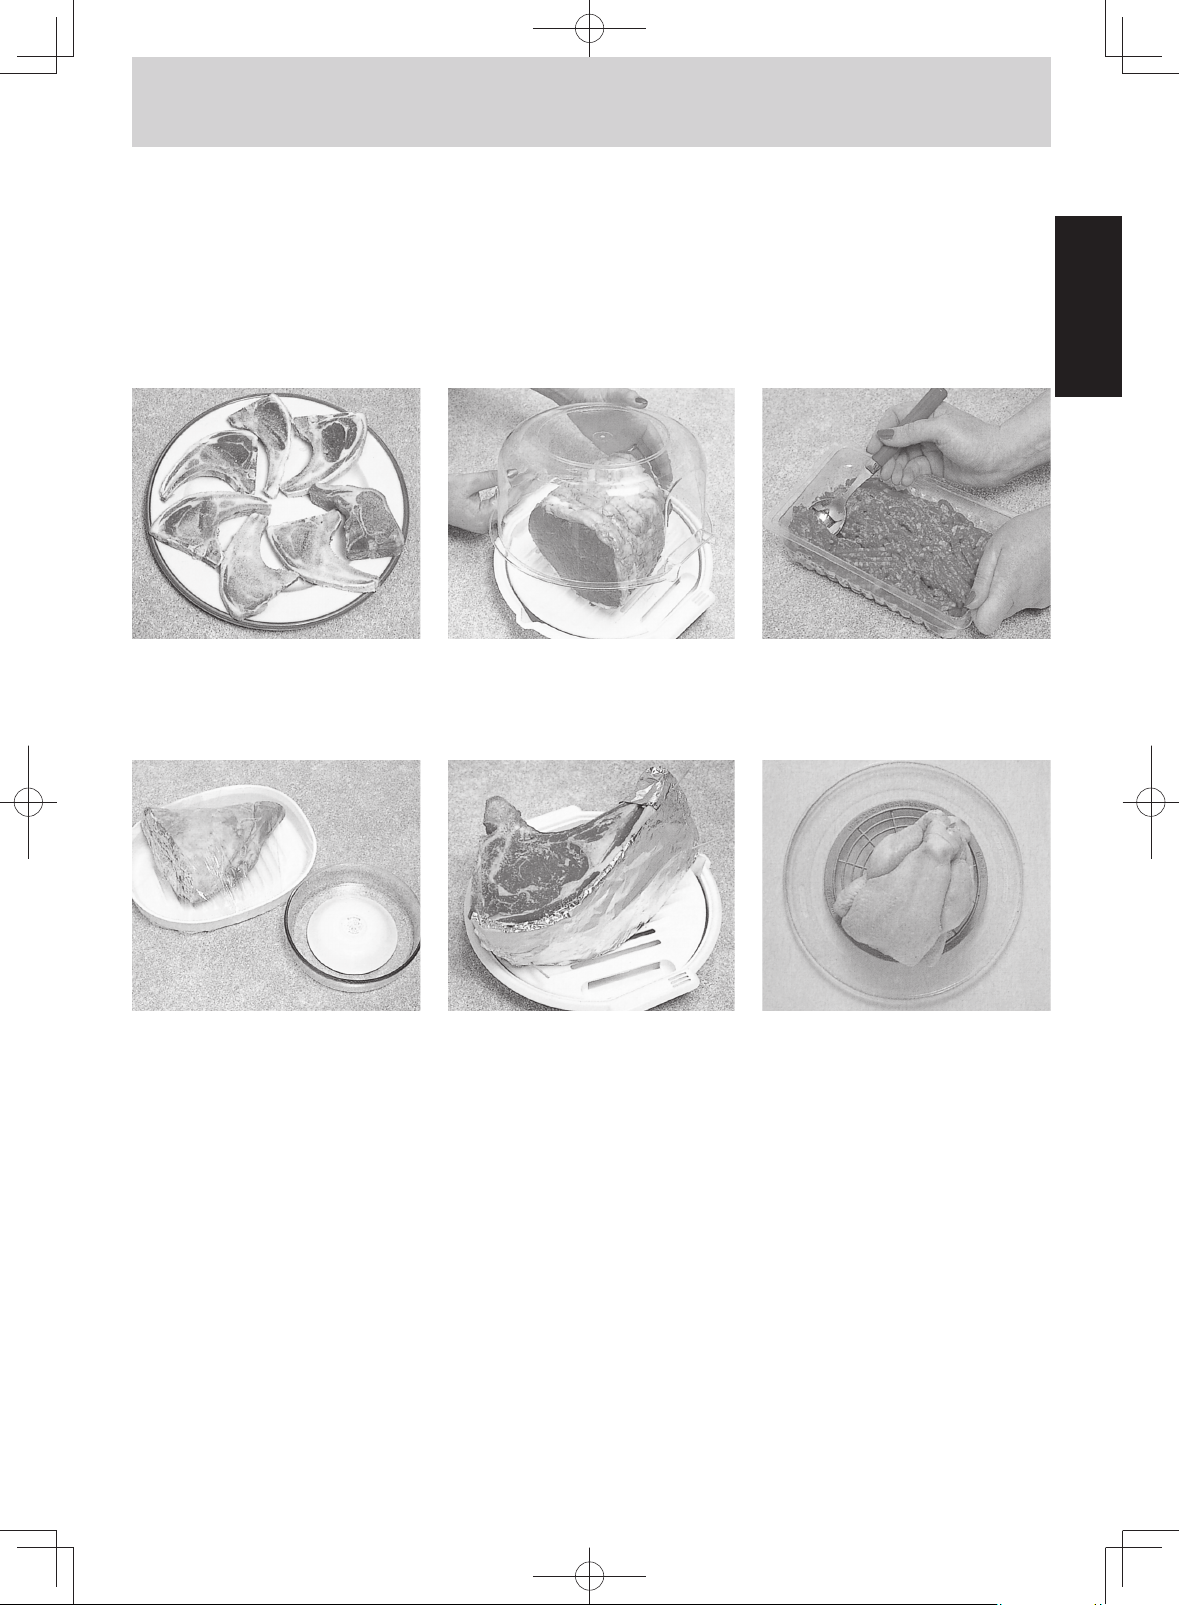
Directions for Cooking Tender Cuts of Meat by Microwave
For best results, select roasts that are uniform in shape.
Place meat on a microwave rack in a suitable dish. Beef
rib roast should be placed cut-side down. Other bone-in
roasts should be placed fat-side down. Boneless roasts
should be placed fat-side up. Halfway through cooking,
English
English
turn roasts. Half hams should be shielded by wrapping an
8 cm wide strip of foil around the large end of the ham.
Secure to the body of the ham with wooden toothpicks.
Fold 3 cm over cut surface. For shank ham halves, shield
shank bone by cupping it with foil. One third of the way
through cooking, remove ham from oven and cut off skin.
Turn fat side up and reshield edges. If desired, glaze last
10 to 20 minutes of cooking.
Loosely cover baking dish with wax paper or paper towel
to prevent splatter. If a large amount of juice accumulates
in the bottom of the dish, drain occasionally. If desired,
reserve for making gravy. Multiply the weight of the roast
by the minimum recommended times per 500 g.
Programme Power and Time.
Meats can be shielded at the beginning of cooking or
halfway through cooking. If you wish to shield at the
g
beginning of cooking, remove foil halfway through the
cooking time. Beef and pork rib roasts should be shielded
by the bones. Foil should extend about
5 cm down from bones. The shank and thin ends of
boneless roasts should also be shielded. Make sure foil
does not touch the sides of the oven, as arcing may
occur. Canned hams should be shielded on the top cutedge with a 3 cm strip of foil. Wrap strip of foil around
ham and secure to body of ham with wooden toothpicks.
Fold 2 cm over cut surface. After heating, check temperature using a meat thermometer. The thermometer should
not touch bone or fat. If it does, the reading could be
inaccurate. Lower temperatures are found in the centre of
the roast and in the muscle close to a large bone, such
as a pork loin centre rib roast. If the temperatures are
low, return meat to the oven and cook a few more minutes at the recommended power level. DO NOT USE A
CONVENTIONAL MEAT THERMOMETER IN THE
MICROWAVE OVEN. Let stand, covered with foil, 10-15
minutes. During standing time the internal temperature
equalises and the temperature rises 5°C to 10°C.
Directions for Cooking Less-Tender Cuts of Meat by Microwave
Less-tender cuts of meat such as pot roasts should be
cooked in liquid. Use 1/2 to 2 cups of soup, broth, etc. per
g
500 g of meat. Use an oven cooking bag or covered
casserole when cooking less-tender cuts of meat. Select
a covered casserole deep enough so that the meat does
not touch the lid. If an oven cooking bag is used, prepare
the bag according to package directions. Do not use wire
or metal twist-ties. Use the nylon tie provided, otherwise,
use a piece of cotton string or a strip cut from the open
end of the bag. Make six 2 cm slits in top of bag to allow
steam to escape. Multiply the weight of the roast by the
minimum recommended minutes per 500 g. Programme
Power and Time. Turn meat over halfway through cooking. Meat should be tender when cooked.
g
Meat Chart for Microwave Cooking
MEAT POWER
Beef
Roasts Medium MEDIUM 12 - 14
Chuck, Flank, Brisket MEDIUM 20 - 30
Pork
Leg of Pork MEDIUM 15 - 18
Loin of Pork MEDIUM 15 - 18
Pork Chops MEDIUM 8 - 10
Lamb
Medium MEDIUM 12 - 14
Well MEDIUM 15 - 18
- Eng-26 -
APPROX. COOKING TIME
(minutes per 500 g)

Main Fare Meats
(continued)
CHILLI B
Serves: 4
Ingredients:
500 g minced beef
1 onion, diced
1 clove garlic, crushed
g
30 g (2 tablespoons) packet chilli seasoning mix
400 ml (1can) Tomato puree
200 g (1 can) kidney been, drained
Method:
Ware: 2-liter pot, plastic wrap.
1. Place all Ingredients, except kidney been in a pot. Stir
well. Cook on MED-HIGH power for 15-20 minutes or
until soft. Stir halfway through cooking and add kidney
been, and stir well.
2. Serve with salad and cheese.
EEF
g
g
CHINESE BEEF AND VEGETABLES
Serves: 4
Ingredients:
g
400 g rump steak, sliced
5 ml (1 teaspoon) chopped ginger
1 clove garlic, crushed
15 ml (1 tablespoon) soy sauce
30 ml (2 tablespoons) Hoi Sin sauce
1
60 ml (
/4 cup) beef stock
500 ml (2 cups) sliced vegetables
Method:
1. Place steak, ginger and garlic in a 3-litre casserole
dish. Cook on HIGH for 1 minute.
2. In a 1 cup jug combine sauces with stock. Add to meat
mixture. Cook on HIGH for 1-2 minutes.
3. Add vegetables and cook on HIGH for 4-5 minutes,
stirring halfway through cooking.
4. Let stand for 5 minutes before serving with rice or noodles.
BARBECUED MARINATED SPARE RIBS
Serves: 4
Ingredients:
1 kg pork spare ribs
kg
190 ml (
190 ml (
15 ml (1 tablespoon) soy sauce
15 ml (1 tablespoon) worcestershire sauce
1. Place all ingredients in 3-litre casserole dish and mari-
2. Cook ribs on MEDIUM for 28 to 32 minutes, turning
3
/4 cup) fruit chutney
3
/4 cup) tomato sauce
Method:
nate for several hours or overnight.
once through cooking.
BEEF STROGANOFF
Serves: 4
Ingredients:
1 onion, sliced
15 ml (1 tablespoon) vegetable oil
g
500 g rump steak sliced into ribbons
30 ml (2 tablespoons) tomato sauce
30 ml (2 tablespoons) Tabasco
g
15 g (1 tablespoon) flour
1 beef stock cub
125 ml (
1
/2 cup) sour cream
Method:
Ware: 1.5-2.0 liter pot, plastic wrap.
1. Place onion, vegetable oil, beef, tomato and bean
sauces in pot. Stir until combined.
2. Cook on MED-HIGH for 12-15 minutes, stir onceduring
cooking. Add flour, beef stock cube, and sour cream.
3. Stir and cook on MED-HIGH for 7-10 minutes or until
soft.
SPAGHETTI MEAT SAUCE
Serves: 4
Ingredients:
g
100 g (1p.) onion, diced
g
5 g (1clove) garlic, crushed
150 g (1 p.) paprika, sliced
g
30 ml (2 tablespoons) vegetable oil
g
100 g (5 p.) sliced mushrooms
225 g lean meat loaf
g
200 ml red wine
400 ml (1 cap.) tomatoes
1
/2 teaspoon salt and pepper
Other spices on taste
Method:
Ware: 2 liter pot, plastic wrap.
1. Cook onion, garlic and vegetable oil in pot on HIGH
for 2 minutes. Add paprika, mushrooms, meat loaf, stir
well, cook, covered, on MED-HIGH for 6-8 minutes
until half done.
2. Add red wine and crushed tomatoes, salt, pepper and
spices and cook, covered, on MED-HIGH for 8-10 minutes.
PILAF
Serves: 4
Ingredients:
g
200g (2 p.) carrot, sliced small cube
g
200g (2 p.) onion, diced
30 ml (2 tablespoons) vegetable oil
g
400 g pork for stew, sliced medium
3
g
150 g (
/4 cup) rice, washed and steeped
250 ml (1cup) water
Salt, spices seasoning mix, barberry on taste
1 clove Garlic
Method:
Ware: 2 liter pot, plastic wrap.
1. Place meat, carrots, onion and oil in pot. Cook without
cover on HIGH power for 10 minutes.
2. Add salt, spices seasoning mix, barberry, stir well, add
water and rice. Cook, covered, on HIGH power for 5-7
minutes. Then go on cook on MEDIUM power for 20-25
minutes or until cook.
3. Let stand for 10 minutes into off oven.
cube
thought 40 minutes with 1 cup
water
English
English
- Eng-27 -
 Loading...