

Page 1

Operating Instructions
Bedienungsanleitung
Gebruiksaanwijzing
Mode dʼemploi
Manuale di istruzioni
Instrucciones de funcionamiento
Manual de instruções
Bruksanvisning
Brugsanvisning
Bruksanvisning
Käyttöohjeet
Instrukcja obsługi
Návod k obsluze
Kezelési útmutató
NN-GD359W / NN-GD369M / NN-GD379S
Microwave Oven/Grill Oven
Mikrowellengerät mit Grill
Magnetron/Grill Oven
Four à Micro-ondes-Gril
Forno a Microonde e Grill
Horno Microondas/Grill
Forno Micro-Ondas/Grelhador
Kombinationsugn med Mikrovågor/Grill
Mikrobølgeovn/Grill
Mikrobølge/Grill Ovn
Mikroaaltouuni/Grilli
Kuchenka Mikrofalowa z Grillem
Mikrovlnná / trouba/ Gril
Grillezös/mikrohullámú sütö
PortuguêsItaliano Español Polski
Nederlands
FrançaisDeutsch
Dansk
Norsk
Svenska
Suomi
English Magyar
Česky
Page 2

IMPORTANT SAFETY INSTRUCTIONS. Before operating this oven, please read these instructions
carefully and keep for future reference.
WICHTIGE SICHERHEITSANWEISUNGEN. Vor Gebrauch des Mikrowellengerätes bitte diese
Bedienungsanleitung sorgfältig durchlesen und aufbewahren.
BELANGRIJKE VEILIGHEIDSINSTRUCTIES. Alvorens u deze microgolfoven gebruikt, raden wij u ten
zeerste aan deze gebruiksaanwijzing door te lezen en bij te houden voor eventueel toekomstig gebruik.
INSTRUCTIONS DE SÛRETÉ IMPORTANTES. Avant dʼutiliser le four à micro-ondes, lisez attentivement les recommandations dʼutilisation et conservez-les soigneusement.
ISTRUZIONI IMPORTANTI PER LA SICUREZZA. Prima di utilizzare questo forno, leggere per favore
con attenzione questo manuale e conservare per referenze future.
INSTRUCCIONES SOBRE SEGURIDAD IMPORTANTES. Antes de comenzar a utilizar su horno
microondas, lea cuidadosamente las siguientes instrucciones y guardelas para futuras cuestiones.
INSTRUÇÕES DE SEGURANÇA DE IMPORTANTES. Antes de utilizar este micro-ondas, leia atentamente este manual de instruções e guarde-o para futuras referências.
TÄRKEITÄ TURVALLISUUSTIETOJA. Ole hyvä ja lue tämä käyttöohje huolellisesti ja talleta
myöhempää tarvetta varten
.
VIKTIGA SÄKERHETSANVISNINGAR. Läs dessa instruktioner noga före användande av ugnen och
behåll dem för framtida bruk.
VIGTIGE SIKKERHEDSFORSKRIFTER. Læs brugsanvisningen omhyggeligt inden ovnen tages i
brug. Læs brugsanvisningen igen hvis der er noget du er i tvivl om.
VIKTIGE SIKKERHETSINSTRUKSJONER. Før du bruker ovnen, vennligst les instruksjonene nøye,
og behold dem for fremtidig bruk.
WAŻNE INSTRUKCJE BEZPIECZEŃSTWA. Przed włączeniem kuchenki prosimy o dokładne
przeczytanie instrukcji obsługi i o zachowanie jej na przyszłość.
INSTRUCŢIUNI DE SIGURANŢĂ IMPORTANTE: Înainte de utilizarea a acestui cuptor, vă rugăm să citiţi
cu atenţie aceste instrucţiuni şi să le păstraţi pentru referinţe ulterioare.
DŮLEŽITÉ POKYNY K BEZPEČNOSTI.
Pečlivě si je prosím přečtěte a uložte pro příští použití.
Page 3
En-1
English
Examine your microwave oven
Unpack the oven, remove all packing material,
and examine the oven for any damage such as
dents, broken door latches or cracks in the
door. If you find any damage, notify your
dealer immediately. Do not install a damaged
microwave oven.
Earthing instructions
IMPORTANT: THIS UNIT HAS TO BE
PROPERLY EARTHED FOR PERSONAL
SAFETY.
If your AC outlet is not grounded, it is the
personal responsibility of the customer to have
it replaced with a properly grounded wall
socket.
Operation voltage
The voltage has to be the same as specified
on the label on the oven. If a higher voltage
than specified is used, it may cause a fire or
other damages.
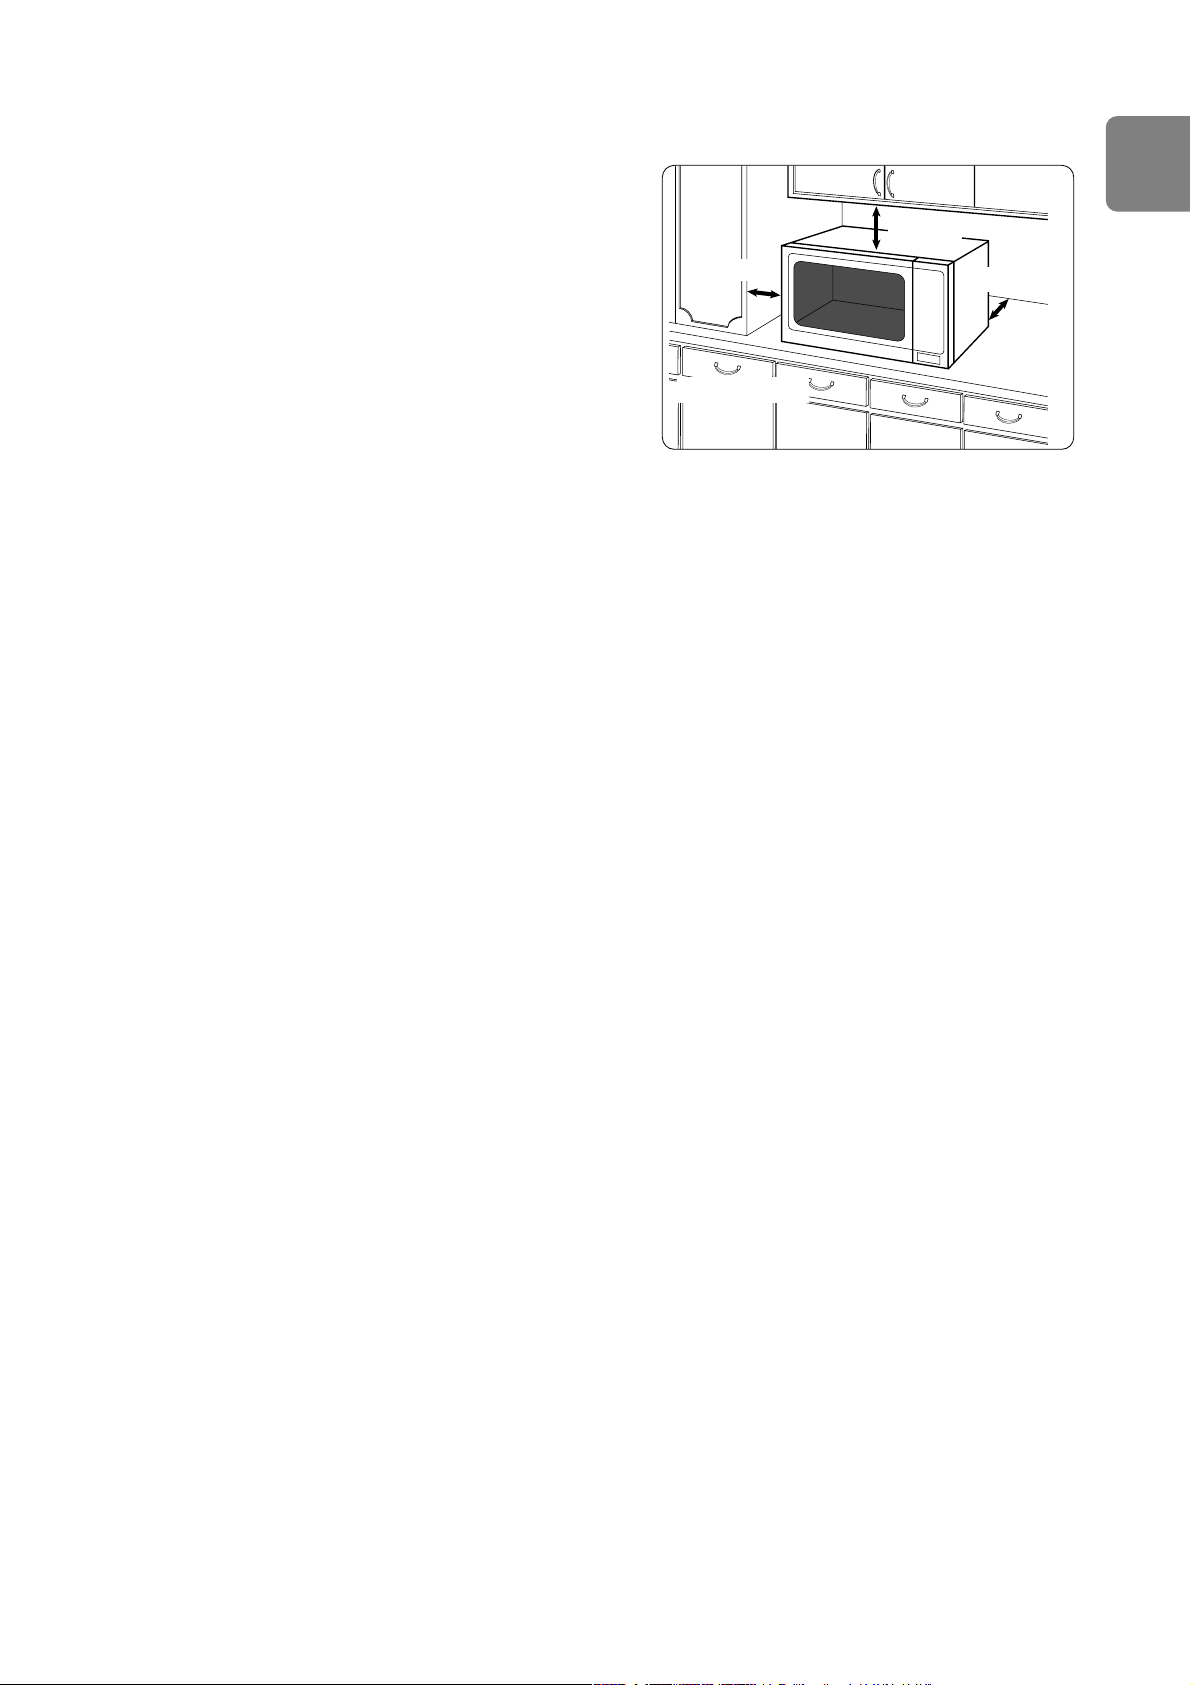
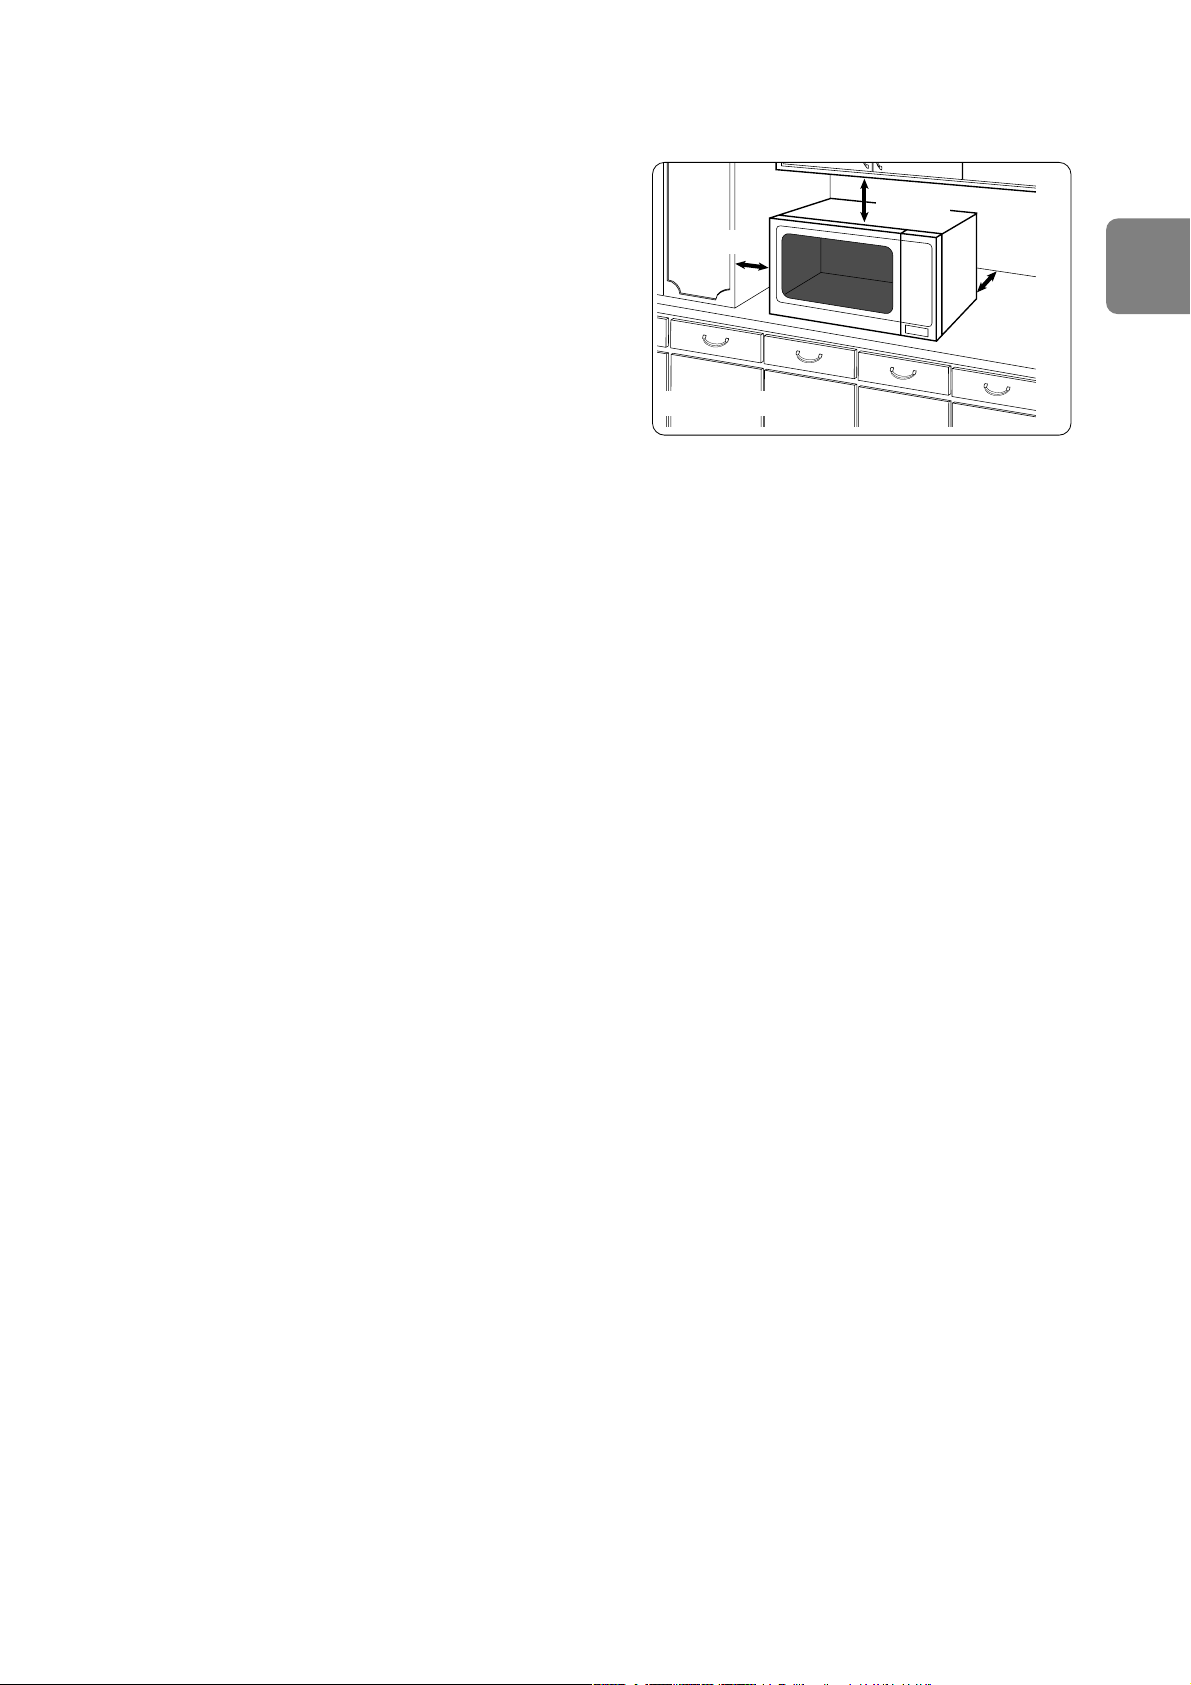
Placement of the oven
This oven is intended for counter-top use only.
It is not intended for built-in use or use inside a
cupboard.
1. Place the oven on a flat and stable
surface more than 85 cm above the floor.
2. When this oven is installed, it should be
easy to isolate the appliance from the
electricity supply by pulling out the plug or
operating a circuit breaker.
3. For proper operation, ensure a sufficient air
circulation for the oven.
Counter-top use:
a. Allow 15 cm of space on the top of the
oven, 10 cm at the back, 5 cm on one side,
and the other side must be opened more
than 40 cm.
b. If one side of the oven is placed flush to a
wall, the other side or top must not be
blocked.
4. Do not place this oven near an electric or
gas cooker range.
5. The feet should not be removed.
6. This oven is only for household usage. Do
not use outdoors.
7. Avoid using the microwave oven in high
humidity.
8. The power cord should not touch the
outside of the oven. Keep the cord away
from hot surfaces. Do not let the cord hang
over the edge of a table or work top. Do not
immerse the cord, plug or oven in water.
9. Do not block the air vents on the top and
back of the oven. If these openings are
blocked during operation the oven may overheat. In this case the oven is protected by a
thermal safety device and resumes operation
only after cooling down.
10.This appliance is not intended to be
operated by means of an external timer or
separate remote-control system.
15 cm
10 cm
OPEN
5 cm
Counter-top
Installation and connection
Page 4

En-2
Installation and connection
WARNING
Important safety instructions
1. The door seals and seal areas should be
cleaned with a damp cloth.
The appliance should be inspected for
damage to the door seals and door seal
areas and if these areas are damaged the
appliance should not be operated until it has
been repaired by a service technician trained
by the manufacturer.
2. Do not attempt to tamper with or make any
adjustments or repairs to the door, control
panel housing, safety interlock switches or
any other part of the oven. Do not remove
the outer panel from the oven which gives
protection against exposure to microwave
energy.
Repairs should only be done by a qualified
service person.
3. Do not operate this appliance if it has a
damaged CORD OR PLUG, if it is not
working properly, or if it has been damaged
or dropped. It is dangerous for anyone other
than a service technician trained by the
manufacturer to perform repair service.
4. If the supply cord is damaged, it must be
replaced by the manufacturer or its service
agent or a similarly qualified person in order
to avoid a hazard.
5. Only allow children to use the oven without
supervision when adequate instructions have
been given so that the child is able to use the
oven in a safe way and understands the
hazards of improper use.
6. Liquids and other foods must not be heated
in sealed containers since they are liable to
explode.
7. This appliance is not intended for use by
persons (including childen) with reduced
sensory or mental capabilities, or lack of
experience and knowledge unless they have
been given supervision or instruction
concerning use of the appliance by a person
responsible for their safety. Children should
be supervised to ensure that they do not
play with the appliance.
Attention: Hot Surfaces
Page 5

En-3
English
Safety Instructions
Use of your oven
1. Do not use the oven for any reason other
than the preparation of food. This oven is
specifically designed to heat or cook food.
Do not use this oven to heat chemicals or
other non-food products.
2. Before use, check that utensils/containers
are suitable for use in microwave ovens.
3. Do not attempt to use this microwave oven
to dry newspaper, clothing or any other
materials. They may catch on fire.
4. When the oven is not being used, do not
store any objects other than oven
accessories inside the oven in case it is
accidentally turned on.
5. The appliance shall not be operated by
MICROWAVE or COMBINATION WITHOUT
FOOD IN THE OVEN. Operation in this
manner may damage the appliance.
6. If smoke or a fire occurs in the oven, press
Stop/Cancel Pad and leave the door closed
in order to stifle any flames. Disconnect the
power cord, or shut off power at fuse or
circuit breaker panel.
Heater operation
1. Exterior oven surfaces, including air vents
on the cabinet and the oven door will get
hot during COMBINATION and GRILLING,
take care when opening or closing the door
and when inserting or removing food and
accessories.
2. The oven has two heaters situated in the
top of the oven. After using the
COMBINATION and GRILL function, these
surfaces will be very hot. Care should be
taken to avoid touching the heating
elements inside the oven.
N.B: After cooking by these modes, the
oven accessories will be very hot.
3. The accessible parts may become hot in
combination use. Young children should be
kept away, and children should only use the
oven under adult supervision due to the
temperatures generated.
Oven light
When it becomes necessary to replace the
oven light, please consult your dealer.
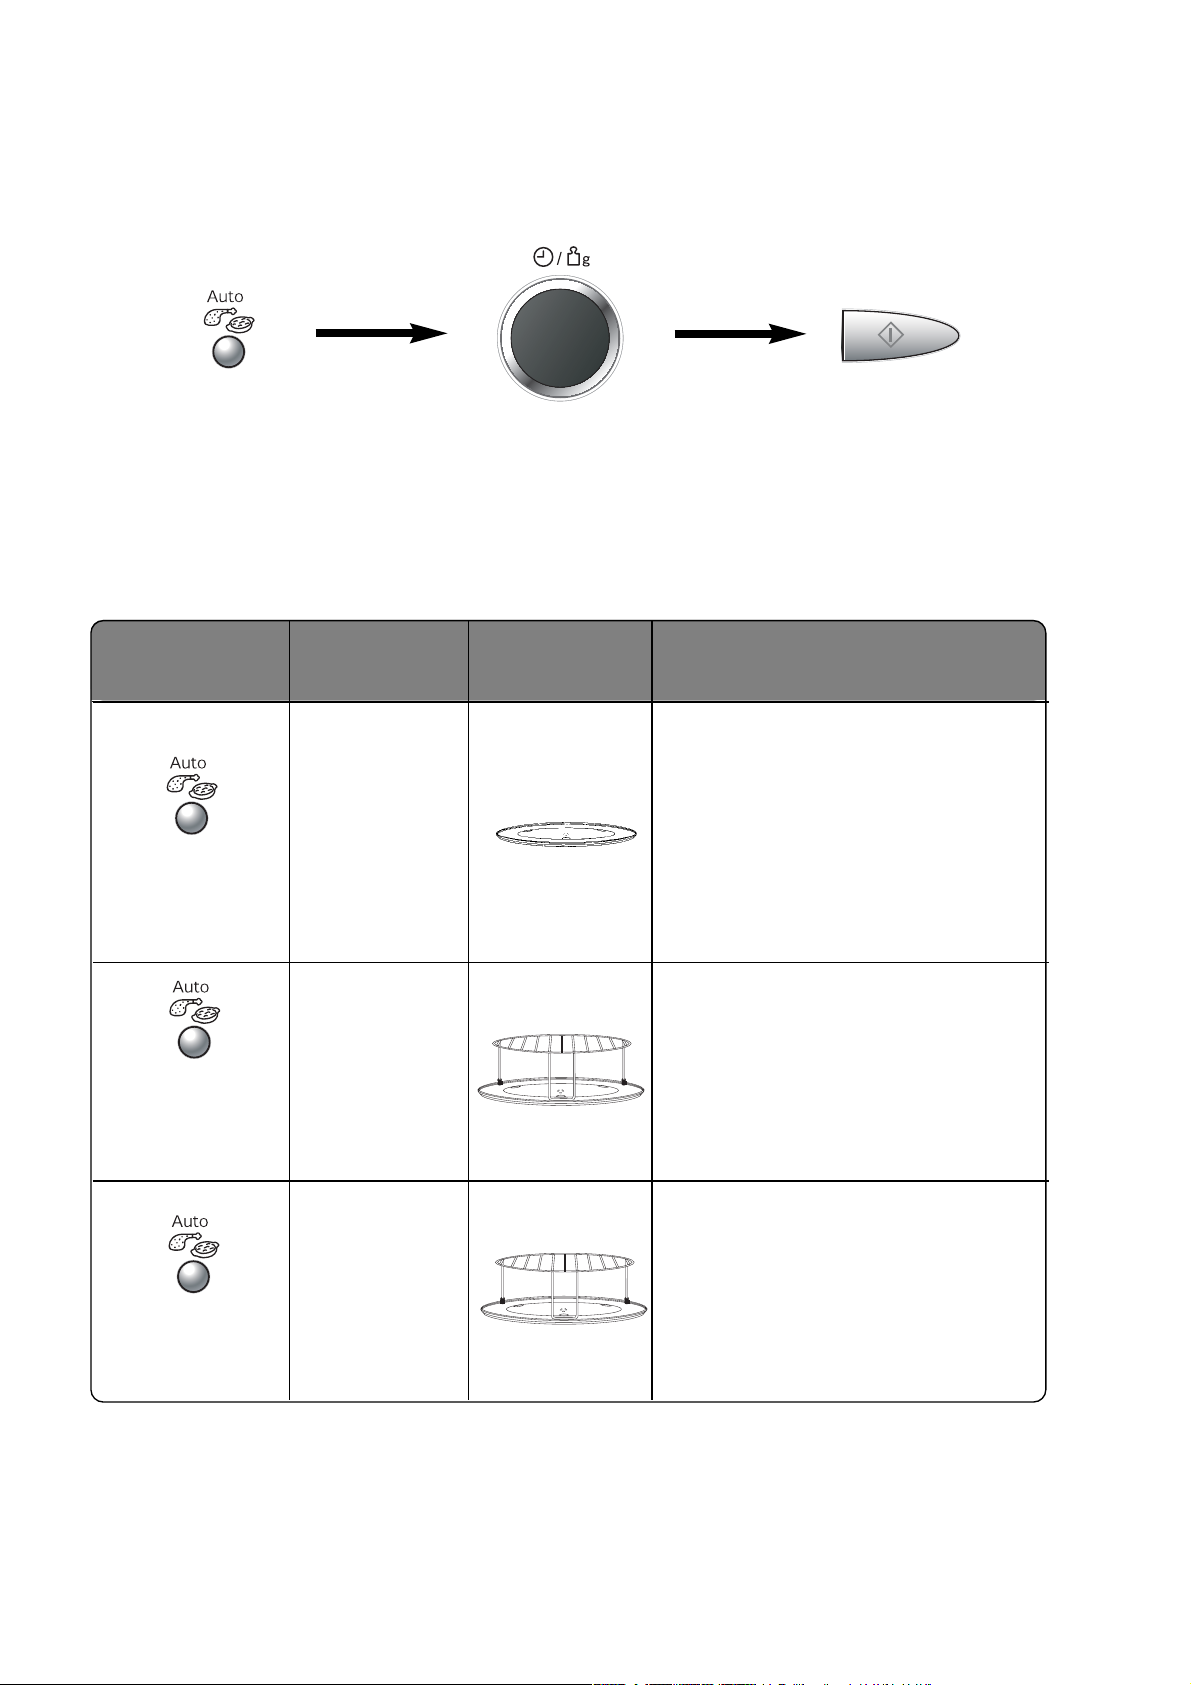
Accessories
The oven comes equipped with a variety of
accessories. Always follow the directions given
for use of the accessories.
Glass tray
1. Do not operate the oven without
the roller ring and the glass tray in place.
2. Never use another type of glass tray than
the one specially designed for this oven.
3. If the glass tray is hot, let it cool before
cleaning or placing in water.
4. The glass tray can turn in either direction.
5. If the food or cooking vessel on the glass
tray touches the oven walls and stops the
tray rotating, the tray will automatically
rotate in the opposite direction. This is
normal.
6. Do not cook foods directly on the glass
tray.
Roller ring
1. The roller ring and the oven floor should be
cleaned frequently to prevent noise and
build-up of remaining food.
2. The roller ring must always be used for
cooking together with the glass tray.
Wire rack
1. The wire rack is used to facilitate browning
of small dishes and help with the good
circulation of the heat.
2. Do not use any metal container directly on
the wire rack in COMBINATION with
MICROWAVE.
3. Do not use the wire rack in MICROWAVE
mode only.
Panacrunch pan- See En-17.
Page 6

En-4
Important Information
1) Cooking times
• The cooking time depends on the
condition, temperature, amount of food and
on the type of cookware.
• Begin with the minimum cooking time to
help prevent overcooking. If the food is not
sufficiently cooked you can always cook it
for a little longer.
N.B.: If the recommended cooking
times are exceeded the food will be
spoiled and in extreme circumstances
could catch fire and possibly damage
the interior of the oven.
2)
Small quantities of foods
• Small quantities of food or foods with low
moisture content can burn, dry out or catch
on fire if cooked too long. If materials inside
the oven should ignite, keep the oven door
closed, turn the oven off and remove the
plug from the socket.
3) Eggs
• Do not cook eggs in their shells and whole
hard-boiled eggs by MICROWAVE.
Pressure may build up and the eggs may
explode, even after the microwave heating
has ended.
4) Piercing skin
• Food with non porous skins, such as
potatoes, egg yolks and sausages must be
pierced before cooking by MICROWAVE to
prevent bursting.
5) Meat thermometer
• Use a meat thermometer to check the
degree of cooking of roasts and poultry only
when the meat has been removed from the
oven. Do not use a conventional meat
thermometer in the microwave oven
because it may cause sparking.
6) Liquids
• When heating liquids, e.g. soup, sauces
and beverages in your microwave oven,
overheating the liquid beyond boiling point
can occur without evidence of bubbling.
This could result in a sudden boil over of
the hot liquid.
To prevent this possibility the followingsteps
should be taken:
a) Avoid using straight-sided containers
with narrow necks.
b) Do not overheat.
c) Stir the liquid before placing the
container in the oven and again
halfway through the cooking time.
d) After heating, allow it to stand in the
oven for a short time, stir again
before carefully removing the container.
7) Paper/plastic
• When heating food in plastic or paper
containers, check the oven frequently as
these types of containers ignite if
overheated.
• Do not use recycled paper products (e.g.
Kitchen Roll) unless the paper product is
labelled as safe for microwave oven use.
Recycled paper products may contain
impurities which may cause sparks and/or
fires during use.
• Remove wire twist-ties from roasting bags
before placing the bags in the oven.
8) Utensils/foil
• Do not heat any closed cans or bottles
because they might explode.
• Metal containers or dishes with metallic trim
should not be used during microwave
cooking. Sparking will occur.
• If you use any aluminium foil, meat spikes or
metalware the distance between them and
the oven walls and door should be at least 2
cm to prevent sparking.
9) Feeding bottles/baby food jars
• The top and teat or lid must be removed
from feeding bottles or baby food jars before
placing in the oven.
• The contents of feeding bottles and baby
food jars are to be stirred or shaken.
• The temperature has to be checked before
consumption to avoid burns.
Page 7
En-5
English
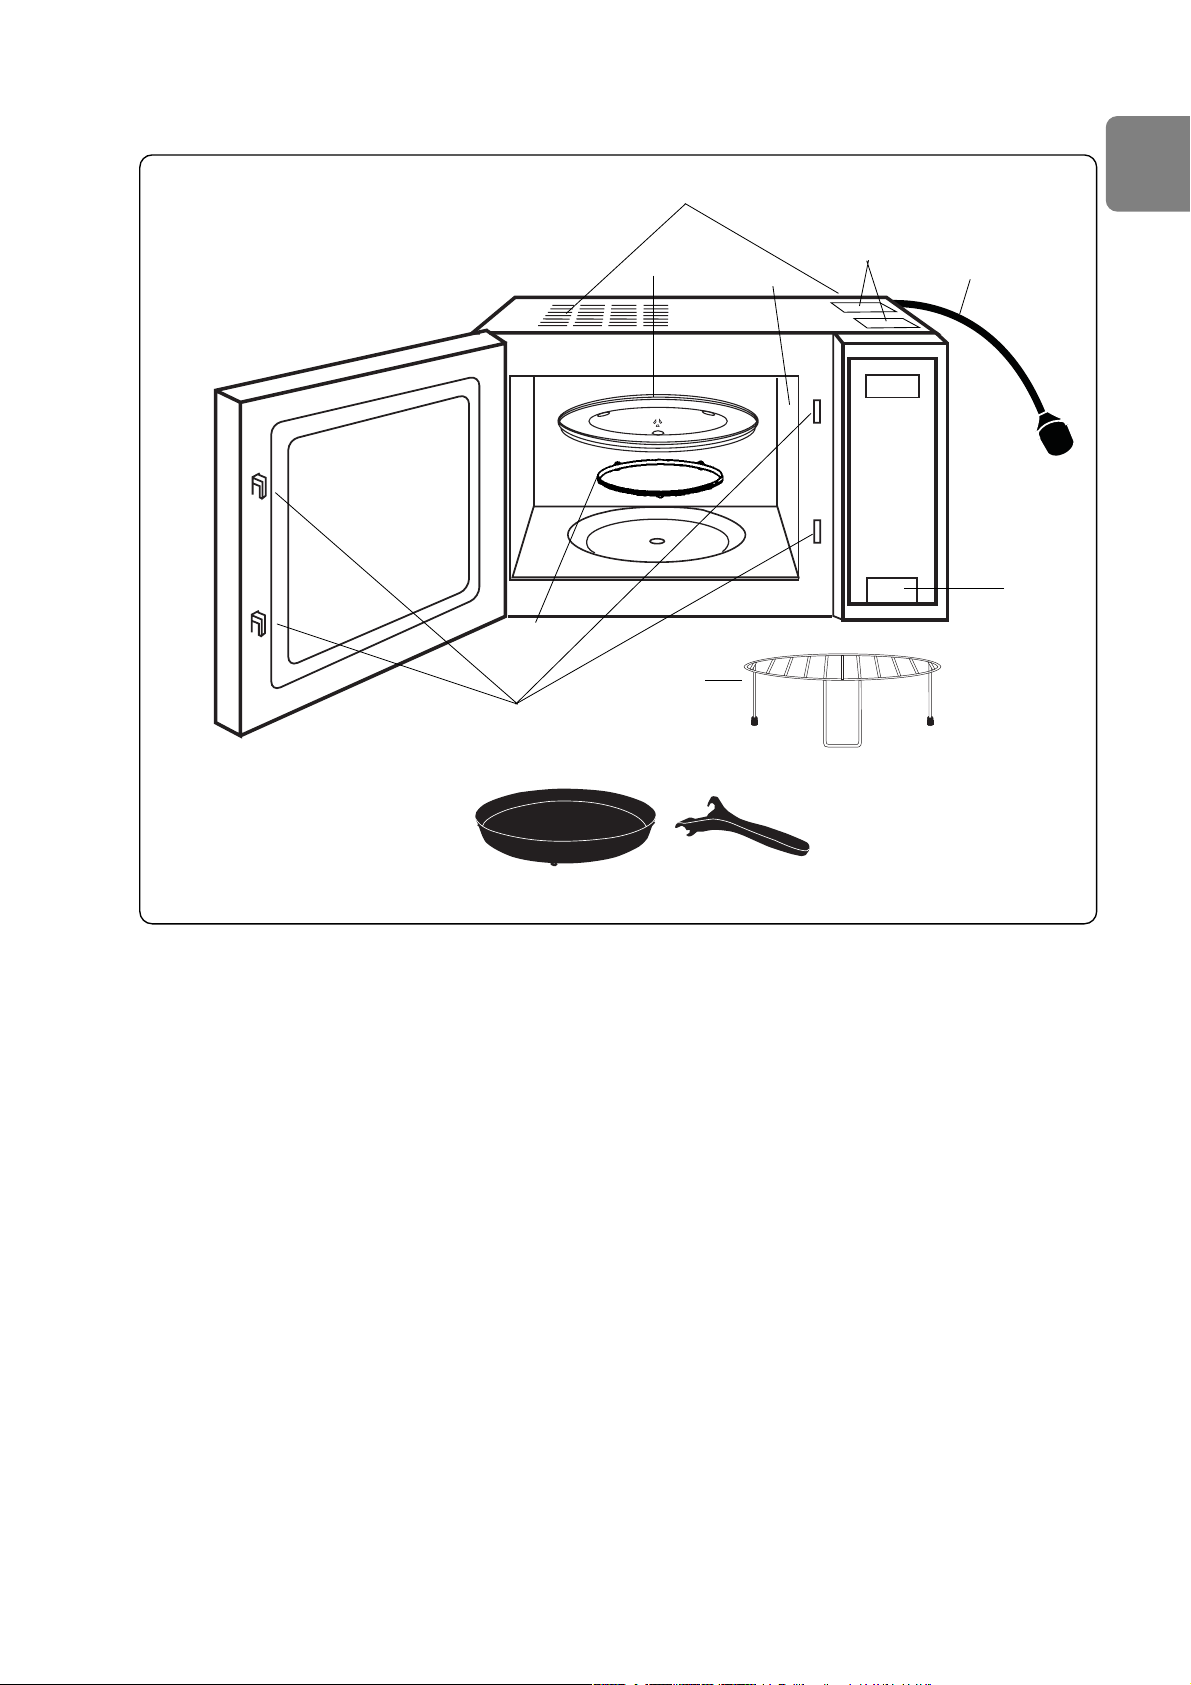
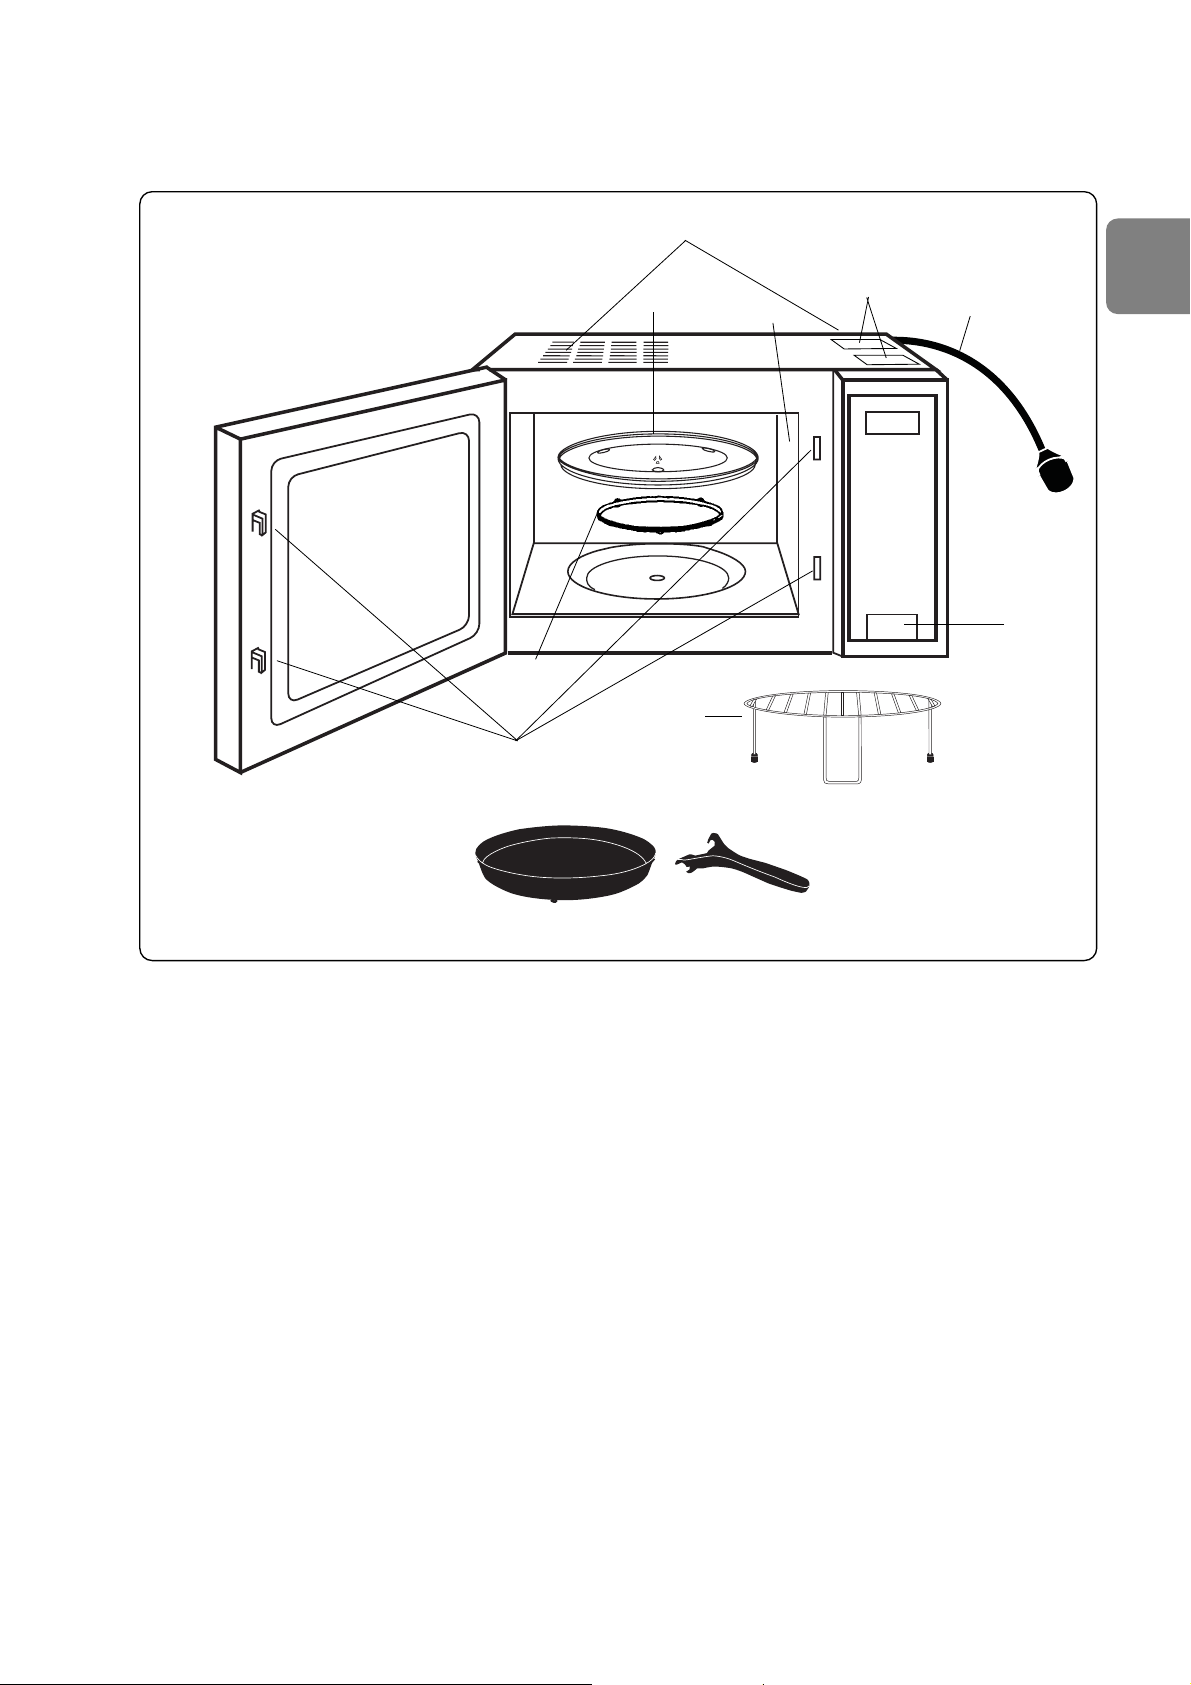
1. Door release button
Press to open the door. When you open the oven door during cooking, the cooking is
stopped temporarily without clearing earlier made settings. The cooking is resumed as soon
as the door is closed and Start Pad pressed.
2. Oven window
3. Door safety lock system
4. Oven air vent
5. Control panel
6. Glass tray
7. Roller ring
8. External oven air vents
9. Wire rack
10. Panacrunch pan
11. Panacrunch pan handle
12. Power cord
13. Caution label (Hot surfaces)
Outline diagram
[1]
[2]
[3]
[4]
[5]
[7]
[9]
[6]
[10]
[11]
[8]
[12]
[13]
Page 8
En-6
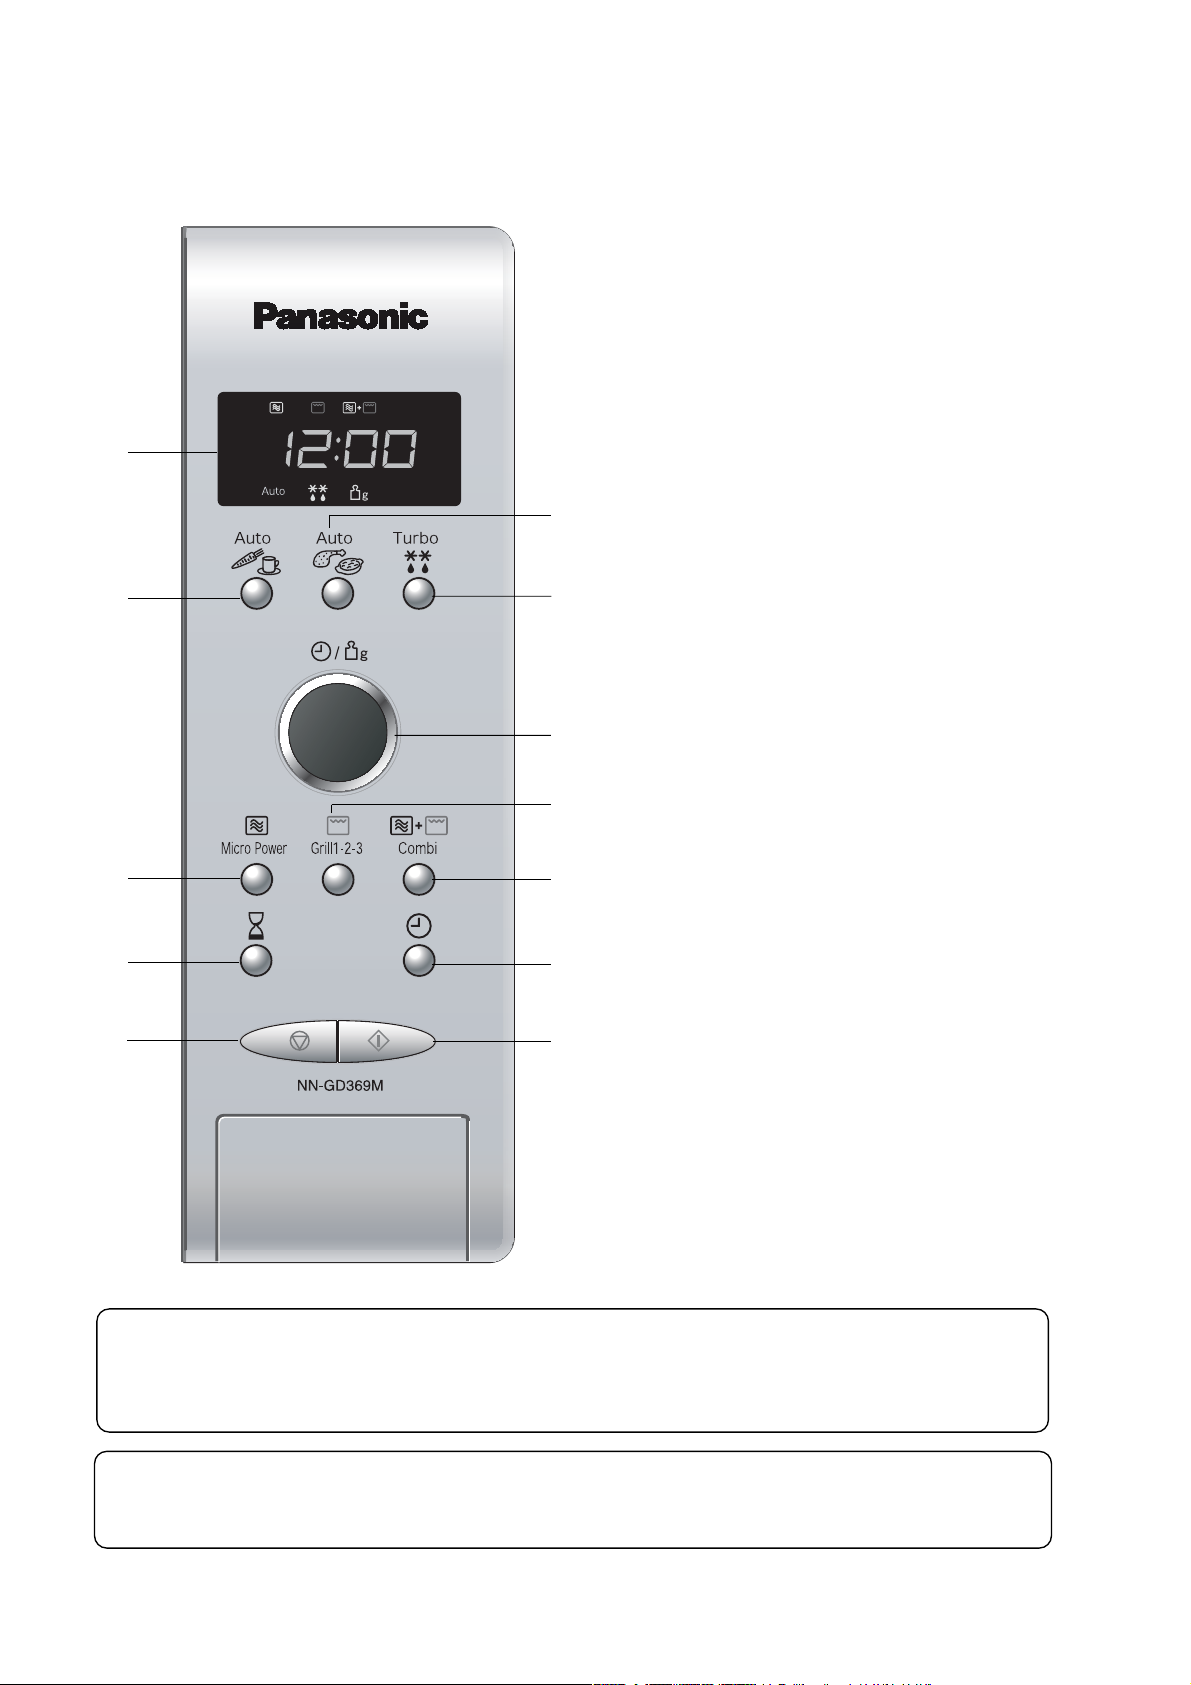
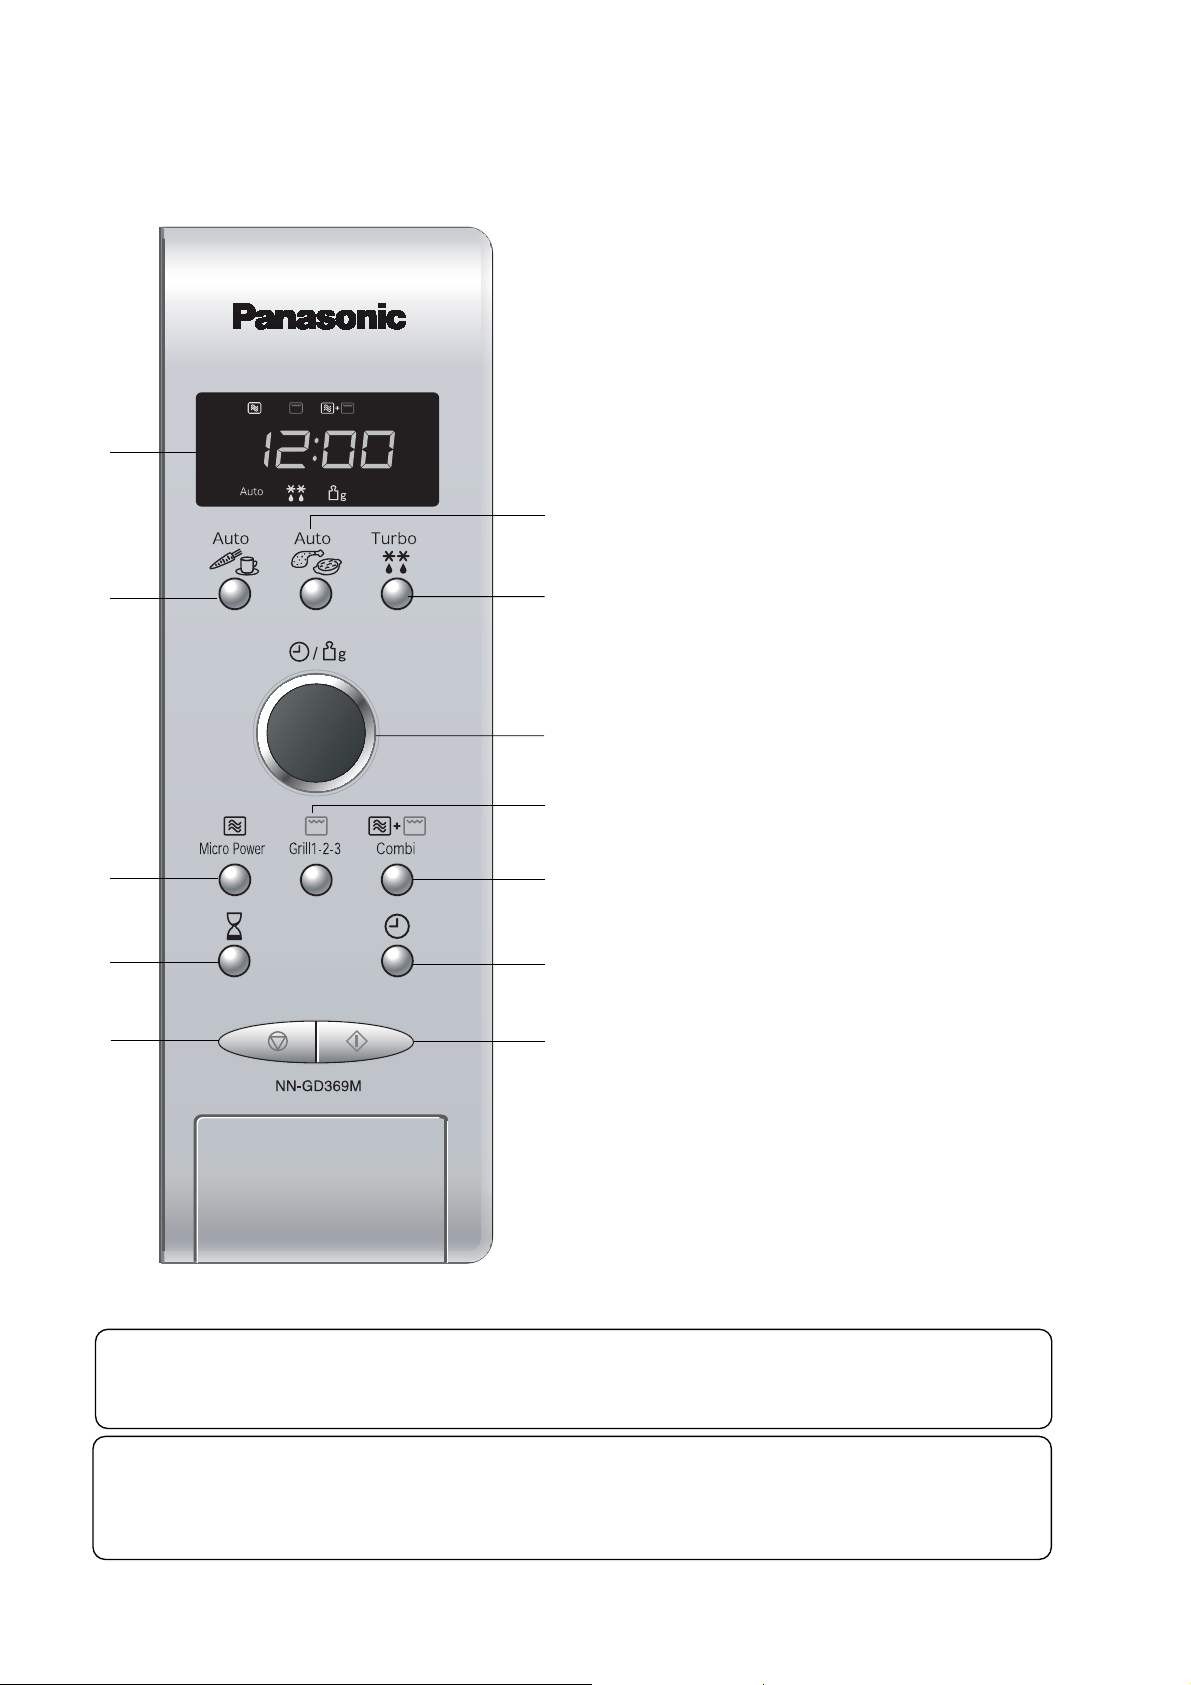
Control panel
NN-GD359W / NN-GD369M / NN-GD379S*
Beep sound:
When a pad is touched correctly a beep will be heard. If a pad is touched and no beep is heard,
the unit has not or cannot accept the instruction. At the end of any complete program, the oven
will beep 5 times.
(1) Display window
(2) Auto weight Microwave programs
(3) Auto weight Combination
programs
(4) Auto weight Turbo Defrost
programs
(5) Time/weight Dial
(6) Microwave power Pad
(7) Grill Pad
(8) Combination Pad
(9) Delay/Stand Pad
(10) Clock Pad
(11) Stop/Cancel Pad:
Before cooking:
One press clears your instructions.
During cooking:
One press temporarily stops the
cooking program. Another press
cancels all your instructions and the
time of day will appear in the display.
(12) Start Pad
The design of your control panel may vary
from the panel displayed (depending on
colour), but the words on the pads will be
the same.
(5)
N.B:
If an operation is set and start pad is not pressed, after 6 minutes, the oven will automatically
cancel the operation. The display will revert back to clock mode.
(1)
(2)
(3)
(4)
(6)
(7)
(8)
(9)
(10)
(12)
(11)
*
This oven is equipped with an energy
saving function.
Please Note:
1. When in stand-by mode the brightness
of the display will be reduced.
2. The oven will enter stand-by mode,
when first plugged in and immediately
after the last operation has completed.
Page 9
En-7
English
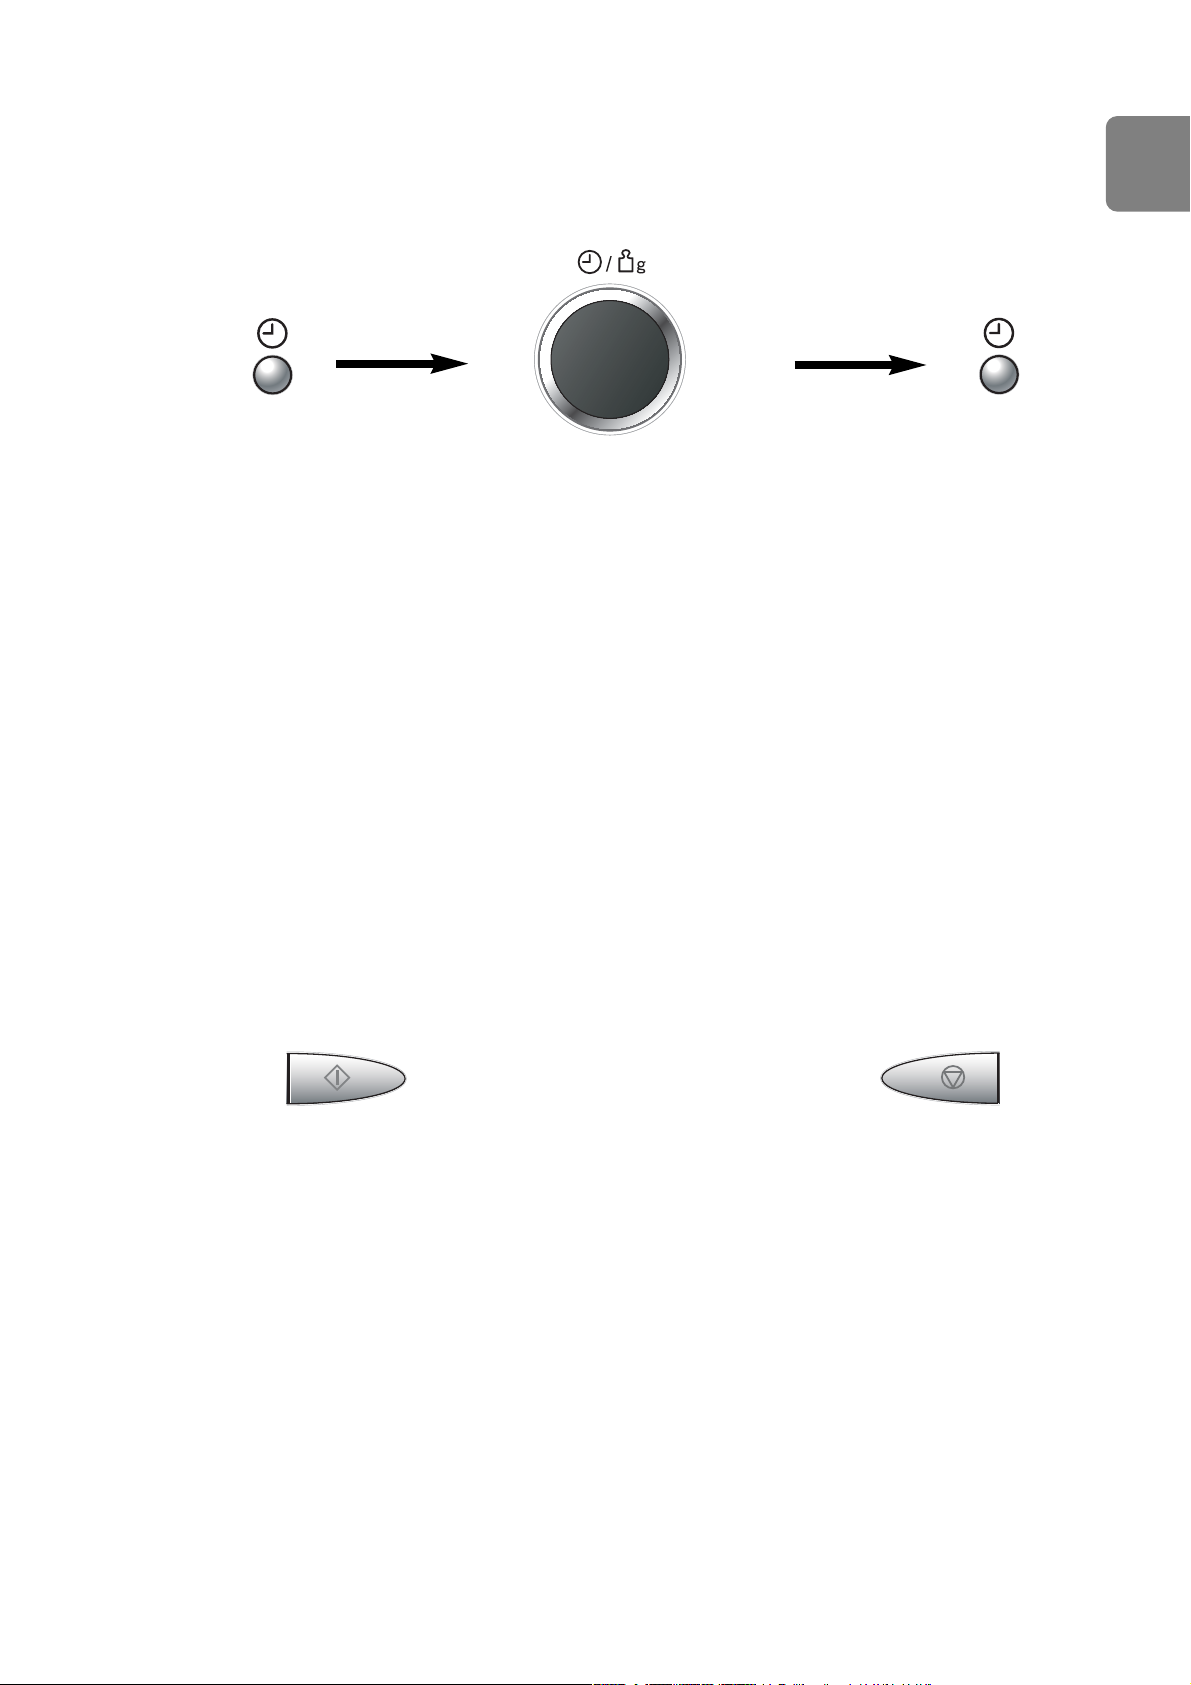
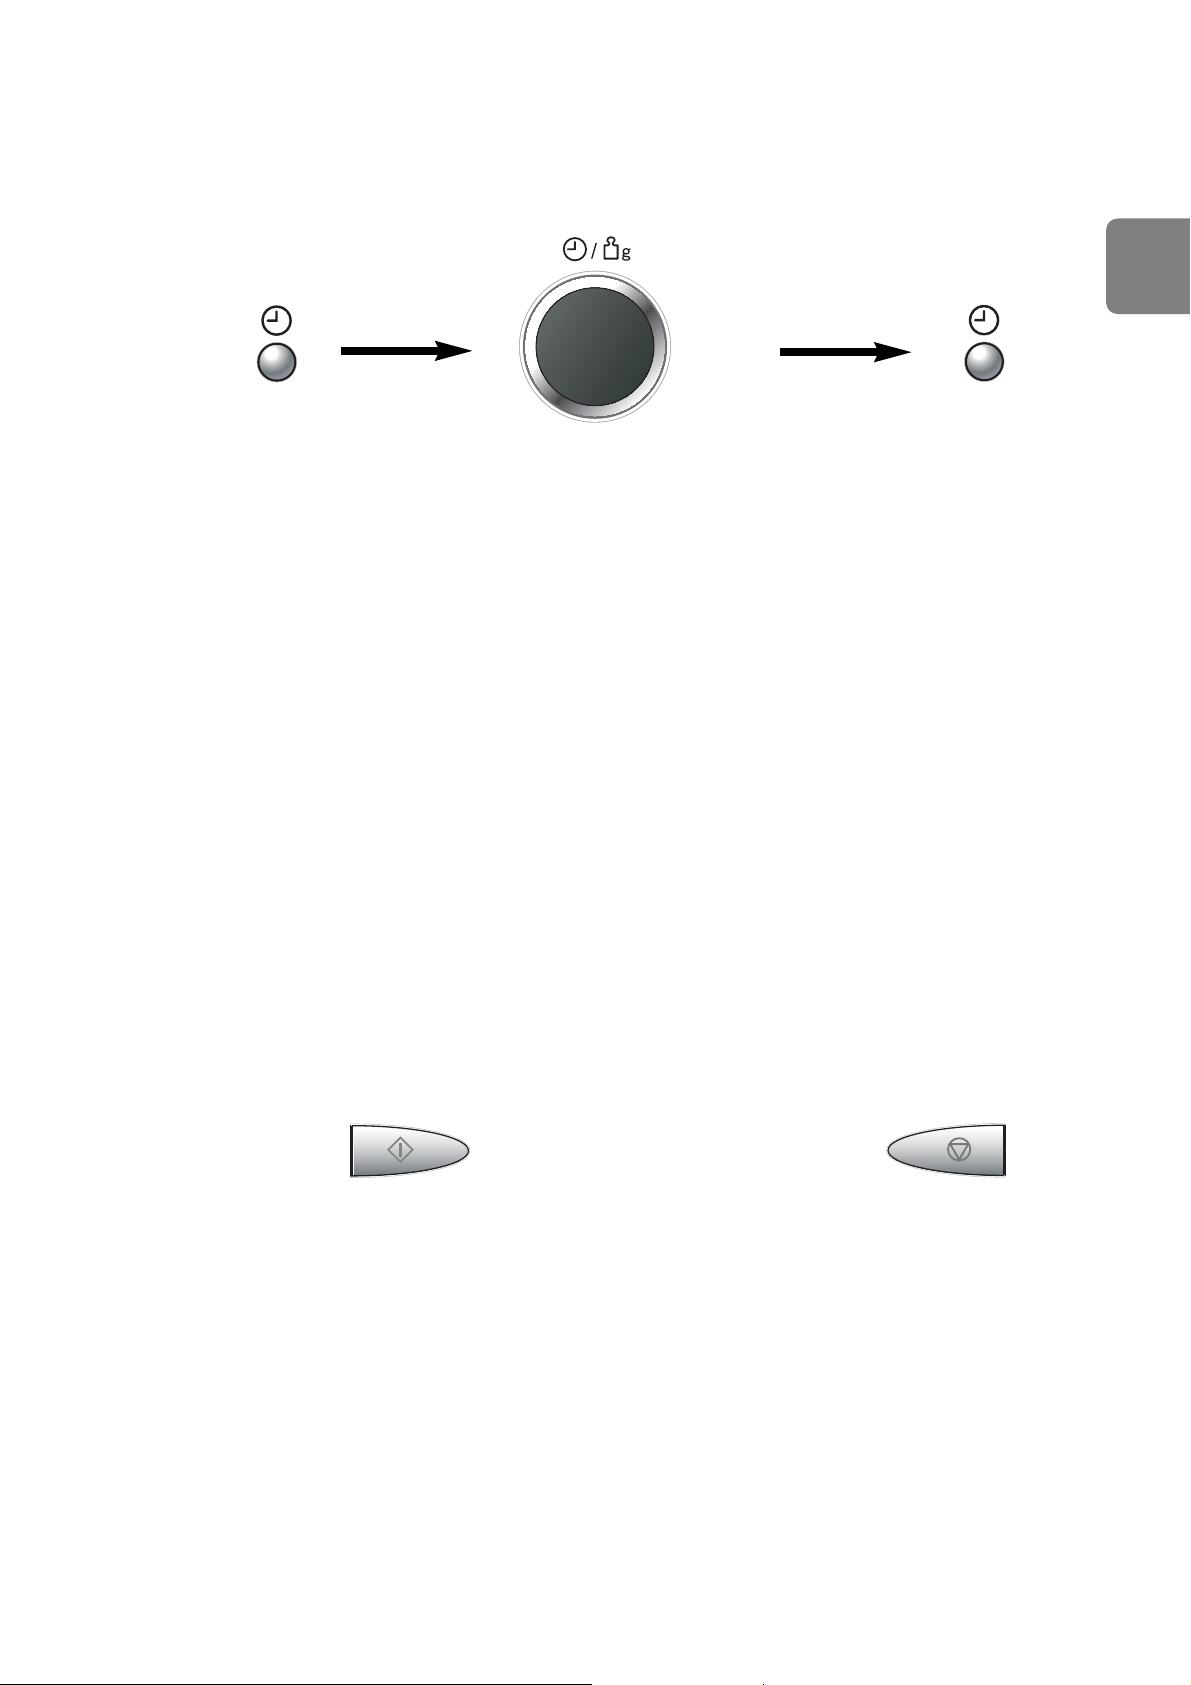
Setting the clock
N.B.
1. To reset time of day, repeat step 1 through to step 3.
2. The Clock will keep the time of day as long as the oven is plugged in and electricity is supplied.
3. This is a 24 hour clock, i.e. 2pm = 14:00 not 2:00.
Using this system will make the oven controls inoperable; however, the door can be opened.
Child Lock can be set when the display shows a colon or the time.
To Set:
To Cancel:
• Press Start Pad three times.
The time of day will disappear.
Actual time will not be lost.
ʻ- - - -ʼ is indicated in the display.
• Press Stop/Cancel Pad three times.
The time of day will reappear in the display.
Child safety lock
• Press Clock Pad
once.
The colon starts
to blink.
• Press Clock Pad once.
The colon stops blinking
and the time of day is
entered.
• Enter the time by turning the
Time/Weight Dial. The time appears
in the display and the colon blinks.
When the oven is first plugged in “88:88” appears in display window.
NOTE: To activate child lock, start pad must be pressed 3 times within a 10 second period.
Page 10
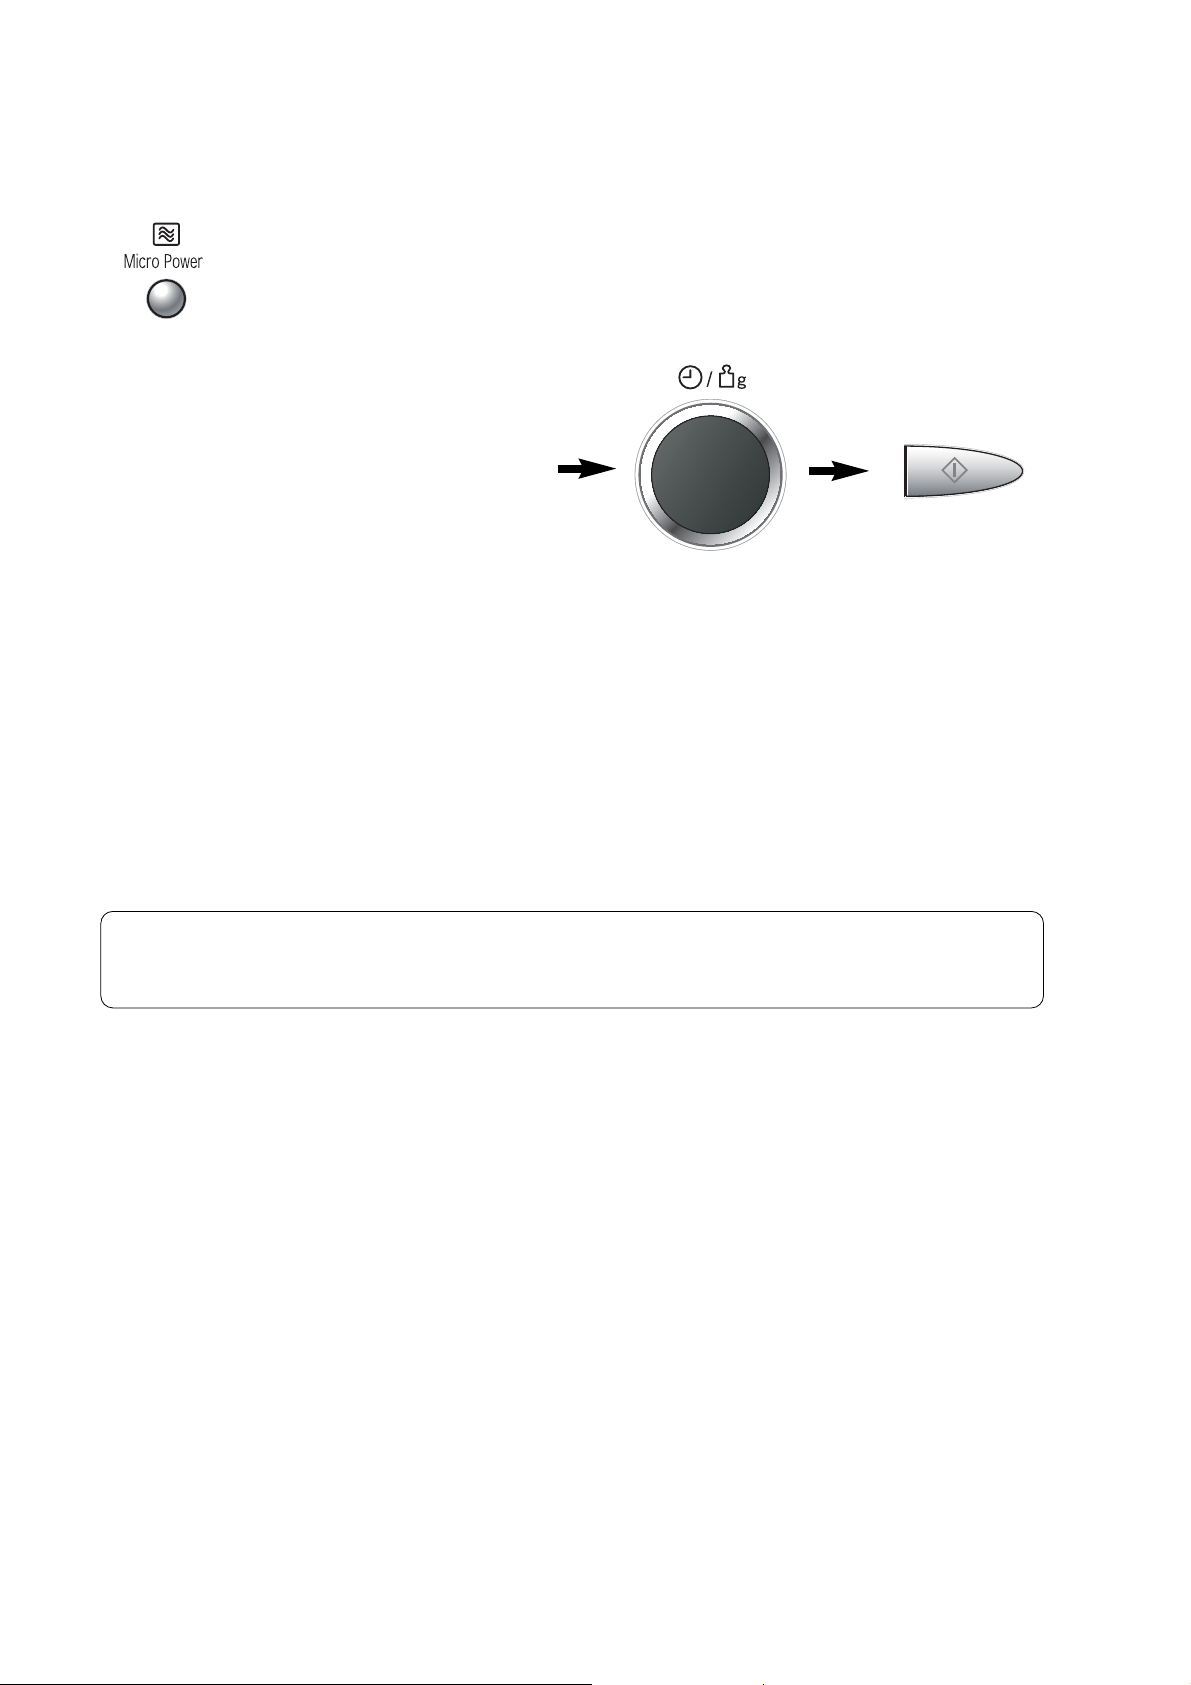
En-8
• Press the Microwave Power Pad.
Select desired power level - The
microwave indicator lights and the
wattage appears in the display.
• Set the cooking time using
the Time/Weight Dial (Max
power: up to 30 minutes
Other powers: up to 90
minutes).
• Press Start Pad.
The cooking program
will start and the time
in the display will
count down.
CAUTION: The oven will automatically work on MAX microwave power if
a cooking time is entered without the power level previously being selected.
The glass tray must always be in position when using the oven.
Wattage
Max
Defrost
Medium
Low
Simmer
Warm
Multi-Stage Cooking
The oven has 3 stage cooking, so you can program up to 3 different instructions and the oven will
switch automatically from power to power (Repeat steps 1 and 2 above but only press Start after
all stages have been entered).
N.B.
Auto Weight / Defrost Pad can be programmed in first stage only.
1 Press
2 Presses
3 Presses
4 Presses
5 Presses
6 Presses
Microwave cooking and defrosting
850 Watts
270 Watts
600 Watts
440 Watts
250 Watts
100 Watts
Page 11
En-9
English
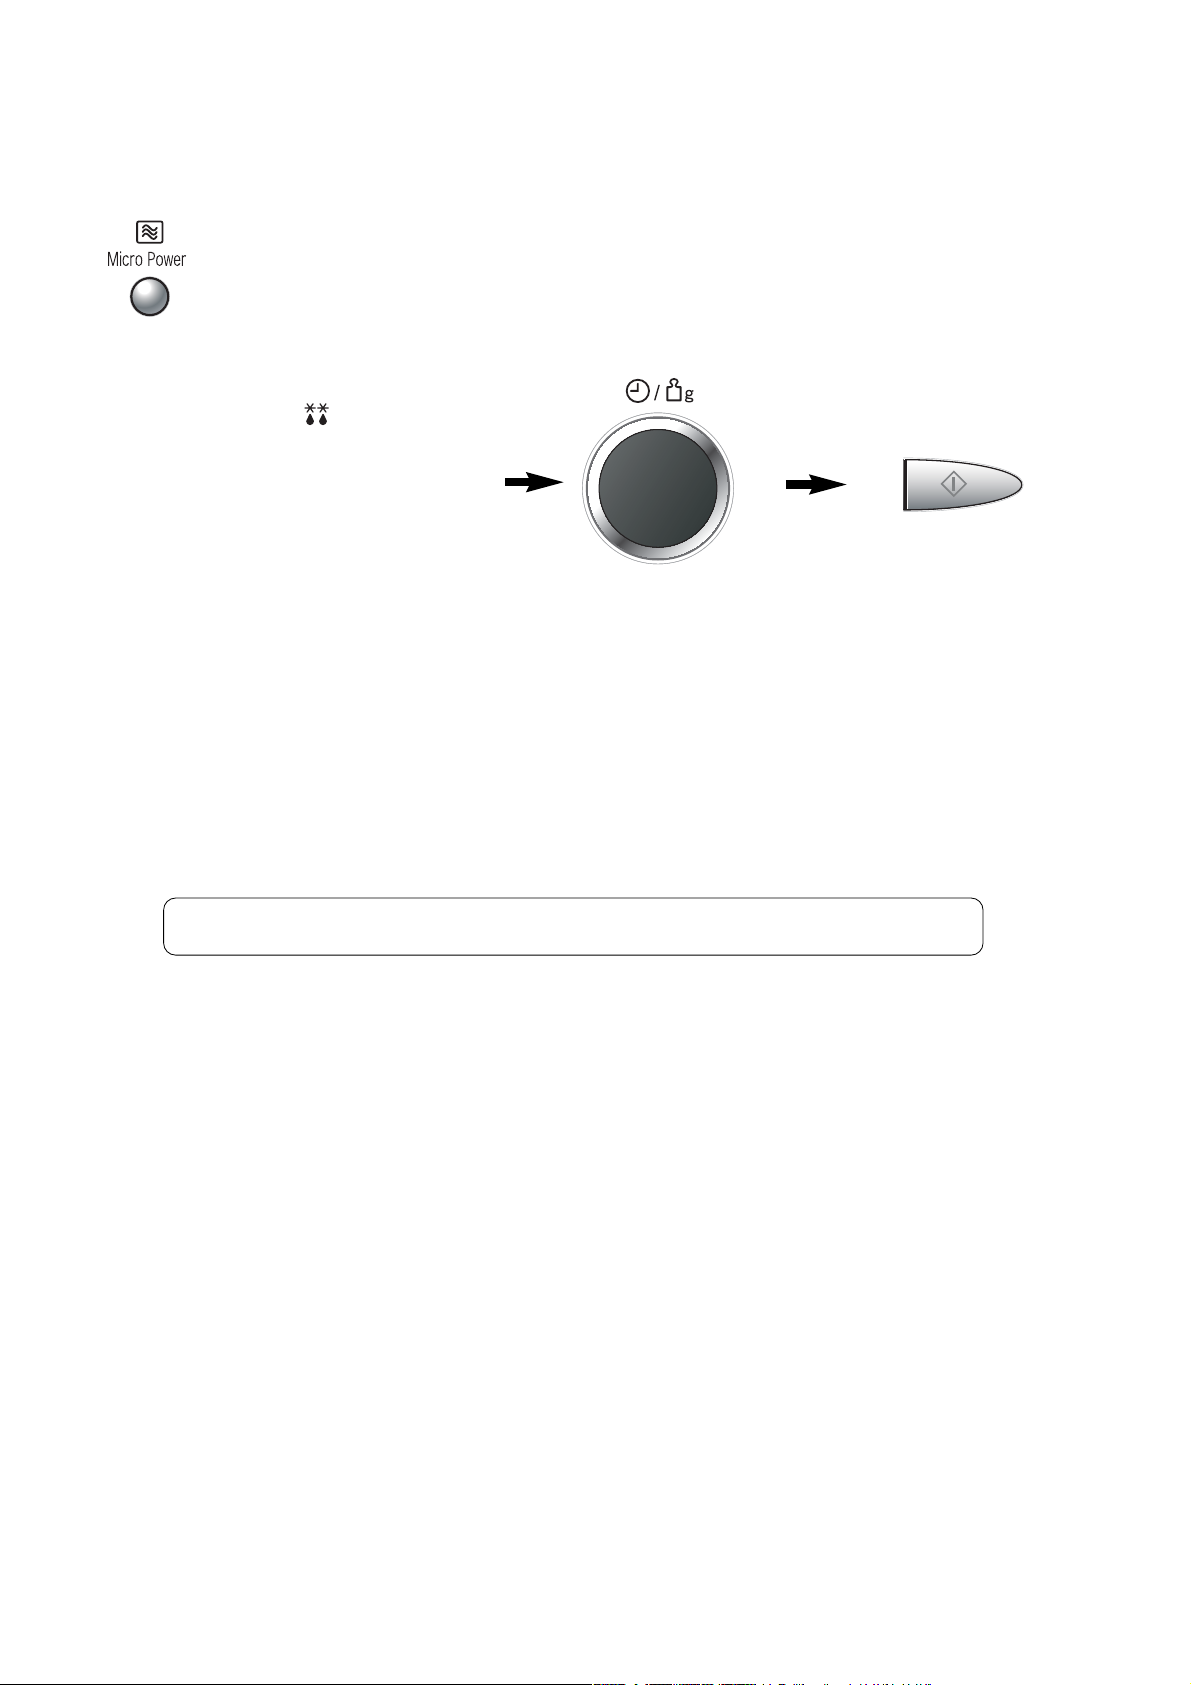
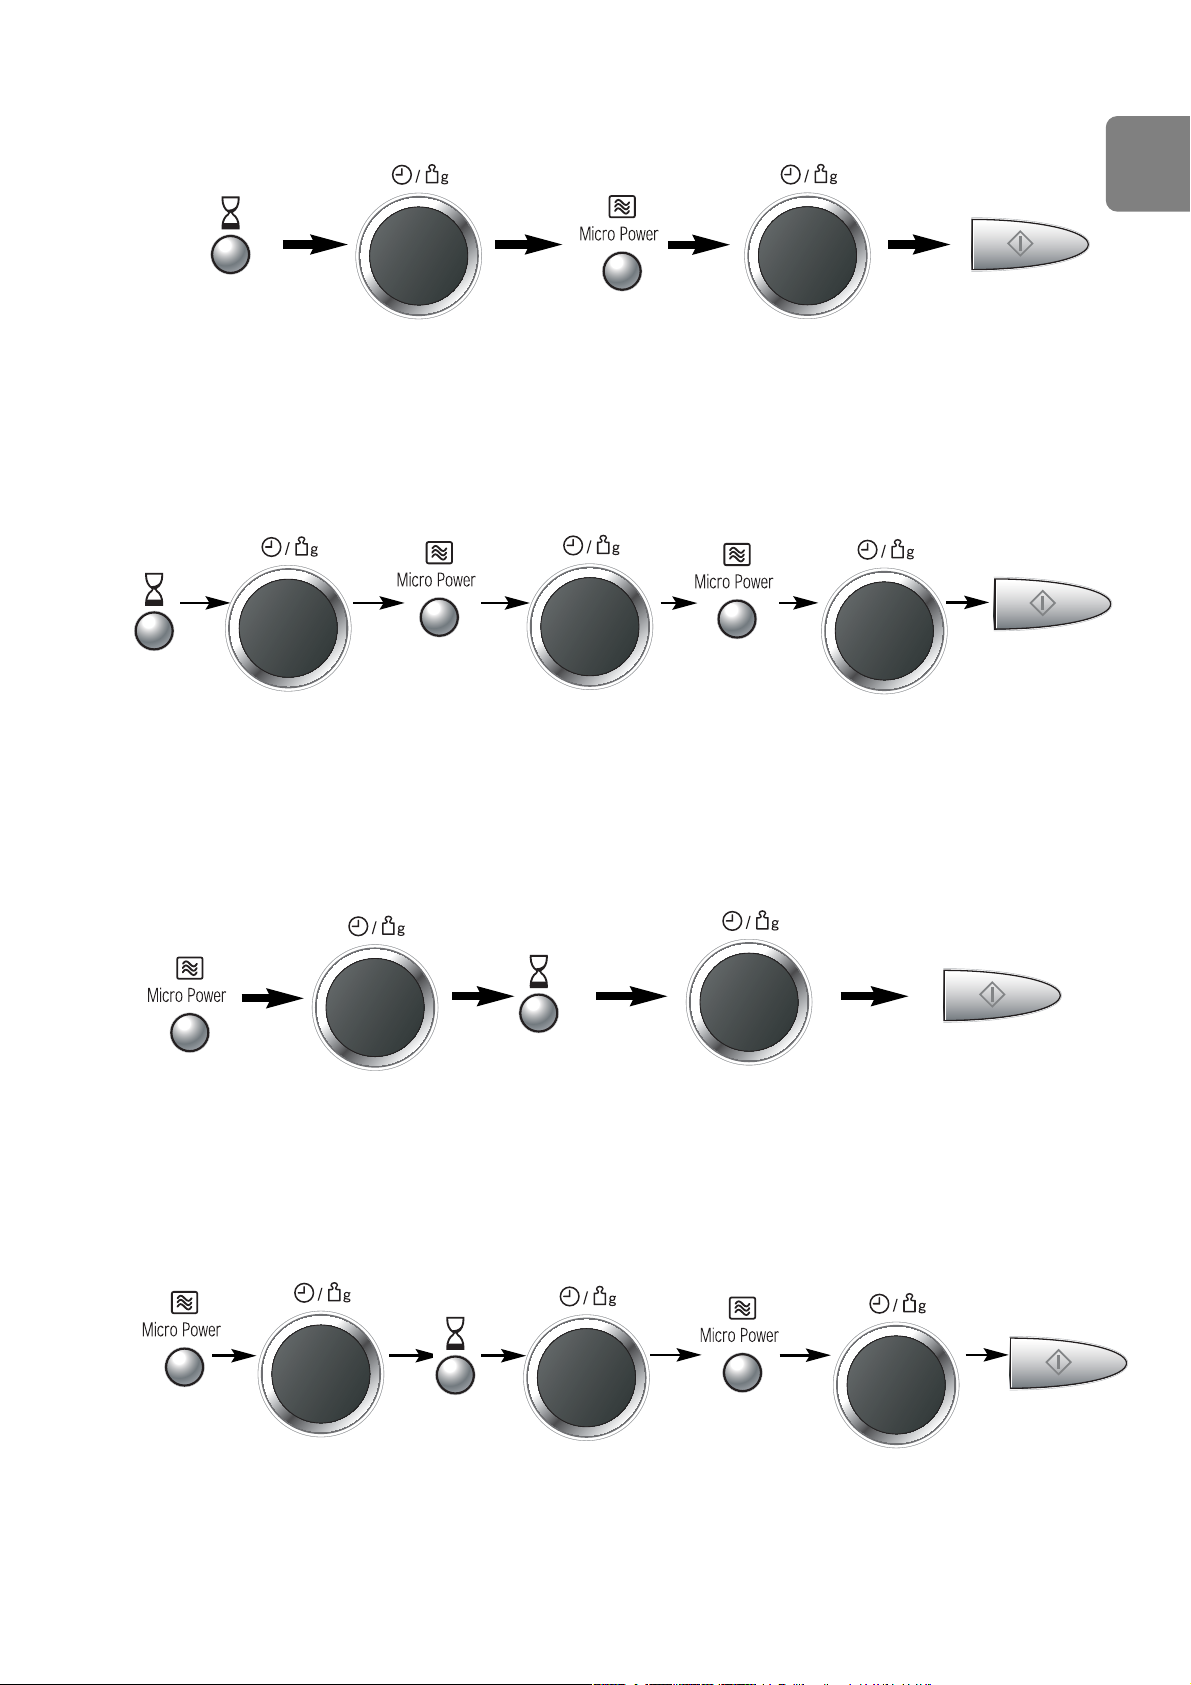
Delay start cooking
By using Delay/Stand Pad, you can program Stand Time after cooking is completed or use to
program the oven as a minute timer.
By using Delay/Stand Pad, you are able to program Delay Start cooking.
• Press
Delay/
Stand Pad.
• Press Start Pad.
e.g.
• Set the desired
cooking program
and cooking time.
• Press Start Pad.
e.g.
Max Power: 4 min. Stand Time: 5 min. Max Power: 2 min.
Stand time
5 timesOnce
Once
Once
• Set the delay time by
turning the Time/
Weight Dial (up to 9
hours).
• Set the desired cooking
program and cooking time.
2. If the programmed delay time exceeds one hour, the time will count down in units of minutes. If
less than one hour, the time will count down in units of seconds.
3. Delay Start cannot be programmed before any Auto Programs.
Delay Start: 1 hour
NOTE:
1. Three stage cooking can be programmed including Delay Start cooking.
e.g.
Max Power: 10 min.
Simmer Power: 20 min.
• Press
Delay/Stand
Pad.
• Set desired amount of
time by turning the Time /
Weight Dial (up to 9 hours).
NOTE:
1. Three stage cooking can be programmed including Stand Time.
e.g.
2. If the oven door is opened during the Stand Time or Minute Timer, the time in the display
window will continue to count down.
3. This feature may also be used as a timer. In this case press Delay/Stand Pad, set time and
press Start Pad.
Page 12
En-10
Defrosting guidelines
Tips for defrosting
Check the defrosting several times,
even if you use the auto programs.
Observe the standing times.
Standing times
Individual portions of food may be cooked
almost immediately after defrosting. It is normal
for large portions of food to be frozen in the
centre. Before cooking, allow to stand for a
minimum of one hour. During this standing
time, the temperature becomes evenly
distributed and the food is defrosted by
conduction. N.B. If the food is not going to be
cooked immediately, store it in the refrigerator.
Never refreeze defrosted food without first
cooking it.
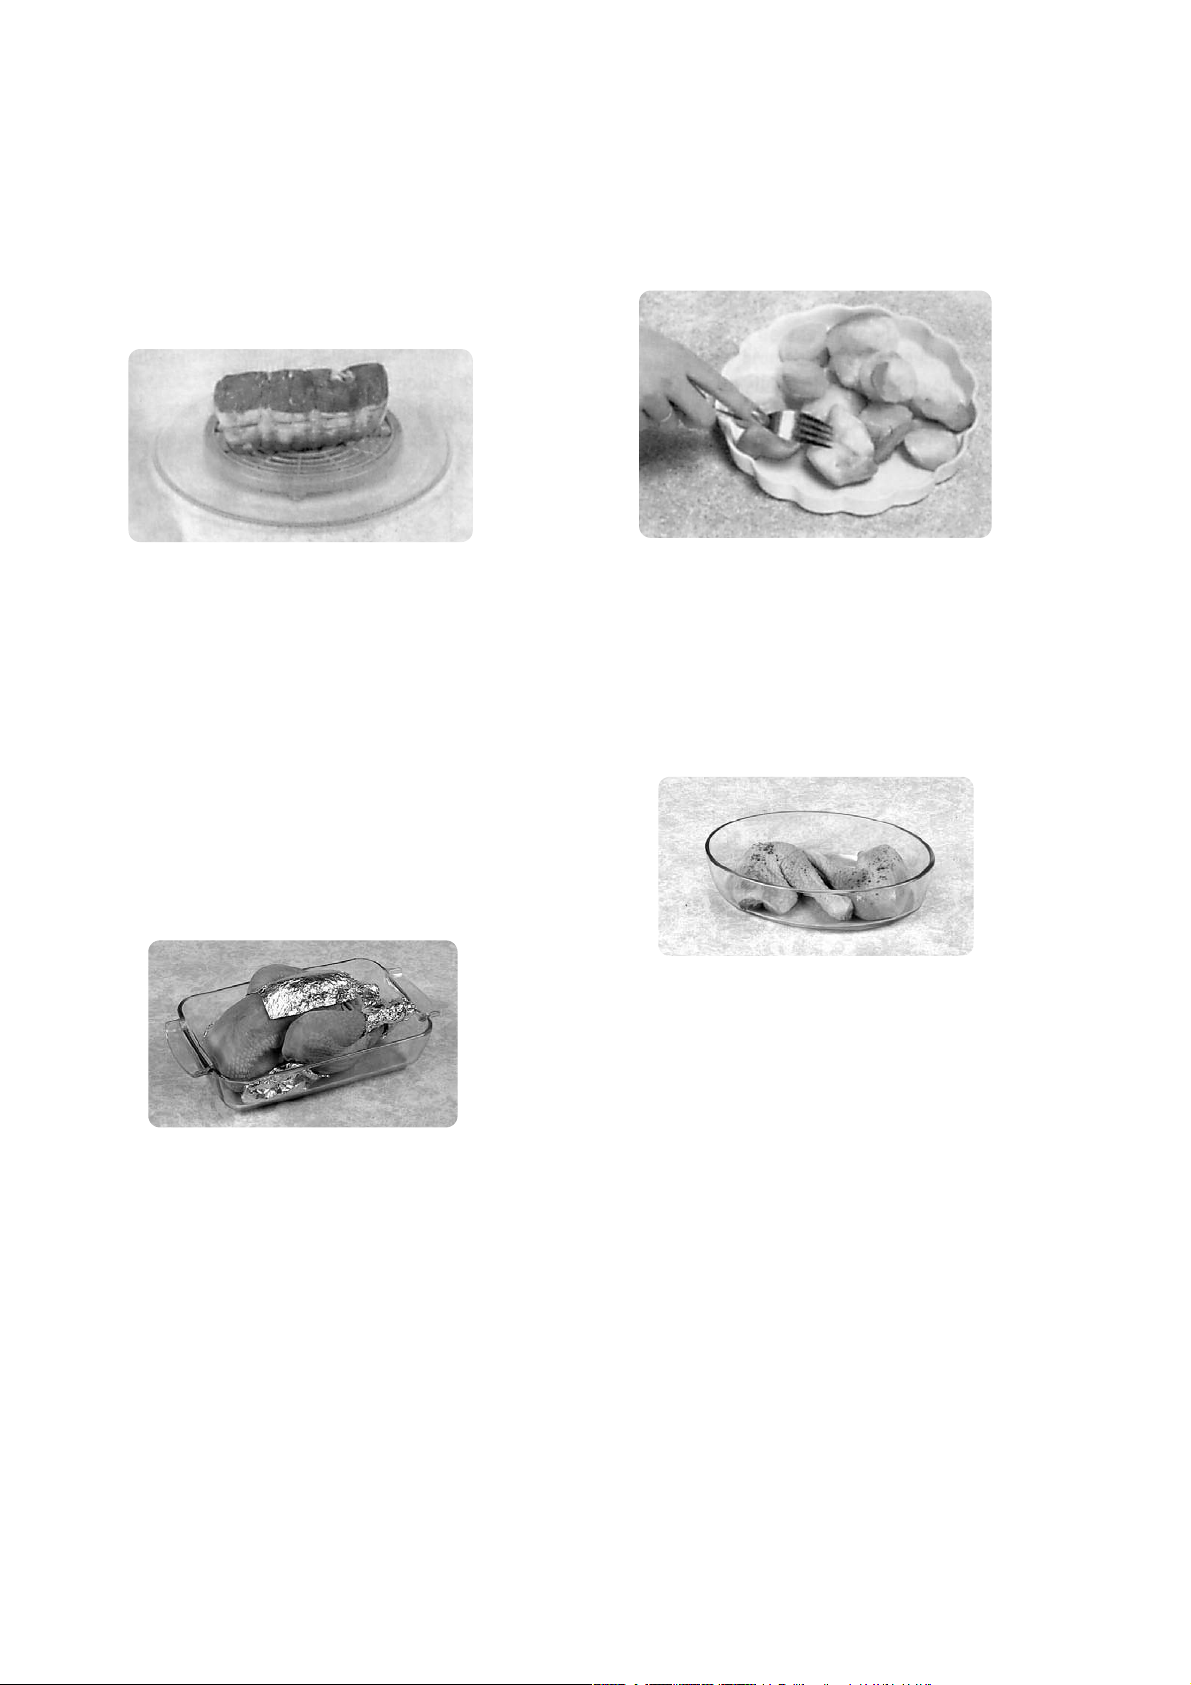
Joints and poultry
It is preferable to place the joints on an
upturned plate or plastic rack so that they are
not resting in the juices. It is essential to protect
delicate or projecting parts of this food with
small pieces of foil to prevent these parts from
cooking. It is not dangerous to use small pieces
of foil in your oven, provided they do not come
into contact with the oven walls.
Minced meat or cubes of meat and
seafood
Since the outside of these foods quickly
defrosts, it is necessary to separate them,
break the blocks into pieces frequently while
defrosting and remove them when they have
defrosted.
Small portions of food
Chops and chicken pieces must be separated
as soon as possible so that they defrost evenly
throughout. Fatty parts and the ends defrost
more quickly. Place them near the centre of the
turntable or protect them.
Bread
Loaves will require standing time to allow the
centre to thaw. Standing time can be shortened
if slices are separated and rolls and loaves cut
in half.
Page 13
En-11
English
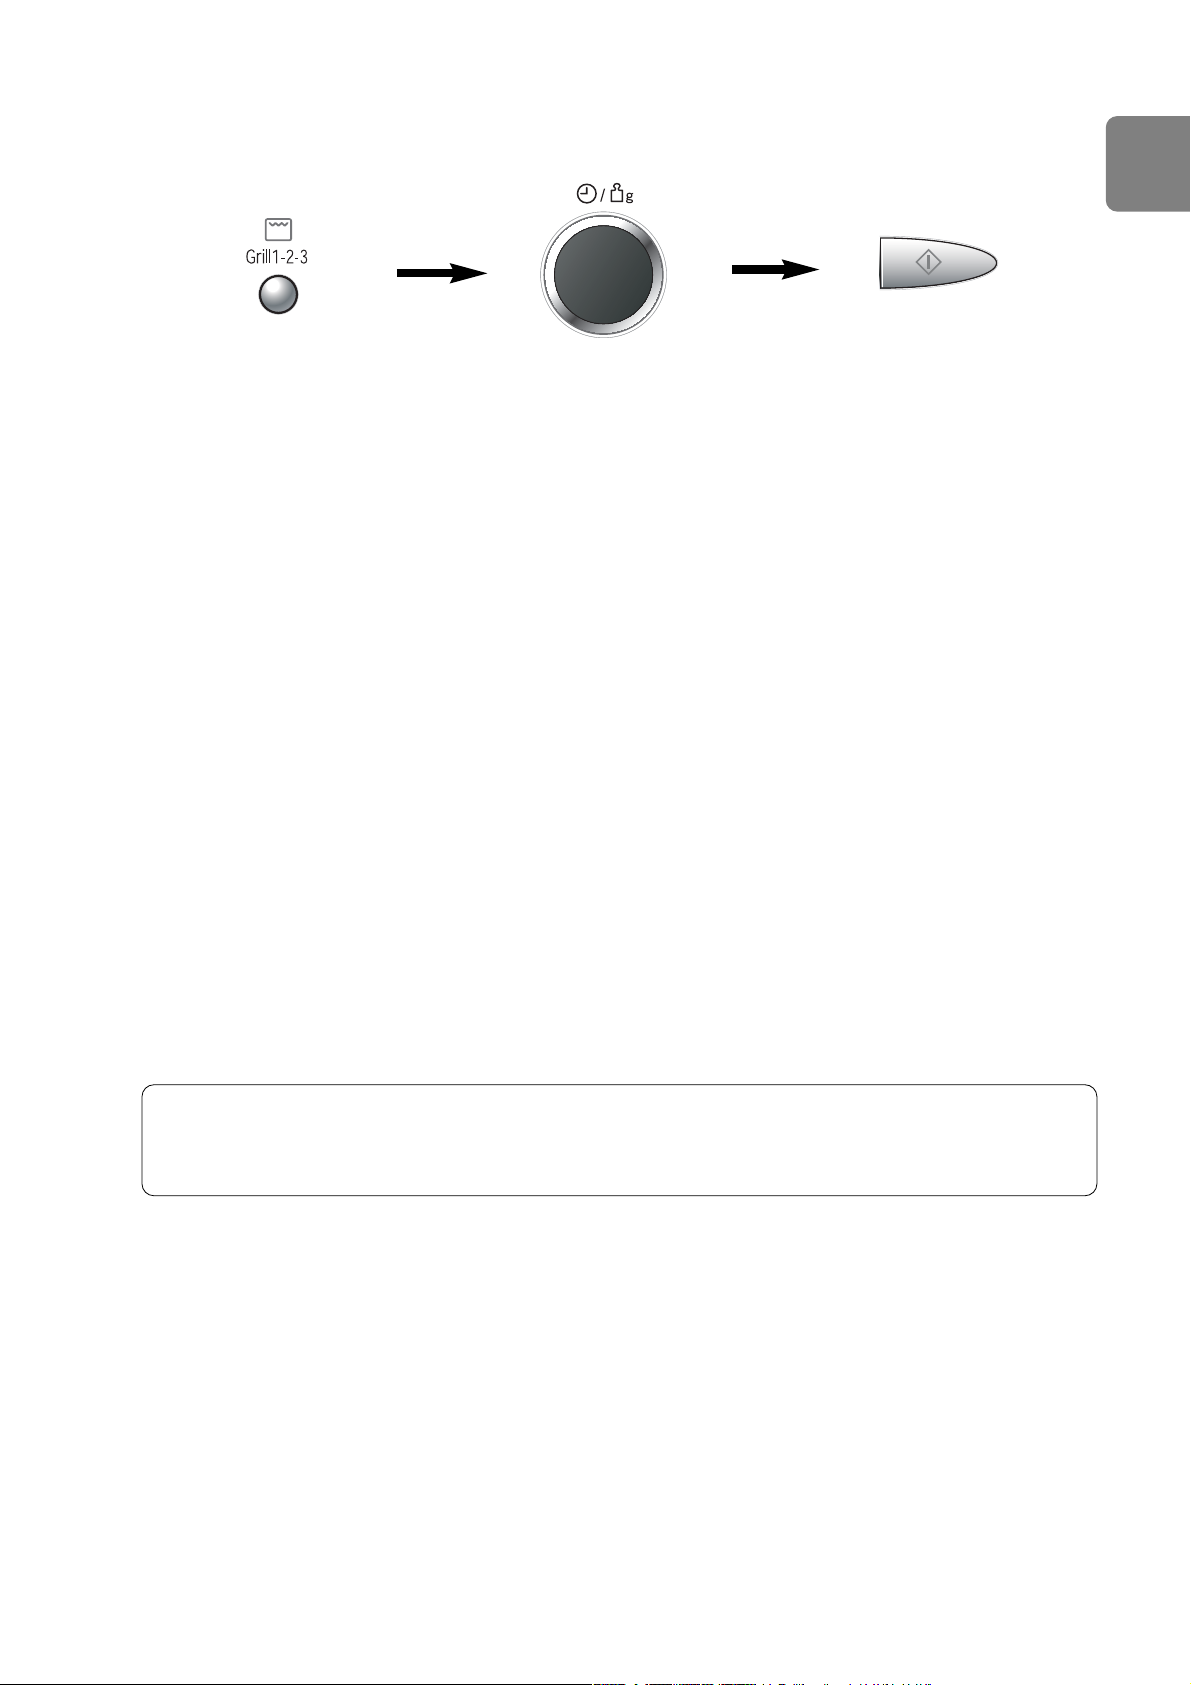
Grilling
N.B.
1. Place food on wire rack on turntable. Place a heatproof plate (Pyrex®) underneath to catch fat
and drips.
2. Never cover foods when grilling.
3. DO NOT attempt to preheat the grill.
4. The grill will only operate with the oven door closed. It is not possible to use the grill function
with the door open.
5. There is no microwave power on the GRILL only program.
6. Most foods require turning halfway during cooking. When turning food, open oven door and
CAREFULLY remove wire rack using oven gloves.
7. After turning, return food to the oven and close door. After closing oven door, press Start Pad.
The oven display will continue to count down the remaining grilling time. It is quite safe to open
the oven door at any time to check the progress of the food as it is grilling.
8. The grill will glow on and off during cooking - this is normal. Always clean the oven after using
the Grill and before using the microwave or combination.
• Press Grill Pad to select level
1 press grill 1 (high)
2 presses grill 2 (medium)
3 presses grill 3 (low)
The grill indicator lights and grill
level (1, 2 or 3) appears in the
display.
• Press Start Pad
The time counts
down in the display.
CAUTION: The wire rack must always be used with the glass tray in position. Remove
wire rack from oven by holding the rack and heatproof dish firmly. Use oven gloves when
removing accessories. Never touch the outside window or inside metal parts of the door
or oven when taking food in or out due to the high temperatures involved.
• Set the cooking time using the
Time/Weight Dial (up to 90
minutes).
Page 14
En-12
Combination cooking
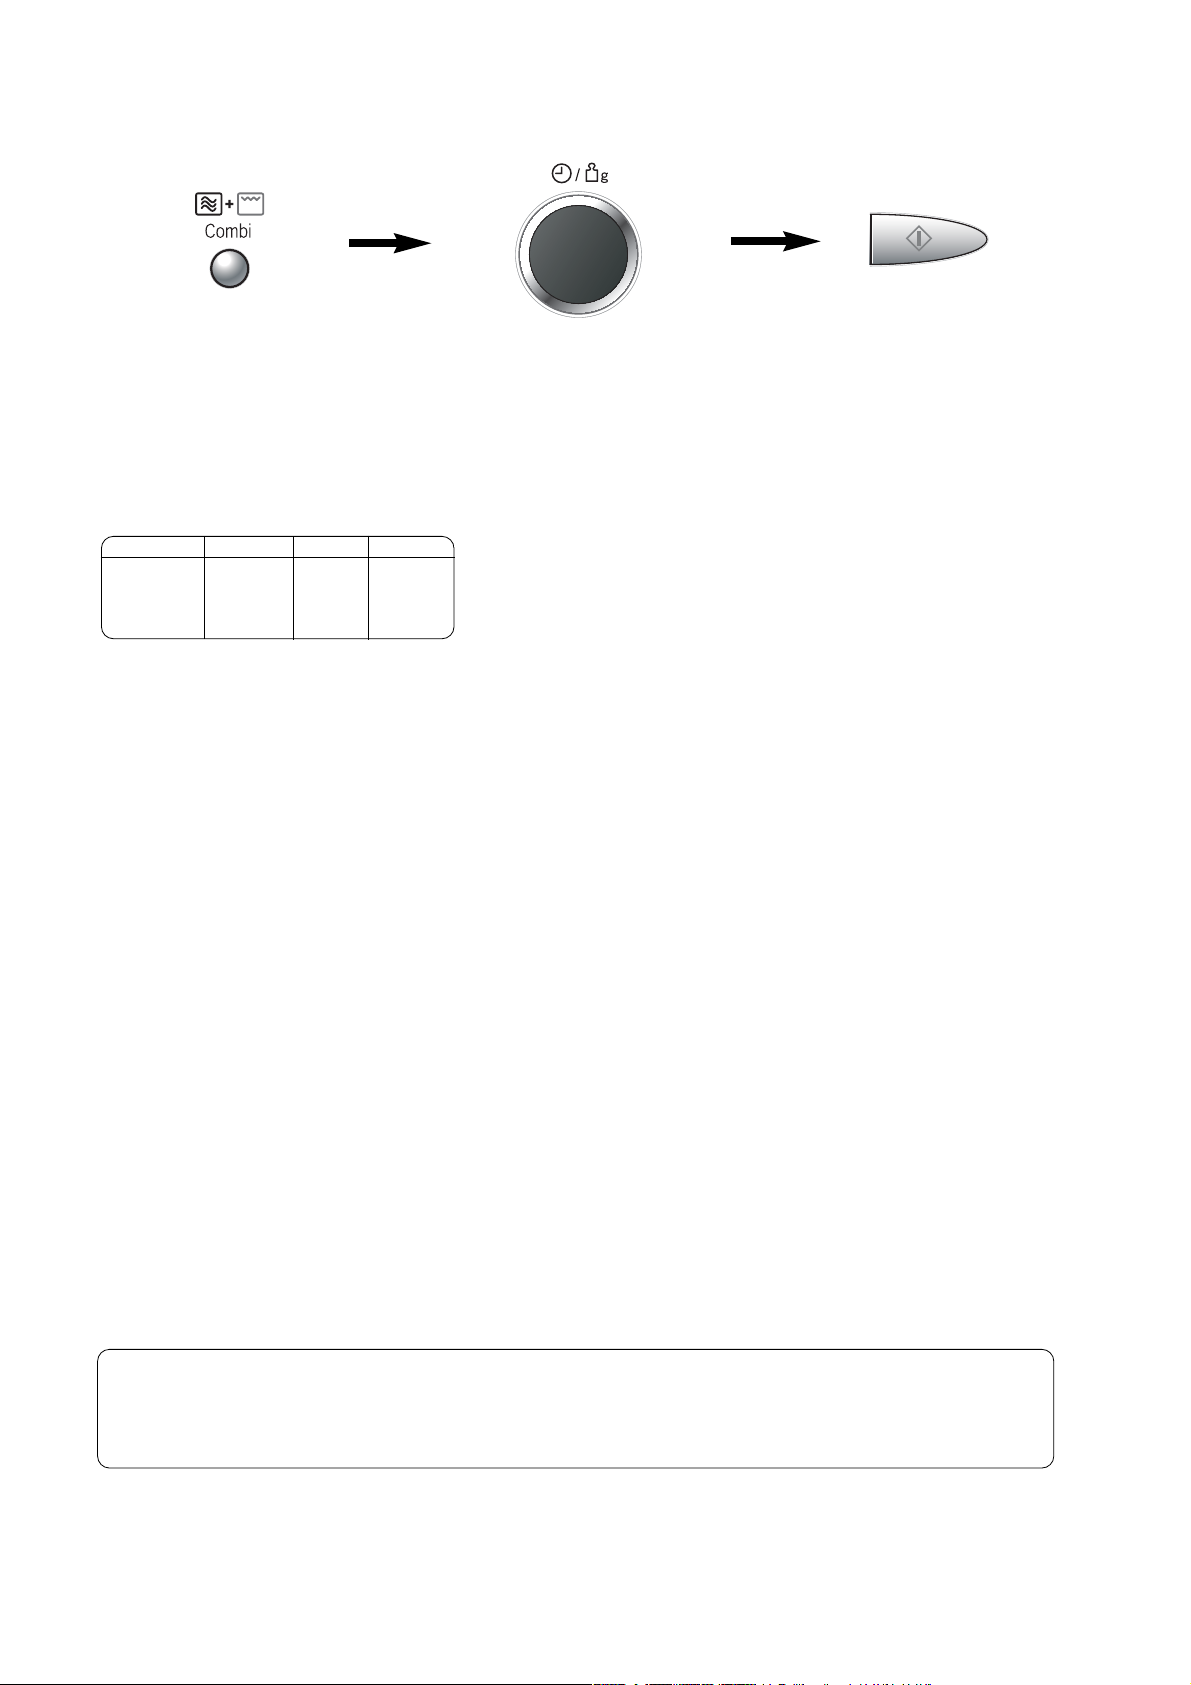
• Press Combination Pad to
select level
The combination indicator lights
and combination level (1, 2 or 3)
appears in the display.
• Press Start Pad
The time counts
down in the display.
When cooking by combination, the microwave power cooks food quickly whilst the grill gives
traditional browning and crisping.
N.B.
1. The wire rack is designed to be used for Combination and Grilling. Never attempt to use any
other metal accessory except the one provided with the oven. Place a heatproof dish
underneath to catch any fat or drips.
2. Use the wire rack only as described. DO NOT use if operating the oven with less than 200g of
food on a manual program. For small quantities do not cook by Combination, cook by GRILL
or MICROWAVE ONLY for best results.
3. Never cover foods when cooking on Combination.
4. DO NOT preheat the grill on Combination.
5. Arcing may occur if the incorrect weight of food is used, the wire rack has been damaged, or a
metal container has been used accidentally. Arcing is flashes of blue light seen in the
microwave. If this occurs, stop the oven immediately.
6. Some foods should be cooked on Combination without using the wire rack i.e. roasts, gratins,
pies and puddings. The food should be placed in a heatproof non-metallic dish and placed
directly onto the turntable.
7. DO NOT use plastic MICROWAVE containers on combination programs (unless suitable for
combination cooking.) Dishes must be able to withstand the heat of the top grill - heatproof
glass e.g. Pyrex
®
or ceramic are ideal.
8. DO NOT use your own metal dishes or tins, as the microwaves will not penetrate the food
evenly.
CAUTION: The wire rack must always be used with the glass tray in position. Remove
grill rack from oven by holding the rack and heatproof dish firmly. Use oven gloves when
removing accessories. Never touch the outside window or inside metal parts of the door
or oven when taking food in or out due to the high temperatures involved.
1 press combi 1 440W 1100W
2 presses combi 2 250W 1100W
3 presses combi 3 440W 950W
Press Level MW Grill
• Set the cooking time using
the Time/Weight Dial
(up to 90 minutes).
Page 15
En-13
English
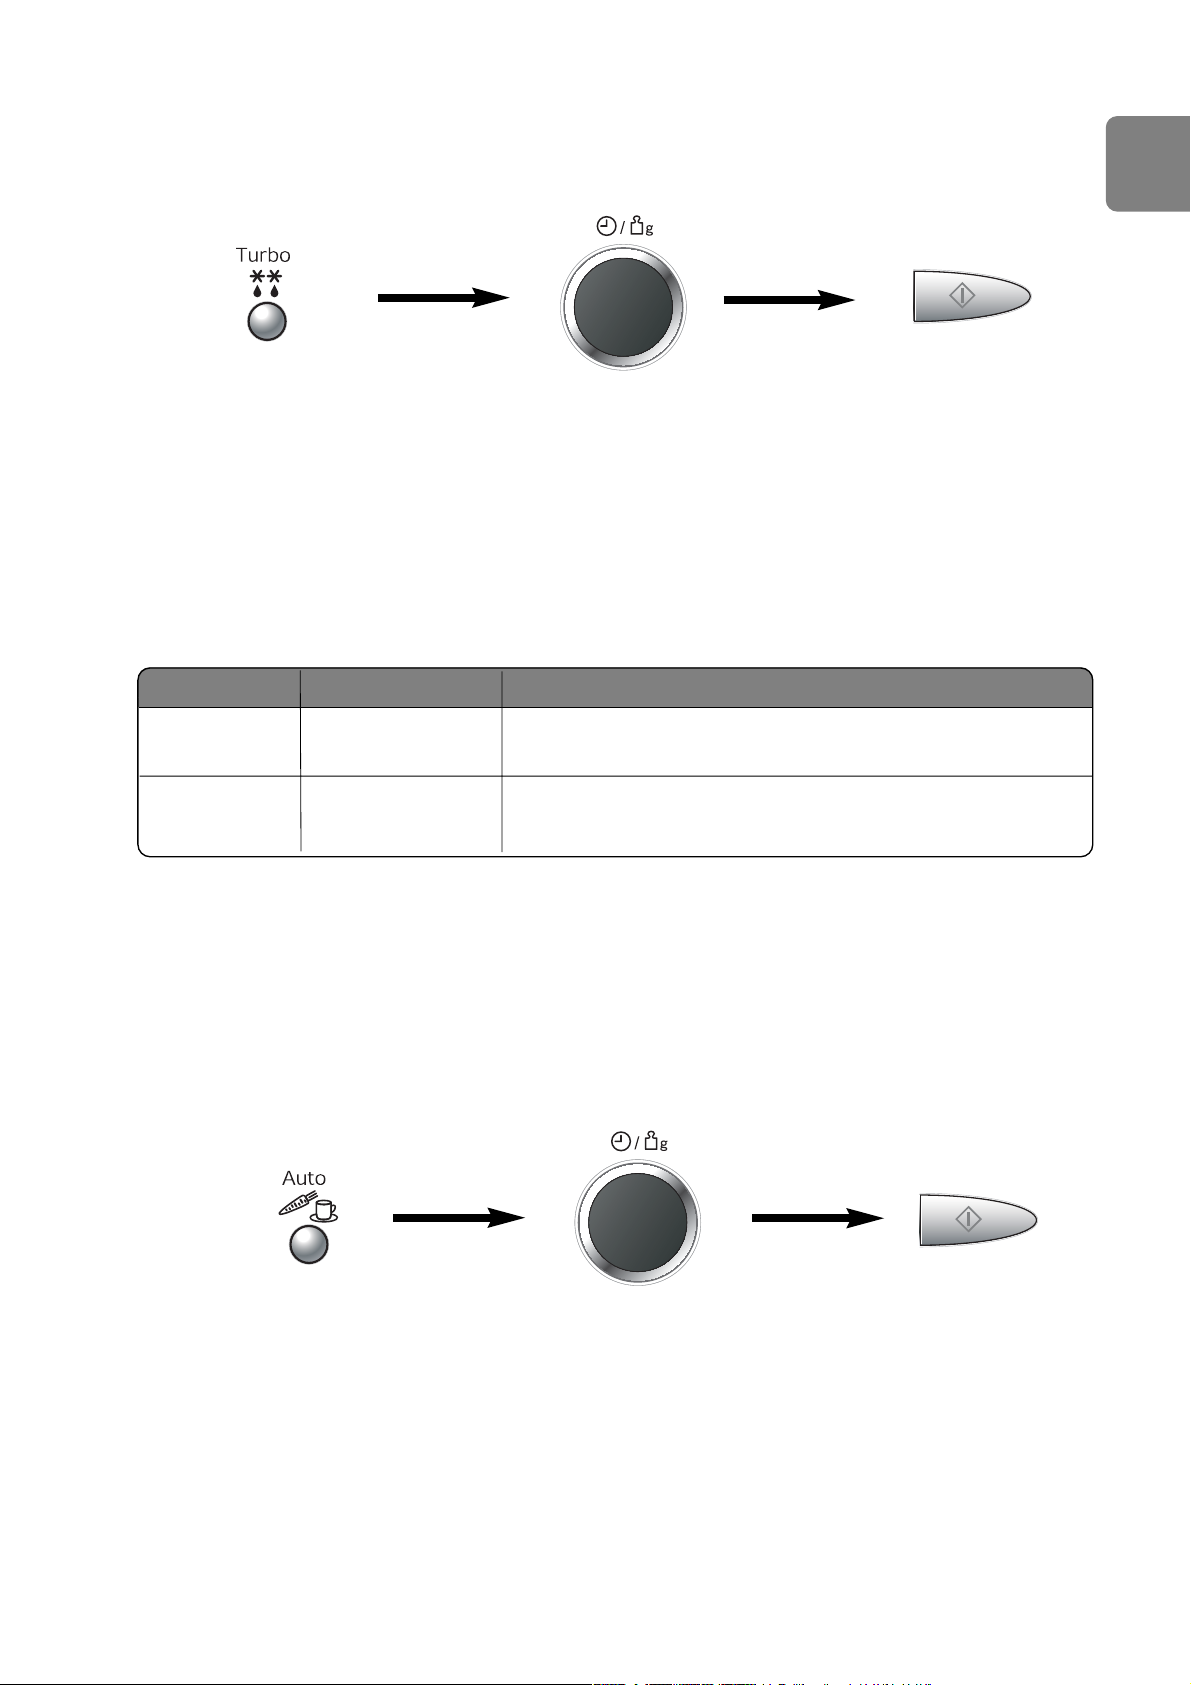
• Press Start Pad.
Auto weight reheat / cook
With this feature food can be cooked or reheated according to the weight. The weight has to be
entered in grams.
• Select desired category.
The auto indicator light and
the program number appears in
the display.
Auto weight defrost
With this feature you can defrost frozen food according to the weight.
• Press Start Pad.
Remember to stir or
turn the food during
defrosting.
• Select the desired Auto
Defrost Program
1 Press small pieces
2 Presses big piece
Auto Program number appears
in the display. The auto and
defrost indicators light.
• Set the weight of the frozen
food by using the
Time/Weight Dial.
Turning the dial slowly will count
up in 10g steps. Turning the dial
quickly will count up in 100g
steps.
Program Min./Max. Weight
Hints
100 - 1000g
Small pieces of meat, escallop, sausages, minced meat, fish
fillets, steaks, chops (each 100g to 400g). Turn / stir at beeps.
1 Small Pieces
400 - 2000g
Big pieces of meat, roast, whole chicken, big piece of fish.
Turn at beeps.
2 Meat Joints
e.g.
IMPORTANT: see page En-9 for defrosting guidelines
• Set Weight.
Set the weight of the food by
using the Time/Weight Dial.
Page 16
En-14
Program
Recommended
Weight
Accessories
Instructions
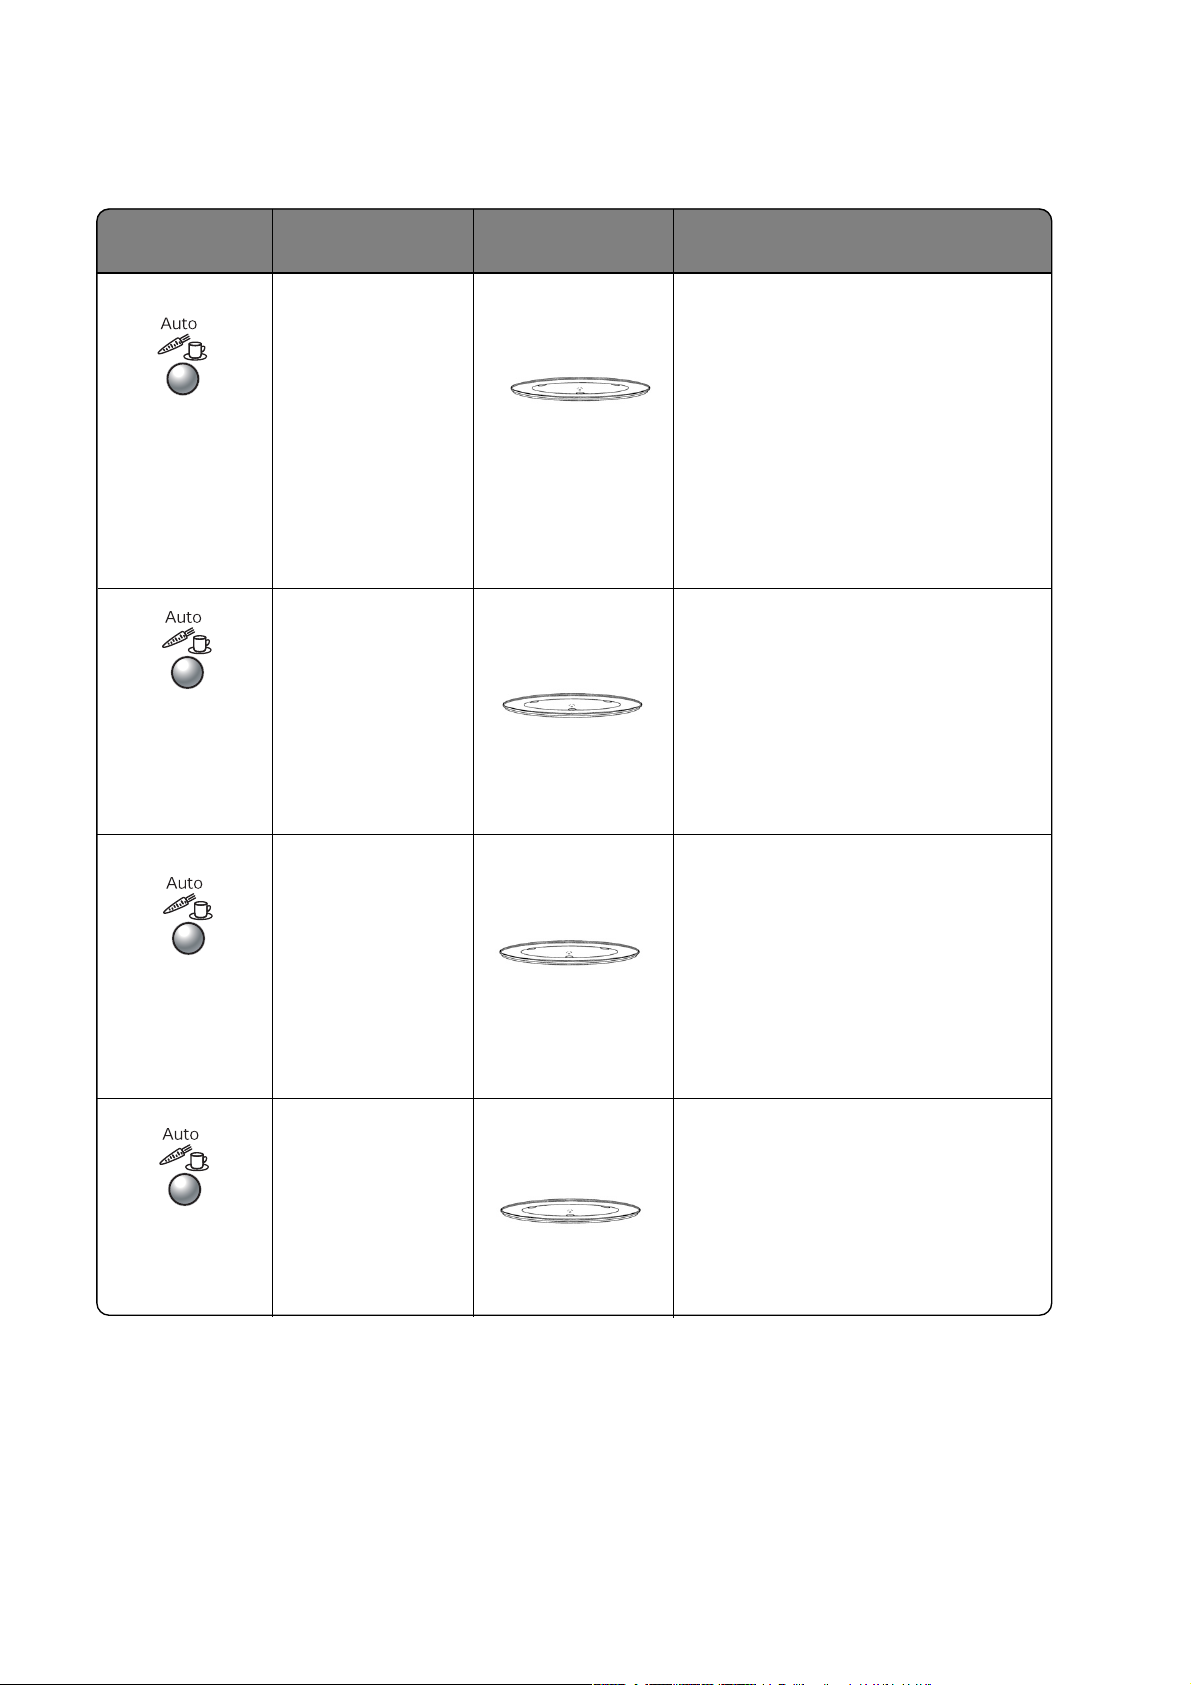
150 - 1200g
For reheating 1 cup (150g), 1
bowl (300g) or 2 bowls (600g) of
hot drink (eg tea, coffee, milk, or
soup).
Select program reheat cup/bowl
(2 presses of auto microwave
program pad). Enter weight 150g,
300g or 600g and press start pad.
Stir at end of heating.
200 - 900g
For cooking fresh fish.
Place in a suitable sized container,
add 2 tbsp (30ml) water. Cover with
pierced cling film or a lid. Select
program fresh fish
(4 presses of auto microwave
program pad).
1 Press
4 Presses
FRESH MEAL
FRESH FISH
Auto weight microwave programs
To reheat a fresh plated meal or
casserole. All foods must be
pre-cooked. Foods should be at
refrigerator temperature approx.
+
5°C or room temperature. Select
program fresh meal (1 press of
auto mirowave program pad). Stir
at beeps. Allow a few minutes
standing time. Ensure food is
piping hot before serving. Large
pieces of fish / meat in a thin
sauce, may require longer cooking.
2 Presses
REHEAT
CUP/BOWL
1cup - 150g
1 bowl - 300g
2 bowls - 600g
3 Presses
FRESH
VEGETABLES
200 - 1100g
To cook fresh vegetables.
Place prepared vegetables into a
suitable sized container. Sprinkle
with 1 tbsp water per 100g
vegetables. Cover with pierced cling
film or a lid. Select program fresh
vegetables (3 presses of auto
microwave program pad). Turn / stir
at beeps.
Page 17
En-15
English
Program
Recommended
Weight
Accessories Instructions
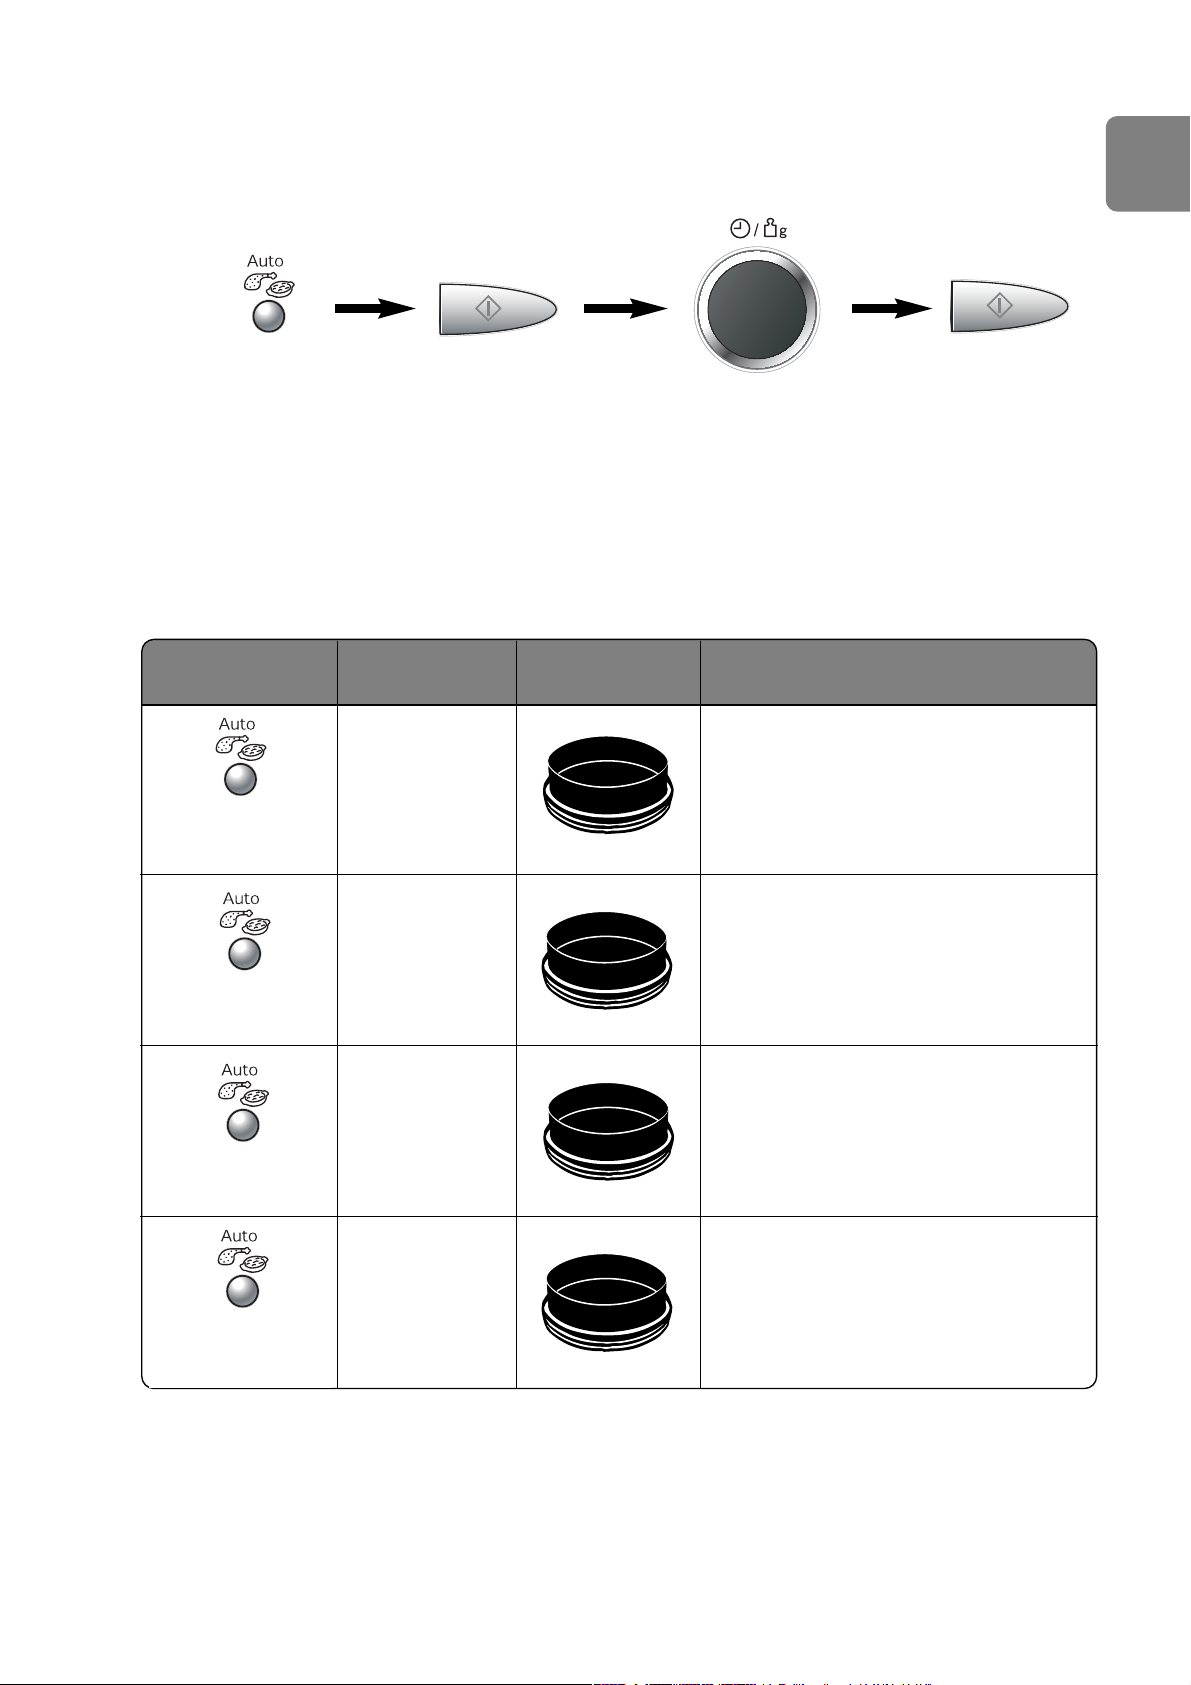
150 - 480g
For reheating, crisping the base and
browning the top of frozen
pre-cooked pizza.
Remove all packaging and place the
pizza in the preheated Panacrunch
Pan.
150 - 480g
For reheating, crisping the base and
browning the top of fresh precooked pizza.
Remove all packaging and place the
pizza in the preheated Panacrunch
Pan.
130 - 500g
For reheating, crisping the pastry
base and browning the top of fresh
pre-cooked quiche.
Remove all packaging and place the
quiche in the preheated Panacrunch
Pan.
150 - 400g
For reheating, crisping and
browning frozen potato products.
After preheating the pan, spread out
potato products in the pan. For best
results, cook in a single layer and turn
at beep.
Auto weight combination programs
Panacrunch programs
1. Select the desired
program and place
the Panacrunch
Pan in the oven
directly on the
glass tray.
2. Press the start Pad
to preheat the
Panacrunch Pan.
3. After pre-heating
beeps sound.
Place the food in
the pan, set
weight.
4. Press Start Pad.
1 Press
FROZEN PIZZA
2 Presses
FRESH PIZZA
3 Presses
FRESH QUICHE
4 Presses
FROZEN POTATO
PRODUCTS
Page 18
En-16
Program
Recommended
Weight
Accessories Instructions
300 - 1000g
For reheating, browning and
crisping the top of pre-cooked
frozen gratin. This program is suitable
for frozen lasagne, cannelloni, potato
topped dishes, pasta bakes. Remove
all packaging and place frozen gratin
in heatproof dish on Glass Tray. Select
program frozen gratin (5 presses of
auto combination program pad).
150 - 1000g
For cooking fresh chicken pieces.
e.g. breasts, thighs, drumsticks and
quarters. Place in a heatproof dish on
wire rack on Glass Tray. Select
program fresh chicken pieces (6
presses of auto combination program
pad). Turn at beeps.
70 - 400 g
For reheating frozen bread, rolls
and Croissants.
Remove all packaging and place on
wire rack on Glass Tray. Select
program bread/croissants
(7 presses of auto combination
program pad). Turn at beeps
Auto weight combination programs
5 Presses
FROZEN
GRATIN
6 Presses
FRESH
CHICKEN
PIECES
7 Presses
BREAD/
CROISSANTS
• Press Start Pad.
With this feature food can be cooked or reheated according to the weight. The weight has to be
entered in grams.
• Select desired category.
The auto indicator light and
the program number appears in
the display.
e.g.
• Set Weight.
Set the weight of the food by
using the Time/Weight Dial.
Page 19
En-17
English
Panacrunch pan
Care of the pan
•
Never use any sharp utensils on the pan
as this will damage the non-stick surface.
•
After use, wash the pan in hot soapy water
and rinse in hot water. Do not use any
abrasive cleaning substances or scouring
pads as this will damage the surface of the
pan.
•
The pan is dishwasher safe.
Notes:
1. Do not pre-heat the Pan more than 8
minutes.
2. Always place the pan in the centre of the
glass tray and ensure it does not touch the
wall of the oven cavity. Failure to do so,
may cause sparking which would damage
the cavity.
3. Always use the Pan on the Glass Turntable.
Do not use with the Wire Rack.
4. Always use the Panacrunch Pan handle or
oven gloves when handling the hot pan.
5. Ensure all food packaging is removed
before cooking.
6. Do not place any heat-sensitive materials
on the hot Pan as this may cause burning.
7. The Pan can be used in a conventional
oven.
8. For best results, use the Pan in
COMBINATION GRILL and MICROWAVE.
The ʻconceptʼ
Some foods cooked by microwave can have
soft and soggy crusts. Your Panacrunch Pan
accessory will brown and crisp pizzas,
quiches, pies, breaded products just as a
conventional oven. Your Panasonic
Panacrunch Pan works in three ways: heating
the pan by absorbing microwaves, heating the
food directly by microwaves and heating the
food by the grill. The base of the pan absorbs
the microwaves and transfers them into heat.
Then the heat is conducted through the pan to
the food. The heating effect is maximised by
the non-stick surface.
Using the Panacrunch Pan (Manual
operation)
•
For best results, pre-heat the pan before
using. Place directly on the glass turntable
and pre-heat on Combination 1 for
3 minutes. To assist browning, brush the
pan with oil before preheating for
items such as sausages and beefburgers.
•
Remove the pan from the oven and place
the food in the pan. Use the Panacrunch
Pan handle or oven gloves as the pan will
be very hot. For best results, it is important
that the food is placed on the pan
immediately after pre-heating. Performance
cannot be guaranteed with a time delay.
Page 20

En-18
Q: There are humming and
clicking noises from my
oven when I cook by
COMBINATION. What is
causing these noises?
Questions and answers
Q: Why wonʼt my oven turn
on?
A: When the oven does not turn on, check the following:
1. Is the oven plugged in securely? Remove the plug from
the outlet, wait 10 seconds and reinsert.
2. Check the circuit breaker and the fuse. Reset the circuit
breaker or replace the fuse if it is tripped or blown.
3. If the circuit breaker or fuse is all right, plug another
appliance into the outlet. If the other appliance works,
there probably is a problem with the oven. If the other
appliance does not work, there probably is a problem
with the outlet.
If it seems that there is a problem with the oven, contact
an authorized Service Center.
A: Some radio and TV interference might occur when you cook
with the microwave oven. This interference is similar to the
interference caused by small appliances such as mixers,
vacuums, blow dryers, etc. It does not indicate a problem
with your oven.
A: The oven is designed not to accept an incorrect program.
For example, the oven will not accept a fourth stage.
A: The heat given off from the cooking food warms the air in
the oven cavity. This warmed air is carried out of the oven
by the air flow pattern in the oven. There are no
microwaves in the air. The oven vents should never be
blocked during cooking.
A: Only when you are using GRILL cooking mode. The metal
in some thermometers may cause arcing in your oven and
should not be used on MICROWAVE and COMBINATION
cooking modes.
A: The noises occur as the oven automatically switches from
MICROWAVE power to GRILL to create the combination
setting. This is normal.
A: This display indicates a problem with the microwave
generation system. Please contact an authorised Service
Centre.
Q: My microwave oven causes
interference with my TV. Is
this normal?
Q: The oven wonʼt accept my
program. Why?
Q: Sometimes warm air
comes from the oven vents.
Why?
Q: Can I use a conventional
oven thermometer in the
oven?
Q: The oven stops cooking by
microwave and 'H97' or 'H98'
appears in the display. Why?
Page 21

En-19
English
8. The roller ring and oven cavity floor should
be cleaned regularly to avoid excessive
noise. Simply wipe the bottom surface of
the oven with mild detergent and hot water
then dry with a clean cloth. The roller ring
may be washed in mild soapy water.
Cooking vapours collect during repeated
use but in no way affects the bottom
surface or roller ring wheels. After
removing the roller ring from the cavity
floor for cleaning, be sure to replace it in
the proper position.
9. When using the GRILL or COMBINATION
mode, some foods may inevitably splatter
grease on to the oven walls. If the oven is
not cleaned occasionally, it may start to
“smoke” during use.
10. A steam cleaner is not to be used for
cleaning.
11. This oven should only be serviced by
qualified personnel. For maintenance and
repair of the oven contact the nearest
authorized dealer.
12. Failure to maintain the oven in a clean
condition could lead to deterioration of
surfaces that could affect the life of the
appliance and possibly result in a
hazardous situation.
13. Keep air vents clean at all times. Check
that no dust or other material is blocking
any of the air vents on the top, bottom or
rear of the oven. If air vents become
blocked this could cause overheating
which would affect the operation of the
oven and possibly result in a hazardous
situation.
1. Turn the oven off before cleaning.
2. Clean the inside of the oven, door seals
and door seal areas regularly. When food
splatters or spilled liquids adhere to the
oven walls, door seals and door seal areas
wipe off with a damp cloth. Mild detergent
may be used if they get very dirty. The use
of harsh detergent or abrasive is not
recommended.
DO NOT USE COMMERCIAL OVEN
CLEANERS.
3. Do not use harsh, abrasive cleaners or
sharp metal scrapers to clean the oven
door glass since they can scratch the
surface, which may result in shattering the
glass.
4. The outside oven surface should be
cleaned with a damp cloth. To prevent
damage to the operating parts inside the
oven, water should not be allowed to seep
into the ventilation openings.
5. If the Control Panel becomes dirty, clean it
with a soft, dry cloth. Do not use harsh
detergents or abrasives on the Control
Panel. When cleaning the Control Panel
leave the oven door open to prevent the
oven from accidentally turning on. After
cleaning touch STOP/CANCEL Pad to
clear display window.
6. If steam accumulates inside or around the
outside of the oven door, wipe with a soft
cloth. This may occur when the microwave
oven is operated under high humidity
conditions and in no way indicates a
malfunction of the unit.
7. It is occasionally necessary to remove the
glass tray for cleaning. Wash the tray in
warm soapy water or in a dishwasher.
Care of your oven
Page 22
Technical specifications
Power Source: 230 V, 50 Hz
Power Consumption: Maximum; 1800 W
Microwave; 1125 W
Grill; 1100 W
Output: Microwave; 850 W (IEC-60705)
Grill Heater;1100 W
Outside Dimensions: 482 (W) x 364 (D) x 284 (H) mm (NN-GD379S)
482 (W) x 368 (D) x 284 (H) mm (NN-GD359W / NN-GD369M)
Oven Cavity Dimensions: 325 (W) x 330 (D) x 191 (H) mm
Uncrated Weight: 9.5 kg (NN-GD359W / NN-GD369M)
10.0 kg (NN-GD379S)
Noise: 58.8 dB (EN60704)
Specifications subject to change without notice.
This product is an equipment that fulfills the European standard for EMC disturbances (EMC =
Electromagnetic Compatibility) EN 55011. According to this standard this product is an equipment
of group 2, class B and is within required limits. Group 2 means that radio-frequency energy is
intentionally generated in the form of electromagnetic radiation for warming up of foods. Class B
means that this product may be used in normal household areas.
Information on Disposal for Users of Waste Electrical & Electronic Equipment
(private households)
This symbol on the products and/or accompanying documents means that used electrical and
electronic products should not be mixed with general household waste.
For proper treatment, recovery and recycling, please take these products to
designated collection points, where they will be accepted on a free of charge
basis. Alternatively, in some countries you may be able to return your products to
your local retailer upon the purchase of an equivalent new product.
Disposing of this product correctly will help to save valuable resources and
prevent any potential negative effects on human health and the environment
which could otherwise arise from inappropriate waste handling. Please contact
your local authority for further details of your nearest designated collection point.
Penalties may be applicable for incorrect disposal of this waste, in accordance
with national legislation.
For business users in the European Union
If you wish to discard electrical and electronic equipment, please contact your dealer or supplier
for further information.
Information on Disposal in other Countries outside the European Union
This symbol is only valid in the European Union.
If you wish to discard this product, please contact your local authorities or dealer and ask for the
correct method of disposal.
Pursuant to the directive 2004/108/EC, article 9(2)
Panasonic Testing Centre
Panasonic Service Europe, a division of Panasonic Marketing Europe GmbH
Winsbergring 15,22525 Hamburg, F.R.Germany
Manufactured by Panasonic Home Appliances Microwave Oven (Shanghai) Co.,Ltd, 898
Longdong Road, Pudong, Shanghai, 201203, China.
En-20
Page 23
D-1
Deutsch
Überprüfung Ihres Mikrowellengerätes
Das Gerät auspacken, Verpackungsmaterial entfernen und auf Beschädigungen wie z.B.
Stoßstellen, gebrochene Türverriegelungen oder
Risse in der Tür überprüfen. Sofort den Händler
benachrichtigen, wenn das Gerät beschädigt ist.
Kein beschädigtes Mikrowellengerät installieren.
Erdungsvorschriften
WICHTIG: ZUR SICHERHEIT VON PERSONEN
MUSS DIESES GERÄT GEERDET SEIN!
Ist die Steckdose nicht geerdet, muß der Kunde
die Steckdose durch eine ordnungsgemäße
Schutzkontaktsteckdose ersetzen lassen.
Betriebsspannung
Die Netzspannung muß der auf dem
Typenschild des Gerätes angegebenen
Spannung entsprechen. Wird eine höhere
Spannung als angegeben verwendet, so kann
ein Brand entstehen oder sonst ein Unfall die
Folge sein.
Aufstellen des Gerätes
Das Gerät ist ausschließlich als Tischgerät
geeignet, nicht als Einbaugerät oder für die
Verwendung in Schränken.
1. Stellen Sie das Mikrowellengerät auf eine
feste, ebene Stellfläche, die ca. 85cm hoch
ist (gemessen vom Fußboden).
2. Achten Sie beim Aufstellen des Gerätes
darauf, daß bei Gefahr jederzeit der Stecker
gezogen oder die Sicherung am
Sicherungskasten ausgeschaltet werden
kann.
3. Das Gerät arbeitet ordnungsgemäß, wenn
eine ausreichende Luftzirkulation stattfinden
kann.
Aufstellen auf der Arbeitsfläche:
a. Sicherheitsrichtlinien empfehlen die
Einhaltung eines Mindestabstands von 15
cm über dem Gerät, 10 cm zur Rückwand
sowie 5 cm zur einen und 10 cm zur ande
ren Seite.
b. Sollte das Gerät an einer Seite direkt an der
Wand stehen, müssen die anderen Seiten
frei bleiben.
4. Das Gerät nicht in unmittelbarer Nähe eines
Gas- oder Elektroherdes aufstellen.
5. Die Stellfüße dürfen nicht entfernt werden.
6. Dieses Gerät ist nur für den Hausgebrauch
konzipiert. Nicht im Freien verwenden.
7. Das Mikrowellengerät nicht bei zu hoher
Luftfeuchtigkeit benutzen.
8. Das Netzanschlußkabel darf die
Gerätegehäuseoberfläche nicht berühren, da
diese während des Betriebes heiß wird. Das
Kabel auch nicht mit anderen heißen
Oberflächen in Berührung bringen. Das
Netzanschlußkabel nicht über Tisch- oder
Thekenkanten hängen lassen. Das Kabel oder
den Netzstecker nicht in Wasser tauchen.
9. Die Lüftungsöffnungen auf der Ober- und
Rückseite des Gehäuses nicht verdecken.
Sind diese Öffnungen blockiert während das
Gerät arbeitet, kann es überhitzen. In diesem
Fall wird das Gerät durch den Überhitzungsschutz ausgeschaltet und kann erst wieder in
Betrieb gesetzt werden, wenn es abgekühlt ist.
10. Dieses Gerät ist nicht zur Bedienung mit
einer externen Zeitschaltuhr oder separaten
Fernbedienung gedacht.
15 cm
10 cm
Freistehend
5 cm
Arbeitsfläche
Aufstellen und Anschließen
Page 24

D-2
Aufstellen und Anschließen
WARNUNG
Wichtige Sicherheitshinweise
1. Die Türverriegelungen und die Türdichtungen
sollten mit einem feuchten Tuch abgewischt
werden. Das Gerät ist vom Benutzer auf mögliche Beschädigungen an den
Türdichtungsflächen zu prüfen, und falls ein
solcher Schaden aufgetreten ist, darf das
Gerät nicht betrieben werden, bevor es vom
Panasonic-Kundendienst repariert worden ist.
2. Führen Sie weder eine Manipulation oder
Reparatur an der Tür, an den Kontrolleinrichtungen oder Sicherheitsvorrichtungen noch an
irgendeinem anderen Teil des Gerätes durch.
In keinem Fall das Gehäuse, das den Schutz
gegen Strahlenbelastung durch
Mikrowellenenergie sicherstellt, abbauen. Das
Gerät darf nur von einem geschulten
Panasonic Kundendienst-Techniker geprüft
oder repariert werden.
3. Das Gerät nicht in Betrieb setzen, wenn das
Netzanschlußkabel oder der Netzstecker
beschädigt ist, bzw. wenn es nicht ordnungsgemäß arbeitet oder eine sichtbare
Beschädigung aufweist.
4. Aus Sicherheitsgründen muß ein beschädigtes
Anschlußkabel durch den Hersteller, seinen
Kundendienst oder eine andere gleichwertig
qualifizierte Person ersetzt werden.
5. Kindern darf die Benutzung des Gerätes ohne
Aufsicht nur erlaubt werden, wenn eine ausreichende Einweisung gegeben wurde, die
das Kind in die Lage versetzt, das Gerät in
sicherer Weise bedienen und die Gefahr einer
falschen Bedienung verstehen zu können.
6. Keine Flüssigkeiten und Nahrungsmittel in
versiegelten Behältern (z.B. Konserven) erhitzen, da diese platzen können.
7. Dieses Gerät darf nicht von Personen (ein
schließlich Kinder) mit eingeschränkten körperlichen, sensorischen oder mentalen
Fähigkeiten benutzt werden. Gleiches gilt
für Personen, denen es an der nötigen
Erfahrung und dem nötigen Wissen man
gelt, außer sie werden durch eine für sie
verantwortliche Person beaufsichtigt oder
im sicheren Gebrauch des Gerätes unter
wiesen. Kinder müssen beaufsichtigt wer
den, damit sichergestellt ist, dass sie nicht
mit dem Gerät spielen.
Achtung: Heiße Oberflächen
Page 25

D-3
Deutsch
Gebrauch und Ausstattung des
Gerätes
1. Das Mikrowellengerät nur zur Nahrungs-
mittelzubereitung benutzen. Dieses Gerät
ist speziell zum Auftauen, Erwärmen und
Garen von Lebensmitteln entsprechend der
Bedienungs- und Kochanleitung konzipiert.
Erhitzen Sie in keinem Fall Chemikalien
oder andere Produkte.
2. Prüfen Sie vor der ersten Benutzung Ihres
Geschirrs, ob es für den Gebrauch im
Mikrowellengerät geeignet ist.
3. Bitte versuchen Sie nicht, Kleidungsstücke,
Zeitungen oder andere Materialien im
Mikrowellengerät zu trocknen. Diese
Gegenstände können sich entzünden.
4. Im Garraum des Mikrowellengerätes dürfen
keine Gegenstände aufbewahrt werden, die
bei unbeabsichtigtem Einschalten des
Gerätes eine Gefahr für die Umgebung darstellen.
5. Nehmen Sie das MIKROWELLENGERÄT
NIE OHNE LEBENSMITTEL in Betrieb.
Dies kann zu Beschädigungen des Gerätes
führen.
6. Kommt es zu einem Brand oder tritt wäh-
rend des Mikrowellenbetriebs Rauch aus
dem Gerät, dann halten Sie die Gerätetür
geschlossen. Schalten Sie das
Mikrowellengerät ab, indem Sie auf die
STOPPTASTE drücken bzw. ziehen Sie
den Netzstecker aus der Steckdose oder
schalten Sie die Installationssicherung aus.
Grillbetrieb
1. Während des GRILL- ODER KOMBINATI-
ONSBETRIEBS werden Gehäuseoberfläche, Entlüftungsschlitze und die Tür
heiß. Seien Sie beim Öffnen/Schließen der
Tür deshalb vorsichtig, ebenso beim
Herausnehmen/Hineinstellen von
Lebensmitteln.
2. Das Gerät hat zwei Heizelemente im
Deckenbereich. Nach dem Gebrauch des
GRILL- ODER KOMBINATIONSBETRIEBS
sind diese Oberflächen sehr heiß, ebenso
das benutzte Zubehör und Geschirr. Achten
Sie auch darauf, daß Sie das Heizelement
im Garraum nicht berühren.
3. Kinder müssen bei der Benutzung des
Grills ferngehalten werden, da die
Gehäuseoberflächen sehr heiß werden können.
Garraumbeleuchtung
Wenn es nötig wird die eingebaute Garraumbeleuchtung zu wechseln, wenden Sie sich
bitte an Ihren Händler.
Zubehör
Das Mikrowellengerät ist mit unterschiedlichem
Zubehör ausgestattet. Verwenden Sie dieses
bitte laut Anweisung.
Glasdrehteller
1. Das Mikrowellengerät nicht ohne den dazu-
gehörigen Glasdrehteller und Rollenring in
Betrieb setzen.
2. Benutzen Sie in keinem Fall einen anderen
als den speziell für dieses Gerät konzipierten Glasdrehteller.
3. Den evtl. heißen Glasdrehteller abkühlen
lassen, bevor Sie diesen reinigen bzw. mit
Wasser abspülen.
4. Der Drehteller kann rechts- oder linksherum
laufen. Dies stellt keine Fehlfunktion dar.
5. Berührt das Lebensmittel bzw.
Kochgeschirr die Garraumwände, läuft der
Drehteller nicht weiter, sondern stoppt und
beginnt, sich in die entgegengesetzte
Richtung zu drehen.
6. Das Lebensmittel nicht direkt auf dem
Glasdrehteller auftauen, erwärmen oder
garen.
Rollenring
1. Der Rollenring und die Vertiefung im
Garraumboden müssen regelmäßig gereinigt werden, um zu verhindern, daß
Geräusche entstehen und sich
Nahrungsmittelreste ansammeln.
2. Den Rollenring immer zusammen mit dem
Glasdrehteller benutzen.
Grillrost
1. Der runde Grillrost wird zum Bräunen von
kleineren Portionen benutzt und unterstützt
die gleichmäßige Hitzeverteilung.
2. Beim KOMBINATIONSBETRIEB mit
Mikrowelle oder beim reinen MIKROWELLENBETRIEB weder Alu- oder Metallspieße
noch irgendein Metallgeschirr direkt auf den
Rost stellen.
3. Den Rost nicht für den reinen MIKROWEL-
LENBETRIEB benutzen.
Panacrunch - siehe Seite D-17.
Sicherheitshinweise
Page 26

D-4
Wichtige Informationen
1) Kochzeiten
• Die Kochzeit ist abhängig von Beschaffenheit,
Ausgangstemperatur und Menge des
Lebensmittels sowie von der Art des verwendeten Kochgeschirrs.
• Gehen Sie zunächst von einer kürzeren
Kochzeit aus, um ein Übergaren der Speisen
zu vermeiden. Hat das Lebensmittel noch
nicht den gewünschten Auftau-, Erwärmungsoder Garzustand erreicht, haben Sie immer
noch die Möglichkeit, die Garzeit zu verlängern.
Wird die empfohlene Kochzeit überschritten, kann das Lebensmittel leicht verbrennen und ggf. einen Brand auslösen
und somit den Garraum zerstören.
2)
Geringe Lebensmittelmengen
• Sehr kleine Lebensmittelmengen oder
Speisen mit geringem Feuchtigkeitsgehalt
können schnell austrocknen und verbrennen,
wenn sie zu lange gegart werden. Kommt es
zu einem Brand, die Tür des
Mikrowellengerätes geschlossen halten, das
Gerät abschalten und den Netzstecker aus
der Steckdose ziehen.
3)
Eier
• Weder rohe, gekochte Eier mit Schale noch
gepellte hartgekochte Eier mit Mikrowellen
erhitzen oder kochen. Nach Ende des
Mikrowellen-Kochvorgangs kann sich noch
weiterhin Druck bilden und die Eier können
explodieren.
4)
Lebensmittel mit Schale oder Haut
• Bei Lebensmitteln wie z.B. Kartoffeln und
Würstchen empfiehlt es sich, sie vorher
anzustechen, um ein evtl. Platzen zu
vermeiden.
5)
Speisethermometer
• Falls Sie den Garzustand mit einem Speisethermometer überprüfen wollen, verwenden
Sie bitte keine herkömmlichen Thermometer
im Mikrowellengerät. Diese können Funken
verursachen. Benutzen Sie diese Speisethermometer nur außerhalb des Mikrowellengerätes.
6)
Flüssigkeiten
• Beim Erhitzen von Flüssigkeiten im
Mikrowellengerät kann durch kurzfristiges
Aufkochen (Siedeverzug) die Flüssigkeit im
Gerät oder bei der Entnahme schlagartig verdampfen und explosionsartig aus dem Gefäß
geschleudert werden. Dies kann zu
Verbrennungen führen.
Sie vermeiden einen Siedeverzug, indem Sie
beim Erhitzen von Flüssigkeiten in Gläsern
oder Tassen immer ein hitzebeständiges Glasstäbchen mithineinstellen oder größere
Gefäße mit einem Deckel bzw. Teller abdekken. Zusätzlich sollten Sie folgende Punkte
beachten:
a) Vermeiden Sie die Verwendung von
geraden Gefäßen mit engem Ausguß.
b) Überhitzen Sie die Flüssigkeit nicht.
c) Rühren Sie die Flüssigkeit einmal um, bevor
Sie das Gefäß ins Gerät stellen sowie noch-
mals nach der halben Kochzeit.
d) Lassen Sie nach Ablauf der Kochzeit das
Gefäß kurze Zeit im Gerät stehen, bevor Sie
es herausnehmen. Rühren Sie die Flüssigkeit
anschließend noch einmal um.
7)
Papier und Plastik
• Wenn Behälter aus Papier, Kunststoff oder
anderen leicht entflammbaren Materialien zum
Erwärmen benutzt werden, darf das
Mikrowellengerät nicht unbeaufsichtigt betrieben werden! Diese Behälter können sich entzünden.
• Verwenden Sie keine recycelten
Papierprodukte (z.B. Küchenrollen), die nicht
ausschließlich für die Benutzung im
Mikrowellengerät geeignet sind. Im Recyclingpapier können Bestandteile sein, die Funkenbildung oder einen Brand verursachen.
• Entfernen Sie Metallverschlüsse von Bratfolien, bevor Sie diese ins Gerät stellen.
8)
Hilfsmittel und Folien
• Erhitzen Sie keine geschlossenen Flaschen
oder Konserven im Mikrowellengerät, da diese
durch den Druck explodieren können.
• Verwenden Sie während des Mikrowellenbetriebes weder Geschirr aus Metall noch
Geschirr mit Metallrand.
• Bei Benutzung von Alufolie, Metallspießen
oder anderen Metallwaren darauf achten, daß
sie mindestens 2 cm von der Gerätewand entfernt sind, um Funkenbildung zu vermeiden.
9)
Babynahrung
• Benutzen Sie nur Fläschchen oder Glasformen aus hochwertigen hitzebeständigen
Materialien und plazieren Sie diese ohne
Deckel in der Mitte des Drehtellers.
• Nach dem Erhitzen sollte die Babynahrung in
Fläschchen oder Gläsern gut geschüttelt bzw.
durchgerührt werden, damit ein Temperaturausgleich stattfinden kann.
• Überprüfen Sie die Temperatur vor dem
Verzehr, um Verbrennungen zu vermeiden.
Page 27
D-5
Deutsch
Schematische Ansicht
1. Türöffnungstaste
Drücken Sie diese Taste, um die Tür zu öffnen. Durch Öffnen der Tür während des
Garvorgangs wird der Betrieb unterbrochen, das Programm bleibt erhalten. Der Garvorgang
läuft weiter ab, wenn die Tür geschlossen und die Starttaste gedrückt wird.
2. Sichtfenster
3. Türsicherheitsverriegelungen
4. Innerer Entlüftungsschlitz
5. Bedienfeld
6. Glasdrehteller
7. Rollenring
8. Äußere Entlüftungsschlitze
9. Grillrost
10. Panacrunch
11. Griff für Panacrunch
12. Stromkabel
13. Warnschild (Heiße Oberfläche)
[1]
[2]
[3]
[4]
[5]
[7]
[9]
[6]
[10]
[11]
[8]
[12]
[13]
Page 28
D-6
(1) Digitalanzeige
(2) Taste für die Gewichtsautomatik
Mikrowellenbetrieb
(3) Taste für die Gewichtsautomatik
Grillkombinationsbetrieb
(4) Autogewicht-Turbo-Auftauen
(5) Drehregler für die Zeit oder
Gewichtseingabe
(6) Mikrowellen-Leistungswahltaste
(7) Grillbetriebtaste
(8) Grillkombinationsbetriebtaste
(9) Vorwahlzeit/Standzeit-Taste
(10) Zeit-Taste
(11) Stopp-/Löschtaste:
Eine Betätigung der Stopp-
/Löschtaste vor dem Betrieb löscht
alle eingegebenen Daten. Durch
einmaliges Drücken der
Stopp-/Löschtaste während des
Garvorgangs wird der Betrieb des
Gerätes unterbrochen.
Durch zweimaliges Drücken wäh-
rend des Garvorgangs werden alle
Eingaben gelöscht und in der
Digitalanzeige erscheint wieder die
Tageszeit.
(12) Starttaste
Akustisches Signal
Bei richtiger Bedienung, d.h. bei Druck auf eine beliebige Funktionstaste, ertönt ein Signal.
Wenn dieses Signal nicht ertönt, wurde die Taste nicht richtig gedrückt, bzw. das Gerät konnte
die Eingabe nicht annehmen. Nach Beendigung eines Programms ertönt das Signal fünfmal.
Bedienfeld
*Das Bedienfeld Ihres Mikrowellengerätes
kann sich von dem hier gezeigten
unterscheiden (abhängig von der Farbe);
die Funktion der Tasten ist jedoch gleich.
Anmerkungen: Wird ein Betriebsvorgang gewählt und die Start-Taste nicht gedrückt, wird
der Vorgang nach 6 Minuten automatisch vom Gerät rückgängig gemacht. Das Display kehrt
zurück zum Zeitanzeige-Modus.
NN-GD359W / NN-GD369M / NN-GD379S*
(5)
(1)
(2)
(3)
(4)
(6)
(7)
(8)
(9)
(10)
(12)
(11)
Dieses Gerät verfügt über eine
Energiesparfunktion.
Bitte beachten:
1. Im Bereitschaftsmodus ist die Helligkeit
des Displays reduziert.
2. Das Mikrowellengerät geht beim ersten
Einschalten und sofort nach Abschluss des
letzten Betriebsvorgangs in den
ereitschaftsmodus über.
Page 29
D-7
Deutsch
Anmerkungen:
1. Um erneut die Tageszeit einzustellen, bitte Schritt 1 bis 3 wiederholen.
2. Die eingestellte Tageszeit bleibt erhalten, solange die Stromzufuhr nicht unterbrochen wird.
3. Dies ist eine 24-Stunden-Uhr, d.h. 2.00 nachmittags = 14.00, nicht 2.00.
Einstellen der Uhr
Die Kindersicherung kann aktiviert werden, wenn ein Doppelpunkt bzw. die Uhrzeit im
Anzeigenfeld steht. Nach Aktivieren der Kindersicherung kann keine Eingabe über das
Bedienfeld erfolgen. Die Funktionen des Gerätes sind blockiert, die Tür kann jedoch wie gewohnt
geöffnet werden.
Aktivieren:
Löschen:
• Drücken Sie 3mal die Starttaste.
Die Uhrzeit erscheint nicht mehr im
Anzeigenfeld, ist aber nicht gelöscht.
Im Anzeigenfeld erscheint “_ _ _ _”.
• Drücken Sie 3mal die Stopp-/
Löschtaste.
Die Uhrzeit erscheint wieder im
Anzeigenfeld.
Kindersicherung
• Drücken Sie einmal
auf das Zeit-Taste.
Der Doppelpunkt blinkt.
• Drücken Sie auf das
Zeit-Taste. Der
Doppelpunkt hört auf zu
blinken und die Uhrzeit
ist eingestellt.
• Stellen Sie durch Drehen des
Drehreglers für die Zeit/Gewichtseingabe die korrekte
Uhrzeit/Tageszeit ein. Die Uhrzeit
erscheint im Anzeigenfeld und der
Doppelpunkt blinkt.
Beim ersten Anschließen des Gerätes erscheint “88:88” in der Digitalanzeige.
HINWEIS: Zum Aktivieren der Kindersicherung muss die Start-Taste dreimal innerhalb von 10
Sekunden gedrückt werden.
Page 30
D-8
• Drücken Sie die MikrowellenLeistungswahltaste. Wählen
Sie die gewünschte
Leistungsstufe. Das
Mikrowellen-Symbol leuchtet
auf und die entsprechende
Wattleistung erscheint in der
Digitalanzeige.
• Stellen Sie mit dem Drehregler für
die Zeit-/ Gewichtseingabe die
gewünschte Zeit ein (Maximale
Leistung: maximal 30 Minuten, alle
anderen Leistungsstufen: maximal
90 Minuten).
• Drücken Sie die
Starttaste. Das
Garprogramm
beginnt und die Zeit
in der Digitalanzeige
wird zurückgezählt.
ACHTUNG: Das Gerät arbeitet automatisch auf der höchsten Mikrowellen-
Leistungsstufe (Max/Garen-850 Watt), wenn eine Garzeit eingegeben wurde, ohne daß
zuvor eine Leistungsstufe gewählt wurde.
Vor Gebrauch des Gerätes vergewissern, daß der Glasdrehteller richtig eingesetzt ist.
850 Watt
270 Watt
600 Watt
440 Watt
250 Watt
100 Watt
Wattleistung
Max/Garen
Auftauen
Medium/Erwärmen
Niedrig/Fertiggaren
Köcheln
Ausquellen
Garen im Mehr-Phasen-Betrieb
Das Gerät ist mit einer Speicherkapazität für bis zu drei automatisch aufeinanderfolgende
Leistungsstufen ausgestattet. Programmieren Sie die gewünschten Phasen und Zeiten ein (wiederholen Sie hierzu Schritt 1 und 2). Drücken Sie die Starttaste jedoch erst nachdem Sie alle
Phasen eingegeben haben.
Anmerkung:
Gewichtsautomatik und Auftautaste können nur als erste Phase programmiert werden.
1mal drücken
2mal drücken
3mal drücken
4mal drücken
5mal drücken
6mal drücken
Mikrowellenbetrieb zum Garen und Auftauen
Page 31

D-9
Deutsch
Gebrauch des Gerätes mit Zeitvorwahl
Das Verzögern/stehen-taste können Sie dazu benutzen, die Standzeit nach Ablauf des
Kochvorgangs zu programmieren oder um das Gerät als Minuten-Schaltuhr zu programmieren.
Indem Sie das Verzögern/stehen-taste benutzen, können Sie den verzögerten Beginn des
Kochvorgangs programmieren.
HINWEIS:
1. Es können drei Kochstufen programmiert werden, einschließlich verzögertem Kochbeginn.
Zum Beispiel:
2. Beträgt die programmierte Verzögerungszeit mehr als eine Stunde, erfolgt der Countdown in
Minuteneinheiten. Beträgt die programmierte Verzögerungszeit weniger als eine Stunde,
erfolgt der Countdown in Sekundeneinheiten.
3. Startverzögerung kann nicht vor den automatischen Programmen programmiert werden.
• Drücken Sie
das
Verzögern/
stehen-taste.
• Stellen Sie die
Verzögerungszeit ein,
indem Sie den
Zeit/GewichtDrehregler drehen (bis
zu 9 Stunden).
• Stellen Sie das gewünschte
Kochprogramm und die
Kochzeit ein.
• Drücken Sie
das Start-taste.
Beispiel:
Start verzögern: 1 Stunde Hohe Kochleistung: 10 Min.
Kochen auf kleiner Flamme: 20 Min.
• Drücken Sie auf
das Verzögern/
Stehen- Taste.
• Stellen Sie die gewünschte Zeitspanne ein, indem
Sie den Zeit/GewichtDrehregler drehen (bis zu
9 Stunden).
• Drücken
Sie das
StartTaste.
HINWEIS:
1. Es können drei Kochstufen programmiert werden, einschließlich den Zeit/Gewicht-Drehregler
2. Wird die Herdtür während der Standzeit oder der Minutenschaltuhr geöffnet, wird der
Countdown im Display-Fenster fortgesetzt.
3. Diese Funktion kann auch als Zeit-Schaltuhr benutzt werden. In diesem Fall drücken Sie das
Verzögern/stehen-taste, stellen die Zeit ein und drücken das Start-Taste.
Beispiel:
Hohe Kochleistung: 4 Min. Standzeit: 5 Min. Hohe Kochleistung: 2 min.
Standzeit
5-malEinmal
Einmal
Einmal
• Stellen Sie das
gewünschte
Kochprogramm und
die Kochzeit ein.
Page 32

D-10
Tips zum Auftauen
Den Auftauvorgang mehrere Male überprüfen,
auch wenn Sie die Automatikknöpfe verwenden. Beachten Sie die Standzeiten.
Standzeit
Einzelne Nahrungsmittelportionen können fast
unverzüglich nach dem Auftauen gegart werden. Es ist normal, daß größere Portionen in
der Mitte noch gefroren sind. Vor dem Garen
bitte mindes-tens eine Stunde stehenlassen.
Während dieser Standzeit verteilt sich die
Temperatur gleichmäßig und das
Nahrungsmittel wird durch Wärmeleitung aufgetaut. Falls das Nahrungsmittel nicht sofort
weiterverarbeitet wird, sollten Sie es im
Kühlschrank aufbewahren. Niemals aufgetaute
Lebensmittel wieder einfrieren bevor sie nicht
gekocht wurden.
Braten und Geflügel
Vorzugsweise sollten Braten auf einen umgedreh-ten Teller oder ein Kunststoffgestell gelegt
werden, so daß sie nicht im Saft liegen. Es ist
äußert wichtig, daß emfindliche oder herausstehende Teile der Lebensmittel mit kleinen
Stücken Alufolie geschützt werden, damit sie
nicht garen. Es ist ungefährlich, kleine Stücke
Alufolie im Ofen zu verwenden, vorausgesetzt
sie kommen mit den Garraumwänden nicht
in Kontakt.
Hackfleisch, gewürfelte fleischstücke
oder fisch
Da die Außenseite dieser Lebensmittel schnell
auftaut, ist es notwendig die Teile während des
Auftauvorgangs regelmäßig auseinander-zubrechen und aufgetaute Stücke aus der Mikrowelle
zu entfernen.
Kleine portionen / fleischteile
Kleine Fleischteile wie Koteletts und
Hühnerteile müssen so schnell wie möglich
voneinander gelöst werden, damit sie gleichmäßig auftauen. Fettreiche Stellen und Enden
tauen schneller auf. Plazieren Sie diese daher
nahe der Mitte des Drehtellers oder decken Sie
sie ab.
Brot
Ganze Brote benötigen eine Standzeit, damit
der Kern auftauen kann. Sie können die
Standzeit verringern, indem Sie Scheiben voneinander trennen und Brötchen und ganze
Brote in Hälften schneiden.
Hinweise zum Auftauen
Page 33

D-11
Deutsch
Grillbetrieb
Anmerkungen:
1. Stellen Sie den Grillrost mit der Speise auf den Glasdrehteller. Plazieren Sie zuvor einen hitze-
beständigen Unterteller (Pyrex
®
) unter dem Grillrost, um Fett- und Essensspritzer aufzufangen.
2. Decken Sie die zu grillende Speise niemals ab.
3. Heizen Sie den Grill NICHT vor.
4. Der Grill funktioniert nur bei geschlossener Gerätetür. Es ist nicht möglich, den Grill bei geöff-
neter Gerätetür zu benutzen.
5. Während des reinen GRILLBETRIEBS werden keine Mikrowellen freigesetzt.
6. Die meisten Speisen müssen nach der halben Grillzeit umgedreht werden. Hierzu öffnen Sie
die Gerätetür und entnehmen mit Hilfe von Topflappen VORSICHTIG den Grillrost.
7. Wenn Sie die Speise umgedreht haben, stellen Sie sie wieder in das Gerät und schließen die
Tür. Bei Gerät drücken Sie die Starttaste. Die im Anzeigenfeld verbliebene Grillzeit wird weiter
zurückgezählt. Sie können während des Grillvorgangs jederzeit die Gerätetür öffnen, um den
Garzustand der Speise zu überprüfen.
8. Es ist völlig normal, daß der Grill während des Betriebs mal stärker, mal weniger stark glüht.
Reinigen Sie immer den Geräteinnenraum bevor Sie den Mikrowellenbetrieb oder die
Grillkombination benutzen.
• Drücken Sie die Grillbetriebtaste um
die gewünschte Grillstufe zu wählen.
1mal drücken Grillstufe 1 (stark)
2mal drücken Grillstufe 2 (mittel)
3mal drücken Grillstufe 3 (niedrig)
Der Grillanzeiger und die gewählte
Grillstufe (1, 2 oder 3) leuchten in
der Digitalanzeige auf.
• Drücken Sie die
Starttaste. Die Zeit
in der Digitalanzeige
wird zurückgezählt.
• Stellen Sie mit dem
Drehregler für die Zeit/Gewichtseingabe die
gewünschte Zeit ein (maximal
90 Minuten).
ACHTUNG: Der Grillrost darf nur auf dem Glasdrehteller benutzt werden. Nehmen
Sie den Grillrost aus dem Geräteinnenraum, indem Sie den Rost und den hitzebeständigen Unterteller feste greifen. Benutzen Sie Topflappen wenn Sie Zubehör
entnehmen. Der Geräteinnenraum kann sehr heiß sein. Achten Sie deshalb bitte
auch darauf, weder die Außenseite des Sichtfensters noch Metallteile an der
Innenseite der Tür oder im Garraum selber zu berühren.
Page 34

D-12
Grillkombinationsbetrieb
• Drücken Sie die Grillkombi-
nationstaste, um das gewünschte
Kombinationsprogramm zu wählen.
Der Grillkombinationsanzeiger leuchtet auf und die Kombi-Stufe (1, 2
oder 3) erscheint in der Anzeige.
• Stellen Sie mit dem
Drehregler für die Zeit/Gewichtseingabe die
gewünschte Zeit ein
(maximal 90 Minuten).
Beim Grillkombinationsbetrieb wird die Speise per Mikrowellen schnell gegart, während der Grill
sie bräunt und knusprig werden läßt.
Anmerkungen:
1. Der Grillrost kann sowohl für den reinen Grillbetrieb als auch für den Grillkombinationsbetrieb
verwendet werden. Benutzen Sie niemals Metallzubehör, das nicht mit dem Mikrowellengerät
geliefert wurde. Plazieren Sie einen hitzebeständigen Unterteller unter dem Grillrost, um Fettund Essensspritzer aufzufangen.
2. Verwenden Sie den Grillrost nur laut Betriebsanweisungen. Verwenden Sie ihn nicht in einem
manuellen Programm zur Bereitung einer Speise mit einem Gewicht unter 200g. Bei geringeren
Mengen bereiten Sie die Speise nur im REINEN MIKROWELLENPROGRAMM und GRILLBETRIEB zu, um das bestmögliche Ergebnis zu erzielen.
3. Decken Sie die zu garende Speise im Grillkombinationsbetrieb niemals ab.
4. Heizen Sie den Grill im Kombinationsbetrieb NICHT vor.
5. Funken können auftreten, wenn das Gewicht der Speise zu gering, der Grillrost beschädigt ist
oder versehentlich ein Metallbehälter verwendet wurde. Kommt es zur Funkenbildung, brechen
Sie den Garvorgang sofort ab.
6. Einige Speisen werden im Grillkombinationsbetrieb ohne die Verwendung des Grillrosts zube-
reitet. Diese Speisen sind z.B. Braten, Gratins, Aufläufe und gratinierte Süßspeisen und sollten in
einem hitzebeständigen, nicht-metallischen Behälter unmittelbar auf dem Glasdrehteller plaziert
werden.
7. Benutzen Sie in KEINEM FALL Mikrowellen-Plastikbehälter im Grillkombinationsbetrieb (es sei
denn, sie sind ausdrücklich hierfür geeignet). Verwendetes Geschirr muß der Hitze des Obergrills
bestehen können - ideal ist hitzebeständiges Glasgeschirr, z.B. Pyrex, oder Keramikbehälter.
8. Verwenden Sie nicht Ihr eigenes Metallgeschirr oder Blechkonserven, da die Mikrowellen die
Speise nicht gleichmäßig durchdringen können.
ACHTUNG: Der Grillrost darf nur auf dem Glasdrehteller benutzt werden. Nehmen Sie
den Grillrost aus dem Geräteinnenraum, indem Sie den Rost und den hitzebeständigen
Unterteller feste greifen. Benutzen Sie Topflappen wenn Sie Zubehör entnehmen. Der
Geräteinnenraum kann sehr heiß sein. Achten Sie deshalb bitte auch darauf, weder die
Außenseite des Sichtfensters noch Metallteile an der Innenseite der Tür oder im Garraum
selber zu berühren.
• Drücken Sie die
Starttaste.
1mal drücken Kombi-Stufe 1 440W 1100W
2mal drücken Kombi-Stufe 2 250W 1100W
3mal drücken Kombi-Stufe 3 440W 950W
Tastendruck Stufe Mikrowelle Grill
Page 35

D-13
Deutsch
• Drücken Sie
die Starttaste.
Gewichtsautomatik zum Erwärmen/Garen
• Wählen Sie das gewünschte
Gewichtsautomatikprogramm.
Der Anzeiger für Automatik
leuchtet auf, und die
Programmnummer erscheint in
der Digitalanzeige.
Gewichtsautomatik zum Auftauen
Mit dieser Ausstattung können Sie Lebensmittel nach dem Gewicht auftauen.
• Geben Sie mit dem Drehregler für
die Gewichtseingabe das Gewicht
des Lebensmittels ein. Langsames
Drehen des Drehschalters wird in
Schritten von 10g gerechnet. Schnelles
Drehen des Drehschalters wird in
Schritten von 100g gerechnet.
• Drücken Sie die
Starttaste. Vergessen
Sie nicht, das
Lebensmittel während
des Auftauprozesses
umzurühren bzw.
umzudrehen.
• Wählen Sie das gewünschte
Gewichtsautomatikprogramm
zum Auftauen.
1mal drücken für kleine Teile
2mal drücken für große Stücke
Die Nummer des gewählten
Gewichtsautomatikprogramms
erscheint in der Digitalanzeige.
Die Anzeiger für Automatik und
Auftauen leuchten auf.
• Geben Sie mit dem
Drehregler für die Zeitund Gewichtseingabe das
Gewicht des Lebensmittels
ein. Langsames Drehen des
Drehreglers wird in Schritten
von 10g gerechnet.
Schnelles Drehen des
Drehschalters wird in
Schritten von 100g gerechnet.
Mit dieser Ausstattung können Lebensmittel nach dem Gewicht gegart werden. Das Gewicht wird
in Gramm eingegeben.
z.B.
200 - 1000g
Kleine Fleischstücke, Schnitzel, Würstchen, Gehacktes,
Fischfilets, Steaks, Koteletts (jeweils 100g bis 400g). Bei
Signalton umrühren / umdrehen.
1 Kleine Teile
400 - 2000g
Große Fleischstücke, Braten, ganzes Hähnchen, große
Fischstücke. Bei Signalton umdrehen.
2 Große Stücke
WICHTIG! Beachten Sie die Hinweise zum Auftauen auf Seite D-9.
Programm
Mindest-/
Höchstgewicht
Lebensmittelhinweise
Page 36

D-14
Gewichtsautomatik zum Erwärmen/Garen
150 - 1200g
200 - 1100g
Zum Aufwärmen eines frischen
Teller- oder Eintopfgerichts. Alle
Gerichte müssen bereits gar sein
und möglichst
Kühlschranktemperatur von ca.
+5°C haben. Programm für frische
Speisen wählen (MikrowellenProgrammtaste einmal drücken).
Bei Pieptönen Speise durchrühren.
Anschließend einige Minuten
stehen lassen. Vor dem Verzehr
sicherstellen, dass Speise
kochend heiß ist. Große Stücken
Fisch / Fleisch in dünner Soße
brauchen eventuell etwas länger.
Zum Garen von frischem
Gemüse.
Das vorbereitete Gemüse in einen
geeigneten Behälter geben. Pro
100 g Gemüse 1 EL Wasser darüber gießen. Mit perforierter
Klarsichtfolie oder einem Deckel
abdecken. Programm für frisches
Gemüse wählen (MikrowellenProgrammtaste drei Mal drücken).
Bei Pieptönen wenden bzw.
umrühren.
200 - 900g
Zum Garen von frischem Fisch.
Fisch in einen geeigneten Behälter
legen und 2 EL (30 ml) Wasser
dazugeben. Mit perforierter
Klarsichtfolie oder einem Deckel
abdecken. Programm für frischen
Fisch wählen (MikrowellenProgrammtaste vier Mal drücken).
1mal drücken
2mal drücken
3mal drücken
FERTIGE
TELLERGERICHTE
FRISCHES
GEMÜSE
FRISCHER FISCH
ERWÄRMEN
TASSE/SCHÜSSEL
Zum Aufwärmen von einer Tasse
(150 g), 1 Schüssel (300 g) oder 2
Schüsseln (600 g) heißer
Getränke (Tee, Kaffee, Milch oder
Suppe).
Programm für Tasse/Schüssel
wählen (MikrowellenProgrammtaste zwei Mal drücken).
Gewicht eingeben (150 g, 300 g
oder 600 g) und Starttaste drücken.
1 Tasse - 150g
1 Schüssel - 300g
2 Schüsseln - 600g
4mal drücken
Programm
Empfohlenes
Gewicht
Zubehör
Hinweise/Tips
Page 37

D-15
Deutsch
1. Wählen Sie das
gewünschte
Programm und
stellen Sie den
Panacrunch direkt
auf den
Glasdrehteller.
2. Drücken Sie die
Starttaste, um den
Panacrunch vorzuheizen.
3. Ist das Vorheizen
beendet, ertönt ein
Signal. Legen Sie
anschließend das
Lebensmittel in den
Panacrunch und
geben Sie das
Gewicht ein.
4. Drücken Sie die
Starttaste.
Gewichtsautomatik zum Erwärmen/Garen
150 - 480g
150 - 480g
130 - 500g
Zum Erhitzen und Bräunen von
tiefgekühlter Pizza,
industriell vorgefertigt. Entfernen
Sie die Verpackung und legen Sie
die Pizza in den vorgeheizten
Panacrunch.
1mal drücken
2mal drücken
3mal drücken
TIEFGEFRORENE
PIZZA
TK-PIZZA
FRISCH-QUICHE
TK-POMMES
4mal drücken
150 - 400g
Zum Erhitzen und Bräunen von
frischer Pizza,
industriell vorgefertigt. Entfernen
Sie die Verpackung und legen Sie
die Pizza in den vorgeheizten
Panacrunch.
Zum Erhitzen und Bräunen von
frischer Quiche,
industriell vorgefertigt.
Entfernen Sie die Verpackung und
legen Sie die Quiche in den vorgeheizten Panacrunch.
Zum Erhitzen und Bräunen von
tiefgekühlten Kartoffelprodukten,
industriell vorgefertigt. Entfernen
Sie die Verpackung und verteilen
Sie die Kartoffelprodukte gleichmäßig auf dem vorgeheizten
Panacrunch . Wenden Sie die
Lebensmittel während der Garzeit
beim Ertönen des Signals.
Panacrunch-Programme
Programm
Empfohlenes
Gewicht
Zubehör
Hinweise/Tips
Page 38

D-16
Gewichtsautomatik zum Erwärmen/Garen
300 - 1000g
150 - 1000g
Zum Aufwärmen, Bräunen und
Knusprigbraten fertiger TiefkühlGratins. Dieses Programm eignet
sich für tiefgekühlte Lasagne,
Cannelloni, Kartoffelgratins und
Nudelaufläufe. Sämtliche
Verpackung entfernen und
Tiefkühl-Gratin in ofenfeste Form
auf Glasteller legen. Programm für
Tiefkühl-Gratin wählen. (KombiProgrammtaste 5 Mal drücken).
Zum Garen von frischen
Hähnchenteilen (Brust, Keulen,
Schenkel und Viertel). Teile in
ofenfeste Form auf Gitterrost auf
Glasteller legen. Programm für
frische Hähnchenteile wählen
(Kombi-Programmtaste 6 Mal
drücken). Bei Pieptönen Teile
umdrehen.
5mal drücken
6mal drücken
TIEFGEFRORENE
GRATINS
FRISCHE
HÜHNERTEILE
BROT/
CROISSANTS
7mal drücken
Zum Aufwärmen von
tiefgekühlten Broten, Brötchen
und Croissants.
Sämtliche Verpackung entfernen
und Brot auf Gitterrost auf
Glasteller legen. Programm für
Brot/Croissants wählen (KombiProgrammtaste 7 Mal drücken).
Bei Pieptönen Teile umdrehen.
70 - 400g
• Drücken Sie die
Starttaste.
• Wählen Sie das gewünschte
Gewichtsautomatikprogramm.
Der Anzeiger für Automatik
leuchtet auf, und die
Programmnummer erscheint in
der Digitalanzeige.
• Geben Sie mit dem Drehregler für
die Gewichtseingabe das Gewicht
des Lebensmittels ein. Langsames
Drehen des Drehschalters wird in
Schritten von 10g gerechnet. Schnelles
Drehen des Drehschalters wird in
Schritten von 100g gerechnet.
Mit dieser Ausstattung können Lebensmittel nach dem Gewicht gegart werden. Das Gewicht wird
in Gramm eingegeben.
z.B.
Programm
Empfohlenes
Gewicht
Zubehör
Hinweise/Tips
Page 39

D-17
Deutsch
Wichtige Hinweise
1. Heizen Sie den Panacrunch maximal 8
Minuten vor.
2. Plazieren Sie den Panacrunch in der
Mitte des Glasdrehtellers. Versichern Sie
sich, daß der Panacrunch
die Garraumwände nicht berührt.
Fehlerhaftes Plazieren könnte
Funkenbildung und damit eine
Beschädigung des Garraums verursachen.
3. Setzen Sie den Panacrunch immer
direkt auf den Glasdrehteller. Benutzen Sie
in keinem Fall zusätzlich das Rost.
4. Wenn Sie mit dem heißen Panacrunch
arbeiten, benutzen Sie bitte immer den
dazugehörigen Griff oder Topfhandschuhe,
um Verbrennungen zu vermeiden.
5. Entfernen Sie sämtliches
Verpackungsmaterial des Lebensmittels,
bevor Sie dieses zubereiten.
6. Plazieren Sie niemals hitzeempfindliches
Material auf dem heißen Panacrunch .
Diese könnten sich entzünden.
7. Der Panacrunch kann auch im Backofen
benutzt werden.
8. Benutzen Sie den Panacrunch in
Kombination mit Mikrowelle und Grill, um
beste Ergebnisse zu erzielen.
Das Konzept
Werden bestimmte Lebensmittel wie z.B.
Pizza oder Quiche im Mikrowellengerät zubereitet, ist das Ergebnis oft nicht mit dem
Backofen zu vergleichen: Der Teig ist meistens weicher und der Boden nicht so knusprig.
Mit dem Panasonic Panacrunch als Zubehör
ist das kein Problem mehr. Pizza, Quiches
oder auch andere Produkte können knusprig
gebräunt werden. Das Prinzip ist folgendermaßen: Der Boden des Panacrunch s absorbiert
Mikrowellen und wandelt diese in Hitze um.
Diese Hitze wird von unten an das
Lebensmittel abgegeben. Eine Bräunung der
Lebensmittel-Oberfläche wird durch den Grill
erreicht. Außerdem unterstützt die Anti-HaftBeschichtung des Panacrunch s den HitzeEffekt.
Anwendung des Panacrunch
• Um die besten Ergebnisse zu erzielen, ist es
notwendig, dieses Zubehör vorzuheizen:
Setzen Sie den Panacrunch direkt auf den
Glasdrehteller und heizen ihn 3 Minuten mit
der Grillkombination 1 vor. Sollen
Lebensmittel wie z.B. Würstchen oder
Frikadellen zubereitet werden, dann fetten
Sie den Panacrunch vor dem Vorheizen
ein, um die Bräunung zu opti mieren.
• Nehmen Sie nach dem Vorheizen den
Panacrunch mit dem dazugehörigen
Griff oder Topfhandschuhen aus dem Gerät.
Legen Sie das Lebensmittel unverzüglich
auf den Panacrunch und stellen Sie den
Teller sofort wieder in das Mikrowellengerät.
Jede Zeitverzögerung kann das Garergebnis
beeinflussen.
Pflege des Panacrunch
• Benutzen Sie auf dem Panacrunch
keine scharfkantigen Gegenstände bzw.
Messer, da sonst die Beschichtung
beschädigt wird.
• Reinigen Sie den benutzten Panacrunch
in heißem Seifenwasser und spülen Sie mit
klarem, heißen Wasser nach. Verwenden
Sie weder Scheuermittel noch Kratzschwämme, da die Oberfläche sonst
beschädigt werden könnte.
• Der Panacrunch ist für die Geschirrspülmaschine geeignet.
Panacrunch
Page 40

D-18
F: Warum sind während des
Kombinationsgarens brummende und klickende
Geräusche zu hören?
F: Warum läßt sich das
Mikrowellengerät nicht
einschalten?
A: Läßt sich das Mikrowellengerät nicht einschalten, dann über-
prüfen Sie bitte folgendes:
1. Steckt der Netzstecker fest in der Steckdose? Ziehen Sie
den Stecker aus der Steckdose und warten Sie 10
Sekunden, bevor Sie diesen wieder hineinstecken.
2. Überprüfen Sie die Netzsicherung und ersetzen Sie diese
gegebenenfalls.
3. Ist die Netzsicherung in Ordnung, schließen Sie ein
anderes Elektrogerät an die Steckdose an. Arbeitet die
ses Gerät auch nicht, ist die Steckdose defekt, Arbeitet
das Gerät jedoch ordnungsgemäß, ist wahrscheinlich Ihr
Mikrowellengerät defekt. Wenden Sie sich in diesem Fall
unbedingt an einen Panasonic- Kundendienst.
A: Beim Betrieb des Mikrowellengerätes können Fernseh- und
Radiostörungen auftreten. Es handelt sich um ähnliche
Störungen, wie sie durch kleine Elektrogeräte wie Mixer,
Staubsauger, Haartrockner usw. verursacht werden können.
Dies bedeutet nicht, daß Ihr Mikrowellengerät defekt ist.
A: Das Gerät akzeptiert keine falschen Programme. Eine vierte
Phase wird z.B. nicht akzeptiert.
A: Die erhitzten Lebensmittel erwärmen den Garraum. Diese
warme Luft wird durch die zirkulierende Luftströmung aus
dem Gerät heraus befördert. In dieser erwärmten Luft sind
keine Mikrowellen enthalten. Die Lüftungsöffnungen dürfen
während des Garens in keinem Fall abgedeckt werden.
A: Nur für den reinen GRILLBETRIEB können Sie ein
Fleischthermometer verwenden. Benutzen Sie für den
MIKROWELLENBETRIEB bzw. für den KOMBINATIONSBETRIEB niemals ein herkömmliches Fleischthermometer, denn
das Metall des Thermometers kann Funkenbildung verursachen.
A: Diese Geräusche sind bedingt durch das automatische
Umschalten von MIKROWELLENLEISTUNG auf GRILLEISTUNG während des Kombinationsbetriebes. Dies ist normal.
F: Das Mikrowellengerät ver-
ursacht Fernsehstörungen.
Ist das normal?
F: Warum nimmt das
Mikrowellengerät das
gewünschte Programm
nicht an?
F: Warum strömt manchmal
warme Luft aus dem
Mikrowellengerät?
F: Kann im Mikrowellengerät
ein herkömmliches
Fleischthermometer
verwendet werden?
Fragen und Antworten
F: Das Gerät stoppt den
Mikrowellen-Garvorgang
und die Meldung „H97“ oder
„H98“ erscheint auf dem
Display.
A: Die Fehlermeldung weist auf ein Problem bei der
Mikrowellenerzeugung hin. Bitte wenden Sie sich an einen
autorisierten Kundendienstvertreter.
Page 41

D-19
Deutsch
Pflege des Mikrowellengerätes
7. Den Glasdrehteller herausnehmen und
abkühlen lassen, bevor Sie diesen in warmem Seifenwasser oder in der
Spülmaschine reinigen.
8. Der Rollenring und die Vertiefung im
Geräteboden sollten regelmäßig gereinigt
werden. Damit werden unnötige
Betriebsgeräusche vermieden und die
Ansammlung von Lebensmittelresten verhindert. Einfach den Boden mit einem
feuchten Tuch auswischen und anschließend trocknen. Der Rollenring kann mit mildem Seifenwasser gereinigt werden.
Achten Sie darauf, daß Sie den Rollenring
und Drehteller nach dem Reinigen wieder
richtig einsetzen.
9. Während des GRILL- und KOMBINATI-
ONSBETRIEBS können Spritzer von
Speisen und Getränken an den
Garraumwänden haften bleiben. Wird das
Gerät nicht regelmäßig gereinigt, kann es
zur Rauchentwicklung während des
Betriebs kommen.
10. Das Mikrowellengerät darf ausschließlich
vom qualifizierten Panasonic-Kundendienst
geprüft oder repariert werden.
11. Ein Dampfreiniger darf nicht zur Reinigung
verwendet werden.
12. Wird das Miikrowellengerät nicht in einem
sauberen Zustand gehalten, kann dies zu
einer Güteminderung der Oberflächen führen, was wiederum eine Beeinträchtigung
der Lebensdauer des Geräts mit sich bringen und eventuell eine Gefahr für den
Benutzer darstellen kann.
13. Die Luftabzüge immer freihalten. Überprü-
fen Sie, dass die Luftabzüge an der Ober-,
Unter- und Rückseite des Geräts nicht
durch Staub oder anderes Material verstopft werden. Wenn die Luftabzüge verstopft sind, kann dies zu Überhitzung führen und die Funktionsfähigkeit des Geräts
beeinträchtigen eine Gefahr für den
Benutzer darstellen kann.
1. Vor dem Reinigen den Netzstecker aus der
Steckdose ziehen.
2. Halten Sie stets den Garraum, die Tür und
den Türrahmen sauber. Entfernen Sie
Spritzer von Speisen und Flüssigkeiten,
die an den Garraumwänden und der Tür
haften, mit einem feuchten Tuch und ggf.
mildem Reinigungsmittel. Scharfe
Reinigungs- und Scheuermittel sind nicht
empfehlenswert. VERWENDEN SIE IN
KEINEM FALL BACKOFENREINIGUNGSMITTEL.
3. Verwenden Sie zur Reinigung der gläser-
nen Mikrowellentür keine Scheuermittel
oder scharfe Metallschaber, da dies eine
Beschädigung der Oberfläche zur Folge
haben und zum Zerspringen des Glases
führen könnte.
4. Das Gehäuse des Gerätes sollte mit einem
weichen Tuch abgewischt werden. Achten
Sie darauf, daß kein Wasser durch die
Entlüftungsschlitze ins Geräteinnere
gelangt, da das Gerät sonst Schaden nehmen könnte.
5. Ist das Bedienungsfeld verschmutzt, säu-
bern Sie dieses mit einem trockenen, weichen Tuch. Verwenden Sie in keinem Fall
scharfe Reinigungs- bzw. Scheuermittel.
Damit es nicht zu einem unvorhergesehenen Betrieb des Gerätes kommt, lassen
Sie die Tür des Gerätes beim Säubern
geöffnet. Drücken Sie nach dem Säubern
die STOPP-/LÖCHTASTE.
6. Während des Betriebes kann sich durch
Verdampfen von Feuchtigkeit innen oder
außen auf dem Sichtfenster des Gerätes
Kondenswasser niederschlagen und evtl.
unter der Tür abtropfen. Dieser Vorgang ist
normal und kann verstärkt bei niedrigen
Raumtemperaturen und hoher Luftfeuchtigkeit auftreten. Die Sicherheit des
Gerätes ist dadurch nicht beeinträchtigt.
Nach dem Betrieb das Kondenswasser mit
einem weichen Tuch abwischen.
Page 42

Technische Daten
Netzspannung: 230 V, 50 Hz
Leistungsaufnahme: Maximum; 1800W
Mikrowelle; 1125 W
Grill; 1100 W
Ausgangsleistung: Mikrowelle; 850 W (IEC-60705)
Grill; 1100 W
Äußere Abmessungen: 482 (W) x 364 (D) x 284 (H) mm (NN-GD379S)
482 (W) x 368 (D) x 284 (H) mm (NN-GD359W / NN-GD369M)
Garraumabmessungen: 325 (B) x 330 (T) x 191 (H) mm
Gewicht: 9.5 kg (NN-GD359W / NN-GD369M)
10.0 kg (NN-GD379S)
Geräuschpegel: 58.8 dB (EN60704)
Die Angaben sind Annäherungswerte; Änderungen ohne Vorankündigung sind vorbehalten.
Bei diesem Produkt handelt es sich um ein Gerät, das die europäische Norm für EMVFunkstörungen (EMV = Elektromagnetische Verträglichkeit), EN 55011, erfüllt. Gemäß dieser
Norm ist dieses Produkt ein Gerät der Gruppe 2, Klasse B und hält alle Grenzwerte ein. Gruppe
2 bedeutet, dass in diesem Gerät Hochfrequenz-Energie für das Erwärmen oder Garen von
Lebensmitteln absichtlich als elektromagnetische Strahlung erzeugt wird. Klasse B sagt aus,
dass dieses Produkt in einem normalen Wohnbereich betrieben werden darf.
Benutzerinformationen zur Entsorgung von elektrischen und elektronischen
Geräten (private Haushalte)
Entsprechend der grundlegenden Firmengrundsätzen der Panasonic-Gruppe
wurde ihr Produkt aus hochwertigen Materialien und Komponenten entwickelt und
hergestellt, die recycelbar und wieder verwendbar sind.
Dieses Symbol auf Produkten und/oder begleitenden Dokumenten bedeutet, dass
elektrische und elektronische Produkte am Ende ihrer Lebensdauer vom Hausmüll
getrennt entsorgt werden müssen.
Bringen Sie bitte diese Produkte für die Behandlung, Rohstoffrückgewinnung und
Recycling zu den eingerichteten kommunalen Sammelstellen bzw.
Wertstoffsammelhöfen, die diese Geräte kostenlos entgegennehmen.
Die ordnungsgemäße Entsorgung dieses Produkts dient dem Umweltschutz und
verhindert mögliche schädliche Auswirkungen auf Mensch und Umwelt, die sich aus einer unsachgemäßen Handhabung der Geräte am Ende Ihrer Lebensdauer ergeben könnten.
Genauere Informationen zur nächstgelegenen Sammelstelle bzw. Recyclinghof erhalten Sie bei
Ihrer Gemeindeverwaltung.
Für Geschäftskunden in der Europäischen Union
Bitte treten Sie mit Ihrem Händler oder Lieferanten in Kontakt, wenn Sie elektrische und elektronische Geräte entsorgen möchten. Er hält weitere Informationen für sie bereit.
Informationen zur Entsorgung in Ländern außerhalb der Europäischen Union
Dieses Symbol ist nur in der Europäischen Union gültig.
Gemäß der Richtlinie 2004/108/EC, Artikel 9(2)
Panasonic Testing Centre
Panasonic Deutschland, eine Division der Panasonic Marketing Europe GmbH
Winsbergring 15,22525 Hamburg, Deutschland
Hergestellt von Panasonic Home Appliances Microwave Oven (Shanghai) Co., Ltd. 898 Longdong
Road, Pudong, Shanghai, 201203, China.
D-20
Page 43

D-1
Deutsch
Überprüfung Ihres Mikrowellengerätes
Das Gerät auspacken, Verpackungsmaterial entfernen und auf Beschädigungen wie z.B.
Stoßstellen, gebrochene Türverriegelungen oder
Risse in der Tür überprüfen. Sofort den Händler
benachrichtigen, wenn das Gerät beschädigt ist.
Kein beschädigtes Mikrowellengerät installieren.
Erdungsvorschriften
WICHTIG: ZUR SICHERHEIT VON PERSONEN
MUSS DIESES GERÄT GEERDET SEIN!
Ist die Steckdose nicht geerdet, muß der Kunde
die Steckdose durch eine ordnungsgemäße
Schutzkontaktsteckdose ersetzen lassen.
Betriebsspannung
Die Netzspannung muß der auf dem
Typenschild des Gerätes angegebenen
Spannung entsprechen. Wird eine höhere
Spannung als angegeben verwendet, so kann
ein Brand entstehen oder sonst ein Unfall die
Folge sein.
Aufstellen des Gerätes
Das Gerät ist ausschließlich als Tischgerät
geeignet, nicht als Einbaugerät oder für die
Verwendung in Schränken.
1. Stellen Sie das Mikrowellengerät auf eine
feste, ebene Stellfläche, die ca. 85cm hoch
ist (gemessen vom Fußboden).
2. Achten Sie beim Aufstellen des Gerätes
darauf, daß bei Gefahr jederzeit der Stecker
gezogen oder die Sicherung am
Sicherungskasten ausgeschaltet werden
kann.
3. Das Gerät arbeitet ordnungsgemäß, wenn
eine ausreichende Luftzirkulation stattfinden
kann.
Aufstellen auf der Arbeitsfläche:
a. Sicherheitsrichtlinien empfehlen die
Einhaltung eines Mindestabstands von 15
cm über dem Gerät, 10 cm zur Rückwand
sowie 5 cm zur einen und 10 cm zur ande
ren Seite.
b. Sollte das Gerät an einer Seite direkt an der
Wand stehen, müssen die anderen Seiten
frei bleiben.
4. Das Gerät nicht in unmittelbarer Nähe eines
Gas- oder Elektroherdes aufstellen.
5. Die Stellfüße dürfen nicht entfernt werden.
6. Dieses Gerät ist nur für den Hausgebrauch
konzipiert. Nicht im Freien verwenden.
7. Das Mikrowellengerät nicht bei zu hoher
Luftfeuchtigkeit benutzen.
8. Das Netzanschlußkabel darf die
Gerätegehäuseoberfläche nicht berühren, da
diese während des Betriebes heiß wird. Das
Kabel auch nicht mit anderen heißen
Oberflächen in Berührung bringen. Das
Netzanschlußkabel nicht über Tisch- oder
Thekenkanten hängen lassen. Das Kabel oder
den Netzstecker nicht in Wasser tauchen.
9. Die Lüftungsöffnungen auf der Ober- und
Rückseite des Gehäuses nicht verdecken.
Sind diese Öffnungen blockiert während das
Gerät arbeitet, kann es überhitzen. In diesem
Fall wird das Gerät durch den Überhitzungsschutz ausgeschaltet und kann erst wieder in
Betrieb gesetzt werden, wenn es abgekühlt ist.
10. Dieses Gerät ist nicht zur Bedienung mit
einer externen Zeitschaltuhr oder separaten
Fernbedienung gedacht.
15 cm
10 cm
Freistehend
5 cm
Arbeitsfläche
Aufstellen und Anschließen
Page 44

D-2
Aufstellen und Anschließen
WARNUNG
Wichtige Sicherheitshinweise
1. Die Türverriegelungen und die Türdichtungen
sollten mit einem feuchten Tuch abgewischt
werden. Das Gerät ist vom Benutzer auf mögliche Beschädigungen an den
Türdichtungsflächen zu prüfen, und falls ein
solcher Schaden aufgetreten ist, darf das
Gerät nicht betrieben werden, bevor es vom
Panasonic-Kundendienst repariert worden ist.
2. Führen Sie weder eine Manipulation oder
Reparatur an der Tür, an den Kontrolleinrichtungen oder Sicherheitsvorrichtungen noch an
irgendeinem anderen Teil des Gerätes durch.
In keinem Fall das Gehäuse, das den Schutz
gegen Strahlenbelastung durch
Mikrowellenenergie sicherstellt, abbauen. Das
Gerät darf nur von einem geschulten
Panasonic Kundendienst-Techniker geprüft
oder repariert werden.
3. Das Gerät nicht in Betrieb setzen, wenn das
Netzanschlußkabel oder der Netzstecker
beschädigt ist, bzw. wenn es nicht ordnungsgemäß arbeitet oder eine sichtbare
Beschädigung aufweist.
4. Aus Sicherheitsgründen muß ein beschädigtes
Anschlußkabel durch den Hersteller, seinen
Kundendienst oder eine andere gleichwertig
qualifizierte Person ersetzt werden.
5. Kindern darf die Benutzung des Gerätes ohne
Aufsicht nur erlaubt werden, wenn eine ausreichende Einweisung gegeben wurde, die
das Kind in die Lage versetzt, das Gerät in
sicherer Weise bedienen und die Gefahr einer
falschen Bedienung verstehen zu können.
6. Keine Flüssigkeiten und Nahrungsmittel in
versiegelten Behältern (z.B. Konserven) erhitzen, da diese platzen können.
7. Dieses Gerät darf nicht von Personen (ein
schließlich Kinder) mit eingeschränkten körperlichen, sensorischen oder mentalen
Fähigkeiten benutzt werden. Gleiches gilt
für Personen, denen es an der nötigen
Erfahrung und dem nötigen Wissen man
gelt, außer sie werden durch eine für sie
verantwortliche Person beaufsichtigt oder
im sicheren Gebrauch des Gerätes unter
wiesen. Kinder müssen beaufsichtigt wer
den, damit sichergestellt ist, dass sie nicht
mit dem Gerät spielen.
Achtung: Heiße Oberflächen
Page 45

D-3
Deutsch
Gebrauch und Ausstattung des
Gerätes
1. Das Mikrowellengerät nur zur Nahrungs-
mittelzubereitung benutzen. Dieses Gerät
ist speziell zum Auftauen, Erwärmen und
Garen von Lebensmitteln entsprechend der
Bedienungs- und Kochanleitung konzipiert.
Erhitzen Sie in keinem Fall Chemikalien
oder andere Produkte.
2. Prüfen Sie vor der ersten Benutzung Ihres
Geschirrs, ob es für den Gebrauch im
Mikrowellengerät geeignet ist.
3. Bitte versuchen Sie nicht, Kleidungsstücke,
Zeitungen oder andere Materialien im
Mikrowellengerät zu trocknen. Diese
Gegenstände können sich entzünden.
4. Im Garraum des Mikrowellengerätes dürfen
keine Gegenstände aufbewahrt werden, die
bei unbeabsichtigtem Einschalten des
Gerätes eine Gefahr für die Umgebung darstellen.
5. Nehmen Sie das MIKROWELLENGERÄT
NIE OHNE LEBENSMITTEL in Betrieb.
Dies kann zu Beschädigungen des Gerätes
führen.
6. Kommt es zu einem Brand oder tritt wäh-
rend des Mikrowellenbetriebs Rauch aus
dem Gerät, dann halten Sie die Gerätetür
geschlossen. Schalten Sie das
Mikrowellengerät ab, indem Sie auf die
STOPPTASTE drücken bzw. ziehen Sie
den Netzstecker aus der Steckdose oder
schalten Sie die Installationssicherung aus.
Grillbetrieb
1. Während des GRILL- ODER KOMBINATI-
ONSBETRIEBS werden Gehäuseoberfläche, Entlüftungsschlitze und die Tür
heiß. Seien Sie beim Öffnen/Schließen der
Tür deshalb vorsichtig, ebenso beim
Herausnehmen/Hineinstellen von
Lebensmitteln.
2. Das Gerät hat zwei Heizelemente im
Deckenbereich. Nach dem Gebrauch des
GRILL- ODER KOMBINATIONSBETRIEBS
sind diese Oberflächen sehr heiß, ebenso
das benutzte Zubehör und Geschirr. Achten
Sie auch darauf, daß Sie das Heizelement
im Garraum nicht berühren.
3. Kinder müssen bei der Benutzung des
Grills ferngehalten werden, da die
Gehäuseoberflächen sehr heiß werden können.
Garraumbeleuchtung
Wenn es nötig wird die eingebaute Garraumbeleuchtung zu wechseln, wenden Sie sich
bitte an Ihren Händler.
Zubehör
Das Mikrowellengerät ist mit unterschiedlichem
Zubehör ausgestattet. Verwenden Sie dieses
bitte laut Anweisung.
Glasdrehteller
1. Das Mikrowellengerät nicht ohne den dazu-
gehörigen Glasdrehteller und Rollenring in
Betrieb setzen.
2. Benutzen Sie in keinem Fall einen anderen
als den speziell für dieses Gerät konzipierten Glasdrehteller.
3. Den evtl. heißen Glasdrehteller abkühlen
lassen, bevor Sie diesen reinigen bzw. mit
Wasser abspülen.
4. Der Drehteller kann rechts- oder linksherum
laufen. Dies stellt keine Fehlfunktion dar.
5. Berührt das Lebensmittel bzw.
Kochgeschirr die Garraumwände, läuft der
Drehteller nicht weiter, sondern stoppt und
beginnt, sich in die entgegengesetzte
Richtung zu drehen.
6. Das Lebensmittel nicht direkt auf dem
Glasdrehteller auftauen, erwärmen oder
garen.
Rollenring
1. Der Rollenring und die Vertiefung im
Garraumboden müssen regelmäßig gereinigt werden, um zu verhindern, daß
Geräusche entstehen und sich
Nahrungsmittelreste ansammeln.
2. Den Rollenring immer zusammen mit dem
Glasdrehteller benutzen.
Grillrost
1. Der runde Grillrost wird zum Bräunen von
kleineren Portionen benutzt und unterstützt
die gleichmäßige Hitzeverteilung.
2. Beim KOMBINATIONSBETRIEB mit
Mikrowelle oder beim reinen MIKROWELLENBETRIEB weder Alu- oder Metallspieße
noch irgendein Metallgeschirr direkt auf den
Rost stellen.
3. Den Rost nicht für den reinen MIKROWEL-
LENBETRIEB benutzen.
Panacrunch - siehe Seite D-17.
Sicherheitshinweise
Page 46

D-4
Wichtige Informationen
1) Kochzeiten
• Die Kochzeit ist abhängig von Beschaffenheit,
Ausgangstemperatur und Menge des
Lebensmittels sowie von der Art des verwendeten Kochgeschirrs.
• Gehen Sie zunächst von einer kürzeren
Kochzeit aus, um ein Übergaren der Speisen
zu vermeiden. Hat das Lebensmittel noch
nicht den gewünschten Auftau-, Erwärmungsoder Garzustand erreicht, haben Sie immer
noch die Möglichkeit, die Garzeit zu verlängern.
Wird die empfohlene Kochzeit überschritten, kann das Lebensmittel leicht verbrennen und ggf. einen Brand auslösen
und somit den Garraum zerstören.
2)
Geringe Lebensmittelmengen
• Sehr kleine Lebensmittelmengen oder
Speisen mit geringem Feuchtigkeitsgehalt
können schnell austrocknen und verbrennen,
wenn sie zu lange gegart werden. Kommt es
zu einem Brand, die Tür des
Mikrowellengerätes geschlossen halten, das
Gerät abschalten und den Netzstecker aus
der Steckdose ziehen.
3)
Eier
• Weder rohe, gekochte Eier mit Schale noch
gepellte hartgekochte Eier mit Mikrowellen
erhitzen oder kochen. Nach Ende des
Mikrowellen-Kochvorgangs kann sich noch
weiterhin Druck bilden und die Eier können
explodieren.
4)
Lebensmittel mit Schale oder Haut
• Bei Lebensmitteln wie z.B. Kartoffeln und
Würstchen empfiehlt es sich, sie vorher
anzustechen, um ein evtl. Platzen zu
vermeiden.
5)
Speisethermometer
• Falls Sie den Garzustand mit einem Speisethermometer überprüfen wollen, verwenden
Sie bitte keine herkömmlichen Thermometer
im Mikrowellengerät. Diese können Funken
verursachen. Benutzen Sie diese Speisethermometer nur außerhalb des Mikrowellengerätes.
6)
Flüssigkeiten
• Beim Erhitzen von Flüssigkeiten im
Mikrowellengerät kann durch kurzfristiges
Aufkochen (Siedeverzug) die Flüssigkeit im
Gerät oder bei der Entnahme schlagartig verdampfen und explosionsartig aus dem Gefäß
geschleudert werden. Dies kann zu
Verbrennungen führen.
Sie vermeiden einen Siedeverzug, indem Sie
beim Erhitzen von Flüssigkeiten in Gläsern
oder Tassen immer ein hitzebeständiges Glasstäbchen mithineinstellen oder größere
Gefäße mit einem Deckel bzw. Teller abdekken. Zusätzlich sollten Sie folgende Punkte
beachten:
a) Vermeiden Sie die Verwendung von
geraden Gefäßen mit engem Ausguß.
b) Überhitzen Sie die Flüssigkeit nicht.
c) Rühren Sie die Flüssigkeit einmal um, bevor
Sie das Gefäß ins Gerät stellen sowie noch-
mals nach der halben Kochzeit.
d) Lassen Sie nach Ablauf der Kochzeit das
Gefäß kurze Zeit im Gerät stehen, bevor Sie
es herausnehmen. Rühren Sie die Flüssigkeit
anschließend noch einmal um.
7)
Papier und Plastik
• Wenn Behälter aus Papier, Kunststoff oder
anderen leicht entflammbaren Materialien zum
Erwärmen benutzt werden, darf das
Mikrowellengerät nicht unbeaufsichtigt betrieben werden! Diese Behälter können sich entzünden.
• Verwenden Sie keine recycelten
Papierprodukte (z.B. Küchenrollen), die nicht
ausschließlich für die Benutzung im
Mikrowellengerät geeignet sind. Im Recyclingpapier können Bestandteile sein, die Funkenbildung oder einen Brand verursachen.
• Entfernen Sie Metallverschlüsse von Bratfolien, bevor Sie diese ins Gerät stellen.
8)
Hilfsmittel und Folien
• Erhitzen Sie keine geschlossenen Flaschen
oder Konserven im Mikrowellengerät, da diese
durch den Druck explodieren können.
• Verwenden Sie während des Mikrowellenbetriebes weder Geschirr aus Metall noch
Geschirr mit Metallrand.
• Bei Benutzung von Alufolie, Metallspießen
oder anderen Metallwaren darauf achten, daß
sie mindestens 2 cm von der Gerätewand entfernt sind, um Funkenbildung zu vermeiden.
9)
Babynahrung
• Benutzen Sie nur Fläschchen oder Glasformen aus hochwertigen hitzebeständigen
Materialien und plazieren Sie diese ohne
Deckel in der Mitte des Drehtellers.
• Nach dem Erhitzen sollte die Babynahrung in
Fläschchen oder Gläsern gut geschüttelt bzw.
durchgerührt werden, damit ein Temperaturausgleich stattfinden kann.
• Überprüfen Sie die Temperatur vor dem
Verzehr, um Verbrennungen zu vermeiden.
Page 47

D-5
Deutsch
Schematische Ansicht
1. Türöffnungstaste
Drücken Sie diese Taste, um die Tür zu öffnen. Durch Öffnen der Tür während des
Garvorgangs wird der Betrieb unterbrochen, das Programm bleibt erhalten. Der Garvorgang
läuft weiter ab, wenn die Tür geschlossen und die Starttaste gedrückt wird.
2. Sichtfenster
3. Türsicherheitsverriegelungen
4. Innerer Entlüftungsschlitz
5. Bedienfeld
6. Glasdrehteller
7. Rollenring
8. Äußere Entlüftungsschlitze
9. Grillrost
10. Panacrunch
11. Griff für Panacrunch
12. Stromkabel
13. Warnschild (Heiße Oberfläche)
[1]
[2]
[3]
[4]
[5]
[7]
[9]
[6]
[10]
[11]
[8]
[12]
[13]
Page 48

D-6
(1) Digitalanzeige
(2) Taste für die Gewichtsautomatik
Mikrowellenbetrieb
(3) Taste für die Gewichtsautomatik
Grillkombinationsbetrieb
(4) Autogewicht-Turbo-Auftauen
(5) Drehregler für die Zeit oder
Gewichtseingabe
(6) Mikrowellen-Leistungswahltaste
(7) Grillbetriebtaste
(8) Grillkombinationsbetriebtaste
(9) Vorwahlzeit/Standzeit-Taste
(10) Zeit-Taste
(11) Stopp-/Löschtaste:
Eine Betätigung der Stopp-
/Löschtaste vor dem Betrieb löscht
alle eingegebenen Daten. Durch
einmaliges Drücken der
Stopp-/Löschtaste während des
Garvorgangs wird der Betrieb des
Gerätes unterbrochen.
Durch zweimaliges Drücken wäh-
rend des Garvorgangs werden alle
Eingaben gelöscht und in der
Digitalanzeige erscheint wieder die
Tageszeit.
(12) Starttaste
Akustisches Signal
Bei richtiger Bedienung, d.h. bei Druck auf eine beliebige Funktionstaste, ertönt ein Signal.
Wenn dieses Signal nicht ertönt, wurde die Taste nicht richtig gedrückt, bzw. das Gerät konnte
die Eingabe nicht annehmen. Nach Beendigung eines Programms ertönt das Signal fünfmal.
Bedienfeld
*Das Bedienfeld Ihres Mikrowellengerätes
kann sich von dem hier gezeigten
unterscheiden (abhängig von der Farbe);
die Funktion der Tasten ist jedoch gleich.
Anmerkungen: Wird ein Betriebsvorgang gewählt und die Start-Taste nicht gedrückt, wird
der Vorgang nach 6 Minuten automatisch vom Gerät rückgängig gemacht. Das Display kehrt
zurück zum Zeitanzeige-Modus.
NN-GD359W / NN-GD369M / NN-GD379S*
(5)
(1)
(2)
(3)
(4)
(6)
(7)
(8)
(9)
(10)
(12)
(11)
Dieses Gerät verfügt über eine
Energiesparfunktion.
Bitte beachten:
1. Im Bereitschaftsmodus ist die Helligkeit
des Displays reduziert.
2. Das Mikrowellengerät geht beim ersten
Einschalten und sofort nach Abschluss des
letzten Betriebsvorgangs in den
ereitschaftsmodus über.
Page 49

D-7
Deutsch
Anmerkungen:
1. Um erneut die Tageszeit einzustellen, bitte Schritt 1 bis 3 wiederholen.
2. Die eingestellte Tageszeit bleibt erhalten, solange die Stromzufuhr nicht unterbrochen wird.
3. Dies ist eine 24-Stunden-Uhr, d.h. 2.00 nachmittags = 14.00, nicht 2.00.
Einstellen der Uhr
Die Kindersicherung kann aktiviert werden, wenn ein Doppelpunkt bzw. die Uhrzeit im
Anzeigenfeld steht. Nach Aktivieren der Kindersicherung kann keine Eingabe über das
Bedienfeld erfolgen. Die Funktionen des Gerätes sind blockiert, die Tür kann jedoch wie gewohnt
geöffnet werden.
Aktivieren:
Löschen:
• Drücken Sie 3mal die Starttaste.
Die Uhrzeit erscheint nicht mehr im
Anzeigenfeld, ist aber nicht gelöscht.
Im Anzeigenfeld erscheint “_ _ _ _”.
• Drücken Sie 3mal die Stopp-/
Löschtaste.
Die Uhrzeit erscheint wieder im
Anzeigenfeld.
Kindersicherung
• Drücken Sie einmal
auf das Zeit-Taste.
Der Doppelpunkt blinkt.
• Drücken Sie auf das
Zeit-Taste. Der
Doppelpunkt hört auf zu
blinken und die Uhrzeit
ist eingestellt.
• Stellen Sie durch Drehen des
Drehreglers für die Zeit/Gewichtseingabe die korrekte
Uhrzeit/Tageszeit ein. Die Uhrzeit
erscheint im Anzeigenfeld und der
Doppelpunkt blinkt.
Beim ersten Anschließen des Gerätes erscheint “88:88” in der Digitalanzeige.
HINWEIS: Zum Aktivieren der Kindersicherung muss die Start-Taste dreimal innerhalb von 10
Sekunden gedrückt werden.
Page 50

D-8
• Drücken Sie die MikrowellenLeistungswahltaste. Wählen
Sie die gewünschte
Leistungsstufe. Das
Mikrowellen-Symbol leuchtet
auf und die entsprechende
Wattleistung erscheint in der
Digitalanzeige.
• Stellen Sie mit dem Drehregler für
die Zeit-/ Gewichtseingabe die
gewünschte Zeit ein (Maximale
Leistung: maximal 30 Minuten, alle
anderen Leistungsstufen: maximal
90 Minuten).
• Drücken Sie die
Starttaste. Das
Garprogramm
beginnt und die Zeit
in der Digitalanzeige
wird zurückgezählt.
ACHTUNG: Das Gerät arbeitet automatisch auf der höchsten Mikrowellen-
Leistungsstufe (Max/Garen-850 Watt), wenn eine Garzeit eingegeben wurde, ohne daß
zuvor eine Leistungsstufe gewählt wurde.
Vor Gebrauch des Gerätes vergewissern, daß der Glasdrehteller richtig eingesetzt ist.
850 Watt
270 Watt
600 Watt
440 Watt
250 Watt
100 Watt
Wattleistung
Max/Garen
Auftauen
Medium/Erwärmen
Niedrig/Fertiggaren
Köcheln
Ausquellen
Garen im Mehr-Phasen-Betrieb
Das Gerät ist mit einer Speicherkapazität für bis zu drei automatisch aufeinanderfolgende
Leistungsstufen ausgestattet. Programmieren Sie die gewünschten Phasen und Zeiten ein (wiederholen Sie hierzu Schritt 1 und 2). Drücken Sie die Starttaste jedoch erst nachdem Sie alle
Phasen eingegeben haben.
Anmerkung:
Gewichtsautomatik und Auftautaste können nur als erste Phase programmiert werden.
1mal drücken
2mal drücken
3mal drücken
4mal drücken
5mal drücken
6mal drücken
Mikrowellenbetrieb zum Garen und Auftauen
Page 51

D-9
Deutsch
Gebrauch des Gerätes mit Zeitvorwahl
Das Verzögern/stehen-taste können Sie dazu benutzen, die Standzeit nach Ablauf des
Kochvorgangs zu programmieren oder um das Gerät als Minuten-Schaltuhr zu programmieren.
Indem Sie das Verzögern/stehen-taste benutzen, können Sie den verzögerten Beginn des
Kochvorgangs programmieren.
HINWEIS:
1. Es können drei Kochstufen programmiert werden, einschließlich verzögertem Kochbeginn.
Zum Beispiel:
2. Beträgt die programmierte Verzögerungszeit mehr als eine Stunde, erfolgt der Countdown in
Minuteneinheiten. Beträgt die programmierte Verzögerungszeit weniger als eine Stunde,
erfolgt der Countdown in Sekundeneinheiten.
3. Startverzögerung kann nicht vor den automatischen Programmen programmiert werden.
• Drücken Sie
das
Verzögern/
stehen-taste.
• Stellen Sie die
Verzögerungszeit ein,
indem Sie den
Zeit/GewichtDrehregler drehen (bis
zu 9 Stunden).
• Stellen Sie das gewünschte
Kochprogramm und die
Kochzeit ein.
• Drücken Sie
das Start-taste.
Beispiel:
Start verzögern: 1 Stunde Hohe Kochleistung: 10 Min.
Kochen auf kleiner Flamme: 20 Min.
• Drücken Sie auf
das Verzögern/
Stehen- Taste.
• Stellen Sie die gewünschte Zeitspanne ein, indem
Sie den Zeit/GewichtDrehregler drehen (bis zu
9 Stunden).
• Drücken
Sie das
StartTaste.
HINWEIS:
1. Es können drei Kochstufen programmiert werden, einschließlich den Zeit/Gewicht-Drehregler
2. Wird die Herdtür während der Standzeit oder der Minutenschaltuhr geöffnet, wird der
Countdown im Display-Fenster fortgesetzt.
3. Diese Funktion kann auch als Zeit-Schaltuhr benutzt werden. In diesem Fall drücken Sie das
Verzögern/stehen-taste, stellen die Zeit ein und drücken das Start-Taste.
Beispiel:
Hohe Kochleistung: 4 Min. Standzeit: 5 Min. Hohe Kochleistung: 2 min.
Standzeit
5-malEinmal
Einmal
Einmal
• Stellen Sie das
gewünschte
Kochprogramm und
die Kochzeit ein.
Page 52

D-10
Tips zum Auftauen
Den Auftauvorgang mehrere Male überprüfen,
auch wenn Sie die Automatikknöpfe verwenden. Beachten Sie die Standzeiten.
Standzeit
Einzelne Nahrungsmittelportionen können fast
unverzüglich nach dem Auftauen gegart werden. Es ist normal, daß größere Portionen in
der Mitte noch gefroren sind. Vor dem Garen
bitte mindes-tens eine Stunde stehenlassen.
Während dieser Standzeit verteilt sich die
Temperatur gleichmäßig und das
Nahrungsmittel wird durch Wärmeleitung aufgetaut. Falls das Nahrungsmittel nicht sofort
weiterverarbeitet wird, sollten Sie es im
Kühlschrank aufbewahren. Niemals aufgetaute
Lebensmittel wieder einfrieren bevor sie nicht
gekocht wurden.
Braten und Geflügel
Vorzugsweise sollten Braten auf einen umgedreh-ten Teller oder ein Kunststoffgestell gelegt
werden, so daß sie nicht im Saft liegen. Es ist
äußert wichtig, daß emfindliche oder herausstehende Teile der Lebensmittel mit kleinen
Stücken Alufolie geschützt werden, damit sie
nicht garen. Es ist ungefährlich, kleine Stücke
Alufolie im Ofen zu verwenden, vorausgesetzt
sie kommen mit den Garraumwänden nicht
in Kontakt.
Hackfleisch, gewürfelte fleischstücke
oder fisch
Da die Außenseite dieser Lebensmittel schnell
auftaut, ist es notwendig die Teile während des
Auftauvorgangs regelmäßig auseinander-zubrechen und aufgetaute Stücke aus der Mikrowelle
zu entfernen.
Kleine portionen / fleischteile
Kleine Fleischteile wie Koteletts und
Hühnerteile müssen so schnell wie möglich
voneinander gelöst werden, damit sie gleichmäßig auftauen. Fettreiche Stellen und Enden
tauen schneller auf. Plazieren Sie diese daher
nahe der Mitte des Drehtellers oder decken Sie
sie ab.
Brot
Ganze Brote benötigen eine Standzeit, damit
der Kern auftauen kann. Sie können die
Standzeit verringern, indem Sie Scheiben voneinander trennen und Brötchen und ganze
Brote in Hälften schneiden.
Hinweise zum Auftauen
Page 53

D-11
Deutsch
Grillbetrieb
Anmerkungen:
1. Stellen Sie den Grillrost mit der Speise auf den Glasdrehteller. Plazieren Sie zuvor einen hitze-
beständigen Unterteller (Pyrex
®
) unter dem Grillrost, um Fett- und Essensspritzer aufzufangen.
2. Decken Sie die zu grillende Speise niemals ab.
3. Heizen Sie den Grill NICHT vor.
4. Der Grill funktioniert nur bei geschlossener Gerätetür. Es ist nicht möglich, den Grill bei geöff-
neter Gerätetür zu benutzen.
5. Während des reinen GRILLBETRIEBS werden keine Mikrowellen freigesetzt.
6. Die meisten Speisen müssen nach der halben Grillzeit umgedreht werden. Hierzu öffnen Sie
die Gerätetür und entnehmen mit Hilfe von Topflappen VORSICHTIG den Grillrost.
7. Wenn Sie die Speise umgedreht haben, stellen Sie sie wieder in das Gerät und schließen die
Tür. Bei Gerät drücken Sie die Starttaste. Die im Anzeigenfeld verbliebene Grillzeit wird weiter
zurückgezählt. Sie können während des Grillvorgangs jederzeit die Gerätetür öffnen, um den
Garzustand der Speise zu überprüfen.
8. Es ist völlig normal, daß der Grill während des Betriebs mal stärker, mal weniger stark glüht.
Reinigen Sie immer den Geräteinnenraum bevor Sie den Mikrowellenbetrieb oder die
Grillkombination benutzen.
• Drücken Sie die Grillbetriebtaste um
die gewünschte Grillstufe zu wählen.
1mal drücken Grillstufe 1 (stark)
2mal drücken Grillstufe 2 (mittel)
3mal drücken Grillstufe 3 (niedrig)
Der Grillanzeiger und die gewählte
Grillstufe (1, 2 oder 3) leuchten in
der Digitalanzeige auf.
• Drücken Sie die
Starttaste. Die Zeit
in der Digitalanzeige
wird zurückgezählt.
• Stellen Sie mit dem
Drehregler für die Zeit/Gewichtseingabe die
gewünschte Zeit ein (maximal
90 Minuten).
ACHTUNG: Der Grillrost darf nur auf dem Glasdrehteller benutzt werden. Nehmen
Sie den Grillrost aus dem Geräteinnenraum, indem Sie den Rost und den hitzebeständigen Unterteller feste greifen. Benutzen Sie Topflappen wenn Sie Zubehör
entnehmen. Der Geräteinnenraum kann sehr heiß sein. Achten Sie deshalb bitte
auch darauf, weder die Außenseite des Sichtfensters noch Metallteile an der
Innenseite der Tür oder im Garraum selber zu berühren.
Page 54

D-12
Grillkombinationsbetrieb
• Drücken Sie die Grillkombi-
nationstaste, um das gewünschte
Kombinationsprogramm zu wählen.
Der Grillkombinationsanzeiger leuchtet auf und die Kombi-Stufe (1, 2
oder 3) erscheint in der Anzeige.
• Stellen Sie mit dem
Drehregler für die Zeit/Gewichtseingabe die
gewünschte Zeit ein
(maximal 90 Minuten).
Beim Grillkombinationsbetrieb wird die Speise per Mikrowellen schnell gegart, während der Grill
sie bräunt und knusprig werden läßt.
Anmerkungen:
1. Der Grillrost kann sowohl für den reinen Grillbetrieb als auch für den Grillkombinationsbetrieb
verwendet werden. Benutzen Sie niemals Metallzubehör, das nicht mit dem Mikrowellengerät
geliefert wurde. Plazieren Sie einen hitzebeständigen Unterteller unter dem Grillrost, um Fettund Essensspritzer aufzufangen.
2. Verwenden Sie den Grillrost nur laut Betriebsanweisungen. Verwenden Sie ihn nicht in einem
manuellen Programm zur Bereitung einer Speise mit einem Gewicht unter 200g. Bei geringeren
Mengen bereiten Sie die Speise nur im REINEN MIKROWELLENPROGRAMM und GRILLBETRIEB zu, um das bestmögliche Ergebnis zu erzielen.
3. Decken Sie die zu garende Speise im Grillkombinationsbetrieb niemals ab.
4. Heizen Sie den Grill im Kombinationsbetrieb NICHT vor.
5. Funken können auftreten, wenn das Gewicht der Speise zu gering, der Grillrost beschädigt ist
oder versehentlich ein Metallbehälter verwendet wurde. Kommt es zur Funkenbildung, brechen
Sie den Garvorgang sofort ab.
6. Einige Speisen werden im Grillkombinationsbetrieb ohne die Verwendung des Grillrosts zube-
reitet. Diese Speisen sind z.B. Braten, Gratins, Aufläufe und gratinierte Süßspeisen und sollten in
einem hitzebeständigen, nicht-metallischen Behälter unmittelbar auf dem Glasdrehteller plaziert
werden.
7. Benutzen Sie in KEINEM FALL Mikrowellen-Plastikbehälter im Grillkombinationsbetrieb (es sei
denn, sie sind ausdrücklich hierfür geeignet). Verwendetes Geschirr muß der Hitze des Obergrills
bestehen können - ideal ist hitzebeständiges Glasgeschirr, z.B. Pyrex, oder Keramikbehälter.
8. Verwenden Sie nicht Ihr eigenes Metallgeschirr oder Blechkonserven, da die Mikrowellen die
Speise nicht gleichmäßig durchdringen können.
ACHTUNG: Der Grillrost darf nur auf dem Glasdrehteller benutzt werden. Nehmen Sie
den Grillrost aus dem Geräteinnenraum, indem Sie den Rost und den hitzebeständigen
Unterteller feste greifen. Benutzen Sie Topflappen wenn Sie Zubehör entnehmen. Der
Geräteinnenraum kann sehr heiß sein. Achten Sie deshalb bitte auch darauf, weder die
Außenseite des Sichtfensters noch Metallteile an der Innenseite der Tür oder im Garraum
selber zu berühren.
• Drücken Sie die
Starttaste.
1mal drücken Kombi-Stufe 1 440W 1100W
2mal drücken Kombi-Stufe 2 250W 1100W
3mal drücken Kombi-Stufe 3 440W 950W
Tastendruck Stufe Mikrowelle Grill
Page 55

D-13
Deutsch
• Drücken Sie
die Starttaste.
Gewichtsautomatik zum Erwärmen/Garen
• Wählen Sie das gewünschte
Gewichtsautomatikprogramm.
Der Anzeiger für Automatik
leuchtet auf, und die
Programmnummer erscheint in
der Digitalanzeige.
Gewichtsautomatik zum Auftauen
Mit dieser Ausstattung können Sie Lebensmittel nach dem Gewicht auftauen.
• Geben Sie mit dem Drehregler für
die Gewichtseingabe das Gewicht
des Lebensmittels ein. Langsames
Drehen des Drehschalters wird in
Schritten von 10g gerechnet. Schnelles
Drehen des Drehschalters wird in
Schritten von 100g gerechnet.
• Drücken Sie die
Starttaste. Vergessen
Sie nicht, das
Lebensmittel während
des Auftauprozesses
umzurühren bzw.
umzudrehen.
• Wählen Sie das gewünschte
Gewichtsautomatikprogramm
zum Auftauen.
1mal drücken für kleine Teile
2mal drücken für große Stücke
Die Nummer des gewählten
Gewichtsautomatikprogramms
erscheint in der Digitalanzeige.
Die Anzeiger für Automatik und
Auftauen leuchten auf.
• Geben Sie mit dem
Drehregler für die Zeitund Gewichtseingabe das
Gewicht des Lebensmittels
ein. Langsames Drehen des
Drehreglers wird in Schritten
von 10g gerechnet.
Schnelles Drehen des
Drehschalters wird in
Schritten von 100g gerechnet.
Mit dieser Ausstattung können Lebensmittel nach dem Gewicht gegart werden. Das Gewicht wird
in Gramm eingegeben.
z.B.
200 - 1000g
Kleine Fleischstücke, Schnitzel, Würstchen, Gehacktes,
Fischfilets, Steaks, Koteletts (jeweils 100g bis 400g). Bei
Signalton umrühren / umdrehen.
1 Kleine Teile
400 - 2000g
Große Fleischstücke, Braten, ganzes Hähnchen, große
Fischstücke. Bei Signalton umdrehen.
2 Große Stücke
WICHTIG! Beachten Sie die Hinweise zum Auftauen auf Seite D-9.
Programm
Mindest-/
Höchstgewicht
Lebensmittelhinweise
Page 56

D-14
Gewichtsautomatik zum Erwärmen/Garen
150 - 1200g
200 - 1100g
Zum Aufwärmen eines frischen
Teller- oder Eintopfgerichts. Alle
Gerichte müssen bereits gar sein
und möglichst
Kühlschranktemperatur von ca.
+5°C haben. Programm für frische
Speisen wählen (MikrowellenProgrammtaste einmal drücken).
Bei Pieptönen Speise durchrühren.
Anschließend einige Minuten
stehen lassen. Vor dem Verzehr
sicherstellen, dass Speise
kochend heiß ist. Große Stücken
Fisch / Fleisch in dünner Soße
brauchen eventuell etwas länger.
Zum Garen von frischem
Gemüse.
Das vorbereitete Gemüse in einen
geeigneten Behälter geben. Pro
100 g Gemüse 1 EL Wasser darüber gießen. Mit perforierter
Klarsichtfolie oder einem Deckel
abdecken. Programm für frisches
Gemüse wählen (MikrowellenProgrammtaste drei Mal drücken).
Bei Pieptönen wenden bzw.
umrühren.
200 - 900g
Zum Garen von frischem Fisch.
Fisch in einen geeigneten Behälter
legen und 2 EL (30 ml) Wasser
dazugeben. Mit perforierter
Klarsichtfolie oder einem Deckel
abdecken. Programm für frischen
Fisch wählen (MikrowellenProgrammtaste vier Mal drücken).
1mal drücken
2mal drücken
3mal drücken
FERTIGE
TELLERGERICHTE
FRISCHES
GEMÜSE
FRISCHER FISCH
ERWÄRMEN
TASSE/SCHÜSSEL
Zum Aufwärmen von einer Tasse
(150 g), 1 Schüssel (300 g) oder 2
Schüsseln (600 g) heißer
Getränke (Tee, Kaffee, Milch oder
Suppe).
Programm für Tasse/Schüssel
wählen (MikrowellenProgrammtaste zwei Mal drücken).
Gewicht eingeben (150 g, 300 g
oder 600 g) und Starttaste drücken.
1 Tasse - 150g
1 Schüssel - 300g
2 Schüsseln - 600g
4mal drücken
Programm
Empfohlenes
Gewicht
Zubehör
Hinweise/Tips
Page 57

D-15
Deutsch
1. Wählen Sie das
gewünschte
Programm und
stellen Sie den
Panacrunch direkt
auf den
Glasdrehteller.
2. Drücken Sie die
Starttaste, um den
Panacrunch vorzuheizen.
3. Ist das Vorheizen
beendet, ertönt ein
Signal. Legen Sie
anschließend das
Lebensmittel in den
Panacrunch und
geben Sie das
Gewicht ein.
4. Drücken Sie die
Starttaste.
Gewichtsautomatik zum Erwärmen/Garen
150 - 480g
150 - 480g
130 - 500g
Zum Erhitzen und Bräunen von
tiefgekühlter Pizza,
industriell vorgefertigt. Entfernen
Sie die Verpackung und legen Sie
die Pizza in den vorgeheizten
Panacrunch.
1mal drücken
2mal drücken
3mal drücken
TIEFGEFRORENE
PIZZA
TK-PIZZA
FRISCH-QUICHE
TK-POMMES
4mal drücken
150 - 400g
Zum Erhitzen und Bräunen von
frischer Pizza,
industriell vorgefertigt. Entfernen
Sie die Verpackung und legen Sie
die Pizza in den vorgeheizten
Panacrunch.
Zum Erhitzen und Bräunen von
frischer Quiche,
industriell vorgefertigt.
Entfernen Sie die Verpackung und
legen Sie die Quiche in den vorgeheizten Panacrunch.
Zum Erhitzen und Bräunen von
tiefgekühlten Kartoffelprodukten,
industriell vorgefertigt. Entfernen
Sie die Verpackung und verteilen
Sie die Kartoffelprodukte gleichmäßig auf dem vorgeheizten
Panacrunch . Wenden Sie die
Lebensmittel während der Garzeit
beim Ertönen des Signals.
Panacrunch-Programme
Programm
Empfohlenes
Gewicht
Zubehör
Hinweise/Tips
Page 58

D-16
Gewichtsautomatik zum Erwärmen/Garen
300 - 1000g
150 - 1000g
Zum Aufwärmen, Bräunen und
Knusprigbraten fertiger TiefkühlGratins. Dieses Programm eignet
sich für tiefgekühlte Lasagne,
Cannelloni, Kartoffelgratins und
Nudelaufläufe. Sämtliche
Verpackung entfernen und
Tiefkühl-Gratin in ofenfeste Form
auf Glasteller legen. Programm für
Tiefkühl-Gratin wählen. (KombiProgrammtaste 5 Mal drücken).
Zum Garen von frischen
Hähnchenteilen (Brust, Keulen,
Schenkel und Viertel). Teile in
ofenfeste Form auf Gitterrost auf
Glasteller legen. Programm für
frische Hähnchenteile wählen
(Kombi-Programmtaste 6 Mal
drücken). Bei Pieptönen Teile
umdrehen.
5mal drücken
6mal drücken
TIEFGEFRORENE
GRATINS
FRISCHE
HÜHNERTEILE
BROT/
CROISSANTS
7mal drücken
Zum Aufwärmen von
tiefgekühlten Broten, Brötchen
und Croissants.
Sämtliche Verpackung entfernen
und Brot auf Gitterrost auf
Glasteller legen. Programm für
Brot/Croissants wählen (KombiProgrammtaste 7 Mal drücken).
Bei Pieptönen Teile umdrehen.
70 - 400g
• Drücken Sie die
Starttaste.
• Wählen Sie das gewünschte
Gewichtsautomatikprogramm.
Der Anzeiger für Automatik
leuchtet auf, und die
Programmnummer erscheint in
der Digitalanzeige.
• Geben Sie mit dem Drehregler für
die Gewichtseingabe das Gewicht
des Lebensmittels ein. Langsames
Drehen des Drehschalters wird in
Schritten von 10g gerechnet. Schnelles
Drehen des Drehschalters wird in
Schritten von 100g gerechnet.
Mit dieser Ausstattung können Lebensmittel nach dem Gewicht gegart werden. Das Gewicht wird
in Gramm eingegeben.
z.B.
Programm
Empfohlenes
Gewicht
Zubehör
Hinweise/Tips
Page 59

D-17
Deutsch
Wichtige Hinweise
1. Heizen Sie den Panacrunch maximal 8
Minuten vor.
2. Plazieren Sie den Panacrunch in der
Mitte des Glasdrehtellers. Versichern Sie
sich, daß der Panacrunch
die Garraumwände nicht berührt.
Fehlerhaftes Plazieren könnte
Funkenbildung und damit eine
Beschädigung des Garraums verursachen.
3. Setzen Sie den Panacrunch immer
direkt auf den Glasdrehteller. Benutzen Sie
in keinem Fall zusätzlich das Rost.
4. Wenn Sie mit dem heißen Panacrunch
arbeiten, benutzen Sie bitte immer den
dazugehörigen Griff oder Topfhandschuhe,
um Verbrennungen zu vermeiden.
5. Entfernen Sie sämtliches
Verpackungsmaterial des Lebensmittels,
bevor Sie dieses zubereiten.
6. Plazieren Sie niemals hitzeempfindliches
Material auf dem heißen Panacrunch .
Diese könnten sich entzünden.
7. Der Panacrunch kann auch im Backofen
benutzt werden.
8. Benutzen Sie den Panacrunch in
Kombination mit Mikrowelle und Grill, um
beste Ergebnisse zu erzielen.
Das Konzept
Werden bestimmte Lebensmittel wie z.B.
Pizza oder Quiche im Mikrowellengerät zubereitet, ist das Ergebnis oft nicht mit dem
Backofen zu vergleichen: Der Teig ist meistens weicher und der Boden nicht so knusprig.
Mit dem Panasonic Panacrunch als Zubehör
ist das kein Problem mehr. Pizza, Quiches
oder auch andere Produkte können knusprig
gebräunt werden. Das Prinzip ist folgendermaßen: Der Boden des Panacrunch s absorbiert
Mikrowellen und wandelt diese in Hitze um.
Diese Hitze wird von unten an das
Lebensmittel abgegeben. Eine Bräunung der
Lebensmittel-Oberfläche wird durch den Grill
erreicht. Außerdem unterstützt die Anti-HaftBeschichtung des Panacrunch s den HitzeEffekt.
Anwendung des Panacrunch
• Um die besten Ergebnisse zu erzielen, ist es
notwendig, dieses Zubehör vorzuheizen:
Setzen Sie den Panacrunch direkt auf den
Glasdrehteller und heizen ihn 3 Minuten mit
der Grillkombination 1 vor. Sollen
Lebensmittel wie z.B. Würstchen oder
Frikadellen zubereitet werden, dann fetten
Sie den Panacrunch vor dem Vorheizen
ein, um die Bräunung zu opti mieren.
• Nehmen Sie nach dem Vorheizen den
Panacrunch mit dem dazugehörigen
Griff oder Topfhandschuhen aus dem Gerät.
Legen Sie das Lebensmittel unverzüglich
auf den Panacrunch und stellen Sie den
Teller sofort wieder in das Mikrowellengerät.
Jede Zeitverzögerung kann das Garergebnis
beeinflussen.
Pflege des Panacrunch
• Benutzen Sie auf dem Panacrunch
keine scharfkantigen Gegenstände bzw.
Messer, da sonst die Beschichtung
beschädigt wird.
• Reinigen Sie den benutzten Panacrunch
in heißem Seifenwasser und spülen Sie mit
klarem, heißen Wasser nach. Verwenden
Sie weder Scheuermittel noch Kratzschwämme, da die Oberfläche sonst
beschädigt werden könnte.
• Der Panacrunch ist für die Geschirrspülmaschine geeignet.
Panacrunch
Page 60

D-18
F: Warum sind während des
Kombinationsgarens brummende und klickende
Geräusche zu hören?
F: Warum läßt sich das
Mikrowellengerät nicht
einschalten?
A: Läßt sich das Mikrowellengerät nicht einschalten, dann über-
prüfen Sie bitte folgendes:
1. Steckt der Netzstecker fest in der Steckdose? Ziehen Sie
den Stecker aus der Steckdose und warten Sie 10
Sekunden, bevor Sie diesen wieder hineinstecken.
2. Überprüfen Sie die Netzsicherung und ersetzen Sie diese
gegebenenfalls.
3. Ist die Netzsicherung in Ordnung, schließen Sie ein
anderes Elektrogerät an die Steckdose an. Arbeitet die
ses Gerät auch nicht, ist die Steckdose defekt, Arbeitet
das Gerät jedoch ordnungsgemäß, ist wahrscheinlich Ihr
Mikrowellengerät defekt. Wenden Sie sich in diesem Fall
unbedingt an einen Panasonic- Kundendienst.
A: Beim Betrieb des Mikrowellengerätes können Fernseh- und
Radiostörungen auftreten. Es handelt sich um ähnliche
Störungen, wie sie durch kleine Elektrogeräte wie Mixer,
Staubsauger, Haartrockner usw. verursacht werden können.
Dies bedeutet nicht, daß Ihr Mikrowellengerät defekt ist.
A: Das Gerät akzeptiert keine falschen Programme. Eine vierte
Phase wird z.B. nicht akzeptiert.
A: Die erhitzten Lebensmittel erwärmen den Garraum. Diese
warme Luft wird durch die zirkulierende Luftströmung aus
dem Gerät heraus befördert. In dieser erwärmten Luft sind
keine Mikrowellen enthalten. Die Lüftungsöffnungen dürfen
während des Garens in keinem Fall abgedeckt werden.
A: Nur für den reinen GRILLBETRIEB können Sie ein
Fleischthermometer verwenden. Benutzen Sie für den
MIKROWELLENBETRIEB bzw. für den KOMBINATIONSBETRIEB niemals ein herkömmliches Fleischthermometer, denn
das Metall des Thermometers kann Funkenbildung verursachen.
A: Diese Geräusche sind bedingt durch das automatische
Umschalten von MIKROWELLENLEISTUNG auf GRILLEISTUNG während des Kombinationsbetriebes. Dies ist normal.
F: Das Mikrowellengerät ver-
ursacht Fernsehstörungen.
Ist das normal?
F: Warum nimmt das
Mikrowellengerät das
gewünschte Programm
nicht an?
F: Warum strömt manchmal
warme Luft aus dem
Mikrowellengerät?
F: Kann im Mikrowellengerät
ein herkömmliches
Fleischthermometer
verwendet werden?
Fragen und Antworten
F: Das Gerät stoppt den
Mikrowellen-Garvorgang
und die Meldung „H97“ oder
„H98“ erscheint auf dem
Display.
A: Die Fehlermeldung weist auf ein Problem bei der
Mikrowellenerzeugung hin. Bitte wenden Sie sich an einen
autorisierten Kundendienstvertreter.
Page 61

D-19
Deutsch
Pflege des Mikrowellengerätes
7. Den Glasdrehteller herausnehmen und
abkühlen lassen, bevor Sie diesen in warmem Seifenwasser oder in der
Spülmaschine reinigen.
8. Der Rollenring und die Vertiefung im
Geräteboden sollten regelmäßig gereinigt
werden. Damit werden unnötige
Betriebsgeräusche vermieden und die
Ansammlung von Lebensmittelresten verhindert. Einfach den Boden mit einem
feuchten Tuch auswischen und anschließend trocknen. Der Rollenring kann mit mildem Seifenwasser gereinigt werden.
Achten Sie darauf, daß Sie den Rollenring
und Drehteller nach dem Reinigen wieder
richtig einsetzen.
9. Während des GRILL- und KOMBINATI-
ONSBETRIEBS können Spritzer von
Speisen und Getränken an den
Garraumwänden haften bleiben. Wird das
Gerät nicht regelmäßig gereinigt, kann es
zur Rauchentwicklung während des
Betriebs kommen.
10. Das Mikrowellengerät darf ausschließlich
vom qualifizierten Panasonic-Kundendienst
geprüft oder repariert werden.
11. Ein Dampfreiniger darf nicht zur Reinigung
verwendet werden.
12. Wird das Miikrowellengerät nicht in einem
sauberen Zustand gehalten, kann dies zu
einer Güteminderung der Oberflächen führen, was wiederum eine Beeinträchtigung
der Lebensdauer des Geräts mit sich bringen und eventuell eine Gefahr für den
Benutzer darstellen kann.
13. Die Luftabzüge immer freihalten. Überprü-
fen Sie, dass die Luftabzüge an der Ober-,
Unter- und Rückseite des Geräts nicht
durch Staub oder anderes Material verstopft werden. Wenn die Luftabzüge verstopft sind, kann dies zu Überhitzung führen und die Funktionsfähigkeit des Geräts
beeinträchtigen eine Gefahr für den
Benutzer darstellen kann.
1. Vor dem Reinigen den Netzstecker aus der
Steckdose ziehen.
2. Halten Sie stets den Garraum, die Tür und
den Türrahmen sauber. Entfernen Sie
Spritzer von Speisen und Flüssigkeiten,
die an den Garraumwänden und der Tür
haften, mit einem feuchten Tuch und ggf.
mildem Reinigungsmittel. Scharfe
Reinigungs- und Scheuermittel sind nicht
empfehlenswert. VERWENDEN SIE IN
KEINEM FALL BACKOFENREINIGUNGSMITTEL.
3. Verwenden Sie zur Reinigung der gläser-
nen Mikrowellentür keine Scheuermittel
oder scharfe Metallschaber, da dies eine
Beschädigung der Oberfläche zur Folge
haben und zum Zerspringen des Glases
führen könnte.
4. Das Gehäuse des Gerätes sollte mit einem
weichen Tuch abgewischt werden. Achten
Sie darauf, daß kein Wasser durch die
Entlüftungsschlitze ins Geräteinnere
gelangt, da das Gerät sonst Schaden nehmen könnte.
5. Ist das Bedienungsfeld verschmutzt, säu-
bern Sie dieses mit einem trockenen, weichen Tuch. Verwenden Sie in keinem Fall
scharfe Reinigungs- bzw. Scheuermittel.
Damit es nicht zu einem unvorhergesehenen Betrieb des Gerätes kommt, lassen
Sie die Tür des Gerätes beim Säubern
geöffnet. Drücken Sie nach dem Säubern
die STOPP-/LÖCHTASTE.
6. Während des Betriebes kann sich durch
Verdampfen von Feuchtigkeit innen oder
außen auf dem Sichtfenster des Gerätes
Kondenswasser niederschlagen und evtl.
unter der Tür abtropfen. Dieser Vorgang ist
normal und kann verstärkt bei niedrigen
Raumtemperaturen und hoher Luftfeuchtigkeit auftreten. Die Sicherheit des
Gerätes ist dadurch nicht beeinträchtigt.
Nach dem Betrieb das Kondenswasser mit
einem weichen Tuch abwischen.
Page 62

Technische Daten
Netzspannung: 230 V, 50 Hz
Leistungsaufnahme: Maximum; 1800W
Mikrowelle; 1125 W
Grill; 1100 W
Ausgangsleistung: Mikrowelle; 850 W (IEC-60705)
Grill; 1100 W
Äußere Abmessungen: 482 (W) x 364 (D) x 284 (H) mm (NN-GD379S)
482 (W) x 368 (D) x 284 (H) mm (NN-GD359W / NN-GD369M)
Garraumabmessungen: 325 (B) x 330 (T) x 191 (H) mm
Gewicht: 9.5 kg (NN-GD359W / NN-GD369M)
10.0 kg (NN-GD379S)
Geräuschpegel: 58.8 dB (EN60704)
Die Angaben sind Annäherungswerte; Änderungen ohne Vorankündigung sind vorbehalten.
Bei diesem Produkt handelt es sich um ein Gerät, das die europäische Norm für EMVFunkstörungen (EMV = Elektromagnetische Verträglichkeit), EN 55011, erfüllt. Gemäß dieser
Norm ist dieses Produkt ein Gerät der Gruppe 2, Klasse B und hält alle Grenzwerte ein. Gruppe
2 bedeutet, dass in diesem Gerät Hochfrequenz-Energie für das Erwärmen oder Garen von
Lebensmitteln absichtlich als elektromagnetische Strahlung erzeugt wird. Klasse B sagt aus,
dass dieses Produkt in einem normalen Wohnbereich betrieben werden darf.
Benutzerinformationen zur Entsorgung von elektrischen und elektronischen
Geräten (private Haushalte)
Entsprechend der grundlegenden Firmengrundsätzen der Panasonic-Gruppe
wurde ihr Produkt aus hochwertigen Materialien und Komponenten entwickelt und
hergestellt, die recycelbar und wieder verwendbar sind.
Dieses Symbol auf Produkten und/oder begleitenden Dokumenten bedeutet, dass
elektrische und elektronische Produkte am Ende ihrer Lebensdauer vom Hausmüll
getrennt entsorgt werden müssen.
Bringen Sie bitte diese Produkte für die Behandlung, Rohstoffrückgewinnung und
Recycling zu den eingerichteten kommunalen Sammelstellen bzw.
Wertstoffsammelhöfen, die diese Geräte kostenlos entgegennehmen.
Die ordnungsgemäße Entsorgung dieses Produkts dient dem Umweltschutz und
verhindert mögliche schädliche Auswirkungen auf Mensch und Umwelt, die sich aus einer unsachgemäßen Handhabung der Geräte am Ende Ihrer Lebensdauer ergeben könnten.
Genauere Informationen zur nächstgelegenen Sammelstelle bzw. Recyclinghof erhalten Sie bei
Ihrer Gemeindeverwaltung.
Für Geschäftskunden in der Europäischen Union
Bitte treten Sie mit Ihrem Händler oder Lieferanten in Kontakt, wenn Sie elektrische und elektronische Geräte entsorgen möchten. Er hält weitere Informationen für sie bereit.
Informationen zur Entsorgung in Ländern außerhalb der Europäischen Union
Dieses Symbol ist nur in der Europäischen Union gültig.
Gemäß der Richtlinie 2004/108/EC, Artikel 9(2)
Panasonic Testing Centre
Panasonic Deutschland, eine Division der Panasonic Marketing Europe GmbH
Winsbergring 15,22525 Hamburg, Deutschland
Hergestellt von Panasonic Home Appliances Microwave Oven (Shanghai) Co., Ltd. 898 Longdong
Road, Pudong, Shanghai, 201203, China.
D-20
Page 63

NI-1
Nederlands
Uw magnetronoven controleren
Pak uw magnetron uit, verwijder al het verpakkingsmateriaal en controleer de magnetron op
schade zoals deuken, beschadigde deurvergrendelingen of barsten in de deur. Waarschuw
uw dealer onmiddellijk als u beschadigingen
waarneemt. Een beschadigde magnetronoven
mag niet worden geïnstalleerd.
Aarding
BELANGRIJK: DIT APPARAAT DIENT VOOR
UW PERSOONLIJKE VEILIGHEID JUIST
GEAARD TE WORDEN AANGESLOTEN.
Indien uw stopcontact niet is geaard, is het de
persoonlijke verantwoordelijkheid van de klant
om het te laten vervangen door een goed
geaarde wand-contactdoos.
Bedrijfsspanning
Het voltage dient in overeenstemming te zijn
met de op het label van de oven opgegeven
spanning. Wanneer een hogere spanning
gebruikt wordt, kan dit brand of andere
beschadigingen veroorzaken.
Plaatsen van de oven
Deze oven is uitsluitend bestemd voor gebruik
op een werkblad en is niet bedoeld als inbouwoven of voor gebruik in een kast.
1. Zet het toestel op een platte, stevige onder-
grond, minimaal 85 cm boven de vloer.
2. Wanneer de oven is geïnstalleerd dan moet
op een eenvoudige wijze de stroom middels
een schakelaar kunnen worden onderbroken
of de stekker uit het stopcontact worden
gehaald.
3. De magnetronoven kan alleen op de juiste
wijze functioneren indien er voldoende ventilatie is.
Plaatsing op een meubel:
a. Boven de magnetronoven moet een ruimte
worden vrij gelaten van 15 cm, aan de
achterzijde 10 cm, aan de zijkant 5 cm en
aan de andere zijkant een ruimte van
meer dan 40 cm.
b. Wanneer één zijde van de magnetronoven
tegen een wand staat, mogen de andere
zijde en de bovenkant niet geblokkeerd
zijn.
4. Plaats de magnetronoven niet vlak naast
andere elektrische apparatuur of een gasfornuis.
5. Verwijder de voetjes van de magnetron-
oven niet.
6. Deze magnetronoven is uitsluitend bestemd
voor huishoudelijk gebruik. Niet buitenshuis
gebruiken.
7. Het is af te raden de magnetronoven in een
vochtige omgeving te gebruiken.
8. Het netsnoer mag niet in aanraking komen
met de buitenzijde van de oven. Houd het
snoer uit de buurt van warme of hete
oppervlakken. Laat het snoer niet over de
rand van een tafel of aanrecht hangen.
Dompel het snoer, de stekker of de oven
niet onder in water.
9. De ventilatie-openingen bovenop en achter-
op de magnetronoven mogen niet worden
geblokkeerd. Indien deze openingen
geblokkeerd zijn terwijl de magnetronoven
in gebruik is, kan deze oververhit raken.
Een thermische beveiliging zal in dit geval
de magnetronoven buiten werking stellen
en de oven weer inschakelen zodra deze is
afgekoeld.
Plaatsing op een meubel
Installatie en aansluiting
Vrije
ruimte
10cm
15cm
5cm
Page 64

NI-2
Installatie en aansluiting
WAARSCHUWING
Belangrijke veiligheidsinstructies
1. De deurafdichtingen en de plaatsen hierom-
heen moeten worden schoongemaakt met
een vochtige doek. Het apparaat moet
gecontroleerd worden op beschadigingen
aan de deurafdichtingen en de plaatsen
rondom deze afdichtingen; indien er sprake
van beschadiging is, mag het apparaat niet
gebruikt worden totdat het door een door de
fabrikant erkende onderhoudstechnicus is
gerepareerd.
2. Probeer niet zelf reparaties uit te voeren aan
de ovendeur, het bedieningspaneel, de veiligheids-vergrendelingsschakelaars of welk
ander deel van de magnetronoven dan ook.
Verwijder de behuizing van de magnetronoven niet; deze biedt bescherming tegen
blootstelling aan magnetron (microgolf) energie. Reparaties mogen uitsluitend door een
door de fabrikant erkende onderhoudstechnicus worden uitgevoerd.
3. Gebruik dit apparaat niet, indien het NET-
SNOER en/of de STEKKER beschadigd zijn.
Indien het apparaat niet goed functioneert,
beschadigd of gevallen is, mogen in verband
met de veiligheid reparaties uitsluitend door
een door de fabrikant erkende onderhoudstechnicus worden uitgevoerd.
4.
Indien het netsnoer beschadigd is, moet dit
direct vervangen worden door gekwalificeerde technici om mogelijke schade/letsel te
voorkomen.
5. Kinderen mogen de magnetronoven uitslui-
tend onder toezicht gebruiken wanneer ze
goed zijn ingelicht zodat ze de oven op veilige wijze kunnen bedienen en zich bewust
zijn van de gevaren van onjuist gebruik.
6. Ontploffingsgevaar bestaat indien voedsel of
dranken in een gesloten blik of fles worden
verwarmd.
7. Dit apparaat is niet bedoeld voor gebruik
door personen (met inbegrip van kinderen)
met beperkte zintuiglijke of mentale vermo
gens of met een gebrek aan ervaring of
kennis, tenzij ze onder toezicht staan van of
richtlijnen hebben gekregen over het
gebruik van het apparaat door een persoon
die verantwoordelijk is voor hun veiligheid.
Kinderen moeten onder toezicht staan om
te verhinderen dat ze spelen met het appa
raat.
Achtung: Heiße Oberflächen
Page 65

NI-3
Nederlands
Veiligheidsinstructies
Gebruik van uw magnetronoven
1. Gebruik de oven uitsluitend voor het berei-
den van voedsel. Deze magnetronoven is
speciaal ontworpen voor het opwarmen en
bereiden van voedsel. Gebruik de magnetronoven niet om chemische of andere niet
eetbare producten te verwarmen.
2. Voor gebruik dient u er zich van te verzeke-
ren dat alle te gebruiken hulpmiddelen
(schalen/bakvormen enz.) geschikt zijn voor
gebruik in de magnetronoven.
3. Gebruik de magnetronoven niet om kran-
tenpapier, kleding of andere materialen te
drogen. Ze kunnen vlam vatten.
4. Gebruik de magnetronoven niet om voor-
werpen (anders dan de accessoires) in op
te bergen.
5. Gebruik het apparaat niet met de functie
MAGNETRON of COMBINATIE ZONDER
DAT ZICH HIERIN VOEDSEL BEVINDT.
Het apparaat kan hierdoor beschadigd
raken.
6. Als er rook in uw oven ontstaat, druk dan
op de STOP/WISTOETS en laat de deur
gesloten. Trek de stekker uit het stopcon-
tact of schakel de elektriciteitsvoorziening
uit.
Werking van oven en grill
1. De buitenwanden van de magnetronoven,
inclusief de ventilatie-openingen en de
ovendeur worden tijdens gebruik van de
COMBINATIE- en GRILL-functies heet; pas
dus op bij het openen of sluiten van de
ovendeur en bij het inbrengen of verwijderen van voedsel en accessoires.
2. De oven heeft twee verwarmingselementen
bovenin de oven. Na gebruik van de COMBINATIE- en GRILL-functies wordt dit
oppervlak zeer heet. Let erop dat u het verwarmingselement in de oven niet aanraakt.
OPMERKING: Na gebruik van deze functies zullen ook de oventoebehoren zeer
heet zijn.
3. De buitenkant van de magnetronoven kan,
tijdens het grillen, warm worden. Kinderen
moeten buiten het bereik van de oven
gehouden worden.
Ovenverlichting
Voor vervanging van de lamp van de oven
moet u contact opnemen met uw dealer.
Accessoires
Er worden een aantal accessoires bij de
magnetronoven geleverd.
Glazen draaiplateau
1. Gebruik de magnetronoven niet zonder de
draairing en het glazen draaiplateau.
2. Gebruik uitsluitend het glazen draaiplateau
dat speciaal voor deze magnetronoven
ontworpen is.
3. Als het glazen draaiplateau heet is, moet
deze eerst afkoelen voordat u het schoonmaakt of in water onderdompelt.
4. Het glazen draaiplateau kan in beide
richtingen draaien.
5. Indien het voedsel in de schaal op het pla-
teau de wanden van de oven raakt, waardoor het draaien stopt, gaat het draaiplateau
automatisch in de tegengestelde richting
draaien. Dit is normaal.
6. Bereid geen voedsel direct op het glazen
draaiplateau.
Draairing
1. De draairing en de ovenbodem moeten
regelmatig worden gereinigd om ongewenste geluiden en het ophopen van voedselresten te voorkomen.
2. Tijdens het koken moet de draairing altijd
samen met het glazen draaiplateau worden
gebruikt.
Grill rooster
1. Het grill rooster wordt gebruikt voor het
bruiningsproces van kleine hoeveelheden
en zorgt bovendien voor een goede circulatie van de warmte.
2. Plaats geen metalen voorwerpen direct op
het grill rooster in COMBINATIE met de
MAGNETRONFUNCTIE.
3. Gebruik het grill rooster nooit als alleen de
MAGNETRONFUNCTIE gebruikt wordt.
Panacrunch Pan- Zie pagina Nl-17
Page 66

NI-4
Belangrijke informatie
1) Kooktijden
• De in het kookboek vermelde kooktijden
zijn bij benadering gegeven. Factoren, die
invloed hebben op de kookduur, zijn: de
begintempe- ratuur, de hoeveelheid voed
sel en de mate-rialen die voor het koken
worden gebruikt.
• Begin met de minimale kooktijd om te voorkomen dat het voedsel te gaar wordt. Als
het voedsel niet gaar genoeg geworden is,
kunt u het altijd nog wat langer bereiden.
OPMERKING: Als u het voedsel langer
kookt dan de aanbevolen kooktijden,
kan het bederven, en in extreme geval
len zelfs vlam vatten en de magnetron
oven beschadigen.
2)
Kleine hoeveelheden voedsel
• Kleine hoeveelheden voedsel met een
gering vochtgehalte kunnen uitdrogen, aan
branden of zelfs verbranden als ze te lang
doorkoken. Indien het voedsel in de oven
vlam vat, moet de ovendeur gesloten blij
ven, de magnetronoven uitgezet worden en
moet de stekker uit het stopcontact worden
genomen.
3)
Eieren
• Kook geen ongepelde eieren en verwarm
geen hardgekookte eieren met de MAGNETRON functie. Er kan een te hoge druk in
de eieren ontstaan, waardoor ze explode
ren, zelfs na bereiding/verwarmen.
4)
Niet-poreuze schil
• Voedsel zonder poreuze schil, zoals
aardappelen, eierdooiers en worstjes, moe
ten doorprikt worden alvorens ze met de
MAGNETRON-functie te bereiden. Zo
voorkomt u dat ze exploderen.
5)
Vleesthermometer
• Indien u gebruik maakt van een vleesthermometer voor vlees en gevogelte, gebruik
deze dan alleen wanneer het voedsel
buiten de magnetronoven is. Gebruik geen
conventionele vleesthermometer binnen de
magnetronoven, omdat vonken kunnen
optreden.
6)
Vloeistoffen
• Indien vloeistoffen, zoals soep, sauzen en
dranken opgewarmd worden in uw magnetronoven, kunnen deze zonder te gaan
borrelen heter worden dan het kookpunt.
Hierdoor kan de hete vloeistof plotseling
gaan overkoken.
Om dit te voorkomen, kunnen de volgende
stappen ondernomen worden:
a) Gebruik geen rechte glazen of bekers met
smalle of toelopende bovenkant.
b) Niet te lang verwarmen.
c) Roer de vloeistof om alvorens deze in de
oven te plaatsen en roer halverwege de
opwarmtijd nogmaals om.
d) Laat de vloeistof na het verwarmen nog
even in de oven staan en roer goed om
voordat u de vloeistof uit de oven haalt.
7)
Papier/kunststof
• Als u voedsel gaat verwarmen in kunststof
of papieren bakjes, dient u de oven regel-
matig te controleren omdat deze bakjes bij
oververhitting vuur kunnen vatten.
• Gebruik geen gerecycled papier (b.v. keu
kenrol), tenzij het papierproduct geken
merkt is als zijnde veilig voor gebruik in
een magnetronoven. Onzuiverheden in
recycled papier kunnen in de magnetron
vonken en/of brand veroorzaken.
• Verwijder metalen sluitingen van braadzak
ken voordat u deze in de oven plaatst.
8)
Keukengerei/folie
• Verwarm nooit gesloten potjes of flessen
omdat deze kunnen exploderen.
• Gebruik geen metalen bakjes of schotels
met metalen randen tijdens de magnetron-
functie. Hierdoor kunnen er vonken ont
staan
• Bij gebruik van aluminiumfolie, vleesspie
sen of andere metalen voorwerpen, moet
de af-stand tot de ovenwanden minimaal 2
cm bedragen om vonkoverslag te voorko
men.
9)
Zuigflessen/potjes babyvoeding
• De speen of deksel moeten verwijderd wor-
den van zuigflessen of potjes babyvoedsel
alvorens ze in de magnetronoven te plaat
sen.
• Schud zuigflessen goed en roer de inhoud
van de potjes met babyvoeding een paar
maal om.
• Controleer de temperatuur, voor het nutti
gen van het voedsel zorgvuldig, om ver
branden te voorkomen.
Page 67

NI-5
Nederlands
De magnetron-oven
1. Deur-ontgrendelknop
Indrukken om de deur te openen. Indien u de deur tijdens het koken opent, wordt het
kookproces tijdelijk onderbroken, zonder dat de eerder ingevoerde instellingen verdwijnen.
Het kookproces zal direct hervat worden, zodra u de deur weer gesloten heeft en op de
starttoets gedrukt heeft.
2. Doorkijkvenster
3. Veiligheids-deurvergrendelingssysteem
4. Ventilatie-openingen
5. Bedieningspaneel
6. Glazen draaiplateau
7. Draairing
8. Externe ventilatie-openingen
9. Grill rooster
10. Panacrunch Pan
11. Handgreep
12.
Stroomkabel
13. Waarschuwingslabel (heet oppervlak)
[1]
[2]
[3]
[4]
[5]
[7]
[9]
[6]
[10]
[11]
[8]
[12]
[13]
Page 68

NI-6
(1) Utileesvenster
(2) Auto-gewicht magnetron programmaʼs
(3) Auto-gewicht combinatie programmaʼs
(4) Auto-gewicht ontdooien programmaʼs
(5) Knop voor het zeer snel ontdooien met
gewichtautomaat
(6) Magnetronvermogen
(7) Grilltoets
(8) Combinatietoets
(9) Delay/Stand knop
(10) Kloktoets
(11) Stop / wistoets
Voor het koken:
Met één druk op de toets wordt het
ingestelde programma gewist.
Tijdens het koken:
Met één druk op de toets wordt het
kookprogramma tijdelijk onderbroken.
Indien u de toets nogmaals indrukt, wordt
het ingestelde programma gewist en ver-
schijnt de tijd in het uitleesvenster.
(12) Starttoets
Pieptoon
Zodra een toets wordt ingedrukt, weerklinkt een piep. Indien er geen piep te horen is dan is de
instelling niet correct. Zodra een kookprogramma is voltooid, klinken er vijf piepjes.
Bedieningspanelen
*
De uitvoering van het bedieningspaneel
kan afwijken van de afbeelding (afhankelijk van de kleur). De functies zijn echter
dezelfde.
OPMERKING: Als u een programma heeft ingesteld, maar niet op de startknop drukt, dan
annuleert de oven het programma automatisch na zes minuten. Op het display wordt dan weer
de tijd van de dag weergegeven.
NN-GD359W / NN-GD369M / NN-GD379S*
(5)
(1)
(2)
(3)
(4)
(6)
(7)
(8)
(9)
(10)
(12)
(11)
Deze oven is voorzien van een functie voor
energiebesparing.
Let op:
1. De helderheid van de display vermindert
als de stand-by mode is ingeschakeld.
2. De oven zal op de stand-by mode over
gaan als deze voor het eerst wordt inge
plugd en direct nadat de laatste handel
ing ermee is verricht.
Page 69

NI-7
Nederlands
Instellen van de klok
Opmerkingen:
1. Om de juiste tijd opnieuw in te stellen, herhaalt u stap 1 tot en met stap 3.
2. Als de magnetronoven op het stopcontact aangesloten is en van elektriciteit voorzien wordt, zal
de klok de tijd blijvend weergeven.
3. Dit is een 24-uurs-klok. Bij 02.00 sʼmiddags = 14:00 uur en niet 2:00.
Met dit systeem worden de bedieningselementen buiten werking gesteld. De ovendeur kan echter
wel geopend worden. Het kinderslot kan ingesteld worden wanneer het uitleesvenster een dubbele punt of de tijd weergeeft.
Instellen:
Opheffen:
• Druk driemaal op de starttoets.
De tijdsaanduiding verdwijnt. De tijd
blijft aanwezig in het geheugen.
“_ _ _ _ “ verschijnt in het uitleesvenster.
• Druk driemaal op de stop/wistoets.
De tijd verschijnt weer in het uitleesvenster.
Kinderslot
• Druk één keer op
de kloktoets. De
dubbele punt gaat
knipperen
.
•
Druk op de kloktoets.
De dubbele punt houdt op
met knipperen en de tijd is in
het geheugen opgenomen.
• Voer de tijd in door de Tijd-
/gewichtschakelaar te draaien.
De tijd verschijnt in het uitleesvenster
en de dubbele punt knippert.
Wanneer de magnetronoven voor het eerst wordt ingeschakeld, verschijnt “88:88” in het
uitleesvenster.
OPMERKING: Om het kinderslot te activeren moet u de startknop 3 keer binnen 10 seconden
indrukken.
Page 70

NI-8
• Druk de toets voor
magnetronvermogen in
verschijnen in het
uitleesvenster. Bepaal
het gewenste vermogen.
De magnetron-wijzer en
het wattage verschijnen
in het utileesvenster.
• Stel de bereidingstijd in met de
Tijd-/gewichtschakelaar
(HOOG vermogen: tot 30 minuten
ander vermogen: tot 90 minuten).
• Druk de starttoets in. Het
kookproces zal starten en
de tijd in het uitleesvenster
zal gaan aftellen.
WAARSCHUWING: Als er tijdens het instellen van de tijd geen stand voor het vermogen
is ingesteld, zal de magnetronoven automatisch in de stand HOOG functioneren.
Het glazen draaiplateau dient tijdens het gebruik van de magnetronoven, altijd op de juiste positie
geplaatst te zijn.
850 W
270 W
600 W
440 W
250 W
Wattage
Max/Hoog
Ontdooien
Medium
Laag
Sudderen
Warmhouden
Koken in multi-fasen
De oven is voorzien van een geheugen. U kunt dus 3 verschillende instructies instellen, waarna
het programma ze allebei automatisch zal doorlopen (Herhaal stap 1 en 2 hierboven, maar druk
de starttoets pas in als alle fasen zijn ingevoerd).
Opmerking:
De functie Auto-gewicht/ontdooi, kan alleen in de eerste fase ingesteld worden.
1 x drukken
2 x drukken
3 x drukken
4 x drukken
5 x drukken
6 x drukken
Koken en ontdooien met de magnetronfunctie
100 W
Page 71

NI-9
Nederlands
Koken met startvertraging
Met behulp van de Startvertraging/Wachttijd knop kunt u de wachttijd programmeren na het
koken of gebruiken om de oven als een minuut timer te programmeren.
Door gebruik van de Startvertraging/Wachttijd knop kunt u het vertraagd starten van het koken
programmeren.
Opmerking:
1. 3-fase koken kan samen met het koken met startvertraging worden geprogrammeerd.
bijvoorbeeld
2. Als de ingestelde vertragingstijd langer is dan 1 uur, dan wordt de tijd in minuten afgeteld. Als
de tijd minder is dan 1 uur dan wordt de tijd in seconden afgeteld.
3. De startvertraging kan niet voor automatische programma's worden geprogrammeerd.
• Druk op
Startvertraging/Wachttijd.
• Stel de vertragings-
tijd in door aan de
Tijd/Gewicht knop te
draaien (tot 9 uur).
• Stel het gewenste kookpro-
gramma en de kooktijd in.
• Druk op de
startknop.
b.v.
Startvertraging: 1 uur Hoog vermogen: 10 min. Sudderen: 20 min.
• Stel het gewenste
kookprogramma en
de kooktijd in.
• Druk op
Startvertraging
/Wachttijd.
• Stel de vertragingstijd in
door aan de Tijd/Gewicht
knop te draaien (tot 9 uur).
• Druk op de
startknop.
Opmerking:
1. 3-fase koken kan samen met de wachttijd worden geprogrammeerd.
bijvoorbeeld
2. Als de ovendeur tijdens de wachttijd of minuut timer wordt geopend, dan wordt het aftellen van
de tijd in het displayvenster voortgezet.
3. Deze functie kan ook als timer worden gebruikt. Druk in dit geval op Startvertraging/Wachttijd,
stel de tijd in en druk op Start.
b.v.
Hoog vermogen: 4 min. Wachttijd: 5 min. Hoog vermogen: 2 min.
Wachttijd na het koken
5 keer1 keer
1 keer
1 keer
Page 72

NI-10
Tips voor het Ontdooien
Controleer het ontdooien een aantal malen,
zelfs indien u de automatische toetsen
gebruikt. Houd rekening met de nagaarperiode.
Nagaartijden
Afzonderlijke porties voedsel kunnen praktisch
onmiddellijk na het ontdooien bereid worden.
Het is normaal dat grotere porties voedsel in
het midden nog bevroren zijn. Alvorens te gaan
bereiden minimaal een uur laten staan.
Tijdens de rusttijd, wordt de temperatuur gelijkmatig verdeeld en wordt het voedsel door
geleiding ontdooid. Opmerking: Indien het
voedsel niet onmiddellijk bereid wordt, moet
het in de koelkast bewaard worden. Ontdooid
voedsel mag nooit opnieuw ingevroren worden
zonder dat het eerst gekookt is.
Braadstuk en gevogelte
Plaats de braadstukken bij voorkeur op een
omgekeerd bord of plastic rooster, zodat ze
niet in hun sappen komen te liggen. Het is van
essentieel belang om delicate of uitstekende
delen van dit vlees af te dekken met kleine
stukjes folie, om te voorkomen dat deze delen
gaan koken. Het is niet gevaarlijk om kleine
stukjes folie in uw magnetron te gebruiken,
mits deze niet in contact komen met de wan-
den van de magnetron.
Gehakt of brokjes vlees en vis
Omdat de buitenkant van dit soort voedsel snel
ontdooit, moeten zij van elkaar gescheiden worden; breek het blok in regelmatige stukken tijdens het ontdooien en verwijder de stukjes die
reeds ontdooid zijn.
Kleine porties voedsel
Koteletten en stukken kip moeten zo snel
mogelijk van elkaar gescheiden worden, zodat
zij gelijkmatig en volledig ontdooien. Vettige
delen en de uiteinden ontdooien sneller. Leg
deze in de buurt van het midden van het draaiplateau of dek ze af.
Ontdooien
Brood
Voor brood is de standaard insteltijd
noodzakelijk om deze geheel te ontdooien. De
standaard insteltijd kan verkort worden door de
sneden uiteen te halen of het brood in twee te
snijden.
Page 73

NI-11
Nederlands
Grillen
Opmerkingen:
1. Plaats het gerecht op het rooster, en plaats deze op het draaiplateau. Plaats de vuurvaste
plaat (Pyrex
®
) onder het rooster, om eventueel vet en druppels op te vangen.
2. Tijdens het grillen dienen gerechten nooit afgedekt te zijn.
3. De grill NIET VOORVERWARMEN.
4. De grill functioneert uitsluitend als de ovendeur gesloten is. Het is niet mogelijk om de grillfunc-
tie te gebruiken als de deur open is.
5. Voor het programma grillen is geen magnetronvermogen beschikbaar.
6. Bij de meeste gerechten is het noodzakelijk om deze, nadat ongeveer de helft van de berei-
dingstijd versteken is, te draaien. Voor het draaien van de gerechten moet u, nadat u de deur
geopend heeft, heel VOORZICHTIG én met ovenhandschoenen, het rooster uit de magnetron
nemen.
7. Na het draaien, zet u het gerecht weer in de oven en sluit u de deur. Na het sluiten van de
deur dient op Start gedrukt te worden. Het uitleesvenster van de magnetronoven zal doorgaan
met het aftellen van de resterende tijd. U kunt zonder gevaar en op ieder moment de deur van
de oven openen om te controleren hoever de bereiding gevorderd is.
8. Tijdens het bereidingsproces kan de grill afwisselend gloeien - dit is normaal. De magnetron-
oven dient na het grillen en voor het gebruik van de magnetron - of combinatiefunctie, altijd
gereinigd te worden.
• Druk op de Grilltoets om de
grillinstelling te kiezen.
1 x drukken grill 1 (hoog)
2 x drukken grill 2 (medium)
3 x drukken grill 3 (laag)
De grill-wijzer en het grill niveau (1,
2 of 3) verschijnen in het
uitleesvenster.
• Druk de Starttoets
in. De tijd zoals
weergegeven in
het uitleesvenster
gaat aftellen.
• Stel de bereidingstijd in met
de Tijd-/gewichtschakelaar
(tot 90 minuten).
WAARSCHUWING: Het GRILLrooster dient altijd met het glazen draaiplateau, in de
juiste positie, te worden gebruikt. Neem het grill rooster uit de oven door het rooster en
de vuurvaste plaat/schaal goed vast te houden. Gebruik ovenhandschoenen voor het
uitnemen van accessoires. In verband met de hoge temperaturen dient u voorzichtig te
zijn bij het plaatsen en of uitnemen van gerechten. Raak het glas aan de buitenzijde of
de metalen delen aan de binnenkant van de oven derhalve niet aan.
Page 74

NI-12
Combinatiekoken
• Druk op de Combinatietoets om
de combinatie-instelling te kiezen.
De combinatie-wijzer en de
combinatie-instelling (1, 2 of 3)
verschijnen in het uitleesvenster
.
• Stel de bereidingstijd in met
de Tijd-/gewichtschakelaar
(tot 90 minuten).
• Druk de starttoets in.
Tijdens het combinatiekoken, zal de magnetron de gerechten snel prepareren, terwijl met het
gebruik van de Grill de gerechten gebruind en knapperig worden.
Opmerkingen:
1. Het grill rooster is ontwikkeld om bij de functie combinatie en grillen te worden gebruikt.
Gebruik nooit een andere metalen accessoire, anders dan die bij de oven geleverd worden.
Plaats onder het grill rooster een vuurvaste plaat om eventueel vet en druppels op te vangen.
2. Gebruik het grillrooster alleen zoals in de instructies is beschreven. Gebruik het grill rooster
NIET voor het bereiden van gerechten met een gewicht van < 200 gram of als de oven handmatig ingesteld staat. Voor optimale resultaten bij het bereiden van kleine hoeveelheden kunt u
de functies GRILL of ALLEEN MAGNETRON gebruiken, maar nooit de functie combinatie.
3. Tijdens het bereiden van gerechten met de functie combinatie dienen gerechten nooit afge-
dekt te zijn.
4. De grill bij de functie combinatie NIET VOORVERWARMEN.
5. Bij een onjuist gewicht van gerechten of als het grill rooster beschadigd is of er per ongeluk
een metalen bakje in de oven geplaatst is, kan het voorkomen dat er vonkontlading is.
Vonkontlading is herkenbaar als blauwe lichtflitsen in de magnetron. Indien dit voorkomt, dient
de oven onmiddellijk uitgeschakeld te worden.
6. Sommige gerechten dienen zonder het gebruik van het grill rooster in de stand combinatie
bereid te worden, bijv. rollades, gratins, taarten en desserts. Deze gerechten dienen op een
vuurvaste niet metalen plaat/schaal geplaatst te worden, direct op het draaiplateau.
7. Gebruik GEEN kunststof (plastic) MAGNETRONschaaltjes bij het bereiden van gerechten in
het programma combinatie (tenzij geschikt voor combinatiekoken). De schalen dienen
bestand te zijn tegen de hitte van de boven-grill - vuurvast glas bijv. Pyrex
®
of keramiek zijn
hiervoor uiterst geschikt.
8. Gebruik uw eigen metalen schaaltjes of bakjes NIET omdat de microgolven het gerecht dan
niet gelijkmatig kunnen verwarmen.
WAARSCHUWING: Het GRILLrooster dient altijd met het glazen draaiplateau, in de juiste posi-
tie, te worden gebruikt. Neem het grill rooster uit de oven door het rooster en de vuurvaste
plaat/schaal goed vast te houden. Gebruik ovenhandschoenen voor het uitnemen van accessoires. In verband met de hoge temperaturen dient u voorzichtig te zijn bij het plaatsen en of
uitnemen van gerechten. Raak het glas aan de buitenzijde of de metalen delen aan de binnenkant van de oven derhalve niet aan.
1 drukken combi 1 440W 1100W
2 drukken combi 2 250W 1100W
3 drukken combi 3 440W 950W
Indrukken Instelling Magnetron Grill
Page 75

NI-13
Nederlands
• Druk de starttoets in.
Auto-gewicht - verwarmen/koken
Met deze functie kunt u gerechten bereiden door alleen het gewicht in te stellen. De instelling van
het gewicht dient in grammen geprogrammeerd te worden.
• Selecteer de gewenste
categorie. Het automatische
indicatielampje en het programmanummer verschijnen
in het display.
Auto-gewicht ontdooien
Met deze functie kunt u bevroren voedsel, op basis van het gewicht, ontdooien.
• Stel het gewicht van het voedsel
in met de Tijd-/gewichtschakelaar. Het gewicht wordt bepaald in
stappen van 10 gram als u langzaam aan de knop draait. Het
gewicht wordt bepaald in stappen
van 100 gram als u snel aan de
knop draait.
• Druk de starttoets
in. Vergeet niet om
tijdens het ontdooien, het gerecht c.q.
het voedsel te draaien of te roeren.
• Selecteer het gewenste autoontdooiprogramma
1 x drukken kleine stukjes
2 x drukken grote stukken
Auto-programmaʼs nummer verschijnt in het uitleesvenster. De
wijzers voor auto en ontdooien
lichten op.
bijv.
• Stel het gewicht van het
bevroren voedsel in met de
Tijd-/gewichtschakelaar. Het
gewicht wordt bepaald in stappen van 10 gram als u langzaam aan de knop draait. Het
gewicht wordt bepaald in stappen van 100 gram als u snel
aan de knop draait.
100 - 1000g
Kleine stukjes vlees, kalfsoesters, gehakt, visfilet, steaks,
koteletten (van 100 gram tot 400 gram per stuk). Draai /
roer het voedsel om zodra de pieptoon weergeven wordt.
1 Kleine
stukjes
400 - 2000g
Grote stukken vlees, rollades, hele kip, groot stuk vis.
Draai het voedsel om zodra de pieptoon weergeven wordt.
2 Grote
stukken
Belangrijk: Zie ontdooien-tips up bladzijde Nl-9.
Programma
Min./Max. gewicht
Tips
Page 76

NI-14
Auto-gewicht - verwarmen/koken
150 - 1200g
200 - 1100g
Opwarmen van een verse maaltijd of
een ovenschotel. Al het voedsel moet
voorgekookt zijn. Het voedsel moet op
koelkasttemperatuur zijn (ca. +5°C).
Selecteer het programma 'Verse
maaltijd' (1x drukken op de toets
'Automatisch magnetronprogramma').
Omroeren zodra de pieptoon klinkt.
Enkele minuten laten rusten. Zorg
ervoor dat het voedsel kokend heet is
voordat u het opdient. Het is mogelijk
dat grote stukken vis / vlees in een
dunne saus langer moeten koken.
Verse groenten bereiden.
Leg de schoongemaakte groenten in
een magnetronbak. Besprenkel de
groenten met 1 eetlepel water per
100g. Bedek de bak met magnetronfolie of een deksel. Selecteer het programma 'Verse groenten' (3x drukken
op de toets 'Automatisch magnetronprogramma'). Omdraaien / omroeren
zodra de pieptoon klinkt.
1 kop - 150g
1 kom - 300g
2 kommen - 600g
Opwarmen van 1 kop (150g), 1 kom
(300g) of 2 kommen (600g) hete
drank (bv. thee, koffie, melk, of
soep). Selecteer het programma
'Opwarmen kop/kom' (2x drukken op
de toets 'Automatisch magnetronprogramma'). Voer het gewicht in (150g,
300g of 600g) en druk op de starttoets.
1 x drukken
3 x drukken
2 x drukken
VERSE KANT-EN-
KLAAR MAAL-
TIJD
VERSE
GROENTE
VERWARM
KOP/KOM
200 - 900g
Verse vis bereiden.
Leg de vis in een magnetronbak en
voeg 2 eetlepels (30ml) water toe.
Bedek de bak met magnetronfolie of
een deksel. Selecteer het programma
'Verse vis' (4x drukken op de toets
'Automatisch magnetronprogramma').
4 x drukken
VERSE VIS
Programma
Aanbevolen
gewicht
Toebehoren
Instructies
Page 77

NI-15
Nederlands
Auto-gewicht - verwarmen/koken
150 - 480g
150 - 480g
130 - 500g
150 - 400g
Bodem knapperig maken en
bovenkant bruin van ingevroren
gekochte pizza.
Verwijder alle verpakking en leg de
pizza in de voorverwarmde
Panacrunch Pan.
Bodem knapperig maken en
bovenkant bruin van verse
gekochte pizza.
Verwijder alle verpakking en leg
de pizza in de voorverwarmde
Panacrunch Pan.
Voor het opwarmen en knapperig maken van de bodem en het
bruinen van de bovenkant van
verse gekochte quiche. Verwijder
alle verpakking en leg de quiche in
de voorverwarmde Panacrunch
Pan.
Voor het opwarmen en bruinen
van bevroren
aardappelproducten. Verdeel na
het opwarmen van de pan de
aardappelproducten over de pan.
Voor de beste resultaten moeten
de aardappelproducten in een
enkele laag gelegd
worden en bij de pieptoon worden
gedraaid.
1 x drukken
2 x drukken
3 x drukken
BEVROREN PIZZA
VERSE
PIZZA
VERSE
QUICHE
4 x drukken
BEVROREN
AARDAPPEL-
PRODUCTEN
Panacrunch Programma
1. Kies het gewenste
programma en
plaats de
Panacrunch Pan
direct op het glazen
draaiplateau.
2. Druk op de
Starttoets om de
Panacrunch Pan
voor te
verwarmen.
3. Bij het einde van de
voorverwarmingstijd weerklinkt een
pieptoon. Doe het
voedsel in de pan.
4. Druk op de
Starttoets.
Programma
Aanbevolen
gewicht
Toebehoren
Instructies
Page 78

NI-16
300 - 1000g
150 - 1000g
70 - 400g
Voor het opwarmen, bruinen en
knapperig maken van de
bovenkant van voorgebakken,
ingevroren gratin. Dit programma
is geschikt voor ingevroren lasagne,
cannelloni, gegratineerde
aardappelen en pasta. Verwijder de
verpakking en plaats de ingevroren
gratin in een vuurvaste schaal op
het glazen draaiplateau. Selecteer
het programma 'Ingevroren
gegratineerd gerecht' (5x drukken
op de toets 'Automatisch
combinatieprogramma').
Voor het bereiden van verse
stukken kip, zoals borst, bouten,
drumsticks en vleugels. Plaats de
stukken kip in een vuurvaste schaal
op het metalen rooster op het
glazen draaiplateau. Selecteer het
programma 'Verse stukjes kip' (6x
drukken op de toets 'Automatisch
combinatieprogramma'). Omdraaien
zodra de pieptoon klinkt.
Voor het opwarmen van bevroren brood, broodjes en croissants. Verwijder alle verpakking
en leg het bevroren brood op het
rooster op het glazen draaiplateau. Omdraaien zodra de pieptoon klinkt.
5 x drukken
6 x drukken
BEVROREN
GRATIN
VERSE STUK-
KEN KIP
7 x drukken
BROOD/
CROISSANTS
Auto-gewicht - verwarmen/koken
• Druk de starttoets in.
Met deze functie kunt u gerechten bereiden door alleen het gewicht in te stellen. De instelling
van het gewicht dient in grammen geprogrammeerd te worden.
• Selecteer de gewenste
categorie. Het automatische
indicatielampje en het programmanummer verschijnen
in het display.
• Stel het gewicht van het voedsel
in met de Tijd-/gewichtschakelaar.
Het gewicht wordt bepaald in stappen van 10 gram als u lang-zaam
aan de knop draait. Het gewicht
wordt bepaald in stappen van 100
gram als u snel aan de knop draait.
bijv.
Programma
Aanbevolen
gewicht
Toebehoren
Instructies
Page 79

NI-17
Nederlands
Gebruik van de panacrunch pan
(Handmatige bediening)
•
Voor de beste resultaten moet de pan voor
gebruik voorverwarmd worden. Plaats hem
direct op het glazen draaiplateau en ver
warm in de Combinatiestand gedurende 1
tot 3 minuten voor. Voor een beter bruin
ingseffect moet de pan ingesmeerd worden
met olie alvorens hem voor te verwarmen
voor producten als worstjes en beefburgers.
•
Verwijder de pan uit de oven en doe het
voed-sel in de pan. Gebruik altijd het hand
vat van de pan of ovenwanten, omdat de
pan zeer heet zal zijn. Voor de beste resul
taten is het van belang dat het voedsel
onmiddellijk na het voorverwarmen op de
pan geplaatst wordt.
De prestaties kunnen anders niet gegarandeerd worden.
Verzorging van de pan
•
Gebruik nooit scherp keukengerei op de
pan, omdat hierdoor het anti-aanbak opper
vlak beschadigt.
•
Na gebruik afwassen in een heet sopje en
afspoelen met heet water. Geen schurende
reinigingsmiddelen of schuursponsjes
gebruiken; hierdoor beschadigt het
oppervlak van de pan.
•
De pan kan veilig in de vaatwasser gerei
nigd worden.
Opmerkingen:
1. Verwarm de pan niet langer dan 8 minuten
voor.
2. Zet de pan altijd in het midden van het gla
zen draaiplateau en zorg ervoor dat hij de
wanden van de oven niet raakt.
Bij aanraking van de ovenwanden kunnen
er vonken ontstaan waardoor de oven
beschadigd kan raken.
3. Zet de pan altijd op het glazen draaipla
teau. Gebruik hem niet met het metalen
rooster.
4. Gebruik altijd het handvat van de pan of
ovenwanten. De pan is heet!
5. Controleer of alle voedselverpakking verw
ij-
derd is voordat u met de bereiding begint.
6. Zet nooit warmtegevoelige materialen op de
hete pan; deze kunnen hierdoor ontbran
den.
7. De pan kan gebruikt worden in conventio
nele ovens.
8. Voor de beste resultaten moet de pan
gebruikt worden in COMBINATIE GRILL en
MAGNETRON.
Het ʻconceptʼ
Bepaalde in de magnetron bereide eetwaren
kunnen een zachte en kleffe korst krijgen. In
uw Panacrunch Pan worden pizzaʼs, quiches,
pasteitjes, gepaneerde producten net zo bruin
en knapperig als in een conventionele oven.
Uw Panasonic Panacrunch Pan functioneert op
drie manieren: opwarmen van de pan door
absorptie van magnetronstralen, direct opwarmen van het voedsel door magnetronstralen
en opwarmen van het voedsel via de grill. De
onderkant van de pan absorbeert de magnetronstralen en zet deze om in hitte. Vervolgens
wordt de hitte via de pan doorgegeven aan het
voedsel. Het verwarmingseffect wordt geoptimaliseerd door het anti-aanbak oppervlak.
Panacrunch Pan
Page 80

NI-18
V: Tijdens het COMBINATIE
koken hoor ik zoemende en
klikkende geluiden in de
oven. Wat is de oorzaak van
deze geluiden?
Vragen en antwoorden
V: Waarom kan de oven niet
worden ingeschakeld?
A: Controleer het volgende wanneer de oven niet kan worden
ingeschakeld:
1. Is de stekker goed aangesloten? Neem de stekker uit het
stopcontact, wacht tien seconden en steek de stekker
weer in het stopcontact.
2. Controleer de zekering en de stroomonderbreker.
Schakel de stroomonderbreker in of vervang de zekering
als hij uitgeschakeld resp. doorgeslagen is.
3. Indien de stroomonderbreker of de zekering in orde zijn,
probeer dan een ander apparaat op het stopcontact aan
te sluiten. Indien het andere apparaat werkt, is er waar
schijnlijk een probleem met de oven. Indien het andere
apparaat niet werkt, is er waarschijnlijk een probleem met
het stopcontact. Indien het er naar uitziet dat er een pro
bleem met de oven is, moet contact opgenomen worden
met een erkend servicecentrum.
A: Er kan een bepaalde mate van storing op de radio en TV
optreden wanneer de magnetronoven wordt gebruikt. Deze
storing is gelijk aan het soort interferentie dat veroorzaakt
wordt door kleine huishoudelijke apparaten zoals mixers,
stofzuigers, haardrogers e.d. Dit duidt niet op een storing in
uw magnetronoven.
A: De oven is zodanig ontworpen dat hij een onjuiste program-
mering niet accepteert. Zo accepteert de oven geen vierde
kookfase.
A: De warmte afkomstig van het bereiden van het voedsel ver-
warmt de lucht in de oven. Deze warme lucht wordt de oven
uitgeleid via het luchtstroompatroon in de oven. Deze lucht
bevat geen magnetronstraling. De ventilatie-openingen van
de oven mogen nooit geblokkeerd worden.
A: Dit kan uitsluitend tijdens het GRILLEN. Het metaal in som-
mige thermometers kan vonkontlading in uw oven veroorzaken en mag niet gebruikt worden tijdens MAGNETRON en
COMBINATIE koken.
A: Deze geluiden worden veroorzaakt door het automatisch
overschakelen van de oven van MAGNETRONOVEN op
GRILL voor het realiseren van de juiste combinatie-afstellingen. Dit is normaal.
V: De oven accepteert mijn
programma niet. Waarom?
V: Soms komt er warme lucht
uit de ventilatie-openingen
van de oven. Waarom?
V: Kan ik in de oven gebruik
maken van een gewone
thermometer?
V: Mijn magnetronoven
stoort mijn TV-toestel.
Is dit normaal?
V: De magnetronfunctie van
mijn oven werkt niet
meer en de melding 'H97' en
'H98' verschijnt in de display.
A: Dit betekent dat er een probleem is met het systeem dat de
microgolven opwekt. Neem contact op met een erkend
onderhoudscentrum.
Page 81

NI-19
Nederlands
Verzorging van uw magnetronoven
1. Zet de oven uit alvorens hem te reinigen.
2. Houd de deurafdichtingen en de plaatsen
hieromheen schoon. Als er spatten en
gemorste vloeistoffen vast zijn gaan zitten
op de ovenwanden, deurafdichtingen en de
plaatsen hieromheen, moeten deze worden
schoongemaakt met een vochtige doek. Als
zij zeer vuil zijn geworden mag gebruik
gemaakt worden van een mild reinigingsmiddel. Het gebruik van agressieve reinigings-middelen of schuursponsjes wordt
niet aanbevolen.
GEBRUIK GEEN COMMERCIËLE
OVENREINIGERS.
3. Gebruik geen ruwe, schurende reinigings-
middelen of scherpe metalen schrapers om
de ruit van de ovendeur te reinigen, aangezien deze het oppervlak kunnen krassen
en het glas kunnen doen barsten.
4. De buitenzijde van de oven moet worden
schoongemaakt met een vochtige doek.
Ter voorkoming van schade aan de onderdelen binnen in de oven, mag er geen
water via de ventilatie-openingen naar binnen sijpelen.
5. Indien het bedieningspaneel vuil wordt,
moet dit met een zachte, droge doek
gereinigd worden. Gebruik geen agressieve reiningingsmiddelen of schuursponsjes
op het bedieningspaneel. Bij het reinigen
van het bedieningspaneel moet de ovendeur open blijven om te voorkomen dat de
oven per ongeluk wordt ingeschakeld. Druk
na het reinigen op de STOP/WIS toets om
het uitleesvenster te wissen.
6. Indien er aan de binnenkant van de oven-
deur of rondom de buitenkant hiervan
stoomvor-ming plaatsvindt, veeg deze dan
weg met een zachte doek. Dit kan het
geval kunnen zijn, wanneer de magnetronoven wordt gebruikt in een ruimte met een
hoge vochtigheidsgraad; dit duidt niet op
foutief functioneren van het apparaat.
7. Van tijd tot tijd moet het glazen draaipla-
teau verwijderd worden om het schoon te
maken. Reinig het draaiplateau in warm
water met een afwasmiddel of in een vaatwasmachine.
8. De draairing en de ovenbodem moeten
regelmatig worden gereinigd om ongewenste ge-luiden te voorkomen. Verwijder
het vuil op de bodem van de magnetronoven met een mild schoonmaakmiddel en
heet water, en maak hem daarna droog
met een schone doek. De draairing moet
worden afgewassen in een mild sopje. Bij
een regelmatig gebruik zetten zich kookdampen vast op de bodem en/of de wielen
van de draairing, maar tasten deze op
geen enkele wijze aan. Wanneer u de
draai-ring uit de uitsparing in de grondplaat
haalt om hem schoon te maken, let er dan
goed op dat de draairing weer in de juiste
positie terug geplaatst wordt.
9. Bij het GRILLEN of COMBINATIE koken
zullen sommige voedselsoorten vetspatten
op de ovenwanden veroorzaken. Indien de
oven niet van tijd tot tijd gereinigd wordt,
kan hij tijdens het gebruik gaan “roken”.
10. De magnetronoven mag uitsluitend door
ge-kwalificeerd servicepersoneel worden
gerepareerd. Neem voor onderhoud en
reparaties van de oven contact op met de
dichtstbij-zijnde erkende dealer.
11. Gebruik geen stoomreiniger voor het reini-
gen.
12. Als u de oven niet schoonhoudt, is het
mogelijk dat de kwaliteit van de oppervlakken vermindert waardoor de levensduur
van het toestel verkort en er mogelijk
gevaarlijke situaties ontstaan.
13. Houd ventilatie-openingen altijd vrij.
Controleer dat stof of andere materialen de
ventilatie-openingen boven-, onder- of achteraan de oven niet blokkeren. Een blokkering van de ventilatie-openingen kan leiden
tot oververhitting en de werking van de
oven hinderen.
Page 82

Technische specificaties
De specificaties kunnen zonder nadere aankondiging worden gewijzigd.
Netvoeding 230 V, 50 Hz
Stroomverbruik: Maximum; 1800 W
Magnetron; 1125 W
Grill; 1100 W
Capaciteit: Magnetron; 850 W (IEC-60705)
Grill; 1100 W
Buitenafmetingen: 482 (W) x 364 (D) x 284 (H) mm (NN-GD379S)
482 (W) x 368 (D) x 284 (H) mm (NN-GD359W / NN-GD369M)
Binnenafmetingen: 325 (B) x 330 (D) x 191 (H) mm
Gewicht: 9.5 kg (NN-GD359W / NN-GD369M)
10.0 kg (NN-GD379S)
Geluidsniveau: 58.8 dB (EN60704)
Dit produkt voldoet aan de Europese standaard (EN 55011) voor EMC interferentie 's ( EMC =
Elektromagnetische Compabiliteit ) Overeenkomstig deze standaard behoort dit produkt tot de
groep 2 apparatuur, klasse B en voldoet deze aan alle vereiste normen. Groep 2 houdt in dat de
Frequentie energie wordt opgewekt in de vorm van elektromagnetische straling bedoeld voor het
verwarmen en koken van voedsel. Groep B wil zeggen dat dit produkt toegepast kan worden voor
normaal huishoudelijk gebruik.
Informatie over het weggooien van elektrische en elektronische apparatuur (particulieren)
Dit symbool betekent in Europa dat gebruikte elektrische en elektronische
producten niet bij het normale huishoudelijke afval mogen.
Lever deze producten in bij de aangewezen inzamelingspunten, waar ze gratis worden
geaccepteerd en op de juiste manier worden verwerkt, teruggewonnen en hergebruikt.
In Nederland kunt u uw producten bij uw winkelier inleveren bij de aanschaf van een
vergelijkbaar nieuw product.
Wanneer u dit product op de juiste manier als afval inlevert, spaart u waardevolle hulpbronnen en voorkomt u potentiële negatieve gevolgen voor de volksgezondheid en het
milieu, die anders kunnen ontstaan door een onjuiste verwerking van afval. Neem contact op met uw gemeente voor meer informatie over het dichtstbijzijnde
inzamelingspunt of raadpleeg www.nvmp.nl, www.ictoffice.nl of www.stibat.nl.
Voor zakelijke gebruikers in de Europese Unie
Neem voor het weggooien van elektrische en elektronische apparatuur contact op met uw leverancier voor
verdere informatie.
Informatie over verwijdering van afval in landen buiten de Europese Unie
Dit symbool is alleen geldig in de Europese Unie.
Neem wanneer u dit product wilt weggooien, contact op met de lokale overheid of uw leverancier en vraag
wat de juiste verwijderingsmethode is.
Uit hoofde van richtlijn 2004/108/EC, artikel 9(2)
Panasonic testcentrum
Panasonic Service Europe, een afdeling van Panasonic Marketing Europe GmbH
Winsbergring 15,22525 Hamburg, F.R. Duitsland
Geproduceerd door Panasonic Home Appliances Microwave Oven (Shanghai) Co., Ltd., 898 Longdong
Road, Pudong, Shanghai, 201203, China.
Oog voor het milieu
NI-20
Page 83

Fr-1
Français
Installation et raccordement
Vérifiez lʼétat du four à micro-ondes
Déballez le four et débarrassez-le de lʼensemble du matériel dʼemballage. Examinez
soigneusement lʼappareil afin de détecter toute
déformation, défectuosité du système de fermeture de la porte ou défaut au niveau de la
porte elle-même. Prévenez immédiatement
votre revendeur si lʼappareil est endommagé.
Nʼinstallez pas un four à micro-ondes abîmé.
Instructions pour la mise à la terre
IMPORTANT: POUR VOTRE SÉCURITÉ, IL
EST TRES IMPORTANT QUE CET APPAREIL
SOIT CORRECTEMENT MIS À LA TERRE.
Si la prise murale nʼest pas mise à la terre, le
client se doit de la faire remplacer par une
prise murale correctement mise à la terre.
Précaution concernant la tension dʼalimentation:
Utiliser une tension identique à celle spécifiée
sur le four micro-ondes. Si on utilise une tension supérieure à celle indiquée, lʼappareil
risque de prendre feu ou dʼêtre endommagé
dʼune autre manière. De même, si la tension
est inférieure, votre appareil sera moins performant. Votre appareil doit être protégé par un
fusible de 10 Ampères.
Emplacement du four
Ce four est conçu pour être posé sur une table
ou un plan de travail. Il ne doit pas être encastré dans une colonne ou un placard.
1. Poser le four sur une surface plate et stable
à plus de 85 cm au-dessus du sol.
2. Une fois le four installé, il faut pouvoir facile-
ment couper son alimentation électrique,
soit en retirant la prise murale soit en
actionnant un disjoncteur ou un fusible.
3. Afin de garantir une utilisation optimale du
four, veillez à ce quʼil soit suffisamment
ventilé.
Espacement nécessaire :
a. Laissez un espace de 15 cm en haut du
four, de 10 cm à lʼarrière, de 5 cm dʼun
côté du four et dʼau moins 40 cm de lʼautre
côté.
b. Si vous placez le four contre le mur, veillez
à ce que lʼautre côté ou le dessus du four
soit totalement libre.
4. Ne placez pas le four à proximité dʼune
cuisinière au gaz ou électrique.
5. Ne retirez pas les pieds du four.
6. Ce four est destiné uniquement à un
usage domestique. Ne lʼutilisez pas à lʼextérieur.
7. Nʼutilisez pas le four dans une pièce dont
le taux dʼhumidité est très élevé.
8. Evitez tout contact entre le cordon dʼali-
mentation et lʼextérieur de lʼappareil et éloignez-le de toute surface chaude. Ne le
laissez pas pendre sur le bord dʼune table
ou dʼun plan de travail. Evitez de mouiller
le cordon dʼalimentation, la prise ou le four.
9. Nʼobstruez pas les ouvertures dʼaération
situées en haut et à lʼarrière du four de
manière à éviter toute surchauffe du four.
Un dispositif thermique de sécurité protège
le four en cas de surchauffe. Sʼil sʼen
clenche, le four ne pourra fonctionner à
nouveau quʼaprès refroidissement.
10. Ce four ne doit pas être commandé par un
minuteur externe ni par un système de
télécommande à distance.
Plan de travail
Côté libre
10cm
15cm
5cm
Page 84

Fr-2
Installation et raccordement
AVERTISSEMENT
Consignes de sécurité importantes
1. Nettoyez les joints dʼétanchéité de la porte
à lʼaide dʼun linge humide.
Vérifiez si lʼappareil ne présente pas de
défaut au niveau des joints dʼétanchéité. Si
cʼest le cas, ne lʼutilisez plus avant que
ceux-ci aient été réparés par un technicien
agréé par le fabricant.
2. Ne tentez jamais de modifier, dʼajuster ou
de réparer la porte, le boîtier du panneau
de commandes, les commutateurs de verrouillage de sécurité ou tout autre élément
du four. Ne retirez pas le capot du four, car
il sert de protection contre les micro-ondes
émises par le four.
Confiez exclusivement les réparations à du
personnel qualifié.
3. Nʼutilisez pas lʼappareil si la PRISE ou le
CORDON DʼALIMENTATION est endommagé, sʼil ne fonctionne pas correctement,
sʼil est abîmé ou sʼil est tombé. Il est dangereux de confier la réparation de lʼappareil à
une personne autre quʼun technicien formé
par le fabricant.
4. Si le cordon d'alimentation est endommagé,
il doit impérativement être remplacé par le
fabricant ou un technicien formé par le
fabricant.
5. Il ne faut laisser les enfants utiliser le four
quʼà la seule condition quʼils en connaissent
le fonctionnement et soient à même de
comprendre les dangers dʼune utilisation
inappropriée.
6. Les aliments et les liquides ne doivent pas
être chauffés dans des récipients fermés
hermétiquement car ceux-ci risquent dʼexploser.
7. Ce four ne sera pas utilisé par des person-
nes (y compris des enfants) dont les capacités sensorielles ou mentales sont réduites,
ou bien qui nʼont pas lʼexpérience ni les
connaissances requises, à moins dʼêtre
surveillées par une personne chargée de
leur sécurité ou dʼavoir reçu de cette personne les instructions nécessaires pour
lʼutilisation de lʼappareil.
Attention : Surfaces brûlantes
Page 85

Fr-3
Français
Consignes de sécurité
Utilisation du four
1. Utilisez le four exclusivement à des fins
culinaires. Ce four est spécialement conçu
pour chauffer ou cuire des aliments. Ne
lʼutilisez pas pour réchauffer des produits
chimiques ou tout autre produit non alimentaire.
2. Vérifiez si les ustensiles et les plats utilisés
conviennent aux fours à micro-ondes.
3. Ne tentez pas de sécher des journaux, des
vêtements ou tout autre matériau dans
votre four à micro-ondes, car ceux-ci pourraient sʼenflammer.
4. Ne placez dans le four aucun objet autre
que ses accessoires et ce même si vous
ne lʼutilisez pas, car celui-ci pourrait être
fortuitement mis en route.
5. Nʼutilisez jamais le four en mode MICRO-
ONDES ou COMBINE SANS Y PLACER
PREALABLEMENT DES ALIMENTS.
Sinon vous risquez dʼendommager lʼappareil.
6. En cas de début dʼincendie à lʼintérieur du
four, appuyer sur la TOUCHE DʼARRÊT/
ANNULATION et maintenir la porte du four
fermée. Débrancher le cordon dʼalimentation ou couper lʼalimentation au niveau du
fusible ou du disjoncteur.
Utilisation du gril
1. Les parois extérieures du four, les ouver-
tures dʼaération et la porte du four
sʼéchauffent lorsque vous utilisez les
modes COMBINE et GRIL. Prenez garde
de ne pas vous brûler en ouvrant et en
refermant la porte ou en manipulant les aliments et les accessoires.
2. Lors de l'utilisation des modes COMBINE
et GRIL , la résistance située dans la voûte
du four est brûlante. Prenez garde de ne
pas toucher cette résistance.
Note : lors de l'utilisation de ces modes,
les accessoires du four seront également très chauds.
Les parties accessibles du four pouvant
devenir très chaudes lors de l'utilisation du
Gril ou du Combiné, il est recommandé
d'éloigner les jeunes enfants et de ne laisser les plus grands se servir du four que
sous la supervision d'un adulte.
3. MISE EN GARDE : si l'appareil fonctionne
en mode Combiné ou Gril, il est recommandé que les enfants n'utilisent le four
que sous la surveillance d'adultes en raison des températures générées.
Lampe du four
Si vous devez remplacer la lampe du four,
adressez-vous à votre revendeur.
Accessoires
Le four est fourni avec toute une série dʼaccessoires. Utilisez-les toujours conformément aux
instructions.
Plateau tournant en verre
1. Utilisez le four uniquement si lʼanneau à rou-
lettes et le plateau tournant en verre sont en
place.
2. Nʼutilisez jamais un autre plateau tournant
en verre que celui spécialement conçu pour
votre four.
3. Si le plateau tournant en verre est chaud,
attendez quʼil refroidisse pour le nettoyer ou
le plonger dans lʼeau.
4. Le plateau tournant en verre peut pivoter
dans les deux sens.
5. Si les aliments ou le plat disposés sur le pla-
teau tournant en verre touchent les parois
du four et lʼempêchent de tourner, celui-ci
pivote automatiquement en sens inverse.
Cʼest normal.
6. Ne cuisez pas dʼaliments à même le plateau
tournant en verre.
Anneau à roulettes
1. Nettoyez régulièrement l'anneau à roulettes
et la sole du four afin de réduire les nuisances dues aux bruits ainsi que lʼaccumulation de particules de nourriture.
2. Utilisez toujours l'anneau à roulettes avec le
plateau tournant en verre pour la cuisson
des aliments.
Trépied métallique
1. Le trépied métallique facilite la coloration des
petits plats et favorise la circulation de la
chaleur.
2. En mode COMBINE ou MICRO-ONDES, ne
mettez jamais de contenant métallique en
contact direct avec le trépied métallique.
3. Nʻutilisez pas le trépied métallique en mode
MICRO-ONDES uniquement.
Plat Panacrunch- Voir page Fr-17
Page 86

Fr-4
Informations importantes
1. Temps de cuisson
• Ils dépendent des conditions, de la température, de la quantité de nourriture ainsi
que du type de récipient utilisé.
• Commencez toujours par le temps de cuisson minimum: si un plat nʼest pas assez
cuit, vous pourrez toujours le remettre dans
le four pour terminer la cuisson.
Note: Il vaut mieux éviter la surcuisson.
Les aliments nʼattachent pas mais peuvent brûler, se dessécher et même dans
des cas extrêmes, prendre feu et
endommager votre four.
2.
Petites quantités de nourriture
• Si vous cuisez trop longtemps de petites
quantités de nourriture ou des aliments peu
riches en eau, ceux-ci peuvent se dessécher, voire brûler ou même prendre feu. Si
des aliments prennent feu, maintenez la
porte fermée, arrêtez le four et débranchez
le cordon dʼalimentation.
3.
Œufs
• Ne cherchez pas à cuire des œufs coques
ou des œufs durs dans votre four à microondes. Ils risquent dʼexploser sous lʼeffet
de la pression, que ce soit pendant ou
même après la cuisson.
4)
Percer
• Les aliments à peau ou enveloppe imperméable tels que les pommes de terre, les
jaunes dʼœuf et les saucisses doivent être
piqués avant dʼêtre cuits dans le four
micro-ondes afin dʼéviter quʼils nʼéclatent.
5.
Thermomètre à viande
• Si vous employez un thermomètre à viande
pour vérifier la température de cuisson des
rôtis et des volailles , ne l'utilisez qu'une
fois ces derniers sortis du four.
6.
Liquides
• Si on chauffe un liquide épais qui nʼa pas
été remué, il risque de déborder et dʼoccasionner des projections brûlantes pendant
et après le réchauffage. Pour éviter cet
inconvénient, respectez les règles suivantes:
a) Evitez d'utiliser des récipients à bords
droits et/ou goulot étroit.
b) Ne surchauffez pas les liquides.
c) Remuez le liquide avant de le mettre dans
le four et à mi-cuisson.
d) Une fois le liquide réchauffé, laissez-le
reposer un court instant dans le four, puis
mélangez-le de nouveau avant de retirer
précautionneusement le récipient du four.
7.
Papier/Plastique
• Si vous réchauffez des aliments dans des
barquettes en plastique ou en papier,
surveillez régulièrement la cuisson, car ces
matériaux ont tendance à sʼenflammer en
cas de surchauffe.
• Nʼutilisez aucun papier recyclé (par
exemple du papier essuie-tout), sauf sʼil est
stipulé quʼil convient aux fours à micro-
ondes. En effet, les papiers recyclés
contiennent des impuretés qui peuvent pro-
voquer des étincelles ou sʼenflammer en
cours de cuisson.
• Avant de placer un sac dans le four, retirez
les liens métalliques de fermeture.
8.
Ustensiles/Papier aluminium
• Ne réchauffez pas des canettes ou des
bouteilles fermées, car celles-ci pourraient
exploser.
• Evitez dʼutiliser des récipients en métal ou
avec des dorures dans votre four à micro-
ondes, car ceux-ci provoqueraient des étin-
celles.
• Si vous utilisez du papier aluminium ou une
barquette métallique, la distance entre ces
matériaux et les parois du four doit être de
2 cm minimum afin dʼéviter les étincelles.
9.
Biberons et aliments pour bébés
• Enlevez toujours le capuchon, la tétine ou
le couvercle des biberons ou des petits
pots pour bébés avant de les placer dans
le four.
• Mélangez ou agitez le contenu des bibe-
rons et des petits pots.
• Vérifiez toujours la température des ali-
ments avant de les proposer à lʼenfant afin
dʼéviter quʼil se brûle.
Page 87

Fr-5
Français
1. Touche dʼouverture de la porte:
Presser pour ouvrir le four. Si on ouvre la porte du four pendant quʼil est en marche, il sʼarrête de fonctionner sans toutefois que les instructions de programmation ne soient annulées. La cuisson reprendra sitôt la porte fermée et la touche Marche pressée.
2. Fenêtre du four
3. Système de verrouillage de sécurité de la porte
4. Ouvertures dʼaération du four
5. Panneau de commandes
6. Plateau tournant en verre
7. Anneau à roulettes
8. Ventilation externe du four
9. Trépied métallique
10. Plat Panacrunch
11. Poignée
12. Cordon d'alimentation
13. Etiquette d'avertissement (surface brûlante)
Schéma descriptif
[1]
[2]
[3]
[4]
[5]
[7]
[9]
[6]
[10]
[11]
[8]
[12]
[13]
Page 88

Fr-6
(1) Fenêtre dʼaffichage
(2) Touche automatique de cuisson/
réchauffage en micro-ondes selon
le poids
(3) Touche automatique de cuisson/
réchauffage en combiné selon le
poids
(4) Bouton de décongélation automa-
tique en fonction du poids.
(5) Sélecteur Durée/Poids
(6) Touche de puissance micro-ondes
(7) Touche du gril
(8) Touche de cuisson combinée
(9) Touche Minuteur/départ différé
(10) Touche horloge
(11) Touche arrêt/annulation:
Avant la mise en marche: une pres-
sion suffit à effacer vos instructions.
Pendant le fonctionnement, 1 pres-
sion stoppe momentanément la cuis-
son, une 2
ème
pression efface définitivement vos instructions et lʼheure sʼaffiche de nouveau.
(12) Touche marche
Les panneaux de commandes
*
Le design du panneau de commandes de
votre four peut différer légèrement de ceux
illustrés ci-contre. Les fonctions sont néanmoins identiques.
Bips sonores :
Lorsquʼon appuie sur une touche pour transmettre une instruction au four, un bip sonore est
émis si lʼinstruction est acceptée, cʼest à dire si cette instruction est conforme au mode de fonctionnement du four. Aucun bip ne sera émis si lʼinstruction est refusée. À la fin d'une cuisson, 5
bips sonores sont émis.
REMARQUE :
Si un programme est choisi et que la touche Marche n'est pas pressée, après 6 minutes, le four
annulera automatiquement l'opération. La fenêtre affichera de nouveau l'heure.
NN-GD379 / NN-GD369 / NN-GD359*
(5)
(1)
(2)
(3)
(4)
(6)
(7)
(8)
(9)
(10)
(12)
(11)
Ce four est équipé dʼune fonction dʼéconomie
dʼénergie.
N.B. :
1. Lorsquʼil est en mode veille, la luminosité
de lʼaffichage sera réduite.
2. Le four est en mode veille par défaut dès
son branchement et sitôt une program
mation terminée.
Page 89

Fr-7
Français
Affichage de lʼheure
Notes
1. Pour remettre le four à lʼheure, répétez les étapes 1 à 3 ci-dessus.
2. Après une coupure de courant, même brève, il faudra remettre votre four à lʼheure.
3. Ce four a une horloge de 24 H.
Ce système rend les commandes du four inutilisables, à lʼexception de la porte qui peut toujours
être ouverte. Vous pouvez activer le verrouillage de sécurité enfant lorsque lʼheure ou le deuxpoints (:) est affiché.
Pour lʼactiver:
Pour le désactiver:
• Appuyez trois fois sur la touche Marche.
Lʼheure disparaît de lʼaffichage (mais nʼest
cependant pas effacée) et “_ _ _ _” apparaît.
• Appuyez trois fois sur la touche
Arrêt/annulation.
Lʼheure apparaît de nouveau sur lʼaffichage.
Verrouillage de sécurité enfant
• Pressez une fois la
touche Horloge.
Le deux-points
(:) commence à clignoter.
• Pressez la touche
Horloge. Le deux-points
(:) cesse de clignoter et
l'heure est mémorisée.
• Affichez lʼheure en tournant le
sélecteur Durée/Poids. Lʼheure
apparaît sur lʼaffichage tandis que le
deux-points (:) clignote.
Lorsque vous branchez le four, “88:88” apparaît dans le fenêtre dʼaffichage.
NOTE : Pour activer le verrouillage de sécurité enfant, appuyez 3 fois sur la touche « Start » en
lʼespace de 10 secondes.
Page 90

Fr-8
100 Watts
850 Watts
270 Watts
600 Watts
440 Watts
250 Watts
• Pressez la touche de puissance
micro-ondes jusquʼà ce que la
puissance désirée sʼaffiche dans la
fenêtre. Lʼindicateur micro-ondes
est éclairé.
• Choisissez la durée de cuisson
à l'aide du sélecteur de durée
(Puissance Fort : jusqu'à 30
min et jusqu'à 90 min pour les
autres puissances).
• Pressez Marche. La
cuisson démarre et le
décompte de la durée
s'affiche dans la
fenêtre.
ATTENTION: si vous affichez directement une durée sans presser au
prélable la touche de micro-ondes, la puissance FORT est automatiquement sélectionnée.
Le plateau tournant doit être en place avant toute utilisation du four.
Cuisson en plusieurs étapes
Votre four vous offre la possibilité de cuire en 3 étapes. Il vous suffit de programmer les étapes
désirées et le four passera automatiquement à une seconde étape une fois le premier temps de
cuisson écoulé (répéter les étapes 1 et 2 ci-dessus AVANT de presser la Touche Marche).
Note
Une cuisson/décongélation automatique selon le poids peut être programmée, mais en première
étape uniquement.
1 pression
2 pressions
3 pressions
4 pressions
5 pressions
6 pressions
Cuisson et décongélation en micro-ondes
Puissance en Watts
Fort
Décongélation
Moyen
Doux
Mijotage
Maintien
Page 91

Fr-9
Français
Mise en marche différée
La touche Minuteur vous permet dʼ'utiliser votre four comme une minuterie ou de programmer un
temps de repos après une cuisson ou une décongélation.
La touche de Minuteur vous permet dʼutiliser la fonction Mise en marche différée.
• Pressez la
touche
Minuteur
• Pressez
Marche
par ex.
• Choisir la
cuisson désirée et sa durée.
• Pressez
Marche.
ex.
Puissance Fort (850 W): 4 min temps de repos: 5 min Puissance Fort (850 W) : 2 min
Fonction Minuteur
Une pression
Une pression
• A lʼaide du sélecteur
de durée choisir la
durée du retardement
(jusquʼá 9 heures).
• Programmer la cuisson
désirée et sa durée.
2. Si la durée du retardement excède 1 heure, le décompte se fera en minutes. Si elle est
inférieure à 1 heure, le décompte se fera en secondes.
3. Il nʼest pas possible de différer la mise en Marche dʼun programme Automatique.
Retardement: 1 heure
REMARQUES:
1. Il est possible de programmer une cuisson en 2 étapes après une mise en Marche différée
par ex.
Puissance Fort (850 W): 10 min
Puissance 250 W
(Mijotage): 20 min
• Presser la
touche
Minuteur
• Choisir le temps de repos
désiré à lʼaide du
sélecteur de durée.
(jusqu'à 9 heures)
REMARQUES:
1. Vous pouvez enchaîner jusquʼa 3 étapes de cuisson, le minuteur ou
temps de repos comptant pour 1 étape.
2. Si la porte du four est ouverte pendant le décompte de la minuterie, ce décompte continue de
défiler dans lʼafficheur.
3. Cette commande peut être utilisée comme une simple minuterie: pressez la touche Minuteur,
choisissez la durée puis pressez Marche.
Page 92

Fr-10
Contrôlez à plusieurs reprises la décongélation
de lʼaliment, même lorsque vous utilisez les
touches Automatiques. Respectez un temps
de repos.
Temps de repos
Les petites pièces peuvent être cuites presque
immédiatement après la décongélation. Il est
normal que les grosses pièces soient encore
congelées au centre. Il faut leur laisser au
minimum une heure de repos avant de les
cuire. Pendant ce temps de repos, la température s'homogénéise et la décongélation se
poursuit par conduction. Note: Si l'aliment n'est
pas destiné à être cuit immédiatement, le
conserver au réfrigérateur. Ne jamais recongeler un aliment décongelé sans le cuire au
préalable.
Les rôtis avec os et les volailles
entières
Il est préférable de placer les rôtis sur une
soucoupe retournée ou bien une passoire en
plastique afin qu'ils ne trempent pas dans le
liquide d'exsudation. Il est indispensable de
protéger les parties fines ou protubérantes de
ces aliments avec de petits morceaux de
papier aluminium afin d'éviter un début de
cuisson de ces parties. Il n'est pas dangereux
d'utiliser des petits morceaux de papier aluminium dans votre four, à condition qu'ils ne
touchent pas les parois du four.
La viande hachée ou en cubes, les
petits crustacés
Les parties extérieures de ces aliments décongelant rapidement, il faut les séparer, briser les
blocs en morceaux à plusieurs reprises pendant la décongélation et les retirer au fur et à
mesure qu'ils sont décongelés.
Petites pièces
Les côtelettes et les morceaux de poulet doivent être séparés sitôt que possible pour faciliter une décongélation homogène. Les parties
grasses et les extrémités décongèlent plus
rapidement. Placez-les vers le centre du plateau ou protégez-les.
Le pain
Les boules et les miches de pain nécessitent
un temps de repos pour permettre une décongélation à coeur. Ce temps de repos sera plus
court si le pain est coupé en tranches ou
même en 2 morceaux.
Conseils pour la décongélation
Conseils pour la décongélation
Page 93

Fr-11
Français
Le mode gril
Notes
1. Placez lʼaliment sur le trépied lui-même posé sur le plateau tournant. Posez dessous un
récipient résistant à la chaleur pour recueillir les graisses.
2. Ne pas couvrir les aliments cuits au gril.
3. NE PAS chercher à préchauffer le gril.
4. Il nʼest pas possible dʼutiliser le gril avec la porte ouverte.
5. Il nʼy a pas de micro-ondes émises en mode GRIL.
6. La plupart des aliments nécessitent dʼêtre retournés à mi-cuisson. Utilisez un gant de protection
et PRENEZ GARDE de ne pas vous brûler en sortant le trépied.
7. Une fois lʼaliment retourné, remettez le trépied dans le four et fermez la porte. Il vous faudra
presser la Touche Marche pour poursuivre la cuisson. Le décompte de celle-ci reprendra. Vous
pouvez à tout moment ouvrir la porte et contrôler la progression de la cuisson.
8. Le gril rougeoie par intermittences; ceci est normal. Pensez à nettoyer le four après toute
grillade de viande ou de poisson et avant de réutiliser les modes combiné ou micro-ondes.
• Pressez la touche du gril afin
de choisir la puissance du gril.
1 pression gril 1 (fort)
2 pressions gril 2 (moyen)
3 pressions gril 3 (faible)
Lʼindicateur du gril sʼéclaire et la
puissance du gril sʼaffiche dans
la fenêtre.
• Pressez Marche. La
durée commence à
décroître dans
lʼ affichage.
• Réglez la durée de
cuisson à lʼaide du
sélecteur Durée/Poids
(90 minutes maximum).
ATTENTION: Le trépied métallique doit toujours être utilisé posé sur le plateau tournant.
Retirez le trépied du four en tenant fermement le trépied et le plat. Prenez garde de ne pas
vous brûler. Ne touchez jamais la fenêtre transparente du four, ni les parties métalliques
de la porte ou de la cavité lors des manipulations dʼaliments, ces parties pouvant être
très chaudes.
Page 94

Fr-12
Le mode combiné
• Pressez la touche de cuisson
combinée afin de choisir la
puissance. Lʼindicateur de
cuisson combinée sʼéclaire et la
puissance cuisson combinée (1,
2 ou 3) sʼaffiche dans la fenêtre.
• Réglez la durée de
cuisson à lʼaide du
sélecteur Durée/Poids (90
minutes maximum).
• Pressez Marche.
Le décompte de la
durée s'affiche
dans la fenêtre.
Notes
1. Le trépied est conçu pour une utilisation en mode Gril ou Combiné. Ne jamais utiliser dʼautre
accessoire métallique que celui livré avec votre four. Placer sous lʼaliment un récipient résistant à la
chaleur pouvant recueillir les graisses.
2. Nʼutiliser le trépied que de la façon décrite. NE PAS lʼutiliser en mode Combiné manuel pour cuire ou
réchauffer une quantité inférieure à 200 g. Pour une petite quantité, utilisez plutôt le mode Gril ou le
mode Mico-ondes uniquement.
3. Ne jamais couvrir les aliments cuits en mode Combiné.
4. NE PAS chercher à préchauffer le gril en mode Combiné.
5 Des étincelles ou même un arc électrique peuvent survenir en cas de poids insuffisant, de trépied
endommagé ou si un récipient métallique est utilisé par erreur. Si vous voyez des étincelles de
lumière bleue dans votre four, arrêtez-le immédiatement.
6. Certains aliments (rôtis, gratins, volaille entière) sont trop volumineux pour être cuits sur le trépied. Il
importe de les disposer dans des récipients résistants à la chaleur et transparents aux ondes que
vous poserez directement sur le plateau tournant.
7. NE PAS utiliser de récipients en plastique spécial pour micro-ondes en mode Combiné (à moins
quʼils ne soient conçus pour le mode Combiné). Les plats doivent pouvoir résister à la chaleur émise
par la résistance du gril.
8. NE PAS utiliser vos plats en aluminium ou métalliques, même émaillés, les micro-ondes ne pouvant
pénétrer les aliments de façon homogène.
ATTENTION: Le trépied doit toujours être utilisé posé sur le plateau tournant. Retirez le
trépied du four en tenant fermement le trépied et le plat. Prenez garde de ne pas vous
brûler. Ne touchez jamais la fenêtre transparente du four, ni les parties métalliques de la
porte ou de la cavité lors des manipulations dʼaliments, ces parties pouvant être très
chaudes.
Lors dʼune cuisson combinée, les micro-ondes cuisent rapidement les aliments pendant que le gril
leur donne une belle couleur dorée et appétissante.
1 pression combiné 1 440W 1100W
2 pressions combiné 2 250W 1100W
3 pressions combiné 3 440W 950W
Pression Puissance Micro-ondes Gril
Page 95

Fr-13
Français
• Pressez la touche
Marche. Pensez à
retourner ou remuer
lʼaliment pendant la
décongélation.
• Pressez la touche
marche.
Les cuissons / réchauffages automatiques
selon le poids
Ces touches vous permettent de cuire ou réchauffer en affichant simplement le poids de lʼaliment.
• Sélectionnez la catégorie
désirée. Les indicateurs auto
et le numéro du programme
automatique sʼaffiche sur la
fenêtre.
Cette fonction vous permet de décongeler vos aliments surgelés en affichant simplement leur poids.
• Affichez le poids de l'aliment à
l'aide du sélecteur Durée/Poids.
Une rotation lente affichera le poids
par pas de 10 g, une rotation rapide,
par pas de 100 g.
• Choisir le programme désiré en
pressant
1 fois pour les petites pièces
2 fois pour les grosses pièces
Le numéro du programme automatique sʼaffiche sur la fenêtre. Les
indicateurs auto et décongélation
sʼéclairent.
Par exemple
La décongélation automatique selon le
poids
100 - 1000 g
Petites pièces de viande, de volaille ou de poisson, saucisses, steaks, côtelettes, viande hachée. (pesant 100 à
400 g chacune). Retournez/remuez au bip sonore.
1 Petites
pièces
400 - 2000 g
Grosse pièces de viande ou de poisson, rôti, volaille entière. Retournez au bip sonore.
2 Grosses
pièces
IMPORTANT voir page Fr-9 pour les conseils de décongélation.
• Affichez le poids de
l'aliment à décongeler à
l'aide du sélecteur
Durée/Poids. Une rotation
lente affichera le poids par pas
de 10 g, une rotation rapide,
par pas de 100 g.
Catégorie
Poids min./max.
Utilisation
Page 96

Fr-14
RÉCHAUFFER
UN PLAT
CUISINÉ
Les cuissons/réchauffages automatiques
selon le poids
150 - 1200 g
Pour réchauffer un plat cuisiné ou
un plat en sauce frais. Tous les
aliments doivent être à température
ambiante ou réfrigérée (env. +4°C à
+ 20°C). Remuer au bip sonore.
Laisser reposer quelques minutes
avant de consommer. Assurez-vous
que les aliments soient suffisamment
chauds avant de servir. Les gros
morceaux épais de viande ou de
poisson avec peu ou pas de sauce
peuvent nécessiter un réchauffage
supplémentaire.
1 pression
2 pressions
RÉCHAUFFER
TASSE/BOL
200 - 1100 g
Pour cuire des légumes frais.
Placez les légumes préparés dans
un récipient de taille adéquate.
Ajoutez 1 c. à s. d'eau pour 100 g de
légumes. Couvrir avec un couvercle
ou du film étirable percé. Retournez /
remuez au bip sonore.
3 pressions
CUISSON DE
LÉGUMES FRAIS
1 tasse - 150 g
1 bol - 300 g
2 bols - 600 g
200 - 900 g
Pour cuire du poisson frais.
Placez le poisson dans un récipient
de taille adéquate et ajoutez 2 c. à s.
(30 ml) dʼeau. Couvrir avec un couvercle ou du film étirable percé.
4 pressions
CUISSON DU
POISSON FRAIS
Pour réchauffer 1 tasse (150 g) , 1
bol (300 g) ou 2 bols (600 g) d'une
boisson chaude (par ex. thé, café,
lait, soupe). La température finale
variera selon la températue initiale
(ambiante ou réfrigérée).
Penser à remuer avant et en fin de
réchauffage.
Catégorie
Poids
recommandé
Accessoire
Utilisation
Page 97

Fr-15
Français
1. Sélectionnez le
programme désiré
et placez le plat
Panacrunch dans
le four, directement sur le plateau en verre.
2. Pressez sur la
touche Marche
pour préchauffer le
plat Panacrunch.
3. Une fois le pré-
chauffage
terminé, le bip
sonore retentit.
Posez les aliments
sur le plat, affichez
le poids.
4. Pressez sur la
touche Marche.
Les cuissons/réchauffages en Combiné
selon le poids
150 - 480 g
Pour réchauffer des pizzas déjà
cuites et surgelées.
Déballez entièrement et posez la
pizza sur le plat Panacrunch préchauffé.
Pour réchauffer des pizzas déjà
cuites et réfrigérées.
Déballez entièrement et posez la
pizza sur le plat Panacrunch préchauffé.
Pour réchauffer les quiches déjà
cuites et réfrigérées.
Déballez entièrement et posez la
quiche sur le plat Panacrunch préchauffé.
1 pression
2 pressions
3 pressions
PIZZA SURGELÉE
PIZZA
FRAÎCHE
QUICHE
FRAÎCHE
Pour réchauffer les frites à four
surgelées.
Répartissez les frites sur le plat
Panacrunch préchauffé. Pour un résultat optimal, étalez les frites en une
seule couche et remuez au bip sonore.
4 Pressions
FRITES À FOUR
SURGELÉES
Les programmes Panacrunch
150 - 480 g
130 - 500 g
150 - 400 g
Catégorie
Poids
recommandé
Accessoire
Utilisation
Page 98

Fr-16
300 - 1000 g
150 - 1000 g
Pour réchauffer et dorer un gratin
surgelé. Cet programme convient aux
lasagnes, aux gratins de pâtes, de
pommes de terre et de légumes ainsi
qu'aux cannellonis. Déballez
entièrement et placez le gratin dans
un plat allant au four directement sur
le plateau en verre.
Pour rôtir des cuisses, des ailes
ou des pilons de poulet frais.
Placez les morceaux de poulet dans
un plat allant au four sur le trépied
métallique, sur le plateau en verre.
Retournez au bip sonore.
5 pressions
6 pressions
GRATIN
SURGELÉ
CUISSON DES
MORCEAUX DE
POULET FRAIS
70 - 400 g
Pour décongeler du pain en
morceaux et des viennoiseries
déjà cuites et surgelées. Déballez
entièrement et disposez sur le trépied
sur le plateau en verre. Retournez au
bip sonore.
7 Pressions
PAIN/
CROISSANTS
Les cuissons/réchauffages en Combiné
selon le poids
• Pressez la touche
marche.
Ces touches vous permettent de cuire ou réchauffer en affichant simplement le poids de lʼaliment.
• Sélectionnez la catégorie
désirée. Les indicateurs auto
et le numéro du programme
automatique sʼaffiche sur la
fenêtre.
• Affichez le poids de l'aliment à
l'aide du sélecteur Durée/Poids.
Une rotation lente affichera le poids
par pas de 10 g, une rotation rapide,
par pas de 100 g.
Par exemple
Catégorie
Poids
recommandé
Accessoire
Utilisation
Page 99

Fr-17
Français
Le Plat Panacrunch
ENTRETIEN DU plat Panacrunch
• Ne pas utiliser d'ustensile tranchant, car cela
endommagerait le revêtement antiadhésif du
plat Panacrunch. Ne pas faire tomber
le plat Panacrunch au risque de le déformer.
• Après utilisation, nettoyez le plat Panacrunch
avec de lʼeau chaude et du savon, puis
rincez-le à lʼeau chaude. Nʼutilisez pas
d'éponge abrasive ou de tampon à récurer,
car cela endommagerait la surface du plat.
• Le plat Panacrunch peut être lavé dans un
lave-vaisselle
REMARQUES :
1. Ne préchauffez pas le plat Panacrunch
pendant plus de 8 minutes.
2. Placez toujours le plat Panacrunch au
centre du plateau tournant en verre et
assurez-vous quʼil ne touche pas les parois
de la cavité du four, car cela risquerait de
provoquer des étincelles susceptibles dʼendommager la cavité.
3. Utilisez toujours le plat Panacrunch avec le
plateau tournant en verre, et non sur le trépied métallique.
4. Utilisez toujours des gants de protection ou
la poignée amovible lorsque vous manipu
lez le plat Panacrunch quand il est chaud.
5. Avant de commencer la cuisson, assurez-
vous que vous avez bien retiré tous les
emballages de lʼaliment.
6. Ne posez jamais dʼustensile sensible à la
chaleur sur le plat Panacrunch, car il risquerait de brûler.
7. Vous pouvez utiliser le plat Panacrunch
dans un four traditionnel.
8. Pour un résultat optimal, n'utilisez le
plat Panacrunch qu'en mode combiné
Micro-ondes + gril.
A quoi sert un plat Panacrunch de
Panasonic ?
Certains aliments tels que les pizzas, les tartes
ou les quiches ne se réchauffent pas aussi
bien dans un four micro-ondes que dans un
four conventionnel. Trop souvent le dessous
des aliments reste humide et la pâte molle.
L'accessoire "Panacrunch" remédie à cet
inconvénient en rendant plus croustillants et
dorés les fonds de pâte de ces aliments. En
effet, la base du plat absorbe les micro-ondes
et les restitue sous forme de chaleur. Ainsi l'aliment bénéficie d'un triple mode de cuisson :
direct par les micro-ondes, par conduction du
plat vers la base de l'aliment et le gril colore le
dessus. Le revêtement anti-adhésif optimise
cette accumulation de chaleur.
UTILISATION DU plat Panacrunch
(utilisation manuelle)
• Pour un résultat optimal, préchauffez le
plat Panacrunch avant de lʼutiliser. Posezle directement sur le plateau tournant en
verre et préchauffez-le en mode combiné
N°= 1 pendant 3 minutes. Pour faciliter la
coloration des aliments tels que les saucisses et les steacks hachés, versez un peu
dʼhuile sur le plat avant de le préchauffer.
• Retirez le plat Panacrunch du four et posez
les aliments dessus. Comme le plat
Panacrunch est extrêmement chaud,
utilisez la poignée amovible ou des gants
de protection. Pour un résultat optimal, il
est important de poser les aliments sur le
plat immédiatement après lʼavoir préchauffé. Un délai nuirait immanquablement aux
performances.
Page 100

Fr-18
Q.: Des ronflements et des
cliquetis sont émis par
le four lorsque je cuisine
en mode combiné. Dʼoù
cela provient-il?
Questions et réponses
R.: Si le four ne fonctionne pas, vérifiez les points suivants:
1. Le four est-il correctement branché ? Débranchez le
cordon dʼalimentation du four, attendez 10 secondes,
puis rebranchez-le.
2. Vérifiez le disjoncteur et le fusible. Enclenchez de nou-
veau le disjoncteur ou remplacez le fusible si nécessaire.
3. Si tout est normal au niveau du disjoncteur ou du
fusible, vérifiez le bon fonctionnement de la prise
murale en y branchant un autre appareil électrique. Si
cet appareil fonctionne, cela signifie que le problème
se situe au niveau du four à micro-ondes. Sʼil ne fonctionne pas, cela signifie que la prise murale est défectueuse. Si le four à micro-ondes est défectueux,
contactez un service dʼentretien et de réparation agréé.
R.: Des interférences radio ou TV peuvent se produire si
un four à micro-ondes fonctionne à proximité. Ce même
type dʼinterférence se produit lorsquʼon utilise de petits
appareils électriques tels quʼun mixeur, un aspirateur, un
sèche-cheveux, etc. La présence dʼinterférences ne
signifie donc pas que le four à micro-ondes est défectueux.
R.: Le four est conçu pour refuser une programmation non
conforme. Par exemple, le four nʼacceptera pas la
programmation dʼune quatrième étape de cuisson.
R.: La chaleur dégagée par la cuisson des aliments réchauf-
fe lʼair contenu dans la cavité du four. Cet air chaud est
évacué du four par ventilation. Il nʼy a pas de microondes dans ce dégagement dʼair. Nʼobstruez jamais ces
aérations en cours de cuisson.
R.: Vous le pouvez uniquement si vous cuisinez en mode
GRIL. Le métal contenu dans certains thermomètres peut
provoquer des étincelles dans votre four. Ne lʼutilisez pas
dans les modes de cuisson MICRO-ONDES et COMBINE.
R.: Ces bruits, qui surviennent lors du passage du mode
MICRO-ONDES au mode GRIL, sont tout à fait normaux.
Q.: Pourquoi mon four ne
fonctionne-t-il pas?
Q.: Est-il normal que mon
four à micro-ondes produise des interférences
sur mon récepteur de
télévision?
Q.: Pourquoi le four refu-
se-tʼil mes instructions
de programmation?
Q.: Il arrive parfois que de
lʼair chaud se dégage
par les ouvertures dʼaé-
ration du four. Pourquoi?
Q.: Puis-je utiliser un ther-
momètre traditionnel
dans le four à microondes?
Q: Mon four arrête de cuire par
micro-ondes et « H97 » et «
H98 » sʼaffichent.
R.: Lʼaffichage indique un problème avec le système d'émis-
sion de micro-ondes. Veuillez contacter un centre de service après-vente autorisé.
 Loading...