

Page 1
Operating Instructions
Bedienungsanleitung
Microwave Oven/Grill Oven
Mikrowellengerät mit Grill
NN-CT569M
NN-CT559W
RRR
R
For domestic use only
Nur für den Privatgebrauch
Before operating this oven, please read these instructions carefully and keep for future reference.
Vor Gebrauch des Mikrowellengerätes bitte diese Bedienungsanleitung sorgfältig durchlesen und
aufbewahren.
Page 2

Your Panasonic oven uses the latest Inverter technology. This unique technology has been used
in microwave ovens in Japan for a long time. It allows significant improvements in your ovenʼs
cooking times. This system, which also reduces the number of components needed, makes the
oven lighter with a greater interior volume, without taking up any more of your work surface.
Operating instructions
Installation and connection . . . . . . . . . . . . . . . . . . . . . . . . . . . . . . . . .1-2
Safety Instructions . . . . . . . . . . . . . . . . . . . . . . . . . . . . . . . . . . . . . . . .2-3
Important Information . . . . . . . . . . . . . . . . . . . . . . . . . . . . . . . . . . . . . . . .4
Outline diagram . . . . . . . . . . . . . . . . . . . . . . . . . . . . . . . . . . . . . . . . . . . .5
Control panel . . . . . . . . . . . . . . . . . . . . . . . . . . . . . . . . . . . . . . . . . . . . . .6
Oven accessories . . . . . . . . . . . . . . . . . . . . . . . . . . . . . . . . . . . . . . . . . . .7
Cooking modes . . . . . . . . . . . . . . . . . . . . . . . . . . . . . . . . . . . . . . . . . . . .7
Controls and operation procedure . . . . . . . . . . . . . . . . . . . . . . . . . . . . . .8
Microwave cooking and defrost . . . . . . . . . . . . . . . . . . . . . . . . . . . . . . . .9
Grilling . . . . . . . . . . . . . . . . . . . . . . . . . . . . . . . . . . . . . . . . . . . . . . . . . .10
Cooking by convection . . . . . . . . . . . . . . . . . . . . . . . . . . . . . . . . . . . . . .11
Combination cooking . . . . . . . . . . . . . . . . . . . . . . . . . . . . . . . . . . . . . . .12
Auto Defrost . . . . . . . . . . . . . . . . . . . . . . . . . . . . . . . . . . . . . . . . . . . . . .13
Auto weight programs . . . . . . . . . . . . . . . . . . . . . . . . . . . . . . . . . . . .14-19
Delay start cooking . . . . . . . . . . . . . . . . . . . . . . . . . . . . . . . . . . . . . . . . .21
Stand time . . . . . . . . . . . . . . . . . . . . . . . . . . . . . . . . . . . . . . . . . . . . . . .21
Questions and answers . . . . . . . . . . . . . . . . . . . . . . . . . . . . . . . . . .22-23
Care of your oven . . . . . . . . . . . . . . . . . . . . . . . . . . . . . . . . . . . . . . . . . .24
Technical specifications . . . . . . . . . . . . . . . . . . . . . . . . . . . . . . . . . . . . .25
Cooking with your oven
Which containers to use? . . . . . . . . . . . . . . . . . . . . . . . . . . . . . . . . .26-27
How do microwaves work? . . . . . . . . . . . . . . . . . . . . . . . . . . . . . . . . . .28
How to cook with microwaves . . . . . . . . . . . . . . . . . . . . . . . . . . . . . .29-31
Choosing the right microwave cooking power . . . . . . . . . . . . . . . . . . . .32
Convection and Grill . . . . . . . . . . . . . . . . . . . . . . . . . . . . . . . . . . . . . . . .33
Combination cooking . . . . . . . . . . . . . . . . . . . . . . . . . . . . . . . . . . . . . . .34
Defrosting . . . . . . . . . . . . . . . . . . . . . . . . . . . . . . . . . . . . . . . . . . . . .35-38
Reheating . . . . . . . . . . . . . . . . . . . . . . . . . . . . . . . . . . . . . . . . . . . . .39-40
Reheating charts . . . . . . . . . . . . . . . . . . . . . . . . . . . . . . . . . . . . . . . .41-47
Tips for microwave cooking . . . . . . . . . . . . . . . . . . . . . . . . . . . . . . . . . .48
Recipes
Soups and Starters . . . . . . . . . . . . . . . . . . . . . . . . . . . . . . . . . . . . . .49-52
Vegetables and Starchy Food . . . . . . . . . . . . . . . . . . . . . . . . . . . . . .53-60
Meat and Poultry . . . . . . . . . . . . . . . . . . . . . . . . . . . . . . . . . . . . . . . .61-68
Fish . . . . . . . . . . . . . . . . . . . . . . . . . . . . . . . . . . . . . . . . . . . . . . . . . .69-74
Sauces . . . . . . . . . . . . . . . . . . . . . . . . . . . . . . . . . . . . . . . . . . . . . . .75-76
Desserts and Pastries . . . . . . . . . . . . . . . . . . . . . . . . . . . . . . . . . . . .77-85
Preserves and Sweets . . . . . . . . . . . . . . . . . . . . . . . . . . . . . . . . . . .85-86
List of Contents
Page 3

English
En-1
Installation and Connection
Examine your microwave oven
Unpack the oven, remove all packing material,
and examine the oven for any damage such
as dents, broken door latches or cracks in the
door. If you find any damage, notify your
dealer immediately. Do not install a damaged
microwave oven.
Earthing instructions
IMPORTANT: THIS UNIT HAS TO BE
PROPERLY EARTHED FOR PERSONAL
SAFETY.
If your AC outlet is not grounded, it is the
personal responsibility of the customer to have
it replaced with a properly grounded wall
socket.
Operation voltage
The voltage has to be the same as specified
on the label on the oven. If a higher voltage
than specified is used, it may cause a fire or
other damages.
Placement of the Oven
This oven is intended for counter-top use only.
It is not intended for built-in use or for use
inside a cupboard.
1. Place the oven on a flat and stable surface,
more than 85 cm above the floor.
2. When this oven is installed, it should be
easy to isolate the appliance from the
electricity supply by pulling out the plug or
operating a circuit breaker.
3. For proper operation, ensure a sufficient air
circulation for the oven.
Counter-top use:
a. Allow 15 cm of space on the top of the
oven, 10 cm at the back, 5 cm on one
side, and the other side must be opened
more than 40 cm.
b. If one side of the oven is placed flush to
a wall, the other side or top must not be
blocked.
Counter-top
Open
10cm
15cm
5cm
4. Do not place this oven near an electric or
gas cooker range.
5. The feet should not be removed.
6. This oven is only for household usage. Do
not use outdoors.
7. Avoid using the microwave oven in high
humidity.
8. The power cord should not touch the
outside of the oven. Keep the cord away
from hot surfaces. Do not let the cord
hang over the edge of a table or work top.
Do not immerse the cord, plug or oven in
water.
9. Do not block the air vents on the top and
back of the oven. If these openings are
blocked during operation the oven may
overheat. In this case the oven is
protected by a thermal safety device and
resumes operation only after cooling
down.
10. This appliance is not intended to be
operated by means of an external timer or
separate remote control system.
Page 4

En-2
Attention: Hot Surfaces
Installation and Connection
WARNING
1. The door seals and door seal areas should
be cleaned with a damp cloth.
The appliance should be inspected for
damage to the door seals and door seal
areas and if these areas are damaged the
appliance should not be operated until it
has been repaired by a service technician
trained by the manufacturer.
2. Do not attempt to tamper with or make any
adjustments or repairs to the door, control
panel housing, safety interlock switches or
any other part of the oven. Do not remove
the outer panel from the oven which gives
protection against exposure to microwave
energy. Repairs should only be done by
a qualified service person.
3. Do not operate this appliance if it has a
damaged CORD OR PLUG, if it is not
working properly, or if it has been damaged
or dropped. It is dangerous for anyone
other than a service technician trained by
the manufacturer to perform repair service.
4. If the supply cord of this appliance is
damaged, it must be replaced with the
special cord available from the
manufacturer.
5. Only allow children to use the oven without
supervision when adequate instructions
have been given so that the child is able to
use the oven in a safe way and
understands the hazards of improper use.
6. Liquids and foods must not be heated in
sealed containers since they are liable to
explode.
7. This oven is not intended for use by
persons (including children) with reduced
physical, sensory or mental capabilities, or
lack of experience and knowledge unless
they have been given supervision or
instruction concerning the use of the oven
by a person responsible for their safety.
Children should be supervised to ensure
they do not play with the oven.
Safety Instructions
Use of your oven
1. Do not use the oven for any reason other
than the preparation of food. This oven is
specifically designed to heat or cook food.
Do not use this oven to heat chemicals or
other non-food products.
2. Before use, check that utensils/containers
are suitable for use in microwave ovens.
3. Do not attempt to use this microwave oven
to dry newspaper, clothing or any other
materials. They may catch on fire.
4. When the oven is not being used, do not
store any objects other than oven
accessories inside the oven in case it is
accidentally turned on.
5. The appliance shall not be operated by
MICROWAVE or COMBINATION
WITHOUT FOOD IN THE OVEN.
Operation in this manner may damage the
appliance. Exception to this is point 1
under heater operation.
6. If smoke or a fire occurs in the oven, press
Stop/Cancel pad and leave the door closed
in order to stifle any flames. Disconnect the
power cord, or shut off power at the fuse or
the circuit breaker panel.
Page 5

English
En-3
Safety Instructions
Heater Operation
1. Before using CONVECTION,
COMBINATION or GRILL function for the
first time, wipe excessive oil off in the oven
cavity and operate the oven without food
and accessories on CONVECTION 250°C,
for 20 minutes. This will allow the oil that is
used for rust protection to be burned off.
This is the only time the oven is used
empty.
2. Exterior oven surfaces, including air vents
on the cabinet and the oven door will get
hot during CONVECTION, COMBINATION
and GRILLING, take care when opening or
closing the door and when inserting or
removing food and accessories.
3. The oven has two quartz heaters situated
in the top of the oven. After using the
CONVECTION, COMBINATION and GRILL
functions, care should be taken to avoid
touching the inside surfaces of the oven, as
these will be very hot.
N.B. After cooking by these modes, the
oven accessories will be very hot.
4. The accessible parts may become hot in
CONVECTION, COMBINATION and GRILL
use. Young children should be kept away
and children should only use the oven
under adult supervision due to the
temperatures generated.
Fan Motor Operation
While the oven is in Microwave/Heater
operation, the cooling fan always rotates to
cool the electric components. After the
completion of operation, the fan may continue
rotating for a while. This is perfectly normal,
and you can take out the food from the oven
while the fan is still in operation.
Oven Light
When it becomes necessary to replace the
oven light, please consult your dealer.
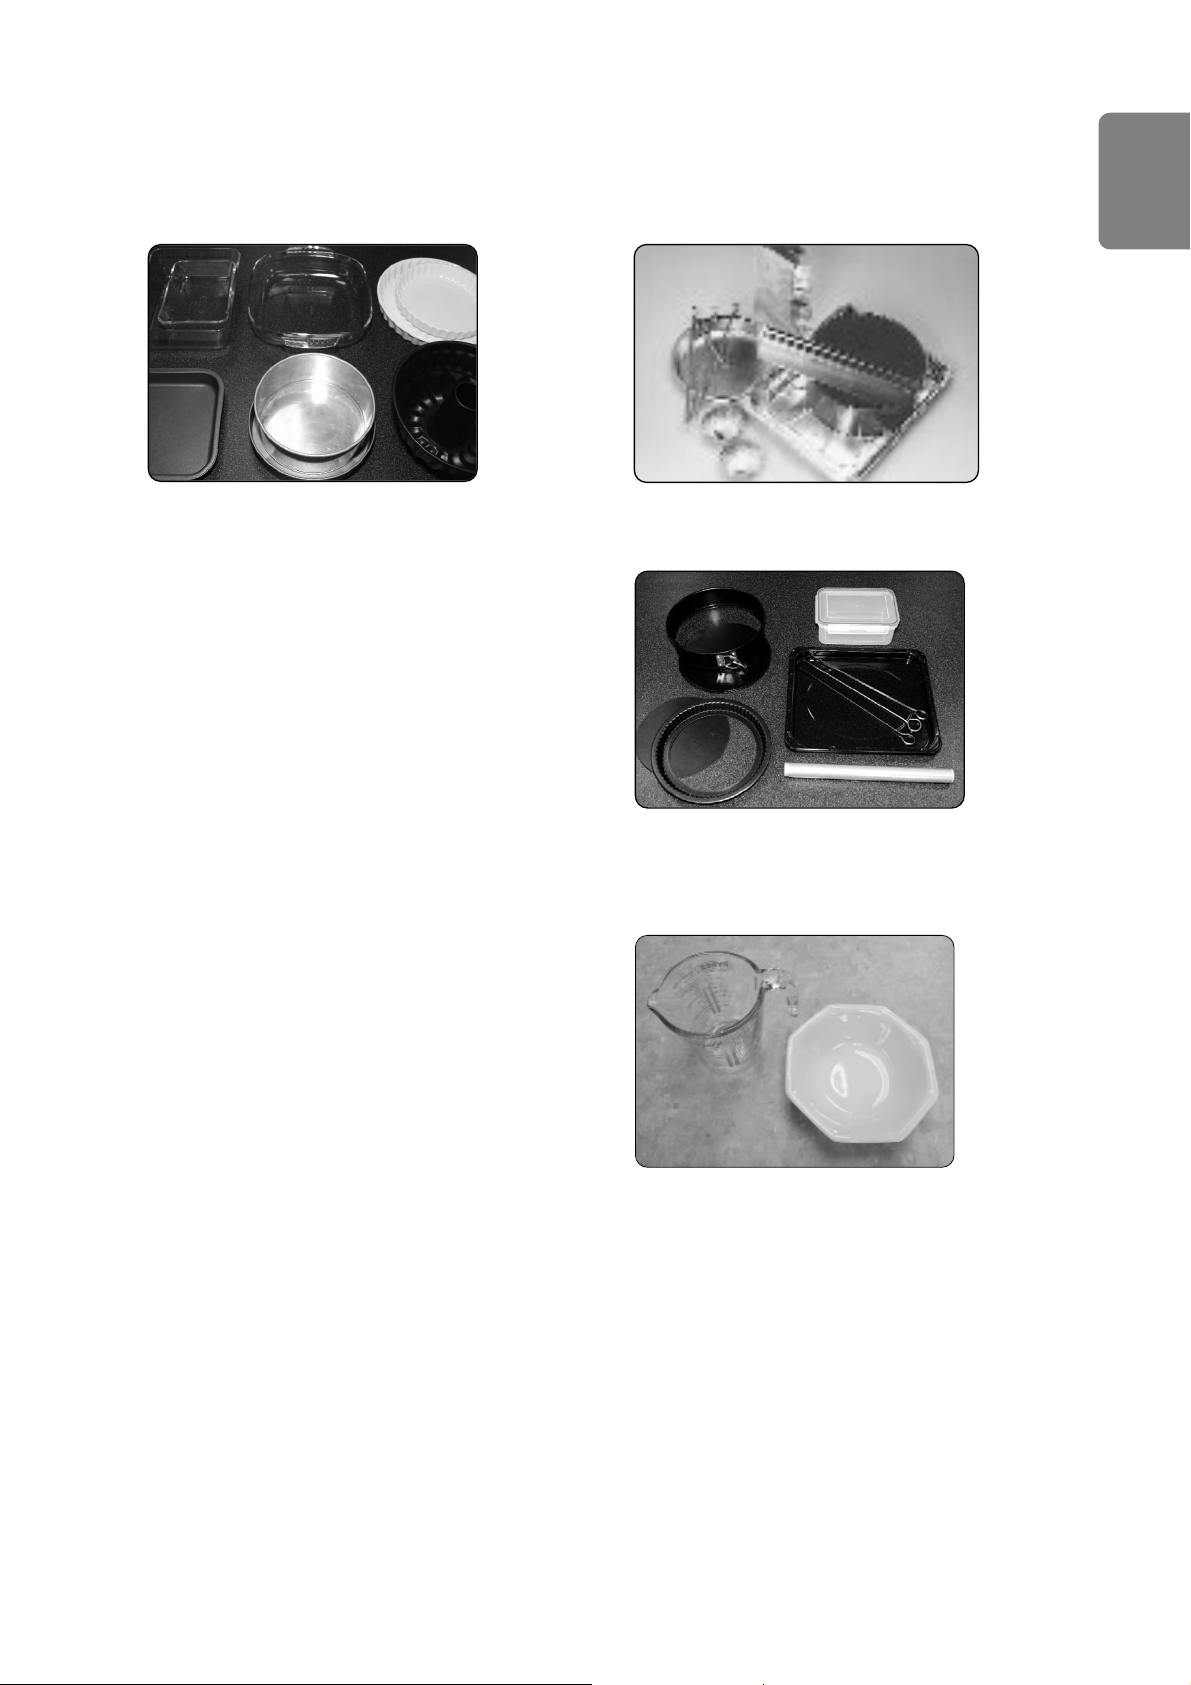
Accessories
The oven comes equipped with a variety of
accessories. Always follow the directions given
for use of the accessories.
Glass Tray
1. Do not operate the oven without the roller
ring and the glass tray in place.
2. Never use another type of glass tray than
the one specially designed for this oven.
3. If the glass tray is hot, let it cool before
cleaning or placing in water.
4. The glass tray can turn in either direction.
5. If the food or cooking vessel on the glass
tray touches the oven walls and stops the
tray rotating, the tray will automatically
rotate in the opposite direction. This is
normal.
6. Do not cook foods directly on the glass
tray, except when cooking Jacket Potatoes
in microwave mode.
Roller Ring
1. The roller ring and the oven floor should be
cleaned frequently to prevent noise and
build-up of remaining food.
2. The roller ring must always be used for
cooking together with the glass tray.
Metal Tray
1. The Metal Tray is for cooking on Grill,
Convection and Combination modes.
Do not use Metal Tray in Microwave mode
only.
2. The Metal Tray should be placed on Glass
Tray or Wire Rack.
Wire Rack
1. The Wire Rack is used to grill small dishes,
and help with the circulation of heat.
2. Do not use any metal container directly on
the Wire Rack in COMBINATION with
MICROWAVE.
3. Do not use the Wire Rack in MICROWAVE
mode only.
Page 6

En-4
Important Information
1. Cooking Times
• Cooking times given in the cookbook are
approximate. The cooking time depends on
the condition, temperature, amount of food
and on the type of cookware.
• Begin with the minimum cooking time to
help prevent overcooking. If the food is not
sufficiently cooked you can always cook it
for a little longer.
N.B.: If the recommended cooking times
are exceeded the food will be spoiled and
in extreme circumstances could catch
fire and possibly damage the interior of
the oven.
2. Small Quantities of Foods
• Small quantities of food or foods with low
moisture content can burn, dry out or catch
on fire if cooked too long. If materials inside
the oven should ignite, keep the oven door
closed, turn the oven off and remove the
plug from the socket.
3. Eggs
• Do not cook eggs in their shells and whole
hard-boiled eggs by MICROWAVE. Pressure
may build up and the eggs may explode,
even after the microwave heating has
ended.
4. Piercing Skin
• Food with non porous skins, such as
potatoes, egg yolks and sausages must be
pierced before cooking by MICROWAVE to
prevent bursting.
5. Meat Thermometer
• Use a meat thermometer to check the
degree of cooking of roasts and poultry only
when the meat has been removed from the
oven. Do not use a conventional meat
thermometer when using MICROWAVE or
COMBINATION because it may cause
sparking.
6. Liquids
• When heating liquids, e.g. soup, sauces and
beverages in your microwave oven,
overheating the liquid beyond boiling point
can occur without evidence of bubbling. This
could result in a sudden boil over of the hot
liquid. To prevent this possibility the
following steps should be taken:
a) Avoid using straight-sided containers
with narrow necks.
b) Do not overheat.
c) Stir the liquid before placing the
container in the oven and again halfway
through the cooking time.
d) After heating, allow it to stand in the
oven for a short time, stir again before
carefully removing the container.
7. Paper/Plastic
• When heating food in plastic or paper
containers, check the oven frequently as
these types of containers ignite if
overheated.
• Do not use recycled paper products (e.g.
Kitchen Roll) unless the paper product is
labelled as safe for microwave oven use.
Recycled paper products may contain
impurities which may cause sparks and/or
fires during use.
• Remove wire twist-ties from roasting bags
before placing the bags in the oven.
8. Utensils/Foil
• Do not heat any closed cans or bottles
because they might explode.
• Metal containers or dishes with metallic trim
should not be used during Microwave
cooking. Sparking will occur.
• If you use any aluminium foil, meat spikes
or metalware the distance between them
and the oven walls and door should be at
least 2 cm to prevent sparking.
9. Feeding Bottles/Baby Food Jars
• The top and teat or lid must be removed
from feeding bottles or baby food jars before
placing in the oven.
• The contents of feeding bottles and baby
food jars are to be stirred or shaken.
• The temperature has to be checked before
consumption to avoid burns.
Page 7
English
En-5
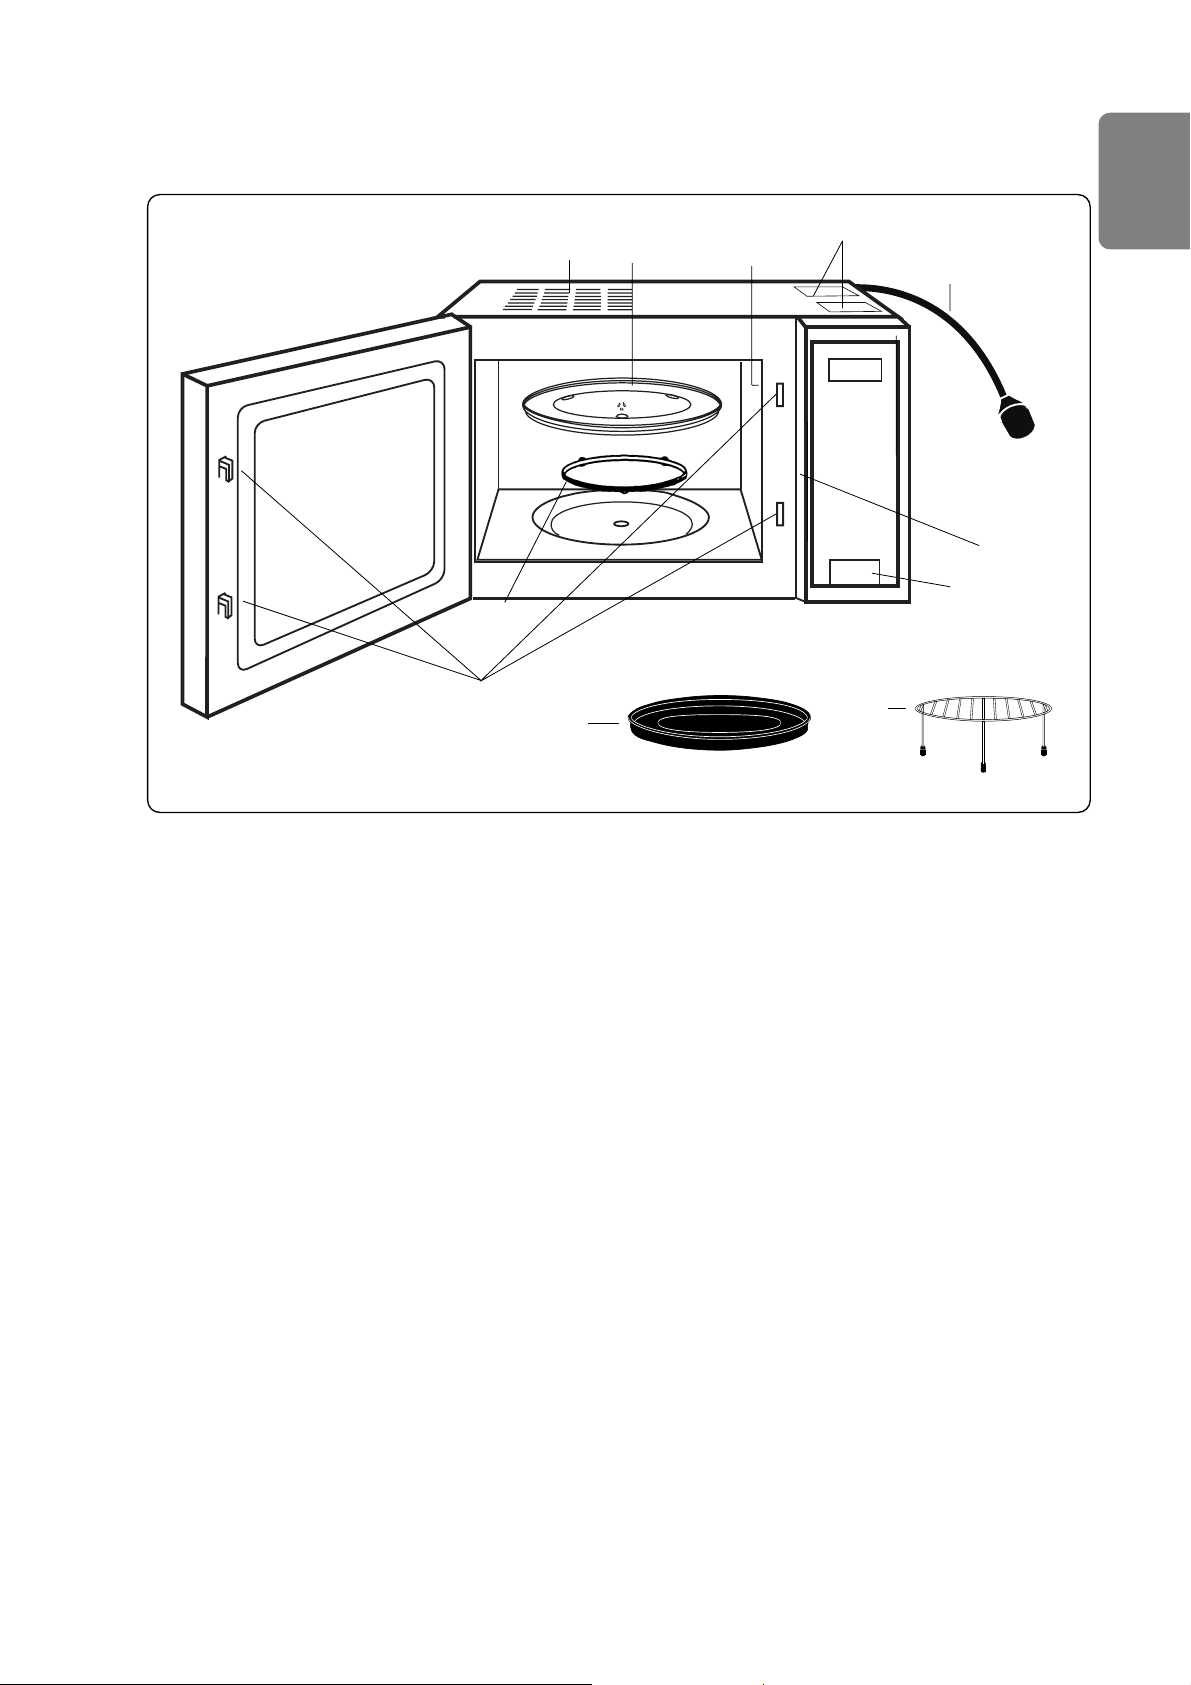
Outline Diagram
1. Door Release Button
Press to open the door. When you open the oven door during cooking, the cooking is
stopped temporarily without clearing earlier made settings. The cooking is resumed as
soon as the door is closed and Start Pad pressed. The oven lamp lights as soon as the
oven door is opened.
2. Oven Window
3. Door Safety Lock System
4. Oven Air Vent
5. Control Panel
6. Glass Tray
7. Roller Ring
8. External Oven Air Vents
9. Metal Tray
10. Wire Rack
11. Power cord
12. Caution Label (Hot Surfaces)
13. Identification Label
[9]
[4]
[8]
[6]
[3]
[7]
[11]
[12]
[13]
[5]
[10]
[1]
[2]
Page 8
En-6
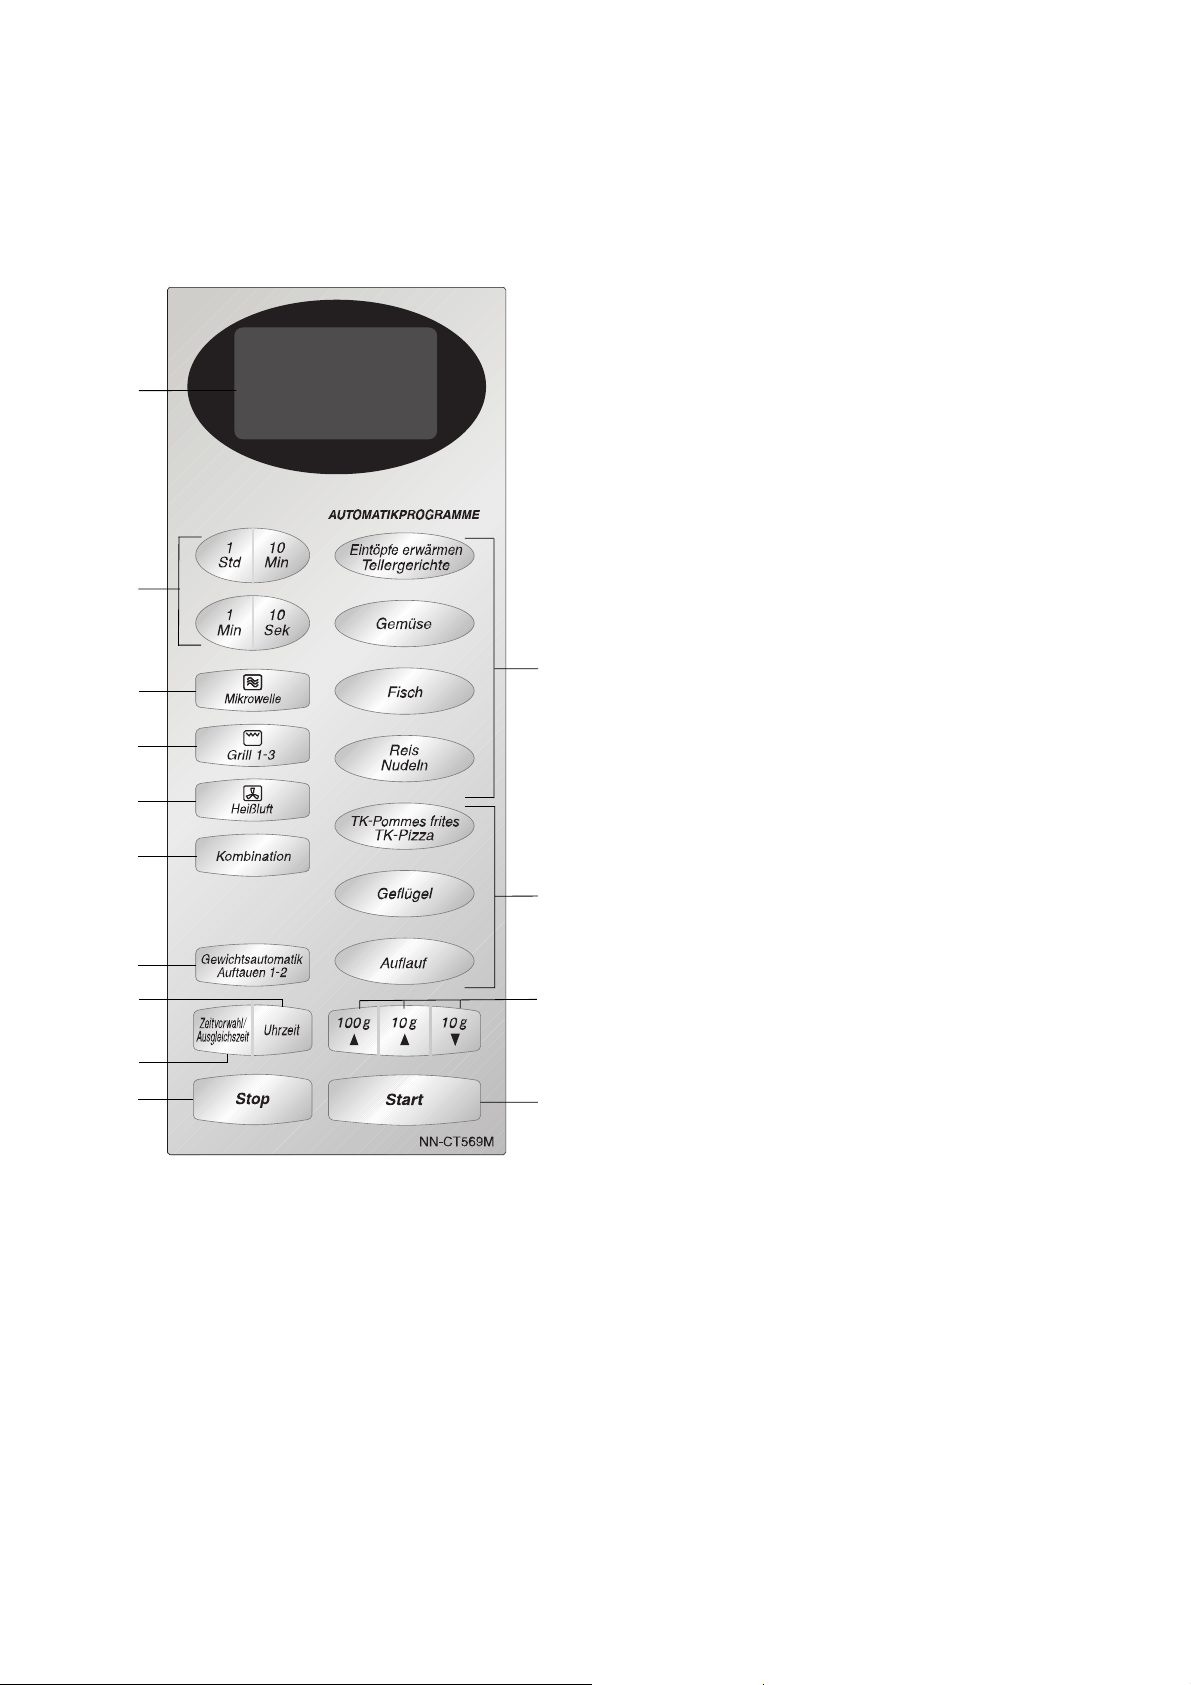
Control Panel
Beep Sound:
A beep sounds when a pad is pressed. If this beep does not sound, the setting is incorrect.
When the oven changes from one function to another, two beeps sound. After the completion of
the preheating on Convection or Combination mode, three beeps sound. After completion of
cooking, five beeps sound.
(1)
(2)
NN-CT569M / NN-CT559W
(3)
(4)
(5)
(6)
(7)
(10)
(14)
(9)
(11)
(13)
(8)
1. Display Window
2. Time Pads
3. Microwave Power Pad
4. Grill Power Pad
5. Convection Pad
6. Combination Pad
7. Auto Defrost Pad
8. Weight Select Pads
9. Clock Pad
10. Delay/Stand Pad
11. Auto Weight Program Pads
12. Auto Weight Combi Program Pads
13. Start Pad:
Press to start operating the oven.
If during cooking the door is opened or
Stop/Cancel Pad is pressed once,
Start Pad has to be pressed again to
continue cooking.
14. Stop/Cancel Pad:
Before cooking: one press clears
your instructions.
During cooking: one press
temporarily stops the cooking
program. Another press cancels all
your instructions and the time of day
will appear in the display.
N.B:
If an operation is set and start pad is not
pressed, after 6 minutes, the oven will
automatically cancel the operation. The
display will revert back to clock mode.
This oven is equipped with an energy
saving function.
Please Note:
1. When in stand-by mode the brightness
of the display will be reduced.
2. The oven will enter stand-by mode,
when first plugged in and immediately
after the last operation has completed.
(12)
The design of your control panel may vary
from the panel displayed (depending on
colour), but the words on the pads will be
the same.
*
Page 9
English
En-7
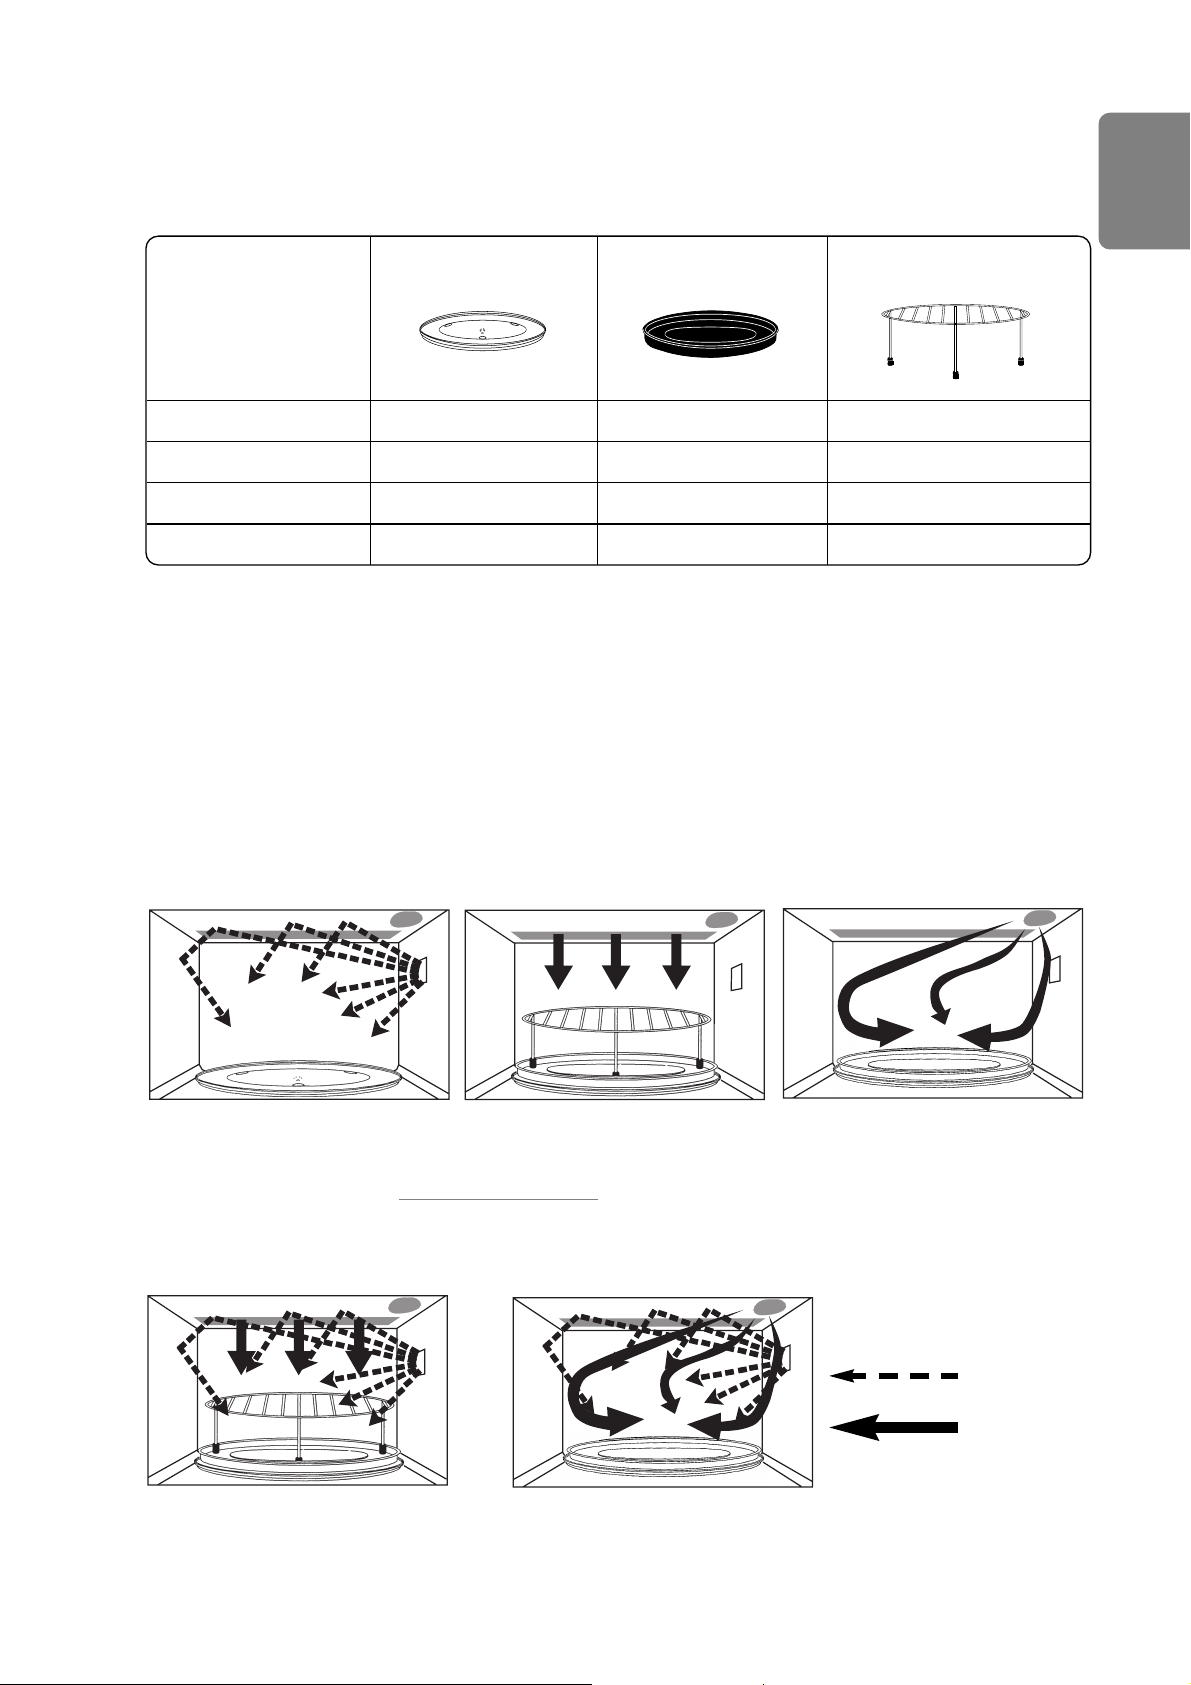
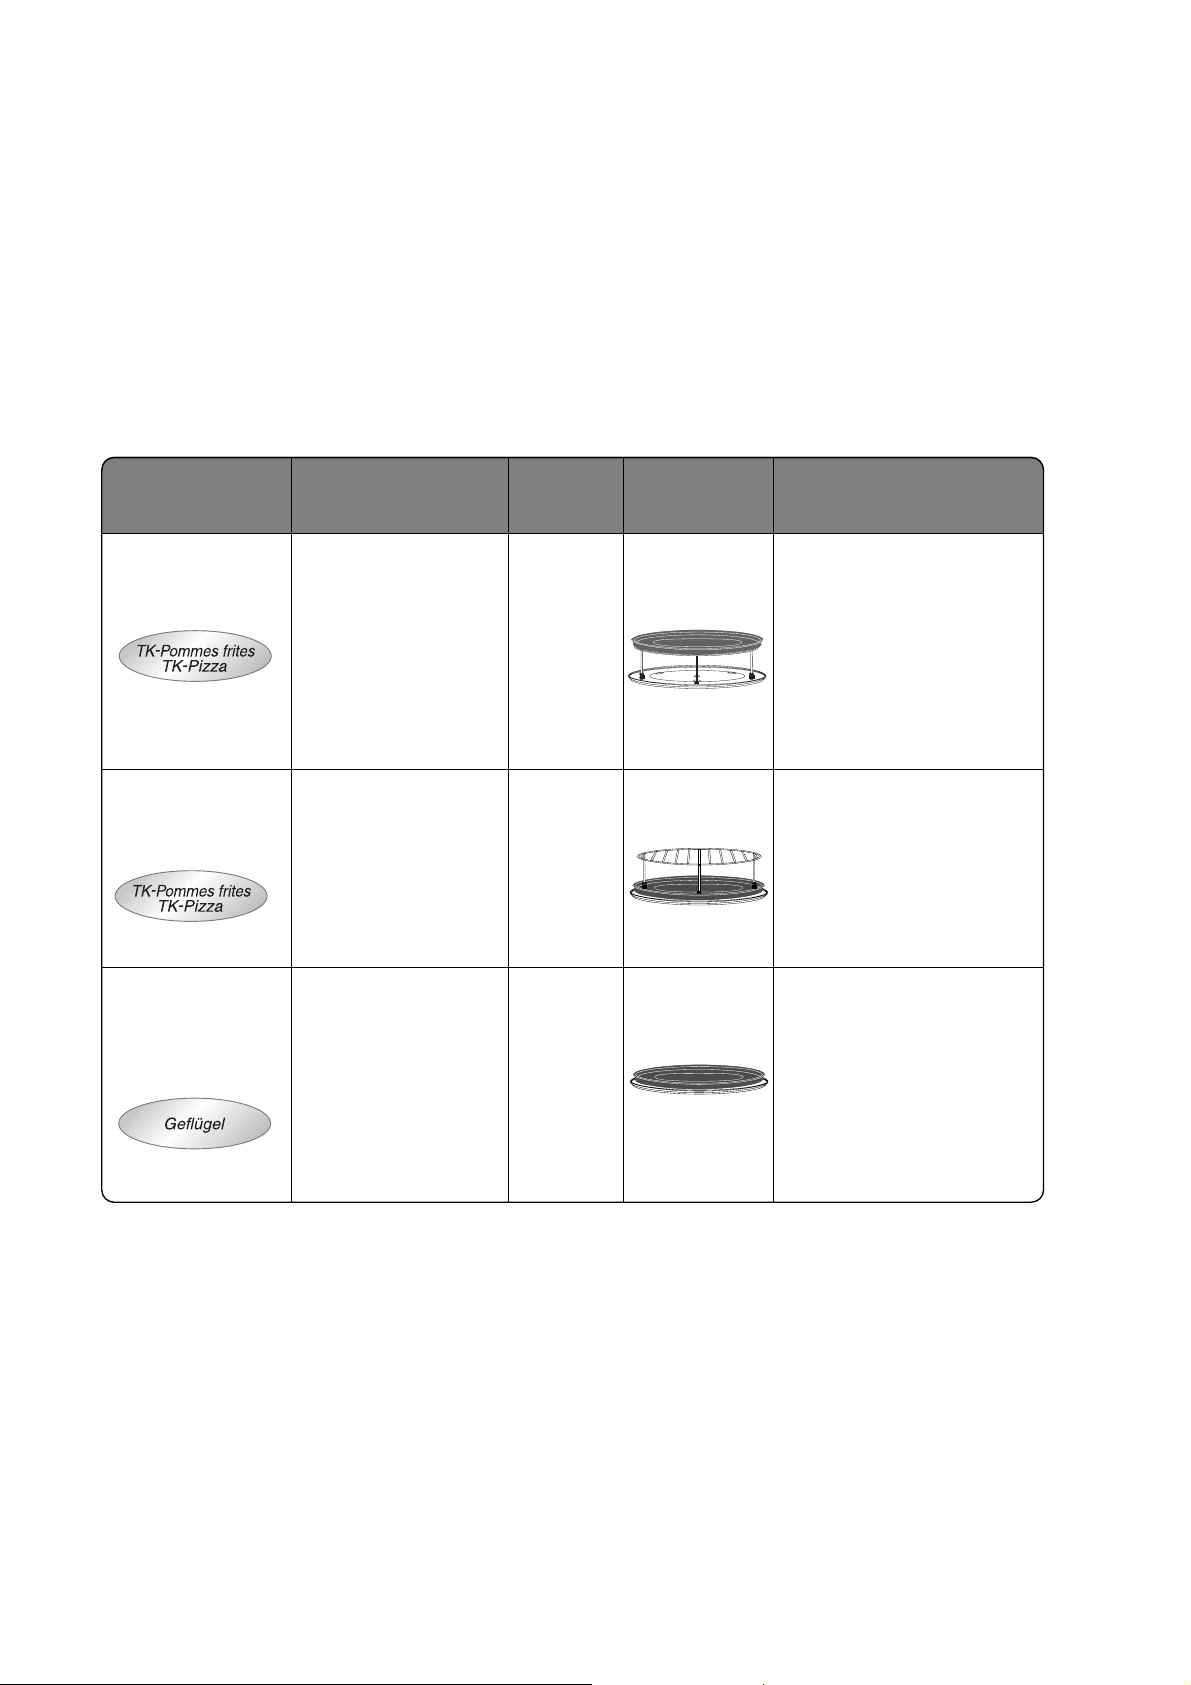
Glass Tray Metal Tray Wire Rack
Microwave YES NO NO
Grill YES YES YES
Convection YES YES YES
Combination YES YES YES
Oven Accessories
The following chart shows correct use of the accessories in the oven.
Cooking Modes
The diagrams shown below are examples of the accessories.
It may vary depending on recipe/dish used. Further information can be found in the Cookbook.
Microwave Grill
Convection
Grill + Microwave Convection + Microwave
Combination
Microwave
Heater
Page 10
En-8
Controls and Operation Procedure
Child Safety Lock:
Using this system will make the oven controls inoperable; however, the door can be opened. Child
Lock can be set when the display shows a colon or the time.
To Set:
To Cancel:
• Press Start Pad three times.
The time of day will disappear.
Actual time will not be lost. A ʻ*ʼ is
indicated in the display.
• Press Stop/Cancel Pad three times.
The time of day will reappear in the display.
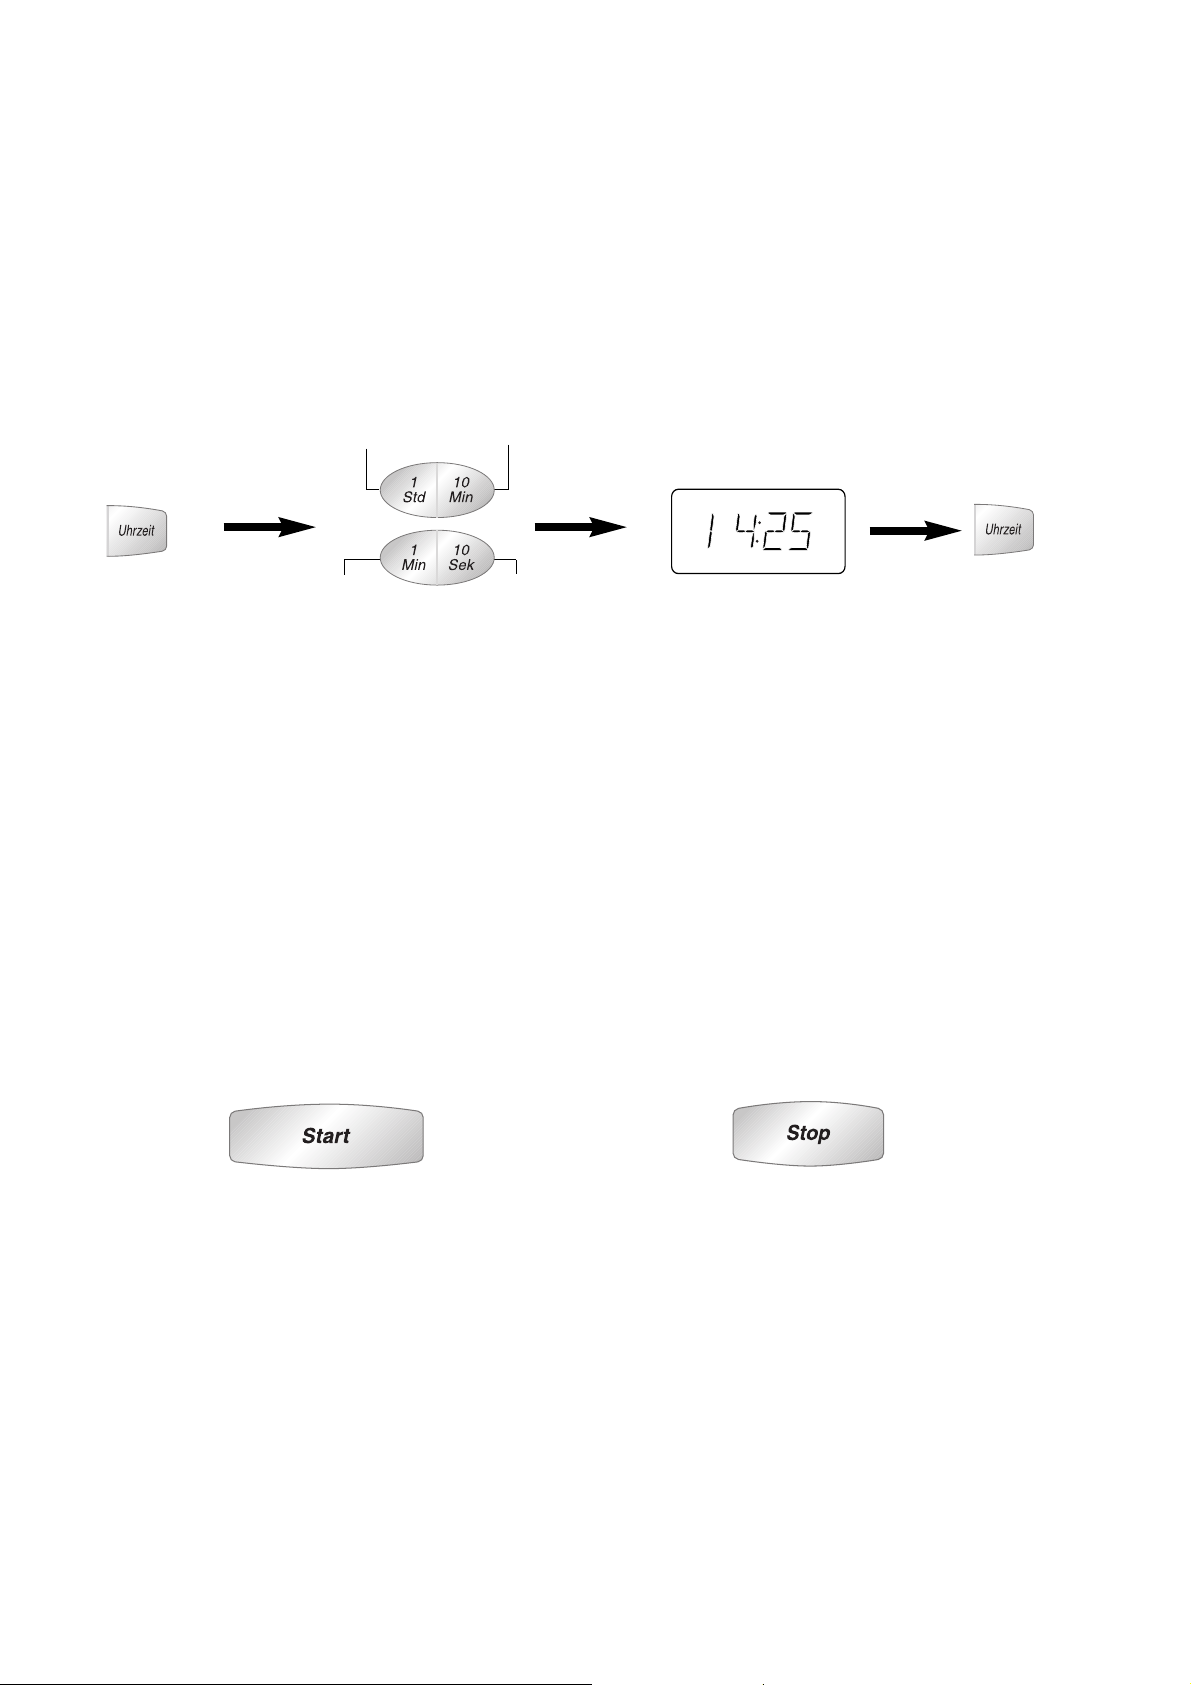
Clock Setting:
Example: To set 14:25
• Press Clock Pad.
The colon starts to
blink.
• Enter the time by pressing the
appropriate Time Pads.
The time appears in the display
and the colon blinks.
• Press Clock Pad.
The colon stops blinking and
the time of day is entered.
NOTE:
1. To reset the time of day repeat all the above steps.
2. The time of day is displayed, unless the power supply is interrupted.
3. This clock has a 24 hour display.
14 times twice
inoperable
5 times
NOTE: To activate child lock, start pad must be pressed 3 times within a 10 second period.
If the Delay/Stand Pad is pressed 4 times, this will turn off the operation guide. To turn the operation
guide back on, press the Delay/Stand Pad 4 times.
Operation Guide
Page 11
English
En-9
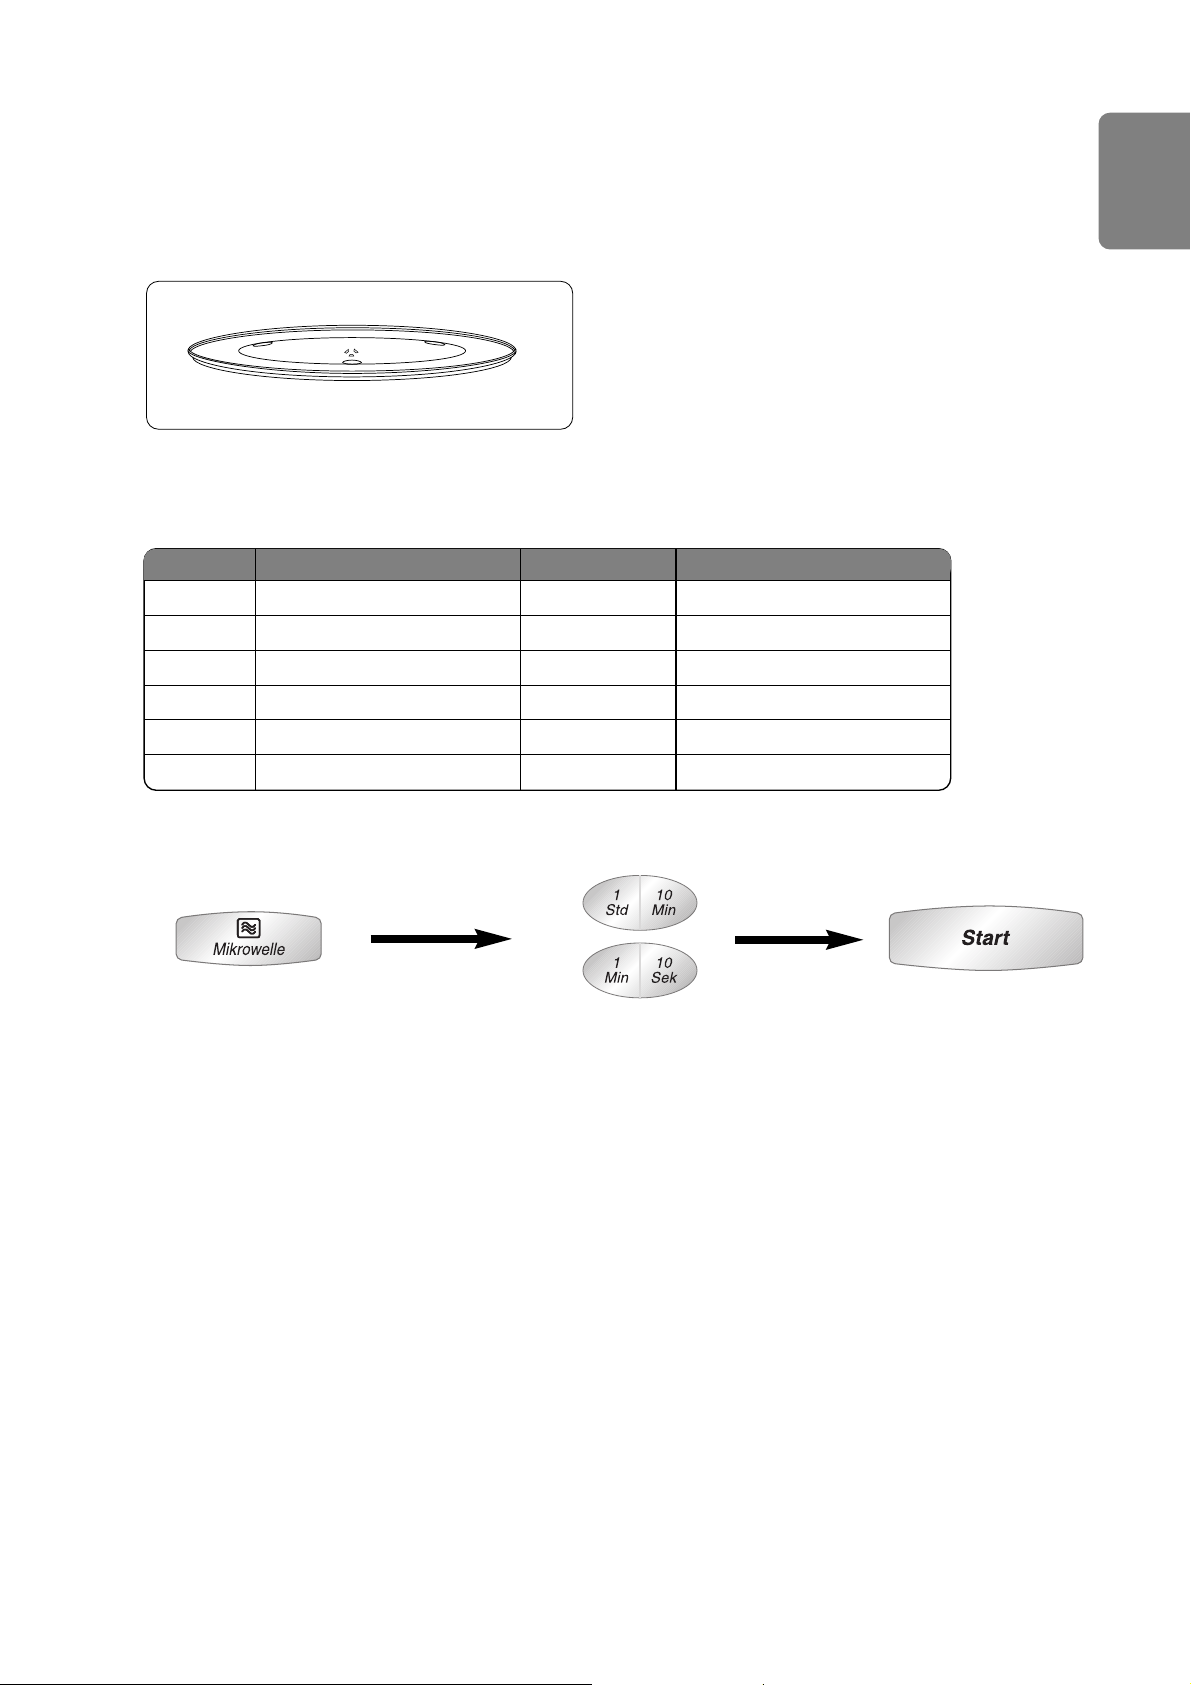
Microwave Cooking and Defrost
There are 6 different microwave power levels available (see the chart below).
• Select Microwave power level.
• Set the cooking time. • Press Start Pad.
Press Power Level Wattage Max time available
once MAX 1000 W 30 minutes
twice MIN (DEFROST) 270 W 99 min. 50 sec.
3 times MEDIUM 600 W 99 min. 50 sec.
4 times LOW 440 W 99 min. 50 sec.
5 times SIMMER 250 W 99 min. 50 sec.
6 times WARM 100 W 99 min. 50 sec.
NOTE:
1. For 2 or 3 stage cooking, before pressing Start Pad, repeat setting the Microwave power level
and cooking time.
e.g. Casserole –– High 10 minutes to bring the casserole to boil. Simmer 60 minutes to
cook. Warm 10 minutes to allow flavours to develop
2. Stand time can be programmed after the Microwave power and time setting.
3. You can add to the cooking time during cooking, if required. Press 1 min pad to increase the
cooking time. Time can be added in 1 minute increments up to maximum time available.
This chart shows approximate wattage for each power level.
Use of accessory:
CAUTION: The oven will automatically operate on 1000 W Microwave Power if a
cooking time is entered without selecting the power level.
Glass Tray
Page 12
En-10
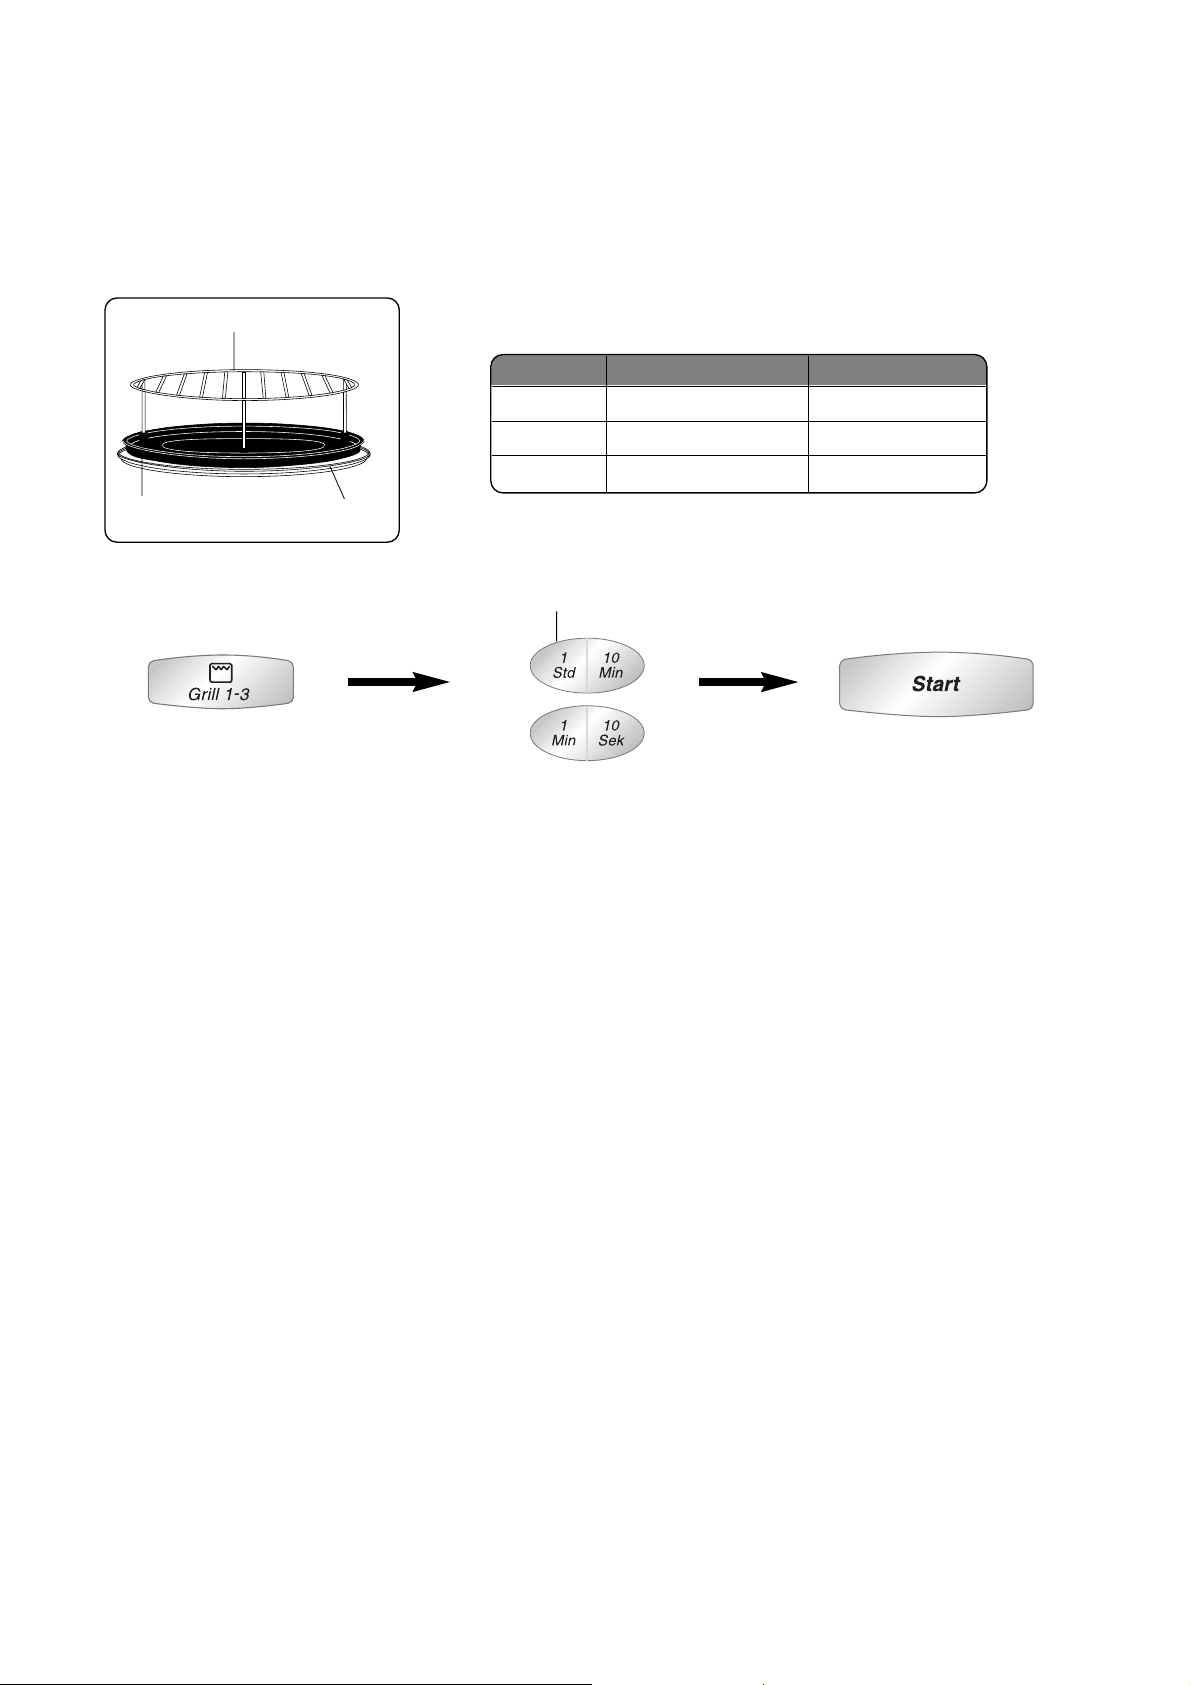
Grilling
The Grill Pad provides 3 Grill settings.
• Press Grill Power Pad for
the desired Grill setting.
• Set the cooking time (up to
99 minutes 50 seconds).
• Press Start Pad.
Press Power Level Wattage
once 1 HIGH 1300 W
twice 2 MEDIUM 950 W
3 times 3 LOW 700 W
NOTE:
1. The Grill will only operate with the oven door closed.
2. The Grill cannot be preheated.
3. You can add to the cooking time during cooking, if required. Press 1 min pad to increase the
cooking time. Time can be added in 1 minute increments, up to 99 minutes 50 seconds.
inoperable
Use of accessory:
Wire Rack
Glass Tray
Metal Tray
Page 13
English
En-11
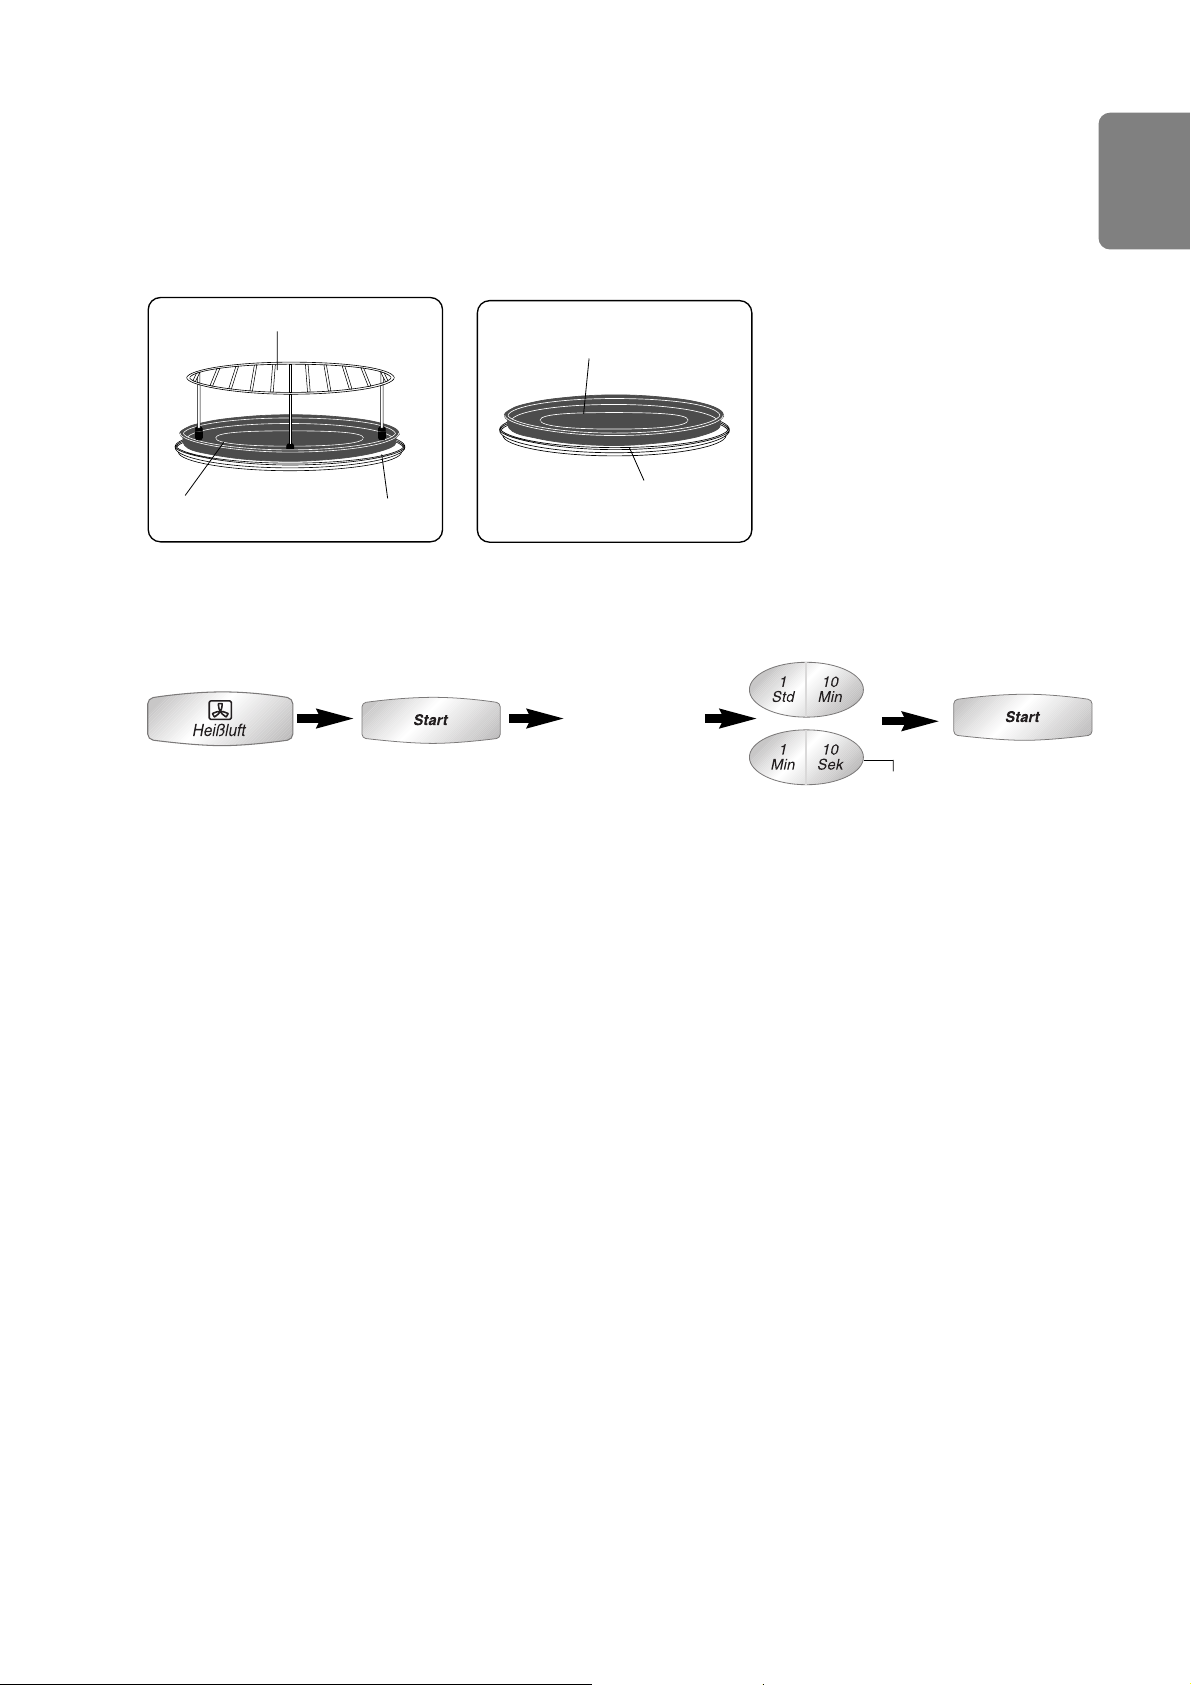
Cooking by Convection
NOTE ON PREHEATING:
1. Do not open the door during preheating. After preheating 3 beeps will be heard and the “P”
will flash in the display window. If the oven door is not opened after preheating, the oven will
maintain the selected temperature. After 30 minutes, the oven will shut off automatically and
revert to time of day.
2. If you want to cook without preheating, after selecting the desired temperature, set the
cooking time then press Start Pad.
NOTE:
1. When the selected cooking time is less than one hour, the time counts down second by
second.
2. When the selected cooking time is over one hour, the time counts down minute by minute
until only “1H 00” (1 hour) remains. The display then indicates minutes and seconds and
counts down second by second.
3. You can add to the cooking time during cooking, if required. Press 1 min pad to increase the
cooking time. Time can be added in 1 minute increments.
4. After pressing Start Pad, the selected temperature can be recalled and changed. Press
Convection Pad once to indicate the temperature in the display window. While the
temperature is recalled in the display window, you can change the temperature by pressing
Convection Pad.
This feature offers a choice of convection temperatures 100 - 220°C in 10°C increments. For
quick selection of the most commonly used cooking temperatures, the temperatures start at
150°C and count up to 220°C then 100°C.
Use of accessory:
Cooking by Convection:
• Set the
desired
temperature.
• Set the cooking time (up
to 9 hours 59 minutes).
• Press
Start Pad.
• Press Start Pad to
start preheating.
inoperable
After
preheating,
place the
food in the
oven.
Wire Rack
Glass Tray
Metal Tray
Metal Tray
Glass Tray
Page 14
En-12
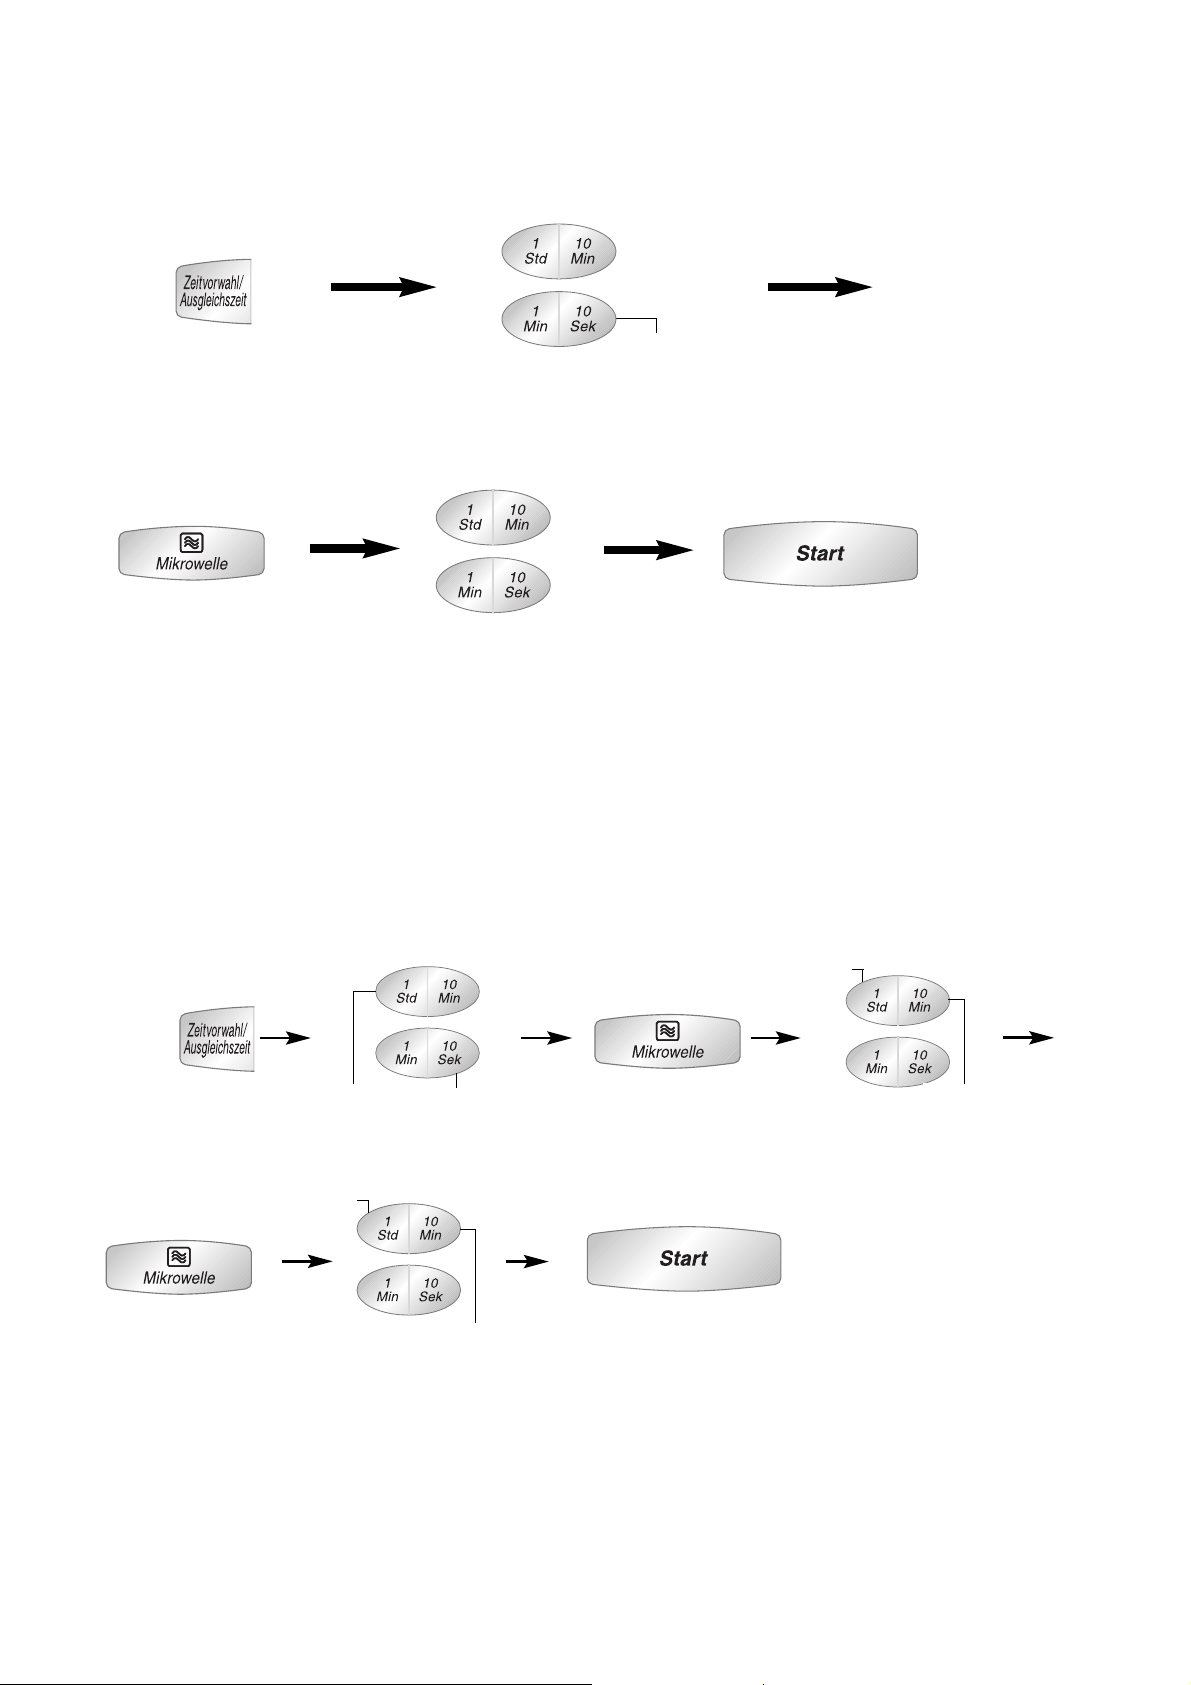
Combination Cooking
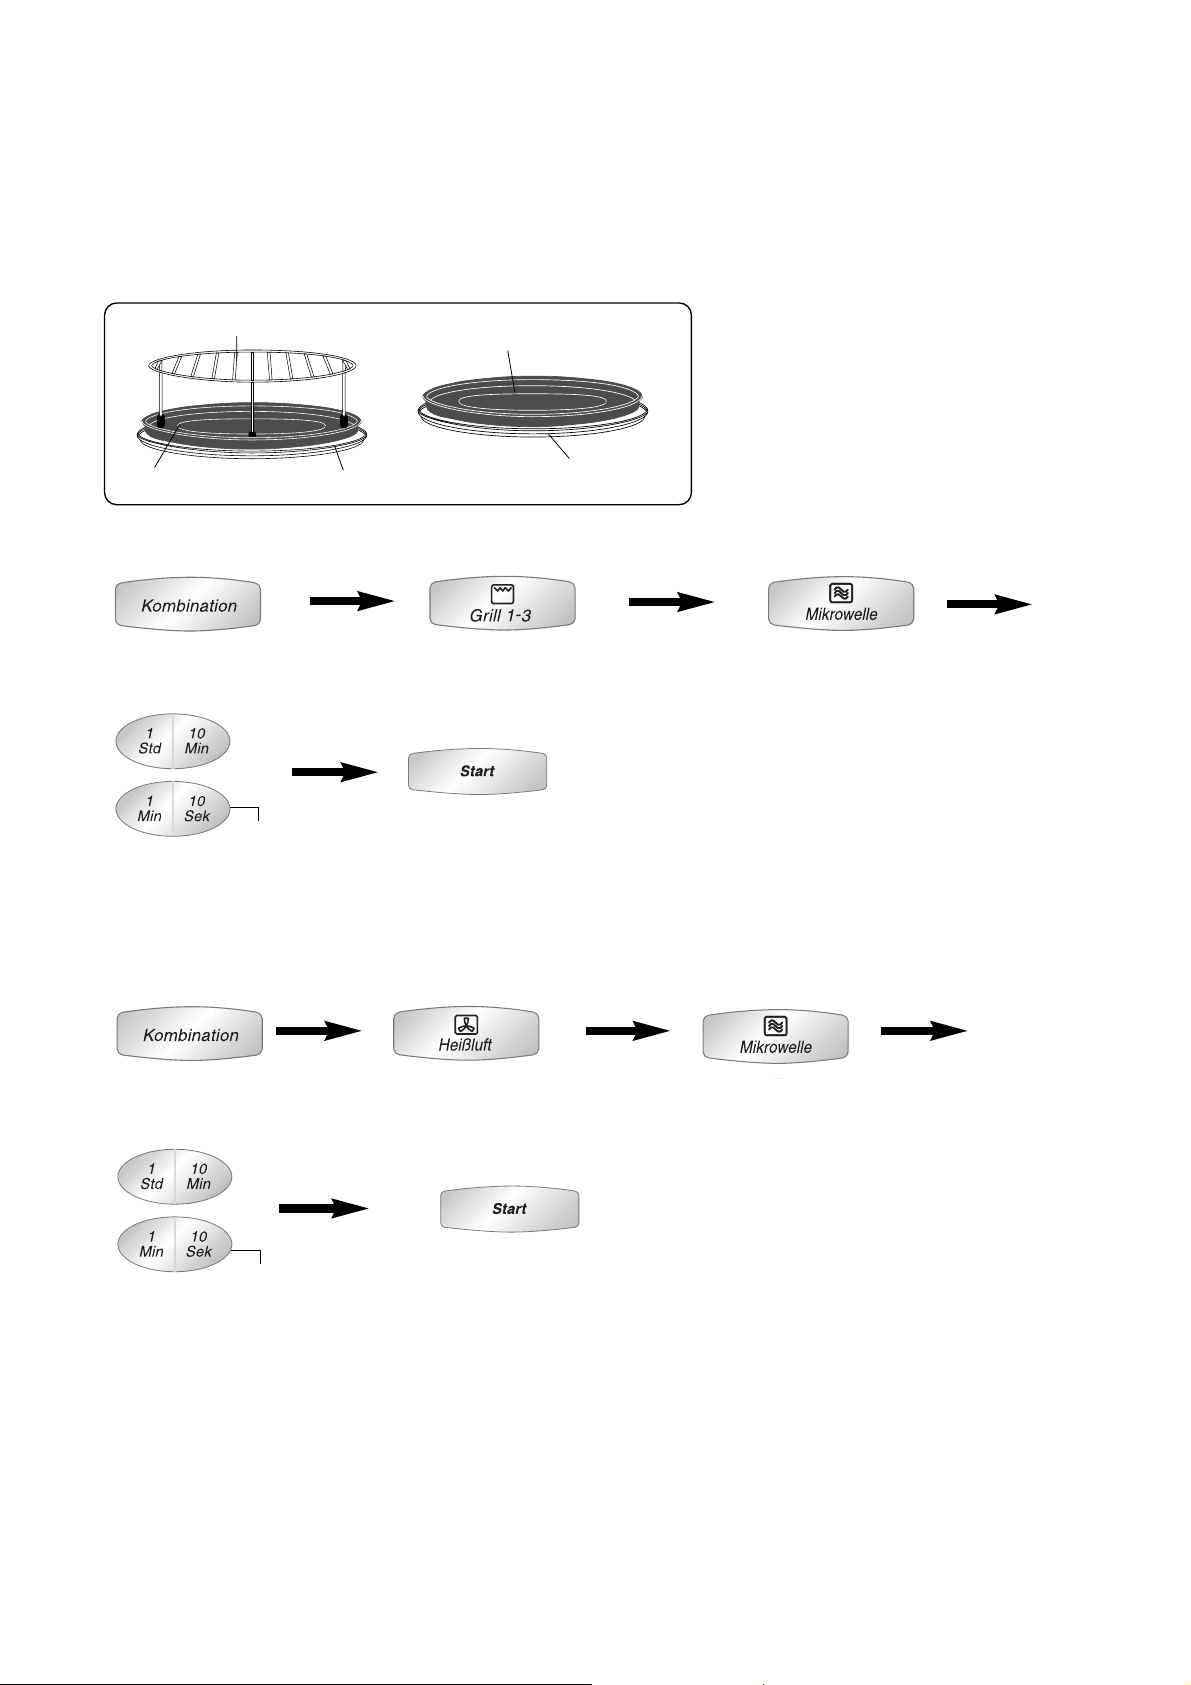
1) Grill + Microwave
• Press
Combination Pad.
• Set the desired
Grill setting.
• Set the desired
Microwave power level.
• Set the desired
cooking time (up to
9 hours 59 minutes).
• Press Start
Pad.
2) Convection + Microwave
• Press
Combination Pad.
• Set the desired
temperature.
• Set the desired
Microwave power level.
• Set the desired
cooking time (up to
9 hours 59 minutes).
• Press Start
Pad.
There are 2 combination settings:
1) Grill 1, 2 or 3 + Microwave 600 W, 440 W, 250 W or 100 W
2) Convection 100 - 220°C + Microwave 600 W, 440 W, 250 W or 100 W
Use of accessory:
inoperable
inoperable
Metal Tray
Convection or Grill + Microwave
Glass Tray
Wire Rack
Glass Tray
Metal Tray
NOTE ON PREHEATING:
1. When using Grill + Microwave mode, preheat is not available.
2. When using Convection + Microwave, the oven can be preheated. Press Start Pad after
selecting Microwave power level and Convection temperature. No microwaves are emitted
during combination preheating.
Page 15
Program Food
Min/max
weight
Accessories Notes/Tips
Meat/Fish
Start weight
800 g
1 Press
Flat pieces of meat,
eg steak roulade,
goulash, mince
200 - 1000 g Upturned
saucer on a
flat plate
Wrap the ends of the legs of
whole chicken and duck in
aluminum foil before
defrosting. Turn food starting
from 500 g during the defrost
time at beep sound. Break up
small meat pieces after
defrosting; in case of minced
meat break up the remaining
ice core.
Poultry and game 200 - 2500 g
Roast 500 - 2500 g
Fish 200 - 1000 g
Bread/Cake
Start weight:
500 g
2 Presses
Bread, whole or
sliced
100 - 1000 g Flat plate Turn Bread starting from 310 g
during defrosting time at beep
sound. Shortcrust pastry with
fruit requires a longer standing
time to complete defrosting.
Cream cakes and cakes with
chocolate icing are not suitable
for these programs.
Yeast cake, biscuit,
pastry Shortcrust
pastry with fruit
100 - 1500 g
English
En-13
Auto Defrost
NOTE:
1. With the meat/fish auto programs over 500 g, a beep sounds approximately half way during
defrosting time. At this time the food should be turned. With bread/cake auto ptograms over
310 g a beep sounds half way through defrosting. The food should be turned when beep
sounds.
Your microwave appliance has 2 programs for defrosting; one for meat, fish and poultry, the
other one for different types of bread and cake.
The food should ideally be frozen and stored flat and evenly arranged at a minimum temperature
of -18°C. Food should be frozen in suitable portions and shapes, so that the food fits into the
appliance for defrosting. All packaging material should be removed where possible. If it is difficult
to remove the the packing, start defrosting at 1000W for 1-2 minutes. Place the food onto a plate
to defrost.
With the meat/fish program put food on an upturned saucer, so the meat juices can drip off.
Under no circumstance should this meat juice be re-used or come into contact with other foods.
When thawing out with the auto-weight programs standing time is necessary, until the food is
thawed out completely or can be processed further. Depending upon weight and type of the food
up to 90 minutes may be required.
• Select the desired
Auto Defrost Program.
1 Press Meat/Fish
2 Presses Bread/Cake
• Set the weight of the frozen food.
weight counts up in 100 g increments
weight counts up in 10 g increments
weight counts down in 10 g increments
• Press Start
Pad.
Page 16
Program Dish
Min/max
weight
Accessories Notes/Tips
Stews
Start weight
500 g
1 Press
Pea stews, ravioli,
ragouts or goulash
(industrially
prepared or home
made)
300 800 g
Remove dish from packaging
and heat in a dish with lid. Stir
after half cooking time and
before the standing time. After
heating, allow to stand covered
for 2 minutes.
Plated meals
Start weight
400 g
2 Presses
Industrially
prepared products
(eg from Sonnen
Bassermann) or
home made plated
meals with up to 3
components
300 500 g
Remove dish from packaging.
Heat dishes on a plate with
cover. Allow to stand for
2 minutes after heating.
En-14
Auto Weight Programs
With this program you can heat up home made or industrially prepared ready meals or stews,
goulash and ragouts.
Always use microwaveable kitchenware with a lid, suitable for the size of the dish, eg a glass
dish with lid. All dishes, including plated meals, have to be covered.
After heating the dishes, allow to stand for approx. 2 minutes covered in order for the
temperature to even out in the food.
Stews etc should be stirred after approx. half the cooking time and again after removing it from
the oven.
Please note that the heating times are suitable for dishes at room or fridge temperature. The
temperature after heating should be approx. 72°C.
Frozen dishes are not suitable for these programs.
• Select the desired
Auto Weight Program.
• Press Start
Pad.
e.g.
• Set the weight of food.
weight counts up in 100 g increments
weight counts up in 10 g increments
weight counts down in 10 g increments
NOTE:
1. Stir the stews at beeps (halfway during reheating).
2. Please follow the min and max weights for the dishes suitable for the programs.
Weights outside these limits must not be heated with these programs
3. Please note that the results depend on the quality of the food and the ingredients and
therefore results can vary.
Page 17
Program Food
Min max
weight
Accessories Notes/tips
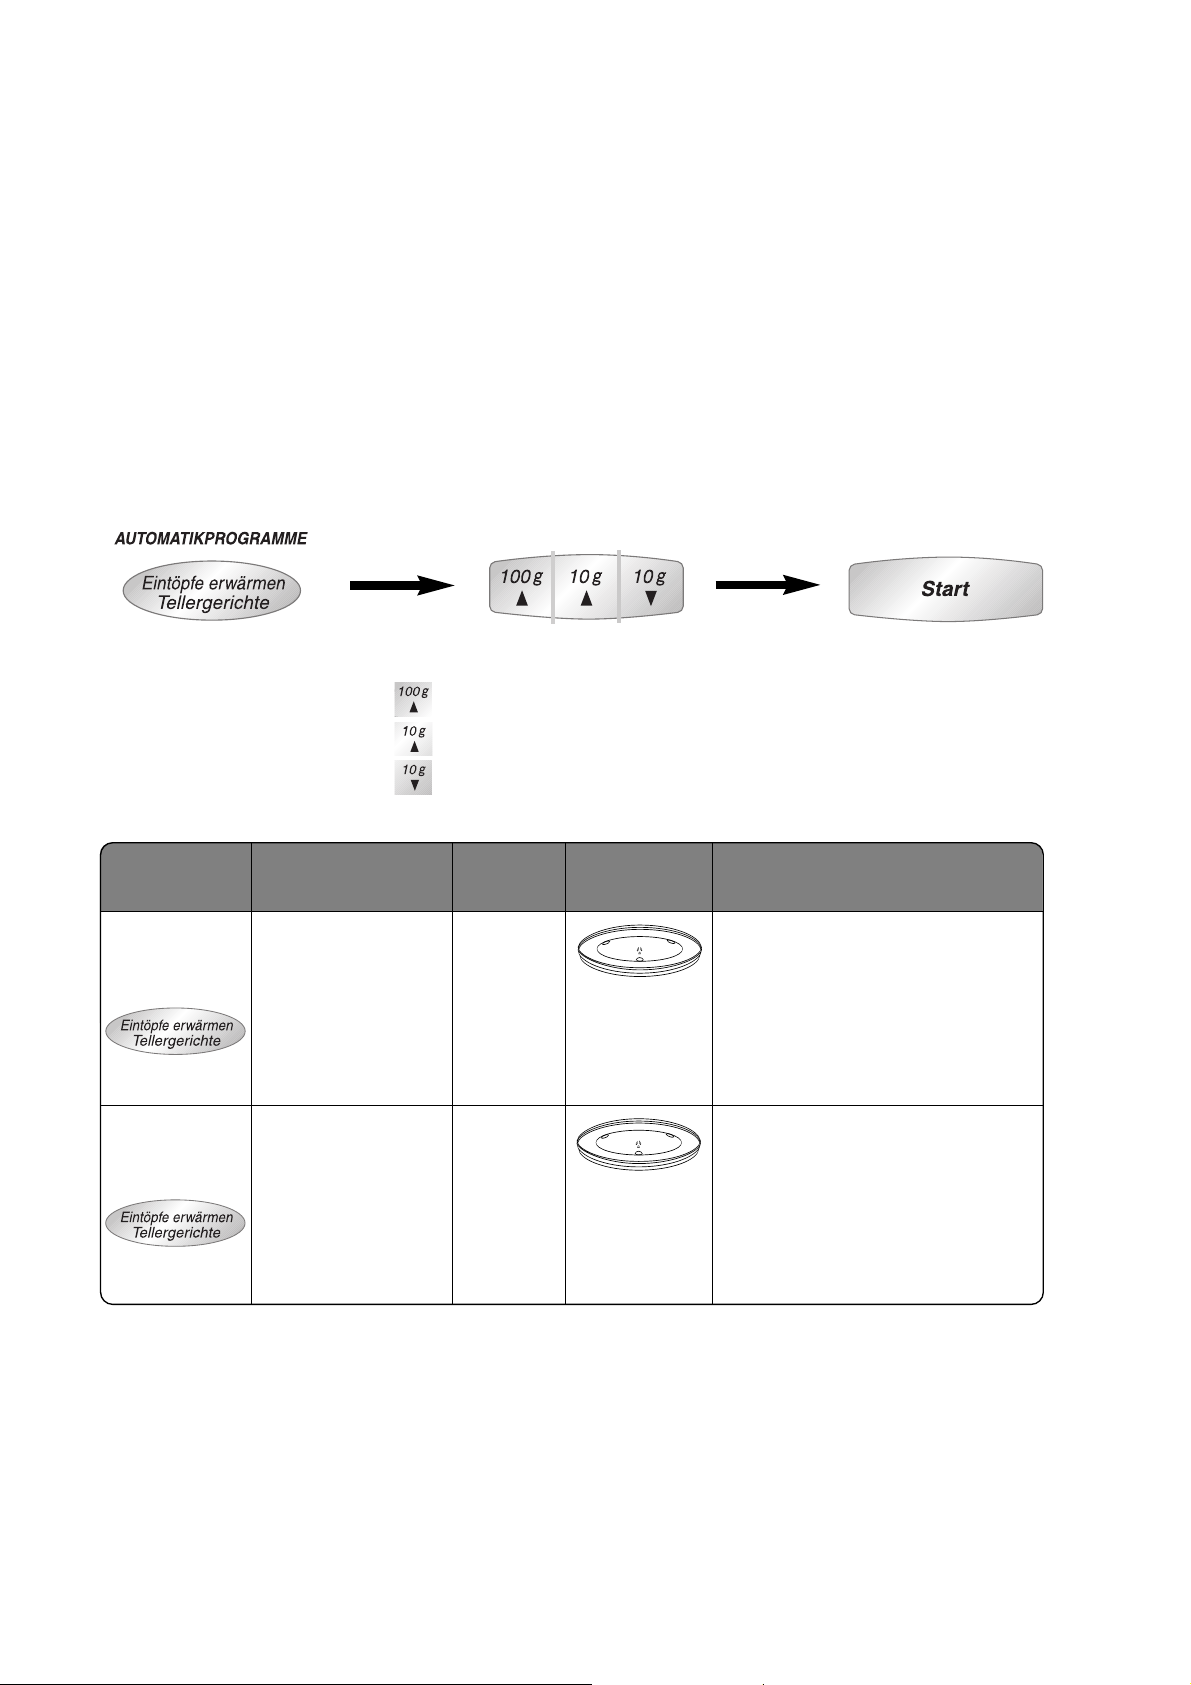
Vegetables
(fresh)
start weight
500g
1 Press
Cauliflower, Broccoli,
Chicorée, China Kohl,
peas, Fennel,
cabbage turnip,
carrots, peppers, leek,
brussel sprouts,
celery, white cabbage,
savoy cabbage and
Zucchini.
200 –
1000 g
(net,
cleaned)
Cook Vegetables in a dish
with cover. Add 1 table spoon
of water and some salt per
100 g. Stir vegetables during
the cooking time at beep
sound and before the standing
time.
Fish (fresh)
Start weight
500g
2 Presses
Fish filet, e.g. plaice,
cod, sea-salmon,
redfish, wolf fish.
No salmon filet
200 –
1000 g
Cook filet in a dish with lid.
Add 1 - 3 table spoons of
liquid (water, lemon or wine)
After cooking allow to stand
covered for 5-10 minutes.
Rice
Start weight
200 g
1 Press
Par-boiled long grain
rice, whole grain and
natural rice, wild rice
mixture, Ketan or
Jasmin rice
100 –
300 g
Add water according to
manufacturersʼ information on
the packing (normally two to
three times the amount of rice)
and cover. Stir approximately
16 minutes before end of the
cooking time (at beep sound)
and before the end of the
standing time.
Pasta
Start weight
300 g
2 Presses
Pasta of all types, incl.
spaghetti
100 –
500 g
Place pasta in a dish with lid
and cover with enough boiling
water. Approx. 1L boiling water
for 100-290 g pasta and 1.5L
boiling water for 300-500 g
pasta. Add 1 tablespoon of oil
and 1 tea spoon of salt. Stir
pasta during the cooking time.
English
En-15
Auto Weight Programs
Use microwaveable dishes with a lid. Allow a standing time of 5 - 10 minutes. This time is
particularly important to even the temperatures. Therefore, please rest fish for 10 minutes before
serving. Please stir rice and vegetables before the standing time.
Notes:
1. The liquid additions are not included during the weight input.
2. During the Pasta and Vegetables programs a beep sounds half way through cooking. For the
rice program approximately 18 minutes before end of the cooking time a beep sound
indicates that the food should be stirred. Please stir the food at that time.
3. Please adhere to the minimum and maximum weight for the programs for suitable food.
Weights outside of this range should not be cooked with the above auto weight programs.
4. Please note that the results depend on the food quality, their condition or the ingredients and
therefore can vary.
5. Instructions for preparation of food which is not suitable for these programs can be found in
the recipe part or the tables in the cook book.
Page 18
Program Food
Min max
weight
Accessories Notes/tips
Frozen chips
Start weight
300 g
1 Press
Frozen chips,
suitable for cooking
in an oven (not deep
fat fryer), industrially
Prepared, eg from
McCain
200 –
500 g
Enamel tray
on the wire
rack
Remove chips from the
packaging and place
directly on enamel tray.
Place tray on wire rack.
Turn chips after ½ cooking time at beep sound in
order to achieve browning
on both sides
Frozen pizza
Start weight:
300 g
2 Presses
Frozen pizza,
industrially prepared,
eg from Dr Oetker,
Feinkost Kaefer, Iglo
or Wagner
100 –
450 g
Wire rack on
enamel tray
For heating up and
browning of industrially
prepared frozen Pizza.
Remove the packing and
place the Pizza directly on
the wire rack on the
enamel tray.
Poultry pieces
(fresh)
Start weight
800 g
1 Press
Whole chicken, duck
or spring chicken,
turkey legs and
turkey breast
900 –
2000 g
Upside down
saucer on the
enamel tray
Cook poultry with breast
or skin side down first.
Remove tips of wings on
larger chickens. Turn after
2
⁄3 cooking time at beep
sound. Attention: Hot fat!
Take care when removing
accessory.
En-16
Auto Weight Programs
Use the program Geflugelteile (Poultry Pieces) just for fresh food. Season the food before
cooking as usual. In order to achieve browning on both sides it is necessary to turn the food.
Cook poultry first with the skin or breast side down before turning the food and continue cooking.
Please stand poultry before serving for approx. 5 minutes to even temperatures. Frozen (TK)
products are industrially prepared frozen goods, which can be bought in a food store. Always
remove the food from the packaging before preparation. Please adhere to the recommended
accessories and weight limits according to the table and follow the notes and tips.
Note:
Before using the programs frozen chips, frozen pizza or poultry the oven and the accessory have to be pre-heated. Refer to page 17.
Page 19

English
En-17
Note:
Before using the programs frozen chips, frozen pizza or poultry the oven and the accessory have
to be pre-heated. Use the following sequence
Notes:
1. During the Frozen Chips program a beep sounds half way through cooking. During the
Poultry program a signal sounds approximately two thirds through the cooking time. Turn food
when beep sounds.
2. Please note that the results depend on the quality of the food and ingredients and therefore
results can vary, especially for ready prepared frozen (TK) products.
3. Please adhere to the minimum and maximum weight for the programs for suitable food.
Weights outside of this range should not be cooked with the above auto weight programs.
4. Instructions for preparation of food which is not suitable for these programs can be found in
the recipe part or the tables of the cook book.
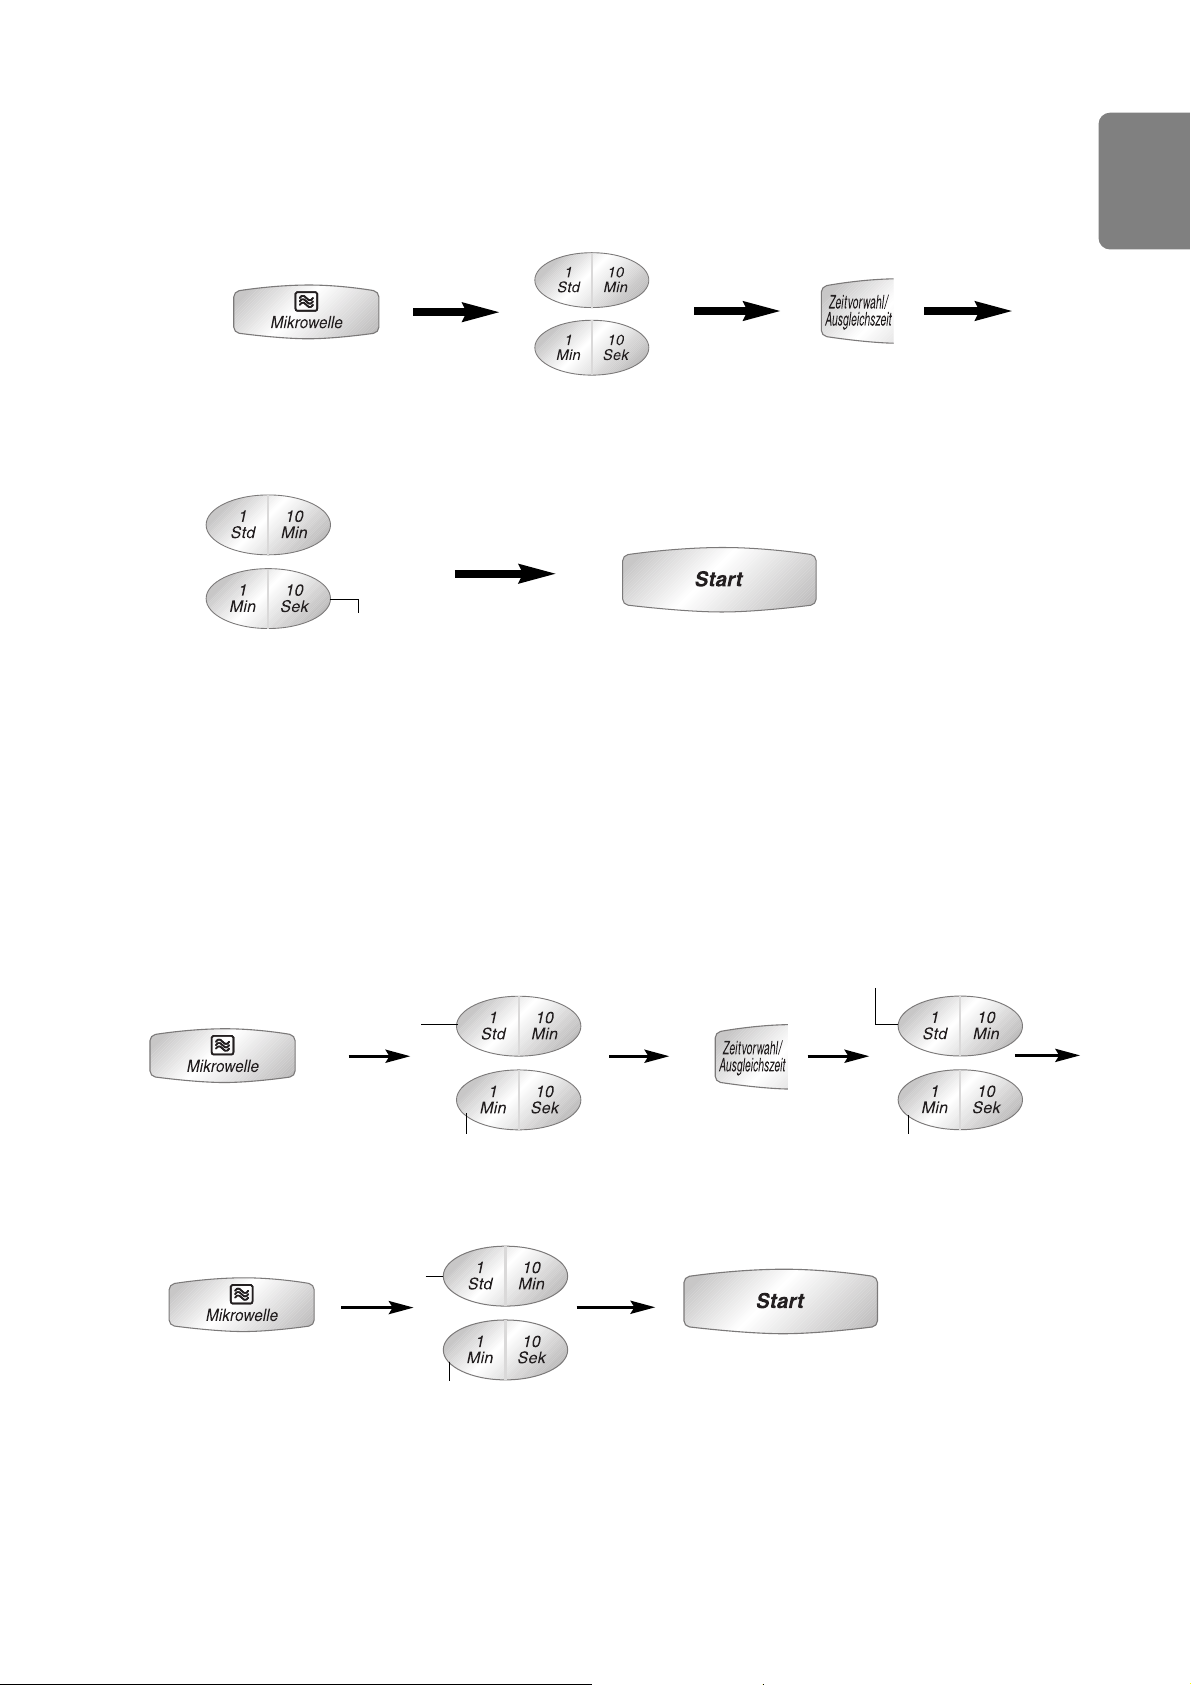
1. Select the
appropriate
program.
2. Press START to
pre-heat. There is
a beep sound
after pre-heating
3. Set the weight and
place food in the
oven.
4. press START.
Auto Weight Programs
Page 20

Gratin Dauphinois 1 Press
Grease casserole dish (approx. 18 x 28 cm) with the butter.
Heat the milk, cream, garlic, thyme and diced shallot in a bowl
for 4 minutes at 1000W. Pour liquid through a sieve and add
the nutmeg.
Peel potatoes and cut into 3mm thick slices. Place half of the
potatoes in layers into the casserole dish; season every layer
with salt and pepper. Pour half of the milk-cream mixture over
the potatoes, then add the rest of the potatoes in layers. Poor
over the rest of the milk-cream mixture. Cover with cheese.
Place the casserole dish on the enamel tray and select
program Gratin Dauphinois (press pad once). Allow to stand
for 5 minutes after cooking, then add a few fresh thyme
leaves.
1 teaspoon butter
750 g potatoes, eg Desiree
200 ml full fat milk
185ml cream
1 clove of garlic,
peeled and halved
2 twigs of thyme,
a little more to garnish
1 shallot, coarsely diced
1 pinch of nutmeg, freshly grated
25 g Parmesan, freshly grated
Salt and freshly ground
black pepper
En-18
Homemade dishes
This function allows cooking of dishes using raw ingredients on the auto weight programs. Gratin
Dauphinois, lasagne pesto and chicken gratin can be prepared using the button “Auflauf”. For
these recipes please follow exactly the amounts and methods, which are described on the next
page.
1. Select the desired
program
(1 Press Gratin
Dauphinois, 2
Presses Lasagne
Pesto, 3 Presses
Chicken gratin).
2. Press START to
pre-heat.
a signal sounds
after pre-heating.
Place food in oven.
3. Press START.
Page 21

English
En-19
Chicken Gratin 3 Presses
Skin the cooked chicken and dispose of the skin. Cut chicken
meat in to bite size pieces. Place meat together with 2/3 of the
Emmental in a bowl. Cut mushrooms into thick slices, potatoes
into 5mm thick slices. Place the mushroom and potato slices
into the bowl as well; mix in the leek slices, cheese sauce,
cream and garlic. Grate the nutmeg and add, season with salt
and pepper. Mix well and pour into casserole dish. Cover with
the rest of the cheese. Place casserole dish onto the enamel
tray and select program “Chicken Gratin” (Haehnchenauflauf)
(Press pad 3 times)
300 g packet of fresh
cheese-sauce mix
1 cooked chicken, 1 kg
(auto program for roast chicken,
cooled down)
225 g Emmental cheese, grated
250 g mushrooms
1 stem of leek, sliced
200 g small potatoes,
eg charlotte, washed
145 ml whipping cream
1 clove of garlic,
peeled and thinly sliced
½ nutmeg grated
Salt and freshly ground pepper
Lasagne Pesto 2 Presses
Melt the butter in a large heatproof bowl on 1000 W for 1
minute, or until melted. Add the flour and cook on 100 W for
30-40 seconds. Gradually add the milk, whisking all the time.
Cook on 1000 W for 8-10 minutes, stirring or whisking every
minute until the mixture has thickened. Add the nutmeg and
allow to cool, stirring occassionally to prevent a skin forming.
Place the spinach in a large heatproof bowl, pour over boiling
water and leave for 30 seconds. Drain under cold water then
squeeze well to remove excess liquid. Chop coarsely. Spread
a spoonful or two of the sauce on the bottom of a large
ovenproof dish, and lay a third of the lasagne on top. Spoon
over a third of the sauce and spread it out. Swirl a spoonful of
pesto through the sauce with a knife and scatter over half the
spinach with a third of the tomatoes, a few basil leaves and a
third of the cheeses. Season and layer another third of the
lasagne, a third of the sauce, a spoonful of pesto, the rest of
the spinach, a third of the tomatoes and cheeses and some
basil. Season. Finish with a layer of lasagne, the last of the
sauce, pesto, cheeses and tomatoes, including those on the
vine. Place dish on the metal tray and select ʻPesto Lasagneʼ
program (tow presses).
1.2 litres milk
100 g butter
100 g plain flour
pinch freshly grated nutmeg
250 g baby spinach leaves
125 g fresh lasagne sheets
2 rounded tbsp pesto
300 g cherry tomatoes on the vine
2 or 3 vines left whole
handful of fresh basil leaves
175 g fresh parmesan,
coarsly grated
2 x 150 g balls of buffalo
mozzarella, torn into bite size
pieces
Homemade dishes
Page 22
En-20
Delay Start Cooking
By using Delay/Stand Pad, you are able to program Delay Start cooking.
NOTE:
1. Three stage cooking can be programmed including Delay Start cooking.
e.g.
2. If the programmed delay time exceeds one hour, the time will count down in units of minutes.
If less than one hour, the time will count down in units of seconds.
3. Delay Start cannot be programmed before any Auto Programs.
• Press
Delay/Stand Pad.
• Set the delay time by
pressing Time Pads (up to
9 hours 59 minutes).
• Set the desired cooking program
and cooking time.
• Press Start Pad.
e.g.
Delay Start: 1 hour High Power: 10 min.
Simmer Power: 20 min.
once
once
once
5 times twice
inoperable
inoperable
inoperable
inoperable
Page 23
English
En-21
Stand Time
By using Delay/Stand Pad, you can program Stand Time after cooking is completed or use to
program the oven as a minute timer.
• Set the desired cooking program and
cooking time.
• Press Delay/Stand Pad.
• Set desired amount of time by
pressing Time Pads (up to 9 hours
59 minutes).
• Press Start Pad.
NOTE:
1. Three stage cooking can be programmed including Stand Time.
e.g.
2. If the oven door is opened during the Stand Time or Minute Timer, the time in the display
window will continue to count down.
3. This feature may also be used as a timer. In this case press Delay/Stand Pad, set time and
press Start Pad.
e.g.
High Power: 4 min.
Stand Time: 5 min.
High Power: 2 min.
inoperable
once
once
twice
inoperable
4 times
inoperable
5 times
inoperable
Page 24

En-22
Questions and Answers
Q: Why wonʼt my oven turn on? A: When the oven does not turn on, check the
following:
1. Is the oven plugged in securely?
Remove the plug from the outlet, wait 10
seconds and reinsert.
2. Check the circuit breaker and the fuse.
Reset the circuit breaker or replace the
fuse if it is tripped or blown.
3. If the circuit breaker or fuse is all right,
plug another appliance into the outlet. If
the other appliance works, there probably is a problem with the oven. If the
other appliance does not work, there
probably is a problem with the outlet. If it
seems that there is a problem with the
oven, contact an authorized Service
Center.
Q: My microwave oven causes interference
with my TV. Is this normal?
A: Some radio and TV interference might occur
when you cook with the microwave oven.
This interference is similar to the interference caused by small appliances such as
mixers, vacuums, blow dryers, etc. It does
not indicate a problem with your oven.
Q: The oven wonʼt accept my program. Why? A: The oven is designed not to accept an
incorrect program. For example, the oven
will not accept a fourth stage, and will not
accept Auto Weight Program after Delay
Start.
Q: Sometimes warm air comes from the oven
vents. Why?
A: The heat given off from the cooking food
warms the air in the oven cavity. This
warmed air is carried out of the oven by the
air flow pattern in the oven. There are no
microwaves in the air. The oven vents
should never be blocked during cooking.
Q: There are humming and clicking noises
from my oven when I cook by
COMBINATION. What is causing these
noises?
A: The noises occur as the oven automatically
switches from microwave power to CONVECTION/GRILL to create the combination
setting. This is normal.
Q: Can I check the pre-set oven temperature
while cooking or preheating by
CONVECTION?
A: Yes. Press Convection Pad and the oven
temperature will appear in the display window for 2 seconds.
Q: Can I easily cook my favourite recipes
using CONVECTION/GRILL?
A: Yes. You can cook your favourite recipe just
as you would in a conventional oven. Check
instructions in the Panasonic Cookbook for
suggested oven temperatures and cooking
times.
Page 25

English
En-23
Questions and Answers
Q: “D” appears in the display and the oven
does not cook. Why?
A: The oven has programmed DEMO MODE.
This mode is designed for retail store
display. Deactivate this mode by pressing
Microwave pad once and Stop/Cancel pad 4
times.
Q: Can I use a conventional oven thermometer
in the oven?
A: Only when you are using
CONVECTION/GRILL cooking mode. The
metal in some thermometers may cause
arcing in your oven and should not be used
on MICROWAVE and COMBINATION
cooking modes.
Q: My oven has an odour and generates
smoke when using the CONVECTION,
COMBINATION and GRILL function. Why?
A: After repeated use, it is recommended to
clean the oven and then run the oven
without food, glass tray, and roller ring on
CONVECTION 250°C for 20 minutes. This
will burn off any food, residue or oil which
may cause an odour and/or smoking.
Q: The oven stops cooking by microwave and
'H97' or 'H98' appears in the display. Why?
A: This display indicates a problem with the
microwave generation system. Please
contact an authorised service centre.
Page 26

En-24
Care of Your Oven
1. Turn the oven off before cleaning.
2. Keep the inside of the oven, door seals
and door seal areas clean. When food
splatters or spilled liquids adhere to the
oven walls, door seals and door seal
areas wipe off with a damp cloth. Mild
detergent may be used if they get very
dirty. The use of harsh detergent or
abrasive is not
recommended.
DO NOT USE COMMERCIAL OVEN
CLEANERS.
3. Do not use harsh abrasive cleaners or
sharp metal scrapers to clean the oven
door glass since they can scratch the
surface, which may result in shattering of
the glass.
4. The outside oven surface should be
cleaned with a damp cloth. To prevent
damage to the operating parts inside the
oven, water should not be allowed to seep
into the ventilation openings.
5. If the Control Panel becomes dirty, clean it
with a soft, dry cloth. Do not use harsh
detergents or abrasives on the Control
Panel. When cleaning the Control Panel,
leave the oven door open to prevent the
oven from accidentally turning on. After
cleaning touch STOP/CANCEL Pad to
clear the display window.
6. If steam accumulates inside or around the
outside of the oven door, wipe with a soft
cloth. This may occur when the
microwave oven is operated under high
humidity conditions and in no way
indicates a malfunction of the unit.
7. It is occasionally necessary to remove the
glass tray for cleaning. Wash the tray in
warm soapy water or in a dishwasher.
8. The roller ring and oven cavity floor
should be cleaned regularly to avoid
excessive noise. Simply wipe the bottom
surface of the oven with mild detergent
and hot water then dry with a clean cloth.
The roller ring may be washed in mild
soapy water. Cooking vapours collect
during repeated use but in no way affects
the bottom surface or roller ring wheels.
After removing the roller ring from the
cavity floor for cleaning, be sure to
replace it in the proper position.
9. When using the GRILL, CONVECTION or
COMBINATION mode, some foods may
inevitably splatter grease on to the oven
walls. If the oven is not cleaned
occasionally, it may start to “smoke”
during use.
10. A steam cleaner is not to be used for
cleaning.
11. This oven should only be serviced by
qualified personnel. For maintenance and
repair of the oven contact the nearest
authorized dealer.
12. Keep air vents clear at all times. Check
that no dust or other material is blocking
any of the air vents on the top, bottom or
rear of the oven. If air vents become
blocked this could cause overheating
which would affect the operation of the
oven and possibly result in a hazardous
situation.
13. Failure to maintain the oven in a clean
condition could lead to deterioration of
surfaces that could affect the life of the
appliance and possibly result in a
hazardous situation.
Page 27

English
En-25
Technical Specifications
Information on Disposal for Users of Waste Electrical & Electronic Equipment
(private households)
This symbol on the products and/or accompanying documents means that used electrical and
electronic products should not be mixed with general household waste.
For proper treatment, recovery and recycling, please take these products to designated collection points, where they will be accepted on a free of charge basis.
Alternatively, in some countries you may be able to return your products to your
local retailer upon the purchase of an equivalent new product.
Disposing of this product correctly will help to save valuable resources and
prevent any potential negative effects on human health and the environment
which could otherwise arise from inappropriate waste handling. Please contact
your local authority for further details of your nearest designated collection point.
Penalties may be applicable for incorrect disposal of this waste, in accordance
with national legislation.
For business users in the European Union
If you wish to discard electrical and electronic equipment, please contact your dealer or supplier
for further information.
Information on Disposal in other Countries outside the European Union
This symbol is only valid in the European Union.
If you wish to discard this product, please contact your local authorities or dealer and ask for the
correct method of disposal.
Pursuant to the directive 2004/108/EC, article 9(2)
Panasonic Testing Centre
Panasonic Service Europe, a division of Panasonic Marketing Europe GmbH
Winsbergring 15,22525 Hamburg, F.R.Germany
Manufactured by Panasonic Home Appliances Microwave Oven (Shanghai) Co.,Ltd, 898
Longdong Road, Pudong, Shanghai, 201203, China.
Power Source: 230 V, 50 Hz
Power Consumption: Maximum; 2400 W
Microwave; 1260 W
Grill; 1360 W
Convection; 1380 W
Output: Microwave; 1000 W (IEC-60705)
Grill Heater; 1300 W
Convection Heater; 1300 W
Outside Dimensions: 510 (W) x 390 (D) x 305 (H) mm
Oven Cavity Dimensions: 359 (W) x 352 (D) x 217 (H) mm
Uncrated Weight: 15 kg
Noise: 50 dB
Specifications subject to change without notice.
This product is an equipment that fulfills the European standard for EMC disturbances (EMC =
Electromagnetic Compatibility) EN 55011. According to this standard this product is an equipment of group 2, class B and is within required limits. Group 2 means that radio-frequency
energy is intentionally generated in the form of electromagnetic radiation for warming and cooking of food. Class B means that this product may be used in normal household areas.
Page 28
En-26
Which containers to use?
For microwave cooking
• Only use white kitchen paper for short
amounts of time. Do not use patterned
kitchen paper.
• Only use plastic which is microwave-safe. Do
not use melamine.
• Do not cook foods with a high fat or sugar
content in plastic containers.
• Only use straw or wicker containers for very
short amounts of time. Make sure they do
not have metal fastenings.
• Only use earthenware or stoneware
containers if they are completely enamelled.
• To use the accessories provided with your
oven please refer to the guidelines on page 7
of your operating instructions.
• DO NOT use porcelain with gold or silver
decoration. Sparks could be produced which
would damage the decoration.
For combination cooking
• You can use smooth metal moulds during
combination cooking by placing them on the
metal tray. For more details please refer to
page 10. Do not use spring form tins or
enamelled iron kitchenware.
• If you see any sparks, turn off the oven and
continue to cook using the traditional
methods (grill, turbogrill or convection
heating) or, if possible, change the container
used.
• DO NOT place metal containers directly on
the wire rack.
YES
YES
YES
For Microwave Cooking
For Cooking with the Grill
NO
Page 29
English
En-27
NO when cooking with microwaves
YES when cooking using the grill
1. Fill a microwave safe measuring jug with
300ml of cold water.
2. Place this bowl next to the container you
want to test, on the glass tray. If the
container to be tested is very wide, place
the measuring bowl inside it.
3. Heat on MAX for 1 minute.
Result
If the container is suitable for microwaves, it
will stay the same temperature whilst the water
will be warm. If the container seems hot, that
means it absorbs microwave energy.
Therefore you cannot use it in Microwave
mode.
Note: This test cannot be used for plastic
containers or containers which are completely
enamelled, such as Le Creuset ® cookware,
as these dishes have cast iron underneath the
layers of enamel.
Testing dishes for suitability - for Microwave cooking only.
When unsure that a cooking container is
suitable for use in your microwave, check by
using the following test:
YES
NO when using Combination cooking
For Combination Cooking
For Convection Cooking
Page 30
En-28
How do microwaves work?
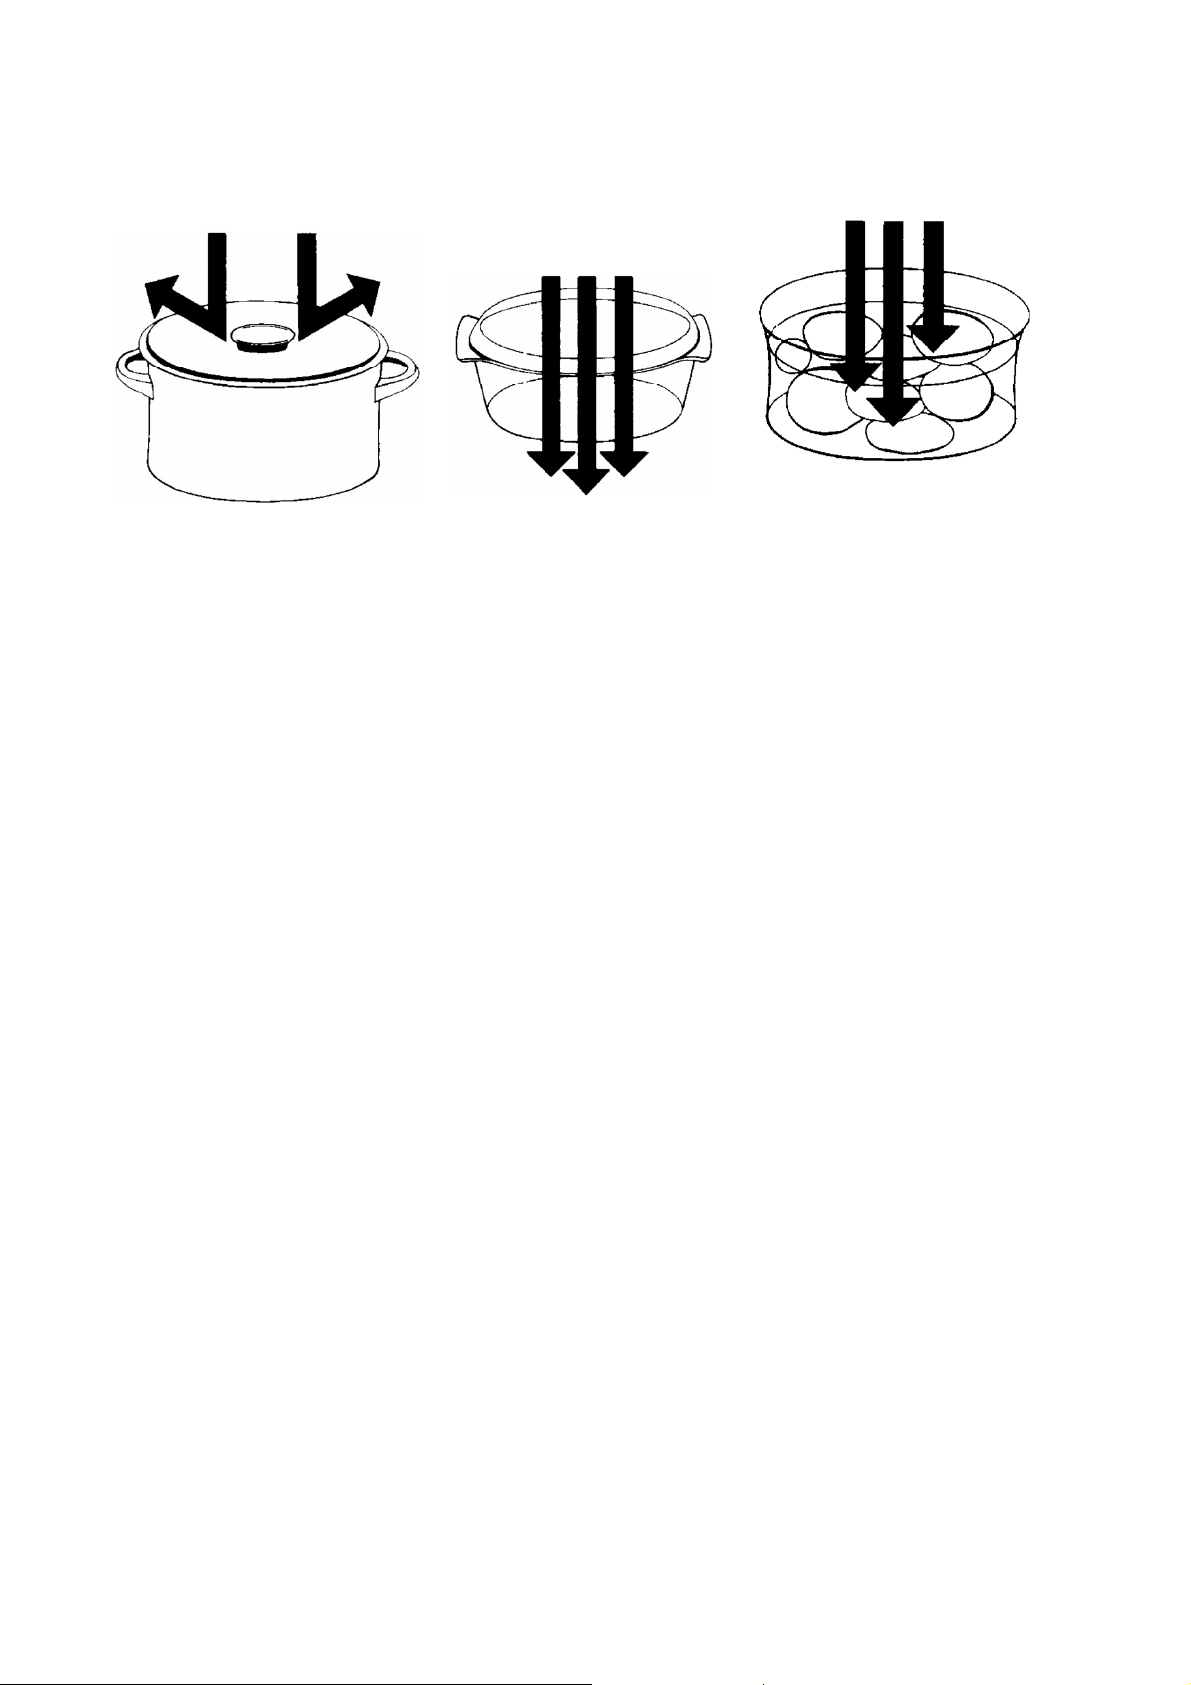
Microwaves have three properties:
In conventional cooking, the hotplate or oven has to heat up first, then the baking dish, before the
heat can reach the food.
This is a long process which wastes a lot of energy. With microwaves, however, the heat reaches
the food directly, with no detours on the way.
The microwaves penetrate the food directly and cause the water, fat or sugar molecules to
vibrate. The friction caused by this produces heat, which then heats the food directly (like when
we rub our hands together to warm them).
This property is called absorption, in other words the transfer of microwave energy to the water
molecules.
Microwaves also have the property of passing through certain materials, in particular glass,
porcelain, ceramic or even paper, without heating up the material itself. If the containers do get
hot, it is because heat is transferred to them from the hot food.
However, microwaves are reflected off metal, so they bounce off the walls and the metal door
screen, back onto the food.
This is why, for microwave cooking, no metal containers or plates with gold or silver decoration
can be used.
Page 31

English
En-29
How to cook with microwaves
Covering
Cover fish, vegetables, soups and stews.
Leave cakes, sauces and potatoes (skin on)
uncovered. Like in traditional cooking, moisture
evaporates during microwave cooking. Cover
the container with the suitable lid or with cling
film.
Stirring and turning
When cooking large quantities, it is often
necessary to stir the food during the cooking
process in order to move the food from the
edge of the dish towards the middle and vice
versa. Large pieces of meat or poultry should
be turned half-way through the cooking
process. On Auto programmes, a beeping
sound will remind you to do this.
Initial temperature
The colder the food is to begin with, the longer
the cooking or reheating will take. Leftover food
kept at room temperature will be reheated more
quickly than leftover food taken straight from
the refrigerator.
Size and shape of container
Microwaves cook more effectively if food is
placed in a round dish rather than a rectangular
or square one. The same quantity of food will
cook more quickly in a wide dish than in a tall
narrow one. Follow the instructions given in the
recipes. Cooking times vary significantly
depending on the size and shape of the
containers used.
Page 32

En-30
How to cook with microwaves
Spreading out the food
Food cooks more quickly and evenly if it is
separated and spread out in the dish. Avoid
piling up or cramming in the food.
Arranging the food
Individual portions such as chicken legs, pork
chops etc. must be arranged in the dish so that
the meaty parts are at the edge of the dish and
the less meaty parts (which need less cooking)
are in the middle.
Quantity
Cooking times are proportional to the quantity
of food to be cooked. 500g of potatoes will cook
more quickly than 1kg.
Standing time
Leave roast meat, whole potatoes (wrapped
in aluminium foil) and cakes to stand
outside the oven for 10 to 15 minutes after
cooking. Most food continues to cook once the
oven is switched off, due to the conduction of
heat. Take this into account when calculating
cooking times.
Page 33

English
En-31
How to cook with microwaves
Ingredients
Food which contains a lot of fat, sugar or salt
heats up very quickly. The filling may be much
hotter than the crust. Be careful when eating.
Do not overheat, even if the crust does not
seem very hot.
Density
Light and airy foods cook more quickly than
heavy dense foods.
Pricking
The skin or airtight membrane of certain food
items prevents steam from escaping during the
cooking process. For example: eggs, potatoes,
apples, sausages, etc.
Cooking time
The cooking times given are approximate and
may vary depending on the initial temperature
of the food, size of container used, quality of
the ingredients and your personal taste. Check
the food during the cooking process.
Remember that undercooked food can be
cooked for longer, whilst overcooked food may
be spoilt.
Page 34

En-32
Choosing the right microwave
cooking power
The 6 possible cooking powers act like the
thermostat of a traditional oven to control the
speed of cooking. Some dishes - for example
soups and stews - need different cooking
powers to be used (MAX for 10 minutes to
bring the food to the boil, before continuing the
cooking process for one hour at 250W). Your
oven allows you to use 3 consecutive stages of
cooking (see directions for use).
NOTES: (1) Whilst the food is cooking, you can
extend the cooking time by pressing the 1 min
pad.
(2) The maximum duration using MAX power is
30 minutes. - The maximum duration using
Defrost mode is 99 minutes 50 seconds.
The EXPRESS function allows you to start
cooking at MAX power immediately, simply by
choosing the cooking time and pressing Start.
Note: This chart is for cooking using microwaves only. Refer to page 10 for instructions for
combination cooking.
Max
Power
Min
Warm
Medium
Low
Simmer
Reheating sauces, starchy food, cooked dishes and
liquids, and cooking stewed fruit, vegetables and red
meat.
Power (Watts)
Uses
1000W
270W
600W
440W
100W
250W
To defrost meat, fish, fruit and pastries, please refer to
the defrosting charts.
For all defrosting which cannot be done using an
Automatic programme.
To keep dishes warm, soften butter or ice-cream, bring
cheese or fruit to temperature.
Slow cooking, braising, casseroles, pâtés, reheating red
meat.
Delicate mixtures containing egg, quiches, reheating
baby food, stews.
Cooking fish, white meat, poultry, cakes, sauces;
reheating milk and frozen dishes with sauces.
Page 35

English
En-33
Convection heating
This traditional cooking method (100°C to
220°C) allows you to cook food using heat
produced by the ventilated element in the top
of the oven. NO MICROWAVES are used in
Convection Heating mode: you can therefore
use any metal dishes or heat-resistant
containers. NB: you can choose a
temperature from 100° to 220°C in 10°C
increments. For quick selection, temperature
starts at 150°C.
Preheating
Remember to preheat the oven for the best
results when cooking meat and pastries. It is
preferable to preheat the oven with the
accessories inside and not to open the oven
door whilst it is preheating. See directions for
use, page 12. The convection assisted top fan
of this oven is particularly quick in browning the
top of cakes, so it may be necessary to reduce
the temperature by 20°C when using cooking
temperatures stated in other cookbooks.
Accessories
In order to get a nice base colour for cakes you
must preheat the oven with the metal tray. For
browning the top of a gratin or grilling relatively
thin meat, you may place the dish on the wire
rack, on the metal tray.
Check the food several times and don't
hesitate to cover the top of a cake or a quiche
with a round of baking foil. You can also lower
the temperature during cooking (press
Convection pad once to indicate the
temperature in the display window, then,
several presses will change the temperature by increments of 10°C)
Warning:
in Convection and Grill Heating mode, the accessories and the oven will be very
hot. Take care not to burn yourself.
DO NOT ATTEMPT TO PREHEAT THE
GRILL.
The quartz Grill on your oven browns and
crisps for a wide variety of foods.
The Grill provides 3 Grill Settings:
1 Press Grill 1 1300 W
2 Presses Grill 2 950 W
3 Presses Grill 3 700 W
Place food to be grilled on the wire rack or in a
shallow dish on wire rack. Place this on the
metal tray. For large weight foods, place the
dish directly on the metal tray.
The food being grilled should normally be
turned over after half the grilling time.
Never cover foods when grilling.
There is NO MICROWAVE POWER ON THE
GRILL ONLY PROGRAM
Grilling
First side Second side
Steak (230 g, 2 pieces, well done) approx. 10 mins. approx. 6 mins.
Rib on the bone 1000 g, medium rare 18 to 22 mins (Grill 2) approx. 20 mins (Grill 2).
Porkchops (320 g, 2 pcs) 11-12 mins. approx. 10 mins.
Kebabs approx. 10 mins. approx. 8 mins.
Sausages (320 g, 4 pcs) 7-9 mins. approx. 7 mins.
Chicken leg (300 g , 1 pce) 9-10 mins. 8-10 mins.
Toast 2-3 mins. 2 mins.
Approximate Times for Grilling (Grill 1)
Page 36

En-34
Combination cooking:
Grill or Convection Heating with Microwaves
What is combination cooking?
Combination cooking adds microwaves to the
traditional cooking process in order to obtain
the taste of traditionally cooked food whilst
reducing cooking times by a third or by half.
Which foods?
Mainly large food items to be cooked or
roasted, which need to be cooked for a long
time, whether they are meat, fish, gratins or
cakes. However, small items (biscuits, pastries,
steaks, brioches, meringues, choux pastry ...),
soufflés and small joints of red meat are not
suitable for Combination cooking.
How does it work?
Press the Combi pad then follow the
instructions (or see page En-13 of Operating
Instructions).
When to preheat?
For slow-cooking, simmering, most cakes, flans
and gratins it is not necessary to preheat the
oven. For short cooking times, roast joints,
quiches, tarts, pies, desserts using puff pastry
or dough, it is necessary to preheat the oven.
For Combination cooking using the Grill only,
the oven must not and cannot be preheated.
As the inside of the oven is smaller than
that of a traditional oven, take care not to
burn yourself when you put the dish into
the oven.
How to preheat?
• With preheating:
Choose combination cooking then press
Start without displaying the cooking time.
Preheating takes place without
microwaves being used. It is better to
preheat with the necessary accessories in
place. When the oven reaches the required
temperature, it makes 3 beeps and “P”
flashes in the display. Put the dish into the
oven (without pressing the Stop/Cancel
button), choose the cooking time and press
Start. If you do not select cooking time and
press start, the oven will maintain its
temperature for 30 min then turn itself off.
• Without preheating:
Place the dish in the oven, choose
combination cooking, enter the cooking time
and then press Start.
Advice for cooking using the
combination mode
First of all check, on the previous page,
whether the food item is suitable for
combination cooking.
Container:
• if using a Pyrex ® or ovenproof porcelain
dish: directly onto the metal tray or the wire
rack or the glass tray (Combination with grill)
• if using a metal dish (smooth and non-
springform): on the metal tray only. DO not
place on the wire rack. Metal dish are
recommended for baking cakes and quiches
in order to get a nice browning of bases and
sides.
Cooking time:
Allow for half to two-thirds of the usual cooking
time. Remember to note down your results in
the chart below. Always check your food as it
cooks. Open the oven door, check the food
then press the Start button again to continue
the cooking process.
Temperature and power:
You will not achieve good results by using a
high microwave power during combination
cooking. Increase the temperature by 20 to
30°C - so the cooking time will be shorter - and
use a power of between 100 to 440W
depending on the size and type of food. If
unsure which combination to use, always try to
find the recipe in this book which is the closest
to what you want to make, and follow the
recommended combination.
Page 37

English
En-35
Automatic defrosting
During automatic defrosting,
beeps will sound to remind
you to stir or turn the food. See also your
instructions for use, page 13.
1-Meat / Fish (200-2500 g)
. Flat pieces of
meat eg. steak,
roulade, mince,
poultry, game, roast
and fish. It is better to
spread out pieces in a
single layer. Separate
the pieces and
turn/stir at beep
sounds. Turn the
joints and poultry at beep sounds and protect
thin, protruding or fatty parts. Allow a standing
time of 15 minutes for pieces to 90 minutes for
joints and poutlry.
Container: having removed the packaging,
place the food in containers which can catch the
liquid released when it defrosts. Do not place
food directly on the glass tray. It is
recommended to place large food items on a
plastic rack or even an upside-down saucer, in
order to prevent the food sitting in its own
juices. It is not necessary to cover the food
during defrosting.
2-Bread / Cake
(100-1500 g): Bread - whole
and sliced, cakes
and pastry cakes
with fruit. Remove
all packaging and
place on a flat plate.
Turn bread over
310 g.
Manual defrosting
Frozen food items which are not suitable for
automatic defrosting can still be defrosted
manually by choosing the MIN power and
entering the defrosting time manually (please
refer to the chart for defrosting times).
The power used is about 270W using a cyclic
defrost. This means that the oven divides the
total defrosting time into 8 sections, alternating
between defrosting and standing time. This
process aims to defrost the middle of the food
item before the outside is cooked.
Defrosting
Page 38

En-36
Defrosting
General recommendations Standing
time
Small food items can
be cooked
immediately after
defrosting. It is normal
for large food items to
still be slightly frozen
in the middle. They
must be left to
stand
for at least one hour
before cooking. During this standing time, the
temperature evens out and defrosting continues
through conduction. NB: if the food item is not
to be cooked immediately, keep it in the
refrigerator. Never refreeze a defrosted food
item without cooking it first.
Roasting meat on the bone and whole
poultry
It may be necessary
to protect the thin and
protruding parts of
these food items with
small pieces of
aluminium foil in order
to stop these parts
starting to cook.
It is not dangerous to
use small pieces of
aluminium foil in your oven, as long as they do
not touch the oven walls.
Minced or cubed meat, small shellfish
As these food items defrost quickly on the
outside, it is necessary to remove them and mix
during defrosting.
Small items
Cutlets and chicken pieces must be separated
as soon as possible to allow them to defrost
evenly. Fatty items (such as lamb chops)
defrost more quickly.
Check the food as it defrosts, and turn the
food items several times, even when using
an automatic programme. Remove pieces of
meat as and when
they are defrosted.
Page 39

English
En-37
Food item Weight / Quantity Duration in minutes Minimum standing time (minutes)
Meat
- meat for roasting on the bone # 500 g 18-20 60
- meat for roasting off the bone # 500 g 20-22 70
- chops # 500 g 8-12 15
- cutlets # 250 g 6-7 10
- kidneys* 250 g 7-8 10
- thin steak* 430 g (2 pieces) 11-12 10
- rib steak* 150 g 4-6 10
- minced meat, sausage meat* 500 g 10-12 10
- hamburger* 100 g (1 pce) 3 min 40 s 1
140 g (1 pce) 5 2
200 g (2 pieces) 6-7 10
400 g (4 pieces) 10-12 10
pieces for stew* 500 g 12-14 15
- whole poultry # 500 g 12-13 60
- poultry in pieces # 1 kg (4 pieces) 22-24 30
- poussin # 400 g 15 30
- rabbit # 500 g 14-15 30
- andouillette sausage* 300 g (2 pieces) 10-11 15
Butter 250 g 2 10
Fruit coulis* 200 g 3-4 10
Cheese* 450 g 3 10
Choose minimum power 270 W then calcuate the cooking time as per the chart below. For large quantities, adjust the cooking time.
The times indicated below are for guidance only. Always check how defrosted the food is by opening the door then restarting the defrosting. It is not necessary to cover
food during defrosting.
NB:
# turn these food items half-way through defrosting and protect the ends and protruding parts with aluminium foil
* Stir, turn or separate several times during defrosting.
Page 40

En-38
Food item Weight / Quantity Duration in minutes Minimum standing time (minutes)
Berries* 200 g
(spread out thinly) 300 g
5-6
10
500 g 12 10
Cooked desserts 5 to 6 10
- Sponge cake 300 g (1 piece) 5 to 6 10
- Black Forest Gateau
550 g (1 piece) 4-5 15
- Bavarian cream 110 g (1 portion) 8 sec. 15
- Raspberry tart 470 g (1 piece) 10 15
- Chocolate cake
500 g (1 piece) 5 60
- Lemon tart 110 g (1 piece) 3 5
Concentrated fruit juice* 200 ml 4 4
Pastry / Dough
- sweet or shortcrust pastry*
300 g (block)
4-5 20
250 g (rolled)
5 20
- pies*
250 g (block)
3 20
250 g (rolled)
3 20
- pizza dough*
240 g (ball)
4 20
350 g (rolled)
5 20
Fish
-whole # 400 g (2 pieces) 10-12 15
-fillets # 500 g (4 pieces) 13-14 15
-fish steak* 380 g (2 pieces) 10 15
-thick pieces of meat*
120 g (2 pieces) 9 15
-prawns*
200 g 7 10
-fish in breadcrumbs* 120g (2 pieces) 5 10
Choose minimum power 270 W then calcuate the cooking time as per the chart below. For large quantities, adjust the cooking time.
The times indicated below are for guidance only. Always check how defrosted the food is by opening the door then restarting the defrosting. It is not necessary to cover
food during defrosting.
NB:
# turn these food items half-way through defrosting and protect the ends and protruding parts with aluminium foil
* Stir, turn or separate several times during defrosting.
Page 41

English
En-39
Your oven allows you to either reheat items
manually, by choosing the cooking time and
method, or, for many popular dishes, to use the
automatic programmes which calculate the
cooking time and choose the best cooking
method for you.
Automatic Reheating
1. Stews
(300-800 g) - Stews, raviolli, ragouts
or goulash (industrially
prepared or home made. Heat
in a dish with lid, stir after half
cooking time and before standing time.
2. Plated meals (200-500 g) - Industrially
prepared products or home made plated meals
with 3 components. Heat on a plate with cover.
Allow to stand 2 minutes after heating.
1. Frozen chips (200-500 g) - Frozen chips
suitable for cooking in an
oven, instrustrially prepared.
Remove all packaging and
place directly on enamel tray on wire rack. Turn
after
1
⁄2 cooking time.
2. Frozen pizza (100-450 g) - For heating and
browing industrially prepared frozen pizza. Place
on the wire rack on the enamel tray. The results
will vary depending on the topping (vegetables
and seafood will take longer to reheat and brown
than cheese or pepperoni) and depending on the
thickness of the base.
Manual Reheating
(microwave or combination):
All sauces or food items which are liquid or
“moist” should be reheated using microwave
only (dishes in sauce, ravioli, pureed food,
soup, vegetables, starchy food etc.). Food
which must be browned or crispy (gratins,
quiches, pies, pizzas, filled-pastry items, sweet
pastries etc.) should be reheated using
combination cooking.
Container and accessories:
• microwaves only: the food to be reheated
should be placed in containers which are
microwave safe, pyrex®, or ovenproof
porcelain. It is recommended to take food out of
any plastic sachets it may be contained in, as
these could cause the reheating to be very
uneven. It is also more difficult to remove this
packaging when the sachets are piping hot.
Food contained in 2 separate packets (for
example rice and meat for a curry) should if
possible be mixed in order to avoid uneven
temperatures; the more fatty food (e.g. meat)
should be placed in the middle or underneath,
with the food which is denser or contains more
water (e.g. vegetables or potatoes) should be
placed around the outside. Cover the dish or
plate with cling film or a lid. Most packaged
ready-meals give instructions for reheating in
the microwave. Follow the manufacturerʼs
advice but check the temperature of food
before eating and increase the reheating time if
necessary.
• combination cooking: remove packaging
from dry food items (deep pan pizzas or pizzas
for cooking). For moist food items (gratins,
lasagnes, shepherdʼs pie etc.) it is preferable to
use dishes which are microwave safe and heatresistant, which you place on the metal tray or
the wire rack according to their thickness.
DO NOT place metal or aluminium containers
or aluminium directly on the wire rack.
Preheating (when using Convection mode) is
often recommended. See the charts on page
18 onwards.
Reheating
Page 42

En-40
General Advice For Reheating
Lid
As a general rule, “moist” food or food with
sauce which is to be reheated in the microwave
must be covered with a lid, dishcover or
clingfilm; “dry” or crispy food or food to be
baked should not be covered. Finally sauces,
drinks and soups which need to be stirred
before and after reheating should not be
covered (be careful the food does not spill) or
should just be covered with a saucer.
Individual portion ready-meals
Place the dense food items around the edges
and spread out the more liquid items. If there is
no sauce, add a knob of butter or other fat on
the starchy food. A standard portion will reheat
in 2 to 3 minutes on MAX power. If you want to
reheat two portions at the same time, place
them one on top of the other using a special
microwave stacker or an upside-down plate on
top of the first portion, remembering to swap
them half-way through the cooking process
(allow for 5 to 6 minutes on MAX altogether).
Aluminium trays
and metal tins
Food in these
containers must be
transferred to other
containers which are
microwave safe.
Soups - Stews
These items may liquify as they defrost, so
make sure you place then in suitable
containers. Remember to cut up the blocks and
stir the pieces as the food reheats.
Filled pastries and pies
The fillings of these items often contain large
amounts of fat, sugar or salt, so they reheat
very quickly and can be much hotter than the
crust. Take care not to overheat and not to burn
yourself. Reheating these food items using
microwaves is not recommended because the
pastry becomes soft. Use combination cooking.
Baby bottles and baby food:
Warning:
after reheating, you must always
test the temperature of the milk or the food in
the usual way (for example on the back of your
hand), BEFORE feeding the baby or young
child, to avoid serious internal burns. The baby
bottle should be shaken vigorously, as the
temperature may vary from the top to the
bottom of the bottle.
Sterilisation: we do not recommend you use
the microwave to sterilise baby bottles.
If you use a microwave steriliser, use the
amount of water advised by the manufacturer
and follow the manufacturerʼs instructions
closely.
Temperature:
Food which has been kept in the refrigerator
will take longer to reheat than food kept at
room temperature.
Always check the temperature before eating,
even if you have kept to the cooking times
indicated in the book or on the packet.
If in doubt, increase the reheating time.
Stirring:
Remember to turn or stir the food as often as
possible during the reheating process in order
to even out the temperature at the edges and
in the middle. Food which cannot be stirred
(such as gratins) must be cut and tested in the
middle.
Standing time:
As heat continues to spread by conduction
after reheating, it is important to wait a few
minutes before eating (from 2-3 minutes for
individual portions, to 8-10 minutes for familysized dishes). This standing time is essential
when using the automatic programmes.
Reheating
Page 43

Food item
Weight or
Quantity
Fresh Frozen
LIGHT DISHES AND SNACKS
Toasted ham and cheese sandwich
(2)
1pce (100 g)
1 pce (150 g)
2 pcs (200 g)
4 min G 1 + 100W (5)
3 min 30 s G 1 + 250 W
4 min 30 s G 1 + 250 W (5)
4 min G 1 + 250W (5)
3 min G 1 + 440W
4 min G 1 + 440W (5)
Seafood Gratin (In scallop shell)
120 g 1 piece
180 g 2 pieces
2 min 30 s G1 + 440 W (1)
-
3 min 40 s G2 + 600 W (1)
5 min G1 + 600 W (1)
- Ham and cheese croissant (6 & 7)
- Puff pastry roll with cheese filling (6
& 7)
- Ham and cheese pasties
or spinach + goat cheese (2, 5 & 7)
- Meat pies (2 & 5)
150 g 1 pce
150 g 1 pce
110 g 1 pce
150 g 1 pce
130 g 1 pce
2 min 40 s CH 200° + 250 W
2 min CH 200° + 250 W then 2 min standing time
2 min 30 s CH 200° + 250 W (6 & 7)
2 min 40 s G 1 + 440W then 2 min CT 150°
2 min G 1 + 250W then 1 to 2 min CH 160°
about. 3 min CH 180° + 440W then 1 min rest
3 min CT 200° + 440W then 2 min standing time
2 min 40 s G 1 + 440W then 1 min CT 150° (2 & 5)
3 min 40 s CH 200° + 440W then 3 min standing
time
2 min 30 s G 1 + 440W then 1 min CT 160°
Cheese-topped baguette/waffle
Hot Dog Knackis (2)
Hot Pocket (2 & 5)
100/120 g 1 pce
120 g 1 pce
130 g 1 pce
2 to 3 min CH 220° + 250W (2 & 7)
2 min 40 s G 1 + 250 W
-
3 min CT 180° + 440W then 2 min standing time (2
& 7)
3 min 30 s G 1 +440W then 2 min standing time
3 min 30 s G 1 + 440W then 1 min standing time
Chicken vol-au-vent (6 & 7) 150 g 1 pce 2 min 30 s CH 180° + 250W then 3 min stand -
Large sausage roll (5, 6 & 7) 400 g 1 pce 5 min CH 180° + 440 W then 5 min standing time -
English
En-41
Reheating charts
Microwave heating guide for fresh or frozen food.
Heating instructions:
The + symbol indicates Combination cooking, G means the Grill, CH means Convection Heating. Unless marked with “for
cooking”, the foods listed have already been cooked and this guide is for reheating them. The times indicated for the Pizza Pan are for foods with
the packaging entirely removed.
Standing time:
It is important to allow the food to stand after heating: 3 to 6 minutes for light dishes and snacks, bread, cakes and pastries,
liquids and main dishes, and 10 minutes for dishes such as baked dishes and pies. Preferably, leave to stand in the microwave oven.
(1) Remove packaging and place onto a heat-resistant, microwaveable dish on the wire rack. (2) Remove packaging and place onto the wire rack
directly or on baking paper. (3) Use a microvaveable dish on the glass turntable. (4) Cover dish. (5) Turn or stir halfway through heating time. (6)
Baking paper on metal tray - (7) Preheated oven on 220°C.
Page 44

Food item
Weight or
Quantity
Fresh Frozen
LIGHT DISHES AND SNACKS
- Tartlets (raw)
- Tartlets (already baked)
- Mini savoury cheese choux pastries (6 & 7)
250 g 20 pcs
320 g 24 pcs
220 g 30 pcs
---
12 min CH 220° + 100W then stand 2 min (6 & 7)
7 min CH 210° + 100W then stand 2 min (6 & 7)
3 min CH 220° + 100W then 2 min standing time
- Large spring rolls (2,5 & 7)
- Meat samosas (2, 5 & 7)
- Vegetable samosas (2, 5 & 7)
280 g 4 pcs
240 g 4 pcs
240 g 4 pcs
6 à 7 min CH 220° + 100W
5 min CH 220° + 100W
5 min 30 s CH 220° + 100W
7 to 8 min CH 220° + 250W then 2 min standing time
4 min 30 s CH 220° + 440W then 2 min standing time
4 min 30 s CH 220° + 440W then 2 min standing time
Filled baked potatoes (1) 130 - 150 g 1 piece
4 to 5 min G2 + 250 W
approx. 4 min 30 s G2 + 600 W then 2 min standing time
Seafood pastries/tarts (2 & 7)
140 g 1 pce
400 g 1 pce
2 min 30 s CH 180° + 100W then 2 min stand
3 min 30 s CH 160° + 440W then 3 min stand
3 min 30 s CH 180° + 440W then 2 min standing time
- Pancakes/Filled pancakes (1 & 5)
- Savoury thick pancakes (1)
150 g 1 pce
300 g 2 pcs
200 g 1 pce
3 min G 1 + 440W then 1 min stand
-
3 min G1 + 440 W
4 min G 1 + 600W then 2 min standing time
6 min G 1 + 600W then 2 min standing time
3 min 20 s G 1 + 600W then 1 min standing time
Snails (3 & 4) 160 g 12 pieces 250 W for approx. 4 min 440 W 3 min to 3 min 30 s then 3 min standing time
Spanish tortilla.(1 & 5)
200 g 1 pce
500 g 1 pce
5 min G 1 + 250 W
5 min G1 + 440 W
-
-
- Pizza Cascione (2 & 5)
- Mini 3-cheeses pizzas(2 & 7)
- Pizza thin base (2 & 7)
- Pizza thick base (2 & 7)
- Pizza with uncooked dough
- Flammekueche (2 & 7)
- Cheese-topped pretzels (2 & 7)
200 g 1 pce
90 g 3 pcs
270 g 9 pcs
180 g 1 pce
400 g 1 pce
160 g 1 pce
290 g 1 pce
600 g 1 pce
180 g 1 pce
350 g 1 pce
110 g 1 pce
220 g 2 pcs
4 min 30 s G 1 + 250 W
--4 min CH 180 ° + 100 W then stand 1 min
5 min CH 150° + 100W then 3 min stand
5 to 6 min CH 170° + 100 W
-
-
3 min 30 s CH 180° + 100W then 3 min stand
5 min CH 160° + 100W then 3 min stand
-
-
5 to 6 min G 1 + 440W
4 min CH 220° + 100W then 1 min standing time
5 min CH 220° + 250W then 2 min standing time
Auto TK Pizza then 1 min CH 150° + 250W
5 min 30 s CH 150° + 440W then 4 min CH 150° (2 & 7)
7 min 30 s CH 160° + 440W then 6 min CH 170° (6 & 7)
Auto TK Pizza then 3 min CH 150°
-
About. 3 min CH 200° + 250W
Auto TK Pizza
En-42
Microwave heating guide for fresh or frozen food.
Heating instructions:
The + symbol indicates Combination cooking, G means the Grill, CH means Convection Heating. Unless marked with “for
cooking”, the foods listed have already been cooked and this guide is for reheating them. The times indicated for the Pizza Pan are for foods with
the packaging entirely removed.
Standing time:
It is important to allow the food to stand after heating: 3 to 6 minutes for light dishes and snacks, bread, cakes and pastries,
liquids and main dishes, and 10 minutes for dishes such as baked dishes and pies. Preferably, leave to stand in the microwave oven.
Reheating charts
Page 45

Food item
Weight or
Quantity
Fresh Frozen
LIGHT DISHES AND SNACKS
- Quiche lorraine (2 & 7)
- Vegetables Quiche (2 & 7)
- Pissaladière Onion Tart (2 & 7)
120 g 1 pce
400 g 1 pce
130 g 1 pce
300 g 2 pcs
4 min CH 150° + 100 W then 1 min standing time
4 min 30 s CH 160° + 250W then 2 standing time
4 min 30 s CH 160° + 100W then 2 standing time
-
3 min 30 s CH 150° + 440W then 3 min stand
6 min 30 s
CH 140° + 440W then 5 min stand
3 min 30 s
CH 160° + 440W then 3 min stand
5 min 30 s
CH 140° + 440W then 4 min stand
Savoury thin tart (2 & 7) 120 g 1 pce - 5 min 30 s CH 180° + 250W then 3 min stand
- Diced pork and Riesling Pie (2,5 & 7)
- Large Ham + chese Pie (2, 5 & 7)
- Small pork pies (for cooking) (6 & 7)
- Small pork pies (for reheating) (6 & 7)
500 g 1 pce
500 g 1 pce
400 g 4 pcs
100 g 1 pce
200 g 2 pcs
-
--2 min 30 s CH 200° + 250W then 1 min stand
3 min 20 s CH 200° + 250W then 1 min stand
11 min CH 150° + 440W then 4 min stand
8 min CH 150° + 440W then 4 min stand
about 22 min CH 180°
-
-
Focaccia bacon-cheese (2, 5 & 7) 400 g 1 pce 3 min CH 180° + 100W 3 min CH 180° + 250W then 1 min stand
MAIN DISHES
Crispy tops (potato gratin, moussaka, lasagne,
tartiflette, cottage pie, pasta bakes)
- individual potato gratins
300 - 350 g
500 - 600 g
900 g - 1 kg
240 g 2 pieces
4 min 30 s to 6 min G1 + 600 W (1)
7-9 min G2 + 600 W (1)
10-11 min G2 + 600 W (1)
-
11 to 13 min G1 + 600 W (3)
5 min MAX then 8-10 min G1 + 600 W (3)
8 min MAX then 10-12 min G1 + 600 W (3)
6 min G2 + 600 W then 2 min standing time (1)
Vegetable gratin (with or without meat)
500 - 600 g
1 kg
-
11 to 12 min G2 + 600 W (1)
13 to 15 min G1 + 600 W (3)
8 min MAX then 10-12 min G1 + 600 W (3)
Individual gratin portions (cauliflower cheese,
potato gratin, tartiflette) (3)
900 g - 15 min G1 + 600 W then 2 min standing time
Quenelles (3, 4 & 5) + 2 tablespoons of water
320 g - 4
pieces
MAX 1 min then 250 W 5 min
-
Stuffed tomatoes (3 & 4)
Stuffed cabbage (3,4 & 5)
300 g 2 pieces
1 kg 8 pieces
1.05 kg 6 pieces
MAX 3 min 30 s then 2 min standing time
MAX 10 -11 min
-
--MAX 24 to 25 min
Fish gratin (3)
400 g
-
10 to 11 min G1 + 600 W and 1-2 min G1
English
En-43
Reheating charts
(1) Remove packaging and place onto a heat-resistant, microwaveable dish on the wire rack. (2) Remove packaging and place onto the wire rack
directly or on baking paper. (3) Use a microwaveable dish on the glass turntable. (4) Cover dish. (5) Turn or stir halfway through heating time. (6)
Baking paper on metal tray - (7) Preheated oven on 220°C..
Page 46

En-44
Food item Weight or Quantity Fresh Frozen
SIDE DISHES
Starchy food and pulses (3, 4 & 5) 600 W 1 min 30 s to 2 min -
Oven chips , potato croquet,
potato Rösti, sauteed potatoes
and other potato dishes
- Dauphines Potatoes (5, 6 & 7)
300 g – 600 g
400 g
-
-
AUTO TK Chips or 6 to 8 min (depending on
size and brands) CH 220° + 600W then 2-4
min CH 220° (2, 5 & 7).
7 min CH 220° + 600W then 4 min CH 220°
Vegetables (3, 4 & 5)
100 g
200 g
MAX 1 min to 1 min 10 s
MAX 1 min 20 s to 1 min 40 s
-
-
Purée/Mash (3, 4 & 5)
- mashed potato
- vegetable purée
200 g
200 g
380 g
1 kg
MAX 1 min 30 s
MAX 1 to 2 min
MAX 2 min 30 s
-
MAX 3 min
MAX 3 min 30 s
MAX 8 min
MAX 12 to 13 min
Rice (3, 4 & 5)
200 g
500 g
MAX 1 min 30 s
MAX 3 min 30 s to 4 min
MAX 2 min 30 s
MAX 6 to 7 min
Spaghetti in sauce (3, 4 & 5)
200 g
500 g
1 kg
MAX 2 min
MAX 4 min
MAX 7 to 8 min
-
-
MAX 13 - 14 min
MEAT & FISH
Duck confit (1)
210 g 1 piece
430 g 2 pieces
7 min 30 s G1 + 250 W
11 min G1 + 250 W
-
-
Tripe (3, 4 & 5) 500 g MAX 4 min to 4 min 30 s MAX 7 - 8 min
Reheating charts
Microwave heating guide for fresh or frozen food.
Heating instructions:
The + symbol indicates Combination cooking, G means the Grill, CH means Convection Heating. Unless marked with “for
cooking”, the foods listed have already been cooked and this guide is for reheating them. The times indicated for the Pizza Pan are for foods with
the packaging entirely removed.
Standing time:
It is important to allow the food to stand after heating: 3 to 6 minutes for light dishes and snacks, bread, cakes and pastries,
liquids and main dishes, and 10 minutes for dishes such as baked dishes and pies. Preferably, leave to stand in the microwave oven.
Page 47

English
En-45
Food item
Weight or
Quantity
Fresh Frozen
MEAT & FISH
Cocktail sausages (3, 4 & 5) 120 g 440 W 1 to 2 min -
Cooked meat (3, 4 & 5)
- steak burger
- white meat
- red meat
- chicken leg
100 g
100 g 2 slices
120 g 3 slices
200 g
600 W 30 to 40 s
600 W 50 to 60 s
440 W 50 to 60 s
MAX 1 min 50 s
-
-
-
-
- Chicken cordon bleu (2 & 5)
- Chicken nuggets (1 & 5)
- Breaded fish fillet (2 & 5)
100 g 1 pce
200 g 9 pcs
100 g 1 pce
220 g 2 pcs
4 min G 1 + 250W then 2 min G 1
7 min G 1 + 100W then 2 min G 1
6 à 7 min G 1 + 100W
5 min 30 s G 1 + 250W
3 min 30 s G 1 + 440W then 1 min G 1
7 min G 1 + 250W then 2 min G 1
-
6 min G 1 + 440W
VARIOUS
Sauce/gravy (4 & 5)
Drinks
- 1 cup
- 2 cups
- 3 cups
250 g
300 g
500 g
240 ml
480 ml
700 ml
MAX 2 min
MAX 2 to 3 min
MAX 3 to 4 min
MAX 1 min 50 s
MAX 3 min 20 s
MAX 4 min 30 s
MAX 3 min 30 s
-
MAX 6 min
-
-
-
-
Milk
- 1 bowl/mug
- 1 jug (3, 4 & 5)
250 ml
600 ml
600 W 2 min
600 W 4 min 30 s
-
-
Reheating charts
(1) Remove packaging and place onto a heat-resistant, microwaveable dish on the wire rack. (2) Remove packaging and place onto the wire rack
directly or on baking paper. (3) Use a microwaveable dish on the glass turntable. (4) Cover dish. (5) Turn or stir half-way through heating time. (6)
Baking paper on metal tray - (7) Preheated oven on 220°C.
Page 48

En-46
Food item
Weight or
Quantity
Fresh Frozen
VARIOUS
Baby food (jar without lid) (4)
- at room temperature
- refrigerated
130 g
200 g
130 g
200 g
600 W 50 seconds, stir and test before serving
600 W 60 to 70 seconds, test before
serving
600 W 60 to 70 seconds, test before
serving
600 W 1 min 20 s to 1 min 30 s, test before
serving
-
-
-
-
Bread
- Country loaf (3 & 5)
- Wholegrain loaf (3 & 5)
450 g
400 g
-
-
Auto program: Bread*** then 10 min standing time
4 min 30 s G1 + 250 W then 6 min standing time, or Auto
program: Bread *** then standing time.
Pretzels (for cooking) (6 & 7) 4 pcs 300 g -
10 to 11 min CH 160° + 100W
- Croissants (2,7 & 5)
- Blinis (2 & 5)
100 g 2 pcs
100 g 2 pcs
CH 160° 2 to 3 min
3 min G 1 + 100W
2 min 20 s CH 160° + 100W then 1 min standing time
3 min 30 s G 1 + 250W
DESSERTS
Coconut balls (3 & 4) 6 pieces 250 W 2 to 3 min 440 W 3 to 4 min
Waffles (2 & 5)
70 g 1 piece
140 g 2 pieces
-
-
2 min G1 + 250 W
3 min G1 + 250 W
Sweet pancakes (3 & 4)
50 g 1 piece
100 g 2 pieces
MAX 20 to 30 seconds
MAX 35 to 40 seconds
MAX 40 seconds (5)
MAX 80 seconds (5)
Cannelés (small caramelized cakes) (3) 3 pieces 180 g - Defrost 3 - 4 min
Apple crumble (1) 170 g - approx. 2 min 40 s G1 + 600 W then 2 min standing time
Reheating charts
Microwave heating guide for fresh or frozen food.
Heating instructions:
The + symbol indicates Combination cooking, G means the Grill, CH means Convection Heating. Unless marked with
“for cooking”, the foods listed have already been cooked and this guide is for reheating them. The times indicated for the Pizza Pan are for
foods with the packaging entirely removed.
Standing time:
It is important to allow the food to stand after heating: 3 to 6 minutes for light dishes and snacks, bread, cakes and pastries,
liquids and main dishes, and 10 minutes for dishes such as baked dishes and pies. Preferably, leave to stand in the microwave oven.
Page 49

English
En-47
Food item
Weight or
Quantity
Fresh Frozen
DESSERTS
Doughnuts/Fritters (2, 5 & 7)
75 g 1 pce
150 g 2 pcs
-
-
2 min 30 s CH 220° + 100W then 2 min stand
3 min CH 220° + 100W then 3 min stand
Basque cake (2, 5 et 7) 6 pers. 620 g - 6 min CH 160° + 250W then 6 min stand
Galette des rois (puff pastry
almond cake) (2 & 5)
for 1 person 120 g
for 6 people 400-
500 g
30 seconds G1 + 250 W then 2 min G3
approx. 2 min 30 s G1 + 250 W and
standing time
-
Chocolate fondant (2, 5 & 7) 450 g - 4 min CH 150° + 250W 5 min then stand 7 min
Macaroons (3) 16 pieces 190 g - 250 W 1 min to 1 min 20 s then 5 min standing time
Chocolate pudding (for cooking)
(1)
1 piece 70 g
1 piece 100 g
2 to 3 min G1 + 250 W
-
-
2 min to 2 min 30 s G1 + 440 W
-Lemon meringue pie (6 & 7)
-Thin apricots tart (2 & 7)
-Thin apple tart (2 & 7)
- Apple Tart Normande (2 & 7)
-Tarte Tatin (6 on a plate - apple
side down)
- Sugar pie (2 & 7)
- Apple and rhubarb tart (2 & 7)
480 g
1 pce 100 g
260 g
500 g
130 g
600 g
350 g
90 g 1 slice
700 g 8 slices
-
-
-
-
-
-
-
-
-
3 min 30 s CH 200° + 100W then 5 min stand
3 min CH 170° + 250W then 3 min stand
5 min 30 s CH 150° + 250W then stand 5 min
5 min CH 150° + 440W then 5 min stand
2 min 30 s CH 220° + 440W then 4 min stand
7 min CH 160° + 440W then 5 min stand
3 min CH 180° + 100W then 5 min stand
2 min CH 150° + 250W then 3 min stand
5 min CH 150° + 440W then 10 min stand
Apple Strudel (5, 6 &7) 600 g - 7 min CH 200° + 600W then 16 min CH 180°
Popcorn with sugar (3) 1 x 100 g - MAX 2 min 30 s to 3 min
Reheating charts
(1) Remove packaging and place onto a heat-resistant, microwaveable dish on the wire rack. (2) Remove packaging and place onto the wire rack
directly or on baking paper. (3) Use a microwaveable dish on the glass turntable. (4) Cover dish. (5) Turn or stir halfway through heating time. (6)
Baking paper on metal tray - (7) Preheated oven on 220°C.
Page 50

En-48
Tips for microwave cooking
• Soften butter which has been in the
refrigerator
Soften for 35 to 40 s at 100W (for 250g).
Remove the foil wrapper first.
• Rehydrating dried fruit
Add 6 tbsp of water to 200g of prunes or raisins,
(or use rum for certain cake recipes). Mix and
heat on MAX for 2 to 3 min. Leave to stand for 2
min.
• Bring cheese up to room temperature
Cheese which has been kept in the fridge
should be placed in the oven and “ warmed” for
30 s to 1 min (depending on the size) at 250W.
• Hulling almonds or hazelnuts
Cover with hot water and cook for 3 to 6 min at
MAX (until the water boils). Rinse in cold water
and drain. The outer skin can then be removed
more easily.
• Drying herbs
Put kitchen paper on the glass tray. Spread out
the finely chopped fresh herbs on the kitchen
paper. Do several batches if necessary. Heat
on MAX for a few minutes checking every 30 s
until the herbs begin to dry out. You have to be
very careful, if the herbs stay in the oven too
long they may disintegrate and even catch fire.
Leave the dried herbs on the kitchen paper for
2 hours at room temperature then store them in
sealed jars.
• Making caramel
Cook 100g of sugar with 2 tbsp of water in a
bowl for 2 to 3 min on MAX checking carefully
after 1 min 30 s. Remove the caramel before
it becomes dark, it will finish cooking outside
the oven. You can stop it cooking by adding 2
tbsp of very hot water (take care it does not
splash).
• Softening set honey
Remove the lid, place the jar in the oven and
heat at 250W for 20 to 40 s depending on the
quantity. Stir and repeat the operation if
necessary.
• Make crispy croutons quickly: Slice 2 slices
of bread into small cubes. Spread cubes out on
a plate. Heat at MAX for 2 min then leave to
stand for 5 min. You can rub a clove of garlic
on the slices of bread before cutting them up,
or moisten them with a few drops of olive oil.
• Get more juice from an orange or a lemon
Before squeezing, heat 1 orange or 1 lemon for
30 to 40 s at MAX, then squeeze it straight away:
it will give more juice.
• Melt chocolate
Break the chocolate into small pieces in a bowl
and heat at 600W for 2 min to 2 min 30 s for
100g (the heating time may vary depending on
the amount of cocoa solids and sugar). Stir at
least once during cooking.
• Melt butter
100g of butter in a ramekin covered with a
saucer will melt in 1 min - 1 min 10 s at 600W.
• Re-crisp nibbles or crisps softened by
moisture
Spread out a handful of crisps on kitchen paper
on a plate and heat at MAX for 40 to 60 s
depending on the quantity. Wait a few seconds
before eating them.
• Soften ice-cream from the freezer
If possible remove the ice-cream from its
packaging and place on a plate. Heat for 1 to
2 min at 250W for half a litre and 2 to 3 min for
1 litre.
• Make dough rise
Place the covered dough in the oven and heat
for approx 5 min at 100W (for 500g of dough).
Leave the dough to stand inside the oven
(sheltered from the air) until it has doubled in
size.
• Make mulled wine
In a heat-resistant glass (or mug) mix 20cl of
red wine with the zest of a lemon, a pinch of
cinnamon, a clove and 2 to 4 sugar lumps,
according to taste. Heat at MAX for 1 min to 1
min 30 s.
• Deodorise your oven
To remove lingering fish smells from your oven,
place a bowl of white vinegar or water with
lemon juice inside the oven. Heat at MAX for 5
min. Dry the condensation on the oven walls
with a cleaning cloth.
• Make a hot compress
Heat up a clean folded dampened cloth on a
plate for 1 to 2 min at MAX. Check the
temperature before using.
Page 51

English
En-49
Soups, starters and eggs
Home-made soups
If you make your own soups, you should
cut all the vegetable to more or less the
same size, and dice the potatoes. Use a
container which is large enough (at least
twice the volume of the soup to be cooked) to
avoid any spillage. Add a small amount of
liquid so the microwaves cook the vegetables
first. Cover and cook at MAX for 10 to 15 min.
Stir once the vegetables are well cooked.
Finish the soup with hot stock to obtain the
required volume. If you want to add pasta or
noodles to the soup, continue cooking it for a
few minutes at MAX.
Quiches
*Combination cooking allows you to cook
your quiches and savoury tarts with slightly
shorter cooking times. Preheat the oven to
220°C with the metal tray on the glass tray.
Only use non-springform smooth metal tins
which are placed on the metal tray once the
oven is up to temperature. Depending on the
size of the tin, cook for 25 to 30 minutes in
Combination mode 220° + 100W.
Don't forget to cover the top of the quiche
with a double round of baking paper after
approx. 10-12 min to prevent overbrowning.
*Traditional cooking using Convection
heating: it is preferable to use metal tins which
are placed on the metal tray in an oven
preheated to 220°C. Continue cooking at a
lower temperature for 180° to 210°C as
indicated in your recipe.
With all cooking modes, don't forget, after 10 to
15 min of cooking, to cover the top of quiche
with baking foil (Convection mode) or Baking
paper (Combination mode) to prevent
overbrowning and always remember to remove
the cooked quiches from the tin and allow them
to cool on a rack. This means the steam which
condenses as the quiche cools will not make
the pastry go soft.
Eggs - Cheese
Do not try to cook eggs in their shells. In the
microwave they would explode due to the
pressure inside the shell. For broken eggs, the
yolk will also explode if the film covering it is
not pierced. Always remember therefore to
prick the middle of the yolk with a tooth-pick; if
the egg is fresh the yolk should not run. The
yolk and the white react differently to the
microwaves and unfortunately it is the yolk
which cooks more quickly.
Poached eggs: heat 50ml of salted water
with a dash of vinegar for 1 min on MAX. Break
the egg into the
boiling water and
gently prick the yolk
and the white with a
tooth-pick; cook at
600W for 30 to 50 s
(depending on the
grade of the egg).
Leave to stand for 1 min before draining and
serving.
Scrambled eggs: mix 2 raw eggs in a bowl
with a bit of cream or milk, a knob of butter, salt
and pepper. Cook for 40 s at MAX. Remove
from the oven and beat vigorously with a fork.
Continue cooking at MAX for another 30 to 50
sec. The eggs should stay creamy.
Baked eggs: break the egg into a buttered
ramekin, add salt and pepper, prick the yolk
and white with a tooth-pick. Add the desired
ingredients (cream, mushrooms, lumpfish roes
etc.). Cover and allow for approx. 2 min
cooking per egg at 250W.
Cheese: different types of cheese react
differently; the more fatty they are the more
quickly they melt. If they are cooked for too
long they will go hard. When possible, it is
preferable to add grated cheese at the last
moment (for pasta, gratins, etc.) or to mix it in
with the food rather than adding it in a layer on
the top.
Page 52

En-50
Marbled Salmon and Spinach Terrine
Cooking time: 15 min 6-8 people - MICROWAVE
Container: 1 Pyrex® loaf tin, 22-25 cm long
Spread the fillets out on a plate, cover and cook on MAX for
approximately 3 minutes (they should only just be cooked),
cut them into 2, putting the thickest pieces to one side to
later place end-to-end in the tin. Flake the thinner pieces in
a bowl and mix with the drained spinach, cream, wellbeaten eggs, salt and pepper. Grease the tin well with
butter. Pour in half the spinach mixture. Season the fillet
pieces well and place them in the tin close together, end-toend. Cover with the remaining spinach mixture. Cover the
tin with cling film and cook in the microwave at MAX for 4
minutes, then take it out, wrap aluminium foil around the 2
to 3 cm from the ends of the tin and continue cooking at
250W for 8 to 10 minutes. Allow the dish to cool without the
cling film then place in the fridge. The terrine can be served
in slices, with a tomato coulis or with cream cheese with
herbs and lemon juice.
500 g spinach, defrosted
(6 min on MAX),
2 tbsp cream,
4 salmon fillets
(approximately 700 g),
4 eggs, salt, pepper.
Aubergine Caviar
Cooking time: 16 - 18 min 4 people - MICROWAVE
Container: 1 round Pyrex® cake tin, 22 cm diameter
Finely chop the onion and sweat in 5 tbsp of olive oil,
covered, at MAX for 3 minutes. Add the washed and diced
aubergines and the peeled and crushed garlic. Cook at
MAX for 13 to 15 min. Start cooking with the dish covered.
Halfway through take out the dish, stir and complete the
cooking with the dish uncovered, to ensure that the water
from the vegetables evaporates. Blend the mixture in a food
processor and check the seasoning. The caviar is perfect
for canapés; if it is too strong, you can add 200 g of yoghurt
or cream cheese to the mixture.
1 large onion,
2 plump aubergines (approx. 500 g),
5 cloves of garlic, salt, pepper,
200 g of cream cheese or yoghurt
(optional), olive oil.
Olive Loaf
Cooking time: approx. 36 min 8-10 people - COMBINATION COOKING
Container: metal loaf tin, 28-30 cm
Mix together the flour and yeast with the oil and white wine.
Add the eggs one by one then the olives, cubed ham and
grated cheese. Grease the tin with butter and line it, then fill
with the mixture. Place on the Metal Tray and cook for 35 to
38 minutes on Combination mode: CONVECTION
HEATING 200°C+ 100W, protecting the top of the loaf with
a sheet of baking paper held in place with toothpicks after
the first 15 to 16 minutes. Serve the loaf in slices or cut into
small cubes for canapés.
250 g flour,
1 sachet of yeast,
120 ml olive oil,
100 ml white wine, 4 eggs,
200 g green pitted olives,
200 g thick ham,
150 g gruyère cheese.
Page 53

English
En-51
Tuna Toasts
Cooking time: 8 min 4 people - COMBINATION COOKING
Container: 1 bowl
Lightly toast the bread for 2 to 3 minutes on each side on
GRILL setting 1, placing them on the Wire Rack or, if you
prefer, in a toaster. Mix together all the other ingredients in
a bowl.
Season the mixture and spread onto the toast. Place the
toast on the Wire Rack and cook for approx. 5 minutes in
Combination mode: GRILL 1 + 100W.
4 large slices of bread,
2 tbsp capers,
2 tbsp chopped parsley,
4 tbsp mayonnaise,
50 g grated cheese,
200 g tuna in brine,
salt, pepper.
Onion Tart
Cooking time: approx. 45 min 7-8 people - MICROWAVE and COMBINATION COOKING
Containers: a quiche tin Ø 26 cm + 1 round Pyrex® cake tin, 22cm diameter
Line the metal tin with the pastry. Put it to one side, in a
cool place. Finely slice the onions. Cook the onion slices,
covered, with butter on MAX for 7 to 9 minutes, stirring
halfway through. Season, add flour and leave to cool.
Cover the base of the tart with the seasoned cooked
onions, the grated cheese, and the seasoned quiche
mixture (eggs, milk and cream beaten together with an
electric whisk). Preheat the oven on Convection 220°C
with the metal tray. Place the quiche in the hot oven and
cook on Combination CONVECTION HEATING 200° + 100
W for about 35 min, protecting the top of the tart with a
folded piece of baking paper after 10 minutes of cooking.
When cooked, remove the tart from the pan and leave to
cool on a Wire Rack before serving.
1 roll of shortcrust pastry.
Topping: 3 large onions
(approx. 400 g),
40 g butter, 1 tbsp flour,
3 eggs, 150 ml milk,
150 ml cream, 60 g grated cheese,
salt, pepper, grated nutmeg.
Pizza
Cooking time: approx. 35 min 2-4 people - CONVECTION HEATING - COMBINATION COOKING Container: 1 bowl + 1 pizza tin Ø 30-32 cm
Cook the finely sliced onions in a bowl, with the oilve oil,
for 3 to 4 minutes on MAX. Leave to cool. Using your
hands, spread out the dough in the pizza tin without
making a raised edge. Preheat the oven on CONVECTION
HEATING 220°C with the metal tray. Spread on the sauce,
onions and herbs, covering all the dough well. Place the
pizza tin in the pre-heated oven and bake on
CONVECTION HEATING 220°C for about 26 to 30 min,
adding the cheese after 10 min and the other ingredients
according to taste - anchovies, olives, bacon pieces etc. Protect the top of the pizza with an oiled piece of foil after
18-19 min.
1 roll of pizza dough.
Topping: 3 garlic cloves, crushed,
salt, pepper,
2 large onions, finely sliced,
1 tbsp olive oil,
200 g tomato sauce,
1 tbsp oregano,
100 g grated mozzarella.
Page 54

En-52
Cream of Courgette Soup
Cooking time: 20 min 4 people - MICROWAVE
Containers: 1 bowl with lid, 2 litre capacity
Peel one of the courgettes and the potato, and cut all the
vegetables into large cubes. Put into the bowl with the stock
cube and half a glass of hot water, cover and cook for 20
minutes on MAX. Add 500 ml of very hot water and 500 ml
of very hot milk, as well as the soft cheese, before blending
everything in the food mixer, season and serve. If the
courgettes are too bitter, you can add milk only. You can
also peel all three courgettes in order to reduce any
possible bitterness from the skin.
3 courgettes (approx. 600g),
1 medium potato,
1 chicken stock cube,
3 portions soft cheese,
salt, pepper.
Tuna Tart
Cooking time: approx. 30 min 6 people - COMBINATION COOKING
Containers: 1 metal tart tin, 25 cm diameter, and 1 bowl.
Line the tin with baking paper, then with the pastry. Put the
eggs, milk and cream into a bowl. Add salt and pepper. Beat
with an electric whisk for one minute. Preheat the oven in
Combination mode: CONVECTION HEATING 220°C +
100 W, with the Metal Tray. Cover the tart base with the
cheese, then the tuna and the beaten egg mixture. Once
the oven is hot, put the tart in and cook for approx. 30
minutes, protecting the top of the tart with a double sheet of
baking paper after 10 to 11 minutes. Remove from the tin
and leave to cool on a wire rack before serving.
1 roll of all-butter shortcrust pastry.
Topping:190 g tuna in brine, drained,
3 eggs,
150 ml milk,
200 ml single cream,
130 g grated cheese,
salt, pepper.
Quinoa Tabbouleh with Mint
Cooking time: approx. 35 min 6-8 people - MICROWAVE
Container: 1 large bowl + 1 medium bowl
Weigh out the quinoa in a large bowl and cook it with twice
the volume of salted hot water, firstly for 5 minutes on MAX
then on 250W for approx. 15 minutes. Drain and leave to
cool. Meanwhile chop the courgettes into large pieces and
place in the blender. Chop in the blender, but do not blend
for so long that you obtain a puree, the courgettes should
just be finely chopped. Cover the chopped courgettes with
water in a bowl and blanche on MAX for approx. 6 to 7
minutes. Drain well. Cover the frozen peas with water and
cook on MAX for 7 to 8 minutes. Drain and leave to cool.
Remove the mint leaves from the stalk and mix with the
olive oil and lemon juice. Add this mixture to the quinoa,
courgette and pea mixture. Check the seasoning and leave
to rest for several hours before serving.
To be prepared the day before it
is eaten.
2 cups of quinoa,
2 courgettes,
300 g frozen peas,
1 bunch of mint,
100 ml olive oil,
juice of 2 lemons,
salt, pepper.
Page 55

English
En-53
Vegetables and starchy food
Use the automatic button for
VEGETABLES to cook most
fresh vegetables without
calculating cooking times (see exceptions in
the table on p.33). Follow the guidelines from
the operating instructions. Beeps will sound
half-way through the cooking time to remind
you to stir or turn the vegetables. When doing
so, take care not to burn yourself when
removing the lid or cling-film.
This programme is not suitable for cooking
steam-in bag vegetables.
Containers
• Place the vegetables in a container which is
microwave safe of a
suitable size for the
amount of
vegetables.
It is better to use
wide dishes (such as
a high-sided wide
Pyrex® dish) than
tall narrow dishes.
Avoid using bowls,
even large ones.
• It is
recommended,
when possible, to
cut the vegetables
into equal pieces to
allow then to cook
evenly.
• Vegetables with
fragile tips such as
asparagus or
broccoli should be
placed in such a way that the tips are in the
centre of the dish and the stalks (which require
more cooking) at the edges.
• Whole vegetables with skin should be
pricked in order to allow the steam to escape
and prevent them from exploding (potatoes,
aubergines, tomatoes, etc.)
Standing time
It is necessary to leave vegetables to stand for
at least 5 min after cooking, except for
vegetables which contain a lot of water
(courgettes, endives, spinach or tomatoes)
which should be left for approx. 2 min standing
time. It is normal for vegetables to seem
undercooked when removed from the oven,
they will finish cooking during the standing
time.
Accessory
When cooking vegetables using microwaves
only, and when using the VEGETABLES
automatic programme, place the dish directly
on the glass tray.
When cooking gratins using Combination
cooking, place a heat-resistant dish which is
microwave safe on metal tray on the glass tray.
When browning the cheese top of already
cooked gratins, place the heat-resistant and
microwave safe container on the wire rack.
Lid
When using microwaves only or the automatic
button, the vegetables must be covered with a
suitable lid or
cling-film. The steam
held in by the lid will
help to cook the
vegetables quickly
and evenly.
Vegetables
Page 56

En-54
It is necessary to add water?
There is a difference between:
• Vegetables which contain a lot of water such
as: tomatoes, courgettes, aubergines,
mushrooms, spinach, endives, lettuce,
onions, peppers, most fruits etc., need little
or no added water, since the microwave
cooking uses the water naturally found in
these foods.
• Vegetables which contain some water, to
which you should add 9 to 10 tbsp of water
(appr. 100 ml), in order to create steam
which will cook the vegetables and stop
them drying out:
cauliflower, leeks, broccoli, Brussels sprouts,
fennel, carrots, celeriac, asparagus,
Jerusalem artichoke. parsnips, borlotti
beans, potatoes, cabbage, turnips,
artichokes, green beans, etc.
• Vegetables which do not contain much water,
to which you should add 13 to 15 tbsp of
water in order to keep the vegetables moist:
peas, broad beans, fresh beans.
For all vegetables: cook at MAX power and
add salt after cooking, not before. Salt
absorbs the natural moisture in the
vegetables and can dry them out.
Vegetables and starchy food
Starchy food
Rice and pasta can be cooked on the
automatic programs. Please refer to p.15.
Rice, bulgur wheat, quinoa: once the
liquid is boiling, allow for approx. 20 minutes
cooking at 250W regardless of the quantity of
rice (except easy-cook rice) and 14 to 18
minutes at 250W for bulgur wheat or quinoa.
Couscous: add 1 to 1.5 parts of hot salted
water to 1 part of couscous, cover and bring to
the boil at Max for 2 to 3 min (for 200g of
medium couscous with 250ml of water) then
rehydrate for approx. 3 to 4 min at 250W. Fluff
up with a fork before serving.
Pasta: remember to add salt to the cooking
water and stir at least
once during cooking.
When the liquid boils,
allow 7 to 8 min at
MAX for 250g of pasta
(for 1 litre of water) and
10 min for 250g of
ravioli.
Dried vegetables: cooking times for dried
vegetables in the microwave are the same as
those for traditional cooking but reheating is
quicker and easier, if the vegetables are placed
in a closed container, mixed with butter or with
sauce. To cook the vegetables, soak them
overnight if necessary. If not, cover them in
water in a large container. Do not add salt
before cooking (this hardens the dried
vegetables).
Allow 10 min at MAX then 15 to 30 min at
250W. Check them while they cook and add
water if necessary, the dried vegetables must
be covered in liquid.
Page 57

English
En-55
• Frozen vegetables should not be defrosted.
They should always be cooked from frozen.
Thatʼs why this book does not contain
defrosting times for frozen vegetables.
• Frozen vegetables should not be cooked in
their packaging. They must be transferred to
a container which is microwave safe.
• When you cook a mixture of frozen
vegetables, some vegetables may be less
cooked than others; this is due to the
different characteristics of these vegetables.
• Most frozen mashed potato and vegetable
puree on the market (sold in small blocks) is
already cooked; reheat it for 8 to 9 min at
1000W stirring half-way through cooking
(for 500g).
• You will only notice the speed of cooking
when cooking small quantities (less than
1kg). For large quantities the cooking times
get much longer, it is better to cook several
smaller batches.
• It is ESSENTIAL to stir the vegetables at
least once during cooking. When using the
Automatic programme, a beep will sound
during cooking to remind you.
• To make vegetable puree, add a few minutes
to the cooking time so your vegetables will
be very well cooked and easy to puree.
• Cooking some vegetables in the microwave,
depending on how fresh they are, does not
give very satisfactory results. You may prefer
to cook these using traditional cooking
methods (peas, whole carrots, broad beans,
beans, mixed vegetables).
• When cooked using microwaves, brown
marks appear on vegetables which are rich
in iron such as cabbage, cauliflower or
broccoli. This is harmless.
Advice for cooking vegetables
Page 58

En-56
VEGETABLES fresh frozen VEGETABLES fresh frozen
Artichokes:
-whole (2 pieces)
-hearts
9-10
9-11
-
12-15
Green beans* 12-13 12-13
Asparagus 10-12 12-13 Runner beans 15-16 -
Aubergines 9-11 - Mixed vegetables* - 15-16
Beetroot*
18-20 -
Corn on the cob
(2 pieces)*
7-10 12-15
Chard 7-9 13-14 Turnips 8-10 18-20
Broccoli, Romanesco 8-9 12-13 Onions 9-12 14-16
Mushrooms 9-10 12-13
Parsnips
Sweet potato
8-10
10-11
-
-
Carrots:
-rounds
-sticks
8-10
12-14
12-13
-
Peas* 20 15-16
Cabbage* 12-14 - Mange-tout 12-13 -
Brussel sprouts 9-10 12-13 Thinly sliced leeks 8-10 15-16
Cauliflower 8-10 12-13 Leek cut into rounds 8-10 15-16
Celeriac 8-9 - Pumpkin 9-10 -
Celery* 15-17 Peppers 12-13 13-15
Courgettes 8-9 12-13
Whole potatoes
(< 220g)
8-10
-
Endives 10-12 18-20 Sliced potatoes 10-11 -
Spinach:
-chopped
-leaves
-
9-10
12
13
Ratatouille 16-18 14-16
Broad beans* 16-19 18-20 Salsify 10-12 14-16
Fennel:
-whole cut into two
-finely sliced
10-12
17-20
Tomatoes*
Jerusalem
artichokes*
4-5
8-9
-
-
Cooking times for fresh and frozen vegetables
(minutes at MAX for 500g)
*: we do not recommend using the Automatic programme for these vegetables.
Page 59

English
En-57
Stuffed Potatoes with Bacon
Cooking time: 20-30 minutes 4 people - MICROWAVE and COMBINATION COOKING
Containers: 1 Pyrex® dish, 25 cm diameter, and 1 bowl.
Wash the potatoes and prick the skins in several places.
Place around the edges of the Glass Tray. Cook for 15 to
17 minutes on MAX. Remove and wrap in aluminium foil.
Leave to stand for at least 5 minutes. Meanwhile, cook the
chopped onion in a bowl with butter, covered, for 3 minutes
on MAX. Cook the bacon pieces for 30 seconds to 1
minute on MAX, then drain. Mix together the soft cheese,
grated cheese, onion and bacon pieces. Hollow out the
inside of the potatoes with a teaspoon; season to taste. Fill
the potatoes with the mixture. Place the potatoes in the
dish on the Wire Rack and cook for 7 to 8 minutes on
Combination mode: GRILL 2 + 440 W (or Combination
mode with 600W if the potatoes have been prepared in
advance).
4 potatoes (approx. 900 g),
1 onion, 1 knob of butter,
50 g smoked bacon pieces,
2 tbsp soft cheese,
50 g grated cheese, salt, pepper.
Carrots with Orange and Cumin
Cooking time: 20-22 min 4-5 people - MICROWAVE
Container: 1 bowl and 1 Pyrex® dish, 27 cm diameter
Cook the chopped onion in the bowl with 1 tbsp olive oil for
2 min 30 s on MAX. Cut the peeled carrots into even-sized
rounds. Place in the dish with the onion, cumin, honey and
the juice and grated zest of the orange. Cook for 18 to 20
minutes on MAX. Halfway through cooking, stir and
season. These carrots can also be served cold as a starter.
1 kg peeled carrots,
1 onion,
1 orange,
1
/2 tsp cumin seeds,
½ tsp honey,
olive oil, salt, pepper.
Vegetarian chilli
Cooking time: ?
Container: large casserole + lid
Place oil, onion, pepper, chilli and carrots in a large casserole, cover and cook on HIGH power for 4-5 mins. or until
softened. Add chilli and cumin. Stir in bulgar wheat,
chopped tomatoes, tomato puree and water. Cover and
cook on HIGH power for 10 mins. Stir in red kidney beans,
cover and cook on HIGH power for 2-3 mins.
15 ml (1 tbsp) oil
1 onion, finely chopped
1 green pepper, chopped
1 chilli, chopped
2 carrots, diced
5 ml (1 tsp) chilli powder
3 ml (
1
/
2
tsp) cumin
175 g (6 oz) bulgar wheat
396 g (14 oz) can chopped toma-
toes
30 ml (2 tbsp) tomato puree
450 ml (
3
/
4
pt) water
396 g (14 oz) can red kidney
beans, drained
Page 60

En-58
Stuffed Artichoke Hearts
Cooking time: approx. 20 min 4 people - MICROWAVE and COMBINATION COOKING
Containers: 1 Pyrex® dish, 25 cm diameter, and 1 bowl.
If the artichoke hearts are frozen, spread them out in the
dish with 4 tbsp of water and cook for 10 to 12 minutes on
MAX. In a food processor, chop up the shallot and the
washed mushrooms. Cook the shallot and mushrooms in
butter, covered, for 4 minutes on MAX. Add the parsley,
coriander and bread, chopped into small pieces. Bind
together with the egg yolk and season to taste. Stuff the
seasoned artichoke hearts. Sprinkle the breadcrumbs /
crispbread over the top. Place the dish on the Wire Rack
and cook for 5 to 6 minutes in Combination mode: GRILL 3
+ 250W (or approx. 7 minutes on GRILL 2 + 440W if you
have prepared the dish in advance).
8 tinned or frozen artichoke
hearts
(approx. 400 g),
250 g mushrooms, 1 shallot,
20 g butter, 2 tbsp parsley,
1 tsp coriander seeds,
2 slices of bread, 1 egg yolk,
1 crispbread, crushed, or 10 g
breadcrumbs.
Cauliflower Cheese
Cooking time: 20-25 min 4 people - MICROWAVE and COMBINATION COOKING
Containers: 1 bowl and 1 round Pyrex® dish, 22 cm diameter
Break the cauliflower up into equal sized florets. Put them
into the dish with half a cup of water. Cover and cook for 15
to 20 minutes on MAX (depending on the size of the pieces).
Meanwhile, prepare the ingredients for the white sauce. Take
the cauliflower out, drain and season it, then return to the
dish. Prepare the white sauce (see recipe in the sauce
chapter), adding half the grated cheese. Pour over the
cauliflower, and sprinkle the rest of the cheese on top. Place
the dish on the Wire Rack and bake for 6 to 8 minutes in
Combination mode GRILL 2 + 440W (or approx. 10 minutes
on Combination mode: GRILL 1 + 600W, placing the dish on
the glass turntable if the cauliflower is cold).
1 cauliflower, 500 ml milk,
35 g butter, 35 g flour,
70 g grated cheese, grated
nutmeg, salt, pepper.
Ratatouille Flan
Cooking time: approx. 35 min 6 people - MICROWAVE and COMBINATION COOKING
Container: 1 round Pyrex® dish, 25 cm diameter
Cook the frozen ratatouille with the cous cous, covered, for
15 minutes on MAX. Beat together the eggs and cream in a
large bowl. Cut the chorizo into small cubes and add them
to the bowl along with the ratatouille. Mix well, add the
grated cheese, check the seasoning then pour the mixture
into the dish. Put into the oven on the Metal Tray and cook
for 18 to 20 minutes in Combination mode: CONVECTION
HEATING 220°C + 440W, protecting the top with a sheet of
baking paper after 12 to 13 minutes, if necessary. Serve hot
or cold.
800 g frozen ratatouille,
5 eggs,
1 tbsp cream,
150 g chorizo,
70 g grated cheese, salt,
pepper,
4 tbsp medium cous cous.
Page 61

English
En-59
Stuffed Courgettes and Aubergines
Cooking time: approx. 30 min 4 people - MICROWAVE and COMBINATION COOKING
Containers: 1 Pyrex® dish, 27 cm diameter, and 1 bowl
Chop the onion and cook in the bowl with butter for 2 to 3
minutes on MAX. Wash the vegetables, cut the aubergines
into 2 lengthways, then put all the vegetables in the dish,
cover with cling film and cook for 18 to 20 minutes, turning
halfway through. Drain and leave to cool before gently
hollowing out the vegetables with a spoon. Meanwhile,
prepare the filling: in a food processor chop up the onion,
garlic, parsley and meat. Bind together with the egg and
check the seasoning. Add the filling to the seasoned
vegetables. Sprinkle the crispbread crumbs on top and
drizzle each vegetable with 1 tbsp of olive oil. Place the
dish on the Wire Rack and cook for 7 to 10 minutes in
Combination mode: GRILL 2 + 440W, checking the colour.
2 courgettes (approx. 500 g),
2 aubergines (approx. 500 g),
1 onion, 1 knob of butter,
1 garlic clove,
2 tbsp chopped parsley,
300 g leftover mince,
1 egg, 3 crispbreads for topping,
olive oil, salt, pepper.
Celeriac Purée
Cooking time: 15-18 min 4 people - MICROWAVE
Container: 1 round Pyrex® dish, 22 cm diameter
Peel the celeriac and potatoes and chop into small cubes.
cook with the butter and 100 ml of water on MAX for 15 to
18 minutes, cover. Pass through a food processor or ricer
and add milk until you reach the desired consistency.
Check the seasoning and add a pinch of grated nutmeg.
800 g celeriac,
2 medium potatoes,
40 g butter,
150 ml milk,
salt, pepper,
nutmeg.
Baked Fennel
Cooking time: 20 min 6 people - MICROWAVE
Container: 1 Pyrex® dish, 25 cm diameter, and 1 bowl
Wash and finely slice the fennel. Put the slices in the large
dish. Chop the onion and cook for 3 minutes in a bowl with
2 tbsp of olive oil. Add this to the fennel along with ½ tsp of
cumin seeds, the juice of half a lemon and the passata.
Cover and cook using the Vegetables automatic program
or for approx. 18 minutes on MAX. Check the seasoning
before serving. This dish is also delicious cold, served as a
starter.
1 kg fennel,
1 jar of tomato passate (400 g),
½ lemon,
1 onion,
cumin seeds.
Page 62

En-60
Porcini Mushroom Risotto
Cooking time: 25 min 4 people - MICROWAVE
Container: 1 Pyrex® casserole dish with lid, 3 litre capacity, and 1 bowl
Soak the mushrooms in 400 ml warm water for at least 2
hours (preferably overnight). Put the chopped onion and
butter into a bowl. Cover and cook for 3 minutes on MAX.
Add the rice and mix. Cover and cook for 3 more minutes
on MAX. Then add the peeled and crushed garlic, the
vegetable stock and the water used to soak the
mushrooms. Cover and cook for 5 minutes on MAX, then for
15 mintues on 250W. Chop the mushrooms into pieces and
add them 5 minutes before the end of the cooking time. If
need be, add a few spoonfuls of water. Season and leave to
stand, covered, for at least 10 minutes before stirring with a
fork and serving.
40 g dried porcini mushrooms,
50 g butter,
1 garlic clove,
1 onion,
250 g arborio rice,
500 ml hot water with 1
vegetable stock cube added,
12 basil leaves,
chopped.
Jerusalem Artichokes
Cooking time: 15 min 4 people - MICROWAVE
Container: 1 Pyrex® dish, 22 cm diameter
Wash and peel the Jerusalem artichokes. Cut them into 2 or
3 pieces. Peel and chop the shallots. Sweat them in a knob
of butter, covered, for 3 minutes on MAX. Add the
Jerusalem artichokes and 3 tbsp of water. Cover with cling
film and cook on MAX for 11 to 13 minutes. Check the
seasoning and add a pinch of chopped parsley and the
parma ham, cut into small pieces, before serving.
At least 1 kg Jerusalem
artichokes,
2 shallots,
2 slices of Parma ham,
butter,
parsley, salt, pepper.
Tartiflette
Cooking time: approx. 35 min 6 people – MICROWAVE and COMBINATION MODE
Container: 1 Pyrex® dish, 25 cm diameter
Peel the potatoes, cut them into thick slices, add 10 tbsp of
water and cook on MAX for 18 minutes, stirring halfway
through. Drain and set aside. Place the bacon pieces on a
plate, cover and cook for 2 minutes 30 seconds on MAX.
Drain. Peel and chop the onion. Put it in a bowl and cook,
covered, for 2 minutes on MAX.
In the dish mix together the potatoes, onion, bacon pieces
and one third of the reblochon, cut into pieces. Season and
add the white wine. Top with the remaining reblochon, cut
into long thick slices. Place on the Metal Tray and cook on
Combination mode: CONVECTION HEATING 200°C +
250W, for 15 to 17 minutes. (or Combination mode + 600 W
if the dish has been prepared in advance and left to cool).
1.3 kg potatoes,
200 g smoked bacon pieces,
1 onion,
500 g reblochon cheese, rind
removed,
100 ml white wine.
Page 63

English
En-61
Meat and poultry
Your oven allows you to cook meat using
combination cooking (automatic programmes
or manual mode, ideal for large pieces of meat
or slow-cooking), using traditional methods convection heating, grill (for small pieces of
meat or specific recipes) and finally using
microwaves only (to quickly finish cooking a
fricassee, poultry in sauce or meat cooked on
the barbecue).
Combination cooking
Automatic programmes
(Whole Poultry).
This program allows you to
roast poultry without having to calculate the
cooking time. It combines traditional heating
with microwaves in order to obtain wellbrowned roast chicken more quickly.
(900 to 2000 g): Whole chicken, duck or spring
chicken, turkey legs and turkey breast. Oven
must be preheated. Start cooking with breast or
skin side down. Turn at beep sound.
Advice for using automatic
programmes:
• Accessories: use only the accessories
displayed, which are also given on page 16
of the operating instructions.
• Beeps: when you hear the beep, remember
to turn the meat.
• Preheating- for whole poultry program
only - is necessary
• Not suitable for frozen meat or meat which
has just been defrosted.
Allow meat to stand for at least 2 hours after
defrosting.
Manual Combination cooking
This is used for roasting all other joints and for
poultry. See charts on page 62 and 63. It is
preferable to preheat the oven when using
manual combination cooking.
Accessories and containers
It is recommended to place the meat on a thin
heat-resistant tray which is microwave safe or
on the metal tray. Large pieces of meat (large
poultry, whole leg of lamb) can be cooked
directly on the metal tray. Dishes containing
meat to be grilled (pieces of chicken, beef ribs)
should be placed on the wire rack. Do not
cover.
• After cooking it is important to allow roast
meat to stand out of the oven, wrapped in
aluminium foil, for 10 to 15 minutes in order to
complete cooking and make it easier to carve.
Advice for combination cooking for
meat
• Do not add salt to the meat before cooking
but afterwards.
• It is important to check the food several
times during cooking (in both Automatic and
manual modes) so you can adjust the
cooking time if necessary.
• Arrange the chicken legs or other poultry so
that the most meaty parts are at the edges of
the dish.
Traditional cooking: convection
heating, grill.
You will find a chart of cooking times using the
Grill on page 9. But you can also use your
usual recipe books for these traditional cooking
methods.
• You can roast meat in your oven in the
traditional way by preheating the oven in
Convection Heating mode before putting the
meat for roasting into the oven and entering
the cooking time. Preheating is essential in
order to seal the meat or poultry.
• The Grill will cook thin pieces of meat:
cutlets, lamb chops, andouillette sausages. It
is not a griddle and is therefore not suitable
for grilling thin pieces of meat such as steaks
or chipolatas. It is not necessary to
preheat the grill.
Note: most importantly the meat must not be
covered, as it cooks due to external heat only.
Page 64

En-62
Cooking with microwaves only
White meat and pieces of poultry cook perfectly
using microwaves, and this is certainly the
quickest method of cooking them. Microwave
cooking is particularly useful for small pieces of
meat or poultry which will be served in sauce,
or to quickly finish cooking a fricasse or meat
cooked on the barbecue.
Container and accessories:
Place the pieces of meat in a dish which is
microwave safe on the glass tray.
Lid:
It is recommended to cover the meat with a lid
or cling film in order to speed up the cooking
process and stop it spitting. It is normal to find a
lot of liquid in the dish after cooking. The speed
of microwave cooking and the lack of radiant
heat does not allow this liquid to evaporate as it
does in traditional cooking. The loss of weight is
not greater than it is for traditional cooking.
Standing time:
After cooking using either Automatic or manual
mode, it is important to cover the meat and
allow it to stand
out of the oven
for 10 to 15
min, to allow
the cooking to
finish and the
temperature to
even out.
Stews and slow-cooked dishes
It is possible to cook stews using microwaves
only or combined cooking with microwaves, but
it will not be any quicker than using a traditional
cooking method. However, the meat will not
stick to the bottom of the container, and less
energy will be used. Use Pyrex or ovenproof
porcelain casseroles with lids.
BEFORE: the vegetables should be cut into
equal pieces and precooked. For many stew
recipes, it is necessary to flour the pieces of
meat to ensure the sauce sticks to them.
DURING cooking, it is essential that the pieces
of meat stay immersed in the liquid using a
saucer or upside-down plate (to prevent the
meat from drying out). As stews take a long
time to cook and there can be a lot of
evaporation, do not hesitate to add more liquid
during cooking if necessary.
Cover the container
with a lid in order to
limit evaporation.
Bring the stew to
the boil at MAX for
10 to 15 minutes
then continue the
cooking for the
required time using Combination cooking with
CONVECTION HEAT 170°C + 250W. It is not
necessary to preheat the oven for this second
stage.
Page 65

English
En-63
Type of meat
Microwave
only
Duration
in
minutes
Grill or Combination
mode
Duration in minutes
Beef
- rib on the bone, 970 g,
very rare
- rib, 970 g, medium rare
/ well done
- meat for roasting, very
rare
- meat for roasting, medium
rare
- stew
-
-
MAX
MAX
-
-
-
4-5
5-6
-
CH 220°+ 250 W (1 and 2)
CH 220° + 250 W (1 and 2)
CH 220° (1 and 2)
CH 220° + 100 W (1 and 3)
CH 170° + 100 W (3 and 4)
7-8 min then 11 min on
Grill 1
10 then 11-12 min on Grill 1
14 to 15 min per 500 g
15 to 16 min per 500 g
60 to 90 min
Lamb
- on the bone = 1.1 kg
well done
- on the bone > 1.1 kg
well done
- meat for roasting off the
bone, rolled, well done
- stew
600 W
600 W
600 W
600 W
-
-
-
5-6
6-7
6-7
7-8
-
-
-
CH 220° + 250 W (1 and 2)
CH 220° + 250 W (1 and 3)
CH 220° + 250 W (1 and 3)
CH 220° + 250 W (1 and 3)
CH 220° + 250 W (1 and 3)
CH 220° + 250 W (1 and 3)
CH 170° + 100 W (3 and 4)
10 min per 500 g
11 to 12 min per 500 g
10 to 11 min per 500 g
12 min per 500 g
12 min per 500 g
14 min per 500 g
50 to 60 min
Veal
- meat for roasting
- stuffed roasting joint
- stew
600 W
-
-
10-12
-
-
CH 220° + 600 W (1 and 3)
CH 200° + 440 W (1 and 3)
CH 170° + 100 W (3 and 4)
14 -15
21 -22
50 to 60 min
Pork
- roasting joint from rump
- roasting joint from loin
< 1.2 kg
≥ 1.2 kg
- stew
600 W
600 W
600 W
-
16
18
18
-
CH 220° + 440 W (1 and 3)
CH 220° + 440 W (1 and 3)
CH 200° + 440 W (1 and 3)
CH 170° + 100 W (3 and 4)
13-14 min per 500 g
15-16 min per 500 g
15-16 min per 500 g
50 to 60 min
Chicken, guinea fowl, turkey
- whole roasting bird,
medium
Very well done
- pieces
- turkey breast joint
- poussin, 470 g
-
MAX
-
-
-
7-8
-
-
CH 220° + 440 W (1 and 3)
or Auto program
CH 220 ° + 440 W (1 and 3)
G1 + 250 W (1 and 2) or Auto
program
CH 220° + 440 W (1 and 3)
CH 220° + 250 W (1 and 2)
7 min per 500 g
8-9 min per 500 g
14-16 min per 500 g, then 5
min Grill 1
14 to 15 min per 500 g
15-16
Cooking times for meat and poultry using microwaves or combination cooking.
+ means Combination Cooking, CH means Convection Heating, G means the Grill. (For
cooking times for meat using the Grill, please refer to page 9) Preheated oven if Combination
mode with Convection Heating is used
(1) turn halfway through cooking. (2) heat-resistant, microwaveable dish on the wire rack. (3) heat-
resistant, microwaveable dish on the metal tray. (4) regardless of the weight.
NB: for meat off the bone and stuffed meat, if the specific cooking time is not shown in the table,
extend the cooking time by at least 10 min. (regardless of the weight).
Cooking times for meat and poultry
Page 66

En-64
Type of meat
Microwave
only
Duration
in
minutes
Grill or Combination
mode
Duration in minutes
Duck
- whole roasting bird
- stuffed roasting bird
- thighs, 2 pieces, 650 g
- stew
- breast (1 piece, 340 g) P
-
-
-
-
-
-
-
-
-
-
Auto program: Whole
poultry
CH 180° + 250 W (1, 3
and 4)
Grill 1 + 440 W (1 and 2)
or Auto program
CH 170° + 440 W (3 and 4)
G1 + 440 W (1 and P)
1 hour to 1 hour 10 min
14 to 15 min
1 hour to 1 hour 15 min
3 min 30 s to 4 min
Rabbit
Max 7-8 - -
Game
- meat for roasting
- stew
Max
-
5-6
-
CH 220° + 100 W (1 and 3)
CH 170° + 440 W (3 and 4)
11-1 2
1 hour 15 min to 1 hour 30
min (2)
Other meat
1 tripe sausage, 180 g
fresh (1 & 5)
frozen (1 & 5)
2 large sausages, 240 g
fresh
frozen
2 chipolatas, 110 g
fresh
frozen
-
-
-
-
-
-
-
-
-
-
-
G1 + 440 W (1 and P)
G1 + 600 W (1 and P)
G1 + 250 W
G1 + 440 W
G1 + 100W
G1 + 250 W
6 min
5 to 5 min 30 s
6 min
6 min
8 min
about 6 min
Cooking times for meat and poultry using microwaves or combination mode.
+ means Combination Cooking, CH means Convection Heating, G means the Grill.
(For cooking times for meat using the Grill, please refer to page 9) Preheated oven if
Combination mode with Convection Heating is used.
(1) turn halfway through cooking. (2) heat-resistant, microwaveable dish on the wire rack. (3) heat-
resistant, microwaveable dish on the metal tray. (4) regardless of the weight.
NB: for meat off the bone and stuffed meat, if the specific cooking time is not shown in the table,
extend the cooking time by at least 10 min. (regardless of the weight).
Cooking times for meat and poultry
Page 67

English
En-65
Normandy Style Turkey
Cooking time: approx. 20 min 4 people - MICROWAVE
Container: 1 round Pyrex® dish, 25 cm diameter
Cut the turkey escalopes into pieces. Coat lightly in flour.
Sweat the chopped shallots in butter, covered, for 2 minutes
on MAX. Add the turkey pieces. Pour over the calvados.
Flambé. Add the white wine or cider, salt, pepper and
apples (which have been peeled, deseeded and cubed).
Cover and cook on MAX for 15 to 17 minutes. Drain the
turkey pieces and put them to one side, covered in
aluminium foil. Add the crème fraîche and reduce the sauce
by cooking, uncovered, on MAX for a few minutes. Check
the seasoning and put the turkey pieces back into the
sauce.
800 g turkey escalope,
30 ml calvados,
4 ripe apples,
2 shallots,
40 g butter,
flour, 3 tbsp crème fraîche,
1 glass of white wine or cider,
salt, pepper.
Herbed Grilled Chicken
Cooking time: approx. 16 min 4 people - COMBINATION COOKING
Container: 1 Pyrex® dish, 25 cm diameter
Spread out the chicken drumsticks in the dish. In a bowl,
mix together the breadcrumbs, chopped parsley and peeled
and crushed garlic. Season the drumsticks and roll them in
the herb mixture, then top with knobs of butter. Put into the
oven on the Wire Rack and cook for 14 to 16 minutes on
Combination mode, GRILL 2 + 600W, turning and adding
the rest of the herb mixture halfway through the cooking
time. leave to stand for 3 minutes and season before
serving.
800 g chicken drumsticks,
50 g butter, 2 cloves of garlic,
50 g breadcrumbs,
half a bunch of parsley,
salt and pepper.
Tarragon Chicken
Cooking time: approx. 20 min 4 people - MICROWAVE
Container: 1 round Pyrex® dish, 25 cm diameter
Coat the chicken pieces in flour. Sweat the chopped onion
in butter, covered, for 3 minutes on MAX. Add the floured
chicken pieces; pour over the stock; add a pinch of salt and
4 sprigs of tarragon, chopped. Cover and cook for 15 to 16
minutes on MAX. Take out the chicken pieces and drain.
Reduce the sauce by cooking, uncovered, on MAX for a few
minutes. Check the seasoning; add the cream and a few
fresh tarragon leaves.
One 1.2 kg chicken cut into 8
pieces,
1 onion, 30 g butter,
500 ml chicken stock,
30 g flour,
5 sprigs of tarragon,
salt, pepper,
3 tbsp cream.
Page 68

En-66
Sage and Onion Stuffed Guinea Fowl
Cooking time: approx. 35 min 6 people - MICROWAVE and COMBINATION COOKING
Container: 1 Pyrex® dish, 25 cm diameter, and 1 bowl
Roughly chop the peeled onions and cook them with butter
in a bowl, covered, for 5 minutes on MAX. In a food
processor blend together the bread (crusts removed), sage
leaves and onions and bind together with the egg yolk. Add
lots of salt and pepper before stuffing the guinea fowl with
this mixture. Close up the bird using thread or toothpicks.
Preheat the oven with the Metal Tray in Combination
mode: CONVECTION HEATING 200°C + 250W. Then put
the guinea fowl in the oven and cook for approx. 35
minutes, turning after two-thirds of the cooking time. When
cooked, season with salt and pepper and leave the guinea
fowl to stand for at least 10 minutes (wrapped in aluminium
foil) before serving.
1 guinea fowl, 1.4 kg,
2 onions,
6 fresh sage leaves,
50 g fresh bread
(about 4 slices),
1 knob of butter,
1 egg yolk,
salt and pepper.
Stewed Leg of Duck
Cooking time: 1 h 15 min to 1 h 30 min 4 people - MICROWAVE and COMBINATION COOKING
Containers: 1 Pyrex® casserole dish with lid, 3 litre capacity, and 1 saucer
Brown both sides of the well-floured duck legs in a frying
pan on the hob. Meanwhile, sweat the chopped onion and
carrot in butter, covered, for 3 minutes on MAX. When the
duck legs are well browned on both sides, place them in
the casserole dish, cover with red wine; add the remaining
flour, the carrot, onion, bouquet garni, crushed garlic and
bacon pieces. Place an upside-down saucer on top of
everything. Cover. Place the casserole dish on the Metal
Tray and cook for 11 minutes on MAX, then for 50 minutes
to 1 hour on Combination mode: CONVECTION HEATING
170°C + 440W (programme the two cooking times). When
cooked, the duck meat should be soft. Remove the
bouquet garni. Skim the grease off the sauce and check
the seasoning before serving.
4 duck or duckling legs,
40 g flour,
10 g butter,
1 onion,
1 carrot,
750 ml red wine,
1 bouquet garni,
100 g smoked bacon pieces,
1 garlic clove,
salt, pepper.
Veal Paupiettes with Morel Mushrooms
Cooking time: 15 min 6 people - MICROWAVE
Containers: 1 round Pyrex® dish, 22 cm diameter, and 1 bowl
Soak the dried morel mushrooms in a bowl of hot water for
at least half an hour. Brown the veal paupiettes on all
sides, in butter in a frying pan on the hob. In the dish, bring
together the veal paupiettes, the chopped shallots, the
mushrooms, drained and chopped into pieces (remember
to keep the water they have been soaked in) and half the
vermouth. Cook, covered, on MAX for 8 to 10 minutes.
Meanwhile, mix the cornflour into the mushroom water.
When cooked, move the veal slices to a serving dish and
cover with aluminium foil. Add the cornflour mixture, cream
and remaining vermouth to the cooking dish. Thicken this
sauce by cooking for 5 to 6 minutes on MAX. Check the
seasoning before pouring over the veal paupiettes. Serve
this dish with fresh pasta.
6 paupiettes of veal,
150 ml Noilly-Prat vermouth,
3 shallots, 2 tbsp cornflour,
150 g cream, 1 knob of butter,
20 g dried morel mushrooms,
salt, pepper.
Page 69

English
En-67
Five Spice Spare Ribs
Cooking time: approx. 25 + 25 min 4 people - MICROWAVE and COMBINATION COOKING
To be prepared a day in advance.
Container: 1 Pyrex® dish, 30 cm diameter, and 1 Pyrex® casserole dish with lid
Cut the spare ribs into pieces and place them in the
casserole dish. Cover with hot water. Cover and cook on
MAX for 8 to 10 minutes, then for 15 minutes on 250 W
(programme the two cooking times). Drain, rinse and return
to the casserole dish with the chopped garlic and onion,
spices, soy sauce and honey. Leave to marinate overnight,
covered and in the fridge. Preheat the oven in Combination
mode: CONVECTION HEATING 190°C + 100W with the
Wire Rack on the Metal Tray. Spread out the spare ribs in
the large dish and cook for approx. 25 minutes, turning the
ribs halfway through the cooking time.
1.3 kg pork spare ribs,
100 ml (9 tbsp) soy sauce,
1 tsp ground mixed spice,
1 tbsp ground cinnamon,
2 garlic cloves,
1 tbsp honey,
1 tsp ground ginger, 1 onion.
Shepherdʼs Pie
Cooking time: approx. 15 min 4 people - MICROWAVE and COMBINATION COOKING
Containers: 1 round Pyrex® dish, 22 cm diameter, and 1 bowl
Sweat the chopped onion in a bowl with butter, covered, for
2 to 3 minutes on MAX. Chop the meat and add the onion,
crushed garlic and chopped parsley to it. Season this
mixture well and place it in the dish. Cover with mashed
potato and grated cheese. - If the mashed potato is still hot
you just need to reheat the meat for 1 minute 30 s to 2
minutes 30 s on MAX, before adding the topping. Then
place the dish on the Wire Rack and heat for 6 to 8 minutes
in Combination mode: GRILL 2 + 250W.
If the meat and mashed potato are cold: place the dish on
the Wire Rack and heat for 12 to 13 minutes in Combination
mode: GRILL 2 + 600 W.
Instant mashed potato for 4
people,
or homemade mashed potato,
400 g cooked mince,
1 garlic clove,
1 shallot, 40 g butter, parsley,
100 g grated cheese,
salt, pepper.
Irish stew
Cooking time: 60-75 min 5-6 people - MICROWAVE and COMBINATION COOKING
Containers: 1 Pyrex® casserole dish with lid, 3 litre capacity, and 1 saucer
Cut the lamb into pieces, peel the potatoes and chop into
rounds, chop the onions. In the dish, alternate layers of
meat, onion and potato, and sprinkle on a little thyme and
pieces of bay leaf. Add the peeled and crushed garlic. Half
cover with water or stock. Place the upside-down saucer
over everything. Cover, place on the Metal Tray and cook
for 20 minutes on MAX, then for 1 hour in Combination
mode: CONVECTION HEATING 160°C + 100W. When
cooked, the lamb pieces should be tender and the potatoes
should be easy to crush with a fork. Check the seasoning
before serving.
1 kg lamb breast,
800 g potatoes,
4 large onions, thyme,
bay leaves, stock, salt, pepper,
2 garlic cloves.
Page 70

En-68
Veal Stew
Cooking time: about 1 hour 4 people - MICROWAVE and COMBINATION COOKING
Containers: 1 Pyrex® casserole dish with lid, 3 litre capacity, 1 saucer and 2 bowls
Peel and chop the onion, carrot and leek and sweat in the
butter for 3 minutes, covered, on MAX. Add the veal, cut
into large cubes, and the bouquet garni and garlic. Cover
with 600 ml of very hot water. Place the upside-down
saucer over everything. Cover, place on the Metal Tray
and cook for 8 minutes on MAX then for 38 to 40 minutes
in Combination mode: CONVECTION HEATING 160°C +
100 W. Remove the veal pieces and set aside, covered.
Incorporate the cooking stock into the roux (melted butter
mixed with the same weight of flour). Mix. Cook again on
MAX for 4 to 5 minutes. Beat together the cream and egg
yolk and add to the mixture. Do not boil the mixture any
more. Season and add the juice of half a lemon. Return the
veal pieces to the sauce and keep warm. Cook the
chopped mushrooms and onions separately, covered, with
20 g butter (and 2 tbsp of water for the onions) on MAX for
3 to 5 minutes each. Season. Add to the sauce just before
serving.
800 g shoulder of veal, off the
bone, or strips of veal,
1 onion, 1 carrot,
1
/2 leek, 100 g cocktail onions,
1 garlic clove, 20 g butter,
1 bouquet garni, 3 tbsp cream,
150 g mushrooms,
40 g flour + 40 g butter,
1 egg yolk,
1
/2 lemon.
Duckling with Apple Stuffing
Cooking time: 60 min 4-6 people - COMBINATION COOKING
Container: 1 round Pyrex® flan dish, 28 cm diameter
Roughly chop one peeled apple, the smoked bacon and
the chicken livers. Add the egg yolk and calvados, mixing
together carefully. Check the seasoning. Stuff the
seasoned duckling with this mixture. Close up the bird
using thread and a large needle or several toothpicks.
Place the seasoned duckling in the dish, placing around it
the three other apples, which have been peeled and
quartered. Place the dish on the Metal Tray and cook for
approx. 60 minutes on COMBINATION COOKING:
CONVECTION HEATING 180°C + 250W, turning the
duckling halfway through the cooking time. Leave to stand
for 10 minutes and skim the fat from the jus before serving.
1 duckling, 1.6 kg,
4 apples,
150 g chicken livers,
100 g cubes of smoked bacon,
1 egg yolk,
1 tsp calvados.
Quick Moussaka
Cooking time: approx 40 min 4-6 people - MICROWAVE and COMBINATION COOKING
Container: 1 round Pyrex® dish 25cm diameter and 1 bowl
Cut the aubergines lengthways into fairly thin slices.
Spread some of the slices out on the clean glass turntable.
Cover with cling film and cook for approx. 10 minutes on
MAX. The slices should be soft and give when pressed.
Repeat the operation for the rest of the aubergine slices.
Drain and set aside. Cook the chopped onion in the bowl
with 3 tbsp olive oil for 3 minutes on MAX. Add the garlic
and mince as well as the thyme, chopped parsley and
passata. Check the seasoning. In the dish, alternate layers
of seasoned aubergine and the mince and sauce mixture.
Finish with a layer of aubergines and pour 2 tbsp olive oil
on top, before covering the whole dish with mozzarella
slices. Preheat the oven in Combination mode,
CONVECTION HEATING 160°C + 600W with the Metal
Tray. Put in the oven and cook for approx. 20 minutes.
3 aubergines (approx. 1 kg),
400 g leftover lamb mince,
100 g mozzarella,
1 onion,
1 garlic clove, thyme,
1 jar of tomato passata (400 g),
olive oil, parsley,
salt, pepper.
Page 71

English
En-69
Food Item Fresh Frozen
Power (minutes) Cooking time Power
Cooking time
(minutes)
Thin fillets of fish
600 W 4-5 MAX 10
Thick fillets of fish
600 W 5-6 MAX 11-12
Fish steak
600 W 5-7 MAX 11-13
Whole fish
600 W 5 MAX 12
Prawns
600 W 4-5 - -
Mussels
600 W 5-6 - -
Scallops
600 W 6-7 - -
Squid
600 W 5-6 MAX 11
Crab
600 W 5-6 - -
Fish in batter
(1 piece = 50g)
- -
MAX
MAX
3 min 30
(2 pieces)
5 min (4 pieces)
Fish and shellfish
Microwaves only
For fresh fish, it is preferable to use power
600W so that the Inverter technology preserves
the texture and flavour of the fish as much as
possible.
Container and accessories
Only use dishes which are microwave safe,
placed directly on the
glass tray. As
cooking this way
uses little liquid, it is
imporant to cover
the dish with a lid
or pierced clingfilm.
Standing time:
The standing time after cooking is relatively
short (2-3 min), but it is essential to ensure the
fish is evenly cooked.
Using combination or traditional
cooking
• Combination: Grill or Convection +
Microwaves.
Preheat the oven
in Combination
mode using
Convection 220°C
+ 250W or 100W
(depending on the
size of fish), to
braise larger fish on the wire rack.
• Traditional cooking methods (Convection
heat, or Grill).
For small fish or kebabs placed on the wire
rack. For fish parcels in aluminium paper, or
large fish, placed on the metal tray. Preheat
the oven.
Containers and accessories
Depending on the size and thickness of the
fish, the heat-resistant dish is placed on the
metal tray or on the wire rack. For combination
cooking, the dish must also be microwave safe.
As these cooking methods use radiant heat,
the dish must not be covered.
Cooking time per 500g.
Page 72

En-70
General advice
Automatic Cooking
Fresh Fish
(200 - 1000 g) Fish
Fillet eg. Paice, Cod,
Sea-salmon, redfish,
wolf fish or salmon
filet. Refer to page En16 for instructions.
Arranging the fish:
fish steaks should be
arranged in a circle
with the thickest part
on the outside.
Uneven or very thin
fish fillets should be
rolled or folded in
order to protect the
thin parts. Whole
small fish (herring,
trout, mackerel)
should be arranged head to tail.
Liquid: add a little stock, white wine or lemon
juice to the fish before cooking. Allow 2 to 3
tbsp per 500g of fish. Adding more liquid will
slow down the cooking process, whereas less
liquid will speed it up.
Salt: do not add salt before cooking as this will
dry out the fish, but you can add pepper and
herbs before cooking.
Composition of the fish: a fillet of oily fish
(halibut, salmon, mackerel) will cook more
quickly than a fillet of white fish (pollock,
whiting, ling). Take this into account by possibly
adding a little more liquid or reducing the
cooking time.
Cooking: when the fish becomes opaque and
starts to come apart when flaked, it is cooked.
Noise: it is normal to hear small noises during
cooking (made by the steam trapped between
the flesh and skin escaping). This noise occurs
more frequently when cooking oily fish such as
salmon or mackerel. You can reduce the noise
by pricking the fish skin in several places.
Speed: fish cooks very quickly in the
microwave; do not cook it until the last minute,
to avoid the need to reheat.
Shellfish: shellfish can be put in the oven as
are they are, but must be taken out as they
open, otherwise they will dry out; if they are
stuffed, their preparation and cooking depends
on the type of filling.
Large fish (more than 500g): it recommended
to turn the fish half-way through cooking and to
protect the tail and head with a small piece of
aluminium foil to avoid possible overcooking.
(Warning: the aluminium must be more than
2cm away from the oven walls).
Fish parcels: you can cook fish parcels in the
microwave by replacing the aluminium foil with
greaseproof paper (also called baking paper),
which is microwave safe.
Fish and shellfish
Page 73

English
En-71
Salmon with Whole Grain Mustard
Cooking time: 11-13 min 4 people - MICROWAVE
Containers: 1 bowl and 1 round Pyrex® dish, 22 cm diameter
Sweat the finely chopped shallots in butter, covered, for 2
minutes on MAX. Place on top of the seasoned salmon
pieces and pour the white wine over this. Cover and cook
at 600W for 8 to 9 minutes or using the FISH Auto
program. Remove the fish and place on a plate, cover with
aluminium foil and leave to stand for at least 3 minutes.
Meanwhile, add the mustard, cream and cornflour to the
cooking dish. Mix and cook, uncovered, for 1 to 2 minutes
on MAX. Serve the salmon pieces covered in this sauce.
700 g salmon fillets
skin removed, cut into 4 pieces,
3 shallots, 40 g butter,
100 ml white wine,
1 tbsp whole grain mustard,
2 tbsp cream,
1 tbsp cornflour, salt, pepper.
Braised Sea Bream
Cooking time: approx. 28 min 4 people - MICROWAVE and COMBINATION COOKING
Containers: 1 Pyrex® dish, 30 cm diameter, and 1 bowl
In the bowl, sweat the chopped onion with butter, covered,
for 2 to 3 minutes on MAX. Spread the onion out in the
dish, along with the mushrooms and chopped tomatoes;
cover and cook for 5 to 6 minutes on MAX. Check the
seasoning, add the herbs and place the seasoned fish
onto the bed of tomatoes and mushrooms. Top with knobs
of butter. Preheat the oven in Combination mode:
CONVECTION HEATING 200°C + 250W with the Wire
Rack. Put in the oven and cook for approx. 20 minutes,
turning the fish halfway through the cooking time.
2 sea bream
(approx. 1 - 1.1 kg, gutted),
1 onion,
250 g mushrooms,
2 tomatoes,
1 knob of butter, herbs,
salt, pepper.
Red Snapper with Saffron
Cooking time: 15 min 4 people - MICROWAVE
Container: 1 round Pyrex® dish, 22 cm diameter, and 1 bowl
Cook the chopped shallots and chilli in a bowl with olive oil
for 4 to 5 minutes on MAX. Spread out a bed of shallots
and chilli in the dish and place the 4 fish fillets on this, then
pour over the lemon juice and white wine. Cover with cling
film or with a lid and cook for 7 to 8 minutes on 600W.
Remove the fish pieces, drain and set aside. Add the
saffron and cream to the dish and reduce by cooking,
uncovered, for 3 to 4 minutes on MAX. Check the
seasoning before returning the fish to the sauce and
serving with rice or baked fennel.
550 g red snapper or tilapia fillets,
juice of half a lemon,
1 red chilli,
2 shallots,
2 tbsp olive oil,
half a glass of white wine,
100 ml single cream,
a few threads of saffron.
Page 74

En-72
Coconut Fish Curry
Cooking time: 8-9 minute 4 people - MICROWAVE
Container: 1 round Pyrex® dish, 22 cm diameter
Sweat the cubed onion and pepper in olive oil, covered, for
5 minutes on MAX. Add the coconut milk and heat for 45
seconds on MAX. Add the other ingredients, the tomato
(peeled, deseeded and chopped) and the fish, cut into
cubes. Cook on MAX for 6 to 7 minutes. Check the
seasoning and serve with rice.
600 g white fish (coley or
pollock),
2 tbsp cream,
1 tbsp olive oil,
1 tomato, 1 onion,
1 tbsp curry powder,
juice of 1 lemon,
1 red pepper,
150 g coconut milk,
salt, pepper.
Trout Fillets with Dill Sauce
Cooking time: 15-17 min 4 people - MICROWAVE
Containers: 1 round Pyrex® dish, 22 cm diameter, and 1 bowl
Cut the trout fillets in 4 equal pieces. Put to one side, in the
fridge. Prepare the sauce : chop up the shallots and peel,
deseed and cut the tomatoes into pieces. Place both in a
large dish with the white wine. Cook on MAX for 6 minutes,
uncovered. Add 2 tsp of cornflour, 1 tsp of dill and the cream;
mix well and cook again for 3 to 4 minutes on MAX. Check
the seasoning and put the sauce to one side. Cook the trout
fillets, covered, for 6 to 7 minutes on 600W, turning the fish
halfway through the cooking time. Take out of the oven and
add the sauce. Cook again, uncovered, for 1 min on MAX to
allow the sauce to mix with the cooking juice. Serve with
white rice or baked leeks.
600 g sea trout fillets, 2 shallots,
3 tomatoes,
100 ml white wine,
cornflour, 150 g cream,
fresh or dried dill, salt, pepper.
Tarragon and Orange Trout
Cooking time: approx. 15 min 4 people - MICROWAVE
Container: 1 Pyrex® flan dish, 27 cm diameter
Place the trout pieces head-to-tail in the dish. Add knobs of
butter, the juice and zest of 2 oranges and the chopped
leaves from 2 sprigs of tarragon. Cover with cling film and
cook for 12 to 14 minutes on 600W. Season and garnish
with the remaining orange, cut into slices, and a few
tarragon leaves. Serve with the sauce.
4 trout portions, gutted,
50 g butter,
juice and zest of 2 oranges,
3 sprigs of tarragon,
1 orange,
salt, pepper.
Page 75

English
En-73
Mackerel Parcels
Cooking time: 10 min 4 people - MICROWAVE
Containers: greaseproof paper (baking paper) and 1 bowl
Cook the chopped shallots in butter in a bowl, covered, for
3 minutes on MAX. Cut 4 fairly large squares of
greaseproof paper. Place one quarter of the cooked
shallots at the centre of each square; add one tsp of
mustard, place one seasoned mackerel fillet on top and
drizzle with lemon juice. Add a pinch of chopped chives
before placing the other mackerel fillet on top, top-to-tail
with the first one. Season again and add one tbsp of
cream. Close up the parcel. Carry out the same process for
the three other parcels, before placing them on the Glass
Tray. Cook for 7 to 8 minutes on MAX (or 3 minutes 30 s to
4 minutes for 2 parcels).
4 mackerel, cut into fillets
by the fishmonger (8 fillets),
4 shallots,
1 knob of butter,
4 tbsp cream,
chives,
mustard, 1 lemon.
Seafood Bake
Cooking time: approx. 35 min 4 people – MICROWAVE and COMBINATION MODE
Container: 1 bowl and 1 Pyrex® dish, 25 cm diameter
Defrost the seafood for 6 minutes on 600 W, stirring
several times. Drain and keep the liquid, adding 250 ml
milk to it. Chop the shallots, the carrot and the mushrooms
and cook this mixture in a bowl, covered, with 30 g of
butter for 5 minutes on MAX. Add 2 to 3 heaped tbsp of
flour and cook again for 40 seconds on MAX, then add the
milk and cooking juice from the seafood. Cook this sauce
for 5 to 7 minutes on MAX. (if the sauce does not seem
thick enough, you can correct it by adding 1 tbsp of
cornflour mixed with white wine). Add the dill and one
tablespoon of fruity white wine, check the seasoning and
mix with the seafood. Pour the mixture into the baking dish.
Sprinkle with grated cheese; put into the oven on the Wire
Rack and cook for 6 to 8 minutes on Combination mode:
Grill 2 + 250W.
500 g frozen mixed seafood,
3 shallots, 1 tbsp chopped dill,
30 g grated emmental cheese,
1 carrot,
150 g mushrooms,
30 g butter,
flour,
250 ml milk,
white wine, salt, pepper.
Potted Salmon
Cooking time: approx. 5 min 4 people - MICROWAVE
Containers: 1 round Pyrex® dish, 22 cm diameter, and 1 bowl
Cook the fresh salmon for 5 minutes on 600W, covered.
Leave to cool. Meanwhile, cut the butter into cubes and
bring it to a creamy consistency by warming at 440W for 2
to 3 minutes (it should not melt). Cut the smoked salmon
into small cubes or chop finely. Remove the skin and
bones from the cooked salmon, break up the fish and mix it
with the butter, smoked salmon, olive oil and boiled egg
yolk, crumbled. Mix well. Season to taste with salt, pepper
and lemon juice. Put the mixture into a terrine tin or mould
into oblongs using 2 tablespoons and put in the fridge to
set for 1 to 2 hours.
NB: If you prefer, you can also put the mixture into the food
processor. This will save time, but the consistency will be
more like a fish mousse than potted fish.
400 g fresh salmon,
150 g smoked salmon,
200 g butter,
1 tbsp olive oil,
1 boiled egg yolk,
salt, pepper, lemon.
Page 76

En-74
Salt Cod and Leek Bake
Cooking time: 40 min 6 people - MICROWAVE and COMBINATION COOKING
Container: 1 round Pyrex® dish, 27 cm diameter
Remove the salt from the cod by soaking it for 24 hours in a
large quantity of cold water which should be changed 2 or 3
times. Put the cod in a microwaveable dish, cover with hot
water and poach for 12 to 15 minutes on MAX. Wash and
finely slice the leeks, cook them for approx. 15 minutes,
covered, on MAX. Cook the potatoes, peeled and
quartered, using the VEGETABLES Auto program. Drain the
cod and break into pieces, taking care to remove all the
bones and the skin. Mix together the fish pieces, leeks,
cream and cheese. Do not add salt. Place the potatoes in a
buttered dish, cover with the fish, leeks and cheese mixture.
Preheat the oven in Combination mode: CONVECTION
HEATING 200°C + 440W (+ 600W if the dish was prepared
in advance) with the Metal Tray; put into the oven and cook
for 13 to 16 minutes, until it is golden brown on top.
800 g dried or salted cod,
300 ml single cream,
2 large leeks,
50 g grated cheese,
500 g potatoes, peeled,
pepper.
Provençal Fish
Cooking time: 19 min 4 people - MICROWAVE
Container: 1 Pyrex® flan dish, 28 cm diameter, and 1 bowl
Finely slice the onion and pepper and cook them in olive oil
in a bowl, covered, for 5 minutes on MAX. Add the passata,
white wine, cognac, tomato puree and a crushed clove of
garlic. Spread this mixture out in the dish and cook for 4
minutes on MAX. Place the fish on top, cover and cook on
MAX for 10 minutes if the fish is in fillets, or 11 to 12
minutes if it is in reconstituted rectangular slices. Check the
seasoning before serving.
200 g tomato passata,
4 frozen white fish fillets (coley or
pollock, approx. 400 g),
1 onion,
100 ml white wine,
1
/2 pepper,
1 tsp tomato puree, 1 tbsp
cognac,
1 tbsp olive oil,
garlic, salt, pepper.
Mussel Flan
Cooking time: approx. 25 min 6 people - COMBINATION COOKING
Container: 1 round Pyrex® dish, 25 cm diameter
Drain the mussels well and squeeze out any remaining
liquid. If frozen, defrost the mussels at 440W for 5 minutes.
Keep the liquid to one side. Make a flan mixture by mixing
together in a bowl the milk, cream and eggs.
In the buttered dish alternate layers of mussels and grated
cheese, sprinkling with chives and mashed potato powder.
Pour the seasoned flan mixture over this. Place the dish on
the Metal Tray and cook for 15 to 17 minutes in
Combination mode: CONVECTION HEATING 170°C +
440W. Leave to stand for at least 10 minutes. Serve warm,
on its own or with a sauce made from butter mixed with the
liquid from the mussels.
400 g mussels, out of their shells,
3 tbsp instant mashed
potato powder,
150 ml milk, 3 eggs,
150 ml single cream,
100 g grated cheese,
2 tbsp chopped chives,
salt, pepper.
Page 77

English
En-75
Sauces
General advice:
• When making your sauce, remember to use a large container to avoid any spillage.
• Stir the sauce before, during and after cooking to prevent it spitting.
• Microwave cooking is particularly useful for creamy sauces such as white sauce as well as thick
sauces containing cornflower, which cook quickly without getting stuck to the bottom of the
container.
• Most sauces can be cooked at MAX except sauces containing egg which cook best at 440W or
600W.
• DO NOT cover sauces, so you can stir them more easily.
• DO NOT leave a wooden spoon in the bowl while cooking. It may dry out or burn. DO NOT leave
a metal spoon in the bowl whilst cooking.
• Reheat emulsion sauces (Béarnaise, Hollandaise, beurre blanc) at 100W power, checking them
as they heat.
Béarnaise Sauce
Cooking time: approx. 10 min 4 people - MICROWAVE
Container: 1 bowl, 1 litre capacity
Put the chopped shallots, tarragon, vinegar and a little
pepper in the bowl. Reduce the sauce by cooking at 600W,
covered to begin with, then uncovered for 3 to 4 minutes;
about 2 tbsp of liquid should remain. Leave to cool, then
add the egg yolks and 2 tablespoons of cold water. Mix and
cook at 600W for 20 to 30 seconds. Remove and whisk
vigorously. Repeat 5 or 6 times until you obtain a creamy
emulsion (the mixture must never boil). The emulsion is
cooked when you can see the bottom of the bowl when you
whisk. Then incorporate the softened butter little by little,
stirring all the time. If necessary, reheat for 10 to 20
seconds at 600W whilst doing this. Check the seasoning
and add a few fresh tarragon leaves. If need to, reheat at
100W, stirring as it heats.
150 g butter,
2 tbsp chopped tarragon,
30 ml vinegar,
3 egg yolks,
30 ml white wine,
3 shallots, salt, pepper.
Roquefort Sauce
Cooking time: 4-5 min 4 people - MICROWAVE
Container: 1 bowl, 500 ml capacity
Cut the Roquefort into pieces and melt by heating for 1
minute 30 s at 600W. Add the cream and cornflour mixed
with 1 tbsp water. Cook for 3 minutes to 3 minutes 30 s on
MAX, whisking vigorously halfway through the cooking
time. Check the seasoning before serving. This sauce
goes very well with red meat.
50 g Roquefort cheese,
200 ml single cream,
2 tbsp cornflour,
salt, pepper.
Page 78

En-76
White Sauce
Cooking time: approx. 8 min for 500 ml - MICROWAVE
Container: 1 bowl, 1 litre capacity
Take the butter out of the fridge in advance, and put it into
the bowl in pieces. Melt by heating for 30 seconds on MAX.
Add the flour, mix and cook for 30 seconds on MAX. Put to
one side. Heat the milk in a high-sided container for 3 to 4
minutes on MAX. Pour the milk over the butter and flour
mixture, whisking all the time. Cook again for 3 to 4 minutes
on MAX, whisking vigorously halfway through the cooking
time. Check the seasoning and add a pinch of grated
nutmeg. Variation: if you add 2 egg yolks and 80 g of grated
cheese to your white sauce it becomes Mornay sauce.
35 g flour,
35 g butter,
500 ml milk, salt, pepper,
grated nutmeg
Confectionerʼs Custard
Cooking time: 5-7 min For 500 ml cream - MICROWAVE
Container: 1 bowl, 1 litre capacity
Bring the milk to the boil by heating for 3 to 4 minutes on
MAX. Meanwhile, mix the sugar and flour together in a
bowl. Add the eggs. Mix. Pour in the boiling milk, whisking
all the time. Cook on MAX for 2 to 3 minutes, whisking
vigorously every minute.
500 ml milk, 50 g flour,
80 g sugar, 3 eggs.
Pepper Sauce
Cooking time: 6 min 5-6 people - MICROWAVE
Container: 1 large bowl
Chop the onion and cook in the bowl with butter for 2 to 3
minutes on MAX. Add 30 g (2 tbsp) of flour, mix, cook again
for 1 minute on MAX and add 400 ml of hot water, 2
crumbled stock cubes, 1 tbsp vinegar and 2 tsp of white
pepper. Cook uncovered at MAX for 3 minutes. Remove
from the oven and add a dash of cognac and a knob of
butter. Mix well and add plenty of salt before serving.
1 onion,
2 stock cubes,
40 g butter,
tarragon vinegar,
2 tsp white pepper,
cognac,
200 ml crème fraîche,
Garlic Cream
Cooking time: 10 min 6 people - MICROWAVE
Container: 1 large bowl
This sauce can only be made in spring when the garlic has
just been harvested. Peel the garlic and cook it in the bowl,
covered, with 10 to 12 tbsp of water and a few sprigs of
thyme, for 8 to 10 minutes on MAX. When the garlic is soft
enough to crush easily, put it in a food processor with the
cream. Check the seasoning before serving. A perfect
accompaniment to roast lamb.
2 cloves of fresh garlic,
200 ml single cream,
salt, pepper, fresh thyme.
Page 79

English
En-77
Desserts and Pastries
Your oven offers several ways of baking cakes,
depending on the desired result.
• Cooking using microwaves is perfect and
quick for custards, flans, poached fruit and
compotes as well as cakes containing raising
agent which do not need to go golden on top
(chocolate cake and sponge cake to be
filled).
• Combination cooking allows you to bake
crispy and golden cakes quickly, using
mixture with raising agent or eggs.
• Traditional cooking (Convection heating) is
essential for certain cakes and desserts:
soufflé, savarin, choux pastry, biscuits, sweet
nibbles, shortbread, puff pastry nibbles and
tarts.
Cooking with microwaves only:
Microwaves cook fruits, compotes, custard,
confectioners custard and choux pastry quickly
and perfectly. Furthermore, microwaves are
excellent for cooking starchy puddings such as
rice pudding, tapioca, semolina, without the risk
of the mixture sticking to the bottom of the dish.
Finally, when preparing traditionally cooked
desserts, microwaves are very useful for
melting butter, chocolate and jelly, as well as
making caramel.
Containers and accessories:
Place the container which is
microwave safe
directly on the glass tray.
Preferably
use round
cake tins. Avoid using rectangular tins.
Lid:
- cakes:
DO NOT cover. -
Fruit
: you can cover
fruit compotes which do not contain much water
and leave compotes which contain a lot of
water uncovered.
Fruit: Allow 4 to 5 min at MAX, covered, to
cook 4 medium peeled pears (remember to turn
them half-way through cooking). Allow 4 to 5
min at MAX, covered, for 500g of plums or
pears cut into quarters with 5 tbsps of water
(whole fruit will take a little longer to cook,
depending on its size). For compotes, allow for
6 to 7 min at MAX for 500g of peeled fruit cut
into cubes. Do not add liquid. Cooking times
will always vary depending on the ripeness of
the fruit and the amount of sugar it contains.
If you add dried fruit to cake mixture, always
make sure the fruit is not at the top of the
mixture as they will burn, due to the large
amount of sugar they contain.
Useful to know: it is impossible to cook a
soufflé in a microwave because it will collapse
as soon as you take it out of the oven. Cakes
made of choux pastry will not expand, because
no crust will form to trap the air inside.
However, ready-made cake-mixes cook very
well in the microwave. The cake must be
prepared following the instructions on the
packet and cooked at 600W for 4 to 7 min in a
tin which is microwave safe.
Page 80

En-78
Desserts and Pastries
Manual Combination cooking:
This combines the effects of radiant heat which
makes the cakes golden, and microwaves
which cook the inside quickly and make the
cakes rise. It is preferable to use a low power
(100W to 250W) with a fairly high temperature
of CONVECTION HEATING (200° to 220°
depending on cooking time) in order to obtain a
satisfactory result. Allow for a cooking time of
at least half or two-thirds of the cooking time for
traditional cooking methods.
Tins:
1) For flans, clafoutis, gratins, use dishes which
are microwave safe and heat-resistant (Pyrex®
or ovenproof porcelain) and preferably round
(or Pyrex® baba cases) or oval.
2) For other cakes (sponge cake, yoghurt cake,
kugelhupf, fruit cake) and tarts, use non-
springform smooth metal tins, preferably
round ones (unless using a loaf tin). Do not use
thin aluminium tins (such as aluminium foil
containers).
3) For tarts, it is important to only use smooth,
nonspringform
metal tins
(aluminium or
non-stick), for
the pastry base
to be well
cooked. In all
cases DO NOT COVER.
4) For most desserts (except tarts), you can
also use flexible silicone moulds when using
microwaves, Combination cooking or
Convection Heating.
Accessories:
When using
combination
cooking, metal
tins must
always be
placed on the
metal tray.
Finally, some gratin or flan recipes in Pyrex® or
ovenproof porcelain dishes can be placed
directly on the wire rack on the metal tray. This
is indicated in the recipe.
Preheating:
1) For brioches, items which are cooked
quickly (in less than 20 min), tarts and pies, it is
essential to preheat the oven. You just have to
choose the cooking combination indicated and
press Start. The oven will preheat automatically
without using microwaves. Once the oven is up
to temperature, you only have to choose a
cooking time, put the cake in the oven and
press Start.
2) For other cakes (sponge cake, fruit cake,
yoghurt cake etc.) flans, clafoutis, it is not
necessary to preheat the oven. In all cases if
preheating is necessary for a recipe in this
book, this will be indicated.
Page 81

English
En-79
Type of metal tin Quantity
Combination cooking
(preheated oven)
Cooking
time in
minutes
Round cake tin Ø 24cm 550 g
CH 160° + 100W
then rest in oven
18 then
4
24cm loaf tin 550 g
CH 160°C + 100W
then rest in oven
20 then
6
Round cake tin Ø 24cm 550 g +/- 300g fruit
CH 160°C + 100W
then CH 140°C
22 then 10
GENERAL ADVICE for cooking using
microwaves and combination cooking:
• Check the food as it cooks: when using
microwaves only, a few minutes cooking is
enough, and every extra minute may dry out
the cake.
If the cake goes hard once it has cooled it
has been cooked for too long or at too high a
temperature.
• You can check the cake is cooked using the
traditional method of inserting the tip of a
knife in the middle (it should come out clean)
or by checking if the edges of the cake come
away from the tin easily.
• Containers: If using a container which is very
different to that advised by the recipe (e.g.
several ramekins rather than a round cake
tin), the end result will be different. The same
quantity will cook more quickly in several
small tins than in one single tin. Line the tins
with greaseproof paper so you can remove
them more easily.
• Storing cakes: once the cake is cool,
remember to wrap it in cling film or
aluminium foil to keep it soft.
• Cake mixes: cook perfectly using
combination cooking. Preheat the oven with
the metal tray and use a metal or silicone tin.
Take the cake mix out of the refrigerator at
least 20 minutes before cooking. Don't forget
to protect the top of the cake from excessive
browning with a double round of baking
paper after 8-10 min cooking time.
TRADITIONAL COOKING USING
CONVECTION HEATING
Essential for cooking patisseries such as
savarins, choux pastry, biscuits, soufflés,
meringues etc. But you can also use it for
cooking all cakes and tarts which you do not
want to cook using combination cooking. The
fan assisted convection from the top of your
oven being very efficient, therefore cakes and
pastries can be cooked quickly at a lower
temperature (minus 20-30°) compared to other
cookbook recipes.
Accessories:
• Metal tray will be used for most quiches,
tartes, pies as well as big cakes or loaves
and soufflés. Wire rack on the metal tray
may be used for fruit gratins or crumbles.
Containers:
You can use any heat-resistant container
(metal, silicone, pyrex or ovenproof porcelain).
Preheating: recommended.
Cooking cake mixtures using Combination cooking
CH: Convection Heating
Page 82

En-80
Banana Cake
Cooking time: approx. 35 min 6 people - MICROWAVE and COMBINATION COOKING
Container: 1 round metal cake tin, 22 cm diameter, and 1 bowl
Cut the bananas into rounds and put them in the bowl with
the sugar. Cover and cook for approx. 6 to 7 minutes on
MAX. Remove the bowl, mash the bananas with a fork, add
the butter, cream and flour (after sieving and mixing with the
yeast and bicarbonate of soda). Add the eggs one by one
and pour in a dash of rum. Preheat the oven in Combination
mode: CONVECTION HEATING 180°C + 250W, with the
Metal Tray. Pour the mixture into the buttered tin, lined with
greaseproof paper, and cook for 23 to 25 minutes,
protecting the top of the cake with a double sheet of baking
paper after 10-12 minutes. Remove from the tin and leave to
cool on a wire rack.
3 very ripe bananas
(black skin),
100 g sugar,
80 g butter,
100 ml single cream,
50 g flour,
1
/4 sachet of yeast,
4 eggs,
1 tbsp rum,
2 tsp bicarbonate of soda.
Orange Cake
Cooking time: approx. 20 min 4-6 people - COMBINATION COOKING and MICROWAVE
Container: 1 round metal cake tin, 25 cm diameter, and 1 bowl
Preheat the oven in Combination mode: CONVECTION
HEATING 180°C + 100W, with the Metal Tray. Weigh out
and mix the sieved flour, sugar, ground almonds, yeast and
salt together in a bowl. Add the orange zest, eggs and
melted butter and mix well. Pour into the buttered tin lined
with greaseproof paper. Cook in a hot oven for 13 to 15
minutes, protecting the top with a sheet of baking paper
after 10 to 11 minutes. Prepare the syrup: mix together the
orange juice, icing sugar and grated zest in a bowl and heat
for 1 to 2 minutes on MAX in order to dissolve the sugar.
Prick the top of the cake with a fork. Pour the syrup over the
whole surface of the cake. Leave to cool for several hours
before serving.
100 g butter,
100g caster sugar,
3 eggs,
100 g flour,
30 g ground almonds,
1 tbsp baking powder,
1 pinch of salt,
zest of half an orange.
For the syrup: 200 ml orange
juice (3 small oranges),
1 tbsp grated orange zest,
60 g icing sugar.
Rhubarb Rice Pudding
Cooking time: 50 min 6 people - MICROWAVE and COMBINATION COOKING
Container: 1 Pyrex® dish, 25 cm diameter, and 1 bowl
Place the milk, cream, rice and both types of sugar in the
bowl. Bring to the boil by heating on MAX for approx. 8
minutes. Spread the rhubarb pieces over the bottom of the
Pyrex® dish. Add a beaten egg to the milk and rice mixture.
Pour this mixture over the rhubarb. Put in the oven on the
Metal Tray and cook on Combination mode: CONVECTION
HEATING 150°C + 250W for about forty minutes. Serve
warm or cold.
100 g pudding rice,
500 ml milk,
1 egg,
100 ml cream,
700 to 900 g peeled
rhubarb,
washed and cut into slices,
1 sachet of vanilla sugar,
100 g sugar.
Page 83

English
En-81
Tarte Tatin
Cooking time: approx. 25 min 6 people COMBINATION COOKING
Containers: 1 round Pyrex® cake tin, 24 cm diameter, and 1 bowl
Peel the apples, remove the core and cut them in two from
top to bottom. Put the sugar, butter and water in the bowl
and cook on MAX for 5 to 7 minutes, checking every so
often. Pour this caramel into the bottom of the tin. Place
the apple halves into the tin, packing them together tightly.
Cover the apples with the pastry without pushing it tightly
into the tin. Put into the oven on the Metal Tray and cook
for approx. 25 minutes on Combination mode:
CONVECTION HEATING 150°C + 440W, protecting the
top with a sheet of baking paper after about fifteen
minutes. Leave to cool before removing from the tin. If the
apples have given out too much liquid, reduce this by
heating in a bowl on MAX for a few minutes.
7 ripe apples
100 g sugar
50 g butter
2 tbsp water
All-butter sweet pastry
Rice Pudding
Cooking time: approx. 2 hours 6 people - MICROWAVE
Container: 1 bowl, 2 litre capacity
Wash the rice twice in clean water. Pour the rice, milk and
sugar into a large bowl. Add the cinnamon and vanilla. Do
not cover. Bring to the boil by heating on MAX for 9 to 10
minutes paying close attention to ensure that the milk does
not overflow, then cook twice for 1 hour at 250W. Leave to
cool, covering the bowl with a plate. The very long cooking
time of this recipe ensures that the rice is very soft without
the risk of it burning or sticking to the bottom of the bowl. If
you donʼt have whole milk replace 200 ml of semi-skimmed
milk with 200 ml of whipping cream.
90 g pudding rice,
1 litre of whole milk,
80 g caster sugar,
1 vanilla pod and 1 small piece of
cinnamon stick.
Apple Crumble
Cooking time: approx. 16 min 4-6 people - MICROWAVE and COMBINATION COOKING
Container: 1 Pyrex® or ovenproof porcelain baking dish
Peel the apples and cut them into pieces. Place in the dish
with the brown sugar and cinnamon and cook on MAX for 6
to 9 minutes, uncovered, stirring halfway through the
cooking time (the time required varies depending on the
type of apple used). Leave to cool. Put the almonds into
the food processor to grind them, then add the butter, flour
and sugar. Pulse the food processor until you obtain a
mixture that looks breadcrumbs, but is not lumped
together. Spread this mixture over the pre-cooked apples.
Place the dish on the Wire Rack and cook for 5 to 7
minutes in Combination mode: CONVECTION HEATING
180°C + 250W, checking the colour. The crumble top, soft
when it comes out of the oven, will become crispy as it
cools.
5 or 6 ripe apples,
40 g brown sugar,
1
/2 tsp ground cinnamon,
75 g sugar,
75 g very cold butter,
75 g flour,
75 g whole almonds.
(or ready-made crumble topping)
Page 84

En-82
Cardamom Flavoured Tapioca
Cooking time: 17 min 4-6 people - MICROWAVE
Container: 1 large bowl
Weigh out the tapioca with the sugar in a bowl. Add the
vanilla sugar. Warm up the milk with the cardamom on MAX
for 5 minutes. Pour the hot milk over the tapioca. Whisk and
continue cooking for 11 to 12 minutes on 440W, uncovered,
stirring at least once during the cooking time. Add the egg
yolks, whisking vigorously; leave to cool.
Whisk the egg whites with 1 tbsp sugar until stiff and add
these to the mixture whilst it is still warm and before it sets
too much. Remove the pieces of cardamom and pour the
mousse into a bowl, then put in the fridge for a few hours
before serving.
750 ml milk,
80 g sugar,
1 sachet of vanilla sugar,
1 cardamom pod,
120 g tapioca,
3 eggs.
Thin Strudel
Cooking time: 20 min 4 people CONVECTION
Container: Baking sheet (round)
Preheat the oven on CONVECTION 180°C.
Put the apples and juice into a bowl and tosstogether. Add
the sugar, walnuts, sultanas, cinnamon and almonds and
mix together. Take three sheets of filo pastry and brush with
melted butter. Place each one with the shortest edge
towards you. Overlap the 2
nd
sheet onto the 1st sheet by 5-6
cms along the long edge and repeat with the 3
rd
sheet
overlapping the second. Place three more sheets of filo on
top, in the same way as in step 4. Spread the apple filling
along the front edge of the filo pastry just 2.5cms from the
edge and 2.5cms from each side. Fold the sides in over the
filling and brush with butter. Roll up from the long front edge
buttering the final long edge to seal the strudel. Place on
baking sheet, seam-side down. Brush with melted butter.
Cook on CONVECTION 180°C for 30-35 mins. Dust with
icing sugar to serve.
600 g (1 lb 5 oz) dessert apples
such as Granny Smithʼs, cored,
peeled and roughly chopped
juice of
1
/
2
lemon
50 g (2 oz) golden caster sugar
50 g (2 oz) walnuts, roughly
chopped
50 g (2 oz) sultanas
5 ml (1 tsp) ground cinnamon
50 g (2 oz) ground almonds
6 sheets filo pastry
50 g (2 oz) butter, melted
icing sugar to serve
Coconut Flan
Cooking time: approx. 30 min 6 people COMBINATION COOKING
Container: 1 round Pyrex® dish, 22 cm diameter
Put the sugar and water into the dish. Cook on MAX for 4 to
5 minutes, checking every so often, until you obtain a
caramel mixture. Tip the dish in all directions to spread the
caramel out evenly. In a bowl mix the fresh milk, coconut
milk and the tapioca. Cook for 4 minutes on MAX. Add the
condensed milk and the eggs. Beat with an electric whisk.
Pour into the dish. Put into the oven on the Metal Tray and
cook for 15 to 17 minutes in Combination mode:
CONVECTION HEATING 160°C + 440W, checking the
colour. Serve warm or cold.
Caramel: 50 g sugar,
2 tbsp water.
1 small tin sweetened
condensed milk (400 g),
1 tin coconut milk (400 g),
100 ml milk, 4 eggs,
2 tbsp tapioca.
Page 85

English
En-83
Cheesecake
Cooking time: 30 min 6 people - COMBINATION COOKING
Container: tart tin Ø 28 cm
Line the the tart tin with the pastry. Put to one side, in the
fridge. Preheat the oven with the metal tray on
CONVECTION HEATING 220°C. Mix all the ingredients
together in the food processor; Pour into the pan and put
into the oven on the metal tray. Cook for 28 to 30 min on
Combination mode CONVECTION HEATING 190° + 100
W protecting the top with a double circle of baking paper
after 13 to 15 minutes. When cooked, take out of the pan
and leave to cool on a wire rack.
All-butter sweet pastry,
400 g (Quark) soft cheese,
150 g fresh sheepʼs cheese
(such as feta or ricotta),
2 tbsp flour, 150 g sugar, 3 eggs,
zest of 1 orange and 1 lemon.
Floating Islands
Cooking time: 8-10 min 4 people - MICROWAVE
Containers: 1 bowl, 1 plate and 1 bowl, capacity 1 litre
Cook the caramel in the bowl on MAX for 3 to 4 minutes
checking it carefully every so often. Stop the caramel
cooking by adding 2 spoonfuls of very hot water.
Pour the milk into the large bowl. Add the vanilla pod, split
into two. Heat for 3 to 4 minutes on MAX (until the milk is
simmering). Meanwhile, whisk together the egg yolks and
caster sugar until the mixture becomes pale. Pour in the
hot milk, whisking all the time. Cook again for 1 minute 30
s to 2 minutes on MAX, whisking every 30 seconds. Stop
cooking when the custard thickens. Remove the vanilla
pod and scratch it to leave a few grains in the custard.
Leave to cool. Beat the egg whites with a pinch of salt until
stiff. Gently mix in the sugar. Shape into oblongs on a plate
and cook for 40 to 60 seconds on MAX, watching them
carefully. Leave to cool before drizzling them with
caramel.
Meringues: 4 egg whites with
40 g sugar.
Custard: 4 egg yolks,
85 g caster sugar, 500 ml milk,
1 vanilla pod.
Caramel: 50 g sugar, 1 tbsp
water.
Breton Prune Pudding
Cooking time: approx. 25 min 6 people - COMBINATION COOKING
Containers: 1 round Pyrex® dish, 22 cm diameter, and 1 bowl
Soak the prunes in a little water and rum and heat on MAX
for 1 minute. Leave to swell for at least 2 hours. Heat the
milk, butter and cream for 3 minutes at 600W. In a
container, mix together the flour, salt, sugar and eggs and
pour the hot milk into this mixture, whisking all the time.
Spread out the drained prunes in the dish and pour the
mixture over them. Place the dish on the Metal Tray and
cook for approx. 22 minutes on Combination mode:
CONVECTION HEATING 180°C + 440W, protecting the top
with a circle of baking paper after 13 -15 minutes.
250 g de prunes, stones removed,
20 ml rum,
250 ml milk,
60 g butter,
200 ml single cream,
100 g flour,
1 pinch of salt,
100 g sugar,
3 eggs.
Page 86

En-84
Molten Chocolate Cake
Cooking time: approx. 20 min 6 people - COMBINATION COOKING
Containers: 1 round metal cake tin, 22 cm diameter, and 1 bowl
Break the chocolate into pieces and melt with the butter for
2 to 3 minutes on 600 W. Add the eggs and sugar, then add
the flour, ground almond and baking powder mixture. Line
the bottom of the tin with a circle of greaseproof paper. Pour
the mixture into the tin and put into the oven on the Metal
Tray to cook for approx. 18 minutes on Combination mode:
CONVECTION HEATING 180°C + 100W, protecting the top
with a circle of baking paper after 8 to 10 minutes, if
necessary.
150 g chocolate,
20 g ground almonds,
1
/4 sachet of baking powder,
110 g sugar,
2 tbsp flour, 120 g butter,
3 eggs
Marble Cake
Cooking time: approx. 20 6 people - COMBINATION COOKING
Container: 1 metal loaf tin, 24 cm long
Mix all the ingredients together with the melted butter.
Separate the mixture into 2 containers and add the cocoa
powder to one of them. Pour the mixture into the buttered
and lined tin, alternating the colours. Place the tin on the
Metal Tray and cook for 20 to 22 minutes on Combination
Cooking: CONVECTION HEATING 180°C + 100W,
protecting the top of the cake with a folded sheet of baking
paper held in place with 2 toothpicks after the first 8 to 10
minutes. Remove from the tin and leave to cool on a wire
rack.
150 g butter, 3 eggs,
140 g sugar,
1 sachet vanilla
sugar,
1
/2 sachet of baking
powder, 150 g flour, 3 tbsp cocoa
powder.
Coffee Flan
Cooking time: 10 min 4-5 people - MICROWAVE and COMBINATION COOKING
Container: 1 round Pyrex® tart dish, 27 cm diameter
Put the milk, coffee and cream in a bowl. Heat on MAX for 1
minute 30 s. In another bowl bring together the egg yolks,
flour and sugar. Add the milk and cream. Whisk and cook
this custard mix for 2 minutes on MAX. Leave to cool. Beat
the egg whites until stiff, adding the sieved icing sugar at
the end. Gently mix into the cooled custard then pour into
the tart tin. Put into the oven on the Wire Rack and cook for
7 to 6 minutes in Combination mode: GRILL 2 + 250W,
checking the colour. Serve warm.
120 ml milk,
200 ml single cream,
3 eggs, 50 g sugar,
20 g flour,
40 g icing sugar,
1 tbsp instant coffee or 10 ml
coffee extract.
Nutella Cake
Cooking time: 8-9 min 6 people - MICROWAVE
Container: 1 round Pyrex® cake tin, 22 cm diameter
In a bowl mix together the yeast, breadcrumbs and sugar.
Add to this the melted butter, whole eggs and Nutella. Mix
well and add the cherries (keeping 6 aside for decoration).
Pour the mixture into the tin, lined with greaseproof paper,
and cook for 8 to 9 minutes on MAX. Remove from the tin
and leave to cool on a wire rack. Decorate with roses of
whipped cream and half cherries.
90 g fine breadcrumbs,
1
/2 sachet of yeast,
60 g sugar,
60 g butter, 4 eggs.
100 g Nutella,
200 g pitted cherries,
whipped cream.
Page 87

English
En-85
Baked Apples
Cooking time: approx. 15 min 4 people - COMBINATION COOKING
Container: 1 ovenproof glass dish, approx. 25 cm diameter
Peel the apples. Remove the core and hollow out the apple
slightly with a teaspoon. Place the apples in the dish.
Preheat the oven in Combination mode: CONVECTION
HEATING 220°C + 250W with the Metal Tray. In a bowl mix
the honey, sultanas, sugar and butter. Fill the apples with
the mixture. Sprinkle with vanilla sugar and cook,
uncovered, for 15 to 20 minutes (depending on the type of
apple used), dousing the apples in the cooking juices after
10 minutes. Leave to stand for at least 5 minutes before
serving. Allow 10 to 12 minutes for 2 apples.
4 ripe cooking apples
(approx. 1 kg),
2 tbsp honey,
20 g sultanas,
1 tbsp brown sugar,
30 g softened butter,
1 sachet of vanilla sugar.
Jams and Sweet Items
The microwave oven is perfect for cooking sweet or rich food items quickly. It allows you to make
small quantities of jam with fresh or frozen fruit without having to get out the large jam pan.
• Always use a large Pyrex® container, a lot larger than the volume of fruit or caramel to be
cooked, to avoid any spillage.
• DO NOT cover the jam during cooking.
• To check how cooked your jam is, pour a few drops of the mixture onto a saucer which you
have kept in the fridge. If the jam goes solid or the caramel goes hard, you can stop cooking.
• You can also sterilise your jam jars by half filling them with water and heating them on MAX
until the water boils. Empty them out and leave them upside-down on kitchen paper before
filling them with jam
.
Lemon Curd
Cooking time: approx. 6 min MICROWAVE
Container: 1 bowl, 2 litre capacity
Place all the ingredients in the bowl and mix together well.
Cook on MAX for 5 to 6 minutes, stirring every minute to
begin with then every 30 seconds once the mixture starts
to thicken. When the mixture stays on the back of the
spoon, stop cooking, before the eggs cook too much. The
mixture will continue to thicken as it cools. Fill the jars
while the curd is hot, close them and turn them over. Keep
the lemon curd in the fridge.
For about 2 jars of curd: the juice
and zest of 4 nice untreated
lemons,
400 g crystalised sugar,
4 beaten eggs,
100 g butter.
Page 88

En-86
Red Berry Jam
Cooking time: 16 min MICROWAVE
Container: 1 bowl, 2 litre capacity
Use well-ripened fruit. Roughly chop the fruit and mix with
the pectin and sugar in the bowl. Leave to steep for 2 hours.
Mix well again, this time crushing the fruit with a fork, before
cooking the mixture, uncovered, on MAX for approx. 16
minutes. Test whether it is cooked by pouring a drop of jam
onto a saucer which has been kept in the fridge. If the drop
goes solid, stop cooking and pour the jam into clean jars.
Close the jars while the mixture is hot and turn them over.
This jam does not contain a lot of sugar, so it will keep for 8
to 10 months at the bottom of the fridge.
For about 4 jars of jam:
300 g strawberries,
250 g raspberries,
150 g blackcurrants or redcurrants,
550 g crystalised sugar,
1
/2 sachet of pectin.
Crispy Chocolate Caramel Bites
Cooking time: approx. 7 min MICROWAVE
Containers: 2 bowls + 1 dish, approx. 15 x 15 cm
Cut the chocolate into small pieces and melt with the butter
by heating for 2 to 3 minutes at 600W. Add the icing sugar
and mix. In another bowl, heat the sugar and water on MAX
for 4 to 5 minutes, checking it carefully after 3 minutes 30
seconds. When the caramel is golden in colour pour it onto
a sheet of aluminium foil and spread into a thin layer. Leave
to cool, then break the caramel in thin pieces. Mix these into
the cooled chocolate. Pour the mixture into a dish, approx.
15 x 15 cm, lined with cling film. Leave to cool for at least 2
hours in the fridge before removing the mixture from the
dish and cutting it into small squares.
200 g dark chocolate,
60 g butter
20 g icing sugar.
For the caramel:
100 g sugar
3 tbsp water
Honey Sweets
Cooking time: approx. 15 min MICROWAVE
Container: 1 bowl, 2 litre capacity
Weigh out the honey, sugar and cream and mix together in
the bowl. Cook on MAX for 12 to 15 minutes (the caramel
should be a nice golden colour and you should be able to
see the bottom of the bowl when you mix with a wooden
spoon). Check every so often, then mix in the butter little
by little to obtain an even mixture. Add the coffee extract if
you wish and pour this caramel into a buttered dish to a
thickness of 2 cm. Leave to cool a little. When the caramel
is cool but still supple, remove it from the dish and cut it
into strips using a large knife or a pair of scissors. Cut these
strips into small squares and sprinkle them with icing sugar
so that they donʼt stick together. These sweets will keep for
8 to 10 weeks in a sealed tin. NB: These sweets will be
even more delicious if you use a strong honey, such as
heather or chestnut honey.
100 g honey,
150 g sugar,
100 g cream,
50 g butter,
1 tbsp coffee extract
(for espresso machines) or
coffee extract to add flavour, if
you wish.
Page 89

Panasonic Corporation
Web Site:http://panasonic.com.net
123456
© Panasonic Corporation 2009
Printed in China
Page 90

Bedienungsanleitung und Kochbuch
Mikrowellengerät mit Grill/Heißluft
Nur für den Privatgebrauch
NN-CT569M
NN-CT559W
Vor Gebrauch des Mikrowellengerätes bitte diese Bedienungsanleitung sorgfältig durchlesen und
aufbewahren.
RRR
R
Page 91

D-1
Ihr Panasonic-Gerät arbeitet mit modernster Invertertechnologie. Diese spezielle Technologie wird
in Japan bereits seit langer Zeit in Mikrowellengeräten eingesetzt. Sie sorgt für eine erhebliche
Verkürzung der Garzeiten. Das System, das mit einer geringeren Anzahl von Komponenten
auskommt, sorgt für eine Gewichtsersparnis bei gleichzeitiger Erhöhung des Innenraumvolumens
ohne größere Standfläche.
Bedienungsanleitung
Aufstellen und Anschließen . . . . . . . . . . . . . . . . . . . . .1-2
Sicherheitshinweise . . . . . . . . . . . . . . . . . . . . . . . . . . .2-3
Wichtige Informationen . . . . . . . . . . . . . . . . . . . . . . . . . .4
Schematische Ansicht . . . . . . . . . . . . . . . . . . . . . . . . . . .5
Bedienfelder . . . . . . . . . . . . . . . . . . . . . . . . . . . . . . . . . . .6
Gerätezubehör . . . . . . . . . . . . . . . . . . . . . . . . . . . . . . . . .7
Betriebsarten . . . . . . . . . . . . . . . . . . . . . . . . . . . . . . . . . .7
Tastatur und Bedienung . . . . . . . . . . . . . . . . . . . . . . . . . .8
Mikrowellen - und Auftaubetrieb . . . . . . . . . . . . . . . . . . .9
Grillbetrieb . . . . . . . . . . . . . . . . . . . . . . . . . . . . . . . . . . .10
Heißluft . . . . . . . . . . . . . . . . . . . . . . . . . . . . . . . . . . . . . .11
Kombinationsbetrieb . . . . . . . . . . . . . . . . . . . . . . . . . . .12
Automatisches Auftauen . . . . . . . . . . . . . . . . . . . . . . . .13
Gewichtsautomatik-Programme . . . . . . . . . . . . . . . .14-17
Hausgemachte Gerichte . . . . . . . . . . . . . . . . . . . . . . . . .18-19
Gerätebetrieb mit Vorwahlzeit . . . . . . . . . . . . . . . . . . . .20
Standzeit . . . . . . . . . . . . . . . . . . . . . . . . . . . . . . . . . . . .21
Fragen und Antworten . . . . . . . . . . . . . . . . . . . . . . .22-23
Pflege des Mikrowellengerätes . . . . . . . . . . . . . . . . . . .24
Technische Daten . . . . . . . . . . . . . . . . . . . . . . . . . . . . .25
Garen mit dem Gerät
Geeignete Gefäße . . . . . . . . . . . . . . . . . . . . . . . . . .26-27
Wie Mikrowellengeräte funktionieren . . . . . . . . . . . . . . .28
Wie man mit Mikrowellengeräten kocht . . . . . . . . . .29-31
Die Einstellung der richtigen Leistung . . . . . . . . . . . . . .32
Heißluft und Grill . . . . . . . . . . . . . . . . . . . . . . . . . . . . . .33
Kombifunktion . . . . . . . . . . . . . . . . . . . . . . . . . . . . . . . .34
Auftauen . . . . . . . . . . . . . . . . . . . . . . . . . . . . . . . . . .35-38
Erwärmen . . . . . . . . . . . . . . . . . . . . . . . . . . . . . . . . .39-40
Erwärmtabellen . . . . . . . . . . . . . . . . . . . . . . . . . . . . .41-47
Tipps für das Garen im Mikrowellengerät . . . . . . . . . . .48
Rezepte
Suppen und Vorspeisen . . . . . . . . . . . . . . . . . . . . . .49-52
Gemüse und stärkehaltige Nahrungsmittel . . . . . . .52-60
Fleisch und Geflügel . . . . . . . . . . . . . . . . . . . . . . . . .61-68
Fisch . . . . . . . . . . . . . . . . . . . . . . . . . . . . . . . . . . . . .69-74
Saucen . . . . . . . . . . . . . . . . . . . . . . . . . . . . . . . . . . .75-76
Desserts und Gebäck . . . . . . . . . . . . . . . . . . . . . . . .77-84
Eingemachtes und Süßes . . . . . . . . . . . . . . . . . . . .85-86
Inhalt
Page 92

D-1
Aufstellen und Anschließen
Überprüfung Ihres Mikrowellengerätes
Das Gerät auspacken, Verpackungsmaterial
entfernen und auf Beschädigungen wie z.B.
Stoßstellen, gebrochene Türverriegelungen
oder Risse in der Tür überprüfen. Sofort den
Händler benachrichtigen, wenn das Gerät
beschädigt ist. Kein beschädigtes
Mikrowellengerät installieren.
Erdungsvorschriften
WICHTIG: ZUR SICHERHEIT VON PERSONEN MUSS DIESES GERÄT GEERDET SEIN!
Ist die Steckdose nicht geerdet, muß der
Kunde die Steckdose durch eine ordnungsgemäße Schutzkontaktsteckdose ersetzen
lassen.
Betriebsspannung
Die Netzspannung muß der auf dem
Typenschild des Gerätes angegebenen
Spannung entsprechen. Wird eine höhere
Spannung als angegeben verwendet, so kann
ein Brand entstehen oder sonst ein Unfall die
Folge sein.
Aufstellen des Gerätes
Das Gerät ist ausschließlich als Tischgerät
geeignet, nicht als Einbaugerät oder für die
Verwendung in Schränken.
1. Stellen Sie das Mikrowellengerät auf eine
feste, ebene Stellfläche, die mindestens
85cm hoch ist (gemessen vom Fußboden).
2. Achten Sie beim Aufstellen des Gerätes
darauf, daß bei Gefahr jederzeit der Stecker
gezogen oder die Sicherung am
Sicherungskasten ausgeschaltet werden
kann.
3. Das Gerät arbeitet ordnungsgemäß, wenn
eine ausreichende Luftzirkulation stattfinden
kann.
Aufstellen auf der Arbeitsfläche:
a. Sicherheitsrichtlinien empfehlen die
Einhaltung eines Mindestabstands von
15 cm über dem Gerät, 10 cm zur
Rückwand sowie 5 cm zu einer und
freistehend zur anderen Seite.
b. Sollte das Gerät an einer Seite direkt an
der Wand stehen, müssen die anderen
Seiten frei bleiben.
Arbeitsfläche
Freistehend
10cm
15cm
5cm
4. Das Gerät nicht in unmittelbarer Nähe
eines Gas- oder Elektroherdes aufstellen.
5. Die Stellfüße dürfen nicht entfernt werden.
6. Dieses Gerät ist nur für den Hausgebrauch
konzipiert. Nicht im Freien verwenden.
7. Das Mikrowellengerät nicht bei zu hoher
Luftfeuchtigkeit benutzen.
8. Das Netzanschlußkabel darf die
Gehäuseoberfläche nicht berühren, da
diese während des Betriebes heiß wird.
Das Kabel auch nicht mit anderen heißen
Oberflächen in Berührung bringen. Das
Netzanschlußkabel nicht über Tisch- oder
Thekenkanten hängen lassen. Das Kabel
oder den Netzstecker nicht in Wasser
tauchen.
9. Die Lüftungsöffnungen auf der Ober- und
Rückseite des Gehäuses nicht verdecken.
Sind diese Öffnungen blockiert während
das Gerät arbeitet, kann es überhitzen. In
diesem Fall wird das Gerät durch den Überhitzungsschutz ausgeschaltet und kann erst
wieder in Betrieb gesetzt werden, wenn es
abgekühlt ist.
10.Dieses Gerät ist nicht für den Betrieb
mittels einer externen Zeitschaltuhr oder
eines getrennten Fernbedienungssystems
ausgelegt.
Page 93

D-2
WARNUNG
1. Die Türverriegelungen und die
Türdichtungen sollten mit einem feuchten
Tuch abgewischt werden. Das Gerät ist
vom Benutzer auf mögliche
Beschädigungen an den
Türdichtungsflächen zu prüfen, und falls ein
solcher Schaden aufgetreten ist, darf das
Gerät nicht betrieben werden, bevor es vom
Panasonic-Kundendienst repariert worden
ist.
2. Führen Sie weder eine Änderung oder
Reparatur an der Tür, an den
Kontrolleinrichtungen oder
Sicherheitsvorrichtungen noch an irgendeinem anderen Teil des Gerätes durch. In
keinem Fall das Gehäuse, das den Schutz
gegen die Mikrowellenenergie sicherstellt,
abbauen. Das Gerät darf nur von einem
geschulten Panasonic KundendienstTechniker geprüft oder repariert werden.
3. Das Gerät nicht in Betrieb setzen, wenn
das Netzanschlusskabel oder der
Netzstecker beschädigt ist, bzw. wenn es
nicht ordnungsgemäß arbeitet oder eine
sichtbare Beschädigung aufweist.
4. Aus Sicherheitsgründen muß ein
beschädigtes Anschlußkabel durch den
Hersteller, seinen Kundendienst oder eine
andere gleichwertig qualifizierte Person
ersetzt werden.
5. Kindern darf die Benutzung des Gerätes
ohne Aufsicht nur erlaubt werden, wenn
eine ausreichende Einweisung gegeben
wurde, die das Kind in die Lage versetzt,
das Gerät in sicherer Weise bedienen und
die Gefahr einer falschen Bedienung verstehen zu können.
6. Keine Flüssigkeiten und Nahrungsmittel in
versiegelten Behältern (z.B. Konserven)
erhitzen, da diese platzen können.
7. Dieses Gerät ist nicht zur Benutzung durch
Personen (einschließlich Kindern) mit verminderten körperlichen, sensorischen oder
geistigen Fähigkeiten oder mangelnder
Erfahrung oder Kenntnis gedacht, es sei
denn, sie werden durch eine für ihre
Sicherheit verantwortliche Person in die
Benutzung des Gerätes eingewiesen oder
von einer solchen Person beaufsichtigt.
Kinder sollten beaufsichtigt werden, um
sicherzustellen, dass sie nicht mit dem
Gerät spielen.
Aufstellen und Anschließen
Achtung: Heiße Oberflächen
Sicherheitshinweise
Gebrauch und Ausstattung des Gerätes
1. Das Mikrowellengerät nur zur
Nahrungsmittelzubereitung benutzen. Dieses
Gerät ist speziell zum Auftauen, Erwärmen
und Garen von Lebensmitteln entsprechend
der Bedienungs- und Kochanleitung konzipiert. Erhitzen Sie in keinem Fall Chemikalien
oder andere Produkte.
2. Prüfen Sie vor der ersten Benutzung Ihres
Geschirrs, ob es für den Gebrauch im
Mikrowellengerät geeignet ist.
3. Bitte versuchen Sie nicht, Kleidungsstücke,
Zeitungen oder andere Materialien im
Mikrowellengerät zu trocknen. Diese
Gegenstände können sich entzünden.
4. Im Garraum des Mikrowellengerätes dürfen
keine Gegenstände aufbewahrt werden, die
bei unbeabsichtigtem Einschalten des
Gerätes eine Gefahr für die Umgebung
darstellen.
5. Nehmen Sie das MIKROWELLENGERÄT
NIE OHNE LEBENSMITTEL in Betrieb. Dies
kann zu Beschädigungen des Gerätes
führen. Ausnahme hierfür ist Punkt 1 unter
Grillbetrieb.
6. Kommt es zu einem Brand oder tritt während
des Mikrowellenbetriebs Rauch aus dem
Gerät, halten Sie die Gerätetür geschlossen.
Schalten Sie das Mikrowellengerät ab, indem
Sie auf die STOPPTASTE drücken. Ziehen
Sie den Netzstecker aus der Steckdose oder
schalten Sie die Installationssicherung aus.
Page 94

D-3
Sicherheitshinweise
Grillbetrieb
1. Vor der ersten Inbetriebnahme des Gerätes
mit HEISSLUFT-, KOMBINATION oder
GRILL den Garraum mit einem Tuch
auswischen, um Ölreste zu entfernen.
Nehmen Sie das Gerät außerdem bei
220°C HEISSLUFT für 20 Minuten ohne
Nahrungsmittel und Zubehör in Betrieb, um
konservierende Ölreste im Garraum vollständig zu verbrennen. Nur bei dieser
Gelegenheit darf das Gerät leer betrieben
werden.
2. Die Gehäuseoberflächen des Gerätes, einschließlich der Lüftungsöffnungen und
Gerätetür, werden während des Betriebs
mit HEISSLUFT, KOMBINATION und
GRILL sehr heiß. Seien Sie beim Öffnen/Schließen der Tür und beim
Hineinstellen/Herausnehmen von
Lebensmitteln deshalb sehr vorsichtig.
3. Der Mikrowellenherd verfügt über zwei
Quarz-Heizelemente, die sich oben im Herd
befinden. Nach Benutzung der KONVEKTIONS-, KOMBINATIONS- und
GRILLfunktionen ist darauf zu achten, dass
die Innenoberflächen des Herdes nicht
berührt werden, da diese sehr heiß sind.
4. Im Garraum des Mikrowellengerätes dürfen
keine Gegenstände aufbewahrt werden, die
bei unbeabsichtigtem Einschalten des
Gerätes eine Gefahr für die Umgebung
darstellen.
Automatischer Entlüftungsbetrieb
Ist das Mikrowellengerät nach dem Betrieb
heiß, setzt automatisch für eine Minute der
Entlüftungsbetrieb ein. Dies ist keine
Fehlfunktion, sondern dient zum Abkühlen der
elektronischen Bauteile. Sie können währenddessen die Gerätetür öffnen und das
Lebensmittel herausnehmen. Der
Entlüftungsbetrieb schaltet sich automatisch ab.
Garraumbeleuchtung
Wenn es nötig wird die eingebaute
Garraumbeleuchtung zu wechseln, wenden
Sie sich bitte an Ihren Händler.
Zubehör
Das Mikrowellengerät ist mit unterschiedlichem
Zubehör ausge-stattet. Verwenden Sie dieses
bitte laut Anweisung.
Zubehör
Das Mikrowellengerät ist mit unterschiedlichem Zubehör ausgestattet.
Verwenden Sie dieses bitte laut Anweisung.
Glasdrehteller
1. Das Mikrowellengerät nicht ohne den
dazugehörigen Glasdrehteller und
Rollenring in Betrieb setzen.
2. Benutzen Sie in keinem Fall einen anderen
als den speziell für dieses Gerät konzipierten Glasdrehteller.
3. Den evtl. heißen Glasdrehteller abkühlen
lassen, bevor Sie diesen reinigen bzw. mit
Wasser abspülen.
4. Der Drehteller kann rechts- oder
linksherum laufen. Dies stellt keine
Fehlfunktion dar.
5. Berührt das Lebensmittel bzw.
Kochgeschirr die Garraumwände, läuft der
Drehteller nicht weiter, sondern stoppt und
beginnt, sich in die entgegengesetzte
Richtung zu drehen. Dies ist normal.
6. Das Lebensmittel nicht direkt auf dem
Glasdrehteller auftauen, erwärmen oder
garen.
Rollenring
1. Der Rollenring und die Vertiefung im
Garraumboden müssen regelmäßig gereinigt werden, um zu verhindern, daß
Geräusche entstehen und sich
Nahrungsmittelreste ansammeln.
2. Den Rollenring immer zusammen mit dem
Glasdrehteller benutzen.
Fettpfanne
1. Die Fettpfanne kann zum Garen bei den
Betriebsarten Grill, Kombination und
Heißluft verwendet werden. Benutzen Sie
die Fettpfanne nicht im reinen
Mikrowellenbetrieb.
2. Die Fettpfanne sollte auf dem
Glasdrehteller oder dem Grillrost plaziert
werden.
Grillrost
1. Der runde Grillrost wird zum Bräunen von
kleineren Portionen benutzt und unterstützt
die gleichmäßige Hitzeverteilung.
2. Beim KOMBINATIONSBETRIEB mit
Mikrowelle oder beim reinen
Mikrowellenbetrieb weder Alu- oder
Metallspieße noch irgendein Metallgeschirr
direkt auf das Rost stellen.
3. Das Rost nicht für den reinen MikrowellenBetrieb benutzen.
Page 95

D-4
Wichtige Informationen
1. Kochzeiten
• Die Kochzeit ist abhängig von
Beschaffenheit, Ausgangstemperatur und
Menge des Lebensmittels sowie von der Art
des verwendeten Kochgeschirrs.
• Gehen Sie zunächst von einer kürzeren
Kochzeit aus, um ein Übergaren der
Speisen zu vermeiden. Hat das
Lebensmittel noch nicht den gewünschten
Auftau-, Erwärmungs- oder Garzustand
erreicht, haben Sie immer noch die
Möglichkeit, die Garzeit zu verlängern.
Wird die empfohlene Kochzeit überschritten, kann das Lebensmittel leicht
verbrennen und ggf. einen Brand auslösen und somit den Garraum zerstören.
2. Geringe Lebensmittelmengen
• Sehr kleine Lebensmittelmengen oder
Speisen mit geringem Feuchtigkeitsgehalt
können schnell austrocknen und verbrennen, wenn sie zu lange gegart werden.
Kommt es zu einem Brand, die Tür des
Mikrowellengerätes geschlossen halten,
das Gerät abschalten und den Netzstecker
aus der Steckdose ziehen.
3. Eier
• Weder rohe oder gekochte Eier in der
Schale noch gepellte hartgekochte Eier mit
Mikrowellen erhitzen oder kochen. Nach
Ende des Mikrowellen-Kochvorgangs kann
sich noch weiterhin Druck bilden und die
Eier können explodieren.
4. Lebensmittel mit Schale oder Haut
• Bei Lebensmitteln wie z.B. Kartoffeln und
Würstchen empfiehlt es sich, sie vor dem
Garen mit Mikrowellen anzustechen, um ein
evtl. Platzen zu vermeiden.
5. Speisethermometer
• Falls Sie den Garzustand mit einem
Speisethermometer überprüfen wollen, verwenden Sie bitte keine herkömmlichen
Thermometer im Mikrowellen- und
Kombinationsbetrieb. Diese können Funken
verursachen. Benutzen Sie diese
Speisethermometer nur außerhalb des
Mikrowellengerätes.
6. Flüssigkeiten
• Beim Erhitzen von Flüssigkeiten im
Mikrowellengerät kann durch kurzfristiges
Aufkochen (Siedeverzug) die Flüssigkeit im
Gerät oder bei der Entnahme schlagartig
verdampfen und explosionsartig aus dem
Gefäß geschleudert werden.
Dies kann zu Verbrennungen führen. Sie
vermeiden einen Siedeverzug, indem Sie
beim Erhitzen von Flüssigkeiten in Gläsern
oder Tassen immer ein hitzebeständiges
Glasstäbchen mit hineinstellen oder
größere Gefäße mit einem Deckel bzw.
Teller abdecken. Zusätzlich sollten Sie folgende Punkte beachten:
a) Vermeiden Sie die Verwendung von ger-
aden Gefäßen mit engem Ausguß.
b) Überhitzen Sie die Flüssigkeit nicht.
c) Rühren Sie die Flüssigkeit einmal um,
bevor Sie das Gefäß ins Gerät stellen
sowie nochmals nach der halben Kochzeit.
d) Lassen Sie nach Ablauf der Kochzeit das
Gefäß kurze Zeit im Gerät stehen, bevor
Sie es herausnehmen. Rühren Sie die
Flüssigkeit anschließend noch einmal um.
7. Papier und Plastik
• Wenn Behälter aus Papier, Kunststoff oder
anderen leicht entflammbaren Materialien
zum Erwärmen benutzt werden, darf das
Mikrowellengerät nicht unbeaufsichtigt
betrieben werden! Diese Behälter können
sich entzünden.
• Verwenden Sie keine recycelten
Papierprodukte (z.B. Küchenrollen), die
nicht ausdrücklich für die Benutzung im
Mikrowellengerät geeignet sind. Im
Recyclingpapier können Bestandteile sein,
die Funkenbildung oder einen Brand verur-
sachen.
• Entfernen Sie Metallverschlüsse von
Bratfolien, bevor Sie diese ins Gerät stellen.
8. Hilfsmittel und Folien
• Erhitzen Sie keine geschlossenen Flaschen
oder Konserven im Mikrowellengerät, da
diese durch den Druck explodieren können.
• Verwenden Sie während des
Mikrowellenbetriebes weder Geschirr aus
Metall noch Geschirr mit Metallrand.
• Bei Benutzung von Alufolie, Metallspießen
oder anderen Metallwaren darauf achten,
daß sie mindestens 2 cm von der
Gerätewand entfernt sind, um
Funkenbildung zu vermeiden.
9. Babynahrung
• Benutzen Sie nur Fläschchen oder
Glasformen aus hochwertigen
hitzebeständigen Materialien und plazieren
Sie diese ohne Deckel in der Mitte des
Drehtellers.
• Nach dem Erhitzen sollte die Babynahrung
in Fläschchen oder Gläsern gut geschüttelt
bzw. durchgerührt werden, damit ein
Temperaturausgleich stattfinden kann.
• Überprüfen Sie die Temperatur vor dem
Verzehr, um Verbrennungen zu vermeiden.
Page 96

D-5
Schematische Ansicht
1. Türöffner
Drücken Sie diese Taste, um die Tür zu öffnen. Wird während des Garvorganges die Tür
geöffnet, ist der Gerätebetrieb unterbrochen, das Programm bleibt aber erhalten. Wird die
Tür wieder geschlossen und die Starttaste gedrückt, läuft der Garvorgang weiter ab. Die
Garraumbeleuchtung schaltet sich ein, wenn die Tür geöffnet wird.
2. Sichtfenster
3. Türsicherheitsverriegelungen
4. Innerer Entlüftungsschlitz
5. Bedienfeld
6. Glasdrehteller
7. Rollenring
8. Äußere Entlüftungsschlitze
9. Fettpfanne
10. Grillrost
11. Stromkabel
12. Warnschild (Heiße Oberfläche)
13. Kennzeichnungsaufkleber (Zuruck von der Mikrowelle)
[1]
[9]
[4]
[8]
[6]
[3]
[7]
[11]
[12]
[13]
[5]
[10]
[2]
Page 97

D-6
Bedienfelder
Akustisches Signal:
Wird eine beliebige Funktionstaste gedrückt,
ertönt ein akustisches Signal. Ist dies nicht der
Fall, war die Eingabe inkorrekt. Beim Wechsel
der Betriebsarten ertönt das Signal zweimal.
Nach erfolgtem Vorheizen im Grill-, Heißluftoder Kombinationsbetrieb ertönt das Signal
dreimal. Nach Ablauf eines Kochvorgangs ist
das akustische Signal fünfmal zu hören.
(1) Digitaldisplay
(2) Zeiteinstellung
(3) Ein-/Austaste für Mikrowelle
(4) Ein-/Austaste für Grill
(5) Heißluftbetrieb
(6) Taste Kombinationsbetrieb
(7) Automatisches Auftauen
(8) Plus/Minus-Tasten
(9) Uhrzeiteinstellung
(10) Vorwahlzeit/Standzeit-Taste
(11) Taste für die Gewichtsautomatik
zum Garen
(12) Taste für die Gewichtsautomatik
zum Kombinationsgaren
(13) Starttaste:
Drücken der Starttaste beginnt den
Betrieb des Geräts. Wird während des
Betriebs die Tür geöffnet oder die
Stopp-/Löschtaste einmal betätigt,
muss die Starttaste erneut gedrückt
werden, um den Betrieb des Geräts
fortzusetzen.
(14) Stopp-/Löschtaste:
Vor dem Betrieb: Einmaliges
Drücken löscht alle Eingaben.
Während des Betriebs:
Einmaliges Drücken unterbricht den
Kochvorgang. Beim zweiten Drücken
werden alle Eingaben gelöscht, und
im Anzeigenfeld erscheint wieder die
Uhrzeit.
Anmerkungen: Wird ein
Betriebsvorgang gewählt und die StartTaste nicht gedrückt, wird der Vorgang
nach 6 Minuten automatisch vom Gerät
rückgängig gemacht. Das Display kehrt
zurück zum Zeitanzeige-Modus.
Dieses Gerät verfügt über eine
Energiesparfunktion.
Bitte beachten:
1. Im Bereitschaftsmodus ist die Helligkeit
des Displays reduziert.
2. Das Mikrowellengerät geht beim ersten
Einschalten und sofort nach Abschluss
des letzten Betriebsvorgangs in
den Bereitschaftsmodus über.
NN-CT569M / NN-CT559W
(1)
(2)
(3)
(4)
(5)
(6)
(7)
(10)
(14)
(9)
(11)
(13)
(8)
(12)
*Das Bedienfeld Ihres Mikrowellengerätes
kann sich von dem hier gezeigten unterscheiden (abhängig von der Farbe); die Funktion
der Tasten ist jedoch gleich.
Page 98

D-7
Glasdrehteller Fettpfanne Grillrost
MIkrowelle Ja Nein Nein
Grill Ja Ja Ja
Heißluft Ja Ja Ja
Kombination Ja Ja Ja
Gerätezubehör
Die nachfolgende Tabelle zeigt den korrekten Einsatz des Zubehörs.
Die nachfolgenden Diagramme zeigen einige Beispiele für den Gebrauch des Zubehörs in den
verschiedenen Betriebsarten. Abhängig vom Rezept/Kochbehälter können die Angaben jedoch
abweichen. Weiter Hinweise finden Sie außerdem im Kochbuch.
Betriebsarten
Mikrowelle
Grill
Heißluft
Grill + Mikrowelle
Heißluft + Mikrowelle
Kombination
Mikrowelle
Heizelemente
Page 99

D-8
Kindersicherung:
Nach Aktivierung der Kindersicherung ist die Eingabe über das Bedienfeld nicht möglich, weil die
Funktionen des Gerätes blockiert sind. Die Tür kann wie gewohnt geöffnet werden. Die
Kindersicherung kann aktiviert werden, wenn ein Doppelpunkt bzw. die Uhrzeit im Anzeigenfeld
steht.
Aktivieren:
Deaktivieren:
• Drücken Sie drei mal die Starttaste.
Die Uhrzeit erscheint nicht mehr im
Anzeigenfeld, ist aber nicht gelöscht. Im
Anzeigenfeld erscheint und
die Kindersicherung ist aktiviert.
• Drücken Sie dreimal die Stopp-/Löschtaste.
Die Uhrzeit erscheint wieder im Anzeigenfeld,
die Kindersicherung ist gelöscht.
Einstellen der Uhr:
Beispiel: Einstellen der Uhr auf 14:25
• Drücken Sie die
Uhrtaste.
Der Doppelpunkt
beginnt zu blinken.
• Drücken Sie die entsprechenden
Uhrzeittasten zum Einstellen der
korrekten Uhrzeit.
Die Uhrzeit erscheint im Anzeigenfeld
und der Doppelpunkt blinkt.
• Drücken Sie die Uhrtaste.
Der Doppelpunkt blinkt nicht
länger, und die Eingabe der
Uhrzeit ist abgeschlossen.
Anmerkungen:
1. Zum Neueinstellen der Uhrzeit wiederholen Sie die zuvor erläuterten Schritte.
2. Die Uhrzeit wird angezeigt, insofern das Gerät an der Spannungsversorgung angeschlossen ist.
3. Die Uhrzeit wird im 24-Stunden-Format angezeigt.
14 Mal Zweimal
nicht einstellbar
5 Mal
Tastatur und Bedienung
HINWEIS: Zum Aktivieren der Kindersicherung muss die Start-Taste dreimal innerhalb von 10
Sekunden gedrückt werden.
Bei viermaligem Drücken der Vorwahlzeit/Standzeit-Taste wird die Laufschrift-Funktion ausgeschaltet. Zum erneuten Einschalten drücken Sie viermal die Vorwahlzeit/Standzeit-Taste.
Page 100

D-9
Mikrowellen - und Auftaubetrieb
Das Gerät verfügt über 6 verschiedene Mikrowellen-Leistungsstufen. Die Wattleistung der einzelnen Leistungsstufen entnehmen Sie bitte der nachfolgenden Tabelle.
Glasdrehteller
ANMERKUNGEN:
1. Für das zwei- oder dreistufige Garen wiederholen Sie – vor dem Drücken der Starttaste – die
Einstellung der Mikrowellen-Leistungsstufe und der Garzeit.
z.B. Schmor-/Eintopf –– 10 Minuten auf hoher Stufe zum Sieden bringen und dann 60
Minuten köcheln lassen.
10 Minuten erwärmen, damit sich das Aroma voll entwickeln kann.
2. Die Standzeit kann nach dem Einstellen der Mikrowellenleistung und der Garzeit programmiert
werden.
3. Es ist möglich, die Garzeit während des Garens zu verlängern. Drücken Sie hierzu die 1-minTaste so oft, wie erforderlich. Die Garzeit wird hierdurch in Einminuten-Intervallen verlängert
(bis zur maximalen Garzeit).
Die in der Tabelle angegebenen Wattleistungen sind die ungefähren Werte für jede
Leistungsstufe.
Zubehör:
ACHTUNG! Wird eine Garzeit eingestellt, ohne dass eine Mikrowellen-Leistungsstufe
ausgewählt wird, erfolgt das Garen automatisch auf der 1000 W-Stufe.
Drücken Leistungsstufe
Wattleistung
Max. verfügbare Zeit
Einmal HOCH 1000 W 30 Minuten
Zweimal AUFTAUEN 270 W 99 Minuten 50 sekunden
3 Mal MITTEL 600 W 99 Minuten 50 sekunden
4 Mal NIEDRIG 440 W 99 Minuten 50 sekunden
5 Mal KÖCHELN 250 W 99 Minuten 50 sekunden
6 Mal ERWÄRMEN 100 W 99 Minuten 50 sekunden
• Wählen Sie die gewünschte
Mikrowellen-Leistungsstufe
aus.
• Stellen Sie die gewünschte
Garzeit ein.
• Drücken Sie die
Starttaste.
 Loading...