

Panasonic NN-CS89LBQPQ User Manual for NN-CS89LBQPQ

Operating Instruction and Cook Book
Steam/Convection/Grill/Microwave Oven
Household Use Only
Model No. NN-CS89LB
Please read these instructions carefully before using this product,
and save this manual for future use.

We are glad you have chosen to purchase a PANASONIC microwave oven. Before operating this oven, please
read these instructions carefully and completely, and keep them for further reference.
If you have only used a microwave oven for reheating and defrosting, with Panasonic’s Inverter Technology you
can be reassured of excellent results when cooking a variety of foods, as the ‘soft’ penetration of microwave
energy to the centre of food helps prevent over cooking on edges and surfaces. Foods can now be gently
simmered without the concern of boil over.
After reading the introductory chapter, we are sure you will be able to master the basic techniques and thereby
develop a firm understanding of your new oven. This book includes recipes from starters to desserts. After trying
our recipes be sure to adapt your favourite recipes to microwave methods.
Start experimenting now, and enjoy the first class results you will achieve by using your new microwave oven.
Panasonic Australia Pty Ltd
1 Innovation Road
Macquarie Park
NSW 2113
Panasonic NZ Ltd
Customer Care Centre
18 Sir Woolf Fisher Drive
Highbrook, Auckland
Private Bag 14911
Panmure, Auckland
Phone: (09) 272 0178
Fax: (09) 272 0129
The serial number of this product may be found on
the back side of the oven. You should note the model
number and serial number of this oven in the space
provided and retain this book as a permanent record
of your purchase for future reference.
MODEL NUMBER _______________________
SERIAL NUMBER _______________________
DATE OF PURCHASE ____________________

Table of Contents
Before Operation
Important Safety Instructions .............................................................................................................................. 5-7
Installation and General Instructions .................................................................................................................. 7-9
Microwaves and How They Work ...................................................................................................................... 9-10
Oven Accessories .............................................................................................................................................11-12
Parts of Your Oven .......................................................................................................................................... 13-14
Control Panel .........................................................................................................................................................15
Display Window .....................................................................................................................................................16
Cooking Modes................................................................................................................................................ 17-19
Cookware and Utensil Chart........................................................................................................................... 20-21
Operation Guide in the Display Window ............................................................................................................... 22
Up/Down Selection ................................................................................................................................................22
INGREDIENT CONVERSION CHART ................................................................................................................. 36
Operation and Hints
Setting the Clock ...................................................................................................................................................23
Child Safety Lock...................................................................................................................................................23
Microwave Cooking and Defrosting .......................................................................................................................24
Grilling ...................................................................................................................................................................25
Convection Cooking ........................................................................................................................................ 26-27
Steam Cooking ................................................................................................................................................ 28-29
Steam Shot ............................................................................................................................................................30
Combination Cooking with Steam ................................................................................................................... 31-32
Combination Cooking without Steam .............................................................................................................. 33-34
Using the Timer ............................................................................................................................................... 35-36
Using the Add Time Function.................................................................................................................................37
Multi-stage Cooking ......................................................................................................................................... 38-39
Sensor Reheat Program .................................................................................................................................. 40-41
Turbo Defrost .........................................................................................................................................................42
Defrosting Tips and Techniques ............................................................................................................................43
Auto Beverage Programs ......................................................................................................................................44
Re-Bake Bread Programs .....................................................................................................................................45
Auto Cook Programs ....................................................................................................................................... 46-48
Junior Menu Programs .................................................................................................................................... 49-50
Tip for Auto Weight Programs................................................................................................................................51
Auto Sensor Programs .................................................................................................................................... 52-53
Healthy Grill Programs ..........................................................................................................................................54
Cleaning Programs .......................................................................................................................................... 55-56
Cleaning the Water Tank .......................................................................................................................................57
Auto Steam Programs ..................................................................................................................................... 58-60
Defrosting Chart ....................................................................................................................................................61
Reheating Charts...................................................................................................................................................62
Cooking Charts ......................................................................................................................................................63
Maintenance
Before Requesting Service .............................................................................................................................. 64-65
Care of your Microwave Oven .............................................................................................................................. 66
Technical Specifications ....................................................................................................................................... 67
Panasonic Warranty (for Australia) ....................................................................................................................... 68
Panasonic Warranty (for New Zealand) ............................................................................................................... 69
© Panasonic Appliances Microwave Oven (Shanghai) Co., Ltd. 2020
- 3 -

Table of Contents (continued)
Cooking Guide
Microwave Recipe Techniques ....................................................................................................................... 70-72
Breakfast Basics ............................................................................................................................................. 73-75
Soups, Snacks and Starters ........................................................................................................................... 76-84
Fish and Shellfish ........................................................................................................................................... 85-92
Poultry .......................................................................................................................................................... 93-101
Main Fare Meats ..........................................................................................................................................102-112
Vegetable Varieties ......................................................................................................................................113-120
Rice, Pasta and Cereal ............................................................................................................................... 121-125
Cakes, Slices and Biscuits ........................................................................................................................ 123-132
Desserts and Pastries ................................................................................................................................ 133-139
Micro - Made Extras ................................................................................................................................... 140-143
- 4 -

Important Safety Instructions
READ CAREFULLY AND KEEP FOR FUTURE REFERENCE
Precautions to be taken when using
Microwave Ovens for Heating Foodstuffs
INSPECTION FOR DAMAGE:
A microwave oven should only be used if an inspection
confirms all of the following conditions:
1. The door fits squarely, securely and opens and
closes smoothly.
2. The door hinges are in good condition.
3. The metal plates of a metal seal on the door are
neither buckled nor deformed.
4. The door seals are neither covered with food nor
have large burn marks.
PRECAUTIONS:
Microwave radiation from microwave ovens can cause
harmful effects if the following precautions are not
taken:
1. Never tamper with or deactivate the interlocking
devices on the door.
2. Never poke an object, particularly a metal object,
between the door and the oven while the oven is
operating.
3. Never place saucepans, unopened cans or other
heavy metal objects in the oven.
4. Do not let other metallic articles, e.g. fast food foil
containers, touch the side of the oven.
5. Clean the oven cavity, the door and the seals with
water and a mild detergent at regular intervals.
Never use any form of abrasive cleaner that may
scratch or scour surfaces around the door.
6. Do not use harsh abrasive cleaners or sharp
metal scrapers to clean the oven door glass, since
they can scratch the surface, which may result in
shattering of the glass.
7. Always use the oven with the cookware
recommended by the manufacturer.
8. Never operate the oven without a load (i.e., an
absorbing material such as food or water) in the
oven cavity unless specifically allowed in the
manufacturer’s literature.
9. For horizontally hinged doors, never rest heavy
objects such as food containers on the door while
it is open.
10. Do not place sealed containers in the microwave
oven. Baby bottles fitted with a screw cap or a teat
are considered to be sealed containers.
11. This appliance is not intended for use by persons
(including children) with reduced physical, sensory
or mental capabilities, or lack of experience
and knowledge, unless they have been given
supervision or instruction concerning use of the
appliance by a person responsible for their safety.
12. Children should be supervised to ensure that they
do not play with the appliance.
13. It is hazardous for anyone other than a competent
person to carry out any service or repair operation
that involves the removal of a cover which gives
protection against exposure to microwave energy.
14. The surfaces are liable to get hot during use.
15. The appliance must not be installed behind a
decorative door in order to avoid overheating.
Practical Hints:
1. For initial use of STEAM, GRILL, CONVECTION
and COMBINATION, if you see white smoke arise,
it is not a malfunction.
2. Exterior oven surfaces, including air vents
on the cabinet and the oven door will get hot
during STEAM, GRILL, CONVECTION and
COMBINATION. Use care when opening or closing
door and when inserting or removing food and
accessories.
3. The oven has heating elements situated in the top
4. During use the appliance becomes hot. Care
5. The accessible parts may become hot
6. Before using GRILL, CONVECTION and
Caution! Hot surfaces
of the oven a steamer boiler situated in the left
side of the oven and a convection heater situated
in the back of the oven. After using the GRILL,
CONVECTION and COMBINATION functions, the
ceiling will be very hot.
should be taken to avoid touching heating elements
inside the oven.
when STEAM, GRILL, CONVECTION and
COMBINATION is in use. Children should be kept
away.
COMBINATION functions for the first time,
operate the oven without food and accessories on
CONVECTION 230 °C for 10 minutes. This will
allow the oil that is used for rust protection to be
burned off. This is the only time that the oven is
operated completely empty.
- 5 -

Important Safety Instructions (continued)
Important Instructions
WARNING—To reduce the risk of burns, electric
shock, fire, injury to persons or excessive microwave
energy:
1. Read all instructions before using the microwave
oven.
2. Some products such as whole eggs and sealed
containers - (for example, closed glass jars and
sealed baby bottles with teat) - may explode and
should not be heated in the microwave oven.
3. Use this microwave oven only for its intended use
as described in this manual.
4. As with any appliance, close supervision is
necessary when used by children.
5. Do not operate this microwave oven, if it is not
working properly, or if it has been damaged or
dropped.
6. Do not store or use this appliance outdoors.
7. Do not immerse cord or plug in water.
8. Keep cord away from heated surfaces.
9. Do not let cord hang over edge of table or counter.
10. To reduce the risk of fire in the oven cavity:
(a) Do not overcook food. Carefully attend
microwave oven if paper, plastic, or other
combustible materials are placed inside the
oven to facilitate cooking.
(b) Heating therapeutic wheat bags is not
recommended. If heating, do not leave
unattended and follow manufacturers’
instructions carefully.
(c) Remove wire twist-ties from bags before placing
bag in oven.
(d) If materials inside the oven should ignite, keep
oven door closed, turn oven off at the wall
switch, or shut off power at the fuse or circuit
breaker panel.
(e) Never leave microwave unattended while
cooking or reheating.
11. Do not remove outer panel from oven.
12. This appliance is not intended to be operated
by means of an external timer or separate
remotecontrol system.
13. Failure to maintain the oven in a clean condition
could lead to deterioration of the surface that
could adversely affect the life of the appliance and
possibly result in a hazardous situation.
Circuits
Your microwave ovens should be operated on a
separate circuit from other appliances. The voltage
used must be the same as specified on this microwave
oven. Failure to do this may cause the power board
fuse to blow, and/or food to cook slower. Do not insert
higher value fuse in the power board.
Earthing Instructions
This microwave oven must be earthed. In the event
of an electrical short circuit, earthing reduces the risk
of electric shock by providing an escape wire for the
electric current. This microwave oven is equipped
with a cord having an earthing wire with an earthing
plug. The plug must be plugged into an outlet that is
properly installed and earthed.
WARNING—Improper use of the earthing plug can
result in a risk of electric shock.
WE CERTIFY THAT THIS MICROWAVE OVEN
HAS BEEN INSPECTED AND COMPLIES WITH
THE REQUIREMENTS OF REGULATION 3,
SUBCLAUSE(2), OF THE MICROWAVE OVENS
REGULATIONS 1982.
(This statement applicable only to New Zealand.)
We certify that this microwave oven has been
inspected and complies with the safety requirements
of government notice 466 of March 1981, and
complies with the Radio Regulation of government
notice 587 of March 1986.
(This statement applicable only to South Africa)
Fan Motor Operation after Cooking
After using this oven, the fan may rotate to cool the
electric components. This is perfectly normal, and
you can take out the food from the oven while the fan
operates.
- 6 -

Important Safety Instructions (continued)
WARNING
a) The door seals and door seal areas should be cleaned with a damp cloth. The appliance should be
inspected for damage to the door seals and door seal areas and if these areas are damaged the
appliance should not be operated until it has been repaired by a qualified service technician trained by the
manufacturer.
b) If the door or door seals are damaged, the oven must not be operated until it has been repaired by a
competent person.
c) It is dangerous for anyone other than a service technician trained by the manufacturer to perform repair
service.
d) It is hazardous for anyone other than a competent person to carry out any service or repair operation that
involves the removal of a cover which gives protection against exposure to microwave energy.
e) If the supply cord is damaged, it must be replaced by the manufacturer, its service agent or similarly
qualified persons in order to avoid a hazard.
f) Before use, the user should check that whether the utensils are suitable for use in microwave ovens.
g) Liquids or other foods must not be heated in sealed containers since they are liable to explode, at the same
time it should avoid the boiling liquids splash.
h) Only allow children to use the oven without supervision when adequate instructions have been given so
that the child is able to use the oven in a safe way and understands the hazards of improper use.
i) When the appliance is operated in the STEAM, GRILL, CONVECTION and COMBINATION modes,
children should only use the oven under adult supervision due to the temperatures generated.
Installation and General Instructions
General Use
1. In order to maintain high quality, do not operate
the oven when empty. The microwave energy will
reflect continuously throughout the oven if no food
or water is present to absorb energy. This can lead
to damage to the microwave oven including arcing
within the oven cavity.
2. If smoke is observed, touch Stop/Cancel and
leave door closed in order to stifle any flames.
Disconnect the power cord, and/or shut off power
at the fuse or circuit breaker panel.
3. The microwave oven is intended for heating food
and beverages. Drying of food or clothing and
heating of warming keys, slippers, sponges, damp
cloth and similar may lead to risk of injury, ignition
or fire.
4. Do not dry clothes, newspapers or other materials
in oven. They may catch on fire.
5. Do not use recycled paper products, unless the
paper product is labelled as safe for microwave
oven use. Recycled paper products may contain
impurities which may cause sparks and/or fires
when used.
6. Do not use newspapers or paper bags for cooking.
7. Do not hit or strike control panel. Damage to
controls may occur.
8. POT HOLDERS may be needed as heat from food
is transferred to the cooking container and from
the container to the oven. The oven can be very
hot after removing the cooking container from the
oven.
9. Do not store flammable materials next to, on top of,
or in the oven. It could be a fire hazard.
10. Do not cook food directly on the base of oven
unless indicated in recipes. (Food should be placed
in a suitable cooking utensil.)
11. DO NOT use this oven to heat chemicals or other
non-food products. DO NOT clean this oven with
any product that is labelled as containing corrosive
chemicals. The heating of corrosive chemicals
in this oven may cause microwave radiation
leaks.
12. When using the COMBINATION with microwave
mode, never place any aluminum or metal
container directly on the wire shelf, grill tray or
metal tray
13. Do not use the wire shelf, grill tray or metal tray
when cooking in the MICROWAVE mode only.
14. During cooking, some steam will condense inside
and/or on the oven door. This is normal and safe.
Steam will disappear after the oven is cool down.
15. Do not leave the microwave unattended while
reheating or cooking food in disposable containers
made of plastic, paper or other combustible
materials, as these types of containers can ignite if
overheated.
16. Metallic containers for food and beverages are not
allowed during microwave cooking.
17. Only use utensils that are suitable for use in
microwave ovens.
.
- 7 -

Installation and General Instructions (continued)
Placement of the Oven
1. The oven must be placed on a flat, stable surface,
more than 85 cm above the floor. For correct
operation, the oven must have sufficient air flow.
Allow 15 cm of space on the top of the oven, 10 cm
at back. If one side of the oven is 5 cm at one
side, the other side or top must not be blocked.
Do not remove feet.
(a) Do not block air vents. If they are blocked
during operation, the oven may be overheated
and damaged. When using any cloth over the
oven, the air intake and exhaust should not be
blocked. Do not place a cloth on top of the unit
during STEAM, GRILL, CONVECTION and
COMBINATION cooking as the top of the oven
gets very hot. Also allow sufficient space on
back and both sides of the oven.
(b) Do not place oven near a hot or damp surface
such as a gas stove, electric range or sink etc.
(c) Do not operate oven when room humidity is too
high.
2. This oven was manufactured for household use
only.
Building-in your oven
1. This oven is intended for counter-top and builtin use only. It is not intended for use inside
a cupboard. This oven may be built into a
wall cabinet by using the proper trim kit (NN-
TK81LCSCP) which may be purchased from your
local Panasonic dealer.
2. In case of fitting into an oven housing, please use
Panasonic’s Trim Kit, NN-TK81LCSCP.
3. Microwave ovens should not be built into a unit
directly above a top front venting conventional
. This may be a safety hazard and could
cooker
result in damage to your oven. This will invalidate
your one year guarantee.
4. A microwave which is built in must be more
than 850 mm above floor level. Read TrimKit instructions carefully before installation. It is
recommended that the microwave oven is placed
below a conventional oven to avoid heat damage
to the facia of the microwave.
Food
1. Do not use your oven for home canning or the
heating of any closed jar. Pressure will build up and
the jar may explode. In addition, the microwave
oven cannot maintain the food at the correct
canning temperature. Improperly canned food may
spoil and be dangerous to consume.
2. Do not attempt to deep fat fry in your microwave
oven.
3. Eggs in their shell and whole hard-boiled eggs
should not be heated in microwave ovens since
they may explode, even after microwave heating
has ended.
4. Potatoes, apples, egg yolks, chicken wings, whole
squash and sausages are examples of foods with
nonporous skins. This type of food must be pierced
before cooking, to prevent bursting.
5. When heating liquids, e.g. soup. sauces and
beverages in your microwave oven, overheating
the liquid beyond boiling point can occur without
evidence of bubbling. This could result in a sudden
boil over of the hot liquid. To prevent this possibility
the following steps should be taken:
(a) Avoid using straight-sided containers with
narrow necks.
(b) Do not overheat.
(c) Stir the liquid before placing the container in the
oven and again halfway through cooking time.
(d) After heating, allow to stand in the oven for
a short time, stirring again before carefully
removing the container.
(e) Microwave heating of beverages can result in
delayed eruptive boiling, therefore care must be
taken when handling the container.
6. DO NOT USE A CONVENTIONAL MEAT
THERMOMETER IN THE MICROWAVE OVEN.
To check the degree of cooking of roasts and
poultry use a MICROWAVE THERMOMETER.
Alternatively, a conventional meat thermometer
may be used after the food is removed from the
oven. If undercooked, return meat or poultry to
the oven and cook for a few more minutes at the
recommended power level. It is important to ensure
that meat and poultry are thoroughly cooked.
- 8 -

Installation and General Instructions (continued)
7. COOKING TIMES given in the Cooking Guide
section are APPROXIMATE. Factors that may
affect cooking time are preferred degree of
moisture content, starting temperature, altitude,
volume, size, shape of food and utensils used. As
you become familiar with the oven, you will be able
to adjust for these factors.
8. It is better to UNDERCOOK RATHER THAN
OVERCOOK foods. If food is undercooked, it can
always be returned to the oven for further cooking.
If food is overcooked, nothing can be done. Always
start with minimum cooking times recommended.
9. Extreme care should be taken when cooking
popcorn in a microwave oven. Cook for minimum
time as recommended by manufacturer. Use
the directions suitable for the wattage of your
microwave oven. NEVER leave oven unattended
when popping popcorn.
10. When heating food in plastic or paper containers,
keep an eye on the oven due to the possibility of
ignition.
11. The contents of feeding bottles and baby food jars
are to be stirred or shaken and the temperature
is to be checked before consumption, in order to
avoid burns.
Microwaves and How They Work
Microwaves are a form of high frequency radio waves
similar to those used by a radio, including AM, FM
and CB. They are similar to a television where the
radio waves are converted to a picture on the screen.
However, microwaves are much shorter than radio
waves; approximately twelve centimetres wave length.
Electricity is converted into microwave energy by the
magnetron tube (which is the heart of the microwave
oven).
From the magnetron tube, microwave energy is
transmitted to the oven cavity. The microwaves are
converted to heat in the food. The microwaves enter
from the outside of the food and travel through the
food losing half of their power every two to three
centimetres. Continued cooking to the centre occurs
by conduction.
Although pacemakers used to be affected by
microwaves (as well as by other radio waves), they
are now shielded and are not bothered by these
interferences. This allows people with pacemakers
to sit calmly by their radio or television and cook with
microwave ovens.
When microwaves come in contact with a substance,
any one or combination of three things may occur.
They can be:
1. REFLECTED
2. TRANSMITTED
3. ABSORBED
Reflection:
Metal substances REFLECT microwave energy and
because there is no absorption, there is no heating.
This is why the oven interior is either stainless steel or
epoxy-coated steel. This ensures that the microwaves
are kept inside the cavity and evenly distributed
throughout the food.
Transmission:
Such substances as paper, glass and plastic
TRANSMIT microwave energy and do not become
hot except from food. Because these substances do
not reflect or absorb microwave energy, they are ideal
materials for microwave cooking containers.
Absorption:
Food contains moisture and will ABSORB microwave
energy, which causes the moisture molecules within
the food to vibrate at an incredible rate (2,450,000,000
times per second). Friction, created by the vibration,
produces heat energy which is conducted throughout
the food.
- 9 -

Microwaves and How They Work (continued)
It is important to use the correct container when
cooking in a microwave oven. The following will help
you make the right selection.
How to Test a Container for Safe
Microwave Oven Use
TO TEST A CONTAINER FOR SAFE MICROWAVE
OVEN USE: Fill a 1-cup glass measure with cool
water and place it in the microwave oven alongside
the empty container to be tested; heat one (1) minute
at 1000 W. If the container is microwave ovensafe
(transparent to microwave energy), the container
should remain comfortably cool, the water in glass
measure should be hot. If the container is hot, it has
absorbed some microwave energy and should NOT be
used. This test cannot be used for plastic containers.
Paper Products and Freezer Wrap
Waxed paper, paper plates, cups and napkins should
not be used for heating or cooking food. Freezer wrap
should not be used as it is not heat resistant and
may melt. Paper towel, greaseproof paper and bake
paper may be safely used for short periods of time for
covering or lining.
Glass, Ceramic and China
Heat-Resistant glass cookware is invaluable in
microwave cooking. Many of these items are readily
available in most homes: glass jugs, mixing bowls, loaf
dishes, covered casseroles, oblong baking dishes, pie
plates and round or square cake dishes. Examples of
this type of cookware are Pyrex® and Corningware®.
Dinnerware can be used for microwave heating. Many
brands of dinnerware are microwave safe. Check
the care information for reference to microwave use
for dinnerware and serving pieces. If dinnerware
is marked ovenproof, it frequently is safe to use in
the microwave oven. However, to be sure, check by
conducting microwave dish test previously mentioned.
Several types of glassware and dinnerware are not
recommended for use in the microwave oven. Do not
use dishes with metallic trim or containers with metal
parts. Do not use cups or mugs with glued on handles,
as they may fall off with continued heating. Do not use
delicate glassware. Although the glassware may be
transparent to microwave energy the heat from the
food may cause the glassware to crack.
Plastic
Plastic dishes, cups and some freezer containers
should be used with care in a microwave oven. Choose
plastic containers carefully, as some plastic containers
may become soft, melt and may scorch. The majority
of plastic dishes, even those designed for use in the
microwave oven, are not suitable for cooking foods
with high fat or sugar content, or for lengthy cooking
times. Most microwave plastic dishes should not be
used for longer than 3 to 5 minutes on 1000 W. These
dishes, although not suitable for extended cooking,
may be used successfully for defrosting or for use on
lower power levels.
Cooking Bags designed to withstand boiling, freezing,
or conventional heating are microwave safe. Prepare
bags according to manufacturer’s directions. When
cooking by microwave, DO NOT use wire twistties
to close bag. They can act as an antenna and cause
arcing (sparks).
DO NOT COOK IN PLASTIC FOOD STORAGE
BAGS. Cling Film such as GLAD WRAP® can
be used to cover dishes in most recipes. Over an
extended heating time, some disfiguration of the wrap
may occur. When removing cling film “covers”, as well
as any glass lid, be careful to remove it away from you
to avoid steam burns.
Loosen plastic but let dish stand, covered.
Jars and Bottles
Jars and bottles can be used to warm food to serving
temperature, if the lid is removed first. Cooking should
not be done in these containers since most are not
heat resistant and during extended heating times, heat
from food would cause cracking or breaking.
Metal
Metal cookware or utensils, or those with metallic
trim, should NOT be used in the microwave. Since
microwave energy is reflected by metal, foods in
metal containers will not cook evenly. There is also a
possibility of “arcing”.
Although metal utensils should be avoided in
microwave cooking, some metal can be helpful when
used correctly. Aluminum foil can be used safely, if
certain guidelines are followed, to prevent overcooking.
Small pieces of foil are used to shield areas such as
chicken wings, tips of roasts, or other thin parts that
cook before the rest of the recipe is finished. Make
sure foil is attached securely and doesn’t touch sides of
oven, otherwise arcing may occur. Foil lined containers,
either cardboard or plastic, should NOT be used in the
microwave oven as arcing could occur.
Metal twist-ties, either paper or plastic coated, should
NOT be used in the microwave oven. Frozen dinner
trays can be used in the microwave, if the container
is no deeper than 2 cm and is filled with food. Metal
skewers can not be used in microwave ovens as
arcing may occur. Wooden skewers are readily
available and give the same result.
Shells: Scalloped baking shells are best used during
reheating and for short periods of cooking time only.
Thermometers are available for use in microwave
ovens. DO NOT USE CONVENTIONAL MERCURY
TYPE CANDY OR MEAT THERMOMETERS in food
while cooking in the microwave oven.
Straw, Wicker and Wood
Straw and wicker baskets may be used in the
microwave oven for short periods of time to warm
rolls or bread. Large wooden utensils, such as bowls
or cutting boards should NOT be used for prolonged
heating as the microwave energy may cause the wood
to become dry and brittle.
- 10 -
Oven Accessories
Accessories
The oven comes equipped with a variety of accessories. Always follow the directions given for use of the
accessories.
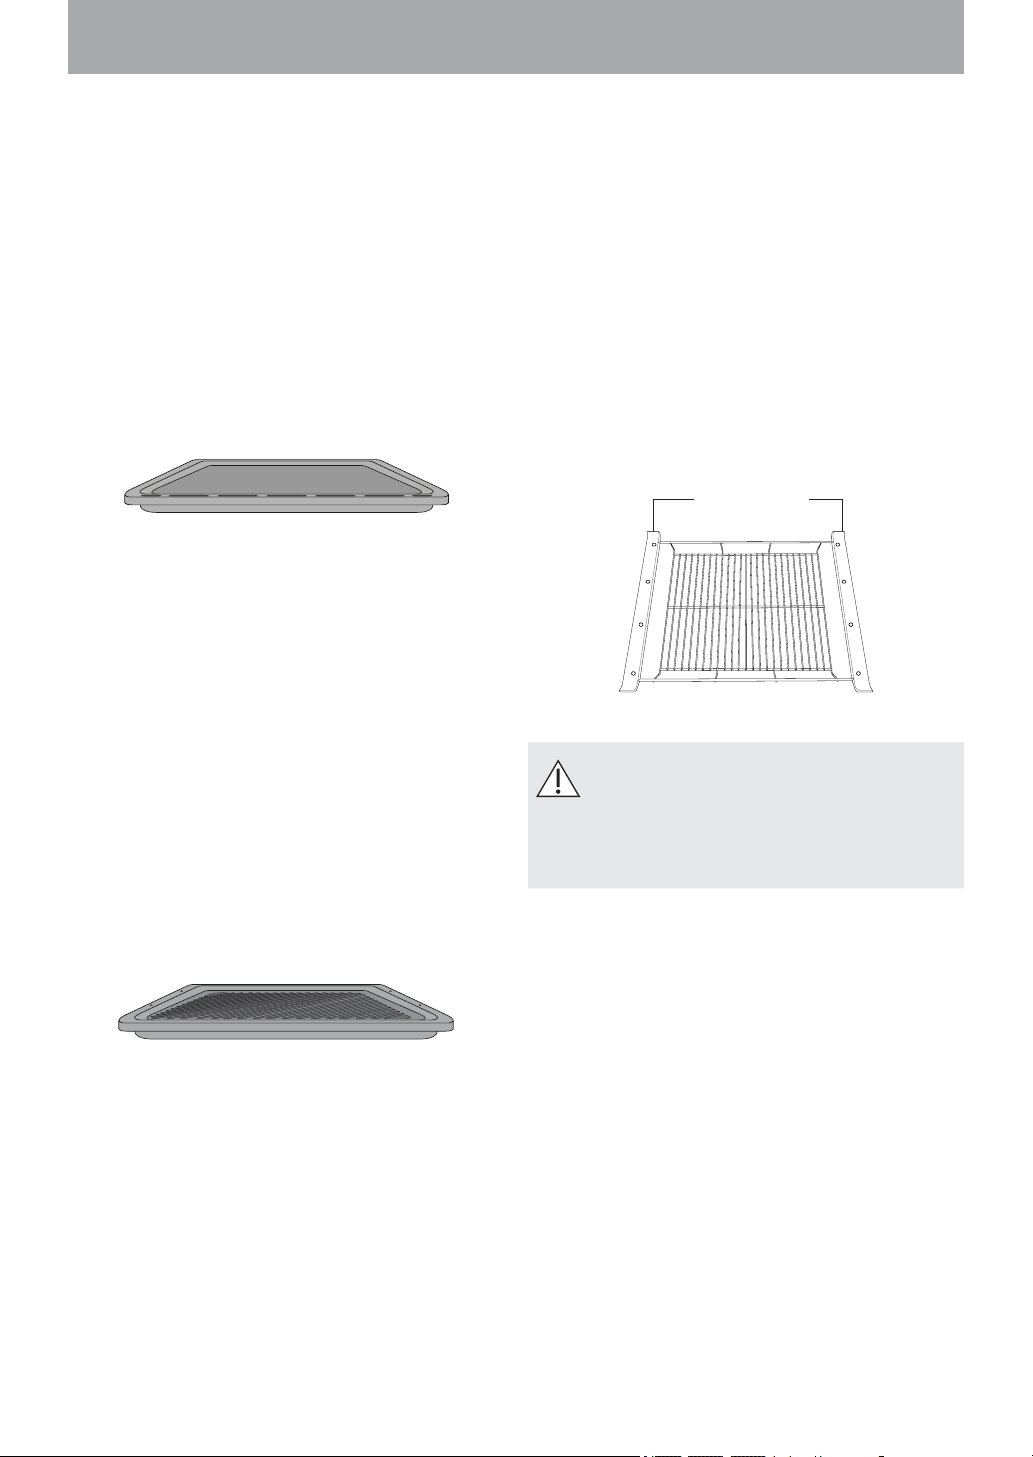
Metal Tray
1. The metal tray is for cooking on convection, grill
or steam mode only. Do not use on microwave or
combination with microwave modes.
2. For 2 level convection cooking, the metal tray can
be used as the lower level and the wire shelf can
be used as the upper level.
3. The maximum weight that can be placed on the
metal tray is 4 kg (this includes total weight of food
and dish).
Metal Tray
Grill Tray
1. The grill tray is for cooking on convection,
grill, steam mode or combination 2-7 and
combination 10 only. Do not use on microwave
modes.
Do not place it on the oven window. Otherwise, the
2.
oven window may be damaged.
3. Place it on the shelves when using.
4. When cooking food, place it in the middle of wavy
range of the grill tray, avoiding letting the food into
the groove around, so that food can’t be completely
baked.
5. The maximum weight that can be placed on the
grill tray is 4 kg (this includes total weight of food
and dish).
Wire Shelf
1. The wire shelf can be used in the upper or middle
shelf position for grilling or steaming foods. It
can be used in the upper, middle or lower shelf
positions for convection or combination cooking.
2. Do not use any metal container directly on the wire
shelf in combination with microwave.
3. Do not use the wire shelf in microwave mode only.
4. The maximum weight that can be placed on the
wire shelf is 4 kg (this includes total weight of food
and dish).
Plastic covers
Wire Shelf
Important User Information
Please note the protective covers on
the wire shelf are designed to remain
on the shelf when in use. They are not
packaging and must not be discarded.
Grill Tray
- 11 -

Oven Accessories (continued)
The following chart shows correct use of the accessories in the oven or you can follow the recipe
instruction.
Wire shelf Metal tray Grill tray
Microwave
Grill
Convection
Steam
Steam + Microwave
(Combi 1)
Steam + Convection
(Combi 2, 3, 4, 5)
Steam + Grill
(Combi 6)
Grill + Convection
(Combi 7)
Convection +
Microwave + Grill
(Combi 8)
Convection + Microwave
(Combi 9)
Grill + Microwave
(Combi 10)
*
*
*
* *
*: Metal containers can not be placed directly on the accessory.
Either place food directly on the wire shelf or place a glass dish directly on the wire shelf.
- 12 -

Parts of Your Oven
1 Door handle
Pull the door handle downwards to open. When
you open the oven door during cooking, the
cooking is stopped temporarily without clearing
the programmed settings. The cooking is resumed
as soon as the door is closed and Start/Set is
touched.
2 Oven window
3 Door safety lock system
To prevent injury, do not insert finger, knife, spoon
or other object into the latch hole.
4 Plug
5 Power supply cord
6 Bottom microwave feeding (refer to page 23)
7 Steam outlets
8 Warning symbol (hot surface)
9 Grill elements
10 Convection heater
11 LED lights
The oven lamp lights as soon as the oven door is
opened or during cooking.
12 Shelf positions (lower, middle or upper)
13 Door hinges
To prevent injury when opening or closing the door,
keep fingers away from the door hinges.
14 Warning label
15. Menu label
Position your supplied Menu Label.
15
Note
The illustration is for reference only.
- 13 -

Parts of Your Oven
1 Control panel
2
Drip tray
3 Water tank (behind drip tray)
4 Air vent exhaust (do not remove)
5 Identification label
6 Warning label
1
4 65
Rear view
Front view
2
3
Drip Tray
1. Before using the oven, the drip tray must be fitted as
it collects excess water during cooking. The drip tray
should be removed and cleaned on a regular basis.
2. Fit the drip tray by holding with both hands and clicking
onto the front legs of the oven.
3. To remove the drip tray, hold with both hands and gently
ease forward. Wash in warm soapy water. Reposition the
drip tray by clicking back onto the legs.
4. Do not use a dishwasher to clean the drip tray.
Drip tray
Re-position the drip tray by clicking back
onto the legs.
Water tank
Guidelines for water tank on page 29.
Water tank
Note
The illustration is for reference only.
- 14 -
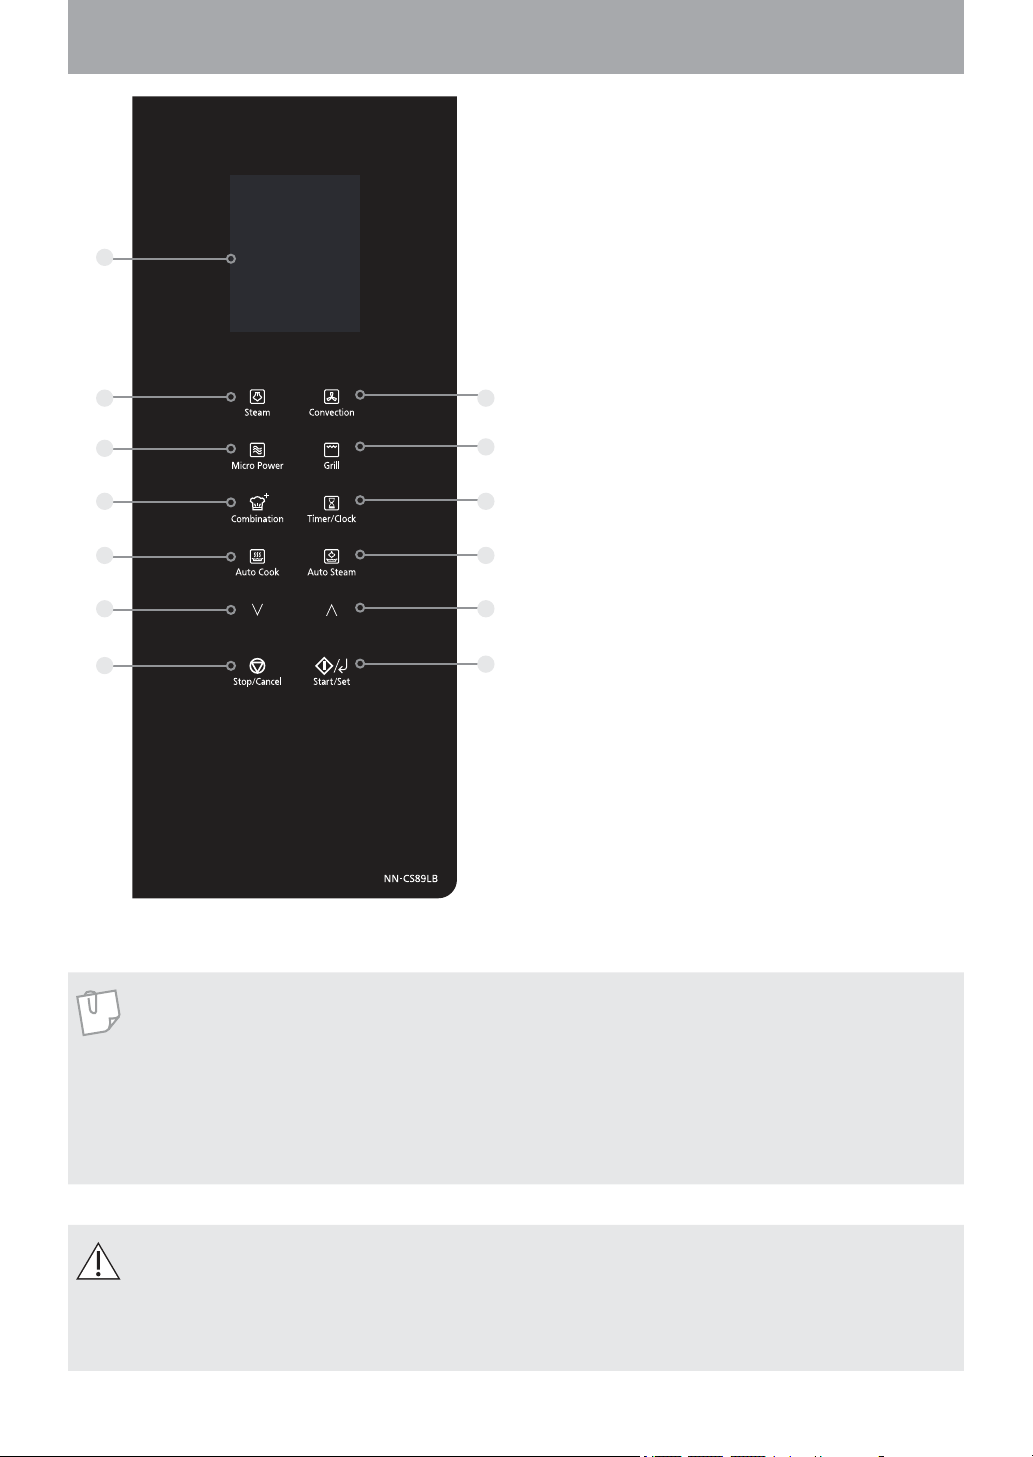
Control Panel
1
2
4
6
8
10
11
1 Display Window
2 Steam (pages 28-30)
3 Convection (pages 26-27)
4 Micro Power (page 24)
5 Grill (pages 25)
6 Combination (pages 31-34)
7 Timer/Clock (page 23, 35-36)
8 Auto Cook (pages 40-56)
9 Auto Steam (pages 58-60)
3
5
7
10 Up/Down Selection (page 22)
Select the time, weight or auto menu by
tapping .
11 Stop/Cancel:
Before cooking:
9
One touch clears your instructions
During cooking:
10
One touch temporarily stops the cooking
program. Another touch cancels all your
instructions and the time of day or a colon
12
will appear in the display.
12 Start/Set
Touch to start operating the oven or
confirm the setting. If during cooking the
door is opened or Stop/Cancel is touched
once, Start/Set has to be touched again to
continue cooking.
This oven is equipped with an energy saving
function.
Note
1. The oven will enter stand-by mode after the last operation has completed. When in stand-by mode,
the brightness of the display will be reduced.
2. When in stand-by mode, it is necessary to open and close the oven door before operating the
oven.
3. If an operation is set and Start/Set is not touched within 6 minutes, the oven will automatically
cancel the operation. The display will revert back to colon or clock mode.
Beep Sound
A beep sounds when a key is touched. If this beep does not sound, the setting is incorrect. When the
oven changes from one function to another or an auto program reminds you to stir or turn food, two
beeps sound. After the completion of the preheating on convection or combination mode, three
beeps sound. After completion of cooking, the oven will beep 5 times.
- 15 -
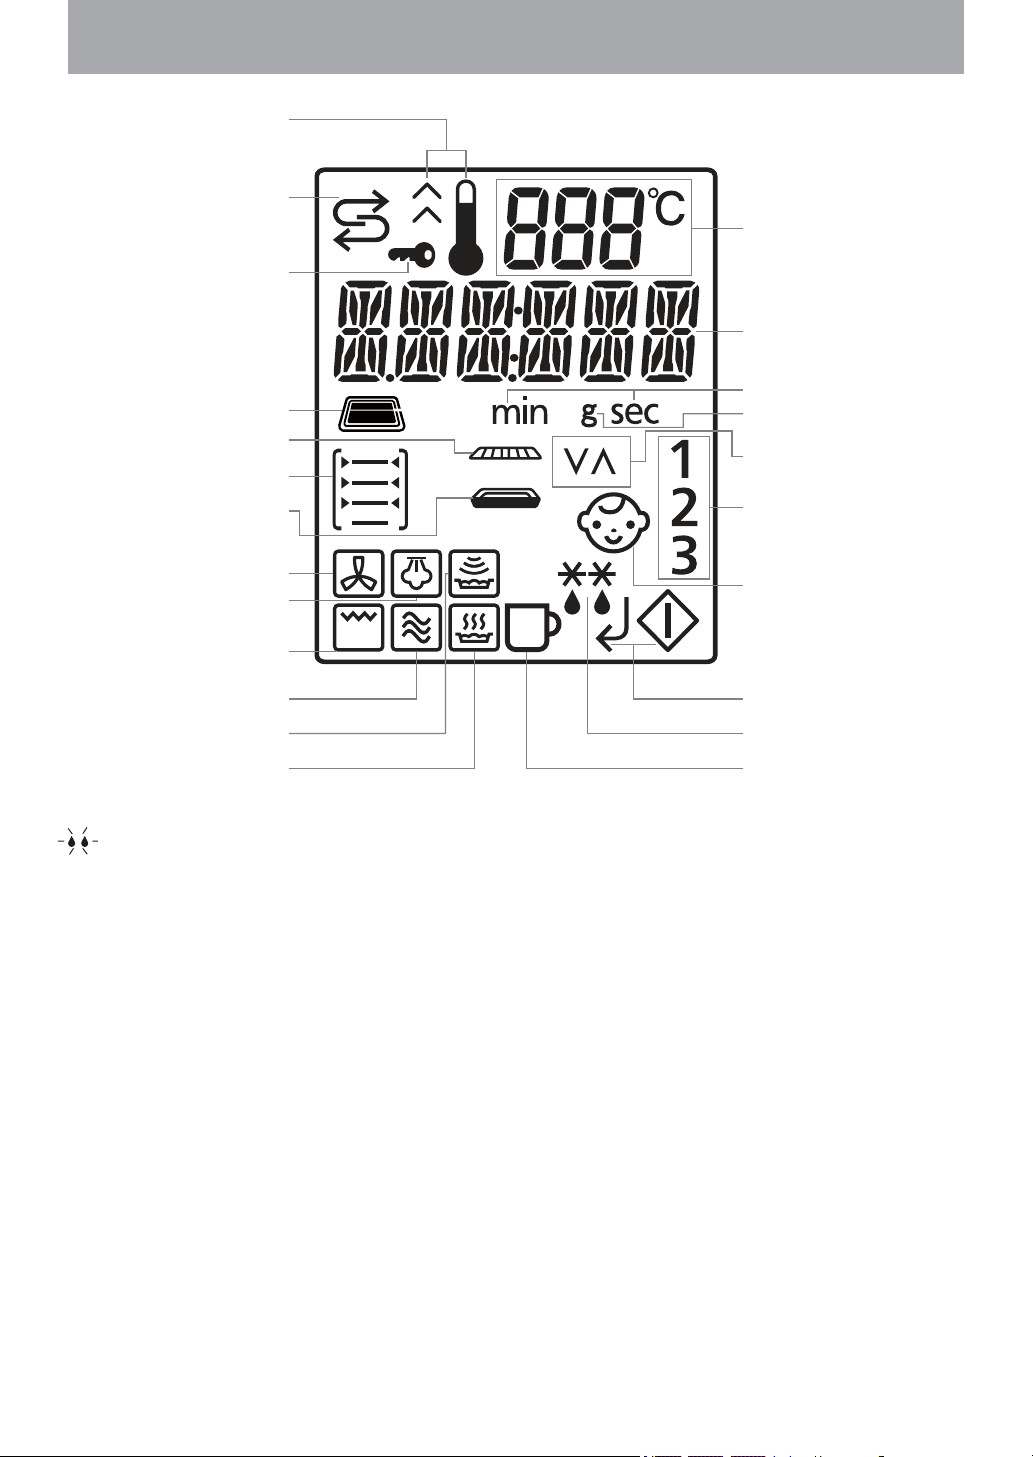
Display Window
Preheating
(Convection)
System Cleaning
Child Lock Setting
Grill Tray
Wire Shelf
Accessory Placement
Metal Tray
emperature Display
T
Number/Character
Time Display
(Minute/Second)
Weight Display
More/Less Display
Multistage Display
Convection
Steam
Microwave
Auto Sensor Program
Auto Cook Program
: Fill the water tank.
Junior Menu Program
Grill
Start/Set
Defrost/Frozen Mark
Auto Beverage Program
- 16 -
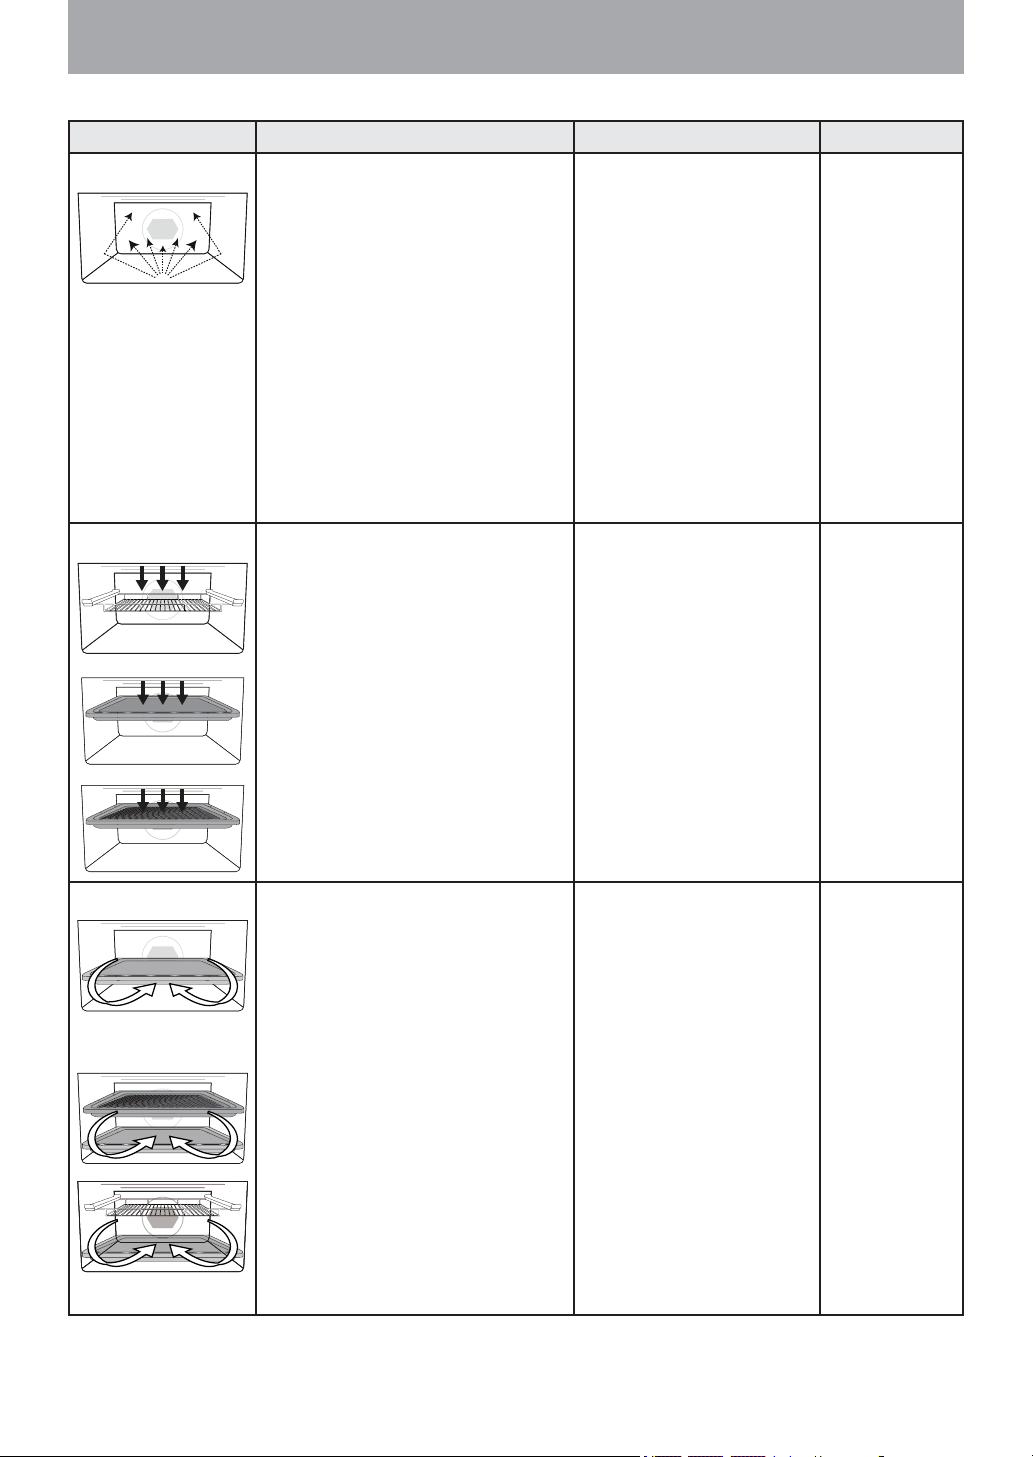
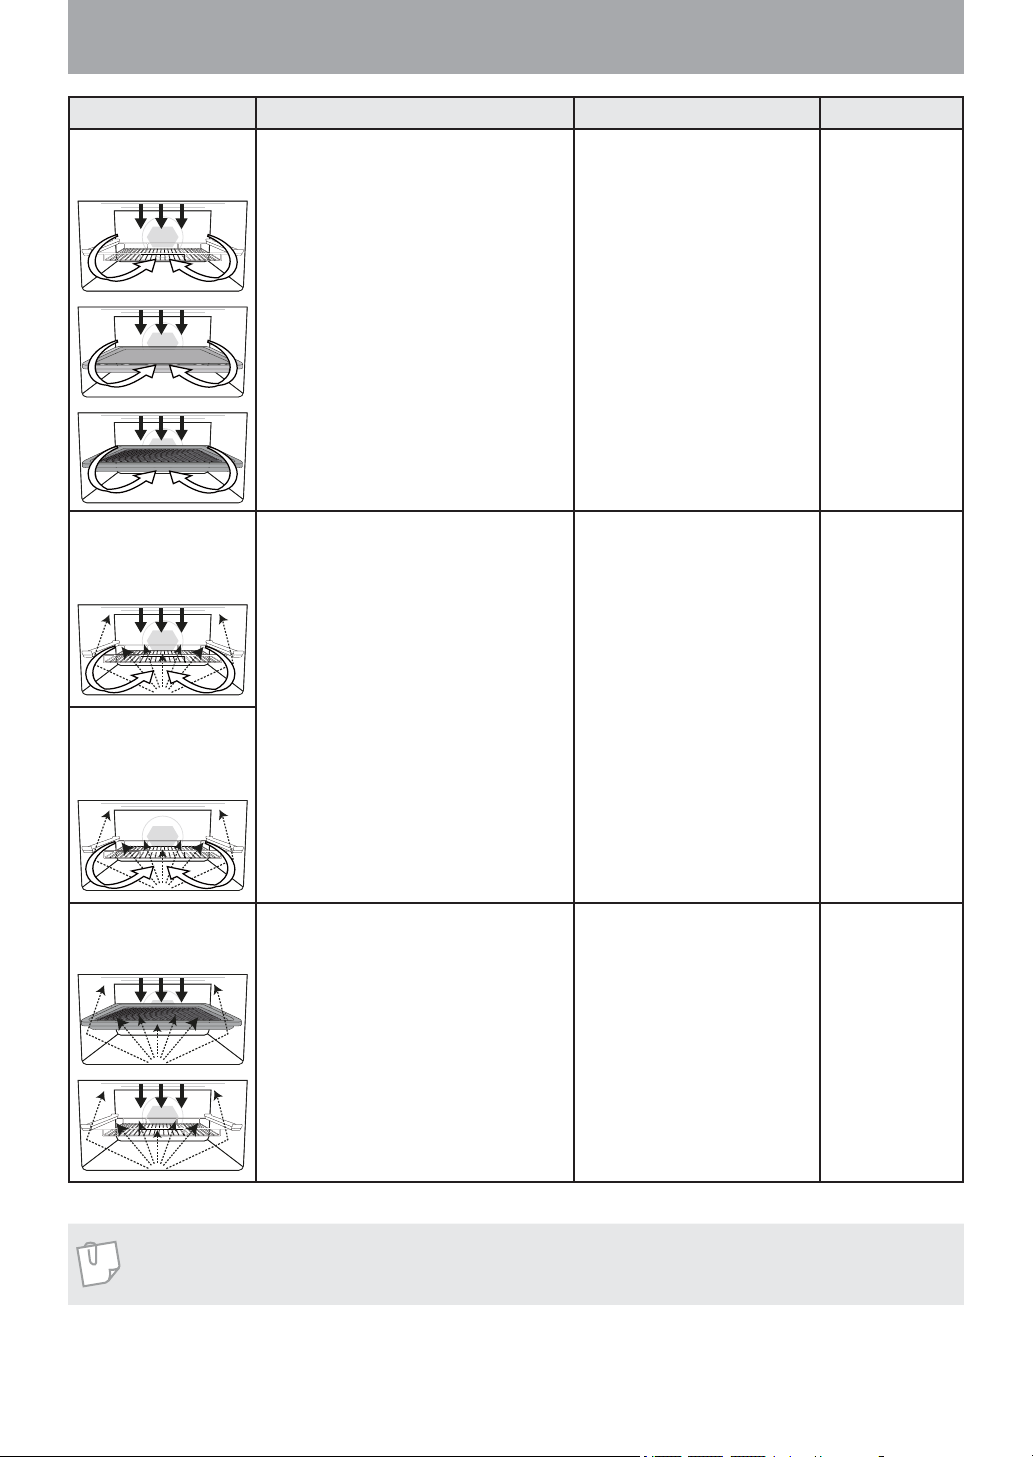
Cooking Modes
The diagrams shown below are examples of the accessories. It may vary depending on recipe/dish used.
Cooking modes Uses Accessories to use Containers
Microwave • Defrosting
• Reheating
• Melting : butter, chocolate, cheese.
• Cooking fish, vegetables, fruits,
eggs.
• Preparing : stewed fruits, jam,
sauces, custards, pastry, caramel,
meat, fish or vegetarian loaves.
• Baking cakes with eggs and baking
powder without colour (Victoria
sandwich, clafoutis etc).
No Preheating
Grill
• Grilling of meat or fish.
• Toast grilling.
• Browning of gratin dishes or
meringue pies.
Use your own dishes, plates
or bowls, directly on the
base of the oven.
Wire shelf, metal tray or grill
tray.
Microwaveable,
no metal.
Heatproof,
metal tin can be
used.
Convection
(1 level)
(2 levels)
No Preheating
• Baking of small pastry items with
short cooking times : puff pastry,
cookies, choux, short pastry, roll
cakes.
• Special baking : souffles, meringues,
vol-au-vent, small loaves of bread
or brioches, sponge cake, meat pie,
etc.
• Baking of quiches, pizzas and tarts.
Preheating advised
Metal tray, wire shelf and grill
.
tray
Heatproof,
metal tin can be
used.
- 17 -

Cooking Modes
Cooking modes Uses Accessories to use Containers
Steam
(1 level)
(2 levels)
Steam + Microwave
(Combi 1)
Convection + Steam
(Combi 2, 3, 4, 5)
• Cooking fish, vegetables, chicken,
rice, potatoes and sponge puddings.
No Preheating
• Cooking fish, vegetables, chicken,
rice, and potatoes.
No Preheating
Wire shelf and grill tray.
Wire shelf or your own
dishes on the base of the
oven.
Metal tin,
Pyrex®
and plastic
containers
suitable for
steaming.
Microwaveable,
no metal.
Grill + Steam
(Combi 6)
• Cooking gratins
• Kebabs
• Baking cakes
• Pastry tarts
• Souffles
• Whole fish
Preheating advised for Combi 2-5
No Preheating for Combi 6
Metal tray, wire shelf and grill
.
tray
Heatproof,
metal tin can be
used.
- 18 -
Cooking Modes
Cooking modes Uses Accessories to use Containers
Grill + Convection
(Combi 7)
• Roasting red meats, thick steak (rib
Grill + Convection +
Microwave
(Combi 8)
Convection +
Microwave
(Combi 9)
of beef, T bone steaks)
• Cooking of fish.
Preheating advised
• Roasting meat and poultry.
• Defrosting and reheating crunchy
foods (quiche, pizza, bread,
viennoiserie, lasagne, gratin.)
• Cooking lasagne, meat, potatoes or
vegetable gratins.
• Baking cakes and puddings with
eggs or baking powder ingredients
with browning, baking of quiches,
pies and tarts.
Wire shelf, grill tray or metal
tray.
Wire shelf.
Heatproof,
metal tin can be
used.
Microwaveable
& heatproof. No
metal.
Preheating advised
Grill + Microwave
(Combi 10)
• Roasting chicken wings, seafood,
fried foods, meat skewers, frozen
potato fries, pizza etc.
No Preheating
Grill tray or wire shelf.
Note
If using wire shelf only, your own glass dish can be placed on base of oven to catch fat and drips.
- 19 -
Microwaveable
& heatproof. No
metal.
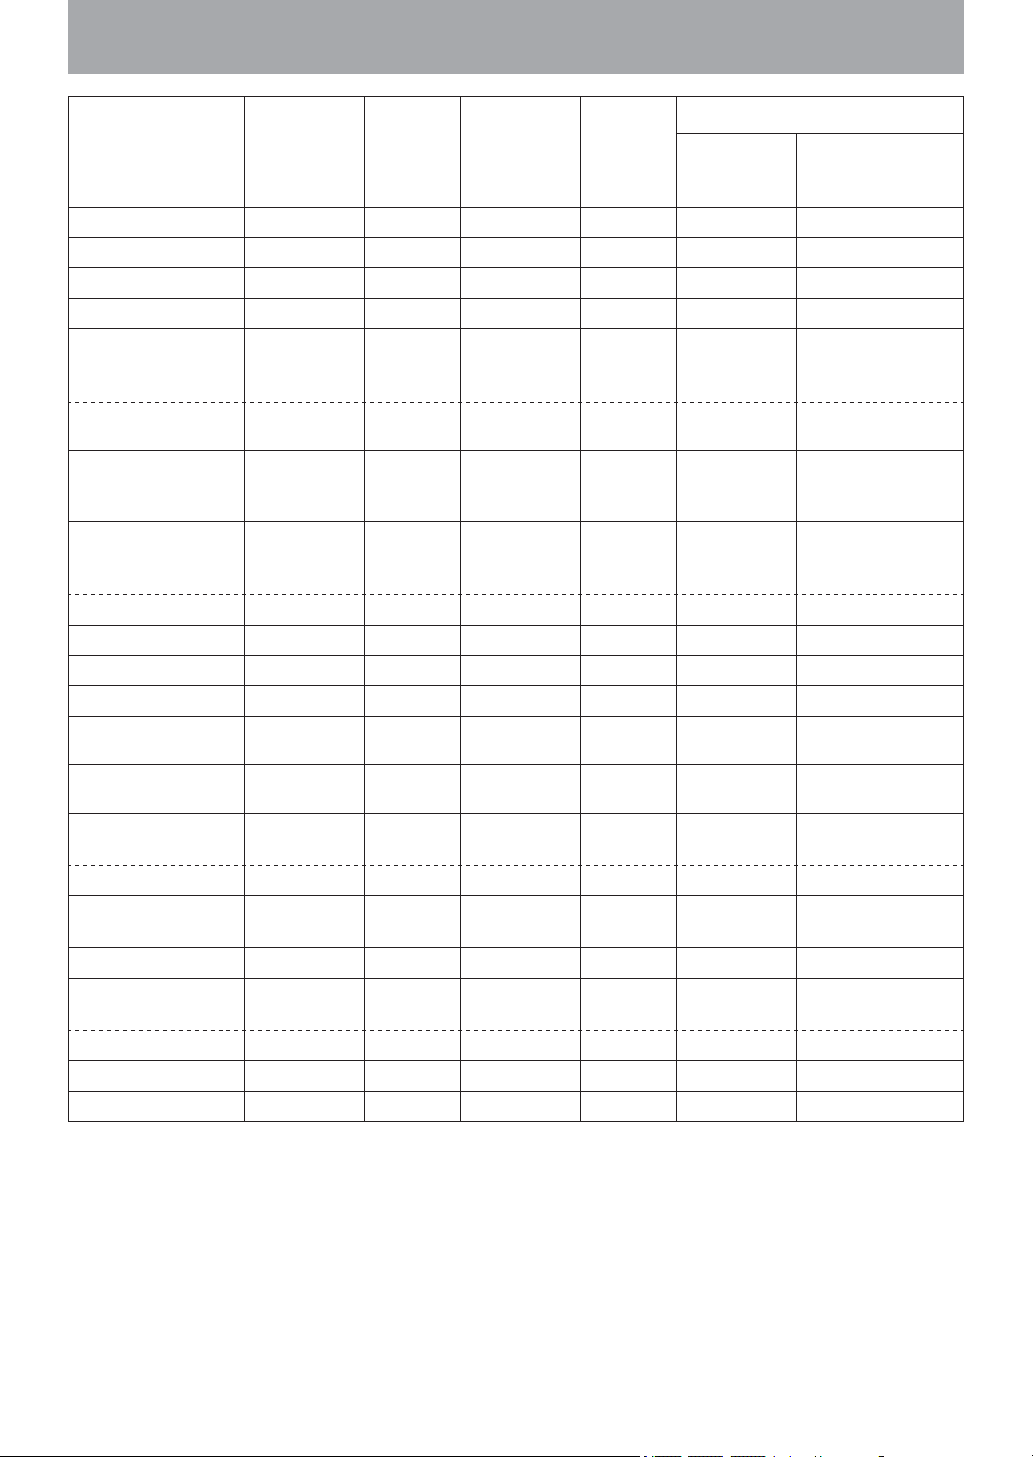
Cookware and Utensil Chart
Combination
Microwave Grill Convection Steam
Combi 1
(Steam +
Microwave)
Aluminium foil for shielding yes yes yes for shielding yes
Ceramic Plate yes yes yes yes yes yes
Browning Dish yes no no no no no
Brown paper bags no no no no no no
Dinnerware
oven/microwave
yes yes yes yes yes yes
safe
non-oven/
microwave safe
no no no no no no
Disposable
paperboard
containers
yes*
1
yes*
1
no yes*
1
yes*
1
Glassware
oven glassware &
yes yes yes yes yes yes
ceramic
non-heat resistant no no no no no no
Metal cookware no yes yes yes no yes
Metal twist-ties no yes yes yes no yes
Oven cooking bag yes yes*
Paper towels and
napkins
Plastic defrosting
rack
yes no no no no no
yes no no no no no
1
yes yes*
1
yes yes
Plastic dishes
microwave safe yes no yes no yes no
non microwave safe no no no no no no
Microwave safe
plastic wrap
yes no no
not
required
not required no
Straw, wicker, wood yes no no no yes no
Thermometers
microwave safe yes no no no no no
conventional no no no no no no
Waxed paper yes yes yes yes yes yes
Silicon bakeware yes*
1
yes*
1
yes*
1
yes*
1
yes*
1
*1 Check manufacturers’ recommendation, must withstand heat or follow the recipe instructions.
Combi 2, 3, 4, 5
(Steam+
Convection)
yes*
no
1
- 20 -
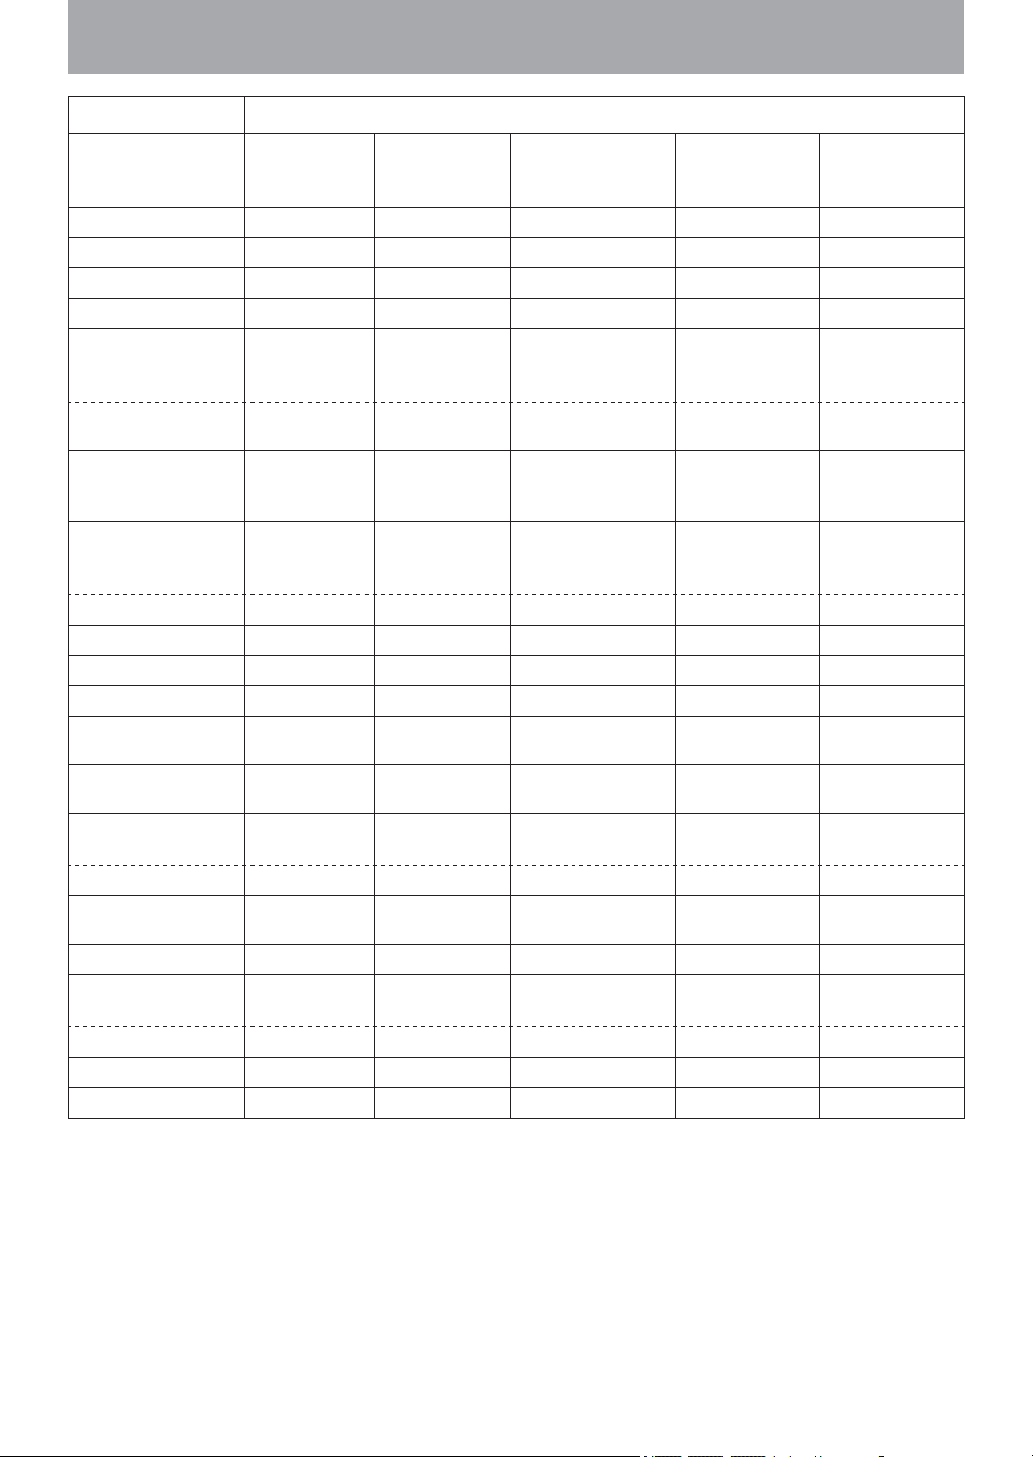
Cookware and Utensil Chart (continued)
Combination
Combi 6
(Steam+
Grill)
Aluminium foil yes yes for shielding for shielding for shielding
Ceramic Plate yes yes yes yes yes
Browning Dish no no no no no
Brown paper bags no no no no no
Dinnerware
oven/microwave
yes yes yes yes yes
safe
non-oven/
microwave safe
no no no no no
Disposable
paperboard
containers
yes*
1
Glassware
oven glassware &
yes yes yes yes yes
ceramic
non-heat resistant no no no no no
Metal cookware yes yes no no no
Metal twist-ties yes yes no no no
Oven cooking bag yes yes yes yes no
Paper towels and
napkins
Plastic defrosting
rack
no no no no no
no no no no no
Plastic dishes
microwave safe no yes no no no
non microwave safe no no no no no
Microwave safe
plastic wrap
no no no no no
Straw, wicker, wood no yes no no no
Thermometers
microwave safe no no no no no
conventional no no no no no
Waxed paper yes yes yes yes yes
Silicon bakeware yes*
1
*1 Check manufacturers’ recommendation, must withstand heat or follow the recipe instructions.
Combi 7
(Convection +
Grill)
Combi 8
(Convection +
Grill + Microwave)
Combi 9
(Convection +
Microwave)
no no no yes*
yes*
1
yes*
1
yes*
1
Combi 10
(Grill +
Microwave)
1
1
yes*
- 21 -

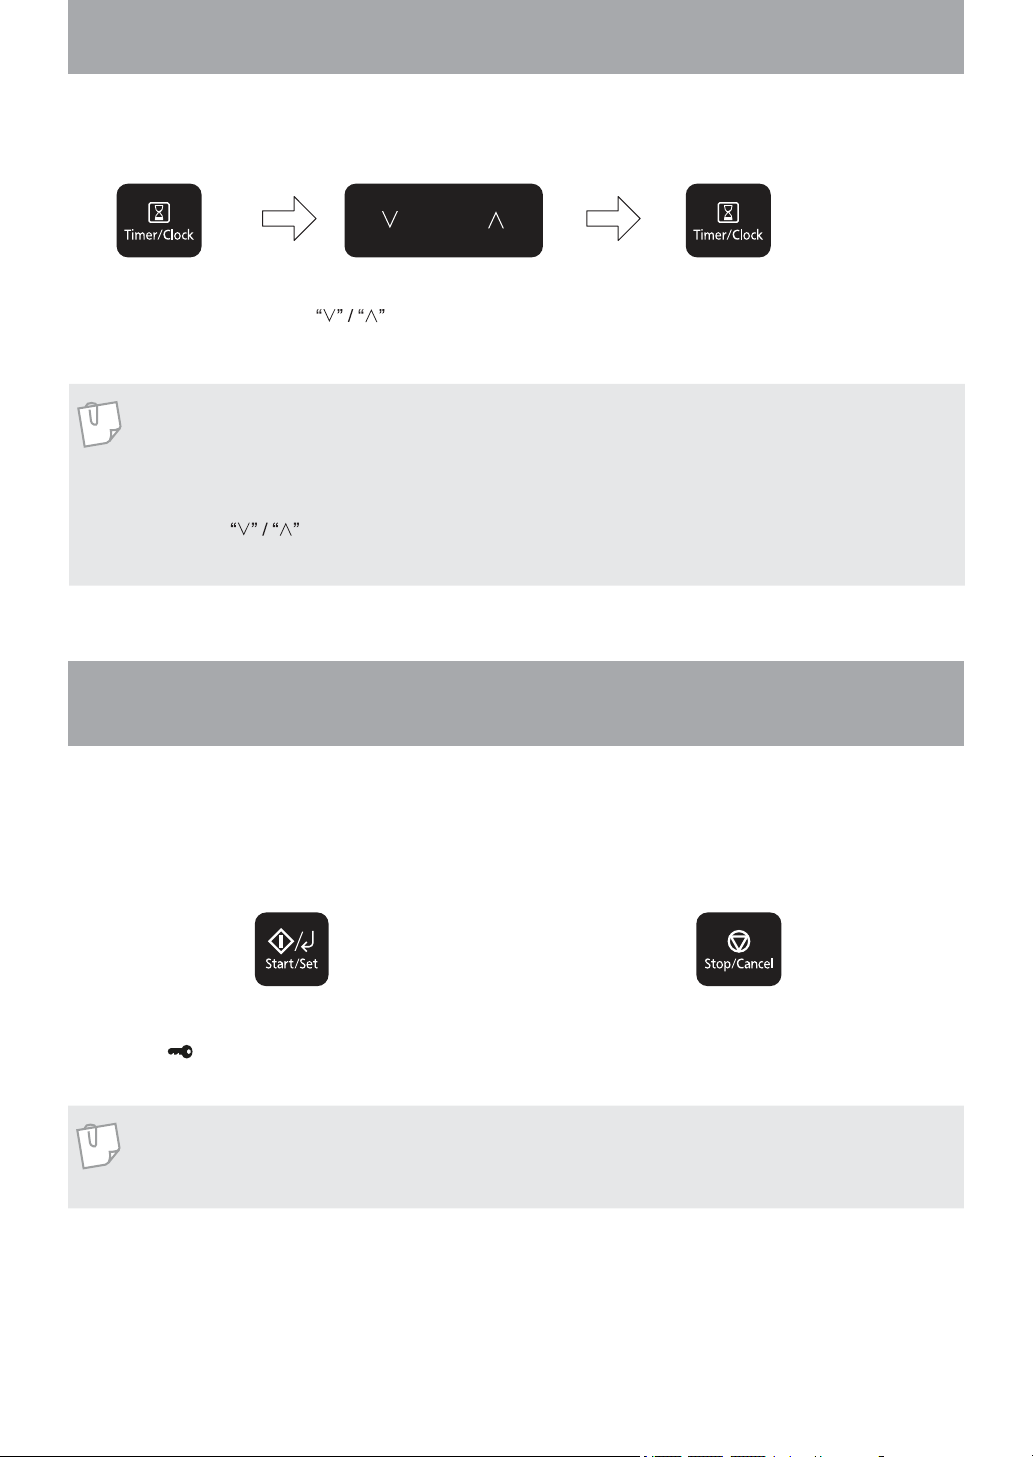
Operation Guide in the Display Window
To assist you in programming your oven, the following operation will appear in the display window. When you
become familiar with your oven, the Operation Guide can be turned off.
If the Timer/Clock is tapped 4 times, this will turn off the operation guide. To turn the operation guide back on, tap
the Timer/Clock 4 times.
To turn off:
Colon or time of day
appears in the display
window.
Tap Timer/Clock four times.
To turn on:
Tap Timer/Clock four times.
Display window.
Colon or time of day
appears in the display
window.
Display window.
Up/Down Selection
Select the time, weight or auto menu by tapping . The time, weight or auto menu number appears in the
display window. The time/weight can be adjusted quickly by holding key.
• Time Setting:
To set cooking time or clock. Use the key for the Add Time
Function. (see page 37)
• Weight Setting:
To set weight of food for auto cook and auto steam
programs. (see pages 42-51, 54, and 58-60).
• Auto Programs Setting:
To select auto menu.
• More/Less Setting:
To set more/less for auto sensor programs
(see page 40-41 and 52-53).
- 22 -
Setting the Clock
When the oven is first plugged in “WELCOME TO PANASONIC MICROWAVE OVEN COOKING” appears
in display window.
Tap Timer/Clock twice. Select the time by tapping
. The time appears in
the display and the colon blinks.
Touch Timer/Clock.
The colon stops blinking and time of
day is now locked into the display.
Note
1. To reset time of day, repeat step 1 through to step 3, as above.
2. The clock will keep the time of day as long as the oven is plugged in and electricity is supplied.
3. One tap will increase or decrease the time by 1 minute, you can also adjust the time quickly by
holding
4. This is a 12 hour clock, there isn't a.m. or p.m. setting.
.
Child Safety Lock
Using this system will make the oven controls inoperable; however, the door can be opened. Child Lock
can be set when the display shows a colon or the time.
To Set: To Cancel:
Tap Start/Set three times. The time of
day will disappear. Actual time will not be
lost. ‘
’ is indicated in the display.
Tap Stop/Cancel three times. The time
of day will reappear in the display.
Note
To activate or cancel child lock, Start/Set or Stop/Cancel must be tapped 3 times within a 10 second
period.
- 23 -
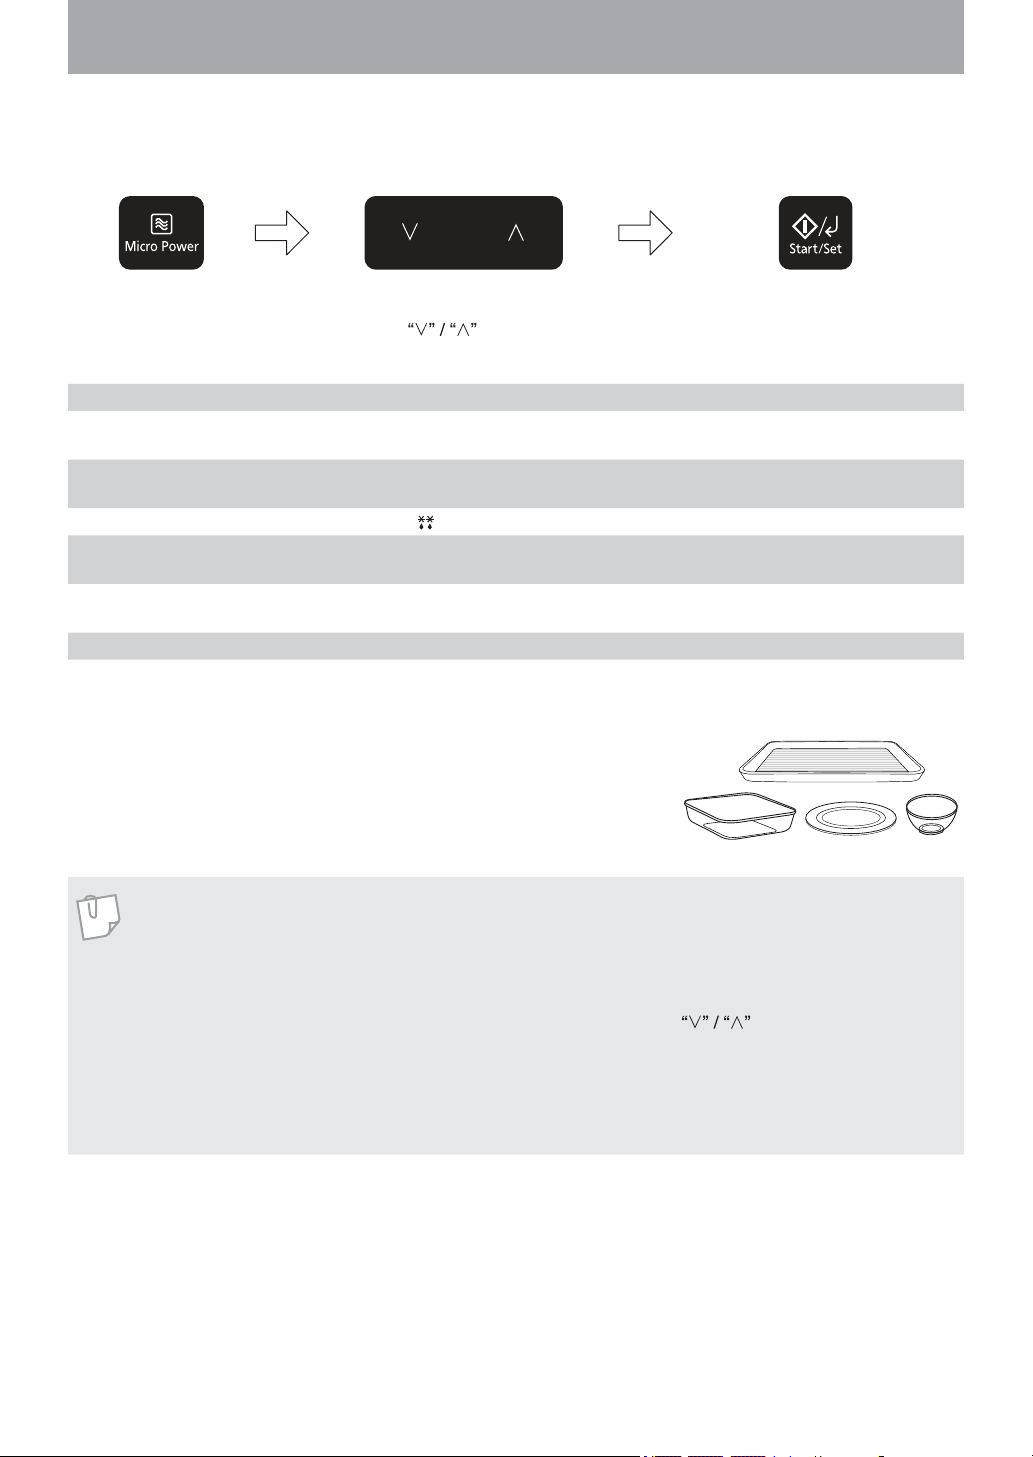
Microwave Cooking and Defrosting
There are 7 different Micro Power levels available (see the chart below).
Tap Micro Power to
select desired power
level.
Taps Display Power Example of use Max time
1 tap 1000 W Max
2 taps 800 W Medium High
3 taps 270 W Defrost
4 taps 600 W Medium
5 taps 440 W Low
6 taps 300 W Simmer Simmer, stew. 1 h 30 minutes
7 taps 100 W Warm Keep food warm and soften ice cream. 1 h 30 minutes
Select the cooking time by
tapping
.
Boil water. Cook fresh fruits, vegetables,
preserved fruit and candies.
Cook fish and seafood, meat, poultry,
Defrost meat, poultry or seafood. 1 h 30 minutes
Cook cakes, stew food, and melt butter
Cook tough meat, stew soup and soften
eggs and cakes.
and chocolate.
Touch Start/Set.
The cooking program will start and the
time in the display will count down
30 minutes
1 h 30 minutes
1 h 30 minutes
butter.
1 h 30 minutes
Use of Dishes/Accessory:
Use your own Pyrex® dishes, plates or bowls covered with a lid or pierced
cling film directly on the base of the oven. Do not place food directly on the
base of the oven.
Note
1. For multi-stage cooking refer to page 37.
2. Stand time can be programmed after Micro Power and time setting. Delay start cooking can be
programmed before Micro Power and time setting. Refer to using the timer page 35.
3. You can change the cooking time during cooking if required. Tap
the cooking time. Time can be increased/decreased in 1 minute increments, up to 10 minutes.
4. Maximum time that can be set on max power (1000 W) is 30 minutes. On all other power levels the
maximum time that can be set is 1 hour 30 minutes.
5. Do not attempt to use microwave only with any metal accessory in the oven.
to increase or decrease
Bottom Feeding Technology
Please note that this product uses bottom feeding technology for microwave distribution which differs from
traditional turntable side feeding methods and creates more useable space for a variety of different sized dishes.
This microwave feeding style can give a difference in heating times (in microwave mode) when compared
against side feeding appliances. This is quite normal and should not cause any concern.
- 24 -
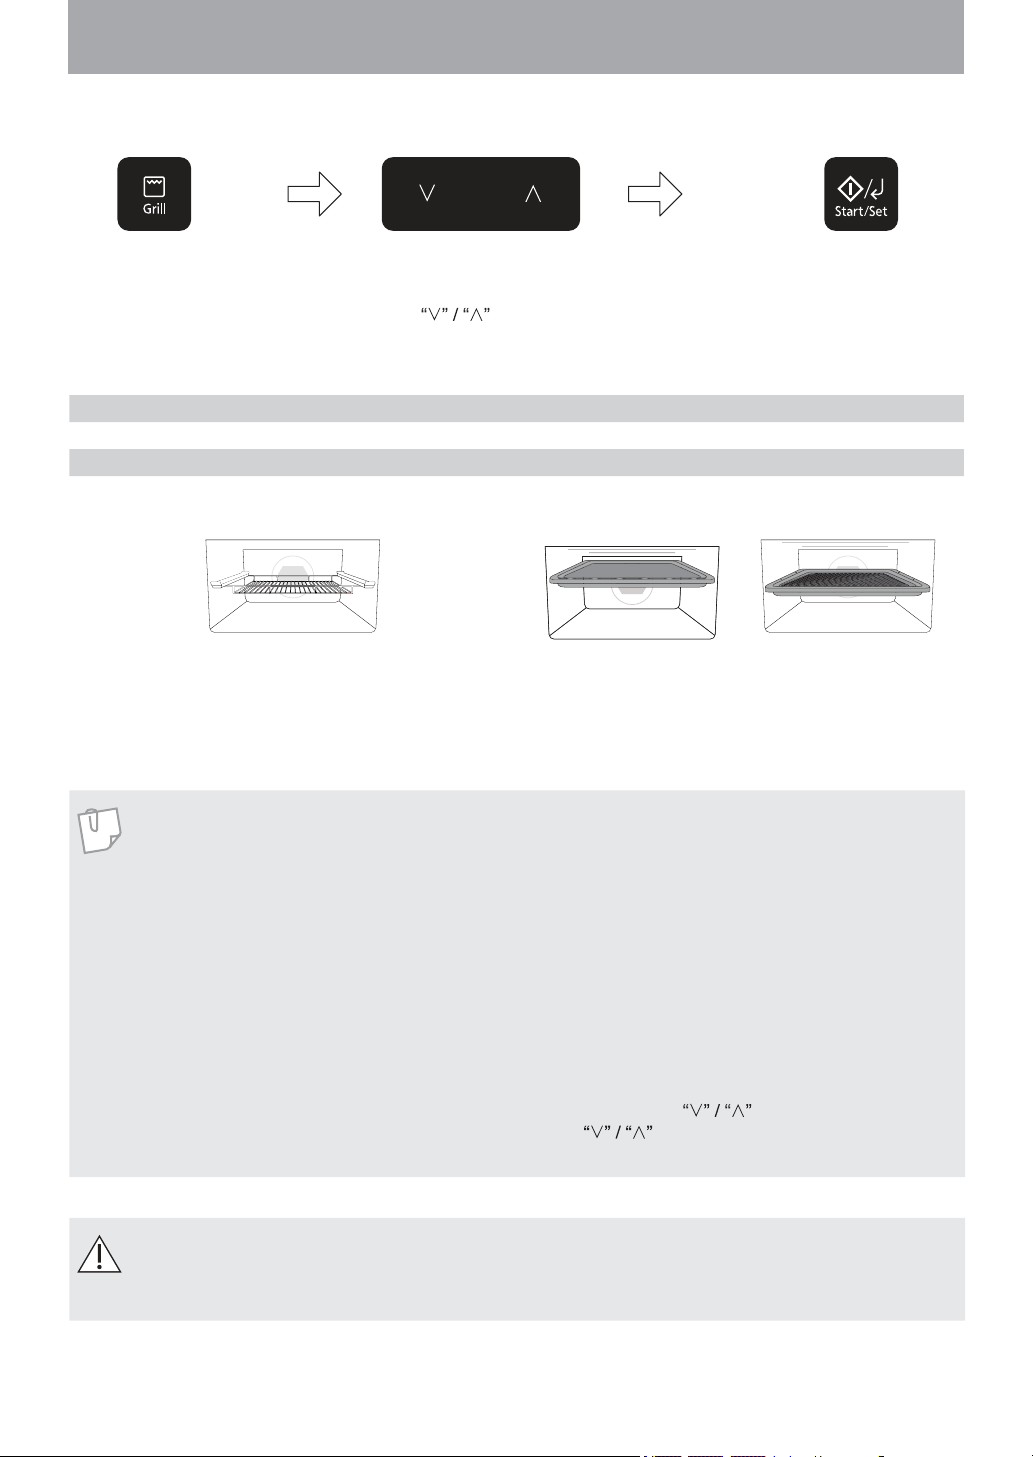
Grilling
There are 3 different Grill settings available.
Tap Grill once, twice
or three times to
select the desired
grill power.
Taps Power Level Example of use
1 tap Grill 1 (high) Garlic Bread, Toast
2 taps Grill 2 (medium) Seafood
3 taps Grill 3 (low) Slice meat or poultry pieces
Place food on wire shelf on the upper or middle
shelf position in the oven.
Place a glass dish on the base of the oven to
catch fat and drips.
Select the cooking time by
tapping
time is 1 h 30 minutes.
. Maximum cooking
For grilling small foods use the metal tray or grill
tray on the upper or middle shelf positions.
Note
1. Never cover foods when grilling.
2. The grill will only operate with the oven door closed.
3. There is no Micro Power on the grill only program.
4. Most foods require turning halfway during cooking. When turning food, open oven door and
carefully remove accessories using oven gloves.
5. After turning, return food to the oven and close door. After closing oven door, touch Start/Set. The
oven display will continue to count down the remaining grilling time. It is quite safe to open the oven
door at any time to check the progress of the food as it is grilling.
6. Always clean the oven after using the Grill.
7. You can change the cooking time during cooking if required. Tap
the cooking time. Time can be increased/decreased in 1 minute increments, up to 10
minutes.
Touch Start/Set.
Time in the display will
count down.
to increase or decrease
Caution
Use oven gloves when removing accessories. Never touch the outside window or inside metal parts of
the door or oven when taking food in or out due to the high temperatures involved.
- 25 -

Convection Cooking
This key offers a choice of convection temperatures 30-230 °C in 10 °C increments. For quick selection of the
most commonly used cooking temperatures, the temperatures start at 150 °C and count up to 230 °C then
30 °C. The oven can not preheat at 30-60 °C.
Set the desired
convection temperature.
After preheating,
place the food in
the oven.
Note
1. The oven can not preheat at 30 °C - 60 °C.
2. If ‘HOT’ appears in the display window, the oven temperature is too high from previous use and
30 °C - 40 °C can not be set. Cooking mode and time may still be set manually.
Use of Accessory:
Touch Start/Set to preheat. A “P” will appear in the
display window. When the oven is preheated the oven
will beep and the “P” will flash. Then open the door
and place the food inside.
* Skip this step when preheating is not required.
Select the cooking time by
tapping
(up to 9 hours) .
Touch Start/Set. Time
in the display will count
down.
For 1 level Convection cooking use the metal tray, wire shelf or grill tray the middle or lower shelf
position. Place a glass dish on the base of the oven to catch fat and drips, if you use wire shelf.
For 2 levels Convection cooking, the metal tray can be used in the lower shelf position and the grill tray
or wire shelf can be used as the upper shelf position.
Note on Preheating
1. Do not open the door during preheating. After preheating 3 beeps will be heard and the “P” will
flash in the display window. If the oven door is not opened after preheating, the oven will maintain
the selected temperature. After 30 minutes, including preheating, the oven will shut off automatically
and revert to a colon or time of day.
2. If you want to cook without preheating, after selecting the desired temperature, set the cooking time
then touch Start/Set.
- 26 -
Convection Cooking (continued)
Note
1. When the selected cooking time is less than one hour, the time counts down second by second.
2. When the selected cooking time is over one hour, the time counts down minute by minute until
only “1H 00” (1 hour) remains. The display then indicates minutes and seconds and counts down
second by second.
3. You can change the cooking time during cooking if required. Tap
the cooking time. Time can be increased/decreased in 1 minute increments, up to 10 minutes.
4. When preheating, the selected temperature can be recalled and changed. Touch Convection once
to indicate the temperature in the display window. While the temperature is recalled in the display
window, you can change the temperature by tapping Convection.
5. Depending on the recipe, you can preheat with or without the shelves in position. See individual
recipes for details. The shelves are ideal for batch baking and when cooking in a large dish.
6. When preheating, the screen displays the actual temperature of the oven cavity. The current
temperature is not displayed until more than 70 °C is reached. To change the temperature during
cooking, touch Convection.
7. Turn the accessories 180° halfway during cooking to ensure a more even cooking result.
Caution
Always use oven gloves when removing the food and accessories after cooking as the oven and
accessories will be very hot.
to increase or decrease
Guideline to Oven Temperatures
For best results always place food in a preheated oven. Don’t forget that for ease of programming of the most
commonly used temperatures, your oven will start at 150 °C and count up in 10 °C stages to 230 °C, then back
to down to 30 °C. Food is generally cooked uncovered - unless it is a casserole or if you wish to use roasting
bags for joints.
Level Temp °C Use
Drying-oven temperature for bread or pizza dough to rise,
making yogurt.
Low
Medium
High
30 / 40 °C
50 °C Warming dishes.
60 °C - 70 °C Dried fruits, beef jerky.
80 °C - 90 °C Slow cooking.
100 °C Pavlova.
110 °C Meringues.
140 °C Rich fruit cake.
150 °C Lemon meringue, meringue roulade, cheesecake.
160/170 °C Casseroles, gingerbread, small tarts, cookies.
180 °C Souffle, strudel, victoria sandwich, fairy cakes, meat joints.
190 °C Filo pastry, quiche, gratins, lasagne, pastry pies, chicken.
200 °C Stuffed peppers, scones, eclairs, swiss roll, muffins.
220 °C Vegetable parcels, yorkshire puddings, bread.
230 °C Garlic bread, roast potatoes, baking pizza
- 27 -
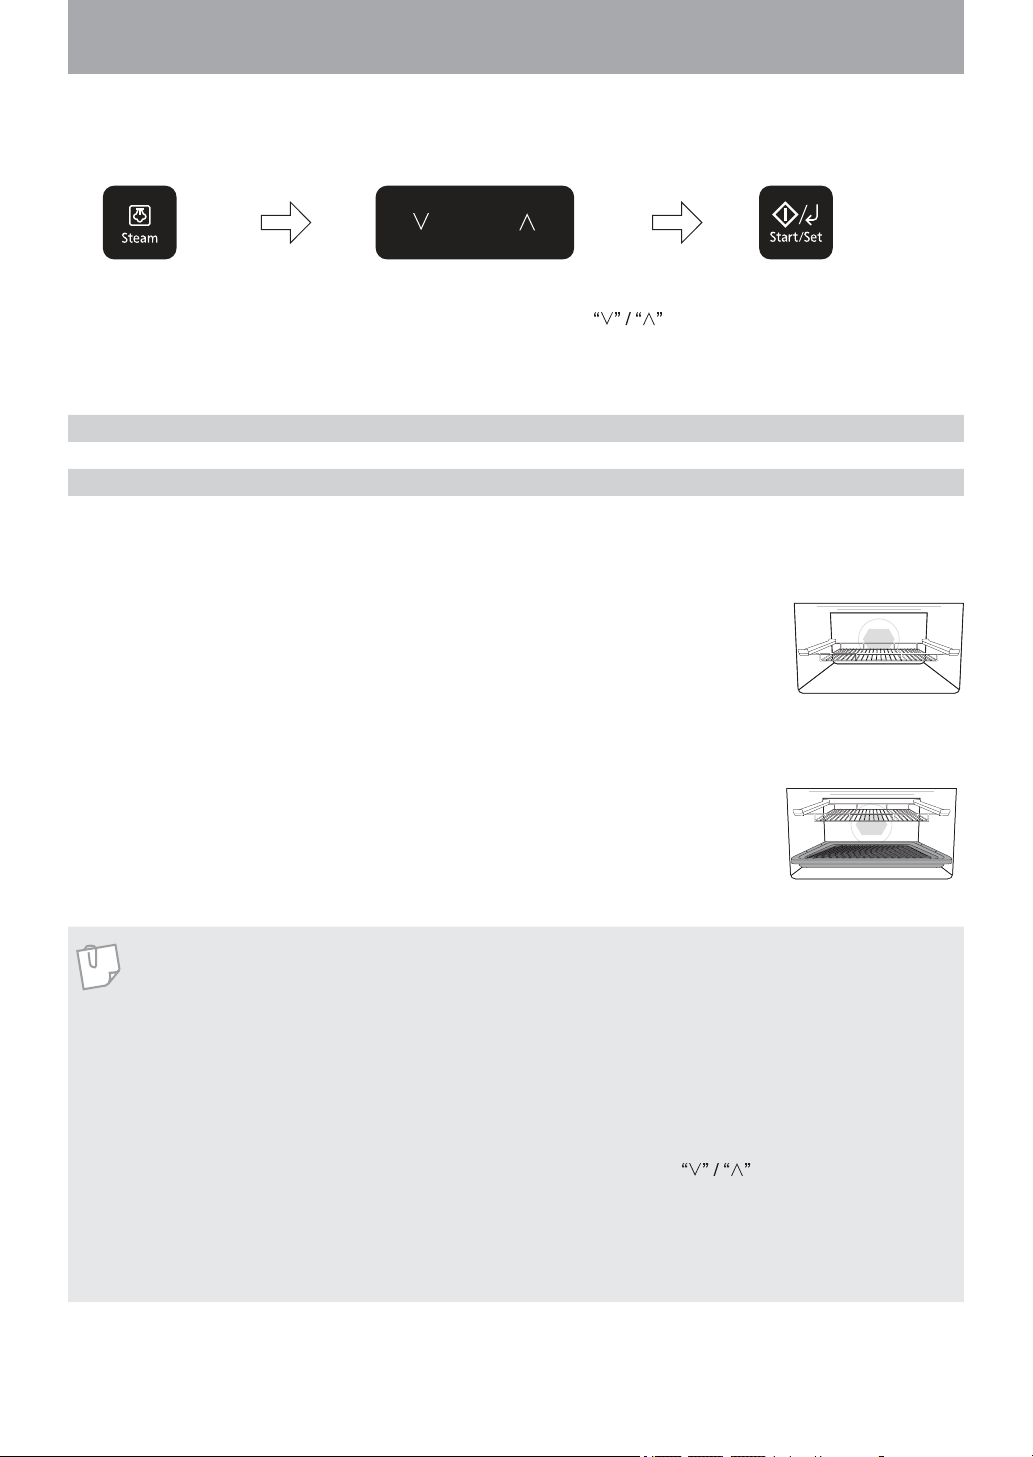
Steam Cooking
The oven can be programmed as a steamer to cook vegetables, fish, chicken and rice. There are 2
different steam settings available.
Tap Steam until the
power you require
appears in the display
window.
Taps Power Level Example of use
1 tap Steam 1 (Maximum) Bun, Meat, Seafood, Chicken Breast
2 taps Steam 2 (Low) Soft-boiled egg, Prawn.
Select the cooking time by tapping
Maximum cooking time is 30 minutes.
Touch Start/Set.
.
The cooking program will start
and the time in the display will
count down.
Oven Accessories to Use:
Steam 1 level
When steaming food, the wire shelf is placed in the middle shelf position. Place a glass
dish on the base of the oven to catch fat and drips.
Steam 2 level
For the first level, place food on the grill tray in the lower shelf position. For the second
level, place food on the wire shelf in the upper shelf position.
Note
1. Fill the water tank before using the steam function.
2. The maximum time for cooking in this mode is 30 minutes. If required to cook for longer than this
time, re-fill the water tank and repeat the above operation for the remaining time.
3. If during operation the water tank becomes empty, the oven will stop operation. The prompt in the
display will ask you to re-fill the water tank. After re-filling the water tank and positioning back in the
oven, touch Start/Set. The oven will not continue cooking until the water tank has been re-filled and
Start/Set touched.
4. You can change the cooking time during cooking if required. Tap
the cooking time. Time can be increased/decreased in 1 minute increments, up to 10 minutes.
5. It is possible to refill water tank at any time during cooking, without having to touch Stop/Cancel
first.
6. It is necessary to wipe the excess water in the cavity after Steam cooking.
- 28 -
to increase or decrease

Steam Cooking (continued)
Caution
The accessories and surrounding oven will get very hot. Use oven gloves.
When removing the food or cooking accessories, hot water may drip from the oven top.
Steam may billow out when you open the door. If there is steam in the oven, do not reach in
with your bare hands! Risk of burns! Use oven gloves.
Take care when removing the drip tray. Wipe any water that drips from the inside of the oven.
This is normal.
Guidelines for Water Tank
Carefully remove the water tank from the oven. Remove the lid and fill with tap water (do not use mineral water).
Replace the lid and position back in the oven. Ensure the lid is closed tightly and securely positioned, otherwise
leakage may occur. It is recommended to clean the water tank in warm water once a week.
Guidelines
1. There is no Micro Power on the Steam only
program.
2. Use the accessories provided, as explained above.
3. The Steam will only operate with the oven door
closed.
4. During and after cooking with steam function, do
not open the oven door when your face is very
close to the oven. Care must be taken when
opening the door as steam may cause injury.
5. Always use oven gloves when removing the food
and accessories after steaming as the oven and
accessories will be very hot.
6. After each steam operation carefully remove the
drip tray from the front of the oven. Gently ease
forwards, holding with both hands. After emptying,
wash in warm soapy water. To re-position, click
back into position on the oven legs.
Re-position the drip tray by clicking
back onto the legs.
- 29 -

Steam Shot
This feature allows you to add steam during cooking (up to 3 minutes). The following modes can use
steam shot - microwave, grill, convection and combination 7-10. Adding steam during cooking enhances
the heat distribution and aids the rising process of breads, cakes and pastries.
Set and operate the
desired program.
As required during operation,
hold steam for 2 seconds and
1 minute will be added.
Note
1. Steam shot is not available during preheating mode.
2. Fill the water tank before use.
3. The original program still counts down when operating steam shot.
4. The steam shot time can not exceed the remaining cooking time.
5. If adding 2 or 3 minutes, steam must be tapped once or twice within a 3 second time period.
6. It is not possible to change the convection temperature and cooking time during steam shot.
()
Optional
If you want to add 2 or 3
minutes, tap Steam once
or twice within 3 seconds
after step 2. The remaining
time displayed includes
steam shot time.
Cautions
The accessories and surrounding oven will get very hot. Use oven gloves.
When removing the food or cooking accessories, hot water may drip from the oven top.
Steam may billow out when you open the door. If there is steam in the oven, do not reach in
with your bare hands! Risk of burns! Use oven gloves.
Food Cooking mode Steam Shot
Pastries Convection ⅔ total time add 3 mins. Steam Shot
Breads Convection ⅔ total time add 3 mins. Steam Shot
Sponge cakes Convection ½ total time add 3 mins. Steam Shot
Part baked rolls Combi 7 ⅔ total time add 3 mins. Steam Shot
- 30 -
 Loading...