

Panasonic MCU-L424 Operating Instructions
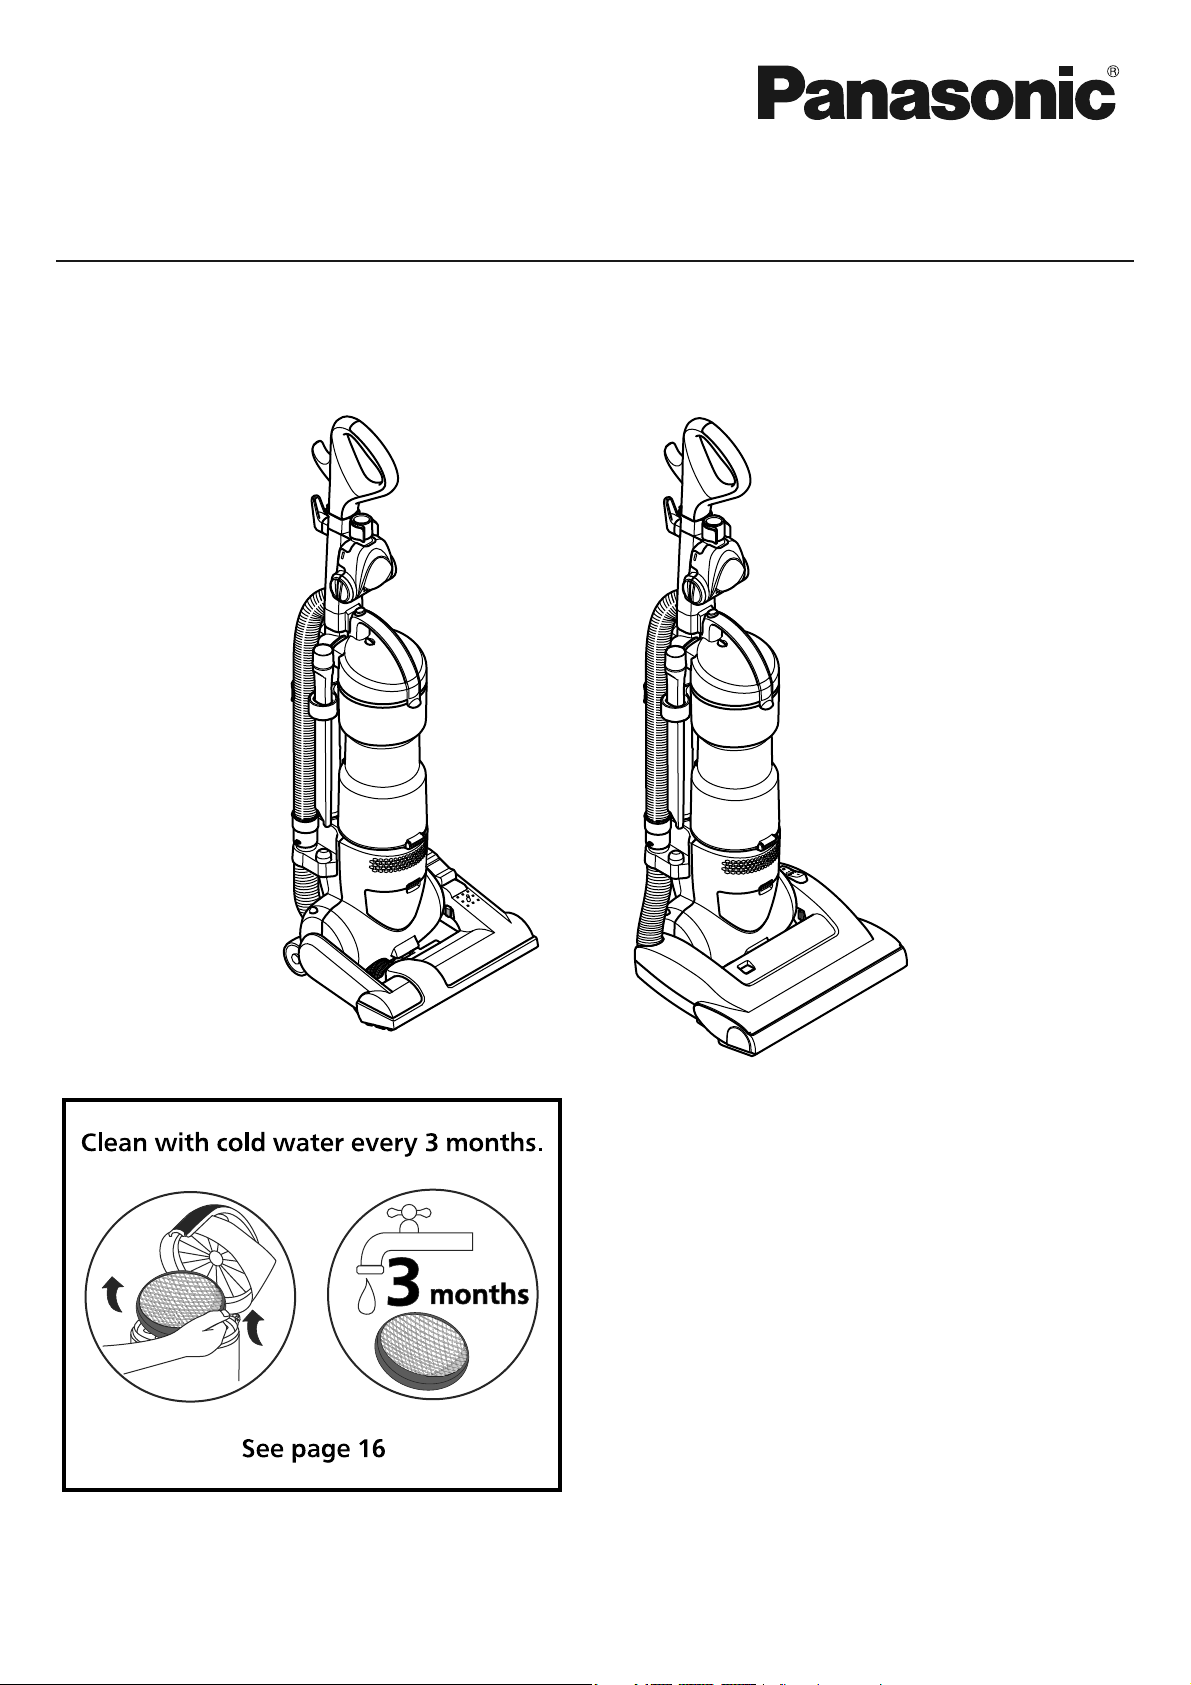
Operating Instructions
Vacuum Cleaner (Domestic)
Model No. MC-UL424
MC-UL426
Thank you for purchasing this vacuum cleaner.
Please read these instructions carefully before using the vacuum cleaner
and save these instruction for future reference.
This product complies with the directive 2006/95/EC and 2004/108/EC
.
Page
• Caution for AC Mains Lead (UK and Ireland only)................ 2
• Important Safety Instructions for the User ............................ 3
• Cautions................................................................................ 3
• Identification of Main Parts.................................................... 4
ASSEMBLY INSTRUCTIONS
A) Handle and Hose Assembly .......................................... 5
B) Tool Storage ................................................................... 6
C) Mains Lead Storage....................................................... 6
HOW TO OPERATE YOUR VACUUM CLEANER
A) Mains Lead..................................................................... 7
B) On/Off Switch ................................................................. 7
C) Handle Release.............................................................. 8
D) Carpet/Bare Floor Selector ............................................ 9
E) How To Use The Accessories ..................................... 10-11
PERFORMANCE FEATURES
A) Edge Cleaning.............................................................. 12
B) Automatic Adjusting Nozzle.......................................... 12
C) Overload Protection (MC-UL426 only) ........................ 12
D) Motor Protection System.............................................. 13
TABLE OF CONTENTS
Page
MAINTENANCE AND SERVICING
A) Emptying Dust Bin.........................................................14
B) Pre-Filter Cleaning ........................................................15
C) Primary Filter Cleaning .................................................16
D) HEPA Media Exhaust Filter Replacement.....................16
E) Belt Replacement (MC-UL424) .....................................17
F) Belt Replacement (MC-UL426) .....................................18
G) Clog Removal................................................................19
H) Beater Bar Cleaning......................................................20
I) Cleaning Exterior...........................................................20
• Troubleshooting ...................................................................21
• Specifications.......................................................................22
• Disposal Information ............................................................23
• Vacuum Cleaner Consumables / Accessories .....................24
• Guarantee ...........................................................................25
• Reminder For Customer .....................................................25
• Notes .............................................................................26-27
FOR YOUR SAFETY PLEASE READ THE FOLLOWING TEXT CAREFULLY
This appliance is supplied with a moulded three pin mains plug for your safety and convenience.
A 13 amp fuse is fitted in this plug.
Should the fuse need to be replaced please ensure that the replacement fuse has rating of 13 amps and that it is approved by ASTA
or BSI to BS1362.
Check for the ASTA mark or the BSI mark on the body of the fuse.
If the plug contains a removable fuse cover you must ensure that it is refitted when the fuse is replaced.
If you lose the fuse cover the plug must not be used until a replacement cover is obtained.
A replacement fuse cover can be purchased from your local Panasonic Dealer.
IF THE FITTED MOULDED PLUG IS UNSUITABLE FOR THE SOCKET OUTLET IN YOUR HOME THEN THE FUSE SHOULD BE
REMOVED AND THE PLUG CUT OFF AND DISPOSED OF SAFELY. THERE IS A DANGER OF SEVERE ELECTRICAL SHOCK IF
THE CUT OFF PLUG IS INSERTED INTO ANY 13 AMP SOCKET.
If a new plug is to be fitted please observe the wiring code as shown below.
If in any doubt please consult a qualified electrician.
IMPORTANT: The wires in this mains lead are coloured in accordance with the following code:
Blue : Neutral
Brown : Live
As the colours of the wire in the mains lead of this appliance may not correspond with the coloured markings identifying the terminals
in your plug, proceed as follows:
The wire which is coloured BLUE must be connected to the terminal in the plug which is marked with the letter N or coloured BLACK.
The wire which is coloured BROWN must be connected to the terminal in the plug which is marked with the letter L or coloured RED.
Under no circumstances should either of these wires be connected to the earth terminal of the three pin plug, marked with the letter
E or the Earth Symbol
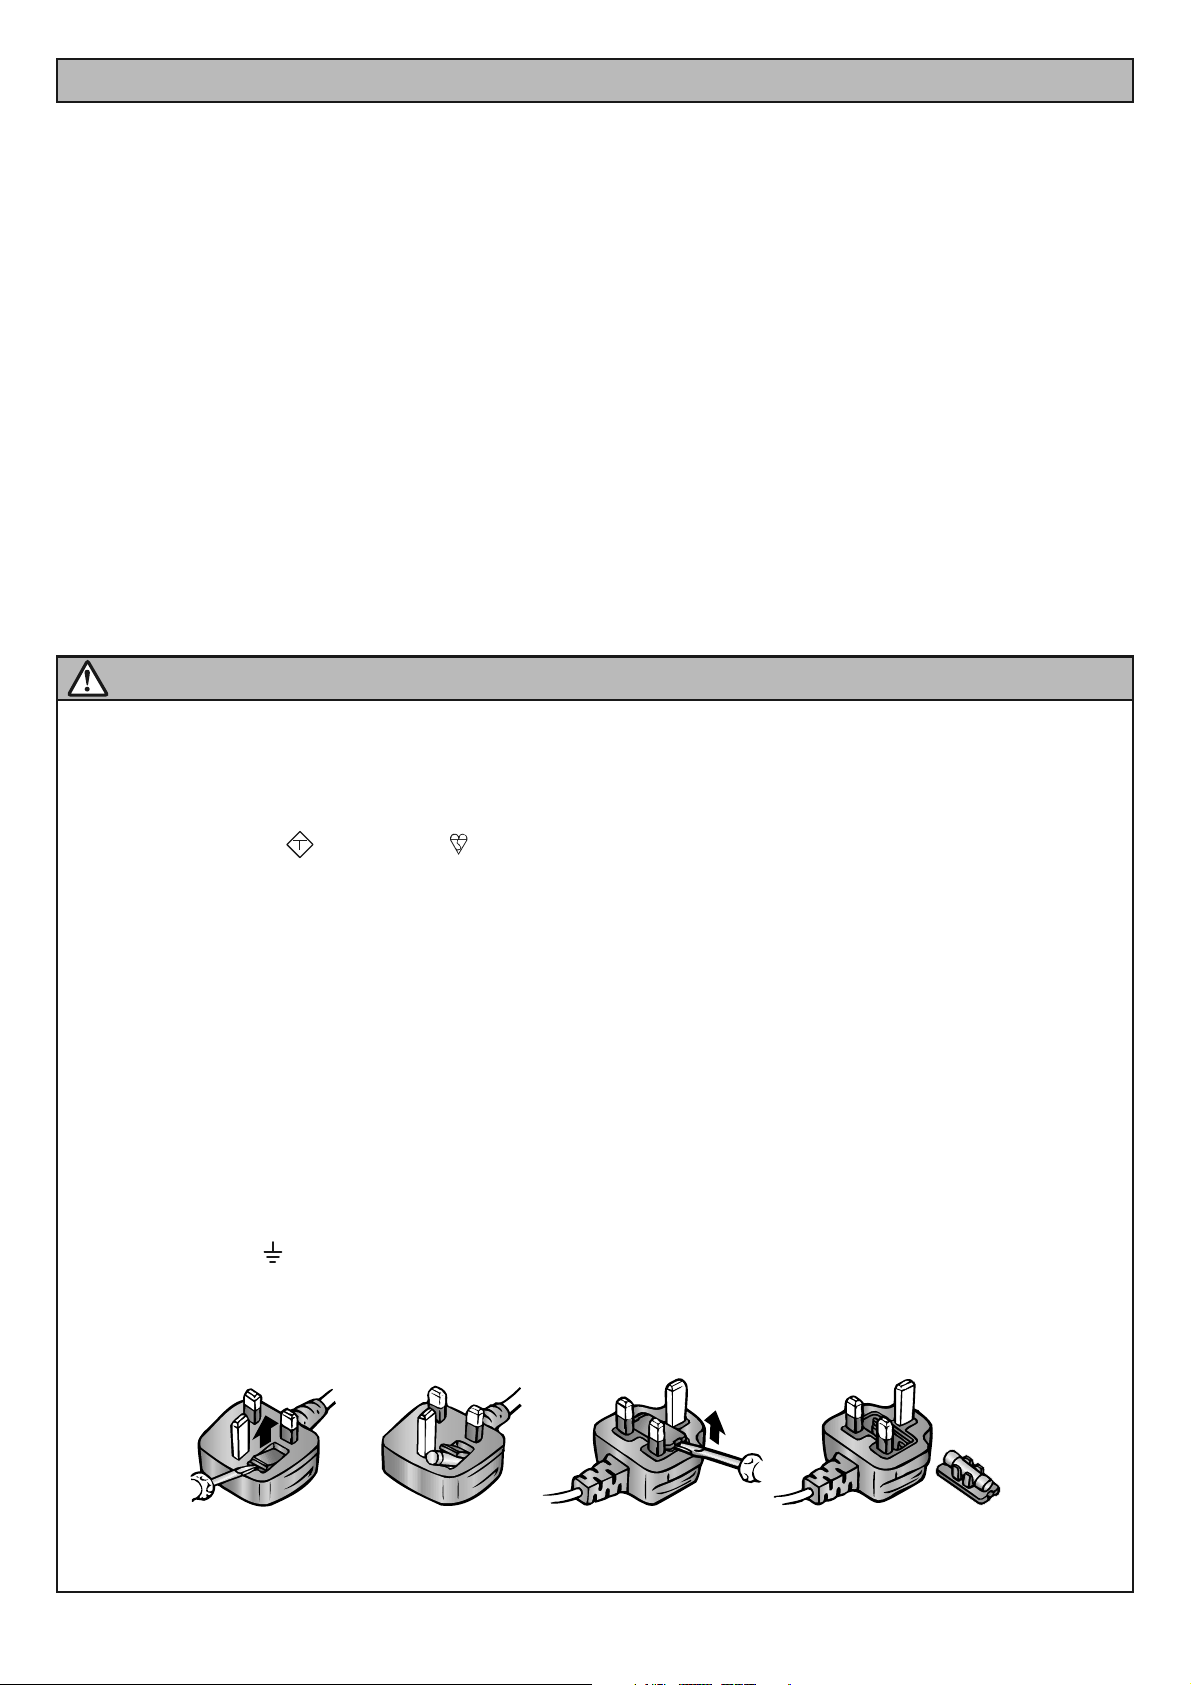
How to replace the Fuse:
• There are two types of the supplied AC Mains Lead : A and B as shown below.
1 Open the fuse compartment with a screwdriver.
2 Replace the fuse and fuse cover if detachable.
ASA
CAUTION FOR AC MAINS LEAD (UK and Ireland only)
TYPE A TYPE B
- 2 -

• Do not leave the vacuum cleaner plugged into mains socket. Unplug from the socket when not in use and before cleaning the appliance
or undertaking maintenance operations.
• This appliance is not intended for use by persons (including children) with reduced physical, sensory or mental capabilities, or lack of
experience and knowledge, unless they have been given supervision or instruction concerning use of the appliance by a person responsible
for their safety.
• Children shall not play with the appliance. Cleaning and user maintenance shall not be made by children without supervisions.
• Do not use if the mains lead or mains plug is damaged. If the mains lead or mains plug is damaged it must be replaced by the manufacturer,
it’s service agent or similarly qualified persons to avoid hazard.
• If the vacuum cleaner is not working as it should be, or has been dropped, damaged, left outdoors, or come into contact with water, consult
an authorised Panasonic Service Centre.
• Do not pull or carry by the mains lead, use the mains lead as a handle, close a door on the mains lead, pull the mains lead around sharp
edges or corners. Do not run over the mains lead with the vacuum cleaner. Keep the mains lead away from heated surfaces.
• Do not handle plug or vacuum cleaner with wet hands.
• Do not put any object into openings. Do not use with any opening blocked; keep free of dust, lint, hair and anything that may block or
reduce air flow.
• Keep hair, loose clothing, fingers, and all parts of body away from openings and moving parts.
• Do not use the vacuum cleaner without filters and /or dust bin in place.
• Do not use wet filters after wash, see C) Primary Filter Cleaning.
• Turn off all controls before unplugging.
• Do not use to pick up flammable or combustible materials, or others that may become so or use in areas where they may be present.
• This appliance should be serviced by an authorised Panasonic Service Centre, and only genuine Panasonic spare parts should be used.
• Use extra care when cleaning on stairs. Keep hold of the handle to prevent the vacuum cleaner from falling.
• To prevent damaging carpeted floors, tiled floors, Linoleum, etc. Do not leave the beater bar rotating in the same place for too long.
• Keep bare feet and hands away from the beater bar. (It may cause injury)
NOTE: This vacuum cleaner is designed for general household use only and is not suitable for use in a garage,
garden or to suck up liquids.
IMPORTANT SAFETY INSTRUCTIONS FOR THE USER
Before using the vacuum cleaner, please read these basic precautions.
WARNING: To reduce the risk of fire, electric shock, or injury.
1. To avoid any possible damage to
the mains lead, never run over the
mains lead or allow it to become
caught in the beater bar when using
the vacuum cleaner.
2. Do not run the vacuum cleaner over
tassels or fringes of rugs or mats as they
could get caught up in the beater bar
and may cause damage to belt.
4. To avoid damaging the vacuum
cleaner, never let the vacuum
cleaner pick up wet matter, mud,
burning ashes or large and sharp
objects.
5. Do not pull on the mains lead when
disconnecting the appliance from the
mains socket, always pull on the plug
body itself.
6. To avoid injury, keep your fingers
and hands away from the beater bar,
and never put them between the body
parts.
CAUTIONS
3. Keep the vacuum cleaner away
from heat sources such as radiators,
fires, direct sunlight, etc.
- 3 -
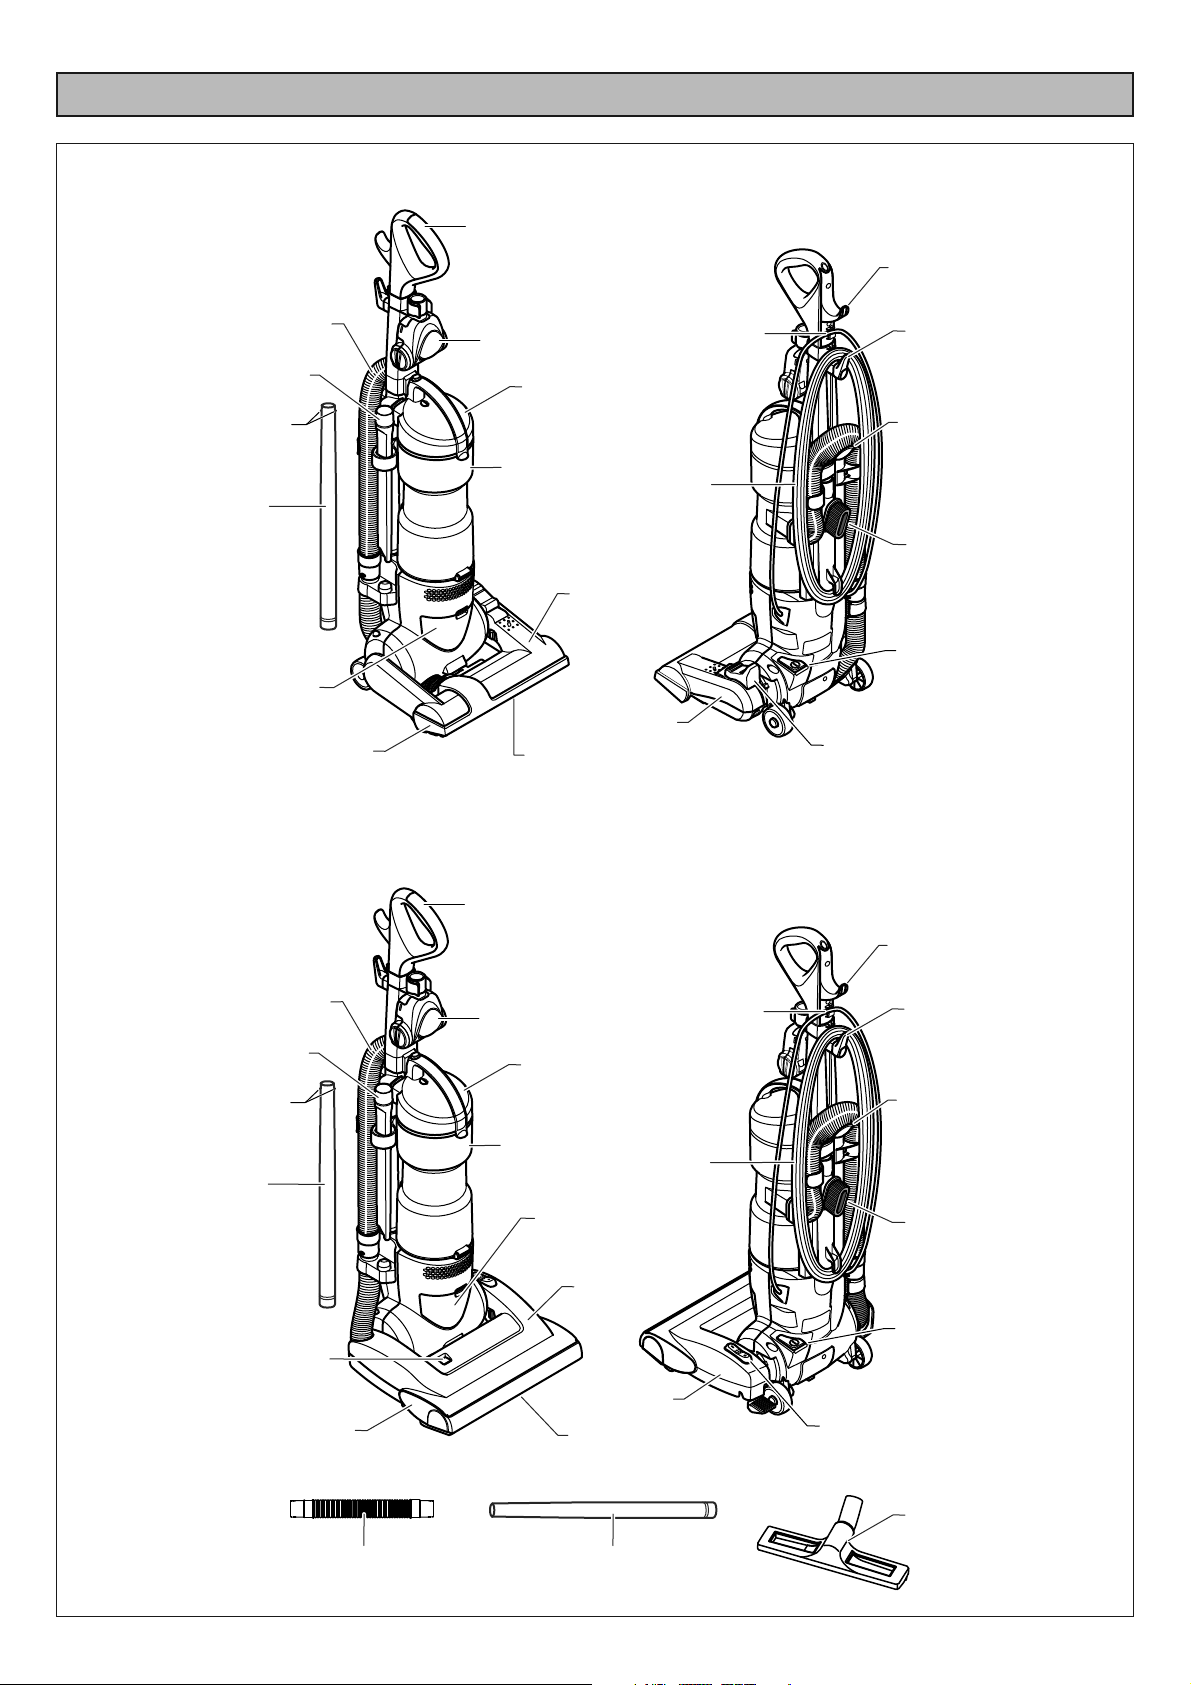
IDENTIFICATION OF MAIN PARTS
MC-UL424
MC-UL426
Belt (inside)
Handle
Dust Bin
Furniture
Guard
Primary Filter
(inside)
Exhaust
Filter
(inside)
Crevice
Tool
QuickDraw
Wand
Hose
Nozzle
Mains
Lead
Dusting
Brush
On/Off
Switch
Carrying
Handle
Hose
Holder
Locking
Notch
Carpet/Bare
Floor Selector
Air Turbine
Mains Lead
Quick Release
Raised
Tabs
Beater Bar
(underneath)
- 4 -
Belt
(inside)
Handle
Dust Bin
Furniture
Guard
Primary Filter
(inside)
Exhaust
Filter
(inside)
Crevice
Tool
Hose
Nozzle
Mains
Lead
Dusting
Brush
On/Off
Switch
Carrying
Handle
Hose
Holder
Carpet/Bare
Floor Selector
Air Turbine
Overload
Protector/
Belt Reset
Bonus
Wand
Floor
Brush
Bonus
Hose
Locking
Notch
Mains Lead
Quick Release
QuickDraw
Wand
Raised
Tabs
Beater Bar
(underneath)
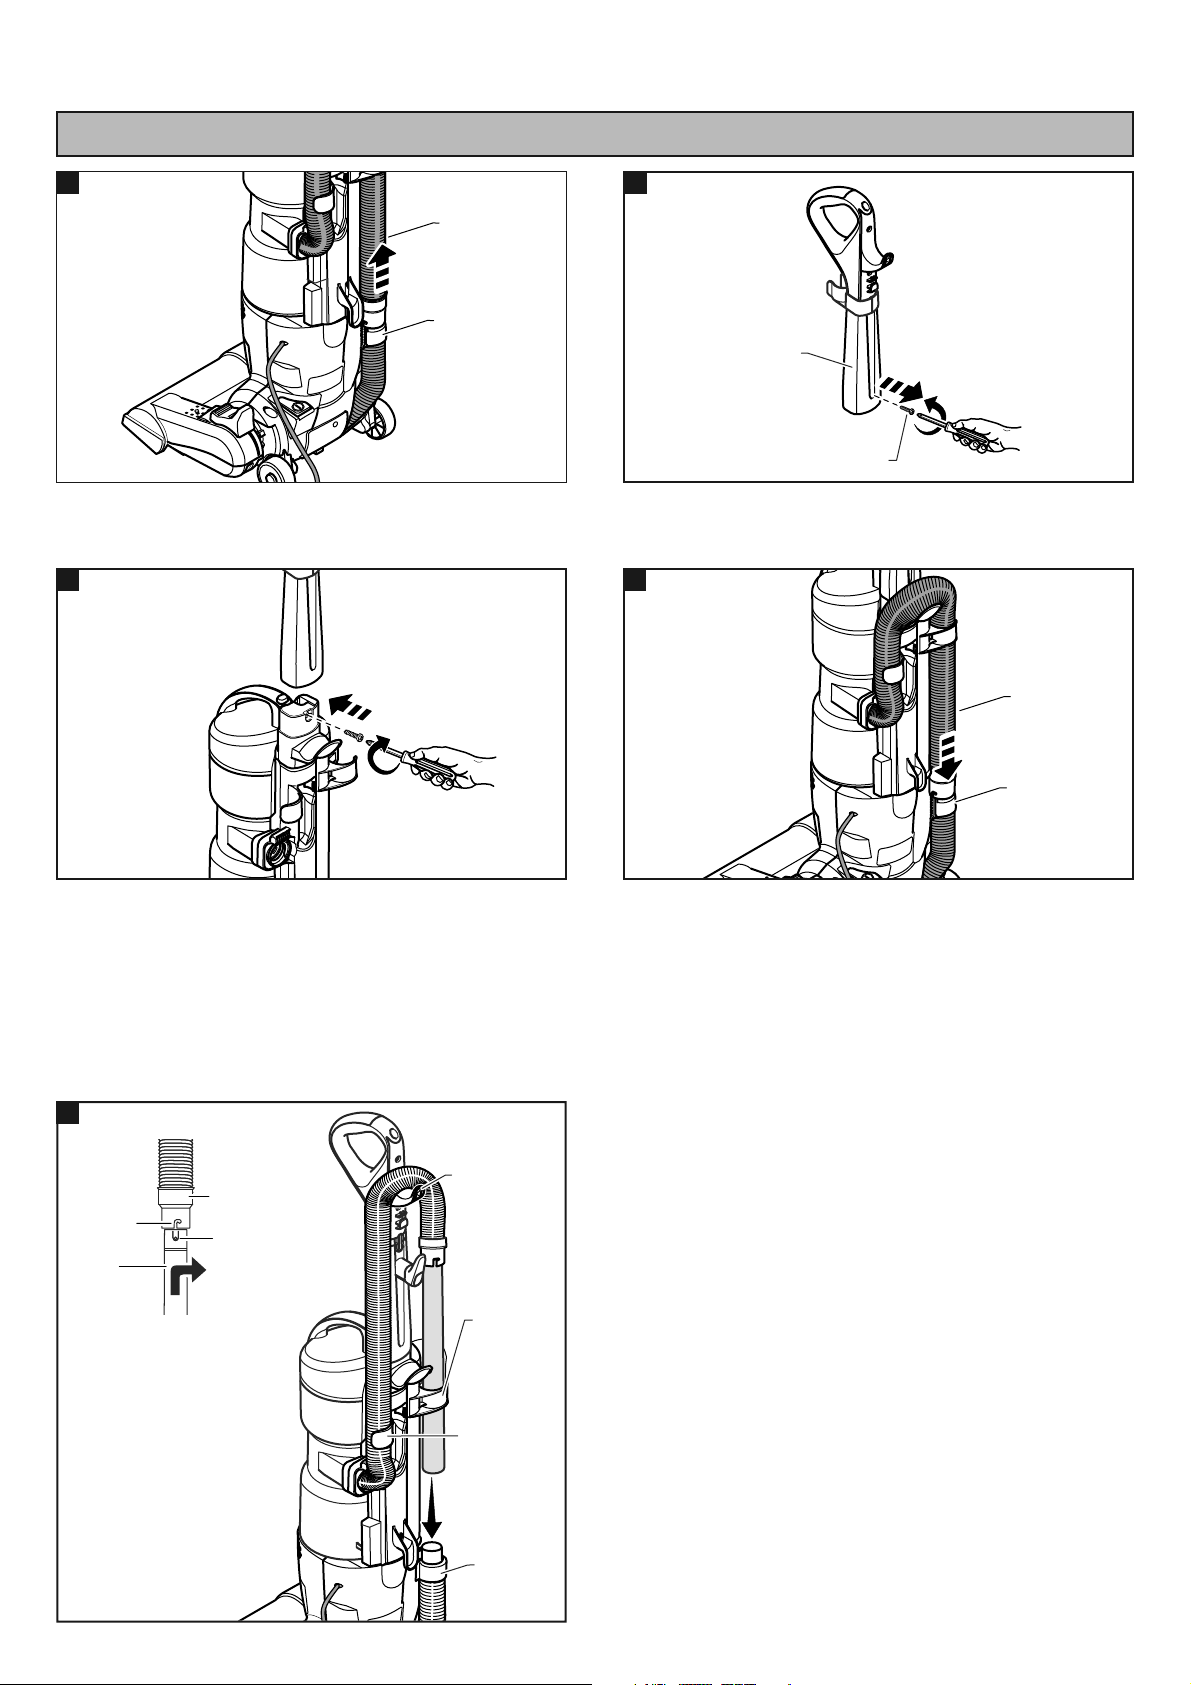
A) HANDLE AND HOSE ASSEMBLY
Handle
Handle Screw
Remove the handle screw from the rear of the handle.
Insert the handle in the handle opening as shown in the
illustration.
Using screwdriver, tighten handle screw.
NOTE: It may be necessary to adjust the handle
slightly to align the screw hole.
13
12
ASSEMBLY INSTRUCTIONS
Hose
Nozzle
Hose
11
Remove the hose from the nozzle hose and carrying
handle.
Alternate assembly:
Reinstall hose onto nozzle hose. Route hose as shown.
Hose
Nozzle
Hose
14
To use the QuickDraw feature, the QuickDraw wand can
be installed and stored on-board the vacuum cleaner.
Insert the tab on the wand into the “J” slot on the hose.
Twist the wand to lock in place.
Place the wand into the wand holder and press firmly
onto nozzle hose.
Route hose in the hose holders as shown.
Nozzle
Hose
Wand
Holder
Hose
Holder
Hose
Holder
15
“J” Slot
QuickDraw
Wand
Hose
Handle
Raised
Tab
- 5 -
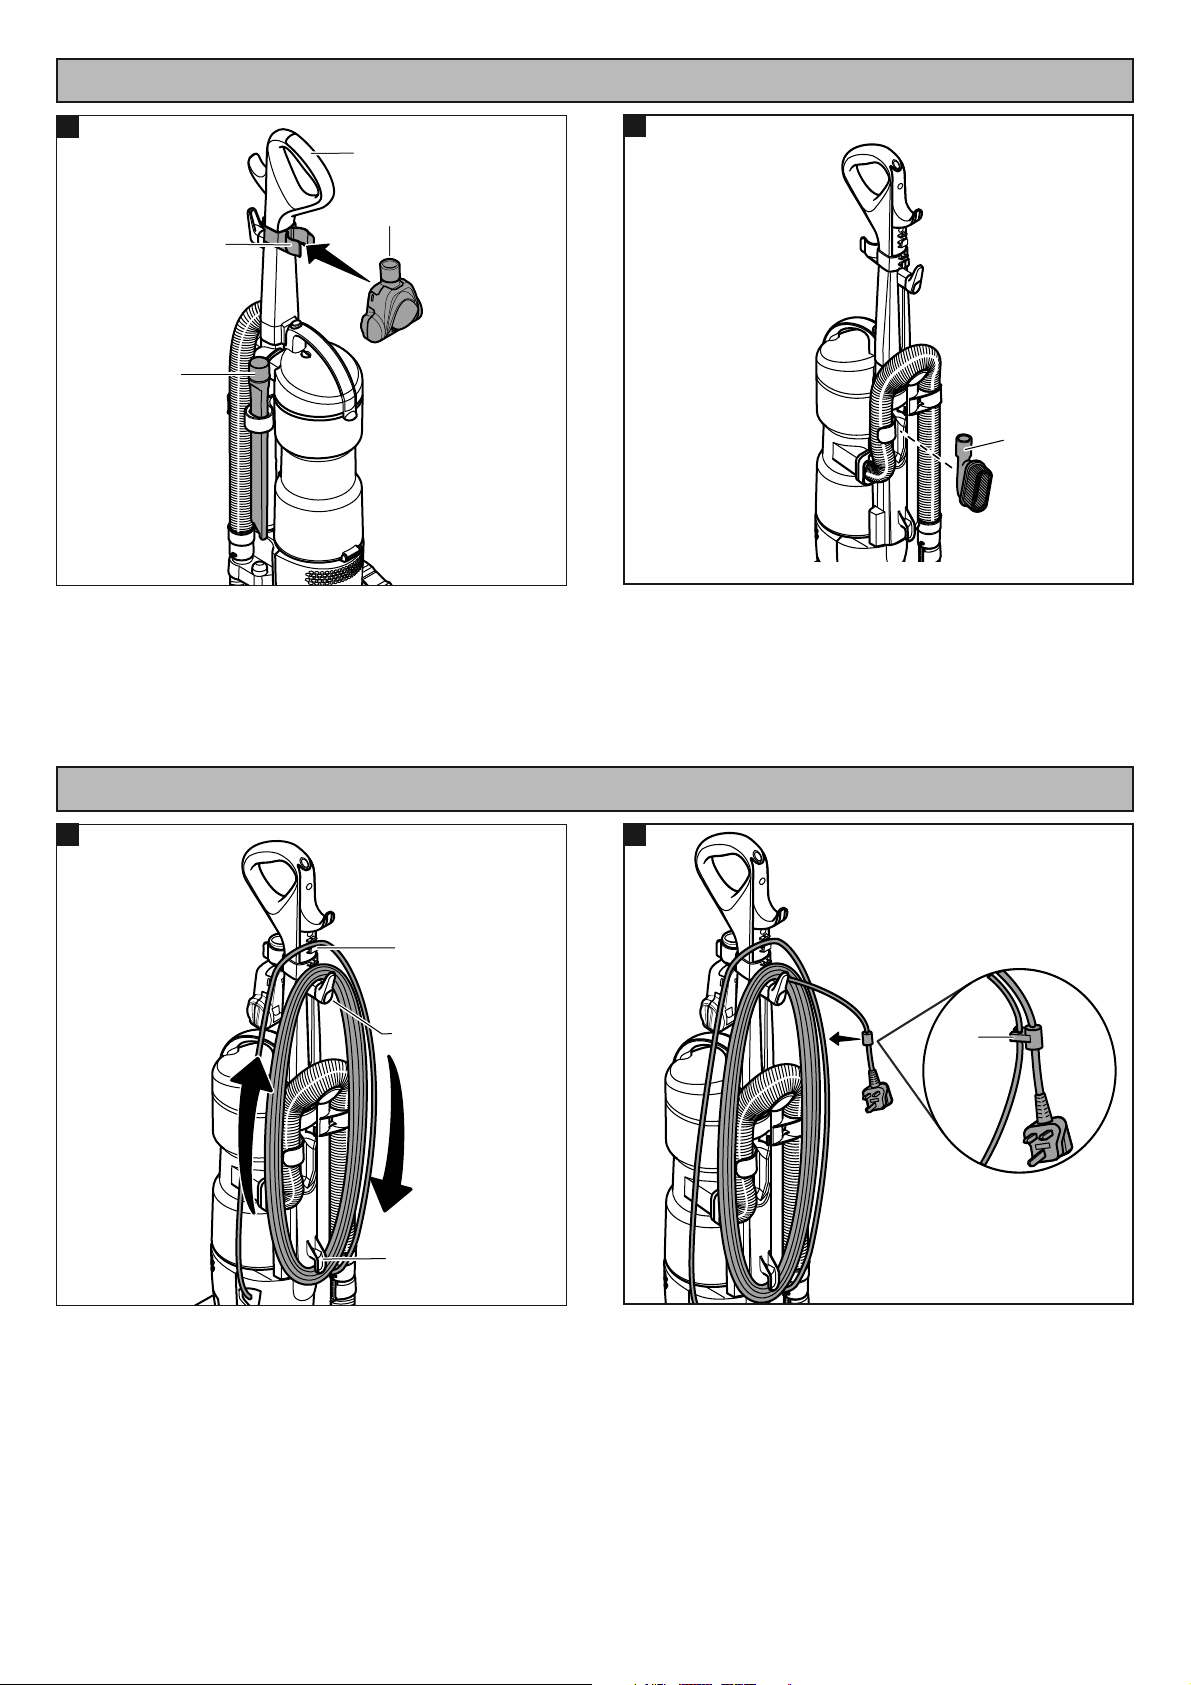
Lower
Cord Hook
Mains Lead
Quick Release
Locking Notch
11
Make sure that the mains lead quick release is rotated in
the upright position as shown.
Insert mains lead into the locking notch on rear of the
handle.
Wrap mains lead loosely around mains lead quick
release and lower cord hook.
Lock the plug onto the mains lead.
C) MAINS LEAD STORAGE
Cord
Lock
12
Clip
Handle
Air Turbine
Crevice
Tool
Insert crevice tool into the storage location as shown.
Place the air turbine into the clip located on the handle.
Insert the dusting brush into the back of the vacuum
cleaner.
B) TOOL STORAGE
Dusting
Brush
12
11
- 6 -
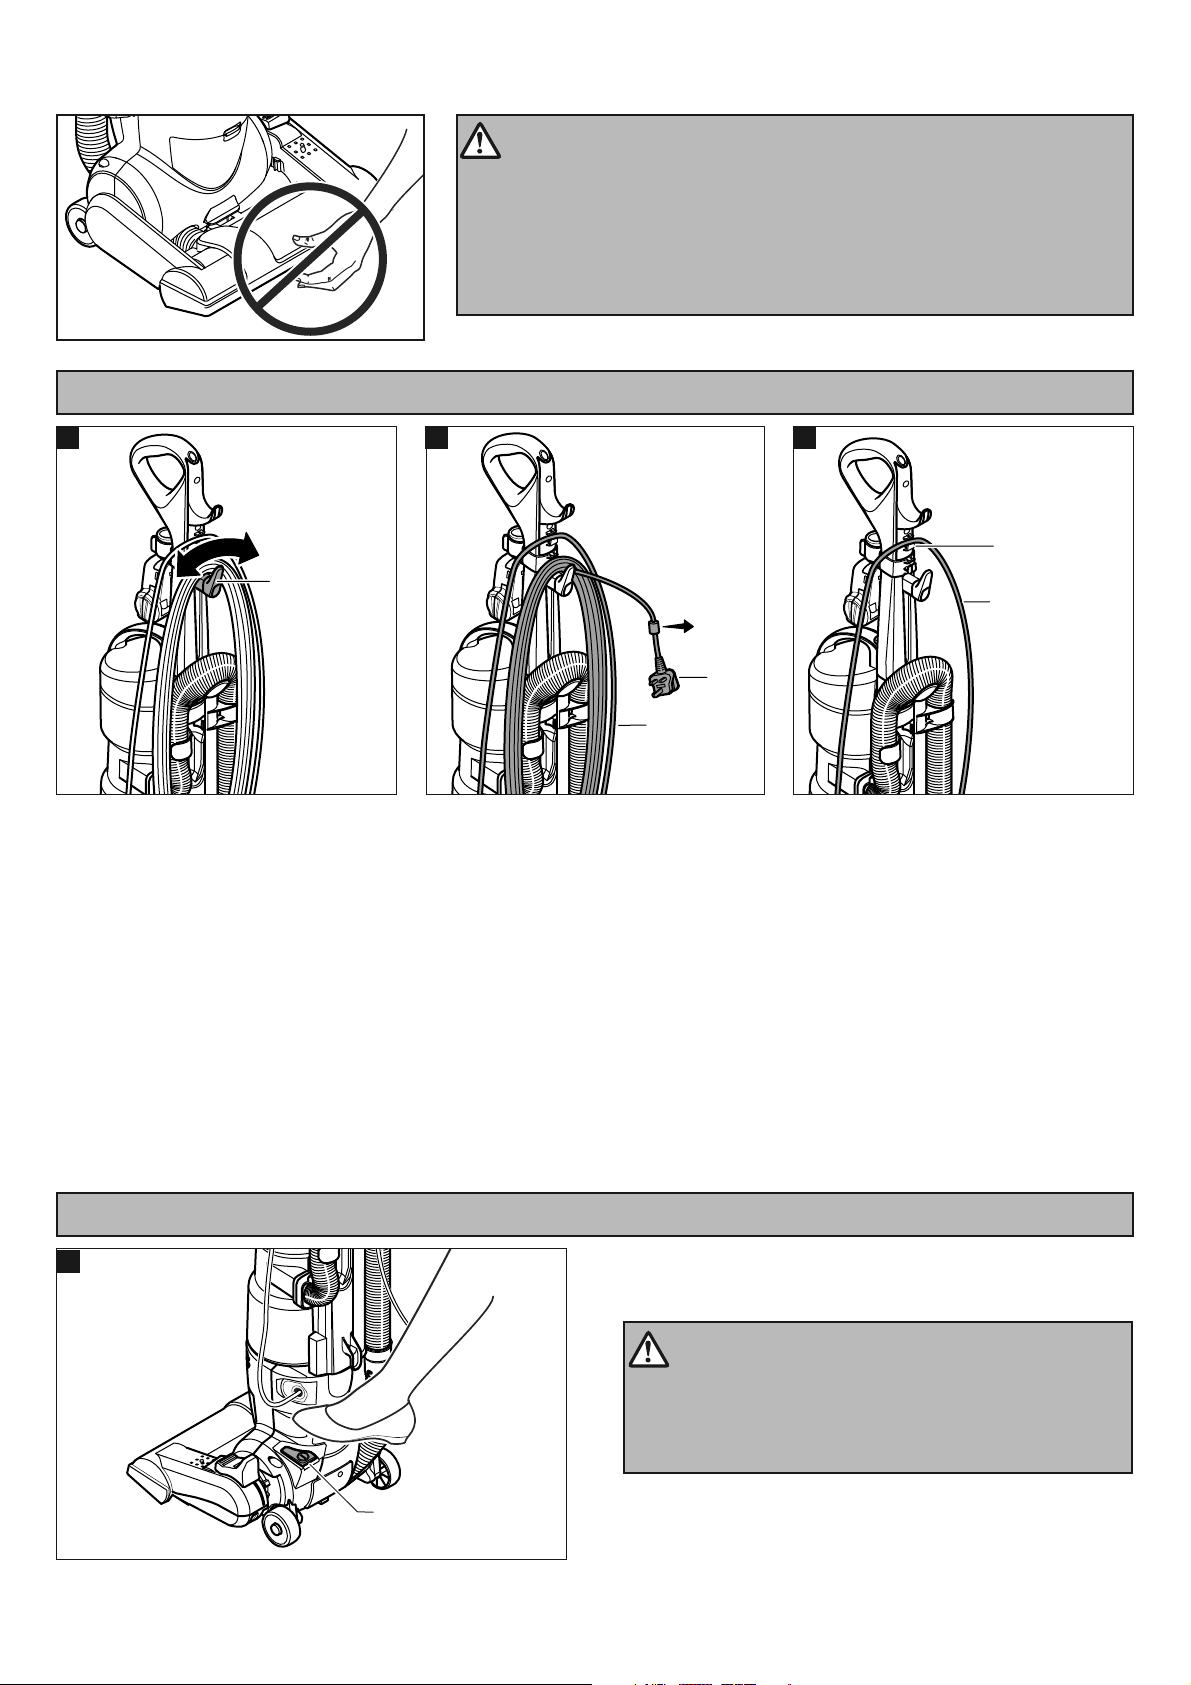
A) MAINS LEAD
Mains Lead
Quick Release
11
Mains Lead
Locking Notch
13
Turn the mains lead quick release to
either side and down to release the
mains lead.
Detach the plug from the mains lead
and pull the mains lead off the mains
lead quick release.
Be sure the mains lead is locked
under the locking notch on the rear of
the handle.
Plug the mains lead into a 230-240
volt mains socket located near the
floor.
Note: To store mains lead, turn the
mains lead quick release to the
upright position, then wrap mains
lead loosely around mains lead
quick release and lower hook.
Refer to MAINS LEAD STORAGE,
page 6.
HOW TO OPERATE YOUR VACUUM CLEANER
B) ON/OFF SWITCH
To turn vacuum cleaner on or off, press on the on/off
switch.
On/Off
Switch
11
CAUTION
To prevent damaging carpeted floors, tiled floors,
linoleum, etc. Do not leave the beater bar rotating in
the same place for too long.
CAUTION
Moving parts! To reduce the risk of personal injury, DO NOT touch
the beater bar when vacuum cleaner is on. Contacting the beater bar
while it is rotating can cut, bruise, or cause other injuries. Always
unplug from electrical socket before servicing.
Use caution when operating near children.
Plug
Mains Lead
13
- 7 -
- 8 -
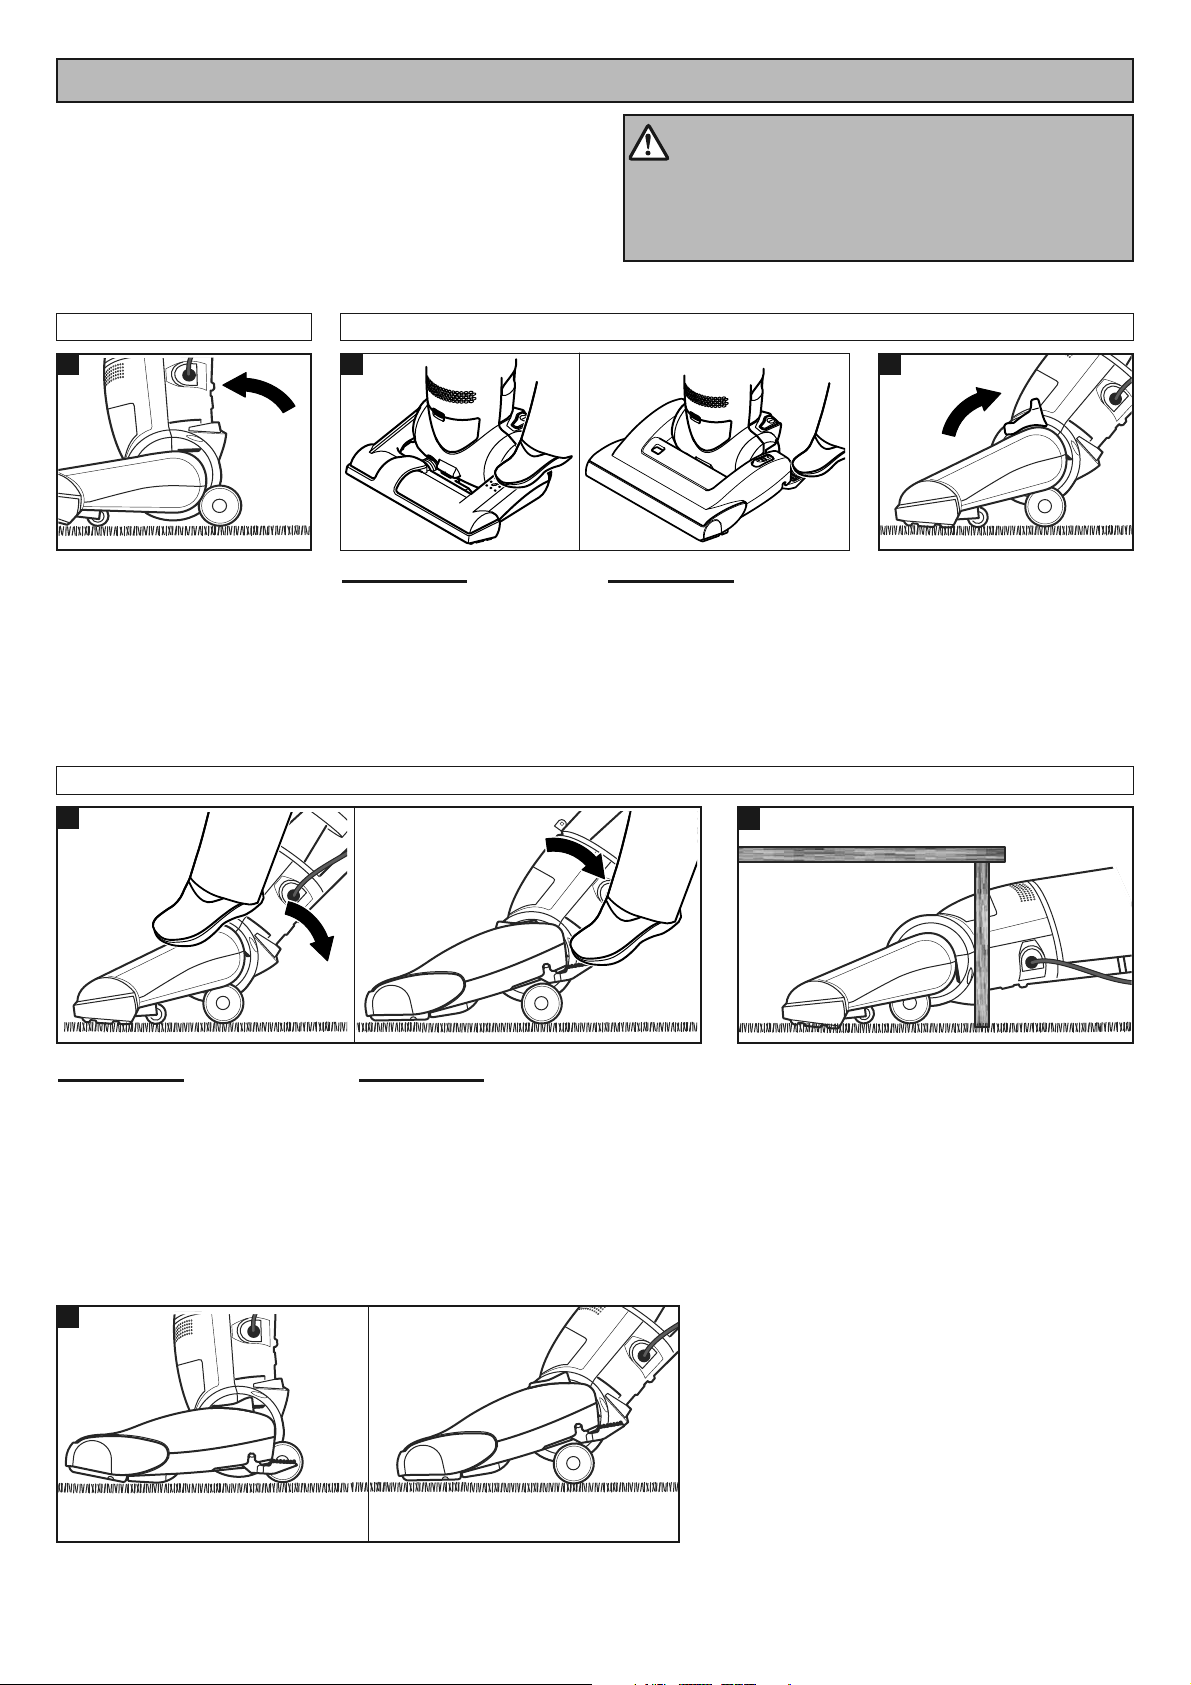
C) HANDLE RELEASE
MC-UL424:
Release the handle by
placing foot on the nozzle
and pulling back and down
on the handle with your
hand.
MC-UL426:
Release the handle by
pressing down on the body
release pedal with your foot
and pulling back and down
on the handle with your
hand.
Your vacuum cleaner is equipped with three (3) position
handle release;
• Upright position (locked)
• Middle position (normal use)
• Low position (under furniture)
CAUTION
To prevent damaging carpeted floors, tiled floors,
linoleum, etc. Do not leave the beater bar rotating in
the same place for too long.
NOTE: After use, unplug the mains lead from the socket and
store the vacuum cleaner in the upright (vertical) position.
Move vacuum cleaner to
middle position for normal
use.
Move vacuum cleaner to low position for
cleaning under furniture.
Move vacuum cleaner to
upright position for storage
and tool use.
UPRIGHT POSITION
11
13
MC-UL426 ONLY:
12
MIDDLE POSITION (NORMAL USE)
MC-UL424:
Release the handle by
placing foot on the nozzle
and pulling back and down
on the handle with your
hand.
MC-UL426:
Release the handle by pressing down
on the body release pedal with your foot
and pulling back and down on the
handle with your hand.
15
LOW POSITION (UNDER FURNITURE USE)
14
This model is fitted with an auto beater bar stop.
While operating the vacuum cleaner in the
CARPET position, the beater bar will
automatically stop rotating when vacuum cleaner
is in the upright (locked) position for storage or
tool use.
16
Beater Bar: AUTO OFF Beater Bar: AUTO ON

- 9 -
MC-UL424:
Use the vaccum with selector in CARPET position when
cleaning carpets.
Use the vaccum with selector in CARPET position when
cleaning carpets.
CAUTION
Incorrect setting may cause floor or carpet damage.
D) CARPET/BARE FLOOR SELECTOR
Carpet/Bare
Floor
Selector
Carpet/Bare
Floor
Selector
MC-UL424 MC-UL426
11
13
13
Selector should be placed in BARE FLOOR (TOOLS)
position when using vacuum cleaner on bare floors and
when using tools. The agitator does not rotate in the
BARE FLOOR (TOOLS) position.
Selector should be placed in CARPET position when
using vacuum cleaner on carpeted floors.
12
Use foot to move pedal to CARPET or BARE FLOOR
(TOOLS) position.
Use the vaccum with selector in BARE FLOOR position
to clean on bare floors and when using attachments.
14
14
MC-UL426:
For best performace it is recommended to use the bonus
brush WHEN CLEANING BARE FLOORS.
Place vacuum cleaner in upright position.
Connect wand and bonus wand to hose (See HANDLE
AND HOSE ASSEMBLY, page 5).
Attach floor brush (See HOW TO USE THE
ACCESSORIES, page 10-11).
For additional reach the bonus hose may be added.
MC-UL424 MC-UL426
 Loading...