

Page 1
®
WARNING
READ and UNDERSTAND the Owner’s Manual completely before using this sprayer.
Assemble, test, and use only in accordance with the Owner’s Manual instructions.
READ and FOLLOW chemical label instructions. Pesticides are hazardous chemicals.
KNOW emergency procedures BEFORE handling chemicals. Sprayer leaks, bodily
chemical contact, poisoning, and spills require immediate response.
AVOID inhaling, ingesting, or coming into contact with any chemicals.
WEAR personal protective gear when filling, using, cleaning, and servicing the
sprayer.
KEEP sprayer and spray materials away from children and pets. Pesticides are
especially toxic to them.
EXERCISE CAUTION in vehicle handling when towing filled sprayer to avoid loss of
control or sprayer overturning.
DO NOT TURN ON POWER to sprayer until ready to spray in order to avoid
unintentional spray release.
Improper use of the sprayer or handling of chemicals could result in serious injury
or illness to the operator or nearby persons/animals, or could cause damage to the
environment.
ITEM NUMBER: 282737
SERIAL NUMBER: _____________
M282737K
Owner’s Manual
Instructions for Assembly, Testing, Operation, Servicing, and Storage
Tow Behind Sprayer: For outdoor use with agricultural
pesticides and other liquids**
** This sprayer is recommended for use in spraying non-flammable liquids such as pesticides, water for plants/trees
or dust control, ice control chemicals, or water-based non-flammable sealants or stains for outdoor wood surfaces.
However, WE RECOMMEND THAT THE SPRAYER NOT BE USED FOR OTHER PURPOSES ONCE IT HAS
BEEN USED FOR SPRAYING PESTICIDES. Any chemical will leave some residual in the tank liner or sprayer
components, even after the sprayer has been properly cleaned. These residual chemicals can have unexpected
effects on future uses. For example, spraying water or other liquids that are contaminated with residual pesticide
may result in unforeseen hazards to plant or animal life.
Any Questions, Comments, Problems, or Parts Orders
Call NorthStar Product Support 1-800-270-0810
Page 2
Hazard Signal Word Definitions
2
Page 3

Table of Contents
Intended Use ............................................................................................................................................................... 4
Summary of Important Safety Information .............................................................................................................. 5
During Assembly
During Use
General Chemical Safety
Chemical Application Safety
Towing Safety
Chemical Accident Procedures
Warning Label Locations............................................................................................................................................ 7
Component Inventory
Unpacking ................................................................................................................................................................ 8
Unpacking the Manual Bag ..................................................................................................................................... 9
Assembly
Step One: Attach the tongue to the cart base ......................................................................................................... 10
Step Two: Attach the hitch mount to the tongue .................................................................................................... 10
Step Three: Attach the cart base to the sprayer ...................................................................................................... 10
Step Four: Attach wheels to cart base .................................................................................................................... 11
Step Five: Attach pressure gauge ........................................................................................................................... 11
Step Six: Attach gun hose to spray gun and pump ................................................................................................. 11
Step Seven: Attach gun clips to tank ..................................................................................................................... 12
Step Eight: Attach drain cap to tank ...................................................................................................................... 12
Step Nine: Attach hose guide to tank ..................................................................................................................... 12
Step Ten: Attach sprayer to vehicle ....................................................................................................................... 13
Step Eleven: Connect power cords to vehicle battery ............................................................................................ 13
Step Twelve: Check and test completed assembly ................................................................................................. 16
Machine Components ................................................................................................................................................ 17
Operation
Important Safety Information - Operation ........................................................................................................ 18
General Chemical Safety
Chemical Application Safety
Towing Safety
Chemical Accident Procedures
Preparing the Sprayer for Each Use .................................................................................................................. 22
Using the Sprayer
Step One: Assess wind conditions and clear work area ................................................................................... 23
Step Two: Fill the sprayer ................................................................................................................................ 24
Step Three: Operate the sprayer ....................................................................................................................... 26
Step Four: Clean sprayer and decontaminate after use ..................................................................................... 29
Storage ........................................................................................................................................................................ 30
Preparing for storage
Removing from storage
Troubleshooting ......................................................................................................................................................... 31
Specifications .............................................................................................................................................................. 32
Parts Breakdown – Exploded View .......................................................................................................................... 33
Limited Warranty...................................................................................................................................................... 35
3
Page 4

Intended Use
The sprayer is intended for use in spraying agricultural pesticides and other nonflammable liquids.
SPRAYING PESTICIDES:
Pesticides are hazardous chemicals that must be handled with caution as directed
throughout this manual and on the pesticide label. Pesticides are regulated by the United
States Environmental Protection Agency (EPA) and defined as:
Any substance or mixture of substances intended for preventing, destroying, repelling, or mitigating any
pest. Though often misunderstood to refer only to insecticides, the term pesticide is a comprehensive
term that applies to insecticides, herbicides, fungicides, and various other substances used to control
pests.
The sprayer is intended for use in spraying pesticides in liquid form only. The sprayer is
NOT intended for use in spraying pesticides in dry or aerosolized form, or for use with
fumigants.
Some formulations of liquid pesticides do not remain in solution and should be agitated
to maintain a uniform mix. This sprayer is equipped with an agitator that should be used
when spraying pesticides classified as “flowable” (“F” or “L”), “wettable powder” (“WP”
or “W”), “emulsion” (“EC” or “E”), “microencapsulated” (“M”), or water dispersible
granules (“WDG” or “DF”). (See pesticide label to determine its classification.)
This sprayer comes equipped with a spot spray gun for applying pesticides on selected
plants. If you wish to spray large ground areas, a broadcast boom (Item #273011) is
available as an optional accessory.
SPRAYING OTHER LIQUIDS:
In addition to spraying pesticides, this sprayer may be used to spray other non-flammable
liquids. Example uses include: watering plants/trees or spraying water for dust control,
applying ice control chemicals, or applying water-based, non-flammable sealant or stain
to outdoor wood surfaces.
However, WE RECOMMEND THAT THE SPRAYER NOT BE USED FOR
OTHER PURPOSES ONCE IT HAS ALREADY BEEN USED FOR SPRAYING
PESTICIDES. Any chemical will leave some residual in the tank liner or sprayer
components, even after the sprayer has been properly cleaned. These residual chemicals
can have unexpected effects on future uses. For example, spraying water or other liquids
that are contaminated with residual pesticide may result in unforeseen hazards to plant or
animal life.
Contact NorthStar Product Support at 1-800-270-0810 for any questions
about the appropriate use of the sprayer and/or optional accessories.
4
Page 5

Summary of Important Safety Information
WARNING
Read and understand this owner’s manual completely before using the sprayer. Read
each chemical label’s instructions before handling the chemical.
Improper use of the sprayer or handling of chemicals could result in serious injury or
illness for the operator or nearby persons/animals, or cause damage to the environment.
LISTED BELOW is a summary of safety information of particular importance. See individual
sections of this owner’s manual for more details.
-------------------------------------- DURING ASSEMBLY --------------------------------------
EXERCISE CAUTION when attaching remote switch to battery terminals. Follow the steps listed in the
Assembly section of this manual in exact sequence when connecting the sprayer’s remote switch battery clamps to
the battery terminals. Caution must be exercised to avoid contact with battery acid and to prevent sparking.
CHECK and TEST completed assembly as directed in this manual. Serious injury could result from chemical
leaks if sprayer is improperly assembled.
DO NOT MODIFY sprayer design.
------------------------------------- DURING OPERATION -------------------------------------
General Chemical Safety
READ and FOLLOW each chemical label’s instructions and warnings.
AVOID inhaling, ingesting, or coming into contact with any chemicals.
KNOW applicable licensing and regulatory requirements for the chemical you plan to use.
KNOW emergency procedures before handling chemicals. Carefully review “Chemical Accident Procedures”
listed below and later in this manual. Also see First Aid instructions on the chemical label.
WEAR protective clothing, eye protection, and chemical resistant gloves when filling, using and cleaning the
sprayer. Wear additional protective gear, such as facemask or apron, as recommended on the chemical label.
EXERCISE EXTRA CAUTION around children and pets. Pesticides are especially toxic to them. Keep
sprayer and spray materials away from them at all times.
DO NOT MIX OR POUR chemicals in an enclosed, unventilated area
DO NOT USE flammable or corrosive chemicals in the sprayer.
FLUSH the sprayer before switching chemicals in order to prevent dangerous chemical interactions.
STORE pesticides in a correctly labeled container and in a secure location.
MONITOR the health of operators frequently exposed to pesticides, as recommended by the chemical label or
local/federal regulations.
Chemical Application Safety
Before Spraying
INSPECT and PREPARE sprayer before each use as directed in this manual.
DO NOT TURN ON POWER to sprayer until ready to spray in order to avoid unintentional spray release.
WEAR ADDITIONAL PERSONAL PROTECTIVE EQUIPMENT if you will be spraying overhead or
fogging. You will be exposed to much more chemical fallout in these applications. Wear chemical resistant head
and neck protection, full face mask or half face mask with sealed goggles, and consider using a respirator.
DO NOT SPRAY when wind speed exceeds 4 MPH in order to minimize spray drift.
CLEAR work area of people/ pets and POST warning notices to restrict access for the period recommended on
chemical label.
KEEP sprayer and spray away from children/pets. Pesticides can be especially toxic to children and animals.
DO NOT ALLOW anyone younger than 16 to operate sprayer since pesticides are especially toxic to children.
During Spraying
DO NOT OVERAPPLY pesticide. Apply at rate recommended by chemical manufacturer. Excess pesticide can
be dangerous to humans/animals, damage desirable plants, and contaminate soil and water sources.
DO NOT EAT, DRINK, SMOKE, RUB YOUR EYES, or TOUCH YOUR BARE SKIN while handling
chemicals and spraying.
NEVER POINT THE SPRAY GUN at people or animals.
ALWAYS HOLD THE SPRAY GUN FIRMLY when spraying at higher pressures to prevent gun from
whipping. Keep good footing and balance at all times.
EXERCISE EXTRA CAUTION when spraying near areas accessible to children and pets.
CLEAN up spills immediately per instructions on the chemical label.
5
Page 6

Summary of Important Safety Information (continued)
Sprayer leak
If the sprayer develops a leak, immediately stop spraying. Turn off power to the
sprayer and follow directions below, as applicable.
Bodily chemical
contact
Personal contamination can occur when chemicals splash, spill, or spray
directly onto a person.
1. Immediately follow First Aid instructions on chemical label.
General procedures can include:
a) Eyes – immediately flush with water.
b) Skin – wash all contaminated skin surfaces with soap and water.
c) Clothing – remove contaminated clothing. Dispose of heavily
contaminated clothing per chemical label instructions.
2. Seek medical advice if instructed on the label or the victim experiences
symptoms of harmful effects. Bring the chemical label for reference.
Poisoning by
ingestion or
inhalation
In case of poisoning from ingestion or inhalation:
If the victim has collapsed or is not breathing, call 911. Otherwise:
1. If you are the victim, immediately seek assistance from nearby personnel
because you may become incapacitated.
2. Immediately follow first aid instructions on chemical label.
3. Call a poison control center for further advice. In the U.S., call 1-800-222-1222.
Have the chemical label available for reference.
Chemical spills
Chemical spills must be quickly contained and properly cleaned up.
Refer to the chemical label for any specific clean-up instructions.
General procedures include:
1. Controlling the spill by stopping the source of the spill.
2. Containing the spill so that it does not spread and get into water sources.
3. Cleaning up the spill immediately.
4. Seeking additional advice from:
- Chemical manufacturer. See chemical label for contact information.
- State pesticide regulatory agency. In the U.S., call the National Pesticide Info.
Ctr. at 800-858-7378 for assistance in contacting your state’s agency.
TURN OFF vehicle and set brake or block wheels, TURN OFF power to sprayer, and RELIEVE system
pressure before leaving sprayer unattended.
SEE Troubleshooting section of this manual before attempting any repairs. Wear personal protective
equipment and follow safety instructions.
After Spraying
CLEAN sprayer immediately after use according to the directions provided in this manual.
DECONTAMINATE yourself after you are done spraying and have cleaned the sprayer. Wash all exposed areas
of the body with soap and water, and remove and launder clothing.
DISPOSE OF or STORE remaining chemicals in secure storage with correctly marked container.
READ towing safety instructions in your towing vehicle manual.
DO NOT ALLOW drivers younger than 16 to operate the towing vehicle with the filled sprayer attached.
MAKE SURE SPRAYER IS SECURELY ATTACHED to vehicle.
EXERCISE CAUTION in vehicle handling when towing filled sprayer to avoid loss of control or overturning.
o Keep speed to a minimum so you can maintain control. Reduce speed prior to turns.
o Allow for wider turns and for more distance to stop.
o Avoid any sudden steering maneuvers, starts, or stops that could create sway.
SLOW DOWN and EXERCISE EXTRA CAUTION on sloped or uneven terrain. Pick the most level route
possible. Drive up and down slopes when necessary, rather than across. Use a vehicle equipped with a roll over
protection system (ROPS) if you will be working on non-level terrain.
BE AWARE of the added length of the sprayer, visibility may be reduced when making turns or backing up.
DO NOT RIDE or TRANSPORT cargo on the sprayer.
COMPLY WITH all local, state, and federal towing requirements if you will be towing on public roads.
TURN OFF both sprayer and vehicle, and SET BRAKES or BLOCK WHEELS before leaving unattended.
Immediate response is necessary in the event of sprayer leaks, bodily chemical contact, poisoning, or spills.
Chemical accident procedures
Towing Safety
6
Page 7
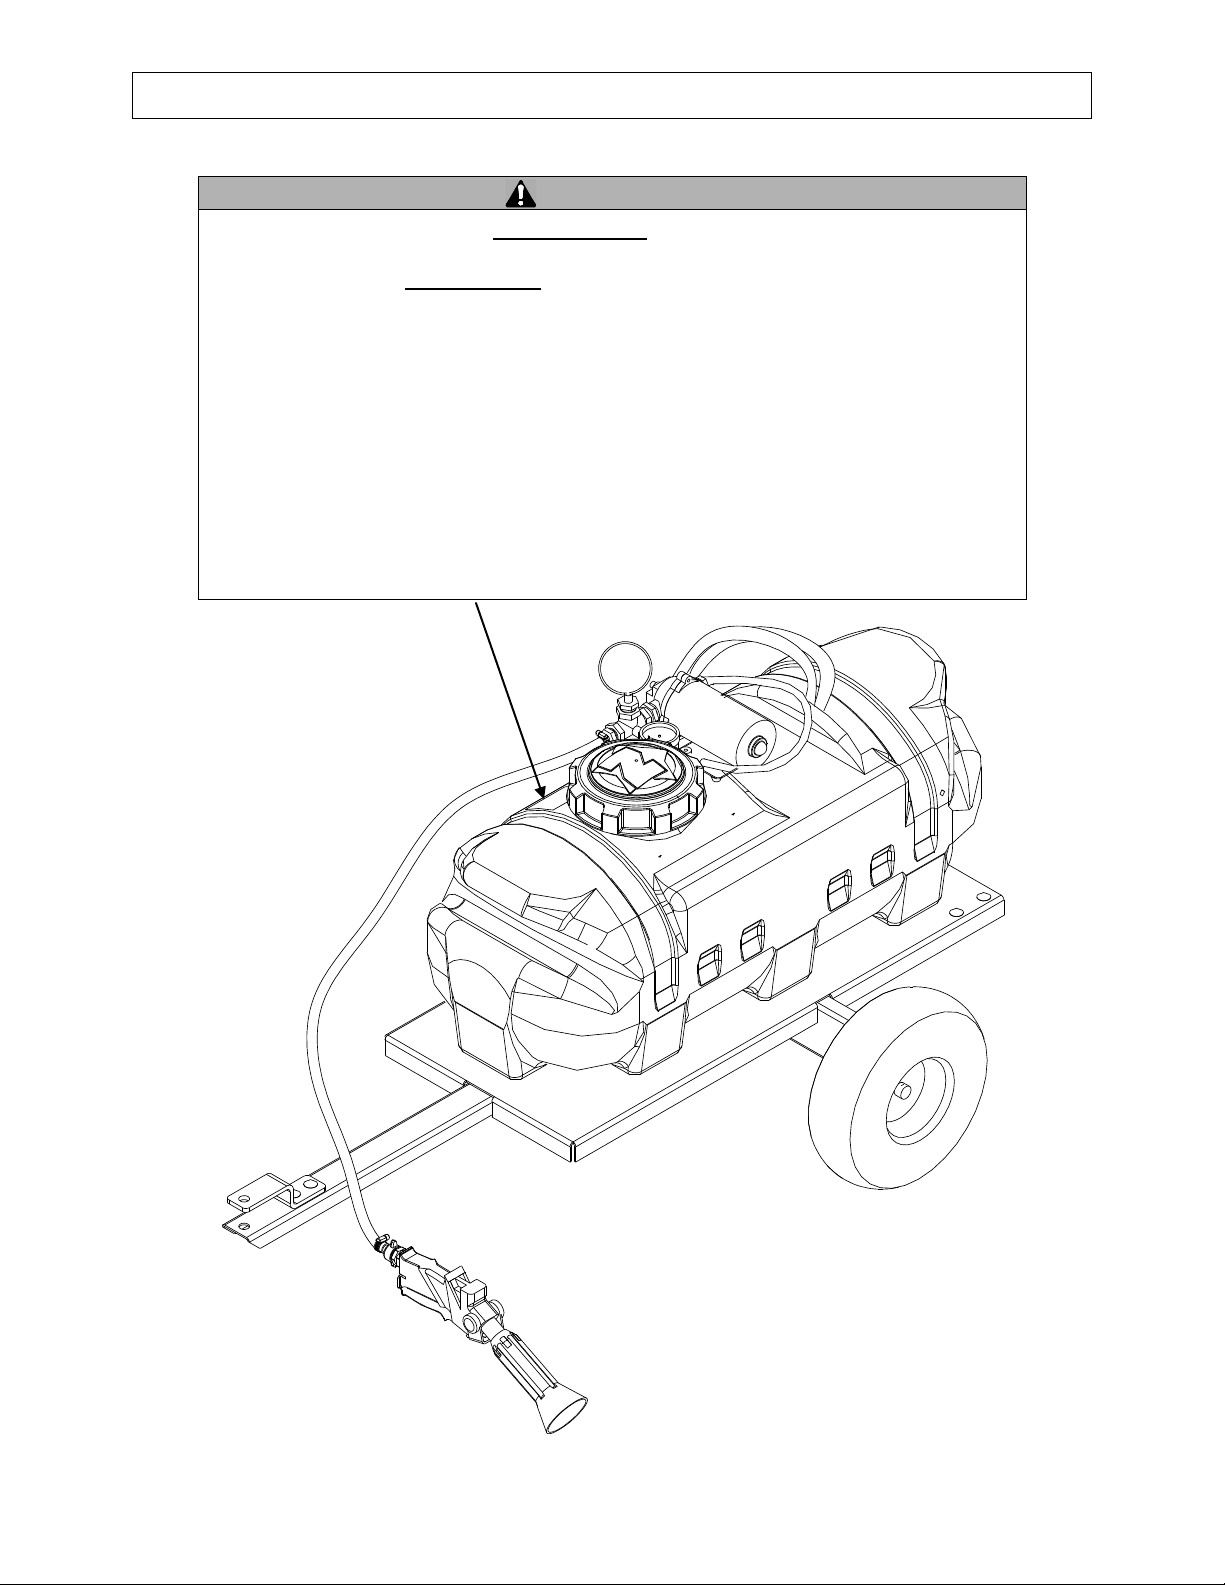
Warning Label Location
Call 1-800-270-0810 to order new label.
Order Part No. 777499 for Chemical
label.
WARNING
READ and UNDERSTAND the Owner’s Manual completely before using this sprayer.
Assemble, test, and use only in accordance with the Owner’s Manual instructions.
READ and FOLLOW chemical label instructions. Pesticides are hazardous chemicals
which must be handled carefully.
KNOW emergency procedures BEFORE handling chemicals. Sprayer leaks, bodily
chemical contact, poisoning, and spills require immediate response.
AVOID inhaling, ingesting, or coming into contact with any chemicals.
EXERCISE CAUTION in vehicle handling. Vehicle will be less stable and handle very
differently with filled sprayer attached.
DO NOT TURN ON POWER to sprayer until ready to spray in order to avoid
unintentional spray release.
Improper use of the sprayer or handling of chemicals could result in serious injury
or illness to the operator or nearby persons/animals, or could cause damage to the
environment.
7
Page 8
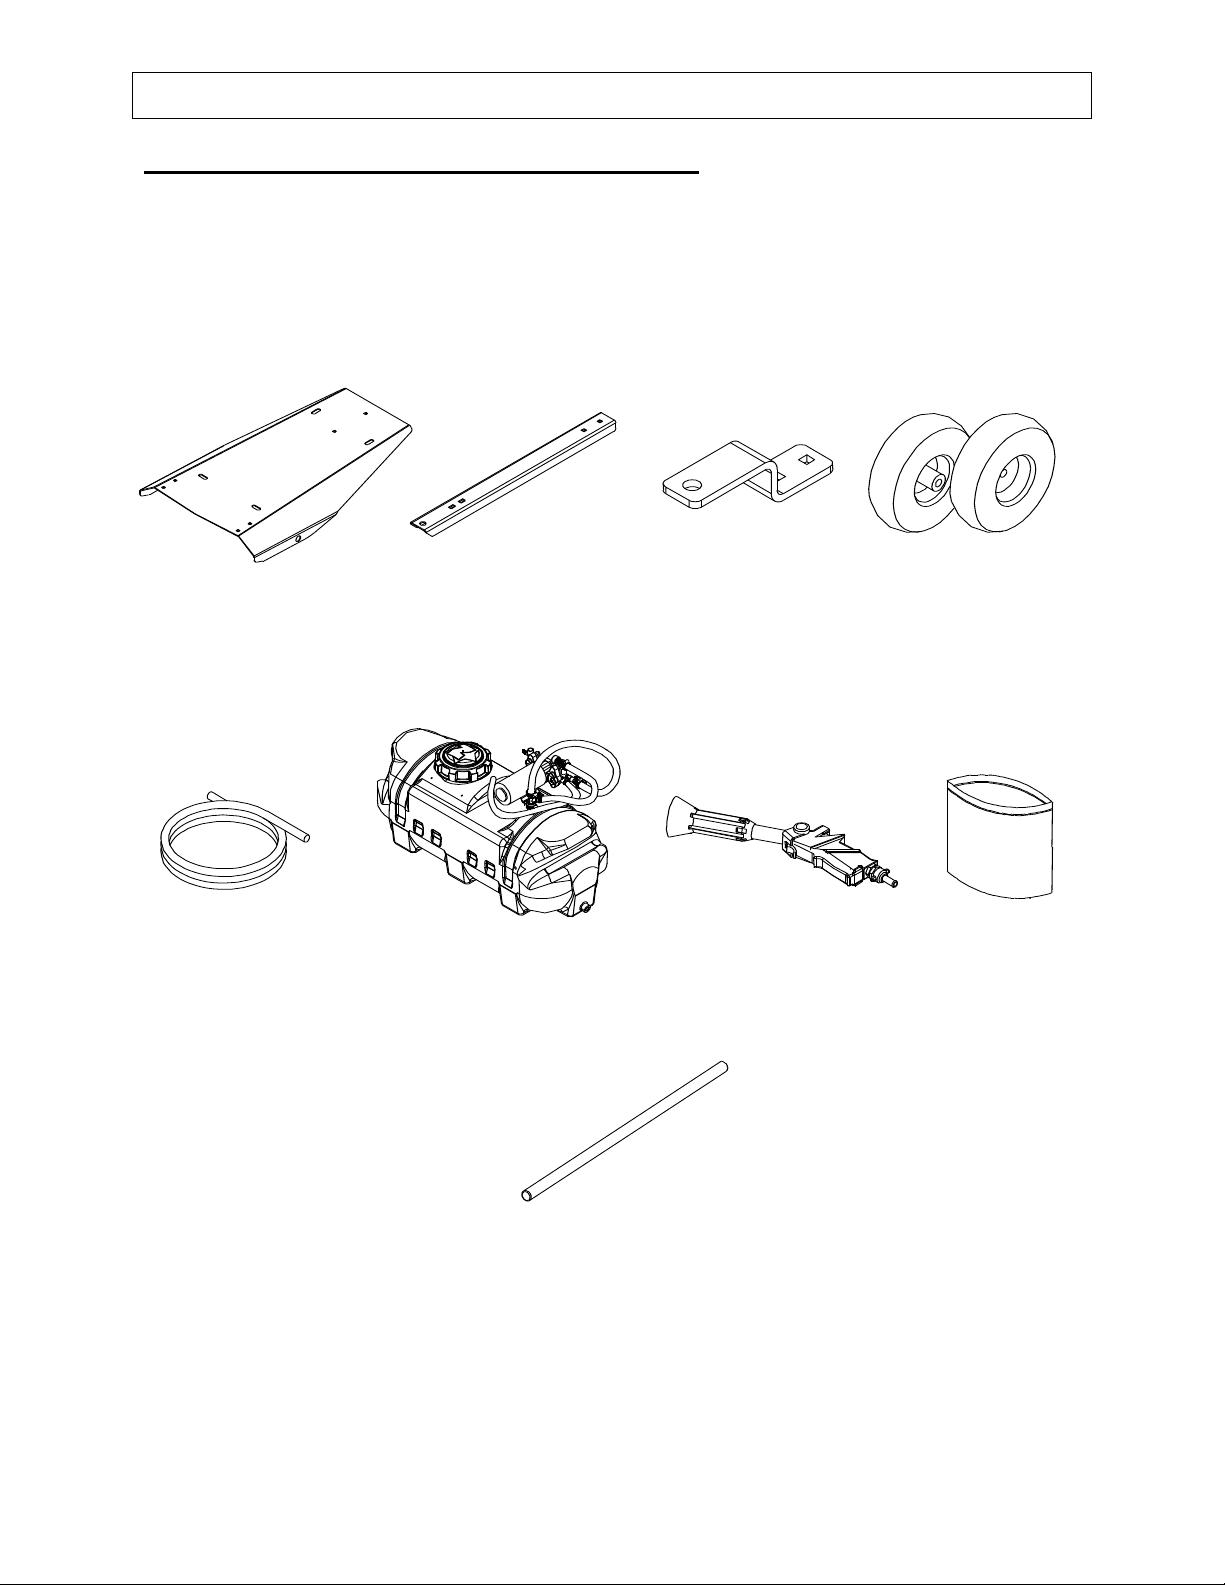
Unpacking
Cart Base
Tongue
Hitch
Tires
420” Gun Hose
Sprayer
Spray Gun
Manual Bag
Axle
Closely inspect all contents in the shipping carton.
Note that some parts are shipped inside the tank.
If you have damaged components: Contact the freight company that delivered the unit and
file a claim.
If you have missing components: Contact NorthStar Product Support at 1-800-270-0810.
8
Page 9
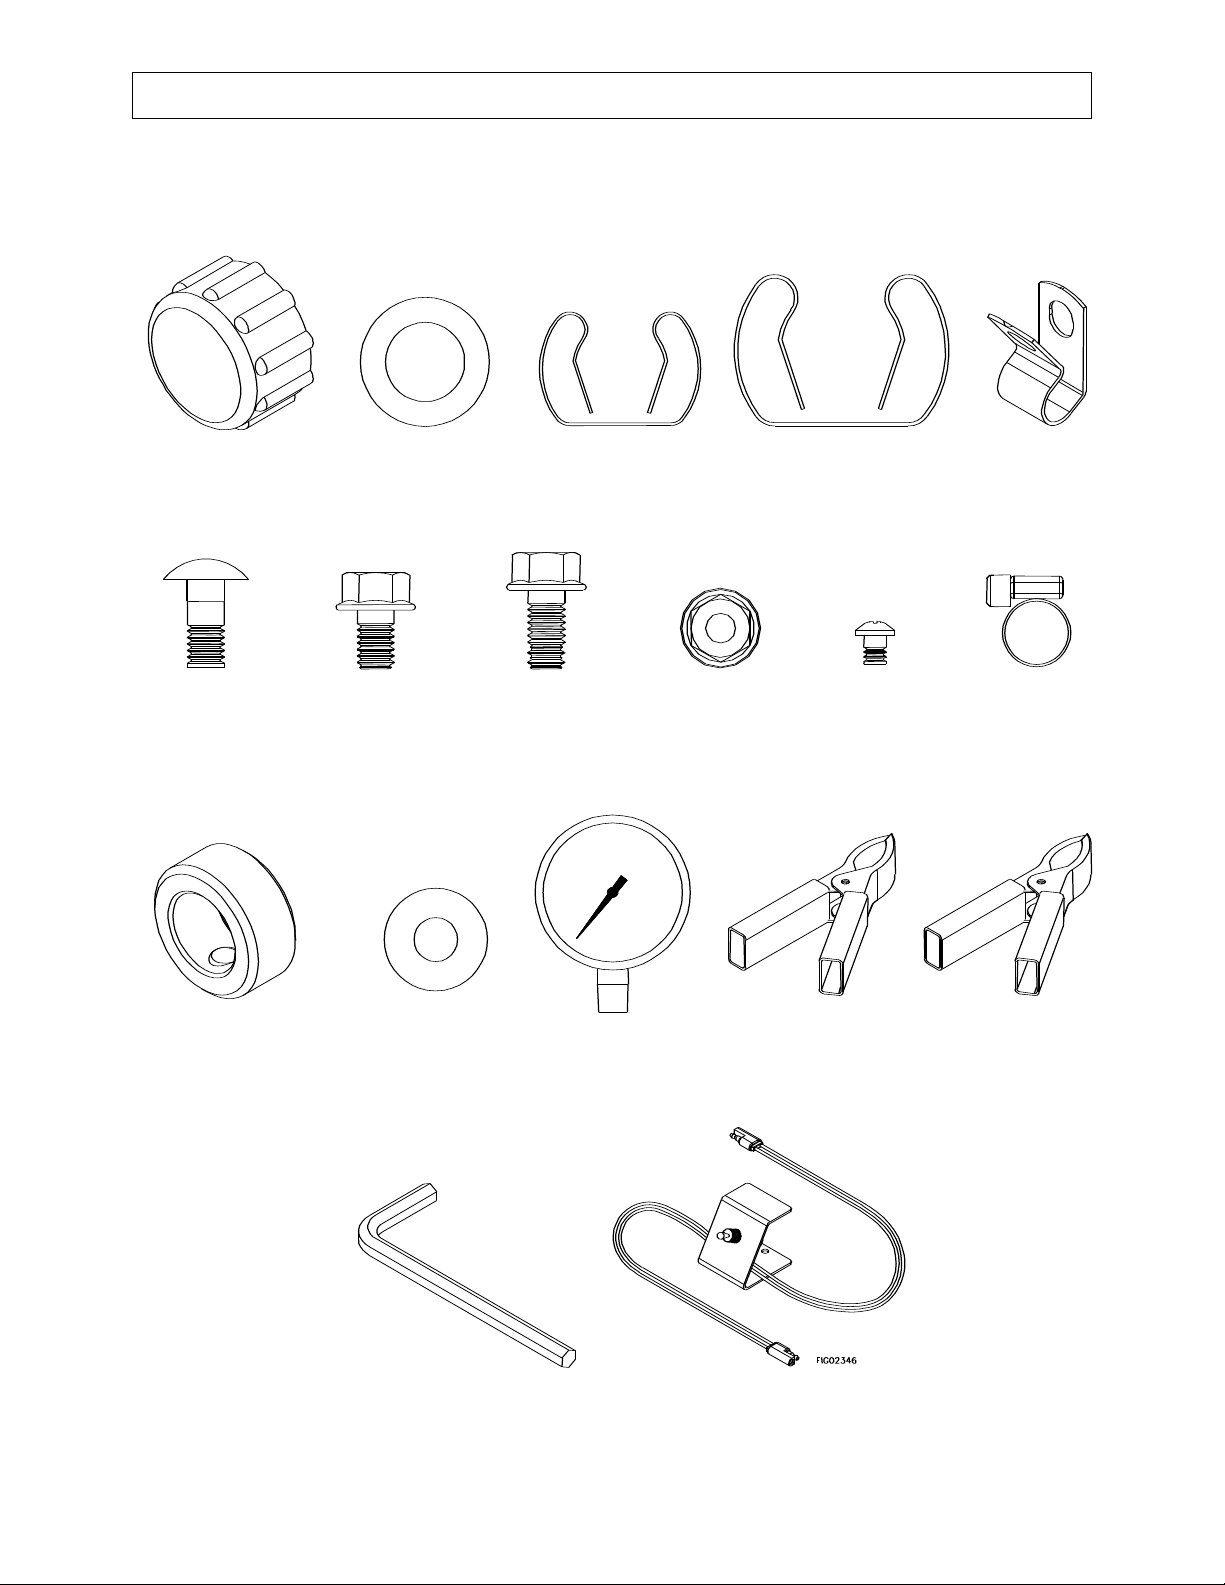
Unpacking the Manual Bag
Drain Cap
Rubber Washer
Gun Clip
Large Gun Clip
Hose Guide
5/16 x ¾”
Carr. Bolt (4)
5/16 x ½”
Flange Bolt (1)
5/16 Flange Nut (4)
#10 x ¼”
Screw (2)
Hose Clamp (4)
Wheel Retainer (2)
5/16 Flat
Washer (4)
Pressure Gauge
Positive Battery
Clamp - Red
Negative Battery
Clamp - Black
Remote Switch
Hex Wrench
5/16 x ¾”
Flange Bolt
(4)
The following items are found in the manual bag.
9
Page 10
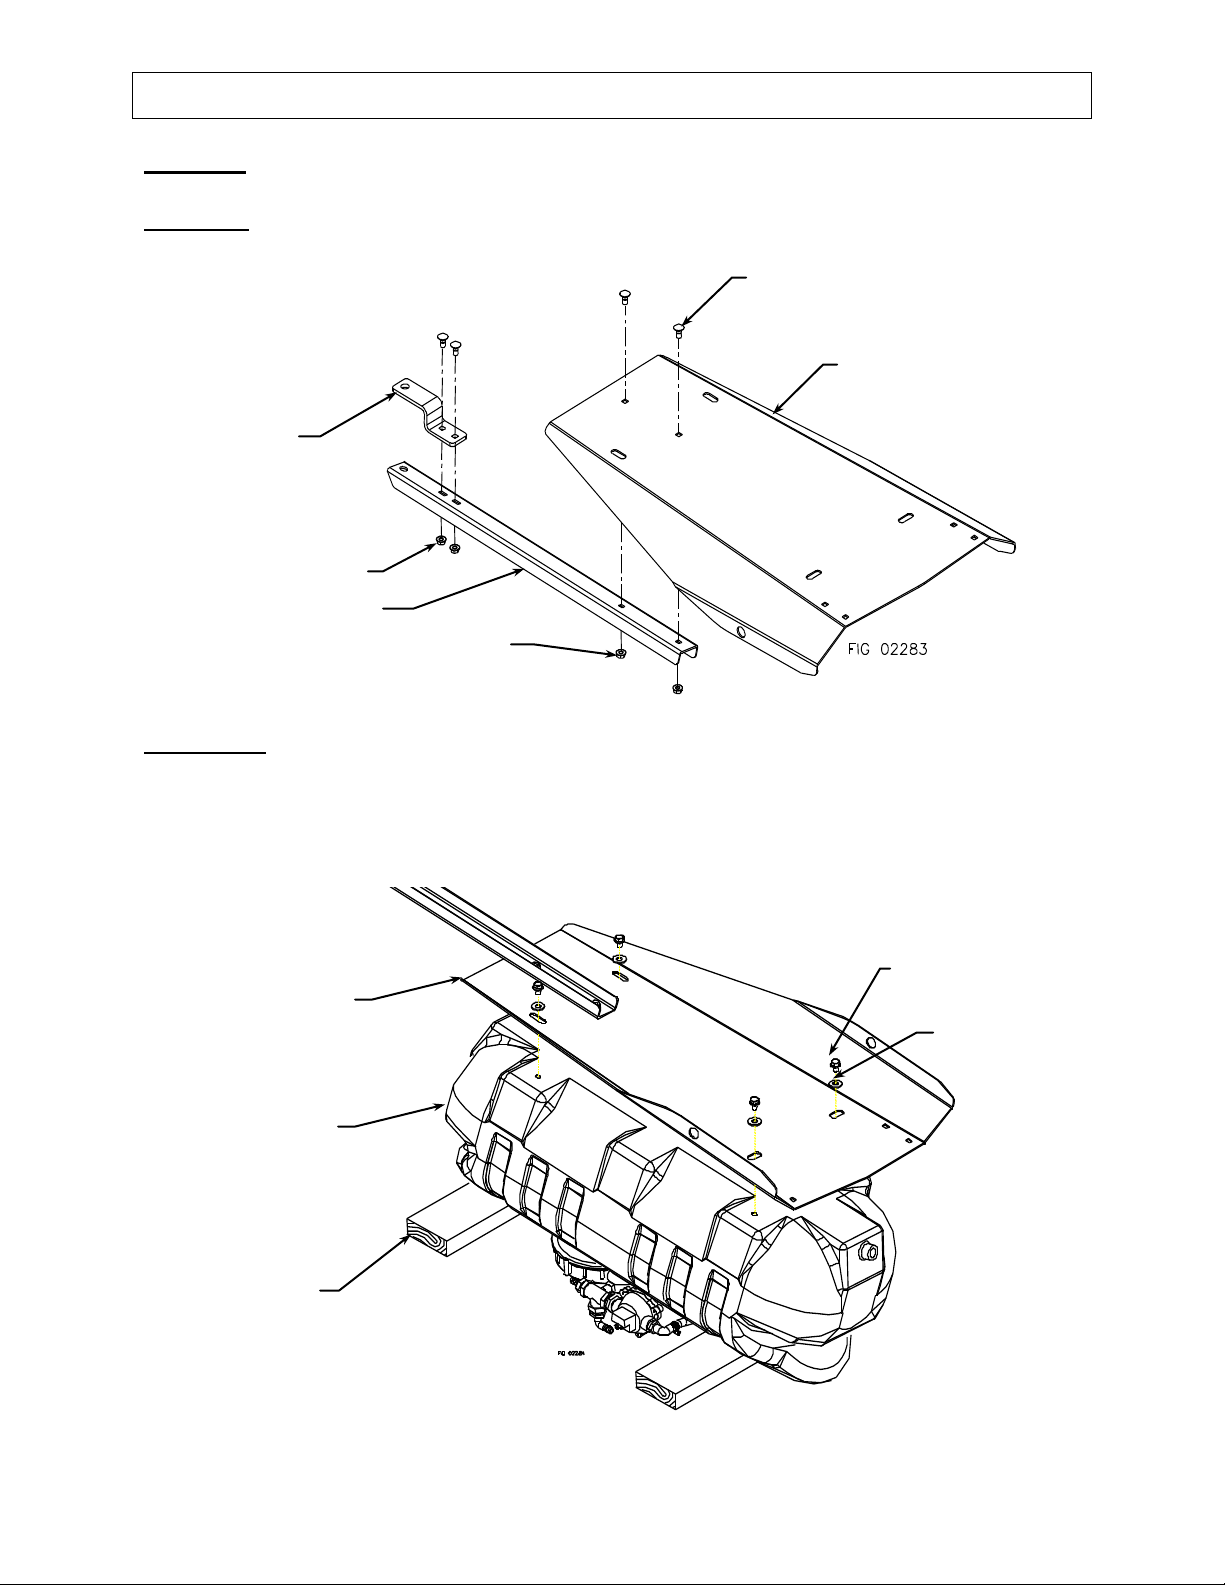
Assembly
Hitch
5/16 Flange nut
Tongue
Cart base
5/16 x ¾” Carriage bolt
5/16 Flange nut
Cart base
Wood planks
or spacers
(Not included)
Sprayer
5/16 x ¾”
Flange bolt
5/16 Flat
washer
Step One: Attach the tongue to the cart base
Fasten with (2) 5/16 x ¾” carriage bolts and (2) 5/16 flange nuts. Tighten to 20 ft-lbs.
Step Two: Attach the hitch mount to the tongue
Fasten with (2) 5/16 x ¾” carriage bolts and (2) 5/16 flange nuts. Tighten to 20 ft-lbs.
Step Three: Attach the cart base to the sprayer
Note: To protect the pump from damage, place two wood planks or spacers under the sprayer to
keep the pump from resting on the ground.
Using (4) 5/16 flat washers, loosely thread (4) 5/16 x ¾” flange bolts into the inserts in the
bottom of the sprayer. Center the sprayer on the cart base and tighten to 5 ft-lbs.
10
Page 11
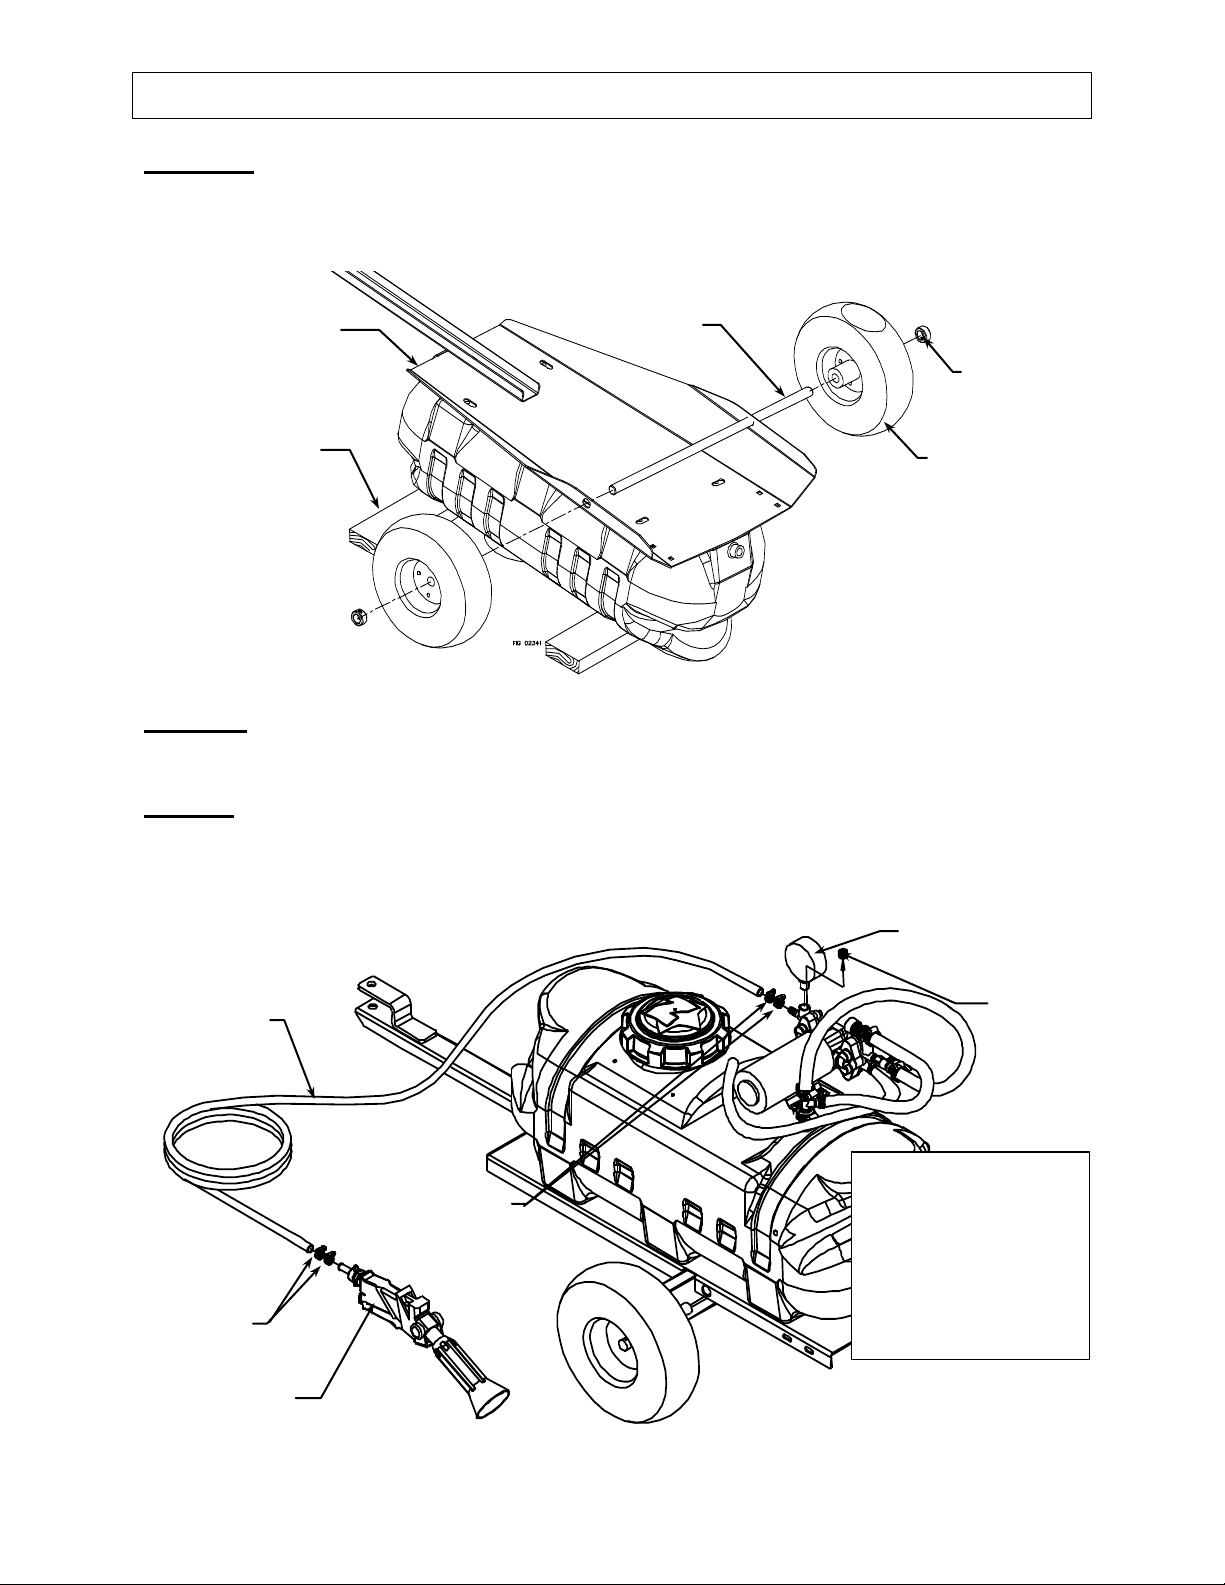
Assembly (continued)
02622
Plug
Pressure gauge
Gun hose
Hose clamps
Spray gun
Hose clamps
Hose Clamp Instructions:
i) Slide hose clamp over
the end of the hose.
ii) Push the hose onto the
hose barb.
iii) Slide the hose clamp
over the hose barb.
iv) Tighten the hose clamp
Wood plank
or spacer
(Not included)
Cart base
Axle
Tire
Wheel
retainer
Step Four: Attach wheels to cart base
1. Slide axle into holes on bottom of cart.
2. Slide tires and wheel retainers onto the axle.
3. Tighten wheel retainers with supplied hex wrench.
Step Five: Attach pressure gauge
1. Remove and discard the plug in the gauge port.
2. Thread in gauge. Hand tighten.
Step Six: Attach gun hose to spray gun and pump
1. Install hose clamps on hose. Follow hose clamp installation instructions below.
2. Using 2 hose clamps, attach one end of the gun hose to the pump hose barb.
3. Using 2 hose clamps, attach the other end of the gun hose to the spray gun.
11
Page 12

Assembly (continued)
Gun hose
5/16 x 1/2” Bolt
Hose guide
#10 x ¼” screw
Small gun clip
Rubber washer
Drain cap
Large gun clip
Step Seven: Attach gun clips to tank
Fasten one gun clip and one large gun clip to the sprayer tank with (2) #10 x 1/4” screws.
Step Eight: Attach drain cap to tank
Press the rubber washer into the drain cap, then thread the drain cap onto the tank.
Step Nine: Attach hose guide to tank
1. Route gun hose around sprayer and through hose guide.
2. Attach hose guide to tank with (1) 5/16 x 1/2” flange bolt.
12
Page 13

Assembly (continued)
WARNING
Batteries are hazardous because they contain caustic acid, can emit explosive
gases, and can cause electric shock.
Caution must be exercised when making connections to a battery to avoid shock
and contact with the acid, and to prevent any sparking that could lead to an
explosion.
ALWAYS follow the safety instructions and steps listed below in exact sequence
when connecting the sprayer’s remote switch to the battery terminals.
1. Preparatory safety
Preparatory safety steps:
ALWAYS use eye protection
NEVER smoke or work near sparks or other sources of ignition.
NEVER touch both battery terminals at the same time or with any non-
insulated tools.
If battery acid contacts skin or clothing, flush immediately with water and
neutralize with baking soda.
Hitch pin (not included)
Step Ten: Attach sprayer to vehicle
Secure the sprayer to the tow vehicle with a hitch pin (not included, call 800.270.0810 and order
Item# 2501946).
Step Eleven: Connect power cords to vehicle battery
13
Page 14

Assembly (continued)
Battery
power cord
Pump power cord
Remote switch
power cord
Hoop
Prongs
Strip ½”
Red wire
Handle
shield
Battery
power cord
Pump power cord
2. Identify sprayer’s
power cords
Identify the power cords shipped with the sprayer.
There are three power cords for the sprayer that you will eventually connect end to
end to power the sprayer. Locate and identify these three cords:
a) The battery power cord and the pump power cord are shipped connected
together to the sprayer.
b) The remote switch power cord is packed separately in the Manual Bag.
3. Separate power
cords
Disconnect the battery power cord from the pump power cord.
4. Prepare wire ends
Prepare the wire ends of the sprayer’s battery power cord for connection to
the vehicle battery:
a) Determine the type of end connectors you need to connect to your vehicle’s
battery terminals.
b) Install battery clamps (supplied) or end connectors of your choosing on the
bare ends of the sprayer’s battery power cord wires.
To install battery clamps:
1. Remove red plastic handle
shield from red battery clamp
and slide onto red wire
2. Strip red battery cord wire ½”
3. Insert bare wire under raised hoop
on red battery clamp handle
4. Use a pliers to press hoop down and crimp wire
5. Fold prongs over wire insulation to hold wire in place
6. Push plastic handle shield back over battery clamp handle
7. Repeat for black wire and black battery clamp.
14
Page 15

Assembly (continued)
5. Connect power cord
to battery
Connect the sprayer’s battery power cord to the vehicle battery using the
following procedure:
a) Disconnect the vehicle battery ground wire.
b) Connect the remote switch’s red battery clamp or red wire connector to the
positive (+) terminal of the battery.
c) Connect the remote switch’s black battery clamp or black wire connector to
the negative (-) terminal of the battery.
d) Reconnect the vehicle battery ground wire.
WARNING: Always connect in this sequence to avoid possible shock.
6. Verify connection
Verify a complete connection has been made by checking with a DC voltmeter,
or briefly connecting to the pump power cord and listening for pump activation.
7. Connect all three
power cord together
Connect the three sprayer power cords together.
a) Check to be sure the power switch is in the “OFF” position on the remote
switch power cord.
b) Connect the one end of the remote switch power cord to the battery power
cord and the other end to the pump power cord.
8. Attach remote switch
to vehicle
Using supplied Velcro pads, affix remote switch to vehicle in a position that is
easily reached from the driver’s seat.
9. Disconnect after use
AFTER EACH USE, disconnect power to the sprayer by disconnecting the
sprayer’s remote switch power cord from the battery power cord – the battery
power cord may remain connected to the battery.
NOTE: It is important to disconnect power to the sprayer when not in use for
safety reasons. ALWAYS verify that the power has been disconnected or the
remote switch is in the OFF position before adding chemicals or servicing.
01981
Battery power cord
Remote switch
power cord
Pump power cord
To Battery
15
Page 16

Assembly (continued)
10. To disconnect
permanently
When it is necessary to disconnect the sprayer’s battery power cord from the
battery, use the following procedure:
1. Disconnect sprayer’s remote switch power cord from the battery power cord.
2. Disconnect the battery power cord from the vehicle battery as follows:
a) Disconnect vehicle battery ground wire.
b) Disconnect the battery cord’s black battery clamp or black wire
connector from the negative(-) terminal of the vehicle battery.
c) Disconnect the battery cord’s red battery clamp or red wire
connector from the positive(+) terminal of the vehicle battery.
d) Reconnect the vehicle battery ground wire.
WARNING: Always connect in this sequence to avoid possible shock.
WARNING
Check and test completed assembly
Serious injury could result from chemical leaks if sprayer is improperly
assembled or the design of the sprayer is modified.
Follow the steps below to ensure the sprayer is properly assembled. Never
modify the sprayer design.
1. Check assembly
Check assembly to assure the sprayer is properly assembled and in safe
working condition:
a) Check that the gun clip screws are tight, hose clamps are secure, and tank
straps are properly fastened.
b) While it is unlikely that factory-assembled components become loose, they
should also be checked to make sure they are tight.
2. Test with water
Test the system for leaks with water:
1) First read the instructions in this Owner’s Manual for Operation of the
sprayer
2) Fill the tank with water per the instructions in this manual.
Important: The sprayer should be OFF when you fill the tank.
3) Check for leaks throughout the system by operating the sprayer per the
instructions in this manual:
a) Turn the sprayer ON. (See Operation Instructions)
b) Operate the spray gun. (See Operation Instructions)
c) Adjust the pressure through its full range – to maximum and back. (See
Operation Instructions)
4) If a leak is detected, fix the leak and re-test the system with water.
Step Twelve: Check and test completed assembly.
16
Page 17

Machine Components
02630
1.) Remote Switch. The remote switch allows the operator to safely turn ON/OFF the sprayer.
2.) Hitch Mount. The hitch mount connects the vehicle hitch to the sprayer.
3.) Pump Power Cord. The pump power cord connects the remote switch to the pump.
4.) Gun Hose. The 420” gun hose transfers chemical from the pump to the spray gun.
5.) Sprayer Tank. The sprayer tank holds the chemical.
6.) Fill Cap. The fill cap has a ball check to allow air to enter the tank as the chemical is dispensed, but
does not allow chemical to escape the tank.
7.) Sprayer Pump. The sprayer pump makes the chemical flow to the spray gun and the nozzle.
8.) Agitation Hose. The agitation hose combines the bypass and priming hose to send the liquid back to
the tank to keep the chemical mixed.
9.) Pressure Gauge. The gauge is an indicator of the pressure in the system.
10.) Pressure Adjustment Knob. Turn the pressure adjustment knob to regulate the sprayer’s pressure.
11.) Priming Hose. The priming hose transfers chemicals from the pump back to the tank while priming.
12.) Suction Tube. The suction tube is the inlet line for the pump. The suction tube has a suction strainer
to prevent debris from entering the pump.
13.) Priming Valve. The priming valve performs three functions. First, it allows the pump to prime itself
when open. Second, it helps keep the chemical well circulated when the valve is left open. Third, it
will relieve the system pressure by opening the valve.
14.) Bypass Hose. The bypass hose transfers liquid from pump to tank when the system is up to pressure.
15.) Hose Wrap. The built-in hose wrap provides a storage location for the gun hose on the tank.
16.) Gun Clips. Use the gun clips to store the spray gun.
17.) Tires. The tires have a wide tread to prevent turf damage.
18.) Spray Gun. The spray gun has three spraying modes; stream, cone, fog (see operation instructions).
19.) Battery Power Cord. The battery power cord connects the vehicle battery to the remote switch. This
cord remains connected to the battery when the sprayer is not in use.
20.) Battery Clamps. Use the battery clamps to connect the battery power cord to the battery.
17
Page 18

Operation – Important Safety Information
WARNING
Carefully read and make sure you understand the following safety information before
using the sprayer.
WARNING
Pesticides are hazardous chemicals.
Heed the warnings below and follow all instructions carefully.
Improper handling of chemicals can result in serious injury or illness,
or cause damage to the environment.
Now that you have completed and tested your assembly, there is some important safety and health
information you need to know with regard to handling and spraying chemicals, as well as vehicle
handling with the sprayer attached.
General Chemical Safety:
Chemical label. ALWAYS READ and FOLLOW all chemical label instructions.
Licensing/regulation. Refer to any applicable licensing restrictions or state/federal regulations
with regard to the application of the particular chemical you plan to use.
Emergency procedures. Before handling chemicals, carefully review the “Chemical Accident
Procedures” listed later in this section, as well as the “Statement of Practical Treatment” on the
chemical label.
Inhalation/contact. ALWAYS take precautions to avoid inhaling or coming into contact with
the chemical.
Personal protective equipment. ALWAYS wear protective clothing, eye protection, and
chemical-resistant gloves when filling, using and cleaning the sprayer. Wear additional
protective gear (such as facemask or apron) as recommended on the chemical label.
Children/pets. Pesticides can be especially toxic to children and animals. ALWAYS exercise
extra caution around children. Keep sprayer and all spray materials away from children and
animals.
Ventilation. ALWAYS ensure there is adequate ventilation when mixing, pouring, or spraying.
Flammables. NEVER use any flammable chemicals in the sprayer.
Corrosives. DO NOT use corrosive chemicals in the sprayer. They can weaken the sprayer and
its parts, resulting in leaks. Check with the chemical manufacturer to ensure chemical is
compatible with all components of the sprayer.
Chemical interaction. ALWAYS flush the sprayer before switching chemicals. Different
chemicals may interact dangerously with each other.
Chemical storage. ALWAYS store pesticides in a properly labeled container and in a secure
location per the manufacturer’s recommendations.
Health monitoring. Monitor the health of operators who are frequently exposed to pesticides, as
recommended by the chemical label or local/federal regulations.
18
Page 19

Operation – Important Safety Information (continued)
WARNING
Caution must be used when spraying chemicals to avoid unsafe exposure to
humans and the environment.
Heed the warnings below and follow all instructions carefully.
Chemical Application Safety:
Before Spraying
Sprayer prep. ALWAYS inspect and prepare the sprayer before use according to the
directions provided in this manual.
Keep sprayer off. Do not turn on power to the sprayer until ready to spray in order to avoid
unintentional spray release.
Overhead spraying or fogging. Wear additional personal protective equipment if you will be
spraying overhead or fogging. You will be exposed to much more pesticide fallout in these
applications. Wear chemical resistant head and neck protection, full facemask or half
facemask with sealed goggles, and consider using a dust/mist respirator.
Wind speed. NEVER spray when wind speed exceeds 4 MPH in order to minimize spray
drift.
Clear area/post. ALWAYS keep the work area clear of people and pets. POST warning
notices to restrict access by the public for the period recommended on chemical label.
Operator age. You must be 16 years of age or older to operate this sprayer. Pesticides are
especially toxic to children.
During Spraying
Over application. DO NOT over apply pesticide. Apply at a rate recommended by chemical
manufacturer. Excess pesticide can be dangerous to humans, damage desirable plants, and
contaminate soil and water sources.
Never point gun. NEVER point the spray gun at people or animals.
Use firm grip. ALWAYS hold the spray gun with a firm grip when spraying at higher
pressures in order to prevent gun from whipping. Keep good footing and balance at all times.
Children/pets. ALWAYS exercise extra caution when spraying near areas accessible to
children and pets.
Eating/smoking. DO NOT eat, drink, smoke, rub your eyes, or touch any part of your bare
skin while handling chemicals and spraying.
Heat/flames. DO NOT spray near open flames or sources of heat.
Spills. ALWAYS clean up spills immediately per instructions on the chemical label.
Unattended. ALWAYS turn off vehicle and set brake or block wheels, turn off power to
sprayer, and relieve system pressure before leaving sprayer unattended.
Troubleshooting. ALWAYS refer to the safety instructions in the Troubleshooting Section
before attempting any repairs.
After Spraying
Clean sprayer. ALWAYS clean the sprayer immediately after use according to the directions
provided in this manual.
Decontaminate. ALWAYS decontaminate yourself immediately after you are finished
spraying and handling chemicals. Wash all exposed areas of the body with soap and water
and remove and launder clothing.
Chemical disposal/storage. ALWAYS dispose of or store remaining chemicals properly as
recommended on the chemical label.
19
Page 20

Operation – Important Safety Information (continued)
WARNING
The filled sprayer is very heavy. It can crush and cause serious
injury if it rolls out of control or tips over.
Follow the instructions below for safely towing the sprayer.
WARNING
Before you fill the sprayer, review the following information with regard
to handling accidents.
Chemical spills, sprayer leaks, personal contamination, and poisoning are
accident situations which you may encounter. All require an immediate
response – See instructions below.
Sprayer leak
In the event that the sprayer develops a leak while spraying chemicals, you
must immediately stop spraying.
Turn off power to the sprayer and follow the directions below, as
applicable.
Towing Safety:
Read vehicle instructions. Review towing safety instructions in your towing vehicle manual.
Driver age. You must be 16 years of age or older to operate the towing vehicle with the sprayer attached.
Securely attached. Make sure sprayer is securely attached to the towing vehicle before towing.
Tires. Make sure sprayer tires are fully inflated and in good repair before towing. Do not over inflate.
Serious injury could occur if tire explodes. Keep wheel and lug nuts tightened to specified torque.
Vehicle handling. Be aware that vehicle handling will be affected when towing the filled sprayer.
Exercise caution to avoid loss of control or sprayer overturning:
o Keep speed to a minimum so you can maintain control at all times. Reduce speed prior to turns.
o Allow for wider turns and for more distance to stop.
o Avoid any sudden steering maneuvers, starts, or stops that could create sway.
Rough or sloped terrain. Slow down and exercise extra caution on rough or sloped terrain in order to
reduce risk of rollover. Pick the most level route possible when transporting across fields. Drive up and
down slopes that cannot be avoided, rather than across. Use a vehicle equipped with a Roll Over
Protection System (ROPS) if you will be operating on non-level terrain.
Added length. Be aware of the added length of the sprayer.
Reduced visibility. Be aware that visibility may be reduced with sprayer attached. Be extra cautious
when backing up or turning.
Ride / transport. Never ride or transport cargo on the sprayer.
Under the influence. Never tow or operate this sprayer while under the influence of alcohol, drugs, or
medication
On public roads. If towing on a public road, make sure to comply with all local, state, and federal towing
requirements. It is the sole responsibility of the purchaser to obtain licensing, trailer lights, safety chains or
signage as needed to comply.
Unattended. Turn off both the sprayer and the towing vehicle, and set the brake or block the wheels,
before leaving the sprayer unattended.
Chemical accident procedures:
20
Page 21

Operation – Important Safety Information (continued)
Bodily chemical
contact
Personal contamination can occur when chemicals splash, spill, or spray
directly onto a person.
1. Follow the emergency first aid instructions on the chemical label listed in the
“First Aid” or “Statements of Practical Treatment” section.
General procedures include:
a) Eyes – immediately flush with water or follow other directions as specified
on the chemical label.
b) Skin – immediately wash all contaminated skin surfaces with soap
and water, or follow directions as specified on the chemical label.
c) Clothing – remove contaminated clothing immediately. Dispose of heavily
contaminated clothing per the instructions on the chemical label for safe
chemical/container disposal.
2. Seek medical advice if instructed on the label, or if the victim experiences
symptoms of harmful effects such as burning, swelling, nausea, chest pain,
difficulty breathing, dizziness or confusion. When seeking medical advice, be
sure to bring the chemical product label.
Poisoning by
ingestion or
inhalation
In case of poisoning from ingestion or inhalation:
IF THE VICTIM HAS COLLAPSED OR IS NOT BREATHING, CALL 911.
Otherwise:
1. If you are the victim, immediately seek assistance from nearby personnel
because you may become incapacitated.
2. Follow the emergency first aid instructions on the chemical label in the “First
Aid” or “Statement of Practical Treatment” section.
3. Call a poison control center for further advice. In the U.S., call 1-800-2221222 to be automatically linked to the nearest certified poison control
center. Have the chemical label available for reference.
Chemical spills
Chemical spills must be quickly contained and properly cleaned up.
Refer to the chemical label for any specific clean-up instructions with regard to
the chemical spilled.
General procedures include:
1. Control the spill by stopping the source of the spill. If the source of the spill
is a container leak, place the leaking container in a larger, watertight
container. Keep unprotected people away from the spill site.
2. Contain the spill so that it does not spread and get into water sources. Use a
shovel or other tool to make a dike around the spill with soil, sod, or absorbent
material.
3. Clean up the spill immediately -- Absorbent materials like ground corncobs
or pet litter should be spread on the spill area to soak up the pesticide. The
contaminated material should then shoveled into a leak proof container. Do
not flush the spill area with water until you receive advice as directed below.
4. Seek additional advice from the chemical manufacturer and your state’s
pesticide regulatory agency regarding decontamination of the spill site:
- Chemical manufacturer. The chemical label provides contact
information for the chemical manufacturer.
- State pesticide regulatory agency. In the U.S., call the National Pesticide
Information Center at 1-800-858-7378 for assistance in determining
how to contact your state’s pesticide regulatory agency.
21
Page 22

Operation – Preparing the Sprayer for Each Use
Fill cap
Suction strainer
(Inside tank)
WARNING
Read instructions below carefully for inspecting and preparing the sprayer.
Damaged or clogged equipment could result in leaks or uncontrolled spray.
Leaks could result in injury to the operator or bystanders from chemical exposure,
or cause damage to the environment.
1. Ensure sprayer
attached
Ensure the sprayer is securely attached to the towing vehicle.
2. Ensure tank
empty
Ensure the sprayer has been thoroughly flushed and drained of all residual
chemical from prior uses.
3. Clean suction
strainer
Clean the suction strainer of any chemical residue.
It is important to clean the suction strainer before each use to ensure it is not
clogged and to prevent residual chemical from contaminating sprayer contents.
IMPORTANT: The strainer must be accessed by reaching into the tank, so the
tank must be empty to avoid immersing your hand in chemicals.
a) Open fill cap on top of tank.
b) USING RUBBER GLOVES, reach into the tank and pull the suction
strainer off the end of the suction tube. (See figure below.)
c) Run the suction strainer under fresh water to remove debris.
d) Replace the suction strainer onto the end of the suction tube.
4. Inspect &
repair
Inspect and test the sprayer thoroughly:
a) Inspect hoses for exposed mesh and holes. Replace all worn or damaged hoses.
b) Inspect tank and fittings for cracks and leaks. Replace all damaged fittings with
original NorthStar parts.
c) Check to be sure all other nuts, bolts, and screws are tight.
d) Check wheels and tires. Make sure wheel lugs are tight and tires are inflated.
e) Partially fill tank with plain water and spray to test for leaks. Repair as needed.
IMPORTANT: After any repair work has been done, ALWAYS test for leaks
with water one final time before using.
If the sprayer has been used previously, it must be prepared BEFORE EACH SUBSEQUENT USE.
Important safety rules:
Power off. Make sure all power is OFF before cleaning, inspecting, or servicing the sprayer.
Guards / shields. Make sure all guards and shields are replaced after servicing the sprayer.
Replacement parts. If a part needs replacement, only use parts that meet the manufacturer’s
specifications. Replacement parts that do not meet specifications may result in a safety hazard
or poor operation of the sprayer.
22
Page 23

Operation – Using the Sprayer
WARNING
Do not spray if wind speeds are greater than 4 MPH or if there are
bystanders in the intended spray area.
1. Assess wind speed
Assess weather conditions to ensure that it is not too windy to spray.
DO NOT SPRAY if wind speeds are greater than 4 MPH.
Visible indication of wind speed:
If leaves are in constant motion or there is any branch movement, DO NOT
spray because the wind is too strong.
2. Clear work area
Clear the work area of all bystanders and pets.
Restrict access by the public for the period recommended on chemical label.
Step One: Assess wind conditions and clear work area.
Before you decide to spray, you must determine whether wind conditions are suitable. You must
also restrict access to the work area to ensure the safety of bystanders.
23
Page 24

Operation - Using the Sprayer (continued)
Fill cap
WARNING
ALWAYS wear personal protective equipment as directed on the
chemical label when handling pesticides.
Long pants and sleeves, chemical resistant gloves, and eye protection are
strongly recommended. Additional protective gear may be required
depending on the particular pesticide.
1. Review safety
information
Review the “Operation – Important Safety Information” related to General
Chemical Safety and Chemical Accident Procedures provided in this manual.
2. Choose safe
mixing/
loading area
Choose a safe pesticide mixing and loading area.
- Choose an outdoor, well-ventilated area away from unprotected people, animals,
food, and other items that might become contaminated.
3. Wear personal
protective
equipment
Wear personal protective equipment as directed on the chemical label.
- Note that additional equipment may be specified for mixing and loading activities.
4. Turn off
sprayer and
vehicle
Turn OFF power to the sprayer before filling.
- The vehicle should also be off, with brake set or wheels blocked to prevent
unintended movement.
5. Remove fill
cap
Remove the fill cap located on top of the sprayer.
6. Ensure tank
flushed
Ensure tank is flushed of all chemicals from prior uses.
- Chemicals can interact dangerously when mixed, and residue chemicals are also a
health hazard.
Step Two: Fill the sprayer.
Fill the sprayer using the following steps:
24
Page 25

Operation - Using the Sprayer (continued)
Drain cap
7. Check drain
cap
Before filling tank, ensure drain cap is securely tightened.
8. Fill tank
Add pesticide to tank through fill cap:
a) Confirm the chemical/water dilution ratios specified on the chemical label.
b) Determine chemical and water volumes needed for the planned application,
taking into consideration that maximum tank capacity is 16 gallons.
Note: Only purchase and mix as much chemical as you need for the
planned application in order to minimize chemical over application and
the need for storing unused chemicals.
c) Add chemical to the tank through the fill cap.
If the chemical is not pre-mixed, add water and pesticide concentrate in the
order prescribed on the label.
9. Ensure
chemical
mixed
Ensure chemical is thoroughly mixed in tank.
- Stirring device should be made of metal or plastic, non-chemical absorbing
material, and then properly cleaned and stored after use.
10. Replace fill
cap
Replace fill cap and tighten securely.
25
Page 26

Operation - Using the Sprayer (continued)
01542
Priming
valve lever
Priming
hose
01542
Priming valve
WARNING
ALWAYS wear personal protective equipment as directed on the
chemical label when spraying.
Long pants and sleeves, chemical-resistant gloves, and eye protection are
strongly recommended. Additional protective gear may be required
depending on the particular pesticide.
1. Review safety
information
Review the “Operation – Important Safety Information” related to Chemical
Application Safety and ATV Vehicle Handling Safety provided in this manual.
2. Wear personal
protective
equipment
Wear personal protective equipment as directed on the chemical label.
WARNING: Wear additional personal protective equipment if you will be
spraying overhead or fogging. You will be exposed to much more pesticide
fallout in these applications. Wear chemical resistant head and neck protection,
full facemask or half facemask with sealed goggles, and consider using a
dust/mist respirator.
3. Open priming
valve
Turn priming valve lever so that it is in-line with the priming hose.
4. Turn on power
Turn on the power to the sprayer.
1. Verify the battery power cord is connected to the remote switch power cord
and that the remote switch power cord is connected to the pump power cord.
2. Turn the remote switch to the “ON” position.
Note: The pump will start automatically when power is turned on. Running
the pump dry will void all warranties.
5. Ensure flow
through priming
hose
Once chemical is flowing through the priming hose, close the priming valve.
Step Three: Operate the sprayer.
26
Page 27

Operation - Using the Sprayer (continued)
6. Operate spray
gun (as needed
for application)
Proper Operation of the Spray Gun
Cone and Stream spray pattern instructions
1. Squeeze the trigger to begin spraying.
2. With choke pulled back, rotate spray pattern selector knob to change
between cone and stream.
Fog and Stream spray pattern instructions
1. Squeeze the trigger to begin spraying.
2. With the choke pushed forward, rotate the spray pattern selector knob to
change between fog and stream.
IMPORTANT: ALWAYS hold the spray gun with a firm grip when spraying
at higher pressures in order to prevent gun from whipping. Keep good footing
and balance at all times.
Note: It is not unusual for the operator to be exposed to chemical drips while
adjusting the spray pattern – gloves should be chemical resistant.
Choke pulled back
Trigger lock
Trigger
Spray pattern selector knob
Spray pattern selector knob
Trigger
Choke pushed forward
27
Page 28

Operation - Using the Sprayer (continued)
01542
Priming valve
Pressure adjustment knob
7. Adjust pressure
and agitation as
needed
-Rotate the pressure adjustment knob until the sprayer is running at the
desired pressure.
-Open priming valve to circulate flow back to the tank and create agitation.
Open until desired amount of agitation is achieved.
8. Leaving
unattended
If the sprayer must be left unattended at any time:
a) Disconnect power to the sprayer.
b) Relieve system pressure by depressing the gun trigger.
c) Turn off the vehicle. Set brake or block the wheels.
9. Discontinue use if
clogged or
inoperative
If the sprayer becomes clogged or inoperative during use, discontinue use
immediately.
- DO NOT attempt to service while chemicals are in the sprayer and power is
connected.
- Return to service area to review instructions for troubleshooting before
attempting to service.
Note: A reserve, clean container capable of holding at least 16 gallons should be kept for use when the sprayer
tank needs to be emptied temporarily for repairs. It is advisable to purchase a reserve tank suitable for
pesticide storage from Northern Tool and Equipment for use in these circumstances. The container
should be properly labeled as to its contents if it is used.
28
Page 29

Operation - Using the Sprayer (continued)
WARNING
Clean-up and decontamination procedures must be followed after each use.
Improper equipment clean-up and disposal of chemicals can result in dangerous
chemical exposure to humans and the environment, as well as equipment damage.
Personal decontamination is required after spraying to minimize unsafe exposure
to chemicals and potential illness.
1. Drain tank
If there is excess pesticide left in the tank, drain the tank:
a) Disconnect power to the sprayer and relieve system pressure by depressing the
gun trigger.
b) Find a suitable container in which to drain the unused pesticide. Place it under
the tank drain hole.
c) While wearing rubber gloves, eye protection, and all other required personal
protective equipment, remove the drain cap and allow pesticide to drain into
container.
d) When tank stops draining, replace drain cap. Tighten securely.
2. Unused chemical
Properly store or dispose of unused chemical:
a) If the unused pesticide is to be stored for future use:
Store all unused pesticide in its original, or a suitably marked, container in a
secure location out of the reach of children & animals.
b) If remaining pesticide is to be disposed:
Properly dispose of the remaining chemical and its container per the chemical
manufacturer’s recommendation and according to local hazardous waste
disposal regulations.
3. Flush sprayer
Flush the sprayer per the chemical manufacturer’s recommendations. A
general procedure is as follows:
a) Add fresh water to the tank.
b) Reconnect power to the sprayer.
c) Operate the spray gun and discharge all rinse water onto an area that can
accept dilute pesticide application.
d) Add 5 gallons of the chemical manufacturer’s recommended cleaning
solution. Operate the spray gun, collecting the discharged solution if
recommended by the manufacturer.
e) After flushing, disconnect power to the sprayer and be sure all system pressure
is relieved by squeezing the gun trigger.
f) Dispose of cleaning solution discharge as recommended by the manufacturer
of the solution.
4. Decontaminate
& launder
Decontaminate yourself after you are finished handling chemicals:
a) Remove all clothing worn during spraying and chemical handling.
b) Wash all exposed parts of the body with soap and water.
c) Launder clothing separately from other wash.
Step Four: Clean sprayer and decontaminate after use.
When done using the sprayer, it is important to clean the sprayer and decontaminate yourself. Do
not store the sprayer with chemicals in the tank, as it is unsafe and could also result in damage to the
equipment.
29
Page 30

Storage
CAUTION
The sprayer will be damaged if it freezes.
Protect the sprayer from freezing during storage by following the instructions
below.
1. Add antifreeze
Pour 1 gallon of RV antifreeze into the tank.
Note: RV antifreeze is non-toxic and biodegradable and generally safer for
the environment than automotive antifreeze.
2. Spray briefly
Turn on the pump motor and squeeze the gun trigger briefly until fluid
sprays.
1. Drain
Drain the antifreeze left in the tank through the tank drain hole into a
suitable container.
2. Flush with
water
Fill the tank with fresh water and run through the system. Operate the
spray gun until the system is completely flushed. Be sure to set up
containers to capture the antifreeze flush water.
3. Disposal
Dispose of the antifreeze and flush water properly.
Prepare the sprayer for end-of-season storage by running RV antifreeze through the system. This will
keep internal parts lubricated, protect against corrosion, and keep the unit from freezing.
Preparing for storage:
Removing from storage:
30
Page 31

Troubleshooting
WARNING
Before troubleshooting or attempting to service, read the following safety rules to
avoid accidental exposure to chemical and also risk of electric shock.
1. Personal
protective
equipment
Wear personal protective equipment as directed on the chemical label while
servicing your sprayer.
2. Review
troubleshooting
table
Review the Troubleshooting Table below for the type of problem you are
experiencing. However, DO NOT attempt to repair until the steps listed below
are followed.
3. Empty and flush
If the cause listed for your problem is Clogged intake tube, Clogged suction
strainer, or Worn spray gun nozzle: empty the tank and flush the sprayer with
water as directed in the section, “Operation – Step Four”.
- In order to avoid accidental exposure to chemicals, never attempt to
unclog the intake tube or suction strainer, or service the spray gun nozzle,
until the tank has been emptied and the sprayer flushed with water.
4. Disconnect
power/relieve
pressure
Disconnect power to the sprayer and be sure all system pressure is relieved
by squeezing the gun trigger.
5. Perform repairs
Follow the directions provided in the troubleshooting table to repair the
sprayer.
NOTE: Never try to unclog the sprayer nozzle by blowing through it.
6. Test after
servicing
After servicing, ALWAYS test the sprayer for leaks with plain water before
using.
PROBLEM
CAUSE
SOLUTION
Pump will not turn on
Bad electrical connection
Check battery connections.
Short in wires
Check condition of wires.
Motor hooked to battery
incorrectly
Ensure red wire is connected to positive
battery terminal. If not, correct wiring,
then remove pump head and tighten
offset bearing.
Low pressure
Worn spray gun nozzle
Replace spray gun.
Improper pressure adjustment
Tighten pressure adjustment knob.
Low flow
Clogged intake tube
Remove obstruction.
Clogged suction strainer
Clean suction strainer.
Obstruction in inlet/outlet valves
Clean inlet/outlet valves.
Leak in the system
Tighten leaking hose clamps or fittings.
Note: A reserve, clean container capable of holding at least 16 gallons should be kept for use when the
sprayer tank needs to be emptied temporarily for repairs. It is advisable to purchase a reserve tank
suitable for pesticide storage from Northern Tool and Equipment for use in these circumstances. The
container should be properly labeled as to its contents if it is used.
Before attempting to service the sprayer:
31
Page 32

Specifications
Electrical System Requirements
Electrical connection……………….
12 VDC
Amp draw from pump……………...
15.0 Amps
Sprayer Specifications
Maximum GPM…………………….
2.0 GPM
Continuous Pressure………………..
200 PSI
Pressure Adjustment………………..
0-200 PSI
Tank Maximum Capacity…………..
16 Gallons
Overall Dimensions………………...
34.0”L x 14.5”W x 20.5”H
Dry Weight / Weight full of water….
60 lb. / 188 lb.
Component Materials*
Tank............................…
Polyethylene, EPDM
Suction Tube...............…
Polypropylene, PVC, Stainless Steel
Hose............................…
PVC
Pump...........................…
Polypropylene, Viton, Sanoprene
Valves.........................…
PVC, Buna-N
Gun and Nozzle..........…
Nylon, Polyacetal
*Before using any chemical, check to ensure the chemical is compatible with all materials in the system.
The manufacturer reserves the right to make improvements in design and/or
changes in specifications at any time without incurring any obligation to install
them on units previously sold.
Any Questions, Comments, Problems or Parts Orders
Call NorthStar Product Support 1-800-270-0810
32
Page 33

Exploded View – 282737 – Rev. K
Item
Part#
Description
Qty
Item
Part#
Description
Qty
1
781088
Spray gun
1 21
5250
Switch
1 2 30746
Hose clamp
10 22
5253
Insulated female spade
2 3 30290
420” Gun hose
1 23
37694
Remote switch 2-way connector
1 4 35118
Pressure gauge
1 24
37693
2-Way connector
1 5 37652
200 PSI Pressure regulator
1 25
777461
Positive battery clamp, red
1 6 30290
3/8” Hose, 12”
1 26
777462
Negative battery clamp, black
1 7 30290
3/8” Hose, 12”
1 27
778036
Hitch mount
1 8 5329
Hose barb tee
1 28
778038
Tongue
1 9 30160
1/2” Hose, 27”
1 29
52035
Gun clip
1
10
777119
Large hose clamp
2 30
777110
Hose guide
1
11
30290
3/8” Hose, 12”
1 31
777358
Large gun clip
1
12
779389
Suction tube
1 32
778190
Cart base
1
13
782491
16 Gallon tank
1 33
35203
Suction strainer
1
14
37679
3/8” Hose barb
1 34
5232
Rubber washer
1
15
37678
Ball valve
1 35
37680
Drain cap
1
16
82061
#10-24 x 1” Screw
4 36
2278
Tire 2 17
37659
Pumptec Pump Series 114
1
37
778192
Axle
1
18
778143
Tank lid
1
38
305200
Locking Collar
2
19
34026
Switch bracket
1 779319
Billboard decal
1
20
35363
Velcro
2
33
Page 34

This page has intentionally been left blank.
34
Page 35

Limited Warranty
Dear Valued Customer:
The NorthStar Product you just purchased is built with the finest material and craftsmanship. Use this product
properly and enjoy the benefits from its high performance. By purchasing a NorthStar product, you show a desire
for quality and durability. Like all mechanical equipment this unit requires a due amount of care. Treat this unit
like the high quality piece of machinery it is. Neglect and improper handling may impair its performance. Please
thoroughly read the instructions and understand the operation before using your product.
Limited Warranty
NorthStar shall warranty any piece of equipment manufactured, or parts of equipment manufactured, to be free from
defects in material or workmanship for a period of 2 years for noncommercial/nonrental use and a period of 90 days
for commercial/rental use from the date of purchase by user.
NorthStar shall warranty any wear item, including, but not limited to, valves, seals, pump diaphragms, hoses, and
filter elements to be free from defects in material or workmanship for a period of 90 days from the date of purchase
by user. This warranty applies to the original purchaser of the equipment and is non transferable. Verification of
purchase is the responsibility of the buyer. Parts will be replaced or repaired at no charge, except when the
equipment has failed due to lack of proper maintenance. Any misuse, abuse, alteration or improper installation or
operations will void warranty. Determining whether a part is to be replaced or repaired is the sole decision of
NorthStar.
NOTE: Some services performed by parties other than NorthStar may void warranty.
This warranty covers parts only. It will not provide for replacement of complete products due to defective parts.
Components not manufactured by NorthStar are guaranteed by their manufacturer and can be serviced at factoryauthorized locations near you. Any costs incurred due to replacement or repair of items outside of a NorthStar
approved facility is the responsibility of the buyer and not covered under warranty. NorthStar can supply you with
the service center location in your area.
This warranty specifically excludes the following; failure of parts due to damage caused by accident, fire, flood,
windstorm, acts of God, applications not approved by NorthStar in writing, corrosion caused by chemicals, use of
replacement parts which do not conform to manufacturer’s specifications, and damage caused by vandalism.
Additional exclusions: loss of running time, inconvenience, loss of income, or loss of use, including any implied
warranty of merchantability of fitness for a specific use.
Warranty does not cover items subject to normal wear such as tires, receptacles or any part subject to direct physical
contact by the public. This warranty does not cover any personal injury or damage to surrounding property caused
by failure of any part.
This warranty is in lieu of any other warranty expressed or implied and NorthStar assumes no other responsibility or
liability outside that expressed within this warranty.
Please fill in the following information and have it on hand when you call in on a warranty claim.
Customer Number: ______________________________________________________________
Date of Purchase: _______________________________________________________________
NorthStar Serial Number: ________________________________________________________
Item Number: __________________________________________________________________
35
Page 36

®
Manufactured by
Northern Tool + Equipment Co.,
2800 SouthCross Drive West
P.O. Box 1499 Burnsville, MN 55337-0499
36
 Loading...