

Page 1
INSTRUCTION MANUAL
Photoelectric Sensor
Digital Mark Sensor
LX-100
CME-LX100 No.2137-00
Thank you very much for using SUNX products. Please read this Instruction
Manual carefully and thoroughly for the correct and optimum use of this
product. Kindly keep this manual in a convenient place for quick reference.
٨
Never use this product as a sensing device for personnel
protection.
٨
In case of using sensing devices for personnel protec-
WARNIN
1
SPECIFICATIONS
Item
Setting distance
Supply voltage
Current consumption
Teaching input
Output 1
(OUT)
Output operation
Short-circuit protection
Output 2 (Inversion output)
(OUT)
Output operation
Short-circuit protection
Response time
Operation indicator
MODE indicator
Digital display
Sensitivity setting
Fine sensitivity adjustment function
Timer function
Protection
Ambient temperature
Ambient humidity
Emitting element
Material
Cable
Weight
Notes: 1)
2)
tion, use products which meet standards, such as
G
OSHA, ANSI or IEC etc., for personnel protection applicable in each region or country.
Type
NPN output
Model
No.
PNP output
10mm r 3mm
12 to 24V DC+/-10%˴Ripple P-P10% or less
Normal mode: 750mW or less (Current consumption 30mA or less at 24V supply voltage)
EOC mode: 600mW or less (Current consumption 25mA or less at 24V supply voltage)
<NPN output type>
Low (ON): 0 to 2V DC
Source current 0.5mA or less
Input impedance 10kǡ approx.
High (OFF): 5V to +V DC, or open
<NPN output type>
NPN open-collector transistor
Max. sink current: 50mA (Note 1)
Applied voltage: 30V DC or less
(between output 1 and 0V)
Residual voltage: 1.5V or less
㨇at 50mA (Note 1) sink current㨉
Mark mode: Light-ON/Dark-ON Auto-setting method on teaching,
Color mode: Coincidence-ON/
Incorporated
<NPN output type>
NPN
open-collector transistor
Max. sink current: 50mA
Applied voltage: 30V DC or less
(between output 2 and 0V)
Residual voltage: 1.5V or less
(at 50mA sink current)
<PNP output type>
PNP
open-collector transistor
Max. source current: 50mA
Applied voltage: 30V DC or less
(between output 2 and +V)
Residual voltage: 1.5V or less
(at 50mA source current)
Inverted operation of the output 1
Incorporated
Mark mode: 45Ǵs or less, Color mode: 150Ǵsorless
Orange LED (lights up when output 1 is ON)
'RUN': Green LED, 'TEACH', 'ADJ', 'COLOR', 'TIMER', 'PRO': Yellow LED
4 digits red LED display
Mark mode: 2-level teaching/Full-auto teaching, Color mode: 1-level teaching
Incorporated
Incorporated OFF-delay timer/ON-delay timer, switchable either effective or ineffective
IP67 (IEC)
-10 to +55 (No dew condensation or icing allowed), Storage: -20 to +70
35 to 85% RH, Storage: 35 to 85% RH
Red/green/blue LED
Enclosure: PBT, Display: Polycarbonate, Operation buttons: Silicon rubber, Lens: Glass
0.2mm25-core cabtyre cable, 2m long
120g approx. 55g approx.
The connector type LX-101غ-Z is 100mA.
The connecting cable is not supplied as an accessory for the connector type
LX-101غ-Z. Make sure to use the optional cables with connector below:
CN-24B-C2 (Straight type, 4-core, Cable length: 2m) CN-24BL-C2 (Elbow type, 4-core, Cable length: 2m)
CN-24B-C5 (Straight type, 4-core, Cable length: 5m) CN-24BL-C5 (Elbow type, 4-core, Cable length: 5m)
Connector typeCable type
LX-101-ZLX-101
LX-101-P-ZLX-101-P
<PNP output type>
High (ON): 5V to +V DC
Sink current0.5mA or less
Input impedance 10kǡ approx.
Low (OFF): 0 to 0.6V DC, or open
<PNP output type>
PNP open-collector transistor
Max. source current: 50mA (Note 1)
Applied voltage: 30V DC or less
(between output 1 and +V)
Residual voltage: 1.5V or less
㨇at 50mA (Note 1) source current㨉
Non-coincidence-ON
2
CAUTIONS
٨
Make sure that the power supply is off while wiring.
٨
Take care that wrong wiring will damage the sensor.
٨
Verify that the supply voltage variation is within the rating.
٨
Take care that if a voltage exceeding the rated range is applied, or if an AC
power supply is directly connected, the sensor may get burnt or damaged.
٨
In case noise generating equipment (switching regulator, inverter motor, etc.) is used in the vicinity of this product, connect the frame ground
(F.G.) terminal of the equipment to an actual ground.
٨
If power is supplied from a commercial switching regulator, ensure that the frame
ground (F.G.) terminal of the power supply is connected to an actual ground.
٨
Do not use during the initial transient time (0.5 sec.) after the power
supply is switched on.
٨
Take care that short-circuit of the load or wrong wiring may burn or damage the sensor.
٨
Do not run the wires together with high-voltage lines or power lines or put
them in the same raceway. This can cause malfunction due to induction.
٨
Take care that the sensor is not directly exposed to fluorescent light
from a rapid-starter lamp or a high frequency light device.
٨
If the surface of the sensing object has a shine,
mount the sensor inclining approx. 10 to 15 degrees
against the sensing object.
٨
Do not touch the lens of the sensor by hand directly. If
the lens becomes dirty, wipe it off with a soft cloth gently.
٨
When the inside lens is steamed up, unscrew the
lens to get rid of the condensation.
٨
For LX-101-غ-Z, b
٨
Extension up to total 100m is possible with 0.3mm2, or more, cable.
e sure to use the optional cable with connector.
However, in order to reduce noise, make the wiring as short as possible.
٨
This sensor is suitable for indoor use only.
٨
Do not use this sensor in places having excessive vapor, dust, etc., or
where it may come in direct contact with water, or corrosive gas.
٨
Take care that the product does not come in direct contact with water,
oil, grease, or organic solvents, such as, thinner, etc.
٨
Make sure that stress by forcible bend or pulling with
76N, or more, force
is not applied directly to the sensor cable joint.
٨
This sensor cannot be used in an environment containing inflammable
or explosive gases.
٨
Never disassemble or modify the sensor.
3
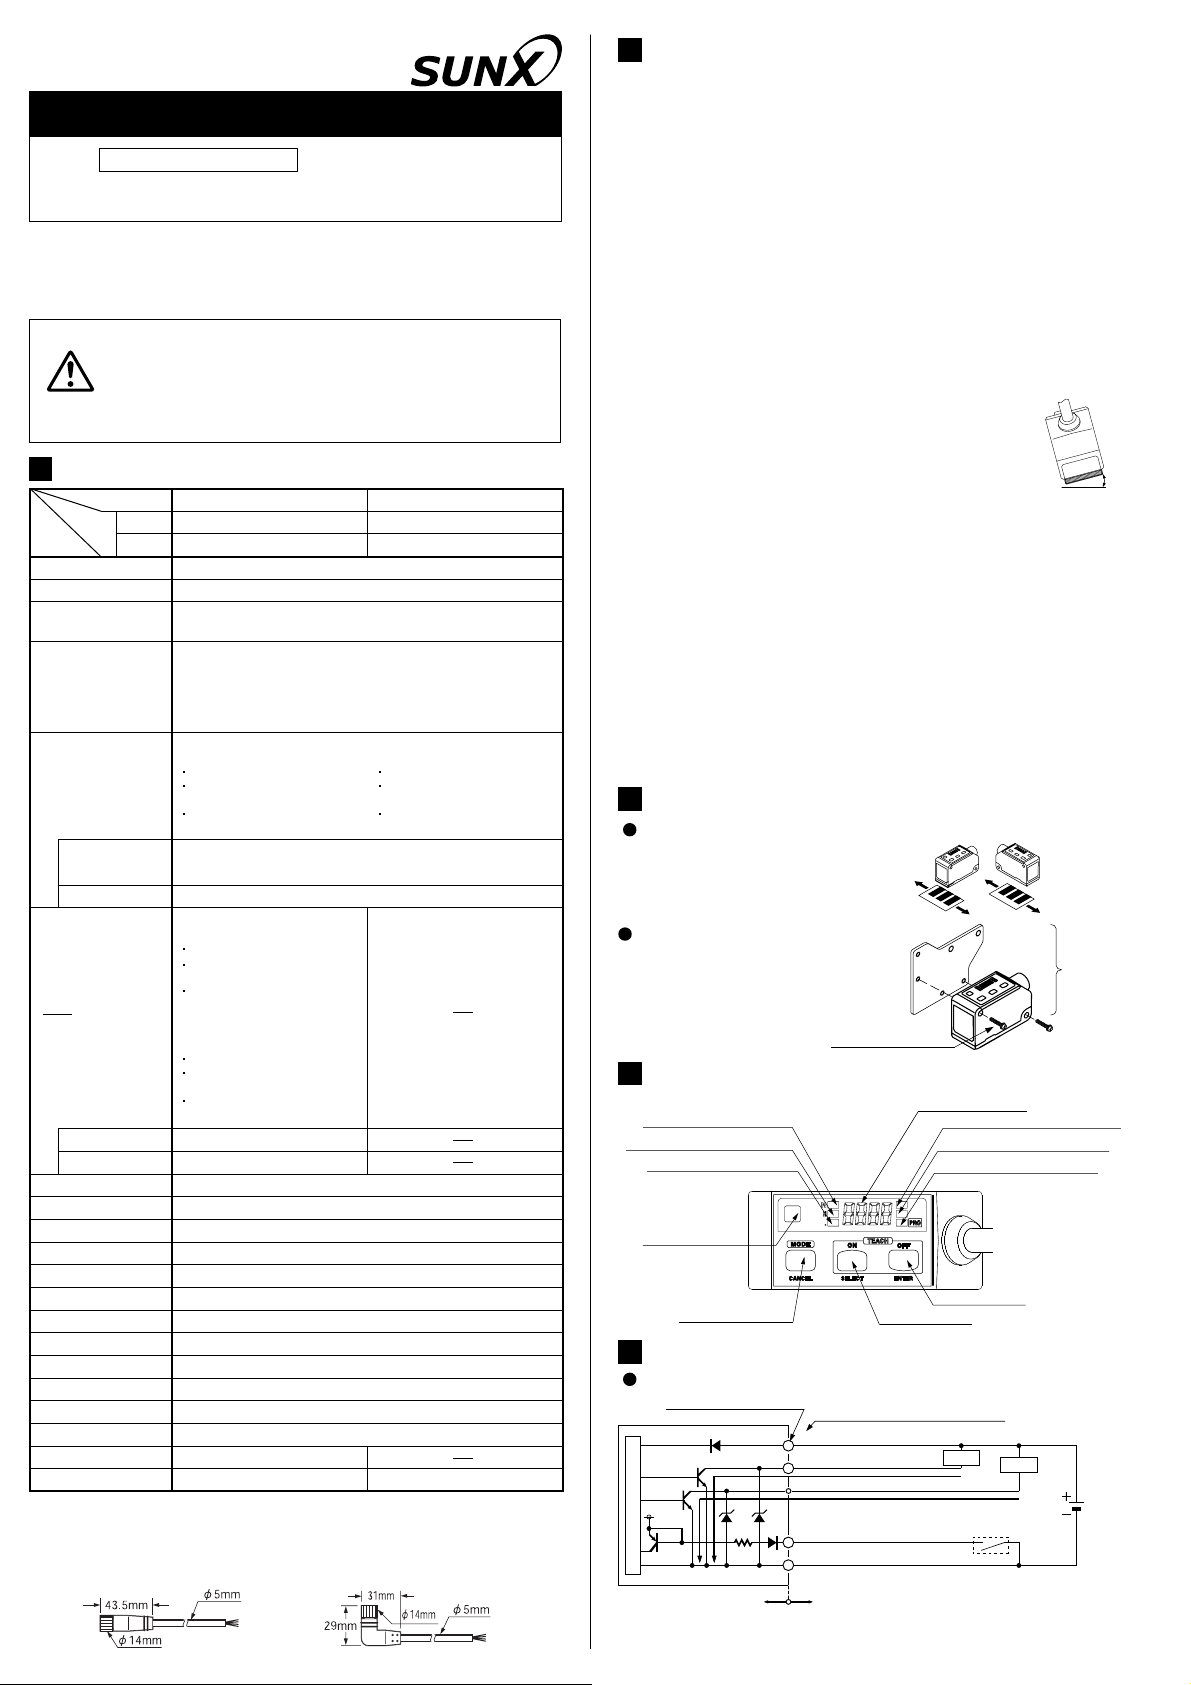
MOUNTING
Care must be taken regarding the
sensor mounting directrion with
respect to the object's direction of
movement.
The tightening torque should be
0.8N䊶m or less.
M4 screw with washers
4
PART DESCRIPTION
MODE indicator / RUN (Green)
MODE indicator / TEACH (Yellow)
MODE indicator / ADJ (Yellow)
RUN
TEACH
Operation indicator
(Orange)
MODE/CANCEL key
5
I/O CIRCUIT DIAGRAMS
OPE.
ADJ.
Good
Digital display (Red)
MODE indicator /
MODE indicator /
MODE indicator /
COLOR
TIMER
OFF/ENTER key
ON/SELECT key
No good
Do not make the
sensor detect an
object in this direction because it
may cause unstable operation.
Sensor mounting
bracket
MS-LX-1
(Optional)
COLOR (Yellow)
TIMER
(Yellow)
PRO
(Yellow)
NPN output type
Terminal No. of Connector
D1
Tr1
Tr2
5V
Sensor circuit
Notes: 1)2)The output 2 is not incorporated to connector type LX-101غ-Z.
The current of the connector type LX-101غ-Z is 100mA.
D2
10kǡ
Color code of cable type/cable with
connector
(Brown) +V
1
(Black) Output 1
4
(White) Output 2
ZD1Z
(Pink) Teaching input
2
(Blue) 0V
D2
3
(Note 1)
Users' circuitInternal circuit
Load
50mA max. (Note 2)
50mA max. (Note 2)
*1
Load
12 to 24V DC
r10%
10䌾15㫦
Page 2
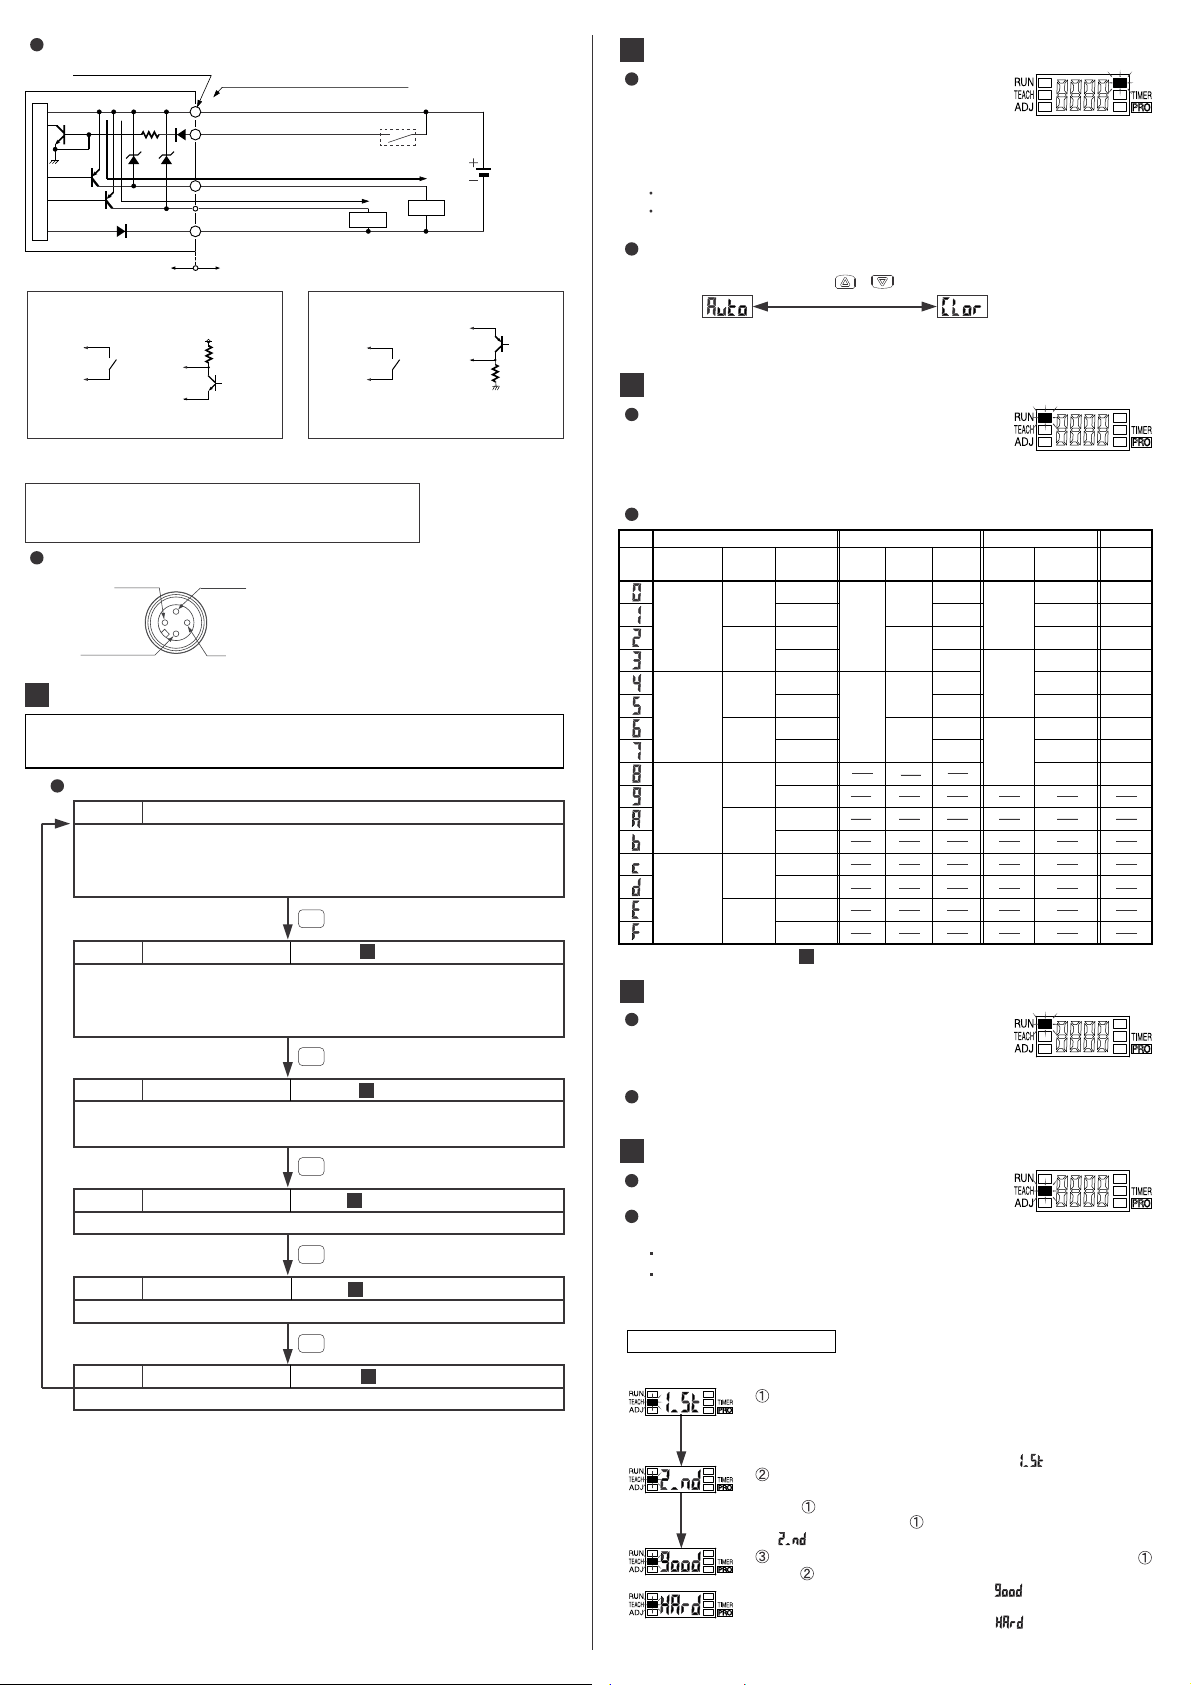
PNP output type
Terminal No. of Connector
10kǡ
0V
Sensor circuit
*1
Non-voltage contact or NPN transistor input
Low(ON):0to2VDC
High (OFF): 5V to +V, or open
Notes: 1)2)The inverting output is not incorporated to connector type LX-101غ-Z.
The current of the connector type LX-101غ-Z is 100mA.
Symbols...D1,D2, D3, D4: Reverse supply polarity protection diode
ZD3Z
Tr3
Tr4
D4
or
D1,ZD2,ZD3,ZD4: Surge absorption zener diode
Z
T
r1,Tr2: NPN output transistor
T
r3,Tr4: PNP output transistor
Color code of cable type/cable with
connector
(Brown) V
1
D3
(Pink) Teaching input
2
D4
4
(Black) Output 1
(White) Output 2
3
(Blue) 0V
Users' circuitInternal circuit
+V
50mA max. (Note 2)
(Note 1)
*2
50mA max. (Note 2)
Load
Load
*2
Non-voltage contact or PNP transistor input
or
High (ON):5V to +V DC
Low (OFF): 0 to 0.6V DC, or open
12 to 24V DC
r10%
0V
Layout of connector pin of connector type LX-101غ-Z
14
+V
2
Teaching input
6
OPERATION PROCEDURE
Output 1
3
0V
Before performing teaching or each detail setting, perform the setting of either
mark mode or color mode with mark/color mode setting of NAVI mode.
NAVI mode
At mark mode setting:
Indicates the absolute value of emitting amount. It is possible to indicate the
relative value (percent value) against threshold value.
At color mode setting:
Indicates color matching degree with relative value.
At mark mode setting:
Sets the threshold value by '2-level teaching' or 'full-auto teaching'.
At color mode setting:
Sets the threshold value by '1-level teaching'.
ADJ
At mark mode setting: Allows fine adjustment of the threshold value.
At color mode setting: Allows adjustment of sensing tolerance value.
COLOR
Sets mark mode or color mode.
TIMER
Configures operation of the timer.
PRO
Allows various detailed settings to be configured.
RunRUN
TeachingTEACH
Adjust
Mark/Color mode setting
Timer operation setting
PRO
Press
10
Refer to ' TEACHING MODE'.
Press
Refer to ' ADJUST MODE'.
11
Press
7
Refer to ' MARK/COLOR MODE SETTING '.
Press
12
Refer to ' TIMER OPERATON SETTING MODE'.
Press
Refer to ' PRO MODE'.
13
7
MARK/COLOR MODE SETTING
This product enables to select the applicable
mark/color mode depending on the using purpose.
Before carrying out teaching or each setting,
set
the mark/color mode in COLOR of NAVI mode.
Since the available functions differ depending on the selected mode, take
care when setting mode. (The factory setting of this product is mark mode.)
Mark mode: Detects incident light intensity at receiving part.
Color mode:
Detects color ratio of the sensing object. This mode can
be used when desired to detect a specific color only.
The mode is selected using either 'ON/SELECT key' or 'OFF/ENTER key'.
OFF
ON
orPress
SELECT
ENTER
(Mark mode) (Color mode)
Press 'MODE/CANCEL key' to confirm.Note :
8
DIRECT CODE DISPLAY
When MODE indicator/RUN (green) lights up, the
direct code is displayed on the digital display by
pressing 'MODE/CANCEL key' for more than 2
seconds. (The direct code is turned off when stop pressing the 'MODE/CANCEL key'. )
The current setting status can be confirmed at a glance with the direct code.
Direct code
Mark/color
Direct
mode
code
Note :
9
KEY LOCK FUNCTION
1st figure 2nd figure 3rd figure 4thfigure
Operation
Sensing
mode
mode
FINE
COARSE
FINE
COARSE
FINE
COARSE
FINE
COARSE
FINE
COARSE
FINE
COARSE
FINE
COARSE
FINE
COARSE
13
(BLUE)
(RED)
Light-ON
Dark-ON
Light-ON
Dark-ON
Light-ON
Dark-ON
Coincidence ON
Incoincidence ON
Mark mode
(GREEN)
Mark mode
Mark mode
Color mode
For details, refer to ' PRO MODE '.
Display
mode
STANDARD
---P
(Displayed
in percentage)
Eco
mode
OFF
ON
OFF
ON
Display inverting mode
OFF
ON
OFF
ON
OFF
ON
OFF
ON
Key lock
mode
FULL lock
RUN
TEACHIN
RUN
ADJUST
Timer
mode
Without timer
OFF-Delay
ON-Delay
Without timer
OFF-Delay
ON-Delay
Without timer
OFF-Delay
ON-Delay
The key operation is locked by pressing both
'MODE/CANCEL key' and 'OFF/ENTER key' for
more than 2 seconds simultaneously when
MODE indicator/RUN (green) lights up.
In order to release the key lock, press both 'MODE/CANCEL key' and
'OFF/ENTER key' for more than 2 seconds again.
10
TEACHING MODE
The teaching setting can be done when MODE
indicator/TEACH (yellow) lights up.
T
he applicable teaching for mark mode and color mode
is differed in the teaching mode as shown below:
Mark mode : Sets either 2-level teaching or full-auto teaching.
Color mode: Sets 1-level teaching
Note :
If stable sensing becomes impossible by environmental effect etc., carry out
the teaching again.
In case of mark mode
<In case of 2-level teaching>
COLOR
Press 'MODE/CANCEL key' to light up 'MODE indicator/TEACH (yellow)'.
When setting the output to ON with mark, press 'ON/SELECT
key' while aligning the beam spot, and when setting the
output to OFF, press 'OFF/ENTER key. ' ' blinks.
COLOR
Align the beam spot to the base (non-mark area) of the mark
to be detected. When 'ON/SELECT key' is pressed at the
step , press 'OFF/ENTER key, and when 'OFF/ENTER
key' is pressed at the step , press 'ON/SELECT key'.
' ' blinks.
COLOR
The threshold value is set at the mid-value between the step
or
and .
In case stable sensing is possible :
COLOR
In case stable sensing is impossible:
' ' is displayed on the
digital display.
' ' is displayed on the
digital display.
Timer
period
1ms
2ms
5ms
10ms
20ms
50ms
100ms
200ms
500ms
COLOR
COLOR
COLOR
COLOR
Page 3

<In case of full-auto teaching>
COLOR
Press 'MODE/CANCEL key' to light up MODE indicator/TEACH (yellow).
are moving on the assembly line, align the beam spot to the
position where the mark on the object passes through.
When setting the output to on for the side with less incident
COLOR
light intensity, press 'ON/SELECT key', and when setting
the output to on for the side with more incident light intensity, press 'OFF/ENTER key' for more than 2 seconds. '˴˴ '
is displayed, and sampling begins.
COLOR
In case stable sensing is possible :
or
Note:
If the output is gained on the opposite side against the side desired to the step ,
carry out the teaching again. In this case, note that, when carrying out the teaching
for this measurement, press the different key from the one previously pressed.
Besides, since the output 2 (invertion output) is incorporated in the cable type
LX-101غ, the output can be inverted. Refer to ' ˴OUTPUT 2 (INVERSION
OUTPUT) (OUT) (For LX-101غtype only)' for the details.
In case stable sensing is impossible:
COLOR
In the state where the sensing objects
' ' is displayed on the
digital display.
' ' is displayed on the
digital display. Slow
down the speed of the
assembly line, and carry
out the teaching again.
15
In case of color mode
<In case of 1-level teaching>
11
ADJUST MODE
COLOR
Press 'MODE/CANCEL key' to light up MODE indicator/TEACH (yellow).
When setting the output to ON with mark, press 'ON/SELECT
key', and when setting the output to OFF, press 'OFF/ENTER
key'. ' ' blinks.
COLOR
In case stable sensing is possible :
or
In case stable sensing is impossible:
COLOR
' ' is displayed on the
digital display.
' ' is displayed on the
digital display, and the setting value is reset to the
pre-teaching value.
The following settings can be done when MODE
indicator/ADJ (yellow) lights up.
In case of mark mode: Fine adjustment of threshold value
The threshold value is fine adjustable using 'ON/SELECT key' or
'OFF/ENTER key'.
In case of color mode: Set judging tolerance
The judging tolerance setting is the function that can change the judging
tolerance with respect to the taught reference color.
Even if the tolerance is changed, the information of the reference
color taught earlier does not change.
The judging tolerance value increases with 'ON/SELECT key', and
decreases with 'OFF/ENTER key'.
Press 'MODE/CANCEL key' to confirm.
Notes: 1)
The numerical value indicated in the digital display should be used as a reference.
2)
12
TIMER OPERATION SETTING MODE
The setting for whether the timer is
used or not can be done when MODE
indicator/TIMER (yellow) lights up.
The initial value of each timer function
is 20ms.
Refer to ' PRO MODE' for the setting
13
delay timer, OFF-delay timer and ONdelay timer
Press 'MODE/CANCEL key' to confirm.
Note:
(Without timer)
ON
SELECT
ON
SELECT
OFF
ENTER
(ON-delay)
<Time chart>
Sensing
Timer operation
Operation
Light-ON/coincident ON
Without timer
Dark-ON/incoincident ON
Light-ON/coincident ON
OFF-delay timer
Dark-ON/incoincident ON
Light-ON/coincident ON
ON-delay timer
Dark-ON/incoincident ON
condition
Timer period: T=1 to 500ms 9-step variable
(OFF-delay)
OFF
ENTER
COLOR
COLOR
ON
SELECT
Beamreceived
Beaminterrupted
ON
OFF
ON
OFF
ON
OFF
ON
OFF
ON
OFF
ON
OFF
13
PRO MODE
٨
The setting for whether PRO is used or not can
be done when MODE indicator/PRO˴(yellow)
lights up. For confirming each selected setting
item, press 'OFF/ENTER key'. After confirming
setting, the digital display flashes.
For canceling setting, press 'MODE/CANCEL key'.
ON
Press
SELECT
Sensing
(
setting
ON
Press
SELECT
Timer
(
setting
ON
Press
SELECT
Key lock
(
setting
ON
Press
SELECT
Display
(
setting
ON
Press
SELECT
Eco
(
setting
ON
Press
SELECT
Display inverting
(
mode setting
ON
Press
SELECT
Reset
(
setting
ON
Press
SELECT
Function
Sensing setting
Timer setting function
Key lock setting
Display setting
Eco setting
Display inverting mode setting
Reset setting
Press
Press
(
(Conf.)
Press
(
(Conf.)
Press
Press
(
Press
(
Press
Press
(
OFF
Press
Press
(
(Conf.)
Press
(Conf.)
Press
(Conf.)
Press
(
(Conf.)
Press
(Conf.)
ENTER
OFF
ENTER
Press to change the timer period.
OFF
ENTER
OFF
ENTER
OFF
ENTER
OFF
ENTER
OFF
ENTER
OFF
ENTER
OFF
ENTER
OFF
ENTER
OFF
ENTER
OFF
ENTER
OFF
ENTER
OFF
ENTER
Sensing level: Fine
ON
Press
SELECT
Sensing level: Coarse
ON
SELECT
(50ms) (500ms)(100ms) (200ms)(20ms)
Set full key lock.
ON
Press
SELECT
Set key lock except
for RUN adjust mode.
(RUN adjust)
Mark mode setting: Displays incident light intesity
Color mode setting: Displays color coincidence
ON
Press
SELECT
Mark mode setting: Displays relative value (percentage)
Color mode setting: Displays color coincidence
Eco setting: OFF
ON
Press
SELECT
Eco setting: ON
Notinvert the display
ON
Press
SELECT
Invert the display.
Not reset the settings.
ON
Press
SELECT
Reset the settings.(After resetting, the sensor goes back to RUN.)
Sets the sensing level (hysteresis).
Sets timer setting period by 9-steps.
Selects key lock function.
Selects display method of digital desplay.
Sets ON/OFF of eco mode.
Changes display direction of digital display.
Resets to factory setting.
(5ms) (2ms) (1ms)(10ms)
ON
Press
SELECT
Set key lock except
for RUN teaching mode.
(RUN teaching)
ON
Press
SELECT
Thisfunctionistoturnoffthedigital
(
display in RUN state.
Description
COLOR
(
Page 4

14
EXTERNAL TEACHING FUNCTION
This product incorporates the external teaching function. Take care that
the teaching methods for mark mode and color mode differ in the
external teaching function.
In case of mark mode
<2-level teaching>
(Timing chart)
Input external signal
aligning beam spot to
mark
<Full-auto teaching>
COLOR
COLOR
COLOR
COLOR
Align the beam spot to the mark to be detected in 'RUN
mode'.
Input the external signal for 20ms or more in step state.
(Do not input the external signal more than 2 sec. continuously.)
Align the beam spot to the base (non-mark area), and input
the external signal for 20ms or more.
Input external signal aligning
beam spot to base (non-mark
Space
1.5 sec
20ms or more 20ms or more
or more
area)
ON
OFF
Put the object on the assembly line at 'RUN mode' state.
Connector type / LX-101غ-Z
24
1.5
5
2535
5
3
15
57
47
Ǿ22
71.5
M12
2-Ǿ4.5
(mounting hole)
Ǿ14.4
9.4
COLOR
or
COLOR
When the external signal is input for 2 sec. or more, sampling
begins. When sampling finishes, the digital display flashes. If
' ' is displayed, slow down the line speed, and carry out
the teaching again.
(Timing chart)
2sec. or more
Start sampling
ON
OFF
When the full-auto teaching is used, the output operation is set to 'DARK-ON'.Note:
In case of color mode
<1-level teaching>
COLOR
COLOR
Align the beam spot to the mark to be detected in 'RUN
mode'.
Input the external signal for 20ms or more in step s
(Timing chart)
20ms or more
15
OUTPUT 2 (INVERSION OUTPUT) (OUT) (For LX-101غtype only)
ON
OFF
The LX-101غ cable type incorporates the output 2 (inversion output)(OUT).
For teaching, this function is convenient for inverting logic of LIGHT-ON /
DARK-ON (mark-mode), and coincidence-ON / incoincidence-ON (color mode).
When the output 2 is used, connect the output wire (output 2) to +V side
(0V side for PNP output type). When the output 2 is not used, be sure to
insulate it.
16
ERROR DISPLAY
٨ Take measurment for the error as shown below:
Display Error content
Shorten the load and flows overcurrent.
17
DIMENSIONS (Unit: mm)
Turn off the power supply and check the
load.
Remedy
Cable type / LX-101غ
24
1.5
5
57
47
tate.
٨ Sensor mounting bracket / MS-LX-1 (optional)
2-M50.8
45
40
4-M40.7
28r0.1
30
15
2-R5
47r0.1
72
57
39
2-R5
25r0.1
27
15
25r0.1
5
5
٨ Sensor mounting bracket / MS-LX-2 (optional)
21r0.1
30.4
2-R4.7
4.5
2-R5
10
20
4
R2
3-M50.8
928r0.1
41
2-M40.7
6
24
R4.7
4
R2
6
25r0.1
60
80
t3
27.2
3-R2
15
47r0.1
5.2
5
4-R2
47r0.1
57
t3
57
t3
35
25
5
3
Ǿ22
15
2-Ǿ4.5
(mounting hole)
SUNX Limited
http://www.sunx.co.jp/
Head Office
2431-1 Ushiyama-cho, Kasugai-shi, Aichi, 486-0901, Japan
Phone: +81-(0)568-33-7211 FAX: +81-(0)568-33-2631
Overseas Sales Dept.
Phone: +81-(0)568-33-7861 FAX: +81-(0)568-33-8591
May, 2004PRINTED IN JAPAN
 Loading...