

Panasonic Lumix DMC-GX1K, Lumix DMC-GX1X, Lumix DMC-GX1 Owner's Manual
PP
For USA and Puerto Rico assistance, please call: 1-800-211-PANA(7262) or,
contact us via the web at: http://www.panasonic.com/contactinfo
Basic Owner’s Manual
Digital Camera/
Lens Kit /Body
Model No. DMC-GX1X/DMC-GX1K
DMC-GX1
Before connecting, operating or adjusting this product, please read
the instructions completely.
More detailed instructions
on the operati on of this
camera are contained in
“Owner’s Manual for advanced features
(PDF format)” in the supplied CD-ROM.
Install it on your PC to read it.
VQT3T96
Dear Customer,
Date of Purchase
Dealer Purchased From
Dealer Address
Dealer Phone No.
Model No.
Serial No.
Thank you for choosing Panasonic!
You have purchased one of the most sophisticated and reliable products on the market
today. Used properly, we’re sure it will bring you and your family years of enjoyment.
Please take time to fill in the information on the below. The serial number is on the tag
located on the underside of your camera. Be sure to retain this manual as your
convenient camera information source.
Please note that the actual controls and components, menu items, etc. of your Digital
Camera may look somewhat different from those shown in the illustrations in this Owner’s
Manual.
Carefully observe copyright laws.
•
Recording of pre-r ecord ed t ape s or disc s or o ther p ublis hed o r br oadcas t mat er ial for pur pos es
other than your own private use may infringe copyright laws. Even for the purpose of private
use, recording of certain material may be restric ted.
A lithium ion battery that is recyclable powers the product you have
purchased. Please call 1-800-8-BATTERY for information on how to
recycle this battery.
Information for Your Safety
WARNING:
TO REDUCE THE RISK OF FIRE, ELECTRIC SHOCK OR PRODUCT DAMAGE,
DO NOT EXPOSE THIS APPARATUS TO RAIN, MOISTURE, DRIPPING OR
•
SPLASHING AND THAT NO OBJECTS FILLED WITH LIQUIDS, SUCH AS VASES,
SHALL BE PLACED ON THE APPARATUS.
•USE ONLY THE RECOMMENDED ACCESSORIES.
•DO NOT REMOVE THE COVER (OR BACK); THERE ARE NO USER SERVICEABLE
PARTS INSIDE. REFER SERVICING TO QUALIFIED SERVICE PERSONNEL.
THE SOCKET OUTLET SHALL BE INSTALLED NEAR THE EQUIPMENT AND SHALL
BE EASILY ACCESSIBLE.
VQT3T96 (ENG)
2

∫ Product identification marking
DMC-GX1
Product Location
Digital Camera Bottom
Battery charger Bottom
THE FOLLOWING APPLIES ONLY IN THE U.S.A.
FCC Note:
This equipment has been tested and found to comply with the limits for a Class B digital
device, pursuant to Part 15 of the FCC Rules. These limits are designed to provide
reasonable protection against harmful interference in a residential installation. This
equipment generates, uses, and can radiate radio frequency energy and, if not installed
and used in accordance with the instructions, may cause harmful interference to radio
communications. However, there is no guarantee that interference will not occur in a
particular installation. If this equipment does cause harmful interference to radio or
television reception, which can be determined by turning the equipment off and on, the
user is encouraged to try to correct the interference by one or more of the following
measures:
•
Reorient or relocate the receiving antenn a.
•Increase the separation between the equipme nt and receiver.
•Connect the equipment into an outlet on a c ircuit different from that to which the receiver is
connected.
•Consult the dealer or an experienced radio/TV technician for help.
FCC Caution: To assure continued compliance, follow the attached installation
instructions and use only shielded interface cables with ferrite core when
connecting to computer or peripheral devices.
Any changes or modifications not expressly approved by the party responsible for
compliance could void the user’s authority to operate this equipment.
Declaration of Conformity
Trade Name: Panasonic
Model No.: DMC-GX1
Responsible party: Panasonic Corporation of North America
One Panasonic Way, Secaucus, NJ 07094
Support Contact:
Panasonic Consumer Electronics Company 1-800-211-PANA (7262)
This device complies with Part 15 of the FCC Rules. Operation is subject to the
following two conditions: (1) This device may not cause harmful interference, and (2)
this device must accept any interference received, including interference that may
cause undesired operation.
(ENG) VQT3T96
3
∫ About the battery pack
CAUTION
Battery pack (Lithium ion battery pack)
•
Use the specified unit to recharge the battery pack.
•Do not use the bat tery pack with equipment other than the specified unit.
•Do not get dirt, sand, liquids, or other foreign matter on the terminals.
•Do not touch the plug terminals (i and j) with met al objects.
•Do not disassemble , remodel, heat or throw into fire.
If any electrolyte should come into contact with your hands or clothes, wash it off
thoroughly with water.
If any electrolyte should come into contact with your eyes, never rub the eyes. Rinse
eyes thoroughly with water, and then consult a doctor.
CAUTION
Danger of explosion if battery is incorrectly replaced. Replace only with the same or
equivalent type recommended by the manufacturer. Dispose of used batteries
according to the manufacturer’s instructions.
•
Do not heat or expose to flame.
•Do not leave the batte ry(ies) in an automobile exposed to direct sunlight for a long period of
time with doors and windows closed.
Warning
Risk of fire, explosion and burns. Do not disassemble, heat above 60 xC (140 oF) or
incinerate.
∫ About the battery charger
CAUTION!
DO NOT INSTALL OR PLACE THIS UNIT IN A BOOKCASE, BUILT-IN CABINET OR
IN ANOTHER CONFINED SPACE. ENSURE THE UNIT IS WELL VENTILATED. TO
PREVENT RISK OF ELECTRIC SHOCK OR FIRE HAZARD DUE TO
OVERHEATING, ENSURE THA T CURTAINS AND ANY OTHER MATERIALS DO
NOT OBSTRUCT THE VENTILATION VENTS.
Battery charger
This battery charger operates on AC between 110 V and 240 V.
But
•
In the U.S.A. and Can ada, the battery charger must be connected to a 120 V AC power
supply only.
•When connect i ng to an AC supply outs ide of the U.S.A. or Canada, use a plug adaptor to
suit the AC outlet configuration.
VQT3T96 (ENG)
4
∫ Cautio ns f o r Use
•
Do not use any other USB con nection cables except the supplied one.
•Always use a genuine Pana so nic HDMI mini cable (RP-CDHM15, RP-CDHM30; optional).
Part numbers: RP-CDHM15 (1.5 m) (5 feet), RP-CDHM30 (3.0 m) (10 feet)
•Always use a genuine Panasonic AV cable (DMW-AVC1; optional).
•Always use a genuine Panasonic remote s hutter (DMW-RSL1; opt i onal).
Keep this unit as far away as possible from electromagnetic equipment (such as
microwave ovens, TVs, video games etc.).
•
If you use this unit on top of or near a TV, the pictures and/or sound on this unit may be
disrupted by elect r omagnetic wave radiation.
•Do not use this unit near cell phones becaus e doing so may result in noise adversely affecting
the pictures and/or sound.
•Recorded data may be damaged, or pi ctures may be distorted , by st rong magnetic fields
created by speakers or large motors.
•Electromagnetic wave radiation generated by microproc essors may adversely affect this unit,
disturbing the pictures and/or so und.
•If this unit i s adversely affected by electromagnetic equipment and stops functioning properly,
turn this unit off and remove the battery or disconnect AC adaptor (DMW-AC8PP; optional).
Then reinsert t he battery or reconnect AC adaptor and turn this unit on.
Do not use this unit near r a dio transmitters or high-voltage lines.
If you record near radio transmitters or high-v oltage lines, the recorded pictures and/or sound
•
may be adversely affected.
-If you see this symbolInformation on Disposal in other Countries outside the European Union
This symbol is only valid in the European Union.
If you wish to discard this product, please contact your local
authorities or dealer and ask for the correct method of disposal.
(ENG) VQT3T96
5

Contents
Informatio n for Your Safety............................. ................... .................................... ...........2
Care of the camera...........................................................................................................7
Standard Accessories.......................... ..................... .......................................... ..............8
Names and Functions of Main Parts...............................................................................10
Changing the Lens..........................................................................................................13
Attaching the Shoulder Strap..........................................................................................14
Charging the Battery.......................................................................................................15
• Charging...................................................................................................................15
Inserting and Removing the Card (optional)/the Battery............................................ .... .16
About the Card................................................................................................................17
• About cards that can be used with this unit..............................................................17
Setting Date/Time (Clock Set)........................................................................................18
Selecting the Recording Mode........................................................................................19
Taking a Still pictu re ............................... ................... ................................... ..................21
• Taking pictures using the Touch Shutter function ....................................................21
Taking Pictures using the Automatic Function (Intelligent Auto Mode) ..........................22
• Recording using Intelligent Auto Plus Mode.............................................................23
Taking Pictures with Defocus Control Function..............................................................24
Recording Motion Pictures....... .................................................... ...................................25
• Recording still pictures while recording motion pictures...........................................25
Compensating the Exposure ................................................................ .. .... .... .. ......... .... .26
Easily set a suitable exposure (one push AE)................................................................27
Using the function button................................................................................................27
Playing Back Pictures/Motion Pictures...........................................................................28
• Playing Back Pictures...............................................................................................28
• Playing Back Motion Pictures...................................................................................29
Deleting Pictures.............................................................................................................30
Switching the display of the LCD Monitor.......................................................................31
Setting the Menu.............................................................................................................32
Setting the Quick Menu..................................................................................................33
Types of menus..............................................................................................................34
About the supplied software ...........................................................................................40
• Installing supplied software ......................................................................................41
Reading the Owner’s Manual (PDF format)....................................................................42
Specifications..................................................................................................................43
Digital Camera Accessory System .................................................................................49
Digital Camera Accessory Order Form (For USA and Puerto Rico Customers) ............ 51
Limited Warranty (ONLY FOR U.S.A. AND PUERTO RICO)......................... ................52
Useful Informa tio n. .................................... ................................... ...................................55
VQT3T96 (ENG)
6
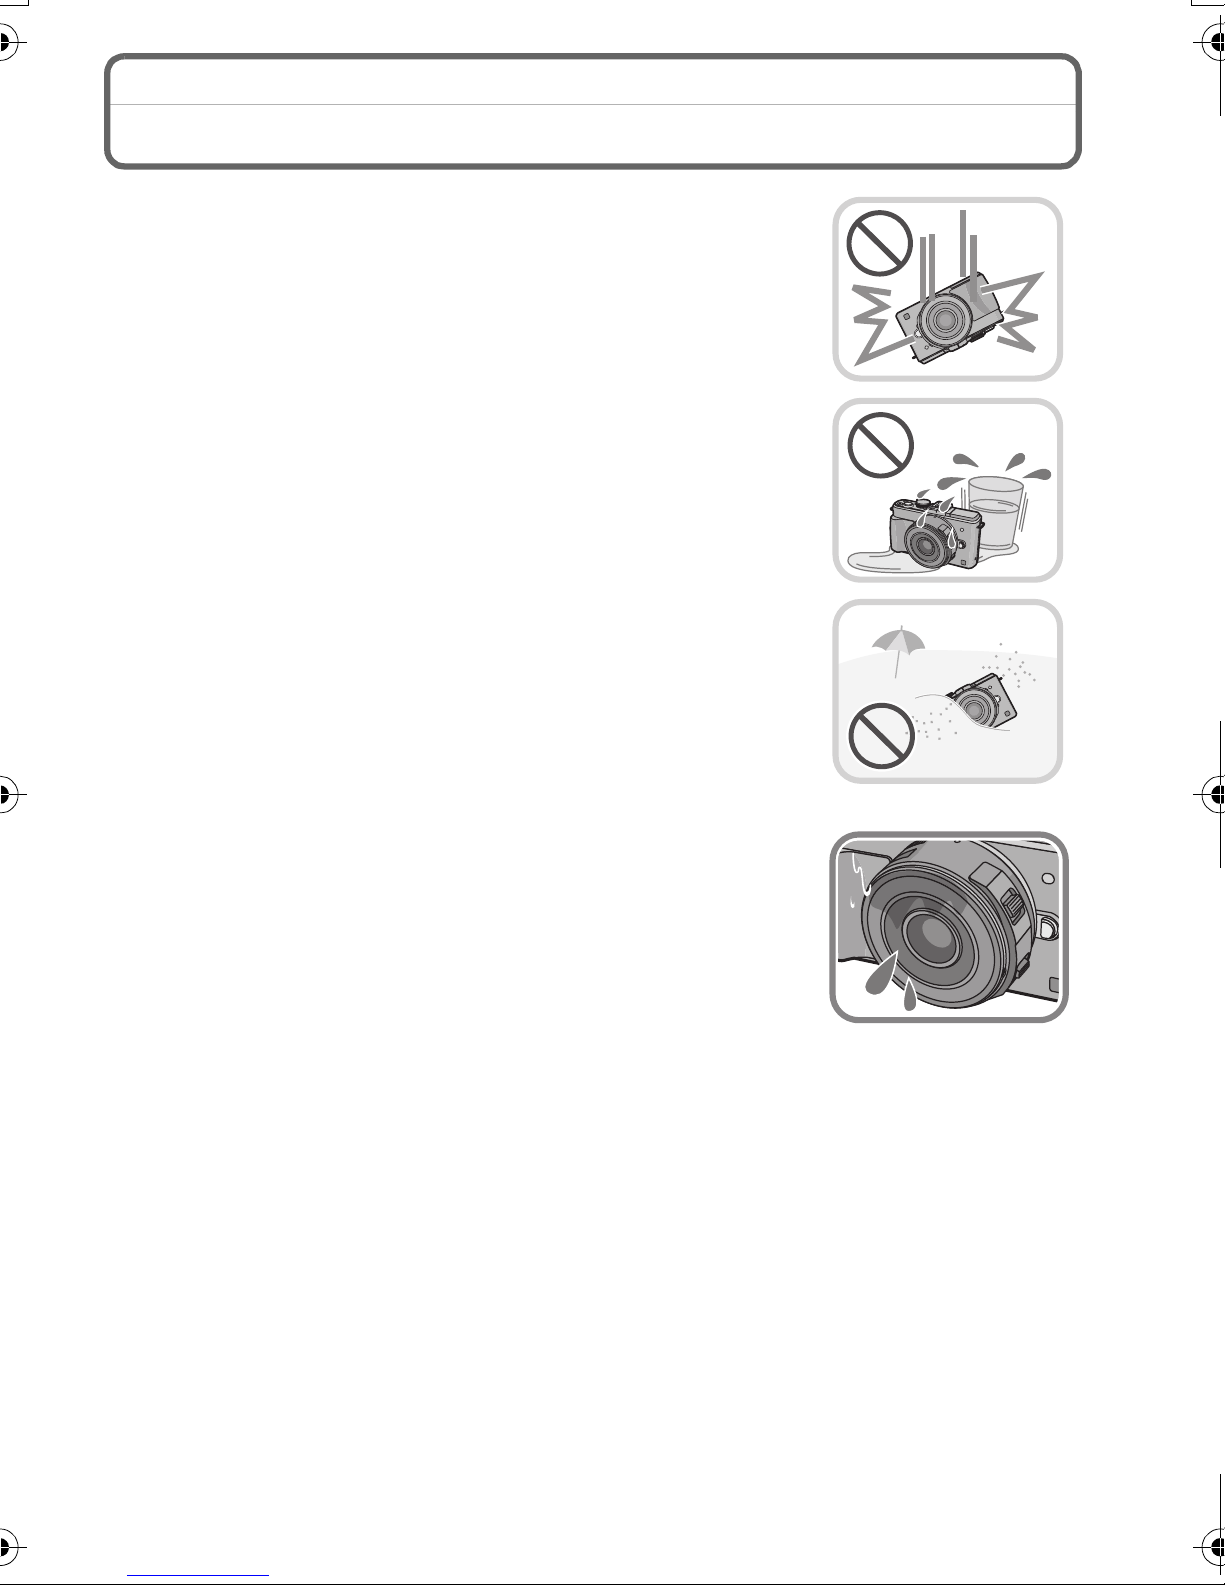
Care of the camera
Do not subject to strong vibration, shock, or pressure.
The lens, LCD monit or , o r externa l case ma y be damage d if used in
•
below conditions. It may also malfunction or ima ge may not be
recorded.
–If you drop or hit the camera.
–If you pres s ha r d on the lens or th e LCD monitor.
This camera is not dust/splash/water proof.
Avoid using the camera in a location with a lot of dust,
water, sand, etc.
•
Liquid, sand and other foreign material may get into the space
around the lens, buttons, etc. Be particularly careful since it may
not just cause malfunctions, but it may become unrepairable.
–Do not use in places with a lot of sand or dust.
–Do not use in places where water can come into contact wi th this
unit such as when using it on a rainy day or on the beach.
Do not place your hands inside the mount of the digital
camera body. Since the sensor unit is a precision
apparatus, it may cause a malfunction or damage.
∫ About Condensa tion (When the lens or the LC D mon itor
is fogged up)
•
Condensation oc curs when the ambient tempe rature or humidity
changes. Be caref ul of condensation since it causes lens and LCD
monitor stains, fungus and camera malfunction.
•If condensation occurs, turn the camera off and leave it for about
2 hours. The fog will disappea r naturally when the temperatur e of
the camera becomes close to the ambient temperature.
(ENG) VQT3T96
7

Standard Accessories
Check that all the accessories are supplied before using the camera.
Product numbers correct as of October 2011. These may be subject to change.
1 Digital Camera Body
(This is referred to as camera body in this Owner’s Manual.)
2 Interchangeable Lens
“LUMIX G X VA RIO PZ 14–42 mm/F3.5–5.6 ASPH./POWER O .I.S.”
(This is referred to as lens in this Owner’s Manual. This is attached to the camera
body at the time of purchase.)
3 Lens Cap
(This is attached to the interchangeable lens at the time of purchase.)
4 Lens Rear Cap
5 Body Cap
6 Interchangeable Lens
“LUMIX G VARIO 14–42 mm/F3.5–5.6 ASPH./MEGA O.I.S .”
(This is referred to as lens in this Owner’s Manual.)
7 Lens Hood
8 Lens Cap
(This is attached to the interchangeable lens at the time of purchase.)
9 Lens Rear Cap
(This is attached to the interchangeable lens at the time of purchase.)
10 Body Cap
(This is attached to the camera body at the time of purchase.)
11 Body Cap
(This is attached to the camera body at the time of purchase.)
12 Battery Pack
(Indicated as battery pack or battery in the text)
Charge the battery before use.
13 Battery Charger
(Indicated as battery charger or charger in the tex t)
14 USB Connection Cable
15 CD-ROM
•
Software:
Use it to install the so ftwar e to your PC.
16 CD-ROM
•
Owner’s Manual
17 Hot shoe cover
(This is attached to the camera body at the time of purchase.)
18 Shoulder Strap
¢1
¢1
¢1 At purchase, these parts are supplied fitted together.
•
SD Memory Card, SDHC Memory Card and SDXC Memory Card are indicated as
•The card is optional.
•Description in this owner’s manual is based on the interchangeable lens (H-PS14042).
•If any accessories are lost, customers in the USA and Puerto Rico should cont act Panasonic’s
parts department at 1-800-833-9626 for further information about ob taining replacement parts.
VQT3T96 (ENG)
8
card
in the text.

DMW-BLD10PP
12 13 14
15
VKF4970 VFC4765VFF0866
16 17 18
DE-A93B
K1HY08YY0017
DMC-GX1X
2
3
VYF3443
H-PS14042
4
VFC4605
5
VKF4385
678 9
VYC1009 VYF3201 VFC4315H-FS014042
DMC-GX1K
3
10
VKF4385
DMC-GX1
4
11
VKF4385
1
2
¢2 Supplied in DMC-GX1X only
¢3 Supplied in
¢4 Supplied in
DMC-GX1K only
DMC-GX1 only
(ENG) VQT3T96
9
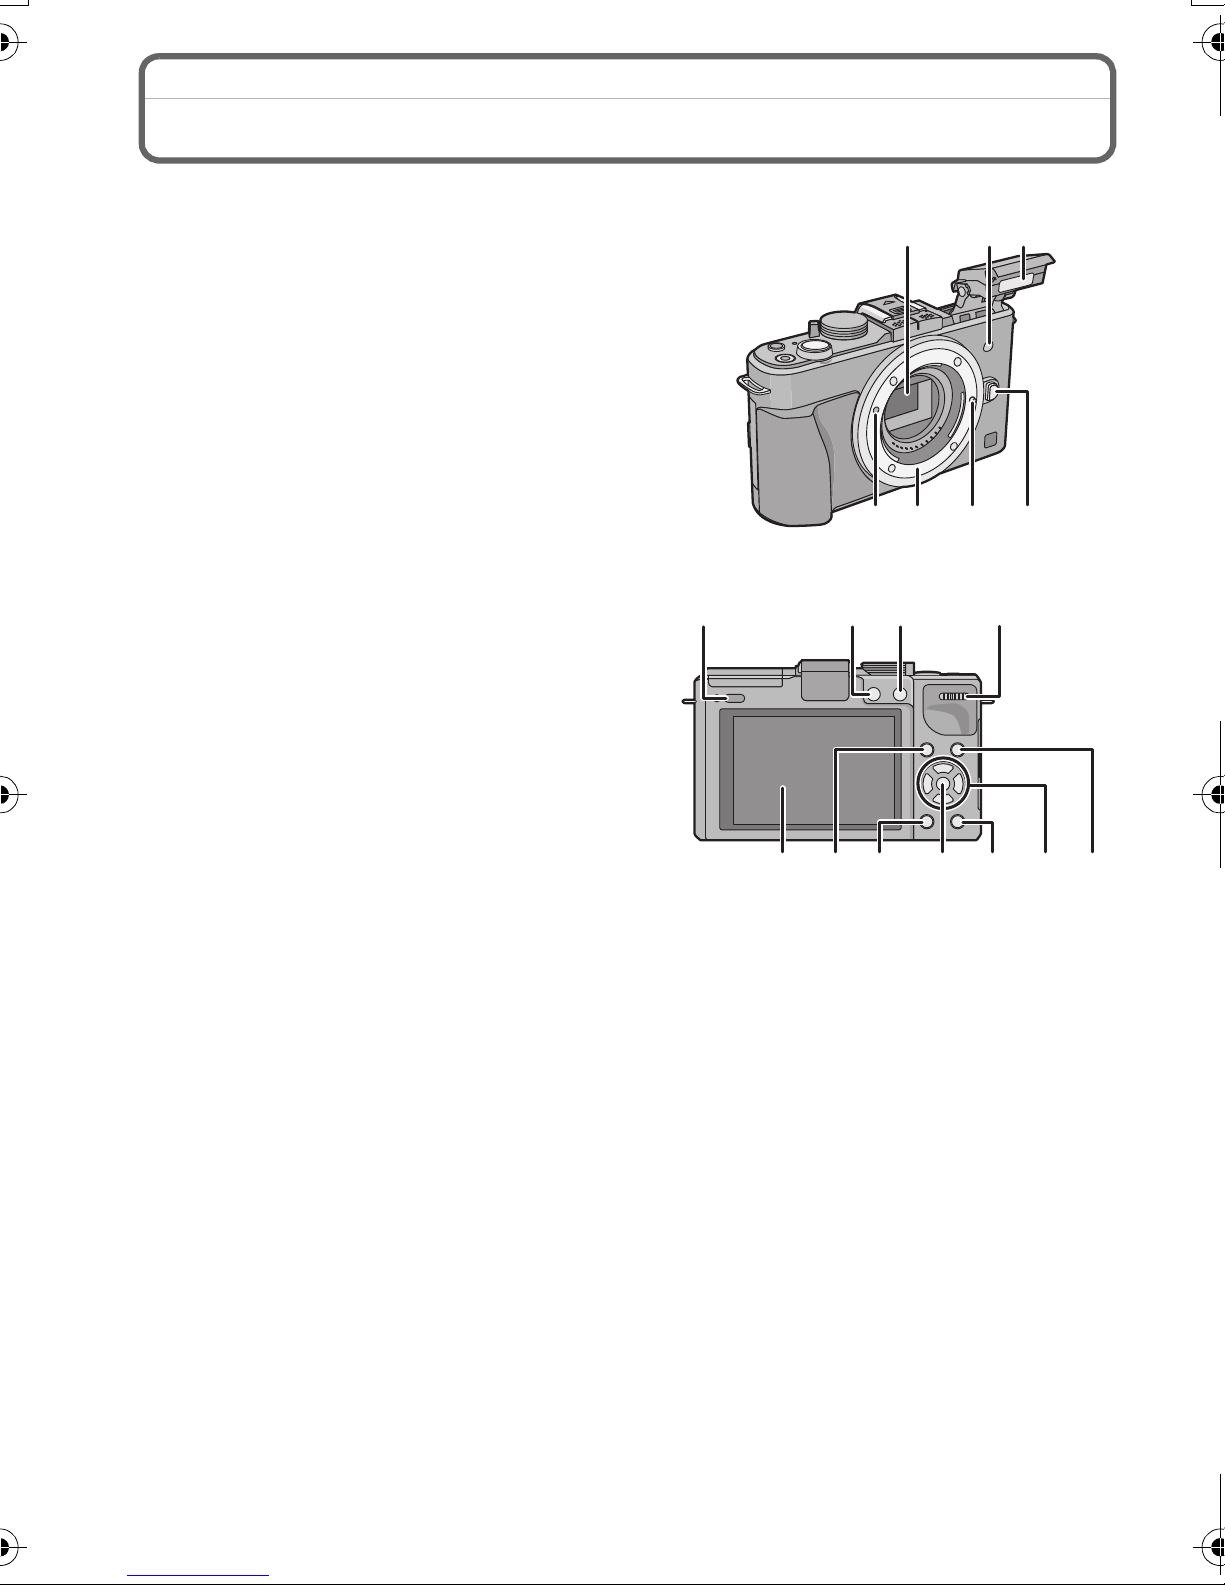
Names and Functions of Main Parts
89
12 13 14 18
11
15 1716
10
∫ Camera body
1 Sensor
2 Self-timer indicator/
AF Assist Lamp
3Flash
4 Lens fitting mark
5 Mount
6 Lens lock pin
7 Lens release button
8 Flash open button
9 Playback button
10 [AF/AE LOCK] button/
[Fn2] button
11 Rear dial
12 Touch screen/LCD monitor
13 [Fn1] button
14 [Q.MENU] button/
Delete/Return button
15 [MENU/SET] button
16 [AF/MF] bu tto n
17 Cursor buttons
3/ISO
1/WB (White Balance)
2/AF Mode button
4/[DRIVE MODE] button
This button in picture record mode will allow the user to select between the following
options.
Single/Burst/Auto bracket/Self-timer
18 [DIS P. ] b u t to n
1
23
4567
10
VQT3T96 (ENG)
19 Stereo microphone
23 24 25 26 27
19 2122
20
3435 3633
20 Mode dial
21 Shutter button
22 Motion picture button
23 Focus distance reference mark
24 Hot shoe cover
•
Keep the Hot Shoe Cove r out of reach of
children to prevent swallowing.
25 Camera ON/OFF sw itch
26 Status indicator
27 Intelligent Auto button
28 Speaker
•
Do not cover the speaker with your fingers,
etc.
29 Shoulder strap eyelet
Be sure to att ach the shoulder strap when
•
using the camera to ensure that you will not
drop it.
30 [REMOTE] socket
31 [HDMI] socket
32 [AV OUT/DIGITAL] socket
33 Tripod receptacle
34 Card/Battery door
35 DC coupler cover
•
When using an AC adaptor, ensure that the
Panasonic DC coupler (DMW-DCC9;
optional) and AC ad aptor (DMW-AC8PP;
optional) are used.
Do not attempt to use AC adaptor in other
devices.
• Always use a genuine Panasonic AC adaptor (DMW-AC8PP; optional).
• It is recommended to use a fully charged battery or AC adapto r when recording motion
pictures.
• If while recording motion pictures using th e AC adaptor and the power supply is cut off
due to a power out age or if the AC adaptor is disconnected etc., the motion picture being
recorded will not be recorded.
36 Release lever
28
29
30
31
32
(ENG) VQT3T96
11
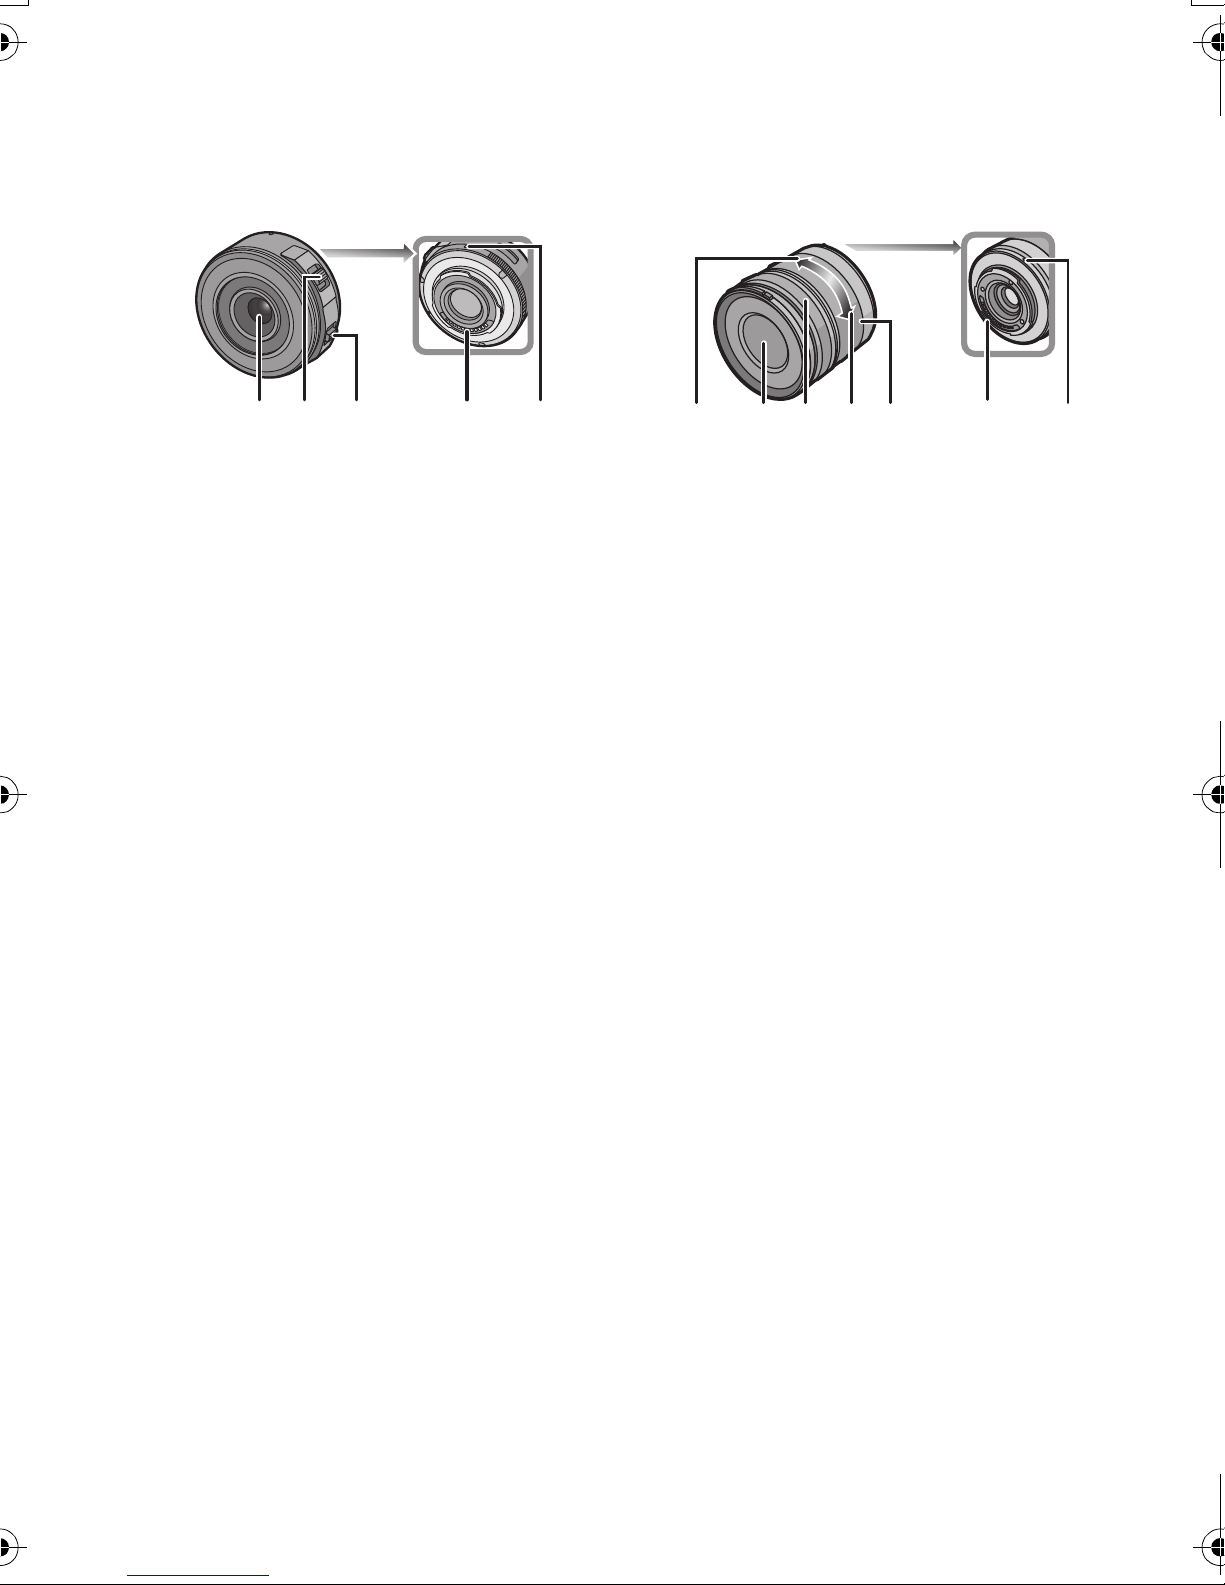
∫ Lens
40 41393837
42 37 43 44 45 40 41
H-PS14042
(LUMIX G X VARIO PZ 14–42 mm/
F3.5–5.6 ASPH./POW ER O.I.S .)
37 Lens surface
38 Zoom lever
39 Focus lever
40 Contact point
41 Lens fitting mark
42 Tele
43 Focus ring
44 Wide
45 Zoom ring
H-FS014042
(LUMIX G VARIO 14–42 mm/F3.5–5.6
ASPH./MEGA O.I.S.)
VQT3T96 (ENG)
12
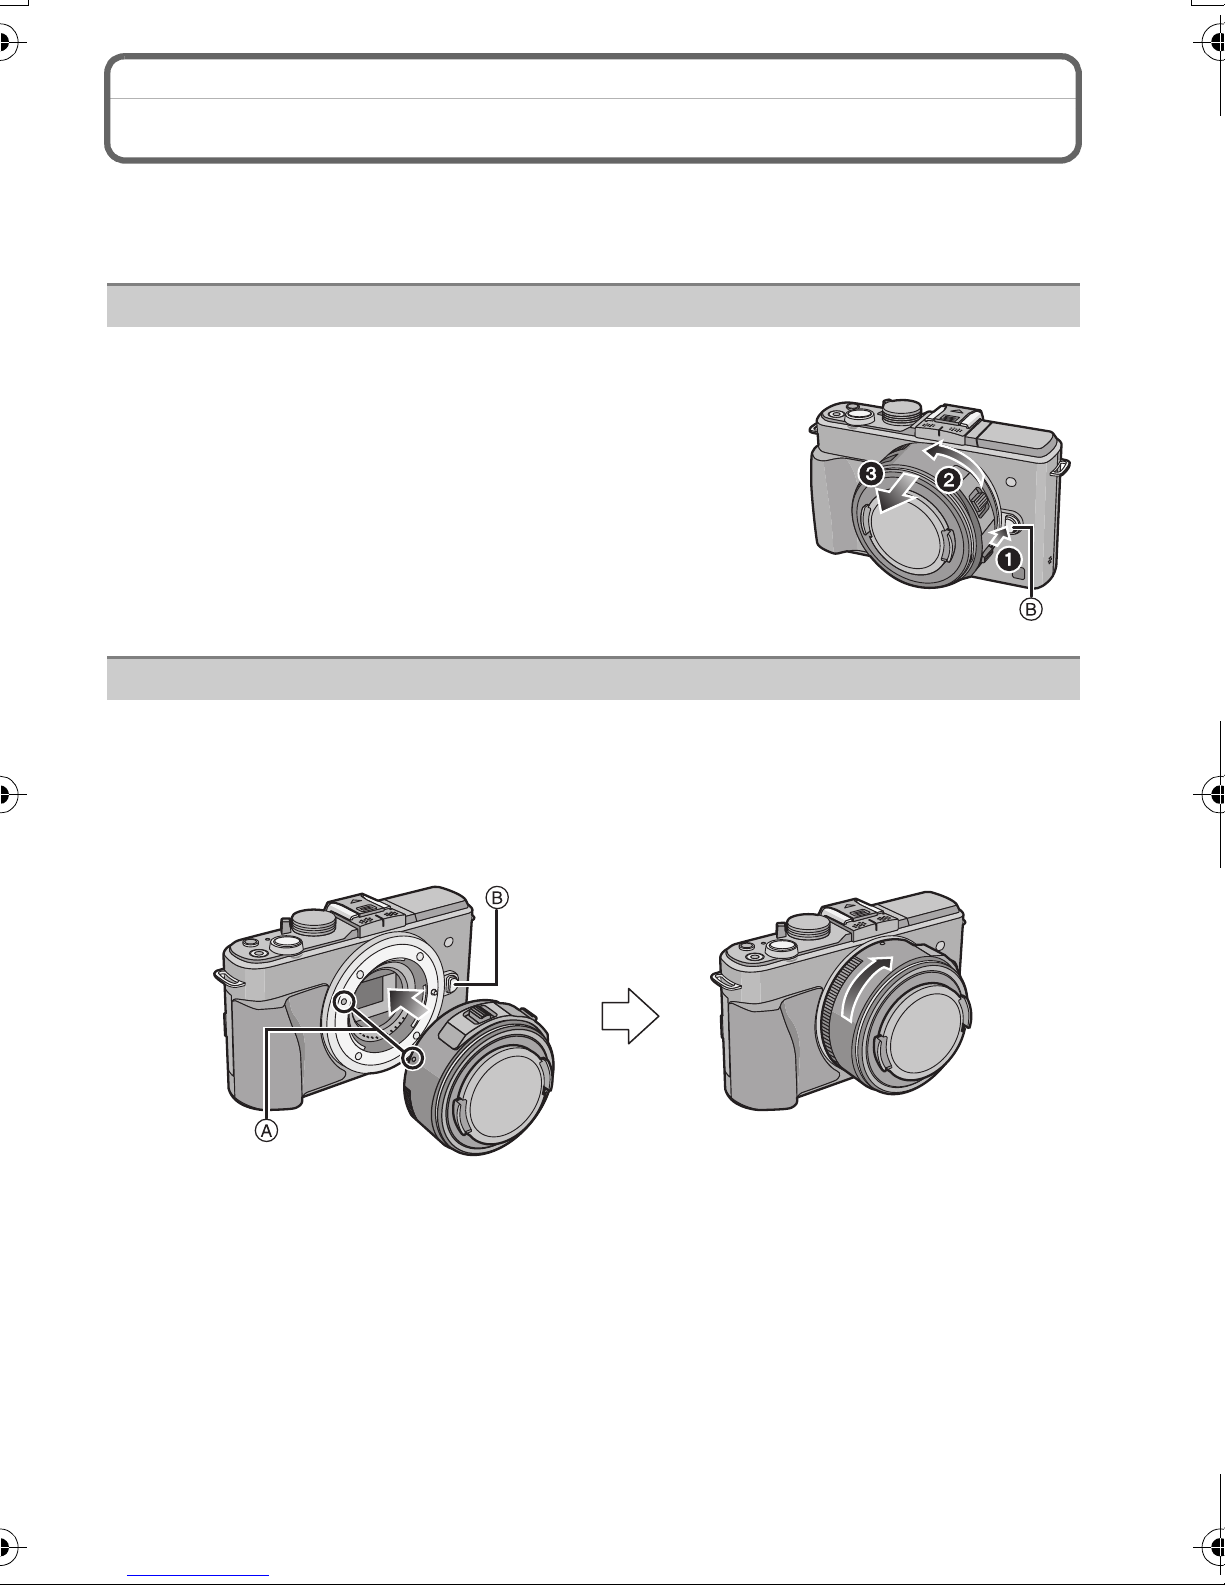
Changing the Lens
By changing the lens, you will increase your picture taking-options and further your
enjoyment of the camera. Change the lens using the following procedure.
•
Check that the camera is turned off .
Detaching the lens
Preparations: Attach the lens cap.
While pressing on the le ns rele as e butto n B, rotate
the lens toward the arrow until it stops and then
remove.
Attaching the lens
Preparations: Remove the lens rear cap from the lens.
•
If the body cap is fitted to the camera, remove it.
Align the lens fitting marks A (red marks) and then rotate the lens in the
direction of the arrow until it clicks.
•Do not press the lens release button B when you attach a lens.
(ENG) VQT3T96
13
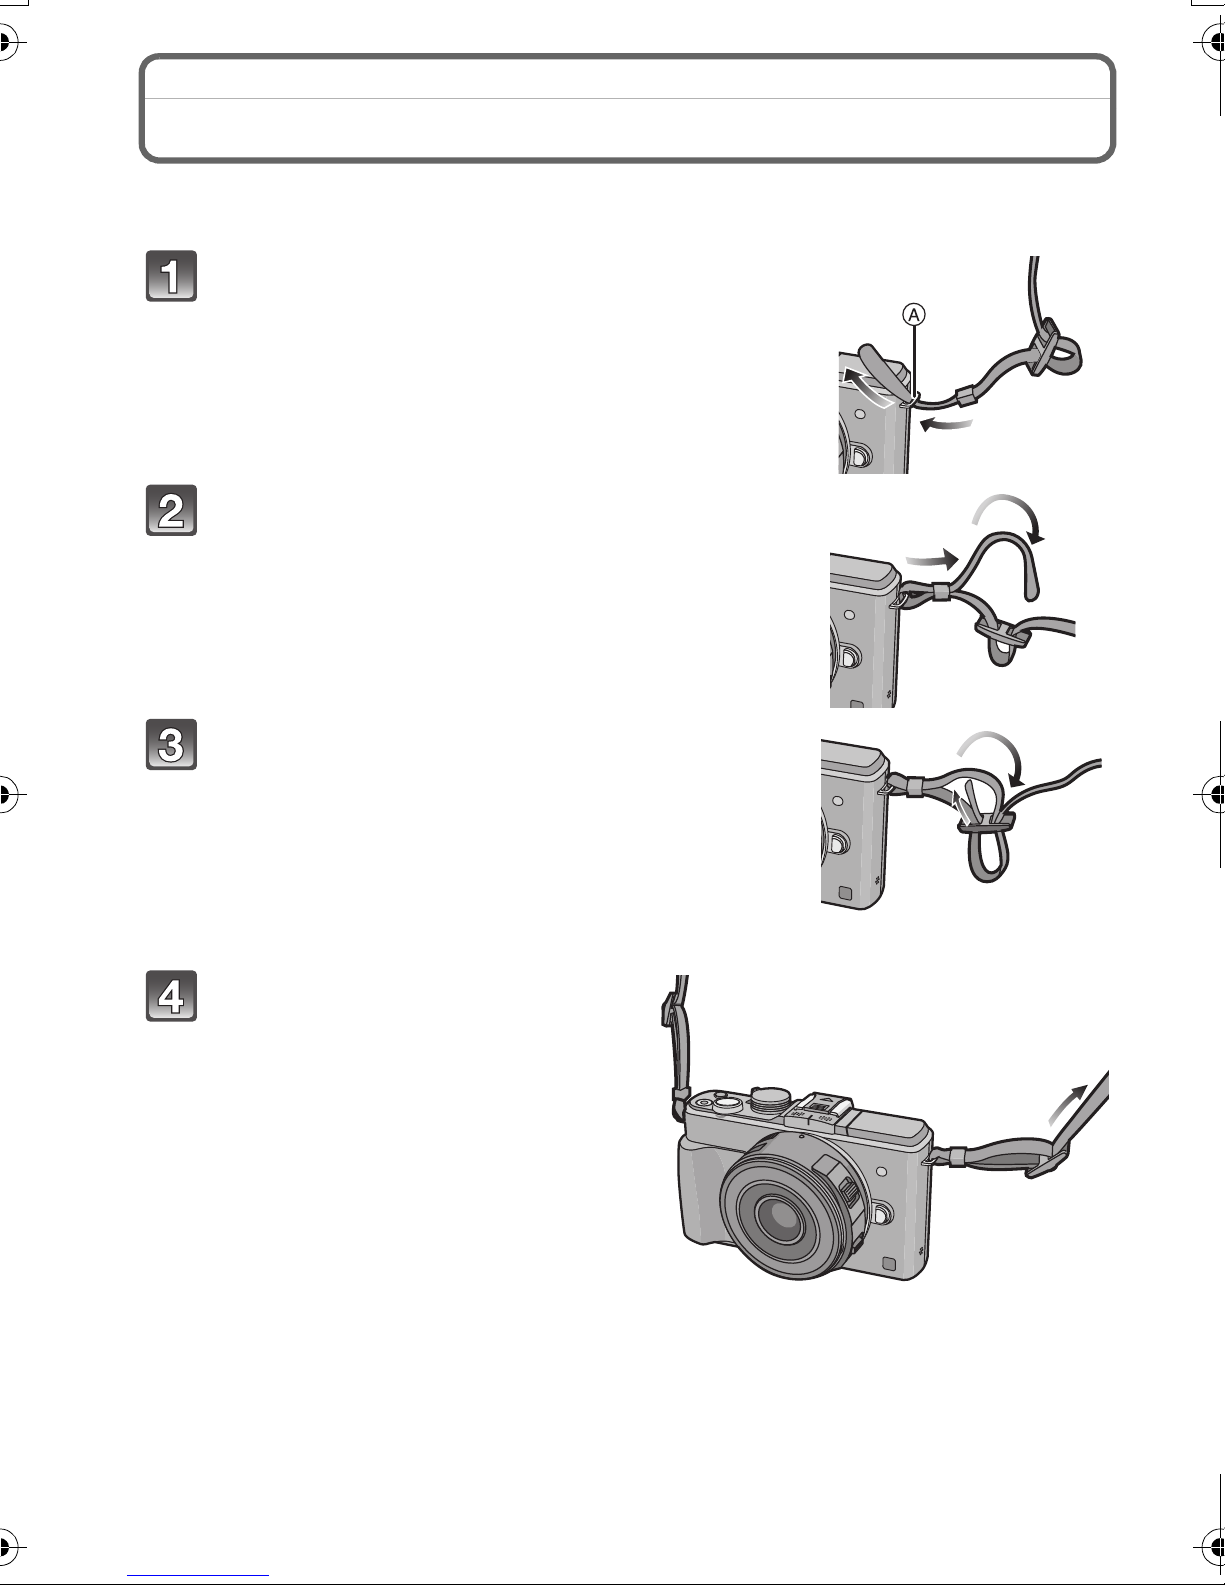
Attaching the Shoulder Strap
•We recommend attaching the shoulder strap when using the camera to prevent it from
dropping.
Pass the shoulder strap through the
shoulder strap eyelet on the camera body.
A:Shoulder strap eyelet
Pass the end of the shoulder strap through
the ring in the direction of the arrow and
then pass it through the stopper.
Pass the end of the shoulder strap through
the hole on the other side of the stopper.
Pull the other side of the
shoulder strap and then check
that it will not come out.
• Pe rform steps 1 to 4 and then attach
the other side of the shoulder strap.
VQT3T96 (ENG)
14
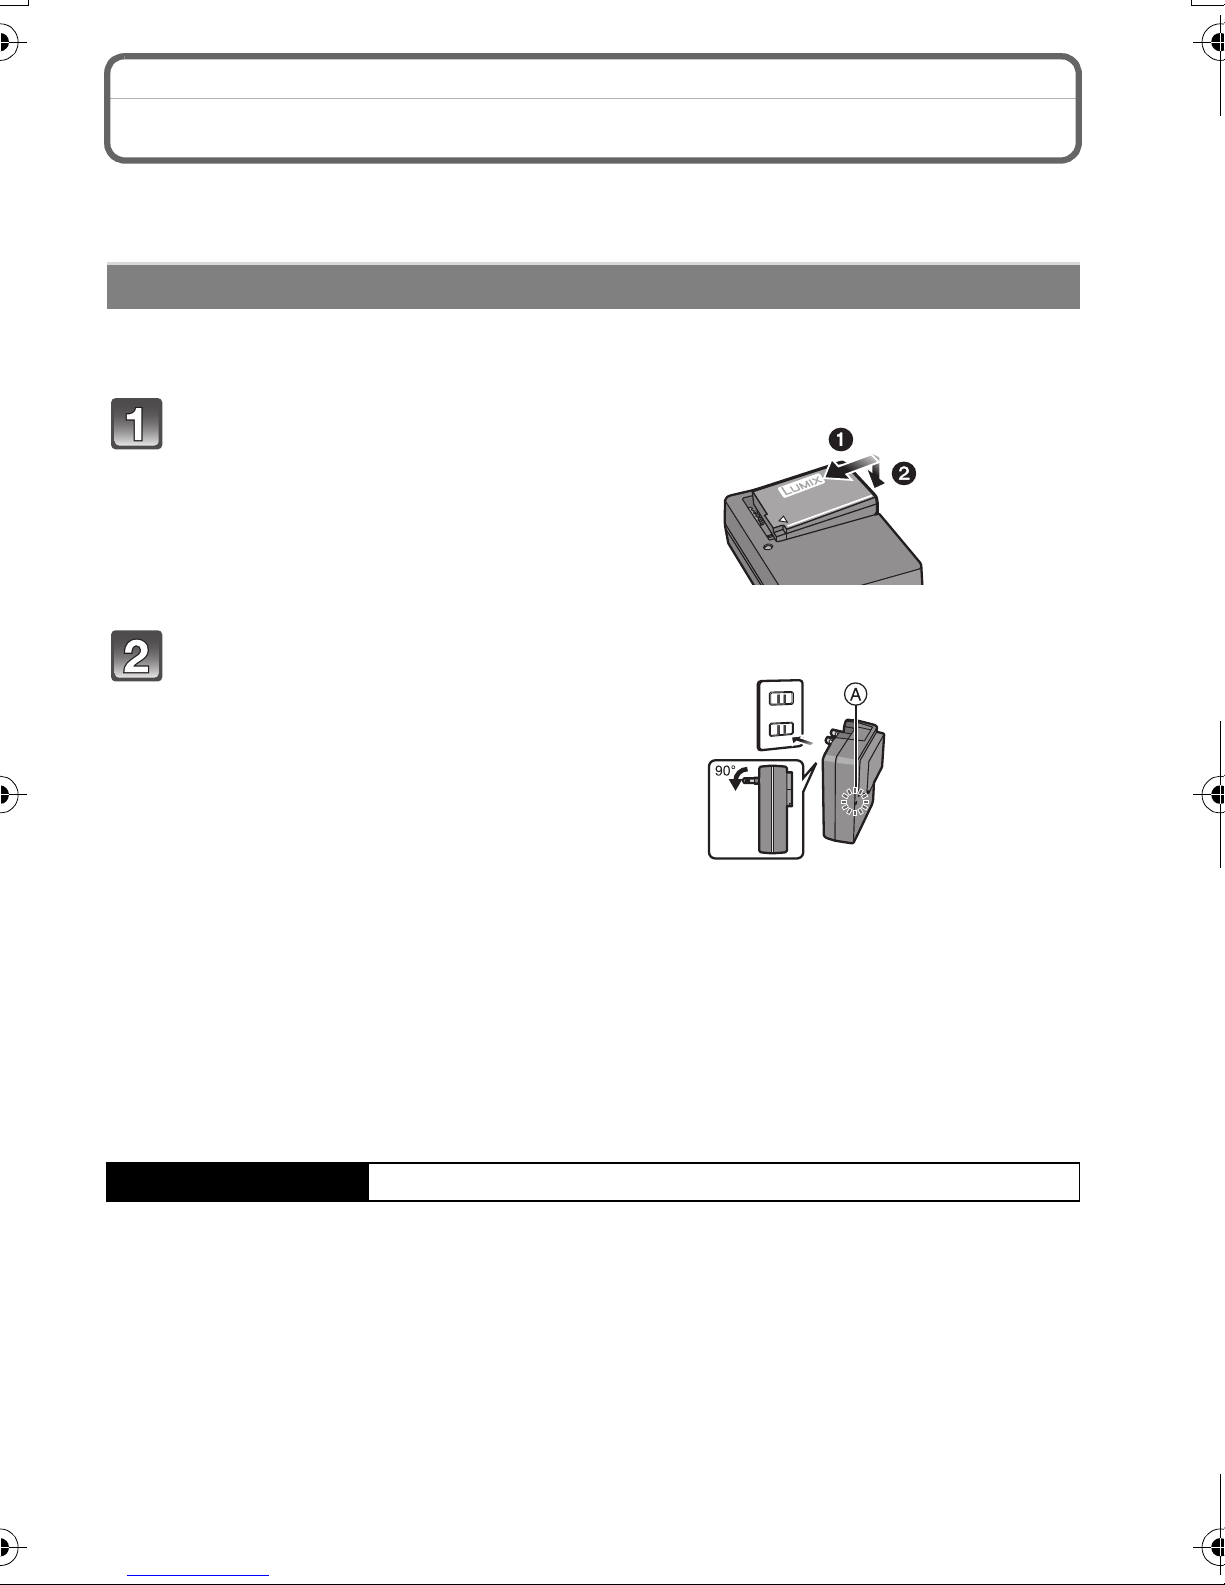
Charging the Battery
∫ About batteries that you can use with this unit
The battery that can be used with this unit is DMW-BLD10PP.
Charging
The battery is not charged when the camera is shipped. Charge the battery before use.
•
•Charge the battery with the charger indoors.
Attach the battery paying
attention to the direction of
the battery.
Connect the charger to the
electrical outlet.
• The [CHARGE] indicator A lights
up and charging begins.
∫ About the [CHARGE] indicator
The [CHARGE] indicator turns on:
The [CHARGE] indicator is turned on during charging.
The [CHARGE] indicator turns off:
The [CHARGE] indicator will turn off once the charging has completed without any
problem. (Disconnect the charger from the electrical socket and detach the battery after
charging is completed.)
∫ Charging tim e
Charging time Approx. 120 min
•
The indicated charging time is for when the battery has been discharged completely.
The charging time may vary depending on how the battery has been used. The charging
time for the battery in hot/cold environments or a battery that has not been used for a
long time may be longer than normal.
(ENG) VQT3T96
15
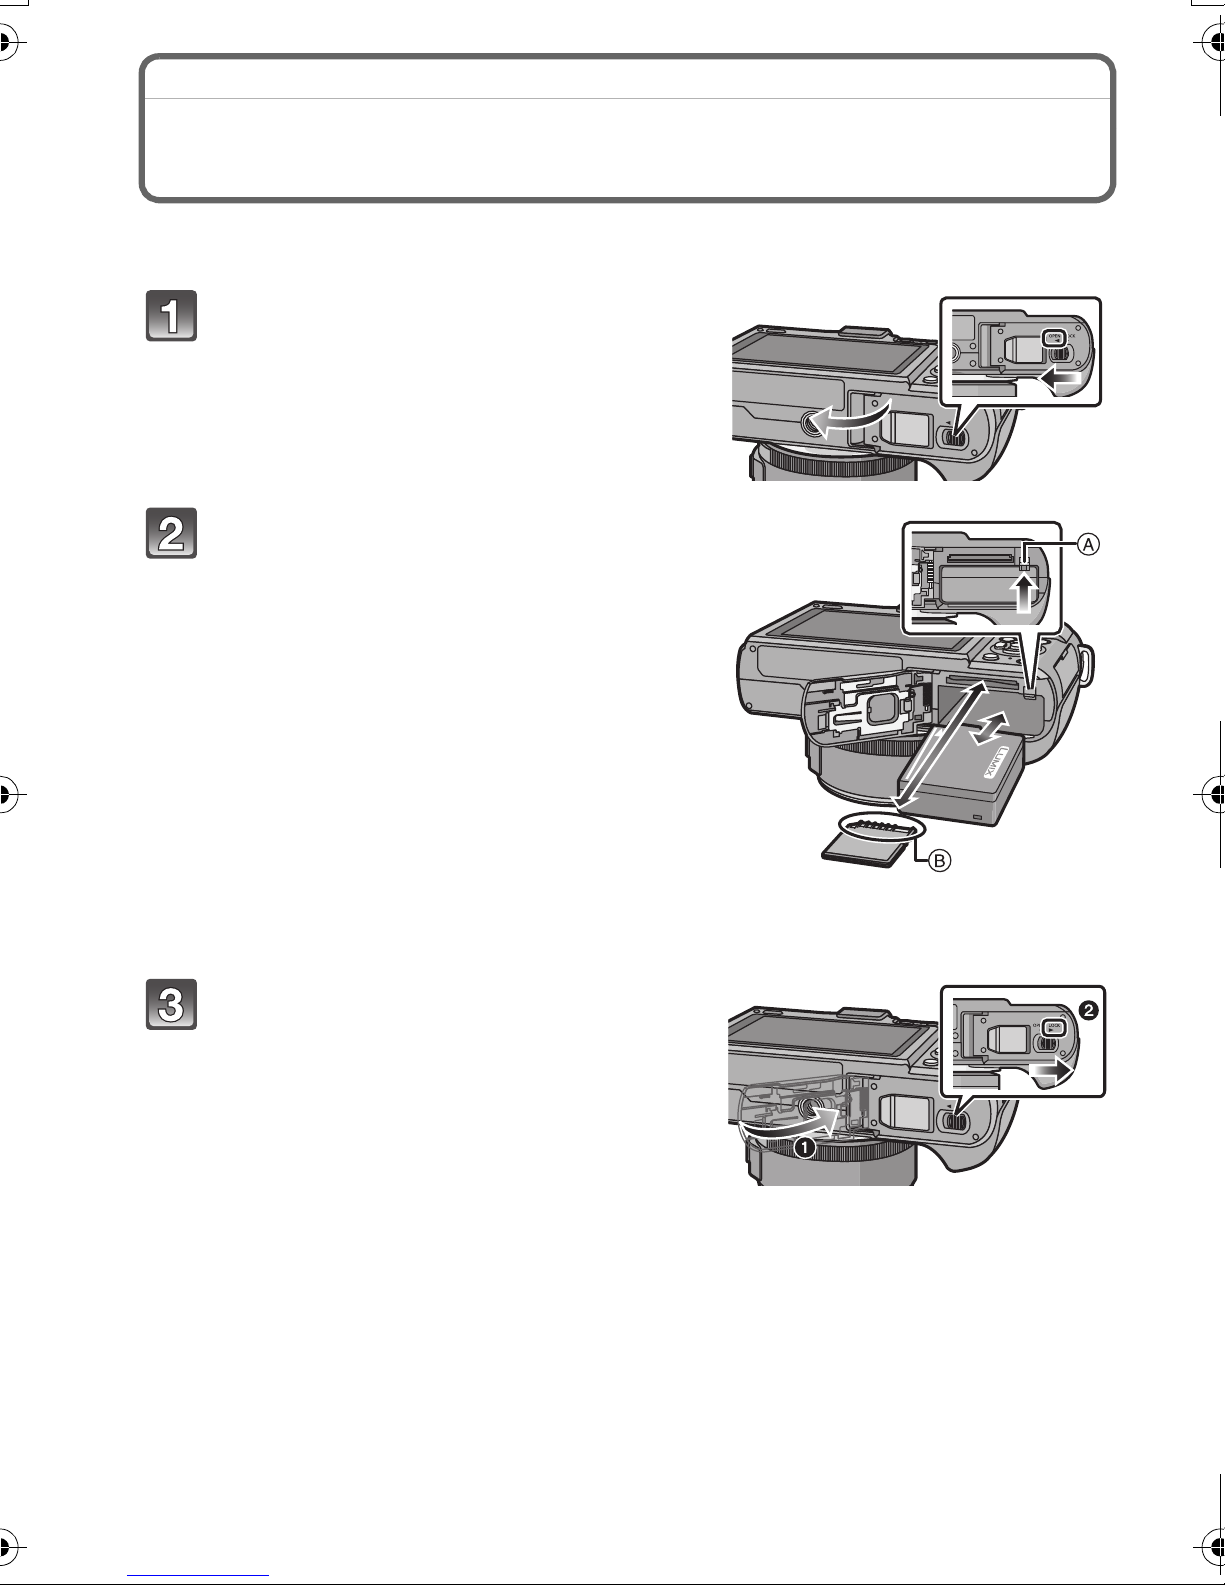
Inserting and Removing the Card (optional)/
the Battery
•Check that this unit is turned off.
•We recommend using a Panasonic card.
Slide the releas e lever in th e directi on
of the arrow and open the card/
battery door.
• Always use genuine Panasonic batteries
(DMW-BLD10PP).
• If you use other batteries, we cannot
guarantee the quality of this product.
Battery: Being careful about the
battery orientation, insert all the way
until you hear a locking sound and
then check that it is locked by lever
A.
Pull the leve r A in the dire ction of the
arrow to remove the battery.
Card: Push it securely all the way
until you hear a “click” while being
careful about the direction in which
you insert it.
To remove the card, push the card
until it clicks, then pull the card out upright.
B:Do not touch the connection terminals of the card.
1:Close the card/battery door.
2:Slide the release lever in the
direction of the arrow.
VQT3T96 (ENG)
16
About the Card
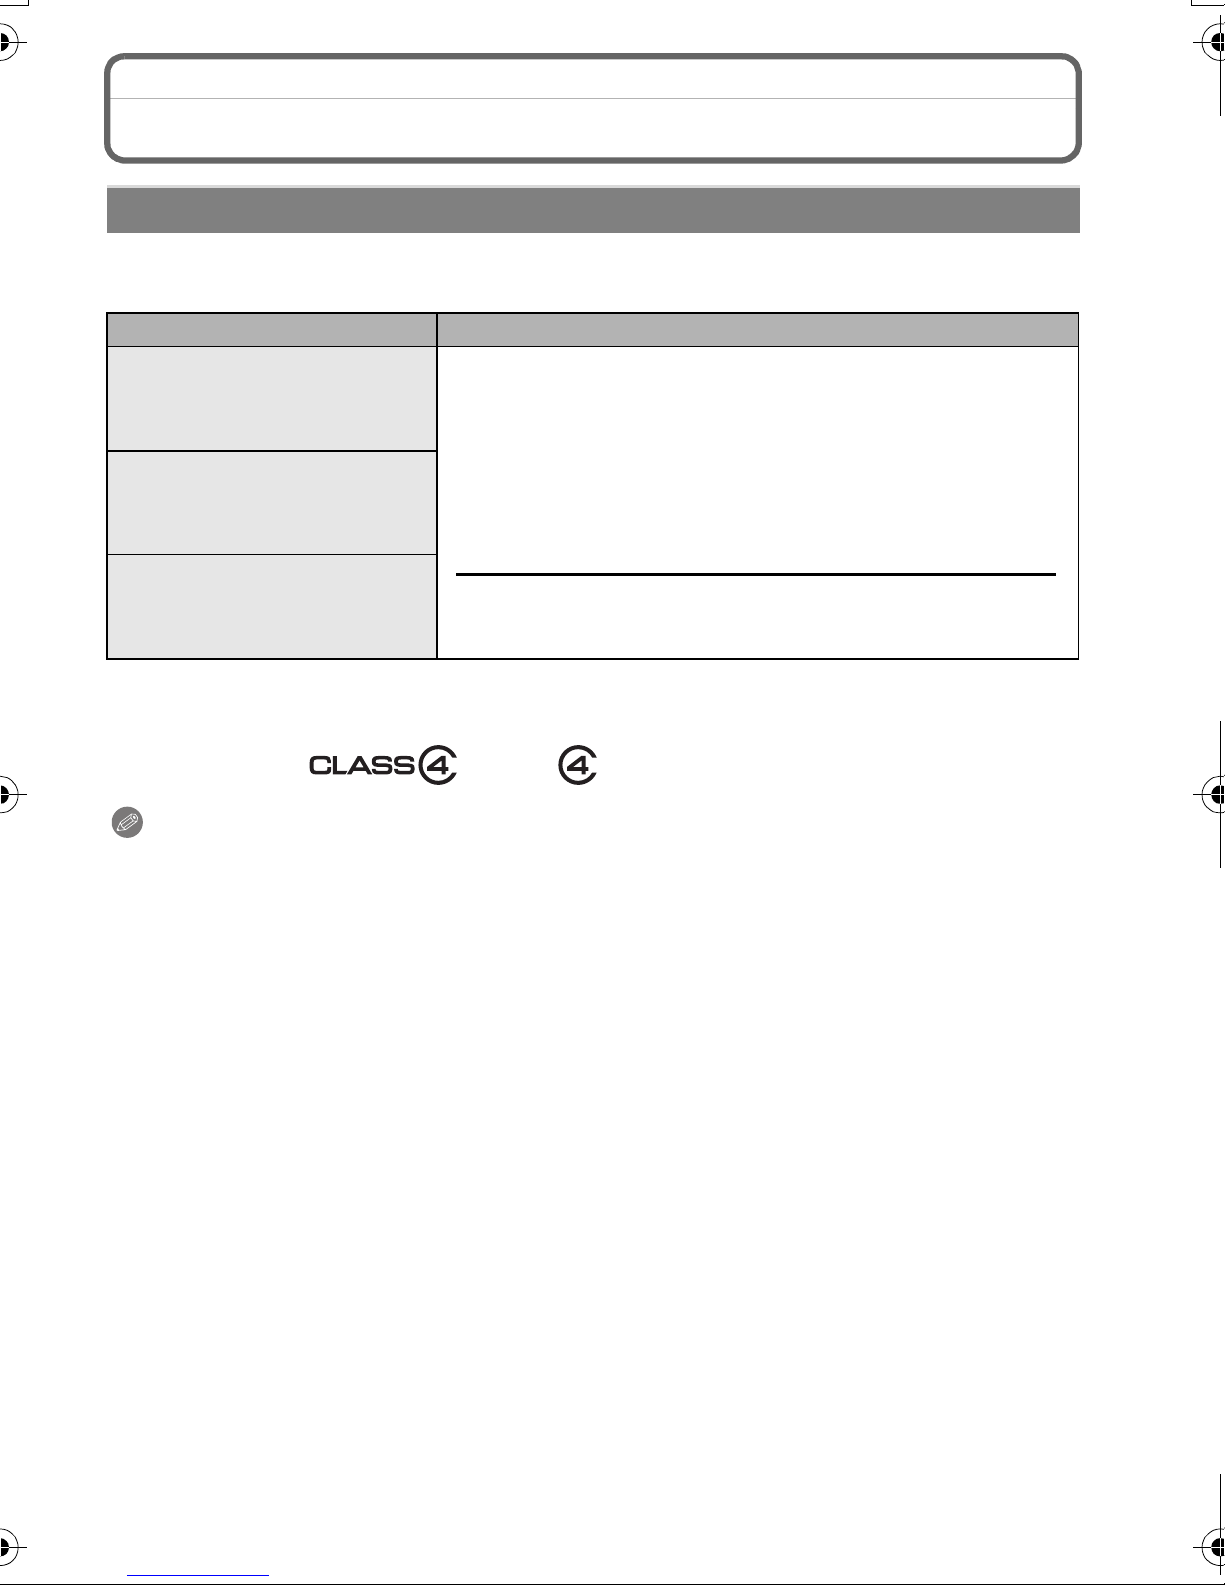
About cards that can be used with this unit
The following cards which conform to the SD video standard can be used with this unit.
(These cards are indicated as card in the text.)
Remarks
SD Memory Card
(8 MB to 2 GB)
higher when recording motion pictures.
•SDHC Memory Card can be used with SDHC Memory Card
or SDXC Memory Card compatible equipment.
•SDXC Memory Card can only be used with SDXC Memory
•Use a card with SD Sp eed Class
SDHC Memory Card
(4 GB to 32 GB)
SDXC Memory Card
(48 GB, 64 GB)
Card compatible equipment.
•Check that the PC and ot her equ ipment are compat ible whe n
using the SDXC Memory Cards.
http://panasonic.net/avc/sdcard/information/SDXC.html
•This unit is compatible with UHS-I standard SDHC/SDXC
memory cards.
•Only the cards with capacity listed left can be used.
¢ SD Speed Class is the speed standard regarding continuous writing. Check via the label on
the card, etc .
e.g.:
¢
with “Class 4” or
Note
Keep the Memory Card out of reach of children to prevent swallowing.
•
(ENG) VQT3T96
17
 Loading...